

GE STS18ZCPSRWW, STS18ZCPPRWW, STS18ZCPNRWW, STS18ZCPMRWW, STS18ZCPLRWW Owner’s Manual
...
r/3
N
www.GEApp;iances.com
Safety Instructions ........... 9-4
Operating Instru_tions
Additional Features ............. 9
Automatic Icemaker ........... 10
Controls ...................... 5
Shelves and Bins ............. 6, 7
Crispers and Pans ............ 8, 9
Care and Cleaning
(:are and Cleaning .......... l l, 12
Replacing the Light Bu]bs ....... 19
Models 18& 19
CongSlateur sup&ieur
R5frig&ateurs
Installation InsTtru_tions
Preparing to Install
the Refrigerator ............... 13
Reversing the Door Swing .... 18-92
_'ater Line Installation ...... 14-17
Troubleshooting Tips ....... 94-26
Normal Operating Sounds ...... 93
Consumer Support
Consumer Support ..... Back Cover
Product Registration ........ 97, 98
Warranty for
Canadian Customers ........... 99
_4'arrantv for U.S. Customers ..... 30
La sectionfran_aise commencea la page 32
Congelador superior
Refrigeradores
La seccion en espa#olempiezaenlapagina 62
Write the model and serial numbers here:
Model #
Serial #
Find these numbers on the gray label
on the left side, near the top of the
refl'igerator compartment.
197D3354PO04 49-60247 02-03JR
IMPORTANTSAFE INFORMATION.
READALLINSTRUCTIONSBEFOREUSING.
WARNING!
Use this appliance only for its intended purpose as described in this Owner's Manual.
SAFETYPRECAUTIONS
When using electrical appliances, basic safety precautions should be followed, including the following:
This refrigerator must be properl} installed
and located in accordance with tile Installation
Instructions befiwe it is used.
Do not allow children to climb, st;rod or hang
on tile shelves in tile refi-igerato_: They could
damage tile refi_igerator and seriously iqj m'e
themselves.
Do not touch tile cold surlilces in tile fl'eezer
compartment when hands are damp or wet.
Skin may stick t() these extremely cokl s/mfhces.
Do not store or use gasoline or other flammable
\:q}ms and liquids in tile vicinity of this or any
other appliance.
In refrigerators with automatic icemake_s,
avoid contn ct with the In oving parts of the
ejector mechanism, or with tile heating element
locamd on tile bottom _ff tile icemake_: Do not
place finge_ or hands on tile automatic
icemaking mechanism while tile refiigerator
is plugged in.
Keep finge_ out of tile "pinch point" areas;
clearances between tile doo_ and between tile
doo_s and cabinet are necessarily small. Be careflfl
closing doms when children are in tile area.
Unplug tile reflJgerator before cleaning and
making repairs.
NOTE."We stronglyrecommendthat anyservl?l))gbe
performedby a qualified individual.
_ Setting either or both controls (some models only
have one control) to tile 0 (off)position does not
relllove power to tile light circ/lit.
Do not reii'eeze ti'ozen fi)ods which have
thawed complemly:
www.GEAppliances.com
DANGER!RISKOFCHILDENTRAPMENT
PROPERDISPOSALOFTHEREFRIGERATOR
Child entrapment and stdtocation are not
i)rol)lems of the past, Junked or abandoned
refrigerators are still dangerous,, .even if they will
sit fi)r "just a few days." If you are getting rid of
your old refiigerato_; please follow the instructions
below to hel I) prevent accidents.
Refrigerants
_M1refrigeration products contain refi_igerants,
which under ti_(leml law must be removed prior
to product disposal. If you are getting rid of an
old reli_igeration product, check with the company
handling the disposal about what to do.
Before YouThrowAway YourOld
Refrigeratoror Freezer:
Take off the (loox_.
i,eaxe the shelxes in place so that children
may not easily climb inside.
USEOFEXTENSIONCORDS
Because of potential safety hazards under certain conditions, we strongly recommend against the
use of an extension cord.
However; if you must use an extension cord, it is absolutely necessa_ T that it be a UiAisted (in the United
States) or a CSA-listed (in Canada), 3-wire grounding type appliance extension cord having a grounding
type plug and outlet and that the electrical rating of the cord be 15 amperes (minimum) and 120 w)lts.
3
IMPORTANTSAFETYINFORMATION.
READALLINSTRUCtiONSBEFOREUSING.
a, WARNING!
HOWTOCONNECTELECTRICITY
Do not, under any circumstances, cut or remove the third (ground) prong from the power cord.
For personal safety this appliance must be properly grounded.
The power cord of this appliance is equipped with
a 3-prong (grounding) plug which nlates with a
standard 3-prong (grounding) wall outlet to
minimize the possibili b' of electric shock hazard
from this appliance.
Have the wall outlet and circuit checked by a
qualNed electridan to make sure the outlet is
propedy grounded.
Where a standard 2-prong wall outlet is
encountered, it is your personal responsibility and
obligation to have it replaced with a properly
grounded 3-prong wall outlet.
The refl-igerator should always be plugged into its
own individual electrical outlet which has a voltage
rating that matches the rating plate.
This provides tile best pe_fimnance and also
I)rexents oxerloading< house wiring circuits which
could cause a fire hazard from oxerheated wires.
Never unplug your refl-igerator by pulling on tile
power cord. Mways grip i)lug firefly and pull
straight out ti'oln tile outlet.
Repair or replace immediately all power cords that
have become fl'ayed or otherwise damaged. Do not
use a cord that sho_:s cracks or abrasion damage
along its length or at either end.
\4lien moving tile refi-igerator away from tile
wall, be carefld not to roll over or damage tile
power cord.
USEOFADAPTERPLUGS(Ad_pterplug_,otpermittedinConadaJ
Because of potential safety hazards under certain conditions, we strongly recommend against the
use of an adapter plug.
Howe\'et; if )_)u must use an adapter; where local
codes i)e_nit, a temporaryconnectionma) be made
to a propedy grounded 2-prong wall outlet bv use
of a UiAisted adapter a\_filable at most local
hardware stores.
Tile larger slot in tile adapter must be aligned with
tile larger slot in tile wall outlet to provide proper
polarity in tile connection of tile power cord.
When disconnecting tile power cord fl'om tile
adapte_; always hold tile adapter in place with one
hand while pulling tile power cord i)lug with tile
other hand. If this is not done, tile adapter ground
te_ninal is very likely to break with repeated use.
If tile adapter ground temfinal brealcs, DO NOTUSE
tile refi-ioerator_ until a I_r°I ,)er ground has been
established.
Attaching the adapter ground terminal to a wall outlet
cover screw does not ground the appliance unless the
cover screw is metal, not insulated, and the wall outlet is
grounded through the house wking Youshould have the
circuit checked by a quadded electrician to make sure the
outlet ssproperly grounded.
READANDFOLLOWTHISSAFETYINFORMATIONCAREFULLY.
SAVETHESEINSTRUCtiONS
4
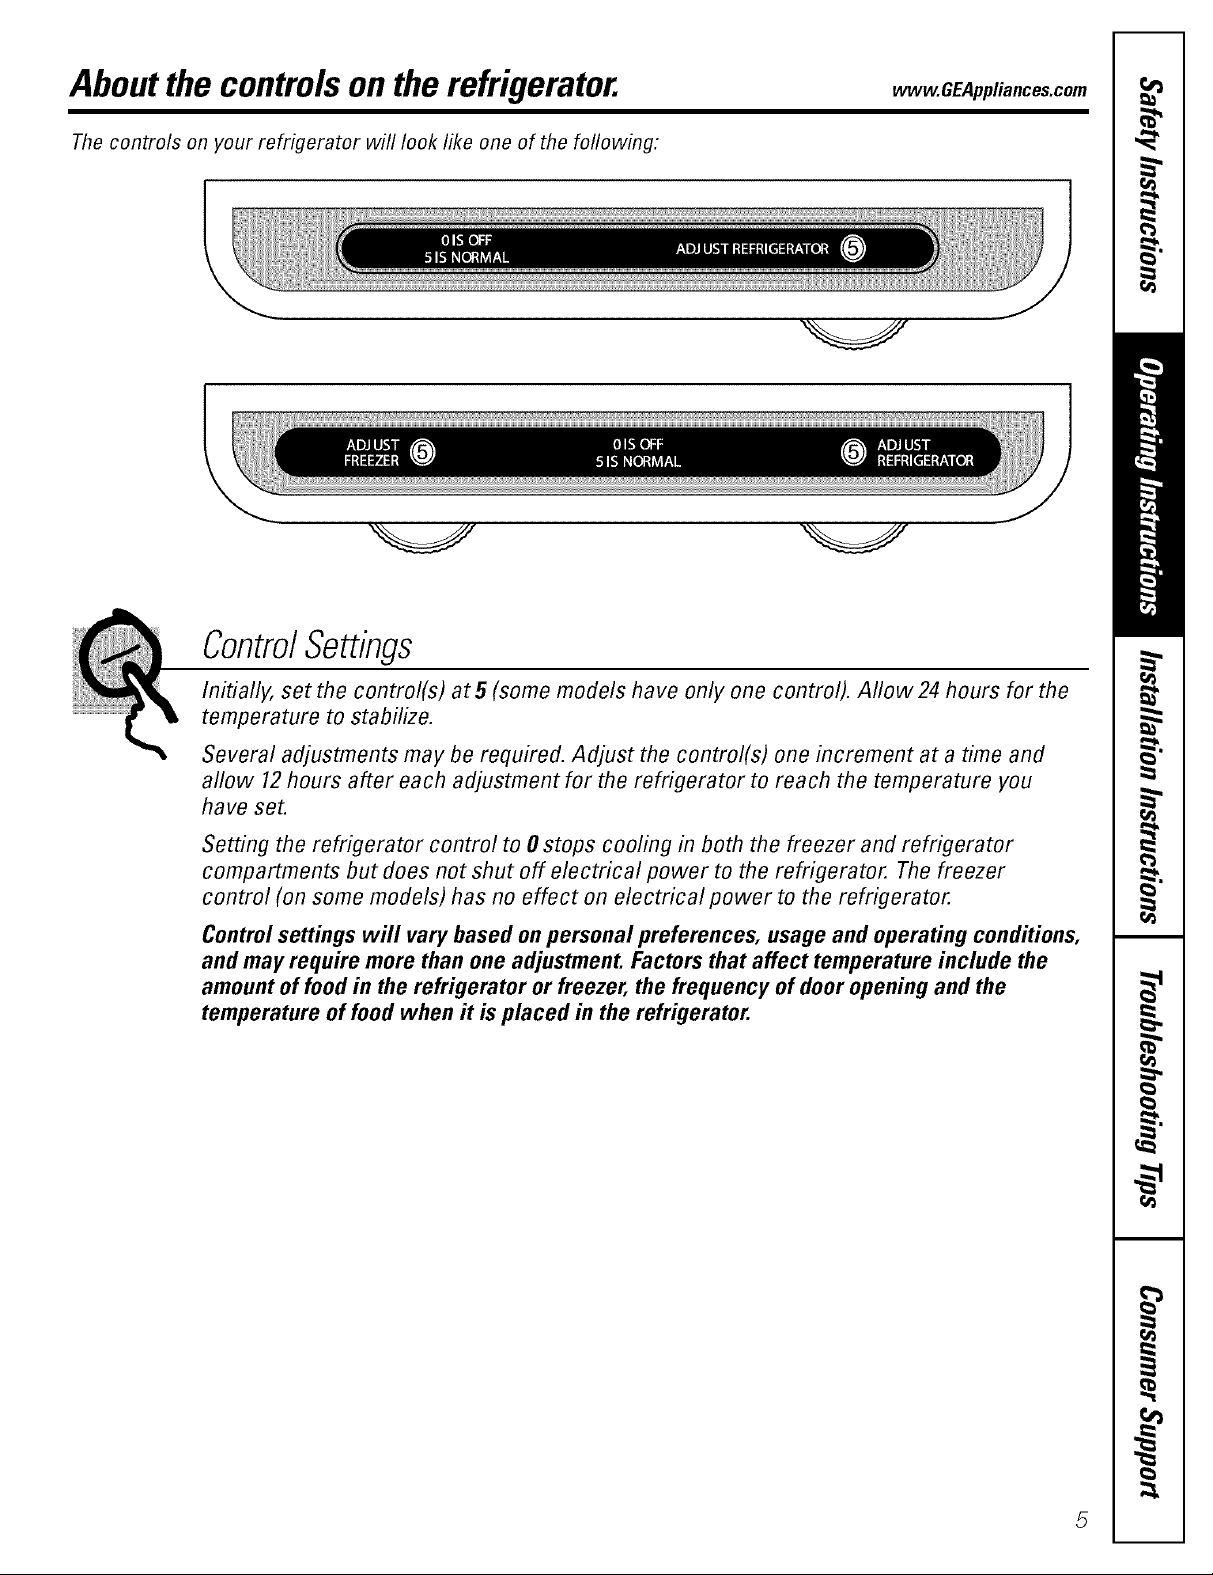
Aboutthe controlsonthe refrigerator, vvvvw.GEAppliances.com
Thecontrols on your refrigerator will look like one of the following:
ControlSettings
Initially, set the control(s) at 5 (some models have only one control). Allow 24 hours for the
temperature to stabilize.
Several adjustments may be required. Adjust the control(s) one increment at a time and
aflow 12hours after each adjustment for the refrigerator to reach the temperature you
have set.
Setting the refrigerator control to 0 stops cooling in both the freezer and refrigerator
compartments but does not shut off electrical power to the refrigerator. The freezer
control (on some models) has no effect on electrical power to the refrigerator.
Controlsettings will vary based on personal preferences, usage and operating conditions,
and may require more than one adjustment. Factors that affect temperature include the
amount of food in the refrigerator or freezer, the frequency of door opening and the
temperature of food when it is placed in the refrigerator.
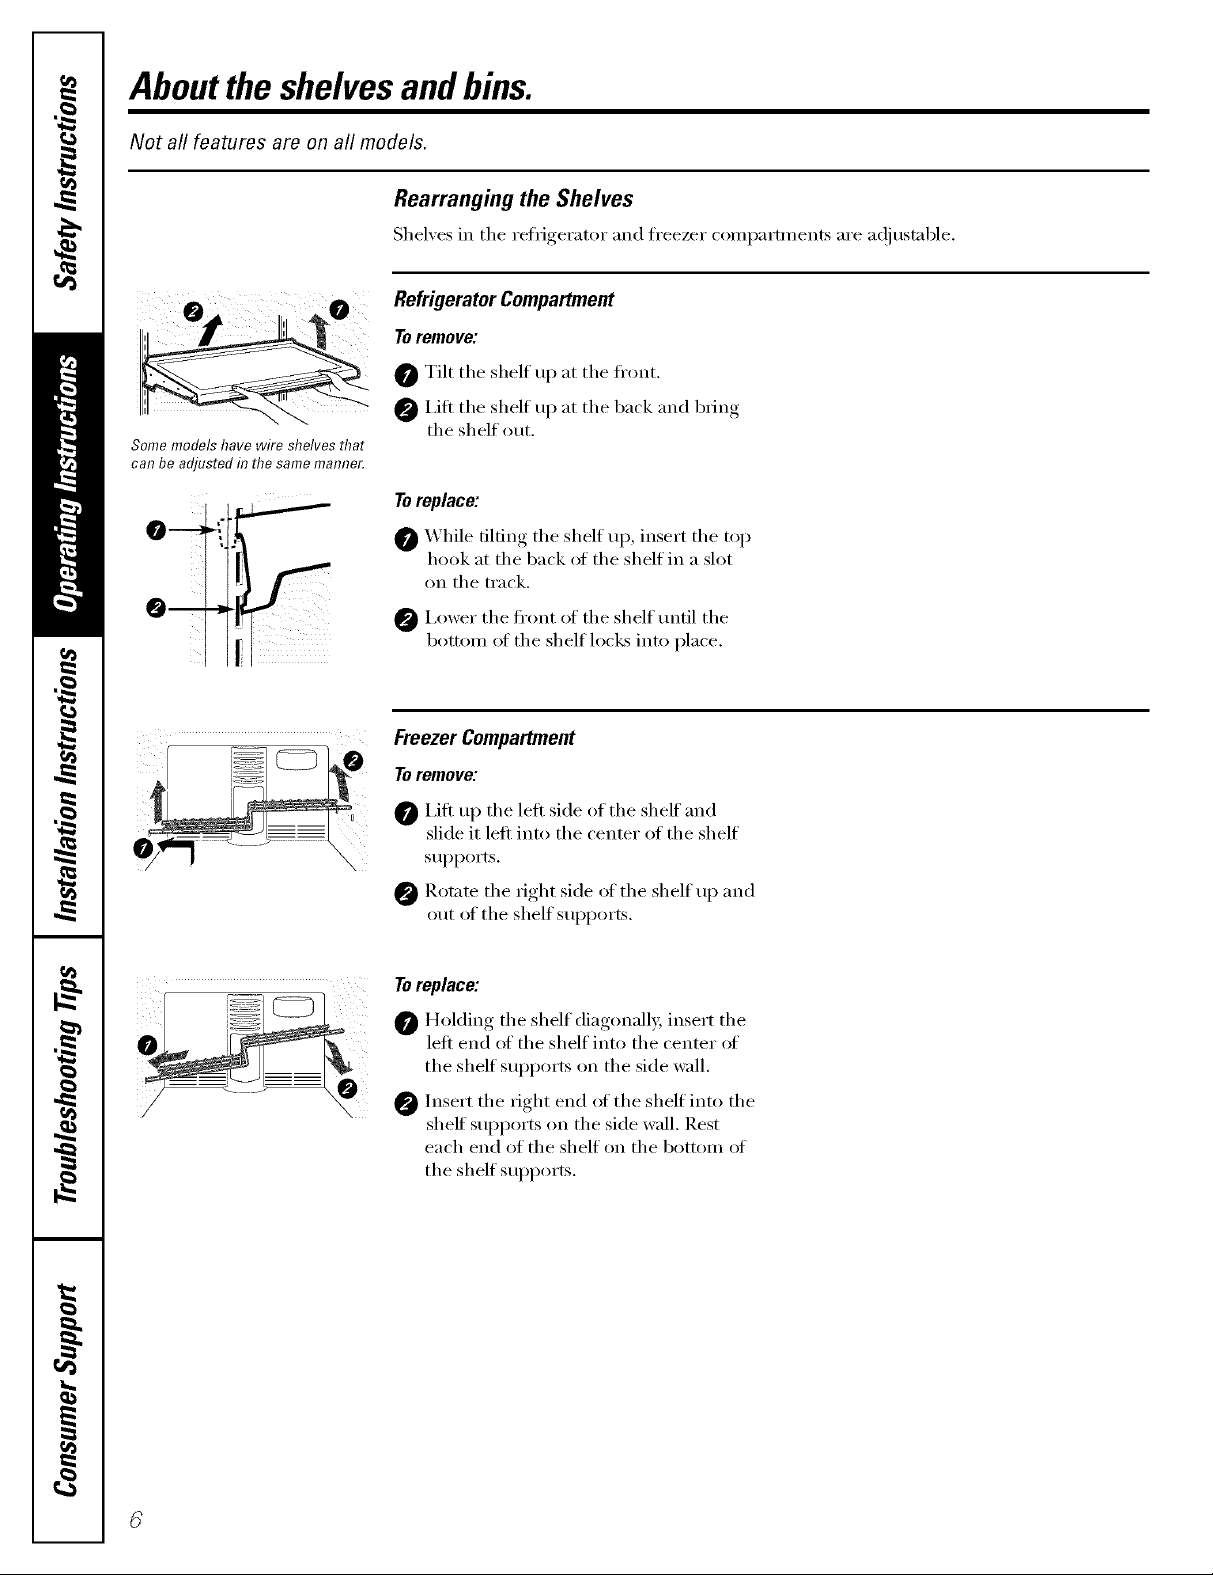
Abouttheshelvesandbins.
Not all features are on all models.
Rearranging the Shelves
Shel;es in the refrigerator and h'eezer con_l)arm_ents are a(!iustable.
Refrigerator Compartment
o, 2o
Some models have wire shelves that
can be adjusted in thesame mamTer.
To remove:
0 Tilt the shelf up at the fl'ont.
0 I,ifl the shelf up at the back and bring
the shelf out.
e--
f
j-
i
i.
Toreplace:
0 _'_hile tilting the shelf Ul), insert the top
hook at the back of the shelf in a slot
on the track.
ii i
0 I,ower the fl'ont of the shelf tmtil the
bottom of the shelf locks into place.
Freezer Compartment
To remove:
I,ifl up the left side ot the shelf and
slide it left into the center of the shelf
suI)ports.
0 Rotam the right side _ff the shelf up and
out of the shelf supl)orts.
Toreplace:
0 Holding the shelf diagonall}; insert the
left end (ff the shelf into the center of
the shelf sui)ports on the side wall.
@ Insert the _ight end (ff the shelf into the
shelf sui)ports on the side wall. ]lest
each end of the shelf on the bottom ot
the shelf supports.
Fr0nt bar
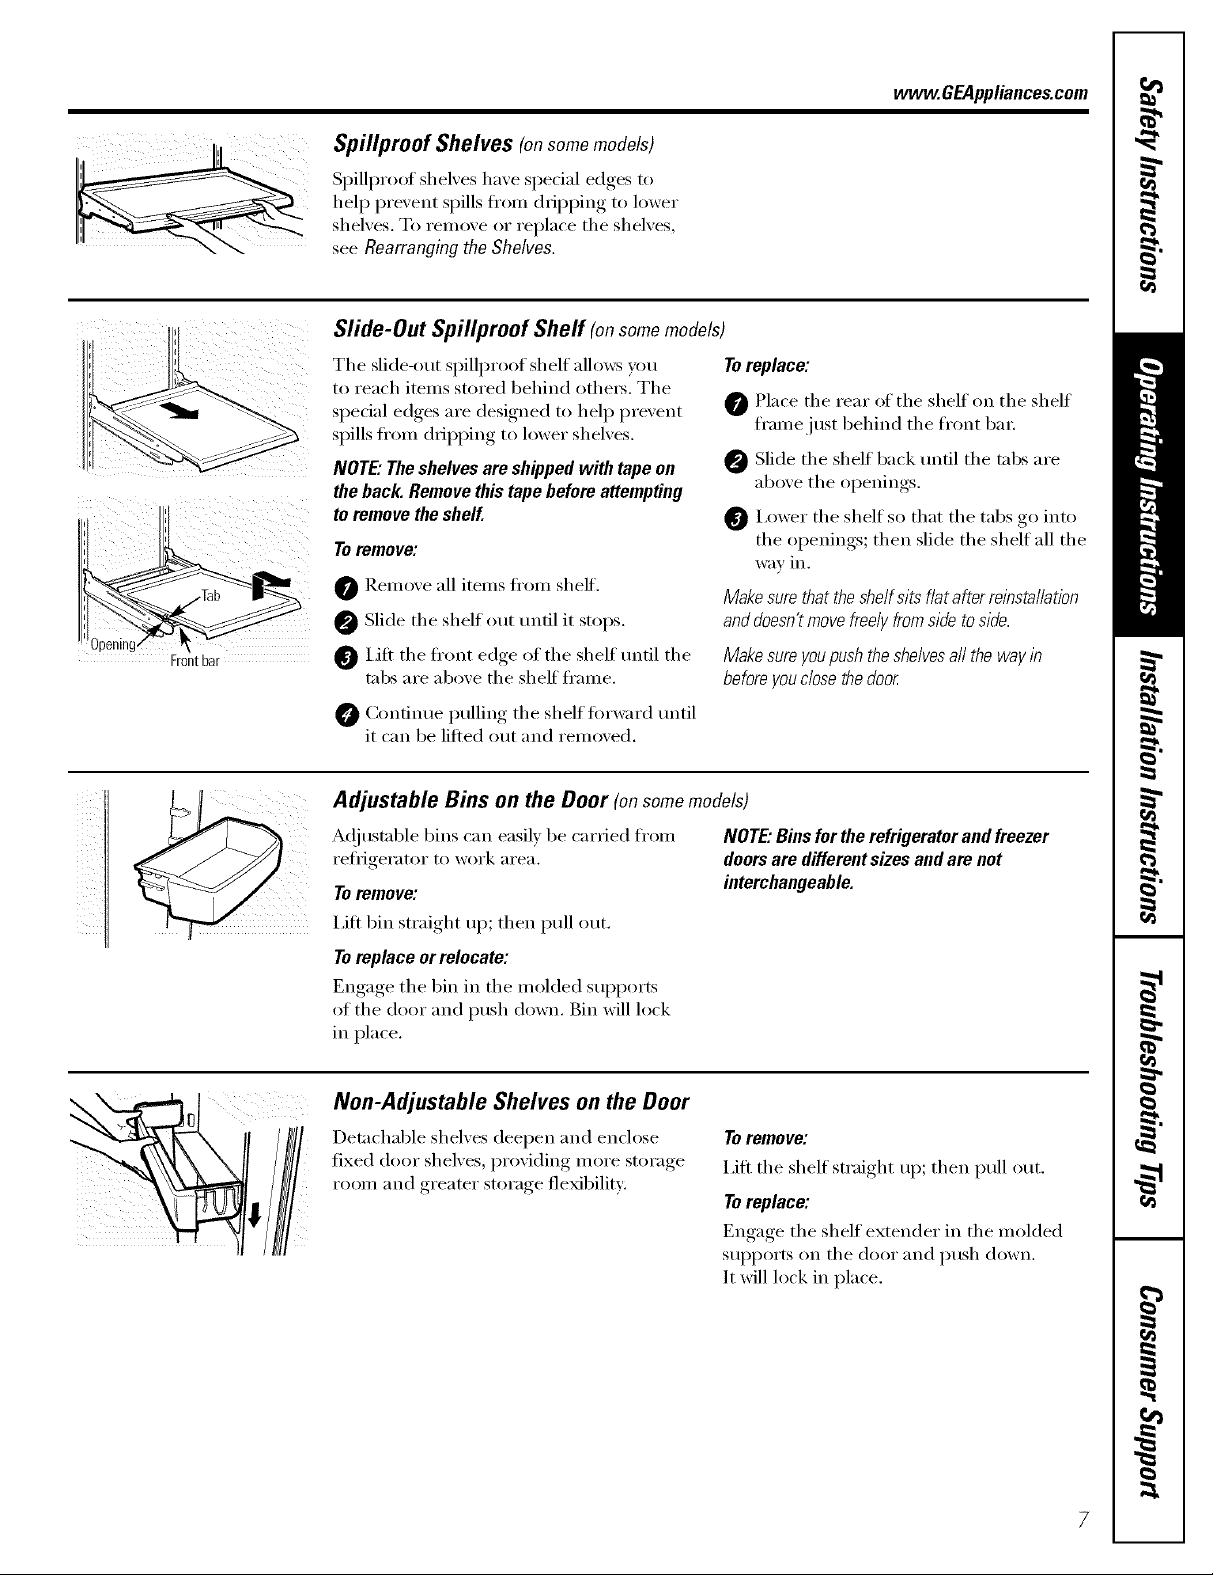
Spillproof Shelves (onsomemodels)
Spillproof shel',es have special edges to
hel I) prexent spills from dripping to lower
shelxes. To remme or replace the shelxes,
seeRearrangingthe Shelves.
Slide-Out Spillproof Sheff (onsomemodels)
The slide-out spillproof shelf allo_vs )_m
to reach items stored behind others, The
special edges are designed to help prevent
spills fi'om dripping to lower shelves,
NOTE."The shelves are shipped with tape on
the back. Remove this tapebefore attempting
to remove the shelf.
Toremove:
Remoxe all items fl'om sheff.
@ Slide the shelf out tmfil it stops.
Lift the fl'ont edge of the shelf tmfil the
tabs are aboxe the shelf fl'ame,
()retinue l)ullim*_ the shelf fi)rward tmtil
it can be lifted out and remoxed,
www.GEAppliances.com
Toreplace:
Place the rear of the shelf on the shelf
fl'amejust behind the fl'ont ba_;
Slide the shelf back tmfil the tabs are
above the openings,
0 I,ower the shelf so that the tabs go into
the openings; then slide the shelf all the
W;_V in.
Makesurethattheshe/fsitsf/atafterreinstaiiation
and doesn't move free/y from side to side.
Make sure you pushthe shelves aft the way in
before you dose the door
Adjustable Bins on the Door (onsomemodels)
A(!justable bins can easily be carried fl'om NOTE."Binsfortherefrigeratorandfreezer
j_
refrigerator to work area. doors are different sizes and are not
To remove: interchangeable.
I,ift bin straight up; then pull out.
To replace or relocate:
Engage the 1)in in the molded SUl)ports
of the door and push down. Bin will lock
in place.
Non-Adjustable Shelves on the Door
Detachable shelves deepen and enclose
fixed door shelves, providing more storage
room and greater storage flexibility:
Toremove:
I,ifl the shelf straight up; then pull out.
Toreplace:
Engage the shelf extender in the molded
supports on the door and push down.
It will lock in place.
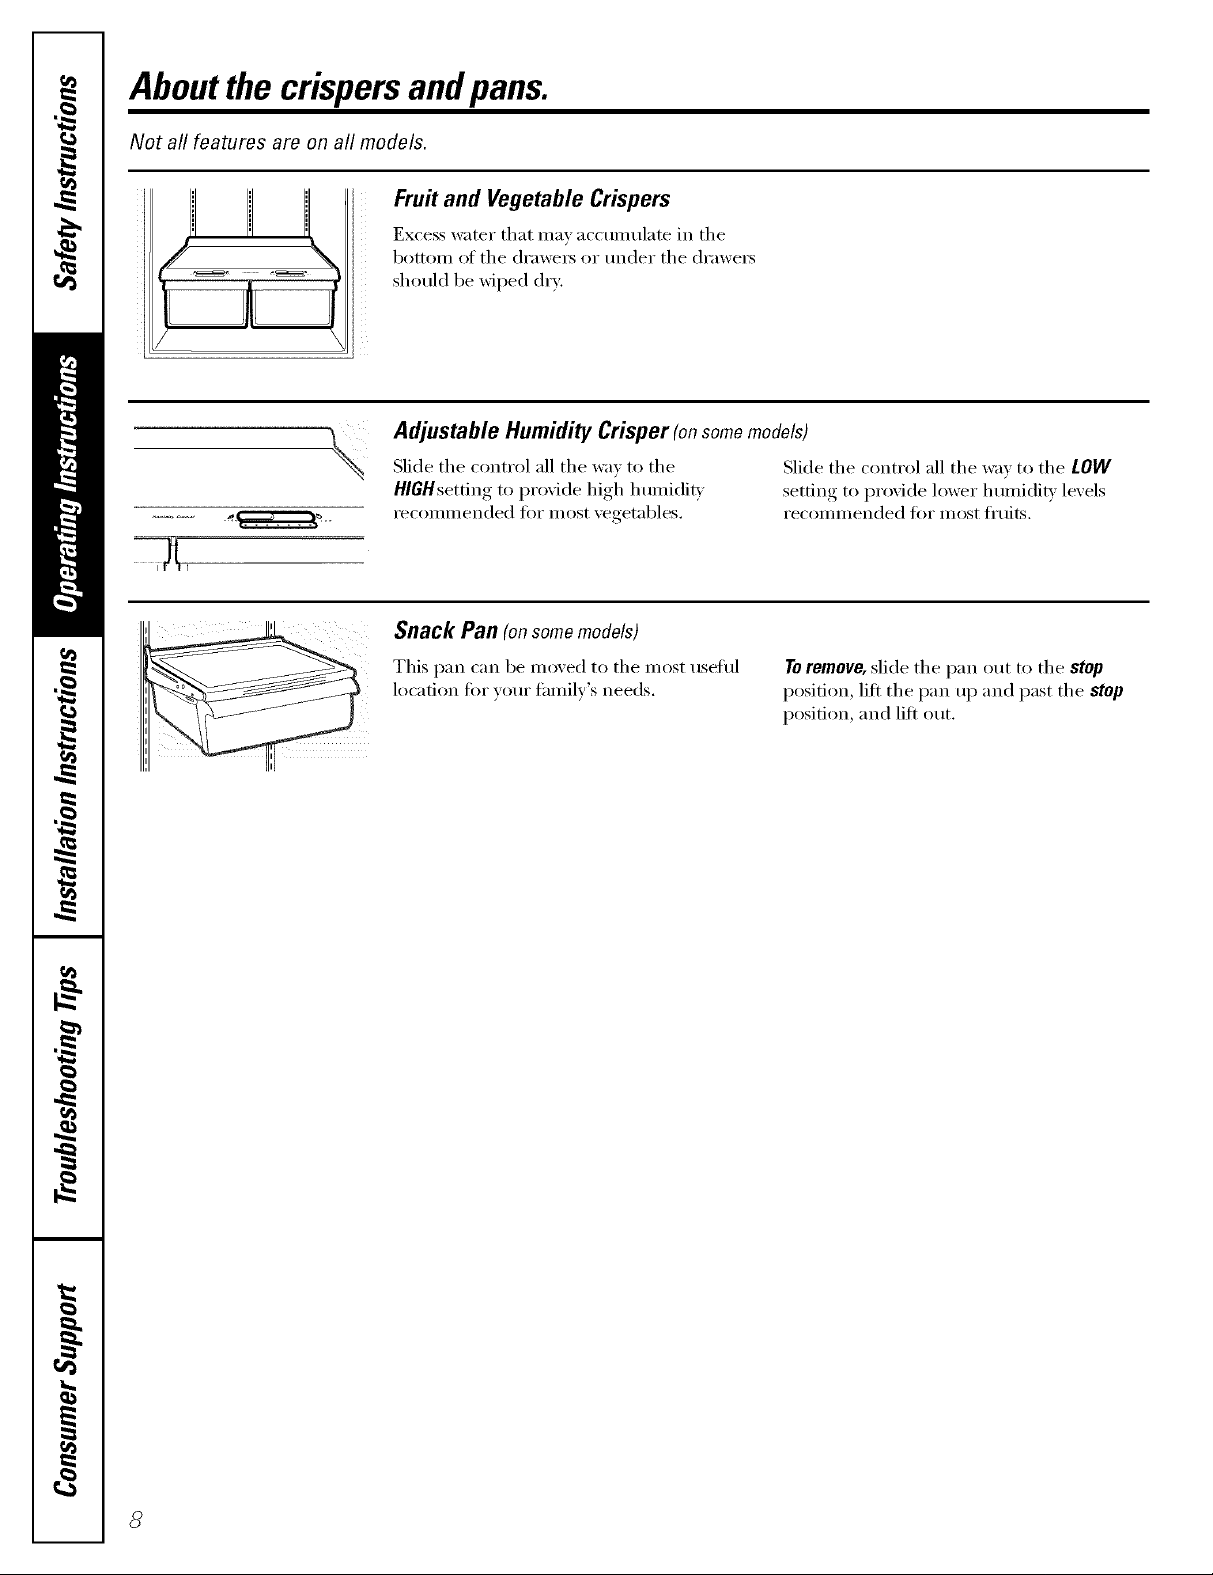
Aboutthe crispersandpans.
Not all features are on all models.
Fru# and Vegetable Crispers
Excess water that may accumulate in the
bottom of the (h'awe_ or under the (h'awe_
should be wiped dry:,
Adjustable Humidity Crisper (onsomemodels)
Slide the control all the wa) to the
HlGHsetfing to proqde high humidi b
recommended fi)r most xegetables.
Snack Pan (onsomemodels)
Slide the control all the wax to the LOW
setting, to I)r°xi(le lower lmmi(lit_ levels
recoinnlended fi)r inost fl'uits.
This pan can be moved to the most tlseitll
location fi)r your family's needs.
Toremove, slide the pan out to the stop
position, lift the pan up and past the stop
position, and lift ()tit.
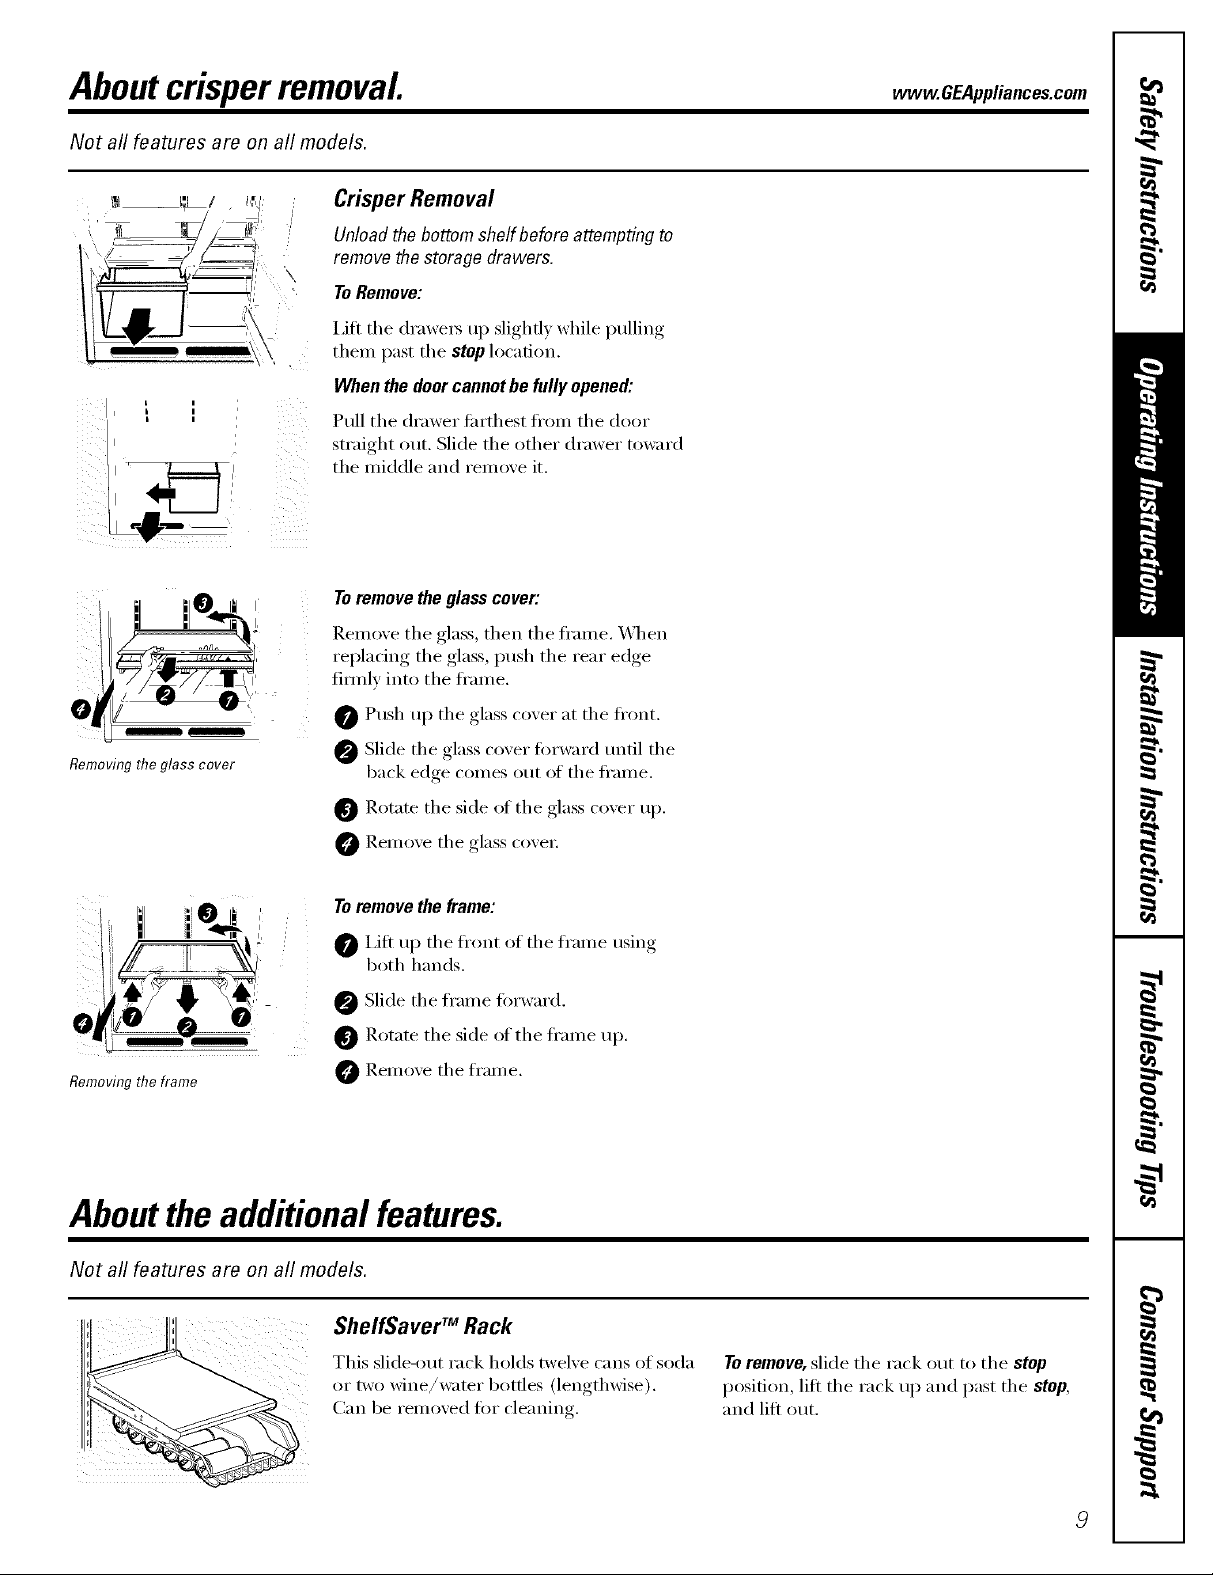
Aboutcrisperremoval, vvvvw.GEAppliances.com
Not all features are on all models.
Crisper Removal
Unload the bottom shelf before attempting to
remove the storage drawers.
ToRemove:
i,ifl the drawe_5 up slightly while pulling
then_ past the stop location.
L Z
I I "
!!,' ' !
G
Removingtheglasscover
When the door cannotbe fully opened:
Pull the drawer fi_rthest fl'om the door
straight out. Slide the other drawer toward
the middle and remove it.
Toremove the glass cover:
Remove the glass, then the fl'ame. _4]_en
replacing the glass, push the rear edge
firefly into the ti'ame.
Push up the glass cover at the fl'ont.
Slide the glass cover fin'ward tmtil the
back edge comes out ot the fl'anle.
Rotate the side ot the glass cover up.
Remove the glass cove_:
Toremove the frame:
I,ift up the ti'ont ot the ti'ame using
both hands.
@ Slide the fl'ame fin'ward.
0 Rotate the side of the fl'ame up.
Removing the frame
@ Remove the ti'ame.
Abouttheadditional features.
Not all features are on all models.
ShelfSaver rMRack
This slide-out rack holds twelve cans ot soda
or two wine/water bottles (lengthwise).
Can be removed fin" cleaning.
Toremove, slide the rack out to the step
position, lilt the rack up and past the stop,
and lift ()tit.
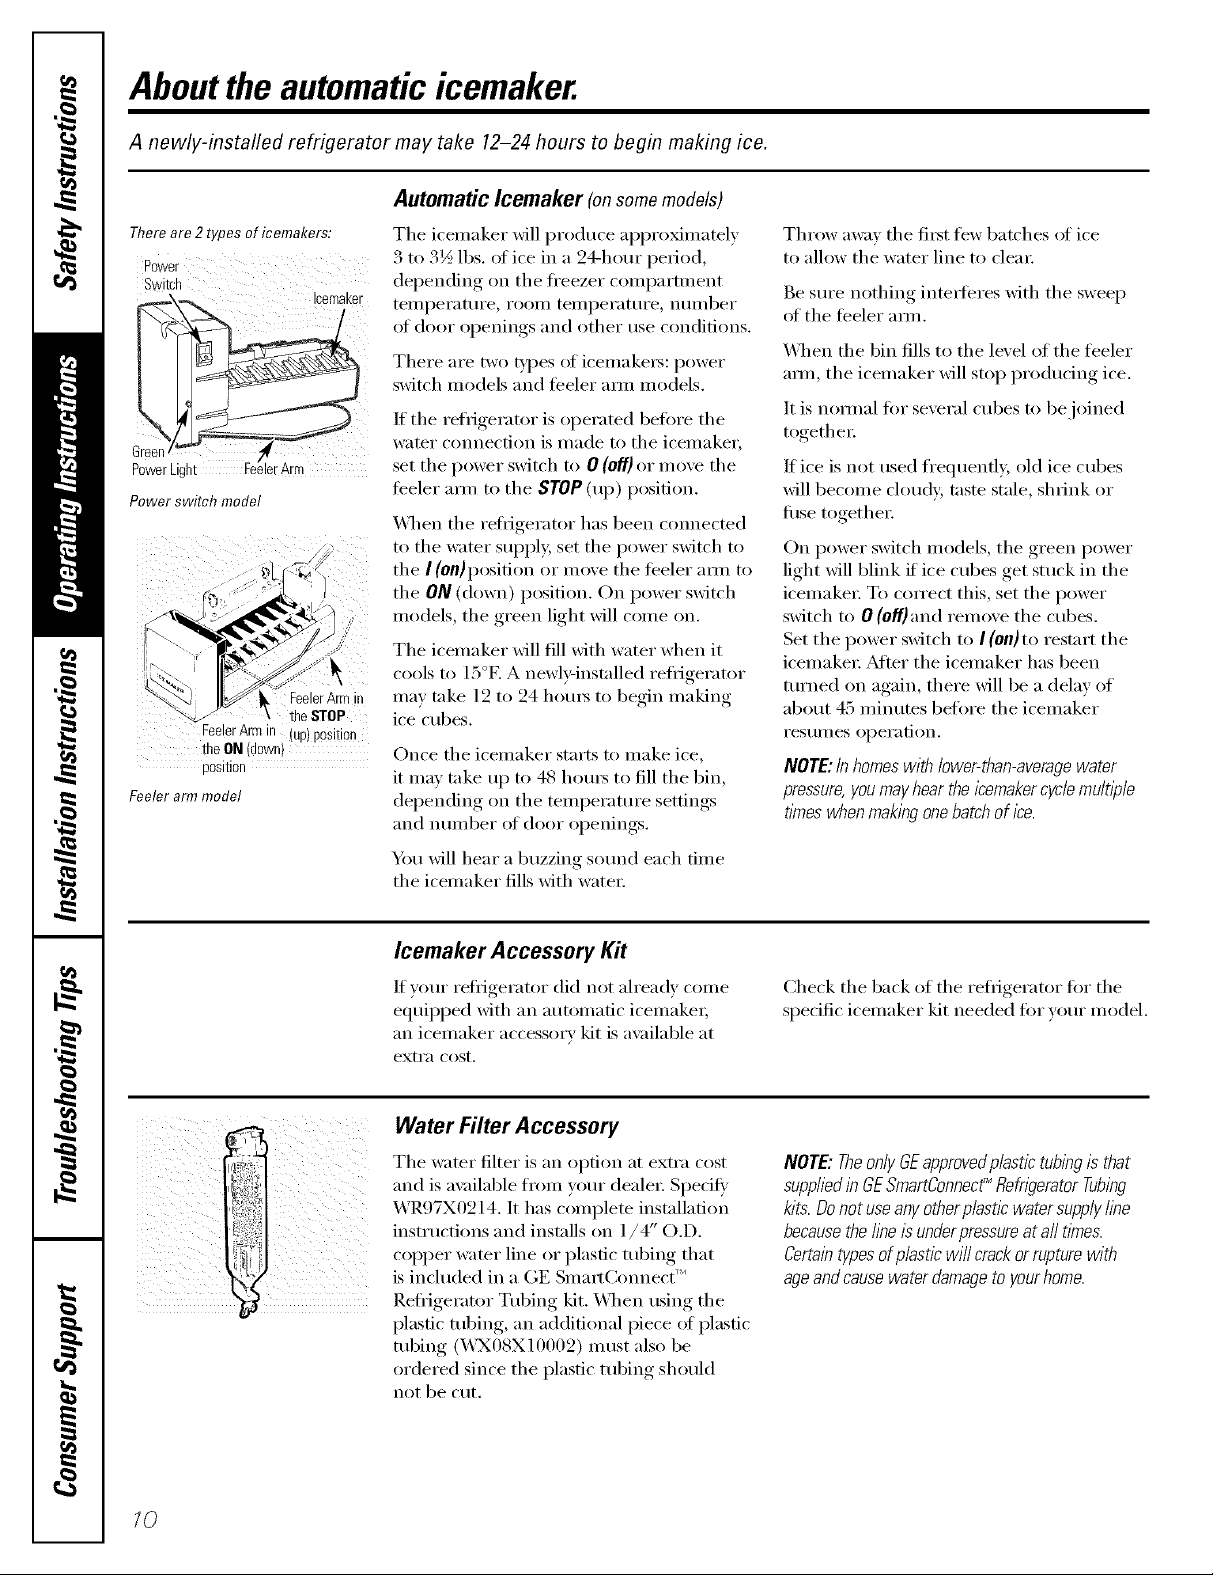
Abouttheautomaticicemaker.
A newly-installed refrigerator may take 12-24 hours to begin making ice.
Automatic Icemaker (onsomemodels)
Thereare2typesoficemakers:
Switch
\
PowerLight eeer rm
Powerswitchmodel
FeelerArmill up position
the.ON down)
posmon
Feeler arm model
Icemaker
FeelerArmin
theSTOP
The icemaker will produce al)pro_nmtely
3 to 3½ lbs. alice in a 24-hour period,
depending on the fl'eezer comI)amnent
tellll)ei'attli'e , i'OOlll tellll)ei'attli'e , ntlll/beF
at door openings and other rise conditions.
There are two t),pes of icemake_: power
switch models and teeler aml models.
If tile refl_igerator is operated beffwe tile
water cmmection is made to tile icemaker,
set tile power switch to 0 (ell) or move tile
feeler am/ to tile STOP (up) position.
_Al/en tile reti_igerator has been comlecmd
to tile water sui)i)l,v, set tile power switch to
tile ] (on) position or move tile teeler aml to
the ON (down) position. On power switch
models, tile green light will come on.
The icemaker will fill with water when it
cools to 15°E A newl>installed refl{gerator
may take 12 to 24 hom_ to begin making
ice cubes.
Once tile icemaker starts to make ice,
it may take up to 48 hom_ to fill tile bin,
del)ending, on tile temperature.setfimm_.
[llld ntlll/beI" of door ol)enings.
You will hear a buzzing sound each time
the icemaker fills with water:
Throw awm tile fi_t few batches of ice
to allow tile water line to clem:
Be sm'e nothing inte_feres with tile sweep
of tile teeler amL
\Allen tile bin fills to tile level of tile fl_eler
am/, the icemaker will stop producing ice.
It is natural t0r several cubes to be joined
together:
If ice is not used fl'equenfl> old ice cubes
will become cloudy, taste stale, shrink or
fiBe together:
On power switch models, tile green power
light will blink if ice cubes get stuck in the
icemake_: To con'ect this, set tile power
switch to 0 (off)and remove tile cubes.
Set tile power switch to I (On)to restart tile
icemake_: _Mter tile icemaker has been
turned on again, there will be a delay of
about 45 minutes before tile icemaker
I'eS/lI//es ol)ei'ation.
NOTE:In homeswith lower-than-averagewater
pressure,you mayhear the l?emakercycle multi)de
times when maklbgonebatch of ice.
10
Icemaker Accessory Kit
If your refl_igerator did not ah'ead_ come
equil)ped with an automatic icemake_;
an icemaker accessory kit is ax filable at
extra cost.
, WaterFilterAccessory
i
Tile water filter is an option at extra cost
and is available from }am" deale_: Specit}
X,\R97X0214. It has complete installation
instructions and installs on 1/4 ( .D.
COl)per water line or plastic tubing that
is included m a GE Smatt(xmnect
Refl{gerator Tubing kit. XAqmn using the
plastic tubing, an additional piece of plastic
tubing (_A'X08X 10002) I/ltlSt also be
ordered since tile plastic tubing should
not be cut.
tr )
Check tile back of tile refligerator fiw tile
specific icemaker kit needed for ",'our model.
NOTE:TheonlyGEapprovedp/astictubingisthat
suppliedi# GESmartConnect_Refn)emtorTubing
kits.Donotuseanyotherplasticwatersupply/be
becausethei/beis underpressureat afttimes.
Certaintypesofplasticwi//crackorrupturewith
ageandcausewaterdamageto yourhome.
Careand cleaningof therefrigerator, vvww.GEAppliances.com
Cleaning the Outside
The doorhandles and trim. Clean with
a (h)th dampened with soap) watex:
Dry with a soft cloth.
a commercially axailable stninless steel
cleane_: Do not use appliance wax or polish
on tile st;finless steel.
Keep the outside clean. Wipe with a clean
cloth lightly dampened Mth kitchen
appliance wax or mild liquid dish
detergent. Dry and polish with a clean,
sott cloth.
The stainless steel panels and door handles
(on some models) can be cleaned with
Cleaning the Inside
Tohelp prevent odors,leaxe an open box ot
baking soda in tile fi'esh food and ti'eezer
compa F[ll/ents.
Unplug the refrigerator before cleaning. If this
is not practical, w_ing excess moisture ()/it
of Sl)onge, or cloth when cleanino_ at(rand
switches, lights or controls.
Use warn/water and baking soda solution--
about a tablespoon (l 5 ml) of baking soda
to a quart (l liter) of watex; This both cleans
and neutralizes odo_. Thoroughly rinse
and wipe dr};
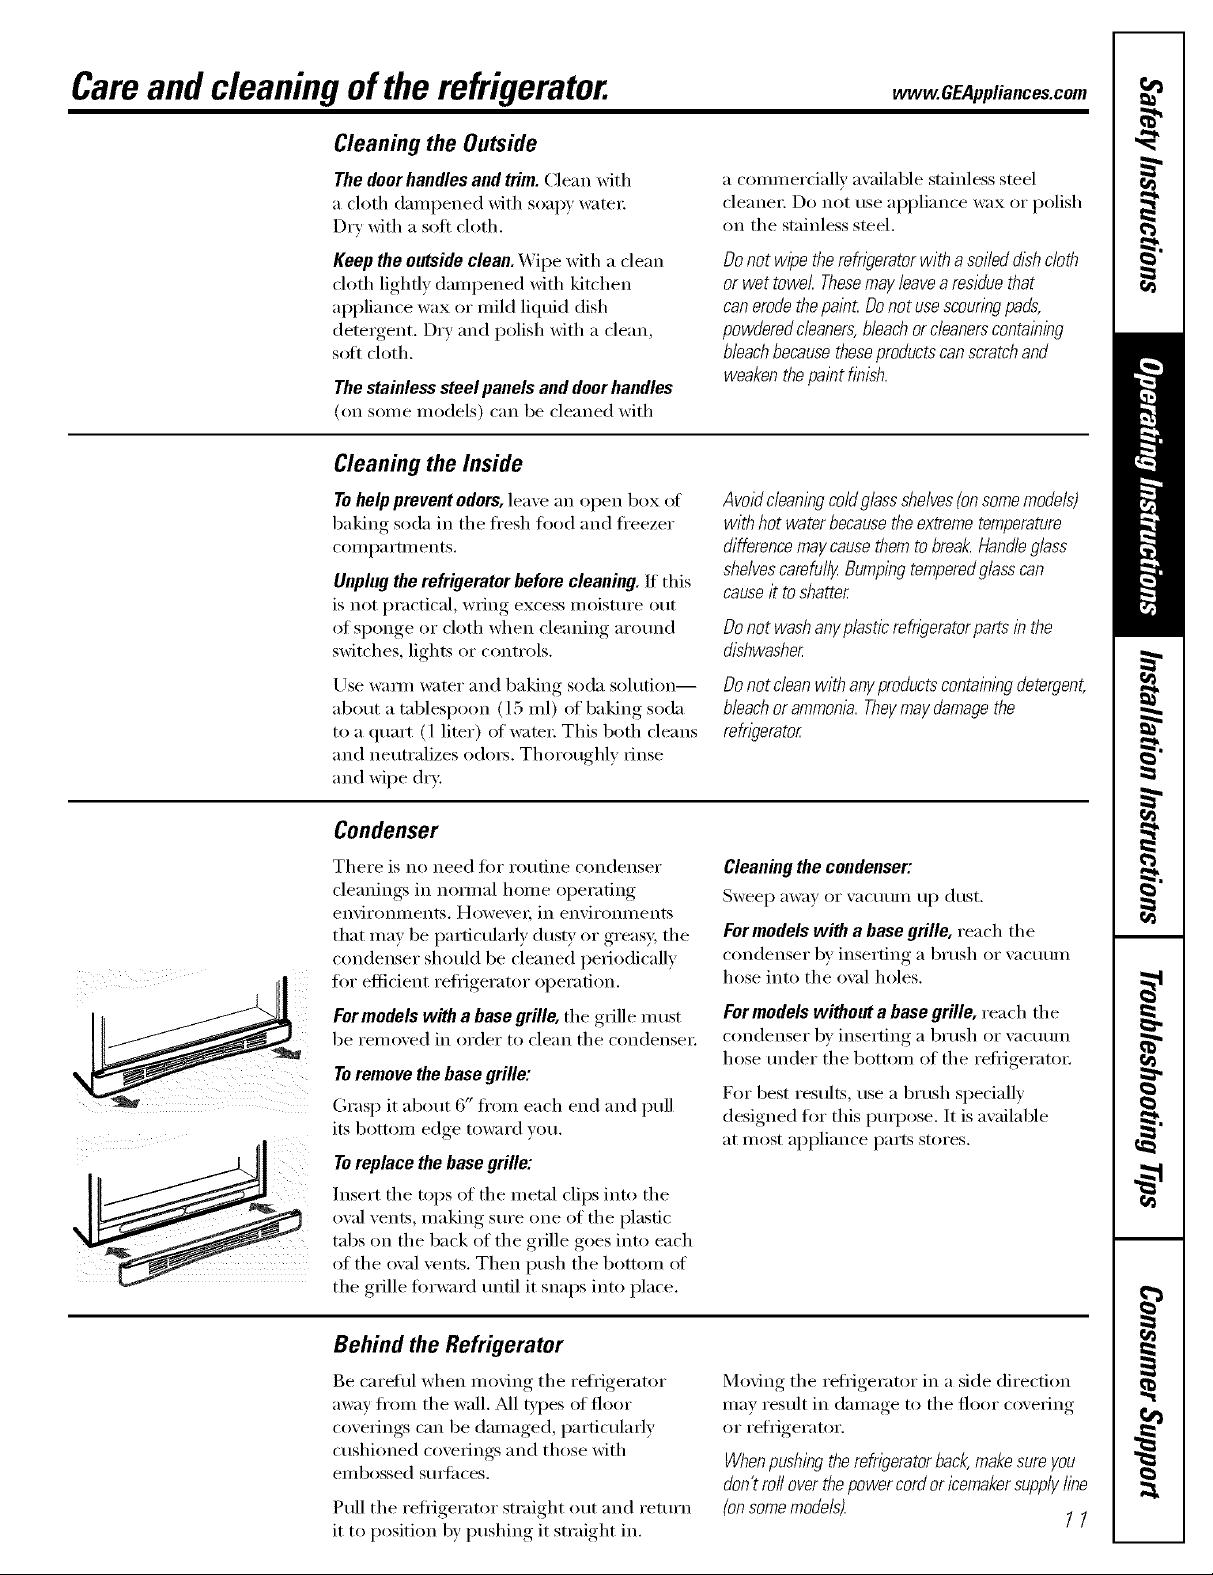
Condenser
There is no need fl)r routine condenser
cleanings in nomml home operating
envii'oniilents. Howevei; in envii'onillents
that may be particularly dusty or greas 5 tile
condenser should be cleaned periodically
t0r eflident refligerator ol)eration.
Formodels with a base grille, the g_ille must
be removed in order to clean tile ('ondense_:
Toremove the base grille:
Grasp it about 6" fl'om each end and pull
its bottom edge toward win.
Toreplace thebase grille:
Insert the tops of the metnl clips into the
owfl vents, making sm'e one of the plastic
tabs on tile back of tile grille goes into each
of the oval vents. Then l)ush the bottom of
tile grille fi)rward tmfil it snaps into place.
Do not wipe therefwerator with a soiled dishcloth
or wet towel Thesemay leavearesidue that
can erode thepalbt Donot usescouringpads,
powdered cleaners,bleachorcleanerscontaining
bleachbecausetheseproductscanscratchand
weakenthepaint finish.
Avoid c/eaningco/dglass shelves(onsome models)
with hot water becausethe extreme temperature
difference maycause them tobreak./-/and/eglass
shelvescarefully Bumpingtemperedglasscan
causeit to shatter
Donot washanyplasticrefn)eratorpartsin the
dishwasher
Donotdeanwithanyproductscontain/bgdetergent,
bleachorammonlkTheymaydamagethe
refngerator
Cleaning the condenser:
Sweep away or vacuum up dust.
For medels with a base grille, tea ch th e
condenser by inserting a brush or vacuum
hose into the o\_d holes,
Formodels without abase grille, reach th e
condenser by inserting a brush or wmuum
hose m_der tile bottom of tile refligerato_:
For best results, use a brush specially
designed for this propose. It is available
at most appliance parts stores.
Behind the Refrigerator
Be careful when mo\ing tile retiigerator
away ti'om tile wall. M1 b'pes of floor
coverings can be damaged, particularly
cushioned coverings and those with
eIIlbossed S/li]il ces.
Pull tile refiigerator ,_" "_ mt and I'ettlFn
it to position by I)ushing, it smfight, in.
stI al(rht (
Moving tile refligerator in a side direction
may result in damage to the floor coveting
or refiigerator.
Whenpushing therefrigerator back,makesureyou
don't ro//over thepower cord or icemakersupply fine
(onsomemodels).
11
Careand cleaningof therefrigerator.
Preparing for Vacation
For long va(-ations or absen(-es_ i'eil/ove
toed and unplug the i'efl_gei'atoi', Move
the refl_igerator control to the 0 (off)position
and dean the interior with a baking soda
solution of one tablespoon (15 ml) of
baking soda to one quart (1 liter) el watei;
I,eave the doo_ open,
Set the icemaker power sMtch to the 0 (of'l}
position or move the teeler am_ to the
STOP(up) position (depending on model)
and shut off the water supply to the
reii_gei'atoi:
If the temperature can drop below fl'eezing,
have a qualified servicer drain the water
supply systeIn (on some models) to prevent
serious proper b' damage due to flooding.
Preparing to Move
Secure all loose items such as grille,
shelves and drawe_ by taping them
securely in place to prevent damage.
Besure therefr/gerator staysinan up@t position
during mow))g
Replacingthelightbulbs.
Setting either or both controls to 0 (off) does not remove power to the light ckcuit.
c_ c-)
Some models have only one fighL
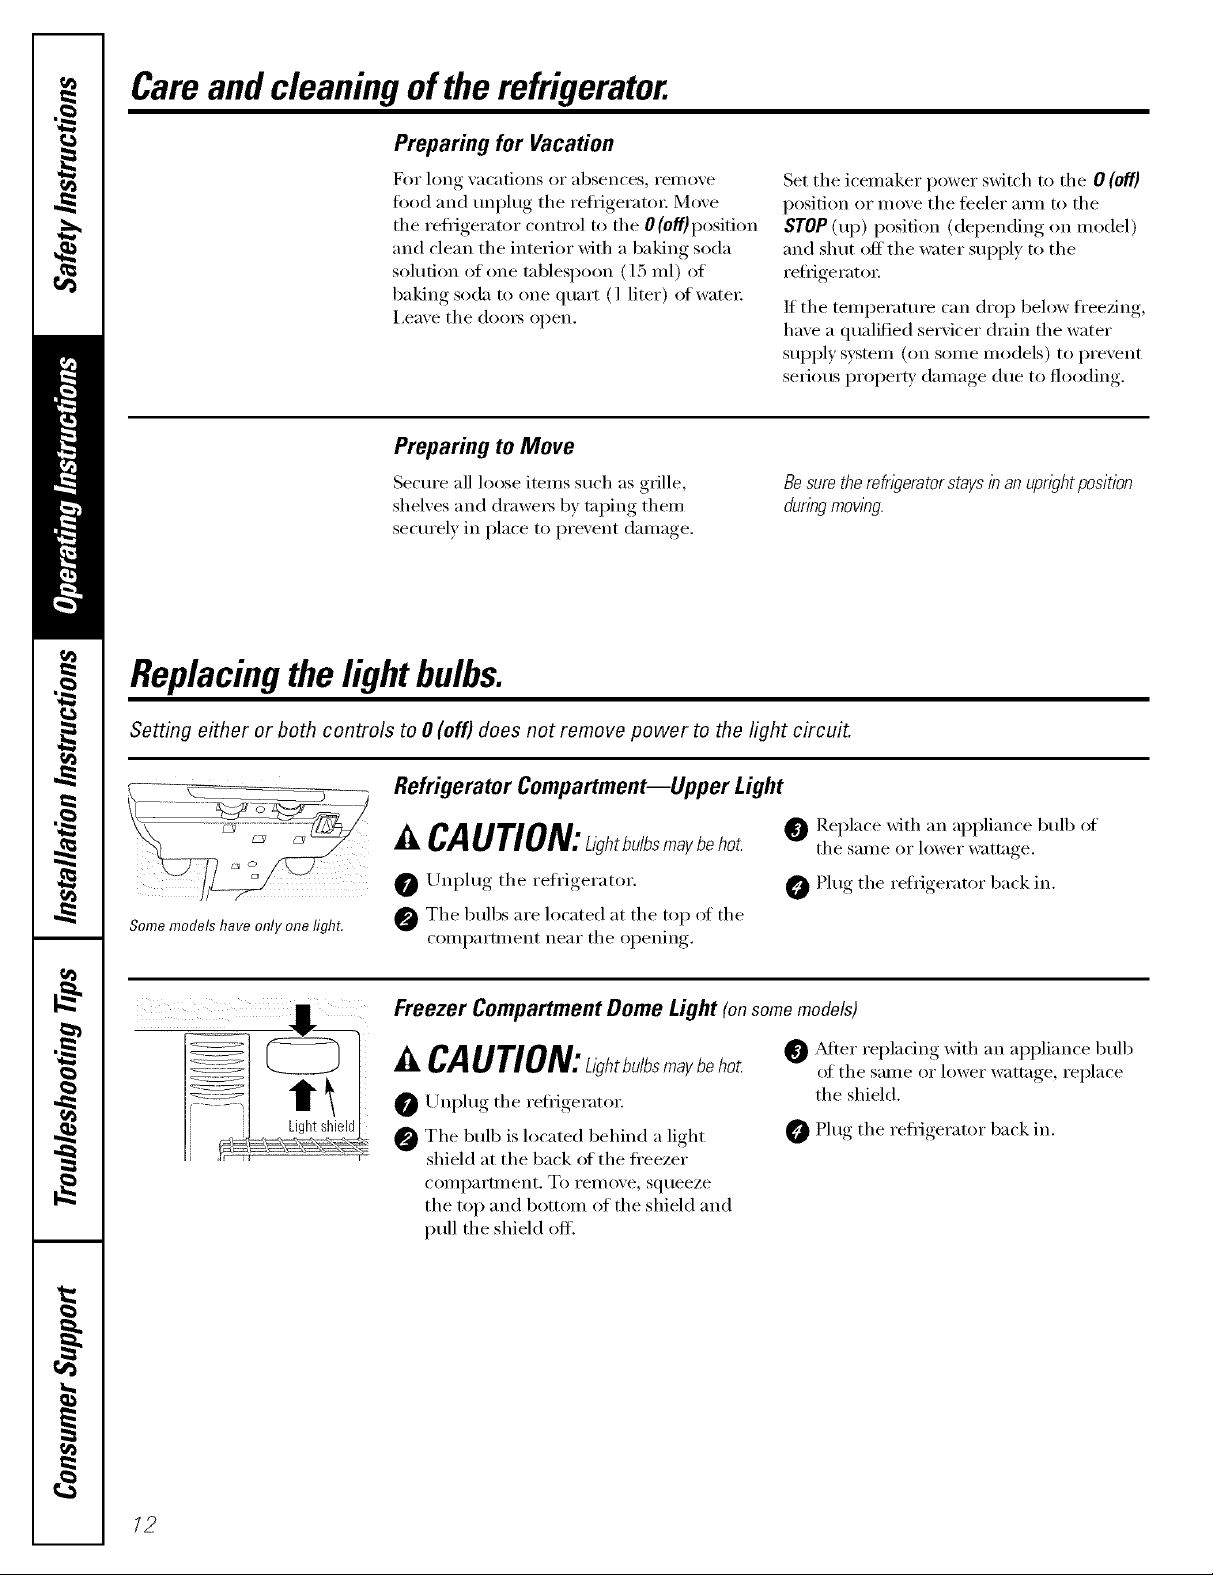
Refrigerator Compartment--Upper Light
ACAUTION:L> bu/bsbeho . @Replace with a,l appliance bulbof
0 Unplug the refrigerator. 0 Plug the refrigerator back in.
@ The bulbs are located at the top ot the
compartment near the opening.
Freezer Compartment Dome Light (on some models)
A CAUTION:L,_h,bu/bsm_ybeho_
0 Unplug the reti_igerato_:
@ The bulb is located behind a light
shield at the back ot the fl'eezer
coi//pai'tlilent. To I'eI//lwe_ squeeze
the top and bottom of the shield and
pull the shield off.
the same or lower wattage
0 _Mter replacing with an appliance bulb
of the same or lower wattage, replace
the shield.
Plug the refl-igerator back in.
12
Installation
Refrigerator
Instructions
Models 18and 19
ffyou have questions,call 1.800.GE.CARESor ,isit ore"_Aebsiteat: www.GEAppliances.com I
BEFORE YOU BEGmN
Read these instrnctim_s completely and carefullyo
° IMPORTANT - S. e
inst_l_cti(ms {or local im_spectm"s line.
" IMPORTANT - .11
_()veI']_Jm_g codes amid or(]importances.
* Note to Installer = Be sm'e to leave these
im_stn*_thms wkb the Consm_er.
* Note to Consumer = Keep these h_sm*c6om_s
fi)r flmn'e reference.
* Skill level - Installation of this applim_ce reqlfres
basic mechm_ical ski]Is.
° Completion time - Refrigerator h_sta]]athm
15 mJm_l_tes.
* Proper h]sta]]atiom_ is the respom_sibi]ity of the
im_sta]]er.
° Prodl_ct %]]m'e (b_e to improper im_sta]]a6om_ is m_t
covered imder die _trranl[v.
CLEARANCES
Allow the fi_llowing clearances fi)r ease of installation,
proper air circulaflon and I)lmnbiI_g, and electrical
connections.
• Sides 1/8" (3 ram)
• Top 1" (25 ram)
• Back 1" (25 ram)
If the reti_igei'ator is to be installed next to a wall on the
hinge side, allow 5/16" (8 ram) door clearance.
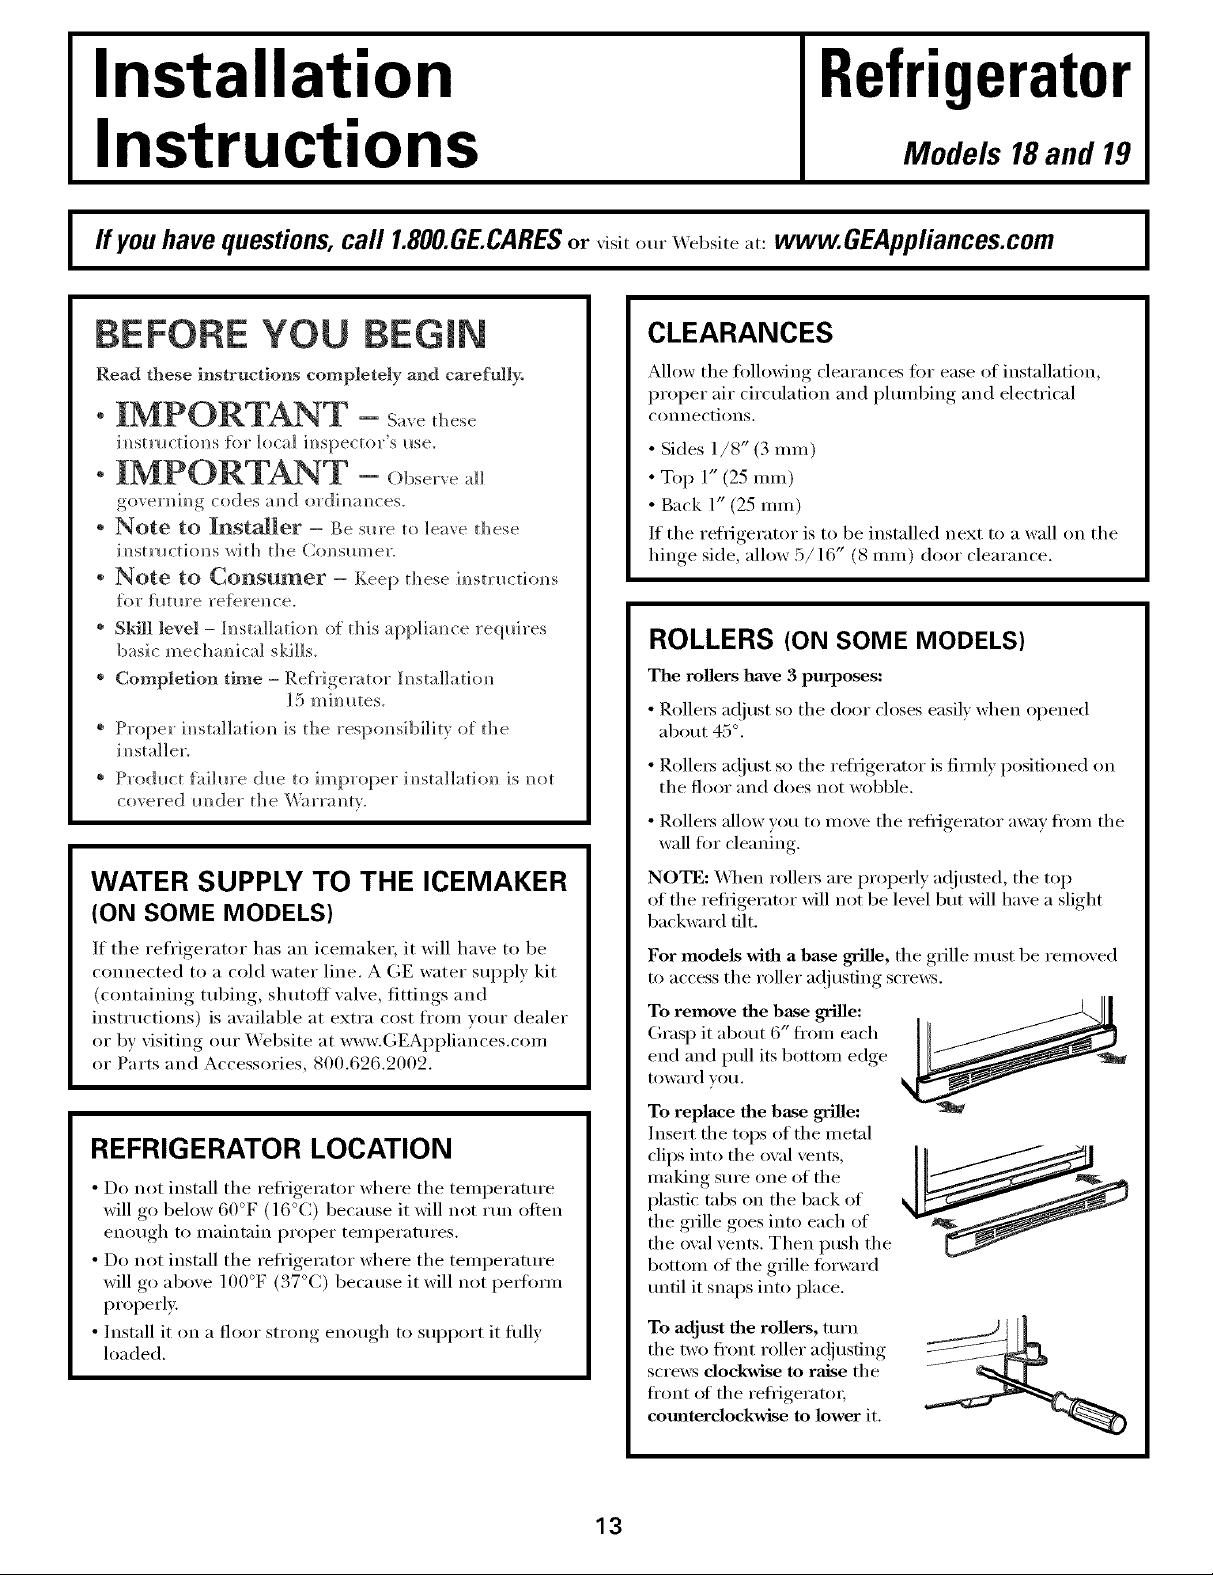
ROLLERS (ON SOME MODELS)
The milers have 3 purposes:
•P.olle_ at!just so the door closes easil) when opened
about 45 °.
• Rolle_ at!just so the refl_igerator is firefly positioned on
the floor and does not wobble.
•Rollet_ allow w)u to mine the refl_igemtor away fl'om the
wall fi_r cleaning.
WATER SUPPLY TO THE ICEMAKER
(ON SOME MODELS)
If the refrigerator has an icemaker, it will have to be
connected to a cold water line. AGE water supply kit
(contailfilag tubing, shutoff wdve, fittings and
ilastructions) is awdlable at extra cost from vom" dealer
or by visiting ore" _'ebsite at _v.GEAppliances.com
or Parts and Accessories, 800.626.2002.
REFRIGERATOR LOCATION
• Do not install the refl'igerator where the telni)erature
will go below 60°F (16°C) because it will not iui_ often
enough to maintain proper temperatures.
• Do not install the refl'igerator where the temi_erature
will go above 100°F (37°C) beca use it will not pell'imn
properl>
• Install it on a floor strong enough to sui)port it flfllv
loaded.
NOTE: X,_q/en rolle_5 are properly a(!justed, the top
of the refl_igerator will not be lexel but will haxe a slight
backward flit.
For models with a base grille, the grille must be removed
to access the roller ac!iusflng screws.
To remove the base grille:
Grasp it about 6" fl'Oln each
end and pull its bottom edge
toward FOil.
To replace the base grille:
]nsert the tops of the metal
clips into the oral vents,
making sm'e one of the
plastic tabs on the back of
the grille goes into each of
the oval vents. Then push the
bottom of the grille torward
tmfll it snaps into place.
To adjust the rollers, tm'n
the two fl'ont roller a(!jusflng
scI'e_,_,:sclockwise to raise the
fl'ont ot the refl_igeratoi;
cotmterclockwise to lower it.
13
mnstaliation mnstructions
mNSTALUNG THE WATER UNE IONSOMEMODELS}
BEFORE YOU BEGIN
Recomme]/ded copper _ater slq)p]y kits are WX8X2,
WXSX3 or WXSX4, depe{/dim/g o{/ die amom/t of
mbh/g you _lee(L Approved plastic water slq)ply lim/es
are (;E SmartCom/ect '_Re{i'igerator T!_bi_lg
(WXOSX 100(}2, WX 08X 1 (1(1(16, WX 08X 1 (1(1]l5 amid
WX 08X 10025).
W]]e{] comlectim/g yore" re{Hgerator to a (;E Reverse
Osmosis _2_ter System, the o{/]y approved im/sta]]atio{/
is wit]] a (;E RVKit. For other reverse osmosis water
systems, ti4]ow die mamli;_cmrer's recommem/datio{/s.
This water ]im/e im/sta]]atitm is m/or warm, rated bv the
icemaker maml[i_ctm'er. FoH({w these
im/strllcti{ms carefll]]y to mim/imize the risk of expe{/sive
Water hammer (water bam/gim/g ira/ the pipes) 1{/ ]]ollse
phm/bim/g c_m Gmse damage to re_Hgerator parts amid
lead to w_ter leakage or fioodi_]g. Ca]]a qlla]ified
phm/ber to correct water hammer betin'e im/sta]]h/g the
water slq)p]y ]im/e to the ref_']gerator.
To preve{/t bin'{is aN/d prodl_ct damage, do m/or hook
Iq) the water lim/e to the hot water lim/e.
If v(m Ilse y(mr re{_'igerator be[in'e co{mecth/g the
water Jim/e, make sllre the icemaker power switch is ira/
the 0 {off)positi{m (ol/ power switch models) or the
feeler arm is ira/ the STOP (11[>) positi{m (o{/ feeler arm
Do m/or ]m/stall the icemaker mbim]g ]m/areas where
temperatm'es fid] below freezh/g.
W]]em/ ilsh/g any electrical device (smh as a pov, rel "
dr]]]) (]_lri_]g i_/sta]]ati{m, be s_lre the device is do_lb]e
i_/s_]ated or grom/ded i_] a ma_/_/er to prevent the
hazard of electric shock, or is batter} powered.
A]] ]_/sta]]atitms m_lst be 1_/ accorda_/ce with Iota]
phm/bi_/g code req_fireme_/ts.
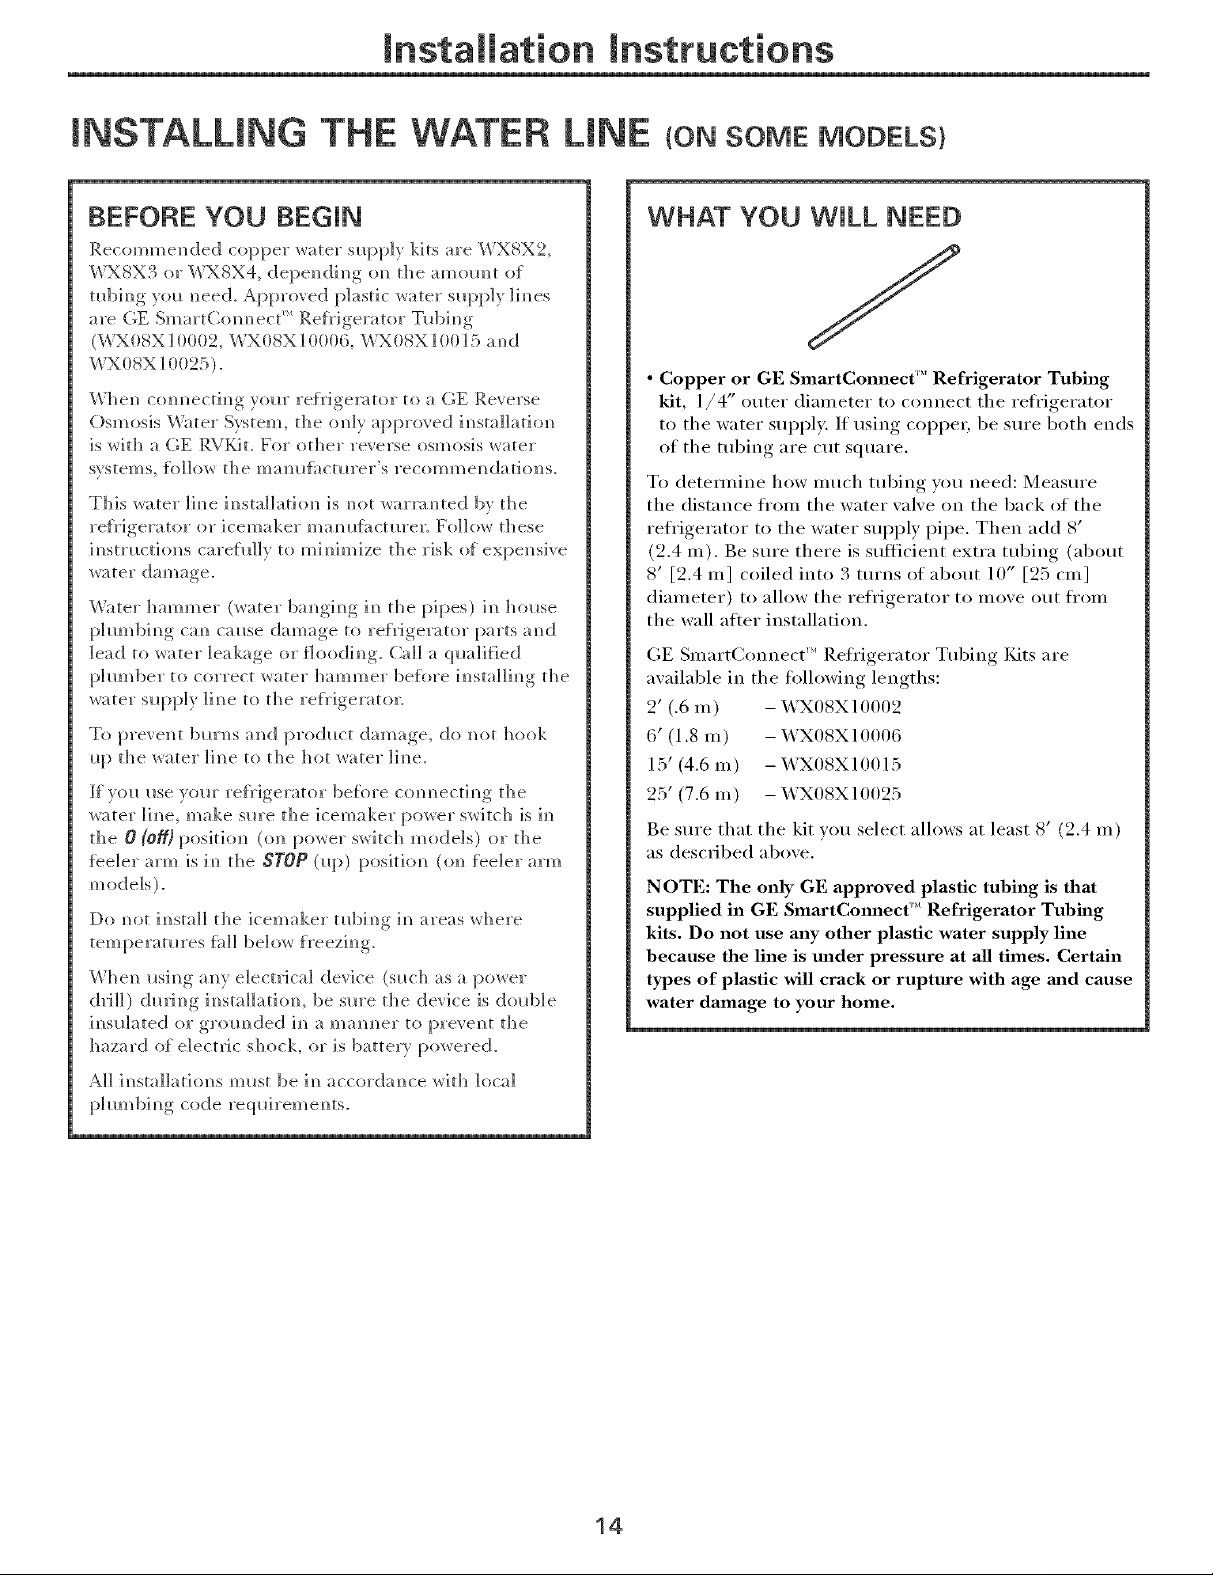
WHAT YOU WILL NEED
• Copper or GE SmartConnect'" Refrigerator Tubing
kit, l/4" outer diameter to connect the refi'igerator
t{>the water supply. If using copper, be stlre both ends
of the tubing are cut square.
T{>detem]ine how much tubing you need: Measure
the distance ti'om the water valve on the back of the
reli'igerator t{>the water supply pipe. Then add 8'
(2.4 m). Be sure there is sufliciei]t extra tubii]g (about
8' [2.4 m] coiled into 3 turns of about 10t' [25 cin]
diameter) to allow the reii'igerator to move out ti'Oll]
the wall atier installation.
GE SmartConnect ''_Refl'igerator Tubing Kits are
available in the fi>lh>wing lengths:
2' (.6 m) - WX08X10002
6' (1.8 m) - WX08X10006
15' (4.6 m) - WX08X10015
25' (7.6 m) - WX08X10025
Be sure that the kit you select allows at least 8' (9.4 m)
as described above.
NOTE: The only GE approved plastic tubing is that
supplied in GE SmartCmmect '_ Refrigerator Tubing
kits. Do not use any other plastic water supply line
because the line is reader pressure at all times. Certain
types of plastic will crack or rupture with age mad cause
water damage to your home.
14

Installation Instructions
WHAT YOU WILL NEED (CONT.)
Install the shutoff valve on the nearest frequently used
drinking water line.
A GE water supply kit (comainim_g mbim_g, shmoff
valve a]_d fittJm]gs listed below) is available at extra
cost {]'om your dealer o1" i}'om Parts amid Accessories,
800.626.2002.
* A cold water supply. The water pressure midst be
90 = p.s.i.betwee]/ 2 amid 190 (1.4-8.1 bar).
° Power drill.
* 1/2" or adjustable wrench.
* Straight and Phillips |]lade screwdriver.
° Two 1/4" outer diameter compression nuts and
2 ferrules (sleeves)--to com]ect the copper ml)im/g to
the sh utolt valve amid the re{rigerator water valve.
OR
[] SHUT OFF THE MAIN WATER
SUPPLY
Turn on the nearest tau{'et lung enuuoh_ t{> clear
the line of water.
[] CHOOSE THE VALVE LOCATION
(2hoose a location fi:,r the valve that is easily
accessible. It is best to connect into the side of a
vertical water pipe. When it is necessary to connect
into a horizontal water pipe, make the connection
to the top or side, rather than at the bottom, to
avoid drawing off any sediment fl'om the water pipe.
* _f"?r(_ are i_sim/g a GE Sma_tCo//ect " Refrigerator
Tl_bim/g kit, the m/ecessar_, titti m/>,s ,qre preassemb]ed to
the mbim/g.
* If yore" existi_]g copper water line has a flared fittim/g
at the end, you will m/eed am1adapter (aw6]ab]e at
p]m//bing supply stores) to c<mm/ect the _ater ]im/e to
the refrigerator OR ytm Gm cllt off the flared {]ttim/g
with a tube cutter amid theN/ ilse a compress]ol/ fittim/g.
Do not cllt formed e]/d f}'om (;E SmartCom/m/ect ''_
* Shutoff valve to conm/ect to the cold water ]]m/e.
The s]mtolt valve should ]]ave a water h/let with a
m ira/]m m// ira/s]de di am eter of 5 / 242" at the pui m/t (if
com/m/ect]o_/ to the COLD WATER LINE. Saddle-type
s]mtoff valves are i_]c]uded im] manly water slq:)p]y ]<its.
Be%re pm'c]]asJm/g, make sm'e a saddle-type valve
complies _ith vollr local [)hm/bim/g codes.
[] DRILL THE HOLE FOR THE VALVE
Drill a 1/4" hole in the water pipe (men if using a
sell2I_iercing, xalxe), using a sharp bit. Remu_e any
burrs resulting fr{:,m drilling the hole in the pipe.
Take care not to allow water to drain into the drill.
Failure t{> drill a 1/4" hole ma) result in reduced
ice production or smaller cubes.
15

Installation Instructions
INSTALLING THE WATER LINE (CONT.)
[] FASTEN THE SHUTOFF VALVE
Fasten the shutoit _al_e to the cold water pipe with
the pipe clamp.
PipeClamp
Saddle-Type
ShutoffValve
NOTE: (:ommonwealth of Massachusetts Plmnbing
Codes 248CMR shall be adhered to. Saddle \_dves
are illegal and rise is not permitted in Massachusetts.
Consult with wmr licensed i)lumbe_:
VerticalCold
WaterPipe
[] TIGHTEN THE PIPE CLAMP
Tighten the clamp screws until the sealing washer
begins to swell.
NOTE: Do not overtighten or vou may crash the
tubing.
Pipe End
ClamF
-Washer
[] CONNECT THE TUBING
TO THE VALVE
Place the compression nut and termle (sleexe)
fin" COl)per tubing onto the end of the tubing and
connect it to the shutoffxalxe.
Make sure the tubing is flflly inserted into the valve.
Tighten the compression nut securelv.
For plastic tubing fl'om a GE SmartConnect "_
Refrigerator Tubing kit, insert the molded end
of the tubing into the shutoff valve and tighten
compression nut tmtil it is hand-tight; then tighten
one additional turn with a wrench. Overtightening
Ill}IV Carise lea ks.
--Compression
Nut
Saddle-Type_,
ShutoffValve
Packing Nut-
OutletValve-- Ferrule(sleeve)
NOTE: Commonwealth of Massachusetts Plumbiw*
Codes 248CMR shall be adhered to. Saddle xalxes
are illegal and use is not pem_itted in Massachusetts.
Consult with _,om" licensed l)lumber.
SmartConnectTM
Tubing
[] ROUTE THE TUBING
Route the tubing between the cold water line and
the refl'igera tot.
Route the tubing through a hole drilled in the wall
or floor (behind the reli'igerator or a@_cent base
cabinet) as close to the wall as possible,
NOTE: Be sm'e there is sufficient extra tubing
(about 8' [2.4 m] coiled into 3 turns of about 10"
[25 cm] diameter) to allow the refrigerator to move
out fix)In the wall al*er installation.
[] FLUSH OUT THE TUBING
Turn the main water supply on and flush out the
tubing tmtil the water is clear.
Shut the water olt at the water valve alier about
one quart (l liter) of water has been flushed
through the tubing.
16
Installation Instructions
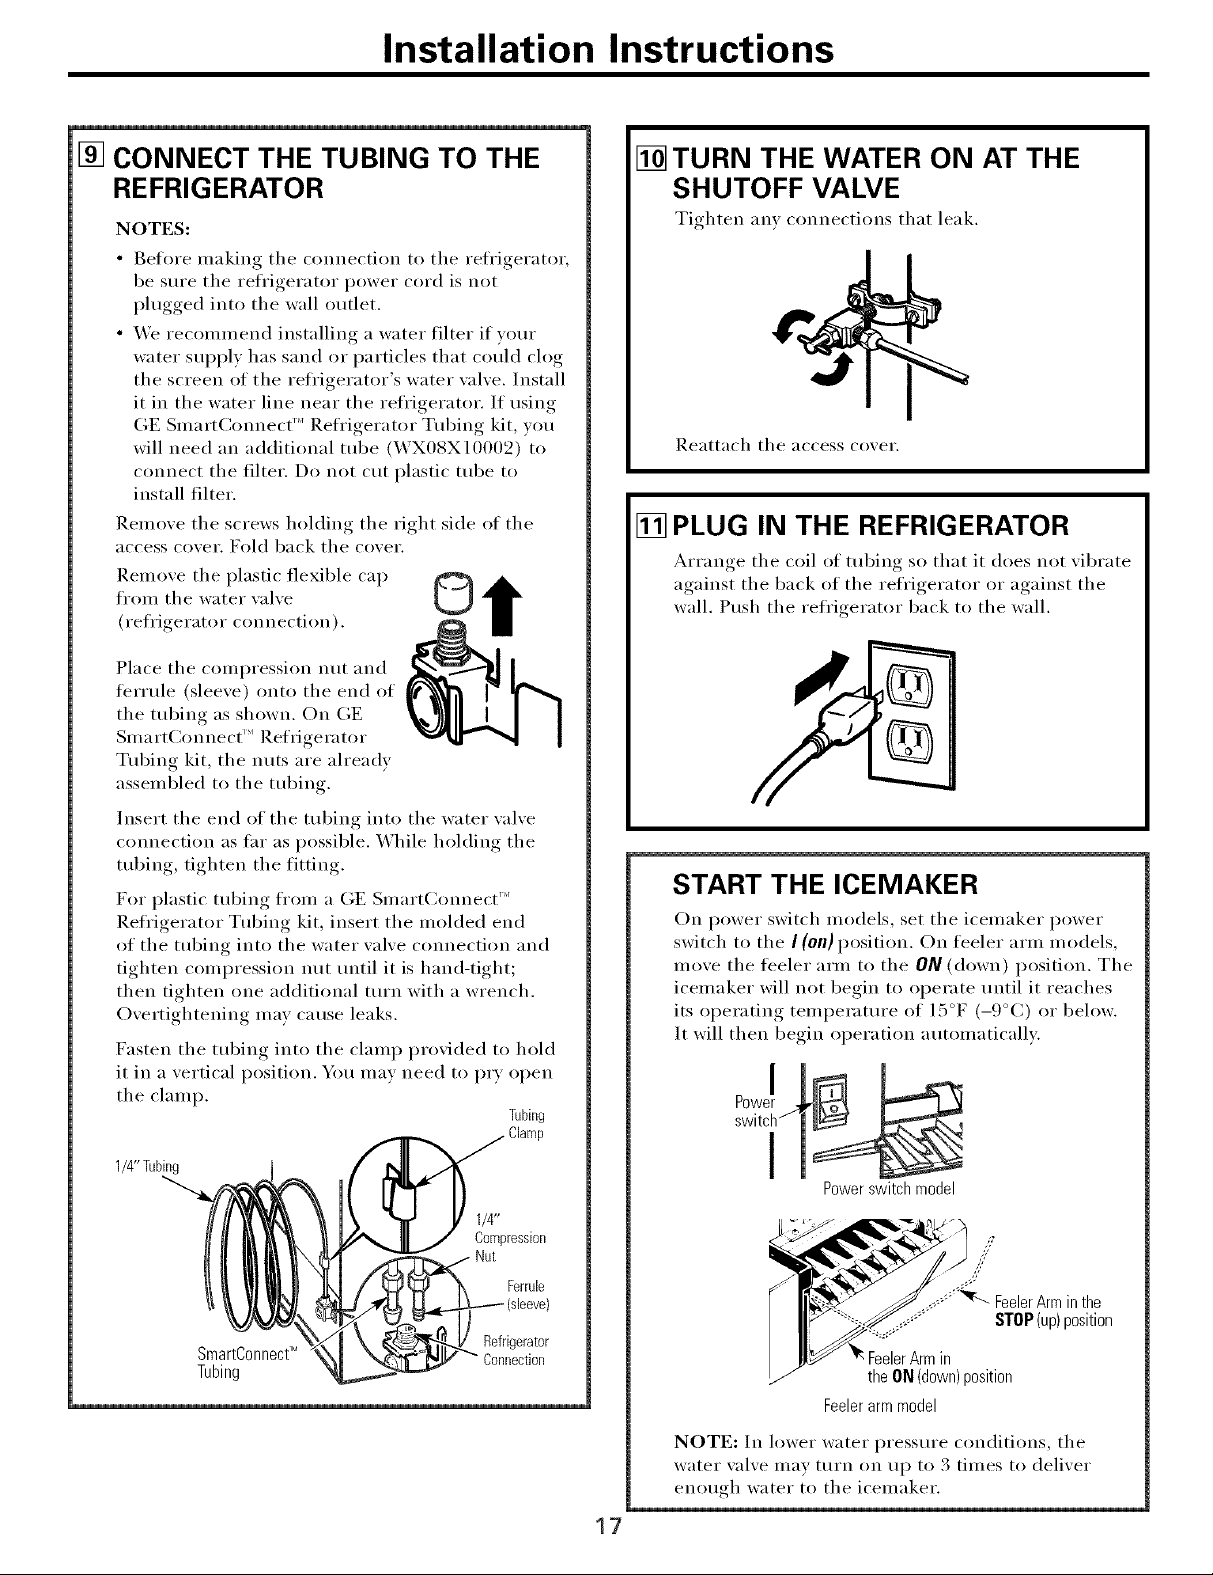
[] CONNECT THE TUBING TO THE
REFRIGERATOR
NOTES:
• Before making tile connection to the reli'igerator,
be sure tile refl'igerator power cord is not
plugged into the wall outlet.
• We recommend installing a water filter if your
water sui)ply has sand or particles that could clog
the screen of the refrigerator's water wdve. Install
it in the water line near the refi'igerator. If using
GE Slnart(_onnect "_ Refl'igerator Tubing kit, you
will need an additional tube (WX08X10002) to
connect tile filter. Do not cut plastic tube to
install filter.
Remove the screws holding the right side of the
access cover. Fold back the cover.
Remoxe tile plastic flexible cap
from tile water xalxe
(refl'igerator connection).
Place tile compression nut and
terrule (sleeve) onto tile end of
the robing as shown. On GE
Smart(]onnect _'_ Refrigerator
Tubing kit, the nuts are already
assembled to the tubing.
Insert the end of the tubing into the water wdve
cmmection as fin" as possible. While holding the
tubing, tighten the fitting.
For plastic tubing fl'om a GE Smart(:(mnect "_
Refl'igerator Tubing kit, insert tile molded end
of tile tubing into tile water valve connection and
tighten compression nut tmtil it is hand-tight;
then tighten one additional turn with a wrench.
Overtightening may cause leaks.
Fasten tile tubing into tile clamp provided to hold
it in a vertical position. You mav need to I)_T open
tile clamp.
U
Tubing
[] TURN THE WATER ON AT THE
SHUTOFF VALVE
Tighten any connections that leak.
Reattach tile access covei',
[] PLUG IN THE REFRIGERATOR
&_rram,e tile coil ot tubing so that it does not _ibrate
against the back of the refl'igerator or against the
wall. Push tile refrigerator back to tile wall.
START THE ICEMAKER
On power switch models, set tile icemaker power
switch to the I (On) position. On feeler arm models,
move tile feeler arm to tile ON(down) position. Tile
icemaker will not begin to operate until it reaches
its operating temperature of 15°F (-9°C) or below.
It will then begin operation automatically:
1/4" Tubing
SmartConnectTM
Tubing
1/4"
Compression
Nut
Ferrule
Refrigerator
Connection
Power switch model
.......;_%v..FeelerArminthe
'Y STOP(up)position
in
the ON(down) position
Feeler arm model
NOTE: In lower water pressm'e conditions, tile
water xalxe may turn on up to 3 times to delixer
enou,d/ water to tile icemaker.
17
Installation Instructions
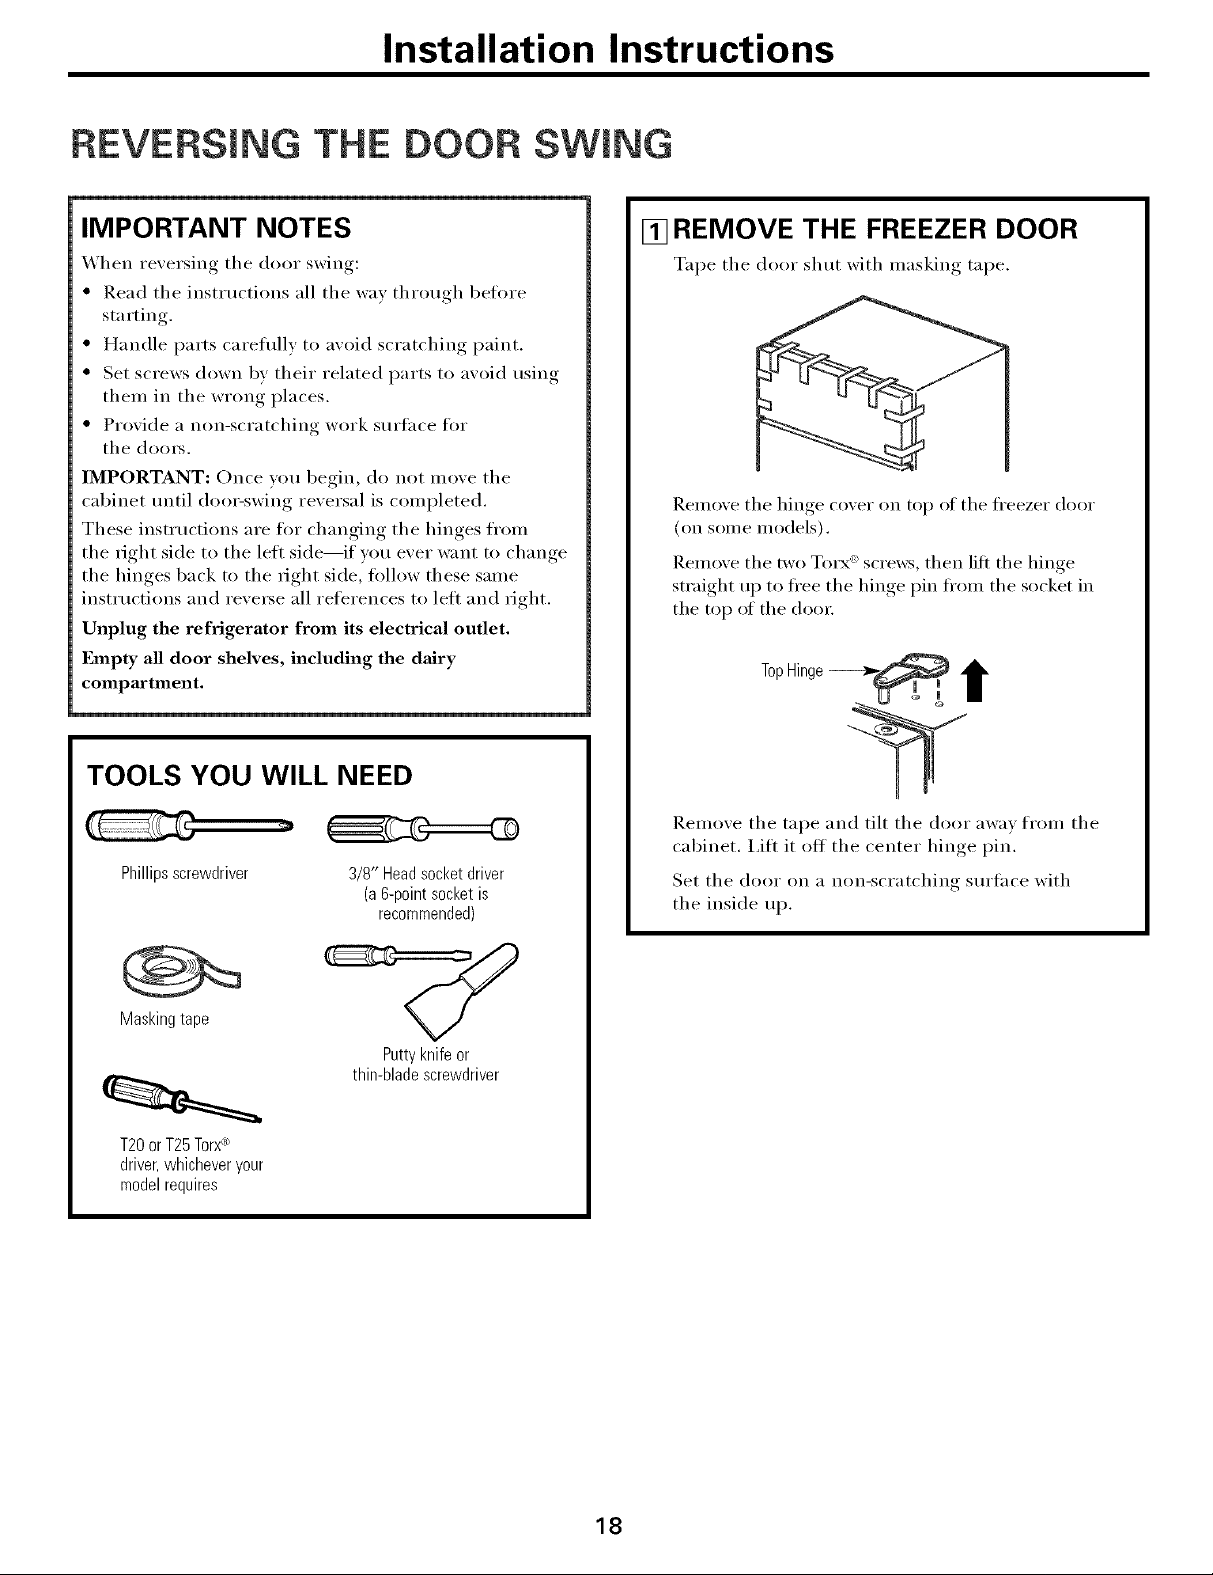
REVERSmNG THE DOOR SW NG
IMPORTANT NOTES
_'_ hen reversing the door swing:
• Read the instructions all the way through before
starting.
• Handle parts careflfllv to axoid scratching, I)aint
• Set screws down b_ their related parts to a',oid usino,
them in the wrong places.
• Proxide a non-scratching work surtace fin,
the doo_.
IMPORTANT: Once you begin, do not Inoxe the
cabinet until doo>swing reversal is completed.
These inst_ uctions are for changing the hinges from
the right side to the left side--if _ou e',er want to change
the hinges back to the right side, follow these same
instructions and rexe_e all references to left and right.
Unplug the refrigerator from its electrical outlet.
Empty all door shelves, including the dairy
compartment,
TOOLS YOU WILL NEED
[] REMOVE THE FREEZER DOOR
Tape the door shut with masking tape.
Remo_e the hinge co_er on top of the fl'eezer door
(on some models).
Remoxe the two To_x ''_screws, then lift the hinoe
straight up to flee the hinge pin fl'om the socket in
the top of the door
Phillipsscrewdriver
Masking tape
T20orT25 Torx_
driver,whicheveryour
modelrequires
3/8" Headsocketdriver
(a6-pointsocketis
recommended)
Puttyknifeor
thin-bladescrewdriver
Remove the tape and tilt the door away from the
cabinet. I,ifl it off the center hinge pin.
Set the door on a non-scratching surtace with
the inside up.
18
mnstaliation mnstructions
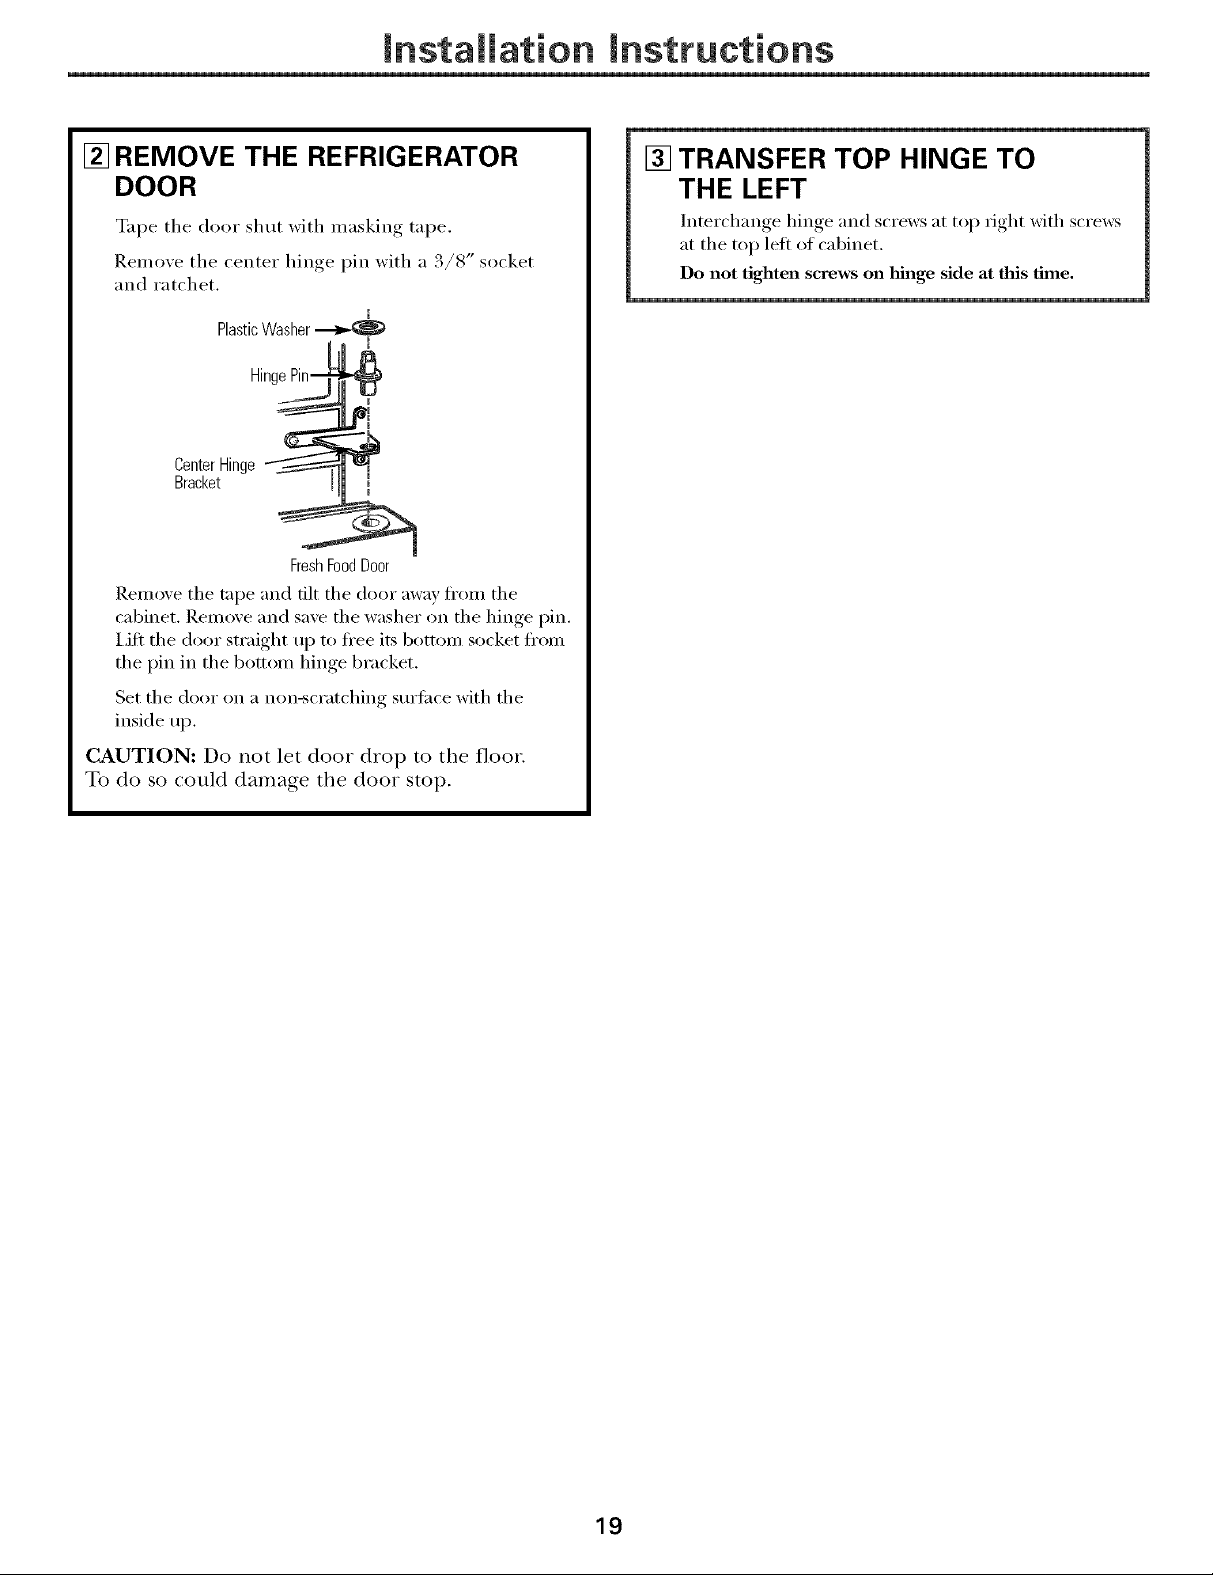
[] REMOVE THE REFRIGERATOR
DOOR
%q_e the door shut with masking tape.
Remove the center hin,,e_ pin with a 3/8" socket
and ratchet.
1
PlasticWasher
HingePin--
CenterHinge
Bracket
I_.em(we the tape and tilt the door away fl'om the
cabinet. ]_,elnove and save the washer on the hinge pin.
I,ifl the door straight up to fl'ee its bottom socket fl'om
the pin in the bottom hinge bracket.
Set the door on a non-scratching surti_ce with the
inside up.
"4
I
FreshFoodDoor
[] TRANSFER TOP HINGE TO
THE LEFT
Interchange, hiw,e_ and screws at toi _ right, with screws
at the top left of cabinet.
Do not tighten screws on hinge side at this time.
CAUTION: Do not let door drop to the floor.
To do so could damage the door stop.
19
mnstaliation mnstructions
REVERSING THE DOOR SWING (CONT.)
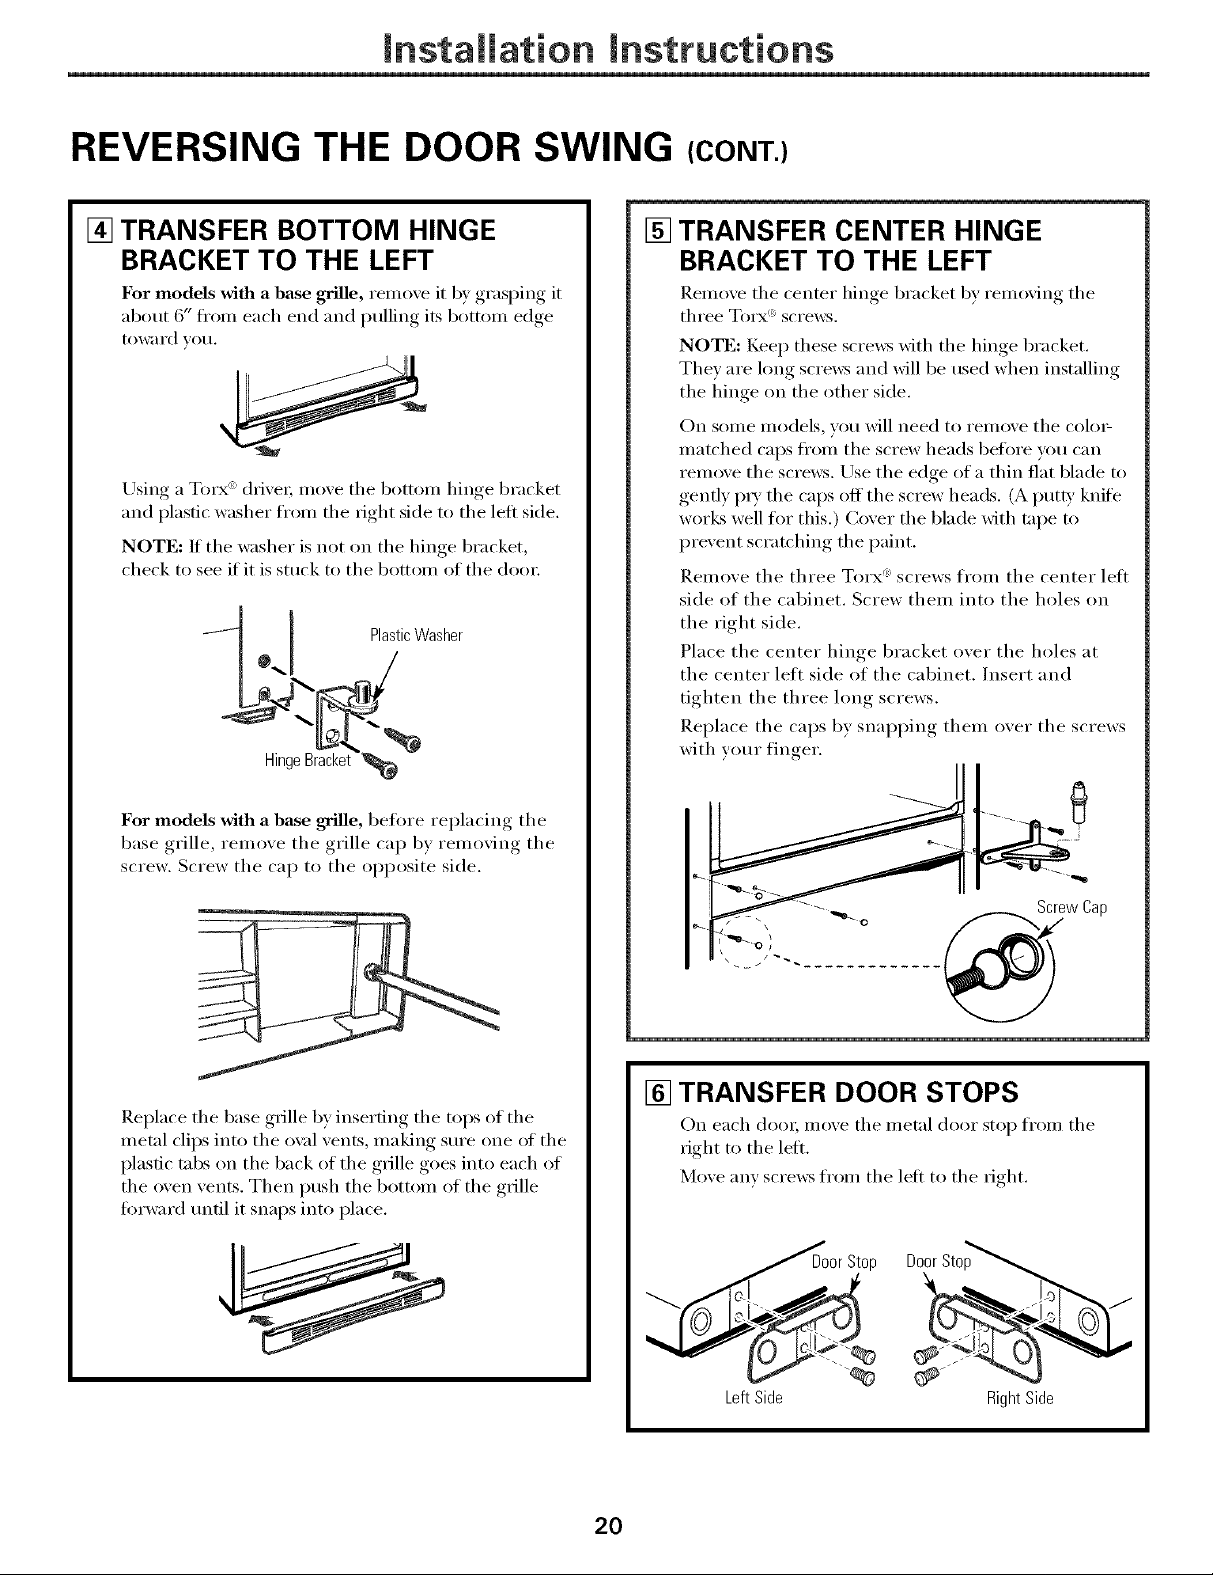
[] TRANSFER BOTTOM HINGE
BRACKET TO THE LEFT
For models with a base grille, remove it b) ,grasI)ing, it
about 6" fl'om each end and pulling its bottom edge
toward _ou,
Using a Torx': dfive_; move the bottom hinge bracket
and plastic washer fl'om the right side to the left side.
NOTE: If the washer is not on the hinge bracket,
check to see if it is stuck to the bottom of the dora:
t I PlasticWasher
o.J /
#\
[] TRANSFER CENTER HINGE
BRACKET TO THE LEFT
Remo_e tile center hinge bracket by removing the
three Torx <_>sci'ews.
NOTE: Kee I) these screws with the hinge bracket.
They are long screws and will be used when installing
the hinge on the other side.
On some models, you will need to remove the colo_
matched caps fl'om the screw heads befi)re you can
remoxe the screws. Use the edge of a thin flat blade to
genfl) pi T tile caps off the screw heads. (A put_' knife
works well for this.) Coxer the blade with tape to
prex ent scratching, the I)aim.
Remoxe the three Torx screws f_om the center left
side of the cabinet. Screw them into the holes on
the right side.
Place the center hinoe bracket oxer the holes at
the center left side of the cabinet. Insert and
tighten the three long screws.
Replace the caps b) snapping them oxer the screws
with your finger.
For models with a base grille, befl>re replacing the
base grille, remoxe the grille cap b) remoxing the
screw. Screw the cap to the opposite side.
Replace the base grille by inserting the tops of the
metal clips into the ox_fl vents, making sure one of the
plastic tabs on the back of the grille goes into each of
the oven vents. Then push the bottom of the grille
forward tmfil it snaps into place.
[] TRANSFER DOOR STOPS
On each doo_, mo_e the metal door stop from the
fight to the left.
Moxe any screws from the left to the fight.
DoorSto
\
Left Side Right Side
2O
mnstaiiation mnstructions
[] TRANSFER REFRIGERATOR
DOOR HANDLE TO THE RIGHT
To remove the handle: Remo_e the plug button by
carefllllv, I)rving,, under the edge, with a putB knife.
Remove the exposed screw holding the handle.
HandlePlug
Remove the two screws holding the handle to the
top of the doo_:
Handle
_jug
[] TRANSFER REFRIGERATOR DOOR
HANDLE TO THE RIGHT (CONT.)
Transf_'r the door plug button to the opposite side.
Reinstalling the handle: Attach the handle to the
right side of the doo_:
Handle
Plug_ ,_
After removing the hmadle: Move the slnall plug
buttons fl'om the top right side of the door top and
insert them into the holes on the opposite side,
SmallPlu,
Buttons
Move the large,I}lu°,_ button from the left edge of the
door and insert it into the hole on the opposite side,
PlugButton
21
Installation Instructions
REVERSING THE DOOR SWING (CONT.)
[] TRANSFER FREEZER DOOR
HANDLE TO THE RIGHT
Remo_e the screws holding the handle to the top and
botton] of the door. Remo_e handle.
Move the plug button on the right side of the door to
the handle screw hole on the left side.
Reattach the handle on the opposite side using the
holes closest to the edge of the door;
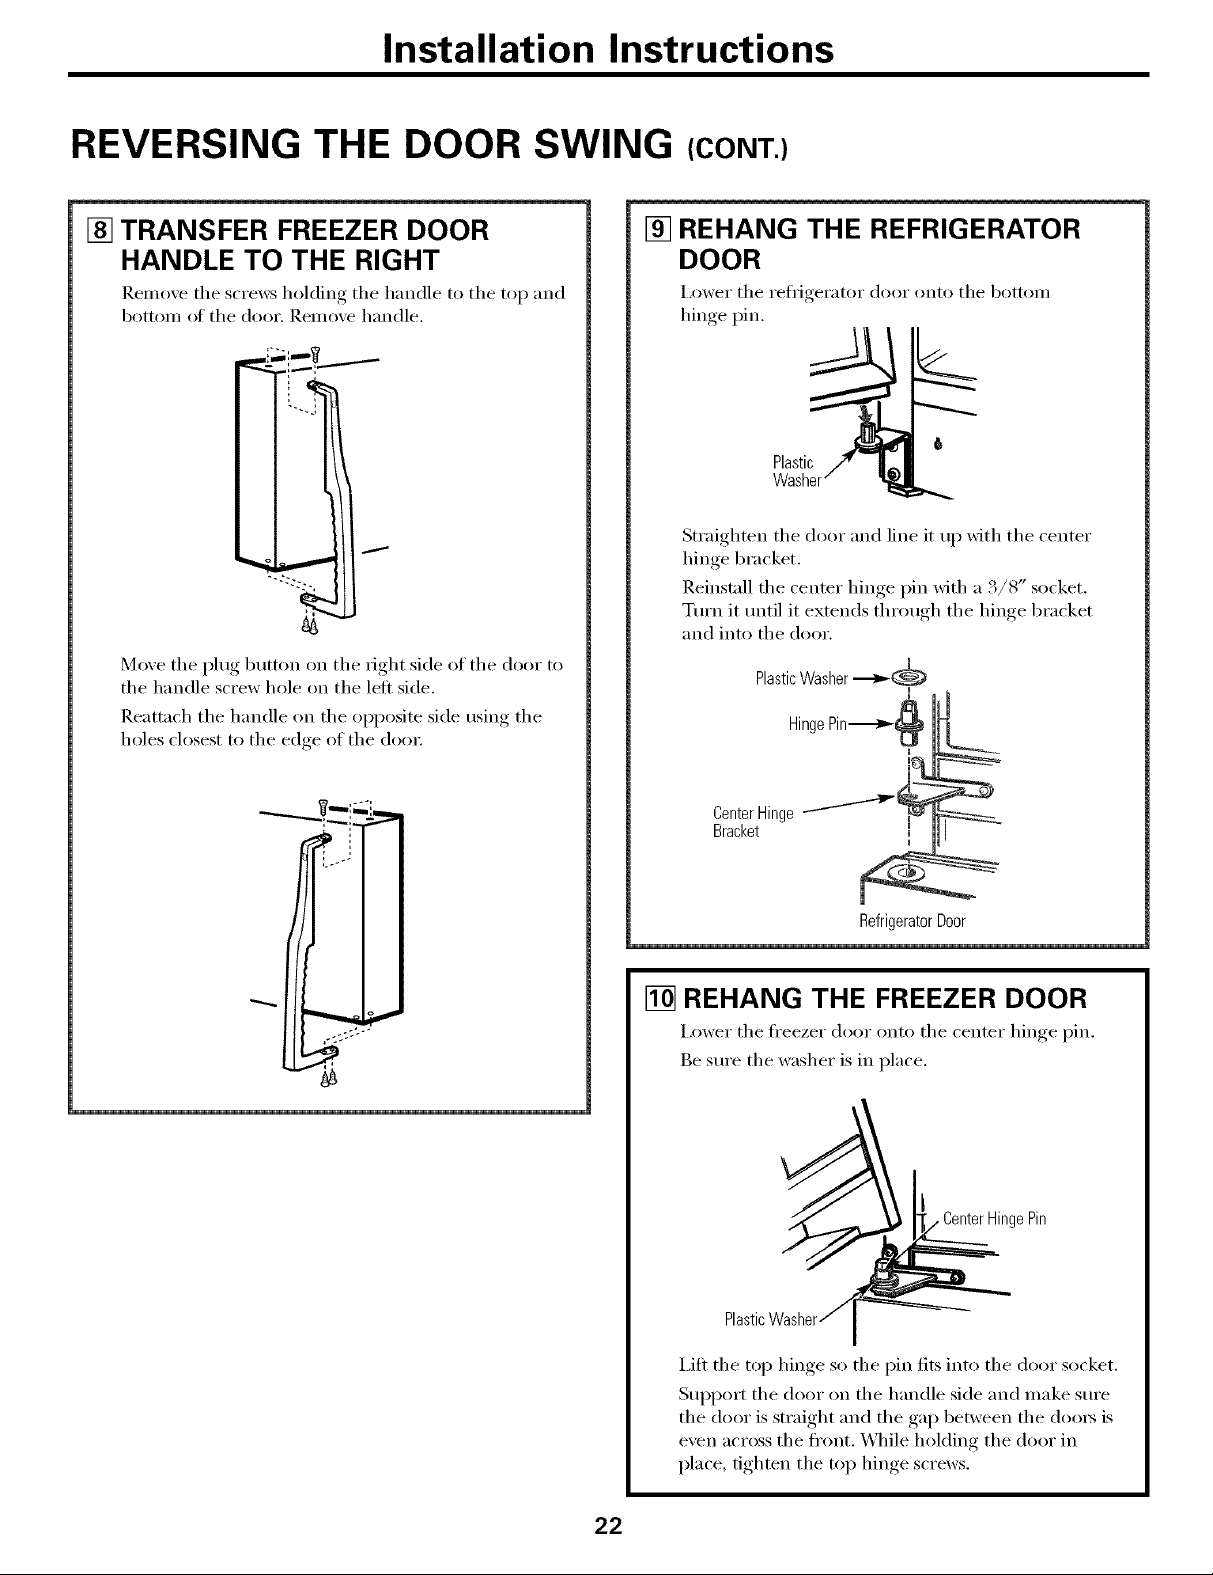
[] REHANG THE REFRIGERATOR
DOOR
I,ower the refligerator door onto the bottom
hinge pin.
6
Plastic
Straighten the door and line it up with the center
hinge bracket.
Reinstall the center hinge pin with a 3/8" socket.
Tm'n it tmtil it extends through the hinge bracket
and into the door.
PlasticWasher ._,_
Hinge Pin--------_
Center Hinge '-_
Bracket
m
Refrigerator Door
[] REHANG THE FREEZER DOOR
I,ower the fl'eezer door onto the center hinge pin.
Be sure the washer is in place.
I{ CenterHinge Pin
Plastic
I,ifl the top hinge so the pin fits into the door socket.
Support the door on the handle side and make sure
the door is straight and the gap between the (loo_ is
even across the fl'ont. _,_lfile hoMing the door in
place, tighten the top hinge screws.
22
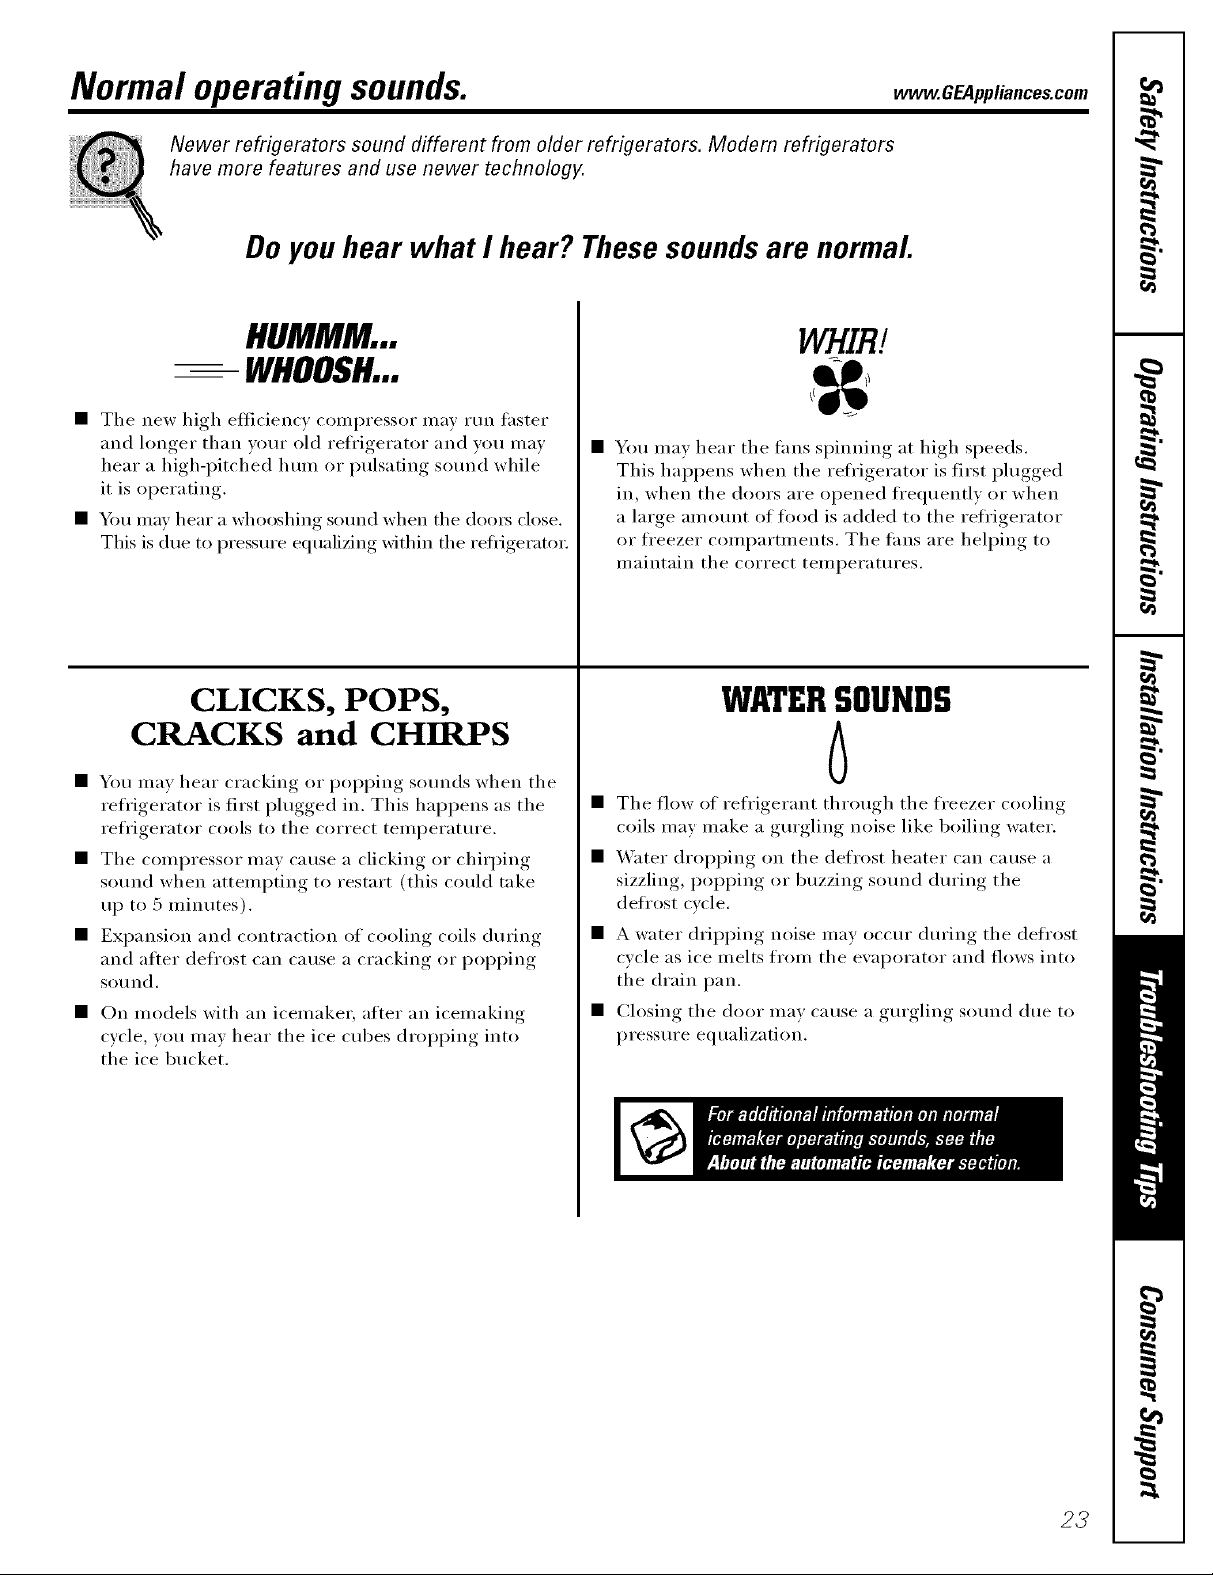
Normal operating sounds, vvvvw.GEAppliances.com
Newer refrigerators sound different from older refrigerators. Modern refrigerators
have more features and use newer technology.
Do you hear what I hear? These sounds are normal.
HUMMM...
-- WHOOSH...
• The new high efficiency compressor may mn faster
and longer than wmr old refl'igerator and you may
hear a high-i)itched hum or pulsating sotmd while
it is operating.
• _4m may hear a whooshing sound when the doo_ close.
This is due to pressure equalizing within the reflJgeratot;
CLICKS, POPS,
CRACKS and CHIRPS
• You may hear cracking or i)oi)ping sounds when the
refrigerator is first i)lugged in. This hal)pens as the
refrigerator cools to the correct teil/l)erattlre.
• The compressor may cause a clicking or chirping
sound when attempting to restart (this could take
up to 5 minutes).
• Expansion and contraction of cooling coils during
and after defl'ost can cause a cracking or i)oi)ping
SOtlnd.
• On models with an icemake_; after an icemaking
cycle, you may hear the ice cubes dropping into
the ice bucket.
WHIRl.
• You mav hear the rims spinning at high speeds.
This hai_pens when the refl'igerator is first i)lugged
in, when the doors are opened fl'equently or when
a large amount of timd is added to the reii'igerator
or fl'eezer comparm_ents. The tans are helping to
maintain the correct temperatures.
WATERSOUNDS
6
• The flow of refl'igerant through the fl'eezer cooling
coils may make a gm'gling noise like boiling water,
• _'ater dropping on the defrost heater can Catlse a
sizzling, i)oi)ping or buzzing sotmd dm'ing the
defl'ost cycle.
• A water dripping noise may occm" dm'ing the defl'ost
cycle as ice melts from the evaporator and flows into
the drain pan.
• Closing the door may Catlse a gm'gling SOtlnd dtle to
pressure equalization.
23
Before yeu call for service...
Troubleshooting -tips
Save time and money! Review the charts on the following
pages first and you may not need to call for service.
Possible Causes What To Do
Freezer door pops open This is normal if, after * This indicates that there is a good seal on the ti'eezer
when refrigerator door popping open, the freezer door./f the fi'eezer door does not automatically close alter
is closed door closed on its own. popping open, the rollex_ need ac!iusfing. See Rollers.
Door does not close Rollers need adjusting. * See Rollers.
by itseff
Refrigerator does Refrigerator in defrost cycle. * Wait ablaut 40 minutes fi w defi'ost cycle to end.
Refrigerator control ha * Nh we the I'efl_i gerat()r a 15d fl'eezer c()utr()l t() a
0 (Off)position, tens )erature setfiug
Refrigerator is unplugged. • Push the }_lu,,.,completely, into the outer.
The fuse is blown/circuit * Replace fl/se or reset the breaker.
breaker is tripped.
Vibration orrattling Refrigerator is not resting * At!just rolle_ (See Rollers).
(slight vibration on all four rogers.
is normal)
Motor operates for Normal when refrigerator * Wait 94 houl_ fl)r the reflJgerator to completely
long periods or cycles is In-st plugged in. c()()l d()wu.
on and offfrequently
(Modern refrigerators
with more storage amounts of food are
space and a larger placed in refrigerator.
freezer require more Door left open. * Check to see if package is holding door open.
operating time. They
start and stop often Hot weather or frequent • This is nomml.
tomaintain even door opelmags.
temperatures.) Temperature controls • See About the controls.
Refrigerator or freezer Temperature control not set * See About the controls.
compartment too warm cold enough.
on frozen food
(frost within package Too frequent or too long
is normal) door openings.
Often occurs when large * This is nom_al,
set at the coldest setting.
Warm weather or frequent * Set the temperature control one step (ol(le_;
door opening. See About the controls.
Door left open. • (_he('k to see if' l)ackage, is holding door open.
Freezer door popped open. * See the problem Freezer door pops open when
refrigerator door is closed.
if )acka,,e is holding door open.Frostor ice crystals Door left open. * Check to see }
Food blocking freezer air vents. • Move items away ti'om the back wall of the ti'eezel:
Frequent"buzzing"
sound
24
lcema_ker power switch is ha
the I (on) position, but the
water supply to the refrigerator
has not been commcted.
• Set the power switch to the 0 (off) position. Keeping it
in the I (On) position will dalnage the water ;al;e.
www.GEAppliances.com
Possible Causes What To Do
Automatic icemaker lcemaker power switch is * On power switch models, set tile power switch to the
(on some models) not on. I(on) position. On feeler :mu models, move tile feeler
does not work am_ to the ON (down) position.
Water supply turned off or * See Installingthe waterline.
not comaected.
Freezer compartment * Wait 24 h otu_ fl n" the refiJgeratl n" tl) c_mq_letely
too Warln. cool dowu.
Piled up cubes ha the storage * l.evel cubes by hand.
bin cause the icemaker
to shut off.
Ice culaes stuck ha icemaker. * Turn off the icemake_; remove cubes and turn tile
(Green power fight on icemaker back on.
icemaker blhfldng.)
Ice cubes have Ice storage bin needs demfing. * Empty and wash bin. Discard old cubes.
odor/taste
Food trmasmitthag odor/taste * _4'rap leeds well.
to ice cubes.
Interior of refrigerator * See Care and cleaning.
needs cleaning.
if )acka_,e is holding door open.Slow ice cube freezing Door left open. * Check to see l
Temperature control not set * See About the controls.
cold enough. * A newly installed refl'igerator may take 12-24 horn's
to begin making ice cubes.
No ice cube production Supply fine or shutoff valve * Call a plum bet.
is clogged.
Moisture forms on Not unusual during * _]pe surfilce d_y; then a(!just tile fl'esh food control
cabinet surface periods of high humidity, setting one number higher and check again in 24 hotus.
between the doors
Refrigeratorhasodor Foods trmasmitthag * Fl)ods with strong od(n_ sill)trial be tightly wrapped.
odor to refrigerator. * Keep au open box of baking soda iu tile refi'igerator;
replace evel'v three mouths.
Interior needs demfing. * See Careand cleaning.
Moisturecollectsinside Too frequent or too
(inhumidweather,air long door ope_fings.
carries moisture into
refrigerator when doors Open COlltaJners of water or • (_OVeI" OY seal I)peu ('out_liIlelS. DtlYiilg ;i (lefi'ost cycle,
are opened) warm food ha the refrigerator, moisture will be removed fi'om tile refliger;mn; but may
Refrigerator compartment No power at outlet. * Replace fl/se or reset tile breaker:
lightdoesnotwork
Light bulb burned out or loose. * See Replacing the light bulbs.
0 O" 0 " " ( ( l _ "return with 1 u_ _ hequeut d ) )r o )euiugs
25
Beforeyou call forservice...
Possible Causes What ToDo
Hot air from bottom Normal air flow cooling
motor. In the refrigeration
process, it is normal that
heat be expelled in the
area under the refrigerator.
Some floor coverings will
discolor at these normal
and safe temperatures.
Food freezing in Food too close to the air vent * Move tile fi)od away from the air vent (near tile controls).
the refrigerator at the back of the refrigerator.
Refrigerator control is set * Move the retrigerator control to a warmer
too cold. temperattu'e setting one increment at a time.
Orange glow Defrost heater is on. * This is normal.
in the freezer
Door bins do not fit The freezer door bins are * Try t(> install tire bins in b(>th doors.
in the door a different size than the
refrigerator door bins.
Freezer light does Some models do not have a * Check for a semi-clear dome light shield in the
not work freezer light, freezer ceiling. If tire dome is opaque white, tire
model does not have a h'eezer h_ht. Check t )r a
door activated light switch on the right side of the
freezer. If there is only a cap in place of a switch,
the model does not have a freezer light.
Light bulb burned out * See Replacing the light bulbs.
or loose.
• • r • (
Controls do not light up Some models do not have */f you can read white mmibers on tire comrol setting,
lighted controls, the model does not have lighted controls.
Refrigerator light bulb burned * See Replacing the light bulbs
out or loose.
Ice bucket does not fit The freezer shelf is in the
under the icemaker top position.
• Place the shelf in the lower position. See Rearranging
the shelves.
26
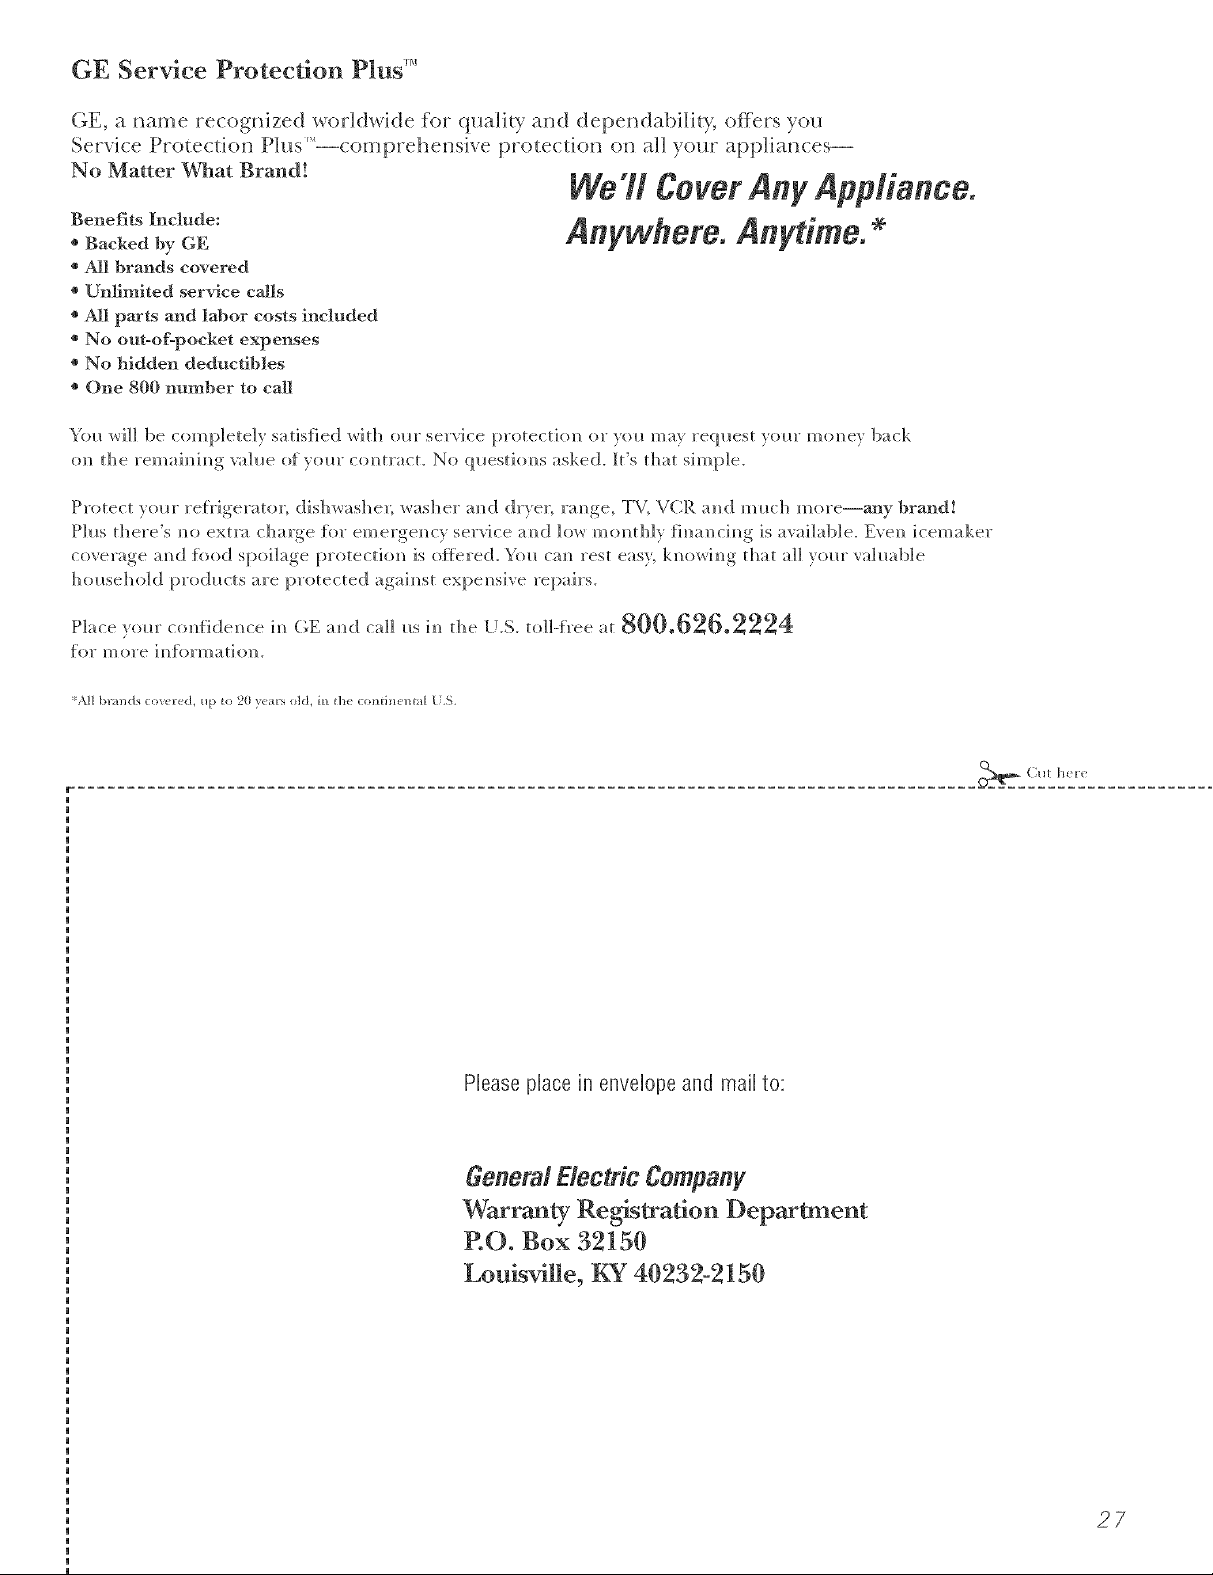
GE Service Protection Plus '_'
GE, a imme recogifized _orhh_hte for qtmlhy a_d depeildabiHty; offers yot_
Ser_h-e Prote(tkm t h_s --comp_ehem_ e protecfio_ o_ aH )our app]iaI_(:es--
) _t "X
No Matter What Brand!
WaTt Cover Any Appliance.
Benefits Include:
o Backed by GE
o All brands covered
o Unfimited service calls
o All parts and labor costs included
o No out-of-pocket expenses
* No hidden deductibles
* One 800 number to ca]]
Y(a_ wi]] be completely satisfied with ol_r serxice protecti(m or )(m may re(p_est y(mr m(mey back
(m the remaim_im_g vahm of)(mr c(mtract. No ql_esti(ms asked. It's that simple.
Protect veto" reI)'igerato_; dishwasher; washer amt dryer; rm_ge, _i VCR amt milch more--aoy brand!
Ph_s there's m_o extra charge %r emergem_cy service am] ]o_ mol_th]y fi_lal_ch_g is available. Evel_ icemaker
coverage am] {ood spoilage protectioN_ is oflbre(L _}m ca_ rest easy, kl_m,,i_g that a]] y(mr yah*able
ho_*seho]d products are protected agah_st expe_sive repairs.
Angwhom. Angtimo.
k!l b_mds cox_ r_d, up to 20 }(ars old, i_} tb_ condnemal /.S.
_(ui h( 1(:
Pleaseplace in envelopeand mail to:
General Electric Cempang
Warranty Registration Department
P.O. Box 32150
Lou_ville, KY 4(}232-2150
27

Consumer Product Ownership Registration
Dear Customer:
Thank you for purchasing our product and thank you for placing your confidence in us.
_A/eare proud to ha'_e you as a customer!
Follow these three steps to protect your new appliance investment:
Complete mid nlall
your Consumer
Product Owuerslfip
Registration today.
t]a_e the t)eace o/
mind of knowing we
c_ln contact you ill
th( unlikely (v(nt of
a sa/;vty lllodJ/ication.
AJler mailing the
registration below,
store this dOCtll//ellt
in a sa/(' place. It
contains intormation
you will need should
you require service.
Our service nmnber is
800 (;E CARES
(800.432.2737).
Model Number Serial Number
, , , , , , I I , , , , ,
Important: If you did not get a registration card with your
product, detach and return the form below to
ensure that your product is registered, or register
online at www.GEAppliances.com.
Consumer Product Ownership Registration
[_C_t(t VO/IF OwnelT'S
Mamml carefully.
It will hel t ) you
operam your new
appliance properly.
, I
_,,,_ (MI h(r(
Model Number Serial Number
Ms. M*>,. Mixs
Fir,,1 I I L_sl]
Name I I I I I I I I I Nain(! I I I I I I I I I I I I
_11-( (!1 I
Addr( ss I I I I I I I I I I I I I I I I I I I I I I I I
A,_.#I, , , , , , , I E-mailAddress*
Zip I
l )u(, Pla_ ed
Monlh
* PI( asc provide your c-mail address to r( cciv(, via e-mail, discounts, special off( rs and odl(r
impormm (ommuni(ations from (;E Applian((s ((;EA).
(iheck her( if you do 11ol Wall[ to receiv(_ cOlnlnt/llic_/tiolls t:i-Olll (;tA's careflllly sel(cted partners.
OEAppfiances
GE Coflst#ne_ Prodltc_s
Ge_lemf Electric Company
Lottisvdto, Kelltuckv
ww_GEA_ti_ncescom
I
I
23
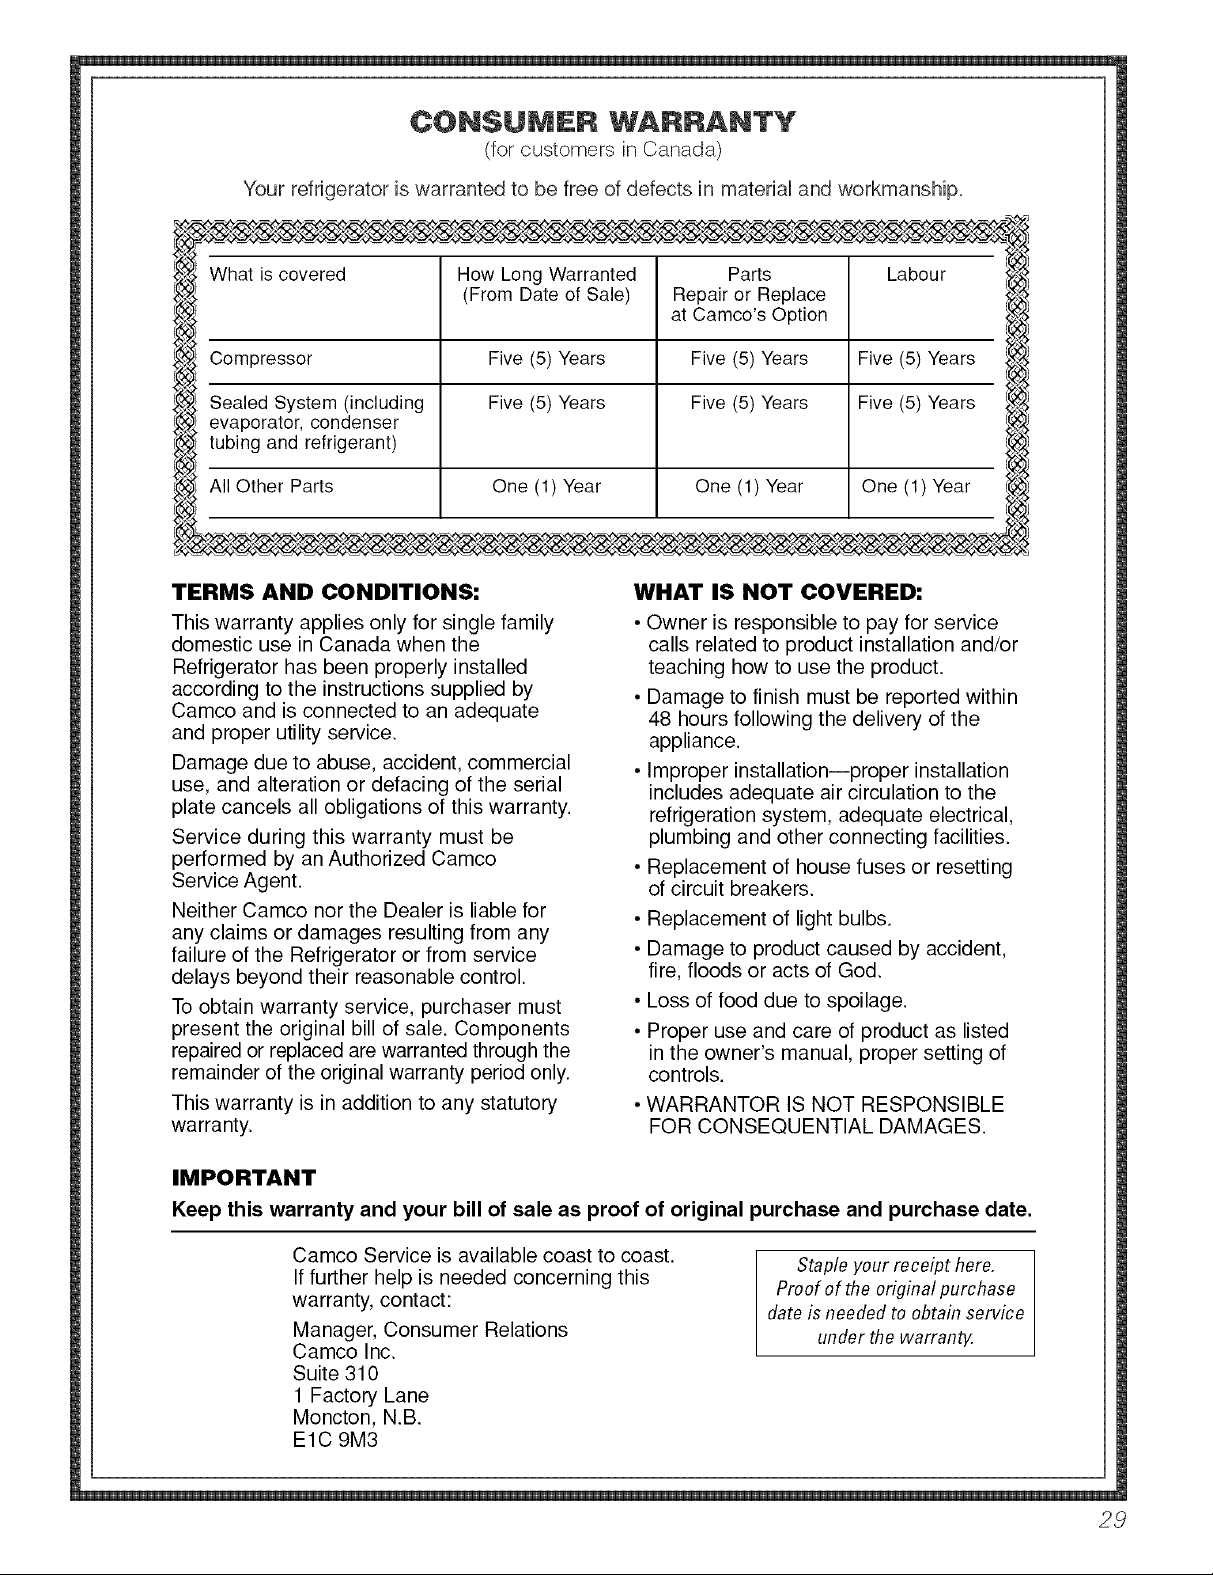
CONSUMER WARRANTY
(for customers in Canada)
Your refrigerator is warranted to be free of defects in material and workmanship.
JVhat is covered
How Long Warranted
(From Date of Sale)
Sompressor Five (5) Years Five (5) Years
Sealed System (including Five (5) Years Five (5) Years
_=vaporator, condenser
ubing and refrigerant)
€11Other Parts One (1) Year One (1) Year One (1) Year
TERMS AND CONDITIONS:
This warranty applies only for single family
domestic use in Canada when the
Refrigerator has been properly installed
according to the instructions supplied by
Camco and is connected to an adequate
and proper utility service.
Damage due to abuse, accident, commercial
use, and alteration or defacing of the serial
plate cancels all obligations of this warranty.
Service during this warranty must be
performed by an Authorized Camco
Service Agent.
Neither Camco nor the Dealer is liable for
any claims or damages resulting from any
failure of the Refrigerator or from service
delays beyond their reasonable control.
To obtain warranty service, purchaser must
present the original bill of sale. Components
repaired or replaced are warranted through the
remainder of the original warranty period only.
This warranty is in addition to any statutory
warranty.
WHAT IS NOT COVERED:
• Owner is responsible to pay for service
calls related to product installation and/or
teaching how to use the product.
• Damage to finish must be reported within
48 hours following the delivery of the
appliance.
• Improper installation--proper installation
includes adequate air circulation to the
refrigeration system, adequate electrical,
plumbing and other connecting facilities.
• Replacement of house fuses or resetting
of circuit breakers.
• Replacement of light bulbs.
• Damage to product caused by accident,
fire, floods or acts of God.
• Loss of food due to spoilage.
• Proper use and care of product as listed
in the owner's manual, proper setting of
controls.
• WARRANTOR IS NOT RESPONSIBLE
FOR CONSEQUENTIAL DAMAGES.
Parts
Repair or Replace
at Camco's Option
Five (5) Years
Five (5) Years
Labour
IMPORTANT
Keep this warranty and your bill of sale as proof of original purchase and purchase date.
Camco Service is available coast to coast.
If further help is needed concerning this
warranty, contact:
Manager, Consumer Relations
Camco Inc.
Staple your receipt here.
Proof of the originalpurchase
date is needed to obtain service
under the warrant_
Suite 310
1 Factory Lane
Moncton, N.B.
ElC 9M3
28
 Loading...