

GE PTS18SHSYRSS, GTS18WCPYRWW, GTS18WCPYRCC, GTS18SBXARSS, GTS18KCPYRWW Owner’s Manual
...
®
Top-Freezer
Top-Freezer
Refrigerators
Modal 18
Safety Instructions ............ 2-3
Operating Instructions
Additional Features ................. 6
Automatic Icemaker . ............... 7
Controls .......................... 4
Crispers and Pans .................. 6
Dispenser . ........................ 7
Shelves and Bins ................... 5
Water Filter . ...................... 4
Care and Cleaning
Care and Cleaning ............... 8, 9
Replacing the i,ight Bulbs ........... 9
Installation Instrud:ions
Preparing to Install
the Refligerator . .................. 10
Reversing the Door Swing ....... 14-18
Water Line Installation .......... 11-14
Troub leshooting Tips ....... 19-21
Normal Operating Sounds .......... 19
Consumer Support
Consumer Support ......... Back Cover
Performance Data Sheet ........... 27
Product Registration
for Canadian Customers ......... 23, 24
State of California Water
Treatment Device Certificate ........ 28
_!arranty for
Canadian Customers ............... 25
Warranty for U.S. Customers ........ 26
Note to Installer - Be sure to leave
these instructions with the Consumer
Note to Consumer - Keepthese
instructions for furore refe.rence.
Write the model and serial numbers hero:
Model #
Serial #
Find these numbers on the gray label
on the lef_ side, near the top of the
refligerator compartment.
FI
Congdlateur suudrieur
Fa FS
Rdfrigdratdurs
ta section franFaisecommencea la page29
Instructions de s&_rit_ .... 29-30
Instructions de fonetionnement
Bacs _ l_gumes ................. 33
Caract&isfiques addifionnelles .... 33
Clayettes et bacs ................ 32
Disuibuteur . ................... 34
Filtre {_eau .................... 31
Machine _ glacons automafique . . .34
R_glages ...................... 31
Soins et nettoyage
Remplacement des
ampoules _lectriques ............ 36
Soins et nettoyage ............ 35, 36
Instructions d 'installation
Installation de la
conduite d'eau .............. 38-41
Inversion du sens
d'ouvertme des portes ........ 41-45
Preparation 5. l'installafion
du r_flig_rateur . ............... 37
En eas de panne ......... 46-49
Bruits normaux
de fbncfionnement .............. 46
Soutien au eonsommateur
Feuillet de donn_es relatives {_la
performance de la cartouche ....... 51
Garanfie ....................... 50
Soutien au consommateur . ....... 52
Note h l'installateur - A_surez-_<,usde
laisserces instructions au consommatem:
Note au consommateur - Conservez
ices instructions pour rdf_mnce tim/re.
EcrivezM le numerode modbleet le numerode
sorie:
Modble#
$orie#
\.%ustrom_rez ces num&os sur l'_fiquette gfise
sim_e_tgauche, pros du haut du comparfiment
r(_flig@amm;
GEAppliances.com
• Congelador superior
Refngeradores
ta seccihn en espaKolempiezaen lapagina 53
Informaci6n de seguridad ...53-54
Instrucdones de operad6n
Caracterfstic_s adiciona/es ........... 57
Controles ......................... 55
Dispensador . ...................... 58
Esmntes y comparfimientos ....... 5€_57
Filuo de agua ...................... 55
(;avetas de a/macenamiento ......... 57
Mfiquina de hielos automfifica ....... 58
Cuidado y limpieza
Cdmo reemplazar las bombillas ...... 60
Cuidado y limpieza .............. 59-60
Instruceiones para la instalac_n
Cdmo inverfir el vaiv_.nde
la puerto ....................... 65-69
Insm/acidn de la mberfa
del agua ....................... 62-65
Preparacidn para insta/ar
el refligerador ..................... 61
Consejos para la solud6n
de problemas ............... 70-74
Sonidos nomm/es de operacidn ...... 70
Soporte al consumidor
Hoja de dates de flmcionamiento .... 78
(;amntfa .......................... 77
Soporm a/consumidor. ............. 79
Nora al instalador - A_egdresede
dejar es/>tsinstrucciones con el consmnkto_:
Nora al consumidor - Conser_
es/asinstrucciones pare reDrencia timbre.
Escribaaquiel modo/oiteln(tmem
desorie:
Modo/o#
Sorie#
Encuentre estos nfimeros en la etiqueta griN en
el lade izquierdo, cerca de la parte superior
del compartimiento del refligemdo_:
19703354PO13 49-6051 l- I 05-09 JR
iMPORTANTSAFETYiNFORMATiON.
READALLiNSTRUCTiONSBEFOREUSING.
A WA
Use this appliance only for its intended purpose as described in this Owner's Manual
,!
m
SAFETYPRECAUTIONS
When using electrical appliances, basic safety precautions should be followed, including the foflowing:
}}_This refligerator must be properly installed
and located in accordance with the Installation
Instructions before it is used.
Do not allow children to climb, stand or hang
on the shelves in the reflJgerator They could
dmnage the reflJgemtor and seriously i_jure
themselves.
}}_Do not touch the cold surfitces in the fleezer
compartment when hands are damp or wet.
Skin may stick to these extremely cold surf_tces.
}}_Do not store or use gasoline or other flammable
xapors and liquids in the vicinity of this or any
other appliance.
',_ In refligerators widl automatic icemake_,
avoid contact with the moving parts of the
eiector mechanism, or with the heating element
located on the bottom of the icemaker Do not
place finge_ or hands on the automatic
icemaldng mechanism while the refligemtor
is plugged in.
,,_Keep fingers out of file "pinch point" areas;
clearances between the doors and between the
doors and cabinet are necessarily stuN1. Be careflfl
closing doors when chiMren are in the area.
}}{_Unplug the refrigerator before cleaning and
maldng repai_.
NOTE:Westronglyrecommendthatanyservicingbe
performedbyaqualifiedindividual
}}_Setting either or both controls (some models only
have one control) to the 0 (off} position does not
remove power to the light circuit.
}}_Do not refleeze flozen foods which have
thawed completely.
A
OF .0 T
PROPERDISPOSALOFTHEREFRIGERATOR
Child entrapment and sufl%cation are not
problems of the past. Junked or abandoned
refligerators are still dangerous...even if they will
sit for 'just a few days." If you are getting rid of
your old refligerato,; please follow the insuuctions
below to help prevent accidents.
Before YouThrowAway YourOld
Refrigoratoror Froozoc
} Take off the doors°
}i_i_eave the shelves in place so that children
may not easily climb inside.
Befrigerants
All refiigeration products contain refligerants,
which under federal law must be removed prior
to product disposal. If you are getdng rid of an
old refligeration product, check with the company
handling the disposal about what to do.
USEOFEXTENSIONCORDS
Because of potential safety hazards under certain conditions, we strongly recommend against the
use of an extension cord.
However; if you must use an extension cord, it is absolutely necessary that it be a UL-listed (in the United
States) or a CSA-listed (in Canada), 3-wire grounding type appliance extension cord having a grotmding
2
type plug and outlet and that the electrical rating of the cord be 15 amperes (minimum) and 120 volts.
GEAppliances.com
A
HOWTOCONNECTELECTRICITY
Do not, under any circumstances, cut or remove the third (ground) prong from the power cord.
For personal safety, this appliance must be properly grounded.
The power cord of dlis appliance is equipped widl
a 3-prong (grounding) plug which mates wifll a
standard 3-prong (grotmding) wall outlet to
minimize the possibility of elecuic shock hazard
fiom this appliance°
Have the wall oudet and drcuit checked by a
qualified electrician to make sme the outlet is
properly grounded.
Where a standard 2-prong wall oudet is
encotmmred, it is your petsonN responsibility and
obligation to have it replaced with a properly
grounded 3-prong wall outlet.
The refligerator should always be plugged into its
own individual electrical outlet which has a voltage
rating dmt matches tl_e rating plate.
This proxides the best performance and also
prevents overloading house wiring circuits which
could cause a fire hazard fiom overheated wires.
Never unplug your refligerator by pulling on the
power cord° Always g_ip plug fimlly and pull
straight out fiom the outlet.
Repair or replace immediately all power cords flint
have become fiwed or otherwise damaged. Do not
use a cord that shows crocks or abrasion damage
along its length or at either end.
When moving the refligerator away flom the
wall, be cmefhl not to roll over or damage the
power cord.
READANDFOLLOWTHISSAFETYINFORMATIONCAREFULLY.
SAgETHESEINSTRUCTIONS
3
About the controls on the refrigerator.
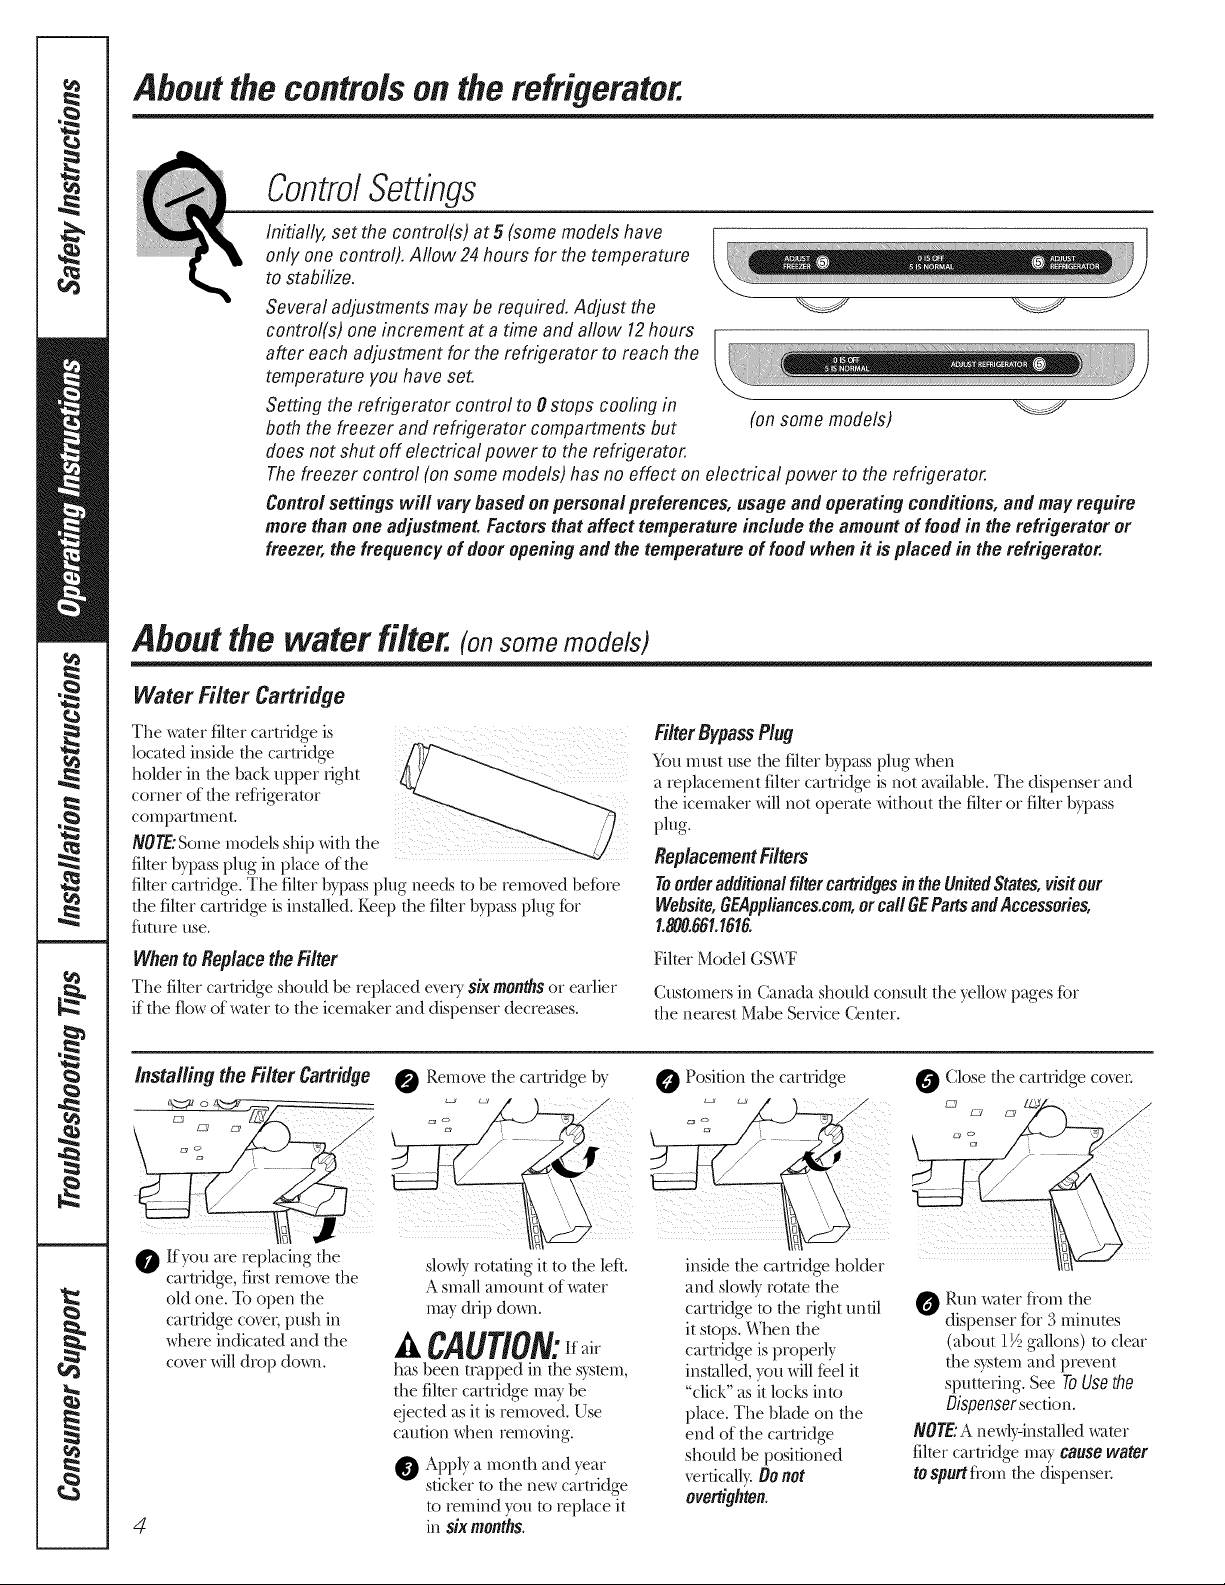
ControlSettings
Initially, set the control(s) at 5 (some models have
only onecontrol). Aflow 24 hours for the temperature
to stabilize.
Several adjustments may be required. Adjust the
control(s) one increment at a time and allow 12hours
after each adjustment for the refrigerator to reach the
temperature you have set.
Setting the refrigerator control to 0 stops cooling in
both the freezer and refrigerator compartments but
does not shut off electrical power to the refrigerator.
Thefreezer control (on some models)has no effect on electrical power to the refrigerator.
Controlsettings will varybasedonpersonalpreferences,usage andoperating conditions,andmay require
morethanone adjustment.Factorsthataffect temperature include the amountof foodin the refrigeratoror
freezer,the frequencyof dooropening andthe temperature of foodwhen it is placed in the refrigerator.
Aboutthe water filter.(onsomemodels)
(on some models)
Water Filter Cartridge
located inside the cartrklge
hoMer in the back upper fight
corner of the refligetator
con_parm_ent.
The water filter cartridge is
NOTE."Some models ship with the
filter bypass plug in place of the
filter cartridge. The filter bypass plug needs to be removed before
the filter cartridge is installed. Keel) the filter bypass plug fbr
tim/re use.
When to Replace the Filter
The filter cartridge should be replaced every six monthsor earlier
if the flow of water to the icemaker and dispenser decreases.
Installing the Filter Cartridge
If you are replacing the
cartridge, firs/remove the
old one. To open the
camidge covel, push in
where indicated and the
cover will drop do_x_.
4
Remove the cartridge by
slowl) rotating it to the left.
A small amount of water
ma) drip down.
CAUtiON:
has been trapped in the s)ts/em,
the filmr cartridge may be
ejecmd as it is removed. Use
caution when remofing.
Apply a month and },eat
sticker to the new cartridge
to remind }ou to replace it
in six months.
FilterBypassPlug
_)u must use the filter b) pass plug when
a replacement filter cartridge is not available. The dispenser and
the icemaker will not ol)et>tte without the filter or filter bypass
plug.
Replacement Filters
Toorderadditionalfiltercartridges in the UnitedStates,visit our
Webs#e,GEAppliances.com,or call GEPartsandAccessories,
1.800.661.1616.
Filter Model GS_T
Customet_ in Canada shouM consult the yellow pages %r
the nearest Mabe Set_'ice Center°
O Position/he cartridge O Close the cartridge covel:
inside the cartridge bolder
and slowly rotate the
cartridge to the fight until
it stops. _]_en the
cartridge is properly
installed, you will Del it
"click" as it locks into
place. The blade on the
end of the cartridge
shouM be positioned
_rtically'. O0not
overtighten.
O Run water flom the
dispenser for 3 minutes
(about 11/_gallons) to cleat
the sy:s/em and i)re_nt
si)utmfing. See ToUse the
Dispenser secdon.
NOTE,'Aneedy-installed _x_tter
filter cartridge may ca#sowater
tOSpUrtflom the dispenseL
Abouttheshelves andbins. OEAppliancescom
Not all features are on all models.
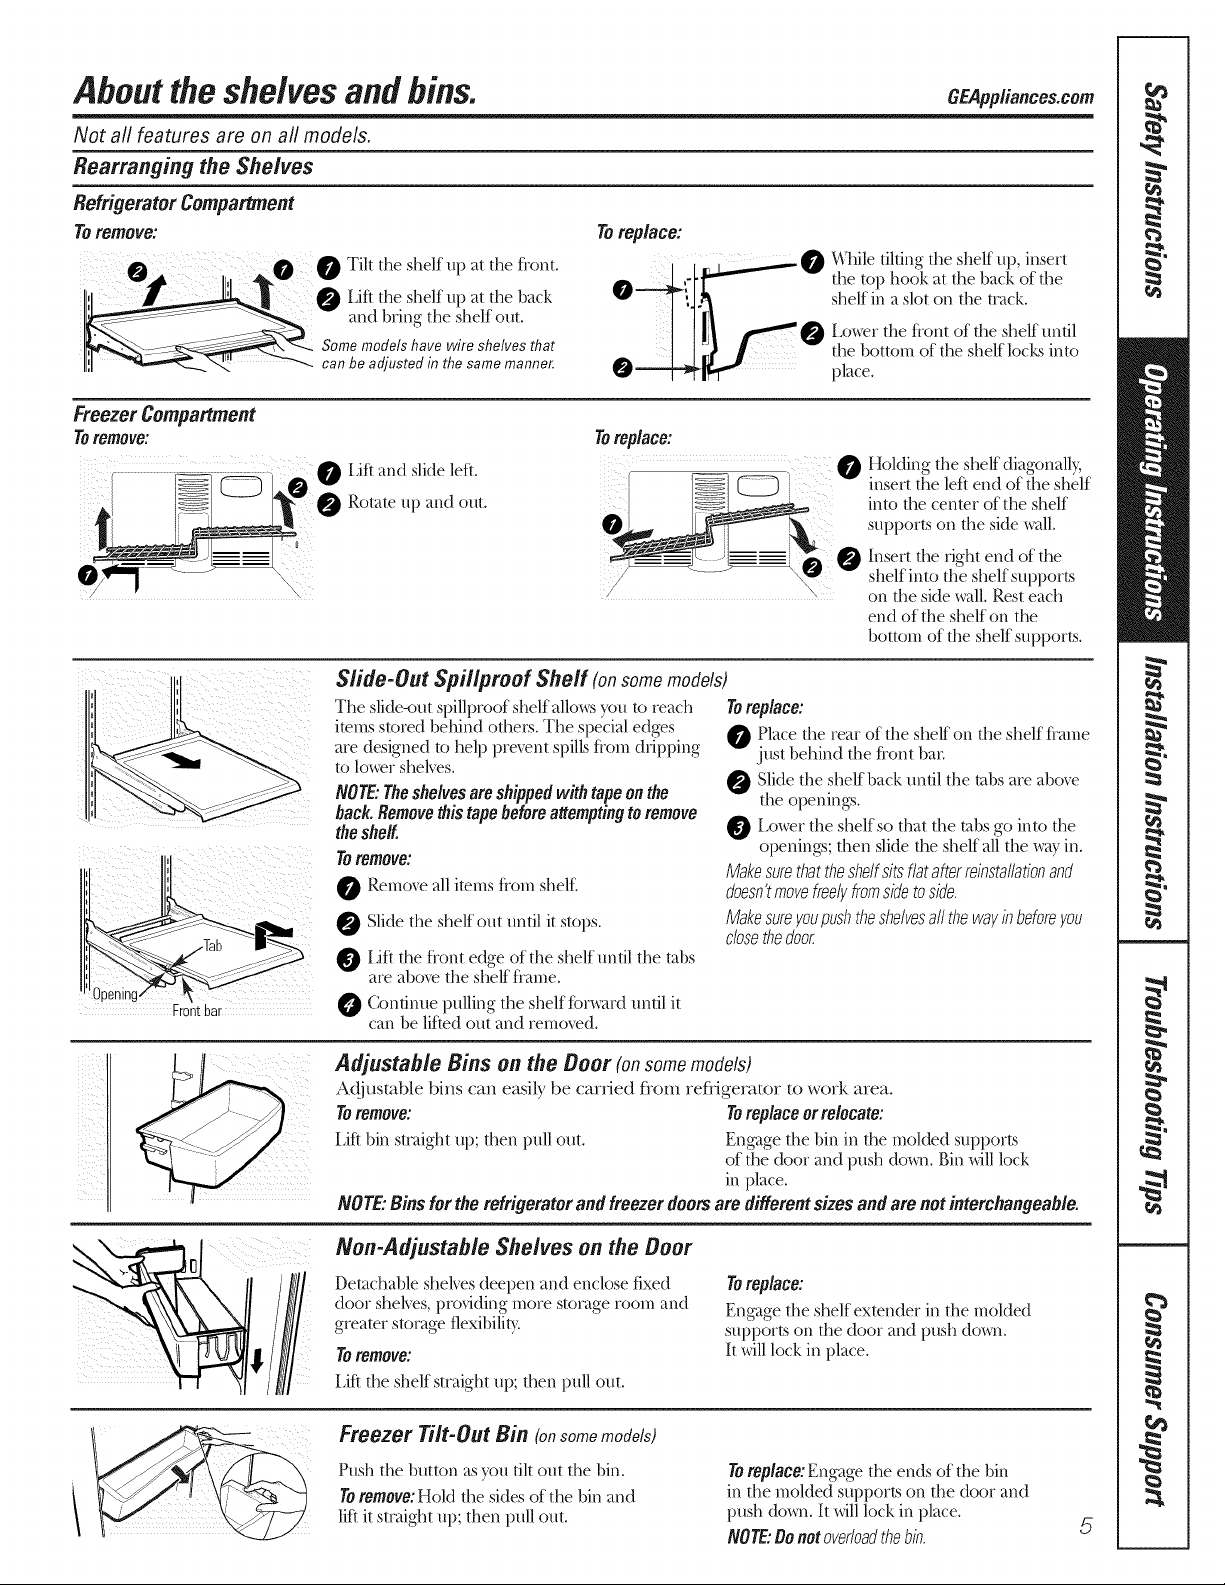
Rearranging the Shelves
Refrigerator Compartment
Toremove:
Toreplace:
e e@ Tiltthesbelf.patthe ont.
Lift the shelf up at the back
and bring the shelf out.
Somemodelshavewireshelvesthat
canbeadjustedin thesamemanner.
Freezer Compartment
Toremove:
Lift and slide left.
, Rotate I/l) and ont.
/ \
Slide-Out SAil/proof Shelf (onsomemodels)
The slide<rot spillproof shelf alkm:syou to reach
imms SlaTedbehind others. The special edges
are designed to helI) pre_>nt spillshom dripping
to lo,xershelves.
NOTE"Theshelvesareshippedwithtapeonthe
back.Removethistapebeforeattemptingtoremove
theshelf.
To remove:
Remove all items honl shel£
O Slide the shelf out until it stops.
0 Lift the flont edge of the shelf until the tabs
are above the shelf flame.
Contim/e pulling the shelf forward until it
can be lifted out and removed.
0 shelf in a slot on the track.
___ 0 [ z)wer the front of the shelf until
Toreplace:
/ \
the top book at the back of the
the bottonl of the shelf locks into
place.
0 Holding the shelf diagonall b
insert the left end of the shelf
into the center of tile shelf
supports on the side _x_lll.
Insert the right end of the
shelf into the shelf supports
on the skte wall. Rest each
end of the shelf on the
bottom of the shelf supports.
Toreplace:
Place the rear of the shelf on tile shelf fi'ame
just behind the flont bat:
Slide the shelf back until the tabs are above
the openings.
_ Lo,xer the shelf so that the tabs go into the
openings; then slide the shelf all the ,xvlyin.
Makesurethattheshelfsitsflatafterreinsta//atiooand
doesn'tmovefreelyfromsidetoside.
Makesureyoupushtheshelvesaftthewayin beforeyou
closethedoor
Adjustable Bins on the Door (onsomemodels)
Adjustable bins can easily be carried flom reflJgerator to work area.
N remove: Toreplace or relocate'.
Lift bin straight I/I,; then pull out. End, lEe tl/e bin in the rooMed supports
of the door and push (lo,x_. Bin will lock
in place.
NOTE:Bins for the refrigerator and freezer doors are different sizes and are not interchangeable.
Non-Adjustable Shelves on the Door
Detachable shelves deepen and enclose fixed
door shelves, providing more storage roonl and
greater storage flexibili_
TOremove:
Liftthe shelfstraight i/l); then pull out.
Freezer Tilt-Out Bin (onsomemodels)
Push the button as )'oil tilt out the bin.
TOremove: HeM the sides of the bin and
lift it suaight i/l); then pull out.
Toreplace:
En_age the shelf ex/ender in the rooMed
supports on the door and push (to_.
It will lock in place.
Toreplace: Engage the ends of the bin
in the molded supports on the door and
push dcm_. It will lock in place.
NOTE"Donotoverloadthebin.
5

Aboutthecrispersandpans.
Not all features are on all models.
Fru# and Vegetable Crispers
Excess water that may
acctlmulate in the bottom
of file drawers or under the
drawers shoukt be wiped dry.
Adjustable Humidity Crisper (onsomemodels)
Slide the control all the way' to the
R/GRsetting to provide high humidi b
recommended for most vegetables.
Crisper Removal
Unloadthe bottomshelf beforeattemptingto
removethestoragedrawers.
ToRemove:
IdA the drawers tip slightly while pulling
them p_L_t the StOp location.
If file door prevents you flom taking out
the draweI_, first try to remove the door
bins. If this does not off;er enough
clearance, file refligerator will need to
be rolled f_>rward until the door opens
enough to slide the draweI_ (>tit. In some
cases, when you roll the reflJgerator (>tit,
you will need to move the refligerator
to the lef_ or right as you roll it out.
Toremovethe glasscover:
Snack Pan (onsomemodels)
This pan can be moved to
the most useflll location for
your fhmily's needs.
Slide the control all the wa) to the LOWsetting to
provide lower hmnidi b levels recommended fin.
most fluits.
Toremove the frame:
Remove the glass, then the flame. _&qlen
replacing the glass, push the flont edge
fimlly into the flame.
iiiii
Lift the back tip off of its supports, slide it
backward, flit it and rake it out.
Removing the glass cover
Abouttheadditionalfeatures.
Not all features are on all models.
ShelfSaver TM Rack
This slide<>ut rack holds la,velve cans of soda
or two wine/wamr bottles (lengthwise).
Can be removed fin cleaning.
6
klfi: the flont of the fYame, pull it forward,
flit it and rake it out.
Toremove, slide the rack (>tit to the StOp
position, lift the rack tip and past the StOp,
and lifZ (>tit.
Abouttheautomaticicemaker. CEApp,ances.cem
A newly-installed refrigerator may take 12-24 hours to begin making ice.
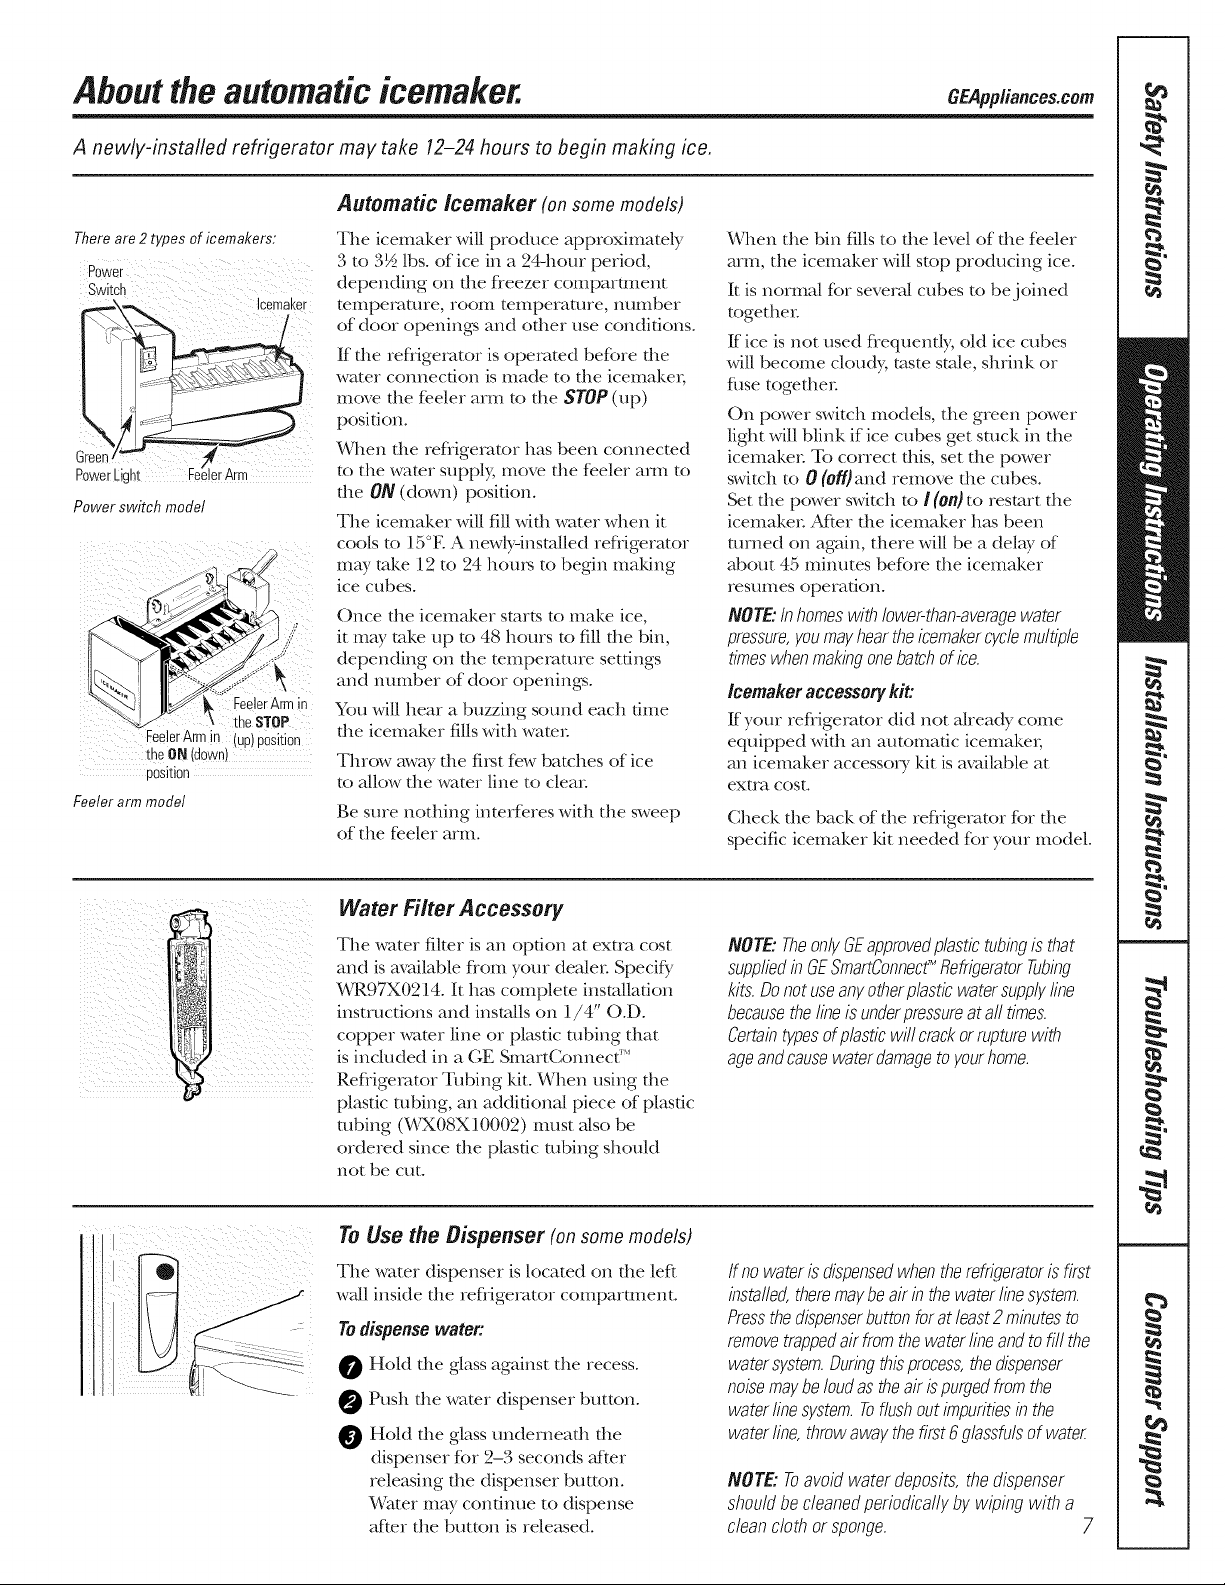
Automatic lcemaker (onsomemodels)
There are 2 types of icemakers:
,_ Icemaker
Power switch model
• FeelerArmin
FeelerArmin (up)position
the oN (down)
position
Feeler arm model
The icemaker will produce approximately
3 to 3½ lbs. of ice in a 24-hour period,
depending on the fleezer comparunent
temperature, room temperature, number
of door openings and other use conditions.
If the refligerator is operamd before the
water connection is made to the icemake,;
move the fe.eler arm to the STOP(up)
position.
¼,qlen file refligerator has been c(mnected
to the wamr suppl 5 move the feeler am1 to
the ON(down) position.
The icemaker will fill with water when it
cools to 15°E A newly-installed refligeraor
mW tal<e 12to 24 hems to begin making
ice cubes.
Once file icemaker starts to make ice,
it may take up to 48 hours to fill file bin,
depending on the temperature settings
and number of door openings.
You will hear a buzzing sound each dine
file icemaker fills with water
Throw away the fiIst few batches of ice
to allow the water line to clear
Be sure nothing interferes with the sweep
of the fe.eler arm.
When the bin fills to file level of file feeler
arm, the icemaker will stop producing ice.
It is normal for several cubes to be joined
together
If ice is not used flequently; old ice cubes
will become cloudy, taste stale, shrink or
fllse together
On power switch models, the green power
light willblink if ice cubes get stuck in the
icemaker To correct this, set die power
switch to 0 (off)and remove the cubes.
Set the power switch to ! (on)to restart the
icemaker After the icemaker has been
turned on again, there will be a del W of
about 45 minutes before the icemaker
res Ullles operation.
NOTE:Inhomeswin lower-Nan-averagewater
pressure,youmayheartheicemakercyclemultiple
timeswhenmakingonebatchofice.
Icemaker accessorykit:
ff your refligemtor did not aheady come
equipped with an automatic icemake_;
an icemaker accessory kit is available at
extra cost°
Check the back of the refligerator for the
specific icemaker kit needed for your model.
Water Filter Accessory
The water filter is an option at exua cost
and is available flom your dealer Specif_,
WR97X0214. It ll_kScomplem installation
instructions and installs on 1/4" O.D.
i
copper wamr line or plastic robing that
is included in a (;E SmartConnect'"
Refligerator Tubing ldt. When using the
plastic robing, an additional piece of plastic
robing (WX08X10002) must else be
ordered since the plastic robing should
not be cut.
NOTE:TheonlygEapprovedplastictubingis that
suppliedinGESmartConnecf_RefrigeratorTubing
kits.Donot useanyotherplasticwatersupplyline
becausethelineisunderpressureat afttimes.
Certaintypesofplasticwill crackorrupturewith
ageandcausewaterdamagetoyourhome.
To Use the Dispenser (onsomemodels)
The water dispenser is located on the lef_
wet1 inskte the refligerator comparmlent.
Todispensewater:
HeM file glass against the recess.
Push file water dispenser button.
Hold the glass underneath the
dispenser for 2-3 seconds _ff*er
releasing file dispenser button°
Water may condnue to dispense
after the button is released.
Ifnowaterisdispensedwhentherefrigeratorisfirst
installed,theremaybeairin thewaterlinesystem.
Pressthedispenserbuttonforatleast2minutesto
removetrappedairfromthewaterlineandtofill the
watersystem.Duringthisprocess,thedispenser
noisemaybeloudastheairispurgedfromthe
waterlinesystem.Toflushoutimpuritiesin the
waterline,throwawaythefirst6glassfulsofwate_
NOTE:Toavoidwaterdeposits,thedispenser
shouldbecleanedperiodicallybywipingwith a
cleancloth orsponge. 7
Careandcleaningoftherefrigerator.
Cleaning the Outside
Thedoor handles and trim. Clean with
a clod1 dampened widl soapy watex:
Dry with a soR cloth.
Keep the outside dean. Wipe with a clean
clod1 lighdy dampened with ldtchen
appliance wax or mild liquid dish
demrgent. Dry and polish with a clean,
soR cloth.
Thestainless steel door panels and handles.
The stainless steel panels can be cleaned
with a commercially available stainless smel
cleaner or a similar product using a clean,
soft clodl. Do not use appliance wax, polish,
bleach or products containing chlorine on
stainless steel doors and handles.
Cleaning the/nside
For best results, (;E recommends using
stainless smel cleaner PM10X311 with
tile WX10X307 polishing cloth, or for
convenience the SS cleaning wipes, part
number WX10X10001.
Donot wipetherefrigeratorwithasoileddishcloth
orwettowel Thesemayleavea residuethat
canerodethepaint.Donotusescouringpads,
powderedcleaners,bleachorcleanerscontaining
bleachbecausetheseproductscanscratchand
weakenthepaintfinish.
Tohelpprevent odors,leave an open box of
baldng soda in die flesh food and fleezer
compartments.
Unplugtherefrigerator beforecleaning If rids
is not practical, wring excess moisture out
of sponge or clodl when cleaning around
switches, lights or controls.
Use _,v}tiIil_g}tteI" and baldng soda solution--
about a tablespoon (15 ml) of baldng soda
to a quart (1 limr) of wamr This both cleans
and neutralizes odo_. Thoroughly rinse
and wipe d_>
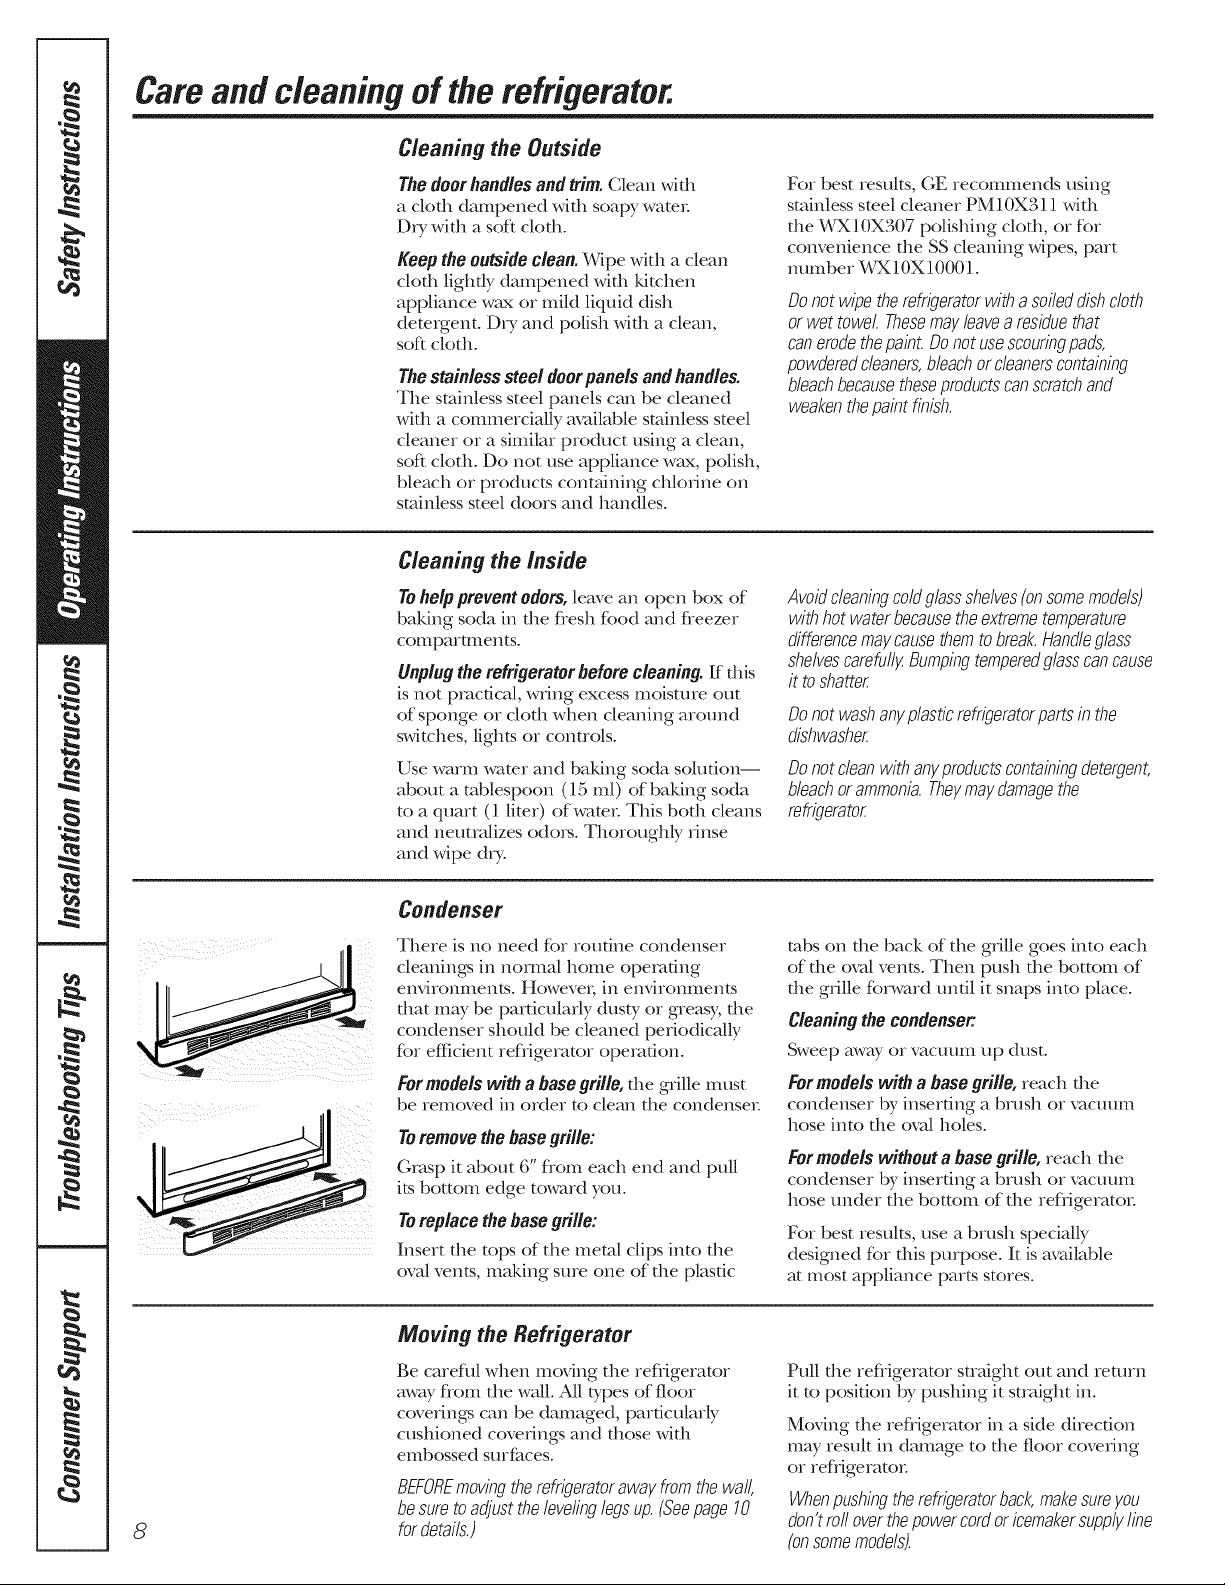
Condenser
There is no need for roudne condenser
cleanings in nomm/home opemdng
enviromnents. However; in enviromnents
that m W be particularly dusty or greasy; tile
condenser should be cleaned periodically
for efficient reflJgemtor operation.
Formodelswith a basegrille, die gqille must
be removed in order to clean die condense_:
Toremove the base grille:
Grasp it about 6" flom each end and pull
its bottom edge toward you.
Toreplace the basegrille:
Insert tile tops of the metal (:lips into tile
ova/vents, making sure one of tile plastic
Avoid cleaningcoldglassshelves(onsome models)
with hot water becausethe extreme temperature
difference maycausethem tobreak.Handleglass
shelvescarefully Bumping temperedglasscancause
it toshatter
Donot washanyplasticrefrigeratorpartsinthe
dishwasher
Donotcleanwithanyproductscontainingdetergent,
bleachorammonia.Theymaydamagethe
refrigerator
tabs on die back of tile grille goes into each
of the ovalvents. Then push tile bottom of
tile grille forward until it snaps into place.
Cleaning the condenser'.
Sweep away or vacumn up dust.
Formodels with a base grille, reach file
condenser by inserting a brush or vacuum
hose into the ova/holes.
For models without a base Nille, reach die
condenser by inserting a brush or vacuum
hose under tile bottom of tile reflJgerator
For best results, use a brush speciaUy
designed for dlis purpose. It is available
at most appliance parts stores.
Moving the Refrigerator
Be carefhl when moving tile refligerator
away flom the wall. All types of floor
coverings can be damaged, particularly
cushioned covenngs and those with
embossed smfaces.
BEFOREmovingtherefrigeratorawayfromthewall,
besuretoadjustthelevelinglegsup.(Seepage10
8
fordetails.)
Pull die refligerator smdght out and return
it to position by pushing it straight in.
M(Mng die refligerator in a side direction
may result in damage to tile floor covenng
or reflJgerator
Whenpushingtherefrigeratorback,makesureyou
don'tfor overthepowercordoricemakersupplyline
(onsomemodels).

Preparing for Vacation
GEAppliances.com
For long V_tCatioIIS Of #_bsences_ I'eIIlOVe
food and mlplug the refligerator Move
file refrigerator control to file 0 (Of[) position
and clean file interior wifll a baMng soda
solution of one tablespoon (15 ml) of
baking soda to one quart (1 limr) of wamr
i,eave the doo_ open.
Set the icemaker power switch to file 0 (off)
position or move the feeler am1 to the STOP
(up) position (depending on model) and
shut off the water supply to the refligerator
If the temperature can drop below freezing,
have a qualified servicer drain the water
supply system (on some models) to prevent
serious property damage due to flooding.
Preparing to Move
Secure all loose items such as grille,
shelves and drawexs by taping them
securely in place to prevent damage.
Besure the refrigeratorstaysin an uprightposifion
during moving
Replacingthefightbulbs.
Setting either or both controls to 0 (off) does not remove power to the light circuit.
Some models have only one light.
Refrigerator Compartment--Upper Light
A CAUTION:Ligh, u/ sm eho,.
O Unplug the refrigerator.
O The bulbs are located at the top of the
compamnent near the opening.
Freezer Compartment Dome Light (onsomemodels)
Replace Mdl an appliance bulb of
the sa[ne oi lo_,vei wattage.
O Plug the refligerator back in.
A CAUTION:Lig, u/ s ho,. O .pp. .,ceb.lb
O Unplug the refligeratc _: the shield.
The bulb is located behind a light _ Plug the refligerator back in.
shield at the back of the fleezer
compartment. To remove, squeeze
the top and bottom of the shieM and
pull the shieM off
h of the same or lower wattage, replace
9
nstallati
Mode/18
ff youhave questions,call 1.800.GE.CARESor vMt our Webske at: GEAppliances.com
in Canada, call 1.800.561.3344or visitoui-Website,t: www.GEAppliances.ca
BEFORE YOU BEGIN
Read these instructions completely and carefully.
" IMPORTANT - S.vethese
instructions if)r local inspector's use.
" IMPORTANT - Obseiveall
governing codes and ordinances.
* Note to Installer - Be sure to leave these
instructions with tile Consumei:
, Note to Consumer - Keep these instructions
K)r future reference.
* Skill level - Installation of this appliance requires
basic mecllanical skills.
* Completion time - Refligerator Installation
15 minutes
Reversing the Door Swing
1 llour
* Proper installation is tile responsibility of tile
installer.
* Product failure due to improper installation is not
covered under the _!arIallty.
WATER SUPPLY TO THE ICEMAKER
{on some models}
If tlle refrigerator has an icemaker, it will llave to be
connected to a cold water line. A water supply kit
(containing copper robing, shutoff valve, fittings and
instructions) is available at extra cost f]om your dealei;
by visiting our Website at GEAppliances.com (in
Canada at www.GEAppliances.ca) or flom Parts and
Accessories, 1.800.661.1616.
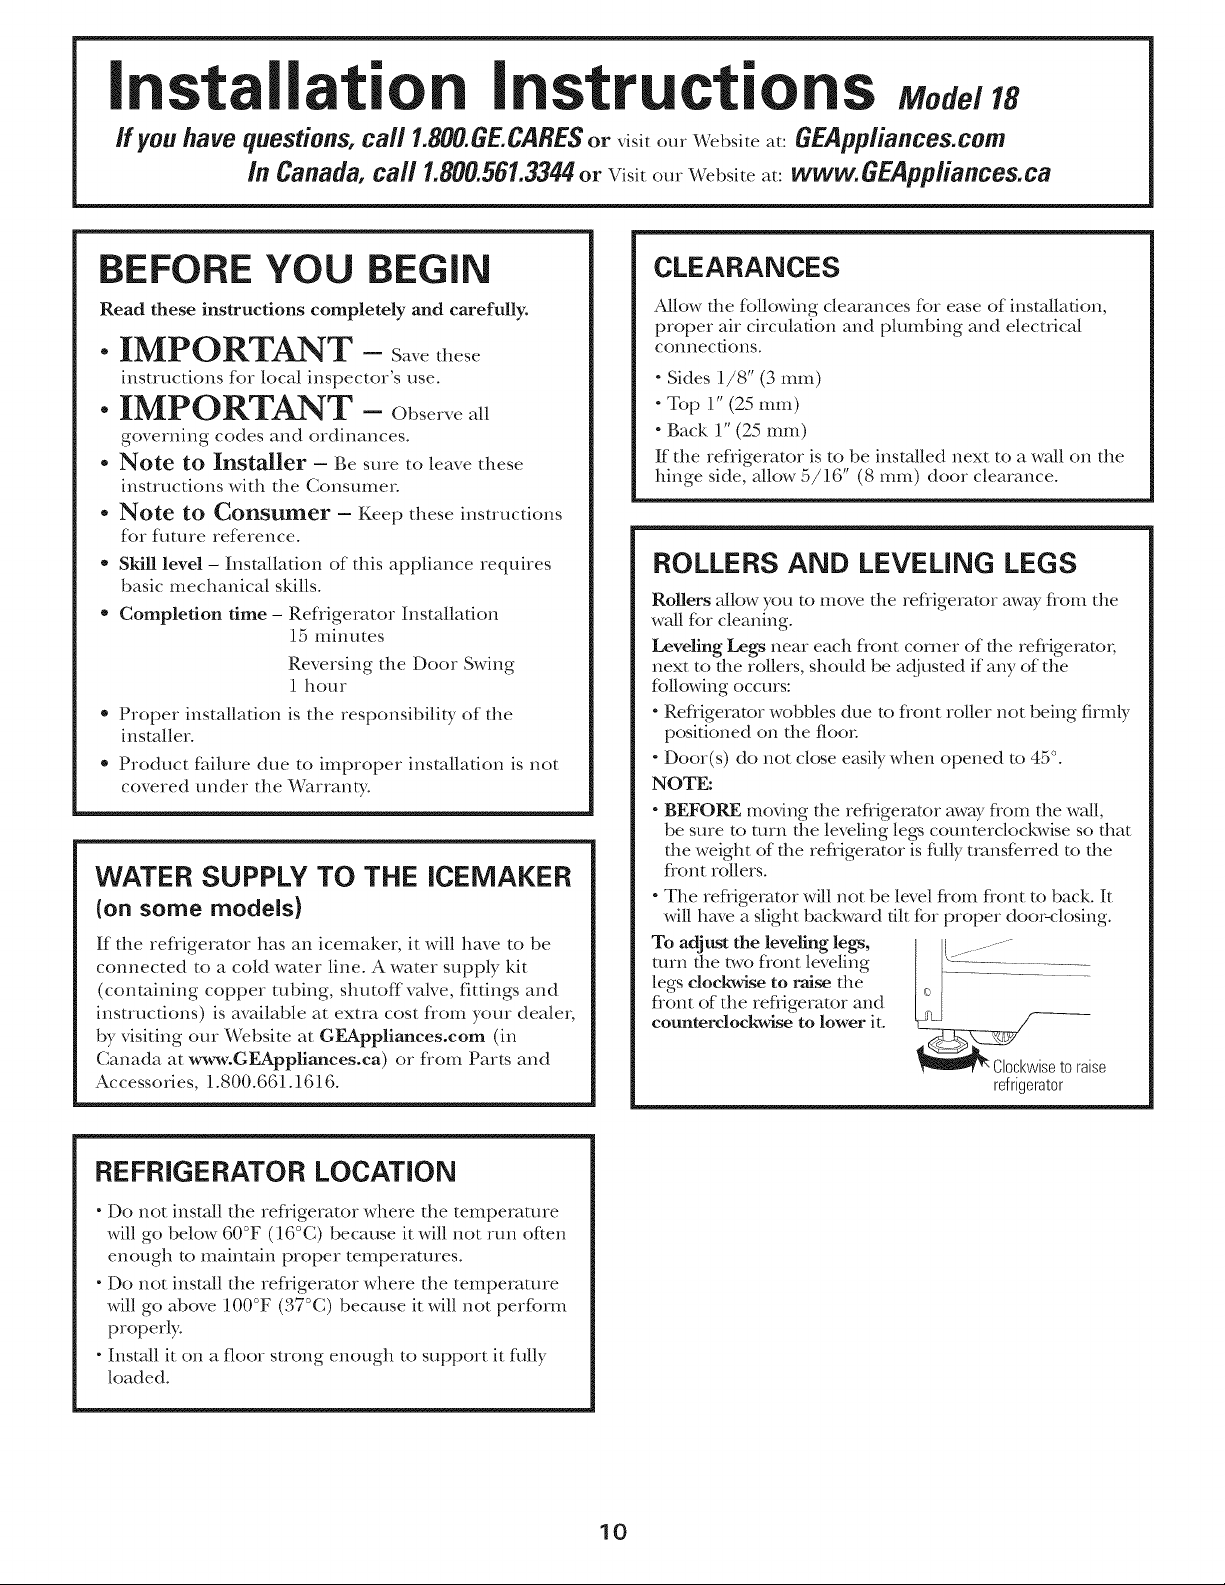
CLEARANCES
Allow file following clearances for ease of installation,
proper air circulation and phmlbing and electrical
connections.
- Sides 1/8" (3 ram)
- Top 1" (25 ram)
- Back 1"(25 ram)
If the refligerator is to be installed next to a wall on the
llinge side, allow 5/16" (8 ram) door clearance.
ROLLERS AND LEVELING LEGS
Rollers allow you to move file refligerator away flom the
wall for cleaning.
Leveling Legs near each flont corner of tile refligerat(m
next to the rollers, should be adjusted if any of the
following occurs:
- Refligerator wobbles due to flont roller not being firmly
positioned on tile floor
" Door(s) do not close easily when opened to 45 °.
NOTE:
"BEFORE moving file refligerator away flom the wall,
be sure to turn tile leveling legs cotmterclockwise so that
the weight of the refligerator is fiflly transferred to the
flont rollers.
"Tile refligerator will not be level flom flont to back. It
will have a slight backward flit for proper doo>closing.
To adjust the leveling legs, 1 <:------__
tHI'IItile two flont leveling ..... -......
legs clockwise to raise the
fiont of tile reflfgerator and
counterclockwise to lower it.
iseto raise
refrigerator
REFRIGERATOR LOCATION
=Do not install tile refligerator where the tenlperamre
will go below 60°F (16°C) because it will not run often
enougtl to maintain proper temperatures.
"Do not install the refligerator wllere tlle temperature
will go above 100°F (37°C) because it will not perform
properly.
" Install it on a floor strong enough to support it flflly
loaded.
10
Installation instructions
iNSTALLiNG THE WATER LiNE (ONSOMEMODELS)
BEFORE YOU BEGIN
Recommended copper ,_atersupply ki/s are _X8X2, _\_8X3
or _TK8X4,depending on the amount of ulbing you need.
Approx>d plastic ,_vtmrsupply lines a_ GE SmmtConnecf *'
Refi-igecatorTnbing (_\_08X10006, _3(08X10015 and
_XO8XlO025).
_3_en connecting your refl-igemtor to a GE Re,w_e Osmosis
Wamr S}:smm,the only approxvd installation is with a GE RVKit.
For other rex_e osmosis _tmr s_:smms,tollow the
manuf_mmrer's recommendations.
This ,_ater line installation is not ,_vtn'antedby the refl-igecator
or icemaker manuf{tcmrer Follow these instructions careflflly'
to minimize the riskof expensive ,_amrdamage.
_hter hammer (,_ater banging in the pipes) in house plumbing
can cause damage to refkige_vttorparts and lead to ,_amr leakage
or flooding. Calla qualified plumber to correct _tmr hammer
betore installing the ,_vtmrsupply line to the refi-igecato_:
To pre,>nt burns and product damage, do not hook up the
,xvtterline to the hot ,xvtterline.
If you use your refl-igecatorbefore connecting the wamrline,
make sure the feeler ann is in the STOP(up) position.
Do not ins/all the icemaker tubing in areas where tempecamres
t_tllbelowfieezing.
_]_en using any electrical device (such as a p(mer drill) during
installation, be sure the device isdouble insulamd or grounded
in a manner to pre,_nt the hazard of electric shock,or isbatmU
p(mered.
M1installations must be in accordance withlocal plumbing
code requirements.
WHAT YOU WiLL NEED (CONT.)
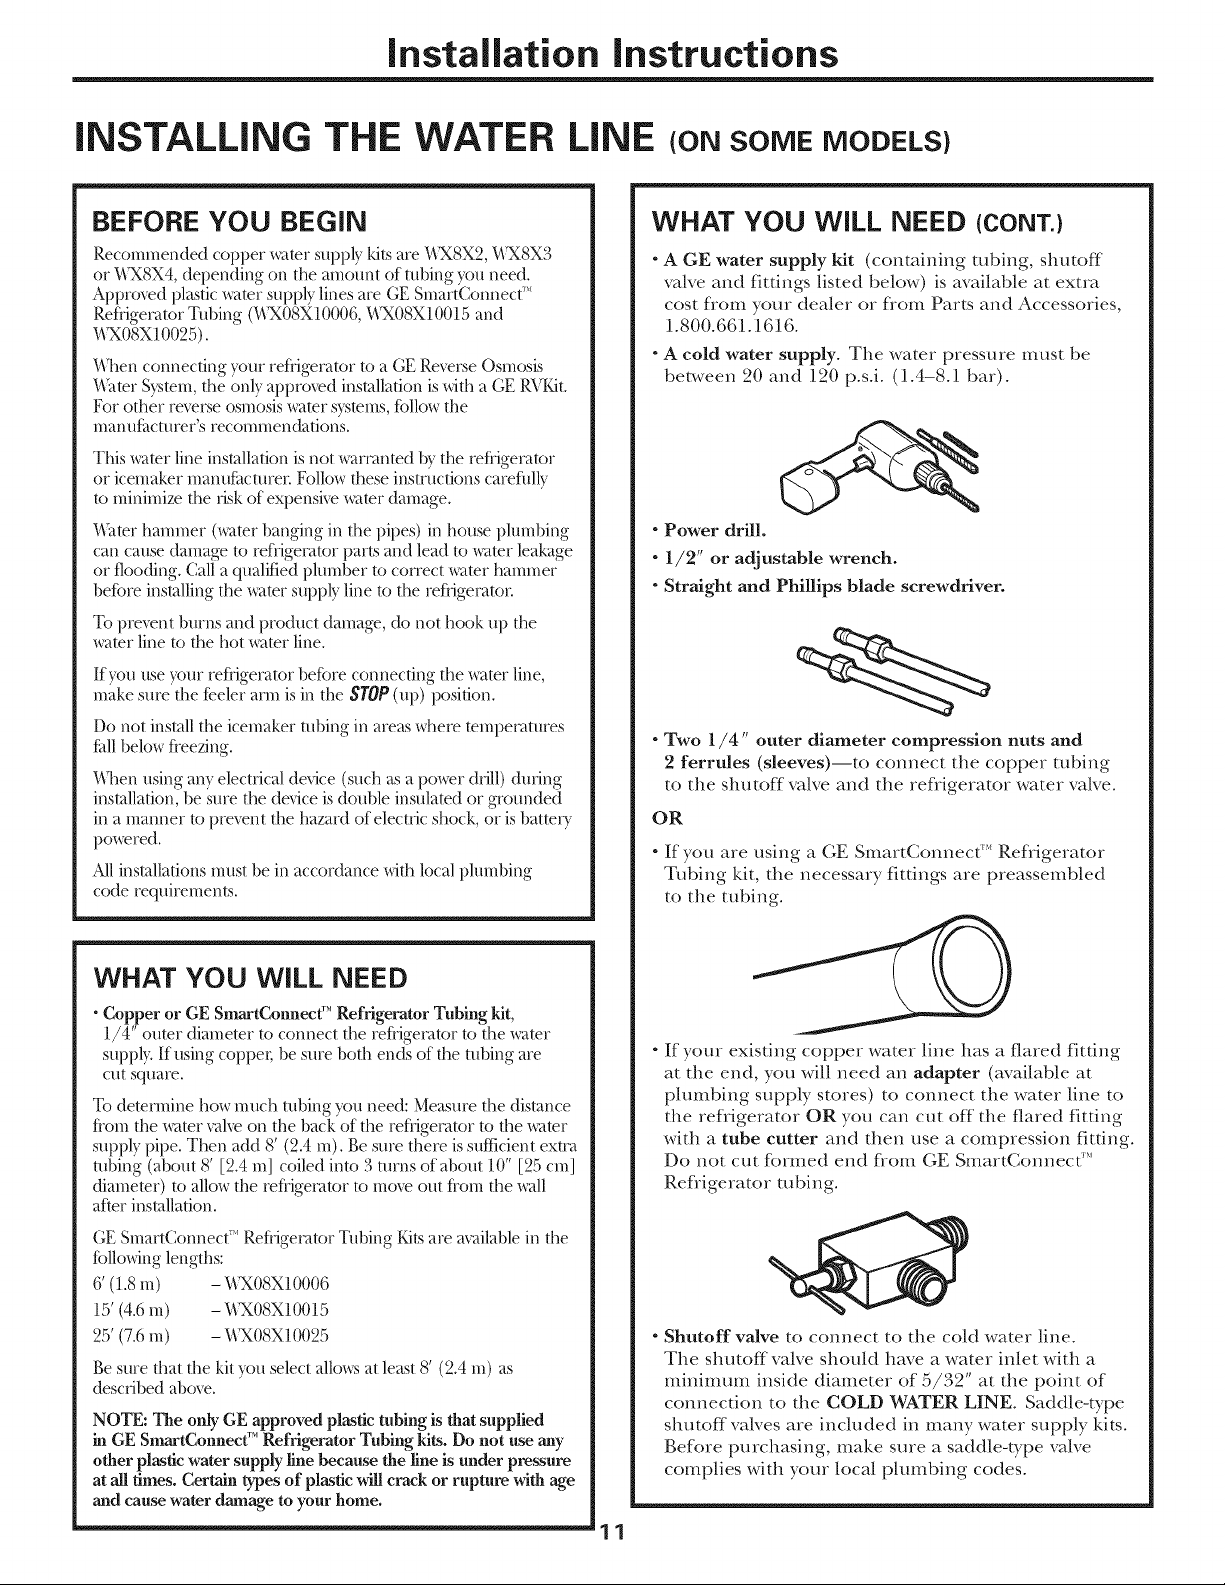
" AGE water supply Mt (containing robing, shutoff
valve and fittings listed below) is available at extra
cost flom your dealer or flom Parts and Accessories,
1.800.661.1616.
- A cold water supply. The water pressure must be
between 20 and 120 p.s.i. (1.4-8.1 bar).
- Power drill.
" 1/2" or adjustable wrench.
- Straight and Phillips blade screwdriver.
- Two 1/4" outer diameter compression nuts and
2 ferrules (sleeves)--to connect the copper robing
to the shutoff valve and the refligerator water valve.
OR
- If you are using a (;E SmartConnect _'*Refligerator
Tubing kit, the necessary fittings are preassembled
to the tubing.
WHAT YOU WiLL NEED
• Copper or GE SmartConneet" Refrigerator Tubing kit,
1/4" outer (tiameter to connect the reflJge_vttor to the ,xater
supply. Ifusing coppe,; be sure both ends of the robing are
cut square.
To demmfine bow much robing you need: Measure the distance
flom the _ater val_e on the back of the refi-igemtor to the _x_tter
supply pipe. Then add 8' (9.4 m). Be sure there is sufficient extra
robing (about 8' [2.4 m] coiled into 3 rams of about 10" [25 cm]
diamemr) to allow the refl-igemtor to mo_ out flom the _x_tll
after installation.
GE SmartConnec[ '_Refl-igemtor Tubing Kits are available in the
tollowing lengths:
6' (1.8 m) - _X08X10006
15' (4.6 m) - _X08X10015
25' (7.6 m) - _08X10025
Be sure that the kit you select allcm:s at least 8' (2.4 m) as
described abox_.
NOTE: The only GE approved plastic tubing is that supplied
in GE SmartConnect" Refrigerator Tubing kits. Do not use any
other plastic water supply line because the line is under pressure
at all times. Certain types of plastic will crack or rupture with age
and cause water damage to your home°
" If your exisOng copper water line has a flared fitOng
at the end, you will need an adapter (available at
plumbing supply stores) to connect the water line to
the refligerator OR you can cut off the flared fitting
with a tube cutter and then use a compression fitting.
Do not cut formed end flom GE SmartConnect'"
Refiigerator robing.
- Shutoff valve to connect to the cold water line.
The shutoff valve should have a water inlet with a
minimmn inside diameter of 5/32" at the point of
connection to the COLD WATER LINE. Saddle-type
shutoff valves are included in many water supply kits.
Before purchasing, make sure a saddle-type valve
complies with your local plumbing codes.
11
Installation instructions
iNSTALLiNG THE WATER LiNE (CONT.)
Install the shutoff valve on the nearest flequently used
drinking water line.
m SHUT OFF THE MAIN WATER SUPPLY
AND UNPLUG REFRIGERATOR
Turn on the nearest f_mcet counterclockwise long
enough to clear the line of water.
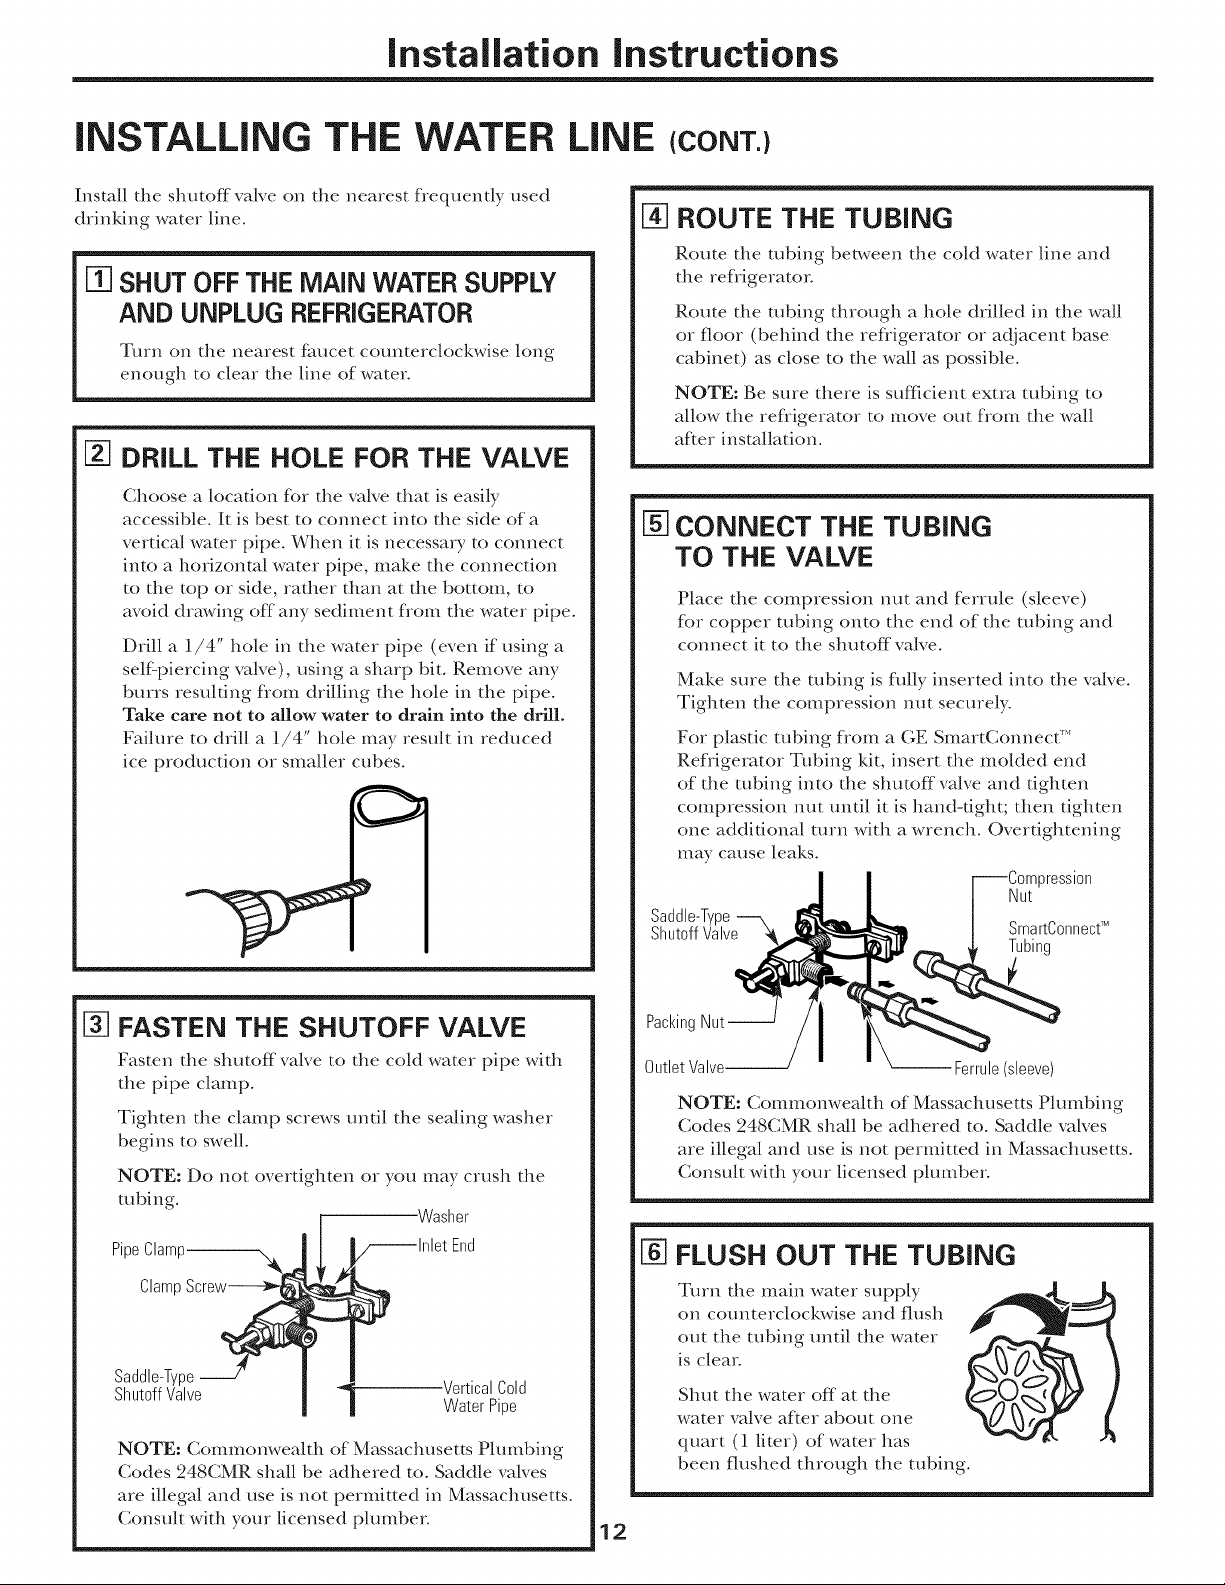
[] DRILL THE HOLE FOR THE VALVE
Choose a location for the valve that is easily
accessible. It is best to connect into the side of a
vertical water pipe. When it is necessary to connect
into a horizontal water pipe, make the connection
to the top or side, rather than at the bottom, to
avoid drawing off any sediment fYom the water pipe.
Drill a 1/4" hole in the water pipe (even if using a
self:piercing valve), using a sharp bit. Remove any
burrs resulting flom drilling the hole in the pipe.
Take care not to allow water to drain into the drill.
Failure to drill a 1/4" hole may result in reduced
ice production or smaller cubes.
Y
[_ ROUTE THE TUBING
Route the robing between the cold water line and
the refrigerator
Route the tubing through a bole drilled in the wall
or floor (behind the refligerator or adjacent base
cabinet) as close to the wall as possible.
NOTE: Be sure there is sufficient extra tubing to
allow the refligerator to move out from the wall
af*er installation.
CONNECT THE TUBING
TO THE VALVE
Place the compression nut and ferrule (sleeve)
for copper tubing onto the end of the tubing and
connect it to the shutoff valve.
Make sure the tubing is fully inserted into the valve.
Tighten the compression n/it securely.
For plastic tubing flom a GE SmartConnect _'*
Refiigerator Tubing kit, insert the molded end
of the robing into the shutoff valve and tighten
compression nut until it is hand-fight; then tighten
one additional mrn with a wrench. Overfigbtening
may cause leaks.
[_ FASTEN THE SHUTOFF VALVE
Fasten the shutoff valve to the cold water pipe with
the pipe clamp.
Tighten the clamp screws until the sealing washer
begins to swell.
NOTE: Do not overtighten or you may crush the
m bin g.
PipeClaml
Clamp
Saddle-Type
ShutoffValve
NOTE: Commonwealth of Massachusetts Plumbing
Codes 248CMR shall be adhered to. Saddle valves
are illegal and use is not permitted in Massachusetts.
Consult with your licensed plumber
Washer
VerticalCold
WaterPipe
Saddle-Type_ A L r---Compression
ShutoffVaIve_ __|SmartC°nnect
Packin "ut-----J/i
OutletValve-------J " " _Ferrule (sleeve)
NOTE: Commonwealth of Massachusetts Plmnbing
Codes 248CMR shall be adhered to. Saddle valves
are illegal and use is not permitted in Massachusetts.
Consult with your licensed plumber.
FLUSH OUT THE TUBING
Turn the main water supply
on counterclockwise and flush
out the robing until the water
is clear
Shut the water off at the
water valve afker about one
quart (1 liter) of water has
been flushed through the tubing.
12
Nut ,_
Installation instructions
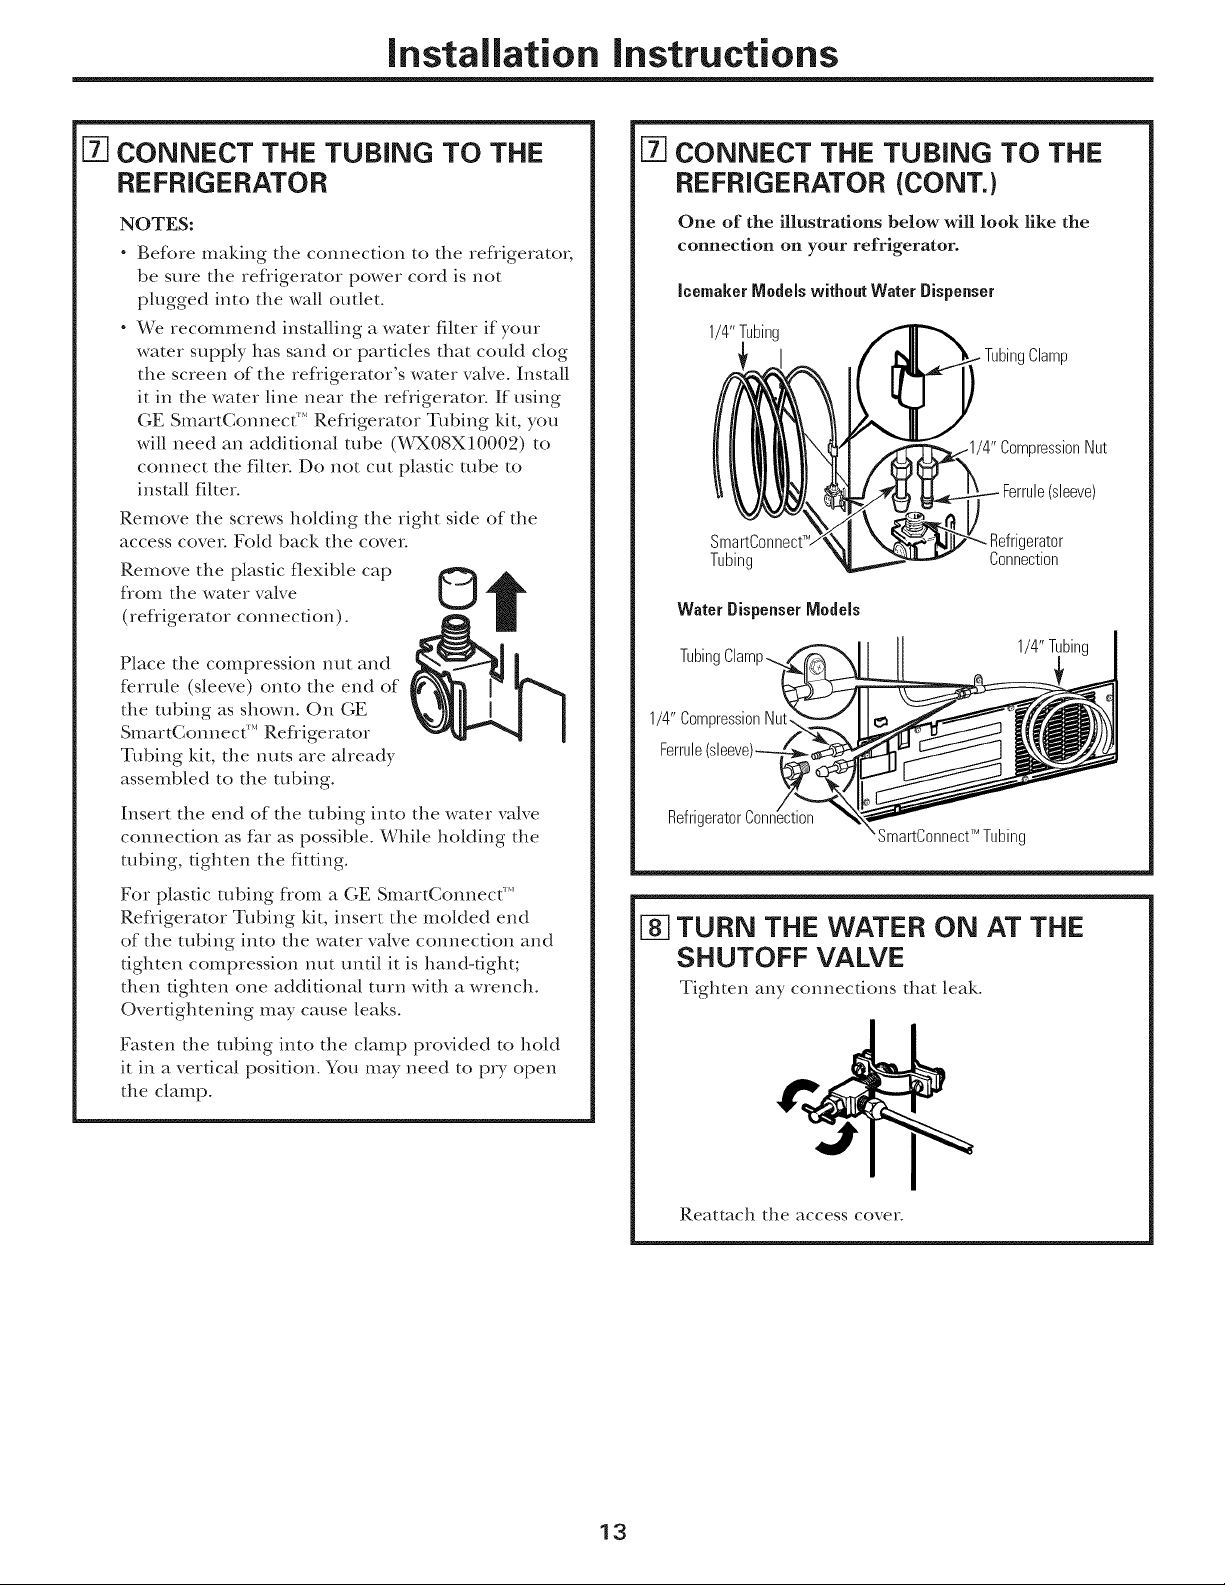
[-_ CONNECT THE TUBING TO THE
REFRIGERATOR
NOTES:
Before making the connection to the refligeratcm
be sure the refligerator power cord is not
plugged into the wall outlet.
We recommend installing a water filter if your
water supply has sand or particles that coukt clog
the screen of the refligerator's water valve° Install
it in the water line near the refligemtor. If using
GE SmartConnect r'' Refligerator Tubing kit, you
will need an additional robe (WX08X10002) to
connect the filter. Do not cut plastic tube to
install filter.
Remove the screws holding the right side of the
access cover Fold back the cover.
Remove the plastic flexible cap
flom the water valve
(refligerator connection).
Place the compression nut and
ferrule (sleeve) onto the end of
the tubing as shown. On (;E
SmartConnect'" Refligerator
Tubing kit, the nuts are aheady
assembled to the tubing.
Insert the end of the tubing into the water valve
connection as flu as possible. While holding the
tubing, tighten the fitting.
For plastic robing flom a GE SmartConnect'"
Refligerator Tubing kit, insert the molded end
of the robing into the water valve connection and
tighten compression nut until it is hand-tight;
then tighten one additional turn with a wrench.
Overtightening may cause leaks.
©
[-_ CONNECT THE TUBING TO THE
REFRIGERATOR (CONT.)
One of the illustrations below will look like the
connection on your refrigerator.
Icernaker Models without Water Dispenser
1/4"Tubing
3ressionNut
Ferrule(sleeve)
- Refrigerator
Tubing
Water DispenserModels
TubingClamp-..
1/4" CompressionNut,
RefrigeratorConnection
SmartConnect_ Tubing
Connection
1/4"Tubin
[_] TURN THE WATER ON AT THE
SHUTOFF VALVE
Tighten any connections that leak.
Fasten the robing into the clamp provided to hold
it in a vertical position. You may need to P_T open
the clamp.
Reatmch the access cover.
13
Installation instructions
iNSTALLiNG THE WATER LiNE (CONT.)
[-gqPLUG iN THE REFRIGERATOR
Arrange the coil of tubing so that it does not vibrate
against the back of the ref_igerator or against the
wall. Push the ref}igerator back to the wall.
REVERSING THE DOOR SWING
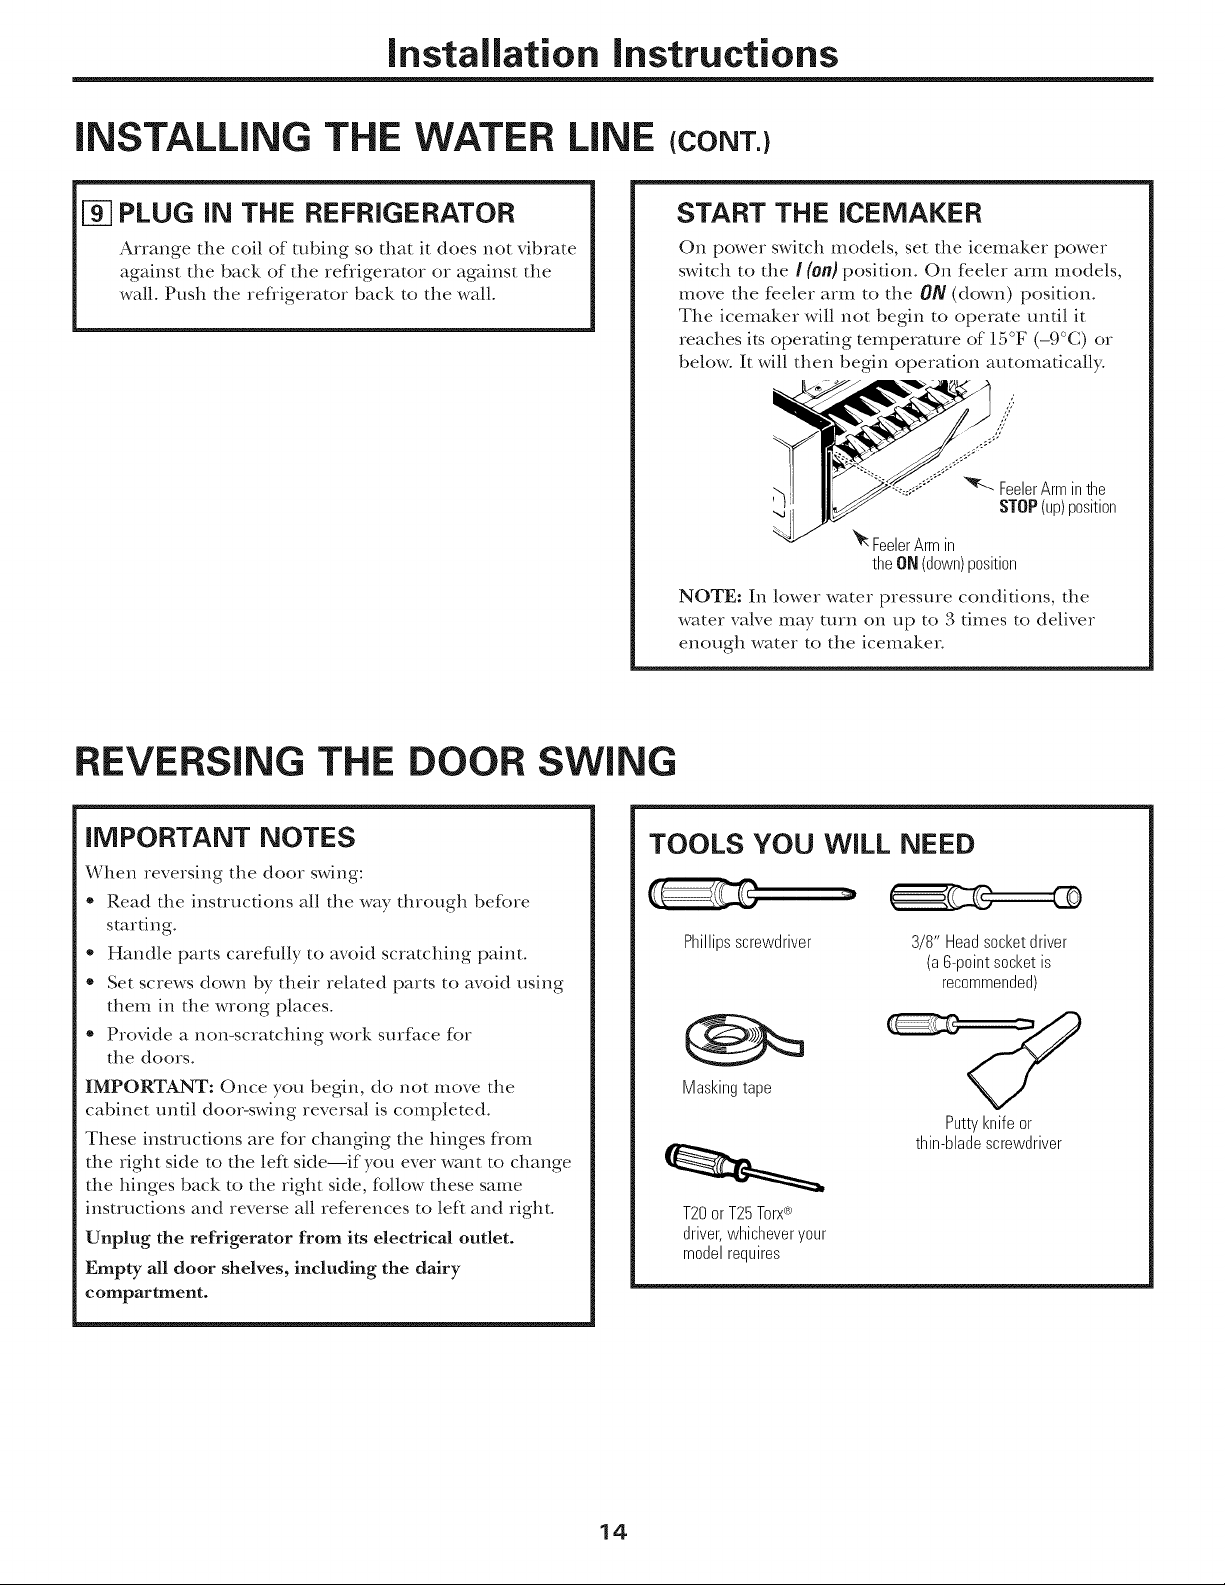
START THE ICEMAKER
On power switch models, set the icemaker power
switch to the ! (on}position. On feeler arm models,
move the feeler arm to the ON (down) position.
The icemaker will not begin to operate until it
reaches its operating temperature of 15°F (-9°C) or
below. It will then begin operation automaficall>
FeelerArm in
the OR(down)position
NOTE: In lower water pressure conditions, the
water valve may ttun on up to 3 times to deliver
enough water to the icemaker.
IMPORTANT NOTES
When reversing the door swing:
* Read the instructions all the way through before
starting.
* Handle parts carefully to avoid scratching paint.
* Set screws down by their related parts to avoid using
them in the wrong places.
* Provide a non-scratching work surface for
the doors.
IMPORTANT: Once you begin, do not move the
cabinet until door-swing reversal is completed.
These instructions are for changing the binges f}om
the right side to the lef_ side--if you ever want to change
the binges back to the right side, follow these same
instructions and reverse all references to left and right.
Unplug the refrigerator from its electrical outlet.
Empty all door shelves, including the dairy
compartment.
TOOLS YOU WILL NEED
Phillipsscrewdriver
Maskingtape
T20or T25Torxce
driver,whicheveryour
modelrequires
3/8" Headsocketdriver
(a6-pointsocketis
recommended)
Puttyknifeor
thin-bladescrewdriver
14
Installation instructions
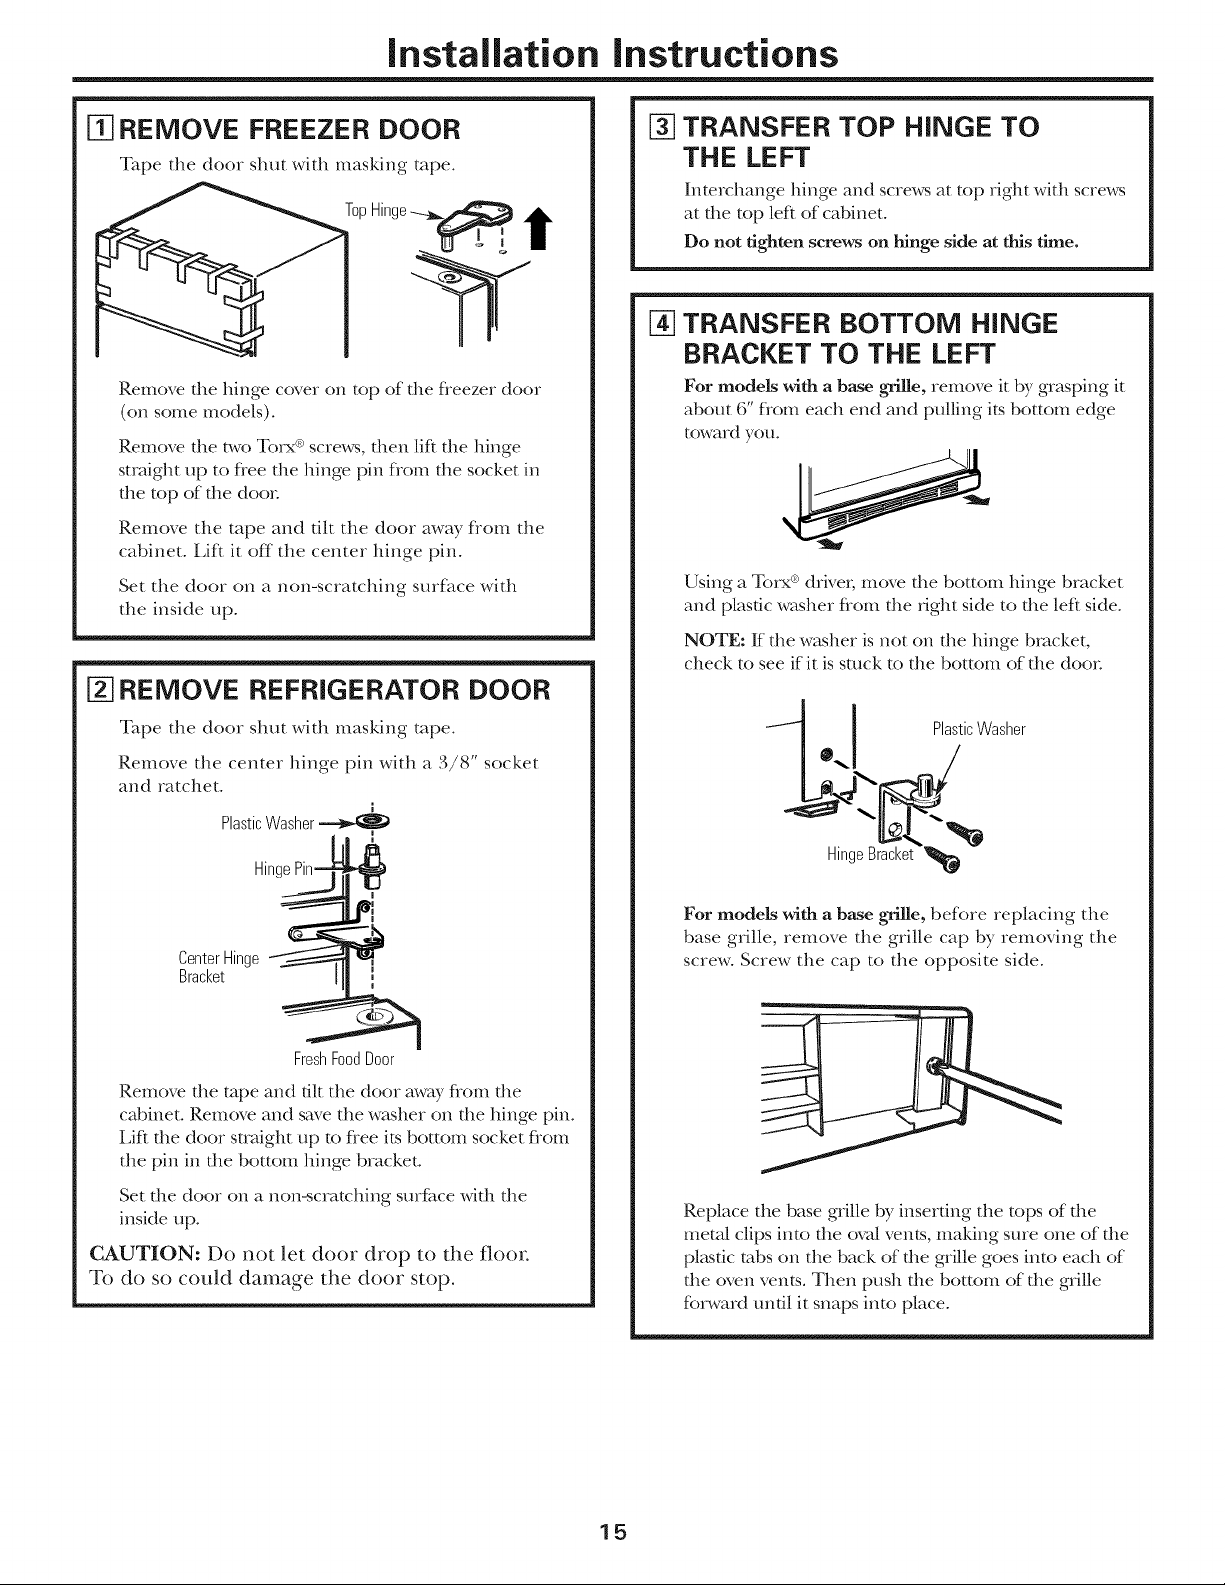
[_ REMOVE FREEZER DOOR
Tape the door shut with masking tape.
Remove the hinge cover on top of the fleezer door
(on some models).
Remove the t_,voTorx ®screws, then lift the binge
straight up to flee the binge pin flom the socket in
the top of the door
Remove the tape and tilt the door away flom the
cabinet, i,iff it off the center binge pin.
Set the door on a non-scratching smface with
the inside up.
REMOVE REFRIGERATOR DOOR
!
[_ TRANSFER TOP HINGE TO
THE LEFT
Interchange binge and screws at top right with screws
at the top left of cabinet.
Do not tighten screws on hinge side at this time.
[_ TRANSFER BOTTOM HINGE
BRACKET TO THE LEFT
For models with a base grille, remove it by grasping it
about 6" flom each end and pulling its bottom edge
toward you.
Using a Torx ®drivex; move the bottom binge bracket
and plastic washer flom the fight side to the left side.
NOTE: If the washer is not on the binge bracket,
check to see ifit is stuck to the bottom of the docn:
Tape the door shut with masking tape.
Remove the center binge pin with a 3/8" socket
and ratchet.
PlasticWasher
HingePin_
CenterHinge
Bracket
FreshFoodDoor
Remove die tape and tilt the door away flom die
cabinet. Remove and save the washer on the binge pin.
Lift the door straight up to flee its bottom socket flom
the pin in the bottom binge bracket.
Set the door on a non-scratching smface with the
inskte up.
CAUTION: Do not let door drop to the floor.
To do so could damage the door stop.
i
I
4}
i
u
--_ 0_ I PlasiicWasher
.4\
For models with a base grille, before replacing the
base grille, remove the grille cap by removing the
screw. Screw the cap to the opposite side.
Replace the base grille by inserting the tops of die
metal clips into file ova/vents, maMng sure one of the
pkkstic tabs on the back of the grille goes into each of
the oven vents. Then push the bottom of the grille
finward until it snaps into place.
15
Installation instructions
REVERSING THE DOOR SWING ICONT.I
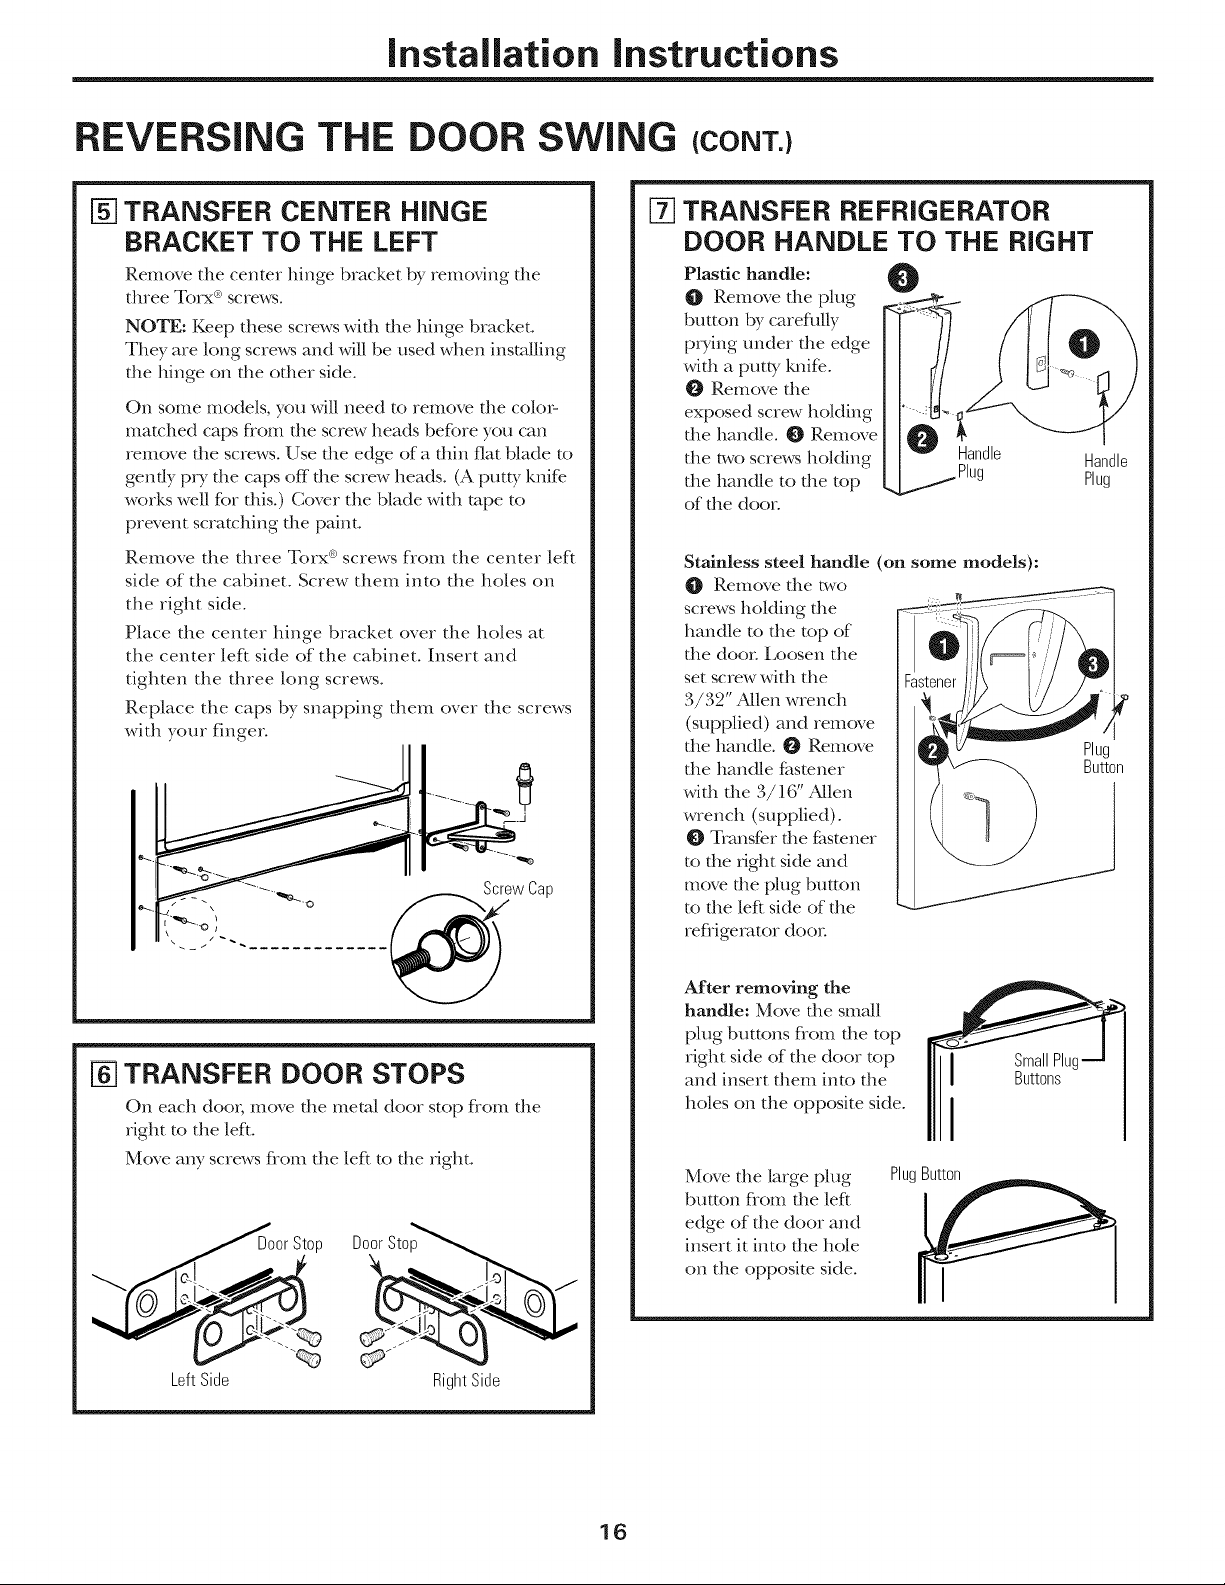
[g] TRANSFER CENTER HINGE
BRACKET TO THE LEFT
Remove the center binge bracket by remoxqng the
three mo_x ® screws.
NOTE: Keep these screws with the binge bracket.
Tile}, are long screws and will be used when installing
tile binge on tile other side.
On some models, you will need to remove die color-
matched caps flom die screw heads before you can
remove the screws. Use the edge of a thin fiat blade to
gently P_T the caps off the screw beads. (A putty knife.
works well for Otis.) Cover the blade with tape to
prevent scratching the paint.
Remove the three Torx ®screws from the center left
side of the cabinet. Screw them into the boles on
the right side.
Place the center binge bracket over the boles at
the center left side of the cabinet. Insert and
tighten the three long screws.
Replace the caps by snapping them over the screws
with your finger.
--. . ap
e-...
TRANSFER REFRIGERATOR
DOOR HANDLE TO THE RIGHT
Plastic handle: 0
Remove the plug
button by carefiflly
pxTing under the edge
with a putty Mfif>.
Remove the
exposed screw hokting
the handle. _ Remove
the two screws holding Handle Handle
the handle to the top Plug
of the door.
Stainless steel handle (on some models):
O Remove file two
screws holding file
handle to the top of
the door Loosen the
set screw with the
3/32" Allen wrench
(supplied) and remove
the handle. _ Remove
the handle fasmner
with the 3/16" Allen
wrench (supplied).
O Transfer file fastener
to the fight side and
move the plug button
to the left side of the
refligerator door
Plug
Button
TRANSFER DOOR STOPS
On each docn; move the metal door stop flom the
right to the left.
Move any screws flom the left to the right.
_or Stop
LeftSide
Door Stop
RightSide
16
After removing the
handle: Move die small
plug buttons flom file top
right side of the door top
and insert diem into the
boles on the opposite side.
Move the large plug
button flom die left
edge of the door and
insert it into the hole
on the opposim side.
I
PlugButton
I
SmallPluc
Buttons
Installation instructions
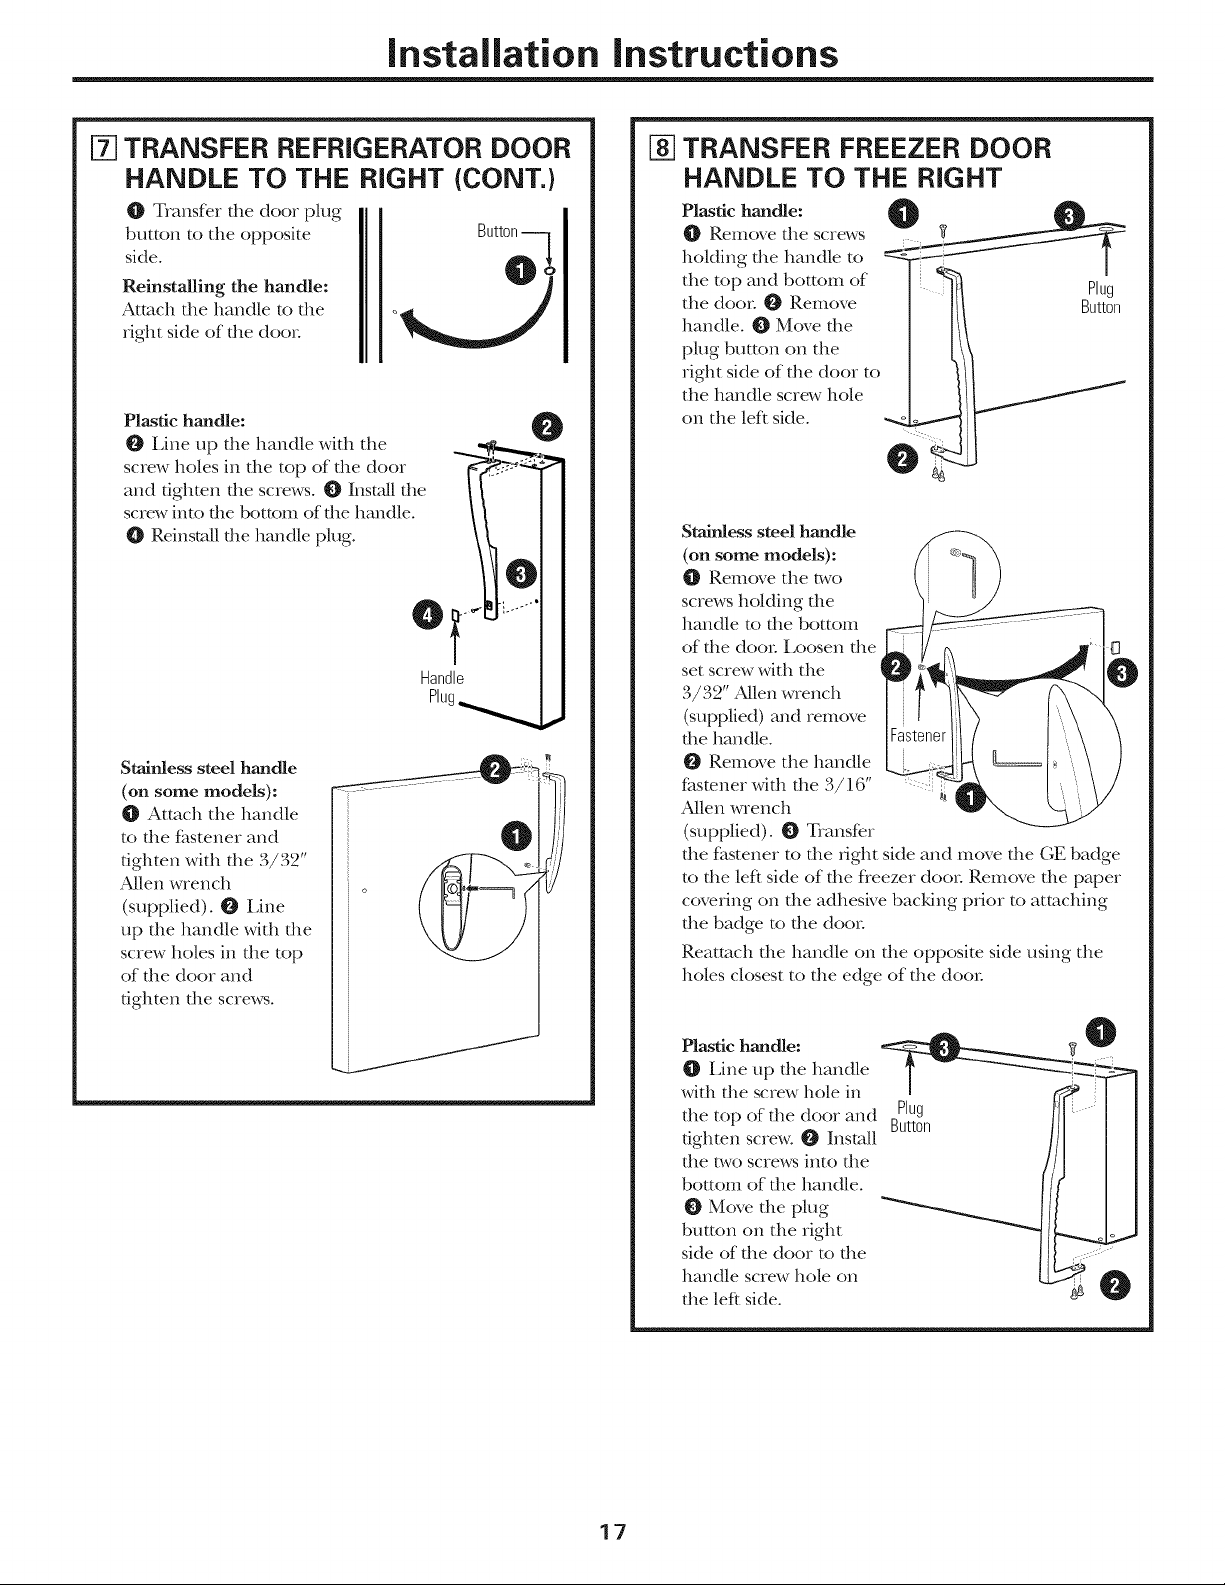
TRANSFER REFRIGERATOR DOOR
HANDLE TO THE RIGHT (CONT.)
O Transfer the door plug
button to the opposite
side.
Reinstalling the handle:
Attach the handle to the
fight side of the door
Plastic handle: _0
O i,ine up the handle with the
screw holes in the top of the door _"_ _
and dghten the screws. O Install the
screw into the bottom of the handle.
O Reinstall file handle plug.
Handle
Plug_ I
Stainless steel handle
(on some models):
O Attach the handle
to the fastener and
tighten with the 3/32"
Allen wrench
(supplied). O Line
up the handle with the
screw boles in the top
of the door and
tighten the screws.
TRANSFER FREEZER DOOR
%
HANDLE TO THE RIGHT
Remove the screws
Plastic handle: 0_..,_
hokling the handle to _r"_,.7 [
the top and bottom of
the door O Remove
ban(tie. O Move the
plug button on the
right side of the door to
the ban(tie screw hole
on the lef* side.
@
Stainless steel handle _-..
(on some models): i _'_
Remove the two
screws homing the
handle to the bottom ..........
of the door Ix_osen the
set screw with the
3/32" 'Allen wrench
(supplied) and remove
the handle.
Remove the handle
fastener widl die 3/16" '
Allen wrench
(supplied). O Transfer
die fastener to die fight side and move die (;E badge
to the left side of the fleezer door Remove the paper
covering on the adbeske backing prior to attaching
the badge to the door
Reattach the handle on the opposite side using the
boles closest to the edge of the do(m
J
17
Plastic handle:
Line up the handle
with the screw hole in
the top of the door and
fighmn screw. _ InstaU
the h,vo screws into the
bottom of the handle.
O Move the plug
button on the right
side of the door to the
handle screw hole on
the left side.
Plug
Button
Installation instructions
REVERSING THE DOOR SWING ICONT.I
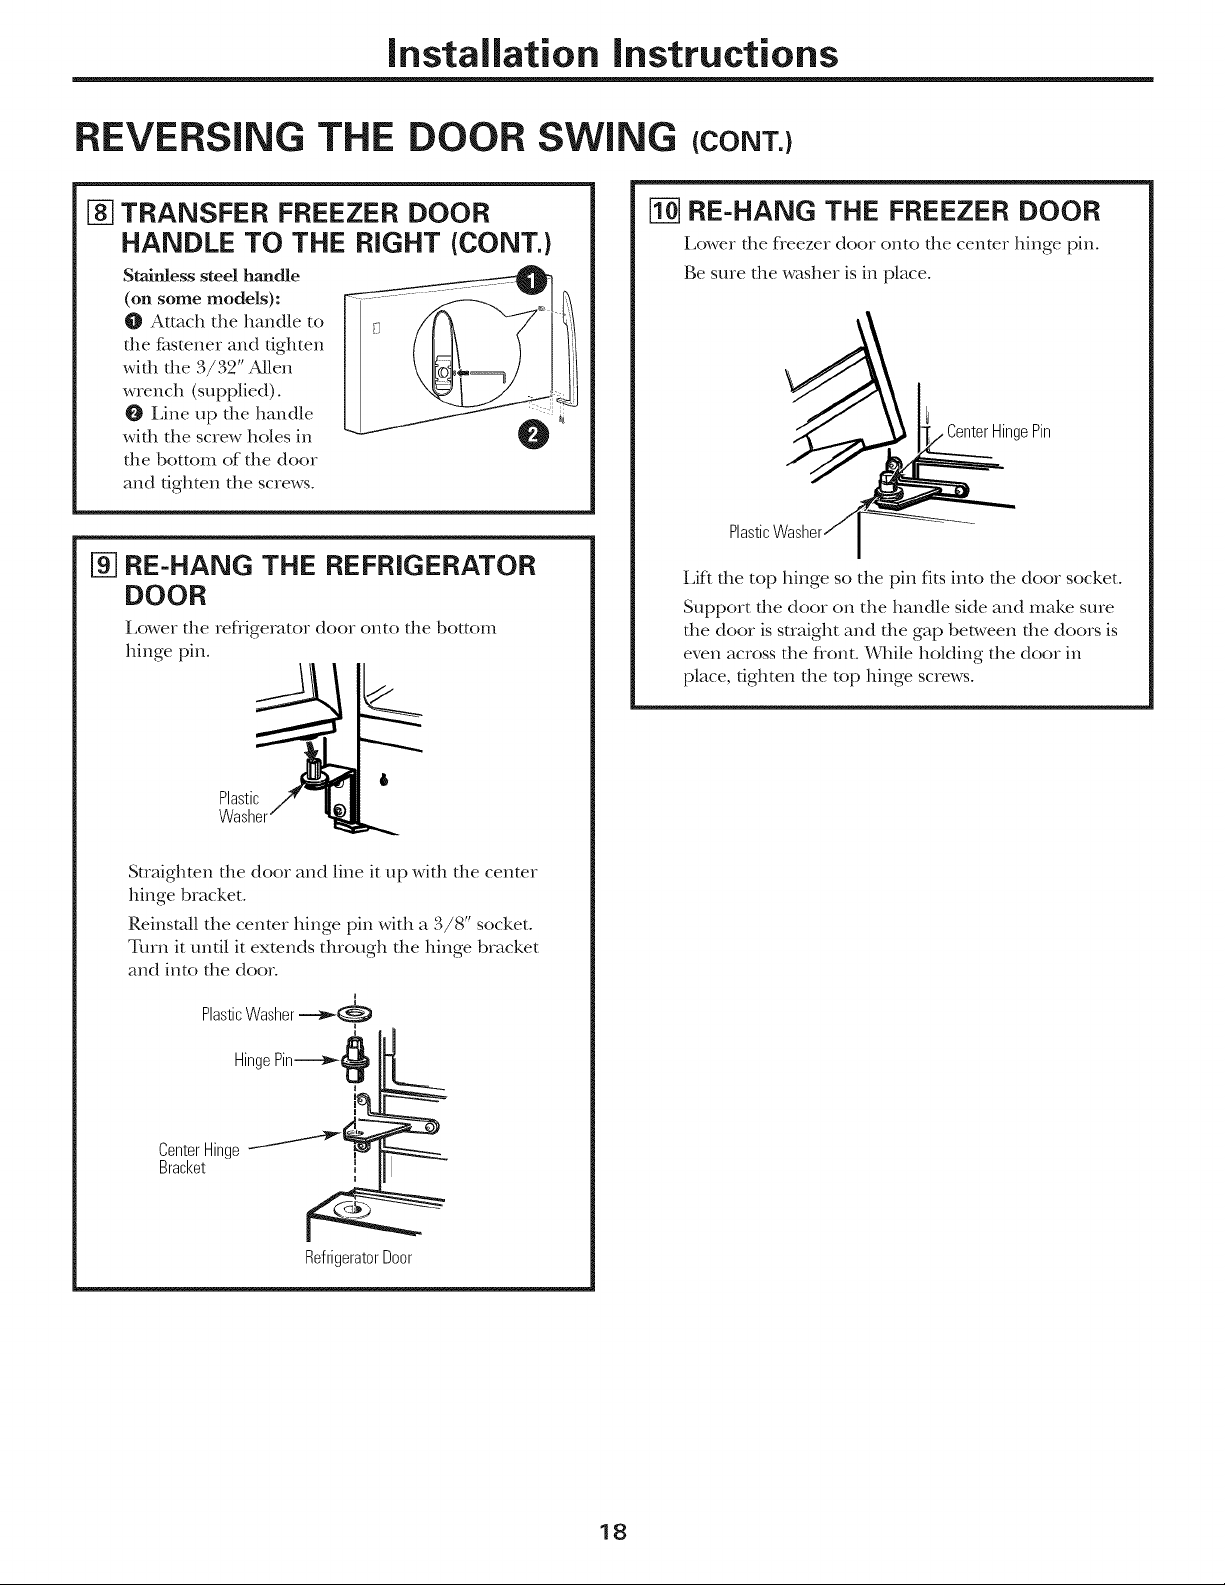
TRANSFER FREEZER DOOR
®
HANDLE TO THE RIGHT (CONT.)
Stairdess steel handle
(on some models):
Attach the handle to
file fitstener and tighten
widl die ,1/32" 'Allen
wrench (supplied).
Line up die handle
widl the screw holes in
die bottom of die door
and fighmn the screws.
® RE-HANG THE REFRIGERATOR
DOOR
Lower the reflJgerator door onto the bottom
hinge pin°
Plastic_ 6
Washer" ,I
[] RE-HANG THE FREEZER DOOR
i,ower the fleezer door onto the center hinge pin.
Be sure the washer is in place.
!
\_ _Hinge Pin
Lif_ the top hinge so the pin fits into the door socket.
Support the door on the handle side and make sure
the door is straight and the gap between the doors is
even across the flont. While holding the door in
place, tighten the top hinge screws.
Suaighten file door and line it up wifll file center
hinge bracket.
Reinstall the center hinge pin with a 3/8" socket.
Turn it until it exmnds through the hinge bracket
and into the door
{
PlasticWasher-----}_(_,
HingePin------_
N_
Center Hinge --""""'_ -I_
Bracket --
|
RefrigeratorDoor
18
Normal operating sounds. CeApplia.ces.com
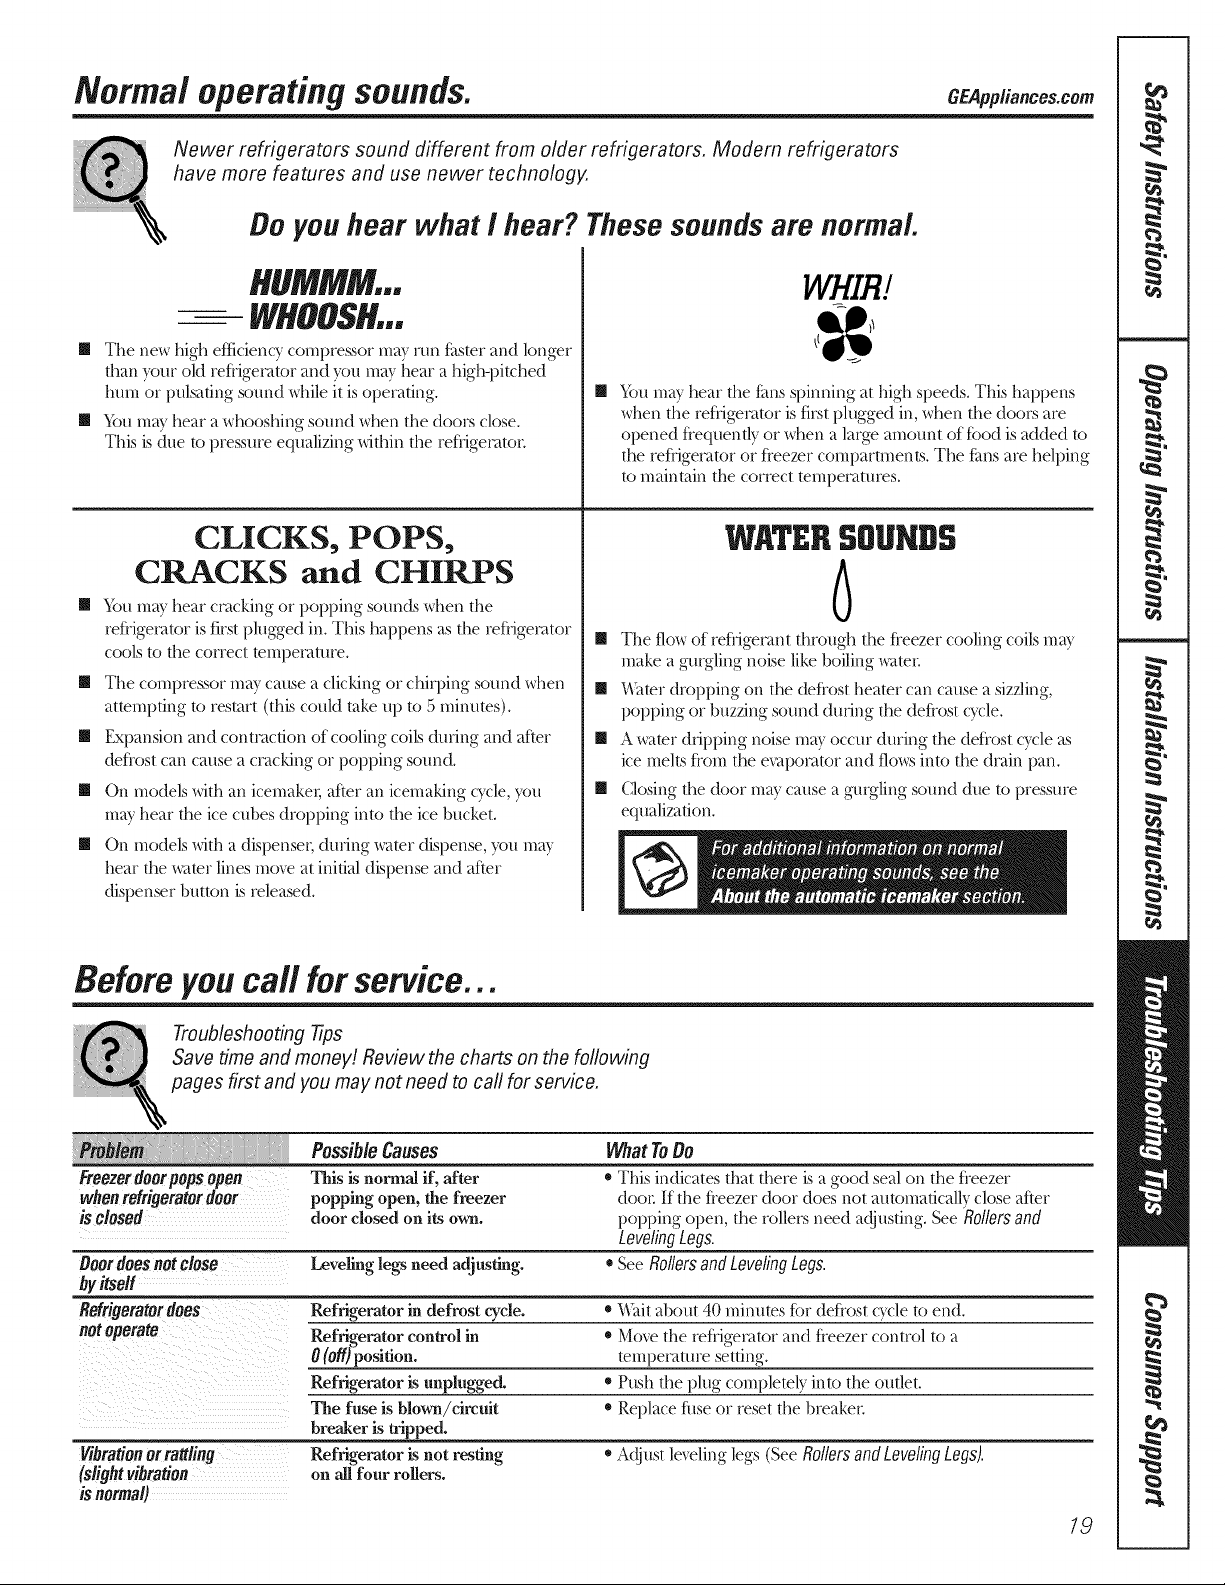
Newer refrigerators sound different from older refrigerators. Modern refrigerators
have more features and use newer technology.
Be youhear what / hear? Thesesounds are normal.
HUMMM,,
-- WHOOSH,..
[] The new high efficiency' compressor may' run f_ster and longer
than }_mr old refiJgemtor and you may hear a high-pitched
hum or pulsating sound while it is operating.
[] Ym may hear a whooshing sound when the doors close.
This is due to pressure equalizing within the reh-igemto_:
CLICKS, POPS,
CRACKS and CHIRPS
[] Ym may hear cracking or popping sounds when the
rehigemtor is first plugged in. This hal)pens as the reh-igemtor
cools to the correct temperature.
[] The compressor may' cause a clicking or chirping sound when
atmmpting to restart (this could rake up to 5 minums).
[] Expansion and contraction of cooling coils during and after
dehost can cause a crocking or popping sound.
m On models with an icemaket; after an icemaking cycle, }_m
may' hear the ice cubes dropi)ing into the ice bucket.
[] On models with a dispense_; during v,amr dispense, you may
hear the _mr lines mo_ at initial dispense and after
dispenser button is released.
WHIR!
[]
Ym may hear the f_msspinning at high speeds. This happens
when the reh-igecatoris fi,_tplugged in,when the doors are
opened fiequently or when a large amount of fbod is added to
the refiigecator or fieezer comi)amnents. The f_msare helping
to maintain the correct temi)e_vttures.
WATERSOUNDS
6
[] The flow of rehJgemnt through the heezer cooling coils may
make a gmgling noise like boiling ,xam_:
[] _Smr dropI)ing on the dehost hearer can cause a sizzling,
popping or buzzing sound during the dehost cycle.
[] A ,_amr dripi)ing noise may' occtlr during the dehost cycle as
ice melts hom the e_ti)omtor and flcm;s into the (hain pan.
[] Closing the (k_or may' cause a gmgling sound due to pressure
equalization.
Before you call forservice...
Troubleshooting 77ps
Save time and money! Review the charts on the following
pages first and you may not need to carl for service.
_ : Possible Causes What To Do
Freezer door pops open This is normal if, after * This indicates that there is a good seal on the fieezer
whenrefrigeratordoor popping open, the freezer dooL If/he heezer door does not automatically' close after
is closed door closed on its own. popping open, the rollers need adjus/ing. See Rollersand
LevelingLegs.
Doordoesnot close Leveling legs need adjusting. * See Rollersand LevelingLegs.
by itseH
Refrigeratordoes Refrigerator in defrost cycle. * \_tit about 40 minutes fk)r dehost cycle k_end.
not operate Refrigerator control in * Move/he reh-ige_ator and heezer control to a
0(off)position, teml)e_amre setting.
Refrigerator is unplugged. * Push the plug complemly' into the outlet.
The fuse is blown/circuR * Replace flJse or reset the breakeL
breaker is tripped.
Vibrationor rattling Refrigerator is not resting * Adjus/leveling legs (See RollersandLevelingLegs).
(slightvibration on all four rollers.
is normal)
19
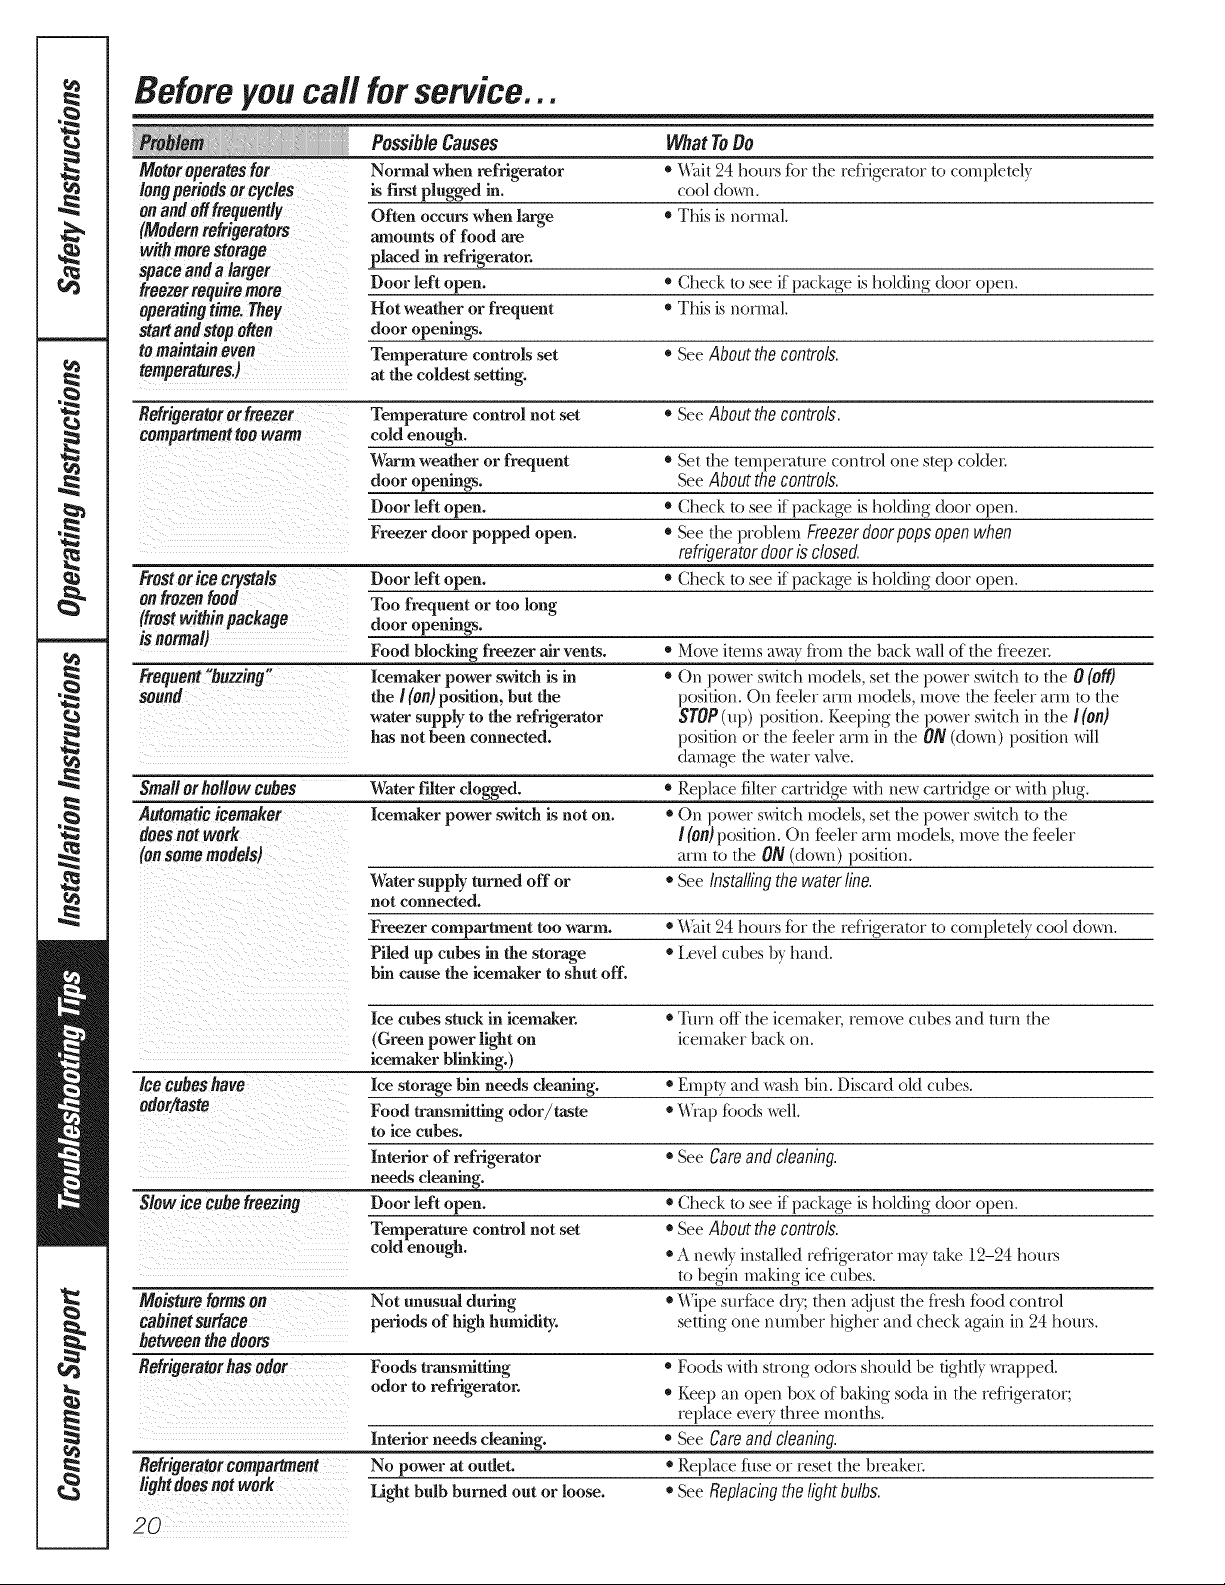
Beforeyou call forservice...
PossibleCauses WhatToOo
Motoroperatesfor Normal when refrigerator * _hit 24 hou_ for the refl_ige_tor to completely
longperiodsor cycles is first plugged in. cool (lo_.
on and offfrequently Often occurs when large * This is nom_al.
(Modernrefrigerators amounts of food are
with morestorage placed in refrigerator.
spaceanda larger
freezerrequiremore Door left open, * Check to seeif package isholding door open.
operating time. They Hot weather or frequent * This is nomlal.
start and stop often door openings.
to maintain even Temperature controls set * See About the controls•
temperatures.] at the coldest setting.
Refrigerator or freezer Temperature control not set *See About the controls•
compartmenttoowarm cold enough.
Warm weather or frequent * Set the teml)el_ture control one s/ep col(lel;
door openings. See About the controls.
Door left open. * Check to see if package isholding door open.
Freezer door popped open. * See the problem Freezer doorpops open when
Frostor ice cp/stals Door left open. * Check to see if package is holding door open.
onfrozenfood Too frequent or too long
(frostwithin package door openings.
is normal)
Frequent"buzzing"
souna
Small or hollow cubes Water Filter dogged. * Replace filler cartridge wi/h new cartridge or wi/h ping.
Automatic icemaker Icemaker power switch is not on. * On po_r switch models, set the power switch to/he
does not work I(on)position. On feeler am_ models, move the feeler
(on some models) am_ to the ON ((lo_) lx)sifion.
Food blocking freezer air vents. * Move items away bum the back _dl of the fleezeL
Icemaker power s_witchis in * On power swi/ch models, set the power switch to the 0 (off)
the I (On)position, but the position. On feeler man models, move the feeler man to the
water supply to the refrigerator STOP (up) lx)sifion. Keeping the power switda in the I (On)
has not been connected, lx)sifion or the feeler am_ in the ON((lo_) lx)sition will
Water supply turned off or * See Installingthe water line.
not connected.
Freezer compartment too warm. * _hit 24 hom_ for the refrigerator/o completely cool (lo_.
Piled up cubes in the storage * Level cubes by hand.
bin cause the icemaker to shut off.
refrigeratordooris closed•
damage the _ter _dve.
Ice cubes stuck in icemaker. * Turn off the icemakel; remo_v cubes and turn the
(Green power light on icemaker back on.
icemaker blinking.)
Ice cubes have Ice storage bin needs cleaning. * Erupt' and _sh bin. Discard old cubes.
odor/taste Food transmitting odor/taste *_q) foe(is well.
Slow ice cube freezing Door left open. * Check to see if package is holding door open.
Moisture forms on Not unusual during * Wipe surfime (hy; then a@/st the flesh food control
cahinetsurface periods of high humidity, setting one number higher and check again in 24 hours.
betweenthedoors
Refrigerator has odor Foods transmitting * Foods with s/rung odors should be tightly _pl)e(1.
Refrigerator compartment No power at oufleL * Replace fl_se or reset the breaker;
light doesnotwork Light bulb burned out or loose. * SeeReplacingthe lightbulbs.
to ice cubes.
Interior of refrigerator * See Care and cleaning.
needs cleaning.
Temperature control not set *See About the controls.
cold-enough.
odor to refrigerator. * Keel) an open box of baking soda in the reflJgevator;
Interior needs cleaning. * See Care and cleaning•
• A newly installed refl_igevator may take 12-24 hours
to begi}_making ice cubes.
replace eve_y three months.
2O
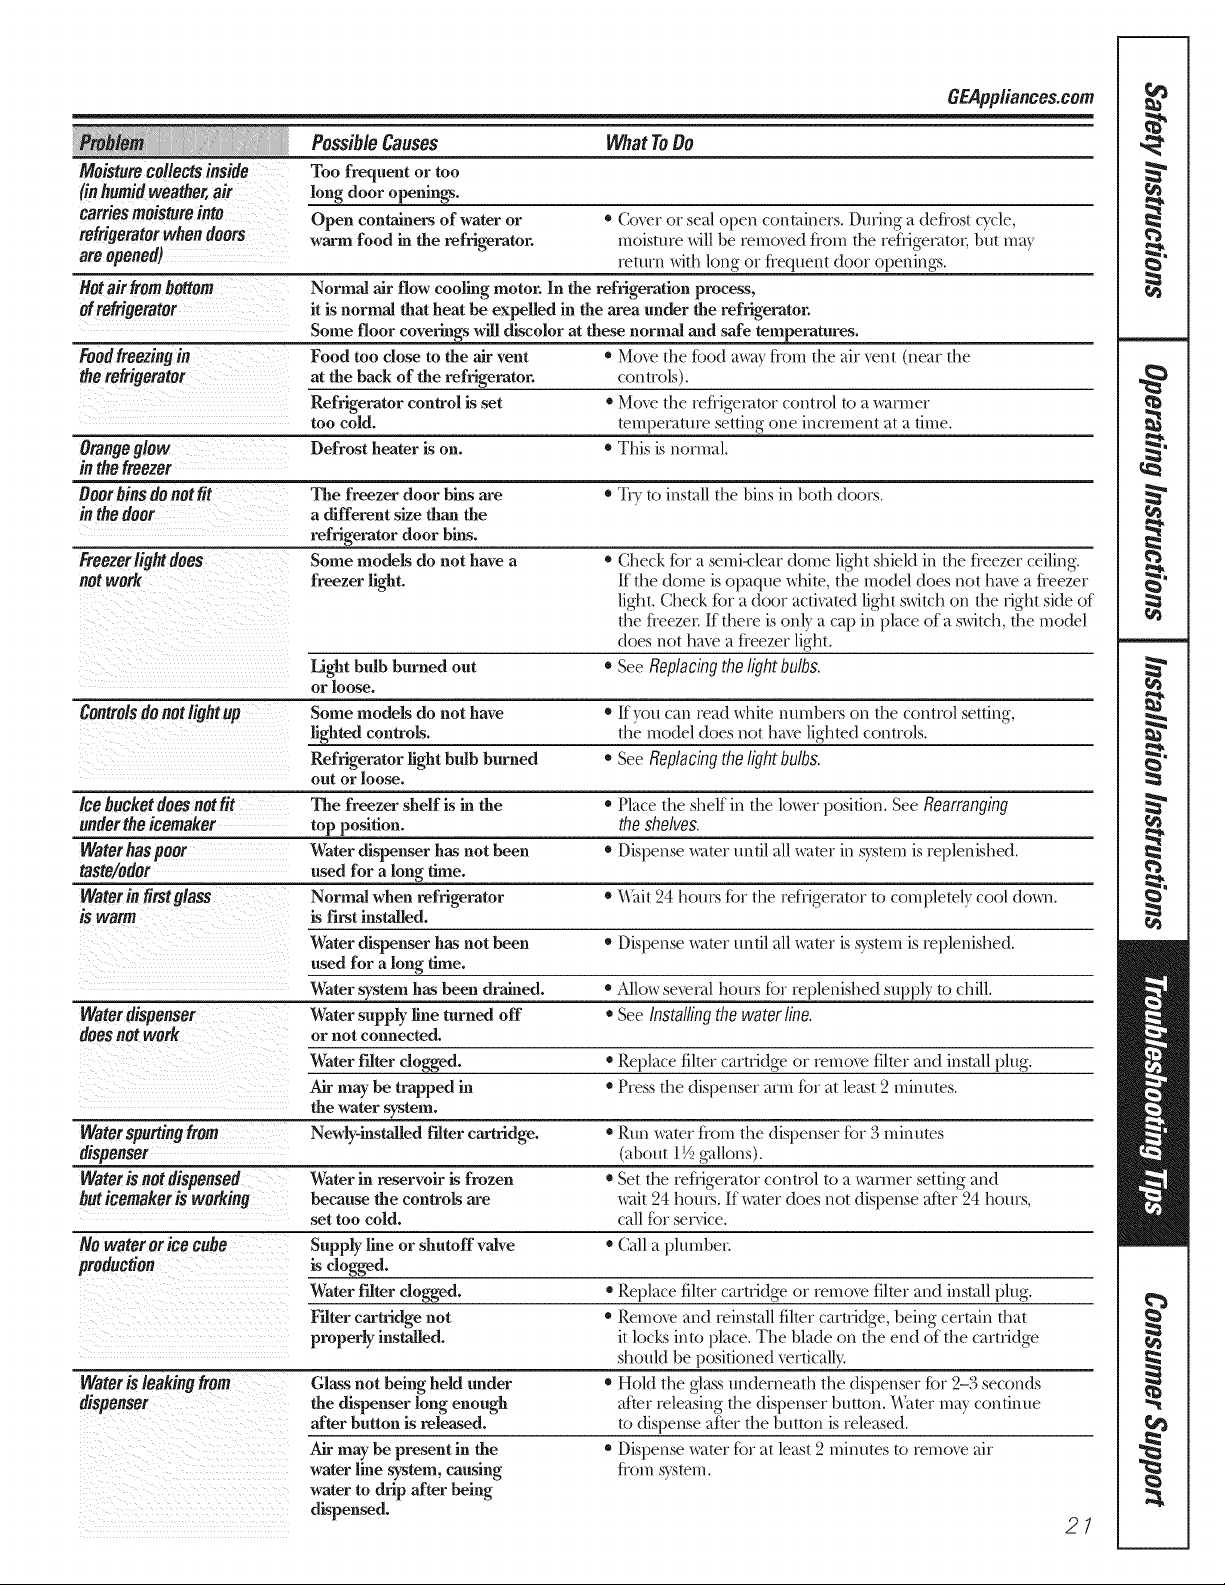
GEAppliances.com
Possib/eCauses WhatToDo
Moistureco/lootsinside Toofrequentor too
(inhumidweather,air longdoor openings.
carriesmoistureinto Opencontainersof wateror * Coveror sealopencontainers.During;tdeftas/cycle,
refrigeratorwhen doors warm food in the refrigerator, moisture will be removed hom the reflJgel>ltoi, hut n_vly
are opened) return with long or frequent door openings.
Hot air Item bottom Normal air flow cooling motor. In the refrigeration process,
Of refrigerator it is normal that heat be expelled in the area under the refrigerator.
Some floor coverings will discolor at these normal and safe temperatures.
Food freezing in Food too dose to the air vent * Move the food a_ly hom the viii vent (near the
the refrigerator at the back of the refrigerator, controls).
Refrigerator control is set = Move the reflJgecator control to a _u_ner
too cold. tempel>m/re settin G one increment at a time.
Orange glow Defrost heater is on. * This is nom_vd.
in thefreezer
Doorbinsdo not fit The freezer door bins are * Tly to ins/all the bins in both doors.
in thedoor adifferent sizethan the
refrigerator door bins.
Freezerlightdoes Some models do not have a * Check fin a semi<lear dome light shield in the fleezer ceiling.
not work freezer light. If the dome is opaque while, the model does not have a fleezer
light. Check for a door activated light switch on the right side of
the fleezeL If there is only a cap in place of a switch, the model
does not have a fleezer light.
Hght bulb burned out + See Replacingthelightbulbs.
or loose.
Controls do not light up Some models do not have * [f you can read white nulnbel_ on the control setting,
lighted controls, the model does not hw_v lighted controls.
Refrigerator light bulb burned * See Replacingthelightbulbs.
out or loose.
Ice bucket does not fit The freezer shelf is in the + Plare the shelf in the lower position. See Rearranging
undertheicemaker top position, theshelves.
Waterhas poor Water dispenser has not been * Dispense _lter until viii _lter in sys/em is replenished.
taste/odor used for a long time.
Water& firstglass Normal when refrigerator * \_hit 24 hours if)r the refl_igex>ltor to completely cool (l(m_L
is warm isfirst installed.
Water dispenser has not been * Dispense _lter until all _lter is sys/em is replenished.
used for a long time.
Water system has been drained. * Allow sexvl_d hours ff)r replenished supply to chill.
Water dispenser Water supply line turned off * See Installing the water line.
does not work or not connected.
Water f'flter clogged. * Replace filter cartridge or remove filter and install plug.
Air may be trapped in * Press the dispenser ann for at least 2 minutes.
the water system.
Waterspurtingfrom Newly-installed Filter cartridge. * Run water hom the dispenser ffw 3 minutes
dispenser (about 1 72,_allons).
Wateris notdispensed Water in reservoir is frozen * Set the reflJgel_ltor control to a wam_er setting and
buticemakeris working because the controls are wait 24 hom_. If water does not dispense after 24 hours,
set too cold. (viii fbr service.
NO water or ice cube Supply line or shutoff valve * (;viii a plmnbe_:
production is dogged.
Water filter dogged. * Replace filter cartridge or remove filter and ins/all plug.
Filter cartridge not * Remove and reinstall filter cartvi(ke, being certain that
properly installed, it locks into place. The blade on the end of the cartridge
should be positioned vertically'.
Water is leaking from Glass not being held under * Hold the glv_ss underneath the dispenser fin 2-3 seconds
dispenser the dispenser long enough after releasing the dispenser button. \_lter mvly c(mtinue
after button is released, to dispense after the button is released.
Air may be present in the
water line system, causing
water to drip after being
dispensed.
• Dispense ,xvtter for at least 2 minutes to remove viii
honl sys/enl.
2/
Notes.
22

Please place in envelope and mail to:
Veuillez mettre dans une enveloppe et envoyez _ :
OWNERSHIPREGJSTRATJOH
P.O. BOX1780
MISSJSSAUGA,OHTARJO
L4Y4G1
(FORCAHADJAHCOHSUMERSOHLY)
._ Cut here
23
For Canadian
Customers
Pour les
Consommateurs
Canadiens
._&u,,,- Cut here
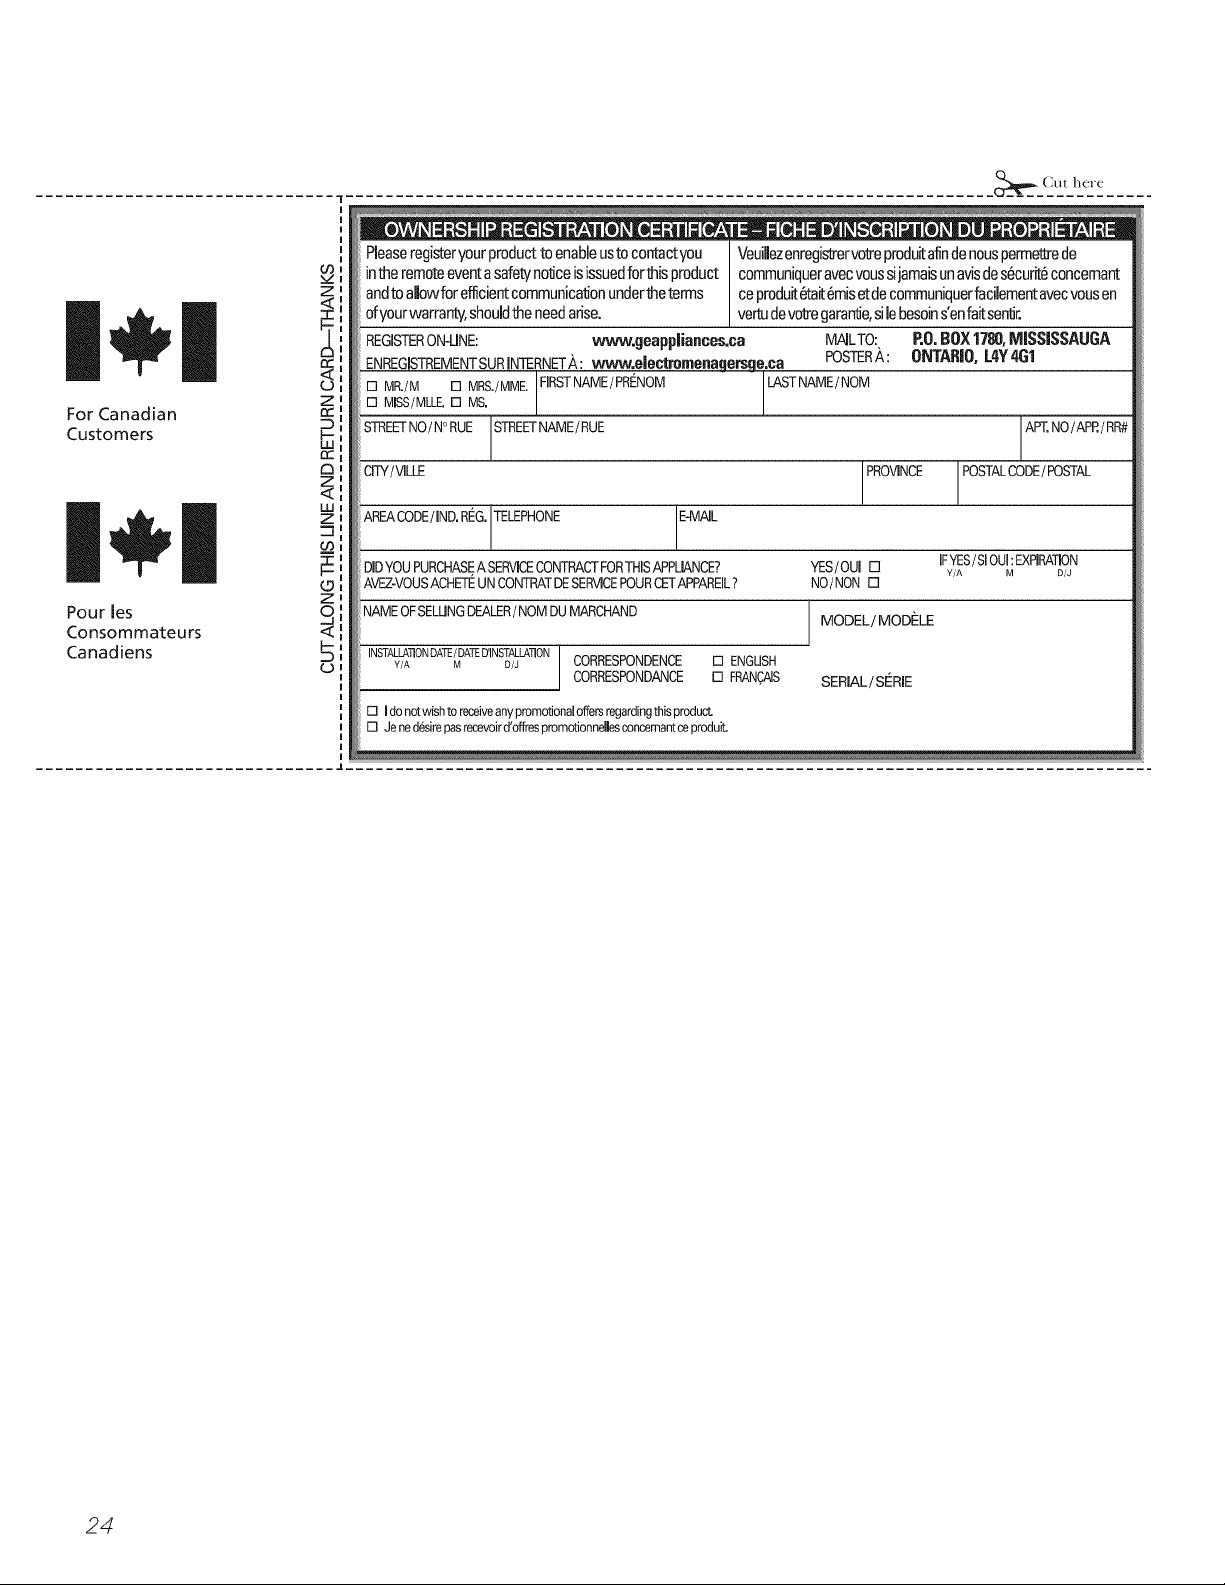
Please register your produnt to enable us to contactyou VeuiUez enregistrer votre produit afio de nous permettre de
intheremoteeventasafetyno_ceisissuedforthisproduct communiqueravecvoussijamaisunavisdes_cudt6concemant
Z
and to allowfor efficient communication under_e terms ce produit#fair 6mis etde communiquerfacilementavec vous en
ofyourwarranty,should tile need arise, ve_ de volre garantie,si le besoin s'en fair se_dr.
REGISTERON-LINE: www.geappliances,ea MAILTO: P.O.BOX1780,MISSlSSAOGA
cr_
ENREGISTREMENTSURINTERNETA: _,_w.electromenagersge.ca POSTER_.: ONTARIO,L4Y4G1
Z
[][] MISS/MLLE.NR'/M[][] Ms.MRS'/MUDFIRSTNAME/PRENOM LASTNAME/NOM
ST£EETNO/N° RUE STREETNAME/RUE
Cl
CITY/VILLE
Z
<
Z
AREACODE/IND. REG.JTELEPHONE _E-MAIL
DIDYOUPURCHASEA SERVICECONTP_CTFORTHISAPPLIANCE?
AVEZ-VOUSACHE_ UNCONTRATDESERVICEPOURCETAPPAREIL?
_9
Z
NAME OFSELUNGDEALER/ NOMDUMARCHAND MODEL /MODELE
INSTALLATIONDATE/DATED'INSTALLATION
Y/A M D/J CORRESPONDENCE [] ENGUSH
[] Ido notwishtoreceiveanypromotionaloffersrecjardingthisproduct,
[] Je nedesirepasrecevoird'offrespromotionnellesconcernantceproduit.
CORRESPONDANCE [] FRAN_AIS SERIAL/SERIE
YES/OUI rl IFYES/SIOUI:EXPIRATION
NO/NON []
PROVINCE POSTALCODE/ POSTAL
Y/A M D/J
APT.NO/APR/ RR#
24
 Loading...