

GE GTH18HBC2RWW, GTH18HBC2LWW, GTH18HBC2RCC, HTJ17CBC2RWW, HTH17CBC2RBB Owner's Manual And Installation Instructions
...Page 1
®
rl
Top-Freezer
ra ors
Top-Freezer
Refrigerators
3lodds 16,17,18
Safety Instructions 9 3
Operating hstrucdons
Automatic Icemaker .............. 5
Care and Cleaning ............... 6
Shelves ........................ 4
Storage Drawers ............... 4, 5
Temperature Controls ............ 4
Installation Instructions
Preparing to Install
the Refrigerator ................. 7
Reversing the Door Swing ..... 11 14
_\_ter Line Installation ......... 8 10
Troubleshooting Tips
Before Sbu Call For SenTice ..... 15, 16
Normal Operating Sounds ........ 15
Consumer Support
Consumer Support ...... Back Cover
Product Registration
(Canadian) ................. 19, 20
Product Reg{stration (U.S.) .... 18 20
"_\_trran_ for
Canadian Customers ........... 17
X\hrranb_ for U.S. Customers ..... 21
Writethe modelandserial
numbershere:
Model #
Serial #
You can find theln on a label oil
tile tipper left side of tile fresh food
coinpartinent.
Congdlmeur sup&ieur
Rdfrig@ateurs
ta section frangaise commencea/a page 22
Mesures de s&uHt_ ....... 22 _3
Instructions de foncdonnement
Bats de rangement ........... 25, 26
Clayettes ................... 24, 25
Commandes de
la tempdramre ................. 24
Entretien et nettoyage ........... 27
Machine 5 glagons
automatique ................... 26
Instructions d'installadon
Installation de la
conduite d'eau .............. 29 32
Inversion de
l'ouvermre des portes ......... 33 37
Pr@aration 5 l'installation
du rdfrigdrateur ................ 28
En cas de panne
Avant d'q)peler
un r@arateur ................ 40, 41
Bruits normaux
de fonctiom_ement .............. 39
Souden au consommateur
Garantie ...................... 42
Soutien au consommateur ........ 43
Ecfivez[ci le num6rode modele et le
num6rodeserie :
Modele #
Serie #
\,))us les trouvez stir une &iquette
darts le coin supdrieur gauche du
compartiment rdfrigdrateur.
go.corn
Congelador superior
ta section enespa_o/empiezaon/a pagina44
Informaci6n de segufidad 44 45
Instrucciones de operacidn
Control ....................... 46
Cuidado y limpieza ............. 49
Estantes .................... 46, 47
Gavetas de
almacenamiento ............. 47, 48
Miquina de
hielos autom_ttica ............... 48
Instrucciones para la instaladdn
Cdmo invertir el
vaiv&l de la puerta ........... 56 57
Instalacidn de la
mberla del agua ............. 51 55
Preparacidn para
instalar el refrigerador ........... 50
Consejos para/a soluci6n
de problemas
Antes de solk:itar
un servicio ................. 58, 59
Sonidos normales
de operacidn ................... 58
Soporte aI consumidor
Garantla ..................... 62
Soporte al consumidor ........... 63
Escribaaqui el modelo y el nfimero
deserie:
Modelo #
Serie #
Encuentre estos nflmeros en la etiqueta en el
lade izquierdo de la parte superior del
coinpartimiento del refrigerador.
197D8622PO02 49-60656 03-11 GE
Page 2
iMPORTANTSAFETYiNFORMATiON.
READALLiNSTRUCTiONSBEFOREUSING.
A
|
m
Use this appliance only for its intended purpose as described in this Owner's Manual.
SAFETYPRECAUTIONS
When using electrical appliances, basic safety precautions should be followed, including the following:
_}}i/iii/}_i
_}}i/iii/}_i
_}}i/iii/}_i
_}}i/iii/}_i
_}}i/iii/}_i
This refrigerator must be properly installed
and located in accordance with the Installation
Instructions heft)re it is used.
Do not _dlowchildren to climb, stand or hang
on the sheh'es in the refrigerator. They could damage
the refrigerator and seriously injure themselves.
Do not touch the cold surtZacesin the freezer
compartment when hands are damp or wet.
Sldnmay stickto these extremely cokl surthces.
Do not store or use gasoline or other flammable
vapors and liqtfids in the vicinio _of this or any other
q)pliance.
In refrigerators with automatic icemakcrs,
avoid contact with the moving parts of the
ejector mechanism, or with the heating element
located on the bottom of the icelnakcr. Do not place
fingers or hands on the automatic icelnaking
medlanism while the refrigerator
is plugged in.
Keep fingers out of die "pindl point" areas;
clearances between die doors alld between
the doors and cabinet are necessarily smn_.
Be careful closing doors when dlildren are
in tile area.
Unplug the refrigerator befiore cleaning and making
repairs.
NOTE:Westronglyrecommendthatanyservicingbe
performedbyaqualifiedindividual.
}}Turning the control to the 0 position does
not remove power to tile light circuit.
}}Do not refreeze frozen floods which have
thawed completely:
a,
r
PROPERDISPOSALOFTHEREFRIGERATOR
Child entrapment and suf[}ocatioi1are not probleins of
the past. Junked or abandoned refrigerators are still
dangerous...even if they will sitfi)r 'just a few days." If
you are getting rid of your old refrigerator, please tbllow
the instructions below to help prevent accidents.
BeforeYouThrow Away Your Old
Refrigerator or Freezer:
Take off the doors.
Refrigerants
_M1refrigeration pro&rots contain refrigerants, whidl
trader federal law must be removed prior
to product disposN. If you are getting rid of an
old refrigeration product, die& with the company
handling the disposal about what to do.
Leave the shelvesin place so that children may not
easily climb inside.
Page 3
iMPORTANTSAFETYiNFORMATiON.
READALLiNSTRUCTiONSBEFOREUSING.
ge.com
A
!
B
HOWTOCONNECTELECTRICITY
Donot, under any circumstances, cut or remove the third (ground) prong from the power cord.
Forpersonal safety, this appliance must be properly grounded.
The power cord of this appliance is equipped with
a 3-prong ig'rotlll(llIlg! plug whidl mates with a standard
3-prong ig'rotlll(llIlg! _v_dloutlet tO minimize tile
possibiliff of electric shock hazard from this appliance.
Have the wall oudet and circuit checked by a qu_dified
electrician to make sure die outlet is properly grounded.
1'\;here a standard 2-prong wall outlet is encountered, it
is your personal responsibili_ _and obligation to have it
replaced with a properb_ grounded 3-prong wall outlet.
The refrigerator should _w@s be plugged into its own
individual electric_ outlet which has a voltage rating that
matches the rating plate.
This provides tile best pert})rmance and _dsoprevents
overloading house wiring circuits which could cause a
fire hazard from overheated wires.
Never unplug your refrigerator by ptdling on tile power
cord. _Mways grip plug firmly and pull straight out from
die outlet.
Repair or replace immediately all power cords that have
become frayed or otherwise dalnaged. Do not use a cord
that shows cracks or abrasion damage _dong its length or
at either end.
l\qlen moving the refrigerator away from the
wall, be careful not to roll over or damage the
power cord.
USEOFEXTENSIONCORDS
Because of potential safety hazards under certain conditions, we strongly recommend against
the use of an extension cord.
However, if you must use an extension cord, it is absolutely necessary that it be a lL;L-listed (in the [;nited States_ or
a C_ A-hsted m Canada!, 3-wire grounding _1)e appliance extension cord having a grounding _1)e plug and outlet
and that the electrical rating of the cord be 15 amperes (minimum) and ] 20 volts.
READANDFOLLOWTHISSAFETYINFORMATIONCAREFULLY.
SAVETHESEINSTRUCTIONS
3
Page 4
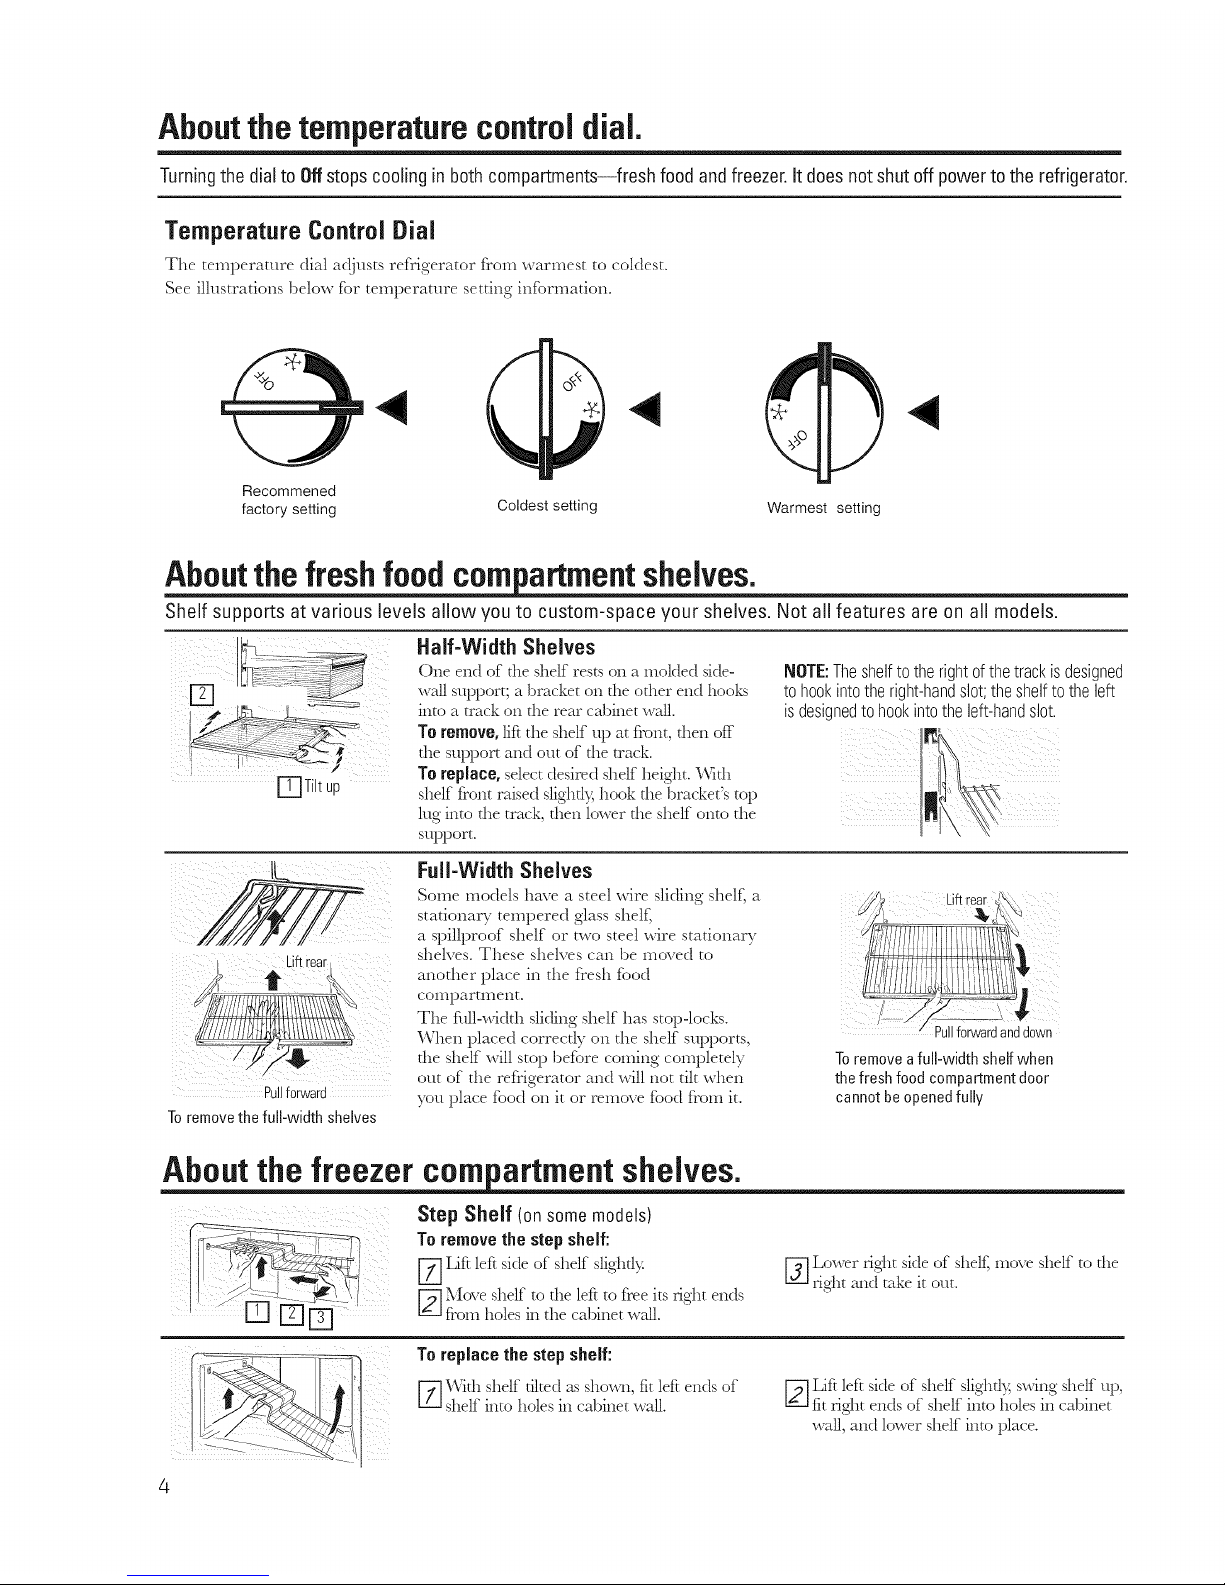
Aboutthetemperaturecontroldial.
Turningthe dial to Off stops cooling in both compartments--fresh food and freezer. Itdoes not shut off power to the refrigerator.
Temperature Control Dial
The temperature dial adjusts refrigerator from warmest to coldest.
See illustrations below %r temperature setting in%rmation.
Recommened
factory setting Coldest setting Warmest setting
Aboutthe fresh food compartmentshelves.
Shelf supports at various levels allow you to custom-space your shelves. Not all features are on all models.
[=T-]Tiltup
Half-Width Shelves
One end of tile shelf rests on a molded side-
wal] support; a bracket on tile odler end hoolcs
into a track on tile rear cabinet walJ.
To remove, lift the shelf up at front, then off
the support and out of the track.
To replace, select desired shelf height, l\Tith
shelf front raised slig'hrl};hook the bra&et's top
lug into the track, then lower the shelf onto the
support.
NOTE:Theshelftotherightofthetrackisdesigned
to hookintotheright-handslot;theshelftotheleft
isdesignedto hookintotheleft-handslot.
Pullforward
To remove the full-width shelves
Full-Width Shelves
Some models have a steel wire sliding shelf, a
stationary telnpered glass shelf,
a spillproof shelf or two steel wire stationary
shelves. These shelves call be moved to
another place ill the fresh food
COlnpartment.
The full-width sliding shelf has stop-locks.
When placed correctly on the shelf supports,
the shelf will stop before coming completely
out of the refrigerator and will not tilt when
you place food on it or remove food from it.
Liftr
Pullforwardanddown
Toremove afull-width shelfwhen
thefresh food compartmentdoor
cannot beopenedfully
About the freeze corn artment shelves.
Step Shelf ionsomemodels)
To remove the step shelf:
Z] Lift left side of shelf slightly.
--] ove shelf to the left to free its right ends
from holes ill the cabinet w_dl.
[_] Lower right side of shelf, move shelf to the
right and take it out.
To replacethe stepshelf:
[_ With shelf tilted as sho_s_, fit left ends of
shelf into holes ill cabinet wall.
-] ift left side of shelf slighd?; swing shelf up,
fit right ends of shelf into holes ill cabinet
wall, and lower shelf into place.
4
Page 5
Aboutthe storagedrawers.
Not all features are on all models.
ge.com
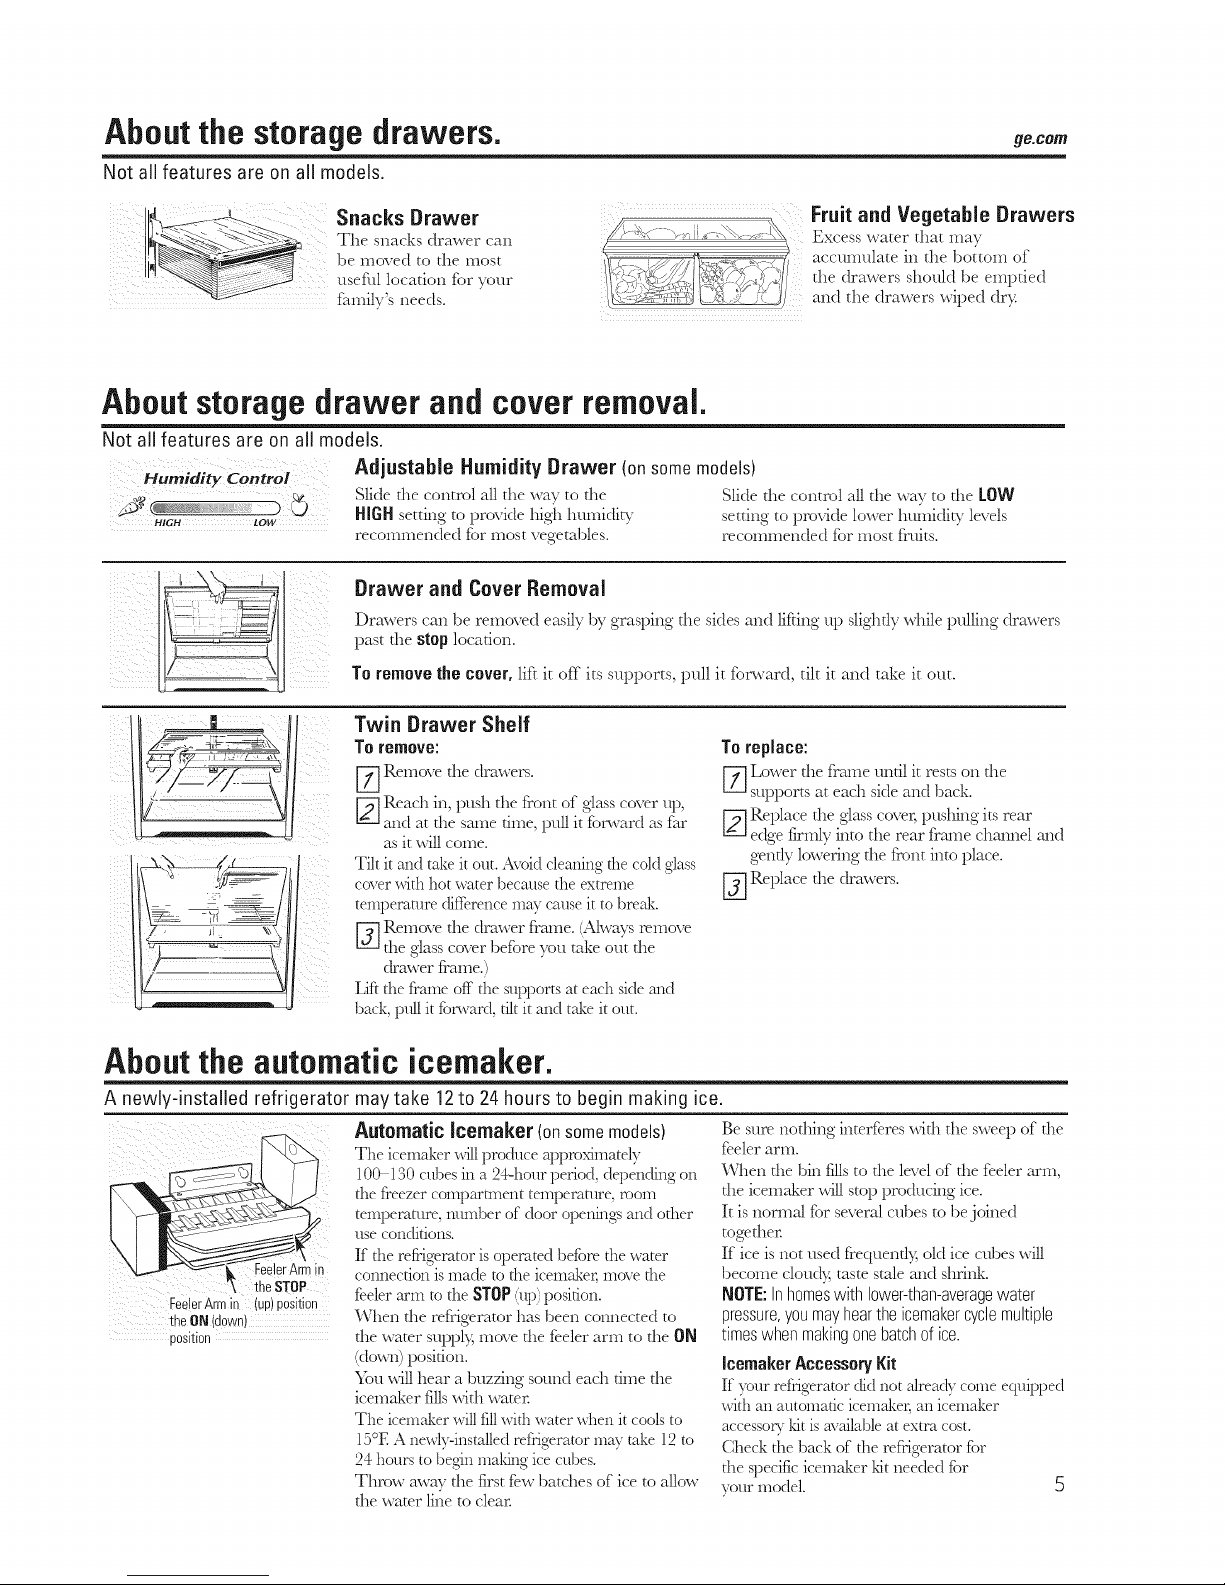
Snacks Drawer
The snacks drawer can
be, o,edtothe, ost
usefullo :ationfi,rtour
ttamily's needs.
Fruit and Vegetable Drawers
Excess water that may
accumulate in the bottom of
the drawers should be emptied
and the drawers wiped dry.
Aboutstoragedrawer and coverremoval.
Not all features are on all models.
HIGH LOW
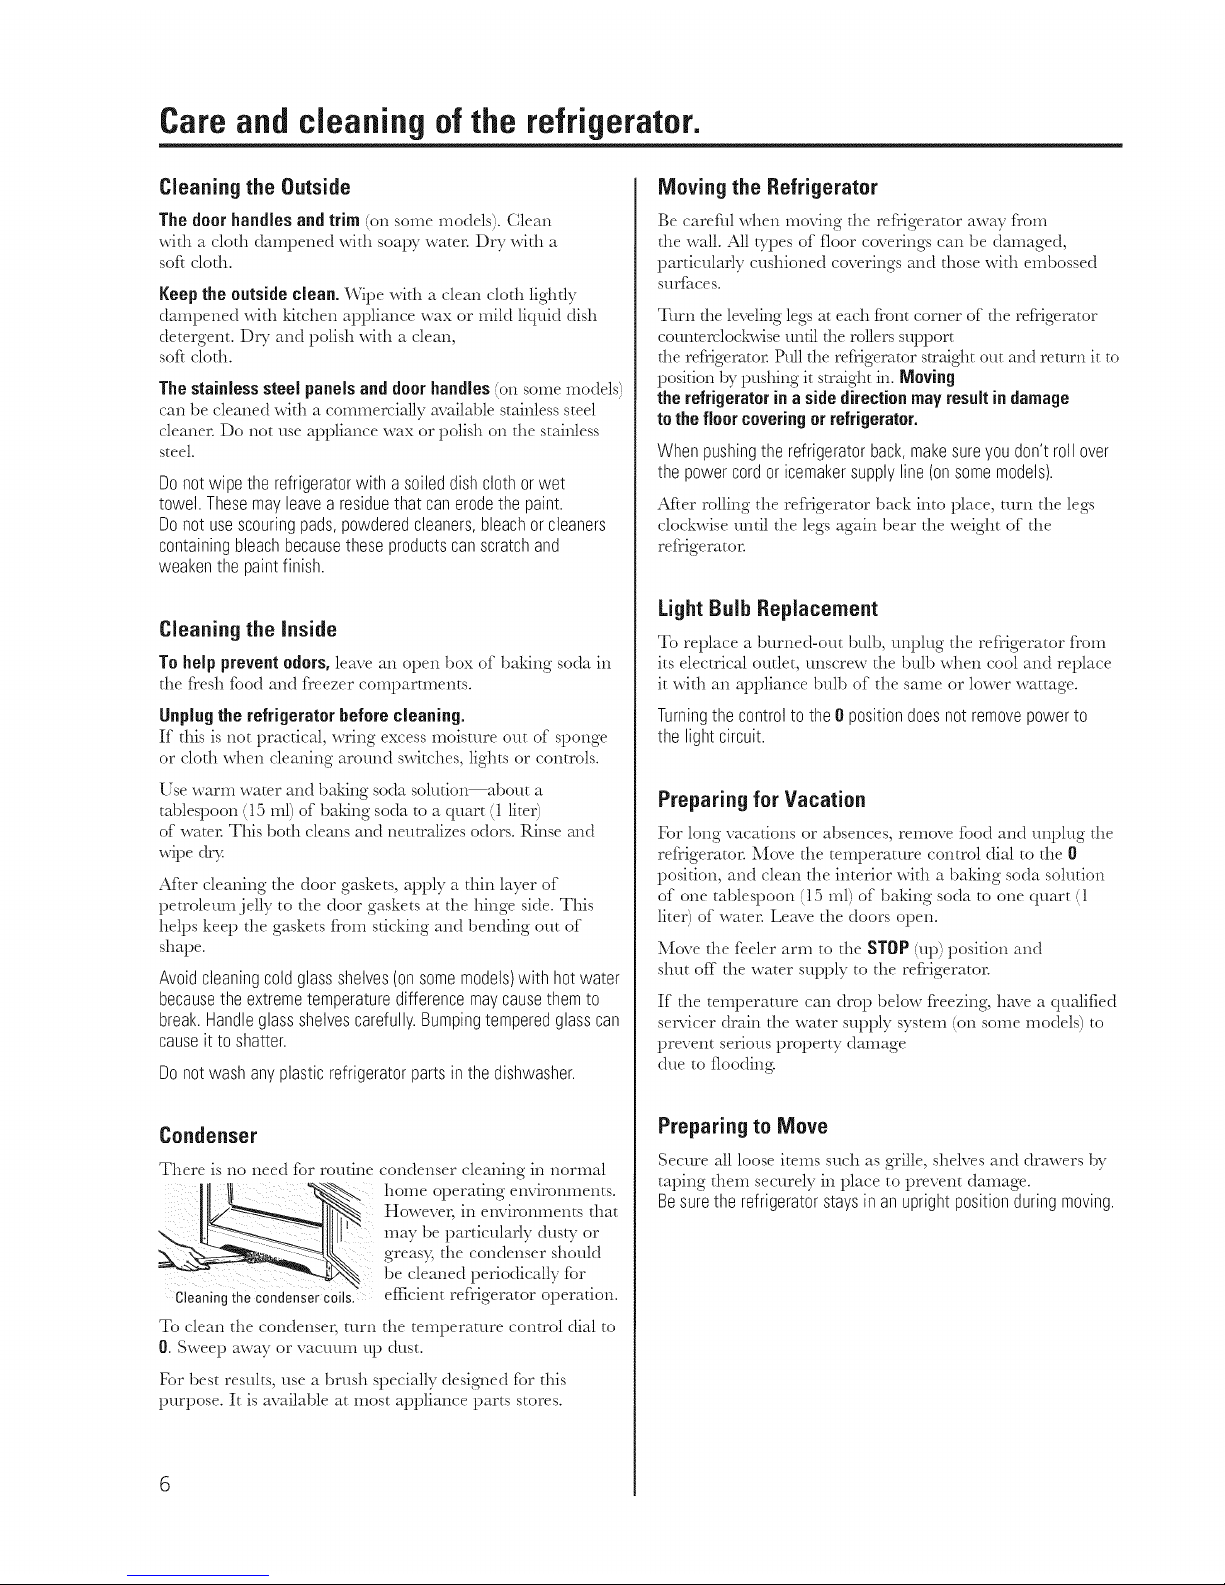
Adjustable Humidity Drawer (on some models)
Slide fl_e control all the way to fl_e Slide d_e control all the way to d_e LOW
HIGH setting to provide high humidi_ _ setting to provide lower humidi_ _levels
recommended fior most vegetables, recommended fior most fruits.
Drawer and Cover Removal
Drawers can be removed easily by grasping the sides and lifting up slightly while pulling drawers
past the stop location.
To remove the cover, lift it off its supports, pull it forward, tilt it and take it out.
ii
i i i
Twin Drawer Shelf
To remove:
[-_ Remove the drawers.
[2-]Reach in, push the front of glass cover _q),
and at the same time, pull it fiorwardas far
asit will come.
Tilt it and take it out. Avokl cleaning the cold glass
cover with hotwater becmlsethe extreme
temperature dift'crencemaycause it to break.
[_] Remove the drawer frame. (Alwaysremove
the glass cover befi,re you take out the
drawer frame.)
Lif_the frame off the supports at each sidem_d
back, ptdl it fi_rward,tiltit and take it out.
To replace:
[-_ Lower the frame until it rests on the
supports at each side and back.
[2--]Replace the glass cover,pushing itsrear
edge firmly into the rear frame chalmel and
gently lowering the front into place.
I-j] Replace the drawers.
Aboutthe automatic icemaker.
A newly-installed refrigerator may take 12to 24 hours to begin making ice.
lerArmin
theSTOP
FeelerArmin {up)position
theON (down)
position
Automatic Jcemaker {on some models)
The icemaker will produce approsmately
100130 cubes in a 24-hour period, dq)ending on
the freezer coml)artment temperature, room
temperature, zmmber of door ot)enh_g>and other
use conditions.
If the re_igerator is operated bef}_rethe water
connection is made to the icemaJ_c_ move the
feeler arm to the STOP(up)position.
When the refrigerator has been cormected to
d_e water supply_ move d_e feeler arm to d_e ON
(down) position.
_}m will hear a buzzing sound ead_ time the
icemaker fills with water.
The icemaker will fill with water when it cools to
15°E A neMy-installed refrigerator may take 12 to
24 hours to begin maldng ice cubes.
Throw away the first few batches of ice to allow
the water line to clear.
Be sure nothing interferes with the sweep of the
feeler arm.
When the bin fills to the level of the feeler arm,
the icemakcr will stop producing ice.
It is normal fi,r several cubes to be joined
together.
If ice is not used frequentl?_ old ice cubes will
become cloud?; taste stale and shrink.
NOTE:In homeswith lower-than-averagewater
pressure,you mayhearthe icemakercycle multiple
timeswhen makingone batchof ice.
Icemaker Accessory Kit
If your reii'igerator did not already come equipped
with an automatic icemaker, an icemaker
accessop,- ldt is available at extra cost.
Check the back of the refrigerator for
the specific icemaker kit needed l_r
your model. 5
Page 6
Careand cleaningof the refrigerator.
Cleaning the Outside
The doorhandlesand trim ;on so,hemodels).Clean
with a cloth da,npened with soapy water. Dry with a
soft cloth.
Keepthe outsideclean. Wipe with a clean cloth lightly
da,npened with kitchen appliance wax or mild liquid dish
detergent. DW and polish with a clean,
soft cloth.
Thestainlesssteelpanelsanddoorhandles(on some models)
can be cleaned with a commercially available stainless steel
cleaner. Do not use appliance wax or polish on the stainless
steel.
Donot wipe the refrigeratorwith a soileddishcloth orwet
towel.Thesemayleavea residuethat canerodethe paint.
Donot usescouringpads,powderedcleaners,bleachorcleaners
containingbleachbecausetheseproductscanscratchand
weakenthe paintfinish.
Cleaning the inside
Tohelp preventodors,leave an open box of baking soda in
the fresh flood and freezer co,npart,nents.
Unplugthe refrigeratorbeforecleaning.
If this is not practical, wring excessmoisture out of sponge
or cloth when cleaning around switches, lights or controls.
Use warm water and baking soda solutio,_about a
tablespoon (15 ml) of baking soda to a quart (1 liter)
of water. This both cleans and neutralizes odors. Rinse and
wipe dr?:
After cleaning tile door gaskets, apply a thin layer of
petroleum jelly to the door gaskets at the hinge side. This
helps keep the gaskets fro,n sticking and bending out of
shape.
Avoidcleaningcoldglassshelves(onsomemodels)with hotwater
becausethe extremetemperaturedifferencemaycausethemto
break.Handleglassshelvescarefully.Bumpingtemperedglasscan
causeit to shatter.
Donotwashany plasticrefrigeratorpartsinthedishwasher.
Condenser
There is no need for routine condenser cleaning in normal
Cleaningthe condenser coils.
home operating enviromnents.
However, in environments that
may be particularly dustT or
greasy, the condenser should
be cleaned periodically for
efficient refrigerator operation.
To clean tile condenser, turn the temperature control dial to
0. Sweep away or vacuum up dust.
For best results, use a brustl specially desig_led for this
purpose. It is available at most appliance parts stores.
Moving the Refrigerator
Be carefifl when moving tile refrigerator away from
the wall. All b_pes of floor coverings can be damaged,
particularly cushioned coverings and those with e,nbossed
SHY_aCeS.
Turn die leveling legs at each front corner of die refrigerator
counterclocl_vise until the rollers support
the refrigeratol: Pttll the refrigerator straight out and return it to
position by pushing it straight hi. Moving
the refrigerator in a side direction may result in damage
to the floor covering or refrigerator.
Whenpushingthe refrigeratorback,makesureyoudon'troll over
thepowercordor icemal<ersupplyline (onsomemodels).
After rolling tile refrigerator back into place, turn tile legs
clockwise until the legs again bear the weight of the
refrigerator.
Light Bulb Replacement
To replace a burned-out bulb, unplug tile refrigerator from
its electrical outlet, unscrew tile bulb when cool and replace
it with an appliance bulb of tile sa,ne or lower wattage.
Turningthe controlto the 0 positiondoesnotremovepowerto
the lightcircuit.
Preparing for Vacation
For long vacations or absences, remove flood and unplug tile
refrigerator. Move the te,nperature control dial to the {1
position, and clean the interior with a baking soda solution
of one tablespoon (15 ml) of baking soda to one quart (1
liter) of water. Leave tile doors open.
Move tile feeler arm to tile STOP(up) position and
shut off the water supply to the refrigerator.
If tile teinperature can drop below freezing, have a qualified
servicer drain the water supply syste*ll (O*lso*lle models) to
prevent serious property damage
due to flooding:
Preparing to Move
Secure all loose iteins such as grille, shelves and drawers by
taping the,n securely in place to prevent da,nage.
Besurethe refrigeratorstaysin anuprightpositionduringmoving.
Page 7
I stall ti st cti ,,,,,,,,
ff yeu have questions, call 1.800.GE.CARESor <sit ourWebsiteat:go.corn
in Canada, call 1.800.561.3344 or visit ourWebsiteat:www.geappliances.ca
BEFORE YOU BEGIN
Read these instructions completely and carefully.
•IMPORTANT - Savethesei structio, s
for local inspector's use.
•IMPORTANT - Obser,'eall
codes and ordinances.
• Note to Installer - Be sure to leave these
instructions with the Consumer.
• Note to Consumer - Keepthese instructions for
future reference.
• Skill level Installation of this appliance requires basic
mechanical skills.
• Completion time Refrigerator Installation
15 minutes
Reversing the Door Swing
1hour
• Proper installation is the responsibilib _of the installer.
• Product failure due to improper installation is not
covered under the _'\;arrant_:
WATER SUPPLY TO THE ICEMAKER
(on some models)
If the refrigerator has an icelnaker, it will have to be
connected to a cold water line. A water supply kit
(containing copper tubing, shutoff valve, fittings and
instructions) is available at extra cost from your dealer, by
visiting our Website at ge.com (in Canada at
www.geappliances.ca) or from Parts and Accessories,
1.800.661.1616.
REFRIGERATOR LOCATION
• Do not install d_e refrigerator where d_etemperature will go
below 60°F (16°(:) because it will not run often enough to
maintain proper telnperamres.
• Install it on a floor strong enough to support it fully loaded.
CLEARANCES
Allow d_efi_llowing clearances fi_rease of installation,
proper air circulation and plumbing and electrical
connections.
• Sides 3/4" (19 ram)
• Top 1" (25ram)
" Back 2" (50 ram)
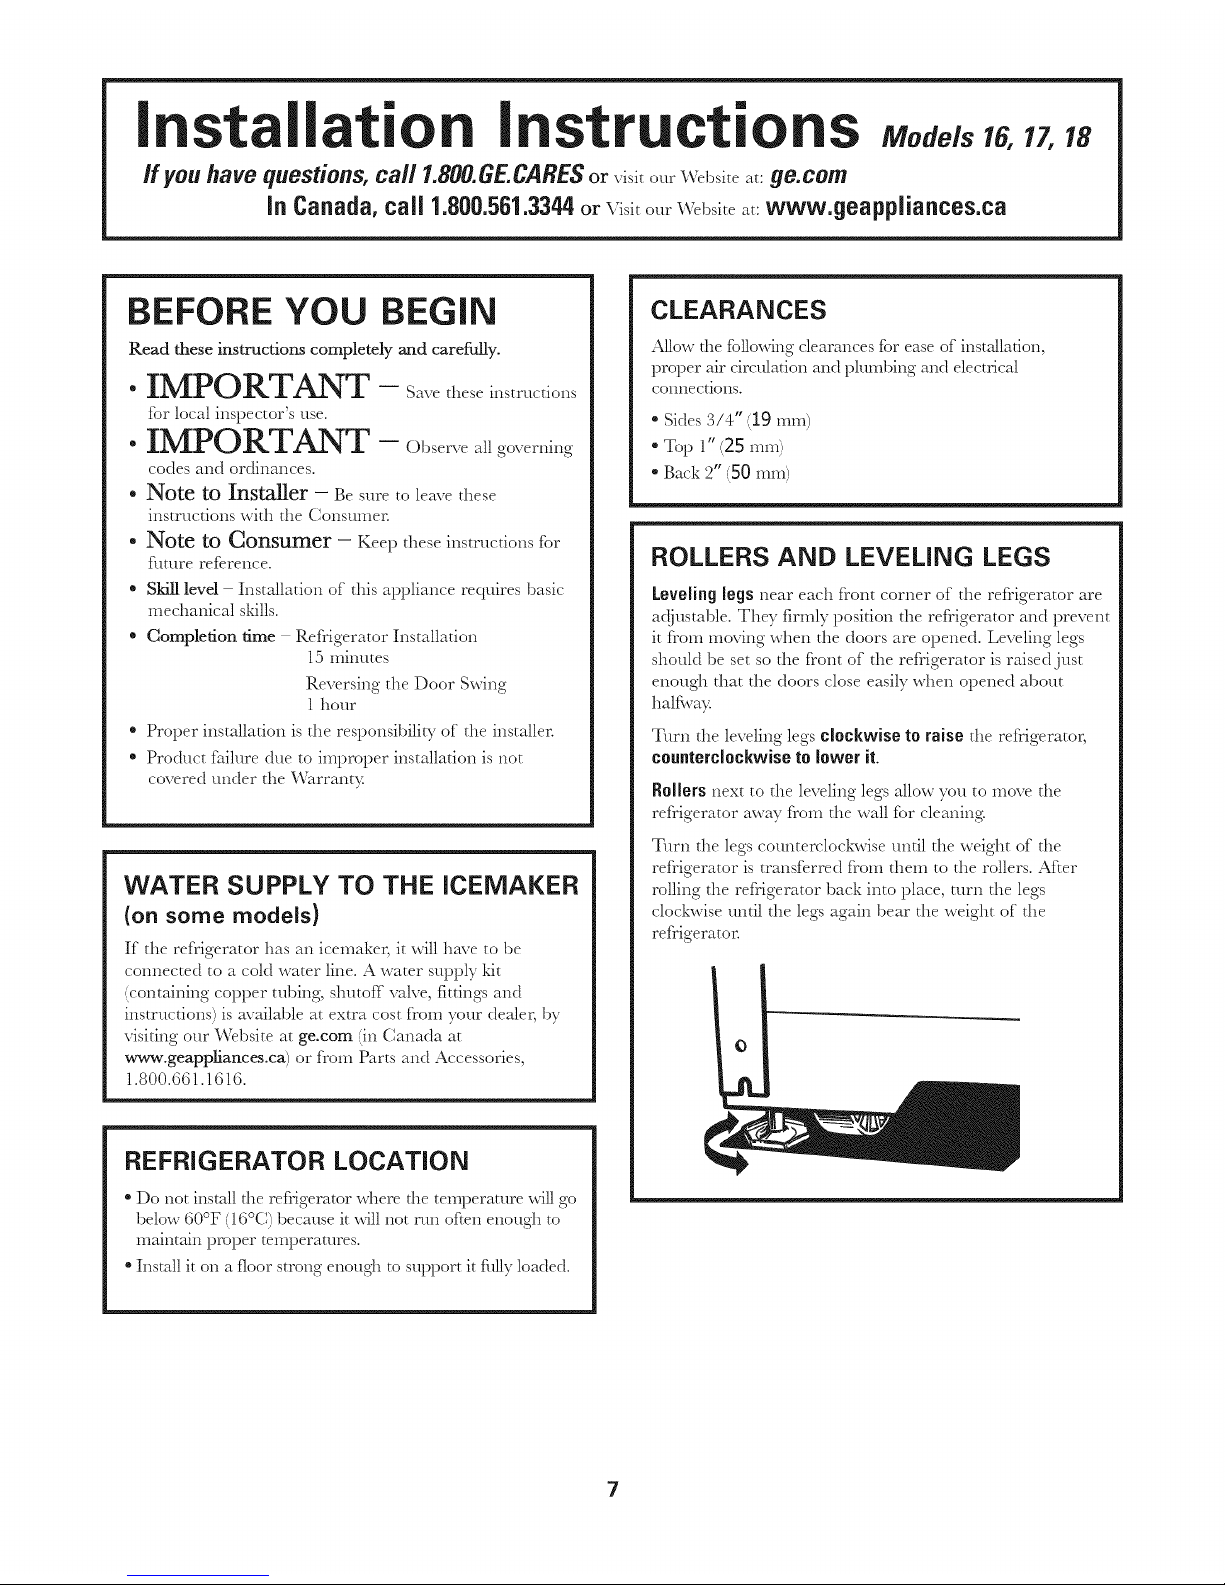
ROLLERS AND LEVELING LEGS
Leveling legs near each front corner of the refrigerator are
adjustable. They firmly position the refrigerator and prevent
it from moving when the doors are opened. Leveling legs
should be set so the front of the refrigerator is raised just
enough that the doors close easily when opened about
halfway:
Turn the leveling legs clockwise to raisethe refrigerator,
counterclockwise to lower it.
Rollers next to the leveling legs allow you to move the
refrigerator away from the wall for cleaning
Turn the legs counterclockwise until the weight of the
refrigerator is transferred from them to the rollers. After
rolling the refrigerator back into place, turn the legs
clockwise until the legs again bear the weight of the
refrigerato_=
7
Page 8
Installation instructions
iNSTALLiNG THE WATER LiNE (ONSOMEMODELS)
BEFORE YOU BEGIN
Recommended copper water supply kits are _VX8X2,
1\'_'X8X3 or WX8X4, depending on the amount of robing
you need. Approved plastic water supply lines are GE
SmartConnect T_'_Refrigerator Tubing (WX08X10006,
1\_08X 10015 and 1\_08X 10025).
When connecting your refrigerator to a GE Reverse
Osmosis Water System, the only approved installation is
with a GE R\TKit. For other reverse osmosis water systelns,
follow the mmmfacmrer's recolnmendations.
This water line installation is not warranted by the
refrigerator or icelnaker manufacturer. Follow these
instructions carefully to minimize the risk of expensive
water damage.
Water hammer ;_vater banging in the pipes) in house
plumbing can cause damage to refrigerator parts and lead
to water leakage or flooding Call a qualified plumber to
correct water hammer before installing
the water supply line to the refrigerator.
To prevent burns and product dalnage, do not hook up the
water line to the hot water line.
If you use your refrigerator before coimecting the water
line, make sure the feeler arm is in the STOP (up) position.
Do not install the icemaker robing in areas where
telnperamres fall below freezing.
When using any electrical device (such as a power drill)
during installation, be sure the device is double insulated or
grounded in a manner to prevent the hazard of electric
shock, or is battery powered.
All installations must be in accordance with local plumbing
code requirements.
WHAT YOU WiLL NEED
• Copper or GE SmartConnect TM Refrigerator Tubing kit,
1/4" outer diameter to com_ect the refrigerator to the
water suppl?: If using copper, be sure both ends of the
robing are cut square.
To determine how much robing you need: measure the
distance from the water valve on the back of the
refrigerator to the water supply pipe. Then add 8'
(2.4 m). Be sure there is sufficient extra robing
(about 8' [2.4 m] coiled into 3 turns of about 10"
[25 cm] dialneter) to allow the refrigerator to move out
froln the wall after installation.
WHAT YOU WiLL NEED (CONT.)
(;E Slnart(_onnect TM Refrigerator Tubing Kits are available
in the following lengths:
6' (1.8 m) 1\'%08X10006
15' (4.6 m) X\'_208X10015
25'(7.6) m) _\_08X10025
Be sure that the kit you select allows at least 8' (2.4 m) as
described above.
NOTE: The only GE approved plastic tubing is that
supplied in GE SmartConnect TM Refrigerator Tubing kits.
Do not use any other plastic water supply line because the
line is under pressure at all times. Certain types of plastic
will crack or rupture with age and
cause water damage to your home.
"A GE water supply kit (containing tubing, shutoff valve
and fittings listed below) is available at extra cost froln
your dealer or froln Parts and Accessories,
1.800.661.1616.
"A cold water supply. The water pressure must be between
20 and 120 p.s.i. (1.4 8.1 bar).
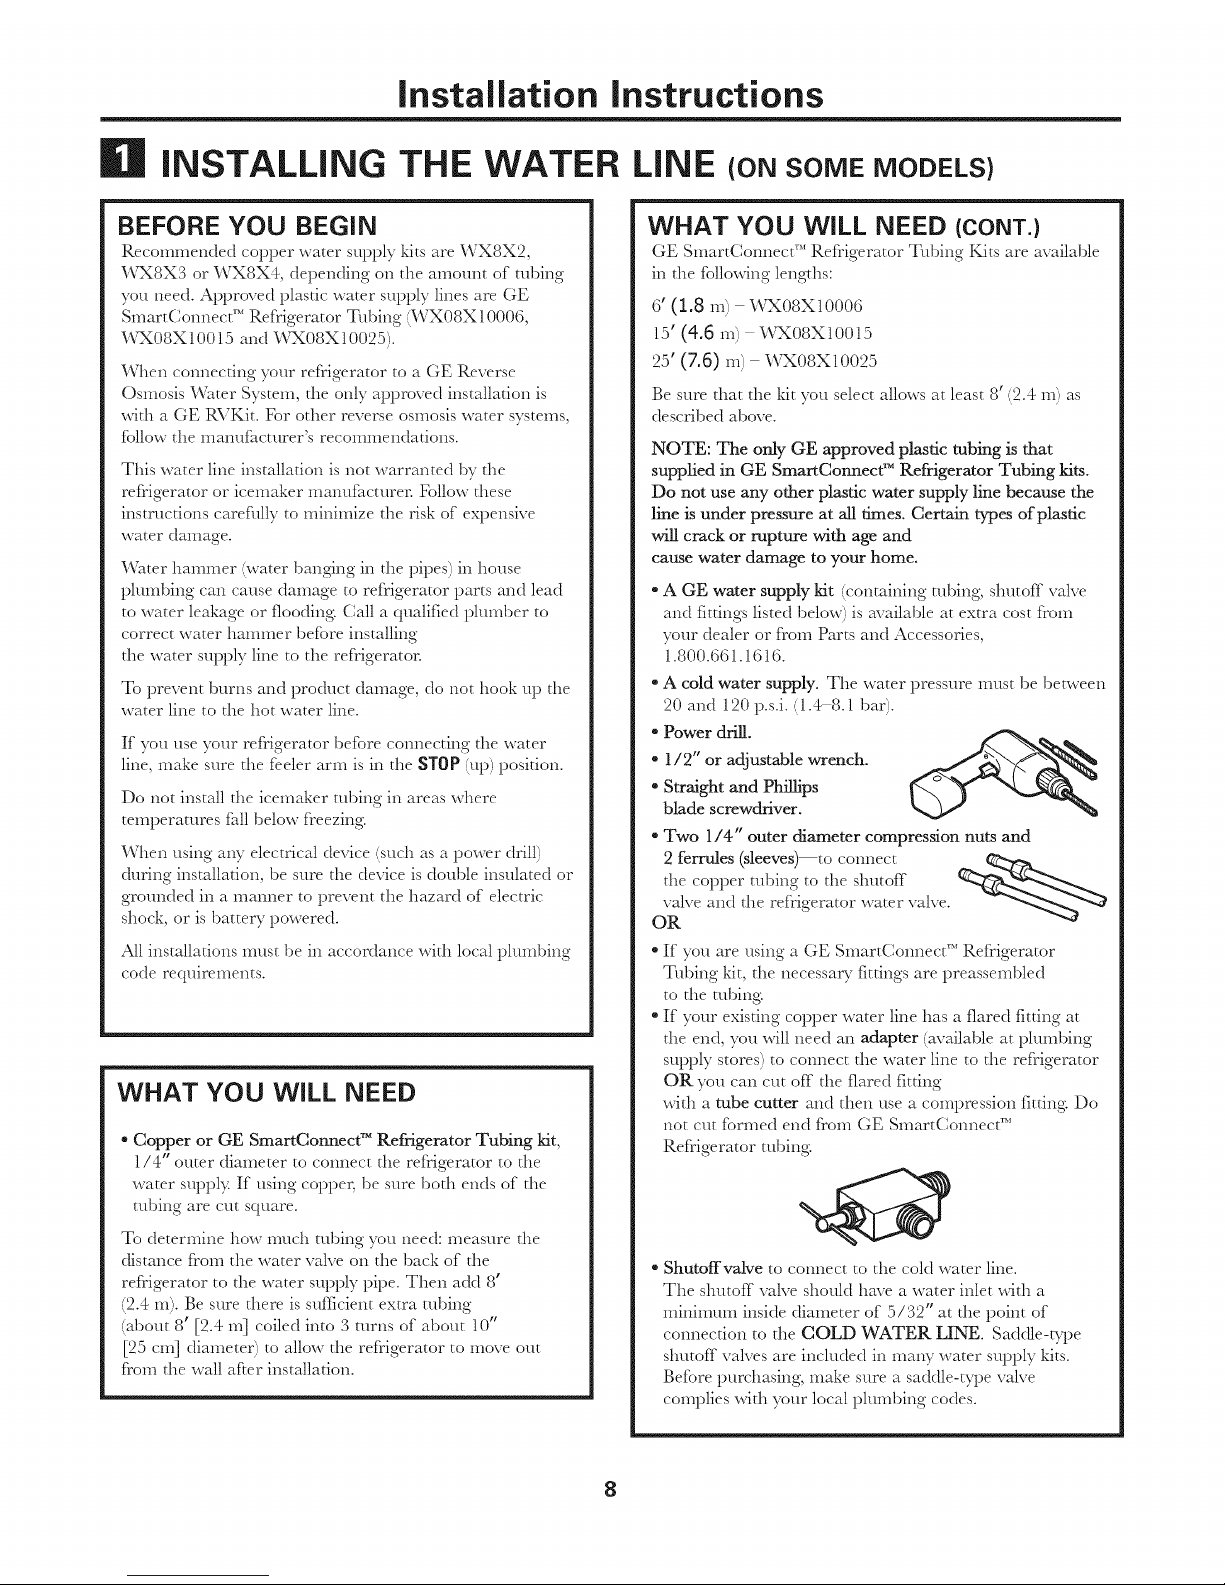
• Power drill.
• 1/2" or adjustable wrench.
• Straight and Phillips
blade screwdriver.
"Two 1/4" outer diameter compression nuts and
2 ferrules (sleeves) to com_ect ¢_2;€_
the copper robing to the shutoff
xalve and the refrigerator water valve.
OR
" If you are using a GE SlnartConi_ect TM Refrigerator
Tubing kit, the necessa W fittings are preassembled
to the robing
• If your existing copper water line has a flared fitting at
the end, you will need an adapter (available at plumbing
supply stores) to com_ect the water line to the refrigerator
OR you can cut off the flared fitting
with a tube cutter and then use a compression fitting Do
not cut formed end from GE SmartConnect T_'_
Refrigerator robing
• Shutoffvalve to connect to the cold water line.
The shutoff valve should have a water inlet with a
minimum inside diameter of 5/32" at the point of
co,mection to the COLD WATER LINE. Saddle-_pe
shutoff valves are included in many water supply kits.
Before purchasing, make sure a saddle-type valve
colnplies with your local plumbing codes.
8
Page 9
Installation instructions
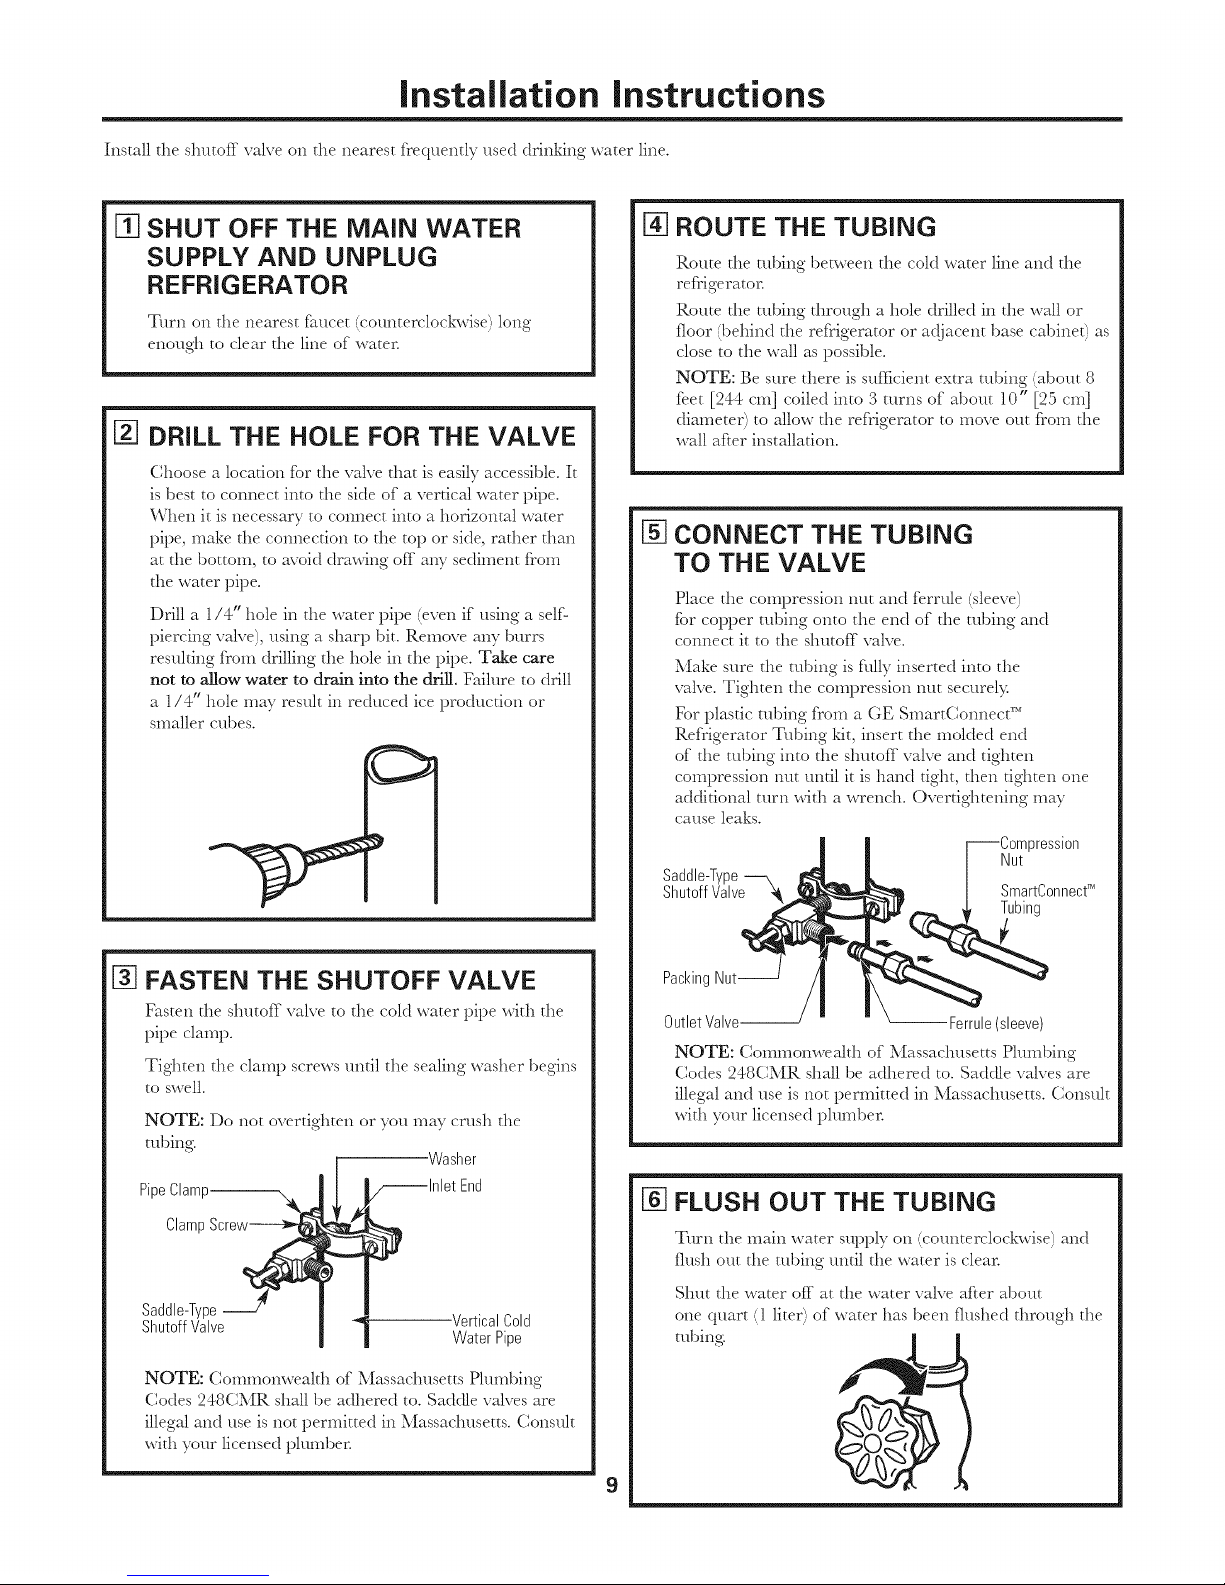
Install the shutoff valve on the nearest frequently used drinking water line.
m SHUT OFF THE MAIN WATER
SUPPLY AND UNPLUG
REFRIGERATOR
Turn on tile nearest faucet (counterclockwise) long
enough to clear the line of water.
[]
DRILL THE HOLE FOR THE VALVE
Choose a location for the valve that is easily accessible. It
is best to com_ect into the side of a vertical water pipe.
When it is necessary to connect into a horizontal water
pipe, make the com_ection to the top or side, rather than
at the bottom, to avoid drawing off any sediment from
the water pipe.
Drill a 1/4" hole in tile water pipe ieven if using a self-
piercing wdve), using a sharp bit. Remove any burrs
resulting from drilling the hole in the pipe. Take care
not to allow water to drain into the drill. Failure to drill
a 1/4" hole may result in reduced ice production or
smaller cubes.
m
FASTEN THE SHUTOFF VALVE
Fastenthe shutoff valve to the cold water pipe with the
pipe clamp.
Tighten the clamp screws until the sealing washer begins
to swell.
NOTE: Do not overtighten or you may crush the
mbing.
Washer
PipeClaml-- End
Claml
Saddle-Type
ShutoffValve
-VerticalCold
WaterPipe
NOTE: Commomsealth of Massachusetts Plumbing
9
Codes _48CMR shall be adhered to. Saddle valves are
illegal and use is not permitted in Massachusetts. Consult
with your licensed plumber.
9
N] ROUTE THE TUBING
Route the tubing between the cold water line and the
refrigerator.
Route the tubing through a hole drilled in the wall or
floor (behind the refrigerator or adjacent base cabinet) as
close to the wall as possible.
NOTE: Be sure there is sufficient extra tubing (about 8
feet [244 cm] coiled into 3 turns of about 10" [25 cm]
diameter) to allow the refrigerator to move out from the
wall after installation.
CONNECT THE TUBING
TO THE VALVE
Place the compression nut and ferrule (sleeve)
fi_r copper tubing onto the end of the tubing and
com_ect it to the shutoff valve.
Make sure the tubing is fully inserted into the
valve. Tighten the COlnpression nut securel>
For plastic tubing from a GE SmartConnect ,M
Refrigerator Tubing kit, insert the molded end
of the tubing into the shutoff valve and tighten
compression mlt until it is hand tight, then tighten one
additional turn with a wrench. Overtightening may
cause leaks.
?ression
Nut
Saddle-Type
ShutoffValve :_ SmartConnect_
Tubing
PackingNut
OutletValve Ferrule(sleeve)
NOTE: Commonwealth of Massachusetts Plumbing
Codes 248CMR shall be adhered to. Saddle valves are
illegal and use is not permitted in Massachusetts. Consult
with your licensed plumber.
FLUSH OUT THE TUBING
Turn the main water supply on (counterclockwise) and
flush out the tubing until the water is clear.
Shut the water off at the water valve after about
one quart (1 liter) of water has been flushed through the
@
Page 10
Installation instructions
Eli iNSTALLiNG THE WATER LiNE (CONT.)
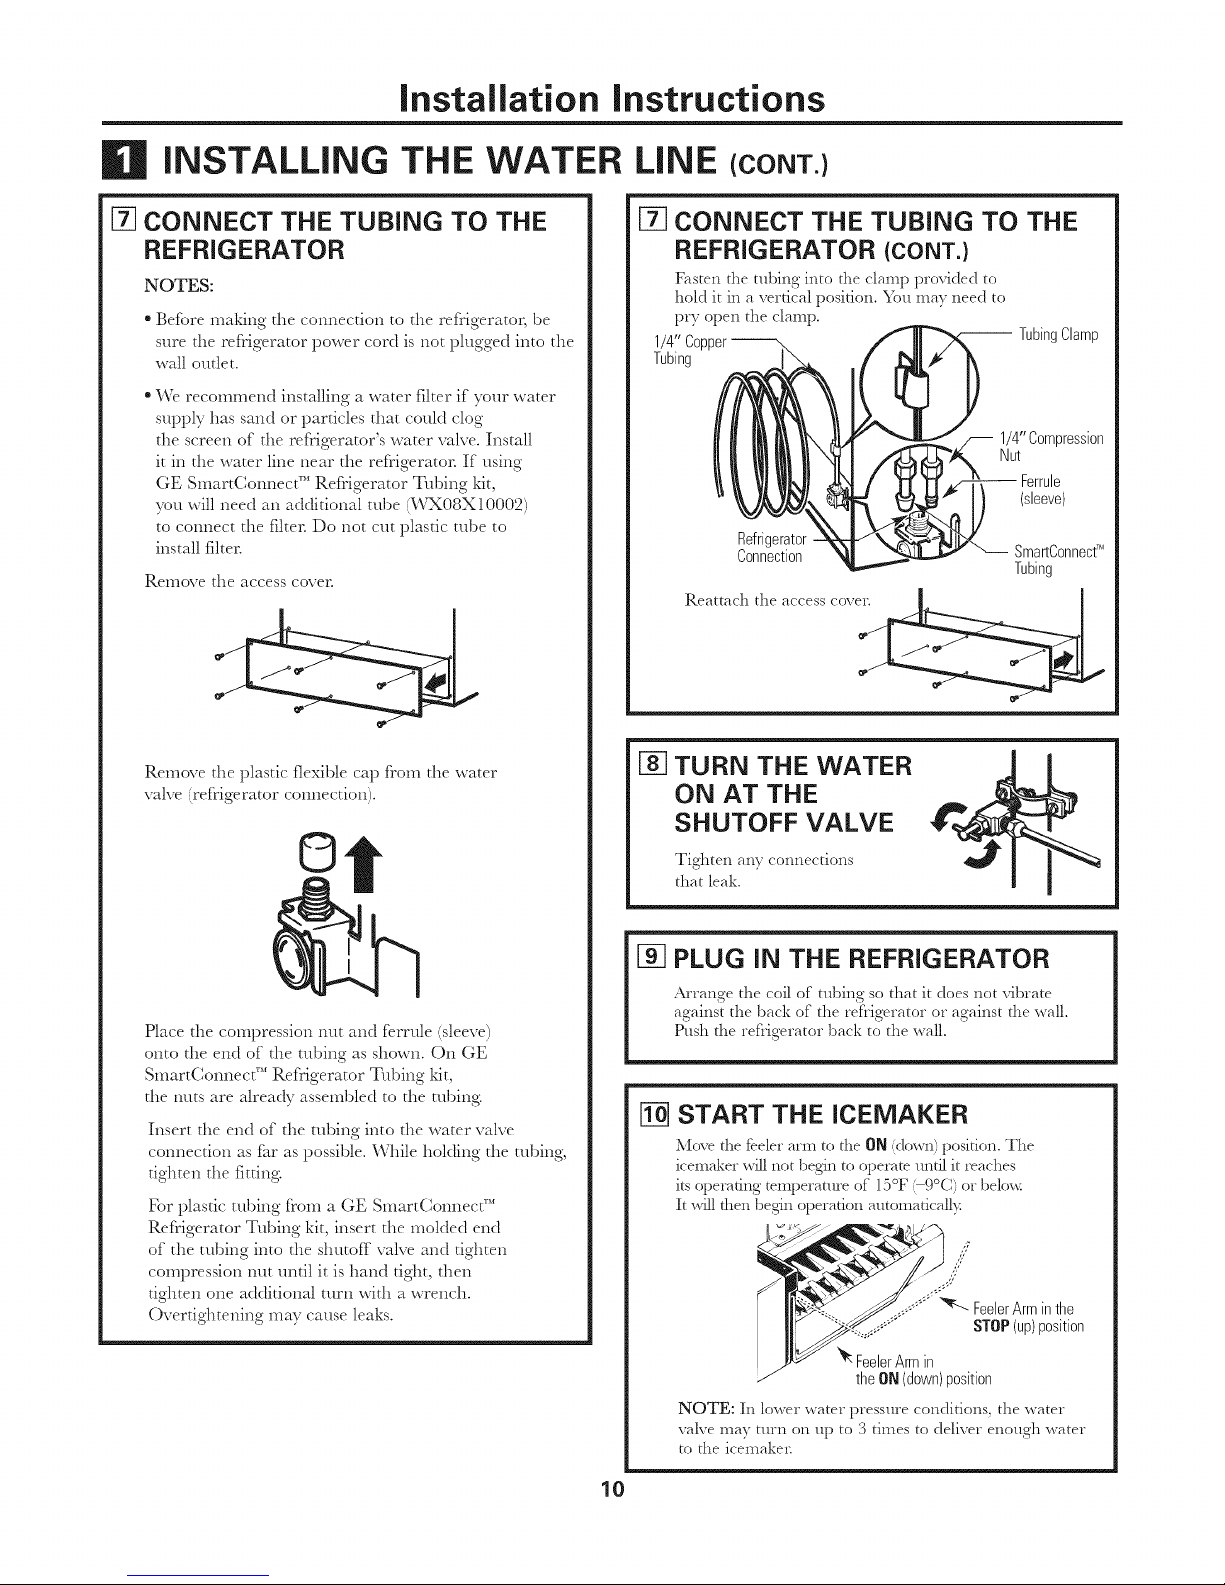
[] CONNECT THE TUBING TO THE
REFRIGERATOR
NOTES:
• Before making the comlection to the refrigeratol; be
sure the refrigerator power cord is not plugged into tile
wall outlet.
• We recoinmend installing a water filter if your water
supply has sand or particles that could clog
the screen of the refrigerator's water valve. Install
it in the water line near the refrigerator. If using
GE SmartConnect T_"Refrigerator Tubing kit,
you will need an additional robe (1\'LX08XI0002)
to connect the filter. Do not cut plastic robe to
install filter.
Remove the access cover.
Remove the plastic flexible cap from the water
valve (refrigerator commction).
Place the compression nut and ferrule (sleeve)
onto the end of the tubing as shown. On GE
SmartConnecg MRefrigerator Tubing kit,
the nuts are already asselnbled to the tubing
Insert the end of the tubing into the water valve
connection as far as possible. While hokling the tubing,
tighten the fitting
For plastic tubing from a GE SmartConnect TM
Refrigerator Tubing kit, insert the molded end
of tile tubing into the shutoff valve and tighten
compression m_t until it is hand tight, then
tighten oile additional turn with a wrench.
Overtightening may cause leaks.
[-_ CONNECT THE TUBING TO THE
REFRIGERATOR (CONT.)
Fasten the robing into the clamp t)rovided to
hold it in a vertical position, x,}m may need to
pry open the clamp.
I/4"
Tubing
-- TubingClamp
1/4" Compression
Nut
(sleeve)
Refrigerator
Connection
SmartConnect_
Tubing
P.e.tt.chthe_cces_cove___.
TURN THE WATER
ON AT THE
SHUTOFF VALVE
Tighten any ccmnections
that leak.
_-] PLUG iN THE REFRIGERATOR
.aaTange the coil of robing so that it does not vibrate
against the back of the refrigerator or against the wall.
Push the refrigerator back to the wall.
[_ START THE ICEMAKER
Move the feeler arm to the ON c!o_1) position. The
icemaker will not beg_n to operate tlntil it reaches
its operating temperature of 15°F '9°C) or belo_
It will then beg_n operation automaticall}:
/;
,,Y
Y
...... _ FeelerArminthe
STOP(up)position
FeelerArmin
theON (down)position
NOTE: In lower water pressm_e conditions, the water
valve may turn on up to 3 times to deliver enough water
to the icemake,:
10
Page 11
Installation instructions
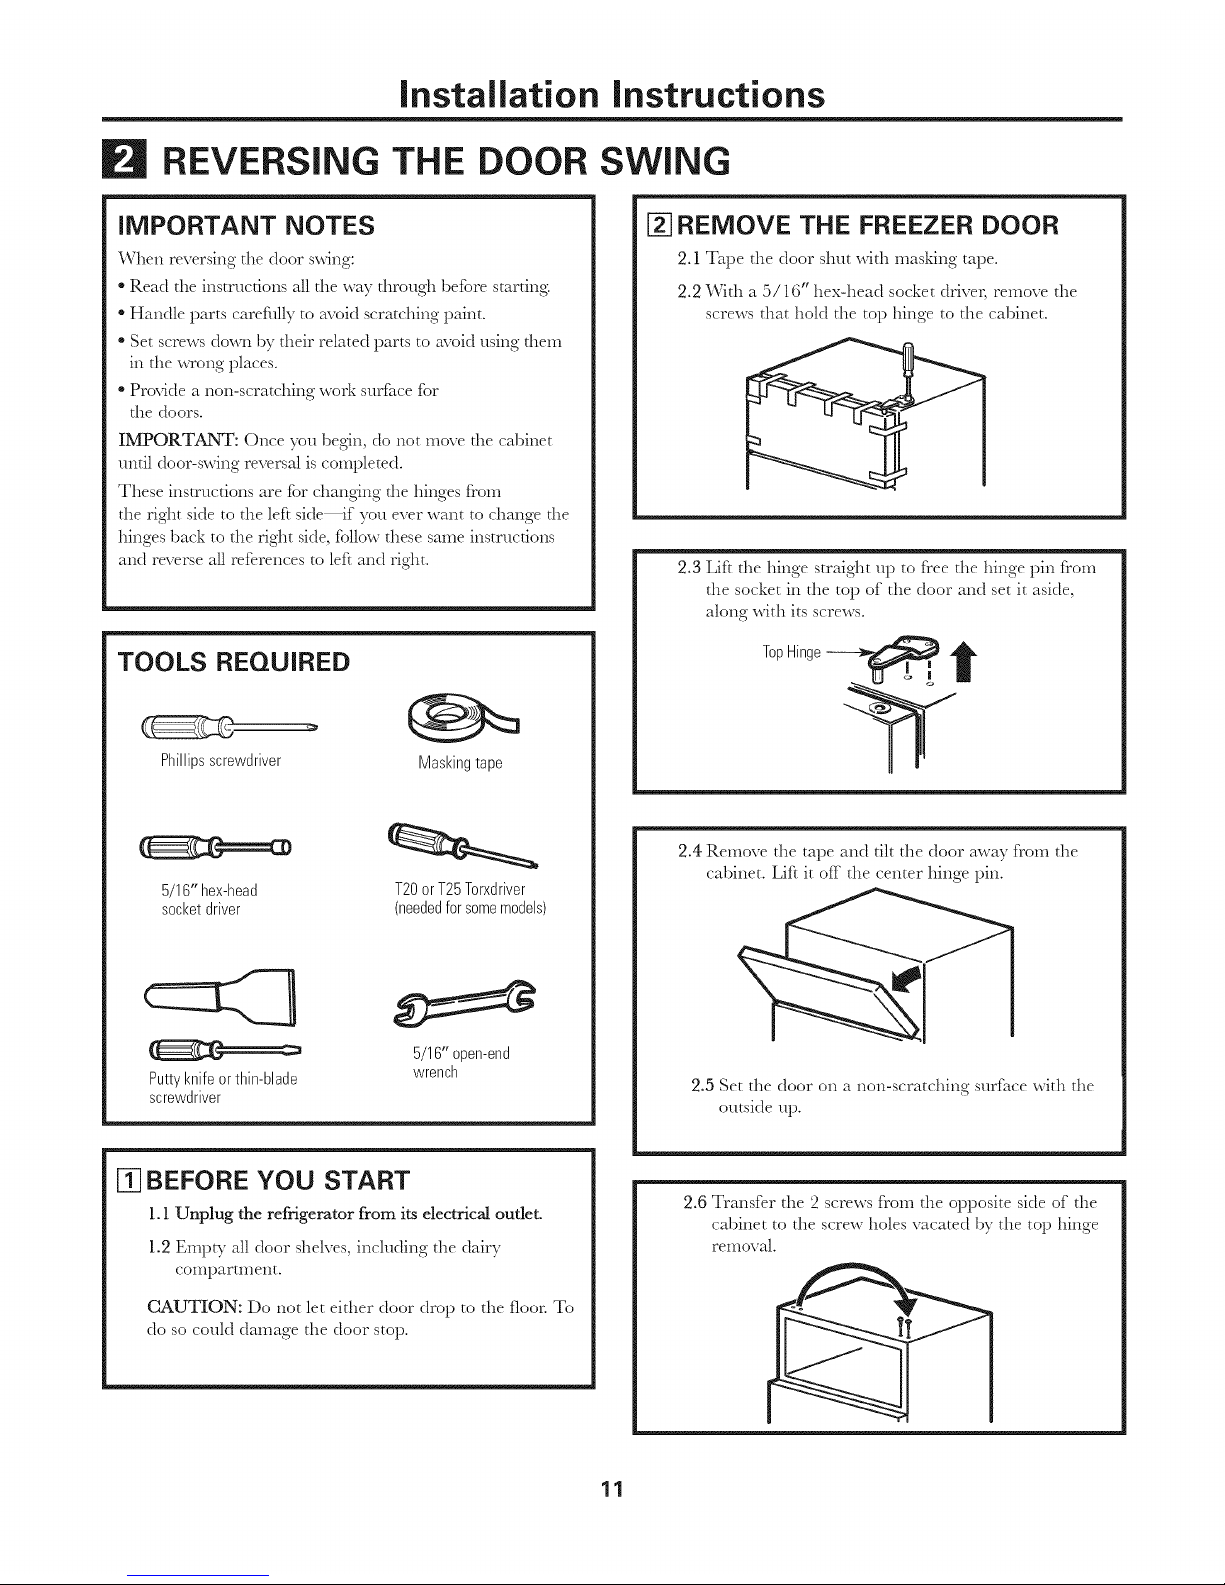
El REVERSING THE DOOR SWING
iMPORTANT NOTES
When reversing the door swing:
• Read the instructions all the way through bet})re starting
Handle parts carefully to avoid scratching paint.
Set screws down by their related parts to avoid using theln
in the _xTong places.
• Provide a non-scramhing work surt_ace for
the doors.
IMPORTANT: Once you begin, do not move the cabinet
until door-swing reversal is completed.
These instructions are fi_rchanging d_e hinges from
the right side to the left side_f you ever want to change d_e
hinges back to the right side, follow these same instructions
and reverse all references to left and right.
TOOLS REQUIRED
Phillipsscrewdriver
Masldng tape
5/16"hex-head
socket driver
T20orT25Torxdriver
(neededforsomemodels)
Puttyknife orthin-blade
screwdriver
5/16"open-end
wrench
m BEFORE YOU START
l. l Unplug the refrigerator from its electrical outlet.
1.2 Empb_ all door shelves, including the dairy
compartlnent.
CAUTION: Do not let either door drop to the floor. To
do so could damage the door stop.
_] REMOVE THE FREEZER DOOR
2.1 Tape the door shut with masking tape.
2.2 With a 5/16" hex-head socket driver, remove the
screws that hold the top hinge to the cabinet.
2.3 Lift the hinge straight up to free the hinge pin from
the socket in the top of the door and set it aside,
along with its screws.
2.4 Remove the tape and tilt the door away from the
cabinet. Lift it off the center hinge pin.
2.5 Set the door on a non-scratching surface with the
outside up.
2.6 Transfer the 2 screws from the opposite side of the
cabinet to the screw holes vacated by the top hinge
rellloval.
11
Page 12
Installation instructions
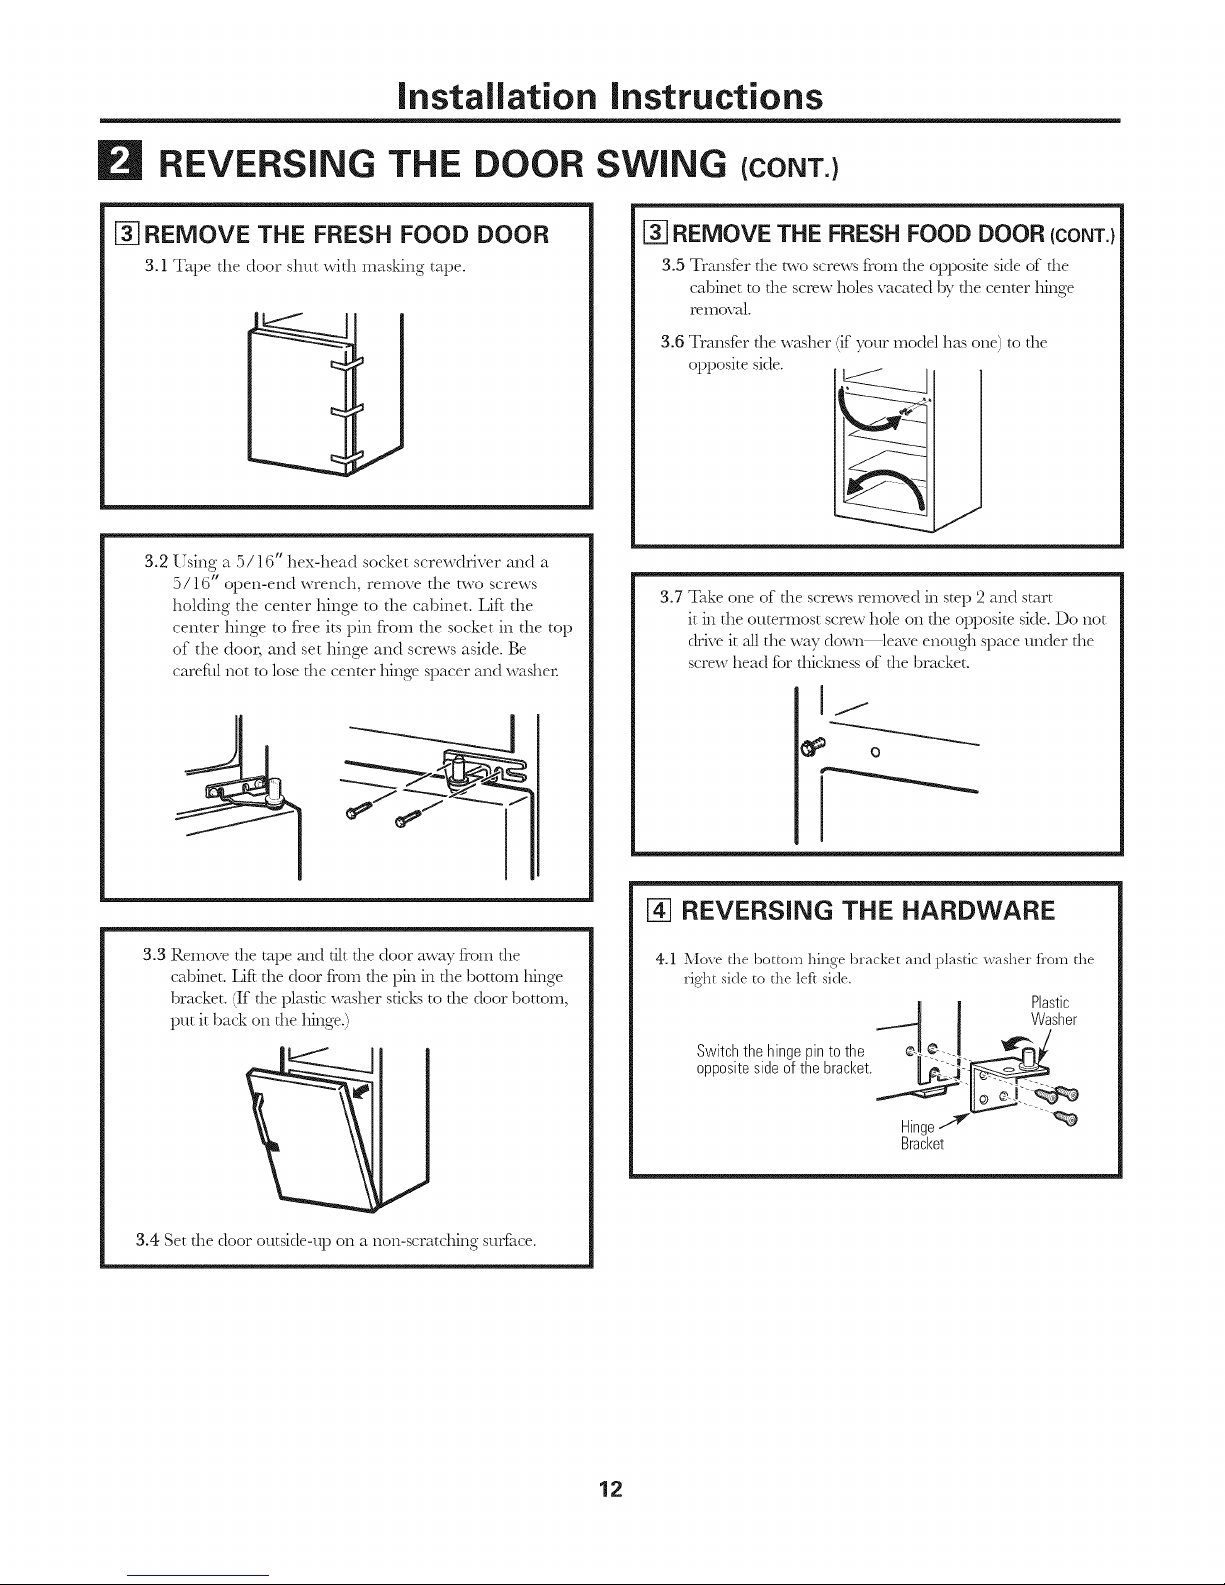
REVERSING THE DOOR SWING (CONT.)
[_ REMOVE THE FRESH FOOD DOOR
3.1 Tape the door shut with masking tape.
3.2 [sing a 5/] 6" hex-head socket screwdriver and a
5/16" open-end wrench, remove the two screws
holding the center hinge to the cabinet. Lift the
center hinge to free its pin from the socket in the top
of the door, and set hinge and screws aside. Be
careful not to lose fl_e center hinge spacer and washer.
3.3 Remove d_e tape and tilt d_e door away from d_e
cabinet. Lift the door from d_e pin in d_e bottom hinge
bracket. [If d_e plastic washer sticks to d_e door bottom,
put it back on the hinge.)
3.4 Set the door outside-up on a non-scratching surface.
REMOVE THE FRESH FOOD DOOR (CONT.}
3.5 Transfer the t_voscrews from the opposite side of the
cabinet to the screw holes vacated by the center hinge
rellloval.
3.6 Transfer the washer (if your model has one) to the
opposite side. /
3.7 Take one of d_e screws removed in step 2 and start
it in the oumrmost screw hole on the opposite side. Do not
drive it _dlthe way down leave enough space under the
screw head fi)r thiclmess of the bracket.
I/
REVERSING THE HARDWARE
4.1 Move the bottom hinge bracket and plastic washer fi'om the
right side to the left side.
Plastic
-'_ I., __1 Washer
Switchthe hingepinto the ®_¢"I _r_
oppositesideof the bracket. 11_[___2_
Hinge_ '_
Bracket
12
Page 13
Installation instructions
[-4]REVERSING THE HARDWARE (CONT.I
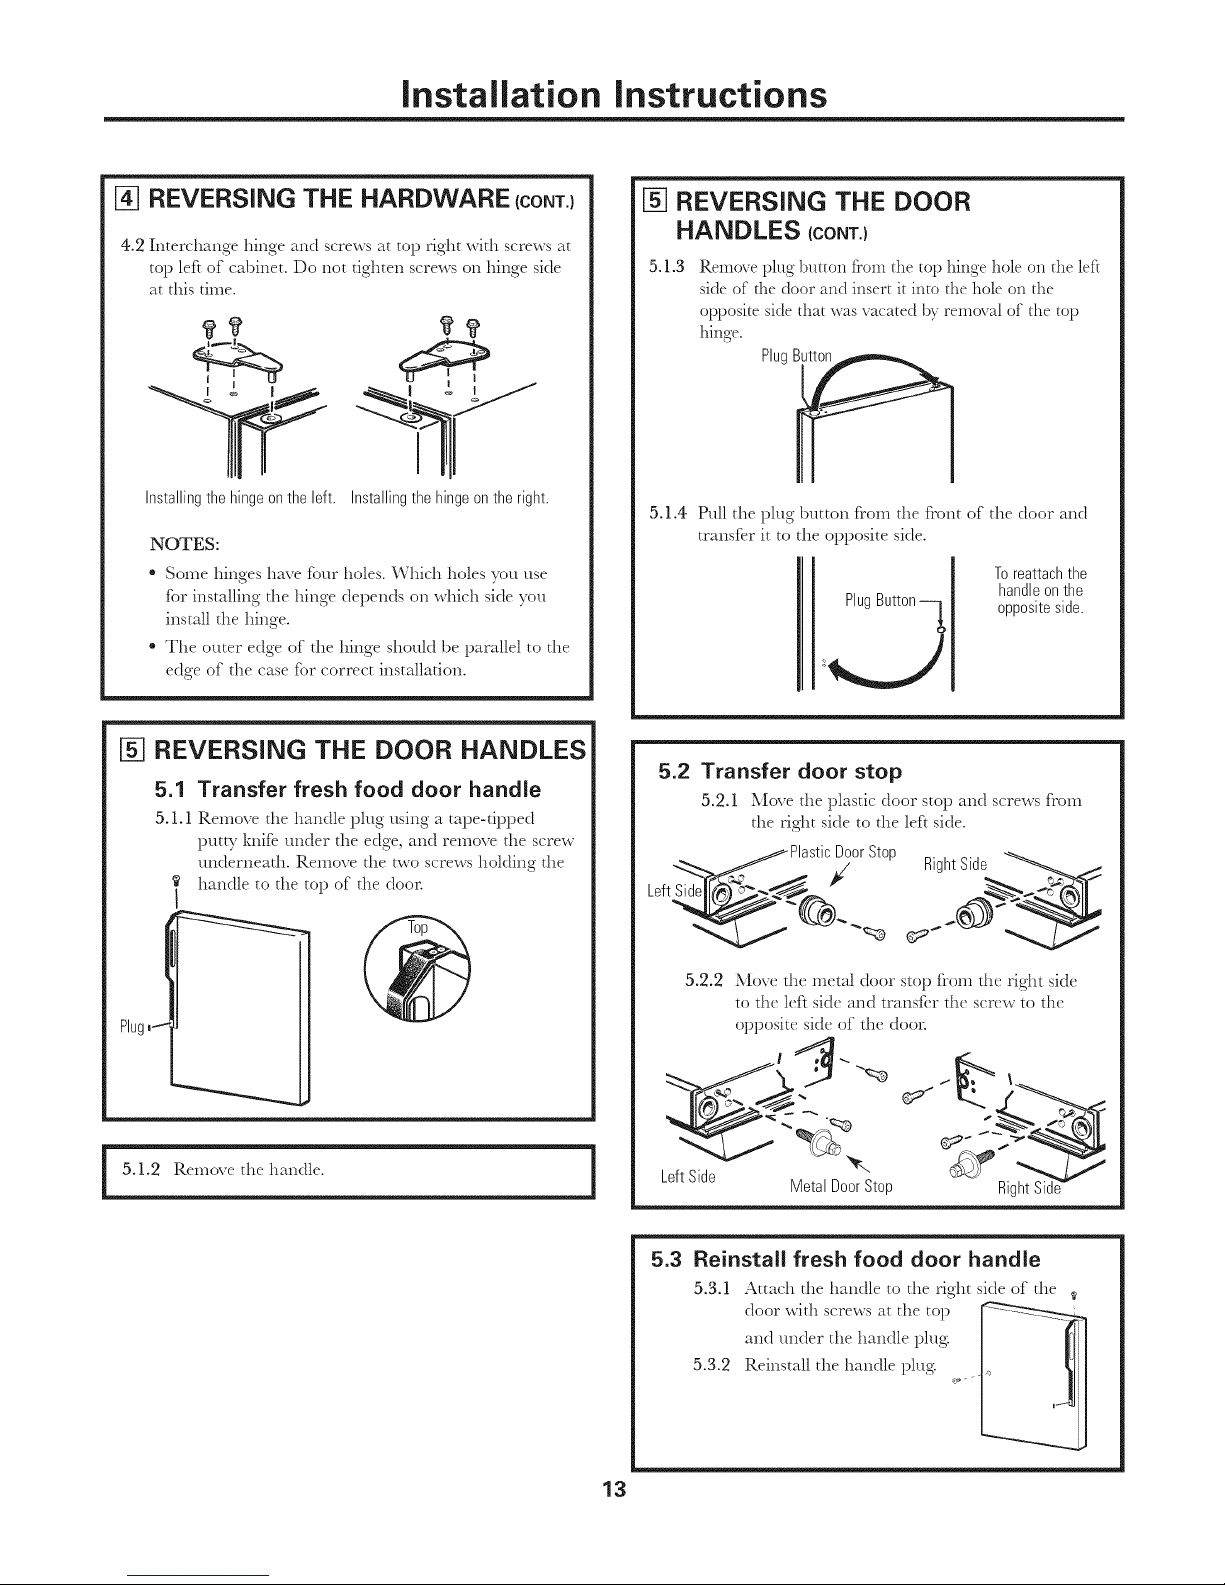
4.2 Interchange hinge and screws at top right with screws at
top left of cabinet. Do not tighten screws on hinge side
at this time.
Installingthe hingeonthe left. Installingthehinge onthe right.
NOTES:
• Some hinges have %ur holes. Which holes you use
for installing the hinge depends on which side you
install the hinge.
The outer edge of the hinge should be parallel to the
edge of the case for correct installation.
[5] REVERSING THE DOOR
HANDLES (CONT.}
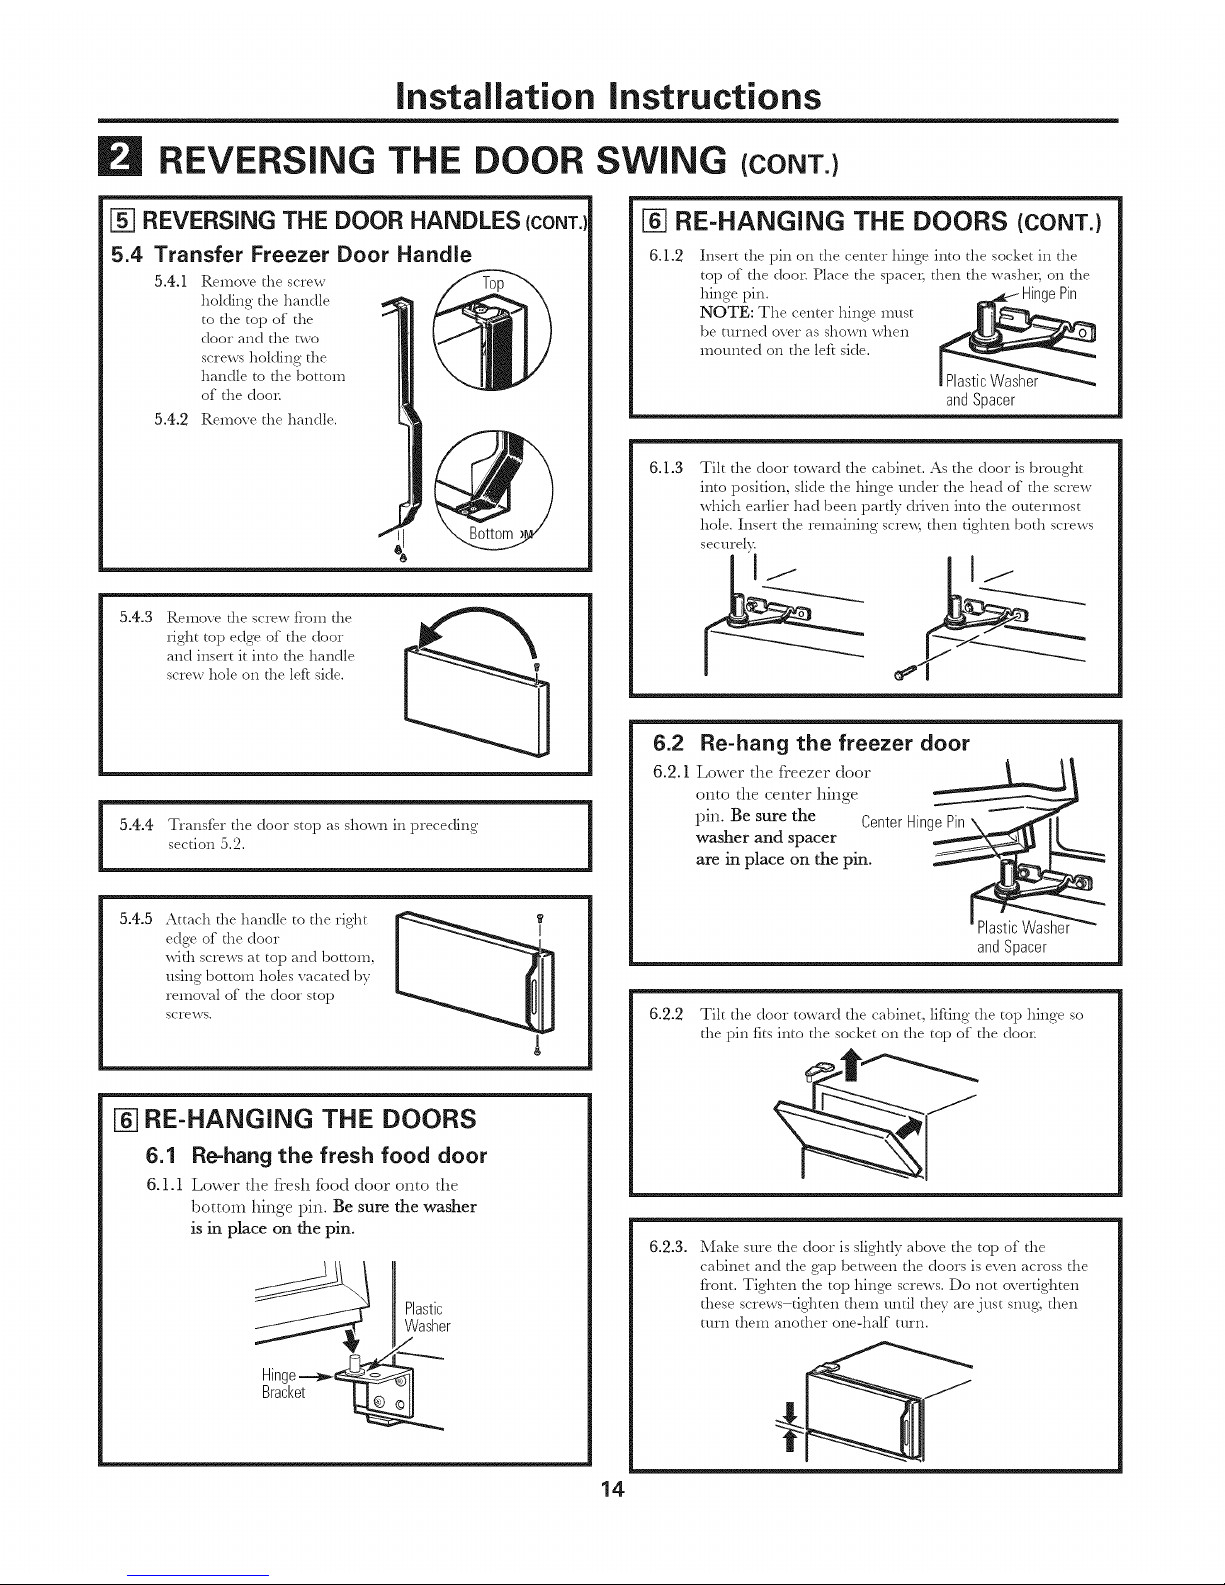
5.1.3
Remove plug button from the top hinge hole on the left
side of the door and insert it into the hole on the
opposite side that was vacated by removal of the top
hinge.
Plug B_
5.1.4 Pull the plug button from the front of the door and
transfer it to the opposite side.
Plug
Toreattachthe
handleonthe
oppositeside.
[_ REVERSING THE DOOR HANDLES
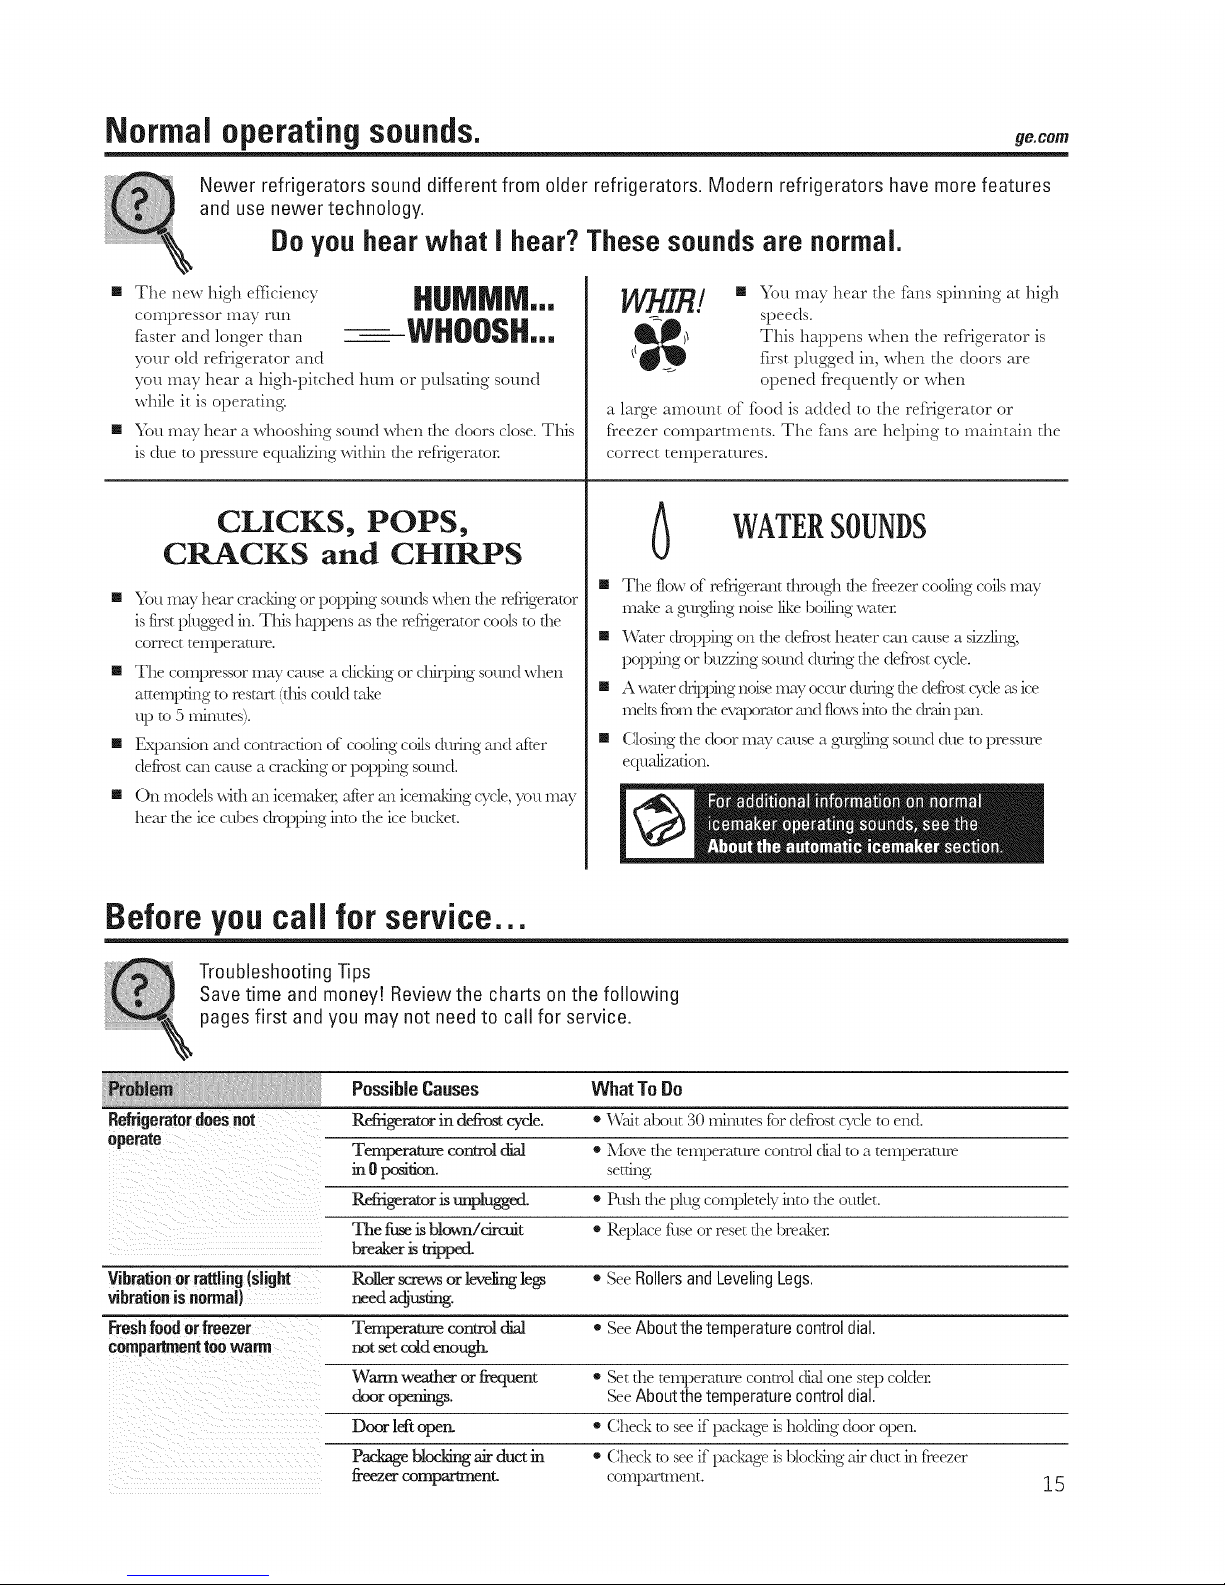
5.1 Transfer fresh food door handle
5.1.1 Rclnove the handle plug using a tape-tipped
putD _knife under the edge, and remove the screw
underneath. Remove the two screws holding the
handle to the top of the door.
Plug,_
l 5.1.2 Remove the handle. I
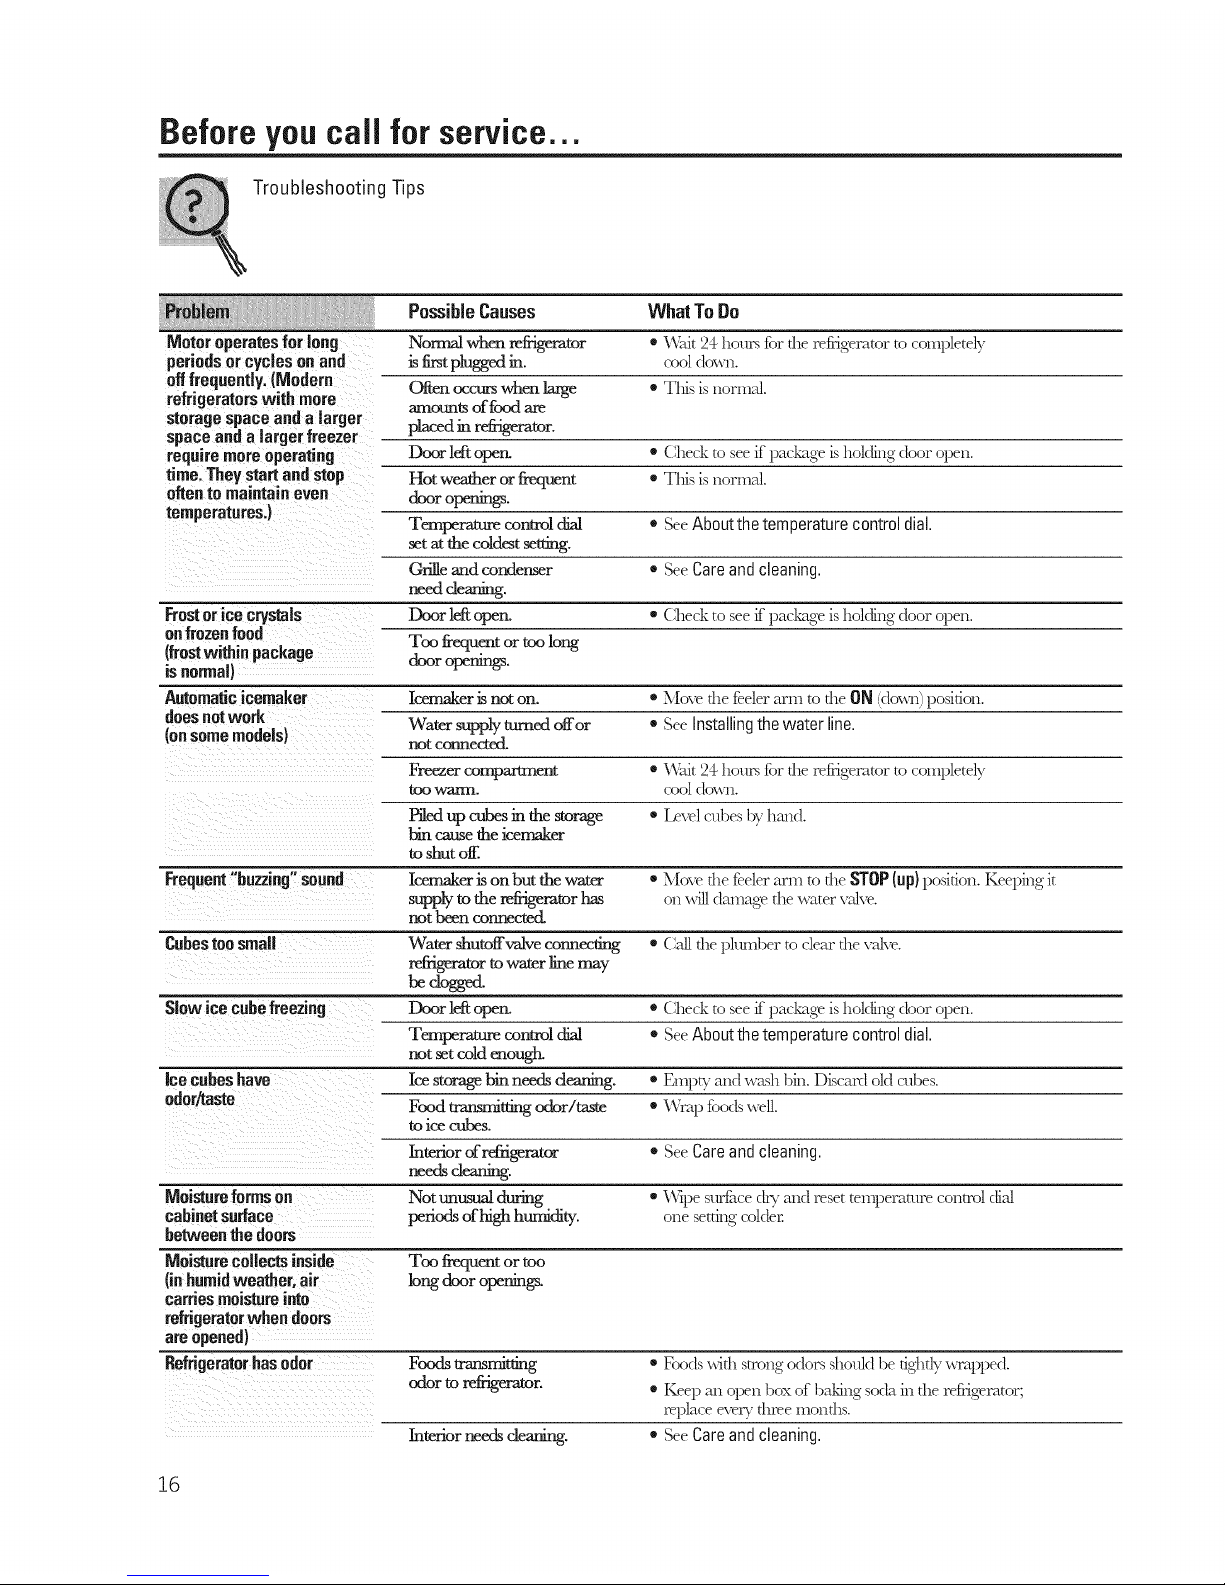
5.2
Transfer door stop
5.2.1 iXfove the plastic door stop and screws from
the right side to the left side.
DoorStop
_¢/ RightSide
5.2.2 Move the metal door stop from the right side
to the ld't side and trans[cr the scrc_x to the
opposite side of the doon
[_eftSide
Metal DoorStop
5.3 Reinstall fresh food door handle
5.3.1 Attach the handle to the right side of the
door with screws at the top
and under the handle plug:
5.3.2 Reinstall the handle plug
13
Page 14
Installation instructions
REVERSING THE DOOR
[-51REVERSING THE DOOR HANDLES (CONT.)
5.4 Transfer Freezer Door Handle
5.4.1 Remove the screw
holding the handle
to the top of the
door and die two
screws holding the
handle m die bottom
of the doon
5.4.2 Remove die handle.
5.4.3 Relnove die screw from die
fig'llt mp edge of the door
and insert it into die handle
screw hole on die left side.
I .4.4 Transfer the door stop as shown in preceding i
section 5.2. ' I
5.4.5
Attach die handle to the rig'ht
edge of die door
widl screws at top and bottom,
using bottom holes vacated by
removal of the door stop
screws.
[-glRE-HANGING THE DOORS
6.1 R_hang the fresh food door
6.1.1 Lower the fresh flood door onto the
bottom hinge pin. Be sure the washer
is in place on the pin.
Plastic
Washer
SWING (CONT.)
[-glRE-HANGING THE DOORS (CONT.)
6.1.2
Insert the pin on the center hing'e into the socket in the
top of the doon Place the space1; then the washe*; on die
hinge pin. Hinge Pin
NOTE: The center hinge must
be turned over as shown when
mounted on the left side.
Plastic Washer
and Spacer
6.1.3 Tilt the door toward the cabinet. As the door is brought
into position, slide the hinge under the head of the screw
which earlier had been partly d*_iven into the outermost
hole. Insert the remaining screxx_ then tighten both screws
securel}:
e¢-i
6.2 Re-hang the freezer door
6.2.1 Lower the freezer door _ _
onto the center hinge
pin. Be sure the Center Hinge Pin \ "-"-_
washer and spacer
and Spacer
6.2.2 Tilt the door toward the cabinet, lifting the top hinge so
the pin fits into the socket on the top of the doon
6.2.3.
Make sure die door is slightly above the top of the
cabinet and the gap between the doors is even across the
front. Tighten the top hing'e screws. Do not overtighten
these screws tig'hten them until they are just snug', then
turn them anodler one-half turn.
14
Page 15
Normal operating sounds, geco,,
Newer refrigerators sound different from older refrigerators. Modern refrigerators have more features
and use newer technology.
Doyou hear what I hear?Thesesoundsare normal.
[]The,,ewhighefficie,,cr HUIVlMM...
co.lpressor.larru. WHOOSH
faster and longer than -- ===
your old refrigerator and
you inay hear a high-pitched hum or pulsating sound
while it is operating
[] _}m may hear a whooshing sound when the doors close. This
is &le to pressure equalizing within the refrigerator.
CLICKS, POPS,
CRACKS and CHIRPS
[] _}m may hear cracldng or popping sounds when die refrigerator
is first plugged in. This happens as the refrigerator cools to the
correct telnperamre.
[] The compressor may cause a clicldlN or d_irpi_N sound when
attempting to restart (this could take
up to 5minutes).
[] Expansion mid contraction of coolhlg coils &rang and after
defrost can cause a cracldng or poppi, N sotmd.
[] On models with an icemaker, after an icemaldng c?_:le,you may
hear the ice cubes dropping into the ice bucket.
WHIR./
[]
_})u may hear tile rims spinning at high
speeds.
This happens when the refrigerator is
first plugged in, when the doors are
opened frequendy or when
a large amount of food is added to tlle refrigerator or
freezer compartments. The rims are helping to maintain the
correct telllperatures.
6
WATERSOUNDS
[] The flow of refrigerant dlrot@l die freezer cooling coils may
make a gl@, N noise like boili_N ware1:
[] Water dropping on the defnost hearer can cause a sizzling,
popping or Nlzzing sotmd &Mng the defrost cycle.
[] A _ter dripping noise may ocotr dtming die de_ost ©vle =tsice
meM _)m d_eexvqx,rator mM flows into fl_edndn pml.
[] Closii g the door may cause a gl@ilg sound due to pressure
equ_zation.
Before you call for service...
Troubleshooting Tips
Save time and money! Review the charts on the following
pages first and you may not need to call for service.
What To Do
Refrigerator does not * Wait about 30 minutes tbr defrost c)vle to end.
operate * _[ove die temperature control cli_ to a temperature
set_lN
• Push the ph g completely into die oudet.
• Replace fuse or reset the breaker.
Vibrationor raRiing(slight • See Rollers and Leveling Legs.
vibrationis normal)
Freshfood or freezer • See About the temperature control dial.
compartmenttoo warm
PossibleCauses
Refrigerator in defrost cyde.
Temperature control
in0position.
Refrigerator isunplugged.
The fuse is blown/c:azatit
breaker istripped.
Roller screws or leveling legs
need adjusting.
Temperature control dial
not set cold enough.
Warm weather or frequent
dooropenings.
Door left open.
Package blocking air duct in
freezer compartment
• Set the mmperature conm)l dial one step colder.
See About the temperature control dial.
• Check to see if paclcage is holding door open.
• Check to see if paclcage is blocldng air duct in freezer
COlllpartllleilt.
15
Page 16
Before youcall for service...
Troubleshooting Tips
PossibleCauses What To Do
Motor operates for long >:formalwhen m:_rator • _\Tait24 hours fiJr the refrigerator to completely
periods or cycles onand isfirst plugged in. cool down.
off frequently. (Modern Often occurswhen large • This is normS.
refrigerators with more
amounts offood are
storage space and a larger placed in refr:_emtor.
space and a larger freezer
require room operating Door left operL • Check to seeif package is hokling door open.
time. They start and stop Hot weather or frequent * This is normal.
oRen to maintain even door openir_.
temperatures.) Temperature control _ * SeeAbout the temperature control dial.
set at the coldest setting.
Grille and condemer * See Care and cleaning.
need cleaning.
Frostor ice crystals Door left open. * Check to see if package is holding door open.
on frozen fooO Too frequent or too long
(frost within package door openings.
is normal)
Automatic icemaker Icemaker is not on. * Move the feeler arm to the ON ;down) position.
doesnotwork Water supply turned offor * See Installing the water line.
{0nsome models} not connected.
Freezer compartment * _\hit 24 hours tbr the refrigerator to completely
too warm. cool down.
Piled up cubes in the storage * Level cubes 1)_hmM.
bin cause the icemaker
to shut off.
Frequent"buzzing"sound Icemaker ison but the water * Xfove file feeler arm to the STOP(up)positior,. Keeping it
supply to the refr:Neratorhas on will damage the water rake.
not been connected.
CubestOOsmall Water shutoffvalve conn_ * C_ the phunber to clear the v_flxe.
refrigerator to water line may
bedog .
Slow ice cubefreezing Door left open. * Check to see if package is holding odor opel,.
Temperature control _ * See About the temperature control dial.
not set cold enough.
ice cubes have Ice storage bin needs deaning. * EmpW and w_sh bin. Discard oM ofl)es.
odor/taste Food transmitting odor/ta_ * Wrap fi)ods well.
to ice cubes.
Interior of refrigerator * See Care and cleaning.
needs deaning.
Moisture forms on Not unusual during * _\Tipe surt_acedDi and reset temperature col-,1Tolc[1_
cabinet sudace periods of high humidity, one setting coldcz:
between the doors
Moisture collects inside Too frequent or too
(in humid weather, air long door openings.
carries moisture into
refrigerator when doors
are opened)
Refrigerator has odor Foods transmitting * t_oods _x4ths/Tong"odors should be tightly wrapped.
odor to refrigerator. • Keep an open box of baldng soda in the refrigerator;
replace every three months.
Interior needs cleaning. * See Care and cleaning.
16
Page 17
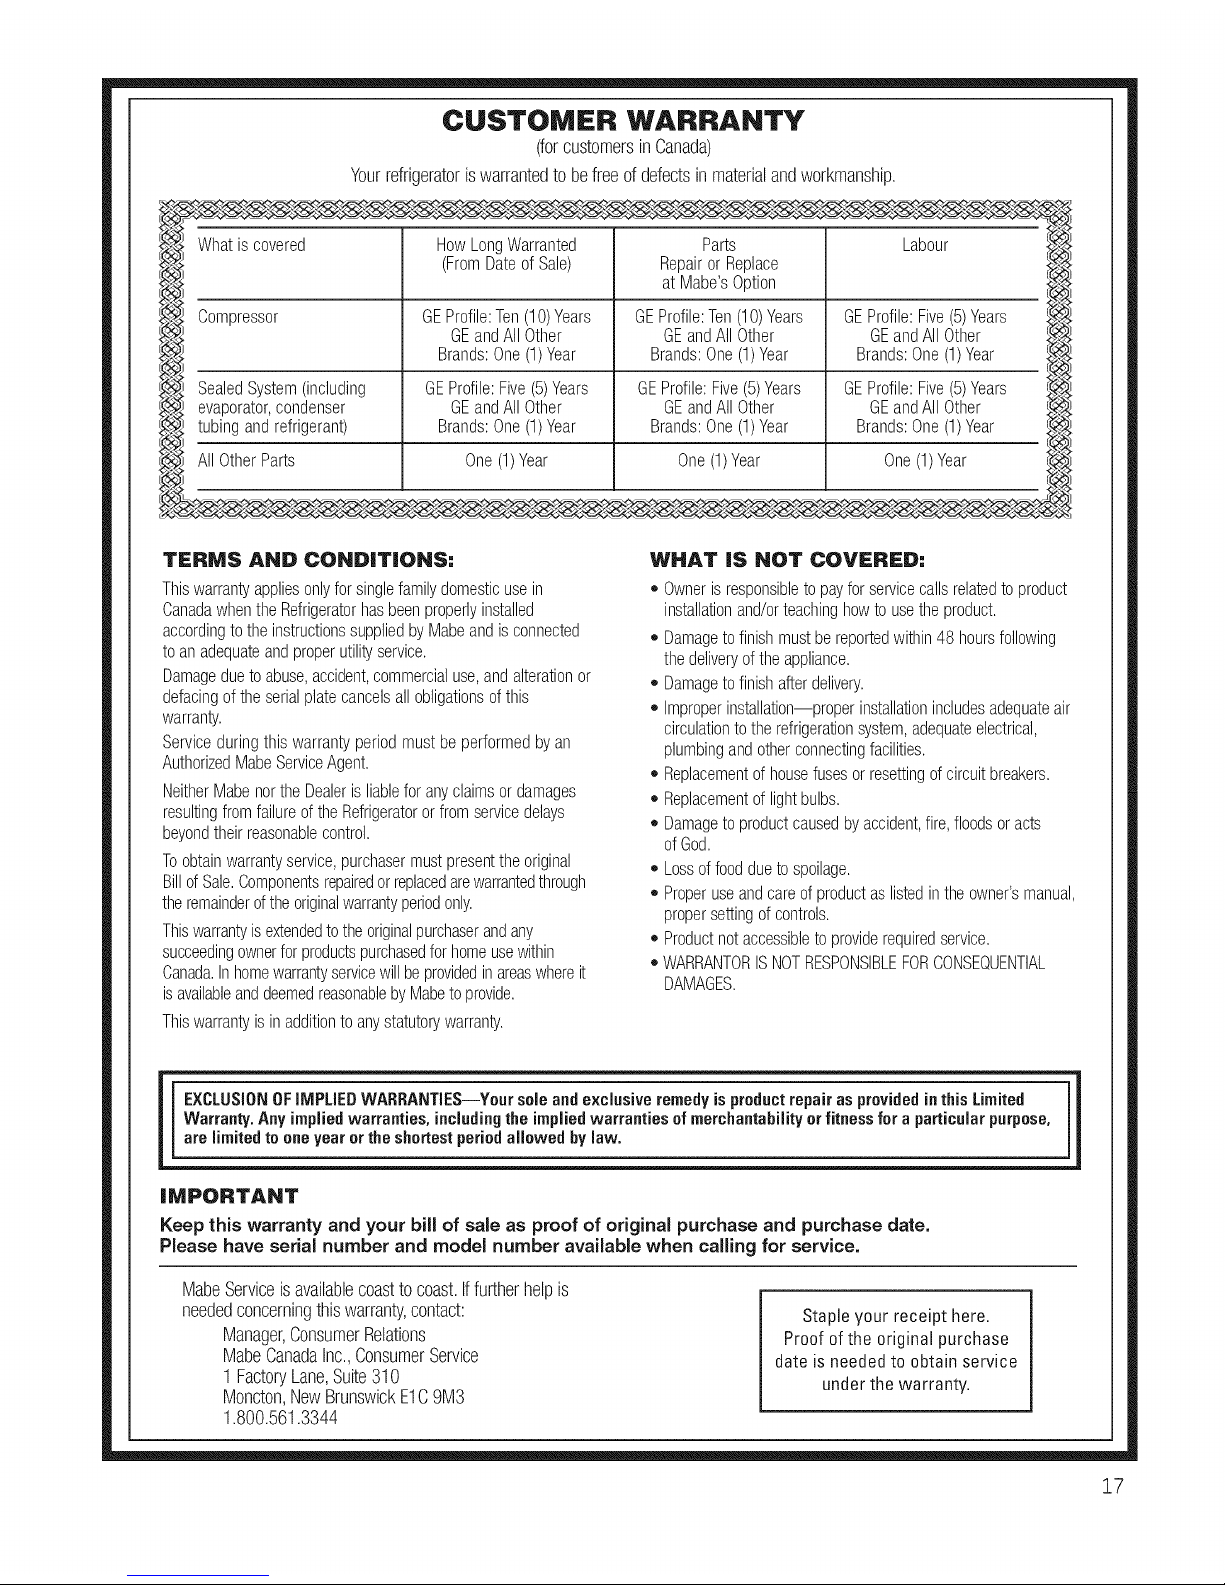
CUSTOMER WARRANTY
(forcustomersin Canada)
Yourrefrigeratoriswarrantedto befreeofdefectsin materialandworkmanship.
7, • .............
Whatiscovered HowLongWarranted Parts Labour
(FromDateofSale) Repairor Replace
at Mabe'sOption
3ompressor GEProfile:Ten(1O)Years GEProfile:Ten(1O)Years GEProfile:Five(5)Years
GEandAll Other GEandAll Other GEandAll Other
Brands:One(1)Year Brands:One(1)Year Brands:One(1)Year
SealedSystem(including GEProfile:Five(5)Years GEProfile:Five(5)Years GEProfile:Five(5)Years
waporator,condenser GEandAllOther GEandAllOther GEandAll Other
tubingandrefrigerant) Brands:One(1)Year Brands:One(1)Year Brands:One(1)Year
&llOtherParts One(1)Year One(1)Year One(1)Year
TERMS AND COND|T|ONS:
Thiswarrantyappliesonlyforsinglefamilydomesticusein
CanadawhentheRefrigeratorhasbeenproperlyinstalled
accordingtotheinstructionssuppliedbyMabeandisconnected
toanadequateandproperutilityservice.
Damageduetoabuse,accident,commercialuse,andalterationor
defacingoftheserialplatecancelsallobligationsofthis
warranty.
Serviceduringthis warrantyperiodmustbeperformedby an
AuthorizedMabeServiceAgent.
NeitherMabenortheDealerisliableforanyclaimsordamages
resultingfromfailureoftheRefrigeratororfromservicedelays
beyondtheirreasonablecontrol.
Toobtainwarrantyservice,purchasermustpresenttheoriginal
BillofSale.Componentsrepairedorreplacedarewarrantedthrough
theremainderofthe originalwarrantyperiodonly.
Thiswarrantyisextendedtotheoriginalpurchaserandany
succeedingownerforproductspurchasedforhomeusewithin
Canada.Inhomewarrantyservicewillbeprovidedinareaswhereit
isavailableanddeemedreasonablebyMabetoprovide.
Thiswarrantyis inadditiontoanystatutorywarranty.
WHAT iS NOT COVERED:
• Ownerisresponsibleto payforservicecallsrelatedto product
installationand/orteachinghowtousetheproduct.
,, Damageto finishmustbereportedwithin48 hoursfollowing
thedeliveryoftheappliance.
,, Damageto finishafterdelivery.
• Improperinstallation--properinstallationincludesadequateair
circulationto the refrigerationsystem,adequateelectrical,
plumbingandotherconnectingfacilities.
,, Replacementof housefusesorresettingofcircuitbreakers.
,, Replacementof lightbulbs.
• Damageto productcausedbyaccident,fire,floodsoracts
ofGod.
• Lossoffoodduetospoilage.
• Properuseandcareofproductaslistedinthe owner'smanual
propersettingof controls.
,, Productnotaccessibletoproviderequiredservice.
• WARRANTORISNOTRESPONSIBLEFORCONSEQUENTIAL
DAMAGES.
EXCLUSIONOFIMPLIEDWARRANTIES--Yoursoleandexclusiveremedyisproductrepairasprovidedinthis Limited
Warra,ty.Anyimpliedwarranties, includingthe impliedwarrantiesofmerchantabilityorfitnessfor a particularpurpose,
arelimitedto oneyearorthe shortestperiodallowedby law.
iMPORTANT
Keep this warranty and your bill of sale as proof of original purchase and purchase date,
Please have serial number and model number available when calling for service,
MabeServiceisavailablecoasttocoast.Iffurtherhelpis
neededconcerningthiswarranty,contact:
Manager,ConsumerRelations
MabeCanadaInc.,ConsumerService
1 FactoryLane,Suite310
Moncton,NewBrunswickE1C9M3
1.800.561.3344
Stapleyour receipt here.
Proof ofthe original purchase
date is needed to obtain service
under the warranty.
17
Page 18
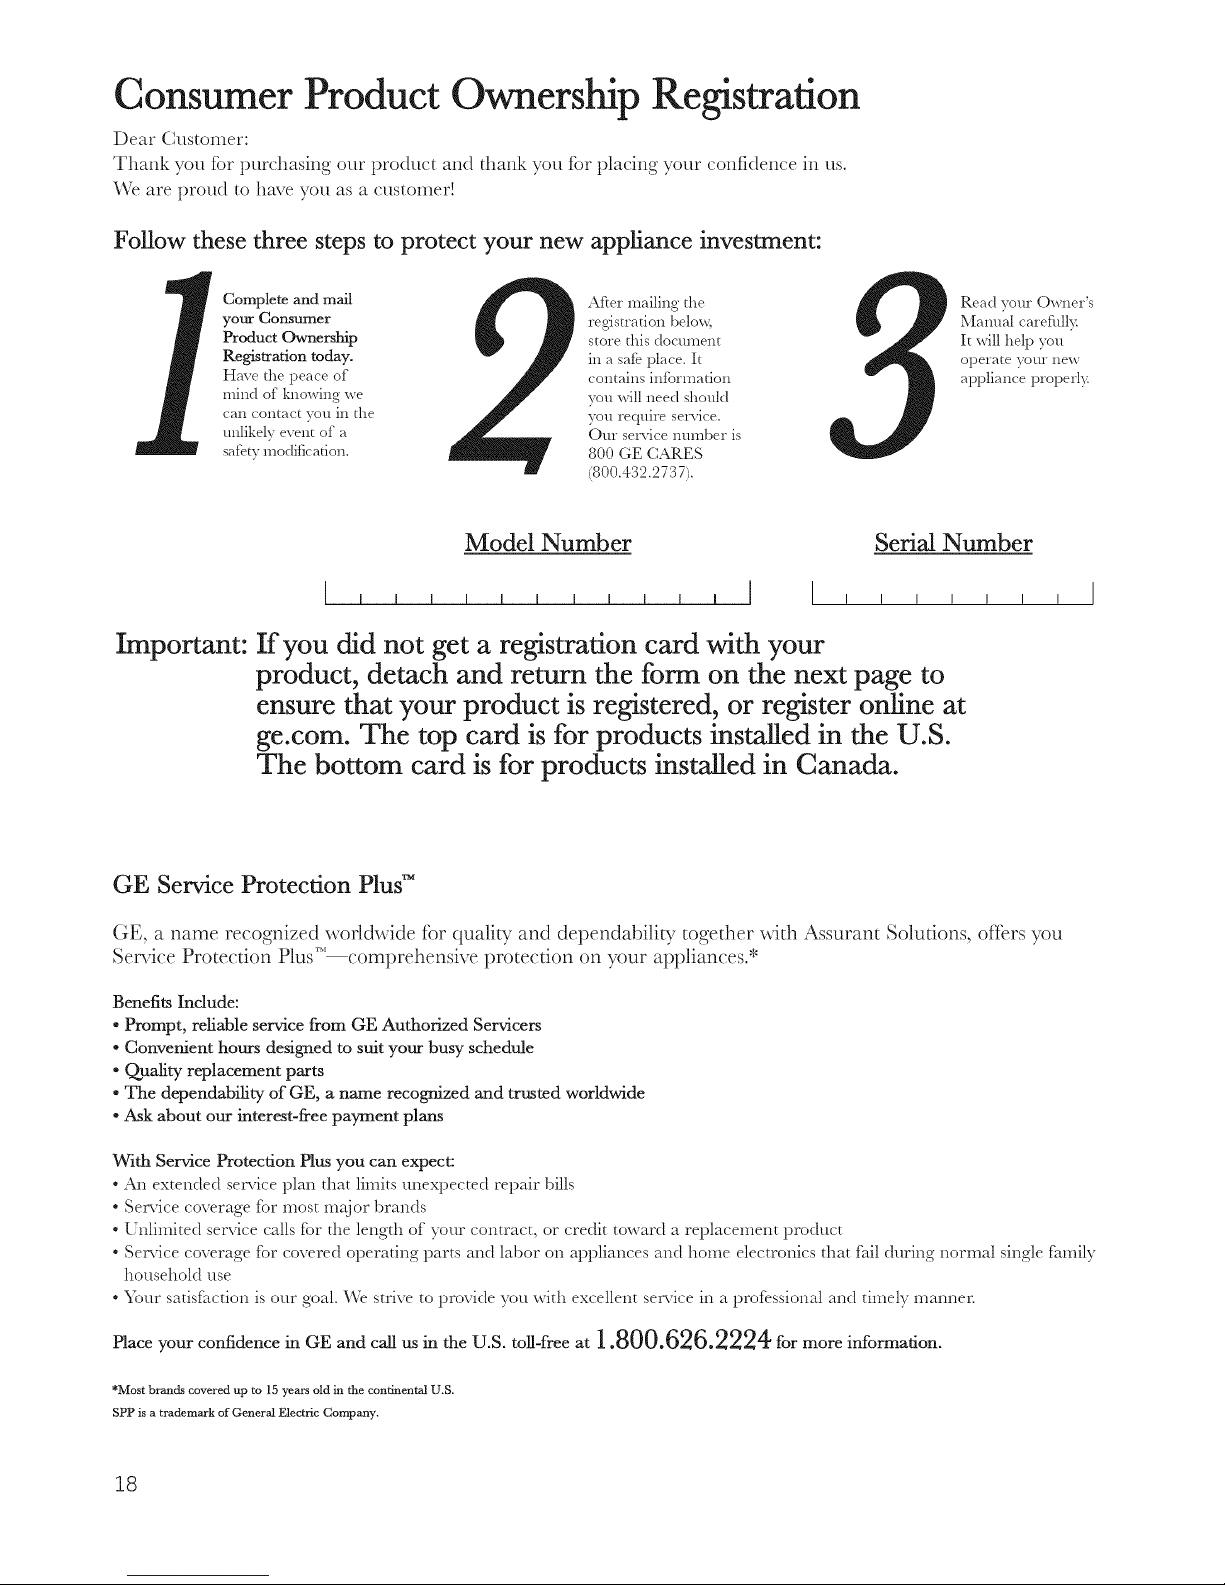
Consumer Product Ownership Registration
Dear Custon_er:
Thank you for purchasing our product and thank you for placing your confidence in us.
"_'\%are proud to have you as a customer!
Follow these three steps to protect your new appliance investment:
Complete and mail
your Consumer
Product Ownership
Registration today.
Have the peace of
mind of knowing we
can contact you in the
unlikely event of a
safe V modification.
ARes"mailing the
registration t)elox_
store this doculnent
in a safe place. It
contains information
you will need should
you require service.
Our service number is
800GECARES
(800.432.2737.
Read your Owner's
Manual carefull>
It will help you
operate }'ollr new
appliance properl):
Model Number Serial Number
Important: If you did not get a registration card with your
product, detach and return the form on the next page to
ensure that your product is registered, or register online at
ge.com. The top card is for products installed in the U.S.
The bottom card is for products installed in Canada.
GE Service Protection Plus TM
GE, a name recognized worl&_ide for quality and dependability together with Assurant Solutions, offers you
Service Protection Plus TM comprehensive protection on your appliances.*
Benefits Include:
• Prompt, reliable service from GE Authorized Servicers
• Convenient hours designed to suit your busy schedule
• Quality replacement parts
• The dependability of GE, a name recognized and trusted worldwide
• Ask about our interest-free payment plans
With Service Protection Plus you can expect:
* An extended service plan that limits unexpected repair bills
* Service coverage for most major brands
* Unlimited service calls for the length of your contract, or credit toward a replacelnent product
* Service coverage for covered operating parts and labor on appliances and holne electronics that fail during normal single family
household use
, Your satist_action is our goal. We strive to provide you with excellent service in a professional and timely manner.
Place your confidence in OE and call us in the U.S. toll-free at 1.800.626.2224 for more information.
*Most brands covered up to 15 years old in the continental U.S.
SPP is a trademark of General Electric Company.
18
Page 19
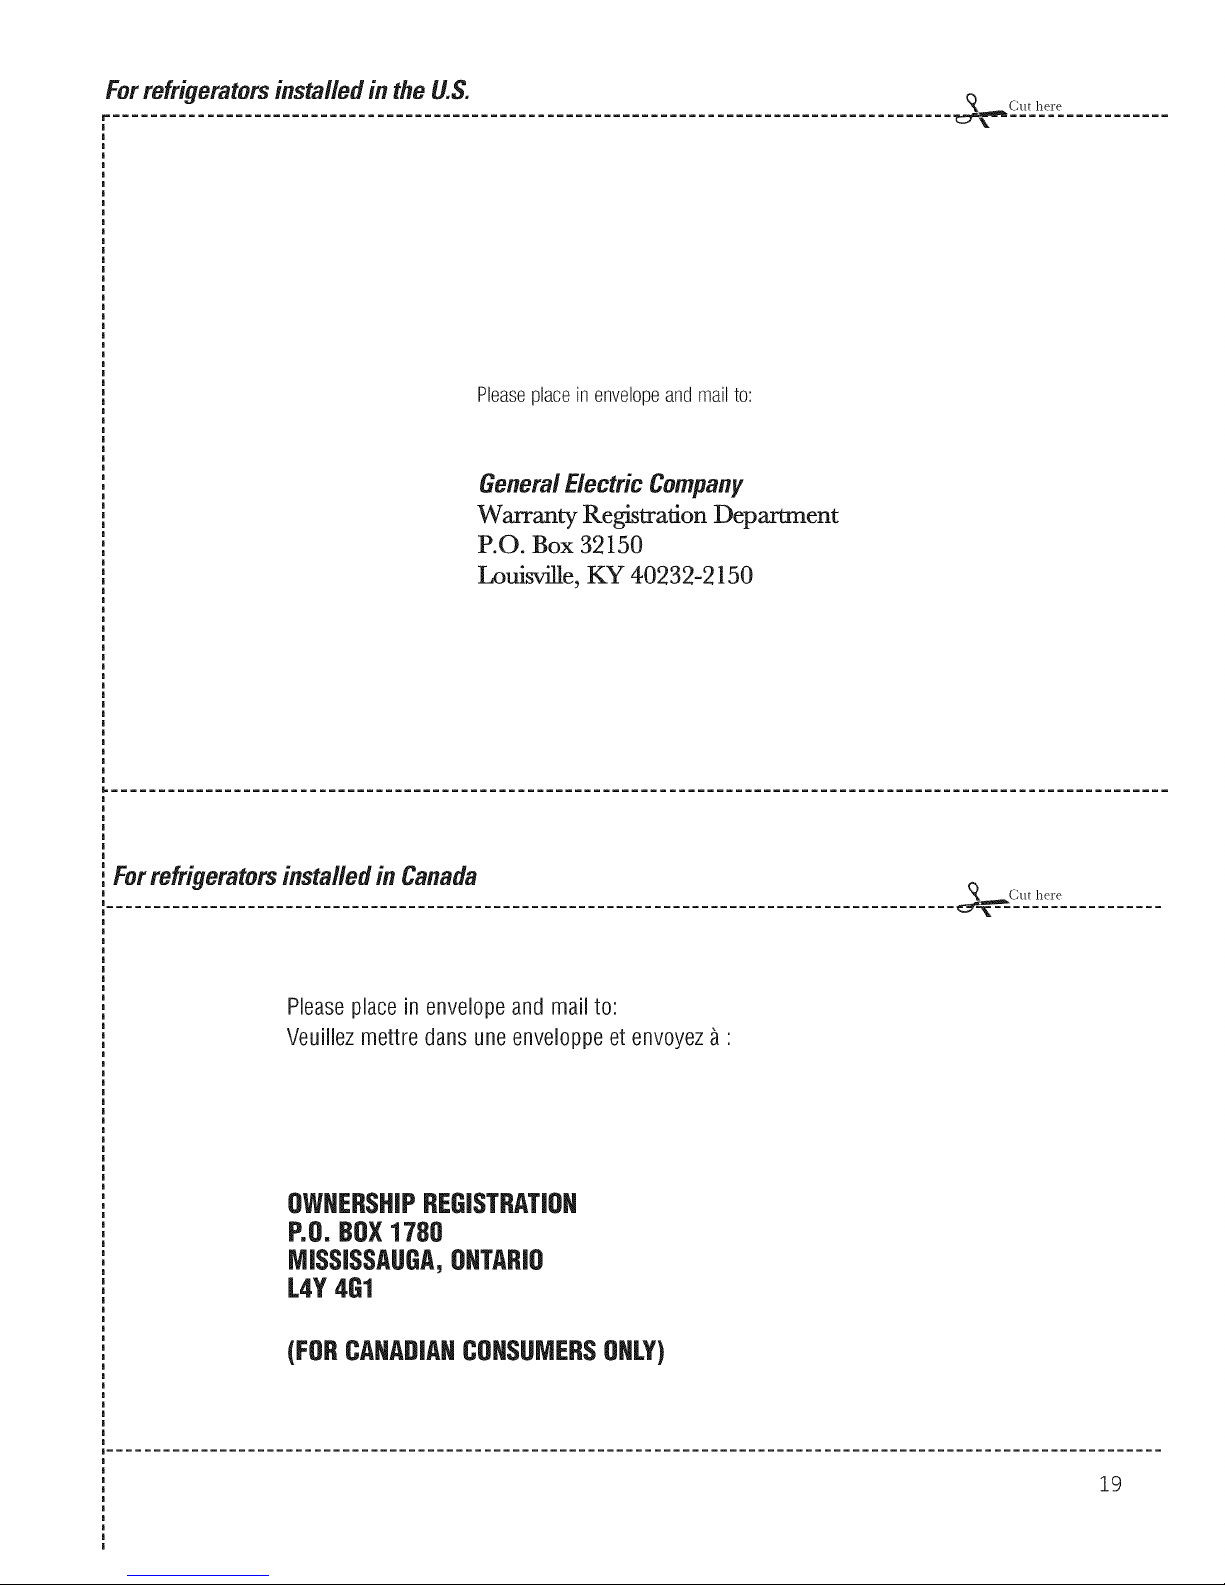
Forrefrigeratorsinstalledin theU.S. _t_ahe,_
Pleaseplace in envelopeand mailto:
GeneralElectricCompany
Warranty Registration Department
P.O. Box 32150
Louisville, KY 40232-2150
Forrefrigeratorsinstalled in Canada
Cut here
Please place in envelope and mail to:
Veuillez mettre dans une enveloppe et envoyez _ :
OWHERSHIPREGISTRATIOH
P.O,BOX1780
NISSISSAIJGA,ONTARIO
L4Y4G1
(FORCAHADIAHCOHSUNERSOHLY)
19
Page 20
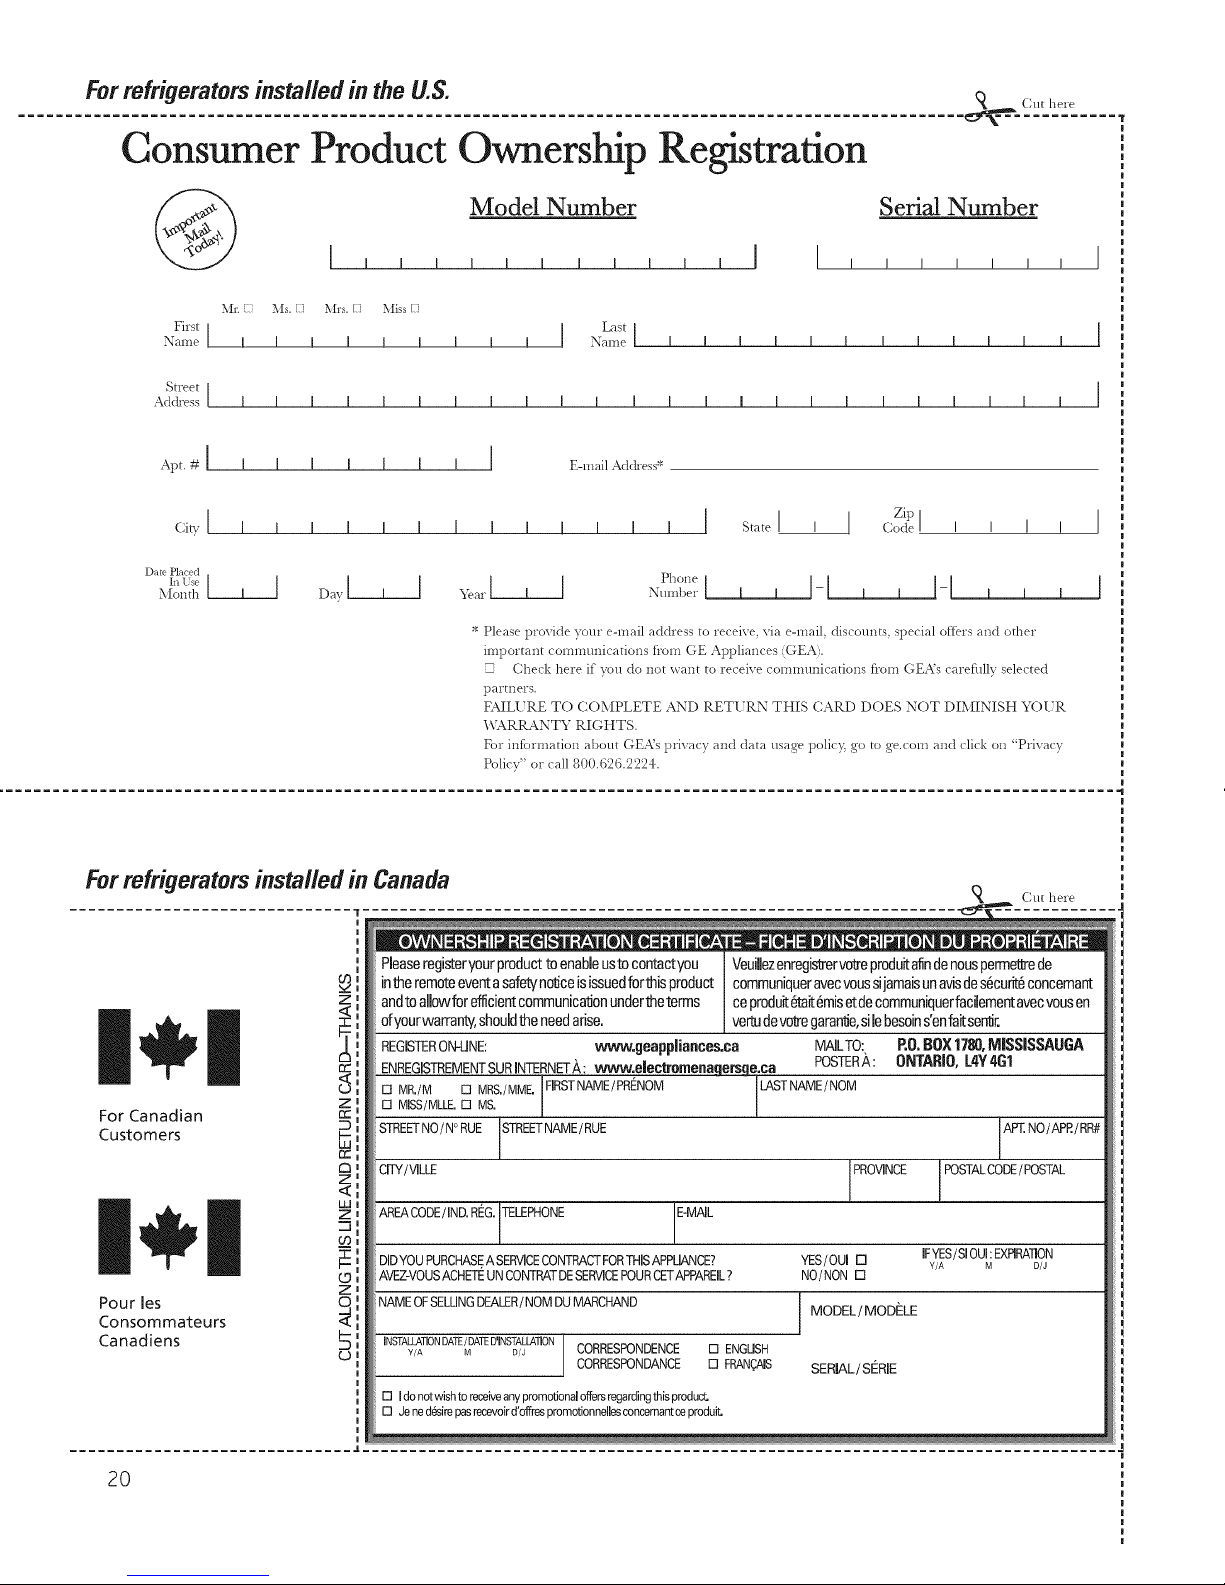
Forrefrigeratorsinstalledin theU.S. R c.there
Consumer Product Ownership Registration
@
Model Number
,,,,,,,,,,,I I,
Serial Number
! ! ! ! !
Mn } Ms. [;] Mrs. [;] Miss [;]
First[ I Last I
Name [ I [ I [ [ I [ [ Name [ I [ [ I [ [ [ I [
Street [
Adch'ess [ ! [ [ [ [ ! [ [ [ [ [ [ [ ! [ ! [ [ [ ! [ [
Apt. # [ I ! I ! ! [ I [ E-rl]ail Address*
(;it?,, [
Date Placed
In l_se [
_{oi]th __
I i ZipI
I J I i I I I I I I I I Statei I ! Code I I ! !
Davl ' I arl' I Pho, e
, N,,mt er[ 1 1-[ l 1 1-[
* Please provide your e-mail address to receive, via e-mail, discounts, special offers and other
important communications from GE Appliances (GEA.
Check here if you do not want to receive cornmunications from GEA's carefldly selected
partners.
FAILURE TO GOMPLETE AND RETURN THIS CARD DOES NOT DIMINISH Y()UR
WARRANTY RIGHTS.
For information about GEA's privacy and data usage polic_,; go to ge.com and click on "Privacy
Policy" or call 800.626.2224.
Forrefrigeratorsinstalled in Canada
.............. R,R___.__=c_:2LI_LL___
Z
Z
For Canadian _:
Customers
C3
Z
(9
Z
Pour les O,
Consommateurs <
Canadiens
c)
Pleaseregisteryour product to enableusto contactyou
inthe remote eventasafety notice isissuedforthis product
andto allowfor efficientcommunication undertheterms
ofyour warranb/,shouldthe need arise.
REGISTERON-UNE: wvvvv,geappliances,ca MAILTO:
ENREGISTREMENTSURINTERNETA:www.electremenagersqe.ca POSTERA:
[][3MISS/MLLE.MR'/M[][]Ms.MRS'/MME'FIRSTNAME/PRI_NOM LASTNAME/NOM
STREETNO/ N°RUE STREETNAME/RUE
CITY/VILLE
Veuillezenregistrervotreproduitafindenouspermetlrede
communiqueravecvoussijamaisunavisdes@urit6concemant
ceproduit6tait_misetdecommuniquerfacilementavecvousen
vertudevotregaran_e,silebesoins'enfaitserdr.
P.O.B0X 1780,MISSISSAUGA
ONTARIO,L4Y4G1
APE.NO/APR/ RR#
PROVINCE POSTALCODE/POSTAL
AREACODE/ IND.REG.]TELEPHONE ]E-MAIL
DIDYOUPURCHASEASERVICECONTRACTFORTHISAPPLIANCE? YES/OUI [] IFYES/SIOUI:EXPIF1ATION
Y/A M D/J
AVEZ-VOUSACHETF2UNCONTRATDESERVICEPOURCETAPPAREIL? NO/NON []
NAME OFSELLINGDEALER/ NOM DU MARCHAND [ MODEL/MODELE
SERIAL/SERIE
INSTALLA]IONDATE/DA_ D'INSTALLA]ION
Y/A M D/J CORRESPONDENCE [] ENGUSH
CORRESPONDANCE [] FRAN_AIS
[] Ido notwishto receiveanypromotionaloffersregardingthisproduct,
[] Jened_sirepasrecevoird'offrespromotionnenesconcemantce produit.
2O
Page 21

RefrigeratorWarranty. (For customers in the United States)
All warranty service provided by our Factory Service Centers,
or an authorized Customer Care ®technician. To schedule service,
on-line, 24 hours a day, visit us at ge.com, or cal! 800.GE.CARES
(800.432.2737).Please have serial number and model number
available when calling for service.
Staple your receipt here.
Proof of the original purchase
date is needed to obtain service
under the warranty.
GEWill Replace:
GEandGEPROFILEMODELS:
OneYear Anypartof the refrigerator which fails dile to a defect in materials or w(_rlmlanship.
Fromthe dateofthe During d_is limited one-yearwarranty, GE will also provide, free of charge,_dllabor and
originalpurchase related self'ice to replace the defective part.
Thirty Days
(Waterfilter, ifincluded)
Fromthe original
purchasedateof
the refrigerator
Any part of the water filter cartridge which fails due to a defect in materials or worl_nanship.
During this limited thirty-day warranty, GE will _dso provide, free of charge, a replacement water
filter cartridge.
GEPROFILEMODELSONLY:
FiveYears Any part of the sealed refrigerating system (the compressor, condenser, evaporator
(GEProfile models only) and al] connecting tubing) which flails due to a defect in materials or worl_nanship.
Fromthe date of the During this limited five-year sealed refrigerating system warranty, GE will also provide,
origina! purchase free of charge, _ labor and related sen'ice to replace the defective part in the seeded
refrigerating system.
Service trips to your home to teach you how to use
the product.
Improper installation, delivery or maintenance.
Failure of the product Kit is abused, misused, or used for other
than the intended purpose or used commercially.
Loss of food due to spoilage.
Replacement of house fuses or resetting of circuit breakers.
Damage caused after delivery.
Replacement of the water falter cartridge, ifinduded, due to
water pressure that is outside the specified operating range or
due to excessive sediment in the
water supply.
Replacement of the light bulbs, if included, or water filter
cartridge, ifinduded, other than as noted above.
Damage to the product caused by accident, fire, floods
or acts of God.
Incidental or consequential damage caused by possible defects
with this appliance.
Product not accessible to provide required service.
EXCLUSION OF iMPLiED WARRANTIES--Your sole and exclusive remedy is product repair as provided in this
Limited Warranty. Any implied warranties, including the implied warranties of merchantability or fitness for a
particular purpose, are limited to one year or the shortest period allowed by law.
This warranty is extended to the original purchaser and any succeeding owner for products purchased for home
use within the USA. Ifthe product is located in an area where service by a GEAuthorized Servicer is not available,
you may be responsible for a trip charge oryou may be required to bring the product to an Authorized GE Service
location for service. In Alaska, the warranty excludes the cost of shipping or service calls to your home.
Some states do not allow the exclusion or limitation of incidental or consequential damages. This warranty gives
you specific legal rights, and you may also have other rights which vary from state to state. To know what your
legal rights are, consult your local or state consumer affairs office or your state's Attorney General.
Warrantor: General Electric Company.Louisville, KY40225
21
Page 22

iNSTRUCTiONSIMPORTANTESDESECURITE.
USEZTOUTESLESiNSTRUCTiONSAVANT
f f
D'UTIUSERVOTREREFRIGERATEUR.
A
N'utilisez cet appareil qu'aux fins pr@ues dans le pr@ent Manuel du propri6taire.
MESURESDESECURITC
Pour utiliser un appareil 61ectrom@ager 61ectrique, vous devez prendre des mesures de s6curit6, en
particulier :
\7ous devez bien installer et placer votre rdfrigdrateur,
confi)rmdment aux Instructions d'inst_dlation avant de
l'utiliser.
Ne permettez jamais atLx enfimts de grimper, de
monter, de se tenir ou de se pendre atLx &ag_res de
votre r_frig_rateur. Ils peuvent endommager
le rdfrigOrateur et se blesser s&ieuselnent.
Ne toud_ez jamais les surthces froides dens le
compartiment congdlation quand vos mains sont
humides ou mouilDes. \.}0tre peau peut coller _tces
surt_aces extr&inelnent froides.
Ne consenez jamais ou n'utilisez jamais d'essence ou
d'autres liquidcs ou gaz inflammables _ proximitO de
votre rdfrigdrateur ou de tout autre appareil
dlectromdnager.
Din> les rdfrigdrateurs qui ont des machines
_tgla{:ons, &'itez tout contact avec les dKments mobiles
du m_canisme d'_jection ou avec l'_l&nent dmuflimt
siuK _tla partie inf&ieure de la mad_ine _t glwons. Ne
mettez jamais ,,'cosdoigts ou vos mains sur le
mdcanisme de thloricadon automadque de glagons
qum_d le rdfrigdrateur
est branded.
Ne laissez jamais vos doigts dam des endroits
o{l ils risquent d'&re pincds, g'dcartement entre les
portes et l'armoire est ndcessairement petit. Faims
attention de fermer les portes quand des enfimts se
trouvent _tproximit&
D_brm_chez votre r_frig_rateur avant de
le nettoyer et de le r@arer.
NOTE:N0usv0usrec0mmand0nsf0rtementde faire
accomplirtout serviceparun teclnnicienqualifiO.
: Lorsque vous rdglez la commande sur 0 ;err&),
l'alimentation dlectrique de l'ampoule n'est pas
couple.
Ne recongelez jamais des aliments congeKs qui ont
complbtelnent ddgel&
A
BONNEMISEAUREBUTDEVOTRERI2FRIGC:RATEUR
Uenfermeinent et l'asph)_e des enfimts ne sont pas des
histoires du pass& Les rdfrigdrateurs jet, sou
aloalKlOllll_S SOllt totljours dangereux... Ii1_ille s'ils ne
doivent rester llt que <<tuelques jours>>.
Si vous vous ddbarrassez de votre vietLx rdfrigdrateur,
suivez les instructions suivanms
pour prdvenir tout accident.
Avant dejeter votre vieu× refrigerateurou
congelateur :
E_]evez lesportes.
Laissez les clayettes en place, pour &'iter que des
entrants puissent t_adlelnent grimper et se tenir dans
votre rdfrigOrateur.
Refrigerants
Tousles appareils de r_frig@ation contiennent
des r4frig@ants qui, confi0rm4ment at_x lois f&14rales,
doivent &re enlevds avant route dlimination de
l'appareil. Si vous vous ddbarrassez de vieux appareils
de rdfrig@ation, vdrifiez, auprOs de la socidtO qui
s'oco_pe de leur dlimination,
ce que vous devez thire.
22
Page 23

iNSTRUCTiONSIMPORTANTESDESECURiTE.
USEZTOUTESLESiNSTRUCTiONSAVANT
D'UTILISERVOTREREFRIGERATEUR.
vvvvw.electromenagersge.ca
A
BRANCHEMENT12LECTRIQUE
Ne coupez ou n'enlevez jamais, en n'importe quelles conditions, la troisi6me broche (mise _ la terre) de
votre cordon d'alimentation. Pourvotre s6curit6 personnelle, vous devez bien mettre _ laterre cet
appareil 61ectrom6nager.
Le cordon d'alimentadon de cet apparel] est mtmi d'une
ridge _Ltrois broches {])ipolaire avec terre) cirri se met darts
une prise inurale _ttrois trous (bipolaire avec terre), pour
rdduire le risque de secousse dlectrique occasionnd par
cet appareil.
Fakes vdrifier la prise murale et le drcuit
dlectrique par un dlectricien qualifid pour vous assurer
que ]a prise murale est bien raise _t]a terre.
Si vous avez tllle prise illtlrale 2t detbx broches seulement
(sans terre), vous &es personnellelnent responsable et
obligd de la thire relnplacer par une bonne prise murale
avec terre, bien raise _tla terre.
\.})us devez toujours brand_er votre rdfrigdrateur _tsa
propre prise dlectrique, qui dolt avoir un vokaoe
correspondant _tcelui de la plaque sig_Ndtique de votre
rdfrig@ateur.
Le rendement de votre rdfrigdrateur sera meil]eur et
vous &'iterez ainsi de surdmrger les circuits dlectriques et
de surchaufl'_r le cdtl)lage de votre maison, et &'iterez
ainsi tout risque d'incendie provoqud par des chbles
surchauff_s.
Ne ddbrand_ez jamais votre r_frigdrateur en
tirant sur le cordon d'a2timentation. Tcnez toujours la
fld_e fcrmement et enlevez-la de la prise en tirant droit.
R@arez ou relnplacez imm&liatement tout
cordon d'alimentation usd ou endommag& N'utilisez
jamais de cordon fissur_ ou usd
sur sa ]ong_leur ou _t]'une de ses extr@nit_s.
Pour dcarter votre rdfrigdrateur du tour, fidtes attention
dene pas dcraser ou d'endommager
le cordon d'_dimenmdon.
UTILISATIONDERALLONGESI_LECTRIQUES
Nous vous recommandons fortement de ne pas utiliser de rallonge 61ectrique,_ cause d'un danger de
risques possibles de s6curit6 dans certaines conditions.
Cependant, si vous devez absolument udliser un cordon rallonge d]ectrique, i] est absolmnent requis que vous
udlisiez un cordon rallonge trifilaire, avec raise _ ]a terre, certifi4 UL (aux t_tats-Unis) ou ACNOR (au Canada),
avec prise et ridge _ttrois conducteurs, et _tnotation 4]ectrique de 15 amp4res ininimum) et 120 vohs.
LISEZETSUIVEZSOI6NEUSEMENTCESMESURESDES¢:CURITI2.
CONSERVEZCESINSTRUCTIONS
23
Page 24

Boutondecommandodelatemperature.
Tournez le bouton _ la position OFF pour arr_ter le refroidissement dans les deux compartiments r6frig6rateur et
cong61ateur, mais cela ne coupe pas I'alimentation du r6frig6rateur.
Recommened
factory setting Coldest setting Warmest setting
Clayettesducompartimentrefrig6rateur.
Les clayettes se placent _ diff6rents niveaux vous permettant de personnaliser I'espace de rangement.
Toutes les carac%ristiques ne sont pas disponibles sur tous les modules.
rT]Relevez
Clayettes demi-largeur
I.jn c6t4 de ]a cla):ette repose sur
le support moul4 darts la cloison lat4rale; un
support de Fautre c6t4 permet d'accrocher
la clayette darts un rail
de ]a c]oison arri_re.
Pour enlever la ciayette, relevez-la _t]"avant
et redrez-la (tt5 support et (lt5rail.
Pourremettrela clayette,s{lectionnez
la hauteur d_sir_e. Relevez Kgarement
la clayette _tFaxant, fixez le crochet
sup_rieur darts le rail, puis abaissez
la clayette sur le support.
REMARQUE: Laclayette8 droitedu railest
cowue pours'accrocherdansI'encochede droite:
la clayette8 gauchedu rail est conguepour
s'accrocherdansI'encochedegauche.
Tire>laveI'avant
Pour enlever les clayettes
pleine largeur
24
Clayettes pleine largeur
Certains modules poss_dent une clayette
coulissante m&allique, une clayette en verre
tremp_e fixe, une clayette anti-d_versement
ou deux clayettes fixes m&alliques. \'_us
pouvez d_placer
ces clayettes _tun autre endroit du
compartiment rdfrigdrateur.
La clayette coulissante pleine largeur poss_de
des buttes. Lorsqu'elle est plac{e
correctement sur ses supports, la clayette
s'arr&era aux but{es et ne sortira pas
compl_tement du r_frig_rateur, et ne
s'inclinera pas si vous y placez ou enlevez de
la nourriture.
Relevezi!arri_re
Tirez-lavers I!avantet vers le bas compl6tement
Pour enlever uneclayette
pleine largeur Iorsque la porte
du compartiment rafrigarateur
ne peut pass'ouvrir
Page 25

Clayettes du compartimentcong61ateur.
Clayette etagee
Pourenleverla clayetteetag6e:
F_ elevez ]_g_rement le c'6t_ gauche de
la clavette.
F_ _placez ]a c]avette vers ]a gauche pore" ]ib&'er son
c6t_ &'oit des trous de la c]oison de la c_isse.
wvvvv.electromenagersge.ca
F_ baissez le c6t6 droit de la clayette d6placez-la vers la
droite pour l_e_lleve_:
illi_ _i i_
Pourremettrela clayetteetageo•
La c]ayette _tant hx']h_e comme il est illustI"_ sur 1_4
figllre, ins&'ez ]es extz'_mit_s gauches de ]a c]aydte
darts ]estrous de ]a c]oison de ]a caisse.
Relevez ]6g6rement le c6{6 gauche de la clayette,
relevez-]a et H_s_rez ]es extr_mit_s droites de ]a c]avette
darts ]es trous de ]a c]oison de ]a caisse. Abaissez la
c]ayette pour la mettre en place.
Bacs de rangement.
Toutes les caract6ristiques ne sont pas disponibles sur tous les modules.
Bacs a legumes et afruits
Lorsque ]'eau s'accumule au t}_)nddes bacs, videz-les et
essuyez-les.
Bac a collation
Le bac _lcollation peut _tre plac_ Ptl'emplacement c]Ln
comdent le mieux aux besoins de votre tilmllle.
Enlevementdubacde rangementet ducouvercle.
Toutes les caract6ristiques ne sont pas disponibles sur tous les modules.
_ ii_ _i _ i_ iii i_
ij ¸ _ i
Bac a legume a humidit6 reglable (surcertains modules)
Faites glisser ]e r_glage en posidonHIGH(elevee)pour Faites glisser ]e r_glage en posidonLOW(basso)pour
obtenh" ]'humidit6 ma_mum qui est recommand6e pour la obtenh" ]'humidit6 mh_im_gn qui est recommand6e pour la
plupart des 16g'umes. plupart des fi'uits.
Enlevement du bac de rangement et du couvercle
Vous pouvez on]ever t_cilement les bacs en relevant l_g_rement les c6t_s lorsque le bac d_passe la position
de butte stop.
i ¸
ii iiii ' i i/ i!ii il
iiiii_i_ iiiii_il_Ii!ii_i
Bac pleine largeur avec couvercle en plastique
Pourenleverle couvercle,sou]evez-lede sessupports,
th'ez-le vezs l'avanL {nclinez-le pour Ue_fleven
25
Page 26

Enievementduhac derangementet ducouvercie.
Toutes les caract6ristiques ne sont pas disponibies sur tous les modules.
' Ciayette du hac double
Pourenlever les bacs"
i
_ Enlevez les deux bacs.
[2--]Relevez l'avant du couvercle en verre
par-dessous et en m&ne temps, tirez-le
vers l'avant aussi loin que possible.
Inclinez-le et enlevez-le, t_vitez de nettoyer le
couvercle en verre froid avec de l'eau
chaude, car la grande difference de
temperature peut le briser.
[_] nlevez le cadre du bac (enlevez toujours
le couvercle en verre avant d'enlever le
cadre).
Soulevez le cadre des supports de chaque
c6td et derribre, tirez-le vers l'avant. Inclinez-
le pour le retirer.
Pourremettreles bacs :
E_ lacez le cadre pour qu'il repose
sur les supports de chaque c6td
et derribre.
--] emettez le couvercle en verre, appuyez
fcrmement le bord arri_re darts la
rainure arri_re du cadre et abaissez
doucement le devant du couvercle pour
le mettre en place.
[_] Rcplacez les bacs.
Machinea gia onsautomatique.
Un r6frig6rateur nouvellement install6 prend de 12/_ 24 heures pour commencer/_ produire des gla_ons.
Lebras
Lebras pa!peurest
palpeuresten enposttt0n.,.(
position ON al,ur }a[re!!
{marche)en en nau-[
bas
26
Machine a gla_ons automatique
(sur certains modiHes)
La machine fl g'lac'ons produit sept glacons par
cycle, environ 100 fl 130 glacons par
24 heures, selon la teml)_rature du compartiment
cong61ation, la teml)_ratule de la piece, le hombre
de fois que la porte est ouverte et les autres
conditions d'utilisation.
Si vous _dtes fonctionner le r_fiig_rateur avant cle
raccorder l'eau fl la machine fl glacons, amenez le
bras palpeur en position STOP(roT& en haut.
A1)r_s av{_ir raccord_ le r6fiig_rateur fl
l'alimentation d'eau, amenez le bras pall)cur en
position ON imarche) en has.
\:}_us entendrez un bourdonnement chaque finis
que la machine fl glacons se remplit d'eau.
La machine fl glacons se remplit d'eau
quand elle atteint 15°E Un r_fiig6rateur
nouveUement hlstaU_ prend de 12 fl 24 heures
pour commencer fl pro&fire des glacons.
Jetez les premiers lots de glacons pour permettre fl
la conduite d'eau de se t)urgel:
Assurez-v()us que rien ne g&_e la course du bras
pall) era:
(_uand le bac se feral)lit jusqu'au niveau du bras
pall)era; la mad_h_e fl glacons s'arr&e de produire
des glacons.
I1 est normal de trouver des glacons qtfi soient
soud_s ensemble.
Si vous n'ut_isez pas souvent vos glac;ons,
les vietLx g'lac'ons deviennent opaques, prennent
un mmlvais goflt et r&r_dssent.
NOTE : Dans les maisons qui ont une pression d'eau
plus faible que la moyenne, vous pouvez entendre la
machine a gla#ons recommencer plusieurs lois son
cycle pour produire une livraison de glagons.
Trousseaccessoire de machinea gla£ons
Si votre r_fiig&ateur n'est pas cl6jfl &tuit)_ d'une
machine fl glacons automatique, vous pouvez
acheter une trousse accessoire cle machine fl
glac;ons.
V&ifiez deni_re votre r_fiig&ateur le module de
trousse fl glacons clue vous devez acheter pour
votre r_fi_ig_ratem:
Page 27

Soinsetnettoyagetie votrereffig6rateur. ,v .e,eotrome,agersge.oa
Nettoyagede I'e×terieur
Lespoigneesde porteet lesgarnituresisur certains mod_les).
Nettoyez avec un linge trelnpd dans de l'eau savom_euse. S&:hez
avec un linge doux.
Conserve;' I'exterieur pro[are. Essuyez avec un lh_ge propre
l_gOrelnenthumect0 de cire k appareil dectrom&mger ou de
d&ersif liqtfide _tvaisselledoux. Sdchez et polissez avec m_ linge
doux, propre.
Vouspouveznettoyerles panneau×et les poigneesde porteen
acier ino×ydable{surcertains mod_les);wec un nett%wnt d'acier
inoxydable vendu sur le martin& N'utilisez pas de cire pour
appareils m_nagers sur Fader inox-,_lal_le.
N'essuyezjamaisv0trerdrigerateuravecunt0rch0nsale0uune
serviettemouillee.Celapeutlaisserunresiduquirisqued'endommager
la peinture.N'utilisezjamaisdetampon8 recurer,denettoyanten
poudre,d'eaudejaveloudeproduitnettoyantcontenantunagentde
blanchiment,carcesproduitspeuventrayeret endommagerlapeinture.
Nettoyagede I'interieur
Pouraidera emp_cher les odeurs,laisseztreebolteouvertede
bicarbonatedesoudedarts]escompartimentsr_frig&adon et
congdlation.
D_}branchezvotrereMg6rateuravantde le nettoyer.
Si ce n'est pas pratique, enlevez toute hmnidit0 au moyen d'une
@onge ou dhm dflflbn pour nettoyer autour
des commutateurs, des lumi_res ou des r_glages.
Udlisez une solution d'eml chmlde et de bicarbonate
de soude 15 ml (soit une ofilDre k soupe environ) de bicarbonate
de soude darts 1 litre (soitune pinte) d'eau). Cette solution nettoie
tout en neutralisant les odeurs. Rincez et sdd_ez en essu?vmt.
Apr&savoir nettoy{ lesjoints de porte, appliquez une mince
coud_e de vaseline sur lesjoints du cStd charni_res afin de les
elnpacher de coller et de se d0tbrmer.
Evitezdenettoyerlesclayettesfroidesenverre(surcertainsmodeles)
I'eauchaude,parcequ'ellesrisquentdesecasser8causedelagrande
differencedetemperatures.Manipulezavecsoinsleverre.Vouspouvez
brisereneclatsleverretrempeenleheurtant.
Nelavezaucunepieceenmatiereplastiquedevotrerdrigerateurdans
votremachine8 laverlavaisselle.
Le condenseur
\.}ms n'avez pas besoin de nettoyer ,_
souvent le condenseur en milieu
domestique normal. Cependant, en
milieu particuli_rement gras ou
poussi&eux, vous devez nettover Nettoyagedu serpentin
p&iodiquement le condenseur ducondenseur.
pour obtenir m_ fimctionnelnent et_cace de votre r_frig&ateur.
Pour nettoyer le condenseur, tournez le bouton de commande de
la telnp&amre _t0. Enlevez la poussi_re _tl'aide d'un balai ou
d'un aspirateur.
Pour obtenir de boris rdsuhats, udlisez une brosse spdciNieinent
con_:ue g cette fin. \,_msla trouverez en vente darts la plupart des
magasins de pi_ces d'appareils dlectromdnagers.
[:cartement du refrigerateur
Faitesattention quand vous &:artezvotre rdfrigdrateur
&l tour. \,_mspouvez endommager votre rev&ement
de pland_er, en particulier s'il est matelassd ou s'ila
tree surfitce en relief.
Tournez los pieds de nivellement _tdmque coin avant
&l rdfrig&ateur vers la gauche pour que les roulettes supportent
le poids du rdfrig&ateur. Tirez le rdfrig&ateur en lig_e &oite et
remettez-le en place en poussant en ligne droite. Vous pouvez
endommagerle rev_tementde plancher
ouvotrer_}frigerateuren le depla{;antlateralement.
Lorsquevousremettezenplacevotrerdrigerateur,assurez-vousde
nepasleroulersurlecordond'alimentationoulaconduited'eaude
lamachine8 gla_ons(surcertainsmodeles).
Apr&savoir remis le rdfrig&ateur en place en le faisant roulel;
tournez los pieds vers la droite pour qu'ils supportent de nouveau
le poids du rdfrig&ateur.
Remplaceme_t de I'ampoule
Pour remplacer une ampoule gTillde, d0brand_ez
le rdfrig&ateur, d&_issez l'ampoule apr_s l'avoir laissd refroidir et
relnplacez-la par une ampoule pour appareil dlectromdnager de
puissance identique ou moindre.
Lefait detournerlacommandedetemperature80necoupepas
I'alimentationelectriqueaucircuitdeslampes.
Preparation de depart en vacances
Pour de longues vacances ou absences, enlevez tous yes aliments
et ddbrand_ez votre rdfrig&ateur. Mettez le bouton de
commande de la temp&amre en position 0 et nettoyez l'int&ieur
avec tree solution de bicarbonate de soude, de
15 m115me ofilDre g soupe) de bicarbonate de soude pour 1 litre
;une pinte) d'eau. Laissez los portes ouvertes.
_-Mnenezle bras paJpeur en position STOP(arr&0 en haut
etfermez l'alimentation d'eau du rdfrigdrateur.
Si la temp&amre risque de descendre en dessous du point de
congdlation, delnandez _tun technicien qualifid de purger votre
systclile d'alimentation d'eau (stir certains modOles) pour
elnpOd_er des inondations pouvant occasionner des d0gfits
sdrieux.
Preparationde demenagement
FLxezen place routes lospiOcesmobiles, comme la grille,
les clayettes et les tiroirs, _tl'aide de ruban adh&if, pour elnp&d_er
tout dommage.
Assurez-vousquevotrerefrigeratedsoitenpositiondroitependant
ledemenagement.
27
Page 28

instruct" d'instaliation
Si vous avezdesquestions,appelez le 1.800.561.3344o, visitez,lotresiteWe__:_l'_dresse:
www. electromenagersge, ca
AVANT DE COMMENCER
Veuillez lire toutes les directives attentivement.
IMPORTANT -
• COllSel_ez ces
instructions pour l'inspecteur local.
• IMPORTANT - a spectezroutes
les ordonnances et les codes locaux.
• Note _ l'installateur - Assu_ez-vousdelaisser
ces instructions au coI1soIllllla[cuE
• Note au consommateur - Conservez
ces instructions pour rdfdrence filulre.
• Niveau de comp$tence Uinstallation de cet appareil
ndcessite des compdmnces mdcaniques de base.
• Temps d'installation Installation du rdfrigdrateur :
15 nfinutes
Inversion du sens d'ouvermre
des portes :
1 heure
• Uinstallateur est responsable de bien installer
ce r4frig4rateur.
• Toute panne du pro&fit &:ett une mauvaise installation
n'est pas couverte par la garantie.
ALIMENTATiON D'EAU DE
LA MACHINE A GLA!_ONS
(SUR CEFITAiNS MODELES)
Si votre rdfrigdrateur a une madfine _Lglwons , il tint
le brandler _tune conduite d'eau froide. \.}ms pouvez acheter
une trousse d'Nimentation d'eau GE (contenant la tuyauterie, le
robinet d'arr&, les joints et les instructions) chez votre revendeur
OU ell vous adressant
_tnotre site X\;eb _tl'adresse _x_x_xcelectromenagersge.ca
ou _tnotre sela_ice de Pibces et accessoires au nmndro
de t4l@hone 1.800.661.1616.
EMPLACEMENT DU REFRIGERATEUR
N'installez jamais votre rdfrigdrat_ur dans un emplaceinent off
la tempdramre ambiante sera infOrieure _L16°C (60°E. I1ne se
mettra pas en mardle sufl_samment souvent pour maintenir
des tempdramres convenables.
• InstalJez votre rdfrigdrateur sur un plandler sttffisamment
solide pour le porter lorsqu'il est plein.
DI_GAGEMENTS
Pr&,oyez les ddgagements stfivants pour thciliter l'installadon, la
bonne circulation d'air et los raccordelnents de pbmberie et
d'dlectricitd.
• Cdt_s : !9 mm (3/z, po)
" Dessus : 25 mm (! po)
• Arribre : 50 mm (2po)
ROULETTES ET PIEDS
DE NIVELLEMENT
Les pieds de niveHement situds _Lproximitd des coins avant
du r_frig_rateur sont rdglables. Ils maintiemlent fermement
le r_frig_rateur en place et l'elnpachent
de bouger lors de l'ouvermre des portes. Les pieds
de nivellement doivent &re r_gl_s de sorte que l'avant du
rdfrig_rateur soil suffisamment relev_ pour que
les portes se ferment thcilement lorsqu'elles
se trouvent _tmi-parcours.
Tournez les pieds de nivellement versla droile pour relever
le rdfrigdrateur, vers la gauche pourrabaisser.
Les roulettes situdes _tproximitd des pieds
de nivellement vous permettent de ddplacer
le rdfrigdrateur du tour pour le nettoyage.
Tournez les pieds vers la gauche jusqu'_L ce que
le poids du rdfrigdrateur soil transfdrd sur les roulettes.
Apr_s avoir relnis le rdfrigdrateur en place, tournez
les pieds vers la droite jusqu'_t ce qu'ils supportent
le poids du rdfrigdrateur.
28
Page 29

instructions d'instailation
iNSTALLATIONDELACONDUITED'EAU{suRCERTAINSMODELES)
AVANT DE COMMENCER
Nousrecommandonslestroussesd'alimenta6ond'eau
en cuivrex\xgx2, x\xgx3, x\xgx4, selonlemontant de con&rite
dont yore avezbesoin.Nousapprouvonslescon&ritesd'eauen
ma6_replas6queGE SmartConnect" Rcfi'igeramrTubing
iXLN_{}gxIo006,X\_{}gxIooI5 et X\_{}gXlO025].
Sivousinstalleztmsvst&ned'eau GE ReverseOsmosis&ms
votrcrdfi'ig_ratcur,la seuleinsmlla6onapprouv&est celle
de latrousseGE RVKIT.Pour lesautrcssvst&nesd'osmose
de l'eau,suivezlesrecommm]da6ons&sfi{bricmm
Cettcinstallationde conduitcd'eau n'es_pas gm'an6epro"
lefid)ricantderdfi'igdratcurou de machine _ glagons.Suivez
soignemementces insmlcfionspour minimiserlerisque de dommages
on&euxd'inonda6on.
Lescoupsde bdier .cau Cliffdonne descoups&msles myatLx)dans la
mvautcriedelamaisonpeuventoccasionnerdesdommagesatLxpiaces
devotrcrdfi'ig_ratcur,ainsique desfifitcsoudesinonda6ons.A1)pelez
un plombier certifidpour corrigerlescoupsde bdlier avantd'insmller
lacon&rited'emsde votrc rdfi'ig_ratctm
Pourpr&enir mute brfflureet mu_dommage £_votrcrdfi'ig_ratcur,ne
bran&ez jmnaislacon&rited'emsit
une canalisationd'eau chaudc.
Sivousudlisezvotrcrdti'ig@atcuravant de brancher la conchfitcd'ems,
assurez-vousde hisser lebras p_@euren positionSTOP(arr&)enhmm
N'instaUezjmnaislesmvauxde lamachine it glagondin>
desendroitsofflatcmpdraatrerisquede descendreen dessousdispoint
de congda6on.
Sivousudliseztm oudldlectrktue{commeuneperceusedlectricttm)
pendant l'insmUa6on,assurez-vousque l'isolementou le cCd)lagede cet
oudl esnp_dleroutdmlgerde secoussedectrique.
\bin devezprocdderitmumsvos installationscontbrmdment
msxesgences de votrcco& localde plomberie.
CE DONT VOUS AUREZ BESOIN
• Tuyaux en cuivreou rousseGE SmartConnectTM Refrigerator
Tubing, diam+trcext&ieurdc 1/4 po pour bran&er
lerdfi'igdratcuri_12dimenta6ond'emLSi vousudlisezun mvau
en cuivre,assurez-vousque lesdettx extr(_mit&dismvau soient
coup&s bien droit.
Pourtrouverla longueurde mvmsdont vousaurezbesoin: mesurezla
distancequi va &srobinet d'emssiredderriare
lerdfi'ig_ratcurjusqu'aumvaud'alimenta6on d'eau. Ajoutcz
2,44m (8pieds).Assurez-vomqu'ily air assezde mvauen trop
.environ2,44m [8 piedq enroul&troisIbisen cerclesd'elMron 25cm
[10pq & diamatrc' pourvouspermettrc
de d&ollerle rdfi'ig_ratcurdis tour aprasl'instalhfion.
LestroussesGE SmanConnecP Rcfi'igeramrTubingsontdisponibles
danslesdimensionssuivantcs:
1,8 m(6 pi) _\%08X10006
/4,6m(KSpi) X\XO8XlO015
7,6 m(25 pi) X\X{}8XIO025
29
CE DONT VOUS AUREZ BESOIN
(SUITE)
Assurez-vousquevotrc trousseairau moins2,4m (8piedslcomme
indiqudci-dessus.
NOTE : Ds seulstuyauxen matihreplastiqueappmuv&par GE sont
ceux quifont foumisdans lestroussesGE SmartConnectTM
RefrigeratorTubing. N'ufilisezjamais un amre myau en mati&e
plasfque, car le myaud'alimentafiond'eau esttoutle tempssous
pression.Certainescategoriesdetuyaux en mati&eplastiquepeuwmt
devenircassantsavecPggeet peuventse fendre,en occasionnantdes
dommagesd'inondationdans
votremaison.
• Vouspouvezacheterune voussed'alimentafiond'eau GE
.contcnantun tuyau,tm robinetd'arr& et lesjointsdntundr&ci-
dessouslchezvotrcdistributcurlocalou en le commm_dantau
senicede pi_cesetaccessoires,au 1.800.66l.1616.
"Une alimentationd'eau froide.La pressiondel'emsdolt&reentre
20et 120p.s.i.(1,4et 8,1 bar'.
• Une perceuse{lectrique.
• Une c!{de l/2po ou
une cl_az_se.
• Un toumevisAlameplateet
un toumm,'isPhillips.
• Deux &rous Acompressiond'un diarnfitreext&ieurde 1/4 po et
deuxbagues(manchons_pour brandler lemvauen cuivreau
robinetd'arr& et au robinet d'eau disrdfi'ig_ratcur.
OU BIEN
• Sivousudlisezune trousseGE SmanConnect" Rcfi'igeratorTubing,
lesgarnimresn&essairessontd@ montdesau mvmL
• Sivotrccmmlisa6ond'eau acmellea un raccorddwtsd
i_treeextrdnfit&vousattrezbesoind'un adaptateur (quevous
trouverezdansvotrcmagasinde mat&ielde plomberie)pour
bran&er le mvaud'eau au rdfi'ig_rateur,OU B[EN vouspouvez
couperleraccord&asd itl'aided'tm coupe-robe,
puisudliserun raccord itcompresdon.Nc coupezjmnaisl'extrdmitd
finied'tm mvaude la trousseGE SmartConnect" Rcfi'igeramr
Tubing
• Un mbinet d'arr&pour bran&er le myaud'eau fi'oide.
Lc robinetd'arr& doit avoirune entr& d'emsavecun diam&rc
int&ieurminhnalde 0,45 cm (5/32 po) mspoh_tdejoncfion avec
LA CONDUTFE D'EAUFROIDE. Desrobinetsd'arr& it&tier
sontsouventindus dans lestroussesd'alimentationd'emLAvant
d'achetcr, assurez-vousque lerobinet it &tier secontbrme itvos
codesdeplomberielocmsx.
Page 30

instructions d'installation
El iNSTALLATiON DE LA CONDUITE D'EAU (SUITE)
Installez le robinet d'arr& sur la canalisation d'eau potable la
plus frdquemment utilisde.
IT] FERMEZ L'ALIMENTATION
PRINCIPALE D'EAU ET
DI_BRANCHEZ LE REFRIGERATEUR
Ouxwezle robinet le plus proche en sens inverse
des aiguilles d'une montre suttisamment longtemps pour
puroer le tuyau.
[_ PERCEZ UN TROU POUR
LE ROBINET
Choisissez,pour le robinet, un elnplacelnent thcilement
accessible.Ii vaut mieux le brancher de cdtd _tun myau
vertical. Si vous devez ]e brancher
_ttm m}_mhorizontal, faites le brand_elnent en haut ou &
c6t_,plut6t qu'en bas du m>_m,pour &_iterde recevoir des
s&liments du uwau d'alimentation d'eau.
Pcrcez un trou de 1/4 po dans le tuyau d'eau,
_tl'aide d'un fi)ret &m Enlevez route barbure &m
au per_:age &l trou dans le ut?_m. Fakes attention
de ne pas laisser de l'eau couler dam votre perceuse
_lectrique. Si vous ne percez pas un trou de 1/4 po, vous
obtiendrez une alimentation d'eau rddtfite et
des gla_:ons plus petits.
[_ FIXEZ LE ROBINET D'ARRI_T
Fixez le robinet d'arr& au tuyau d'eau froide _t]'aide du
collier de serrage.
Serrez les vis du collier jusqu'g ce que la rondelle
d'dtanchditd commence _tenfler.
NOTE : Ne serrez pas trop. \.bus risquez d'dcraser
le tuyau de cuivre.
Collierde serrage
Vis duc011ie_
Robinetd'arr@_/' {
6trier
Rondelle
Entree
Tuyauvertical
d'eaufroide
NOTE : \.bus devez vous confi)rmer atLx Codes
de plomberie 248CMR du Commonwealth of
Massadmsetts. Les robinets d'arr& _tdtrier sont illdgaux et
leur utilisation n'est pas autorisde au Massachusetts.
Consuhez votre plombier local.
ACHEMINEZ LE TUYAU
Acheminez le tuyau du tuyau d'eau froide au rdfrig@ateur.
Faites passer le myau par tm trou percd darts le tour
ou le plancher (derribre le rdfrigdrateur ou au nNeau de
l'armoire de cuisine adjacente), aussi pr&sdu tour que
possible.
NOTE : Assurez-vous qu'il y ait assez de myau en
trop (environ 2,44 m [8 pieds] enroulds trois Ibis en cercles
d'environ 25 cm [10 po] de diam&re) pour vous permettre
de ddcoller le rdfrigdrateur du tour apr&s l'inst_dladon.
3O
Page 31

instructions d'installation
BRANCHEZ LE TUYAU AU ROBINET
Placez un dcrou de compression et une bague imand_on) it
l'extrdmitd du ulym et brand_ez-les au robinet d'arr&.
Assurez-vous que le ul?_m soit bien insdrd darts
le robinet. Serrez fiort l'&:rou de compression.
Pour le twau en matibre plastique d'une trousse
GE SmartConnecU Refrigerator Tubing, insdrez l'extrdmitd
moulde du myau darts le robinet d'arr& et serrez l'dcrou de
compression it la main, pttis serrez
un autre demi tour avec une rid. Si vous serrez trop fiort,
vous pouvez occasionner des fuites.
NOTE : \,bus devez vous cont_ormer atLx Codes
Ecroude
compression
Tuyau
SmartConnectTM
Presse-joint
Robinetdesortie -- Bague(manchon)
de plombefie 248CMR &l Commonweald_ of
Massachusetts. Les robinets d'arr& it dtrier sont illdgatLxet
leur udlisation n'est pas autorisde au Massadmsetts.
Constfltez votre plombier local.
I-g]PURGEZ LE TUYAU
Ouw:ez le robinet d'alimentation principale d'eau en sens
inverse des aiglfilles d'une montre et purgez le tuyaujusqu'it
ce que l'eau soit claire.
Fermez l'eau au niveau du robinet d'eau apr&sdcotflement
d'environ 1litre (1 quart) d'eau par
le tuyau.
BRANCHEZ LE TUYAU A VOTRE
RI FRIGERATEUR
NOTES :
" Avant de brand_er le myau k votre rdfrig_ratetm assurez-
vous que le cordon d'alimentation dlectrique &l
rdfrigdrateur ne soit pas branded it la prise murale.
• Nous vous recommandons de poser un filtre it eau
si votre alimentadon d'eau condent &l sable ou des
partictfles cirripeuvent boud_er la grille du robinet d'eau
de votre rdfrigdrateur. Inst_dlez-le sur la condttite d'eau
pros de votre rdfrigdratetm Si vous udlisez une trousse (-)E
SmartConnect _'_Refrigerator Tubing, vous aurez besoin
d'un tuvau, additionnel (1\'_208X ]0009__,.pour brancher le
filtre. Ne coupez jamais un myra en madbre plasdque
pour installer votre filtre.
Enlevez le couvercle d'acc&s.
Enlevez le capuchon en matibre plastique flexible du robinet
d'arr& d'eau (branchement du rdfrigdrateur).
Placez l'dcrou de compression et la bague (manchon)
O
it l'extrdmitO du myau comme l'indique l'illustration.
Si vous utilisez une trousse GE SmartConnect _'_Refrigerator
Tubing, les dcrous sont ddj_t asselnblds
au al?:tu.
31
Page 32

instructions d'installation
iNSTALLATiON DE LA CONDUITE D'EAU (SUITE)
[] BRANCHEZ LE TUYAU A VOTRE
R(---FRIG(---RATEUR(SUITE)
Insdrez l'extrdmitd &l myau darts le brand_ement
du robinet d'arr& d'eau, le plus loin que possible.
Tout en tenant le utyau, serrez le raccord.
Si vous udlisez un utyau en read,re plasdque d'une trousse
GE SmartConnec/"'_' Refrigerator Tubing, insdrez l'exgdmffd
mouKe du myau dans le robinet d'arr& et serrez l'dcrou de
compression _tla main, puis serrez un autrc tour avec ui,e
dd. Si vous serrez trop flort, vous pouvez occasionner des
fuites.
FLxez le myau au collet fimrni pour le tenir en position
verticaJe. I1 est possible que vous ayez _tdisjoin(ke
le collet.
Collet
tuyau
Tuyaude 0,63cm(1/4po)
Ecroude
compressionde
0,63cm(1/4po)
Collet
Branchement
Tu aurdrig6rateur
SmartConnectTM
Remettez le couvercle d'acc_s.
[_] BRANCHEZ VOTRE
Ri_FRIGi_RATEUR
Disposez la spirale de m}wu en cuivre de mani_re
_tce qu'elJe ne vibre pas contre l'arri_re de votrc
rdfrigdrateur ou contre le tour. Mettez votre rdfrigdrateur _t
sa place contre le tour en le poussant.
METTEZ EN MARCHE
LA MACHINE A GLA_ONS
Amenez le bras palpeur en position ON (inarche) en has.
La madflne _tgla_:ons ne se met en inard_e que lorsqu'elle
atteint une telnpdramre de t})i_ctiolmelner, t de 9°C (15°F)
OU I1]OillS.
Elle commence immddiatelnent _ttbnctionner.
,,/
......._ Lebras
_;_:_ palpeuresten
positionSTOP
Lebraspalpeur (arr6t)enhaut
estenposition
OR(marche)
enbas
NOTE :Si votre pression d'eau est trop thible,
le robinet peut serelnettre en marche jusqu'_t trois
ibispour envoyer suffismnment d'eau _tla machine
_tglas:ons.
[-87FERMEZ L'EAU AU NIVEAU
DU ROBINET D'ARRI_T
Resserrez tout joint qui flflt.
32
Page 33

instructions d'installation
B iNVERSiON DE L'OUVERTURE DES PORTES
NOTES IMPORTANTES
Pour inverser le sens d'ouverture des portes :
* Lisez toutes les directives avant de commencer.
*Manipulez les pibces avec prdcaution pour &_iterde rayer la
peinulre.
* Posez les visk cdtd des pibces correspondantes pour
ne pas les utiliser aux mauvais en(koits.
* Posez les portes sur un plan de travail qui ne risque pas de
rayer la peinture.
IMPORTANT : [ne ibis commencde votre inversion
du sens d'ouverture des portes, ne d@lacez jamais votre
rdfrigdrateur avant d'avoir terminal.
Ces directives s'applktuent _tl'inversion des charniares
du c6td droit au c6td gaud_e. Si vous voulez relnettre
les dmrniares _t&oite, suivez les m&nes directives en inversant
routes les rdfdrences aux c6tds gaud_e et droit.
OUTILS REQUIS
ToumevisPhillips
Ruban-cache
Tournevis_t6te deforce
T 20 ouT25,(n6cessaire
pourc6rtainsmod61es)
Tourne4crou_douillede5/16 po
Couteau_mastiquerou
tournevis_ lamemince
CI6ouvertede5/16 po
[I_-]AVANT DE COMMENCER
1.1 D4branchez le r_frig_rateur.
1.2 Videz tous les balcom_ets y compris le compartiment
hider.
ATFENTION : Ne laissez pas tomber la porte sur
le sol ce qui pourrait endommager la butte de porte.
33
[_]ENLi'-:VEMENT DE LA PORTE
DU CONGELATEUR
2.1 Maintenez la porte fermde avec du ruban
masquer.
2.2 _\ l'aide d'un tourne-dcrou hex. de 5/16 po, enlevez
les vis qui retiennent la charni&re supdrieure _tla
caisse.
2.3 Enlevez la charni_re en la soulevant pour libdrer
l'axe de charni_re du trou sur le dessus de la porte et
mettez-la de c6td avec ses vis.
2.4 Enlevez le ruban et inclinez la porte en l'4loig_mnt
de la caisse. Soulevez-la de l'axe
de charni4re centrale.
2.5 Placez la porte sur une surthce antiOgratig_mre avec
la surthce extOrieure vers le haut.
2.6 Transfdrez les 2 vis du c6td opposd de la caisse darts
les trous laissds libres par l'enlbvement de la
charni_re supdrieure.
Page 34

instructions d'installation
iNVERSiON DE L'OUVERTURE DES PORTES (SUITE)
_-I ENLI_VEMENT DE LA PORTE
DU REFRIGERATEUR
3.1 5iaintenez la por_c fermde avec du mban _Lmasquel_
3.2 ,\ l'aide d'un tourne-dcrou hex. de 5/16 po et d'une
cld ouverte de 5/16 po, enlevez les deux vis
maintenant la charni_re centrale _tla caisse. Rclevez
la charni_re centrale pour libdrer son axe du trou
au-dessus de la porte et mettez la charni_re et ses vis
de c6td. Assurez-vous de ne pas perdre la ronddle et
la piece d'espacement de la charni_re centrale.
3.5 Transfdrez les deux vis du c6td opposd de la caisse dans
les trous laiss_s libres par l'e_fl_vement de
la charnibre centrale.
3.6 Transfdrez la rondelie (si votre module en possbde une)
au cdtd oppose.
3.7 Prenez l'une des vis enlcvdes it l'&ape 2 et insdrez-la
dans le trou extdrieur du cdtd opposd. Ne l'insdrez pas
complbtement. Laissez suffisamment d'espace sous la
t_te de la vis pour pour l'@aisseur du support.
IJ
-______
3.3 EIflevez le ruban et inclinez la porte en
l'dloig_mntde la caisse.Rclevez la porte
de l'axe darts lcsupport de dmrniare inf&ieure
(sila rondelie en plastique colic au bas de la porte,
replacez-la sur la dmrnibre).
3.4 Placez la porte avec l'extdrieur vers le haut sur
une surt_ace anti_gratig_mre.
34
Page 35

instructions d'installation
[_ INVERSION DE LA QUINCAILLERIE
4.1 D@lacez le support de la charni4re inf4rieure
et ]a rondelle en plastique du c6t_ droit au c6t_ gauche.
d | Rondelleen
I plastique
-°4
bJ:
Support ,/!€'_ _
decharni6re
ChangezI'axedecharni6reau
c6t6oppositedela charni6re.
4.2 Intervertissez la charni_re et les vis dans le coin
sup_rieur droit avec les vis du coin sup_rieur gauche de
la caisse. Ne serrez pas les vis du c6t_
de la charni_re pour l'instant.
I
Installationdela charni6re Installationdela charni6re
gauche _ droite
REMARQUES :
Certaines charni&res possbdent quatre
trous. Les trous _tutiliser pour l'installation
de la charni&re d@endent du cdt6 o_l vous installez
la charniare.
Le bord ext_rieur de la charni_re doit
&re paralMe avec le bord de la caisse pour
une installation correcte.
INVERSION DES POIGNI_ES
DE PORTE
5.1
Transfert de la poignee de porte
du refrig@rateur
5.1.1 Enlevez le capuchon de la poignde 5 l'aide
d'un couteau _tmastic en pla_:ant la pointe,
qui a dtd recouverte de ruban, sous le bord
et enlevez la vis
qui se trouve en dessous du capuchon.
Enlevez les deux vis maintenant
la poig_de sur le dessus de la porte.
Dessus
Capuchon
5.1.3 Enlevez les vis du c6td droit du dessus de
la porte et insdrez-les dans les trous des vis
de poig_6e du cdt6 oppos&
5.1.4 EIflevez le Calmchon &l support de la charni@e sup@ieure
sur le c&4 gmld_e de la porte et ins_rez-le dans le trou
du cdt_ oppose, laiss_ libre par l'enl_velnent de la
charni_re sup_rieure.
Capuc_
35
Page 36

instructions d'installation
iNVERSiON DE L'OUVERTURE DES PORTES (SUITE)
[]iNVERSiON DES POIGNEES
DE PORTE (SUITE)
5.1
Transfert de la poign@e de porte
du refrigerateur (suite)
5.1.5 Rctirez le capuchon it l'avant
de la porte et transfdrez-le du cStd oppose
Capuchonq
Pourfixer la
poign6e sur le
c6t6 oppos6.
]a porte.
5.4.2 Enlevez la poig_e.
5.4 Transfert de la poignee de la porte
du congelateur
5.4.1 Enlevez la vis maintenant la poig_a_e
sur le dessus de la porte et les deux vis
maintenant Dessus._
la poig_e sur
le dessous de
f
Dessous
5.2
C6t6
gauche
Transfert de la butee de porte
5.2.1 Transfdrez la butte de porte en
plastique et les vis du cdtd droit vers le cdtd
gauche.
But6edeporteen C6t6droit
plastique_/ ___°_
5.2.2
Transl'(:rcz la but&: de porte en mdtal du
(:6td droit xcrs le ('6td gau(:hc, puis
trans£:rcz la xis du cgtd opposd de la port<
0auche 'Wij
But6edeporte C6t6droit
enm_tal
5.3
Remise de la poignee de la porte
du refrigerateur
5.3.1 Fixez la poig_e au c:St_
droit de la porte avec
les vis sur le dessus et
sous le capuchon de _-
la poignde.
5.3.2 Rclnettez le capuchon
de la poig_de.
5.4.3
Enlevez la vis du cdtd supdrieur droit
de la porte et insdrez-la dans le trou
de la poig_de sur le cdtd gauche.
5.4.4 Transfdrez la butde de porte comme il est illustrd it
I
la section 5.2 pr&&lente.
|
5.4.5
Fixez la poignde au cdtd droit de la porte
avec les vis sur le dessus et le dessous, en utilisant les
trous infdrieurs laissds libres par l'enlbvelnent
des vis de la butde de porte.
36
Page 37

instructions d'installation
[-giREMONTAGE DES PORTES
6.1
Remontage de la porte
du refrigerateur
6.1.1 Placez la porte du rdfrigdrateur sur l'axe de
charni_re infdrieure. Assurez-vous clue la
mndelle se trouve bien
sur l'axe.
Axede
charni6re"
Rondelle
en
slastique
£
6.1.2
Insdrez l'axe sur la charni&re centrale, dans
l'emplacement sur le dessus de la porte. Mettez la
pi&ce d'espacement, puis la rondelle sur l'axe de
charnibre. REMARQUE : La charni_re centrale
doit _tre retournde comme il est illustrd lors du
montage du cdtd gauche.
Axedecharni6re
at pi6ced'espacement
6.1.3
Inclinez la porte vers la caisse. Lorsque
la porte est amen& en position, faites coulisser la
charni_re sous la t_te de la vis qui a dtd insdrde
prdcddelnlnent dans le trou extdrieur de la caisse.
Insdrez la vis restante, puis serrez bien les deux vis.
I-g]REMONTAGE DES PORTES (SUITE)
6.2 Remontage de la porte
du congelateur
6.2.1 Placez la porte du congdlateur sur l'axe de
charni_re centrale. Assurez-vous clue la
rondelle et la pi&ce d'espacement sont bien
plac&s sur l'axe.
Axe de charni6re centrale,
Rondelle en
plastique et pi6ce
d'espacement
6.2.2 Ii_clinez la porte vers la caisse, relevez
la charni_re supdrieure pour clue l'axe s'ins_re dans
l'emplacement sur le dessus de la porte.
6.2.3. Assurez-vous que la porte se trouve
ldg_rement au-dessus de la caisse et que
l'dcartement entre les pones est le m_me. Serrez les
vis de la charnibre supdrieure.
Ne serrez pas trop fort ces vis. Serrez-les pour
qu'elles soient bien en place puis vissez d'un delhi-
tour suppldmentaire.
37
Page 38

Notes.
38
Page 39

Bruitsnormau×de |onctionnement w .o oo,,omo,ogo,sgo.oo
Les r6frig6rateurs plus r6cents font des bruits diff6rents de ceux
des anciens. Les r6frig6rateurs modernes pr6sentent plus de
fonctions et sont plus avanc6s sur le plan technologique.
Entendez-vous ce que j'entends ? Ces bruits sont norrnau×.
HIJMMM,,,
--OUUCH,,,,
Le nouveau compresseur 5 rendement dlevd
peut fonctionner plus longtemps et plus vite que votre
ancien r_frig_rateur et vous pouvez entendre un son
modul_ ou un ronflement aigu pendant
son fonctionnement.
gous pouvez entendre un sit_ement lorsque les portes
se ferment. Cela vient de l'4quilibrage de pression dans le
r4frig4rateur.
CLICS, CLAQUEMENTS,
CRAQUEMENTS et
GRESILLEMENTS
[] \,))us pouvez entendre des craquements ou des
claquements lorsque le r_frigdrateur est brancha pour la
premiere lois. Cela se produit lorsque
le r_frig_rateur se refroidit Ala bonne telnp_rature.
[] Le compresseur petit causer un clic ou
un gr_sillelnent lors de la tentative de red_marrage
(cela petit prendre 5 minutes).
[] L'expansion et la contraction des serpendns
de refroidissement pendant et apr_s le d_givrage peuvent
causer till craqtieltlent oti till claquelt]ellt.
[] Stir les modules dquipds d'une machine A glagons, apr_s
un cycle de fabrication de gla_:ons, vous pouvez entendre
les gla(;ons tomber dans le bac.
OUIR !
[] \'}gus pouvez entendre les ventilateurs
tourner A hautes vitesses. Cela se produit lorsque
le rdfrigdrateur vient d'etre branchd, lorsque
les portes sont ouvertes frdquemment ou lors de
l'ajout d'une grande (tuantit4 d'aliments dans
les compartiments congdlateur ou rdfrigdrateur.
Les ventilateurs permettent de maintenir
les bonnes temperatures.
BRUITSD'EAU
6
[]
Le passage de l'agent frigorifique dans les serpentins de
refroidissement du cong_lateur petit _tre accompagn_
d'un gargouillement semblable Acelui de l'eau en
4bullition.
[] L'eau tombant stir ]'dldment chauffant de ddgivrage petit
f.tire un bruit de grdsillement, de claquement ou de
bourdonnement pendant le cycle de ddg_vrage.
[] I.n bruit de suintement d'eau petit _tre entendu pendant
le cycle de d_givrage ]orsque la glace de l'_vaporateur
fond et tombe dans le bac de r_cup_ration.
[] Former la porte petit causer un gargouillement
en raison de l'4quilibrage de pression.
39
Page 40

Avantd'appelerunreparateur...
En cas de panne
Economisez votre temps et votre argenfl Consultez les
tableaux des pages suivantes, vous 6viterez peut-_tre
d'appeler un r6parateur.
Causes possibles Solutions
Votre r_frig6rateur ne Votre r_frig_rateur se trouve • Attendez environ 40 minutes la tin du d_g_Taoe.
fonctionne pas dans son cycle de d_givrage.
Bouton de commande de • Placez ]e bouton de commande de ]a temperature
temperature 5,la position O, it un r_glage de temperature.
Le rfifrig_rateur est d4branch4, • Poussez la fiche compl_tement dans in prise murale.
Le fusible a saut4 ou • Changez le fusible ou rebranchez le disjoncteur.
le disjoncteur a saut4,
Vibrations ou bruits Les vis des roulettes ou les • \,})yez la section Roulettes et pieds de nivellement.
de casse (une petite pieds de nivellement ont
vibration est normale) besoin d'etre r_gl&,
kemoteurfonctionne C'est normal quand on met • Attendez 24 heures que le r_frig_rateur se refroidisse
pendant de Jongues en marche le rfifrig_rateur complbtement.
p6riodes ou se met en pour la premiere fois,
marche et s'arr_te Cela arrive souvent quand * C'est normal.
frequemment (Les on met beaucoup d'aliments
refdg6rateurs modemes, dam le r_frig_rateur,
qui ont davantage
d'espace de rangement La porte est restfie ouverte, =\:drifiez qu'un paquet d'aliments n'emp&he pas la porte
et un compartiment de bien se former.
congeiation plus grand, ]1fait chaud ou vous * C'est normal.
necessitent plus de ouvrez souvent la porte,
temps de fonctionnement.
Ils se mettent en marcbe Les boutons de r_glage de * \,Lycz la section Bouton de commando de latemp6rature.
et s'arr_tent souvent temperature sent mis _ leur
pour maintenir des position la plus fmide.
temperatures constantes.) Vous devez nettoyer le = \:oyez la secdon Entretien et nettoyage.
condenseur et la grille,
Le cumpartiment L_ bouton de commande de • \,Ly_z la section Bouton de commande de la temp6rature.
refrigeration ou temp&ature n'est pas plaofi _ une
c0ngelatien est position suffisamment froide,
tmp chaud
11_ait chaud ou vous • 5[ettez le bouton de rdglage de tempdramre un numdro
ouvrez souvent la porte, plus froid. Consultez B0ut0ns de r6glage de temp6rature.
La porte est restfie ouverte, • Vdritiez qu'm_ paquet d'aliments n'emp_d_e pas la porte
de bien se former.
Un article bloque F_vent dans * V_rifiez si tm article ne bloque pas in fcrmeulre
le compartiment du cong_lateur, de la porte.
Ou givre ou des cris_aux La porte est rest_e ouverte, • V_ritiez (lU'm_ paquet d'aliments n'emp_d_e pas la porte
de glace se ferment sur de bien se former.
ins aliments congelfis
(dugivre _ rint_rieur
des paquets d'aliments
est normal}
Vous ouvrez la porte trop
souvent ou trop longtemps.
4O
Page 41

www.electromenagersge.ea
Causes possibles Solutions
_ne/i gla_ons La machine & giagons . Amenez ]e bras palpeur en posidon ON ;marche) en has.
automatique ne n'est pas en position ON (marche).
fonetinnne pas L'alimentafion d'eau est arr_t_e * Consultez Installation de ]a conduite d'eau.
(sur certains modules) ou n'est pas branch_e.
Le compartkn_lt * Attendez 24 heures que le r_frig_rateur soit
cong_lateur est trap chaud, complOtement froid.
Une accumulation de gla_ons • I_g_disez ]es gla_ons _t]a main.
dam le firoir Agla_ns peut
causer un arr_t de la machine
glacons.
Bnurdonnement La machine >aqons * Eteignez la machine it gl%ons. _nenez ]e bras palpeur
frequent marche, mats l'arriv_e d'eau en posidon STOP(arr_t)en haut.
au r_frig_rateur n'a pas
fit_ raccord6e.
61agons trod petits Le robinet d'arr_t d'eau . Appelez un plombier pour nettoyer ]e robinet.
raccordant le r_frigfirateur &la
conduite d'eau peut _tre obstru&
La formation des La porte est rest6e ouverte. . \:drifiez qu'un paquet d'alimems n'emp_che pas ]a porte
gia_ons est lente de bien se former.
Le bouton de commande de la . \:oyez Bouton de commande de la temp6rature.
temperature nese trouve pas A
une position suflfisamment fmide.
Losgla_0ns 0nt une Le bac A gta_om dolt * Videz et ]avez ]e bac ff gl%ons.Jetez ]es vieux glag_ns.
efleur ou an gofit _tre nettoy£
I_s aliments donnent de * Emballez bien les aliments.
l'odeur ou du gofit aux gla_ons.
L'int_rieur du rfifrigfimteur * Consttltez Soinsat nettoyagedevotre r6frig6rateur.
a besoin d'etre nettoy&
De l'humidit6 se forme C'est normal pendant * Essuyez compl_tement la surt_ace, pttis rdglez la
sur ia surface de l'armoire les p_riodes de grande humidit& tempdrature du compartiment rdfrigdration un chifl're
flu r_frig_rateur entre plus haut et vdrifiez _tnouveau 24 heures plus tard.
los portes
De l'humiflit_ se forme
fint6rieur (quand it
fair humide, fair
transporte de i'humidit6
l'int_rieur du
refrigerateur quand
vousouvroz los portes)
Le refrigerateur sent
Vous ouvrez les portes troD
souvent ou troD longtemps.
I._s aliments donnent une
odeur au r_frigfimteur.
* \.bus devez bien empaqueter los aliments qtti sentent
fi)rt.
* Conservez une bolte ouverte de bicarbonate de soude
dans votre rdfrigdrateur; remplacez-la tous los trois ranis.
L'int_rieur a besoin
d'un nettoyage.
*Constfltez Soinset nettoyagedevotre r_frig_rateur.
41
Page 42

GARANTiE DU CLIENT
(pourla clienteleau Canada)
Votrerdrigerateurest garanticontretoutddaut de materiauetdefabrication.
Cequecette Dur@de garantie Pieces Main-d'oeuvre
garantiecouvre (_tpartirde la R@arationou
dated'achat) remplacementau
choixde Mabe
Compresseur GEProfile: Dix(10) ans GEProfile: Dix(10) ans GEProfile: Cinq (5)ans
GEet toutes autre GEettoutes autre GEettoutes autre
marques: Un(1)an marques: Un(1) an marques: Un(1) an
Systemescelle(y GEProfile: Cinq (5) ans GEProfile: Cinq(5) ans GEProfile: Cinq(5) ans
comprisI'@aporateur,la GEettoutes autre GEet toutes autre GEet toutes autre
tuyauteriedu condenseur marques: Un(1)an marques: Un(1)an marques: Un(1)an
et lefrigorigene)
Touteslesautres pieces Un(1)an Un(1)an Un(1)an
TERMES ET CONDITIONS :
La presentegarantiene s'applique qu'a I'utilisationdomestiquepar
uneseulefamille au Canada,Iorsquelerdrigerateur a ete installe
conformementaux instructionsfournies par Mabeet est alimente
correctementen eauet enelectricit&
Lesdommagesdos _tuneutilisationabusive, unaccident,
uneexploitationcommerciale,ainsique la modification,
renl@ementou I'alterationde la plaquesignaletiqueannulentla
presentegarantie.
L'entretieneffectuedans lecadrede la presentegarantiedoit I'_tre
parun r@arateur agreeMabe.
Mabeet le marchandne peuvent_tretenuspour responsablesen
casde reclamationsou dommagesresultantdetoute pannedu
rdrigerateur ou d'un entretienretarde pourdes raisonsqui
raisonnablementechappent_tleur contr61e.
L'acheteurdoit, pourobtenir un service dansle cadre de la
garantie,presenterla facture originale.Les elementsr@aresou
remplacesne sontgarantisque pendantle restant de la periodede
garantieinitiale.
Cettegarantieest offerte_tracheteur initial, ainsi qu'_ttout
proprietairesubsequentd'un produitachete envue d'une
utilisationdomestiqueau Canada.Leservice_tdomicile envertu
de la garantieserafourni dansles regionsoi il est disponibleet
oi Mabeestime raisonnablede lefournir.
Cettegarantieest en susde toute garantiestatutaire.
EXCLUSIONS DE LA GARANTiE :
,_Leproprietaireest responsablede payerlesr@arations
occasionn@sparrinstallationde ce pro@it et/ou lesvisites
necessairespourlui apprendre_tutiliserce produit.
oToutdommageau fini de rappareildoit 6tre signaleaupres
dumagasinoi a ete effectuerachat dans les 48 heuressuivant
la livraisonde rappareil.
o Dommagescauses_tla peinture ou _tI'email apreslivraison.
o Installationincorrecte--I'installation correcteinclut la
bonnecirculation d'air pour le systemede rdrigeration,
despossibilitesde branchementauxcircuits electriques,
d'alimentationeneauetautres.
o Remplacementdesfusibles ou rearmementdes disjoncteurs.
o Remplacementdes ampouleselectriques.
o Dommagessubispar rappareil _tla suited'un accident,d'un
incendie,d'inondationsou en cas deforce majeure.
o Utilisationcorrecteet entretienadequatde rappareilselon
le manueld'utilisation, reglagecorrect descommandes.
o Pertedesalimentsdoe _tla deterioration.
o Leservices'ilestimpossibled'avoiraccesauproduit
pourcefaire.
o LEGARANTN'ESTPASRESPONSABLEDESDOMMAGES
INDIRECTS.
i EXCLUSIONDEGARANTiESIMPLICJTES--Votreseul et uniquerecoursestla reparationduproduitselonles dispositionsde|
cetteGarantielirnitee.Toutesles garantiesirnplicites, incluantles garantiesde corflrnercia_iteetd'adequationa un usage
lspecifique,sent lirniteesa une annee oua la periodela pluscourteautorisee par la legislation.
iMPORTANT
Gardez cette garantie et votre facture originale cornrne preuve d'achat et preuve
de la date d'achat.
Mabe vous offre ses services dans tout le pays. Pourde plus amples renseignements
sur la presente garantie, veuillez prendre contact avec :
Directeur, Relationsavec les consommateurs, Mabe Canada Inc., Bureau 310,
1Factory Lane, Moncton, N.B. E1C 9M3
1.800.561.3344
Agraphezvotre re(_uici.
Vous devezfournir la preuve de
I'achat original pour obtenir des
services en vertu de la garantie.
42
Page 43

Soutien au consommateur.
SiteWebappareils61ectrom6nagersGE www.electremenagersge.ca
Vous avez tllle question ou vous avez besoin d'aide pour votre _t])I)_trei] dlectroi:ndnager? COlltStctez-llOUS par
Internet au site www.electromenagersge.ca 24 heures par jour, tousles jours de l'am_de.
Serviceder@arations
Service de r@arations GE est tout pr&s de vous.
Pour faire r@arer votre dlectromdnager (-;E, il std_t de nous tall@honer.
1.800.561.3344
Studiodeconceptionr6aliste
Sur demande, (-;E peut t})urnir m_e brodmre sur l'amdnageinent d'une cuisine pour les personnes
_tmobilit_ r_duite.
t_crivez: Directeur, Relations avec les consommateurs, Mabe Canada Inc.
Bureau 310, 1 FactoQ _Lm_e
Moncton, N.B. E1C 9M3
Prolongationdegarantie www.electromenagersge.ca
Achetez m_ contrat d'entretien (-;E avant clue votre garantie n'expire et 1)_n_ficiez d'm_ rabais substantiel. Ainsi ]e
sela_ice apr_s-vente (-;E sera toujours ]_tapr_s expiration de la garantie.
Visitez notre site Web ou appelez-nous au 1.888.261.2133.
Piecesetaccessoires
CetLx qui ddsirent r@arer eux-m&mes leurs dlectromdnagers peuvent recevoir pibces et accessoires directement _tla
maison (cartes VISA, MasterCard et Discover accept_es).
Les directives stipulees dans le present manuel peuvent _tre effectuees par n'imperte quel utilisateur. Les autres
reparations deivent gen6ralement _tre effectuees par untechnicien qualifi& Seyez prudent, car une reparation
inadequate peut affecter le |enctiennement securitaire de rappareil,
\'))us trouverez dans les pages jmmes de votre ammaire le mmldro (lu Centre de service Mabe le plus lxoche.
Autrelnent, a])pelez-nous au ] .800.661.1616.
Contactez-nous
Si vous n'&es pas satistCaitdu ser,'ice al)r&s-vente dent vous avez bdndfidd :
Premi_rement, communiquez avec los gens qui ont r@ard votre appareil.
F_alsuite, si VOUSn'&tes toujours pas satist_ait envoyez tousles ddtNls_mmdro de tall@hone COlnpris_tu
Directeur, Relations avec les consommateurs, Mabe Canada Inc.
Bureau 310, 1 FactoQ _Lm_e
Moncton, N.B. E1C 9M3
Inscrivezvotreappareil61ectrom6nager
Inscrivez votre appareil _lectrom_nager en direct, aussitSt clue possible. Cela amdliorera nos commtmicadons et
notre se_a:ice apr_s-vente. \,'ous pouvez dg_ement nous envoyer par la poste
le t})rmulaire d'inscripdonjoint _tvotre documentation.
43
Page 44

IMPORTANTEINFORMACIONDESEGURIDAD.
LEATODASLASINSTRUCCIONESANTESDESUUS0.
A iADVERTENCIA!
Use este aparato s61ocon el fin para el cual fue disefiado como se describe en este Manual del propietario.
PRECAUCIONESDESEGURIDAD
A! usar aparatos el6ctricos, se deben seguir precauciones b_sicas de seguridad, incluyendo las siguientes:
Este refl_igerador debe instalarse y ubicarse _,_antenga los dedos alejados de las _ieas estrechas; los
correctamente segim las Instrucciones de instalacidn
antes de su uso.
No t)ermita que los nifios se suban, se t)aren
o se ctmlgtmn de los estantes en el refiigeradot: Podrlan
dafiar el refiigerador y sufiir graves dafios.
No toque las SUl)erficies fiias en el compartimiento del
congelador con las manos hfimedas o mojadas. La piel se
t)uede t)egar a estas superficies extremadamente fiias.
No almacene o use gasolina u otros vapores y liqtfldos
i_Namables en las fireas cercanas a este
o a cualquier otto at)arato.
En los refiigeradores con mfiqttinas de hielo automfiticas,
evite el contacto con las t)artes en movimiento del
mecanismo eyectot; o con el elemento calei_ctor
localizado en la parte inferior del diN)ositivo para hacer
hielo. No coloque los dedos o las manos en el mecanismo
de la mfiqttina de hielos mientras el refiigerador est6
conectado.
esl)acios entre las t)uertas y entre las puertas
y los gabinetes son necesariamente t)ectuefios.
Tenga ctfldado al cerrar las t)uertas cuando haya nifios
en el firea.
Desconecte el refrigerador antes de liml)iar y hacer
reparaciones.
NOTA: Recomendamos enf_ticamente que cualquier servicio
sea realizado por un individuo calificado.
Fijar el conu'ol en la posici6n 0 (apagad0} no elimina la
corriente hacia el circtflto de luces.
No vuelva a congelar alimentos que se han descongelado
t)or completo.
A i IE:
AI
ELIMINACIONAPROPIADADELREFRIGERADOR
Los problemas de que los nifios se queden atrapados y
se sot})quen no son cosas del pasado. Los refrigeradores
desechados o abandonados sigllen siendo peligrosos,
afro si s61o estfin por "unos pocos dlas". Si est(t
desechando su refrigerador viejo, por favor siga las
instrucciones
a continuacidn para a?_ldarle a evitar accidentes.
Antes de desechar su viejo refrigerador
o congelador:
; O uftele las puertas.
; Deje los estantes en su lugar, de manera que los nifios
no puedan subirse facihnente al interior.
Refrigerantes
Todos los aparatos de refrigeracidn contienen
refrigerantes, los cuales se deben retirar antes de la
eliminacidn del producto de acuerdo con la ley
federal. Siva a desechar algt'm aparato antiguo de
refrigeracidn, consulte con la compafifa a cargo de
desechar el aparato
para saber qud hacer.
44
USODECABLESDEEXTENSION
Debido a peligros potenciales de seguridad bajo ciertas condiciones, nos oponemos al uso de cables de
extensi6n.
Sin emba_o, si debe usar un cable de extensidn, es absolutamente necesario que sea tm @o de cable
de extensidn para aparatos con conexidn a tierra de tres cables, que estO en la lista de [L (en los Estados 1. nidos) o
en la lista CSA (en Canad_), que tenga un encht_c de @o conexidn a tierra y sNida y que
el grado eldctrico del cable sea de 15 amperios ;mfnimo) y 120 voltios.
Page 45

GEApp/iances.com
!
B
COMOCONECTARLAELECTRICIDAD
Bajo ninguna circunstancia, no corte ni retire la tercera pata (conexi6n a tierra) del cable de electricidad.
Por seguridad personal, este aparato debe estar correctamente conectado a tierra.
E1 cable eldctrico de este aparato ester provisto de
un enctmt'c de tres patas (conexidn a tierra) que encaja
en un tomacorriente estfindar de 3 orificios (conexidn a
tierra) para minimizar la posibilidad
de peligro de tm d_oque el_ctrico de este aparato.
Haga que el tomacorriente de la pared y el circuito sean
revisados por un electricista calificado para asegurar que
el tomacorriente tiene la conexidn a tierra apropiada.
Cuando haya un tomacorriente est5ndar de dos paras, es
su responsabilidad y obligacidn personal reemplazarlo
con un tomacorriente adecuado de tres orificios
correctamente conectado a tierra.
sobrecargar los circtfitos eldctricos de la casa que podrlan
causar un incendio a partir de los cables recalentados.
Nunca desconecte su refrigerador hNando del cable
eldctrico. Siempre tome el enchufc firmemente y h(delo
directmnente del tomacorriente.
Repare o reen@lace de inmediato todos los cables
el_ctricos que se hayan desgastado o daflado. No use un
cable que tenga grietas o dafios de abrasidn en su
longimd o en cualquier extrclnO.
_4dretirar el refrigerador de la pared, tenga ctfidado de
no enrollar o dafiar el cable eldctrico.
E1refrigerador deber_ siempre estar conectado en su
propio tomacorriente eldctrico individu_ que tenga un
nivel de vohaje que se ajuste a la placa de potencia.
Esto ofrece el mejor desempefio y tambidn evita
USODEENCHUFESADAPTADORES
(los enchufes adaptadores no est_n permitidos en CanadS)
Debido a peligros potenciales de seguridad bajo ciertas condiciones, nos oponemos al uso de un encbufe
adaptador.
Sin embargo, si debe usar tm adaptador, donde los
cddigos locaJes lo permitan, se puede hater una
c0ne×i6n temp0ral a un tomacorriente de dos paras con
el uso de tm adaptador en la lista de [L, disponible en
la mayorla de las fcrreterfas.
E1 orificio mits grande en el adaptMor deber_ alinearse
con el orifido in(ts grande en el tomacorriente para
brindar la polaridad adecuada en la conexidn del cable
eldctrico.
_Ndesconectar el cable eldctrico del adaptador, sieinpre
sostenga el adaptador en su lugar con una mano,
mientras hala el enctmt'c del cable eldctrico con la otra.
Si no hate esto, esprobable que el terminal a tierra del
adaptador se rompa con el uso repetido.
Si el terminN a tierra del adaptador se rompe,
N0 [IS[ el refrigerador hasta que se haya establecido
una conexidn a tierra adecuada.
Unit elterminala tierra deladaptadora untornillode la
tapade untomacorrientenoequivaleaunaconexiOna
tierra,a menosqueel tornillode latapaseametSlico,y no
estOaislado,y el tomacorrientetengaconexiOnatierra per
mediodelcableadode lacasa.Deber8hacerqueun
electricistacalificadorevisesi eltomacorrienteest8
correctamenteconectadoa tierra.
LEAYSIGACUIDADOSAMENTEESTAINFORMACION
DESEGURIDAD.
CONSERVEESTASINSTRUCCIONES
a5
Page 46

Sobreel dialdecontroldelatemperatura.
Girar e! dial a O/Off interrumpe el enfriamiento en ambos compartimientos: el compartimiento de alimentos frescos
y el congelador, aunque no apaga el suministro de corriente hacia el refrigerador.
Dial de control de la temperatura {enalgunosmodelos)
El dial de control de la temperamra 6ene nueve niveles m(_s 0. 1 es el nivel m(/s caliente y 9 es el nivel m(/s fi#o.
Inicialmente, fije el dial en 5. Despu_s de usar el refiigerado_; ajuste el dial de set necesario.
n_c_idad_._n_r_.hamon_da_nlaran.ra_n_l_n_rod_ldialvpo_'a_rar_ldialha_ia_lni,'_lq._m_jor_ adap_a_._
Permka 24 horas para que el refiigerador se enfi'ie.
4
Dial de control de temperatura (en algunos modelos)
E1 dial de conu'ol de temperamra ajusm la temperamra del refi'igerador desde la mils elevada
hasta la mils baja. En la ilustraci6n de la izquierda se indica la configuraci6n de ff/brica
recomendada. Para una temperatura mils baja, gire el dial hacia el copo de nieve. Para una
temperatura mils elevada, gire el dial en sentido contrm'io alas agujas del reloj, alejfindose del
copo de nieve. Deje transcurrir 24 horas para su ajuste.
Sobrelosestantesdelcompartimientodealimentosfrescos.
Los soportes de los estantes en diferentes niveJes le permiten adaptar el espacio de los estantes segOn sus
necesidades. No todas las caracteristicas est_n presentes en todos los modelos.
Estantes medios
r-_ Levantehacia Un extremo del estante desc'ansasobre un soporte
mokleadoen el costado; elsoporte en el ou'oexu'emose
e*ga*mhaen un _ielen la parte posterior de lapared del
gabinete.
Para retirar,levmlteel estante en la parte delantera,
luegosaque del sq)orte ythera del fleL
Para reemplazar,seleccionela akura deseada para
elestante. Con elestante delantero levantado
Inclinehaciaarriba ligeramente, e*vanche h oreja supeflor del SOl)Oneenel
z{el,luegob_0eel estante hastael sq)orte.
NOTA: El estante hacia la derecha del rbl est_
disefiado para engancharse en la ranura de la derecha;
el estante hacia la izquierda est5 dise_ado para
engancharse en la ranura izquierda.
Levante]aparteposterior
Para retirar los estantes de
tama_o completo
Estantes compietos
Algunos mndelos tienen un estante deslizante en
alambre de acern, un estante de vichio temperado
estacionmio, un estante a prueba de salpicaduras o dos
estantes estacionarios en alambre de acem. Estos
estantes se pueden mover hacia otto lugar en el
compartimienm de alimenms fi'escos.
E1estante deslizante de mmafio ccnnpleto tiene fi'enos.
Cuando se cobca correctamente en los soportes del
estante, el esmnte fi'enaantes de sa[i_3ecc_mplemmente
del refiigemdor y no se inclinm3 cuando coloque o
retire alimentos
del mismo.
Tirea lafrenteVhaciaabajo
Para retirar un estante de tama_o completo
cuando la puerta deJ compartimiento de alimentos
frescos no se pueda abrir completamente
Page 47

Sobre los estantesdel compartimientodel congelador. GEAppliances.com
Estante de escai6n
Para retirar el estantede escaion:
[-_ Levante el lado izquierdo del escaldn
ligeramente.
---] ueva el estante hacia la izquierda
para liberar los extremos derechos de los orificios
en la pared del gabinete.
[_] aje el costado derecho del estante, mueva el
estante hacia la derecha y sfiquelo.
Parareemplazarel estantedeescalon:
[-_Con el estante inclinado como aparece,
ajuste los extremos del lado izquierdo del
estante en los orificios de la pared del
gabinete.
[2--]Levante el costado izquierdo del estante
ligeramente, mueva el estante hacia arriba,
ajustc los extrelnos del lado dered_o del
estanm en los orificios de
la pared del gabinete y baje el estante
a su hNar.
Sobre las gavetasde almacenamiento.
No todas las caracteristicas est_n presentes en todos los modelos.
Gavetas para frutas y
vegetales
Se debe retirar el exceso de
agua que se pueda aculnular
al fondo de las gavetas y se
deben secar las gavetas.
Gaveta de refrigerios
La gaveta de refrigerios se puede
mover a la posicidn m(ts fltil segfm
las necesidades de su fiunilia.
Sobre la remocionde la gavetade aimacenamientoy cubierta.
No todas las caracteristicas est_n presentes en todos los modelos.
Humidfty Control
HIGH LOW
Gaveta preservadora de humedad ajustable {enalgun0sm0del0s)
Deslice el control completamente hasta Lleve el control por completo hasta la posicidn
la posicidn HlllH (alto) para ofrecer la alta LOWilbajo) para ofrecer los niveles bajos de
hmnedad recomendada para la mayorla hmnedad recomendados para la mayorfa de las
de los vegetales, frutas.
Remocic_nde la gaveta y cubierta
Se pueden retirar las gavetas fScilmente tomando los costados y levantando ligeramente mientras
hala las gavetas m(ts all_ de la ubicacidn del freno.
!17
/
Gaveta de tarnafio completo con
cubierta plastica
Para retirar la cuNerta, levante de los
soportes, hale hacia dehnte, inclfnela
y s&tuela.
47
Page 48

Sobre la remoci6nde la gaveta de almacenamientoy cubierta.
No todas las caracteristicas est_n presentes en todos los modelos.
(
Estante para las gavetas gemelas
Para retirar:
p-] Retire ]as gavetas.
[2-]Empuje el frente de la cubierta
de vidrio hacia arriba, y al mismo
tiempo, hale hacia delante tanto como se
pueda.
Inclinela y s{tquela. Evite ]impiar ]a cubierta
de vidrio frfa con agua caliente ya que la
diferencia de telnperaturas extremas podrfa
causar que se quiebre.
[_] Retire el marco de la gaveta. (Siempre
retire la cubierta de vidrio antes de sacar
el marco de la gaveta.)
Levante el marco de los soportes en
cada costado y atrls, hale hacia delante,
incline y saque.
Parareemplazar:
[_] Baje el marco hasta que descanse sobre
los soportes en cada costado
y atr(ts.
[2--]Rcemplace la cubierta de vidrio,
empujando su horde posterior
firmemente en el canal del marco
posterior y suavemente baje el frente
hacia su lugar.
[_] Rcemplace las gavetas.
Sobrela maquinadehielosautomatica.
Un refrigerador recientemente instalado puede tomar entre 12 y 24 horas para empezar a hacer hielo.
Brazode
Ilenadohaciala
Brazo de!!enado posici6nSTOP
haciaIaposici6n (haciaarriba)
ON (haciaabajo)
La m(Nuina dc hielos producifft siete
cubos por ciclo,aproximadalnente entre 100 y
130cubos entm perfodo de 24 horas,
dependiendo de la temperamra del
compartimienm del congelador, la telnperamra
del cuarto, el nOlnero de veces que se abre la
puerta y otras condiciones
de uso.
Si elrefrigerador se opera antes dc hater
la conexidn del agl:a hacia la m&tuina
de hielo, mueva elbrazo de llenado hacia
la posiddn STOP 0mcia arriba).
(]uando se haya conectado el refrigerador al
suministro de agua, mueva el brazo de llenado
hacia la posicidn 0N (hacia abajo).
Escuchafft un zumbido cada vez que la
mltquina de hielos se llene de aglm.
La m&tuina dc hielos se llenafft de
aglm cuando se enfrle hasta 15°F In
refrigerador recidn instalado se puede tomar
entre 12 y 24 horas para eln]oezar a hater
cubos de hielo.
Deseche los primeros cubos de hielo para
permitir que la llnea del aglm se limpie.
AsegOrese de que nada interfiera con el
movimiento del brazo indicador.
Cuando el contenedor se llene al nivel
del brazo indicador, la m&tuina de hielos
dejarft de producir hielos.
Es normal que ratios cubos de hielo sejunten.
Si elhielo no se usa con frecuencia, los cubos
de hielo viejo se volveffm turbios,
con sabor rancio y se encogeffm.
NOTA:EnhogaresconpresiOndeaguainferior
alpromedio,esposiblequeescucheel ciclode
lamSquinadehielosvariasvecesal hacerunIote
dehielo.
Kit de accesorios de la maquina
de hielos
Si su refrigerador no viene ya equipado con
una m(tquina de hielos autom{tdca, existe un kit
accesorio para la mitquina de hielos que estit
disponible por tm costo adicional.
Revise en la parte posterior del refrigerador en
busca del kit para la m&tuina de hielos
espedfica que necesita para su modelo.
48
Page 49

Cuidadoy limpiezadelrefrigerador, c App,a,co,com
Limpieza exterior
Los rnanijas de la puerta y accesorio en alg'unos modelosl;. Limpie
con un patio humedecido con agua jabonosa. Seque con un patio
seco.
Mantenga e[ exterior lirnpio. Limpielo con m_ patio ligeramente
humedecido con cera de cocina para electrodom_sticos o detergente
liquido suave para platos. Seque y brille con tm patio limpio y seco.
Los paneles y los manijas de laspuertas
de acere ino×idable en alg)mosmodelosl;pueden serlhnpiados con
un limpiador para acero ino_dable para usos eomercMes. No udJke
cera para elecgodom6sticos sobre el acero inoxidable.
No limpie elrefrigerador con un patio sucio para platoso con una
toalla mojada. Estospueden dew residuosy puedenerosionarla
pintura. Nousealmohadillas de restregar,limpiadores enpolvo,
blanqueadoreso limpiadoresque contenganblanqueadoresya que
estos productospueden raspary debilitar el acabadode pintura.
Limpieza interior
Para ayudar a evitar olores, deje una caja abierta de bicarbonato
en los compmtimientos de alimentos fiescos
yen el congelador
Desconecteel refrigerador antes de limpiarlo.Si esto no es
pr{tctico, escurra la hmnedad excesiva con una esponja o patio al
lhnpiar ahededor de los interruptores, hlces o conuoles.
Use una solucidn de agua tibia y bicarbonato_ma cucharada (15
roll; de bicaJ)onato para un cuarto (l litro) de agua. Esto limpia y
neutraliza los olores. Enjuag_le y seque.
Despu_s de limpiar los empaques de la puerta, aplique una
capa delgada de vaselina en los empaques de la puerta en el
costado de la bisagra. Esto ayuda a evitar que los empaques se
peguen y se doblen hasta perder su forma.
Evitelimpiar los estantes devidrio fr[os (on algunosmodelos) conagua
caliente yaque la diferenciade las temperaturas extremaspuede
causarque se quiebren. Manipule los estantesdevidrio concuidado.
Golpearel vidrio templado puedecausarque se quiebre.
No lave ningunapartepl_sticadel refrigeradoren la lavadorade platos.
Condensador
No hay necesidad de una limpieza de rutina del condensador en
ambientes de operaddn de hogares normales. Sin embargo, en
ambiente quepuedan
grasosos el condensador debe
limpiarse periddicamente para tma
mpi a delos operaci6n eficiente del
Serpentines del c0ndenSad0r refi-igeradot:
Para limpiar el condensadcn; gire el dial de control de la
temperamra a O. Barra o aspire el t)olvo.
Para mejores restfltados use un cepillo especiahnente disefiado para
este fin. Estfi disponible en la mayorla de tiendas de partes de
electrodom&sticos.
Mover el refrigerador
Tonga cuidado al mover el refiigerador lejos de la pared. Todos los
tipos de ctd)iertas de piso se pueden dafim; pmdcularmente las
cubiertas acojinadas y aquellas con superficies con disefios en
relieve.
Hale el refrigerador en linea recta y regr6selo a su posicidn
eml)uj{mdolo de la misma forma. Mover el refrigerador en aria
direccionlateral puede resultar en dodosa la super[icie delpiso
o al refrigerador.
Cuandoempuje de nuevoel refrigerador, asegOresede no pisar el
cable el_ctrico ola I[neade suministroala m_quinade hielos
(onalgunosmodelos).
Despu_s de rodar el refrigerador a su posicidn, gire
las paras del refrigerador en el sentido de las manecillas del reloj
hasta que las paras sostengan nuevamente el peso del
refrigeradcn:
Reposici6n de la bombilla
Para reemplazar una bombilla quemada, desconecte el
refrigerador del tomacorriente el&ctrico, desenrosque la
bombilla cuando est_ fria y reemplficela con una bombilla para
refrigeradores de similar o inferior voltaje.
Girarel control a la posiciOn0 nodesconectala corriente del
circuito de laluz.
C6mo prepararse para las vacaciones
Para una largas vacaciones o ausendas, retire los alimentos y
desconecte el refrigerador. Gire el dial de control de
la temperamra hacia la posicidn 0 (apagade}, y limpie el interior
con una solucidn de una cudmrada de bicarbonato (l 5 ml) y un
cuarto (l litro) (lc agua.
Deje las puertas abiertas.
Mueva el brazo de llenado a la posici6n STOPJmcia arrib£ y
cierre el suministro del aglm hada el refrigerador.
Si la temperamra puede caer por debajo del punto de
congelamiento, haga que una persona calificada drone el sistema
del suministro de agua (en algunos modelos) para evitar serios
dalSos a la propiedad causados por inundaciones.
Cbmoprepararse para trasladarse
Asegure todos los artfculos sueltos como la rejilla, los estantcs y
calories peg;(mdolos con cinta en su lugar para evitar daflos.
AsegOresedequeel refrigeradorpermanezcaen unaposiciOn
verticalduranteel traslado.
49
Page 50

stru
"nstal
[]
[] f
pa
Modelos 16,17, 18
Si tiene preguntas,liame al 800.GE.CARES(800.432.2737)o_ienvisi_e,_,es_mp_in_We_:
GEPppliances.com
ANTES DE INiCIAR
Lea estas hlstruc'c'lones completa y culdadosamente.
•IMPORTANTE -
instrucciones para uso del inspector local.
•IMPORTANTE -
cddigos y 6rdenes de le?_
• Nora al instalador A_a<_r_d_d_dar_a_
insu'ucciones con el consumidon
• Nora al consumidor Conserve estas insu'ucciones
para referencia fumra.
• Nivel de desu'eza La instalacidn de este aparato requiere de
desu'ezas mecfinicas bfisicas.
• Tiempo de ejecucidn Instalacidn del refi'igerador
15 minutos
Inverdr el vaiv_n de la puerta
1 hora
• La instalacidn apropiada es la responsabilidad del instaladon
" La falla del producto debido a una instalacidn inadecuada no
estfi cubierta pot la garantla.
SUMiNiSTRO DE AGUA HACiA
LA MAQUINA DE HIELOS
(en algunos modelos)
Si el refi'igerador tiene una mfiquina de hielos, se tendril que
conectar a una tuberla de agua potable fl{a. Un kit de suminisu'o
de agua ,:contiene tuberla de cot)re, vfilvula de cierre, accesorios e
insu'uccionesi estfi disponible con un costo adicional a tray, s de su
proveedox; visitando nuesu'a pfigina Web GEAppliances.com o bien
a trax4s de Partes y Accesorios, 1.800.661.1616.
UBICACiON DEL REFRIGERADOR
=No instale el refrigerador donde la temperatm'a baje de 60°F
(16°C) ya que no con'erfi con suficiente frecuencia para mantener
las temperaturas apropiadas.
=Instfilela en un piso fuerte para que Io soporte con carga completa.
AREA
Permita el siguiente espacio para una Fdcilinstalaci6n, apropiada
circulacidn del ai*ey cone_ones de plomel_a y el_cuicas.
=Costados 3/4" (!9 mm)
• ._'_it)a !" (25 ram)
• Atnls 2" (50 mm)
RODILLOS Y PATAS NiVELADORAS
Laspatasniveladorascerca de cada esquina delantera del
refrigerador son ajustables, t_stas co]ocan firmemente el
refrigerador y evitan que se mueva cuando las puertas se
abran. Las patas niveladoras
se deben colocar de manera que el frente del refrigerador se
levante lo suficiente para que las puertas se cierren
fficihnente cuando se abran hasta
la mitad.
Gire ]as paras niveladoras ell eJsentido de JasmafleciJJas
del reloj para levantar el reffigerador, y en el sentido
contrario para bajarlo.
Losrodillosal lado de las paras niveladoras le permiten
mover el refrigerador lejos de la pared para limpiarlo.
(;ire las patas en el sentido contrario de las manecillas del
reloj hasta que el peso del refrigerador se traslade de dstas
hacia los rodillos. Despuds de rodar el refrigerador de nuevo
hacia su lugm; gire las patas en el sentido de las manecillas
del reloj hasta que las patas sostengan nuevalnente el peso
del refrigerador.
5O
Page 51

Instrucciones para la instalacion
COlVIO INSTALAR LA TUBERiA DEL AGUA
(EN ALGUNOS MODELOS)
ANTES DE INICIAR
Los idts de cobre recomendados para el smninistro de agua son
1\'LXSX2,1\'LXSX3o 1\'LXSX4,dependiendo de la cantidad de
ulberfa necesaria. Las utberfas plfisticasaprobadas para el
suministro de agua son las mberfas para el refrigerador
SmartConnect TM de GE (1\'LX08X10006, 1\'LX08X10015 y
1\'_1208X10025).
,4flconectar su refrigerador a un Sistema de Aglm de ()smosis
Inversa de GE, la finica instalacidn aprobada es con un ldt de
()smosis Inversa de GE. Para otros sistelnas de aglm de 6smosis
inversa, siga las instrucciones del thbricante.
Esta instalacidn de la mberfa del aglm no estfigarantizada por
elthbricm_te del refrigerador o de la mfiquina de hielos. Siga
estasinstrucciones ofidadosamente para minimizar el riesgo de
un daflo costoso debido al agua.
E1martilleo de] agua (aglm g'olpealldo COlltra la mberfa) en la
mberfa de la casa puede causar daflos alas partes del
refrigerador y con&mir a un goteo o immdaddn por el agua.
Elaine a tm plomero calificado para corregir el martilleo del
agxmantes de instalar la mberfa del aglm
alrefrigerador.
Para evitar quemaduras y daflos con elproducto, no conecte la
mberfa del agua a la mberfa del aglm caliente.
Siusa el refrigerador antes de conectar la mberfa, asegllrese de
que el brazo de llenado est_en laposiddn STOP(hada arriba).
No instale la mberfa de la mfiquina de hielos en hgares donde
la temperamra caiga por debajo del nivel de congelamiento.
_Musar cu_quier aparato eldctrico (como un taladro eldctrico)
durante la instalacidn, aseg_'lresede que el aparato estd aislado o
conectado de manera que evite elpeligro de tma descarga
eKctrica, o se opere por baterfas.
Todas las instalaciones se deben realizar segfin los requisitos del
cddigo Mealde plome6a.
QUE NECESITA
* Kit de mberfa de cobre para el refrigerador o SmartConnect TM
de GE, 1/4" de difimetro externo para conectar el
refrigerador al suministro de aglm. Si usa cobre, asegfirese de
que ambos extremos de la tuberfa
se corten unifiormelnente.
Para determinar la cantidad de tuberfa que necesita: mida la
distm_ciadesde la vfilvtfladel aglm en la parte posterior del
refrigerador hasta el mbo de suministro de aglm. Luego agreglle
8 pies (2,4 m). Asegllrese de que haya sufidente mberfa
adicional ;smos 8pies [2,4 m] enrollado en tres x_leltasde unas
10 pulgadas [25 cm] de difimetro) para permitir que el
refrigerador se pueda mover de la pared despuds de la
instalacidn.
51
QUE NECESITA (CONT.)
Los kits de tubeda para el refrigerador Smart(]onnect TM de GE
estfin disponibles en las siguientes long_tudes:
6' (!,8 m) 1\LX08X10006
!5'(4,6rn) 1\LX08X10015
25'(7,6 m) 1\LX08X10025
Asegflrese de que el kit que haya seleccionado permita al menos 8
pies (2,4 mi como se describe arriba.
NOTA: La flnica tubez{a de plSstico aprobada de GE
es la que viene provista con los kits de tuberla para el refrigerador
SmartConnect TM de GE. No use ninguna otra tuberla plSstica para
el suministro del agua ya que la tubel{a estfi bajo presidn todo el
tiempo. Ciertos tipos de plfistico se fracturarfin o se romperfin con
el tiempo y causarfin dafios en su casa debido al agua.
• Un kit de suministro de agua de GE (contiene tubez{a, vfilvula de
cierre y accesorios enumerados abajo) estfi disponible a un costo
adieional en su tienda o pot medio de Partes y Accesorios,
1.800.661.1616.
• Un suministro de agua frla. La presidn del agua debe estar entre
20 y 120 p.s.i. (1,4-8,1 bari.
" Taladro el_ctrico.
• Llave de 1/2"o ajustable.
• Destornillador plano
y de estrella.
• Dos tuercas de compresidn de 1/4"
de diSmetro exterior y 2 f_rulas
(mangas) para conectar la tubel_a
de cobre a la vfilvula de cierre y 1
a vfilvula del agua del refrigerador.
O BIEN
= Si est5 usando un kit de tuberla para el refi'igerador
SmartConnect TM de GE, los accesorios necesarios ya vienen
preinstalados en la tuberla.
• Si su tubel{a existente de cobre para el agua tiene un accesorio
con vuelo en el extremo, necesitarfi un adaptador (disponible en
las tiendas de suministros de plomerla) para coneetar la llnea del
agua al refrigerador O BIEN, podrfi cortar el accesorio con vuelo
con un cortador de tubos y luego usar un accesorio de
compresidn. No corte el extremo formado de la tubel{a para el
refrigerador SmartConnect TM de GE.
=VSlwfla de cierre para conectar a la llnea del agua frla. La
vfilvula de cierre deber5 tener una entrada de agua con un
diSmetro interno mlnimo de 5/32" en el punto de conexidn a la
TUBERIA DEL AGUA FRIA. Las vfilvulas de apagado tipo silla
vienen inchfidas en muchos kits de suministro de agua. Antes de
compraz; asegfu'ese de que una vfilvula fipo silla cumple con los
cddig'os de plomel{a en su localidad.
Page 52

Instrucciones para la instalaci6n
Instale la vfdvula de cierre en la mberfa del agua de consumo m{ts frecuentemente udlizada.
[i] CIERRE EL SUMINISTRO
PRiNCiPAL DE AGUA Y
DESENCHUFE EL REFRIGERADOR
Abra el grifo mils cercano en contra del sentido de las
agujas del reloj pot suficiente tiempo para limpiar la
mberia del agua.
[-2=]SELECCIONE LA UBICACION
DE LA VALVULA
Seleccione una ubicacidn para la vfilvula que sea
fficilmente accesible. Es mejor conectarla en el costado de
una mberia vertical de agua. (luado sea necesario
conectarla en una mberia horizontal de agua, haga la
conexidn en la parte superior o al lado, en vez de hacerlo
en la parte de abajo, para evitar retirar cualquier
sedimento de la mberia del agua.
Perfbre un orificio de 1/4" en la mberia del agua (incluso
si estfi usando una vfilvula auto perforadora), usando una
broca afilada. Retire cualquier sobrante que resulte de
perforar el orificio en la mberia. Tenga cuidado de no
permitir que se filtre agua hacia el taladro. No perforar un
orificio de 1/4" puede resultar en menor produccidn de
hielo o cubos mils pequefios.
[] INSTALE LA VALVULA DE CIERRE
Una la vilvula de cierre a la tuberfa de agua frfa con la
abrazadera para el mbo.
Apriete los tornillos de la abrazadera hasta que la
arandela sellante elnpiece a hincharse.
NOTA: No apriete demasiado la mberfa ya que podrfa
romperse. Arandela
Abrazadera
deltubo- de
entrada
Tornillode la
abrazadera
Wlvula de Tuber[a vertical
cierre too silla de agua fr[a
NOTA: Se deberlm seguir los C6digos 248CMR
de Plomerfa para el Estado de Massachusetts. Las
vfdvulas tipo silla son ilegales y su uso no estl
permitido en Massachusetts. Consuhe con un plolnero
licenciado.
52
[-4]DIRIJA LA TUBERiA
Dirija la tuberia entre la llnea del ag3m illa y el refiigerado,:
Dirija la tuberla a tray, s de un orificio perforado en la pared o
en el piso _detrfis del refrigerador o del gabinete de la base
a@acente) lo mils cerca posible a la pared.
NOTA: Asegjuese de que haya suficiente mberia adicional
(unos 8 pies [2,4 m] enroUada en tres vueltas de ahededor de
10" [25 cnq de difimetro) para permitir que el refiigerador se
pueda mover de la pared despu_s de la instalacidn.
[5]CONECTE LA TUBERiA
A LA VALVULA
Coloque la merca de comt)residn y f6rula para
la mberia de cobre ,manga) en el extremo de la mberia y
con6ctela a la vfilvula de cierre.
Aseg(uese de que la mberia est_ complemente insertada en
la vfilvula. Apriete la merca de compresidn firmemente.
Para mberia de plfistico de un kit de mberia para
el refrigerador SmartConnect _" de GE, inserte el extremo
moldeado de la mberia en la vfilvula de cierre y apriete la
merca de compresidn hasta que est_ firmemente apretada a
mano, luego apriete otto gjro con una llave. Apretar
demasiado puede causar fugas.
V_lvulade "
too silla Tuberia
Tuercade
compresi6n
Tuercade empaque
V_lvuladesalida_ --F@ula (manga)
NOTA: Se deberfin seguir los Cddigos 248CMR
de Plomeria para el Estado de Massachusetts.
Las vfilvulas tipo silla son ilegales y su uso no estfi
permitido en Massachusetts. (]onsulte con un plomero
licenciado.
[-glLAVE LA TUBERiA
Abra el suministro principal de agua en contra del sentido
de las agujas del reloj y lave la mberia hasta que el agua
est_ limpia.
Cierre el agua en la vfilvula despu_s de que un cuarto (1
litro) de agua se haya eliminado pot la mberia.
Page 53

Instrucciones para la instalacion
COIVIO INSTALAR LA TUBERiA DEL AGUA (CONT.)
[] CONECTE LA TUBERIA AL
REFRIGERADOR
NOTAS:
" Antes de hacer la conexidn al rei]qgerador, aseg_'tresede que
el cable de corriente del rei]qgerador no estd conectado en el
tomacorriente de la pared.
" Recomendamos instalar un filtro de agua si su suministro de
agua tiene arena o partfculas que podrfan obstrtflr la m_la
de la vidvula de agua del ret]qgerador. Instidelo en la mberfa
del agua cerca
al ret]qgerador. Si usa un ldt de tuberla para el ret]qgerador
SmartConnec£ _'de GE, necesitar{t un mbo adicional
IWX0gX10002) para conectar el filtro. No corte la mberfa
pl{tstica para instalar el filtro. .,,_-------_, I
Retire la cubierta del acceso, o.
Retire la tapa flexible de plitstico de "
la v/dvula del agua (conexidn
del ret]qgerador). O
Coloque la merca de compresidn y la
t}rula imanga) en el extremo de la
tuberfa como se muestra. En el
ldt de mberfa para el refrigerador
SmartConnec£ _'de GE, las tuercas va
vienen armadas con la mberfa.
Inserte el extremo de la tuber_a en la
conexidn de la v/dvula del agua lo mits que se pueda. Mientras
sostiene
la mberfa, apriete el accesorio.
Para tuber_a de pl{tsdco de un ldt de mberfa para el
ret)igerador SmartConnect _"de GE, inserte el extremo
moldeado de la mberfa en la v/dvula de cierre y apriete
la merca de compresidn hasta que est{"firmemente apretada a
mano, luego apriete otra vuelta con una llave. Apretar
demasiado puede causar fugas.
Una la mberfa a la abrazadera provista para sostenerla
en una posicidn vertical. Quiz/ts necesite apalancar
la abrazadera. Abrazadera
dela
Tuberfade1/4" tuberfa
Tuercade
compresi6n
F@ula
Tubode Conexi6ndel
SmartConnect_ refrigerador
Reemplace la cubierta de acceso.
FfflABRA LA LLAVE DEL AGUA
EN LA VALVULA DE CIERRE
Apriete cualquier conexidn que pueda presentar figas.
CONECTE EL REFRIGERADOR
Organice el cable de la mberfa de manera que no vibre contra
la parte trasera del refrigerador o contra la pared. Empuje el
refi'igerador hacia la pared.
[_ INICIE LA MAQUINA DE HIELO
Mueva el brazo de llenado a la posici6n OR ]mcia abajof
La mitquina de hielos no empezafft a operar hasta que alcance
su temperatura de operacidn de 15°F _9°C ' o menor. Luego,
empezafft a operar automitticamente.
zq .. IF> ........ Ilenadohacia
S'%_'_'_'/ Ii_ ....... laposici6n
_"'J ! _ _: Brazode STOP(hacia
ilenad0hacia la arriba)
posici6nON
(haciaabajo)
NOTA: En condiciones de menor presidn
del agua, la v(dvula de agua puede encenderse
hasta 3 veces para suministrar suficiente agua a
la m(tquina de hielos.
53
Page 54

Instrucciones para la instalacion
COMO INVERTIR EL VAIVEN DE LA PUERTA
NOTAS IMPORTANTES
A] invertir el vaiv_n de la puerta:
• Lea las instrucciones completamente antes de empezar.
• Maneje las partes con cuidado para evitar raspar la
pinmra.
• Ponga los tornillos con su parte correspondiente para
evitar usarlas en el lugar equivocado.
• Disponga de una superficie de trabajo que no se
raspe para las puertas.
IMPORT_NTE: [na vez que empiece, no mueva el
gabinete hasta que haya completado el proceso de invertir
el vaiv_n de la puerta.
Estas instrucciones son para cambiar las bisagras del lado
derecho al izquierdo, si algmm vez desea cambiar las
bisagras al lado derecho nuevamente, siga las mismas
instrucciones e invierta toda las referencias hacia la
izquierda y derecha.
HERRAMIENTAS REQUERIDAS
Destornilladorde estrella
Cintade enmascarar
Destornilladorde casquillo
concabezade5/16"
Cuchilloparamasilla
(esp_tula)o destornillador
delgado
DestornilladorTorx®
T206 T25,(necesitado
paraalgunosmodela)
Llaveabierta
de 5/16"
[_ RETIRE LA PUERTA
DEL CONGELADOR
2. ] Pegue la puerta cerrada con cinta dc enmascarar.
2.2 Con un destornillador dc casqttillo de cabeza hexagon_ dc
5/16," retire los tornillos que sostienen la bisagra superior
del gabinete.
2.3 Levantc la bisagra direcmmente hacia arriba para liberar el
pasador de la bisagra del casquillo en la partc superior de la
puerto y coldquela a un lado, junto con los tornillos
correspondientes.
Bisagrasuperior
l
2.4 Rcdre la cinm y levante la puerto hacia filera del
gabinete. Levlmtela del pasador de la bisagra central.
2.5 Coloque la puerto sobre una superficie que no raye con la
parte exterior hacia arriba.
[_ANTES DE INICIAR
l. l Desconecte el refrigerador del tomacorriente el_ctrico.
1.2 Desocupe todos los esmntes de la puerta, induyendo el
compartimiento de l(mteos.
PRECAI_ CI(')N: No permita que ninguna puerta se caiga
al piso, ya que esto podrla dafiar el freno de la puerto.
2.6 Traslade los dos tornillos del lado opuesto del gabinete
hacia los orificios de los tornillos desocupados al redrar la
bisagra supel_ior.
54
Page 55

Instrucciones para la instalaci6n
[] RETIRE LA PUERTA DE
ALIMENTOS FRESCOS
3.1 Pegue la puerta cerrada con cinta de emnascarar.
3.2 Usando un destornilladordecasquillode cabeza hexagonalde
5/16"v una llaveabierta de 5/16," retirelos dos mrnillosque
sostienenla bisagracentral algabinete.Levantelabisagra central
para liberarelpasador del casquiUoen laparte superiorde la
puerta ycoloquelabisagray los mrniUosa un lado.Tenga
cuidadode no perder eleq)aciador y la arandela de la bisagra
central.
3.3 Retire la dnta e incline la puerta hacia filera del gabinete.
Lewmte la puerta del pasador en el soporte de la bisagra
inferior. (Si la arandela plltstica se pega al t})ndode la
puerta, coldquela de nuevo en la bisagra.)
3.4 Coloque la puerta con el exterior hacia arriba en una
superficie que no raye.
3.5 Traslade losdos tornillos del lado opuesto del gabinete a los
orificiosde los tornillos desocupados al retirar la bisagTa
central.
3.(5Traslade la arm_dela (si su modelo la incluye)hada el
costado opuesto.
_-]RETIRE LA PUERTA DE
ALIMENTOS FRESCOS (CONT.)
3.7 Tome uno de los tornillos redrados en elpaso 2 y col6quelo
en el orifido para tornillo m(_sexterior en ellado opuesto.
No atornille por completo, deje atficiente espacio bajo la
cabeza del tornillo para elgxosor del soporte.
@
4.1
COMO INVERTIR LOS
ELEMENTOS DE SOPORTES
Mueva el soporte de la /I I Arandela
-1tl I Pl_stica
arandela pl{lsticadel lado
derecho al izquierdo. II_.---.j:_>.-_
S0p0rtede ,f .... -_
Cambieelpasadordelabisagralabisagra"/"
alladoopuestodelsoporte.
4.2 Intercambie la bisagra ? los tornillos en la parte superior
derecha con los ton_los en la parte superior izquierda del
gabinete. No apriete los ton_los en el lado de la bisagra en
este illOlllelltO.
Instalaci6ndelabisagra Instalaci6ndelabisagra
a laizquierda, aladerecha.
NOTAS:
• Alglmas bisagras tienen cuatro orificios. Los orifidos a
utilizar para la instaladdn de la bisagra dependen del
lado que instale la bisagra.
• E1 borde externo de la bisagra deber_ estar paralelo al
borde de la caja para una instalacidn correcta.
55
Page 56

Instrucciones para la instalaci6n
C0MO INVERTIR EL VAIVEN DE LA PUERTA (CONT.)
!
[-5]COMO INVERTIFI LAS MANUAS
DE LAS PUERTAS
5.1 Traslade la manija de la puerta
de alimentos frescos
5.1.1 Retire el tapdn de la inanija por debajo dcl horde usmldo
un cudlillo de inasilla con la punta t})rrada coil dnta, y
retire el tornillo que est5 por debajo. Retire los dos
tornillos que sostienen la nlanija coil la parte superior de
la xierta.
Partesuperior
Tap6n
5.1.2 Retire la manija.
5.1.3
Retire los tornillos del horde derecho de la parte
superior de la puerta e insdrtelos en los orificios de los
tornillos de la manija en el lado opuesto.
5.1.4
Retire el bot6n de la bisagra superior del lado izqitierdo de
la puerta e ins@telo en el orificio en el lado opuesto que se
desocup6 al retirar la bisagra superioc
5.1.5 Retire el tapdn del frente
de la puerta y traslAdelo
aJ lado opucsto.
Paravolverainstalarla
manijaen el ladoopuesto.
1
5.2 Traslade el freno de la puerta
5.2.1 Desplace la traba pl_stica de la puerta y los
tornillos del lado derecho al lado izquierdo.
Trabapl_stica
_ _ dela puerta
Lado_.
izquierdoIlAS,s,-._-_
Lado
5.2.2
Desplacc la traba mctfili(-a de la pucrta dcl
lado derccho al lado izquierdo y dcsi)lacc el
tornillo a] lado opucsto de la puerta.
iria,ss_-.
izquierdo Trabamet_lica
de la puerta
derecho
5.3.2
Como reinstalar la manija de la
puerta de los alimentos frescos
Pegue la manija en el lado
derecho de la puerta coil
los tornillos que est_n en
la parte superior y debajo
del tapdn de la manija. _
\,_ielva a instalar el tapdn
de la manija.
5.4
5.4.1
5.4.2
Traslade la manija de la puerta
del congelador Partesuperi0r
Retire el tornillo que sostiene la
coil la parm
superior de la puerta y
los dos tornillos que
sostienen la manija con
la parte inferior de
la puerta.
Retire la manija.
Parteinferior
56
Page 57

Instrucciones para la instalacion
Fg]COMO INVERTIR LAS MANiJAS
DE LA PUERTA (CONT.)
5.4.3 Rcdre el tornillo del borde
superior dered_o dc la puerta
e insdrtclo en el oriflcio del
rornillo de la manija en el
lado izquierdo.
5.4.4 Traslade el freno de la puerta, como se muestra en |
|
la seccidn 5.2 anterior.
1
5.4.5 [na la manija al horde
derecho de la puerta con
tornillos en la partc supel%r
e inferior, usando los
orificios que quedan =d
retirar los tornillos del freno
de la puerta.
[]C0MO VOLVER A COLGAR
LAS PUERTAS
6.1 Vuelva a colgar la puerta de los
alimentos frescos
6.1.1 Baje la puerta de los alimentos frescos al pasador de la
bisagra inferior. Asegfn_ese de que la arandela estd en su
hNar en el pasador.
Arandela
pl_stica
Soporte __"""
dela /!_ i J_ 211
bisagra_
6.1.2
Inserte el pasador en
la bisagra central en
el casquillo de la
parte st@erior de
la puerta. Coloque
el espaciador,
luego la arandela
en elpasador de la bisagra. NOT.&: La bisagra central
debe girarse como se muestra al instalarse en el lado
izquierdo.
57
[] C0MO VOLVER A COLGAR
LAS PUERTAS (CONT.)
{5.1.3 Incline la ix_erta ]vtcia el gabinetc. A ntedkla que la
puerto xa_elvca su posicidn, dcslicela bisagra dcbajo dc la
cabeza dcl tornillo que anteriormente se habfa insertacb
i)alvialmente en el orificiom_s extcrno. Inserted tornillo
restante, luego apriete ambos rorlffilosfirmemente.
6.2 Vuelva a colgar la puerta
del congelador
6.2.1
Baje la puerta del
congelador aJ
pasador de la
bisagra central.
Cercidrese de que
la arandela y el e
spaciador estdn en
su lugar en el pasador.
pl_sticay espaciador
6.2.2 Incline la puerta hacia el gabinete, levanmndo la bisagra
superior de manera que el pasador se ajuste en el
casquillo en la parte superior de la puerta.
6.2.3
Cercidrcse de que la puerta estd ligeramente por encima
de laparte superior del gabinete y el espacio entre las
puertas estd unifbrme por el frcnte. Apriete los tornillos
de la bisagra superior. No q)riete demasiado estos
tomillos, apridtelos hasta que estdn ajustados, luegv)dd
otro medio giro.
Page 58

Sonidos normalesde operacion.
Los refrigeradores m_s nuevos producen sonidos diferentes a los modelos m_s antiguos. Los refrigeradores
modernos tienen m_s funciones y usan tecnologia m_s reciente.
i,Ustedescucha Io queyo escucho?Estossonidossonnormales.
[] El,_ue,,oco._pre_ordealta HMMMM...
eficiencia puede fimcionar
m_ts r@ido y durar m_s --WHOOSHee=
que el de su refrigerador
anterior y puede escuchar un zumbido de tone alto o un
sonido pulsante mientras opera.
[] Puede escudmr un sonido de soplido cuando las
puertas se cierran. Esm se debe a que la presi6n se
esfft estabi]izando denFo del refrigerador.
CHASQUIDOS,
ESTALLIDOS, CRUJID O,
GORJEOS
[] Puede escuchar sonidos como de crujido o estallidos cuando
el refrigerador se conecta por primera vez. Esto pasa a
medida que el refrigerador se enfrla hasta la temperamra
correcta.
[] E1 compresor puede cm,sar un dmsquido o un gorjeo cuando
intenta voh'er a arrancar (esto puede tomar hasta 5 nliimtos).
[] Expansi6n y contracci6n de las bobinas durante o despuds del
ciclo de descongelaci6n puede causar sonidos como de
crujido o est_dlidos.
[] En modems con m@uina de hielos, despuds de completar un
ciclo de hacer hielo, se pueden escudmr los cubos de hielo
cuando caen a la bandeja de hielos.
WHIR![]Puedeescuchar los ventiladores movidndose
_. a gran velocidad. Esto pasa cuando el
_, refrigerador se conecta por primera vez,
t_ cuando las puertas se abren frecuentemente
o cuando se guarda
gran cantidad de alimentos en el refrigerador o en los
compartimientos del congelador. Los ventiladores est_n
ayudando a mantener las temperaturas correctas.
6
SONIDOSDEAGUA
[] E1 fluido del refrigerante a travds de las bobinas puede
producir un sonido de borbotco como de ag_m hirviendo.
[] E1 aglm que cae en el calentador de descongelacidn puede
causar un dflsporroteo, estallido o zmnbido &,rante el ciclo
de descongelacidn.
[] In rtfido dc agua cayendo se puede escudmr &,rante el ciclo
de descongelacidn a medida que el hieb se derrite del
evaporador y fluye hacia la bandeja de drenaje.
[] E1 cierre de las puertas puede producir un sonido de gorooteo
debido a la estabilizacidn de la presidn.
Antesde liamara solicitarservicio...
Consejos para la soluci6n de problemas
iAhorre tiempo y dinero! Revise las tablas en las siguientes p_ginas
pfimero y quiz_s no necesite Ilamar a solicitar el servicio.
Elrefrigerador no opera
Posibies causas Ou6 hacer
Vibraci6no traqueteo(una
_era esnormal)
Hie]oo cristalesdehieloen
losalimentoscongeiados(El
hielodentrodeunpaquete
esnormal)
Loscubesson
rnu¥peque_os
58
E1 refrigerador est_ en
el ciclo de dcscon,%elado.
E1 di_ de control de la temperatura
est_ en posicidn 0 (spa{!ade}.
E1 refrigerador est_ desconectado.
E1 fusible esfft quemado / el
interrulotor autom(ttico se salt&
Los rodillos o patas
niveladoras necesitan _uste.
La puerta se deia abierta.
Abrir la puerta con mudm
frecuenda o por mucho tielllpo.
La vldvula de cierre del agua que
conecta el refrigerador a la llnea
del aglm puede estar obstruida.
* Espere tmos 30 minutos hasta que el ciclo
dc descongelado termine.
* Mueva el din de control de la telnperatura
a tnl ,,ixel de temperamra.
, Elnpuje el enctmt'e completamente en el tomacorrientc.
* Rcemplace el fusible o flje el interruptor.
* Consulte la seccidn Rodillos Ypatas niveladoras.
* Rcxdse si un paquete est_ reteniendo la puerta abierta.
* Llame al plomero para que limpie la vltlvttla.
Page 59

GEAppliances.com
Posibles causas Que hacer
E!motoroperacon
frecuencia perlargos
periodoso ciciosde
farina intermitente(Los
refrigeradoresmodemos
conmasespaciode
almacenamientoy un
coogeladormasgrande
requiere, demastiempo
deoperaci6n.Arrancany
parancogfrecuenciapara
mantenertemperaturas
ufliformes.)
E!compartimientode
aiimentosfrescoso el
congeladornoestanmuy
fries
Lamaquina de hieios
automatica nofunciooa
(enalgunos modelos)
Zumbido
frecuente
Congelamientolentode
loscubesdehielo
Loscubesdehieiotienen
oior/ saber
Normal cuando el refrigerador
se conecta iniciahnente.
Con frecuenda ocurre cuando
grandes cantidades dc Nimentos
se Nmacenan en el refrigerador.
La puerta se dcja abierta.
E1 clima caliente o abrir
la puerta frecuentcmentc.
E1dial de control de la tcmperamra
esdm en en el nivel mits fifo.
• Espere 24 horas hasta que el refrigerador se enfrfe
per complete.
• Esto es nonmd.
• Revise si un paquete est_ retcniendo ]a puerta abierta.
• Esto es normal.
, Consulte la secddn Sobreeldial decontrolde latemperatura.
La rejilla y el condensador
necesitan limpieza.
E1control dc la tcmperamra no esdt
en un nivel stNcientcmentc fifo.
• Consulte la secd6n Cuidado y limpieza.
• Consulte la secd6n Sobre eldial de control de la temperatura.
E1 clima caliente o abrir
la puerta frecuentcmente.
La puerta se dcja abierta.
l_n paquete est_ obstruyendo
el con&rote del aire en el
COlnpartillliei,to del congelador.
La in(tquina de hielos no
est_ encendido.
• Fije el control de la tcmperamra a un hive] mits frfo.
Consultc la seccidn S0bre 10sc0ntr01es.
*Revise si un paquete est_ reteniendo la puerta abierta.
e Revise si hay tm paquete bloquem_do el con&rote
del aire en el compartimiento del congelador.
* Mueva el braze de llenado a la posicidn ON (hacia abajo).
E1 smninistro del aglm estit
apagado o no est_ conectado.
E1 compartimiento del
congelador no es may fi_o.
H@ cubes amonmnados en
el recipiente de almacenamiento
que causan que ]a m_quina de
hielos se apague.
La m&tuina de hielos est(_ en
la posicidn de encendido, pero
el smninistro de aglm hada el
• Consuhe la secci6n C6mo instalar la tuberia del agua.
• Espere 24 horas para que el refrigerador se enfrfe
completamente.
• Nivele los cubes con la mane.
• Mueva el braze de llenado a la posicidn STOP 'lmcia
arriba). Mantener el braze en la posicidn ON (hacia
abajo) dafiaff_ la v_dvula del aglm.
refrigerador no est(tconectado.
La puerta se dcia abierta. • Revise si un paquete est_ reteniendo la puerta abierta.
E1cl£ddecontroldela temperautrano • Consulte la seccidn S0bre el dial de c0ntr0i de la temperatura.
esd_en un nivelstff]cientcmentcfifo.
E1 redpientc de almacenamiento
de hielos necesita limpieza.
Hay alimentos que trasmiten
olor / saber a los cubes de hielo.
• Desocupe el recipiente y litvelo. Deseche los cubes viejos.
• EnvueNa bien los alimentos.
Se farina hamedad eo
la supefficie del gabinete
entre las puertas
ltumedad se farina ai
interior {en clima humeda,
el aire lleva la humedad
al refrigerador cuando
las puertasse abren)
E! refrigerador tiene olor
E1 interior del refrigerador
necesita limpieza.
No es rare durm_te
periodos de alta humedad.
Abfir la puerta con mucha
frccuencia o per mud_o tieinpo.
Hay alimentos que trasmitcn
olor / saber al refrigerador.
E1 interior necesita limpieza.
• Consuhe la secci6n de Cuidado y limpieza.
• Seque]a superflcie, ]uego fije el control de ]a
telnperamra a un hive] mits frfo.
• Los alimentoscon oloresfilertcsdcben envolvcrsefirmementc.
• Mantenga tma caja abierta de bicarbonate
en el refrigerador, reemplimela cada tres meses.
• Consuhe la seccidn de Cuidad0 y iimpieza.
59
Page 60

Notes.
60
Page 61

No_aS. GEAppliances.com
61
Page 62

Garantiadelretrigerador.
Todos los servicios de garantia los proporcionan nuestros Centros de
Reparaci6n de F_brica o nuestros t6cnicos Customer Care® autorizados.
Para concertar una cita de reparaci6n, en linea, 24 horas al dia, visite nos
al GEAppfiances, com, o Ilame a! 800.GE.CARES(800.432.2737). Cuando
Ilame para solicitar servicio, pot favor tenga a mano el n_mero de serie y
el n_mero de modelo.
Grape aquisu recibo.
Se requiere faciiitar prueba
de ia fecha de compra
original para obtener un
servicio bajo la garantia.
GE reemplazar£
MODELOSGEy GEPROFILE:
Un a_o Cualquier parte del refrigerador que _alle dcbido a defcctos en los materiMes o en
A partir de lafecha ]a _abricad6n. Durante esta garantia limitada de an afio, GE mmbi_n propordonaff_, sin costo
de la c0mpra original alguno, t_Jda ]a mano de obra y el sel_'ido relacionado para reemplazar partcs defccmosas.
Treintadias
(Filtrodeagua,siinctuido)
A partir de lafecha
de la compraoriginal
del refrigerador
Cualquier parte de] carmcho del fi]tro de ag_la que falle debido a defcctos en los materi_es o en
]a t_abricacidn. Durante esta garantia limitada de treinta dias, GE tambidn proporcionar£ sin c0st0
algun0, un carmcho de fikro de aglla de repuesto.
MODELOSDEGEPROFILESOLAMENTE:
ci. oaaos/Mode os
de GE Profile solamente)
A partir de la fecha
de la cOmpraoriginal
Cualquier parte del sistema sellado de refrigeraci6n (compresor, condcnsadol, evaporador y mberlas
de conexidn) que t_al]endcbido a defcctos en los materi_es o fifl)ricacidn. Durante esm garantia
limitada de cinco a_os del sistema sellado de refrigeraei6n, GE mmbi_n propordonar£ sin costo
algan0, toda la mano de obra y el sen'icio relacionado para reemiolazar partes defccmosas en
el sistelna sellado de refrigeracidn.
Viajes de servicio a su hogar para ensefiarle c6mo usar
el producto.
Instalacidn o entrega inapropiada, o mantenimiento impropio.
Fal]as del pro&into si hay abuso, real uso, o uso para
otros propdsitos que los propuestos, o uso para fines
comerciales.
Pdrdida de alimentos por averfas.
Rcemplazo de fusibles de su hogar o reajuste de interrulxores
de circuko.
Causar dafios despuds de ]a entrega.
Rceinplazo del carmd_o del filtro dc agua, si inchtido, debido a
presidn de agua afilera de las limites de operacidn espedficados
o sedimento excesivo en
el amlinistro de aglm.
Rremplazo de las bombillas, si incluidas, odel carmd_o de
filtro de agua, si inchtido, diferente a como se espedfica
anteriormente.
Dafio N producto causado por accidente, fuego, inundaciones
o actos de Dios.
Dafio incidental o consecuenciN causado pot posibles defectos
con el aparato.
Producto no accesible para fitcilimr el sen'icio requerido.
EXCLUSION DE GARANTiAS IIVlPLiCITAS--Su unico y e×clusivo derecho es la reparaci6n del producto, tal y
como se indica en esta Garantia limitada. Cualquier garantia implicita, incluyendo las garantias implicitas de
comerciabilidad o adecuacion para uu fin determinado, estan limitadas a un a_o o el periodo de tiempo mas
breve permitido pot la ley.
Esta garantia se extiende al comprador original y cualquier comprador posterior de productos comprados para uso
residencial dentro de Estados Unidos. Si el producto est_ situado en un _rea que no dispone de servicio por parte
de un proveedor de servicio autorizado de GE, podria tenet que hacerse cargo de los costes de envio o bien podria
solicit_rsele que Ileve e! producto a una centro de servicio de GE autorizado para realizar la reparaci6n. EnAlaska,
la garantia excluye el costo de envio o las visitas de servicio a su casa.
Algunos estados no permiten la exclusi6n o las limitaciones de dafios incidentales o consecuenciales. Esta garantia da
derechos legales especificos, y usted podria tenet otros derechos que variar_n de estado a estado. Para saber curies son
sus derechos legales, consulte a la oficina de asuntos del consumidor local o la oficina del Attorney General en su Iocalidad.
62 Garante: General Electric Company. Louisville, KY40225
Page 63

Soporte al Consumidor.
I I
P_iginaWebdeGEAppliances
GEPppliances.com
www.Hotpoint.com
cTiene alg_ma preguma sobre su electrodomdsdco? iPruebe la pAgina Web de GE Appliances 24 horas al dla,
cu_qLtier dla del afio! Para mayor conveniencia y servicio m_s r_pido, ya puede descargar los Mmm_es de los
Propietarios, pedir piezas o inch:so hacer una cita en llnea para que vengan a realizar una reparacidn.
Soliciteunareparaci6n
GEAppliances.com
www,Hotpoint.cem
E1 servicio de expertos GE esfft a tan s61o un paso de su puerta, iEntre en llnea y solicite su reparacidn cuando le
venga bien _94horas al dla cualqttier dla del afio! O llame al 800.GE.(LM_ES (800.439.9737___ , durante horas normales
de oficina.
RealLifeDesignStudio(Estudiodedise_oparalavidareal)
GEPpp/iances.com
GE apoya el concepto de Disefio [ niversal productos, se:aicios y ambientcs que pueden usar genre de todas las
edades, tamafios y capacidades. RccoilocelllOS la necesidad de disefiar para una grm_ gmna de habilidadcs y
dificultades flsicas y mentNes. Para m(ts detalles cobre las aplicaciones de GE Disefio [ niversal, induyendo ideas de
disefio para la cocina para personas con discapacidades, mire nuestra pi@na Web hoy mismo. Para personas con
dificultades auditivas, favor de llmnar al 800.TDD.(;EAC (800.833.4322).
Garant[asampliadas GEPpp/iances.com
Compre una garantla ampliada y obtenga det_dles sol)re descuentos especiNes disponibles mientras su garantla esfft
afro activa. Puede comprarla en llnea en cualquier momento, o llamar al (1.888._961 ._9133_,durante horas normales de
oficina. GE Consumer Home Se:a'ices estafft afro ahl cuando su garantla termine.
Piezasy accesorios
GEAppliances.com
www,Hotpoint.cem
Aquellos indMduos con la calificaddn necesaria para reparar sus propios electrodomdsticos pueden
pedir que se les manden las piezas o accesorios directmnente a sus hogares (aceptamos las tarjetas
VISA, MasterCard y Discover). Haga su pedido en llnea ho?; 24 horas cada dla o llalnar por teKfi)no
al 1.800.661.1616 durm_te horas normales de ofidna.
Lasinstruccionesdescritasen estemanualcubrenlosprocedimientosa seguirporcualquierusuario.Cualquier
otrareparaciondeberia,porreglageneral,refefirseapersonalcalificadoautorizado.Debeejercerseprecauci6n
ya que lasreparacionesincorrectaspuedencausarcondicionesde|uncionamientoinseguras.
POngaseencontactoconnosotros
GEAppliances.com
www.Hotpoint.com
Si no est_ satisfed_o con el servido que recibe de GE, pdngase en contacto con nosotros en nuestra p@na Web
indicando todos los det_dles asl como su nfnnero dc teKt})no o escrlbanos a:
General Manage:; Customer Relations
GE Appliances, Appliance Park
Louisville, KY 40225
Registresuelectrodom6stico
GEAppliances.com
www.Hotpoint.com
iRcgistre su nuevo electrodomdstico en lfnea cuando usted prefiera! E1registrar su producto a dempo le
proporcionar_, si surgiera la necesidad, una mejor comunicacidn y un servicio m_s if@do bajo los t_rminos de su
garantla. Tambi_n puede enviar st: tarjeta de registro pre-impresa que se incluye en el mate:q_ de embalaje.
63
Page 64

ConsumerSupport.
GEAppliancesWebsite
GEPppliances.com
L_the(:.S.:www.Hotpoint.corn
Have a question or need assistance with your appliance? Try the GE Appliances Website 24 hours a day;
a_) _day of the year! For greater convenience and thster sela_ice, you can now dowlfload Owner's _ianuals,
order parts, or even schedule sea'ice on-line. In Canada: _ssss<geappliances.ca
ScheduleService
GEPppliances.com
L_the(:.S.:www.Hotpoint.corn
EN)ert GE repair service is o_fly one step away from your door. Get on-line and schedule your service at your convenience
_94hours any, day, of the year!, Or call 800.GE.CARES (800.439.9737___ . during normal 1)usiness hours.
In Canada, c_dl 1.800.561.3344
RealLifeDesignStudio
_,_the(:S: GEApp/iances.com
GE supports d_e UniversN Design concept products, services and environments that can be used by people of all ages, sizes
and capabilities. We recog_ize the need to design for a wide range of physical and mental abilities and impairments. For
details of GE's [ niversal Desig_ applications, including kitchen design ideas tbr people with disabilities, check out our
Website toda?: For the hearing impaired, please call 800.TDD.GEA(_ (800.833.4322).
In Canada, contact: Managel; Constmmr Relations, Mabe Canada Inc.
Suite 310, 1 Factory Lane
Moncton, N.B. E1C 9M3
ExtendedWarranties
_,_theUS.:GEApp/iances.com
Purchase a GE extended warranff and learn about special discounts that are available while your warranb_ is still
in effect. _bu can purchase it on-line anytime, or call 1.888.261.2133 during normal business hours. GE Consumer Home
Se_a_iceswillstill be there after your warranb_ expires.
PartsandAccessories
GEPppliances.com
L_theU.S.:www.Hotpoint.corn
Individuals quNified to sela_ice their cown appliances can have parts or accessories sent direc@ to their homes ;VISA,
MastcrCard and Discover cards are accepted). Order on-line toda?; 24 hours eveW day or by phone at
1.800.661.1616 during normal business hours.
Instructions contained in this manual cover procedures to be performed by any user. Other servicing generally should be
referred to qualified service personnel.Caution must be exercised, since improper servicing may cause unsafe operation.
Customers in Canada should consult the yellow pages fi)r the nearest Mabe sela_ice centel; or call 1.800.661.1616.
ContactUs
GEAppliances.com
L_theU.S.:www.Hotpoint.com
If you are not satisfied with the sem_ice you receive from (-)E, contact us on our Website with all the details including your
phone numbel; or write to: GenerN Manage1; Customer Relations
GE Appliances, Appliance Park
Louisville, KY 40225
In Canada: '_x-_x-<geappliances.ca, or '_xTiteto: Director, Consumer Relations, Mabe Canada Inc.
Suite 310, 1 Factory Lane
Moncton, XB. E1C 9M3
RegisterYourAppliance
GEAppliances.com
L_theU.S.:www.Hotpoint.com
Register your new appliance on-line_t your convenience! Timely product registration will allow tbr
enhanced communication and prompt service under the terms of your warran%_ should the need arise.
_bu may Nso mail in the pre-printed registration card included in the pacldng material.
In Canada: _sss-v<geq)pliances.ca _÷_' Printedinthe UnitedStates
_ PrintedonRecycledPaper
 Loading...