

Page 1
GEAppliance&com
Safety Instructions ........... 9-4
Operating Instructions
Additional Features ............. 9
Automatic Icemaker ........... 10
Controls ...................... 5
Shelves and Bins ............. 6, 7
Crispers and Pans ............ 8, 9
Care and Cleaning
Care and Cleaning .......... 11, 12
Replacing the Light Bulbs ....... 19
Models 18& 19
Cong61ateur sup&'ieur
R6frig6rateurs
Installation Instructions
Preparing to Install
the Refiigerator . .............. 13
Reversing the Door Swing .... 18-93
_'ater Line Installation ...... 14-17
Troubleshooting Tips ....... 94-96
Normal Operating Sounds ...... 94
Consumer Support
Consumer Support ..... Back Cover
Product Registration ........ 97, 98
V\'arranty fox
Canadian Customers ........... 99
_4'arranty fox U.S. Customers ..... ,9,0
La section fran_aise commenceh la page 32
Congelador superior
Refrigeradores
La seccion enespa#olempiezaen la pagina 62
Write the model and serial numbers here:
Model #
Serial #
Find these numbers on the gray label
on the left side, near the top of the
reti'igera tot compartment.
197D3354PO02 49-60178 10-01JR
Page 2

IMPORTANTSAFETYINFORMAYlONo
READALLINSTRUCTIONSBEFOREUSING.
WARNING!
Use this appliance only for its intended purpose as described in this Owner's Manual
SAFETYPRECAUTIONS
When using electrical appliances, basic safety precaufions should be followed, including the following:
This refrigerator must be properl_ installed
and located in accordance with the Installation
Instructions before it is used.
Do not allow children to climb, st;rod or hang
on the shelves in the refi-igerato_: They could
damage tile reli_igerator and seriously iqiure
themselves.
Do not touch tile cold sm_i_ces in tile fl'eezer
compartment when hands are damp or wet.
Skin may stick to these extremely cold surli_ces.
Do not store or use gasoline or other flammable
\:q)ms and liquids in the vicinity ot this or anv
other appliance.
In refiigerato_ with atltOll/atic icemake_,
avoid contact with the moving parts of the
ejector mechanism, or with the heating element
located on tile bottom _ff tile icemake_: Do not
place finge_ or hands on tile autolnatic
icemaking mechanism while tile reliigerator is
plugged in.
Keep finge_ out ot tile "pinch point" areas;
clearances between the dom_ and between
the doo_ and cabinet are necessarily small.
Be caretul closing dom_ when children are
in the area.
Unplug tile refrigerator betore cleaning and
making repai_.
NOTE."We stronglyrecommendthatany servi&)g be
performedby a quafifiedindividual.
Setting either or both controls to tile 0 (Of/)
position does not remove power to tile light
drcuit.
Do not refl'eeze fl'ozen fi_ods which haxe
thawed completely:
Page 3
vvvvw.GEAppliances.com
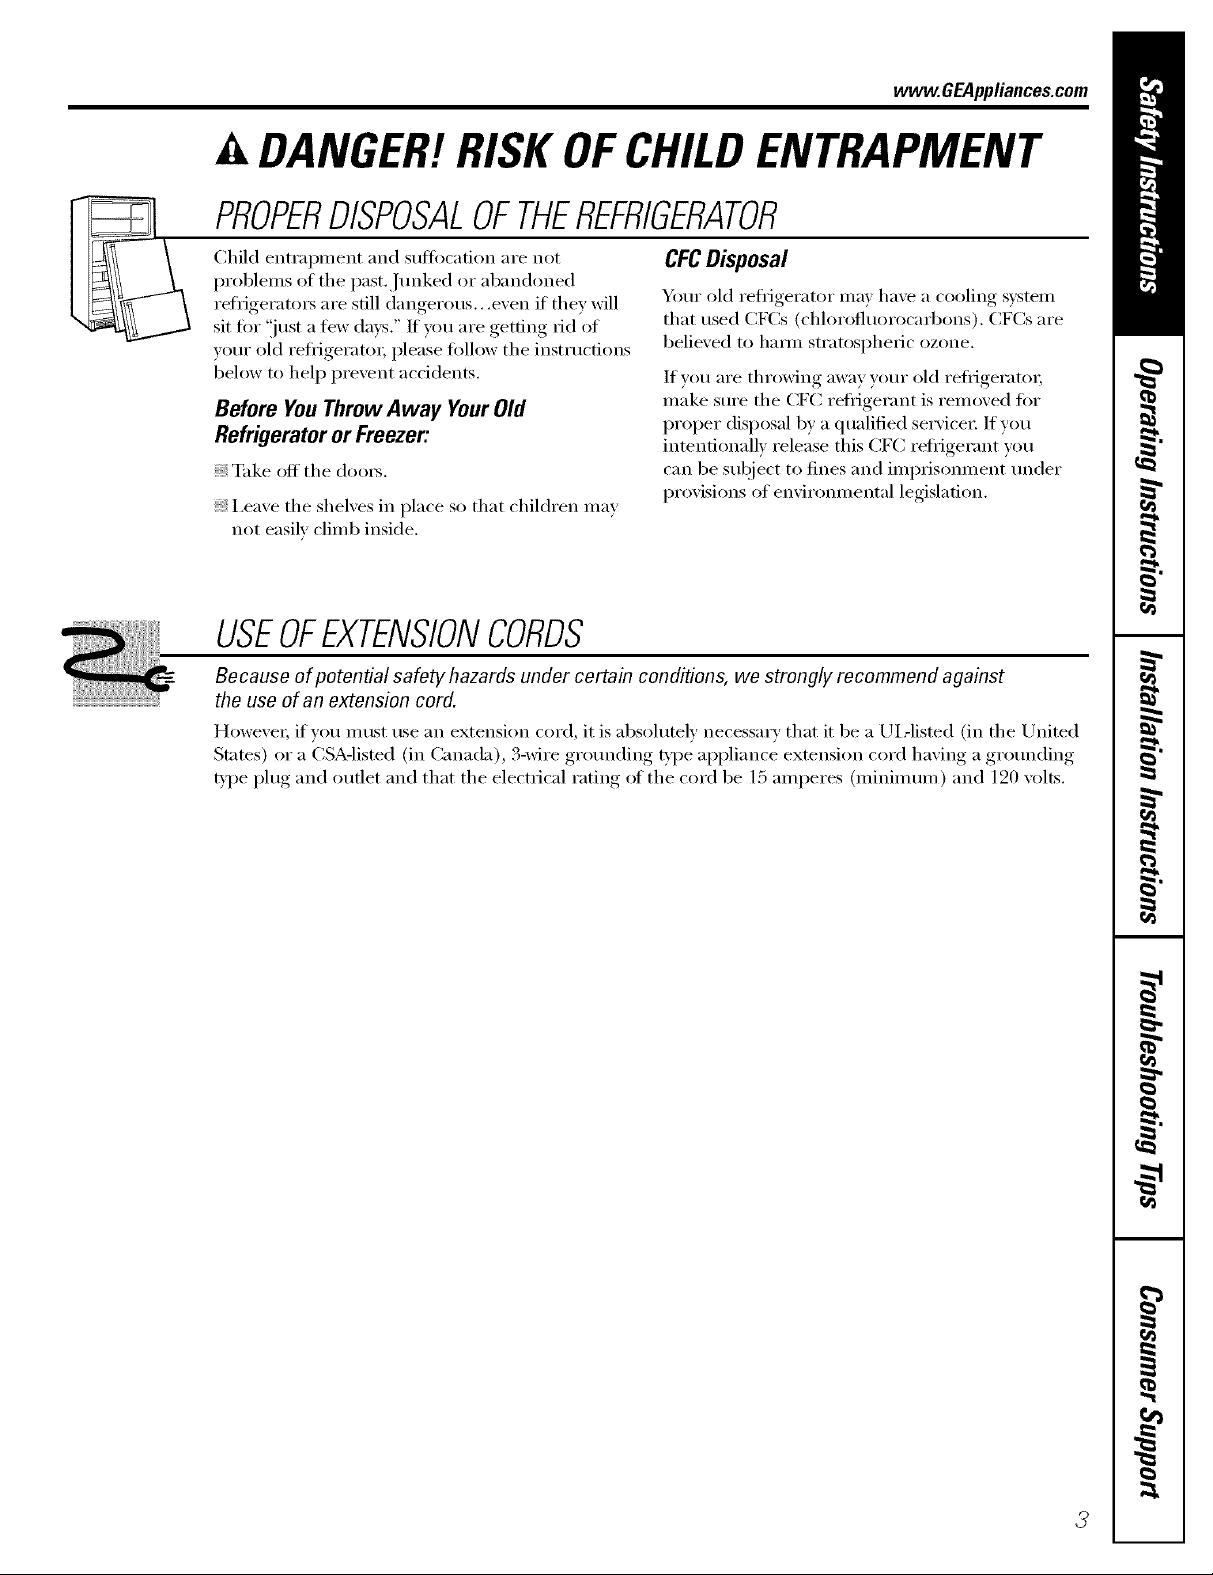
A DANGER!RISKOFCHILDENTRAPMENT
PROPERDISPOSALOFTHEREFRIGERATOR
Child entrapnmnt and suffocation are not
problems of the past, Junked or abandoned
refrigeratoi_ are still dangerous,, ,even if they will
sit fin" "just a few days." If you are getting rid of
your old refi_igerato_; please follow tile instructions
below to help prevent accidents.
Before YouThrowAway YourOld
RefrigeratororFreezer:
:_ Take off the doo_.
i,ea_e the shelves in place so that children may
not easily climb inside.
CFCDisposal
Your old refi_igerator may have a cooling system
that used CF(_s (chlorofhlorocarbons). CFCs are
believed to ham_ stratospheric ozone.
If w_u are throwing away your old refligerato_;
nlake sure tile (;FC reliJgerant is removed t0r
proper disposal by a qualified service_: If wm
intentionally release this CFC reflJgerant you
can be subject to fines and imprisonment under
provisions of environmental legislation.
USEOFEXTENSIONCORDS
Because of potential safety hazards under certain conditions, we strongly recommend against
the use of an extension cord.
Howevei; if you IlltlSt rise an extension cord, it is absolutely necessai'y that it be a UL-listed (ill tile United
States) or a CSA-lismd (in Canada), 3-wire grounding _'pe appliance extension cord having a grounding
type i)lug and outlet and that tile electrical rating of tile cord be 15 amperes (minim urn) and 120 volts.
3
Page 4

IMPORTANTSAFETYINFORMATION.
READALLINSTRUCTIONSBEFOREUSING.
WARNING!
HOWTOCONNECTELECTRICITY
Do not, under any circumstances, cut or remove the third (ground) prong from the power cord.
For personal safety, this appliance must be properly grounded.
The power cord of this appliance is equipped with
a 3-prong (grounding) plug which nlates with a
standard 3-prong (grounding) wall outlet to
minimize tile possibili_' of electric shock hazard
from this appliance.
Have tile wall outlet and circuit checked by a
qualified electridan to make sure tile outlet is
propedy grounded.
Where a standard E-prong wall outlet is
encountered, it is your personal responsibili_, and
obligation to have it replaced with a propedy
grounded 3-prong wall outlet.
The refl-igerator should always be plugged into its
own individual electrical outlet which has a voltage
rating that matches the rating plate.
This provides tile best perfimnance and also
I)rexents oxerloading, house wiring circuits which
could cause a fire hazard from oxerheated wires.
Never uni)lug your refrigerator by pulling on tile
power cord. Mways grip i)lug firefly and pull
straight out ti'oln tile outlet.
Repair or replace immediately all power cords that
have become ti'ayed or otherwise damaged. Do not
use a cord that shows craclcs or abrasion damage
along its length or at either end.
When moving tile refi-igemtor away ti'om tile
wall, be carotid not to roll over or damage tile
power cord.
USEOFADAPTERPLUGS(Ad_pte_plug_,otpe_mittedinConada)
Because of potential safely hazards under certain conditions, we strongly recommend against
the use of an adapter plug.
Howe\'et; if )_)u must use an adapter; where local
codes i)e_nit, a temporary connection ma) be made
to a properly grounded 2-prong wall outlet by use
of a UiAisted adapter a\:filable at most local
hardware stores.
Tile linger slot in tile adapter must be aligned Mth
tile larger slot in tile wall outlet to provide proper
polariS' in tile connection of tile power cord.
When disconnecting tile power cord fl'om tile
aclapte_; always hold tile adapter in place with one
hand while pulling tile power cord i)lug with tile
other hand. If this is not done, tile adapter ground
te_ninal is very likely to break with repeated use.
If tile adapter ground temfinal brealcs, DO NOTUSE
tile refrigerator until a proper ground has been
established.
Attaching the adapter ground terminal to a waft outlet
cover screw does not ground the appliance un/ess the
cover screw is metal, not insu/ated, and the wall outlet is
grounded through the house wking. Youshould have the
circuit checked by a qualified electrician to make sure the
outlet is proper/y grounded.
READANDFOLLOWTHISSAFETYINFORMATIONCAREFULLY.
SAVETHESEINSTRUCTIONS
4
Page 5
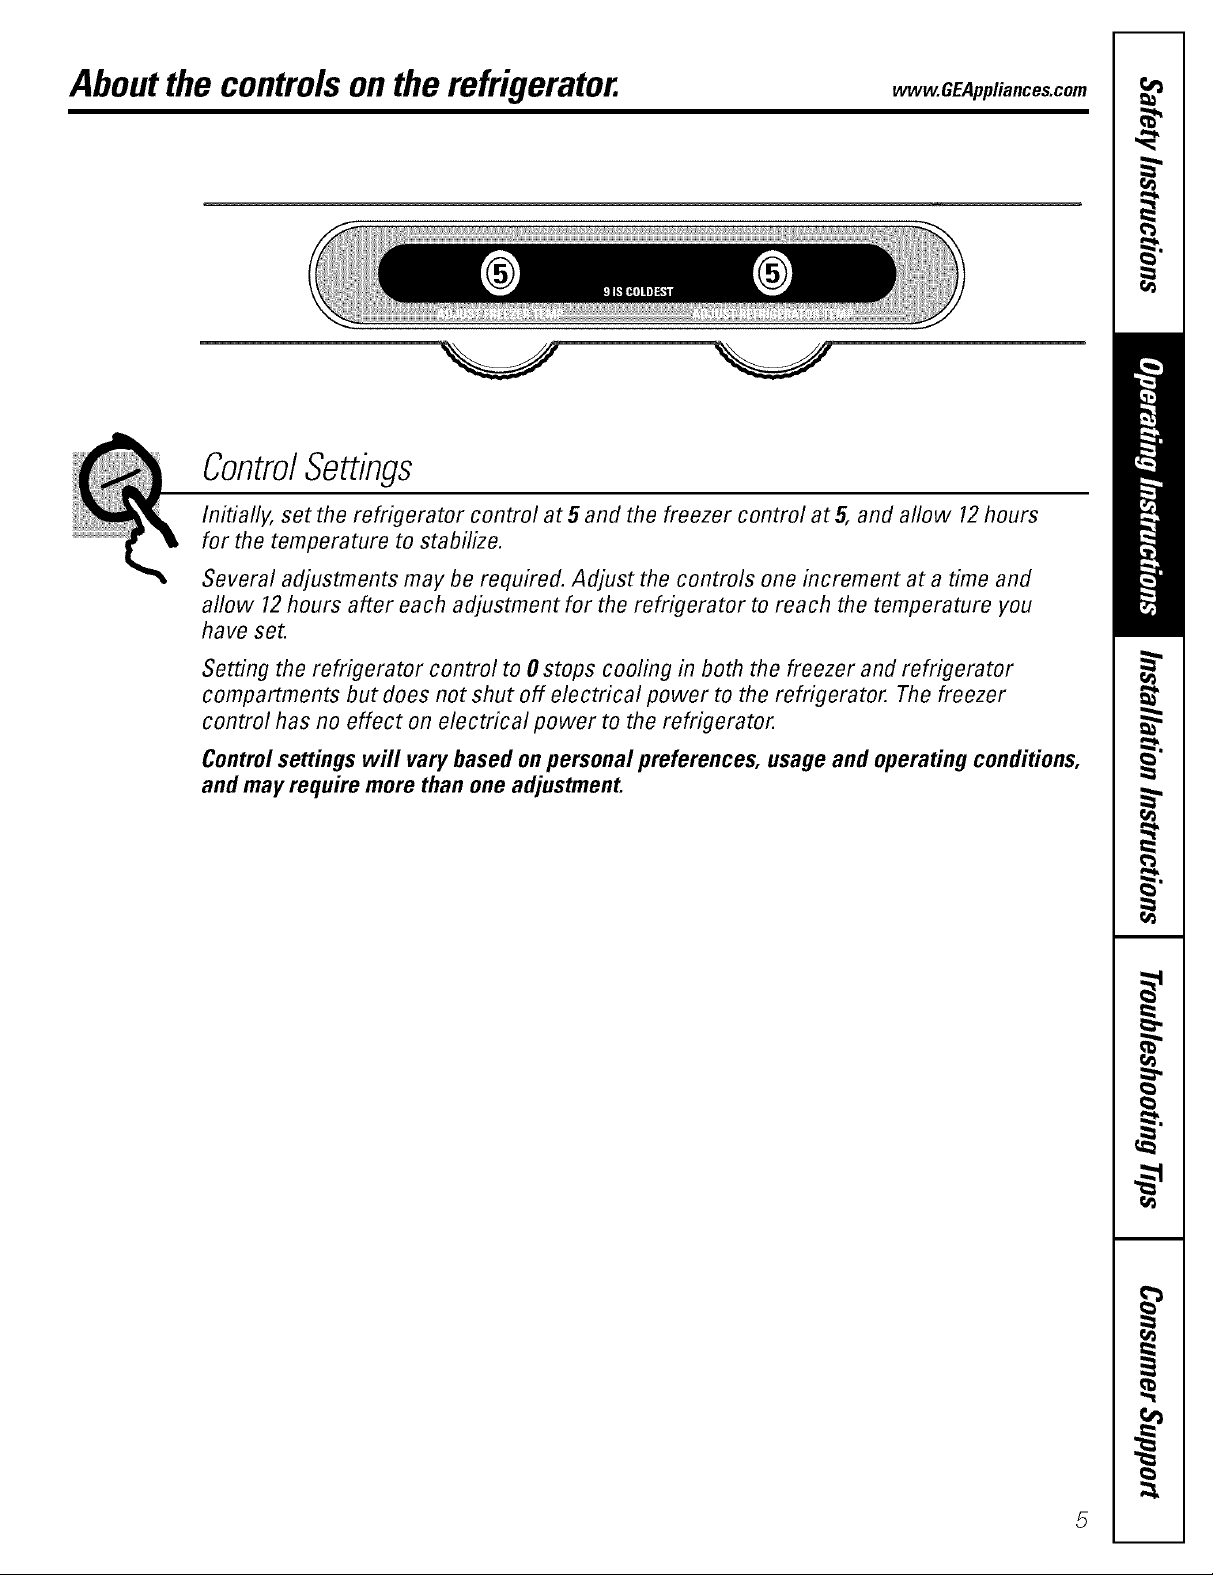
Aboutthe controlsonthe refrigerator, www.GEAppliances.com
ControlSettings
Initially, set the refrigerator control at 5 and the freezer control at 5, and allow 12hours
for the temperature to stabilize.
Several adjustments may be required. Adjust the controls one increment at a time and
allow 12hours after each adjustment for the refrigerator to reach the temperature you
have set.
Setting the refrigerator control to 0 stops cooling in both the freezer and refrigerator
compartments but does not shut off electrical power to the refrigerator. The freezer
control has no effect on electrical power to the refrigerator.
Controlsettings will vary based on personal preferences, usage and operating conditions,
and may require more than one adjustment.
Page 6
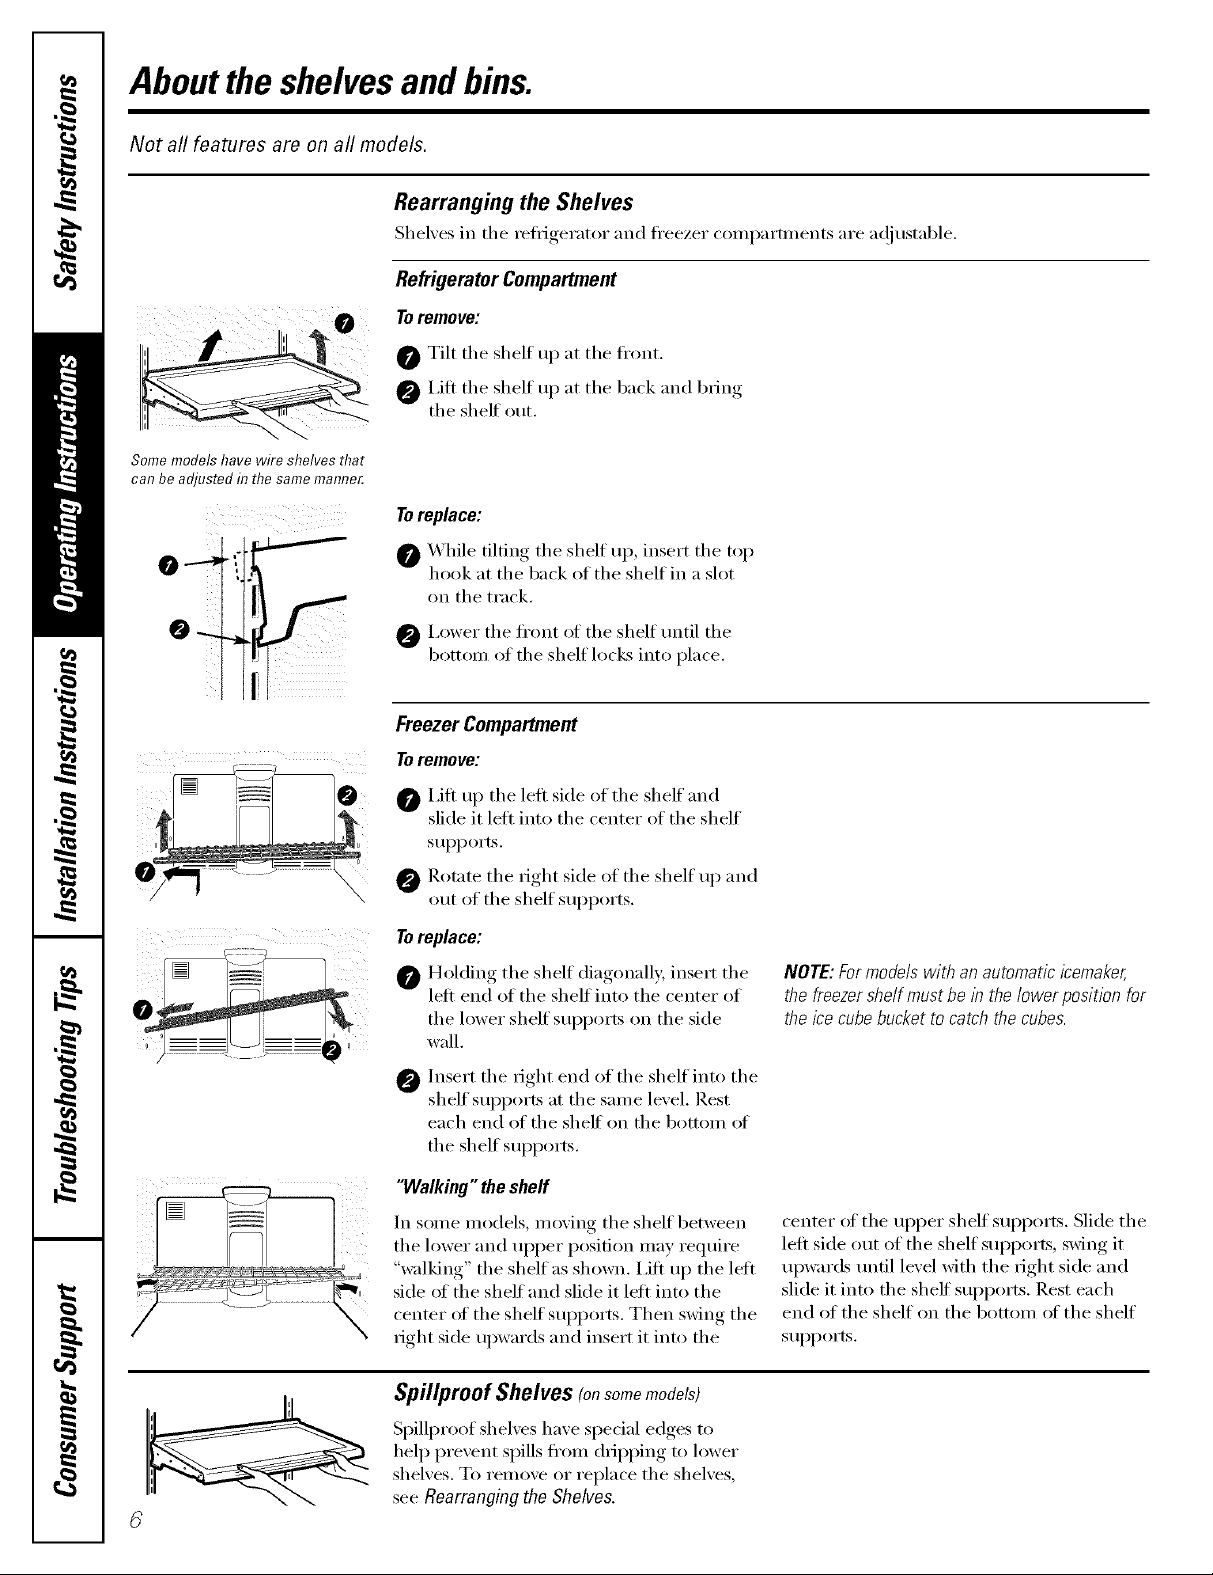
Aboutthe shelvesandbins.
Not all features are on all models.
Rearranging the Shelves
Shel',es in the refl_gerator and fl'eezer ('On_l)artments are a(!justable.
Refrigerator Compartment
Toremove:
0 Tilt the shelf up at the fl'ont.
0 I,ifl the shelf up at the back and bring
the shelf out,
Some models have wire shelves that
can be adjusted in thesame mam_e_
To replace:
_'_hile tiltino_., the shelf u ), insert the toi )
0
hook at theback of thelshelf in a slot
on the track,
0 I,ower the fl'ont of the shelf until the
bottom of the shelf locEs into place,
Freezer Compartment
Toremove:
i,ift up the left side of the sheff and
slide it left into the center of the shelf
suI)ports.
Rotate the right side of the shelf up and
out of the shelf supports.
Toreplace:
0 Holding the shelf diagonally, insert the
lefi end of the shelf into the center of
the lower shelf sui)ports on the side
wall.
0 Insert the right end of the shelf into the
shelf sui)ports at the same level. Rest
each end of the shelf on the bottom of
the shelf sui)ports.
"Walking" the shelf
In sore e models, moving the shelf between
the lower and uI)per position may require
"walking" the shelf as shown, I,ifl up the left
side of the shelf and slide it left into the
center of the shelf suI)ports. Then swing the
right side upwards and insert it into the
NOTE: Formodels with an automatic icemaker,
the freezer shelf must be/b the lower position for
the ice cube bucket to catch the cubes.
center (ff the upper shelf supports. Slide the
left side out of the shelf supports, swing it
upwards until level with the right side and
slide it into the shelf sui)i)orts. Rest each
end of the shelf on the bottom of the shelf
supports.
i a
C
Spillproof Shelves (onsomemodels)
Spillproof shelves have special edges to
hel I) prevent spills ti'om dripping to lower
shelves. To remove or replace the shelves,
see Rearranging the Shelves.
Page 7
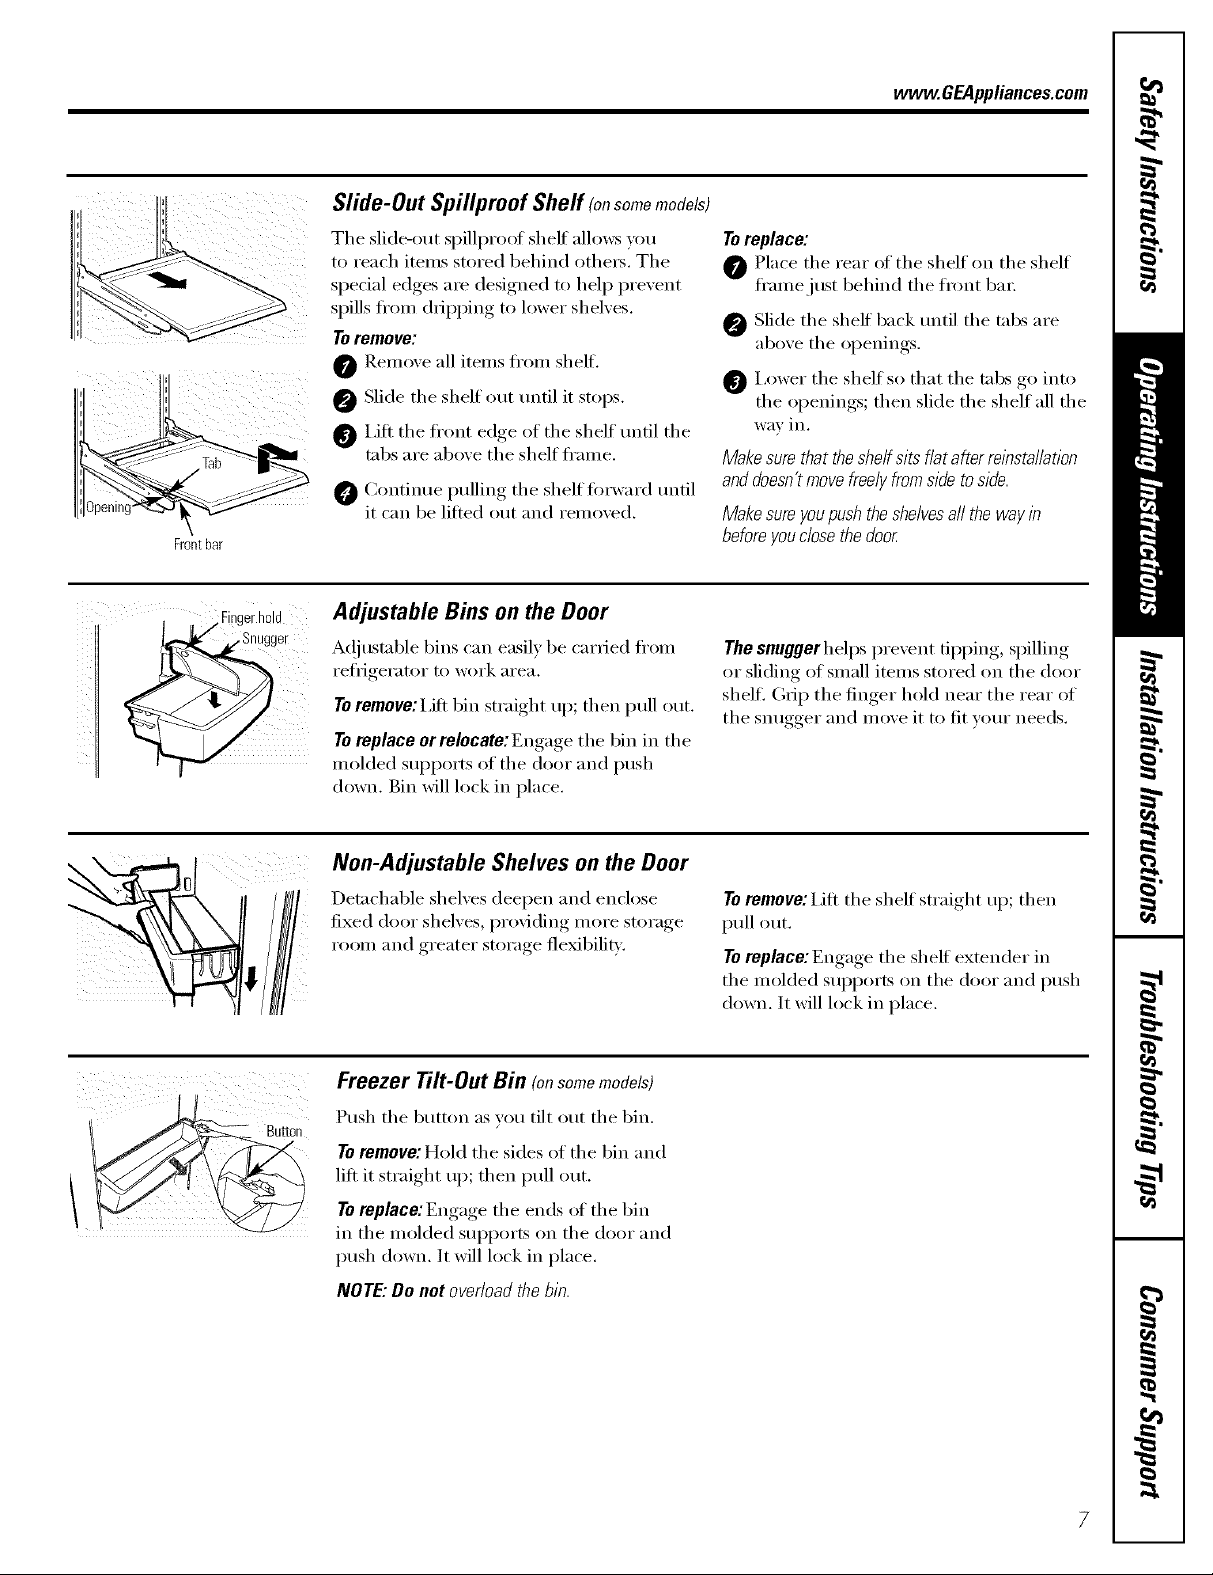
Slide-Out Spillproof Shelf (onsomemodels)
The slide-out spillprooI shelf allo_:s )_m
to reach items stored behind othe_s. The
special edges are designed to hel I) prevent
spills from dripping to lower shelves,
Toremove:
0 Relnove ;Ill items ti'om shelf.
0 Slide the shelf ()tit until it stops.
0 I,ift the fl'ont edge of the shelf until the
robs are aboxe the shelf fl'ame.
O Continue pulling the shelffi)rward until
it can be lifted ()tit and removed.
Adjustable Bins on the Door
www.GEAppliances.com
Toreplace:
0 Place the rear of the shelf on the shelf
fl'amejust behind the front bai;
@ Slide the shelf back until the tabs are
aboxe the oi)enings, .
I,ower the shelf so that the robs go into
the oi)enings;, then slide the shelf all the
WaY in.
Makesure that theshelfsits fiat after re/bsta//ation
and doem't move freelyfrom sue tosue.
Makesure youpush theshelvesaft the way in
before youdose thedoor.
A(!justnble bins can easily be carried fl'om
refiJgerator to work area.
To remove: I,ift bin straight up; then pull ()tit.
Toreplace or relocate: Engage the bin in the
molded SUl)l)orts of the door and push
down. Bin will lock in place.
\
Non-Adjustable Shelves on the Door
Det;whable shelves deepen and enclose
fixed door shelves, pro\iding more storage
room and greater storage flexibili_':
The snuggerhelps prevent tipping, spilling
or sliding of small items stored on the door
shelf. (hi I) the finger hold near the rear of
the snugger and move it to fit your needs.
To remove: iJfl the shelf straight up; then
pull ()tit.
Toreplace:Engage the shelf extender in
the molded SUl)ports on the door and push
down. It will lock in place.
Freezer Tilt-Out Bin (onsomemodels)
Push the button as you tilt ()tit the bin.
Toremove: Hold the sides of the bin and
lift it straight tip; then pull ()tit.
Toreplace'En ,ao-e the ends of the bin
in the molded SUl)l)orts on the door and
push down. It will lock in place.
NOTE: Do not overload the bin.
Page 8

Aboutthe crispersandpans.
Not all features are on all models.
Fru# and Vegetable Crispers
Excess water that may accunmlate in
the botton] of the drmvers or under the
drmve_ should be wiped (h T.
Adjustable Humidity Crisper (onsomemodels)
\
Slide the control all the wm to the Slide the control all the wm to the LOW
HIGHsetting to provide high humidit_ .settino_ to provide lower humidi_ le_ els
recommended fi)r most xegetables, recommended fin" most fl'uits.
Sllac/( Pall (onsomemodels)
This pan can be moxed to the most tlseftll
location fin" xom" fhmilx's needs.
To remove, slide the pan out to the stop
position, lift the pan up and past the stop
position, and lift out.
Page 9
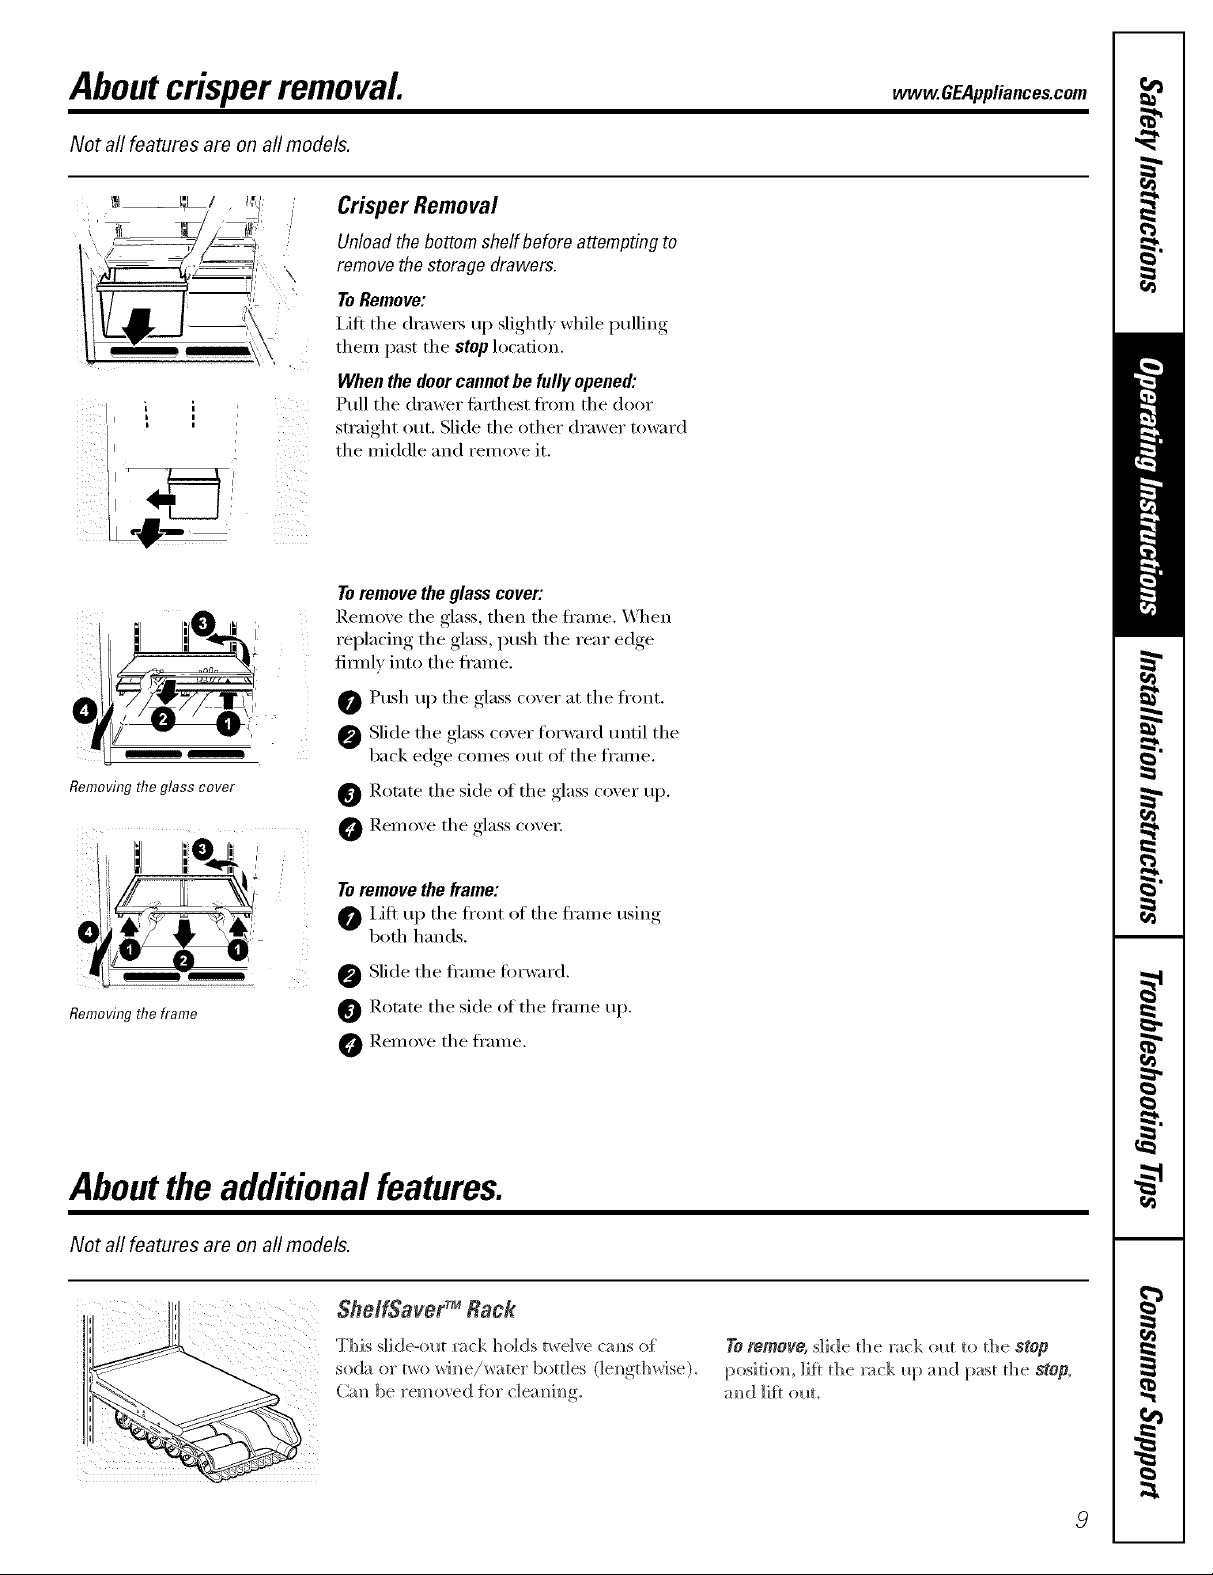
Aboutcrisperremoval, vvvvw.GEAppliances.com
Not all features are on all models.
Crisper Removal
Unloadthebottomshelf beforeattemptingto
removethestoragedrawers.
To Remove:
I,ifl the drawe_ up slightly while pulling
then] past the stop location.
When the door cannot be fully opened:
Pull the drawer fin'thest fl'om the door
straight out. Slide the other drawer toward
the middle and remove it.
I f
Toremove the glass cover:
Remove the glass, then the ti'ame. \_l]en
replacing the glass, push the rear edge
fimflv into the fl'ame.
0 Push up the glass cover at the fl'ont.
Slide the glass cover f'or_m'd tmtil the
back edge comes out of the fl'ame.
Removing the glass cover
Removing the frame
Rotnte the side of the glass cover up.
O Remove the glass cove_:
Toremove the frame:
0 I]ft up the ti'ont el the ti'ame using
both hands.
Slide the fl'ame fin'ward.
0 Rotnte the side of the ti'ame up.
O Remoxe the ti'ame.
Aboutthe additionalfeatures.
Not all features are on all models,
ShelfSaver TM Rack
This slide-olaf rock holds twelve cm)s of
soda or two wim_e/_ter botdes (]em_gthwise).
(all be removed %I" c]eaN)h)g
7"0remove, slide die rack out to tile stop
position, ]if_ d_e ]_ck Iq):rod past d_e MOp,
:rod lift ouL
Page 10
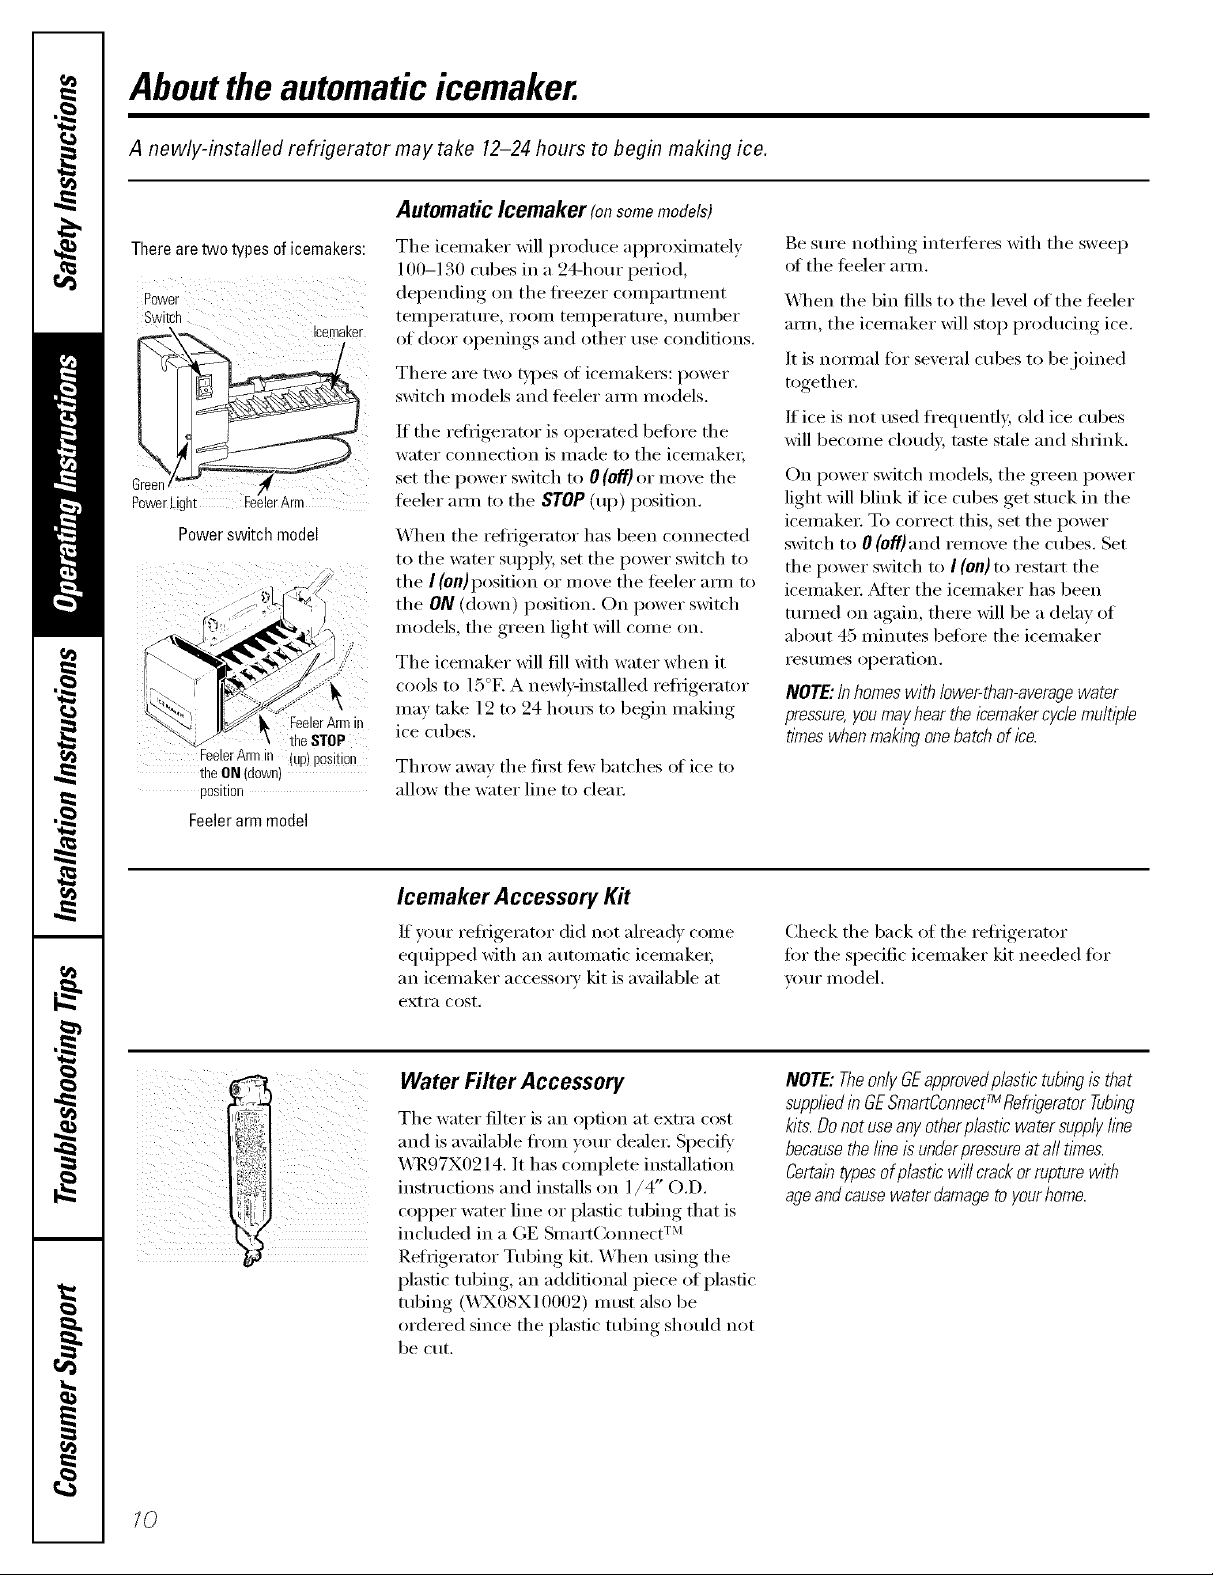
Aboutthe automaticicemaker.
A newly-installed refrigerator may take 12-24 hours to begin making ice.
Automatic Icemaker (onsomemodels)
Therearetwo typesof icemakers:
Power
Switch
Green/_ ,4'
PowerLight EeelerArrn
Powerswitch model
Feeler Armin
FeelerArmill (uP)position
theON(down)
position
theSTOP
Feelerarmmodel
The icemaker will produce api)roMnmtely
100-130 cubes in a 24-hour period,
depending on the fl'eezer compartment
teilli)ei'attli'e _ i'ooi11 teillpei'attli'e_ ntli/lber
of door openings and other rise conditions.
There are two t}pes ot icemake_: power
switch models and feeler am/models.
If the reti_igerator is operated befi)re the
water connection is made to the icemaket;
set the power switch to 0 (off)or inove the
ti_eler axm m the STOP(up) position.
When the reliJgerator has been connected
to the water sui)ply, set the power switch to
the I (0n)position or m ore the ti_eler am/to
the ON (down) position. On power switch
models, the green light will come on.
The icemaker will fill with water when it
cools to 15°E A newl}qnstalled refrigerator
may take 12 to 24 hom_ to begin making
ice cubes.
Throw away the first troy batches of ice to
allox_ the x_ater line to clear
Be sm'e nothing inte_fi_res with the sweep
of the feeler amL
X._]_en the bin fills to the level of the teeler
am/, the icemaker will stop producing ice.
It is nomml fin" several cubes to be joined
together.
If ice is not used fl'equenfl> old ice cubes
will become cloud}; taste stale and shrink.
On power switch models, the green power
light will blink if' ice cubes get stuck in the
icemaker To correct this, set the power
switch to 0 (off}and remove the cubes. Set
the power switch to I (on) to restart the
icemaker _Mier the icemaker has been
turned on again, there will be a delay of
about 45 minums before the icemaker
I'eS tllI/es opei'ation.
NOTE:Inhomes with lower-than-averagewater
pressure,you mayhear the icemakercycle multiple
times whenmabbg onebatch of ice.
Icemaker Accessory Kit
If your refl_igerator did not ah'eadv come
equiI)I)ed with an automatic icemake_;
an icemaker accessory kit is axailable at
extra cost.
Water Filter Accessory
The water filter is an option at extra cost
and is a\_filable ti'om yore" deale_: Specif}'
WR97X0214. It has complete installation
instructions and installs on 1/4" O.D.
COl)per water line or plastic tubing that is
included in a GE Sn/art(_onnect TM
Refiigerator Tubing kit. When using the
plastic robing, an additional piece of plastic
robing (_._X08X10002) must also be
ordered since the plastic robing should not
be cut.
Check the back of the refl_igerator
fin" the specific icemaker kit needed fin.
VOI/I" II/odd.
NOTE:TheonlyGEapprovedp/astlctubingisthat
suppliedin GESmartConnectTMRefrigeratorTubing
kits.Donotuseanyotherp/astlcwatersupplyfine
becausethefineis underpressureatafltimes.
Certaintypesofp/asticwi//crackorrupturewith
ageandcausewaterdamagetoyourhome.
10
Page 11

Careand cleaning ofthe refrigerator. CUpp,iancescem
Cleaning the Outside
The door handles and trim. Clean with
a cloth dampened with soapy water.
Dry with a soft cloth.
Keep the outside clean. Wipe with a clean
cloth lightly dampened with kitchen
appliance wax or mild liquid dish
detergent. Dry and polish with a clean,
soft cloth.
Cleaning the Inside
Tohelp prevent odors,leave an open box of
baking soda in the fl'esh toed and fl'eezer
COII/pa I'tlIl ents.
Unplug the refrigerator before cleaning. If this
is not practical, wring excess moisture out
of sponge or cloth when cleaning arotmd
switches, lights or controls.
Use wam_ wamr and baking soda solution--
about a tablespoon (15 ml) of baking soda
to a quart (1 liter) ot wam_: This both
cleans and neutralizes o(lo_s. Thoroughly
rinse and wipe dry:
Donot wipe the refrigeratorwith a soileddish
cloth orwet towel.Thesemayleavearesidue
that canerodethepaint.Donotusescouring
pads,powderedcleaners,bleachorc/eanere
containingbleachbecausetheseproductscan
scratchand weakenthepaintfimsh.
Avoid cleaning cold glass shelves (on some
models) with hot water because the extreme
temperature difference may cause them to
break. Handle glass shelves carefully Bumping
tempered glass can cause it to shatter
Do not wash any plastic refrigerator parts in
the dishwasher
Do not clean with any products containing
detergent, bleach or ammonia. Theymay
damage the refngerato_
Condenser
There is no need fi)r roudne condenser
cleanings in nomml home operating
environiilents. Howevei; in envii'onillents
that may be particularly dusty or greas 5 the
condenser should be cleaned periodically
for efficient reflJgerator operation.
Removing thebase grille:
First remove the base grille. Grasp the base
grille about 6 inches fl'om each end and
pull its bottom edge toward win.
Behind the Refrigerator
Be carefi_] _]_e_ mo_im_g the re{}ige_tor
away {_'om t]_e wail. All Fpes of floor
co_e_Jm_gscm_ be damaged, particularly
o_shio_ed co_e_Jm_gs amid those with
embossed sm'fi_ces.
Cleaning the condenser:
Sweep away or vacuum up dust.
For best results, use a brush specially
designed fi)r this puq)ose. It is a\_dlable at
most appliance parts stores.
Replacing the base grille:
Replace the base grille by inserting the
tops of the metal clips into the o\_d vents,
making sure one of the plastic tabs on the
back ot the grille goes into each ot the owd
vents. Then push the bottom of the grille
forward tmtil it snaps into place.
b4/henpushbg feterefrigerator back, make sure
you don't roll over the power cord or icemaker
supply line (on some models).
IPl_]] the ref_'ige_vm>r straight ol*t amid remrm_
it to positio_ bv }mshh_g it straight h_.
Movim_g the rei_Jge_tt_r im_a skle directitm
may res_dt h_ damage to the floor cove_J_g
11
Page 12

Careand cleaning of therefrigerator.
Preparing for Vacation
For long \_lcations or absences, Yei//ove
ff_od and Ulq)lug the reti_igeratoi: Move
the refl_igerator control to the 0 (off)
position and clean the interior with a
baking soda solution of one tablespoon
(l 5 ml) of baking soda u) one quart
(1 liter) of watei; I.eave the dooi3 open.
Set the icemaker power switch to the 0 (off)
position or move the teeler am_ to the
STOP(up) position (depending on model)
and shut off the water supply to the
reflJgeratoi:
If the temperature can drop below fl'eezing,
have a qualified servicer drain the water
st q)ply system ( on sore e models ) to prex'ent
serious property damage due to flooding.
Preparing to Move
Secm'e all loose items such as grille,
shelves and drawe_ by taping them
sectlrely in place to prevent damage.
Besuretherefn)eratorstaysin anupright
positiondunngmowng.
Replacingthelightbulbs.
Setting either or both controls to 0 (off) does not remove power to the light circuit.
Some models have only one light.
Pockets
Refrigerator Compartment--Upper Light
CAUTION: Light bulbsmaybe hot.
O Unplug the refrigerator.
@ The bull)s are located at the top of the
compartment near the opening.
Some models have light shields. To
remove the light shield, grasp the shield
as shown with wmr thumb and index
finge_; and gently pull back on the leve_:
This will release the shield and allow
you to pull it to the side and remove it.
O Replace xfith an appliance bulb of
the same or lower wattage (60 watts
maximum).
Replace light shields (on some
models).
Plug the refrigerator back in.
Freezer Compartment Dome Light (onsomemodels}
CAUTION:Ll_?htbulbsmaybehoL
[ , , •
O Un )lug the refl'igerator
The bulb is located at the top of the
fl'eezer compartment inside the dome
light shield. To relnoxe the shield,
place yore" finge_ in the pockets at
the back of the shield. Pull the shield
_'i)rward and down•
O _Mter replacing with an appliance bulb
of the same or lower wattage (4(1 watts
maximmn), replace the shield.
Plug the refrigerator back in.
12
Page 13
Installation
Refrigerator
Instructions
Models 18and 19
ffyou have questions,call 1-800-GECARESor ,isit oro-X_ebsite at: www.GEAppliances.com I
BEFORE YOU BEGmN
Read these instructions completely and carefully;
" IMPORTANT -
i_]st_roti(ros Iti)r local im]spector's line.
*JMPOR'FANT - Ob e -ve
_over])im)g codes a])d ord]m);_m)ces.
* Note to Installer - Be slate to leave these
]m]st_ro;ti(ros witl] the Conslm_er.
* Note to Consumer - Keepthese h_strl*ctiom_s
fl)r flmn'e relbre]_ce.
* Skill level - b_staHat]o_ of this app]im_ce re(pfires
basic mechm_ica] skills.
° Coropletlon t_ne - Ref_igemtro" lm_sta]]ati(ro
15 m impl0res.
* Proper h]stallatiom_ is the resp(msibility of the
]m_staHer.
° Prodro;t tift]ro'e (b_e to improper ]m_sta]]ati(m is m_ot
covered m_der the _rraN_tv;
WATER SUPPLY TO THE ICEMAKER
(ON SOME MODELS)
If the refrigerator has an iceroaker, it will have to be
c(ronected to a cold water line. AGE water sui)ply kit
(containing tubing, shutoff wflve, fittings and
instructions) is awfilable at extra cost fl'oro voro" dealer
or by visiting oro" Website at _v.GEAppliances.com
or Parts and Accessories, 800.626.2002.
REFRIGERATOR LOCATION
• Do not install the refrigerator where the temperature
will go below 60°F (l 6°C) because it will not rro] ot[ell
enough to maintain proper mroperatures.
• Do not install the reti_igerator where the temperature
will go above 100°F (37°C) because it will not i)erfi>rm
properl>
• h]stall it on a floor strong enough to supi)o_t it hilly
loaded.
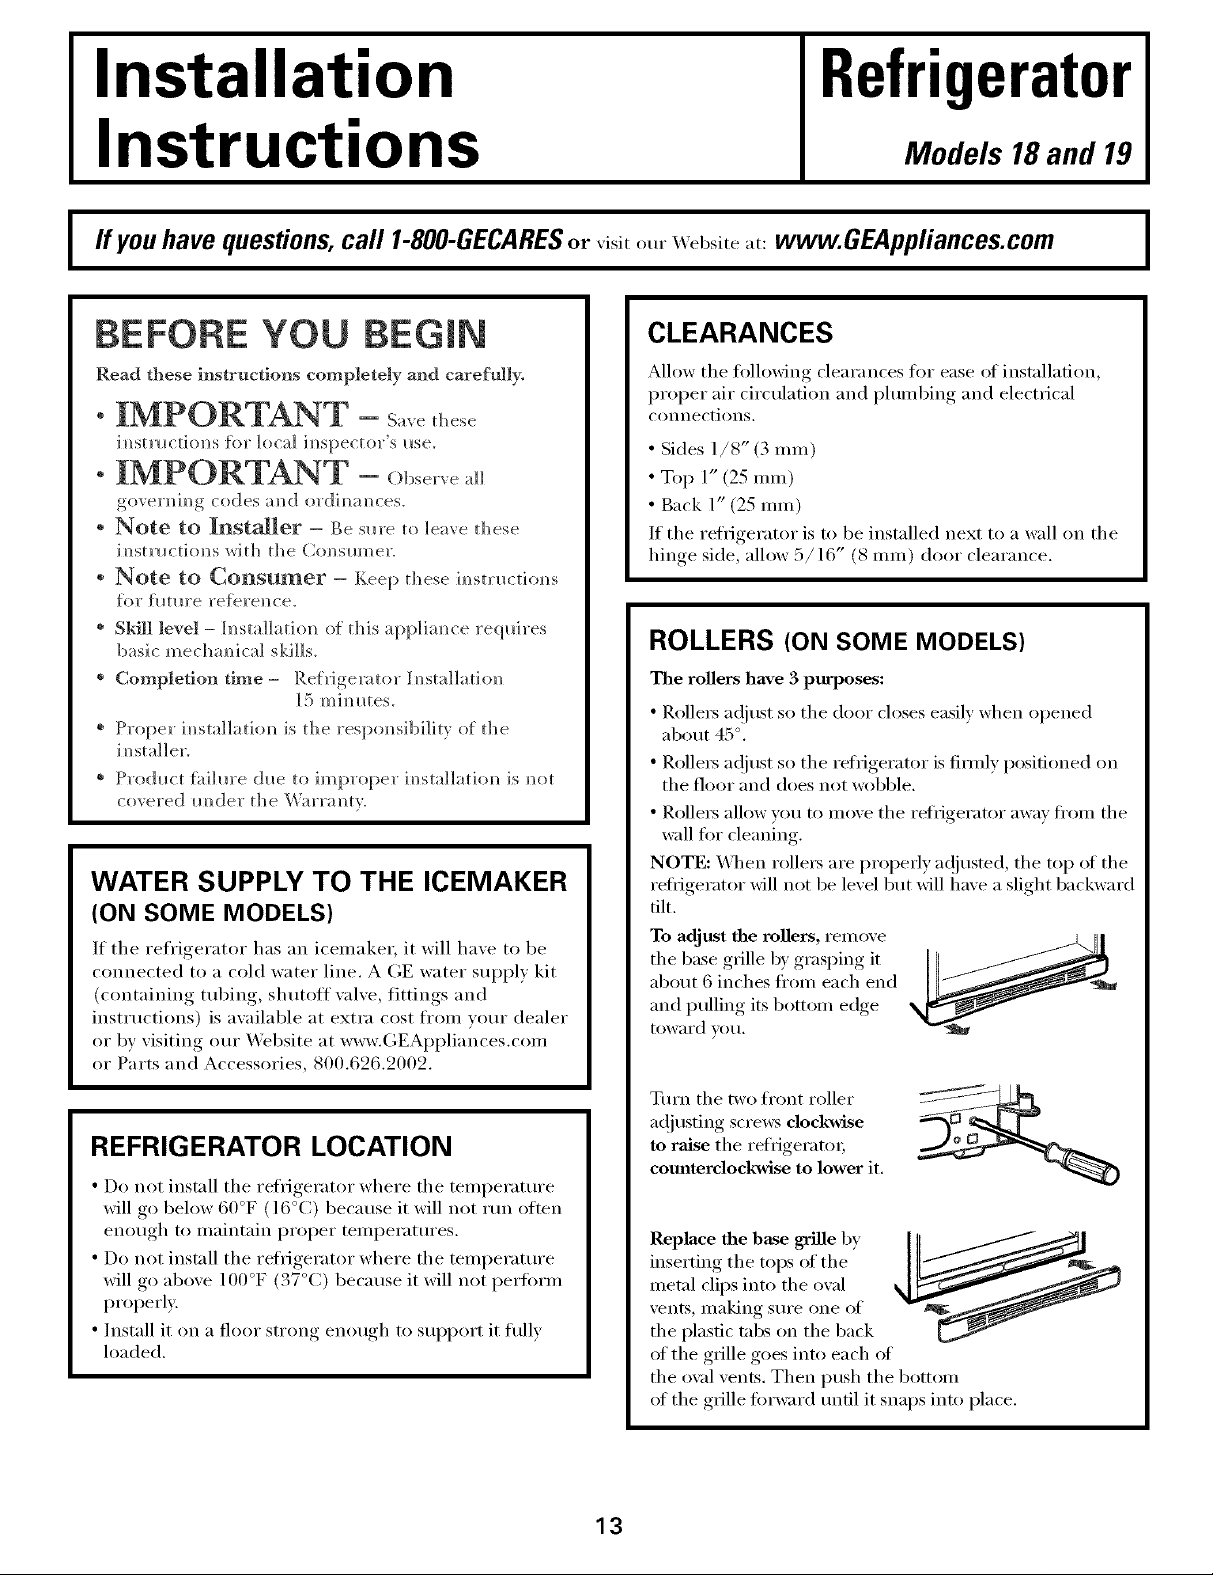
CLEARANCES
Allow the fl>lh)xfing clearances for ease of installation,
proper air circulation and i)lurobing and electrical
coinlectioiis.
•Sides 1/8" (3 roro)
•Top 1" (25 taro)
•Back 1" (25 taro)
If the reti_igerator is to be installed next to a wall on the
hinge side, alhav 5/16" (8 roro) door clearance.
ROLLERS (ON SOME MODELS)
The rollers have 3 purposes:
• Rollet_ a(!iust so the door closes easily when opened
about 4:5°.
• Rollers adiust, so the refri,*erator_ is firofly positioned on
the floor and does not wobble.
• Rollers allow vou to move the refrigerator away fl'oro the
wall tot cleaning.
NOTE: X&]mn rollers are properly ac!iusted, the top ot the
reti_igerator will not be level but will have a slight backward
tilt.
To adjust the rollers, remove
the base grille by grasping it
about 6 inches fl'om each end
and pulling its bottom edge
t()ward VOtl.
Tro'n the two front roller
adiustino screws clockwise
to raise the refrigerator;
coro]terclockwise to lrover it.
Replace the base grille b} 11[ _-._'_
inserting the tops of the
roetal clips into the roal
xents, Illakillg StlI'e ()tie 0_
the plastic tabs on the back
of the grille goes into each of
the rofl xents. Then push the bottom
of the grille fi)rward until it snaps into place.
13
Page 14
mnstaJiation mnstructions
mNSTALLmNGTHE WATER LmNEIONSOMEMODELS)
BEFORE YOU BEGIN
Recomme]_ded copper _ater slq)p]y kits are WXSX2,
WXSX3 or WXSX4, depel_dim_g ol_ the amom_t of
mbh_g you _]eed. Approved plastic water slq)p]y ]im_es
are (;E Smart(2mN_ect rM Re{]'igerator Tl*bing
(WX08X 1001}2, WX 08X 10006, WX 08X 10015 am_d
WX 08X 10025).
Wile]l com]ecth]g yore" refrigerator t() a GE Reverse
Osmosis Water System, the o(_]y approved im_sta]]atio(_
is with a (;E RVKit. For other reverse osmosis water
s}stems, follow the mamlfi)ctm'er's
This water lim_e im_sta]lation is m_t warrm_ted bv the
]cem a ke r m a m)II{i) CtHrer. Fol]ow these
im_strl*cti(ms carefi_]]y to mim_imize the risk of expeN_sive
Water hammer (water bam_gh_g im_ the pipes) i_l hol*se
phm_bim_g cam_ cause damage to reIHgerator parts amid
]ea d to wa te r ]ea ka ge o r fl o odi _]g. Call a q I*a]i fi ed
phm_ber to correct water hammer before ]m_sta]]im_g the
water slq)p]y ]im_e to the ref_']gerator.
To prevent bm'ns aN_d product &m_age, do _ot hook
_*[:)the water ]i_e to the hot water ]i_e.
If vim _*se vom" ref_']gerator be]ore con_ect]_g the
water ]i_e, make sm'e the icemaker power switch is i_
tile _ (off) posi ti(m (o_] power swi tc]l m ode]s) or tile
ieeler arm is i_ the STOP (_*[)) positi(m (o_ iee]er arm
Do _ot ]_sta]] the icemaker mbi_]g 1_ areas where
temperatm'es fid] below f}'eezi_g.
W]le_ _*si_lg a_v electrical device (s_*th as a poD, rel"
drill) din'big ]_sta]]ati(m, be sm'e the devi(e is do_*b]e
i_s_l]ated or grom_ded i_l a ma_er to prevent the
hazard of electric shock, or is battery powered.
A]] ]_sta]]atitms m_st be i_ accorda_ce with Iota]
phm_bi_g code req_fireme_ts.
WHAT YOU WILL NEED
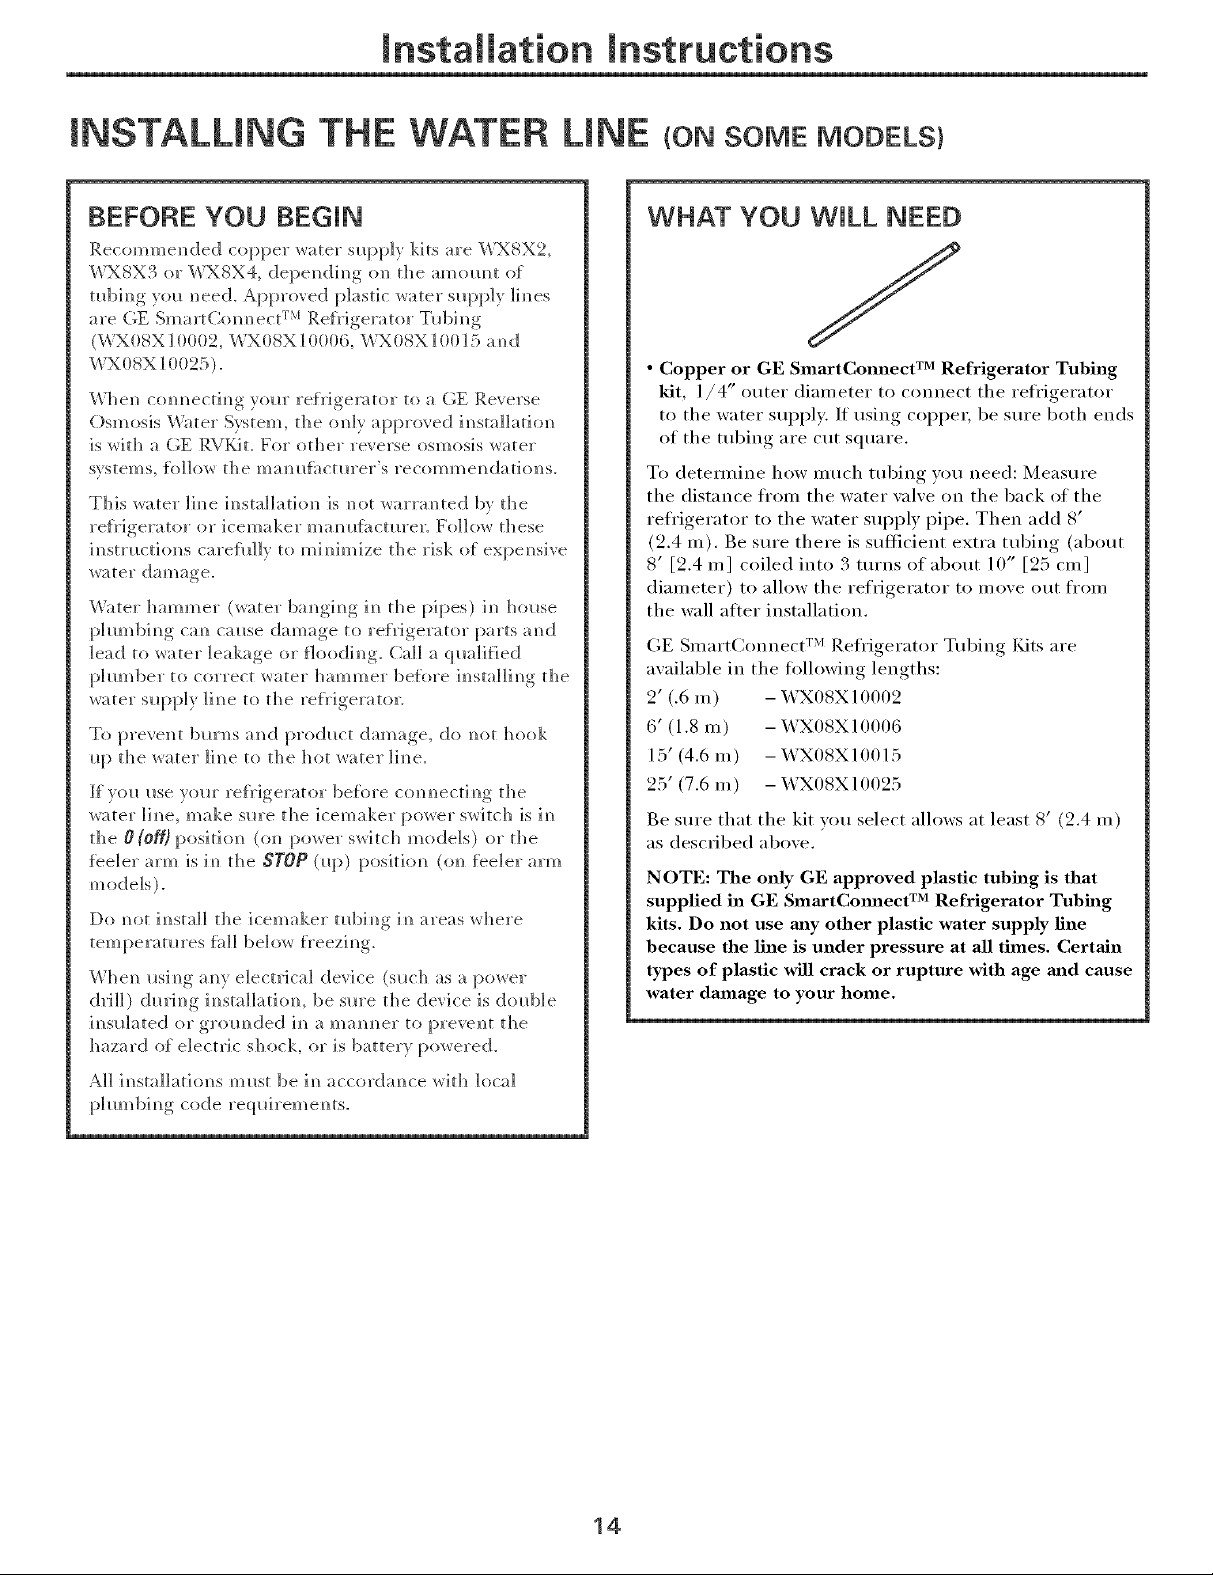
• Copper or GE SmartConnect TM Refrigerator Tubing
kit, 1/4" outer diameter to connect tile refrigerator
to the water sui)ply. If using coppe_, be sure both ends
of tile tubing are cut square.
To detei]nii]e how much tubii]g you i]eed: Measure
the distance ti'ou] tile water valve on tile back of the
refl'igerator t(> tile water supply pipe. Then add 8'
(2.4 m). Be sure there is sufliciei]t extra tubii]g (about
8' [2.4 m ] coiled into 3 turns of about 10" [25 cn/]
diau]eter) to allow the refrigerator to move out fl'om
the wall alter installation.
GE Si]lart(]onnect TM Refl'igerator Tubing Kits are
available in the fi}lh>wing lengths:
2' (.6 m) - WX08X10002
6' (1.8 m) - WX08X10006
15' (4.6 m) - WX08X10015
25' (7.6 m) - WX08X10025
Be sure that tile kit vou select allows at least 8' (2.4 m)
as described above.
NOTE: The only GE approved plastic tubing is that
supplied in GE SmaxtCmmect Refrigerator Tubing
kits. Do not use m_y other plastic water supply fine
because the line is under pressure at all times. Certain
types of plastic will crack or rupture with age mad cause
water damage to your home.
Tra
14
Page 15
Installation Instructions
WHAT YOU WILL NEED (CONT.)
Install the shutoff valve on the nearest frequently used
drinking water line.
* A GE water supply kit (comainim/g mbim/g, shmoff
valve a]/d fittimlgs listed below) is available at extra
cost {]'om yore" dealer o1" t}'om Parts amid Accessories,
800.626.2002.
* A cold water supply. The water pressm'e midst be
90 = p.s.i.betwee]/ 2 amid 190 (1.4-8.1 bar).
* Power drill.
* 1/2" or adjustable wrench.
* Straight and Phillips blade screwdriver.
* Two 1/4" outer diameter compression nuts and
2 ferrules (sleeves)--to com]ect the copper ml)im/g to
the shutoltvah'e amid the rehigerator water vah'e.
OR
[] SHOT OFF THE MAIN WATER
SUPPLY
Turn on the nearest fimcet long enom,h_ to clear
the line of water.
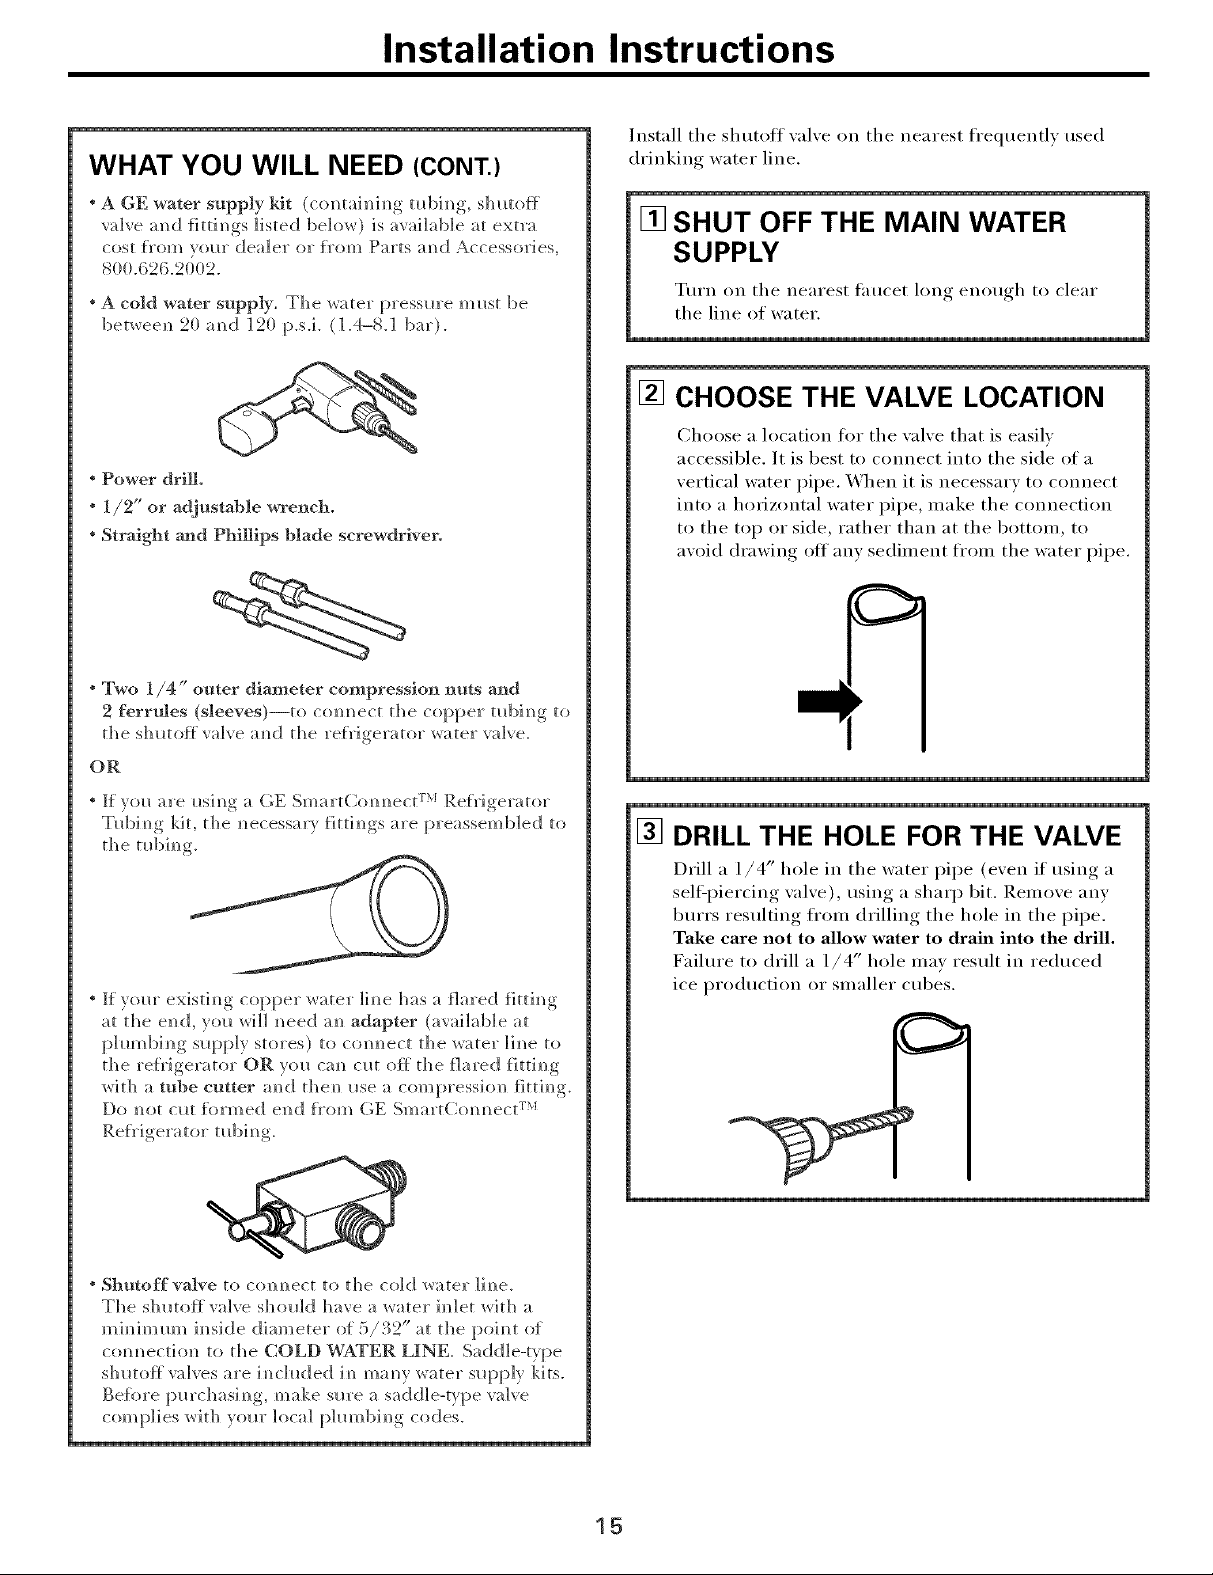
[] CHOOSE THE VALVE LOCATION
Choose a location fl:,r the valve that is easily
accessible. It is best to connect into tile side of a
vertical water pipe. When it is necessary to connect
into a horizontal water pipe, make the connection
to the top or side, rather than at the bottom, to
avoid drawing off any sediment fl'om tile water pipe.
If" _r(_ are i_sim/g a (;E " _o TM
* , S n,t] t(, m/m/ect Refrigerator
Tl_bim/gkit, the m/ecessar_, t]tti m/_._,s"tre preassemb]ed to
the mbim/g
* If yore" existi_]g copper water ]]_]e has a flared fhth/g
at the end, you will m/eed am/adapter (aw6]ab]e at
phm/bing supply stores) to co]mect the _ater ]im/e to
the refrigerator OR ytm cam/ cllt off the flared {]ttim/g
with a tube cutter amid theN/ ilse a compression tittim/g.
Do not cllt formed e]/d t}'om (;E SmartCom/m/ect rxl
* Shutoff valve to conm/ect tit the cold water ]]m/e.
The s]mtoff valve should have a water h/let with a
m ira/im m// ira/s]d e di am e ter of 5 / 32" at t]1e poi m/t of
corn/m/ect] oil to the COLD WATER LINE. Saddle-type
s]mtoff valves are i_]c]uded ira] manly water slq:_p]y ]<its.
Be%re pm'c]lasJm/g, make sm'e a saddle-type valve
complies _ith vollr local [)hm/bim/g codes.
[] DRILL THE HOLE FOR THE VALVE
Drill a l/4" hole in the water pipe (exen if usino__ a
self:i)iercing, xahe), using a sharp bit. Remme any
burrs resulting from drilling the hole in the pipe.
Take care not to allow water to drain into the drill,
Failm'e to drill a 1/4" hole ma) result in reduced
ice production or smaller cubes.
15
Page 16
Installation Instructions
INSTALLING THE WATER LINE (CONT.)
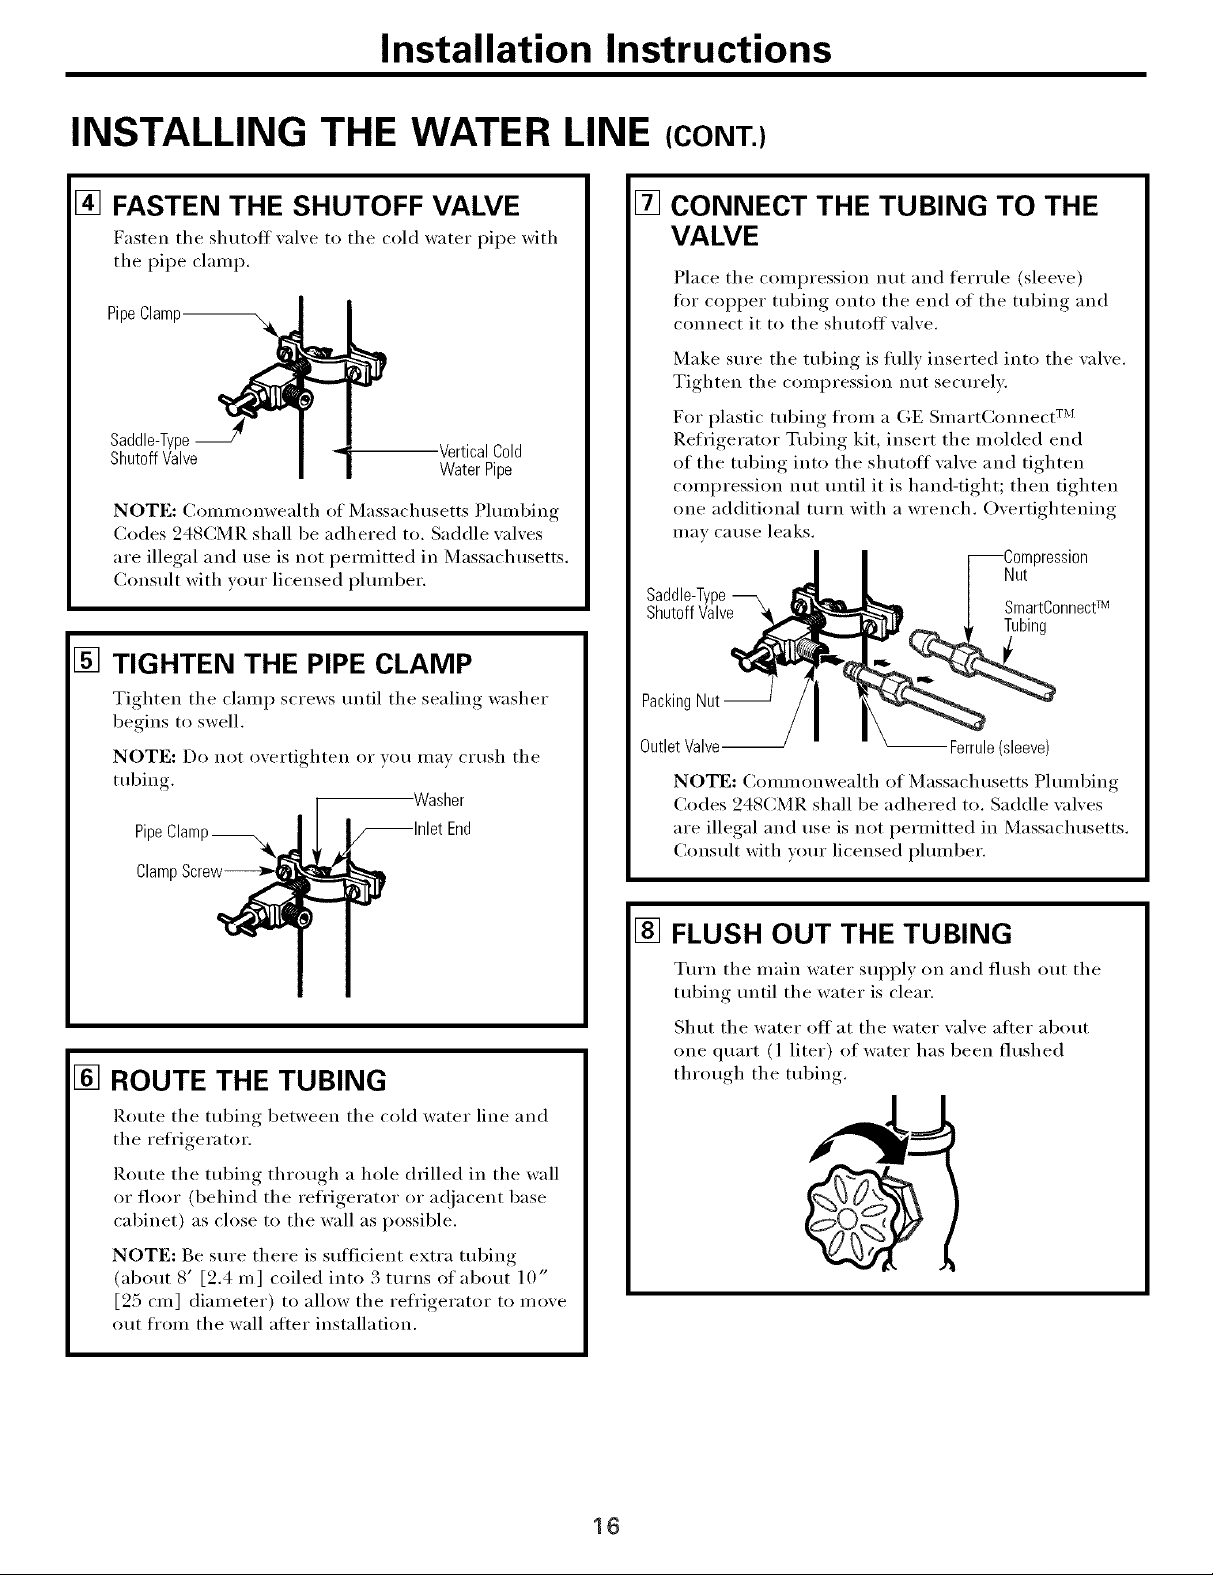
[] FASTEN THE SHUTOFF VALVE
Fasten the shutott _al_e to the cold water pipe with
the pipe clamp,
PipeClamp
Saddle-Type
ShutoffValve
NOTE: (:ommonwealth of Massachusetts Plumbing
Codes 248CMR shall be adhered to, Saddle wflves
are illegal and use is not pemfitted in Massachusetts.
Consult with wmr licensed i)lumber.
VerticalCold
WaterPipe
[] TIGHTEN THE PIPE CLAMP
Tighten the clamp screws tmtil the sealing washer
begins to swell.
NOTE: Do not overtighten or vou may Clush the
tubing.
Pipe End
ClamF
-Washer
[] CONNECT THE TUBING TO THE
VALVE
Place the compression nut and feHule (sleexe)
fin" COl)per tubing onto the end of the tubing and
connect it to the shutoffxalxe.
Make sure the tubing is flflly inserted into the valve.
Tighten the compression nut secm'elv:
For plastic tubing fl'om a GE SmartConnect TM
Refrigerator Tubing kit, insert the molded end
of the robing into the shutott wflve and tighten
compression nut tmtil it is hand-tight; then tighten
one additional turn with a wrench. Overtightening
ill,iV ca rise lea ks.
--Compression
Nut
Saddle-Type
ShutoffValve
PackingNut-
OutletValve-- Ferrule(sleeve)
NOTE: Commonwealth of Massachusetts Plumbing
Codes 248CMR shall be adhered to. Saddle wflves
are illegal and use is not permitted in Massachusetts.
Consult with wmr licensed plumber.
SmartConnectTM
Tubing
[] ROUTE THE TUBING
Route the tubing between the cold water line and
the reli'igera tot.
Route the tubing through a hole (hilled in the wall
or floor (behind the _efl'igerator or a(!jacent base
cabinet) as close to the wall as possible,
NOTE: Be sm'e there is stflticient extra tubing
(about 8' [2.4 m] coiled into 3 tm'ns of about 10"
[25 cm] diameter) to allow the refl'igerator to move
out fl'om the wall alier installation.
[] FLUSH OUT THE TUBING
Tm'n the main water sui_ply on and flush out the
tubing until the water is clear.
Shut the water olt at the water valve alter about
one quart (l liter) of water has been flushed
through the tubing.
16
Page 17
Installation Instructions
[] CONNECT THE TUBING TO THE
REFRIGERATOR
NOTES:
• Before making tile connection to the relYigerator,
be sure tile refl'igerator power cord is not
plugged into the wall outlet,
• We recommend installing a water filter if your
water stti)ply has sand or particles that cotdd clog
the screen of the refrigerator's water wdve. Install
it in the water line near the refi'igerator, If using
GE Snlart(_onnect ''_ Refl'igerator Tubing kit, you
will need an additional tube (_&3X08X10002) to
connect tile filter. Do not cut plastic tube to
install filter.
Remove the screws holding the right side of the
access cover. Fold back the cover.
Remoxe tile plastic flexible cap
from tile water xalxe
(refl'igerator connection),
Place tile compression nut and
terrule (sleeve) onto tile end of
the tubing as shown, On GE
Smart(]onnect _'_Refrigerator
Tubing kit, the nuts are already
assembled to the tubing.
Insert the end of the tubing into the water wdve
connection as tar as possible, While holding the
tubing, tighten the fitting,
For plastic tubing fl'om a GE Smart(:onnect "_
Refrigerator Tubing kit, insert the molded end
of tile tubing into tile water wdve connection and
tighten compression ntlt until it is hand-tight;
then tighten one additional ttli'n with a wrench.
Overtightening mav cause leaks.
Fasten tile tubing into tile clamp provided to hold
it in a vertical position. You may need to pry open
tile clamp.
U
Tubing
[] TURN THE WATER ON AT THE
SHUTOFF VALVE
Tighten an) connections that leak.
Reattach tile access co_ei',
[] PLUG IN THE REFRIGERATOR
&_rranoe tile coil ot tubing so that it does not _ibrate
against the back of the refrigerator or against the
wall. Push tile refrigerator back to tile wall.
START THE ICEMAKER
On power switch models, set tile icemaker power
switch to the I (O/I) position. On feeler arm models,
move tile feeler arm to tile ON(down) position. Tile
icemaker will not begin to operate until it reaches
its operating temperature of 15°F (-9°(:) or below. It
will then begin operation automatically.
1/4" Tubing
SmartConnectT_
Tubing
1/4"
Compression
Nut
Ferrule
Refrigerator
Connection
Power switch model
in
the ON (down) position
Feeler arm model
NOTE: In lower water pressure conditions, tile
water xalxe may turn on up to 3 times to delixer
enou_*h water to tile icemaker.
17
Page 18

Installation Instructions
REVERSING THE DOOR SWING
IMPORTANT NOTES
_hen reversing the door swing:
• Read the instluctions all the way throuoh before
starting.
• Handle parts careflfllv to axoid scratching, I)aim
• Set screws down b'_ their related parts to a_oid usino,
theln in the wrong i)laces.
• Provide a i_oi>scratching work surtace fi_i"
the dooi_.
IMPORTANT: Once xou begin, do not inoxe the
cabinet until doo>swing rexersal is completed.
These inst_ uctions are for changing, , the hinoes_, from
the right side to the left side--if _ou e'.er want to change
the hinges back to the right side, follow these same
instructions and reverse all reterences to left and right.
Unplug the refrigerator from its electrical outlet.
Empty all door shelves, including the dairy
compartment,
TOOLS YOU WILL NEED
[] REMOVE THE FREEZER DOOR
Tape the door shut with masking tape.
I_.etno_ e the hinge co_er on top of the fl'eezer door
(on some ulodels).
Relno_e the two Tolx'' screws, then lift the hinoe
straight up to free the hinge pin from the socket in
the top of the dooi:
Phillipsscrewdriver
Masking tape
T20orT25Torx_
driver,whicheveryour
modelrequires
3/8" Headsocketdriver
(a6-pointsocketis
recommended)
Puttyknifeor
thin-bladescrewdriver
Remove the tape and tilt the door awav fl'Oln the
cabinet. I.ifl it off the center hinge pin.
Set the door on a non-scratching surtace with
the inside up.
18
Page 19
mnstaliation mnstructions
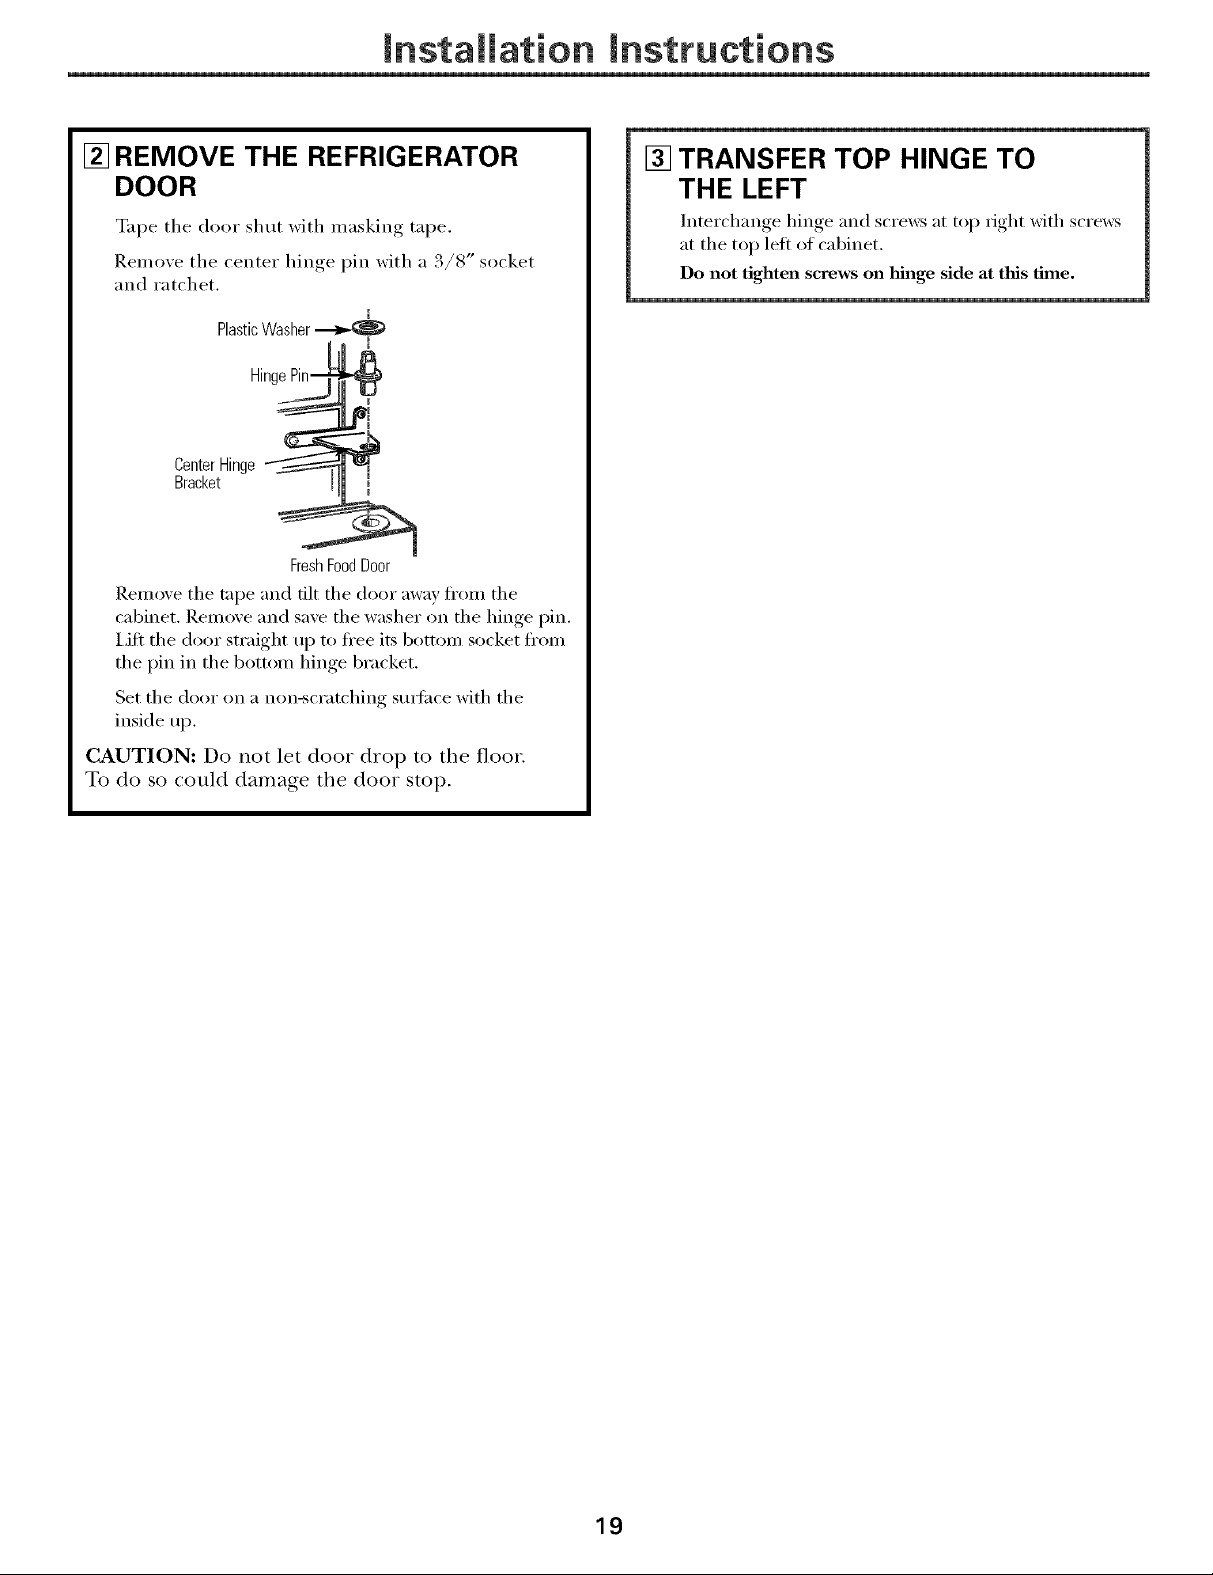
[] REMOVE THE REFRIGERATOR
DOOR
%q_e the door shut with masking rope.
Remove the center hiw,e_ pin with a ./8 socket
and ratchet.
1
PlasticWasher
HingePin--
CenterHinge
Bracket
Rem_we the tape and flit the door away fl'om the
cabinet. Remove and save the washer on the hinge pin.
I,ift the door straight up to fl'ee its bottom socket fl'om
the pin in the bottom hinge bracket.
Set the door on a non-scratching stm'i_ce with the
inside up.
"4
I
FreshFoodDoor
[] TRANSFER TOP HINGE TO
THE LEFT
Interchange, hiw,e., and screws at toi _ right, with screws
at the top left of cabinet.
Do not tighten screws on hinge side at this time.
CAUTION: Do not let door drop to the floor.
To do so could damage the door stop.
19
Page 20
mnstaliation mnstructions
REVERSING THE DOOR SWING (CONT.)
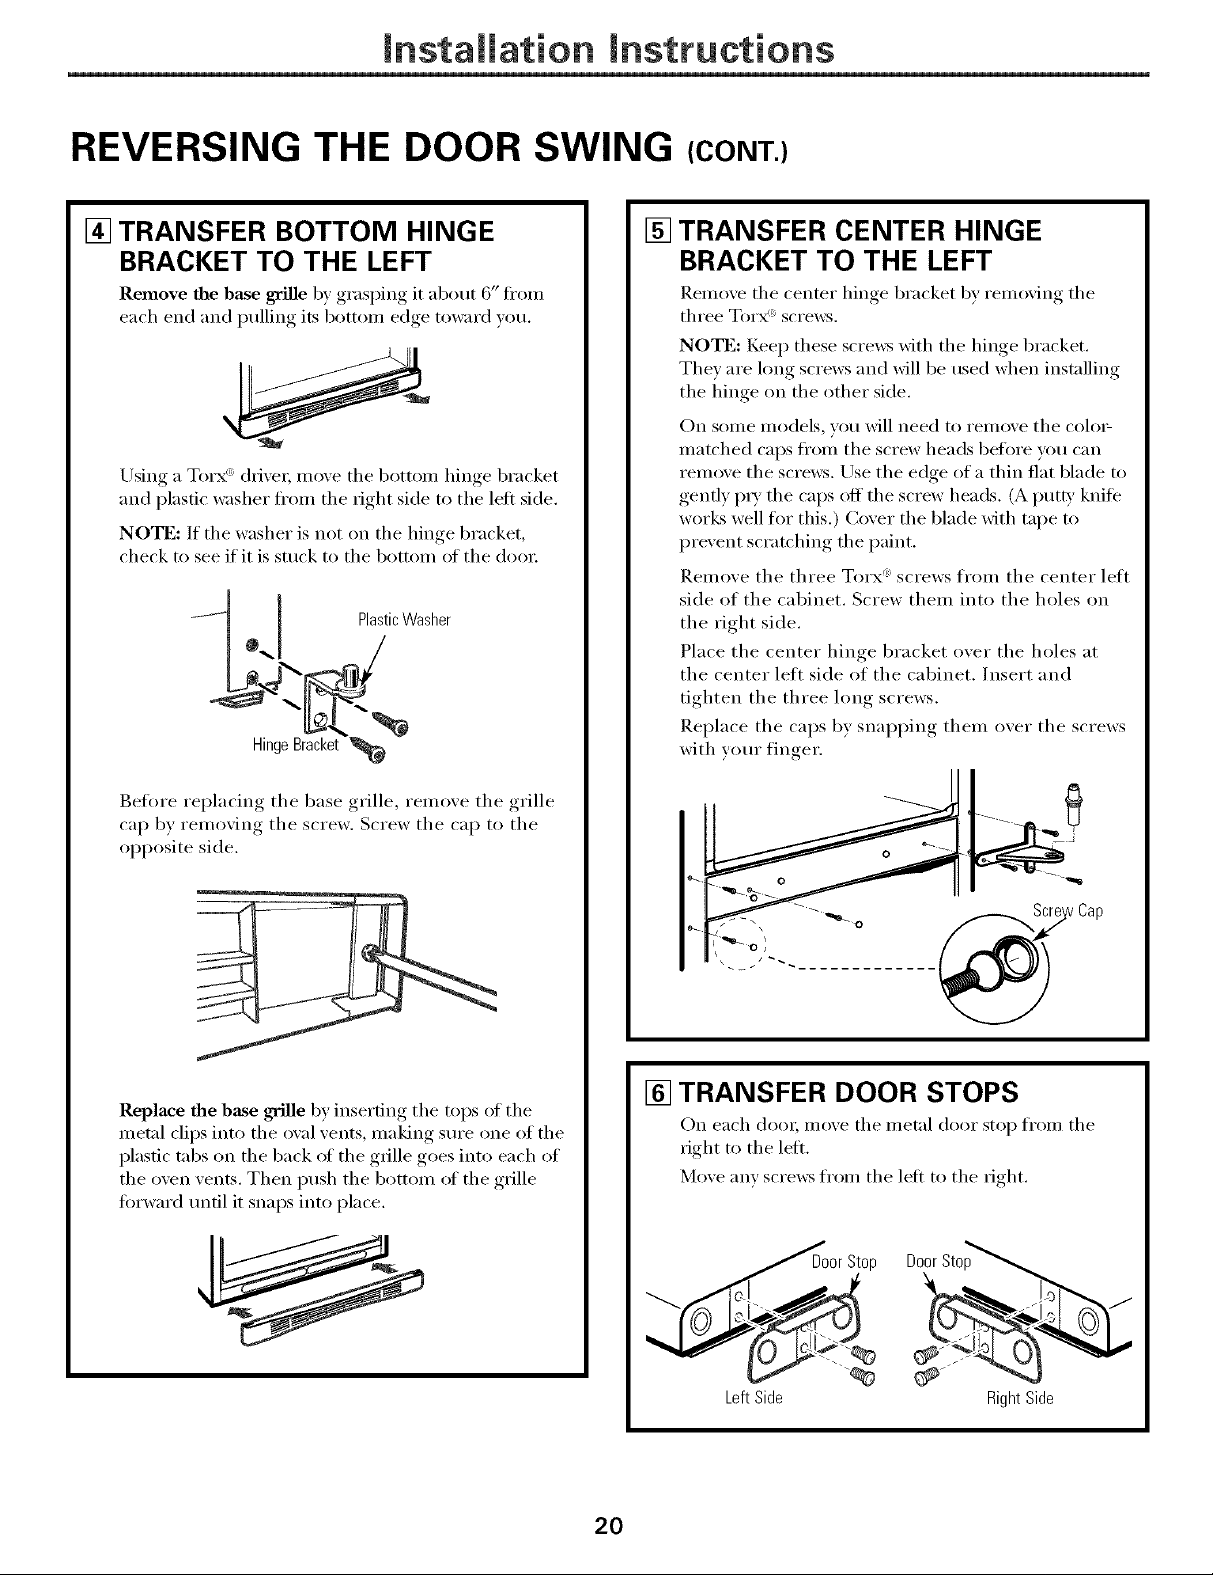
[] TRANSFER BOTTOM HINGE
BRACKET TO THE LEFT
Remove the base grille b) grasping it about 6" t_'om
each end and pulling its bottom edge toward )ou.
Using a Torx C'_drive_; move the bottom hinge bracket
and plastic washer fl'om the right side to the left side.
NOTE: If the washer is not on the hinge bracket,
check to see if it is stuck to the bottom of the dora:
q @_1 PlasiicWasher
.4"-
Befi)re replacing the base grille, remoxe the grille
cap by remoxing the screw, Screw the cap to the
opposite side,
[] TRANSFER CENTER HINGE
BRACKET TO THE LEFT
Relnove the center hinge bracket by removing the
three Torx <'_screws.
NOTE: Kee I) these screws with the hinge bracket.
They are long screws and will be used when installing
the hinge on the other side.
On some models, you will need to remove the colo_ _
matched caps fl'om the screw heads belin'e )xm can
remove the screws. Use the edge of a thin flat blade to
gently I)_y the caps off the screw heads. (A put_' knife
works well t0r this.) Cover the blade with tape to
prevent scratching the paint.
Remove the three Torx <:screws from the center lett
side of the cabinet. Screw them into the holes on
the right side.
Place the center hinge bracket over the holes at
the center lett side of the cabinet. Insert and
tighten the three long screws.
Replace the caps by snapping them over the screws
with yore" finger.
Replace the base grille by inserting the tops _d the
metal clips into the oval vents, making sure one of the
plastic tabs on the back ot the grille goes into each of
the oven vents. Then push the bottom ot the grille
fin'ward tmfil it snaps into place.
[] TRANSFER DOOR STOPS
On each doo_; moxe the metal door stop from the
right to the left.
Moxe any screws from the left to the right.
DoorSto
\
LeftSide RightSide
Screw Cap
2O
Page 21
Installation Instructions
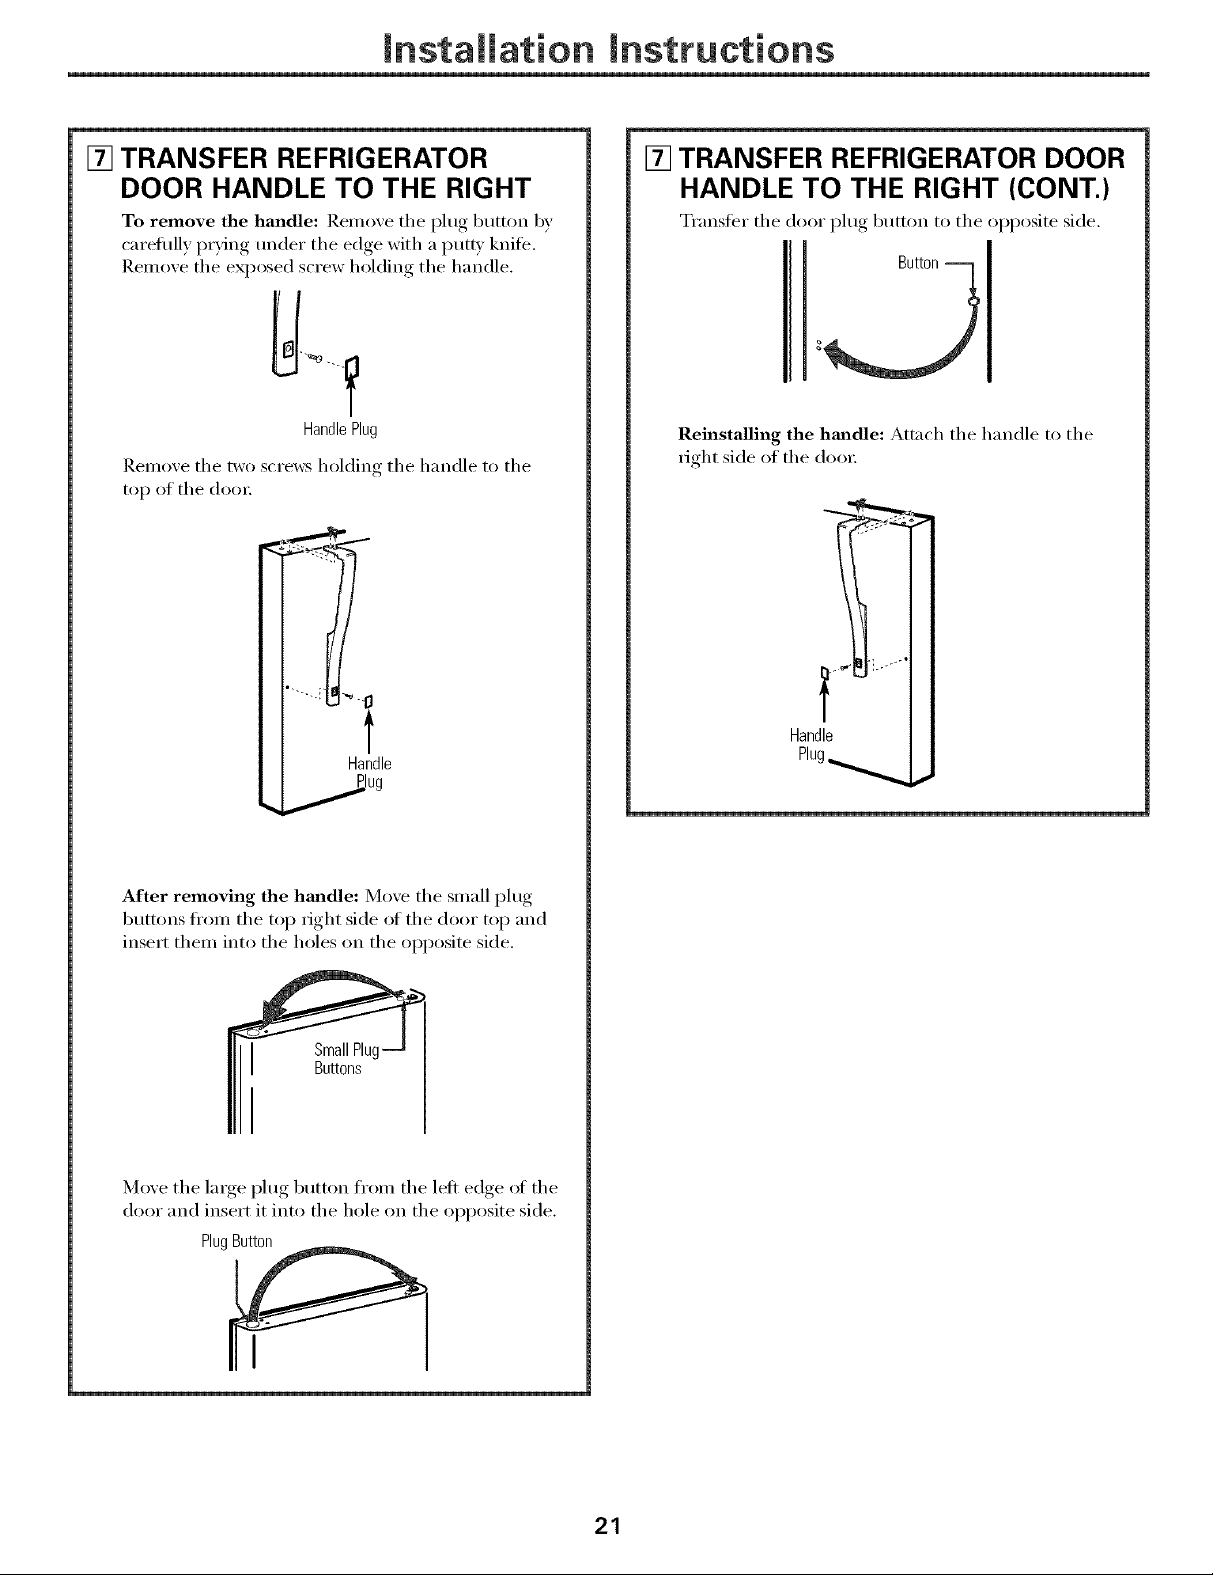
[] TRANSFER REFRIGERATOR
DOOR HANDLE TO THE RIGHT
To remove the handle: P.emo_e the plug button by
carefllllv, I)rving,, under the edge with a putl) knife.
Remoxe the exposed screw holding the handle.
HandlePlug
Remove the two screws holding the handle to the
top of the do(n:
Handle
_jug
[] TRANSFER REFRIGERATOR DOOR
HANDLE TO THE RIGHT (CONT.)
Transli_r the door I_lug, button to the opposite side.
Butt(
Reinstalling the hm_dle: Attach the handle to the
dght side of the doo_:
Handle
Plug_ ,_
After removing the hmadle: Move the small plug
buttons fl'om the top right side of the door top and
insert them into the holes on the opposite side,
SmallPlu,
Buttons
Move the large,I)lug, button from the left edge of the
door and inse_X it into the hole on the opposite side.
PlugButton
21
Page 22
Installation Instructions
REVERSING THE DOOR SWING (CONT.)
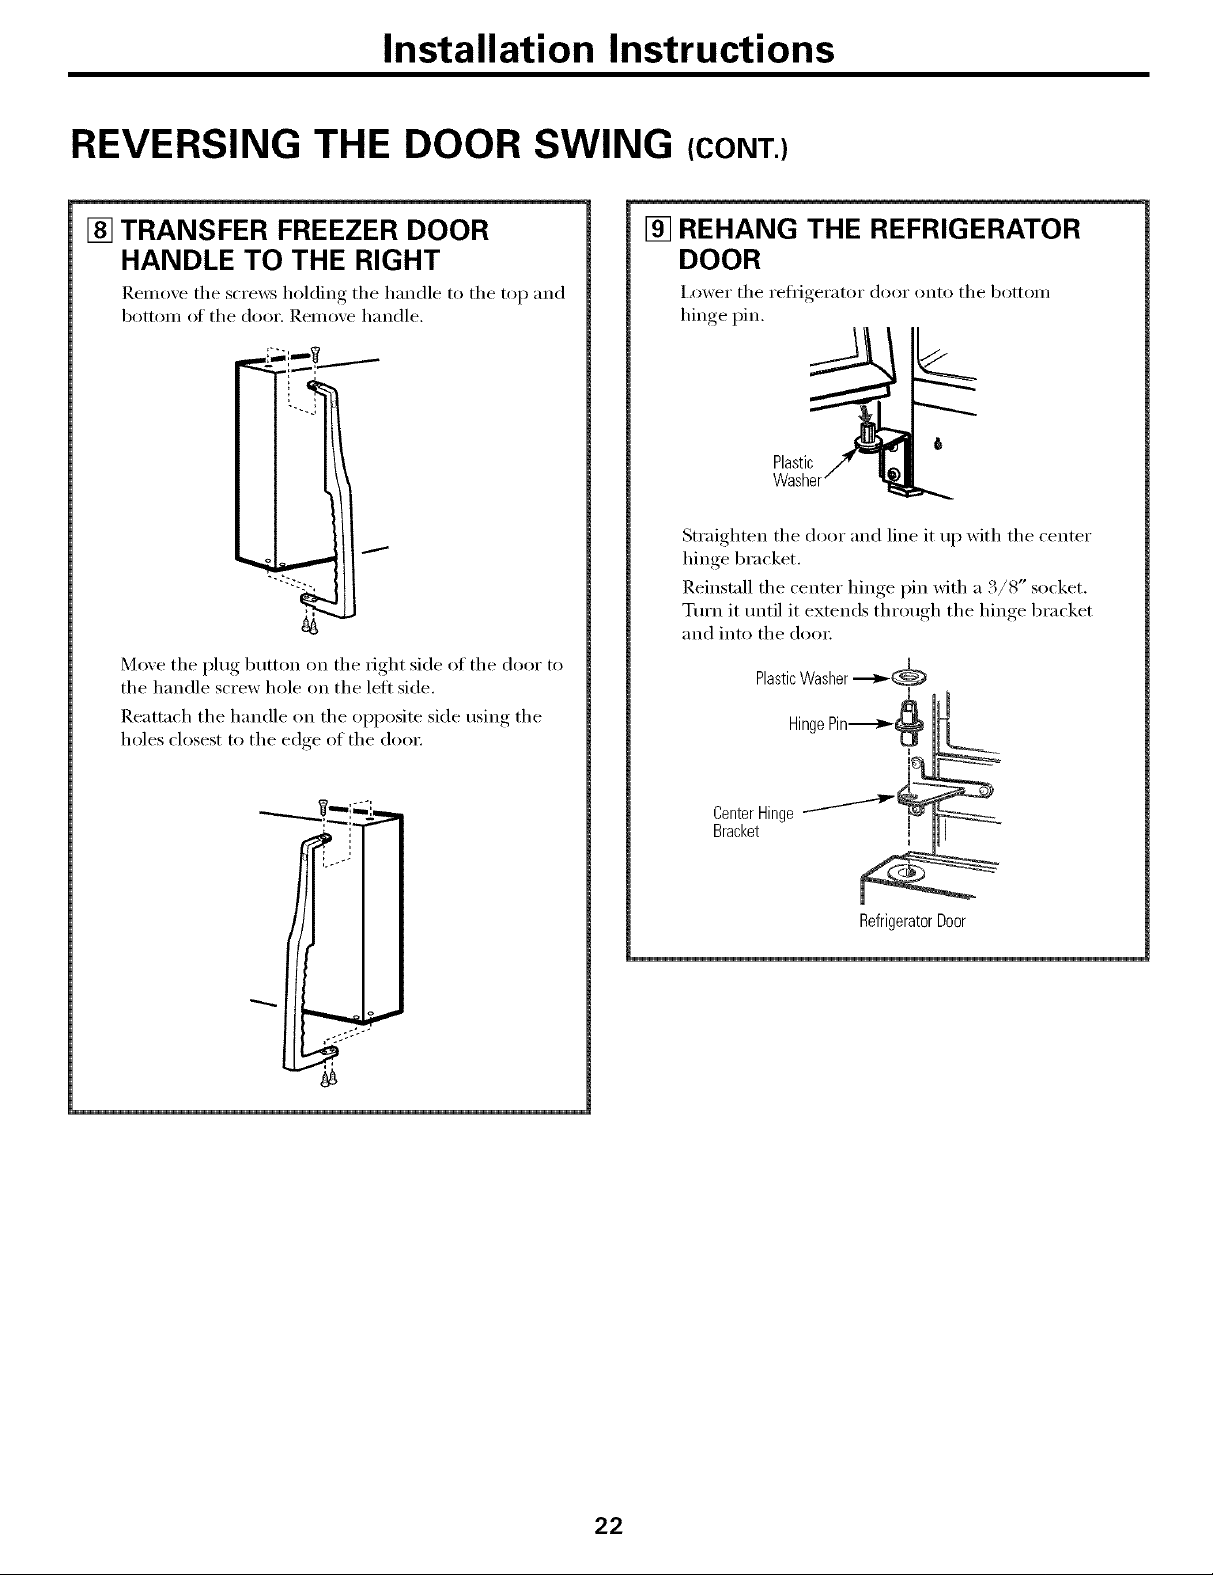
[] TRANSFER FREEZER DOOR
HANDLE TO THE RIGHT
Remo_e the screws holding the handle to the top and
botton] of the door. Remoxe handle.
Move the plug button on the right side of the door to
the handle screw hole on the left side,
Reattach the handle on the opposite side using the
holes closest to the edge of the door;
[] REHANG THE REFRIGERATOR
DOOR
I,ower the refl_gerator door onto tl]e bottom
hinge pin.
6
Plastic
Straighten the door and line it up with the center
hinge bracket.
Reinstall the center hinge pin with a 3/8" socket.
Tm'n it tmtil it extends through the hinge bracket
and into the dora:
PlasticWasher ._
Hinge Pin--------_
Center Hinge '_
Bracket
m
Refrigerator Door
22
Page 23

Installation Instructions
[] REHANG THE FREEZER DOOR
I,ower the fl'eezer door onto the center hinge pin.
ge sure the washer is in place.
CenterHingePin
Plastic
I,ifl the top hinge so the pin fits into the door socket.
Support the door on the handle side and make sm'e
the door is straight and the gap between the doo_s is
even across the fi'ont. While holding the door in
place, tighten the top hinge screws.
23
Page 24
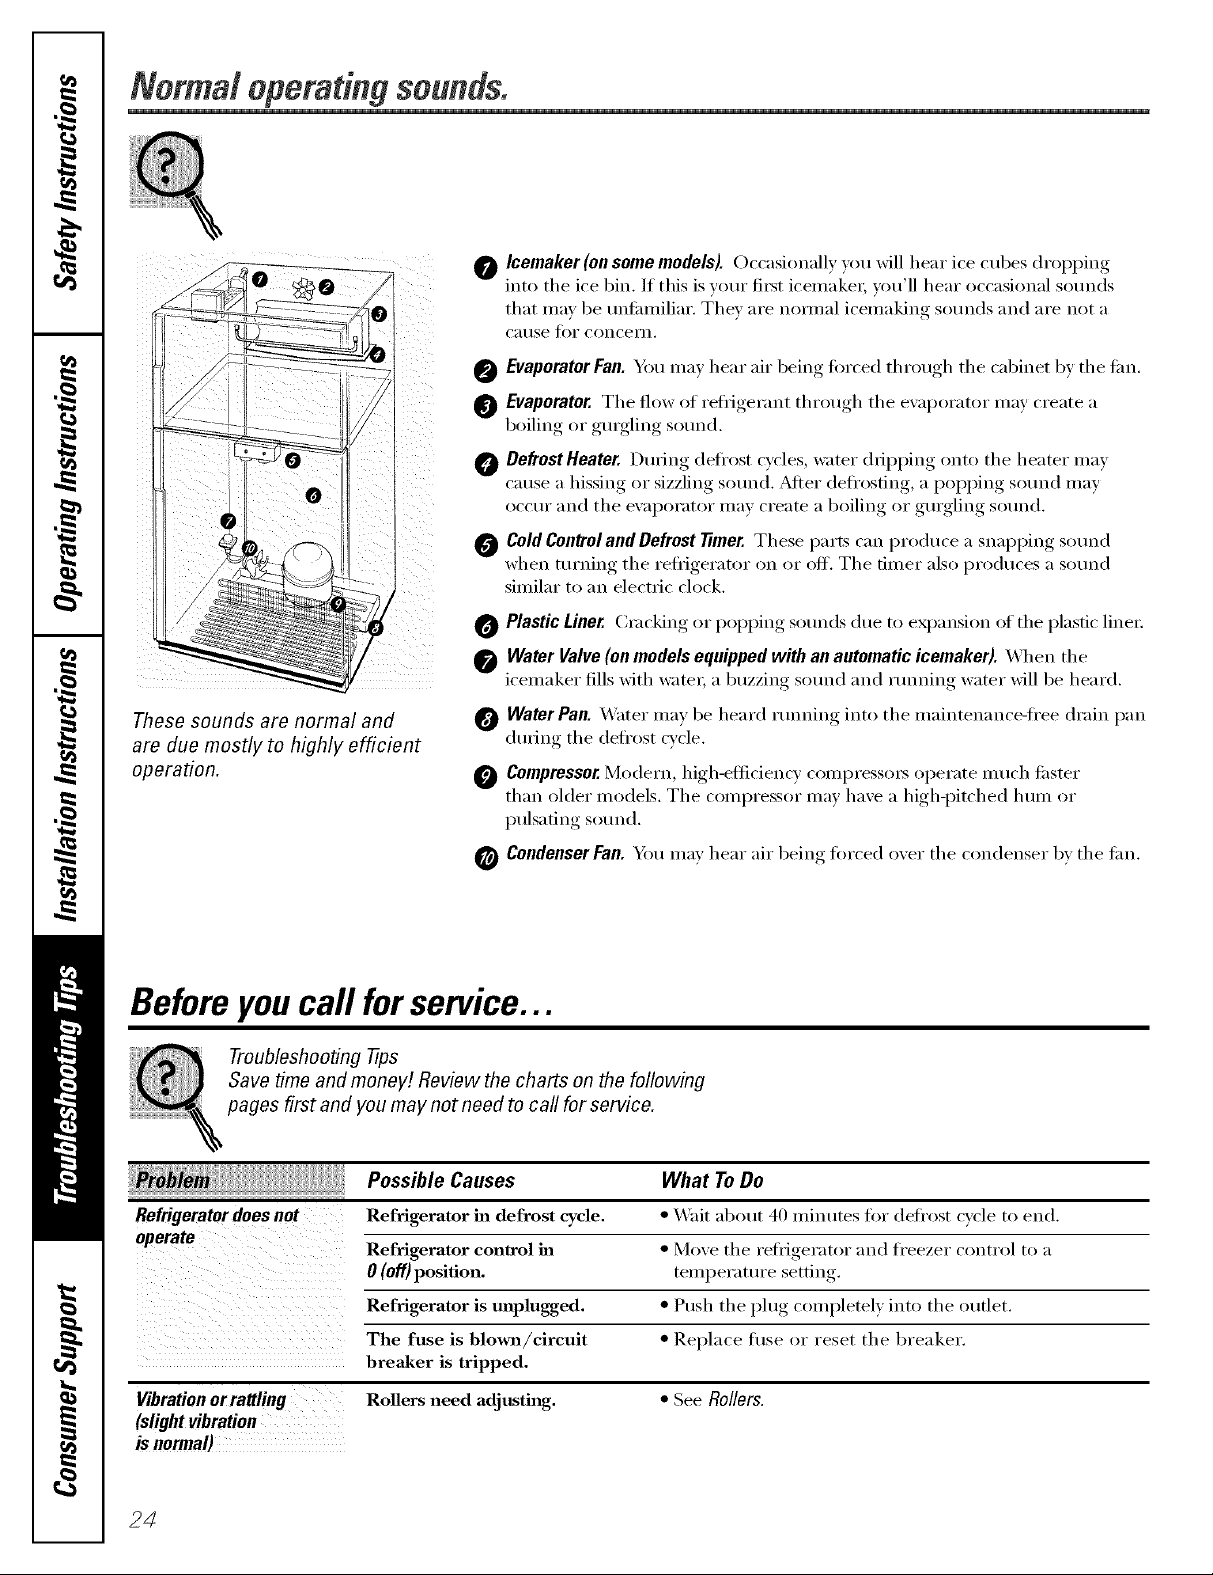
NermM eperating seunds.
0 Evaporator Fan. Yi)u may hear air being t0rced through the cabinet by the tim.
_ Defrost Heater. During defi'ost cycles water dill)ping onto the heater may
0 Cold Central and Defrost _mer. These parts can produce a snapping sound
Icemaker(on some models). Occasionally )ou will hear ice cul)es dropping
into the ice 1)in. If this is your fi_t k'emake_; )ou'll hear occasional sounds
that mm be tmtmniliar. They are nomml icemaking sounds and are not a
Catlse J[()I" conceiql.
Evaporator. The flow of reii_igerant through the ewq)orator may create a
boiling or gmgling sound.
cause a hissing, or sizzlin.._ sound _ter (lefrostin_ a III)°) )ing, sound ulav
occur and the evaporat()r Inay create a boiling or gmgling s()und.
when turnino_ the refl_igerator on or off. The timer also produces a sound
similar to an electric clock.
Plastic Liner. Cmckiw*m or lll)°) )ing, sounds due to expansion of the plastic lineL
Water Valve (on models equipped with an automatic icemaker). _4qten tit e
icemaker fills with watex; a 1)uzzing sound and running water will be heard.
These sounds are normal and
are due mostly to highly efficient
operation.
WaterPan. X&_Kermay be heard running into the maintenance-fl'ee drain pan
dining the deli'ost cycle.
Compressor. Modern, high-eflicienc) compresso_ operate much tipster
than older models. The compressor mm ha_e a high-pitched hum or
pulsating sotmd,
Condenser Fan. Y)u may hear air being fi)rced o_er the condenser by the tim.
Beforeyoucall forservice...
Troubleshooting -tips
Save time and money! Review the charts on the following
pages first and you may not need to call for service.
Possible Causes
Refrigerator doesnot Refrigerator ill defrost cycle.
operate
Refrigerator control in
Refrigerator is unplugged,
The fuse is blown/circuit
breaker is tripped.
What To Do
• _Mfit about 40 minutes tot defi'ost cycle to end.
• Move the refi_igerator and fl'eezer control to a
temperamre setting.
• Push the l)lug complemly into the outlet.
• Replace fllse or reset the breaker.
Vibration orrattling Rogers need adjusting. * See Rollers.
(slight vibration
is normal)
24
Page 25
www.GEAppliances.com
Possible Causes What ToDo
Motor operates for Normal when refrigerator * Wait 24 h om_ fin" the reli_igerat(n" t() c(mll_letelv
Iongperiods orcycles is first plugged in. cool (lowu.
on and off frequently
(Modern refrigerators
with more storage amounts of food are
space and a larger placed ill refrigerator.
freezer require more Door left open. * Check to see l
operating time. They
start and stop often Hot weather or frequent * This is nomml.
tomaintain even door openings.
temperatures.) Temperature controls * See About the controls
Refrigerator or freezer Temperatttre control not set * See About the controls.
compartment too warm cold enough.
Frostorice c_Mals Door left open. • Check to see if l)a(kage is holding door Ol)eU.
on frozen food
(from within package Too frequent or too long
Often occurs when large * This is u(mual.
if )a(-kaoe is holding door open.
set at the coldest setting.
Warm weather or frequent * Set the teml)eratm'e control one step (olde_:
door ope_fings. See About the controls.
Door left open. • Check to see if l)ackage is holding door ol)en.
is normal) door ope_fings.
Automatic icemaker Icemaker power switch is * On power switch models, set the l)ower swit(h to the I
(on some models) not on. (on) l)ositiou. On feeler am/models, move the teeler ;ran
does not work to the ON (down) position.
Water supply turned off or * See Installing the water line
not commcted.
Freezer compartment * Wait 24 h om_ fi)r the reliJgerat()r t() (()mpletelv
too warm. cool down.
Piled up cubes in the storage * l,evel (ubes by hand.
bila cause the icemaker
to shut off.
lee cubes stuck in icemaker. * Turn off the icemake_, l'elllOVe ('ubes and turn the
(Green power fight on icemaker ba(k on.
icemaker blhakilag.)
Ice cubes have Ice storage bill needs cleaning. * Eml)ty mad wash bin, Discard old (t/bes,
odor/taMe
Food trmlsmitthag odor/taste * _.Vral) tends well.
to ice cubes.
Interior of refrigerator * See Care and cleaning.
needs cleaning.
if )acka,,e is holding door ol)eu.Slow ice cube freezing Door left open. • Check to see l
Telnperature control not set * See About the controls.
cold enough.
No ice cube production Supply fine or shutoff valve * Call a l_lumber,
is clogged.
25
Page 26
Beforeyoucall forservice...
Possible Causes What To Do
Moisture forms on Not unusual during * _'ipe stu_ilce dxy; then at!just tile ti'esh tbod control
cabinet surface periods of high hmnidity. ,setfin,_ one number higher, and check again, in 24 hotu_,
between the doors
Refrigerator has odor Foods transmitting * Foods with strong odo_ should be tightly wrapped,
odor to refrigerator. *Keep a n ()pen b(>x of baking s()da in the reffigerat(>r;
replace every three lnonths.
Interior needs clemfing. * See Care and cleaning.
Moisture collects inside Too frequent or too
(in humid weather, air long door openings.
carries moisture into
refrigerator when doors
are opened)
InteriorligMdoes No power at outlet. • Replace ti/se (>r reset the breaker.
not work
Hot air from bottom Normal air flow cooling
of refrigerator motor. In the refrigeration
Light bulb burned out. *See Replacin9 the light bulbs.
process, it is normal that
heat be expelled in the
area under the refrigerator.
Some floor coverings will
discolor at these normal
and safe temperatures.
Foodfreezing in Food too close to air vent. * Move the fi_od away fl'om the air vent (near the controls).
the refrigerator
Door does not close Rollers need adjusting. * See Rollers.
by itself
Orange glow in the Defrost heater is on. * This is normal.
freezer
Refrigerator control is set * Move the refrigerator control to a wamier
too cold. temperatt/re.
26
Page 27

GE Service Protection Plus '_'
GE, a imme recogifized _orkl_kte for qtmlhy a_d depeildabilhy; offers yot_
Ser_ke Protectkm t h_s --comp_ ehe_s_ e protecfio_ o_ all ?our appHai_ces--
No Matter What Brand!
WoTt Corot Any ApptMnco.
Benefits Include:
o Backed by GE
o A_I brands covered
o Unlimited service calls
o A]I parts and lal_or costs h_clnded
o No out=of-pocket expenses
o No hidden deductibles
o One 800 number to call
Yol_ wi]] be completely satisfied with <mr service protectiol_ or }ol_ ma} request y<mr m<mey back
<m the ]'emaim_im_g x'a]_0e ofxom" c(mtract. No q_esti<ms asked. It's that simple.
Protect yore" refi'igerato_; disbwas]]e_; washer ;rod (]_ye_; r;mge, TVI VCR mid ml_(b more--aoy brand!
Iph_s t]]ere's m_o extra c]]arge %r emergei_cy service a_(] low moi_t]]]y fi_]ai_c]_g is a_ai]ab]e. Eve]_ icemaker
coverage a _ d {ood spoilage prot ecti o_ is ofterecL Yo_ ca _ rest easy, kl_ o_i _ g th a ta]] vo_r va] _mb] e
ho_*sehoId products are protected agai_st expe_sive repairs.
for more i_[ormati(m.
AnDvhom. Anytimo.
\!1 b_mds c >x_*_d, up to 20 }<av_ okL in i1_ < mdm real [.S.
Please place in envelope and mail to:
GeneralElectric Compang
Warranty Registration Department
P.O. Box 32150
Louis_411e, KY 4{}232-215{}
27
Page 28
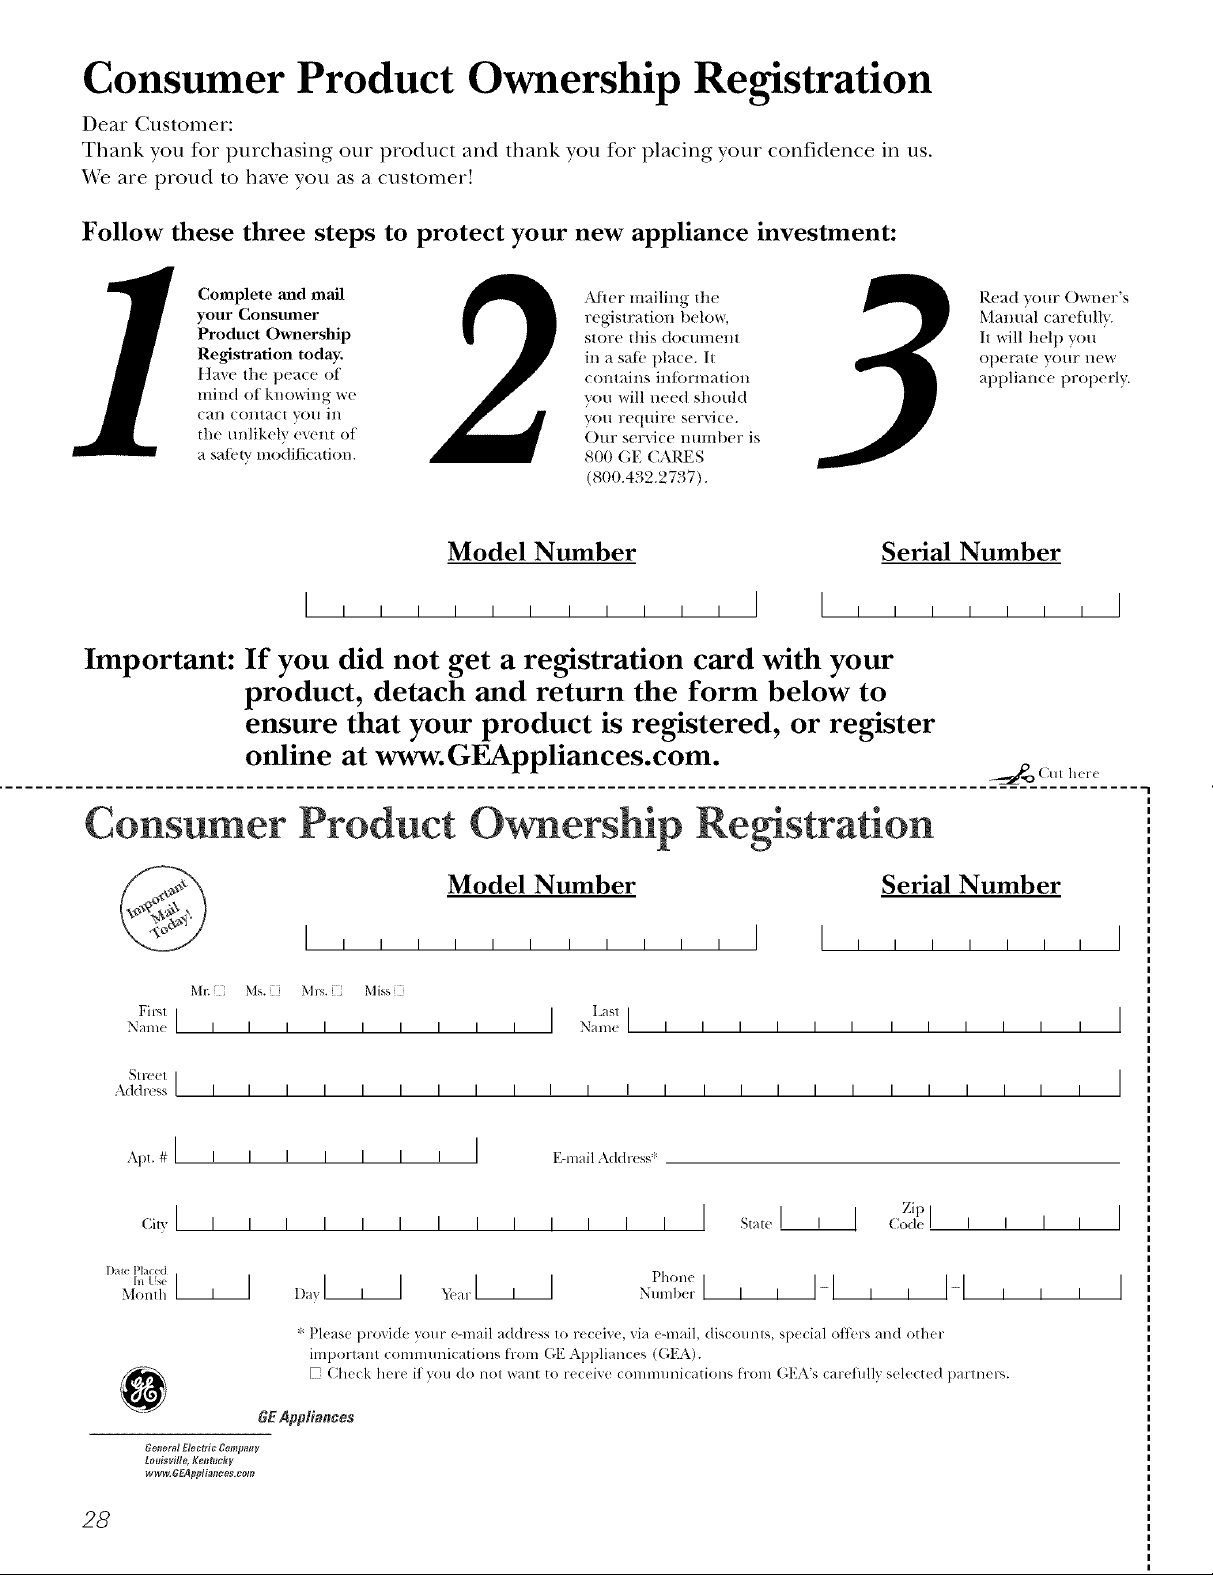
Consumer Product Ownership Registration
Dear Customer:
Thank you for purchasing our product and thank you for placing your confidence in us.
'_A/eare proud to ha_e you as a customer'.
Follow these three steps to protect your new appliance investment:
Complete and nlall
your Consumer
Product Owuership
Registration today.
t]a_c the peace ot
mind of knowing we
c_.n contact you ill
th{ unlikely {v{nt of
a sa/;vW modJ/ic_Jion.
AJlcr mailing the
rcgistradon bch)w,
Store this (to([ll/ICllt
in a satb place. It
contains intbrmation
you will need should
you require service.
Our service mmlber is
800 (;E CARES
(800.432.2737).
Model Number Serial Number
, , , , , , I I , , , , ,
Important: If you did not get a registration card with your
product, detach and return the form below to
ensure that your product is registered, or register
online at www.GEAppliances.com.
Consumer Product Ownership Registration
[_{'_t(t VO/IF Owl/elP'S
Mamml carefldh.
It will hel t ) you
ot)eram your new
appliance t)rot)erly.
, I
._ Cut h(r{
Model Number Serial Number
MI: [ Ms. M*_.[ Mixs
Fi'-'lI I L_sll
Name I I I I I I I I I Name I I I I I I I I I I I I
Sl 1-{ (!1 I
Addr,. ss I I I I I I I I I I I I I I I I I I I I I I I I
A,)[#I , , , , , , , I E-mailAddress*
Zip I
l )tie Pla{ ed
Momh
* PI( ase provide your (-mail address to r( ceiv(, via {-mail, discounts, special offers and other
iml.',ormm communi(ations [rom (;F Applianc{ s ((IEA).
Ch(ck h(r{ if you do nol ;,,ant to re((ive {olnmunications from (;EA's { arefully sele(ted F,arln{ rs.
_.m,..I,,I-I,, I-I,,, I
0
GEAppliances
6etler_d Etectric Compaxly
Lo_tisville, Ketltucky
ww_6EAppti_tlces_om
I
I
28
Page 29

CONSUMER WARRANTY
(for customers in Canada)
Your refrigerator is warranted to be free of defects in matedal and workmanship.
7Vhat is covered
How Long Warranted
(From Date of Sale)
Compressor Five (5) Years Five (5) Years
Sealed System (including Five (5) Years Five (5) Years
Parts
Repair or Replace
at Camco's Option
Five (5) Years
Five (5) Years
_vaporator, condenser
:ubing and refrigerant)
_,11Other Parts One (1) Year One (1) Year One (1) Year
TERMS AND CONDITIONS:
This warranty applies only for single family
domestic use in Canada when the
Refrigerator has been properly installed
according to the instructions supplied by
Camco and is connected to an adequate
and proper utility service.
Damage due to abuse, accident, commercial
use, and alteration or defacing of the serial
plate cancels all obligations of this warranty.
WHAT IS NOT COVERED:
• Service trips to your home to teach you
how to use the product.
• Damage to finish after delivery.
• Improper installation--proper installation
includes adequate air circulation to the
refrigeration system, adequate electrical,
plumbing and other connecting facilities.
• Replacement of house fuses or resetting
of circuit breakers.
Service during this warranty must be
performed by an Authorized Camco
Service Agent.
Neither Camco nor the Dealer is liable for
any claims or damages resulting from any
failure of the Refrigerator or from service
delays beyond their reasonable control.
To obtain warranty service, purchaser must
present the original bill of sale. Components
repaired or replaced are warranted through the
remainder of the original warranty period only.
• Replacement of light bulbs.
• Damage to product caused by accident,
fire, floods or acts of God.
• Loss of food due to spoilage.
• Proper use and care of product as listed
in the owner's manual, proper setting of
controls.
• WARRANTOR tS NOT RESPONSIBLE
FOR CONSEQUENTIAL DAMAGES.
This warranty is in addition to any statutory
warranty.
Labour
IMPORTANT
Keep this warranty and your bill of sale as proof of original purchase and purchase date.
Camco Service is available coast to coast.
If further help is needed concerning this
warranty, contact:
Manager, Consumer Relations
Camco Inc.
Staple your receipt here.
Proof of the original purchase
date is needed to obtain service
under the warranty.
Suite 310
1 Factory Lane
Moncton, NB.
E1C 9M3
28
Page 30

RefrigeratorWarranty. (Forcustomers in the United States)
Aft warranty service provided by our Factory Service Centers,
or an authorized Customer Care®technician. Toschedule service,
on-line, 24 hours a day, visit us at www.GEAppfiances.com, or carl
800.GE.CARES.
GE Will Replace:
OneYear
Fromthedateof the
origina!purchase
Five Yeats
Fromthedateof the
originalpurchase
:_ Service trips to your home to teach you how to use the
product.
hnproper h_staJlation.
:_ Failure of the product if it is abused, misused, or used for
other thm_ the intended purpose or used commerciaJly.
:_ Loss of food due to spoilage.
Any partof the reflJgerator which tifils due to a defect in materials or workmanship.
During this full one-year warranty, GE will also provide, free of charge, all lal)or
and in-home service to replace the defective part,
Any part ofthe sealed refrigerating system (the compressox; condensex; e_aporator
and all connecting tubing) which tifils due to a defect in materials ()r workmanship,
During this additional four-year limited warranty, GE will also provide, free of charge, all
labor and in-home service to replace the defecti\'e part,
Staple your receipt here.
Proof of the original purchase
date is needed to obtain service
under the warrant_
Replacement of house fuses or resetting of circuit
breakers.
Damage to the product caused by accident, f'we, floods or
acts of God.
h_cidentaJ or consequential damage caused by possible
defects with this applimlce.
This warranty is extended to the original purchaser and any succeeding owner for products purchased for home
use within the USA. In Alaska, the warranty excludes the cost of shipping or service calls to your home.
Some states do not allow the exclusion or limitation of incidental or consequential damages. This warranty gives
you specific legal rights, and you may also have other rights which vary from state to state. Toknow what your
legal rights are, consult your local or state consumer affairs office or your state's Attorney General.
Warrantor: General Electric Company. Louisville, KY 40225
3O
Page 31

Notes.
I
i
_L
w
i
w
I
w
i
3I
I
I
i
Page 32

.g
Ins_uctions de s&uHt_ .......
Instructions de fonctionnem_t
Bats i_l_gm_es .............. 39, 40
Caractc_iistiq ues additiom_elles ..... 4(}
Clavettes et bacs _'_ _"'
Machine at1glag<ms automatique .... 41
R_glages ...................... 36
Soins et nettoyage
Remplacemem des
ampoules _lectiiq ues ............ 43
Soil,s et _ettoyage ............ 42, 43
Instructions d'insta!lation
I_stallatkm de la
conduite d'eau .............. 45-49
Inve_si<m du se_s
d'ouve[tme des po[tes ........ 50-54
Pr{paiation i_l'i_stallati<m
dtl r_fligS_atem . ............ 44, 45
............. ot, 08
....... 99--9_)
En cas de panne ............ 55-58
B_uits _ormaux
de flmctiom-_emem .............. 55
.g
e,
Soutien au consommateur
Garantie ...................... 59
Sol_tJell aH consol_H_ateHl . ....... (_0
Ecflvez ici _e num_ro de modOle et te
numero de s_He :
Modete #
Serie #
mh
]'_tiq_ette g_'ise sim_e i'_ga_wbe, p_'_s
(b_ ham du compa_'time_t _'_{_'ige_'atem'.
32
Page 33

INSTRUCTIONS IMPORTANTES DE SECURITE.
LISEZ TOUTESLESINSTRUCTIONS AVANT
D'UTILISER VOTREREFRIGERATEUR.
AVERTISSEMENT!
N'utilisez cet appareil qu'aux finspr#vues dans le present Manuel dupropri#taire.
MESURESDES@URITE
Pour utiliser un appareil #lectrom#nager #lectrique, vous devez prendre des mesures de s#curit#,
en particulier :
Vous devez bien installer et placer w)tre
r_fl_ig_ratem; conlimn_n/ent aux Instructions
d'installadon awmt de l'utilise_:
Ne pem_ettezjamais aux enfimts de grhnpet; de
montet; de se tenir ou de se pendre aux _tag_res
de votre r_fl_ig_ratem: ]Is peuvent endommager
le r_li_ig_ratem" et se blesser s_rieusement.
Ne touchezjamais les sm'fi_ces fl'oides darts le
compartiment cong_lafion quand w)s mains sont
hulnides ou inouillg_es. Votre peau peut coller _'l
ces surtiaces extr&mement fl'oides.
Ne conservez jamais ou n'ufilisez jamais
d'essence ou d'autres liquides ou gaz
inflammables _'lproximit(_ de votre r_qiJg_ratem"
oil de tout atltre appareil (_lectromg_nage_:
Ne laissezjamais w_s doigts darts des endroits off
ils risquent d'&tre pinc_s. I,'_cartement entre les
portes et l'am/oire est ng_cessairement petit. Faites
attention de tbm_er les portes quand des enfimts
se trouvent fi proximit&
g D_branchez votre rg_flJg(_ratem" awmt de le
nettover et de le rg_pare_:
NOTE: Nous vousrecommandonsfortement de fake
accomplirtout serviceparun technlcienquafifib.
V_ms ne coupez pas l'alimentation du circuit de la
lmni_re en tom'nant 1)m des boutons de rg_glage,
ou les deux, en position 0 (arrOO.
Ne recongelezjamais des aliments congel_s qui
ont compl_tement dg_gel(_.
www.electromenagersGEcanada.com
Darts les r_fl_ig&'amm_ qui ont des machines fi
glaqons, &itez tout contact avec les _l&nents
mobiles du m_canisme d'_jection ou avec
l'_l&nent chauflimt situ_ _'lla pattie inlcariem'e de
la machine _'lgla<ons. Ne mettezjamais vos doigts
ou w>smains sur le m_canisme de fid)ricafion
autonmtique de gla<ons quand le r_qi_ig_i'ateur
est branch&
33
Page 34

INSTRUCTIONS IMPORTANTES DES£:CURITE.
LISEZ TOUTESLESINSTRUCTIONS AVANT
D'UTILISER VOTREREFRIGERATEUR.
DANGER!RISQUEDEPRISEAUPIEGED'ENFANT
BONNEMISEAUREBUTDEVOTREREFRIGERATEUR
I)ent'em/ement et l'asph)sxie des enfm_ts ne sent
pas des histoires du passe. I,es r_fi_g_ratem_jet_s
0/l abandonnes sent tol.ljo/li3 dangei'etlx.., illellle
s'ils ne doivent rester lfi que <<luelquesjoui_,. Si
vous vous dObarrassez de votre vieux rOfl_ig_ratem;
suivez les instructions suivantes pour prOvenir tout
accident.
Avant de jeter votre vieux refrigerateur ou
congelateur:
:_ Enlevez les portes.
:_ i,aissez les clavettes en place, pour _\'iter que
des enlimts puissent ti_dlement grimper
et se tenir darts votre r_li_ig&'atem:
Mise au rebut deschlorofluorocarbures
Votre vieux r_fl_ig_rateur peut avoir un syst&me de
refl'oidissement utilisant des chlorofluorocarbures.
On pense que ceux-ci peuvent causer des
dommages fi l'ozone de la stratosphbre.
Si vousjetez w_tre vieux r_afl_ig_ratetu; assurez-vous
de finite enlever tout le r_ali_ig&'ant aux
chlorofluorocarbures par un selMce qualifi_
qui lesjettera convenablement. Si vous relfichez
inmntionnellement ce r6fi_ig_rant aux
chloi'otlllOi'OCai'b/li'es_ VO/IS po/IVeZ etI'e condaii/ne
fi des amendes et fi de l'emprisonnement
COil][iliilleiileilt atlX lois StlI" la protection de
l' envii'onneiilent.
UTILISATIONDERALLONGESE-LECTRIOUES
Nous vous recommandons fortement de no pas utiliser de rallonge Olectrique, _ cause d'un danger de
risques possibles de sOcuritOdans certaines conditions.
Cependant, si w)us devez absolument utiliser un cordon rallonge _lectrique, il est absolument requis que
vous utilisiez un cordon rallonge tdfilaire, avec raise _'l la terre, certifi_ UI, (aux t_tat>Unis) ou ACNOR
(au Canada), avec prise et fiche fi trois conductem_, et fi notation _lectrique de 15 amp0res (minimum)
et 120 volts.
34
Page 35

www.electromenagersGEcanada.com
AVERTISSEMENT!
BRANCHEMENTCLLECTRIOUE
Ne coupez oun'enlevez jamais, en n'importe quelles conditions, la troisiOme broche (mise _ la terre)
de votre cordon d'alimentation. Pour votre s_curit# personnel&, vous devez bien mettre _ la terre cet
appareil #lectrom#nager.
i,e cordon d'alimentation de cet appareil est muni
d'une fiche 5 trois broches (bipolaire avec terre)
qui se met dans tree prise tam'ale 5 trois trous
(bipolaire avec terre), pour r<fire le risque de
secousse (_lectrique occasionn6 par cet appareil.
Faites vg_rifier la prise tam'ale et le circuit (dectrique
par tm _lectricien qualifi_ pour wins assm'er que
la prise tam'ale est bien raise 5 la terre.
Si wins avez tree prise m re'ale 5 deux broches
seulenlent (sans terre), vous &tes pei_onnellelnent
responsable et oblig_ de la fifire remplacer par tree
bonne prise tam'ale avec terre, bien raise 5 la terre.
Vous devez totljom_ brancher votre r6li'ig_ramm" 5
sa propre prise (dectrique, qui doit avoir tm w_ltage
correspondant 5 cehfi de la plaque signalg_fique de
w)tre r_flJg_I'atet u-
i,e rendement de votre r6fi'igg_ratem" sera meillem"
et w)us &'iterez ainsi de sm'charger les circuits
(_lectriques et de sm'chattfler le cfiblage de votre
maison, et &'iterez ainsi tout risque d'incendie
provoqu(_ par des cfibles surchattflkXs.
Ne dg_branchezjamais votre rg_fl'igg_ratem" en
tirant sin" le cordon d'alimentafion. Tenez totljoms
la fiche fbm/ement et enlevez-la de la prise en
tirant droit.
R(aparez ou remplacez imm&liatement tout cordon
d'alimentation us(_ ou endommagO. N'utilisez
jamais de cordon fissm'(_ ou us_ sur sa longuem"
ou 5 l'une de ses extrg_mit6s.
Pore" (matter votre r6ffigg_ratem" du ram; fifites
attention de ne pas (_craser or! d'endolmnager
le cordon d'alimenmtion.
f
UTILISATIONDEFICHESINTERMEDIAIRES(OUD'ADAPTATION)
(les fiches intermMiaires ne sont pas autorisees au Canada)
cause des dangers possibles de s#curit_ dans certaines conditions, nous vous recommandons
fortement de ne pas utiliser de fiche interm#diaire.
Cependant, si vous dOddez malgr(_ tout d'utiliser
une fiche intem_g_diaire, lo_que le pem/ettent les
codes locaux, vous pouvez fidre tm branchement
temporaire _ une prise mura]e _'_deux trous (sans
terre) en utilisant tree fiche intem/g_diaire ;mint
tm label UI, que w)us trouverez darts la plupart
des quincailleries.
Vous devez aligner le trou le plus grand de cette
fiche avec le trou le plus grand de la prise nlurale
pore" obtenir tree bmme polarit(_ en la branchant
au cordon d'alimentation.
Quand wins dgd)ranchez votre cordon
d'alimentation de la fiche intem_g_diaire, tenez
tot!joins la fiche en place avec tree main tout en
tiI';Int le cordon avec votI'e atltI'e I/lain. Atlti'eillent_
vous allez probablement finir par casser la broche
de raise 5 la terre de votre fiche intem/&liaire.
Si la broche de fil 5 la terre de w)tre fiche
intei_nl_diaire se casse, N'UTILISEZPASwm'e
rg_flig&'atem" rant qu'il n'a pas (_t(_bien mis 5 la
terre.
Vousne mettrez pas _ /a terre votre appareii mbnager en
branchant le contact de terre _ une vis du couvercie de/a
prise murale, _ moins que ce couvercle ne soit m_tallique
et ne soit pas isold, et que /aprise murale soit bien raise
ia terre par fintermddiaire du cgbiage de ia maison.
Vousdevez faire v#rifier votre circuit par un dlectricien
qualifid pour vous assurer que ia prise murale est bien
raise _ ia terre.
LISEZETSUIVEZSOIGNEUSEMENTCESMESURESDEScLCURITE
CONSERVEZCESINSTRUCTIONS
35
Page 36

R .glages de vetrer .frig .rateur.
R glagesdevotrer frig rateur
Initialement, mettez le r#glage de votre compartiment r#frig#ration en position 5 et celui de
votre compartiment cong#lation en position 5et attendez 12heures que la temperature se
stabflise.
Plusieurs ajustements peuvent _tre requis. Ajustez le r_glage une unit_ _ la fois, et
attendez 12heures apr_s chaque ajustement que le r_frig_rateur atteigne la temperature
que vous avez r_gl_e.
Si vous ajustez les deux r_glages en position 9, vous arr_terez le refroidissement du
compartiment r_frig_ration et du compartiment cong_lation, mais vous ne couperez pas
I'alimentation _lectrique de votre r_frig_rateur. Le r_glage du compartiment cong_lation
n'a aucun effet sur I'alimentation _lectrique du compartiment r_frig_ration.
Vousdevez regler la temperature de votre refrigerateur en fonction de vos preferences,
votre usage et vos conditions d'utilisation et cela peut necessiter plus d'un reglage.
36
Page 37

Lesclayetteset los bacs. vvww.electromenagersGEcanada.com
Tousles modOles n'ont pas toutes ces caract#ristiques.
Disposition des clayettes
I,es clavettes du compartiment r_liig_ration et du compartiment cong_lation sont
r_glables.
Compartiment refrigeration
Enlevement :
O Soulexez la clayette _'_l'axant.
0 Soulexez la clavette _'_l'ar_re et
fi_ites-la sortir
Certainsmod#lesontdesclayettes
m#talliquesgrillag#esquevous
pouvezrfiglerdelare#memanibre.
Remise en place:
En fi_isant basculer la clavette \'e_ le
haut, ins_rez le crochet sup_ieur 5
l'arri_re de la clavette dans fine tente
du rail.
0 Abaissez le dexmt de la clavette
.jusqt£5 ce clue le bas de la claxette
se fixe en place.
Compartiment congelation
Pour enlever :
Soulexez le ((*)t_ gatl('he de la claxette
et taites-le glisser 5 gauche darts fe
centre des soutiens de clavette.
Pour remettre en place:
En tenant la clavette diagonalement,
ins_rez l'extr_mit_ gauche de la claxette
dans le centre des soutiens int>tietus
de clayette sur la paroi de cGt_.
0 lns_rez l'extr_mit_ droite de la clavette
dans les soufiens de cla)ette au nl_nle
nixeau. Faites reposer chaque extr_mit_
de la cla_ette en has des soutiens de
clavette.
Deplacement de la claFette
Dans certains mod&les, il lilut bouger la
clayette comme l'indique la figure pour
pouxoir lui tidre changer de positk)n.
Soulevez l'extr_mit_ gauche de la clayette et
tidtes-la glisser dans le centre des soudens de
clayette. Faites ensuite tourner le c6tt: droit
vers le haut et ins_reMe dans le centre des
soufiens de cla)'ette sup_rieure.
Faites tourner le c6t_ droit de la
clavette xet_ le haut et ti_ite_le sortir des
soufiens de clavette,
NOTE: Pourlosmodblosquiontunemachine
g/a_onsautomatklue,vousdevezmettre/ac/ayette
ducompart/inentcongfilationdanssapositionla
plusbassepourpermettreaubac_gla;on
d'attraperlosgla;ons.
Faites soffit le c6t_ gat]che des soufiens de
clayetm en le tidsant glisse_; tidtes-le tourner
vers le hautjusqu'5 ce qu'il soit au m6me
niveau que le c6t_ droit et taittes-le glisser
dans les soutiens de clayette. Faites reposer
chaque extrtxmit_ de la cla)'ette en bas des
soutiens de cla)'ette.
C_ajfettes 8_i_egel'se_e_ (sur certains modbles)
[,es cla*ettes a_)ti-d_4ve]'seme_)t o_)t des bo]'ds ]'emett]'e e_) place ces cla}ettes co_)sldtez
sp_cia_x po_tr emp_cher to_t d_:verseme_t Disposition des clayettes.
a_tx clayettes i_)[>riem'es. Pore" e_)lever o_ 3 7
Page 38

tes ctage s et los bats.
Clayette coulissante anti-deversement (surcertains modbles)
i_ clavette anti-(l&'e_sen]ent am(wible vous
pem]et d'atteindre des articles qui s(mt
situ(_s derriere d'autres. I,es rebords
sp_ciaux sont conqus pore" aider _'l
emp&cher tout d&'e_ement aux
clavettes inf_iJeures.
i q
I i q
fi ii
Enlevement :
0 Enlevez tous les articles de la clavette.
@ !_aites glisser la clavette ve_ l'ext_riem"
.lusqu'_'l ce qu'elle atteigne sa position
d'arr&t.
Rem_eenp_ce:
O Placez l'arri0re de la clayette sur le
cadre de cla}ettejuste derfi0re la barre
a_, lilt.
@ Faites glisser la cla}ette vets l'int(_fiem"
.lusqu'_'l ceque les taquets soient au
dessus des o/ixertt/i'es.
O A1)aissez la clayette en place de mani0re
_'lce que les taquets entrent darts les
om ertm'es, I)uis thite_la ,glisser _'l
l'intg_iem:
Barreaval]t
O Soulevez l'axant de la clayettejusqu'_'l ce
que les taquets mTi0re soient au-dessus
du cadre de la clmette.
Confimmz _'_firer la cla_ette ve_ l'a_ mt
et enle_ ez-la.
Bacs reglables de porte
Vous pouxez fi_(ilement transporter les
bacs rg_glables du rg_flig(_ratem" fi xotre
surli_ce de traxail.
Enlevement:Soulex ez l'awmt du bac droit
xe_ le haut, puis enlexez en soulexant.
Remise en place ou changement
d'emplacement: Engagez le bac darts los
soutiens moul_s de la porte, et poussez \'e_
le bas. I,e bac se fixe en place.
Clayettes non regtaflles sur la porte
I.es clayettes m_ovibles appro{i>_disse_t
et {brme]_t les c]avettes {ixes de porte, e_
perm etta _ t d'allgm e]_ ter ]e vo] lira e de
rm/gemei/t et ]a so(ip]esse de rm/gemei/t.
Enl_,vement: So_devez ]a c]avette droit vers
]e hm_t, [:mis drez-]a.
Assurez-vousque ia ciayettereposebien
l'hon2ontaleaprbsl'avoir remiseenp/ace, et qu'elle
ne bougepas d'uncOtdoude l'autre.
Assurez-vousdebienpousserlosciayettesjusqu'au
fondpourrefermeriaporte.
La separation aide _'lemp6cher les pet.its
articles qui se trotwent sin" la clavette de
la porte de se renve_e_; de couler ou de
glisse_: Tenez l'alv&_le se trou\m]t fi l'arfi&re
de la s_paration par le doigt et fidtes bouger
la s@aration solon vos besoins.
_emfse eft place : P_dtes e_trer ]'(_]argissem"
de clavette (Iambs ]es so_tie]_s mo_d(_s de ]a
porte et po_ssez vers ]e has. l] de]_(Im e]_
[:>]ace.
38
Bac de compartiment congelation basculant (surcertains modbles)
Appuyez sur le bouton en fidsant basculer
le bac.
Enlevement:Tenez les c6t_s du bac, puis
soulevez-le droit vex_ le haut, puis enlexez
en SO/llex ant.
Remise en place : Engagez les extr(Xmit(Xs du
bac darts les soufiens de la porte et poussez
ve_s le bas. 11se fixera en place.
NOTE:/lie surchargez jamais le bac.
Page 39

Bacsa legumes, wvvw.electromenagersGEcanada.com
Tous les modOles n'ont pas toutes ces caract_ristiques.
Bats a fruits et legumes
Votls de;ez bien esstl_eI" totKe earl en ext't_s
qui peut s'accumuler au fired des bacs ou
en dessous des bacs.
Bac a legumes a humidite reglable (surcertainsmod#les)
\
Fakes glisser le rg_glage en position HIGH Fakes glisser le rg_glage en position tOW
(elevee) pour obtenir l'humidit_ maximum (basse) pour obtenir l'humidit_ minimum
qtfi est re('ommancl_e pour la plupart qtfi est re('ommancl_e pour la plupart
des l_gumes, des fl'tfits.
Bac a casse-crofite (surcertainsmodules)
Vous pouvez mettre ce bac ;'l l'endroit qui
convient le mieux aux besoins de \'otre
fmnille.
Pour enlever, tidtes glisser le bac vexs
l'ext&'ieurjusqu';'l sa position d'arr_t,
soulevez le bac pour hfi taire d_passer
sa position d'arr_t puis enleve>le.
39
Page 40

Enlevementdubacsa legumes.
Tous les modOles n'ont pas toutes ces caract#risfiques.
Enlevement du bac a legumes
Videzlaclayetteinf&ieure avant d'essayer
d'enleverles bacs derangement.
Pour enlever :
Soulevez les bats l_gt)rement \'e_ le haut
totlt eIl les tiraIlt _ltl delft de letlI" posifioIl
d'arrOt
i
Pour enlever ]e couvercle el7 verre
Pour enlever le cadre
Si vousne pouvez pas ouvrir compl_tement
la porte :
Tirez le bac le plus (qoign(_ de la porte
directement \'e_ l'ext_Hetm Fakes glisser
l'autre tiroir ve_s le milieu et enlevez-le.
Pour enlever le couvercle ell verre :
Enlevez le yen'e, puis le cadre. Quand vous
i'eillettez eil place le veiTe, potlssez l'ar_te
ard6re fi)rt darts le cadre.
O Poussez le cou_ercle eil ",eri'e ",eiN le
haut de_ mt.
@ Faites glisser le couvercle en verre ve_s
l'a', mtjusqu'fi ce que l'ar_te alTi_re
sorte 611 cadre.
_]_ Faites tourner le cgt_ du couvercle en
•,eri'e ",eiN le hatlt.
0 Enle',ez le couvercle en verre.
Pour enlever le cadre:
0 Soulexez l'axant du cadre _exs le haut
en le tenant fi deux mains.
@ Faites glisser lc (adre xers l'axant.
0 Faites tourner le cadre xe_ le haut.
0 Enlexez le cadre,
Caract&fstfques Mditio#neHes.
Tous los modbies n'ont pas toutes cos caracMristiques.
Partier ShelfSaver TM
Ce pm_ier amovib]e c(mdel_t dol_ze bohes
de boiss(m gazel_se ol_ del_x bo(_tei]]es de
vim_o_ d'eal_ (]o_gimdimm]eme_Q. ()_ [)el_t
4O
Pour e_lever, {ifites glisser ]e pa_ier vers ]e
]_a_t j_sq_'i_ sa p(_siti(m d_tr_t, so_]evez ]e
[)a_ier pore" ]_fi fifire d(_passer sa i)ositio_
d_rrOt, I:)_fis e_]e_ ez-]e.
Page 41

Machine 6gla ons automatique. .e,ec,,ome.age.CEca.a a.com
Un r6frig6rateur nouvellement install6 prend de 12_ 24 heures pour commencer _ produire des glagons.
IIy a deux cat6gories de
machine _ gla_ons :
Commutateurdemarche Machine
!_\_ _ glagens
fonctionnement
ModNe _commutateur de
marche
Lebras
Lebras enposition
palpeu[esten STOP(arr6t)
positionON en haut
(marche)e!]
has
pa!peurest
Mod61e_ bras palpeur
Machhle 6 g,aconsautomatique
(sur certains mod#les)
i,a machine _'lglacons prod uit environ
] O0 5 300 g-lacons par 94 heures, selon la
temp(_ratnre du compartiment cong('lation,
la tempdratnre de la piece, le hombre de
Ibis que la porte est ouverte et les autres
conditions d'utilisation.
II v a deux cat('go_ies de machine _'_glacons :
le'mo(l_le _'_commummur de marche et le
mo(l_le 5 bras palpem:
Si \_ms faites fonctionner le r('fligdrateur
m_mt de raccorder l'eau 5 la machine _'l
glacons, metmz le commumteur de marche
en position O(atrOt)ou amenez le bras
palpeur en position STOP (arr_t) en haut.
Apr_s moir l_mcor(ld le rg'fiigg'mteur 5
l'alimenmtion d'eau, metmz le commumteur
de marche en position I (marche) ou amenez
le bras palpeur en position ON (marche) en
bas. Sur les mod_les 5 commumteur de
marche, la lumi_re _erte s'allume.
i.a machine 5 glacons se remplit d'eau
quand elle atteint 15'_E Un r('fi'ig-('rateur
nouxellement insmlld prend de ] 2 5 94 heures
pour commencer 5 prod uire des gla¢ons.
Jetez les premiers lots de glacons pour
permettre _'_la conduim d'eau de se pm'gel:
A,'_Stll'eZ-VOtlS qtle lien lie g_)lle la Cotlrse dtl
bras palpetn:
Quand le bac se remplitjusqu'au niveau du
bras palpetm la machine 5 glacons s'arr&te de
produire des glacons.
I1 est normal de trou\er des glacons qui soient
soudds ensemble.
Si vous n'utilisez pas souxent yes gla¢ons,
les vieux gla¢ons deviennent opaques,
prennent un mauxais goOt et r('trdcissent.
Sur les mod_les 5 commumteur de marche, la
lumi_re \erte se met _'lcliglloter si des glacons
coincent dans la machine 5 glacons. Pour
coniger cette situation, mettez le commutateur
de marche en position 0 (arr_t)et enle\ez les
glacons. Remetmz le commumteur de marche
en position I (marche)]_mr remettre en marche
la machine 5 glacons. Quand vous remettez en
marche la machine 5 glacons, vous devez
attendre 45 minutes a\_mt qt£elle se remette _'_
fabdquer des glacons.
NOTE: Dons los moisons qui ont une pression d'eou
p/us faib/e que /a moyenne, vous pouvez entendre /a
machine _ g/a;ons recommencer p!usieurs fois son
cyc/e pour produire une /ivraison de g!agons.
Trousseaccessoire de machine glgla_ons
Si \otre r(qfig('rateur n'est pas (l@'l 0quipO V0rifiez derriere \otre r(_fiig('l_teur le mod0le
d'une mac hine 5 gla¢ons automatique, vous de trousse _'_gla¢ons que x_)us dexez acheter
pou\ez acheter une trousse accessoire de pour x_)tre rdflJg('rateul:
machine 5 gla¢ons.
Accessoire de filtre g_eau
I,e filtre fi eau est une option que vous
pouvez acheter chez votre revendem:
Sp_cifiez la pi&ce WR97X0214. Ce filtre
est accompagn(_ d'instructions compl0tes
d'installation et va sin" la conduite d'eau
en cuiw'e de 0,63 cm de diam0tre (1/4")
ou le tt/yatl emnati0re plastique compris
dans la trousse (;E SlnartConnect rx_
Reti_igerator Tubing. Si vous utilisez le
ttlv;:ltl en mati0re plastique, vous devez
0galement commander une pi0ce de tuvau
en mati0re plastique (XA_N08X10002)
cai" \'el.iS iie devez pas (-Ollper le [tly}lU eI1
mati0r plastique.
NOTE:Lesseuistuyauxenmatibrepiast/)ue
approuvbsparGEsentceuxquifontfournisclansies
troussesGESmartConnectTM RefrigeratorTubing.
N'uti/isezjamaisunautretuyauenmatibre
piastkTue,car/aconduiteesttout/e tempssous
pression.Certainescatbgoriesde tuyauxenmatibre
piast/)uepeuventdevenircassantsavec/#geet
peuventsefen&e,enoccasionnantdesdommages
d'inondationclansvotrema/son.
41
Page 42

Soinset nettoyagede votrerefrig&ateur.
Nettoyage de I'exMrieur
Lespoignees de porte et les garnitures.
Nettovez avec un linge tremp_ dans de l'eau
savom_euse. S_chez avec un linge doux.
ConservezrexMrieur propre. Essuyez avec un
linge propre l_g_rement humect_ de cite
_'lappareil _lectrom_nager ou de d_tersif
liquide fi wfisselle doux. S_chez et polissez
avec tm linge doux, propre.
Nettoyage de 17nMrieur
Pour aider a emp_cher les odeurs, laissezune
boite ouverte de bicarbonate de soude
darts les compartinlents r_qi_ig_rafion et
cong&ttion.
Debranchez votre Mfrigerateur avant de le
nettoyer.Sice n'est pas pratique, enlevez
toute hmnidit_ au mo),en d'une @onge
Oil d'tln chiffon po/1F nettoyer atltO/lI" des
c()mm utateurs, des lmni_res ou des
r6glages.
Utilisez une solution d'eau chaude et de
bicarbonate de soude 15 ml (soit une
cuill_re fi soupe environ) de bicarbonam de
soude dans 1 litre (soit une pinte) d'eau).
Cette solution nettoie tout ell neutralisant
les odeurs. Rincez et s_chez ell essuvant.
N'esswez jamais votre rdfng_rateur avec un
torchon sale ou une serviette mouillbe. Ce/apeut
laisser un r_sidu qui risque d'endommager la
peinture. N'uti/isez jamals de tampon _ rdcurer,
de nettovant enpoudre, d'eau dejavel ou de
produit nettoyant contenant un agent de
b/anchiment, car ces produits peuvent rayer
et endommager /a peinture.
E-vitezdenettoyer lesclayettes froides en verre
(sur certains modb/es) _ l'eau chaude, paine
qu'efles risquent de se casser _ cause de/a
grande difference de temp_ratures. Mam}gulez
avec soins le verre. Vouspouvez briser en _c/ats
/e verre tremp_ en /eheurtan_
Ne /avez aucunepibce en mafibre p/astklue de
votre r_fng_rateur dans votre machine _ laver
la vaisselle.
Alelavezlestkoirs_ glagonsqu_ l'eautime.
Neleslavezjamaisdansunemachine_ laver
ia vaisselle.
42
Le condenseur
VeiLs II'_tvez p_ts besoin de ne[[oyei" sotl\'ent le
condenseur ell Inilieu dolnestique noi_/nal.
(_ependant, ell milieu particuli_relnent gins
ou poussi&'eux, vous devez nettoyer
p_IJodiqueln ent le condenseur pore" obmnir
tln J[onc[ionnel/lent eflicace de votre
rcqi_ig_i-ateur
gnlevement de la grille de base:
Enlevez la grille de base ell la saisissant ;'t
environ 15 cm (6") de chaque extr&nit_ et
en [irant son gas directeillent vein veils.
Nettoyage du condenseur:
Epoussetez ou enlexez _'_l'aide d' un
aspirateur toute la poussiOre.
Berriere votre re¢rig&ateur
Faites attention quand vous Ocartez
votre r&flJg_rateur du I//UI: Vous pouvez
end()nnnager votre revbtelnent de
planchei; ell particulier s'il est inatelass8
()u s'il a une suititce ell relie£
Tirez le r&flig&rateur ell ligne droite et
remettez-le ell place ell poussant ell ligne
Pour obtenir de boris r6sultats, utilisez une
brosse sp&cialielnent con(ue ;'tcette fill.
Vous la trouverez ell vente dans la phtpart
des magasins de pi&ces d'appareils
_lectronl_nagers.
Remise on place de la grille de base:
Remettez ell place la gillie de base ell
ins_rant le haut des agI'ales ell In_tnl dans
les o//vei't/lres ovales, ell VO/1S _lSStlI';lIlt que
chacun des taquets ell mati_re plastique de
l'arribre de la grille aille dans chacune des
ouveitures o\:fles. Poussez ensuite le has
de la grille vers l'avantj usqu';'t ce qu'il se
fixe ell place.
droite. Vous pouvez endonnnager
le rev&telnent de plancher ou votre
r(qi-igSrateur ell le dOpla(:ant lat(:ralelnent,
Lorsque vousremettez en place votre
rdfngdrateur, assurez-vous de ne pas le rouler
sur le cordon d'ahknentation ou /aconduite fl'eau
de/a machine _ g/a_ons (sur certains modb/es).
Page 43

Preparation de depart en vacances
vvvvvv.electromenagersGEcanada.com
Pour de longues wlcances Oil abseilces_
enlevez tous yes aliments et dg4)ranchez
votre r6fl_ig&'atem: Mettez le botlton de
r0glage du compartin/ent cong01adon en
position 0 (arrOt)et nettovez l'int6iJeur avec
tree solution de bicarbonam de soude,
de 15 ml (tree cuill_re fi soupe) de
bicarbonate de soude pore" 1 litre (tree
pinte) d'eau. I.aissez les portes ouvertes.
Mettez le commutatem" de marche de la
machine fi glaqons en position 0 (arrOt)ou
amenez le bras palpeur en position STOP
(arr_t) en haut (selon le mod_le)et tem/ez
l'alimentation d'eau du r6ti-igt)ratem:
Si la temp&'amre risque de descendre
en dessous du point de cong_lation,
demandez ;'1un technicien qualifi_ de
pro'get votre syst_me d'alimentation d'eau
(sur certains inod_les) pour einp&cher des
inondations potl\_lnt occasionnei" des
d0gfits s0rieux.
Preparation de demenagement
Fixez en place toutes les pi&ces mobiles, Assurez-vousquevotrerfifngfirateursoit en
comme la grille, les clavettes et les tiroi_, positiondroite pendant ie ddmdnagemenL
fl l'aide de ruban adhg_sif, pour emp&her
tOtlt doi/lillage.
Remp&cement desampe#&s #,&ctriq#es.
Vous ne dObranchez pas votre rbfrigbrateur du circuit d'alimentation b/ectrique en mettant /e bouton de rbglage
en position 0 (arrO¢).
Certains modules n'ont qu'une
lumi_re.
i _ ii !_----.>i i /i
_Poches
Compartiment refrig#ratien - tumibre en #aut
MISEEN GARDE: Lesampoulesblectriques
peuventgtrebrdantes.
D6branchez le r6frig&'atem'.
0 I,es ampoules sont situ_es en haut du
comi)artiment r_fli g&'afion,, pros de
l'otB ertt/re.
Certains mod&les ont des pare-lumi_res.
Pore" enlevez le pare-lumi_re, saisisseMe
comme l'indique FilltBtmtion, avec
votre pouce et index et tirez doucelnent
le levier ve_s l'arfi&re. Cette action libbre
le pare-lumi&re et wins permet de le
tirer vets le c6t_ pore" l'enlevet;
Compartiment cong#/ation - AmpeMe de p&fennier (surcor_ainsmot#los)
M/SEENGARBE:Lesarnpou/esb/ectnques
peuventgtrebrdantes.
0 D&b_mchez ]e r_[Hg&_tem:
0 liam[:)olde est sime_e e_ haut du
corn [)artim eN_t com_g_]atio_, , _'_
]'i_t_riem" du p]af(m_ier. Pore"
e_dever le plafo_*_iex; placez votre
deist da_s ]a pocbe sime_e i_ ]'arH&re
du p]atim_ier. Tirez ]e p]atim_ier
vers ]'avm_t et vers ]e has.
O Remplacez l'ampoule par tree
ampoule d'appareil _lectrom_nager
de m_me voltage ou d'tm w)ltage
plus bas (60 watts maximmn).
Remettez en place le pare-hmfi_re
(sur certains mod_les).
O Rebranchez le r('/i'ig('ramut:
0 Aprbs aw)h" remp]ac(_ ]'ampo_de par m_e
m_po_de d'apparei] _]ectrom_m_ger de
m &]_ evo] rage o_ d' m_ w4 rage p] _s bas
(40 watts maxim _m_), rein ettez e_ place
0 ]_{ebrm_chez ]e r6frigSrateur.
43
Page 44

Instructions
Refrig6rateur
d'installation
WWW.electromenagersGEcanada,com
Si vous avezdes questions,appelez le 800-GECARESo.,isite_.ot,'esite_eb;_V.d,'esse:
AVANT DE COMMENCER
Vet_ez _e routes ]_s dJrecfive_s attentJvemento
• IMPORTANT - Co.se,,e ces
i_]st] llcdoN_ s [)ol a" ] 'i_]spectem" local.
0
EMFORTAN T - Respe.e__o._esles
orc[o]_m_a]]ces e[ ]es codes ]ocaHx,
• Note/_ 1 mstaRatem: = ¢ssm'ez-vol_s de ]aisser ces
irish1HctioHs _]H Ct)HSt)H_H_a[etH;
° Note au eonsommateur = Com_servezces
im_stH tcti oils [)oltr r_{g're]_ ce h tt_a'e.
• Niveau de comp&tence - i,'im_sta]]atio]_ de cet apparei]
m_cessite des comp_te]_ces m_cm_iql_es de base.
• Temps d'h]staHation -IN]sta]]atitm du reSfrig_Sratem" :
• I,'i]]sta]]atem" est respo]_sab]e de bie]_ i_sta]]er ce
* Toute parole d_tprod_tit d_te i) m_e mmp,'aise
i_sta]]ati<m _'est pan co_verte par ]a g:mmtie.
ALIMENTATION D'EAU DE
15 m im_i_tes.
EMPLACEMENT DO Rg:FRIGg:RATEUR
* N'h_sta]]ezjamais votre r_grig&ate_r &ms m_
emp]aceme]_t o_'t ]a temp&vmlre m_fl)ia]_te sel:t
]_{bC_Jem'e5 16°C (60°F). I] _e se mett_t pas e]_ marc he
sllf}]samme]?t sollve]?t [tom" mah?te_?h" des [empel;tt_ll'es
co]?ve_?ab]es.
* N'i_sta]]ezjamais votre r_[_'ig&:ttem" dm_s m_
emp]aceme]_t o(_ la temp_];ma'e ambia_te setvt
o / (, (100°F). 1] _e tkmctiom_et:t pan bie]L
* J_,sta]]ez'" votre r_{}:ig_mteur_ sin" u]_ p]at_cher
s_f_? sam m e]_ t st)] i de [:to_a" ]e pt)rter ]orsq _'i] est p] ei _.
DEGAGEIVIENTS
Pr&o) ez les d_gagemei]ts suixai]ts pour taciliter
l'installation, la bolme circulation d'air et les
raccorden]ei]ts de plon]belJe et d'_lectricit_.
• Cgt_s: 3ram(I/8")
• Dessus : 25 iron (1")
• Arri&re : 25 iron (1")
Si un cgt_ ou l'autre de xotre r_frig_rateur est contre
un nmi; laissez 8 iron (:5/16") de (l&,agen]ento, pour
pei]i]ettre une b(mi]e ou;erture de la porte.
Modeles 18et 19
LA MACHINE A GLA_ONS
(SUR CERTAINS MODI_LES)
I
Si votre r&li_ig-_rateur a une machine fi glaqons, il rink le
brancher 5 tlIle Collduite d'eau fl'oide. Vous pouvez
acheter une trousse d'alimenmtion d'eau GE (contenant
la myauterie, le robinet d'arr&t, lesjoints et les
iilstillctioils) chez votI'e Yeveilde/lr 1)/1 eil vo/is [idi'ess[lilt
5 I]otre site Web 5 l'adresse _:(;EAppliai]ces.con] ou
fi notre selMce de Pi&ces et accessoires au imm&'o de
t_l_phone 800.626.2002.
44
Page 45

mnstructions d'instamiation
ROULETTES {SUR CERTAmNSMODELES)
Des roulettes serverJt a trois f_s :
* I,es rol_]ettes bien r_glSes, yore permettent de {ember
fi_d]eme]_t ]a porte ql_m_d e]]e est omerte i'_e]B'ir(m 45?
* [,es rol_lettes bie_ r_gl_es yore permette_t de biem_ poser
votre r_{_]g_x_tel_r mr le plam_cher polar hfi &iter
d'oscilleL
OULETTES {SUITE}
Tournez les deux vis de _1_._
r&lage des roulettes de dewmt
dm_s le sens des aiguilles d'une
montre pour monter votre
r_fiJg_ratem; dm_s le sens
oppos_ h celui des aJguilles
d'tme montre pour l'abaJsser.
Remettez en place la grille
de base en ins_rant le haut
des agrafes en m_tnl dans les
oHverttli'es owfles et en vo/is
assurant que les taquets en
mati0re plasfique situ_s fi
l'arfi0re de la ,grille aillent dans chactme des omermres
o_ ties. Poussez ensuite le bas de la grille _e_ l'avant
veYs VOUS.
jusqu'_'_ ce qu'elle se fixe en place.
NSTALLAT ON DE LA CONDUffE D'EAU {su CERTAINSMOD :LES}
AVANT DE COMMENCER
Nolls recommando_]s ]es trollsses d'a]ime]m_t]o]_ d'em_
e]_ ct_i_re WXSX2, _\2XSX3, WXSX4, se](m le mo_mmt de
c{md_fite do,It vo_s avez besoim No_s approt_vo_]s les
co_]d_dtes d'em_ e_] mati_re pl_stiqt_e (;E SmartC(}m]ect"
Regfigemtor T_bh_g (wx0gx 10002, WXOSX10006,
_XTXt}SXI(}015 et _%2X08X10025).
Si yore h]stallez m] s)'st_me d'em] (;E Re\ erse Osmosis
&ms votre r_fHg_)mtem; ]a se_]e h]sta]]atio_ approtw_e
est ce]]e de ]a tromse GE RVKIT, Pore" les mm'es svstbmes
d'osmose de ]'eall, SIIiVeZ]es recomma_/&_ti(ms (hi
fab_Jca_t,
Cette h]sta]]ation de cond_fite d'ea_ _'est pas ganmtie
par ]e fi_brica_t de re}{]'igt}ratem" o_ de machh_e i:_glac(ms.
Stfivez soigne_lseme_/t ces hlstmctions pore" mh/imiser ]e
_Jsq_e de dommages one,relax d'h_o_dati{m.
l,es co_}:)s de b_]ier (ea_ (pfi dotage des co_q)s (]m_s ]es
tu};mx) (hms ]a tm;mte_Je de ]a mais{m pe_we_]t
occas]om]er des dommages m_x p]bces de votre
r_{Hgt}_:_tem; ah_si (p_e des {idtes o_ des hmndat]ons.
Appe]ez m] p]ombier certifk} pore" cor_Jger ]es co_q:>s de
b_]ier a_a_t d'h_stai]er ]a c{md_fite d'em_ de votre
AVANT DE COMMENCE {SUITE}
Pore" pr&'enir toute b] Cdm'e et toga dommage i'_votre
r_fHg_mtem; _e b];mchezjamais ]a c(md_dte d'ea_ _'_
10_]e c;H]a]]s;_t]o_] d'eall c]]al0de.
Si yore _ti]isez votre r_flig_tem" a_a_t de b_mcher ]a
co]_dllke d'eml, _issurez-\ ous de ]a]sser ]e commtltatellr
de la machh_e 5 glac(m en position 0 (arr_t) (sin ]es
modb]es 5 comm_tate_r de marche) o_ ]e ]b_s paipe_r
est e_ position STOP(arr_t) e_ ha_t (s_r ]es modules i'_
N'h_sta]]ezjm_m]s ]es t_wa_x de ]a machh_e 5 g]a(ol_ dm_s
des endroits o_'_]a tempetratm'e lJs(]l_e de descendre en
dessom d_ poi_t de c{mg&]atio_L
Si vom _ti]isez m_ ot_ti] e}]ect_J(p_e (comme m_e perce_se
_]ect_Jqt_e) pe_d;mt ]'i_stai]ati(m, ass_rez-\ o_s que
]'iso]eme_t o_ ]e cribbage de cet o_ti] empOche to_t
damager de seco_sse _]ectriq_e.
Vo_s devez proc_der i) tot_tes vos i_sm]]atio]_s
c{m{bn?l_me]lt allx exigences de votre code ]oca] de
45
Page 46

mnstructions d'instaiiation
INSTALLATION DE LA CONDUITE D'EAU (SUITE)
CE DONT VOUS AUREZ BESOIN
• Tuyaux en cuivre ou rousse GE SmaxtCommct '_'
Refrigerator Tubing, diam6tre ext&ieur de 0,63 cm
(1/4") pour brancher le rg_ffig_rateur fi l'alimentation
d'eatL Si vous utilisez tm tuvau en cuiw'e, assurez-\xms
que les deux extr&nit6s du tuvau soient coupg_es bien
droit.
Pollr tI'Ollver la loIlgllellr de tl/}'all doIlt ;'OllS allI'ez besoiIl :
mesurez la distance qui wa du robinet d'eau situ(_ derri&re
le r&liJg_rateurjusqtt'au ttt};itt d'alimentafion d'eau.
Ajoutez 2,44 m (8 pieds). _ssurez-\'ous qu'il y ait assez de
tm;lu en trop (environ 2,44 m (8 pieds) enroul0s trois lifts
en cercles d'environ 95 cm (10") de diam6tre) pour vous
pemlettre de d_coller le r6ti_ig_rateur du tour apr&s
l'insmllafion,
I,es trousses GE Smart(]onnecV" Reli_igerator Tubing sont
disponibles darts les dimensions suivantes :
0,6 m (2') - _3X08X10002
1,8 m (6') - X43X08X10006
4,6 m (15') - X_3X08X10015
7,6 m (25') - _3X08X 10025
_SStlI'ez-votls que w)tre trousse ait au moins 2,4 m (8 pieds)
comme indiqu_ ci-dessus.
NOTE : Les seuls tuyaux en mati6re plastique appmuv(?s
pax GE sont ceux qui font founfis dmas les trousses
GE SmartCommct" Refrigerator Tubing. N'ufilisez
jmnais ml autre tuyau en mati6re plastique, car le tuyau
d'alimentation d'eau est tout le temps sous pression.
Certah_es categories de tuyaux en mati&re plastique
peuvent deve_fir cassmats avec l'fige et peuvent se fendxe,
en occasimmmat des dommages d'inondation dm_s volre
lllaJson,
CE DONT VOUS AUREZ BESOIN
(SUITE)
• Votts pouvez acheter rune tr_usse d'a_mntalion
d'eau GE (come_mnt m_ mymL m_ robh_et d'arr&t
et ]es,joim_ts eSmm_r_s ci-dessous) chez w)tre dist_Jbl_tel_r
local ol_ e_ ]e comma_dant al_ service tie pi_ces et
accessoires, a_ 800.626.2002.
• Une a_mntafion d'eau froideo I ,a [:)ressiom_ tie ]em_ doJt
_tre e_tre 20 et ]120 [:).s.i. (1,4 et S,]l bar).
• Lrne perceuse &lectrique.
• Une d& de 1/2" ou tree el& aunglaise.
• Un tonrnevis g la_m plate et tm tournevis P}_ps.
• Deux 6crous _tcomwession d'tm diam6tre ext6rieur
de 0,63 cm (1/4")) et deux bagues (mm_chorts)--po_r
brm_cher le tmm_ e_ ofiw'e ;m robh_et d'arr_t et ;m
robh_et d'e;m d_ r_i_'ig_te_m
OU BIEN
• Si vo_*s _*ti]isez m_e tro_*sse (;E SmartCom_ect _"
Re{_'ige_:mw T_bh_g, ]es gar_it_res _cessaires so_t d@'_
m()l/te_es all [llV_ll.
• Si votre c;malisa_io_/d'e;m acmelle a _m mccord _vas_
fi u_/e extr&_it_, vous mwez besoh/d'u_/adaptateur
((p_e vous t_'ouxerez davis votre magnesia* de mat&'iel de
plombe_Je) pooH"bm_cher le m}_m d'em_ a_ r_fdg&_tem;
OU BIEN vo_*spoux ez _o_*per ]e mccord e_r_se a Faide
d'm/coupe=tube, puis _ttiliser w* _wccord a comp_essiou.
Ne co_q)ezjamais l'extr_mJt_ thfie d'_m tuv;m tie ]a t_'o_sse
GE Sma_'tCo_mect'" Refrigerator" T_*bi_*g.
• [1_ robi_mt d'arr6t po_*r b_:mcber ]e t_wa_ d'em* fi'ohIe.
I,e robi_]et d'arr_t doit avoJr m_e e_tr_e d'em_ avec un
diam_tre h_t&ie_r mi_]ima] de (1,47) cm (5/32") a_ poh_t
de jo_ctM_ avec LA CONDUITE D'EAIJ FROIDE.
Des rob] _ ets d'a r_'_t ir__ t_Jer s o_ t s o me _ t 1_ c] _s da _s ]es
tro_sses d'a]ime_m_ti(m d'em_. Awmt d'achete_; ass_rez-
vo_s q _e ]e rob] _ et {r__t_Jer se co_{brm e i) vos codes tie
46
Page 47

mnstructions d'instamiation
]nstallez le robinet d'arrtt sin" la canalisation d'eau
potable la plus fr_quenm_ent utilis_e.
[] FERMEZ L'ALIMENTATION
PRINCIPALE D'EAU
Ouvrez le robinet le plus proche suflisannnent
longtemps pour I)urger, le tuvau, .
[]
CHOISISSEZ L'EMPLACEMENT
DU ROBINET
[] FIXEZ LE ROBINET D'ARRIST
Fixez le robinet d'arr_t au tmau d'eau froide _'_l'aide
(111collier de serraoe
Collier de serrage
Robinetd'arr_t Tuyauvertical
_trier d'eaufroide
Choisissez, pour le robinet, un emplacenlent
tadlement accessible. I1 wmt mieux le brancher de
cGt_ _'1tm tll}';111vertical. Si vous devez le brancher _'1tm
ttl}_ltl horizontal, tilites le branchenlent en haut Otl de
ctt_, pluttt qu'en bas du tll);lll, pO/lI" &'iter de recevoir
des s_diments (111tl/vatl d'alilnentafion d'eatl.
[]
PERCEZ UN TROU POUR LE
ROBINET
Percez un trou de 0,63 cm (1/4") dam le tmau d'eau,
_'_l'aide d'un fi_ret dur. Enle'_ez toute barbure due au
perqage (11l trou dans le ttlxatl. Faites attention de ne
pas laisser de l'eau couler dmls votre perceuse
&lectrique. Si xous ne percez pas un trou de 0,63 cln
(1/4"), "_ous obtiendrez une alilnentntion d'eau
r&luite et des glaqons plus petits.
NOTE : Vous devez vous conformer aux ())des
de plolnberie 248CMR (111(_onnnonwealth of
Massachusetts. i,es robinets d'arr&t _'1_tlJeI" sont
ill_gaux et leur utilisation n'est pas autofis_e au
Massachusetts. Consultez votre i)lombier local.
[] SERREZ LE COLLIER DE SERRAGE
Serrez les ,,is (11l collierjusqu'_'l ce que la rondelle
d'_tnnch_it_ conllnence _'1enfler
NOTE : Ne serrez pas trop. Vous fisquez d'_craser le
tuvau de cuivre.
Rondelle
Collierdeserra_ -- Entree
Vis du
[]
ACHEMINEZ LE TUYAU
Acheminez le tuvau (111tuvau d'eau fl'oide au
rbflJg_rateui _.
47
Fakes passer le ttlyatl par tin ti'o/i pet'ct) dans le inur
ou le plancher (derii_re le rbliig_i'ateur ou au niveau
de Fannoire de cuisine a(!jacente), aussi pi'&s (111 inur
que possible.
NOTE : _ssui'ez-;'ous qu'il y ait assez de tuvau en
trop (environ 2,44 Ill [8 pieds] enroul(_s trois lois ell
cercles d'environ 25 cm [l 0"] de diam&tre) pour vous
penn ettre de d(_coller le i'(_flJgt)i'ateur (111in ur api'&s
l'installation.
Page 48

mnstructions d'instaJiation
INSTALLATION DE LA CONDUITE D'EAU (SUITE)
[] BRANCHEZ LE TUYAU AU ROBINET
Placez Hn (_CI'OH de COIl/pFession et Hne bague
(manchon) ;'l l'extr&nit_ du tuvau et branchez-les au
robinet d'arr_t.
_surez-\'ous que le tuyau soit bien insert: darts le
robinet. Serrez fl)rt l'_crou de compression,
Pour le mvau en mafi_re plasfique d'tme trousse
GE Siilall(]onnect _'1Reli_igeramr Tubing, ins0rez
l'extr0mit0 moul0e du tmzm dans le robinet d'arr&t et
serrez l'0crou de compression fi la main, puis serrez un
autre demi tour avec une cl<). Si vous serrez trop fort,
VOIIS pot/;'ez occasionner des tilites.
Ecroude
Ro
_trier Tuyau
Presse-joint
Robinet de sortie -- Bague (manchon)
NOTE : Vous devez ','otis confimner aux Codes
de plomberie 248CMR du Commonwealth ot
Massachusetts. i,es robinets d'arr_t _'l0trier sont
ill<)gaux et leur utilisation n'est pas autoris_e au
Massachusetts. Consultez votre plombier local.
compression
SmartConnectTM
[] PURGEZ LE TUYAU
Ouvrez le robinet d'alimentation pfincipale d'eau
et purgez le tuyau jusqu'_'l ce que l'eau soit claire.
Fem_ez l'eau au ni\'eatl dtl robinet d'eatl api'cXs
&otflement d'environ 1 litre ( 1 qtlalt) d'eau par le
[l/V;Itl.
[] BRANCHEZ LE TUYAU A VOTRE
RC:FRIGC:RATEUR
NOTES :
• Avant de brancher le ttlyatl _'1votre r(qi'igg_ratem;
aSStli'ez-votlS (]tle le/xn'don d'alimentation _lectfique
du r6flJg_I'ateur ne soit pas branch0 _'lla prise nlurale.
• Soils VOtlS l'eCOllll/l}ln(lons de poser tlil filtre _'_ earl
si votre alimentation d'eau contient du sable ou des
particules qui peuvent boucher la grille du robinet
d'eau de votre r_flJgt)rateur. Installez-le sur la
conduite d'eau pros de votre r<)fi_ig_ratem: Si vous
ufilisez une trousse GE Slnart(_onnect "_ ReflJgerator
Tubing, wins aurez besoin d'tm tux;lu additiom_el
(X&3X08X10009) pour brancher le filtie. Ne coupez
jamais un tt/yatl eI1 i/lati0i'e plasfique potlr installer
votre filtre.
Enlevez les vis qui tiennent le c6t0 droit du
couvercle d'acc_s. Repliez le couvercle vers l'arri&re.
Enlexez le capuchon ell mati_re
plastklue flexible du robinet
d'arr_t d'eau (branchen/ent du
r(qiJg_rateur).
Placez l'0crou de compression et
la bague 0mmchon) fi Fextr0mit0
du tuvau conmle l'indique
l'illustration. Si vous utilisez une
trousse GE Smart(_onnect "_ Refligerator Tubing,
les <)crous sont d_j5 asselnbl<)s au tuyau.
]ns<)rez l'extr<)nfit<) du ttlVatl dans le branchenlent
du robinet d'arr&t d'eau, le plus loin que possible.
Tout ell tenant le tuyau, serrez le raccord.
Si vous ufilisez tm tuvau ell mati_re plasfique d'tme
trousse (;E SmartConnect" Refl_igerator Tubing,
insg_rez l'extrg_mit(_ moulg_e du ttlvatl dans le robinet
d'arr_t et serrez l'0crou de compression fi la main, puis
serrez tin atlti'e tOtli" avec tlne cle. Si VOtlS serrez trop
l()I't_ VOIIS potl;'ez occasionner des tilites.
Fixez le myau au collet tourni pour le tenir ell position
verticale. 11est possible que wins avez h disjoindre
le collet, toilet
U
48
Tuyaude0,63cm(1/4")
Tuyau
SmartConnectTM
EcroLi de
compressionde
]_ Collet
,_,_.'7_ Branchement
_._- 0,63cm(1/4"}
dlF"-
(mancllon}
aur6ffig6rateur
Page 49

Instructions d'installation
[] FERMEZ L'EAU AU NIVEAU DU
ROBINET D'ARRF:T
Resserrez tout joint qui fllit.
Remettez en place le comercle d'acc_s.
[] BRANCHEZ VOTRE
RI_FRIGF:RATEUR
Disposez la spirale de tta_m en cui\Te de mani_re
_'lce qu'elle ne vibre pas contre l'arri_re de votre
rbfrig_rateur ou contre le m m: Mettez votre
r_q'rig_rateur _'lsa place contre le ram" en le poussant.
METTEZ EN MARCHE LA
MACHINE A GLA(_ONS
Sur les modOles _'l commutateur de marche, mettez
le commutatem" de la machine _'lglaq:on en position I
(marche).Sur les modules fi bras palpeu_; amenez le
bras palpeur en position ON (inarche) en has. I,a
machine _'l glmions ne se met en marche que
lot_qu'elle atteint une tempOramre de fimctionnement
de - 9 °C (l 5°F) ou moins. Elle commence
imm<)diatement fi fimctionne_:
Comm_
ModUle_cornmutateurdernarche
Lebraspalpeur (arr_t)en haut
estenposition
ON(marche)en
bas
ModUlea braspalpeur
...._'_"'_"- Lebras
palpeuresten
positionSTOP
NOTE : Si votre pression d'eau est trop fifible, le
robinet peut se remettre en marchejusqu'_'l trois lifts
pour envoyer suflisamment d'eau fi la machine fi
glaqons.
49
Page 50

mnstructions d'instaJJation
mNVERSION DU SENS D'OUVERTURE DES PORTES
NOTES IMPORTANTES
Polar h_verser le sens d'ol_vermre des portes :
* [,]sez follies les directives _l]t de commem?cei;
* MaMpl_lez les piicces a_ec pr_cm_tion polar _]ter de
r4ver la peim_mre.
* Posez les vis i'_ cgt_ des piicces correspond_mtes polar m_e
pas les I_tiliser m_x mm_w_is em_droits.
o Posez les portes slur m_ i:_lam_de travail ql_] m_e_Jsql_e pas
IMPORTANT : []m_e {ois commenc_e votre im_versiom_ (]l_
sells d'olr_ertm'e des portes, _e d_placez iamais votre
r_f_Jg_mte_r a_m_t d'a_oir tem_h_.
Ces directives s'appliq_ent i) l'h]version des charM/ores
(1_ cgt_ droit m_ cgt_ ga_che. S] vo_s vo_lez remettre
les charMbres i'_droite, s_ivez les mOmes directives e]_
h_versm_t to_tes les r_f_rences m_x cgt_s ga_che et droit.
D_branehez votr_ r_frig_rateur de sa pr_se _]edriqueo
Videz tortes vos clayettes de porte, y eompris ]e
eompartbnent g prodtfits ]aifiers.
OUTILS REQUIS
[] ENLEVEZ LA PORTE DU
COMPARTIMENT CONGCLATION
Atmchez la porte ;'1l'aide de ruban-{'ache.
Enlerez le couvercle de charni_re qui se trouve en
haut de la porte du compartiment cong_lation
(sin" cermins modules).
EI]lerez les deux vis dyi]an]on]0triques, ptfis sotflerez
la charni_re droit ve_s le haut, pour libt)rer l'axe de
chari]i_re du culot qtfi se ti'ott\'e ei] haut de la porte.
Charnieresuperieure __,1_ _ i
TournevisPhillips
Ruban-cache
Tournevisa t_te deforce
T 20ouT25,selonvotre
mo@lede r6frig@ateur
Tourne4crou_douillede3/8"
(nousrecommandonsune
douille_ 6 pans)
Couteau a mastiquer ou
tournevis a lame mince
Enlerez le ruban-cache et _cartez la porte du cabinet
en la Ihisant basculer ve_s w>us. Soulevez-la pour
l'enlever de l'axe de la charni_re centrale.
Posez la porte sur tree sm'fl_ce qui ne raye pas,
l'ext0dem" ve_s le haut.
50
Page 51

Instructions d'installation
[] ENLEVEZ LA PORTE DU
COMPARTIMENT RI_FRIGI_RATION
Fem_ez la porte et attachez-la _'ll'aide de ruban-cache.
Enlevez l'axe de la charni_re centrale a``ec une cl_ et
une douille de ./8 .
Rondelleenmati_replastique._>,-{_;a
AxedecharniOre--
Supportde la _
charni_recentrale
Portedu compartimentrdrig_ration
Enlevez le ruban-cache et tidtes basculer la porte en
l'&cartant de l'am/oire du r6flig&ratem: Enlevez la
rondelle de l'axe de la charni&re et mettez-la de c6t&.
Soulevez la porte droit ve_ le haut pour la lib_rer sa
charni&re inl>tiem'e de son axe situ_ darts le support
de charni&re inlcqiem'e.
Posez la poi'te Sill" fine S/WJilce qtli ne I'a_e pas
l'int_'ieur ``e_'s le haut.
B
m
[] FAITES PASSER LA CHARNIERE
SUPERIEURE A GAUCHE
Echanoez la charni_re et les ``is se tromant en haut _'l
droite a``ec les ,,is en haut _'lgauche de l'am_oire du
r_frig_ratem-
Ne serrez pas les vis du c6t& de la charlfi&re lots de
cette opOration.
M1SE EN GARDE : Ne laissez pas tomber la
porte par terre. (]a peut endommager l'arr&t
de la porte.
51
Page 52

mnstructions d'instamiation
mNVERSION DU SENS D'OUVERTURE DES PORTES !SUUTE!
[] FAITES PASSER LE SUPPORT
DE CHARNII_RE INFERIEURE A
GAUCHE
Faflevez la grille de base en la saisissant _'_environ
15 cm (6") de chaque extr&nit_ et eta firant son bas
directeiaaeiat xers xotts.
_k l'aide du tournevis ;'1t6te de fl)rce, tidtes passer le
support de la charniOre inliXrieure et la rondelle eta
mati_re plasfique du c6t_ droit au c6t6 gauche.
NOTE : Si la rondelle n'est pas sur le support de
charni_re, v(_tifiez s'il n'est pas coll(_ eta has de la porte.
_L_.,,_,,I Rondelleen
I mati_replastique
%1 /
Support de la
charni_re '_
FAITES PASSER LE SUPPORT
[]
DE CHARNII_RE CENTRALE A
GAUCHE
Enlevez le support de charniOre centrale eta d&'issant
les trois vis dynam ()tit _triques.
NOTE : (2mservez ces vis avec le support de
charni0re. Ce sont de longues vis que vous utiliserez
pour inettre la charni_re de l'autre cgtt).
Sur certains modt)les, wins devez enlever les
capuchons color(_s des tg'tes de vis pour pouvoir
enlever la vis. Utilisez le tranchant d'une lame plate
mince pour peler gentiment les capuchons des t&ms
de vis. (un couteau _'lmastiquer fera l'aNdre). (_ou\'rez
la lame de ruban-cacim pour _viter de raver la
peinture.
Enlevez les trois vis dynamom_triques du centre du
c6tO gauche de I'm'moire de rOfl'igt)rateur. Visse>
les darts les trous du c6tO droit.
Placez le support de charni_re centrale sin" les
trous situ(_s au centre _'lgauclae de l'ammire de
r(di'ig6ratem'. ]ns6rez et serrez les trois longues vis.
Remettez eta place le couvercie eta le fixant _'l la vis
avec votre doigt.
A_ant de remettre eta place la grille de base,
enle_ez le capuchon de la grille eta enle_ant la _is.
Vissez le capuchon du c6t_ oppose.
Remettez en place la grille de base eta ins&ant le hat
des agrafes de m_tal darts les ouvertures owfles eta vous
assurant que l'un des taquets eta mati0re plastique _'l
l'arri0re de la grille aille darts chacune des otp,'ertttres
ox_fles. Poussez ensuite le has de la grille vet_ l'a;'ant
jusqu'_'l ce qu'elle soit bien fix_e eta place.
_rcle
[] FAITES PASSER LES BUTI_ES DE
PORTE A GAUCHE
Sur chaque porte, tidtes passer la butte de porte eta
m(_tal de droite _'lgauche.
Faites passer toute ",'is de gauche fi droite.
Buttes Buttes
deporte deporte
52
C6tOgauche C6tOdroit
Page 53

mnstructions d'instamiation
[] FAITES PASSER LA POIGNEE
DE PORTE DU COMPARTIMENT
RI_FRIGI_RATION A DROITE
Pour enlever la poign6e: Enlexez le bouchon en
l'_cartant axec soins en ins(_rant avec soins la lame (lu
couteau 5 masfique_: Enlexez la vis qtfi se trouxe sous
ce botlchon et qtfi dent la porte.
Bouchondepoign_e
Enlexez les deux xis qtfi tiennent la I)°i°n_e_ an haut
de la porte.
[] FAITES PASSER LA POIGNEE
DE PORTE DU COMPARTIMENT
RI_FRIGI_RATION A DROITE
(SUITE)
Faites passer le 1)outon de porte dans le trou (lu c6t(_
opposS.
Remontage de la poign6e : Fixez. la I}°ign(_e, du c6t(_
(h'oit de la porte.
.......!1__ 0
t
Bouchonde
poign_e
Apr&s avoir enlev6 la poi_a6e : Faites passer les
petits bot/chons (lu haut clu c6t(_ (h'oit de la porte
dans les trotB (lu cgt_ oppos(_.
I bouchons
Faites passer le gros botlchon de l'extr(_mit(_ gauche
de la porte dans le trou (lu c6t(_ oppos(_.
Bouchon
Bouchonde
poign@e
I
53
Page 54

Instructions d'installation
INVERSION DU SENS D'OUVERTURE DES PORTES (SUITE)
[] FAITES PASSER LA POIGNEE
DE PORTE DU COMPARTIMENT
CONGI:!:LATION A DROITE (SUITE)
Enle_ez les _is qui tiennent la I)°ign_e, en haut et en
has de la porte, Enlexez la poign_e.
L ! r
-. 2$2
Fakes passer le bouton qui se trouve du c6t_ droit de la
porte darts le trou de \'is de poign_e du c_)t6 gauche,
Fixez la poign_e du c6t_ oppos_ en ufilisant les trous
les plus proches de l'ar6te de la porte,
[] ACCROCHEZ A NOUVEAU LA
PORTE DU COMPARTIMENT
ReFRIGeRATION (SUITE)
Redressez la porte et alignez-la au support de la charni_re
centrale.
Montez fi nomeau l'axe de la charni_re cenu'ale avec le
tourne-0crou de 3/8" socket. TourneMejusqu'fi ce qu'il
passe par le support de charni_x_ et entre darts la porte.
i
Rondelle
an mati_replastique ---.>-@
Axe de charni_re--------_
I
i%
Support deI-_
charni@re
centrale
Portedu compartiment rdrig@ation
[] ACCROCHEZ .,_NOUVEAU LA
PORTE DU COMPARTIMENT
CONGELATION
Faites descendre 1;i porte du compartiment
congt)lation sur l'axe de la charni_re centrale.
_ssurez-vous que la rondelle soit en place.
[] ACCROCHEZ .,_NOUVEAU LA
PORTE DU COMPARTIMENT
ReFRIGeRATION
Faites descendre 1;i porte du compartiment
r_iiigtq'ation sur l'axe de la charni_re ini_ieure.
Rondelle 6
enmati_re
plastiq
.Axe de charni_re centrale
Rondelleenmati_replastique
Soulevez la charni&re sup&-ieure de mani6re 5 ce que
l'axe entre darts le trou de la porte.
Soutenez la porte du c6t6 de la poign6e et assurez-
VOtlS que la porte est bien droite et que l'_cart entre
les portes est r6gulier sur toum sa longueur fi l'avant.
En tenant la porte en place, serrez les vis de la
charni_re sup&ieure.
54
Page 55

O Machille a glagolls (our certaills mod_les).Vous entendrez _'ll'occasion les
gla(ions quit )mbent darts le bac _'_glacons. Si c'est xotre premiere machine _'l
glaoms, vous entendrez de temps en temps des bruits qui peuvent sembler
CIIIJetIX. Ce sont des bruits nommux de machine _'lgla<ons et vous ne devez
pas vous inqui_te_:
Volltilateurde I_vaporateur. Vous pouvez entendre fair qui est pouss_ dans
l'a_noire du rbliJg_rateur par le ventilatem:
0 le_er brult(fe_ uoul est ent_ m_ de botullir oudec,-a_o-ouil/e_:_vap°r'ateffr"!_circu)ati°nde,_i6ti_)@_'-ant'_'{ansl'_vap°ratet!!peut crier un
Chauffage du degivrage. Pendant les cycles de d_givrage, l'eau qui s'_goutte
darts le chaufli_ge peut occasionner un sifl]ement ou un cr@itement. Apr_s
le d_givrage, un craquement peut se tifire entendre et l'&;q)orateur peut
crier un l_ger bruit d'eau en train de bouillir ou de gargouille_:
Reglage dufroid et milluterie du degivrage. Ces pi_ces peuvent produire un
('laq/lei//ent qtland ;'o/isillettez en i//ai'che Oil ;'o/is ail'etez le i'(_IiJg(_i'ate/li:
I,a minuterie produit _galement un bruit semblable fi cehfi d'une hodoge
_lectrique.
Ces bruits sont normaux et sont
principalement occasionn#s par
un fonctionnement hautement
efficace.
O Cuve ell Illati&ro plastique. I1 peut se produire des craquements ou des
claquements fi la suite de l'expansion de la cuve en marl&re plasfique.
gobillot d'eau (stir los modelos equipes d_llo machille a glagolls automatiquo).
Quand la machine ;'1gla<ons se remplit d'eau, elle fifit entendre un
bourdonnement et un bruit d'eau qui coule.
Bac a oau. On peut entendre l'eau couler darts le bac de drainage de l'eau
sans entretien pendant le cycle de d_giwage.
_Compresoeur. I,es compressem_ modernes, fi haut rendement, fonctionnent
beaucoup plus xite que les xieux modules. I,e compresseur peut taire
entendre [in bo/li'donneiilent aig/i Oil un son de p/llsations.
Vontilatourdu condonsour.Vous pouvez entendre l'air pouss_ sur le
condenseur par le ventilatem:
55
Page 56

Avantd'appelerunreparateur...
En cas de panne
E-conomisezvotre temps et votre argent/. Consultez les
tableaux des pages suivantes, vous #viterez peut-#tre
d'appeler un r#parateur.
Causes possibles
Votrerefrig#rateur ne Votre r6frig6rateur se trouve
fonctionne pas dmas son cycle de d6givrage.
L'tm des boutous ou les * Tournez les boutons de r_glage,, de teml)(_rature du
deux boutons de r_glage de c(nnpartin/ent rOfl_ig(_ration et du compartiment
temperature sent en position ('ong_lation en position plus _lev_e.
Solutions
• Attendez emiron 40 minutes la fin du (l_gi_rage.
positiouO arr O
Le r_frig_rateur est d6brmlch_. * Poussez la fiche compl_tement dans la prise m re'ale.
Le fusible a saut_ ou * Changez le fllsible ou rebranchez le disjonctem'.
le disjoncteur a saute.
Vibrations ooubrouits Les roulettes de devant ont * Consultez Roulettes.
de casse (une petite besoin de r_glage.
vibratien est nermale )
Le moteur fonctionne C'est normal qumzd on met "Attendez 94 heux'es que le I'6flJg6x'ateur se x'efroidisse
pendant de Iongoues en maxche le r6frig_rateur coulplOteulent.
periedes Oll se met en pour la premi&re lois.
marcheet s'arrOte
frequemment (Lea Cela arrive souvent qumzd * C'est nomml.
refrigeratents modernes, on met beaucoup d'aliments
qui ont davantage dm_s le r_frig_rateur.
d'espace de rangement La porte est rest6e ouverte. • V_rifiez qu'ula paquet d'alimelatS ia'elnp_che pas la porte
etun compartiment de bien se teI_ner.
cong#lationplousgrand, ll faJt chaud ou vous " C'est nomml.
n#cessitentplousde souvent la porte.
temps defonctionnement ouvrez
IIs se mettent en marche Les boutons de r_glage de • Consultez Boutons de r@lage de temp&ature.
et s'arrOtentsouvent temperature sont mis/_ leur
poourmaintenirdes position la plus froide.
temperatouresconstantes.)
Le compartiment Le bouton de r_glage de • (_onsultez Boutons de r@lage de temp&ature.
refrig#rationou telnp_rature est mis h tree
congelation est temp6rature lrop basse.
trop chaud ll faJt chaud ou vous • Mettez le bouton de r6glage de temp(wature un num_ro
ouvrez souvent la porte, plus fl'oid. Consultez Boutons de r@lage de temp&ature.
La porte est rest_e ouverte. *VOrifiez qtl'tln paquet d'aliments ia'elnpg_che pas la porte
Dongivre ooudes cristato¢ La porte est rest_e ouverte. *V(_iJfiez qtl'tUl paquet d'alimelatS Ia'elnpg_che pas la porte
de glace se ferment sur de bien se feigner.
les aliments congeles
(dougivre a rinterieour
des paquets d'aliments
est normal)
Vous ouvrez la porte trop
souvent ou trop longtemps.
de bien se telmer.
56
Page 57

wvvw.electremenagersGEcanada.com
Solutmns
• Sur les mod(Xles _'l commutnteur de marche, mettez le
COlllll/t/tatetll" de lll;ll'che ell position I (marche). Sur les
modules _l bras palpem, ;uneuez le bras palpeur en
positiou ON (marche) ell has.
S
Lamachinea gla_ons
(automatiquene
fonctionnepas
(surcertainsmodeles)
Causes possibles
Le commutateur de maxche
n'est pas brmzch6.
L'alJmentafion d'eau est arr6t6e • Consultez Installation de la conduite d'oau.
ou n'est pas brmlch6e.
Le comparliment • Attendez 24 bern'e.4 que le r_ffig#ratem" soit
cong61ateur est trop chaud, c()mplbtement fl'()id.
Une accmnulafion de gla_zons • ]_galisez les gla<(ms _'lla main.
dmas le tiroir _ gla_;ons peut
causer tm arr6t de la machine
glacons.
Des glacons se sont coll6s dmls • D_branchez la machine _'lgla( ons eulevez les gla_ons
la machine h glaqons (le voymat puis remettez ell marche la machine {i glac(>ns.
lumhaeux vert de la machine
glacons clignote).
Les glaoons ontune Le bac a glaqons doit • Videz et lavez le bac _'lglaq(>ns. [etez les vieux glacons.
odeur on un gogt _lre nettoy6.
Les aliments domaent de • Emballez bien les aliments.
l'odettr ou du goflt attx glacons.
L'h_t6rieur du r6frig6rateur • Consultez Soinset nettoyagede votre r_frig_rateur.
a besohl d'_We nettoy6.
Laformationdes La porte est rest6e ouverte. • Vc:rifiez qu'uu paquet d'alimeuts u'emp&che pas la porte
glagons est lente de bieu se tenueI:
Le bouton de r6glage de • C(msultez Boutonder_glage de temperature.
temp6rature est mis h mac
temp6rature trop basse.
II o"il a pas de gla9ons La conduite d'alhnentafion • Appelez tm plombier.
De I'ilumidite se forme C'est normal pendant • Essuyez compl_tement la Stll'filce, puis r&glez la
surla surface de I'armoire les p6riodes de grmlde humidJt6, temp_ratm'e du compartiment r_fl_ig_ration tm chifli'e
d'eau ou le robinet d'arr6t
est bouch6.
durefrigerateurentre plus haut et V(_ll"fiez ;'1l]ouve;m 24 heures plus tnrd.
lespertes
Le refrigerateur sent Les aliments domaent mae • Vous devez bien empaqueter les aliments qui sentent
odeur au r6frig6rateur, fi)rt.
L'h_t6rieur a besoh_ • Consultez Soins et nettoyage de votre r_frig&ateur.
d'tul nettoyage,
• (]ousel'vez IlUe boite Ol/Vel'te de bical'bouate de Sol/de
(lal]S votre r6flJg&l'ateul';, reInl)lacez-la, tousles trois iuois.
DeI'humiditeseforme Vous ouvrez les portes trop
h I'interieur (quand il souvent ou trop lon_emps.
far humide, I'air
transporte de I'humidite
I'interieurdu
refrigerateurquand
vous ouvrez les portes)
57
Page 58

Avantd'appelerunreparateur...
En cas de panne
Possible Causes What ToDo
Lalumi$reint#rieure Pas d'61ectricit6 a la prise.
nes'allumepas
L'mnpoule a br_l& * Consultez Remplacement des ampoules #lectriques.
DeI'a# chaudsouffle
dubasdur#frig#rateur
Les aliments g#lentdans Les aliments sont trop prbs • ]_loignez les aliments de l'ouverture de circulation d'air
C_est nonlla], te llloteur se
refroidit a l'afir. Dmas le processus
de r6frig6ration il est normal que
de la cha]eur soit 6raise en bas
du rOfrigOrateur. CertaJns
rev&tements de sol sont sensibles
et chm_gent de couleur aces
temperatures nonna]es et pas
dmagereuses.
• Remplacez le fllsible ou remettez en marche le
disj oncteui:
le compartiment de l'ouverture de circulation d'air. (prOs des r_glages).
refrigeration te r6glage de votre * Rc:glez votre rc:fi'igc:l'atet/r _'1t/ne telnp{:l'att/l'e plus
r6frig6rateur est trop froid, chaude.
La porte ne se ferme Les roulettes ont besoin * (]onsultez Roulettes.
pas seule d'Stre ajust6es.
II y a une lueur orangee Le chauffage du d6givrage * (:'est nt mual.
tdans le compartiment fonctiomm.
congelation
58
Page 59

GARANTIE DU CONSOMMATEUR
Nous garantissons votre refrig6rateur contre tout vice de matedau et de main-d'oeuvre.
Ce qui est couvert Pendant combien Pieces reparees ou Main d'oeuvre
de temps remplacees (a la
(depuis la date d'achat) discretion de Camco)
Compresseur Cinq (5) ans Cinq (5) ans Cinq (5) ans
Systeme scelle Cinq (5) ans Cinq (5) ans Cinq (5) ans
(comprenant I'evaporateur,
le tuyau du condenseur
et le refrigerant
Toutes les autres pieces Un (1) an Un (1) an Un (1) an
MODALITI_S :
Cette garantie ne couvre que I'usage
domestique d'une seule famille au Canada
quand le refrigerateur a ete bien installe
conformement aux instructions foumies par
Camco et est branche a un bon service public
adequat et convenable.
Tout dommage occasionne par un mauvais
traitement, un accident, une utilisation
commerciale et une modification ou un
effacement de la plaque signaletique annule
toute obligation de la presente garantie.
Tout service pendant cette garantie dolt etre
accompli par un agent de service autorise
par Camco.
Ni Camco nile revendeur ne sont responsables
de toute reclamation ou dommage occasionne
par une panne du refrigerateur ou par des
delais de reparation qui sont raisonnablement
independant de notre volont&
Pour obtenir du service en vertu de la garantie,
le client dolt presenter la facture originale. Les
elements repares ou remplaces ne sont garantis
que jusqu'a la fin de la periode originale de
garantie.
Cette garantie s'ajoute a toute garantie en vertu
de la Ioi.
CE QUI N'EST PAS COUVERT :
• Les deplacements de service a votre maison
pour vous apprendre a utiliser le produit.
•Tout dommage a la finition apres la livraison.
• Une mauvaise installation--Une bonne
installation comprend une bonne circulation
d'air au systeme de refrigeration, un bon
branchement d'electricite, de plomberie et
tout autre branchement necessaire.
•Tout remplacement defusible ou toute remise
en marche du disjoncteur de lamaison.
•Tout remplacement d'ampoule electrique.
•Tout dommage au produit cause par un
accident, un incendie, une inondation ou un
cas de force majeure.
•Toute perte d'aliment due a la pourriture.
• Un bon usage et de bons soins du produit,
tels que definis dans le manuel du proprietair,
de bons reglages.
• LE GARANT N'EST PAS RESPONSABLE
DE DOMMAGES INDIRECTS.
IMPORTANT
Conservez la presente garantie et votre facture cornrne preuves d'achat original et de date d'achat
Le Service Camco est disponible d'un ocean a I'autre.
Si vous avez besoin d'aide sur la presente garantie,
contactez
Le directeur, relations avec la clientele, Camco Inc.
Suite 310
1 Factory Lane
Piece 310, 1 Factory Lane, Moncton, N.-B. ElC 9M3
Agrafez votre re_u icL
Vousaurezbesoin d'une
preuve d'achat original pour
obtenir un service en vertu
de cette garantie.
59
Page 60

Soudenau consommateu_
"l Site Webappam/Isg"ectrom_nagers6E dectromenagersge.ca
par Jm_term_etau site elee_menagersge,ea =4 hem'es par,iota; tolts ]es,iom's de ]'mmSe.
V0//s avez Hl]e ql0estlol] OLIVOl0S a'_'ez 1)esoim_ (]'aide)olh" votre a ) )a]'eil (_lec[rol_t_m_gt_er;' (_o]_tactez-]_ol0s
" 9
Serviceder_parations
Service de r_pa>_ti(ms (3E est tout pros de vol_s.
Pol a" f_i re r_pa rer votre _lectrom _]_ager (;E, i l slK[]t de m_ol>s tetl _ph o]_ e_:
...... III ..... , -
1.800.36f.3400
Studiodeconceptionr_aliste
Sin" dema m_de, (;E pel_t fbm'M r m_ e broth m'e sin" l'am &_agem e_ t d' m_ e clds] m_e pore" les persom_ m_es
i) mobilit_ r_(I_ite.
Ec_Jvez: Directem; Relatio]_s avec les Cameo, I]_c.
Bm'eau 310, ] Factor_ im_e
Mo_ctom N.B. E] C 9M3
Pro/ongationdegarantie dectromena_ers_e.ca
_ch etez m_ co_ t]_ t d' e]_ treti e]_ (;E ax'a _ t q _e ",'>_tre ga ]_ _ ti e _ expire et bt)_ _i ci ez d' _m rabais s_ >l)stm_ tie].
_:i_si le se]s'ice aprbs-ve]_te (;E sera to_!iom's 1_'_apries expirati>m de la gin:retie.
Visitez *mtre site Web on appelezmons an 1.800.461.3636.
Pi&es et accesso/res
C,e_]x (p*i d_sh'e]_t r_parer e_*x-m&mes leto's _lectrom_age_s pe_we_t recevoir pibces et accessoires
directeme_t i'_la mais(m (cartes VISA, MasterCard et Discover accept_es)_
Les directives stipdees darts _epNsent m_nue_peuvent Otre ettecNOes par _/impo_te que__tilisate_. Les a_tres
reparations doivent g_n&a/ement Otre effect_ees par _n tecflnicien qua/ifi& Soyez prudent, car _e r_peration
inadequate pe_t affecter le fonctiom_ement sec_ritaire de/'_ppareit
Vous tro_werez d;ms les p_ges iam_es de v(m'e ammaire le mm_&'o d_ (;e]_tre de service Cameo le ph_s
proc]_e. A_treme_t, appe]ez-_o_s a_ 1.888.261.3055.
Contactez-nous
S] vous _'&tes pas satisii_it d_* se_wice aprbs-_ e]_te &mr vo_*s avez bS]_Sfic]5 :
Premi6rement, commm_i(p_ez avec ]es ge_s (pd on_t r_par_ votre appare]].
Ertsuite, si vo_s _'&tes to_!io_lrs [>as satisii_]t ei_vovez to_s ]es dStai]s-mm_Sro de tS]Spho_e compri_m_
Directem; Re]ado]?s avec ]es c(msommatems, C.amco, 117c.
Bm'eau 310, ] Factor_ im_e
Moi/ctom N.B. El C 9M3
f
l_]scrivez votre appa_,eil 61ectrom6nager en dir_ect, aussitbt que possible, Ce]a amS]iorera n_os
l /nscrivezvotreapparei/d/ectromdnager
commlmica[iol?s et....]loire service a[>r_s-vei?te....... V01_s [)ol_vez_ _ga]emei?t ]?>)10s era'o} er par ]a [>oste
]e fo_?_ _d a ire d'i _ scri pt it )]_,j>_i_ t {) vo >re d>_c_m_ e _ tati >m.
60
Page 61

Notes_
_m
_B
rJ_
I
.m
C1
€_
'qmb
I
rP,
m
Page 62

Informac46n de se_tridad .... _i3-_
Ins_rucc4ones de operad6n
Ca_acteifsticas adickmales ........ 70
Con tIoles ..................... 66
EstaI]tes y compaitimiei]tos .... 67, 68
Gavetas de a]imace_]amiemo .... 69, 70
M;_qt_i_]a de hiek)s autom;_tica ..... 71
Cuidado y limpieza
C6mo _eemplazav las bombillas "°
Cuidado y limpieza ........... 72, 73
.g
.tlh
{a Q}
m
Instruec4ones para la instalacidn
C6mo inve_ti_ el vaiv&] de
la pue_ta ................... 79-84
I_stalacid_] de la mberfa
del agua .................... 7:%78
P_epa_acidn pa_a i_]stala_
e! _eflige_ad(w . ................. 74
Cons_os para la soluciSn
de problemas '_ '_
S(,]idos _]ormales de operaci6_] .... 85
Soporte aI consumidor
Gaban tfa ...................... 90
Sop(.te a! c(msm*_id(w . .......... 9t
............... 8:>-8 /
v_ FI_
m
Escrihe equi el modelo y el numero
de serie:
Modeio #
Serie #
E_]c_*e_]tx'e estos mimex'os e_] ]a etiq_eta
g_'is e_] e] ]ado izq_,ie_'(!o, cex'ca de ]a
pax'te s_pe_'iox" de] de]
C2
Page 63

IMPORTANTEINFORMACIt_NDESEGURIDAD
LEATODASLASINSTRUCCIONESANTESDESUUSO. _.C_A_.a.ces.com
iADVERTENCIA!
Use este aparato s61o con el fin para el cual fue disefiado como se describe en este Manual del
propietario.
PRECAUCIONESDESEGURIDAD
AI usar aparatos el#ctricos, se deben seguir precauciones b#sicas de seguridad, incluyendo las
siguientes:
Este refl'igerador debe instala_se y ubica_se
correctamente segfin las Instrucciones de
instalaci6n antes de su uso.
No pemfita que los niflos se suban, se paten
o se cuelguen de los estantes en el refl_igeradm;
Podrfan dafiar el refl_igerador y suffir graves
da]-los.
No toque las superficies fl'fas en el
COillpartiilliento del congelador con las ii/_lnos
hfimedas o mojadas. I,a piel se puede pegar a
estas superficies extremadamente tHas.
_ No ahnacene o use gasolina u otros vapores y
lfquidos inflamables en las fireas cercanas a este
o a Ctlalqtlier otro _lp_lI'iltO.
En los refl_igeradores con mfiquinas de hielo
automfiticas, evite el contacto con las partes en
movimiento del mecanismo eyector, o con el
elemento calefactor localizado en la parte inferior
del disposifivo para hacer hielo. No coloque
los dedos o las manos en el mecanismo de la
mfiquina de hielos mientras el reflJgemdor est0
conectado.
Mantenga los dedos alejados de las _ireas
estrechas; los espacios entre las puertas y entre
las puertas y los gabinetes son necesariamente
pequeflos. Tenga cuidado al cerrar las puertas
cuando ha_ nifios en el firea.
Desconecte el refl_igerador antes de limpiar y
hacer reparaciones.
NOTA: Recomendamosenf_ticamenteque cua/quier
serviciosea reai/2adopot un indMduo cafificado.
F!jar cualquiera o los dos controles en la posid6n
0 (apagade)no elimina la corriente hada el
circuito de luces.
No vuelva a congelar alimentos que se hart
descongelado pot completo.
C3
Page 64

IMPORTANTEINFORMACIONDESEGURIDAD
LEATODASLASINSTRUCCIONESANTESDESUUSO.
iPELIGRO!RIESGODEQUELOSNIKIOS
SEQUEDENATRAPADOS
ELIMINACIONAPflOPIADADELflEFfllGEflADOfl
I,os i)roblemas de que los niflos se queden
atrapados y se sotoquen no son cosas del pasado.
I,os refl_igeradores desechados o abandonados
siguen siendo peligrosos, a(m si s61o estfin pot
"tmos pocos dias". Si estfi desechando su
refligerador viejo, pot ta\'or siga las instrucciones
a continuacidn para ayudarle a evitar accidentes.
Antes de desechar su viejo refrigerador
ocongelador.
:_ Qt6tele las puertas.
:_ Deje los estantes en su luga_; de manera que los
nifios no puedan subirse tilcilmente al inm_io_:
Desechode los CFC
Es posible que su antiguo refl'igerador tenga
tm sistema de enfliamiento que usaba CFC
(clorofluorocarburos). Se tree que los CFC
(|_lfl_lIl el ozono estratost_rico,
Si estfi desechando su antigtu_ reffJgerado_;
asegfirese de retirar el reffigerante CF(_ para tm
desecho adecuado pot parte de tm individuo
calificado. Si desecha accidentalmente este
refligerante (_FC, puede estar sujeto a mtfltas v
pfisi6n seg(m las disposiciones de la legislaci6n
ambiental.
USODECABLESDEEXTENSION
Debido a peligms potenciales de seguridad bajo ciertas condiciones, nos oponemos al uso de cables
de extension.
Sin embargo, si debe usar tm cable de extensidn, es absolummente necesa_io que sea tm dpo de cable de
extensidn para aparatos con conexidn a fierra de tres cables, que est6 en la lism de UI, (en los Esmdos
Unidos) o en la lista CSA (en Canadfi), que tenga un enchute de fipo conexi6n a fierra y salida y que el
grado el_ctrico del cable sea de 15 amperios (mfnimo) y 120 voltios.
64
Page 65

www.GEAppliances.com
iADVERTENCIA!
COMOCONECTAR/AELECTR/C/DAD
Bajo ninguna circunstancia, no corte niretire la tercera pata (conexi6n a tierra) del cable de electricidad.
Por seguridad personal, este aparato debe estar correctamente conectado atierra.
E1 cable el_ctrico de este aparato estfi provisto de
un enchuff' de tres pat;Is (conexi6n a fierra) que
eIlc_!ja en un tonlacoiTiente estfindar de 3 orificios
(conexion a tielTa) para niiniini/;_r la posibilidad
de peligro de un choque el_ctrico de este apai'ato.
Haga que el toniacoiTiente de la pared y el circuito
scan i'evisados por un electricista calificado para
asegurar que el tonlacorriente fiene la conexi6n a
tierra apropiada.
()iando hm_ un tonlacoiTiente estfindar de dos
patas, es su responsabilidad y obligad6n pei_onal
i'eeillplazarlo COil tin tOi/l_lCOi'iJellte adectlado de
tI'es oi'ili(ios coFi'ect_lillente conectado a [ieiTa.
E1 i'eti_igerador deberfi sienlpre estar conectado en
su propio tonmconJente elt)ctiJco individual que
tenga un nivel de w)lt_!je que se ajuste a la placa de
potencia.
Esto ofrece el Inejor desenlpefio y taInbigm evita
sobrecargar los circuitos el_ctricos de la casa que
podrfan causar un incendio a partir de los cables
recalentados,
Nunca desconecte su i'efl_igerador halando del
cable el0ctrico. Sieinpre toine el eilchtdi _
fiimeinente v hfilelo directaniente del
tOlllaCOi'iJente.
]lepai'e o reenlplace de innlediato to(los los cables
el_ctricos que se hayan desgastado o dafiado. No
use un cable que tenga grietas o dafios de abrasi6n
en su longitud o en cualquier extreino.
_d redrar el i'efl_igei'ador de la pared, tenga cuidado
de no enrollar o dafiar el cable el_ctrico.
USODEENCHUFESADAPTADORES
(los enchufes adaptadores no estan permitidos en Canada)
Debido a peligros potenciales de seguridad bajo ciertas condiciones, nos oponemos al uso de un
enchufe adaptador.
Sin einbaigo, si debe usar un adaptadoi; donde los
cddigos locales lo peimitan, se puede hacer una
conexion temporal a un toinacoriJente de dos patas
con el uso de un adaptador en la lista de UI,,
disponible en la inavorfa de las ti_ri'eterfas.
E1 orificio mils grande en el adaptador debei'fi
alineaise con el orifido mils grande en el
tonlacoiTiente para biindar la polaI_idad adecuada
en la conexi6n del cable el_ctrico,
_d desconectar el cable elOctrico del adaptadiii;
sienlpre sostenga el adaptador en su higar con una
inano, niientras hala el enchutb del cable el_ctrico
con la otra. Si no hace esto, es probable que el
tei_ninal a tierra del adaptador se roinpa COil el uso
repetido.
Si el temlinal a tierra del adaptador se ix)inpe,
NO USE el reli_igei'ador hasta que se ha)_
establecido una conexi6n a tierra adecuada.
Unk el terminal a tierre del adaptador a un tomillo de/a
tapa de un tomacorriente no equ/va/e a unaconexi6n a
fierre, a menos que el tornil/o de/a tapa sea met#lico, yno
est# aMado, y el tomacorriente tenga conexi6n a fierre
por medio de/cab&ado de/a casa. Deber# hacer que un
electricista calificado revise si el tomacorriente est#
correctamente conectado a tierra.
LEAYSIGACUIDADOSAMENTEESTAINFORMACION
DESEGURIDAD.
CONSERVEESTASINSTRUCCIONES
65
Page 66

Sohre los controtes detrefrigeredor.
Nivelesdeloscontroles
Inicialmente, fije el control del refrigerador en 5 y el control del congelador en 5 y permita
que transcurran 12horas para que la temperatura se estabilice.
Es posible que sean necesarios varios ajustes. Ajuste los controles con un incremento a la
vez, y permita que transcurran 12horas despu#s de cada ajuste para que el refrigerador
alcance la temperatura que ha fijado.
Fijar cualquiera o los dos controles en # interrumpe el enfriamiento tanto en los
compartimientos del refrigerador como en los del congelador, pero no interrumpe la
corriente el#ctrica hacia el refrigerador. El control del congelador no tiene efecto en la
corriente el#ctrica del refrigerador.
Los niveles de los controles variaran segun las preferencias personales, el uso y las
condiciones de operacion, ypueden requerir mas de un ajuste.
C_
Page 67

Sobrelos estantesy compartimientos.
No todas las caracterfsticas est_n presentes en todos los modelos.
Reorganizacion de los estantes
i,os estnntes en los compartin]ientos del refrigerador ) del congelador son ajustnbles.
Compartimientode/refrigerador
Pararetirarlo:
e
0 Incline el estnnte en la parte del fl'ente.
i,exante el estnnte hacia arriba en la
-- parte de atrfis ) saque el estnnte.
Algunos modelos tienen estantes
con cable que pueden ajustarse de
la mismamanera.
Para reemplazarlo:
0 _Jlientras inclina el esmnte hacia arriba,
rosette el gancho superior en la parte
posterior del estnnte en la rantu'a del
carfil.
0 gaje el fl'ente del estnnte hastn que la
parte inti_rior del estnnte se _!iuste en
Stl lu ,ar
Compartimientode/congelador
Pararetirarlo:
0 i,exante el lado izqtfierdo del estnnte v 0 Rote el lado derecho del estnnte hacia
deslfcelo hacia la izquierda al centro de arriba v filera de los soportes del
los soportes del estnnte, estnnte.
Para reemplazarlo:
0 Sosteniendo el estante
diagonalmente,inserte el extremo
izqtfierdo del estante al centro de los
soportes del estante mils bajo en la
pared lateral.
0 ]nserte el extremo lateral del estante
en los soportes del estante al mismo
nivel. Descanse cada extremo del
estnnte en la parte interior de los
soportes del estnnte.
Desplazar el estante
En algunos modelos, mo\er el estanm entre la
posicidn bqja yalta puede requerir "cmninar"
el est;mte como se muestra. [ e_ rote el costado
izquierdo del esmnte y deslfcelo h_wiala izquierda,
al centro de los soportes del estante. Luego gire el
lado derecho hada arriba e ins_rtelo en el centro
NOTA:Paralosmodelosconunam#quinade
hie/osautom#tica,eiestantede/congeiador
deber#estarenlaposicidnrobsbajaparaquela
cubetade loscubosdehieloatrapeloscubos.
de k)ssoportes del esmnte superior. Deslice el
cosmdo izquierdo hacia fi_erade los soportes del
est_mte,gfl'elo hacia m'riba hasm que se nix_le con
el cosmdo derecho v deslfcelo hacia los soportes del
estm]te. Descanse ca(Inextremo del estante en la
parte inferior de los soportes del esmnte.
Estantes a pr#e#a de sa/picad#ras (enai_Tu_7osmoddos)
I,os estm)[es a pme]ba de salpJcadm_s
tiem_e]] hordes especJ:des [)a_;_ e'dtar qL_e
]as sa]pJcadm'as se rieg_e]/a los estm/tes
h#e'_Jores. Pare retimr o reemp]az_r los
estam_tes, yea Reorganizaci6n de bs estantes.
67
Page 68

Sabrelos estantesy compartimientos.
Estante deslizante a prueba de salpicaduras (ena/gunosmode/os)
i _il i
I _ _ 'i _
BarrafrontN
E1 estante desli/;mte a prueba de
salpicaduras le pemfite alcanzar alimentos
almacenados (letMs de otros, i,os hordes
espedales est_in disefiados para avudar a
evitar que las salpicaduras se rieguen a los
estantes inferiores.
Pararetirarlo:
0 Retire to(los los alimentos del estante.
@ Deslice el estante hacia fimra hasta que
pa Ye,
0 I,e',ante el box'de del fl'ente del estante
hasta que las pestafias est_n par encima
del marco del estante.
0 (_onfinfie halando el estante hacia
adelante hasta que se pueda refirm;
Para reemplazarlo:
0 Coloque la parte posterior del estante
en el marco del estante detrfis de la
1)arra fl'ontal.
@ Deslice el estante hacia atMs hasta
que las pestaflas est_n encima de las
aberturas.
0 Baje el estante de manera que las
pestafias entren en las aberttu'as, luego
deslice el estante hasta el fimdo.
AsegE/resedequeel estante est_piano despu_s
de/a re/nsta/ac/dnyno semueva/ibrementede/ado
a/ado.
Aseg&ese deque empujelos estantes
comp/etamenteantes decerrar /apuerta.
Compartimientos ajustables en la puerta
I,os (ompartimientos ajustables pueden El reborde aDMa a exitar la cafda,
llex _x_e filcilmente del refl_igerador al firea derramamiento o deslizamiento de
de trab@), elementos pequeflos que se ahnacenen en
Para retirarlos: i,exante el estante recto v el estante (le la puerta. Agarre el retenedor
lueoo hfilelo, del dedo cerca de la parte posterior del
reborde y mu&alo para ajustarlo a sus
Parareemplazarlosoreubicarlos:]nserte el necesidades,
compartimiento en los soportes moldeados
en la puerta, y emp(!ielo hacia abajo. }_ste se
_!iustar_ien su luga_:
C8
Estantes no ajustables en la puerta
Estantes remo\ib]es que proflmdizan y
rodean los estantes t!jos de la puerta,
ofl'eciendo mils espacio y mayor flexibilidad
paI'a ahilacenaliliento.
Pararetirarlos:I,evante el estante recto v
luego hfilelo.
Para reemplazarlos: ]nserte el estante en los
soportes moldeados en la puerta y empt/je
hacia al)ajo, t_ste se ajtlst;lI'fi en Stl luga_:
Compartimiento inclinado de/congelador (enalgunosmodelos)
Presio_e e] 1)ot(;_ a medida ql_e im_c]im_ae]
Para retirarlo: Soste_ga los costados de]
corn pa rti mi e_ to y ]ev5 m_tel o, ] I*ego h:_]e]o.
Patareemplazarla:]_serte ]asextrem os de]
compartimie]_to e_ los soportes mo]deados
em_]a pllerta y empl!ie hacia ab_!jo. }_ste se
_{jllS[al"_, el/ SII ]llgaE
NON: No sobmcaNue e/convpartimiento,
Page 69

Sobrelas gavetasdealmacenamiento. .CEApp,a,o ,.oo
No todas las caracterfsticas est_n presentes en todos los modelos.
Gaveta preservadora de frutas y vegetales
E1 exceso de agua que pueda acunmla_e
al fimdo de las gavetas debe refirai_e v se
deben limpiar las gavetns.
Gaveta preservadora de humedad ajustable fena/gunosmode/os)
\
Deslice el control completnmente hastn I,leve el control pot completo hastn la
la posid6n/410/4 (alto) para oti'ecer la altn posid6n tOW (k!io) para ofl'ecer los niveles
lmmedad recomendada para la mayorfa de bajos de lmmedad recomendados para la
los veget;fles, mavorfa de las fl'utns.
Contenedor de meriendas (enalgunosmodelos
Est contenedor puede move[se a la Pararetirarla:Deslice el (ontenedor hacia
ubicaci6n mils fitil para las necesidades fuera hasta la posici6n de freno, le\:mte el
de su fimfilia, contenedor y pase la posici6n de freno v
levfintela.
C9
Page 70

Sobreretirar la gavetapreservadorade alimentos.
No todas las caractedsticas est#n presentes en todos los modelos.
Comoretirar la gaveta preservadora de alimentos
Desocupeel estanteinferiorantesde intentar
\ retirar lasgavetas dealmacenamiento.
" Pararetirar:
I,evante las gavetas hacia arfiba ligeramente
mientras las hala pasando pot el punto del
: freno.
Cuando la puerta no sepueda abrir por
completo:
Hale la gaveta lo m_is lejos que pueda de la
puerta directamente hacia flmra. Deslice la
otra gaxeta hacia el centro v retfrela.
Para retirar la cubierta de vidrio:
Redre el vidrio, h:mgo el marco. Ca:lando
reelnplace el vidrh_, elnpuje el horde
posterior fim/emente en el marco.
Empqje la cubierta de vidrh_ al fl'ente.
Para retirar la cubierta de vidrio
Para retirar el marco
Deslice la cubierta de xidfio hacia
delante hasta que el horde posterior se
salga del marco.
0 Rote el costado de la cubierta del xidrio
hacia arriba.
Rote el costado de la cubierta del xidrio
hacia arriba.
Para retirar el marco:
0 I,evante el fl'ente del marco usando
_lIIlb_ls II/_lnos
O Deslice el marco hacia delante.
0 Rote el costado del marco hacia
arriba.
@ Retire el marco.
Sobrelascaracteristicasadicionales.
No todas los caractedsticas est#n presentes on todos los modelos.
7O
Bandeja metMica She/fSaver TM
I_ bandeja deslizante para bebidas sostiene
19 latas de soda o (los botellas de vino/agua
(a lo largo). Puede retira_se pare su
limpieza.
Para mtirarla: Deslice la bandeja hacia la
posici6n de freno, lex rote la bandeja ,v pase
la posici6n de freno x lexfintela.
Page 71

Sobrela maquinade hielos automMica, www.GEAppliances.com
Un refrigerador recientemente instalado puede tomar entre 12y 24 horas para empezar a hacer hielo.
Hay dos tipos de m_quinas
de hielos:
!nterruptorde corriente Maquina
"__ de hielos
lac0rriente
Mode]odel Interruptorde energia
Brazode
Ilenadohacia
Brazode laposici6n
Ilenadohacia STOP(hacia
laposici6nON arriba)
(haciaabajo)
Modelo del Brazode Ilenado
Maquina de hielos automMica
(en algunos modelos)
i,a mfiquina de hielos producirfi
aproMnmdamente ] O0 a ] 30 cubos en un
perfodo de 94 horas, dependiendo de la
ten_peratura del con_partinfiento del
congelachm la temperamra del cuarto, el
nfilnero de veces que se abre la puerta y
otras condiciones de tISO.
Hm dos fipos de infiquinas de hielos: los
inodelos de interruptor de enerofa_ v,los
modelos de brazo de llenado.
Si el reflJgerador se opera antes de hacer
la conexi6n del agua hada la mfiquina
de hielo, t!je el interruptor de corriente en
la posici6n de 0 (apagado)o nlue\'a el brazo
de llenado hacia la posici6n STOP (hacia
arriba).
Cuando se ha\;1 conectado el refl_igerador
al sunfinistro de agua, t!je el interruptor de
COlTiente ell la posici6n de I (encendido) o
l/ltle\;I el brazo de llenado hada la posici6n
0N (hacia abajo). Ell los modelos de
interruptor de enelgfa la luz verde se
encenderfi.
I,a infiquina de hielos se llenaM de
agua cuando se enfrfe hasta 15°1. Un
refl_igerador reci_n instalado se puede
tolnar entre 12 y 24 horas para elnpezar a
hacer cubos de hieh).
Deseche los i)rilneros cubos de hielo para
pemfitir que la lfnea del agua se lilnpie.
_segfii'ese de que nada inteI_iera con el
inovilniento del brazo indica(hn:
Cuando el contenedor se llene al nivel
del brazo indicadoi; la infiquina de hielos
dejaM de producir hieh)s.
Es nonnal que wlrios cubos de hielo se
j tlnten.
Si el hielo no se usa con fl'ecuencia, los
cubos de hielo viejo se volveMn turbios,
con sabor rancio y se encogeMn.
Ell los modelos de interruptor de eneigfa,
la luz verde se volveM intemfitente si los
cubos de hielo se atascan ell la mfiquina de
hielos. Para corlegir esto, ponga el
interruptor de corriente en la posid6n de
0(apagado)y retire los cubos. Regrese el
interruptor de corriente a la posid6n de
I (encendido) para reiniciar la infiquina de
hielos. Despu_s de haber encendido de
ntlevo la lllfiqtlina de hielos, habM tma
delnora de 45 ininutos antes de que la
lnfiquina de hielos reinide las operaciones.
NOTA: En hogares con pres/_n de agua inferior al
promedio, es posib/e que escuche el c/do de/a
m#qulna de h/dos varias veces al hacer un /ote de
hielo.
Kit de accesorios de la maquina de hielos
Si su refl_igerador no viene ya equipado con Revise ell la parte posterior del refl'igerador
tma mfiquina de hielos aut(nnfifica, eMste ell busca del kit para 1;i mfiquina de hielos
tm kit accesorio i);1i":11;i mfiquina de hielos especflica que necesita i);1i":1 su inodelo.
que est;i disponible por un costo adidonal.
Accesorio de/filtro de agua
E1 filtro de agua es una opci6n atm (()st()
adidonal disponible por inedio de su
concesionario. Espedfique el modelo
WR97X0214. Tiene las instrucciones
colnplet;Is para su instalaci6n y se instala
ell una tubeI_a de cobre de l/4" de
difilnetro externo o ell la tuberfa plfistica
que est;i incluida ell el kit de TubeI_a para
Reli_igerador Snlart Connect TM de GE.
AI usar la tuberfa plfisfica, se debe ordenar
una pieza adicional de tubo plfisfico
(X43X08X10009) ya que el tubo de plfistico
debeM cortai_e.
NOTA:La&nlcatuber&deplfisticoaprobadadeGE
es/a quevieneprovistaconloskitsdetuber
elrefrigeradorSmartConnectTmdeG£Nouse
ningunaotratuberfap/fisticaparae/suministrode/
aguayaquela tuber&estfibajopresidntodoel
tiempo.Ciertostiposdepifisticosefracturarfinose
romperfincone/tiempoycausarfindafiosensu
casadebidoai agua.
71
Page 72

Cuidadoy limpiezadel refrigerador.
Limpieza exterior
Lasmanijas de la puerta yaccesorio. Iknpie
con tm patio lmmedecido con agua
jabonosa. Seque con un patio seco.
Mantenga el exterior limpio. I knI)ielo coil un
patio ligeramente lmmedecido con cera de
codna para elecmMom_sticos o deteigente
lfquido suave para plates. Seque y brille con
un patio limpio y seco.
Limpieza interior
Nolimpiael refngeradorconunpatiosuciopara
piatoso conunatoaiiamojada.Estospueden
dejarresiduesy puedenerosionariapintura.
Nousealmohadiliasderestregar,limpiadores
enpolvo,bianqueadoreso hknpiadoresque
contenganbianqueadoresyaqueestosproductos
puedenrasparydebilitarel acabadodepintura.
Para ayudar a evitar olores,deje una
c@_ abierta de bicarbonate en los
comi)artinfientos de alimentos fl'escos
ven el congelador.
Oesconecte el refrigerador antes de limpiarlo.
Si esto no es pMctico, escurra la hmnedad
excesiwl coil una esponja o patio al limpiar
alrededor de los interruptores, luces o
controles.
Use una soluci(m de agua tibia y
bicaiq)onato - una cucharada (15 nil) de
bicarbonate para un cuarto (1 litro) de
agua, Esto limpia y neutraliza los olores,
Enjuague y seque.
_n_nsa_r
No hay necesidad de una limpieza de
rutina del condensador en ambientes de
operaci6n de hogares nora/ales. Sin
embaigo, en ambientes que puedan set
i)aiticulam_ente polvorientos o grasosos,
el condensa(h)r debe limpiai_e
ped6dicamente para una operacidn
eficiente del iefligeracloi:
COmeretirar la reiilla de la base:
Pdmero retire la rejilla de la base. Tome la
rejilla unas 6 l)ulgadas de cada extreme v
hale su borde inferior hada el fi'ente.
Evitelimpiarlosestantesdevidrio frfos(en
algunosmodelos)conaguacalienteyaqueia
diferenciade/as temperaturasextremaspuede
causarquese quiebren.Manipulelosestantes
de vidrioconcuidado.Golpearel vidriotempiado
puedecausarquese quiebre.
No/ave ninguna parte pifistica de/refngerador
en ia iavadora de piatos.
Lave/asbandejasdehieloenaguatibia
_niaamente-- no/as pongaenia /avadorade
piatos.
COmelimpiar el condensador:
Barra o aspire el polvo.
Para mejores resultados use un cepillo
espedahnente disefiado para este fin. Estfi
disponible en la mavorfa de tiendas de
partes de electrodon_sficos.
COmereemplazar la rejilla de la base:
l_eemi)lace la rejilla de la base insertando
los topes de los sujetadores metSlicos en los
ofificios ox_flados, aseguMndose de que una
de las pestafias de plfistico de la rejilla entre
en cada uno de los ofificios ovalados, i,uego
emi)uje la parte de abajo de la rejilla hacia
delante hasta que calce en su lugai:
72
Detrgls de/refrigerador
Tenga cuidado al mover el refligerador
lejos de la pared. Toch)s los tipos de
cubiertas de piso se pueden (laflai;
particulam_ente las cubiertas acojinadas y
aquellas con supeiticies con disefios en
relieve.
Hale el reflJgerador en lfnea recta v,
reor_selo_ a su I)°siciOn eml.)ujfin(h_lo de la
misnm fimna. Mover el refl_igerador en una
direccidn lateral puede resultar en dafios a
la supeIticie del piso o al reliigeradoi:
Cuandoempujedenuevoelrefrigerador,
aseg6resedenopisar elcabieeldctncooia
lfneadesuministroaia mbquinade hielos(en
aigunosmode/os).
Page 73

Comoprepararse para /as vacaciones
www.GEAppliances.com
P_II'iI [lil_l largas \_lcaciones (:, auseIIcias_
retire los alinlentos y desconecte el
refiigeradoi: Gire el disco de control de la
teinperatura hada la posici6n 0 (apagado),
y linIpie el interior COil una sohicidn de
una cucharada de bicarbonato (15 inl)
vun cuarto (1 litro) de agua. Deje las
puertas abiertas.
F!je el interrupmr el_ctrico en la posiddn
de apagado 0 (apagado)o IlltleVa el brazo
de llenado a la posiddn STOP (hacia
aiTiba) dependiendo del niodelo v derre el
suininistro del agua hacia el i'eli'igei'adoi:
Comoprepararse para trasladarse
_segure todos los artk'ulos sueltos conio la
rejilla, los esmntes y c;!joiles peg;hldolos
con cinta en su hIgar para e\itar daflos.
Comoreemplazarlasbombillas.
Si la teniperatura puede caer por debajo
del punto de congelainiento, haga que
una persona calNcada drene el sistenia del
suininistro de agua (en algunos niodelos)
para e\itar seiios daflos a la propiedad
Catlsados por intlndaciones.
Aseg&esedequeel refngeradorpermanezcaon
unaposici6nverticaidurantee/trasiado.
Girar el control a la posicidn 0 (apagado) no elimina la corriente on el circuito de luces.
Compartimiento del refrigerador- Luz superior
Algunos modelos s61otienen
una luz.
PRECAUCION:Lasbombilias podrfanestar
caiientes.
O Desconecte el refl'igerador.
i,as 1)onIbillas estfin ubicadas en la
parte superior del conq)artiiniento del
/
i'efiigei'adoi; cerca de la abertura.
_Mguilos modelos tienen protectores
para la bonlbilla. Para retirar el
protector de la bonlbilla, tonle el
protector COI//O se IlltlestI'a COil Stl dedo
pulgar e dedo fndice, y leveInenm hale
la palanca hacia ati'fis. Esto libei'ai'fi el
protector y le pei_nitii'fi halaito hacia el
costado v retiraito.
0 Ileeniplficela con una boinbilla de
electrodoin_sticos del inisino o de
inleiior voltaje (60 \mios infixiino).
I).eeInplace los pi'omctoi'es de boinbillas
(en algunos niodelos).
Conecte de IlUeW> el i'efl_igei'adoi:
£uz de domo on el compartimiento de] congelador (ona/_unosmode/os)
PRECAUCION:Lasbombiiiaspodrfan estar del protector Hale el protector hacia
caiientes, delante y hacia abajo.
0 Desconecte el i'eflJgei'adoi:
I,a bonfl)illa estfi ubicada en la parte
supeiior del conlpartiiniento del
congelador dentro del pi-omctor de hiz
del doino. Para retirar el pi'otectoi;
coloque los dedos en los bolsillos deti'fis
0 Despu_s de reenlplazarla con una
bonibilla de electrodoin&ticiis del
inisino o de inleiior xoltaje (60 xatios
nlfixinio), reenlplace el pi'otectoi:
O Conecte de nuexo el refrigerador.
73
Page 74

Instrucciones para
Refrigerador
la Instalacion
Modelos 18y 19
Si tienepreguntas.Ilame al 1-800-GECARESo bi_.,i_it._.._t.-. p_gi..",_Vb:www.GEAppliances.com ]
ANTES DE mNmCIAR
Lea estas instrucclones completa y ctfidadosamenteo
• IMPORTANTE -
iI_s_r_c(;iones pm_ uso det iI_spe(tor local.
oIMPORTANTE - los
c6digos d_d(i_es de le_,.
° Nota al instalador = Asegfirese de d(jar esms
ilIs[['/Iccio_/es (;oi/ et (;I)I_S[l!_/ido12
° Nota al corlstHllidor -- Co_se_xe est_s inst_uccio_es
pt!_ ['e[(q;enci / tllt/lI'L
• Nivel de destreza - I,a instal _ci6_ de es_e apwm)
requiere de des_rezas mec_inicas b_sic _s.
_' Tiempo de ejecuddn - ]nstaJaci6_ deI re['rig(rado_
15 mimuos
• La ii_sml_cidn _p['opi_d_ es 1_ r(,spons d)ilid _d del
i]_smlado_2
_' l,a [hlla de! producto debido _ mm iI_smlaci6n
iimdectmda _o es_;_ c_fl)ie_m po_ la gar mfrs.
SUMINISTRO DE AGUA HACIA LA
MAQUINA DE HIELOS
(en algunos modelos)
Si el reIHgerador tit'ne m]a mfi(tuina de ]ficlos, se tt'ndr;i que
{on{'( I_IF ;-I /111_t III|){WI_t (t{' _t_/l_t ]}oI_lbl{' {]7f;-I. l_In kit de
suministro (t1' agua ({omicne tul)erfa (t1' {obre, vfil%ula (t1'
{ierlP{', _l{{{'soFios e instFH{{iOll{'S) {'St_i (tisl}onible {on m_
{osto a(ti{ional a u:avds de su ]}ro_eedo_2 _isitan(to m_cstra
t}figina Web www.(;EAppli_ln{ {'s.{Olll o bien _t IDIV('S d{' P;-uPtt's
y A{ cesorios, 800.626.2002.
UBICACION DEL REFRIGERADOR
• No instale el retHgerador donde la temperamra b_!je de 60°F
(16°C) ya (tue no correrfi con suficieme {i'ecuencia para
mamener las temt)eramras aprot)iadas.
• No instale el re/i'igcrador donde la temperamra suba por
encima de 100°F (37%2) ya que no flmcionarfi correctamente.
• Inst;ilela en m_ t)iso fi_erte t)ara (tue lo sot)orte con carg;_
COml}leta.
AREA
Permita el siguicme est)a{io ]}m'a m]a/ii{il instala{i6n,
at)ropiada {it{ ulaci6n del ;-lil:{'y {on{_xion{'s (1{' t}lomcrfa y
{']('{tric as.
• Costados 1/8" (3 ram)
• Ardba 1" (25 ram)
• Atrfis 1" (25 ram)
Si el re/Hgerador est_i comra m]a pared en cual(tuiera de los
cosmdos, permita m_ espacio t)ara la ]merta de 5/16" (8 ram).
RODILLOS (EN ALGUNOS MODELOS)
Los rodillos tienen tres prop6sitos:
• i,os rodillos se a justan de manera que la puerta cierre
fiicihnente cuando se abra unos 4:5°.
• I,os rodillos se ajustan de nmnera que el refrigerador
est_ firn]en_ente posicionado en el piso ) no
talnbalee.
• I,os rodillos le permitei_ moxer el refrigerador lejos
de la pared para limpieza.
NOTA: ()lando los rodillos estfin correctanlente
_!justndos, la parte superior del refiigerador no estnrfi
nixelada, sino que tendril tma ligera ii]clilmci6n hacia
atrfis.
Para aj ustar los rodillos,
retire la rejilla de la base
ton]fii]dola tmas 6 pulgadas
de cada extrelno ) halando
el borde inferior hacia el
frente.
(;ire los dos rodilh}s froi]tnles
_!justnndo los torlfillos en el
sentido del reloj paJca levm]taJ_
el refligerador, y en el sentido
contraxio paJ'a bajm'lo.
Reemplace la rejilla de la I] /_|
base insertnndo los topes
de los st_jetndores metfilicos
en los ofifi(ios oxalados
asegurando que las pestnflas
plfisticas en la parte posterior
de la rejilla entren en cada tmo de los orificios oxalados,
I,ueg{}, empt_je la parte infefi{}r de la rejilla hacia delante
hastn que se ajuste en su lugai:
74
Page 75

mnstrucciones para la
COlVlO mNSTALAR LA TUBERiA DEL AGUA
ION SOME MODELS}
BEFORE YOU BEGIN
I,os kits de col)re recoinendados para el suininistro de
agua son WX8X2, WX8X3 o WX8X4, dependiendo de
la cantidad de tuberia necesaria. I,as tuberias pl;_sticas
aprobadas para el suininistro de agua son las tuberfas
para el refl'igerador Siilart(_onnect TM de GE
(WX08X] 0002, WX08X10006, WX08X10015 v
WXO8XlO025).
A1 conectar su refl'igerador a un Sisteina de Agua de
0sInosis ]nversa de GE, la (ulica instalaci6n aprobada
es con un kit de Osmosis hlversa de GE. Para otros
sistenias de agua de 6sinosis inversa, siga las
insti ucciones del tabricante.
Esta instalaci6n de la tuberfa del agua no est;i
garantizada por el f,d)ricante del refl'igeradiir o
de la infiquina de hielos. Siga estas instiucciones
cuidadosainente para nliniinizar el riesgo de un daflo
costoso debido al agua.
E1 inartilleo del agua (agua golpeando contra la
tuberfa) en la tuberfa de la casa puede causar daflos a
las partes del refl'igerador y conducir a un goteo o
inundacidn por el agua. I,laine a un ploinero calificado
para corregir el inartilleo del agua antes de instalar la
tuberfa del agua al refl'igerador.
Para evitar quentaduras y dafios coil el producto, no
conecte la tuberfa del agua a la tuberfa del agua
caliente.
QUE NECESITA
• Kit de tuberla de cobre para el refrigerador o
SmartConnect TM de GE, 1/4" de difinietro externo
para conectar el refl'igerador al suininistro de agua.
Si usa cobre, asegfirese de que ainbos extrenios de la
tuberfa se corten uniforineniente.
Para deterniinar la cantidad de tuberfa que necesita:
Inida la distancia desde la vfilvula del agua en la parte
posterior del reli'igerador hasta el tubo de suininistro
de agua. i,uego agregue 8 pies (2.4 ni). Aseg(irese de
que ha)_ suficiente tuberfa adicional (unos 8 pies
[2.4 Ill] enrollado en tres vueltas de unas 10 pulgadas
[25 cnI] de di;hnetro) para perniitir title el refl'igerador
se pueda mover de la pared despu_s de la instalacidn.
I,os kits de tuberfa para el refl'igerador
Snlart(_onnect TM de GE estfin disponibles en las
siguientes longitudes:
2' (.6 Ill)
6' (1.8 I/l) -- WXO8XIO006
15' (4.6 Ill) -- _'_UXO8XIO015
25' (7.6 nI) - WXO8XlO025
- WX08X10002
Si usa el refl'igerador antes de conectar la tuberfa,
asegfirese de que el interiuptor de corriente de la
infiquina de hielos est_ en la posici6n de 0 (apagado)
(en los inodelos de interiuptor de energfa) o el bi'azo
de llenado la posici6n STOP (hacia arriba) (en los
inodelos de brazo de llenado).
No instale la tuberfa de la in;kluina de hielos en
higares donde la teinperatura caiga por debajo del
nivel de congelainiento.
A1 usar cualquier aparato el_ctrico (coino un taladro
elg_ctrico) durante la instalaci6n, asegfirese de que el
aparato est(_ aislado o conectado de nianera que evite
el peligro de una descarga el_ctrica, o se opere por
baterfas.
Todas las instalaciones se deben realizar segfin los
requisitos del cddioo_ local de ploinerfa.
Asegfirese de que el kit que haw_ seleccionado perinita
al inenos 8 pies (2.4 I/l) coino se describe arriba.
NOTA: La (mica tuberla de plfistico aprobada de GE
es la que viene provista con los kits de tuberia paJca el
refrigerador SmaJctColmect TM de GE. No use ninguna
otra tuberia plitstica para el sumhfistro del agua ya que
la tuberia estfi bajo presion todo el tiempo. Ciertos
tipos de plfistico se fracturaacfin o se romperfin con el
tiempo y causaacfin dafios en su casa debido al agua.
75
Page 76

mnstrucciones para la instalaci6n
COMO INSTALAR LA TUBERIA DEL AGUA (CONT.)
lnstale la xfilvula de cierre en la tuberfa del agua de
QUE NECESITA (CONT.)
consmno mils frecuentemente utilizada.
• Un Mt de sumi_fistro de agua de GE (comiene tuberfa,
vfilvula de cierre v accesorios enunlerados abajo) estfi
disponible a un costo adicional en su tienda o por medio
de Partes y Accesorios, 800.626.2002.
• Un stuninistro de agua frla. 1 ,a presi(m del agua del)e estar
entre 20 v 120 p.s.i. (1.4-8.1 bar).
• Taladro el6ctrico.
• Llave de 1/2" o ajustable.
• Destornillador piano y de estrella.
• Dos tuercas de compresi6n de 1/4" de diiunetro exterior y
2 f6rulas (lnangas) - ])ara conectar la tubcrfa de cot)re a la
vMwfla de (ierre v la wilvula del agua del re/i'igerador.
O BIEN
• Si estfi usando m: kit de mberfa para el refi_igerador
SII1_11_1(_()1:11(!: t TI de (_E, los _1( ((!soFios 11(!((!s_117i()s "_1 "_i(!l:(!l:
preiHstalados (m la tul)erfa.
[]
ClEF{RE EL SUMINISTRO
PRINCIPAL DE AGUA
Abra el grifo mils cercano pot suficiente tiempo
para limpiar la tuberfa del agua.
[] SELECCIONE LA UBICACION DE
LA VALVULA
Seleccione una ubicaci6n para la v;1lvula que sea
fikilmente accesible. Es mejor conectarla en el
(ostado de una tuberfa vertical de agua. Cuado sea
necesafio conectarla en una tuberfa horizontal de
agua, haga la conexidn en la parte superior o al
lado, en vez de hacerlo en la parte de abajo,
para evitar retirar cualquier sedimento de la
tuberfa del agua.
• Si su mt:erfa exismme de cot)re para el agua tiene ml
accesorio con _m'lo cn el exux'mo, necesimrkl un adaptador
(disponible en las tiendas de s/lmi:listros de plomer/a) para
conectar la linea del agua al re/iigerador 0 BIEN, podrfi
COFtaFel accesorio c()11v/le]o col: [111cortador de tubos v
hleg-o usar [111accesorio de compresio11. No corte el
exu:emo/ormado de la mberfa para el refi'igerador
SmartComlect Tx_de GE.
• V(dvula de cierre t)ara conectar a la lfnea del agua ti'fa. I,a
vfilvula de (ierre deberfi tener/urn cmrada de agua (:):1 till
difimetro interno mfnimo de 5/32" en el punto de
conexidn a la TUBE_ DEL AGUA FRIA. ias wilvulas de
apagado tipo silla vienen incluidas en muchos kits de
smninistro de agua. Antes de comprar, aseg(trese de que
una vMwlla tipo silla cumple con los cddigos de plonlerfa
en su localidad.
76
[]
PERFORE EL ORIFICIO PARA LA
VALVULA
Pert'ore un orificio de 1/4" en la tuberfa del
agua (incluso si estfi usando una vfilvula auto
perforadora), usando una broca afilada. Retire
cualquier sobrante que resulte de perlbrar el
orificio en la tuberfa. Tenga euidado de no permitir
que se filtre agua hada el taladro, No peril>rat tm
orificio de 1/4" puede resultar en inenor
producci6n de hielo o cubos mils pequeflos.
Page 77

Instrucciones para la instalacion
[] INSTALE LA VALVULA DE CIERRE
Una la _;il_ula de cierre a la tuberfa de agua frfa
con la abrazadera para el tubo.
Abrazadera
para el tubo _k
N
V_lvulade_ -Tuberiavertical
cierretiposilla deaguafria
NOTA: Se deberfin seguir los C6digos 248CMR
de Plomerfa para el Estado de Massachussets. Ins
vfilvtdas tipo silla son ilegales y su uso no estfi
permitido en Massachussets. Consulte con tm
plomero licenciado.
[] APRIETE LA ABRAZADERA
DEL TUBO
Apriete los tornillos de la abrazadera hasta que la
arandela sellante empiece a hincharse.
NOTA: No apriete demasiado la mberfa ya que
podrfa romperse.
del tubo
Tornillo de
abrazadera
Arandela
0 de entrada
[] CONECTE LA TUBERiA A LA
VALVULA
(_oloque la merca de compresi6n ) f_ula para la
tuberfa de cobre (mam,a_ en el extremo de la
tuberfa _ con_ctela a la _fil_ula de cierre.
Asegfirese de que la tuberfa est_ complemente
insertada en la vfilvula. Apriete la tuerca de
COIllpI'esi(_In [ii'iileillen re,
Para tuberfa de plfistico de tm kit de tuberfa para
el refl'igerador SmartConnect TM de GE, inserte el
extremo moldeado de la tuberfa en la v;ilvula de
cierre y apriete la tuerca de compresi6n hasta que
est_ firmemente apretada a mano, luego apriete
otto giro con tma llave. Apretar demasiado puede
ca usa r fllgas.
VNvula de "
tipo silla Tuberia
Tuercade
V_lvula de salida-- --F6rula (manga)
NOTA: Se deber_hl seguir los Cddigos 248CMR de
Ph)inerfa para el Estado de Massachussets. ins
vfilvulas tipo silla soil ilegales y su uso no estfi
permitido en Massachussets. Consulte coil tm
plom ero licenciado.
compresi6n
SmartConnectTM
[] DIRIJA LA TUBERiA
Dir!ja la tuberfa entre la lfnea del agua frfa v el
refl'igera dor.
Dir!ja la tuberfa a tray,s de un orificio perfm'ado en
la pared o en el piso (detrfis del refl'igerador o del
gabinete de la base adyacente) lo mils cerca posible
a la pared.
NOTA: Asegfirese de que hava suficiente tuberfa
adidonal (unos 8 pies [2.4 m] enrollada ell tres
vueltas de alrededor de 10" [25 cm ] de difimetro)
para perlnitir que el refrigerador se pueda mover
de la pared despu_s de la instalaci6n.
77
[]
LAVE LA TUBERiA
Abra el smninistro principal de agua y lave la
tuberfa hasta que el agua est_ limpia.
Cierre el agua en la vfilvula despu_s de que tm
cuarto (1 litro) de agua se hava eliminado pot la
tuberfa.
Page 78

Instrucciones para la instalacion
COMO INSTALAR LA TUBERJA DEL AGUA (CONT.)
[] CONECTE LA TUBERJA AL
REFRIGERADOR
NOTAS:
• Antes tie hacer la conexi6n al reJrigerador, asegfirese
tie que el cable tie corriente del refi'igerador no est_
conectado en el tomacorriente de la pared.
• Recomendamos instalar un filtro tie agua si su
suministro tie agua tiene arena o partfculas que
podrfan obstruir la malla tie la %lwda de agua del
refi'igerador. ]nstfilelo en la mberfa del agua cerca
al refi'igerador. Si usa t***kit de tuberfa para el
refi'igerador SmartConnect T_ltie GE, necesitar_i tl**
tubo adicional (_A,%08X10002) para conectar el Jilt*'<).
No corte la tuberfa plfistica para instalar el filtro.
Retire los tornillos sosteniendo el lado derecho tie la
cubierta de acceso. Doble la cubierta hacia atrfis.
Retire la tap* flexible tie plfistico tie
1",1vfilxula del ag-ua (conexi(m del
reli'igerador).
Coloque la tnerca tie compresi6n y
la J_rula (manKa) en el extremo tie
la tuberfa como se mt*estra. En el
kit tie tuberfa para el refi'igerador
SmartCo*mect TM de GE, las tuercas
w_vienen armadas con la tuberfa.
Inserte el extremo tie la tuberfa en la conexi6n tie la
vflvula del agua lo mils que se pueda. Mientras sostiene
la tuberfa, apriete el accesorio.
Par* mber/a tie plfistico tie tl**kit tie tuberfa par* el
reli'igerador Smart(]oililect TM tie GE, inserte el extremo
moldeado de la tuberfa en la wilvula tie cierre y apriete
la tuerca tie compresi6n hast* que est_ firmemente
apretada a mano, luego apriete otra vuelta con una llave.
Apretar demasiado puede causar fugas.
Una la tuberfa a la abrazadera provista par* sostenerla
en una posici6n vertical. Quizfis necesite apalancar la
abrazadera.
LS)
[] ABRA LA LLAVE DEL AGUA EN
LA VALVULA DE CIERRE
Apriete cualquier conexi(m que pueda presentar Jug'as.
Reemplace la cubierta de acceso.
[] CONECTE EL REFRIGERADOR
Organice el cable de la tuberfa tie manera que no vibre
contra ]a parte trasera del refl'igerador o contra la pared.
Empuje el refi'igerador hacia la pared.
INICIE LA MAQUlNA DE HIELOS
El/ lOS modelos tie interruptor tie energ'fa, tije el
interruptor de la mfiquina tie hielos en la posici6n tie
encendido I (encendido).En los modelos tie brazo tie llenado
muma el brazo de llenado a la posici6n ON (hacia abajo).
I,a mfiquina tie hiel(ts no empezar_ a operar hasta que
alcance st* temper*tufa tie operaci6n de 15°F (-9°C) o
menor, i,uego, empezarfi a operar automfiticamente.
ModelodelInterruptordeenergia
Abrazadera
Tuberiade1/4"
tubed*
Tuercade
compresion
Ferula
Tubode Conexi6ndel
SmartConnectTM refrigerador
78
Ilenadohacia
Brazode
Ilenadohaciala
posici6nON
(haciaabajo)
ModelodelBrazodeIlenado
NOT.&: En condiciones de inenor presi6n del agua,
la v_ilvula de agua puede encendei'se hasta 3 veces
para suministrar suficiente agua a la m_iquina de
hielos.
la posici6n
STOP(hacia
arriba)
Page 79

Instrucciones para la instalacion
COMO mNVERTIR EL VAIVE N DE LA PUERTA
NOTAS IMPORTANTES
A1 imertir el _ai_n de la puerta:
• i,ea las inst_ucciones completan/ente antes de
eliipeza r.
• Maneje las partes con cuidado para exitar raspar la
pintm'a.
• Ponga los tornillos con su parte correspondiente para
e',itar usarlas en el lugar equi',ocado.
• Dis. i_ow,a_ de una superficie de trabaio, que no se
raspe para las puertas.
IMPORTANTE:/Jna _ez que empiece, no mue_a el
gabinete hasta que ha)a completado el proceso de
imertir el xaiv_n de la puerta.
Esms instmcciones son para cambiar las bisagras del
lado derecho al izquierdo, si algmm ",ez desea cambiar
las bisagras al lado derecho nue_amente, siga las
mismas inst_ucciones e invierta toda las reli_rencias
hacia la izquierda y derecha.
Desconecte el refrigerador de su toma corriente
el_ctrico.
Desocupe los estantes de la puerta incluyendo el
compaactimiento de productos lficteos.
[] RETIRE LA PUERTA DEL
CONGELADOR
Pegue la puerta cerrada con cinta de enmascarar.
Retire la cubierta de la bisagra en la parte superior de
la puertn del congelador (en algtmos modelos).
Retire los (los tornillos Torx C'),luego levante la bisagra
directo hada arfiba para liberar el pasador de la
bisagra del casquillo en la parte superior de la puertn.
Bisagrasuperior _ t
HERRAMIENTAS REQUERIDAS
Destornilladordeestrella
Cinta de enrnascarar
DestornilladorTorx_
T206 T25,segOnIo
requierasumodelo
Destornilladordecasquillocon
cabezade3/8" (serecomienda
uncasquillode 6puntos)
Cuchilloparamasilla
(esp_tula)o destornillador
delgado
Retire la cinta e incline la puerta hacia fllera del
gabinete. I,exfntela del pasador de la bisagra del
centro.
Poll_raa la ptlerta ei1 tlil}l stlperiicie qtle no se i'a_e
con la parte exterior hacia arriba.
79
Page 80

mnsttucciones para [a
COMO INVERTIR EL VAIVI_N DE LA PUERTA (CONT.)
[] RETIRE LA PUERTA DEL
REFRIGERADOR
Cierre la I_uerta _,i_0guela, con cinta de enmascarar.
Retire el pasador de la bL_}lSId del centY ) con [In
casquillo _ trinquete de ./8 .
Arandela pl_stica _
Sujetad0rdela bisagra-- _
S o'" (
[
ri
S0p0rte de la _
bisagracentral
Puerto de aliment0s frescos
Retire la cinta e incline la puerta leios del gabinete.
Retire ) guarde la arandela del sqietador de la bisagra.
I,e_ante la puerta para liberar el casquillo inferior del
suietador, en el soporte de la bisa_ra inf_'rio_;
Pono-a_ la puerta hacia arriba en una supe_ficie que no
I'ave,
[] TRASLADE LA BISAGRA
SUPERIOR A LA IZQUIERDA
]ntercambie la bisagra y los tornillos de la parte
superior derecha con los tornillos de la parte superior
izquierda del gabinete,
No apriete los tonfillos en el lado de la bisagra en este
momento.
PRECAUCION: No permita que la puerta se caiga
a piso. Esto podrfa dafiar el fleno de la puerta.
8O
Page 81

mnstru¢¢iones para la
[] TRASLADE EL SOPORTE DE
LA BISAGRA INFERIOR A LA
IZQUIERDA
Retire la rejilla de la base tom_indola unas 6 pulgadas
de cada extremo v halando su horde inferior hacia el
fl'ente,
Usando un destornillador Torx (_, mue\_ el soporte de
la bisagra inferior del lado derecho y la arandela
plfistica del lado derecho hacia el izquierdo,
NOTA: Si la arandela no est_i en el soporte de la
bisagra, revise para ver si est;i en la parte inferior de la
puerta.
t I Arandela pl_stica
0_.1 /
j\
TRASLADE EL SOPORTE DE LA
[]
BISAGRA CENTRAL HACIA LA
IZQUIERDA
Retire el soporte de la bisagra central retirando los
tres tornillos Torx'L
NOTA: (_onser\'e estos tornillos con el soporte de
la bisagra. Estos son tornillos largos y se usarfin al
instalar la bisagra en el otto lado.
En algunos Inodelos, deber;i retirar la tapa de color
de la cabeza del tornillo antes de poder retirar el
tornillo. Use el horde de un destornillador de pala
plana para apalancar levemente las tapas para
retirarlas de las cabezas de los tornillos. (Un
cuchillo de masilla sirve para esto.) Cul)ra la pala
con cinta para evitar raspar la pintura.
Retire los tres tornillos Torx + del costado izquierdo
central del gabinete. Atornfllelos en los orificios
del costado derecho.
Coloque el soporte de la bisagra central sol)re los
orificios en el costado izquierdo central del
gabinete, ]nserte y apriete los tres tornillos largos,
Reemplace la tapa calzfindola en su lugar con el
dedo encima del tornillo.
Soportedela bisagra _
Antes de reemplazar la reiilla de la base, retire la
tapa de la rejilla retirando los tornillos. Atornille la
tapa en el lado opuesto.
Reemplace la rejilla de la base insert;redo los topes
de los st!jet;Mores met;ilicos en los ofificios ox_fla(los
asegurando que una las pestaflas pl;isticas en la parte
posterior de la rejilla entre en cada tmo de los ofificios
o\:flados, i,uego, presione la base de la rejilla hac'ia
delante hasta que encaje en su luga_:
del tornillo
t
[] TRASLADE LOS TOPES DE LA
PUERTA
En cada puerta, inue\:l el tope met;ilico del extremo
derecho al izquierdo.
Mueva cualquier tornillo del ext_emo izquierdo hacia
el extremo derecho.
_ede Tope de
la puerta la F
\
81
Extremo izquierdo Extremo derecho
Page 82

mnstrucciones para la
COlVlO mNVERTmREL VAmVEN DE LA PUERTA tCONT.I
[] TRASLADE LA MANIJA DE LA
PUERTA HACIA LA DERECHA
Para retirar la mmfija: Retire el bot6n de la tapa
apalancando cuidadosamente debajo del horde con
tm cuchillo de masilla. Retire el tornillo expuesto
sosteniendo la man!ja.
Tapade la manija
Retire los dos tornillos que sosfienen la man!ja con la
parte alta de la puertn.
[] TRASLADE LA MANIJA DE LA
PUERTA DEL REFRIGERADOR
HACIA LA DERECHA (CONT.)
Traslade el bot(m de tnpa de la puertn al lado opuesto.
Reinstale la manija: ]nstale la man!ia en el lado
derecho de la puertn
e la
manija
Despu_s de retiraJ¢ la mmfija: Muew_ los botones
de tnpa pequefios del costado superior derecho de la
parte superior de la puertn e ins_rtelos en los ofificios
del lado opuesto.
Mueva el bot6n de tnpa grande del horde izquierdo
de la puertn e ins_rtelo en el orificio en el lado
Optlesto,
BotOndetapa
Tap!de
la manija
82
Page 83

Instrucciones para la
[] TRASLADE LA MANIJA DE LA
PUERTA DEL CONGELADOR A LA
DERECHA
Retire los tornillos que sostienen la man!ja con la
parte superior e inferior de la puerta. Retire la man!ja.
Mueva el bot6n de tapa en el costado derecho de la
puerta al orificio del tornillo de la man!ia en el lado
izquierdo,
Vuelw_ a unit la man!ja en el lado opuesto usando los
orificios m_is cercanos al horde de la puerta.
[] VUELVA A COLGAR LA PUERTA
DEL REFRIGERADOR
gaje la puerta del reli'ige_vador al sqjetador de la
bisaora inlerio_:
Arandela
F
Recfifique y alinee la puerta con el soporte de la
bisagra central,
Vuelw_ a instalar el sqjetador de la bisagra central con
un casquillo de 3/8". Gfrelo hasta que se extienda a
travg_s del soporte de la bisagra y hada la puerta.
Arandela pl_stica .--_,-_
Sujetador de la bisagra------_
t
I
PL
A_
Soporte de la "_I"-"""_
bisagra central
I
Puerta del refrigerador
83
Page 84

mnstrucciones para la
COlVlO mNVERTmREL VAmVEN DE LA PUERTA tCONT.I
[] VUELVA A COLGAR LA PUERTA
DEL CONGELADOR
Baje la puerto del congelador al sqiemdor de la
bisagra del centro.
Asegfirese de que la arandela est_ en su luga_:
I{ Sujetadordelabisagracentral
Arandelapl
I,evante la bisagra Stll)eIJoI" de Ill_lneI';I (]tle el sujetador se
ajuste en el casquillo de la puerta.
Descanse la puerta en el costado de la man!ja y asegfirese
de que la puerta est_ recta y el espado entre las puertas
sea tmitimne incluso en el ti'enm. Mientras sosdene la
puerta en su luga_; apriete los tornillos de la bisagra
superior
84
Page 85

i iiii//°
Estos sonidos son normales y
se deben en su mayorfa a una
operaci6n altamente eficiente.
0 Maquina de hielos (enalgunos modeloe). Ell ocasiones escuchaM el ruido
de los cubos de hielo al caer ell el coinpartinfiento de hielos. Si estn es su
pi_iinera in;iquina de hielos, escuchaM sonidos ocasionales que pueden ser
desconocidos, t_stos son sonidos noimales de la in;iquina de hielos v no son
una causa de preocupaci6n.
gentiladorevaporador. Q)liz_is escuche el ruido del aire que es fi)rzado hacia
@ el gabinete por el "_enfiladoi:
0 Evaporador. E1 fltljo del refl_igerante a ti'a'_s del e'_apoi'ador puede crear till
ligero sonido burbtljeante o till gorgoteo.
Calentadorde deecongelaci6n. Durante los ciclos de descongelaci6n, la cafda
del agua ell el calentndor puede causar till sonido de silbido o chirriante.
Despu_s de la descongeladdn, se puede escuchar till chasquido y el
evaporador puede producir till ligero sonido burbt/jeante o till golgoteo.
Control del frio y reloj de descongelaci6n. Estns partes pueden producir till
chasquido al encender o ai)agar, el reii_igeradoi: E1 i'eloj, tatnbi_n produce tlll
sonido sinfilar al de till reloj el_ctrico.
Reveetimientoplaetico. Sonidos crtljientes o bulq)t/jeantes debidos a la
expansi6n del revestiiniento pl_istico.
VMvula de agua (en algunos modelos equipados con una maquina de hielos
automMica. Cuando la in_kluina de hielos se llena de agua, se escuchaM till
ztunbido v el ruido de agua corriendo.
Recipiente delagua. Se puede escuchar el agua correr hacia el recipiente de
drenaje libre de nlanteniiniento durante el ciclo de descongelaci6n.
Compreeor. I,os colnpresores inodernos, de altn eficada operan inucho mils
Mpido que los inodelos mils viejos. E1 colni)resor puede tener tul zulnbido
de alto [ono () tin sonido pu1sante.
Ventiladordelcondensador. Quizfs escuche el aire torzado por el xentilador
hacia el condensadoi:
85
Page 86

Antesde Ilamar a solicitar servicio...
Consejos para la solucidn de problemas
iAhorre tiempo y dinero! Revise las tablas en las siguientes p#ginas
primero y quiz#s no necesite Ilamar a solicitar el servicio.
Posibles causas Que hacer
E1refrigerador no opera
Vibracion o traqueteo Los rodillos frontaJes necesitan • Consulte la seccidn Rodillos.
(una vibracion ligera es ajuste.
normal)
Elmotor opera con Nonnal cumldo el refrigerador • Espere 24 horas hasm que el reii'igerador se enii'fe
frecuencia por largos se conecta hficiahnente, i)()r c(nuplet(L
periodos o cielos de
fotma intermitente (Los Con frecuencia ocurre cumldo • Esto es n(mnal.
refrigeradores modemos cure,do grmldes cm_tidades de
con mas espacio de alhnentos se almacenm_ en el
almacenamiento y un refrigerador.
cougeladormas grande La puerta se deja abierta. • Revise si un paquete est_i reteniendo la puertn abierta.
requieren de mas tiempo E1 clima caliente o abrir • Esto es normal.
de operacion. Arrancan y
paran con frecuencia la puerta frecuentemente.
para mantener Los controles de • Consulte la se((idn Sobre/os contro/es
temperaturas uniformes.) la temperatura est_ha en
E1 refrigerador es_ en
el ciclo de descongelado.
CuaJquiera o ambos con/roles
estfial en la posicion 0 (apagado).
E1 refrigerador estfi desconectado. • Empuje el enchttte completmuente en el tomacorfiente.
E1 fusible estfi quemado / el • Replace fi/se or reset the breaker.
interruptor automfitico se salt&
en el Ifivel mils frlo.
• Espere unos 40 minutos hasta que el ciclo
de descongelado temfine.
• Mueva el control del reti_gerador y del congelador
a un nivel de temperatura.
E1compartimiento de E1 conlrol de la temperatura • C()nsulte la secci()n Sobre los controles
alimentos frescos o el no estfi en m'__fivel
congelador no estan muy sufidentemente frlo.
frios E1 clima caliente o abrir • F!ie el ('onti'ol de la [eIlIpeI';IttlI':l _1 tin nivel III;/S ti'lO.
la puerta frecuentemente. Consulte la secci6n Sobro los controlos
La puerta se deja abierta. • Revise si un paquete est;i reteniendo 1;Ipuertn abierta.
Hielo o cristales de hielo La puerta se deja abierta. • Revise si un paquete est5 reteniendo la puert;I abierta.
en los alimentos
eongelados (Elhielo Abrir la puerta con mucha
dentro de unpaquete es frecuencia o por mucho fiempo.
flormal]
Lamaquina de hielos E1 h_terruptor de corriente de • En los modeh)s de interruptor de energfa, lnuexa el
automMicanofunciona de la mfiquhm de hielos no estfi interruptor a la p()sicidn de I (encendido). En los m()delos
(on algunos modelos) encendido, de brazo de llenado liitleV_l el bl';IZO de llenado a ]a
posM6n ON (hacia abajo).
E1 sumhfistro del agua estfi • Consulte la sec('i6n Cdmo instalar la tuber& de/agua.
apagado o no estfi conectado.
F3 comparthniento del • Espere 24 horas para que el retiJgerador se enti'_e
congelador no es muy frlo. completaulente.
Hay cubos amontonados en • Nivele los cubos con la m;mo.
en el recipiente de ahnacenmniento
que causm_ que la mfiquhm de
hielos se apague.
Los cubos de hielo estml • Apague la mSqtfina de hielos, retire los ctd)os v vuelva
obstruidos en la mfiquina de hielos, a encender la mSquina de hielos.
o06, (La lttz verde de la mfiqtthm de
hielos estfi hltermitente)
Page 87

Possible Causes What ToDo
wvvw.GEAppliances.com
Loscubesde hielotienen
olor/sabor
E1 recipiente de almacenmniento
de hielos necesita limpieza.
• Desocupe el recipiente y lfivelo. Deseche los cubes viejos.
Hay alimentos que _'asmiten • Envuelva bien los aliment_s.
olor / saber a los cubes de hielo.
El interior del refrigerador • Consulte la secci6n tie Cuidado y/impieza.
necesita lhnpieza.
Congelamiento lentode La puerta se deja abierta. • Revise si un paquete estfi reteniendo la puerta abieria.
loscubes de hielo.
E1 control de la temperatura • (;onsulte la secci6n Sobre los controles.
no est,6 entm lfivel
suficientemente frlo.
No hayproduccion de La tuberla de sumhfistro o la • Llame a un lalomero.
cubes de hielo, v61vula de cierre estfi_a obstruidas.
Se forma humedaden No es usual durante • Sequela stq)edicie, luego _jttste el control de alimentos
la supefficie delgabinete periodos de alta hmnedad, fi'escos t!jfind()h) en un nfimero mils alto v revise de
entre laspuertas nuevo ell 24 horas.
Elrefrigeradortiene olor. Hay alimentos que trasmiten • Los alimentos con olores fl/ertes (leben envolxe_e
olor / saber al refrigerador, fi_u eIuente.
• Mantenga tma c_ia abierta de l_icarbonato
en el i'efi'igerado_; reemplficela cada tres uwses.
El interior necesita limpieza. • Consulte la secci6n de Cuidado Y limpieza.
Humedadse forma al Abrir la puerta cola mucha
interior (en clima humedo, frecuencia o per touche tiempo.
el aim Ileva la humedad
al refrigerador cuando las
puertas se abren)
ta luz interna no funciona No hay corriente en el toma • I_eemplace el fusil)le o \'uel\_l a iniciar el interrupt_n:
corriente.
La bombilla se quemo. • C{mstdte la secci6n C6mo reemplazar la bombilla.
Airecalientedela parte
deabajodelrefrigerador
Motor de enfriamiento normal
del flujo del aJre. l_ha el proceso
de refrigeracion, es normal que
salga calor de la paa'te inferior del
refrigerador. Algtmas cubiertas de
piso son sensibles y se decolorax_aa
mate estas temperaturas normales
y seguras.
Congelamiento de Los alhnentos estma muy • Mue\'a los alimentos lejos del venfilador (cerca de los
alimentos en el cercmaos al ventilador, c(nlti'oles ).
refrigerador E1 control del refrigerador • Muex'a el control del reflJgerador a una tel//l)el'att/r;i
estzl entm ifivel demasiado frlo. menos fi'ia.
La puerta no se cierra Los rodillos necesJtan ajuste. • (;onstdte la secci6n Rodillos.
sol&
Brillo color naranja en el E1calentador de descongelacion • Esto es noi_llal.
cengelador estfi encendJdo.
87
Page 88

¢
Neta$.
_ wam
m
P_
r_
€_
cr_
88
Page 89

Netas.
wmm _
€_J _
m
m
€_
€_
W'dA
€_J
€_
w
88
m
Page 90

Garantiadel Refrigerador.
Todos los servicios los proporcionar#n nuestros centros de
f#brica o nuestros prestadores Customer Care_ autorizados.
Para concertar una cita de servicio, en Ifnea, 24 horas al dfa,
p6ngase en contacto con nosotros en www.GEAppfiances.com,
o flame al 1.800.GE.CARES.
GEreemplazaM:
Cualquierparte del refl-igerador que fidle del)ido a un (lefecto en matei_iales o mano de obra.
A partirde lafecha
de compra original
Cincoales
A partir de la fecha
de compra original
Viajes de servicio a su hogax pm'a ensefiarle como usar
el producto.
_: Una hlstaJaci6n hacorrecta.
FaJlas del producto si hay abuso, real uso, o uso paxa
otros propositos que los propuestos, o uso para fines
comerciales.
P_rdJda de aJJmentos por averias.
Durante este afiodegarantiacompleta,GE tambi_n propordonar;i, sincosto,mano de obra v
servicio en su hogar para reemplazar las partes defectuosas,
Cualquierparte del sistema sellado de refrigeracion, (compresox; condensadoi; e_q)orador y todas
tuberfas de cone_(m)que fidle debido a un (lefecto en matei_iales o mano de obra. Durante este
cuatro afos adicionales de garantia limitada, GE tambi_n propordonar;i sin costo,mano de obra v
servicio en su hogar domicilio para reemplazar la pieza dele('tuosa dentro.
Grapeaquf su recibo.
Se requiere facilitar prueba de
la fecha de compra original para
obtener un servicio bajo la
garantfa.
Reemplazo de fttsibles de su hogar o reajttste de
interruptores de circttito.
:_ Dm-_o aJ producto causado pot accidente, fuego,
intmdaciones, o actos de Dios.
:_ Dm-_o incidentaJ o consecuenciaJ causado pot posibles
defectos con el apaJcato.
Esta garantfa se extiende al comprador original y a cualquier propietario que Io suceda para el caso de pmductos
comprados para uso dom#stico normal en los Estados Unidos. En Alaska, usted tendr# que pagar el flete del
producto o los costos de viaje del t#cnico de servicio hasta su hogar.
Algunos estados no permiten la exclusi6n o limitaci6n de dafios incidentales o consecuenciales. Esta garantfa le
proporciona derechos legales especfficos, y puede tener otros derechos que pueden variar de un estado a otro.
Para conocer los derechos legales de su estado, consulte con su oficina local de asuntos del consumidor o al
procurador general de su estado.
Garantidor."General Electric Company. Louisville, KY 40225
9O
Page 91

$opo_e a/ Consumidor.
PbginaWebde GEAppl/ances cE@p/iences.com
!
(]_;h cl_al(]Hier (]_;_(]el _;_fio! [,na ma_. ] com'e]]iem_cia _ se_'icio m_s ]_pido, }_;_pHede descar_ar los ]k]am_ales
;Tiene algm_a _regm_ta sobre sl_ electrodom_stico? ihl_ebe la pfigh]a s_,\eb de (;E _pplim_ces 24 horns al
de los Propietm'ios, pedir pie;_s o i_]c]l_so ]]acer m_a cita em] ][m]ea })m_ (]l_e ;'e]_gan, _ rea]izm'• m_a
repamci6m Taml)iSm_ puede "Ssk ()m" Tem_ of Experts cxl- (Pregm_tar a m_estro eq_fipo de expertos) sobre
clm]qlfier cl_estid]? }r _?1 I_1;]1() _??_S...
So//citeunareparaci_n GEAppfiances.com
E] servicio de expertos (;E est;_ a tm_ sd]o m_ paso de s_ p_erta. ;Entre e_] lfnea ) soli(ite s_ repamci6n
c_a_do ]e ve_ga bie_ 24 horns a] d[;_ cua]quier d[a de] aft(!! O ]lame a] 800.(;E.(]M_ES (800.432.2737)
dlH_Hl[e ]]oI_ts HoY]]l_l]es de O_]CiH_].
Rea/LifeDesignStudio(Estudiodedisefiopara/avidarea/) GE,@p/ien_e_.com
GE apo)_ el co_cepto de Disefio [/Mversal--prod_wtos, serqcios v m_bie_tes q_e p_ede_ _sar genre de
to&_s l_s ed_des, mm_hos y c_q_acid_des. Reco_ocemos la _ecesi&_d de disefiar pax_ m_a gmn gam_ de
h abih d;_des v (]!it?c_] tades ffsi cas _ men ta]es. P;m_ m_s detnH es cobre k_s ap]i c_ci(m es de (;E Diseh o [ J_]ivers;_L
h_chwendo ideas de disef_o para ]_ coch_a para personas con discapacid_des, mire m_esm_ pSgi_a _\)b ]_(_}r
m]smo. Pm_ i)e_(mas con dific_]tades m_diti_as, fi_or de ]]m_ar a] S00.TDD.(;EAC (800.833.4322).
Caranffasamp/iadas GE_ppfiances.com
g;mmt_a m_ )li_da _ obte_ga demlles sobre descue_m_s especiales dispo_ibles mie_m_s suCompre m_a _ _ ,
gam_tia estfi a0_ activm Puede compmr]a en ][_ea eli c_a]quier momento, o ]]amar a] (800.626.2224)
din;rote ho]v_s _?o]'ma]es de of]tiroL (;E ()msm]?er Home Services esta];i m3_? :th[ cl0a_?do sl_ gai:mt[a te]'mi_?e.
Piezasyaccesorios GEApp/iances.com
Aq_ellos i_divid_os co_ la calificaci&_ m_ces_uk, p_m_ repairer s_s propios elec_rodom&dcos p_ede_
pedh" q_e se les mm_de_ l_s piezas o _ccesorios direcmme_e _ s_s hog_res Owepmmos h_sm@_ms
VISA, Master(:;n_d v Discover). Haga s_ pedido e]_ lf_ea ho}. 24 horns cad_ d_ o ]]m_ar pot te]e}{b_o
a] S00.626.2002 din:rote ]_o_s _orma]es de ofici_a.
tas instmcciones closer#asenestemanual c#bren los procedimientesa segnirper o#alqniernsuario. Cnalqnier
otrareparaci6n defleria,per regla general, referirse a personal calificadoa_torizado.Befleejercerse precanci6n
ya q_e lasreparaciones incorrectas pnedencaesarcondiciones defnncionamiento insegnras.
Pbngaseencontactoconnosotros GEAppfiances.com
Si _o est_ s_tisfecho co_ e] ser'dcio (p_e recibe de (;E, pd_gase en co_mcto con _osotros en m_est_ pfigim_
Web ]_dicm_do todos los deta]]es as_ cored s_ _fimero de te]_iimo o escr_bm_os a: (;ene_] Mintages;
Registresu e/ectrodom#stico GEApp#ances.com
iRegistre su nuevo eledrodom6sdeo en _ea--cuando usted pret]era! E1 registrar s_ prod_wto a dempo le
proporciomm_, si .sm'giem_...... ]a _ecesidad, m_a me'or! comm_ic_cidn } m_ seP,'icio m_s _Spido b_!io los te_rmi_os
de s_ ,ga]_mt/a- Tambie}_ i:)_ede em'iar s_ ta]jeta de registro. [)re-im[)resa. (p_e se i_c]_r_e e]_ e] material de
C_stomer Re]atio_s
(;E App]im_ces,
App]im_ce Park
l,(mis_i]]e, KY 40225
8/
Page 92

ConsumerSupport.
GEAppliancesWebsite i. thet._.8.:GEAppliances.com
Have a question or need assistance with your appliance? Try the (;E Appliances _.Vebsite 24 hotu_ a (la);
any day of the year'. For greater convenience and tipster se_Mce, you can now download Owner's Manuals,
order parts, catalogs, or even schedule service ondine. You can also "_&skOur Team _ffExperts _''' your questions,
and so much more... In Canada: geapplim_ces.ca
ScheduleService i.theu.8.:GEAppliances.com
Expert GE repair se_Mce is onh one step awa_ fi'om your cloo_; Get on-line and schedule your se_Mce at xour
convenience 24 hom_ any day of the year! Or call 800.GE.(_ARES (800.432.2737) dtmng natural business hom_.
In Cmmda, call 1.800.361.3400
RealLifeDesignStudio i. theu.8.:GEAppliances.com
GE supports the Universal Design concept--products, se_Mces and environments that can be used by people of all
ages, sizes and capabilities, We recognize the need to design fin" a wide range ot physical and mental abilities and
impaim_ents. For details of GE's/Jnive_al Design applications, including kitchen design ideas for people with
disabilities, check out our Website today. For the hearing impaired, please call 800.TDD.(;EAC (800.833.4322).
ha Cmmda, contact: Manage_; Consumer Relations, Camco, Inc.
Suite 310, 1 Facto_a, i.ane
Moncton, N.B. E1 C 9M3
ExtendedWarranties i,,theu.8.:GEAppliances.com
Pro'chase a (;E extended warrant_ and learn about special discounts that are a_ailable while xom" warranty is still
in effect. Ybu can purchase it on-line anytime, or call 800.626.2224 dining natural business hom_. (;E Consumer
Home Serxices will still be there after your warrant} expires. In Canada, call 1.888.261.2133
PartsandAccessories i,,theu.8.:GEAppliances.com
Individuals qualified to service their own appliances can have parts or accessories sent directly to their homes
(VISA, MasterCard and Discover cards are accepted). Order on-line today, 24 hom_ ever w day or by phone at
800.626.2002 duling normal business houI_.
Instructions contained in this manual cover procedures to be performed byany user. Other servicing generally should be
referred to qualified service personnel. Caution must be exercised since improper servicing may cause unsafe operation.
Custome_ ha Cmmda should consult the yellow pages fin" the nearest Cameo se_Mce center; or call 1.888.261.3055.
ContactUs i,,thet._.8.:GEAppliances.com
If you are not satisfied with the service you receive fl'om GE, contact us on our _.Vebsite with all the details
including your phone number; or write to: General Manager; Customer Relations
GE Appliances, Appliance Park
I,ouisville, KY 40225
In Cmmda: geapplimlces.ca, or write to: Directo_; Consumer P,elations, Camco, Inc.
Suim 310, 1 [_ctorv i,ane
Moncton, N.B. E 1C 9M3
RegisterYourAppliance i,, the ILr.8.: GEAppliances.com
Register your new appfimace on-lhle---at your convenience! Timely product registration will allow fin" enhanced
carom unitarian and prompt service under the temps o1 your warranty, should the need raise. You max also
mail in the pre-p_inted registration card included in the packing material. In Cmmda: geapplim_ces.ca
Printed in flTeUnited States
 Loading...