

GE GTE18FTLKBB, GTS18FTLKWW, GTS18FTLKBB, GTE18FSLKSS, GTS18FSLKSS OWNER’S MANUAL & INSTALLATION INSTRUCTIONS
...Page 1
SAFETY INFORMATION . . . . . . . . . 4
USING THE REFRIGERATOR
Control Settings . . . . . . . . . . . . . . . . . . . . . . . 6
Storage Drawers . . . . . . . . . . . . . . . . . . . . . . . 6
Ice Service . . . . . . . . . . . . . . . . . . . . . . . . . . . . 7
CARE AND CLEANING . . . . . . . . . . . 8
INSTALLATION INSTRUCTIONS
Before You Begin . . . . . . . . . . . . . . . . . . . . . 10
Refrigerator Features . . . . . . . . . . . . . . . . . . . 11
Reversing the Door Swing . . . . . . . . . . . 12-15
TROUBLESHOOTING TIPS
Normal Operating Sounds . . . . . . . . . . . . . . 16
Problem Solver . . . . . . . . . . . . . . . . . . . . . 17, 18
WARRANTY . . . . . . . . . . . . . . . . . . . . . . 19
CONSUMER SUPPORT . . . . . . . . . . 20
OWNER'S MANUAL
AND INSTALLATION
INSTRUCTIONS
GTE18
GTS18
ENGLISH/FRANÇAIS
Write the model and serial
numbers here:
Model #
Serial #
You can find them on a label
inside the refrigerator
GE is a trademark of the General Electric Company. Manufactured under trademark licence.
29-6144 11/18 M
Page 2

29-6144
THANK YOU FOR MAKING GE APPLIANCES A PART OF YOUR HOME.
Whether you grew up with GE Appliances, or this is your first, we’re happy to have you in the family.
We take pride in the craftsmanship, innovation and design that goes into every GE Appliances
product, and we think you will too. Among other things, registration of your appliance ensures that we
can deliver important product information and warranty details when you need them.
Register your GE appliance now online. Helpful websites and phone numbers are available in the
Consumer Support section of this Owner’s Manual. You may also mail in the pre-printed registration
card included in the packing material.
2
Page 3

Notes
WELCOME
29-6144
3
Page 4
IMPORTANT SAFETY INFORMATION
READ ALL INSTRUCTIONS BEFORE USING THE APPLIANCE
WARNING
Ŷ 7KLVrefrigeratorPXVWEHSURSHUO\LQVWDOOHGDQG
located in accordance with the Installation
Instructions before it is used.
Ŷ 8QSOXJWKHrefrigeratorEHIRUHPDNLQJUHSDLUVRU
cleaning.
NOTE: Power to the refrigerator cannot be
disconnected by any setting on the control panel.
NOTE: Repairs must be performed by a qualified
Service Professional.
Ŷ 5HSODFHDOOSDUWVDQGSDQHOVEHIRUHRSHUDWLQJ
SAFETY INFORMATION
Ŷ 'RQRWVWRUHRUXVHJDVROLQHRURWKHUIODPPDEOH
vapors and liquids in the vicinity of this or any other
appliance.
Ŷ 'RQRWVWRUHH[SORVLYHVXEVWDQFHVVXFKDVDHURVRO
cans with a flammable propellant in this appliance.
Ŷ 'RQRWXVHDQH[WHQVLRQFRUG
CAUTION
Ŷ 'RQRWFOHDQshelvesZLWKZDUPZDWHUZKHQ
cold. Components may break if exposed to sudden
temperature changes or impact, such as bumping or
dropping.
Ŷ .HHSILQJHUVRXWRIWKH³SLQFKSRLQW´DUHDV
clearances between the lid and cabinet are
necessarily small. Be careful closing lid when
children are in the area.
To reduce the risk of fire, explosion, electric shock, or injur
these basic safety precautions:
To reduce the risk of injury when using your refrigerator, follow these basic safety precautions.
y when using your refrigerator, follow
Ŷ 7RSUHYHQWVXIIRFDWLRQDQGHQWUDSPHQWKD]DUGVWR
children, remove the doors of the refrigerator
before disposing of it or discontinuing its use.
Ŷ 7RDYRLGVHULRXVLQMXU\RUGHDWKFKLOGUHQVKRXOGQRW
stand on, or play in or with the appliance.
Ŷ &KLOGUHQDQGSHUVRQVZLWKUHGXFHGSK\VLFDOVHQVRU\
or mental capabilities or lack of experience and
knowledge can use this appliance only if they are
supervised or have been given instructions on safe
use and understand the hazards involved.
Ŷ 7KLVDSSOLDQFHLVLQWHQGHGWREHXVHGLQKRXVHKROG
and similar applications such as: staff kitchen areas
LQVKRSVRIILFHVDQGRWKHUZRUNLQJHQYLURQPHQWV
IDUPKRXVHVE\FOLHQWVLQKRWHOVPRWHOVEHG
EUHDNIDVWDQGRWKHUUHVLGHQWLDOHQYLURQPHQWV
catering and similar non-retail applications.
Ŷ 'RQRWWRXFKWKHFROGVXUIDFHVLQWKHIUHH]HU
compartment when hands are damp or wet, skin
may stick to these extremely cold surfaces.
Ŷ 'RQRWUHIUHH]HIUR]HQIRRGVZKLFKKDYHWKDZHG
completely.
WARNING
This appliance contains isobutane refrigerant,
R600a, a natural gas with high environmental
compatibility. However, it is also combustible.
Adhere to the warnings below to reduce the risk of
injury or property damage.
1. When handling, installing and operating the
appliance, care should be taken to avoid damage to
the refrigerant tubing.
2. Service shall only be performed by authorized
VHUYLFHSHUVRQQHO8VHRQO\PDQXIDFWXUHUDXWKRUL]HG
service parts.
EXPLOSION HAZARD Flammable Refrigerant
3. 'LVSRVHRIDSSOLDQFHLQDFFRUGDQFHZLWK)HGHUDO
DQG/RFDO5HJXODWLRQV)ODPPDEOHUHIULJHUDQWDQG
insulation material used require special disposal
procedures. Contact your local authorities for the
environmentally safe disposal of your appliance.
4. .HHSYHQWLODWLRQRSHQLQJVLQWKHDSSOLDQFH
enclosures or in the built-in structure clear of
obstruction.
5. 'RQRWXVHPHFKDQLFDOGHYLFHVRURWKHUPHDQVWR
accelerate the defrosting process.
6. 'RQRWGDPDJHUHIULJHUDQWFLUFXLW
7. 'RQRWXVHHOHFWULFDODSSOLDQFHVLQVLGHWKHIRRG
storage compartment of the appliance.
STATE OF CALIFORNIA PROPOSITION 65 WARNINGS:
WARNING
This product contains one or more chemicals known to the State of California to cause cancer
and birth defects or other reproductive harm.
READ AND SAVE THESE INSTRUCTIONS
4 29-6144
Page 5
IMPORTANT SAFETY INFORMATION
READ ALL INSTRUCTIONS BEFORE USING THE APPLIANCE
INSTALLATION
SAFETY INFORMATION
WARNING
.HHSIODPPDEOHPDWHULDOVDQGYDSRUVVXFKDVJDVROLQHDZD\IURPrefrigerator)DLOXUHWRGRVRFDQUHVXOWLQfire
explosion, or death.
EXPLOSION HAZARD
CONNECTING ELECTRICITY
WARNING
Plug into a grounded 3-prong outlet.
'RQRWUHPRYHWKHJURXQGSURQJ
'RQRWXVHDQDGDSWHU
'RQRWXVHDQH[WHQVLRQFRUG
)DLOXUHWRIROORZWKHVHLQVWUXFWLRQVFDQUHVXOWLQGHDWKILUHRUHOHFWULFDOVKRFN
Do not, under any circumstances, cut or remove the third (ground) prong from the power cord. For
personal safety, this appliance must be properly grounded.
The power cord of this appliance is equipped with a
3-prong (grounding) plug which mates with a standard
3-prong (grounding) wall outlet to minimize the
possibility of electric shock hazard from this appliance.
Have the wall outlet and circuit checked by a qualified
electrician to make sure the outlet is properly
grounded.
Where a standard 2-prong wall outlet is encountered, it
is your personal responsibility and obligation to have it
replaced with a properly grounded 3-prong wall outlet.
The refrigerator should always be plugged into its
own individual electrical outlet which has a voltage
rating that matches the rating plate.
ELECTRICAL SHOCK HAZARD
A 115 Volt AC, 60 Hz, 15- or 20-amp fused, grounded
electrical supply is required. This provides the best
performance and also prevents overloading house
wiring circuits which could cause a fire hazard from
overheated wires.
Never unplug your refrigerator by pulling on the
power cord. Always grip plug firmly and pull straight
out from the outlet.
Immediately discontinue use of a damaged supply
cord. If the supply cord is damaged, it must be
replaced by a qualified service professional with an
authorized service part from the manufacturer.
When moving the refrigerator away from the wall,
be careful not to roll over or damage the power
cord.
PROPER DISPOSAL OF YOUR OLD APPLIANCE
WARNING
)DLOXUHWRIROORZWKHVHGLVSRVDOLQVWUXFWLRQVFDQUHVXOWLQGHDWKRUVHULRXVLQMXU\
IMPORTANT: Child entrapment and suffocation are not
problems of the past. Junked or abandoned appliances
DUHVWLOOGDQJHURXVHYHQLIWKH\ZLOOVLWIRU³MXVWDIHZ
GD\V´,I\RXDUHJHWWLQJULGRI\RXUROGDSSOLDQFH
please follow the instructions below to help prevent
accidents.
Refrigerant and Foam Disposal:
'LVSRVHRIDSSOLDQFHLQDFFRUGDQFHZLWK)HGHUDODQG/RFDO5HJXODWLRQV)ODPPDEOHUHIULJHUDQWDQGLQVXODWLRQ
material used require special disposal procedures. Contact your local authorities for the environmentally safe
disposal of your appliance.
SUFFOCATION AND ENTRAPMENT HAZARD
Before You Throw Away Your Old Refrigerator:
Ŷ Take off the fresh food and freezer door
Ŷ Leave the baskets in place so that children may not
easily climb inside.
.
READ AND SAVE THESE INSTRUCTIONS
29-6144 5
Page 6
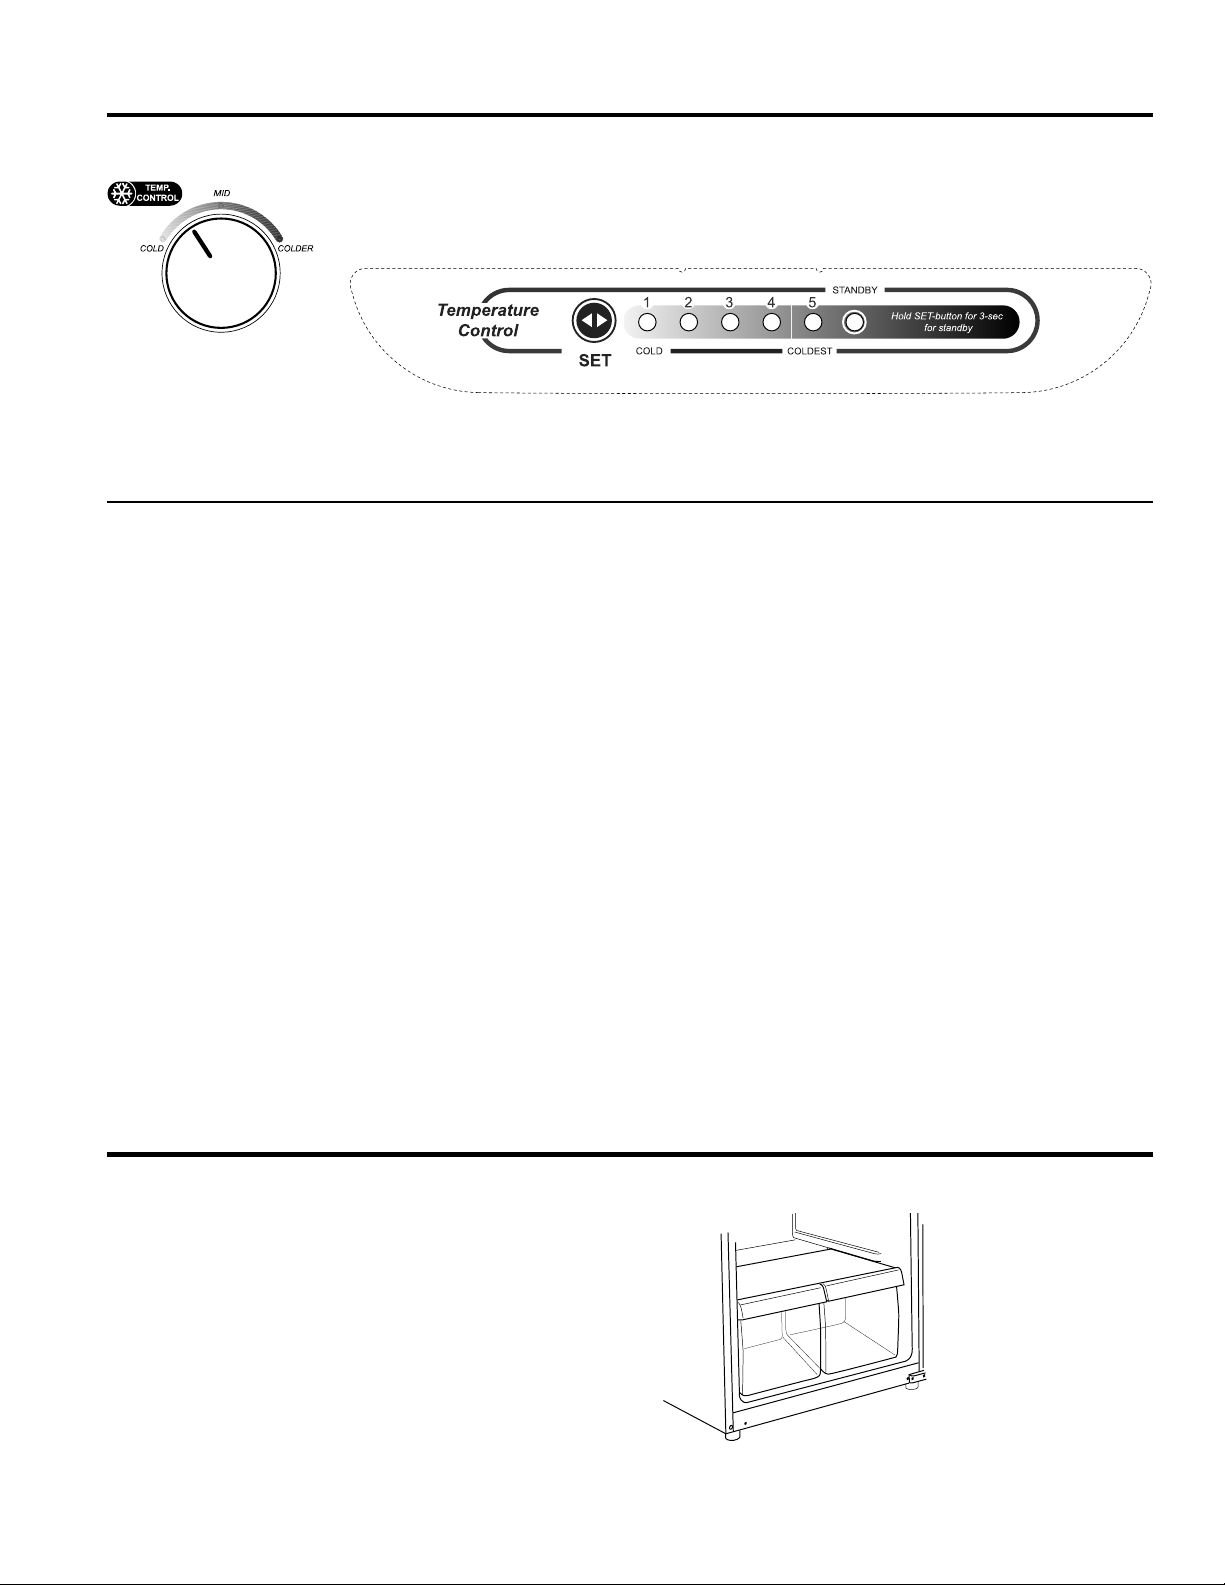
About the controls on the refrigerator
There is a temperature control in the fresh food compartment as well as the freezer compartment. Initially set the control to the recommended normal settings in the fresh food and
freezer compartments. Allow 24 hours for the temperature to stabilize.
Freezer Temp Control
Min is Cold
Middle is Normal
Max is Coldest
Control Settings
Fresh Food Temp Control
1 is cold
5 is coldest
Refrigerator Control
USING THE REFRIGERATOR
When first powered all lights are illuminated for 3 seconds. The factory setting 3 is displayed after 3 seconds.
Change setting by pressing SET key, each time you press
it will advance by 1. Press until the desired setting is
achieved. Adjust controls one increment at a time to determine your preferred setting. Allow 12 hours after each
adjustment for the refrigerator reach the temperature you
have set. Setting 1 is the warmest 5 is the coldest.
Standby Mode
When the refrigerator is in ON, Press SET for 3 seconds
the refrigerator will go into standby mode, the standby indicator light will be on.
Standby setting will stop cooling in both the refrigerator
and freezer compartments but does not shut off electrical
power to the refrigerator.
About the storage drawers
Revert to normal operation by pressing the SET button ,
the standby light will go off, it will go back to the last setting.
After each adjustment, check both the freezer and the
fresh food compartments. Changing the fresh food control
will affect the temperature of the freezer compartment.
Likewise, changing the freezer control can affect the temperature of the fresh food compartment.
Control settings will vary based on personal preferences,
usage and operating conditions and may require more
than one adjustment. Factors that affect temperature include the amount of food in the fresh food and freezer
compartments, frequency of door opening, and temperature of food when placed in either compartment.
Fruit and Vegetable Drawers
These storage drawers provide space to store fruits, vegetables and meats.
To remove and replace the drawers and the cover above
them, the door must be fully opened. In some installations, the refrigerator may have to be moved away from
the wall for the door to be fully opened.
6
29-6144
Page 7
About ice service
Ice Trays
USING THE REFRIGERATOR
To make ice, fill the ice tray with water and set it on a level
surface in the freezer compartment. Ice cubes will form in
a few hours.
To release ice cubes, turn the tray upside down, hold it
over a container and twist both ends.
For only one or two ice cubes, leave the tray right-side up,
twist both ends slightly and remove as many cubes as you
want.
Wash ice trays in lukewarm water only— do not put them
in an automatic dishwasher.
29-6144
7
Page 8

Care and cleaning
Cleaning the Outside
Keep the outside clean. Wipe with a clean cloth lightly
dampened with mild liquid dish detergent. Dry with a
clean, soft cloth.
Do not wipe the stainless steel door with a soiled dishcloth
or wet towel. These may leave a residue that can erode
the finish. Do not use scouring pads, powdered cleaners,
bleach or cleaners containing bleach because these products can scratch and weaken the finish. Use only a liquid
cleanser free of grit and rub in the direction of the brush
lines.
The stainless steel door and door handle can be cleaned
CARE AND CLEANING
with a commercially available stainless steel cleaner.
Cleaners with oxalic acid (e.g. Bar Keepers Friend Soft
Cleanser) will remove rust, lime, and other tarnish. Do not
use appliance wax or polish on the stainless steel.
Protect the paint finish. The finish on the outside of the
refrigerator is a high quality, baked-on paint finish. With
proper care, it will stay new-looking and rust free for
years. Apply a coat of kitchen/appliance wax when the refrigerator is new, and then at least twice a year.
Cleaning the Inside
To help prevent odors, leave an open box of baking
soda in the fresh food and freezer compartments.
Unplug the refrigerator before cleaning.
If this is not practical, wring excess moisture out of
sponge or cloth when cleaning around switches, lights or
controls.
Use warm water and baking soda solution—about a tablespoon (15 ml) of baking soda to a quart (1 liter) of water.
This both cleans and neutralizes odors. Rinse and wipe
dry.
Other parts of the refrigerator—including door gaskets,
fruit and vegetable drawers, and all plastic parts—can be
cleaned the same way.
After cleaning the door gaskets, apply a thin layer of petroleum jelly to the door gaskets at the hinge side. This
helps keep the gaskets from sticking and bending out of
shape.
Do not use cleansing powders or other abrasive cleaners.
Do not wash any plastic refrigerator parts in the dishwasher.
Avoid cleaning cold glass shelves (on some models) with
hot water because the extreme temperature difference
may cause them to break. Handle glass shelves carefully.
Bumping tempered glass can cause it to shatter.
8
29-6144
Page 9
Care and cleaning
Replacing the Light Bulb
CARE AND CLEANING
WARNING
Before replacing a burned-out light bulb, the refrigerator
should be unplugged in order to avoid contact with a live
wire filament (A burned out light bulb may break when being replaced.) Turning the control to the OFF position
does not remove power to the light circuit.
Maximum bulb wattage: 40 W
Unplug the refrigerator
1
The bulb is located at the top of the refrigerator com-
2
partment.
Unfasten screw to remove light cover.
Replace bulb with a new one of the same or lower
3
wattage.
Reattach light cover using screw.
4
Plug the refrigerator back in.
5
Light bulb may be hot.
Preparing for Vacation
CAUTION
housing and light lens.
Using a bulb rated higher than
40W may damage the control
For long vacations or absences, remove food and unplug
the refrigerator. Clean the interior with a baking soda solution of one tablespoon (15 ml) of baking soda to one quart
(1 liter) of water. Leave the doors open.
Preparing to Move
Remove food and unplug the refrigerator. Secure all loose
items such as shelves and drawers by taping them securely in place to prevent damage.
Be sure the refrigerator stays in an upright position during
moving.
29-6144
9
Page 10
Installation
Refrigerator
Instructions
If you have questions, call 1.800.561.3344 or Visit our Website at: www.GEAppliances.ca
BEFORE YOU BEGIN
Read these instructions completely and carefully.
• IMPORTANT – Save these instructions for local
inspector’s use.
• IMPORTANT – Observe all governing codes and
ordinances.
• Note to Installer – Be sure to leave these instruc-
tions with the Consumer.
• Note to Consumer – Keep these instructions for fu-
INSTALLATION INSTRUCTIONS
ture reference.
• Skill level – Installation of this appliance requires basic mechanical skills.
• Completion time – Refrigerator Installation
15 minutes
• Proper installation is the responsibility of the installer.
• Product failure due to improper installation is not covered under the Warranty.
LOCATION REQUIREMENTS
• Do not install the refrigerator where the temperature
will go below 55°F (13°C) because it will not run often
enough to maintain proper temperatures.
• Install it on a floor strong enough to support it fully
loaded.
UNPACKING YOUR REFRIGERATOR
• Remove tape and any labels (except for the rating label) from your refrigerator. Tape or glue residue can
also be removed by rubbing a small amount of liquid
dish soap over the adhesive with your fingers. Wipe
with warm water and dry.
• Do not use sharp instruments, rubbing alcohol, flammable fluids, or abrasive cleaners to remove tape or
glue. These products can damage the surface of
your refrigerator.
• When moving the refrigerator, do not tilt the refrigerator beyond 45° from upright position.
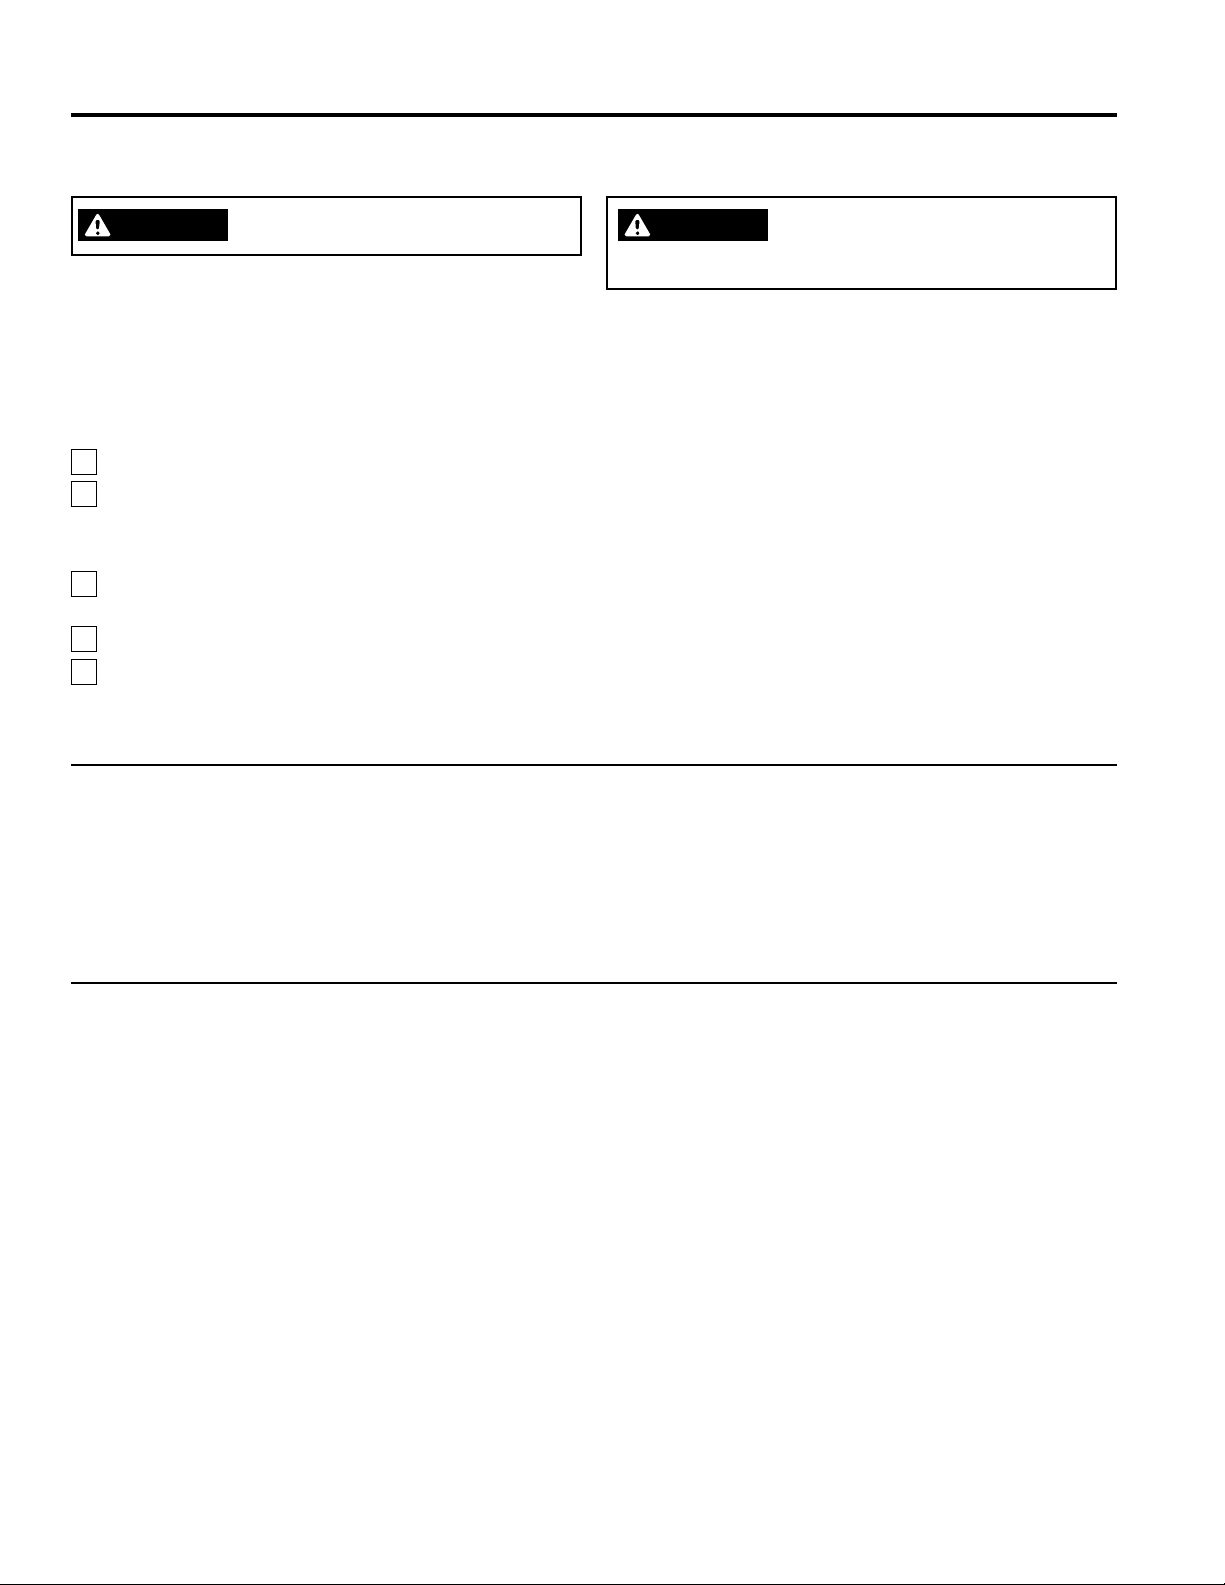
LEVELING LEGS
Adjustable legs at the front corners of the refrigerator
should be set so the refrigerator is firmly positioned on
the floor, and the front is raised just enough that the
door closes easily when opened about halfway.
To adjust the leveling legs, turn the legs clockwise
to raise the refrigerator, counterclockwise to lower
it.
Models GTE18 & GTS18
CLEARANCES
• Free-standing installation only.
• If the refrigerator is being installed next to a wall,
leave sufficient space on the hinge side to allow the
door to swing open enough to access the clear bins
in the refrigerator compartment.
• Do not install within 5” (13 cm) of the range.
• Minimum Clearances:
Back 2” from wall
Sides 3/4”
Top 3/4”
10
To raise the refrigerator
POWER CORD
• Plug the refrigerator power cord into its own properly
grounded wall outlet with a voltage rating matching
that on the refrigerator rating plate.
• Do not use an extension cord.
• Read all safety precautions on pages 2 and 3.
29-6144
Page 11
Installation Instructions
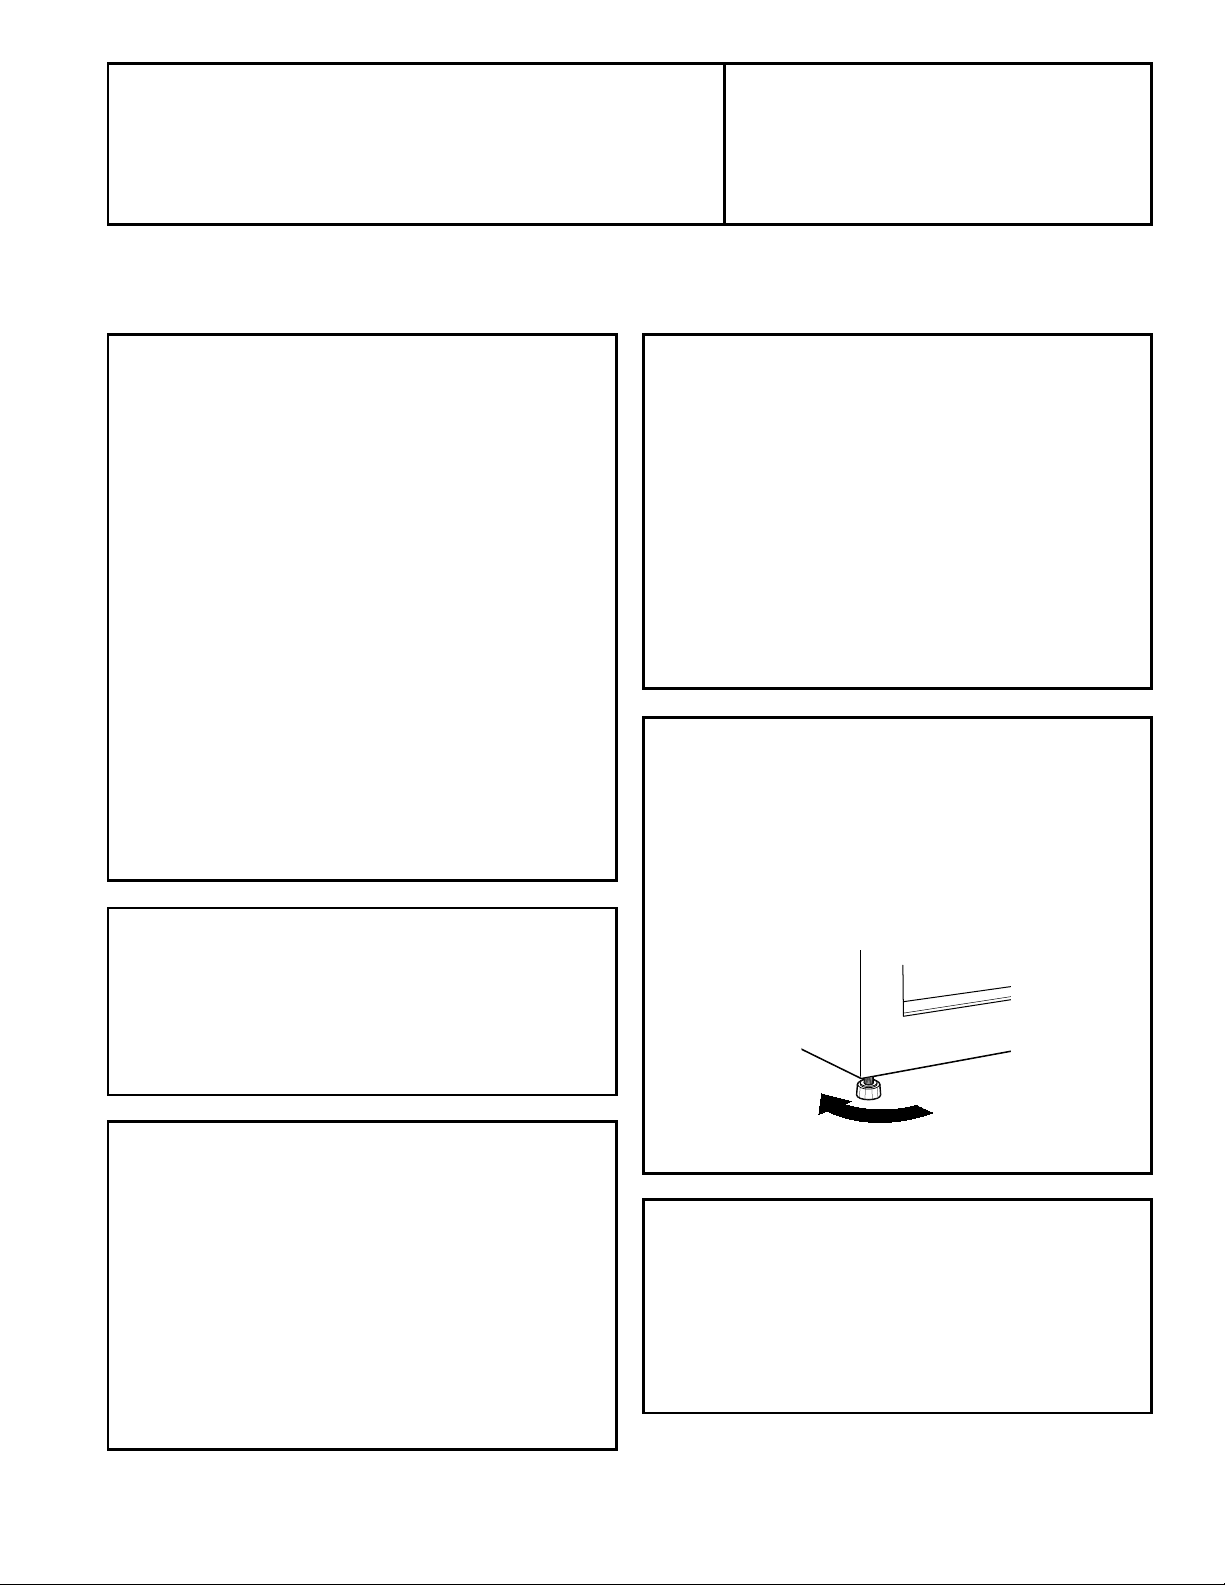
REFRIGERATOR FEATURES (appearance and features may vary)
Freezer Shelf
Control Dial
Temperature
Control Panel
INSTALLATION INSTRUCTIONS
Door Shelf
Dairy Bin
Adjustable
Shelves
Crisper
Cover
Fruit and
Vegetable
Crispers
Leveling legs
All images in this instruction manual are for indication only; please refer to your individual unit for details.
Door Shelf
29-6144
11
Page 12
Installation Instructions
REVERSING THE DOOR SWING
IMPORTANT NOTES
When reversing the door swing:
• Read the instructions all the way through before starting.
• Handle parts carefully to avoid scratching paint.
• Set screws down by their related parts to avoid using
them in the wrong places.
• Provide a non-scratching work surface for the doors.
IMPORTANT: Once you begin, do not move the cabinet until door-swing reversal is completed.
These instructions are for changing the hinges from
the right side to the left side—if you ever want to
change the hinges back to the right side, follow these
same instructions and reverse all references to left and
right.
Unplug the refrigerator from its electrical outlet.
INSTALLATION INSTRUCTIONS
NOTE: Do not let either door drop to the floor. To do so
could damage the door stop.
CAUTION
both hands to secure the doors before lifting.
Lifting Hazard. The Fresh Food
and Freezer doors are heavy Use
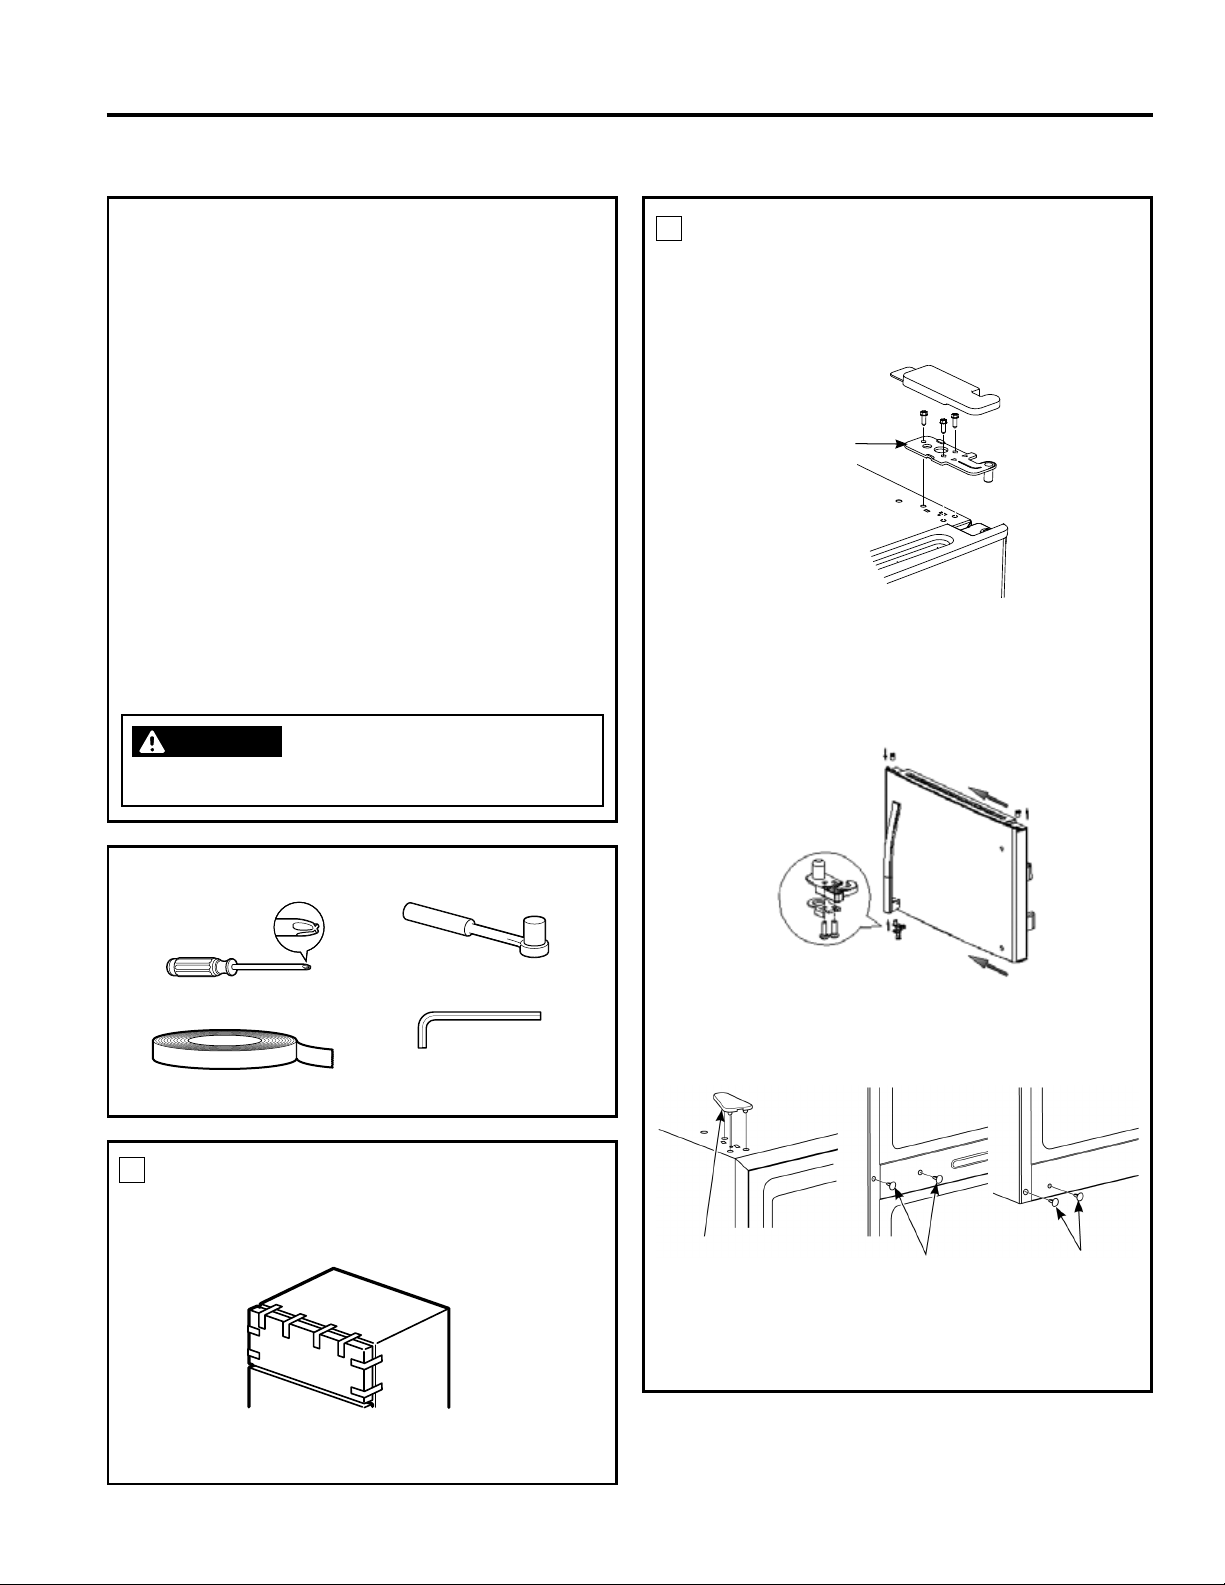
REMOVE FREEZER DOOR (CONT.)
1
4. Remove the three screws with a 5/16? socket
and ratchet, then lift the hinge straight up to free
the hinge pin from the socket in the top of the
door.
Top Hinge
5. Remove the tape and tilt the door away from the
cabinet. Lift it off the center hinge pin.
6. Transfer plastic bushing from right side of top of
freezer door to the left side.
TOOLS YOU WILL NEED
Phillips screwdriver
Masking tape
REMOVE FREEZER DOOR
1
1. Remove all food from the inner door liner..
2. Tape the door shut with masking tape.
3. Remove the hinge cover on top of the freezer door
with a thin-blade screwdriver.
5/16" socket and ratchet
Allen wrench (Stainless
Steel Handle Models)
7. Remove the hole covers with a putty knife on
the opposite side of the three hinges.
Hole Cover
Center Hinge
Hole Covers
8. Set the door on a non-scratching surface with
the inside up.
Bottom Hinge
Hole Covers
12
29-6144
Page 13

Installation Instructions
REVERSING THE DOOR SWING (CONT.)
INSTALLATION INSTRUCTIONS
REMOVE REFRIGERATOR DOOR
2
1. Remove all food from the inner door liner.
2. Tape the door shut with masking tape.
3. Remove the center hinge by removing two
hinge screws with a 5/16? socket and ratchet.
Save the center hinge and screws.
4. Remove the tape and tilt the door away from
the cabinet. Lift the door straight up to free its
bottom socket from the pin in the bottom hinge
bracket.
5. Transfer plastic bushing from right side of top of
refrigerator door to the left side.
TRANSFER BOTTOM HINGE TO THE
3
LEFT
1. Using a 5/16" Socket
and ratchet, remove
the 2 screws from the
bottom hinge.
2. Move the bottom hinge
pin from the right to the
left side with a thinblade screwdriver until
the shoulder of the
hinge pin is touching
the hinge.
3. Move the bottom hinge
from the right to the left
side and tighten the 2
screws.
4. Install the 2 hole plugs
from the opposite side
of the cabinet to the
screw holes vacated
by the bottom hinge removal.
6. Set the door on a non-scratching surface with
the inside up.
7. Install the 2 hole plugs from the opposite side of
the cabinet to the screw holes vacated by the
center hinge removal.
29-6144
TRANSFER DOOR STOP TO THE LEFT
4
1. On both the refrigerator and freezer doors, remove the screws from the door stop on the
right with a Phillips screwdriver.
2. Install the door stop on the left of each door.
13
Page 14

Installation Instructions
REVERSING THE DOOR SWING (CONT.)
REVERSING DOOR HANDLES —
5
TRANSFER FREEZER DOOR HANDLE
TO THE LEFT SIDE
1. Loosen the set screws on the handle with 1/8”
wrench and remove handle.
INSTALLATION INSTRUCTIONS
2. Remove the fasteners from the surface of the
freezer door, and cover the new vacant holes..
3. Remove the plug buttons from the surface of
the right side of the refrigerator door and insert
the fasteners with a Phillips screwdriver.
REVERSING DOOR HANDLES —
6
TRANSFER REFRIGERATOR DOOR
HANDLE TO THE LEFT SIDE
1. Loosen set screws on handle with 1/8” wrench
and remove handle.
2. Remove the fastener from the surface of the refrigerator door, and cover the new vacant hole
with the plug from the opposite side.
3. Insert the fastener into the surface of the right
side of the freezer door with a Phillips screwdriver.
14
4. Attach handle to freezer door with screws at the
top of the handle. Use 1/8” allen wrench to
tighten the set screws.
NOTE: Do not overtighten.
4. Attach the handle to the freezer door with set
screws. Use 1/8” allen wrench to tighten the set
screws.
NOTE: Do not overtighten.
29-6144
Page 15

Installation Instructions
REVERSING THE DOOR SWING (CONT.)
INSTALLATION INSTRUCTIONS
REHANG THE REFRIGERATOR DOOR
7
1. Lower the refrigerator door onto the bottom
hinge pin.
2. While holding the door securely, use the new
left-hand middle hinge from the accessory kit
insert hinge pin into socket in door. Attach the
center hinge with two screws with a 5/16"
socket and ratchet.
REHANG THE FREEZER DOOR
8
1. Lower the freezer door onto the center hinge
pin.
2. Place the left top hinge so the pin fits into the
door socket. (Left top hinge and cover can be
found inside of the product. Call GE A Appliances service support at 800.561.3344 if parts
are missing. Support the door on the handle
side and make sure the door is straight and the
gap between the doors is even across the front.
While holding the door in place, tighten the top
hinge screws. Do not overtighten these screws.
Tighten them until they are just snug, and then
turn them another one-half turn.
29-6144
3. Snap the left top hinge cover over the hinge.
15
Page 16

Normal operating sounds.
Newer refrigerators sound different from older refrigerators. Modern refrigerators have more features and use newer
technology.
Do you hear what I hear? These sounds are normal.
HUMMM...
WHOOSH...
The new high efficiency compressor may run faster
and longer than your old refrigerator and you may hear
a high-pitched hum or pulsating sound while it is operating.
You may hear a whooshing sound when the doors
TROUBLESHOOTING TIPS
close. This is due to pressure equalizing within the refrigerator.
CLICKS, POPS,
CRACKS and CHIRPS
You may hear cracking or popping sounds when the refrigerator is first plugged in. This happens as the refrigerator cools to the correct temperature.
The compressor may cause a clicking or chirping
sound when attempting to restart (this could take up to
5 minutes).
Expansion and contraction of cooling coils during and
after defrost can cause a cracking or popping sound.
On models with an ice maker, after an ice making
cycle, you may hear the ice cubes dropping into the ice
bucket.
WHIR!
You may hear the fans spinning at high speeds. This
happens when the refrigerator is first plugged in, when
the doors are opened frequently or when a large
amount of food is added to the refrigerator or freezer
compartments. The fans are helping to maintain the
correct temperatures.
WATER SOUNDS
The flow of refrigerant through the freezer cooling coils
may make a gurgling noise like boiling water.
Water dropping on the defrost heater can cause a sizzling, popping or buzzing sound during the defrost
cycle.
A water dripping noise may occur during the
defrostcycle as ice melts from the evaporator and flows
into the drain pan.
Closing the door may cause a gurgling sound due to
pressure equalization.
16
29-6144
Page 17

Troubleshooting tips... Before you call for service
Problem Possible Causes What To Do
TROUBLESHOOTING TIPS
Refrigerator does not
operate
Vibration or rattling
(slight vibration is normal)
Motor operates for
long periods or cycles
on and off frequently.
(Modern refrigerators
with more storage
space and a larger
freezer require more
operating time. They
start and stop often to
maintain even temperatures.)
Fresh food or freezer
compartment too warm
Refrigerator in defrost cycle. Wait about 30 minutes for defrost cycle to end.
Refrigerator is unplugged. Push the plug completely into the outlet.
The fuse is blown/circuit breaker is
tripped.
Front leveling legs need adjusting. See Leveling Legs.
Normal when refrigerator is first
plugged in.
Often occurs when large amounts
of food are placed in refrigerator.
Door left open. Check to see if a package is holding door open.
Hot weather or frequent door openings.
Temperature control set at the
coldest setting.
Temperature control not set cold
enough.
Replace fuse or reset the breaker.
Wait 24 hours for the refrigerator to completely
cool down.
This is normal.
This is normal.
See About the control.
See About the control.
Warm weather or frequent door
openings.
Door left open. Check to see if a package is holding door open.
Frost or ice crystals on
frozen food (frost
within package is normal)
Ice cubes have odor/
taste
Slow ice cube freezing Door left open. Check to see if package is holding door open.
Refrigerator has odor Foods transmitting odor to refrig-
Door left open. Check to see if a package is holding door open.
Too frequent or too long door
openings.
Food transmitting odor/taste to ice
cubes.
Interior of refrigerator needs cleaning.
Temperature control not set cold
enough.
erator.
Interior needs cleaning. See Care and cleaning.
Set the temperature control one step colder. See
About the control.
Wrap foods well.
See Care and cleaning.
See About the control.
Foods with strong odors should be tightly wrapped.
Keep an open box of baking soda in the refrigerator; replace every three months.
Moisture forms on outside of refrigerator
29-6144
Not unusual during periods of high
humidity.
Wipe surface dry.
17
Page 18

Troubleshooting tips... Before you call for service
Problem Possible Causes What To Do
Moisture collects inside (in humid weather,
air carries moisture
into refrigerator when
doors are opened).
Interior light does not
work.
Food is freezing in the
refrigerator
Too frequent or too long door
openings.
No power at outlet. Replace fuse or reset the breaker.
Light bulb burned out. See Replacing the light bulb.
Food too close to the air vent at the
back of the refrigerator.
Refrigerator control is set too cold. Move the refrigerator control to a warmer tempera-
TROUBLESHOOTING TIPS
Rust, tarnish, or grime
on stainless steel
doors
Moist environment or salt air. Clean stainless steel with cleaners containing ox-
Move the food away from the air vent.
ture setting one increment at a time. See About the
controls.
alic acid (e.g. Bar Keepers Friend Soft Cleanser)
will remove rust, lime, and other tarnish. Do not
wipe the refrigerator with a soiled dish cloth or wet
towel. Do not use scouring pads, powdered cleaners, bleach or cleaners containing bleach because
these products can scratch and ruin the brush finish of the stainless steel.
18
29-6144
Page 19

GE Appliances Refrigerator Warranty
GEAppliances.com
For US Customers, all warranty service provided by our Factory Service Centers, or an authorized Customer Care®
technician. To schedule service, on-line, 24 hours a day, visit us at GEAppliances.com, or call 800.GE.CARES
(800.432.2737). Please have serial number and model number available when calling for service.
In Canada, call 800.561.3344.
Servicing your refrigerator may require the use of the onboard data port for diagnostics. This gives a GE
Appliances Factory Service Technician the ability to quickly diagnose any issues with your appliance and
helps GE Appliances improve its products by providing GE Appliances with information on your appliance. If
you do not want your appliance data to be sent to GE Appliances, please advise your technician NOT to
submit the data to GE Appliances at the time of service.
For the Period of: GE Appliances Will Replace
One Year
From the date of the
original purchase
What GE Appliances will not cover:
Service trips to your home to teach you how to use the
product.
Improper installation, delivery or maintenance.
Failure of the product if it is abused, misused, or used
for other than the intended purpose or used
commercially.
Loss of food due to spoilage.
Replacement of house fuses or resetting of circuit
breakers.
Damage caused after delivery.
Replacement of the water filter cartridge, if included due
to water pressure that is outside the specified operating
range or due to excessive sediment in the water supply.
Replacement of the light bulbs, if included, or water
filter cartridge, if included, other than as noted above.
Any part of the refrigerator which fails due to a defect in materials or workmanship.
During the limited one-year warranty, GE Appliances will also provide, free of charge,
all labor and related service to replace the defective part.
Damage to the product caused by accident, fire, floods
or acts of God.
Incidental or consequential damage caused by possible
defects with this appliance.
Product not accessible to provide required service.
Damage caused by a non-GE Brand water filter.
Damage to finish (rust, tarnish, or small blemishes)
must be reported within 48 hours following delivery of
appliance.
Products which are not defective, broken, or which are
working as described in the owner’s manual.
WARRANTY
Staple your receipt here. Proof of the original purchase
date is needed to obtain service under the warranty.
WARRANTOR IS NOT RESPONSIBLE FOR CONSEQUENTIAL DAMAGES.
EXCLUSION OF IMPLIED WARRANTIES
Your sole and exclusive remedy is product repair as provided in this Limited Warranty. Any implied warranties,
including the implied warranties of merchantability or fitness for a particular purpose, are limited to one year or the
shortest period allowed by law.
For US Customers: This warranty is extended to the original purchaser and any succeeding owner for products
purchased for home use within the USA. If the product is located in an area where service by an Authorized Servicer is
not available, you may be responsible for a trip charge or you may be required to bring the product to an Authorized
Service location for service. In Alaska, the warranty excludes the cost of shipping or service calls to your home.
Some states do not allow the exclusion or limitation of incidental or consequential damages. This warranty gives you
specific legal rights, and you may also have other rights which vary from state to state. To know what your legal rights
are, consult your local or state consumer affairs office or your state's Attorney General.
Warrantor US: General Electric Company. Louisville, KY 40225
For Customers in Canada: This warranty is extended to the original purchaser and any succeeding owner for
products purchased in Canada for home use within Canada. In-home warrant service will be provided in areas where it
is available and deemed reasonable by MC Commercial Inc. to provide.
Warrantor Canada: MC Commercial Inc., Burlington, Ontario, L7R 5B6
29-6144
19
Page 20

Consumer Support
GE Appliances Website
Have a question or need assistance with your appliance? Try the GE Appliances Website 24 hours a day, any day of
the year! You can also shop for more great GE Appliances products and take advantage of all our on-line support
services designed for your convenience. In the US: GEAppliances.com
Register Your Appliance
Register your new appliance on-line at your convenience! Timely product registration will allow for enhanced
communication and prompt service under the terms of your warranty, should the need arise. You may also mail in the
pre-printed registration card included in the packing material. In the US: GEAppliances.com/register
Schedule Service
CONSUMER SUPPORT
Expert GE Appliances repair service is only one step away from your door. Get on-line and schedule your service at
your convenience any day of the year. In the US: GEAppliances.com/ge/service-and-support/service.htm or call
800.432.2737 during normal business hours.
Extended Warranties
Purchase a GE Appliances extended warranty and learn about special discounts that are available while your warranty
is still in effect. You can purchase it on-line anytime. GE Appliances Services will still be there after your warranty
expires. In the US: GEAppliances.com/ge/service-and-support/shop-for-extended-service-plans.htm or call
800.626.2224 during normal business hours.
Remote Connectivity
For assistance with wireless network connectivity (for models with remote enable), visit our website at
GEAppliances.com/ge/connected-appliances/ or call 800.220.6899 in the US.
Parts and Accessories
Individuals qualified to service their own appliances can have parts or accessories sent directly to their homes (VISA,
MasterCard and Discover cards are accepted). Order on-line today 24 hours every day.
In the US: GEApplianceparts.com or by phone at 877.959.8688 during normal business hours.
Instructions contained in this manual cover procedures to be performed by any user. Other servicing generally
should be referred to qualified service personnel. Caution must be exercised, since improper servicing may
cause unsafe operation.
Contact Us
If you are not satisfied with the service you receive from GE Appliances, contact us on our Website with all the details
including your phone number, or write to:
In the US: General Manager, Customer Relations | GE Appliances, Appliance Park | Louisville, KY 40225
GEAppliances.com/ge/service-and-support/contact.htm
20
29-6144
Page 21

SÉCURITÉ . . . . . . . . . . . . . . . . . . . . . . . . . 4
UTILISATION
Réglage des commandes . . . . . . . . . . . . . . . 6
Bacs de rangement . . . . . . . . . . . . . . . . . . . . 6
Production de glace . . . . . . . . . . . . . . . . . . . . 7
ENTRETIEN ET NETTOYAGE . . . 8
INSTRUCTIONS
D'INSTALLATION
Avant de commencer . . . . . . . . . . . . . . . . . . 10
Composants du réfrigérateur . . . . . . . . . . . 11
Inversion de la porte . . . . . . . . . . . . . . . . 12-15
CONSEILS DE DÉPANNAGE
Bruits normaux de fonctionnement . . . . . . 16
Avant d'appeller un réparateur . . . . . . . 17, 18
GARANTIE . . . . . . . . . . . . . . . . . . . . . . . . 19
SERVICE À LA CLIENTÈLE . . . . . 20
MANUEL
D’UTILISATION ET
D'INSTALLATION
GTE18
GTS18
29-6144
Inscrivez ci-dessous les numéros
de modèle et de série
N° de modèle
N° de série
Vous les trouvez sur une étiquette
dans le coin supérieur gauche du
compartiment réfrigérateur.
GE est une marque déposée de General Electric Company. Fabriqué sous licence de marque.
Page 22

29-6144
MERCI DE PERMETTRE À ÉLECTROMÉNAGERS GE DE FAIRE PARTIE
DE VOTRE FOYER.
Que vous ayez grandi avec des électroménagers GE ou qu'il s'agisse de votre premier appareil GE,
nous sommes heureux de vous avoir dans la famille.
Nous sommes fiers du savoir-faire, de l'innovation et du design qui font partie intégrante de tous les
électroménagers GE que nous fabriquons, et nous pensons que vous le serez aussi. À cet égard,
l'enregistrement de votre appareil nous assure que nous pourrons vous fournir des informations
importantes sur votre appareil et des détails sur sa garantie si vous en avez besoin.
Enregistrez votre électroménager GE en ligne dès maintenant. Des sites Web et des numéros de
téléphone utiles sont disponibles dans la section « Service à la clientèle » de ce manuel de l'utilisateur.
Vous pouvez également envoyer par courrier la carte d'enregistrement préimprimée qui se trouve dans
l'emballage de votre appareil.
2
Page 23

Notes
BIENVENUE
29-6144
3
Page 24

INSTRUCTIONS IMPORTANTES DE SÉCURITÉ
LIRE TOUTES LES INSTRUCTIONS AVANT D'UTILISER L'APPAREIL
AVERTISSEMENT
Ŷ &HFRQJpODWHXUGRLWrWUHFRUUHFWHPHQWLQVWDOOp
conformément aux Consignes d’Installation avant toute
utilisation.
Ŷ 'pEUDQFKH]OH
UpSDUDWLRQGHUHPSODFHUXQHDPSRXOHRXGHOHQHWWR\HU
Remarque
déconnectée par aucune des fonctions sur le panneau
de commande.
Remarque : Les réparations doivent être effectuées par
un professionnel qualifié.
Ŷ 5HPHWWH]WRXWHVOHVSLqFHVHWSDQQHDX[HQSODFHDYDQW
d’utiliser l’appareil.
Ŷ $EVWHQH]YRXVG¶HQWUHSRVHURXG¶XWLOLVHUGHO¶HVVHQFHRX
d’autres vapeurs et liquides inflammables aux alentours de
cet électroménager ou d’autres appareils.
Ŷ 1¶HQWUHSRVH]SDVGDQVFHWpOHFWURPpQDJHUGHV
substances explosives telles que des bombes aérosols qui
INFORMATION DE SÉCURITÉ
contiennent un gaz propulseur.
Ŷ 1¶XWLOLVH]SDVGHFRUGRQGHUDOORQJH
ATTENTION
Ŷ 1HQHWWR\H]SDVOHréfrigérateurDYHFGHO¶HDXWLqGHTXDQG
celui-ci est froid. Les composants peuvent se casser
s’ils sont exposés à des changements soudains de
température ou si vous les cognez ou les faites tomber.
Ŷ eORLJQH]OHVGRLJWVGHVSDUWLHVGXréfrigérateurRO¶RQSHXW
facilement se pincer : les espaces entre le couvercle et
ODFXYHVRQWWRXMRXUVpWURLWV6R\H]SUXGHQWORUVTXHYRXV
fermez le couvercle en présence d’enfants.
réfrigérateurDYDQWG¶HIIHFWXHUXQH
: L’alimentation du réfrigérateur ne peut être
Pour réduire le risque de blessures lorsque vous utilisez votre réfrigérateur veuillez suivre les consignes de
Pour réduire le risque d’incendie, d’explosion, de choc électrique ou de blessures lorsque vous
utilisez votre r
sécurité suivantes :
éfrigérateur, veuillez suivre ces consignes de sécurité :
Ŷ 3RXUpYLWHUWRXWULVTXHGHVXIIRFDWLRQRXG¶HQIHUPHPHQW
retirez le couvercle d’un réfrigérateur avant de le mettre
rebut ou si vous arrêtez de l’utiliser.
au
Ŷ $ILQGHSUpYHQLUOHVDFFLGHQWVJUDYHVRXODPRUWOHV
enfants
l’électroménager.
Ŷ /HVHQIDQWVHWOHVSHUVRQQHVGRQWOHVFDSDFLWpVVRQW
UpGXLWHVVXUOHSODQSK\VLTXHVHQVRULHORXPHQWDORXTXL
manquent d’expérience ou de connaissances, peuvent
utiliser cet électroménager seulement si elles sont
surveillées ou ont reçues des consignes de sécurité sur
VRQXVDJHHWOHVULVTXHV\VRQWDVVRFLpV
Ŷ &HWpOHFWURPpQDJHUHVWFRQoXSRXUXQHXWLOLVDWLRQ
domestique et applications similaires : salle du personnel
dans une usine, un bureau ou d’autres lieux de travail;
maison de ferme; clients dans un hôtel, un motel, un gîte
touristique et d’autres lieux résidentiels; approvisionnement
et applications similaires non reliées au commerce de
détail.
Ŷ 1HWRXFKH]SDVOHVVXUIDFHVIURLGHVGXréfrigérateur
lorsque vous avez les mains humides ou mouillées. La
peau risque d’adhérer à ces surfaces extrêmement froides.
Ŷ 1HUHFRQJHOH]SDVOHVDOLPHQWVVXUJHOpVTXLRQW
complètement dégelé.
ne doivent pas se tenir ni jouer dans ou sur
AVERTISSEMENT
Cet électroménager contient le réfrigérant isobutane,
R600a, un gaz naturel à compatibilité élevée avec
l’environnement. Il s’agit cependant d’un combustible.
Observez les consignes de sécurité ci-dessous afin
de réduire le risque de blessure ou de dommage à la
propriété.
1. Lors de la manipulation, de l’installation et de l’utilisation de
cet appareil, prenez soin de ne pas endommager les tubes
de circulation du fluide frigorigène.
2. L’entretien ou la réparation doivent être effectués par un
personnel de service autorisé. Utilisez seulement des
pièces de rechange autorisées par le fabricant.
RISQUE D’EXPLOSION Fluide frigorigène inflammable
3. Mettez le appareil au rebut conformément aux
réglementations fédérales et locales. Le fluide frigorigène
inflammable et le matériel isolant utilisés nécessitent des
procédures de mise au rebut spéciales. Communiquez
avec les autorités locales compétentes pour la mise au
rebut de votre appareil sans danger pour l’environnement.
4. 1¶REVWUXH]SDVOHVpYHQWVGDQVO¶HQFHLQWHSUpYXHSRXU
l’appareil.
5.1¶XWLOLVH]SDVG¶DSSDUHLOVRXDXWUHVPR\HQVPpFDQLTXHV
pour accélérer le processus de dégivrage.
6. 1¶HQGRPPDJH]SDVOHFLUFXLWGXIOXLGHIULJRULJqQH
7. 1¶XWLOLVH]SDVG¶DSSDUHLOVpOHFWULTXHVGDQVOHFRPSDUWLPHQW
réfrigérateur de cet appareil.
AVERTISSEMENTS DE LA PROPOSITION 65 DE L’ÉTAT DE LA CALIFORNIE:
AVERTISSEMENT
Ce produit contient une ou plusieurs substances chimiques reconnues par l’État de Californie pour
causer le cancer et des anomalies congénitales ou d’autres problèmes liés à la reproduction.
LIRE ET CONSERVER CES INSTRUCTIONS
4 29-6144
Page 25

INSTRUCTIONS IMPORTANTES DE SÉCURITÉ
LIRE TOUTES LES INSTRUCTIONS AVANT D'UTILISER L'APPAREIL
INSTALLATION
INFORMATION DE SÉCURITÉ
AVERTISSEMENT
Conservez les matériaux et vapeurs inflammables tels que l’essence à l’écart de votre appareil. Une explosion, un incendie
voire la mort pourrait en résulter.
Risque d’explosion.
BRANCHEMENTS ÉLECTRIQUES
AVERTISSEMENT
Branchez l’appareil dans une prise triple avec terre.
1HUHWLUH]SDVODEURFKHGHWHUUH
1¶XWLOLVH]SDVG¶DGDSWDWHXU
1¶XWLOLVH]SDVGHFRUGRQGHUDOORQJH
Le non-respect de ces instructions peut entraîner des risques d’incendies, des chocs électriques ou la mort.
Ne coupez ni retirez en aucun cas la troisième broche (mise à la terre) de la fiche du cordon d’alimentation. Pour
votre sécurité, cet appareil doit être correctement mis à la terre.
Le cordon d’alimentation de cet appareil est muni d’une fiche
à 3 broches (mise à la terre) qui se branche dans une prise
murale ordinaire à 3 alvéoles (mise à la terre) pour réduire au
minimum les risques de chocs électriques.
Faites examiner la prise de courant et le circuit par un
électricien qualifié pour vous assurer que la prise est
correctement mise à la terre.
'DQVOHFDVG¶XQHSULVHELSKDVpHO¶LQVWDOODWHXUDOD
responsabilité et l’obligation de la remplacer par une prise
WULSKDVpHFRUUHFWHPHQWPLVHjODWHUUH1¶XWLOLVH]SDV
d’adaptateur.
Le réfrigérateur doit toujours être branché dans sa propre
prise de courant, dont la tension nominale est identique à
celle indiquée sur la plaque signalétique.
8QHDOLPHQWDWLRQpOHFWULTXHjYROWV&$+]DYHF
XQIXVLEOHGHRXDPSqUHVHWXQHPLVHjODWHUUHHVW
nécessaire. Ceci permet d’obtenir un meilleur rendement et
RISQUE DE CHOC ÉLECTRIQUE.
évite de surcharger les circuits électriques du domicile qui
risque d’occasionner un incendie en surchauffant.
1HGpEUDQFKH]MDPDLVOHFRQJpODWHXUHQWLUDQWVXUOHFRUGRQ
d’alimentation. Saisissez fermement la fiche du cordon et
tirez droit pour la retirer de la prise.
Cessez immédiatement d’utiliser un cordon électrique
endommagé. Si le cordon électrique est endommagé,
son remplacement doit être effectué par un technicien en
UpSDUDWLRQTXDOLILpDXPR\HQG¶XQFRUGRQGHUHFKDQJH
autorisé par le fabricant.
Lorsque vous déplacez votre congélateur du mur, faites
attention de ne pas le faire rouler sur le cordon d’alimentation
afin de ne pas l’endommager.
MISE AU REBUT APPROPRIÉE DE VOTRE ANCIEN RÉFRIGÉRATEUR
AVERTISSEMENT
Le non-respect de ces instructions d'élimination peut entraîner la mort ou des blessures graves.
IMPORTANT: /HVHQIDQWVSULVDXSLqJHRXPRUWVG¶DVSK\[LH
sont toujours d’actualité. Les réfrigérateurs et réfrigérateur
abandonnés sont toujours aussi dangereux, même si on
n’attend que «quelques jours» pour s’en débarrasser. Si vous
ne gardez pas votre ancien réfrigérateur ou congélateur,
veuillez suivre les directives ci-dessous afin de prévenir les
accidents.
Mise au rebut des produits réfrigérants et en mousse
Mettez l’électroménager au rebut conformément à la réglementation fédérale et locale. Le fluide frigorigène inflammable et le
matériel isolant utilisés nécessitent des procédures de mise au rebut spéciales. Communiquez avec les autorités locales pour
connaître la façon de mettre votre électroménager au rebut qui soit respectueuse de l’environnement.
RISQUE DE SUFFOQUER OU D’Y ÊTRE EMPRISONNÉ
Avant de vous débarrasser de votre ancien réfrigérateur
ou congélateur :
Ŷ'pPRQWH]OHFRXYHUFOHGXréfrigérateur
Ŷ/DLVVH]OHVFOD\HWWHVHQSODFHDILQG¶HPSrFKHUOHVHQIDQWV
de grimper à l’intérieur.
LIRE ET CONSERVER CES INSTRUCTIONS
29-6144 5
Page 26

À propos du bouton de commande du réfrigérateur
Une commande de température se trouve dans les compartiments réfrigérateur et congélateur.
Au début, réglez les commandes aux valeurs normales recommandées pour les
compartiments réfrigérateur et congélateur. Allouez 24 heures pour la stabilisation de la
température.
Commande de température du
Max correspond à Le plus froid
congélateur
Min correspond à Froid
Middle correspond à Normal
Réglage des commandes
Commande du réfrigérateur
En mettant l’appareil sous tension pour la première fois, tous
les voyants s’allument pendant 3 secondes. Le réglage d’usine
3 s’affiche après 3 secondes.
Vous pouvez changer le réglage en appuyant sur la touche
SET (réglage). Chaque fois que vous appuyez sur la touche, le
réglage augmente de 1. Appuyez sur la touche jusqu’à ce que
UTILISATION DU RÉFRIGÉRATEUR
le réglage désiré s’affiche. Ajustez les commandes d’un
incrément à la fois pour déterminer votre réglage préféré.
Attendez 12 heures pour que la température du réfrigérateur
atteigne la température que vous avez programmée. Le
réglage 1 est le niveau de température le plus chaud alors que
le réglage 5 est le niveau le plus froid.
Commande de température du réfrigérateur
1 correspond à Froid
5 correspond à Le plus froid
Mode veille
Lorsque le réfrigérateur est en marche (ON), appuyer sur la
touche SET (réglage) pendant 3 secondes permet de mettre le
réfrigérateur en mode veille (le voyant du mode veille
s’allumera).
Le réglage en mode veille arrêtera le refroidissement des
compartiments réfrigérateur et congélateur, mais ne coupe pas
l’alimentation électrique du réfrigérateur.
Pour retourner au fonctionnement normal, appuyez sur la
touche SET (réglage). Le voyant de mise en veille s’éteindra et
le réfrigérateur retournera au dernier réglage.
Après chaque réglage, vérifiez les deux compartiments,
réfrigérateur et congélateur. Une modification de la commande
réfrigérateur aura un effet sur la température du compartiment
congélateur. L’inverse est aussi vrai, une modification de la
commande congélateur aura un effet sur la température du
compartiment réfrigérateur.
Les réglages vont varier en fonction de vos préférences et des
conditions d’utilisation, et ils peuvent nécessiter plus d’un
ajustement. Parmi les facteurs qui influencent la température,
mentionnons la quantité de nourriture dans les compartiments
réfrigérateur et congélateur, la fréquence d’ouverture des
portes et la température de l’aliment lorsqu’il est placé dans un
des compartiments.
À propos des bacs de rangement
Bacs à légumes et à fruits
Ces bacs de rangement procurent de l’espace pour les fruits,
les légumes et la viande.
Pour enlever et replacer les bacs et le couvercle au-dessus
d’eux, la porte doit être entièrement ouverte. Dans certaines
installations, il peut s’avérer nécessaire d’éloigner le
réfrigérateur du mur pour obtenir une ouverture totale de la
porte.
6
29-6144
Page 27

À propos de la production de glaçons
Moules à glaçons
Pour produire de la glace, remplissez le moule à glaçons avec
de l’eau et placez-le sur une surface de niveau dans le
compartiment congélateur. Les cubes de glace se formeront en
quelques heures.
Pour libérer les cubes, tournez le moule à l’envers en le
maintenant au-dessus d’un récipient et tordez les deux
extrémités.
Pour obtenir un ou deux cubes seulement, tenez le moule à
l’endroit, tordez-le légèrement et sortez le nombre de glaçons
dont vous avez besoin.
Lavez les moules à glaçons avec de l’eau tiède seulement. Ne
les placez pas dans un lave-vaisselle automatique.
UTILISATION DU RÉFRIGÉRATEUR
29-6144
7
Page 28

Entretien et nettoyage de votre réfrigérateur
Nettoyage de l’extérieur
Conservez l’extérieur propre. Essuyez avec un linge propre
légèrement humecté de détersif liquide à vaisselle doux.
Séchez et polissez avec un linge doux, propre.
N’essuyez pas la porte en acier inoxydable avec un linge à
vaisselle souillé ou une serviette mouillée. Ils peuvent laisser
un résidu susceptible d’éroder le fini. N’utilisez pas de tampons
à récurer, de nettoyants en poudre, de javellisants ni de
nettoyants qui contiennent du javellisant puisque ces produits
peuvent rayer et détériorer le fini.
Utilisez uniquement un nettoyant liquide exempt d’abrasif et
frottez dans la direction des lignes de brosse.
La porte et la poignée de porte en acier inoxydable peuvent se
nettoyer à l’aide d’un nettoyant pour acier inoxydable offert
dans le commerce. Les nettoyants à l’acide oxalique (p.ex. le
produit Bar Keepers Friend Soft Cleanser) vont enlever la
rouille, le calcaire et autres ternissements. N’utilisez pas de cire
ou de poli pour électroménagers sur de l’acier inoxydable.
Protection de la peinture de finition.
L’extérieur du réfrigérateur est revêtu d’une peinture de haute
qualité cuite au four.
Avec un entretien approprié, il gardera son aspect neuf exempt
de rouille pendant de nombreuses années. Appliquez une
couche de cire pour cuisine/électroménagers à la réception du
réfrigérateur, puis au moins deux fois l’an par la suite.
ENTRETIEN ET NETTOYAGE
Nettoyage de l’intérieur
Pour aider à empêcher les odeurs, laissez une boîte ouverte
de bicarbonate de soude dans les compartiments réfrigération
et congélation.
Débranchez votre réfrigérateur avant de le nettoyer.
Si ce n’est pas pratique, enlevez toute humidité au moyen
d’une éponge ou d’un chiffon pour nettoyer autour des
commutateurs, des lumières ou des réglages.
Utilisez une solution d’eau chaude et de bicarbonate de soude
— environ une cuillère à soupe (15 ml) de bicarbonate de
soude pour 1 litre (une pinte) d’eau. Cette solution nettoie tout
en neutralisant les odeurs. Rincez et séchez en essuyant.
Les autres pièces du réfrigérateur — incluant les joints de
porte, les bacs à fruits et légumes et toutes les pièces en
plastique — peuvent être nettoyées de la même manière.
Après avoir nettoyé les joints de porte, appliquez une mince
couche de vaseline sur les joints du côté charnières afin de les
empêcher de coller et de se déformer.
N’utilisez pas de nettoyants en poudre ni d’autres nettoyants
abrasifs.
Ne lavez aucune pièce en matière plastique de votre
réfrigérateur dans votre lave-vaisselle.
Évitez de nettoyer les clayettes froides en verre (sur certains
modèles) à l’eau chaude, parce qu’elles risquent de se casser
à cause de la grande différence de températures.
Manipulez avec soins le verre. Vous pouvez briser en éclats le
verre trempé en le heurtant.
8
29-6144
Page 29

Entretien et nettoyage de votre réfrigérateur
Remplacement de l’ampoule
ENTRETIEN ET NETTOYAGE
AVERTISSEMENT
Avant de remplacer une ampoule grillée, débranchez le
réfrigérateur pour éviter tout contact avec un filament sous
tension. (Une ampoule grillée peut se briser lorsqu’on la
remplace.) Tourner le bouton de commande à la position OFF
(arrêt) ne coupe pas l’alimentation de l’éclairage.
Puissance maximale de l’ampoule : 40 W
Débranchez le réfrigérateur.
1
L’ampoule est située dans le haut du compartiment
2
réfrigérateur.
Dévissez la vis pour retirer le couvercle de la lumière.
3
Remplacez l’ampoule par une nouvelle ampoule de
4
puissance identique ou inférieure.
Remettez en place le couvercle de la lumière en utilisant la
vis.
Rebranchez le réfrigérateur.
5
L’ampoule peut être chaude.
Avant de partir en vacances
ATTENTION
d’endommager le boîtier de la commande et la lentille de
la lampe.
L’utilisation d’une ampoule d’un
calibre supérieur à 40 W risque
Pour de longues vacances ou absences, enlevez tous vos
aliments et débranchez votre réfrigérateur. Nettoyez l’intérieur
avec une solution d’eau et de bicarbonate de soude, à raison
d’une cuillère à soupe (15 ml) de bicarbonate de soude pour 1
litre (une pinte) d’eau. Laissez les portes ouvertes.
Avant un déménagement
Enlevez tous vos aliments et débranchez votre réfrigérateur.
Attachez tous les articles mobiles tels que les tablettes et les
bacs en les enrubannant en place afin de prévenir les
dommages.
Assurez-vous que le réfrigérateur reste en position verticale
durant le déménagement.
29-6144
9
Page 30

Instructions
Réfrigérateur
d’installation
Si vous avez des questions, composez le 1 800 561-3344 ou consultez notre site Web à
www.electromenagersge.ca
AVANT DE COMMENCER
Veuillez lire toutes les directives attentivement.
• IMPORTANT – Conservez ces instructions pour
l’inspecteur local.
• IMPORTANT – Respectez toutes les ordonnances
et les codes locaux.
• Note à l’installateur – Assurez-vous de laisser ces
instructions au consommateur.
• Note au consommateur – Conservez ces instructions
pour référence future.
• Niveau de compétence – L’installation de cet appareil
INSTRUCTIONS D'INSTALLATION
nécessite des compétences mécaniques de base.
• Temps d’installation – Installation du réfrigérateur:
15 minutes
• L’installateur est responsable de bien installer ce
réfrigérateur.
• Toute panne du produit due à une mauvaise
installation n’est pas couverte par la garantie.
EXIGENCES CONCERNANT
L’EMPLACEMENT D’INSTALLATION
• N’installez jamais votre réfrigérateur dans un
emplacement où la température ambiante sera inférieure
à 13 °C (55 °F). Il ne se mettra pas en marche
suffisamment souvent pour maintenir des températures
convenables.
• Installez votre réfrigérateur sur un plancher suffisamment
solide pour le porter lorsqu’il est plein.
DÉBALLAGE DU RÉFRIGÉRATEUR
• Retirez le ruban adhésif et toute étiquette (sauf l’étiquette
des spécifications) du réfrigérateur. Les résidus de ruban
ou de colle peuvent se dégager en frottant une petite
quantité de savon à vaisselle liquide sur l’adhésif avec les
doigts. Essuyez avec un chiffon imbibé d’eau chaude puis
asséchez.
• N’utilisez pas d’instruments coupants, d’alcool à friction,
de liquides inflammables ni de nettoyants abrasifs pour
enlever le ruban ou la colle. Ces produits peuvent
endommager la surface de votre réfrigérateur.
• Lors de son déplacement, ne penchez pas le réfrigérateur
de plus de 45° par rapport à sa position droite.
PIEDS DE NIVELLEMENT
Les pieds ajustables dans les coins avant du réfrigérateur
doivent être ajustés de façon que le réfrigérateur repose
solidement contre le plancher; il faut aussi que l’avant soit
légèrement plus haut afin que les portes se ferment
aisément lorsqu’elles sont ouvertes à mi-course.
Pour ajuster les pieds, tournez-les dans le sens des
aiguilles d’une montre pour abaisser le réfrigérateur, et
dans le sens inverse pour le soulever.
Modèle GTE18 et GTS18
Pour soulever le réfrigérateur
DÉGAGEMENTS
• Installation amovible seulement.
• Si le réfrigérateur est installé à proximité d’un mur, laissez
suffisamment d’espace du côté charnière pour permettre
une ouverture de porte qui permettra l’accès aux bacs du
compartiment réfrigérateur.
• N’installez pas le réfrigérateur à moins de 5 po (de la
cuisinière.
• Dégagements minimaux :
Arrière 2 po du mur
Côtés 3/4 po
Haut 3/4 po
10
CORDON D’ALIMENTATION
• Branchez le cordon d’alimentation du réfrigérateur dans sa
propre prise murale correctement mise à la terre; la
spécification de tension de la prise doit correspondre à
celle figurant sur la fiche signalétique du réfrigérateur.
• N’utilisez pas une rallonge.
• Lisez les consignes de sécurité des pages 22 et 23.
29-6144
Page 31

Instructions d'installation
REFRIGERATOR FEATURES (appearance and features may vary)
INSTRUCTIONS D'INSTALLATION
Étagère
congélateur
Bouton de
commande
Tableau de commande
de la température
Clayettes
ajustables
Couvercle du
bac à légumes
Clayette
de porte
Balconnet à
produits laitiers
Clayettes
de porte
Bac à légumes
Pieds de mise à niveau
All images in this instruction manual are for indication only; please refer to your individual unit for details.
29-6144
11
Page 32

Instructions d'installation
INVERSION DE LA PORTE
REMARQUES IMPORTANTES
Lorsque vous inversez la porte :
• Lisez bien toutes les instructions avant de commencer.
• Manipulez les pièces avec précaution pour éviter de rayer
la peinture.
• Posez les vis à côté des pièces auxquelles elles
correspondent pour éviter de les utiliser au mauvais
endroit.
• Aménagez un espace qui ne présente aucun risque de
rayure pour la porte.
IMPORTANT : Une fois l'inversion commencée, ne
déplacez pas le réfrigérateur jusqu'à ce que l'inversion soit
terminée.
Ces instructions indiquent comment inverser les charnières
de la droite vers la gauche. Si vous souhaitez mettre les
charnières du côté droit, suivez les mêmes instructions en
inversant toutes les références faites aux côtés droit et
gauche.
Débranchez le réfrigérateur de la prise murale.
REMARQUE : Ne laissez aucune des deux portes tomber
INSTRUCTIONS D'INSTALLATION
sur le sol. Cela pourrait endommager la butée de porte.
ATTENTION
frais et du compartiment congélateur sont lourdes.
Utilisez vos deux mains pour les soulever.
Risque lié au levage. Les portes
du compartiment des aliments
RETIRER LA PORTE DU
1
COMPARTIMENT CONGÉLATEUR
(SUITE)
4. Retirez les trois vis avec une clé à douille munie d'un
cliquet de 5/16 po, puis soulevez la charnière vers le
haut pour libérer l'axe de son logement.
Charnière
supérieure
5. Enlevez le ruban-cache et inclinez la porte à une
bonne distance du caisson. Soulevez la porte pour la
dégager de l'axe de la charnière centrale.
6. Transférez la bague en plastique du côté droit du
haut de la porte du congélateur au côté gauche.
TOOLS YOU WILL NEED
Tournevis Phillips
Ruban-cache
RETIRER LA PORTE DU
1
Clé à douille munie d'un cliquet
Clé hexagonale (pour les modèles
à poignées en acier inoxydable)
de 5/16 po
COMPARTIMENT CONGÉLATEUR
1. Retirez tous les aliments des bacs situés à l'intérieur de
la porte.
2. Immobilisez la porte en position fermée au moyen de
ruban-cache.
3. Enlevez le couvre-charnière sur le dessus de la porte du
congélateur avec un tournevis à lame fine.
7. Enlevez le cache-orifices à l'aide d'un couteau à
mastic du côté opposé aux trois charnières.
Cache-orifices
Cache-orifices
de la charnière
centrale
8. Posez la porte, face intérieure vers le haut, sur une
surface qui ne risque pas de la rayer.
Cache-orifices
de la charnière
inférieure
12
29-6144
Page 33

Instructions d'installation
INVERSION DE LA PORTE (SUITE)
INSTRUCTIONS D'INSTALLATION
RETIRER LA PORTE DU
2
COMPARTIMENT RÉFRIGÉRATEUR
1. Retirez tous les aliments des bacs situés à l'intérieur
de la porte.
2. Immobilisez la porte en position fermée au moyen
de ruban-cache.
3. Retirez la charnière centrale en enlevant les 2 vis
qui la retiennent à l'aide d'une clé à douille munie
d'un cliquet de 5/16 po. Conservez la charnière
centrale et les vis.
4. Enlevez le ruban-cache et inclinez la porte à une
bonne dist
le haut pour libérer son logement inférieur de l'axe
situé dans le support de la charnière inférieure.
5. Transférez la bague en plastique du côté droit du
haut de la porte du réfrigérateur au côté gauche.
ance du caisson. Soulevez la porte vers
TRANSFÉRER LA CHARNIÈRE
3
INFÉRIEURE VERS LA GAUCHE
1. À l'aide de la clé à douille
munie d'un cliquet de 5/
16 po, retirez les 2 vis de
la charnière inférieure.
2. Transférez l'axe de la
charnière inférieure du
côté droit au côté gauche
à l'aide d'un tournevis à
lame fine jusqu'à ce que
l'épaulement de l'axe de
la charnière entre en
contact avec la
charnière.
3. Transférez la charnière
inférieure du côte droit au
côté gauche et fixez-la
avec les 2 vis.
4. Installez les 2
cacheorifices du côté
opposé du caisson sur
les trous de vis libérés
par le retrait de la
charnière inférieure.
6. Posez la porte, face intérieure vers le haut, sur une
surface qui ne risque pas de la rayer.
7. Installez les 2 cache-orifices du côté opposé du
caisson sur les trous de vis libérés par le retrait de la
charnière centrale.
29-6144
TRANSFÉRER LA BUTÉE DE LA
4
PORTE VERS LA GAUCHE
1. Sur les portes du réfrigérateur et du congélateur,
retirez les vis des butées des portes de droite avec
un tournevis Phillips.
2. Installez les butées sur les deux portes du côté
gauche.
13
Page 34

Instructions d'installation
INVERSION DE LA PORTE (SUITE)
5
INSTRUCTIONS D'INSTALLATION
INVERSION DES POIGNÉES DE
PORTE - TRANSFÉRER LA POIGNÉE
DE PORTE DU COMPARTIMENT
CONGÉLATEUR SUR LE CÔTÉ
GAUCHE
1. Desserrez les vis de montage de la poignée à l'aide
d'une clé de 1/8 po et retirez la poignée.
2. Retirez la fixation de la poignée du congélateur et
bouchez l'orifice de la vis que vous venez de créer.
3. Retirez le capuchon cache-trou du côté droit de la
porte du réfrigérateur et insérez la fixation avec un
tournevis Phillips.
INVERSION DES POIGNÉES DE
6
PORTE - TRANSFÉRER LA POIGNÉE
DE PORTE DU COMPARTIMENT
RÉFRIGÉRATEUR SUR LE CÔTÉ
GAUCHE
1. Desserrez les vis de montage de la poignée à l'aide
d'une clé de 1/8 po et retirez la poignée.
2. Retirez la fixation de la poignée du réfrigérateur et
bouchez l'orifice de la vis que vous venez de créer
avec le capuchon du côté opposé.
3. Insérez la fixation dans la surface du côté droit de la
porte du congélateur avec un tournevis Phillip
s.
14
4. Fixez la poignée de la porte du congélateur avec
des vis dans la partie supérieure de la poignée.
Utilisez une clé hexagonale de 1/8 po pour serrer
les vis de montage.
REMARQUE : Ne pas trop serrer.
4. Fixez la poignée de la porte du congélateur avec
des vis de montage. Utilisez une clé hexagonale de
1/8 po pour serrer les vis de montage.
REMARQUE : Ne pas trop serrer.
29-6144
Page 35

Instructions d'installation
INVERSION DE LA PORTE (SUITE)
INSTRUCTIONS D'INSTALLATION
RÉINSTALLATION DE LA PORTE DU
7
COMPARTIMENT RÉFRIGÉRATEUR
1. Faites descendre la porte du réfrigérateur sur l'axe
de la charnière inférieure.
2. Tout en maintenant la porte fermement, utilisez la
nouvelle charnière centrale gauche de la trousse
d'accessoires et insérez l'axe de la charnière dans
le logement de la porte. Avec une clé à douille
munie d'un cliquet de 5/16 po, fixez la charnière
centrale à l'aide de deux vis.
RÉINSTALLATION DE LA PORTE DU
8
COMPARTIMENT CONGÉLATEUR
1. Faites descendre la porte du congélateur sur l'axe
de la charnière centrale.
2. Placez la charnière supérieure gauche de façon à
ce que l'axe soit ajusté au logement de la porte. (La
charnière supérieure gauche et le couvre-charnière
peuvent être trouvés à l'intérieur du réfrigérateur.
Appelez votre fournisseur de service GE Appliances
au 800 561-3344 s'il manque des pièces.) Soutenez
la porte sur le côté de la poignée et assurez-vous
que la porte est bien droite et que l'écart entre les
portes est égal sur leur face avant. En tenant la
porte en place, serrez les vis de la charnière
supérieure. Veillez à ne pas trop serrer ces vis.
Serrez-les jusqu'à ce qu'elles soient légèrement
serrées, puis vissezles d'un autre demi-tour.
29-6144
3. Enclenchez le couvre-charnière sur la charnière
supérieure.
15
Page 36

Bruits normaux de fonctionnement.
Les réfrigérateurs plus récents font des bruits différents de ceux des anciens. Les réfrigérateurs modernes présentent plus de
fonctions et sont plus avancés sur le plan technologique.
Entendez-vous ce que j’entends? Ces bruits sont normaux
HUMMM...
WOUUCH...
Le nouveau compresseur à rendement élevé peut
fonctionner plus longtemps et plus vite que votre ancien
réfrigérateur et vous pouvez entendre un son modulé ou un
ronflement aigu pendant son fonctionnement.
Vous pouvez entendre un sifflement lorsque les portes se
ferment. Cela vient de l’équilibrage de pression dans le
réfrigérateur.
CONSEILS DE DÉPANNAGE
CLICS, CLAQUEMENTS,
CRAQUEMENTS et
GRÉSILLEMENTS
Vous pouvez entendre des craquements ou des
claquements lorsque le réfrigérateur est branché pour la
première fois. Cela se produit lorsque le réfrigérateur se
refroidit à la bonne température.
Le compresseur peut causer un clic ou un grésillement lors
de la tentative de redémarrage (cela peut prendre 5
minutes).
L’expansion et la contraction des serpentins de
refroidissement pendant et après le dégivrage peuvent
causer un craquement ou un claquement.
Sur les modèles équipés d’une machine à glaçons, après un
cycle de fabrication de glaçons, vous pouvez entendre les
glaçons tomber dans le bac.
OUIR !
Vous pouvez entendre les ventilateurs tourner à hautes
vitesses. Cela se produit lorsque le réfrigérateur vient d’être
branché, lorsque les portes sont ouvertes fréquemment ou
lors de l’ajout d’une grande quantité d’aliments dans les
compartiments congélateur ou réfrigérateur. Les ventilateurs
permettent de maintenir les bonnes températures.
BRUITS D’EAU
Le passage de l’agent frigorifique dans les serpentins de
refroidissement du congélateur peut être accompagné d’un
gargouillement semblable à celui de l’eau en ébullition.
L’eau tombant sur l’élément chauffant de dégivrage peut
faire un bruit de grésillement, de claquement ou de
bourdonnement pendant le cycle de dégivrage.
Un bruit de suintement d’eau peut être entendu pendant le
cycle de dégivrage lorsque la glace de l’évaporateur fond et
tombe dans le bac de récupération.
Fermer la porte peut causer un gargouillement en raison de
l’équilibrage de pression.
16
29-6144
Page 37

CONSEILS DE DÉPANNAGE...
Problème Causes possibles Solutions
Avant d’appeler un réparateur
CONSEILS DE DÉPANNAGE
Le réfrigérateur ne
fonctionne pas.
Vibration ou cliquetis
(une légère vibration est
normale)
Le moteur fonctionne
pendant de longues
périodes ou se met en
marche et s’arrête
fréquemment (Les
réfrigérateurs modernes, qui
ont davantage d’espace de
rangement et un
compartiment congélation
plus grand, nécessitent plus
de temps de fonctionnement.
Ils se mettent en marche et
s’arrêtent souvent pour
maintenir des températures
constantes.)
Le compartiment
réfrigérateur ou congélateur
est trop chaud
Le réfrigérateur est au cycle dégivrage.
Le réfrigérateur est débranché. Insérez complètement la fiche dans la prise.
Le fusible est grillé/le disjoncteur est
déclenché.
Les pieds de nivellement avant doivent
être ajustés.
C’est normal quand on met en marche
le réfrigérateur pour la première fois.
Cela arrive souvent quand on met
beaucoup d’aliments dans le
réfrigérateur.
La porte est restée ouverte. Vérifiez si un emballage empêche la fermeture de la
Température ambiante élevée ou
ouvertures fréquentes de la porte.
La commande de température est
réglée à la valeur la plus froide.
La commande de température n’a pas
été placée à un réglage suffisament
froid.
Attendez environ 30 minutes pour la fin du cycle
dégivrage.
Remplacez le fusible ou réarmez le disjoncteur.
Consultez la section Pieds de nivellement.
Attendez 24 heures que le réfrigérateur se
refroidisse complètement.
Ceci est normal.
porte.
Ceci est normal.
Consultez la section À propos du bouton de
commande du réfrigérateur.
Consultez la section À propos du bouton de
commande du réfrigérateur.
Du givre ou des cristaux de
glace se forment sur les
aliments congelés (la
présence de givre à
l’intérieur des emballages
est normale)
Les glaçons ont une odeur
ou un goût désagréable
La formation des glaçons est
lente
Température ambiante élevée ou
ouvertures fréquentes de la porte.
La porte est restée ouverte. Vérifiez si un emballage empêche la fermeture de la
La porte est restée ouverte. Vérifiez si un emballage empêche la fermeture de la
Vous ouvrez la porte trop souvent ou
trop longtemps.
L’odeur/le goût désagréable des
glaçons provient d’aliments.
L’intérieur du réfrigérateur a besoin
d’être nettoyé.
La porte est restée ouverte. Vérifiez si un emballage empêche la fermeture de la
Le réglage de la commande de
température n’est pas suffisamment
froid.
Ajustez la commande de la température à un
réglage plus froid. Consultez la section À propos du
bouton de commande du réfrigérateur.
porte.
porte.
Emballez bien les aliments.
Consultez Entretien et nettoyage.
porte.
Consultez la section À propos du bouton de
commande du réfrigérateur.
29-6144
17
Page 38

CONSEILS DE DÉPANNAGE...
Problème Causes possibles Solutions
Avant d’appeler un réparateur
Le réfrigérateur dégage de
mauvaises odeurs
De l’humidité se forme sur
l’extérieur du réfrigérateur
De l’humidité se forme à
l’intérieur (quand il fait
humide, l’air transporte de
l’humidité à l’intérieur du
réfrigérateur quand vous
ouvrez les portes)
CONSEILS DE DÉPANNAGE
La lampe intérieure ne
fonctionne pas
Les aliments gèlent dans le
réfrigérateur
Des aliments dégagent des odeurs. Les aliments qui dégagent une forte odeur doivent
être bien emballés.
Gardez une boîte de bicarbonate de soude ouverte
dans le réfrigérateur et remplacez-la tous les trois
mois.
L’intérieur a besoin d’un nettoyage. Consultez Entretien et nettoyage.
C’est normal pendant les périodes de
grande humidité.
Vous ouvrez les portes trop souvent ou
trop longtemps.
Pas de courant à la prise électrique. Remplacez le fusible ou réarmez le disjoncteur.
L’ampoule est grillée. Consultez la section Remplacement de l’ampoule.
Les aliments sont trop proches de
l’évent à l’arrière du réfrigérateur.
Le réglage de la commande du
réfrigérateur est trop froid.
Essuyez complètement la surface.
Éloignez les aliments de l’évent.
Réglez la commande à une température plus
chaude, d’une unité à la fois. Consultez la section À
propos du bouton de commande du réfrigérateur.
De la rouille, du
ternissement ou de la saleté
est visible sur les portes en
acier inoxydable
Environnement humide ou air salé. Nettoyez l’acier inoxydable à l’aide de nettoyants
qui contiennent de l’acide oxalique (ex. : la marque
Bar Keepers Friend Soft Cleanser) pour enlever la
rouille, le calcaire et les autres ternissements.
N’essuyez pas le réfrigérateur avec un linge à
vaisselle souillé ou une serviette mouillée. N’utilisez
pas de tampons à récurer, de nettoyants en poudre,
de javellisants ni de nettoyants qui contiennent du
javellisant puisque ces produits peuvent rayer et
détériorer le fini.
18
29-6144
Page 39

Garantie du réfrigérateur.
www.electromenagersge.ca
Pour les clients des États-Unis, toutes les réparations en vertu de la garantie sont fournis par nos Centre de Service d’Usine ou
par un technicien autorisé Customer Care®. Pour prévoir une réparation, consultez notre site GEAppliances.com ou appelez le
800.GE.CARE5 (800.432.2737). Veuillez avoir votre numéro de série et votre numéro de modèle à portée de main lorsque vous
appelez pour obtenir un service.
Au Canada, appelez le 800.561.3344.
Pour le diagnostic, la réparation de votre réfrigérateur peut nécessiter l’utilisation du port de données embarqué. Celui-ci
permet au technicien de réparation GE Appliances de diagnostiquer rapidement des problèmes avec votre appareil. Il
permet également à GE Appliances d’améliorer ses produits en fournissant à ces derniers des informations sur votre
appareil. Si vous ne voulez pas que les données de votre appareil soient envoyées à GE Appliances, veuillez demander à
votre technicien de NE PAS soumettre les données à GE Appliances pendant la réparation.
Pour une période de : GE Appliances remplacera :
Un An
Un an à partir de la date
d’achat initial
Ce qui n’est pas couvert par GE Appliances :
Les déplacements à votre domicile pour vous expliquer
l’utilisation de ce produit.
Une installation, livraison ou maintenance défectueuse.
Une panne du produit par abus d’utilisation, par mauvaise
utilisation, par modification ou s'il a été utilisé dans un but
autre que celui pour lequel il a été fabriqué.
Détérioration des aliments.
Le remplacement des fusibles ou le réenclenchement du
disjoncteur du domicile.
Les dommages causés après la livraison.
Le remplacement de la cartouche filtrante, si incluse, à
cause d’une pression d’eau en dehors de la gamme de
fonctionnement recommandée ou à cause d’une
concentration excessive de sédiments dans l’eau
d’alimentation.
Toute pièce du réfrigérateur qui s’avère défectueuse en raison d’un défaut de matériau ou de
fabrication. Pendant la validité de la présente garantie limitée d’un an, GE Appliances fournira
également gratuitement la main d’oeuvre et le service pour réparer la pièce défectueuse.
Le remplacement des ampoules, si incluses, ou la cartouche
filtrante, si incluse, et dans des conditions autres que celles
susmentionnées.
Tout dommage causé par accident, incendie, inondation ou
une catastrophe naturelle.
Tout dommage fortuit ou indirect causé par des défauts
éventuels de cet appareil.
Le service s’il est impossible d’avoir accès au produit.
Dommages causés par l'utilisation dún filtre qui n'est pas de
marque GE.
Tout dommage au fini de l'appareil doit être signalé auprès
du magasin où a été effectué l'achat dans les 48 heures
suivant la livraison de l’appareil.
Les produits n’étant pas défectueux, brisés ou qui
fonctionnent selon la description du manuel du propriétaire.
GARANTIE
Agrafez votre facture ici. Pour bénéficier du service de réparation
sous garantie, une preuve de la date d’achat initial est nécessaire.
LE GARANT N’EST PAS RESPONSABLE DES DOMMAGES CONSÉQUENTS.
EXCLUSION DE GARANTIES IMPLICITES
Votre seul et unique recours est la réparation du produit selon les dispositions de cette Garantie limitée. Toutes les garanties
implicites, incluant les garanties de commercialité et d’adéquation à un usage spécifique, sont limitées à une année ou à la
période la plus courte autorisée par la législation.
Pour les clients des États-Unis : Cette garantie est étendue à l’acheteur d’origine et aux propriétaires suivants pour tout produit
acheté pour une utilisation domestique aux États-Unis. Si le produit est installé dans une région où ne se trouve aucun réparateur
autorisé GE Appliances, vous devrez peut-être assumer les frais de transport ou apporter l’appareil à un centre de service autorisé
GE Appliances. En Alaska, cette garantie exclut le coût d’expédition ou de dépannage à votre domicile.
Certains états n’acceptent pas d’exclusion ou de limites aux dommages indirects consécutifs. Certains droits particuliers vous sont
dévolus en vertu de la présente garantie et peuvent s’accompagner d’autres droits qui varient selon votre lieu de résidence. Pour
connaître vos droits juridiques, veuillez consulter le bureau local ou le bureau d'etat des affaires aux consommateurs ou le
Procureur Général de votre état.
Garant : États-Unis : GE Appliances, Louisville, KY 40225
Cette garantie est étendue à l’acheteur d’origine et aux propriétaires suivants pour tout produit acheté aux Canada pour une
utilisation domestique aux Canada. Le service à domicile en vertu de la garantie sera fourni dans les régions où il est disponible et
où MC Commercial Inc. estime raisonnable de le fournir.
Garant Canada: MC Commercial Inc., Burlington, ON, L7R 5B6
29-6144
19
Page 40

Soutien au consommateur
Site Web de GE Appliances
Vous avez une question ou vous avez besoin d’aide pour votre appareil électroménager? Visitez le site Web de GE
Appliances 24 heures par jour, tous les jours de l’année! Vous pouvez aussi y trouver d’autres formidables produits GE
Appliances et tirer avantage de tous nos services d'assistance en ligne. Aux Étas-Unis : GEAppliances.com Au Canada :
GEAppliances.ca
Enregistrez votre électroménager
Enregistrez votre nouvel appareil en ligne au moment qui vous convient le mieux! L’enregistrement de votre produit dans les
délais prescrits permet une meilleure communication et un service rapide, selon les modalités de votre garantie, si besoin
est. Vous pouvez également envoyer par courrier la carte d’enregistrement pré-imprimée qui se trouve dans l’emballage de
votre appareil.
Aux Étas-Unis : GEAppliances.com/register
Au Canada : Prodsupport.mabe.ca/crm/Products/ProductRegistration.aspx
Service de réparation
Un service de réparation expert GE Appliances se trouve à quelques pas de chez vous. Rendez-vous sur notre site et
programmez, à votre convenance, une visite de réparation à n'importe quel jour de l'année.
Aux Étas-Unis : GEAppliances.com/ge/service-and-support/service.htm ou composez le 800.432.2737 durant les heures
normales de bureau.
Au Canada : GEAppliances.ca/en/support/service-request ou composez le 800.561.3344
SOUTIEN AU CONSOMMATEUR
Prolongation de garantie
Procurez-vous une prolongation de garantie GE Appliances et informez-vous des rabais spéciaux en vigueur pendant la
durée de votre garantie. Vous pouvez vous la procurer en ligne en tout temps. Les services GE Appliances seront toujours
disponibles après l'expiration de la garantie. Aux Étas-Unis :
GEAppliances.com/ge/service-and-support/shop-for-extended-service-plans.htm ou composez le 800.626.2224 durant
les heures normales de bureau.
Au Canada : GEAppliances.ca/en/support/purchase-extended-warranty ou composez le 800.290.9029
Connectivité à distance
Pour de l'assistance concernant la connectivité au réseau sans fil (pour les modèles équipés de cette fonction), visitez notre
site Web au GEAppliances.com/ge/connected-appliances/ ou composez le 800.220.6899 aux ëtas-Unis seulement.
Pièces et accessoires
Les personnes ayant les compétences requises pour réparer elles-mêmes leurs appareils peuvent recevoir directement à la
maison des pièces ou accessoires (les cartes VISA, MasterCard et Discover sont acceptées). Commandez en ligne 24
heures par jour.
Aux Étas-Unis : GEApplianceparts.com ou par téléphone au 877.959.8688 durant les heures normales de bureau.
Les instructions contenues dans le présent manuel comportent des procédures que tout utilisateur peut effectuer.
Les autres types de réparation doivent généralement être confiés à un technicien qualifié. Usez de prudence : une
réparation ou un entretien mal effectués peuvent rendre l’utilisation de l’appareil dangereuse.
Les consommateurs au Canada doivent consulter les pages jaunes pour connaître le centre de service Mabe le plus
proche, visiter notre site Web au GEAppliances.ca/en/products/parts-filters-accessories ou composer le 1.800.661.1616
Communiquez avec nous
Si vous n’êtes pas satisfait du service après-vente de GE Appliances, communiquez avec nous depuis notre site Web en
fournissant tous les détails dont votre numéro de téléphone, ou écrivez à :
Aux Étas-Unis : General Manager, Customer Relations | GE Appliances, Appliance Park | Lousville, KY 40225
GEAppliances.com/ge/service-and-support/contact.htm
Au Canada : Director, Consumer Relations, Mabe Canada Inc. | Suite 310, 1 Factory Lane | Moncton, N.B. EIC 9M3
GEAppliances.ca/en/contact-us
20
Printed in China
29-6144
 Loading...