

Page 1

QUICK USE & CARE
Refrigerators-Top Freezer
SAFETY
IMPORTANT SAFETY INFORMATION READ ALL INSTRUCTIONS BEFORE USING
GE Appliances Website
For more information on your refrigerator’s operation, visit www.GEAppliances.com or call
800.GECARES (800.432.2737). In Canada visit GEAppliances.ca or call 800.561.3344.
REFRIGERATOR SAFETY INFORMATION
This is the safety alert symbol. This symbol alerts you to potential hazards that can kill or hurt you and others. All safety
messages will follow the safety alert symbol and the word “DANGER”, “WARNING”, or “CAUTION”. These words are defined as:
DANGER
Indicates a hazardous situation which, if not avoided, will result in death or serious injury.
WARNING
Indicates a hazardous situation which, if not avoided, could result in death or serious injury.
CAUTION
Indicates a hazardous situation which, if not avoided, could result in minor or moderate injury.
IMPORTANT SAFETY INSTRUCTIONS
WARNING
To reduce the risk of fire, explosion, electric shock, or injury when using your
refrigerator follow these basic safety precautions:
This refrigerator must be properly installed and located in
accordance with the Installation Instructions before it is used.
Unplug the refrigerator before cleaning and making repairs.
NOTE: Repairs must be performed by a qualified Service Professional.
Replace all parts and panels before operating.
Because of potential safety hazards under certain conditions, we
strongly recommend against the use of an extension cord. However,
if you must use an extension cord, it is absolutely necessary that it
be a UL-listed (in the United States) or a CSA certified (in Canada),
3-wire grounding type appliance extension cord having a grounding
type plug and outlet and that the electrical rating of the cord be 15
amperes (minimum) and 120 volts.
To prevent suffocation and entrapment hazards to children, Remove
the fresh food and freezer doors from any refrigerator before
disposing of it or discontinuing its use.
Do not store or use gasoline or other flammable vapors and liquids in
the vicinity of this or any other appliance.
Power to the refrigerator cannot be disconnected by any setting
on the control panel, refrigerator must be unplugged to remove
power.
Do not allow children to climb, stand or hang on the door handles or
the shelves in the refrigerator. They could seriously injure themselves.
In refrigerators with automatic icemakers, avoid contact with the
moving parts of the ejector mechanism, or with the heating element
that releases the cubes. Do not place fingers or hands on the
automatic ice making mechanism while the refrigerator is plugged in.
Do not clean glass shelves or covers with warm water when they
are cold. Glass shelves and covers may break if exposed to sudden
temperature changes or impact, such as bumping or dropping.
Tempered glass is designed to shatter into many small pieces if it
breaks.
Keep fingers out of the “pinch point” areas; clearances between the
doors and between the doors and cabinet are necessarily small. Be
careful closing doors when children are in the area.
Do not touch the cold surfaces in the freezer compartment when
hands are damp or wet, skin may stick to these extremely cold
surfaces.
Do not refreeze frozen foods which have thawed completely.
Before replacing a burned-out light bulb, the refrigerator should
be unplugged in order to avoid contact with a live wire filament. (A
burned-out light bulb may break when being replaced.)
Pub. No. 49-60697-1 245D1573P001 03-14 GE
Page 2
Safety
WARNING
Explosion Hazard.
Keep flammable materials and vapors, such as gasoline, away from refrigerator. Failure to do so can result in fire, explosion, or death.
CONNECTING ELECTRICITY
WARNING
Plug into a grounded 3-prong outlet.
Do not remove the ground prong.
Do not use an adapter.
Failure to follow these instructions can result in
death, fire, or electrical shock.
Do not, under any circumstances, cut or remove the third (ground) prong from the power cord.
For personal safety, this appliance must be properly grounded.
The power cord of this appliance is equipped with a 3-prong (grounding)
plug which mates with a standard 3-prong (grounding) wall outlet to minimize the possibility of electric shock hazard from this appliance.
Have the wall outlet and circuit checked by a qualified electrician to make
sure the outlet is properly grounded.
Where a standard 2-prong wall outlet is encountered, it is your personal
responsibility and obligation to have it replaced with a properly grounded
3-prong wall outlet. Do not use an adapter.
The refrigerator should always be plugged into its own individual electrical outlet which has a voltage rating that matches the rating plate.
Electrical Shock Hazard.
A 115 Volt AC, 60 Hz, 15- or 20-amp fused, grounded electrical supply is
required. This provides the best performance and also prevents overloading house wiring circuits which could cause a fire hazard from overheated
wires.
Never unplug your refrigerator by pulling on the power cord. Always grip
plug firmly and pull straight out from the outlet.
Repair or replace immediately all power cords that have become frayed
or otherwise damaged. Do not use a cord that shows cracks or abrasion
damage along its length or at either end.
When moving the refrigerator away from the wall, be careful not to roll
over or damage the power cord.
PROPER DISPOSAL OF YOUR OLD REFRIGERATOR
WARNING
Remove fresh-food and freezer doors from the refrigerator, prior to disposal. Failure to do so can result in
child entrapment which can lead to death or brain damage.
IMPORTANT:
Suffocation and child entrapment hazard.
Child entrapment and suffocation are not problems of
the past. Junked or abandoned refrigerators are still
dangerous even if they will sit for “just a few days.” If
you are getting rid of your old refrigerator, please follow the instructions below to help prevent accidents.
Before You Throw Away Your Old Refrigerator
or Freezer:
Take off the fresh food and freezer doors.
Leave the shelves in place so that children may not
easily climb inside.
Refrigerants
All refrigeration products contain refrigerants, which
under federal law must be removed prior to product
disposal. If you are getting rid of an old refrigeration
product, check with the company handling the disposal about what to do.
READ AND FOLLOW THIS SAFETY INFORMATION CAREFULLY.
SAVE THESE INSTRUCTIONS
2
Page 3
Installation Instructions
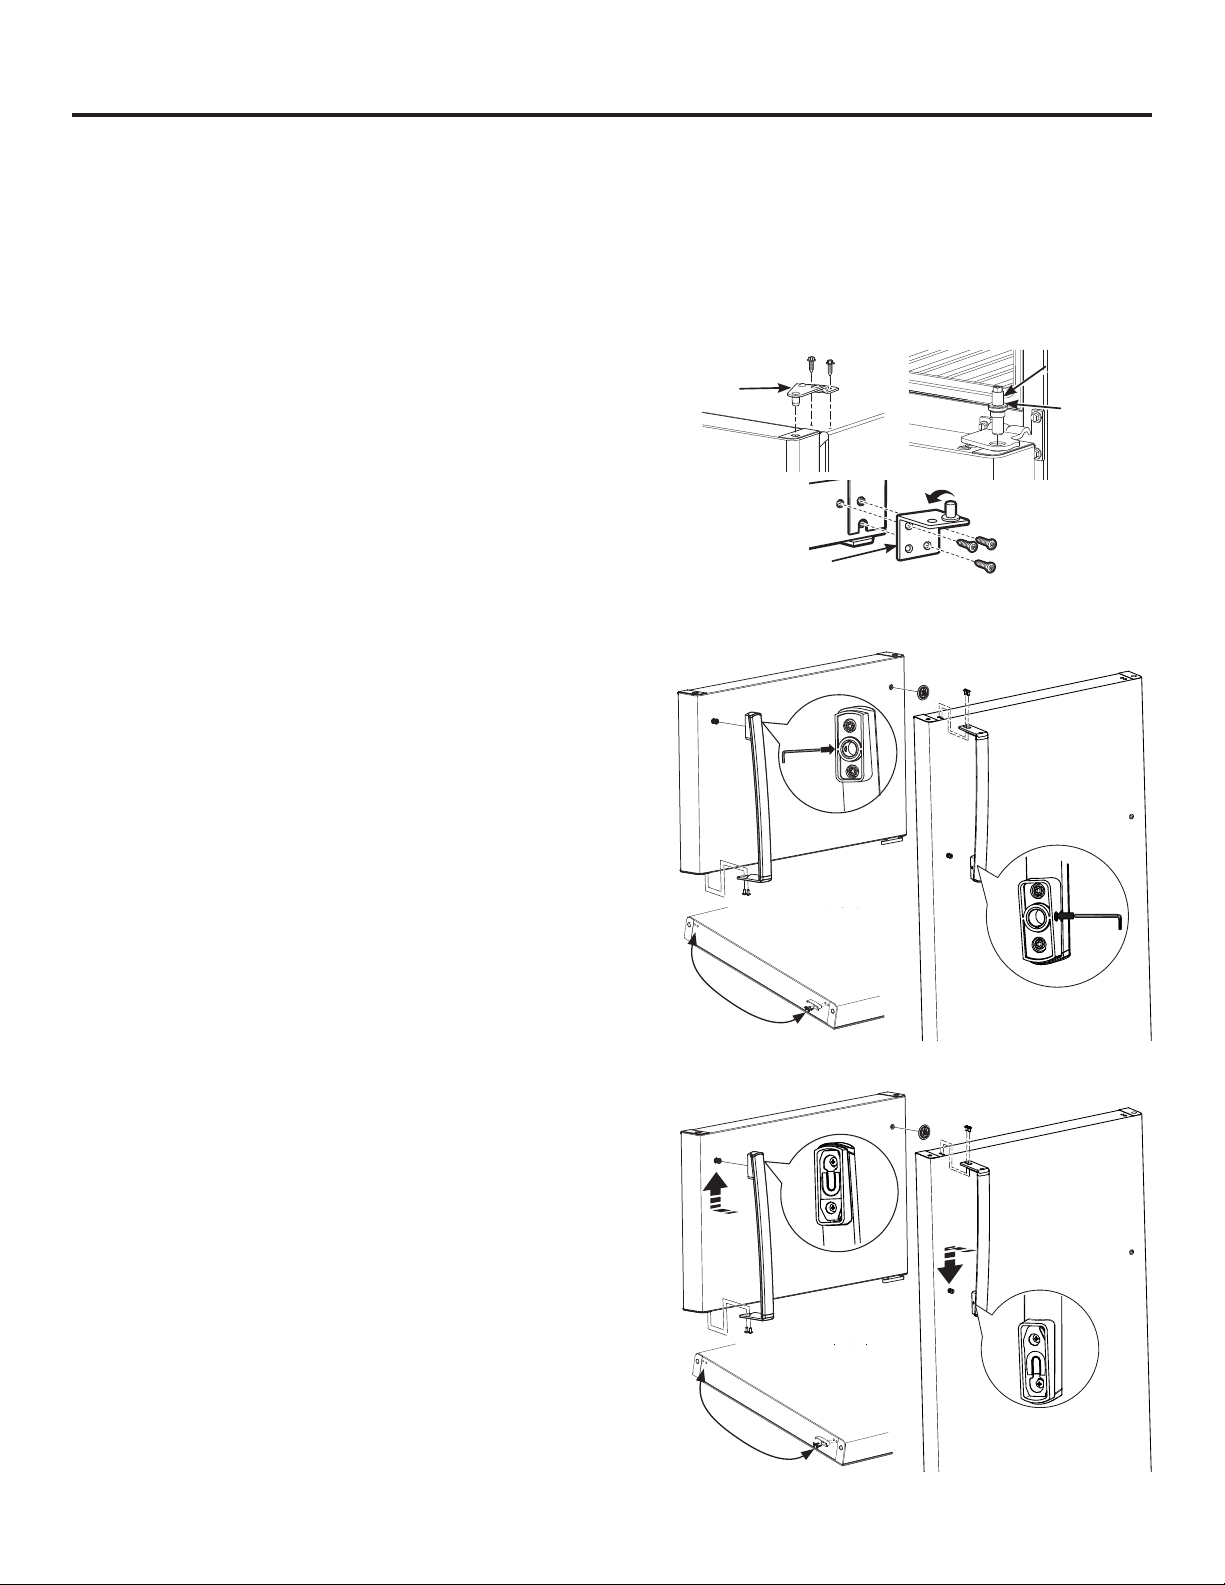
REVERSING THE DOOR SWING
BEFORE YOU START
• Unplug the refrigerator from its electrical outlet.
• Empty all door shelves, including the dairy compartment.
NOTICE: Do not let either door drop to the floor. To do so could damage the door stop.
TO REMOVE DOORS
1. Remove top hinge.
2. Lift off freezer door.
3. Remove the center hinge pin.
4. Lean the fresh food door forward and lift door off of lower hinge pin.
5. Be careful not to lose the spacer and washers.
STAINLESS STEEL HANDLE
6a. Remove handle screws from the top of fresh food door. Remove
handle screws from the bottom of freezer door.
7a. Loosen set screw on handle with the provided 1/8” wrench.
8a. Remove door handle.
9a. Change places between the handle fastener and plug button on
door front.
10a. 0RYHWKHSOXJEXWWRQVRQWRSDQGIURQWRIWKHGRRUWR¿OOWKH
now vacant holes.
11a. Transfer the door stop on the bottom of the door.
12a. Attach handle to fresh food door with screws at top of handle.
Use 1/8” allen wrench to tighten set screw at bottom of handle.
13a. Attach handle to freezer door with screws at bottom of handle.
Use the provided 1/8” allen wrench to tighten set screw at top
of handle.
14a. Attach badge on freezer door opposite the handle.
Top hinge
Hinge
bracket
Center Hinge
Pin
Washer
PLASTIC HANDLE ASSEMBLY
6b. Remove handle screws from the top of fresh food door. Remove
handle screws from the bottom of freezer door.
7b. Remove door handle on fresh food door by sliding the handle
XSRȺRIWKHIDVWHQHU5HPRYHGRRUKDQGOHRQIUHH]HUGRRUE\
VOLGLQJWKHKDQGOHGRZQRȺRIWKHIDVWHQHU
8b. Change places between the handle fastener and plug button on
door front.
9b. 0RYHWKHSOXJEXWWRQVRQWRSDQGIURQWRIWKHGRRUWR¿OOWKH
now vacant holes.
10b. Transfer the door stop on the bottom of the door.
11b. Attach handle to fresh food door by sliding handle down onto
fastener and with screws at top of handle.
12b. Attach handle to freezer door by sliding handle up onto
fastener and with screws at bottom of handle.
13b. Attach badge on freezer door opposite the handle.
3
Page 4
Installation Instructions
REVERSING THE DOOR SWING (Cont.)
TO RE-HANG THE DOORS
1. Remove the hinge pin from the lower hinge bracket.
2. Remove the lower hinge bracket.
3. Install bottom hinge bracket on the opposite side of the
opening.
4. Install the lower hinge pin into the hinge bracket hole to the
outside of the refrigerator.
5. Remove the center hinge bracket.
Plastic
Switch the
hinge pin to the
opposite side of
the bracket.
Hinge
Pin
Plastic
Washer
Hinge
Bracket
Washer
Hinge
Pin
Hinge
Bracket
8. Install the center hinge pin into the center hinge bracket
9. Place the freezer door on top of the center hinge pin.
10. With the freezer door in place, replace install the top hinge
and into the hole in the fresh food door. Make sure the
washer is in place over the hinge pin on top of the bracket.
into the top of the freezer door. The holes in the hinge will
align with 2 of the holes on top of the refrigerator. Install
the 2 screws into the top hinge.
6. Install center hinge bracket on the opposite side of the
opening. (You will have to turn the hinge over to install.)
7. Position the fresh food door, tilted forward, over the lower
hinge pin and slide it into place.
4
Page 5
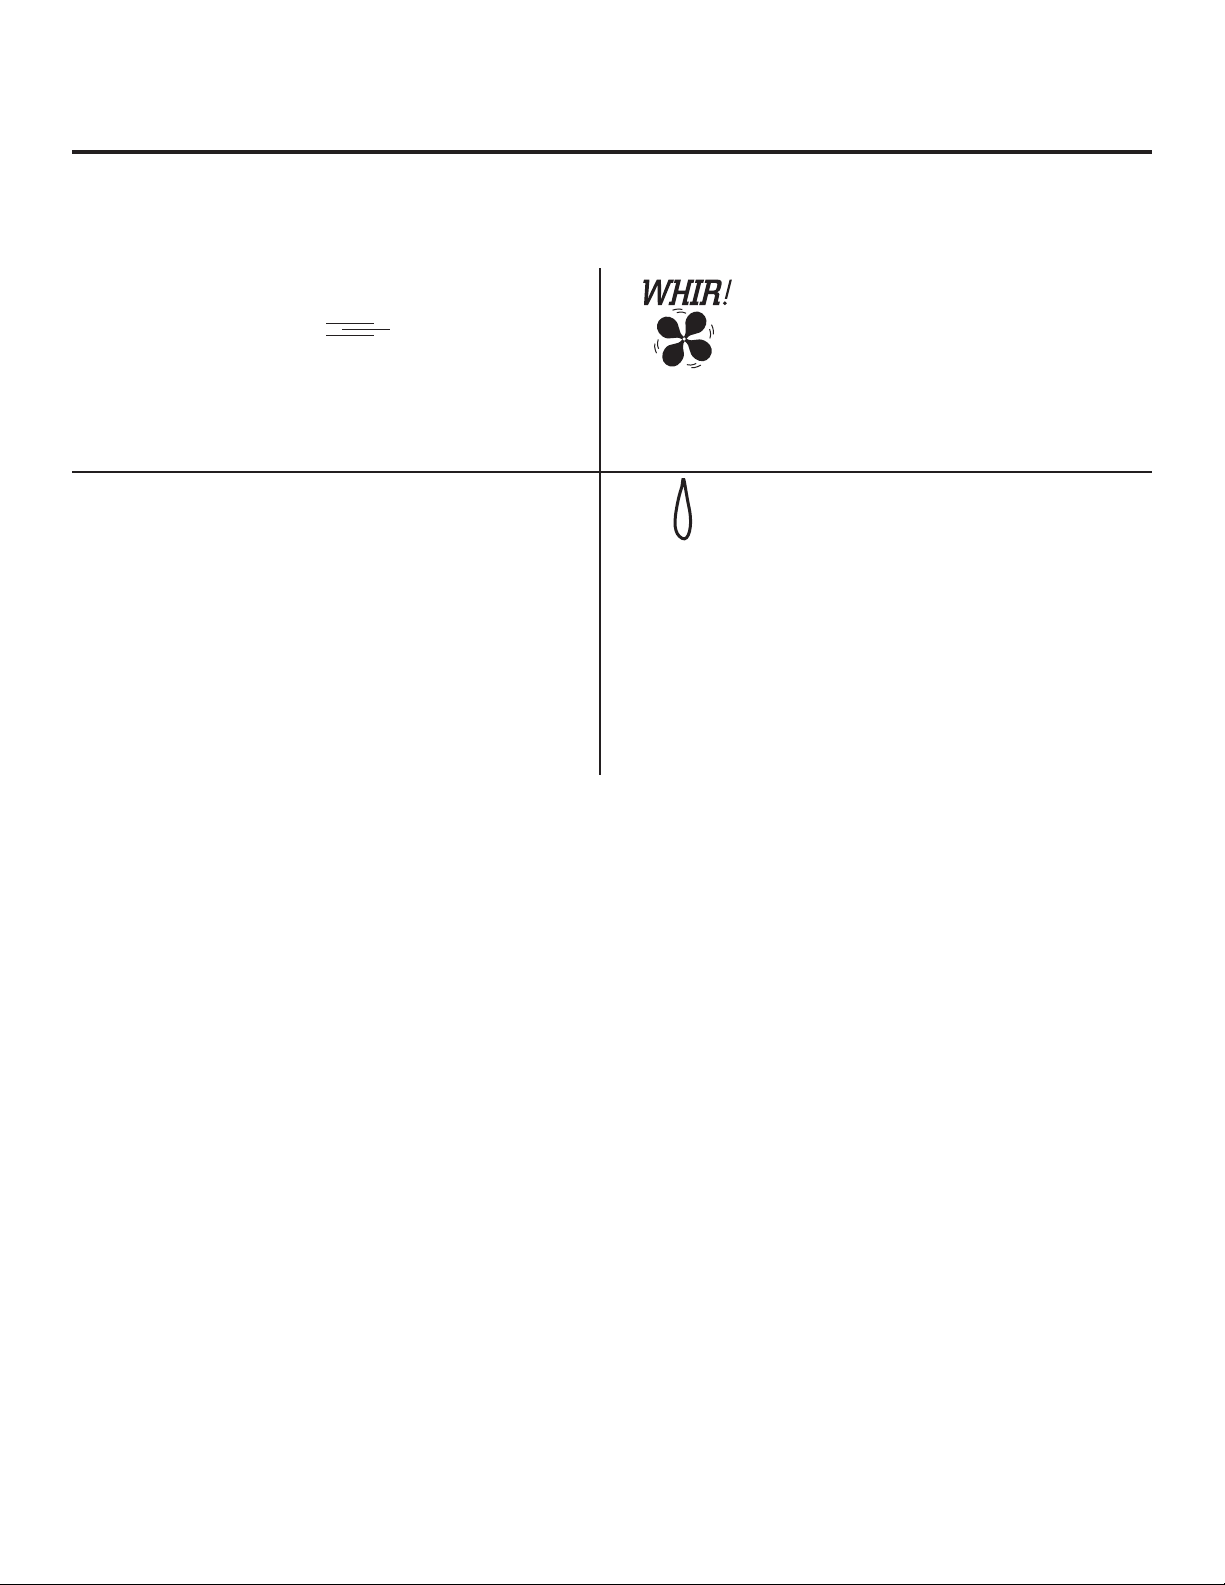
Normal operating sounds.
www.GEAppliances.com
Newer refrigerators sound different from older refrigerators. Modern refrigerators have more features and use
newer technology.
Do you hear what I hear? These sounds are normal.
The new high efficiency
compressor may run
faster and longer than
your old refrigerator and
you may hear a high-pitched hum or pulsating sound
while it is operating.
You may hear a whooshing sound when the doors close.
This is due to pressure equalizing within the refrigerator.
HUMMM...
WHOOSH...
CLICKS, POPS,
You may hear the fans spinning at
high speeds. This happens when the
refrigerator is first plugged in, when the
doors are opened frequently or when
a large amount of food is added to the
refrigerator or freezer compartments. The
fans are helping to maintain the correct
temperatures.
WATER SOUNDS
CRACKS and CHIRPS
You may hear cracking or popping sounds when the
refrigerator is first plugged in. This happens as the refrigerator
cools to the correct temperature.
The compressor may cause a clicking or chirping sound when
attempting to restart (this could take up to 5 minutes).
Expansion and contraction of cooling coils during and after
defrost can cause a cracking or popping sound.
On models with an ice maker, after an ice making cycle, you
may hear the ice cubes dropping into the ice bucket.
The flow of refrigerant through the freezer cooling coils may
make a gurgling noise like boiling water.
Water dropping on the defrost heater can cause a sizzling,
popping or buzzing sound during the defrost cycle.
A water dripping noise may occur during the defrost cycle as ice
melts from the evaporator and flows into the drain pan.
Closing the door may cause a gurgling sound due to pressure
equalization.
5
Page 6
Service.
Before you call for service, review the detailed troubleshooting tips in the Owner’s manual. If needed, service can be scheduled by
visiting us online GEAppliances.com or calling 800.GECARES 800.432.2737. In Canada visit GEAppliances.ca or call 800.561.3344.
Truth or Myth
Truth or Myth? Answer Explanation
The automatic ice maker in my
refrigerator will produce ice when the
refrigerator is plugged in to a power
receptacle.
I will never see frost inside the freezer
compartment.
Refrigerator door handles can be
easily tightened.
After starting the ice maker throw
away 24 hours of ice production.
Door removal is always required for
installation.
MYTH The refrigerator must be connected to water, and the ice maker must be turned
on. Make sure the ice maker is turned on, only after the water line is connected
and water is turned on. The ice maker can be turned off by switching it to the OFF
position.
The freezer must be 15 degrees or colder before the icemaker will produce ice. Please
allow at least 24 hours for the refrigerator to pull down and the unit’s temperature to
stabilize.
MYTH Frost inside the freezer typically indicates that the door is not properly sealed, or
has been left open. If frost is found, clear the frost using a plastic spatula and towel,
then check to ensure that no food packages or containers are preventing the freezer
door from closing. To help reduce to the potential for frost please make sure there
is proper clearance to the air supply and vents in the freezer to improve circulation.
Always cover food before loading into the refrigerator, moisture from open containers
can add to the frost load.
TRUE If door handles are loose or have a gap, the handle can be adjusted with set screws
located on the ends of the handles.
TRUE To avoid issues with odor and taste the first batch of ice should be discarded
MYTH Doors should only be removed when necessary to prevent damage from passage
way or access to final location. If doors are removed please review Reversing the
Door Swing section for re-hang procedure.
There is an adjustment to rear wheels. MYTH Front leveling legs are adjustable and should be used to balance the refrigerator.
Any All-Purpose cleaner can be used to
clean my refrigerator.
Gaskets will last longer with regular
cleaning and maintenance.
Doors may be shipped with protective
¿OPWKDWKDVWREHUHPRYHGEHIRUH
use.
Have more questions? For more information on your refrigerator or other GE appliances please visit
www.geappliances.com/videos
MYTH All-purpose cleaners are not recommended for use on the refrigerator.
TRUE Clean gaskets with warm soapy water. Make sure all folds are clean and dry after
TRUE 6PRRWK¿QLVKHGGRRUV6WDLQOHVV6ODWH*ORVV%ODFNDQG*ORVV:KLWHRU6LOYHU0HWDOOLF
Leveling legs are used to make initial fresh food door adjustment. There should be
approximately a ¼” fall from the front to back to ensure that the doors always close.
Do not use wax, polish, ammonia, bleach, or other products containing chlorine on for
any surfaces. Clean with a cloth dampened with soapy water. Dry with a soft cloth.
The stainless steel doors can be cleaned with a commercially available stainless steel
cleaner. Cleaners with oxalic acid such as Bar Keepers Friend Soft Cleanser™ will
remove rust, tarnish and small blemishes. Use only a liquid cleanser free of grit and
rub in the direction of the brush lines with a damp soft sponge. Do not use appliance
wax or polish on the stainless steel.
cleaning. Make sure flanges are clear of any grit or grime. After cleaning the door
gaskets, apply paraffin wax or petroleum jelly to the door gaskets and hinges at the
hinge side. This helps keep the gaskets from sticking and bending out of shape.
ZLOOKDYHDFOHDUSODVWLF¿OPRQWKHGRRUWKDWPXVWEHUHPRYHGDIWHULQVWDOO
6
Page 7

Notes.
www.GEAppliances.com
7
Page 8
Refrigerator Warranty.
For US Customers, all warranty service provided by our Factory Service
Centers, or an authorized Customer Care
®
technician. To schedule
service, on-line, 24 hours a day, visit us at GEAppliances.com, or call
800.GE.CARES (800.432.2737). Please have serial number and model
Staple your receipt here. Proof
of the original purchase date is
needed to obtain service under
the warranty.
number available when calling for service.
In Canada, call 800.561.3344.
Servicing your refrigerator may require the use of the onboard data port for diagnostics. This gives a GE Factory
Service technician the ability to quickly diagnose any issues with your appliance and helps GE improve its
products by providing GE with information on your appliance. If you do not want your appliance data to be sent
to GE, please advise your technician NOT to submit the data to GE at the time of service.
For the Period of: GE Will Replace
One Year
From the date of the original
purchase
Any part of the refrigerator which fails due to a defect in materials or workmanship.
During the limited one-year warranty, GE will also provide, free of charge, all labor and related service
to replace the defective part.
What is Not Covered:
■ Service trips to your home to teach you how to use the product.
■ Improper installation, delivery or maintenance.
■ Failure of the product if it is abused, misused, or used for other than
the intended purpose or used commercially.
■ Loss of food due to spoilage.
■ Replacement of house fuses or resetting of circuit breakers.
■ Damage caused after delivery.
■ Replacement of the water filter cartridge, if included, due to water
pressure that is outside the specified operating range or due to
excessive sediment in the water supply.
■ Replacement of the light bulbs, if included, or water filter cartridge,
if included, other than as noted above.
■ Damage to the product caused by accident, fire, floods or acts of
God.
■ Incidental or consequential damage caused by possible defects with
this appliance.
■ Product not accessible to provide required service.
■ Damage caused by a non-GE Brand water filter.
■ Damage to finish (rust, tarnish, or small blemishes) must be reported
within 48 hours following delivery of appliance.
■ Products which are not defective, broken, or which are working as
described in the owner’s manual.
(;&/86,212),03/,(':$55$17,(6³<RXUVROHDQGH[FOXVLYHUHPHG\LVSURGXFWUHSDLUDVSURYLGHGLQWKLV
Limited Warranty. Any implied warranties, including the implied warranties of merchantability or fitness for
a particular purpose, are limited to one year or the shortest period allowed by law.
For US Customers: This warranty is extended to the original purchaser and any succeeding owner for products
purchased for home use within the USA. If the product is located in an area where service by a GE Authorized
Servicer is not available, you may be responsible for a trip charge or you may be required to bring the product to an
Authorized GE Service location for service. In Alaska, the warranty excludes the cost of shipping or service calls to
your home.
Some states do not allow the exclusion or limitation of incidental or consequential damages. This warranty gives
you specific legal rights, and you may also have other rights which vary from state to state. To know what your legal
rights are, consult your local or state consumer affairs office or your state’s Attorney General.
Warrantor US: General Electric Company. Louisville, KY 40225
For Customers in Canada: This warranty is extended to the original purchaser and any succeeding owner for
products purchased in Canada for home use within Canada. In-home warrant service will be provided in areas
where it is available and deemed reasonable by Mabe to provide.
Warrantor Canada: MC Commercial, Burlington, Ontario, L7R 5B6
8
Page 9

Guide d’utilisation et d’entretien rapide
Réfrigérateurs-
SÉCURITÉ
Congélateur superposé
IMPORTANTES CONSIGNES DE SÉCURITÉ VEUILLEZ LIRE TOUTES LES CONSIGNES AVANT UTILISATION
Site Internet d’Électroménagers GE
Pour de plus amples informations sur le fonctionnement de votre réfrigérateur, consultez le site
www.electromenagersge.ca ou composez le 800.561.3344.
CONSIGNES DE SÉCURITÉ POUR LE RÉFRIGÉRATEUR
Ce symbole représente une alerte de sécurité. Ce symbole vous avise de dangers possibles pouvant causer la
mort, des blessures ou autres. Tous les messages de sécurité seront pr écédés du symbole d’ alerte de sécurité ainsi
que des mots « DANGER », « AVER TISSEMENT » ou « MISE EN GARDE ». Ces messages sont les suivants :
DANGER
graves, voire la mort.
AVERTISSEMENT
blessures graves, voire la mort.
MISE EN GARDE
blessures mineures ou graves.
AVERTISSEMENT
Signale une situation qui présente un danger imminent et qui, si elle n’est pas évitée, entraînera des blessures
Signale une situation qui présente un danger imminent et qui, si elle n’est pas évitée, peut entraîner des
Signale une situation qui présente un danger imminent et qui, si elle n’est pas évitée, peut entraîner des
.
IMPORTANTES CONSIGNES DE SÉCURITÉ
Pour réduire le risque d’incendie, d’explosion, de choc électrique ou de blessures lorsque
vous utilisez votre réfrigérateur, veuillez suivre ces consignes de sécurité :
Ce réfrigérateur doit être correctement installé conformément aux
Consignes d’Installation avant toute utilisation.
Débranchez le réfrigérateur avant tout entretien ou réparation.
REMARQUE : Les réparations doivent être effectuées par un
professionnel qualifié.
Remettez toutes les pièces et panneaux en place avant d’utiliser
l’appareil.
Nous déconseillons fortement l’utilisation d’une rallonge à cause
des risques potentiels dans certaines conditions. Cependant, si
l’utilisation d’un cordon prolongateur est nécessaire, ce dernier doit
obligatoirement être homologué UL (aux USA) ou CSA (au Canada),
à trois brins avec mise à la terre pour appareil électroménager et
doit être équipé d’une fiche et d’une prise femelle avec terre. Les
caractéristiques électriques du cordon prolongateur doivent être de
15 ampères (minimum) et de 120 volts.
Pour éviter les risques d’asphyxie et d’enfermement pour les
enfants. Démontez les portes du congélateur et du compartiment
de réfrigération avant de le mettre au rebut ou d’interrompre son
utilisation.
Ne stockez pas ou n’utilisez pas d’essence ou d’autres vapeurs et
liquides inflammables à proximité de cet appareil ou de tout autre
appareil électroménager.
L’alimentation électrique du réfrigérateur ne peut pas être
coupée par l’intermédiaire du panneau de commande. Pour ce
faire, il est nécessaire de débrancher le réfrigérateur pour couper
l’alimentation.
Ne laissez pas les enfants grimper, se mettre debout ou se suspendre
aux poignées de portes dans le réfrigérateur ou aux clayettes du
réfrigérateur. Ils pourraient se blesser gravement.
Si votre réfrigérateur est doté d’une machine à glaçons automatique,
évitez le contact avec les pièces mobiles du mécanisme éjecteur,
ou avec l’élément chauffant qui libère les glaçons. Ne posez pas
les doigts ou les mains sur le mécanisme de la machine à glaçons
automatique pendant que le réfrigérateur est branché.
Ne nettoyez pas les clayettes ou les couvercles en verre avec de l’eau
tiède quand ceux-ci sont froids. Les clayettes et couvercles en verre
peuvent se casser s’ils sont exposés à des changements soudains
de température ou si vous les cognez ou les faites tomber. Le verre
trempé est conçu pour se briser en petits morceaux en cas de casse.
Éloignez les doigts des parties du réfrigérateur où l’on peut facilement
se pincer : les espaces entre les portes, et entre les portes et les
placards sont toujours étroits. Soyez prudent lorsque vous fermez les
portes du réfrigérateur en présence d’enfants.
Ne touchez pas les surfaces froides du congélateur lorsque vous
avez les mains humides ou mouillées. La peau risque d’adhérer à ces
surfaces extrêmement froides.
Ne recongelez pas les aliments surgelés qui ont complètement
dégelé.
Avant de remplacer une ampoule grillée, le réfrigérateur doit être
débranché afin d’éviter le contact avec un filament sous tension. (Une
ampoule grillée peut se briser lors de son remplacement.)
Pub. No. 49-60697-1 245D1573P001 03-14 GE
Page 10

Sécurité
AVERTISSEMENT
Risque d’explosion.
Conservez les matériaux et vapeurs inflammables tels que l’essence à l’écart de votre réfrigérateur. Une
explosion, un incendie voire la mort pourrait en résulter.
BRANCHEMENTS ÉLECTRIQUES
AVERTISSEMENT
Branchez l’appareil dans une prise triple avec terre.
Ne retirez pas la broche de terre.
N’utilisez pas d’adaptateur.
Le non-respect de ces instructions peut entraîner des risques d’incendies, des chocs électriques ou la mort.
Ne coupez pas ou n’enlevez pas, sous aucun prétexte, la troisième broche de mise à la terre du cordon
d’alimentation. Pour des raisons de sécurité, cet appareil doit être correctement mis à la terre.
Le cordon d’alimentation de cet appareil est équipé d’une fiche
à trois broches (pour une mise à la terre) qui s’adapte à la prise
de courant standard à 3 broches (pour une mise à la terre) pour
minimiser les risques de chocs électriques par cet appareil.
Faites vérifier la prise murale et le circuit électrique par un
électricien qualifié pour s’assurer que le système est correctement
mis à la terre.
Dans le cas d’une prise biphasée, l’installateur a la responsabilité
et l’obligation de la remplacer par une prise triphasée
correctement mise à la terre. N’utilisez pas d’adaptateur.
Le réfrigérateur doit toujours être branché à sa propre prise
électrique d’une tension nominale correspondant à celle indiquée
sur sa plaque signalétique.
Une alimentation électrique à 115 volts CA, 60 Hz, avec un fusible
de 15 ou 20 ampères et une mise à la terre est nécessaire. Ceci
Risque de choc électrique.
permet d’obtenir un meilleur rendement et évite de surcharger
les circuits électriques du domicile qui risque d’occasionner un
incendie en surchauffant.
Ne débranchez jamais le réfrigérateur en tirant sur le cordon
d’alimentation. Prenez toujours fermement la fiche en main et
tirez pour la sortir de la prise.
Réparez ou remplacez immédiatement tout cordon électrique usé
ou endommagé. N’utilisez pas un cordon fissuré ou présentant
des dommages dus aux frottements soit sur sa longueur ou aux
extrémités.
Lorsque vous éloignez votre réfrigérateur du mur, faites attention
à ne pas le faire rouler sur le cordon d’alimentation afin de ne pas
l’endommager.
MISE AU REBUT APPROPRIÉE DE VOTRE ANCIEN RÉFRIGÉRATEUR
AVERTISSEMENT
Démontez les portes du compartiment de réfrigération et du compartiment de congélation du
réfrigérateur, avant mettre celui-ci au rebut. Le non-respect de cette recommandation peut entraîner
l’enfermement d’un enfant qui peut entraîner la mort ou des lésions cérébrales.
IMPORTANT:
Un enfant risque de suffoquer ou d’y être emprisonné.
Les enfants pris au piège ou morts d’asphyxie sont toujours
d’actualité. Les réfrigérateurs jetés ou abandonnés
restent dangereux même si vous ne les laissez au rebut
que pour « quelques jours ». Si vous voulez jeter votre
ancien réfrigérateur, suivez les instructions suivantes pour
empêcher les accidents.
Avant de jeter votre ancien réfrigérateur ou
congélateur:
Démontez les portes du compartiment de réfrigération et
du compartiment de congélation.
Laissez les clayettes en place, pour éviter que des enfants
puissent facilement grimper dans votre réfrigérateur.
Fluides frigorigènes
Les appareils réfrigérants contiennent des fluides
frigorigènes qui conformément à la législation fédérale
doivent être retirés avant la mise au rebut de l’appareil. Si
vous mettez au rebut un ancien réfrigérateur contenant
des fluides frigorigènes, vérifiez la procédure à suivre
auprès de la compagnie responsable de l’élimination.
LISEZ ET SUIVEZ SOIGNEUSEMENT CES MESURES DE SÉCURITÉ.
CONSERVEZ CES INSTRUCTIONS
10
Page 11

Installation
INVERSION DE L’OUVERTURE DES PORTES
AVANT DE COMMENCER
• Débranchez le réfrigérateur de la prise électrique.
• Videz tous les balconnets, y compris le compartiment des produits laitiers.
AVIS : Ne laissez tomber aucune porte sur le plancher. La chute risquerait d’endommager la butée de porte.
Axe de
POUR ENLEVER LES PORTES
1. Enlevez la charnière supérieure.
2. Soulevez la porte du congélateur.
3. Enlevez l’axe de charnière central.
4. Poussez la porte du réfrigérateur vers l’avant puis soulevez-la
pour la sortir de l’axe de charnière inférieur.
5. Veillez à ne pas perdre les espaceurs et les rondelles.
POIGNÉE EN ACIER INOXYDABLE
6a. Enlevez les vis de la poignée dans le haut de la porte du réfrigérateur.
Enlevez les vis de la poignée dans le bas de la porte du réfrigérateur .
7a. Desserrez la vis de pression de la poignée à l’ aide de la clé 1/8 po
fournie.
8a. Retirez la poignée de porte.
9a. ,QYHUVH]OHVSRVLWLRQVGHOD¿[DWLRQGHSRLJQpHHWGXERXFKRQVXUOH
devant de la porte.
10a. Déplacez les bouchons dans le haut et le devant de la porte pour
boucher les trous inoccupés.
11a. Déplacez la butée de porte dans le bas de la porte.
12a. Fixez la poignée de la porte du réfrigérateur à l’aide de vis dans le
haut de la poignée. Utilisez la clé hexagonale 1/8 po pour serrer
la vis de pression dans le bas de la poignée..
13a. Fixez la poignée sur la porte du congélateur à l’aide de vis dans
le bas de la poignée. Utilisez la clé hexagonale 1/8 po pour serrer
la vis de pression dans le haut de la poignée.
14a. Fixez l’écusson sur la porte du congélateur du côté opposé de la
poignée.
Charnière
supérieure
Support de
charnière
charnière
central
Rondelle
MONTAGE DE LA POIGNÉE DE PLASTIQUE
6b. Enlevez les vis de la poignée dans le haut de la porte du réfrigérateur.
Enlevez les vis de la poignée dans le bas de la porte du réfrigérateur .
7b. Enlevez la poignée de la porte du réfrigérateur en la glissant vers le
KDXWSRXUODGpJDJHUGHOD¿[DWLRQ(QOHYH]ODSRLJQpHGHODSRUWHGX
FRQJpODWHXUHQODJOLVVDQWYHUVOHEDVSRXUODGpJDJHUGHOD¿[DWLRQ
8b. ,QYHUVH]OHVSRVLWLRQVGHOD¿[DWLRQGHSRLJQpHHWGXERXFKRQVXUOH
devant de la porte.
9b. Déplacez les bouchons dans le haut et le devant de la porte pour
boucher les trous inoccupés.
10b. Déplacez la butée de porte dans le bas de la porte.
11b. Fixez la poignée sur la porte du réfrigérateur en la glissant vers le
bas sur la fixation puis à l’aide de vis dans le haut de la poignée.
12b. Fixez la poignée sur la porte du congélateur en la glissant vers le
haut sur la fixation puis à l’aide de vis dans le bas de la poignée.
13b. Fixez la poignée sur la porte du congélateur en la glissant vers le
haut sur la fixation puis à l’aide de vis dans le bas de la poignée.
11
Page 12

Installation
INVERSION DE L’OUVERTURE DES PORTES (SUITE)
POUR REMETTRE LES PORTES EN PLACE
1. Enlevez l’axe du support de charnière inférieur.
2. Enlevez le support de charnière inférieur.
3. Posez le support de charnière inférieur du côté opposé de
l’ouverture.
4. Posez l’axe de charnière inférieur dans le trou du support
de charnière sur l’extérieur du réfrigérateur.
5. Enlevez le support de charnière central.
Rondelle
Placer l’axe de
charnière du
côté opposé du
support
Axe
de charnière
Rondelle
de plastique
de plastique
Axe de
charnière
Support
de charnière
Support
de charnière
6. Posez le support de charnière central du côté opposé de
l’ouverture. (Vous devrez retourner la charnière pour la
pose.)
8. Posez l’axe de charnière central dans le support de charnière central et dans le trou de la porte du réfrigérateur. Assurez-vous que la rondelle est en place au-dessus de l’axe
de charnière sur le dessus du support.
9. Placez la porte du congélateur sur le dessus de l’axe de
charnière central.
10. Porte du congélateur en place, posez la charnière
supérieure dans le haut de la porte du congélateur. Les
trous de la charnière s’aligneront sur les deux trous dans
le haut du réfrigérateur. Posez les deux vis à tête dans la
charnière supérieure.
7. Placez la porte du réfrigérateur, inclinée vers l’avant,
au-dessus de l’axe de charnière inférieur et glissez-la en
place.
12
Page 13

Bruits normaux de fonctionnement.
Les réfrigérateurs plus récents font des bruits différents de ceux des anciens. Les réfrigérateurs modernes
présentent plus de fonctions et sont plus avancés sur le plan technologique.
Entendez-vous ce que j’entends? Ces bruits sont normaux.
HUMMM...
WOUUCH....
Le nouveau compresseur à rendement élevé peut fonctionner
plus longtemps et plus vite que votre ancien réfrigérateur et
vous pouvez entendre un son modulé ou un ronflement aigu
pendant son fonctionnement.
Vous pouvez entendre un sifflement lorsque les portes se
ferment. Cela vient de l’équilibrage de pression dans le
réfrigérateur.
CLICS, CLAQUEMENTS, CRAQUE-
MENTS et GRÉSILLEMENTS
Vous pouvez entendre des craquements ou des claquements
lorsque le réfrigérateur est branché pour la première fois.
Cela se produit lorsque le réfrigérateur se refroidit à la bonne
température.
Le compresseur peut causer un clic ou un grésillement lors
de la tentative de redémarrage (cela peut prendre 5 minutes).
L’expansion et la contraction des serpentins de
refroidissement pendant et après le dégivrage peuvent
causer un craquement ou un claquement.
Sur les modèles équipés d’une machine à glaçons, après un
cycle de fabrication de glaçons, vous pouvez entendre les
glaçons tomber dans le bac.
Vous pouvez entendre les ventilateurs tourner à hautes vitesses.
Cela se produit lorsque le réfrigérateur vient d’être branché,
lorsque les portes sont ouvertes fréquemment ou lors de l’ajout
d’une grande quantité d’aliments dans les compartiments
congélateur ou réfrigérateur. Les ventilateurs permettent de
maintenir les bonnes températures.
Le passage de l’agent frigorifique dans les serpentins de refroid-
issement du congélateur peut être accompagné d’un gargouillement semblable à celui de l’eau en ébullition.
L’eau tombant sur l’élément chauffant de dégivrage peut faire un
bruit de grésillement, de claquement ou de bourdonnement pendant le cycle de dégivrage.
Un bruit de suintement d’eau peut être entendu pendant le cycle
de dégivrage lorsque la glace de l’évaporateur fond et tombe dans
le bac de récupération.
Fermer la porte peut causer un gargouillement en raison de l’équil-
ibrage de pression.
www.electromenagersge.ca
OUIR !
BRUITS D’EAU
13
Page 14

Service après-vente.
Avant de communiquer avec le service après-vente, consultez les conseils de dépannage dans le manuel d’utilisation. Au besoin,
une visite de service peut être cédulée en appelant le 800.561.3344.
Vérité ou mythe
Vérité ou mythe? Réponse Explication
La machine à glaçons automatique
produit de la glace lorsque le réfrigérateur est branché dans une prise
électrique.
Je n’observerai jamais de givre à l’intérieur du compartiment congélateur.
Les poignées de la porte du réfrigérateur peuvent se serrer facilement.
Une fois démarrée, la machine à
glaçons a gaspillé 24 heures de production de glace.
La porte doit toujours être enlevée lors
de l’installation.
Il est possible d’ajuster les roulettes
arrière.
N’importe quel nettoyant tout usage
peut servir à nettoyer le réfrigérateur.
Un nettoyage et un entretien réguliers
prolongeront la durée de vie des joints
d’étanchéité.
À la livraison, les portes peuvent
comporter une pellicule protectrice qui
doit être retirée avant l’utilisation.
Vous avez d’autres questions? Pour plus de renseignements sur votre réfrigérateur ou d’autres électroménagers GE, veuillez visiter le
www.electromenagersge.ca .
MYTHE Le réfrigérateur doit être raccordé à l’alimentation d’eau et la machine à glaçons doit
être allumée. Assurez-vous d’allumer la machine à glaçons, mais seulement après
avoir raccordé la conduite d’eau et ouvert le robinet d’eau. La machine à glaçons
s’éteint en mettant l’interrupteur à la position OFF (Arrêt).
La température du congélateur doit être égale ou inférieure à 15 degrés avant que
la machine à glaçons ne produise de la glace. Veuillez patienter 24 heures pour
permettre au réfrigérateur de refroidir et à la température de se stabiliser.
MYTHE Le givre à l’intérieur du congélateur indique généralement que la porte n’est pas
suffisamment étanche ou qu’elle a été laissée ouverte. Si du givre est observé,
enlevez-le à l’aide d’une spatule en plastique et d’une serviette, puis assurez-vous
qu’aucun emballage ou contenant d’aliment ne gêne la fermeture de la porte.
Pour réduire le risque de givrage, assurez-vous de laisser un dégagement suffisant
à l’admission d’air et aux évents du congélateur afin d’améliorer la circulation.
Recouvrez toujours les aliments avant de les ranger dans le réfrigérateur puisque
l’humidité émanant des contenants ouverts peut contribuer à l’apparition du givre.
MYTHE Lâche ou ont une poignées d’écart peuvent être serrées à l’aide des vis aux
extrémités des poignées.
MYTHE Le premier lot de glace doit être jeté en raison d’une odeur et d’un goût douteux.
MYTHE Les portes ne doivent être enlevées qu’en cas de nécessité pour éviter
d’endommager les lieux de passage ou permettre l’accès à l’emplacement final. Si les
portes sont enlevées, veuillez consultez la section Inversion de l’ouverture des portes
pour connaître la procédure de remise en place.
MYTHE Les pattes de nivellement avant sont ajustables et sont utilisées pour équilibrer le
réfrigérateur. Les pattes de nivellement servent à l’ajustement initial de la porte du
réfrigérateur. Une légère pente d’environ ¼ po doit être laissée de l’avant vers l’arrière
pour garantir la fermeture des portes.
MYTHE Les nettoyants tout usage ne sont pas recommandés pour le réfrigérateur.
N’utilisez pas de cire, de produit à polir, d’ammoniaque, de javellisant ou d’autres
produits contenant du chlore sur aucune des surfaces. Nettoyez les surfaces à
l’aide d’un chiffon imbibé d’eau savonneuse. Asséchez à l’aide d’un linge doux.
On peut nettoyer les portes en acier inoxydable avec un nettoyant de commerce
spécialement conçu à cet effet. Les nettoyants qui contiennent de l’acide oxalique
(p.ex. Bar Keepers Friend Soft Cleanser™) élimineront la rouille, la ternissure et les
petites taches. Utilisez uniquement un nettoyant liquide exempt d’abrasif et frottez
dans la direction des lignes de brosse à l’aide d’une éponge douce humide. N’utilisez
pas de cire ou de produit à polir pour électroménagers sur l’acier inoxydable.
MYTHE Nettoyez les joints d’étanchéité avec de l’eau tiède savonneuse. Assurez-vous que
les plis sont bien propres et secs après le nettoyage. Assurez-vous que les rebords
sont exempts de particules et de saletés. Une fois les joints d’étachéité nettoyés,
appliquez de la paraffine ou de la gelée de pétrole sur les joints d’étanchéité et sur les
charnières (du côté charnière). Cette mesure empêchera les joints de coller ou de se
déformer.
MYTHE /HVSRUWHVDX¿QLOLVVHLQR[DUGRLVHQRLUHWEODQFEULOODQWVRXDUJHQWPpWDOOLTXH
comportent une pellicule de plastique transparent sur la porte qui doit être retirée
après l’installation.
14
Page 15

Notes.
www.electromenagersge.ca
15
Page 16

Garantie du réfrigérateur.
Pour les clients des États-Unis, toutes les réparations en vertu de
la garantie sont fournis par nos Centre de Service d’Usine ou par un
technicien autorisé Customer Care®. Pour prévoir une réparation,
consultez notre site GEAppliances.com ou appelez le 800.GE.CARE5
(800.432.2737). Veuillez avoir votre numéro de série et votre numéro de
modèle à portée de main lorsque vous appelez pour obtenir un service.
Agrafez votre facture ici.
Pour bénéficier du service de
réparation sous garantie, une
preuve de la date d’achat ini-
tial est nécessaire.
Au Canada, appelez le 800.561.3344.
Pour le diagnostic, la réparation de votre réfrigérateur peut nécessiter l’utilisation du port de données embarqué. Celui-ci permet au technicien de réparation GE de diagnostiquer rapidement des problèmes avec votre
appareil. Il permet également à GE d’améliorer ses produits en fournissant à ces derniers des informations sur
votre appareil. Si vous ne voulez pas que les données de votre appareil soient envoyées à GE, veuillez demander
à votre technicien de NE PAS soumettre les données à GE pendant la réparation.
Pendant la période de
GE remplacera :
garantie de :
Un An
A compter de la date d’achat
initial
Toute pièce du réfrigérateur qui s’ avère défectueuse en raison d’un défaut de matériau ou de
fabrication. Pendant la validité de la présente garantie limitée d’un an, GE fournira également
gratuitement la main d’œuvre et le service pour réparer la pièce défectueuse.
Ce qui n’est pas couvert par GE :
■ Les déplacements à votre domicile pour vous expliquer l’utilisa-
tion de ce produit
■ Une installation, livraison ou maintenance défectueuse.
■ Une panne du produit par abus d’utilisation, par mauvaise utili-
sation, par modification ou s’il a été utilisé dans un but autre que
celui pour lequel il a été fabriqué.
■ Détérioration des aliments.
■ Le remplacement des fusibles ou le réenclenchement du dis-
joncteur du domicile.
■ Les dommages causés après la livraison.
■ Le remplacement de la cartouche filtrante, si incluse, à cause
d’une pression d’eau en dehors de la gamme de fonctionnement
recommandée ou à cause d’une concentration excessive de
sédiments dans l’eau d’alimentation.
■ Le remplacement des ampoules, si incluses, ou la cartouche
filtrante, si incluse, et dans des conditions autres que celles susmentionnées.
■ Tout dommage causé par accident, incendie, inondation ou une
catastrophe naturelle.
■ Tout dommage fortuit ou indirect causé par des défauts éventu-
els de cet appareil.
■ Le service s’il est impossible d’avoir accès au produit.
■ Dommages causés par l’utilisation d’un filtre qui n’est pas de
marque GE.
■
Tout dommage au fini de l’appareil doit être signalé auprès du
magasin où a été effectué l’achat dans les 48 heures suivant la
livraison de l’appareil.
■
Les produits n’étant pas défectueux, brisés ou qui fonctionnent
selon la description du manuel du propriétaire.
EXCLUSION DES GARANTIES TACITES - Votre recours exclusif est l’échange du produit suivant les modalités de
la Garantie Limitée. Toutes garanties tacites, y compris les garanties de valeurs marchandes ou d’adéquation à
des fins particulières, sont limitées à une durée d’un an ou à la durée la plus courte autorisée par la loi.
Pour les clients des États-Unis : Cette garantie est étendue à l’acheteur d’origine et aux propriétaires suivants
pour tout produit acheté pour une utilisation domestique aux États-Unis. Si le produit est installé dans une région
où ne se trouve aucun réparateur autorisé GE, vous devrez peut-être assumer les frais de transport ou apporter
l’appareil à un centre de service autorisé GE. En Alaska, cette garantie exclut le coût d’expédition ou de dépannage à votre domicile.
Certains états n’acceptent pas d’exclusion ou de limites aux dommages indirects consécutifs. Certains droits particuliers vous sont dévolus en vertu de la présente garantie et peuvent s’accompagner d’autres droits qui varient
selon votre lieu de résidence. Pour connaître vos droits juridiques, veuillez consulter le bureau local ou le bureau
d’état des affaires aux consommateurs ou le Procureur Général de votre état.
Garant :
États-Unis :
General Electric Company. Louisville, KY 40225
Cette garantie est étendue à l’acheteur d’origine et aux propriétaires suivants pour tout produit acheté aux Canada pour une utilisation domestique aux Canada.Le service à domicile en vertu de la garantie sera fourni dans les
régions où il est disponible et où Mabe estime raisonnable de le fournir.
Garant Canada: MC Commercial, Burlington, Ontario, L7R 5B6
16
Page 17

Guia rápida de uso y cuidado.
Refrigeradores
SEGURIDAD
INFORMACIÓN IMPORTANTE DE SEGURIDAD LEA TODAS LAS INSTRUCCIONES ANTES DE USAR
Freezer Superior
-
Sitio Web de Electrodomésticos de GE
Para más información sobre el funcionamiento de su refrigerador, visite www.GEAppliances.com
o comuníquese al 1-800-GECARES (432-2737).
INFORMACIÓN DE SEGURIDAD DEL REFRIGERADOR
Éste es el símbolo de alerta de seguridad. El mismo alerta sobre potenciales riesgos de muerte o lesiones tanto para usted con
para otras personas. Todos los mensajes de seguridad estarán a continuación del símbolo de alerta de seguridad y con la palabra
“PELIGRO”, “ADVERTENCIA” o “PRECAUCIÓN”. Estas palabras se definen como:
PELIGRO
ADVERTENCIA
blessures graves, voire la mort. .
PRECAUCIÓN
blessures mineures ou graves.
ADVERTENCIA
Signale une situation qui présente un danger imminent et qui, si elle n’est pas évitée, entraînera des blessures
graves, voire la mort.
Signale une situation qui présente un danger imminent et qui, si elle n’est pas évitée, peut entraîner des
Signale une situation qui présente un danger imminent et qui, si elle n’est pas évitée, peut entraîner des
INSTRUCCIONES IMPORTANTES DE SEGURIDAD
A fin de reducir el riesgo de incendio, explosión, descargas eléctricas o lesiones al usar
su refrigerador, siga estas precauciones básicas de seguridad:
Este refrigerador se deberá instalar y ubicar adecuadamente de
acuerdo con las Instrucciones de Instalación antes de ser usado.
Desenchufe el refrigerador antes de realizar su limpieza o
reparaciones.
NOTA: Las reparaciones deberán ser realizadas por un
Profesional del Servicio Técnico calificado.
Reemplace todas las piezas y paneles antes de utilizar.
Debido a los posibles riesgos sobre la seguridad bajo
ciertas condiciones, recomendamos enfáticamente no
usar prolongadores. Sin embargo, si es necesario usar
un prolongador, es absolutamente necesario que sea un
prolongador para electrodoméstico de la lista UL (en Estados
Unidos) o uno certificado por CSA (en Canadá), de 3 cables con
conexión a tierra, que cuente con un enchufe con conexión
a tierra y un tomacorriente con una graduación eléctrica del
cable de 15 amperes (mínimo) y 120 volts.
A fin de evitar riesgos de que los niños sufran asfixia o queden
atrapados, retire las puertas de comidas frescas y del freezer de
cualquier refrigerador antes de deshacerse o dejar de usar el mismo.
No guarde ni use gasolina u otros vapores inflamables y
líquidos cerca de éste o de otros electrodomésticos.
La corriente al refrigerador no puede ser desconectada por
ninguna configuración del panel de control; el refrigerador
debe ser desconectado para quitar la corriente.
No permita que los niños se trepen, paren o cuelguen de las
manijas de la puerta o de los estantes del refrigerador. Podrían
sufrir lesiones graves.
En refrigeradores con máquinas de hacer hielo automáticas,
evite el contacto con las partes móviles del mecanismo
eyector o con el elemento de calefacción que libera los cubos.
No coloque los dedos ni las manos en el mecanismo de la
máquina de hielo automática mientras el refrigerador esté
enchufado.
No limpie estantes de vidrio ni tapas con agua caliente cuando
estén fríos. Los estantes de vidrio y las tapas se pueden
romper si son expuestos a cambios de temperatura repentinos
o impactos, tales como sacudones o caídas. El vidrio templado
está diseñado para destruirse en pequeñas piezas en caso de
rotura.
Mantenga los dedos fuera de los espacios de “riesgo de
lastimaduras”; los despejes entre las puertas y entre las
puertas y el gabinete son necesariamente pequeños. Tenga el
cuidado de cerrar las puertas cuando los niños se encuentren
en el área.
No toque las superficies frías del compartimiento del freezer
cuando las manos estén húmedas o mojadas, la piel se podrá
adherir a estas superficies extremadamente frías.
No vuelva a congelar comidas que hayan estado totalmente
congeladas en forma previa.
Antes de reemplazar una lámpara quemada, el refrigerador
deberá ser desenchufado a fin de evitar el contacto con el
filamento de un cable con corriente. (Existe riesgo de que una
lámpara quemada se rompa durante su reemplazo).
Pub. No. 49-60697-1 245D1573P001 03-14 GE
Page 18

Seguridad
ADVERTENCIA
Riesgo de Explosión.
Mantenga cualquier material y vapores inflamables, tales como gasolina, alejados del refrigerador. Si no
se cumple con esto se podrá producir una explosión, incendio o la muerte.
CONEXIÓN DE LA ELECTRICIDAD
ADVERTENCIA
Enchufe en un tomacorriente con conexión a tierra de 3 cables.
No elimine el cable de conexión a tierra.
No use un adaptador.
Si no se siguen estas instrucciones se podrá producir a muerte, incendios o descargas eléctricas.
Nunca, bajo ninguna circunstancia, corte o elimine el tercer cable (tierra) del cable de corriente.
Para su seguridad personal, este electrodoméstico debe estar adecuadamente conectado a tierra.
El cable de corriente de este electrodoméstico contiene un
enchufe de 3 cables (conexión a tierra) que se conecta a un
tomacorriente de pared estándar de 3 cables (conexión a tierra)
para minimizar la posibilidad de riesgos de descargas eléctricas
por parte del mismo.
Contrate a un electricista calificado para que controle el
tomacorriente y el circuito eléctrico, a fin de asegurar que el
enchufe esté correctamente conectado a tierra.
En caso de contar con un tomacorriente de pared de 2 cables,
es su responsabilidad y obligación reemplazarlo por un
tomacorriente de pared de 3 cables correctamente conectado a
tierra. No use un adaptador.
El refrigerador debería estar siempre conectado a un enchufe
específico con un índice de voltaje equivalente al que figura en su
Riesgo de Descarga Eléctrica.
etiqueta de características técnicas.
Se requiere un suministro eléctrico con fusible y conexión a tierra
de 115 voltios de CA, 60 Hz, 15 o 20 amperes. Esto garantiza el
mejor funcionamiento y además previene la sobrecarga de los
circuitos del hogar, lo cual podría ocasionar riesgos de incendio
debido al recalentamiento de cables.
Nunca desenchufe el refrigerador tirando del cable de corriente.
Siempre tome su enchufe firmemente y empuje el mismo hacia
afuera para retirarlo.
Repare o reemplace de inmediato todos los cables de corriente
pelados o con cualquier tipo de daño. No use un cable con
cortaduras o abrasión sobre su extensión o extremos.
Al alejar el refrigerador de la pared, se deberá tener cuidado de
que no ruede sobre ni dañe el cable de corriente.
FORMA ADECUADA DE DESCARTAR SU ANTIGUO REFRIGERADOR
ADVERTENCIA
Retire del refrigerador las puertas de comidas frescas y del freezer, antes de descartar el refrigerador. Si
esto no se realiza, los niños podrán quedar atrapados y ocasionar la muerte o daño cerebral.
IMPORTANTE:
: Riesgo de que los niños sufran asfixia o y queden atrapados.
Que un niño quede atrapado o que sufra una asfixia no son
problemas del pasado. Los refrigeradores antiguos o abandonados aún son peligrosos, incluso aunque se conserven
por “sólo unos pocos días”. Si se deshará de su antiguo
refrigerador, siga las siguientes instrucciones a fin de evitar
accidentes.
Antes de Descartar su Antiguo Refrigerador o Freezer:
Retire las puertas de comidas frescas y del freezer.
Deje los estantes en su lugar de modo que los niños no
puedan trepar dentro con facilidad.
Refrigerantes
Todos los productos de refrigeración cuentan con refrigerantes, que de acuerdo con la ley federal deberán ser
eliminados antes de descartar el producto. Si se deshará
de un producto de refrigeración antiguo, consulte a la
compañía a cargo sobre cómo deshacerse del mismo.
LEA Y SIGA ESTA INFORMACIÓN DE SEGURIDAD
CUIDADOSAMENTE.
GUARDE ESTAS INSTRUCCIONES
18
Page 19

Instalación
INVERSIÓN DE LA APERTURA DE LAS PUERTAS
ANTES DE COMENZAR
• Desenchufe el refrigerador del tomacorriente.
• Vacíe todos los estantes de la puerta, incluyendo el compartimiento de lácteos.
AVISO: No permita que ninguna de las puertas caiga al piso. Esto podría dañar la traba de la puerta.
PARA RETIRAR LAS PUERTAS
1. Retire la bisagra superior.
2. Levante la puerta del freezer.
3. Retire la clavija de la bisagra central.
4. Incline la puerta de comidas frescas hacia adelante y levante la
puerta de la clavija .
5. Tenga cuidado de no perder el separador ni las arandelas.
MANIJA DE ACERO INOXIDABLE
6a. Retire los tornillos de la manija de la parte superior de la puerta de
comidas frescas. Retire los tornillos de la manija de la parte inferior
de la puerta del freezer .
7a. $ÀRMHHOWRUQLOORGHODPDQLMDFRQODOODYHGHµSURYLVWD
8a. Retire la manija de la puerta.
9a. Intercambie los lugares entre el ajuste de la manija y el botón de
corriente en el frente de la puerta. .
10a. Mueva los botones de corriente en la parte superior y en el frente
de la puerta para llenar los agujeros ahora vacíos.
11a. 7UDQV¿HUDODWUDEDGHODSXHUWDHQODSDUWHLQIHULRUGHODSXHUWD
12a. Adhiera la manija a la puerta de comidas frescas con tornillos
HQODSDUWHVXSHULRUGHODPDQLMD8VHXQDOODYH$OOHQGHµ
para ajustar el tornillo específico en la parte inferior de la
manija.
13a. Adhiera la manija a la puerta del freezer con tornillos al final
GHODPDQLMD8VHODOODYH$OOHQGHSURYLVWDµSDUDDMXVWDUHO
tornillo específico en la parte superior de la manija.
14a. Adhiera la insignia en la puerta del freezer en la posición
opuesta a la manija.
Bisagra
superior
Soporte de
la bisagra
Clavija de la
Bisagra Central
Arandela
ENSAMBLE DE LA MANIJA PLÁSTICA
6b. Retire los tornillos de la manija de la parte superior de la puerta de
comidas frescas. Retire los tornillos de la manija de la parte inferior
de la puerta del freezer .
7b. Retire la manija en la puerta de comidas frescas, deslizando la
manija hacia arriba y afuera del ajuste. Retire la manija en la puerta
del freezer, deslizando la manija hacia abajo y afuera del ajuste.
8b. Intercambie los lugares entre el ajuste de la manija y el botón de
corriente en el frente de la puerta.
9b. Mueva los botones de corriente en la parte superior y en el frente
de la puerta para llenar los agujeros ahora vacíos.
10b. 7UDQV¿HUDODWUDEDGHODSXHUWDHQODSDUWHLQIHULRUGHODSXHUWD
11b. Adhiera la manija a la puerta de comidas frescas, deslizando
la misma hacia abajo en el ajuste y con tornillos en la parte
superior de la manija.
12b. Adhiera la manija a la puerta del freezer, deslizando la manija
hacia arriba sobre el ajuste y con los tornillos en la parte
inferior de la manija
13b . Adhiera la insignia en la puerta del freezer en la posición
opuesta a la manija
19
Page 20

Instalación
INVERSIÓN DE LA APERTURA DE LAS PUERTAS (CONT.)
PARA VOLVER A COLGAR LAS PUERTAS
1. Retire la clavija de la bisagra del soporte de la bisagra infe-
rior.
2. Retire el soporte de la bisagra inferior.
3. Instale el soporte de la bisagra inferior del lado opuesto de
la abertura.
4.
Instale la clavija de la bisagra inferior en el agujero del
soporte de la bisagra hacia la parte externa del refrigerador.
5. Retire el soporte de la bisagra central.
Arandela
Cambie la clavija
de la bisagra al
lado opuesto del
soporte.
Clavija de
la Bisagra
Arandela
de Plástico
6. Instale el soporte de la bisagra central del lado opuesto
de la abertura. (Deberá dar vuelta la bisagra para la instalación).
de Plástico
Clavija de
la Bisagra
Soporte de
la Bisagra
Soporte de
la Bisagra
8. Instale la clavija de la bisagra central en el soporte de la
bisagra central y en el agujero de la puerta de comidas
frescas. Asegúrese de que la arandela esté ubicada sobre
la clavija de la bisagra, encima del soporte.
9. Coloque la puerta del freezer sobre la clavija de la bisagra
central.
10. Con la puerta del freezer colocada, instale la bisagra supe-
rior en la parte superior de la puerta del freezer. Los agujeros de la bisagra se alinearán con 2 de los agujeros en
la parte superior del refrigerador. Instale los 2 tornillos con
sobre la bisagra superior.
7. Posicione la puerta de comidas frescas, inclinada hacia
adelante, sobre la clavija de la bisagra inferior y deslice la
misma sobre su posición.
20
Page 21

Sonidos De Funcionamiento Normal
El sonido de los refrigeradores nuevos es diferente al de aquellos más antiguos. Los refrigeradores modernos
cuentan con más funciones y utilizan una tecnología más nueva.
¿Escuchas lo que yo escucho? Estos sonidos son normales.
HUMMM...
WHOOSH...
Es posible que el nuevo compresor de alta efectividad funcione más
rápido y por más tiempo que aquel de su refrigerador antiguo, y es
posible que escuche un zumbido o sonido de pulsación en un tono alto
mientras está funcionando.
Es posible que escuche gorgoteos al cerrar la puerta. Esto se debe al
equilibrio de la presión dentro del refrigerador.
Es posible que escuche los ventiladores girar en altas velocidades. Esto
sucede cuando el refrigerador se enchufa por primera vez, cuando las
puertas se abren con frecuencia o cuando una gran cantidad de comida
es agregada a los compartimientos del refrigerador o del freezer. Los
ventiladores están ayudando a mantener las temperaturas correctas.
CHASQUIDOS, ESTALLIDOS,
CRUJIDO, GORJEOS
Puede escuchar sonidos como de crujido o estallidos cuando el
refrigerador se conecta por primera vez. Esto pasa a medida que
el refrigerador se enfría hasta la temperatura correcta.
El compresor puede causar un chasquido o un gorjeo cuando
intenta volver a arrancar (esto puede tomar hasta 5 minutos).
Expansión y contracción de las bobinas durante o después del
ciclo de descongelación puede causar sonidos como de crujido o
estallidos.
En modelos con máquina de hielos, después de completar un
ciclo de hacer hielo, se pueden escuchar los cubos de hielo
cuando caen a la bandeja de hielos.
SONIDOS DE AGUA
El fluido del refrigerante a través de las bobinas puede producir un
sonido de borboteo como de agua hirviendo.
El agua que cae en el calentador de descongelación puede causar un
chisporroteo, estallido o zumbido durante el ciclo de descongelación.
Un ruido de agua cayendo se puede escuchar durante el ciclo de
descongelación a medida que el hielo se derrite del evaporador y
fluye hacia la bandeja de drenaje.
El cierre de las puertas puede producir un sonido de gorgoteo debido
a la estabilización de la presión.
21
Page 22

Servicio Técnico.
Antes de solicitar el servicio técnico, revise los consejos para la solución de problemas de forma detallada en el Manual del
Propietario. En caso de ser necesario, se podrá programar el servicio técnico visitándonos a través de Internet en
GEAppliances.com o llamando al 800.ge.CARES 800.432.2737.
Verdad o Mito
¿Verdad o Mito? Respuesta Explicación
La máquina de hielos automática de
mi refrigerador producirá hielo cuando
el refrigerador se encuentre enchufado a un receptáculo de corriente.
Nunca veré escarcha dentro del compartimiento del freezer.
Las manijas de la puerta del refrigerador se pueden ajustar fácilmente.
Luego de activar la máquina de hielos,
descarte la producción de hielo de las
primeras 24 horas.
Siempre se requiere el retiro de la
puerta para la instalación.
MITO El refrigerador debe estar conectado al agua, y la máquina de hacer hielo debe
estar encendida. Asegúrese de que la máquina de hielos esté encendida, sólo
después de que se haya realizado la conexión a la cañería de agua y que el agua
esté abierta. La máquina de hielos se podrá apagar presionando el interruptor en
la posición OFF (Apagado).
El freezer debe estar a 15 grados o menos para que la máquina de hielos
produzca hielo. Espere por lo menos 24 horas hasta que el refrigerador esté
preparado y a que la temperatura de la unidad se estabilice.
MITO La escarcha dentro del freezer típicamente indica que la puerta no está
correctamente sellada, o se dejó abierta. Si se encuentra escarcha, despeje la
misma utilizando una espátula de plástico y una toalla, luego asegúrese de que
no haya paquetes ni envases de comida que impidan que la puerta del freezer
se cierre. Para ayudar a reducir la producción de escarcha, asegúrese de que
haya suficiente espacio para el suministro de aire y que las ventilaciones del
freezer mejoren la circulación. Siempre cubra la comida antes de colocarla en el
refrigerador, ya que la humedad de envases abiertos puede contribuir a la carga
de escarcha.
VERDADERO Si las manijas de la puerta están flojas o tienen una separación con la puerta, se
deberán ajustar sobre los tornillos ubicados en los extremos de las manijas.
VERDADERO Para evitar problemas de olor y gusto, la primera producción de hielo deberá ser
descartada.
MITO Las puertas sólo se deben retirar cuando sea necesario para evitar daños en el
pasillo o en el acceso hasta la ubicación final. Si las puertas son retiradas, revise la
sección de Inversión de la Puerta Giratoria para proceder a colocarla nuevamente.
Hay un ajuste sobre las ruedas
traseras.
Se puede usar cualquier limpiador
multiuso para limpiar el refrigerador.
Las juntas durarán más con una
limpieza y mantenimiento regular.
La puerta podrá ser enviada con una
película protectora, la cual deberá ser
retirada antes del uso.
¿Tiene más preguntas? Para más información sobre su refrigerador u otros electrodomésticos de GE, visítenos en www.geappliances.com/
videos
MITO Las patas niveladoras frontales son ajustables y se deberían usar para equilibrar
el refrigerador. Las patas niveladoras se usan para hacer el ajuste inicial de la
puerta de alimentos frescos. Debería haber aproximadamente ¼” de caída desde
el frente hasta la parte trasera, a fin de asegurar que las puertas siempre se
cierren.
MITO Los limpiadores multiuso no son recomendables para refrigeradores.
No use cera, pulidores, amoníaco, blanqueadores u otros productos que
contengan cloro sobre ninguna superficie. Limpie con una tela humedecida
con agua y jabón. Seque con una tela seca. Las puertas de acero inoxidable se
pueden limpiar con un limpiador de acero inoxidable disponible comercialmente.
Los limpiadores con ácido oxálico tales como Bar Keepers Friend Soft Cleanser™
eliminarán el óxido, deslustres y pequeñas manchas. Use sólo un limpiador líquido
libre de material abrasivo y frote en la dirección de las líneas del cepillo con una
esponja suave y húmeda. No use cera para electrodomésticos ni pula sobre el
acero inoxidable.
VERDADERO Limpie las juntas con agua caliente y jabón. Asegúrese de que todos los pliegues
estén limpios y secos luego de la limpieza. Asegúrese de que los rebordes estén
limpios de cualquier arenilla o suciedad. Luego de limpiar las juntas de la puerta,
aplique cera de parafina o de vaselina a las juntas de la puerta y bisagras del lado
de las bisagras. Esto ayuda a evitar que las juntas se peguen o pierdan su forma
debido a una inclinación.
VERDADERO Las puertas con acabado delicado (acero inoxidable, pizarra, negro brillante y
blanco brillante, o metálico plateado) tendrán una película plástica clara en la
puerta, la cual deberá ser retirada luego de la instalación.
22
Page 23

Notas.
www.GEAppliances.com
23
Page 24

Garantía del refrigerador.
Todos los servicios de garantía los proporcionan nuestros Centros de Reparación de
Fábrica o nuestros técnicos Customer Care® autorizados. Para concertar una cita
de reparación, en línea, 24 horas al día, visíte nos al GEAppliances.com, o llame al
800.GE.CARES (800.432.2737). Cuando llame para solicitar servicio, por favor tenga
a mano el número de serie y el número de modelo.
Grape aquí su recibo. Se
requiere facilitar prueba de
la fecha de compra original
para obtener un servicio
bajo la garantía.
Por el período de: GE reemplazará:
MODELOS GE y GE PROFILE:
Un año Cualquier parte del refrigerador que falle debido a defectos en los materiales o en
A partir de la fecha la fabricación. Durante esta garantía limitada de un año, GE también proporcionará, sin costo
de la compra original alguno, toda la mano de obra y el servicio relacionado para reemplazar partes defectuosas.
Treinta días Cualquier parte del cartucho del filtro de agua que falle debido a defectos en los materiales o en
(Filtro de agua, si incluido)
A partir de la fecha alguno, un cartucho de filtro de agua de repuesto.
de la compra original
del refrigerador
MODELOS DE GE PROFILE SOLAMENTE:
Cinco años (Modelos Cualquier parte del sistema sellado de refrigeración (compresor, condensador, evaporador y tuberías
de GE Profile solamente) de conexión) que fallen debido a defectos en los materiales o fabricación. Durante esta garantía limitada
A partir de la fecha de cinco años del sistema sellado de refrigeración, GE también proporcionará, sin costo alguno, toda la mano
de la compra original
la fabricación. Durante esta garantía limitada de treinta días, GE también proporcionará, sin costo
de obra y el servicio relacionado para reemplazar partes defectuosas en el sistema sellado de refrigeración.
Lo que GE no cubrirá:
Viajes de servicio a su hogar para enseñarle cómo usar
el producto.
Instalación o entrega inapropiada, o mantenimiento impropio.
Fallas del producto si hay abuso, mal uso, o uso para
otros propósitos que los propuestos, o uso para fines comerciales.
Pérdida de alimentos por averías.
Reemplazo de fusibles de su hogar o reajuste de interruptores
de circuito.
Cualquier daño sobre la terminación deberá ser informado
dentro de las 48 horas luego de la entrega del electrodoméstico.
Cualquier daño sobre la terminación que incluya óxido, deslus-
tres o pequeñas manchas, luego de la entrega.
(;&/86,Ï1'(*$5$17Ë$6,03/Ë&,7$6³6X~QLFR\H[FOXVLYRGHUHFKRHVODUHSDUDFLyQGHOSURGXFWRWDO\FRPR
se indica en esta Garantía limitada. Cualquier garantía implícita, incluyendo las garantías implícitas de comerciabilidad o adecuación para un fin determinado, están limitadas a un año o el período de tiempo más breve
permitido por la ley.
Esta garantía se extiende al comprador original y cualquier comprador posterior de productos comprados para uso residencial dentro de
Estados Unidos. Si el producto está situado en un área que no dispone de servicio por parte
de un proveedor de servicio autorizado de GE, podría tener que hacerse cargo de los costes de envío o bien podría solicitársele que
lleve el producto a una centro de servicio de GE autorizado para realizar la reparación. En Alaska, la garantía excluye el costo de envío
o las visitas de servicio a su casa.
Productos que no presenten defectos ni estén rotos, o que
estén funcionando de acuerdo con lo descrito en el Manual del
Propietario
Reemplazo del cartucho del filtro de agua, si incluido, debido a
presión de agua afuera de las limites de operación especificados o sedimento excesivo en el suministro de agua.
Reemplazo de las bombillas, si incluidas, o del cartucho de
filtro de agua, si incluido, diferente a como se especifica anteriormente.
Daño al producto causado por accidente, fuego, inundaciones
o actos de Dios.
Daño incidental o consecuencial causado por posibles defectos
con el aparato.
Producto no accesible para facilitar el servicio requerido.
Algunos estados no permiten la exclusión o las limitaciones de daños incidentales o consecuenciales. Esta garantía da
derechos legales específicos, y usted podría tener otros derechos que variarán de estado a estado. Para saber cuáles son sus derechos legales,
consulte a la oficina de asuntos del consumidor local o la oficina del Attorney General en su localidad.
Garante: General Electric Company. Louisville, KY 40225
24
 Loading...