

GE GTDP520GD3WW, GTDP520GD2WW, GTDP520ED5WW, GTDP520ED3WW, GTDN550GD5WW Owner’s Manual
...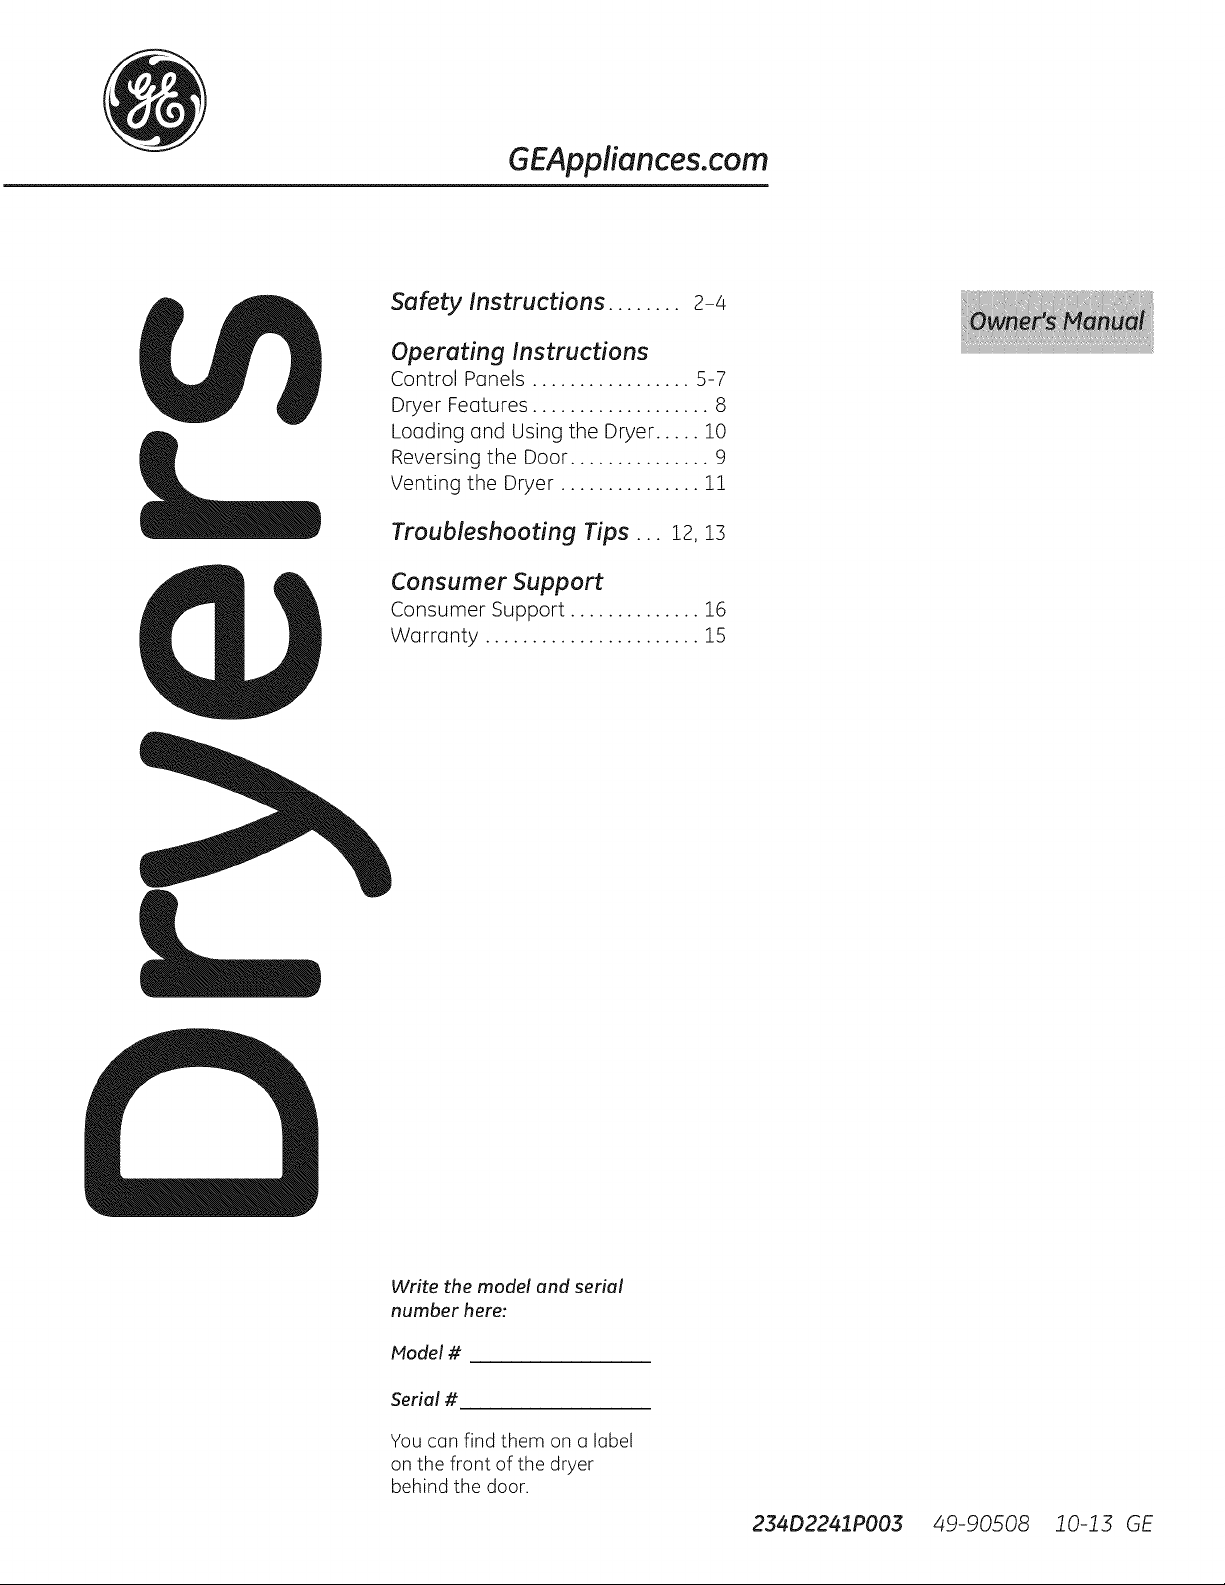
GEAppliances.com
Safety Instructions ........ 2-4
Operating Instructions
Control Panels ................. 5-7
Dryer Features ................... 8
Loading and Using the Dryer ..... 10
Reversing the Door ............... 9
Venting the Dryer ............... 11
Troubleshooting Tips... 12,13
Consumer Support
Consumer Support .............. 16
Warranty ....................... 15
Write the model and serial
number here:
Model #
Seriol #
You can find them on a label
on the front of the dryer
behind the door.
234D2241PO03 49-90508 10-13 GE
IMPORTANT SAFETY INFORMATION.
READ ALL INSTRUCTIONS BEFORE USING.
ik WARNING!
For your safety, the information in this manual must be followed to minimize the
risk of fire or explosion, electric shock, or to prevent property damage, personal
inJury, or death.
[] Do not store or use gasoline or other
flammable vapors and liquids in the
vicinity of this or any other appliance.
[] Installation and service must be
performed by a qualified installer,
service agency or the gas supplier.
WHAT TO DO IF YOU SMELL GAS"
[_ Do not try to light a match, or cigarette,
or turn on any gas or electrical
appliance.
_-_Do not touch any electrical switch; do
not use any phone in your building.
[_ Clear the room, building or area of
all occupants.
California Safe Drinking Water and Toxic Enforcement Act
Thisact requiresthe governor of Californiato publisha list of substancesknown to the state to causecancer,
birth defects or other reproductive harm and requires businessesto worn customers of potential exposure to
such substances.
Gasappliances can cause minor exposure to four of these substances,namely benzene,carbon monoxide,
formaldehyde and soot, caused primarily by the incomplete combustion of natural gas or LPfuels.
Properlyadjusted dryers will minimize incomplete combustion. Exposureto these substancescan be minimized
further by properly venting the dryer to the outdoors.
[_ Immediately call your gas supplier from
a neighbor's phone. Follow the gas
supplier's instructions carefully.
_-_ Ifyou cannot reach your gas supplier,
call the fire department.
PROPERINSTALLATION
This dryer must be properly installed and located in accordance with the Installation Instructions
before it is used. If you did not receive an Installation Instructions sheet, you can receive one by
visiting GEAppliances.com or by calling 800.GE.CARES (800.432.2737).
[] Properlyground dryer to conform with all
governing codes and ordinances. Followdetails
in Installation Instructions.
[] Install or storewhere it will not beexposed to
temperatures below freezing or exposedto
the weather.
[] Connect to a properly rated, protected and sized
power supply circuit to avoid electrical overload.
[] Remove all sharp packing items and disposeof
all shipping materials properly.
[] Removethe colored protective tape from the
control panel.
2
Exhaust/Ducting:
r_AII dryers MUSTbe exhausted to the outsideto
prevent largeamounts of moisture and lint from
being blown into the room.
F1Use only rigid metal 4" diameter ductwork inside
the dryer cabinet and use only rigidmetal 4"
diameter or UL approved transition ducting
between the dryer and the home duct. USEOF
PLASTICOROTHERCOMBUSTIBLEDUCTWORK
CANCAUSEA FIRE.PUNCTUREDDUCTWORK
CANCAUSEA FIREIF ITCOLLAPSESOR
BECOMESOTHERWISERESTRICTEDINUSEOR
DURINGINSTALLATION.
Forcomplete details, follow the Installation
Instructions.
IMPORTANT SAFETY INFORMATION.
READ ALL INSTRUCTIONS BEFORE USING.
YOURLAUNDRY AREA
[]
Keepthe area underneath and around your
appliances free of combustible materials (lint,
paper, rags,etc.),gasoline, chemicals and other
flammable vapors and liquids.
[]
Keepthe floor around your appliances clean and
dry to reduce the possibility of slipping.
[]
Closesupervision isnecessaryifthis appliance is
used near children. Donot allow children to play
on,with or insidethis or any other appliance.
Keepall laundry aids(such asdetergents, bleaches,
etc.)out of the reach of children, preferably in a
locked cabinet. Observe all warnings on container
labelsto avoid injury.
[]
Neverclimb on or stand on the dryer top.
[]
Keepthe area around the exhaust opening
and adjacent surrounding areas free from the
accumulation of lint,dust, and dirt.
Donot obstruct the flow of ventilating air. Donot
stack orplace laundry orthrow rugs against the
front or back of the dryer.
A WARNING!
WHEN USING YOURDRYER
[]
Neverreach intothe dryer while the drum is
moving. Before loading,unloading or adding
clothes,wait until the drum hascompletely
stopped.
[]
Cleanthe lint filter before each load to prevent
lint accumulation insidethe dryer or in the room.
DONOT OPERATETHEDRYERWITHOUT
THELINTFILTERIN PLACE.
[]
Donot wash or dry articles that have been
cleaned in,washed in, soaked in orspotted
with combustible or explosivesubstances (suchas
wax, oil,paint,gasoline,degreasers,dry-cleaning
solvents,kerosene,etc.).Thesesubstances give
off vaporsthat may ignite or explode. Donot add
these substances to the wash water. Do not use
or placethese substances around your washer or
dryer during operation.
[]
Donot place items exposed to cooking oils inyour
dryer. Itemscontaminated with cooking oilsmay
contribute to a chemical reaction that could cause
a clothes load to catch fire.
[]
Any article on which you have used a cleaning
solvent or that contains flammable materials (such
as cleaning cloths,mops, towels usedin beauty
salons,restaurants or barber shops,etc.)must not
be placed in or nearthe dryer.There are many
highly flammable items usedin homes such as
acetone, denatured alcohol, gasoline,kerosene,
some household cleaners,some spot removers,
turpentines, waxes,wax removers and products
containing petroleum distillates.
Thelaundry process can reducethe flame
retardancy of fabrics. Toavoid such a result,
carefully follow the garment manufacturer's
care instructions.
Donot dry articles containing rubber, plastic,
foam or similar materials such aspadded bras,
tennis shoes,galoshes,bath mats,rugs,bibs,baby
pants, plastic bags,pillows, etc.,that may melt
or burn.Some rubber materials, when heated,
can under certain circumstances produce fire by
spontaneous combustion.
Donot storeplastic, paper or clothing that may
burn or melton top of the dryerduring operation.
Garments labeled DryAway from Heat or DoNot
Tumble Dry(suchas lifejackets containing Kapok)
must not be put inyour dryer.
Donot dry fiberglass articles inyour dryer.
Skinirritation could result from the remaining
particles that may bepicked up by clothing during
subsequent dryer uses.
Tominimize the possibilityof electric shock, unplug
this appliance from the power supply ordisconnect
the dryer at the household distribution panel by
removing the fuseor switching off the circuit
breaker before attempting any maintenance or
cleaning (exceptthe removal and cleaning of the
lint filter).NOTE:Turning the CycleSelectorknob
to an off position, or pressing PAUSEdoes NOT
disconnect the appliance from the power supply.
GEAppliunces.com
IMPORTANT SAFETY INFORMATION.
READ ALL INSTRUCTIONS BEFORE USING.
WARNING!
WHEN USING YOURDRYER(cont.)
[]
Neverattempt to operate this appliance
if it isdamaged, malfunctioning, partially
disassembled,or hasmissing or broken parts,
including a damaged cord or plug.
[]
Theinterior of the machine and the exhaust duct
connection insidethe dryer should becleaned at
least once a year by aqualified technician. Seethe
Loading and Usingthe Dryer section.
[]
Ifyours isa gasdryer, itis equippedwith an
automatic electric ignition and does not have a
pilot light. DONOTATTEMPTTOLIGHTWITHA
MATCH.Burns may resultfrom having your hand
in the vicinity of the burner when the automatic
ignition turns on.
[]
You maywish to softenyour laundered fabrics
or reduce the static electricity in them by using
a dryer-applied fabric softener oran anti-static
conditioner. We recommend you useeither a
fabric softener inthe wash cycle,according to the
manufacturer's instructions for those products,
or try a dryer-added product for which the
manufacturer gives written assurance on the
package that their product can be safelyused
in your dryer. Serviceor performance problems
caused by use ofthese products arethe
responsibility of the manufacturers of those
products and are not covered under the warranty
to this appliance.
[]
Ifyou seewater on the floor around the dryer,call
for service.
[]
Donot spray any type of aerosol into, on, or near
dryer at any time. Donot use any type of spray
cleanerwhen cleaning dryer interior.Hazardous
fumes or electrical shockcould occur.
[]
Never attempt to use the Steam Dewrinkleor
Steam Refreshcycles without clothes inthe drum.
It is highly recommended to selectthe appropriate
load sizefor best results.Selectinglarge load cycles
for small loadsmay result in clothes being wet,
and selectingsmall loadcyclesfor large loads may
result in poordewrinkling performance.
WHEN NOT USING YOURDRYER
[]
_l| S
Graspthe plug firmly when disconnecting this
appliance to avoid damage to the cord while
pulling. Placethe cord away from traffic areas
so itwill not be steppedon,tripped over or
subjected to damage.
[]
Donot attempt to repair or replaceany part of
this appliance or attempt any servicing unless
specificallyrecommended inthis Owner's Manual
or inpublished user-repair instructionsthatyou
understand and have the skillsto carry out.
[] Beforediscarding a dryer, or removing itfrom
service,remove the dryer door to prevent children
from hiding inside.
[] Donot tamper with controls.
,,,,__i READAND FOLLOWTHISSAFETYINFORMATIONCAREFULLY.
I_\'_ SAVE THESE INSTRUCTIONS
4
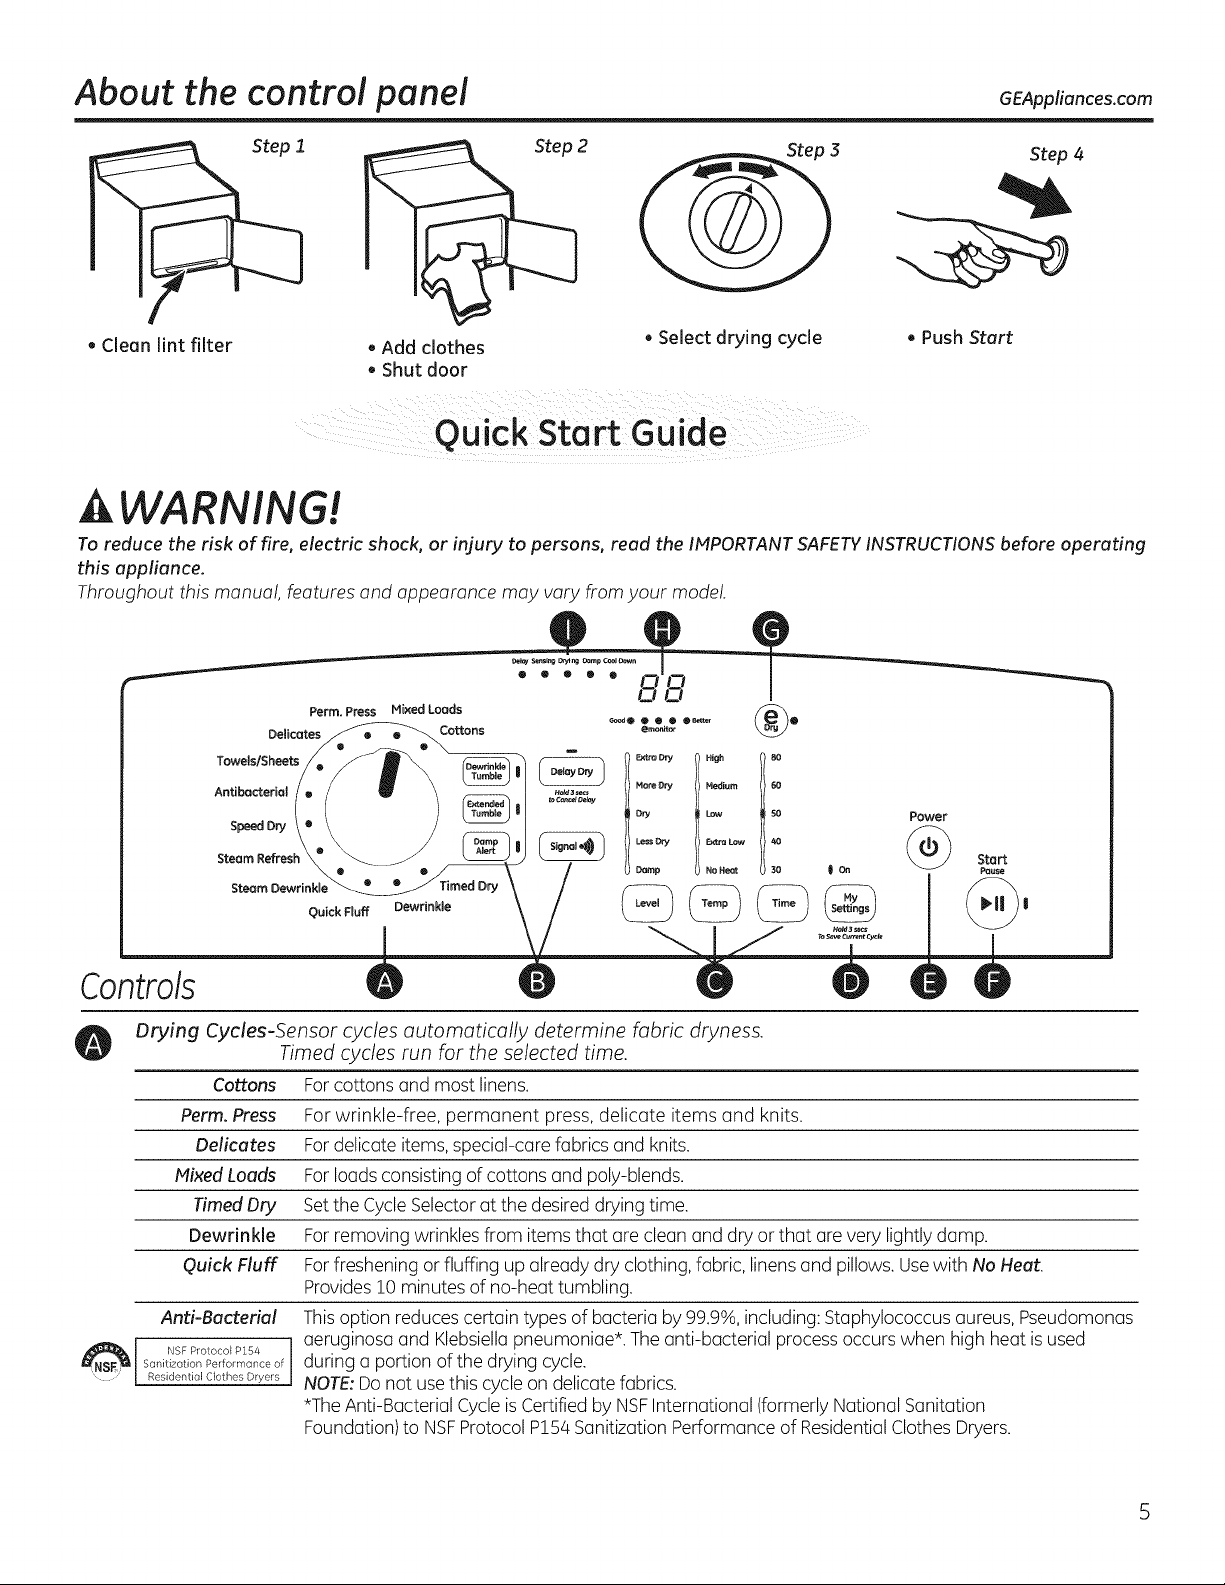
About the control panel GEAppliances.com
, Cleon lint filter
•Add clothes
• Shutdoor
2
, Select drying cycle
, Push Start
Step 4
AWARNING!
To reduce the risk of fire, electric shock, or injury to persons, read the IMPORTANTSAFETYINSTRUCTIONSbefore operating
this appliance.
Throughout this manual, features and appearance may vary from your model.
0
Delicates
Towels/Sheets
Antibecteriol
Pern% Press
MixedLoads
Cot_ons emon_or
Speed Dry
Steam Refresh
®
QuickRuff Dewrinkle
1
Controls
Drying Cycles-Sensor cycles automatically determine fabric dryness.
Timed cycles run for the selected time.
Cottons Forcottons and most linens.
Perm. Press Forwrinkle-free, permanent press, delicate items and knits.
Delicates Fordelicate items, special-care fabricsand knits.
Mixed Loads Forloadsconsisting of cottons and poly-blends.
Timed Dry Setthe CycleSelector at the desireddrying time.
Dewrinkle For removing wrinklesfrom items that are clean and dry or that are very lightlydamp.
Quick Fluff Forfreshening or fluffing upalready dry clothing,fabric, linensand pillows.Usewith NoHeat.
Anti-Bacterial
NSF Protocol P154 ]
Sanitizotion Performance of
Residential Clothes Dryers
Thisoption reduces certain types of bacteria by99.9%, including: Staphylococcus aureus,Pseudomonas
aeruginosa and Klebsiellapneumoniae*. The anti-bacterial processoccurs when highheat isused
during a portion of the drying cycle.
J
NOTE:Do not usethis cycleon delicate fabrics.
*The Anti-Bacterial CycleisCertified by NSFInternational (formerly National Sanitation
O
Provides10 minutes of no-heat tumbling.
Foundation)to NSFProtocol P!54 Sanitization Performance of ResidentialClothes Dryers.
About the control panel
Towels/Sheets Formost towels and linens.
Speed Dry
Energy Saver
Steam Refresh
(on some models)
Steam Dewrinkle
(on some models)
Options
Dewrinkle Tumble
Usethis option to minimize the wrinkles in clothes. Itprovides 30 minutes of no-heat tumbling after the clothes are dry. Ifyou
are usingthe cycle Signal and you select the Oewrinkle Tumble option,a signal will sound at the end of the drying time and
severaltimes during the Dewrinkle Tumble cycle.Thiswill remind you that it istime to remove the clothes.
Extended Tumble
Usethis option to minimize the wrinkles in clothes. Itprovides I hour of no-heat tumbling after the clothes are dry. Ifyou
are usingthe cycle Signal and you select the Extended Tumble option,a signalwill sound at the end ofthe drying time and
severaltimes during the Extended Tumblecycle.Thiswill remindyou that it istime to removethe clothes.
Damp Alert
Thisoption causesthe dryer to beep when clothes have driedto adamp level.Removeitems that you wish to hang dry.The
Damp Alert will only beep when this option isselected(but the dry cyclewill keep running).Removingclothes and hanging
them when they (]re d(]mp, c(]n reduce the needto iron some items.The light besidethe p(]dwill belitwhen Damp Alert is
on,
Delay Dry
On modelswith a TimeRemainingdisplay,asthe Delay Dry pad is repeatedly pressed,the delay time setsto 30 minutes,1
hour,2 hours, 4 hours,8 hours,(]nd b(]ck to cle(]r (0minutes).After selectingthe del(]y time, pressStart (]nd the del(]ytime will
count down the time rem(]ining until the cyclest(]rts.
On modelswithout aTimeRemainingdisplay,(]sthe Delay Dry p(]d is repe(]tedly pressed,the del(]y time setsto 2 hours,/4
hours, 8hours,(]nd b(]ckto cle(]r (0hours).
Forall models,if the Delay Dry p(]d ispressedfor 3 seconds,it cle(]rs(reg(]rdlessofthe del(]y time).
Signal
Usethe Signal p(]dto ch(]ngethe volume of the end of cyclesign(]l. Pressthe p(]d until you re(]ch the desired volume or off.
Theclothes should be removed when the beeper goes off sowrinkles do not set in.
NOTE:
, Remove g(]rments promptly (]tthe sound of sign(]l.Pl(]ceclothes on h(]ngers sowrinkles will not set in.
, Usethe Signal especi(]llywhen drying fabrics likepolyester,knits(]nd perm(]nent press.Thesefabrics should beremoved so
wrinkleswill not set in.
Forsmallloads that areneededinu hurry,suchus sportor schooluniforms.Canalso be usedifthe previous
cycleleft some itemsdamp,suchascollarsor waistbands.NOTE:On some models,thetime remainingin
the cyclewillshow counting down in thedisplay.
Forcottons and most linens.Thecycle offerso reduction inenergyuse when compared to the Cottons
cycle.Thedryer automaticallysetsthe mostenergyefficientsettingsand only changesto the Dryness Level
are allowedbythe user.
Forslightly wrinkled dry garments. Significantly reduces wrinkles.After the Steam Refreshcycle,
the unit will beep(if Signal isselected)and display"00."
Steam Refresh is recommended for 1-2garments
NOTE:Steamcycles are not intended for usewith towels.
NOTE:Asingle extremely light fabric item may needto have(]n (]dditional item included in
the Steam Refresh cycleto achieveoptimum results.
Important - the temperature setting must be set to HIGHand water must be turned on
before running the Steam Refresh cycle.
Foruse with larger loadsthan Steam Refresh.Ideal for loadsleft in the dryer for an extended time.
Steam Dewrinkle is recommended for 8-13 garments
NOTE:Steam cycles are not intended for use with towels.
Important - the temperature setting must be set to HIGH and water must be turned on
before running the Steam Refresh cycle.
6
Abou_t the control panel GEAppliances.com
Settings
Individual settings for dryness level (Level),temperature (Temp),and Timed Dry cycle minutes (Time) can be set from
the minimum (lowest in column) to maximum (highest in column). In general, the higher up the column, the more
energy will be used.
Dryness Level-Selection only used for Sensor cycles. Timed cycles run for the selected time.
Extra Dry
More Dry
Less Dry
Damp
Temperature
High For regular to heavy cottons.
Medium Forsynthetics, blends,delicates and items labeledpermanent press.
Low For delicates,syntheticsand items labeledtumble dry low.
Extra Low Fordelicates,syntheticsand items labeled tumble dry low.
No Heat Forfluffing items without heat. For useonly with the Timed Dry cycles.
Ply Settings (onsome models)
Asthe cycle selector knob is turned,the Level (DrynessLevel),Temp(Temperature)and Time (TimedDry)settings change to
automatic pre-set default settings. Ifyou desireadifferent setting, pressthe appropriate pad(s).Then pressand hold the MV
Settings pad for 3 seconds and the dryer will "remember" these settings for that KnobSelection.Inthe future, when you turn
the selector knob to that cycle,your settings will be automatically recalled.NOTE:Signalvolume cannot be set for My Settings.
Power
Press to "wake up" the display. If the display is active, press to put the dryer into idle mode.
NOTE:Pressing Power does not disconnect the appliance from the power supply.
Start
PressStart to begin the cycle. NOTE:Thedoor must beclosedfor the dryer to start the cycle. PressingStart again will Pause
the cycle andthe cycle IndicatorLight will blink.
Tocontinue the cycle, pressStart again. To stop the cycle,hold the pod for 5 seconds.
eDry (onsome models)
When the eDry pad ispressed, cyclesettings change to reduce the total energy consumption of the selectedsensor cycle.
NOTE:Cycletimes will change when eDry isselected.
Display (onsomemodels)
Thedisplay shows the approximate time remaining until the end of the cycle.
In addition, this display will, "scroll" the dryer status:
• PAUSE Themessage "PAUSE"will scrollacrossthe display when the dryer's cycle ispaused. Thecyclemay be
door Themessage "door_'will bedisplayed when the door isopened duringthe dryer's cycle.
TheeMonitor lights display the relative energy useofyour selected cycle and options.They are provided asan energy guide
and rangefrom Good (1light)to Better(5lights).Cycle(time),dryness level,temperature, and additional tumble options can
increase ordecreaseyour energy efficiency. Somespecialcycleswill not provide a display.
Indicator lights
Five LEDlights indicate the current dryer status moving from left to right as the cycle progresses.
Usefor heavy-dutyfabricsor itemsthat should beverydry,such ustowels.
Usefor heaw-duty or mixed type fabrics.
Dry
Usefor a normal dryness level suitablefor most loads.This isthe preferred cycle for energy savings.
Usefor lighter fabrics.
Forleaving items partially dump.
NOTE:Steam Dewrinkle and Steam Refresh require the Hightemperature setting.
re-started by pressingthe Start pad.
DSM
Demand Side Management (onsome models) - When connected to your power company's rate monitoring system, the
dryer will automatically delay starting if the rates are high/critical. An "ES"will be displayed and the selected cycle will
start after 4 hours or when the rates drop to low/medium, whichever comes first. Ifthe rates are not high/critical, the
selected cycle will start immediately.
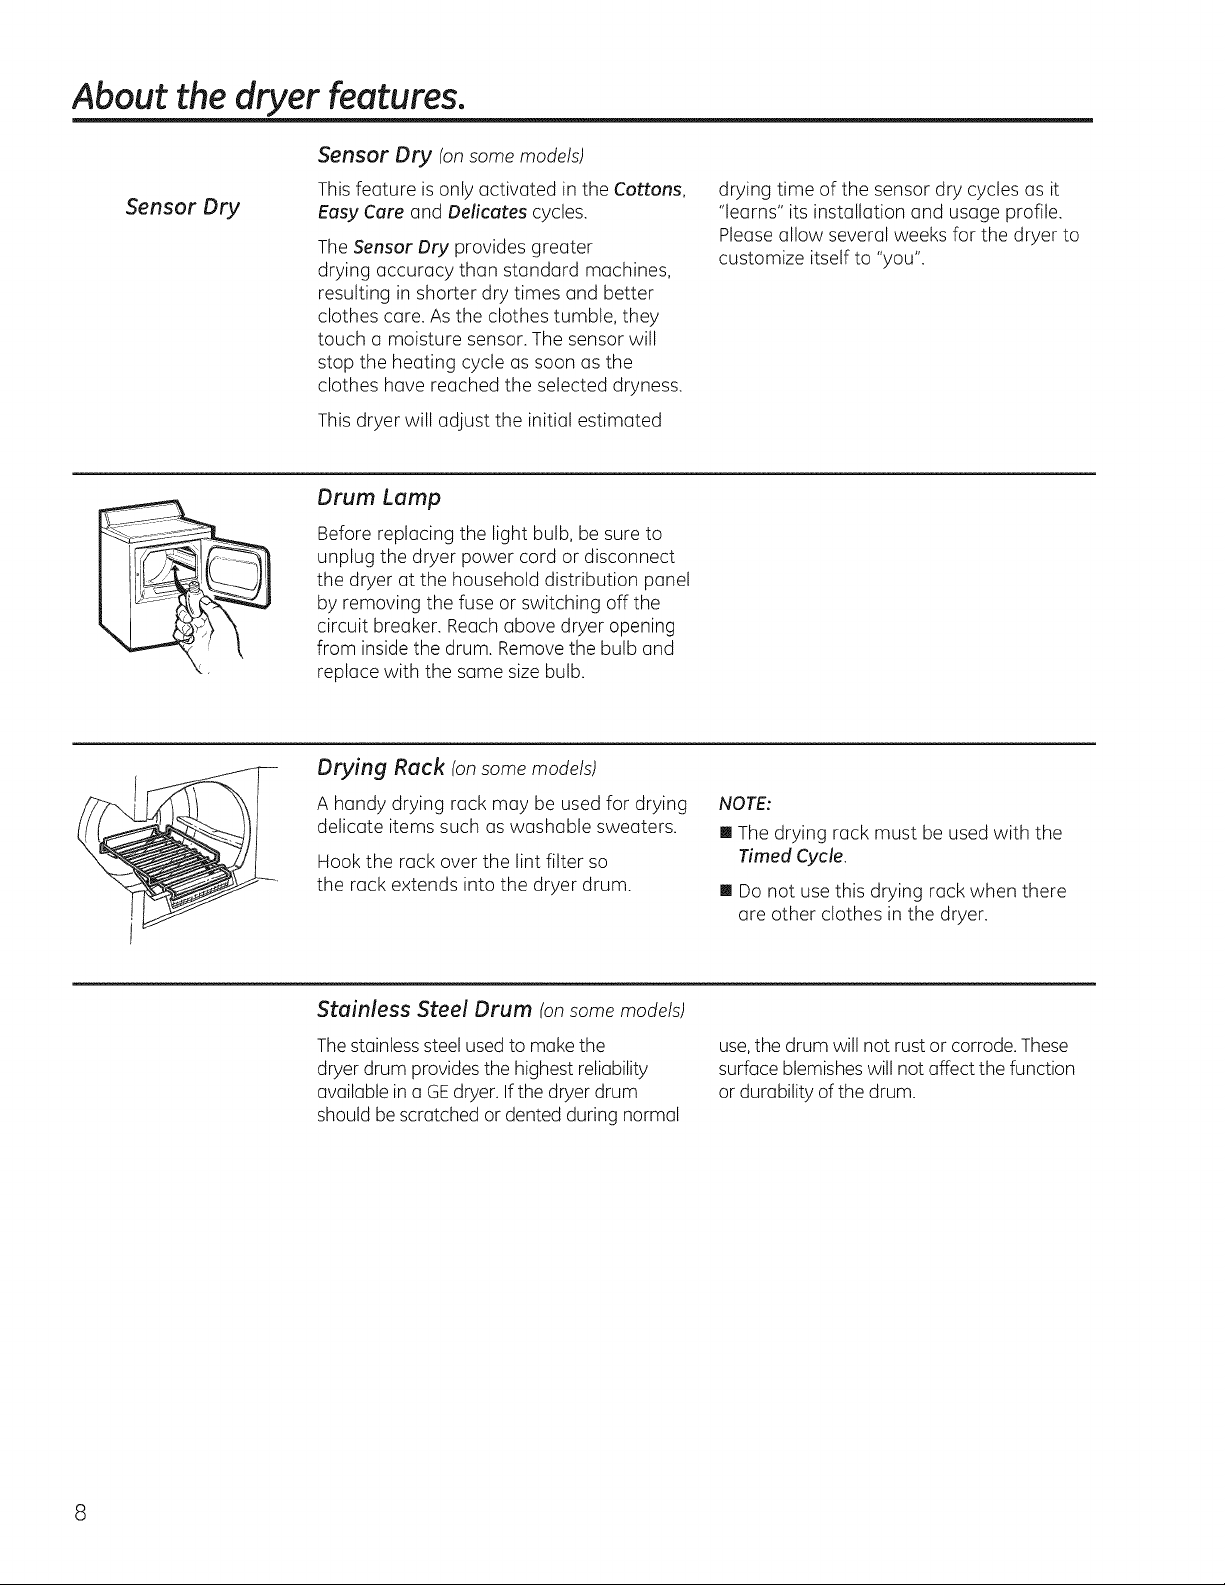
About the dryer features.
Sensor Dry (on some models)
Sensor Dry
This feature is only activated in the Cottons,
Eusy Cure and Delicutes cycles.
The Sensor Dry provides greater
drying accuracy than standard machines,
resulting in shorter dry times and better
clothes care. Asthe clothes tumble, they
touch a moisture sensor. The sensor will
stop the heating cycle as soon as the
clothes have reached the selected dryness.
This dryer will adjust the initial estimated
Drum Lump
Before replacing the light bulb, be sure to
unplug the dryer power cord or disconnect
the dryer at the household distribution panel
by removing the fuse or switching off the
circuit breaker. Reach above dryer opening
from inside the drum. Remove the bulb and
replace with the same size bulb.
drying time of the sensor dry cycles as it
"learns" its installation and usage profile.
Please allow several weeks for the dryer to
customize itself to "you".
Drying Rack (on some models)
A handy drying rack may be used for drying
delicate items such as washable sweaters.
Hook the rack over the lint filter so
the rack extends into the dryer drum.
Stainless Steel Drum (on some models)
Thestainlesssteel usedto make the
dryer drum provides the highest reliability
available in a GEdryer. Ifthe dryer drum
should be scratched or dented during normal
NOTE:
[] The drying rack must be used with the
Timed Cycle.
[] Do not use this drying rack when there
are other clothes in the dryer.
use,the drum will not rustor corrode. These
surface blemisheswill not affect the function
or durability of the drum.
8
About reversing the door. GEApUio.ces.com
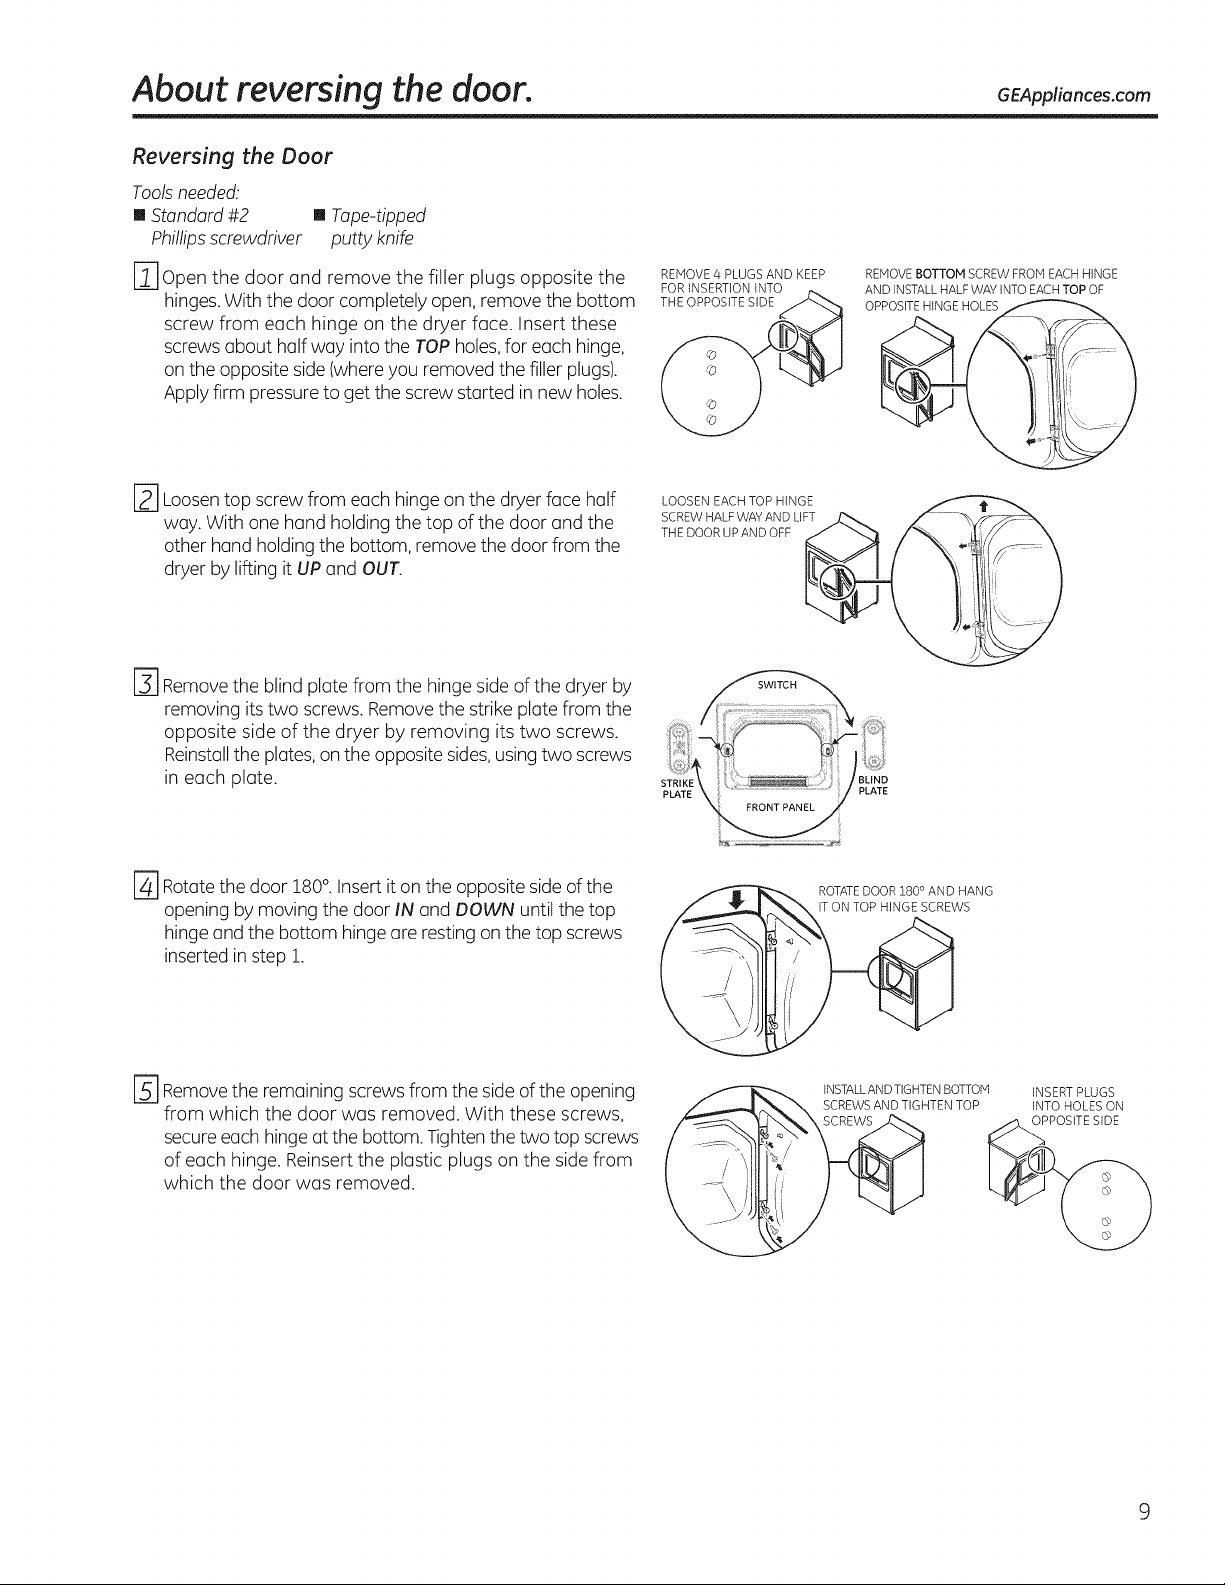
Reversing the Door
Toolsneeded.
[] Standard #2 [] Tape-tipped
Phillipsscrewdriver putty knife
F_ open the door and remove the filler plugs opposite the
hinges.With the door completely open, removethe bottom
screw from each hinge on the dryer face. Insert these
screws about half way into the TOP holes,for each hinge,
on the opposite side (whereyou removed the filler plugs).
Applyfirm pressureto get the screw started in new holes.
REMOVE 4 PLUGS AND KEEP
FOR INSERTION INTO
__THEOPPOSITE SIDE
REMOVE BOTTOM SCREW FROM EACH HINGE
AND INSTALL HALF WAY INTO EACH TOP OF
OPPOSITEHINGE HOLES t_'_--_-,_
F2---]Loosentop screw from each hinge on the dryer face half
way. With one hand holding the top of the door and the
other hand holding the bottom, removethe door from the
dryer by lifting it UPand OUT.
F3] Removethe blind plate from the hinge side ofthe dryer by
removing itstwo screws. Removethe strike plate from the
opposite side of the dryer by removing its two screws.
Reinstallthe plates,on the opposite sides,usingtwo screws
in each plate.
F_JRotatethe door 180°.Insert it onthe opposite side of the
opening by moving the door IN and DOWN until the top
hinge and the bottom hinge are resting onthe top screws
inserted in step1.
LOOSEN EACH TOP HINGE /
i __
SCREWHALEWAYANDUFTJ-'-_ /
THE DOOR UP AND OFF _'_
PLATE
ROTATE DOOR 2800 AND HANG
IT ON TOP HINGE SCREWS
Fs-]Removethe remaining screws from the sideof the opening
from which the door was removed. With these screws,
secureeach hinge at the bottom.Tightenthe two top screws
of each hinge. Reinsert the plastic plugs on the side from
which the door was removed.
"_ SCREWSANDTIGHTEN TOP
INSTALL AND TIGHTEN BOTTOM
INSERT PLUGS
INTO HOLES ON
About loading and using the dryer,
Always follow the fabric manufacturer's care label when laundering.
SortkTaand LoadinnHints
__;:_ s a general rule, if clothes are sorted properly for
the washer, they are sorted properly for the dryer.
Do not add fabric softener sheets once the load
has become warm. They may cause fabric
softener stains. Bounce®Fabric Conditioner
Dryer Sheets have been approved for use in all
GEDryers when used in accordance with the
manufacturer's instructions.
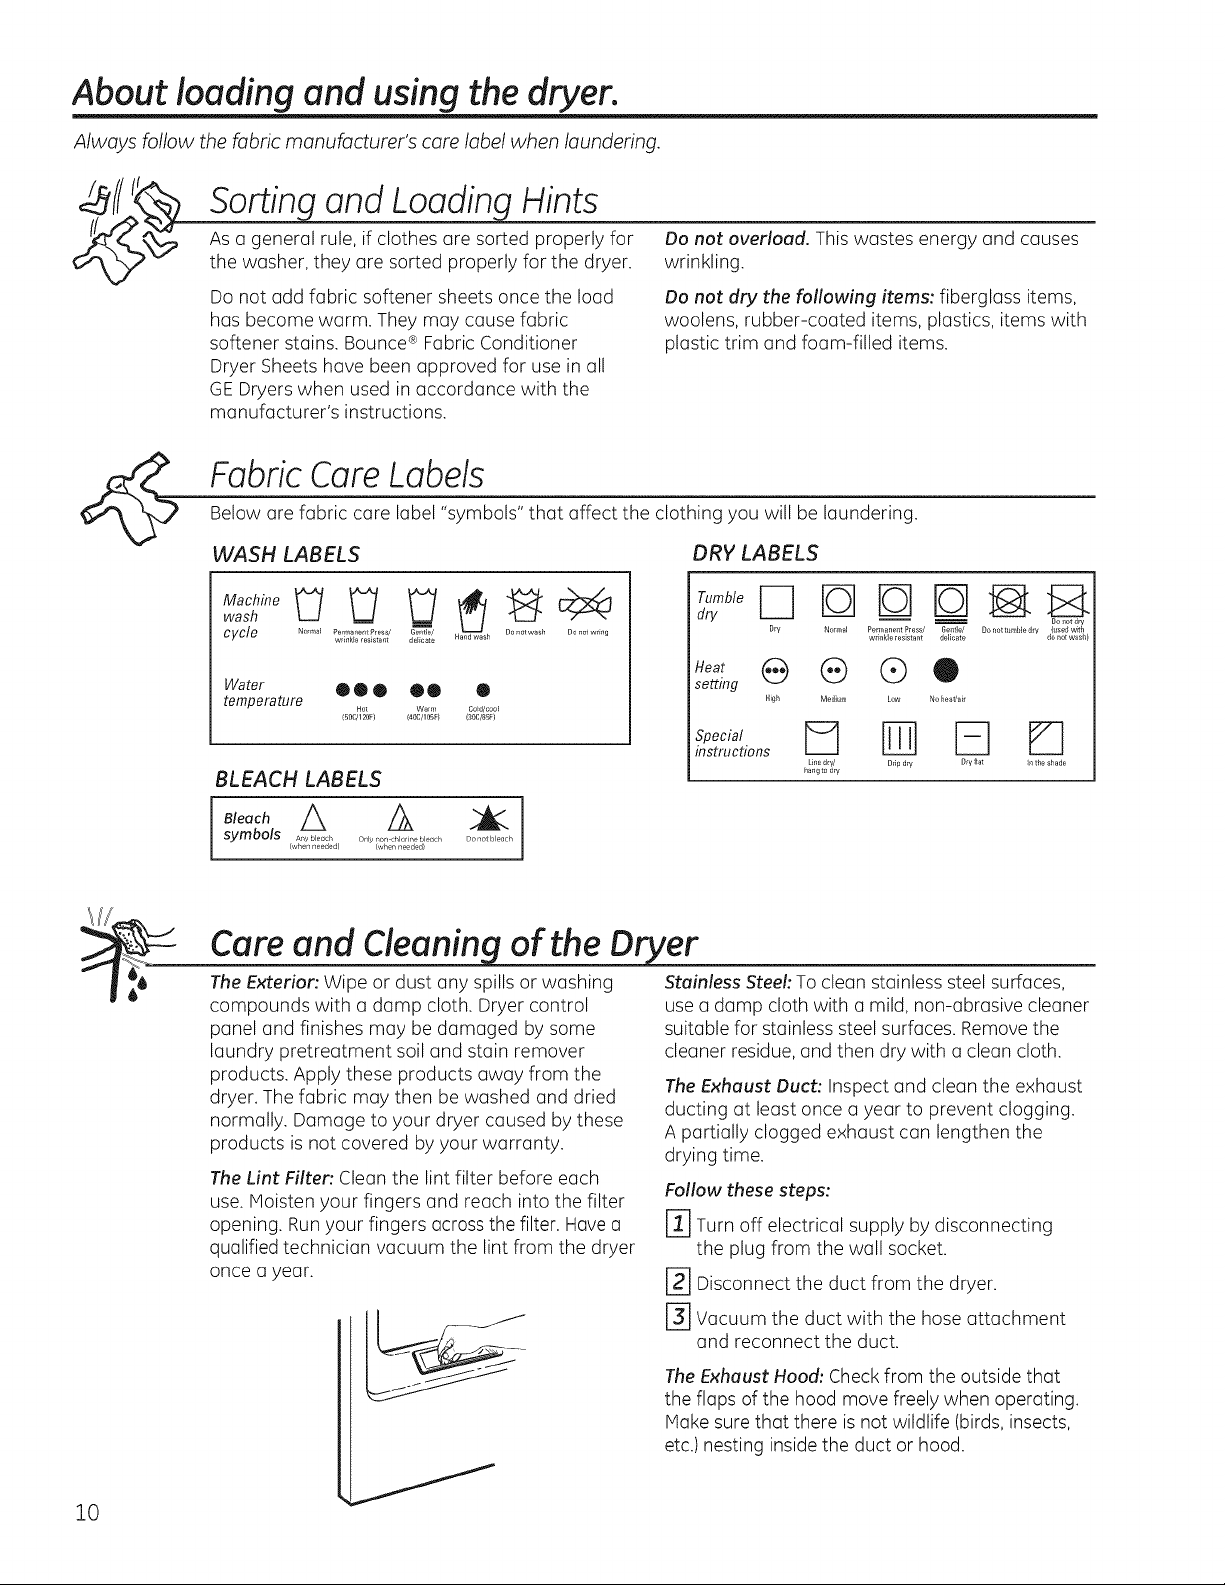
FabricCareLabels
Below are fabric care label "symbols" that affect the clothing you will be laundering.
WASH LABELS DRY LABELS
wash m
achin' UU S
cycle l_ormal Pe mla nerlt Press/ Geiile_/ an was DO notwash DO not wrillg
Water 00 • QO •
temperature
BLEACH LABELS
wri_kle res_sta nt deffcate h
Hot Wa,m Co_d/coo_
150C/120F} 140C/1O5F} (30C/B5F}
Do not overload. This wastes energy and causes
wrinkling.
Do not dry the following items: fiberglass items,
woolens, rubber-coated items, plastics, items with
plastic trim and foam-filled items.
-rz _ DO_lot gl
.eat e "@P® ®
setting
Dry No_mal Permane_t P_ess/ _e_t]e/ Do not tt_mNe dw {used with
High Medium Low No heat/ai_
Une d[y/ Drip dry Dry fiat In the shade
hang to dry
wrinkle _esistant delicate do not wasl
symbols [vA_jYr bnee@e__d} ..... r0o_echIrOer_r_leeb}...................
\I/
66 The Exterior: Wipe or dust any spills or washing Stainless Steel:To clean stainless steel surfaces,
compounds with a damp cloth. Dryer control use a damp cloth with a mild, non-abrasive cleaner
panel and finishes may be damaged by some
laundry pretreatment soil and stain remover
products. Apply these products away from the
dryer. The fabric may then be washed and dried
normally. Damage to your dryer caused by these
products is not covered by your warranty.
The Lint Filter', Clean the lint filter before each
use. Moisten your fingers and reach into the filter
opening. Runyour fingers acrossthe filter. Havea
qualified technician vacuum the lint from the dryer
once a year.
suitable for stainless steelsurfaces. Remove the
cleaner residue, and then dry with a clean cloth.
The Exhaust Duct: Inspect and clean the exhaust
ducting at least once a year to prevent clogging.
A partially clogged exhaust can lengthen the
drying time.
Follow these steps:
rl] Turn off electrical supply by disconnecting
the plug from the wall socket.
r2] Disconnect the duct from the dryer.
r-J] vacuum the duct with the hose attachment
and reconnect the duct.
The Exhaust Hood: Checkfrom the outside that
the flaps of the hood move freely when operating.
Hake sure that there is not wildlife (birds, insects,
etc.)nesting inside the duct or hood.
10
J
 Loading...