

GE GTX18GSSJ0WW, GTX18ESSJ0WW, GTV21ESSJ1WW, GTD18ESSJ2WW, GTD18GSSJ2WW Owner’s Manual
...
0
GEAppliances.com
Safety Instructions ........ 2-4
Operating Instructions
Control Panel ................. 5, 6
Control Settings .................. 7
Features ......................... 8
Loading and Using
the Dryer .................... 10-11
Reversing the Door ............... 9
Venting the Dryer ............... 11
Troubleshooting Tips... 12, is
Consumer Support
Consumer Support .............. 16
Warranty ....................... 15
Write the model and serial
numbers here:
Model #
Serial #
Youcanfindthemon a label
onthefrontofthedryerbehindthe
door.
Printedin Mexico 234D2238PO04 49-90532 09-24 GE

IMPORTANT SAFETY INFORMATION.
READ ALL INSTRUCTIONS BEFORE USING.
_j_ This is the safety alert symbol. This symbol alerts to potential hazards that can kill or hurt you and others.
All safety messages will follow the safety alert symbol and the word "DANGER","WARNING", or "CAUTION".These
words are defined as:
_ Indicates a hazardous situation which, if not avoided, will result in death or seriousinjury.
Indicates a hazardous situation which, if not avoided, could result in death or serious injury.
Indicates o hazardous situation which, if not avoided, could result in minor or moderate injury.
you you
IMPORTANT SAFETYINSTRUCTIONS
To reduce the riskof fire, explosion, electric shock, or injury to persons when using your appliance, follow
basic precautions, including the following:
[] Readall instructionsbeforeusing theappliance.
[] DONOTdry articles that have been previously cleaned in, washed in, soaked in or spotted with gasoline, dry-cleaning
solvents, or other flammable or explosive substances, as they give off vapors that could ignite or explode.
[] DONOTallow children to play on or in this appliance. Close supervision of children is necessary when this appliance
is used near children. Before the appliance is removed from service or discarded, remove the door to the drying
compartment.
[] DONOTreach into the appliance if the drum is moving.
[] DONOTinstall or store this appliance where it will be exposed to the weather.
[] DONOTtamper with controls, repair or replace any part of this appliance or attempt any servicing unless specifically
recommended in the user maintenance instructions or in published user repair instructions that you understand and
have the skillsto carry out.
[] DONOTuse fabric softeners or products to eliminate static unless recommended by the manufacturer of the fabric
softener or product.
[] DONOTuse heat to dry articles containing foam rubber or similarly textured rubber-like materials.
[] Clean lint screen before or after each load. DONOToperate the dryer without the lint filter in place.
[] Donot store combustible materials, gasoline or other flammable liquids near the dryer. Keep area around the exhaust
opening and adjacent surrounding areas free from the accumulation of lint, dust and dirt. Keep dryer area clear and free
from items that would obstruct the flow of combustion and ventilation air.
[] The interior of the appliance and exhaust duct should be cleaned periodically by qualified service personnel.
[] DONOTplace items exposed to cooking oils in your dryer. Items contaminated with cooking oils may contribute to a
chemical reaction that could cause a load to catch fire.
[] Keepthe floor around your appliancesclean and dry to reduce the possibility of slipping.
[] Unplugthe appliance or turn offthe circuit breaker before servicing. Pressingthe Power or Stort/Pouse button DOESNOT
disconnect power.
[] DONOToperate this appliance if it isdamaged, malfunctioning, partially disassembled,or has missing or broken parts,
including a damaged cord or plug.
[] DO NOTspray any type of aerosol into, on or near dryer at any time. Donot useany type of spray cleanerwhen cleaning dryer
interior. Hazardousfumes or electrical shock could occur.
[] See "Electrical Connection" located in the Installation Instructions for grounding instructions.
SAVETHESE INSTRUCTIONS

GEAppliances.com
ADDITIONAL GAS DRYERWARNINGS
Foryour safety, the information in this manual must befollowed to minimize the risk of fire or explosion 1
or to prevent damage, personal injury, or death.
- DONOTstore or usegasolineor other flammable vapors and liquids in the vicinity ofthis or any other appliance.
- WHATTODOIFYOUSHELLGAS:
• DONOTtry to light any appliance.
• DONOTtouch any electrical switch; DONOTuseany phone inyour building.
• Clearthe room, building, or area of any occupants.
• Immediately call your gassupplier from a neighboCsphone.Followthe gassupplier'sinstructions.
• Ifyou cannot reachyour gas supplier, call the fire department.
- Installation and service must be performed by a qualified installer, service agency,or the gas supplier.
State of California Proposition 65 Warnings:
TheCaliforniaSafe DrinkingWater and Toxic EnforcementAct requiresthe governor of Californiato publish a list of substances
known to the state to cause cancer, birth defects or other reproductiveharm andrequires businessestowarn of potential
exposureto such substances.
Thisproduct contains one or more chemicals known to the Stateof Californiato causecancer, birth defects
or other reproductive harm.
Gasappliances can cause low-level exposureto some ofthesesubstances,including benzene,carbon monoxide,formaldehyde
and soot,causedprimarilyby the incomplete combustion of natural gasor LPfuels. Exposureto these substances can be
minimizedby properlyventing the dryerto the outdoors.
I
SAVE THESE INSTRUCTIONS

About the dryer control panel.
A WARNING!
To reduce the risk of fire, electric shock, or injury to persons, read the IIvIPORTANTSAFETYINSTRUCTIONSbefore
operating this appliance.
Explosion Hazard
Keepflammablematerialsand vapors,suchasgasoline,
away from dryer.
DONOTdry anything that haseverhad anything flammable
on it (evenafter washing).
Failureto do socan result in death, explosion,orfire.
Nowashercan completely remove oil.
Donot dry anything that has ever had any type of oil on it
(including cooking oils).
Items containing foam, rubber,or plastic must bedriedon a
clotheslineorby usinganairdry cycle.
Failureto follow these instructions can result in death or fire.
Throughout this manual features and appearance may vary from your model.
f
Signal
Fire Hazard
Cottons _,_o o_
Optimum Dry
IB
Casuals
Start
®
Time Dry
/
Signal
Medium
Temperature
ExtendedTumble
Cottons LessDry
Optimum DI
More Dry i
o_Mo_eOry Casuals
Less Dry Easy Core
30 to so Time Dry
Start
®
m

IMPORTANT'. Clean the lint filter each time you use the dryer.
_ Temperature (Not all features are on all models)
Cottons Forregal(Jrto he(ivy cottons.
High Heat
Casuals/ Forsynthetics, blends,delic(]tes (]nd items I(]beled perm(]nent press.
EasyCare
Medium Heat
DELICATESOn some models.Fordelic(]tes,synthetics (]nd items I(]beledtumble dry low.
Low Heat
GEAppliances.com
Air Fluff
Forfluffing items without he(It. Usethe Time Dry cycle.
No Heat
Automatic cyclesautomatically determine fabric dryness.SelectLessDry if you want your clothesslightly damp at theend of
the drying cycle.SelectMore Dry if you want them to feeldrier.
Timedcyclesrun for a selectedtime.
l_ Drying Cycles (Not all features are on all models)
Cottons Forcottons (]nd most linens. For most loads, select Optimum Dry (onsome models).
Casuals/ For wrinkle-free, perm(]nent press (]nd delic(]te items, (]nd knits.
Easy Care
Delicates
Time Dry
Dewrinkle
Fordelic(]te items, speci(]l-c(]ref(]brics(]nd knits.
Setthe CycleSelector(it the desired drying time.
Forremovingwrinkles from items th(]t (]re cle(]n (]nd dry or th(]t (]revery lightly d(]mp.
Air Fluff Forfreshening or fluffing up (]lre(]dy dry clothing, fabrics, linens(]nd pillows.Usewith Air FluffNo Heat.
Provides 10 minutes of no he(]t tumbling.
Start-Close the dryer door. SelectStart. Openingthe door during oper(]tion will stop the dryer.
To rest(]rt the dryer, close the door (]nd selectStart to complete the cycle.
NOTE: Drying times will vary according to the type of heat used (Electric, Natural or LP gas), size of
load, types of fabrics, wetness of clothes and condition of exhaust ducts.

About the dryer features.
Extended Tumble
Off On
Signal
Medium
off
Loud
Extended Tumble Option (on some models)
Usethis option to minimize the wrinkles
in clothes. It provides approximately
15 minutes of no-heat tumbling after
the clothesare dry.
Thisoption can only be usedwith the Cottons
and Casuals/Easy Carecycles.
Cycle Signal Option (onsome models)
Thissignal will sound just before the end
of the cycle to remind you to remove the
clothes. On some models,the signalsound
levelcannot be adjusted.
Ifyou selected the Extended Tumble option,
the signalwill sound at the end of the drying
time and will sound several times during the
Extended Tumble cycle.This will remind you
that it istime to remove the clothes.
Ifyou are using the cycle Signal knob
and you selectthe Extended Tumble option,
a signalwill sound at the end of the drying
time and several times during the Extended
Tumble cycle.Thiswill remind you that it is
time to remove the clothes.
If Extended Tumble is not on,the dryer will
stop once the timer reachesthe Extended
Tumble murk on the cycle dial.
NOTE:
[] Removegarments promptly at thesound
of the signal. Placeclothes on hangers so
wrinkles won't set in.
[] Use the cycle Signal especially when
drying fabrics like polyester knits and
permanent press. These fabrics should
be removed so wrinkles won't set in.
Automatic Cycle Signal (on some models)
At the end of each cycle,there is
approximately !5 minutes of no-heat
tumbling after the laundry isdry.
Drum Lump (onsome models)
Beforereplacing the light bulb, be sure to
unplug the dryer power cord or disconnect
the dryer at the householddistribution panel
by removing the fuse or switching off the
circuit breaker. Reachabove dryer opening
from insidethe drum. Removethe bulb and
replace with the same size bulb.
Drying Rack (onsome models)
A handy drying rack may be used for drying
delicate items such as washable sweaters.
Hookthe rack over the lint filter so the rock
extends into the dryer drum.
A reminder signalwill sound periodically
during this time to remind you to remove
the laundry.
NOTE:
[] The drying rack must be used with the
Time Dry cycle.
[] Do not use this drying rack when there
are other clothes in the dryer.
Stainless Steel Drum (on some models)
Thestainlesssteelusedto make the dryer
drum provides the highest reliability available
in a GEdryer. Ifthe dryer drum should be
scratched or dented during normal use,
the drum will not rust or corrode. These
surface blemishes will not affect the function
or durability of the drum.
About reversing the door. GEApUio.ces.com
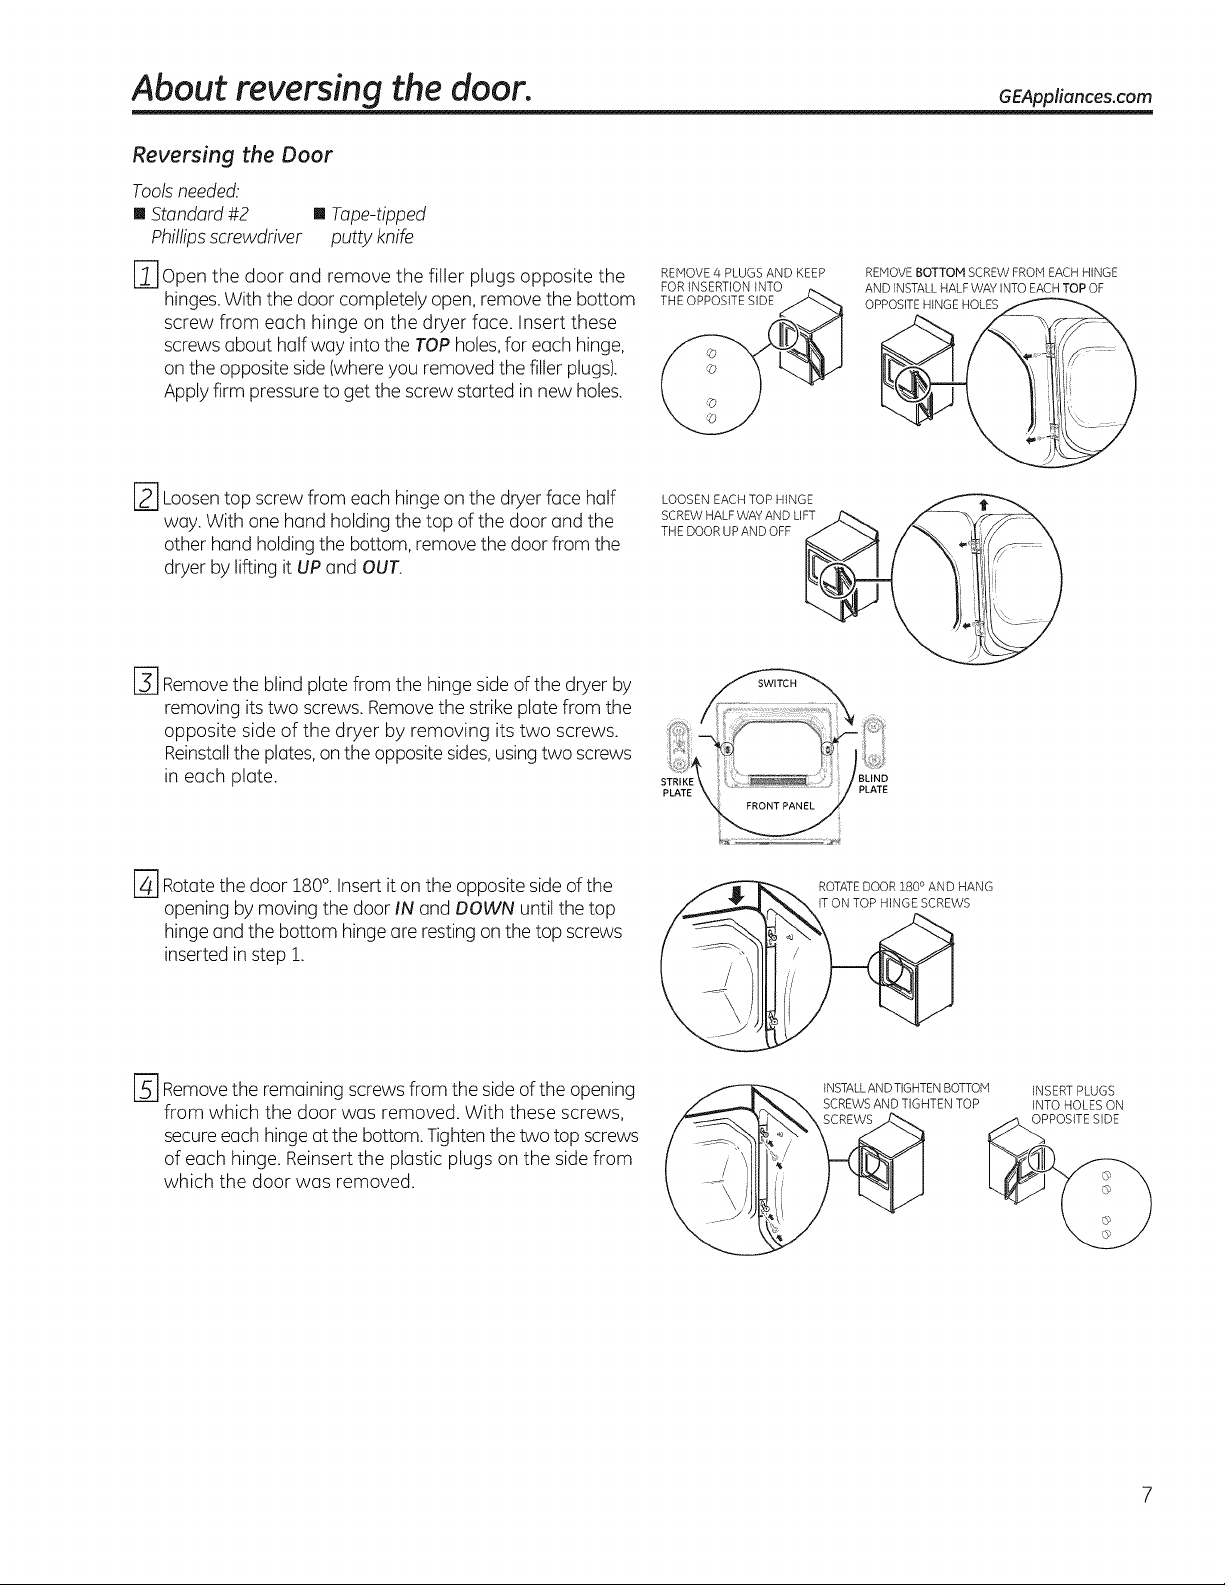
Reversing the Door
Toolsneeded.
[] Standard #2 [] Tape-tipped
Phillipsscrewdriver putty knife
r-_ open the door and remove the filler plugs opposite the
hinges.With the door completely open, remove the bottom
screw from each hinge on the dryer face. Insert these
screws about half way into the TOPholes,for each hinge,
on the opposite side (whereyou removed the filler plugs).
Applyfirm pressureto get the screw started in new holes.
[] Loosentop screw from each hinge on the dryerface half
way. With one hand holding the top of the door and the
other hand holding the bottom, remove the door from the
dryer by lifting it UPand OUT.
REMOVE 4 PLUGS AND KEEP
FOR INSERTION INTO
__THEOPPOSITE SIDE
EWo Lu WAZ20 ;L'FTm- .....
LOOSEN EACH TOP HINGE __I__""A'_"-_ _
REMOVE BOTTOM SCREW FROM EACH HINGE
AND INSTALL HALF WAY INTO EACH TOP OF
oPPOSiTEH NGEHOLES
[] Removethe blind plate from the hinge side of the dryer by
removing itstwo screws. Removethe strike plate from the
opposite side of the dryer by removing its two screws.
Reinstallthe plates,onthe opposite sides,usingtwo screws
in each plate.
[_ Rotate the door 180°.Insert it on the opposite side of the
opening by moving the door IN and DOWN until the top
hinge and the bottom hinge are resting on the top screws
inserted in step 1.
[_ Removethe remaining screws from the sideof the opening
from which the door was removed. With these screws,
secureeach hinge at the bottom. Tightenthe two top screws
of each hinge. Reinsert the plastic plugs on the side from
which the door was removed.
STRIKE BLIND
PLATE PLATE
ROTATE DOOR 280 ° AND HANG
IT ON TOP HINGE SCREWS
_N SCREWSANDTIGHTEN TOP
INSTALL AND TIGHTEN BOTTOM
, /
INSERTPLUGS
INTOHOLES ON

Loading and using the dryer,
Always follow the fabric manufacturer's care label when laundering.
Sortingand Loading Hints
Asageneral rule, if clothes are sorted properly for the
washer,they are sorted properly for the dryer.
Donot add fabric softener sheets once the loadhas
become warm. They may cause fabric softener stains.
Bounce®FabricConditionerDryerSheetshave been
approved for use in all GEDryerswhen used in
accordance with the manufacturer's instructions.
Careand Cleaningof the Dryer
TheExterion Wipe or dust any spillsorwashing
compounds with a damp cloth. Dryercontrol
panel and finishes may be damaged by some laundry
pretreatment soil and stain remover products. Apply
these products away from the dryer.Thefabric may
then be washed and dried normally. Damage to your
dryer caused by these products is not covered by
your warranty.
TheLint Filter'.Cleanthe lint filter before each
use.Moistenyour fingers and reach into the filter
opening. Runyour fingers acrossthefilter. Havea
qualifiedtechnician vacuum the lint from the dryer
once a year.
Do not overload. Thiswastes energy and causes
wrinkling.
Do not dry the following items: fiberglass items,
woolens, rubber-coated items, plastics,itemswith
plastic trim and foam-filled items.
Stainless Steel: Toclean stainless steel surfaces,
use a damp cloth with a mild, non-abrasive cleaner
suitable for stainless steel surfaces. Remove the
cleaner residue, and then dry with a clean cloth.
TheExhaust Duct: Inspectand clean the exhaust
ducting at least once a year to prevent clogging.
A partially clogged exhaust can lengthen the
drying time.
Follow these steps:
F_ Turnoff electrical supply by disconnecting the
plug from the wall socket.
-2---]Disconnectthe duct from the dryer.
J
F3] vacuum the duct with the hose attachment and
reconnect the duct.
TheExhaust Hood: Checkfrom the outside that the
flaps of the hood move freelywhen operating. Make
surethat there is not wildlife (birds,insects,etc.)nesting
insidethe duct or hood.
GEAppliances.com
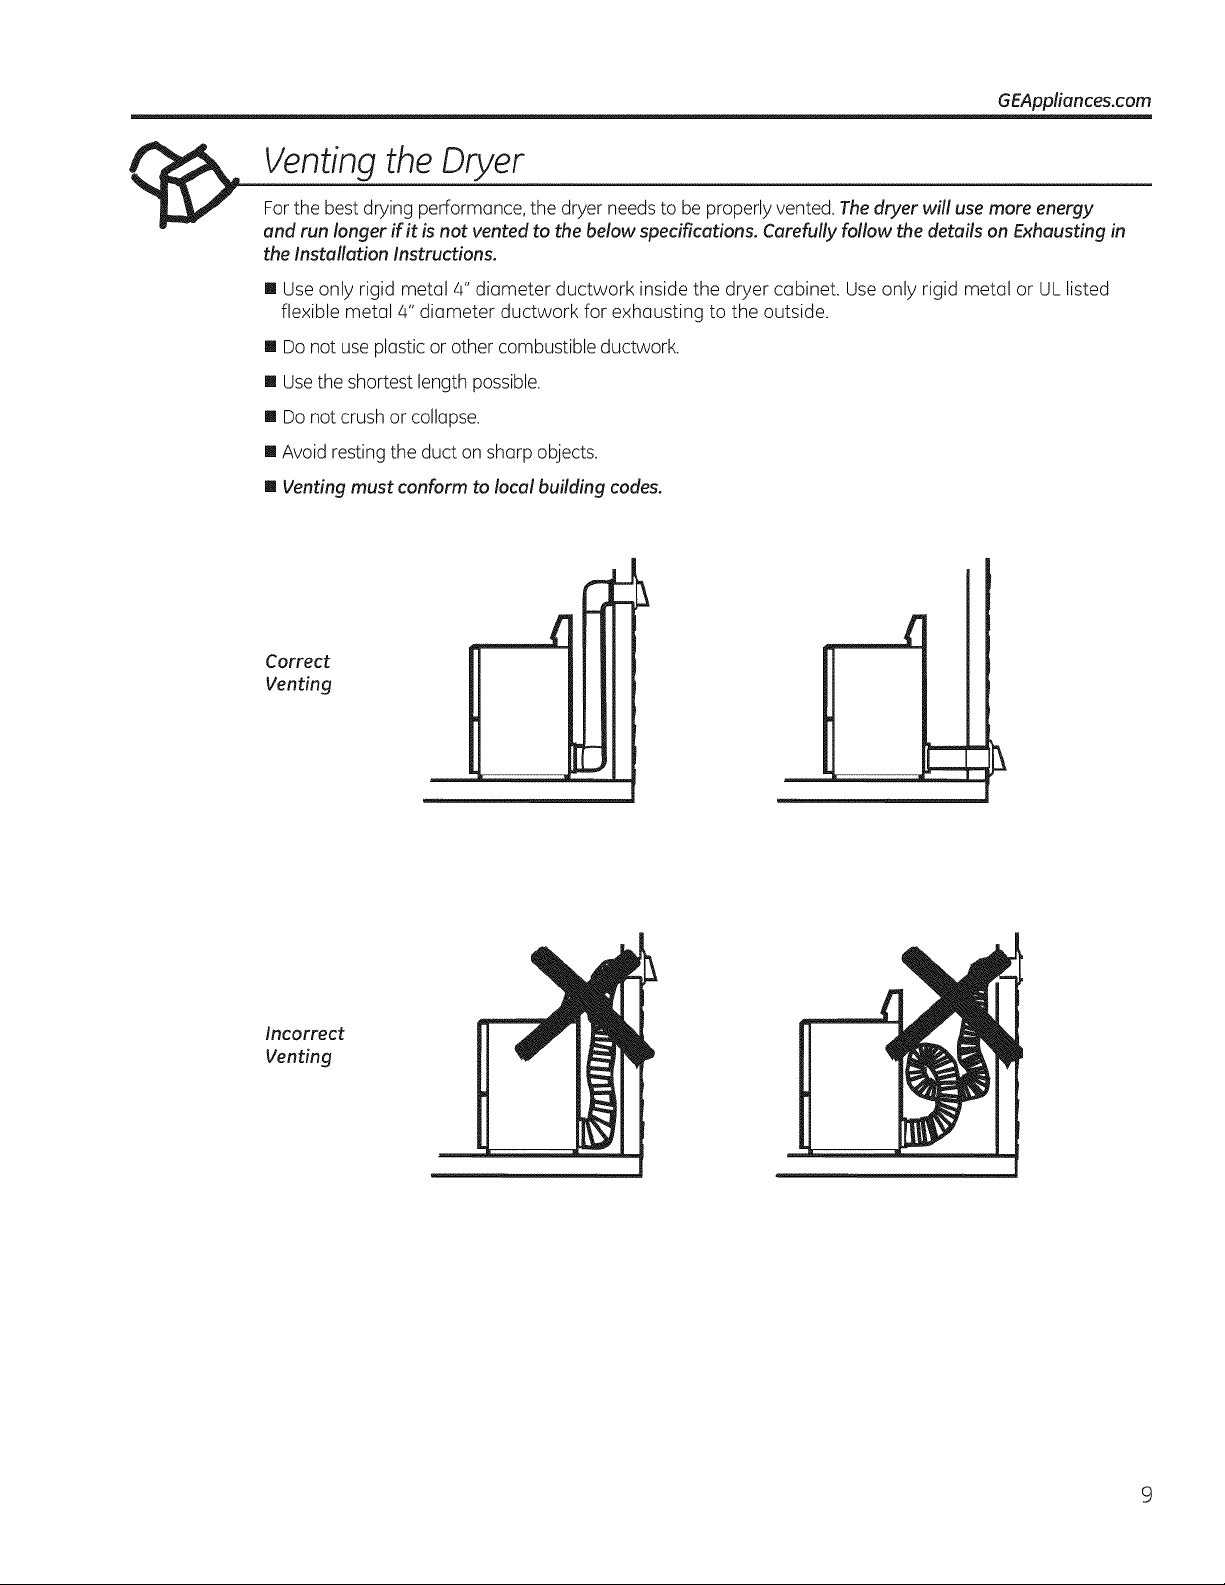
Venting the Dryer
Forthe best drying performance, the dryer needs to be properlyvented. Thedryer will use more energy
and run longer if it is not vented to the below specifications. Carefully follow the details on Exhausting in
the Installation Instructions.
[] Use only rigid metal 4" diameter ductwork inside the dryer cabinet. Useonly rigid metal or UL listed
flexible metal 4" diameter ductwork for exhausting to the outside.
[] Do not use plastic or other combustible ductwork.
[] Usethe shortest length possible.
[] Do not crush or collapse.
[] Avoid resting the duct on sharp objects.
[] Venting must conform to local building codes.
Correct
Venting
Incorrect
Venting
 Loading...