

Page 1

°_
oq
www.GEAppliances.com
Safety Information
Adapter Plugs ................... 4
Electricity ....................... 4
Extension Cords ................. 3
Proper Disposal ................. 3
Safety Precautions ............. 2, 3
Operating lnstructions
Automatic Icemaker ............ 9
Controls ....................... 5
Crispers and Pans .............. 8-9
Ice and Water Dispenser ......... 10
Shelves, Bins and Racks ........ 6-8
Water Filter Cartridge ............ 6
Models 20, 22and 25
C6te fi c6te
Rdfrigdrateurs
La section frae_aise commence a la page 31
Care and Cleaning
Cleaning ................... 11, 12
Lightbulbs ..................... 13
Installation Instructions
Preparing to Install
the Refrigerator ............. 14, 15
Water Line Installation ....... 16-20
Troubleshooting Tips
Before You Call For Service ...22-25
Normal Operating Sounds ....... 22
Consumer Support
Consumer Support ...... Back Cover
Performance Data Sheet ......... 27
Product Registration ......... 29, 30
State of California Water
Treatment Device Certificate ..... 28
Warranty (Canadian) ........... 25
Warranty (U.S.) ................ 96
Lado a lado
Refrigeradores
La secci6n en espafiol empieza en la p_gina 58
Write your model and serial numbershere:
Model #
Serial #
Find these numbers on a label inside
the refrigerator compartment at the top
on the right side behind the controls.
197D3351PO02 49-60131 03-01 JR
Page 2
IMPORTANTSAFETYINFORMATION.
READALLINSTRUCTIONSBEFOREUSING.
A WARNING!
Usethis applianceonlyfor its intended purpose as described in this Owner'sManual.
SAFETYPRECAUtiONS
Whenusing electricalappliances,basicsafetyprecautionsshouldbe followed,includingthe following:
IllThis refrigerator must be properly installed
and located in accordance with the Installation
Instructions before it is used.
• Do not allowchildren to climb, stand or hang
on the shelvesin the refrigerator.They could
damage the refrigeratorand seriously injure
themselves.
1 Do not touch the cold surfaces in the fi'eezer
compartment when hands are damp or wet. Skin
may stick to these extremely cold surfaces.
• Do not store or use gasoline or other flammable
vapors and liquids in the vidnity of this or any
other appliance.
• In refrigerators withautomatic icemakers,
avoid contact with the moving parts of the
ejector mechanism, or with the heating element
that releases the cubes. Do not place fingers or
hands on the automatic icemaking mechanism
while the refrigeratoris plugged in.
[] Keep fingers out of the =pinch point" areas;
dearances between the doors and between
the doors and cabinet are necegsa_y small.
Be care_l dosing doors when children are
in the area.
• Unplug the refrigerator before cleaning and
making repairs.
NOTE."Westronglyrecommendthatanyservicingbe
performedbyaqualifiedindividual
• Setting the freezer control to the 0 (off) position
does not remove power to the lightcircuit.
• Do not refreeze frozen foods which have
thawed completely.
2
Page 3
ww_.GF-.Appliance_com
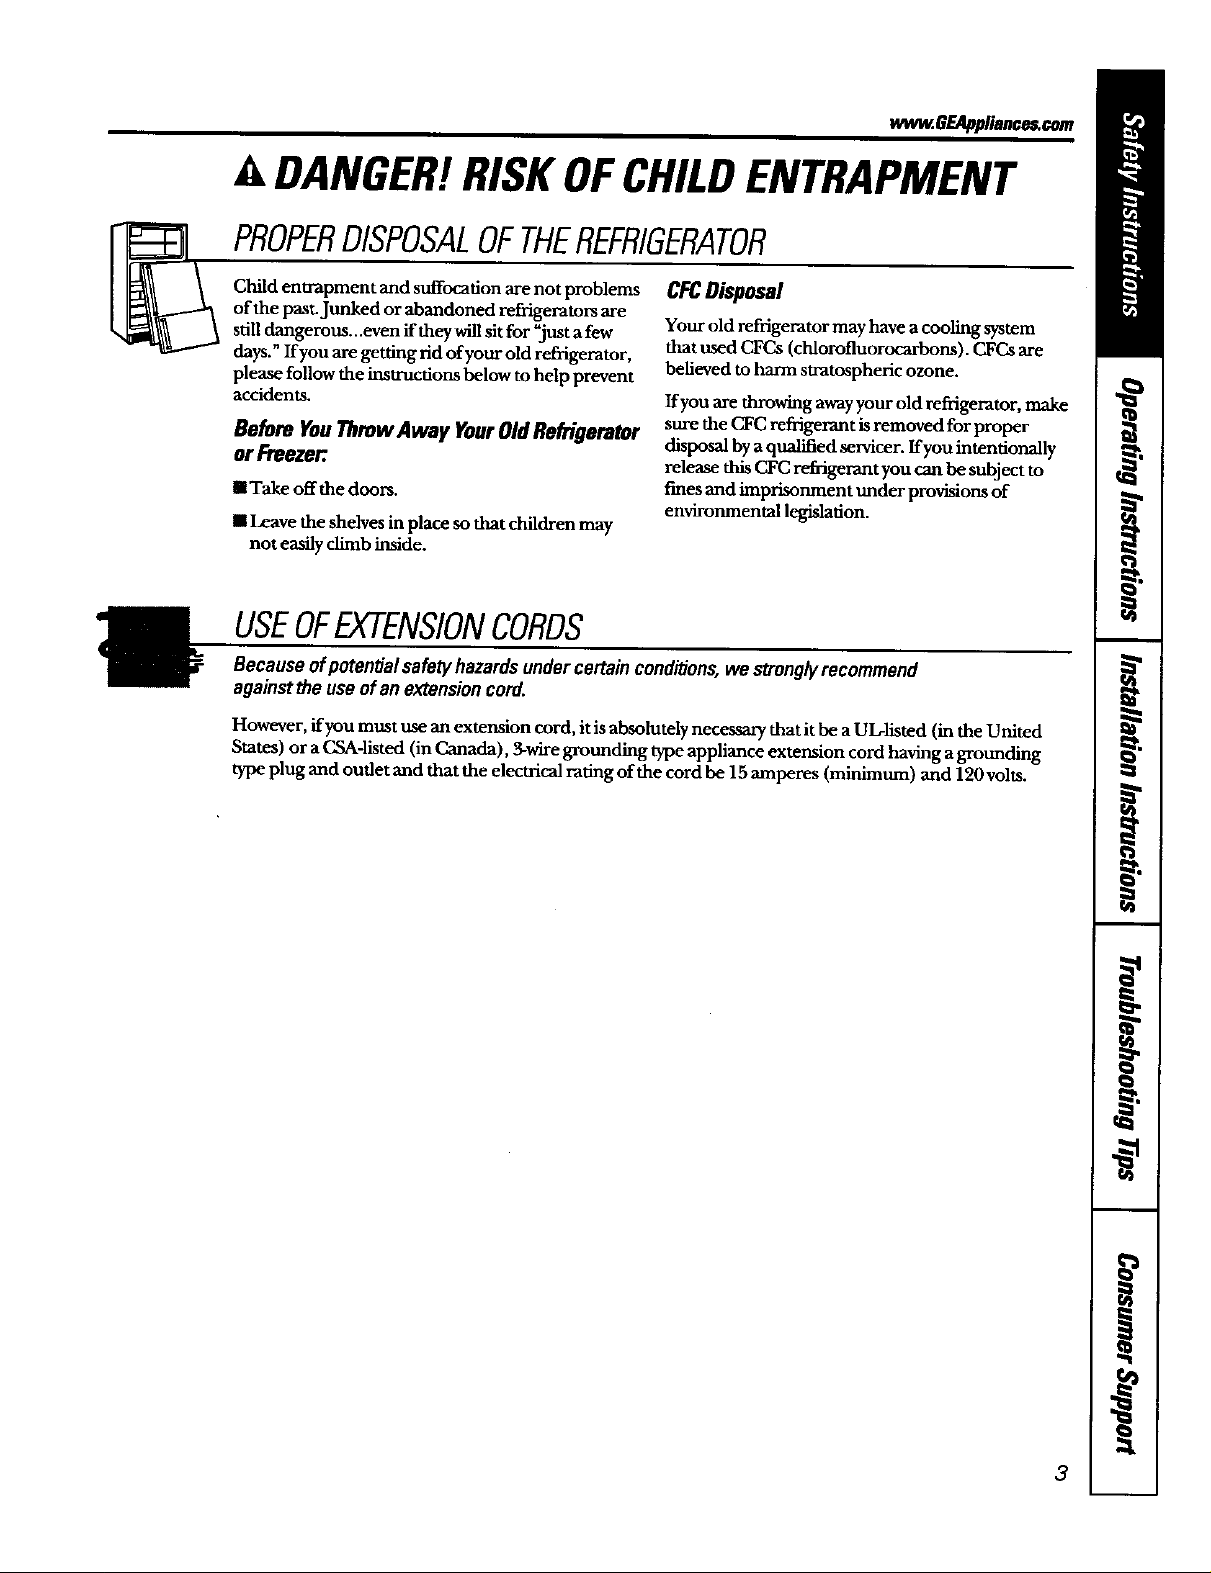
A DANGER!RISKOFCHILDENTRAPMENT
PROPERDISPOSALOFTHEREFRIGERATOR
Child entrapment and suffocation are not problems
of the past.Junked or abandoned refrigerators are
still dangerous...even if they will sit for "just a few
days." If you are getting rid of your old refiigemtor,
please follow the instructions below to help prevent
accidents.
BeforeYouThrowAway YourOldRefrigerator
orFreezer:.
1 Take off the doors.
• Leave the shelves in place so that children may
not easily climb inside.
CFCDisposal
Your old refrigerator may have a cooling system
that used CFCs (chlorofluorocarbous). CFCs are
believed to harm stratospheric ozone.
If you are throwing away your old refrigerator, make
sure the CFC refrigemt is removed for proper
disposal by a qualified servicer. If you intentionally
release this CFC refrigerant you can be subject to
fines and imprisonment under provisions of
environmental legislation.
USEOFEXTENSIONCORDS
Because ofpotential safety hazards under certain condi#ons, we strongly recommend
against the use of an extension cord.
However, ffyou must use an extension cord, it is absolutely necessary that it be a UL-listed (in the United
States) or a _A-listed (in Canada), 3-wire grounding type appliance extension cord having a grounding
type plug and oudet and that the electrical rating of the cord be 15 amperes (minimum) and 190 volts.
3
Page 4
IMPORTANTSAFETYINFORMATION.
READALLINSTRUCTIONSBEFOREUSING.
A WARNING!
HOWTOCONNECTELECTRICITY
Do no_ under any circumstances, cut or remove the third (ground) prong from the power cord. For
personal safety, this appliance must be properly grounded.
The power cord of this appliance is equipped with
a 3-prong (grounding) plug which mates with a
standard 3-prong (grounding) wall outlet to
minimize the possibility of electxic shock hazard
from this appliance.
Have the wall outlet and circuit checked by a
qualified electrician to make sure the outlet is
properly grounded.
If the oudet is a standard 2-prong outlet, it isyour
personal responsibility and obligation to have it
replaced with a properly grounded 3-prong wall
outlet.
The refrigerator should always be plugged into its
own individual electrical outlet which has a voltage
rating that matches the rating plate.
This provides the best performance and also
prevents overloading house wiring circuits which
could cause a fire hazard from overheated wires.
Never unplug your refrigerator by pulling on the
power cord. Always grip plug firmly and pull straight
out fi'om the oudeL
Repair or replace immediately all power cords that
have become frayed or otherwise damaged. Do not
use a cord that shows cracks or abrasion damage
along its length or at either end.
When moving the refrigerator away from the
wall, be careful not to roll over or damage the
power cord.
USEOFADAPTERPLUGS(Adap_rplog,not_,_i,_inCanada)
Because of potential safe#/hazards under certain conditions, we strongly recommend against
the use of an adapter plug.
However, ffyou must use an adapter, where local
codes permit, a temp0raty connectionmay be made
to a properly grounded 2-prong wall outlet by use
ofa UL-listed adapter available at most local
hardware stores.
The larger slot in the adapter must be aligned with
the larger slot in the wall outlet to provide proper
polarity in the counecfion of the power cord.
When disconnecting the power cord from the
adapter, always hold the adapter in place with one
hand while pulling the power cord plugwith the
other hand. If this is not done, the adapter ground
terminal is very likely to break with repeated use.
If the adapter ground terminal breaks, D0 NOTUSE
the refrigerator until a proper ground has been
established.
Attachingtheadaptergroundterminaltoa walloutlet
coverscrewdoesnotgroundtheapplianceunlessthe
coverscrewismetal,andnotinsulated,andthewall
outletisgroundedthroughthehousewiring.Youshould
havethecircuitcheckedbyaqualifiedelectricianto make
suretheoutletisproperlygrounded.
READANDFOLLOWTHISSAFETYINFORMATIONCAREFULLY.
SAVETHESEINSTRUCTIONS
4
Page 5
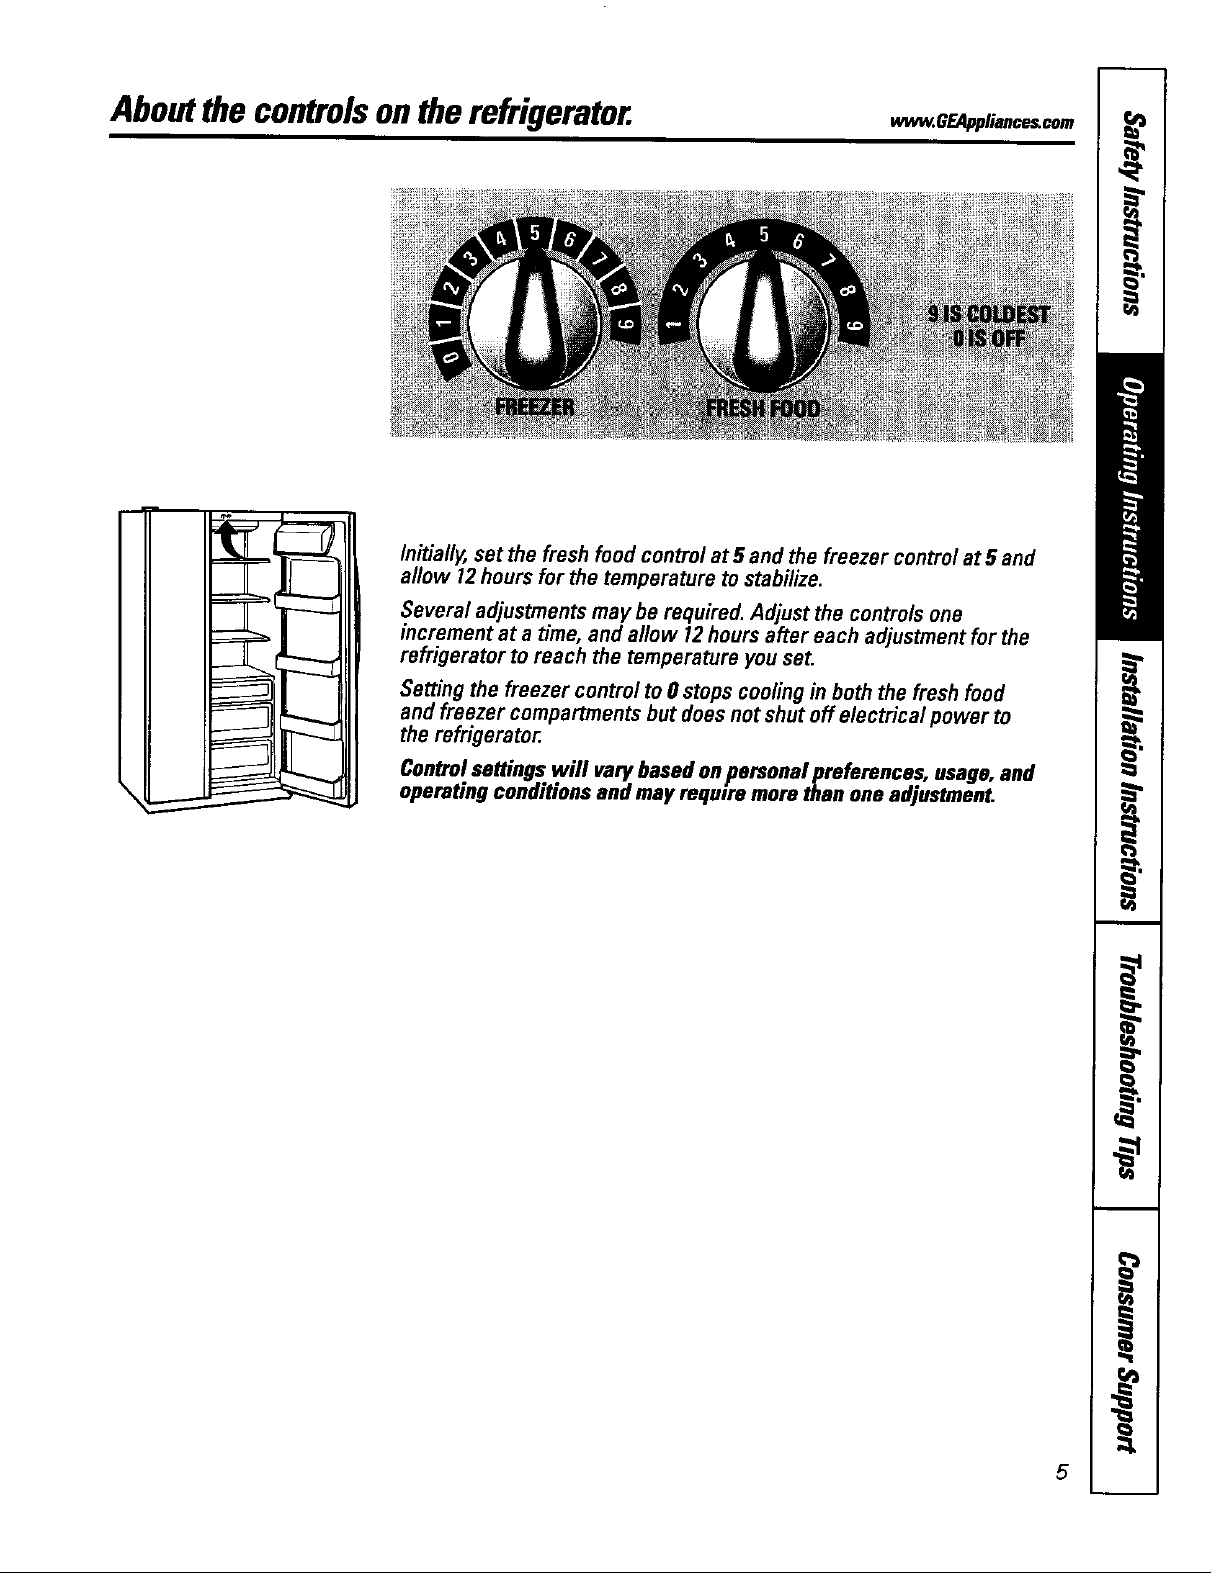
Aboutthecontrolsontherefrigerator. ,,,_.OF_Appli,,,_,o,,
Initially, set the fresh food control at 5 and the freezer control at 5 and
allow 12hours for the temperature to stabilize.
Several adjustments may be required. Adjust the controls one
increment at a time, and allow 12hours after each adjustment for the
refrigerator to reach the temperature you set.
Setting the freezer control to 0 stops cooling in both the fresh food
and freezer compartments but does not shut off electrical power to
the refrigerator,
Control settings will vary based on personal preferences, usage, and
operating conditions and may require more than one adjustment.
5
Page 6
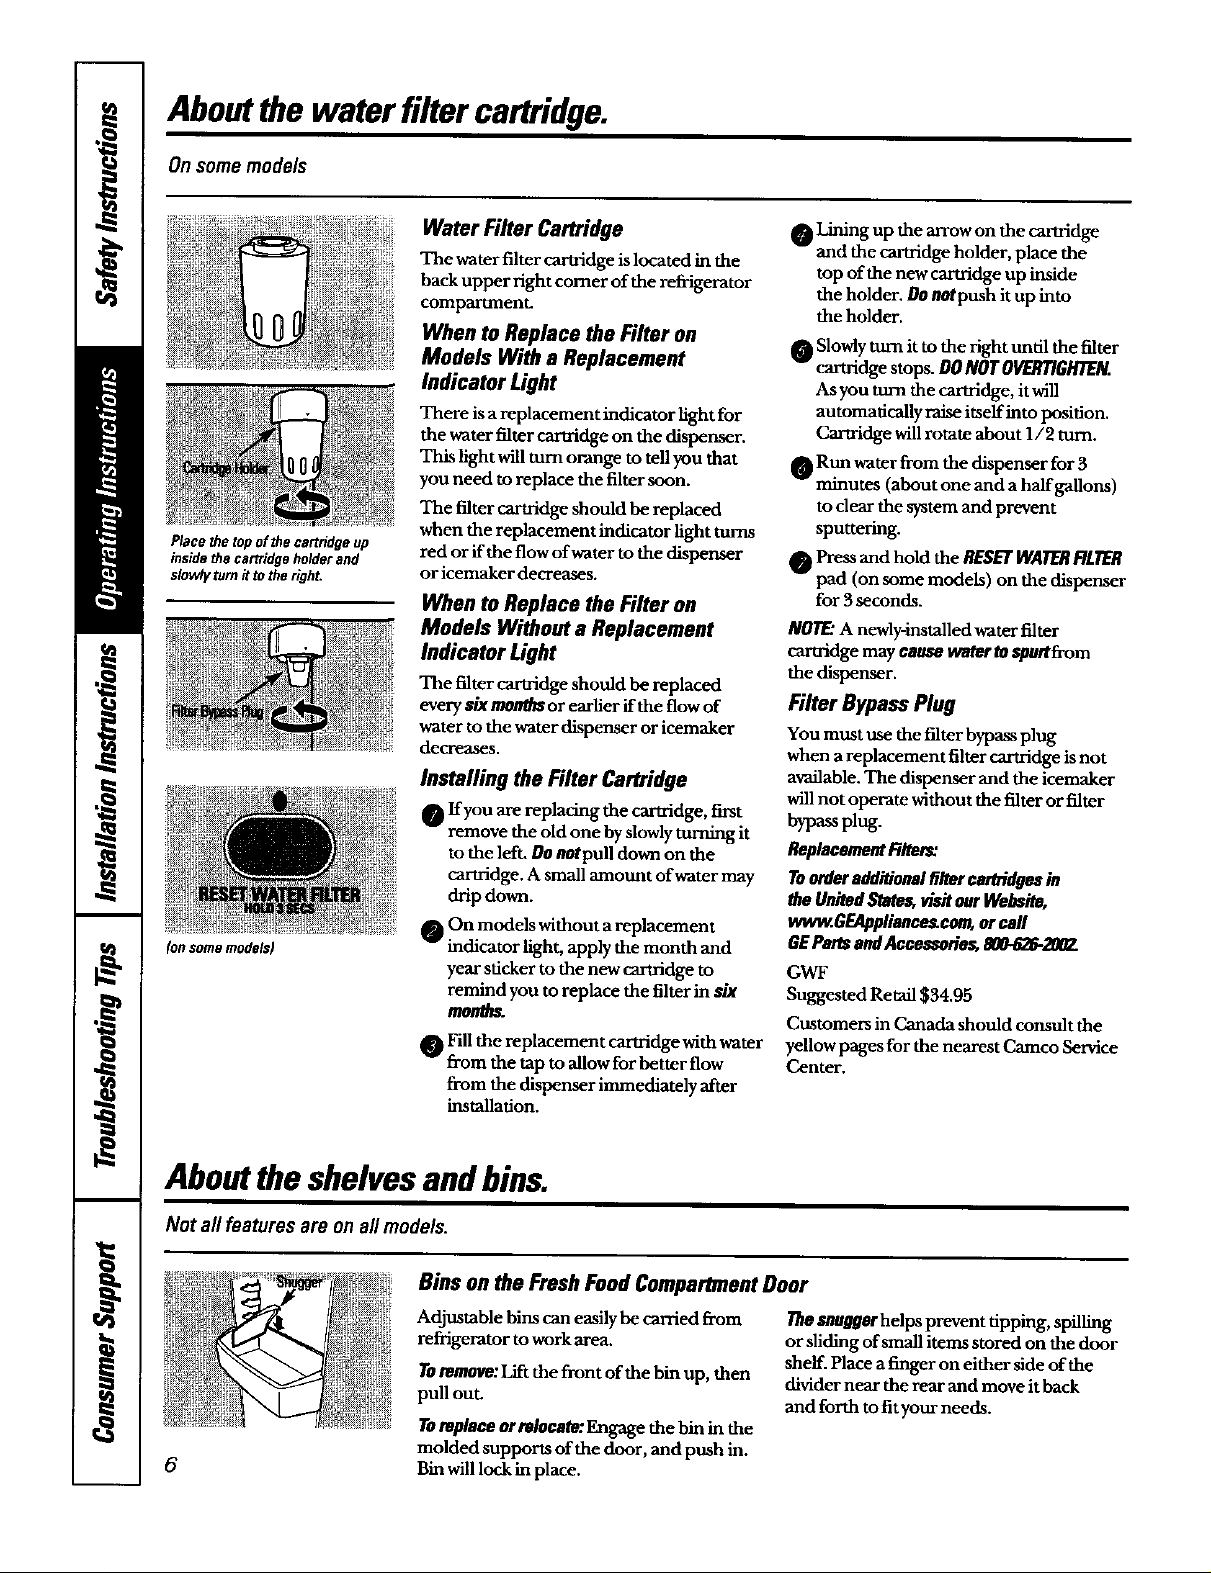
Aboutthe water filter cartridge.
On some models
Placethetopof thecartridgeup
insidethe cartridgeholderand
slowiyturnitto the right.
(onsomemode_)
Water Filter Cartridge
The water filter cartridge is located in the
back upper right comer of the refrigerator
comparUnent-
When to Replace the Filter on
Models With a Replacement
IndicatorLight
There is a replacement indicator light for
the water filter cartridge on the dispenser.
This fight will turn orange to tell you that
you need to replace the filter soon.
The filter cartridge should be replaced
when the replacement indicator light turns
red or if the flow of water to the dispenser
or icemaker decreases.
When to Replace the Filter on
Models Without a Replacement
Indicator Light
The filter cartridge should be replaced
every six mouthsor earlier if the flow of
water to the water dispenser or icemaker
decreases.
Installing the Filter Cartridge
O If you are replacing the cartridge, first
remove the old one by slowly turning it
to the left. Do ontpull down on the
cartridge. A small amount of water may
drip down.
O On models without a replacement
indicator light, apply the month and
year sticker to the new cartridge to
remind you to replace the filter in shr
m0ndm
Fill the replacement cartridge with water
fi'om the tap to allow for better flow
from the dispenser immediately after
installation.
Lining up the arrow on the cartridge
and the cartridge holder, place the
top of the new cartridge up inside
the holder. Do n0tpush it up into
the holder.
Slowlyturn itto the right until the filter
cartridgestops. DONOTOVERTIGHTEN.
As you turn the cartridge,itwill
automatically raise itselfinto position.
Cartridge willrotate about 1/2 turn.
Run water from the dispenser for 3
minutes (about one and a halfgaUons)
to dear the systemand prevent
sputtering.
0 Pressand hold the RESETWATERFILTER
pad (on some models) on the dispenser
for 3 seconds.
NOTE:A newly-installedwater filter
cacuidge may causewatertospurtfrom
the dispenser.
Filter Bypass Plug
You must use the filter bypass plug
when a replacement filter cartridge is not
available. The dispenser and the icemaker
will not operate without the filter or filter
bypass plug.
ReplacementRltors:
Toorderadditionalflffercartridgesin
the UnitedStates,visitourWebsito,
vvww.GEApplionou_com,orcall
DEParts andAccessoties,800-6_-200Z
GWF
Suggested Retail $34.95
Customers in Canada should consult the
yellow pages for the nearest Camco Service
Center.
Aboutthe shelvesandbins.
Not all features are onall models.
Dins on the Fresh Food Compartment Door
Adjustable bins can easily be carried from
refrigerator to work area,
Toremove:Igt the front of the bin up, then
pull out.
Toreplace or relocate: Engage the bin in the
6
molded supports of the door, and push in.
Bin will lock in place.
Thesnugger helps prevent tipping, spilling
or sliding of small items stored on the door
shelf. Place a finger on either side of the
divider near the rear and move it back
and forth to fit your needs.
Page 7
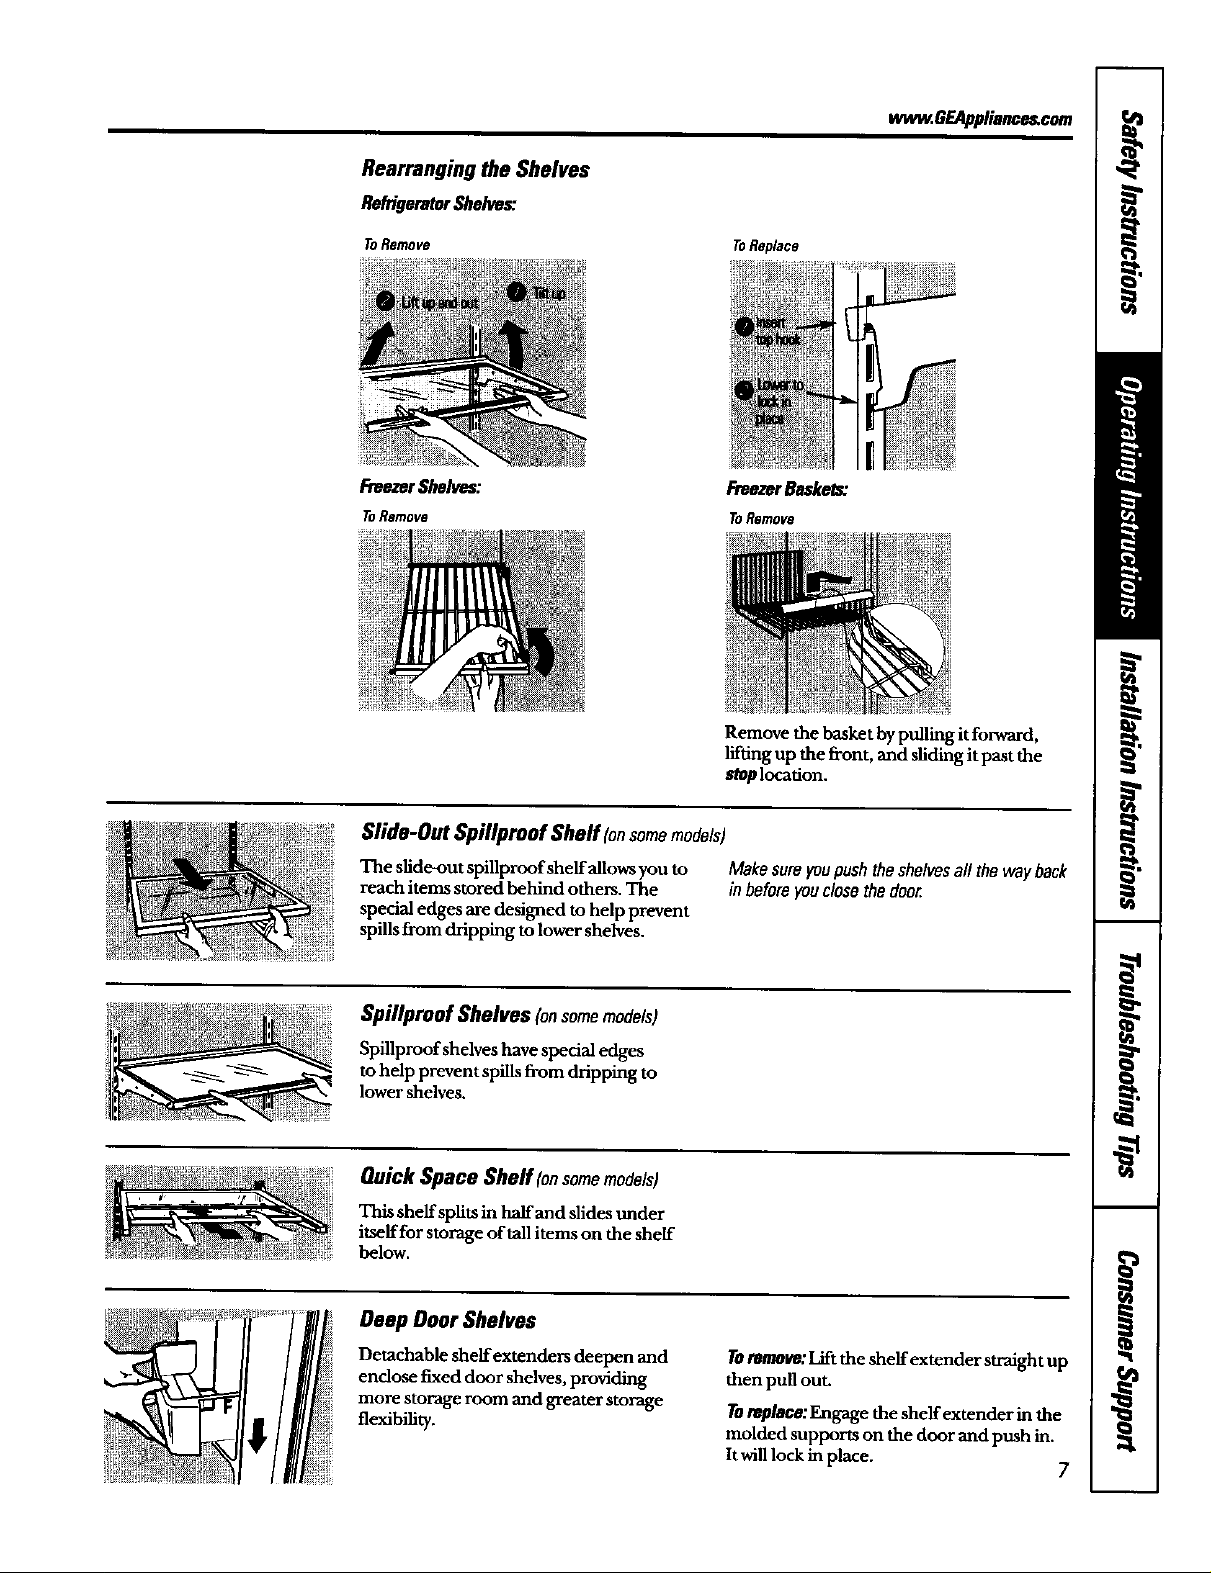
Rearranging the Shelves
ReldgeretorShelve_"
ww_.GEAppliance_cmn
ToRemove
FreezerShelves:
TO Remove
ToReplace
FreezerBasket_
TO Remove
Remove the basket by pulling it forward,
lifting up the front, and sliding it past the
stop location.
IJ
Slide-Out Spillproof Sheff /onsomemodels)
The slide-out spillproof shelf allowsyou to
reach items stored behind others. The
special edges are designed to help prevent
spillsfrom dripping to lower shelves.
Spillproof Shelves (onsomemodels)
Spillproofshelves have special edges
to help prevent spills flom dripping to
lower shelves.
Quick Space Sheff (onsomemodels)
This shelf splits in half and slides under
itself for storage of tall items on the shelf
below.
Deep Deer Shelves
Detachable shelfextenders deepen and
enclose fixed door shelves, providing
more storage room and greater storage
flexibility.
Makesereyoupushtheshelvesall the wayback
inbeforeyouclosethedoo_
Toremo_: Lift the shelf extender straight up
then pull out.
Toreplace: Engage the shelf extender in the
molded supports on the door and push in.
It will lock in place. 7
Page 8
Aboutthe additional features.
Not all features are on all models.
ShelfSaver TM Rack
Use this rack to store beverage cans for
easy access,
It can also hold a 9" x 13" baking dish.
Aboutthe crispersand pans.
Not all features are on all models.
Fruit and Vegetable Crispers
Excesswater that may accumulate in the
bottom of the drawersshould be wiped dry.
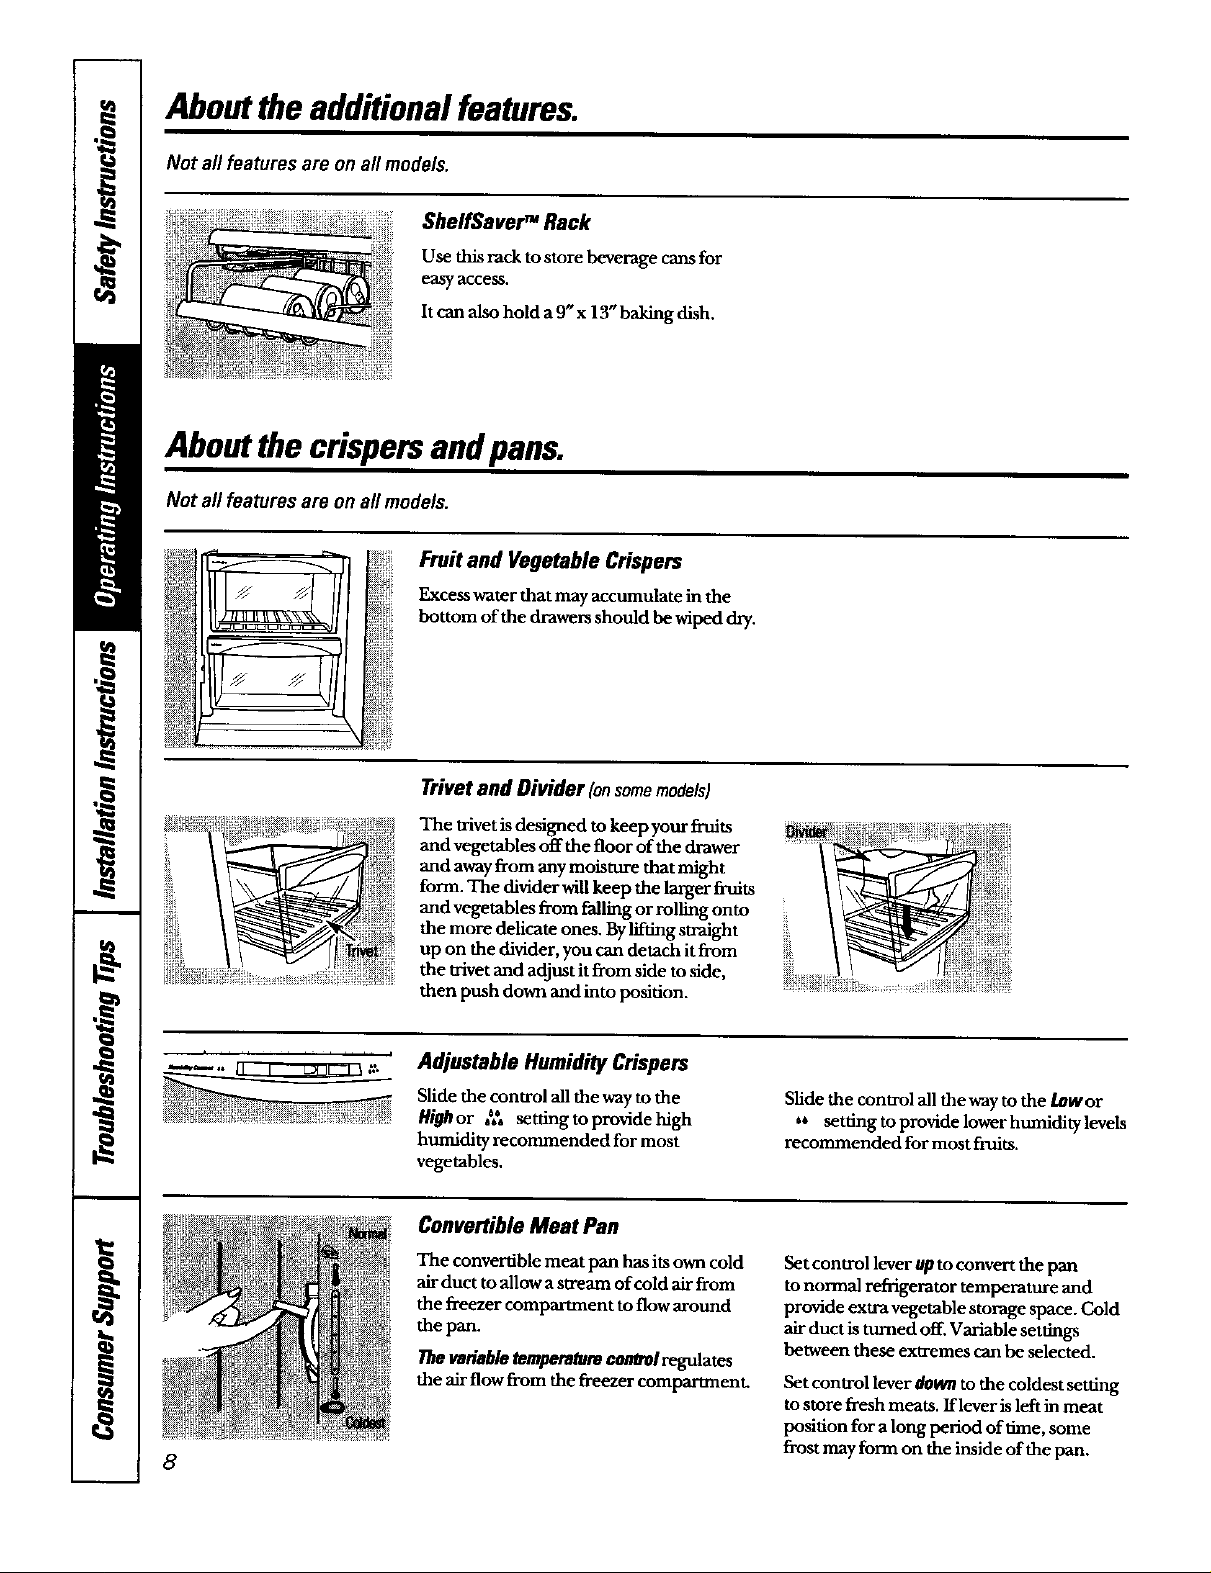
Trivet and Divider (onsomemodels)
The trivet is designed to keep your fruits
and vegetables off the floor of the drawer
and away from any moisture that might
form. The divider will keep the larger fruits
and vegetables from falling or rolling onto
the more delicate ones. By lifting straight
up on the divider, you can detach it fi'om
the trivet and adjust it f_m side to side,
then push down and into position.
Adjustable Humidity Crispers
Slide the control all the way to the
Highor _:, settingtoprovidehigh
humidity recommended for most
vegetables.
Slide the control all the way to the Low or
** setting to provide lower humidity levels
recommended for most fruits.
Convertible Meat Pan
The convertible meat pan has its own cold
air duct to allow a stream of cold air from
the freezer compartment to flow around
the pan.
Thevariabletemperaturecormolregulates
the air flow from the freezer compartment.
Set control lever up to convert the pan
to normal refrigerator temperature and
provide extra vegetable storage space. Cold
air duct is turned off. Variable settings
between these extremes can be selected.
Set control lever downto the coldest setting
to store fresh meats. Iflever is left in meat
position for a long period of time, some
8
frost may form on the inside of the pan.
Page 9
Aboutcrisperremoval
Not all features are onall models.
CrisperRemoval
Crispers can easily be removed by tilting up
slightly and pulling past stop location.
Whenreplacingthecrispers,make
sureyouslidethemthrough the
crisperguides.
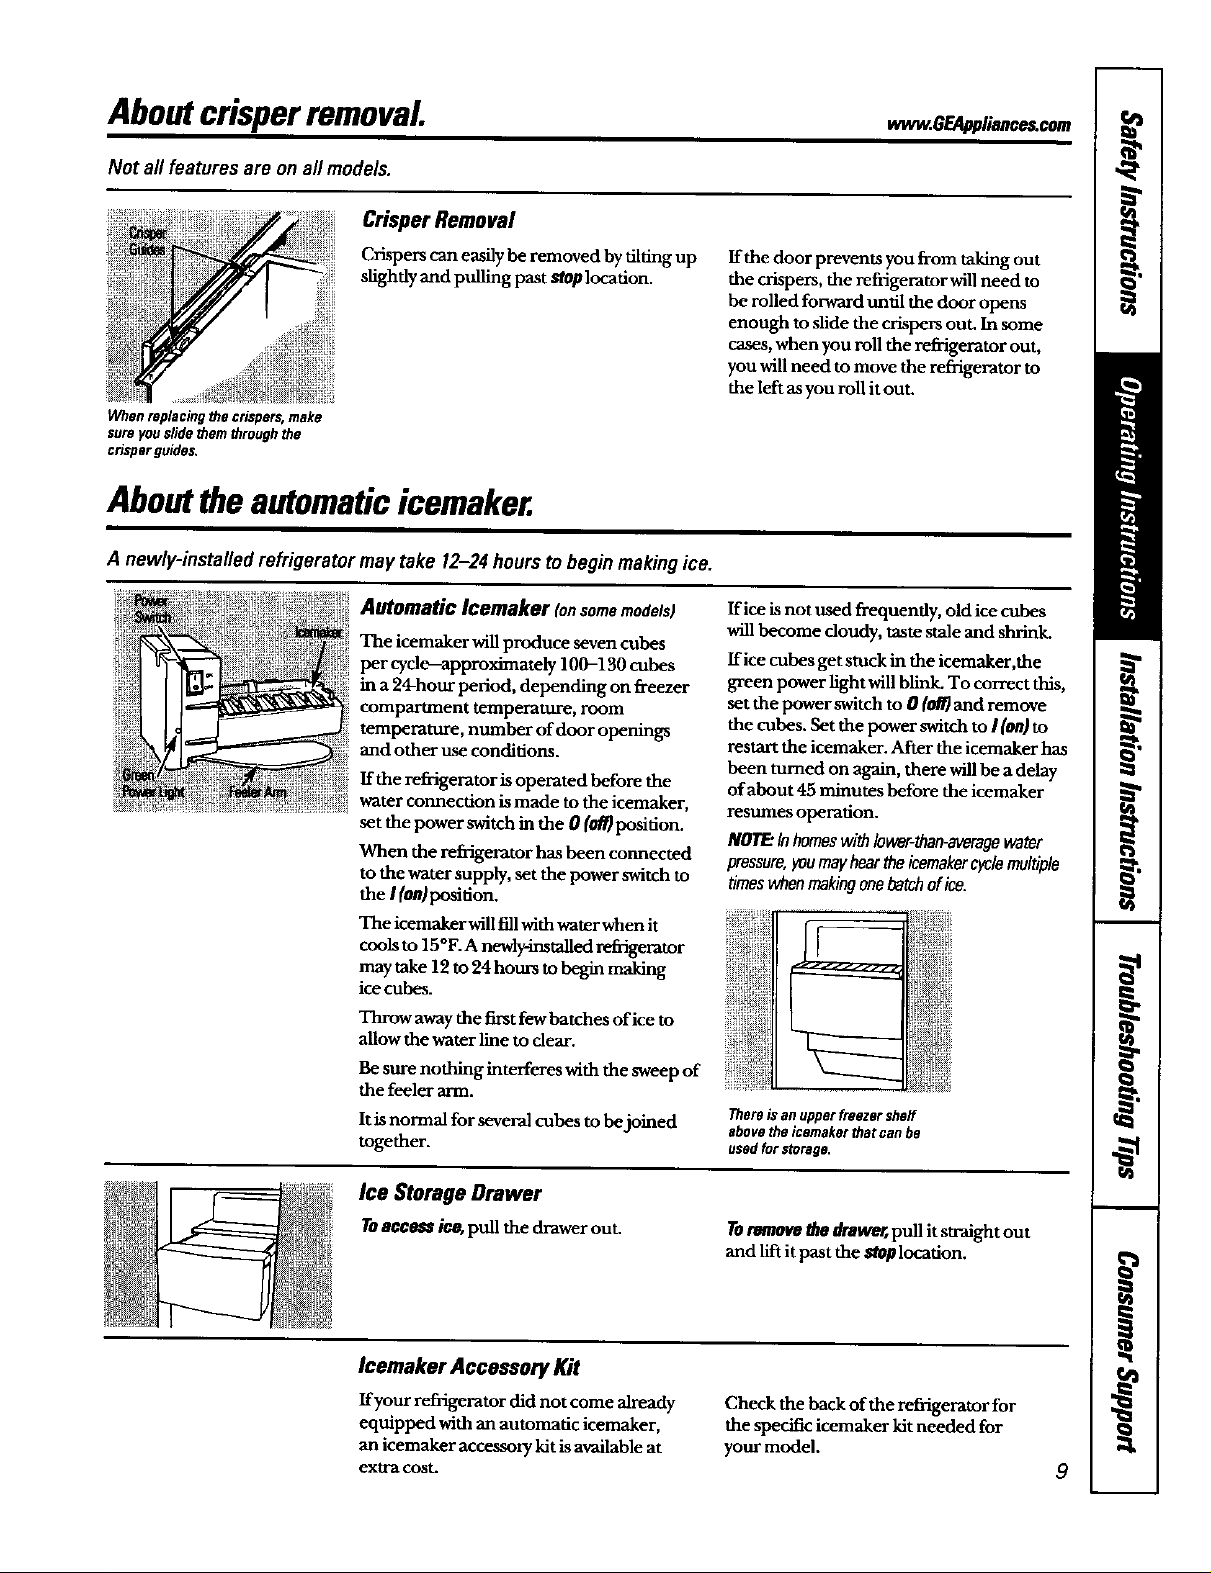
About theautomaticicemaker.
A newly-installed refrigerator may take 12-24 hours to begin making ice.
Automatic leemaker (onsomemodels)
The icemaker will produce seven cubes
per cycle--approximately 100-130 cubes
in a 24-hour period, depending on freezer
compartment temperature, room
temperature, number of door openings
and other use conditions.
If the refrigerator is operated before the
water connection is made to the icemaker,
set the power switch in the 0 (off)position.
When the refrigerator has been connected
to the water supply, set the power switch to
the I (onJposition.
The icemaker will fill with water when it
cools to 15°E A newly-imtalled _a'igerator
may take 12 to 24 hours to begin making
ice cubes.
Throw awaythe firstfewbatches ofice to
allowthe water line to dear.
Be sure nothing interferes with the sweep of
the feeler arm.
Itis normal for several cubes to be joined
together.
If the door prevents you from taking out
the crispers, the refrigerator will need to
be rolled forward until the door opens
enough to slide the crispers out. In some
cases, when you roll the retiigerator out,
you will need to move the refrigerator to
the left as you roll it out.
If ice is not used frequently, old ice cubes
will become doudy, taste stale and shlinL
If ice cubes get stuck in the icemaker,the
green power light will blink. To correct this,
set the power switch to 0 (off] and remove
the cubes. Set the power switch to I (on)to
restart the icemaker. After the icemaker has
been ttmled on again, there will be a delay
of about 45 minutes before the icemaker
resumes operation.
NOTE:Inhomeswith lower-than-averagewater
pressure,youmayheartheicemakercyclemultiple
timeswhenmakingonebatchofice.
There is an upper freezer shelf
above the icemaker that can be
used for storage.
Ice Storage Drawer
Toaccession,pull the drawerout.
Icemaker Accessory Kit
Ifyour refligerator did not come already
equipped with an automatic icemaker,
an icemaker accessory kit is available at
extra cost.
Toremovethedrawer,pull it straight out
and lift it past the stoplocation.
Cheek the back of the refrigerator for
the specific icemaker kit needed for
your model.
9
Page 10

Aboutthe ice and water dispenser.
On some models
To Use the Dispenser
I
SpilJSheff
Select CUBEDICE_, CRUSHEDICE
or WATER_.
Pressthe glass gendy against the top of the
dispenser cradle.
The spill shelf is not serf-draining. To
reduce water spotting, the shelf and its grille
should be cleaned regularly.
If nowaterisdispensedwhentherefrigeratoris
\
firstinstalled,theremaybeairinthewaterline
system.Pressthedispenserarmforatleasttwo
minutestoremovetrappedairfromthewaterline
andtofill thewatersystem.Toflushoutimpurities
in thewaterline,throwawaythefirstsixglassfuls
ofwater.
CAUTION:Neverput fingersoranyother
objectsintotheicecrusherdischargeopening.
Locking the Dispenser (onsomemodels)
Press the LOCK
CONTROLpad for 3
seconds to lock the
dispenser and control
panel. To unlock, press
and hold the pad again
for 3 seconds.
Dispenser LigM
This pad turns the night
IigMin the dispenser on
and off. The light also
comes on when the
dispenser cradle is
pressed, ffthis light
burns out, it should be
replaced with a 6 watt
maximum, 12volt DC
bulb.
Ice Storage Drawer
on Dispenser Models
Toremove:
Set the icemaker power switch to the 0 (off)
posidon. Pull the drawer straight out and
then lift past the Mop position.
Toreplace:
When replacing the drawer, make sure to
push it firmly into place. If it does not go all
the way back, remove it and rotate the drive
mechanism 1/4 turn. Then push the
drawer back again.
fO
Important Facts About Your Dispenser
• Do not add ice fia3m trays or bags to
the storage bin. It may not crush or
dispense well.
• Avoid overfilling glass with ice and use of
narrow glasses. Backed-up ice can jam the
chute or canse the door in the chute to
fi'eeze shut. If ice is blocking the chute,
poke it through with awooden spoon.
• Beverages and foods should not be
quick-chilled in the ice storage bin.
Cans, bottles or food packages in the
storage bin may cause the icemaker
or auger tojam.
• To keep dispensed ice from missing
the glass, put the glass dose to, but not
touching, the dispenseropening.
• Some crushed ice may be dispensed even
though you selected CUBEDICEThis
happens occasionally when a fewcubes
have been left in the crusher.
• After crushed ice is dispensed, some
water may drip flora the chute.
• Sometimes a small mound of snowwill
form on the door in the ice chute. This
condition is normal and usually occurs
when you have dispensed crushed ice
repeatedly. The snow will eventually
evaporate.
Page 11

Careandcleaningoftherefrigerator. , .6 linnca, ,
Cleaning the Outside
Thedoorhandlesand _m. Clean with a
cloth dampened with soapy water. Dry
with a soft cloth.
Keeptheoutsideclean.Wipe with aclean
doth lightly dampened with kitchen
appliance wax or mild liquid dish detergent.
Dry and polish with a clean, soft doth,
Donotwipetherefrigeratorwitha soileddish
clothor wet towel Thesemayleavea residue
thatcanerodethepaint.Donotusescouring
pads,powderedcleaners,bleachorcleaners
containingbleachbecausetheseproductscan
scratchandweakenthepaintfinish.
Drainopeninginfreezercompartment.
During yearly cleaning, remove bottom
freezer basket and flush asoludon of baking
soda--1 teaspoon (5lift) and 2 cups (500
ml) of hot (not boding) water-through the
drain line with the help of a meat baster.
This willhelp eliminate odor and reduce
the likelihood of aclogged drain line. If
drain becomes dogged, use a meat baster
and baking soda solution to force the clog
through the drain line.
Avoid cleaningcoldglassshelveswith hot water
because the extremetemperaturedifference may
causethem to break.Handleglass shelves
carefully.Bumpingtemperedglass cancause it to
shatte_
Donot washanyplasticrefrigeratorpartsin the
dishweshe_
Dispenserdriparea.
Thedispeneer ddp area, (on some models)
beneath thegrille, should be wiped dry.Water
left in this area may leave deposits. Remove
the deposits by adding undiluted vinegar to
the well. Soak until the deposits disappear
or become loose enough to rinse away.
The dispenser cradle (on some models).
Before cleaning, lock the dispenser by
pressing and holding the LOCI( CON1710L
pad for 3 seconds. Clean with warm water
and baking soda solution-about a
tablespoon (15 ml) of baldng soda to a
quart (1 l) of water. Rinse thoroughly
and wipe dry.
Cleaning the Inside
Tohelppreventodors,leave an open box of
baking soda in the fresh food and freezer
compartments.
Unplugthersfrigerntorbeforecleaning.If this
is not practical, wring excess moisture out of
sponge or cloth when deaning around
switches, lights or controls.
Use warm water and baking soda solution--
about a tablespoon (15 ml) of baking soda
to a quart (1 1)of water. This both deans
and neutralizes odors. Rinse and wipe dry.
After cleaning the door gaskets,apply a thin
layer ofpetroleum jelly to the door gaskets
atthe hinge side. This helps keep the
gasketsfrom sticking and bending out
of shape.
Condenser
There is no need for routine condenser
cleaning in normal home operating
environments. However, in environments
that may be particularly dusty or greasy, the
condenser should be cleaned periodically
for ellident refligemtor operation.
Cleaningb_econdenser.
The condenser is located inside the back
of the refrigerator. To access it, first unplug
the refrigerator. Then remove the access
cover. The condenser is on the right side.
11
Page 12

Careand cleaning ofthe refrigerator.
Behind the Refrigerator
Be careful when moving the refrigerator
awayfrom the wall.All typesof floor
coverings can be damaged, particularly
cushioned coverings and those with
embossed surfaces.
Pull the refrigerator straight out and return
it to position by pushing it straight in.
Moving the refvigemtor in a side direction
may result in damage to the floor coveting
or refrigerator.
Preparing for Vacation
For long vacations or absences, remove
food and tmplug the refrigerator. Clean the
interior with a baking soda solution of one
tablespoon (15 ml) of baking soda to one
quart (1 l) of water. Leave the doors open.
Set the icemaker power switch to the 0 (o//]
position and shut off the water supply to the
refrigerator.
Preparing to Move
Whenpushingtherefrigeratorback,makesure
youdon'trolloverthepowercordoricemaker
supplyline(onsomemodels).
If the temperature can dropbelow fi-eezing,
have a qualifiedservicer drain the water
supply system (on some models) to prevent
serious propertydamage due to flooding.
Secure all loose itemssuch asgrille, shelves and drawers by taping them securely
in place to prevent damage.
Besuretherefrigeratorstaysinanuprightpositionduringmoving.
12
Page 13

Replacingthelighthulbs.
Turning the control to the 0 (off) position does not remove power to the light circuit.
Fresh Food Compartment--Upper Light
9) Unplug the refrigerator. 0 Plug the refrigerator backin.
The bulb islocated behind the contloh.
Replace withan appliance bulb of the
same or lowerwattage.
Fresh Food Compartment--Lower Light (onsomemodels)
Thislight is/ocated abovethetop drawer.
Unplug the refiigerator.
_ Grasp the lip at the bottom of the light
shield and pull it up and forward.
Freezer Compartment
After replacing with an appliance
bulb of the same or lower wattage,
replace the shield.
Plug the refrigerator back in.
Unplug the refrigerator.
_ Remove the shelf just belowlight shield.
(The shelf win be easier to remove if it is
emptied first.)
Lift up on the light shield to remove.
Dispenser
Unplug the refrigerator.
The bulb is located on the dispenser
under the control panel.
Remove the lightbulb by turning
it counterclockwise.
_After replacing with an appliance
bulb of the same or lower wattage,
reinstall the shield by hanging it
from the three tabs.
Reinstall the shelf and plug the
refrigerator back in.
Replace the bulb with a bulb of the
same size and wattage.
Plug the refrigerator back in.
13
Page 14

Installation
Refrigerator
Instructions
I Questions?Carl 800-GE-CARES(800-432-2737)orvisitour Websiteat:www.GEAppliances.com
BEFORE YOU BEGIN
Read these instructions completely and carefully.
• IMPORTANT - Savethese
instructions for local inspector's use.
• IMPORTANT - Ohse,veall
governing codes and ordinances.
• Note to Installer - Be sure to leave these
instructions with the Consumer.
• Note to Consumer - Keep these instructions
for future reference.
• Skilllevel- Installation of this appliance requires
basic mechanical skills.
• Completion time - Refrigerator Installation
• Proper installation is the responsibility of the
installer.
• Product failure due to improper installation is not
covered under the Warranty.
In Canada,call 1-800-361-3400orvisitourWet_iteat:vvvvw.gaappliances.ca I
CLEARANCES
Allow the following clearances for ease ofinstalladon,
proper air circulation and plumbing and electrical
connections.
• Sides 1/8" (4 ram)
• Top 1" (25 ram)
• Back 1" (25 mm)
A door clearance of 3/4" (19 ram) is needed for a 90g
door opening which provides better access to the food
storage area.
ROLLERS
15 minutes
The rolters have 3 purposes:
• Rollers adjust so the door closes easily when opened
about halfway.
• Roners adjust so the refiigerator is firmly positioned on
the floor and does not wobble.
• Rollers allowyou to move the refrigerator awayfrom
the wall for cleaning.
Models 20,22,25
WATER SUPPLY TO THE ICEMAKER
(on some models)
If the refrigerator has an icemaker, it will have to be
connected to a cold water line. AGE water supply kit
(containing tubing, shutoffvalve, fittings and
instrncdons) is available at extra cost from your dealer,
by visiting our Website at www.GEAppliances.eom
(in Canada, at www.geappliances.ca) or from Parts
and Accessories, 800-626-2002.
To adjust the rollml, remove the base grille by pulling it
out at the bottom.
Turn the roller adjusting screws dockwise to raise the
refiigerator, counterclockwise to loweT it- Use an
adjustable wrench (3/8" hex head bolt) or pliers.
REFRIGERATOR LOCATION
• Do not install the refrigerator where the temperature
will go below 60°F (16°C) because it will not run often
enough to maintain proper temperatures.
• Install it on a floor strong enough to support it fully
loaded.
To replace base grille, line up the clips on back ofgriUe
between the bar and the bottom of the cabinet. Push
forward until grille maps into place.
14
Page 15

Installation Instructions
DOOR ALIGNMENT
After leveling, make sure that doors are even at the top.
To make the doors even, adjust the refrigerator door.
O Using a 5/16" socket wrench, turn the door adjusting
screw to the right to raise the door, to the left to lower
it. (A nylon plug, embedded in the threads of the pin,
prevents the pin from umting unless a wrench is used.)
After one or two turns of the wrench, open and close
the fresh food door and check the alignment at the top
of the doors.
Toremovethebase
grille,ope_thedoms
andth_ Nil the
g_illestraightout,
--_ Raise
15
Page 16

Installation Instructions
INSTALLING THE WATER LINE
BEFORE YOU BEGIN
Recommended copper water supply kits are WX8X2,
WX8X3 or WX8X4, depending on the amount of
tubing you need. Approved plastic water supply lines
are GE SmartConnect TM Refrigerator Tubing
(WX08X10002, WX08X10006, WX08X10015 and
WX08X10025).
When connecting your refrigerator to a GE Reverse
Osmosis Water System, the only approved installation
is with a GE RVKit. For other reverse osmosis water
systems, follow the manufacturer's recommendations.
If the water supply to the refrigerator is from a Reverse
Osmosis Water Filtration System AND the refrigerator
also has a water filter, use the refrigerator's filter bypass
plug. Using the refrigerator's water filtration cartridge
in conjunction with the RO filter can result in hollow
ice cubes and slower water flow from the water
dispenser.
This water line installation is not warranted by the
refrigerator or icemaker manufacturer. Follow these
instructions carefully to minimize the risk of expensive
water damage.
Water hammer (water banging in the pipes) in house
plumbing can cause damage to refrigerator parts and
lead to water leakage or flooding. Call a qualified
plumber to correct water hammer before installing
the water supply line to the refrigerator.
To prevent burns and product damage, do not hook
up the water line to the hot water line.
If you use your refrigerator before connecting the
water line, make sure the icemaker power switch is in
the 0 (off) position.
Do not install the icemaker tubing in areas where
temperatures fall below freezing.
When using any electrical device (such as a power
drill) during installation, be sure the device is double
insulated or grounded in a manner to prevent the
hazard of electric shock, or is battery powered.
All installations must be in accordance with local
plumbing code requirements.
WHAT YOU WILL NEED
• Copper or GE SmartConnect TM Refrigerator Tubing
kit, 1/4 u outer diameter to connect the refrigerator to
the water supply. If using copper, be sure both ends of
the tubing are cut square.
To determine how much tubing you need: measure
the distance from the water valve on the back of the
refrigerator to the water supply pipe. Then add 8'
(2.4 m). Be sure there is sufficient extra tubing (about
8" [2.4 m] coiled into 3 turns of about 10u [25 cm]
diameter) to allow the refrigerator to move out from
the wall after installation.
GE SmartConnect TM Refrigerator Tubing Kits are
available in the following lengths:
2"(.6 m) - WX08X10002
6" (1.8 m) -WX08X10006
15' (4.6 m) - WX08X10015
25" (7.6 m) -WX08X10025
Be sure that the kit you select allows at least 8' (2.4 m)
as described above.
NOTE: The only GE approved plastic tubing is that
supplied in GE SmartConnect TM Refrigerator Tubing
kits. Do not use any other plastic water supply line
because the line is under pressure at all times. Certain
types of plastic will crack or rupture with age and cause
water damage to your home.
16
Page 17

Installation Instructions
WHAT YOU WILL NEED (CONT.)
Install the shutoffvalve on the nearest frequently used
drinking water line.
• AGE water supply kit (containing tubing, shutoff
valve and fittings listed below) is available at extra
cost from your dealer or from Parts and Accessories,
800-626-2002.
• A cold water supply. The water pressure must be
between 20 and 120 p.s.i. (1.4-8.2 bar) on models
without a water filter and between 40 and 120 p.s.i.
(2.8-8.2 bar) on models with a water filter.
• Power drill.
• 1/2 _ or adjustable wrench.
• Straight and Phillips blade screwdriver.
• Two 1/4 = outer diameter compression nuts and
2 ferrules (sleeves) to connect the copper tubing
to the shutoffvalve and the refrigerator
water valve.
OR
• If you are using a GE SmartConnect TM Refrigerator
Tubing kit, the necessary fittings are preassembled to
the tubing.
• If your existing copper water line has a flared fitting
at the end, you will need an adapter (available at
plumbing supply stores) to connect the water line to
the refrigerator OR you can cut off the flared fitting
with a tube cutter and then use a compression fitting.
Do not cut formed end from GE SmartConnect TM
Refrigerator tubing.
[] SHUT OFF THE MAIN WATER
SUPPLY
Turn on the nearest faucet long enough to clear the
line of water.
[] CHOOSE THE VALVE LOCATION
Choose a location for the valve that is easily
accessible. It is best to connect into the side of a
vertical water pipe. When it is necessary to connect
into a horizontal water pipe, make the connection
to the top or side, rather than at the bottom,
to avoid drawing off any sediment from the
water pipe.
[] DRILL THE HOLE FOR THE VALVE
Drill a 1/4" hole in the water pipe (even
if using a self-piercing valve) using a sharp bit.
Remove any burrs resulting from drilling the hole in
the pipe. Take care not to allow water to drain into
the drill. Failure to drill a 1/4" hole may result in
reduced ice production or smaller cubes.
• Shutoff valve to connect to the cold water line.
The shutoffvalve should have a water inlet with a
minimum inside diameter of 5/32" at the point of
connection to the COLD WATER LINE. Saddle-type
shutoffvalves are included in many water supply kits.
Before purchasing, make sure a saddle-type valve
complies with your local plumbing codes.
17
Page 18

Installation Instructions
INSTALLING THE WATER LINE (cont.)
[] FASTEN THE SHUTOFF VALVE
Fasten the shutoffvalve to the cold water pipe with
the pipe clamp.
PipeClamp
Saddle-Type
ShutoffValve
NOTE: Commonwealth of Massachusetts Plumbing
Codes 248CMR shall be adhered to. Saddle valves
are illegal and use is not permitted in Massachusetts.
Consult with your licensed plumber.
WaterPipe
[] TIGHTEN THE PIPE CLAMP
Tighten the clamp screws until the sealing washer
begins to swell.
NOTE: Do not overtighten or you may crush the
tubing.
PipeClamp_ _lnlet End
,Washer
[] CONNECT THE TUBING TO THE
VALVE
Place the compression nut and ferrule (sleeve) for
copper tubing onto the end of the tubing and
connect it to the shutoffvalve.
Make sure the tubing is fully inserted into the valve.
Tighten the compression nut securely.
For plastic tubing from a GE SmartConnect TM
Refrigerator Tubing kit, insert the molded end
of the tubing into the shutoffvalve and tighten
compression nut until it is hand tight, then tighten
one additional turn with a wrench. Overtightening
may cause leaks.
Saddle4ype
ShutoffValve_1_
PackingNut
OutletValve-- -- Ferrule(sleeve)
NOTE: Commonwealth of Massachusetts Plumbing
Codes 248CMR shall be adhered to. Saddle valves
are illegal and use is not permitted in Massachusetts.
Consult with your licensed phtmber.
SmaflConnectTM
Tubing
ROUTE THE TUBING
Route the tubing between the cold water line and
the refrigerator.
Route the tubing through a hole drilled in the wall
or floor (behind the refrigerator or adjacent base
cabinet) as close to the wall as possible.
NOTE: Be sure there is sufficient extra tubing
(about 8' [2.4 m] coiled into 3 turns of about 10"
[25 cm] diameter) to allow the refrigerator to move
out from the wall after installation.
[] FLUSH OUT THE TUBING
Turn the main water supply on and flush out the
tubing until the water is clear.
Shut the water off at the water valve after about
one quart (1 liter) of water has been flushed
through the tubing.
18
Page 19

Installation Instructions
[] CONNECT THE TUBING TO THE
REFRIGERATOR
NOTES:
• Before making the connection to the refrigerator,
be sure the refrigerator power cord is not plugged
into the wall outleL
• If your refrigerator does not have a water filter, we
recommend installing one ff your water supply
has sand or particles that could clog the screen of
the refrigerator's water valve. Install it in the water
line near the refrigerator. If using a GE
SmartConnect TM Refrigerator Tubing kit, you
will need an additional tube (WX08Xl0002)
to connect the filter. Do not cut plastic tube
to install filter.
Some models have the refrigerator connection at
the end of tubing located outside the compressor
compartment access cover. On other models, the
compressor compartment access cover must be
removed in order to access the refrigerator
connection at the water valve.
[] CONNECT THE TUBING TO THE
REFRIGERATOR (CONT.)
Insert the end of the tubing into the refrigerator
connection as far as possible. While holding the
tubing, tighten the fitting.
For plastic tubing from a GE SmartConnect
Refrigerator Tubing kit, insert the molded end of
the tubing into the refrigerator connection and
tighten the compression nut until it is hand tight,
then tighten one additional turn with a wrench.
Over tightening may cause leaks.
Fasten the tubing into the clamp provided as
shown to keep it in position. You may need to pry
open the clamp.
One of the illustrations below will look like the
connection on your refrigerator.
Tubing.
Clamp
Ferrule
(sleeve)
Cecmectio_
Tubing
SmartConr_-tTM
Tubing
On models using the refrigeration connection at
the water valve, remove the plastic flexible cap.
Place the compression nut and ferrule (sleeve)
onto the end of the tubing as shown. On a GE
SmartConuect Refrigerator Tubing kit, the nuts
are already assembled to the tubing.
Tubing
Clamp
Ferrule
C0nc_ti0n Tul_ng
1/4_ 1/4_
,Cetnprsssioo Tubing
Nut
SmartConnectTM
[] TURN THE WATER ON AT THE
SHUTOFF VALVE
Tighten any connections that leak.
Reattach the access cover.
19
Page 20

Installation Instructions
INSTALLING THE WATER LINE (cont.)
[] PLUG IN THE REFRIGERATOR
Arrange the coil of tubing so that it does not vibrate
against the back of the refrigerator or against the
wall. Push the refrigerator back to the wall.
START THE ICEMAKER
Set the icemaker power switch to the I (on)position.
The icemaker will not begin to operate until it
reaches its operating temperature of 15°F (-9°C)
or below. It will then begin operation automatically
if the icemaker power switch is in the I (on) position.
NOTE: In lower water pressure conditions, the
water valve may turn on up to 3 times to deliver
enough water to the icemaker.
2O
Page 21

Notes.
rJ_
/
pt_
m
m
_JJ
m
m
m_J
m
21
Lm
m
m
r_
TJ_
i
mm
L_
Page 22

Normaloperatingsounds.
The new high efficiency compressor runs faster and will have a higher pitch hum
or pulsating sound while operaung.
"_'- The fan circulating air reside the freezer which keeps the temperatures
throughout.
sound during the defrost cycle.
, The flowof refrigerantthrough the freezer cooling cotlssounds like boiling
wateror agurgling noise.
, Crackingor popping of cooling cods caused by expansion and contraction
dunng defrost and refiageradon following defrost
during the defrost cycle.
on the defrost heater causing a sizzling, hissing or popping
as it melts from the evaporator and flows to the drain pan
Icemaker Ionsomemodelsl
The icemaker water valve will buzz when the tcemaker fills with water. If the power
switch is m the ! (on) pos_don, itwill buzz even if it has not yet been hooked up to
water Keeping the power switch m the I (on)position before it is hooked up to
water can damage the memaker. To prevent this, set the power switch to the 0 (off)
posinon This will stop the buzzing.
The sound of cubes dropping into the bin and water running m pipes as
These sounds are normal
and are due mostly to highly
efficient operation.
icemaker refills.
Beforeyou carlfor service...
Savetimeandmoney!lRewewthechartsonthe following
_ roubleshootingtips
Balt_ralr db_ eet ' Refrigerator hi de frost cycle. * Wait about 30 minutes for defrost cycle to end.
[/_tm/_7 _' m_inl/ Front rollers need adjusting. *See Rollers.
fsl_
_ nmlw_
22
pagesfirstand youmaynotneedto callforservice,
Possible Causes What To Do
Freeze_ control • Move the freezer control to a temperature setting.
in O(off) position.
Refrlgea-atar is unplugged. • Push the plug completely into the outlet.
The fuse is blown/circuit • Replace fuse or reset the breaker.
breaker is tripped.
Page 23

wwvz.GEApplianc_com
Possible Causes What To Do
ll_W" el_rml _ Normal whe_arefrigerator • Wmt 24 hours for the refrigerator to completely
is pl din, cooldown
(Madem nffrilleca_m Often occurs whe_ _ •Thts is normal
tV_ m_vtV_ amotmts of food are
_/Ir_ i_t¢_ Door left open. * Check to see if package is holding door open.
b m_ain _ . door openings.
/_#rJl, llealr Temperattwe control not set • See Aboutthe controls.
__wa_ coldenoug_
g'_f_nt/S Door left open. - Check to see if package isholding door open.
_ ttdff_ TOOfrequent or too long
iS,_ _/) door openings.
placed in refrigerator.
Hot weather or frequent * This ,s normal.
Temperature controls * See Aboutthe controls.
set at the coldest
_mg.
Warm weather or frequent • Set the temperature control one step colder
door o_ See Aboutthe controls.
Doorleftopen. •Checkto see ffpackage isholding door open.
_'l_t_ _ _ Automatic energy saver • This helps prevent condensauon on the outside.
tmd_ system circulates wren
liquid mound front edge
_ of fzeezer compartment.
Almma¢ m
ab_ mint
/c@_he_ Ice storage bin needs cleaning. • Empty and wash bin. Discard old cubes.
•_ff f/_i_V _I_S,. Water filter dogged. * Replace filter carmdge with new cai-tndge or with plug.
r
S/#W__ Door left open. • Check to see if package is holding door open
Icemaker power switch
is in the 0 (o_) posltlon.
WateT supply turned off or
not connected.
Freezer compartment *Wait 24 hours for the refrigerator to completely
too warm. cool down.
Piled up cubes in the storage • Level cubes by hand.
bin cause the icemaker
toshut off.
Ice cubes stack in icemaker. • Turn off the memaker, remove cubes, and turn the
(Green power light on icemaker back on.
icemaker bllnldng).
Food transmitting odor/taste • Wrap foods well.
to ice cubes.
Interior of refi_eramr • See Careand cleamng.
needs cleaning.
Temperatm-e control not set • SeeAbout the controls.
• Set the power switch to the I (ml)position.
• See Installing the water line.
cold,mongh.
_ m_'e/_ Door gasket on hinge side *Apply petroleum jelly on face of gasket.
r
_/_ Defrost heater is on. • This is normal.
slicking or folding over.
t_ frse_r
23
Page 24

Before youcall forservice...
Possible Causes What To Do
c_a_tw_ramtt=t
wmkloa_we mdels)
mmPr/w.mer'-_
(easawellleda_ used for a long thne.
[_4ltrh _U/aS _ Normal wben refrigerator • Wait 24 hours for the refrigerator to completely
tqA'lm(_ _ nwds_ is first h]staned, cool down.
_ d_t_mlutd_s Water supply line turned * See Installingthe water line.
n_mm_,/__ off or not connected.
iq_ef _qllg lh_ Newly-hu_talled filter cartrldge. • Run water from the chspenser for 3 minutes (about
' one and a half gallous).
I/__ Water in reservohr is • Call for serwce.
t_is_ frozen.
NO tat,Jwrm'i_ _ Supply line or shutoff • Call a plumber
l_nrffi_Wm" k_ _ Foods transmitting • Foods with strong odors should be ughdy wrapped.
_ m Not unusual during • Wipe surface dry.
ma a Ommr : petin ofhlghhmidity.
_ l_ll_ilUiff# - Too frequent or too
(iHhlmM _ _l" long door openings.
can_m
Icemaker turned off or
water supply turned off.
Ice cubes are frozen to
icemaker feeler artm
damp,in
storage contains.
Dispenser is LOCKED. * Press and hold the LOCKCONTROLpad for 3 seconds
Water dispenser has not been • Dispeuse water unul all water in system is replemshed.
Wate_ dispenzer has not been "Dispense water unnl afi water in system is replemshed.
used for a long time.
Water system has been drain_L • Allow several hours for replenished supply to chin.
WateT filter dogged. • Replace filter carmdge or remove filter and install plug.
Ah" may be trapped in the * Press the dispenser arm for at least two minutes,
• Turn on memaker or water supply.
• Remove cubes.
• Break up with fingertip pressure and discard
remaining dumps.
• Freezer may be too warm. Adjust the fi'eezer control
to a colder setting, one posmon at a dme, until clumps
do not form.
water _yst_a.
_nser is LOCKED. * Press and hold the fOIKCONTROL pad for 3 seconds.
v eisdogg
Water filter dogged. • Replace filter carmdge or remove filter and tustall plug.
_mer is LOCKED. *Press and hold the LOCKCONTROLpad for 3 seconds
odor to refrigerator. • Keep an open box of baking soda m the refrigerator;
replace every three months
Interior needs cleaning. * See Careand cleaning
Defrost water _h'ainage • See Careand cleaning.
_tem need__.
8/lit_, f
/mtzdut_l_d_ ' No power at outlet. * Replace fuse or reset the breaker
_ ' " '*" Light bulb burned out. • See Replacingthe hghtbulbs.
, . =
i_r m Id_/_X' )_" K Drain in the bottom of • See Care and cleaning.
@n/_W _/#'@_K thef_ezerdogged.
24 Cubesjammedin chute. • Poke me through with a wooden spoon.
Page 25

IlataitfmmlA_t_m
CtmEDICEw_
betCRUStEDICEwas
Your refrigerator is warranted to be flee of defects in material and workmanship.
What iscovered How LongWarranted Parts Labour
Compressor Ten (10) Years Ten(10) Years JTen (10) Years
Sealed System(including Five(5) Years Frve(5) Years !Five (5) Years
evaporator,condenser
tubingandrefdgerant)
AllOther Parts One (1) Year One (1) Year One (1) Year
ww_.GEAppliance_com
Possible Causes What ToDo
Normal air flow cooling
motor. In the refxlger_on
proce_ it is normal that
heat be expoUed in the
area trader the refrigerator.
Some floor coverhzgs are
sensitlve and will discolor at
these normal and safe temperatm_
Last setfingw"_ CRUSHEDIC/E * A few cubes were left m the crusher fi-om the previous
setung. This ts normal.
CONSUMER WARRANTY
(for customers in Canada)
(From Dateof Sale) Repairor Replace
at Camco'sOption
TERMS AND CONDITIONS:
This warranty applies only for single
family domestic use in Canada when the
Refrigerator has been properly installed
according to the instructionssupplied by
Camco and is connected to an adequate
and proper utihtyservice.
Damage due toabuse, accident,commercial
use, and aiteratnonor defacing of the serial
plate cancels all obligabonsof thiswarranty.
Service duringthis warranty mustbe performed
by an Authorized Camco Service Agent.
Neither Camco nor the Dealer is liable for any
claims or damages resultingfrom any failure
of the Refngeratoror from service delays
beyond their reasonable control.
To obtain warranty service, purchaser must
present the originalbillof sale Components
repanrador replacedare warranted through the
remainderof the onginalwarranty penodonly.
WHAT IS NOT COVERED:
• Service tripsto your home to teach you how
to usethe product.
• Damage tofinish after delivery.
• Improper installation---properinstallation
includesadequate aircirculationto the
refrigerationsystem, adequate electrical,
plumbingand other connecting facilities.
• Replacementof housefuses or resettingof
circuntbreakers.
• Replacementof lightbulbs.
• Damage to productcaused by accident, fire,
floods or actsof God.
• Loss of food due to spoilage.
• Proper use and care of product as listed
in the owner's manual, propersetting of
controls.
• WARRANTOR IS NOT RESPONSIBLE
FOR CONSEQUENTIAL DAMAGES.
This warranty is inadditionto any statutory
warranty.
IMPORTANT
Keep this warranty and your bill of sale as proof of original purchase and purchase date,
Camce Se_ce is availablecoast to coast.
If further help is needed concerning thiswarranty, contact:
Manager, Consumer Relations, Camco Inc.,
Suite 310, 1 Factory Lane, Moncton, N.B. E1C 9M3
Staple your receipt here. I
Pmof of the ongmal purchase I
date _sneeded toobtain service
under the warranty
25
Page 26

Refrigerator Warranty.(Fore.stomersi.theUmtedStates)
All warranWservice providedby our FactoryService Centers,
41
_ Anypattofthe refrigerator which fails due to a defect in materials or workmanship.
R'omthe da_ ofti_e During th_ _ll one-year watralW, GEwillalso provtde, lraeef charge, all labor and m.home
_t_ha_ service to replace the defective part.
Rm_
om#ai daw €
II Sea'vicetrips to your home to teach you how touse the
prodac
IIImproper installation.
IIFailm'eof the product if itis abused, nfisused, or used for
otherthan the inteaaded p_ or used commordany.
IIILoss of food due to spoilage.
I Replacement of house ftLqmor resetthlg of circuit
breakers.
or an authorizedCustomerCare® techmclan. Toschedule service,
on-line,24 hoursa day, contact us at _ GEAppllancescorn,or
carl800-GE-CARES
GE Will Replace:
Any patt ofthesealedrefrigeratingsystem(thecompressor, condenser, evaporator
and all connecting tubing) wtuch fails due to a defect in materials or workmanslup.
1
During ttus _ll five-yearsealedrefrigeratingsystemwarranty,,GEwill also provide, free ofcharge,
all laborandm-homeservzcetoreplacethe defectivepartin thesealedrefrigerating system.
II Replacement of the wate_ filter cartridge due to water
pressure that is outside the specified operatlng range or
due to excessive sedime_nt in the water slapply.
IIReplacement of veate_filter cartridgeaft_ its expected
useful llfe.
II Damage to the product caused by accident, fire, floods or
acts of God.
• Inddental orconsequential damage caused by possible
defects with this appliance.
Staple your receipt here.
Proofof theoriginal purchase
date Is needed to obtain sentlce
under the warranty
Thtswarranty is extendedto the originalpurchaser andany succeeding owner forproductspurchased for home
usewithin the USA.In Alaska, the warranty excludesthe costof shippingor service calls to yourhome.
Some states donotallow the exclusionor limitationof incidental or consequentialdamages. Thiswarranty gives
you specific legal rights,and you may alsohave other rights which varyfrom state to state. Toknowwhat your
legal rightsare, consult yourlocal orstate consumeraffairs officeor yourstate'sAttorney General.
Warrantor. General Electric Company.Louisville, KY 40225
26
Page 27

Performance Data Sheet
GESmartWater Filtration System
GWF Cartridge
Health Claim Performance Certified by NSF/ANSI*
100%safety factors bui/t in for unmetered usage)
Standard No. 42: Aesthetic Effects
Paz-axneter
Chlorine
T&O
Partkxtlate**
Pm-ameter
Turbidity
cysts
Lead at PH 6.5
Lead at pH 8.5
Lindane
Awazine
2,4-D
Asbestos
* Testedusinga flow rate of 0.5gpm;pressureof 120psig;pH ofZ5_0.5;temp.of20_Z5 C
** Measurementinpar_cles/ml
*** NTU= Nephe/ometn'cUnits
USEPA Influe_nt Effluem
MCL
1.9 ppm 0.02 ppm
I
Otall_ge Average ]
200,000 3,978
Standard No. 53: Health Effects
USEPA
MCL
1 NTU***
99.95% Reduction
15 pph
15 ppb
0.0002 ppm
0.003 ppm
0.100 ppm
99%
Influent
Ch_Gmge
24.3 NTU
105,750
160 ppb
150ppb
0.00062 ppm
0.0084 ppm
0.272 ppm
690 MFL/ml
Average Maxhmnn
0.07 NTU 0.1 NTU
1 ppb 1 ppb
1.8 ppb 4.3 ppb
0.90005 ppm 0.00005 ppm
0.002 ppm 0.003 ppm
0.042 ppm 0.090 ppm
0.32 MFL/ml 1.2 MFL/ml
0.05 ppm
_t
26 55
% Reduction
Average Minimtma
98.90% 97.37%
98.00% 96.10%7,800
% Reduction
Average Minlmltm
99.71% 99.59%
99.97% 99.95%
99.37% 99.37%
98.8O% 97.13%
91.93% 91.93%
76.19% 64.28%
84.89% 67.63%
99.95% 99.82%
Operating Specifications
• Capacity: certified for up to 300 gallons (1135 l); up to six months for models without a replacement filter indicator light;
up to one year for models with a replacement filter indicator light
INPressure requirement: 40-120 psi (2._8.2 bar), non-shock
• Temperature: 33-100 F (0.6-38 C)
• Flow rate: 0.5 gpm (1.9 lpm)
General Installation/Operation/Maintenance Requirements
• Flush new cartridge at full flow for 3 minutes to purge out trapped air.
• Replace cartridge when flow becomes too slow.
Special Notices
• Installation instructions; parts and service availability; and standard warranty are included with the product when shipped.
I This drinking water system must be maintained according to manufacturer's instructions, including replacement of
filter cartridges.
• Do not use with water that is microbiologically unsafe or of unknown quality without adequate disinfection before or after
the system. Systems certified for cyst reduction may be used on disinfected water that may contain filterable cysts.
IThe contaminants or other substances removed or reduced by this water treatment system are not necessarily in your water.
• Check for compliance with the state and local laws and regulations.
System Tested and Cet titled by NSF lntemadonai against ANSI/NSF
Standard 42 & 53 for the reduction of:
Standard No. 42: Aesthetic Effects
Chemical Unit
Taste and Odor Reduction
Chlorine Reduction, Class I
Mechanical Filtration Unit
Particulate Reduction, Class I
Standard No. 53: Health Effects
Chemical Reduction Unit
Lead and Atrazine Reduction
Lindane and 2,4-D Reduction
Mechanical Filtration Unit
Turbidity Reduction
Cyst and Asbestos Reduction
Manufactured for: General Electric Company, Lottisville, KY 40225 2 7
Page 28

State of California
Department of Health Services
Water Treatment Device
Certificate Number
00-1434
Date Issued: May 30, 2000
Date Revised: Febnmry 9, 2001
Trademarl_Model Deslenation ....... Revlaeement Elements
GE Smart Water Filtration Systems _ G_ ,:, _ ;_ i _ GWF06
GE Smart Water Filt mti0n,tty_lam _ W_ _ : ,-- _'_G_W
/
Manufacturer:, G_'_ Appliances
Cysts (
Atra_ne ', /
Lmdane :,
2,4-D
Rated Service Capacity: 300 gallons* Rated Service Flow: 0.5 gpm
* 500 gallons for models that Include a replacement filter Indicator light.
Do not use where water Is mlcrobiologlcally unsafe or with water of unknown quality, except that systems
claiming cyst reduction may be used on water containing cysts.
For Purchases Made In lowa: This form must be signed and dated by the buyer and seller prior to the consummation of this
sale. This form should be retained on file by the seller for a minimum of two years.
BUYER: SELLER:
Name Name
Address Address
City State Zip City State Zip
Signature Date Signature Date
28
Page 29

GE Service Protection Plus TM
GE, a name recognized worldwide for quality and dependability, offers you
Service Protection Plush---comprehensive protection on all your appliances--
No Matter What Brand! We 71 Cover Any Appliance.
BenefitsInclude: Anywhere. Anytime.*
• Backed by GE
• All brands covered
• Unlimited service calls
• All parts and labor costs included
• No out-of-pocket expenses
• No hidden deductibles
• One 800 number to call
You will be completely satisfied with our service protection or you may request your money back
on the remaining value of your contract. No questions asked. It's that simple.
Protect your refrigerator, dishwasher, washer and dryer, range, TV, VCR and much more-any brand!
Plus there's no extra charge for emergency service and low monthly financing is available. Even icemaker
coverage and food spoilage protection is offered. You can rest easy, knowing that all your valuable
household products are protected against expensive repairs.
Place your confidence in GE and call us in the U.S. toll-free at 800-626-2224
for more information.
*All brands covered, up to 20 years old, in the continental U.S.
Cut here
Please place in envelopeand mail to:
GeneralElectric Company
Warranty Registration Department
P.O. Box 32150
Louisville, KY 40232-2150
29
Page 30

Consumer Product Ownership Registration
Dear Customer:
Thank you for purchasing our product and thank you for placing your confidence in us.
We are proud to have you as a customer!
Follow these three steps to protect your new appliance investment:
Read your Owner's
your Commmer registration below,
Product Ownership store this document
Registration today, ina safe place. It
Have the peace of contains information
mind of knowing we you will need should
can contact you in the you require service.
Complete_dmail 2 Aftermallingthe
unlikely event of a Our service number is
safety modification. 800 GE CARES
(800-432-2737).
Model Number Serial Number
3
,,,,,,,,,,I I,,,,,,,I
Important: If you did not get a registration card with your
product, detach and return the form below to
ensure that your product is registered, or register
................................................................................................. _:. _.C_,___.e:.,.....
online at www.GEAppliances.com.
Manual carefully.
It will help you
operate your new
appliance properly.
Consumer Product Ownership Registration
_) Model Number Serial Number
Mr._ Ms._ Mrs._ Miss[:]
First Last J_1 , , , , , , , , , I _,_1 ) , , , , , , , , , , i
s_t i
Address [ I I I I I I r i I I i I i I i I I I I I I I I i
Apt-# I ) I I I I ) I I E_nailAddress*
o_1 i , f i i i I i I i f I I I s..!__L_l _! , i I i I
_o°thl . I _yl I Yea.L--_ ehono
I , = , I = , , I I I _ i I , r i i i i , I
NumbS)' II,., I
* Please provide your e-mail address to receive, via e-mail, discounts, special offers and other important
communications from GE Appliances (GEA).
[] Check here ifyou do not want to receive communications from GEA's carefully selected partners.
@
GEAppliancRs
m6F_com
3O
 Loading...