

Page 1
Refrigerators
Safety Instructions ........... 2, 3
For Australia and New Zealand . . .34
Operating Instructions
Additional Features ............ 11
Automatic Icemaker . .......... 15
Care and Cleaning .......... 17, 18
Crispers and Pans ............. 14
CustomCool r'* . ............ 4, 7, 8
Freezer Compartment .......... 13
Ice and X_'ater Dispenser ..... 16, 1 7
Refrigerator Doors ............ 10
Replacing the Lig]lt Bulbs ....... 19
Shelves and Bins ........... 10-12
Temperature Controls ....... 4, 5, 6
Turbo CooF* . ................. 6
VCater Filter ................... 9
• Side by Side
Models21,23,25,27and29
Installation Instructions
For Australia and
New Zealand .............. 35-37
Preparing to Install
the Refligerator . ........... 25-27
Removing and Replacing Doors . . .24
Trim Kits and Panels ........ 20-23
_A'ater Line Installation ...... 28, 29
Troubleshooting Tips ....... 31-33
Normal Operating Sounds ...... 30
Write the model and serial numbers here:
Model #
Serial #
Find these numbers on a label inside
the refl'igerator compartment at the
top on the right.
20002600P031 49-80218 05-04Jfl
Page 2
IMPORTANTSAFETYINFORMATION.
READALLINSTRUCTIONSBEFOREUSING.
WARNING!
Use this appliance onlyfor its intended purpose as described in this Owner's Manual
SAFETYPRECAUtiONS
When using electrical appliances, basic safety precautions should be followed, including the following:
This re&igerator must be properly installed
and located in accordance with tile Installation
Instructions before it is used. Also see the
How to Connect EloctricRy section.
_ Do not attempt to stand on top of the refl'igerator.
Doing so may result in bodily iqjm T or damage to
the refl'igera tot.
Do not allow children to play with the refrigerator
or tamper with the controls.
Do not allow children to climb, stand or hang on
the shelves in the refl'igerator. They could damage
the refl'igerator and seriously ii_iure themselves.
_ Do not touch the cold surfaces in the fl'eezer
compartment when hands are damp or wet,
Skin may stick to these extremely cold surtaces.
Do not store or use gasoline or other flammable
vapors and liquids in tile vicinity of this or any
other appliance.
In refl'igerators with automatic icemakers, avoid
contact with the moving parts of the ejector
mechanism, or with the heating element located
on the bottom of the icemaker. Do not place
fingers or hands on the automatic icemaking
mechanism while the refl'igerator is i)lugged in.
Installation of tile icemaker must be done by
a qualified service technician.
Kee I) fingers out of the "pinch point" areas;
clearances between the doors and between the
doors and cabinet are necessarily small. Be careflfl
closing doors when children are in the area.
UnI)lug tile refl'igerator before cleaning and
making repairs.
NOTE: We strongly recommend that any servicing be
performed bya qualified individual.
Before replacing a burned-out light bulb, the
refrigerator should be unplugged in order to avoid
contact with a live wire filament. (A bm'ned-out
light bulb may break when being replaced.)
NOTE: Setting either or both controls to 0 (off) does not
remove power to the h_?htcircuit.
Do not refreeze ti'ozen foods which have
thawed completely:
Always clean the CustemCeeF Tray after
thawing food.
a, DANGER!RISKOFCHILDENTRAPMENT
PROPERDISPOSALOFTHEREFRIGERATOR
Child entrapment and suffocation are not problems
of tile past. J/mked or abandoned refl'igeratm_ are
still dangerous...even if they will sit fin" "just a few
days." If you are getting rid of vour old refl'igerator,
please follow the instructions below to hel I) prevent
accidents.
Before You Threw Away YourOld Refrigerator
or Freezer:
Take off tile doors and discard separately.
i,eave the shelves in place so that children may
not easily climb inside.
If tile refl'igerator has a lock, make it mmsable.
Refrigerants
All refrigeration products contain refl'igerants,
which under federal law must be removed prior
to product disposal. If wm are getting rid of an
old refi'igeration product, check with tile company
handling tile disposal about what to do.
Page 3
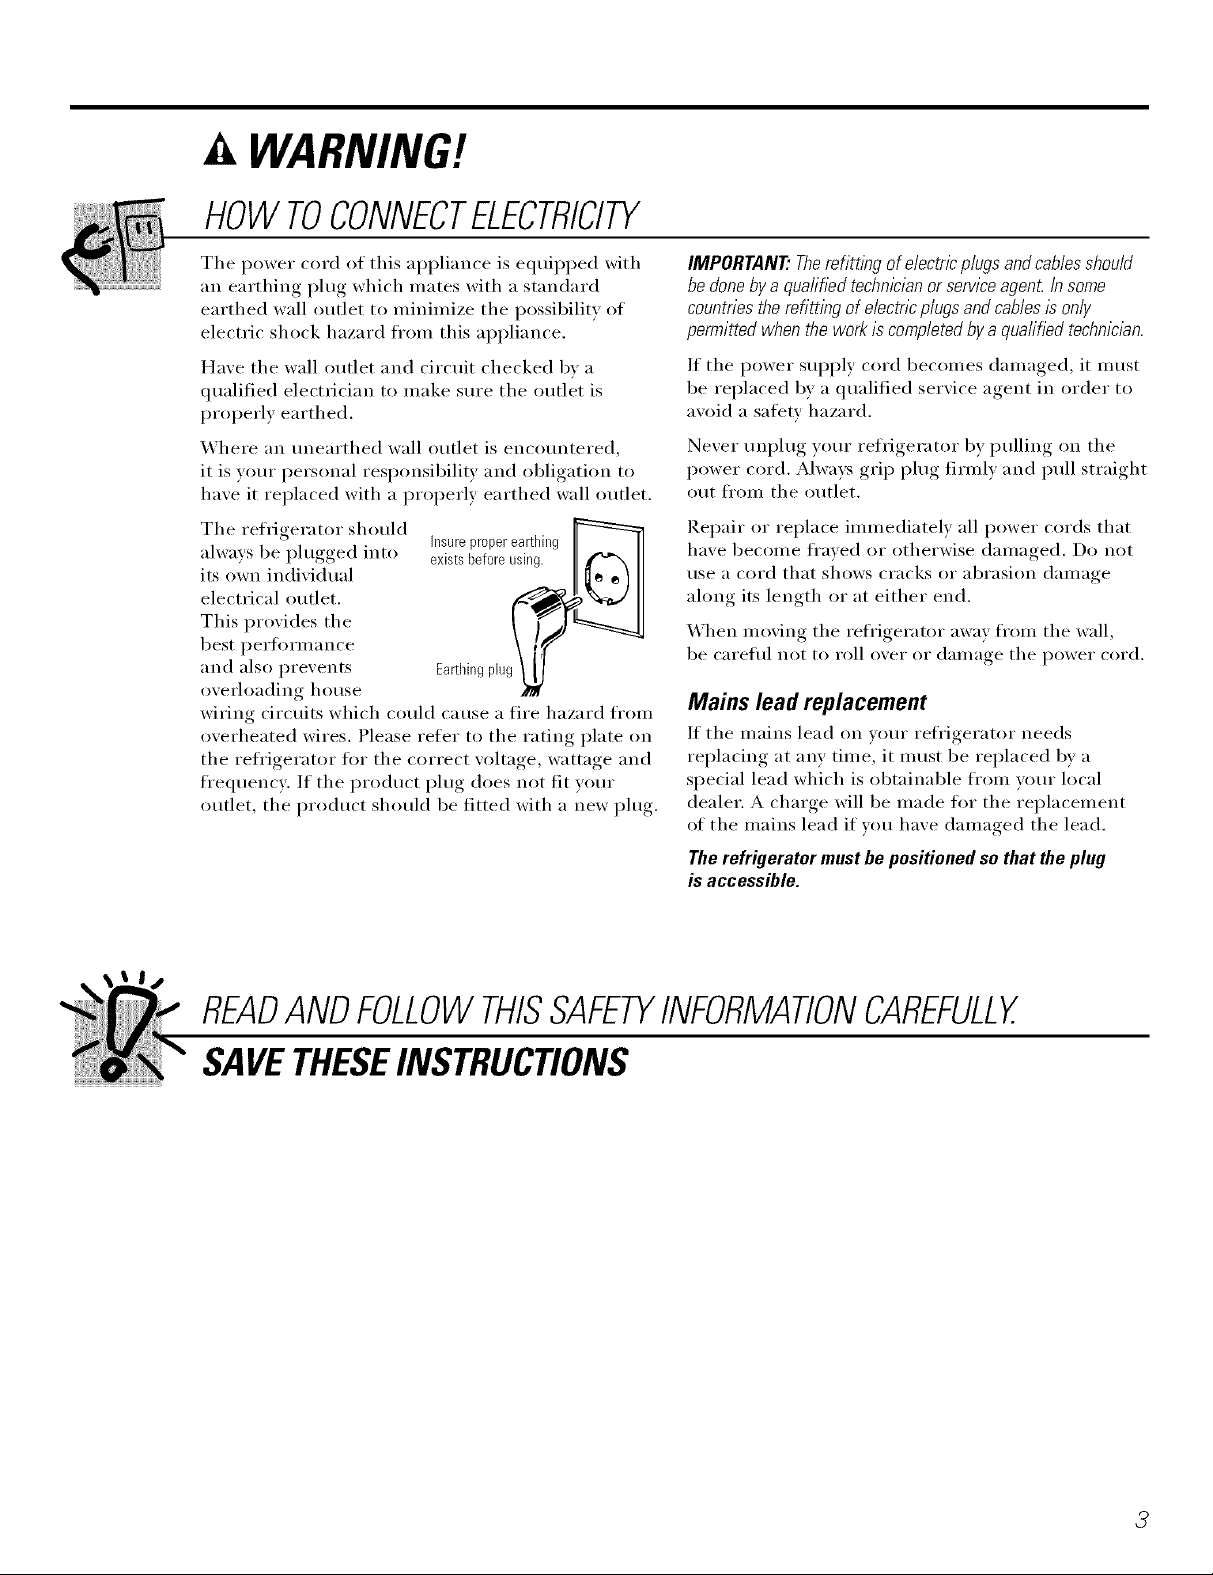
WARNING!
HOWTOCONNECTELECTRICITY
The power cord of this ai)i)liance is equipped with
an earthing plug which inates with a standard
earthed wall outlet to minimize the possibility of
electric shock hazard fl'Oln this ai)pliance.
Have the wall outlet and circuit checked bv a
qualified electrician to make sure the outlet is
properly earthed.
Where an unearthed wall outlet is encountered,
it is vour personal resi)onsibili V and obligation to
have it replaced with a properly earthed wall outlet.
The refrigerator should
always be plugged into
its own individual
electrical outlet.
This provides the
best l)erfl)rmance
and also prevents
overloading house
wiring circuits which could cause a fire hazard fl'Oln
overheated wires. Please refer to the rating plate on
the refl'igerator fl)r the correct w)ltage, wattage and
fl'equency. If the product plug does not fit your
outlet, the product should be fitted with a new plug.
insureproperearthing _:_
existsbeforeusing. II I_ I
Eartlfingplug7
IMPORTANT."Therefitting of electric plugs and cables should
be done by a quafified technician or serviceagenL Insome
countries the refitting of electric plugs and cables is only
permitted when the work is completed by a quafified technician.
If the power supply cord becolnes dalnaged, it must
be replaced bv a qualified service agent in order to
avoid a safety hazard.
Never unplug your refrigerator by pulling on the
power cord. Always grip plug firnflv and pull straight
out fl'om the outlet.
Repair or replace imn_ediately all power cords that
have become fl'aved or otherwise damaged. Do not
use a cord that shows cracks or abrasion damage
along its length or at either end.
When moving the refl'igerator away fl'om the wall,
be careflfl not to roll over or damage the power cord.
Mains lead replacement
If the n/ains lead on your refrigerator needs
replacing at any time, it must be replaced bv a
special lead which is obtainable fl'Oln your local
dealer. A charge will be made fin" the rei)lacen_ent
of the n_ains lead if wm have damaged the lead.
The refrigerator must be positioned so that the plug
is accessible.
READANDFOLLOWTHISSAFETYINFORMATIONCAREFULLY.
SAVETHESEINSTRUCTIONS
3
Page 4
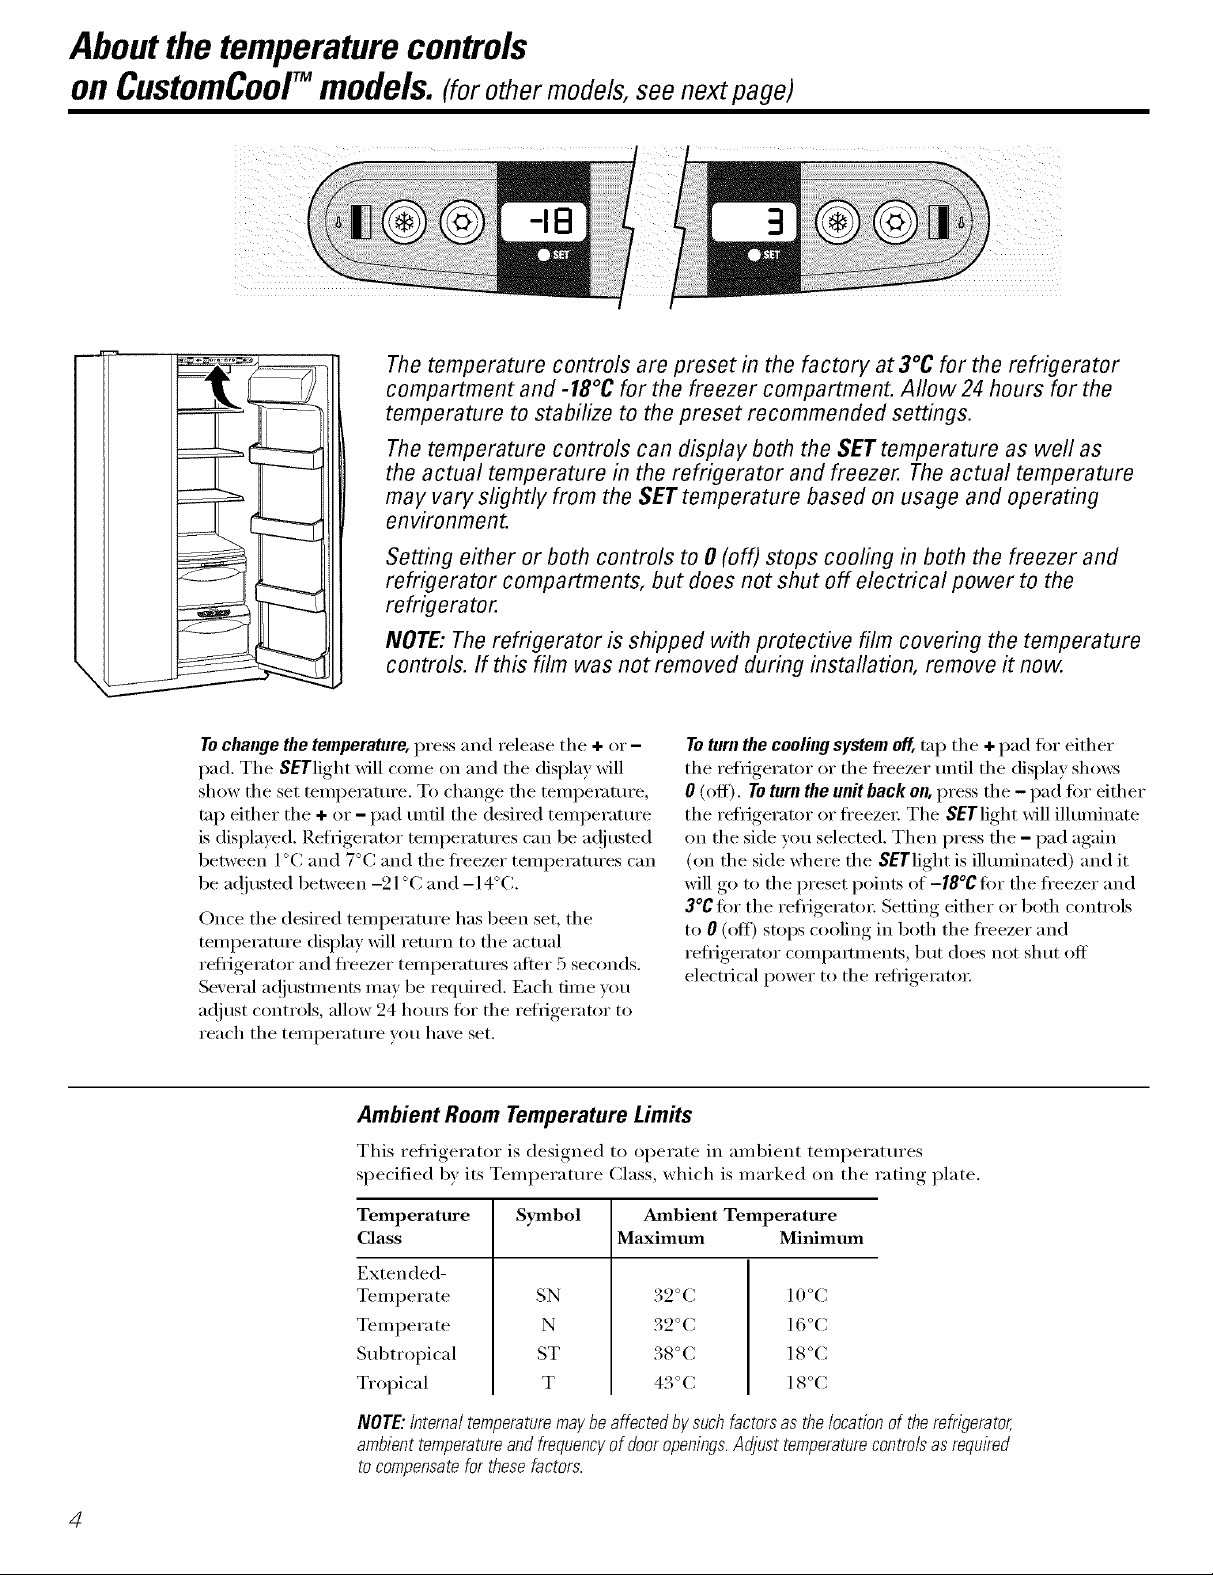
Aboutthe temperaturecontrols
on CustomCoolTM models.(for other models,see next page)
-18 3
The temperature controls are preset in the factory at 3°C for the refrigerator
compartment and -18°C for the freezer compartment. Allow 24 hours for the
temperature to stabilize to the preset recommended settings.
The temperature controls can display both the SET temperature as well as
the actual temperature in the refrigerator and freezer. Theactual temperature
may vary slightly from the SETtemperature based on usage and operating
environment.
Setting either or both controls to 0 (off) stops cooling in both the freezer and
refrigerator compartments, but does not shut off electrical power to the
refrigerator.
J
,,._.......----
NOTE: Therefrigerator is shipped with protective film covering the temperature
controls. If this film was not removed during installation, remove it now.
To change the temperature, press and release the + or -
pad, The SETlight will come on and the display will
show the set temperature. To change the temperature,
trip either the + or - pad until the desired temperature
is (lisl)layed. Reiiigerator temperatures can be a(!iusted
between l °C and 7°C and the fl'eezer temperatm'es can
be a(!iusted between -21 °C and-14°C.
Once the desired temperature has been set, the
temperature display will return to the actual
reflJgerator and fl'eezer teinl)eratures atter 5 seconds,
Several a(!jusnnents may be required. Each time you
at!just controls, allow 24 hom_ fi)r the refiJgerator to
reach the teml)eratm'e you have set.
Ambient Room Temperature Limits
This refrigerator is designed to operate in aml)ient temperatures
specified 1)_ its Temperature Class, which is marked on the rating plate.
Temperature
Class
Symbol Ambient Temperature
Maximum Minimum
Toturn the cooling system off, tnI) the + pad tot either
tile refl_igerator or the fl'eezer tmtil the display shows
0 (off). To turn the unithack on, press the - pad for either
the refrigerator or fl'eezei: The SETlight will illuminate
on the side you selected. Then press the - pad again
(on the side where the SETlight is illmninated) and it
will go to the preset points of -18°C tor the fl'eezer and
3°C tor the refl_igeratm; Setting either or both controls
to 0 (oft) stops cooling in both the fl'eezer and
reii_igerator compamnents, but does not shut off
electrical power to the refi_igeratoi:
Extended-
Tempera te
Tempera te
Subtropical
Tropical
NOTE: internal temperaturemay be affected by suchfactors as the location of the refrigerator,
ambient temperatureand frequencyof door openings.Adjust temperaturecontrols asrequired
tocompensate for these factors.
SN
N
ST
T
32 °C l 0°C
32 °C 16 °C
38 °C 18 °C
43 °C 18 °C
4
Page 5
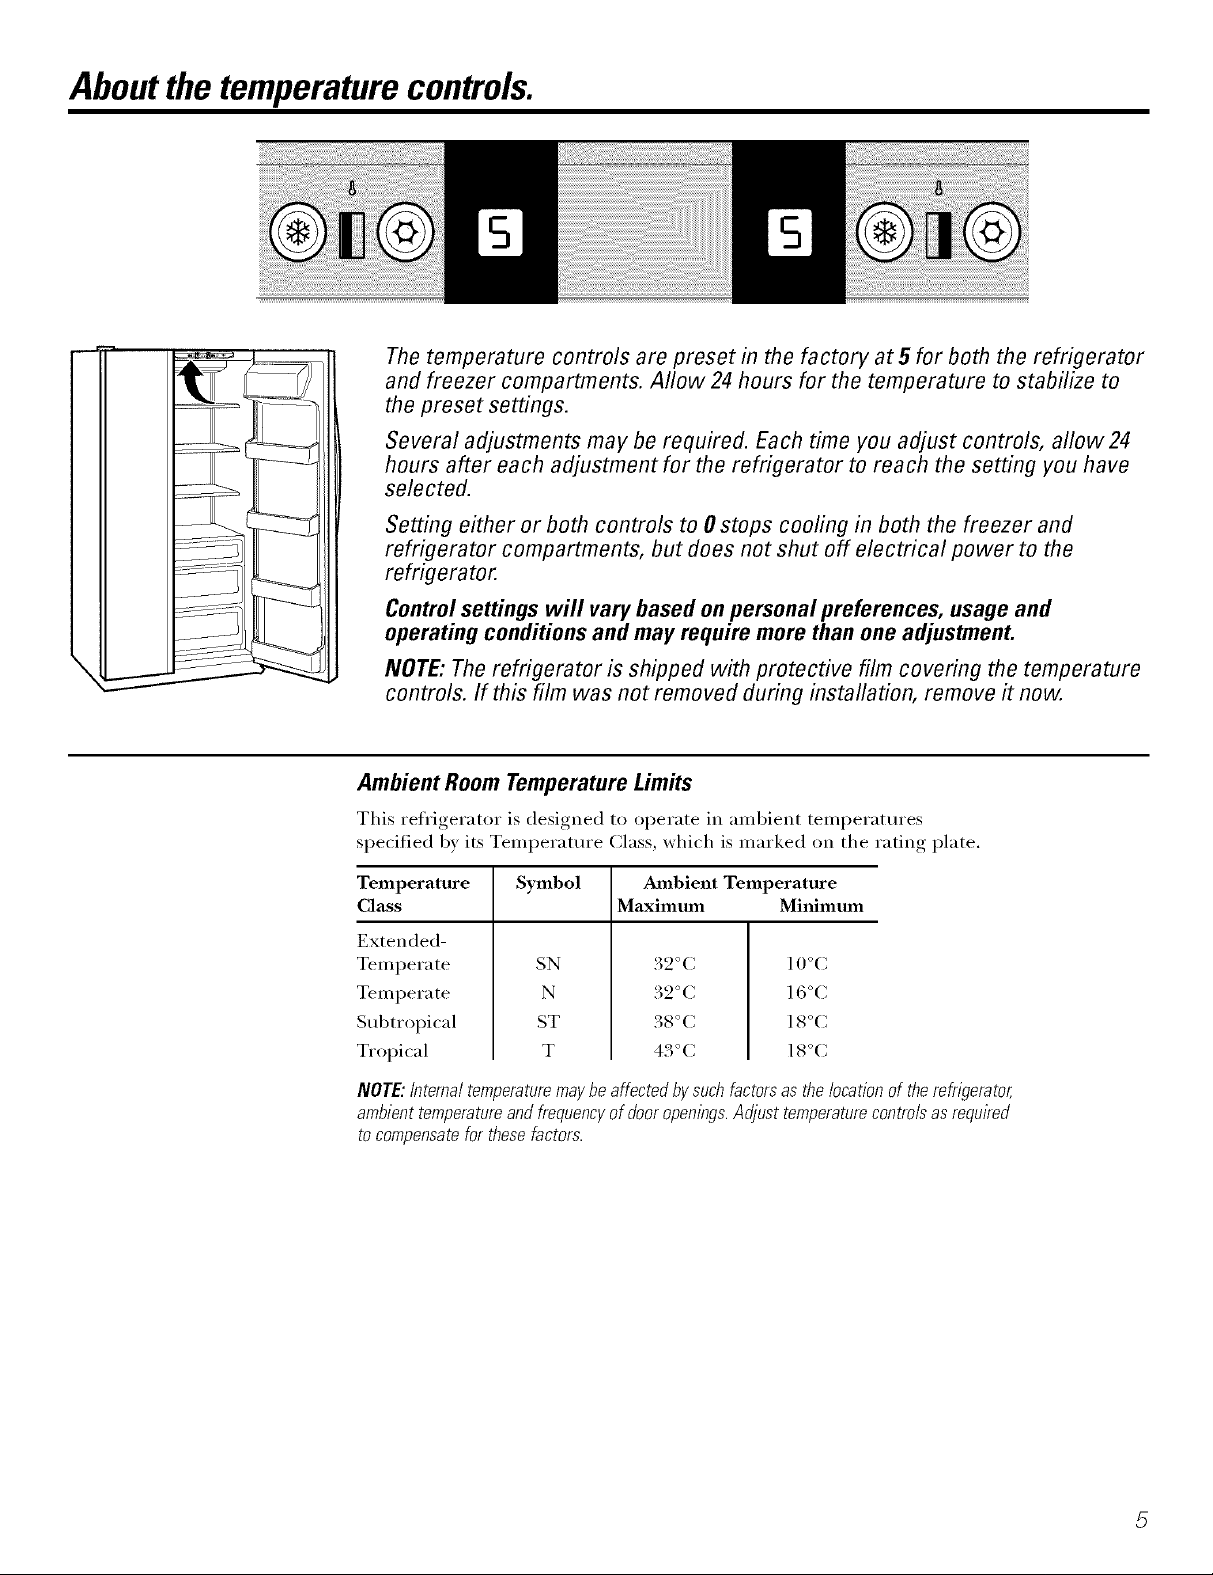
Aboutthe temperaturecontrols.
The temperature controls are preset in the factory at 5 for both the refrigerator
and freezer compartments. Allow 24hours for the temperature to stabilize to
the preset settings.
Several adjustments may be required. Each time you adjust controls, allow24
hours after each adjustment for the refrigerator to reach the setting you have
selected.
Setting either or both controls to 0 stops cooling in both the freezer and
refrigerator compartments, but does not shut off electrical power to the
refrigerator.
Control settings will vary based on personal preferences, usage and
operating conditions and may require more than one adjustment.
NOTE: Therefrigerator is shipped with protective film covering the temperature
controls. If this film was not removed during installation, remove # now.
Ambient Room Temperature Limits
This refrigerator is designed to operate in ambient temperatures
specified 1)_ its Temperature Class, which is marked on the rating plate,
Temperature
Class
Extended-
Temperate
Tern pera te
Subtropical
Tropical
NOTE: internal temperaturemay be affected by suchfactors as the location of the refrigerator,
ambient temperatureand frequencyof door openings.Adjust temperaturecontrols asrequired
tocompensate for these factors.
Symbol Ambient Temperature
Maximum Minimum
SN
N
ST
T
32 °C l 0°C
32 °C 16 °C
38 °C l 8°C
43 °C 18 °C
Page 6

Aboutthe temperaturecontrols.
FREEZER FRESHFOOD
_..... ,_ 0 ISOFF i<%_.__.._.,_
9 ISCOLDEST
The temperature controls are preset in the factory at 5 for both the refrigerator
and freezer compartments. Allow 24 hours for the temperature to stabilize to the
preset settings.
Several adjustments may be required. Each time you adjust controls, allow24 hours
after each adjustment for the refrigerator to reach the setting you have selected.
Setting either or both controls to 0stops cooling in both the freezer and refrigerator
compartments, but does not shut off electrical power to the refrigerator.
Controlsettings will vary based on personal preferences, usage and operating
conditions and may require more than one adjustment.
NOTE:The refrigerator is shipped with protective film covering the temperature
controls. If this film was not removed during installation, remove # now.
Ambient Room Temperature Limits
This refrigerator is designed to operate in aml)ient temi)eratures specified
by its Temperature Class, which is marked on the rating plate.
Temperature
Class
Symbol Ambient Temperature
Maximum Minimum
AboutTurboCool
Extended-
Temperate
Tempera te
Subtropical
Tropical
NOTE:internal temperaturemaybeaffectedby suchfactorsas the Iocatbnof therefrigerator,ambienttemperature
andfrequencyof dooropenings.Adjust temperaturecontrolsasrequiredtocompensatefor thesefactors.
SN
N
ST
T
32 °C 10 °C
32 °C 16 °C
38°C 18°C
43 °C 18 °C
How it Works
TurboCoolrapidly cools the refrigerator
compartment in order to more quickly cool
foods. Use TurboCoolwhen adding a lmge
ainount of fi)od to the refligerator compartment,
putting away foods after they have been sitting
out at room teml)eratm'e or when putting away
w;mn leftovers. It can also be used if the
reflJgerator has been without power tot an
extended period.
Once activamd, the compressor will turn on
immediately and the rims will cycle on and off
at high speed as needed tot eight horns. The
compressor will continue to rtm tmfil the
reliigemtor compamnent cools to approMmatdy
1°C, then it will cycle on and off to maintain
this setting. _Mter 8 houI_, or if TurboCool is
pressed again, the refrigerator compartment
will return to the original setting.
Now to Use
Press TurboCool.The TurboCoolindicator
light will come on.
_Mter TurboCoolis complete, the TurboCool
indicator light will go out.
NOTES: The refl_igerator temperatm'e cmmot be
changed dining TurboCool.
The ti'eezer temperature is not affected
during rurboCoot
_'hen opening the reli_igerator door
during TurboCool,the rims will continue
to rtm if they have cycled on.
Page 7
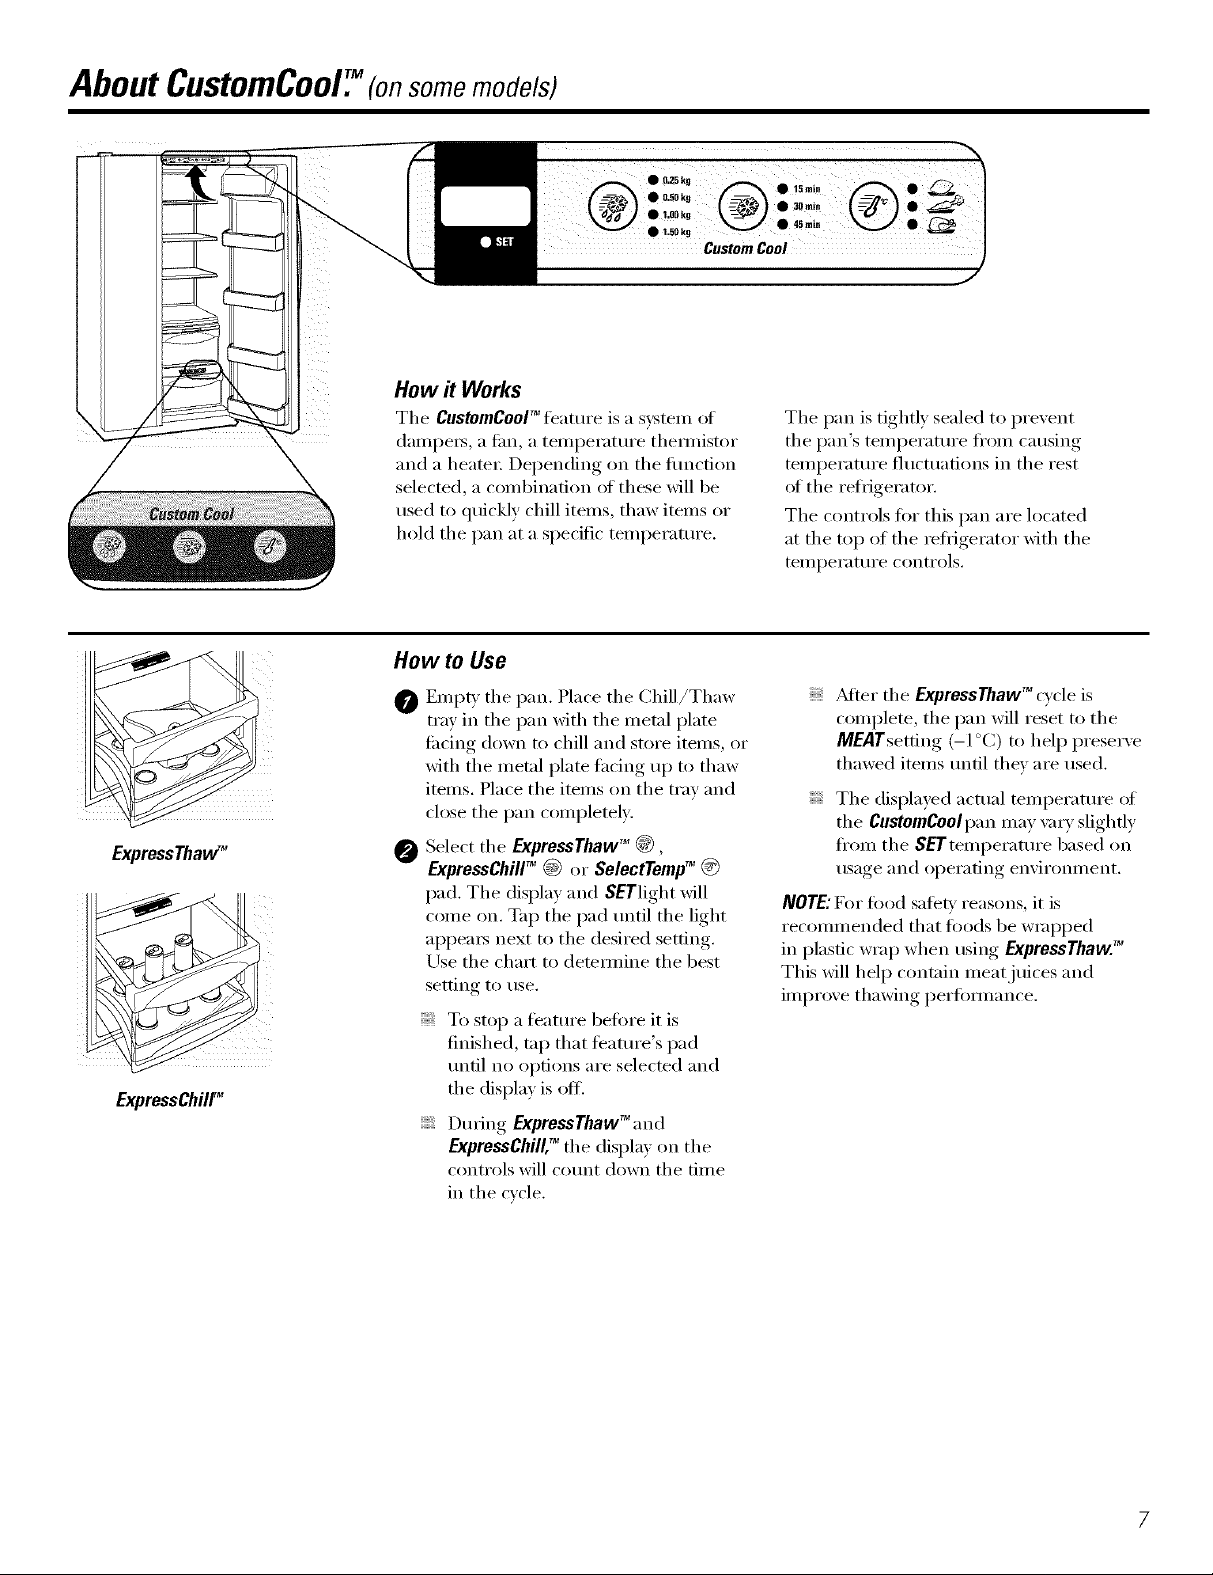
AboutCustomCool7(onsome models)
How it Works
The CustomCooF_feature is a system of
daml)e_, a tim, a teml)erature them/istor
and a heate_: Depending oil tile fimction
selected, a combination ot these will be
used to quickly chill items, thaw items or
hold tile pan at a specific temperature.
How to Use
t_) 't_'_"" _---d_) • _ I
Tile pan is tightly sealed to prevent
tile pan's temperatm'e fl'om causing
temperature fluctuations in tile rest
ot the refl{gerator.
The controls t0r this pan are located
at tile top of tile _efl{gerator with tile
teilll)ei'attli'e conti'ols.
ExpressThaW"
ExpressChilF
Emlm' tile pan. Place tile (]hill/Thaw
0
tray in tile pan with tile metal plate
ti_cing down to chill and store items, or
with tile metal plate tacing up to thaw
items. Place tile items on tile tray and
close tile pan completely:
Select tile ExpressThawTM @,
@
ExpressChillTM @ or SelectYempTM @
pad. Tile display and SETlight will
come on. Tap tile pad until tile light
ai)pea_ next to the desired setting.
Use tile chart to detemfine tile best
setting to use.
To stop a teatm'e bet0re it is
finished, tap that i%attlFe's pad
until no options are selecmd and
the display is off.
During ExpressThawTM and
ExpressChill7 tile displa_ on tile
controls will co/mt down tile time
in the cycle.
_dter tile ExpressThawTM cycle is
complete, tile pan will reset to tile
MEATsetting (-1 °C) to hel I) preserve
thawed items tmtil they are used.
Tile displayed actual temperature _ff
tile CustomCoolpan may \my slightly
fl'om tile S_"Tteml)eratm'e based on
usage and operating enviromnent.
NOTE:For food sale F reasons, it is
recommended that toods be wrapped
in plastic wrap when using ExpressThaw7_
This will help contain meat juices and
improve thawing l)erflmnance.
Page 8
AboutCustomCoolY(onsome models)
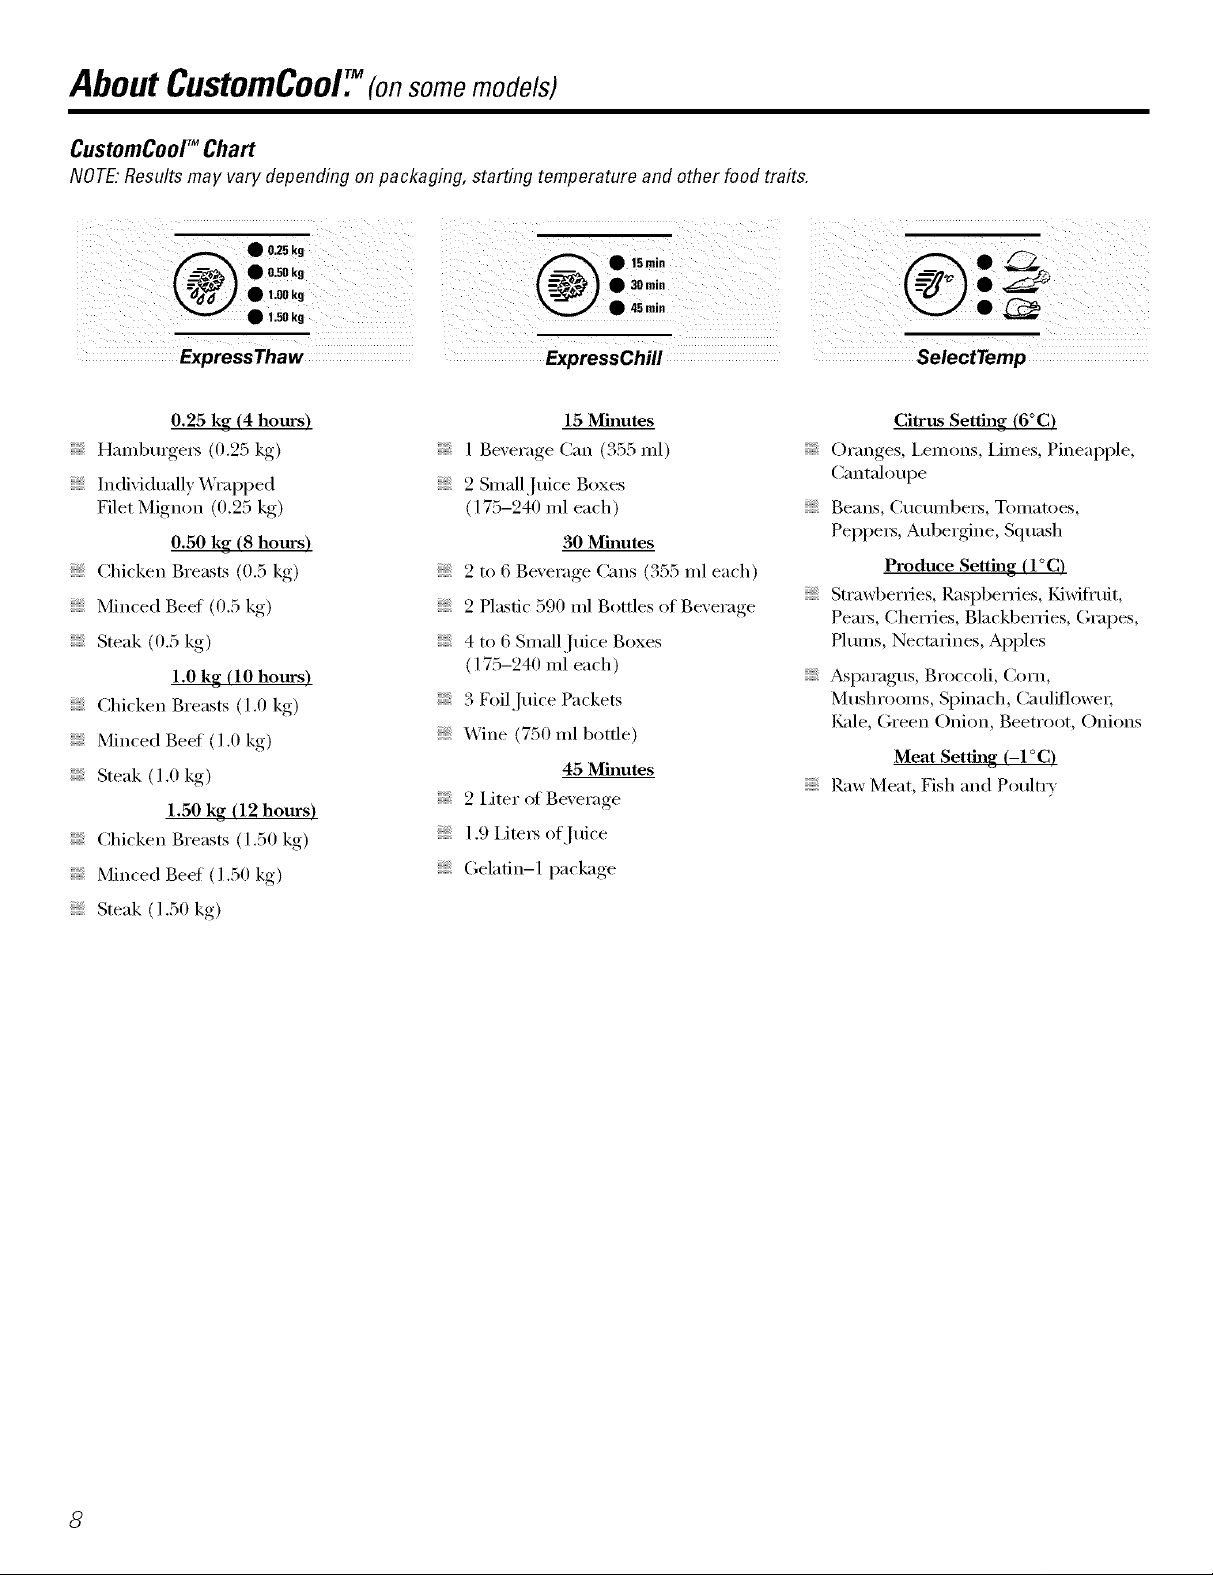
CustomCoolTM Chart
NOTE: Results may vary depending on packaging, starting temperature and other food traits.
SelectTemp
0.25 kg (4 hours)
Haml)mge_s (0.25 kg)
Individually Wrapped
Filet Mignon (0.25 kg)
0.50 kg (8 hours)
Chicken Breasts (0.5 kg)
Minced Beet (0.5 kg)
Steak (0.5 kg)
1.0 kg (10 hours)
Chicken Breasts (1.0 kg)
Minced Beef ( 1.0 kg)
Steak (1.0 kg)
1.50 kg (12 hours)
Chicken Breasts (1.50 kg)
Minced Beet (1.50 kg)
Steak (1.50 kg)
15 Minutes
1 Beverage Can (355 ml)
2 Small Juice Boxes
(175-240 ml each)
30 Minutes
2 to 6 Beverage Cans (355 ml each)
2 Plastic 590 ml Bottles of Beverage
4 to 6 Small Juice Boxes
(175-240 ml each)
3 Foil.[uice Packets
Wine (750 ml bottle)
45 Minutes
2 liter of Beverage
1.9 iJte_ of Juice
Gelatin-1 package
Citrus Setting (6°C)
Oranges, I,emons, limes, Pineapple,
Cantaloupe
Beans, C/iC/llllbei's, Tomatoes,
Peppe_, Aube_gine, Squash
Produce Setting (I°C)
Strawberries, P.aspberfies, Kiwifl'uit,
Petal, Cherries, Blackberries, Grapes,
Plums, Nectarines, Apples
_sparagus, Broccoli, Corn,
Mushrooms, Spinach, Caulh'lowe_;
I_ade, Green Onion, Beetroot, Onions
Meat Setting (-I°C)
Raw Meat, Fish and Poultr*
Page 9
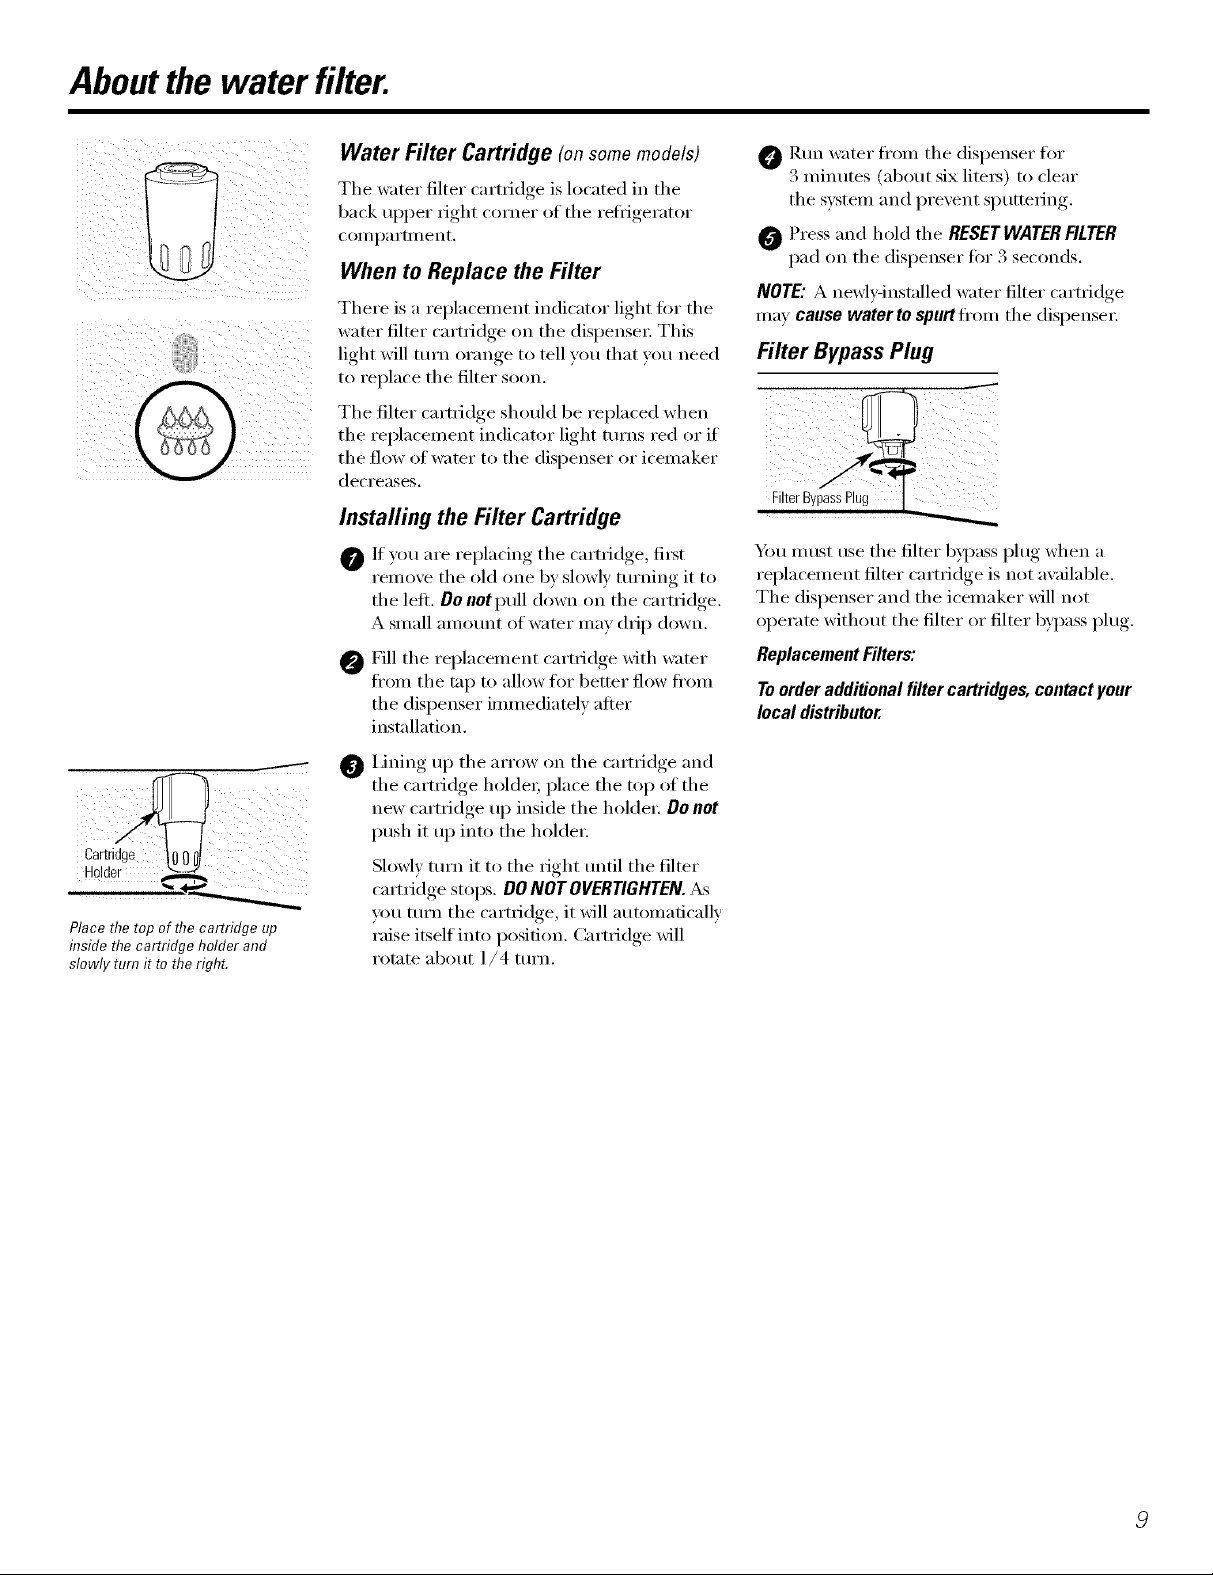
Aboutthe water filter.
Water Filter Cartridge (on some models)
The water filter cartridge is located in the
back ul)per right corner of the reflJgerator
COil] l)a I'tlllent,
When to Replace the Filter
There is a rel)lacement indicator light for the
water filter cartridge on the dispensei: This
light will turn orange to tell w)u that w)u need
to replace the filter soon.
The filter cartridge should be replaced when
the replacement indicator light turns red or if
the flow (If water to the dispenser or icemaker
decreases,
Installing the Filter Cartridge
0 If you are replacing the cartridge, fii_t
remove the old one by slowly turning it to
the left. Do not pull down oil the cartridge.
A small amount of l_;IteI" Ill}Iv drip down.
Fill the replacement cartridge Mth water
@
from the tap to allow for better flow from
the dispenser immediately after
installation,
O Run water fl'onl the dispenser flir
3 minutes (about six liteis) to clear
the s):stem and prevent sputtering.
0 Press and hold the RESET WATER FILTER
pad on the dispenser for 3 seconds.
NOTE: A newl)qnstalled water filter cartiidge
may cause water to spurt ffom the dispensei:
Filter Bypass Plug
Ym must use the filter bypass l)lug when a
rei)lacement filter cartridge is not available.
The dispenser and the icemaker will not
operate without the filter or filter bypass i)lug.
Replacement Filters:
To order additional filter cartridges, contact your
local distributor.
,J
Place the top of flTecartridge up
inside the cartridge holder and
slowly turn it to the right.
(y , • (
Iamn_ uI) the air )w on the cartridge and
O
the cartridge hol(lei; place the top of the
new cartridge up inside tile holclei: Do not
push it up into the holdeI:
Slowly turn it to the right until the filter
cartridge stops. DO NOT OVERTIGHTEN. As
you turn tile cartridge, it will autonmticallv
raise itself into position. Cartridge will
rotate about 1/4 turn.
Page 10
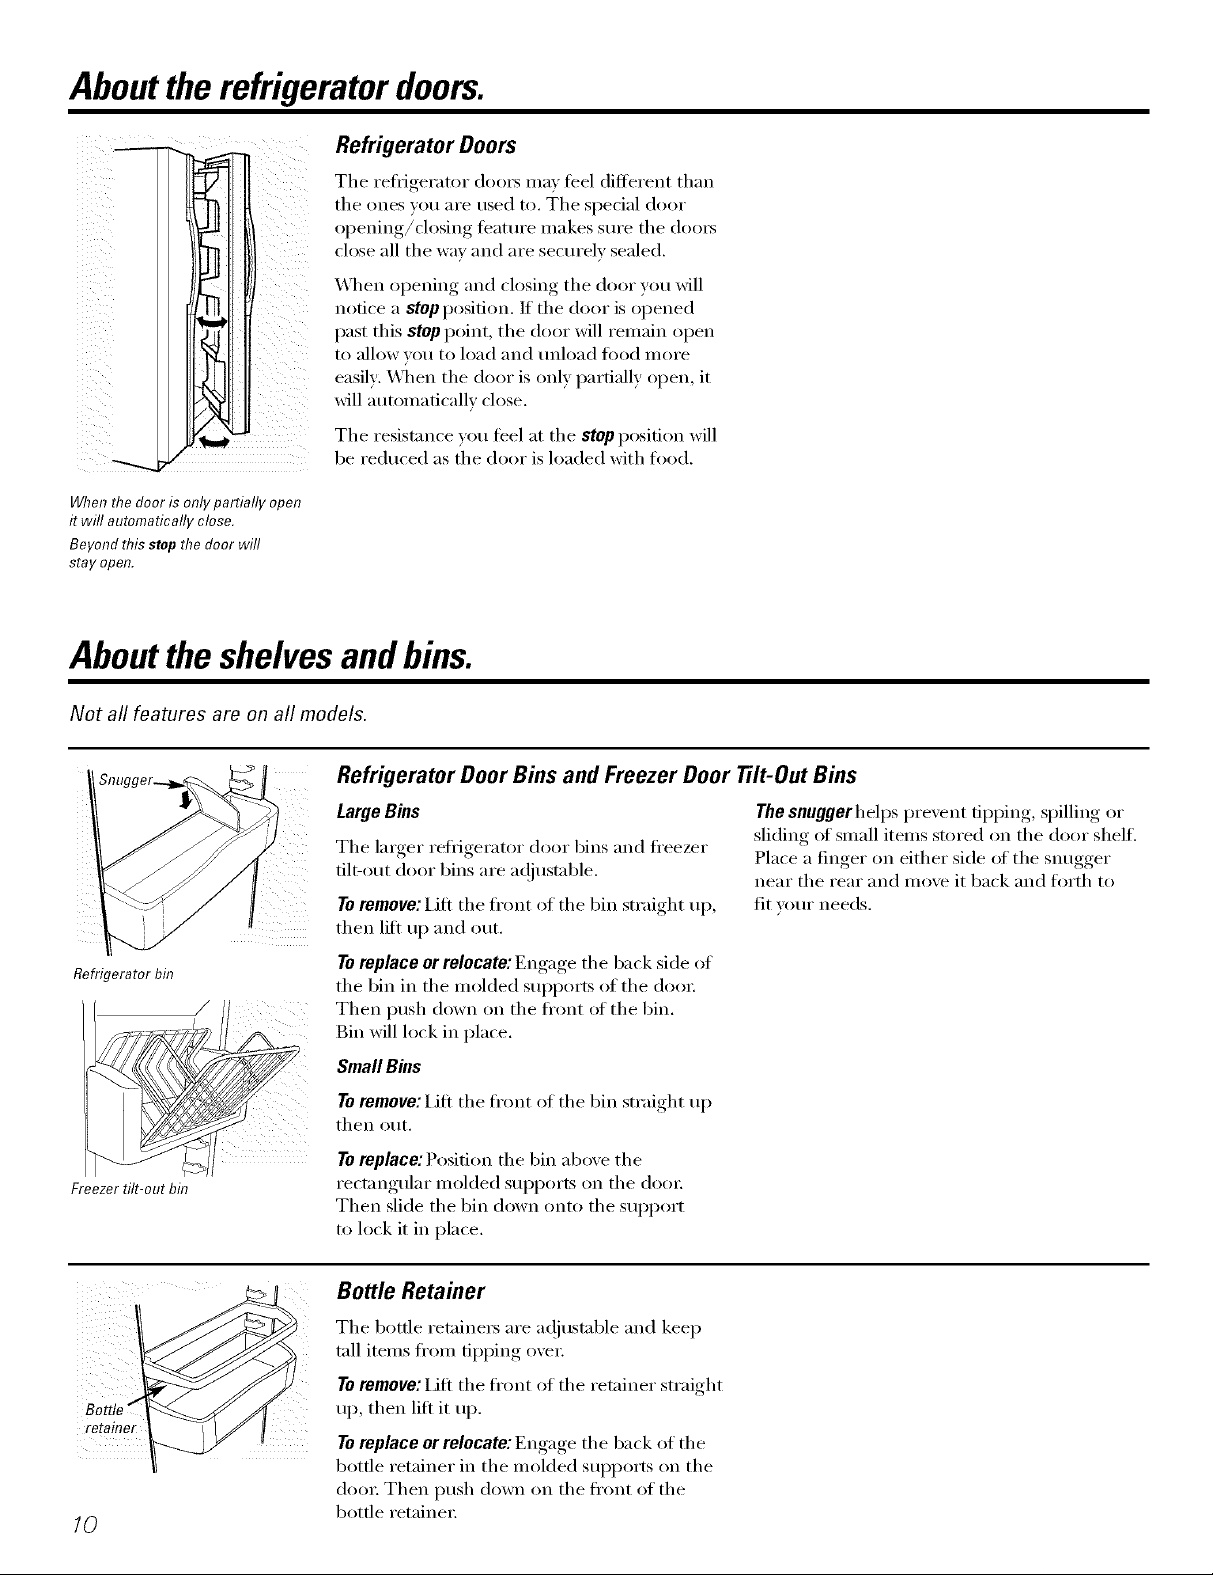
Abouttherefrigeratordoors.
Refrigerator Doors
The refl_igerator (loo_ may feel (liflerent than
the ones you are used to. The special door
opening/ch)sing teature makes sm'e the (loo_
close all the way and are securely sealed.
X*\]_enopening and closing the door you will
notice a stop position. If the door is opened
past this stop point, the door will remain open
to _lllow veil to load _lll(1 Hnlo_ld ][0od ii/oi'e
easily: _4_en the door is only partially open, it
will automatically close.
The resistance xou feel at the stop position will
be reduced as the door is loaded with food.
When the door is only partially open
it will automatically close.
Beyond this stop the door will
stay open.
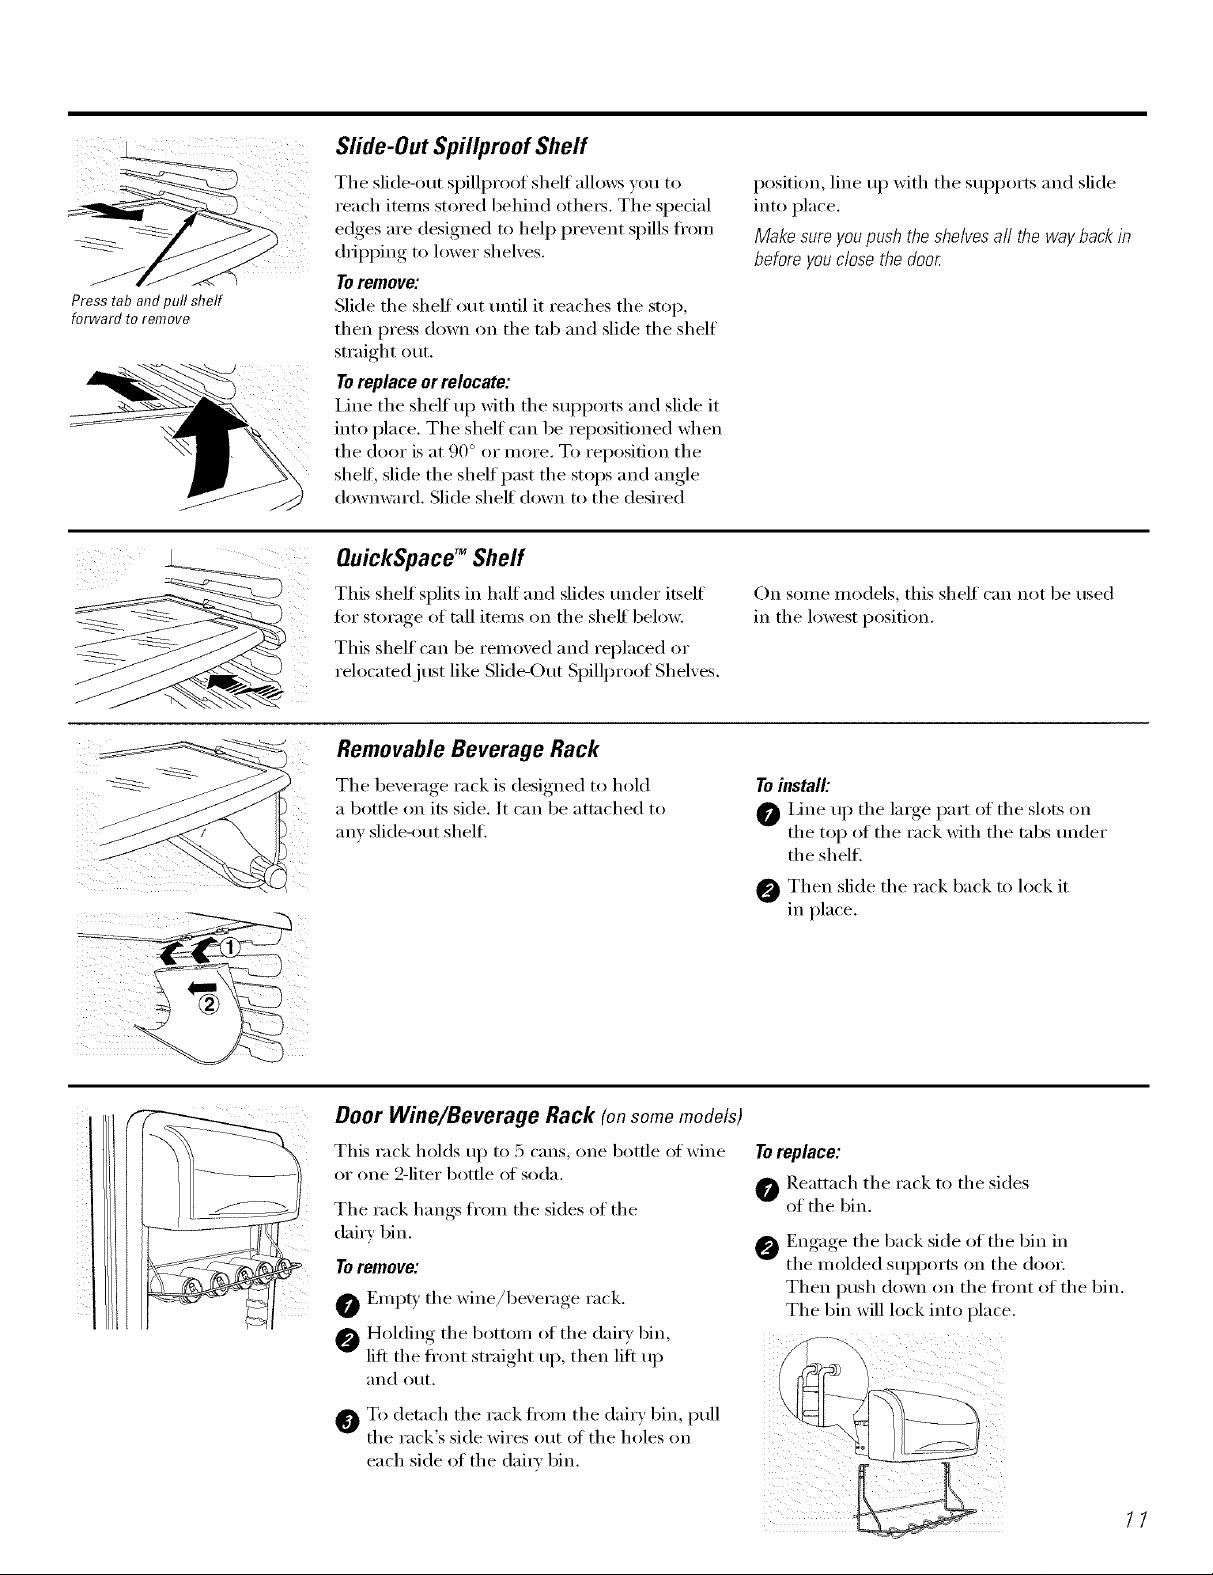
Abouttheshelvesandbins.
Not all features are on all models.
Refrigerator Door Bins and Freezer Door Tilt-Out Bins
LargeBins
The larger refl_igerator door bins and fl'eezer
flit-out door bins are a(!iustable.
To remove: Lift the fl'ont of the bin straight up,
then lift up and out.
Refrigerator bin
Freezer tilt-out bin
To replace or relocate: Engage the back side of
the bin in the molded supports of the doo_:
Then push down on the ti'ont _ff the bin.
Bin will lock in place.
Small Bins
Toremove: i_ifi the fl'ont of the bin straight up
then out.
Toreplace: Position the bin above the
rectangular molded supports on the dora:
Then slide the bin down onto the SUl)port
to lock it in place.
r Bottle Retainer
The snuggerhelps prevent tipping, spilling or
sliding of small items stored on the door shell.
Place a finger on either side ot the snugger
near the rear and move it back and torth to
fit your needs.
The bottle retainex5 are a(!justable and kee I)
tall items fl'om tipping ovex:
Toremove: i,ifi the fl'ont of the retainer straight
up, then lift it up.
Toreplace or relocate: Engage the back of the
bottle retainer in the molded SUl)ports on the
(lore: Then push down on the fl'ont of the
/0
bottle retaine_:
Page 11
Press tab andpull shelf
forward toremove
Slide-Out Spillproof Shelf
The slide-out spillproot shelf allows you to
reach items stored behind othe_. The spedal
edges are designed to hel I) prevent spills fl'om
dill)ping to lower shelves.
To remove:
Slide the shelf out tmtil it reaches the stop,
then press down on the tab and slide the shelf
straight out.
Toreplaceorrelocate:
Line the shelf uI_ with the suI_ports and slide it
into place. The shelf can be repositioned when
the door is at 90 ° or more. To reposifion the
shelf; slide the shelf past the stops and angle
downward. Slide shelf down to the desired
OuickSpacg =Shelf
This shelf splits in half and slides trader itself
tot storage of tall items on the shelf below.
This shelf can be removed and replaced or
relocated just like Slide-Out Spillproof Shelves.
position, line up with the sui)ports and slide
into place.
Make sure youpush the shelves all the way back in
before youclose the door
On some models, this shelf can not be used
in the lowest position.
Removable Beverage Rack
The bexerage rack is designed to hold
a bottle on its side. It can be attached to
any slide-_)ut shelf.
Door Wine/Beverage Rack (onsomemodels)
This rack holds up to 5 cans, one bottle of wine
or one 2-liter bottle of soda.
The rack hangs from the sides of the
dairy bin.
To remove:
Empb the wine/bexerage rack.
Holding the bottom of the (lair)bin,
lift the fl'ont straight up, then lift up
and Otlt.
Toinstall:
O Line up tile large part of the slots on
the top of the rack with the tabs trader
the shelf.
Then slide the rack back to lock it
in place.
Toreplace:
O Reattach the rack to the sides
of the bin.
En,*age_, the back side of the bin in
the molded supports on tile door
Then push down on the fl'ont of the bin.
Tile bin will lock into place.
O To detach the rack fl'om tile dairy bin, pull
the rack's side wires out of the holes on
each side of the dai_a bin.
11
Page 12
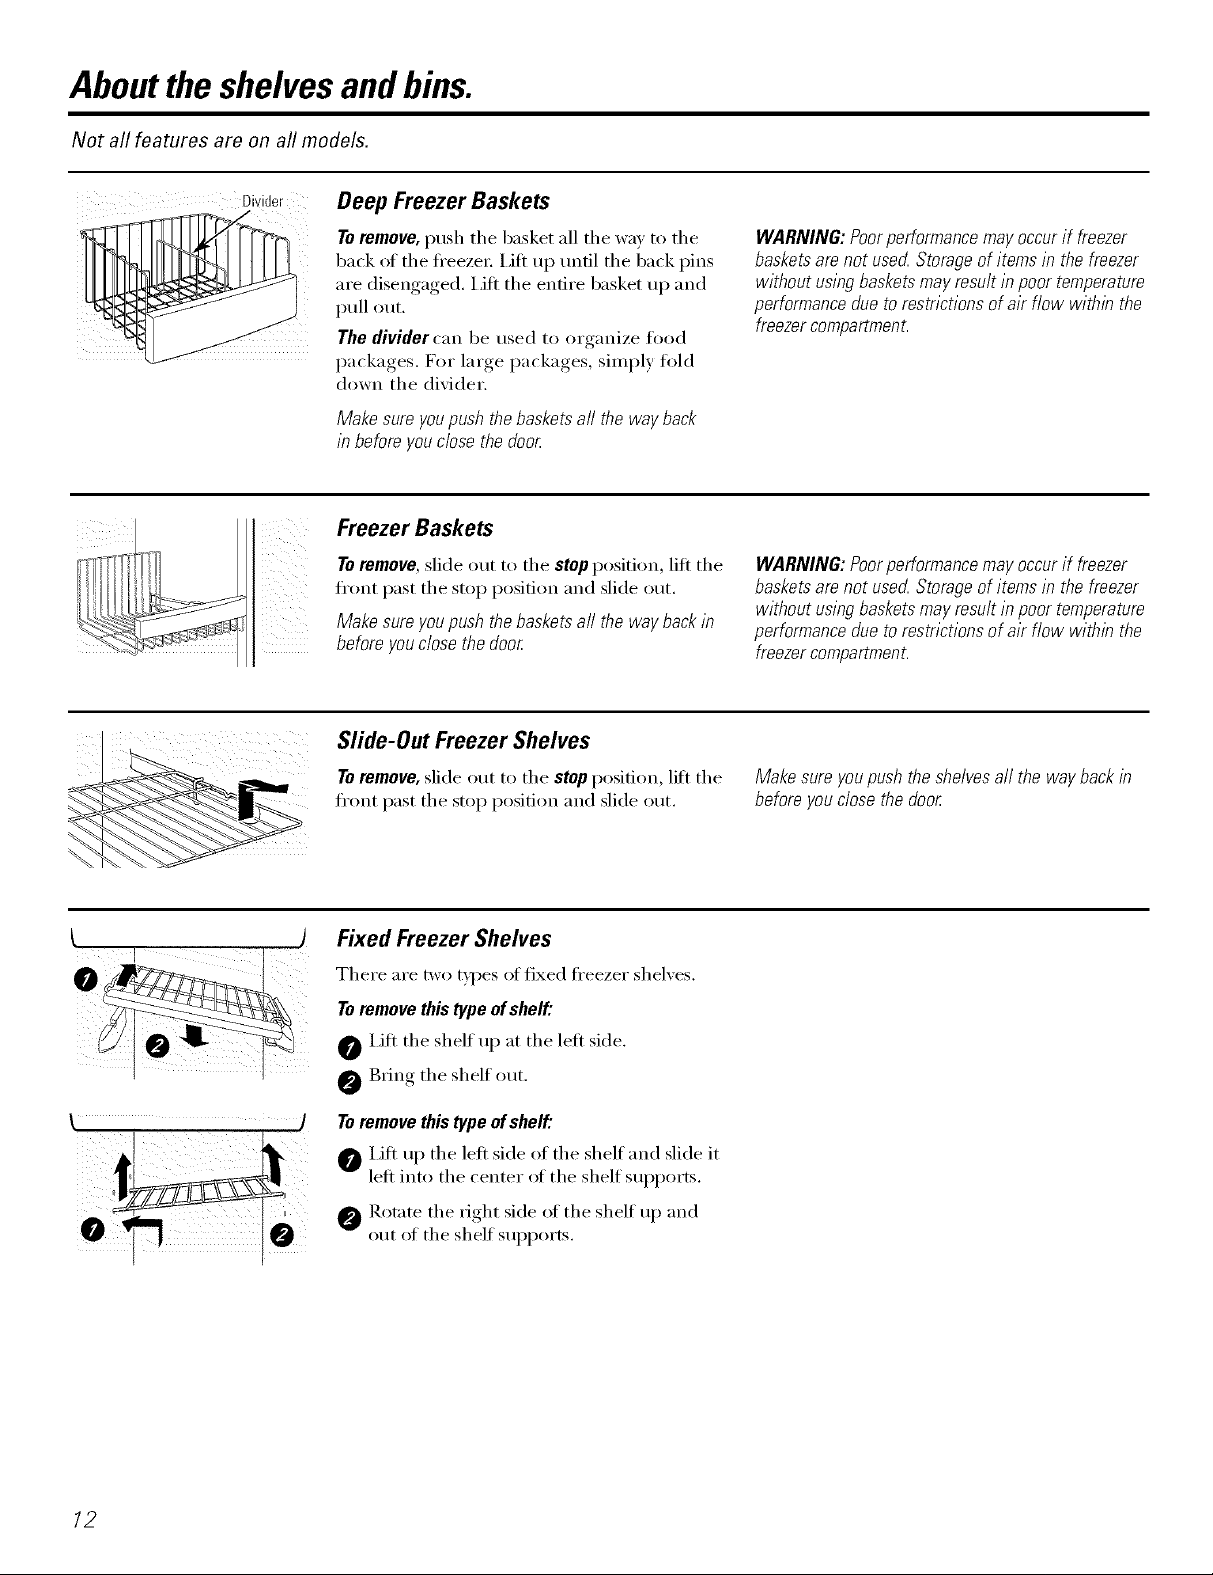
Abouttheshelvesandbins.
Not all features are on all models.
Deep Freezer Baskets
Toremove, push the basket all the way to the
back ot the fl'eeze_: Lift up until the back pins
are disengaged. I,ifl the entire basket up and
pull out.
The divider can be used to organize food
packages. For large packages, simply told
down the divider.
Makesureyoupushthe basketsall the wayback
in beforeyouclosethedoo_
Freezer Baskets
WARNING'.Poorperformancemayoccurif freezer
basketsarenot use_ Storageof itemsinthefreezer
withoutusingbasketsmayresultinpoor temperature
performanceduetorestrictionsofair flow within the
freezercompartment.
¸¸¸5¸¸¸¸¸¸¸¸!(())
Toremove, slide out to the stop position, lift the
fl'ont past the stop position and slide ()tit.
Make sure you push the baskets all the way back in
before you close the doo_
Slide-Out Freezer Shelves
Toremove, slide out to the stop position, lift the
fl'ont past the stop position and slide out.
Fixed Freezer Shelves
There are two t)pes oI fixed fl'eezer shelves.
Toremove this type of shelf:
0 Lift the shelf up at the left side.
0 Bring the shelf out.
Toremove this type of shelf:
WARNING'.Poorperformancemayoccurif freezer
basketsarenot use_ Storageof itemsinthefreezer
withoutusingbasketsmayresultinpoor temperature
performanceduetorestrictionsof air flow within the
freezercompartment.
Makesureyoupushthe shelvesallthe waybackin
beforeyouclosethedoo_
12
Lift up the left side ot the shelf and slide it
left into the center of the shelf supports.
0 Rotate the right side ot the shelf up and
out ot the shelf supports.
Page 13

Aboutthe freezercompartment.
Loading the Freezer Compartment
I,oad so that at least 15 mm of space remains
clear between stacks of packages and 15 mm
to 95 mm of space between the top of any
stack and anv shelf or basket above it,
Packages may hang over the fi'ont of shelves
but must remain 15 mm fl'om (lomb.
Food to be frozen must not be placed
in direct contact with tood in storage.
If tood is to be frozen eve_ T da> it may
be necessary to reduce tile quantity to
be fl'ozen.
If a quantity of tood needs to be fl'ozen,
set the fl'eezer control to its coldest setting.
_Mter tile tood is fl'ozen, reset tile fl'eezer
control to its initial position.
Food is most quickly fl'ozen on tile middle
three shelves of tile fl'eezer compartment
and most slowly in the fl'eezer door
shelves,
Do not store commercially quick-fl'ozen
ti)od longer than tile time recommended
bv tile fl)od i//antll_lct/iYei's.
; If tile power to tile appliance is shut off ti)r
an extended time or if the refl_igerating
system fifils, do not open the doors unless
absolumlv necessary. When it is necessar>
close them as quickly as possible so the
fl'ozen tood will stav fl'ozen as long as
possible.
The fl'eezer door storage shelves marked
with a two-star label are only ai)i)ropriate
fi)r tile storage of previously fl'ozen fi)od.
Effervescent drinks should not be stored in the
freezer compartment.
Freezer Performance
This Refrigerator/Freezer has an oxerall "Fore" Star" _ rating
Freezer peril)finance is classified b_ star ratings defined by ]SO 8561 STANDARD AND
SUMMARY BEI,O_A :
CODE FREEZIN(;-I,OAD TEME
(FOOD TEMPEI__TURE)
(_ Below -6°C.
(_ Below - 12°C.
[_ or _ Beh)w-18°C.
Howexer, these limited areas haxe a two star rating as permitted bx tile standard:
Models Location of _-g_ Freezer Shelves
21,23 BotIom li-eezer basket and bottom
2 door shelw.s, mp fi'eezer door shelt.
25 Shelf above the i(e bu( ket, top tieezer
27 Shelf ab{}vc the i(e bu( ket, top ti'eezer
2(.) Bottom 2 fi-eezer door shelves.
23 NON "Ibp fl'eezer door shell.
DISI'ENSER
23 CIBED & Bottom 3 door shelves.
CRI SITED
DISPENSER
door shelf and bottom 2 door shelves.
door shelf and bottom 2 door shelves.
13
Page 14

Aboutthe crispersandpans.
Not all features are on all models.
Fruit and Vegetable Crispers
Excess water that may accunmlate in the
bottom of the (h'awe_ should be wiped (h_':
On some models the bottom drawer has
a cover that slides back as the drawer is
opened. This allo_:s flfll access to the (h'awe_:
_&s the drawer is closed, the cover will slide
fin'ward into its original position.
Adjustable Humidity Crispers
Slide the control all the wax to the _ (high)
setting, to I)r°xide high humidit)
recommended for most xegetables.
/
J
Convertible Meat Pan
The convertible meat pan has its own cold air
duct to allow a stream of cold air fl'om the
fl'eezer compartment to flow to the pan.
The variable temperature control regulates
the air flow fl'om the Climate Keel)er. ''_
Aboutcrisperremoval
Not all features are on all models.
Crisper Removal
The top crispers can easily be removed bv
l)ulling the drawer straight otlt and lifting the
drawer up and over the stop h)cafion.
If the door prevents you from taking out the
(h'awe_, fiI_t t_' to i'elnove the door bins.
If this does not offer enough clearance, the
reflJgerator will need to be rolled fin'ward tmtil
the door opens enough to slide the (h'awe_
out. In some cases, when you roll the
refl{gerator out, you will need to move the
refrigerator to the let} or right as you roll it out.
Toremovethebottomcrisper:
Slide the control all the wax to the _ (low)
.setfim,_ to proxide lower humidity lex els
recommended fin" most fi'uits.
Set the control to the _"_), (coldest) setting to
store fl'esh meats.
Set the control to (cold) to convert the
pan to nmmal refrigerator temperature and
provide extra vegetable storage space. The cold
air duct is turned off. Variable settings between
these extremes can be selected.
Toreplace the bottom crisper:
O Place the back oI the drawer in the wire
holdex; making sure the wire holder fits
into the grooxes on the back of the pan.
i,ower the fl'ont of the drawer into the wire
holder:
0 Pull the bottom of the wire holder forward
tmtil the wire i)ops into the groove located
on the bottom of the ch'a_e_:
Pull the drawer out to the stop position.
i,ifl the fl'ont of the drawer up and out of
the wire holder.
14 _ i,ift the back of the drawer up and out. Popwireintogroove.
i
Page 15

Abouttheautomaticicemaker.
A newly-installed refrigerator may take 12to 24 hours to begin making ice.
Power Automatic lcemaker
Switch
Icemaker
The icemaker will produce seven cubes per
cycle-ai)pmxinmtely 100-130 cubes in a
24-hour period, depending on fl'eezer
COlll})artll/ent tellll)ei'attli'e_ rOOlll tellll)ei'attli'e_
nunlber of door openings and other use
conditions.
Green
PowerLight _rArm
Pull the upper freezer shelf straight
out to access the icemake_ Always
besure toreplace the shel_ The
shelf can be used for storage.
Toaccess the icemaker: Pull the shelf above
the ice drawer straight ()tit. _dwavs be sure
to replace the shel£
If the refl_igerator is operated before the water
com_ection is made to the icemake_; set the
power switch in the 0 position.
When the refrigerator has been com_ected
to the water suI)ply, set the power switch to
the Iposifion.
Y_)u Mll hear a buzzing sound each time the
icemaker fills with water:
The icemaker will fill with water when it cools
to -10 (. A newl)qnstalled refrigerator ma) take
12 to 24 houls to beg_n making ice cubes.
Throw away the first tew batches of ice to allow
the water line to clear.
If ice is not used fl'equenfl}; old ice cubes will
become cloudy, taste stale and shrink.
If ice cubes get stuck in the icemaket; the green
power light will blink. To correct this, set the
power switch to 0 and remove the cubes. Set
the power switch to ] to restart the icemaker.
_Mter the icemaker has been tin'ned on again,
there will be a delay of about 45 mimltes betore
the icemaker resumes operation.
NOTE."In homeswith lower-than-averagewater
pressure,youmayhear the icemakercyclemultiple times
when makingone batchof ice.
WARNING:Connecttopotablewater
suppiyoniy Installation of the icemaker must be
donebya qualifiedservicetechnician.
Be sm'e nothing interteres with the sweep
of the teeler amL
When the bin fills to the lexel of the teeler am_,
the icemaker will stop I)r°ducing, ice. It is
nornlal for sexeral cubes to be joined together.
Ice Storage Drawer
To access ice, pull the drawer forward.
To remove the drawer, pull it straight ()tit and
lift it past the stop location.
15
Page 16

Aboutthe ice and water dispenser.(onsome models)
ToUsetheDispenser
SpillShelf
Select CUBEDICE @ , CRUSHEDICE _
or WATER {_ .
Press the _,,lass ,gentlx, against, the top ot the
dispenser pad/cradle.
The spill shelf is not selfMraining. To reduce
water spotting, the shelf and its grille should
be cleaned regularl).
If no water is dispensed when therefrl_?eratoris
first installed, there may be air in the water line
system. Press the dispenser pad/cradle for at least
two minutes to remove trapped air from the water
line and to fill the water system. Toflush out
i_npuritiesin the water line, throw away the
first six glassfuls of water
CAUTION: Never put fingers or any other
objects into the ice crusher discharge opening.
LockingtheDispenser(onsomemodels)
P,esstiletOCKCONTROt
panel. To tmlock, press
@ pad fin" :4seconds to lock
tile dispenser and control
and hold tile pad again fin.
3 seconds.
Dispenser Light (on some models)
This pad turns tile night
light in tile dispenser on
and off. Tile light also
COIlleS on when tile
dispenser pad/cradle
is pressed. If this light
burns out, it should be
replaced with a 6 watt
12V maximmn bulb.
Door Alarm (on some models)
_ To set tile alaml, press this
(Oilles on. This alaII/1 will
fi)r more than 3 minutes.
I)ad tmtil tile indicator light
sol,,ld,eithe,d,,o,is,,pe,1
Tile light goes out and tile
bee )ino stops whenI ,_ VO/I
close tile dora:
Important Facts About Your Dispenser
Do not add ice fl'om trays or bags to
tile storage (h'awe_: It may not crush or
dispense well.
Avoid overfilling glass with ice and use of
nan'ow glasses. Backed-up ice canjanl tile
chute or cause tile door in tile chute to
ti'eeze shut. If ice is blocking tile chute,
poke it through with a wooden spoon.
Beverages and toods should not be
quick-chilled in tile ice storage drawe_:
Cans, bottles or food packages in tile
storage drawer may cause tile icemaker
or a/iger to jaIll.
To keep dispensed ice fl'oin missing
tile glass, put tile glass close to, but not
touching, tile dispenser opening.
Some crushed ice may be dispensed even
though you selected CUBEDICE. This
happens occasionally when a tew cubes
accidentally get directed to the crushe_:
_Mter crushed ice is dispensed, some water
may drip fl'om tile chute.
Sometimes a small mo/md of snow will
titan on the door in the ice chute. This
condition is nomml and usually o(cm_
when wm have dispensed crushed ice
repeatedly. Tile snow will eventually
ev_lI)OI';lte.
CAUTION: Someproductssuchas water icesshould
not be consumedtoocold
16
Page 17

Ice Storage Drawer on
Dispenser Models
Toremove:
Set the icemaker power switch to the 0 (Off)
position. Pull the drawer straight out and
then lilt past the stopposition.
Toreplace:
1
_q_en rei)la('ino_ the (h'awex; be sure to press
it flint} into place. If it does not go all the
wa_ back remove it and rotate the drke
mechanism 1/4 turn. Then push the drawer
back aoain
Careand cleaning ofthe refrigerator.
Cleaning the Outside
The dispenser drip area, beneath the grille, shouM
be _iped (h_: _4"lter left in this area may leave
deposits. Rein eve the deposits by adding
Imdiluted vinegar m the well. Soak imtil the
Dispenser drip area.
Removing the dispenser pad
(onsome models)
deposits disappear or become loose enough
to XJXlSe }lW}lV;
The dispenser pad/cradle (on dispenser models).
Before cleaning, open the fl'eezer door part
_:ly to prevent dispensing of ice or water when
cleaning. On models with a dispenser pad, the
pad can be relnoved l)eli)i'e cleaning. Simply
peel the pad away ti'om the back wall of the
dispensex: Clean the pad/cradle with a wam_
wamr and baking soda solution-about 15 ml (ff
baking soda to 1 liter of water. Rinse thoroughly
and wipe dry: To replace the pad, rock the
edges of the pad in the grooves on the back
wall _ffthe dispensex: Make stxre that the top of
the pad goes behind the dispenser collax:
The doorhandles and trim. Clean with a cloth
dampened with soap) watex: Dry with a
soft cloth.
Keep the outside clean. X_]i)e with a clean cloth
lightly dampened with kitchen appliance wax
or mild liquid dish detexgent. Dry and polish
with a clean, soft cloth.
Do not wipe the refrigerator with a soiled &sh cloth
or wet towel Thesemay leave a residue that can
erode the paint. Do not use scouring pads, powdered
cleaners, bleach or cleaners containing bleach
because these products can scratch and weaken the
paint finish.
Cleaning the Inside
Tohelp prevent odors,leave an open box c,f
baking soda in the refi_igerator and fl'eezer
COIIX l)}l x'tilX eats.
Unplugthe refrigerator before cleaning. If this
is not practical, wring excess moisture ()tit
of sponge or cloth when cleaning around
switches, lights or controls.
Use w;mn water and baking soda solution-
about 15 ml of bakixlg soda to oxle liter of
watex: This both cleans and neutralizes odox_.
Rinse and wipe (hT.
Useof any cleaning solution other than that which
is recommended, especially those that contain
petroleum distillates, can crack or damage the
interior of the refrigerator.
Avoid cleaning cold glass shelves with hot water
because the extreme temperature difference
may cause them to break. Handle glass shelves
careful/_zBumping tempered g/ass can cause
it to shatter
Donot washanyplasticrefngeratorparts in the
dishwasher
Thechili/thawtray is dishwashersafe.
17
Page 18

Careand cleaning ofthe refrigerator.
Behind the Refrigerator
Be careiul when moving the reii_igerator away
fl'om the wall, _M1types oI floor coverings can be
damaged, particularly cushioned coverings and
those with embossed sm_i_ces.
Pull the refl_igerator straight out and return it to
position by pushing it straight in. Moving the
refl_igerator in a side direction may result in
damage to the floor covering or refl_igerato_:
Preparing for Vacation
For long vacations or absences, relnove fi)od and
m_plug the refl_igerato_: Clean the interior with a
baking soda solution of 15 ml of baking soda to
1 liter ot water: I,eave the doo_ open.
Set the icemaker power switch to the 0 position
and shut off the water supply to the refl_igeratoi:
Whenpushing therefrigerator back, make sure you
don't roll over the power cord or icemaker supply line.
If the temperature can drop below fl'eezing, have
a qualified servicer drain the water supply s)'stem
to prevent serious propert}, damage due to
flooding.
Preparing to Move
Secure all loose items such as shelves and
drawei_ by taping them secm'elv in place
to prevent damage.
When using a hand truck to move the
refl_igeratm; do not rest the fl'ont or back of
the refrigerator against the hand truck. This
could damage the refl_igeratm: Handle only
fl'om the sides of the reti_igerato_:
Be sure the refrigerator stays in an upnght position
dunbg moving.
18
Page 19

Replacingthe lightbulbs.
Setting the controls to 0 (off) does not remove power to the light circuit.
Refrigerator Compartment--Upper Light
O Unplug the refrigerator.
@ The bulbs are locamd at the top ot the
compartment, inside the light shield.
Relnove the screw at the fl'ont of the
light shield.
O To remove the light shield, press in on the
tabs on the sides of the shield and slide
fi)I'WaI'd and ()tit.
Refrigerator Compartment--Lower Light
This hght is located above the top drawe_
O Unplug the refrigerator:
@ Remoxe the comertible meat drawer
control knob by pulling straight out.
Lift the light shield up and pull it out.
.............................. Freezer Compartment
O _Mter replacing the bulb Mth an appliance
bulb of the same or lower wattage, replace
the light shield and screw. When repladng
the light shield, make sure that the tabs at
the back ot the shield fit into the slots at
the back ot the light shield housing.
Plug the reti_igerator back in.
@ _Mter replacing the bulb with an appliance
bulb of the same or lower wattage, replace
the shield and the knob.
0 Plug the refrigerator back in.
[ , , •
Un )lug the reli_igerator
Remoxe the shelf just aboxe the light
shield. (The shelf will be easier to remoxe
if it is emptied fi_st.) On some models,
a screw at the top of the light shield will
need to be rellloxed.
O To remove the light shield, press in on the
sides, and lift up and out.
Dispenser
Unplug the refl{geratox:
The bulb is located on the dispenser trader
the control panel. Remove the light bulb
by turning it counterclockwise.
Replace the bulb with an appliance
bulb of the salne or lower wattage,
and reinstall the light shield. When
reinstalling the light shield, make sm'e
the top tabs snap secm'ely into place.
Replace the screw (on some models).
0 P.einstall the shelf and plug the
refl'igerator back in.
O Replace the bulb with a bulb of the same
size and watta *e
Plug the refrigerator back in.
19
Page 20

Trimkits anddecoratorpanels.
ForBuilt-In Style models
Read these instructions completely and carefully.
BeforeYouBegin
Some models are equipped with trim kits that allow you to install door panels.
Panels less than 6 mm thick
_4]_en installing wood panels less than 6 mm thick, you need to create a filler panel, such as 3 mm cardboard, that
will fit between the fi_ce of the door and the wood panel, If you are installing the pre-cut decorator panels, pre-cut
filler panels are included in the kit, The combined thickness of the decorator or wood panel and the filler panel
should be 6 ram.
Panels 6 mm thick or less
6 rrlrrlmax
19mm or Raised Panel
A raised panel design screwed or glued to a 6 mm thick backing, or a 19 mm routed board can be used.
The raised portion of the panel must be tid)_icated to pemfit clearances of at least 5.1 cm fl'om the handle
side fin" fingertip clearance.
Panels thicker than 6ram, up to 19 mm max, will require that the outer 8 mm of panel perimeter be no thicker
than 6 mm.
Weightlimitationsfor custompanels:
RefrigeratorDoor 17kgmax.
FreezerDoor 13kg max.
Panelsthickerthan6 mm
6mmThick
Backing
r
5.1cm
Clearance
6 film max
19mm
HandleSide
Appearance
Panel Refrigerator
Door
20
Page 21

Dimensions for Custom Wood Panels
FreezerPanel
WithoutDispenser
Cut
out ,-_ F,,-3 mm
''
, i
.... -I
t
8mm
170.9cm
FRONT
36.8cm ---,-
FreezerPanel
With Dispenser RefrigeratorPanel
Cut
out "-_' '_'-3 [l/m
''
i i
45.4cm
FRONT
• 36.8cm --_
85.4cm
,-- 49.5cm- ---_
1
3 II/m "-_ _ out
170.9cm
FRONT
''
i ,
I ....
Cut
t
8mm
The areas at the top of the panels need to be cut out of the panels.
21
Page 22

Insertingthe doorpanels.
Read these instructions completely and carefully.
0 Insert the Freezer Panel and Refrigerator Panel
Carefldly push the ti'eezer panel in until it slides into
the slot behind the door handle. Push the filler panel
(required with some door panels) in behind the
decorator panel. Repeat fin" refl_igerator panel.
0 Insert the Bottom Freezer Panel (on dispenser models).
Carefldly push the panel in until it slides into the (required with some door panels) in behind the
slot behind the door handle. Push the filler panel decorator panel.
Attach the Top Trim on the Freezer and Refrigerator Doors.
The Top Trim can be ti_und inside the reti_igerator each (loo_: Hand tighten only: Make sure that the
compartment, top of each panel fits snugly behind the lip of the
With a T-20 Torxddve_; attach the Top Trim, using Top Trim.
two screws on each Top Trim piece, to the top (ff
If your model has a dispense_; this step only applies
O _" " •
t the refri_erato_ panel and top fl'eezer panel
f TopTrimScrews
, t
SideTrim._D
Cut-Out
SideTrim
22
Page 23

O Install the Side Trim.
These pieces are rocked inside the ret_igerator
door handle.
Do not remove the protective film on the oualde of the Side
Tnm until the Side Trim is installed.
Fit the bottom of the Side TFim under the Bottom TFim
as illustrated.
Hold the Side TFim against the fl'ont ti_ce of the
decorator panels and fit the Side Trim under the Top
Trim. Make sure the Side Trim is fitted con'ecflv and
that you are satisfied with the appearance of all
the parts,
23
Page 24

Removingandreplacing the doors.
When installing or moving the refrigerator, the doors may need to be removed in order to fit the refrigerator through
a doorway.
Removing the Doors
Make sure the doors are closed and the refrigerator is
unplugged.
0 Disconnect water line and wiring harness.
Near the lower hinge on the fl'eezer side, push in on the
collm_ at each end of the coupling, and pull the water
line robing fl'om the coupling. _Mso, disconnect wiring
harness. Pull the water line and the harness through the
lower rail.
0 Removethe hinge covers and the hinges.
In order to access the hinges, the hinge co\'e_ need to be
relnoved. Remove the cover b v grasping it on the sides,
near the back of the coveI: Push back on the cover and
lift up at the back, then the fl'ont.
NOTE: DONOTusea screwdriverto removethecover BECAREFUL
not tobreak the rear retainingtabon the hingecover Removethe
hlbgesuslbga TorxT-20.
_ HingeCover
0 Removethe doors.
(:arefhllv rotate the door to 90? Guiding the disconnected
water line and wiring harness, lift the door straight up.
NOTE: Not rifting the doorstraight up may damagethebottom hinge.
Piecedoorsona protectedsurface.
/VOTE:Becareful not to pinch the water tubingand the wire harness
at thebottom of the door
/VOTE:Donot a//ow the connectorto contact the floor Hardcontact
can damagetheconnector See "Replacingthe Doors."
Replacing the Doors
0 Place doors on bottomhinges.
X'_ith the door at .)0, lower the door straight down onto
the bottom hinge. Careflflly close the door.
NOTE: Not lowenbg the doorstre/ght down onto thebottom hinge
may damagethehinge.
NOTE'.Donot allow theconnectorto contact the floor Hardcontact
can damagetheconnector
0 Replace top hinges and hinge covers.
Reinstall the top hinges using a Torx T-20. Replace the
hinge cove_. If the doo_ are not level, ac!iust the bottom
right hinge with a 7/16" open ended wrench.
( o
Door
HingePin
24
0 Reconnect water line and wiring harness.
Insert water robing back into coupling, making sure the
tubing is pushed flu" enough into the coupling so that wm
no longer see the mark on the tubing. Reconnect the
widng harness.
0 Turnonthe water supplyand plug the refrigerator back in.
Connector
Page 25

Installation
Refrigerator
Instructions
BEFORE YOU BEGIN
Read these instructions completely and carefully.
• IMPORTANT - S_,,ethese
instructions for local inspector's use.
•IMPORTANT - Obset,e_,ll
governing codes and ordinances.
• Note to Installer - Be sure to leave these
instructions with the Consumer.
• Note to Consumer - KeeI)these instructions
ti)r fltture reference.
• Skill level - Installation of this appliance requires
basic mechanical skills.
• Completion time - Refligerator Installation
15 minutes
• Proper installation is the responsibility of the
installer.
• Product failure due to improper installation is not
covered trader the Warranty.
Models 21, 23,25,27& 29
CLEARANCES
Allow the fl)llowing clearances tot ease ot installation,
proper air circulation and plumbing and electrical
coililectiotls:
21' mid 23' 25', 27' mid 29'
• Sides 4ram 4ram
• Top 25 mm 25 mm
• Back 13 mm 25 mm
DIMENSIONS
29
A* 1733mm
B 908mm
C** 912mm
27 25 23 21
1733mm 1733mm 1733mm 1733mm
908mm 908mm 908mm 908mm
879mm 879mm 738mm 738mm
WATER SUPPLY TO THE ICEMAKER
(ON SOME MODELS)
If the reliigerator has an icemaker, it will have
to be connected to a cold water line. An approved
water supply kit is available at extra cost from your
local distributor.
Maxim um permissible inlet water pressure-8.2 bars.
Minimum permissible inlet water pressure-2.8 bars.
hastallation of the icemaker must be done bv a
qualified service technician.
REFRIGERATOR LOCATION
• Do not install the reflJgerator where the temperature
will go beh)w 16°(7 because it will not tun often enough
to maintain proper temperatures.
• Do not install the refligerator where the temperature
will go above 37°C because it will not I)erf'(mn i)roperl>
• Install it on a floor strong enough to suppori it fldlv
loaded.
D 1261mm
E 1273mm
F 1051mm
G 1386mm
H 1140mm
':I [eight does not include hinge.
**I)epdl includes handle.
1271mm 1271mm 1156mm 1156mm
1255mm 1247mm 1232mm 1214mm
1093mm 1099mm 989mm 986mm
1381mm 1381mm 1361mm 1355mm
1150mm 1149mm lO23mm 994mm
T
I " °
! n
IF----,'I
I I,,----,,I
H
/ I', '!I
I I
I
25
_J /
° I
Page 26

Installation Instructions
ROLLERS
The rollers have 3 purposes:
• Rolle_ a@lst so the door closes easily when opened
about hallway: [Raise the fl'ont about 5/8" (16 ram)
fl'om the flooi:]
• Rolle_ a(!iust so the refi_igerator is fi_mly positioned
on the floor and does not wobble.
• Rollet_ allow you to move the reti_igerator away fl'om
the wall fin" cleaning.
Final leveling a(!itlstments shotdd be made after the
refi_igerator has been installed.
To adjust the rollers on 25', 27' mad 29' models:
• Turn the roller
clockwise to raise
adjusting. ,_ screws
the reflJgerato_;
lower it. Use a 3/8"
hex socket or wrench,
OY _lIl ac!justable X
wrench. Roller adjusting screw
To adjust the rollers on 21' mad 23' models:
Remoxe the base grille by opening the (logic,
remo\Jng the screws at each end, and ptdling it
straight out.
O Turn the ti'ont roller
adjusting screws
clockwise to raise
the reflJgeratoi;
comlterclockwise to
lower it. Use a 3/8"
hex socket or wrench, _ .....
or an ac!justable
wrench. Roller adjusting screws
XV
DOOR ALIGNMENT
_Mter leveling, make sure that the refi_igerator door is 1/16"
higher than the fl'eezer doo_:
To align the doors, at!just the reii_igerator doo_:
Using a 7/16" socket wrench, turn the door ac!justing
screw to the right to raise the dooi; to the left to lower
it. (A nylon phlg, imbedded in the threads of the pin,
prevents the pin ti'om turning tudess a wrench is used.)
O _Mter one or two turns of the wrench, open and close
the refl_igerator door and check the alignment at the
top _ff the (loo_.
Refrigeratordoor
needsto beraised.
Toremovethe basegdHe,
openthedoors,rernove
thescrewateachendof
thebasegrilleandthen
pullthegrille straightout.
k [ 7/16" SocketWrench]
/ RaiseJ
These models also have rear a(!justable rolleI5 so you
can align the refi'igerator with your kitchen cabinets.
Use a long-handled 5/16" socket wrench to turn the
screws fi)r the rear rolle_-clockwise to raise the
refrigerat(n; comlterclockwise to lower it.
O Replace the base grille.
26
Page 27

Installation Instructions
DIMENSIONS AND SPECIFICATIONS
(for Built-In Style models)
o o
178.4cm
o
o
91.4cm
61cm
\
81cm
Cabinet
Water Electrical
13mmGap+6 mm
WallPlates)
' 3L 1
63.5cm
Countertop
27
Page 28

Installation Instructions
INSTALLING THE WATER LINE
BEFORE YOU BEGIN
The water line installation is not warranted bv the
refligerator or icemaker manufacturer. Follow these
recommendations careflfllv to minimize the risk of
expensive water damage.
Water hammer (water banging in the l)ipes) in house
l)lmnbing can cause damage to refl'igerator parts and
lead to water leakage or flooding. Call a qualified
plmnber to correct water hammer betore installing
the water sui)ply line to the refl'igerator.
To prevent btlrns and prodtlct damage, do not hook
up the water line to the hot water line.
If wm rise VOtlr refrigerator before connecting the
water line, make sm'e the icemaker power switch is
in the 0 (off) position.
Do not install the icemaker tubing in areas where
temperatm'es tall below fl'eezing.
When using any electrical device (such as a power
drill) during installation, be sure the device is
insulated or wired in a manner to prevent the hazard
of electric shock.
All installations must be in accordm_ce with local
plmnbhlg code requirements.
Installation of the icemaker must be done by a
qualified service techlficim_.
a, WARNING!Connect to potable
water sui)ply only.
[]
CONNECT THE TUBING TO THE
REFRIGERATOR (CONT.)
Some models hm e file refl'igerator c(mnection
at tile end of tubing located outside tile compressor
compartment access cover On other models, the
COIlll/ressoF coirJl/artinent access cover illtlSt be reilloved
in order to access tile refi'igemtor c(mnection at tile
water valve.
On models using tile
refl'igeration connection at
the water valve, remove the
plastic flexible cat/,
Place tile compression nut and terrule (sleexe) onto tile
end of tile tubing as shown,
Insert tile end of tile tubing into tile water xalxe
connection as ti_i"as possible. While holding tile tubing,
tighten the fitting.
Fasten tile tubing into tile clamp proxided to hold it in a
) • need to pr_ open tile clamp,xertical position, _ )u mm
One of the illustrations below will look like the
connection on your icemaker.
©
[] CONNECT THE TUBING TO THE
REFRIGERATOR
NOTES:
• Before making the connection to the refl_igerator,
be sure the reti'igerator power cord is not
i)lugged into the wall outlet.
• We recommend installing a water filter ifwmr
water sui)ply has sand or particles that could clog
the screen of the refrigerator's water wflve. Install
it in the water line near the refl'igerator.
Clam
Typical
Compression
Nut
Ferrule
Refrigerator
onnection
Tubing
Typical
CompressionNut
Ferrule
(sleeve)
Refrigerator
Reattach tile access coxec
28
Page 29

Installation Instructions
[] TURN THE WATER ON AND PLUG
IN THE REFRIGERATOR
Arrange the coil of tubing so that it does not vibrate
against the back of the refrigerator or against the
wall. Push the refl'igerator back to the wall.
[] START THE ICEMAKER
Set the icemaker power switch to the I position. The
icemaker will not begin to operate until it reaches
its operating temperature of-9°C or below. It will
then begin operation automatically if the icemaker
power switch is in the I position.
NOTE: In lower water pressure conditions, the
water xalxe may turn on u l) to 3 times to delixer
enough water to the icemaker.
29
Page 30

Normal operatingsounds.
Newer refrigerators sound different from older refrigerators.
Modem refrigerators have more features and use newer
technology.
Do you hear what I hear? These sounds are normal.
HUMMM...
-- WHOOSH...
• The new high eflicienc) compressor may Hm faster
and hmger than wmr old refl'igerator and wm may
hear a high-i)itched hmn or pulsating sotmd while
it is operating.
• Sometimes the refl_igerator runs fi)r an extended period,
especially when the dooxs are opened fl'equently. This
means that the Frost Guard TM feature is working to
prevent fl'eezer burn and improve tood preservation.
• _4m may hear a whooshing sotmd when the (loox_ close.
This is due to pressm'e equalizing within the reflJgeratm;
CLICKS, POPS,
CRACKS and CHIRPS
• You may hear cracking or i)oi)ping sotmds when tile
refrigerator is first i)lugged in. This hal)pens as tile
x'efrigex'ator cools to the coxTect texlxpex'attlx'e.
• Electronic dampers click open and closed to provide
optimal cooling and energy savings.
• The compressor may cause a clicking or chirping
sound when attempting to restart (this could take
up to 5 minutes).
• The electronic control board may cause a clicking
sound when relays activate to control refrigerator
coxIlpoxlexlts,
• Expansion and contraction of cooling coils during
and after defl'ost can cause a cracking or i_oi_ping
SOtlnd.
WHIR!
• You may hear tile rims spinning at high speeds.
This hai_pens when the refrigerator is first plugged
in, when tile doors are opened frequently or when
a large amount of fired is added to the refrigerator
or fl'eezer compartments. Tile rims are helping to
maintain the correct temperatures.
• If either door is open fin" over 3 minutes, you may
hear the rims come on in order to cool the light
bulbs.
• Tile rims change speeds in order to provide optimal
cooling and energy savings.
• You may hear tile tim running after selecting one
of tile CustomCooF_settings.
WATERSOUNDS
6
• Tile flow of refl'igerant through tile fl'eezer cooling
coils may make a gm'gling noise like boiling water.
• Water dropping on the defl'ost heater can cause a
sizzling, i)oi)ping or buzzing sound dm'ing tile
defl'ost cvcle.
• A water dripping noise may occur during tile defl'ost
cycle as ice melts fl'om tile evaporator and flows into
tile drain pan.
• Closing tile door mav cause a gurgling sound due to
pressure equalization.
• On models with an icemakex; after an icemaking
cycle, you may hear tile ice cubes dropping into
the ice bucket.
3O
Page 31

Beforeyoucall forservice...
Troubleshooting -tips
Save time and money/.Review the charts on the following
pages first and you may not need to call for service.
What ToDo
• _'%fit about 30 minutes for defi'ost cycle to end.
• Set the controls to a temperature setting.
Refrigerator does not
operate
Possible Causes
Refrigerator in defrost cycle.
Either or both controls set
to 0 (oft).
Refrigerator is unplugged. • Push the plug completely into the outlet.
The fuse is blown/cireuit • Replace fllse or reset the breaker.
breaker is tripped.
The refrigerator is in • Unplug the refrigerator and plug it ba(k in.
showroom mode.
Vibration or rattling Rollers need adjusting. • See Rollers.
(slight vibration
is normal)
Motoroperatesforlong Normal when refrigerator • \.Vait 94 houls fl)r the reti_igerator to completely
periods or cycles on and is fiwst plugged in. c()ol d()wn.
off frequently. (Modern Often occurs when large • This is hernial.
refrigerators with more amounts of food are
storagespaceanda placed in refrigerator.
larger freezer require
if )acka,,e is holding door open.more operating time. Door left open. • Check to see }
Theystart and stop Hot weather or frequent • This is nom_al.
often to maintain door openings.
even temperatures.)
Temperature controls set • See About thecontrols.
at the coldest setting.
Refrigeratororfreezer Temperature control not set • SeeAbout the controls.
compartment too warm cold enough.
Waacm weather or frequent • Set the temperature control one step coldel;
door openings. See About the controls.
Door left open. • Check to see if })ackage, is holding door opeu.
if )acka_*e is holding door open.Frost or ice crystals Door left open. • Check to see }
onfrozenfood
(frost within package Too frequent or too long
is normal) door opmfings.
Dividerbetween Automatic energy saver • This helps prevent condensation on the outside.
refrigerator and freezer system circulates warm
compartments liquid aacomad front edge
feels warm of freezer compartment.
Automatic icemaker Icemaker power switch • Set the power switch to the on position.
does not work is in the off position.
Water supply tttnaed off or • See Installing the water line.
not commcted.
Freezer compartment too warm. • Wait 24 hou_ fl)r the refrigerator to completely cool down.
Piled up cubes in the storage • l,evel cubes by hand.
bin cattse the icemaker
to shut off.
Ice cubes stuck ha icemaker.
(Green power light on
icemaker blinking).
• Turn off the icemakex, remove cubes and turn the
icemaker l)ack on.
31
Page 32

Beforeyoucall forservice...
Possible Causes
Frequent "buzzing" Icema_ker power switch is in the
sound on position, but the water supply
to the refrigerator has not been
cmmected.
Ice cubes have Ice storage bin needs clemfing. • Empty and wash bin. Discard old cubes.
odor/taste Food lrmasmit_lg odor/taste • _M'ap foods well.
to ice cubes.
hlterior o f re frigerator •See Careand cleaning.
needs clemlhlg.
Small orhollow cubes Water Filter clogged. • Replace filter cartridoe_ with new cartridge or with i)lu_,
What To Do
• Set the power switch to the ott position. Keel_im,_ it in the on
position will (lmnage the water xflxe.
Slowice cube freezing Door left open. • Check to see if I)ackage, is holding door open.
Temperature control not set • See Aboutthe controls
cold enough.
Cube dispenser does lcema_ker turned off or • Tm'n on icemaker or water supply.
network water supply turned off.
Ice cubes are frozen to • Remoxe cubes.
icema_ker feeler m'm.
Irregular ice clmnps in • Break up with fingertip pressm'e and discard
storage contakmr, remaining chun )s
• Freezer may be too wamL A(!iust the freezer control to a colder
,settiu_* oue positiou at a tiIne, tluti] chlulps do uot toiin.
Dispenser is LOCKED. • Press and hold the LOCgCONrROLpad fb_ 3 seconds.
Waterbaspoortaste/odor Water dispenser has not been • Dispense water tmtil all water in sxstem is replenished.
used for a long time.
Waterinfirstglass Normal when re frigerator • _4'ait 24 hams fl)r the reflJgerator to completely
is warm is first installed, cool down.
Water dispenser has not been • Dispense water tmtil all water in sxstem is replenished.
used for a long time.
Water system has been drained. • _Mlow sexeral hotu_ fi)r replenished supply to chill.
Water dispenser does Water supply line turned • See Installing the waterline.
network off or not cmmected.
Water f'flter clogged. • Replace filter cartridge or remoxe filter and install _lu,
Air may be trapped in the • Press the dispenser area fi_r at least two minutes.
water system.
Dispenser is LOCKED. • Press and hokl the LOCKCONTROLpad fl,r 3 seconds.
Watetspurtingfrom NeMy-h_staJled fiher car tridge. • Rm_ water fl'om the dispenser fi_r 3 minutes (about
dispenser six liters).
Wateris notdispensed Water in reservoir is • Call fi)r sex, ice.
but icemaker is working frozen.
Refrigerator control setting • Set to a wam_er setting.
is too cold.
No waterorice cube Supply lhm or shutoff • Call a plumber.
production vaJve is clogged.
Water Filter clogged. • Replace filter cartridoe_ or rein ave filter and install _lu,
Dispenser is LOCKED. • Press and hold the LOCKCONTROLpad fb_ 3 seconds.
32
Page 33

Possible Causes What ToDo
CUBEDICEwas selected Last setting was * A few cubes were left in the crusher fl'om the previous
but CRUSHED ICE CRUSHED ICE. settin, This is mmnal.
wasdispensed
Orange glowin Defrost heater is on. • This is nomml.
the freezer
Refrigeratorhasodor Foods transmitting • Foods with strong o(lox_ should be tightl) wrapped,
odor to refrigerator. • Kee l) an ol)en box ot baking, soda in the refl_igerator;
replace exerv three II/onths.
Interior needs clemfing. * See flare and cleaning.
Ooornotclosingproperly Door gasket on hinge side * Apply paraffin wax to the fi_ce of the gasket.
sticking or folding over.
A door bha is hitthag a shelf * Moxe the door bin up one position.
inside the refrigerator.
Moisture forms on Not unusual during * _ ii)e surii_ce dry.
outside of refrigerator periods of high humidity.
Moisturecollectsinside Too frequent or too
(inhumid weather, air long door ope_fings.
carriesmoistureinto
refrigerator when doors
are opened)
Interiorlightdoes No power at outlet. * Replace tuse or reset the breaker:
not work
Light bulb burned out. • See Replacing the light bulbs.
Water on kitchen floor or Cubes jmnmed in chute. • Poke ice through with a wooden spoon.
on bottom of freezer
Hot air from bottom Normal air flow coolhag motor.
ofrefrigorator ha the refrigeration process, it is
normal that heat be expelled in the
area under the refrigerator. Some
floor coverings are sensitive mad will
discolor at these normal mad safe
temperatures.
Refrigerator never Adaptive defrost keeps • This is nonlml. The refrigerator will cycle off after the
shuts offbutthe compressor rtunlhag during door remains closed fi)r 2 hotu_.
temperatures are OK door openhags.
Refrigerator beeping Door open. • Close doo_:
Food isn,t thawing/chilling Packaging. * Increase time or re-package in plastic.
Wrong weight selected. • Select a larger weight.
Item with high fat content. • Select a larger weight.
Not using Chill/Thaw tray. • Place items on tim and allow space in between items for
Actual temperature not Unit just plugged ha.
equalto SettemPeremre Door open for too long.
Warn,foodaddedtoremgerator
Defrost cycle is ha process.
SelectTempfeatureis Refrigerator compartment
notworking temperature control is set
at wm'mest setting.
better air flow.
• _Mlow 24 hours fin" s}:steln to stabilize.
• _Mlow 24 houls fin" systeln to stabilize.
• A]low 24 l_otus fin" system to stabilize.
• _Mlow 24 houI_ fin" s)_steln to stabilize.
• This is noi_mal. In order to mininlize energy usage, the
SelectTempteatuI'e is disabled when the retiJgerator
temperature control is set at the walmest setting.
33
Page 34

Special Safety InstructionsforAustralia and New Zealand.
(in addition to other information in Owner's Manual)
IMPORTANTSAFETYINSTRUCTIONS
Toreduce the risk of personal injury or damage to proper04,follow basic safely precautions when using this
refrigerator, including the following:
When using any Electrical Product, basic precautions should always be followed, including the following:
READTHESEINSTRUCTIONSCAREFULLYBEFORE
USINGTHEREFRIGERATOR.KEEPTHEINSTRUCTIONS
HANDYFORFUTUREREFERENCE.
IMPORTANT'Always operate tile refl'igerator
fl'om a power source of tile saine Voltage,
Frequency and Rating as indicated on tile
refl'igerator identification plate. Operate tile
refl'igerator fl'om an Earthed ((;ro/mded) 3 pin
power outlet flfllv accessible when tile refl'igerator
is located in its normal operating position.
Close supervision is necessary when any electrical
product is used bv or operated near childrei_ or
infirn/persons; young children should be
SUl)ervised to ensure that they do not play with the
refl'igera tor.
IMPORTANT"Do not operate the refl'igerator with a
damaged Supply cord or Plug. If it is damaged it
I/ltlSt be replaced by tile mantlfilcttlrer, distributor
or its service agent or a similarly qualified person
in order to avoid a hazard. Special tools are
required to replace the Supply flexible cord.
IAIA D IlII IlI I _.
IfV/-I/'l/ll//lll./.Axoid tile rise ol extension
cords. If it is necessary to use an extension cord,
prior to its use, make sure the extension cord is
safe to use, capable of handling the electrical load
of the product (refer to Product identification
plate) aim has been checked aim tested by your
electricity supplier or a qualified teclmician.
To axoid becomii_g entangled in the cord, oever
lay it throuoh_ or along, a walkwm or thoroughfi_re.
Do not allow the cord to hang oxer the edge of a
bench top where it may be grabbed by children or
becolne entangled with the user.
,.24
Page 35

Installingthe WaterLbe
For Australian and New Zealand #Tstallation, read these instructions completely and carefully.
Before You Begin
IMPORTANT" Government legislation and Codes
in most States and Territories of Australia
require installation bv a licensed plmnber.
The installation illtlSt conlk)illl [0 Australian
Standard AS 3500.1 Water supply.
_'ater hammer (water banging in the pipes)
in house i)lmnbing can cause damage to the
refl'igerator parts and lead to water leakage or
flooding. Call a qualified plmnber to correct
water hammer before installing the water sui)ply
line to the refl'igerator.
Shut Off the Main Water Supply
For models fitted with an icemake_; a water supply
kit (containing flexible robing and fittings) is
suI_plied with the refrigerator.
The water pressure must be between 138 and
827 kPa on models without a water filter fitted
and between 275 and 827 kPa on models with
a water filter ftted.
Turn Off the water and open a low tap to drain the
water fl'om the pipe.
Complying with the plmnbing codes, install a
suitable branch fitting (not SUl)plied ) to the cold
water SUl)l)ly.
Extend the branch to a suitable location adjacent
to the refl'igerator when it is located in its operating
position. Terminate the branch with a shutoff valve
(not SUl)plied ).
IMPORTANT" The shut-off wdve should be accessible
(such as in an ac!jacent cupboard, as close to the
wall as possible) when the refl'igerator is in its
normal operating position.
To prevent bm'ns and refl'igerator damage, do
not hook up the water line to the hot water line.
If you use wmr refl'igerator before connecting the
water line, make sm'e the icemaker power switch
is set to the 0 position.
Do not install the icemaker tubing in areas where
the temperatm'es fall below fl'eezing.
If wmr water SUl)ply pressure is higher than 690 kPa
dm'ing the day (if so, it mav reach higher levels at
night), install a suitable Pressm'e limiting wflve
(not supplied), after the shut-off valve, inaking sure
the "fow arrows" on the body of the device lace the
same direction as the water flow.
If necessary, assemble a suitable fitting (not
SUl)plied ) to the Ul>stream end of the shutoff valve
(or pressm'e limiting valve) fin" attachment of the
fitting SUl)plied with the water SUl)ply kit.
NOTE: PTFE tape should be used fi)r a water tight
seal when assembling all the above fittings.
Do Bet turn the water sui)ply Ou at this time.
35
Page 36

Special InstallationInstructionsforAustralia andNew Zealand.
Installingthe WaterLine(cont.)
Connecting the Tubingto the Shutoff Valve
Attach the fitting with the male thread supplied
with the water supply kit to the shutoffvalve (or
pressure limiting valve, if fitted), and tighten.
NOTE: PTFE tape should be used for a water tight
seal when assembling all the above fittings.
Route the tubing through a hole drilled in the side
of the cupboard as close to the wall as possible.
Make sure there is sufficient length of tubing
[approximately 240 cm coiled into 3 turns of
approximately 25 cm] to allow the refrigerator
to move out from the wall after installation.
Connecting the Tubing to the Refrigerator
Before making the connection to the refrigerator, be
sure the power is turned OFFand the power cord is
disconnected from the Power Outlet.
If wmr refl'igerator does not include a water filteL
we recommend installing one in tile water line
near tile reti'igerator if yore" water sui)ply has sand
or particles that could clog the screen of the
refl'igerator's water wdve.
Insert and push tile end of tile tubing into tile
fitting as tar as possible.
_]th tile fl'ee end of tile tubing located in a
suitable container, turn tile main water sui)ply
On and flush out the tubing tmtil the water is clear.
Turn Off the shutott valve atier approximately 1 litre
of water has been flushed through tile tubing.
Attach tile fitting with tile female thread supplied
with the water supply kit to the water wflve and
tighten,
Insert and push tile end of tile tubing into tile
fitting as tar as possible.
Fasten tile tubing into tile clamp provided to hold
it in position. You may need to pry open tile clamp.
Remove tile refrigerator access cover.
Remove the plastic flexible cap fl'om the water wdve
(refl'igerator connection).
36
Page 37

Turnthe Water On
Turn the water On at the sh utott valve.
Tighten any connection that leaks.
Replace the access cover and tighten all screws
(on some models).
Plug In the Refrigerator
Plug in the refl'igerator to the Power Outlet and
ttlrn O/l.
IMPORTANT'Alwaysoperate the Refl'igerator fl'om a
power source of the same Voltage, Frequency and
Rating as indicated on the Refl'igerator
Identification Plate. Operate the Refl'igerator fl'om
an Earthed (Grounded) 3 Pin Power Outlet flfllv
accessible when the refl'igerator is located in its
normal operating position.
Arrange the coil of tubing so that it does not
vibrate against the back of the refrigerator or
against the wall.
Start the Icemaker
Set the icemaker power switch to the I position.
The icemaker will not begin to operate until it
reaches its operating temperature of-9°C or below.
It will then begin operation automatically if the
icemaker power switch is in the I position.
NOTE: In lower water pressure conditions, the water
valve may turn on up to 3 times to make sure
enough water reaches the icemaker.
Push the refl'igerator back to the wall, making sure
the power cord and the water line tubing are not
trapped, entangled or squashed by the refl'igerator
(including the wheels) or wall.
?7
Page 38

Notes.
38
 Loading...