

Page 1
❑
instructions .........................3
Dishwasher
●
❑
Problem Solver
More questions
GE Answer Center” 800.626.2000
❑
Care and Cleaning
❑
Operating Instructions, Tips
Appliance Registration ..................................2
China, Crystal, Sterling . . . . . . . . . . . . . . . . . . . . . . . . . . . . . 10
Cycle Features .................................................4
Detergent Guide .............................................7
Dispenser Cups ...............................................7
Drying Options ................................................4
Energy-Saving Tips. . . . . . . . . . . . . . . . . . . . . . . . . . . . . . . . . . . . . . . ..5
Features
Loading . . . . . . . . . . . . . . . . . . . . . . . . . . . . . . . .
Operating instructions ..............................4, 5
Rinse Agent......................................................6
Water Temperature ........................................6
Air Gap
Winter Storage . . . . . . . . . . . . . . . . . . . . . . . . . . . . . . . . . . . . . . . .
. . . . . . . . . . . . . . . . . . . . . . . . . . . . . . . . . . . . . . . . . . . . . . . . . . . . . . . . . . .
5
9
11
11
Preparation
Front Panel Change . . . . . . . . . . . . . . . . . . . . . . . . . . . . . . . . . . . . . 12
Consumer Services ...................15
Model and Serial Numbers ..........................2
Repair Service .................................................2
Warranty ........................................Back Cover
GE Appliances
Page 2
US
YOU...
Before using your
dishwasher, read this
guide carefully.
It is intended to help you
operate and maintain your new
dishwasher properly.
Keep it handy for answers to
your questions.
you don’t understand something
or need more help, write (include
your phone number):
Consumer Affairs
GE Appliances
Appliance Park
Louisville, KY 40225
To obtain a Spanish language
version of this book,
GE Answer
800.626.2000
consumer information service.
If you received
a damaged dishwasher...
Immediately contact the dealer
(or builder) that sold you the
dishwasher.
Save time and money.
Before you request
service . . .
Check the Problem Solver in the
back of this guide. It lists causes
of minor operating problems that
you can correct yourself.
de
name a
GE Answer
de information
800.626.2000.
manual,
Write down the model
and serial numbers.
You’ll find them on a label
fastened to the tub
inside the dishwasher door.
These numbers are also on the
Consumer Product Ownership
Registration Card that came
with your dishwasher. Before
sending in this card, please write
these numbers here:
Model Number
Serial Number
Use these numbers in any
correspondence or service calls
concerning your dishwasher.
just
YOU NEED SERVICE...
To obtain service, see the Consumer Services page in
the back of this guide.
We’
proud of our service and want you to be
pleased. If for some reason
service you receive, here are three steps to follow for
further
FIRST, contact the people who serviced your
appliance. Explain why you are not pleased. In most
cases, this will
the problem.
are not happy with the
NEXT, if you are still not pleased, write all the
details—including your phone number—to:
Manager, Consumer Relations
GE Appliances
Appliance Park
Louisville, KY 40225
FINALLY, if your problem is still not resolved, write:
Major Appliance Consumer Action Panel
20 North
Chicago, IL 60606
Drive
2
Page 3
SAmTY
Read
WARNING-When
appliance, always exercise basic
A
.
Use this appliance only for its intended
as you
Guide.
‘Q-\”:
.
receive an Installation Instructions sheet with your
dishwasher, you can obtain one by calling, toll
free, the GE Answer
—This appliance must be connected to a grounded
metal, permanent wiring system; or an
equipment-grounding conductor must be run
with the circuit conductors and connected to
the equipment-grounding terminal or lead of
the appliance.
—Connect to a properly rated, protected and sized
power-supply circuit to avoid electrical overload.
in the vicinity of this or any other appliance.
●
Use only powder or liquid detergents or wetting
agents recommended for use in a dishwasher.
●
Do not wash plastic items unless marked
“dishwasher safe” or the equivalent. For plastic
items not so marked, check the manufacturer’s
recommendations.
● Load light plastic items so they
dislodged and drop to the bottom of the
dishwasher—they might come into contact with
the
safety precautions, including the
following:
find described in this
●
This dishwasher must be properly
installed and located in accordance
. .
with the Installation Instructions
before it is used, If you did not
●
Do
not store or use combustible
materials, gasoline or other
flammable vapors and liquids
heating element and be damaged.
using this
Use
and Care
not become
before using
purpose,
To minimize the possibility of
●
When loading items to be washed:
A. Locate sharp items so that they are not likely
to damage the door seal, and
B. Load sharp knives with the handles up to
reduce the risk of cut-type injuries.
Do not touch the
or immediately after use.
●
Do not operate your dishwasher unless all enclosure
panels are properly in place.
●
Do not abuse, sit on, or stand on the door or dish
rack of the dishwasher.
●
Close supervision is necessary if this appliance
is used by or near children. Do not allow children
to play inside, on or with this appliance or any
discarded appliance. Dispose of discarded
appliances and shipping or packing material
properly. Before discarding a dishwasher, remove
the door of the washing compartment.
Keep all washing detergents and wetting agents
out of the reach of children, preferably in a locked
cabinet. Observe all warnings on container labels
to avoid personal injury.
●
To minimize the possibility of
electric shock, disconnect this
appliance from the power supply
before attempting any maintenance. NOTE:
Turning the control dial to the OFF position
does not disconnect the appliance from the
power supply. We recommend having a qualified
technician service your appliance.
WARNING—HYDROGEN GAS is
produced by the chemical action
A
water pipes if hot water has not been used for a
period of two weeks or longer. HYDROGEN GAS
IS EXPLOSIVE. To prevent the possibility of
damage or injury, if you have not used hot water
for two weeks or more, or moved into a residence
in which the hot water system may not have been
used for some time, turn on all hot water faucets
and allow them to run for several minutes before
using any electrical appliance which is connected
to the hot water system. This
hydrogen gas to escape, Also, since the gas is
flammable, do not smoke or use an open flame
or appliance during this process.
within your water heater. It can
accumulate in the water heater and/or
heating element during
allow any
SAVE THESE
INSTRUCTIONS
Do not tamper with controls,
3
Page 4
HOW TO OPERATE YOUR
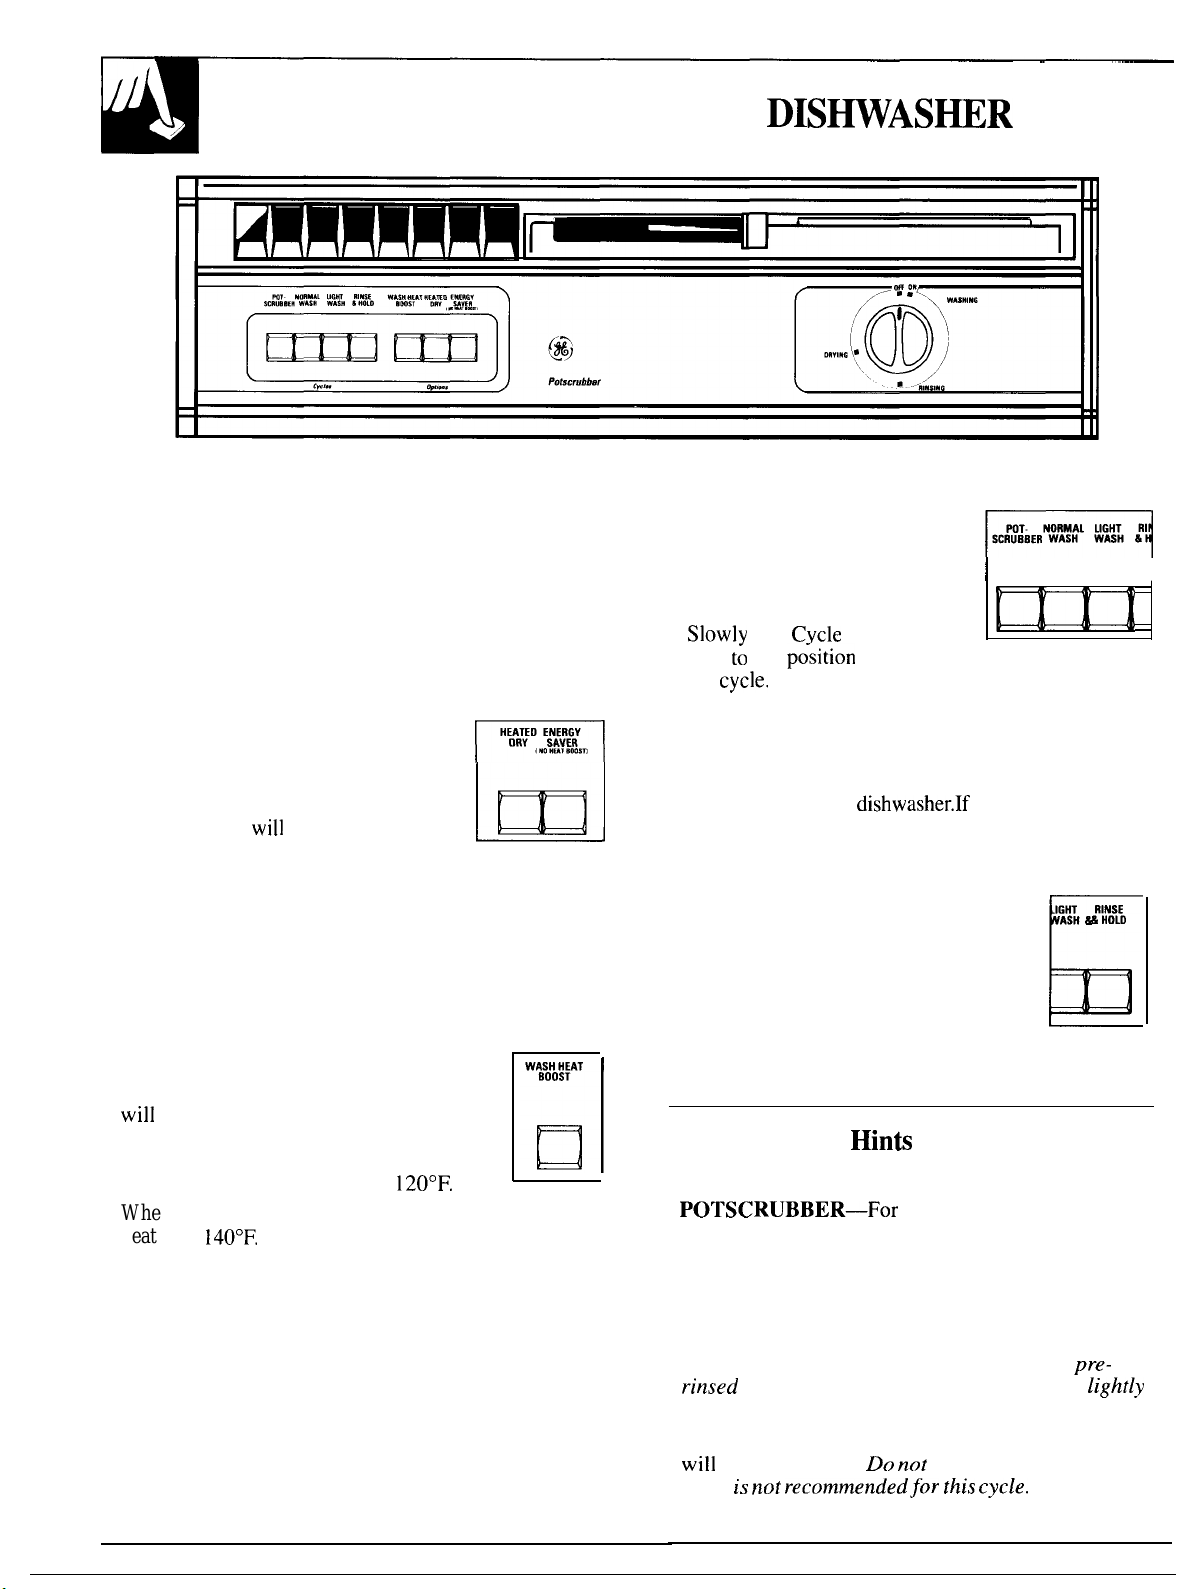
STEP 1.
Load your dishwasher with dishes, silverware,
pots, pans, bowls, etc., according to the Leading section.
STEP 2. Add detergent to the detergent dispenser.
Make sure the Cycle Indicator Dial is at OFF position
before adding detergent. (See Detergent Guide.)
Use rinse aid agent to help prevent spotting.
Occasionally check to insure that rinse agent
container is at least half full. (See How to Use
a Rinse Agent section. )
STEP 3. Select drying option.
HEATED DRYING. Turns the
drying heater on for fast drying.
ENERGY SAVER (no-heat boost).
Turns the drying heater off to save
energy. Dishes
dry naturally
over a longer period such as overnight.
If you need your dishes sooner, open the dishwasher
door after the cycle is complete to reduce the natural
drying time.
Note:
The ENERGY SAVER option will also cancel the
WASH HEAT BOOST. To obtain WASH HEAT BOOST
without HEATED DRY, select only the WASH HEAT
BOOST option. (See Energy-Saving Tips section).
STEP 4. WASH HEAT BOOST Option
WASH HEAT BOOST. This cycle
be extended for 21 minutes while
the dishwasher automatically heats the
water for good washing and drying. The
entering water must be at least
When this option is selected entering water must
beat least
To test water, see How to Test Water
Temperature section.
STEP 5. Select the wash cycle and start the dishwasher.
(See Cycle Selection Hints.)
● For POTSCRUBBER, NORMAL
WASH and LIGHT WASH cycles:
a.
Push selected cycle button.
b. Latch the door.
c.
Dial
the
turn
ON
Indicator
to start
You will hear the motor start. There is a
time delay between start-up and water fill so you will
not hear any wash action right away.
To obtain the benefits of a complete cycle, be careful
that you
necessary
do not turn the dial any further than
to start the
your dishwasher
drains into a food waste disposer, operate the disposer
until it is empty before starting
the dishwasher.
●
For
RINSE & HOLD cycle:
ASH
RINSE
HOLO
a. Be sure door is unlatched.
b. Select ENERGY SAVER
drying option.
c. Slowly turn Cycle Indicator Dial
to the ON position.
d. Latch the door to start the cycle.
Cycle Selection Hink
It is important to follow the Loading instructions.
● POTSCRUBBER—For items such as pots, pans and
casseroles with dried-on or baked-on soils. Everyday
dishes may be included.
● NORMAL WASH—For loads of everyday dishes,
glasses and cookware with medium soils. Designed
to yield high performance on normal soils.
● LIGHT WASH—For dishes that have been
before loading. Also, for washing very
soiled dishes with soils that have not dried on.
● RINSE & HOLD—For rinsing partial loads which
be washed later. Do not use detergent. Delay
Start
recommendedfor
I
4
Page 5
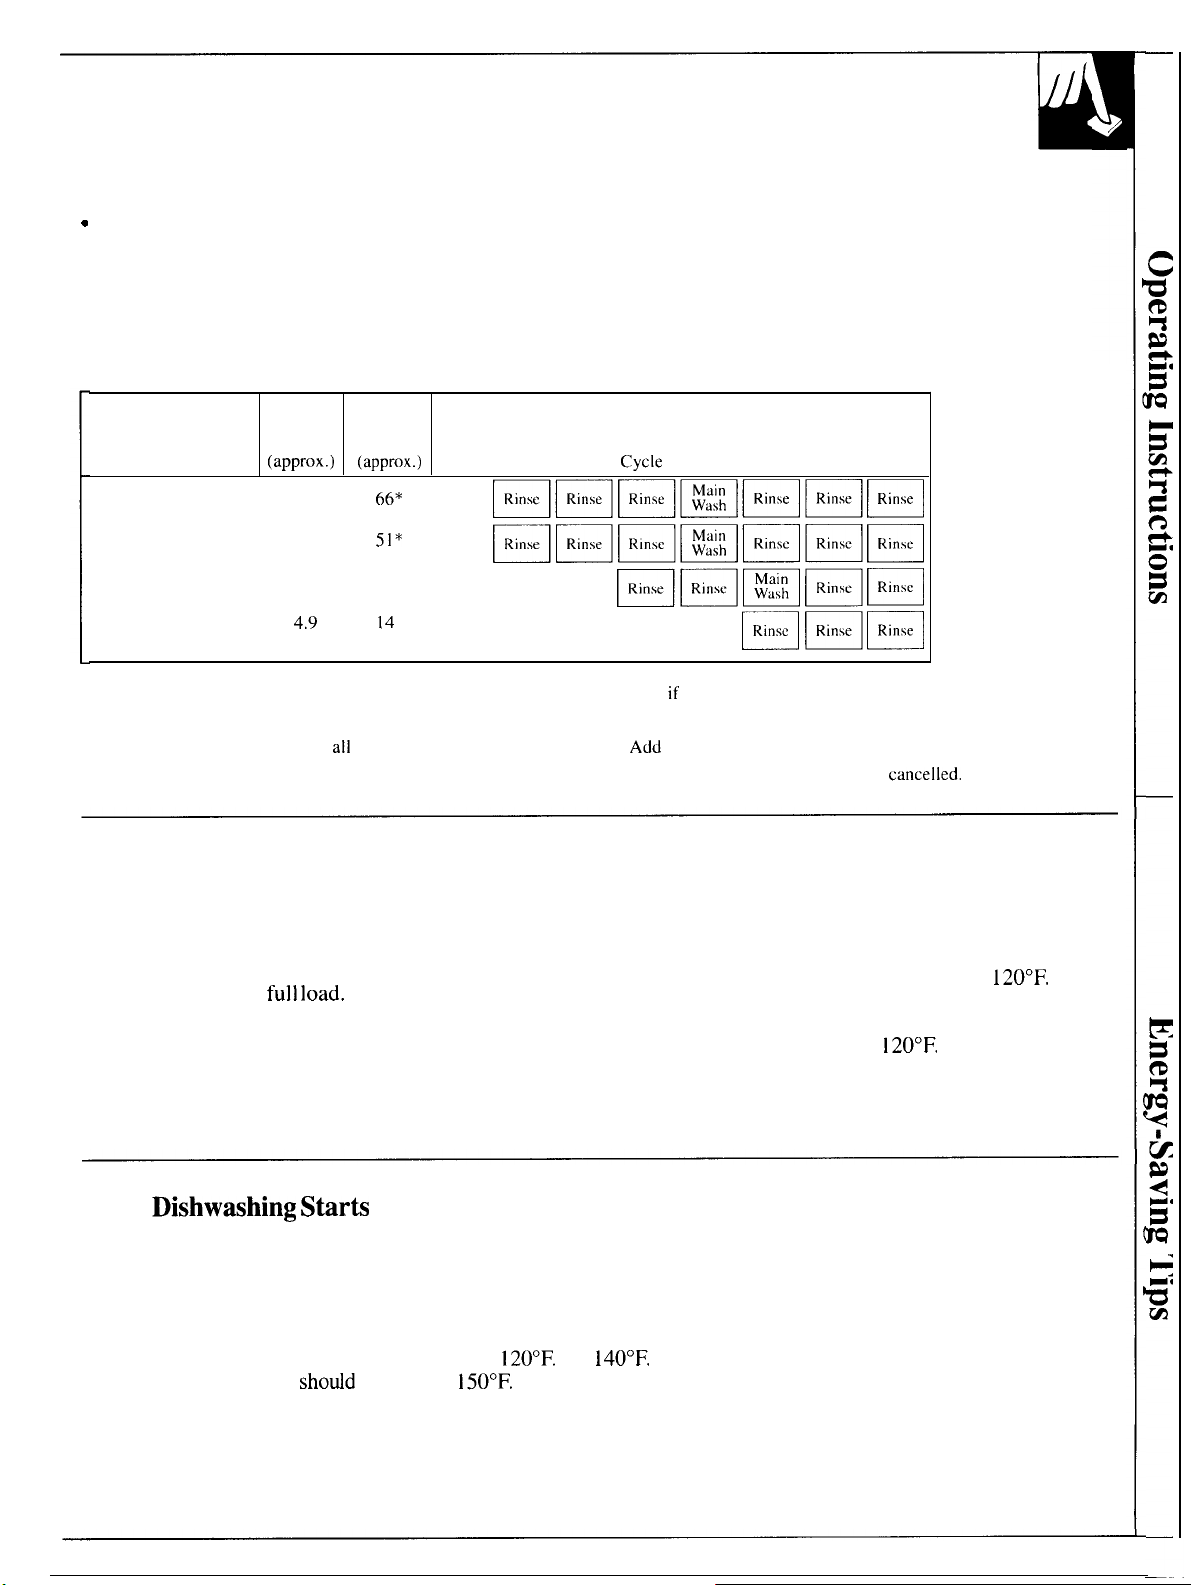
What Happens in Each Cycle
You’11 hear occasional clicking sounds:
● During the drying period:
—Soft food disposer shredding action. —The motor stops.
—Drain valve opening to pump water out.
—Timer control as cycle progresses.
—Detergent cup opening.
Water Use
Wash Cycles (approx.) (approx.)
POTSCRUBBER
NORMAL WASH
LIGHT WASH
Gallons
12.1
12.1
10.3
Wash Cycle
Time
Minutes
51*
— Water vapor comes through the vent by the door
latch during drying and when water is being
pumped out.
Sequence
RINSE & HOLD
*Unextended times. These cycle times will be increased approximately 2 I minutes if WASH HEAT BOOST
Drying Options:
HEATED DRYING. Available on
ENERGY SAVER (No Heat Boost). Drying heater is turned off. Dishes dry naturally. WASH HEAT BOOST is
wash cycles except RINSE & HOLD.
25 minutes to wash cycle time.
Option is selected.
Energy-Saving Tips
● Operate dishwasher only when it’s full. Let the
dishes accumulate in dishwasher. When you put in
only a partial load, use the RINSE & HOLD cycle
to rinse off heavy soils. Be sure to latch the door
when waiting for a
This helps keep soils
moist, easier to remove.
● If you don’t need your dishes right away, use your
ENERGY-SAVER no heat boost feature that turns
the drying heater off automatically. Dishes dry
naturally over a longer period such as overnight.
Good
with HOT Water
To get dishes clean and dry, you need hot water. To help you get water of the
proper temperature, your dishwasher has a WATER HEAT BOOST feature.
When selected (see Operating section), this water heating feature allows you
to turn down your household water heater and save energy if you’re willing to
let the dishwasher run a little longer while it heats water. For good washing
and drying, the entering water must be between
and
dish damage, inlet water
● Always select the cycle that uses the least amount
of water that will remove the soil from the load.
(See the Operating section.)
● Turn your water heater down to deliver
water to your dishwasher and use the WASH HEAT
BOOST Option. Make sure the entering water
temperature is no less than
Water Temperature section).
To prevent
(See How to Test
5
Page 6

How to Test Water Temperature
Higher water temperature is needed to dissolve grease
and activate powder detergents. If the water temperature
is less than
option. See WATER HEAT BOOST section.
Check your water temperature with a candy or meat
thermometer. Turn on the hot water faucet nearest
the dishwasher. Put the thermometer in a glass and
let the water run continuously into the glass until the
temperature stops rising. If the water temperature is
below
Helpful hints:
low, or if your water travels a long distance from water
heater to dishwasher, you may need to set your water
use the WATER HEAT BOOST
adjust your water heater.
If outside temperatures are unusually
How to Use a Rinse Agent
The rinse agent makes water flow off dishes
quicker than usual. This lessens water spotting
and makes drying faster, too.
For best
agent such as JET-DRY brand is recommended.
Rinse agents come in either liquid or solid form.
Your dishwasher uses the liquid form.
How to fill the rinse agent dispenser.
Unscrew the cap. Add liquid rinse agent
it just reaches the bottom of the lip
inside the dispenser opening. Replace the
cap. The dispenser automatically releases
the rinse agent into the
performance, use of a rinse
rinse water.
FULL
heater’s thermostat up. If you have not used hot water
for some time, the water in the pipes will be cold. Turn
on the hot water faucet at the sink and allow it to run
until the water is hot. Then start the dishwasher. If
you’ve recently done laundry or run hot water for
showers, give your water heater time to recover before
operating the dishwasher.
To improve washability if the water is less than
and you cannot adjust your water heater: Select a longer
cycle and fill both detergent cups at least half-full with
detergent.
If you accidentally spill: Wipe up the rinse
agent with a damp cloth. Don’t leave the spill in the
dishwasher. It can keep your detergent from working.
If you can’t find any rinse agent, write:
(“JET-DRY”)
Corporate Centre 1
55 Federal Road
Box
Danbury, CT 06813-1991
How to Choose and Use the Right Detergent
First, use only powder or liquid
detergent specifically made for
use in dishwashers. Other types
will cause
Second, check the phosphate
content.
hard-water materials from forming
spots or film on your dishes. If your
water is hard (7 grains or more),
your detergent has to work harder.
Detergents with a higher phosphate you need extra detergent to get
level will probably work better. If
the phosphate content is low (8.7%
or less), you’ll have to use extra
detergent with hard water.
Phosphate helps prevent
Your water department can tell
you how hard your water is. So
can your county extension agent or
your area’s water softener company.
Just call and ask them how many
“grains”
your water.
How much detergent should you
use?
“hard” or “soft”? With hard water,
dishes clean. With soft water, you
need less detergent.
Too much detergent with soft water
not only wastes money, it can be
harmful. It can cause a permanent
cloudiness of glassware, called
“etching.” An outside layer of glass
is etched away! Of course, this takes
of hardness there are in
That depends. Is your water
6
some time. But why take a chance
when it’s easy to find out the
hardness of your water.
Keep your detergent fresh and
Under the sink isn’t a good place to
store detergent because there is too
much moisture. Don’t put powder
detergent into the dispenser until
you’re ready to wash dishes, either.
won’t be fresh OR dry.)
If your powder detergent gets
or lumpy, throw it away.
detergent often won’t dissolve. If you
use a liquid dishwasher detergent,
these precautions are not necessary
because liquid detergents don’t
“lump” as they age or come
in contact with moisture.
Old
Page 7

You’ll find two detergent dispensers on the inside
door of your dishwasher. Two, because some cycles
use two washes.
MAIN CUP
Close the main cup.
NOTE: To open detergent cup after it has
been closed, unlatch the
the Cycle Indicator Dial
to the OFF position.
When the closed cup
contains soap it is
best that the door
be in a partially
open position before
\
rotating the Cycle Indicator
Dial. This will
of detergent and rinse aid
reduce the amount cLosE
spillage into the tub.
ROTATE AND
Detergent Usage Guide
CYCLES Main Cup Open Cup Main Cup Open Cup
POTSCRUBBER
NORMAL WASH
LIGHT WASH
RINSE & HOLD
*12 grains and up is extremely hard water. A water softener is recommended. Without it, lime
can build up in the water valve. The water valve may stick while open and cause flooding.
I I I
(powder or liquid)
WATER
(O-3 grains hardness)
Half Full
Half Full None
Use no detergent Use no detergent
Half Full
MEDIUM WATER
(3-7 grains)
Completely
Full
Half Full
HARD WATER
(7-12 grains*)
Main
Half Full Completely
Full
None
Completely
Full
Use no detergent
Main Cup holds
Filled Open Cup holds 2 tablespoons.
Open
Completely
None
tablespoons;
How to Prepare the Dishes for Washing
[f this is your first dishwasher, or if you’re replacing 3. Try to remove food scraps and
a much older model, you may wonder how much
preparation your dishes need. Actually very little.
Pre-rinsing of normal food soils is not necessary. With difficult to wash and may not come clean in the
common sense and a little practice you’ll soon know
what foods to remove. Here are some guidelines:
1. Scrape off bones, seeds, skins, toothpicks and other
hard solids. It is also best to remove hard-shelled Other foods not mentioned may also need to be
vegetables, meat trimmings, leafy vegetables and removed from your dishes. You may also want to
crusts. Remove excessive quantities of oil or grease.
2. Remove large quantities of any food. Your
dishwasher has a built-in soft food disposer that
pulverizes soft food bits and flushes them away.
It can handle small amounts of soft foods, but
large amounts will be difficult to handle.
dishwasher before soil has a chance to dry and
become hard. Dishes with dried-on soil are more
NORMAL WASH cycle. Remember to use your
RINSE & HOLD cycle for small “holding” loads.
NOTE: The foods mentioned are examples only.
consider removing foods such as mustard, mayonnaise,
vinegar, lemon juice and other foods that can cause
discoloration of stainless steel if allowed to remain
on dishes for a long period of time.
dishes in
7
Page 8

HOW TO LOAD YOUR DISHWASHER
This is a
Make sure dishes are properly loaded to insure that
water can reach the soiled surfaces. The wash arm in
the bottom sprays water up. The tower that rises in
the center sends water out over the dishes to wash the
items in the upper rack. A spray arm in the top washes
down also. Make sure to
so the upper wash arm is not blocked.
mixed load, the most
tall items to the outside
type
HOW TO LOAD THE TOP RACK
&
WATCH OUT FOR THIS.
The washer tower rises through the center of the
bottom rack during the wash and rinse portions of
the cycle. Don’t block it or load tall things next to it.
be careful not to let a portion of an item such
as a pot or dish handle extend through the bottom
rack. This could block the wash arm and cause poor
washing results.
The top rack is best for glasses, cups and saucers.
Cups and glasses fit best along the sides. This is the
place for dishwasher-safe plastics, too. Make sure
small plastic items are lodged in tightly so they can’t
onto the
stemware so that it cannot move easily. Don’t let the
glasses touch each other.
element. Arrange
8
Sauce pans, mixing bowls and other small items may
be placed—face down—in the top rack. The top rack
is handy for all kinds of odd shapes.
Page 9

HOW TO LOAD
,..’
BOTTOM
Fit plates
pots and bowls along the sides, in corners or in the back.
Heavily
pans and racks along the edge.
saucers between the pins. Load platters,
pots, pans and casseroles MUST be
in the bottom rack, facing down. Prop broiler
As shown here this plate is being placed with
side facing the center of the rack so water and detergent
from wash arm can reach soiled surfaces.
Put flatware in the removable basket with handles up to
protect
don’t n;st together. Distribute evenly.
such as measuring spoons and lids from small containers,
are not recommended for automatic
placed in the dishwasher, they should go in
silverware basket with silverware on top.
Precaution!
Take out anything that may fall or extend through
bottom of the basket.
hands. Mix knives, forks and
plastic
soiled
any item
so
bottom of
9
Page 10

WHAT YOU CAN USUALLY WASH SAFELY
YOUR
Material
Aluminum
Stoneware
Crystal YES
Non-dishwasher
items—such
as electronic
air cleaner
filters, furnace
filters, paint
brushes, etc.
Glass
Iron
Pewter
Plastics
Stainless steel
Sterling Silver
and Silver plate
Non-stick
coatings
Wood
Usually
Safe
YES
NO
YES
NO
NO
YES
YES
YES
YES
NO
NO
Exceptions (not safe) Special Instructions
Some
Some
colored anodized
aluminum can fade.
Antique, metal-trimmed,
hand-painted or over-the-glaze
patterns fade. Gold leaf
will discolor.
Antique, metal-trimmed or
hand-painted patterns fade.
Gold leaf
glass may yellow.
Iron will rust.
Pewter tarnishes.
Don’t put in same silverware
basket with stainless steel.
Contact between
damage silver.
Don’t wash copper utensils in
the same load. Silver may get a
brown
Adhesive used to attach some
hollow-handle knives can loosen.
Tin can rust.Tin
Wood can warp, crack or lose
its finish with any type of washing.
discolor.
can
darkening or spotting
scouring with soap-filled steel wool pads.
If in doubt, check with the manufacturer. Or test wash
one piece daily for at least a month. Compare with the
rest of the set.
Load securely to prevent movement. Check your
manufacturer’s instructions for your crystal.
Do not wash in dishwasher. Damage to dishwasher
and discoloration or staining of dishwasher may result.
If it doesn’t say DISHWASHER
the top rack before
Rinse if not washing immediately. Salty or acid foods
can stain if left on.
Rinse if not washing immediately. Salty or acid foods can
stain if left on. Dry detergent can cause difficult-to-remove
black spots. Place in back section of silverware basket to avoid
exposure to detergent from the detergent cup.
After washing, wipe the non-stick coating area with
vegetable oil to keep it from losing its non-stick quality.
possible. Remove by
test one piece in
an entire set.
Forget a dish? Here’s when you can add it.
Add dishes any time during the RINSE & HOLD
cycle. With other wash cycles, you can add dishes
at any time BEFORE the main detergent wash portion
of the cycle.
However, opening the door during any cycle
lessens cleaning power. So try to load everything
at the beginning.
Here’s how to add a forgotten dish:
1. Push the door
to the
Washing will stop.
2. Wait a few seconds until the water calms. Then
open the door. WARNING: Hot vapor may rise
from opened door.
3. Add dishes you’ve forgotten.
4. Close the door and push the latch to the far right.
When the door is locked, washing will continue.
Page 11

USER MAINTENANCE INSTRUCTIONS
Clean the control panel with a lightly dampened
cloth. Dry thoroughly. Do not use abrasives or
sharp objects on the panel. They can damage it.
Clean the outside with a good appliance polish
wax. The outside cabinet finish is durable, but it
can scratch. So use no scouring pads, or harsh or
gritty cleaners.
Not Using Your Dishwasher in
Winter? Protect Against Freezing.
If your dishwasher is left in an
unheated place during the winter,
PUMP COVER SCREWS
ask a service technician to:
● Cut off electrical power to the
dishwasher. Remove fuses or trip
circuit breaker.
● Turn off the water supply.
● Disconnect the water inlet line
from the water valve.
Appliance Polish Wax & Cleaner (Cat. No.
Parts Marts.
The inside usually takes care of itself. If it should
ever need cleaning, use a mild cleansing powder.
Scouring pads and harsh cleaners can mar the finish.
●
Drain water from the inlet 1
and water valve. (Use a pan to
catch the water.)
Reconnect the water inlet line to
●
-
the water
● Remove the plastic pump cover
in the tub bottom and use a
sponge to soak up water in
the rubber boot.
Built-in Dishwashers Often
An air gap is a plumbing device.
It protects your dishwasher against
water backing up into it if a drain
clogs. The air gap is not a part of
the dishwasher. And you may not
even have one. Not all plumbing
codes require air gaps.
Use an Air Gap. Keep It Clean.
TWO TYPES OF Alfi’G~PS:ll
Check the air gap any time your
dishwasher isn’t draining
If you have an air gap, check it at
once a month. IT IS NOT
PART OF YOUR DISHWASHER.
IT IS NOT COVERED IN YOUR
WARRANTY.
The air gap is easy to
With most types, first turn off the
dishwasher, then
off the chrome
cover. Then unscrew the plastic cap
and check for any buildup of grit.
A toothpick makes cleaning easy.
11
Page 12

HOW TO CHANGE COLOR PANELS
If you are redecorating,
you can change your
dishwasher’s front
panels to match or
blend with your new colors.
The panel is held in place by
the door trim
the panel below the door. Each
side of each panel is a different color. Or you
can paint a panel with the color of your own choice.
NOTE: Do not operate the dishwasher while changing
panels or when lower access panel is removed.
How to change door panel insert:
1. Take out trim screws on either side of
the dishwasher door. Remove the side trim.
2. Slide out the insert panel.
3. Put the color you want in front.
4. Replace the insert panel, side trim and screws.
the trim on
maybe sharp).
How to change the lower panel:
1.
Remove panel attachment screws.
2. Remove the entire panel.
3. Take out screws and remove the top trim.
4. Slide the door panel out.
5. Turn the panel around and put the color you want in
front.
6. Replace the lower panel, top trim and screws.
7. Replace the entire panel and attachment screws.
A wood panel trim kit contains trim and instructions
for adding a decorative wood door panel and lower
access panel no thicker than 1/4” to match kitchen
cabinets. The kit is available at no extra cost.
(Specify
Order from:
GE Appliances
c/o
4706 Allmond Ave.
Louisville, KY 40209
Manufacturing
PROBLEM
DISHWASHER
WON’T RUN
UNUSUAL NOISE
DISHES DON’T DRY
UNCLEAN DISHES
AND FLATWARE
QUESTIONS?
USE THIS PROBLEM SOLVER
POSSIBLE CAUSE
A fuse in your home maybe blown, or the circuit breaker tripped. Replace fuse or
reset circuit breaker. Remove any other appliances from the circuit.
Utensils may not be secure on rack pins, or something small may have dropped from
the rack. Water is causing utensils to rattle. Make sure everything is securely placed
in dishwasher.
Make sure inlet water temperature is correct. (See How to Test Water Temperature
section).
Unload the bottom rack first. Water from dishes in the top rack maybe spilling into
the bottom rack,
Check for improper loading. Dishes shouldn’t nest together. Avoid overloading.
Check the rinse agent dispenser to see that it’s not empty.
Check inlet water temperature. It should be at least
Water Temperature section).
Water pressure may be temporarily low. Turn on a faucet. Is water coming out slower
than usual? If so, wait until pressure is normal before using your dishwasher.
(To test, see How to Test
12
Plugged air gap. (See Care and Cleaning section).
Improper rack loading. (See Loading section).
Page 13

PROBLEM
POSSIBLE CAUSE
DETERGENT CUP
LID WON’T LATCH
DETERGENT
OR
BROWN FILM
SPOTS AND FILMING
ON GLASSES AND
FLATWARE
Cycle
Indicator
unlatch the door and
must be
for cup lid to close and latch properly. If you
it to dry your dishes,
Cycle Indicator Dial does
not advance by itself.
Tea or
coffee can stain
bleach and 3 cups warm water.
An overall yellow or brown film on dishes or glassware can be caused by iron
deposits in water. A special filter in the water supply line is the only way to correct
this problem. Your water softener company can tell you about the filter.
Yellow film on sterling silver results when you wash copper utensils in the same load.
Silver
Spotting can be caused by
●
Extremely hard water. (See How to Choose and Use Detergent section).
●
Low inlet water temperature. (See How to Test Water Temperature section).
Overloading the dishwasher.
●
Improper loading. (See Loading section).
●
Old or damp powder detergent.
●
Phosphate level in detergent too low. (See How to Choose and Use Detergent section).
●
Rinse agent dispenser empty. (See How to Use a Rinse Agent section).
will usually remove this stain.
Remove the stain by hand, using a solution of
cup
these things:
. Too little detergent. (See How to Choose and Use Detergent section).
Local water conditions and personal preferences vary. Try several brands of
detergents to find one that gives the best results for you. A liquid dishwasher
detergent may help reduce filming.
To remove stubborn spoh and film from glassware:
1. Remove all metal utensils from the dishwasher.
2. Do not add detergent.
3. Select POTSCRUBBER cycle.
4. Start the dishwasher and allow to run for 18 to 22 minutes. The dishwasher will
now be in the main wash.
5. Then open the door and pour 2 cups (500 ml) of white vinegar into the bottom of
the dishwasher.
6. Close the door and
If vinegar rinse doesn’t work:
to complete the cycle.
Repeat as above, except use 1/4 cup (60 ml) of citric
acid crystals instead of vinegar. (Most drugstores carry citric acid crystals. If yours
doesn’t, call GE Factory Service).
Using a vinegar or citric acid crystal rinse more than twice a month? Consider a home
water softener.
(continued next
13
Page 14

PROBLEM
(continued)
PROBLEM
DETERGENT LEFT
IN DISPENSER CUPS
CLOUDINESS ON
GLASSWARE
CHIPPING OF CHINA
BLACK OR GRAY
MARKS ON DISHES
POSSIBLE CAUSE
Water may not be reaching the detergent cups. Move dishes that maybe blocking
detergent cup.
The dispenser cover may not be opening or may be blocked by improperly loaded
items. If you used a powder detergent, open the cup and remove any caked-on
detergent. If the cup still doesn’t open automatically, call for service.
Detergent may be old. If the powder detergent is hard or caked in the box, throw it
away. The detergent may not be working
If vinegar or citric acid crystal rinse doesn’t work, the cloudiness is “etching.”
The film cannot be removed.
It can be prevented:
Use less detergent if you have soft water. Wash glassware in
Try another brand.
the shortest cycle that will get them clean.
Water temperature entering dishwasher exceeds
Rough handling can cause chipping. Load with care. Make sure glassware and china
are secure and can’t jar loose. (See Loading section). Make sure
stemware will clear the top of the tub when you push the rack into the dishwasher.
glasses and
Always use the top rack for delicate items.
Aluminum utensils often leave marks when they rub against dishes. Remove marks
with a mild abrasive cleanser.
SMALL AMOUNT OF
WATER STANDING
IN THE BOTTOM
OF THE TUB
WATER WON’T PUMP
OUT OF THE TUB
SUDS
THE TUB
DISHWASHER
LEAKS
MOTOR HUMS
Water around the outlet on the tub bottom at the back of the tub is normal. It is clean
water. It’s there to keep the water seal lubricated.
If the entire bottom of the tub has water, you may have a drain problem. Clean the air
gap,
if you have one. (See Care and Cleaning section).
Check the kitchen sink. Is it draining well? You may need a plumber.
If dishwasher drains into disposer, run disposer to clear. Be sure disposer is not
clogged.
detergents are not meant for dishwashers. USE ONLY AUTOMATIC
DISHWASHER DETERGENTS TO AVOID
To remove suds from the tub:
Open the dishwasher. Let suds evaporate. Add 1 gallon
of cold water to the tub. Close and latch the dishwasher. Pump out water by slowly
turning the control dial until a drain period is reached.
Repeat if necessary.
Suds can cause unit to ovetiow. That’s why it’s so important to use a detergent that’s
designed for automatic dishwashers.
Spilling the rinse agent can cause foam during washing. This can lead to overflowing.
Wipe up accidental
of rinse agent with a damp
Dishwasher has not been used on a regular basis.
If
you do not use your dishwasher often, set it to fill and pump out once every week.
This will help keep the
If you need more help... call, toll free: GE Answer Center@ 800.626.2000 consumer information service
moist, and the garbage disposer
14
Page 15

Be There
With the purchase of your new GE appliance, receive the
assurance that if you ever need information or assistance
from GE, we’ll be there.
In-Home Repair
Service
888-GE-CARES
AGE Consumer Service professional
will provide expert repair service,
scheduled at a time that’s convenient
for you. Many GE Consumer Service
company-operated locations offer you
service today or tomorrow, or at your
convenience
days). Our factory-trained
your appliance inside and out—
know
so most repairs can be
one visit.
a.m. to
a.m. to
p.m.
p.m. Satur-
in just
Service Contracts
You cart have
GE Consumer Service will still be
there after your warranty expires. Purchase a GE contract while your warranty is still in effect and you’ll receive
a
year contract, you’re assured of future
service at today’s prices.
secure feeling that
discount. With a
Center
a
800.626.2000
Whatever your question about any
major appliance, GE Answer Cente@
information service is available to
help. Your cdl—and your question—
will be answered
courteously And you can
time. GE Answer
open 24 hours a
days a week.
Device for the Deaf
any
800-626-2002
own appliances
parts or accessories sent directly to
their home. The
vides access to over 47,000 parts... and
all GE Genuine Renewal Parts
fully warranted. VISA, MasterCard
User maintenance instructions
in this
dures intended to be performed by
any user. Other servicing
be referred to
vice personnel. Caution must be
exercised, since improper servicing
may cause unsafe operation.
to service their
needed
parts system pro-
cover proce-
ser-
For Customers
Special Needs...
800.626.2000
Upon request, GE will provide Braille
controls for a variety of GE appliances,
and a brochure to assist in planning a
barrier-free kitchen for persons with
limited mobility To obtain these items,
free of charge,
Consumers with impaired hearing
or speech who have access to a
or a conventional teletypewriter may
to request information or service.
800.626.2000.
(800-833-4322)
Page 16

YOUR GE DISHWASHER WITH
WARRANTY
Save proof of original purchase date such as your sales slip or
INTERIOR
check to establish warranty period.
II
II
I
I
WHAT IS COVERED
FULL ONE-YEAR WARRANTY
For one year from date of original
purchase, we will provide, free of
charge,
your home to repair or replace
part
because of a manufacturing defect.
FULL TEN-YEAR WARRANTY
For ten years from date of original
purchase, we will provide, free of
charge,
your
home to repair or replace
to contain water because of
a manufacturing defect such as
cracking, chipping, peeling
or rusting.
WHAT
and sewice labor in
dishwasher that
or door /iner
NOT COVERED
fails
if it
LIMITED SECOND-YEAR
WARRANTY
For the second year from date of
original purchase, we will provide,
free of charge, replacement parts for
any part of the Water Distribution
System
(as illustrated below) that
fails because of a manufacturing
defect. Associated inlet and drain
plumbing
are not covered by
this warranty. You pay for the
labor charges.
Power Shower
Power Tower
Wash arm
(spray arm)
Boot
Soft Food Disposer
-1
TM
Motor
Water Distribution System
●
you how to use the product.
Read your Use
If
then have any questions
and Care material.
about operating the-product, please
contact your dealer or our
Consumer Affairs office at the
address below, or call, toll free:
GE Answer Center”
800.626.2000
consumer information service
●
Improper installation.
If you have an installation problem,
contact your dealer or installer. You
are responsible for providing
Hose
Hub
connection
assembly
This warranty is extended to
the original purchaser and any
succeeding owner for products
purchased for
the
48 mainland states, Hawaii and
Washington,
home use in
In Alaska the
warranty is the same except that it is
LIMITED because you must pay to
ship the product to the service shop
or for the service technician’s travel
costs to your home.
All warranty service will be
provided by our
Centers or by our authorized
Customer
normal working hours.
Should your appliance need
beyond, call 800-GE-CARES
(800-432-2737).
Sewice
adequate electrical, plumbing, and
other connecting facilities.
● Replacement of house fuses or
resetting of circuit breakers.
●
Cleaning or servicing of air gap
device in drain line.
● Failure of the product if it is used for
other than its intended purpose or
used commercially.
●
Damage to product caused by
accident, fire, floods or acts of
WARRANTOR IS NOT RESPONSIBLE
FOR CONSEQUENTIAL DAMAGES.
I
,
book
Part No.
I Pub
Some states do not allow the exclusion or limitation of incidental or consequential damages, so the above limitation or exclusion
may not apply to you. This warranty gives you specific legal rights, and you may also have other rights which
To know what your legal rights are in your state, consult your local or state consumer affairs office or your state’s Attorney General.
from state to state
Warrantor: General Electric Company
If further help is needed concerning this warranty, write:
Manager—Consumer Affairs, GE Appliances, Louisville, KY 40225
printed on recycled paper.
49-5583
1
 Loading...