

Page 1
!
❑
SafetyInstructions... ..... ...... ..... ......3
OperatingInstructions,Tips
China, Crystal, Sterling ... ...... ..... ...... ..... ......1O
Cycle Features ... .... ....... ..... ..... ..... ...... ..... ....4. 5
Cycle Selection Chart ...... ..... ...... .... ...... ..... ....5
Detergent Guide ....... ..... ...... ..... ...... .... ...... ......7
Dispenser Cups .. ...... ..... ...... ..... ..... ...... ..... .......7
Drying Options ... ..... ...... ..... ...... .... ...... ..... ....4. 5
Features... ..... ...... ..... ...... ..... ..... ...... ..... ...... ....4. 5
Loading ..... ..... ..... ...... ..... ...... ..... ...... ..............8. 9
Operating Instructions ...... ...... ..... ..... ....4.5
Rinse Agent ...... .... ...... ..... ...... ..... ..... ...... ..... ......6
Water Temperature ...... ..... ..... ..... ...... ..... .......6
Dishwasher
●
p
✎✎✎✎
Problem Solver.......................l3- I 5
More questions ?...call
✎✌
GEAnswerCentera80~626.2000
Preparation
Front Panel Change . ...... ..... ...... ..... ..... ...... ...l 2
Consumer Services...................l9
Appliance Registration..., .. ..... ...... ..... ...... ......2
Important Phone Numbers.,, .... ...... ..... ......l9
Model and Serial Numbers .... ..... ...... .... .......2
Repair Sewice .. ...... .... ...... ..... ...... ..... ..... ...... ..l8
Warran~ .... ..... ..... ...... .... ...... ..... ..... Back Cover
CareandCleaning
Air Gap...... .... ...... ..... ..... ...... ..... ...... .... ...... ..... ..
Winter Storage ..... ..... ...... ..... ..... ...... ..... ........11
To obtain a Spanish language
version of his book, call
GE Answer Center Q
800.626.2000
consumer information service.
1
GEAppliances
11
Para obtener la versi6n en
espafiolde este manual,
name a
GE Answer Center,@
servicio de informaci6n
para el consumidor,
tel~fono800.626.2000.
Models: GSD750
J
GSD780
Page 2
A note to consumer—
We’d like to thank you and congratulate you for making the wise decision in purchasing your dishwasher.
This User Guide is designed to be kept near your dishwasher at all times for quick and easy reference. Features
may vary on some dishwasher models. Please read the following tips to insure your dishwasher is operating at its
best performance.
We care about you and your appliance and we want your dishwasher to do itsjob~or you.
● HOT WATER—Your dishwasher
m
+
needs hot water for best results. Water
entering the dishwasher should be at
least 120°F.but your dishwasher
performs BETTER with HIGHER
water temperatures not to exceed 150”F.
GWATERHARDNESS-The hardness
of thewaterplaysan important part in
how wellyourdishwashercleans.In
areaswhere waterisvery hard (12grains
ormore),it maybe necessaryto install
a watersoftener.Ifyoudo notknowthe
hardnessof yourwater supply,contact
yourlocalwaterdepartment.
● DETERGENTS-Only usedetergents
labeledfor usein automaticdishwashers.
A Never uselaundrydetergentsor
liquidsoaps..that willcauseoversudsing
and leaks.The amountofdetergentyou
usedependson the waterhardnessand the
amountof soilon yourdishes.In most
cases,detergentamountsshouldbe
increasedforhardwater andheavysoil.
‘Q-t”:b
>+ ..
.=.
@
Keep it handy for answers to your questions.
If you don’t understand something or need more help, call:
GE Answer Center@
800.626.2000
24 hours a day, 7 days a week.
~
Savetimeandmoney.
Beforeyou requestservice...
Check the Problem Solver in the back of this guide. It lists
causes of minor operating problems that you can correct
yourself.
Beforeusingyourdishwasher,
readthisguidecarefully.
It is intended to help you operate and
maintain your new dishwasher properly.
Ifyou receiveda
I damageddishwasher...
Immediatelycontactthe dealer(or
builder)thatsoldyouthe dishwasher,
~!
Q
&
w
● RINSEAGENT—should alwaysbe used:
— to reduce water spotting.
— to improve drying.
Always check and refill the rinse agent
when necessary.
● FOR BEST RESULTS—Thecycles
and the options you choose have an
effect on the results you get. The
following are examples. (Please, see the
Operating Instructions, Tips for more
information.)
QTEMP BOOST OPTION—
— use with heavily soiled loads.
— extends cycle to heat water for best
washing and drying.
● POTS PANS CYCLE—
— use with dried or baked-on heavily
soiled loads.
Writedown the model
andserialnumbers.
You’llfindthemon a labelfastenedtothe
tub walljust inside the dishwasherdoor.
These numbers are also on the Consumer Product
Ownership Registration Card that came with your
dishwasher. Before sending in this card, please write
these numbers here:
ModelNumber
SerialNumber
Use these numbers in any correspondence or service calls
concerning your dishwasher.
We’11be there...
No matter what major appliance you buy from us, you
always get more than a quality product. Youreceive the
added assurance that, should you ever need our help, we’ll
be there.
We ask that you please be sure to read all the Important
Safety Instructions before operating your new appliance
to insure your safety.
2
Page 3
mRTANT SAFETYINSTRUCTIONS
Readallhtructiom beforew;ngttis appliance.
WARNING-Whenusingthis
appliance,alwaysexercisebasic
A
● Usethis applianceonlyforitsintended
purpose, as you will find describedin this
Useand Care Guide.
‘Q:;$
...*.‘
a
receiveanInstallationInstructionssheetwithyour
dishwasher,youcanobtainonebycalling,toll
free,theGEAnswerCenter~800.626.20M.
—Thisapp~iancemustbeconnectedtoa grounded
metal,permanentwiringsystem;oran
equipment-groundingconductormustberun
withthecircuitconductorsandconnectedto
theequipment-groundingterminalorleadof
theappliance.
—Connecttoaproperlyrated,protectedandsized
power-supplycircuittoavoidelectricaloverload.
i
=
..= flammablevaporsand liquids
in the vicinityofthis oranyotherappliance.
● Use onlypowderorliquiddetergentsorwetting
agentsrecommendedforuseinadishwasher,
● Donotwashplasticitemsunlessmarked
“dishwashersafe”
itemsnotsomarked,checkthemanufacturer’s
recommendations.
● Loadlightplasticitemssotheywillnot
becomedislodgedanddroptothebottomof
thedishwasher—theymightcomeintocontact
withtheheatingelementandbedamaged.
safetyprecautions,includingthe
following:
● Thisdishwashermustbeproperly
installedandlocatedin accordance
,..
withtheInstallationInstructions
beforeitisused.Ifyoudidnot
● Donot storeorusecombustible
materials,gasolineor other
or theequivalent,Forplastic
Tominimize the possibility of injury.
● Whenloadingitemstobewashed:
A.Locatesharpitemssothattheyarenotlikely
todamagethedoorseal,and
B,Loadsharpkniveswiththehandlesupto
reducetheriskofcut-typeinjuries.
● Donottamperwithcontrols.
4Donottouchtheheatingelementduringor
immediatelyafteruse.
● Donotoperateyourdishwasherunlessallenclosure
panelsareproperlyinplace.
● Donotabuse,siton,orstandonthedoorordish
rackofthedishwasher.
● Closesupervisionisnecessaryifthisappliance
isusedbyornearchildren.Donotallowchildren
toplayinside,onorwiththisapplianceorany
discardedappliance.Disposeofdiscarded
appliancesandshippingorpackingmaterial
properly.Beforediscardingadishwasher,remove
thedoorofthewashingcompartment.
● Keepallwashingdetergentsandwettingagents
outofthereachofchildren,preferablyina locked
cabinet.Observealiwarningsoncontainerlabels
toavoidpersonalinjury.
● Tominimizethepossibilityof
/“
$%
b~foreattemptinganymaintenance.NOTE:
TurningthecontroldialtotheOFFposition
doesnotdisconnecttheappliancefromthe
powersupply.Werecommendhavingaqualified
technicianserviceyourappliance,
*Do~ot attemptto repairor replaceanypart
of yourdishwasherunlessit is specifically
recommendedin thisguide.
shouldbereferredto aqualifiedtechnician.
A
waterpipesifhotwaterhasnotbeenusedfora
periodoftwoweeksorlonger.HYDROGENGAS
ISEXPLOSIVE.Topreventthepossibilityof
damageorinjury,ifyouhavenotusedhotwater
fortwoweeksormore,ormovedintoaresidence
inwhichthehotwatersystemmaynothavebeen
usedforsometime,turnonallhotwaterfaucets
andallowthemtorunforseveralminutesbefore
usinganyelectricalappliancewhichisconnected
tothehotwatersystem.Thiswillallowany
hydrogengastoescape.Also,sincethegasis
flammable,donotsmokeoruseanopenflame
orapplianceduringthisprocess.
electricshock,disconnectthis
appliancefromthepowersupply
Allotherservicing
WARNING-HYDROGENGAS
isproducedbythechemicalaction
withinyourwaterheater.It can
accumulateinthewaterheaterand/or
SAVE THESE
INSTRUCTIONS
Page 4
HOWTOOPERATEYOURDIS~ASHER
Yourdishwasher is designed to give maximum
performance on loads with normal and heavy soils.
Youmay find that many of your dishes have lighter
soils than normal; if this is the case you can save
water and energy by selecting a cycle other than
NORMAL WASH.
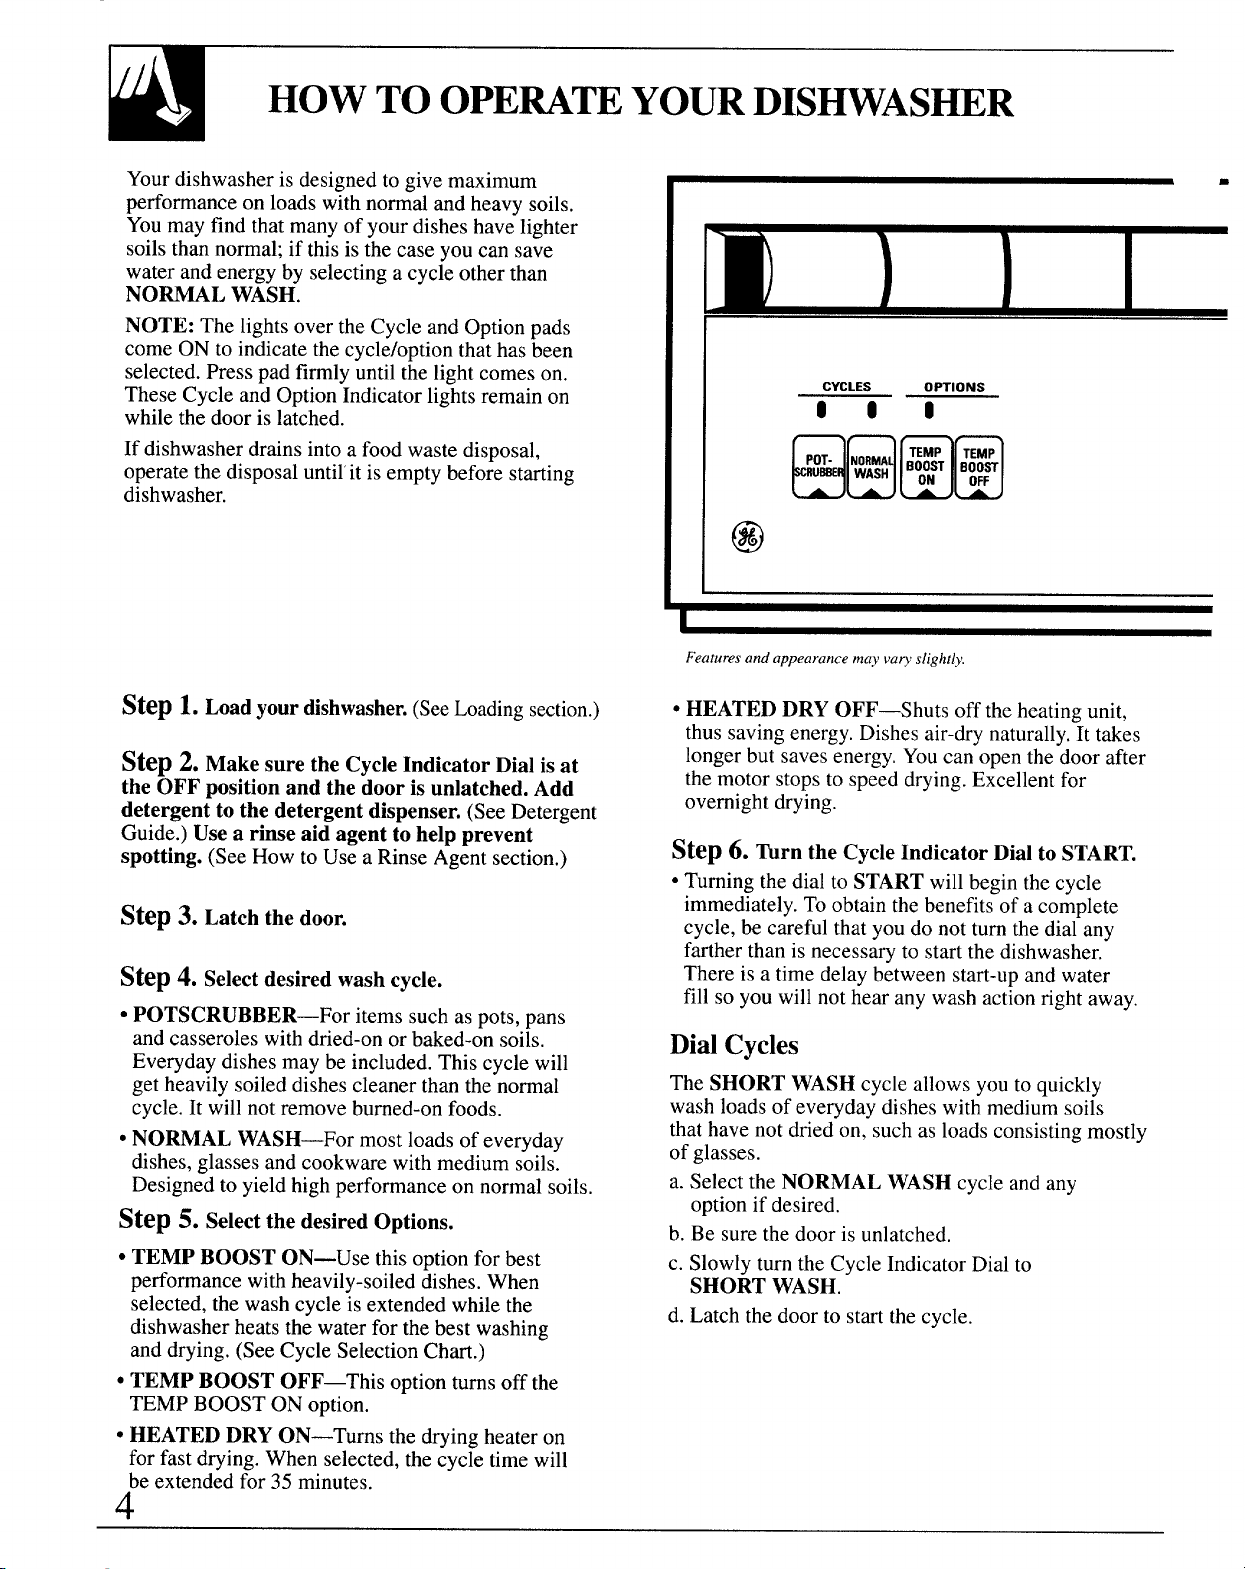
NOTE: The lights over the Cycle and Option pads
come ON to indicate the cycle/option that has been
selected. Press pad firmly until the light comes on.
These Cycle and Option Indicator lightsremain on
while the door is latched.
If dishwasher drains into a food waste disposal,
operate the disposal until it is empty before starting
dishwasher.
CYCLES
000
Featuresand appearance may va~ slightly.
OPTIONS
Step
1.Loadyourdishwasher.(SeeLoadingsection.)
Step z. Make sure the Cycle Indicator Dial is at
the OFF position and the door is unlatched. Add
detergent to the detergent dispenser. (See Detergent
Guide.) Use a rinse aid agent to help prevent
spotting. (See How to Use a Rinse Agent section.)
Step 3. Latch the door.
Step x. Select desired wash cycle.
● POTSCRUBBER—For items such as pots, pans
and casseroles with dried-on or baked-on soils.
Everyday dishes may be included. This cycle will
get heavily soiled dishes cleaner than the normal
cycle. It will not remove burned-on foods.
● NORMAL WASH—Formost loads of everyday
dishes, glasses and cookware with medium soils.
Designed to yield high performance on normal soils.
Step 5. Select the desired Options.
● TEMP BOOST ON—Use this option for best
performance with heavily-soiled dishes. When
selected, the wash cycle is extended while the
dishwasher heats the water for the best washing
and drying. (See Cycle Selection Chart.)
● TEMP BOOST OFF—This optionturnsoff the
TEMPBOOSTON option.
● HEATED DRY ON—Turnsthe dryingheateron
forfastdrying.Whenselected, thecycle timewill
be extendedfor 35 minutes.
4
● HEATED DRY OFF—Shuts off the heating unit,
thus saving energy. Dishes air-dry naturally. It takes
longer but saves energy. Youcan open the door after
the motor stops to speed drying. Excellent for
overnight drying.
Step6. Turn the Cycle Indicator Dial to START.
● Turning the dial to START will begin the cycle
immediately. To obtain the benefits of a complete
cycle, be careful that you do not turn the dial any
farther than is necessary to start the dishwasher.
There is a time delay between start-up and water
fill so you will not hear any wash action right away.
Dial Cycles
The SHORT WASH cycle allows you to quickly
wash loads of everyday dishes with medium soils
that have not dried on, such as loads consisting mostly
of glasses.
a. Select the NORMAL WASH cycle and any
option if desired.
b. Be sure the door is unlatched.
c. Slowly turn the Cycle Indicator Dial to
SHORT WASH.
d. Latch the door to start the cycle.
Page 5
~
*M
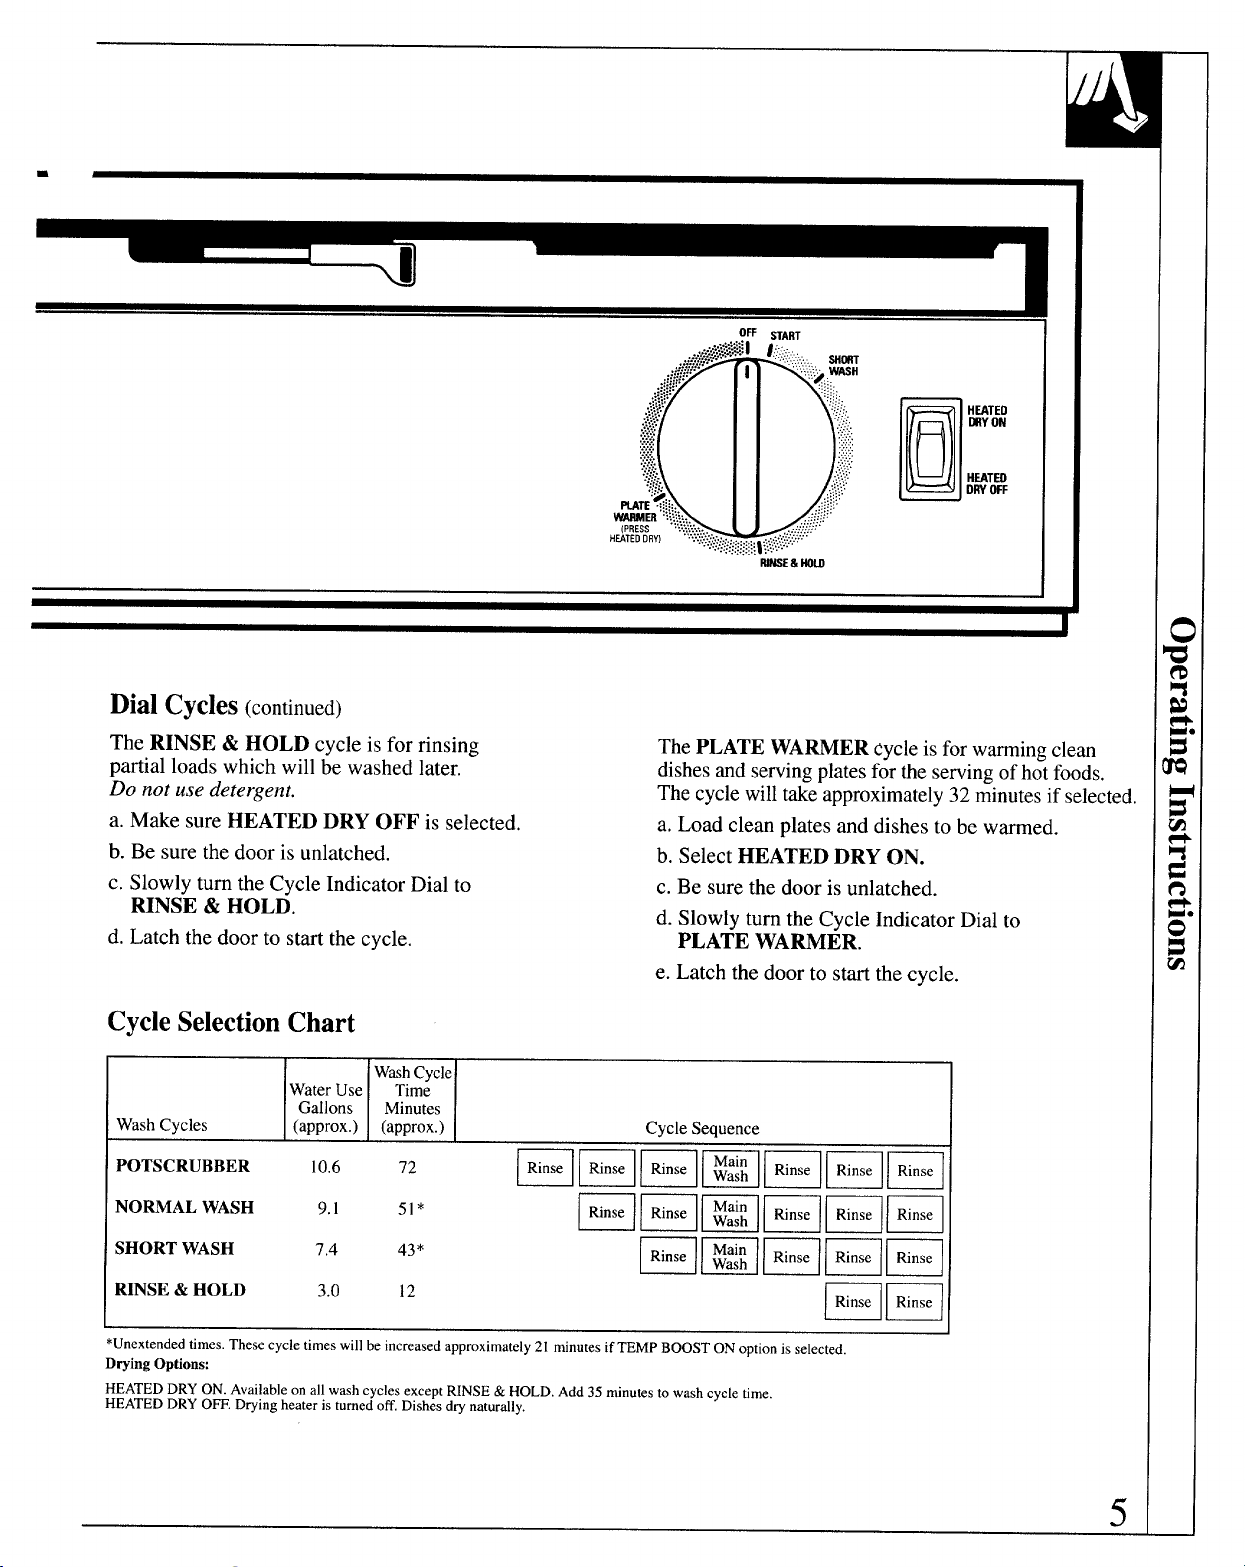
DialCycles(continued)
The RINSE & HOLD cycle is for rinsing
partial loads which will be washed later.
Do not use detergent.
a. Make sure HEATED DRY OFF is selected.
b. Be sure the door is unlatched.
c. Slowly turn the Cycle Indicator Dial to
RINSE & HOLD,
d. Latch the door to start the cycle.
.k~g%:[1-;,,,,,,
...
,~.......
;.5:.;;,.
.
.:::,:.
.;*
.;:-.
,:,::.
..$.
..
.:.::::.’
;,..;:,.
..,.,.,.
::::::::
:::!.;.:
::,.::.:
........... .
........
.jJ.i, :.:...
an
~w”q!.
WASMES “’G;:+:,.,,
HEATEDDRY)
,..,:,,..............
(PRESS
ThePLATE WARMER cycleisforwarmingclean
dishesand servingplatesfortheservingof hotfoods.
The cyclewill takeapproximately32 minutesif selected.
a, Load clean plates and dishes to be warmed.
b. Select HEATED DRY ON.
c. Be sure the door is unlatched.
d. Slowly turn the Cycle Indicator Dial to
PLATE WARMER.
e. Latch the door to start the cycle.
I
:.::~~~:{j;j;:lr ‘“ “::’:’”
, ,..,:,.,,..::
. . .. . . . . .
tUNSE&HDLD
““”:’<;iy
.:,,:,:,:,:,
,,,.,,:.:::,:,.::.’.,.,
....
:.:::,,:,,
.,::.,.:.:,.,
,..}.:. ....
.,.,.
.,.,..
,.:,;,:
.: :.,
:...:.:,.,
;:,:;,:
,.,.,,,,
.,,,,,.
::::.::
.,..
HmET;j
D
HEATED
DRY OFF
CycleSelectionChart
7.4
WashCycle
Time
(approx.) CycleSequence
mmammmm
51*
mammmm
43*
mmaaa
m=
WaterUse
WashCycles (approx.)
POTSCRUBBER 10,6 72
NORMALWASH 9.1
SHORTWASH
RINSE&HOLD 3.0 12
*Unextendedtimes.Thesecycletimeswillbeincreasedapproximately21 minutesif TEMP BOOSTONoptionis selected,
Drying Options:
HEATEDDRYON. AvailableonallwashcyclesexceptRINSE& HOLD.Add35minutestowashcycletime.
HEATEDDRYOW. Dryingheateris turnedoff.Dishesdrynaturally.
Gallons Minutes
5
Page 6

GoodDishwashingStartswith HOTWater
To get dishesclean and dry,you need hot water.Forgoodwashingand drying,
the entering water mustbeat least 120°F.Toprevent dish damage, inletwater shouldnotexceed 150”F.
Howto TestWaterTemperature
Check your water temperaturewith a candy or meat Helpfulhints:If outsidetemperaturesareunusually
thermometer.Turn on the hot water faucet nearest low,or if your water travelsa long distancefrom water
the dishwasher.Put the thermometerin a glass and
let the water run continuouslyinto the glass until the heater’sthermostatup. If you have notused hot water
temperature stopsrising. If the water temperature is for some time,thewater in the pipeswill be cold. Turn
below 120°F.,adjustyour water heater. on the hot waterfaucetat the sinkandallowit to run
heater to dishwasher,you may need to setyourwater
untilthe water is hot.Then startthe dishwasher.If
you’verecently donelaundryor run hotwaterfor
showers,giveyour waterheatertimeto recoverbefore
operatingthe dishwasher.
To improve washabilityif the water is less than
120°F.and you cannot adjust yourwaterheater:Select
a longer cycleor theTEMP BOOST ON option and
fill both detergentcups at least half-fullwith detergent.
Howto Usea RinseAgent
The rinse agent makes water flow off dishes
quicker than usual. This lessens water spotting
and makes drying faster, too.
For best dishwashing performance, use of a rinse
agent such as JET-DRY brand is recommended.
Rinse agents come in either liquid or solid form.
Yourdishwasher uses the liquid form.
How to fill the rinse agent dispenser.
Unscrew the cap.
Add liquid rinse agent
until itjust reaches the
bottom of lip inside the
dispenser opening.
Replace cap. The
dispenser automatically
releases rinse agent into
final rinse water.
Youmay check to see if you need to add rinse agent by
removing the fill cap and looking into the container.
You may also check the rinse agent, on some models,
by pressing the clear center of the fill cap 2 or 3 times.
If rinse agent is drawn into the center of the fill cap,
you have enough. If the center area remains clear add
rinse agent.
4L
Q
/’
Q)
D
Yourdishwasher’s rinse agent container holds
approximately 4X ounces. This should last about
3 months. Fill as needed.
If you accidentally spill: Wipeup the rinse
agent with a damp cloth. Don’t leave the spillin the
dishwasher. It can keep your detergent from working.
If you can’t find any rinse agent, write:
BENCKISERCONSUMERPRODUCTS,INC.
(“JET-DRY”)
Corporate Centre 1
55 Federal Road
P.O. Box 1991
Danbury, CT 06813-1991
6
Page 7

Howto Chooseand Use the RightDetergent
Useody powderor liquiddetergentspecifically
madeforusein dishwashers.Othertypeswillcause
oversudsing.
Howmuchdetergentshouldyou use?Thatdepends.
Isyourwater“hard”or“soft”?Withhard water,you
need extradetergentto get dishesclean.With softwater,
you needlessdetergent.
Yourwaterdepartmentcan tellyou howhardyour
wateris.So can yourcountyextensionagentoryour
area’swatersoftenercompany.Just calland ask them
how many “grains” ofhardnessthereare in yourwater.
Toomuchdetergentwithsoftwaternotonlywastes
money,itcan be harmful.Itcancausea permanent
Detergent Dispensers
cloudinessof glassware,called“etching.” Anoutside
layerofglassis etchedaway!Ofcourse,thistakessome
time.Butwhy takea chancewhenit’s easy to findoutthe
hardnessofyour water.
Keepyourdetergentfresh anddry. Underthesink
isn’ta good placeto storedetergentbecausethereis
too muchmoisture.Don’tputpowderdetergentinto
thedispenser untilyou’reready to washdishes,either.
(Itwon’tbefresh ORdry.)
If yourpowder detergentgets oldor lumpy,throwit
away.Old detergentoftenwon’tdissolve.If you usea
liquiddishwasherdetergent,theseprecautionsare not
necessarybecauseliquiddetergentsdon’t“lump” as
they ageorcome in contactwith moisture.
You’llfind two detergent dispensers on the inside
Closethe maincup.
NOTE: Toopendetergentcupafierit has
beenclosed,unlatchthedoorand rotatethe
CycleIndicatorDialafill turnto theOFF
position.Whentheclosedcupcontains
soapit isbestthatthedoorbeina partially
openpositionbeforerotatingtheCycle
IndicatorDial.This}villhelp reducetheamountof
detergentandrinseaidagentspillageintothetub.
Grasphandle,
rotateand
closetightly
DetergentUsageGuide(powderor liquid)
SO~ WATER(O-3grainshardness)
CYCLES
POTSCRUBBER HalfFull
NORMALWASH
SHORTWASH
RINSE&HOLD
*12grainsandupisextremelyhardwater.Awatersofteneris recommended.Withoutit, lime $FilledMainCupholds3tablespoons;
canbuildupinthe watervalve.Thewatervalvemaystickwhileopenandcauseflooding.
MainCup
HalfFull None
Usenodetergent Usenodetergent Usenodetergent
OpenCup MainCup
~ HalfFull Completely ~ HalfFull Completely ~ Completely
MEDIUM WATER (3.7 grains)
OpenCup
I
Full Full Full
HalfFull None
HARDWATER(7-12grains*)
MainCup$
Completely
Full
filledOpenCupholds2 tablespoons.
OpenCup$
None
r
How to Prepare the Dishes for Washing
If this is your first dishwasher, or if you’re
replacinga mucholdermodel, you maywonder
how much preparation your dishes need. Actually
very little. Scrape off bones, seeds, skins, toothpicks stainless steel if allowed to remain on dishes for a long
and other hard solids. Remove excessive quantities period of time.
of oil or grease.
NOTE: Youmay also wanttoconsiderremoving
foods such as mustard, mayonnaise, vinegar, lemon
juice and other foods that can cause discoloration of
The POTSCRUBBER cycle cartwash heavily soiled
dishes and remove dried-on and baked-on soils from
pots, pans and casseroles. Items with burned-on
soils need extra preparation.
7
Page 8

HOWTOLOADYOURDISHWASHER
NOTE: Do notloadlargeplattersortraysin front rightcornerof lower
rack.Theymay preventdetergentfromcirculatinginthe washcycle.
The upper rack is best for glasses, cups and
saucers. Cups and glasses tit best along the sides.
This is also the place for dishwasher-safe plastics.
Make sure small plastic items are lodged in tightly so
they can’t fall onto the heating unit. Arrange stemware
so that it cannot move easily. Don’t let the glasses
touch each other.
The upper rack is handy for all kinds of odd shapes. Sauce pans, mixing bowls and other items should be placed
face down. When loading dishwasher safe plastics make sure each plastic item is secured over two finger;. This
will insure good washing results.
8
Page 9

The lower rack is best used for plates, saucers, and
cookware. Large items such as broiler pans and racks
should go in the lower rack along the edge. Load
platters, pots and bowls along the sides, in corners,
or in the back. For best washing results, all items
should be positioned with the soiled side of the dish
facing the center of the rack.
Put flatware in the removable basket with fork and knife
handles up to protect your hands. Place spoons in the
basket with handles down. Mix knives, forks and
spoonsso they don’t nest together.Distributeevenly.
Keep center area clear in the lower rack.
Thewashtowerrisesthroughthecenterof thelower
rackduringthewash andrinseportionsof the cycle.
Don’tblock it orloadtallthingsnexttoit.Also, be
CWefUlnOtto let a portion of an item such as a Dot or
dish handle extend-through the bottom rack. T~is could
block the wash arm and cause poor washing results.
Don’t let any
item extend
through bottom
I
Precaution!
Takeout anythingthatmay fallorextendthroughthe
bottomof thebasket.
Small plastic items, such as measuring spoonsand
lids from small containers are not recommended for
automatic dishwashing. If placed in dishwasher, they
should go in bottom of silverware basket with
silverware on top.
9
Page 10

WHATYOUCANUSUALLYWASHSAFELY
INYOURDIS~ASHER
Material Exceptions(notsafe) SpecialInstructions
Alumiaum Somecoloredanodized
Ctinti
Stoneware
Crystal
Non-dishwasher
items—such
aselectronic
aircleaner
filters,furnace
filters,paint
brushes,etc.
Glass YES
fron
Pewter
Plastics YES
Stainlesssteel
Sterlingsilver
andsilverplate
Non-stick
coatings
Tin
Wood
Usually
Safe
YES
YES
YES
NO
NO Ironwillrust.
NO
YES
YES
YES
NO
No Woodcanwarp,crackorlose
aluminumcanfade.
Antique,metal-trimmed,
hand-paintedorover-the-gIaze
patternsfade.Goldleaf
willdiscolor.
Antique,metaI-trimmedor
hand-paintedpatternsfade.
Goldleafwilldiscolor.
Pewtertarnishes.
Don’tputinsamesilverware
basketwithstainlesssteel.
Contactbetweenmetalscan
damagesilver.
Don’twashcopperutensilsin
thesameload.Silvermaygeta
brownfilm.
Adhesiveusedtoattach
hollow-handleknivescanloosen.
Tincanrust.
itsfinishwithany typeofwashing.
Scrmedarkeningorspottirigpossible.Removeby
scouringwithsoap-filledsteelwoolpads.
J.firidottbt,checkwiththemanufactur~r.Ortestwash
onepiecedailyfor at leastamonth.Comparewiththe
restoftheset.
Loadsecurelytopreventmovement.Checkyour
manufacturer’sinstructionsfor yourcrystal.
Do notwashindishwasher.Damagetodishwasher
and discolorationorstainingof dishwashermayresult.
Ifit doesn’tsayDISHWASHERSAFE,testonepiecein
thetoprackbeforedishwashinganentireset.
Rinseif notwashingimmediately.Saltyor acidicfoods
canstainiflefton.
Rinseif notwashingimmediately.Saltyoracidicfoodscan
stainif lefton,Drydetergentcancausedifficult-to-remove
blackspots.Placeinbacksectionofsilverwarebasketto
avoidexposureto detergentfromthedetergentcup.
some
Afterwashing,wipethenon-stickcoatingareawith
vegetableoil tokeepit fromlosingitsnon-stickquality.
Forgeta dish?Here>swhenyoucanadd it.
Add dishes any time during the RINSE & HOLD
cycle. With other wash cycles, you can add dishes
at any time BEFORE the main detergent wash portion
of the cycle.
However, opening the door during any cycle
lessens cleaningpower.So tryto loadeverything
atthebeginning.
10
Here’s how to add a forgotten dish:
1. Push the door latch to the left. Washing will stop.
2. Wait a few seconds until the water calms. Then
open the door.WARNING:Hotvapormayrise
fromopeneddoor.
3. Add dishesyou’ve forgotten.
4. Close the doorandpushthe latchto thefarright.
Whenthe door is locked, washing will continue.
Page 11

CAREANDCLEANING
USERMAINTENANCEINSTRUCTIONS
Cleanthecontrolpanelwitha lightlydampened
cloth.Dry thoroughly.Do not use abrasives or
sharp objects on the panel. They can damage it.
Cleantheoutiidewitha good appliancepolish
wax.Theoutside cabinet finish is durable, but it
can scratch. So use no scouringpads, or harsh or
Appliance Polish Wax & Cleaner (Cat. No.
WR97X0216) is availablefrom GE Service and
Parts Centers.
Theinsideusuallytakescareof itself.
ever need cleaning, use a mild cleansing powder.
Scouring pads and harsh cleaners can mar the finish.
gritty cleaners.
NotUsingYourDishwasherinWinter?ProtectAgainstFreezing.
If your dishwasher is left in an
unheated place during the winter,
ask a service technician to:
● Cut off electrical power to the
dishwasher. Remove fuses or trip
circuit breaker.
● Turn off the water supply.
● Disconnect the water inlet line
from the water valve.
:; e’
}~&~
ti
Pump Cover Screws
~’
w
,,<,:~
\
~
● Drain water from the inlet line
● Reconnect the water inlet line to
● Remove the plastic pump cover
Built-inDishwashersOftenUse an AirGap.KeepIt Clean,
An air gap is a plumbing device.
It protects your dishwasher against
water backing up into it if a drain
clogs. The air gap is not a part of
the dishwasher. And you may not
even have one. Not all plumbing
codes require air gaps.
If you have an air gap, check it at
least once a month. IT IS NOT
PARTOF YOUR DISHWASHER.
IT IS NOT COVERED IN YOUR
WARRANTY.
Theairgapis easyto clean.
With most types, first turn off the
dishwasher,then lift off the chrome
cover.Then unscrew the plastic cap
and check for any buildup of grit.
A toothpick makes cleaning easy.
If it should
and water valve, (Use a pan to
catch the water,)
the water valve.
in the tub bottom and use a
sponge to soak up water in
the rubber boot.
Checktheairgapanytimeyour
dishwasherisn’tdrainingwell.
11
Page 12

HOWTOCHANGECOLORPANELS
If you are redecorating, you can change your dishwasher’s front panel to
match or blend with your new colors by flipping it over. Each side of each
panel is a different color. Youmay also paint a panel with a color of your
own choice.
Howto ChangetheDoorPanel
1. Take out trim screws on either side of the
dishwasher door. Remove the side trim.
2. Slide the door panel out.
(Careful-edges may be sharp.)
3. Turn the door panel around and put the color you
want in front.
4. Replace the door panel, side trim and screws.
Howto ChangetheLowerPanel
1.Remove the bottom panel attachment screws.
2. On models without top mounting screws, remove
the entire access assembly by rotating the bottom
out and lifting it up and over the retaining tabs.
3. On models with top mounting screws, remove
NOTE: Do not operate
dishwasherwhilechanging
panelsorwhenloweraccess
panelis removed.
:’ ‘g@~inin
\
—
BottomPanelAttachmentScrews
g ‘hescrews
WoodPanelTrimKik
Wood panel trim kits containtrimandinstructions
foraddinga decorativewood door panel and lower
access panel no thicker than 1/4”to match kitchen
cabinets.
Specify the trimnumberwhenordering:
GPF40BC(ChromeTrim& Screws)
GPF40BK(BlackTrim)
GPF40WD(WhiteTrim)
GPF40AD(AlmondTrim)
4. Take out the top trim screws and remove the
top trim.
5. Slide the color panel(s) up and out and put the
color you want in front.
6. Replace the top trim and screws.
7. Replace the entire access assembly by reversing
the steps.
OrderingInformation
Wood panel trim kitsare availablefor$10.00each
whichincludesshippingand handling. Make check
payable to General Electric Co.
Order from:
Dri-ViewManufacturing
4706 AllmondAve.
Louisville,KY 40209
12
Page 13

QUESTIONS?
USE THISPROBLEM SOLVER
●
PROBLEM
DIS~ASHER
WON’T RUN
UNUSUAL NOISE
DISHES DON’T DRY
UNCLEAN DISHES
AND FLATWARE
DETERGENT LEFT
IN DISPENSER CUPS
POSSIBLECAUSE
Afise inyourhomemaybeblowmorthecircuitbreakertripped.Replacefuseor
resetcirettit~aker. Retnoveanyotherappliancesfromthecircuit.
Utenstismaynotbesecureonrackpins,orsomethingsmallmayhavedroppedfromthe
rack,Wateriscausingutensilstorattle.
sureinletwater temperature is correct. (See How to TestWaterTemperaturesection.)
Make
Unload the bottom rack first. Water from dishes in the top rack maybe spillinginto
Webottom rack.
Check for improper loading, Dishes shouldn’t nest together. Avoid overloading.
Check the rinse agent dispenser to see that it’s not empty.
Check inlet water temperature. It should he at least 120”F.(To test, see How to Test
WaterTemperature section,) Try to use the Temp Boost On option.
Waterpressure may be temporarily low.Turn on a faucet. Is water coming out slower
than usual? If so, wait until pressure is normal before using your dishwasher.
Plugged air gap. (See Care and Cleaning section.)
Improper rack loading. (See Loading section.)
Choose another cycle to give you longer washing time.
Water may not be reaching the detergent cups. Move dishes that maybe blocking
detergent cup.
Make sure everythingissecuredindishwasher.
DETERGENT CUP
LID WON’T LATCH
AFTER ADDING
DETERGENT
YELLOW OR
BROWN FLM
CYCLE AND OPTION
INDICATOR LIGHTS
STAYON WHEN
CYCLE IS
COMPLETED
The dispenser cover may not be opening or may be blocked by improperly loaded
items. If you used a powder detergent, open the cup and remove any caked-on
detergent. If the”cup still doesn’t open automatically, call for service.
Detergent may be old. If the powder detergent is hard or caked in the box, throw it away.
The detergent may not be working well. Try another brand.
Cycle Indicator Dial must be in OFF position for cup lid to cIose and latch properly. If
you unlatch the door and open it to dry your dishes, the Cycle Indicator Dial does not
advrmceby itself.
Teaor coffee can stain cups. Remove the stain by hand, using a solution of 1/2cup
bleach and 3 cups warm water.
An overall yellow or brown film on dishes or glassware can be caused by iron
deposits in water. A special filter in the water supply line is the only way to correct
thisproblem. Your water softener company can tell you about the filter.
Yellowfilm on sterling silver results when you wash copper utensils in the same load.
Silverpolish will usually remove this stain.
‘I’hisis normal. Unlatch the door to turn off the Cycle and Option Indicator lights.
(continued next page)
13
Page 14

THEPROBLEMSOLVER
(continued)
PROBLEM
SPOTSAND
FILMfNGON
GLASSESAND
FLATWARE
POSSIBLECAUSE
Spottingcan becausedby alltheseWings:
● Extremely hard water. (See Row to Choose and Use Detergent section.)
● Low inlet water temperature. (See How to Test Water Temperature section.)
● Overloading the dishwasher.
cImproper loading. (See Loading section.)
● Old or damp powder detergent.
● Phosphate level in detergent too low. (See How to Choose and Use
Detergent section.)
● Rinse agent dispenser empty. (See How to Use a Rinse Agent section.)
● Too little detergent. (See How to Choose and Use Detergent section.)
Local water conditions and personal preferences vary, Try several brands of
detergents to find one that gives the best results for you. A liquid dishwasher
detergent may help reduce filming.
Toremove stubborn spots and film from glassware:
1. Remove alI metal utensils from the dishwasher.
2. Do not add detergent.
3. Select POTSCRUBBER cycle.
4. Start the dishwasher and allow to run for 18 to 22 minutes. The dishwasher will
now be in the main wash.
5. Then open the door and pour 2 cups (500 ml) of white vinegar into the bottom of
the dishwasher.
6. Close the door and allow to complete the cycle.
If vinegar rinse doesn’t work: Repeat as above, except use 1/4cup (60 ml) of citric
acid crystals instead of vinegar. (Most drugstores carry citric acid crystals. If yours
doesn’t, call GE Factory Service.)
Using a vinegar or citric acid crystal rinse more than twice a month? Consider a home
water softener.
CLOUDINESS ON
GLASSWARE
CHIPPING OF CHINA
14
If vinegar or citric acid crystal rinse doesn’t work, the cloudiness is “etching.”
The film cannot be removed.
Itcan be prevented: Use less detergent if you have soft water. Wash glassware in
the shortestcycle that will get them clean.
Water temperature entering dishwasher exceeds 150°F.
Rough handling can cause chipping. Load with care. Make sure glassware and china
are secure and can’t jar loose. (See Loading section.) Make sure tall glasses and
stemware will clear the top of the tub when you push the rack into the dishwasher.
Always use the top rack for delicate items.
Page 15

PROBLEM
POSSIBLE CAUSE
BLACK OR GRAY
MARKS ON DISHES
SMALL AMOUNT OF
WATERSTANDING
IN THE BO~OM
OF THE TUB
WATERWON’T PUMP
OUT OF THE TUB
SUDS IN THE TUB
DISHWASHER
LEAKS
Aluminum utensils often leave marks when they rub ngainstdishes. Remove marks
with a mild abrasive cleanser.
Water around the outlet on the tub bottom at the back of the tub is normal. It is clean
water. It’s there to keep the water seal lubricated.
If the entire bottom of the tub has water, you may have a drain problem. Clean the air
gap, if you have one. (See Care and Cleaning section.)
Check the kitchen sink. Is it draining well? Youmay need a plumber.
If dishwasher drains into disposer, run disposer to clear. Be sure disposeris not
clogged.
Sudsing detergents are not meant for dishwashers. USE ONLY AUTOMATIC
DISHWASHER DETERGENTS TO AVOID SUDSING.
Toremove suds from the tub: Open the dishwasher. Let suds evaporate. Add
1gallon of cold water to the tub. Close and latch the dishwasher. Pump out water
by S1OWIy turning the control dial until a drain period is reached.
Repeat if necessary.
Suds can cause unit to overflow. That’s why it’sso important to use a detergent that’s
designed for automatic dishwashers.
Spilling the rinse agent can cause foam during washing. This can lead to overflowing.
Wipe up accidental spill of rinse agent with a damp cloth.
MOTOR HUMS
Dishwasher has not been used on a regular basis.
If you do not use your dishwasher often, set it to fill and pump out once every week.
This will help keep the seal moist, and the garbage disposer clear.
STAINING OF
TUB INTERIOR
Some detergents contain colorant (pigment or dyes) that will discolor the tub
interior with extended use. Check the detergent cup for signs of any discoloration.
If cup is discolored, change to detergent without any colorant.
SOUNDS YOU
WILL HEAR
You’llhear occasional clicking sounds.These are normal.
● Soft food disposal shredding action.
● Drain valve opening to pump water out.
● Timer control as cycle progresses.
● Detergent cup opening.
During the drying period:
● The motor stops.
VAPOR AT
THE VENT
Water vapor comes through the vent by the door latch during drying and when
water is being pumped out.
Ifyouneedmorehelp..call, tollfree:
GEAnswerCenter@
800.626.2000
consumerinformationservice
15
Page 16

NOTES
16
Page 17

NOTES
17
Page 18

IF YOUNEEDSERVICE...
Toobtainservice,seetheConsumerServicespagein the
backof thisguide.
We’re proud of our service and want you to be
pleased. If for some reason you are not happy with the
service you receive, here are three steps to follow for
further help.
FIRST, contact the people who serviced your
appliance. Explain why you are not pleased. In most
cases, this will solve the problem.
NEXT, if you are still not pleased, write all the
details—including your phone number—to:
Manager, Consumer Relations
GE Appliances
Appliance Park
Louisville, KY 40225
FINALLY,ifyour problem is stillnotresolved, write:
Major Appliance Consumer Action Panel
20 North Wacker Drive
Chicago, IL 60606
Page 19

We’ll BeThere
Withthepurchase of your new GEappliance, receive the assurance fiat ifyou ever need
information orassistancefrom GE,we’llbethere.Allyou havetodo iscall—toll-fi-ee!
GEAnswerCente~
Whateveryour question about any GEmajor appliance, GEAnswerCenter@
information serviceisavailabletohelp.
answeredpromptlyandcourteously.And you cancallanytime.GEAnswer
Center@serviceisopen 24hoursaday,7daysaweek.
lmHomeRepairService
8iJME#ARES(80M32-273~
AGE consumerserviceprofessionalwillprovideexpertrepairservice,
scheduledatatimethat’sconvenientfor you. ManyGEConsumerService
company-operatedlocationsofferyou servicetodayor tomorrow,or atyour
convenience (7:00 a.m.to 7:00p.m. weekdays,9:00a.m. to2:00p.m. Saturdays).
Our factory-trainedtechniciansknowyour applianceinsideandout–so most
repairscanbe handledinjust onevisit.
Yourcall—andyourquestion—willbe
ForCustomemWdhSpecialNeeds...
80f16262000
Upon request,GEwillprovide Consumerswithimpairedhearingor speechwho have
Braillecontrolsforavarietyof GE
appliances,andabrochure to
assistinplanningabarrier-free informationor service.
kitchenfor personswithlimited
mobility.To obtaintheseitems,
freeof charge,call800.626.2000.
accesstoaTDDoraconventionalteletypewritermay
call800-TDD-GEAC(800-833-4322)torequest
SewiceContracts
80@62&2224
You can have thesecurefeeling thatGEConsumerServicewillstillbe there
afteryourwarrantyexpires.PurchaseaGEcontractwhileyourwarrantyisstill
ineffectandyou’ll receiveasubstantialdiscount.Withamultiple-yearcontract,
you’re assuredof futureserviceattoday’s prices.
PatisandAccessories
80M26-2D02
Individualsqualifiedtoservicetheirownappliances
can have needed partsor accessoriessentdirectlyto
theirhome. The GEpartssystemprovidesaccesstoover
47,000
fullywarranted.VISA,MasterCardandDiscovercards
are accepted.
parts.. and ali GE Genuine Renewal Parts are
User maintenanceinstructionscontainedin thisbooklet
coverproceduresintendedtobe performed byanyuser.
Otherservicinggenerally shotidbe referred toqualified
service
improperservicingmaycauseunsafe operation.
personnel.Cautionmustbe exercised,since
Page 20

YOUR GE DISHWASHERWITH
PERMATU~ INTERIOR
WARRANTY
Staplesales slip or cancelled check
here. Proof of original purchase date
is needed to obtain service
under warranty.
WHATISCOVERED
FULLONE-YEARWARRANTY
Foroneyearfromdate of original
purchase,wewillprovide,free of
charge,partsandservicelaborin
your hometo repairor replaceany
part of the dishwasherthatfails
becauseof a manufacturingdefect.
FULL TEN-YEAR WARRANTY
Forten yearsfrom dateof original
purchase,wewill provide,free of
charge,partsand servicelaborin
your hometo repairor replace the
PermaTu~ tubor door /iner if it
fails to containwater becauseof
a manufacturingdefectsuch as
cracking,chipping,peeling
or rusting.
WHATIS NOTCOVERED
LIMITEDSECOND-YEAR
WARRANTY
Forthe secondyear from dateof
originalpurchase,wewill provide,
free of charge,replacementpartsfor
anypati of the WaterDistribution
System
fails becauseof a manufacturing
defect.Associatedinletand drain
plumbingpartsarenot coveredby
thiswarranty.Youpay forthe
servicetripto yourhomeand
servicelaborcharges.
Power Showe~arm~
3 Piece Power TowerTM
Soft Food Disposer
“
● Improperinstallation.
(as illustratedbelow)that
Wash arm
(spray arm)
Boot
s
WaterDistributionSystem
Servicetripsto your home to teach
you howto usethe product.
Readyour Use and Care material.
Ifyouthen have anyquestions
aboutoperatingthe”product,please
contactyour dealeror our
ConsumerAffairsoffice at the
addressbelow,or call,toll free:
GE AnswerCenter@
800.626.2000
consumer informationservice
Ifyou havean installationproblem,
contactyour dealeror installer.You
are responsiblefor providing
i
m Motor
#
Pump
Hose
Hub
connection
assembly
***** ************************
This warrantyis extendedto
the originalpurchaserandany
succeedingownerfor products
purchasedfor ordinaryhomeuse in
the 48 mainlandstates, Hawaiiand
Washington,D.C.InAlaskathe
warrantyis the sameexceptthat it is
LIMITEDbecauseyou must payto
shipthe producttotheservice shop
orforthe servicetechnician’stravel
coststo your home.
All warrantyservicewill be
providedbyourFactoryService
Centersor by ourauthorized
CustomerCare@servicersduring
normalworkinghours.
Shouldyour applianceneed
service,duringwarrantyperiodor
beyond,call 800-GE-CARES
(800-432-2737).
adequateelectrical,plumbing,and
other connecting facilities.
● Replacementof housefuses or
resettingofcircuitbreakers.
● Cleaningor servicingof air gap
deviceindrain line.
● Failureofthe productif it is usedfor
otherthan its intendedpurposeor
usedcommercially.
● Damageto productcausedby
accident,fire,floods or actsof God.
WARRANTORISNOTRESPONSIBLE
FORCONSEQUENTIALDAMAGES.
Somestates
maynotapplyto you.Thiswarrantygivesyouspecificlegalrights,andyou mayalsohaveotherrightswhichvatyfromstateto state.
Toknowwhatyour legalrightsareinyourstate,consultyourlocalorstateconsumeraffairsofficeoryourstate’sAttorneyGeneral.
donotallowtheexclusionorlimitationof incidentalor consequentialdamages,sotheabovelimitationorexclusion
I
If further help is needed concerning this warranty, write:
Manager—Consumer Affairs, GE Appliances, Louisville, KY 40225
Thisbook is printed on recycled paper.
~
2-95 CG
Warrantor: General Electric Company
.
GSD750
GSD780
Printed in Louisville, KY
 Loading...