

Page 1
EDW4000 Series
GHDA960 Series
GHDA980 Series
GSD6100 Series
GSD6200 Series
GSD6300 Series
GSD6500 Series
GSD6600 Series
GSD6700 Series
GSD6800 Series
GSD6900 Series
SSD4900 Series
Owner’s Manual
Dishwashers
165D4700P298 49-5974 02-04 JR
Safety Instructions . . . . . . . 2, 3
Operating Instructions
Care and Cleaning . . . . . . . . . 10
Control Panel and Settings . . 4–6
Loading Place Settings . . . . . . . 9
Loading the Racks . . . . . . . . . . 8
Optional Accessories . . . . . . . . .9
Using the Dishwasher . . . . . .6, 7
Troubleshooting Tips . . . 11, 12
Consumer Support
Consumer Support . . .Back Cover
Product Registration . . . . .13, 14
Warranty . . . . . . . . . . . . . . . . . 15
www.GEAppliances.com
Write the model and serial
numbers here:
Model # __________________
Serial # __________________
You can find them on the tub wall
just inside the door.
Triton XL
™
Page 2
PROPER INSTALLATION AND MAINTENANCE
IMPORTANT SAFETY INFORMATION.
READ ALL INSTRUCTIONS BEFORE USING.
WARNING!
For your safety, the information in this manual must be followed to minimize the risk of fire
or explosion, electric shock, or to prevent property damage, personal injury, or death.
2
Operating Instructions Safety InstructionsConsumer Support Troubleshooting Tips
Under certain conditions hydrogen gas may be produced in a water heater that has not been
used for two weeks or more. HYDROGEN GAS IS EXPLOSIVE.
If the hot water has not been used for two weeks or more, prevent the possibility of damage
or injury by turning on all hot water faucets and allow them to run for several minutes. Do this
before using any electrical appliance which is connected to the hot water system. This simple
procedure will allow any built-up hydrogen gas to escape. Since the gas is flammable, do not
smoke or use an open flame or appliance during this process.
WATER HEATER SAFETY
Use this appliance only for its intended purpose as described in this Owner’s Manual.
This dishwasher must be properly installed and located in accordance with the Installation
Instructions before it is used. If you did not receive an Installation Instructions sheet with your
dishwasher, you can receive one by visiting our Website at GEAppliances.com.
■ Connect to a grounded metal, permanent
wiring system; or run an equipmentgrounding conductor with the circuit
conductors and connect to the equipmentgrounding terminal or lead of the appliance.
■ Improper connection of the equipment-
grounding conductor can result in a risk
of electric shock. Check with a qualified
electrician or service representative if you
are in doubt whether the appliance is
properly grounded.
■ Use supply conductors rated at least 75°C
(167°F).
■ Dispose of discarded appliances and shipping
or packing material properly.
■ Do not attempt to repair or replace any part
of your dishwasher unless it is specifically
recommended in this manual. All other
servicing should be referred to a qualified
technician.
■ To minimize the possibility of electric shock,
disconnect this appliance from the power
supply before attempting any maintenance.
NOTE: Turning the dishwasher off does not
disconnect the appliance from the power
supply. We recommend having a qualified
technician service your appliance.
DO NOT…
■ Do not tamper with controls.
■ Do not abuse, sit on, or stand on the door
or dish rack of the dishwasher.
■ Do not discard a dishwasher without first
removing the door or removing the door
latch.
■ Do not store or use combustible materials,
gasoline or other flammable vapors and
liquids in the vicinity of this or any other
appliance.
■ Do not allow children to play around
dishwasher when opening or closing door
due to the possibility of small fingers being
pinched in door.
■ Do not allow children to play with, on
or inside this appliance or any discarded
appliance.
WARNING!
Page 3
3
Consumer SupportTroubleshooting TipsOperating InstructionsSafety Instructions
www.GEAppliances.com
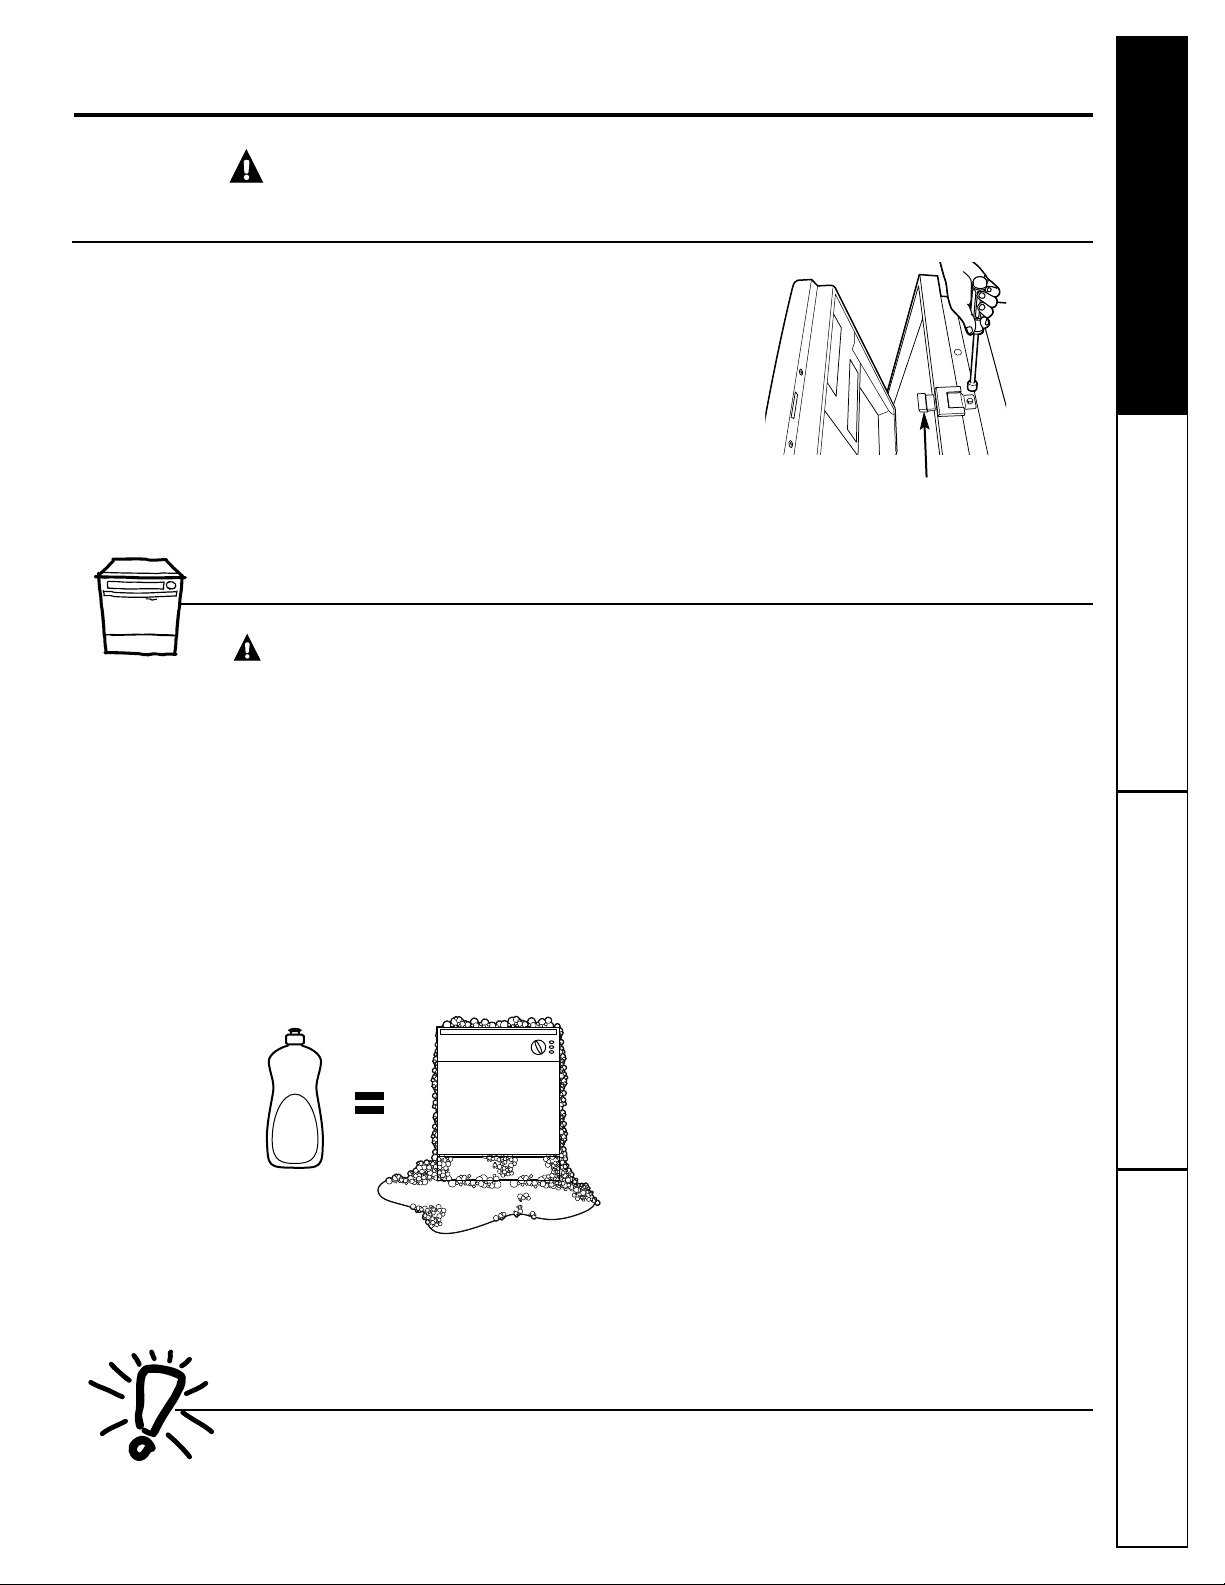
PROPER DISPOSAL OF THE DISHWASHER
Junked or abandoned dishwashers are
dangerous…even if they will sit for “just a
few days.” If you are getting rid of your old
dishwasher, please follow the instructions
below to help prevent accidents.
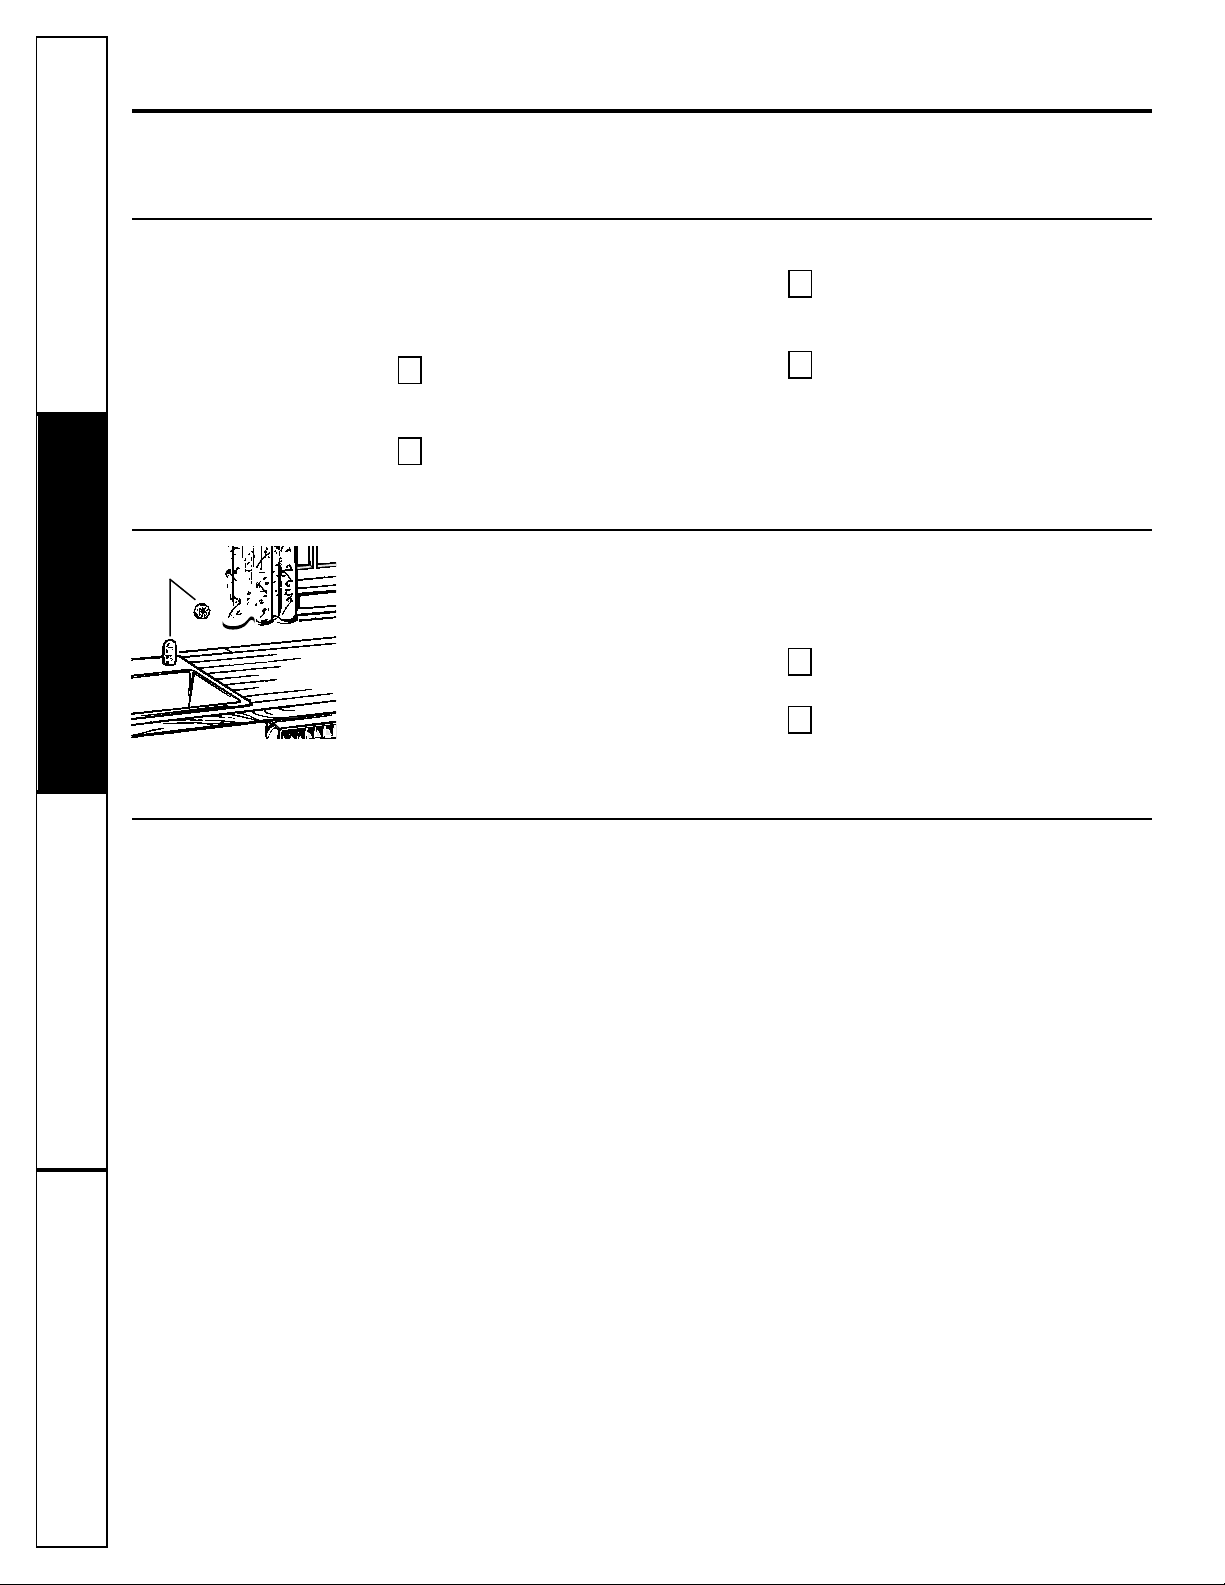
Before You Throw Away Your Old Dishwasher:
■ Take off the door of the washing
compartment or remove the door latch
keeper (as shown).
WARNING! RISK OF CHILD ENTRAPMENT
WHEN USING YOUR DISHWASHER
CAUTION: Contents washed in
Anti-Bacteria cycle may be hot to the touch.
Use care before unloading.
■ Use only powder, tabs, liquid detergents
or rinse agents recommended for use in a
dishwasher and keep them out of the reach
of children. Cascade®, Cascade®Complete
and Electrasol®Automatic Dishwashing
Detergents, and Jet-Dry®and Cascade Rinse
Aid®rinse agents have been approved for use
in all GE dishwashers.
■ Using a detergent that is not specifically
designed for dishwashers will cause the
dishwasher to fill with suds.
■ Locate sharp items so that they are not likely
to damage the door seal.
■ Load sharp knives with the handles up to
reduce the risk of cut-type injuries.
■ Do not wash plastic items unless marked
dishwasher safe or the equivalent. For
plastic items not so marked, check the
manufacturer’s recommendations.
■ Non-Dishware Items: Do not wash items such
as electronic air cleaner filters, furnace filters
and paint brushes in your dishwasher.
Damage to dishwasher and discoloration
or staining of dishwasher may result.
■ Do not touch the heating element during
or immediately after use.
■ Do not operate your dishwasher unless all
enclosure panels are properly in place.
■ Close supervision is necessary if this
appliance is used by or near children.
■ Load light, plastic items so they will not
become dislodged and drop to the bottom
of the dishwasher—they might come into
contact with the heating element and be
damaged.
READ AND FOLLOW THIS SAFETY INFORMATION CAREFULLY.
SAVE THESE INSTRUCTIONS
Door latch keeper
Page 4
4
Operating Instructions Safety InstructionsConsumer Support Troubleshooting Tips
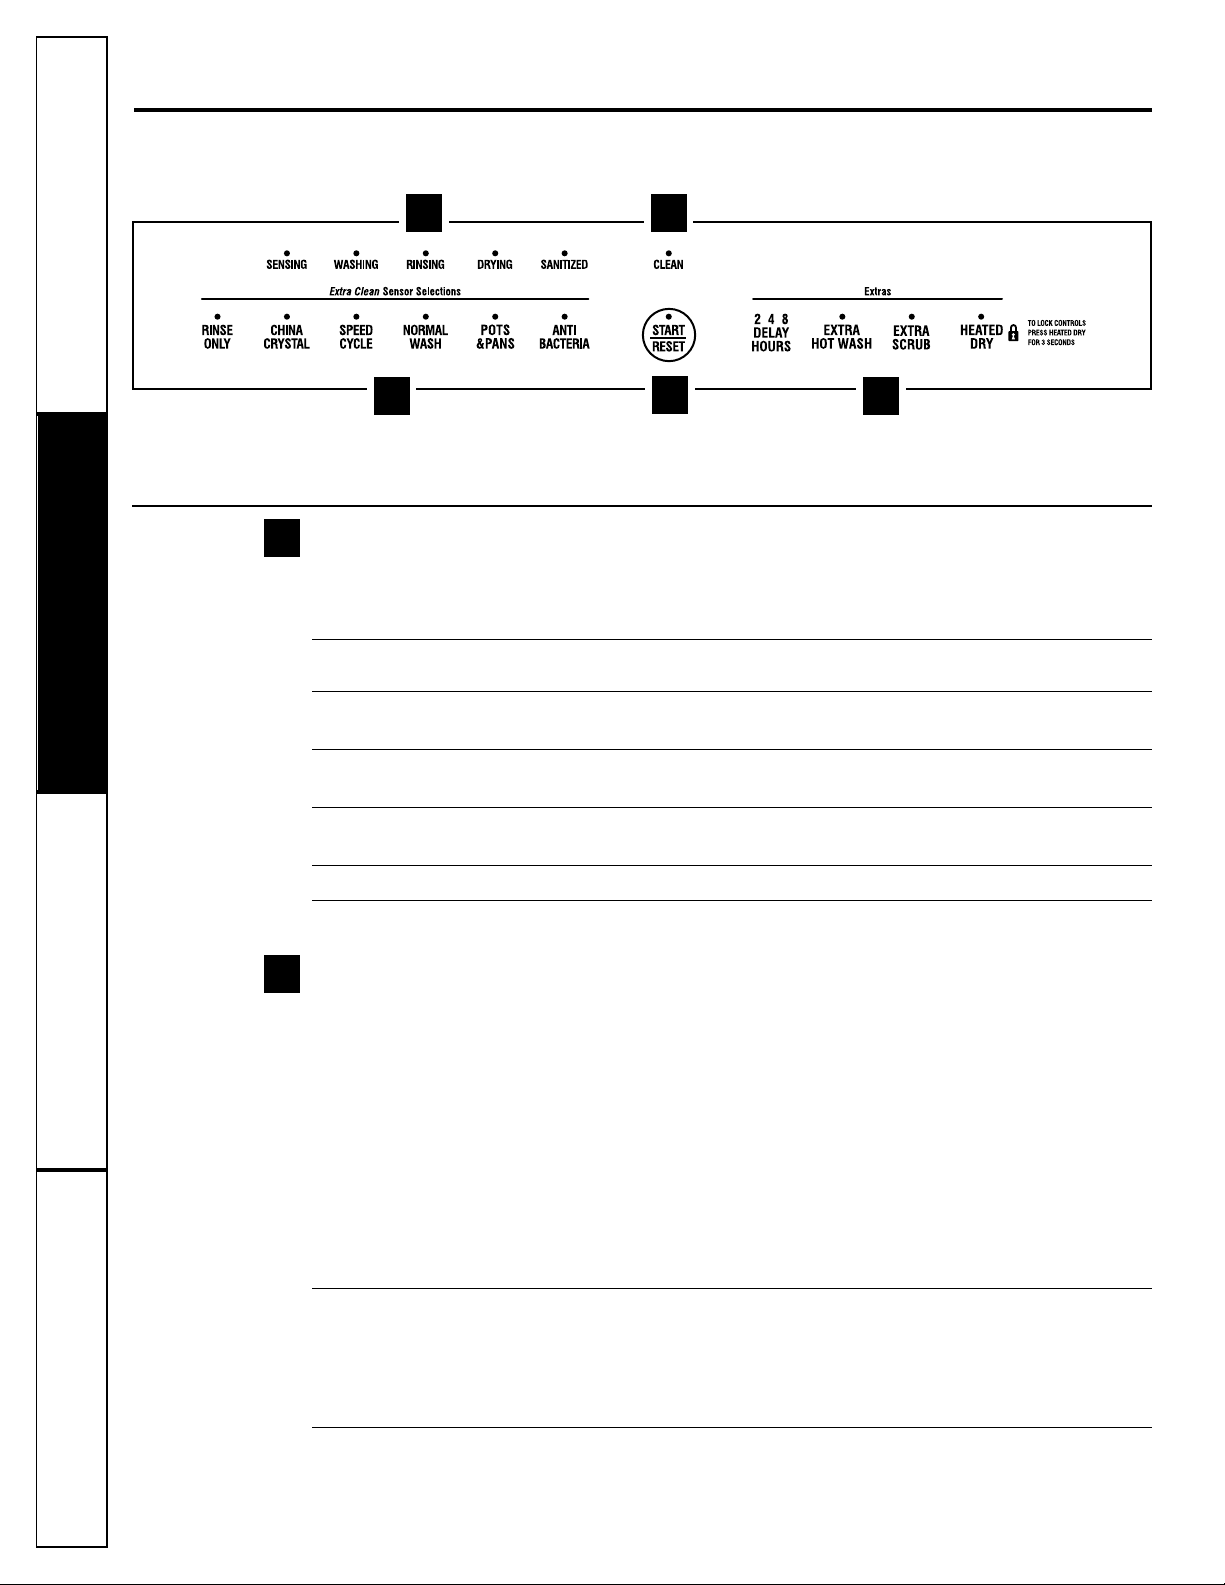
About the dishwasher control panel.
You can locate your model number on the tub wall just inside the door.
Throughout this manual, features and appearance
may vary from your model.
Control Settings
Status Indicator Lights
The Status display tells you what’s happening while the dishwasher is in operation and may
flash, indicating a malfunction (see page 6). The lights will come ON indicating the sequence
of operation the dishwasher is in.
SENSING Displayed while the ExtraClean™Sensor is measuring the amount of soil and temperature of water.
(on some models)
The dishwasher will adjust the selected cycle to achieve optimal performance.
WASHING Displayed during prewash and main wash periods.
(on some models)
RINSING Displayed during rinse periods.
(on some models)
DRYING Displayed during HEATED DRY.
(on some models)
SANITIZED Displayed when cycle has met sanitization conditions. Light remains ON until door is opened.
CLEAN Displayed when a wash cycle is complete. The light will remain ON until door is opened.
ExtraClean™Sensor Selections
The light above the selected pad will be ON to indicate which ExtraClean™Sensor Selection has been
selected.
ANTI-BACTERIA Heavy 10.0 gal., 93 min.
or SANI WASH Medium 8.6 gal., 90 min.
Light 7.2 gal., 90 min.
This cycle raises the water temperature in the final rinse to sanitize your dishware. The cycle
length will vary depending on the temperature of your inlet water.
NOTE: The Anti-Bacteria cycle is monitored for sanitization requirements. If the cycle is
interrupted during or after the main wash portion or if the incoming water temperature is so
low that adequate water heating cannot be achieved, the sanitizing conditions may not be met.
In these cases, the sanitized light will not illuminate at the end of the cycle.
NOTE: NSF certified residential dishwashers are not intended for licensed food establishments.
POTS Heavy 11.4 gal., 95 min.
& PANS Medium 10.0 gal., 71 min.
Light 10.0 gal., 66 min.
This cycle is meant for heavily soiled dishes or cookware with dried-on or baked-on soils.
This cycle may not remove burned-on foods. Everyday dishes are safe to be used in this cycle.
NORMAL WASH Heavy 9.9 gal., 74 min.
Medium 7.0 gal., 61 min.
Light 5.6 gal., 48 min.
This cycle is for medium/heavily soiled dishes and glassware.
1
1 5
3
4
2
2
Page 5

5
Consumer SupportTroubleshooting TipsOperating InstructionsSafety Instructions
SPEED CYCLE Heavy 9.3 gal., 36 min.
or Medium 7.2 gal., 36 min.
SPEED WASH Light 5.7 gal., 33 min.
(on some models)
This cycle is for everyday dishes and glassware.
CHINA CRYSTAL Heavy 10.0 gal., 49 min.
(on some models) Medium 7.2 gal., 36 min.
Light 7.2 gal., 36 min.
This cycle is for lightly soiled china and crystal.
RINSE ONLY Heavy 2.9 gal., 7 min.
Light 1.4 gal., 3 min.
For rinsing partial loads that will be washed later. Do not use detergent with this cycle.
NOTE: This dishwasher is equipped with an ExtraClean™Sensor with automatic temperature
control; therefore cycle length and time may vary depending on soil and temperature conditions.
NOTE: Only the Anti-Bacteria cycle has been designed to meet the requirements of Section 6,
NSF 184 for soil removal and sanitization efficacy.
Extras
The light above the selected pad will be ON to indicate which EXTRA has been selected.
EXTRA For use with heavily soiled and/or dried-on, baked-on soils. This option MUST be selected
SCRUB PRIOR to starting the cycle. This option adds 16 minutes to the cycle time.
(on some models) NOTE: Cannot be selected with RINSE ONLY cycle.
HEATED DRY Shuts off the drying heat option. Dishes air dry naturally and energy is saved. For faster air dry,
Light OFF you can prop the door open after the CLEAN light illuminates.
HEATED DRY Turns the heater on for fast drying. This will extend the time to your wash cycle by 8 minutes
Light ON for the SPEED CYCLE and 30 minutes for all other cycles. NOTE: Cannot be selected with
RINSE ONLY cycle.
LOCK You can lock the controls to prevent any selections from being made. Or you can lock the
controls after you have started a cycle.
Children cannot accidentally start dishwasher by touching pads with this option
selected.
To unlock the dishwasher controls, press and hold the HEATED DRY pad for 3 seconds.
To lock the dishwasher, press and hold the HEATED DRY pad for 3 seconds. The light above
the LOCK pad will turn off.
EXTRA When selected, the cycle will run longer with heating elements on to improve both wash and
HOT WASH dry performance. NOTE: Cannot be selected with RINSE ONLY cycle.
DELAY HOURS You can delay the start of a wash cycle for up to 8 hours. Press the DELAY HOURS pad to
choose the number of hours you want to delay the start of the cycle, then press START/RESET.
The machine will count down and start automatically at the correct time. Pressing START/RESET
a second time will cancel the DELAY START selection. NOTE: If you forget to fully close the
door, a reminder signal will beep until you do so.
RESET To change a cycle after washing starts, touch the START/RESET pad to cancel the cycle.
The START/RESET light will flash while the water is pumped out if needed. This takes
approximately 90 seconds. When the light stops flashing, the dishwasher can be reprogrammed
and restarted.
3
www.GEAppliances.com
Page 6
6
Operating Instructions Safety InstructionsConsumer Support Troubleshooting Tips
About the dishwasher control panel.
Start
Close the dishwasher door and select the
cycle and desired enhancements. Touch the
START/RESET pad to begin the cycle. Water fill
begins, and approximately 60 seconds later the
wash action begins.
NOTE: The dishwasher remembers your last cycle so
you don’t have to reprogram each time. When the
dishwasher door is fully closed, the control panel
lights will display the last settings you selected.
If you don’t want to change any of the settings, simply
touch the START/RESET pad to begin the cycle.
If the door is closed the indicator lights will turn
off if the START/RESET pad is not selected within
two minutes. To activate the display, open and
close the door or press any pad.
Also, if a power failure occurs, NORMAL and HEATED
DRY will automatically be programmed. Make any
new selections and touch the START/RESET pad to
begin the cycle.
Clean
The CLEAN light is illuminated when a wash cycle
is complete. The light will stay ON until the door
is opened.
4
5
Status Indicator Lights What It Means
START/RESET Cycle has been interrupted by pressing the START/RESET pad. Light will quit
flashing after the dishwasher automatically drains out the water.
Flashing display lights.
Using the dishwasher.
Check the Water Temperature
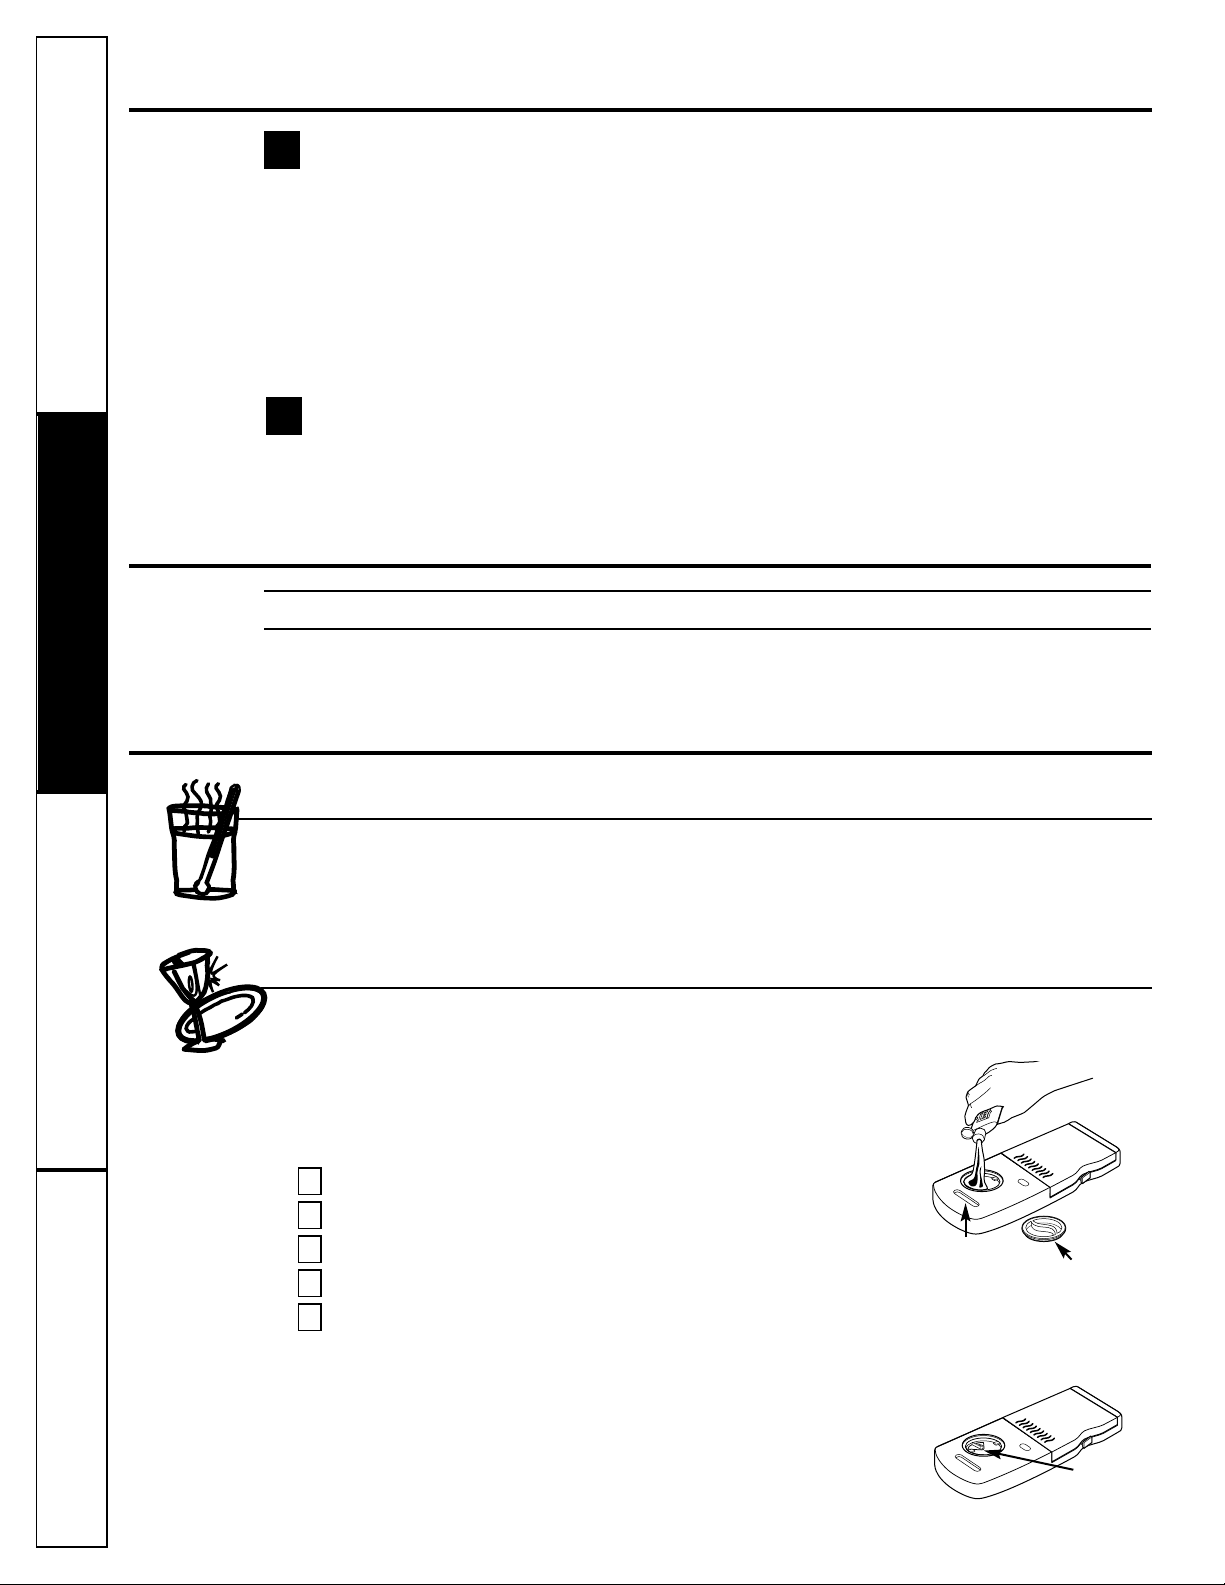
Use Jet-Dry®or Cascade Rinse Aid®Rinse Agent
Jet-Dry®or Cascade Rinse Aid®rinse agent removes spots and prevents new film buildup on your
dishes, glasses, flatware, cookware and plastic.
Filling the Dispenser
The rinse agent dispenser holds 3.5 oz. of rinse agent. Under normal
conditions, this will last approximately one month. Try to keep it full,
but do not overfill.
Make sure the dishwasher door is fully open.
Turn the dispenser knob to the left and lift it out.
Add rinse agent until the indicator window looks full.
Clean up any spilled rinse agent with a damp cloth.
Replace the dispenser knob.
Rinse Aid Setting
The amount of rinse agent released into the final wash can be
adjusted. The factory setting is at the midpoint. If there are rings
of calcium (hard water) spots on dishes, try a higher setting.
To adjust the setting
Remove the dispenser knob, then turn the adjuster counterclockwise
to increase the amount of rinse agent.
5
4
3
2
1
The entering water should be at least 120°F and not
more than 150°F, for effective cleaning and to prevent
dish damage. Check the water temperature with a
candy or meat thermometer. Turn on the hot water
faucet nearest the dishwasher, place the thermometer
in a glass and let the water run continuously into the
glass until the temperature stops rising.
Indicator
window
Dispenser cap
Rinse
agent
adjuster
Page 7
A forgotten dish can be added any time before
the main wash.
Squeeze the door latch to release the door.
Do not open the door until the water spray
action stops. Steam may rise out of the
dishwasher.
Add forgotten dishes.
Close the door.
4
3
2
1
7
Consumer SupportTroubleshooting TipsOperating InstructionsSafety Instructions
Using the Dishwasher Door
Dish Preparation Prior to Loading
Using the dishwasher.
www.GEAppliances.com
The door must be closed to select a
LOAD SELECTION or an ENHANCEMENT.
If the door is opened during a cycle and
left open, the dishwasher will beep once
every minute until the door is closed.
2
1
■ No pre-rinsing of normal food soil is
required.
■ Scrape off hard soils, including bones,
toothpicks, skins and seeds.
■ Remove large quantities of any remaining
food.
■ Remove leafy vegetables, meat trimmings,
and excessive amounts of grease or oil.
■ Remove acidic food soils that can discolor
stainless steel.
Proper Use of Detergent
Use only detergent specifically made for use in
dishwashers. Cascade®, Cascade®Complete and
Electrasol®Automatic Dishwashing Detergents
have been approved for use in all GE dishwashers.
Keep your detergent fresh and dry. Don’t put
powder detergent into the dispenser until you’re
ready to wash dishes.
All wash cycles except RINSE ONLY require
detergent in the main and pre-wash cup.
The amount of detergent to use depends on
whether your water is hard or soft. With hard
water, fill the main wash section and pre-wash
section completely. With soft water, fill both
sections halfway. When using automatic
dishwashing detergent tabs, simply place
one tab in the main wash section and close.
Protect your dishes and dishwasher by
contacting your water department and asking
how hard your water is. Twelve or more grains
is extremely hard water. A water softener is
recommended. Without it, lime can build up
in the water valve, which could stick while
open and cause flooding. Too much detergent
with soft water can cause a permanent
cloudiness of glassware, called etching.
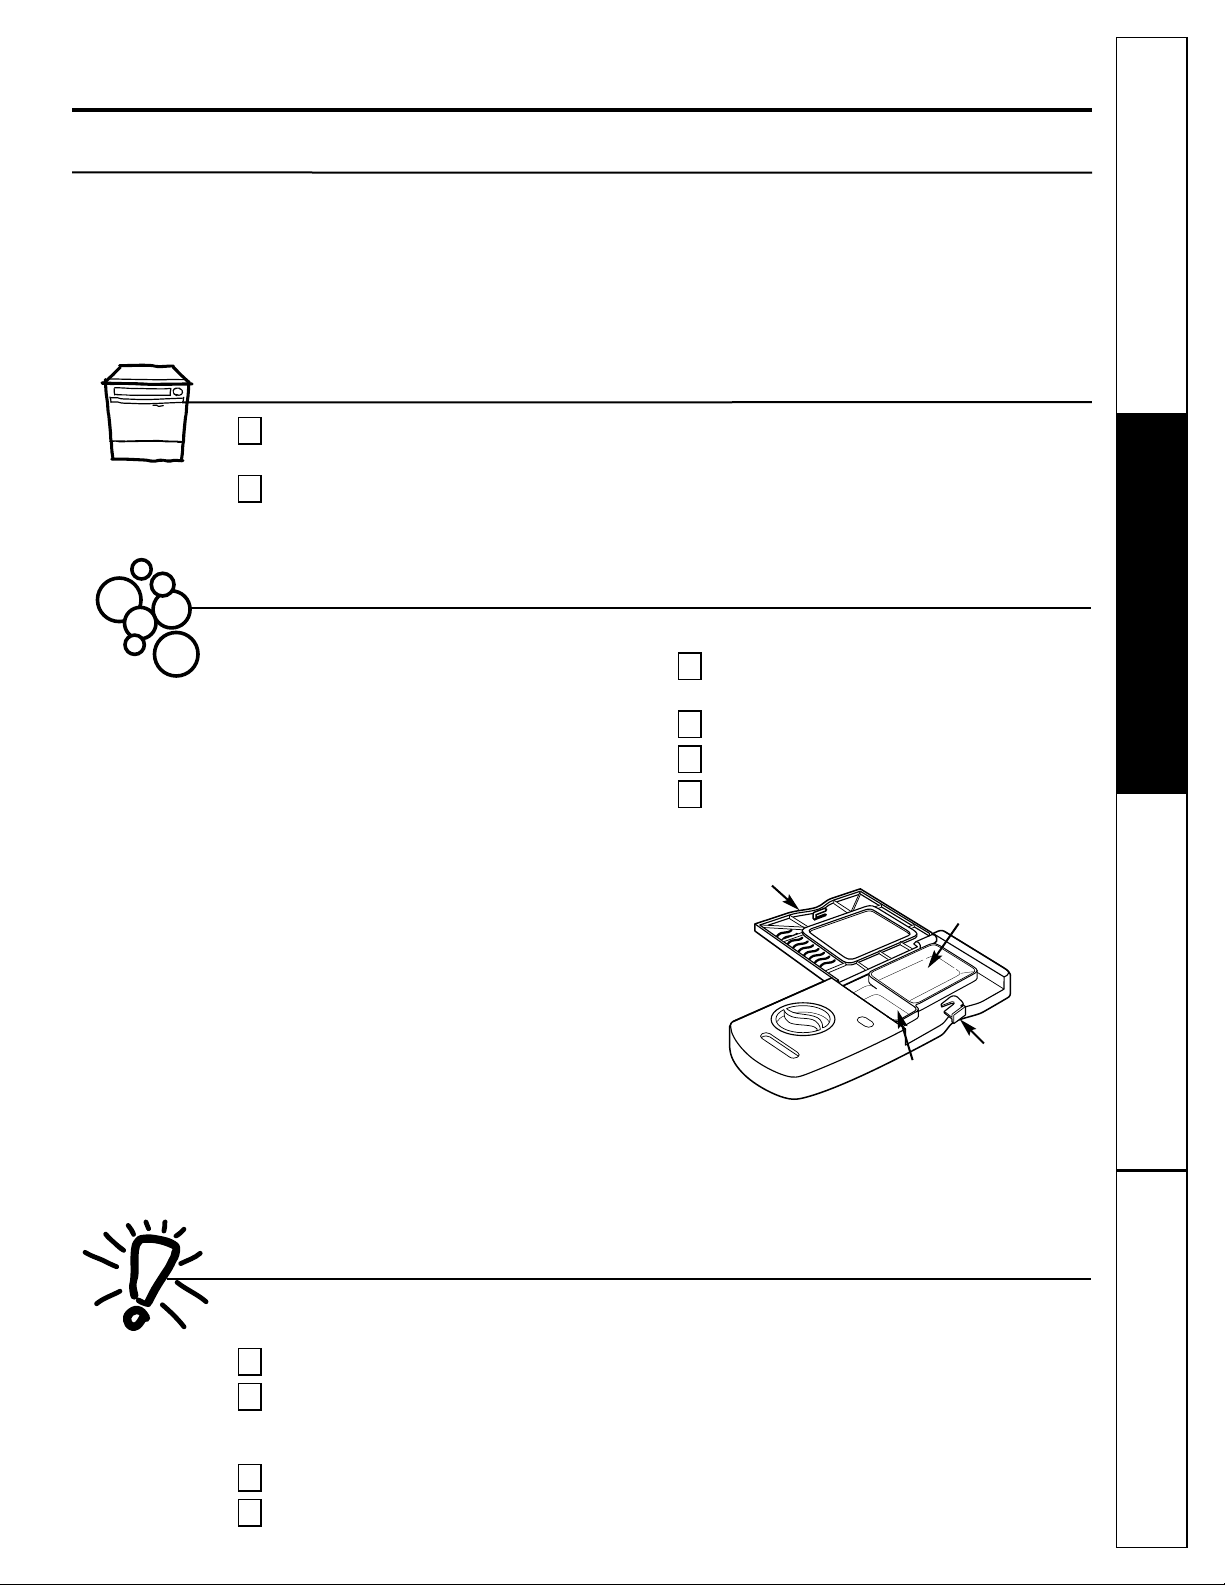
Filling the Dispenser
If the dispenser cover is closed, open the
cover by depressing the cover latch.
Fill the Main Wash section with detergent.
Fill the Pre-Wash section if needed.
Close the dispenser cover.
It is normal for the cover to open partially
when dispensing detergent.
4
3
2
1
Cover
latch
Pre-wash
section
Main
wash
section
Cover
Forget to Add a Dish?
Page 8
8
Operating Instructions Safety InstructionsConsumer Support Troubleshooting Tips
Loading the dishwasher racks.
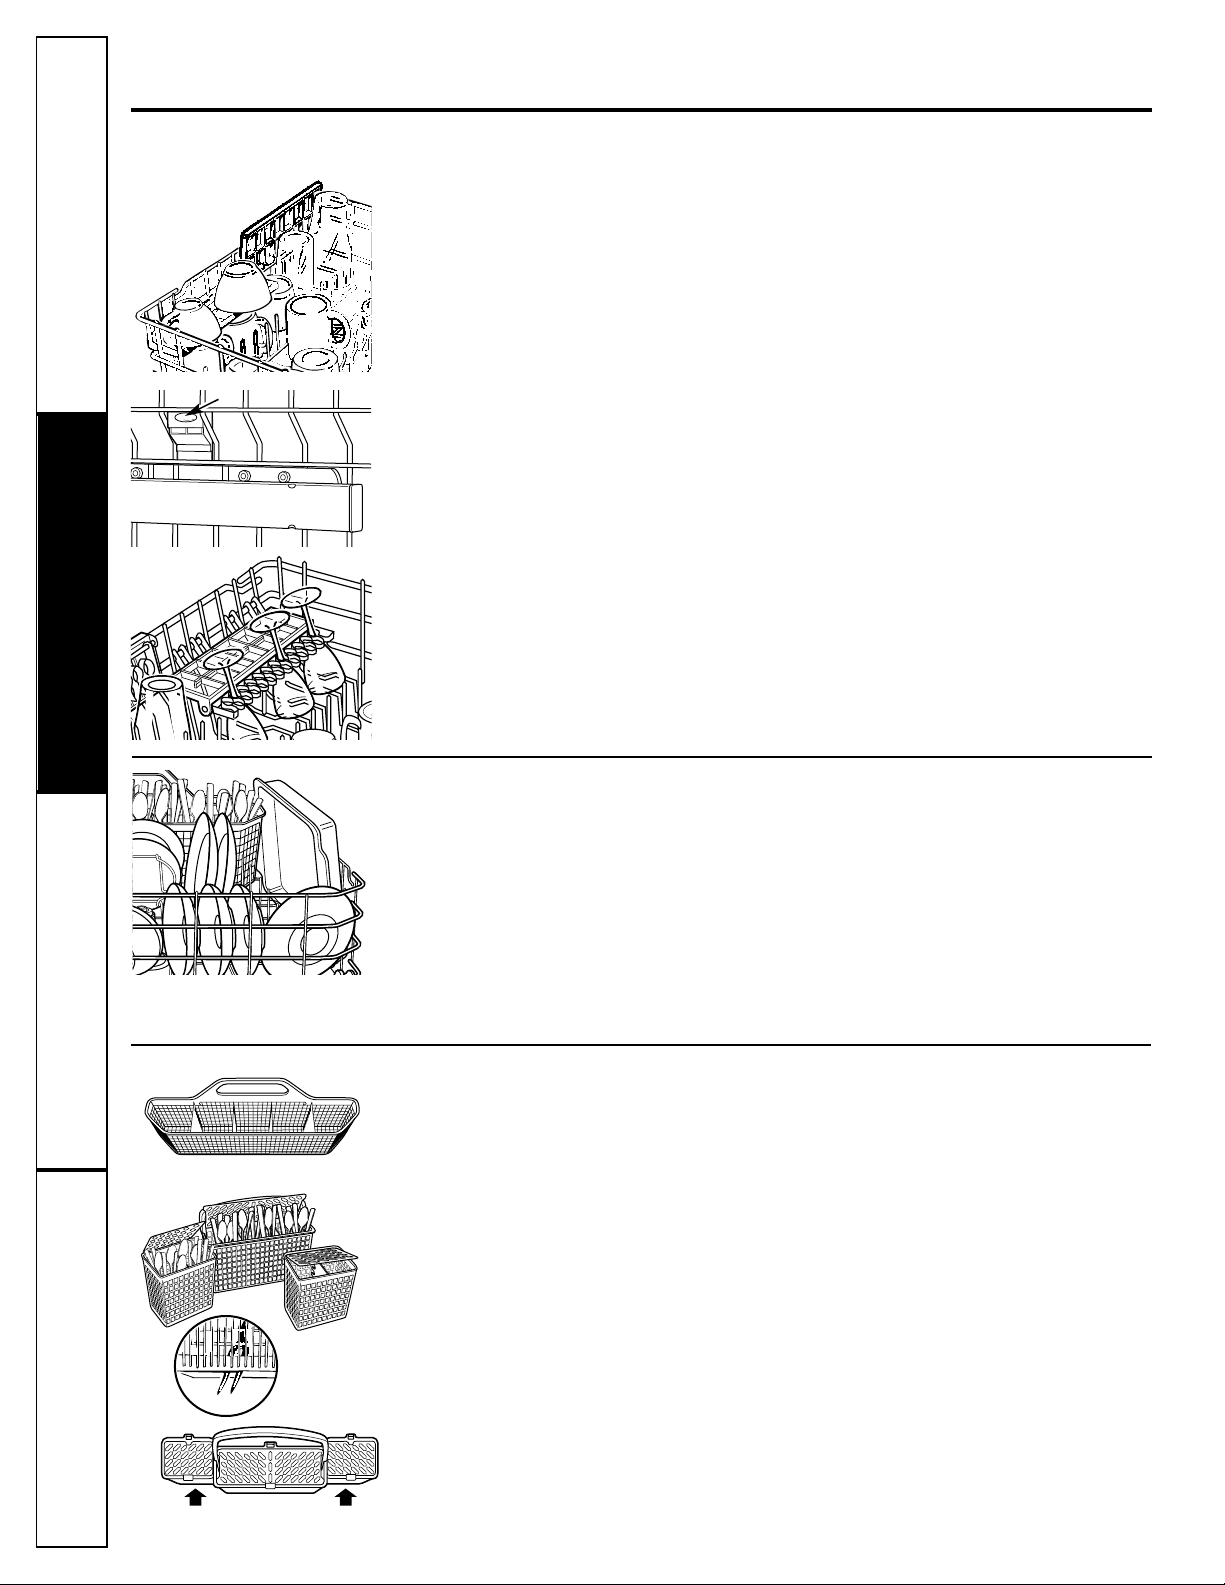
Lower Rack
The lower rack is best used for plates,
saucers and cookware. Large items such
as broiler pans and baking racks should
go along the left-hand side. Load platters,
pots and bowls along the sides, in corners
or in the back. The soiled side of items
should face the center of the rack. If
necessary, oversized glasses and mugs can
be placed in the lower rack to maximize
loading flexibility.
Also, be careful not to let a portion of
an item such as a pot or dish handle
extend through the bottom rack. This
could block the wash arm and cause poor
washing results.
Fold-down tines (on some models) provide
flexibility for extra-large and hard-to-fit
items. The tines may be left in the up
position or folded down to customize the
lower rack.
Silverware Basket
To load flatware, simply push the adjustable
handle to either side (on some models).
Put flatware in the removable basket with
fork and knife handles up to protect your
hands. Place spoons in the basket with
handles down. Mix knives, forks and spoons
so they don’t nest together. Distribute
evenly. Small plastic items, such as
measuring spoons and lids from small
containers should go in the bottom of the
silverware basket with the silverware on top.
The one-piece silverware basket (on some
models) can be placed in the front, right
side or back of the lower rack.
A variety of options is available regarding
the three-piece silverware basket (on some
models) in your dishwasher. The complete
basket is designed to fit on the right side
of the lower rack. Additionally, each end
of the basket is removable to add loading
flexibility to accommodate flatware and
lower rack capacity needs.
The lids of both end and middle baskets
(on some models) can be closed to contain
small items. Long items can be placed on
the utility shelf in the upper rack.
For best dishwashing results, follow these loading guidelines. Features and appearance of racks and silverware
baskets may vary from your model.
Upper Rack
Although the upper rack is for glasses, cups
and saucers, pots and pans can be placed
in this rack for effective cleaning. Cups and
glasses fit best along the sides. This is also
a secure place for dishwasher-safe plastics.
The upper rack is adjustable (on some
models) to add flexibility in loading your
dishwasher. To lower, push tabs in and
lower rack. To raise, just pull up on rack
until it snaps.
The utility shelf (on some models) may be
placed in the up or down position to add
flexibility. A wine glass holder (on some
models) secures wine glasses for best
washability. Because wine glasses come
in various sizes, after loading, slowly push
in the rack to make sure they will clear
the top of the dishwasher.
The upper rack is good for all kinds of
odd-shaped utensils. Saucepans, mixing
bowls and other items should be placed
face down. Fold-down tines (on some
models) provide flexibility for extra-large
and hard-to-fit items.
Secure larger dishwasher-safe plastics over 2 tines
when possible.
Make sure small plastic items are secure so they
can’t fall onto the heater.
Be sure that items do not protrude through the
bottom of the rack and block rotation of the
middle spray arm. This could result in poor
wash performance for items in the upper rack.
Check to make sure that no items will block rotation
of the wash arms.
Tab
Don’t let any
item extend
through bottom.
To remove end baskets, grasp the basket
at opposite corners and slide apart.
Three-piece basket (on some models)
One-piece basket (on some models)
Page 9
9
Consumer SupportTroubleshooting TipsOperating InstructionsSafety Instructions
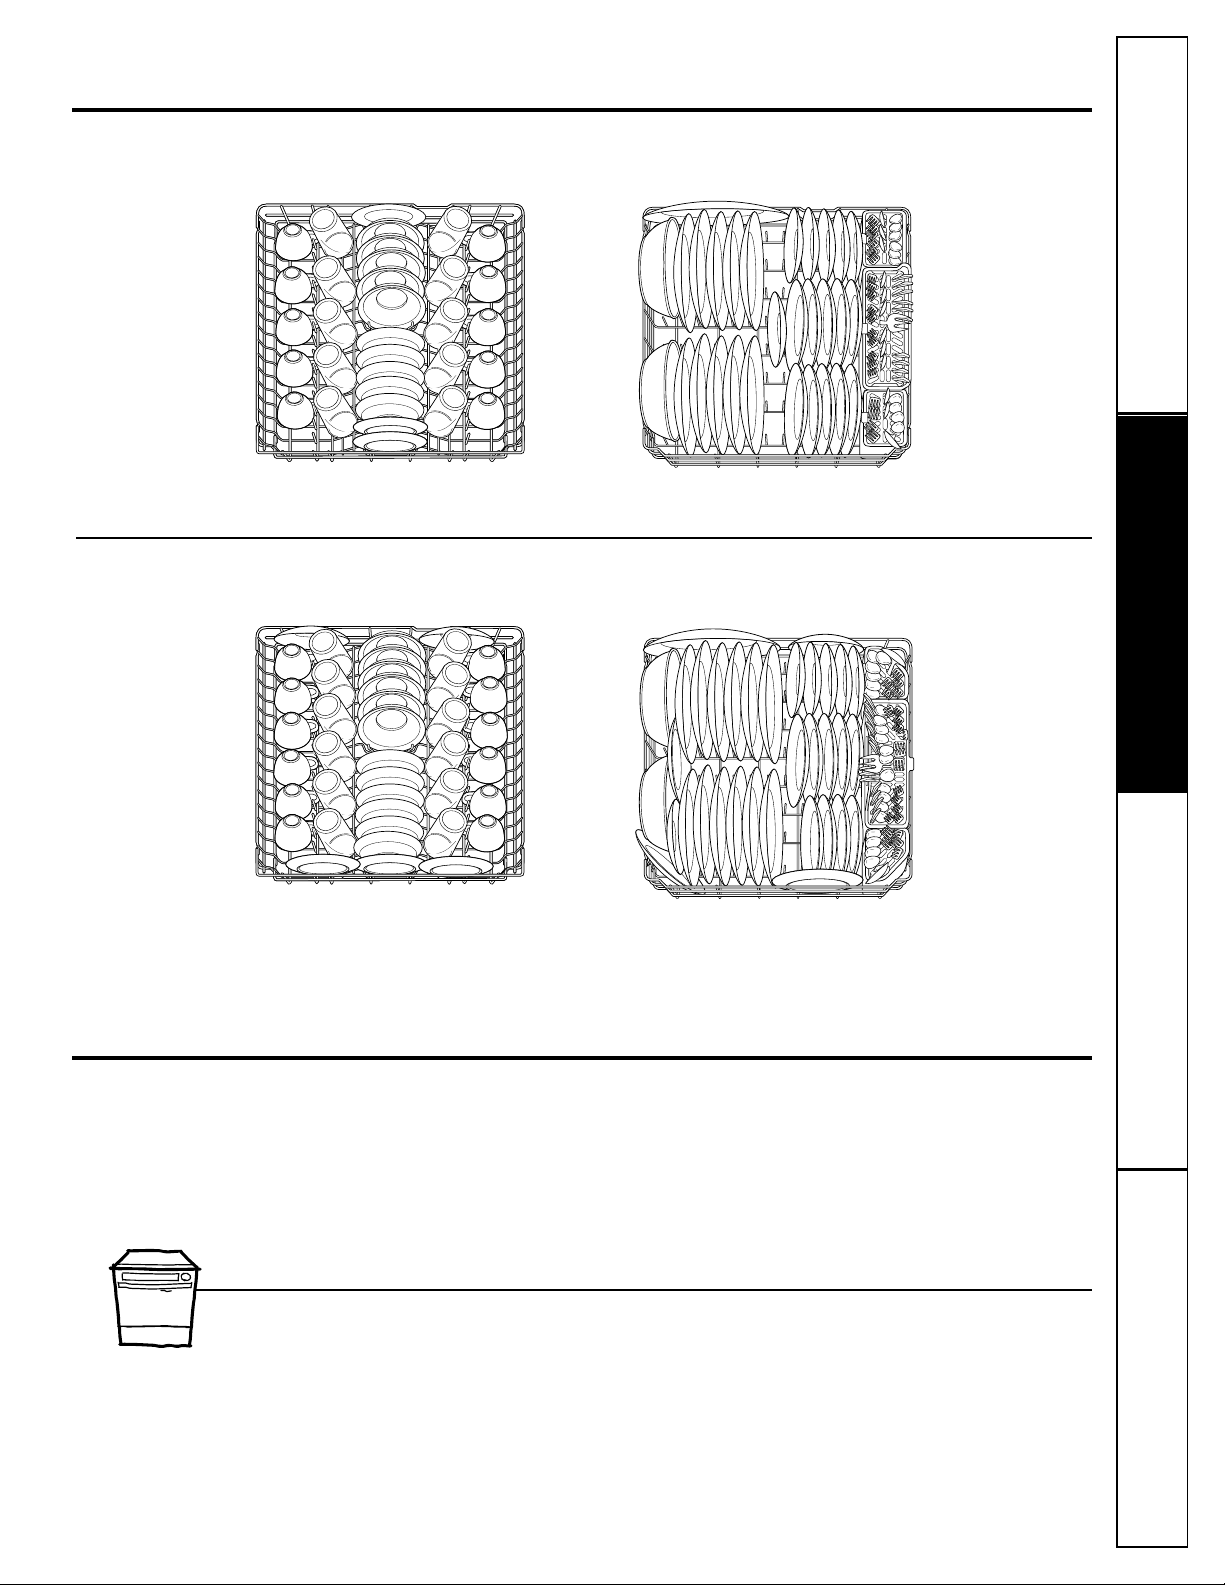
Follow these guidelines for loading 10 place settings. Features and appearance of racks and silverware baskets
may vary from your model.
Upper Rack—10 place settings Lower Rack—10 place settings
Follow these guidelines for loading 12 place settings. Features and appearance of racks and silverware baskets
may vary from your model.
Upper Rack—12 place settings Lower Rack—12 place settings
You can change the appearance of your
dishwasher to match your kitchen cabinets by
ordering one of these optional accessories:
■ 1/4” Wood Panel Trim Kit
■ 3/4” Trimless Wood Panel Kit
These accessories are available at extra cost
(VISA, MasterCard, or Discover cards accepted)
by calling 800.626.2002.
Specify accessory number when ordering.
Descriptions of Optional Accessories
Wood panel trim kit—This accessory contains
trim and instructions for you to supply and install
a 1/4″ thick decorative wood door:
■ GPF625B (Black)
■ GPF625W (White)
■ GPF625C (Bisque)
■ GPF825B (Black)
■ GPF825W (White)
■ GPF825C (Bisque)
Trimless wood panel kit—This accessory contains
parts and instructions for you to supply and install
a 3/4″ thick decorative wood door:
■ GPF675B (Black)
■ GPF675W (White)
■ GPF675C (Bisque)
■ GPF875B (Black)
■ GPF875W (White)
■ GPF875C (Bisque)
About optional accessories.
Loading place settings…
www.GEAppliances.com
Page 10
10
Check the air gap any time your
dishwasher isn’t draining well.
The Stainless Steel Panels
The stainless steel panels can be cleaned
with Stainless Steel Magic or a similar
product using a clean, soft cloth.
You can order Stainless Steel Magic #
WX10X15 through GE Parts by calling
800.626.2002.
Does Your Dishwasher Have
an Air Gap?
An air gap protects your dishwasher
against water backing up into it if a drain
clogs. The air gap is not a part of the
dishwasher. It is not covered by your
warranty. Not all plumbing codes require
air gaps, so you may not have one.
The air gap is easy to clean.
Turn off the dishwasher and lift off
the chrome cover.
Remove the plastic cap and clean with
a toothpick.
2
1
Two types of
air gaps
Caring for the dishwasher.
To clean the control panel, use a lightly dampened
cloth, then dry thoroughly. To clean the exterior,
use a good appliance polish wax.
Never use sharp objects, scouring pads or harsh
cleaners on any part of the dishwasher.
Protect Against Freezing
If your dishwasher is left in an unheated
place during the winter, ask a service
technician to:
Cut off electrical power to the
dishwasher. Remove fuses or trip
circuit breaker.
Turn off the water supply and
disconnect the water inlet line
from the water valve.
Drain water from the water inlet line
and water valve. (Use a pan to catch
the water.)
Reconnect the water inlet line to the
water valve.
4
3
2
1
Operating Instructions Safety InstructionsConsumer Support Troubleshooting Tips
Page 11

Consumer SupportTroubleshooting TipsOperating InstructionsSafety Instructions
Before you call for service… www.GEAppliances.com
Problem Possible Causes What To Do
Control panel lights go off Time too long between • Each pad must be touched within 30 seconds of the others.
when you’re setting controls touching of selected pads To relight, touch any pad again, or unlock and relatch door.
Noise Some of the sounds you’ll • Detergent cup opening.
hear are normal
• The motor stopping during the drying period.
• Water draining out of the tub immediately after you
touch START/RESET pad.
Utensils are not secure in the • Make sure everything is secured in dishwasher.
rack or something small has
dropped into the rack
Motor hums • Dishwasher has not been used on a regular basis. If you
do not use your dishwasher often, set it to fill and pump
out once every week. This will help keep the seal moist.
Detergent left in Dishes are blocking the • Reposition the dishes.
dispenser cups detergent cups
Water standing in This is normal • A small amount of clean water around the outlet on the
the bottom of the tub tub bottom at the back of the tub keeps the water seal
lubricated.
Water won’t pump Drain is clogged • If you have an air gap, clean it.
out of the tub
• Check to see if your kitchen sink is draining well. If not,
you may need a plumber.
• If the dishwasher drains into a disposer, run disposer clear.
Suds in the tub Correct detergent • Use only automatic dishwasher detergents to avoid sudsing.
wasn’t used Cascade®, Cascade®Complete and Electrasol®Automatic
Dishwashing Detergents have been approved for use in all
GE dishwashers.
• To remove suds from the tub, open the dishwasher and let
suds evaporate. Add 1 gallon of cold water to the tub. Close
and latch the dishwasher. Pump out water by pressing the
START/RESET pad; then immediately press the START/RESET
pad again. Repeat if necessary.
Rinse agent • Always wipe up rinse agent spills immediately.
was spilled
Stained tub interior Detergent with • Some detergents contain colorant (pigment or dyes) that will
colorant was used discolor the tub interior with extended use. Check the detergent
cup for signs of any discoloration. If cup is discolored, change
to detergent without any colorant. Cascade®, Cascade®Complete
and Electrasol
®
Automatic Dishwashing Detergents have been
approved for use in all GE dishwashers.
Some tomato-based • Use of the RINSE ONLY cycle (on some models) after adding
foods can stain the dish to the load can decrease the level of staining. GE
recommends Cascade®Power Booster to help remove these
types of stains.
Dishes and flatware Low inlet water temperature • Make sure inlet water temperature is correct (see page 6).
not clean
Water pressure is temporarily low • Turn on a faucet. Is water coming out more slowly than usual?
If so, wait until pressure is normal before using your dishwasher.
Air gap is clogged • Clean the air gap.
Improper rack loading • Make sure large dishware does not block the detergent
dispenser or the wash arms.
Troubleshooting Tips
Save time and money! Review the charts on the following pages,
or visit GEAppliances.com. You may not need to call for service.
11
Page 12

Operating Instructions Safety InstructionsConsumer Support Troubleshooting Tips
Problem Possible Causes What To Do
Spots and filming • Use Jet-Dry®and Cascade Rinse Aid®rinse agents to remove spots and
on glasses and prevent new film buildup.
flatware
• To remove stubborn spots and pre-existing film from glassware:
1 Remove all metal utensils from the dishwasher.
2 Do not add detergent.
3 Select the POTS & PANS cycle.
4 Start the dishwasher and allow to run for 18 to 22 minutes. Dishwasher
will now be in the main wash.
5 Open the door and pour 2 cups (500 ml) of white vinegar into the
bottom of the dishwasher.
6 Close the door and allow to complete the cycle. If vinegar rinse doesn’t
work: Repeat as above, except use 1/4 cup (60 ml) of citric acid crystals
instead of vinegar.
Cloudiness on Combination of soft water and • This is called etching and is permanent. To prevent this from happening,
glassware too much detergent use less detergent if you have soft water. Wash glassware in the shortest
cycle that will get them clean.
Water temperature entering • Lower the water heater temperature.
the dishwasher exceeds 150°F
Black or gray Aluminum utensils have • Remove marks with a mild, abrasive cleaner.
marks on dishes rubbed against dishes
Yellow or brown film Tea or coffee stains • Remove the stain by hand, using a solution of 1/2 cup bleach and
on inside surfaces 3 cups warm water.
WARNING
Before cleaning interior wait at least 20 minutes after a cycle for the
heating element to cool down. Failure to do so can result in burns.
An overall yellow or brown film can • A special filter in the water supply line is the only way to correct
be caused by iron deposits in water this problem. Contact a water softener company.
White film on inside Hard water minerals • GE recommends Jet-Dry®or Cascade Rinse Aid®to help remove some
surfaces hard water mineral stains.
• For extreme staining, clean the interior by applying dishwasher
detergent to a damp sponge. Wear rubber gloves. Do not use any type
of cleaner other than those recommended or hand dishwashing
detergent because it may cause foaming or sudsing. Cascade®, Cascade
®
Complete and Electrasol®Dishwashing Detergents have been approved
for use in all GE dishwashers.
Dishes don’t dry Low inlet water temperature • Make sure inlet water temperature is correct (see page 6).
• Select HEATED DRY.
Rinse agent dispenser is empty • Check the rinse agent dispenser.
Control panel responded Door latch may not be properly • Call for service.
to inputs but dishwasher seated
never filled with water
Dishwasher won’t run Fuse is blown, or the • Replace fuse or reset circuit breaker. Remove any other appliances from
circuit breaker tripped the circuit.
• Try resetting the START/RESET pad.
Steam This is normal • Steam comes through the vent by the door latch during drying and
when water is being pumped out.
Sanitized light does The door was opened and the • Do not interrupt the cycle anytime during or after main wash.
not illuminate at the cycle was interrupted during
end of the cycle or after the main wash portion
(Anti-Bacteria
The incoming water • Raise the water heater temperature to 120°F.
cycle only)
temperature was too low
Extremely hard water
Low inlet water temperature
Overloading the dishwasher
Improper loading
Old or damp powder detergent
Rinse agent dispenser empty
Too little detergent
Before you call for service…
12
Page 13

General Electric Company
Warranty Registration Department
P.O. Box 32150
Louisville, KY 40232-2150
GE Service Protection Plus
™
GE, a name recognized worldwide for quality and dependability, offers you
Service Protection Plus
™
—comprehensive protection on all your appliances—
No Matter What Brand!
Benefits Include:
• Backed by GE
• All brands covered
• Unlimited service calls
• All parts and labor costs included
• No out-of-pocket expenses
• No hidden deductibles
• One 800 number to call
You will be completely satisfied with our service protection or you may request your money back
on the remaining value of your contract. No questions asked. It’s that simple.
Protect your refrigerator, dishwasher, washer and dryer, range, TV, VCR and much more—any brand!
Plus there’s no extra charge for emergency service and low monthly financing is available. Even icemaker
coverage and food spoilage protection is offered. You can rest easy, knowing that all your valuable
household products are protected against expensive repairs.
Place your confidence in GE and call us in the U.S. toll-free at 800.626.2224
for more information.
*All brands covered, up to 20 years old, in the continental U.S.
We’ll Cover Any Appliance.
Anywhere. Anytime.*
Please place in envelope and mail to:
✁
Cut here
13
Page 14

14
Consumer Product Ownership Registration
I
m
p
o
r
t
a
n
t
M
a
i
l
T
o
d
a
y
!
GE Appliances
GE Consumer & Industrial
Louisville, Kentucky
www.GEAppliances.com
First
Name
Mr. ■■ Ms. ■■ Mrs. ■■ Miss ■■
Street
Address
City
State
Date Placed
In Use
Month
Day
Year
Zip
Code
Apt. #
Last
Name
Phone
Number
_
_
Consumer Product Ownership Registration
Dear Customer:
Thank you for purchasing our product and thank you for placing your confidence in us.
We are proud to have you as a customer!
Follow these three steps to protect your new appliance investment:
Important: If you did not get a registration card with your
product, detach and return the form below to
ensure that your product is registered, or register
online at www.GEAppliances.com.
1
23
Model Number Serial Number
✁
Cut here
Complete and mail
your Consumer
Product Ownership
Registration today.
Have the peace of
mind of knowing we
can contact you in
the unlikely event of
a safety modification.
After mailing the
registration below,
store this document
in a safe place. It
contains information
you will need should
you require service.
Our service number
is 800.GE.CARES
(800.432.2737).
Read your Owner’s
Manual carefully.
It will help you
operate your new
appliance properly.
Model Number Serial Number
E-mail Address*
* Please provide your e-mail address to receive, via e-mail, discounts, special offers and other important
communications from GE Appliances (GEA).
■■ Check here if you do not want to receive communications from GEA’s carefully selected partners.
FAILURE TO COMPLETE AND RETURN THIS CARD DOES NOT DIMINISH YOUR
WARRANTY RIGHTS.
For information about GEA’s privacy and data usage policy, go to www.GEAppliances.com and click
on “Privacy Policy” or call 800.626.2224.
Page 15

Warrantor: General Electric Company. Louisville, KY 40225
What GE Will Not Cover:
For The Period Of: GE Will Replace:
One Year Any part of the dishwasher which fails due to a defect in materials or workmanship. During this
From the date of the full one-year warranty, GE will also provide, free of charge, all labor and in-home service to replace
original purchase the defective part.
Second Year Any part of the dishwasher which fails due to a defect in materials or workmanship. During this
From the date of the second-year limited warranty, you will be responsible for any labor or in-home service costs.
original purchase
Five Years The electronic control module, if it should fail due to a defect in materials or workmanship. During
(for models EDW4000, this five-year limited warranty, you will be responsible for any labor or in-home service costs.
EDW4060, GSD6200,
GSD6300, GSD6500,
GSD6560, GSD6600,
GSD6660, GSD6700,
GSD6760, GSD6860,
GSD6900, GSD6960
and SSD4900)
From the date of the
original purchase
Five Years The nylon-coated dishwasher racks, if they fail due to a defect in materials or workmanship. During
(for EDW4000, EDW4060, this five-year limited warranty, you will be responsible for any labor or in-home service costs.
GSD6500, GSD6560,
GSD6600, GSD6660,
GSD6700, GSD6760,
GSD6860, GSD6900,
GSD6960, GHDA980
and GHDA986
models only)
From the date of the
original purchase
Ten Years The PermaTuf®tub or door liner, if it fails to contain water due to a defect in materials or
From the date of the workmanship. During this full ten-year warranty, GE will also provide, free of charge, all labor
original purchase and in-home service to replace the defective part.
15
GE Dishwasher Warranty.
■ Service trips to your home to teach you how to use
the product.
■ Improper installation, delivery or maintenance.
■ Failure of the product if it is abused, misused, or used for
other than the intended purpose or used commercially.
■ Replacement of house fuses or resetting of circuit
breakers.
■ Damage to the product caused by accident, fire, floods
or acts of God.
■ Incidental or consequential damage caused by possible
defects with this appliance.
■ Cleaning or servicing of the air gap device in the
drain line.
■ Damage caused after delivery.
This warranty is extended to the original purchaser and any succeeding owner for products purchased for home
use within the USA. Proof of original purchase date is needed to obtain service under the warranty. In Alaska, the
warranty excludes the cost of shipping or service calls to your home.
Some states do not allow the exclusion or limitation of incidental or consequential damages. This warranty gives
you specific legal rights, and you may also have other rights which vary from state to state. To know what your
legal rights are, consult your local or state consumer affairs office or your state’s Attorney General.
Consumer Support
Troubleshooting TipsOperating Instructions
Safety Instructions
All warranty service provided by our Factory Service Centers,
or an authorized Customer Care
®
technician. To schedule service,
on-line, 24 hours a day, visit us at www.GEAppliances.com,
or call 800.GE.CARES (800.432.2737).
Staple your receipt here.
Proof of the original purchase
date is needed to obtain service
under the warranty.
Page 16

Consumer Support.
GE Appliances Website
www.GEAppliances.com
Have a question or need assistance with your appliance? Try the GE Appliances Website 24 hours a day,
any day of the year! For greater convenience and faster service, you can now download Owner’s Manuals,
order parts, catalogs, or even schedule service on-line. You can also “Ask Our Team of Experts™”
your questions, and so much more...
Schedule Service www.GEAppliances.com
Expert GE repair service is only one step away from your door. Get on-line and schedule your service at
your convenience 24 hours any day of the year! Or call 800.GE.CARES (800.432.2737) during normal
business hours.
Real Life Design Studio www.GEAppliances.com
GE supports the Universal Design concept—products, services and environments that can be used by
people of all ages, sizes and capabilities. We recognize the need to design for a wide range of physical and
mental abilities and impairments. For details of GE’s Universal Design applications, including kitchen
design ideas for people with disabilities, check out our Website today. For the hearing impaired, please call
800.TDD.GEAC (800.833.4322).
Extended Warranties www.GEAppliances.com
Purchase a GE extended warranty and learn about special discounts that are available while your warranty
is still in effect. You can purchase it on-line anytime, or call 800.626.2224 during normal business hours.
GE Consumer Home Services will still be there after your warranty expires.
Parts and Accessories www.GEAppliances.com
Individuals qualified to service their own appliances can have parts or accessories sent directly to their
homes (VISA, MasterCard and Discover cards are accepted). Order on-line today, 24 hours every day or
by phone at 800.626.2002 during normal business hours.
Instructions contained in this manual cover procedures to be performed by any user. Other servicing generally
should be referred to qualified service personnel. Caution must be exercised, since improper servicing may cause
unsafe operation.
Contact Us www.GEAppliances.com
If you are not satisfied with the service you receive from GE, contact us on our Website with all the details
including your phone number, or write to: General Manager, Customer Relations
GE Appliances, Appliance Park
Louisville, KY 40225
Register Your Appliance www.GEAppliances.com
Register your new appliance on-line—at your convenience! Timely product registration will allow for
enhanced communication and prompt service under the terms of your warranty, should the need arise.
You may also mail in the pre-printed registration card included in the packing material, or detach and
use the form in this Owner’s Manual.
Printed in the United States
Printed on Recycled Paper
Page 17

Specification Revised 6/02
GE Appliances
GSD6200G – GE Triton XL™Built-In Dishwasher
For answers to your Monogram,® GE Profile™or
GE appliance questions, visit our website at
GEAppliances.com or call
GE Answer Center®service, 800.626.2000.
R
Listed by
Underwriters
Laboratories
24
25-1/4
21-1/4
4
4 (Adjustable)
34-1/8 MIN.
adj. to 35
27-1/2
22-1/2
Built-In Dishwasher Dimensions
(in inches)
Models/Kit A B C - Panel Thickness
GE Models
GPF625 Kit* 25-1/16" 23-1/2" 1/4"
GPF675 Kit** 25-7/16" 23-3/4" 3/4"
**GPF800 Heavy Spring Kit required for custom door panel
weighing more than 4 lbs.
**GPF800 Heavy Spring Kit included.
Wood Insert Cut-Out Dimensions
(flat door models only)
B
See Detail E for 3/4" Panel
Door insert
A
Detail E for 3/4 panel only
Back ViewFront View
F
F
2219-3/4
Section F-F
3/8
3/8
3/4
Electrical Rating
Voltage AC . . . . . . . . . . . . . . . . . . . . . . . 120
Hertz . . . . . . . . . . . . . . . . . . . . . . . . . . . . . 60
Total connected load amperage . . . . . . . 9.1
Calrod®heater watts max. . . . . . . . . . . .875
For use on adequately wired 120-volt,
15-amp circuit having 2-wire service with
a separate ground wire. This appliance
must be grounded for safe operation.
As an ENERGY STAR®partner,
GE has determined that this product
meets the ENERGY STAR
®
guidelines for energy efficiency.
Dishwasher Rough-In Information
Note: Dishwasher must not be installed more
than 10 feet from sink for proper drainage.
All plumbing and electrical work must be in
accordance with local codes.
The power cord and connections must comply
with the National Electrical Code Section 422
and/or local codes and ordinances. The cord
must be no longer than 6 ft. from the junction
box to the receptacle.
Installation Information
(in inches)
This wall area
must be free of
pipes or wires
Countertop
4
6
Hot
water
line on
left
44
2
Plumbing and electrical
service must enter
inside shaded area
24" From wall
24" MIN.
90°
19" MIN. from wall
24"
MIN.
6
34-1/2±1/4"
Underside
of countertop
to floor
55
90°
Electrical
wiring on
right
Electrical
wiring is
3" from
cabinet
White (neutral)
Black (line)
Ground
Page 18

Specification Revised 6/02
GE Appliances
GSD6200G – GE Triton XL™Built-In Dishwasher
T
rit
o
n
X
L
R
IN
S
E
O
N
L
Y
C
H
IN
A
C
R
Y
S
T
A
L
N
O
R
M
A
L
W
A
S
H
P
O
T
S
&
P
A
N
S
A
N
T
I
B
A
C
T
E
R
I
A
S
T
A
R
T
R
E
S
E
T
D
E
L
A
Y
H
O
U
R
S
E
X
T
R
A
H
O
T
W
A
S
H
H
E
A
T
E
D
D
R
Y
T
O
L
O
C
K
C
O
N
T
R
O
L
S
P
R
E
S
S
H
E
A
T
E
D
D
R
Y
F
O
R
3
S
E
C
O
N
D
S
E
x
t
r
a
C
l
e
a
n
S
e
n
s
o
r
S
e
l
e
c
t
i
o
n
s
S
A
N
I
T
I
Z
E
D
C
L
E
A
N
E
x
t
r
a
s
2
4
8
Features and Benefits
• ENERGY STAR®Qualified
• Full-Length Flat Door
• Tall-Over-Tall™Towerless Rack Design: Tiered Upper Rack w/PVC Tines and
Two Utility Shelves, Lower Rack
• QuietPower™IV Sound Insulation Package with ActiveVent II System
• XtraClean™Wash System with Six Wash Levels
• XtraClean™Sensor with Integrated Automatic Temperature Control
• Variable Cycles: Anti-Bacteria (NSF Certified), Pots & Pans, Normal Wash,
China/Crystal and Rinse Only
• Three Full-Size, Direct-Feed Wash Arms
• 100% Triple Water Filtration System with XtraFine™Filter/Dual Pumps and Motors
• Inlaid Light-Touch Electronic Controls with “Clean” and “Sanitized” Indicator Lights
• Silverware Basket with Two Cell Covers
• Multi-Wattage Heating Element
• Options: Start/Reset, Child Lock-Out, Delay Start (2/4/8 Hours), Heated Dry,
ExtraHot Wash and Auto HotStart™Feature
• Model GSD6200GWW – White on white
• Model GSD6200GBB – Black on black
• Model GSD6200GCC – Bisque
Page 19

Installation
Built-In
Dishwasher
Instructions
If you have questions, call 800-GECARES or visit our website at: www.GEAppliances.com
BEFORE YOU BEGIN
Read these instructions completely and carefully.
• IMPORTANT – Observe all governing
codes and ordinances.
• Note to Installer – Be sure to leave these instruc-
tions for the consumer’s and local inspector’s use.
• Note to Consumer – Keep these instructions with
your Owner’s Manual for future reference.
• Skill Level – Installation of this dishwasher requires
basic mechanical and electrical skills. Proper installa-
tion is the responsibility of the installer. Product failure
due to improper installation is not covered under the
GE Appliance Warranty.
• Completion Time – 1 to 3 Hours. New installations
require more time than replacement installations.
• IMPORTANT – The dishwasher MUST be
installed to allow for future removal from the enclosure if service is required.
If you received a damaged dishwasher, you should
immediately contact your dealer or builder.
Optional Accessories – See the Owner’s Manual
for available custom panel kits.
FOR YOUR SAFETY
Read and observe all CAUTIONS and WARNINGS
shown throughout these instructions. While performing
installations described in this booklet, gloves, safety
glasses or goggles should be worn.
READ CAREFULLY.
KEEP THESE INSTRUCTIONS.
1
Page 20

Installation Preparation
PARTS SUPPLIED:
¨ Two #8 Phillips flat head wood screws, 5/8" long to
secure dishwasher to underside of countertop or to
side of cabinetry. (Taped to top or side of
dishwasher.)
¨ Side and top trim pieces
¨ 2 Side mounting brackets with 4 mounting screws
(for non-wood countertops) on some models
2 Wood Screws
MATERIALS YOU WILL NEED :
¨ Ferrule, compression nut and 90° Elbow (3/8"NPT external
thread on one end, opposite end sized to fit water supply)
¨ Thread seal tape
¨ UL Listed wire nuts (3)
Materials For New Installations Only:
¨ Air gap for drain hose, if required
¨ Waste tee for house plumbing, if applicable
¨ Electrical cable or power cord, if applicable
¨ Screw type hose clamps
¨ Strain relief for electrical connection.
¨ Hand shut-off valve (recommended)
¨ Water line 3/8" min. copper or 1/2" min. plastic
(plastic must be tested for temperature and pressure)
¨ Coupler for extending drain line, if applicable
Trim Pieces
4, #8 Pan head Phillips Screws
3/8" long for side mounting
90° Elbow,
Ferrule and
Compression Nut
Waste Tee
Air Gap
Screw Type
Hose Clamps
Side Mounting Brackets
(some models)
Hand
Shut-Off
Valve
Electrical Cable
(or Power Cord, if applicable)
Thread
Seal Tape
Strain Relief
(some models)
Wire Nuts (3)
Hot Water line
Coupler
TOOLS YOU WILL NEED:
¨ Phillips head screwdriver
¨ 5/16" and 1/4" nutdriver
¨ 6" Adjustable wrench
¨ Level
¨ Carpenters square
¨ Measuring tape
¨ Safety glasses
¨ Flashlight
¨ Bucket to catch water when flushing the line
¨ 15/16" socket (optional for skid removal)
¨ Gloves
For New Installations Only:
¨ Tubing cutter
¨ Drill and appropriate bits
¨ Hole saw set
15/16" Socket
Gloves
Phillips
Head
Screwdriver
Flashlight
Bucket
2
1/4"
and 5/16"
Nutdriver
6" Adjustable
Wrench
Safety Glasses
Hole Saw Set
Level
Carpenters
Square
Tubing Cutter
Measuring Tape
Drill and Bits
Page 21

Installation Preparation
PREPARE DISHWASHER ENCLOSURE
This Wall Area
must be Free of
Figure A
34-1/2"±1/4"
Underside of
Countertop
to Floor
Floor MUST be Even
Pipes or wires
5"
Plumbing and Electric Service
Must Enter Inside This Area
With Room Floor.
4"
24"
Min.
24"
Min.
5"
4"
Cabinets
Square
and
6"
Plumb
• The dishwasher must be installed so that drain hose is
no more than 10 feet in length for proper drainage.
• The dishwasher must be fully enclosed on the top,
sides and back, and must not support any part of the
enclosure.
CLEARANCES: When
installed into a corner,
allow 2" min. clearance
between dishwasher and
adjacent cabinet, wall or
other appliances. Allow
28-3/8" min. clearance
from the front of the
dishwasher for door
opening. Figure B
Countertop
Dishwasher
28-3/8"
Clearance for Door
Opening 2" Minimum
• The rough cabinet opening must be at least 24" deep,
24" wide and approximately 34-1/2" high from floor to
underside of the countertop.
DRAIN REQUIREMENTS
• Follow local codes and ordinances.
• Do not exceed 10 feet distance to drain.
Note: This dishwasher is equipped with a high drain
loop. There is no minimum height required for drain
hose routing. However, 18" minimum from floor to
center of waste tee or disposer inlet is required. See
Figure D.
DETERMINE DRAIN METHOD
The type of drain installation depends on the following
question.
¨ Do local codes or ordinances require an air gap?
¨ Is waste tee less than 18" above floor?
If the answer to either question is YES, Method 1 MUST
be used.
• If the answers are NO, either method may be used.
Figure B
Figure C
Method 1 – Air Gap with Waste Tee or Disposer
An air gap must be used when required by local codes and ordinances.
The air gap must be installed according to manufacturers instructions.
18"
Min.
18"
Min.
CABINET PREPARATION
• Drill a 1-1/2" dia. hole in the cabinet wall within the
shaded areas shown in Figure A for the drain hose
connection. The hole should be smooth with no sharp
edges.
IMPORTANT: When connect-
ing drain line to disposer, check to
be sure that drain plug has been
removed. DISHWASHER WILL
NOT DRAIN IF PLUG IS LEFT IN PLACE.
Remove
Hopper
Figure D
Method 2 – Built-in “High Drain Loop” with Waste Tee or
Disposer
Plug
3
Page 22

Installation Preparation
White
18"
6"
24"
from Wall
3"
from
Cabinet
Alternate
Receptacle
Location
Ground
Black
1-1/2" Dia. Hole (Max.)
18"
6"
Receptacle
Location
Area
PREPARE ELECTRICAL WIRING
FOR PERSONAL SAFETY: Remove
house fuse or open circuit breaker
before beginning installation. Do not
use an extension cord or adapter plug
with this appliance.
Electrical Requirements
• This appliance must be supplied with 120V, 60 Hz., and
connected to an individual properly grounded branch
circuit, protected by a 15 or 20 ampere circuit breaker
or time delay fuse.
• Wiring must be 2 wire with ground and rated for 75°C
(176°F).
• If the electrical supply does not meet the above
requirements, call a licensed electrician before
proceeding.
Grounding Instructions–Cable Direct
This appliance must be connected to a grounded metal,
permanent wiring system, or an equipment grounding
conductor must be run with the circuit conductors and
be connected to the equipment grounding terminal or
lead on the appliance.
Grounding Instructions–Power Cord Models
This appliance must be grounded. In the event of a
malfunction or breakdown, grounding will reduce the
risk of electric shock by providing a path of least resistance for electric current. This appliance is equipped
with a cord having an equipment grounding conductor
and a grounding plug. The plug must be plugged into an
appropriate outlet that is installed and grounded in
accordance with all local codes and ordinances.
The improper connection of the
equipment grounding conductor can
result in a risk of electric shock. Check
with a qualified electrician or service
representative if you are in doubt that
the appliance is properly grounded.
For models equipped
Figure E
with power cord: Do not modify the plug provided with
the appliance; if it will not fit the outlet, have a proper
outlet installed by a qualified technician.
Cabinet Preparation & Wire Routing
• The wiring may enter the opening from either side, rear
or the floor within the shaded area.
• Cut a 1-1/2" max. dia. hole to admit the electrical cable.
Cable direct connections may pass through the same
hole as the drain hose and hot water line, if convenient.
If cabinet wall is metal, the hole edge must be covered
with a bushing. NOTE: Power cords with plug must pass
through a separate hole.
Electrical Connection to Dishwasher
Electrical connection is on the right front of dishwasher.
• For cable direct connections the cable must be routed as
shown in Figure E. Cable must extend a minimum of
24" from the rear wall.
• For power cord connections, install a 3-prong grounding type receptacle in the sink cabinet rear wall, 6" min.
or 18" max. from the opening, 6" to 18" above the floor.
4
Page 23

Installation Instructions
Increase
Spring
Tension
Decrease
Spring
Tension
Insert
Hook
Over
Bracket
Correct
Incorrect
PREPARE HOT WATER LINE
• The line may enter from either side, rear or floor
within the shaded area shown in Figure F.
• The line may pass through the same hole as the
electrical cable and drain hose. Or, cut an additional
1-1/2" dia. hole to accommodate the water line. If
power cord with plug is used, water line must not pass
through power cord hole.
4"
2" From Floor
4"
5"
6"
Hot
From
Cabinet
Cabinet Face
Figure F
Shut-off
Valve
2"
1-1/2" Dia.
Hole
5"
19" From Wall
Water Line Connection
• Turn off the water supply.
• Install a hand shut-off valve in an accessible location,
such as under the sink. (Optional, but strongly recommended and may be required by local codes.)
• Water connection is on the left side of the dishwasher.
Install the hot water inlet line, using no less than 3/8"
O.D. copper tubing. Route the line as shown in Figure
F and extend forward at least 19" from rear wall.
• Adjust water heater for 120°F to 150°F temperature.
• Flush water line to clean out debris.
• The hot water supply line pressure must be 20-120 PSI.
Do not remove wood base until you are ready to install
the dishwasher. The dishwasher will tip over when the
door is opened.
Before You Begin
Locate and set aside the 2 Phillips head countertop
mounting screws wrapped with yellow tape and stuck to
the top or side of the dishwasher.
STEP 1 CHECK DOOR BALANCE
With dishwasher on wood skid, check the door balance
by opening and closing the door.
• If door drops open when released, increase spring
tension. If door closes when released, decrease tension.
Note: Increase or decrease
tension as shown. Adjust
both springs to the same
tension setting to correct
balance.
Figure G
TIP: If door spring adjustment is necessary, check door
opening and closing. If door does not open easily or
falls too quickly, check spring cable routing. The cable is
held in place by “shoulders” on the pulley. Check to be
sure cable has not slipped over the pulley shoulders.
STEP 2 REMOVE WOOD BASE,
INSTALL LEVELING LEGS
IMPORTANT – Do not kick off wood base!
Damage will occur.
• Move the dishwasher close to the installation
location and lay it on its back.
• Remove the four leveling legs on the underside of
the wood base with an adjustable
wrench or 15/16" socket.
• Discard base.
Approx.
1/4"
Figure H
• Screw leveling legs back into the dishwasher frame,
approximately 1/4" from frame as shown.
5
Page 24

Installation Instructions
STEP 3 REMOVE TOEKICK
• Remove the two toekick screws.
oekick
T
Remove 2
Toekick Screws
Figure I
STEP 4 INSTALL POWER CORD
Skip this step if dishwasher will be direct wired or has
a factory installed power cord.
The power cord and connections must comply with
the National Electrical Code, Section 422 and/or
local codes and ordinances.
• Maximum power cord length is 6 feet.
A
Remove
Junction Box
Cover
B
Check That White, Black and
Green Dishwasher Wires Are Threaded
Thru Small Hole in Bracket
Figure J
C
Insert Power
Cord Wires Thru
Strain Relief
and Tighten
Ground
White
Black
D
Use UL Listed
Wire Nuts
STEP 5 INSTALL 90° ELBOW
• Wrap 90° elbow with thread seal tape.
• Install a 90° elbow onto the water valve.
Front of Dishwasher
Water Valve
Bracket
90°
Elbow
Fill
Hose
Figure K
Thread Seal Tape
• Do not over tighten 90° elbow, water valve bracket
could bend or water valve fitting could break.
• Position the end of the elbow to face the rear of the
dishwasher.
STEP 6 POSITION WATER LINE
AND HOUSE WIRING
• Position water supply line and house wiring on the
floor of the opening to avoid interference with base
of dishwasher and components under dishwasher.
5"
4"
5"
4"
• Connect incoming power cord white (or ribbed) to
dishwasher white, black (or smooth) to black and
ground to dishwasher green wire. Use UL listed wire
nuts of appropriate size.
• Replace junction box cover. Be sure wires are not
pinched under the cover.
4"
6"
Figure L
Water
Line
House
Wiring
6"
6
Page 25

Installation Instructions
House
Wiring
Water Line
90° Elbow
Water Line
STEP 7 INSERT DRAIN HOSE
THROUGH CABINET
• Upright the dishwasher and position in front of the
opening. Insert drain hose into cabinet wall hole. If
a power cord is used, guide the end through a
separate hole.
Maximum Drain Hose
Length 10'
Insulation
Blanket
Figure M
Water
Line
Drain
Hose
House
Wiring
Power Cord
(If Used)
STEP 9 INSTALL TRIM PIECES
Skip this step if trim is not supplied with the dishwasher.
• Locate trim strips inside dishwasher.
• Press trim onto the tub flange on each side. Start with
the top edge, pressing on as you move towards the
bottom.
• Press the two top trim pieces on each side of the latch.
• Open and close the door to check that trim does not
bind and does not interfere with door latch.
Trim Strip
Trim
Strip
Trim
Strip
Figure O
TIP: Position water line and house wiring on the
floor to avoid interference with base of dishwasher.
STEP 8 SLIDE DISHWASHER
PARTIALLY INTO CABINET
DO NOT PUSH AGAINST FRONT PANEL WITH KNEES.
DAMAGE WILL OCCUR.
• Slide dishwasher into the opening a few inches at a
time.
Do Not Push Against
Front Door Panel With
Knee. Damage to The
Door Panel Will Occur.
• As you proceed, pull the drain hose through the
opening under the sink. Stop pushing when the
dishwasher is a few inches forward of adjacent
cabinetry.
• Make sure drain hose is not kinked under the dishwasher and there is no interference with the water
line and wiring or any other component.
Figure N
STEP 10 PUSH DISHWASHER
INTO FINAL POSITION
• Check to be sure that wires are secure under the
dishwasher and not pinched or in contact with door
springs or other dishwasher components.
Note: If stone countertops
are used, see Step 12 before
pushing the dishwasher into
the opening.
Figure P
TIP: Check tub insulation blanket, if equipped. It
should be positioned so it is not “bunched up” or
interfering with door springs. Check by opening and
closing door.
• Push dishwasher into the cabinet. The front corners
of the dishwasher door should be flush with cabinet
doors. Be careful not to dent front panel with knees
or damage countertop or cabinets with dishwasher
parts.
7
Page 26

Installation Instructions
STEP 11 LEVEL DISHWASHER
• Level the dishwasher by adjusting
IMPORTANT – Dishwasher must be level for proper
dish rack operation and wash performance.
• Place level on
door and rack
track inside the
tub as shown to
check that the
dishwasher is
level.
Check
Level
Front
to Back
Check Level
Side To Side
the four leveling
legs individually.
• If adjustment to the
right rear leveling
leg is required,
loosen junction box
bracket screw
(through the access
hole) and rotate
bracket clockwise.
TIP: Pull lower rack out, about halfway. Check to be
sure the rack does not roll forward or back into dishwasher. If the rack rolls either direction, the dishwasher
must be leveled again.
• If door hits tub, the dishwasher is not installed
Figure Q
correctly. Adjust leveling legs to align door to tub.
STEP 12 POSITION DISHWASHER, SECURE TO CABINET
The dishwasher must be secured to the countertop or
the cabinet sides. When countertops are made of wood,
use Method 1. Some models are supplied with side
mounting brackets for use when countertops are granite
or other materials that will not accept screws. Use
Method 2 to secure dishwasher at the sides.
• Fasten a side mounting bracket to each side of the tub
with the #8 pan head screws provided.
Side
Mounting
Brackets
Access Hole
Turn Legs
to Adjust
Figure R
Method 1
Secure dishwasher to wood countertop
• Position dishwasher so that the door lines up with the
front face of adjacent cabinet.
Brackets
Figure S
Wood Countertop
3/4"
IMPORTANT: Check to be sure the dishwasher is
centered in the opening and there is no interference
with adjacent cabinets when opening or closing the door.
• Fasten the dishwasher to the underside of the countertop with the 2 Phillips screws provided.
Method 2
For Models supplied with side mounting brackets
• Pull dishwasher out of the opening just enough to
access the tub frame.
Countertop
Mounting
Brackets
Figure T
Tub Frame
Install
2 Screws
Each Side
• Position dishwasher so that the door lines up with the
front face of adjacent cabinet.
IMPORTANT: Check to be sure the dishwasher is
centered in the opening and there is no interference
with adjacent cabinets when opening or closing the door.
Stone Countertop
3/4"
Figure U
Side Brackets
• Fasten the brackets to cabinet sides using the 2
Phillips head countertop screws.
IMPORTANT: Drive screws straight and flush. Protruding screw heads will scratch the top or sides of the
control panel and can interfere with door closing.
8
Page 27

Installation Instructions
18"
Min.
STEP 13 CONNECT WATER SUPPLY
Connect water supply line to 90° elbow.
• Slide compression nut, then ferrule over end of
water line.
• Insert water line into 90° elbow.
• Slide ferrule against elbow and secure with compression nut.
IMPORTANT: Check to be sure that door spring
does not rub or contact the fill hose or water supply
line. Test by opening and closing the door. Re-route the
lines if necessary.
STEP 14 CONNECT DRAIN LINE
FOLLOW ALL LOCAL CODES AND ORDINANCES.
The drain hose molded end will fit 5/8", 3/4" or 1"
diameter connections on the air gap, waste tee or
disposer. Cut on the marked line as required for your
installation.
Cutting Lines
Compression Nut
Ferrule
Hot Water
90° Elbow
Figure V
Door Spring
Supply Line
90° Elbow
DRAIN LINE INSTALLATION
• Connect drain line to air gap, waste tee or disposer
using either previously determined method.
Method 1 – Air gap with waste tee or disposer
3/4"
1"
IMPORTANT: Do not cut corrugated
5/8"
Figure W
portion of hose
• If a longer drain hose is required, add up to 42" of
length for a total of 10 ft. length to the factory installed
hose. Use 5/8" or 7/8" inside diameter hose and a
coupler to connect the two hose ends. Secure the
connection with hose clamps.
Coupler
Hose Clamp
Hose Clamp
Figure X
• Secure the drain hose to the air gap, waste tee or
disposer with clamps.
Note: TOTAL DRAIN HOSE LENGTH MUST NOT
EXCEED 10 FEET FOR PROPER DRAIN OPERATION.
Waste Tee Installation
Method 2 – Built-in “High drain loop” with waste tee or
disposer
Waste Tee Installation
Disposer Installation
Figure Y
18"
Min.
Disposer Installation
Figure Z
IMPORTANT: When connecting
drain line to disposer, check to be
sure that drain plug has been
removed. DISHWASHER WILL NOT
DRAIN IF PLUG IS LEFT IN PLACE.
Remove
Hopper
Plug
9
Page 28

Installation Instructions
STEP 15 CONNECT POWER
SUPPLY
Skip this step if equipped with power cord
Verify that power is turned off at the source.
(If a power cord with plug is used, proceed to Step 16.)
• Remove junction box cover.
• Secure house wiring to the back of the junction box
with a strain relief.
• Locate the three dishwasher wires, (white, black and
green) with stripped ends. Insert dishwasher wires
through the small hole in the junction box. Use wire
nuts to connect incoming ground to green, white to
white and black to black.
• Replace junction box cover. Check to be sure that
wires are not pinched under the cover.
A
Remove
Junction Box
Cover
C
Insert Power
Cord Wires Thru
Strain Relief
and Tighten
Ground
White
Black
STEP 16 PRE-TEST CHECK LIST
Review this list after installing your dishwasher to
avoid charges for a service call that is not covered by
your warranty.
¨ Check to be sure power is OFF.
¨ Open door and remove all foam and paper
packaging.
¨ Locate the Owner’s Manual in the literature
package.
¨ Read the Owner’s Manual for operating
instructions.
¨ Check door opening and closing. If door does not
open and close freely or tends to fall, check spring
cable routing. See Step 1.
¨ Check to be sure that wiring is secure under the
dishwasher, not pinched or in contact with door
springs or other components. See Step 10.
¨ Check door alignment with tub. If door hits tub,
level dishwasher. See Step 11.
¨ Pull lower rack out, about half way. Check to be
sure it does not roll back or forward on the door. If
the rack moves, adjust leveling legs. See Step 11.
B
Check That White, Black and
Green Dishwasher Wires Are Threaded
Thru Small Hole in Bracket
Figure AA
If house wiring is not 2-wire with
ground, a ground must be provided
by the installer. When house wiring is
aluminum, be sure to use UL Listed
anti-oxidant compound and aluminum-to-copper connectors
D
Use UL Listed
Wire Nuts
¨ Check door alignment with cabinet. If door hits
cabinet, reposition dishwasher. See Step 12.
¨ Check that door spring does not contact water line,
fill hose, wiring or other components. See Step 13.
¨ Verify water supply and drain lines are not kinked
or in contact with other components. Contact with
motor or dishwasher frame could cause noise.
¨ Turn on the sink hot water faucet and verify water
temperature. Incoming water temperature must be
between 120°F and 150°F. 120°F min. temperature
is required for best wash performance. See “Prepare Hot Water Line,” page 4.
¨ Add 2 quarts of water to the bottom of the
dishwasher to lubricate the pump seal.
¨ Turn on water supply. Check for leaks. Tighten
connections if needed.
¨ Remove protective film if present from the control
panel and door.
10
Page 29

Installation Instructions
Attachment Screws
T
oekick
STEP 17 DISHWASHER WET TEST
¨ Turn on power supply (or plug power cord into
outlet, if equipped).
¨ Latch door.
¨ Push “Normal Wash” button.
¨ Push start/reset pad once.
¨ Check to be sure that water enters the dishwasher.
If water does not enter the dishwasher, check to be
sure that water and power is turned on.
¨ Check for leaks under the dishwasher. If leak is
found, turn power supply off, then tighten connections. Restore power after leak is corrected.
¨ Check for leaks around the door. A leak around the
door could be caused by door rubbing or hitting
against adjacent cabinetry. Reposition the dishwasher if necessary. See Step 12.
¨ The dishwasher will drain about 5 minutes after the
first fill. Check drain lines. If leaks are found, turn
power off, correct as necessary. See Step 14.
¨ Open dishwasher door and make sure most of the
water has drained. If not, check that disposer plug
has been removed and/or air gap is not plugged.
See Step 14.
STEP 18 REPLACE TOEKICK
• Place toekick against the legs of the dishwasher.
FigureBB
• Align the toekick with the bottom edge and make
sure it is against the floor.
• Insert and tighten the two toekick attachment
screws. The toekick should stay in contact with the
floor.
TIP: Make sure toekick is against floor to minimize
noise.
¨ Let dishwasher run through another fill and drain
cycle. Check again for leaks and correct as required.
¨ At the end of the second drain, push the start/reset
pad once. Wait for dishwasher to pump out and
then unlatch the door.
STEP 19 LITERATURE
• Be sure to leave complete literature package and
installation instructions with the consumer.
11
Page 30

SPECIFICATIONS SUBJECT TO CHANGE WITHOUT NOTICE
Pub. No. 31-30530
Dwg. No. 206C1559P070
(N.D. 212) 6/01
Page 31

 Loading...