

Page 1
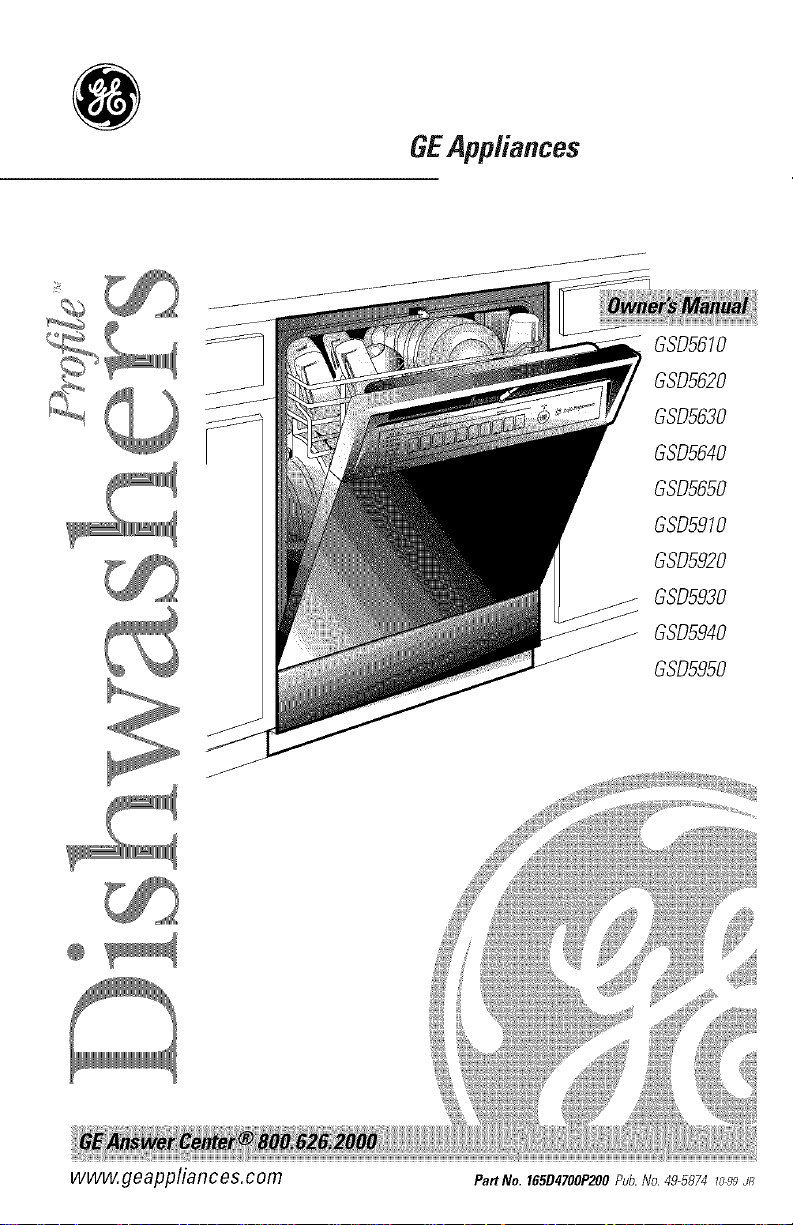
GEAppliances
GSD5610
GSD5620
GSD5630
GSD5640
GSD5650
GSD5910
GSD5920
GSD5930
GSD5940
GSD5950
www.geappliances.com P.. No. 165B4700P200 Pub.No. 49-5874 1o99JR
Page 2
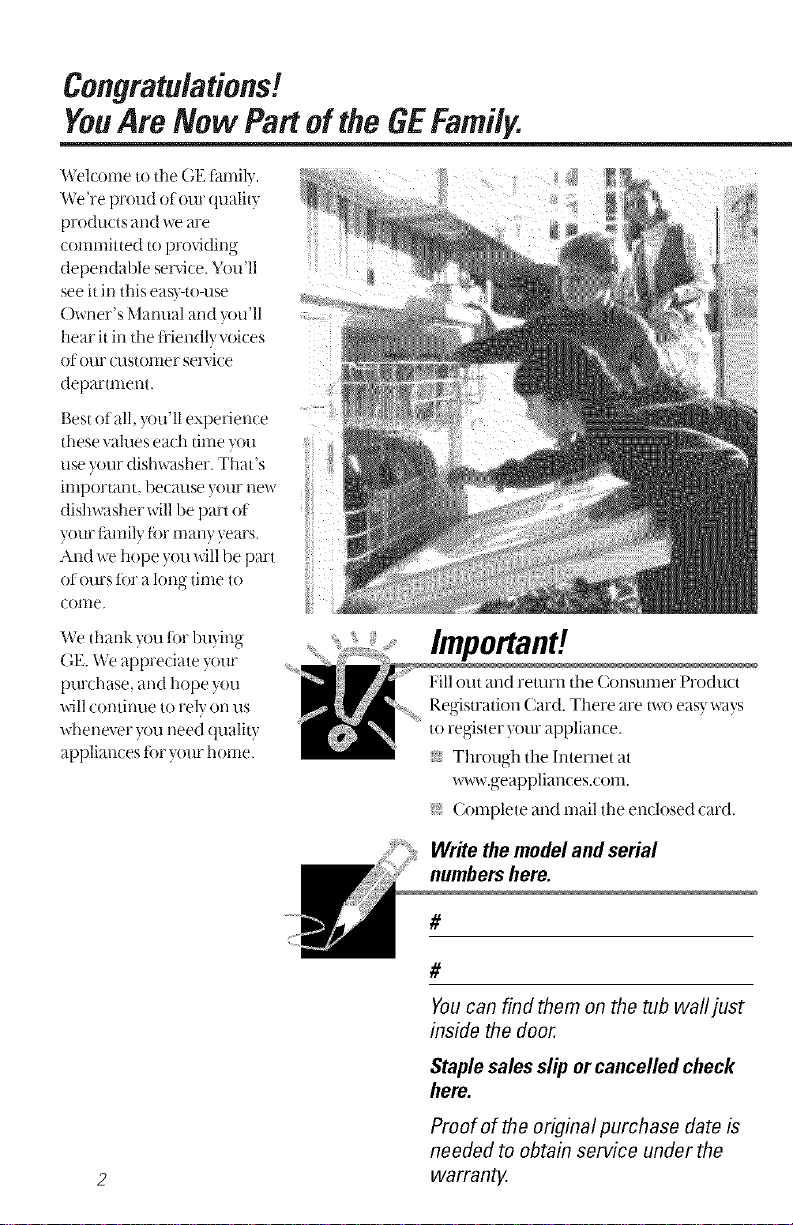
Congratulations!
YouAre Now Partof theGEFamily.
_,_elconle to the (;E t_unily.
_,_e're proud of our quality
prodtlctS and "_e are
comnlitted to providing
(lependable service. "1ou'll
see it in this eas}-to-use
()wner's Manual and )ou'll
hear it in the tAendly voices
O_ Ollr (llStOiller sel_Ti(e
deparmlent.
Best of all, you'll experience .........
these vahles each time you
use your dishwasher. That's
iiilportant, because yOllr new
dish_<_sher will be part of
your liunily tbr many years.
And we hope you will be part
of ours lor a long tinle to
COllie.
iiiiI
We thank you lot 1)uying
GE. We appreciate your
purchase, and hope you
will continue to rely on us
whenever you need quality
appliances tor your home.
Important!
lqllout and return the Consunler Product
Regisu'ation Card. There are two eas} ways
to register your appliance.
s_?'Through the lnternet at
_acw.geappliances.com.
i¢ Complete and mail the enclosed card.
Write themodel and serial
numbers here.
#
Youcan find them on the tub wall just
inside the door.
Staple sales slip orcancelled check
here.
Proofof the origina/ purchase date is
needed to obtain service under the
warran_
Page 3
GE& You,
A ServicePartnership.
Ask any GEappliance owner and they will
te#you we stand behind our products with
unmatched quality service. However, did
you know that most questions result from
simple problems that you can easily fix
yourself in just a few minutes? This
Owner's Manual can tefl you how.
thisManual
Inside you will find many
helpful hints on how to use and
maintain your dishwasher
properly.Just a little preventive
care on y)ur part can save you a
gTeat deal of time and money
over the lite of your dishwasher.
ReviewtheSection
onTroubleshooting
Safety Information ...... 4J
OperatingInstructions
ControlPaneland
Settings ............... 8-11
UsingtheDishwasher ... 12-13
LoadingtheRacks ...... 1_16
OptionalAccessories ....... 17
CareandCleaning ......... !8
TroubleshootingTips
BeforeYou
CallForService ........ 19-23
Tips
You'll find many answers to
common problems here.
lfv()tl review our chart of
Troubleshooting Tips first.
)ou ma) not need to call for
servk e at all.
If YouNeedService
Lryoudo need service, you can
relax knowing help is only a
phone call away. A list of toll-fl'ee
{_lstomer service numbers is
included in the back section.
()r you can aMays call the
GE Answer Center ('_at
800.626.2000, 24 hours aday,
7 days a week.
CustomerService
ProductRegistration..... 29-30
Warrantj ................ 31
ServiceTelephone
Numbers.......... Back Cover
Page 4
IMPORTANTSAFETYINFORMATION.
READALLINSTRUCTIONSBEFOREUSING.
i!iiiiiiHiiHiililH!iiiiiHi
A WARNING!
For your safe_ the information in this manual must be
foflowed to minimize the risk of fire, explosion, electric
shock, or to prevent property damage, personal injury,
or loss of life.
WATERHEATERSAFETY
Under certain conditions hydrogen gas may be produced
in a water heaterthat has not been used fortwo weeks or
more. HYDROGEN GAS IS EXPLOSIVE,
If tile hot water has not been tlsed tot two weeks or more, prevent
the possibilit 3 of damage or ir{itu), by turning on all hot water
tm_cets and allow them to run tor several minutes. Do this betore
using any electrical appliance which is connected to the hot water
s_stem. This simple procedure will allow any built-up hvdro_,-en oas
to escape. Since the gas is flammable, do not smoke or use an open
fianm or appliance during this process.
!iiiii!iN_i!iiil
i_i!ii_i:iiiiii!i
ilii_i:iiii!i:ii!iliii!iiiii_
Page 5
Use this appliance only for its intended purpose as
described in this Owner's Manual
PROPERINSTALLATION
ANDMAINTENANCE
This dishwasher must be properly installed and located in
accordance with the Installation Instructions before #is
used. If you did not receive an Installation Instructions
sheet with your dishwasher, you can receive one by calling
us toll-free at the GEAnswer Cente_ 800.626.2000.
s_,Connect to a grounded
metal, permarmr_t wiring
system; or run an equipment-
grour_dir_oconductor with
the cirolit conductors and
connect to the equipment-
groundino terminal or lead
of the appliance.
N Improper connection ot
the equipmentNrounding
conductor can resuh in a risk
of electric shock. Check with
a qualitied electrician or
service representative if you
are in doubt whether the
appliance is properly
grounded.
_ l)ispose of discarded
appliances and shipping or
packing material properl).
N I)o not attempt to repair
or replace any part ot ?x_ur
dishwasher unless it is
specitically recommended
in this manual. All other
servicing should be reterred
to a qualitied technician.
N To minimize the possibility ot
electric shock, disconnect this
appliance ti'om the power
supply betk_re attempting any
maintenance. NOTE:Turning
the disl'rwasher offdoes not
disconnect the appliance
t;'om the power supply.
We recommend having a
qualified technician service
your appliance.
iiiiHi!i iiiiii!!
l{i{{iiii!i>ii_i,!ii{iiiii!ii
iii!!iii i iiiHH
5
Page 6
IMPORTANTSAFETYINFORMATION.
READALLINSTRUCTIONSBEFOREUSING.
A WARNING!
DONOT...
i!iiiiiiHiiHiililH!iiiiiHi
!iiiii!iN_i!iiil
i_i!ii_i:iiiiii!i
i¢ Do not tamperwith controls.
i_ Do not abuse, sit on, or stand
on the door or dish rack oi
dm dishwasher,
s_i'I)o not discard a dishwasher
without first removing the
door of the washing
compartment.
i_ Do not store or use
combustible materials,
g_/soline or other tlammable
vapors and liquids in the
vicinity ot this or any other
appliance.
i¢ Do not allowchiMren to
playinside, on or with this
appliance or any discarded
appliance.
ilili:iiii!ili!iliii!iiiii_
Page 7
WHENUSINGYOURDISHWASHER
CAUTION
J'_ Contents washed in
SaniWash _ycle may be hot to
the touch. Use care bei0re
unloading.
_ Use only powder, tabs,
liquid detergents or rinse
agents recommended t0r use
in a dishwasher and keep
them out of the reach of
children, Cascade '>
Automatic Dishwashing
Detergent has been approved
tot use in all GE dishwashers.
s_?'I,ocate sharp items so that
tile) are not likely to dmnage
the door seal.
_ I,oad sharp knives widl tile
handles up to reduce tile risk
of/alt-t)pe iqjuries.
i¢ Do not wash plastic items
unless marked dishwasher
safe or the equivalent. For
plastic items not so marked,
check the mamdilcturer's
reconnnendations.
i¢ Nonq)ishware Items: I)o not
"_\]/Sll items such as electronic
air cleaner fihers, turnace
filters and paint brushes in
your dishwasher. Damage to
dishwasher and discoloration
or staining ot dishwasher
may resuh.
s_?'l)o not touch tile heating
element during or
immediatel) after use,
_ I)o not operate your
dishwasher unless all
enclosure panels are
properly in place.
N Close supervision is necessary
it this appliance is used by or
near chiMren.
i¢ Ix_ad light, plastic items
so they will not become
dislodged and drop to tile
bottom ot the dishwasher-
tile) might come into contact
with tile heating element and
be dal-nau-ed
Readand follow this
SafetyInformation carefully.
SAVETHESEINSTRUCTIONS
iliiiii_liP_"lii_liiii_tii_
7
Page 8

_iiiiii_iiiiliiiil
Aboutthe dishwasher controlpanel
Youcan locate your model number on the tub wall just inside the door.
Throughout this manual, features and appearance may vary from your model.
STATUS
| SENSING
| WASHING
| RINSING
| DRYING
I SANITIZED
ControlSettings
Tho Status
The St}lttlS display tells you What's hapl)eningwhile the dishwasher is in operation
and also any malfunctions if they occur (see page 10). The lights will come ON
indicating the sequence of operation the dishx_-asher is in,
SENSING DisplayedduringperiodsusingCleanSensortechnologyto measurethe amountof soil
inthe loadanddecideif anotherprewashisneeded.TheSENSINGlight isdisplayed
onlyduringNORMALandPOTS& PANScycles.
WASHING Displayedduringprewashand n_ainwashperiods.
RINSING Displayedduringrinseperiods.
DRYING DisplayedduringSPEEDDRYING.
SANITIZED Displayedwhencyclehasmetsanitizationconditions.LightremainsONuntildoor is
opened.
!_, Load Selections
Tile lightabove tile selected pad will beON to indicate which LOADSELECTIONbasbeen selected,
SANIWASH This cycleraisestile water temperature intile final rinseto sanitizeyourdishware.
ilii i iiii!i:ii ! iliii!iiiii
POTS& PANS Forheavilysoileddishesorcookwarewith dried-onor baked-onsoils.Everyday
NORMAL Forloadsofeverydaydishesandglasswarewith mediumsoils.
CHINACRYSTALForlightly soiledchinaandcrystal.
SPEEDWASH Forlightlysoileddishesandglassware.
RINSEONLY Forrinsingpartialloadsthat will be washedlater.Donot usedetergentwith
Thecyclelengthwill varydependingonthe temperatureof your inletwater.
NOTE:TheSaniWashcycleis monitoredfor sanitizationrequirements,ifthe
cycleis interruptedduringor after themainwash portionor if tile incoming
water temperatureis so low that adequatewater heating cannotbeachieved,
the sanitizingconditionswill not bemet. In thesecases,tile sanitizedlight will
notilluminateat the endof thecycle.
dishesmaybe included.Thiscyclewill not removeburned-onfoods.
thiscycle.
Page 9
@tio,s
Thelight abovefiveselected pad will be ONto indicate which OPTIONhasbeen selected,
POWER Forusewith heavilysoiledand/ordried-on,baked-onsoils. ThisoptimlMUSTbe
PRESOAK selectedPRIORto star_ingthecycle. This option adds 16minutes to the
SPEEDDRY Shutsoff thedrying heatoption.Dishesair drynaturallyand energyis saved.You
OFF canpropthe dooropenafter the CLEANfight iIlumhlates.
SPEEDDRY Turnsthe heateronfor fast drying.ThiscyclewiiI extendthetime toyour wash
ON cycleby23 minutesforthe NORMALcycleand 30minutesfor tile SAM WASH
DELAYSTART
cycle time,
cycle.NOTE:Cannotbeselectedwith RINSE ONLYcycle.
LOCK Whenthe LOCKpadistouchedtwice within3 seconds,allpadsbecomeinoperative.
Youcanbck tile _rltrols to preventanysebctionsfrombeingmade Oryeacarlbck _le
_rltro/s afteryoo/lavestarteda cycleorselectedBELAYSTARTsothecycleorDELAY
STARTisnotioterrupted
Children cannot accidentally start dishwasher by touching pads with this
option selected.
Tounlockthedishwasherafterit hasbeenlocked,touchthe LOCI(padtwice within
3seconds.Thelight abovetheLOCI(padwill turnoff.
Youcandelaythe startof a wash cyclefor up to 8 hours.PresstheDELAYSTART
padto choosethe numberof Imursyouwant to delaythestar of the cycle.The
machinewill countdownandstar automaticallyatthe correcttime. Pressing the
START/RESETbuttonwill cancel the DELAYSTARTseIectinn
NOTE:If youforgetto latchthe doora remindersignalwill beepuntilyou do so.
RESET Tochangea cycleafterwashing starts,touchtheSTART/RESETpadto cancel
thecycle. Afterwater ispumpedoutand the motorstops,you canreprogram
andrestart the dishwasher.Thiswill takeapproximately90seconds.
iiii iiH!
!i ii ,iii iiiiii!
Close and latch the door. Touch the START/RESETpad to begin the cycle. Water
fill begins, and approximately 40 seconds later the wash action begins.
NOTE: The dishwasl-_er remembers )our last Q,cle so )ou don't have to reprogram
each time. When the dishwasher is loaded and the door latctl is in the locked
position, the control panel lights will be ONand display the last settings }ou
selected.
llyou don't want to change any otthe settings, simpl} touch the START/RESET
pad to begin the cycle.
Also, if a power t_filure occurs, NORMALand SPEEDORYwill automatically be
pr%q'ammed. Make any new selections and touch the START/RESETpadtObegin
the Qvle.
Cl.a.
This light is illuminated when a wash c, cle is complete. The light will sta} ON
until the door is opened.
iili!i!i!i,liliii
9
Page 10
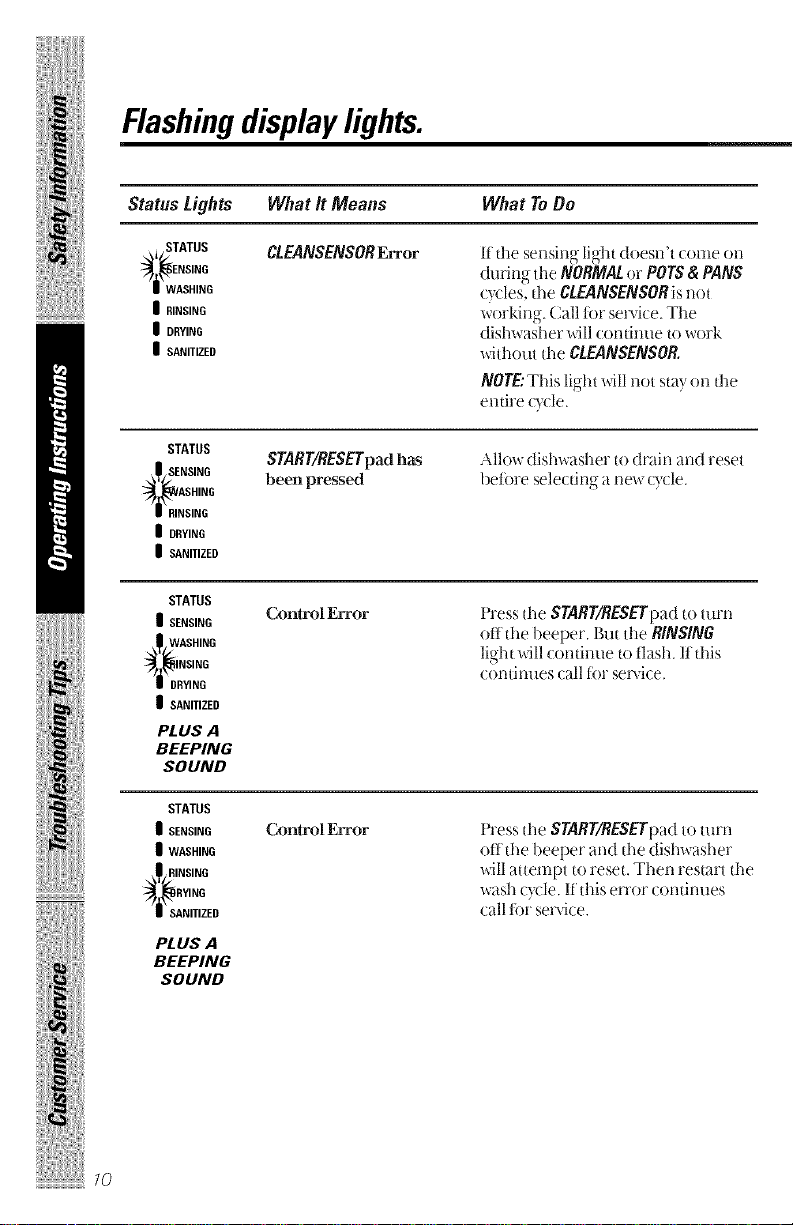
Flashingdisplaylights.
Status Lights What It Means What To Do
i STATUS
_)_._ENSING
i WASHING
| RINSING
| DRYING
| SANITIZED
STATUS
_L SENSING
2:_. _/ASHING
i RINSING
I DRYING
| SANITIZED
STATUS
| SENSING
_ WASHING
NG
_ DRYING
I SANITIZED
PLUS A
BEEPING
SOUND
STATUS
SENSING
| WASHING
_ RINSING
, R.NG
_ SANITIZED
PL US A
BEEPING
SOUND
CLEANSENSORError
START/RESETpadhas
been pressed
Control Error
Control Error
If the sensing light doesn't come on
during the NORMALor POTS& PANS
Q'cles, the CLEANSENSORisnot
working. Call tor service. The
dishwasher',_ill comintm to work
_itbotEt the CLEANSENSOR.
NOTE:This light will not stay on the
entire c?de.
Allowdishx_asherto drain and reset
before selecting a new cycle.
Press the START/RESETpad to turn
oflthe beeper. But the RINSING
light x_ll continue to tlash. If this
(onthllleS call tbr secdce.
Press the START/RESETpadto turn
off the beeper and the dishwasher
will attempt to reset. Then restart the
wash cycle. If this error (ontinues
call lin"service.
/0
Page 11

TheCleanSensor.
The dishwasher has an exclusive CleanSensor System that measures the
amount of soil in the load and determines the number of prewashes needed
to clean the dishes.
WATER TOTAL
SOIL CYCLE USAGE TIME
CYCLE LEVEL SEQUENCES GALLONSM/NUTES
Sani 8.5 45-90
Wash
Pots Heavy 11.5 68-83
& Pans
Medium 9.9 64
Light 8.3 6O
F_ F_ F_ F_ F_ F_
Medium 9.9 58
Light 8.3 54
China/ 6.6 33
Crystal
iiii iiH!
!i ii ,iii iiiiii!
;;;;;;;;;;;;;;;;;;;;;;;;;;;;;;;;;;;;;
Speed 8.3 38
Wash
Rinse Only 1.6 4
11
Page 12

Using thedishwasher.
Checkthe Water Temperature
The entering water must be at least 120°t ;. and not more than
150°1% t0r otto(rive cleaning and to prevent dish damage, Check
the water temperature "_titha candy or meat thermometer, Turn on
the hot water taucet nearest the dishwasher, place the thermometer
in a glass and let the water mn continnousl) into the glass until the
temperature stops rising.
det-Dry®rinse agent removes spots and prevents new tilm build-up
on )our dishes, glasses, tlatware, cookware and plastic.
Fill the rinse agent dispenser
until it reaches the bottom of lip
inside the opening. Do not overlill
the dispenser, Replace cap.
To check it rinse agent is needed,
press the clear center ot the till cap 2 or 3 times, If rinse agent tills
the center ot the till cap, }x)u have enough,
A full dispensershouldlastabout onemonth.
If rinse agentis spilled,wipe upthe excess.
DishPreparationPriorto Loading
;_'No t-)re-rinsin°__ of normal toed soil is require(L
Scrape oil hard soils, including bones, toothpicks, skins.
and seeds.
Remove large quantities of any remainir N toed.
Remove loath, vegetables, meat trimmings, and
excessive anlounts ot grease or oil.
_ Remove acidic t0od soils that can discolor stainless steel.
Using theDishwasherDoor
"adkxkedinto "- "--"--°°---''
_: If the door isopened during a t?cle and left open, thedishwasher
.....................willhoop once every minute until the door is closed and latched
into place.
12
Page 13

ProperUseof Detergent
Use only detergent spedfirally made for use in dishwashers. Cascade/'
Autonmtic Dishwashing Detergem has been approved for use in all GE
dishwashers. Keep ymr detergent fi'esh and d[)'. Don't put detergent
into the dispenser until you're ready to wash dishes.
'_ou'll tind two detergent dispensers on the _
i,,sidedooro_,,o,rdishwasher.._lh,',_sh__des /__f-_,
require detergent in the main cup. _ash (y(les open CuP_
w,,apre-wasl,andamainwas,..-illalsot.se_,e -i'-\\'_,_
open cup. The amount oi detergent to use _._
depends on whether ,our water is hardor seft _0 _._"_\
,,'ithhardw.ter., ll,hemai,, .,pandope,,
cup completely. With soft water, fill both Glps
halfiva}. _qlen using automatic dishwashing detergent tabs, simpl}
place one tab in the main cup and dose.
Protect your dishes and dishwasher 1)7,"contacting your w_lter
deparm_ent and asking how hard )our water is. Twelve or more
grains is extremely hard water. A water softener is recommended.
Without it, lime can buiM up in the water valve, which could stick
while open and cause flooding. Too much detergent with soft x_ater
can cause a permanent doudiness ofglassuvu'e, called otching.
NOr£:To open detergent cup alker it has
been closed, unlatch the door. t'ress the
START/RESETpadthree times within t_x)
seconds and the deteNent (alp will release.
You ma) also turn the detergent cup handle
counter<lockwise until it releases. A snapping sound may be heard.
toAdda Dish?
A forgotten dish can be added any time beibre the main wash.
Push the door latch to the left.
l)o not open the door ur_til the water spra} action stops. Steam
Ilia} rise ()tit of the dishwasher.
Close the door and push the latch to the tar right.
13
Page 14

Loadingthe dishwasher racks.
For best dishwashing results, follow these loading guidelines. Features and
appearance of racks and silverware baskets may vary from your model.
Upper Rack
The upper rack is tbr glasses, cups and saucers.
(;lips and glasses fit best along tile sides. This is
also a se(_lre place tbr dishwasher-s_de plastics.
The cup shelf (on some models) may be placed
in tile up or down position to add flexibility. A
wine glass holder (on some models) se(xu'es wine
glasses at an an_te for best _ashabilil_ Because
wine lasses COllieill various sizes after loadin,y
slowly push in the rack to make sure they will clear
the top of tile dishwasher.
The upper rack is good tor all kinds ot odd-shaped
utensils. Saucepans, mixing bowls and other items
should be placed fitce down. Fold-down fin_,-ers
(on some models) provide flexibilityt0r
extra-large and hard-to-fit items.
Securelargerdishwasher-safeplasticsovertwofingers
whenpossible.
Makesuresmaflplasticitemsaresecureso theycan'tfall
oetotheheater
Be sure that items do notprotrude throughthe bottom of
therack andblock rotation of themiddle spray arm. This
could result in poor wash performance for items in the
upperrack.
Checkto make sure that tall items will not block rotation of
the top wash arm,
o
The Wash Tower
Keep thecenter area clear ie the lower rack
Tile wash tower rises throtlgh tile center of the lower
rack during tile _ash and rinse portions of tile cycle.
Tile wash tower shoots water into tile mid-level wash
arm located under the upper rack. Blocking the
wash tower could result ill poor wash performance
tot items in the upper rack.
Don'tblockorloadtagthingsnexttothe
WashTower
14
Page 15

Don't let any
item extend
throughbottom.
Toremove endbaskets, grasp the
basketat opposite cornersand slide
apart. Thebasketsections should be
placed in the lower rack by banging
themon the top hoop.
Lower Rack
Whenloadingthelowerrack,donotloadlargeplattersor
traysinthefrontdgbtcorner.Theymaypreventdetergent
fromcirculatingduringthewashcycle.
Tile lower rack is best used tbr plates, saucers, and
cookware. [,arge items Stlch as broiler pans and
racks should go along the right-hand side. [_oad
platters, pots and bowls along the sides, in corners,
or in the back. The soiled side of items should face
the center of the rack.
Also, be carelul not to let a portion ()fan item such
as apot or dish handle extend through the bottom
rack. This could block the wash arm and cause
poor washing results.
l_'old-down fingers (on some models) provide
flexibility lot extrMaNe and hard-to-tit items.
The fingers ma} be left in the up position or
folded down to customize the lower rack.
Silverware Basket
A varie b, of optiorls is available regarding the
three-piece silverware basket in your dishwasher.
The complete basket is designed to fit on the
right side or back of the lower rack. Additionall},
each end of the basket isremovable to better
accommodate flat_re and lower rack capacity
needs.
To load flatware, simply push the a(!justable handle
to either side. Put flatware in the basket with knits'
handles up to protect your hands. ['lace spoons in
the basket with handles do_a-_.Mix knives, forks
and spoons so they don't nest together. Distribute
evenl). Small plastic items, such as measurir N
spoons and lids for small containers, should go in
the bottom of the silveiavare basket with silveiavare
on top.
The lids of both end baskets can be closed to
contain small items, fx)ng items can be placed
on the cupshelf in the upper rack.
iiii iiH!
!i ii ,iii iiiiii!
ii::
75
Page 16

iiiiii_Ii;iiiiY
Loading lOplace seeings...
Follow these guidelines for loading 10place settings. Features and
appearance of racks and silverware baskets may vary from your model.
Upper Rack--lO place settings Lower Rack--lO place settings
ii_i{i,iiiiii/iJ}iiiiii}iiiiiii{i
Page 17

Aboutoptional accessories.
Youcan change the door and lower access panel appearance of your
dishwasher by ordering one of these optional accessories:
> Color Panels
_ 1/4" Wood Panel TrimKit
_,_3/4" Trimless Panel Kit
These accessories are available at extra cost (VISA, MasterCard, or
Discover cards accepted) by calling 800-626-2002.
Specify accessory number when ordering.
Descriptionsof OptionalAccessories
Colorpanels--Replacenmnt door panels and lower a(cess panels
are available in the tollowing colors:
_i; OPF4OOA(Almond)
_ GPF4OOB(Black)
i_ GPF4OOW(White)
i_ GPF400S(StainlessSteel)
i_ GPF400C(Bisque)
iiii iiH!
!i ii ,iii iiiiii!
NOTE:The GPFIO0dishwasherdoorspringkit is included with tlle
stainlesssteel colorpanelkitand must be installed with it (GPF400S).
Woodpaneltrimkit--This ac(essoU contains trimand instructions
tor _x_uto supply and install a 1/4" tlli(k de(orative x_x)o(ldoor and
lower access panel:
_;i:GPF425A (Almond)
_i:GPF425B(Black)
_ GPF425W(White)
i_ GPF425C(Bisque)
NOTE:The GPFIO0dishwasherdoorspring kit must also be ordered
and installed when the door panel weighs fourIbs.or more.
Trimlesspanelkit--This ac(esso_T contains parts andinstructions
tot you to supply and install a 3/4" thick decorative wood door and
lower access panel:
N GPF475
NOTE:The 8PEI_O dishwasher door spring Idt is included with the
trimloss panol kit and must be installed with it.
17
Page 18

Caringfor the dishwasher.
Toclean the control panel use a lightly dampened cloth then dry thoroughly.
Toclean the exterior use a good appliance polish wax.
Never use sharp objects, scouring pads or harsh cleaners on any part of
the dishwasher.
Protect Against Freezing
11your dishwasher is leIi in an unheated place during the winter, ask a sep,dce
techrfician to:
cutofrelectri,alpowertothedishw,sher,l_emove_sesortrir,,ircuitt_reaker.
Turrl °It'the water suI_pl} and disc°rmect the water inlet line ti'°rn the
.....................water valve.
N l)rain water ti'om the wmer inlet line and water valve. (Else a pan to catd,
the'water.)
, e onnec, hewater nletHne,othewaterv.lve
Bees YourDishwasher Have anAir Gap?
An air gap protects yarn" dish',_asher against water
backing up into it ira drain clogs. The air gap ixnot
a part of the dishwasher. It is not covered by your
_arranty Not all plumbing (odes require air gaps
i_I ii "
Checktheairgapany
timeyourdishwasherisn't
drainingwell,
SO yet, ,nay not have o,,e.
The air gap N easy toclean.
Turn of[ the dishwasher and lilt oft the chrome
(over.
18
Remove the pl_,stic c_,p and clean "aith a toothpid<.
The StainlessSteel Panels
The stainless steel panels can be cleaned with Stainless Steel Magic or a
similar product ,,sing a (:lea,,, soli (lath.
ou can order Stainless Steel Magic//WXIOXI5 throu ,t, (;l_'_l:arts by
"" " o" -c • c
(alhn o 800-62(>20(12.
Page 19

Beforeyou call for service...
Troubleshooting tips
Review the charts on the following pages first and you may not
need to call for service.
i , Possible Causes What To Do
Control panel lights go Time too long between Each pad must be t(m(hed
off when you're setting touching of selected pads withiri 30 seconds oi the
controls others, To relight, touch
any pad again, or unlock
and relatch door.
Noise Some of the sounds
you'll hear are normal
Utensils are not secure
in the rack or something
small has dropped into
the rack
Motor hums l)ishwasher has not been
Detergent left in Dishes are blocking the Reposition the dishes.
dispenser cops detergent cups
Detergent cop lid
latched accidentally
by oser
Hard tbod disposal
shredding action.
Drain valve opening to
pump water out.
Timer control as cycle
progTesses,
l)etergent cup opening.
The motor stopping during
the (h)dng period.
Water draining ()tit ot tim
tub immediately after you
touch START/RESETpad,
Make sure everything is
se(alred in dishwasher,
used on a reglflar basis. If
you do not use your
dishwasher often, set it to
till and pump OUtonce
eveuweek. This will help
keep the seal moist and
the garbage disposer clear,
' Unlatch the door. Press
the START/RESETpad
three times within two
seconds. The detergent
(alp will trip.
/9
Page 20

Beforeyou call forservice...
Water standing in This is normal
the bottom of the tub
i iiii ;iiiii!iiii i ii; ;ii
Water won't pmnp Drain is clogged
out of the tub
Suds in the tub Correct detergent
Stained tub interior
2O
Possible Causes
wasn't used
Rinse agent
was spilled
Detergent with
colorant was used
Some tomato-based
foods can stain
What ToDo
A small amount of clean
water around the outlet on
the mb bottom at the back
ot the mb keeps the water
seal lubricated.
lt) ou have an air gap,
clean it.
Check 1o see if your kitchen
sink is draining well. If not,
you may need a pluml)er.
If the dishwasher drains into a
disposer, mn disposer clear.
Use only mm)matic dishwasher
detergents to avoid sudsino-
Cascade '_Automatic
l)ishwashing l)etergent has
been approved ti)r use in all
GE dishwashers.
' To remove suds fl'om the rob,
open the dishwasher and let
suds dissipate. Add 1 gallon
ot cold water to the tub. (;lose
the door until it locks imo
place. Pump out water by
pressing START/RESET,therl
immediately press START/RESET
again. Repeat it necessai)_.
•51"waxs,wiPteu 3rinse, oaoen t
spills immediately.
Some deter\gents contain
colorarlt (pigrnerlt or d}es)
that will discolor the tub
interior with extended use.
Check the detergent cup
tot signs otany discoloration.
If cup is discolored, change to
detergent without any colorant,
Cascade '_Automati(
l)ishwashing l)etergent has
been approved ii)r use in all
GEdishwashers.
Use of the RINSEONLYcycle
after adding the dish to the
load can decrease the level ot
stainir N.
Page 21

i Possible Causes
Dishesandflatware Low inlet water
notclean temperature
Water pressure is Turn on a thucet. Is water
temporarily low coming out more slowly
Air gap is clogged ' Clean the air gap.
hnproper rack loading Make sure lane dislm_are
Spots and fihning
on glasses and
flatware
Extremely hard water
Low inlet water
temperature
Overloading the
dishwasher
Improper loading
Old or damp powder
detergent
Rinse agent dispenser
empty
Too tittle detergent
What To Do
Make sure inlet water
temperature is correct
(see page 12).
than usual? If so, wait until
pressure is normal bet0re
using }our dishwasher.
does not block the
TO I "
dete ge it (hspenser or the
wash arms,
Use Jet-Dq® rinse agent to
renlove spots and prevent
new fihn 1)uiMup.
To renlove stubborn spots
and pre-existing t]lm tram
glasg_are:
I Remove all metal utensils
fl'om the dishw_lsher.
2 l)o not add detergent.
3 Select tile longest (? tie.
4 Start the dishwasher and
allow to mn tor 18 to 22
minutes. I)ishwasher will
now be in the m_fin wash.
5 ()fen tile door and pour
( " S
2 (ups (500 rnl) ot white
vinegar into tile bottom of
the dishwasher.
6 (;lose tile door and allow
to complete the (ycle.
If vinegar rinse doesn't
work: Repeat as above,
except use l/4 cup (60ml)
ot citric acid oystals
instead ot vinegar.
2/
Page 22

iili,i i!iHiWi!ii!,ii
Beforeyou call forservice...
]]]ig!{iiiii!;iiiiiiiiiiiiiiii!7
Possible Causes
Cloodinesson Combination of soft
glassware water and too much
detergent
Water temperature
entering the dishwasher
exceeds 150°F.
Black orgray Almninum uteI_ils have Remove marks with a mild,
markson dishes rubbed against dishes abrasive cleaner.
Yelloworhrown fihn Tea or coffee stains Remove tile stain by band,
oninsidesurfaces using a solution ot 1/2 (up
An overall yellow or
brown film can be caused
by iron deposits in water
Whitefihnon inside
surfaces
Hard water minerals
What ToDo
This is called etchingand
is permanent. To prevent
tiffs ti'om happening, use
less detergent if)ou have
soft water. Wash glassware
in the shortest (ycle tllat
will get them clean.
Is)wertile water heater
temperature.
blea(ll and 3 cups warm
water,
A WARNING
Betbre cleaning interior
wait at least 90 minutes
alter a cytle tbr tile
beating element to cool
down. Faihtre to do so can
resuh in burns.
A special fiher in tile xt_ater
supply line is tile only way
to correct this proMem.
Contact a "_vltersotiener
company.
To clean tile interior, apply
dishwasher detergent to a
damp sponge, Wear
rubber gloves. Donotuse
any type of cleanser other
than dishwasher detetgem
because it may cause
foanfing or sudsing.
Cascade _'Automatic
I)ish_wshing Detergent
has been approved t()r use
in all GE dishwashers.
22
Page 23

: i¸ i¸,i.i!
Dishesdon'tdry
Controlpanel
respondedto inputs
butdishwashernever
filled withwater
Dishwasherwon'trun
Steam This is normal
Sanitized light does
not illuminate at the
odd ofthe cycle
Possible Causes What ToDo
Lowinlet water Make sure inlet water
temperature temperature is correct
Rinse agent dispenser Check the rinse agent
is empty dispenser.
Door latch may not be Call tot se_'ice.
properly seated
Fuse is blown, or the ' Repla(e fllse or reset
circuit breaker lripped cir(alit breaker. Remove
The door was opened
and the cycle was
interrupted during or
after the main wash
portion
The incoming water Raise the water heater
temperature was too low temperature to 120°F,
(see pa_e 12).
o
Select SPEEDDRY.
any other appliances ti'om
the circuit.
T_),resetting the
START/RESETpad.
Steam comes through
the vent by the door latch
during (hTing and when
_ ater is t)eing pumped Otlt.
Do not interrupt the (ycle
anytime durir N or after
main wash.
i_iiLJ,!,ii{ii{i/i
iiiiiiiii iii!
22
Page 24

iI!l_li
i_m_l Notes
i_i_iiiiiiiiiiiii!iiiiii/iii
ilii_i_iiii!i_ii_!_iliii!iiiii_
Page 25

i_iiiiiliiiilliiiiii;iiiiiiiiiiiiHi
_iiiiii/iii_iiiii/iiiiii,ii_;,;i
iiiiHi!i_i_iiiii!!
l!iiiiiii!iii_ii_i,!iiiiiiii!ii
iii!!iii_i'_iiiHH_
25
Page 26

_iiiiiiiiiiiiiiii/ii/iiiiiiiii_¸
Notes
iliiiii_ii!!iii!
i!iiiiiiHiiHii/ilH!iiiiiHi
i_i!ii_iiiiiiii!i
ilii_i_iiii!i:ii_!_iliii!iiiii_
?6
Page 27

i/iiiii_liiJ_'_"lii_/iiii_tii_
27
Page 28

_iiiiiiiiiiiiiiii/ii/iiiiiiiii_¸
Notes
iliiiii_ii!!iii!
i!iiiiiiHiiHii/ilH!iiiiiHi
i_i!ii_iiiiiiii!i
ilii_i_iiii!i:ii_!_iliii!iiiii_
?8
Page 29

GE Service Protection Plus TM
(;E, a name recognized worldwide for qualit) and dependabilit},
offers )ou Servke Protection PlusTM--con]prehensive protection on
all )our appliam es--No Matter What Brand!
Benefits Include:
• Backed by GE
• All brands covered
• Unlimited service calls
• All parts and labor costs included
• No out-of-pocket expenses
• No hidden deductibles
• One 800 number to call
You will be completely satistied with our servi(e protection or you may request your
mone) back on the remaining value of)our contract. No questions asked, It's that simple.
Protect your refi'igerator, dishwasher, washer and (h3 er, range, TV, VCR and rnuctl
more--any brand! l'lus there's no extra charge for emergent) servke and low monthl)
financing is available. Even icemaker coverage and food spoilage protection is oflered.
You can rest easy, knowing that all your valuable household products are protected
against e×pensive repairs.
Place your contidence in (;E and call us in the U.S. toll-t_'ee at 800-626-2224
for more illformatioll.
*Allbrm(s(oxere( lp o20}etl'sl)l(,ill he(onin!n IU.S.
We'll CoverAnyAppliance.
Anywhere. Anytime.*
............................................................. _,_g.(.:z¢Z,_,ae.....
Please place in envelope and mail to:
General Electric Company
Warranty Registration Department
P.O. Box 32150
Louisville, KY 40232-2150
29
Page 30

Consumer Product Ownership Registration
I)ear Custonler:
Thank )ou for purchasing our product and thank you for placing your contidence in us.
We are proud to have )ou as a custonler!
Follow these three steps to protect your new appliance investment:
Complete and mail
Product Ownership
Registration today.
Have the peace ot
mind ot knowing
we can contact you
in the tmlikel} event ot a satet} you require service. ()ur
moditication, service munber is 800 (;E
Model Number Serial Number
I I I I I I I I I I I III I I I I I I I I
Important: If you did not get a registration card with your product, detach and
return the form below to ensure that your product is registered, or
register online at www.geappliances.com.
2
CARES (800-432-2737).
.................................................................._,,_J.:i,t_e,,e..
Consumer Product Ownership Registration
M'ler mailino
tile registration
below, store this
doCtllnellt iI1 ;-Isafe
place. It contains
inff)rmation you
will need should
Read ?x)ur
()wner's Manual
carefully.
5
lf v(/tl have qtlestJol-lS, or need
more information, call tile GE
Answer Center_ 800.626.2000.
It will help 7,_m
operate 7,xmr
new appliance
properly.
I ........... I I,, ,,,, ,I
Mr. [] Ms. [] Mrs. [] Miss []
Name I I I I I I I I I I Narne I I I I I I I I I I I I I
Street I I
Model Number Serial Number
apt.#I , , , , , , , IE-naailAddress
I I I,l_ip I I
(itv i i i i i i i i i i i i i State Codel I I I I
Month _ l)ayL=a=J _earL=_ Nlunberl,, I-I,, I-I , , , I
3O
Date l>la(ed In Use Phone
()ccasionall}, we ma} allow selected companies to send }ou inforn]ation.
[] Check here it}ou do not want this information.
GEAppliances
General Electric Company
Louisville, Kentucky
ww_goapp/iances com
Page 31

GEDishwasherWarranty
All warranty service provided by our Factory Service Centers,
or an authorized Customer Care®technician. For service,
call 800-GE-CARES.
_ GEWill Replace:
One Year Anypart o! the dishwasher whkh [_dls due 1o a detect in
From the date of the materials or workmanship. During this full one-year
original purchase warranq, GE will also provide, free of charge, all labor
and in4_ome service to replace the defective part.
Second Year Awpart el the dishwasher which t_tils due to a detect in
From the date of the materials or workmanship. 1)urin_ this second-year
original purchase limited warran_ 7,_m will be responsible t()r any labor or
in-home service (osts.
Five Years The dishwasher rack, ilit shouM rust, or the electronic
From the date of the control module il it shouM tail due to a deleo in
original purchase materials or _)rkrnanship. l)urir_g this five-year limited
warranq, you will be responsible l()r any labor or in-home
seP,-ice costs,
Lifetime ofProduct The Penna Tuf_>tub or door liner, if it lhils to c(mtain
water due to a deie(l in materials or workmanship.
1) nri. hi'u " g ( "s full watran_ (;E will also provide, free of
charge, all labor and in-home service to replace the
(tetective part.
iI!ltl
_iiiiiiliii'i'i,'ii_iiii!iiiiiii¸
!li'ii ill
iiiii!iili:iii!l
iiiiiiiiiiiiiiiiiiiliiliiiiiii
i_£Service flips to your home to teach you
how to use the product.
i_ Improper installation.
_£Replacement of house fuses or
resetting of circuit breakers.
i_£Failure of the product ff it is
abused, misused, or used for other
than the intended purpose or used
conunercially.
Thiswarranty is extended to the originalpurchaser and any succeedingowner for products purchased
for home use with#_the USA. Proofof the original purchasedate is needed to obtain service under the
warranty InAlaska, thewarranty excludes the cost of shipping or servicecalls to your home,
Some states donot allow the exclusionor limita tioe of incidental or consequential damages. This
warrantygives youspecific legal dghts, and youmay also haveother dghts which varyfrom state to
state. Toknow what your legal dghts are, consult your local or state consumeraffairs office or your
state's Attorney General
Warrantor:GeneralElectric Company.Louisville,KY40225
_ Damage to the product caused by
accident, fire, floods or acts of God.
i_ Incidental or consequential dmnage to
personal property caused by possible
defects with this appliance.
i__Cleaning or servicing, of the air gap
device in the drain line.
37
Page 32

ServiceTelephoneNumbers.
GEAnswer Center_ 8oo.62a2ooo
The ( _FAnswer (_enter'" is open 24 hours a day. t days a ,,reek.
In-HomeRepairServiceSOO-GE-CARES(800-,uZ-ZTaa
Fxpert (;E repair service s only a phone call away.
SpecialNeedsService800.626.2000
;t
TDD 800-TDD-GEAC (800-833-4322)
(;E otters, t_'ee of dlarg-e, a brocl-mre..... to assist in l)lannin°_ a barrier-
t_'eek tchen for persons with lira ted mobil tv..
ServiceContracts800-82_-2224
)
_iii!i!_!_ili!!iiiiii!!ii!i!/iiii_
I urdlase a (;E se_ice ¢onu'act while your warranty sstill in ef_e(t
and you'll receive a substantial discount. (;E Consumer Se*_,kewill
still be there al_eryour warrant) expires.
_i_,l_!iiii!i{iii
;;;;;;;;;;;;;;;;;;;;;;;;;;;;;;;;;;;;;
32 Printed in LoulsvlT/e,KY
PartsandAccessories800-626-2002
lndMduals qualitied to sepdce their own appliances can have parts
or accessories sent directly to their homes (VISA, MasterCard and
Discover cards are accepted).
Instructionscontainedinthismanual coverproceduresto beperformed
byanyuser.Otherservicing generallyshouldbe referredtoqualified
servicepersonnel. Cautionmustbe exercised, since improperservicing
may causeunsafeoperation.
ServiceSatisfaction
If you are not satistied with the service you receive ti'om GE, tbllow
these sleps. First, contact the people who serviced 7,xmrappliance.
Next, ifyou are still not pleased, write all the details--including your
phone number-to: Manager, Customer Relations, GE Appliances,
Appliance Park, I_ouisville, KY 40225.
 Loading...