

Page 1
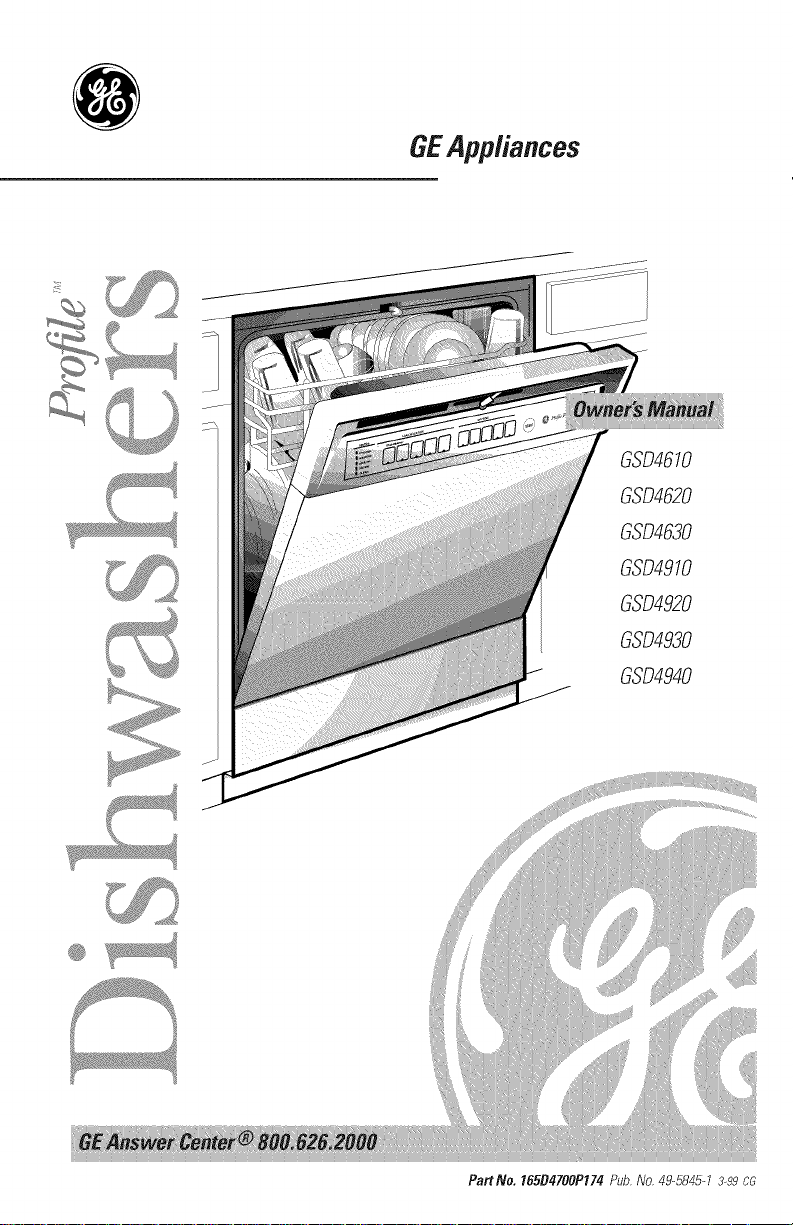
GEAppliances
GSD4610
GSD4620
GSD4630
GSD4910
GSD4920
GSD4930
GSD4940
Part Ne. 165D4700P174 Pub. No,49.5845.1 _99 cG
Page 2
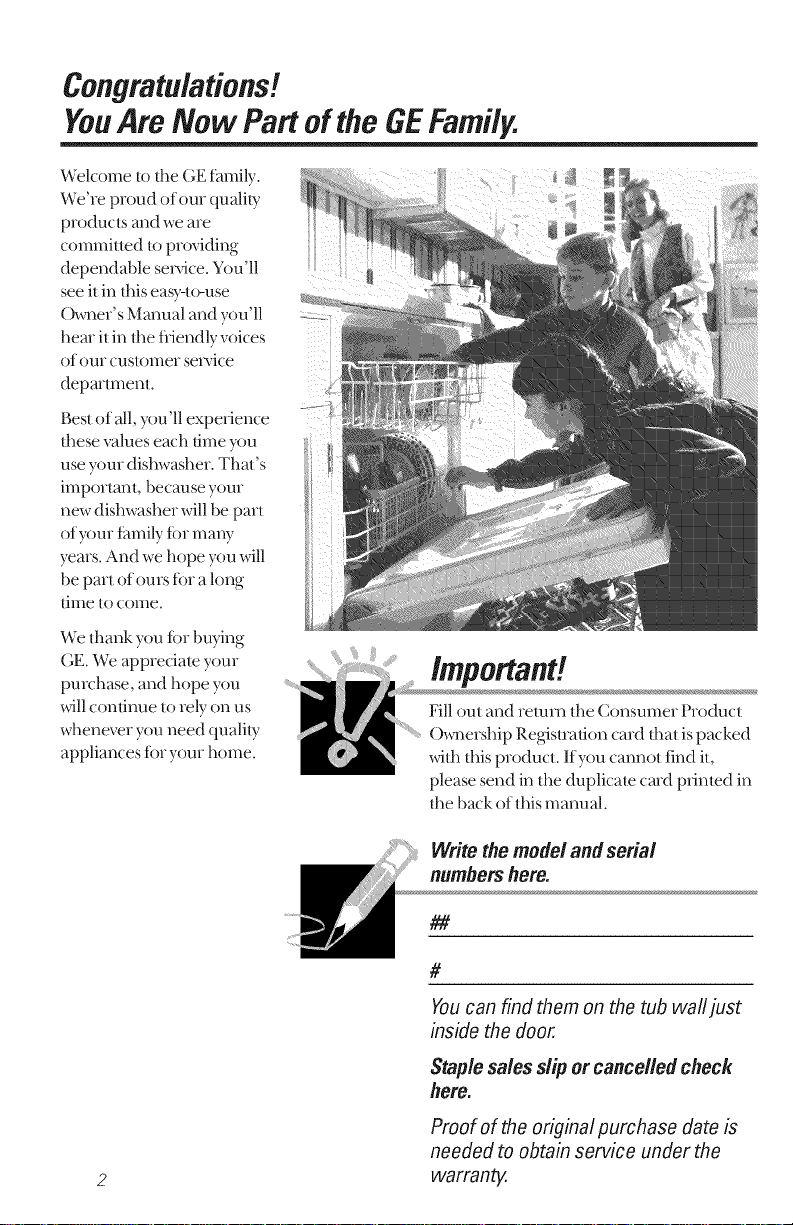
Congratulations!
YouAmNow Partof theGEFamily.
Welcome/o tim GE t_tmily.
We're proud of our quality
products and we are
commitmd toproviding
dependable se_,ice. You'll
see it in fl_iseasy-lo-use
Owner' s Mmmal and you'll
hem il in tim fi_iendlyvoices
of our customer se_,ice
departmenl.
Best of all, you'll experience .....
fl_ese values each lime you ii
use your dishwasher. That's
important, because your
new dishwasher will be part
of your family t_)rma W
years. And we hope you will
be part of ours tar a long
time tocome.
Weflmnkyou fi)r bwing
GE. Weappreciate your
purchase, and hope you
_ll continue lo rely on us
whenever you need quality
appliances tar your home.
Important!
Fill out and relnm fl_e (;onsumer Product
()_ership Regisuafion card flint ispacked
_qth this product. If you cannot find il,
please send in the duplicam cmd prinled in
fl_e back of fl_ismanual.
Write the modeland serial
numbershere.
##
#
Youcan find them on the tub wa// just
inside the door.
Staple sales slip or cancelled check
here.
Proof of the original purchase date is
needed to obtain service under the
warrang
Page 3
GE& You,
AServicePartnership_
Ask any GEappliance owner and they will
tefl you we stand behind our products with
unmatched quality service, However, did
you know that most questions result from
simple problems that you can easily fix
yourself injust a few minutes ?This
Owner's Manual can tell you how
ReadthisManual
Inside you will find ma W
helpfhl hinls on how to use and
maintain your dishwasher
properly..lust a liule preventive
care on your part Call save you a
Deat deal of time and money
over die life of your dishwasher.
ReviewtheSectionon
TroubleshootingTips
Safety Information ....... 4-7
Operating Instructions
ControlPanelandSettings..8, 9
DishwasherDoor.......... 12
LoadingtheRacks ...... 14-I6
OptionalAccessories ....... 17
Careand Cleaning....... 18-I9
Troubleshooting _ps
BeforeYou
CallForService......... 20-24
You'll find many answers to
cOlnlnoll piobIeIns here.
If you review our chart of
Troubleshooting Tips fixst,
you may not need to call fbr
seiMce at all.
ff YouNeedService
If you do need sei_ice, you can
relax know,ring help is only a
phone call away. A list of toll-flee
cus/omer sei_4ce numbers is
included in the back secdon.
Or you Call always call tile
GE Answer Center ®at
800.626.2000, 24 hours a dW,
7 days a week.
Customer Service
ProductRegistration ........ 29
Warranty ................ 31
ServiceTelephone
Numbers .......... BackCover
3
Page 4
iMPORTANTSAFETYiNFORMATION.
READALL iNSTRUCTiONSBEFOREUSING
B
For your safety, the information in this manual must be
followed to minimize the risk of fire, explosion, electric
shock, or toprevent property damage, personal injury,
or loss of life.
WATERHEATERSAFETY
Under certain conditions hydrogen gas may be produced in
a water heater that has not been used for two weeks or
more. HYDROGENGAS iS EXPLOSIVE.
If the hot water has not been used tbr t_voweeks or more, prevent
the possibilily of damage or injm_i by turning on all hot water
faucets and allow them to run tbr several minutes. Do fl_is bei()re
using any electi_ica] appliance which is connected to the hot water
system. This simple procedure will allow a W buih-up hydrogen gas
to escape. Since the gas is flammable, do not smoke or use an open
flame or appliance du|ing this process.
il il
Page 5
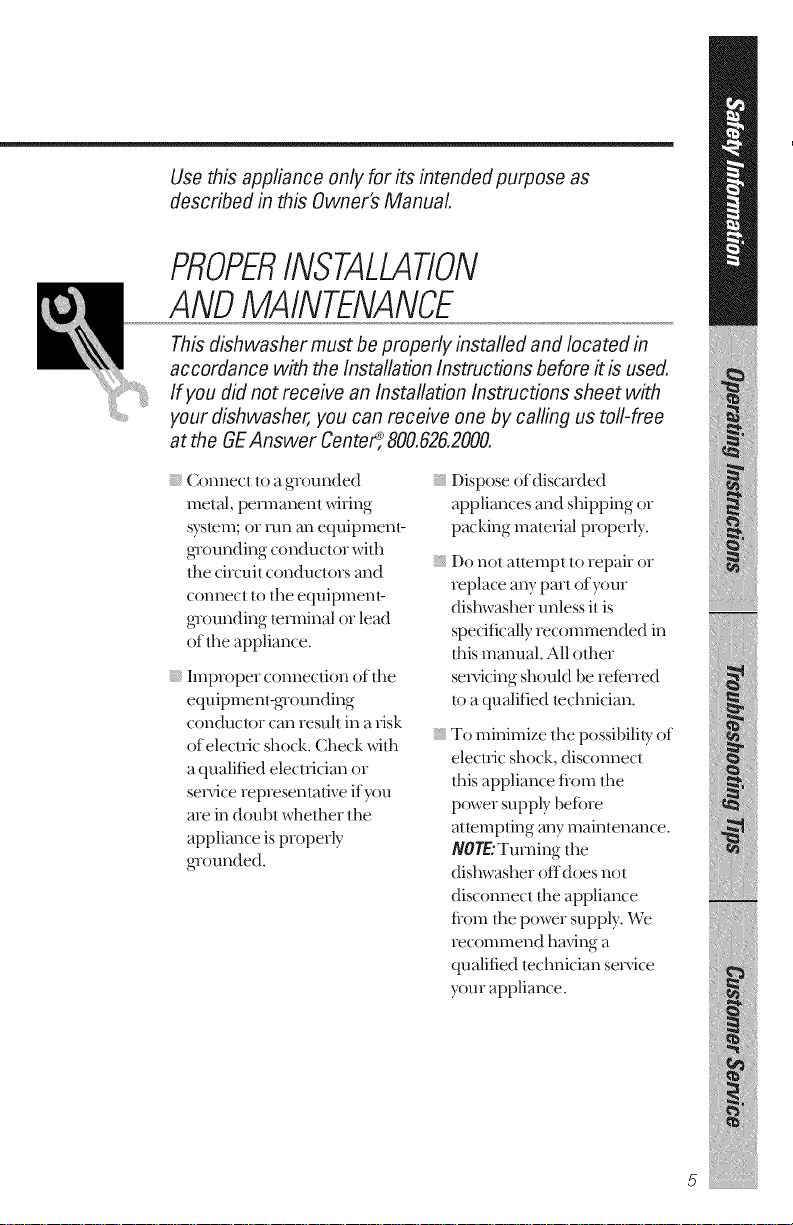
Use this appliance only for its intended purpose as
described in this Owner's Manual
PROPER/NSTALMTION
ANDMAINTENANCE
This dishwasher must be properly installed and located in
accordance with the Installation Instructions before #is used.
If you did not receive an Installation Instructions sheet with
your dishwasher, you can receive one by calling us toll-free
at the GEAnswer CenteF?800.626.2000.
Connect to a grounded
metal, permanent wiring
system; or run an equipmenI_
gTounding conduclox with
the circuit conduclors and
connect Io the equipmenI_
gTounding lenninal or lead
of lhe appliance.
Improper connection of the
equipment-gTounding
conductor can resuh in a risk
of eleclxic shock. Check with
a qualified elecuician or
sex-vice representative if you
ae in doubt wheflmr the
appliance is properly
gTounded.
Dispose of discarded
appliances and shipping or
packing material properly.
Do not attempt to repair or
replace a W part of your
dishwasher unless it is
specifically recommended in
this manual. All odmr
sex,Tieing should be refened
/o a qualified technician.
To minimize the possibilib: of
elecuic shock, disconnecl
fl_isappliance flx)m fl_e
power supply befbre
attempting any mainlenance.
/VOTE."Turning the
dishwasher offdoes not
disconnect file appliance
fiom the power supply. We
recommend hm4ng a
qualified lechnician sex_ice
your appliance.
5
Page 6

IMPORTANTSAFETYINFORMATION.
READALL INSTRUCTIONSBEFOREUSING
,!
m
O0NOT_..
Do nol lamper wifl_controls. Do not allow children _oplay
} Do not abuse, sil on, or stand
on the door or dish rack of appliance or any discarded
the dishwasher, appliance.
Do not discmd a dishwasher
_qd_out first removing the
door of the washing
companmenl.
Do noÁstore or use
combuslible mam_ials,
gasoline or other tlammable
vapors and liquids in fl_e
vicinily of lhis or aW other
appliance.
inside, on or wilh this
il il
Page 7
WHENUSINGYOURDISHWASHER
Use only powder, tabs or
liquid delergenls or weuing
agents recommended tor use
in a dishwasher and keep
them out of the reach of
children. Cascadd'
Autonlatic Dishwashing
Detergent has been approved
tor use in all GE dishwashers.
Locate sharp items so flint
dmy are not likely to damage
the door seal.
Load shmp knives _th tl_e
handles up to reduce tl_erisk
of cuHype il_jufies.
Do not wash plastic itelns
unless marked dishwasher
safe or the equivalent. For
plastic items not so marked,
check the manuf_tcmrer's
recommendations.
Non-Dishware Items: Do not
wash items such as elecnonic
air cleaner fihers, tumace
fihers and paint brushes in
your dishwasher. Damag_ to
dishwasher and discoloration
or staining of dishwasher
m W result.
Do not/ouch the heating
element during or
immediately after use.
Do not operate your
dishwasher unless all
enclosure panels me properly
in place.
Close supe_,ision isnecessmT
ifthis appliance is used by or
near children.
Load light plastic ilems so
they will not become
dislodged and drop to the
bottom of the dishwashe_
riley might come into contact
_qth dm heating element and
be damaged.
Readand follow this
SafetyInformationcarefully.
SAVETHESEINSTRUCTIONS
Page 8
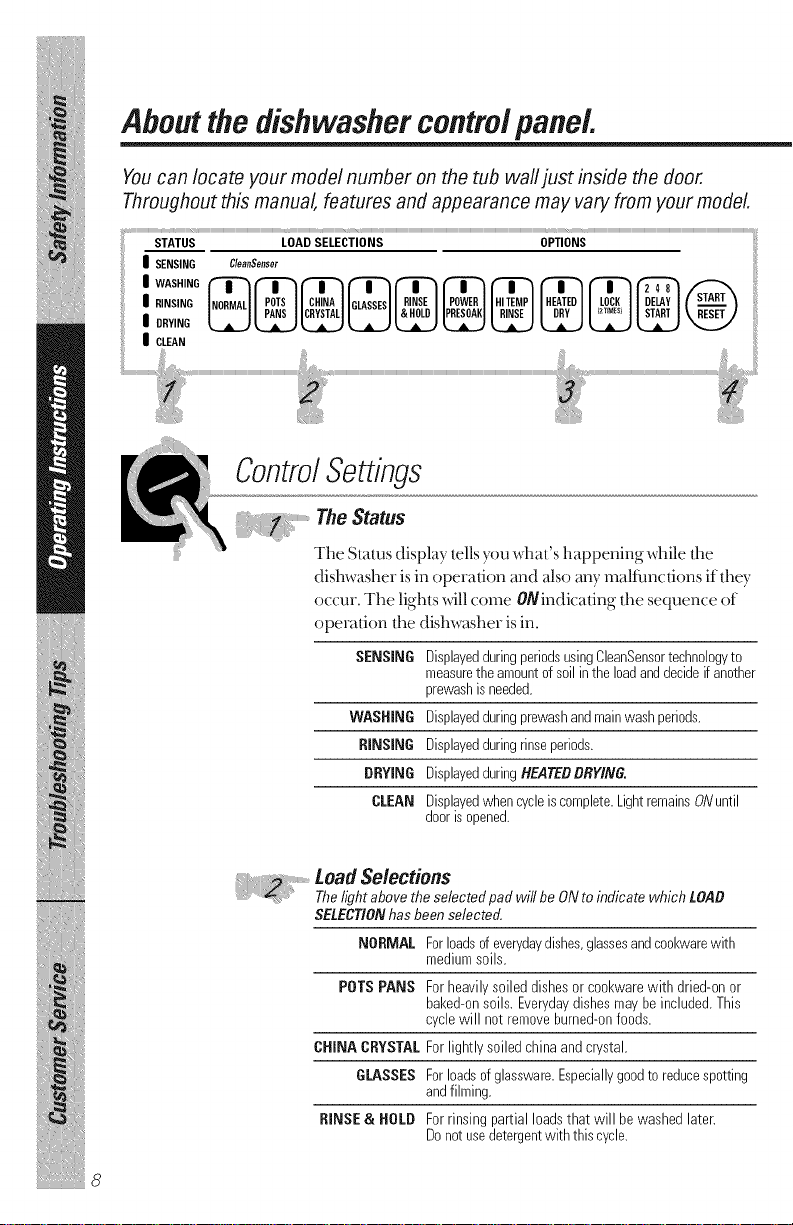
Aboutthe dishwasher controlpanel.
Youcan locate your model number on the tub waftjust inside the door
Throughout this manual, features and appearance may vary from your model
,+++++++++++++++++++++++++++++++r_,++++r,,J,,,_++++++++++++++++++++++++++++++++++++++++++++++++++++++++++++++++++++++++++++++++++++++++++++++++++++++++++++r____++,++++++++++_,+++++++++++++++++++++r,,,++++++++r,,,++++++++++++++++++++++++++++++++++++++++++++++++++++++++++++++++++++++++++++++,,++++++++++++++_++++++++++_++++++++++++++++++++++++++++++++++++++++++++++++++++++++++++++++++++++++++++++++++++++++++++++++++++++++++++++++++++++++++++++++++++++++++++++++++++++++++++++++++++++++_
STATUS LOAD SELECTIONS OPTIONS
| SENSING CleanSensor
II CLEAN
ControlSettings
T_heStat.s
The Status display tells you what's happening while the
dishwasher is in oper;+fion _u_d _dso _u_ym_dfhn(tJons if they
o((u_. The lights _ill come ONindic_+fing the sequen_e of
oper_ttion the dishw_tsher is in.
SENSING
WASHING
RINSING
DRYING
DisplayedduringperiodsusingCleanSensortechnologyto
measuretheamountofsoil inthe loadanddecideifanother
prewashisneeded.
Displayedduringprewashandmainwashperiods.
Displayedduringrinseperiods.
DisplayedduringHEATEDDRYING.
CLEAN
Displayedwhencycleiscomplete.LightremainsONuntil
dooris opened.
il il
LoadSelections
Thefight abovetheselected padwill be ONto indicate which LOAD
SELECTIONhasbeenselected.
NORMAL Forloadsd everydaydishes,glassesandcoolcvarewith
POTSPANS Forheavilysoileddishesorcool<warewith dried-onor
CHINA CRYSTALForlightlysoiledchinaandcrystal.
GLASSES Forloadsofglassware.Especiallygoodtoreducespotting
RINSE& HOLD Forrinsingpartial loadsthat will be washedlater.
8
mediumsoils.
baked-onsoils. Everydaydishesmay beincluded.This
cyclewill not removeburned-onfoods.
andfilming.
Donotusedetergentwith thiscycle.
Page 9
opt o,s
Thelight abovethe selectedpad will be ONto indicate which OPTIONhasbeen selected.
POWER Forusewith heavilysoiledand/ordried-on,baked-onsoils.Thisoption
PRESOAKMUSTbe selectedPRIORtostarting the cycle. Thisoption adds 16
HI TEMP RINSE Turnsontheheaterin all prerinseandfinal rinsecyclesto help prevent
HEATEDDRY Shutsoffthe dryingheatoptions.Dishesairdrynaturallyandenergyis
HEATEDDRY Turnsthe heateron for fast drying.This cyclewill extendthetime
DELAYSTART
minutes to the cycle time.
spottingon dishware.ThisoptionmaybeturnedONor OFFduringthe
washcycle.
OFF saved.Youcanpropthedooropenafterthe lightgoesON nexttothe
word CLEANwhichappearsinthe STATUSdisplayfor faster drying.
ON toyourwashcycleby 30minutes.NOTE:Cannotbeselectedwith
RINSE& HOLDcycle.
LOCK WhentheLOCKpadistouchedtwicewithin3seconds,allpadsbecome
inoperative.Youcanlockthecontrolstopreventanyse/ectionsfrombeingmade.
Oryoucanlockthecontrols"afteryouhavestarteda cycleorselectedDELAY
STARTsothecycleorDELAYSTARTisnotinterrupted
Children cannot accidentally start dishwasher by touching pads
with this option selected.
Tounlockthedishwasherafterit hasbeenlocked,touchtheLOCKpadtwice
within3seconds.ThelightabovetheLOCKpadwill beoff.
Youcandelaythe start ofa washcyclefor up to 8 hours.Pressandhold
theBELAY STARTpadto choosethe numberof hoursyouwant to delay
thestartof thecycle.Themachinewill countdownandstart automatically
atthe correcttime. NOTE:Ifyouforget to lockthedoor a remindersignal
will beepuntilyou doso.
RESET
Tochangea cycleafter washingstarts,touchthe START/RESETpadto
cancelthe cycle.After water is pumpedoutand motorstops,you can
reprogramandrestartthe dishwasher.
Start
Close the door until it locks into place and touch the START/RESETpadto
begin the (T(le. There isa time delay between stalt-up and water fill soyou
will not hear aW wash action fight awW.
The tTcle is complete when the light is 0Nnext to the word CLEANin the
STATUSdisplay.
NOTE."The dishwasher remembers your last wcle so you don't have to
reprogram each time. %qmn the dishwasher is loaded and door latch is
in the locked position, the conuol panel lights willbe ONand displ W the
last settings you selected.
If you don't want to change aW of the settings, simply t(mch the
START/RESETpadto begin the (Tcle.
Also, ifapowert_dlmeoccurs, NORMALand HEATEDORYx_illautomatically
beprogrammed. Make anynew selections and louch the START/RESET
pad Iobegin the cycle.
9
Page 10
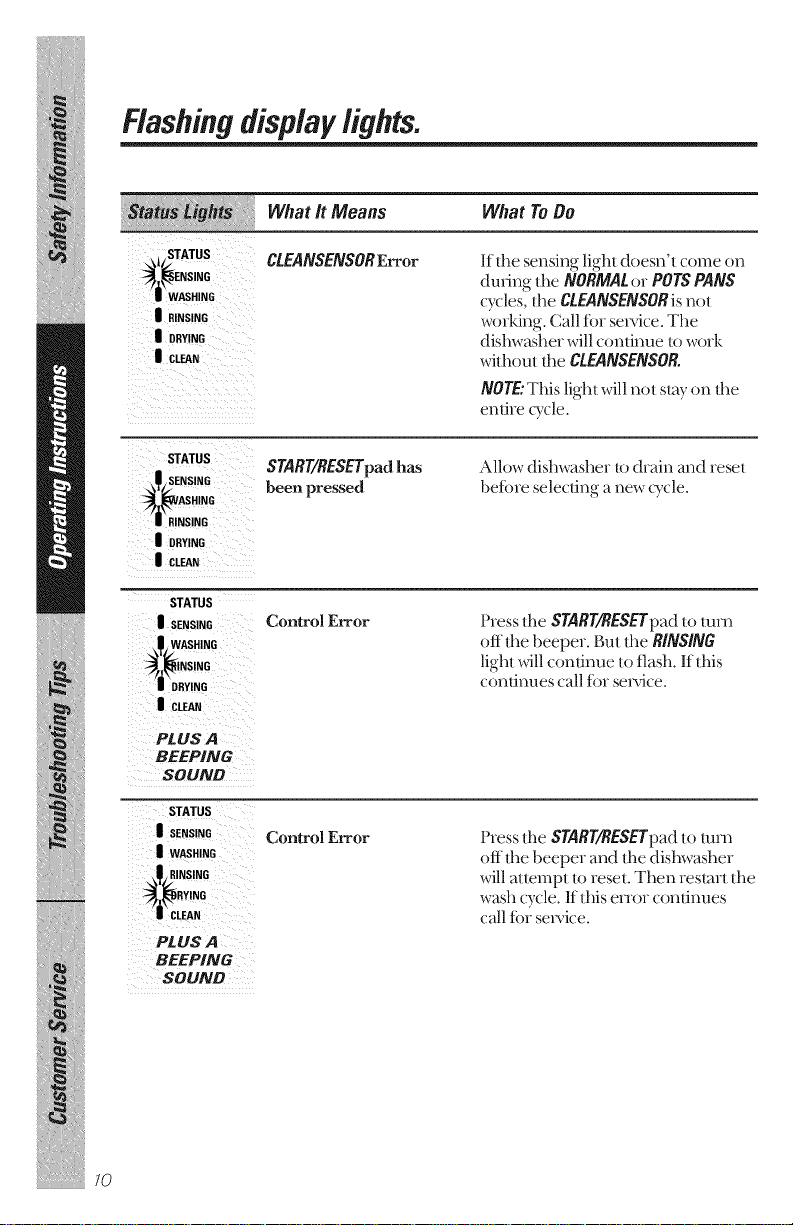
Flashingdisp/ayfights.
What It Means What To Do
i STATUS
NNS,NO
| WAG.ING
I RINSING
l GRYmNG
IGL_N
STATUS
SENSING
_,_S,_NG
•| RINSING
| GRY!NG
I CLEAN
STATUS
II SENSING
WASHING
i DRYING
I CLEAN
PLUS A
BEEPING
SOUND
| SENSING : :
| WASHING
R'NS!NG
.Y,N0
iCLEAN
: PLUS A
BEEPING
SOUND
CLEANSENSORError
START/RESETpad has
been pressed
Control Error
Control Error
If the sensing light doesn't come on
during the NORMALor POTS PANS
cycles, the CLEANSENSORis not
working. Call fin set_qce. The
dishwasher will continue to work
without the CLEANSENSOR.
NOTE."This light willnot stay on the
entire _Tcle.
Allow dishwasher to drain and resel
before selecting anew (Tcle.
Press the START/RESETpadto lure
offthe beeper. But tim RINSING
lighl _qll continue to flash. If this
continues call fbr set_ice.
Press the START/RESETpadto mm
off the beeper and tim dishwasher
will attempt 1o reset. Then restart the
wash cycle. If this enor continues
call fbr set_4ce.
il il
7O
Page 11

TheC/eanSensor.
Thedishwasher has an exclusive CleanSensor System that measures the
amount of soil in the load and determines the number of prewashes needed
to clean the dishes.
CYCLE USAGE TIME
SEOUENCES GALLONS MINUTES
Nerma{ Heavy
_oro_,_ _ ____
_o_ _______
Pans Heavy 10.5 66-81
Pans
Crystal 6.1 33
Glasses
Rinse _:_
& Held
WATER TOTAL
9 62
z5 58
4.6 31
1,5 5
11
Page 12

Usingthe dishwasher.
i ii
ChecktheWaterTemperature
The entering water umst be at least 120°F. and not more than
150 °F., t_)r ettecfive cleaning and to prevent dish damage. Check
the water temperature with acandy or meat the_mometer. Turn on
the hot water faucet nearest the dishwasher, place the the_mometer
in a glass and let the water run continuously into the glass until the
temperatme stops dsing.
UseJet-D ,BinseA_fient
Jet-Dry®rinse agent _emoves spots and prevents new fihn buikl-up
on yore dishes glasses, flat:_vare,cookware and plastic.
Fill the rinse agent dispenser
until it reaches the bottom of lip
inside the opening. Replace cap.
To check ifrinse agent is needed,
remove the cap and look into tim
dispenser. On some models, the
dispenser can be checked by
pressing the clem center of the
fill cap 2 or 3 times. Ifrinse agent
fills the cenmr of the fillcap, you
have enough.
A furldispensershould last aboutone month.
il il
If rinse agent spills, wipe up the excess.
UsingtheDishwasherDoor
The door must be closed and locked into place to select a
_={'_'LOaDSELECTIONoran OPTION.
:_ If the door isopened dudng acycle andleft open, thedishwasher
willbeeponce everyminuteund] the door isclosed and latched
into place.
72
Page 13

ProperUseof Detergent
Use only detergent specifically made tOTuse in dishwashers, Cascade +_
Aulomatic Dishwashing Detergent has been approved fi>ruse in all GE
dishwashers. Keep yore deteigenI fiesh and dry. Don't put powder
detergent into the dispenser until you're ready to wash dishes.
The mnounl ofdele_gent to use depends on whed_er your wa/er is
hardor soft. Wilh hard water, you need exua deletgenl. Wifl_ soft
water, you need less delergenl.
Promct your dishes and dishwasher by conlacting your water
deparnnenl and asking how hmd your water is. Twelve or more gTains
is exUemely hmd wamr. A water softener is recommended. Wilhout
il, lime can build up in the water valve, which could stick while open
and cause flooding. Too much demtgenl _4th soft waler can cause a
pennanenl cloudiness ofglasswme, called etching.
You'll find two delergem dispensers on the
inside door ofyour dishwasher. All wash _Tcles
require detergent in ll_e main cup. Wash _Tcles
with twowashes will also use the open cup. _q_en
using aulomatic dishwashing detergent tabs, <
simply place one tab in the main cup and close.
Be sure the conuol panel lights are not lit
betbre adding dem_gent. ()flmt'_4se, the
detergem cup _dllnot close and lalch properly.
Add delergent then close the main cup.
NOTE"To open demtgent cup after it has
been closed, simply mm the detergent cup
handle counle>clockwise until it releases.
A snapping sound may be heard.
ForgettoAdd a Dish?
A ibrgonen dish can be added any tilne beibre the main wash.
::_ Do not open the door until lhe water spray action stops. Sleam
{ _'may rise out of tl_edishwasher.
Close the door and push the latch to tl_etin fight.
.+ I3
Page 14

Loadingthe dishwasherracks.
For best dishwashing results, follow these loading guidelines. Features and
appearance of racks and silverware baskets may vary from your model
UpperRack
The upper rack is tot glasses,cups and saucers.
Cups and glasses titbest akmg tim sides. This is
alsoa secure place for dishwashe>s_e plastics.
The cup shelf (on some models) may be placed in
tl_eup or do,m position to add flexibility. A wine
glass holder (on some models) secures wine glasses
at an angle tot best washability. Because _4ne
glasses come in vmious sizes, after loading, slowly
push in the rack to make sure d_ey will clear dm
top of tl_edishwasher.
The upper rack is good tot all kinds of odd-
shaped utensils. Saucepans, mixing bowls and
other items should be placed t_tcedo,re.
Securelarger&hwasher-safeplasticsOvertwo fingers
whenpossible
MakeSure_mall#fastic!ternsaresecureso theycan'tfall
ontotheheatingelement
il il
Appearanceof upperrack andlowerrackwash
towerswill var/
74
The Wash Tower
KeeptheCenterarea Clearb the lowerrack.
The wash lower rises [hioug_ [he cemer of _he lower
1 nn_* h x
>t(:_du" _ [ e ,rashand nnse pordons of the cycle.
A second wash toweris located in the top rack.
i,
Water tiom the wash tower in tl_e lower rack
shoots up into this wash tower and out _he
openin_,sb,a_ the _op. X,_q_enloading items around
_hiswash _ower do not block the top openings.
Don'tblockit or bail tall thingsnextto it.
Also, be cmefld not to let a pordon
of an item such as a pot or dish
handle extend through the bottom
rack. This could block the wash
m_n and cause poor washing results.
Page 15

Lower Rack
When loading the !ower rack,do not load largeplatters Or
trays in the front right Comer.Theymayprevent detergent
from circulating during the wash cycle,
The lower rack is best used tbr plates, saucers, and
cookware. Lmge imms such as broiler pans and
racks should gs) along the sides. Load platters, pots
and bowls along dm sides, in comers, or in tile
back. The soiled side of items should t_tce die
center of die rack.
Fold<lo,m fingers provide flexibility tbr exua large
and hard-to-fit items.
The fingers may be left in the up posidon or tblded
doom to customize die lower rack.
Silverware Basket
Put flatware in tlle removable basket _4tll fbrk and
knite handles up to protect your hands. Place
spoons in die basket _4tll handles doom. Mix
knives, fbrks and spoons so dmy don't nest
together. Dist_ibum evenly. Small plastic imms,
such as measuring spoons and lids flom small
containers, should g_ in the bottom of the
silverware basket _4tll silver,rare on top.
Don't/etanYitemextend
throughbottom,
To increase tlle flexibility of the lower rack, tile
silver,rare basket may be split. (;rasp tile basket at
opposite comers and slide apart. The basket
sections should be placed in tile lower rack by
hanging them on dm top hoop.
A cover can be lowered to eidler side
to secure liglmveight items flom the
eflec ts of tile vigorous wash ac/ion.
Theaccessorybasketcan hold small imms such as:
baby botde nipples, plastic lids, corn cob holders,
etc. It canhangfrom the tophoop ofthe upper rack
alongtheright side or it can alsohangon theright or
leftside of the lower rack. Whenhangingthe accessory
basketontheright side in theupperrackmakesurethe
topis closedand nothingissticking out.
I5
Page 16

Loading12and10place settings...
Follow these guidelines for loading 12and 10place settings. Features and
appearance of racks and silverware baskets may varyfrom your model
Upper Rack--lO place setting Lower Rack--lO place setting
Upper Rack--12 place setting Lower Rack--12 place setting
78
Page 17

Aboutoptional accessories.
Youcan change the door andlower access panel appearance of your
dishwasher by ordering one of these optional accessories:
Color Panels
I/4" Wood Panel Trim Kit
3/4" Trimless Panel Kit
These accessories are available at extra cost (VISA,MasterCard, or Discover
cards accepted) by calling 800-626-2002.
Specify accessory number when ordering.
Descriptionsof OptionalAccessories
Color panels-- Replacement door panels and loweI access panels
are availablein tile ff)llo,_qn,gcolors:
GPFaOOA(Almond)
:_GPF4OOB(Black)
GPF4OOW(White)
GPF400S(StainlessSteel)
NOTE."The GPFIO0dishwasher doorspringkit _411be included with
the stainless steel color paneland illust be installed _th it.
Woodpaneltrimkit--This accessorycontains trimandinstructions
fbr you to supply and install a 1/4"thick decorative wood door and
lowe_accesspanel:
GPF425A(Almond)
_,GPF425B(Black)
GPF425W(White)
NOTE."The GPFIO0dishwasherdoorspringk# must also be orde_ed
and installed when the doorpanel weighs fourIbs.or more.
Trimlesspanelkit--This accesso U contains parts and instructions
fbr you to supply and install a 3/4" thick decorative wood door and
lowe_ access panel:
GPF475
NOTE."The GPFIO0dishwasherdoorspringkit_ll be included with
the trimlesspanelkitand must be installed _th it.
77
Page 18

Caringforthe dishwasher.
Toclean the control panel use a lightly dampened cloth then dry
thoroughly. Toclean the exterior use a good appliance polish wax.
Never use sharp objects, scouring pads or harsh cleaners on any
part of the dishwasher.
Protect AgainstFreezing
If your dishwasher is left in an unheated place dining
lhe winter, ask a seevice technician to:
...............................................fuses c,rtrip ci_cuit breaker.
_ Turn offthe water supply and disconnect d_e wamr
.......................inlet line fiom the water valve.
{_ii Drain water fiom the water inlet line and water
.......................valve. (Use a pan It:,catch the water.)
Reconnect d)e water inlet line to the water valve.
Remove the plastic sump cover in the tub
.......................botIOlll and use a sponge to soak up water in the
robber boot.
78
Page 19

Does YourDishwasher Have an Air Gap?
An air gap protects your dishwasher against wamr
backing up into it ira drain clogs. The air gap is not a
part of the dishwasher. It is not covered by your
wanamy. Not all plumbing codes require air gaps, so
you may not have one.
Theair gap is easy to clean.
Checkthea#gapanytime
yourdishwasherisn't
drabingwe#.
The StainlessSteel Panels
The stainless steel panels can be cleaned _4th Stainless Steel Magic or a
similar product using a clean, soft cloth.
You (:an order Stainless Steel Magic # WXIOXI5 through GE Parts by
calling 800-626-2002.
Turn offthe dishwasher and lift off the chrome
coveI.
Unscrew the plastic cap and clem_with a toothpick.
79
Page 20

Beforeyoucarl for service...
Troubleshooting Tips
Review the charts on the following pages first and you may not
need to carl for service.
Controlpanellightsgo
offwhen you'resetting
controls
Noise
Possible Causes
Time too long between
touching of selected pads
Some of the sounds
you'll hear are normal
Utensils are not secure
in the rack or something
small has dropped into
the rack
Motor hums Dishwasher has not been
What ToDo
Ea(h pad must be louched
_4thin 30 seconds of the
others. To relighl, touch
aW pad again, or unlock
and relawh door.
Soft food disposal
shredding acdon.
Drain valve opening to
pump water out.
Timer conlrol as (ycle
proglesses.
Delergenl cup opening.
The motor stopping during
the &ying period.
Water draining out of the
mb immediately atier you
touch $TART_ESETpad.
Make sure eveiTthing is
secured in dishwasher.
used on a regular basis. If
you do not use your
dishwasher often, set it lo
till and pump out once
eveU week. This will help
keep the seal moist and
the garbage disposer clear.
Detergentleftin Dishes are blocking the Reposidon/l_e dishes.
dispensercups detergent cups
Detergentcup lid
latchedaccidentally
by user
()pen the door and press
the START/RESETpad
three times _thin t_vo
seconds. The delergenl
cup will t_ip.
2O
Page 21

PossibleCauses
Waterstanding in
thebottomof thetub
out ofthe tub
Suds in the tub Correct detergent
Stained tub interior
This is normal
Drain is cloggedWaterwon'tpump
wasn't used
Rinse agent
was spilled
Detergent with
colorant was used
Some tomato-based
foods can stain
What ToOo
A small alnount ofclem]
water around the outlet on
the tub bottom at the back
of the tnb keeps the water
seal lubficamd.
If you have an air gap,
clean it.
Check to see ifyour kitchen
sink isdraining well.Ifnot,
youmay need aplumber.
Ifthe dishwasher drains into a
disposer, run disposer clem.
Use onlyau/omafic dishwasher
dem_gents toavoid sudsing.
Cascade" Automatic
Dishwashing Demrgent has
been approved for use in all
GEdishwashers.
To remove suds flom the tnb,
()pen the dishwasher and let
suds evaporam. Add 1 gallon
of cold water to the rob. Close
the door until it locks into
place. Pump out waler by
pressing STRRT/RESET,then
immediately press SURT/RESEr
again. Repeat ifnecessa U.
Always_6pe up rinse agent
spillsimmediamly.
Some detergents contain
colorant (pigment or dyes)
that will discolor the tub
interior with exmnded use.
Check the dem_gent cup
tot signs of any discoloration.
If cup isdiscolored, change to
detergent will]out any colorant.
Cascade" Automatic
Dishwashing Demrgent has
been approved tot use in all
GE dishwashers.
Use of the RINSE& HOLOcycle
(on some models) after adding
die dish to the load can
decrease the level of staining.
21
Page 22

Beforeyou carl forservice...
Possible Cause'_s-- What ToD'_'o_
Dishesandflatware Inlet water temperature Raise the wa/ev heater
notclean isbelow 120°F. tempevatme tn 120°F.
Use HITEMPWASH.
Water pressure is Turn (m a thuce/. Is water
Spotsandfilming
ong/asses and
flatware
temporarily low coming out move slowly
Air gap is clogged Clean the air gap.
Improper rack loading Make sure large dishware
Extremely hard water
Low inlet water
temperature
Overloading the
dishwasher
Improper loading
Old or damp powder
detergent
Rinse agent dispenser
empty
Too tilde detergent
/han usual? If so, wait until
pvessme isnormal betbve
using your dishwasher.
does not block the
dete_genl dispenser or the
wash ainu.
Use Jet-Dry ® rinse agem to
remove spo/s and prevenl
new fihn build-up.
To remove stubborn spots
and pre-existing tihn tiom
glassware:
I Remove all metal utensils
flom the dishwasher.
2 Do not acid demtgent.
3 Select the long_st cycle.
4tStart the dishwasher mad
allow to run fbr 18 to 22
minutes. Dishwasher will
nowbe in the main wash.
5 ()pen the door and pour
2 cups (500 ml) of while
xqnegar into the bottom of
the dishwasher.
6 Close the door and allow
to complete tim cycle.
If vinegar rinse doesn't
work: Repeat as above,
except use 1/4 (:up (60 ml)
ofciwic acid c_ystals
instead of vinegar.
22
Page 23

Possible Causes What ToDo
Cloudinesson Combination of soft
glassware water and too much
detergent
Water temperature
entering the dishwasher
exceeds 150°F.
Black orgray
marksondishes
Yelloworbrown film
Aluminum utensils have Remove marks x_dfl_a mild,
rubbed against dishes abrasive cleaner.
Tea or coffee stains Remove the stain by hand,
oninsidesurfaces
This is called etchingand
is permanent. To prevent
this tiom happening, use
less delerg_nt if you have
soft water. Wash glassware
in the shortest cycle that
will get flmm clean.
Lower the water healer
temperature.
using a soludon of 1/2 cup
bleach and 3 cups wm_n
water.
A WARNING
Beit)re cleaning interior
wait at least 20 minutes
alier a (Tcle for tl_e
heating element to cool
doom. Failure to do st) can
result in bums.
iai,iiiiiiiiii!!iii!iiiiiii{{ii:i:i{g{i{iii
;;;;;;;;;;;;;;;;;;;;;;;;;;;;;;;;;;;;;;;;;;;;;
Whitefilmoninside
surfaces
An overall yellow or
brown t'dm can be caused
by iron deposits in water
Hard water minerals
A special fiher in the water
supply line is dm only way
iv)conect this problem.
Contact a water softener
company.
To clean the inmfior, apply
dishwasher detergent to a
damp sponge. Wear
rubber gloves. 1)onotuse
aW type ofclem_ser other
dmn dishwasher detergent
because it may cause
toaming or sudsing.
Cascade" Automatic
Dishwashing Detergent
has been approved fbr use
in all GE dishwashers.
23
Page 24

Beforeyou call forservice...
PossibleCause'_s What ToD'_'o_
Dishes don't dry Low inlet water Make sure inle! water
temperature /empera/ure is toneel.
Selec/HI TEMPmNSE
and/or HEATEDORg
Controlpanel
respondedto inputs
hutdishwashernever
filledwith water
Dishwasher won't run
Steam
Rinse agent dispenser
is empty
Door latch may not be
properly seated
Fuse is blown, or the
circuit breaker _ripped
This is normal
Check ll_e rinse a,g_nt
dispenser.
Call tot se_,ice.
Replace tuse or reset
circuit breaker. Remove
aW other appliances tiom
the circuit.
TIy resetting the
START/BESETpad.
Steam comes through
the vent by the door latch
during d_ying and when
wa_er is being pumped out.
24
Page 25

Notes
i_i,iiiiiiiiii!!iii!iiiiiiiiiii_i_ii_iiiiii
25
Page 26

Notes
il_il
Page 27

i_i,iiiiiiiiii!!iii!iiiiiiiiiii_i_ii_iiiiii
27
Page 28

Notes
il_il
Page 29

GE Service Protection Plus TM
GE, a narne recognized worldwide for quality and dependability,
offers you Sei_qce Protection PlusTH--comprehensive protection on
all your appliances--No Matter What Brand[
Benefits Include:
* Backed by GE
* All brands covered
* Unlimited service calls
* All parts and labor costs included
* No out-of-pocket expenses
* No bidden deductibles
* One 800 number to call
You will be completely satisfied with our se_i(e i)rotection or you may request your money
back on the remaining value el your contract. No questions asked. It's that simple.
Protect your refl'igerator, dishwasher, washer and (hyer, range, qa/, VCR and much more-
any brand! Plus there's no extra charge for emergency service and low monthly financing is
available. Even icemaker coverage and food spoilage protection is offered. You can rest easy,
knowing that all your valuable household products are protected against expensive repairs.
We'll CoverAny Appliance.
Anywhere. Anytime.*
H_,ceyo,_confidencein(;E_,ndca||,_in theU.S.to||-t;ee_,t800-626-2224
for more information.
Lkll brands (o\crcd, up Io 20 years old, in die <onlincnlal L.S.
_ Cut Imrc
Please place in envelope and mail to:
GeneralElectricCompany
Warranty Registration Department
P.O. Box 34070
Louisville, KY 402324070
29
Page 30

Consumer Product Ownership Registration
Dear Cuslonler:
Thank you tot purchasing our product and thank you for placing your
confidence in us. We are proud 1o have you as a customer!
Follow these three steps to protect your new appliance investment:
( ompleu and mail
your ( onsum_ r
Product Ownership
P.eg-isl ration loda}.
Haw lhe petc_ ol
mind ot knowing we
Call con1 tct vou ill
the unlikely event ol
t s ticly modification.
Afier mailing the
rcgislration beloss,
strait Ibis doculn( nt
in a sail., place. 11
o,ntains inl} wnaation
you will need shouM
you icquile Selwice.
()ur service number
is 800J. ;E-( ARES
(800432-_737).
Rctd your (h_ 1-1121-'s
Manual car_ liflly, h
will help you operal{
your new tppliance
properly. Ilyou
have questions,
or _leed llll)l(,
infi wmalion call the
(;E Ans_er (emer
800.626.2000.
Model Number Serial Number
Important: If you did not get a registration card with
your product, detach and return the form
below to ensure that your product is registered.
....... _._ Cul here
Consumer Product Ownership Registration
Model Number Serial Number
M_. D Ms. D Mrs. D Miss
l'irsl
N I 1"1112 I I I I I I I I I I I I I
1.aSl
N_m e I I I I I I I I I I I I I I I I I I
_,lreel
A( ( tess I I I I I I I I I I I I I I I I I I I I I I
ApI. # [ I I I I I I I
(i b [ I I I I I I I I I I I I I I I I I I I I I I
I
Slale
l)al¢l'lar _d
In [se
Monlh _ 1)a, _ Year
lqlolae I _ I
N .......... " I I I _ I I I I
GeneralElectricConl&,any
Loulsw#<gentu&y40225
Zi
Co( e i I I I I
GE,4ppliances
IRT
3O
nCJll
Page 31

GEDishwasher Warranty
All warranty service provided by our Factory Service Centers,
or an authorized Customer Care®technician. Forservice,
call 800-GE-CARES.
GEWill Replace:
One Year Any part of lhe dishwasher which fails clue/o a det((1 in
Fromthe date of the materials or workmanship. During this h///one-year
originalpurchase warranty, GE will also provide, free of charge, all labor
and in-home service to replace dm defective pro1.
Second Year Any part of the dishwasher which tails due loa deice/in
From the date of the me/oriels or workmanship. During this second-year
origlnalpurchase limited warranty, you will be responsible tot any labor or
Five}team
Fromthe date of the
originalpurchase
TwentyYears
Fromthe date of the
originalpurchase
in-home sei_,i(e (()sis.
Thedishwasherrock, ifit should rust, or theelectronic
control moduleit it should tail clue to a detect in
materials or workmanship. During this five-year limited
warranty,you xdll be responsible tot any labor or in-home
seivice costs.
ThePermaruf®tubor doorliner,ifil tails Iv)contain
water due to a detect in materials or w(wkmanship.
During this fulllwenty-year warranty,GE xdll also
provide, free of charge, all labor and in-home service
toreplace the detective part.
Service trips to your home to teach you
how to use the product.
Improper installation.
Replacement of house fuses or
resetting of circuit breakers.
Failure of the product if it is
abused, misused, or used for other
than the intended purpose or used
commercially.
Damage to the product caused by
accident, fire, floods or acts of God.
Incidental or consequential damage to
personal property caused by possible
defects with this appfiance.
Cleaning or servicing of the air gap
device in the drain llne.
Thiswarrantyis extendedto theoriginalpurchaserandanysucceedingownerforpmductspurchased
forhomeusewithintheUSA.InAlaska,thewarrantyexcludesthecostofshippingorservicecallsto
yourhome.
Some states donot a/low the exclusion or hmitation of incidentalor consequential damages.This
warrantyrives you specific legal rights, andyou may a/sohave other rights which varyfromstate to
state. Toknow what your legal rights are, consult your local or state consumeraffairs office oryour
state'sAttorney Genera/.
Warrantor:General ElectricCompany.Louisville, I0/40225
3I
Page 32

ServiceTelephoneNumbers.
GEAnswerCenter® 800.626.2000
The GE Answer Center ®is open 24 hours a day 7 days a week.
In-HomeRepairService800-CE-CARES(80&432-2737)
Expert GE repair service is only a phone (all away.
SpecialNeedsService800.626.2000
TDD800-TDD-GEAC(800-833-4322)
GE offers, flee ofchar,ge, a brochure to assist in planning a bmrie>
flee kitchen tbr persons with limited mobility.
ServiceContracts8_-_2_-2224
Purchase a (;E service contract while your warranty is still in effect
and you'll receive a substantial discount. GE Consumer Sex_qcewill
still be there 'atier your warranty expires.
PartsandAccessories800-626-2002
Individuals qualified to service their oxm appliances can have pmts
or accessories sent directly to their homes (VISA, MasmrCmd and
Discover cards me accepted).
Instructionscontained in this manualcoverprocedurestohe performed
byany user.Otherservicing generally shouldhe referredto qualified
servicepersonnel.Cautionmusthe exercised,since improper servicing
maycauseunsafeoperation.
ServiceSatisfaction
If you me not satisfied with the ser\qce you receive flom GE, tbllow
these three steps. First,contact the people who serviced your
appliance. Next,if you axe still not pleased, wrim all the delails-
including your phone numbex=to: Manager, Customer Relations,
GE Appliances, Appliance Park, Louis_qlle, KY 40225. Finall_ if your
problem is still not resolved, w_im:
Major Appliance (_onsumer Action Pio,gralll
20 North Wacker Drive, Chica,go, IL 60606.
32
PfinteflinLouisville,KY
 Loading...