

Page 1
!
❑
Safe~
instructions .,.............,..,......3
UseandtireGui*l
Dishwasher
●
❑
Problem Solver
More questions ?...call
GE Answer
Center@ 80~626.2000
.......................l
9-2l
H
❑
Operating Instructions, Tips
Appliance Registration .,................................2
China, Crystal, Sterling 16
Convenience
Cycle Features .................................................4
Detergent Guide . . . . . . . . . . . . . . . . . . . . . . . . . . . . . . . . . . . . . . . . . . . 12
Dispenser Cups 11
Dishwashing
Drying Options .....................,......,.................,.4
Energy-Saving Tips.,...,..,...,..,......,......,..,...,..,.2
Features
Loading 13-15
Lock Controls Feature
Operating instructions,..........................4- 12
POTSCRUBBER .......................................4, 12
Rinse Agent 11
Soil Level 10
Systems Monitor
Water Temperature 11
~~;:
Care and Cleaning
Air Gap 17
User Maintenance 17
Winter Storage 17
........................................................4, 5
Features...................................2
Shortcuts . . . . . . . . . . . . . . . . . . . . . . . . . . . . .....6
...........................,.......6
......,..,......,......,......,..,...,.7–9
Preparation
Front Panel Change . . . . . . . . 18
Consumer Services ...................23
Model and Serial Numbers ..........................2
Repair Service .................................................2
Warranty ........................................Back Cover
Model
GSD2900
SERIES
GE Appliances
Page 2
HELP US HELP YOU...
Before using your
dishwasher, read this
guide carefully.
It
is intended to help you
operate and maintain your new
dishwasher properly.
Keep it handy
for
answers to
Save time and money.
Before you request
service . . .
Check the Problem Solver in the
back of this guide. It
of minor operating problems that
you can correct yourself.
your questions.
If you don’t understand something
or need more help, write (include
your phone number):
Consumer Affairs
GE Appliances Appliance Park
If you received
a damaged dishwasher...
Immediately contact the dealer
(or builder) that sold you the
dishwasher.
Louisville. KY 40225
Energy-Saving Tips
● Operate the dishwasher only when it’s full. Let
the dishes accumulate in dishwasher. When you put
in only a partial load, use the RINSE & HOLD cycle
to rinse off heavy soils. Be sure to latch the door
when waiting for a
moist, easier to remove.
Always select the cycle that uses the least amount
of water that will remove the soil from the load.
●
Select a SOIL OPTION that
● If you don’t need your dishes right away, use your
HEATED DRY off (Energy saver) feature that
turns the drying heater off automatically. Dishes
dry naturally over a longer period such as overnight.
● Watch the SYSTEMS MONITOR for more ideas.
See Systems Monitor section.
full
load. This helps to keep soils
will
remove soil from
load.
Write down the model
and serial numbers.
You’ll find them on a label
fastened to the tub wall just
lists
causes
inside the dishwasher door.
These numbers are also on the
Consumer Product Ownership
Registration Card that came
with your dishwasher. Before
sending in this card, please write
these numbers here:
Model Number
Serial Number
Use these numbers in any
correspondence or service
calls
concerning your dishwasher.
Convenience Features
This dishwasher has many convenient features:
● Controls are arranged left to right as you use them.
● Automatic “beep” responses to instructions and a
lighted display will let you know the desired
function has been selected.
● Lets you adjust your washing cycle to the amount
of soil on your dishes.
● Lets you select fast, heated drying or energy-saving,
no-heat drying.
●
SYSTEMS MONITOR
in
the
dishwasher
● Lets you
LOCK
the controls to prevent accidental
tampering.
● Remembers your
reprogram each time. See Shortcut section.
will
tell you
and
if
certoin
last
cycle so you don ‘t have to
whtit
things
’s happening
are
wrong.
If You Need Service
To obtain service, see the Consumer Services page in
the back of this guide.
We’re proud of our service and want you to be
pleased. If for some reason you are not happy with the
service you receive, here are three steps to follow for
further help.
FIRST, contact the
people
who serviced your
appliance. Explain why you are not pleased. In most
cases, this will solve the problem.
2
NEXT. if you
still not pleased, write
all
are
details—including your phone number-to:
Manager, Consumer Relations
GE Appliances
Appliance Park
Louisville, KY 40225
FINALLY, it your problem is
Major
Appliance Consumer Action Panel
20 North
Wacker
Drive
still
not resolved, write:
Chicago, IL 60606”
the
Page 3
WARNING—When
appliance, always exercise basic
A
●
Use this appliance only for its intended purpose,
as you
safety precautions, including the
following:
wi~
find described in this Use and Care
Guide.
●
This dishwasher must be properly
‘Q~;b
“.. .<-
o
receive an Installation Instructions sheet with your
dishwasher, you can obtain one by calling, toll
free, the GE Answer Center! 800.626.2000.
—This appliance must be connected to a grounded
metal, permanent wiring system; or an
equipment-grounding conductor must be run
with the circuit conductors and connected to
the equipment-grounding terminal or lead of
the appliance.
—Connect to a properly rated, protected and sized
power-supply circuit to avoid electrical overload.
.’
1
*
*
installed and located in accordance
. . .with the Installation Instructions
before it is used. If you did not
●
Do
not store or use combustible
materials, gasoline or other
~
flammable vapors and liquids
~
using this
●
Do not touch the
or immediately after use.
●
Do not operate your dishwasher unless all enclosure
panels are properly in place.
●
Do not abuse, sit on, or stand on the door or dish
rack of the dishwasher.
●
Close supervision is necessary if this appliance
is used by or near children, Do not
to play inside, on or with this appliance or any
discarded appliance. Dispose of discarded
appliances and shipping or packing material
properly. Before discarding a dishwasher, remove
the door of the washing compartment.
●
Keep all washing detergents and wetting agents
out of the reach of children, preferably in a locked
cabinet, Observe all warnings on container labels
to avoid personal injury.
/.
b~fore
Turning the control dial to the OFF position
does not disconnect the appliance from the
power supply, We recommend having a qualified
technician service your appliance.
in the vicinity of this or any other appliance.
●
Use only powder or liquid detergents or wetting
agents recommended for use in a dishwasher.
●
Do not wash plastic items unless marked
“dishwasher safe” or the equivalent. For plastic
items not so marked, check the manufacturer’s
recommendations,
●
Load light plastic items so they will not become
dislodged and drop to the bottom of the
dishwasher—they mi ht come into contact with
the
Calrod@
heating e
To minimize the possibility of
●
When loading
A. Locate sharp items so that they are not likely
to damage the door seal, and
B. Load sharp knives with the handles up to
reduce the risk of cut-type injuries.
items
P
ement
and be damaged.
to be washed:
inju~.
A
water pipes if hot water has not been used for a
period of two weeks or longer. HYDROGEN GAS
IS EXPLOSIVE. To prevent the possibility of
damage or injury, if you have not used hot water
for two weeks or more, or moved into a residence
in which the hot water system may not have been
used for some time, turn on all hot water faucets
and allow them to run for several minutes before
using any electrical appliance which is connected
to the hot water system. This
hydrogen gas to escape. Also, since the gas is
flammable, do not smoke or use an open flame
or appliance during this process.
SAVE THESE
INSTRUCTIONS
Calrod@
●
To minimize the possibility of
$3
attempting any maintenance. NOTE:
electric shock, disconnect this
appliance from the power supply
heating element during
allow
WARNING—HYDROGEN GAS
is produced by the chemical action
within your water heater. It can
accumulate in the water heater and/or
will
allow any
children
●
Do not tamper with controls.
3
Page 4
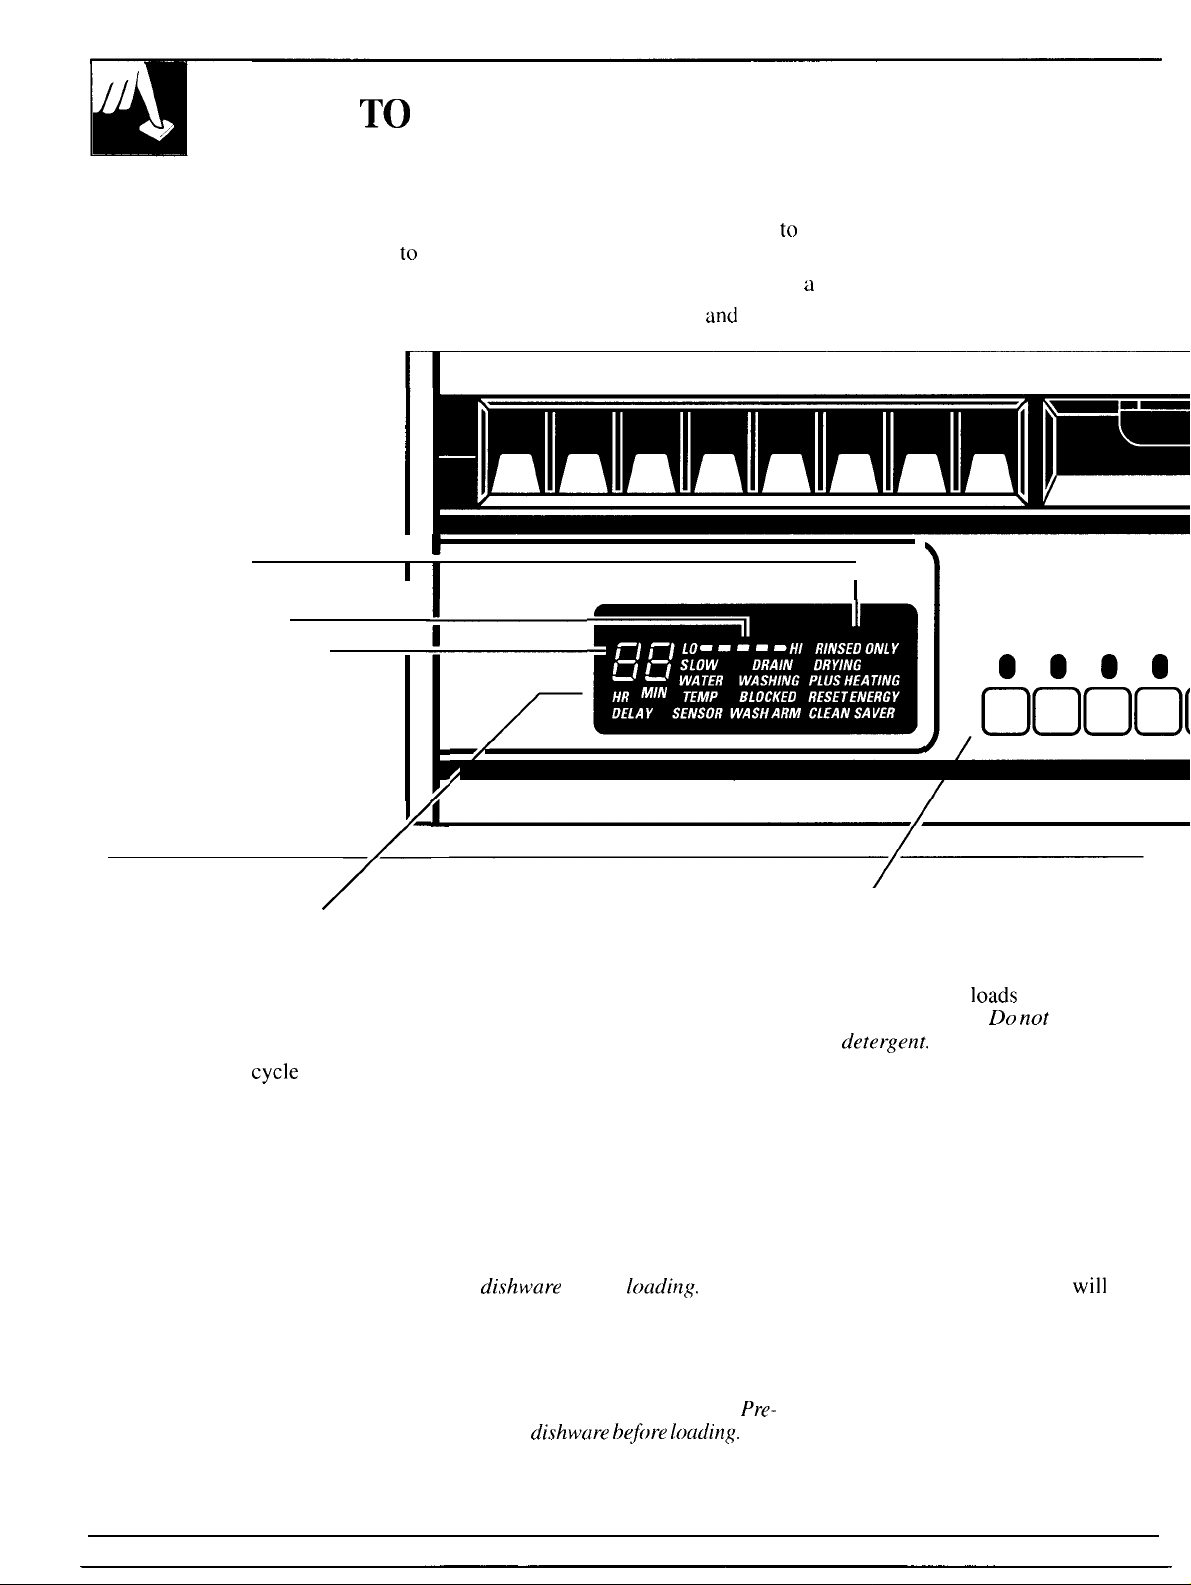
HOW
TO
OPERATE YOUR DISHWASHER
Step 1
Load your dishwasher with dishes, silverware, Add detergent to the detergent dispenser.
pots, pans, bowls, etc. according
in the Loading section.
CYCLE PHASE
ENERGY MONITOR
TIME TO END OF CYCLE
to
instructions
I
I
I
1
I
I
Step 2
Use rinse aid agent to help prevent spotting.
(See How to Use a Rinse Agent section.)
Close
and
latch dishwasher door.
●
SYSTEMS MONITOR
1
I
POT- NORMAL SHORT CHINA
SCRUBBER WASH WASH CRYSTAL
,0000(
CYCLE SELECTIONS
0000
/
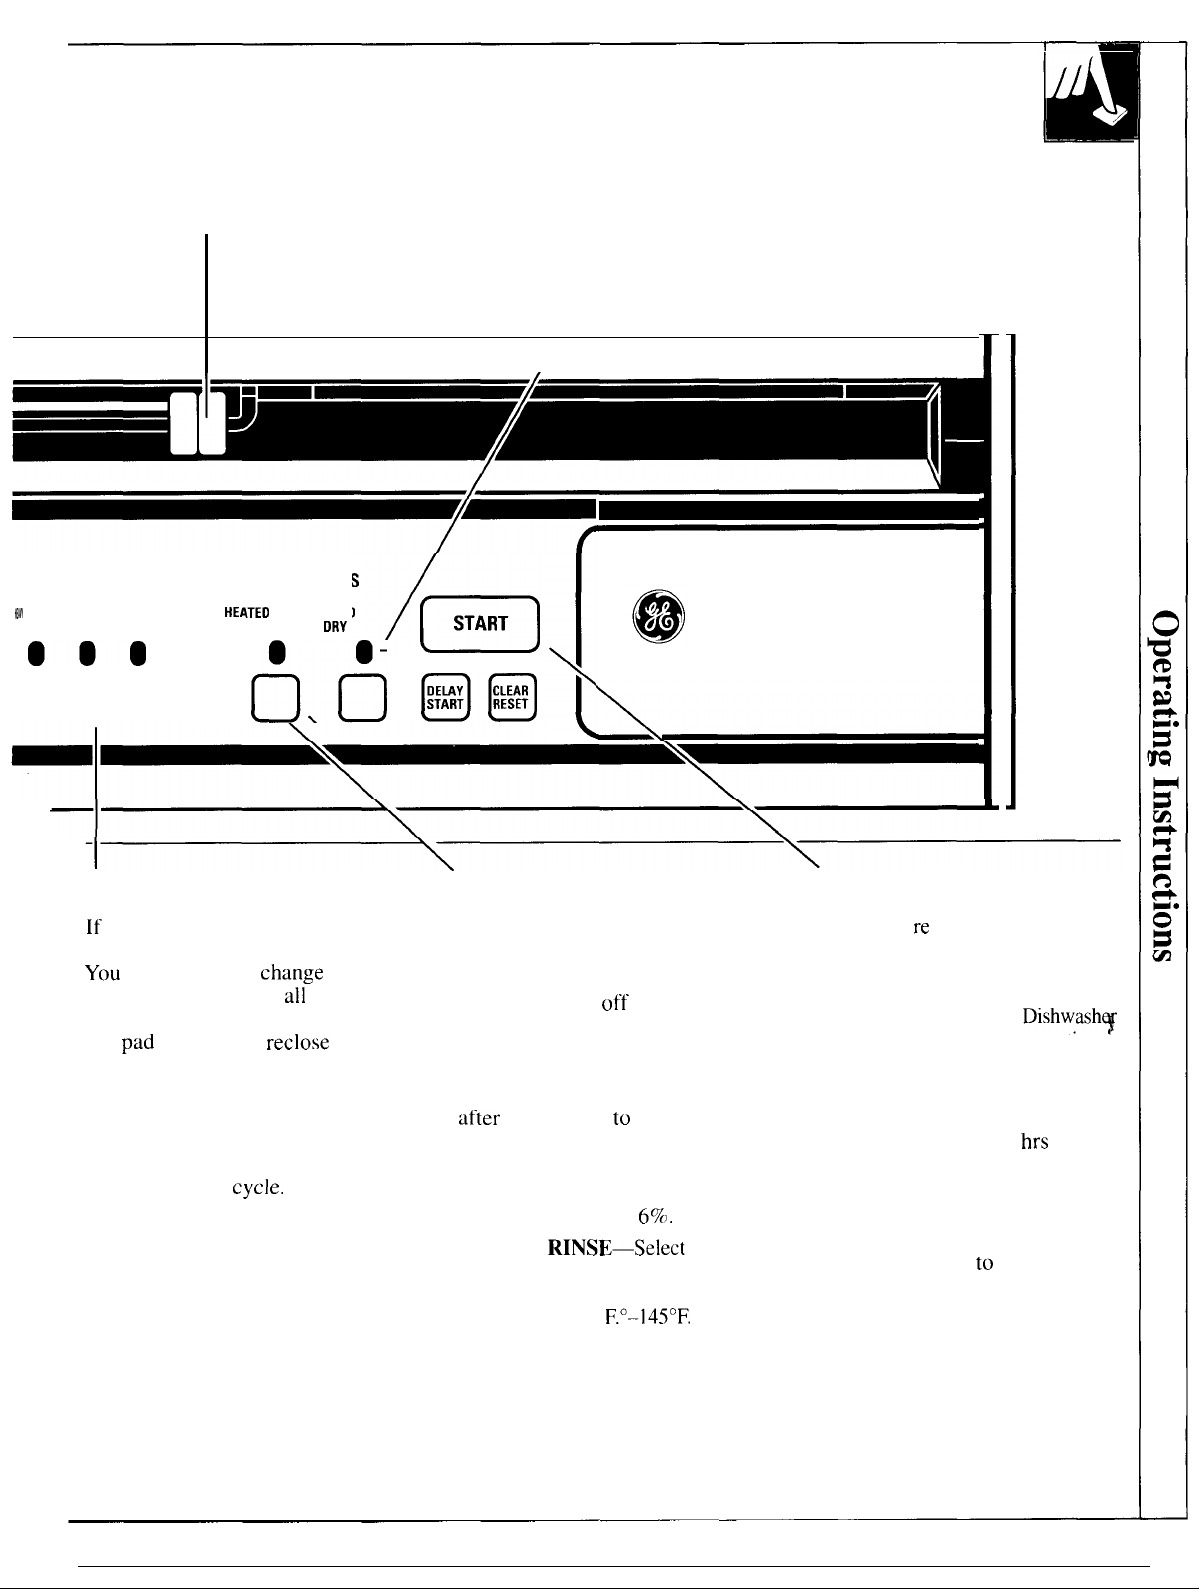
Systems Monitor
This panel tells you what is
happening in the dishwasher
and can alert you to some
possible problems.
Information displayed:
● Selected wash
● Selected dry option
● Minutes to end of cycle
● Cycle phase, such as WASHING,
RINSING or DRYING
● Diagnostic codes to alert you to
possible problems
● Relative energy used by
each cycle. Lets you choose
the cycle you need that uses the
least energy.
See Systems Monitor section for
explanation of displays and codes.
cycle
z
Step 3. Select desired wash cycle. /
Touch the center of the pad.
● POTSCRUBBER is for items
such as pots, pans and casseroles.
Everyday dishes may be included.
● NORMAL WASH is for loads
of everyday dishes with medium
soils. Designed to yield high
performance on normal loads.
● SHORT WASH is for most
loads of everyday dishes with
light soils or soils that have not
dried on. It saves hot water over
the higher performance cycles,
thus saving energy.
dishware
● CHINA CRYSTAL is for
lightly soiled china and crystal.
The wash action is softened by
pumping air along with the water
to protect your delicate items.
rinse
Follow loading instructions in
the Loading section.
before
dishware b<fore loading.
Pre-rinse
loading.
Pre-
● RINSE & HOLD is for
rinsing partial
be washed later.
defergent.
START with this cycle.
To change a setting,
desired pad.
Your dishwasher is now
automatically programmed
including a Soil Option Selection.
Cycle Indicator Lights tell you the
complete program and a number in
the SYSTEMS MONITOR will
tell you how long the cycle
take. If you’re satisfied, just touch
the START pad.
loads
which will
Do not
use
Do not use DELAY
just touch
will
4
Page 5
DOOR LATCH “OFF “POSITION SELECTED CYCLE INDICATOR LIGHTS
/
SOIL OPTIONS
HEAVV
NORMAL LIGHT
SOIL SOIL SOIL
000
000
Step 4. Select a soil option
[f
you wish to make program
changes, start with the soil level.
You
should select a
30 seconds, otherwise
lights will go out. To relight, touch
any
pad
or open and
● HEAVY SOIL should be
selected when dishes are extra
soiled or extra greasy. This gives
dishes an extra rinse in every
cycle except RINSE & HOLD.
This lengthens
●
NORMAL SOIL is
programmed when a cycle is
selected. You may want to
change the selection depending
on the soil on your dishes.
● LIGHT SOIL will save time
and money if you pre-rinse
your dishes. This shortens all
cycles except RINSE & HOLD.
HEATING OPTIONS
HEATEO
RINSE
HEATED
ORV
START
/0
6.6
change
all
reclose
cycle.
automatically
within
panel
door.
@@
Step 5. Select a drying option
. HEATED DRY on-Provides
faster drying. Can be changed
while cycle is running.
● HEATED DRY off (Energy
Saver)—Shuts off heating unit.
Dishes air-dry naturally. It takes
longer, but saves energy. You can
prop door open about 3 inches
after
motor stops to speed drying.
Excellent for overnight drying.
Energy Saver helps reduce
electrical energy used by this
model approximately
● HEATED
either POTSCRUBBER or
NORMAL WASH. Heats water in
final rinse to 140
pad once for on, once more for off.
This option may be changed at any
time before or after start of cycle.
When selected, the cycle may
extend up to 20 minutes while the
machine heats the water. During
the heating extension the minutes
countdown is on hold.
6Yc.
RINSF.—Select
F.0–1450F.
with
Touch
Step
6.
Start dishwasher
●
When you’ re ready to wash dishes,
touch the START pad. There is a
time delay between start-up and
water fill so you will not hear any
wash action right away.
will proceed through your entire
program and turn off automatically.
To delay the start, touch DELAY
START pad. The SYSTEMS
MONITOR will read”1
Touch pad once again for each
hour desired up to 9 hours. The
machine will count down and start
automatically at the correct time.
Note: Don’t forget
in cup and close cup. Do not use
DELAY START with the RINSE
& HOLD cycle.
To change a cycle after washing
starts, touch the CLEAR RESET
pad to cancel cycle. After water
is pumped out and motor stops,
you can reprogram and restart
the dishwasher.
Dishwash~
hrs
delay.”
to
put detergent
5
Page 6

OPEMTING mSTRUCTIONS
(continued)
Dishwashing
The dishwasher remembers your last
have to reprogram each time.
shortcut
cycle
so you don’t
When the dishwasher is loaded and the door latch
is moved to the ON position, the control panel will
display the last settings you selected.
If you don’t want to change any of the settings,
simply touch START.
NOTE: If there has been a power failure, NORMAL
WASH, NORMAL SOIL and HEATED DRY off will
automatically be programmed. Make any new
selections as desired and touch START.
How to lock dishwasher controls to prevent use by children
Your dishwasher has a “hidden”
control pad. When this
touched twice within
all pads become inoperative and no
new selections can be made until
the lock is released. The word
LOCKED appears in the
SYSTEMS MONITOR.
pad
is
3
seconds,
Children cannot accidentally start
dishwasher by touching pads. The here twice
only control unaffected is the within 3
DELAY START. If this selection
has been made, dishwasher
start automatically after whatever
delay you have selected.
will
Touch
seconds
to lock
ii{~f::o’
SOIL OPTIONS
HEAW
NORMAL LIGHT
SOIL
666,
SOIL
SOIL
6
Page 7
THE SYSTEMS MONITOR TELLS YOU
W~T’S ~PPENING
k
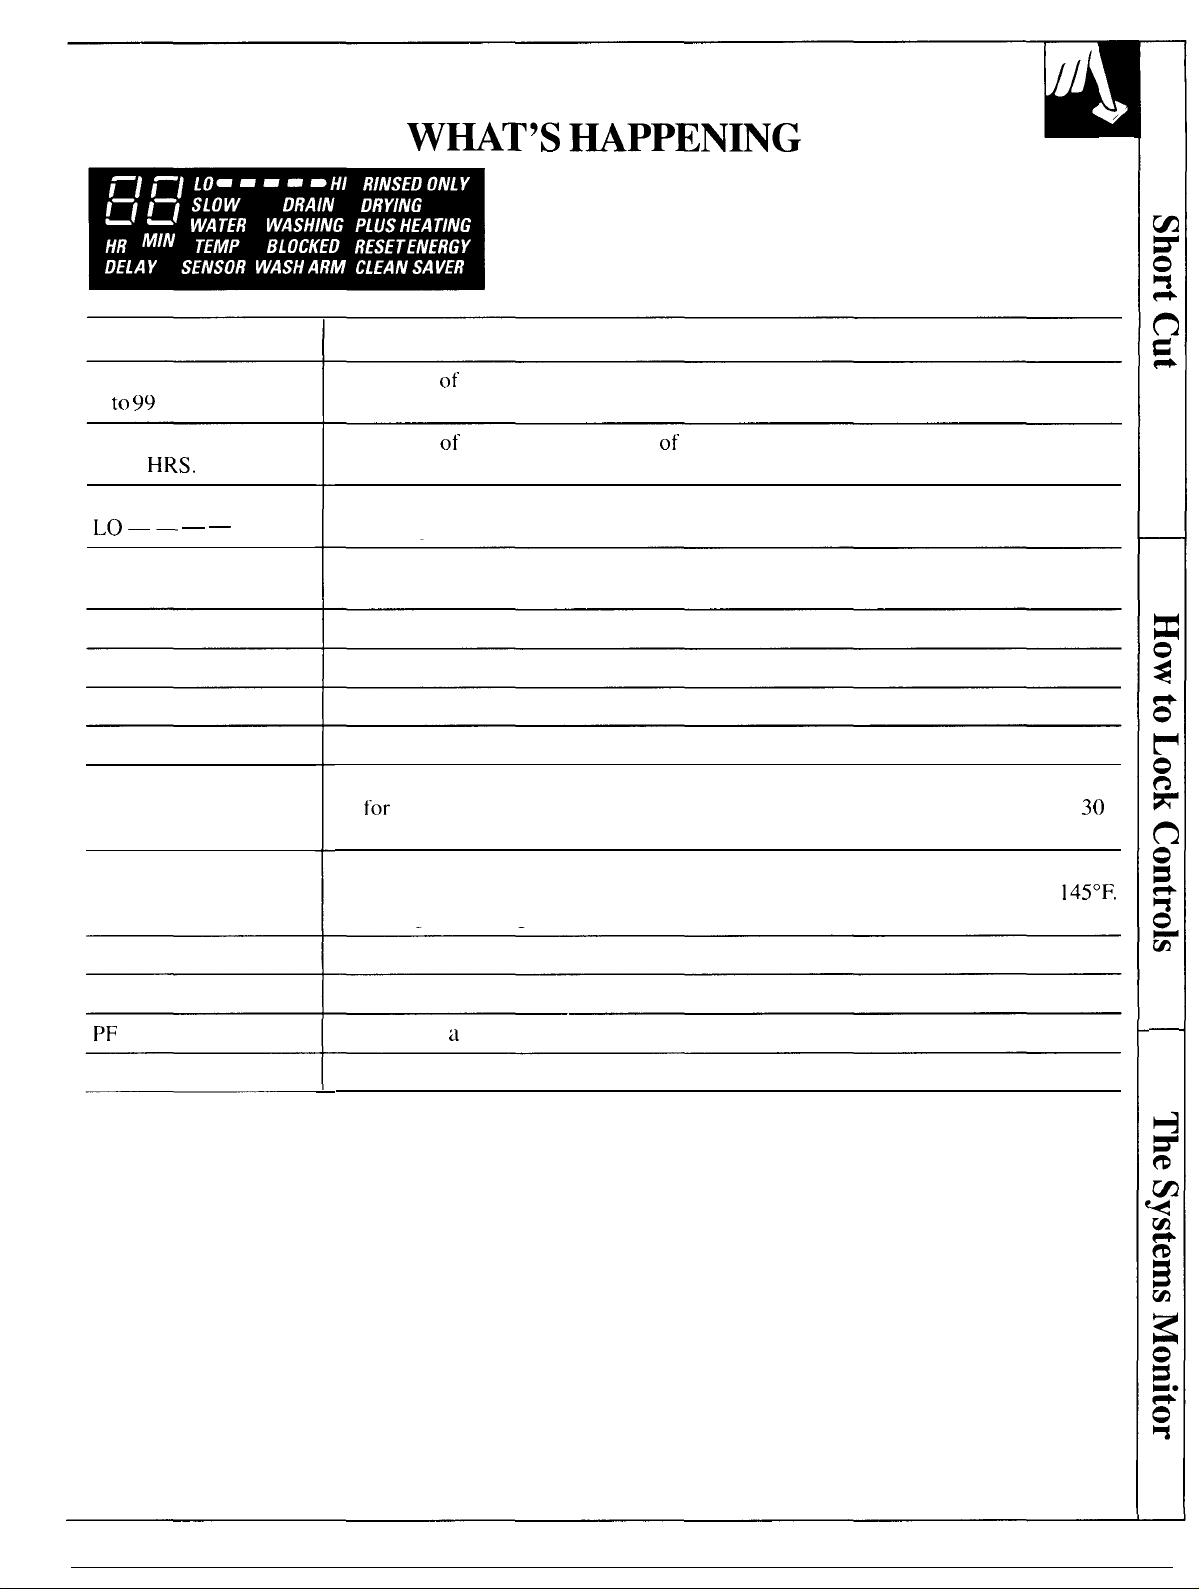
DISPLAY
NUMERALS FROM
1
to 99
MINUTES
NUMERALS FROM
I to 9
HRS.
DELAY
ENERGY MONITOR
LO—— _
ENERGY SAVER
WASHING
RINSE
DRYING
RINSED ONLY
HEATING
PLUS HEATING
— — HI
WHAT IT MEANS
Number of minutes left in the cycle.
Number
Shows relative amount of energy used from LO (one bar lighted) to HI (all five
bars lighted).
Indicates energy-efficient selection made such as SHORT WASH, LIGHT SOIL
or ENERGY SAVER (UNHEATED) DRYING.
Displayed during Pre-wash, Pre-rinse and Main Wash periods.
Displayed during Rinse periods following the Main Wash.
Displayed during HEATED DRY on when selected.
Indicates completion of RINSE & HOLD cycle. Remains on until door is unlatched.
Indicates water is being heated—in wash or rinse period—to temperature necessary
for
minutes when “HEATING” is displayed.
Indicates HEATED RINSE on option was selected prior to start of cycle. Cycle time
may be increased (up to a maximum of 20 minutes) to heat final rinse water to
During the heating extension the minutes countdown is on hold.
of
hours delay until start of cycle.
good washability. The minutes countdown is on hold for up to a maximum of
145°F.
30
CLEAN
LOCKED
PF
RESET
RESET
Indicates completed cycle (except RINSE & HOLD). Remains on until door is unlatched.
Indicates controls are locked to prevent unauthorized use.
Indicates
The CLEAR RESET pad was touched.
a
power failure occurred.
7
Page 8
THE SYSTEMS MONITOR
TELLS YOU IF CERTAIN THINGS ARE WRONG
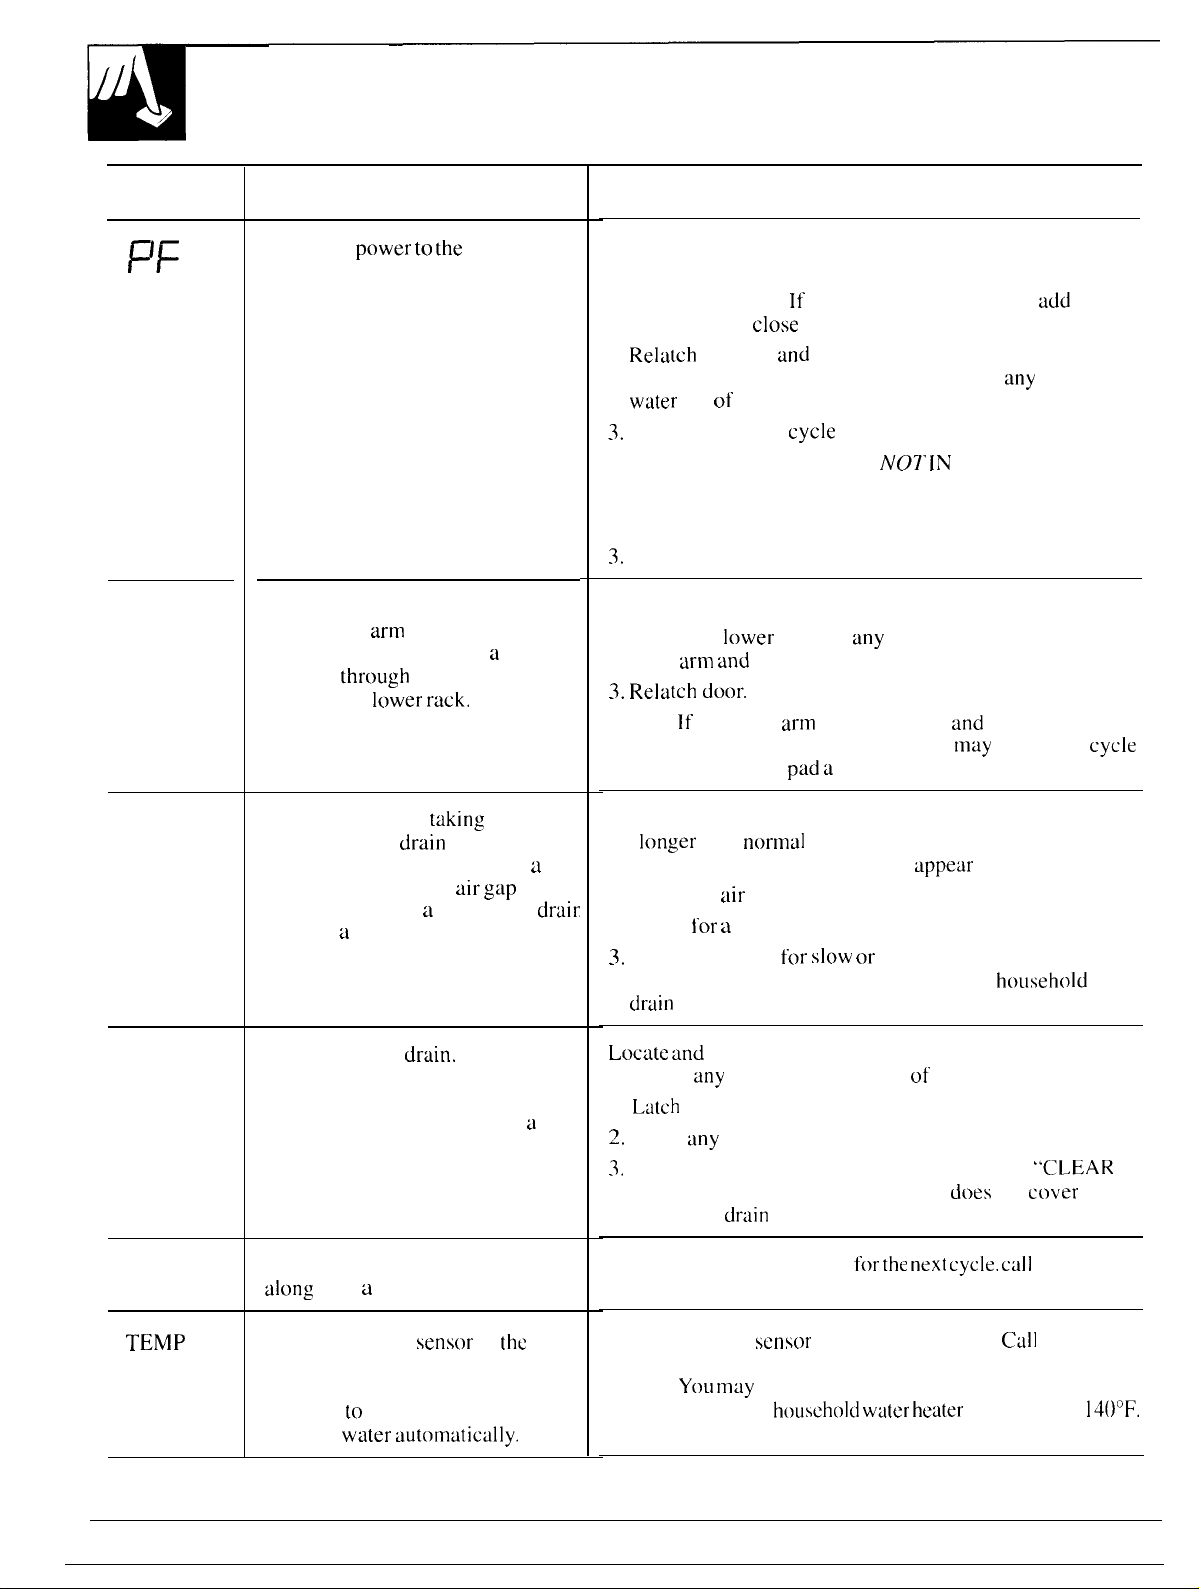
DISPLAY
PF
and
RESET
BLOCKED
WASH
ARM
WHAT IT MEANS
Electrical
has been interrupted but is now
back on.
An obstruction is preventing the
lower wash
This is usually caused by
sticking
through the
power to
arm
through
lower rack.
the
dishwasher
from turning.
a
utensil
the bottom of the
WHAT TO DO
IF DISHWASHER WAS IN USE WHEN THE POWER
FAILURE OCCURRED:
1. Unlatch the door.
detergent and
2.
Relatch
touch “CLEAR RESET.” (This will pump
water out of the machine. )
3.
Select the desired
IF THE DISHWASHER WAS
1. Latch door.
2. Select desired cycle.
3.
Run cycle when desired.
1. Unlatch door.
2. Check the
wash
3. Relatch door.
NOTE: If the wash
BLOCKED” display still appears, you
by pressing START
the door
lower
arm and
If
the detergent cup is open,
close
the cup.
and
touch “START,” then immediately
cycle
and rerun the load.
rack for
reposition it.
arm
is not blocked
pad a
second time.
N07 IN
any
item that could block the
USE:
and
“WASH ARM
may
add
any
remaining
start wash
cycle
SLOW
DRAIN
BLOCKED
DRAIN
DRAIN
SENSOR
TEMP
SENSOR
The dishwasher is
than normal to
out. This is usually caused by
blockage in the drain
Air Gap section),
hose, or a stopped-up drain pipe.
Similar to slow
indicates that the drain is so
clogged that the dishwasher
cannot continue to operate in
satisfactory manner. Dishwasher
will stop.
Dishwasher will continue cycle
along
with a drain period.
The temperature
dishwasher is not functioning
properly. Dishwasher may
continue to be used, but it will
not heat
water
taking
longer
drain
the water
air gap
a
kink in the
drain.
This
sensor
in
the
automatictil]y.
a
(see
a
draic
This dishwasher is designed to automatically compensate
for
longer
than
normal
drain times, but cycle time will be
extended. If this code continues to
1. Clean the
2. Check
3.
Check plumbing
(NOTE: Warranty service does not cover
drain
Locate and
To pump
1.
Ltitch
2.
Select
3.
Touch “STAR T.’ and then immediately touch “CLEAR
RESET.” (NOTE: Warranty service
household
If DRAIN SENSOR repeats
The temperature
NOTE:
results adjust your
;iir
gap (See Air Gap section).
for a
kink in the drain hose.
f(]r slow c]r
problem s.)
remove the blockage in the drain system.
any
remaining water out of the machine:
door.
any
cycle.
drain
problems. )
for the next cycle. CJII
sensor
needs to be replaced.
YOLI may
continue to use your dishwasher. For best
housch(>kl water heater
appear
frequently:
stopped-up drains.
household
does
not
Cull
thermostat to
cover
for service.
for service.
1400F.
8
Page 9

DISPLAY
WHAT IT MEANS
WHAT TO DO
DRAIN
WATER
LOW
WATER
There is too much water in the
dishwasher. If DRAIN WATER
appears after a power failure, this
is normal and the dishwasher will
correct itself.
This can be caused by either of
these reasons:
Not enough water is entering the
dishwasher.
or
The dishwasher is designed to automatically pump out
extra water as long as the door is latched. When you hear
the motor stop running:
1. Unlatch the door and see if all the water is gone. (It is
normal for a small amount of water to remain in the
bottom of tub to keep the water seal lubricated.)
2. If you see water entering the dishwasher, close and latch
the door. Shut off the water supply to the dishwasher.
3. If water is gone and no water is entering the dishwasher,
restart cycle.
4. If DRAIN WATER repeats, shut off the water supply to
the dishwasher. Call for service.
Unlatch the door. If there is no water in the bottom of the
dishwasher, check the water supply to the dishwasher.
. Is the dishwasher water supply turned on?
(Valve usually located under the sink.)
. Is the household water supply turned on?
● If you use well or cistern water, is the supply adequate?
If the water supply is adequate, try the cycle again. If LOW
WATER repeats, call for service.
The drain pump could be
temporarily blocked (usually
caused by food particles such
as cereal).
LOW
WATER
TEMP
The water temperature in the
dishwasher did not reach the
proper wash temperature. This
is usually caused by lack of hot
water coming from the household
water heater.
Before you call for service
● Try the cycle again to see if the Code reappears.
The dishwasher may correct itself.
. Electronic controls can be affected by outside
interference.
c
Sometimes shutting off the power to the dishwasher
(at the fuse or circuit breaker) will correct the problem.
Unlatch the door. If there is standing water in the bottom
of the dishwasher,
relatch
the door, touch “START,” then
immediately touch “CLEAR RESET” to start the pump.
If LOW WATER continues to appear, you may need to
do this several times to break up the blockage.
Avoid showers or laundry just prior to running the
dishwasher. (Use the “DELAY START” feature to start
dishwasher when the water heater is up to
normal
temperature.) Adjust household water heater thermostat
to
120°F.
minimum
If LOW WATER
TEMP appears nearly every cycle and
you know the water from the household water heater is hot
(120°F.
or more), call for service.
. Restore power after about five seconds and try the
cycle again.
. Check the guide for things you can do to correct the
problem.
9
Page 10

What happens in each cycle
●
You’11 hear occasional clicking
sounds:
—Soft food disposer shredding
action.
—Drain valve opening to pump
water out.
—Detergent cup opening.
Water Usage
Gallons
Ieavy
Wash Cycles
Fills
8
POTSCRUBBER
7
NORMAL WASH
NORMAL WASH
6
7
SHORT WASH
SHORT WASH
6
SHORT WASH
5
Soil
14
13
12
(Approx.)
14
14
12
II
II
9
● The motor stops during drying.
● Water vapor comes through the
vent by the door latch during
drying and when water is being
pumped out.
Cycle Sequence
Cycle
Time
Minss~es
(A
tied
Ieav!
Soil
Soil
—
—
63*
65*
60*
57*
42
38
rox.)
Light
Soil
62.
49*
33
CHINA CRYSTAL
7
CHINA CRYSTAL
6
CHINA CRYSTAL
5
2
RINSE & HOLD
*Unextended times. These
proper temperature for
20 minutes until water temperature reaches
9
8
3.4
cvcle
times
may
goo~ washability.-If
7
HmBHH
HH
be increased
HEATED RINSE is selected time maybe
140°F.
to
up
to
145°F.
30
minutes if necessary for your dishwasher to heat the water to
fu~her
extended in final rinse for up to
46
Drying Cycle Options:
HEATED DRY on. Available on all wash cycles except RINSE& HOLD. Add 34 minutes to wash cycle time.
HEATED DRY off (Energy Saver Drying). Drying heater is turned off. Dishes dry naturally.
40
35
12
10
Page 11

Temperature Sensor System
To get dishes clean and dry you need hot water. To help you get water of the proper temperature, your dishwasher
has a water heating feature that automatically senses the temperature of the water in the wash cycle and heats it, if
necessary, to the proper temperature. This water heating feature may allow you to turn down your household water
heater and save energy if you’re willing to let the dishwasher
How to test water temperature:
Higher water temperature is needed to dissolve grease
and activate powder detergents.
Check your water temperature with a candy or meat
thermometer. Turn on the hot water faucet nearest the
dishwasher. Put the thermometer in a glass and let the
water run continuously into the glass until the
temperature stops rising. If the water temperature is
below
120°F.;
adjust your water heater.
Helpful hints:
low, or if your water travels a long distance from water
heater to dishwasher, you may need to set your water
heater’s thermostat up. If you have not used hot water
for some time, the water in the pipes
on the hot water faucet at the sink and allow it to run
until the water is hot. Then start the dishwasher. If
you’ve recently done laundry or run hot water for
showers, give your water heater time to recover before
operating the dishwasher. To improve washability if
the water is less than
your water heater: Select a longer cycle and fill both
detergent cups at least half-full with detergent.
If outside temperatures are unusually
will
be cold. Turn
120°F.
and you cannot adjust
How to use a rinse agent.
A rinse agent makes water flow off dishes quicker some models, by pressing the clear center of the
than usual. This lessens water spotting and makes fill cap 2 or 3 times. If rinse agent is drawn into the
drying faster, too.
For best
agent
Rinse
dishwasher’s dispenser uses the
How to fill rinse agent dispenser.
liquid rinse agent until it just
reaches the bottom of lip
inside the dispenser opening.
Replace cap. The dispenser
automatically releases rinse
agent into final rinse water.
You may check to see if you need to add rinse agent
by removing the fill cap and looking into the
container. You may also check the rinse agent, on
dishwashing
such as JET-DRY brand is recommended.
agents
come in either
performance, use of a rinse
liquid
or solid form. Your
Iiquid
form.
Unscrew cap. Add
center of the fill cap, you have enough. If the center
area remains clear add rinse agent.
agent
Your dishwasher’s rinse
ounces. This should last
needed. Do not overfill.
If you accidentally spill: Wipe up the rinse
agent with a damp cloth. Don’t leave the spill in the
dishwasher. It can keep your detergent from working.
If you can’t find any rinse agent, write:
BENCKISER CONSUMER
PRODUCTS, INC.
(“JET DRY”)
55 Federal Rd.
P.O.
Box 1991
Danbury, CT. 06313-1991
container holds
about
3 months. Fill as
4%
How to choose and use the right detergent.
First, use only powder or liquid detergent specifically
made for use in dishwashers. Other types will cause
oversudsing.
Second, check the phosphate content.
prevent hard-water materials from forming spots or film
on your dishes. If your water is hard (7 grains or more),
your detergent has to work harder. Detergents with a
higher phosphate level will probably work better. If the
phosphate content is low (8.7% or less), you’ll have to
use extra detergent with hard water.
Phosphate helps
Your water department can tell you how hard your
water is. So
area’s water softener company. Just call and ask them
how many “grains of hardness” are in your water.
How much detergent should you use? That
depends. Is your water “hard” or “soft”? With hard
water, you need extra detergent to get dishes clean.
With soft water, you need less detergent.
can your county extension agent or your
(continued next poge)
11
Page 12

OPEWT~G ~STRUCTIONS
(continued)
How to choose and use the right detergent. (continued)
Too much detergent with soft water not only wastes
money, it can be harmful. It can cause a permanent
cloudiness of glassware, called “etching.” An outside
layer of glass is etched away!
Of course, this takes
some time. But why take a chance when it’s easy to
find out the hardness of your water?
Keep
your detergent fresh and
the
~i~k
isn’t a
go~d
place to store detergent.
dry.
Under
Too much moisture. Don’t put powder detergent
into the dispenser until you’re ready to wash dishes,
either. (It won’t be fresh OR dry).
If your powder detergent gets old or lumpy, throw
it
away.
Old detergent often won’t dissolve. If you use
a liquid dishwasher detergent, these precautions are not
necessary because liquid detergents don’t “lump” as
they age or come in contact with water.
Detergent Usage Guide (powder of liquid)
SOFT WATER
(()-3
grains
Main
CYCLES
POTSCRUBBER
NORMAL WASH
SHORT WASH
CHINA CRYSTAL
RINSE & HOLD
~ 12
~rains
and up is extremely hard water, A water softener is recommended. Without
lime can build up in the water valve. The
Cup
Half
Full
Half
Full
Use no detergent
hardness)
Open Cup Main Cup Open Cup
+ Half Full
None
water
valve may stick while open and
MEDIUM WATER
(3-7 grains)
Completely
Full
Half
You’ll find two detergent
dispensers on the inside
door of your dishwasher.
Two, because some cycles
use two washes.
See “Detergent
U.~age
Guide” below.
Always close the main cup
tightly. When it is firmly
latched you will hear a
clicking sound. It is not
necessary to
+
Full
Use no detergent
it,
cause
flooding.
Half
None
Full
overtighten.
OPEN
CUP
*
@
“’
GRASP HANDLE, ROTATE
AND CLOSE TIGHTLY
MAIN
CUP
HARD WATER
(7-1 2 grains*)
Open
Cups:
Main
Completely
Full
Completely
Full
~:
Filled
Main
Filled Open Cup holds 2 tablespoons
+ Completely
Use no detergent
Cup holds 3 tablespoons;
Cup~
Full
None
How to Prepare the Dishes for Washing
If this is your first dishwasher, or if you’re replacing a much older model, you may wonder how much preparation
your dishes need. Actually very little. Pre-rinsing of normal food soils is not necessary. With common sense and a
little practice you’ll soon know what foods to remove. Here are some guidelines:
1.
Scrape off bones, seeds, skins, toothpicks and other
hard solids. It is also best to remove hard-shelled
NOTE: The foods mentioned are examples only. Other
foods not mentioned may also need to be removed from
vegetables, meat trimmings, leafy vegetables and your dishes. You may also want to consider removing
crusts. Remove excessive quantities of oil or grease.
2. Remove large quantities of any
dishwasher has a built-in soft food
pulverizes soft food bits and flushes them
food.
dis~oser
Your
that
away.
It can handle small amounts of soft foods, but
large amounts will be difficult to handle.
3. Try to remove food scraps and place dishes in
dishwasher before soil has a chance to dry and
become hard. Dishes with dried-on soil are more
difficult to wash and may not come clean in the
NORMAL WASH cycle. Remember to use your
foods such as mustard, mayonnaise, vinegar, lemon juice
and other foods that can cause discoloration of stainless
steel if allowed to remain on dishes for a long
petiod.
When using the POTSCRUBBER cycle, less
preparation is required before loading. The
POTSCRUBBER cycle can wash heavily-soiled
dishes and remove dried-on and baked-on soils
from pots, pans and casseroles. Items with burned-on
soils may not come clean and the dishwasher cannot
remove burn marks or restore fading caused by
overheating during cooking.
RINSE & HOLD cycle for small “holding” loads.
12
Page 13

HOW TO LOAD YOUR DISHWASHER
Thi.\ i.~ (i r(lrrdotn tnixed lo(ld, th(~
.YYOU
will
h(~~(’.
Make sure dishes
water can
the
the center sends water
items in the upper rack. A spray
down also.
so the upper wash
bottom
reach
sprays water up. The tower that rises in
are
properly
the soiled surfaces. The wash arm in
out over
Make
sure
t(:
place tall items to the outside
arm
is not blocked.
most
loaded to
the dishes to wash the
cotnrtlotl” t}p(~
insure that
arm
in the top washes
—
WATCH OUT FOR THIS.
The washer tower rises through the center
bottom rack
the cycle. Don’t block it or load
Also, be careful not to let a portion
as a pot or
rack. This could block the wash
washing results.
during
the wash and rinse portions of
tall
things next to it.
of
ari
dish
handle extend through the bottom
arm
and cause poor
of the
item such
HOW TO LOAD T
,:
The top rack is best for glasses, cups and saucers.
Cups and glasses fit best along the sides. This is the
place for dishwasher-safe plastics, too. Make sure
small plastic items are lodged in tightly so they can’t
fall onto the
stemware so that it cannot move easily. Don’t let the
glasses touch each other.
Calrod@heating
element. Arrange
‘HE TOP RACK
Sauce pans,
be placed—face
is handy for all kinds of odd shapes.
mixing
bowls and
down—in the top rack. The top rack
other
small
(( ’0111
items
may
;/114(,(/ tl<,.k’t /)([,?(,)
13
Page 14

HOW TO LOAD YOUR DISHWASHER
Shelf Up
Fold the folding shelf
Place tall items-to the
not blocked.
HOW TO LOAD
up
for
glasses
o~tside-so
and tall
the upper wash
things.
Shelf Down
The folding shelf gives you
~rm
is
long utensils on two levels.
then fold the shelf
down,
THE BOTTOM RACK
—
extra space for
Load the
lower level first,
cups and
Fit plates and saucers between the pins. Load platters,
pots and bowls
along
the sides, in comers or in the back.
14
,,..
1
As shown here this
side
facing the cent~r
from
wash arm
ciin reach soi led surlaces.
~late
is
of
[he rac[ ;O
hcinx Dlaced
water
with the
and
detergent
soiled
Page 15

Pots, pans, casseroles,
lids
rnu.st be loaded
in
salad
bowls, mixing bowls and
the bo[~om rack, facing
down.
and
Heavily soiled pots, pans
loaded in the bottom rack, facing down. Prop broiler
ans
and racks along the
casseroles MUST be
edge.
Put flatware in
to protect your hands. Mix knives, forks
so they don’t nest together. Distribute evenly.
The security cell cover,
lowered to either side to
the effects of the
needed, this cover
the
removable basket with handles up
and
spoons
hinged
in the handle, can be
secure
light-weight items from
vi&orous
wash action. When it is not
can
remain upright.
Precaution!
Take out anything that may fall or extend through the
bottom of the basket.
15
Page 16

Material
Aluminum
Chinti
Stoneware
CrystJl
No!l-dishwasher
itetns—such
JS
electronic
ait- cleanet-
filters. furnace
filters,
paint
brushes. etc.
Glass
Iron
Pewter
Plastics
Stainless steel
Sterling Silver
and
Silver plate
Nm-stick
coatings
Tin
wood
WHAT YOU CAN USUALLY WASH SAFELY
IN YOUR DISHWASHER.
Usually
Safe
YES
YES
YES
NO
YES
NO
NO
YES
YES
YES
YES
NO
NO
Exceptions (not safe)
Some colored anodized
aluminum
Antique. metal-trimmed,
hand-painted or over-the-glaze
patterns fade. Gold
will discolor.
Antique, metal-trimmed or
hand-painted patterns fade.
Gold leaf will discolor.
Milk
Iron will rust.
Pewter tarnishes
Don’t put in
basket with stainless steel.
Contact between metals can
damage silvel-.
Don’t wash copper utensils in
the
brown film.
Adhesive used to
hollow-handle knives can loosen
Tin can rust
Wood can warp. crock or lose
its
can fade.
ZIJSS mav vellow.
sfime
s~me Imrd.
finish
with
Silver may
fitly
leaf
silverware
get a
~ttach
some
type of washing.
Special Instructions
Some
darkeninE
scouring with
If
in doubt, check with the manufacturer. Or test wash
one piece daily
rest
of the set.
Load securely to prevent movement. Select
CRYSTAL cycle.
instructions
Do not wash in dishwasher. Damage to dishwasher
and
discoloration or staining of dishwasher may result.
If’ it doesn’t say DISHWASHER SAFE. test one piece in
the top rack betore dishwashing an entire set.
Rinse
if not washing immediately. Salty or acid foods
can stain if’
if not washing immediately. Salty or acid foods can
Rinse
stain if’
blttck spo[s. Place
exposure to detergent
After
wfishing,
vegetable oil to keep it from losing its non-stick quality.
or spotting possible. Remove by
soap-filled steel wool pads.
Ior
at
le~st
a month. Compare with the
CHINA-
Check your manufacturer’s
for vour
crvstai.
left
on.
left
on. Dry detergent can cause difficult-to-remove
in back section of silverware basket to avoid
from
the detergent cup.
wipe the
norl-stick
coating area with
Forget a dish? Here’s when you can add it.
Add dishes any time during the RINSE & HOLD
cycle. With other wash cycles, you
at any
time BEFORE the main detergent wash portion
of
the cycle.
can ~ldd
dishes
However, opening the door during any cycle lessens
cleaning power. So try to load everything at the
beginning.
16
Here’s how to
1. Push the door
2. Wait
add a
forgotten dish:
latch
to the left. Washing will stop.
a few
seconds until the water calms. Then
open the door. WARNING: Hot vapor may rise
from opened door.
3.
Add dishes you’ ve forgotten.
4. Close the door
and
push the
latch
to the
far
When the door is locked, washing will continue.
right.
Page 17

USER MAINTENANCE INSTRUCTIONS
Clean
the control panel with a lightly dampened
cloth. Dry thoroughly.
sharp objects
on (he
[10
not
usc
panel. They
abrasives or
catl dtimage i[.
Clean the outside with a good appliance polish
wax.
The ou(side cahi nc( I’inish
catl
scratch.
gritty
Not
Using Your Dishwasher in
[i’
yourunheated ptacc
ask a
service
●
C’u( 01.1. cteclricat power to [he
dishwasher. Rcrno\c
circuit
● Turn
●
Di scc)rlrlec’t the
S() Lrsc no scour”i n:
ctcancrs.
dishwasher is
during the
technician
hrcakcr.
0[.(’
the
Wa[cr Slrppty.
water i n
tel’t
to:
[’uses or [rip
tct
is
dur-ahte.
pads. or harsh or
in an
win(cr.
I i
nc
hut
i[
Winter? Protect Against Freezing.
PUMP
I
from the water vatvc.
●
Dr-ar
n
water from the
and water vat
catch the water. )
i
rltc( t
vc.
( Use a pan
i
rlc
to
COVER
Appliance Polish Wax
WR97X02 16)
is
& Cletiner (Cat.
avoilab]e from
GE Appliance
Ptirts Marts,
The inside usually takes care of itself.
ever need cteaning, use a rnitd
Scouring pads and harsh
SCREWS
● Reconnect the water inlet tine
the
● Drain the
rear
cleansing powder.
cteaners can mar
wtiter
vat
cot Iection
of unit
betow filter
disconnecting hose to pump.
Reconnect
●
Rcrnovc
in the tub
sponge
after draining.
the plastic pump
bottom and
to soak up water in
the rubber boot.
ve.
No.
If
it
should
the finish.
chamber at
by
use
a
to
cover
Built-in Dishwashers Often Use an Air Gap. Keep It Clean.
An air
It
wutcr
ctogs. The
the
even
codes r-ec]u
Check the air gap any time your
dishwasher isn’t draining well.
~ap
is a
ptumbing
pr”otcc[s your
backing
dishwasher against
LIp
i
air
gap
dishwasher and
have one.
No[ at t pt
i re air
rlto
it i [’ a drain
is
not
you
gaps.
device.
a part
may
u
mbi ng
of”
not
11’
you have an air gap,
check
it at
least once a month. IT 1S NOT
PART OF YOUR DISHWASHER.
IT IS NOT COVERED IN YOUR
WARRANTY.
The
air
gap is easy to clean.
With most types,
dishwasher. then
cover. Then unscrew the plastic
and
check for any
A toothpick
first
turn off the
litt
off the chrome
buildup of grit.
makes cteaning easy.
cap
17
Page 18

HOW TO CHANGE COLOR PANELS
If
you are
redecorating, you
can change your
dishwasher’s front
panels to
blend with your
new colors.
The
held
the door trim
the trim on the panel below the door. Each side of each
panel
the color
How to change door panel insert:
1.
Take out trim screws on either side
of the dishwasher door. Remove the side trim.
2. Slide out
3. Put the
(Careful—edges may be sharp).
4. Replace the insert panel,
How
1. Remove panel attachment screws.
2. Remove the
3.
Take
4.
Slide
5. Put the color you want in front.
6. Repluce
7. Replace the entire panel and attachment screws.
match
or
panels are
in
place
by
and
is a different
of your own choice.
the
color
to change lower panel insert:
out screws and remove the top trim.
out the insert panel.
the insert panel. top trim and screws.
color,
Or you
insert panel.
you want in
entire panel.
can
front.
side
trim and screws.
paint a panel with
Color insert panels for both the door and the lower
panel can be replaced by 1/4” thick wood inserts to
match your kitchen cabinets. Get them from your
nearest cabinet or lumber dealer.
Dimensions for 1/4” wood inserts:
Door Panel:
Lower
NOTE: Do not operate dishwasher while changing
panels or when lower access
Panel:
i9X”
H X
31 X,” H X
23(fi~”
23LX,,”
W.
W.
panel
is removed.
Page 19

PROBLEM
POSSIBLE CAUSE
CONTROL PANEL
LIGHTS GO OFF
WHEN YOU’RE
SE~ING
DISHWASHER
WON’T RUN
UNUSUAL NOISE
CONTROLS
DISHES DON’T DRY
UNCLEAN DISHES
AND FLATWARE
Time too long between touching
30 seconds of the others. To relight, touch any
A fuse in your home may be blown, or the circuit breaker tripped. Replace fuse or
reset circuit breaker. Remove any other appliances from the circuit.
Utensils may not be secure on rack pins, or something small may have dropped
the rack. Water is causing utensils to rattle. Make sure everything is securely placed
in dishwasher.
Water draining out of tub immediately after you touch CLEAR RESET pad. The
sounds you hear are normal ones.
Make sure inlet water temperature is correct. (To test, see How to Test Water
Temperature section.)
Unload the bottom rack first. Water from dishes in the top rack may be spilling
onto the bottom rack.
Check for improper loading. Dishes shouldn’t nest together. Avoid overloading.
Check the rinse agent dispenser to see that it’s not empty.
Check inlet water temperature. It should be at least
Test Water Temperature section.)
of selected pads. Each pad must be touched within
pad
again, or unlock and
120°F.
(To test, see How to
relatch
door.
from
BLACK OR GRAY
MARKS ON DISHES
DETERGENT
IN DISPENSER CUPS
LE~
Water pressure may be temporarily low. Turn on a faucet. Is water coming out slower
than usual? If so, wait until pressure is normal before using your dishwasher.
Plugged air gap. (See Care and Cleaning section.)
Improper rack loading. (See Loading section.)
Aluminum utensils often leave marks when they rub against dishes. Remove marks
with a mild abrasive cleanser.
Water may not be reaching the detergent cups. Move dishes that may be blocking
the detergent cup.
The dispenser cover may not be opening or may be blocked by improperly loaded
items. If you used a powder detergent, open the cups and remove any caked-on
detergent. If the cup still doesn’t open automatically, call for service.
Detergent may be old. If the powder is hard
The detergent may not be working well. Try another brand.
or
caked in the box, throw it away.
19
Page 20

THE PROBLEM SOLVER
(continued)
PROBLEM
SPOTS AND FILMING
ON GLASSES AND
FLATWARE
POSSIBLE CAUSE
can
be
caused
by
all
Spotting
● Extremely hard water. (See How
● Low inlet water temperature. (To test, see How to Test Water Temperature section.)
● Overloading the dishwasher.
● Improper loading. (See Loading section. )
● Old or
●
Phosphate level in detergent too low. (See How to Choose
● Rinse agent dispenser empty. (See How to Use a Rinse Agent section. )
“
Too little detergent. (See How to Choose and Use Detergent section. )
Due to varying
damp
powder detergent.
local
water conditions and personal preferences, try several brands of
of these things:
to
Choose and Use Detergent section. )
and
Use Detergent section.)
detergents to find one that gives the best results for you. A liquid dishwasher detergent
may
help reduce filming.
To remove spots and film from glassware:
1. Remove
all metal
utensils from the dishwasher.
2. DO NOT ADD DETERGENT.
3.
Select POTSCRUBBER cycle, LIGHT SOIL (Energy saver) SOIL OPTION and
HEATED DRY
off (Energy
saver
drying).
CLOUDINESS ON
GLASSWARE
YELLOW OR
BROWN FILM
4.
Start
the dishwasher
5. Then open the door
and
allow to run
and
pour 2 cups
until
“497’ minutes to end of cycle is displayed.
(500ml)”
of white vinegar into the bottom of the
dishwasher.
6.
Close the door
If vinegar rinse doesn’t work: Repeat
crystals instead of vinegar. (Most drugstores carry citric acid crystals.
call
General Electric Factory Service. )
Using a vinegar or citric acid crystal rinse more than twice a
and allow
the dishwasher to complete the cycle.
as
above, except use 1/4 cup of citric acid
month’1
If yours doesn’t,
Consider a home
water softener.
If vinegar or citric
The
film cannot
acid
crystal rinse doesn’t work, the cloudiness is “etching.”
be removed.
It can be prevented: Use less detergent if you have soft water. Wash glassware in the
shortest cycle that will
Water temperature entering dishwasher exceeds
Tea
or
coffee
can stain cups. Remove the stains by hand.
bleach and
~ cLlps wfirnl water.
An overall yellow or brown
in
water.
A special
prob]em. Your water softener company
Yellow
Silver
film on sterling
polish
will
get
them clean.
film
on
dishes
filter
in the
wuter
supply I
can
silver
results when you wash copper utensils in the same load.
usLIa[[y remove this stain.
1500F.
usin& a
solution of 1/2 cup
or glassware can be caused by iron deposits
ine
is the only
way
to correct this
tell you about the filter.
20
Page 21

●
●
B
PROBLEM
CHIPPING OF CHINA
SMALL AMOUNT OF
WATER STANDING
IN THE BOTTOM
OF THE TUB
WATER WON’T PUMP
OUT OF THE TUB
SUDS IN THE TUB
POSSIBLE CAUSE
Rough handling can cause chipping. Load with care. Make sure glassware and china
for
are secure and can’t jar loose. (See Loading section
Make sure tall glasses and stemware will clear the top
rack into the dishwasher.
Use the CHINA CRYSTAL
Water around the outlet on the tub bottom at the back of the tub is normal. It is clean
water. It’s there to keep the water seal lubricated.
If the entire bottom of the tub has water, you may have
gap, if you have one. (See Care
Check the kitchen sink. 1s it draining
If dishwasher drains into a disposer, run the disposer to clear. Be sure the disposer is
not clogged.
See the SYSTEMS MONITOR section.
Sudsing
DISHWASHER DETERGENTS TO AVOID
To remove suds from the tub: Open the dishwasher. Let suds evaporate. Add 1 gallon
of cold water to the tub. Close and latch the dishwasher. To pump out
START two times, then immediately touch CLEAR RESET.
detergents are not meant
Always
cycle for
use the top rack
fine
china.
and
Cleaning section.)
well’?
You may need a plumber.
for
dishwashers. USE ONLY AUTOMATIC
SUDSING.
correct way to load glassware.)
of the tub when you push the
for
delicate items.
a
drain problem. Clean the air
water,
touch
Repeat if necessary.
DISHWASHER LEAKS
MOTOR HUMS
CONTROL PANEL
DOESN’T RESPOND
TO INPUTS
If you need more help.. call, toll free:
GE Answer
800.626.2000
consumer information service
Center@
Suds can cause unit to overflow. That’s why it’s so important to use a detergent that’s
designed for automatic dishwashers.
Spilling the rinse agent can cause
(Wipe up accidental spill of rinse agent with
Dishwasher has not been used on a regular basis.
If you do not use your dishwasher often set it to
This will help keep the seal moist, and
Shut off power to dishwasher at fuse or circuit breaker. Wait 5 seconds and restore
power to dishwasher. Try input panel again.
foam
during washing. This can lead to overflowing.
a
damp cloth.)
fill and
pump out once every week.
the
garbage disposer clear.
21
Page 22

NOTES
22
Page 23

Wdll
Be There
With the purchase of your new GE appliance, receive the
assurance that if you ever need information or assistance
from GE, we’ll
be
there. Ml you have to do is cdl—toll-free!
GEAnswer Center@
In-Home
Repak
Service
800-GE-CARES
A
C,E
Consumer Service professional
will provide expert repair service,
scheduled at a time that’s convenient
for you. Many GE Consumer Service
company-operated locations offer you
service today or tomorrow, or at your
convenience
weekday% 9:00
days). Our factory-trained technicians
know your appliance inside and
so most repairs can be handted in just
one visit.
(7:00
a.m. to
a.m. to
7:00
2:00
p.m. Satur-
p.m.
ou-
Service Con*acts
800-626-D24
You can have the secure feeling that
GE Consumer Service will still be
there after your warranty expires. Purchase a GE contract while your warranty is still in effect and you’ll receive
a substantial discount. With a
year contract, you’re assured of fiture
service at today’s prices.
multiple-
Whatever
major appliance,
information service is available to
help. Your cat—anci your
will be
courteously. And
time.
open 24 hours a
I
Telecommunication Device
yOLlr
question about any GE
GE
Answer Cente@
question-
answerecl
CE
Answer Ccnte@ service is
prornpdy and
you
can call any
day
7 days a week.
for
the Deaf
I
$
Parts
andAccessories
800-626-2002
Individu&
own appliances
parls or- accesso~-ies
their
vides access to
all GE (;enuinc
fully
warranted. VISA, Mastcr(;ard
and Discover cards
User maintenance instructions
contained in this
dures intended to be performed by
any user. Other servicing
shodd
vice personnel. Caution must be
exercised, since improper servicing
maycawe
qudfied
can
11
OIIIC. ‘l-he (;E
over
Renewal
be referred to
unsafe operation.
have needed
senl
p:iI”Ls sys(ern
47,()()() parls... and
are
boo~et
to service
dil-e{’Liy 10
Parts
accep[ed.
cover proce-
gener~y
qufified
heir
arc
ser-
pl()-
—~
, ----
‘.-. . . . .
. . .
-,” ..- - ,.-.. -..” . . .
.,(, ,,., . .
“----- —..
.
I
For Customers With
Special Needs...
80~62E2000
Upon request, GE will provide Braille
controls
and a brochure to assist in planning
barrier-free kitchen for persons with
limited mobility
free
or speech who have access
or a conventional teletypewriter may
Cdl
to request
fi)r
a variety of GE appliances,
‘Ib
obtain these items.
of
charge,
Consumers with impaired hearing
800-TDD-GEAC
cdl
800.626.2000.
to
a TDD
(800-833-4322)
information or sewice.
a
Page 24

YOUR GE DISHWASHER
WARRANTY
Save proof of original purchase date such as your sales slip or cancelled check to establish warranty period.
I
WHAT IS COVERED
FULL ONE-YEAR WARRANTY
For one year from date of original
purchase, we will provide, free of
sewice
charge, parts and
your home to repair or replace
pah
of
the
dishwasher that
because of a manufacturing defect.
LIMITED SECOND-YEAR PARTS
WARRANTY
For the second year from date of
original purchase, we will provide,
free of charge, replacement
a~Ypati
because of a manufacturing defect.
You pay for the service trip to your
home and service labor charges.
Of
the
dishwasher that
labor in
any
fails
patis for
fails
LIMITED FIVE-YEAR
RACWELECTRONIC
PARTS
WARRANTY
For five years from date of original
purchase, we will provide, free of
charge, replacement parts for any
●
rack
that rusts because of a
manufacturing defect
or any
●
electronic control
because of a manufacturing defect.
You pay for the service trip to your
home and
sewice
FULL TWENTY-YEAR TUB/DOOR
LINER WARRANTY
For twenty years from date of original
purchase, we will provide, free of
charge, parts and
your home to repair or replace
PermaTuf(n’ tub
fails
to contain water because of a
manufacturing defect.
module that fails
labor charges.
sewice
labor in
or door /iner
the
if it
This warranty is extended to
the original purchaser and any
succeeding owner for products
purchased for
ordina~
home use in
the 48 mainland states, Hawaii and
D.C.
Washington,
In Alaska the
warranty is the same except that it is
LIMITED because you must pay to
ship the product to the service shop
serv;ce
or for the
technician’s travel
costs to your home.
All warranty service will be
provided by our Factory
Sewice
Centers or by our authorized
Customer Care” servicers during
normal working hours.
Should your appliance need
sewice,
during warranty period or
beyond, call 800-GE-CARES
(800-432-2737).
WHAT IS NOT COVERED
Some
may not apply to you. This warranty gives you
This book is printed on recycled paper.
states do not allow the exclusion or limitation of incidental or consequential damages, so the above limitation or exclusion
To know what your legal rights are in your state, consult your local or state consumer affairs
If further help is needed concerning this warranty, write:
Manager—Consumer Affairs, GE Appliances, Louisville, KY 40225
●
Semice
trips to your home to teach
you how to use the product.
Read your Use and Care material.
If you then have any questions
about operating the” product, please
contact your dealer or our
Consumer Affairs office at the
address below, or call, toll free:
GE Answer
Center’’”
800.626.2000
consumer information service
● Improper installation.
If you have an installation problem,
contact your dealer or installer. You
are responsible for providing
specific legal rights, and
you may also have other rights which vary from state to state.
Warrantor: General Electric Company
adequate electrical, plumbing, and
other connecting facilities.
c
Replacement of house fuses or
resetting of circuit breakers.
●
Cleaning or servicing of air gap
device in drain line.
●
Failure of the product if it is used for
other than its intended purpose or
used commercially.
●
Damage to product caused by
accident, fire, floods or acts of God.
WARRANTOR IS
NOT
RESPONSIBLE
FOR CONSEQUENTIAL DAMAGES.
office or your state’s Attorney General.
1
Pafl No. 165
Pub No. 49-5580
8-92 CG
D3080P270
GSD2900
Ser;es
 Loading...