

Page 1
v
D!kkasher
Contents
Air Gap 19
Appliance Registration
Care and Cleaning
China, Crystal, Sterling 4,7,15 Safety Instructions
Convenience Features
Cycle Features
Detergent, Detergent Guide 10, 11
Dispenser Cups
Energy Saver Switch
Energy-Saving Tips
Features 4,5
Front Panel Color Change
Loading 12-14
Model and Serial Numbers
Operating Guide 4,5
Cycle Selection
Dishwashing Shortcut
Drying Options
Soil Level 11
P~SCRUBBER Cycle
4,6,7,11
2
19
2
6 User Maintenance Instructions 19
11
5,6 Winter Storage
2
21
2
4
6
5,6
Problem Solver
Repair Service 23
Rinse Agent
Systems Monitor
Warranty
Water Temperature
GEAnswwCkit@
m*mxJlz
16-18
10
3
5,7-9
Back Cover
10
19
Built-in Models
GSD2200
GSD2400
.. . . -.
Page 2
%%
Help us help you...
Before usingyourdishwasher,
read this book carefully.
It is intended to help you operate
and maintain your new dishwasher
properly.
Keep it handy for answers to your
questions.
If you don’tunderstand something
or need more help, write (include
your phone number):
Consumer Affairs
GE Appliances
Appliance Park
Louisville, KY 40225
Write downthemodel
and serial numbers.
You’llfind them on a label
fastened to the tub wall just inside
the dishwasher door.
These numbers are also on the
Consumer Product Ownership
Registration Card that came with
your dishwasher. Before sending in
this card, please write these
numbers here:
Model Number
Serial Number
Use these numbers in any
correspondence or service calls
concerning your dishwasher.
If youreceived
a damaged dishwasher...
Energy-sating tips z
. op~te dishwasher only when
it’sfull. Let the dishes accumulate
in dishwasher. When you put in
only a partial load, use the RINSE
& HOLD cycleto rinse off heavy
soils. Be sure to latch the door
when waiting for a full load. This
helps keep soils moist, easier
to remove.
● Always select the cycle that uses
least amount of water that will
removethe soil from the load.
See page 6.
● If you don’t need your dishes
right away,use your ENERGY
SAWR drying feature that turns
the drying heater off automatically.
Dishes dry naturally over a longer
period such as overnight.
Convenience features
This dishwasherhasmanyconvenient
features. Among them are:
● Controls are arranged leftto right
as you use them.
. Automatic “beep” responses to
instructions and alighted display
let you know the desired fimction
has been selected.
Immediately contact the dealer
(or builder) that sold youthe
dishwasher.
Savetime andmoney.
Before you request
servica..
Check the Problem Solver (pages
16through 18).It lists causes of
minor operating problems that you
can correct yourself.
● Lets you select fast, heated drying
or energy-saving, no-heat drying.
● A SYSTEMS MONITOR that
tells you what’s happening in the
dishwa$er,and i?:mething’% w
wrong. ~~ “
● Remembers your last cycle so you
don’t have to reprogram each time.
See SHORT-CUT on page 6.
8 ‘ -*
++
2
Page 3
IMPORT~T SAFETY INSTRUCTIONS
Read all instructions before using this appliance.
WARNING-When using this
appliance, always exercise basic
safety precautions, including the
following:
● Use this appliance only for
its intended purpose, as you
will fmd described in this Use
and Care Book.
● This dishwasher must be
properly installed and located
in accordance with the
Installation Instructions before
it is used. If you did not receive
an Installation Instructions sheet
with your dishwasher, you can
obtain one by contacting the
service location nearest you.
—This appliance must be
connected to a grounded metal,
permanent wiring system; or an
equipment-grounding conductor
must be run with the circuit
conductors and connected to the
equipment-grounding terminal
or lead of the appliance.
—Connect to a properly rated,
protected and sized power-supply
circuit to avoid electrical overload.
● Use only powder or liquid
detergents or wetting agents
recommended for use in a
dishwasher.
● Do not wash plastic items unless
mal ked “dishwasher safe” or the
equivalent. For plastic items not so
marked, check the manufacturer’s
recommendations.
● Load light plastic items so
they will not become dislodged
and drop to the bottom of the
dishwasher—they might come
into contact with the heating
unit and be damaged.
TOminimize the possibility of
injury.
● When loading items to be
washed:
A. Locate sharp items so that
they are not likely to damage
the door seal, and
B. Load sharp knives with the
handles up to reduce the risk
of cut-type injuries.
● Do not touch the heating
element during or immediately
after use.
● Do not operate your dishwasher
unless all enclosure panels are
properly in place.
● Do not tamper with controls.
● Do not abuse, sit on, or stand
on the door or dish rack of the
dishwasher.
● Close supervision is necessary
if this appliance is used by or near
children. Do not allow children
to play inside, on or with this
appliance or any discarded
appliance. Dispose of disc~arded
appliances and shipping or
packing material properly.
Before discarding a dishwasher,
remove the door of the washing
compartment.
c Keep all washing detergents
and wetting agents out of the
reach of children, preferably in
a locked cabinet. Observe all
warnings on container labels to
avoid personal injury.
● HYDROGEN GAS is
produced by the chemical action
within your water heater. It can
accumulate in the water heater
and/or water pipes if hot water
has not been used for a period of
tw weeks or longer. HYDROGEN
GAS IS EXPLOSIVE. To prevent
the possibility of damage or
injury, if you have not used hot
water for two weeks or more, or
move into a residence in which
the hot water system may not
have been used for some time,
turn on all hot water fimcets and
allow them to run for several
minutes before using any
electrical appliance which is
comected to the hot water
system. This will allow any
hydrogen gas to escape. Also,
since the gas is flammable, do
not smoke or use an open flame
or appliance during this process.
SAm THESE
INSTRUCTIONS
3
Page 4
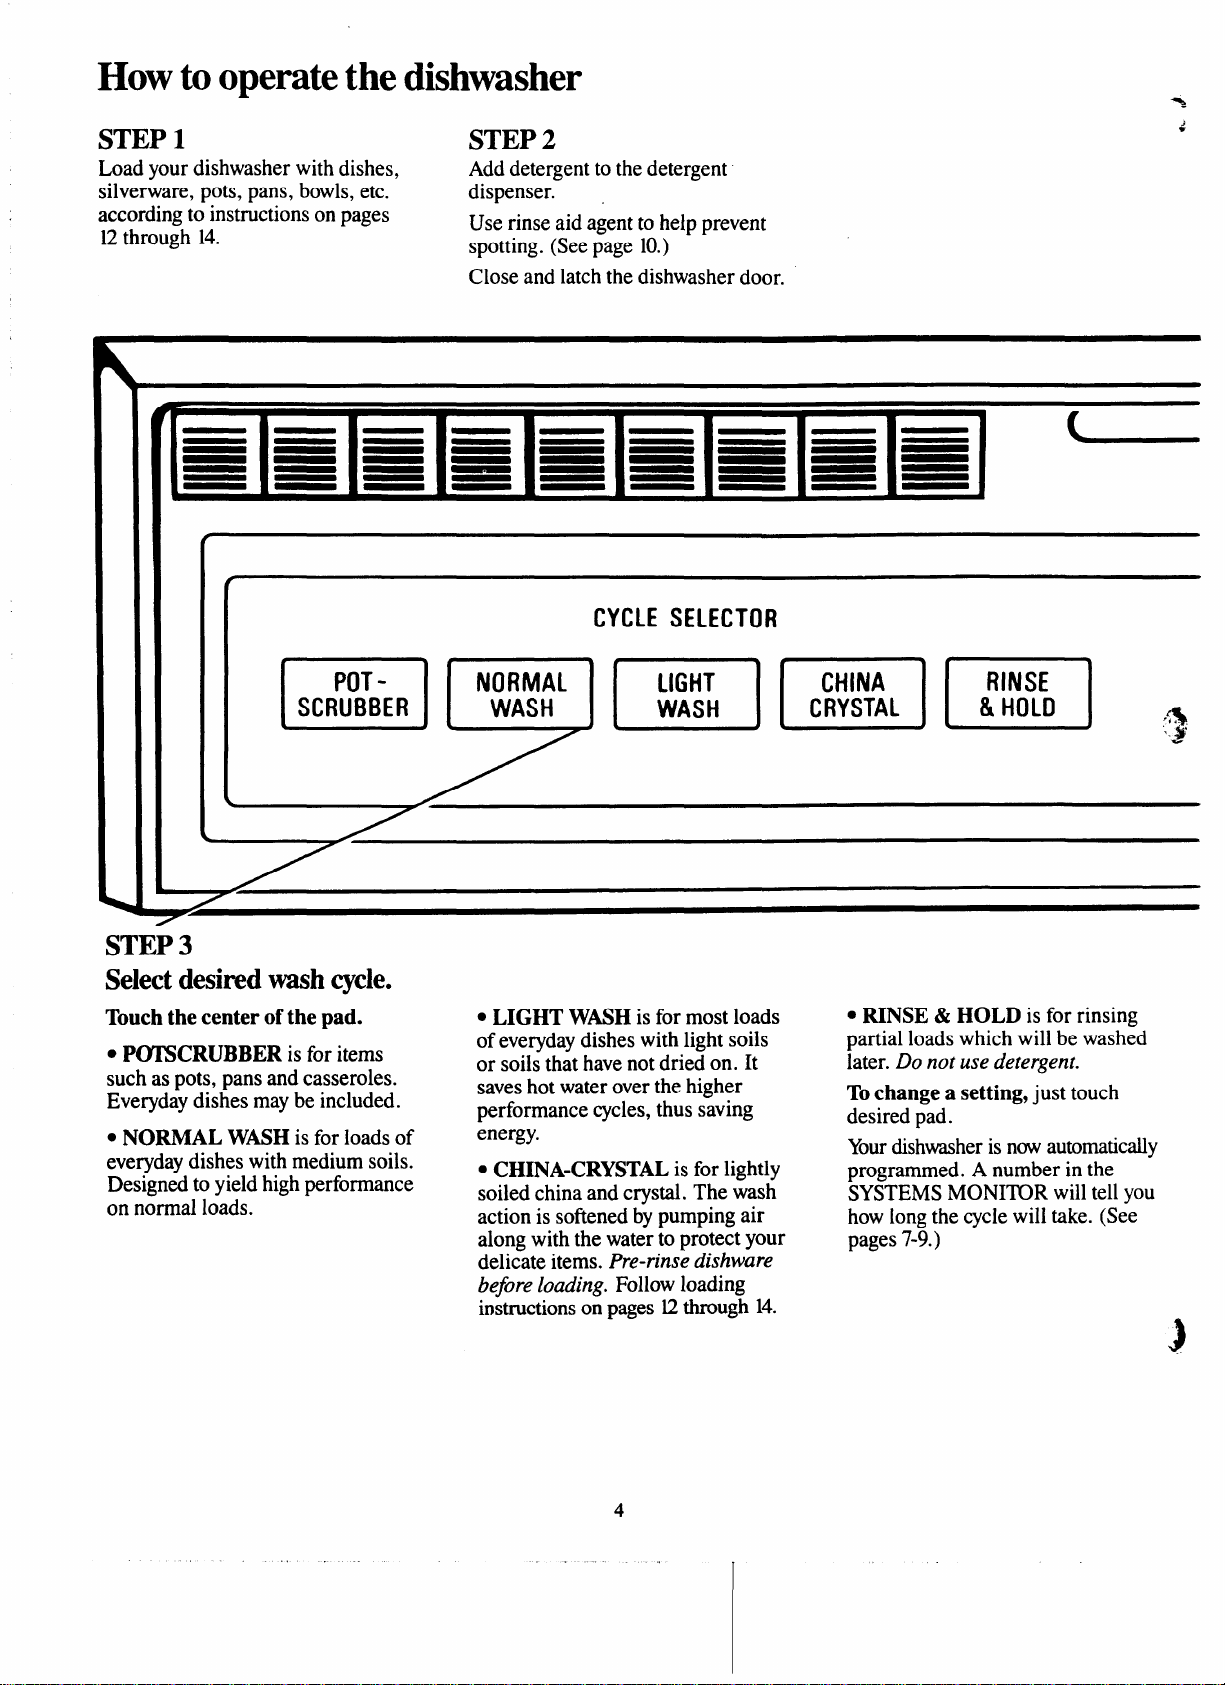
How to operatethe dishwasher
STEP 1
Load your dishwasher with dishes,
silverware, pots, pans, bowls, etc.
according to instructions on pages
12through 14.
POT -
SCRUBBER
STEP 2
Add detergent to the detergent
dispenser. .
Use rinse aid agent to help prevent
spotting. (Seepage 10.)
Close and latch the dishwasher door.
CYCLE SELECTOR
NORMAL
.ASHmm
m
9
STEP 3
Select desired wash cycle.
Touch the center ofthe pad. ● LIGHT WASH is for most loads
s PO’ESCRUBBERis for items
such as pots, pans and casseroles.
Everyday dishes may be included.
● NORMAL WNH is for loads of
everyday dishes with medium soils.
Designed to yield” “ “ on n~rmal loads.
high performance
of everyday dishes with light soils
or soils that have not dried on. It
saveshot water over the higher
performance cycles, thus saving
energy.
c CHINA-CRYSTALis for lightly
soiled china and crystal. The fiash
action is softened bypumping air
along with the water to protect your
delicate items. Pre-rinse dishware
before loading. Follow loading
instructions on pages 12through 14.
● RINSE & HOLD is for rinsing
partial loads which will be washed
later. Do not use detergent.
Tochange a setting, just touch
desired pad.
Yourdishwasheris nowautomatically
programmed. A number in the
SYSTEMS MONITOR will tell you
how long the cycle will take. (See
pages 7-9.)
4
.
Page 5
,-. ,
●
DRY OPTIONS
HEATED
~RYING
I
./‘
--l
II
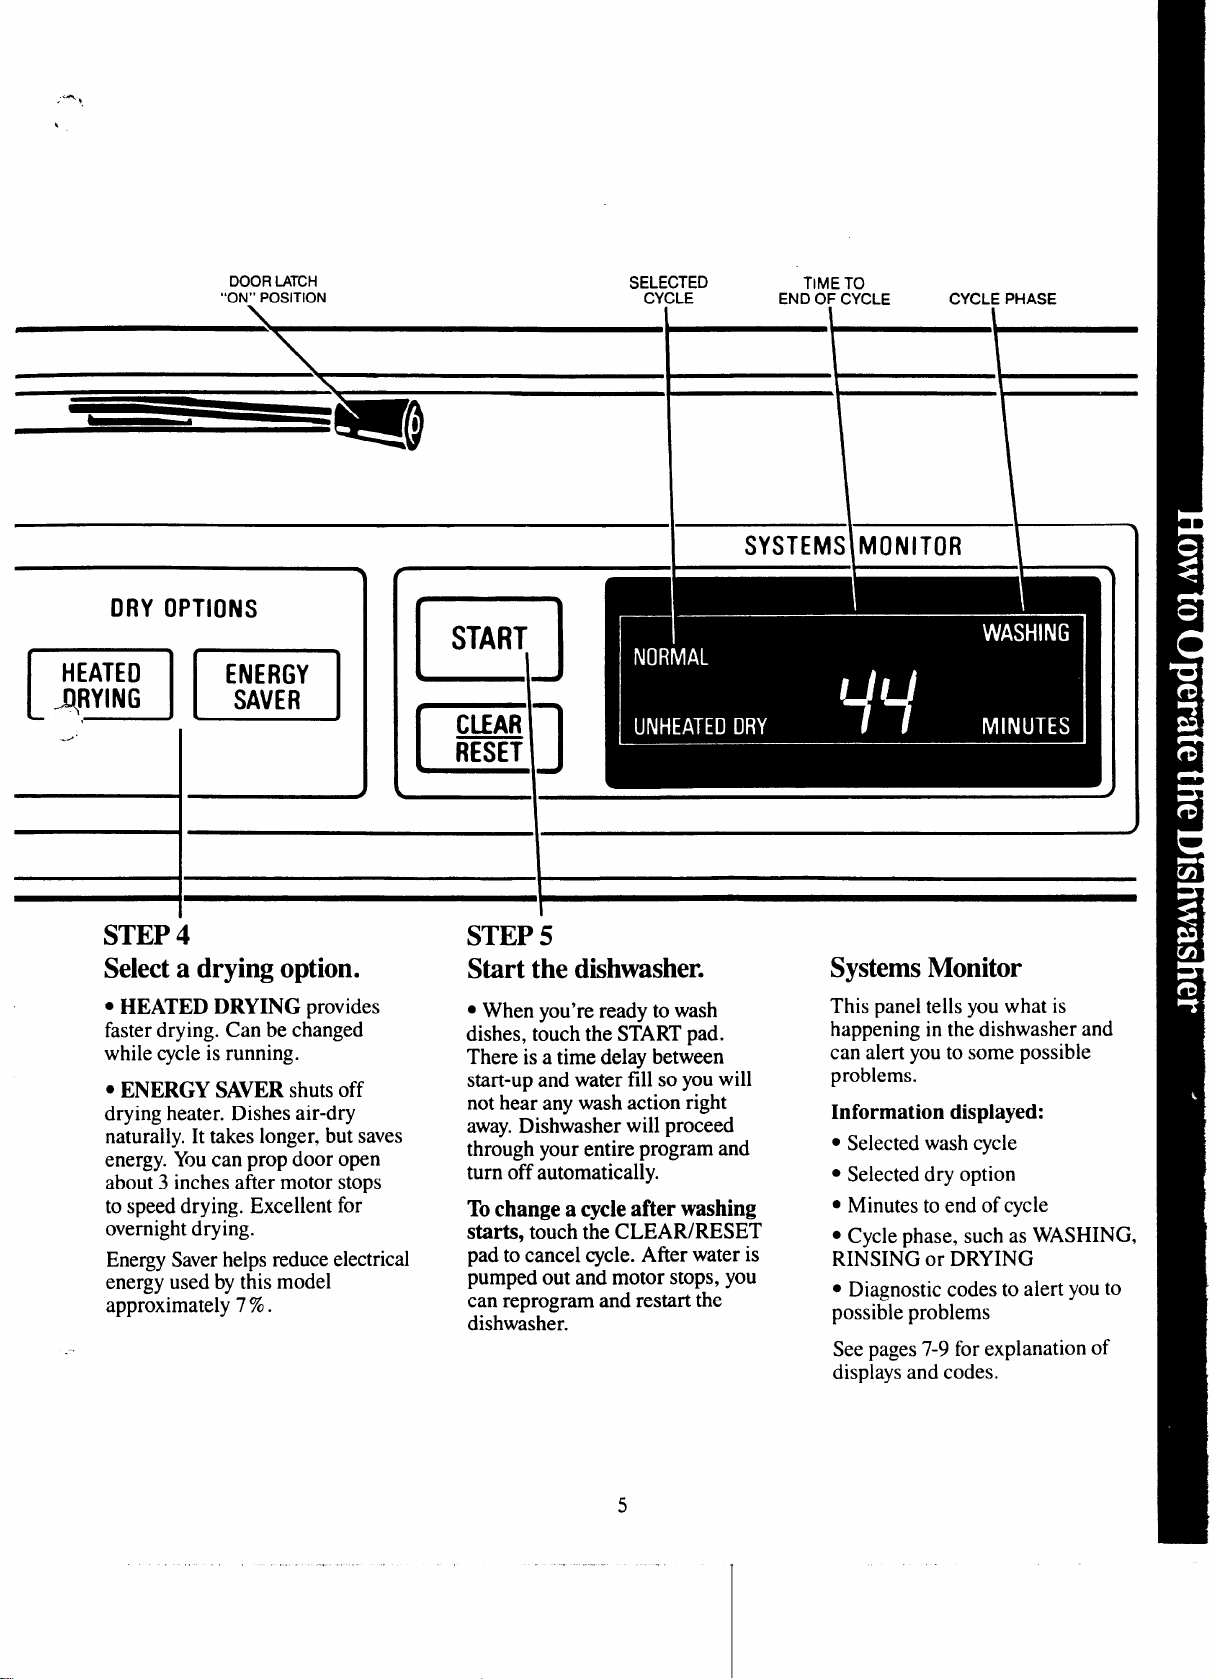
DOOR LATCH
“ON” POSITION
ENERGY
SAVER
SEL+E:::D TIMETO
I
ENDOF CYCLE CYCLEPHASE
SYSTEMS\ MONITOR
\
START
n
I
CLEAR
irsn
r~
STEP 4
Select a drying option.
● HEATED DRYING provides
faster drying. Can be changed
while cycle is running.
. ENERGY SAVERshuts off
drying heater. Dishes air-dry
naturally. It takes longer, but saves
energy. Youcan prop door open
about 3 inches after motor stops
to speed drying. Excellent for
overnight drying.
EnergySaverhelps reduce electrical
energy used by this model
approximately 7%.
STEP 5
Start the dishwasher.
● When you’re ready to wash
dishes, touch the STARTpad.
There is a time delay between
start-up and water fill so you will
not hear any wash action right
away.Dishwasher will proceed
through your entire program and
turn off automatically.
Tochange a cycleafter washing
starts, touch the CLEAR/RESET
pad to cancel cycle. After water is
pumped out and motor stops, you
can reprogram and restart the
dishwasher.
5
Systems Monitor
This panel tells you what is
happening in the dishwasher and
can alert you to some possible
problems.
Information displayed:
● Selected wash cycle
● Selected dry option
● Minutes to end of cycle
● Cycle phase, such as WASHING,
RINSING or DRYING
● Diagnostic codes to alert you to
possible problems
See pages 7-9 for explanation of
displays and codes.
.
Page 6
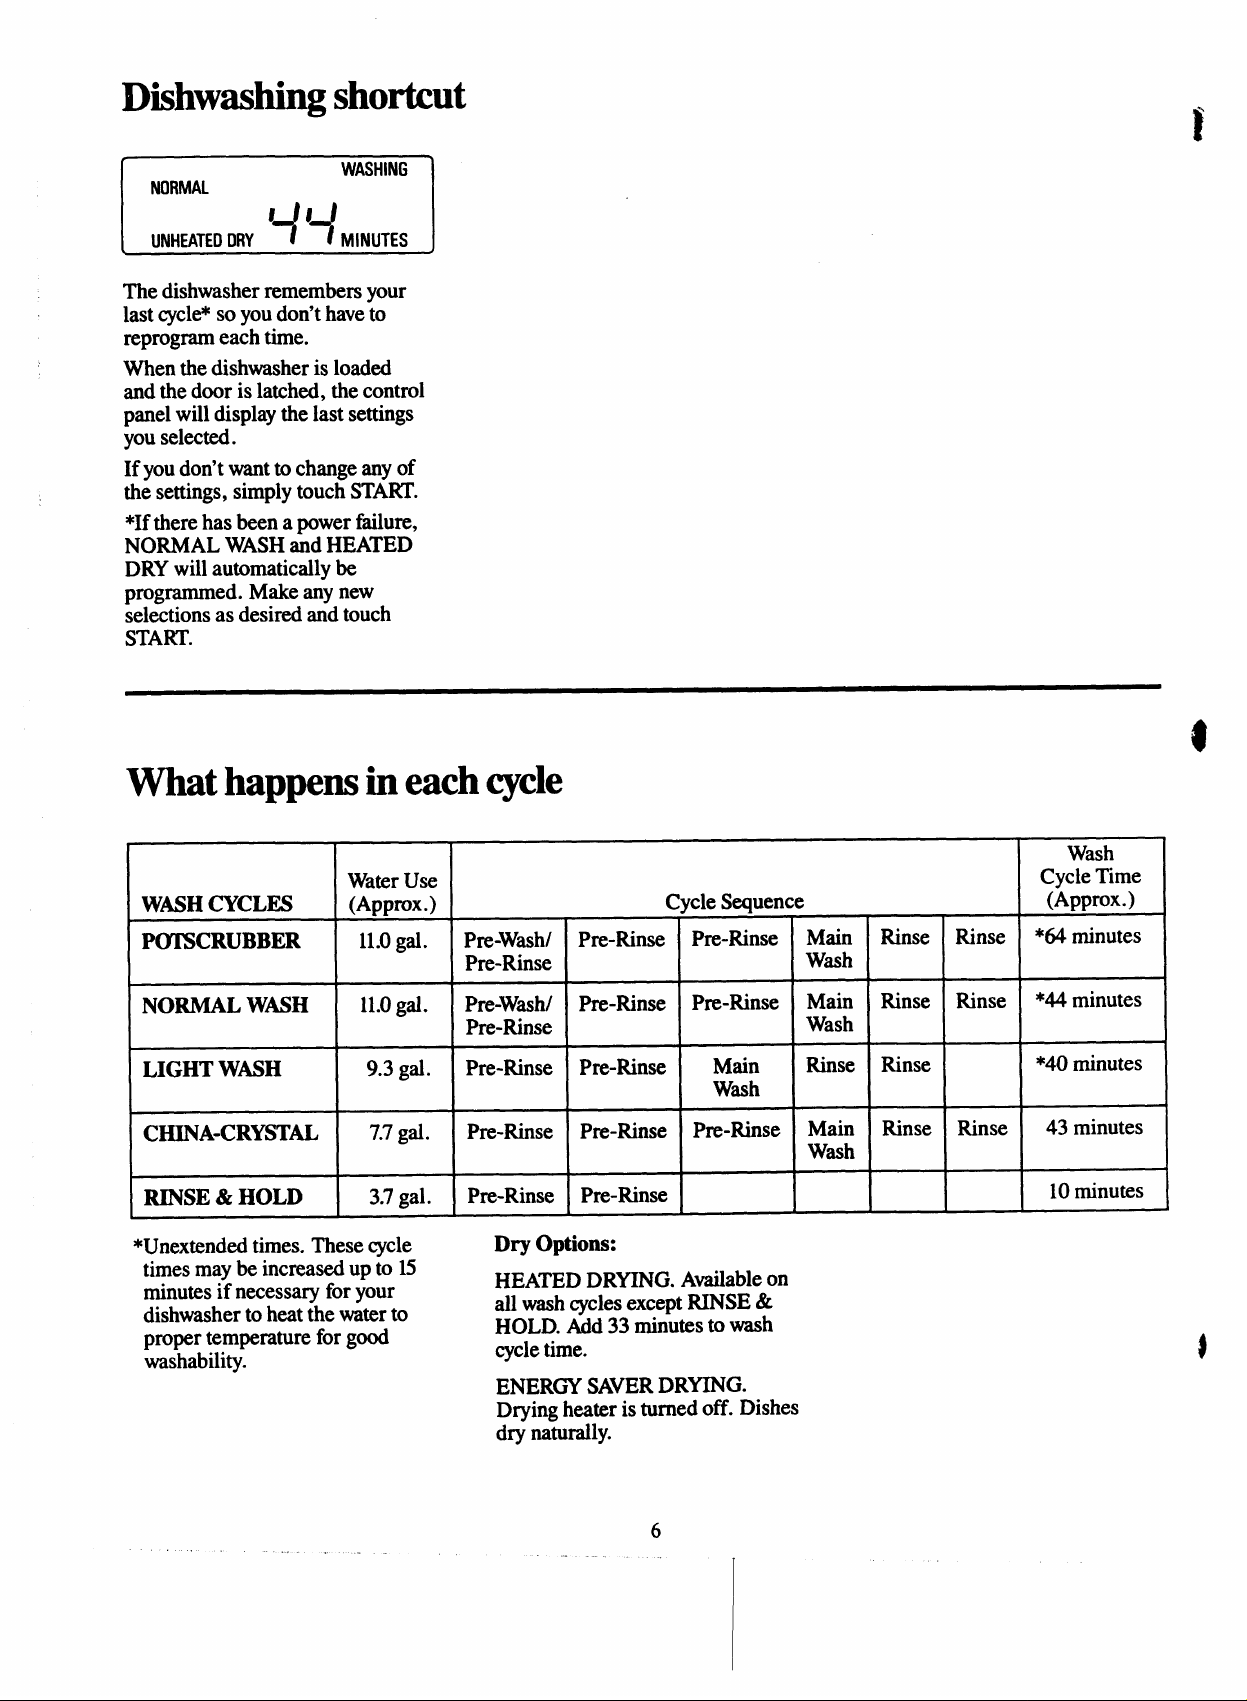
IMshwashingshortcut
NORMAL
UNHEATED DRY
I
J n_/
+
WASHING
t MINUTES
The dishwasher remembers your
last cycle*so you don’t have to
reprogram each time.
When the dishwasher is loaded
and the door is latched, the control
panel will display the last settings
you selected.
If you don’t want to change any of
the settings, simply touch START.
*If there has been a power ftilure,
NORMAL WASHand HEATED
DRY will automatically be
programmed. Make any new
selections as desired and touch
START.
What happens in eachcycle
Water Use
WASHCYCLES
P(Y13CRUBBER 11.0gal.
NORMAL WNH
LIGHT WASH 9.3 gal.
CHINA-CRYSTAL
RINSE & HOLD 3.7gal.
*Unextended times. These cycle
times may be increased up to 15
minutes if necessary for your
dishwasher to heat the water to
proper temperature for good
washability.
(Approx.)
11.0gal.
7.7gal.
Pre-W=hl Pre-Rinse Pre-Rinse Main
Pre-Rinse
Pre-Washl Pre-Rinse Pre-Rinse Main Rinse Rinse *44 minutes
Pre-Rinse
Pre-Rinse Pre-Rinse
Pre-Rinse Pre-Rinse
Pre-Rinse Pre-Rinse
Dry Options:
HEATED DRWNG. Atiable on
all washcycles except RINSE &
HOLD. Add 33
cycletime.
ENERGY SAVERDRYING.
Drying heater is turned off. Dishes
dry naturally.
Cycle Sequence
Wash
Wash
Main
Rinse Rinse
Wash
pre-Rinse Main Rinse Rinse
W~h
lIliIIUteS to wash
Rinse
Wash
Cycle Time
(Approx.)
Rinse *W minutes
*4Ominutes
43 minutes
10minutes
..
. .
6
Page 7
.2+
,’,
.,
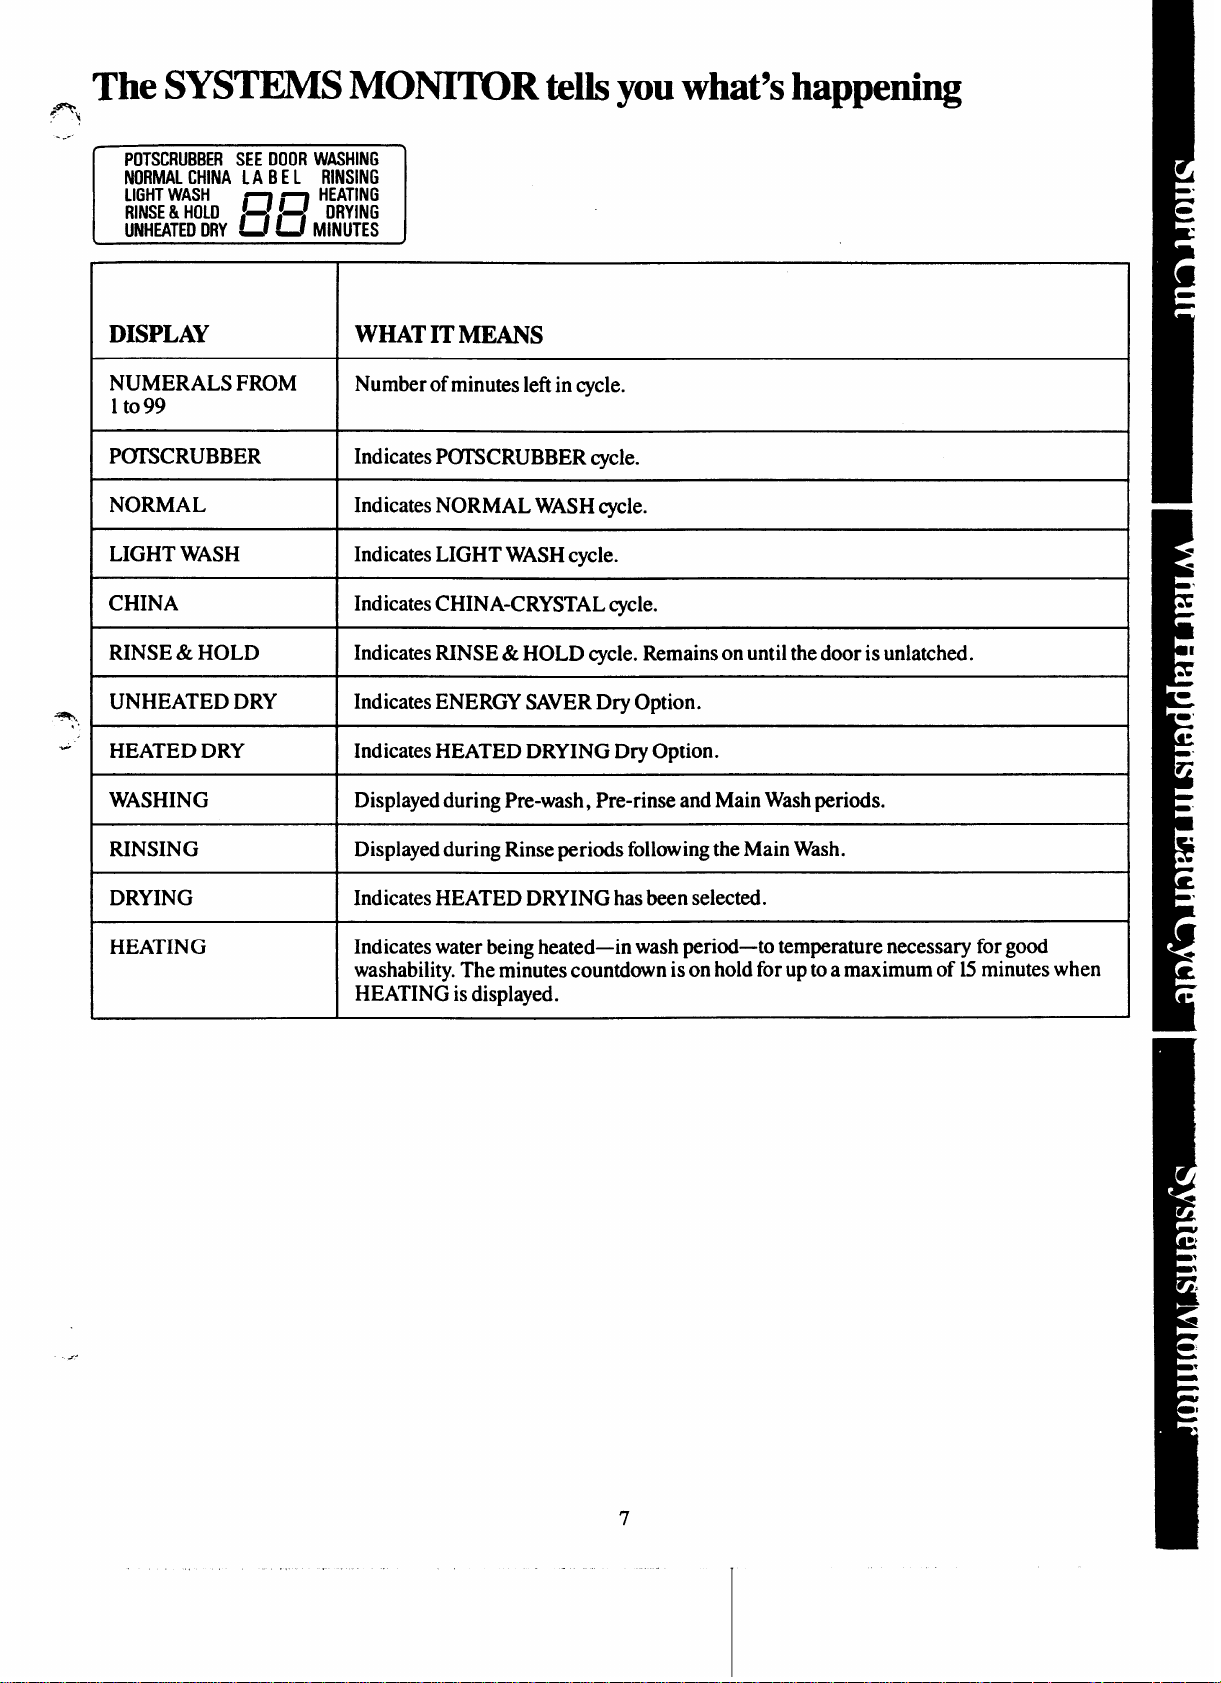
The
SYSTEMS MONITOR tellsyouwhat’shappening
POTSCRUBBER SEE DOOR WASHING
NORMAL CHINA LAB E L RINSING
LIGHT WASH
RINSE & HOLO
UNHEATED DRY !-f 1 MINUTES
#g1
3
HEATING
DRYING
DISPLAY
NUMERALS FROM
1to 99
P~SCRUBBER
NORMAL
LIGHT WASH
CHINA
RINSE & HOLD
UNHEATED DRY
+),
w
HEATED DRY
WASHING
RINSING
DRYING
WHAT IT MEANS
Number of minutes left in cycle.
Indicates P(YI’SCRUBBERcycle.
Indicates NORMAL WASHcycle.
Indicates LIGHT WASHcycle.
Indicates CHINA-CRYSTALcycle.
Indicates RINSE &HOLD cycle.Remains on until the door is unlatched.
Indicates ENERGY SAVERDry Option.
Indicates HEATED DRYING Dry Option.
Displayedduring Pre-wash, Pre-rinse and Main Washperiods.
Displayedduring Rinse periods following the Main Wash.
Indicates HEATED DRYING has been selected.
HEATING
Indicates water being heated—inwash period-to temperature necessary for good
washability.The minutes countdown is on hold for up to a maximum of 15minutes when
HEATING is displayed.
7
Page 8
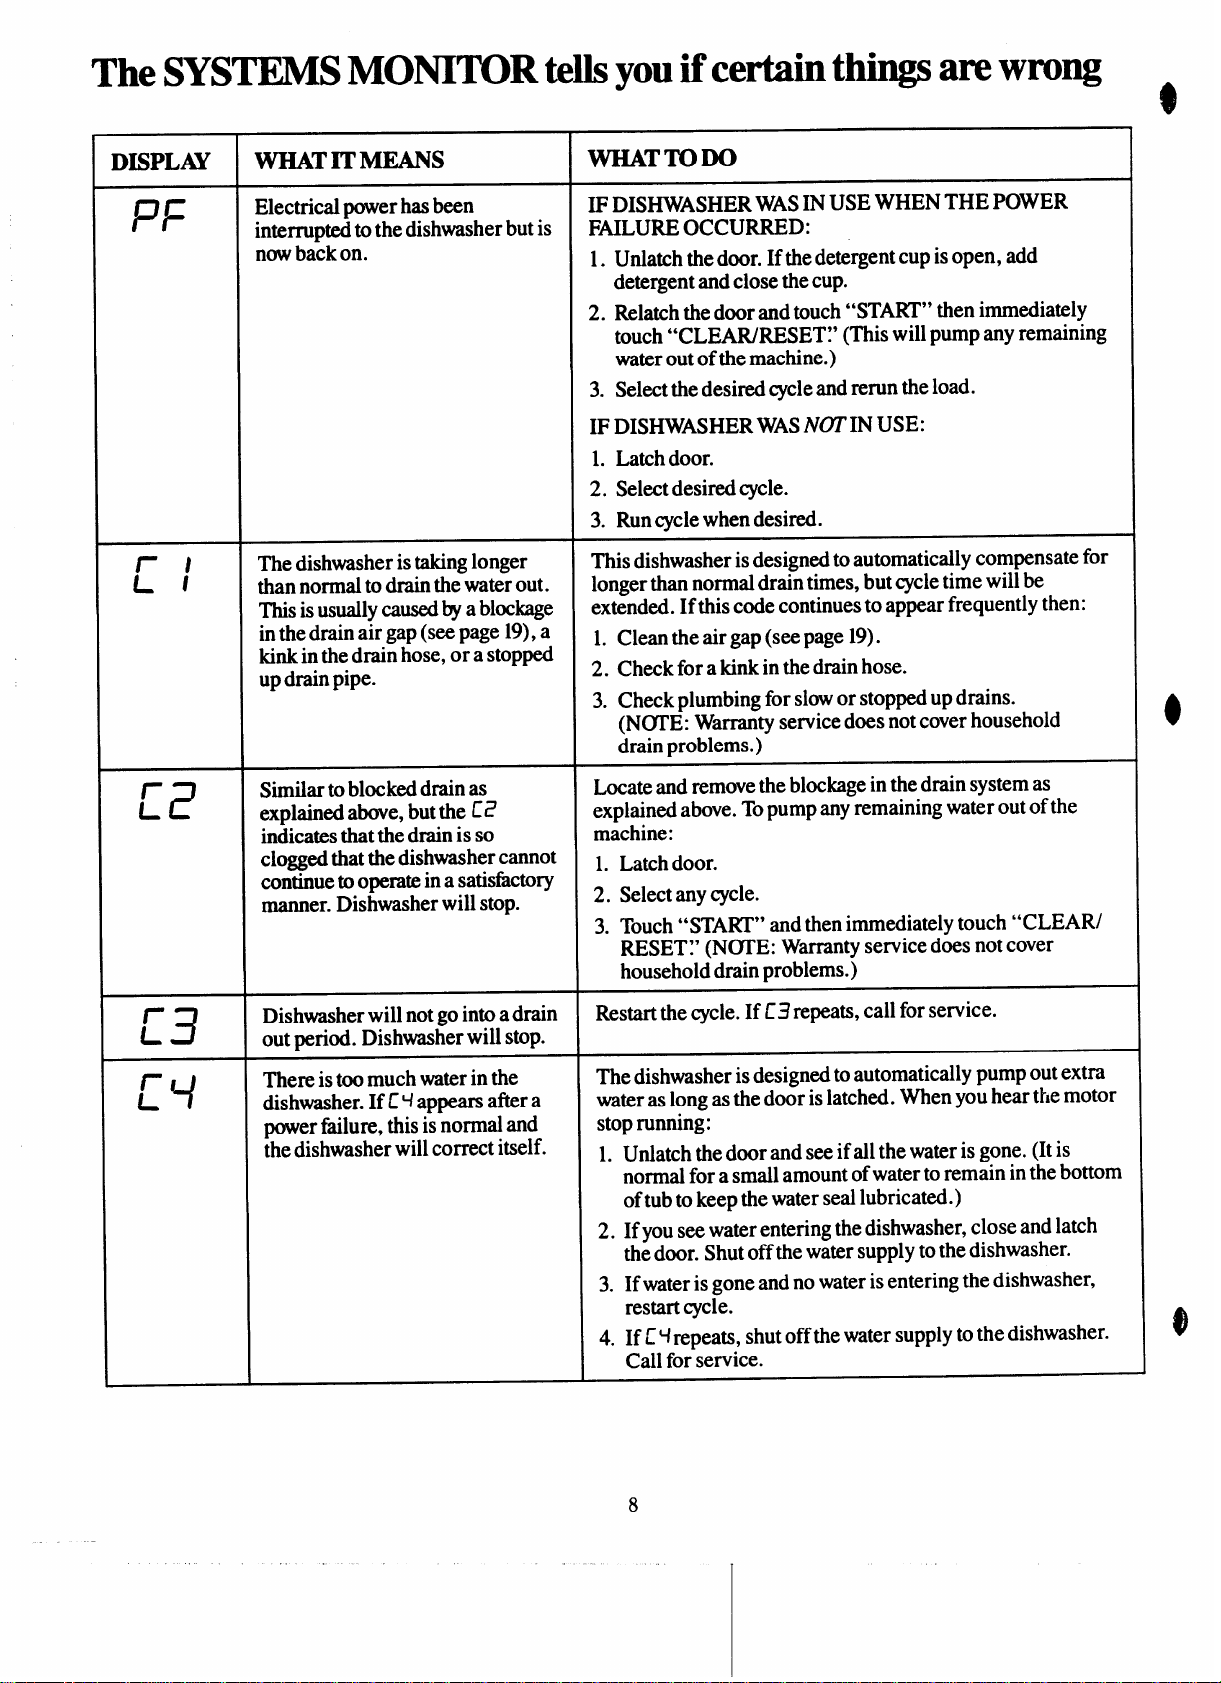
The SYSTEMS MONITOR tellsyou if certain things arewrong
KPLAY
FF
rt
(_/
WHAT IT MEANS
Electrical power has been
interrupted tothe dishwasherbut is
nowback on.
The dishwasher istaking longer
than normal to drain the water out.
Thisis usuallycausedby ablockage
inthe drain air gap (seepage 19),a
kink in the drain hose, or a stopped
updrainpipe.
VVHATTODO
IF DISHWASHERWASIN USE WHEN THE POWER
FAILURE OCCURRED:
1. Unlatch the door. If the detergent cup isopen, add
detergent and close thecup.
2. Relatch the door and touch “START” then immediately
touch “CLEAR/RESET~’ (This will pump any remaining
waterout ofthe machine.)
3. Select the desired qcle and rerun the load.
IF DISHWASHER WASNOTIN USE:
L Latchdoor.
2. Select desired cycle.
3. Run cyclewhen desired.
This dishwasher is designed to automatically compensate for
longer than normal drain times, but cycletime will be
extended. Ifthis code continues to appear frequently then:
1. Clean the air gap (seepage 19).
2. Check for akink inthe drain hose.
3. Check plumbing for slowor stopped updrains.
(N~E: W~ty service does notcover household
drain problems.)
r
L
r
L
r
L~
z
3
Similar
explained above, but the Z?
indicates that the drain is so
cloggedthat the dishwashercannot
continue to operate in a satistictory
manner. Dishwasher will stop.
Dishwasher will not gointo a drain
out period. Dishwasher will stop.
There istoo much waterin the
dishwasher. If E~appears aftera
powerftilure, this isnormal and
thedishwasher will correct itself.
toblocked drain as
Locate and remove the blockagein the drain system as
explained above. Topump any remaining waterout of the
machine:
1. Latch door.
2. Selectany cycle.
3. Touch “START” andthen immediately touch “CLEAR/
RESET:’ (NOTE: W-nty service does not cover
household drain problems.)
Restartthe cycle.If E3 repeats, call for service.
The dishwasher isdesigned toautomatically pump out extra
wateras long as the door is latched. When you hear the motor
stoprunning:
1. Unlatch the door and see if all the wateris gone. (It is
normal fora small amount ofwaterto remain in the bottom
oftub to keep the water seal lubricated.)
2. If you seewater entering thedishwasher, close and latch
the door. Shut offthe water supply tothe dishwasher.
3. If water is gone and no wateris entering the dishwasher,
restart cycle.
4. If Z~repeats, shut off the water supply tothe dishwasher.
Call forservice.
8
.
Page 9

n
4
. .
‘
.+
:=$
“a ‘
DISPLAY
r
L5
F
WHAT IT MEANS
This can be caused by either of
these reasons:
Not enough water is entering the
dishwasher.
or
The drain pump could be
temporarily blocked (usually
caused byfd particles such
as cereal).
The temperature sensor in the
dishwasher is not functioning
properly. Dishwasher may
continue to be used, but it will
not heat water automatically.
WHATTODO
Unlatch the door. If there is no water in the bottom of the
dishwasher, check the water supply to the dishwasher.
● Is the dishwasher water supply turned on?
(Vidveusually located under the sink.)
● Is the household water supply turned on?
● If you use well or cistern water, is the supply adequate?
If the water supply is adequate, try the cycle again. If ES
repeats, call for service.
Unlatch the door. If there is standing water in the bottom of
the dishwasher, relatch the door. Touch “START;’ then
immediately touch “CLEARRESET” to start the pump.
If [5 continues to appear, you may need to do this several
times to breakup the blockage.
The temperature sensor needs to be replaced. Call for
service.
N~E:
Youmay continue to use your dishwasher. For best results,
adjust your household water heater thermostat to 140°F.
Before you call for service
● Try the cycle again to see if the
Code reappears. The dishwasher
may correct itself.
● Electronic controls can be
affected by outside interference.
s Sometimes shutting off the power
to the dishwasher (at the fhse or
circuit breaker) will correct the
problem.
● Restore power after about five
seconds and try the cycle again.
● Check the chart above for things
you can do to correct the problem.
9
Page 10

0
lkmperature Sensor System
Toget dishes clean and dry you
need hot water. Tohelp you get
water of the proper temperature,
your dishwasher has a water heating
feature that automatically senses
the temperature of the water in the
washcycleand heats it, if necessary,
to the proper temperature. This
water heating feature may allow
you to turndown your household
water heater and saveenergy if
you’rewilling to let the dishwasher
run a little longer while it heats
water to the proper temperature.
For good washing and drying, the
entering water must beat least
120*F.To prevent dish damage,
inlet water should not exceed 150*F.
How to test water temperature:
Check your water temperature
inside your dishwasher with a
candy or meat thermometer.
Let the dishwasher run through
one fill and pump out cycle, then
let the dishwasher fill with water
the second time.
When you hear the water stop
filling, unlatch the door and slowly
open it.
Measure the temperature of the
water in the bottom of the tub this
way:
Removethe silverware basket and
place a candy or meat thermometer
in the water towards the middle of
the tub. If the temperature is less
than 120*F,you will not get good
washing results. Higher water
temperature is needed to dissolve
grease and activate powder
detergents.
Helpful hints: If outside
temperatures are unusually low, or
if your water travels a long distance
from water heater to dishwasher,
you may need to set your water
heater’s thermostat up. If you have
not used hot water for some time,
the water in the pipes will be cold.
‘Ihm on the hot water faucet at the
sink and allow itto run until the
water is hot. Then start the
dishwasher. If you’ve recently done
laundry or run hot water for
showers, give your water heater
time to recover before operating the
dishwasher.
Toimprove washability if the water
is less than 120*Fand youcannot
adjust your water heater: Select a
longer cycleand fill both detergent
cups at least half-full with detergent.
Howto use a rinse agent.
A rinse agent makes water flow
off dishes quicker than usual. This
lessens water spotting and makes
drying faster, too.
For best dishwashing performance,
use of a rinse agent such as JET-
DRYbrand is recommended.
Rinse agents come in either liquid
or solid form. Yourdishwasher’s
dispenser uses the liquid form.
How to fill the rinse agent
dispenser. Unscrew the cap. Add
the liquid rinse agent until itjust
reaches the bottom of the lip inside
the dispenser opening. Replace the
cap. The dispenser automatically
releases the rinse agent into the
final rinse water.
If you accidentally spill: Wipe
up the rinse agent with a damp
cloth. Don’t leave the spill in the
dishwasher. It can keep your
detergent from working.
If you can’tfind any rinse agent,
write:
BENCKISER CONSUMER
PRODU~S, INC.
(“JET DRY”)
411 W. Putnam Ave.
Greenwich, CI’ 06830
I
Yourdishwasher’s rinse agent
container holds 4% ounces. This
should last about 3 months. Fill
as needed. Do not overfill.
I
Howtochoose and use
detergent.
use only powderor liquid
First,
detergentsspecifically made for
use in dishwashers. Other types
will cause oversudsing.
Second, check the phosphate
content. Phosphate helps prevent
hard-water materials from forming
spots or film on your dishes. If
your water is hard (7 grains or
more), your detergent has to work
harder. Detergents with a higher
phosphate level will probably work
better. If the phosphate content is
low (8.7%or less), you’ll have to
use extra detergent with hard water.
Yourwater department can tell
you how hard your water is. So
can your county extension agent.
Or your area’swater softener
company. Just call and ask them
how many “grains of hardness”
there are in your water.
How much detergent should you
use? That depends. Is your water
“hard” or
you need extra detergent to get
dishes clean. With soft water, you
need less detergent.
Toomuch detergent with sofi water
not only wastes money, it can be
harmful. It can cause a permanent
cloudiness of glassware, called
“etching.” An outside layerof glass
is etched away!Of course, this
takes some time. But why take a
chance when it’seasy to find out
the hardness of your water.
“soft”? With hard water,
/1
$
e
10
Page 11

I
/
I
$
Keep your detergent f~h and
dry. Under the sink isn’ta good
place to store detergent. Tbomuch
moisture. Don’t put powder
detergent into the dispenser until
you’re ready to wash dishes, either.
(It won’tbe fresh OR dry.)
If your powder detergent gets old
or lumpy, throw it away.It won’t
wash well. Old detergent often
won’tdissolve.
If you use a liquid dishwasher
detergent, these precautions are not
necessary because liquid detergents
don’t “lump” as they ageor come
in contact with water.
You’llfind two detergent
dispensers on the inside door of
your dishwasher. ~o, because
some cycles use two washes.
See “Detetgent UsageGuide”
below.
Always close themain cup tightly
Men it is~rmly latched you-will
hear a clicking sound. It is not
necessary to ovem”ghten.
NOTE:Deteqent cupmaybe
opened manuallywz”thno harm.
Turnhandle
counterclockwise until
it releases. A snapping sound is
normal whenit opens.
How toplWptUR
the dishes for washing
If this is your first dishwasher, or
if you’re replacing a much older
model, you may wonder how much
pre-preparation your dishes need.
Actually very little. Pre-rinsing of
normal food soils is not necessary.
With common sense and a little
practice you’ll soon know what
fds to remove. Here are some
guidelines:
1. Scrapeoff bones, seeds, skins,
toothpicks and other hard solids. It
is also best to remove hard shelled
vegetables, meat trimmings, lea~
vegetables and crusts. Remove
2. Remove large quantities of any
food. Yourdishwasher has a built-in
sofi fd disposer that pulverizes
softfood bits and flushes them away.
It can handle small amounts of
soft fds, but large amounts will
be diflicult to handle.
3. Try to remove food scraps and
place dishes in dishwasher before
soil has a chance to dry and become
hard. Dishes with dried-on soil are
more difficult to wash and may
not come clean in the NORMAL
WASHcycle. Remember to use
your RINSE & HOLD cyclefor
small “holding” loads.
Note: The foods mentioned above
are for examples only. Other foods
not mentioned may also need to be
removed from your dishes. You
may also want to consider removing
foods such as mustard, mayonnaise,
vinegar, lemon juice and other
foods that can cause discoloration
of stainless steel if allowed to
remain on dishes for a long period
of time.
When using the P(YJ13CRUBBER
cycle, less preparation is required
befbre loading.The WI’SCRUBBER
cyclecan wash heavily-soiled
dishes and remove dried-on and
baked-on soils from pots, pans and
casseroles. Items with burned-on
soils may not come clean. And the
dishwasher cannot remove bum
marks or restore fading caused
byoverheating during cooking.
excessive quantities of oil or
grease.
Dete~ent Usage Guide (powderor liquid)
SOFTWATER
(O-3grains
CYCLES Main
IYYI13CRUBBERand 1lbblespoon ~ 1 lhblespoon
NORMAL WASHcycles minimum
>. CHINA-CRYSTAL and
LIGHT WASHcycles minimum
‘4 RINSE & HOLD cycle
*12grains and up is extremely hard water. A water softener is recommended. Wkhoutit,
lime can build up in the water valve.The water valve may stick while open and cause flooding.
$Filled Main Cup holds 3 tablespoons; Filled Open Cup holds 2 tablespoons.
1‘lhblespoon
hardness)
@ I OpenCup
minimum Full
None Half Full
Usenodetergent Useno detergent
MEDIUMWATER HARDWATER
(3-7grains)
Main Cup
Half Full
11
(7-12grains*)
I Open Cup Main Cup$ I Open Cup4
: Half Full Completely
None
~:l~pletely
Use nodetergent
J Completely
Full
None
Page 12

Howtoload your dishwasher
This is a random mixed load, the most common type you
will have.
Make sure dishes are properly loaded to insure that
water can reach the soiled surfaces. The wash arm in the
bottom sprayswater up. The towerthat rises in the center
sends water out over the dishes to wash the items in the
upper rack. A spray arm in the top washes down also.
Make sure to place tall items to the outside so the upper
wash arm is not blocked. Model shown is GSD2400.
Howto loadthe TOP RACK
Models with aFixed Shelf
WATCHOUTFOR THIS.
The washer tower rises through the center of the bottom
rack during the wash and rinse portions of the cycle.
Don’t block it or load tall things next to it. Also, be
carefi.dnot to let a portion of an item such as a pot or
dish handle extend through the bottom rack. This could
block the wash arm and cause poor washing results.
The top rack is best forglasses, cups and saucers. Cups
and glasses fitbest along the sides. This isthe place for
dishwasher-safe plastics, too. Make sure small plastic
items are lodged intightly sothey can’tfall onto the
Calrod” heating unit. Arrange stemware so that it cannot
moveeasily.Don’tlet theglassestouch eachother.
.
Sauce pans, mixing bowls and other small items may be
placed-—facedown—
handy for all kinds of odd shapes. Besure the forceof
water and detergent can reach soiled surfaces.
12
inthe top rack. The top rack is
Page 13

How toload the NIP RACK
Model with a Movable Shelf
The top rack is best for glasses, cups and saucers. Tkvo
rows of cups can be washed when using the folding
shelf. Load the bottom row first, then fold down the
shelf and load the top row. Cups and glasses fit best
along the sides. This is the place for dishwasher-safe
plastics, too. Make sure small plastic items are lodged
in tighfly so they can’t fdl onto the Calrod@heating
unit. Arrange stemware so that it cannot move easily.
Don’tlet the glasses touch each other.
Shelf Up
Fold the-folding shelf up for glasses and tall things.
Place tall items to the outside so the upper wash arm is
not blocked.
Sauce pans,
placed—face down—
handy for all kinds of odd shapes.
mixing bowls and other small items maybe
in this top rack. The top rack is
Shelf Down
The folding shelf gives you extra space for cups and
long utensils on two levels. Load the lower level first,
then fold the shelf down.
13
Page 14

I
:;
t
!i:
,1
t
,/
,
i,
;’
4,
!,
‘$
i
Howto loadtheBOTTOM RACK
Fit plates and saucers between the pins. Place items so
tha~water and detergent from wash arm can reach soiled
surfaces.
Heavily soiled
pots, pans and casseroles MUST be
loaded in the bottom rack, facing down. Prop broiler
pans and racks along the edge.
-+L!-.+
Pots, pans, casseroles, salad bowls, mixing bowls and
lids must be loaded in the bottom rack, facing down.
ModelGSD2200
Don’tletany
itemextend
throughbottom ~
\
G!h -
Put flatware in the removable basket with handles up to
protect your hands. Mix knives, forks and spoons so
they don’t nest together. Distribute evenly. Small plastic
items, such as measuring spoons and lids from small
containers are not recommended for automatic
dishwashing. If placed in dishwasher, they should go in
bottom of silverware basket with silverware on top.
Precaution!
T*e out anything that may fall or extend through the
bottom of the basket.
Oon’tletany la
itemextend
throughbottom
The security cell cover, hinged in the handle, can be
lowered to either side to secure light-weight items from
the effects of the vigorous wash action. When it is not
needed, this cover can remain upright.
.
14
Page 15

What you can usually wash safely in your dishwasher.
..-N,
.,
And what you can’t.
. .
-..
‘1
Forgeta dish?Here’swhen
YOUcan add it.
~dd dishes any time during the
RINSE & HOLD cycle. With other
wash cycles, you can add dishes at
any time BEFORE the WASHING
.
signal light goes off.
However, opening the door during
any cycle lessens cleaning power
because the temperature inside the
dishwasher is lowered. So try to
load everything at the beginning.
Here’show to add a forgotten dish:
1. Push the door latch to the left.
Washing will stop.
2. Wtit a few seconds until the
water calms. Then open the door.
3. Add dishes you’ve forgotten.
4. Close the door and push the
latch to the fhrright. When the
door is locked, washing will
continue.
15
Page 16

Questions?
Use This
PROBLEM
UNCLEiN DISHES
AND FLATWARE
Problem Solver
POSSIBLE CAUSEAND REMEDY
A fuse in your home maybe blown, or the circuit breaker tripped. Replace fuse or
reset circuit breaker. Remove any other appliances from the circuit.
Utensils may not be secure on rack pins, or something small may havedropped from
the rack. Wateris causing utensils to rattle. Make sure everything is securely placed
in dishwasher.
Make sure inlet water temperature is correct. (See page 10.)
Unload the bottom rack first. Water from dishes in the top rack maybe spilling into the
bOttOIXl rack.
Check for improper loading. Dishes shouldn’t nest together. Avoidoverloading.
Check the rinse agent dispenser to see that it’s not empty.
Check inlet watertemperature. It should be at least 120”F.(Totest, see page 10.)
Waterpressure maybe temporarily low. Tbrn on a faucet. Is water coming out slower
than usual? If so, wait until pressure is normal before using your dishwasher.
BLACK OR GRAY
MARKS ON DISHES
DETERGENT LEFT
IN DISPENSER CUPS
SP(YBAND FILMING
ON GLASSESAND
FLATWARE
Plugged air gap. (See page 19.)
Improper rack loading. (See pages 12through 14.)
Aluminum deposits often leave marks when they rub against other things. Remove
marks with a mild abrasive cleanser.
Watermay not be reaching the detergent cups. Move dishes that maybe blocking the
detergent cup.
The dispenser cover may not be opening or maybe blocked by improperly loaded
items. If you used a powder detergent, open the cup and remove any caked-on
detergent. Ifthe cup still doesn’t open automatically, call for service.
Detergent may be old. If the powder detergent is hard or caked in the box, throw it away.
The detergent may not be working well. Try another brand.
Spotting can be caused by all these things:
Extremely hard water. (See page 10.)
Low inlet watertemperature. (Totest, see page 10.)
Overloading the dishwasher.
Improper loading. (See pages 12through 14.)
Old or damp powder detergent.
Phosphate level in detergent too low. (See page 10.)
Rinse agent dispenser empty. (See page 10.)
16
Page 17

PROBLEhl
POSSIBLE CAUSE AND REMEDY
SPOTSAND FILMING
ON GLASSES AND
FLATWARE
(continued)
● Toolittle detergent. (See page 10.)
Due to varying local water conditions and personal preferences, try several brands of
detergents to find one that gives the best results for you. A liquid dishwasher detergent
may help reduce filming.
To remove spots and film from glassware:
1. Remove all metal utensils from the dishwasher.
2. DO NOT ADD DETERGENT.
3. Select P~SCRUBBER cycle and ENERGY SAVER dry option.
4. Start the dishwasher and allow to run until “25” minutes to end of cycle is displayed.
5. Then open the door and pour 2 cups (500ml) of white vinegar into the bottom of
the dishwasher.
6. Close the door and allow the dishwasher to complete the cycle.
If vinegar rinse doesn’t work: Repeat as above, except use 1/4 cup (60ml) of citric
acid crystals instead of vinegar. (Most drugstores carry citric acid crystals. If yours
doesn’t, call General Electric Factory Service.)
Using a vinegar or citric acid crystal rinse more than twice a month? Consider a home
water softener.
CLOUDINESS ON If vinegar or citric acid crystal rinse doesn’t work, the cloudiness is “etching:’
GLASSWARE
The film cannot be removed.
Itcan be prevented: Use less detergent if you have sofi water. Wash glassware in the
that will get them clean.
exceeds 150”F.
YELLOW OR BROWN
FILM
shortest cycle
Water temperature entering dishwasher
Tea or coffee can stain cups. Remove the stains by hand, using a solution of 1/2 cup
bleach and 3 cups warm water.
An overall yellow or brown film on dishes or glassware can be caused by iron deposits
in water. A special filter in the water supply line is the only way to correct this
problem. Your water softener company can tell you about the filter.
Yellow film on sterling silver results when you wash copper utensils in the same load.
Silver polish will usually remove this stain.
CHIPPING OF CHINA
Rough handling can cause chipping. Load with care. Make sure glassware and china
are secure and can’t jar loose. (See pages 12and 13for correct way to load glassware. )
Make sure tall glasses and stemware will clear the top of the tub when you push the
rack into the dishwasher. Always use the top rack for delicate items.
Use the CHINA-CRYSTAL cycle for fine china.
SMALL AMOUNT OF
Water around the outlet on the tub bottom at the back of the tub is normal. It is clean
WATER STANDING water. It’s there to keep the water seal lubricated.
IN THE BOTTOM
OF THE TUB
17
{c OIl[itllid He.Yl/YlvL’ I
-
Page 18

The Problem solver (continued)
PROBLEM POSSIBLECAUSEAND REiMEDY
WATERWON’TPUMP If
OUT OF THE TUB
SUDS IN THE TUB Sudsing detergents are not meant for dishwashers. USE ONLY AUlOMATIC
DISHWASHER LEAKS
CONTROL PANEL
DOESN’T RESPOND
‘IQINPUTS
the entire bottom of the tub has water, you may have a drain problem. Clean the air
gap, if you haveone. (Seepage 19.)
Check the kitchen sink. Is it draining well? Youmay need a plumber.
If dishwasher drains into a disposer, run the disposer to clear. Be sure the disposer is
not clogged.
See the SYSTEMS MONIIXIR (pages 7 to9).
DISHWASHER DETERGENTS ‘IOAVOIDSUDSING.
Toremove suds from the tub: Open the dishwasher. Let suds evaporate. Add 1gallon
of cold water to the tub. Close and latch the dishwasher. To pump out water, touch
START two times, then immediately touch CLEAR-RESET.
Repeat if necessary.
Suds can cause unit to overflow. That’s why it’sso important to use a detergent that’s
designed for automatic dishwashers.
Spilling the rinse agent can cause foam during washing. This can lead to overflowing.
Wipe up accidental spill of rinse agent with a damp cloth.
Shut off power from dishwasher at fuse or circuit breaker. Wait 5 seconds and restore
power to dishwasher. Try input panel again.
If you need more help.. call, toll free:
GE Answer Cente#
800.626.2000
consumer information service
18
Page 19

Care and Cleaning
USER INLAENTENANCE
INSTRUCTIONS
Clean the control panel with a
lightly dampened cloth. Dry
thoroughly.
or sharp objects on the panel.
They can damage it.
DO not Use abrasives
Clean the outside with a good
appliance poiish wax. The outside
cabinet finish is durable, but it can
scratch. So use no scouring pads,
or harsh or gritty cleaners.
Appliance Polish Wax & Cleaner
(Cat. No. WR97X0216) is available
from GE Appliance Parts iMarts.
The inside usually takes care
of itself. If it should ever need
cleaning. use a mild cleansing
powder. Scouring pads tind harsh
cleaners can mar the finish.
Built-in dishwashers
often use an air gap.
Keep it clean.
An air gap is a plumbing device.
It protects your dishwasher against
water backing up into it if a drain
clogs. The air gap is not a part of
the dishwasher. And you may not
even have one. Not all plumbing
codes require air gaps.
If you have an air gap, check it
at least once a month. IT IS NOT
PART OF YOUR DISHWASHER.
IT IS NO_I’COVERED IN YOUR
WARRANTY.
The air gap is easy to clean.
With most types, first turn off the
dishwasher, then lift off the chrome
cover. Then unscrew the plastic cap
and check for any buildup of grit.
A toothpick makes cleaning easy.
Check the air gap any time your
dishwasher isn’t draining well.
Not using your
dishwasher in winter?
Protect against freezing.
If your dishwasher is left in an
unheated place during the winter,
ask a service technician to:
● Cut off electric power to the
dishwasher. Remove fuses or trip
circuit breaker,
● Turn off the water supply.
● Disconnect the water inlet line
from the water valve.
● Drain water from the inlet line
and water valve. (Use a pan to
catch the water. )
● Reconnect the water inlet line to
the water valve.
c Remove the plastic pump cover in
the tub bottom and use a sponge to
soak up water in the rubber boot.
19
Page 20

I
t-d
o
Page 21

How to change colorpanels
-T,
If you are redecorating, you can
change your dishwasher’s front
panels to match or blend with
your new colors.
The panels are held in place by
the door trim and the trim on the
panel below the door. Each side
of each panel is a different color.
Or you can paint a panel with the
color of your own choice.
How to change the door panel:
1. Take out three trim screws on
either side of the dishwasher door.
-=, Remove the side trim.
‘2. Slide the door panel out.
(Careful-edges may be sharp.)
3. Tbrn the door panel around and
put the color you want in front.
4. Replace the door panel, side
trim and screws.
How to change the lower panel:
1. Remove four panel attachment
screws. (WO abovethe panel, two
below the panel.)
2. Removethe entire panel.
3. Takeout three screws and
remove the top trim.
4. Slide the door panel out.
5. Turn the panel around and put
the color you want in front.
6. Replace the lower panel, top
trim and screws.
7. Replace the entire panel and
four attachment screws.
Do not operate the dishwasher
while changing panels or when
, lower access panel is removed.
Note: Other color panels are
available for your dishwasher.
Check the color you wanton the
color panel order form below and
mail it to us.
A wood panel trim kit contains
trim and instructions for adding
decorative wood door panel or
lower access panel to match kitchen
cabinets. The kit is an option at
extra cost and is available from
your GE dealer. Speci~ GPF40.
.—— ——— —
r
I
I
I
I
I
I
I
I
I
I
I
I
I
I
I
I
I
w
a
w
I
1a
~ ‘OLD‘ERE
I
I
I
I
I
I
I
I
I
I
I
I
I
I
I
I
I
I
I
I
I
COLOR P~L ORDER FORM
If you need a color panel not supplied with your dishwasher,
you may order one at no charge with this form.
Mark the appropriate box for panel selection.
Name:
Address:
City:
state:
Model No.:
Date Purchased:
– –
CUT HERE
Coffee/Avocado
❑ Door and
Access Panel
GPF 25
8=
——
Harvest/Black
❑ D
Zip Code:
Serial No.:
oor and
Access Panel
GPF 26
—-
——
1
I
I
I
I
I
I
I
I
I
I
I
I
I
I
I
I
I
I
Page 22

I
.—
r
I
I
I
I
I
I
I
I
I
I
I
I
I
I
I
I
I
I
I
I
I
I
I
I
I
I
I
I
I
I
I
I
I
I
I
I
I
I
I
I
I
I
I
Name
Address
City
Zip
—— —— —
STAPLE HERE
State
GE Appliances
c/o Dri-View Mfg.
4700 Allmond Ave.
Louisville, KY 40209
— —
—
—__ —.
PLACE
STAMP
HERE
1
I
I
I
I
I
I
I
I
I
I
I
I
I
I
I
I
I
I
I
I
I
I
I
I
I
I
I
I
I
I
I
I
I
I
I
I
I
I
I
I
I
I
I
d
Page 23

*.
\
If YouNeed Service
Toobtain service, see your warranty
on the back page of this book.
We’reproud of our service and
want you to be pleased. If for some
reason youare not happy with the
service you receive, here are three
steps to followfor further help.
FIRST, contact the people who
serviced your appliance. Explain
why you are not pleased. Inmost
cases, this will solve the problem.
NEXT, if you are still not pleased,
write all the details-including
your phone number—to:
Manager, Consumer Relations
GE Appliances
Appliance Park
Louisville, Kentucky 40225
FINALLY, if your problem is still
not resolved, write:
Major Appliance
Consumer Action Panel
20 North Wacker Drive
Chicago, Illinois 60606
23
Page 24

YOURGENERALELECTRIC DISHWASHERWITH PERMATUF@INTERIOR
WARRANTY
Save proof oforiginalpurchasedate suchas yoursales slip or cancelledcheck to establishwarrantyperiod.
4
1
.
WHATIS COVERED
FULL ONE-Y*R WARRANTY
Forone year from date of original
purchase, wewill provide, free of
charge, parts and service labor in
your home to repair or replace any
part of the dishwasher that fails
because of a manufacturing defect.
FULL TEN-YEARWARRANTY
Forten years from date of original
purchase, we will provide, free of ~Wer~hOW~p~r~ .
charge, parts and service labor in
your home to repair or replace the 3‘ie:~~~:;TOwerm
Pk3rmaTuFtub or door Ih)er if it
fails to contain water because of
a manufacturing defect such as
cracking, chipping, peeling or
rusting.
WHAT IS N~ co~~ ~e&!~u~!~~ ~%&%Jct
LIMITED SECOND-YEAR
WARRANTY
For the second year from date of
original purchase, we will provide,
free of charge, replacement parts for
any part of the WaterDistribution
System (as illustrated below) that
fails because of a manufacturing
defect. Associated inlet and drain
plumbing parts are not covered by co5t5to your home
this warranty. Youpay for the
service trip to your home and
service labor charges. byour Factory Service Centers or
(spray arm)
Boot
-g
Soft
Food Disposer
Water Distribution System
Read your Useand Care material.
If you then have any questions
about operating the product,
please contact your dealer or our
Consumer Affairs office atthe
address below,or call, toll free:
GE Answer Cente@
800.626.2000
consumer information service
c Improper installation.
Ifyou have an installation problem,
contact your dealer or installer.
Youare responsible for providing
adequate electrical, plumbing
and other connecting facilities.
~
J
n
1
R
Pump
hose
Hub
connection
assembly
Motor
This warranty isextended to
- the original purchaser and any
succeeding owner for products
purchased for ordinary home use
in the 48 mainland states, Hawaii
and Washington, D.C.In Alaska the
warranty isthe same except that it
is LIMITED because you must pay to
ship the product to the service shop
or for the service technician’s travel
.
All warranty service will be provided
by our authorized Customer Care”
servicers during normal working
hours.
Look inthe White or Yellow Pages
of your telephone directory for
GENERAL ELECTRIC COMPANY,
GENERAL ELE~RIC FACTORY
SERVICE, GENERAL ELECTRIC-
H(XPOINT FAC173RYSERVICE or
GENERAL ELE~RIC CUSTOMER
CARE@SERVICE.
. Replacement of house fuses or
. resetting of circuit breakers.
. Cleaning or servicing of air gap
device in drain line.
. Failure of the product if it is used
for other than its intended purpose
or used commercially.
c Damage to product caused by
accident, fire, floods or acts of God.
WARRANlOR ISNOTRESPONSIBLE
FOR CONSEQUENTIAL DAMAGES.
{
Some states do not allow the exclusion or limitation of incidental or consequential damages, sothe above limitation or exclusion
may not apply to you. This warranty givesyou specific
Toknow what your legal rights arein your state,consult your local or state consumer affaks office or your state’sAttorney General.
If further help is needed concerning this warranty, write:
Manager—Consumer Affairs, GE Appliances, Louisville, KY 40225
EsE&EJ
10-s9
legal rights, and you mayalso haveother rights which varyfrom state to state.
Warrantor: General Electric Company
!
GSD2200
GSD2400
I
 Loading...