

Page 1
!
❑
Safetyinstructions.........................3
D
●
B
.,:
,::;:;;:., ,,
Problem Solver
Morequestions?...call
...... ................I 3-15
>, ,.
@
.,:::.:, ,:..
.>,:,.,.::;,::
~<
,.,,~‘:l!iiji CycleFeatures.. ..........................................4.5
,..,,.>,..>.,
a
,:
,, :’,:!
To obtain a Spanish language
version of this bookdcall
GE Answer Center
800.626.2000
consumer information service. servicio de inforrnaci6n
OperatingInstructions,Tips
China,Crystal,Sterling...............................10
~
~~;~CareandCleaning
Air Gap
.. .........................................................
m
~~~~~~~~~~~~
<::i:\.,,::;..,
11
Para obtener la versi6n en
espafiolde este manual,
name a
GE Answer Center,@
para el consumidor,
te16fono800.626.2000.
Preparation
FrontPanelChange. ...................................12
Models:GSD1206GSD1236
GEAppliances
Page 2
A note to consumer—
We’d like to thank you and congratulate you for making the wise decision in purchasing your dishwasher.
This User Guide is designed to be kept near your dishwasher at all times for quick and easy reference. Features
may vary on some dishwasher models, Please read the following tips to insure your dishwasher is operating at its
best performance.
We care about you and your appliance and we want your dishwasher to do itsjob for you.
● HOT WATER—Your dishwasher
needs hot water for best results. Water
entering the dishwasher should be at
*
least 120”F.but your dishwasher
performs BETTER with HIGHER
water temperatures not to exceed 150°F.
● WATER HARDNESS-The hardness
of the water playsan importantpartin
howwellyourdishwashercleans.In
areaswhere water is veryhard (12 grains
or more),it maybe necessaryto install
a water softener.If you do notknowthe
hardnessofyourwater supply,contact
yourlocalwater department.
● DETERGENTS—Only usedetergents
labeledfor usein automaticdishw~shers.
A Neveruselaundrydetergentsor
liquidsoaps..that will causeoversudsing
and leaks.The amountof detergentyou
usedependson the water hardnessandthe
amountof soilon yourdishes.In most
cases,detergentamountsshouldbe
increasedfor hard waterandheavy soil.
$Q?\Q
~.$
o
Keep it handy for answers to your questions.
If you don’t understand somethingor need more help, call:
GE Answer Center@
800.626.2000
24 hours a day, 7 days a week.
%
‘+
Savetimeandmoney.
Beforeyou requestservice...
Check the Problem Solver in the back of this guide. It lists
causes of minor operating problems that you can correct
yourself.
Beforeusingyour dishwasher,
readthisguidecarefully.
..
It is intended to help you operate and
maintain your new dishwasher properly.
If you receiveda
I damageddishwasher...
Immediatelycontactthedealer(or
builder)thatsoldyouthedishwasher.
p,
Q
R
e
u
“-
*
m
● RINSE AGENT—should alwaysbe used:
— to reduce water spotting.
— to improve drying.
Always check and refill the rinse agent
when necessary.
● FOR BEST RESULTS—The cycles
and the options you choose have an
effect on the results you get. The
following are examples. (Please, see the
Operating Instructions, Tips for more
information.)
● TEMP BOOST OPTION—
— use with heavily soiled loads.
—
extends cycle to heat water for best
washing and drying.
“POTS PANS CYCLE—
— use with dried or baked-on heavily
soiled loads.
“HEATED DRY OPTION—
— assuresfasterdrying.
— besureto usea rinseagent.
Writedownthemodel
andserialnumbers.
You’llfindthemon a labelfastenedto the
tub walljust insidethedishwasher door.
These numbers are also on the Consumer Product
Ownership Registr~tionCard that came with your
dishwasher. Before sending in this card, please write
these numbers here:
Model Number
Serial Number
Use these numbers in any correspondence or service calls
concerning your dishwasher.
We’11be there...
No matter what major appliance you buy from us, you
always get more than a quality product. You receive the
added assurance that, should you ever need our help, we’ll
be there.
We ask that you please be sure to read all the Important
Safety Instructions before operating your new appliance
to insure your safety.
2
Page 3

IMPORTANTSAFETYINSTRUCTIONS
Readallinstructionsbeforeusingthisappliance.
WARNING—Whenusingthis
appliance,alwaysexercisebasic
A
● Usethisapplianceonlyforitsintended
purpose,asyouwillfinddescribedinthis
UseandCareGuide.
\u i,:,
L.\\~
> Q ... withtheInstallationInstructions
...=.~
o
receiveanInstallationInstructionssheetwithyour
dishwasher,youcanobtainonebycalling,toll
free,theGEAnswerCenter?800.626.2000.
—Thisappliancemustbeconnectedtoa grounded
metal,permanentwiringsystem;oran
equipment-groundingconductormustberun
withthecircuitconductorsandconnectedto
theequipment-groundingterminalorleadof
theappliance.
—Connecttoaproperlyrated,protectedandsized
power-supplycircuitto avoidelectricaloverload.
\
=
..= flammablevaporsandliquids
inthevicinityofthisoranyotherappliance.
● Useonlypowderorliquiddetergentsorwetting
agentsrecommendedforuseina dishwasher.
● Donotwashplasticitemsunlessmarked
“dishwashersafe”ortheequivalent,Forplastic
itemsnotsomarked,checkthemanufacturer’s
recommendations.
● Loadlightplasticitemssotheywillnot
becomedislodgedanddroptothebottomof
thedishwasher—theymightcomeintocontact
withtheheatingelementandbedamaged.
Tominimize the possibility of injury.
● Whenloadingitemstobewashed:
A.Locatesharpitemssothattheyarenotlikely
todamagethedoorseal,and
B.Loadsharpkniveswiththehandlesupto
reducetheriskofcut-typeinjuries.
● Donottamperwithcontrols.
~Donottouchtheheatingelementduringor
immediatelyafteruse.
safetyprecautions,includingthe
following:
● Thisdishwashermustbeproperly
installedandlocatedinaccordance
beforeitisused.Ifyoudidnot
● Donotstoreorusecombustible
materials,gasolineorother
● Donotoperateyourdishwasherunlessallenclosure
panelsareproperlyinplace.
sDonotabuse,siton,orstandonthedoorordish
rackofthedishwasher.
● Closesupervisionisnecessaryifthisappliance
isusedbyor nearchildren,Donotallowchildren
toplayinside,onorwiththisapplianceorany
discardedappliance,Disposeofdiscarded
appliancesandshippingorpackingmaterial
properly.Beforediscardingadishwasher,remove
thedoorofthewashingcompartment.
● Keepallwashingdetergentsandwettingagents
outofthereachofchildren,preferablyina locked
cabinet.Observeallwarningsoncontainerlabels
toavoidpersonalinjury.
cTominimizethepossibilityof
0“
$-
b~foreattemptinganymaintenance.NOTE:
TurningthecontroldialtotheOFFposition
doesnotdisconnecttheappliancefromthe
powersupply.Werecommendhavingaqualified
technicianserviceyoura~liance.
● Donotattempttorepairorreplaceanypart
ofyourdishwasherunlessitisspecifically
recommendedinthisguide.
shouldbereferredtoaqualifiedtechnician.
A
waterpipesifhotwaterhasnotbeenusedfora
periodoftwoweeksorlonger.HYDROGENGAS
ISEXPLOSIVE.Topreventthepossibilityof
damageorinjury,if youhavenotusedhotwater
fortwoweeksormore,ormovedintoaresidence
inwhichthehotwatersystemmaynothavebeen
usedforsometime,turnonallhotwaterfaucets
andallowthemtorunforseveralminutesbefore
usinganyelectricalappliancewhichisconnected
tothehotwatersystem.Thiswillallowany
hydrogengastoescape.Also,sincethegasis
flammable,donotsmokeoruseanopenflame
orapplianceduringthisprocess.
electricshock,disconnectthis
appliancefromthepowersupply
Allotherservicing
WARNING—HYDROGENGAS
isproducedbythechemicalaction
withinyourwaterheater.It can
accumulatein thewaterheaterand/or
SAVETHESE
INSTRUCTIONS
Page 4
HOWTOOPERATEYOURDIS~ASHER
Yourdishwasher is designed to give maximum
performance on loads with normal and heavy soils.
Youmay find that many of your dishes have lighter
soils than normal; if this is the case you can save
water and energy by selecting a cycle other than
NORMAL WASH.
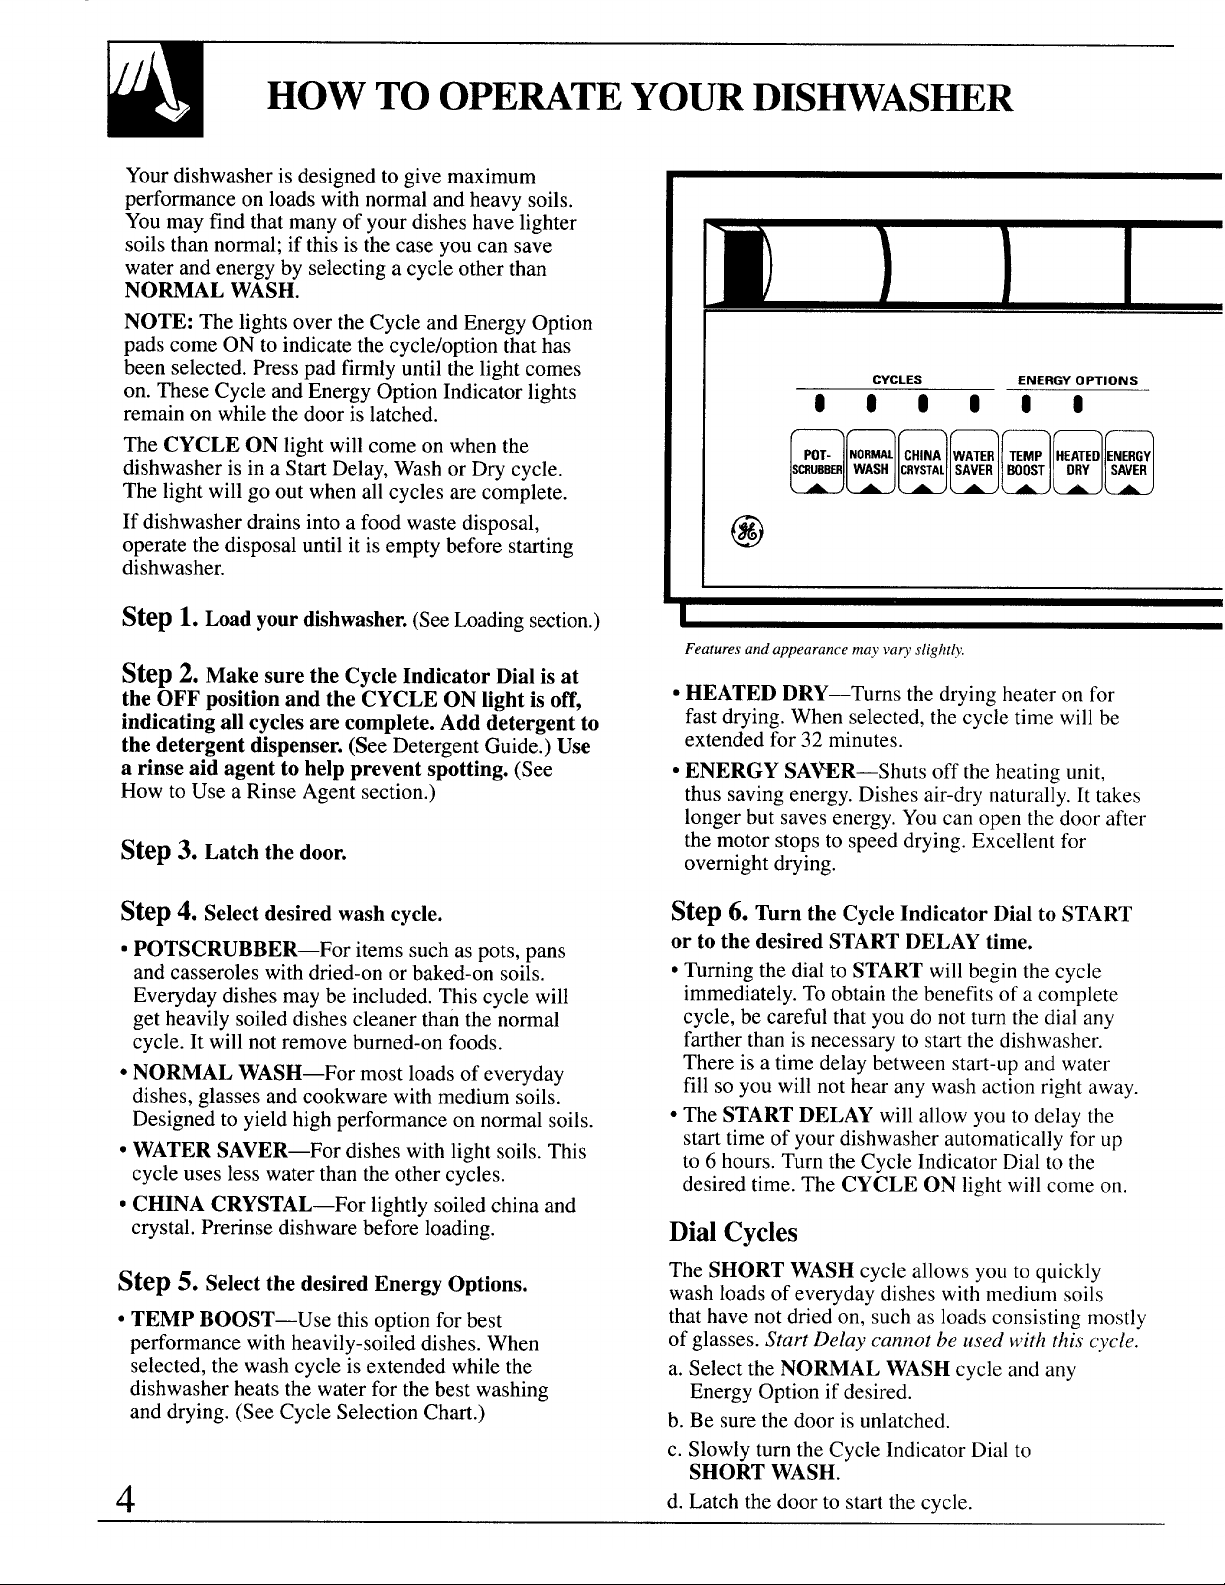
NOTE: The lights over the Cycle and Energy Option
pads come ON to indicate the cycle/option that has
been selected. Press pad firmly until the light comes
on. These Cycle and Energy Option Indicator lights
remain on while the door is latched.
The CYCLE ON light will come on when the
dishwasher is in a Start Delay, Wash or Dry cycle.
The light will go out when all cycles are complete.
If dishwasher drains into a food waste disposal,
operate the disposal until it is empty before starting
dishwasher.
Step
1.Load your dishwasher. (See Loadingsection.)
Step z. Make sure the Cycle Indicator Dial is at
the OFF position and the CYCLE ON light is off,
indicating all cycles are complete. Add detergent to
the detergent dispenser. (See Detergent Guide.) Use
a rinse aid agent to help prevent spotting. (See
How to Use a Rinse Agent section.)
Step3. Latch the door.
CYCLES
080099
POT- NORMALCHINA WATER TEMP HEATEDENERGY
SCRUBB~ WASH CRYSTALSAVER BOOST
UDUDOBB
@
Features and appearancemay ~,a~slightly,
● HEATED DRY—Turns the drying heater on for
ENERGY OPTIONS
fast drying. When selected, the cycle time will be
extended for 32 minutes.
● ENERGY SAVER—Shuts off the heating unit,
thus saving energy. Dishes air-dry naturally. It takes
longer but saves energy. Youcan open the door after
the motor stops to speed drying. Excellent for
overnight drying.
Step 4. Select desired wash cycle.
● POTSCRUBBER—For items such as pots, pans
and casseroles with dried-on or baked-on soils.
Everyday dishes may be included. This cycle will
get heavily soiled dishes cleaner than the normal
cycle. It will not remove burned-on foods.
● NORMAL WASH—For most loads of everyday
dishes, glasses and cookware with medium soils.
Designed to yield high performance on normal soils.
● WATER SAVER—For dishes with light soils. This
cycle uses less water than the other cycles.
● CHINA CRYSTAL—For lightly soiled china and
crystal. Prerinse dishware before loading.
Step 5. Select the desired Energy Options.
● TEMP BOOST—Use this option for best
performance with heavily-soiled dishes. When
selected, the wash cycle is extended while the
dishwasher heats the water for the best washing
and drying. (See Cycle Selection Chart.)
4
Step6. ~rn the Cycle Indicator Dial to START
or to the desired START DELAY time.
● Turning the dial to START will begin the cycle
immediately.To obtain the benefits of a complete
cycle, be careful that you do not turn the dial any
farther than is necessary to start the dishwasher.
There is a time delay between start-up and water
fill so you will not hear any wash action right away.
● The START DELAY will allow you to delay the
start time of your dishwasher automatically for up
to 6 hours. Turn the Cycle Indicator Dial to the
desired time. The CYCLE ON light will come on.
Dial Cycles
The SHORT WASH cycle allows you to quickly
wash loads of everyday dishes with medium soils
that have not dried on, such as loads consisting mostly
of glasses. Start Delay cannot be Llsedwith this cycle.
a. Select the NORMAL WASH cycle and any
Energy Option if desired.
b. Be sure the door is unlatched.
c. Slowly turn the Cycle Indicator Dial to
SHORT WASH.
d. Latch the door to start the cycle.
Page 5
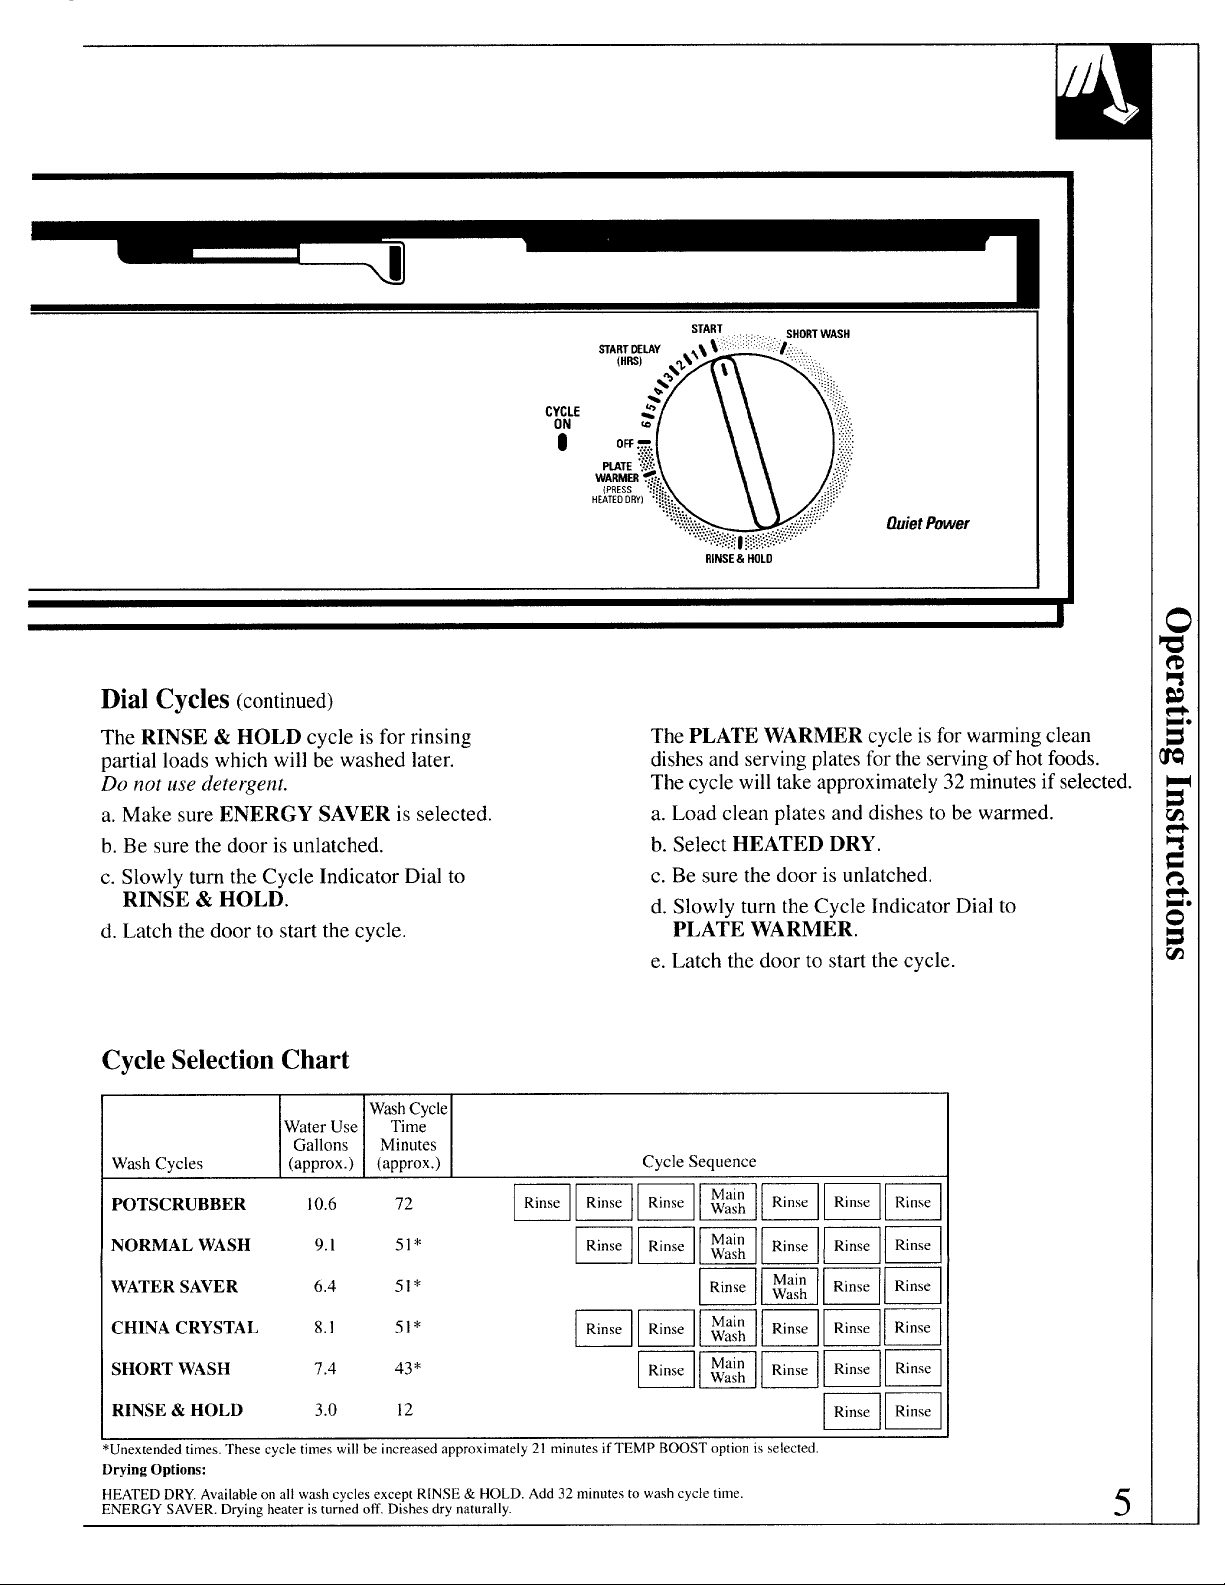
Dial Cycles(continued)
QuietPower
RINSE&“HOLO
The RINSE & HOLD cycle is for rinsing
partial loads which will be washed later.
Do not ltse detergetxt.
a. Make sure ENERGY SAVER is selected.
b. Be sure the door is unlatched.
c. Slowly turn the Cycle Indicator Dial to
RINSE & HOLD.
d. Latch the door to start the cycle.
CycleSelectionChart
WashCycle
Water Use
WashCycles (approx.) (approx.)
POTSCRUBBER 10.6
NORMAL WASH
WATER SAVER 6,4
CHINA CRYSTAL
SHORT WASH
Gallons
9.1
8,1
7.4
Time
Minutes
~~
5]*
51*
5]*
43*
The PLATE WARMER cycle is for warmingclean
dishesand servingplatesfor theservingof hotfoods.
The cycle will take approximately32 minutesif selected.
a. Load clean plates and dishes to be warmed.
b. Select HEATED DRY.
c. Be sure the door is unlatched.
d. Slowly turn the Cycle Indicator Dial to
PLATE WARMER.
e. Latch the door to start the cycle.
Cycle Sequence
mmmmmmm
BEmEBE
mmmm
BmBBmB
WWI-IFIW
RINSE & HOLD 3.0
*Unextended times. These cycle times will be increased approximately 21 minutes If “1’bMPBOLSS1 option ISselected
Drying Options:
HEATED DRY. Available on all !vash cycles except RINSE& HOLD. Add 32 minutes to wash cycle time.
ENERGY SAVER. Drying heater is turned off. Dishes dry naturally.
12
.—
Bm
5
Page 6
GoodDishwashingStartswithHOTWater
To get dishesclean and dry,you need hot water. For good washing and drying,
the entering water must beat least 120°F.To preventdish damage, inletwater shodd not exceed 150”F.
Howto TestWaterTemperature
Check your water temperature with a candy or meat
thermometer.Turn on thehot water faucet nearest low,or if yourwater travelsa long distance from water
the dishwasher.Put the thermometerin a glass and
let the water run continuouslyinto the glass untilthe
temperature stopsrising. If the water temperature is
below 120°F.,adjust your water heater.
Helpful hints: If outsidetemperaturesare unusually
heaterto dishwasher,you may needto setyour water
heater’sthermostatup. Ifyou have not usedhot water
for sometime, the water in the pipes will be cold.Turn
on the hot water faucet atthe sink and allow it to run
untilthewater is hot.Then startthe dishwasher.If
you’verecentlydonelaundryor run hot waterfor
showers,give your waterheatertimeto recoverbefore
operatingthe dishwasher.
To improve washabilityif the water is less than
120°F.and you cannotadjustyour water heater: Select
a longercycle or the TEMP BOOST option and fill
both detergentcups at least half-full with detergent.
How to Use a RinseAgent
The rinse agent makes water flow off dishes
quicker than usual. This lessens water spotting
and makes drying faster, too.
For best dishwashing performance, use of a rinse
agent such as JET-DRY brand is recommended.
Rinse agents come in either liquid or solid form.
Yourdishwasher uses the liquid form.
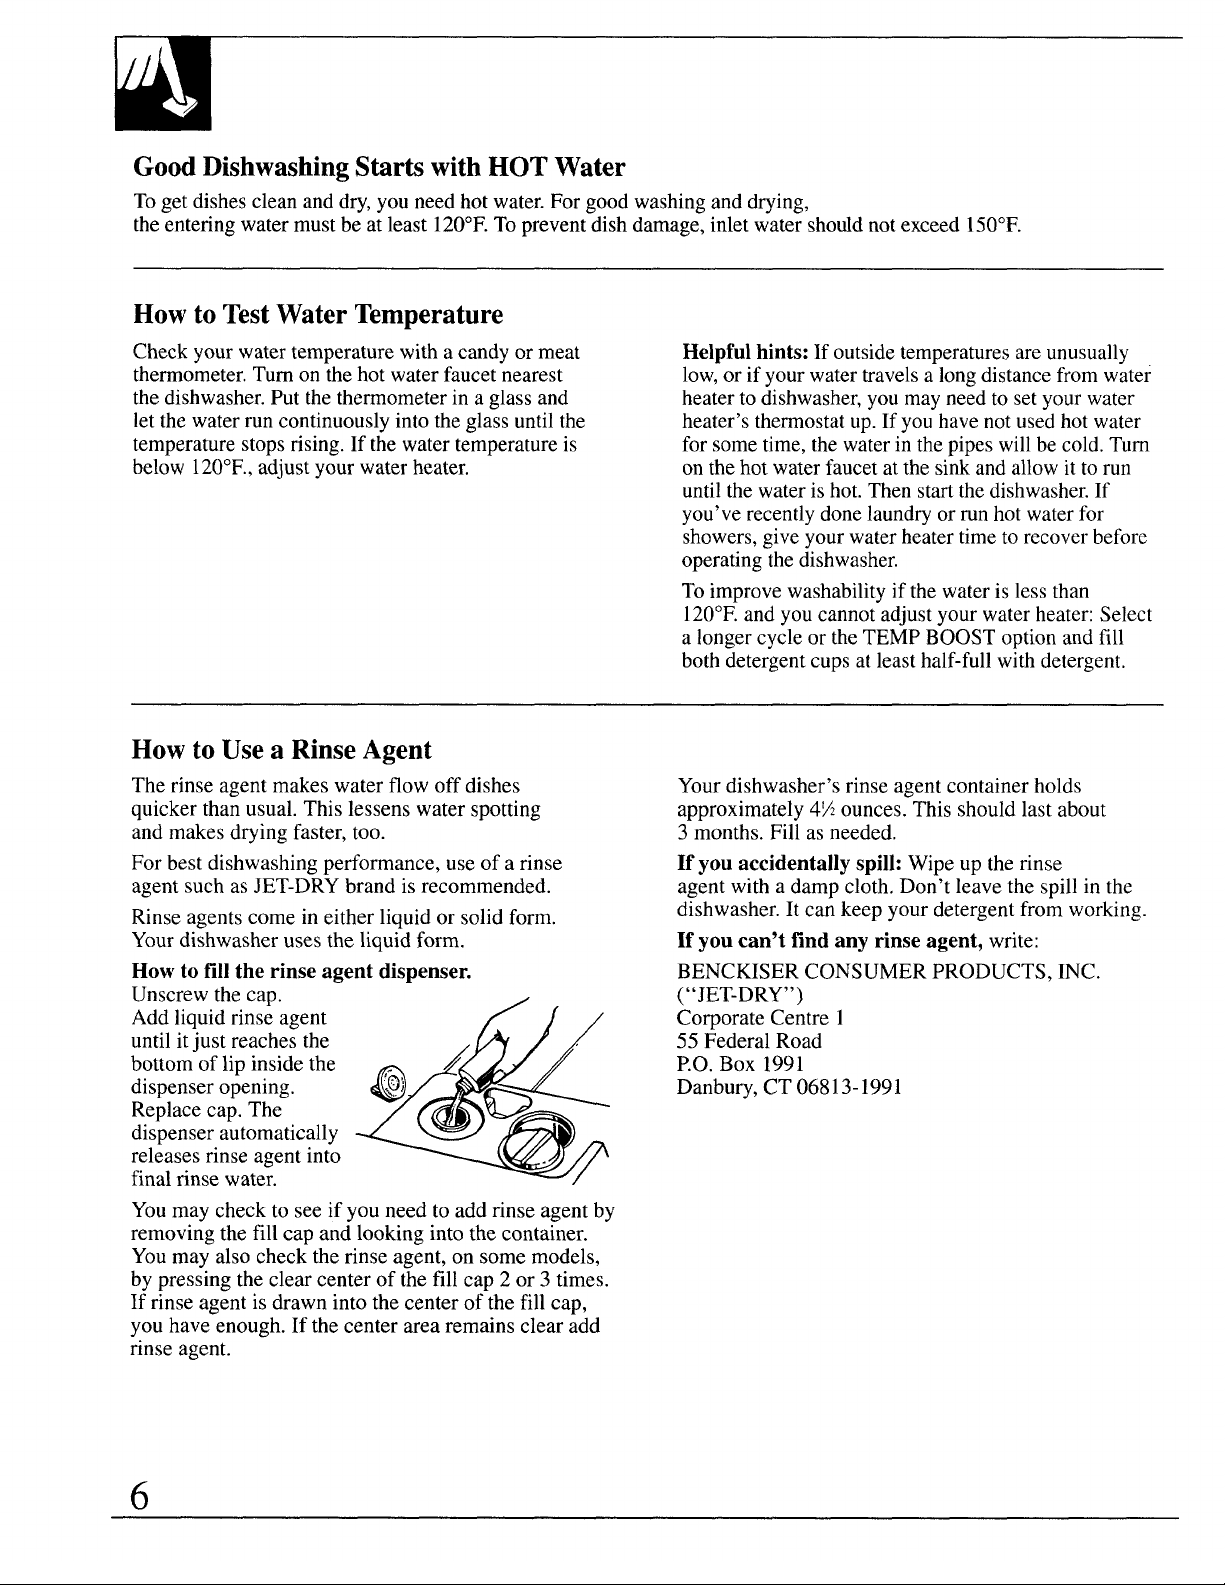
How to fill the rinse agent dispenser.
Unscrew the cap.
Add liquid rinse agent
until itjust reaches the
bottom of lip inside the
dispenser opening.
Replace cap. The
dispenser automatically
releases rinse agent into
final rinse water.
Youmay check to see if you need to add rinse agent by
removing the fill cap and looking into the container.
Youmay also check the rinse agent, on some models,
by pressing the clear center of the fill cap 2 or 3 times.
If rinse agent is drawn into the center of the fill cap,
you have enough. If the center area remains clear add
rinse agent.
4L
Q
/’
~;
D
Yourdishwasher’s rinse agent container holds
approximately 4X ounces. This should last about
3 months. Fill as needed.
If you accidentally spill: Wipe up the rinse
agent with a damp cloth. Don’t leave the spill in the
dishwasher. It can keep your detergent from working.
If you can’t find any rinse agent, write:
BENCKISER CONSUMER PRODUCTS, INC.
(“JET-DRY”)
Corporate Centre 1
55 Federal Road
P.O. Box 1991
Danbury, CT 06813-1991
6
Page 7

Howto Chooseand Usethe RightDetergent
Use only powder or liquid detergent specifically
made for use in dishwashers. Other types willcause
oversudsing.
How much detergent should you USC?That depends.
Is your water “hard” or “soft”? Withhard water,you
need extradetergentto getdishesclean.Whh softwater,
you need lessdetergent.
Your water department can tell you how hard your
water is. So canyourcountyextensionagentor your
area’swater softenercompany.Justcalland ask them
how many “grains” of hardness there are in yourwater.
Toomuchdetergentwithsoftwaternotonlywastes
money,itcanbeharmful.It cancausea permanent
Detergent Dispensers
cloudinessofglassware,called “etching.” An outside
layerof glassisetchedaway!Ofcourse,thistakessome
time.Butwhytakea chance when it’seasyto find out the
hardnessof yourwater.
Keep your detergent fresh and dry. Under the sink
isn’tagoodplaceto storedetergentbecausethere is
too much moisture.Don’tputpowderdetergentinto
thedispenseruntilyou’rereadyto washdishes,either.
(Itwon’tbefreshOR dry.)
If your powder detergent getsold or lumpy, throw it
away. Olddetergentoften won’tdissolve.If you usea
liquiddishwasherdetergent,theseprecautionsare not
necessarybecauseliquiddetergentsdon’t “lump” as
they age or come in contactwithmoisture.
You’ll find two detergent dispensers on the inside
door of your dishwasher.Two, because
some cycles use two washes.
“DetergentUsage Guide“below.
See
(Be sure the CYCLE INDICATOR
DIAL is at OFF position before
adding detergent. Otherwise,
the detergent cup willnot
Main
closeand latchproperly.)
4$
cup
Open
cup
%
\
-Q~
A
Closethe main cup.
NOTE: Toopendetergentcupafterit has
beenclosed,unlatchthedoorand rotatethe ‘-
CycleIndicatorDialafill turn to the OFF
position.Whentheclosedcup contains
soapitisbest thatthedoorbe inapartially closetightly
openpositionbeforerotatingtheCycle
IndicatorDial.Thiswillhelpreducetheantountof
detergentand rinseaidagentspillageintothetub.
DetergentUsageGuide(powderorliquid)
SOFT WATER(O-3grains hardness)
CYCLES
POTSCRUBBER
NORMAL WASH
WATERSAVER Half Full
CHINA CYRSTAL
SHORTWASH
RINSE & HOLD Use
*12
grains and up is extremely hard water. A water softener is recommended. Whhout it, lime
can build up in the water valve. The water valve may stick while open and cause flooding.
Main Cup Open Cup
Half Full ~ Half Full Completely
None Half Full None Completely
nodetergent
MEDIUM WATER(3-7 grains)
Main Cup Open Cup
~ Half Full Completely J Completely
Full Full Full
Usenodetergent
/.
C*
Grasphandle,
rotateand
HARD WATER(7-12grains*)
Main Cup~
Full
Open Cup*
None
Usenodetergent
$Filled Main Cup holds 3 tablespoons;
filled Open Cup holds 2 tablespoons.
IM
v
~
m
z
8
m
u
M-
How to Prepare the Dishes for Washing
If this is your first dishwasher, or if you’re
replacing a much older model, you may wonder
how much preparation your dishes need. Actually
—
NOTE: Youmay also want to consider removing
foods such as mustard, mayonnaise, vinegar, lemon
juice and other foods that can cause discoloration of
very little. Scrape off bones, seeds, skins, toothpicks stainless steel if allowed to remain on dishes for a long
and other hard solids. Remove excessive quantities
of oil or grease.
period of time.
The POTSCRUBBER cycle can wash heavily soiled
dishes and remove dried-on and baked-on soils from
pots, pans and casseroles. Items with burned-on
soils need extra preparation.
&
7
Page 8

HOWTOLOADYOURDISHWASHER
NOTE: Do not load large platters or trays in front right corner
of lower rack. They may prevent detergent from circulating in the wash cycle.
The u~~er rack is best for glasses. CUDSand saucers.
Cups ~~dglasses fit best a~ongthe si~es. This is also
the-placefor dishwasher-safe plastics. Make sure small
plastic items are lodged in tightly so they can’t fall onto
the heating unit. Arrange stemware so that it cannot
move easily. Don’t let the glasses touch each other.
The upper rack is handy for all kinds of odd shapes.
Sauce pans, mixing bowls and other items should
be placed face down. When loading dishwasher safe
plastics make sure each plastic item is secured over
two fingers. This will insure good washing results.
The cup shelves (number may vary) may be placed
in the up or down position to add flexibility. Load the
bottom row first, then fold down the shelf and load the
top row.
8
Page 9

The lower rack is best used for plates, saucers, and
cookware. Large items such as broiler pans and racks
should go in the lower rack along the edge. Load
platters, pots and bowls along the sides, in comers,
or in the back. For best washing results, all items
should be positioned with the soiled side facing the
center of rack.
Don’t let any
itemextend
throughbottom.
Keep center area clear in the lower rack.
The wash tower rises through the center of the lower
rack during the wash and rinse portions of the cycle.
Don’t block it or load tall things next to it. Also, be
careful not to let a portion of an item such as a pot or
dish handle extend through the bottom rack. This could
block the wash arm and ~ause poor washing results.
Put flatware in the removable basket with fork and knife
handlesup to protect your hands. Place spoons in the
basket with handles down. Mix knives, forks and
spoonsso they don’t nest together.Distributeevenly.
Be sure handles do not touch upper rack. For best
washing results be sure not to load large plates and
cookware between silverware basket and the center
of the rack.
To increasethe flexibilityof the lowerrack, the flexible
silverwarebasket may be split.Grasp the silverware
basketat oppositecomers and slideapart. The silverware
basket sectionsshouldbe placed in the lower rack by
hangingthem on the tophoop.
Don’tplacethe silverwarebasket in the front right corner
becausethedetergentcould pour into it and damage
silverware.
9
Page 10

WHATYOUCANUSUALLYWASHSAFELY
INYOURDIS~ASHER
Usually
Material
Ab.rmintrm
China/
Stoneware
Crystal
Non-dishwasher
items—such
as electronic
air cleaner
filters, furnace
filters, paint
brushes, etc.
Glass
Iron
Pewter
Plastics
Stainless steel YES Rinse if not washing immediately. Salty or acidic foods
Sterling silver
and silver plate
Non-stick
coatings
Tin
Wood
Safe
YES
YES Antique, metal-timmed,
YES
NO
YES
NO Iron will rust.
No Pewter tarnishes.
YES
YES
YES After washing, wipe the non-stick coating area with
NO
NO
Exceptions(notsafe)
Somecoloredanodized
aluminumcanfade.
hand-painted or over-the-glaze
patterns fade. Gold leaf
will discolor.
Antique, metal-trimmed or
hand-painted patterns fade,
Gold leaf will discolor.
Don’t put in same silverwme
basket with stainless steel.
Contact between metals can
damage silver.
Don’t wash copper utensils in
the same load. Silver may get a
brown film.
Adhesive used to attach some
hollow-handle knives can loosen.
Tlrrcan rust.
Woodcan warp, crack or lose
its finish with any type of washin~.
SpecialInstructions
Somedarkeningorspottingpossible.Removeby
scouringwithsoap-filledsteelwoolpads.
If in doubt, check with the manufacturer. Or test wash
one piece daiiy for at least a month. Compare with the
rest of the set.
Load securely to prevent movement. Select CHINA
CRYSTALcycle. Check your manufacturer’s instructions
for your crystal.
Do not wash in dishwasher. Damage to dishwasher
and discoloration or staining of dishwasher may result.
If it doesn’t say DISHWASHER SAFE, test one piece in
the
toprack before dishwashing an entire set.
can stain if left on.
Rinse if not washing immediately. Salty or acidic foods can
stain if left on. Dry detergent can cause difficult-to-remove
biack spots. Place in back section of silverware basket to
avoid exposure to detergent from the detergent cup.
vegetable oil to keep it from losing its non-stick quality.
Forgeta dish?Here’swhenyou canaddit.
Add dishes any time during the RINSE & HOLD
cycle. With other wash cycles, you can add dishes
at any time BEFORE the main detergent wash portion
of the cycle.
However, opening the door during any cycle
lessens cleaning power. So try to load everything
at the beginning.
10
Here’s how to add a forgotten dish:
1. Push the door latch to the left. Washing will stop.
2. Wait a few seconds until the water calms. Then
open the door. WARNING: Hot vapor may rise
from opened door.
3. Add dishes you’ve forgotten.
4. Close the door and push the latch to the far right.
When the door is locked, washing will continue.
Page 11

CAREANDCLEANING
USERMAINTENANCEINSTRUCTIONS
Clean the control panel with a lightly dampened
cloth. Dry thoroughly.Do not use abrasives or
sharp objects on the panel. They can damage it.
Clean the outside with a good appliance polish
Appliance Polish Wax & Cleaner (Cat. No.
WR97X0216) is availablefrom GE Service and
Parts Centers.
The inside usually takes care of itself. If it should
wax. The outside cabinet finish is durable, but it ever need cleaning, use a mild cleansing powder.
can scratch. So use no scouring pads, or harsh or Scouring pads and harsh cleaners can mar the finish.
gritty cleaners.
NotUsingYourDishwasherin Winter?ProtectAgainstFreezing.
If your dishwasher is left in an
unheated place during the winter,
ask a service technician to:
● Cut off electrical power to the
dishwasher. Remove fuses or trip
circuit breaker.
● Turn off the water supply.
● Disconnect the water inlet line
from the water valve.
Pump C%ver Screws
● Drain water from the inlet line
and water valve. (Use a pan to
catch the water.)
● Reconnect the water inlet line to
the water valve.
cRemove the plastic pump cover
in the tub bottom and use a
sponge to soak up water in
the rubber boot.
Built-inDishwashersOftenUse anAirGap.KeepIt Clean.
An air gap is a plumbing device.
It protects your dishwasher against
water backing up into it if a drain
clogs. The air gap is not a part of
the dishwasher. And you may not
even have one. Not all plumbing
codes require air gaps.
If you have an air gap, check it at
least once a month. IT IS NOT
PARTOF YOUR DISHWASHER.
IT IS NOT COVERED IN YOUR
WARRANTY.
The air gap is easy to clean.
With most types, first turn off the
dishwasher,then lift off the chrome
cover.Then unscrew the plasticcap
and check for any buildup of grit.
A toothpick makes cleaning easy.
Check the air gap any time your
dishwasher isn’t draining well.
11
Page 12

HOWTOCHANGECOLORPANELS
If you are redecorating, you can change your dishwasher’s front panel to
match or blend with your new colors by flipping it over. Each side of each
panel is a different color. You may also paint a panel with a color of your
own choice.
Howto Changethe DoorPanel
1. Take out trim screws on either side of the
dishwasher door. Remove the side trim.
2. Slide the door panel out.
(Careful—edges may be sharp.)
3. Turn the door panel around and put the color you
want in front.
4. Replace the door panel, side trim and screws.
Howto Changethe LowerPanel
Top
Trim
‘“in<~inin
\
-~ *“I
1. Remove the bottom panel attachment screws.
2. On models without top mounting screws, remove
the entire access assembly by rotating the bottom
out and lifting it up and over the retaining tabs.
3. On models with top mounting screws, remove
g ‘hescrews
Take out the top trim screws and remove the
4.
top trim.
5. Slide the color panel(s) up and out and put the
color you want in front.
6. Replace the top trim and screws.
7. Replace the entire access assembly by reversing
the steps.
NOTE: Do not operate
dishwasherwhilechanging
panelsor whenloweraccess
panelis removed.
“L-
Bottom Panel Attachment Screws
Adding1/4”WoodInserts
Color insertpanels for both the
door and the lower panel can be
replaced by 1/4”thick wood inserts
to match your kitchen cabinets.
Get them from your nearest
cabinet or lumber dealer.
Dimensions for 1/4”wood inserts:
Door Panel: 19X”H x 23X6”W.
Lower Panel:
3’~6° H x 23%6”W.
ColorPanels
If youhaveredecoratedandthe
colorpanelsin your dishwasher
do notblendwithyour new color
schemeyou may orderan additional
colorpanel.
Specifythecolorpanelnumber
when ordering:
GPF24 White/Almond
GPF26 Harvest/Black
GPF27 Black/White
OrderingInformation
Color Panels are available for
$5.00(shipping and handling).
Make check payable to General
Electric Co.
Order a colorpanel from:
Dri-ViewManufacturing
4706 Allmond Ave.
Louisville,KY 40209
Page 13

QUESTIONS?
USETHISPROBLEMSOLVER
●
PROBLEM
DISHWASHER
WON’T RUN
UNUSUAL NOISE
DISHES DON’T DRY
UNCLEAN DISHES
AND FLATWARE
POSSIBLE CAUSE
A fuse in your home maybe blown, or the circuit breaker tripped. Replace fuse or
reset circuit breaker. Remove any other appliances from the circuit.
Utensils may not be secure on rack pins, or something small may have dropped from the
rack. Water is causing utensils to rattle. Make sure everything is secured in dishwasher.
Make sure inletwater temperature is correct. (See How to TestWaterTemperaturesection.)
Unload the bottom rack first. Water from dishes in the top rack maybe spilling into
the bottom rack.
Make sure the Cycle On light is off, indicating the dry cycle (if selected) is complete.
Check for improper loading. Dishes shouldn’tnest together. Avoid overloading.
Check the rinse agent dispenser to see that it’s not empty.
Check inlet water temperature. It should be at least 120”F. (To test, see How to Test
Water Temperature section.) Try to use the Temp Boost option.
Waterpressure may be temporarily low. Turn on a faucet. Is water coming out slower
than usual? If so, wait until pressure is normal before using your dishwasher.
Plugged air gap. (See Care and Cleaning section.)
Improper rack loading. (See Loading section.)
Choose another cycle to give you longer washing time.
DETERGENT LEFT
IN DISPENSER CUPS
DETERGENT CUP
LID WON’T LATCH
A~ER ADDING
DETERGENT
YELLOW OR
BROWN FILM
CYCLE AND OPTION
INDICATOR LIGHTS
STAYON WHEN
CYCLE 1S
COMPLETED
Water may not be reaching the detergent cups. Move dishes that maybe blocking
detergent cup.
The dispenser cover may not be opening or may be blocked by improperly loaded
items. If you used a powder detergent, open the cup and remove any caked-on
detergent. If the cup still doesn’t open automatically, call for service.
Detergent may be old. If the powder detergent is hard or caked in the box, throw it away.
The detergent may not be working well. Try another brand,
Cycle Indicator Dial must be in OFF position and Cycle On light must be off for
cup lid to close and latch properly. If you unlatch the door and open it to dry your
dishes, the Cycle Indicator Dial does not advance by itself.
Tea or coffee can stain cups. Remove the stain by hand, using a solution of 1/2 cup
bleach and 3 cups warm water.
An overall yellow or brown film on dishes or glassware can be caused by iron
deposits in water. A special filter in the water supply line is the only way to correct
this problem. Your water softener company can tell you about the filter.
Yellowfilm on sterling silver results when you wash copper utensils in the same load.
Silver polish will usually remove this stain,
This is normal. Unlatch the door to turn off the Cycle and Energy Option Indicator lights.
NOTE: The Cycle On light will stay on until all cycles are complete. Wait until this
light goes off to unlatch the door or a cycle will be interrupted.
(continued next page)
13
Page 14

THEPROBLEMSOL~R
(continued)
PROBLEM
SPOTSAND
FILMINGUN
GLASSESAND
FLA~ARE
POSSIBLE CAUSE
Spottingcanbecausedbyallthese things:
● Extremely hard water. (See How to Choose and Use Detergent section,)
● Low inlet water temperature. (See How to Test Water Temperature section.)
● Overloading the dishwasher.
● Improper loading. (See Loading section.)
● Old or damp powder detergent.
● Phosphate level in detergent too low. (See How to Choose and Use
Detergent section.)
● Rinse agent dispenser empty. (See How to Use a Rinse Agent section.)
● Too little detergent. (See How to Choose and Use Detergent section.)
Local water conditions and personal preferences vary.Try several brands of
detergents to find one that gives the best results for you. A liquid dishwasher
detergent may help reduce filming.
To remove stubborn spots and film from glassware:
1, Remove all metal utensils from the dishwasher.
2. Do not add detergent,
3. Select POTSCRUBBER cycle.
4. Start the dishwasher and allow to run for 18 to 22 minutes. The dishwasher will
now be in the main wash.
5. Then open the door and pour 2 cups (500 ml) of white vinegar into the bottom of
the dishwasher.
6, Close the door and allow to complete the cycle.
If vinegar rinse doesn’t work: Repeat as above, except use 1/4cup (60 ml) of citric
acid crystals instead of vinegar. (Most drugstores carry citric acid crystals. If yours
doesn’t, call GE Factory Service.)
Using a vinegar or citric acid crystal rinse more than twice a month? Consider a home
water softener.
CLOUDINESS ON
GLASSWARE
CHIPPING OF CHINA
14
If vinegar or citric acid crystal rinse doesn’t work, the cloudiness is “etching.”
The film cannot be removed.
It can be prevented: Use less detergent if you have soft water. Wash gIassware in
the shortest cycle that will get them clean.
Water temperature entering dishwasher exceeds 150”F.
Rough handling can cause chipping. Load with care. Make sure glassware and china
are secure and can’tjar loose. (See Loading section.) Make sure tall glasses and
stemware will clear the top of the tub when you push the rack into the dishwasher.
Always use the top rack for delicate items.
Page 15

PROBLEM
POSSIBLE CAUSE
BLACK OR GRAY
MARKS ON DISHES
SMALL AMOUNT OF
WATERSTANDING
IN THE BOTTOM
OF THE TUB
WATERWON’T PUMP
OUT OF THE TUB
SUDS IN THE TUB
DISHWASHER
LEAKS
Aluminumutensils often leave marks when they rub against dishes. Remove marks
with a mild abrasive cleanser.
Water around the outlet on the tub bottom at the back of the tub is normal. It is clean
water. It’sthere to keep the water seal lubricated.
If the entire bottom of the tub has water, you may have a drain problem. Clean the air
gap, if you have one. (See Care and Cleaning section.)
Check the kitchen sink. Is it draining well? You may need a plumber.
If dishwasher drains into disposer, run disposer to clear. Be sure disposer is not
clogged.
Sudsing detergents are not meant for dishwashers. USE ONLY AUTOMATIC
DISHWASHER DETERGENTS TO AVOID SUDSING.
To remove suds from the tub: Open the dishwasher, Let suds evaporate. Add
1gallon of cold water to the tub. Close and latch the dishwasher. Pump out water
by slowly turning the control dial until a drain period is reached.
Repeat if necessary.
Suds can cause unit to overflow. That’s why it’s so important to use a detergent that’s
designed for automatic dishwashers.
Spilling the rinse agent can cause foam during washing. This can lead to overflowing.
Wipe up accidental spill of rinse agent with a damp cloth.
MOTOR HUMS
Dishwasher has not been used on a regular basis.
If you do not use your dishwasher often, set it to fill and pump out once every week.
This will help keep the seal moist, and the garbage disposer clear,
STAINING OF
TUB INTERIOR
Some detergents contain colorant (pigment or dyes) that will discolor the tub
interior with extended use. Check the detergent cup for signs of any discoloration.
If cup is discolored, change to detergent without any colorant.
SOUNDS YOU
WILL HEAR
You’llhear occasional clicking sounds. These are normal.
● Soft food disposal shredding action.
● Drain valve opening to pump water out.
● Timer control as cycle progresses.
● Detergent cup opening.
During the drying period:
● The motor stops,
VAPOR AT
THE VENT
Water vapor comes through the vent by the door latch during drying and when
water is being pumped out.
If you need more help.. call, toll free:
GE Answer Center@
800.626.2000
consumer information service
15
Page 16

NOTES
16
Page 17

NOTES
17
Page 18

IFYOUNEEDSERVICE...
Toobtainservice,seetheConsumerServicespagein the NEXT, if you are still not pleased, write all the
backofthisguide.
We’re proud of our service and want you to be
pleased. If for some reason you are not happy with the
service you receive, here are three steps to follow for
further help.
FIRST, contact the people who serviced your FINALLY,if your problem is still not resolved, write:
appliance. Explain why you are not pleased. In most
cases, this will solve the problem.
details—including your phone number—to:
Manager, Consumer Relations
GE Appliances
Appliance Park
Louisville, KY 40225
Major Appliance Consumer Action Panel
20 North Wacker Drive
Chicago, IL 60606
18
Page 19

WdllBeThere
With the purchase ofyour new GEappliance, receive the assurance that ifyou ever need
information or assistance from
GEAnswerCentep
Whatever your question about any GE major appliance, GE Answer Center@
information service is available to help, Your call—and your question—till be
answered promptly and courteously. And
Center@serviceisopen 24hoursaday,7daysaweek.
lmHomeRepairSewice
80MEXARES(80W32-2737)
AGE consumerserviceprofessionalwillprovideexpertrepairservice,
scheduledatatimethat’sconvenientfor you. ManyGE Consumer Service
company-operatedlocationsofferyouservicetodayor tomorrow,or atyour
convenience (7:00a.m.to7:00p.m. weekdays,9:00a.m.to2:00p.m. Saturdays).
Our factory-trainedtechniciansknowyourapplianceinsideandout–so most
repairscanbe handledinjust one visit.
GE,we’llbe there. All you have to do is call—toll-free!
youcancallanytime,GEAnswer
ForCustomersWfihSpecialNeeds...
Upon request, GEwillprovide Consumerswithimpaired hearing or speech who have
Braillecontrols for avarietyof
GEappliances, and a brochure to
assistin planning a barrier-free information or service.
kitchen for persons with limited
mobility. To obtain these items,
free ofcharge, call800.626.2000.
accessto a TDDor a conventional teletypewritermay
call800-TDD-GEAC(800-833-4322)to request
SemiteContracts
80M2&2224
You canhavethesecurefeelingthatGE Consumer Servicewillstillbe there
afteryourwarrantyexpires.PurchaseaGEcontractwhileyourwarrantyisstill
ineffectandyou’ll receiveasubstantialdiscount.Withamultiple-yearcontract,
you’re assuredoffutureserviceattoday’sprices.
PartsandAccessories
8&J&62&2002
Individualsqualified to servicetheir ownappliances
can haveneeded parts or accessoriessent directly to
theirhome. The GEpartssystemprovidesaccessto over
47,000parts...and all GEGenuine Renewal Partsare
fullywarranted.VISA,kIasterCardandDiscovercards
areaccepted.
User maintenance instructions contained in this booklet
coverprocedures intended to be performed
Otherservicing
servicepersonnel. Caution mustbe exercised, since
improperservicing
byanyuser.
generallyshodd bereferred to qualified
maycauseunsafeoperation.
Page 20

YOUR GE DISHWASHERWITH
PERMATUp INTERIOR
WARRANTY
Staple sales slip or cancelled check
here. Proof of original purchase date -
is needed to-obtain service
under warranty.
II
II
WHATIS COVERED
FULLONE-YEARWARRANTY
Foroneyearfrom date of original
purchase,wewill provide,free of
charge,partsand servicelabor in
your hometo repairor replaceany
partofthedishwasherthat fails
becauseof a manufacturingdefect.
LIMITEDSECOND-YEARPARTS
WARRANTY
Forthe secondyearfrom date of
originalpurchase,we will provide,
free of charge,replacementpartsfor
anypati of thedishwasherthatfails
becauseof a manufacturingdefect.
Youpay for the servicetrip to your
homeand servicelaborcharges.
WHATIS NOT COVERED
LIMITED FIVE-YEAR
RACK/ELECTRONICPARTS
WARRANTY
Forfiveyearsfrom date of original
purchase,we will provide,free of
charge, replacementpartsfor any
● rackthat rustsbecauseof a
manufacturingdefect
or any partof
● e/actroniccontro/modulethat fails
becauseof a manufacturingdefect.
Youpayfor the servicetrip to your
homeand servicelaborcharges.
FULL TWENTY-YEARTUB/DOOR
LINER WARRANTY
Fortwentyyearsfrom dateof original
purchase,we will provide,free of
charge,partsand servicelabor in
your hometo repairor replacethe
PermaTu~ or stainless steel tub
or door /inerif it fails to containwater
becauseof a manufacturingdefect.
● Servicetrips to your hometo teach
you howto use the product.
Readyour Use and Carematerial.
If you then haveany questions
aboutoperatingthe product,please
contactyour dealeror our
ConsumerAffairsofficeat the
addressbelow,orcall,toll free:
GE Answer Center@
800.626.2000
consumer information setvice
● Improper installation.
Ifyou have an installationproblem,
contactyourdealeror installer.You
are responsiblefor providing
***** **************************
Thiswarrantyisextendedto
the original purchaserand any
succeedingownerfor products
purchasedfor ordinaryhomeusein
the 48 mainlandstates,Hawaiiand
Washington,D.C. InAlaska the
warrantyisthesame exceptthat it is
LIMITEDbecauseyou must payto
shipthe producttothe serviceshop
or for the servicetechnician’stravel
coststo your home.
All warrantyservicewill be
providedby our FactoryService
Centersor byour authorized
CustomerCare@servicersduring
normalworking hours.
Should
service,duringwarrantyperiod or
beyond,call 800-GE-CARES
(800-432-2737).
● Replacementof housefuses or
● Cleaningor servicingof air gap
● Failureof the productif it is used for
● Damageto productcausedby
WARRANTORISNOTRESPONSIBLE
FORCONSEQUENTIALDAMAGES.
yourapplianceneed
adequateelectrical,plumbing, and
other connecting facilities.
resettingof circuitbreakers.
deviceindrain line.
otherthan its intendedpurposeor
usedcommercially.
accident,fire, floods or acts of God.
Some states do not allow the exclusion or limitation of incidental or consequential damages, so the above limitation or exclusion
may not apply to you, This warranty gives you specific legal rights, and you may also have other rights which vary from state to state,
To knowwhat your legal rights are in your state, consult your local or state consumer affairs office or your state’s Attorney General.
If further help is needed concerning this warranty, write:
Manager—Consumer Affairs, GE Appliances, Louisville, KY 40225
Thisbook is printed on recycled paper.
~
2-95 CG
Warrantor: General Electric Company
GSD1206
GSD1236
Printedin Louisville, KY
 Loading...