

Page 1
contents
D
Air Gap 15 ProblemSolver
ApplianceRegistration
Careand Cleaning
China,Cn@al,Sterlimz
ConsumerServices
CycleFeatures 5
Detergent,Detergent Guide 6,’7 Wi&erStorage
DispenserCups
Energy-SavingTips
Features 4
FrontPanel ColorChange
Loaciiw
Model and SerialNumbers
O~eratin~Guide
CycleSelection 5
DrvirwChxions 4,5
SoilLevel
POTSCRUBBERCycle 4,5,7 8117.626.20LU7
Built-inModel GSDI140P
2
15
11
19
7
2
8-:;
2
4,5
7
RinseAgent
SafetyInstructions
UserMaintenanceInstructions 15
warranty .
WaterTemperature
GEAi9swerCentera
12-14
6
3
BackCover
6
15
Page 2
If youneedservice
Before using‘your
dishwasher,read this
book W“efwy.
It is intendedto help you
operate and maintainyournew
dishwasherproperly.
Keep it handy for answers to
your questions.
If you don’t understandsomething
or need more help, write (include
your phone number):
Consumer Affairs
GE Appliances
Appliance Park
Louisville, KY 40225
VV~i@
dom themodeland
serialInRmberso
You’llfind them on a label
fastened to the tub walljust inside
the dishwasher door.
These numbers are also on the
Consumer Product Ownership
Registration Card that came with
your dishwasher.Before sending
in this card, please write these
numbers here:
ModelNumber
SerialNumber
Use these numbers in any
correspondence or service calls
concerning your dishwasher.
If
youreceiveda
da-mageddishwasher...
Immediately contact the dealer
(or builder) that sold you the
dishwasher.
savetime
andmoney.
Bdkm! ‘you HXp?st
service...
Check the ProblemSolver(pages
12through 14),It lists causes of
minor operatingproblemsthatyou
can correct yourself.
To obtain a Spanish language
version of thisbook,call
GE Answer Center@
800.626.2000
consumer informationservice.
Para obtener la versi6n en
espaiiolde este manual,
name a
GE Answer Center?
servicio de informaci(m
para el consumidor,
teli$fono800.626.2000.
.
Energy=savingtips
The power consumption of your
dishwasher can be minimized if
you follow these suggestions:
e(@mate dishwasher onlywhen
it%fu~l.Let the dishes accumulate
in dishwasher. When you put in
only a partial load, use the RINSE
& HOLD cycle to rinse off heavy
soils. Be sure to latch the door
when waiting for a full load.
This helps keep soils moist, easier
to remove.
UIIf you don‘t need your dishes
right away, use your ENERGY
SAVER noheatfeaturethat turns
the drying heater off automatically.
Dishes dry naturally over a longer
period such as overnight.
QAlways selectthe cyclethat
uses least amountofwater that
NmImve ‘thesoilfromthe
Wiu
load. See pages 4 and 5.
0Turn your water heater down to
120°F and use the WATER HEAT
option. Make sure the entering
water temperature is no less than
120”F(see page
6).
To obtainservice,seethe
ConsumerServicespage in the
back of this book.
We’reproudof our serviceand
want you to be pleased. If for some
reason you are not happy with the
serviceyou receive, here are three
stepsto followforfurtherhelp.
FIRST,contact the peoplewho
servicedyour appliance.Explain
why you are not pleased.In most
cases, this will solvetheproblem.
NEXT, if you are still notpleased,
write all the details—including
your phone number—to:
Manager,Consumer Relations
GE Appliances
AppliancePark
Louisville,Kentucky40225
FINALLY,if your problem is still
not resolved, write:
Major Appliance Consumer
Action Panel
20 North WackerDrive
Chicago, Illinois 60606
o
2
Page 3
IMPORTANTSAFETY INSTRUCTIONS
E?
mad $311instructionsbefore usingthisappliance
-
WARNING—Whenusing this
appliance,always exercisebasic
safetyprecautions,including
the foHowing:
.
@Usethisappiianceonlyforits
intendedpurpose,asyouwillfind
describedin this UseandCare
Book.
@This dishwasher must be
propedy installed and
located in accordancewith
the InstallationInstructions
beforeit is usd If you did ‘
notreceive an Installation
Instructions sheet with your
dishwasher,you can obtainone
by contacting the service
location nearest you.
—This appliance must be
connected to a grounded metal,
permanent wiring system; or an
equipment-grounding conductor
must be run with the circuit
conductors and connected to the
equipment-grounding terminal
or Iead of the appliance.
—Connect to a properly rated,
protectedandsized power-supply
circuit to avoid electrical
overload.
QDo not store or use
combustible materials9
gasoline or other flammable
vapors and liquids in the
vicinity of this or any other
appIia~]ee.
~Use only powder or liquid
detergents or wetting agents
recommended for use in a
dishwasher.
~Do not washplasticitemsunless
marked “dishwashersafe” or the
equivalent.For plasticitemsnotso
marked,check the manufacturer’s
recommendations.
~Load lightplastic items so
they will not becomedislodged
and drop to the bottomof the
dishwasher—they might come
into contactwith the heating
unit and be damaged.
TOminimize the possibility
of injury.
oWhen loading items to be
washed:
A. Locate sharp items so that
they are not likelyto damage
the door seal, and
B. Load sharp knives with the
handles up to reduce the risk
of cut-type injuries.
~Do not touch the heating
element during or immediately
after use.
eDo not operateyourdishwasher
unless all enclosure panels are
properly in place.
eDo not tamper with controls.
~Do not abuse, sit on, or stand
on the door or dish rack of the
dishwasher.
~ Close supervision is necessary
if this appliance is used by or
near children. Do not allow
children to play inside, on or
with this ap~liance or any
discarded appliance. Dispose
of discarded appliances and
shipping or packing material
properly. Before discarding a
dishwasher, remove the door
of the washing compartment.
~ Keep all washing detergents
and wetting agents out of the
reach of children, preferably in
a locked cabinet. Observe aH
warnings on container labels to
avoid personal injury.
@To minimize the possibility
of electric shock,disconnect
this appliancefrom the power
supply before attemptingany
maintenance.
Note: Turning the control dial
to the OFF position does not
disconnectthe appliance
from the power supply.We
recommend having,.a.qualified.
technicianserviceyour appliance
w~m~–m~o~~~ cx3
is produced by the chemical
action within your water heater.
It can accumulate in the water
heater and/or water pipes i-fhot
water has not been used for a
period of two weeks or longer.
HYDROGEN GAS IS
13XPLOSPLE.To prevent the
possibility of damage or injury,
if you have not used hot water
for two weeks or more, or
moved into a residence in which
the hot water system may not
have been used for some time,
turn on all hot water faucets and
allow them to run for several
minutes before using any
electrical appliance which is
connected to the hot water
system. This will allow any
hydrogen gas to escape. Also,
since the gas is flammable, do
not smoke or use an open flame
or appliance during this process.
SAVE THESE
INSTRUCTIONS
—
1-
E$
w
m
Page 4
JydesO/MOr Ewrw .Wor Opic+?a
6!3
Pofscrubberff40
0 RINSE
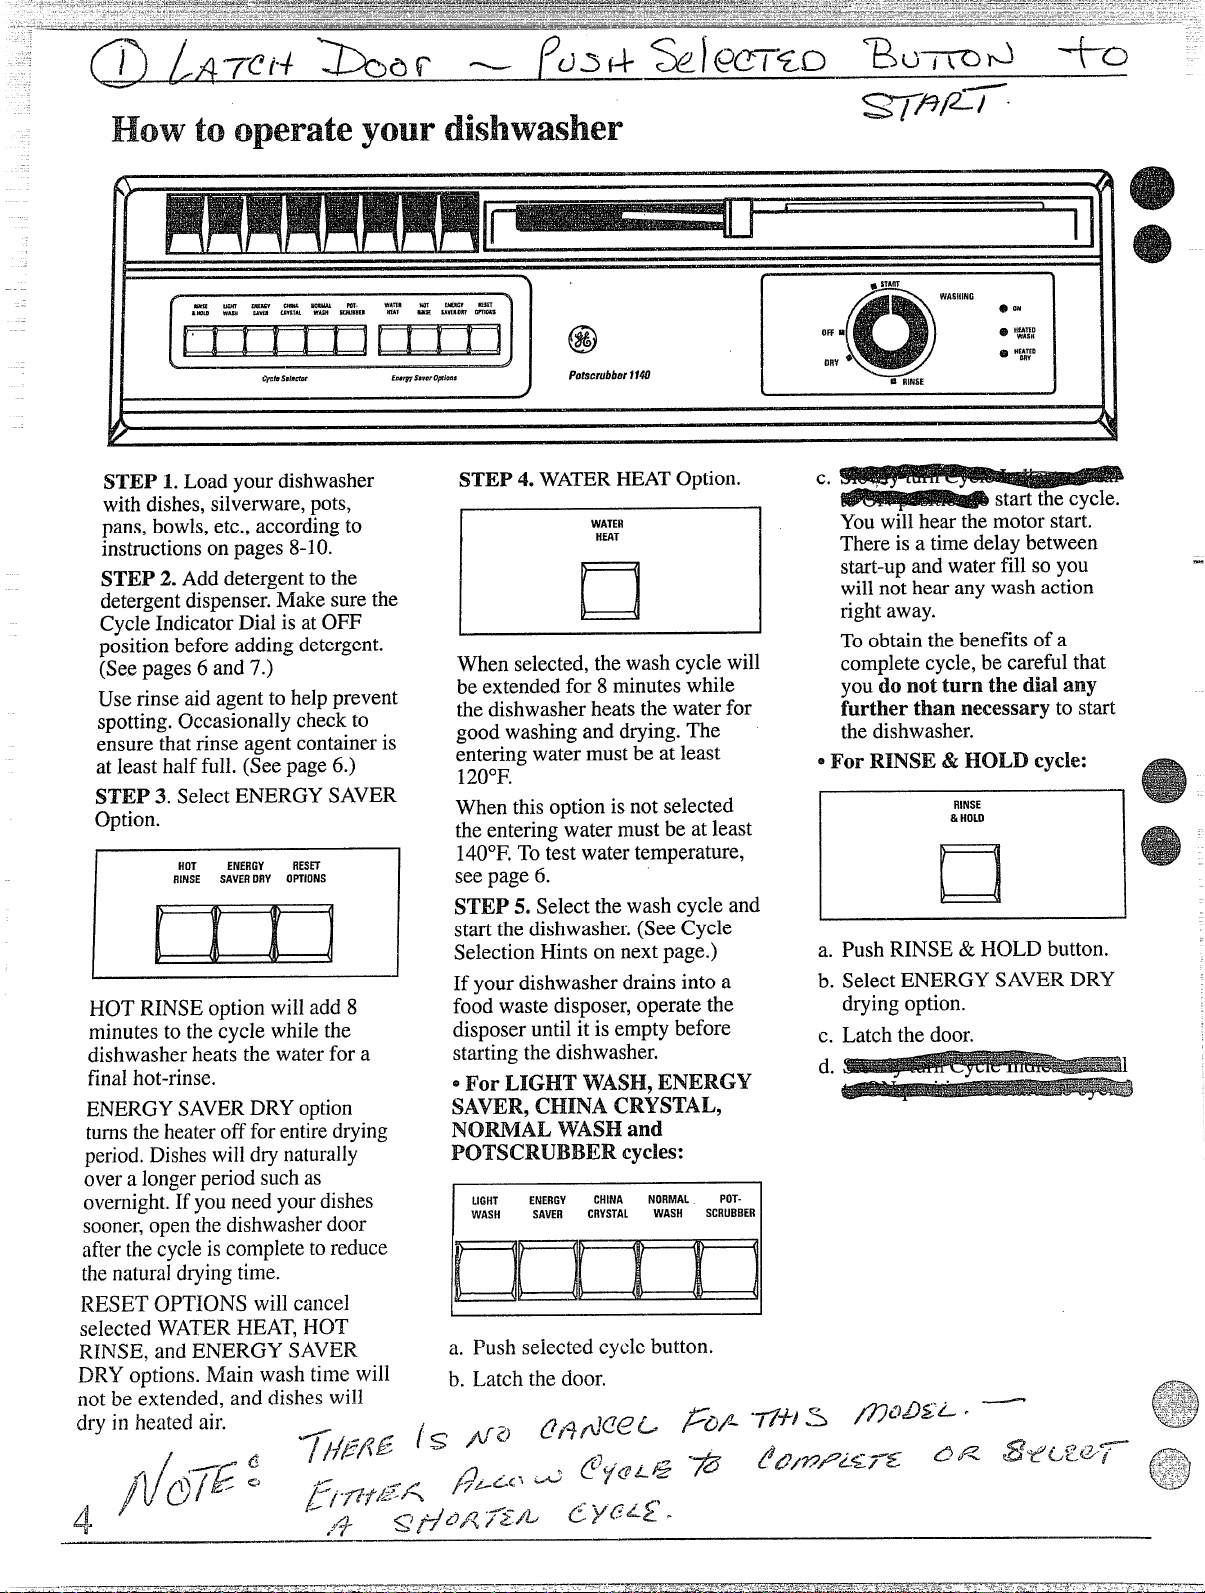
S’I’EFL Load your dishwasher
with dishes, silverware,pots,
pans, bowls, etc., accordingto
instructionson pages 8-10.
STEP 2. Add detergentto the
detergentdispenser.Make sure the
Cycle Indicator Dial is at OFF
positionbefore adding detergent.
(See pages 6 and 7.)
Use rinse aid agent to help prevent
spotting.~ccasionally check to
ensure that rinse agent container is
at least half full. (See page 6.)
STEP 3. Select ENERGY SAVER
Option.
HOT ENERGY RESIZ
RINSE SAVERDRY OPTIONS
I
KEEN
HOT RINSE option will add 8
minutes to the cycle while the
dishwasher heats the water for a
final hot-rinse.
ENERGY SAVERDRYoption
turnsthe heateroff forentiredrying
period.Disheswilldry naturally
overa longerperiod such as
overnight.If you need yourdishes
sooner,openthedishwasherdoor
after thecycleiscomplete toreduce
thenatural dryingtime.
RESETOPTIONSwillcancel
selectedWATERHEAT,HOT
RINSE,andENERGYSAVER
DRYoptions.MainwashtimewiH
notbe extended,anddisheswiH
dry in heatedair.
~/./j$fllz
---7/
&
/
STEP 4. WATERHEATOption.
WATER
I
HEAT
El
When selected, the wash cycle will
be extended for 8 minutes while
the dishwasher heats the water for
good washing and drying. The
entering water must be at least
120”F.
When this option is not selected
the entering water must be at least
140°F.To test water temperature,
see page 6.
I
STEP 5. Selectthe wash cycle and
start the dishwasher. (See Cycle
Selection Hints on next page.)
If your dishwasher drains into a
food waste disposer, operate the
disposer until it is empty before
starting the dishwasher.
~
ForLIGHTWASH, ENERGY
SAVER, CHINA Cm!YiH’fm,
NORiMAL WASH and
POTSCRIJBBER cycles:
LIGHT ENERGY
WASH SAVER CRYSTAL
I
a. Push selected cycle button.
b. Latch the door.
CHINA NORMAL
WASH
POT-
SCRUBBER
Youwill hear the motor sta;t.
There is a time delay between
start-upand water fill so you
will not hear any wash action
right away.
To obtain the benefits of a
complete cycle, be careful that
you do not turn the dial any
further than necessary to start
the dishwasher.
~For RINSE & HOLD cycle:
I
I & HOLD
RINSE
❑
Push RINSE & HOLD button.
a.
Select ENERGY SAVER DRY
b.
drying option.
c.
Latch the door.
d.
I
I
Page 5
—
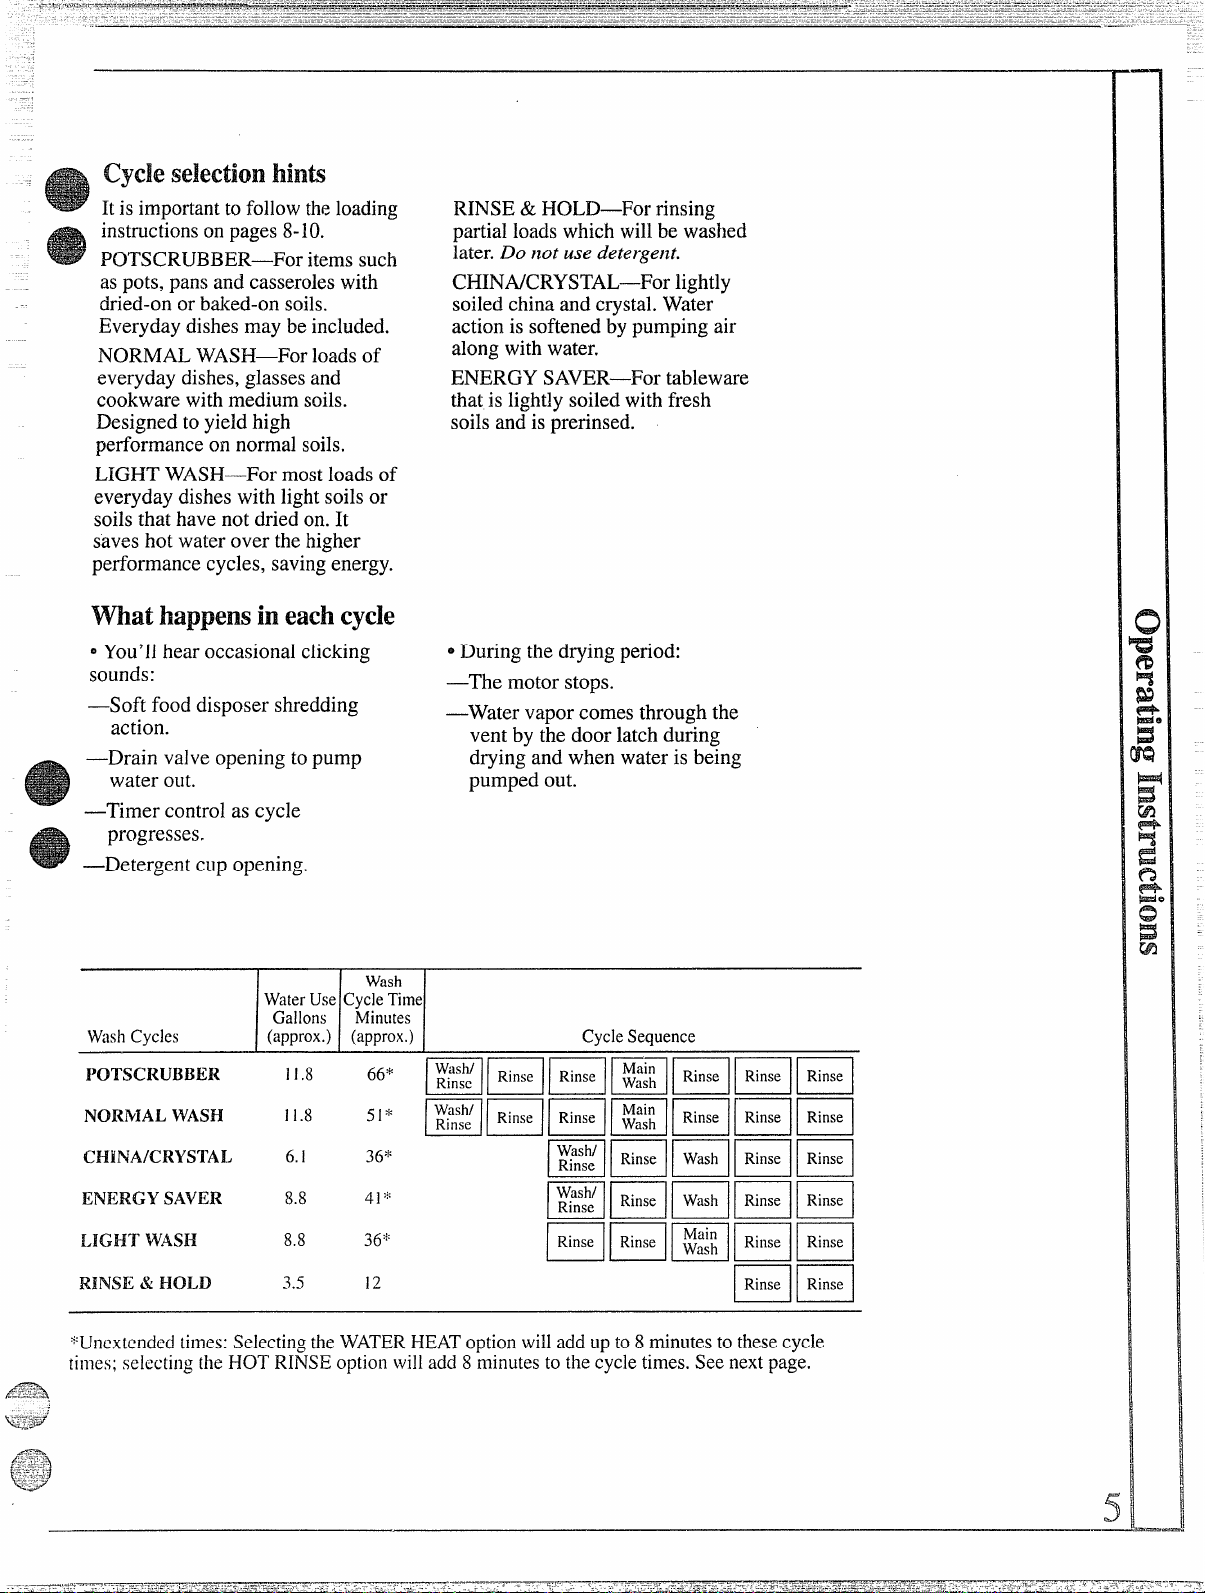
cycleSelectionhints
Ris important to followthe loading
instructionsonpages 8-10.
POTSCRUB13ER-For itemssuch
aspots, pansand casseroleswith
dried-on or baked-onsoils.
Everydaydishesmay be included.
NORMAL WASH—Forloadsof
everydaydishes,glassesand
cookwarewith medium soils.
Designedto yield high
performanceon normal soils.
LIGHT WAS13-For mostloads of
everyday dishes with lightsoilsor
soilsthat have not dried on. It
saveshot water over the higher
performance cycles, savingenergy.
mathappensh eachcycle
oYou’llhear occasional clicking
sounds:
—Soft food disposer shredding
action.
—Drain valve opening to pump
water out.
—Timer control as cycle
progresses.
—Detergent cup opening.
RINSE & HOLD—Forrinsing
partial loadswhich will be washed
later.Do not use detergent.
CHH’iA/CRYSTAL-For lightly
soiledchinaand crystal.Water
actionis softened~y pumping air
along with water.
ENERGY SAVER—Fortableware
that is lightly soiledwith fresh
soilsandisprerinsed.
~During the drying period:
—The motor stops.
—Watervaporcomes through the
vent by the door latch during
drying and when water is being
pumped out.
I --l
I
.<*
~:w~
Wash
Minutes
““ REIEEIBEBHB
‘l” F@ilBBmmHE
3’:K
Q]>!
3’:,
12
Cycle Sequence
EEIEEIEIEEIEEI
EEiilmBm
EIHEIEIEEI
Elm
WashCycles
IVYI’SCRUBBEX?
NORMAL WASH
CHH’+JA/CRYSTAL
ENERGY SAVER
LIGHT
RmlsE & HOLD
WASH
WaterUseCycleTime
Gallons
(approx.) (approx,)
11.8
11.8
6.i
8.8
8.8
3.5
N_Jnextcndedtimes:SelectingtheWATERHEAToptionwilladdupto8 minutestothesecycle
tinwx; selecting the HOTRIIWEoptionwilladd 8minutesto thecycletimes.Seenextpage,
e
Page 6

GtmddishwashingSW4s
~J-.~-
with I-Ion’ water
Togetdishescleananddryyouneed
hotwater.Tohelpyougetwaterof
theproper temperature,your
dishwasherhasa WATERHEAT
feature.Whenselected(seepage4),
thiswaterheatingfeatureallowsyou
toturndownyour householdwater
heaterandsaveenergyifyou’re
willingto letthedishwasherrun a
li~e longerwhileit heatswater.For
goodwashinganddrying,the
enteringwatermustbebetween
120”Fand140”F.Toprevent dish
damage,inletwatershouldnot
exceed150°F.
How to test water temperature:
Check the water temperature inside
your dishwasher with a candy or
meat thermometer.
Let the dishwasher run through one
fill and pump out cycle, then let the
dishwasher fill with water the
second time, approximately 5
minutes after starting the machine.
When you hear the water stop
filling,-urdatch the door and ;lowly
open it.
Measurethe temperatureofthewater
in the bottom of the tub this way:
Remove the silverware basket and
place a candy or meat thermometer
in the water towards the middle of
the tub. If the temperature is less
than 120”F,you will not get good
washing results. Raise your water
heater temperature, wait 30 minutes
and test again. I+igherwater
temperature is needed to dissolve
grease and activate powder
detergents. If the water temperature
is less than 140”F’,use the WATER
HEAT Option (see page 4).
He#pfulhints: If outside
temperaturesareunusuallylow,or
if your water travelsa long distance
from waterheater to dishwasher,
you may need to setyourwater
heater’sthermostatup. If you have
not usedhot waterfor sometime,
the water in the pipeswillbe cold.
Turnon the hot water faucet at the
sink and allowit to run until the
water is hot. Then start the
dishwasher.Ifyou’verecently done
laundryor run hot water for
showers,give your water heater
time to recover before operating the
dishwasher.
How to use a Rinse Agent
A rinse agent makes water flow off
dishesquickerthan usual. This
lessens water spottingand makes
drying faster,too.
For best dishwashingperformance,
use of a rinse agent such as JET-
DRY brand is recommended.
Rinse agents come in either liquid
or solidform. Yourdishwasher’s
dispenseruses the liquid form.
EIowto fi~lthe rinse agent
dispenser. Unscrew the cap. Add
the liquid rinse agent until itjust
reaches the bottom of the lip inside
the dispenser opening. Replace the
cap. The dispenser automatically
releases the rinse agent into the
final rinse water.
Myou accidentally spill: Wipe up
the rinse agent with a damp cloth.
Don’t leave the spillin the
dishwasher. It can keep your
detergent from working.
If you.can’t find any rinse agent,
write:
BENCKISER CONSUMER
PRODUCTS, INC.
(“JET DRY”)
411 W. Putnam Ave.
Greenwich, CT 06830
Yourdishwasher’s rinse agent
container holds 4X ounces. This
should last about 3 months. Fill as
needed. Do not overfill.
How tod-momand we
detergent
e
First, use only powderorIiquid
detergentsspecificallymadefor
use in dishwashers.Othertypes
wiUcause ovenmlsing.
Second,checkthephosphate
content.Phosphatehelps prevent
hard-watermaterialsfrom forming
spotsorfilm un yourdishes. If your
wateris hard(7grains or more),
yourdetergenthastoworkharder.
Detergentswitha higherphosphate
levelwillprobablyworkbetter,If
thephosphatecontentislow(8.7%
orless),you’llhaveto useextra
detergentwithhardwater.
Yourwater departmentcan tell
you how hard your water is. So
canyour county extensionagent
or your area’s water softener
company.Just call and ask them
how many “grains of hardness”
there are in your water.
How much detergent shodd you
use? That depends. Is your water
“hard” or “soft”? With hard water,
you need extra detergent to get
dishes clean. With soft water, you
need less detergent.
Toomuch detergentwith softwatel
notonlywastesmoney,it can be
harmful It can cause a permanent
cloudinessofglassware,called
“etching.” A~outside layer of glass
is etched away!Of course,this takes
sometime. Butwhy take a chance
when it’seasy to find out the
hardnessof yourwater,
Keep your detergent fresh and.
dry. Under the sink isn’t a good
place to store detergent. Too much
moisture. Don’t put powder
detergent into the dispenser until
you’re ready to wash dishes, either.
(It won’t be fresh OR dry.)
If your powder detergent gets old
or lumpy9throw it away.Itwon’t
wash well. Old detergent often
won’tdissolve.
If you use a liquid dishwasher
detergent, these precautions are not ~~~
necessary because liquid detergents “%””
don’t “lump” as they age or come L3:t
in contact with water.
&j~.,.
. .
r“i.
L
)
)
~
6
Page 7

You’ilfind two detergent
-
--
dispenserson theinsidedoorof your
dishwasher-.There are two, because
somecycles use two washes.
See “DetergentUsageGuide”
below.(Besurethe CycleIndicator
Dial isat OFFposition before
addingdetergent.Otherwise,the
detergentcup willnot closeand
latchproperly.)
Close the main CUP.
NOTE: Detergent cup may be
opened manually with no harm.
Turnhandle co~nterclockwise
until it releases.A snapping sound
is normal when it opens.
.
How toprepare the dishes
forvvashhg
If thisisyourfirstdishwasher,or
ifyou’rereplacingamucholder
model,youmay wonderhowmuch
preparationyourdishesneed.
Actuallyverylittle. Ike-rinsingof
normalfoodsoilsisnotnecessary.
Withcommonsenseand a little
practiceyou’llsoonknowwhat
foodstoremove.Hereare some
guidelines:
1.Scrapeoffbones,seeds,skins,
toothpicksandotherhardsolids.It
isalsobesttoremovehard shelled
vegetables,meattrimmings,lea~
vege~bles and c~sts. Remove
excessivequantitiesofoil or grease.
2. Removelargequantitiesofany
food.Yourdishwasherhas a built-in
softfood disposer that pulverizes
softfood bitsand flushesthem
away.It can handlesmallamounts
of softfoods, but largeamountswill
be difficulttohandle.
3.Try to removefoodscrapsand
placedishesin dishwasherbefore
soil has a chanceto dry andbecome
hard.Disheswithdried-onsoil are
moredifficulttowash andmay not
comecleanin theNORMAL
WASHcycle,Rememberto use
yourRINSE& HOLDcyclefor
small“holding”loads.
Note:Thefoodsmentionedabove
areforexamplesonly.Otherfoods
notmentionedmay alsoneedtobe
removedfromyourdishes.Youmay
alsowantto considerremoving
foodssuchas mustard,mayonnaise,
vinegar,lemonjuice and otherfoods
thatcan causediscolorationof
stainlesssteelifallowedto remain
ondishes for a longperiodof time.
When usingthePOTSCRUB13ER
cycle9lesspreparationisrequired
beforeloading.TheI?OTSCRUBBER
cyclecanwashheavily-soileddishes.
Itemswithburned-onandbaked-on
soilsmaynotcomeclean.Andthe
dishwashercannotremoveburn
marksorrestorefadingcausedby
overheatingduringcooking.
Detergent Usage Guide (powderor liquid)
SOFT WATER MEDIUM WATER
(O-3grains hardness)
I
CYCLES
POTSCRUBBER,and
NORMALWASH
cycles
LIGHTWASH,
ENERGYSAVERand
CHINACRYSTAL
cycles
RINSE&HOLDcyclel use no detergent
‘~12grainsand up isextremelyhard water.A watersofteneris recommended.Withoutit,lime
canbuildupinthe watervalve.The watervalvemaystickwhileopenandcauseflooding.
:~~illcdMainCupholds3
MainCup OpenCup
I
I Tablespoon 1Tablespoon
minimum minimum
I Tablespoon None
‘~ini~num
tabkspoons; IWed Open Cupholds2 tablespoons.
+
I
(3-7 grains)
MainCup OpenCup
I
HalfFull HalfFull
+
I
HalfFull None
I
usenodetergentIIJsenodetergent
HARD WATER
(7-12 grains*)
MainCup~
Completely
Full Full
Completely
OpenCup*
Completely
-4None
I
7
Page 8

This isa random mixed load, the most common ~pe
you will have.
Make suredishesare properly loaded to insure that
water can reach the soiled surfaces. The wash arm in
the bottom sprays water up. The tower that rises in the
center sends water out over the dishes to wash the
iternsin the upper rack. A spray arm in the top washes
down also. Make sure to place tall items to the outside
so the upper wash arm is not blocked.
WATCHOUT FOR THIS.
The wash tower rises through the center of the bottom
rack during the wash and rinse portions of the cycle.
Don’t block it or load tall things next to it. Also, be
careful not to let a portion of an item such as a pot or
dish handle extend through the bottom rack. This could
block the wash arm and cause poor washing results.
The
toprack is best for glasses, cups and saucers, Two
rows of cups can be washed when using the folding
shelf. Load the bottom row first, then fold down the
shelf and load the top row, Cups and glasses fit best
along the sides. This is the place for dishwasher-safe
plastics, too. Make sure small plastic items are lodged
in tightly so they can’t fall onto Calrod@heating unit.
Arrange stemware so that it cannot move easily, Don’t
let the glasses touch each o~her.
f
s
Saucepans, mixing bowls and other small items may
be placed—face down—in the top rack. The top rack is
handy for all kinds of odd shapes.
Page 9

HowtoloadtheTOP MCK
-.
shelf’up
Fold the folding shelf up for glassesand tall things.
Place tall items to the outsideso theupper wash arm is
not blocked.
HowtoloadtheBOTTOMMCK
-.=-% I ,
,-...
.-.
~lt plates and saucers between the pins. Load platters,
pot; and bowls along the sides, in corners or in the
back.
SheIt’Down
The folding shelf givesyou extra space for cups and
long utensils on two levels. Load the lower level first,
then fold the shelf down.
As
shownhere,thisplate is beingplacedwiththe
soiledside facingthecenteroftherack sowaterand
detergentfrom washarmcanreachsoiledsurfaces.
(continuednextpage)
II
I
9
Page 10

EIOWtoloadtheBOTTOM RJA
~~
(continued)
Pots,pans, casseroles, saladbowls, mixing bowls and
lidsnzustbe
Pr’ecautiorl!
Take out anything that may fall or extend through the
bottom of the basket.
loadedin thebottomrack,facingdown.
Heavily soiledpots, pans and casserolesmust be loaded
in the bottomrack, facing down. Propbroiler pans and
racks along the edge. Shallowitems may be angled
providedthelower side does not shield the soiled
surfaceinsidefrom the water.
Put flatware in the removable basket with handles up to
protect your hands. Mix knives, forks and spoons so
they don’t nest together. Distribute evenly.
The security cell cover, hinged in the handle, can be
lowered to either side to secure light-weight
the effectsofthevigorouswashaction.Whenit is not
itemsfrom
needed,thiscovercan remainupright.
.-
;.,
Page 11

-—
#
whatyou aimusuallym’ashsafelyinyour dishwasher.
MateriaE
Aluminum
UsualIy
I
China/Stoneware YES
crystal
Non-dishwasher
items-such as
electronic air cleaner
filters, furnace filters,
paint brushes, etc.
Glass
Iron
Pewter
Plastics
Stainless steel
I
I
I
j YES
Safe
YES
YES
NO
YES
NO Iron wiUrust,
NO
YES
I Exceptions(not safe)
I
Some colored anodizedaluminumcan
fade.
Antique, metal-trimmed, hand-painted
or over-the-glazepatterns fade. Gold
leaf will discolor.
Antique, metal-trimmed or handpainted patterns fade. Gold leaf will
discolor.
Milk glass may yellow.
Pewter tarnishes.
SpecialInstructions
Somedarkeningor spottingpossible.Removeby
scouringwith soap-filled steel woolpads.
If in doubt,check with the manufacturer,ortest wash
one piece daily for at least a month.Comparewith the
rest of the set.
Load securely to prevent movement.Check
manufacturer’sinstructionsfor yourcrystal.
Do notwash in dishwasher.Damageto dishwasher and
discolorationor staining of dishwasher mayresult.
If it doesrl’tsay DISHWASHERSAFE, test one piece in
the toprack before dishwashingan entire set. Wash in
top rack only.
Rinse if not washing immediately.Salty or acid foods
can stain if left on.
Sterling Silver
and Silver plate
Non-stick
coatings
Tin
wood
YES
YES
I
NO
I
NO Woodcan warp, crack or lose its
I
Forgetadish?Here’s
‘when
Adddishesany timeduringthe
RINSE& HOLD
otherwashcycles,youcanadd
~iishesat any”time~EFORE the main
detergentw;sh portionof thecycle.
Jw.B canaddit.
cycle.With
Don’t put in same silverware basket
with stainless steel. Contact between
metals can damage silver. Don’t wash
copper utensils in the same load. Silver
may get a brown film. Adhesive used
to attach some hollow-handle knives
can loosen.
Tin can rust.
finish with any type of washing.
However, opening the door during
any cycle lessens cleaning power
becausethe temperatureinsidethe
dishwasher is lowered. So try to
load everything at the beginfiing.
Here’s how to add a forgotten dish:
1.Push the door latch to the left.
Washing will stop.
Rinse if not washing immediately. Saltyor acid foods
can stain if left on. Dry detergent can cause difficult-toremove black spots. Place in back section of silverware
basket to avoid exposure to detergent from the detergent
cup.
After washing, wipe the non-stick coating area with
vegetable oil to keep it from losing its non-stick quality.
2. Wait a few seconds until the
water calms. Then open the door.
3. Add dishes you’ve forgotten.
4. Close the door and push the
Iatch to the far right. When the
door is locked, washing will
continue.
-rL .s.
-.
-
Page 12

.-
-====--
—-
-
-—
“~~ UseThisProblemSolver
.—
PROBLEM
DKHWVASHER.
WON’T RUN
UNUSUAL NO.ISE
DISHES DON’T DRJ
UNCLEAN DISHES
AND FLATWARE
Questions?
I
POSSIBLE CAUSE AND REMEDY
A fuse in yourhomemaybe blown, or the circuitbreaker tripped,Replace fuse or
reset circuitbreaker.Remove any otherappliancesfrom the circuit.
Utensilsmay not be secure on rack pins,orsomethingsmallmay have droppedfrom
therack. Wateriscausing utensilsto rattle. Mike sure everything is securelyplaced in
dishwasher.
Make sure inlet water temperatureiscorrect.(See Page 6.)
Unloadthe bottomrack first, Waterfrom dishes in the top rack maybe spillinginto the
bottomrack.
Check for improper loading.Dishesshouldn’tnest together.Avoid overloading.
Check the rinse agentdispenserto see that it’snot empty.
Check inlet water temperature. It should be at least 120”F.(To test, see page 6.)
Waterpressure may be temporarily low.Turn on a faucet. Is watrer coming out slower
than usual? If so, wait until pressureis normal before using your dishwasher.
Plugged air gap. (See page 15.)
Improper rack loading. (See pages 8-10.)
,,
BLACK OR GRAY
MARKS IN CUPS
DETERGENT LEFT 11
DISPENSER CUPS
DETERGENT CUP
LID WON’T LATCH
AFTER ADDING
DETERGENT
YELLOW OR
BROWN FILM
Aluminum utensils often leave marks when they rub against dishes. Remove marks
with a mild abrasive cleanser.
Water may not be reaching the detergent cups. Move dishes that maybe blocking
detergent cup.
The dispenser cover may not be opening or may be blocked by improperly loaded
items. If you used a powder detergent,open the cup and remove any caked-on
detergent. If the cup still doesn’t open automatically, call for service.
Detergent may be old. If the powder detergent is hard or caked in the box, throw it
away.The detergent may not be working well, Try another brand.
Cycle Indicator Dial must be in OFF position for CUDlid to close and latch properly. If
y& unlatch the door and open it to dl~ your dishes,~heCycle Indictor Dial_do&snot
advance to OFF by itself.
rea or coffee can stain cups. Remove the stains by hand, using a solution of 1/2 cup
gleachand 3 cups warm water.
4n overall yellow or brown film on dishes or glassware can be caused by iron
ieposits in water. A special filter in the water supply line is the only way to correct
his problem. Your water softener company can tell you about the filter.
(ellow film on sterling silver results when you wash copper utensils in the same
oad. Silver polish will usually remove this stain,
12
Page 13

PROBLEM
I
POSSIBLE CAUSE AND REMEDY
SPOTS AND
FILMING ON
GLASSES AND
FLATWARE
Spottingcan be caused by all thesethings:
@ Extremely hard water. (See page 6.)
“ Low inlet water temperature. (Totest, see page 6.)
~ Overloadingthe dishwasher.
~ Improper loading.(See pages 8-10.)
“ Old or damp powder detergent.
~ Phosphatelevel in detergent too low.(See page 6.)
~ Rinse agent dispenser empty.(See page 6.)
* Too littledetergent. (See page 7.)
Due to varying local water conditionsand personal preferences,try severalbrands of
detergentsto find one that gives the best resultsfor you. A liquiddishwasherdetergent
may help reduce fihning.
To remove stubborn spots and fihn from ghssware:
1. Remove all metal utensils from the dishwasher.
2. Do not add detergent.
3. Select P0TSCRU1313ERcycle.
4. Startthe dishwasher and allow to run for 15to 20 minutes. The dishwasherwill
now be in the main wash.
5. Then open the door and pour 2 cups (500ml) of white vinegarinto the bottom of
the dishwasher.
6. Close the door and allow to complete the cycle.
If’vinegar rinse doesn’t work: Repeat as above, except use 1/4cup (60ml) of citfic
acid crystals instead of vinegar. (Most drugstores carry citric acid crystals. If yours
doesn’t, call GE Factory Service.)
Using a vinegar or citric acid crystal rinse more than twice a month? Consider a
homewater softener.
CLOUDINESSON
GLASSWARE
[fvinegar or citric acid crystal rinse doesn’t work, the cloudiness is “etching.”
I’hefilm cannot be removed.
U
can be prevented: Use less detergent if you have soft water. Wash glassware in
the shortest cycle that will get them clean.
Water temperature entering dishwasher exceeds 150°F.
(cmtinuedonnextpage
Page 14

PROBLEM
—— — . . ..— . ... ... . ..—.—
POSSIBLE CAUSE AND REMEDY
e
CHIPPINGOl?
CHINA
SMALL AMOUNT
OF WATER
STANDINGIN
THE BOTTOM
OF THE TUB
WATERWON’T
PUMP OUT
THE TUB
SUDS IN THE TUB
OF
Roughhandlingcan causechipping. Load with care. Make sure glasswareand china
are secureandcan’tjar loose. (See page 8 for correctway to load glassware.) Make
suretall glassesand stemwarewill clear the top of the tub when you push the rack
into thedishwasher.
Alwaysusethetoprackfordelicateitems.
Wateraroundtheoutletonthetubbottomatthebackof thetubis normal.
water.It’s thereto keep the water seal lubricated.
If the entire bottomof the tub has water, you may have a drain problem. Clean the air
gap, if you have one. (See page 15.)
Check the kitchen sink.Is it draining well? Youmay need a plumber.
If dishwasher drains into disposer,run disposer to clear. Be sure disposer is not
clogged.
It is clean
Sudsingdetergentsarenotmeantfordishwashers.USEONLYAUTOMATIC
DISHWASHERDETERGENT’STOAVOIDSUDSING.
To remove suds from the tub: Open the dishwasher.Let suds evaporate. Add 1
gallon of cold water to the tub. Close and latch the dishwasher. Pump out water by
slowly turning the control dial until a drain period is reached.
Repeat if necessary.
DISHWASHER
LEAKS
If you need!more help...d, toll free:
GE Answer Center@
800.626.2000
consumer information service
Sudscancauseunittooverflow.That’swhyit’ssoimportanttousea detergentthat’s
designedforautomaticdishwashers.
Spilling the rinse agent can cause foam during washing. This can lead to overflowing.
Wipe up accidental spill of rinse agent with a damp cloth.
Page 15

CareandCleaning
USERMAINTENANCE
INSTRUCTIONS
Cleanthe controlpanelwith a
lightlydampened cloth.Dry
thoroughly.Donotuseabrasives
or sharpobjectson the panel.They
candamageit.
Clean the outside with
appliancepolish wax. The outside
cabinetfinish is durable,butit can
scratch.So useno scouringpads,
orharsh or gritty cleaners.
AppliancePolishWax & Cleaner
(~;t. No. WR97X0216)is
availablefrom GE Appliance
PartsMart.
The inside usuallytakes careof
itself.If it shouldever need
cleaning,use a mild cleansing
powder.Scouringpads and harsh
cleanerscan mar the finish.
a good
B1.nikindishwashers
OftenuseWIi airgap.
Keepit dean.
An air gap is a plumbingdevice.
It protectsyour dishwasheragainst
water backingup into it if a drain
clogs.The air gap is nota part of
the dishwasher.Andyoumay not
even have one. Not all plumbing
codesrequireair gaps.
If you have an air gap, check it at
least once a month. IT IS NOT
PARTOF YOUR DISHWASHER.
IT IS NOT COVERED IN YOUR
WARRANTY.
The air gap is easy to ckan.
With most types, first turn off the
dishwasher,then lift off the
chrome cover. Then unscrew the
plastic cap and check for any
buildup
cleaning easy.
Check the air gap any time your
dishwasher isn’t draining welL
ofgrit.A toothpickmakes
Notusingyour dishwasher
iinwh@??-Pmtect
againstfreezing.
If your dishwasheris left in an
unheatedplace during the winter,
ask a servicetechnicianto:
*Cutoff electricpower to the
dishwasher.Removefuses or trip
circuitbreaker.
~Turn off the water supply.
~Disconnect the water inletline
from the water valve.
*Drain water from the inlet line
and water valve. (Use a pan to
catch the water.)
~Reconnect the water inlet line to
the water valve.
~Removetheplastic pump coverin
thetubbottomanduse a
soakupwaterinthe rubberboot.
PUMP COVERSCREWS
spongeto
-.
-
Page 16

If you are redecorating,youcan
changeyourdishwasher’sfront
panels to match or blendwith your
new colors.
The panels are held in place by the
door trim and the trim on the panel
below the door.Each sideof each
panel is a differentcolor.Or you
can paint a panel with thecolorof
your own choice.
4WL
‘VI &
fi
..
;.:..:
........
..W.>.. ::
:.;+.W .N,
. . . . .. . .
x+...:.:.) ,%*
.:.:::::}:.:. ++.,
.,.. . .............
. .:.::::.:.:.:.:::
w.::.:
;~
1~
Do not operate the dishwasher
whi~echanging paneksorwhen
Iower accesspaneIis removed.
.
tochange the door panel:
How
1.Takeouttrim screwson either
sideof the dishwasherdoor.
Removethe side trim.
2. Slide the door panelout.
(Careful-edges may be sharp.)
3. Turn the door panel aroundand
put the coloryou wantin front.
4. Replace the doorpanel, side
trim and screws,
How to change the lower paneh
1. Removepanelattachment
screws.
2. Remove the entirepanel.
3. Takeout screw’sand remove the
top trim.
4. Slide the door panel out.
5. Turn the panel around and put
the color you want in front.
6. Replace the lower
trim and screws.
7. Replace the entire
attachment screws.
panel, top
panel and
A woodpaneltrimkitcontains
trimandinstructionsforadding
decorativewooddoorpanelor
loweraccesspanelto matchkitchen
cabinets.Thekitis availableatno
extracost.(SpecifyGI?F40.)
Order from:
GE Appliances
c/o Dri-ViewManufacturing
4706 AllmondAve.
Louisville,KY 40209
@
16
Page 17

we’llBeThere
.-—
—
.—
.—
—-—. .—
—
With the pw..chaseof’yournewGE appliance,receivethe
assunmce that if you everneed information or assistance
from GE,we’llbe there.AHyou haveto do iscall--toll-free!
Youcanhavethesecurefeelingthat
GEConsumerServicewillstillbe
there afteryourwarmmtyexpires.Pur-
AGE ConsumerServiceprofessional
will
provicie expert repair service,
scheduled
at a time that’sconvenient
foryou.ManyGEConsumerService
company-operatedlocationsofferyou
servicetodayor tomomow,or at your
convenience(7W a.m. to ZOOp.m.
weekda~ 9:00a.m.to 2:00p.m.Saturdays).Our factory-trainedtechnicians
knowyourappliance insideand out—
somostrepairs can be handled injust
one visit.
chasea GEcontract whileyourwarrantyisstillin effectand you’llreceive
a substantialdiscount.With a multipleyearcontrac~you’reassuredof fimn-e
serviceat today’sprices.
WhateveryourquestionaboutanyGE
majorappliance,GE
informationserviceisavailableto
help.Yourcall-and yourquestion—
willbe answeredpromptlyand
courteously,Andyoucancallany
time.GEAnswerCente@serviceis
open 24hoursaday’7daysaweek.
TelecommunicationDevicefor theDeaf
AnswerCente@
%ii
hhkb.ls Cpdifkd! tow-vice their
owna@ances can haveneeded
parts or accessoriessentdirectlyto
their home, free of shippingcharge!
The GE parts systemprovidesaccess
to over47,000parts...and allGE
Genuine RenewalPartsare filly
warranted.VISA,MasterCardand
Discovercardsare accepted.
user mtitenanee imwlwetions
contained in this bookletcoverpmce=
dines intended to be perfomed by
my user. other servicinggerm-ally
should be referred to qualified servicepersonnel. Caution must be
@xemised9since improper servicing
may cause unsafe operation.
(p+#x&2 I “-
1 *W - . . . . ,.> . .. . . . -.
.>.. —. .
..0 e. ““-...
Upon request,GEwillprovideBraille
controlsfora varietyof GEappliances,
anda brochuretoassistin planning a
barrier-freekitchenfor personswith
limitedmobilityToobtaintheseitems,
freeof charge,call800.626.2000.
Consumerswithimpairedhearing
or speechwhohaveaccesstoaTDD
s_.lq. A.&
A’- L
e... ... ,
or a conventionalteletypewritermay
Cdl 800-TDD-GEAC(800-833-4322)
to request information or service.
Page 18

$
YOURGE!DISHWASHERWITHPERMATuF@INTERIOR
Saveproof of originalpurchasedate such asyour sales slip or cancelled check to establish warranty period.
WHAT1sCOVERED
FLU ONE-YEARWARRANTY
Foroneyearfromdate oforiginal
purchase,wewill provide,freeof
charge,partsandservicelaborin
yourhometo repairor replaceany
partd the dishwasherthatfails
becauseof a manufacturingdefect.
TEIN-YEARWARRANTY
FULL
Fortenyearsfrom dateoforiginal
purchase,wewill provide,free of
charge,partsandservicelaborin
yourhometo repairor replacethe
Penna7W’ W7 or door linerif it
failsto containwaterbecauseof
a manufacturingdefectsuchas
cracking,chipping,peeling
or rusting.
WARRANTY
LMTH3 SHXM4D-M%W?
WARRANTY
Forthe secondyearfromdateof
originalpurchase,wewillprovide,
freeofcharge,replacementpartsfor
anypart of the WaterDistribution
System(asillustratedbelow)that
failsbecauseof a manufacturing
defect.Associatedinletanddrain
plumbingpartsarenotcovered by
thiswarranty.You
servicetripto your
servicelaborcharges,
Water Distribution System
payforthe
homeand
Thiswarrantyisextendedto
theoriginalpurchaserandany
succeedingownerfor products
purchasedforordinaryhomeusein
the 48 mainlandstates,Hawaiiand
Washington,D,C,InAlaskathe
warrantyisthesameexceptthat it is
L!MITEDbecauseyou mustpayto
shipthe producttothe serviceshop
orfor the servicetechnician’stravel
coststo yourhome.
/411warrantyservicewill be
providedby our FactoryService
Centersor byourauthorized
CustomerCare@servicersduring
normalworkinghours,
LookintheWhiteorYellowPages
of yourtelephonedirectoy for
ion
GENERALELECTRICCOMPANY,
Iy
GENERALELECTRICFACTORY
SERVICE,GENERALELECTRICHOTPOINTFACTORYSERVICEor
GENERALELECTRICCUSTOMER
CARE@SERVICE.
4
WHATIs NOT COVERED
Some states do not allow the exclusion or limitation of incidental or consequential darnages, so the above limitation or exclusion
may not apply to you. This warranty gives you specific legal rights, and you may also have other rights which vary from state to state.
To know what your legal rights are in your state, consult your local or state consumer affairs office or your state’s Attorney General.
if further help is needed concerning this warranty, write:
Manager—Consumer
* Setvicetripsto your hometo teach
you howto usethe product.
Readyour Useand Care material.
Ifyouthenhaveanyquestions
aboutoperatingtheproduct,please
contactyour dealeror
ConsumerAffairsofficeatthe
addressbelow,orcall,tollfree:
GE AnswerCenter’]
800.626.2000
consumer informationservice
~Improperinstallation.
Ifyou havean installationproblem,
contactyourdealeror installer.You
are responsiblefor providing
Wa~~a~~O~:
General Electric Company
our
Affairs,GEA~@i2m3es,Lcmkwilk,KY40225
adequateelectrical,plumbing,and
other connecting facilities.
~Replacementof housefuses or
resettingofcircuit breakers.
QCleaningor servicingofair gap
devicein drain line.
@Failureof the productif it is used
for otherthan its intendedpurpose
or usedcommercially.
~Damageto productcaused by
accident,fire,floodsoractsof God.
WARRANTORISA/OTRESPONSIBLE
FORCONSEQUENTIALDAMAGES.
4
.
-+
L
 Loading...