

Page 1
.—
.-
COntents
Air Gap
Appliance Registration
Care and Cleaning
China, Crystal,Sterling
Consumer Services
CycleFeatures
DelayStart
Detergent, Detergent Guide 6,’7
Dispenser Cups
EnergySaverSwitch
Energy-SavingTips
Features
Front Panel Color Change
Loading
Modeland Serial Numbers
Operating Guide
CycleSelection
Drying Options
SoilLevel
POTSCRUBBERCycle
4,5
4,5
4,5,7
14
2
14
10
19 Warranty
5
4
7
4
2
4
15
8,9
2
5
7
ProblemSolver
RinseAgent
SafetyInstructions
UserMaintenanceInstructions 14
WaterTemperature
Winter Storage 14
GEAIVsw@”&?llter@
11-13
6
3
BackCover
6
Built-in Model GSDIIOOM
Page 2
,
US YOU..*
Beforeusingyourdi$hwash?r,
readthisbookcarefully.
It is intendedto helpyouoperate
andmaintainyournewdishwasher
properly.
Keepit handyforanswerstoyou~
questions.
If youdon’t understandsomething
or need more help, write (include
yourphonenumber):
ConsumerAffairs
GE Appliances
AppliancePark
Louisville,KY 40225
Writedownthemoddi
andserialIn.mlbem.
You’llfindthemon a labelfastened
tothe tub wall just insidethe
dishwasherdoor.
Thesenumbersare alsoon the
ConsumerProductOwnership
RegistrationCardthatcamewith
yourdishwasher.Beforesending
in this card, pleasewrite these
numbershere:
ModelNumber
SerialNumber
Use these numbersin any
correspondenceor servicecalls
concerning yourdishwasher.
Myoureceived
a
Immediately contact the dealer
(or builder) that sold you the
dishwasher.
● .
savetimeW’Mimoney.
Beforeyou
service..,
Checkthe ProblemSolver
(pages11-13).Itlistscausesof
minoroperatingproblemsthatyou
can correctyourself.
ToobtainaSpanishlanguage
versionof thisbook, call
GE AnswerCenter”
800.626.2000
consumerinformationservice.
Paraobtenerlaversi6nen
espaiiolde estemanual,
llarnea
GE Answer Center?
serviciode informaci6n
para el consumidor,
tel~fono800.626.2000.
Thepowerconsumptionofyour
dishwashercanbeminimizedifyou
followthesesuggestions:
e @w~~~dishwasheronly when
full. Letdishesaccumulatein
dishwasher.Whenyouputinonlya
partialload, useRINSE &HOLD
cycletorinseoffheavysoils.Besure
tolatchdoor when waitingforfull
load. Thishelpskeepsoilsmoist,
easiertoremove.
~Ifyoudon’tneedyourdishesright
away,useyour EPJH?GY $JiVEll
no-heat feature thatturns the
dryingheater offautomatically.
Dishesdry*naturallyovera longer
period such as overnight.
~S&Wtcyclethat useskwt
mount
from km!. Seepages4 and 5.
ofwater toremove soil
request
M’youneedservice
TOobtainservice,seethe
ConsumerServicespageinthe
backofthisbook.
We’reproudofour serviceand want
youto-bepleased.If forsome
reasonyouarenothappywiththe
serviceyou receive,hereare three
stepsto followfor fhrther help.
FIRST,contactthepeoplewho
servicedyour appliance.Explain
whyyouare notpleased. In most
cases,thiswill solvethe problem.
NEXT,ifyouare stillnotpleased,
writeallthedetails-including your
phonenumber—to:
Manager,ConsumerRelations
GE Appliances
AppliancePark
Louisville,Kentucky40225
FINALLY,ifyourproblemisstill
notresolved,write:
MajorAppliance
ConsumerActionPanel
20 North WackerDrive
Chicago,Illinois60606
2
Page 3
SAFE
Readallinstructionsbeforeusingthisappliance.
W~G—When usingthis
appliance, always exercis; basic
safety precautions, including the
following:
@Use
this appIianceonlyfor
itsintendedpurpose, asyou
wiIlfinddescriki! inthisUse
andCareBook.
~Thisdishwashermustbe
properlyinstdied andlocated
inaccordancewiththe
InstallationInstructionsbefore
it isused. If youdid not receive
an InstallationInstructionssheet
with your dishwasher, you can
obtain one by contacting the
service location
—Thisappliancemust be
connectedto a grounded metal,
permanentwiring system;or an
equipment-groundingconductor
must be run with the circuit
conductors and connected to the
equipment-grounding
or lead of theappliance.
–Connect to a properly rated,
protectedand sized power-supply
circuittoavoidelectricaloverload.
@Do not store or use
cond3ustibIematerials,gasoline
orother llanmable vaporsand
liquidsin the vicinity of this or
anyother appliance.
@Use only powderor liquid
detergentsor wetting agents
recommended for use in a
dishwasher.
@Do notwashplastic itemsunless
marked “dishwashersafe” or the
equivakmt.Forplastic itemsnotso
marked, check the manufacturer’s
recommendations.
nearestyou.
terminal
* Loadlightplasticitemsso
theywill not becomedislodged
and drop to thebottomofthe
dishwasher—theymightcome
intocontactwith the heating
‘unitandbe damaged.”
‘lbminimizethepossibilityof
injury.
@When loadingitemsto be
washed:
A. Locate sharp itemsso that
theyare not likelyto damage
the door seal, and
B. Load sharp kniveswith the
handlesup to reducetherisk
of cut-typeinjuries.
@Do nottouch the heating
elementduring or immediately
after use.
@Do notoperateyourdishwasher
unless all enclosurepanelsare
properly in place.
~Do not tamper with controls.
QDo notabuse, siton, or stand
on thedoor or dish rack ofthe
dishwasher.
~Close supervision is necessary
ifthisapplianceisusedbyor near
children. Do not allowchildren
to play inside, on or with this
applianceor any discarded
appliance. Dispose of discarded
appliances and shippingor
packingmaterial properly.
Beforediscarding a dishwasher,
removethe door ofthe washing
compartment.
* Keep all washing detergents
and wetting agents out of the
reach of children, preferably
a lockedcabinet.observe all
warningson containerlabelsto
avoidpersonalinjury.
oTOminimize thepossibilityof
electricshock, disconnectthis
appliancefrom the powersupply
beforeattemptinganymaintenance,
Note:T’urningthecontroldial to
the OFF position does not
disconnectthe appliancefrom
thepowersupply.Werecommend
havinga qualifiedtechnician
serviceyour appliance.
in
w~ G-I’rYDR!Gm GAS
isproducedby the chemical
actionwithin yourwaterheater.
It canaccumulatein the water
heaterand/or waterpipesif hot
waterhas notbeen used for a
period of twoweeksor longer.
HYDROGEN GASIS
EXPLOSIVE. Topreventthe
possibilityof damageor injury,
if youhavenotused hotwaterfor
two weeksor more, or moved
intoa residencein which the hot
watersystemmaynot havebeen
used for some time, turn on all
hot water faucetsand allowthem
to run for severalminutesbefore
using any electrical appliance
which is connectedto the hot
water system, This will allow
any hydrogengasto escape. Also,
sincethe gas is flammable, do
not smokeor use an openflame
or applianceduring thisprocess.
SAW
3
Page 4
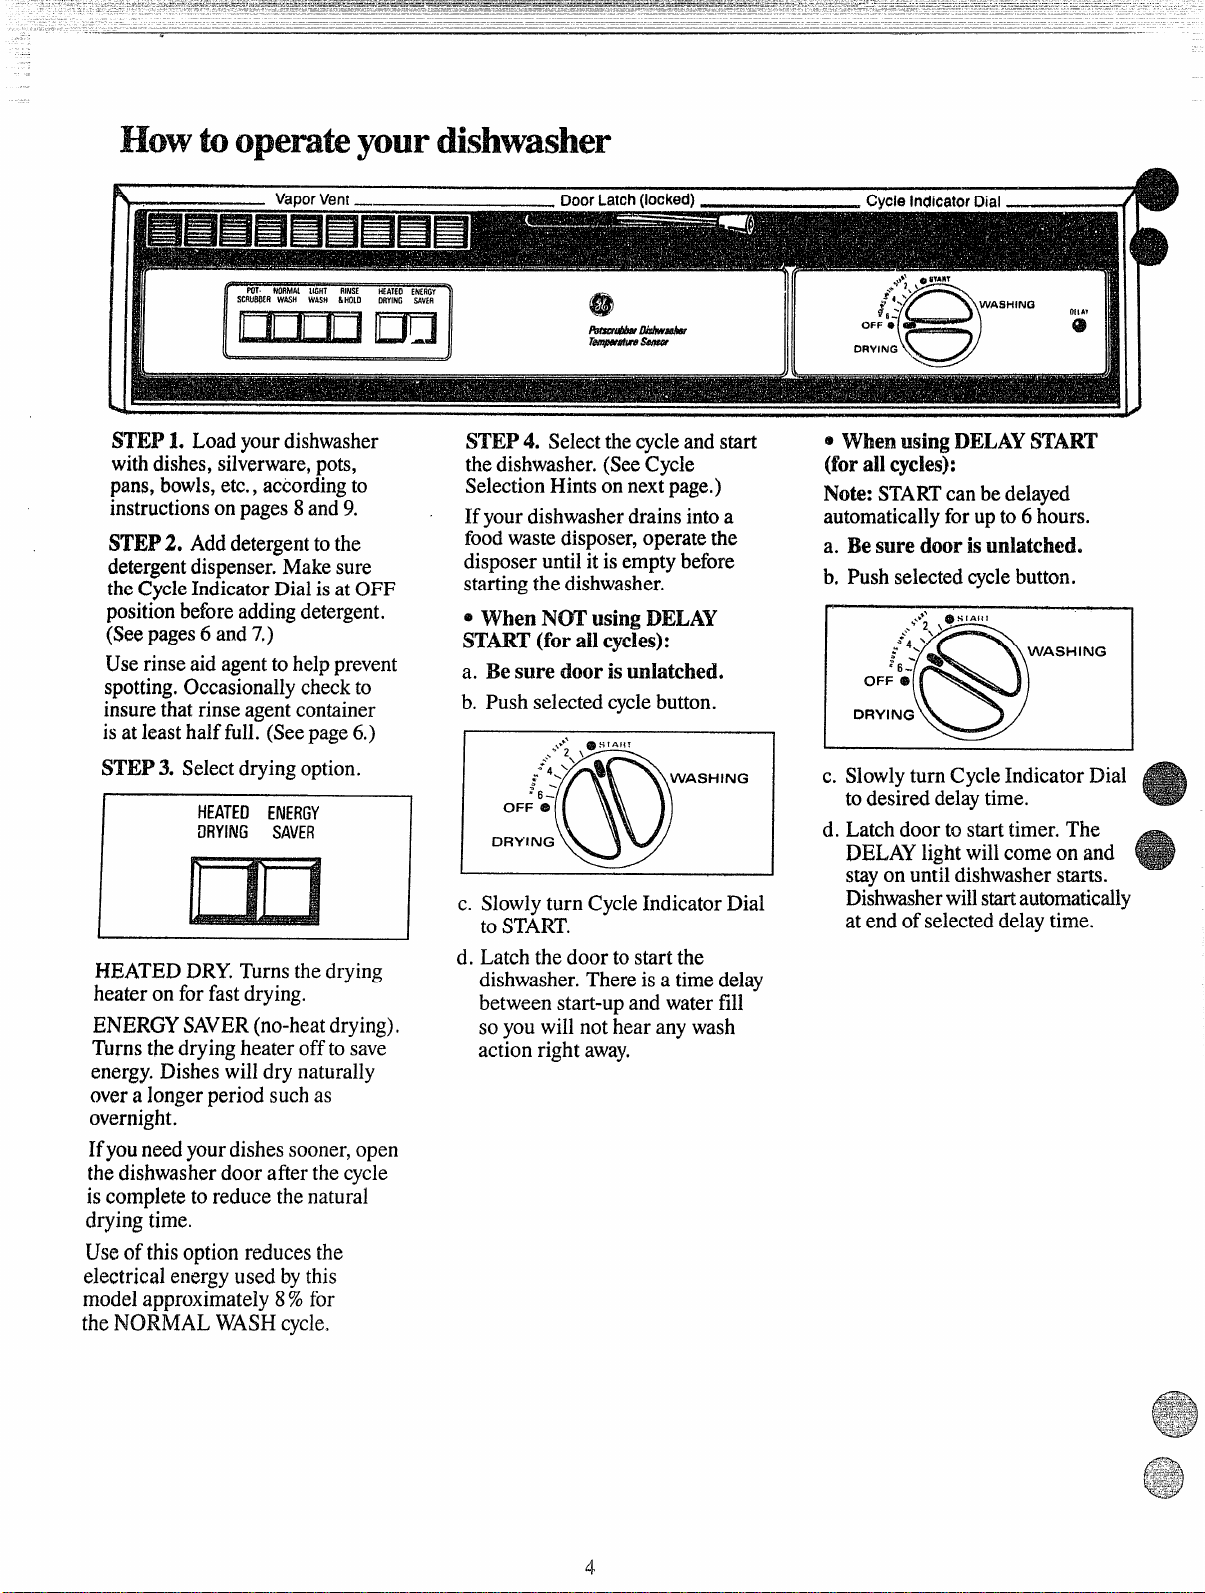
STEP L Load your dishwasher
withdishes, silverware,pots,
pans,bowls,etc., accordingto
instructionsonpages 8 and 9.
STEP2. Adddetergenttothe
detergentdispenser.Makesure
the CycleIndicatorDial is at OFF
positionbeforeaddingdetergent.
(Seepages6 and 7,)
Use rinse aid agenttohelp prevent
spotting.Occasionallycheckto
insurethat rinseagent container
isat leasthalf full. (Seepage 6.)
ST_EP4.Selectthecycleandstart
thedishwasher.(SeeCycle
SelectionHintsonnextpage.)
Ifyour dishwasherdrainsintoa
foodwastedisposer,operatethe
disposeruntilitisemptybefore
startingthedishwasher.
@When NOTusingDELAY
START’(forall cycles):
a. Be sure dooris mhtchede
b. Push selectedcyclebutton.
o Whenusing DELAYSTART
(forall cycles):
Note: STARTcan be delayed
automaticallyforupto 6 hours.
a. Be sure door isunlatched.
b, Push selected cyclebutton.
r *
OFF @
DRYING
..’”:,\
:24,’
s
:6: %
@
@s Ialtl
WASHING
STEP3. Selectdrying option.
HEATED ENERGY
ZJRYIN6SAVER
HEATED DRY.Turns the drying
heater on for fast drying.
ENERGYSAVER(no-heatdrying).
Turns the drying heater off to save
energy. Dishes willdry naturally
overa longerperiod such as
overnight.
Ifyouneed yourdishes sooner,open
thedishwasherdoor after thecycle
iscomplete toreduce the natural
drying time.
Useofthisoption reduces the
e~ectricalenergy used by
model approximately 8%for
this
theNORMALWASHcycle.
c. Slowly turn Cycle Indicator Dial
to START.
d. Latch the door tostart the
dishwasher.There isa time delay
between start-up and water fill
so you will nothear any wash
action right away.
Slowlyturn CycleIndicator Dial
c.
to desired
d.
Latchdoor to starttimer. The
delaytime.
DELAYlightwillcome on and
stayon until dishwasherstarts.
Dishwasherwillstartautomatically
atend ofselecteddelay time.
Page 5
ydeSekcthsihints
tisimportantto follow the loading
structionsonpages8 and9,
POI’SCRLJIH3ER-Foritemssuch
aspots,pans andcasseroleswith
dried-onor baked-onsoils.
Everydaydishesmay be included,
NORMAL WASH—Forloads
ofeverydaydishes,glasses
andcookware withmedium
soils.Designed toyield high
performanceonnormal soils.
LIGHT WASH—Formost loads
ofeverydaydishes with lightsoils
or soilsthat havenot dried on. It
saveshot water overthe higher
performancecycles,savingenergy.
RINSE & HOLD—For rinsing
partialloads whichwill be washed
later.Do
notusedetergenl.
what ineachcycle
~ You’llhear occasionalclicking
ounds:
–Soft food disposershredding
action.
@During thedryingperiod:
—Themotor stem.
—Watervapor c;mes throughthe
ventbythe door latchduring
–Drain valveopeningto pump drying and when water is being
waterout. pumped out.
—Timercontrol as cycle
progresses.
–Detergent cup opening.
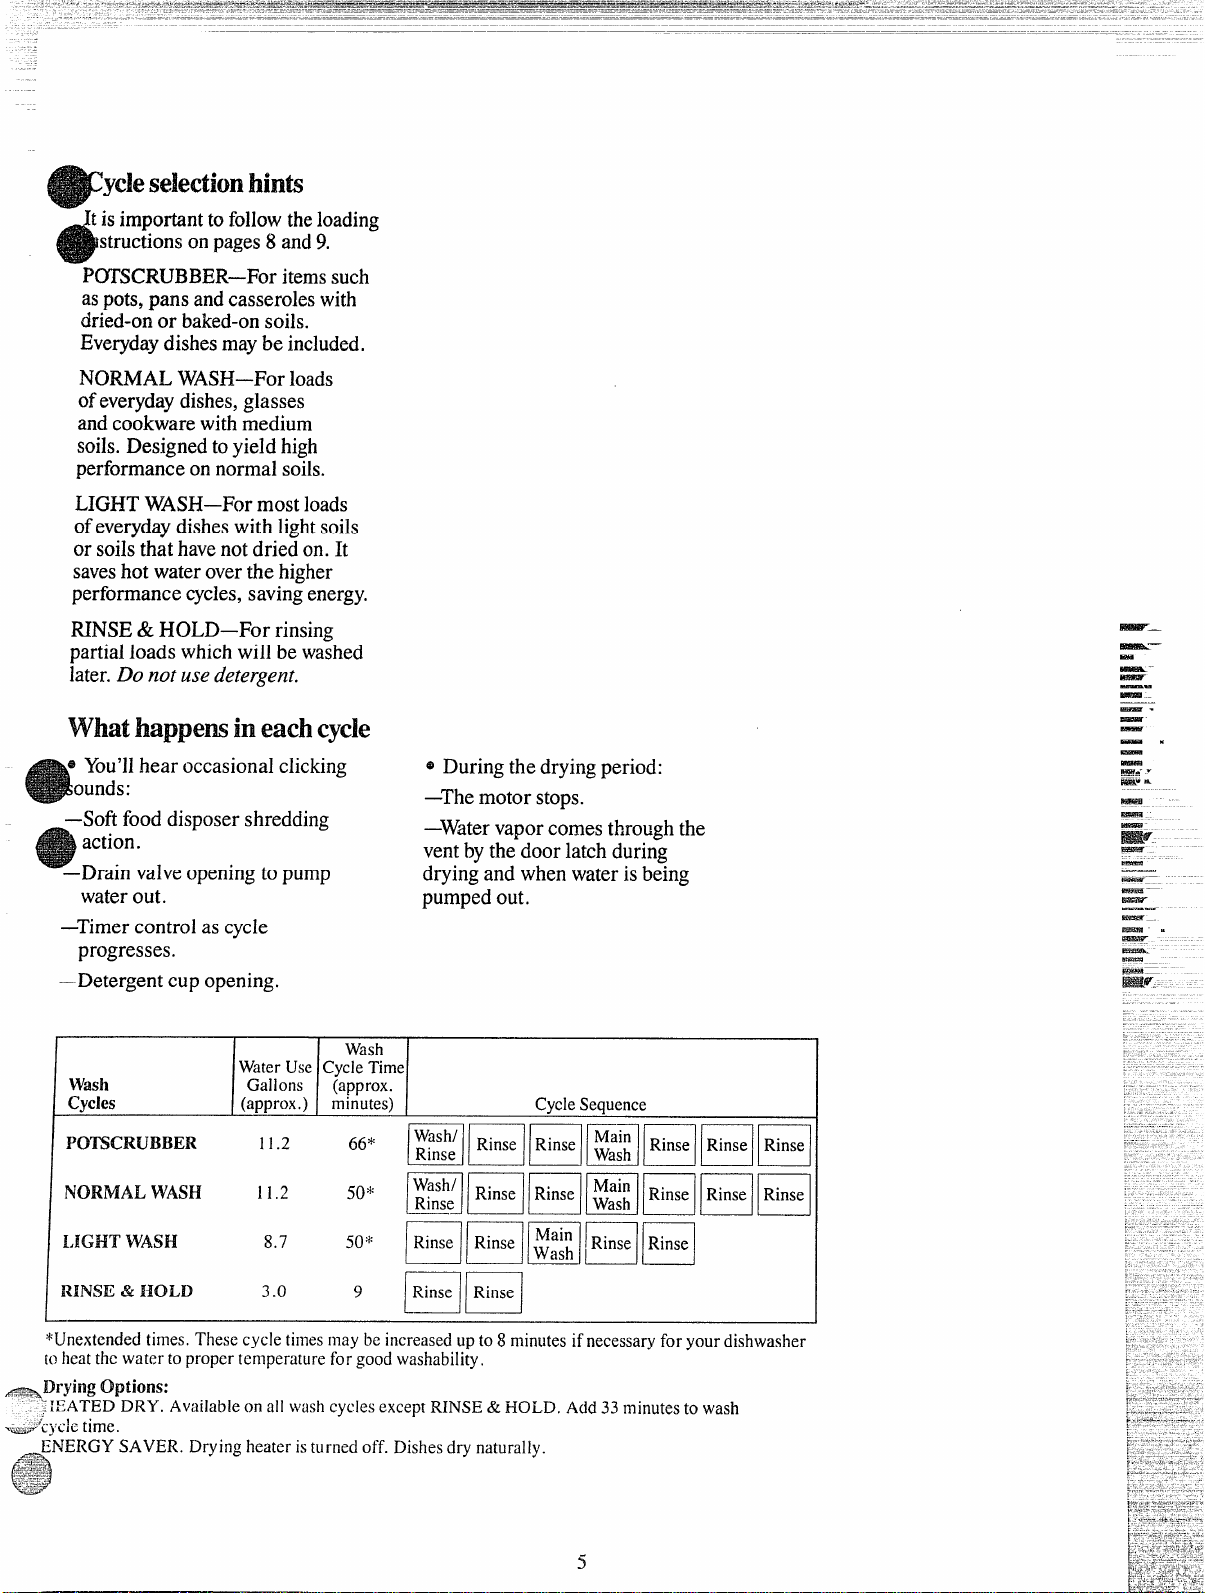
WaterUse CycleTime
Wash
Cycles
RINSE&!HOLD
I
*Unextendedtimes.Thesecycletimesmaybeincreasedupto8minutesifnecessaryforyour dishwasher
toheatthewatertopropertemperatureforgoodwashability.
-~v~w Optiom:
:
::;ATEDDRY,Availableonall washcyclesexceptRINSE&HOLD.Add33 minutestowash
-.m=y.’-~j~~~~~ time.
_EI?ERGY SAVER.Dryingheateristurnedoff. Dishesdrynaturally.
$%g$J
Gallons
(approx,) minutes) CycleSequence
3.0
wash
(approx.
9
Rinse Rinse
——
-
&
——
-—
-
B.Saw
--
Page 6
——
:::4
:,~~+
-.*-..J..,
IL’:Z
TemperatureSemsorsystem
Togetdishesclean and dry you
needhotwater.Tohelpyouget
waterof theproper temperature,
yourdishwasherhasa waterheating
featurethatautomaticallysenses
thetemperatureof the waterin the
washcycleandheatsit, if necessary,
tothe propertemperature. This
waterheatingfeaturemayallow
youto turn downyourhousehold
waterheater and saveenergy if
you’rewillingtolet thedishwasher
run a littlelongerwhileit heats
waterto the proper temperature.
For good washinganddrying, the
enteringwatermust beat least
120”F.Topreventdish damage,
inletwate; shouldnot excee~ 150”F.
How to test watertemperature:
Check your watertemperature
insideyour dishwasherwith a
candy or meat thermometer.
Let the dishwasherrun through
one fill and pump out cycle,then
letthe dishwasherfill withwater
the second time.
When you hear the waterstop
filling, unlatch the doorand;lowly
open it.
Measure the temperature of the
water in the bottom ofthetub this
way:
t
Removethe silverware basket and
place a candy or meat thermometer
in the water towards themiddle of
the tub. If the temperature isless
than
120”F,youwillnotgetgood
washingresults.Higherwater
temperatureis neededtodissolve
grease
detergents.
and activatepowder
Helpfulhints:If outside
temperaturesare unusuallylow,or
ifyourwatertravels a longdistance
fromwaterheatertodishwasher,
youmayneed to setyour water
heater’sthermostatup.If youhave
notusedhot waterfor sometime,
the waterin the pipeswill be cold,
Turnon the hotwaterfaucetat the
sinkand allowitto run untilthe
waterishot. Thenstartthe
dishwasher.If you’verecentlydone
laundryor run hotwaterfor
showers,give yourwaterheater
timeto recoverbeforeoperatingthe
dishwasher.
Toimprovewashabilityif the water
islessthan 120”Fandyoucannot
adjustyourwaterheater: Selecta
longercycleand fillboth detergent
cupsatleastha~f-fullwith detergent.
Howtousearinseagent.
A rinseagentmakeswater flow
offdishesquickerthan usual. This
lessenswater spottingand makes
drying faster, too.
For best dishwashing performance,
use ofa rinse agentsuch as .TETDRYbrand is recommended.
Rinseagentscome in either liquid
or solidform. Yourdishwasher’s
dispenseruses the liquid form.
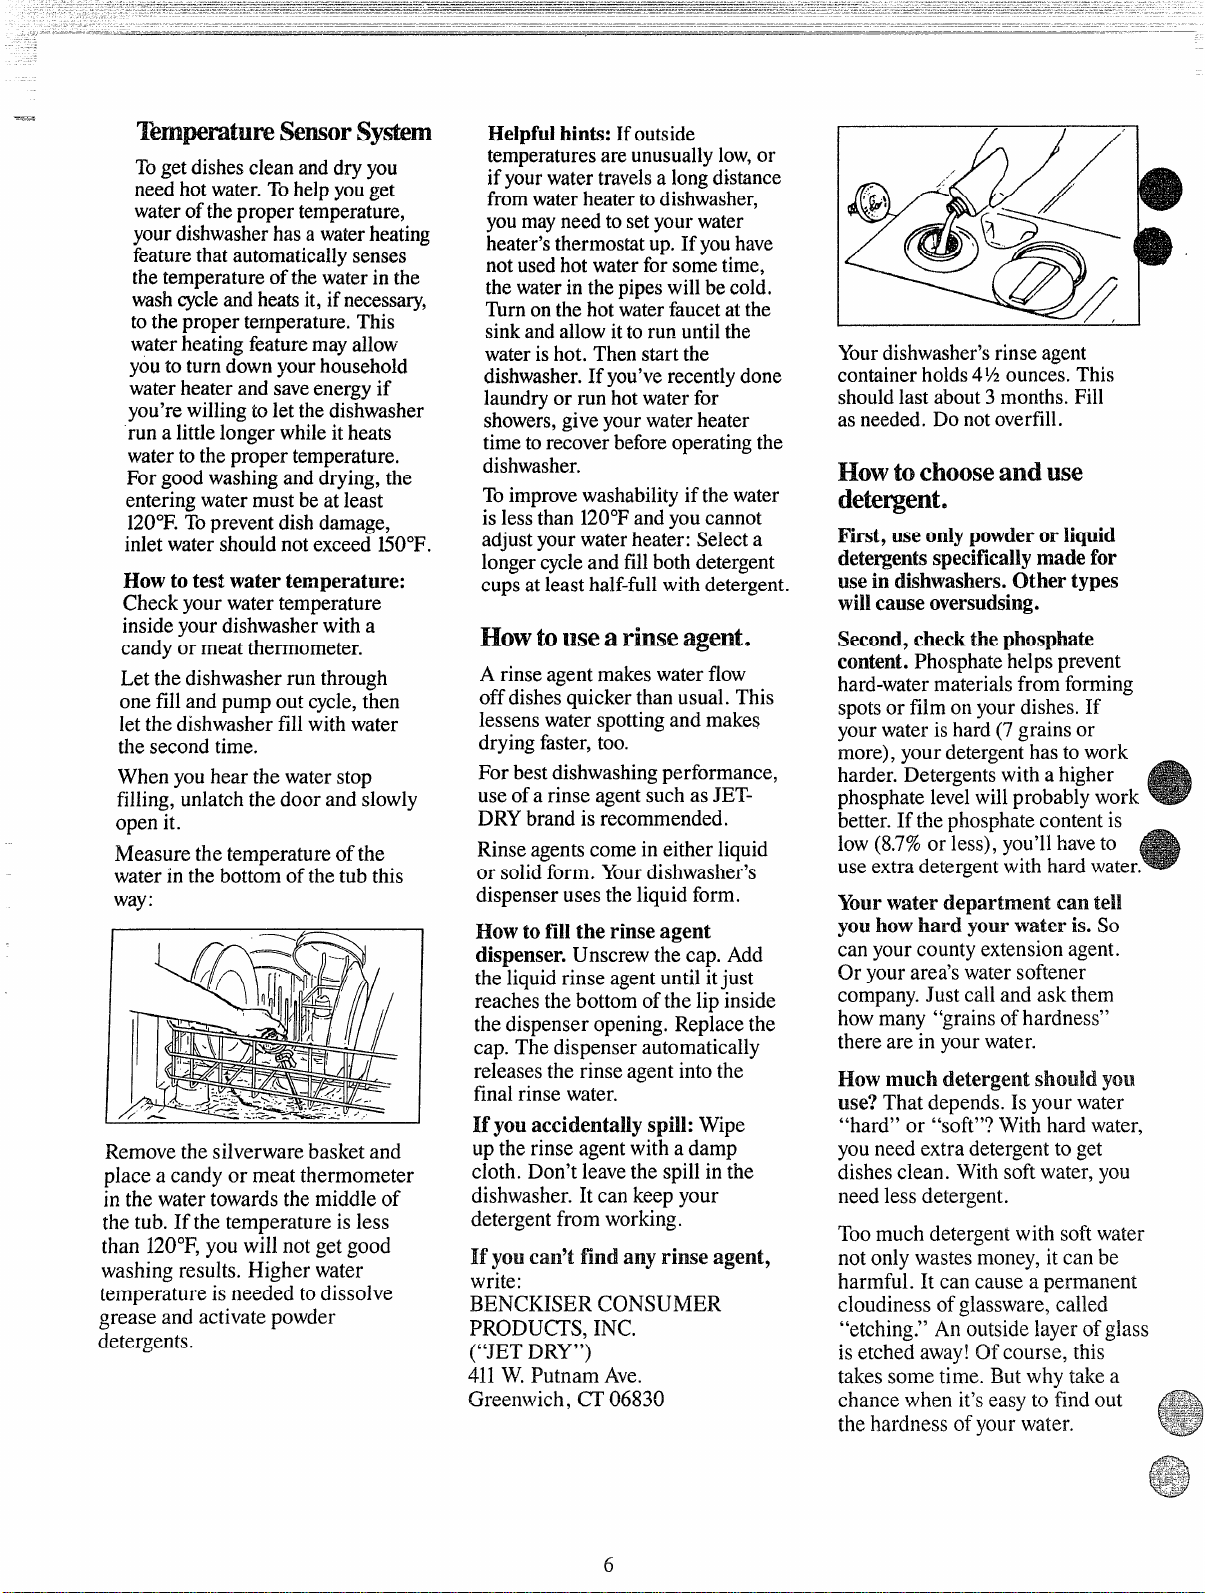
How tofill the rinseagent
dispenser.Unscrew the cap. Add
the liquidrinse agentuntil itjust
reachesthe bottom of the lip inside
the dispenser opening. Replace the
cap. The dispenser automatically
releases the rinse agent into the
final rinse water.
H’youaccidentally spill: Wipe
up the rinse agentwith a damp
cloth. Don’tleavethe spillin the
dishwasher. It can keep your
detergent from working.
H’ you
can’tfindany rinse agent,
write:
13ENCKISER CONSLJMER
PRODUCTS, INC.
(“JET DRY”)
411W, Putnam Ave.
Greenwich, CT 06830
Yourdishwasher’srinse agent
containerholds4% ounces.This
shouldlast about3 months.Fill
as needed. Donotoverfill.
HowtoChooseandlxx?
detergent.
First,useonlypowderor liquid
detergentsspecificallymadefor
usein dishwashers.Other types
wiUcauseoversudsing.
Second, checkthephosphate
content.Phosphatehelps prevent
hard-watermaterialsfrom forming
spotsor fi~mon yourdishes. If
yourwater ishard (7grains or
more), yourdetergenthasto work
harder. Detergentswith a higher
phosphatelev;l willprobab~ywork
better.If the phosphatecontentis
low(8.7%orless), you’ll haveto
use extra detergentwith hard water.
Yourwater department can te~l
you howhard your water is. So
can your county extensionagent.
Or yourarea’swater softener
company.Just call and ask them
howmany “grains of hardness”
there are in yourwater.
How much detergent should you
use? That depends. Isyour water
“hard” or “soft”? With hard water,
youneed extra detergentto get
dishesclean. With softwater, you
need lessdetergent.
Toomuch detergent with soft water
not only wastesmoney, it can be
harmful. It can cause a permanent
cloudiness ofglassware, called
“etching.” An outsidelayer ofglass
is etched away!Of course, this
takes some time. But why take a
chance when it’seasy to -findout ‘-=
the hardnessofyourwater.
.’5.
.,>ii
(>
Page 7

Keep yourdetergentfreshand
dry.Under thesinkisn’ta good
placeto storedetergent.Toomuch
moisture.Don’tputpowder
detergentintothedispenseruntil
you’reready to washdishes, either.
(Itwon’tbe freshOR dry.)
2. Removelargequantitiesof any
food.Yourdishwasherhasa built-in
sofifooddisposerthatpulverizes
soft foodbitsandflushesthemaway.
It can handle
softfoods,butlargeamountswill
bedifficulttohandle.
smallamountsof
If your powderdetergentgetsokl
orlumpy, throwit tiway.
Itwon’t
washwell. Olddetergentoften
won’tdissolve.
If youusea liquid dishwasher
detergent,these precautionsare not
necessary becauseliquiddetergents
don’t“lump” astheyageor come
in contactwith water.
You’llfind two detergent
dispenserson the inside doorof
yourdishwasher.Two,because
somecyclesuse two washes.
See “DetergentUsageGuide’’below.
(Besurethe CycleIndicator.Dialis
atQFFpositionbeforeadding
detergent.Otherwise,thedetergent
cuplidwillnot closeandlatch
properly.)
Alwaysclosethemaincuptightly.
??%enitis~rrnlylatchedyouwill
heara clickingsound.Donot
overtighten.
IVOTE:Detergentcupmaybe
openedmanuallywithnoharm.
Turnhandlecounterclockwiseuntil
itreleases.Asnappingsoundis
normalwhenitopens.
How to prepare
the CMM?sfor
If this is your first dishwasher,or
ifyou’re replacing a much older
model, youmay wonderhowmuch
preparation yourdishesneed.
Actuallyvery little.Pre-rinsing of
normal food soilsis not necessary.
Withcommon sense and alittle
practice, you’llsoon know what
foodsto remove. Here are some
guidelines:
L Scrape off bones, seeds, skins,
toothpicksand otherhard solids. It
is also bestto removehard-shelled
vegetables,meat trimmings, leafy
vegetablesand crusts. Remove
excessivequantitiesofoil or grease.
washing
3. Try to removefoodscrapsand
placedishes indishwasherbefore
soilshave a chancetodry and
becomehard. Disheswithdried-on
soilare moredifficultto washand
maynot comecleanin theNORMAL
WASHcycle.Rememberto use
yourRINSE ONLYcycleforsmall
“holding” loads.
Note: The foodsmentionedhere
are examplesonly.Other foodsnot
mentionedmayalsoneedto be
removedfromyourdishes. You
mayalso wantto considerremoving
foodssuch as mustard, mayonnaise,
vinegar,lemonjuice andother
foodsthat can causediscoloration
of stainlesssteelif allowedto
remain on dishesfor a longperiod
oftime.
When using thePOTSCRUBBER
cyck7lesspreparationis required
beforeloading.ThePOI’SCRUB13ER
cyclecan wash heavily-soiled
dishesand removedried-on and
baked-on soils from pots, pansand
casseroles. Itemswith burned-on
soilsmay notcome clean. Andthe
dishwashercannot removeburn
marks or restore fading caused
byoverheatingduring cooking.
usage Glide @MNvderor
I
CYCLES MainCup
POTSCRUBBERand 1Tablespoon ~ 1Tablespoon
NORMALWASHcycles
ENERGYSAVERcycle
RINSEONLYcycle
*12grainsandupisextf”elne]yhardwater.Awatersoftenerisrecommended,Withoutit,
limecanbuildupinthewatervalve.Thewatervalvemaystickwhileopenandcauseflooding.
+FilledMainCupholcis3tablespoons;FilledOpenCupholds2tablespoons.
I SOFTWATER
(0-3grainshardness)
I OpenCup MainCup
minimum
1Tablespoon
minimum
nodetergent
Use
minimum
None
I MEDIUMWATER
(3-7grains)
I OpenCup MainCup~
HalfFull
HalfFull
~ HalfFull Completely
Wenodetergent
None
! HARDWATER
(7-12grains*)
[ OpenCup*
J. Completely
Full Full
Completely
Full
Wenodetergent
I ‘-
None
Page 8

-.
HowtoIwi’your dishwasher
Thisisa randomretiedload,themostcommontypeyou
willhave.
Make suredishes are properly loaded to insurethat
water can reach the soiledsurfaces. The wash arm in the
bottomsprays water up. The towerthat rises in the
center sendswater outoverthe dishesto washtheitems
in upper rack. A sprayarm in thetop washesdownalso.
Make sureto place tall items to theoutside so theupper
wash arm isnot blocked,
HOWtobad theT’OPRACK
#iiP’”:;-’r--%_.
The top rack is best forglasses, cups and saucers. Cups
and glasses fit bestalongthe sides. This is the placefor
dishwasher-safeplastics, too. Makesure smallplastic
itemsare lodged in tightlysotheycan’t fall onto the
Calrod@heating unit.Arrange stemwareso that it
cannot moveeasily.Don’tletthe glassestoucheach
other.
WATCHOUTFOR THIS.
washer tower rises through the center of the bottom
The
rack during the wash and rinse portions of the cycle.
Don’tblock it or load tall things next to it. Also, be
careful not tolet a portion of an item such as a pot or
dish handle extend through the bottom rack. This could
block the wash arm and cause poor washing results.
Sauce pans, mixing bowlsand other small items maybe
placed–face down–in the top rack. The top rack is
handy for all kinds of odd shapes. 13esure the force of
water and detergent can reach soiled surfaces.
8
Page 9

Hmvtokmdithe RACK
1
Fitplatesandsaucersbetweenthepins. Placeitemsso
waterand detergentfromwasharm can reach soiled
that
surfaces.
Loadplatters,pots,pansandbowlsalongthesides,in
cornersor in theback,Alllarge items,suchaspitchers,
saladbowls,andmixingbowls,shouldbewashedinthe
lowerrack.
I
Asshownhere, this plate is being placed with.thesoiled
sidefacingthe center of the rack so waterand detergent
from wash arm can reach soiledsurfaces.
.
‘k ,$
Heavily soiled pots, pans and casseroles MUST be
loaded in thebottom rack, facing down. Prop broiler
pans and racks along the edge.
.,
) ,>
put flatware in the removablebasket with handles Upto –
protectyour hands. Mix knives, forks and spoons so
theydon’tnest together. Distribute evenly.~mall plastic
items, such as measuring spoons and lids from small
containers are not recommended for automatic
ciishwashing.Ifplaced in thedishwasher, they should go
in bottomof the silverwarebasketwith silverwareon top.
Precaution!
Takeout anything that may fallor extend through the
bottom of the basket.
A
v
9
Page 10

(an Vvashi inyour’
Material
Murninum
China/
Stoneware
Crystal
I
Non-dis~ware
items-such
aselectronic
aircleaner
filters,furnace
filters,paint
brushes,etc.
Ghlss
Iron
Pewter
Plastics
Stainlesssteel
Sterlingsilver
andsilver
plate
Non-stick
coatings
Tin
VVood
TiiiTrice.titm(notsak!)
YES
YES
YES
NO Donotwashindishwasher,Damagetodishwasher
YES
NO
NO
YES
YES
YES Don’tputinsamesilverware
YES Afterwashing,wipethenon-stickcoatingareawith
NO
NO
Somecoloredanodized
aluminumcanfade,
I
j Antique,metil-trimmed,hand-
paintedorover-the-glazepatterns
fade.Goldleafwilldiscolor.
Antique,metal-trimmedorhandpaintedpatternsfade.Goldleaf
willdiscolor.
Milkglassmayyellow. ‘
Ironwillrust.
Pewtertarnishes.
basketwithstainlesssteel.
Contactbetweenmetalscan
damagesilver.
Don’twashcopperutensilsin
thesameload.Silvermaygeta
brownfilm.
Adhesiveusedtoattachsome
hollow-handleknivescanloosen.
Tincanrust.
Woodcanwarp,crackorlose
itsfinishwithanytypewashing.
SwcialInstructions
Somedarkeningorspottingpossible.Removeby
scouringwithsoap-filledsteelwoolpads.
Ifindoubt,checkwiththemanufacturer,Ortestwash
onepiecedailyforatleastamonth.Comparewiththe
restof theset.
Loadsecurelytopreventmovement.
Checkmanufacturer’sinstructionsforyourcrystal.
anddiscolorationor stainingofdishwashermayresult.
,,.
Ifitdoesn’tsayDISHWASHERSAFE,testonepiece
beforedishwashinganentireset.Washintoprackonly.
Rinseifnotwashingimmediately.Saltyoracidfoods
canstainiflefton.
Rinseifnotwashingimmediately.Saltyoracidfoodscan
stainiflefton.Drydetergentcancausediftlcult-to-remove
blackspots:Placeinbacksection ofsilverwarebasketto
avoidexposuretodetergentfromthedetergentcup.
vegetableoiltokeepitfromlosingitsnon-stickquality.
Fmgetadim?Here’swhen
‘yNiuuRaddit.
Add dishes any time during a
RINSE & HOLD cvcle. With other
~,ashcycles,
any time 13EFC)R13the main
detergent washportion of the cycle.
you ca; add dishes at
However, opening the door during
any cyclelessens cleaningpower.
So try to load everything at the
beginning.
Here’show toadd a forgottendish:
1. Push the door latch to the left.
Washingwill stop.
10
2. Waita fewseconds until the
water calms. Then open thedoor.
3. Add dishesyou’veforgotten.
4. Close the door and push the
latch tothe far right. When the
door is locked, washing will
continue.
Page 11

.~=
~
PROBLEM
DISHWASHER
WON’TRUN
UNUSUALNOISE
DISHES DON’T DRY
UNCLEAN DISHES
AND FLATWARE
BLACKORGRAY
MARKS ON DISHES
POSSIBLECAUSEAND REMEDY
fuseinyour homemaybe blown,or thecircuitbreakertripped. Replacefuseor
A
reset circuitbreaker. Removeanyother appliancesfromthe circuit. ~à
Utensilsmaynot be secure on rack pins, or something small mayhavedroppedfrom
therack.Wateriscausingutensilstorattle.Makesureeverythingis securelyplaced
indishwasher.
Make sure inletwatertemperatureis correct. (Seepage 6.)
I
Unloadthe bottomrack first.Waterfromdishesin the toprack maybe spillingintothe
bottomrack,
Check for improper loading. Dishesshouldn’tnesttogether.Avoidoverloading,
Checkthe rinse agentdispenserto seethatit’snotempty.
Check inletwatertemperature. It should be atleast 120°F.(Totest, see page 6.)
Waterpressuremay be temporarilylow.Turnon a faucet. Is watercomingout slower
than usual?If so, wait untilpressure is normal before usingyour dishwasher.
Pluggedairgap. (Seepage 14.)
Improper rack loading. (Seepages8and $?.)
Aluminumutensilsoftenleavemarks when theyrub against dishes. Removemarks
with a mild abrasive cleanser.
DETERGENT LEFT
IN DISPENSER CUPS
i
I
DETERGENT CUP
LID WON’TLATCH
AFTER ADDING
DETERGENT
YELLOW OR BROWN
I
Watermaynot be reaching the detergent cups. Movedishes that maybe blocking
detergentcup.
The dispensercovermay notbe opening or may be blockedby improperly loaded
items. If youused a pov)derdetergent, openthe cup and removeany caked-on
detergent. If the cup stilldoesn’topen automatically,call for service.
Detergent may be old. If the powderdetergentis hard or caked inthebox, throw it
away.Thedetergent may not be workingwell. Try another brand.
Cycle Indicator Dial must be in OFF positionfor cup lid to closeand latch properly.
If youunlatch the door and open ittodry your dishes, the Cycle Indicator Dial does
not advance to OFF by itself.
Teaor coffee can stain cups. Removethe stainsbyhand, using a solutionof 1/2cup
bleach and 3 cups warm water.
An overallyellowor brownfilm ondishesor glasswarecan be caused by irondepositsin
water. A special filter inthe water supply line isthe only wayto coiarectthis problem.
Yourwater softenercompany can tell you about the filter.
Yellowfilm on sterling silver results when you wash copper utensils in the same load.
Silver polish will usually remove thisstain.
(continued next page)
Page 12

—.
PROBLEM
~01~~~ (continued)
POSSIBLECAUSEANDREMEDY
SPOT$ANDFILMING>
oN-GLAss&M’@ ~~Q
FLATWARE ,
,,.
!.
,,
~, ,,
~*
,,
,,
4. Start the dishwasher and allowtorun for 18to 20 minutes.The dishwasherwill now
Spottingcanbecausedbyallthesethings:
‘!
O’Extremelyhardwater.(Seepage6.)
@Lowinle~watertemperature.(Totest,seepage6,)
w‘C)verkmdingthedishwasher.
hpropw loading. (Seepages 8and ~.)
-,.
* Old’ordamppowderdetergent.
e J?hosphak levelin detergenttoolow.
@
R@seagentdispenserempty.(Seepage6.)
(Seepage6.) ‘
,,
-,
@Toolittledetergent.(Seepage7.)
Localwaterconditionsandpersonalpreferencesvary.Tryseveral
tofindonethat givesthebestresultsforyou.Aliquiddishwasherdetergentmayh~lp
reducefilming.
lxandsofdetergents
,.
Toremovestubborn spotsand filmfromglassware:
1. Removeallmetal
2. Do notadd detergent.
3. SelectIUIXCRUBB13Rcycle.
be in themain wash.
utensilsfromthedishwasher.
5. Then opentnedoorandpour2 cups (500ml)ofwhite vinegar into the bottcunof
the dishwasher.
6. Close the door and allowto completethe cycle.
If vinegarrinsedoesn’twork:Repeatasabove,exceptuse 1/4cup(60ml)ofcitric
acidcrystalsinsteadofvinegar.(Mostdrugstorescarrycitricacidcrystals.Ifyours
doesn’t,callGEFactoryService.)
Usinga vinegarorcitricacidcrystalrinsemorethantwiceamonth?Considerahome
watersoftener.
DI.X)UDINESSON
If vinegarorcitricacidcrystalrinsedoesn’twork,thecloudinessis “etching?Thefilm
3LASSWARE cannotberemoved.
It canbeprevented:
shortestcyclethatwillgetthemclean.
Watertemperatureenteringdishwasherexceeds150°E
;HIPP~NGOF CHINA
~0 ughhandlingcancausechipping.Loadwithcare.Mike sureglasswareandchina
are secureandcan’tjarloose.(Seepage8forcorrectwaytoload glassware.)F&ik
sure tallglassesandstemwarewillclear thetopofthetubwhenyoupushthe rackinto
thedishwasher.
Always usethetoprackfordelicateitems.
Use lessdetergentifyouhavesoftwater.Washglassware.inthe
—.
12
Page 13

WATERSTANDING
INTHE130TTON!~ ~
CM?THETUB ‘ ~ ~
POSSIBLECAUSEAIWIREMEDY
‘Wateraroundthe outletonthetubbottomatthebackofthetubisnormal,Itisclean
water.It’stheretokeepthewaterseallubricated.
,> ‘
.,
.
WATERW6N’TPUMP
C)U’I’OFTHETUB
Ifthe entirebottomofthetub
gap, if you haveone. (Seepage 14.)
Checkthe kitchen sink. Isitdrainingwell?Youmayneed a plumber,
,
Ifdishwasherdrainsintodisposer,rundisposertoclear.Besuredisposerisnot
clogged.
SUDSINTHETUB
Sudsingdetergentsarenot meant
DISHWASHERDETERGENTS TO AVOIDSUDSING.
Toremovesuds from the tukxOpen
ofcoldwatertothetub.Closeandlatchthedishwasher.Pumpoutwaterbyslowly
turningthecontrol
Repeatif necessary.
DISHWASHERLEAKS
Sudscancauseunit
designedforautomaticdishwashers. “ “
Spillingtherinseagentcancausefoamduringwashing.Thiscanleadtooverflowing.
Wipeupaccidentalspillofrinseagentwitha dampcloth.
Hyou need more help.. .caIl, M free:
GEAnswer Center@
800.626.2000
conmner infimnation service
has water,youmayhaveadrainproblem. Clean the air
for dishwashers.USE ONLYAU7QMATK2.
thedishwasher.Letsudsevaporate,Add1gallon
dial untila drainperiodisreached,
to overflow.That’swhyit’sso important to usea deter~entthat’s
Page 14

———
Careand
USERMA.U’’U’ENANC!E
DWTRLJCTK)NS
Clean the controlpanelwitha
lightlydampenedcloth. Dry
thoroughly.Do not useabrasives
or sharpobjectson thepanel.
Theycandamageit.
Cleantheoutsiclewitha good
appliancepolishwax. The outside
cabinetfinishisdurable, but it can
scratch. So useno scouringpads,
or harsh or gritty cleaners.
AppliancePolishWax& Cleaner
(Cat. No. WRWX0216)isavailable
fromGE Appliance PartsMart.
The insideusually takescare of
itself. Hit shouldeverneed
cleaning,use a mildcleansing
powder.Scouringpads and harsh
cleaners can mar the finish.
dishwashers
oftenusean airgap.
Keepitdean.
An air gap isa plumbingdevice.
It protectsyour dishwasheragainst
waterbacking up into itif a drain
clogs. The air gapis not a part of
the dishwasher.And youmay not
evenhaveone. Not all plumbing
codes require air gaps.
youhaveanairgap,checkit
If
atleastoncea month.ITISNOI’
PARTOFYOURDISHWASHER.
ITISNOI’COVEREDINYOUR
WARRANTY.
Theair gap
Withmost types,first turn offthe
dishwasher,thenlift offthe chrome
is easyto clean.
cover.Then unscrewthe plasticcap
and check for anybuildup ofgrit.
A toothpick makescleaningeasy.
Check the air gapany timeyour
ciishwasherisn’tcirainingwell.
Notusingyour dishwasher
inwinter?Protectagainst
freezing.
If yourdishwasherisleftinan
unheatedplace during the winter,
aska service technicianto:
@Cutoffelectricpowerto the
dishwasher.Removefusesor trip
circuitbreaker.
@Turnoffthe watersupply.
~Disconnectthe waterinletline
fromthe water valve.
@Drain water from the inletline
and watervalve. (Usea panto
catchthewater.)
~Reconnectthewater inletline to
thewatervalve.
~Drain the collectionchamber
at rear ofunit below filter by
disconnectinghoseto pump.
Reconnectafter draining,
@Removethe plasticpump cover in
the tub bottom and use a spongeto
soak up waterin the rubber boot.
Page 15

to color
If youare redecorating,youcan
changeyourdishwasher’sfront
panelsto match or blendwith
yournew colors.
Thepanels are held in placeby
thedoor trim and the trimonthe
panelbelowthe door. Eachside
ofeach panel isa differentco~or.
Or you can paintapanel withthe
colorofyour ownchoice.
—
Do not operatethe dishwasher
whilechanging panels orwhen
loweraccess panelis removed.
How
tochange the door panel:
L Takeout three trim screwson
either side ofthe dishwasherdoor.
Removethe side trim.
2. Slide the doorpanel out,
(Careful–edges may be sharp.)
3. Turn the door panel around and
put the color you want in front.
4. Replace the door panel, side
trim and screws.
How to change the lowerpanel:
L
Removefourpanel attachment
screws. (TWOabovethe panel, two
belowthe panel.) -
2. Remove the entire panel.
3. Takeout three screws and
removethe top trim.
4. Slide the door panel out.
5. Turn the panel around and
put
thecolor you wantin front.
6,Replace the lowerpanel, top
[rimand screws,
7.Replace the entire panel and
fourattachment screws.
A woodpaneltrimkit contains
trim andinstructions for adding
decorativewooddoor panel and
loweraccesspanelto matchkitchen
cabinets.Use the order formbelow
to order thiskit.
—————————————- ——————————————
r
I
I
I
I
I
I
I
I
I
I
I
I
I
I
Lu
u
w
r
+
5
I
I
I
I
I
I
I
Name:
I
I
Address:
I
I
city:
I
I
State:
I
I
NlodelNo.:
I
I
Date Purchased:
I
I
I
I
I
I
I
Usethis form to order, withoutcharge,
a woodpaneltrim kit.
❑
Kit ‘GET40
WoodE?md TrimKit
FOLDHERE
ZipCode:
Serial No.:
——
-.
-
I
I
I
I
I
I
1-
I
I
I
1
1-
Page 16

TAPEHERE
Name
Address
City
Zip
State
GE
do Dri-ViewMfg.
47”6 Ave.
Louisville, KY 40209
I I
PLACE
STAlvlP
HERE
h
Page 17

There
With-the ~urc~ase of your new GE appliance, r~ceiv~ the
as~uran~e that if you ever neecl infOrmatiO~ or assistance
~rom ~~, we’ll be there. All you have to do is call-toll=free!
WhateveryourquestionaboutanyGE
majorappliance,GEAnswerCented@
informationserviceis availableto
help.Yourcall—andyour question—
willbe answeredpromptlyand
courteouslyAnd youcan call any
time.GEAnswerCente# serviceis
open 24hoursa day7 daysaweek.
.4GE Consumer Service professional
willprovide expert repair service,
scheduled at a time that’s convenient
you.ManyGEConsumerService
for
ompany-operatedlocationsofferyou
servicetodayor tomorrow,or at your
convenience(7:00a.m.to 7:00p.m.
weekdan 9:00a.m.to2:00p.m.Satur-
days).Our factory-tminedtechnicians
knowyourapplianceinsideand out—
somostrepairs canbe handled injust
onevisit,
Youcan havethe
secure feeling that
GEConsumerServicewillstillbe
thereafteryourwarrantyexpires.Pur-
chasea GEconmactwhileyourwarrantyisstillin effectand you’llreceive
a substantialdiscount.Witha multiple-
yearcontract,you’reassuredof future
serviceat today’sprices.
Individuals’ Cpd.ifkd toservicetheir
ownappliances can haveneeded
parts or accessoriessent directlyto
their home, freeof shippingcharge!
The GEparts systemprovidesaccess
to over47,000parts..and allGE
Genuine RenewalPartsare .fidly
warranted.VISA, MasterCardand
Discovercards are accepted.
user maintenance instructions
contained in this bookletcoverprocedms intended to be pwformed by
anyuser.
Skmkl be mfm-ed to qwdifid. E@!-”
‘viceper$mlde Ckiutionmust be
exercised, since improper servicing
may causeU.Emm$eoperation.
mx!r servicing gem?la.uy
TelecommunicationDevicefor the Deaf
!,4— - . .. . . ,“, ..7” -. -.
,..’ —. . . .
SCcmm AC.
s. -a-,m ~a.,,..
Upon request,GEwillprovideBraille
controlsfor a varietyof GEappliances,
and a brochure to assist in planning a
barrier-freekitchenfor personswith
limitedmobility
Toobtaintheseitems,
free of charge,call800.626.2000.
Consumerswithimpaired hearing
or speechwho haveaccessto aTDD
or a conventionalteletypewritermay
Cd 800-TDD-Guc (800-833-4322)
to request informationor service.
Page 18

—.
YOURGE Wnw
Saveproofof original purchase date suchasyour salesslip orcancelledcheck to establishwarrantyperiod.
!s COVERED
FULL ONE-YEAR WARRANTY
Foroneyearfrom dateoforigica!
purchase,we will provide,free of
charge,parts andservicelaborin
your home to repairor replace
part ofthe dishwasherthat tails
becauseof a manufacturingdefect,
FULL TEN-YEAR WARRANTY
Forten yearsfrom dateof original
Purchase,we will lxovide. freeof
charge, parts andrservice’labor in
your hometo repairor replacethe ~
J%m@lJf@tub orcfoorher if it
fails tocontain waterbecauseof
a manufacturing defect such as
cracking, chipping, peeling or
rusting.
any
LIMITED $ECX3ND-YEAR
WARRANTY
Forthesecondyearfrom dateof
original purchase,wewill provide,
freeofcharge,replacementpartsfor
anypartof the Waterlktribution
System
(asillustratedbelow)that
fails becauseof a manufacturing
defect.Associatedinlet and drain
plumbing partsarenot coveredby
this warranty.Youpayforthe
service
trip to your homeand
servicelabor charges.
PO
FoodDisposer - “
WaterDistribution System
Thiswarranty is extendedto !
the original purchaserandany
succeedingownerfor products
purchasedfor ordinary homeuse
inthe 48mainlandstates,Hawaii
andWashington, D,C.In Alaskathe
warrantyis the sameexceptthat it
is LIMITED becauseyou must payto
shipthe productto the serviceshop
orfor the servicetechnician’stravel
coststo your home.
All warrantyservicewill be provided
byour FactoryServiceCentersor
byour authorizedCustomerCare”
servicersduring normalworking
hours.
Lookin the Whiteor YellowPages
of your telephone directoryfor
ion
GENERAL ELECTRICCOMPANY,
Iy
GENERAL ELECTRICFACTORY
SERVICE,GENERAL ELECTRICl-KITPOINTFACTORYSERVICEor
GENERAL ELECTRICCUSTOMER
CARE@SERViCE.
(
44fl
Is NO-r “ servicetriPstoYourhomet~
teach youhowto usethe product.
Read yourUseand Care material.
If you then haveanyquestions
about operating the product,
please contact yourdealer or our
Consumer Affairs office atthe
address below,orcall, toll free:
GE Answer Center@
800.626.2000
consumer information service
~ Improper installation,
e Replacement of housefuses or
resetting of circuit breakers.
e Cleaning or servicing of air gap
device in drain line.
~ Failureof the product if it is used
for other than its intended purpose
or usedcommercially.
e Damageto product caused by
accident, fire, floods or acts ofGod,
WARRANTORIS
NOTRESPONSIBLE
FORCONSEQUENTIAL DAMAGES,
If you havean installation problem,
contact your dealer or installer.
Youare responsible for providing
adequate electrical, plumbing
and other connecting facilities,
Some statesdo notallowthe exclusionorlimitationof incidentalorconsequentialdamages,sotheabovelimitationorexclusion
may ilot apply to you.This warranty gives you specific legal rights, and you may also have other rights which varyfrom stateto state.
Toknowwhat your legalrights are in your state, consult your local or state consumer affairs office or your state’sAttorney General.
General Electric
furtherhelp isneeded this write:
if
Affairs, GE bukwwe, KY 40225
.
6-90 cc+
 Loading...