

GE GSC720, GSC900 Use and Care Manual
Use and Care Guide
Dishwasher
Welcome to the GE family!
Register your product today – call toll-free 800.626.2000 – 24 hrs. a day.
You’ll find the Model & Serial numbers located on a label fastened on the inside of your new dishwasher.
Safety Instructions.........................3
Operating Instructions, Tips
China, Crystal, Sterling ...............................12
Connecting Electricity ...................................5
Cycle Features ............................................6, 7
Detergent Guide .............................................9
Dispenser Cups...............................................9
Drying Options............................................6, 7
Features........................................................6, 7
Loading ...................................................10, 11
Operating Instructions..............................6, 7
Rinse Agent......................................................8
Unicouple.....................................................4, 5
Water Temperature .......................................8
Care and Cleaning
Dishwasher Top ...........................................13
Winter Storage.............................................13
Problem Solver.......................15–17
More questions ?…call
GE Answer Center® 800.626.2000
Preparation
Front Panel Change.....................................14
Consumer Services...................19
Appliance Registration..................................1
Important Phone Numbers........................19
Model and Serial Numbers ..........................2
Repair Service...............................................18
Warranty ........................................Back Cover
Convertible Models GSC720
GSC900
GE Appliances
A note to consumer—
We’d like to thank you and congratulate you for making the wise decision in purchasing your dishwasher.
This User Guide is designed to be kept near your dishwasher at all times for quick and easy reference. Features
may vary on some dishwasher models. Please read the following tips to insure your dishwasher is operating at its
best performance.
We care about you and your appliance and we want your dishwasher to do its job for you.
• HOT WATER—Your dishwasher
needs hot water for best results. Water
entering the dishwasher should be at
least 120°F. but your dishwasher
performs BETTER with HIGHER
water temperatures not to exceed 150°F.
• WATER HARDNESS—The hardness
of the water plays an important part in
how well your dishwasher cleans. In
areas where water is very hard (12 grains
or more), it may be necessary to install
a water softener. If you do not know the
hardness of your water supply, contact
your local water department.
• DETERGENTS—Only use detergents
labeled for use in automatic dishwashers.
Never use laundry detergents or
liquid soaps…that will cause oversudsing
and leaks. The amount of detergent you
use depends on the water hardness and the
amount of soil on your dishes. In most
cases, detergent amounts should be
increased for hard water and heavy soil.
Before using your dishwasher,
read this guide carefully.
It is intended to help you operate and
maintain your new dishwasher properly.
Keep it handy for answers to your questions.
If you don’t understand something or need more help, call:
GE Answer Center
®
800.626.2000
24 hours a day, 7 days a week.
If you received a
POT-
NORMAL
SCRUBBER
WATER
WASH
RINSE
SAVER
WASH HEAT
& HOLD
HEATED
BOOST
ENERGY
DRY
SAVER
( NO HEAT BOOST)
Cycles
Y
START
A
L
E
2
D
Options
S
R
4
U
O
WASHING
H
6
Potscrubber 1125
OFF
DRYING
DELAYED
START
RINSING
Quiet Power
damaged dishwasher…
Immediately contact the dealer (or
builder) that sold you the dishwasher.
Save time and money .
Before you request service…
Check the Problem Solver in the back of this guide. It lists
causes of minor operating problems that you can correct
yourself.
• RINSE AGENT—should always be used:
— to reduce water spotting.
— to improve drying.
Always check and refill the rinse agent
when necessary.
• FOR BEST RESULTS—The cycles
and the options you choose have an
effect on the results you get. The
following are examples. (Please, see
the Operating Instructions.)
• TEMP BOOST OPTION—
—
use with heavily soiled loads.
— provides additional heat for best
washing and drying.
• POTS PANS CYCLE—
— use with dried or baked-on heavily
soiled loads.
• HEATED DRY OPTION—
—
assures faster drying.
— be sure to use a rinse agent.
Write down the model
and serial numbers.
You’ll find them on a label fastened to the
tub wall just inside the dishwasher door.
These numbers are also on the Consumer Product
Ownership Registration Card that came with your
dishwasher. Before sending in this card, please write
these numbers here:
Model Number
Serial Number
Use these numbers in any correspondence or service calls
concerning your dishwasher.
Para obtener la versión en
llame a
GE Answer Center,
®
servicio de información para el
consumidor,
teléfono 800.626.2000.
español
,
2
IMPOR TANT SAFETY INSTRUCTIONS
Read all instructions before using this appliance.
WARNING—When using this
appliance, always exercise basic safety
precautions, including the following:
• Use this appliance only for its
intended purpose, as you will find described in
this guide.
• Use only powder or liquid detergents or wetting
agents recommended for use in a dishwasher .
Keep all washing detergents and wetting agents
out of reach of children, preferably in a locked
cabinet. Observe all warnings on container labels
to avoid personal injury .
• When loading items to be washed:
A. Locate sharp items so that they are not
likely to damage the door seal, and
B. Load sharp knives with the handles up
to reduce the risk of cut-type injuries.
• Do not wash plastic items unless marked
“dishwasher safe” or the equivalent. For plastic
items not so marked, check the manufacturer’s
recommendations.
• Do not touch the heating element during or
immediately after use.
• Do not o perateyour dishwasher unless all enclosure
panels are properly in place.
• Do not tamper with controls.
• Do not abuse, sit on, or stand on the door or dish
rack of the dishwasher .
• Close supervision is necessary if this appliance
is used by or near children. Do not allow children
to play inside, on or with this appliance or any
discarded appliance. Dispose of discarded
appliances and shipping or packing material
properly . Before discarding a dishwasher,
remove the door of the washing compartment.
POT-
NORMAL
SCRUBBER
WATER
WASH
RINSE
SAVER
& HOLD
WASH HEAT
HEATED
BOOST
ENERGY
DRY
SAVER
( NO HEAT BOOST)
Cycles
Y
START
A
L
E
2
D
Options
S
R
4
U
O
WASHING
H
6
Potscrubber 1125
OFF
DRYING
RINSING
Do not store or use combustible
DELAYED
START
Quiet Power
materials, gasoline or other flammable
GAS
vapors and liquids in the vicinity of
this or any other appliance.
• Load light plastic items so they will not
become dislodged and drop to the bottom of
the dishwasher—they might come into contact
with the heating element and be damaged.
• To minimize the possibility of electric shock,
disconnect this appliance from the power supply
before attempting any maintenance. NOTE: Turning
the dishwasher off does not disconnect the appliance
from the power supply . We recommend
having a
qualified technician service your appliance.
• Do not attempt to repair or replace any part
of your dishwasher unless it is specifically
recommended in this guide. All other servicing
should be referred to a qualified technician.
GROUNDING INSTRUCTIONS
This dishwasher must be properly
installed and located in accordance
with the Installation Instructions
before it is used. If you did not receive
an Installation Instructions sheet with your
dishwasher, you can obtain one by calling, toll-free,
the GE Answer Center®, 800.626.2000.
• This appliance must be connected to a grounded
metal, permanent wiring system; or an equipmentgrounding conductor must be run with the circuit
conductors and connected to the equipmentgrounding terminal or lead of the appliance.
WARNING—Improper connection of
the equipment-grounding conductor
can result in a risk of electric shock.
Check with a qualified electrician or
service representative if you are in doubt whether
the appliance is properly grounded.
WARNING—HYDROGEN GAS
is produced by the chemical action
within your water heater. It can
accumulate in the water heater
and/or water pipes if hot water has not been used
for a period of two weeks or longer.
HYDROGEN GAS IS EXPLOSIVE. To prevent
the possibility of damage or injury , if you have
not used hot water for two weeks or more, or
moved into a residence in which the hot water
system may not have been used for some time,
turn on all hot water faucets and allow them to
run for several minutes before using any
electrical appliance which is connected to the hot
water system. This will allow any hydrogen gas
to escape. Also, since the gas is flammable, do not
smoke or use an open flame or appliance during
this process.
SAVE THESE
INSTRUCTIONS
Important Safety Instructions
3
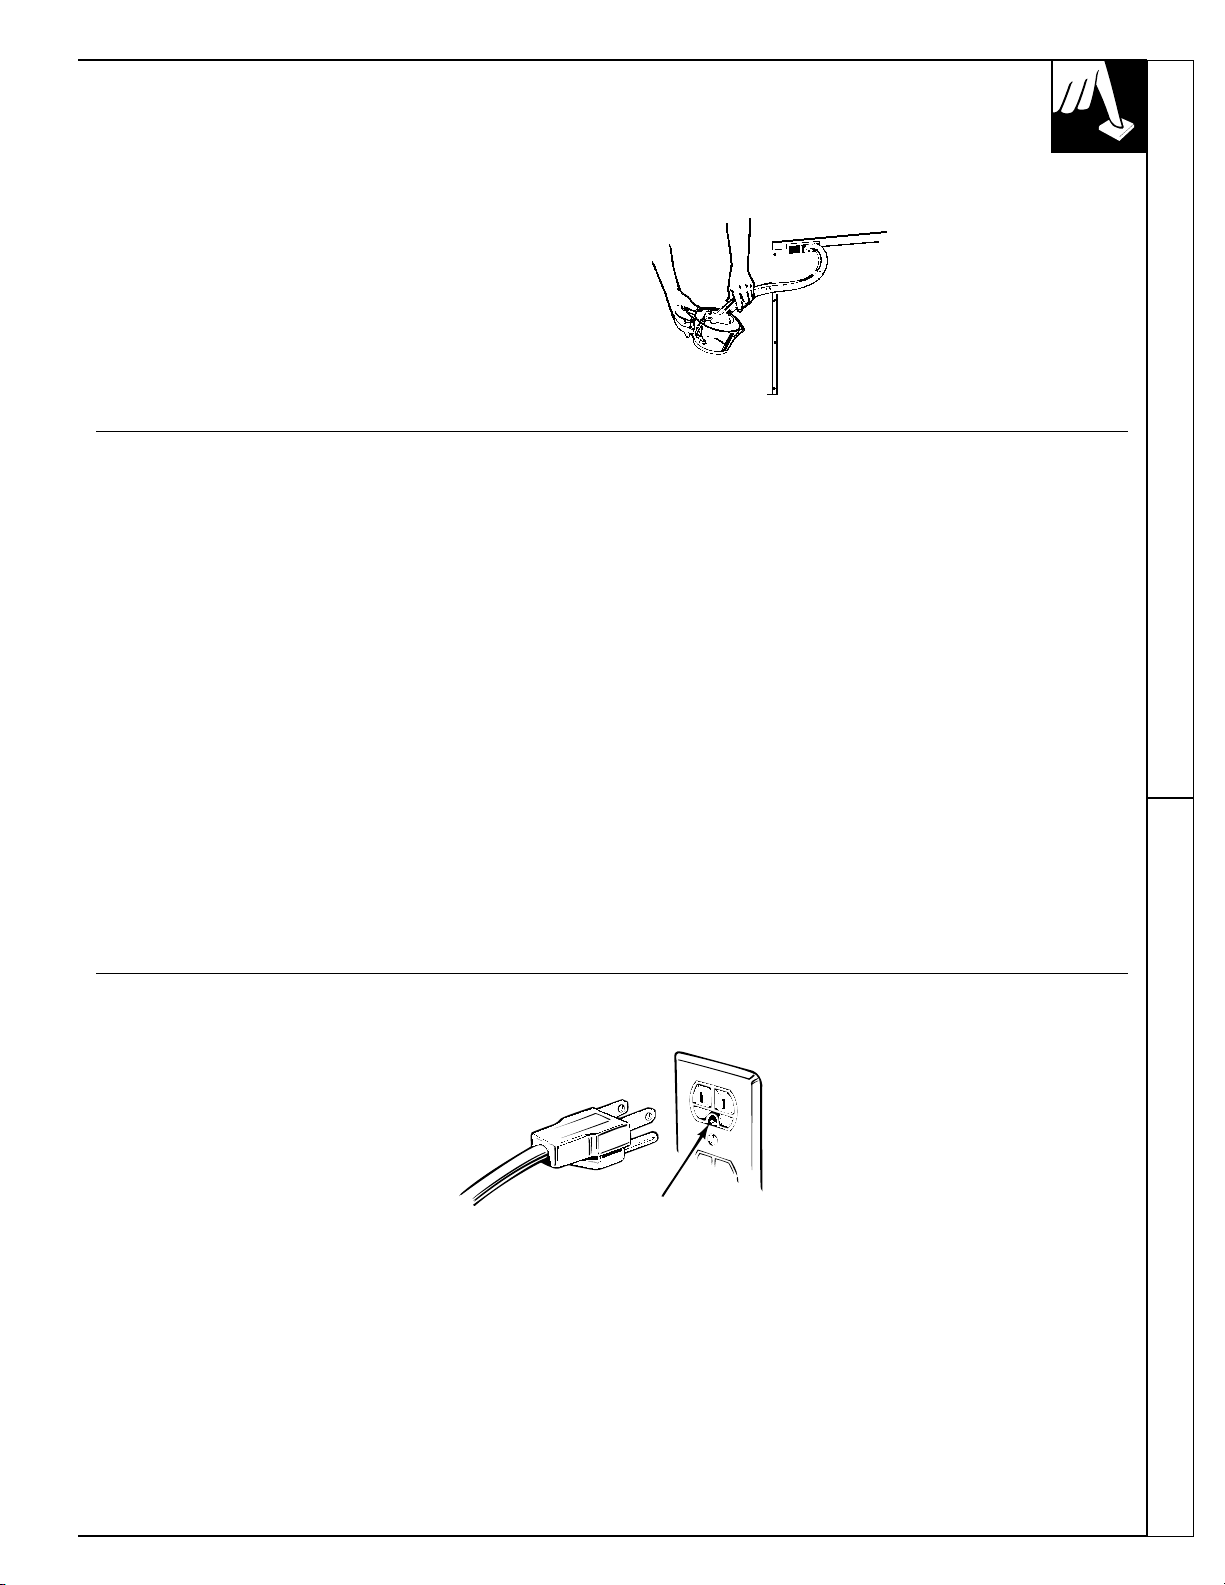
HOW TO USE THE UNICOUPLE
Before Operating Your Dishwasher the First Time…
Attach the Faucet Adapter. The special faucet adapter
supplied with your dishwasher must be assembled to the
sink faucet before you can use your dishwasher.
The faucet adapter is designed to fit standard spouts
having internal or external threads. You will find the
adapter and two washers in the “Faucet Adapter”
packet in your dishwasher.
To install faucet adapter, first remove the old aerator
or trim ring on your faucet spout.
If faucet has external threads:
Insert the thinner of the two
washers into the faucet adapter
and attach it to the faucet spout.
Tighten with pliers.
How to Connect the Unicouple
1. Pull Unicouple and its hoses completely out from
storage compartment located at rear of dishwasher
and attach it to the faucet adapter.
2.
Attach the Unicouple
connector to the
faucet adapter by
depressing the
collar at the top
of the connector.
When Unicouple
is all the way up
onto the adapter,
release the collar. It will then
snap into position to lock the Unicouple in place.
If faucet has internal threads:
Insert both of the washers into
the faucet adapter and attach it
to the faucet spout.
Tighten with pliers.
If the faucet adapter threads
do not match your faucet spout,
your local hardware or plumbing
supply store normally has additional
fittings to adapt your faucet spout to
the special faucet adapter .
NOTE: A sink spray attachment hose can burst if it
is installed on the same sink with your dishwasher.
We suggest that you disconnect the sink spray
attachment if your sink has one and plug the hole.
The Unicouple’s small hose carries water from
the faucet to the dishwasher. Its large hose carries
drain water to the sink. Be sure Unicouple is
pointing toward the sink bowl drain opening and
the sink drain is open for water that will drain from
your dishwasher. If your dishwasher drains into a
disposer, operate the disposer until it is completely
empty before starting the dishwasher.
3. Turn hot water fully on before starting the dishwasher.
How to Disconnect the Unicouple from Faucet Adapter
1. Turn off the hot water.
2. Release the water pressure by depressing
the pressure release button. This relieves water
pressure and protects you, and the room, from
severe splashing.
3. Release Unicouple from faucet by depressing
the collar at the top of the Unicouple connector.
How to Disconnect Your Dishwasher
1. Remove the power cord plug from the wall
receptacle.
2. Disconnect Unicouple from faucet adapter.
NOTE: When motor stops at the end of the final
rinse, the Unicouple can be disconnected and returned
to storage.
4
How to Drain Excess W ater from Unicouple Hoses
If the sink is 34″ or higher from the floor,
the excess water in Unicouple hoses cannot be
drained directly into the sink. It will be necessary to
drain excess water from hoses into a bowl or suitable
container that is held outside and lower than the sink.
HOW TO CONNECT ELECTRICITY
How to Connect Unicouple How to Connect Electricity
Caution, for personal safety:
DO NOT USE AN EXTENSION CORD OR
AN ADAPTER PLUG WITH THIS APPLIANCE.
DO NOT, UNDER ANY CIRCUMSTANCES,
CUT OR REMOVE THE THIRD GROUNDING
PRONG FROM THE POWER CORD.
GROUNDING INSTRUCTIONS—This appliance
must be grounded. In the event of a malfunction or
breakdown, grounding will reduce the risk of
electric shock by providing a path of least
resistance for electric current. This dishwasher is
equipped with a cord having a grounding
conductor and a grounding plug. The plug must be
plugged into an appropriate outlet that is installed
and grounded in accordance with the NATIONAL
ELECTRIC CODE, ANSI/NPFA NO. 70.
Electrical Requirements
•This appliance must be
supplied with 120V, 60 Hz,
and connected to an individual,
properly grounded branch circuit,
protected by a 15 or 20 amp circuit
breaker or time-delay fuse.
If the electric supply
•
provided does not meet the above
specifications, it is recommended
that a licensed electrician install
an approved outlet.
DANGER—Improper connection of the
equipment/grounding conductor can result in
a risk of electric shock. Check with a qualified
electrician or serviceman if you are in doubt as to
whether the dishwasher is properly grounded. Do
not modify the plug provided with the appliance;
if it will not fit the outlet, have a proper outlet
installed by a qualified electrician.
INSURE PROPER
GROUND EXISTS
BEFORE USE
• Your dishwasher circuit
should not be used for any
other appliance while the
dishwasher is in operation as
the dishwasher requires the full
capacity of the circuit.
• If the wall receptacle you
plug the dishwasher’s power
cord into is controlled by a
switch, turn on the switch.
5
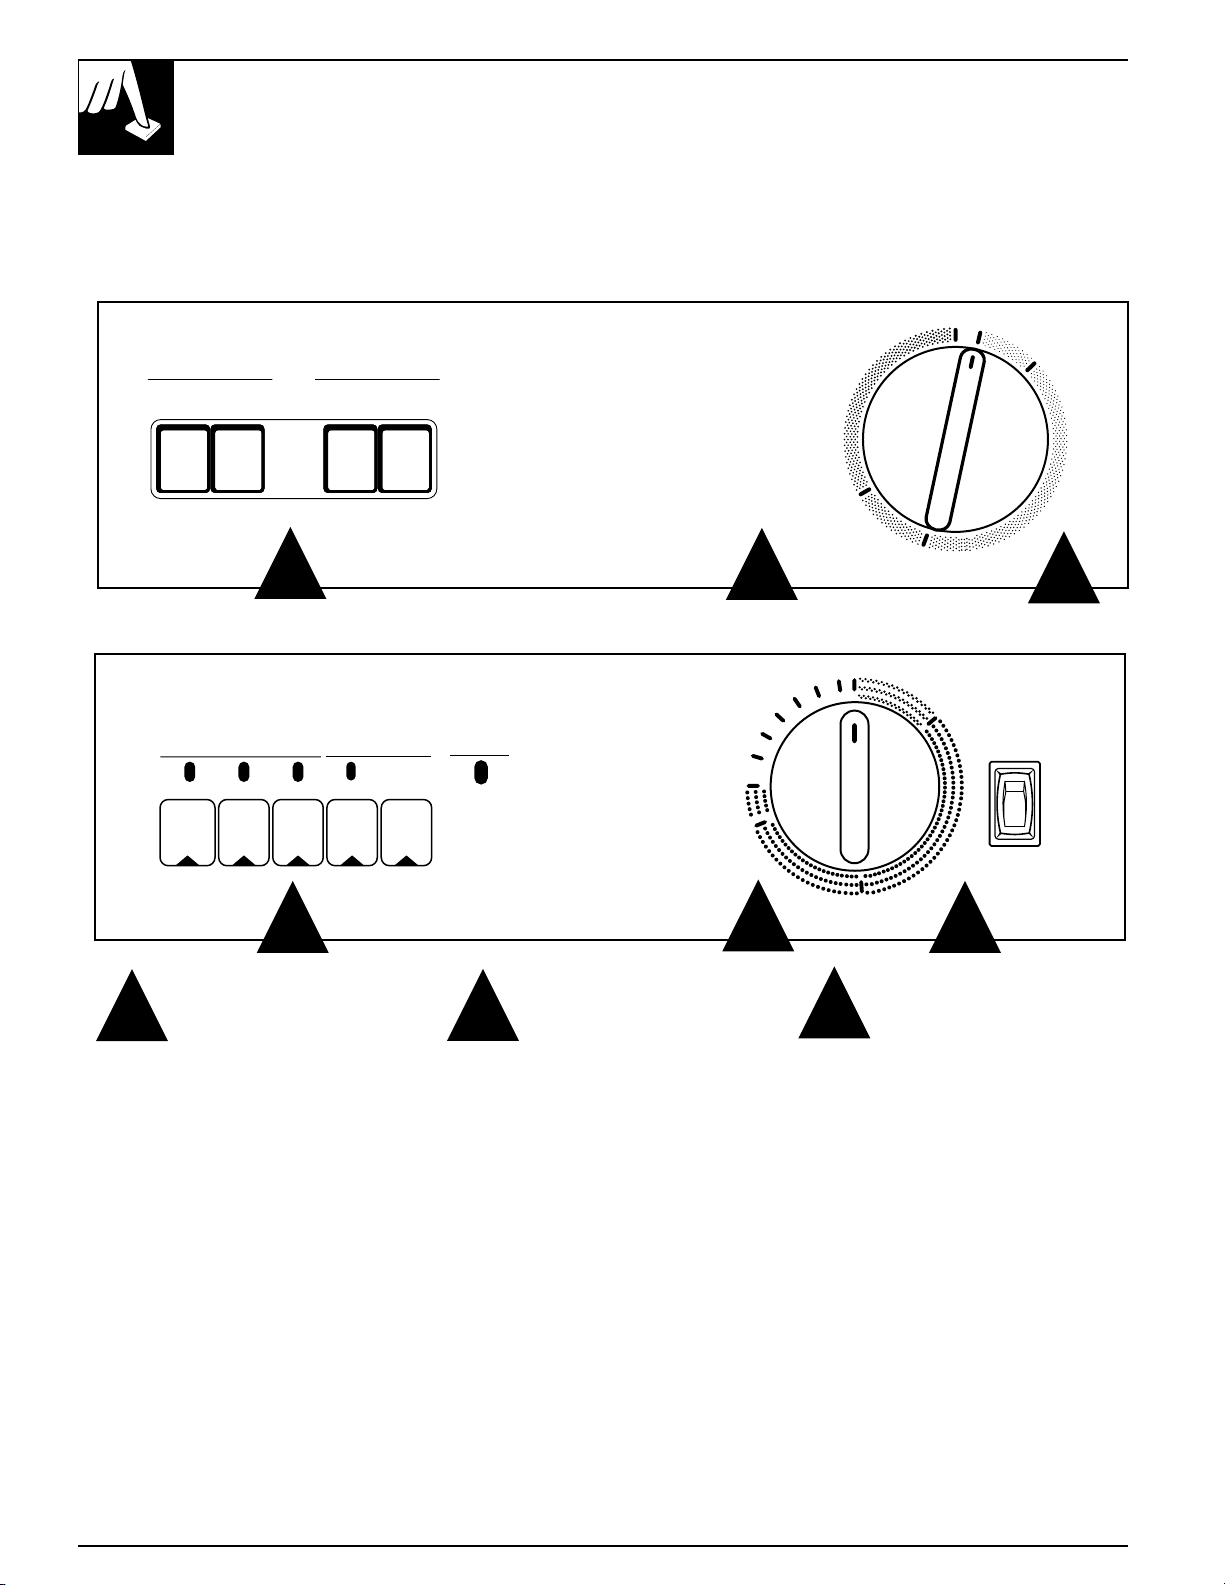
OPERATING INSTRUCTIONS
Find your model. Locate your model number by
looking on the label fastened to the tub wall just
Your dishwasher is designed to give maximum
performance on loads with normal and heavy soils.
inside the dishwasher door.
GSC720 Features and appearance may vary
OFF
START
SHORT
CYCLES
POT-
SCRUBBER
NORMAL
WASH
ENERGY OPTIONS
HEATED DRY
ON OFF
2
PLATE
WARMER
(PRESS
HEATED DRY)
RINSE & HOLD
2
WASH
3
GSC900 Features and appearance may vary
START
1
2
3
4
SHORT
WASH
HEATED
DRY O N
HEATED
DRY OFF
POT-
SCRUBBER
CYCLES
NORMAL
WASH
LIGHT
WASH
OPTIONS
TEMP
BOOST
ON
TEMP
BOOST
OFF
STATUS
CYCLE
ON
START DELAY
(HRS)
OFF
PLATE
WARMER
(PRESS
HEATED DRY)
5
6
2 2
1
Before you Begin
• Load dishware. (See Loading
section.)
• Make sure the Cycle Indicator Dial
is at the OFF position and the
Cycle On light (on some models)
is OFF.
• Add detergent. (See Detergent
Dispensers and Detergent Guide
sections.)
• Check rinse agent level. (See Rinse
Agent section.)
NOTE: If dishwasher drains into a
garbage disposal, operate the disposal
until it is empty before starting the
dishwasher.
2
Select Cycle/Option
*If you want to use a cycle on the
Dial go to Using the Cycles on the
Dial section.
• Latch the door.
• Select your desired wash cycle
and (energy) options.
NOTE: The light over the pads
(on some models) comes ON when
pressed, to indicate the cycle/option
that has been selected. Press pad
firmly until light comes on. These
lights remain on while the door is
latched.
RINSE & HOLD
3
3
Starting the Cycle
Turning the Cycle Indicator Dial to
START will begin the cycle
immediately.
NOTE: To obtain the benefits of a
complete cycle, be careful that you
do not turn the Dial any farther than
is necessary to start the dishwasher.
There is a time delay between startup and water fill so you will not hear
any wash action right away.
6
 Loading...