

—,.
you
operatInstruc
fo
* ENERGY-SAVER
NO HEAT-DRYING OPTION
Lets you save electrical energy
by automatically shutting off the
heater during the drying cycle
when fast drying is not needed.
FOUR CYCLE OPTIONS
*
Normal Soil plus Short Washon the
dial—each with Heated Drying or
No Heat Drying.
2-LEVEL WASH SYSTEM
*
Directs water action from the
bottom and the middle to clean
the dishes.
9
dishwa
.
S F
UNICOUPLE *
*
FAUCET CONNECTOR
Makes iteasyto hook updishwasher
to faucet with one easy motion.
Lets you continue to use faucet
while dishwasher is operating.
CONVERTS TO BUILT-IN
*
Use as a portable now and convert
to built-in later.
SOFT FOOD DISPOSER
*
Load dirty dishes without pre-
rinsing ...just tip off large amounts
of food and hard scraps. The soft
food disposer pulverizes soft food
scraps and flushes them away.
SOUND INSULATED
for quiet operation.
DOUBLE-FIRED
*
PORCELAIN ENAMEL INTERIOR
is tough, durable and virtually
immune to hot water, odors, food
acids and harsh detergents. The
gleaming white porcelain enamel
interior maintains its appearance
year after year and resists most
abrasions, scratches and stains.
@ CONVENIENT
WORK-SURFACE TOP
Q CYCLE-INDICATOR @
CONTROL DIAL
6 DUAL DETERGENT 9
DISPENSER
9
CUSHIONED
FULL-EXTENSION RACKS
REMOVABLE
SILVERWARE BASKET
ISOLATION MECHANISM
MOUNTING
e
RETRACTING STABILIZERS
~ ,
volts: 115
Amps:15amp circuit breaker
or r~gti!ar housefuse.
Eiwtz: 60
Three-orcmg grounding
type receptacle is
required.
O WASH-WATER TEMPERATURE
MAINTENANCE
O CALI?OD’”HEATING UNIT
~ AUTOMATIC WATER LEVEL
CONTROL
@ EASY-ROLLING CASTERS
* WhitepweJain enfmwdinterior.
e Metwater pressurerequired:
15 to 120Jbs.per squareinch.
,,)
L
!
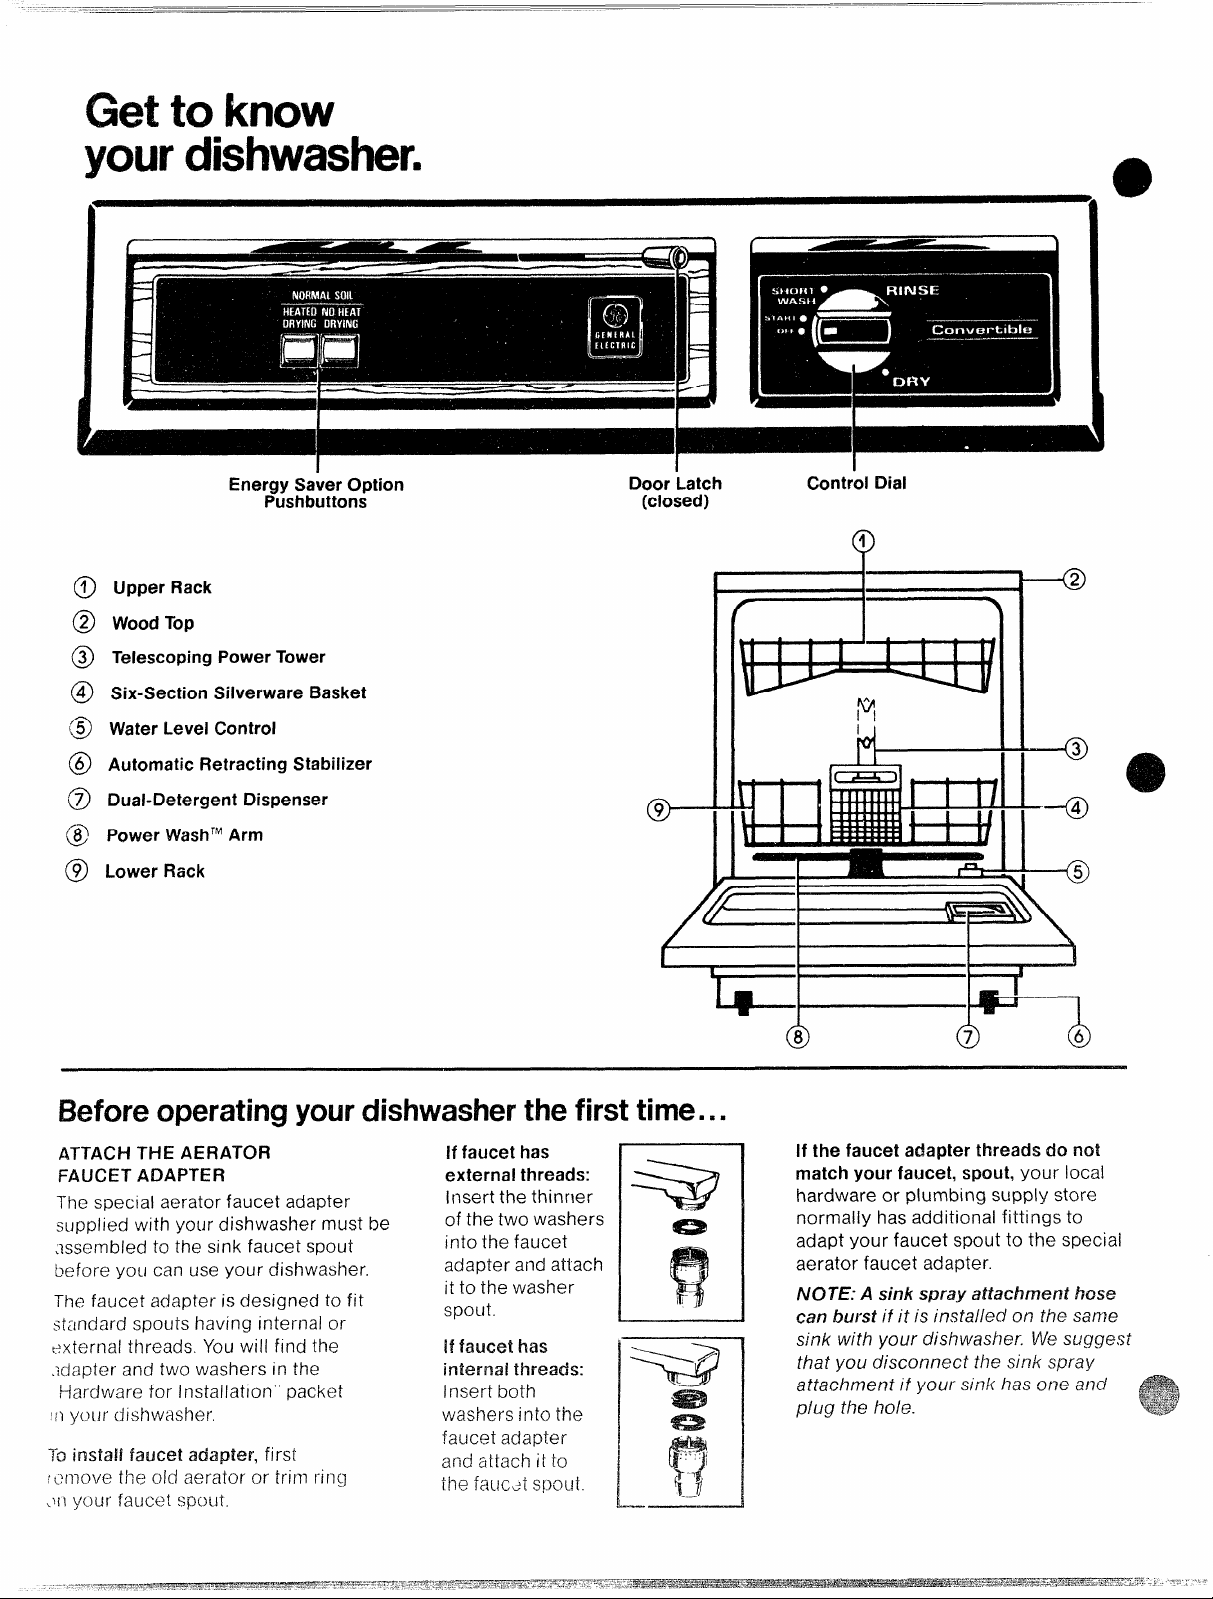
to know
yourdishwasher.
I
Energy Saver Option
Pushbuttons
@ upper mick
@ Wood
@
@ Six-Section Silverware Basket
@) Water Level Control
@ AutotnaticRetracting Stabilizer
@ Dual-Detergent Dispenser
@ pOwerWashTMArn’l
@ Lower Rack
TOP
TelescopingPowerTower
Door Latch
(closed)
0
II
Ii
Control Dial
8
o
I
1 I
0
---@
---@
-
7
0
6
B o y d t f t ...
ATTACH THE AERATOR
FAUCET’ADAPTER external threads:
The special
SUPPIied with your’ dishwasher must be
~~s~~mbledto the sink faucet
before
The faucet adapter is designed to fit
standard spoLIts having internal or
external threads. You wi II find the If faucet has
.~dapter and two washers in the threads:
iHardware for Installation” packet
III your dishwasher.
TOinstallfawei
~cmove the old aerator or trim ri
\){] Yc)IJ~
aerator faucet adapter
spout into the faucet
Y can use your dishwasher.
first
flg
fEIUC~?t~~WJt
If faucet has
Insert the thinr~er
of the two washers
adapter and attach
it to the washer
e
nnt It
o&/&/ u L .
Insert both
washers into the
faucet
adapter
and attach it to
the taucdl w3ut.
I
If the faucet adapter threads do not
match your faucet, spout, your local
hardware or plumbing supply store
normally has additional fittings to
adapt your faucet spout to the special
aerator faucet adapter.
NOTE: A sink spray aftacfmer%t hxe
J
can lwst if it is installed cm h% same
sink with your dishwasher. We suggest
that you disconnect the sink spray
attachment it your sink has one a!7d
p/ug the ho/e.

..—
—
tO OlFM%3te
y d
PREPARE YOUR TABLEWARE,
~
~ POTS& PANS, AN13LOAD THE
DISHWASHER PROPERLY
See your Use & Care”Book for loading
help.
ADD DETERGENT
L!!Ll
Proper detergents are very important
to goad dishwashing. Use only fresh
detergents designed for automatic
dishwashers. Be sure to read the
section on detergents in your Use &
Care Book.
CONNECT THE UNICOUPLE
3
TO THE FAUCET
c1
See your Use & Care Book for instruc-
tions.
4 PLUG IN THE POWER CORD
FOR PERSONAL -
o
SAFETY, THIS
APPLiANCE
MUST BE
PROPERLY
GROUNDED.
The power cord of this appliance is
equipped with a three-prong (grounding) plug which mates with a standard
three-prong (grounding) wall receptacle
to minimize the possibility of electrical
shock hazard from this appliance.
The customer sho[lid have the wall
receptacle and circuit checked by a
qualified electrician to make sure
the receptacle is properly grounded.
IF DIFFERENT CONDITIONS ARE
ENCOUNTERED, SEE YOUR USE &
CARE BOOK.
If the wall receptacle is controlled by a
switch, turn on the switch.
y II
L
.— o
r’
‘>
($
,$$
P’
5 SELECT THE CYCLE
c1
When selecting a cycle, you should
consider the soil condition of the load.
Then use the cycle most suited to
that soil condition.
9 NORMAL SOIL cycle is for most
loads of everyday dishes, glasses and
cookware.
@ SHORT WASH cycle is for dishes
that are mildly soiled with soils that
have not dried on, Also everyday dishes
that have had extra preparation before
loading. Use this cycle to save water
and energy.
0 DRYING OPTIONS
HEATED DRYING–Press this button
and the drying heater is turned on to
provide heated air over the dishes for
fast drying.
NO HEAT DRYING–Press this button
and the drying heater is disconnected
to save electrical energy and allow
the dishes to dry by their own heat over
time. This option is best used when
the dishes are washed at night and can
remain in the dishwasher until the
next morning. Natural drying time will
be reduced if you open the dishwasher
‘3
door after the cycle is complete.
Use of this option reduces the
electrical energy used by this model
s
approximately 8%.
Estimated yearly savings, depend-
ing on your local electrical rates, are
as follows:
Electric Rate
(per Kwh)
Estimated
Yearly Savings
$ .05 $ .08 $ .11
$5.20 $8.32 $11.44
STARTYOUR DISHWASHER
l!d
Be surethe sinkdrain is open. If
yourdishwasherdrainsinto a food
wastedisposer,operate the disposer
untilit is completely empty before
startingthe dishwasher.
TO START DISHWASHER:
8 For NORMAL SOIL cycle, close
door and move door latch to the right to
the locked position,
Slowlvturn the controi cfiaitothe
STAR~posit~on
or untii you
hearthe dishwasherstart.
For the benefits of a complete cycle,
#be careful to not turn the dial any
further than necessary to start the
dishwasher.
@ For SHORT WASH cycie, close
door but do not latch it. Slowly turn
dial clockwise to SHORT WASH position. Then move door latch to the right
to the locked position.

h
d c
F a d
H w
l d
y d
O Dishwasher wiil complete the cycle
sequence automaticallyy and the control
dial will advance to OFF position.
@You’ll hear occasional clicking
sounds:
● soft food disposershredding
action.
@drain valve opening to ptirnp
water out.
. timer control as cycle progresses.
● detergent cup opening.
O The motor stops during drying.
O Water vapor comes through the vent
under the door handle during drying
and when water is being pumped out.
CYCLE SEQUENCE
Normal Short
(minutes–approx.) Soil
Wash/R inse
Rinse 6
Rinse
Main Detergent Wash
Rinse
Rinse
*Electric Drv
Total
Time
(approx. )
“Thts
poftlon of the cycle ISeliminated with
HEAT DRYING
NO
. ...-—..-—-—...-—-
18
23
67
—— —.
Add dishes any time BEFORE the main
detergent wash portion of the cycle.
However, opening the door lessens
cleaning power. So try to load everything at the beginning.
Here’s howto adda forgotten dish:
1. Push the door latch to the left.
Washing will stop.
2. Wait a few seconds until the water
calms. Then open the door.
3. Add dishes you’ve forgotten. (Also,
you can remove something.)
4. Close the door and push the latch
to the far right. When the door islocked,
washing continues.
Wash
4
3
: 9
—
—
18
23
57
1. Remove the power cord plug from
the wall receptacle.
2. Turn off the hot water faucet.
3. Release water pressure by raising
tabs on Unicouple handle.
4. Release Unicouple from faucet by
pushing movable thumb tab down.
5. Shake excess water out of Unicouple
and return it and its hoses to the
dishwasher storage compartment.
NOTE: When motor stops at the end of
the final rinse, the Unicouple can be
disconnected and returned to storage.
3
4
m
BEFORE OPERATINGYOUR 13RN4WASHE%?
Readyour
~S43andCareBook.lf wntains IMPORTANTSAFETY’
for~hePERSONALSAFETYof thoseusingthe
;!;
( i EN F !i /\ L E L E ( T[3IC (’O M PA NY
)I) I I A N ( F I’A N K [ O LIISb’i1-LE K E NT UC KY 40225
 Loading...