

GE GLC4000 Series, GSC3500NBB - Full Console Portable Dishwasher, GSC3500 Series Installation Instructions Manual
GE Consumer & Industrial
Appliances
Installation Instructions
Portable Dishwasher
If you have questions, call 800.GE.CARES (800.432.2737) or visit our website at: www.GEAppliances.com;
in Canada, call 1.800.561.3344 or visit www.GEAppliances.ca.
STOP
BEFORE YOU BEGIN
Read these instructions completely and
carefully.
IMPORTANT – Observe all governing codes and
ordinances.
• Note to Installer – Be sure to leave these instructions
for the consumer’s and local inspector’s use.
• Note to Consumer – Keep these instructions with your
Owner’s Manual for future reference.
• Skill Level – Installation of this dishwasher requires
basic mechanical, electrical and plumbing skills. Proper
installation is the responsibility of the installer. Product
failure due to improper installation is not covered under
the GE Appliance Warranty. See warranty information.
READ CAREFULLY.
KEEP THESE INSTRUCTIONS.
GLC4000 Series
GSC3500 Series
IMPORTANT – If you received a damaged dishwasher,
you should immediately contact your dealer or builder.
FOR YOUR SAFETY
Read and observe all CAUTIONS and WARNINGS shown
throughout these instructions. While performing
installations described in this booklet, gloves and either
safety glasses or goggles should be worn.
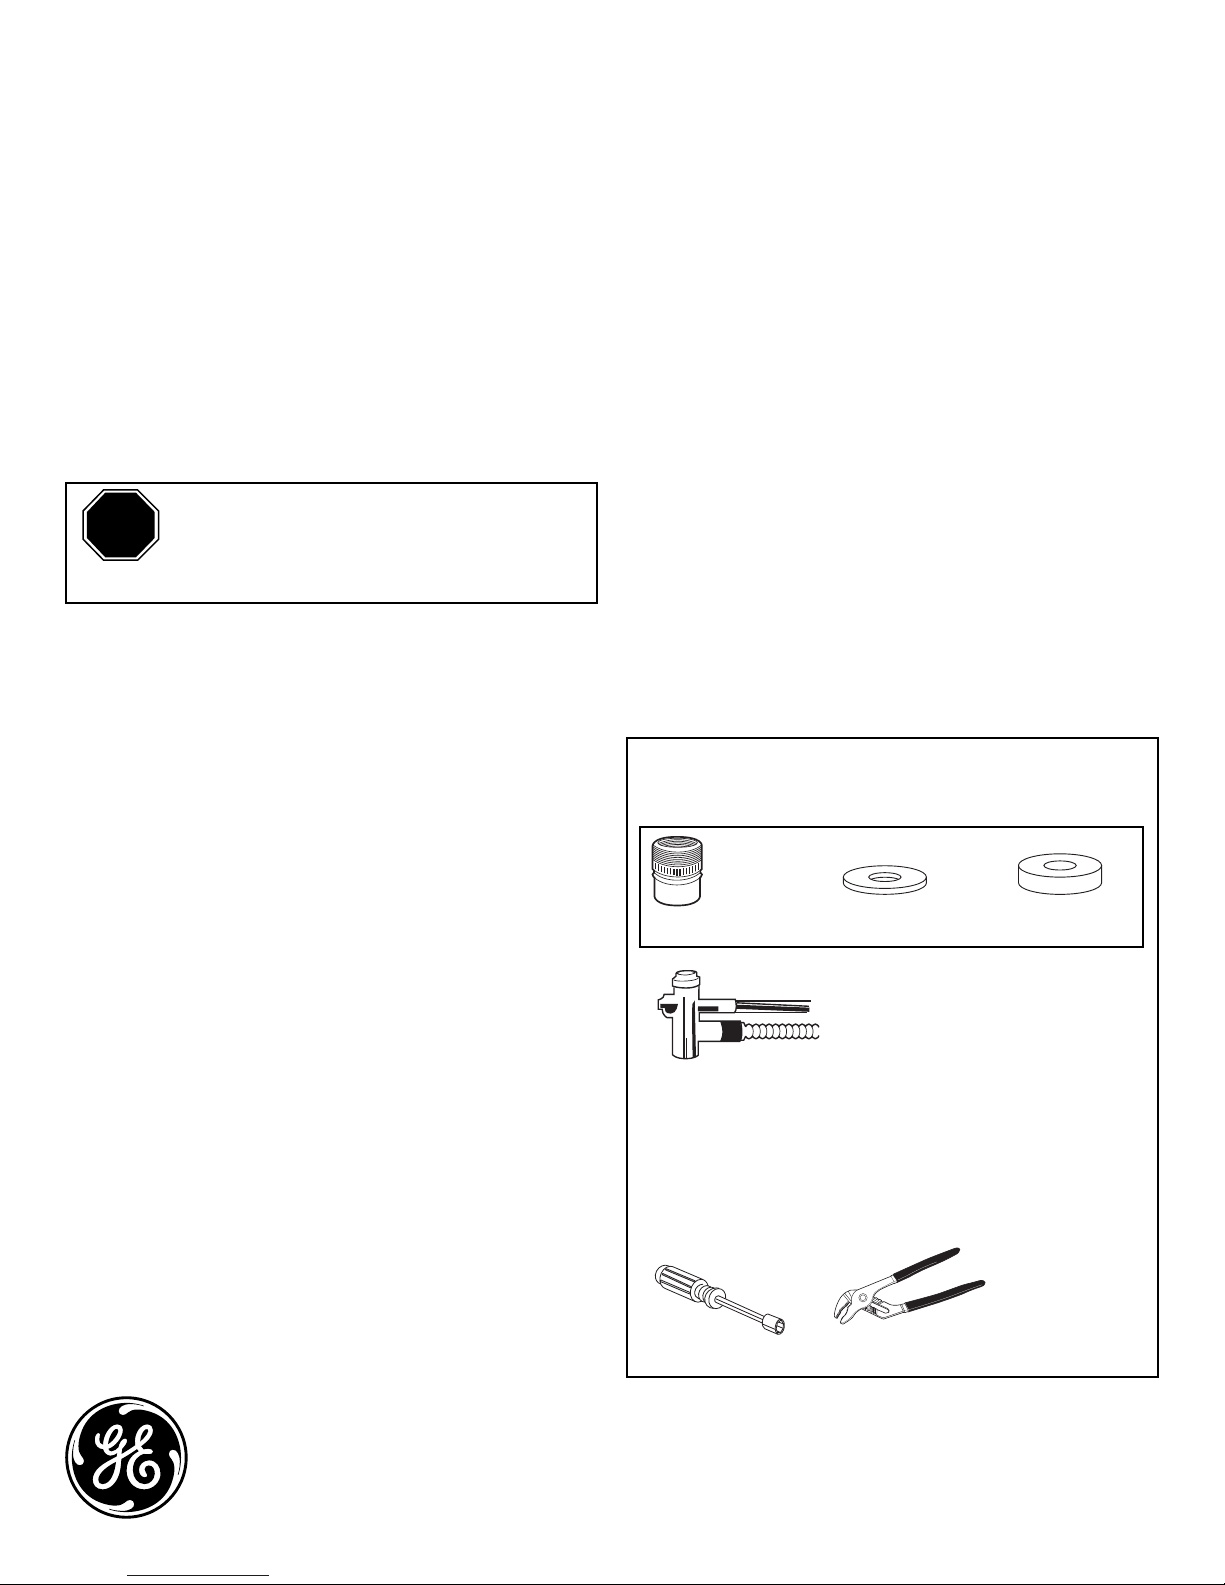
PARTS SUPPLIED:
Faucet adapter kit included in Installation Package.
Faucet Adapter Thin washer Thick Washer
Unicouple – Attached
to dishwasher and
stored in pocket on
back of dishwasher
imagination at work
TOOLS YOU WILL NEED:
3/8" Nut Driver
Pliers

Installation Preparation
■
■
PREPARE ELECTRICAL WIRING
WARNING
FOR PERSONAL SAFETY: Do not use an
extension cord or adaptor plug with this
appliance.
ADVERTENCIA
PARA SEGURIDAD PERSONAL: No utilice un
cable de extensión o un enchufe adaptador
con este aparato.
Electrical Requirements
• This appliance must be supplied with 120V, 60 Hz., and
connected to an individual properly grounded branch circuit,
protected by a 15 or 20 ampere circuit breaker or time delay
fuse.
• If the electrical supply does not meet the above
requirements, call a licensed electrician before proceeding.
■ Your dishwasher circuit should not
be used for any other appliance while
the dishwasher is in operation since
the dishwasher requires a full capacity
of the circuit.
■ If the wall receptacle you plug the
dishwasher’s power cord into is
controlled by a switch, turn on
Ensure proper ground
exists before use
the switch.
WARNING
Do not, under any circumstances, cut or
remove the third grounding prong from the
power cord.
ADVERTENCIA
Bajo ninguna circunstancia corte o quite la
tercera clavija con conexión a tierra del cable
de energía.
Grounding Instructions–Power Cord Models
This appliance must be grounded. In the event of a malfunction
or breakdown, grounding will reduce the risk of electric shock
by providing a path of least resistance for electric current.
This appliance is equipped with a cord having an equipment
grounding conductor and a grounding plug. The plug must
be plugged into an appropriate outlet that is installed and
grounded in accordance with all local codes and ordinances.
WARNING
The improper connection of the equipment
grounding conductor can result in a risk
of electric shock. Check with a qualified
electrician or service representative if you
are in doubt that the appliance is properly
grounded. Do not modify the plug provided
with the appliance, if it will not fit the outlet,
have a proper outlet installed by a qualified
technician.
2
ADVERTENCIA
La conexión inadecuada del conductor de
conexión a tierra del equipamiento puede
provocar un riesgo de descarga eléctrica.
Consulte a un electricista calificado o
representante de servicio técnico si tiene
dudas sobre la correcta conexión a tierra del
aparato. No modifique el enchufe provisto con
este aparato; si no entra en el tomacorriente,
solicite a un electricista calificado que instale
un tomacorriente adecuado.

Installation Instructions
■
■
■
■
■
STEP 1 REMOVE WOOD BASE
IMPORTANT – Do not kick off wood base! Damage
will occur.
• Move the dishwasher close to the installation location and lay
it on its back.
• Remove the four skid bolts on the underside of the wood
base with 3/8" nut driver.
• Discard base and bolts.
• Upright the dishwasher.
STEP 2 INSTALL FAUCET ADAPTER
The special faucet adapter supplied with your dishwasher
must be attached to the sink faucet before you can use your
dishwasher.
The faucet adapter is designed to fit standard spouts having
internal or external threads. You will find the adapter and two
washers in the faucet adapter packet in your dishwasher.
Attach the Faucet Adapter
• To install faucet adapter, fi rst remove the old aerator or trim
ring on your faucet spout.
External Threads
• If faucet has external threads: Insert the
thinner of the two washers into the faucet
adapter and attach it to the faucet spout.
• Tighten with pliers.
Internal Threads
• If faucet has internal threads: Insert both
of the washers into the faucet adapter
and attach it to the faucet spout.
• Tighten with pliers.
Non-Standard Threads
• If the faucet adapter threads do not
match your faucet spout, your local
hardware or plumbing supply store
normally has additional fi ttings to adapt
your faucet spout to the special faucet
adapter.
CAUTION: A sink spray attachment hose can
burst if it is installed on the same faucet as your dishwasher.
We suggest that you disconnect the sink spray attachment,
if your sink has one, and place a cap over the opening.
STEP 3 CONNECT THE UNICOUPLE
TO THE FAUCET
• Run garbage disposer,
if you have one, to
clean out the disposer
and thus allow water
to drain from the sink
through the disposer
and down the drain.
• Run hot water faucet
to purge cold water from
the hot water line. The hot water must be between 120°F and
150°F for best wash performance.
• Roll the dishwasher to a position just in front of the sink.
• Pull the unicouple and its hoses completely out from storage
compartment at rear of the dishwasher.
• Attach the unicouple to the faucet adapter following the three
steps below:
– Depress the locking collar at the top of the unicouple.
– Place the unicouple completely over the faucet adapter.
– Release the locking collar. The unicouple should now be
locked onto the faucet adapter.
• Turn on the hot water faucet and check for leaks. If a leak is
detected, disconnect the unicouple, and refer to Step 4.
Note: The unicouple’s small hose carries water from the
faucet to the dishwasher. The large hose carries water from
the dishwasher to the sink. Orient the faucet with the unicouple
attached so water from the unicouple will run into the sink drain.
Collar
STEP 4 FAUCET ADAPTER LEAK
Skip this step if no unicouple leak was observed.
If a unicouple leak was observed in Step 3, take whatever
actions are necessary to repair the leak. This may be as simple
as tightening the faucet adapter. Or, it may require the services
of a plumber if water is leaking from the interface between the
moveable faucet arm and the fixed part of the faucet fastened
to the sink.
STEP 5 PRETEST CHECK LIST
Review this list after connecting your dishwasher to avoid
charges for a service call that is not covered by your warranty.
■ Open the door and remove all foam and paper packaging.
■ Locate the Owner’s Manual.
■ Read the Owner’s Manual to familiarize yourself with the
operation of the dishwasher.
■ Remove the protective film, if present, from the control
panel.
■ Add 2 quarts of water to the bottom of the dishwasher
to lubricate the pump seal.
3
 Loading...