

Page 1
GEAppliances
Safety Infin_nat ion ....... 4-8
Operating Instructions
Connecting Elect_icitv ..... 12
Control Panels ........... 13
Control Settings .......... 14
Dial Cycles ........... 15, 16
I,oading the
Dishwasher Racks ...... 19, 20
Optional Accessories ...... 22
Unicouple ............. 9-1 l
Using the Dishwasher . .17, 18
Ca*v and Cleaning ........ 21
7)_rmbleshooting Tips
Befiwe You Call
tot Service ............ 23-27
Customer So'vice
Product Registration ...... 29
Service Telephone
Numbe_ ...... 3, Back Cover
_'a rra ntv ................ 31
GSC3200
GSC3230
GSC3400
GSC3430
ge.com 165D4700P334 49-55014 11-05JR
Page 2
GE& You,A ServicePartnership.
Important!
iii iiiiiii
!iiiiiiiiii!@iiiiiiiii_iiiii_i
iii!iiiiii_i;iiiiii/iii[iii!iil;
Two easy ways to register your appliance!
_! Through the interne{ at _e.(on_
_ (',Oml)lete alld mail the _!II(Ios(x] P£odtl(t R(!gistt'_tioll (_1£([
Write themodel andserial numbershere.
#
#
Youcan find them on the tub wall just insido the door.
Staple sales slip orcancelled check here.
Proof of the original purchase date is needed to obtain
service under the warran_
Manual
h_side you will fi_(t many hell)tiff hints (m how 1o use and maim_dn
_x)ur dishwa_,her t)rol)erl_..Jt_st a little t)r('v('nti_e care ol} yore" l)art
can s_\'e you a gTeat deal of time a_d money o\'('r the lilt' of your
(tishwash('t:
_i_l_!iiii!iiiii
Page 3
Page 4
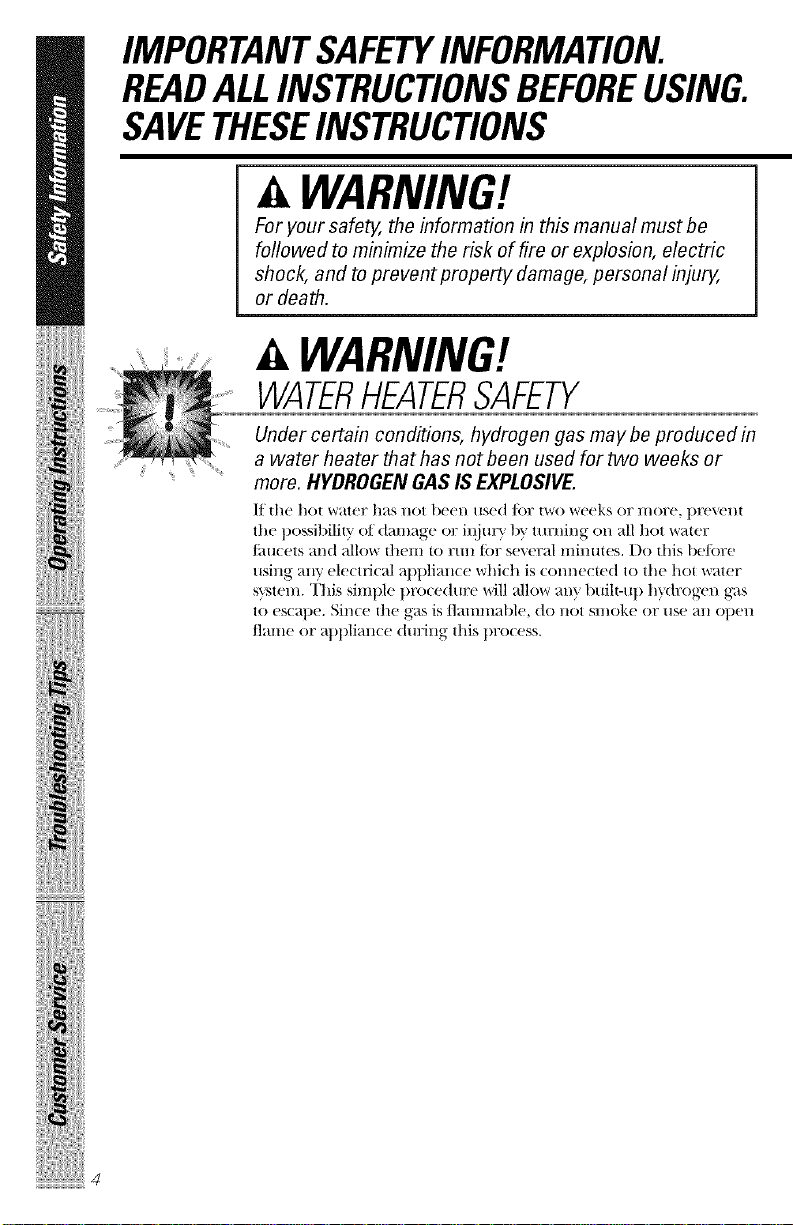
IMPORTANTSAFETYINFORMATION.
READALLINSTRUCTIONSBEFOREUSING.
SAVETHESEINSTRUCTIONS
WARNING!
For your safe_ the information in this manual must be
followed to minimize the risk of fire or explosion, electric
shock, and to prevent property damage, personal injury,
or death.
WARNING!
WATERHEATERSAFETY
Under certain conditions, hydrogen gas may be produced in
a water heater thathas notbeen used for two weeks or
more. HYDROGENGASIS EXPLOSIVE.
If die ho[ water has not been used ]()r two weeks or n/ore, prevent
the possibilil 7 of damage or iqjury tU turning on all hot water
/imcets m_d allow them to _tm t_)r several minutes. I)o this be/_)re
using any' ele( trical appliance which is colmected to the hot water
sy_'qem. This siml)le procedure will allow any built-u l) h}_trogen g_ls
to escape. Since the ga_, is flammable, do not smoke or use all open
flame or appliance dm:ing this process.
iliiii_iiiiiiiHH!
Page 5

PROPERINSTALLATION
ANDMAINTENANCE
Thisdishwasher must be properly installed and located in
accordance with the Installation Instructions before it is used.
If you didnot receive an Installation Instructions sheet with
your dishwasher, youcan receive one by visiting our website
at ge.com.
J) Connect to a grotmdcd
metal, ])crmm_cnt widng
s}:_,tcm; or rtm an cquipn_cnt-
gr(mnding ( ondmtor with
the (it'(t+it conductors and
c(mnect to the equipment-
gro/mding termin_d
or lead of file applim_ce.
_: Improper conne(tion of
the equipment-gromlding
condu( tot (ma restflt in _1risk
of ele(tric sho(k. Check with
_ qu_dified electfi(ian or
servi(e rcl)resemafi_' i] yrou
are in doubt wheOler the
appliance is properly
gromlded.
N Dispose of discarded
appliances and shipping
or packing material properly:
_: I)o not attempt to repair
or replace any t)art of your
dishwasher mfless it is
N_ecilically recommended
in this mamlal. All other
ser\'icing should be rct_'rred
to _ quail/led te(hni(imL
i_i;To minimize the possibility of
electric shock, (tisc(mnect this
appliance/i'om the power
supply 1)e/brc attempting any
maintenm_ce. NOTE:'Ihrning
the dishwasher off does not
dis(onnect the appliance
/i'om the power suppl_'.
Wc recommend having a
qualified teclmicim_ service
_)ur appliance.
5
Page 6
IMPORTANTSAFETYINFORMATION.
READALLINSTRUCTIONSBEFOREUSING.
SAVETHESEINSTRUCTIONS
CAUTION:
Toprevent minor injury or property damage
ii_i_ii'_iiiiililill!iiliilli
iliiii_iiiiiiiHH!
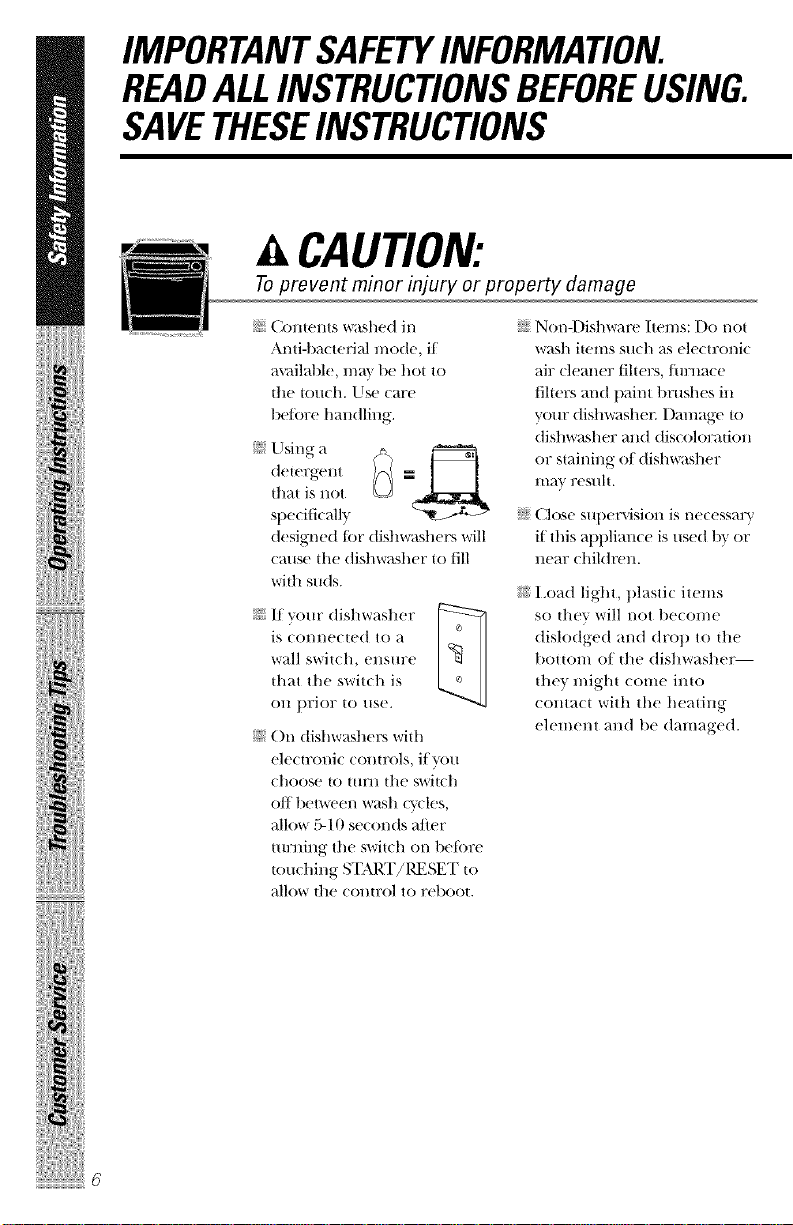
_: Contents washed in
Anti-bacterkfl mode, if
m'ail_fl)le, may be hot to
the touch. Use care
betbre handling.
that is not
detergent @_
spedtk al b
designed tor dish_a_,her_, will
cause tile dishwasher to fill
with suds.
_!/f your dishwasher
is (onne( te(t to a
wall swit(h, ellS[ll?e
that the s'witdl is
on prior to use.
N ()n dishwashers with
electronic controls, ifym
€hoose to [[IFII tile ,,,witch
off between wash (ycles,
allow 5-10 seconds a/ier
tm:ning tile switch on belore
touching S'I_\RT!I@]SET to
allow tile control to reboot.
i_i;Non-Dishware hems: Do not
wa_.,h items such as electronic
air cleaner tilters, fin:nace
filters mid l/aint brushes ill
y(mr dishwashel; [)amage to
dishwasher and discoloration
or staining of dishwa_,her
mm result.
s;?Close sui/er\4sion is necessary
if this al/t)lian( e is used 1)'_or
near ( hildren.
I,oad light, plastic items
so they will not t/econ/e
dislodged and drop to tile
botton/ of tile dishwashetm
they might come into
conta(t with tile heating
element and be damaged.
Page 7
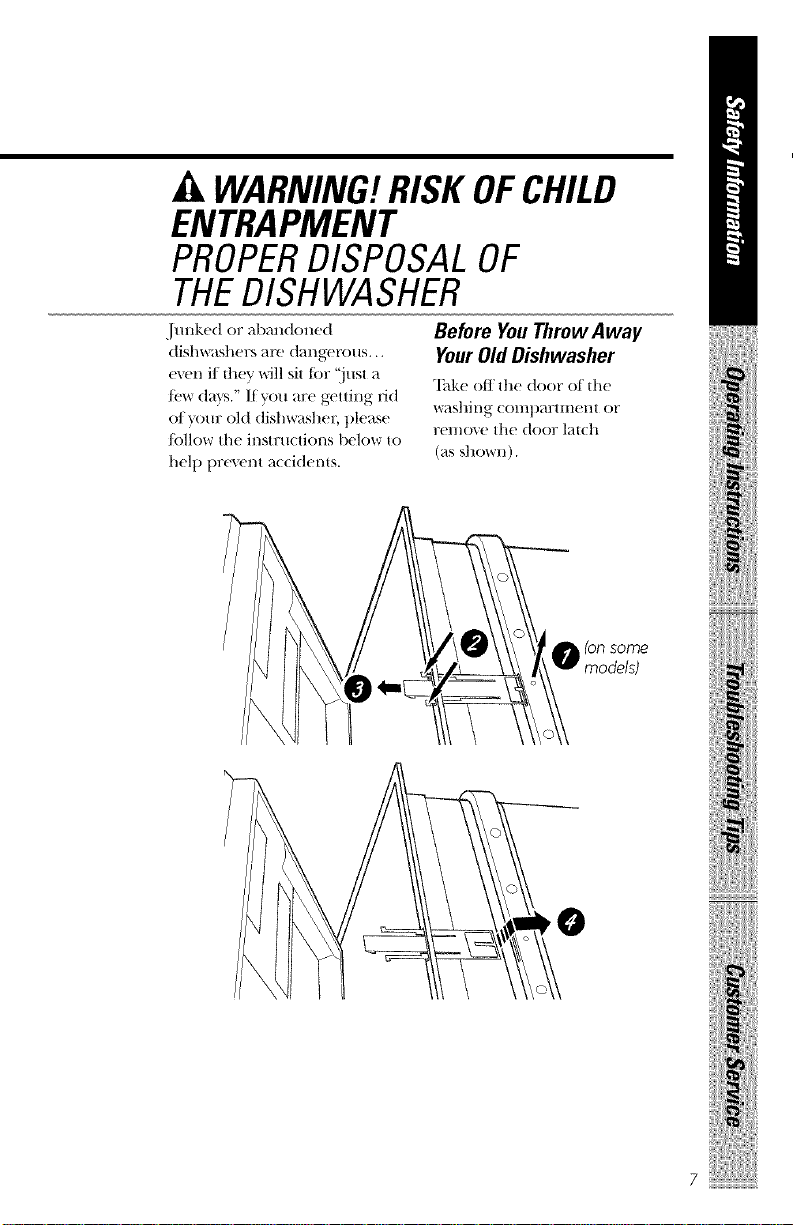
A WARNING!RISKOFCHILD
ENTRAPMENT
PROPERDISPOSALOF
THEDISHWASHER
.]mlked or abandoned
dishwashers atv dangctxms...
cvcn if flley will sit tbr '_just a
/('w dm:s." If you are getting rid
of _x)m: old dishwashel; please
/()llow the instructions bdow to
help prevent _c(idents.
Before YouThrowAway
YourOld Dishwasher
"Ihkc oil the door ot the
w_ls]lil/g +col/ip_ll?tiiici/t OF
remo\e the door latch
O (onsome
models)
Page 8
ii+++ ii
IMPORTANTSAFETYINFORMATION.
READALLINSTRUCTIONSBEFOREUSING.
WARNING!
When using your dishwasher, follow basic precautions,
including the following:
_: [lse this appliance only/br
its intended puq)ose as
desoJbed in this Owner's
Manual.
J} Use only powdel; tabs, liquid
detergents or rinse agents
reconnnended {or use in a
dishwasher and kee t) fl_em
out of the reach of chiMren.
Cascade®, Cascade® Complete
mid Electrasol®_\HtOl//_tti(
Dishwitshi11_ [)t'teFgeltts, _il/(t
Jet-Dry ®and Cascade Rinse
Aid® rinse agents have been
i_l)l)mved/br use in ifll GE
dishwashers.
_: I x)cate sharp items so that
they are not likely
to damage the door seal.
J? I 1)_(t shin: t) knives with the
handles ul) to reduce the risk
of cut-t}])e i_jufies.
_: Do not wash plastic items
mlless mm:ked dishwasher
sat(' or the e(tuiv_dem. For
plastic items not so marked,
check the lll_(l//iJilCHil?er's
reconnnendations.
J) Do not touch the heating
eh'mem during or
il//l//edii-iR'lv _dtt'r list'.
i_i;Do not operate your
dishwasher mfless all
enclosure panels are
p_x)l)erly in place.
i_ Do hi){ romper with (Olltl:OlS.
_i; Do not _d)use, sit on or stand
on the door or dish ratk of
tile dishwasher.
ii::Do ni)t allow (hildren to
t)la} around dishw;Mler
when opening or ch)sing
door due to tile possibility of
small lingers being t)int bed
in door.
i_i;Do not discard a (lishw_M/er
without fit'st renlovil/g +tilt'
door of tile washing
(?Ol//t)_tl?tlI/el/t.
i_i; [)o llOt stol'e or/Ise
con/t)ustible materials,
gasoline or other flanml_ff)le
vapors _uld liquids in d_e
vi( initv of this or any other
_t)t)limlce.
ii::Do not allow chiMren to play
with, on or inside this
appliance or any discarded
appliance.
READAND FOLLOWTHIS
SAFETYINFORMATIONCAREFULLY
SAVETHESEINSTRUCTIONS
Page 9
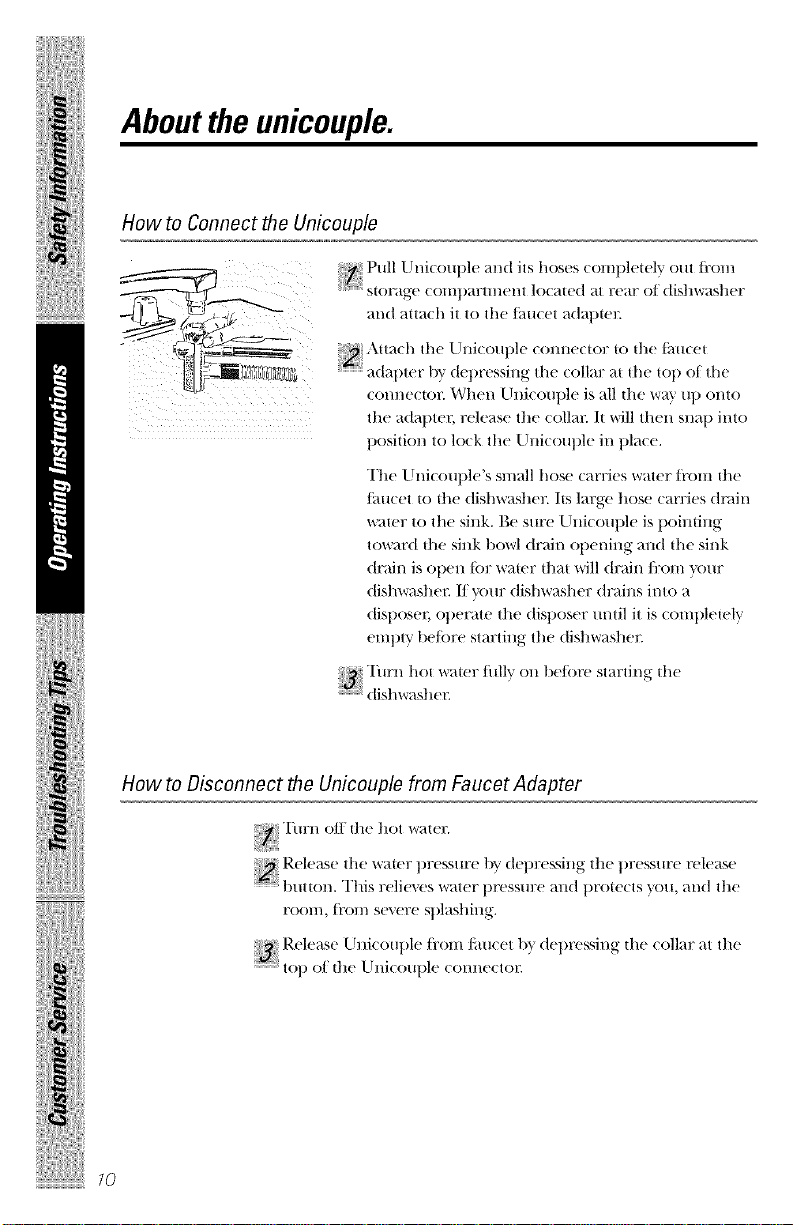
Aboutthe unicouple.
Before Operating the Dishwasher the First -time
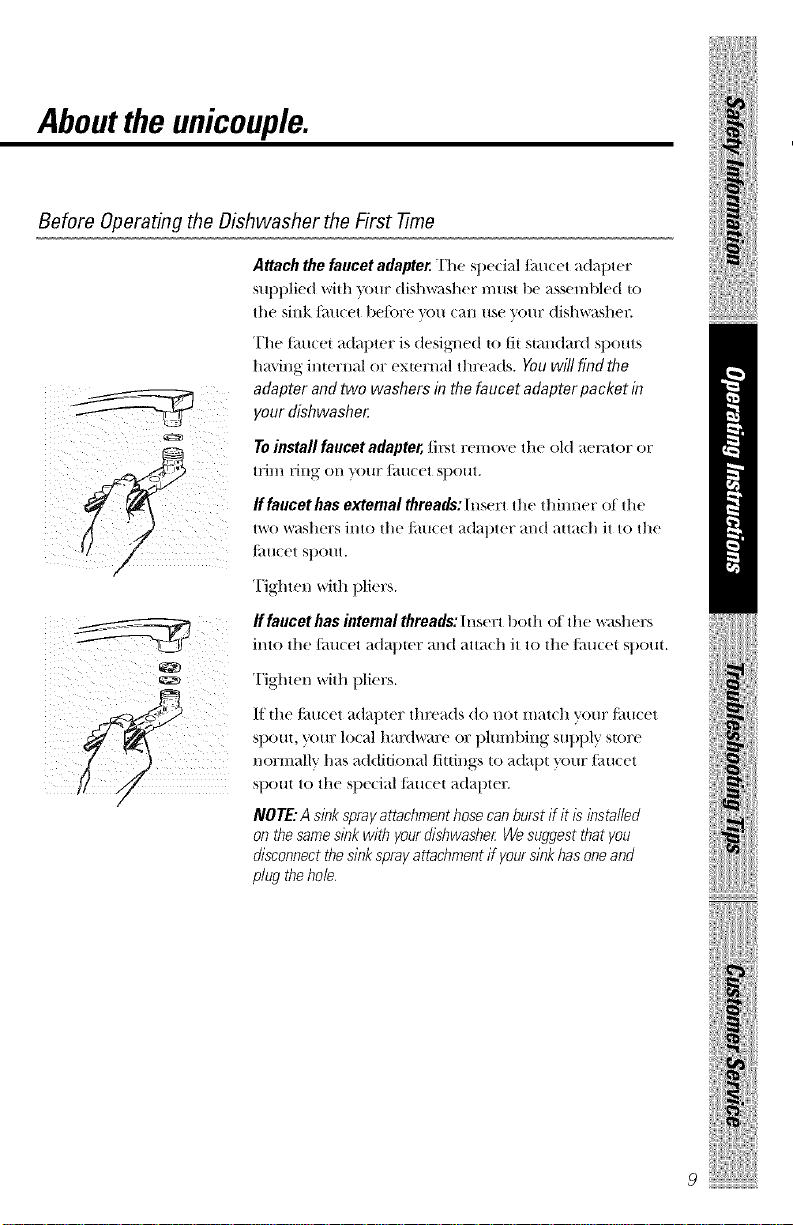
Attach the faucet adapter. "[]le sl)e(iM t:au(et ad;_l)ter
SUl)plicd wid/your (tish_sller must b(' _ss('mblcd to
the sink Jimcet be/ore _x)u can use your (lishwa_ller.
The thucet adapter is (lesigl_e(t to fit stun(lard spouts
having internal or external threads. You will find the
adapter and two washers in the faucet adapter packet in
your dishwashe_
Toinstall faucet adapter, first rein(we the old aen_tor or
tlJl// l+illg on }_()/IF Jittl(t't S})()tlt+
If faucet has external threads: Insert the thim_er of the
two washers into the Jimcet adapter m)d aHach it to the
t:au(et spout.
Tighten with 1)lier_.
If faucet has internal threads:Insert t)oth of the washeJ_',
into tile/imcet a(lal)ter m_d atta(h it to the/imcet st)elm
Tighten with t)lier.s.
I["lilt? f:au(et adal)ter threads do n(lt match your f:au(et
spore, y(mr lo(al hardware or 1)lmnt)ing supply store
normally has a(lditional fittings t() a(tat)t y)ur t:au(et
/
st)out to the Sl)e(ial tiau(et a(tat)ter.
NOTE:A sink sprayattachment hose can burst ff it is installed
on the samesink with your dishwasher We suggest that you
disconnect the sick spray attachmeet ff yoursick has one and
plug the hole.
!i ii,ii iiiiiii
9
Page 10
ii+++ ii
Aboutthe unicouple.
How to Connect the Unicouple
__:_j_._ _ Pull klnkouple and its hoses compleu4v out lixm)
_:_ _._ _Attach the Uuicoul)le com_eitor u) d)e lhu(et
_--._%_d_ adapter l D'de])ressiug the collm" at the o_ the
m_d atl:a(h it to the thu(el ada])ter.
top
((.,uric( tor. When (hficou])le is al| the way u l) onto
lhe _ida|)leF+ re|e_-)se l]le (-oHar. It v,'J]l lheH Slla|) Jnlo
position to lock the ()_ficoul)le in ])lace.
The Unicouple's small hose carries water ti'om the
/imcet to the dishwasher. Its large hose carries dndn
wamr to the sink. Be sure Llnicout)le is poindng
toward the sink t)owl drain opening and tl/e sink
drain is open {or water that will drain from your
dishwashe): [/your dishwasher drains into a
disposer+ ot)erate the disposer until it is ( ompletely
empty be/6re starting tl/e (tisl_r_lsl_e)_
Turn hot _*¢_{terIiflly (m before starting the
S S
How to Disconnect the Unicouple from Faucet Adapter
Turn off the hot water.
Release the xs'ater pressure 1)y depressing the pressure release
button. This reliexes water pressure and prote(ts you, and the
r/)ol//, {t'01// se'_ere S])]as]lill_.
Rdease U,li( oupk, from i:au( et I))depressing the ( ollar at the
-- f
top of tlle [ ni(o/lple (()l/l/e(t()l;
10
Page 11

How to Disconnect the Dishwasher
Remoxe the power (ord phig from the wall receptacle.
,Jiii
_ I)is(om_e(t UllJ(Olll)le ti'Olll [_tllce| _tdt-ii)teI;
NOTE:Whenmotorstopsat theendof thefinaldnse,theUnicoup/ecanbe
disconnected and returned to storage,
How to Drain Excess Water From Unicouple Hoses
If the sink is 34" or higher fl:om the floor, the excess
_ter in Uni(otq)le hoses emmet be drained directly
into the sink. It will be necessary to drain excess water
ti'om hoses into a bowl or suitable container that is held
outside m)d lower thin) the sink.
ii [I /
H
!i ii,ii iiiiiii
Page 12

iil ii
Aboutconnecting electricity.
CAUTION, for personal safely:
DONOTUSEAN EXTENSIONCORDORANADAPTERPLUGWITHTHIS
APPLIANCE.
DONOTUNDERANY CIRCUMSTANCES,CUTORREMOVETHETHIRD
GROUNDINGPRONGFROMTHEPOWERCORD.
GROUNDING INSTRUCTIONS_Fhis at)tdiance must be grounded.
In the event ofa mallimction or breakdown, grounding will reduce
the risk of electti( shock by providing a l/ath of least resistance/or
ele( t_Jc (re:rent. This dishwasher is equipped with a cord having a
grounding conductor and a grom/ding plug. The plug must be
t)hlgged into all _q)llrOl)lJ_lte O/ltlet that is inst_dled and gTotlnded
in ac( ordance with the NATIONAtEtECTRICCOO£ANSI/NPFA NO. 70.
DANGER--lmln:oper com/ection of the equil)ment/grounding
cond btctor can r,.'slth in a risk of elecUJc shock. Check with a
,:lbtalified electricim/or ser\'icemm/if vobt are ilJ, dobdlt as to whether
tile dishwasher is lm)perly gtx)unded./)o not modi[_' tile plug
t)rovided with tile at)llliance; if it will not/it the outlet, ha_' a
protler outlet installed 1)y a quali/ied electrician.
Electrical Requkements
72
@ This al/pliance must be suplllied with 120X; 60 t ]z,
and connected to all in(Ill'dual, tlrol/erly gTounded
t/mnch circuit, t)rote(ted b_ a 15 or 20 am t) circuit
breaker or thne-delm fi_se.
_:_If tile electric supply t)rovided does not meet tile
abo\e slle(i/ications, it is reconmlended that a
licensed electrician install an atll)ro\ed outlet.
?_::_i/ur dislm;@l(r circuit should not be os(d fi_r any
other applia_lce _ hik th_ dishw;_sher is ill op_ radon as
th( dishw;_sher lx,(/uir( s tile fifll capacity of tile circuit.
_: If the w_dl receptacle you lllug the dishwasher's l)ower
cord into is controlled by a switch, turn on the switch.
Page 13

About the dishwasher controlpanel
Youcan locate your model number on the tub wall just inside the door.
Throughout this manual, features and appearance may vary from your model
Models GSC3200and GSC3230
i' 0PTION
CYCLES ENERGy OPTIONS ON
& PANS WASH (_N (_FF (_ OFF
[SIS[SIS ...........
Models GSC3400and GSC3430
CYCLES ENEMY OPTIONS
CYCLE OFF $H(_RTW¢_$H
rH_AIEDD_ O_
START DELAY % START
_.'_." %._
!i_iiiii_iiiiiii
RINSE ONLY rH_A_DDRY_
H()TSTART
Page 14
ii,+++;i
_ii++++_iiiilii+++
Aboutthe dishwasher controlpanel
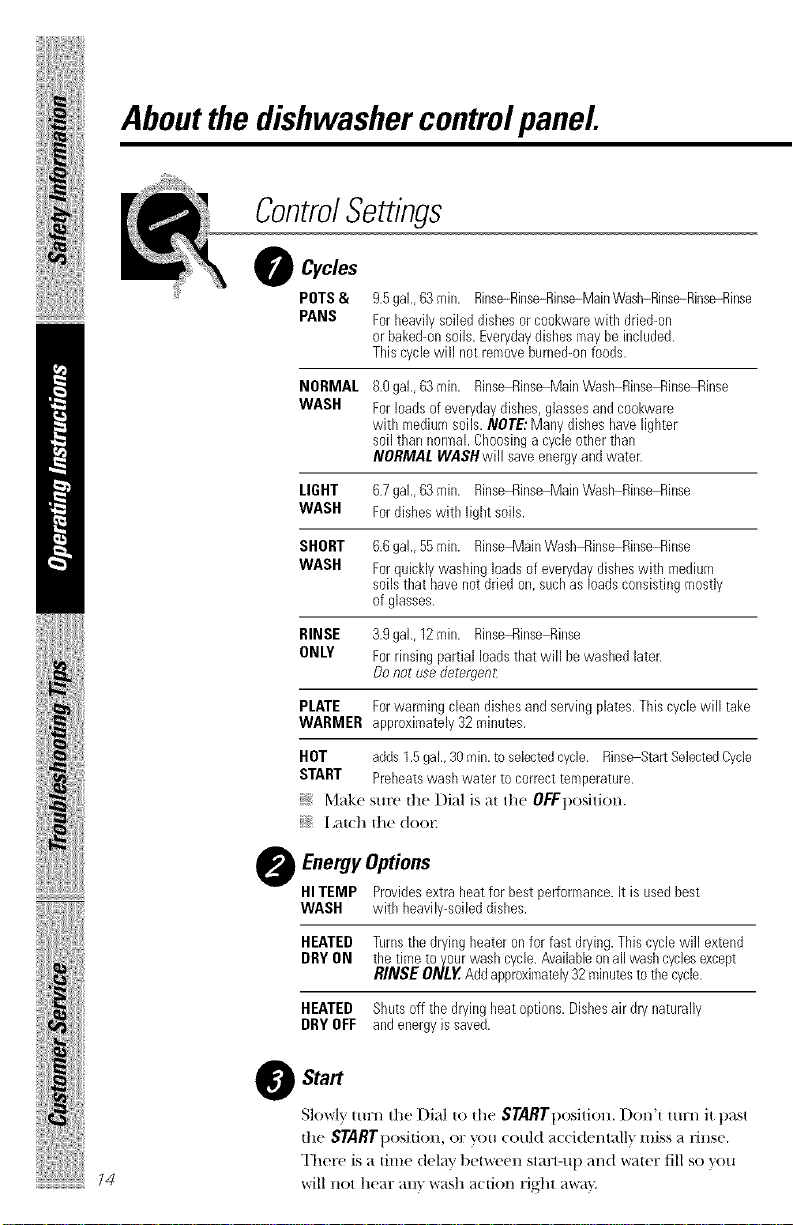
ControlSettings
O Cycles
POTS&
PANS
NORMAL 8.0gal.,63rain. Rinse_:lins_MainWash RinseRinseWlinse
WASH Forloadsof everydaydishes,glassesandcookware
LIGHT 6.7gal.,63rain. Rinse_:linse-MainWash RinseRinse
WASH Fordisheswith light soils.
SHORT 6.6gal.,55 rain. Rinse_VlainWash_:lins_Rinse Rinse
WASH Forquicklywashing loadsof everydaydisheswith medium
RINSE 3.9gal.,12rain. Rinse_:linseRinse
ONLY Forrinsingpartial loadsthat will be washedlater.
PLATE Forwarming cleandishesand servingplates.Thiscyclewill take
WARMER approximately32 minutes.
HOT adds1.5gal.,30 rain.to selectedcycle. Rinse-StartSelectedCycle
START Preheatswashwater to correcttemperature.
_{_:Make sure the I)ial is at the OFFt)osition.
_;_ [ ,at(h tl_te door.
9.5gal.,63rain. Rinse-Rinse-Rinse-MainWash-Rinse-Rinse-Rinse
ForI_eaviiysoileddishesorcookwarewitll dried+on
or baked+onsoils.Everydaydishesmaybe included.
Tiffscyclewill not removeburned-onfoods.
with mediumsods.NOTE:ManydishesI_aveiigl=ter
soil tllan normal Choosinga cycleotherthan
NORMALWASHwiii saveenergyandwater.
soilsthat havenotdriedon,suchas loadsconsistingmostly
of glasses.
Donot used_t_rgen_
O EnergyOptions
HITEMP Providesextra heatfor bestperformance.Itis usedbest
WASH with heavily-soileddishes.
HEATED Turnsthe dryingheater on for fast drying.Thiscycle wiii extend
DRYON the time to yourwashcycle.Availableonaii washcyclesexcept
HEATED Shutsoff tile dryingI_eatoptions.Disl_esair dry naturally
DRYOFF andenergyis saved.
Start
@
Slowly ttu:n the Dial to the STARTposition. Don't turn it past
the STARTl)osition, or you cotfld accidentally miss a rinse.
14
There is a time (lelav between stm:t-u 1) and water fill so you
will not hear all} wash action tight awa}.
RINSE ONLY,Addapproximately32minutesto tile cycle.
Page 15

Aboutthe dial cycles.
ffOT START
STAIIT [IELAy _ '_ STAR T
pLATE WARMERIHEATe00RyONIOFF!_S)R[N_ _'i_ ASH% SHORT
START DELAy _ '_ START
oFF
pLaTE WA_MER
START DELAy % '_ START
pLATEWA_IMEII
OPT[QN
OPTION
(H]IS! '5 SHORT
_'_ASH
HOTSTART
O_'TION
!lt_S) _ SHORT
_" WASH
OFF
ShortWash
For qui(kly w_tshillg loads of ex ery(t_ly dishes with
medium soils that haxe n()t (hJed on.
i Sele(t the NORMAL WASH (v(le.... and m_x'options.
Desire he(Doris /lit(he(
Slowly mrn the Dial to SHORT WASH.
I_lt(h d_e door to stun the (y(le.
Rinse Only
use detergen_
Make sure HEATED DRYOFFis sele(ted.
_/': Sl()Wl'v rmrn the Dial to RINSE ONLY.
I,_lt(]l II/(! door to stun the (_r(l(!.
Plate Warmer
For wat'lilillg (lean dishes and serving t)lates. "[tfis (y(le
"will take al)t)roximaiely rz)2 mi _ t(s.
_I,oad cleall dishware to be wanned.
_ Sele(i HEATED DRY.ON.
_Be sm'e the door is m_lat(lwd.
!i iiii iiiiiii
_ Slowly mrn the I)ial to PLATE WARMER.
_I_t(]_ the door to start the (_v(l(,.
Page 16

iil ii
Aboutthe dial cycles.
HOT START
$TAET OELAY % _ START
_LATEWARME8
_N_IED0
START DELAy % '_ STAR T
OPT[Oh
IHR$) % SHORT
HOT ST_T
OPTION
(HRs) _ SHORT
_- WASH
HotStart
Sele(l the HOTSTART(vde. and any. olher ot)ti(m.
Be sure the door is unl_.t(h(!(1.
_{ Slo,,rl'v ' t/lFn th(, I')i_l t(, HOTSTART
I _at(]l |he door to st_.r| the (v(le.
Start Delay (GSC3400and GSC3430only)
The STARTDEIJIYwill allow roll tO delay the start time of
any ('}cl_ not on th_ Dial mttomaticall} t_)r uI) to 6 hours.
Be sm'e lhe door is unlatd_ed.
ii
the wash (_(]e and op_iOll yOll want.
Slow]'}' turn the Dial _o desired ume. The CYCLEON
light will (ome on.
i a_ch the door to start _he cycle.
Page 17

Usingthe dishwasher.
Checkthe WaterTemperature
Th( entering _%r_'_" _I_lSt 1)_' _t l't'ast ] 21)'q _. and not more than
15IFE, tot eJIb_ tire demling mid to prevent dish damage. Check
the water tel//l)et_lttlFe with a C_t]I(I_' ()]: II/eat thet'lllOl//eteE TIIFII O]1
tile hot x'_uer t_tu(et nearest tile dishwasheE t)laee tile therlnometer
ill a g+lass and let tile water r/in (OlltillttOttS]v i]lto tile _l_i_,s umil tile
telllllel?at/iFe stot)s l-|sing +.
UseJet-Dry®RinseAgent
Jet-Dry ® rinse a_zem remow'_ spols rand t)yevelllS Ine_r Ii]ln b/lild-tlp
Oil }'OIl]" dislws, _lasses [l_il,,vare. (-ookw;ire [lll(] plasti)
Fill the rim, e a_enl dispenser
tmtil it tea(tries line boltom o/lip
inside tin(+opetdng. Replace cap.
"lb check i| rinse a_eut is needed.
remo_e line ca]) and look imo the
diN)euser. ()n some modeb,, the
diN)euser can be clwcked l ,_
})l'essi/ng +line clear ce)lter oJ line
fill cap 2 or 3 times. If rinse a_vm
fills the cemer o/the ti|| cap, you
]n_l\ e ellOtlglL
A full dispenser shouldlast about one month.
!i_iiii_iiiiiii
If rinse agent spills, wipe up the excess.
ForgettoAdda Dish?
A t_)rgotten dish can be added mw time be/_)re the detergent
cup opens.
Push tile door latch to the h'fl.
I)O not opell |he (]0017 /Illtil tile W}IIeF St)r_tv _t(tiOll StOllS. S{e_llll
.l_+ d._eo/it of the di_tl_+'m/e_:
Add forg-otten dishes.
_ Close tile door and push the latch to tile till? )Jg]lt,
Page 18

ii+++ ii
_{{++++_JJJJlii+++
I it
Using the dishwasher.
/.%,
ProperUseof Detergent
Use onl} dctel_-ent sl)eci_ically made Jot use ill dishwashers. Cascad_ ®
Automatic Dishwashing l)et_ _g_ m has be_n al:llm/xed lot us_ ill all (;E
dishwashers. Keep your demrgent ti'esh and dry. I)on't put powder
detergent into tile dispenser until you're ready to wash dishes.
Tlle alllOtllll of detergent to/lse depends Oil whelller }X)/lr vv_ler is
hardor so_t. \Vitft hard watec }_m need extra detergent. Witll soft
watec you need less detergent.
Promet yore: dishes and dishwasher by contacting your water
dellarm_ent and asking how hard your water is. "I\*,relvcor lnore
grains is extremely hard _vv_ler.A water sottener is recommended.
\Vitllout it, lime can build up ill the water _vd_e, which could stick
while open and cause flooding. Too much detergent with soft wamr
call cause a permanent cloudinexs of gkt,+'+ware, called etching.
door ot your dislr_svtshel: All v_is]/Qvcles except
RlNSEONtYrequired,.tergent in t]_( IIl_lill etlt), open Cup
lfyour dishes liar,. _xtra h_ax T soil or you hm_
]/al(/water v()tl lll_t_' x_a1/t to add d( t( rgent to
++++++o;2
th_ open cup also. Wash <3cks with two washes
will also use the OlXn (ttp. 'Wh(>/I using
auu)matic dislmashing deu rg-em tabs, simpl} plac_ on_
tab in tile main cup and close.
Be sure tile Dial is OFF beR)re adding detergent. Otherwise, tile
detergent CUll will not close and latch protler] > Add detergent then
close tile main cup.
NOTE:'Ibopen detergent CUll after it has
been closed, simply turn the detergent CUll
handle cotmtel-clockwise tmtil it releases.
A snapping Somld may be heard.
1,:9
Page 19

Loadingthe dishwasher racks.
Forbest dishwashing results, follow these loading guidelines. Features and
appearance of racks and silverware baskets may vary from your model
Upper Rack
The upper rack is for glasses, cups mid s;mcera.
Cut)s mid glasses fit best along tile sktes. This is
also a secure place {or dishwashe}_sat_' 1)lastics.
The upper rack is good {or all kinds of odd-
shaped utensils. Saucepans, mixing bowls and
other items should be placed l,_ce dowl:t.
Securelargerdishwasher-safeplastics over two fingers
when possible.
Make sure small plastic items aresecure so they can't fall
onto theheating element.
Anupper wash arm (on some models) is located above the
top rack. Checkto make surethat tall items will net block
rotation of this arm.
The Wash Tower
Keep the center area clear in the fewer rac/_
The w_tsh [/)wel: lises through tile center o/the
IOWeFrock during tilt' w;tsh illld I_llse t)oI'dOllS 0{'
the c_le.
Don'tblockit ortoadtallthingsnexttoit.
Also, be careflll not to let a
t)OFtiOll of ;-Ill item S/l(h _tS ;-I t)Ot
or dish hm/dle extend through
tile bottom rack. This couM block
tile wash alan and cause t)oor
w_lshing resuhs.
!i iiiii iiiiiii
19
Page 20

iil ii
Loadingthe dishwasher racks.
Lower Rack
When loading the lower rack, do not load largeplatters Or
trays in the front right corner Theymayprevent detergent
from circulating during the wash cycle.
The lower rack is best used lot plates, sauce_:,,
a]l(I cookw_ll?e. I,al'ge items such as broiler pans
and racks shouM go along die sides. I ,oad
plaUers, pois and Bowls along the sides, in
corners, or in the back. The soiled side of items
shouM/i_ce tile center of the rock.
Silverware Basket
Put flatware in the remo_d_le basket with/ork
and kni/c handles u l) to 1)rotect }x)m: hands. Place
Sl)OOnS in tile basket with handles down. Mix
k]lives, t_)rks and st)oo]ls so Ihev don't lies|
togedle): l)isnibute menl}. Small plastic items,
such as measming spoons and lids/i'om m/all
comainers, shouM go in tile bottom of the
silverware baske_ with silverware on tot).
A security cell cover (on SOl//e
. models) hinged in son/e
handles can be lowered to
either side to secure
lightweight items/t'oln the
e/t_'ets of the vigorous
wash action.
Page 21

Caringfor the dishwasher.
Toclean the control panel use a lightly dampened cloth then dry thoroughly.
Toclean the exterior use a good appliance polish wax.
Never use sharp objects, scouring pads or harsh cleaners on any part of
the dishwasher.
ProtectAgainst Freezing
I[ VoIIr dls]lwi4s]l('r is h'/i in an/reheated place during
the _*_'inter _-isk _t ser_,Jce w( hnidan m:
(lilt offele(lri(al power to the (tishwashel; Remoxe
fllses or trip cir(?/tit 1)reaker.
Sumccoversciews
vwo,ws0f1=:;ijF=T,,L
'['llrl/ ()1_ |t1(! wa{er suppl}' and discolmect {he walel?
inle{ line frolll {tie water val'_e.
(Use 9.pall to (a{( 11{tie watel/.)
_ Recom/ect {tie water inle{ line 1o {tie water v_O_,.
,:_ Remoxe the plastic sump coxer in the mr)
bottolll ;-ii/(t /lse a SpOllge to soak/1p w_lter ill the
rubber boot.
Does YourDishwasher Have an Air Gap?
An air g;ip prote(ts }'our (tisllwasher agvfinst water
t/a(king up into it ita drain (log-s. The air g_q) is not
a par{ of the (tislrwashel; It is not ( oxered 1)y your
warnmr_ Not all plmnbing codes require air gaps,
so you ma'_ not haxe one.
!i iiiii iiiiiii
Checktheairgapanytimeyour
dishwasherisn'tdrainingwell.
The air gap is easy toclean.
,__,_ Turn ot] the dishwasher and lift ot] the (hrome
( ox, er.
[ll_S(l'(_r t_(_ t/l'_s ( (a t and clean with a tootht/i(k.
Page 22

iil ii
About optional accessories.
Youcan change the door and lower access panel appearance of your
dishwasher by ordering one of these optional accessories:
Theseaccessories are available at extra cost (VISA, MasterCard or Discover
cards accepted) by calling 800-626-2002.
Specify accessory number when ordering.
_ Color Panels
_ 1/4" Wood Panel TrimKit
> 3/4" Trimless Panel Kit
Descriptionsof OptionalAccessories
Colorpanels--Rcl)la(-cmcm door t)ancls and ]()_r('_"_( (('SS ])_]_]S
arc ax ailal)h' in the/()llowing (olors:
_:'; GPF3OOA (Almond)
_' GPF3OOB (Black)
_:_ GPF3OOW(White)
Wood panel trim kit--This accessory (ontains trim and instructions
t()r _)11 to s/lpl)ly and install a lf4" thi(k (h'(orauvc _()()d door alld
lower access panel:
N GPF325A (Almond)
_' GPF325B (Black)
_ GPF325W (White)
NOTE:The GPFIO0 dishwasher door spring kitmus_ also be or(h'r('d
and instalh'd when the door panel weighs four Ibs, or more,
Trimlesspanel kit--This ac(cssory (ontains parts and instructions
1()]7 _r()[I t() SUl)I)ly and install a 3/4" thi(k (h'(oradv(' _r()()(t (t()()]" alld
lower a(cess panel:
_ GPF375
NOTE: The 8PFIO0 dishwasher door springkit will be included wid_
_l_e trimless panel kitand musi be installed wii]l i|.
Page 23

Beforeyou call for service...
Troubleshooting -tips
Review the charts on the following pages first and you may not
need to call for service.
Possible Causes What ToDo
Dishwasherwon'true
Noise Some of the sotmds
Fuse is blown, or the
circuit breaker tripped
you_l hear are normal
Utensils are not secure
hi the rack or something
slnall has dropped hlto
the rack
Momrhmns I)ishwasher has not been
Replace fuse or reset
circuit breaker. Remoxe
all_vrother apt)lianccs from
the circuit.
Sofl food disposal
shredding a(tion.
I)min vahe opening to
t)/IH/t) water Oil|,
Timer COl/trol as (vole
l)ro}gTesscs.
I)ctergent cup opening.
The motor st()t)tfing during
the drying period.
Make sm:e c_+x'rythiDg is
secm:ed in dishwasher.
used on a regular basis.
If rOll do I/O| Hse 'vr()lll?
dishwasher otten, set it to
fill m_d tmmt ) out ome
every week. This will help
keep the seal moist and
the garbage dist)oser (lear.
iiii;iiiii/i!!iii//H!!!!
ili!Jiii/iii/ii!iiiii/iii;ii_i
23
Page 24

iiiiiiT+i+iii+:+i{{{i!iii++ii{!i{+++++
Beforeyou call for service...
Troubleshooting -tips
Possible Causes
Water standing in This is normal
the bottom of the tub
Water won't pump Drain is dogged
out of the tub
Suds in the tub Correct detergent
wasil_t used
Rinse agent
was spilled
What ToDo
A ,small amount of clean
water around the outlet on
tile tub bottoul _++tthe back
ot tilt' tub keel)s the %_r_{('}_
seal lubricated.
If you have an air g_q),
clean it.
Check to see if yore:
kitchen sink is draining
well. If not, you ma} need
a t)hunt)er.
If the dishwasher dnfius
into a disposer, run
disposer cleat:
+ Use only automatic
dishwasher detergents to
mold sudsing. Cascade _>
Automatic Dishwashing
Detergent has 1)een
al)t)roved lot use in all
(;E dishwashers.
+ To remove suds ti'om the
tub, ot)en the dishwasher
and let suds evaporate.
,\dd 1 g_dlon of cold water
to the tub. Close and latch
tile (tishwashel: Pure t) out
water by slowly turning the
Dial mJ,til a drain ])elJod
is reached. Ret)eat il
I/ecess_trv.
+ ,\lwa}:_ wil)e up rinse agent
spills immediatel}.
24
Page 25

iiii;iiiii/i!!iii//H!!!!
i_ PossibleCauses
Stained tub interior Detergent with
Dishesdon'tdry
Dishesandflatware
notclean
colormlt was used
Some tomatobased
foods cml stab1
Low hflet water
temperature
Rinse agent dispenser
is empty
hflet water temperature
is below 120°E
Water pressure is
temporarily low
Air ,gap is do_ed
]anproper rack loadhlg
What ToDo
Sortie (tetergel/tS contain
colot_mt (t)iglnem or dyes)
thai _ill discolor till' mb
interior with extcn(h'd use.
Che(k the detergem ctq)
Jot sig_ls ot any
dis(oloration, ff cup is
discolored, change to
detergent withom any
colot_mt. Cascade®
Automatic Dishwasbing
I)etergent has been
al)l)roved {or use in _fll
(',E dishwashers.
Llse of the RINSE ONLY
U'v'cle (on SOI/le models)
aller adding the dish to the
load can (tecrea_,e the le\'el
of staining.
Make sm'e inlet water
tem])erature is correct.
Check the lJnse agent
(tisi)ense_;
R;dse the water hearer
temperature to 120°F.
Use the HI TEMP WASH or
HOT START option.
Ttn'n on a Jiml et. Is w_.ter
(Oil/ilia- oHt lllOt'e slowly
than usual? If so, wait tmtil
t)re._Mll'e is norlllal beJ()t'e
using your dishwashel:
Clean the air gap.
Make sm'e large dishware
does not block the
(tetergcnt disl)enser
or the _sh arm.
ili!Jiii/iii/ii!iiiii/iii;ii_i
;!iiiii , iiiil
i_;ii_;_;iiii+i:,_iiiii
25
Page 26

iiiiiiYiiiiii_:_i{{{i!iii'_ii{!i{iiiii
Beforeyou call for service...
Troubleshooting -tips
Spots and filming
on glasses and
flatware
Cloudinesson
glassware
Possible Causes
Exwemely hard water
Low hllet water
temperature
Overloadhlg the
dishwasher
hnproper loadhlg
Old or damp powder
detergent
Rinse agent disloenser
empty
Too litde detergent
Combhlafion of soft
water mid too much
detergent
Water temperature I,ower the wamr heater
enterhlg the dishwasher tempe_ltm:e.
exceeds 150°E
What ToDo
Use Jet-Drv® rinse agent
t() l'eII/OVe Sl)O|S alld
pre\ ent new fihn build-ut).
' To Yell/eve SHII)BoFn spo|s
and l)re-exisung film ti'om
1 P,<'mox( all met;d utensils
ti:om the dishwasher.
2 Do not add demrgent.
3 Select the longest c_le.
4 Start the dishwasher and
allow to _ml {or 18 to 22
mim_ms. Dishwasher will
IIOW t)e ill [he lIl_lil I w_lsl/,
50t)en the door and
pour 2 cups (500 ml)
of \_hite _inegar imo
the botu)m of d_e
dish_lshe_;
6 Clos_ the door and allow
to comt)lem tlle cycle.
If vinegar rinse doesn't
work: Repeat as above,
except use 1/4 cup (60
ml)of dtric acid crystals
instead of _ineg'ar.
This is called etching and
is permanent. "Ib t)revem
this ti'om hal)l)ening, use
less detergent it _x)u ha\ e
so/i v_ltelz \%lsh glassware
in the shortest cycle tl_at
will get diem clean.
26
Page 27

Yellow or brown fihn
on inside surfaces
Possible Causes What ToDo
Tea or coffee stahls
+ Remo\'e the stain b} band,
using a solution of 1/2 cup
bleach and 3 cul)s wam_
watel',
_k WARNING
be/_)re cleaning interior
wait at least 20 l//intltes
a/ier a (_le tot the
beating element to cool
down. Igailure to do so can
resuh in bin:us.
iiiiiiiH{/i!!iii//H!!!!
ili!Jiii/iii/ii!iiiii/iiiiii_i
_!iiiii_,_iiiil
i_!ii_i_iiiiiii_{iiii
An overall yellow or
brown film cml be caused
by iron deposits hi water
Whitefihnon inside
Hard water Ulhmrals
surfaces
Detergent cup lid Dial is not hi file OFF ['urn line Dial to OFF
won'tlatch posidon ;rod slide tin(' door lat(ln to
Detergent left in Dishes are blocl_lg file Ret)osition tint" dishes.
dispenser cups detergent cups
Steam Tiffs is normal Stei-iIH colnes tlux)/lg]l tim
' A sl)eckd fiher in the _s_ter
supply line is the only wa,,
to correct tiffs problem.
Conta(t a water softener
company.
+ To clean the imefior, apply
dishwasher deterg+ent to a
damp sponge. \Year
rubber gloves. Do not use
_.l/y t_pe of cleallser oilier
than dishwasher (temrgent
because it may cause
/_)aming or sudsing.
Cascade® Amomafic
I)ishwashing Detergent
has been al)l)ro_ed ti)r use
in all (',E (tishwashel:s.
line ]eli.
Vel/l bv the door latcln
during dryillg illld wheu
water is being pUml)ed out.
Black orgray Almnhlmn utensils have Remoxe marks \vith a mild,
marksondishes rubbed agah_st dishes al)n_si_e clemner. 2 7
Page 28
ill
ii!ii!i{!iiiiIlii
ii
):_ii
li
.....................................28
Page 29

GE Service Protection Plus TM
(;E, a name re(ognizcd worldwide for qualit? and dcpcndabilit_,
ofJ'(trs vo/l SelwJ( e Prot(ctiOl/ t)]IIsT_I--( OIIlpl?(_b(!l/Si_,(_ pl'OI('(IiOll OI/
all _our applian(cs--No Matter What Brmld!
Benefits Include:
• Backed by GE
• All brands covered
• Unlhnited service calls
• All parts mid labor costs hlcluded
• No out-of-pocket expenses
• No lfidden deductibles
• One 800 ntunber to call
YOll will |)e coml)letely satistied with our serxicc protection or you ma}' request your
IIIOI/(!V ba(k Ol/ 111(_ F(!l//_lillil/g "_alll(! ()_ v()lll7 (Ol/|lTa(|. No questiOllS asked. It's that silIlple.
l)rowct yore: re/i'igerator, dishwashel; washer and dryer, range, TK VCR and much more--
rely brmld! Plus dlere's no exu:a charge tbr emergency service and low monthly tinancing
is available. Even icemaker (overage and tbod spoilage prow(don is o/]cred. _i)u can rest
easy, knowing that all your valuable household products are protected against expensive
repairs.
Place "_our confidcn(x in (;E and call us in die U.S. toll-ii'ec at 800-626-2224
tor more intbrmadon.
*-M1 brands (ov(_((I, up to 20 ycals old, in d_( comincnml U.S.
We'll CoverAny Appliance.
Anywhere. Anytime.*
............................................................. _.(._.. _.¢_'.....
Please place in envelope and mail to:
General Electric Company
Warranty Registration Department
P.O. Box 32150
Louisville, KY 40232-2150
29
Page 30

Consumer Product Ownership Registration
I)em: Customer:
Thank v(m tor purchasing our t)rod uct and thank you tbr t)lacing yore: confidence in us.
_;'e are t)rotld to ha'_e vo/| as a (tlStOl/ler!
Follow these three steps to protect your new appliance investment:
Complete mid mail
1
your Consmner
Product Ownership
Reglsa'ation today.
t ]_m' the t)ea(c o/
mind of knowing we
can comact you in
the tmlikelv event of
a sa/i,tv modi/ication.
the registration
below, store this
,\tier mailing
do(tll/lellt ill a safe
ph'a e. It (ontains
in/[)rln_ltioll you will
need shouM you
require service.
Our servk e mmfl)er
is 800 GE (2\RES
(800-432-2737).
Model Number Serial Number
I I I I I I I I I I I I II I I I I I I
hnportant: If you did not get a registration card with your product, detach
mid return the form below to ensure that your product is
registered, or register online at ge.com.
Consumer Product Ownership Registration
Mamml carefully.
It will hel t) you
P.ead v(mr ()wner's
ot)erate yotlr I/(!W
applian(e t)roperl_.
If VOlt tla'_ e
(l/lestiOllS, Or I/eed
l/lOlTe il/t()rlIlatiol/,
(all the GE Answer
Center®
800.626.9000.
I ........... I I,, ,,,, ,I
Nil-. [] Ms. [] Mrs. [] Miss []
First Il_astI I
Name I I I I I I I I I Name I I I I I I I I I I I I I
Street] I
\ddt'ess I I I I I I I I I I I I I I I I I I I I I I I I I I
Apt. # I , , , , , , , IE-m+,il \ddress
I I I,l it' I I
(;it_ I I I I I I I I I I I I I State Code I I I I
l)at( Phl(ed In Ls(
Model Number Serial Number
Phone
Mo,,,t,L_J D_LJ _,a_L.M _,..t_.I,, I-I,, I-I,, , I
()ccasionally, we may allow selected coml)anies to send xou information.
[] Check here if'_ou (t(7 not want this information.
GEAppliances
General Electric Conlpan/
Louisville, Kentucky ge com
3O
Page 31

GEDishwasher Warranty
Aft warranty service provided by our Factory Service Centers,
or an authorized Customer Care® technician. For service,
carl 800-GE-CARES.Please have serial number and model
number available when calling for service.
GEWill Replace:
OneYear
Frerothe date of the
originalpurchase
Anypart o/th(' dishw_tsh('r whi(h/i_ils duc to a (hdbct in
mat('ri_ds or workmauship. Dudllg this limited one-year
warran_ (;E will also provide, free of charge, all labor
and related scr\'icc to rcpl_(c the dc_'(ti_v pm't.
_: Service trips to your home to teach
you how to use die product.
J) hnproper hlstallafion.
_: Replacement of house fuses or
resetting, of circuit breakers.
_: Failure of the product if it is
abused, luisused, or used for other
than the hltended purpose or used
colmnercially.
EXCLUSION OFIMPLIED WARRANTIES--Your sole and exclusive remedy is
product repair as provided #1 this Limited Warranty. Any implied warranties,
including the impfied warranties of merehantability or fitness for a particular
purpose, are limited to one year or the shortest period allowed by law.
Thiswarranty is extended to the original purchaser and any succeedingowner for products purchased
for home use within the USA. If the product is located in an area where service by a GE
Authorized Servicer is not available, you may be responsible fora trip charge or you may be
required to bring the product to an Authodzed GE Service location for service, InAlaska, the
warrantyexcludes the cost of shipping or service calls to your home.
Some states donot allow the exclusionor limitation of incidental or consequential damages. This
warrantygives youspecific legal dghts, andyou may also haveother rights which varyfrom state to
state. Toknow what your legal rights are, consult your local or state consumer affairs office or your
state's Attorney General
_: Dmnage to the product caused by
accident, fire, floods or acts of God.
J_ Incidental or consequential damage to
personal property caused by possible
defects with tiffs appllmlce.
J_ Cleal_hlg or servichlg of file air gap
device hi file drain line..
_: lncldental or consequential dmnage
caused by possible defects with tlds
appliance.
Warrantor:GeneralElectricCompany.Louisville,KY40225
31
Page 32

ServiceTelephoneNumbers.
iiiii iiiiii
GEAnswerCenter_ 800.626.2000
OR
_isit ore: W_ bsite at: ge.com
In-HomeRepairService800-GE-CARES(800-432-2737)
EXl>ert (;E repair servk e is only a phone (M1 _r_ r.
SpecialNeedsService800.626.2000
TOO800-TDD-GEAC(800-833-4322)
(;E ott_rs, fi:e( of (harge, a l>ro(lmre to assist ill t)lmming a 1)arriel_
fi:ee kit(hen tor t)ersons with lhnited mobility.
!iii!iiiiiiiiiii_iiiiiiililiiii[iii
PHr(hase a (;E ser\_(e COlltra(t while "vO/ll_ warr_tl/t',; is still in efl_x;t
and you'll re(eixe a subsmndal (tis(oum. (;E Consmner Service will
still 1)e dlere a/ier yore: warr_tl/t'_ expires.
PartsandAccessories800-626-2002
ServiceContracts80o-6z6-22z4
Individuals qualified to service their own at>pliances can have parts
or accessories sere dir'ectlv to their hon/es (_qSA, Master'(_ard alld
_i_l_!iiii!iiiii
I)iscov_'r cards are accepted).
Instructions contained in this manual cover procedures to be performed
by any user. Other servicing generally should be referred to qualified
service personnel Caution must be exercised, since improper servicing
may cause unsafe operation.
ServiceSatisfaction
If you are not satisfied with the service you receive/i'om (;E, tbllow
these two steps. First, contact tile people who serviced _r()/l_:al)t)liance.
Next, il }_ou are still not pleased, write all tile details induding );our
t)hone numbe_mto: Mintages; Customer Rclado_t._,
(;E At)pliances, At@brace Park, Iouisville, KY 40225.
32 PrintoflinCanada
 Loading...