

Page 1

GEAppliances.ca
GSC1807
GSD1807
GSD3800
GCD4800
Owner’s Manual
Dishwashers
350A4502P596
Safety Instructions . . . . . . . . . 2, 3
Operating Instructions
Care and Cleaning . . . . . . . .10, 11
Control Panel and Settings . . . 5, 6
Loading the
Dishwasher Racks . . . . . . . . . . . . .9
Optional Accessories . . . . . . . . . .9
Using the Dishwasher . . . . . . . .7, 8
Troubleshooting Tips . . . . 12, 13
Consumer Support
Warranty . . . . . . . . . . . . . . . . . . . 15
Consumer Support . . . . . . . . . . 16
Write the model and serial
numbers here:
Model # ____________________
Serial # ____________________
You can find them on a label on the
tub wall just inside the door.
Manuel d’utilisation
Lave-vaisselle
La section française commence
après la section anglaise
Page 2
PROPER INSTALLATION AND MAINTENANCE
IMPORTANT SAFETY INFORMATION.
READ ALL INSTRUCTIONS BEFORE USING.
WARNING!
For your safety, the information in this manual must be followed to minimize the risk of fire
or explosion, electric shock, or to prevent property damage, personal injury, or death.
2
Operating Instructions Safety InstructionsConsumer Support Troubleshooting Tips
Under certain conditions hydrogen gas may be produced in a water heater that has not been
used for two weeks or more. HYDROGEN GAS IS EXPLOSIVE.
If the hot water has not been used for two weeks or more, prevent the possibility of damage
or injury by turning on all hot water faucets and allow them to run for several minutes. Do this
before using any electrical appliance which is connected to the hot water system. This simple
procedure will allow any built-up hydrogen gas to escape. Since the gas is flammable, do not
smoke or use an open flame or appliance during this process.
WATER HEATER SAFETY
Use this appliance only for its intended purpose as described in this Owner’s Manual.
This dishwasher must be properly installed and located in accordance with the Installation
Instructions before it is used. If you did not receive an Installation Instructions sheet with your
dishwasher, you can receive one by visiting our Website at GEAppliances.ca.
■ Connect to a grounded metal, permanent
wiring system; or run an equipmentgrounding conductor with the circuit
conductors and connect to the equipmentgrounding terminal or lead of the appliance.
■ Improper connection of the equipment-
grounding conductor can result in a risk
of electric shock. Check with a qualified
electrician or service representative if you
are in doubt whether the appliance is
properly grounded.
■ Dispose of discarded appliances and shipping
or packing material properly.
■ Do not attempt to repair or replace any part
of your dishwasher unless it is specifically
recommended in this manual. All other
servicing should be referred to a qualified
technician.
■ To minimize the possibility of electric shock,
disconnect this appliance from the power
supply before attempting any maintenance.
NOTE:
Turning the dishwasher off does not
disconnect the appliance from the power
supply. We recommend having a qualified
technician service your appliance.
DO NOT…
■ Do not tamper with controls.
■ Do not abuse, sit on, or stand on the door
or dish rack of the dishwasher.
■ Do not discard a dishwasher without first
removing the door or removing the door
latch.
■ Do not store or use combustible materials,
gasoline or other flammable vapors and
liquids in the vicinity of this or any other
appliance.
■ Do not allow children to play around
dishwasher when opening or closing door
due to the possibility of small fingers being
pinched in door.
■ Do not allow children to play with, on
or inside this appliance or any discarded
appliance.
WARNING!
Page 3
3
Consumer SupportTroubleshooting TipsOperating InstructionsSafety Instructions
GEAppliances.ca
PROPER DISPOSAL OF THE DISHWASHER
Junked or abandoned dishwashers are
dangerous… even if they will sit for “just a
few days.” If you are getting rid of your old
dishwasher, please follow the instructions
below to help prevent accidents.
Before You Throw Away Your Old Dishwasher:
■ Take off the door of the washing
compartment or remove the door latch
keeper (as shown).
WARNING! RISK OF CHILD ENTRAPMENT
WHEN USING YOUR DISHWASHER
■ Use only powder, tabs, liquid detergents
or rinse agents recommended for use in a
dishwasher and keep them out of the reach
of children. Cascade®, Cascade Complete
®
and Electrasol®Automatic Dishwashing
Detergents, and Jet-Dry®rinse agent have
been approved for use in all GE dishwashers.
■ Using a detergent that is not specifically
designed for dishwashers will cause the
dishwasher to fill with suds.
■ Locate sharp items so that they are not likely
to damage the door seal.
■ Load sharp knives with the handles up to
reduce the risk of cut-type injuries.
■ Do not wash plastic items unless marked
dishwasher safe
or the equivalent. For
plastic items not so marked, check the
manufacturer’s recommendations.
■ Non-Dishware Items: Do not wash items such
as electronic air cleaner filters, furnace filters
and paint brushes in your dishwasher.
Damage to dishwasher and discoloration
or staining of dishwasher may result.
■ Do not touch the heating element during or
immediately after use.
■ Do not operate your dishwasher unless all
enclosure panels are properly in place.
■ Close supervision is necessary if this
appliance is used by or near children.
■ Load light, plastic items so they will not
become dislodged and drop to the bottom
of the dishwasher—they might come into
contact with the heating element and be
damaged.
READ AND FOLLOW THIS SAFETY INFORMATION CAREFULLY.
SAVE THESE INSTRUCTIONS
Door latch keeper
Hold nut at top of dishwasher
while removing screw
Page 4
4
Operating Instructions Safety InstructionsConsumer Support Troubleshooting Tips
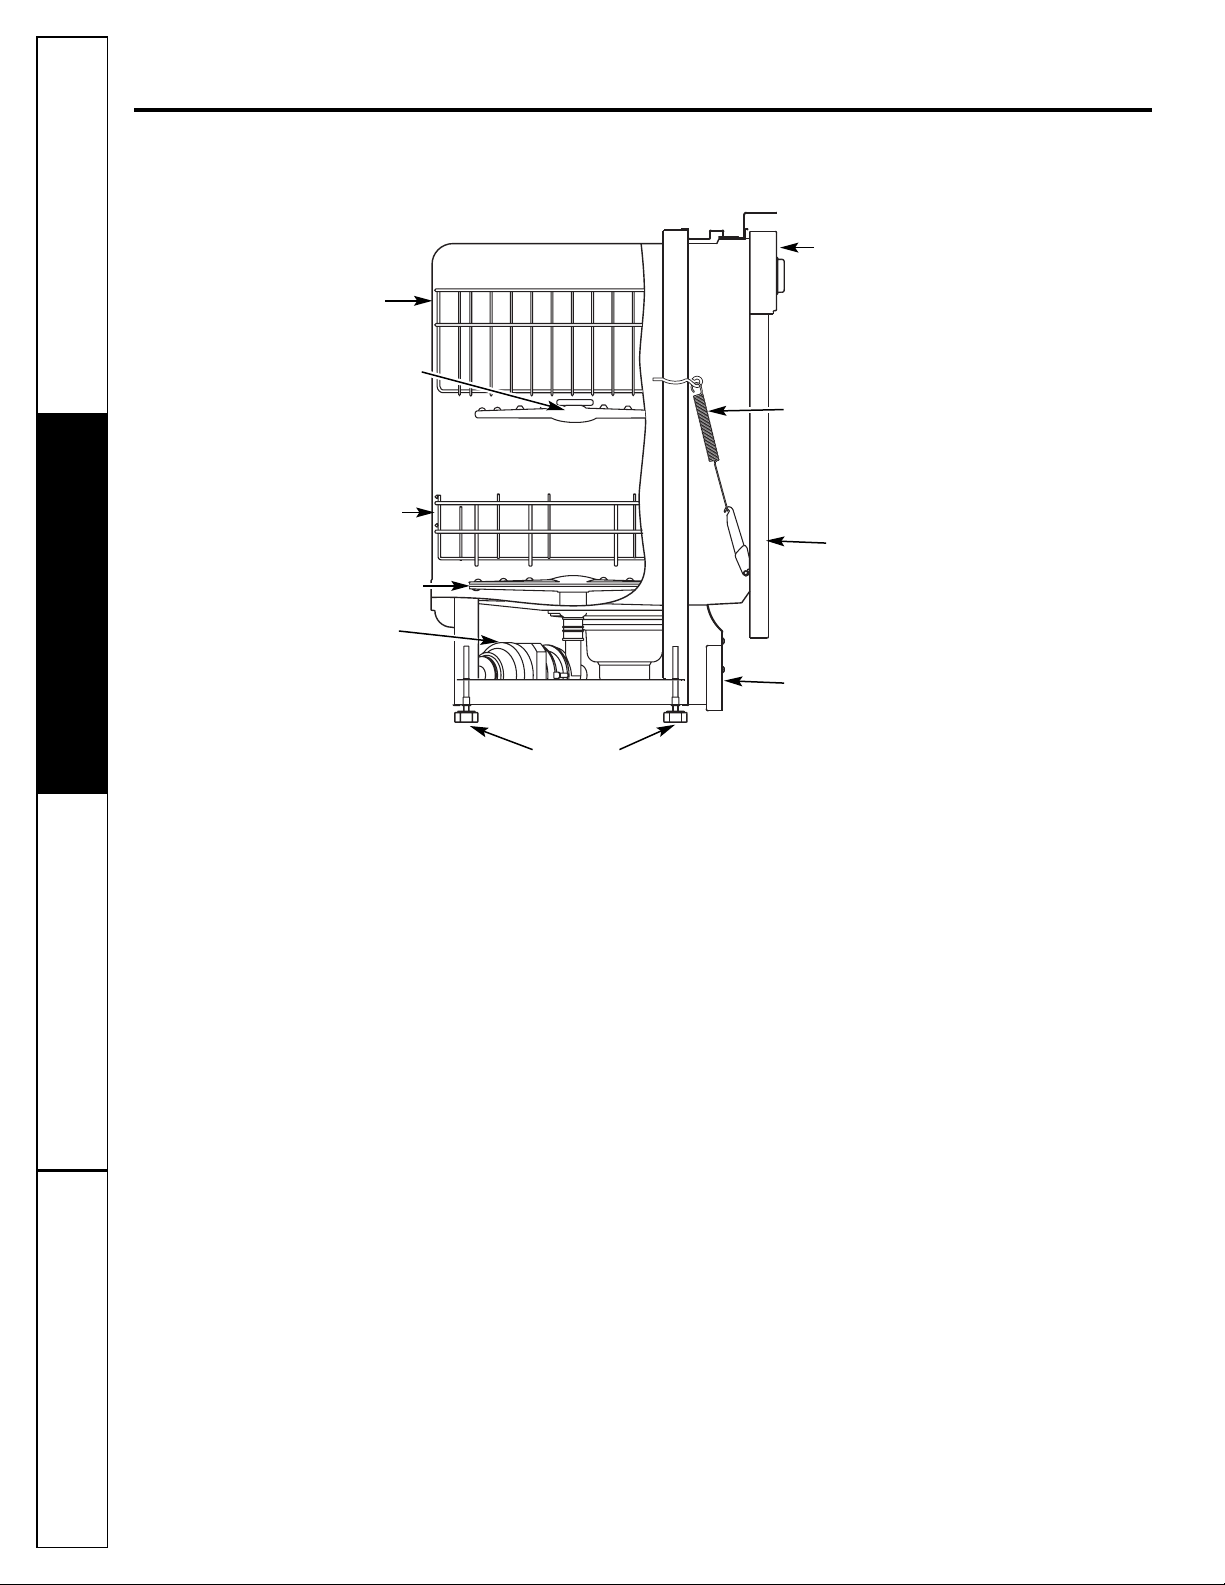
Features of the dishwasher (a side view).
Upper rack
Upper spray arm
Lower rack
Lower spray arm
Panel
Motor
Leveling legs
Door spring
Control panel
Toe kick
Page 5
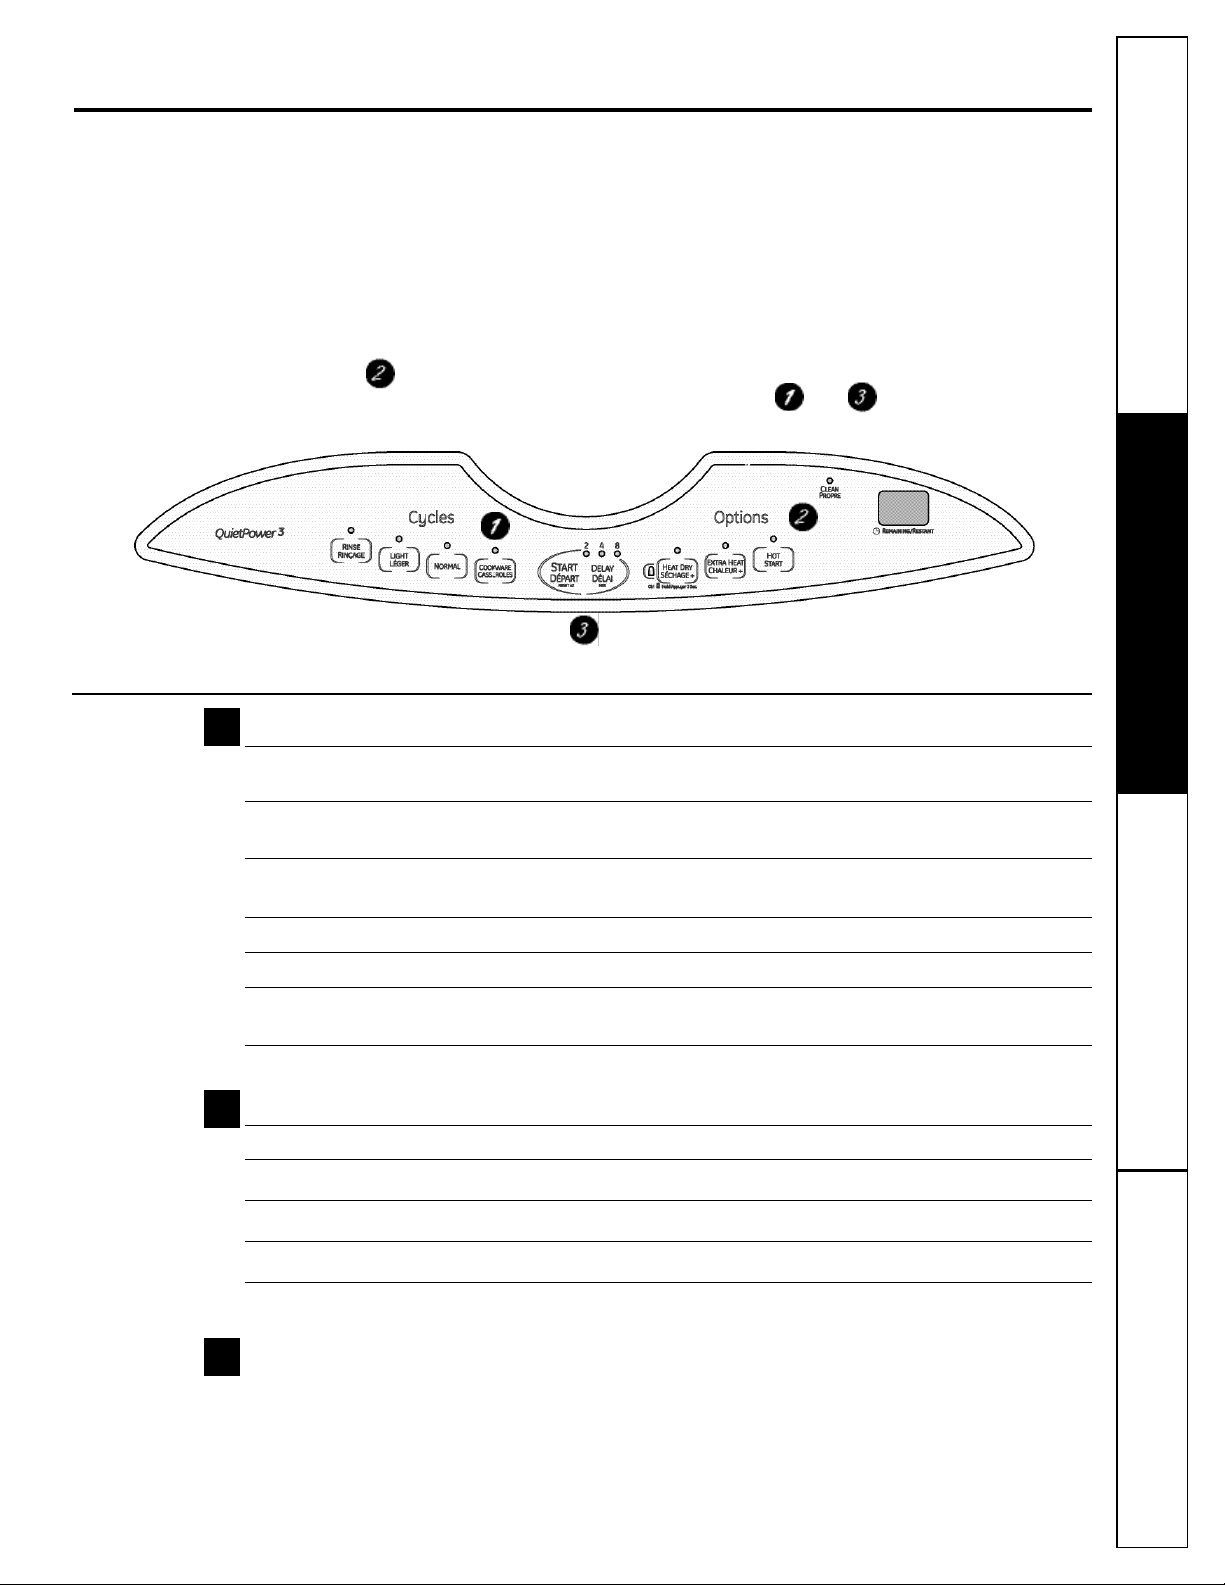
About the dishwasher control panel.
GEAppliances.ca
You can locate your model number on the tub wall just inside the door.
Throughout this manual, features and appearance
may vary from your model.
Control Settings
Wash Cycles (vary depending on model)
POTS & PANS For heavily soiled dishes or cookware with dried-on or baked-on soils. Everyday dishes may
COOKWARE be included. This cycle will not remove burned-on foods.
SUPER For heavily soiled dishes or cookware. For dried-on or baked-on soils, use the POTS & PANS
cycle. Everyday dishes may be included.
NORMAL For loads of everyday dishes, glasses and cookware with medium soils.
NOTE:
Many dishes have
lighter soil than normal. Choosing a cycle other than
NORMAL WASH
will save energy and water.
LIGHT For dishes with light soils.
CHINA For lightly soiled china and crystal, use the
CHINA
cycle.
RINSE For rinsing partial loads that will be washed later.
DO NOT use detergent or HEATED DRY
OPTION.
PLATE WARMER For warming clean dishes and serving plates. This cycle will take approximately 36 minutes.
Options
HEATED DRY ON Turns the heating element on for fast drying. This option will extend the time of your wash cycle.
HEATED DRY OFF Turns
HEATED DRY ON
off. Dishes air dry naturally and energy is saved.
EXTRA HEAT Wash temperature will be a little higher.
HOT START Wash time will be a little longer, and initial wash temperature will be higher.
DELAY You can select 2, 4 or 8 hours later to start the dishwasher.
Start
Slowly turn the Dial to the
desired
position on the Dial after selecting a drying option. Don’t turn it
past that position, or you could accidentally miss a rinse. There is a time delay between start-up and
water fill so you will not hear any wash action right away.
Electronic models:
After selecting wash cycle and options, press the Start button.
1
2
3
Consumer SupportTroubleshooting TipsOperating InstructionsSafety Instructions
5
Page 6
6
About the dishwasher control panel.
Operating Instructions Safety InstructionsConsumer Support Troubleshooting Tips
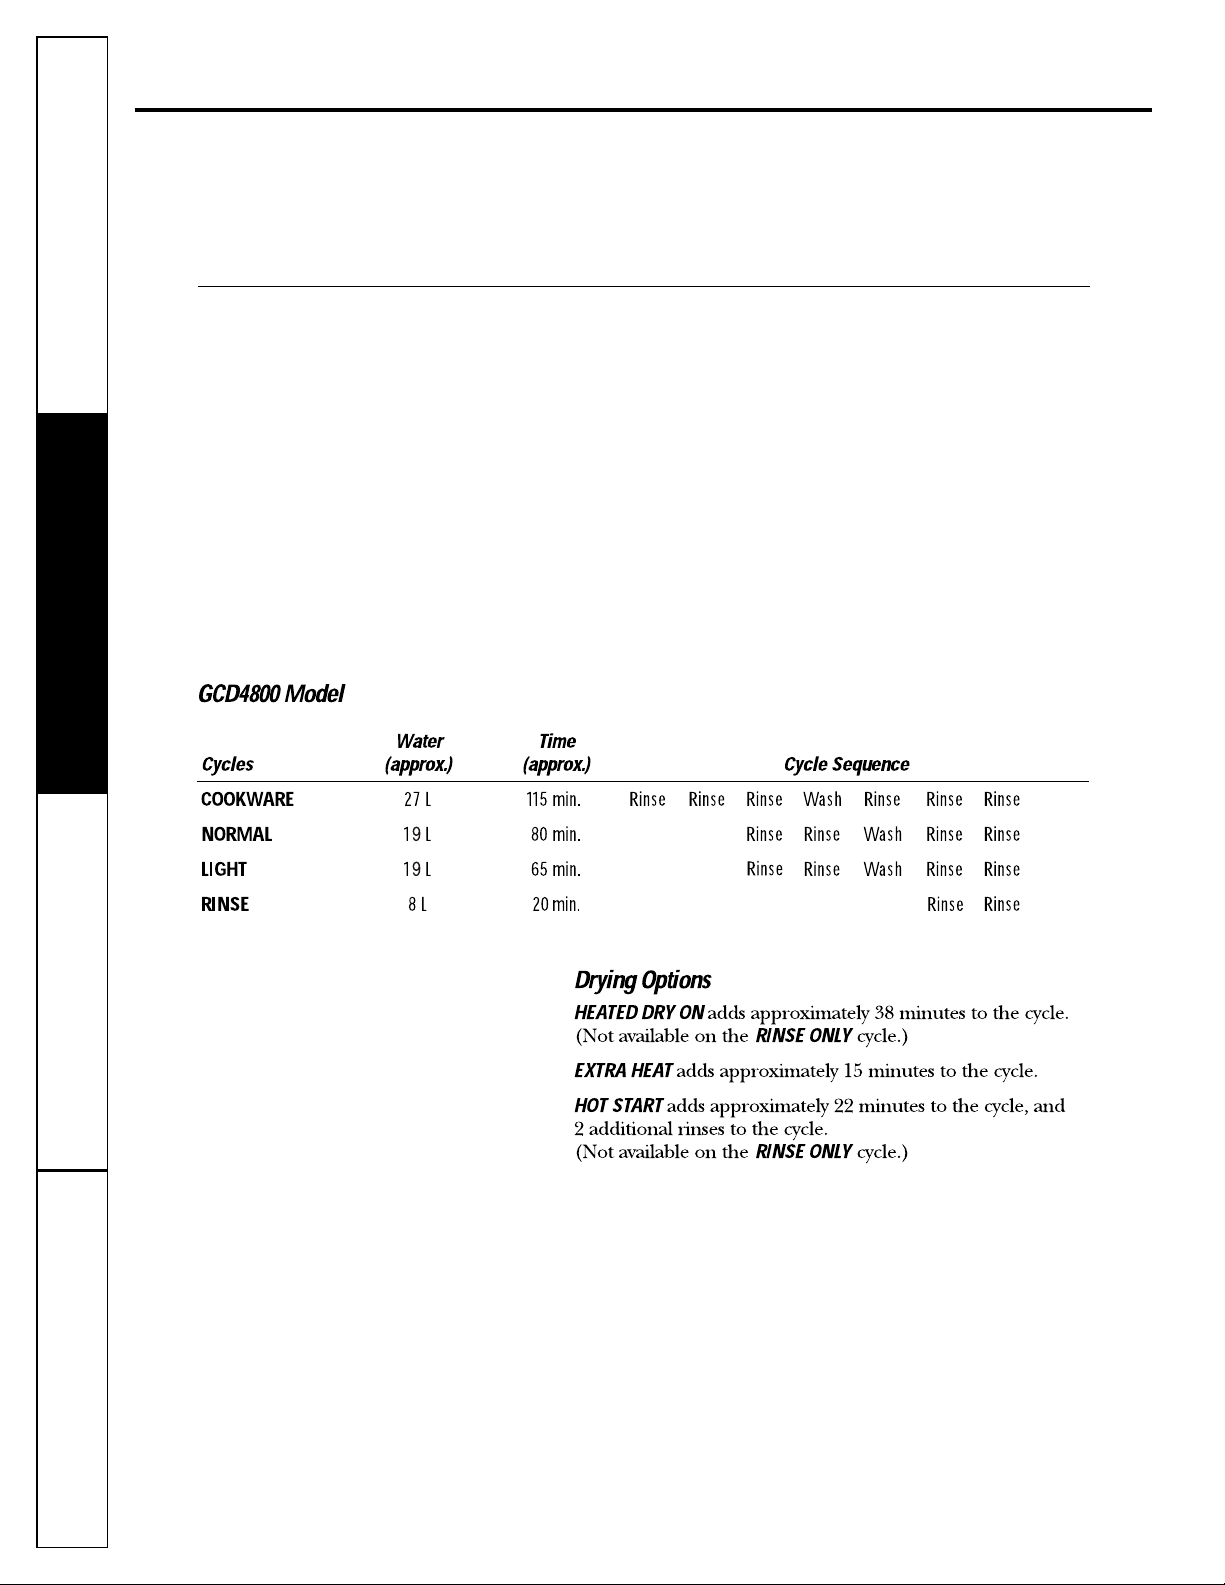
Cycle Sequence
Drying Options
HEATED DRY ON
adds approximately 36 minutes to the cycle.
(Not available on the
RINSE ONLY
cycle.)
Water
(approx.) Time
Cycles
GSD1807K GSD3800K
(approx.) Cycle Sequence
POTS & PANS 26 L 32 L 74 min. Rinse Rinse Rinse Rinse Rinse Wash Rinse Rinse
SUPER 23 L 28 L 68 min. Rinse Rinse Rinse Rinse Wash Rinse Rinse
NORMAL 20 L 24 L 62 min. Rinse Rinse Rinse Wash Rinse Rinse
LIGHT 17 L 21 L 56 min. Rinse Rinse Wash Rinse Rinse
CHINA 13.5 L 16.7 L 50 min. Rinse Wash Rinse Rinse
RINSE 6.8 L 8.3 L 20 min. Rinse Rinse
Water Time
Page 7
7
Using the dishwasher.
GEAppliances.ca
Check the Water Temperature
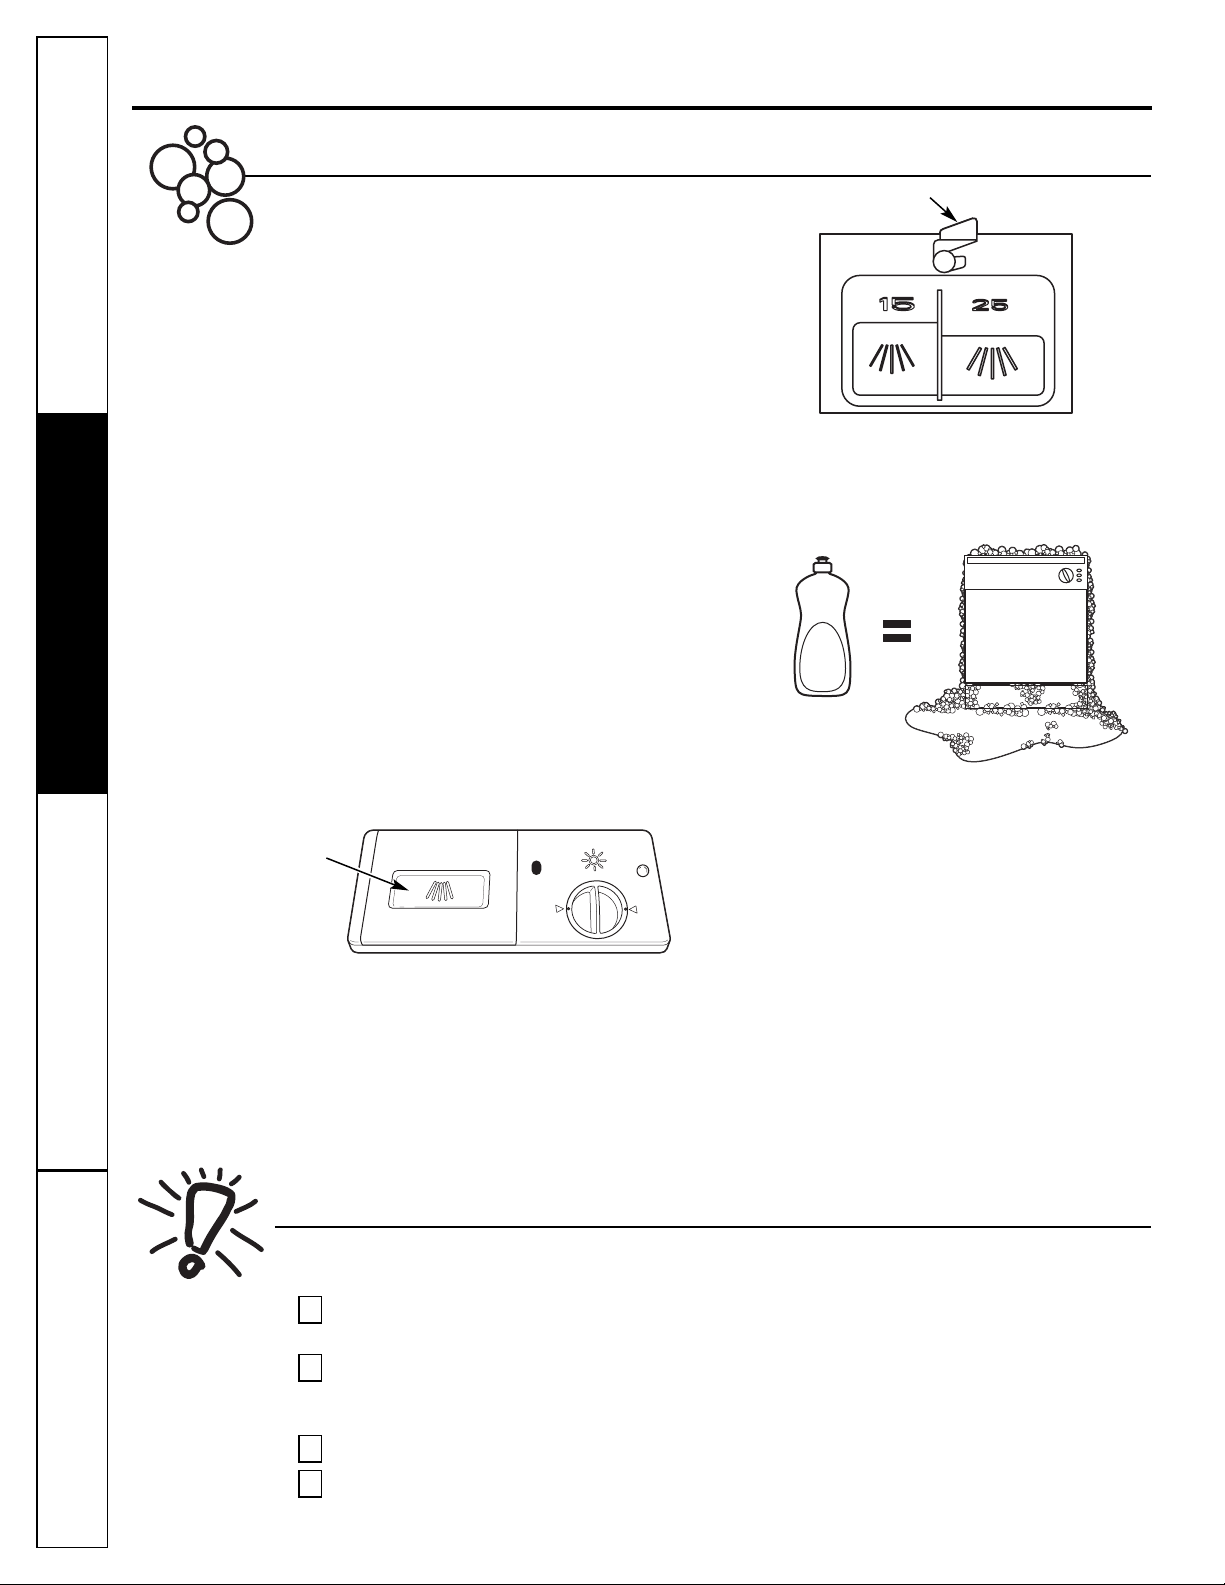
Use Jet-Dry®Rinse Agent
Jet-Dry
®
rinse agent removes spots and prevents new film buildup on your dishes, glasses, flatware,
cookware and plastic.
Filling the Dispenser
The rinse agent dispenser holds 3.5 oz. (99 mL) of rinse agent. Under normal
conditions, this will last approximately one month. Try to keep it full,
but do not overfill.
Make sure the dishwasher door is fully open.
Turn the dispenser cap to the left and lift it out.
Add rinse agent until the indicator window looks full.
Clean up any spilled rinse agent with a damp cloth.
Replace the dispenser cap.
Rinse Aid Setting
The amount of rinse agent released into the final wash can be adjusted.
The factory setting is at the midpoint. If there are rings of calcium
(hard water) spots on dishes, try a higher setting.
To adjust the setting
Remove the dispenser cap; then turn the adjuster counterclockwise
to increase the amount of rinse agent.
5
4
3
2
1
The entering water should be at least 120°F
(50 °C) and not more than 150°F (65.5 °C), for
effective cleaning and to prevent dish damage.
Check the water temperature with a candy or
meat thermometer.
Turn on the hot water faucet nearest the
dishwasher, place the thermometer in a glass and
let the water run continuously into the glass until
the temperature stops rising.
Consumer SupportTroubleshooting TipsOperating InstructionsSafety Instructions
Indicator
Dispenser cap
Adjustable setting
Portable Models
For instructions on how to use the unicouple, please refer to the
Installation Instructions
.
Page 8
Operating Instructions Safety InstructionsConsumer Support Troubleshooting Tips
A forgotten dish can be added any time before
the main wash.
Unlatch the door to interrupt the cycle.
Squeeze the door latch to release the door.
Do not open the door until the water spray
action stops. Steam may rise out of the
dishwasher.
Add forgotten dishes.
Close the door and push it in to relatch.
4
3
2
1
8
Using the dishwasher.
Proper Use of Detergent
Use only detergent specifically made for use
in dishwashers. Cascade®, Cascade Complete
®
and Electrasol®Automatic Dishwashing
Detergents have been approved for use in
all GE dishwashers. Keep your detergent
fresh and dry. Don’t put powder detergent into
the dispenser until you’re ready to wash dishes.
The amount of detergent to use depends on
whether your water is
hard
or
soft
. With hard
water, you need extra detergent. With soft
water, you need less detergent.
Protect your dishes and dishwasher by
contacting your water department and asking
how hard your water is. Twelve or more grains
is extremely hard water. A water softener is
recommended. Without it, lime can build up
in the water valve, which could stick while
open and cause flooding. Too much detergent
with soft water can cause a permanent
cloudiness of glassware, called
etching
.
For heavily soiled loads, use the
POTS & PANS,
COOKWARE, SUPER
or
NORMAL WASH
cycle, fill
one or both of the interior cups, depending on
the hardness of your water, and also fill the
open cup on the dispenser lid.
To open the wash cover, press the button and the cover
will flip back.
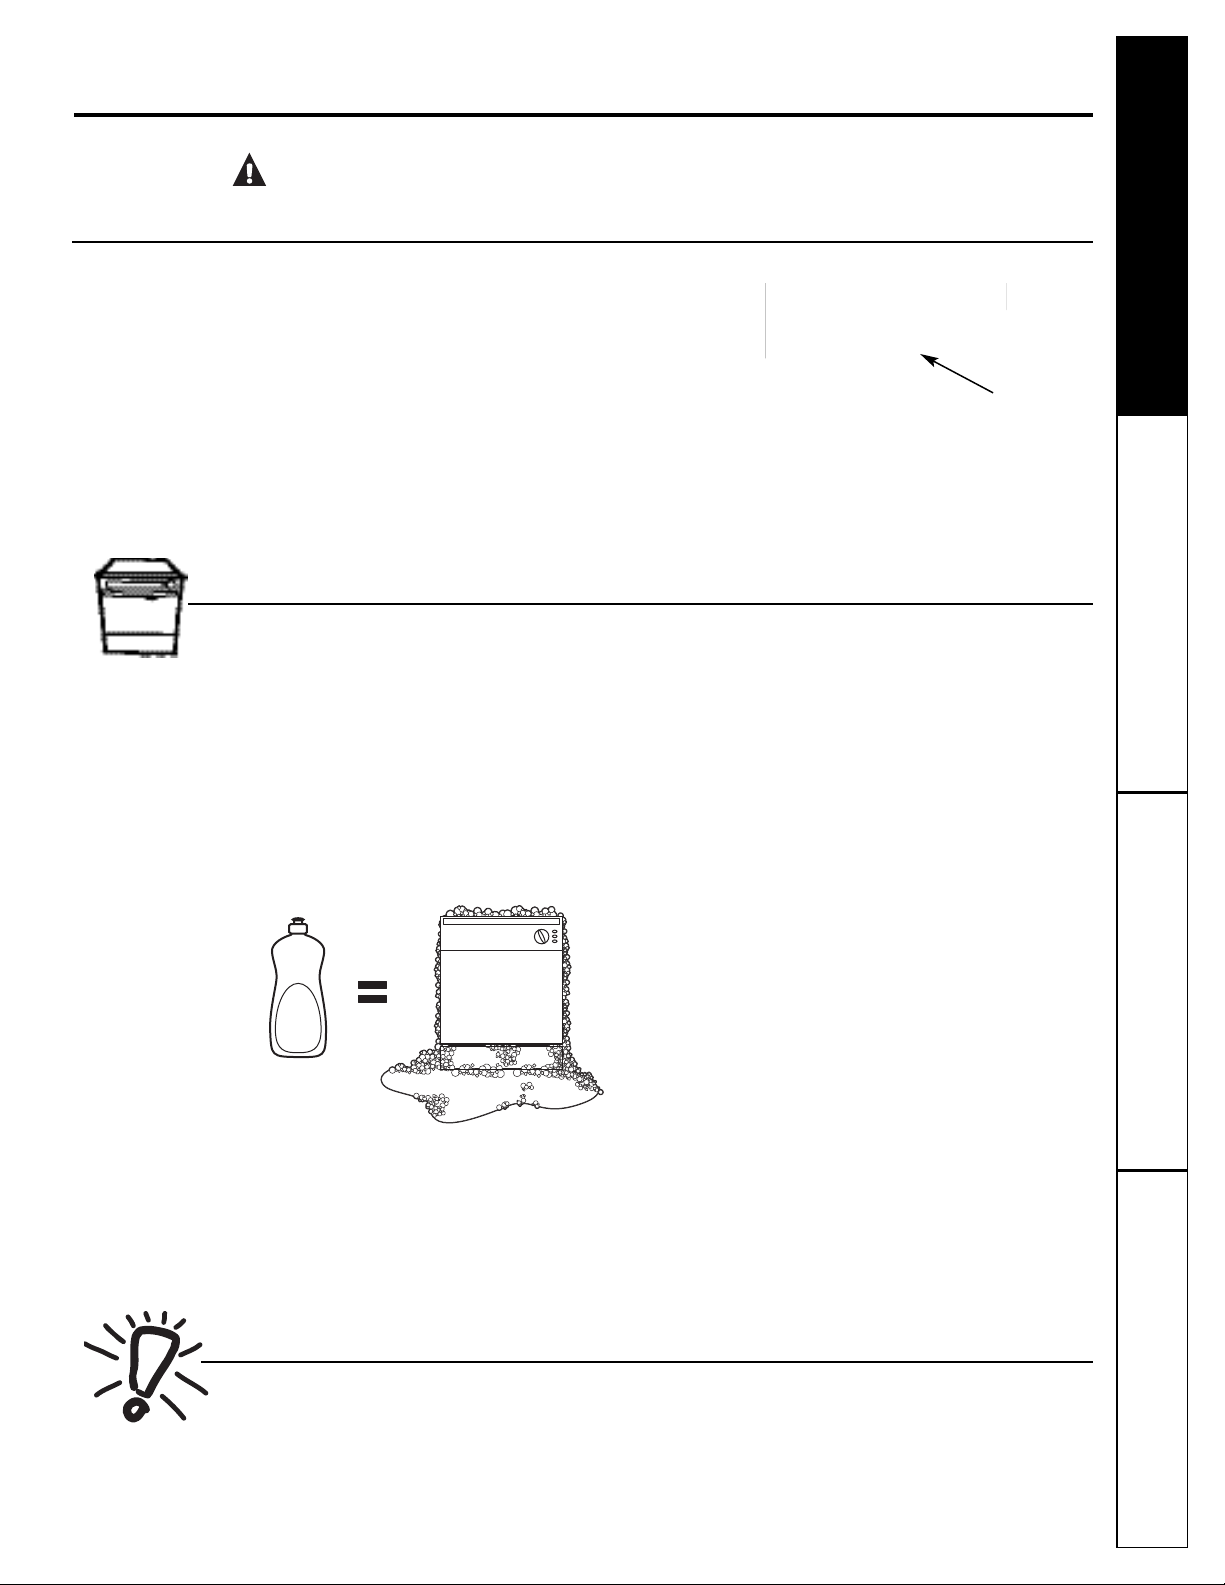
DO NOT USEHAND DISH DETERGENT
NOTE:
Using a detergent that is not specifically
designed for dishwashers will cause the dishwasher
to fill with suds. During operation, these suds will
spill out of the dishwasher vents, covering the
kitchen floor and making the floor wet.
Because so many detergent containers look alike,
store the dishwasher detergent in a separate space
from all other cleaners. Show anyone who may use
the dishwasher the correct detergent and where it
is stored.
While there will be no lasting damage to the
dishwasher, your dishes will not get clean using a
dishwashing detergent that is not formulated to
work with dishwashers.
Forget to Add a Dish?
Button
Open
cup
Page 9

Loading the dishwasher racks.
GEAppliances.ca
Silverware Basket
The silverware basket may be used without the topper for quick
loading; with the topper, it may be beneficial for holding small items
in place.
Without the topper
Put the flatware in the removable basket with fork and knife handles
up to protect your hands. Place spoons in the basket with handles
down. Mix knives, forks and spoons so they don’t nest together.
Distribute evenly. Small plastic items, such as measuring spoons and
lids from small containers, should go in the bottom of the silverware
basket with silverware on top.
With the topper
Place small plastic items, such as measuring spoons and lids from
small containers, in the bottom of the basket and snap the topper in
place. Insert spoons and forks, handles first, through the holes in the
topper. Place knives, blades first, through the holes in the topper.
About optional accessories.
For best dishwashing results, follow these loading guidelines. Features and appearance of racks and silverware
baskets may vary from your model.
Upper Rack
The upper rack is for glasses, cups and saucers. This is also a secure
place for dishwasher-safe plastics. A cup shelf may be placed in the up
or down position to add flexibility. The upper rack is good for all
kinds of odd-shaped utensils. Saucepans, mixing bowls and other
items should be placed face down.
Secure larger dishwasher-safe plastics over two fingers when possible.
Make sure small plastic items are secure so they can’t fall onto the heating element.
Be sure that items do not protrude through the bottom of the rack and block rotation
of the middle spray arm. This could result in poor wash performance for items in the
upper rack.
Lower Rack
When loading the lower rack, do not load large platters or trays in the front left
corner. They may prevent detergent from circulating during the wash cycle.
The lower rack is best used for plates, saucers and cookware. Large
items should go along the sides. Load platters, pots and bowls along
the sides, in corners or in the back. The soiled side of items should
face the center of the rack.
Be careful not to let a portion of any item such as a pot or dish handle extend
through the bottom rack. This could block the wash arm and cause poor
washing results.
Consumer SupportTroubleshooting TipsOperating InstructionsSafety Instructions
You can change the appearance of your dishwasher to match your kitchen cabinets by ordering one of the following
optional accessories.
Wood Panel Trim Kit – For GSD1807 models only.
This accessory contains
trim and instructions
for you to supply and install a 1/4” (0.6 cm) thick decorative wood door.
GPF18W (White)
GPF18B (Black)
9
Page 10
Caring for the dishwasher.
To clean the control panel, use a lightly dampened cloth, then dry thoroughly. To clean the exterior, use a good
appliance polish wax. Never use sharp objects, scouring pads or harsh cleaners on any part of the dishwasher.
The dishwasher will flush away all normal food soils. However, objects (fruit pits, bones, etc.) may collect in
openings and should be removed occasionally to avoid clogging the drain system.
CAUTION
Personal injury hazard. Before cleaning the interior, wait at least 20 minutes after a cycle for the heating element
to cool down. Failure to do so could result in burn injuries.
Cleaning the Spray Arms
Because hard water chemicals will clog the
spray arm jets and bearings, it is necessary
to clean the spray arms regularly. To remove
the spray arm, twist the retaining nut 90
degrees and pull the spray arm off the shaft.
Wash the arms in soapy, warm water and use
a soft brush to clean the jets. Replace them
after rinsing thoroughly.
Cleaning the Filters
For best performance and results, the filter
assembly must be cleaned regularly. The
filter efficiently removes food particles from
the wash water, allowing water to be
recirculated during the cycle. For this reason,
it is a good idea to remove the large food
particles trapped in the filter frequently by
rinsing the main filter and cup under
running water. To remove the filter
assembly, pull up on the cup handle. The
entire filter assembly should be cleaned at
least once a month. To clean the main filter
and fine filter, use a cleaning brush. Then,
reassemble the filter parts as shown in the
illustration and reinsert the entire assembly
in the dishwasher, positioning it in place and
pressing downward. The dishwasher must
never be used without the filters. Improper
replacement of the filter may reduce the
performance level of the appliance and may
damage dishes and utensils.
Cleaning the Spray Arms and the Filters
Main filter
Fine filter
Retaining
nut
Washer
Cup
Protect Against Freezing
If your dishwasher is left in an unheated
place during the winter, ask a service
technician to:
Cut off electrical power to the dishwasher.
Remove fuses or trip circuit breaker.
Turn off the water supply and
disconnect the water inlet line from
the water valve.
Drain water from the water inlet line
and water valve. (Use a pan to catch
the water.)
Reconnect the water inlet line to the
water valve.
4
3
2
1
Check the air gap any time your
dishwasher isn’t draining well.
Does Your Dishwasher Have
an Air Gap?
An air gap protects your dishwasher
against water backing up into it if a drain
clogs. The air gap is not a part of the
dishwasher. It is not covered by your
warranty. Not all plumbing codes require
air gaps, so you may not have one.
The air gap is easy to clean.
Turn off the dishwasher and lift off
the chrome cover.
Remove the plastic cap and clean with
a toothpick.
2
1
Two types of
air gaps
Retaining nut
Stainless Steel Interior—
Tub and Inner Door
The stainless steel used to make the
dishwasher tub and inner door provides the
highest reliability available in a GE dishwasher.
If the dishwasher tub or inner door should
be scratched or dented during normal use,
they will not rust or corrode. These surface
blemishes will not affect their function
or durability.
10
Operating Instructions Safety InstructionsConsumer Support Troubleshooting Tips
Upper rack
Page 11

11
Caring for the dishwasher.
GEAppliances.ca
Consumer SupportTroubleshooting TipsOperating InstructionsSafety Instructions
Painted Door Panel (model numbers ending in
BB-black or WW-white)
Use a clean, soft, lightly dampened cloth, then dry
thoroughly. You may also use a good appliance wax or
polish.
Stainless Steel Door Panel (model numbers ending in SS)
The stainless steel panels can be cleaned with
Stainless Steel
Magic
or a similar product using a clean, soft cloth. Do not
use appliance wax, polish, bleach or products containing
chlorine on Stainless Steel doors.
You can order
Stainless Steel Magic
#WX10X15 through GE
Parts by calling 1.888.261.3055.
Do not wipe the dishwasher with a soiled dish cloth or wet towel. These
may leave a residue. Do not use scouring pads or powdered cleaners
because these products can scratch the finish.
Before cleaning the front panel, make sure you know what type of panel you have. Refer to the last two letters of
your model number. You can locate your model number on the left-hand tub wall just inside the door. If your model
number ends with BB or WW, then you have a Painted Door panel. If your model number ends with SS, then you
have a Stainless Steel Door panel.
Follow the instructions below for cleaning the door panel for your specific model.
Cleaning the Door Panel
Page 12

Problem Possible Causes What To Do
Noise
Some of the sounds you’ll • Detergent cup opening.
hear are normal
• The motor starting during the drying period.
• Water draining out of the tub immediately after you
start the dishwasher.
Utensils are not secure in the • Make sure everything is secured in dishwasher.
rack or something small has
dropped into the rack
Motor hums • Dishwasher has not been used on a regular basis. If you
do not use your dishwasher often, set it to fill and pump
out once every week. This will help keep the seal moist.
• Dishwasher control was not advanced properly to the start
of the desired cycle. Advance the control to the start of
the desired cycle.
Detergent left in
Dishes are blocking the • Reposition the dishes.
dispenser cups
detergent cups
Water won’t pump
Drain is clogged • If you have an air gap, clean it.
out of the tub
• Check to see if your kitchen sink is draining well. If not,
you may need a plumber.
• If the dishwasher drains into a disposer, run disposer clear.
Suds in the tub
Correct detergent wasn’t used • Use only automatic dishwasher detergents to avoid sudsing.
Cascade®, Cascade Complete®and Electrasol®Dishwashing
Detergents have been approved for use in all GE dishwashers.
• To remove suds from the tub, open the dishwasher and let
suds evaporate. Add 1 gallon (4 L) of cold water to the tub.
Close and latch the dishwasher. Pump out water by slowly
turning the dial until a drain period is reached. Repeat if
necessary.
Rinse agent was spilled • Always wipe up rinse agent spills immediately.
Stained dishwasher parts
Detergent with • Some detergents contain colorant (pigment or dyes) that
colorant was used will discolor the tub interior with extended use. Check the
detergent cup for signs of any discoloration. If cup is
discolored, change to detergent without any colorant.
Cascade®, Cascade Complete®and Electrasol®Dishwashing
Detergents have been approved for use in all GE dishwashers.
Some tomato-based • Use of the
RINSE
cycle after adding the dish to the load can
foods can stain decrease the level of staining.
Dishes and flatware
Low inlet water temperature • Make sure inlet water temperature is correct (see page 7).
not clean
Water pressure is temporarily low • Turn on a faucet. Is water coming out more slowly than usual?
If so, wait until pressure is normal before using your dishwasher.
Air gap is clogged • Clean the air gap.
Improper rack loading • Make sure large dishware does not block the detergent
dispenser or the wash arms.
Before you call for service…
Troubleshooting Tips
Save time and money! Review the charts on the following pages,
or visit GEAppliances.ca. You may not need to call for service.
12
Operating Instructions Safety Instructions
Consumer Support
Troubleshooting Tips
Page 13

13
Problem Possible Causes What To Do
Spots and filming
• Use
Jet-Dry
®
rinse agent to remove spots and prevent new film buildup.
on glasses and
• To remove stubborn spots and pre-existing film from glassware:
flatware
1
Remove all metal utensils from the dishwasher.
2
Do not add detergent.
3
Select the
POTS & PANS
or
COOKWARE
cycle.
4
Start the dishwasher and allow to run for 30 minutes. Dishwasher
will now be in the main wash.
5
Open the door and pour 2 cups (480 mL) of white vinegar into the
bottom of the dishwasher.
6
Close the door and allow to complete the cycle. If vinegar rinse doesn’t
work: Repeat as above, except use 1/4 cup (60 mL) of citric acid crystals
instead of vinegar.
Cloudiness on
Combination of soft water and • This is called
etching
and is permanent. To prevent this from happening,
glassware
too much detergent use less detergent if you have soft water. Wash glassware in the shortest
cycle that will get them clean.
Water temperature entering • Lower the water heater temperature.
the dishwasher exceeds 150°F
(65.5 °C)
Black or gray
Aluminum utensils have • Remove marks with a mild, abrasive cleaner.
marks on dishes
rubbed against dishes
Yellow or brown film
Tea or coffee stains • Remove the stain by hand, using a solution of 1/2 cup (120 mL) bleach
on inside surfaces
and 3 cups (720 mL) warm water.
CAUTION
Before cleaning interior wait at least 20 minutes after a cycle for the
heating element to cool down. Failure to do so can result in burns.
An overall yellow or brown film can • A special filter in the water supply line is the only way to correct
be caused by iron deposits in water this problem. Contact a water softener company.
White film on inside
Hard water minerals • To clean the interior, apply dishwasher detergent to a damp sponge.
surfaces
Wear rubber gloves.
Do not
use any type of cleanser other than
dishwasher detergent because it may cause foaming or sudsing. Cascade
®
,
Cascade Complete®and Electrasol®Automatic Dishwashing Detergents
have been approved for use in all GE dishwashers.
Dishes don’t dry
Low inlet water temperature • Make sure inlet water temperature is correct (see page 7).
• Select
HEATED DRY.
Rinse agent dispenser is empty • Check the rinse agent dispenser.
Dishwasher won’t run
Fuse is blown, or the • Replace fuse or reset circuit breaker. Remove any other appliances
circuit breaker tripped from the circuit.
Steam
This is normal • Steam comes through the vent during washing, drying and when
water is being pumped out.
Extremely hard water
Low inlet water temperature
Overloading the dishwasher
Improper loading
Old or damp powder detergent
Rinse agent dispenser empty
Too little detergent
Before you call for service…
GEAppliances.ca
Consumer SupportTroubleshooting TipsOperating InstructionsSafety Instructions
Page 14

14
Operating Instructions Safety InstructionsCustomer Service Troubleshooting Tips
Notes.
Page 15

What is not covered:
15
GE Dishwasher Warranty.
■ Service trips to your home to teach you how to use
the product.
■ Damage to finish after delivery.
■ Improper installation – proper installation includes
adequate electrical, plumbing and other connecting
facilities.
■ Replacement of house fuses or resetting of circuit
breakers.
■ Replacement of light bulbs.
■ Damage to product caused by accident, fire, floods or
acts of God.
■ Proper use and care of product as listed in the owner’s
manual, proper setting of controls.
WARRANTOR IS NOT RESPONSIBLE FOR
CONSEQUENTIAL DAMAGES.
EXCLUSION OF IMPLIED WARRANTIES – Your sole and exclusive remedy is product repair as provided in this
Limited Warranty. Any implied warranties, including the implied warranties of merchantability or fitness for a
particular purpose, are limited to one year or the shortest period allowed by law.
Consumer Support
Troubleshooting TipsOperating Instructions
Safety Instructions
Your appliance is warranted to be free of defects in material and workmanship.
Staple your receipt here.
Proof of the original purchase
date is needed to obtain service
under the warranty.
What is covered
All parts
How Long Warranted
(From Date of Sale)
One (1) year
Parts
Repair or Replace
at Supplier’s Option
One (1) year
Labour
One (1) year
Terms and Conditions:
This warranty applies only for single family domestic use in
Canada when the appliance has been properly installed
according to the instructions supplied by Mabe and is
connected to an adequate and proper utility service.
Damage due to abuse, accident, commercial use, and
alteration or defacing of the serial plate cancels all
obligations of this warranty.
Service during this warranty must be performed by an
Authorized Mabe Service Agent.
Neither Mabe nor the Dealer is liable for any claims or
damages resulting from any failure of the dishwasher or
from service delays beyond their reasonable control.
To obtain warranty service, purchaser must present the
original bill of sale. Components repaired or replaced are
warranted through the remainder of the original warranty
period only.
This warranty is extended to the original purchaser and any
succeeding owner for products purchased for home use
within Canada. In home warranty service will be provided in
areas where it is available and deemed reasonable by Mabe
to provide.
This warranty is in addition to any statutory warranty.
IMPORT ANT
Keep this warranty and your bill of sale as proof of original purchase and purchase date.
Mabe Service is available coast to coast.
To schedule service, call 1.800.561.3344
If further help is needed concerning this warranty, contact:
Manager, Consumer Relations, Mabe Canada, Inc.,
Suite 310, 1 Factory Lane, Moncton, N.B. E1C 9M3
Page 16

Consumer Support.
GE Appliances Website GEAppliances.ca
Have a question or need assistance with your appliance? Try the GE Appliances Website 24 hours a
day, any day of the year! For greater convenience and faster service, you can now download Owner’s
Manuals, order parts, catalogs, or even schedule service on-line. You can also “Ask Our Team of
ExpertsTM” your questions, and so much more...
Schedule Service 1.800.561.3344 or GEAppliances.ca
Expert GE repair service is only one step away from your door. Get on-line and schedule your service
at your convenience 24 hours any day of the year! Call 1.800.561.3344 during normal business hours.
Real Life Design Studio
GE supports the Universal Design concept---products, services and environments that can be used by
people of all ages, sizes and capabilities. We recognize the need to design for a wide range of physical
and mental abilities and impairments. For details of GE’s Universal Design applications, including
kitchen design ideas for people with disabilities, check out our Website today.
In Canada, contact: Manager, Consumer Relations, Mabe Canada Inc.
Suite 310, 1 Factory Lane
Moncton, N.B. E1C 9M3
Extended Warranties 1.888.261.2133 or GEAppliances.ca
Purchase a GEextended warranty and learn about special discounts that are available while your
warranty is still in effect. You can purchase it on-line anytime, or call 1.888.261.2133 during normal
business hours. GE Consumer Home Services will still be there after your warranty expires.
Parts and Accessories 1.800.661.1616 or GEAppliances.ca
Individuals qualified to service their own appliances can have parts or accessories sent directly to their
homes (VISA, MasterCard and Discover cards are accepted). Order on-line today, 24 hours every day
or by phone at 1.800.661.1616 during normal business hours.
Instructions contained in this manual cover procedures to be performed by any user. Other
servicing generally should be referred to qualified service personnel. Caution must be
exercised, since improper servicing may cause unsafe operation.
Contact Us GEAppliances.ca
If you are not satisfied with the service you receive from GE, contact us on our Website with all the
details including your phone number, or write to:
Director, Consumer Relations, Mabe Canada Inc.
Suite 310, 1 Factory Lane
Moncton, N.B. E1C 9M3
Register Your Appliance GEAppliances.ca
Register your new appliance on-line----at your convenience! Timely product registration will allow for
enhanced communication and prompt service under the terms of your warranty, should the need
arise. You may also mail in the pre-printed registration card included in the packing material.
Page 17

electromenagersGE.ca
GSC1807
GSD1807
GSD3800
GCD4800
Manuel de
l’utilisateur
Lave-vaisselle
Inscrivez ici les numéros de
modèle et de série :
N° de modèle ________________
N° de série__________________
Vous trouverez ces numéros sur une
étiquette située sur la paroi de la
cuve, à l’intérieur de la porte.
Instructions de sécurité
. . . . . . . . . . . . . . .2, 3
Mode d’emploi
Accessoires en option . . . . . . . . . . . . . . . . . . . . .9
Chargement des paniers . . . . . . . . . . . . . . . . . . .9
Entretien et nettoyage . . . . . . . . . . . . . . . .10, 11
Tableau de commande et réglages . . . . . . . . 5, 6
Utilisation du lave-vaisselle . . . . . . . . . . . . . . .7, 8
Conseils de dépannage
. . . . . . . . . . . . . .12, 13
Service à la clientèle
Garantie . . . . . . . . . . . . . . . . . . . . . . . . . . . . . . 15
Service à la clientèle . . . Dernière de couverture
Page 18

INSTALLATION ET ENTRETIEN APPROPRIÉS
CONSEILS DE SÉCURITÉ IMPORTANTS.
LISEZ TOUTES LES INSTRUCTIONS AVANT L’UTILISATION.
AVERTISSEMENT!
Pour votre sécurité, les renseignements contenus dans ce manuel doivent être suivis à la
lettre afin de réduire les risques d’incendie ou d’explosion, de choc électrique, ou pour
prévenir des dommages, des blessures, ou même la mort.
2
Mode d’emploi Instructions de sécuritéService à la clientèle Dépannage
Dans certaines conditions, il peut y avoir production d’hydrogène dans un chauffe-eau qui n’a pas été utilisé pendant
2 semaines ou plus. L’HYDROGÈNE EST UN GAZ EXPLOSIF.
Si le chauffe-eau n’a pas été utilisé pendant deux semaines ou plus, évitez le risque de dommages
ou de blessures en ouvrant tous les robinets d’eau chaude et en laissant couler l’eau pendant plusieurs
minutes. Faites de même avec tout appareil électrique raccordé au circuit d’eau chaude. Cette précaution
toute simple permet à l’hydrogène gazeux de s’échapper. Comme le gaz est inflammable, ne fumez pas et
n’utilisez pas d’appareil ou de flamme nue pendant cette opération.
SÉCURITÉ – CHAUFFE-EAU
Cet appareil doit être utilisé uniquement aux fins prévues et décrites dans ce manuel.
Ce lave-vaisselle doit être correctement installé, conformément aux instructions d’installation, avant que vous ne
l’utilisiez. Si vous n’avez pas reçu les instructions d’installation en même temps que votre lave-vaisselle, vous pouvez
les obtenir en consultant notre site web : www.electromenagersge.ca
■ Raccordez l’appareil à un système de câblage
métallique de mise à la terre, permanent; ou bien
installez un conducteur de mise à la terre de
l’équipement avec les conducteurs du circuit et
raccordez à un fil ou à une borne de mise à la
terre de l’appareil.
■ Un raccordement inapproprié du conducteur de
mise à la terre de l’équipement peut entraîner un
risque de choc électrique. En cas d’incertitude
quant à la qualité de la mise à la terre de
l’appareil, consultez un électricien qualifié ou un
représentant du service après-vente.
■ Mettez correctement au rebut les appareils que
vous jetez et tous les matériaux d’emballage et
d’expédition.
■ N’essayez pas de réparer ou de remplacer une
pièce du lave-vaisselle, sauf si cela est
spécifiquement recommandé dans ce manuel.
Toutes les autres réparations doivent être confiées
à un technicien qualifié.
■ Pour minimiser le risque de choc électrique,
débranchez l’appareil avant de procéder à toute
opération d’entretien.
REMARQUE :
La mise à l’arrêt du lave-vaisselle ne le
déconnecte pas de l’alimentation électrique. Nous
vous recommandons de faire appel à un
technicien qualifié pour réparer votre appareil.
NE PAS...
■ Falsifier les commandes.
■ S’asseoir ou se tenir sur la porte ou un panier du
lave-vaisselle et ne pas le maltraiter.
■ Mettre au rebut un lave-vaisselle sans avoir
d’abord enlever la porte ou retirer le loquet.
■ Ranger ni utiliser près de cet appareil ou de tout
autre appareil ménager, un matériau combustible,
de l’essence ou autre liquide ou vapeur
inflammable.
■ Laisser les enfants jouer près du lave-vaisselle en
ouvrant ou en fermant la porte par suite du risque
de se pincer les doigts.
■ Laisser les enfants jouer avec le lave-vaisselle ou
dans celui-ci ou avec tout autre appareil mis au
rebut.
A VERTISSEMENT!
Page 19

Les lave-vaisselle abandonnés ou mis au rebut sont
dangereux... même si ce n’est que pour quelques
jours. Si vous vous débarrassez de votre vieux lavevaisselle, veuillez suivre les directives ci-dessous afin
de prévenir les accidents.
Avant de mettre au rebut votre lave-vaisselle :
■ Enlevez la porte du compartiment de lavage ou
retirez le loquet (comme sur l’illustration).
3
Service à la clientèleDépannageMode d’emploiInstructions de sécurité
electromenagersGE.ca
COMMENT BIEN SE DÉBARRASSER D’UN LAVE-VAISSELLE
AVERTISSEMENT!
RISQUE D’ENFERMEMENT D’UN ENFANT
LORS DE L’UTILISATION DE VOTRE LAVE-VAISSELLE
■ N’utilisez que des détergents ou agents de rinçage
liquides, en poudre ou en tablettes, à usage
recommandé dans un lave-vaisselle et gardez-les
hors de portée des enfants. L’utilisation des
détergents Cascade
®
, Cascade Complete®et
Electrasol
®
pour lave-vaisselle automatiques, ainsi
que de l’agent de rinçage Jet-Dry
®
a été approuvée
pour tous les lave-vaisselle GE.
■ L’utilisation d’un détergent non spécifiquement
prévu pour lave-vaisselle entraînera la formation
excessive de mousse.
■ Disposez les articles pointus pour qu’ils ne
risquent pas d’endommager le joint de la porte.
■ Rangez les couteaux tranchants avec les manches
vers le haut pour réduire le risque de coupure.
■ Ne lavez pas d’articles en plastique, sauf s’ils sont
prévus pour le lavage au lave-vaisselle. Pour les
articles en plastique ne portant pas d’indications,
vérifiez les recommandations du fabricant.
■ Articles autres que vaisselle : Ne lavez pas d’articles
tels que filtres de purificateur d’air électronique,
filtres d’appareil de chauffage ou pinceaux dans
votre lave-vaisselle. Il pourrait en résulter des
dommages, une décoloration ou des taches du
lave-vaisselle.
■ Ne touchez pas l’élément chauffant lors de son
utilisation ou immédiatement après.
■ N’utilisez pas votre lave-vaisselle s’il manque des
panneaux.
■ L’utilisation du lave-vaisselle par ou près des
enfants doit faire l’objet d’une étroite supervision.
■ Rangez les articles légers en plastique pour qu’ils
ne risquent pas de se trouver délogés et de tomber
dans le fond – ils risqueraient de venir en contact
avec l’élément chauffant et de s’endommager.
LISEZ ET SUIVEZ ATTENTIVEMENT CES CONSEILS
DE SÉCURITÉ IMPORTANTS.
CONSERVEZ CES INSTRUCTIONS
Loquet
Retenez l’écrou en haut du
lave-vaisselle en retirant la vis
Page 20

4
Mode d’emploi
Instructions de sécurité
Service à la clientèle Dépannage
Caractéristiques du lave-vaisselle (vue latérale)
Panier supérieur
Bras de lavage supérieur
Panier inférieur
Bras de lavage inférieur
Panneau
Moteur
Ressort de porte
Tableau de commande
Plaque inférieure
Pieds de mise à niveau
Page 21

À propos du tableau de commande du lave-vaisselle
electromenagersGE.ca
Vous trouverez le numéro de votre modèle sur une étiquette située sur la paroi de la cuve, à l’intérieur de la porte.
Dans tout ce
manuel, les caractéristiques et l’aspect peuvent varier selon le modèle.
Réglages des commandes
Programmes de lavage (selon le modèle)
CASSEROLES Pour ustensiles ou vaisselle très sales avec dépôts alimentaires séchés ou cuits. Convient aussi à la vaisselle
de tous les jours. Ce programme n’enlève pas les aliments carbonisés.
SUPER Pour ustensiles ou vaisselle très sales. Pour les dépôts alimentaires séchés ou cuits, choisissez le
programme CASSEROLES. Convient aussi à la vaisselle de tous les jours.
NORMAL Pour la vaisselle de tous les jours, la verrerie et les ustensiles moyennement sales.
REMARQUE :
De
nombreux ustensiles sont moins que moyennement sales. Le choix d’un programme autre que
NORMAL
économisera de l’eau et de l’énergie.
LÉGER Pour la vaisselle peu sale.
PORCELAINE Pour le cristal et la porcelaine peu sales.
RINÇAGE Pour le rinçage de charges partielles qui seront lavées plus tard.
N’
utilisez
PAS
de détergent ni l’option de
SÉCHAGE AVEC CHALEUR.
CHAUFFE-ASSIETTES Pour réchauffer des assiettes et plats propres. Prend environ 36 minutes.
Options
SÉCHAGE AVEC Allume l’élément chauffant pour accélérer le séchage. Cette option prolonge la durée du
CHALEUR - MARCHE programme de lavage.
SÉCHAGE AVEC Interrompt le
SÉCHAGE AVEC CHALEUR
. La vaisselle sèche naturellement à l’air et de l’énergie est
CHALEUR - ARRÊT économisée.
CHALEUR + La température de lavage est un peu plus élevée.
HOT START La durée de lavage est un peu plus longue et la température initiale de lavage est un peu plus élevée.
(Démarrage à chaud)
DELAI Vous pouvez choisir de différer la mise en marche du lave-vaisselle de 2, 4 ou 8 heures.
START (Mise en marche)
Tournez lentement le bouton à la position
désirée
après avoir choisi une option de séchage. Ne le tournez pas
au-delà de cette position, sinon vous pourriez rater un rinçage. Il existe un délai entre la mise en marche et le
remplissage avec l’eau; vous n’entendrez donc pas de bruit de lavage immédiatement.
Modèles électroniques :
Après avoir sélectionné le cycle et les options de lavage, appuyez sur le bouton Départ.
1
2
3
Service à la clientèleDépannageMode d’emploiInstructions de sécurité
5
Page 22

6
À propos du tableau de commande du lave-vaisselle
Mode d’emploi
Instructions de sécurité
Service à la clientèle Dépannage
Séquence des programmes
Options de séchage
Le
SÉCHAGE AVEC CHALEUR
ajoute environ 36 minutes au programme.
(Pas disponible sur le programme
RINÇAGE SEULEMENT
.)
Eau
(approx.) Durée
Programmes GSD1807K GSD3800K (approx.) Séquence des programmes
CASSEROLES 26 L 32 L 74 min. Rinçage Rinçage Rinçage Rinçage Rinçage Lavage Rinçage Rinçage
SUPER 23 L 28 L 68 min. Rinçage Rinçage Rinçage Rinçage Lavage Rinçage Rinçage
NORMAL 20 L 24 L 62 min. Rinçage Rinçage Rinçage Lavage Rinçage Rinçage
LÉGER 17 L 21 L 56 min. Rinçage Rinçage Lavage Rinçage Rinçage
PORCELAINE 13,5 L 16,7 L 50 min. Rinçage Lavage Rinçage Rinçage
RINÇAGE 6,8 L 8,3 L 20 min. Rinçage Rinçage
Eau Durée
Page 23

7
Utilisation du lave-vaisselle
electromenagersGE.ca
Vérification de la température de l’eau
Utilisation de l’agent de rinçage Jet-Dry
®
L’agent de rinçage
Jet-Dry
®
enlève les taches et empêche la formation d’un nouveau film sur la vaisselle, les
verres, les plats, les casseroles et le plastique.
Remplissage du distributeur
Le distributeur d’agent de rinçage contient 99 mL (3,5 oz) de produit. Dans des
conditions normales, cette quantité suffira pour environ un mois. Essayez de le
garder plein, sans trop le remplir.
Assurez-vous que la porte du lave-vaisselle est grande ouverte.
Tournez le capuchon du distributeur à gauche et sortez-le.
Ajoutez l’agent de rinçage jusqu’à ce que le regard indique que le niveau
maximal est atteint.
Essuyez tout produit renversé avec un linge humide.
Remettez le capuchon du distributeur.
Réglage – agent de rinçage
Il est possible de modifier la quantité d’agent de rinçage libéré dans le lavage
final. Le réglage de l’usine est à un niveau moyen. Si la vaisselle présente des
auréoles dues à l’eau dure, essayez un réglage plus élevé.
Modification du réglage
Enlevez le capuchon du distributeur; puis, tournez le repère à gauche pour
augmenter la quantité d’agent de rinçage.
À l’arrivée, l’eau doit être à une température d’au
moins 50 °C (120 ºF) et pas plus de 65,5 °C
(150 ºF) pour que le nettoyage soit efficace et que la
vaisselle ne soit pas endommagée. Vérifiez la
température de l’eau avec un thermomètre à viande
ou à confiserie.
Ouvrez le robinet d’eau chaude le plus proche du
lave-vaisselle, placez le thermomètre dans un verre
et laissez l’eau couler en continu dans le verre
jusqu’à ce que la température s’arrête de monter.
Service à la clientèleDépannageMode d’emploiInstructions de sécurité
Regard
Capuchon du
distributeur
Réglage modifiable
1
2
3
4
5
Modèles portatifs
Pour connaître les instructions sur la façon d'utiliser le raccord universel, reportez-vous aux instructions
d'installation.
Page 24

Mode d’emploi
Instructions de sécurité
Service à la clientèle Dépannage
Un plat oublié peut être ajouté à tout moment avant
le lavage principal.
Déverrouillez la porte pour interrompre le
programme. Serrez le loquet pour ouvrir la
porte.
N’ouvrez pas la porte tant que la pulvérisation
d’eau n’a pas cessé. De la vapeur pourrait
s’échapper du lave-vaisselle.
Ajoutez les plats oubliés.
Fermez la porte et poussez-la pour la verrouiller.
8
Utilisation du lave-vaisselle
Bon emploi du détergent
N’utilisez que du détergent spécialement prévu
pour les lave-vaisselle. L’utilisation des détergents
Cascade
®
, Cascade Complete®et Electrasol®pour
lave-vaisselle automatiques a été approuvée pour
tous les lave-vaisselle GE. Votre détergent doit être
récent et conservé à l’abri de l’humidité. Ne mettez
pas de détergent en poudre dans le distributeur tant
que le lave-vaisselle n’est pas prêt à démarrer.
La quantité de détergent à utiliser dépend de la
dureté
de l’eau. Avec de l’eau dure, il faut plus de
détergent. Avec de l’eau douce, il faut moins de
détergent.
Protégez votre vaisselle et votre lave-vaisselle en
prenant contact avec le service des eaux pour
connaître la dureté de l’eau. Une eau de douze
grains ou plus est extrêmement dure. Il est alors
recommandé d’installer un adoucisseur d’eau. Sans
cela, du calcaire se déposera dans l’électrovanne, ce
qui pourrait la gripper en position ouverte et
entraîner une inondation. Un excès de détergent
dans de l’eau douce entraîne la formation d’une
pellicule blanchâtre sur les verres.
Si la vaisselle est très sale, choisissez le programme
CASSEROLES, SUPER ou NORMAL,
remplissez un
godet ou les deux, selon la dureté de l’eau et
remplissez aussi le godet ouvert dans le couvercle du
distributeur.
Pour ouvrir le couvercle, appuyez sur le bouton et le
couvercle se relève.
N’UTILISEZ PAS DE DÉTERGENT POUR LAVER LA
VAISSELLE À LA MAIN
REMARQUE :
L’utilisation d’un détergent non
spécifiquement prévu pour lave-vaisselle entraînera
la formation excessive de mousse. En cours de
fonctionnement, cette mousse va sortir des évents
du lave-vaisselle et se répandre sur le plancher de la
cuisine.
Comme de nombreux contenants de détergent se
ressemblent, rangez le vôtre dans un endroit séparé
de tous les autres nettoyants. Montrez à quiconque
risquant d’utiliser le lave-vaisselle, quel est le
détergent à utiliser et où il est rangé.
Même si le lave-vaisselle n’en sera pas endommagé
de façon permanente, l’utilisation d’un détergent
non prévu pour les lave-vaisselle ne donnera pas une
vaisselle propre.
Avez-vous oublié d’ajouter un plat?
Bouton
Godet
ouvert
1
2
3
4
Page 25

Chargement des paniers
electromenagersGE.ca
Panier à couverts
Il peut être utilisé sans la plaque de retenue pour un chargement
rapide; la plaque peut être utile pour retenir de petits articles en place.
Sans la plaque de retenue
Mettez les couverts dans le panier amovible, le manche des couteaux et
des fourchettes vers le haut pour vous protéger les mains. Placez les
cuillères, manche vers le bas. Mélangez couteaux, fourchettes et cuillères
pour qu’ils ne s’emboîtent pas les uns dans les autres. Répartissez-les
uniformément. Rangez les petits articles en plastique, comme les
cuillères à mesurer et les petits couvercles, dans le bas du panier à
couverts, avec les couverts par-dessus.
Avec la plaque de retenue
Rangez les petits articles en plastique, comme les cuillères à mesurer et
les petits couvercles, dans le bas du panier à couverts, puis installez la
plaque de retenue. Mettez les cuillères et les fourchettes, manche en
premier, dans les trous de la plaque. Mettez les couteaux, lame en
premier, dans les trous de la plaque.
À propos des accessoires en option
Pour obtenir les meilleurs résultats, suivez ces conseils. Les caractéristiques et l’aspect des paniers peuvent varier selon le
modèle.
Panier supérieur
Le panier supérieur est prévu pour les verres, les tasses et les soucoupes.
C’est aussi une place sûre pour les plastiques lavables au lave-vaisselle.
Un support à tasses peut être placé en position haute ou basse, ce qui
apporte plus de flexibilité. Le panier supérieur convient aussi à toutes
sortes d’ustensiles de formes variées. Disposez les poêlons, les bols à
mélanger et autres articles en les retournant.
Disposez les plus grands contenants en plastique, si possible en les faisant
chevaucher sur deux tiges.
Assurez-vous que les petits articles en plastique sont bien en place pour éviter
qu’ils tombent sur l’élément chauffant.
Assurez-vous qu’aucun article ne dépasse du bas du panier et ne bloque le
bras intermédiaire. Ceci pourrait diminuer la qualité de lavage des articles dans
le panier supérieur.
Panier inférieur
Ne mettez pas de grands plats ou plateaux dans le coin avant gauche. Ceci
pourrait entraver la dispersion du détergent pendant le lavage.
Le panier inférieur est prévu pour les assiettes, les soucoupes et les
ustensiles. Placez les grands articles le long des côtés. Disposez les grands
plats, les casseroles et saladiers le long des côtés, dans les coins ou à
l’arrière. Le côté sale des articles doit faire face au centre du panier.
Ne laissez aucune partie d’un article, comme une poignée, dépasser du bas du
panier. Ceci pourrait bloquer le bras et entraîner de mauvais résultats de
lavage.
Service à la clientèleDépannageMode d’emploiInstructions de sécurité
Vous pouvez changer l’extérieur de votre lave-vaisselle, en l’assortissant aux armoires de cuisine. Il suffit de commander les
accessoires suivants.
Ensemble de panneau en bois – Pour les modèles GSD1807 seulement
Cet ensemble contient
les instructions et le panneau
pour installer une porte en bois décorative de 0,6 cm (¼ po) d’épaisseur.
GPF18W (Blanc)
GPF18B (Noir)
9
Page 26

Entretien du lave-vaisselle
Pour nettoyer le tableau de commande, utilisez un linge légèrement humide, puis séchez bien. Pour nettoyer l’extérieur, utilisez
une bonne cire pour électroménagers. N’utilisez jamais d’objets tranchants, de tampons à récurer ou de nettoyants agressifs
sur une partie du lave-vaisselle.
Le lave-vaisselle éliminera par rinçage toutes les saletés alimentaires normales. Cependant, des objets (os, pépins, etc.)
peuvent s’accumuler dans les ouvertures. Il faut les enlever de temps à autre pour éviter de boucher l’évacuation.
ATTENTION
Risque de blessures. Avant de nettoyer l’intérieur, attendez au moins 20 minutes après la fin d’un programme, pour que
l’élément chauffant refroidisse. Sinon, vous pourriez vous brûler.
Nettoyage des bras gicleurs
Comme les produits chimiques présents dans
l’eau dure risquent de boucher les gicleurs et
les coussinets, il est nécessaire de nettoyer
régulièrement les bras gicleurs. Pour enlever
un bras, tournez l’écrou de retenue de 90º et
sortez le bras de son pivot. Lavez les bras dans
de l’eau savonneuse tiède, et utilisez une
brosse souple pour nettoyer les gicleurs.
Remettez en place le bras après l’avoir
soigneusement rincé.
Nettoyage des filtres
Pour les meilleurs résultats et performances,
nettoyez régulièrement l’ensemble de filtre.
Le filtre enlève efficacement les particules
alimentaires de l’eau de lavage, en permettant
à l’eau de recirculer pendant le programme.
Pour cette raison, il est préférable d’enlever
fréquemment les grosses particules
alimentaires emprisonnées dans le filtre, en
rinçant le filtre et son boîtier à l’eau
courante. Pour enlever l’ensemble de filtre,
soulevez le boîtier par sa poignée. Tout
l’ensemble de filtre doit être nettoyé au moins
une fois par mois. Pour nettoyer le filtre fin et
le filtre principal, servez-vous d’une brosse.
Puis, remontez les pièces du filtre comme il
est illustré et replacez tout l’ensemble dans le
lave-vaisselle en le positionnant et en
l’abaissant. N’utilisez jamais le lave-vaisselle
sans les filtres. Une mauvaise installation du
filtre peut réduire le niveau de performance
de l’appareil et endommager les ustensiles et
la vaisselle.
Nettoyage des bras gicleurs et des filtres
Filtre principal
Filtre
fin
Écrou de
retenue
Rondelle
Boîtier
Protection contre le gel
Si le lave-vaisselle se trouve dans un endroit
non chauffé pendant l’hiver, demandez à un
technicien de :
Couper l’alimentation électrique du lavevaisselle, d’enlever les fusibles ou de
déclencher le disjoncteur.
Couper l’arrivée d’eau et de débrancher
la conduite d’arrivée d’eau de
l’électrovanne.
Purger l’eau de la conduite et de
l’électrovanne. (Récupérez l’eau dans un
récipient.)
Rebrancher la conduite d’eau à
l’électrovanne.
Vérifiez le brise-vide toutes les fois
que l’évacuation se fait mal.
Votre lave-vaisselle a-t-il
un brise-vide?
Un brise-vide empêche l’eau de refouler si
l’évacuation se bouche. Le brise-vide ne fait
pas partie du lave-vaisselle. Il n’est pas couvert
par la garantie. Les codes de plomberie
n’exigent pas tous l’installation d’un brisevide. Il est possible que vous n’en ayez pas.
Le brise-vide est facile à nettoyer.
Arrêtez le lave-vaisselle et enlevez le
couvercle chromé.
Retirez le capuchon en plastique et
nettoyez avec un cure-dents.
Écrou de retenue
Intérieur en acier inoxydable –
Cuve et contre-porte
L’acier inoxydable utilisé pour la contre-porte
et la cuve donne la plus grande fiabilité possible
dans un lave-vaisselle GE. Si la contre-porte et la
cuve venaient à être bosselées ou rayées en
cours d’usage normal, elles ne rouilleraient pas.
Ces dommages superficiels n’affecteront pas
leur durabilité ni leur fonctionnement.
10
Mode d’emploi
Instructions de sécurité
Service à la clientèle Dépannage
Panier supérieur
Deux types de
brise-vide
1
2
3
4
1
2
Page 27

11
Entretien du lave-vaisselle
electromenagersGE.ca
Service à la clientèleDépannageMode d’emploiInstructions de sécurité
Panneau de porte peint (numéros de modèle se terminant par « BB » [noir]
ou « WW » [blanc])
Utilisez un chiffon propre, doux et légèrement humide, puis
essuyez bien. Vous pouvez également utiliser de la cire ou un
produit à polir pour appareils électroménagers de bonne qualité.
Panneau de porte en acier inoxydable (numéros de modèle se terminant
par « SS »)
Les panneaux en acier inoxydable peuvent être nettoyés avec du
Stainless Steel Magic
ou un produit semblable, à l'aide d'un chiffon
doux et propre. N'utilisez pas de cire pour appareils
électroménagers, de produit à polir, d'agent de blanchiment ou de
produits contenant du chlore sur les portes en acier inoxydable.
Vous pouvez commander le produit
Stainless Steel Magic n° WX10X15
auprès du service Pièces et accessoires GE en téléphonant au
1-888-261-3055.
N'essuyez pas le lave-vaisselle avec un torchon sale ni avec une serviette
humide. Cela pourrait laisser des résidus. N'utilisez pas de tampon à récurer ni
de poudre nettoyante, car ces produits peuvent rayer le revêtement.
Avant de nettoyer le panneau avant, assurez-vous de savoir de quel type de panneau il s'agit. Reportez-vous aux deux
dernières lettres du numéro de votre modèle. Vous trouverez le numéro de votre modèle sur une étiquette située sur la paroi
gauche de la cuve, à l'intérieur de la porte. Si le numéro de votre modèle se termine par « BB » ou « WW », cela signifie que le
panneau de porte de votre lave-vaisselle est peint. Si le numéro de votre modèle se termine par « SS », cela signifie que votre
lave-vaisselle est muni d'une porte en acier inoxydable.
Suivez les instructions ci-dessous pour nettoyer le type de panneau de porte dont est muni votre modèle.
Nettoyage du panneau de porte
Page 28

Avant de contacter un service de dépannage…
Problème Causes possibles Solutions
Bruit
Certains bruits que vous entendrez •Ouverture du godet à détergent.
sont normaux
•Démarrage du moteur pendant le séchage.
• De l’eau s’écoule de la cuve immédiatement après
le démarrage du lave-vaisselle.
Ustensiles ne pas bien retenus • Assurez-vous que tout est bien retenu dans le lave-vaisselle.
dans le panier ou un petit
objet est tombé dans le panier
Le moteur murmure • Le lave-vaisselle n’a pas été utilisé régulièrement. Si vous
ne l’utilisez pas souvent, programmez-le pour le remplir et
le vider une fois par semaine. Ceci aidera à garder le joint
humide.
• La commande n’a pas été avancée jusqu’au départ du
programme désiré. Avancez bien la commande.
Détergent laissé
Godets bloqués par de la • Redisposez la vaisselle.
dans les godets
vaisselle
L’eau ne s’écoule pas
Évacuation bouchée • S’il y a un brise-vide, nettoyez-le.
de la cuve
• Vérifiez si l’eau de l’évier de la cuisine s’écoule bien.
Sinon, appelez un plombier.
• Si le lave-vaisselle s’écoule dans un broyeur, faites-le
fonctionner pour évacuer l’eau.
Mousse dans la cuve
Mauvais détergent • N’utilisez que des détergents pour lave-vaisselle
automatiques. L’utilisation des détergents Cascade
®
,
Cascade Complete
®
et Electrasol®pour lave-vaisselle
automatiques a été approuvée pour tous les lave-vaisselle GE.
• Pour enlever la mousse de la cuve, ouvrez le lave-vaisselle
et laissez la mousse s’évaporer. Ajoutez 4 L (1 gallon) d’eau
froide dans la cuve. Fermez et verrouillez le lave-vaisselle.
Enlevez l’eau en tournant doucement le bouton jusqu’à
une période de vidange. Répétez au besoin.
Agent de rinçage renversé • Essuyez toujours immédiatement tout renversement.
Pièces de lave-vaisselle
Détergent avec colorant utilisé • Certains détergents contiennent des colorants (pigments
tachées
ou teintures) qui modifient la couleur de l’intérieur de la
cuve après un certain temps. Vérifiez si les godets à
détergent présentent des signes de changement de couleur.
Si tel est le cas, choisissez un détergent sans colorant.
L’utilisation de Cascade®, Cascade Complete® et
Electrasol® a été approuvée pour tous les lave-vaisselle GE.
Certains aliments à base de • Le choix du programme
RINÇAGE
après avoir
tomates peuvent tacher ajouté le plat taché, peut diminuer l’importance de la
tache.
Plats et couverts
Basse température d’eau d’arrivée • Choisissez la bonne température (page 7).
toujours sales
Pression d’eau temporairement • Ouvrez un robinet. L’eau s’écoule-t-elle plus lentement que
basse d’habitude? Si oui, attendez que la pression redevienne
normale avant d’utiliser le lave-vaisselle.
Brise-vide bouché • Nettoyez-le.
Chargement inapproprié • Assurez-vous que les grands plats ne gênent pas les bras de
lavage ni les distributeurs de détergent
.
Conseils de dépannage
Économisez du temps et de l’argent! Vérifiez les tableaux des
pages qui suivent, ou consultez electromenagersGE.ca. Vous
pourriez vous éviter un appel.
Mode d’emploi
Instructions de sécurité
Service à la clientèle Dépannage
12
Page 29

13
Service à la clientèleDépannageMode d’emploiInstructions de sécurité
ATTENTION
Problème Causes possibles Solutions
Taches ou pellicule
Eau très dure • Utilisez l’agent de rinçage
Jet-Dry
®
pour enlever les taches et
sur les verres et
Basse température d’eau empêcher la formation d’une nouvelle pellicule.
la verrerie
d’arrivée
• Pour enlever les taches rebelles et la pellicule de la verrerie :
Surcharge du lave-vaisselle
1
Enlevez tous les ustensiles en métal du lave-vaisselle.
Chargement inapproprié
2
N’ajoutez pas de détergent.
Détergent en poudre vieux ou
3
Choisissez le programme
CASSEROLES.
humide
4
Mettez le lave-vaisselle en marche et faites-le fonctionner pendant
Distributeur d’agent de
30 minutes. Le lave-vaisselle sera maintenant au stade du lavage
rinçage, vide
principal.
Trop peu de détergent
5
Ouvrez la porte et versez 480 mL (2 tasses) de vinaigre blanc dans
le fond du lave-vaisselle.
6
Fermez la porte et laissez le programme se terminer. Si le rinçage au
vinaigre n’a pas d’effet : répétez comme ci-dessus, mais utilisez
60 mL (1/4 de tasse) de cristaux d’acide citrique au lieu du vinaigre.
Pellicule blanchâtre
Combinaison d’eau douce • Ceci est un dommage permanent. Pour l’éviter, utilisez moins de
sur la verrerie
et d’excès de détergent détergent si votre eau est douce. Choisissez le programme le plus
court pour laver vos verres.
Température de l’eau à • Baissez la température du chauffe-eau.
l’entrée du lave-vaisselle
au-dessus de 65,5 ºC (150 °F)
Marques grises
Frottement des articles en • Enlevez les marques à l’aide d’un nettoyant légèrement abrasif.
ou noires sur la
aluminium contre la vaisselle
vaisselle
Pellicule jaune ou
Taches de thé ou de café • Enlevez la tache à la main avec une solution de 120 mL (1/2 tasse)
brune sur les surfaces
d’agent de blanchiment et de 720 mL (3 tasses d’eau) tiède.
intérieures
Avant de nettoyer l’intérieur, attendez au moins 20 minutes après la
fin d’un programme, pour que l’élément chauffant refroidisse.
Sinon, vous pourriez vous brûler.
Du fer dans l’eau peut causer • L’installation d’un filtre spécial dans la conduite d’eau est la seule
une pellicule jaune ou brune façon de corriger le problème. Prenez contact avec une compagnie
d’adoucisseurs d’eau.
Pellicule blanche sur
Minéraux de l’eau dure • Pour nettoyer l’intérieur, appliquez du détergent pour lave-vaisselle
les surfaces intérieures
avec une éponge humide. Portez des gants en caoutchouc.
N’utilisez pas
de nettoyant autre qu’un détergent pour lave-vaisselle
car il risquerait de mousser. Les détergents Cascade®, Cascade
Complete®et Electrasol®pour lave-vaisselle automatiques ont été
approuvés pour être utilisés dans tous les lave-vaisselle GE.
Vaisselle pas
Température basse de l’eau • Vérifiez la température de l’eau d’arrivée (page 7).
sèche
d’arrivée
• Choisissez
SÉCHAGE AVEC CHALEUR.
Distributeur d’agent de • Vérifiez le distributeur d’agent de rinçage.
rinçage vide
Mauvais
Fusible grillé ou disjoncteur • Remplacez le fusible ou réenclenchez le disjoncteur. Enlevez tous les
fonctionnement du
déclenché autres appareils branchés sur le même circuit.
lave-vaisselle
Vapeur
Ceci est normal • De la vapeur s’échappe de l’évent lors du lavage lorsque l’eau
est évacuée.
Avant de contacter un service de dépannage…
electromenagersGE.ca
Page 30

14
Notes
Mode d’emploi Instructions de sécuritéService à la clientèle Dépannage
Page 31

15
Garantie du lave-vaisselle GE
Service à la clientèle
Dépannage
Mode d’emploiInstructions de sécurité
Agrafez votre facture ici.
Une preuve de la date d’achat
d’origine est requise pour obtenir
le service en vertu de la garantie.
Exclusions de la garantie :
■ Visites à domicile pour vous apprendre à vous servir de
l’appareil.
■ Dommages causés à la peinture ou à l’émail après livraison.
■ Installation incorrecte – l’installation correcte inclut des
possibilités de branchement aux circuits électriques,
d’alimentation en eau et autres.
■ Remplacement des fusibles ou réarmement des disjoncteurs.
■ Remplacement des ampoules électriques.
■ Dommages subis par l’appareil à la suite d’un accident, d’un
incendie, d’inondations ou en cas de force majeure.
■ Utilisation correcte et entretien adéquat de l’appareil selon le
manuel d’utilisation, réglage correct des commandes.
LE GARANT N’EST PAS RESPONSABLE DES DOMMAGES
INDIRECTS.
EXCLUSION DE GARANTIES IMPLICITES – Votre seul et unique recours est la réparation du produit selon les dispositions
de cette Garantie limitée. Toutes les garanties implicites, incluant les garanties de commercialité et d’adéquation à un
usage spécifique, sont limitées à une année ou à la période la plus courte autorisée par la législation.
Votre appareil est garanti contre tout défaut de matériau et de fabrication.
Ce que cette
garantie couvre
Toutes les pièces
Durée de garantie
(à partir de la
date d’achat)
Un (1) an
Pièces – Réparation ou
remplacement au choix
de Mabe
Un (1) an
Main-d’œuvre
Un (1) an
Termes et conditions :
La présente garantie ne s’applique qu’à l’utilisation domestique
par une seule famille au Canada, lorsque l’appareil a été installé
conformément aux instructions fournies par Mabe et est alimenté
correctement en eau et en électricité.
Les dommages dûs à une utilisation abusive, un accident, une
exploitation commerciale, ainsi que la modification, l’enlèvement
ou l’altération de la plaque signalétique annulent la présente
garantie.
L’entretien effectué dans le cadre de la présente garantie doit
l’être par un réparateur agréé Mabe.
Mabe et le marchand ne peuvent être tenus pour responsables en
cas de réclamations ou dommages résultant de toute panne du
lave-vaisselle ou d’un entretien retardé pour des raisons qui
raisonnablement échappent à leur contrôle.
L’acheteur doit, pour obtenir un service dans le cadre de la
garantie, présenter la facture originale. Les éléments réparés ou
remplacés ne sont garantis que pendant le restant de la période de
garantie initiale.
Cette garantie est offerte à l’acheteur initial, ainsi qu’à tout
propriétaire subséquent d’un produit acheté en vue d’une
utilisation domestique au Canada. Le service à domicile en vertu
de la garantie sera fourni dans les régions où il est disponible et où
Mabe estime raisonnable de le fournir.
Cette garantie est en sus de toute garantie statutaire.
IMPORTANT
Gardez cette garantie et votre facture originale comme preuve d’achat et preuve de la date d’achat.
Mabe vous offre ses services dans tout le pays. Pour de plus amples renseignements, sur
la présente garantie, veuillez prendre contact avec :
Directeur, Relations avec les consommateurs
Mabe Canada Inc., Bureau 310
1 Factory Lane, Moncton, N.-B. E1C 9M3
1-800-561-3344
Page 32

Service à la clientèle
Site Web des électroménagers GE
www.electromenagersge.ca
Vous avez une question ou besoin d’aide concernant votre appareil? Consultez le site Web des électroménagers
GE accessible 24 heures sur 24, tous les jours de l’année! Pour un service pratique encore plus rapide, vous
pouvez maintenant télécharger des manuels, commander des pièces, des catalogues ou même faire une
demande de réparation en ligne. Vous pouvez également faire appel à notre service « Consultez nos experts
MC
»
et bien plus encore...
Demande de réparation
au 1-800-561-3344 ou sur www.electromenagersge.ca
Pour bénéficier du service de réparation expert de GE, il suffit de téléphoner. Demandez une réparation en
ligne, 24 heures sur 24, tous les jours! C’est pratique! Téléphonez au 1-800-561-3344 durant les heures normales
de bureau.
Centre de conception universelle
GE soutient la conception universelle : produits, services et environnements à la portée de tous, quels que soient
leur âge, taille ou capacités mentales et physiques. Nous avons conscience qu’il est nécessaire d’adapter la
conception à toute la variété de capacités et handicaps physiques et mentaux existants. Pour plus de détails sur
les applications de conception universelle de GE, dont la conception de cuisines pour les personnes atteintes
d’un handicap, consultez notre site Web dès aujourd’hui.
Au Canada, écrivez à : Directeur, Relations avec les consommateurs, Mabe Canada Inc.
Bureau 310, 1 Factory Lane
Moncton, N.-B. E1C 9M3
Garanties prolongées
au 1-888-261-2133 ou sur www.electromenagersge.ca
Procurez-vous une garantie prolongée GE et informez-vous au sujet des rabais spéciaux offerts tout au long de la
durée de votre garantie. Vous pouvez vous la procurer en ligne en tout temps ou en téléphonant au
1 888 261-2133 durant les heures normales de bureau. Les services à domicile GE seront toujours disponibles
après expiration de votre garantie.
Pièces et accessoires
au 1-800-661-1616 ou sur www.electromenagersge.ca
Les personnes ayant les compétences requises pour réparer elles-mêmes leurs appareils peuvent recevoir
directement à la maison des pièces ou accessoires (les cartes VISA, MasterCard et Discover sont acceptées).
Commandez en ligne dès aujourd’hui, 24 heures sur 24, ou en téléphonant au 1-800-661-1616 durant les heures
normales de bureau.
Les instructions contenues dans le présent manuel comportent des procédures que tout utilisateur
peut effectuer. Les autres types de réparation doivent généralement être confiés à un technicien
qualifié. Usez de prudence : une réparation ou un entretien mal effectués peuvent rendre l’utilisation
de l’appareil dangereuse.
Communiquez avec nous
www.electromenagersge.ca
Si vous n’êtes pas satisfait du service après-vente de GE, communiquez avec nous sur notre site Web en
fournissant tous les détails et votre numéro de téléphone, ou écrivez à :
Directeur, Relations avec les consommateurs, Mabe Canada Inc.
Bureau 310, 1 Factory Lane
Moncton, N.-B. E1C 9M3
Enregistrez votre appareil
www.electromenagersge.ca
Enregistrez votre nouvel appareil en ligne au moment qui vous convient le mieux! L’enregistrement de votre
produit dans les délais prescrits permet une meilleure communication et un service rapide, selon les modalités
de votre garantie, si besoin est. Vous pouvez également envoyer par courrier la carte d’enregistrement préimprimée qui se trouve dans l’emballage de votre appareil.
 Loading...