

GE GRCR3960ZWW Use And Care Manual

30’’
Convection Stove
Use and Care
Guide
Consumer Services ..................2, 31
Safety Instructions ..................2, 3, 4
Installation Instructions..............2, 5
Quick Operating Instructions ......32
Operating Instructions, Tips
Stove Features ....................................6
Cooktop Element Information..............7
Selection and Use of Pots and Pans ..8
Home Canning Tips ............................9
Operating Instructions
Stovetop Cooking ..............................10
Oven Roasting ..................................11
Oven Broiling ....................................12
Convection Cooking ..........................13
Convection Roasting..........................14
Convection Roasting with Probe ......16
RECYCLED PAPER
RECYCLABLE
Oven Timer Instructions
Setting Clock / Minute Timer .............17
Baking ..............................................18
Convection Cooking ..........................19
Broiling...............................................19
Special Features of the Timer ...........20
Self Cleaning .....................................21
Care and Cleaning .........................23
Cleaning Summary Guide .................28
Problem Solver ........................29, 30
Part No. 350A4545P039 Rev.0
Catalogue No. WB60M938
We care about our environment

HELP US HELP YOU
Before using your oven, read this
book carefully.
It is intended to help you operate and maintain your new
stove properly. Keep it handy for answers to your
questions.
If you received a damaged stove…
Immediately contact the dealer (or builder) that sold you
the stove.
Write down the model
and serial numbers.
You’ll find them on a label behind
the storage drawer.
These numbers are also on the
Ownership Registration Card that
came with your stove. Before
sending in this card, please write
these numbers here.
Model Number
Save time and money.
Before you request service…
Check the Problem Solver in the back of this guide. It
lists causes of minor operating problems that you can
correct yourself.
Serial Number
Use these numbers in any correspondence or service
calls concerning your stove.
INSTALLATION OF ANTI-TIP BRACKET
Retailer’s Name
Date of Purchase
WARNING: SAFETY INSTRUCTIONS
• RANGE MUST BE SECURED BY THE
ANTI-TIP BRACKET SUPPLIED IN THE
BAG.
• UNLESS PROPERLY INSTALLED, THE
RANGE COULD BE TIPPED BY
STEPPING OR SITTING ON THE DOOR.
INJURY MIGHT RESULT FROM SPILLED
HOT LIQUIDS OR FROM THE RANGE
ITSELF.
Installation instructions are provided for wood and concrete floors. Any other type of construction may require special
installation techniques to provide adequate fastening of the ANTI-TIP bracket to the floor.
Note: The installation of the ANTI-TIP bracket must meet all local codes for securing appliance.
The use of this bracket does not preclude tipping of the range when not properly installed.
Be sure that screws do not penetrate electrical wiring or plumbing.
1. Push range into exact position where you intend to install it.
2. Remove storage drawer by pulling it all the way out, then lifting the front of the drawer to allow the wheels to come
out of their tracks. (See Use & Care Guide.)
3. Slide the anti-tip bracket over one of the rear
4. Mark its location on the floor with a pencil.
5. Pull the range out of the way and reposition the bracket using your pencil marks from step 4.
6. Drill 2 holes into the floor (1/8” for “wood floor” or recommended size hole for hardware for “concrete floor”).
Hardware 1/4” x 1-1/2” lag bolt & 1/2” O.D. sleeve anchor not provided.
7. Screw the bracket to the floor using screws provided for “wood floor” or lag bolt & O.D. sleeve anchor (not
provided) for “concrete floor”.
8. Slide the range into position, ensuring that the leveling foot fully engages in the slot in the anti-tip bracket.
9. Test the installation by grasping the top edges of the rear surface and carefully attempt to tilt the range forward.
Customer Service Troubleshooting Tips Installation Instructions Care and Cleaning Operating Instructions Safety Instructions
2
leveling feet as shown (Fig. 1).

IMPORTANT SAFETY INFORMATION.
READ ALL INSTRUCTIONS BEFORE USING.
WARNING!
For your safety, the information in this manual must be followed to minimize the risk of fire or
explosion, electric shock, or to prevent property damage, personal injury, or loss of life.
All ranges can tip and injury could result.
To prevent accidental tipping of the range, attach it to the floor by installing the Anti-Tip
device supplied.
To check if the device is installed and engaged properly, remove the kick panel or storage drawer
and inspect the rear leveling leg. Make sure it fits securely into the slot.
If you pull the range out from the wall for any reason, make sure the device is properly
engaged when you push the range back against the wall. If it is not, there is a possible risk of
the range tipping over and causing injury if you or a child stand, sit or lean on an open door.
Please refer to the Anti-Tip device information in this manual. Failure to take this precaution
could result in tipping of the range and injury.
WARNING ANTI-TIP DEVICE
IMPORTANT SAFETY NOTICE
The fiberglass insulation in self-clean ovens gives off a very small amount of carbon monoxide during
the cleaning cycle. Exposure can be minimized by venting with an open window or using a ventilation
fan or hood.
Fluorescent light bulbs contain mercury. If your model has a surface light, you must recycle the
fluorescent light bulb according to local, provincial and federal codes.
When using electrical appliances, basic safety precautions should be followed, including the following:
■ Use this appliance only for its intended
purpose as described in this Owner’s Manual.
■ Be sure your appliance is properly installed
and grounded by a qualified technician in
accordance with the provided installation
instructions.
■ Do not attempt to repair or replace any
part of your range unless it is specifically
recommended in this manual. All other
servicing should be referred to a qualified
technician.
■ Have the installer show you the location of
the circuit breaker or fuse. Mark it for easy
reference.
■ Before performing any service, disconnect
the
outlet or remove the fuse that is located in the
household distribution panel (switching off
range power supply cord from the wall
the circuit breaker).
■ Do not leave children alone—children
should not be left alone or unattended in
an area where an appliance is in use. They
should never be allowed to sit or stand on
any part of the appliance.
■ Do not allow anyone to climb, stand or
hang on the door, storage drawer or
cooktop. They could damage the range
and even tip it over, causing severe
personal injury.
SAFETY PRECAUTIONS
Safety Instructions Operating Instructions Care and Cleaning Installation Instructions Troubleshooting Tips Customer Service
3

IMPORTANT SAFETY INFORMATION.
READ ALL INSTRUCTIONS BEFORE USING.
■ Do not store flammable materials in an
oven or near the cooktop.
■ CAUTION: Items of interest to children
should not be stored in cabinets above a
stove or on the backsplash of a stove—
children climbing on the stove to reach
items could be seriously injured.
■ Never wear loose-fitting or hanging
garments while using the appliance. Be
careful when reaching for items stored over
the stove. Flammable material could be
ignited if brought in contact with hot
surface units or heating elements and may
cause severe burns.
■ Use only dry pot holders—moist or damp
pot holders on hot surfaces may result in
burns from steam. Do not let pot holders
touch hot surface units or heating elements.
Do not use a towel or other bulky cloth.
■ Do not use water on grease fires. Never
pick up a flaming pan. Turn the controls
off. Smother a flaming pan on a surface
unit by covering the pan completely with a
well-fitting lid, cookie sheet or flat tray. Use
a multi-purpose dry chemical or foam-type
fire extinguisher.
■ Flaming grease outside a pan can be put
out by covering it with baking soda or, if
available, by using a multi-purpose dry
chemical or foam-type fire extinguisher.
■ Flame in the oven can be smothered
completely by closing the oven door and
turning the oven off or by using a multipurpose dry chemical or foam-type fire
extinguisher.
■ For your safety, never use your appliance
for warming or heating the room.
■ Do not let cooking grease or other
flammable materials accumulate in or
near the stove.
■ Do not touch the surface units, the heating
elements or the interior surface of the
oven. These surfaces may be hot enough to
burn even though they are dark in color.
During and after use, do not touch, or let
clothing or other flammable materials
contact the surface units, areas nearby the
surface units or any interior area of the
oven; allow sufficient time for cooling first.
■ Potentially hot surfaces include the
cooktop, areas facing the cooktop, oven
vent opening, surfaces near the opening,
crevices around the oven door and metal
trim parts above the door.
■ REMEMBER : The inside surface of the oven
may be hot when the door is opened.
■ Do not store or use combustible materials,
gasoline or other flammable vapors and
liquids in the vicinity of this or any other
appliance.
■ Keep the hood and grease filters clean
to maintain good venting and to avoid
grease fires.
■ Teach children not to play with the
controls or any other part of the range.
■ Always keep dish towels, dish cloths, pot
holders and other linens a safe distance
from your range.
■ Always keep wooden and plastic utensils
and canned food a safe distance from
your stove.
■ Always keep combustible wall coverings,
curtains or drapes a safe distance from
your stove.
WARNING!
SAFETY PRECAUTIONS
Cook meat and poultry thoroughly—meat to at least an INTERNAL temperature of 160°F. and poultry
to at least an INTERNAL temperature of 180°F. Cooking to these temperatures usually protects against
foodborne illness.
COOK MEAT AND POULTRY THOROUGHLY…
Customer Service Troubleshooting Tips Installation Instructions Care and Cleaning Operating Instructions Safety Instructions
4

Installing Your Stove
Safety Instructions Operating Instructions Care and Cleaning Installation Instructions Troubleshooting Tips Customer Service
A stove, like many other household items, is heavy and
can settle into soft floor coverings such as a cushion
vinyl or carpeting. When moving the stove on this type
of flooring, use care. (A sheet of plywood installed under
the stove will protect the flooring.)
Allow minimum of 1/2” clearance on all three sides for
proper stove ventilation.
Electrical Connection
This stove requires a special 240V receptacle for the
factory installed power cord. If your kitchen does not
have a receptacle, have one installed by a licensed
electrician. Failure to do so may void the warranty.
Leveling Your Stove
Ensure that the stove is
level when installed.
Open the oven door and
place a level on the oven
rack as shown.
To gain access to the leveling
screws, remove the bottom
drawer by pulling forward as
far as possible, lifting up and
pulling forward.
If the stove must stand beside a refrigerator, allow at
least 5” between the two appliances. The heat from the
stove may affect refrigerator performance.
Make sure that all the packing materials, including tape
on elements and packing material above and below oven
elements, have been removed and that all controls are in
the
OFF
position before plugging in the power cord.
If the supply cord of the appliance becomes damaged, it
must only be replaced by an authorized service
representative.
Leveling screws are
located on each
corner of the base of
the stove. The
leveling screws can
be adjusted using a
socket and ratchet or
an adjustable
wrench. Turn the
leveling feet to raise
or lower the corners
of the stove.
Before Using Your Stove
Money Saving Tips
■ Develop the habit of turning the control to
removing foods from the oven or cooktop elements.
■ Allow food to thaw before cooking. Thawed food
requires less cooking.
■ Before basting, adding vegetables or checking the
internal temperature of a roast, remove the food from
the oven and close the door. Prepare food as needed,
then return to the oven.
■ Preheat the oven only when recommended in the
recipe. Put roasts and casseroles into a cold oven and
then turn the oven ON.
■ Glance through the window in the oven door to check
on foods. Opening the oven door frequently to check
on food wastes electricity.
■ Use the oven to prepare complete meals. For instance,
start a roast, add vegetables when the meat is halfcooked, and then warm rolls or desserts after the main
dishes are cooked.
OFF
before
■ Use cookware with tight-fitting lids and flat bottoms
which completely cover the heated portion of the
element.
■ Watch foods when bringing them to cooking
temperatures at high heat. When foods reach cooking
temperature, reduce heat to the lowest setting that will
keep the food cooking.
■ When boiling water for tea or coffee, heat only the
amount needed.
■ Do not use a wire trivet or any other kind of heat
retarding pad between the pan and the element.
5

Features of Your Stove
(Features will vary with model)
Feature Index
1 Model and Serial Numbers
2 Cooktop Element Controls
3 “ON” Indicator Lights for
Cooktop Elements
4 Oven Selector Control
5 Oven Temperature Control
6 Oven Cycling Light
7 Oven Timer, Clock and
Minute Timer
8 Door Locked Light
(Some Self-Clean Models)
9 Glass-Ceramic Cooktop
10 Oven Light/Fluorescent
Light Switch
11 Broil Element
12 Oven Interior Light
13 Oven Racks
14 Oven Rack Supports
15 Broiler Pan and Grid
16 Oven Liner
17 Bake Element (May be lifted
18 Storage Drawer
19 Door Latch (Self-Clean Model)
20 Door Gasket (Self-Clean
21 Oven Vent
22 Coil Element
23 Electronic Clock, Timer &
Feature Index
gently for wiping oven floor.)
Model)
Oven Control
Feature Index
24 Fuse Cover
25 Probe
26 Appliance Outlet
27 Fluorescent Light
28 Oven Gasket
(Easy-Clean Models)
30 Roastmeter Plug
31 Drip Bowls
Customer Service Troubleshooting Tips Installation Instructions Care and Cleaning Operating Instructions Safety Instructions
6
Heating Elements
Cooktop Elements
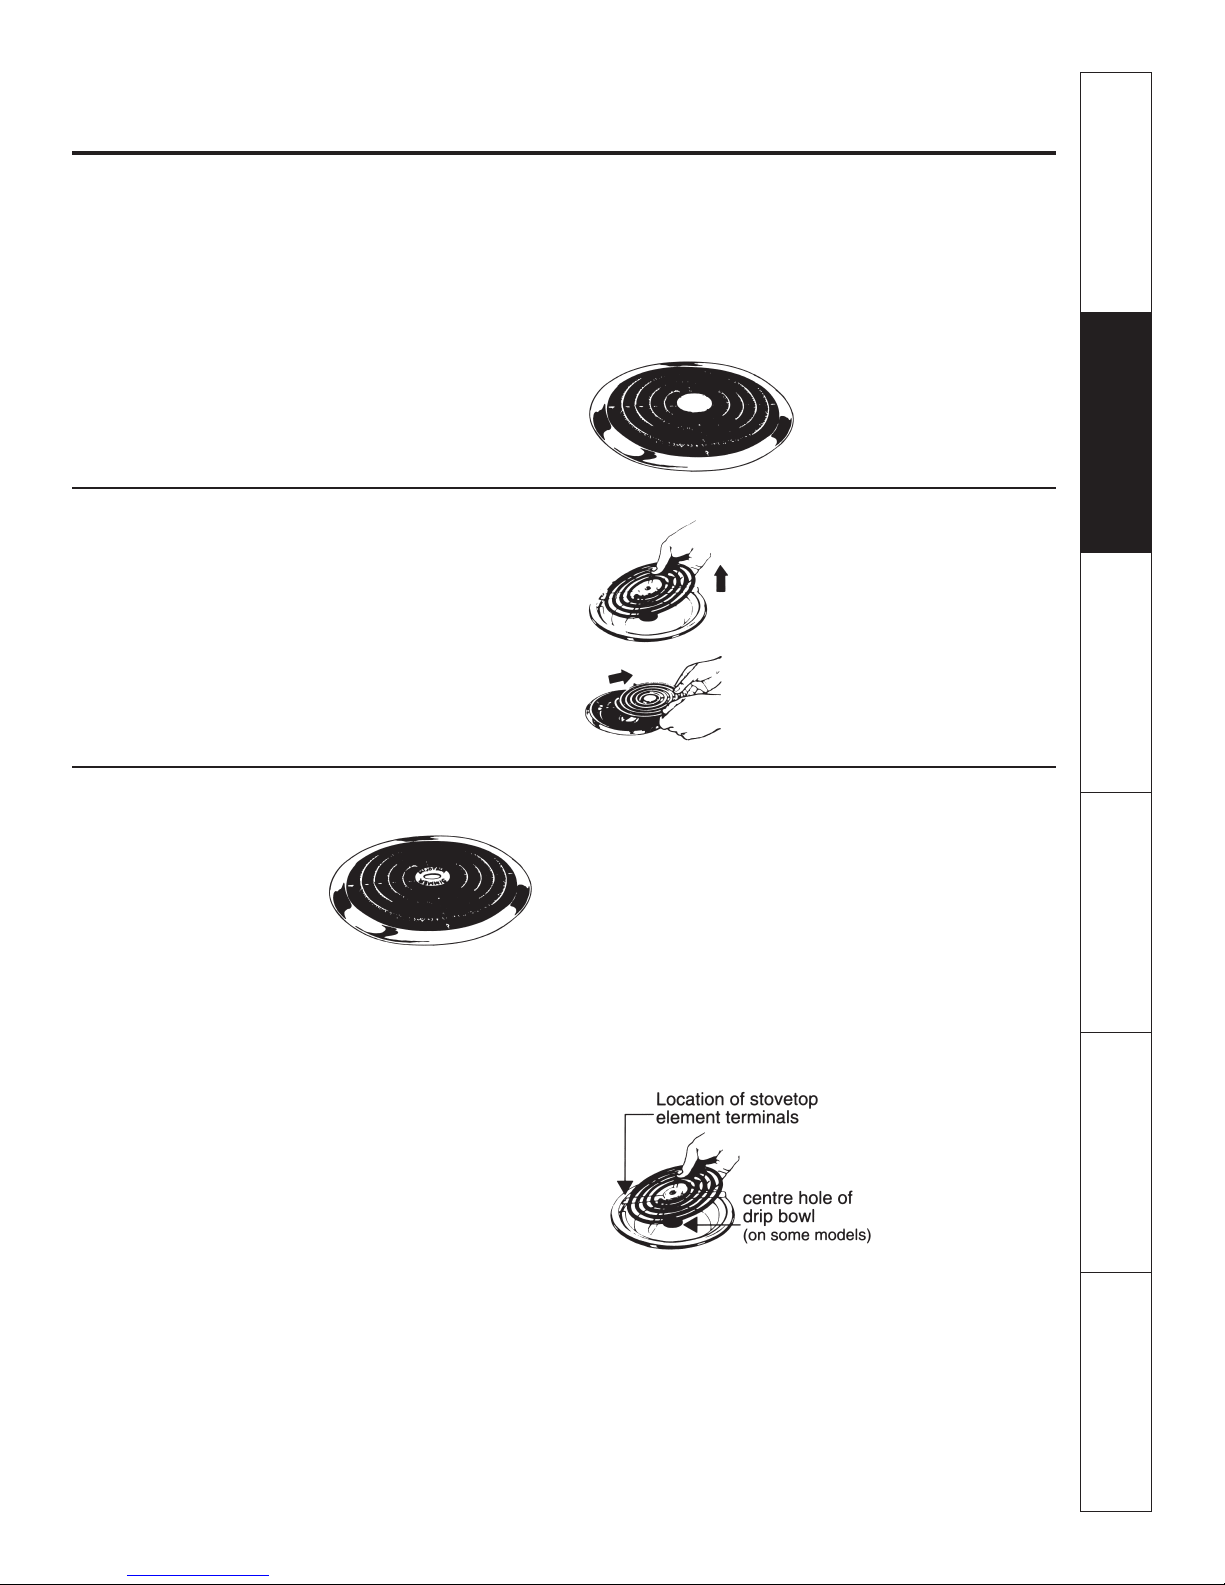
Coil Elements
Description: Flattened metal tubing containing electric
resistance wire, suspended over a drip pan.
How it Works: Heats by direct contact with the pan and
by heating the air under the pan. For best cooking results,
use good quality pans. Electric coils are more forgiving
of warped pans than other types of cooktop elements.
Heats up quickly but does not change heat settings very
quickly. Electric coils stay hot long enough to continue
cooking for a short time after they are turned off.
Coil Element Removal (on some models)
To remove an element, ensure it is cold, then gently raise
the side opposite the receptacle and pull it out of the
stovetop receptacle. To replace, reverse the procedure.
The drip bowls may be removed for cleaning.
The round centre disc of the element can be replaced.
Caution: Drip bowls should be used at all times.
Caution: Do not immerse elements in water.
Safety Instructions Operating Instructions Care and Cleaning Installation Instructions Troubleshooting Tips Customer Service
These elements are self-cleaning. However, after the
elements have cooled down, removal of large pieces of
food or excess oil is recommended to prevent the element
from smoking.
Simmer Element (on some models)
When set at minimum heat
the simmer element provides
temperatures low enough for
melting butter, heating
delicate sauces, maintaining
coffee at serving
temperature, or anytime food
preparation requires a very
low heat.
CAUTION:
■ Do not use aluminum foil to line drip bowls. This
could result in a shock and fire hazard, damage to
the stove and shorten element life.
■ If it is absolutely necessary to use aluminum foil, it
is recommended to buy the aluminum foil inserts
from your local grocery store.
■ Again, lining of the drip bowls should not be done.
However, if you still decide to line the bowls, make
certain that the foil:
■ Does not block the centre hole on the drip bowl.
■ Does not come near the terminals of the elements.
7
Selecting Types of Cookware
The following information will help you choose cookware which will give good performance on glass cooktops.
Stainless Steel:
recommended
Aluminum:
heavy weight recommended
Good conductivity. Aluminum residues
sometimes appear as scratches on the
cooktop, but can be removed if cleaned
immediately. Because of its low melting
point, thin weight aluminum should not
be used.
Copper Bottom:
recommended
Copper may leave residues which can
appear as scratches. The residues can be
removed, as long as the cooktop is
cleaned immediately. However, do not let
these pots boil dry. Overheated metal can
bond to glass cooktops. An overheated
copper bottom pot will leave a residue
that will permanently stain the cooktop if
not removed immediately.
Porcelain Enamel Covered Cast Iron:
recommended
As long as the cookware is covered
completely with porcelain enamel, this
cookware is recommended. Caution is
recommended for cast iron cookware
that is not completely covered with
smooth porcelain enamel, as it may
scratch the glass ceramic cooktop.
Glass-ceramic:
usable, but not recommended
Poor performance. May scratch the
surface.
Stoneware:
usable, but not recommended
Poor performance. May scratch the
surface.
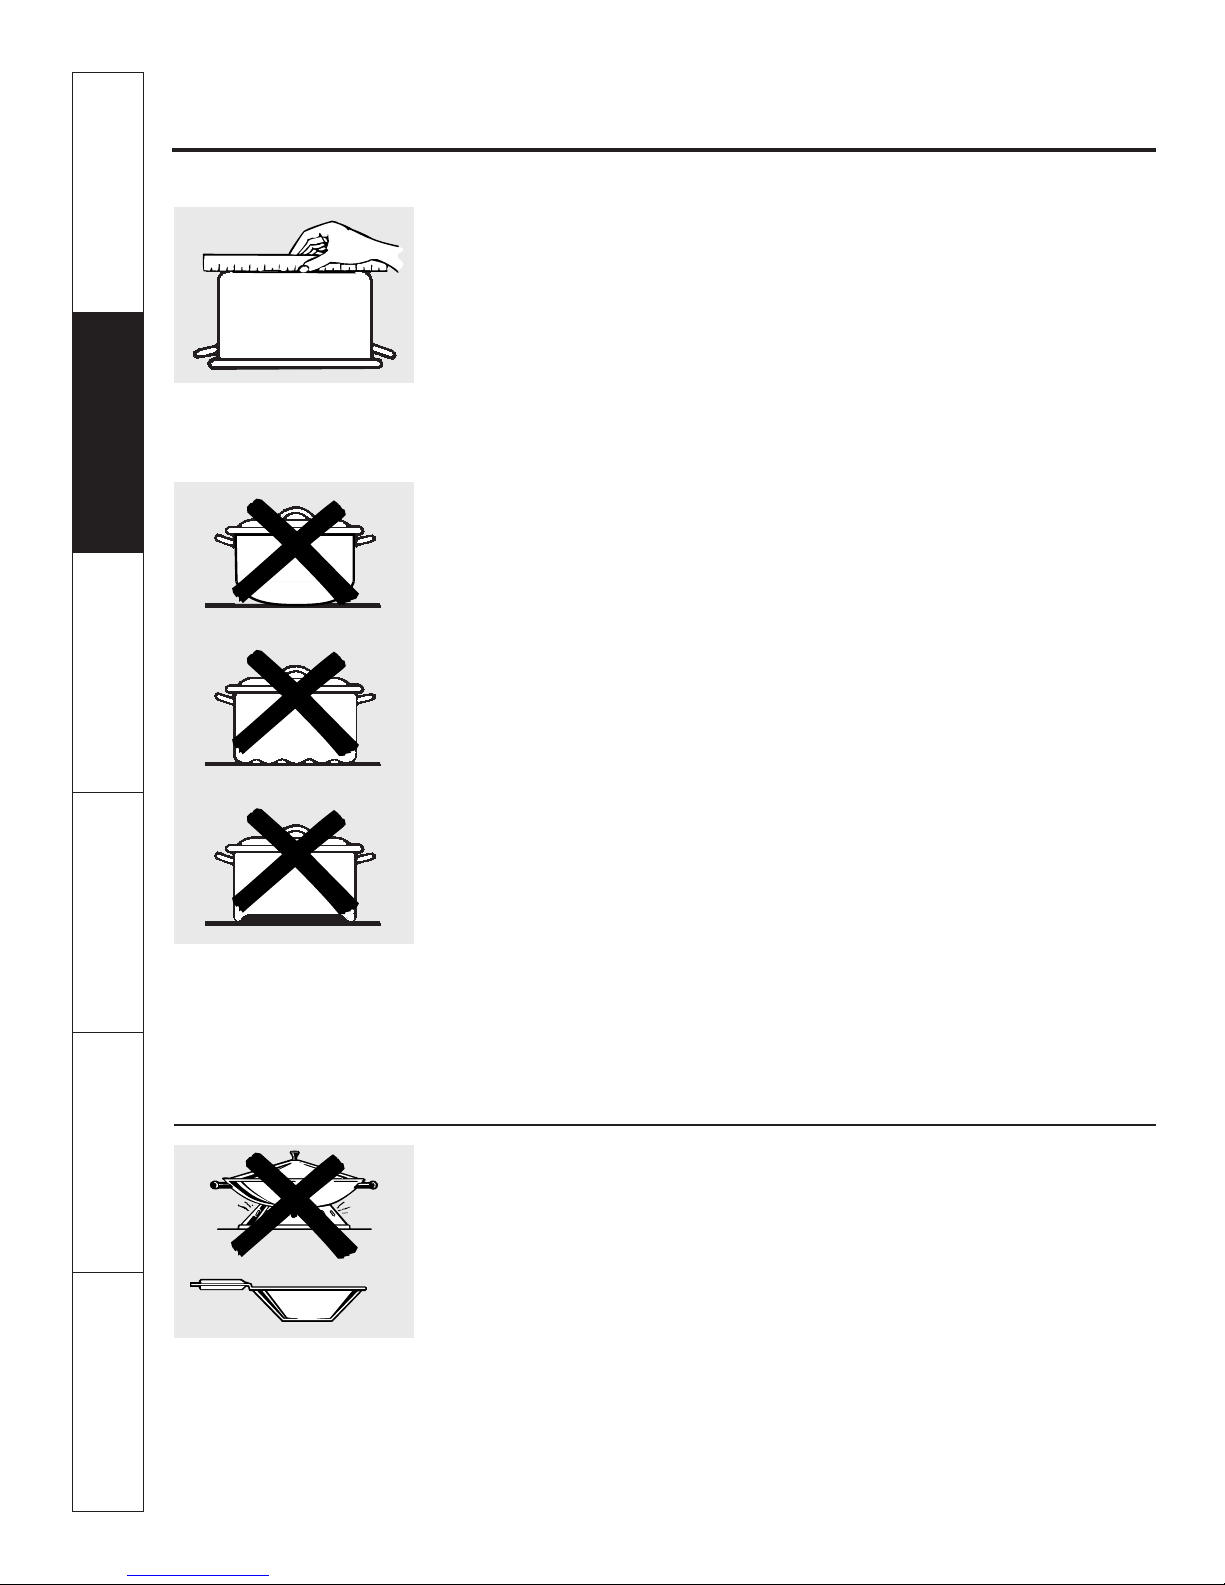
Check pans for flat bottoms by
using a straight edge.
Pans with rounded, curved, ridged
or warped bottoms are not
recommended.
Use only flat-bottomed woks.
Wok Cooking
We recommend that you use only a flat-bottomed
wok. They are available at your local retail store.
Do not use woks that have support rings.
Use of these types of woks, with or
without the ring in place, can be
dangerous. Placing the ring over the
surface unit will cause a build-up of heat
that will damage the porcelain cooktop.
Do not try to use such woks without the
ring. You could be seriously burned if the
wok tipped over.
Customer Service Troubleshooting Tips Installation Instructions Care and Cleaning Operating Instructions Safety Instructions
8

Home Canning Tips
Safety Instructions Operating Instructions Care and Cleaning Installation Instructions Troubleshooting Tips Customer Service
Canning should be done on the cooktop only.
The use of cookware extending more than one inch
beyond the edge of the element is not recommended.
However, when canning with water-bath or pressure
canner, larger-diameter cookware may be used. This is
because boiling water temperatures (even under pressure)
will not damage cooktop finish.
Canning Tips
Bring water to boil on
begun, adjust to lowest setting to maintain boil. This
saves energy.
Be sure the canner fits over the centre of the element. If
your stove or its location does not allow the canner to be
centred on the element, use smaller diameter containers
for good canning results.
When canning, use recipes from reputable sources.
Reliable recipes are available from the manufacturer of
your canner, manufacturers of canning jars and the
Department of Agriculture.
Remember that canning generates large amounts of
steam. Use care to prevent burns.
Note: If your stove is operating on low voltage, canning
may take longer than expected, even though directions
have been carefully followed. The process may be
improved by:
1) using a pressure canner
2) starting with hot tap water for faster heating of large
quantities of water.
MAX
heat. After boiling has
WARNING
Do not use large diameter canners or other large
diameter pans for frying or boiling foods other than
water. Most syrups or sauces and all types of frying
require cooking temperatures much higher than the
temperature required to boil water. Such
temperatures will eventually damage cooktop finish.
CAUTION: Safe canning requires that harmful micro-
organisms are destroyed and the jars are
sealed completely.
When canning in a water bath canner, a gentle but steady
boil must be maintained continuously for the required
time.
When canning with a pressure canner, the pressure must
be maintained continuously for the required time.
For best results, use a flat bottom, heavy gauge canner.
Canners with rippled bottoms are not recommended
because the bottom does not make enough contact with
the element. This wastes energy and takes a long time to
boil water.
Temperature Conversions
Fahrenheit˚ 140 150 170 200 250 275 300 325 350 375 400 425 450 475 500 525 550
Celsius˚ 60 65 75 95 120 135 150 160 175 190 205 220 230 245 260 275 290
9

Operating Instructions
Stovetop Cooking Controls
How to set the controls
When the control is in the
pushed in to turn. When control is in any position other
than
OFF
, it may be rotated without pushing in.
Be sure the control is in the
cooking. An indicator light will glow whenever a
cooktop element is turned on.
OFF
position, it must be
OFF
position when finished
Using Your Oven
Before Using Your Oven
1. Look at the controls. Be sure to understand how to set
them properly. Read over the directions for the Oven
Controls in order to understand how to use them.
2. Check the oven interior. Look at the shelves. Take a
practice run at removing and replacing them properly,
to give sure, sturdy support.
3. Read over information and tips that follow.
4. Keep this guide handy, especially during the first
weeks of use.
NOTE:
■ A “burning” or “oily” smell may be noticed the first
few times the oven is turned on. This is normal in a
new oven and will disappear in a short time. To speed
the process, set a self-clean cycle (for some models)
for a minimum of 3 hours. See Operating the SelfCleaning Oven section.
■ Check the oven interior. Make sure all packaging
material has been removed.
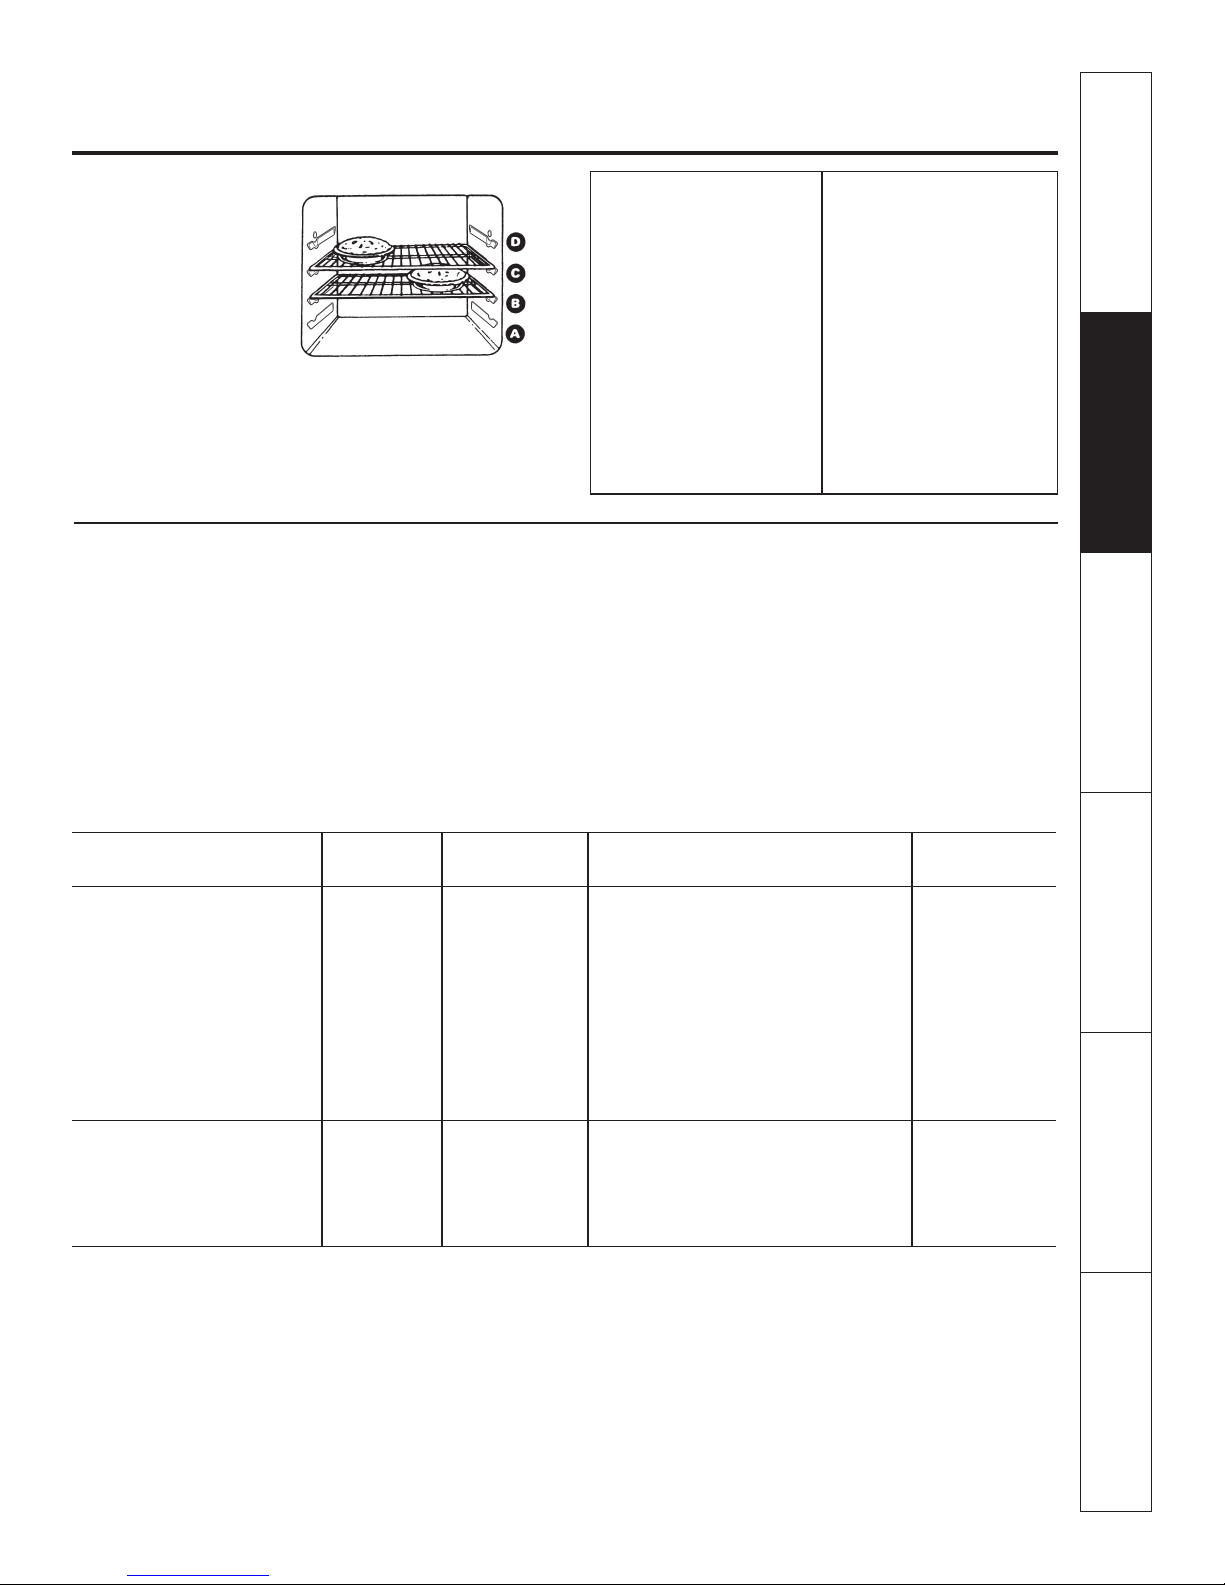
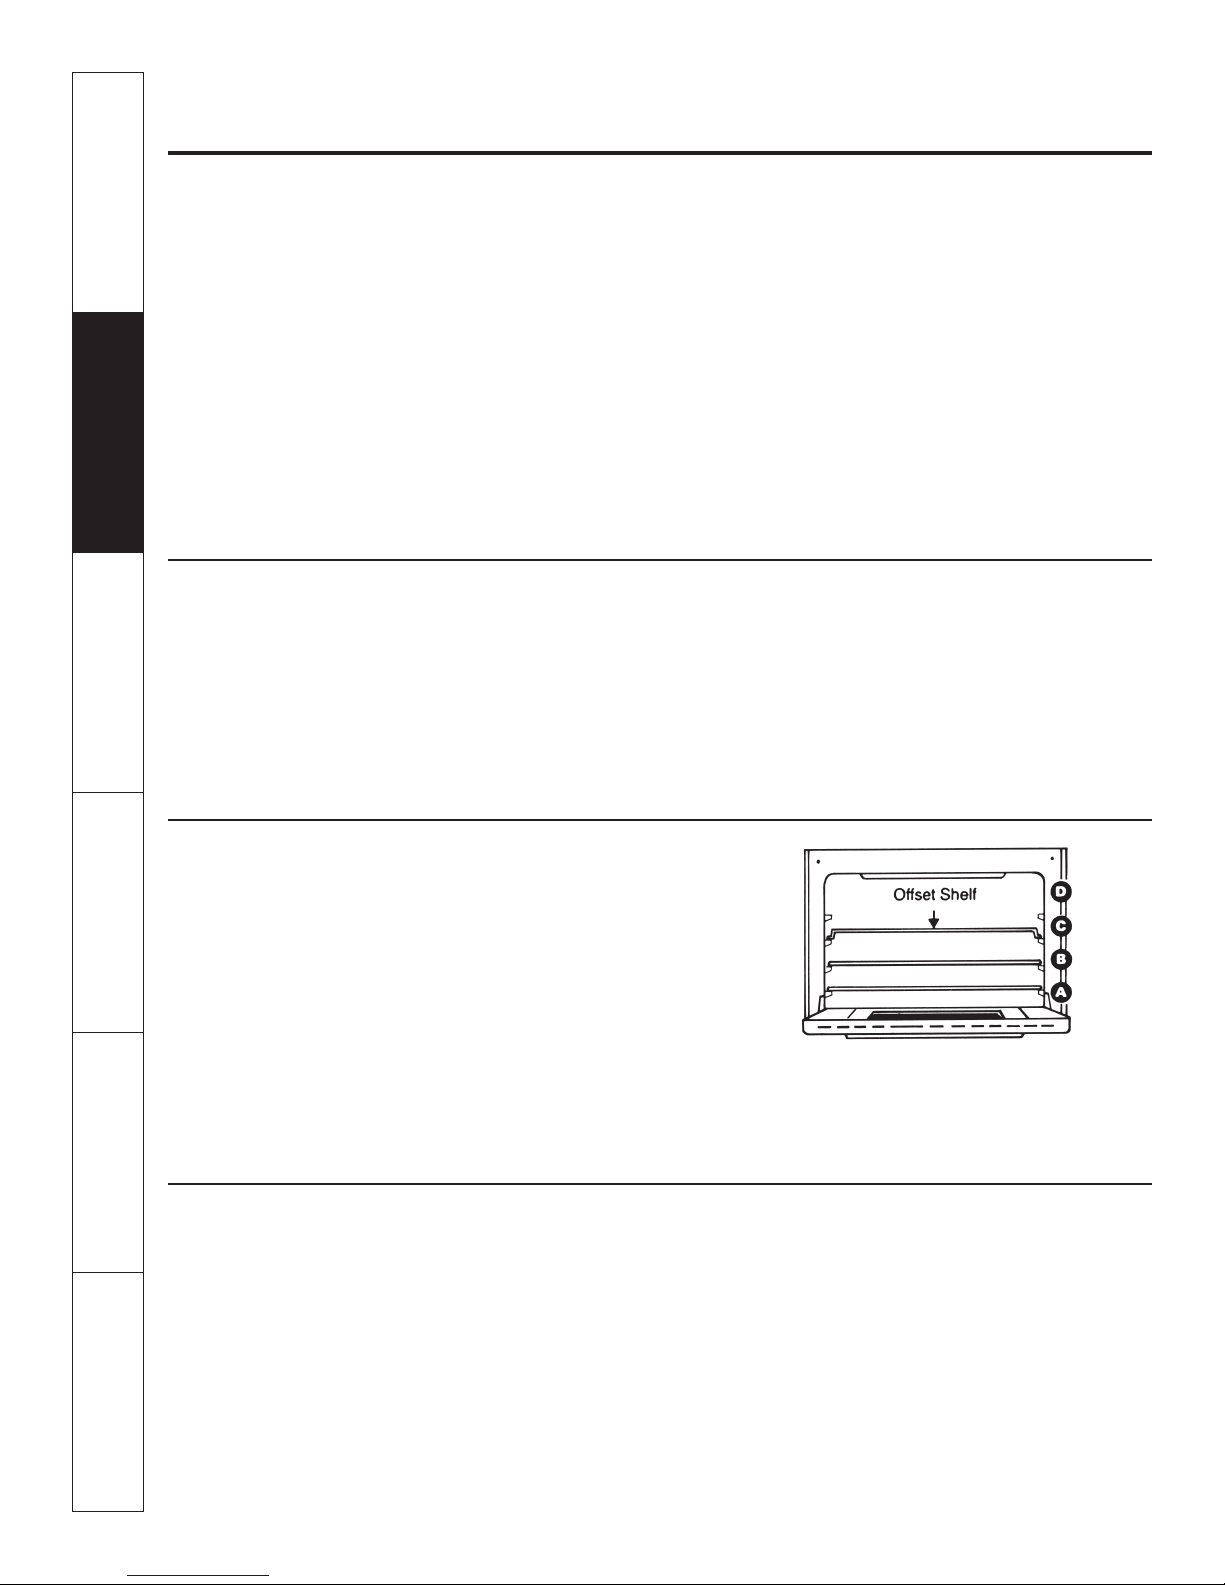
The oven has four rack
positions to allow
adjustment for baking and
broiling.
The shelves are designed
with stop-locks so that
when placed correctly on
the shelf supports, they
will stop before coming
completely out from the
oven.
Grasp control knob and
push in.
When placing cookware
on a shelf, pull the shelf
out to the stop position.
This will eliminate
reaching into the hot
oven. Place the
cookware on the centre
of the shelf, as placing
heavy cookware towards
the back of the rack
could cause the rack to tip when fully extended. Placing
the food in the centre of the rack will also allow better air
circulation for more uniform cooking. When loaded, slide
the shelf to the back of the oven.
To remove the rack from the
oven, pull it forward and tilt
the front end upward. Be
certain that the rack is cold
before touching with bare
hands.
To replace rack in oven,
place the rack in desired
position so the rear of rack
is toward the rear of the
oven. Tilt up the front of the rack and push it toward the
back of the oven until it goes past the ridge on the oven
liner. Lower the front of rack and push it to the back of
the oven.
Turn either clockwise or
counter clockwise to
desired heat setting.
Customer Service Troubleshooting Tips Installation Instructions Care and Cleaning Operating Instructions Safety Instructions
10
Safety Instructions Operating Instructions Care and Cleaning Installation Instructions Troubleshooting Tips Customer Service
Position of Oven
Shelves
Arrange the oven shelf or
shelves in the desired
locations while the oven is
cool. The correct shelf
position depends on the
kind of food and the
browning desired. As a
general rule, place most foods in the middle of the oven,
on either shelf position B or C. See the chart for
suggested shelf positions.
Oven Roasting
For self-clean models, do not lock the latch during
regular roasting. The latch is used for self-cleaning
only.
Roasting is cooking by dry heat. Tender meat or poultry
can be roasted uncovered in your oven. Roasting
temperatures, which should be low and steady, keep
spattering to a minimum.
Type of Food
Angel food cake
Biscuits or muffins
Cookies or cupcakes
Brownies
Layer cakes
Bundt or pound cakes
Pies or pie shells
Frozen pies
Casseroles
Roasting
Roasting is really a baking procedure used for meats.
Therefore, oven controls are set for BAKE or TIME
BAKE. (You may hear a slight clicking sound, indicating
the oven is working properly.)
Shelf Position
A
B or C
B or C
B or C
C
B
B or C
A (on cookie sheet)
B or C
A or B
ROASTING GUIDE
Type Doneness
Meat 3 to 5 lbs. 6 to 8 lbs.
Tender cuts; rib, high quality 325˚ Rare: 24 - 33 18 - 22 140˚ - 150˚
sirloin tip, rump or top round Medium: 35 - 39 22 - 29 150˚ - 160˚
Lamb leg or bone-in shoulder 325˚ Rare: 21 - 25 20 - 23 140˚ - 150˚
Veal shoulder, leg or loin 325˚ Well Done: 35 - 45 30 - 40 170˚ - 180˚
Pork loin, rib or shoulder 325˚ Well Done: 35 - 45 30 - 40 170˚ - 180˚
Ham, precooked 325˚ To Warm: 17 - 20
Poultry 3 to 5 lbs. Over 5 lbs.
Chicken or Duck 325˚ Well Done: 35 - 40 18 - 22 185˚ - 190˚
Chicken pieces 350˚ Well Done: 35 - 40 22 - 29 185˚ - 190˚
Turkey 325˚ Well Done 18 - 25 15 - 20 185˚ - 190˚
Oven
Temperature
Well Done: 40 - 45 30 - 35 170˚ - 185˚
Medium: 25 - 30 24 - 28 150˚ - 160˚
Well Done: 30 - 35 28 - 33 170˚ - 185˚
Approximate Roasting Time
in Minutes per Pound
minutes per pound (any weight)
10 to 15 lbs. Over 15 lbs. In thigh:
(1 Kg = 2.2 lbs.)
Internal
Temperature ˚F
115˚ - 120˚
11

Using the Oven
Broiling Guide
Quantity and/ Shelf First Side Second Side
Food or Thickness Position Time (min.) Time (min.) Comments
Ground Beef 1 lb. (4 patties) C 10 7 Space evenly. Up to 8
Well Done 1/2 to 3/4″ thick patties take about the
same time.
Beef Steaks
Rare 1″ thick C 6 5 Steaks less than 1″
Medium 1 to 1
1
⁄2lbs. C 8 6 thick cook through
Well Done C 12 11 before browning. Pan
frying is recommended.
Slash fat.
Rare 1
1
⁄2″ thick C 10 7–8
Medium 2 to 2
1
⁄2lbs. C 15 14–16
Well Done C 25 20–25
Chicken 1 whole A 35 10–15 Reduce time about 5
2 to 2
1
⁄2lbs., to 10 minutes per side
split lengthwise for cut-up chicken.
Brush each side with
melted butter. Broil
skin-side-down first.
Lobster Tails 2–4 B 13–16 Do not Cut through back of
6 to 8 oz. each turn shell. Spread open.
over. Brush with melted
butter before broiling
and after half of
broiling time.
Fish Fillets 1/4 to 1/2″ thick C 5 5 Handle and turn very
carefully. Brush with
lemon butter before
and during cooking, if
desired. Preheat
broiler to increase
browning.
Ham Slices 1″ thick B 8 8 Increase time 5 to 10
(precooked) minutes per side for
1
1
⁄2″ thick or home-
cured ham.
Pork Chops 2 (1/2″ thick) C 10 10 Slash fat.
Well Done 2 (1″ thick) about 1 lb. B 13 13
Lamb Chops
Medium 2 (1″ thick) about 10 C 10 9 Slash fat.
Well Done to 12 oz. C 12 10
Medium 2 (11⁄2″ thick) about 1 lb. C 14 12
Well Done B 17 12–14
Oven Broiling
Broiling cooks food by intense
radiant heat from the upper
element in the oven. Most fish
and tender cuts of meat can be
broiled. Follow these steps to
keep spattering and smoking to
Leave the door open to the broil
stop position. The door stays open
by itself, yet the proper temperature
is maintained in the oven.
about 2 inches apart. If desired, fat may
be trimmed.
Place meat on broiler grid which comes
with stove. Always use grid and pan
together. Fats drip into broiler pan and
are shielded from the broil element.
Otherwise juices may become hot
enough to smoke or catch fire.
Most broiling is done on shelf position C.
Turn food only once during cooking.
Do not lock the oven door with the latch
(on self clean models) during broiling.
The latch is used for self-cleaning only.
a minimum.
If meat has fat or gristle near
edge, cut slashes through both
Use of Aluminum Foil.
You can use aluminum foil to line
the broiler pan and broiler grid.
However, you must mold he foil
tightly to the grid and cut slits in
it just like the grid.
Without the slits, the foil will
prevent fat and meat juices from draining into the broiler
pan. The juices could become hot enough to catch on
fire. If you do not cut the slits, you are essentially frying,
not broiling.
Do not use aluminum foil on the bottom of the oven.
Never entirely cover a shelf with aluminum foil. This
will disturb the heat circulation and result in poor baking.
A smaller sheet of foil may be used to catch a spillover
by placing it on a lower shelf several inches below the
food.
Cut slits in the foil just like the grid.
Broiling Guide
■ If desired, marinate meats or chicken
before broiling, or brush with
Customer Service Troubleshooting Tips Installation Instructions Care and Cleaning Operating Instructions Safety Instructions
barbecue sauce last 5 to 10 minutes
only.
■ When arranging food on the pan, do
not let fatty edges hang over the
sides. These could soil the oven
bottom.
■ Frozen steaks can be broiled by
positioning the oven shelf at next
lowest shelf position and increasing
cooking time given in this guide
1 1/2 times per side.
12
What is Convection?
Safety Instructions Operating Instructions Care and Cleaning Installation Instructions Troubleshooting Tips Customer Service
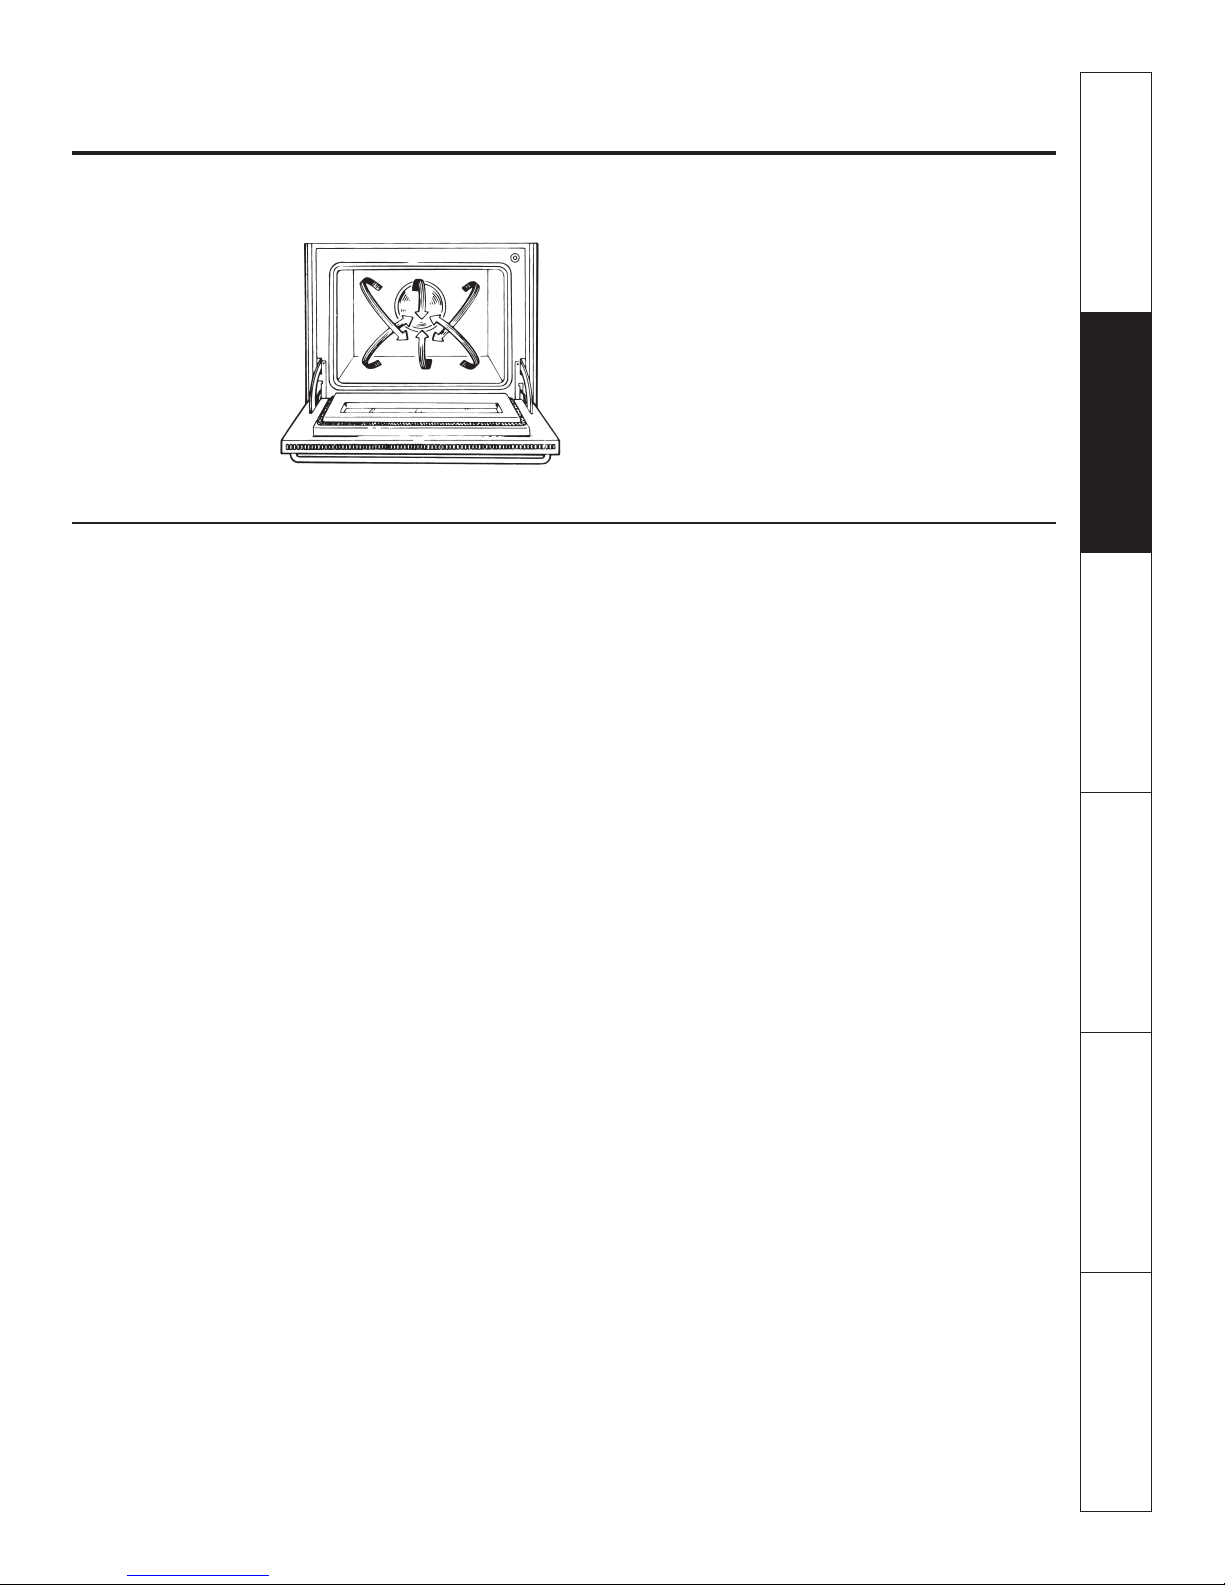
In a convection oven, a
fan circulates hot air
over, under and around
the food. This
circulating hot air is
evenly distributed
throughout the oven
cavity. As a result, foods
are evenly cooked and
browned – often in less
time with convection
heat.
You can use your favourite recipes in the convection
oven. Recipe conversion is as easy as 1, 2, 3.
1. When roasting and baking, reduce normal cooking
times by 10 minutes per hour.
2. Also reduce cooking temperature by 25˚F.
3. Only preheat for delicate foods and foods requiring
less than 15 minutes to cook.
CAUTION: DO NOT leave the door open for long
periods of time while using convection cooking or you
may shorten the life of the convection heating element.
When should you use Convection Bake or Convection Roast?
To help you understand the difference between
convection bake and roast and traditional bake and roast,
here are some general guidelines.
In convection bake, heat comes from the heating
element in the rear of the oven. The convection fan
circulates the heated air evenly, over and around the
food. Preheating is not necessary with foods having a
bake time of over 15 minutes.
In regular baking, the bottom heating element heats the
air in the oven which then cooks the food.
Convection Bake
• Ideal for evenly browned baked foods cooked on all 3
shelves.
• Good for large quantities of baked foods.
• Good results with cookies, biscuits, muffins, brownies,
cupcakes, cream puffs, sweet rolls, angel food cake
and bread.
Regular Bake
• Foods such as layer cakes have a more level top crust,
and pound cakes are more evenly cooked throughout,
when not baked with convection heat.
In convection roast, heat comes from the top heating
element. The convection fan circulates the heated air
evenly over and around the food. Meat and poultry are
browned on all sides as if they were cooked on a
rotisserie. Using the roasting rack provided, heated air
will be circulated over, under and around the food being
roasted. The heated air seals in juices quickly for a moist
and tender product while, at the same time, creating a
rich golden brown exterior.
Convection Roast
• Large tender cuts of meat, uncovered.
• Roasting pans with low sides to allow air movement
around food.
• Turkeys over 16 lbs. are more evenly cooked through
when not cooked on convection roast.
Regular Roast
• Less tender cuts of meat because these need to cook a
long time in liquid to become tender.
• Turkeys over 16 lbs are more evenly cooked through
when not cooked using convection roast.
• Cooking bag
• Foil tent
• Covered dish
13
Using the Oven
Convection Cooking
Cookware for Convection Cooking
Before using your convection oven, check to see if your
cookware leaves room for air circulation in the oven. If
you are baking with several pans, leave space between
them. Also, be sure the pans do not touch each other or
the walls of the oven.
Metal and Glass
Any type of cookware will work in your convection
oven. However, metal pans heat the fastest and are
recommended for convection baking.
• Darkened or matte-finished pans will bake faster than
shiny pans.
• Glass or ceramic pans cook more slowly.
Convection Baking
Adapting Recipes for Convection Baking
As a general rule, reduce the temperature by 25˚F for
convection baking.
Preheat the oven only if cooking delicate foods or foods
that take less than 15 minutes to cook. When pre-heating,
allow 10 minutes for the oven temperature to stabilize.
Paper and Plastic
Heat-resistant paper and plastic containers that are
recommended for use in regular ovens can be used in
convection ovens. Plastic cookware that is heat-resistant
to temperatures of 400˚F can also be used.
When baking cookies, you will get the best results if you
use a flat cookie sheet instead of a pan with low sides.
For recipes like oven-baked chicken, you should use a
pan with low sides. Hot air cannot circulate well around
food in a pan with high sides.
Check the foods for doneness at the minimum suggested
cooking time.
Use pan size recommended in the recipe. Trays should be
no larger than 15 1/4 x 10 1/4.
Multi-Shelf Baking
Because heated air is circulated evenly throughout the
oven, foods can be baked with excellent results on 2 or 3
shelves at a time. Multi-shelf baking may increase cook
times slightly for some foods but the overall result is
time saved. Cookies, muffins, biscuits, and other quick
breads give very good results with multi-shelf baking.
When baking on 3 shelves, divide the oven into thirds
by placing the offset shelf in the (C) shelf position and
the straight shelves in (A) and (B) shelf position.
For 2-shelf baking, place the straight shelves in the (A)
and (C) positions.
Convection Roasting
Meats cooked in a convection oven are dark brown on
the outside and tender and juicy on the inside. In most
cases, cooking time will be less when using the
Convection Roast feature. In general, cooking time is
reduced by 10 minutes per hour.
To make sure the meat is cooked the way you want it, we
recommend using a meat thermometer or the temperature
probe provided with the oven (in some models).
NOTE: When convection baking with only 1 shelf,
follow the shelf positions recommended in the Oven
Shelves section of the Regular Baking section.
(Refer to stove timer operating instructions to set oven
for convection baking.)
The special roasting rack and pan allow heated air to
circulate over and under the meat. This allows the meat
to brown on all sides.
Turkeys over 16 lbs are more evenly cooked through
when not cooked on convection roast.
(Refer to stove timer operating instructions to set oven
for convection roasting.)
Customer Service Troubleshooting Tips Installation Instructions Care and Cleaning Operating Instructions Safety Instructions
14
Convection Roasting
Adapting Recipes for Convection Roasting
Use the temperature recommended in the Convection
Roasting Guide. Generally you will need to reduce the
temperature by 25˚F. depending on the type of food being
cooked.
Preheating is not necessary for foods that take more than
15 minutes to cook.
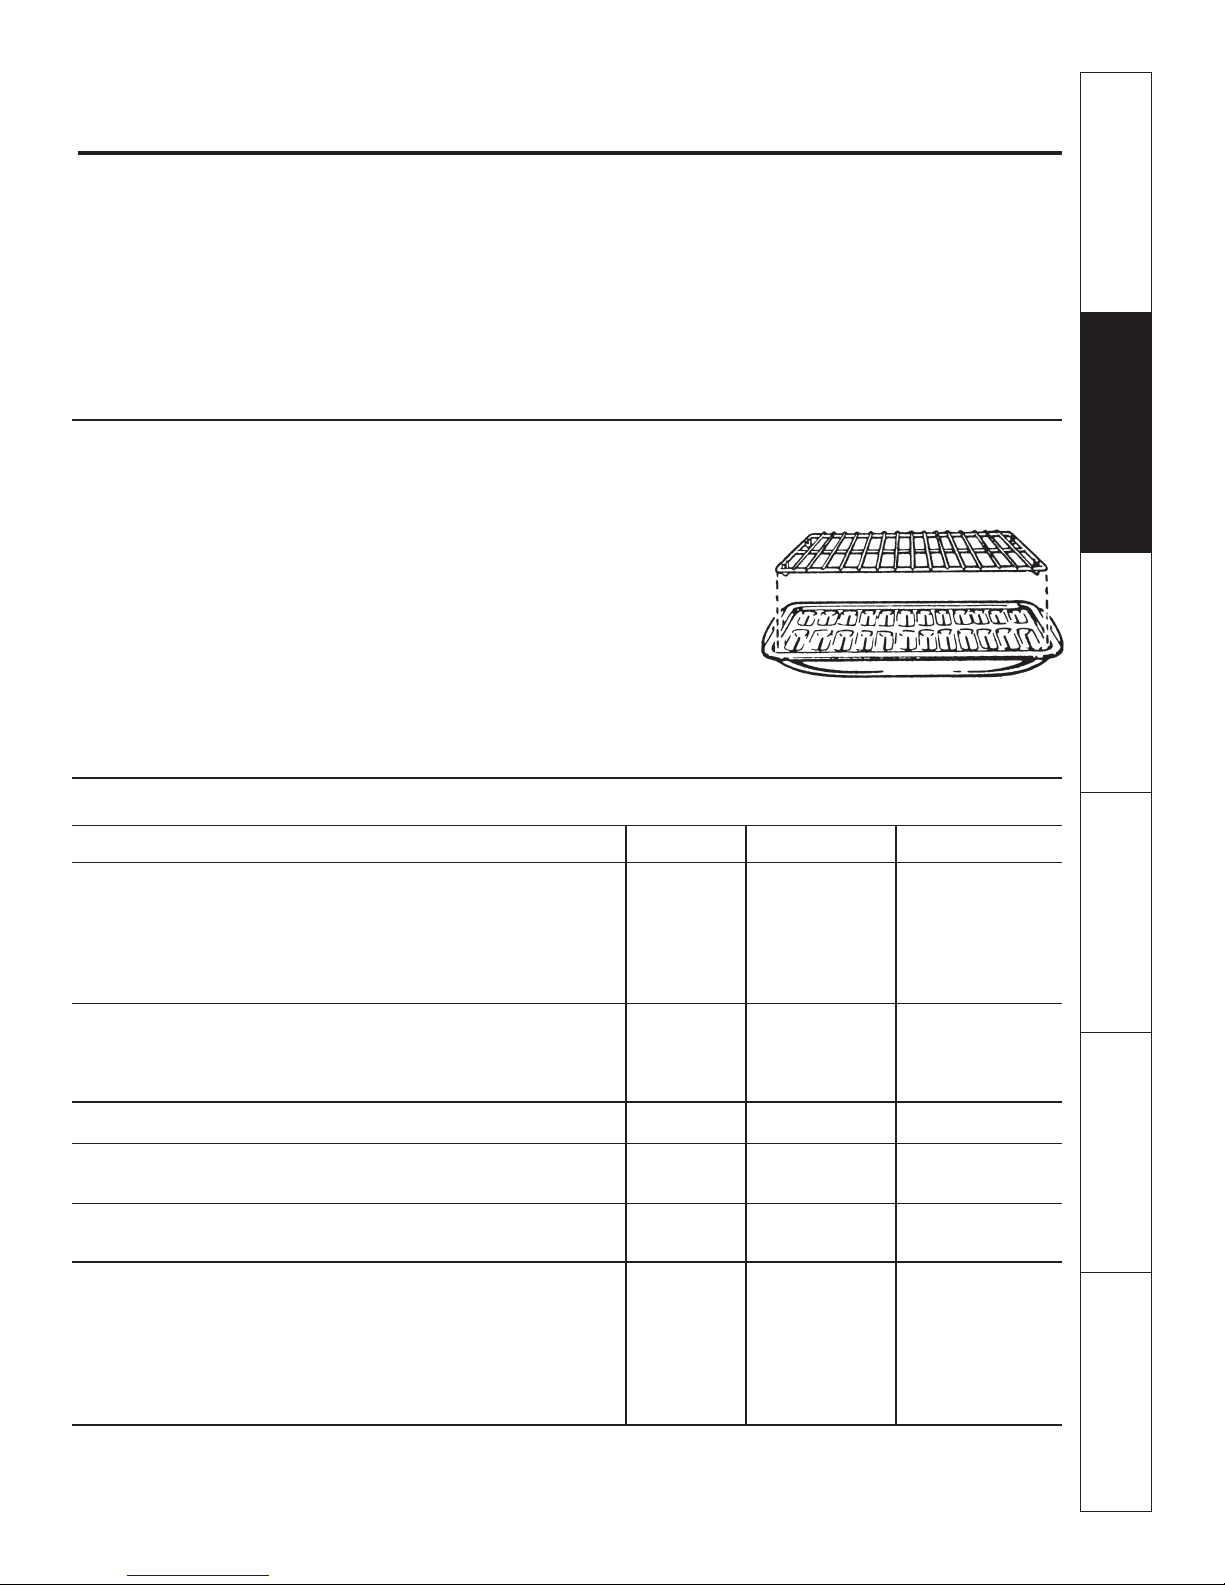
Convection Roasting Rack
Roasts or poultry should be cooked on the lowest shelf
position (A) on the straight shelf.
When you are convection roasting you will use the
broiler pan and grid and the special roasting rack. The
pan is used to catch grease spills and the grid is used
to prevent grease spatters. The rack holds the meat.
The rack allows the heated air to circulate under the
meat and increase browning on the underside of the
meat or poultry.
1. Place the straight shelf in the lowest shelf position (A).
2. Place the roasting rack on the broiler pan and grid.
3. Place the meat on the special roasting rack.
Check foods for doneness at the minimum suggested time.
Use the special roasting rack with the broiler pan and grid.
See the Roasting
with the Probe
section to insert the
probe correctly (on
some models only).
NOTE: It is
important that the
broiler pan and
grid be used with
the roasting rack
for best convection
roasting results.
Roasting Rack
Broiler Pan and grid
Safety Instructions Operating Instructions Care and Cleaning Installation Instructions Troubleshooting Tips Customer Service
CONVECTION ROASTING GUIDE
Meats Minutes/Lb. Oven Temp. (˚F) Internal Temp. (˚F)
Beef Rib, Boneless Rib, Rare 20 - 24 325˚ 140˚†
Top Sirloin (3 to 5 lbs.) Medium 24 - 28 325˚ 160˚
Well 28 - 32 325˚ 170˚
Beef Tenderloin Rare 10 - 14 325˚ 140˚†
Medium 14 - 18 325˚ 160˚
Roast (2 1/2 to 3 lbs.) Chuck, Rump 35 - 45 300˚ 170˚
Pork Bone-in, Boneless (3 to 5 lbs.) 23 - 27 325˚ 170˚
Chops 2 chops 30 - 35 total 325˚ 170˚
(1/2 to 1-inch thick) 4 chops 35 - 40 total 325˚ 170˚
6 chops 40 - 45 total 325˚ 170˚
Ham Canned, Butt, Shank (3 to 5 lbs. fully cooked) 14 - 18 325˚ 140˚
Lamb Bone-in, Boneless Medium 17 - 20 325˚ 160˚
(3 to 5 lbs.) Well 20 - 24 325˚ 170˚
Seafood Fish, whole (3 to 5 lbs.) 30 - 40 total 400˚
Lobster Tails (6 to 8 oz. each) 20 - 25 total 350˚
Poultry Whole Chicken 24 - 26 350˚ 180˚ - 185˚
(2 1/2 to 3 1/2 lbs.)
Cornish Hens Unstuffed (1 to 1 1/2 lbs.) 50 - 55 total 350˚ 180˚ - 185˚
Stuffed (1 to 1 1/2 lbs.) 55 - 60 total 350˚ 180˚ - 185˚
Duckling (4 to 5 lbs.) 24 - 26 325˚ 180˚ - 185˚
Turkey, whole* Unstuffed (10 to 16 lbs.) 8 - 11 325˚ 180˚ - 185˚
Turkey Breast (4 to 6 lbs.) 16 - 19 325˚ 170˚
* Stuffed birds generally require 30 - 45 minutes additional roasting time. Shield legs and breast with foil to prevent over browning and drying of skin. Birds over 16
lbs. are more evenly cooked through when not cooked on convection roast.
† Cooking rare beef to only 140˚F means some food poisoning organisms may survive.
15

Using the Oven
Convection Roasting with the Probe
Correct Placement of the Temperature Probe
On some models a temperature probe has been provided
for use in the oven. This probe is designed to withstand
high temperatures. Temperature probes provided with
other products, such as those used for microwave ovens,
may not be designed to withstand high temperatures. Use
of probes other than the one provided with this product
may result in damage to the probe.
Never leave your probe inside oven during a self
cleaning cycle.
For many foods, especially roasts and poultry, internal
food temperature is the best test for “doneness”. The
temperature probe takes the guesswork out of roasting.
When the internal temperature of the food reaches the
temperature you set, the oven automatically shuts off.
The temperature probe has a skewer-like probe at one
end and a plug at the other end that goes into the outlet
on the oven wall.
After preparing the meat and placing it on a trivet or on
the broiler pan grid, follow these directions for proper
probe placement.
1. Lay the probe on the
outside of the meat
(along the top or
side) and mark with
your finger where
the edge of the meat
comes to on the
probe. The point of
the probe should rest
in the centre of the
thickest meaty part
of the roast.
Use the handles of the probe and plug when inserting and
removing from the meat and wall outlet. Do not use
tongs to pull on the cable when removing the probe.
TO AVOID BREAKING THE PROBE, MAKE SURE
FOOD IS COMPLETELY DEFROSTED BEFORE
INSERTING.
(Refer to Oven Control Centre’s Operating Instructions
insert to set the oven for convection roasting with a
probe.)
2. Insert the probe into
the meat up to the
point marked off with
your finger. It should
not touch the bone, fat
or gristle.
No more than 2
inches of the probe,
not counting the
handle, should be left
exposed outside the
meat.
(on some models)
Suggested probe placement for:
Ham or Lamb Casseroles or Fish Poultry
Customer Service Troubleshooting Tips Installation Instructions Care and Cleaning Operating Instructions Safety Instructions
16

Oven Controls
Your stove may have one of several different oven controls. Refer to the separate set of instruction if your stove does not
have an electronic oven control with rotary switch.
Electronic Convection Control with Rotary Switch
Clock
The
CLOCK
tells the time of day and must be set to the
correct time for the automatic oven timing function to
work properly. The
BAKING
NOTE: Pressing an UPor
change the time by increments of 1 minute. Pressing and
holding the UPor
time in 10 minute increments.
To set the clock
1. Press the
2. Press the
or
SELF-CLEANING
CLOCK
light will start flashing, and a time with a flashing colon
will appear in the display, (i.e. “12:00”.)
UP/DOWN ARROW
time is set. (i.e. “12:30”).
CLOCK
cannot be set during a
cycle.
DOWN ARROW
DOWN ARROW
button. (The green
buttons until the correct
TIMED
button will
button will change the
CLOCK
indicator
3. Five seconds after the
been pressed for the last time, the
will go out, the colon will stop flashing, and the
will be set.
4. If the
Power failure
If the display is flashing, (i.e. “12:00”), there has been a
power failure. Reset the
described above.
If the oven was in any heating mode before the power
failure, it will remain off after the power failure. To reset,
turn the selector switch to
heating mode.
UP/DOWN ARROW
25 seconds, the
indicator light goes out.
UP/DOWN ARROW
buttons are not pressed within
CLOCK
mode is cancelled and the
CLOCK
to the correct time as
OFF
and then to the desired
CLOCK
buttons have
indicator light
CLOCK
Safety Instructions Operating Instructions Care and Cleaning Installation Instructions Troubleshooting Tips Customer Service
Minute Timer
You may set the
household activities for up to 11 hours and 59 minutes.
The
MINUTE TIMER
The
MINUTE TIMER
flashing), one minute at a time. For times less than 1 hour,
both minutes and seconds are displayed. When the last
minute is reached, the time will beep. When the display
reaches
every 10 seconds for the next 10 minutes (or until the
TIMER
How to set the MINUTE TIMER
1. Press the
2. Press the
“0:00”
button is pressed).
light will start flashing and
display).
desired time. (i.e. 1:30 for one hour and 30 minute
countdown).
MINUTE TIMER
does NOT control oven functions.
counts down (with the colon
, the
TIMER
will beep once, and then once
TIMER
button. (The green
UP/DOWN ARROW
to time cooking or other
TIMER
indicator
“0:00”
will flash in the
buttons to enter the
3. Five seconds after the
been pressed for the last time, the countdown will
begin, and the
4. To check the time-of-day during countdown, press the
CLOCK
5. When the countdown time reaches
will beep.
6. Press the
return to the
7. To cancel the
press the
displayed. After 5 seconds, the control will return to the
CLOCK
TIMER
button.
TIMER
CLOCK
TIMER
DOWN ARROW
display.
UP/DOWN ARROW
indicator light will stop flashing.
button to cancel the beeping, and
display.
before the set time is reached,
button until
“0:00”
“0:00”
buttons have
, the
TIMER
is
17

Oven Controls
Baking
The oven can be set, in increments of 5 degrees F, to bake
at temperatures between 170˚F and 550˚F (75˚C to 290˚C).
To switch between degrees F and C, refer to that section
under SPECIAL FEATURES OF THE OVEN CONTROL.
When the oven reaches the selected temperature, the
ON
indicator light will stop flashing and the control will
beep indicating that the oven has been pre-heated. The
control will maintain this temperature until the baking
operation is cancelled by turning to the OFF position.
How to set the control to bake
1. PUSH and turn the
knob from the
desired baking temperature. The
display will show the set
temperature with a degree symbol
in the top, right corner (i.e. 375˚).
2. Five seconds after the temperature
has been adjusted for the last
time, the
light will start to flash and the
oven will start to heat.
“OVEN ON”
SELECTOR
OFF
position to the
indicator
OVEN
An automatic shut-off of the oven after 12 hours of
cooking can be selected as described under SPECIAL
FEATURES OF THE OVEN CONTROL.
NOTE:
If the oven door is locked when the selector switch
is turned to
mode cannot be set until the door is unlocked.
LOCKING THE OVEN DOOR WHILE IN THE BAKE
MODE WILL CAUSE “door” TO BE DISPLAYED, AND
THE OVEN WILL SHUT OFF.
3. Five seconds later, the temperature in the display will
revert to the time-of-day.
4. When the oven reached the selected temperature (i.e.
375˚), the control will beep once, and the
indicator light will stop flashing.
5. To change the temperature during baking, simply turn
the
6. When baking is done, turn the
OFF
BAKE
SELECTOR
position.
, “door” will be displayed and the bake
“OVEN ON”
knob to the new temperature.
SELECTOR
knob to the
How to bake with automatic shut-off
The oven control can be set to start immediately and cook
for a selected length of time, up to 11 hours and 59
minutes. At the end of the selected time, the oven will turn
off automatically, and the control will beep for up to 10
minutes, or until turned off.
1. PUSH and turn the
position to the desired baking temperature (i.e. 375˚).
2. Press the
light will start to flash, and
3. Press the
cooking time is selected (i.e. 3:00 for a three hour bake
before automatic shut-off.)
COOK TIME
UP/DOWN ARROW
SELECTOR
button. (The
“0:00”
knob from the
COOK TIME
will be displayed.)
button until the desired
How to set delay start baking with automatic
shut-off
The oven control can be set to turn the oven on
automatically at some time within the next 12 hours, cook
for a specific length of time, and then turn off
automatically.
For example: Let’s say it is 1:00 and dinner time is
shortly after 7:00. The recipe suggests
3 hours baking at 375˚F.
Here is how to set the control:
1. PUSH and turn the
position to the desired baking temperature (i.e. 375˚)
2. Press the
indicator light will start to flash and
displayed).
3. Press the
Customer Service Troubleshooting Tips Installation Instructions Care and Cleaning Operating Instructions Safety Instructions
cooking time (i.e. 3:00) is selected.
COOK TIME
UP/DOWN ARROW
SELECTOR
button. (The
knob from the
“COOK TIME”
“0:00”
button until the desired
18
OFF
indicator
OFF
will be
4. Five seconds after the
been pressed for the last time, the timer will be set, the
COOK TIME
countdown will begin.
5. Pressing the
display the time-of-day for 3 seconds before reverting
back to the remaining cook time.
6. At the end of the selected bake time, the control will
beep 4 times, the oven will shut off, and
displayed.
7. The timer will continue to beep (maximum of 10
minutes) and the
“ON”
4. Press the
will be displayed and the
will start to flash).
5. Press the
of 4:00 is reached.
6. Five seconds after the
pressed for the last time, the timer will be set, and the
“start time” will be replaced by the time-of-day.
At 4:00 the oven will turn “ON” automatically, and the
“OVEN ON”
cook for 3 hours at 375˚F, then shut “OFF” automatically
at 7:00. The control will beep and the control will show
“END”
completed. The
on.
7. Turn the
indicator will stop flashing, and the
CLOCK
until the
START TIME
UP/DOWN ARROW
indicator light will come on. The oven will
to indicate that the timed cooking has been
“COOK TIME”
SELECTOR
UP/DOWN ARROW
button during the countdown will
“END”
COOK TIME
SELECTOR
indicator light will remain
knob is turned to
button. (The current time of 1:00
START TIME
button until the start time
indicator light
UP/DOWN ARROW
indicator light will remain
knob to
OFF
to cancel the beeping.
button has
will be
OFF
.
buttons has

Convection Cooking
The oven control can be set to
CONVECTION ROAST
550˚F (75˚C to 290˚C). In
bake and broil elements will pre-heat the oven. Once preheated, the temperature will be maintained by the hidden
convection element. If
the oven is heated and the oven temperature is maintained
by the broil element. In either mode, the convection fan
circulates the air for uniform and fast cooking.
at temperatures between 170˚F and
CONVECTION ROAST
Differences in Cooking for
with Rotary Switch
To ensure uniform cooking in the
mode,
always pre-heat
oven. For
does not need to be reduced 25 degrees
suggested baking temperature for conventional baking, as
it is already programmed into this control.
CONVECTION BAKING,
”
CONVECTION BAKE
CONVECTION BAKE
or
mode, the
is selected,
“Electronic Control
CONVECTION BAKE
the oven before putting food in the
the
oven temperature
from the
Broiling
Once selected, the broiling mode will continue until the
SELECTOR
hours.
NOTE:
turned to
mode cannot be set until the door is unlocked.
1. Leave the oven door open at the
‘BROIL STOP’
broiling.
2. PUSH and turn the
knob from the
the
knob is turned to
If the door is locked when the selector switch is
BROIL
, ‘door’ will be displayed and the broil
position during
OFF
, or for a maximum of 12
SELECTOR
OFF
position to
BROIL
setting.
1. PUSH and turn the
position to the desired oven temperature (i.e. 375˚).
2. Before the
press the
BAKING
corresponding
on, and the
3. Five seconds later, the temperature in the display will
revert to the time-of-day.
4. When the oven reaches the selected temperature (i.e.
375˚), the control will beep once, and the
indicator light will stop flashing.
5. To change the oven temperature during baking, simply
turn the
6. When the cooking is done, turn the
the
indicator light will go out.
3. The display will show
mode has been selected.
4. Five seconds after the
to the
will come on and broiling will start.
5. Five seconds later, the display will revert back to the
time-of-day.
6. When the broiling is finished, turn the
to the
“OVEN ON”
CONVECTION
, twice for
“OVEN ON”
SELECTOR
OFF
position, and the
BROIL
OFF
position.
SELECTOR
knob from the
indicator light starts flashing,
button once for
CONVECTION ROAST
CONVECTION
knob to the new temperature.
indicator light will come
indicator will start flashing.
“OVEN ON”
‘Brl’
to indicate that the broil
SELECTOR
position, the
“OVEN ON”
OFF
CONVECTION
. The
“OVEN ON”
SELECTOR
and
knob has been moved
indicator light
SELECTOR
knob to
CONVECTION
knob
Safety Instructions Operating Instructions Care and Cleaning Installation Instructions Troubleshooting Tips Customer Service
19

Oven Controls
Special Features of the Oven Control with Rotary Switch
Your new electronic oven control has additional special features that you may choose to use. Once selected these special
features remain in the control’s memory, (even after a power failure), or until they are re-programmed. The special feature
modes can only be activated when the clock is displaying the time-of-day and the
Adjust the oven temperature – do it yourself
You may find that your new oven cooks differently than
the one it replaced. We recommend that you use your new
oven for a few weeks to become familiar with it, following
the cooking times given in the recipes as a guide. However,
if you think that the temperature of your new oven is still
too hot or too cool, you may increase or decrease the oven
baking temperature by up to 35 degrees F.
1. Ensure that the
2. Hold down both the
the same time for 5 seconds until flashing
displayed.
SELECTOR
UP
and
switch is turned to
DOWN ARROW
“00˚”
OFF
.
buttons at
is
3. Press the
temperature by up to 35˚F.
4. Press the
temperature by up to -35˚F.
5. Five seconds after the
been pressed for the last time, the desired selection will
be saved and the display will revert back to the time-ofday.
SELECTOR
UP ARROW
DOWN ARROW
button to increase the oven
UP/DOWN ARROW
switch is turned to
button to decrease the oven
OFF.
button has
Child Lock-Out
The control can be set to the
that if the
the heating modes, the oven will not heat up.
1. Press both the
same time for 5 seconds until
2. After 5 seconds the display will revert back to the timeof-day.
SELECTOR
CLOCK
switch is accidently turned to one of
CHILD LOCK-OUT
and
START TIME
“OFF”
buttons at the
is displayed.
Fahrenheit or Celsius Oven Temperature
Selection
Your oven control is set to display the oven temperature in
degrees FAHRENHEIT, but you may change it to degrees
CELSIUS.
1. Press
COOK TIME
time for 5 seconds until either
and
START TIME
buttons at the same
“F”
or
“C”
Automatic Shut-Off After 12 Hours of Cooking
The control has been programmed to continue to bake
(without automatic shut-off), once the baking operation
has started. It can be programmed to cook for a maximum
of 12 hours, and then automatically shut-off, should you
forget to turn the oven off.
1. Hold down both the
the same time for 5 seconds until
Customer Service Troubleshooting Tips Installation Instructions Care and Cleaning Operating Instructions Safety Instructions
displayed.
TIMER
and
COOK TIME
“ON”
20
mode, so
is displayed.
buttons at
or
“OFF”
3. If one of the heating modes is selected,
displayed and the oven will not heat up.
4. To cancel this mode for cooking, press both the
START TIME
the
“OFF”
5. The timer can then be set to bake, broil, or self-clean.
2. Press the
FAHRENHEIT temperatures or the
button to display
3. After 5 seconds, the display will revert back to the timeof-day.
2. Press the
off after 12 hours of cooking.
3. Press the
automatic shut-off after 12 hours of cooking.
4. Five seconds after the
is
been pressed for the last time, the desired selection will
be saved and the display will revert back to the time-ofday.
buttons at the same time for 5 seconds until
is replaced by the time-of-day.
UP ARROW
UP
button to display
DOWN
button to display
“C”
for CELSIUS temperatures.
“ON”
button to display
UP/DOWN ARROW
“OFF”
will be
CLOCK
“F”
for
DOWN ARROW
for automatic shut-
“OFF”
for
NO
button has
and
 Loading...