

Page 1

ijtfc i.orci!..=rrìer^ O !ro:c,,isiriu
Appliances
Installation Instructions
GPS5CC, G PS 5 WW
Dishwasher Side Panel Kit
The Side Panel Kit is used to enclose o built-in dishwasher
when a fully supported countertop and cobinet cavity do not
have an end panel present. The Side Panel Kit is not designed
to support the countertop or cobinets, so it is important that
they be fully supported prior to installing the kit. The kit may be
used for either a left-hand or a right-hand opening.
BEFORE YOU BEGIN - Read these instructions
completely and carefully.
IMPORTANT - Save these instructions for local
inspector's use.
IMPORTANT - OBSERVE ALL GOVERNING CODES
AND ORDINANCES.
PARTS SUPPLIED:
□ End panel
□ Toekick panel
□ Panel support bracket
□ 2 - #8 X 3/4" wood screws
□ 4 - #10 X 1" wood screws
n 4 -1/4" X 3/8" machine screws
□ 4 -1/4" nuts
□ 4 -1/4" lock washers
n 2 - 3/16" X 3“ toggle bolt screws
□ 2 - 3/16" toggles
□ 6 - 3/16" flat washers
□ Installation Instructions
End Panel
Instoliation of this panel kit requires basic mechanical ond
carpentry skills. Wear your safety equipment when using tools
and handling parts for your protection. Proper installation is
the responsibility of the installer.
Toekick
l\ Panel
Panel Support
Bracket
Lock
Washer
(#8i 3/4"
Wood Screws
1/4" Nut
(#10) 1"
Wood Screws
Toggle Bolt Screw
Flat Washer
D
1/4"X 3/8"
Machine Screws
NOT INCLUDED:
2 - Lag bolts of appropriate size for use when the floor
is ceramic tile, quarry tile or similar material.
TOOLS YOU WILL NEED:
□ Phillips head screwdriver
□ Drill and assorted drill bits
□ 7/16" socket, box-end or open-end wrench
n Measuring tape
□ Carpenters square
□ Safety glosses
□ Gloves
Phillips Head
Screwdriver
Measuring Tape
Carpenters
Square
Safety Glasses
Wrench
Gloves
Page 2
Installation Instructions
The installation of the side panel requires the panel support
bracket to be mounted to the underside of the countertop
ond the toekick panel to be mounted to the floor. If the panel
is installed perpendicular to a wall, the side panel will also be
fastened to the wall.
The enclosure for the dishwasher must be at least 24" wide.
The dimensions on the adjacent diagrams show locations of
the screw holes for the toekick ponei and the support bracket
panel. Locating the screw holes as shown will provide the
required 24" opening for the dishwasher.
The toekick ponei is mounted with its 1" flange against the
floor. Similarly, the panel support bracket is mounted with its
1" flange against the underside of the countertop.
STEP 1 ADJACENT CABINET SHOULD BE
SQUARE AND PLUMB FOR GOOD
DISHWASHER FIT
Check cabinet for perpendicularity to the floor with a
carpenter's squore. If the cabinet is out of square, it may be
necessary to make adjustments in the instollation of this panel
to ensure the dishwasher will fit properly in the opening.
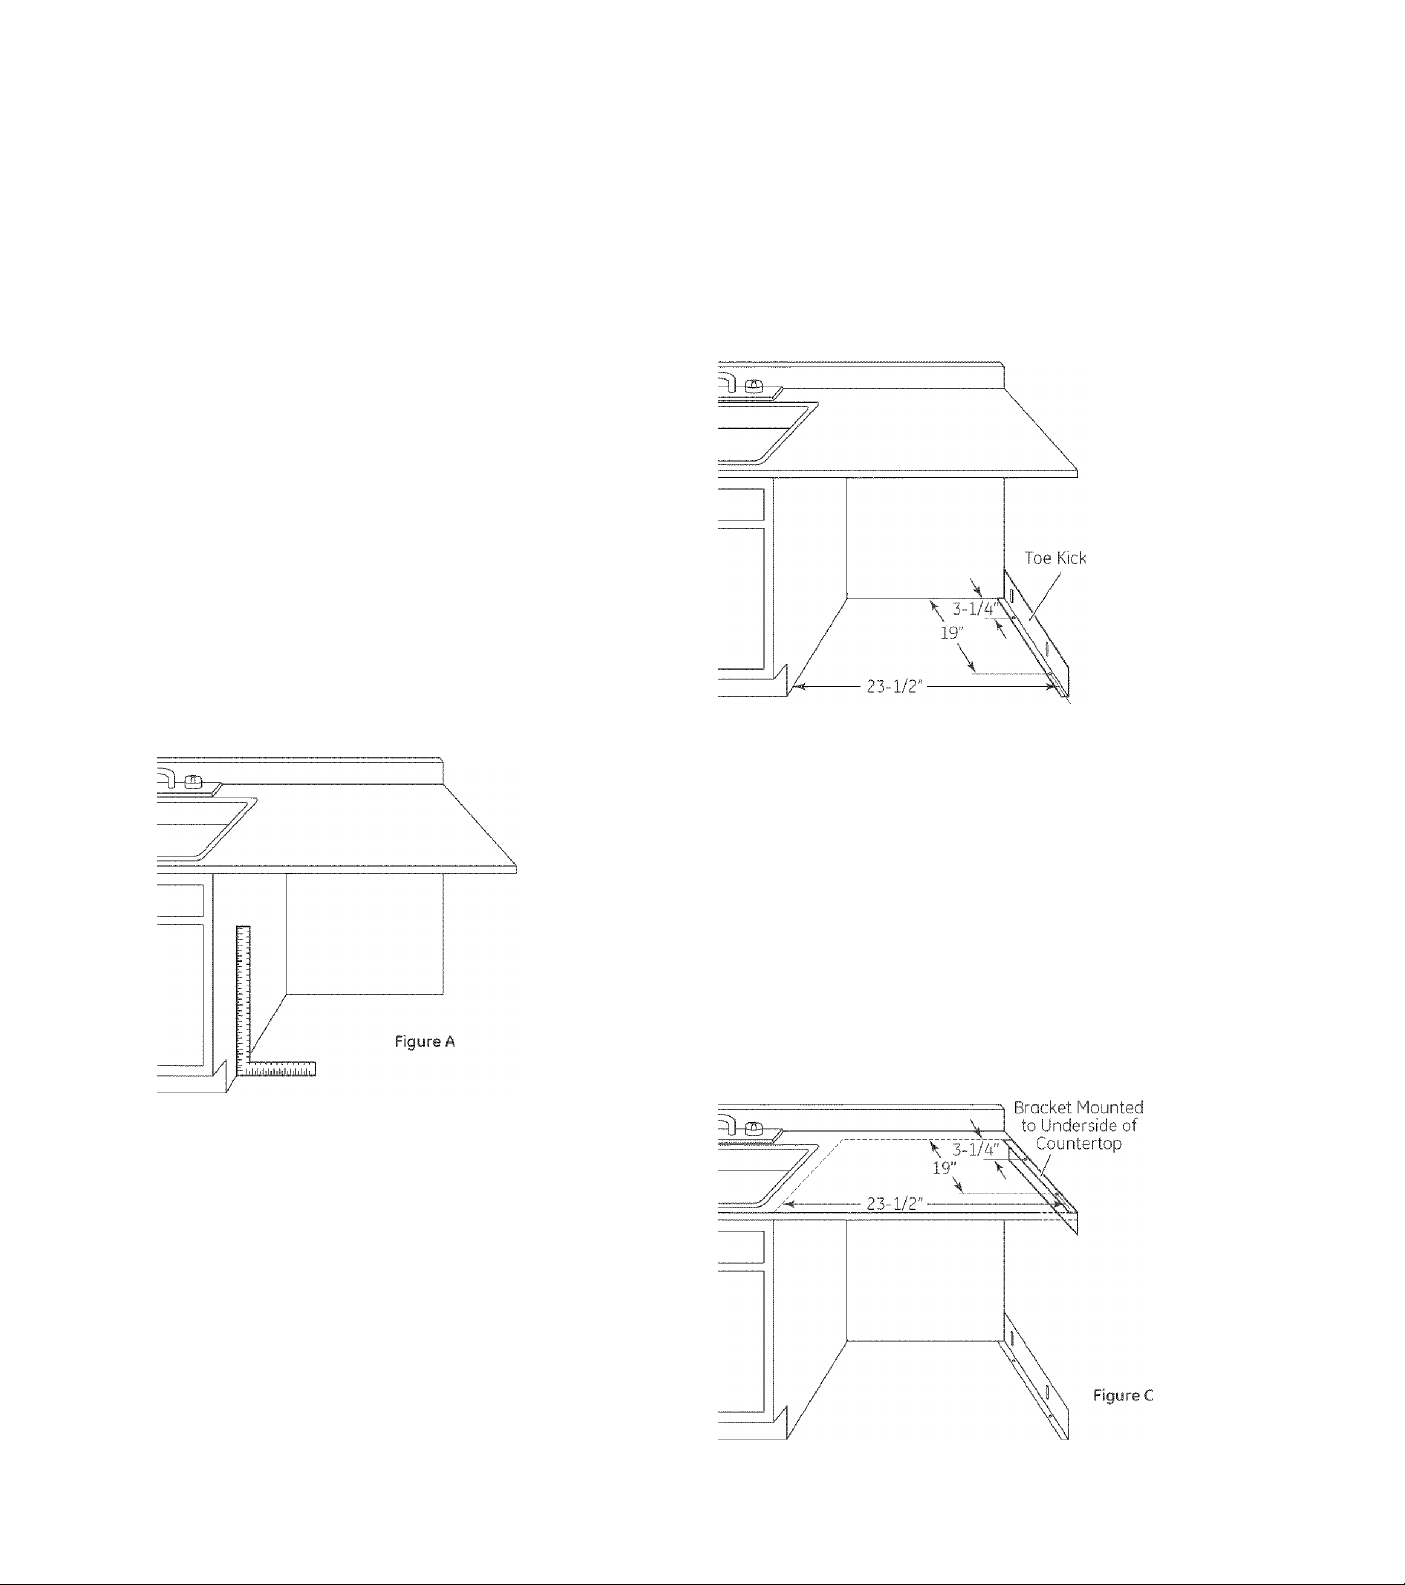
STEP 2 LAY OUT MOUNTING HOLES FOR
TOEKICK PANEL
The rear-mounting hole must be 3-1/4" from the back of
the opening and 23-1/2" from the opposite side. The front
mounting hole must be 19" from the back of the opening and
23-1/2" from the opposite side. Mark these two screw hole
locations and punch or drill an appropriate pilot hole.
Figure B
Note: Measurements are to Center of Holes
If the floor is ceramic tile, quarry tile or similar material, it will
be necessary to drill cleorance holes through the tile so lag
bolts can be screwed into the sub-floor to securely fasten the
toekick panel against the floor.
STEP 3 LAY OUT MOUNTING HOLES FOR
PANEL SUPPORT BRACKET
In the same monner os above and using the same dimensions,
lay out the hole locations on the underside of the countertop.
Use 0 punch to create a pilot hole or drill a pilot hole. However,
when drilling pilot holes be extremely careful. Do not drill holes
all the way through the countertop.
Panel Support
Note: Measurements are to Center of Holes
Page 3

Installation Instructions
STEP 4 FASTEN PANEL SUPPORT BRACKET
TO UNDERSIDE OF COUNTERTOP
AND TOEKICK PANEL TO FLOOR
Fasten the panel support bracket to the underside of the
countertop using two #8 x 3/4" wood screws and two 3/16"
flat washers.
Mount Panel
Fasten the toekick panel to the floor using two #10 x 1" wood
screws and two 3/16" flat washers.
STEP 6 POSITION PANEL AGAINST BACK OF
CABINET
Skip this step and go to Step 10 if the back of the dishwasher
enclosure is not a wall or if you choose not to fasten the side
panel to the back of the dishwosher enclosure.
Gently push side panel against the rear wall of the dishwasher
enclosure. Mork the location of the screw cutouts in the panel
on the back wall of the enclosure.
Figure F
If the floor is ceramic tile or similar material that will not accept
screws, use two lag bolts of appropriate size and length along
with 2 flat washers to fosten the toekick panel to the floor.
STEP 5 LOOSELY INSTALL SIDE PANEL
Mount the side panel to the toekick panel and panel support
brocket using four 1/4" x 3/8" machine screws, 4 lock washers
ond four 1/4" nuts. Do not tighten the fosteners at this time.
Figure E
STEP 7 DETERMINE WALL COMPOSITION
If woll is solid or there is a stud behind the panel, attach the
panel to the wall using two #10 x 1" wood screws and two
3/16" flat woshers. Install the screws loosely - do not tighten.
Skip to Step 10
If wall Is hollow, for example, drywoll without a stud, it will
be necessary to use toggle bolts to attach the side panel to
the wall.
STEP 8 INSTALL TOGGLE BOLTS
Remove side panel from toekick and support brocket. Drill a
1/2" hole at each of the positions marked in Step 5. Place a
washer on the 3" mochine screw. Screw the toggle onto the
bolt a few turns. Insert toggle into the top hole in the wall.
Repeot with a second toggle bolt in the bottom hole. Do not
tighten toggle bolts at this time.
Page 4

Installation Instructions
STEP 9 ATTACH SIDE PANEL TO SUPPORT
BRACKET AND TOGGLE BOLTS
Place the side panel against the panel support bracket and
insert two 1/4" machine screws through the side panel and
support bracket while aligning the side panel with the toggle
bolts. Install the lock washers and 1/4" nuts on the machine
screws but do not tighten.
Install the remaining two 1/4" machine screws through the side
panel and toekick panel. Install the lock washers and 1/4" nuts
on the machine screws, but do not tighten.
Tighten the fosteners in this order:
1. Toggle bolts or wood screws on bock of panel (if present)
2. Machine screws on top of panel
3. Machine screws on bottom of panel.
Figure H
imagination at work
SPECIFICATIONS SUBJECT TO CHANGE WITHOUT NOTICE
GE Consumer & Industrial
General Electric Company
Louisville, Kentucky 40225
ge.com
Pub. No. 3030204
Dwg. NO.206C1559P144
ND05J-1434 (9/051
 Loading...