

Installation
3/4" Custom Dishwasher
Door and Access Panel Kit
Instructions
BEFORE YOU BEGIN
STOP
IMPORTANT – Save these instruc-
tions for local inspector’s use.
IMPORTANT – Observe all governing
codes and ordinances.
Note to Installer – Be sure to leave these
instructions with the Consumer.
Note to Consumer – Keep these instructions
with your Owner’s Manual for future
reference.
To prevent electric shock, disconnect
electrical power supply to dishwasher before
changing panels. Do not operate dishwasher
while changing panels or when lower access
panel assembly is removed.
Read these instructions completely
and carefully.
WARNING:
GPF475 Kit
TOOLS AND MATERIALS REQUIRED:
• 1/4" socket driver
• Phillips screwdriver
• Electric drill
• 1/8" and 3/16" drill bits
• Carpenters square
• Safety Glasses
The custom panels should be constructed in
the same manner as cabinet doors. Cut edges
can be seen and must be finished for the best
appearance.
The GPF475 Trim Kit provides for the installation of 3/4" thick custom door and access
panels with a typical 4" high toekick.
KIT INCLUDES:
• Door panel support
• 7, 5/8" phillips flat head screws
• 3 round head screws
• GPF100 spring kit
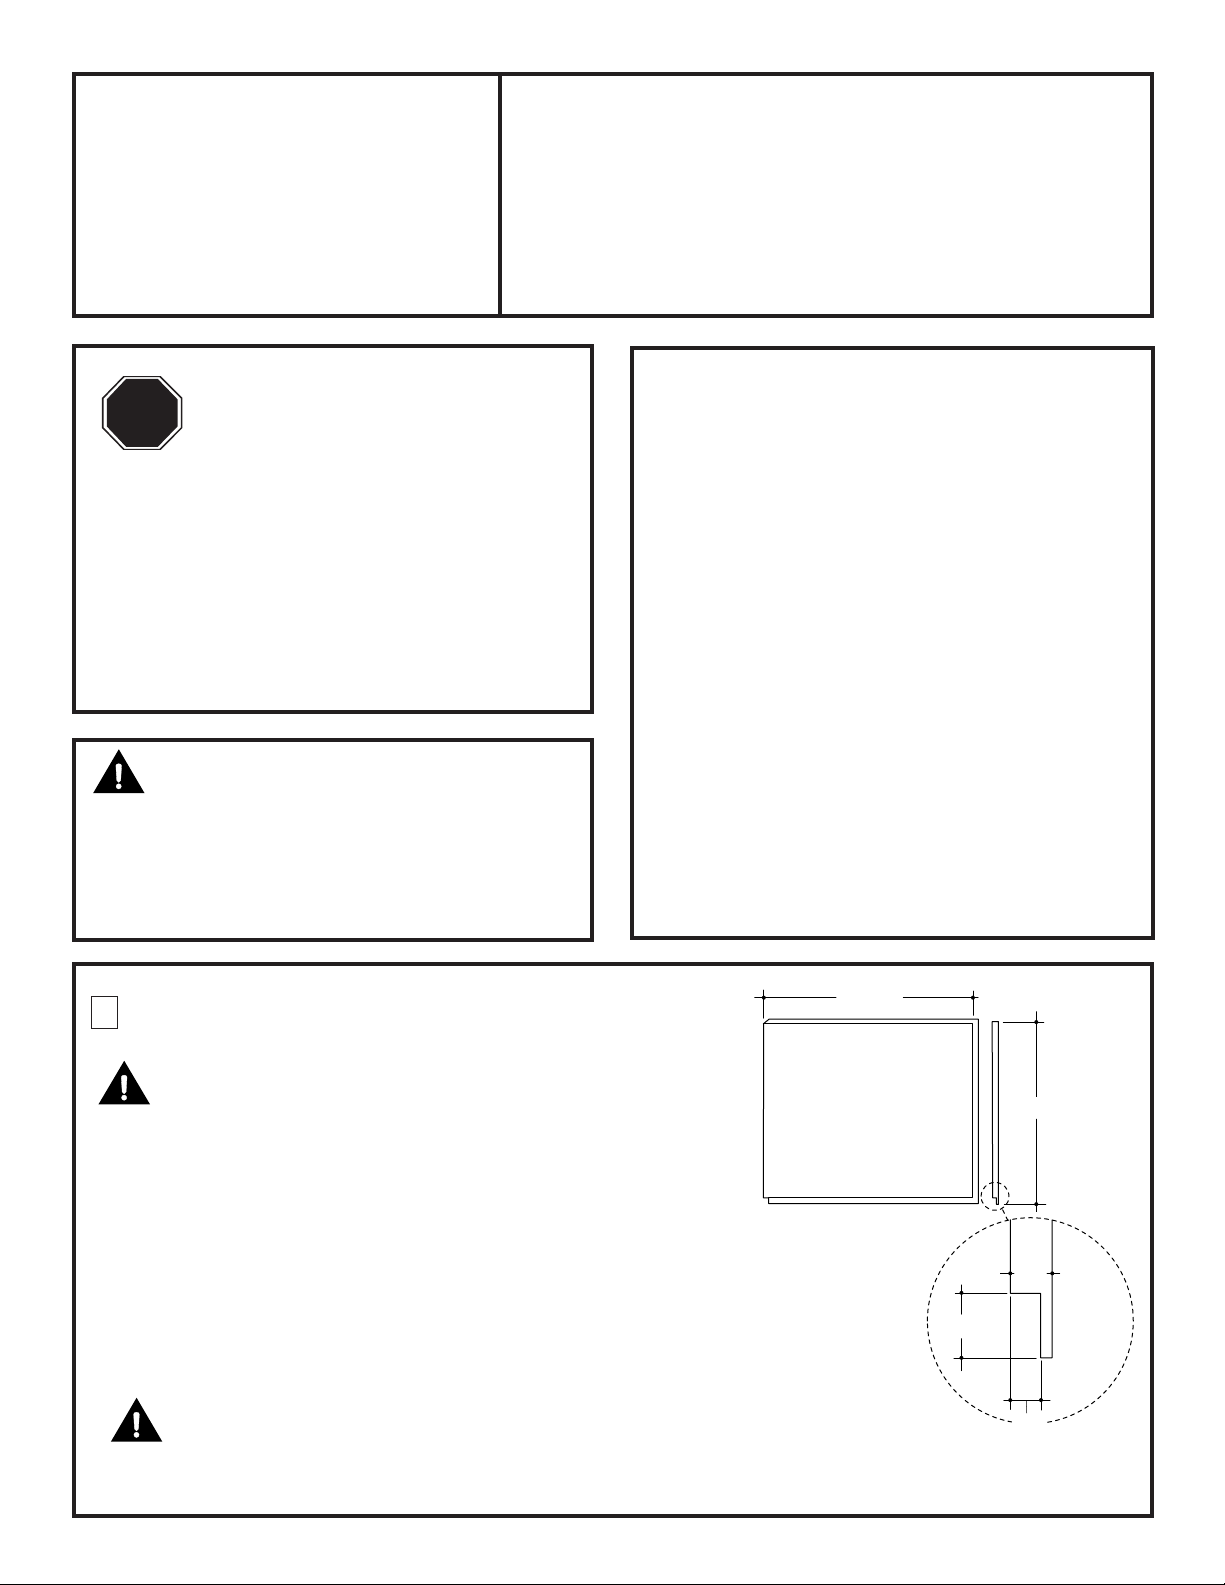
1 CUT 3/4" THICK CUSTOM
PANELS TO SIZE
CAUTION:
Verify door panel height before cutting the
custom panel. Measure from the bottom of the
escutcheon to the bottom of the door. Some
models require shorter door panels.
• Cut the 3/4" thick door panel to the
dimensions shown. (19-13/16" or 19-3/8"H x
23-5/8"W.)
• Rout the bottom edge of the door panel on
the appearance side, 1/2" deep and 1-9/16"
high resulting in 1/4" thickness. See
illustration.
CAUTION:
Some models require 19-3/8" panel height.
Measure before cutting the panel.
23-5/8"
3/4" Thick Panel
Appearance Side
Note:
The custom wood
access panel should
evenly match the
bottom of adjacent
cabinets. Adjustments
made to the leveling
legs to obtain correct
height can affect the
vertical dimension
(height) of the access
panel.
19-13/16"
3/4"
1-9/16"
1/2"
1 CUT 3/4" THICK CUSTOM
PANELS TO SIZE
(CONTINUED)
3 MOUNT CUSTOM PANEL TO
METAL SUPPORT PANEL
• The access panel height may be 3-3/4" to
4-1/4" max. The access panel height can vary
depending upon toekick height and adjustments made to the leveling legs.
A*
*3-3/4" min., 4-1/4" max. for typical 4" toekicks.
Adjustments may be required to match adjacent cabinet
fronts.
3/4" Thick Access Panel
23-5/8"
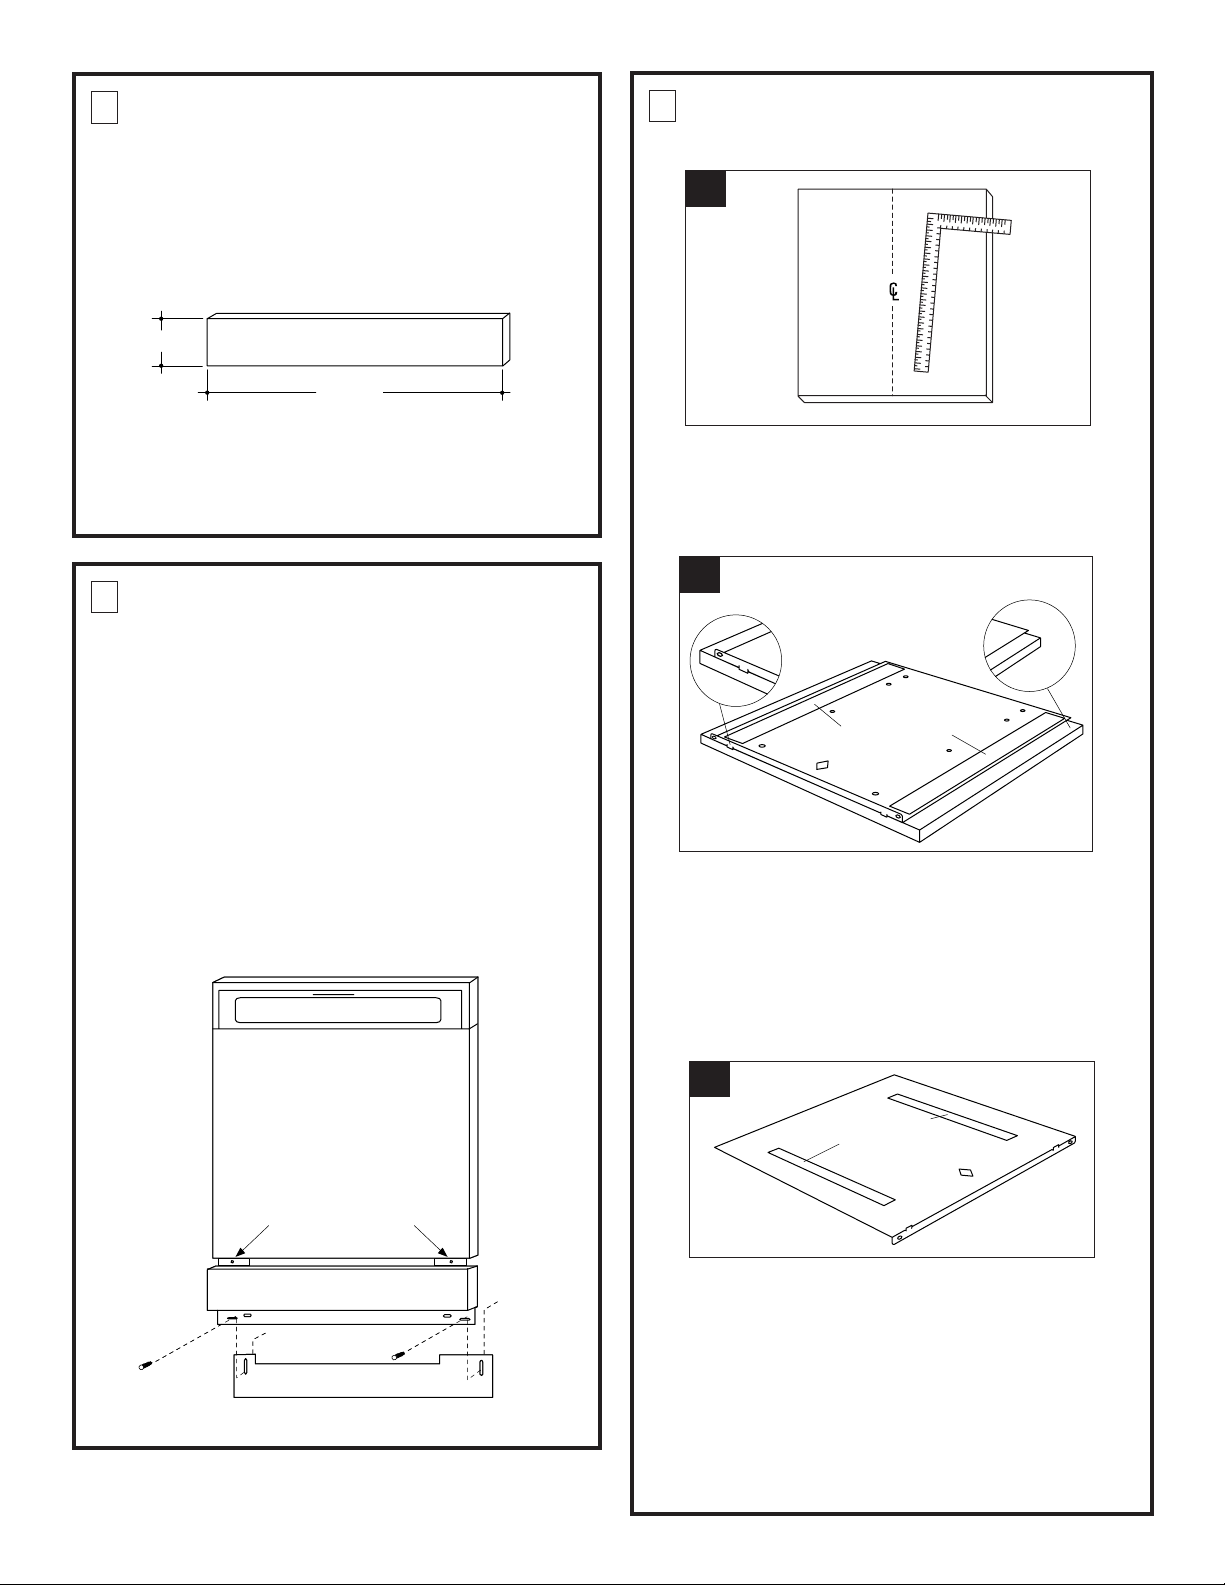
2 REMOVE LOWER ACCESS
PANEL ASSEMBLY
• Remove the two screws below the access
panel. Retain screws.
• Loosen the two screws located between the
door and the access panel. Do not attempt
to remove these screws. They are secured
to the access panel with washers.
• Remove the access panel assembly and
toekick from the dishwasher. Set aside.
A
• Lay the custom panel on a flat surface with
appearance side down.
• Measure and mark the center line. Use a
carpenters square to draw the center line.
B
Tabs
Overlap
Bottom
Edge
Tab
Metal Support
Overlaps
Top
Edge
Foam
Double Sided
Tape
NOTE: Do not remove the insulation behind
the access panel
or toekick.
Escutcheon
Escutcheon
Door
Door
Panel
Panel
Loosen 2 Screws
Loosen 2 Screws
Access Panel
Access Panel
Toekick
Toekick
• Place the metal door panel support on the
custom panel, with the projecting tabs
overlapping and against the bottom edge.
Center the support panel by matching the
center line to the diamond cutout.
NOTE: Do not remove tape from adhesive
strips.
C
Remove
Tape Covering
Adhesive Strips
• Remove the custom panel from the support.
• Remove tape from adhesive strips on the
metal support – on the side that touches the
custom panel.
• Carefully, position the metal support onto the
custom panel with center line showing
through the diamond. Press the metal support against the panel.
2

3 MOUNT CUSTOM PANEL TO
METAL SUPPORT PANEL
(CONTINUED)
D
Drill 4 Holes,
In Locations Shown
• Drill 1/8" dia. pilot holes, 5/8" deep through
support holes.
• Install 4 flathead screws through the support
and into the panel.
F
Install 3 Round
Head Screws
• Secure the panel to the door by installing 3
round head screws into the bottom of the
metal support and into the dishwasher door.
Install center screw first, then left and right
screws.
• Press the custom panel against the
dishwasher door.
CAUTION:
Do not drill pilot holes too deeply to avoid
damaging the appearance side of the panel.
E
Custom Panel
• Remove tape from adhesive strips on the back
side of the metal support.
• Carefully, mount the panel onto the dishwasher by tipping the protruding metal at the
top under and up against the escutcheon.
3

4 INSTALL GPF100 SPRING KIT
This kit must be installed to achieve proper
door balance which is affected by the addition of a heavy custom door panel.
• Follow the instructions provided with the
GPF100 kit.
5 INSTALL CUSTOM PANEL TO
ACCESS ASSEMBLY
• Drill 3 holes 3/16" dia. into the access panel
as shown.
• Place the custom panel onto the access
assembly and mark hole locations.
• Drill 3 holes, 1/8" dia. holes, 5/8" deep into
the custom panel.
• Align the custom panel with screw holes
and drive 3 screws into the back side of the
assembly panel and through the custom
panel. The top edges should align evenly.
6 INSTALL ACCESS PANEL
ASSEMBLY AND TOEKICK
• Place the toekick against the bottom of the
dishwasher.
• Place the access panel assembly against the
dishwasher and tighten the attached
screws.
• Re-install two original bottom screws
loosely.
Adjust the toekick up or down and tighten
screws.
Escutcheon
Escutcheon
Door
Door
Panel
Panel
Loosen 2 Screws
Tighten 2 Screws
CAUTION:
Do not drill pilot holes too deeply to avoid
damaging the appearance side of the panel.
1/2" to 2"
3/16" Dia.
Three Places
1/2" to 2"
1/2" to 2"
1/2" to 2"
Center Line
Access Panel
Access Panel
Toekick
Toekick
Pub. No. 31-30521 SPECIFICATIONS SUBJECT TO CHANGE WITHOUT NOTICE DWG. NO. 206C1559P061
(ND 923-17) 2/04

Instrucciones
19-13/16 pulg.
(50 cm)
23-5/8 pulg. (60 cm)
Lado decorativo del
panel con espesor
de 3/4 de pulg. (19 mm)
1/2 pulg.
(12 mm)
3/4 pulg.
(19 mm)
1-9/16 pulg.
(40 mm)
de instalación
Juego de panel de acceso y puerta
personalizado de 3/4 de pulg.
(19 mm) del lavavajillas
Juego GPF475
ANTES DE COMENZAR
PARE
Lea cuidadosamente todas estas
instrucciones.
IMPORTANTE: Conserve estas
instrucciones para uso del inspector local.
IMPORTANTE: Observe todos los
códigos y reglamentos vigentes.
Nota para el instalador: Asegúrese de dejar
estas instrucciones con el consumidor.
Nota para el consumidor: Conserve estas
instrucciones junto con el Manual del
propietario para futura referencia.
ADVERTENCIA:
Antes de cambiar los paneles, desconecte el
suministro de electricidad al lavavajillas para
prevenir el peligro de electrocución. No use
el lavavajillas mientras cambia los paneles ni
al retirar el conjunto del panel de acceso
inferior.
HERRAMIENTAS Y MATERIALES
REQUERIDOS:
• Llave con casquillo de 1/4 de pulg.
• Destornillador en cruz (Phillips)
• Taladro eléctrico
• Brocas de taladro de 1/8 y 3/16 de pulg.
• Escuadra de carpintero
• Gafas de seguridad
Los paneles personalizados se deben fabricar
de igual forma que las puertas de armario. Los
bordes cortados quedan a la vista y deben
acabarse para obtener buen aspecto.
El juego de molduras GPF475 permite instalar
paneles de acceso y una puerta personalizados
de 3/4 de pulg. (19 mm) con una rejilla típica de
4 pulg. (100 mm) de altura.
EL JUEGO INCLUYE:
• Soporte de panel de puerta
• 7 tornillos Phillips de cabeza plana de 5/8 de
pulg.
• 3 tornillos de cabeza redonda
• Juego de resortes GPF100
1 CORTE LOS PANELES PERSONALIZADOS DE
3/4 DE PULG. (19 mm) AL TAMAÑO DESEADO
PRECAUCIÓN:
Verifique la altura del panel de la puerta antes de
cortar el panel personalizado. Mídalo de la parte
inferior de la lámina a la parte inferior de la
puerta. Algunos modelos requieren paneles de
puerta más cortos.
• Corte el panel de puerta de 3/4 de pulg. (19 mm)
a la dimensión indicada (19-13/16 pulg. o 19-3/8
pulg. de altura x 23-5/8 pulg. de ancho [50 cm o
49,25 cm de altura x 60 cm de ancho]).
• Rebaje con fresadora el borde inferior del lado
decorativo del panel de puerta a 1/2 pulg. (12
mm) de profundidad y 1-9/16 pulg. (40 mm) de
altura, para obtener un espesor de 1/4 de pulg.
(6 mm). Vea la ilustración.
PRECAUCIÓN:
*Algunos modelos requieren una altura de
panel de 19-3/8 pulg. (49,25 cm). Mida antes
de cortar el panel.
Nota: El panel de
acceso de madera
personalizado debe
coincidir con la parte
inferior de los armarios
contiguos. Los ajustes
que se hagan a las patas
de nivelación para obtener
la altura correcta podrían
afectar la dimensión
vertical (altura) del panel
de acceso.

1 CORTE LOS PANELES
PERSONALIZADOS DE 3/4 DE
PULG. (19 mm) AL TAMAÑO
DESEADO
• El panel de acceso puede tener una altura
máxima de 3-3/4 (95 mm) a 4-1/4 pulg. (108
mm). Su altura varía según la altura de la
rejilla y los ajustes realizados en las patas de
nivelación.
(CONTINUACIÓN)
3 COLOQUE EL PANEL
PERSONALIZADO SOBRE EL
PANEL DE SOPORTE DE METAL
A
A*
*3-3/4 pulg. (95 mm) mín., 4-1/4 pulg. (108 mm) máx.
para rejillas típicas de 4 pulg. (100 mm). Podría requerir
ajustes para igualar al frente de los armarios contiguos.
Panel de acceso con espesor
de 3/4 de pulg. (19 mm)
23-5/8 pulg. (60 cm)
2 RETIRE EL CONJUNTO DEL
PANEL DE ACCESO INFERIOR
• Retire los dos tornillos que están debajo del
panel de acceso. Conserve los tornillos.
• Afloje los dos tornillos situados entre la
puerta y el panel de acceso. No trate de
retirar estos tornillos. Están fijados al panel
de acceso con arandelas.
• Retire el conjunto del panel de acceso y la
rejilla del lavavajillas. Póngalos a un lado.
NOTA: No saque el aislamiento que está
detrás del panel de acceso o la rejilla.
Lámina
Escutcheon
• Acueste el panel personalizado sobre una
superficie plana con el lado decorativo hacia
abajo.
• Mida y marque la línea del centro. Use una
escuadra de carpintero para dibujar la línea
del centro.
B
Pestaña
• Ponga el soporte de metal del panel de
puerta sobre el panel personalizado, con las
pestañas que sobresalen contra el borde
inferior. Para centrar el panel de soporte,
haga coincidir la línea del centro con el
recorte en forma de diamante.
NOTA: No retire la cinta de las tiras
adhesivas.
Las
pestañas
solapan
sobre
el borde
inferior
Cinta adhesiva
doble de espuma
El soporte
solapa sobre
de metal
el borde
superior
Panel de puerta
Door
Panel
Loosen 2 Screws
Afloje los 2 tornillos
Panel de acceso
Access Panel
Toekick
Rejilla
C
Retire la cinta
que cubre las tiras
adhesivas
• Retire el panel personalizado del soporte.
• Retire la cinta de las tiras adhesivas en el
soporte de metal – en el costado que toca el
panel personalizado.
• Coloque cuidadosamente el soporte de metal
sobre el panel personalizado de forma que la
línea del centro se vea a través del diamante.
Presione el soporte de metal contra el panel.
2

3 COLOQUE EL PANEL
PERSONALIZADO SOBRE EL
PANEL DE SOPORTE DE METAL
(CONTINUACIÓN)
D
Taladre 4
orificios en los
sitios indicados
• Taladre orificios piloto de 1/8 de pulg. a
través de los orificios de apoyo, hasta una
profundidad de 5/8 de pulg. (16 mm).
• Atornille 4 tornillos de cabeza plana a
través del soporte y dentro del panel.
F
Atornille los 3 tornillos
de cabeza redonda
• Fije el panel en la puerta atornillando 3 tornillos de cabeza redonda en la parte inferior del
soporte de metal y dentro de la puerta del
lavavajillas. Instale primero el tornillo del
centro y después los tornillos de la derecha y
la izquierda.
• Presione el panel personalizado contra la
puerta del lavavajillas.
PRECAUCIÓN:
No taladre orificios piloto demasiado
profundos para no dañar el lado decorativo
del panel.
E
Panel personalizado
• Retire la cinta de las tiras adhesivas en la
parte posterior del soporte de metal.
• Incline cuidadosamente el metal que
sobresale en la parte superior del lavavajillas
por dentro y hacia arriba de la lámina para
montar el panel en el lavavajillas.
3

4 INSTALE EL JUEGO DE
RESORTES GPF100
Es necesario instalar este juego para
balancear bien la puerta debido a la adición
del panel personalizado pesado.
• Siga las instrucciones suministradas con el
juego GPF100.
5 INSTALE EL PANEL
PERSONALIZADO EN EL
CONJUNTO DE ACCESO
• Taladre 3 orificios de 3/16 de pulg. en el
panel de acceso en la forma indicada.
• Ponga el panel personalizado contra el
conjunto de acceso y marque la ubicación
de los orificios.
• Taladre 3 orificios de 1/8 de pulg. a través
del panel personalizado, hasta una
profundidad de 5/8 de pulg. (16 mm).
• Haga coincidir el panel personalizado con
los orificios taladrados y atornille 3 tornillos
en la parte posterior del panel del conjunto
y a través del panel personalizado. Los
bordes superiores deben quedar alineados.
6 INSTALE EL CONJUNTO DEL
PANEL DE ACCESO Y LA
REJILLA
• Ponga la rejilla contra la parte inferior del
lavavajillas.
• Ponga el conjunto del panel de acceso
contra el lavavajillas y apriete los tornillos
adjuntos.
• Vuelva a atornillar los tornillos inferiores
originales, sin apretarlos. Ajuste la rejilla
hacia arriba o abajo y apriete los tornillos.
Lámina
Escutcheon
Door
Panel de puerta
Panel
Apriete los 2 tornillos
Loosen 2 Screws
Access Panel
Panel de acceso
PRECAUCIÓN:
No taladre orificios piloto demasiado
profundos para no dañar el lado decorativo
del panel.
De 1/2 pulg. (12 mm)
a 2 pulg. (51 mm)
Línea del
centro
Diám. de 3/16 de pulg.
(5 mm) en tres sitios
De 1/2 pulg. (12 mm)
a 2 pulg. (51 mm)
Toekick
Rejilla
Pub. No. 31-30521 ESPECIFICACIONES SUJETAS A CAMBIO SIN PREVIO AVISO DWG. NO. 206C1559P061
(ND 923-17) 2/04
 Loading...