

Page 1
1/4" Custom Dishwasher
Installation
Instructions
BEFORE YOU BEGIN
STOP
IMPORTANT – Save these instruc-
tions for local inspector’s use.
IMPORTANT – Observe all governing
codes and ordinances.
Note to Installer – Be sure to leave these
instructions with the Consumer.
Note to Consumer – Keep these instructions
with your Owner’s Manual for future
reference.
Read these instructions completely
and carefully.
GPF425A-Almond Trim Kit, GPF425B-Black Trim Kit,
GPF425C-Bisque Trim Kit, GPF425W-White Trim Kit
Door and Access Panel Kit
GPF425 Series Kit
TOOLS AND MATERIALS REQUIRED:
• 1/4" socket driver
• Phillips screwdriver
• Electric drill
• 1/8" drill bit
• Masking tape
• Safety glasses
• Gloves to protect against sharp edges
KIT INCLUDES:
• Left, right and bottom door trim
• Top and bottom access panel trim
• Color matched screws
WARNING:
To prevent electric shock, disconnect electrical power supply to dishwasher before
changing panels. Do not operate dishwasher
while changing panels or when lower access
panel assembly is removed.
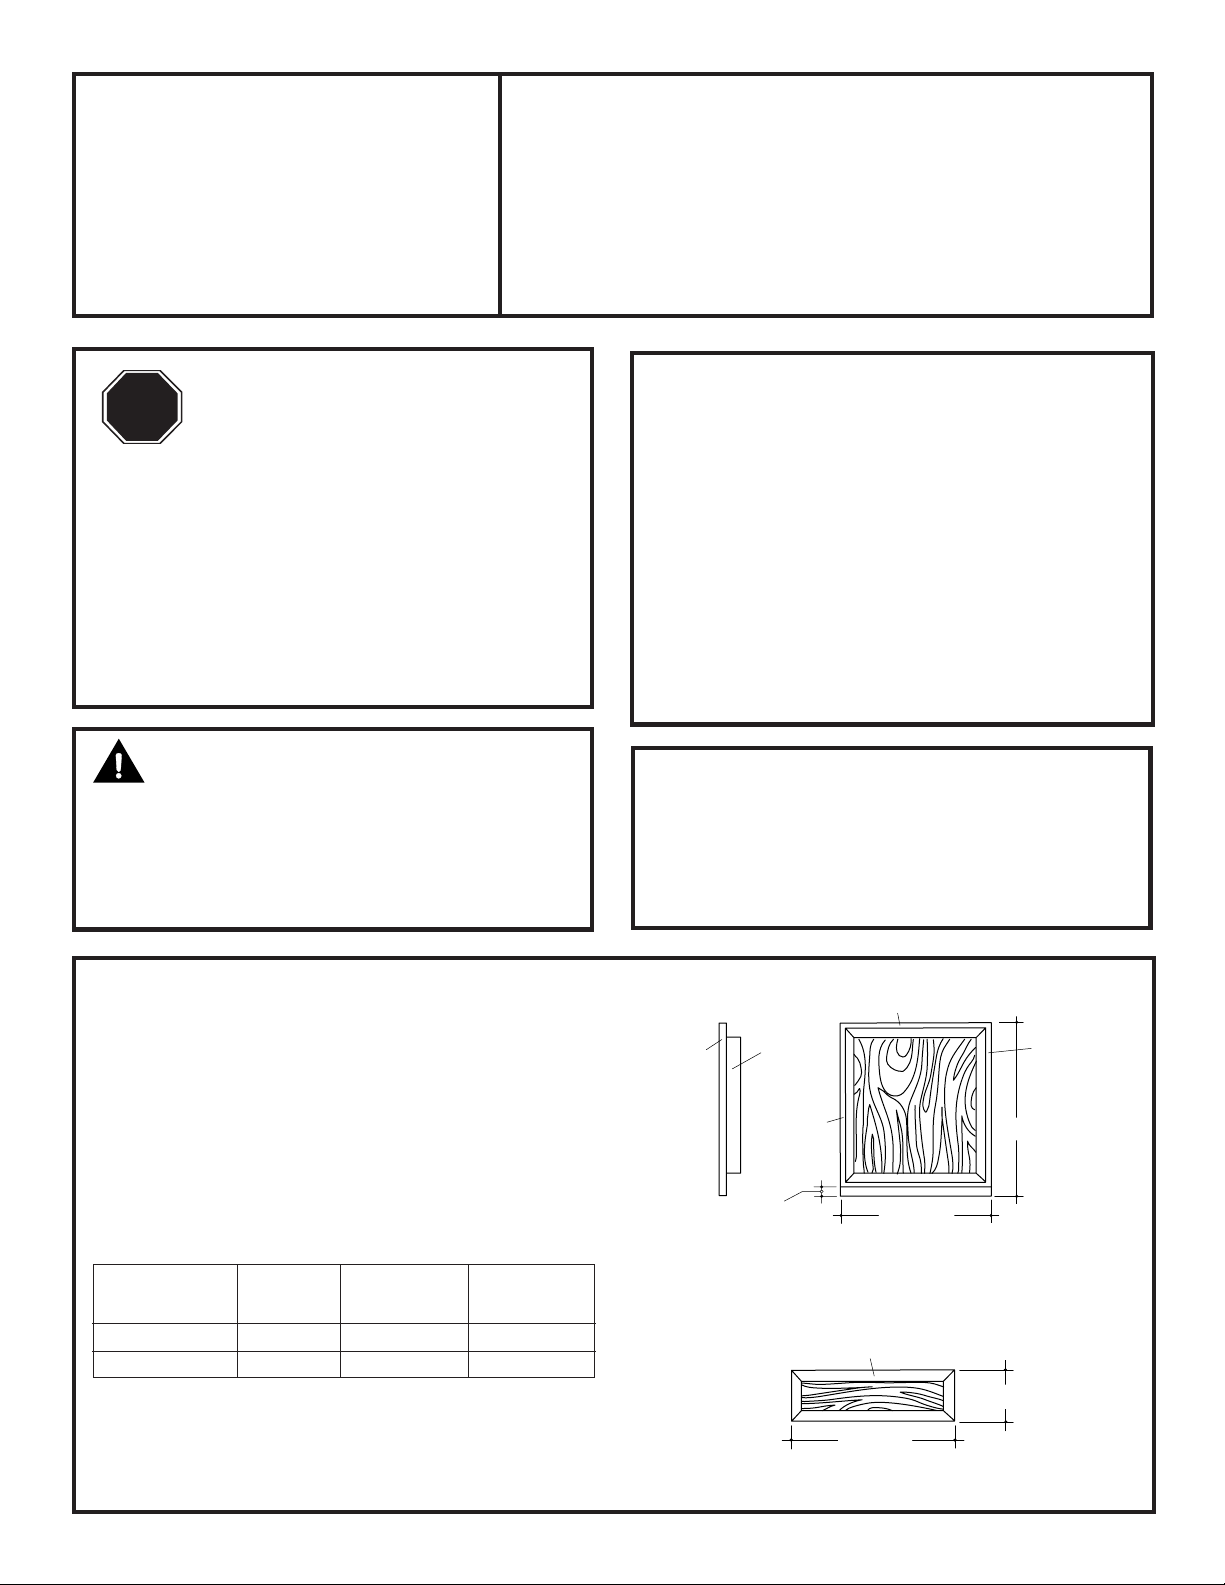
INSTALLATION OPTIONS
This trim kit is designed to accommodate 1/4"
thick panels. A raised panel screwed or glued to
1/4" thick backing can be used. The raised
portion of the panel must be fabricated to
permit clearances for the trim on all sides.
• “X” Clearance shown at the bottom of the
raised panel must be maintained to prevent
the door from striking the access panel when
opened.
Appearance Total “X”
Panel Backing Thickness Clearance
3/4" 1/4" 1" 2"
1/2" 1/4" 3/4" 1-7/8"
A 3/4" thick custom panel may be installed by
routing the top and sides to 1/4" thickness. The
bottom edge, Dimension “X”, should be 1-1/2"
high and 1/4" thick.
IMPORTANT!
GPF100 Dishwasher Door Spring Kit
MUST BE installed when custom
door panels weigh 4 pounds or more.
1/4" Min. Clearance
1/8" Min.
Clearance
18-7/8"
1/4"
Thick
Panel
Appearance
Panel
1/8" Min.
Clearance
X
Clearance
1/4" Min. Clearance
23-9/16"
Access Panel
All Sides
3-11/16"
29-9/16"
Page 2
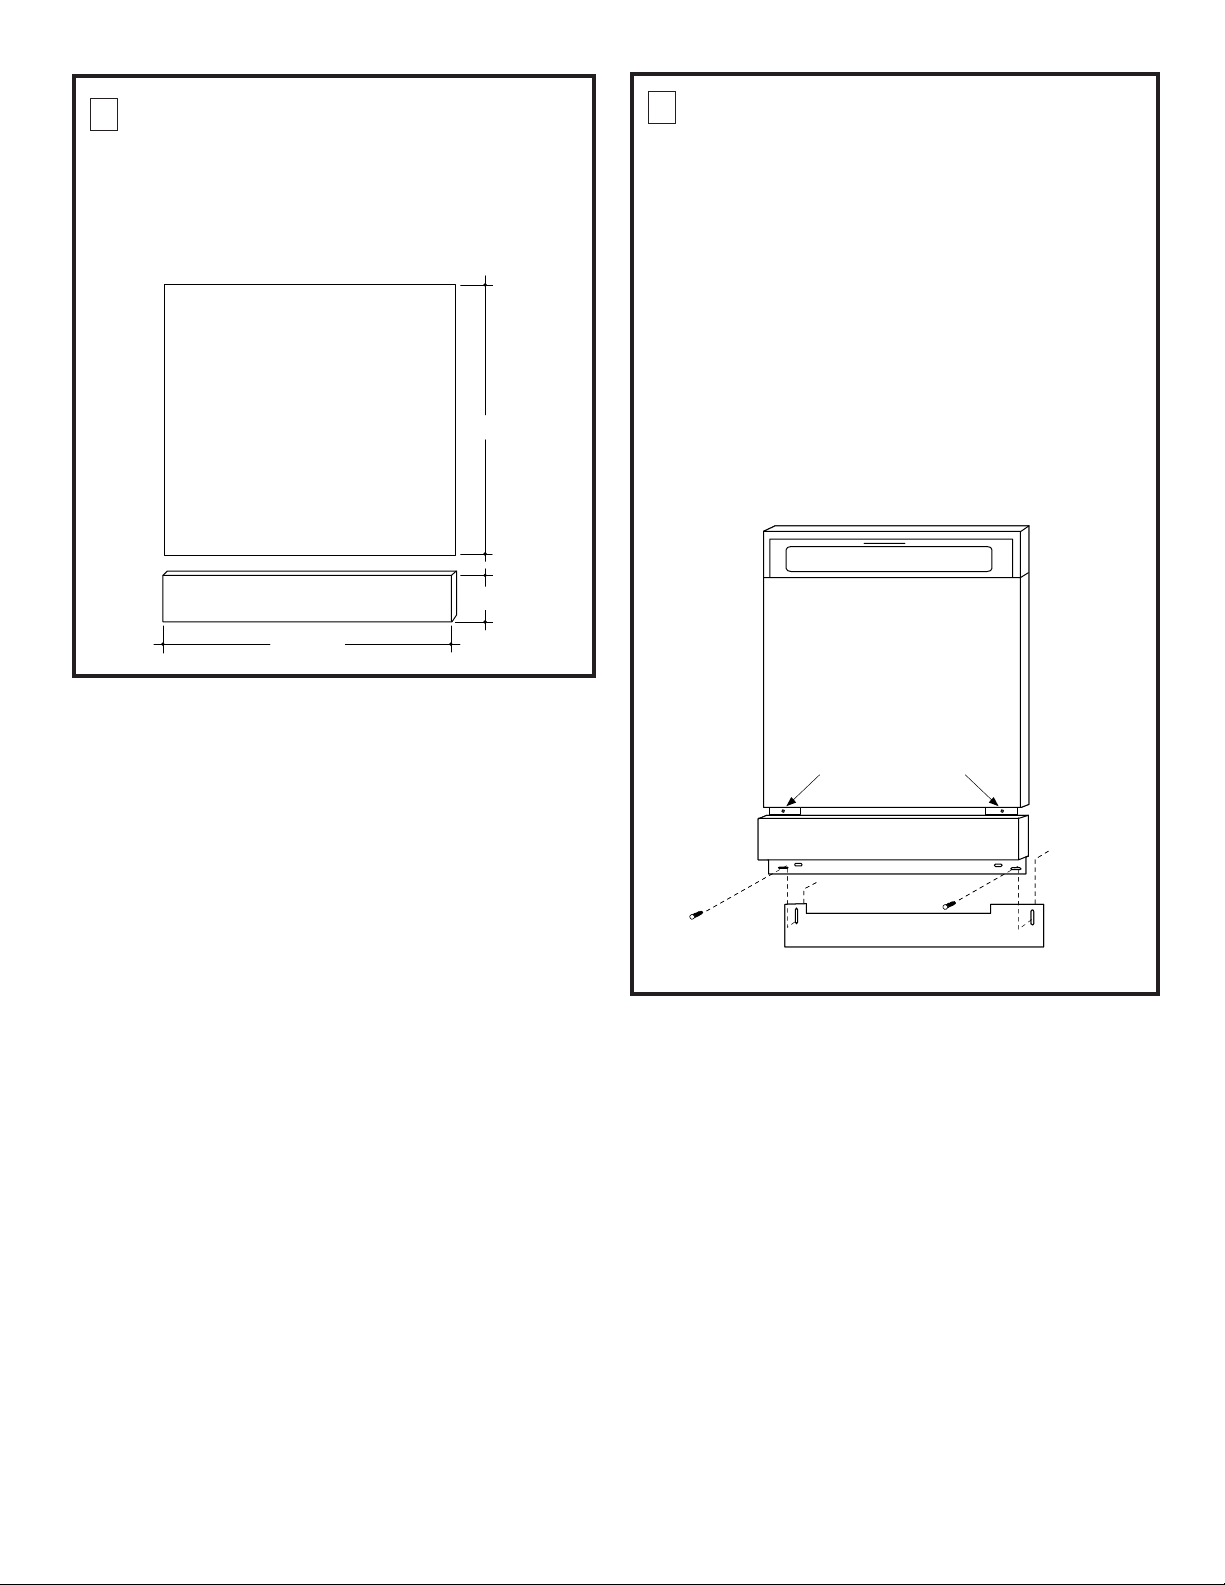
1 CUT 1/4" THICK CUSTOM
PANELS TO SIZE
• Cut door panel and access panel to the
dimensions shown.
NOTE: The trim provided will conceal the cut
edges of the panels.
1/4" Thick
Door Panel
19-3/4"
2 REMOVE LOWER ACCESS
PANEL ASSEMBLY
• Remove the two screws below the
access panel. Retain screws.
• Loosen the two screws located
between the door and the access
panel. Do not attempt to remove
these screws. They are secured to
the access panel with washers.
• Remove the access panel assembly
from the dishwasher.
• Remove the toekick and set aside.
NOTE: Do not remove the insulation
behind the access panel or toekick.
Escutcheon
Escutcheon
1/4" Thick Access Panel
23-9/16"
3-11/16"
Door
Door
Panel
Panel
Loosen 2 Screws
Loosen 2 Screws
Access Panel
Access Panel
Toekick
Toekick
2
Page 3
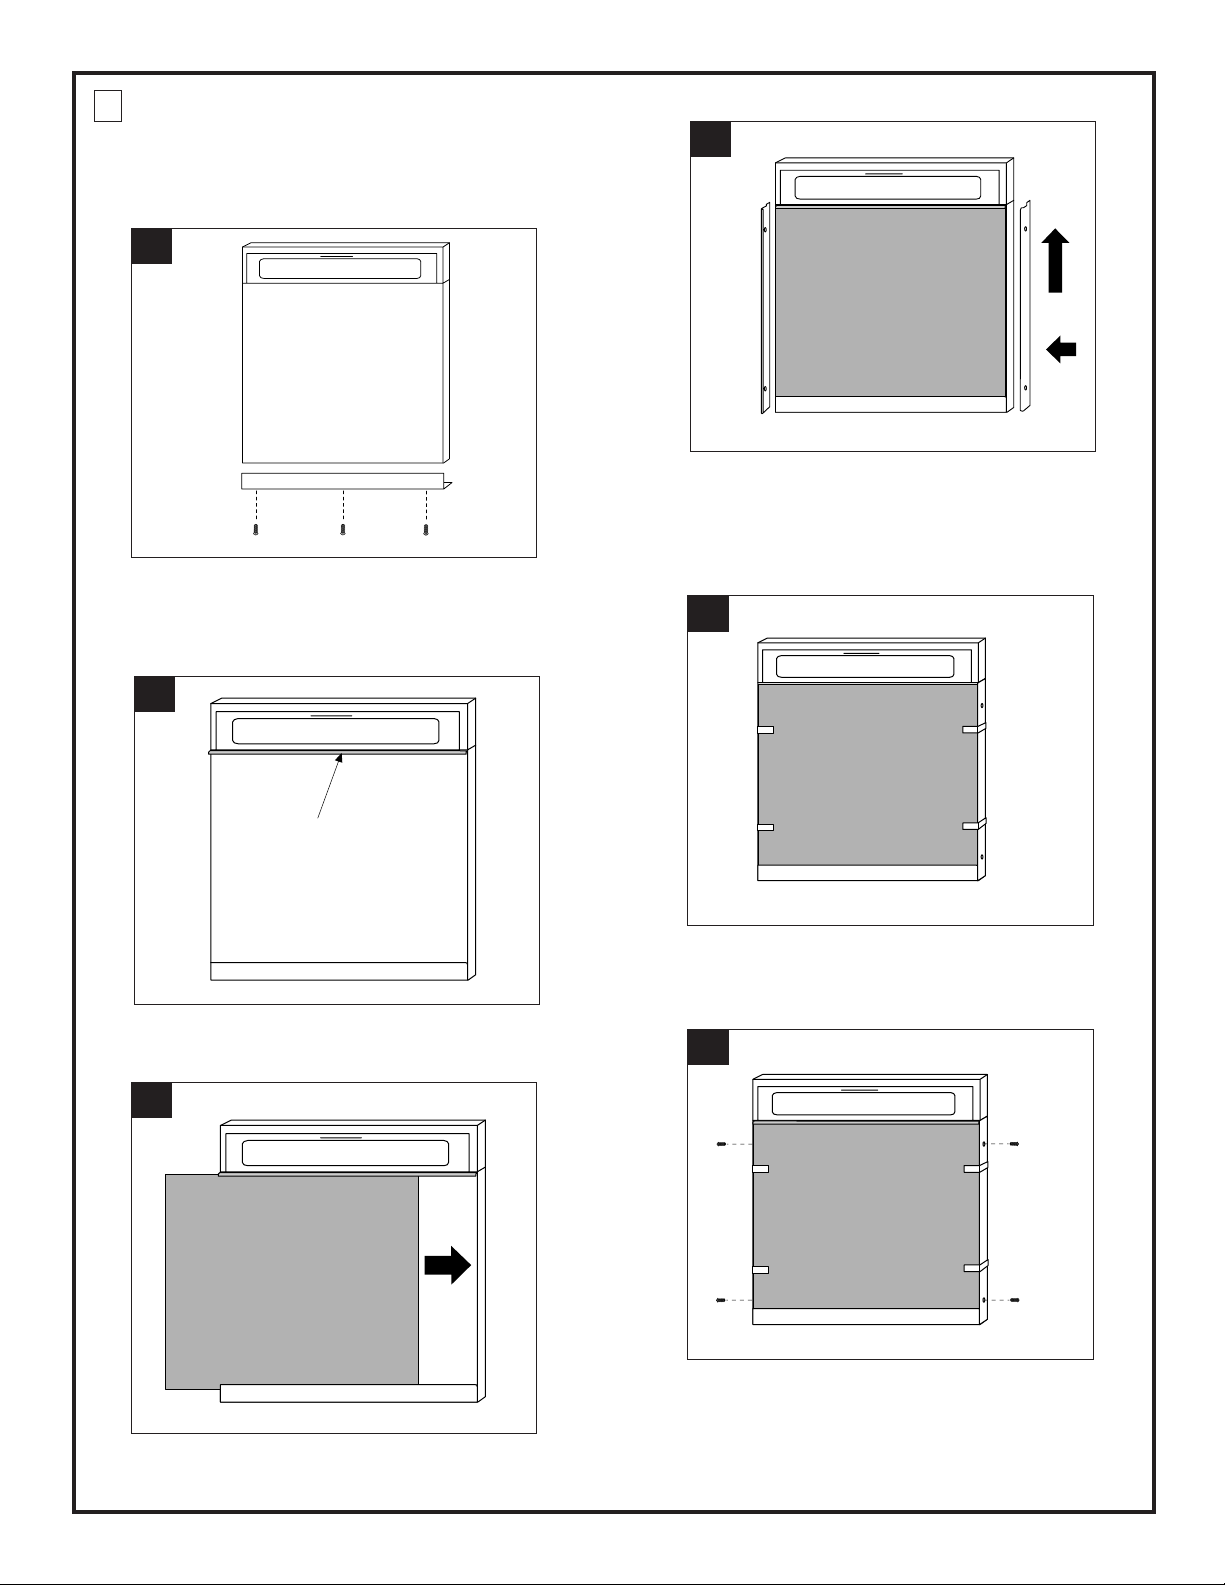
3 INSTALL DOOR PANEL TRIM
AND CUSTOM PANEL
• Remove the protective plastic covering from
side trim pieces.
A
• Place bottom trim against the bottom of the
door panel and drive center screw, then left
and right screws.
D
• The notch on the side trim pieces goes
towards the front. Slide side trim up and
under the escutcheon and over the edge
of the custom panel.
E
B
“Z” Trim
• Slide “Z” shaped trim under the escutcheon.
C
Tape Trim
to Custom
Panel on
Each Side
• Use masking tape to hold trim tightly
against the custom panel.
F
Drill Holes
and Install
Screws
• Slide custom door panel under the “Z” trim
and bottom trim.
• Center punch and drill holes through the
holes in the side trim and into the dishwasher
door.
• Secure the trim to the door with color
matched screws provided. Remove tape.
3
Page 4

4 INSTALL CUSTOM ACCESS
PANEL
• Place 1/4" custom panel in position on the
access panel assembly. Use masking tape
to hold in position.
• Loosely, install 3 color matched screws into
the bottom of the access panel.
• Peel paper backing off the tape on the
bottom trim piece.
• Slip trim under screw heads and press the
trim against the bottom of the access panel.
Tighten screws.
• Remove masking tape.
• Position top trim against the custom panel
and form the ends over the sides of the
panel.
• Remove the trim and peel off the paper
backing on the tape.
• Reinstall the trim over the assembly.
• Use masking tape to hold the trim against
the panel on each side.
• Drill holes through the side trim holes and
into the access panel. Secure each side with
one screw.
• Remove masking tape.
5 INSTALL ACCESS PANEL
ASSEMBLY AND TOEKICK
• Place the toekick against the bottom of the
dishwasher.
• Place the access panel assembly against the
dishwasher and tighten the attached
screws.
• Re-install two original bottom screws
loosely. Adjust the toekick up or down and
tighten screws.
Tighten
2 Screws
Pub. No. 31-30500-2 SPECIFICATIONS SUBJECT TO CHANGE WITHOUT NOTICE DWG. NO. 206C1559P036
(ND 923-16) 2/04
Page 5

Instrucciones
de instalación
Juego de panel de acceso y puerta personalizado
de 1/4 de pulg. (6 mm) del lavavajillas
JUEGOS DE LA SERIE GPF425
GPF425A, Juego de molduras almendra
GPF425B, Juego de molduras negras
GPF425C, Juego de molduras esmaltadas
GPF425W, Juego de molduras blancas
ANTES DE COMENZAR
PARE
Lea cuidadosamente todas estas
instrucciones.
IMPORTANTE: Conserve estas
instrucciones para uso del inspector local.
IMPORTANTE: Observe todos los
códigos y reglamentos vigentes.
Nota para el instalador: Asegúrese de dejar
estas instrucciones con el consumidor.
Nota para el consumidor: Conserve estas
instrucciones junto con el Manual del
propietario para futura referencia.
ADVERTENCIA:
Antes de cambiar los paneles, desconecte
el suministro de electricidad al lavavajillas
para prevenir el peligro de electrocución.
No use el lavavajillas mientras cambia los
paneles ni al retirar el conjunto del panel de
acceso inferior.
HERRAMIENTAS Y MATERIALES
REQUERIDOS:
• Llave con casquillo de 1/4 de pulg.
• Destornillador en cruz (Phillips)
• Taladro eléctrico
• Broca de taladro de 1/8 de pulg.
• Cinta adhesiva de papel
• Gafas de seguridad
• Guantes para protegerse de bordes afilados
EL JUEGO INCLUYE:
• Molduras de puerta izquierda, derecha e
inferior
• Molduras superior e inferior del panel de
acceso
• Tornillos de igual color
¡IMPORTANTE!
SE DEBE instalar el juego de resortes de
puerta para lavavajillas GPF100 si los
paneles de puerta personalizados pesan 4
libras (1,8 kg) o más.
OPCIONES DE INSTALACIÓN
Este juego de molduras se puede colocar en paneles
de 1/4 de pulg. (6 mm) de espesor. Se puede usar un
panel sobresaliente atornillado o encolado a un
respaldo de 1/4 de pulg. (6 mm). Se debe fabricar la
porción sobresaliente del panel a fin de proveer
espacio para la moldura en todos los costados.
• Se debe mantener la separación “X” que se indica
en la parte inferior del panel sobresaliente para
evitar que la puerta golpee el panel de acceso al
abrirla.
Panel decorativo Respaldo Espesor total Separación “X”
3/4 pulg. (19 mm) 1/4 pulg. (6 mm) 1 pulg. (25 mm) 2 pulg. (51 mm)
1/2 pulg. (12 mm) 1/4 pulg. (6 mm) 3/4 pulg. (19 mm) 1-7/8 pulg. (48 mm)
Se puede instalar un panel personalizado de
3/4 de pulg. (19 mm) rebajando la parte superior
y los costados a un espesor de 1/4 de pulg.
(6 mm). El borde inferior, dimensión “X”, debe
tener una altura de 1-1/2 pulg. (38 mm) y un
espesor de 1/4 de pulg. (6 mm).
pulg. (6 mm)
Panel con
espesor
de 1/4 de
Separación mínima
Panel
decorativo
Separación
mínima de
1/8 de pulg.
(3 mm)
Separación X
Separación mínima de 1/4 de pulg.
(6 mm) en todos los costados
de 1/4 de pulg.
23-9/16 pulg.
(60 cm)
Panel de acceso
23-9/16 pulg.
(60 cm)
Separación
mínima de
1/8 de pulg.
(3 mm)
19-3/4 pulg.
(50 cm)
3-11/16 pulg.
(94 mm)
Page 6

1 CORTE LOS PANELES
PERSONALIZADOS DE 1/4 DE
PULG. (6 mm) AL TAMAÑO
DESEADO
• Corte el panel de puerta y el panel de
acceso a las dimensiones indicadas.
NOTA: La moldura que se suministra
ocultará los bordes cortados de los paneles.
2 RETIRE EL CONJUNTO DEL
PANEL DE ACCESO INFERIOR
• Retire los dos tornillos que están debajo del
panel de acceso. Conserve los tornillos.
• Afloje los dos tornillos situados entre la
puerta y el panel de acceso. No trate de
retirar estos tornillos. Están fijados al panel
de acceso con arandelas.
• Retire el conjunto del panel de acceso del
lavavajillas.
• Retire la rejilla y póngala a un lado.
NOTA: No saque el aislamiento que está
detrás del panel de acceso o la rejilla.
Panel de puerta con
espesor de 1/4 de pulg. (6 mm)
Panel de acceso con espesor
de 1/4 de pulg. (6 mm)
23-9/16 pulg. (60 cm)
19-3/4 pulg.
(50 cm)
3-11/16 pulg. (94 mm)
Lámina
Escutcheon
Panel de puerta
Door
Panel
Loosen 2 Screws
Afloje los 2 tornillos
Panel de acceso
Access Panel
Rejilla
Toekick
2
Page 7

3 INSTALE LAS MOLDURAS DEL
PANEL DE PUERTA Y EL PANEL
PERSONALIZADO
• Desprenda el plástico de protección que
cubre las molduras laterales.
A
• Ponga la moldura inferior contra la parte
inferior del panel de puerta, atornille primero
el tornillo del centro y después los que están
a su derecha e izquierda.
B
D
• La ranura en las molduras laterales se debe
orientar hacia el frente. Deslice la moldura
lateral hacia arriba y debajo de la lámina y
sobre el borde del panel personalizado.
E
Fije las
molduras
a cada lado
del panel
personalizado
Moldura en “Z”
• Deslice la moldura en “Z” bajo la lámina.
C
• Deslice el panel de puerta personalizado bajo
la moldura en “Z” y la moldura inferior.
• Use cinta adhesiva de papel para sujetar
bien la moldura contra el panel
personalizado.
F
Taladre
orificios
y atornille
los tornillos
• Marque con el punzón de centros la posición
de los orificios en la moldura lateral y taladre
orificios en la moldura y la puerta del
lavavajillas.
• Fije la moldura a la puerta con los tornillos de
igual color suministrados. Retire la cinta
adhesiva.
3
Page 8

4 INSTALE EL PANEL DE ACCESO
PERSONALIZADO
• Ponga el panel personalizado de 1/4 de
pulg. (6 mm) en posición sobre el conjunto
del panel de acceso. Use cinta adhesiva de
papel para mantenerlo en posición.
• Atornille, sin apretar, 3 tornillos de igual
color en la parte inferior del panel de
acceso.
• Retire el respaldo de papel de la cinta que
está en la moldura inferior.
• Coloque la moldura bajo las cabezas de los
tornillos y presiónela contra la parte inferior
del panel de acceso. Apriete los tornillos.
• Retire la cinta adhesiva de papel.
• Ponga la moldura superior contra el panel
personalizado de forma que los extremos
coincidan con los lados del panel.
• Retire la moldura y desprenda el papel de la
cinta adhesiva.
• Vuelva a colocar la moldura sobre el
conjunto.
• Use cinta adhesiva de papel para sujetar la
moldura contra cada extremo del panel.
• Taladre orificios a través de los orificios
existentes en la moldura lateral y dentro del
panel de acceso. Fije cada extremo con un
tornillo.
• Retire la cinta adhesiva de papel.
5 INSTALE EL CONJUNTO DEL
PANEL DE ACCESO Y LA
REJILLA
• Ponga la rejilla contra la parte inferior del
lavavajillas.
• Ponga el conjunto del panel de acceso
contra el lavavajillas y apriete los tornillos
adjuntos.
• Vuelva a atornillar los tornillos inferiores
originales, sin apretarlos. Ajuste la rejilla
hacia arriba o abajo y apriete los tornillos.
Apriete los
2 tornillos
Pub. No. 31-30500-2 ESPECIFICACIONES SUJETAS A CAMBIO SIN PREVIO AVISO DWG. NO. 206C1559P036
(ND 923-16) 2/04
 Loading...