

Page 1

Safety Instructions .............. 2, 3
Operating Instructions
Control Settings .......................4
Thermistor ............................4
Storage Drawers .......................5
Ice Service ..............................5
Care and Cleaning ..................6, 7
Owner’s Manual and
Installation Instructions
GPE12
Installation Instructions
Advanced Planning ................... 8
Refrigerator Features ..................9
Reversing the Door Swing ........ 10, 11
Top Freezer
Troubleshooting Tips
Normal Operating Sounds ........... 12
Problem Solver ...................13, 14
Consumer Support
Warranty ........................... 16
Consumer Support .......... Back Page
Congélateur supérieur
Réfrigérateurs
Manuel d’utilisation
et d’installation
La section française commence à la page 17
Congelador superior
Refrigeradores
Manual del propietario
e instalación
La sección en español empieza en la página 33
Write the model and serial
numbers here:
Model # ____________________
Serial # ____________________
Refrigerator
You can find them on a label inside
the refrigerator.
245D2030P001 49-60749 12-15 GE
Page 2
IMPORTANT SAFETY INFORMATION.
READ ALL INSTRUCTIONS BEFORE USING.
IMPORTANT SAFETY INFORMATION READ ALL INSTRUCTIONS BEFORE USING
GE Appliances website
For more information on your refrigerator’s operation, visit GE Appliances at
GEAppliances.com or call 800.GECARES (800.432.2737).
www.
In Canada visit GEAppliances.ca or call 800.561.3344.
REFRIGERATOR SAFETY INFORMATION
This is the safety alert symbol. This symbol alerts you to potential hazards that can kill or hurt you and others. All safety
messages will follow the safety alert symbol and the word “DANGER”, “WARNING”, or “CAUTION”. These words are defined as:
DANGER
Indicates a hazardous situation which, if not avoided, will result in death or serious injury.
WARNING
Indicates a hazardous situation which, if not avoided, could result in death or serious injury.
Indicates a hazardous situation which, if not avoided, could result in minor or moderate injury.
CAUTION
IMPORTANT SAFETY INSTRUCTIONS
WARNING
This refrigerator must be properly installed and located in
accordance with the Installation Instructions before it is used.
Unplug the refrigerator before making repairs, replacing a light
bulb, or cleaning.
Note: Power to the refrigerator cannot be disconnected by any
setting on the control panel.
Note: Repairs must be performed by a qualified service
professional.
Replace all parts and panels before operating.
Do not store or use gasoline or other flammable vapors and
liquids in the vicinity of this or any other appliance.
CAUTION
Do not clean glass shelves or covers with warm water
when they are cold. Glass shelves and covers may break if
exposed to sudden temperature changes or impact, such
as bumping or dropping. Tempered glass is designed to
shatter into many small pieces if it breaks. Do not wash any
plastic refrigerator parts in the dishwasher.
Keep fingers out of the “pinch point” areas; clearances
between the doors and between the doors and cabinet are
necessarily small. Be careful closing doors when children
are in the area.
To reduce the risk of fire, explosion, electric shock, or injury when using your
refrigerator follow these basic safety precautions:
To reduce the risk of injury when using your refrigerator, follow these basic
safety precautions.
Because of potential safety hazards under certain conditions,
we strongly recommend against the use of an extension cord.
However, if you must use an extension cord, it is absolutely
necessary that it be a UL-listed (in the United States) or a CSA
certified (in Canada), 3-wire grounding type appliance extension
cord having a grounding type plug and outlet and that the electrical
rating of the cord be 15 amperes (minimum) and 120 volts.
To prevent suffocation and entrapment hazards to children,
remove the fresh food and freezer doors from any refrigerator
before disposing of it or discontinuing its use.
Do not allow children to climb, stand or hang on the door
handles or the shelves in the refrigerator. They could seriously
injure themselves.
Do not refreeze frozen foods which have thawed
completely.
In refrigerators with automatic icemakers, avoid contact
with the moving parts of the ejector mechanism, or with the
heating element that releases the cubes. Do not place fingers
or hands on the automatic ice making mechanism while the
refrigerator is plugged in.
2
Page 3

IMPORTANT SAFETY INFORMATION.
READ ALL INSTRUCTIONS BEFORE USING. GEAppliances.com
WARNING
Explosion Hazard.
Keep flammable materials and vapors, such as gasoline, away from refrigerator. Failure to do so can
result in fire, explosion, or death.
CONNECTING ELECTRICITY
WARNING
Plug into a grounded 3-prong outlet
Do not remove the ground prong
Do not use an adapter
Failure to follow these instructions can result in death, fire, or electrical shock.
Electrical Shock Hazard.
Do not, under any circumstances, cut or remove the third (ground) prong from the power cord.
For personal safety, this appliance must be properly grounded.
The power cord of this appliance is equipped with a 3-prong
(grounding) plug which mates with a standard 3-prong
(grounding) wall outlet to minimize the possibility of electric
shock hazard from this appliance.
Have the wall outlet and circuit checked by a qualified
electrician to make sure the outlet is properly grounded.
Where a standard 2-prong wall outlet is encountered, it is
your personal responsibility and obligation to have it replaced
with a properly grounded 3-prong wall outlet. Do not use an
adapter.
The refrigerator should always be plugged into its own
individual electrical outlet which has a voltage rating that
matches the rating plate.
This provides the best performance and also prevents
overloading house wiring circuits which could cause a fire
hazard from overheated wires.
Never unplug your refrigerator by pulling on the power cord.
Always grip plug firmly and pull straight out from the outlet.
Repair or replace immediately all power cords that have
become frayed or otherwise damaged. Do not use a cord
that shows cracks or abrasion damage along its length or at
either end.
When moving the refrigerator away from the wall, be careful
not to roll over or damage the power cord.
PROPER DISPOSAL OF YOUR OLD REFRIGERATOR
WARNING
Remove fresh-food and freezer doors from the refrigerator, prior to disposal. Failure to do so can
result in child entrapment which can lead to death or brain damage.
IMPORTANT:
Suffocation and child entrapment hazard.
Child entrapment and suffocation are not problems of
the past. Junked or abandoned refrigerators are still
dangerous even if they will sit for “just a few days.” If you
are getting rid of your old refrigerator, please follow the
instructions below to help prevent accidents.
Before You Throw Away Your Old Refrigerator or
Freezer:
Take off the fresh food and freezer doors.
Leave the shelves in place so that children may not
easily climb inside.
Refrigerants
All refrigeration products contain refrigerants, which
under federal law must be removed prior to product
disposal. If you are getting rid of an old refrigeration
product, check with the company handling the disposal
about what to do.
READ AND FOLLOW THIS SAFETY INFORMATION CAREFULLY.
SAVE THESE INSTRUCTIONS
3
Page 4
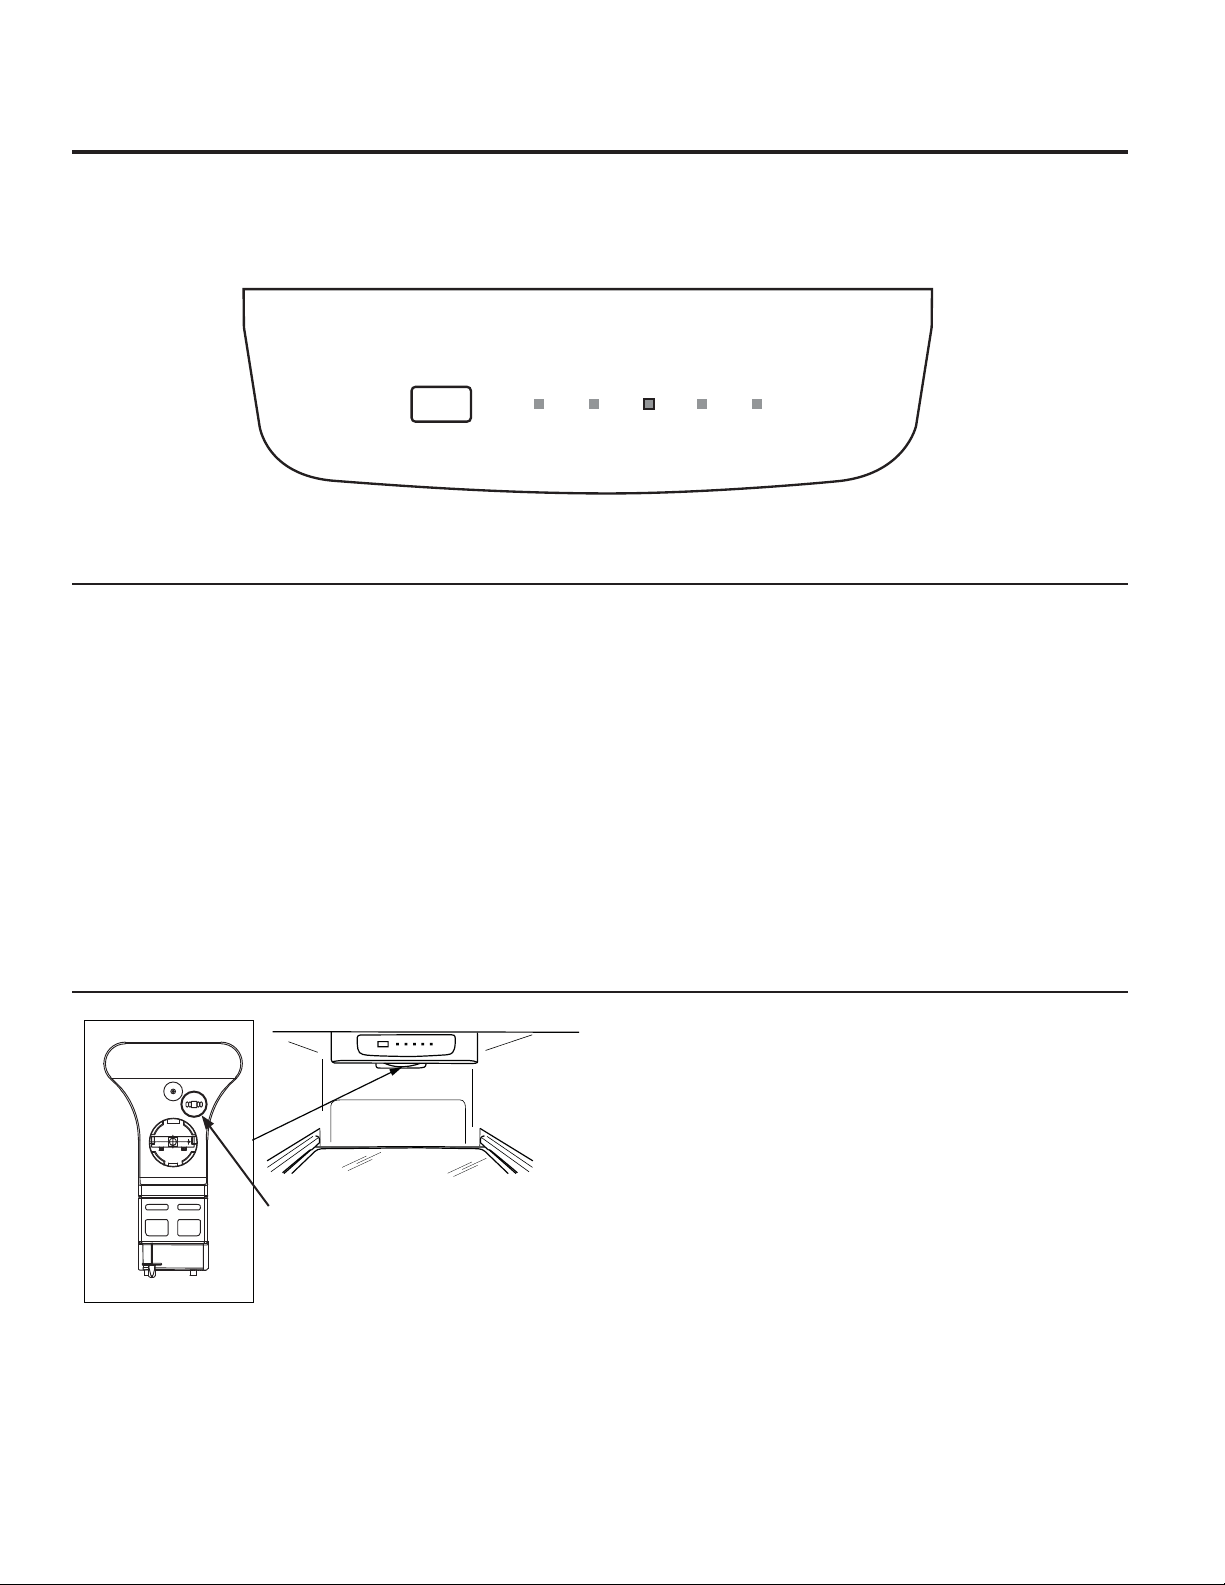
About the control on the refrigerator.
The temperature control is located in the fresh food compartment. Initially set the control to
the recommended setting. Allow 24 hours for temperature to stabilize.
Temperature Control
Select
Coldest Colder
Fresh Food Temp Control
Recommended
Control Settings
Cold
The control in the fresh food compartment should be adjusted
one increment at a time. Allow 12 hours after each adjustment
for the compartment to reach the temperature you have set.
The freezer compartment will be colder when the fresh food
compartment temperature is lower.
Thermistor
Control settings will vary based on personal preferences, usage
and operating conditions and may require more than one
adjustment. Factors that affect temperature include the amount
of food in the fresh food and freezer compartments, frequency
of door opening, and temperature of food when placed in either
compartment.
The thermistor located at the bottom of the fresh food
control housing is one of the key elements for temperature
control. Keep all items away from blocking the thermistor as
this will reduce the sensitivity of the thermistor and cause
temperature issues. Food may freeze or become too warm
depending on the compressor cycle if the air flow is blocked.
Thermistor
4
Page 5

About the storage drawers. GEAppliances.com
Fruit and Vegetable Drawers
About ice service.
Ice Trays
To make ice, fill the ice tray with water and set
it on a level surface in the freezer compartment.
Ice cubes will form in a few hours.
To release ice cubes, turn the tray upside down,
hold it over a container and twist both ends.
These storage drawers provide space to store
fruits, vegetables and meats.
To remove and replace the drawers and the
cover above them, the door must be fully
opened. In some installations, the refrigerator
may have to be moved away from the wall for
the door to be fully opened.
For only one or two ice cubes, leave the tray
right-side up, twist both ends slightly and
remove as many cubes as you want.
:DVKLFHWUD\VLQOXNHZDUPZDWHURQO\³
do not put them in an automatic dishwasher.
Ice maker Accessory Kit
An ice maker accessory kit is available from
your dealer. The IM-4D or IM-6D accessory
kit will work with your refrigerator. To
order, go to GEApplianceparts.com or call
800.626.2002. In Canada call 800.661.1616.
NOTE: The step shelf in the freezer MUST be
placed in the lowest position when the ice
maker is installed.
Water Supply Kits
Kits containing copper tubing, shutoff valve,
fittings and instructions needed to connect the
ice maker to your cold water line are available
at extra cost from your dealer or from Parts and
Accessories. In the U.S., call 800.626.2002. In
Canada, call 800.661.1616
The water valve cover assembly that
came with the Owner’s Manual must be
installed when installing the optional ice
maker kit. Please call 1-800-432-2737 and
order part WR13X20070 if the water valve
cover assembly is missing. In Canada, call
800.561.3344.
5
Page 6

Care and cleaning of the refrigerator.
Cleaning the Outside
Keep the outside clean. Wipe with a clean
cloth lightly dampened with mild liquid dish
detergent. Dry with a clean, soft cloth.
Do not wipe the stainless steel door with
a soiled dishcloth or wet towel. These
may leave a residue that can erode the
finish. Do not use scouring pads, powdered
cleaners, bleach or cleaners containing
bleach because these products can
scratch and weaken the finish. Use only a
liquid cleanser free of grit and rub in the
direction of the brush lines.
Cleaning the Inside
To help prevent odors, leave an open box
of baking soda in the fresh food and freezer
compartments.
Unplug the refrigerator before cleaning.
If this is not practical, wring excess moisture
out of sponge or cloth when cleaning around
switches, lights or controls.
8VHZDUPZDWHUDQGEDNLQJVRGDVROXWLRQ³
about a tablespoon (15 ml) of baking soda to
a quart (1 liter) of water. This both cleans and
neutralizes odors. Rinse and wipe dry.
2WKHUSDUWVRIWKHUHIULJHUDWRU³LQFOXGLQJGRRU
gaskets, fruit and vegetable drawers, and all
SODVWLFSDUWV³FDQEHFOHDQHGWKHVDPHZD\
The stainless steel doors and door handles
(on some models) can be cleaned with
a commercially available stainless steel
cleaner. Cleaners with oxalic acid such as Bar
Keepers Friend Soft Cleanser™ will remove
surface rust, tarnish and small blemishes.
Use only a liquid cleanser free of grit and
rub in the direction of the brush lines with a
damp soft sponge. Do not use appliance wax
or polish on the stainless stee
Protect the paint finish. The finish on the
outside of the refrigerator is a high quality,
baked-on paint finish. With proper care, it
will stay new-looking and rust free for years.
Apply a coat of kitchen/appliance wax when
the refrigerator is new, and then at least
twice a year.
After cleaning the door gaskets, apply a thin
layer of petroleum jelly to the door gaskets
at the hinge side. This helps keep the gaskets
from sticking and bending out of shape. Do
not use cleansing powders or other abrasive
cleaners.
CAUTION
shelves or covers with warm water
when they are cold. Glass shelves and
covers may break if exposed to sudden
temperature changes or impact such as
bumping or dropping. Tempered glass is
designed to shatter into many small pieces
if it breaks.
Do not wash any plastic refrigerator parts
in the dishwasher.
Do not clean glass
l.
6
Page 7
GEAppliances.com
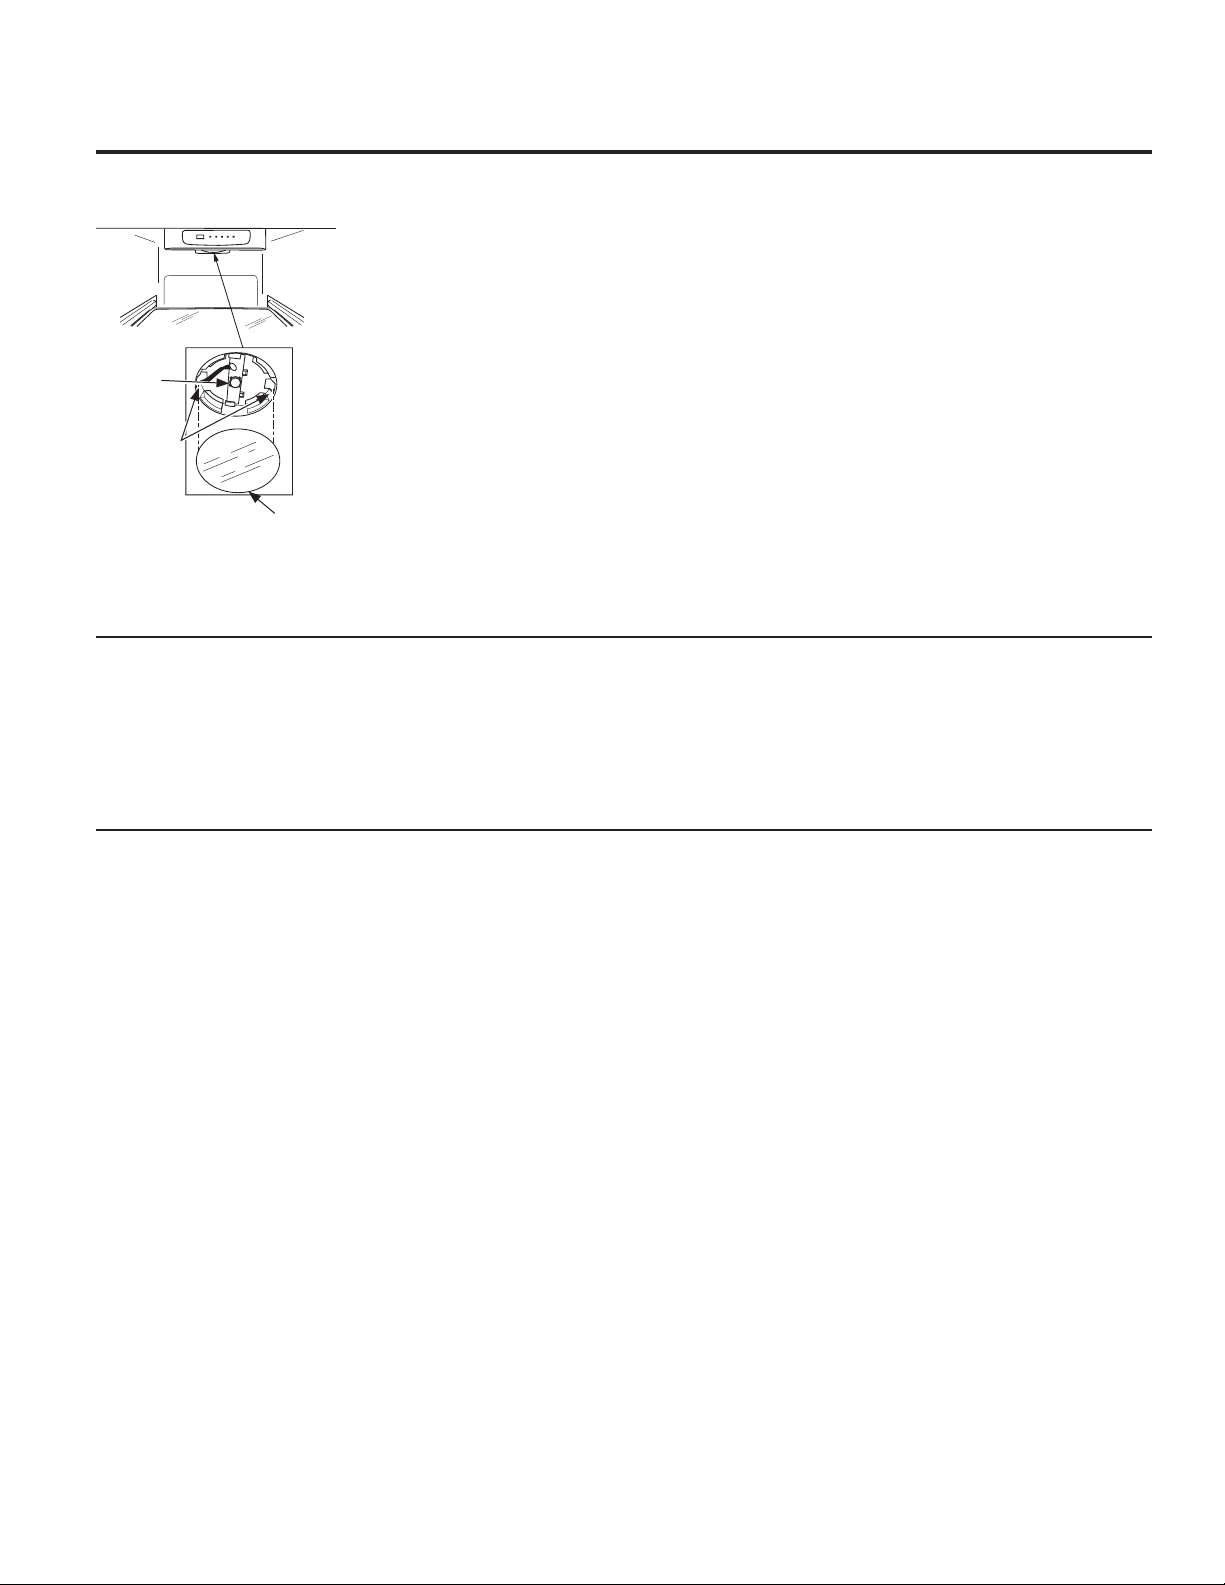
Replacing the LED Light
The LED light is located behind a light lens in
the celling of the refrigerator section.
7. Replace the light lens by snapping it into
place.
LED Assy.
Tabs snap
here
Light
Lens
1. Remove the top shelf (if necessary).
2. Drop down the control housing assemlby.
3. Remove the light lens by using a flat head
screwdriver to push one of tabs down. The
lens snaps in and out.
4. Slide the LED assembly from the mounting
slot.
5. Gently pull the leads out and disconnect
from the control housing assembly.
6. Replace with new LED assembly and slide
assembly back into the mounting slot.
Preparing for Vacation
For long vacations or absences, remove food
and unplug the refrigerator. Clean the interior
with a baking soda solution of one tablespoon
(15 ml) of baking soda to one quart (1 liter) of
water. Leave the doors open.
Preparing to Move
8. To order the LED assembly, please
call GE Appliances at 800.GE.CARES
(800.492.2737) during normal business
hours.
Remove food and unplug the refrigerator.
Secure all loose items such as shelves and
drawers by taping them securely in place to
prevent damage.
Be sure the refrigerator stays in an upright
position during moving.
7
Page 8
Installation
Instructions
Refrigerator
Model GPE12
If you have questions, call GE Appliances at 1.800.GE.CARES or visit our Website at:
GEAppliances.com. In Canada, call 1.800.561.3344 or Visit our Website at:
www.geappliances.ca.
BEFORE YOU BEGIN
Read these instructions completely and carefully.
•
IMPORTANT – Save these instructions for local
inspector’s use.
•
IMPORTANT – Observe all governing codes
and ordinances.
• Note to Installer – Be sure to leave these instructions
with the Consumer.
• Note to Consumer – Keep these instructions
for future reference.
• Skill level – Installation of this appliance requires basic
mechanical skills.
• Completion time – Refrigerator Installation -15 minutes
Reversing the Door Swing - 1 hour
• Proper installation is the responsibility of the installer.
• Product failure due to improper installation is not covered
under the Warranty.
LOCATION REQUIREMENTS
• Do not install the refrigerator where the temperature will
go below 60°F (16°C) because it will not run often enough
to maintain proper temperatures.
• Do not install the refrigerator where the temperature
will go above 100°F (37°C) because it will not perform
properly.
• Do not install the refrigerator in a location exposed to water
(rain, etc.) or direct sunlight.
• Install it on a floor strong enough to support it fully
loaded.
UNPACKING YOUR REFRIGERATOR
• Remove tape and any labels (except for the rating label)
from your refrigerator. Tape or glue residue can also be
removed by rubbing a small amount of liquid dish soap
over the adhesive with your fingers. Wipe with warm
water and dry.
• Do not use sharp instruments, rubbing alcohol,
flammable fluids, or abrasive cleaners to remove tape
or glue. These products can damage the surface of your
refrigerator.
• When moving the refrigerator, do not tilt the refrigerator
beyond 45° from upright position.
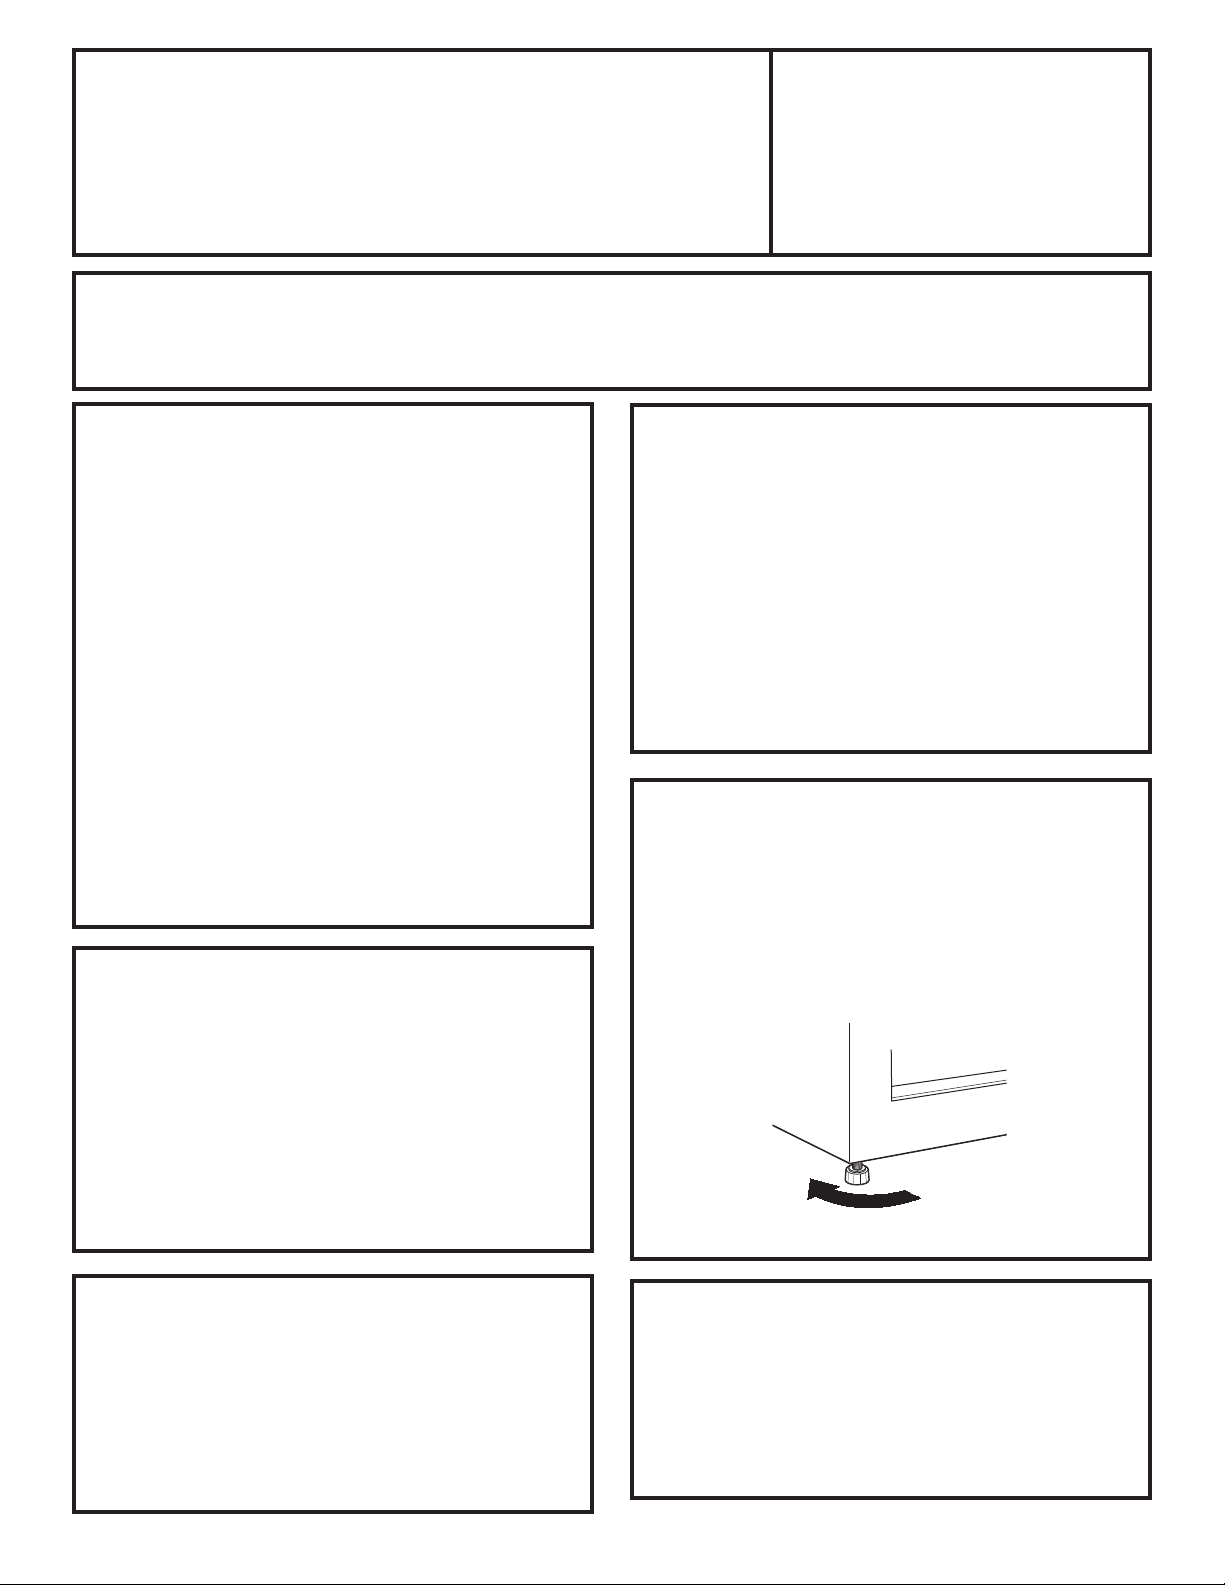
LEVELING LEGS
Adjustable legs at the front corners of the refrigerator
should be set so the refrigerator is firmly positioned
on the floor, and the front is raised just enough that
the door closes easily when opened about halfway.
To adjust the leveling legs, turn the legs clockwise
to raise the refrigerator, counterclockwise to lower it.
To raise the refrigerator
CLEARANCES
• Free-standing installation only.
• If the refrigerator is being installed next to a wall, leave
sufficient space on the hinge side to allow the door
to swing open enough to access the clear bins in the
refrigerator compartment.
• Do not install within 5” (13 cm) of the range.
• Minimum Clearances: Back – 3” from the wall
POWER CORD
• Plug the refrigerator power cord into its own properly
grounded wall outlet with a voltage rating matching that
on the refrigerator rating plate.
• Do not use an extension cord.
• Read all safety precautions on pages 2 and 3.
8
Page 9

REFRIGERATOR FEATURES
1
2
Installation Instructions
6
6
7
3
4
5
1 Freezer Shelf 5 Leveling Legs
2 Fresh Food and Freezer Controls 6 Freezer Door Bins
3 Fresh Food Shelves 7 Fresh Food Door Bin
4 Vegetable Crisper with Glass Cover and Humidity
8 Gallon/2-Liter Bottle Storage Door Bin
Control
8
7
9
Page 10

Installation Instructions
REVERSING THE DOOR SWING
IMPORTANT NOTES
When reversing the door swing:
• Read the instructions all the way through before starting.
• Handle parts carefully to avoid scratching paint.
• Set screws down by their related parts to avoid using
them in the wrong places.
• Provide a non-scratching work surface for the doors.
• It is recommended that 2 people perform this task.
IMPORTANT: Once you begin, do not move the cabinet
until door-swing reversal is completed.
These instructions are for changing the hinges from the
ULJKWVLGHWRWKHOHIWVLGH³LI\RXHYHUZDQWWRFKDQJH
the hinges back to the right side, follow these same
instructions and reverse all references to left and right.
Unplug the refrigerator from its electrical outlet.
Empty all door shelves.
2
REMOVE THE FRESH FOOD DOOR
Tape the door shut with masking tape.
Remove the center hinge by removing the screws. Lift
up the hinge to remove it.
NOTE: Some models have a shim between the center
hinge and the case that may stick to the case. Do not
lose. Also save the washes for the center hinge screws
for future use.
Remove the tape holding the door shut.
TOOLS YOU WILL NEED
8 mm Socket driver
Phillips screwdriver
1
REMOVE THE FREEZER DOOR
Remove the hinge
cover. Unscrew and
remove the top hinge
and shim.
Lift the freezer door
up and away from the
appliance.
Set the door on a nonscratching surface with
the outside up.
NOTICE: Do not let
door drop to the floor.
Doing so could damage the door stop.
NOTE: When removing the top hinge,
watch for shim between the bottom
of the hinge and the top of the case
that may stick to the case. Do not
lose.
NOTE: When removing the door, watch for washer
between the center hinge pin and the bottom of the
freezer door that may stick to the door. Do not lose.
Putty knife or
thin-blade screwdriver
Masking tape
Shim
Lift the fresh food door up and off the bottom hinge.
Set the door outside-up on a non-scratching surface.
NOTE: When removing the door, watch for washer
between the bottom hinge pin and the bottom of the
fresh food door that may stick to the door. Do not lose.
NOTICE: Do not let door drop to the floor. Doing so
could damage the door stop.
3
BOTTOM HINGE
Remove the screws and bottom hinge with shim from
the right side. Remove the screw covers from the left
corner.
Using the left hinge included with the parts that came
with your refrigerator along with the screws (and
washers if applicable) removed earlier, install the left
hinge onto the bottom left of your refrigerator. Make
sure a shim is attached to your left hinge before
installation.
Place the screw covers into the holes now vacant on
the right.
10
Page 11

Installation Instructions
REVERSING THE DOOR SWING (CONT.)
4
TRANSFER FRESH FOOD DOOR STOP
TO THE LEFT
Remove the door stop and hinge pin sleeve from the
bottom of the right side of the door.
Using the left door stop included with the parts that
came with your
refrigerator, transfer
the hinge pin sleeve
to the left side and
install the left door
stop.
5
REHANG THE FRESH FOOD DOOR
Make sure the washer(s)
are in place on the bottom
hinge pin. Make sure the
door is aligned horizontally
and vertically. Place the
fresh food door on the
bottom hinge, close the
door and tape it in place
with masking tape.
Remove the screw
covers from the left
edge of the door and
insert it into the hole
on the opposite side.
6
I
NSTALL CENTER HINGE ON THE LEFT
Remove the three screw
covers on the left side and
install two of them on the
right.
Using the middle hinge
with shim and screws
(and washers if applicable)
removed earlier, install the
middle hinge on the left side.
Remove the tape holding the
door shut.
Screw Covers
7
TRANSFER TOP HINGE TO THE LEFT
Using a putty knife with the edge covered with
masking tape, remove the screw cover on the left.
Be careful of the
paint finish.
Reinstall the screw
cover on the right
side.
8
TRANSFER FREEZER DOOR STOP TO
THE LEFT
Remove the door stop and
hinge pin sleeve from the
bottom of the right side of
the door.
Using the left door stop
included with the parts that
came with your refrigerator,
transfer the hinge pin sleeve to the left side and
install the left door stop.
9
REHANG THE FREEZER DOOR
Transfer the
screw cover on
top of the door to
the opposite side.
Make sure the
washer (if applicable) is in place on the center hinge pin.
Place the freezer door on the center hinge over the pin.
Assure the door is aligned horizontally and vertically,
and that the gasket seals on all sides.
Attach the top hinge removed earlier on the left side of
your refrigerator and replace the hinge cover
Screw Cover
NOTICE: When assembled
correctly, the hinge is tight
against the cabinet.
ATTENTION: The screws must be properly tightened.
Turn the screws until snug. Then tighten the screws a
minimum of 1/2 turn using both hands.
11
Page 12

Normal operating sounds.
Newer refrigerators sound different from older refrigerators. Modern refrigerators
have more features and use newer technology.
Do you hear what I hear? These sounds are normal.
HUMMM...
WHOOSH...
The new high efficiency compressor may run faster and
longer than your old refrigerator and you may hear a
high-pitched hum or pulsating sound while
it is operating.
You may hear a whooshing sound when the doors close.
This is due to pressure equalizing within the refrigerator.
You may hear the fans spinning at high speeds.
This happens when the refrigerator is first plugged in,
when the doors are opened frequently or when a large
amount of food is added to the refrigerator or freezer
compartments. The fans are helping to maintain
the correct temperatures.
CLICKS, POPS,
CRACKS and CHIRPS
You may hear cracking or popping sounds when
the refrigerator is first plugged in. This happens
as the refrigerator cools to the correct temperature.
The compressor may cause a clicking or chirping sound
when attempting to restart (this could take
up to 5 minutes).
Expansion and contraction of cooling coils during and
after defrost can cause a cracking or popping sound.
On models with an ice maker, after an ice making
cycle, you may hear the ice cubes dropping into the ice
bucket.
WATER SOUNDS
The flow of refrigerant through the freezer cooling coils
may make a gurgling noise like boiling water.
Water dropping on the defrost heater can cause a
sizzling, popping or buzzing sound during the defrost
cycle.
A water dripping noise may occur during the defrost
cycle as ice melts from the evaporator and flows into
the drain pan.
Closing the door may cause a gurgling sound due
to pressure equalization.
12
Page 13
Before you call for service… GEAppliances.com
Troubleshooting Tips
Save time and money! Review the charts on the following
pages first and you may not need to call for service.
Problem Possible Causes What To Do
Refrigerator does not
operate
Vibration or rattling
(slight vibration is
normal)
Motor operates for long
periods or cycles on and
off frequently. (Modern
refrigerators with more
storage space and a
larger freezer require
more operating time.
They start and stop
often to maintain even
temperatures.)
Fresh food or freezer
compartment too warm
Frost or ice crystals on
frozen food (frost within
package is normal)
Ice cubes have odor/
taste
Slow ice cube freezing Door left open. Check to see if package is holding door open.
Refrigerator has odor Foods transmitting odor to refrigerator. Foods with strong odors should be tightly wrapped.
Moisture forms on
outside of refrigerator
Moisture collects inside
(in humid weather, air
carries moisture into
refrigerator when doors
are opened)
Refrigerator in defrost cycle. Wait about 30 minutes for defrost cycle to end.
Refrigerator is unplugged. Push the plug completely into the outlet.
The fuse is blown/circuit breaker is
tripped.
Front leveling legs need adjusting. See Leveling Legs.
Normal when refrigerator is first plugged
in.
Often occurs when large amounts of
food are placed in refrigerator.
Door left open. Check to see if a package is holding door open.
Hot weather or frequent door openings. This is normal.
Temperature control set at the coldest
setting.
Temperature control not set cold
enough.
Warm weather or frequent door
openings.
Door left open. Check to see if a package is holding door open.
Door left open. Check to see if a package is holding door open.
Too frequent or too long door openings.
Food transmitting odor/taste to ice
cubes.
Interior of refrigerator needs cleaning. See Care and cleaning.
Temperature control not set cold
enough.
Interior needs cleaning. See Care and cleaning.
Not unusual during periods of high
humidity.
Too frequent or too long door openings.
Replace fuse or reset the breaker.
Wait 24 hours for the refrigerator to completely cool
down.
This is normal.
See About the control.
See About the control.
Set the temperature control one step colder. See
About the control.
Wrap foods well.
See About the control.
Keep an open box of baking soda in the refrigerator;
replace every three months.
Wipe surface dry.
13
Page 14
Before you call for service…
Troubleshooting Tips
Save time and money! Review the charts on the following
pages first and you may not need to call for service.
Problem Possible Causes What To Do
Interior light does
not work
Food is freezing in the
refrigerator
Rust, tarnish, or grime on
stainless steel doors
No power at outlet. Replace fuse or reset the breaker.
LED light burned out. See Replacing the LED light
Food too close to the air vent at the
back of the refrigerator.
Refrigerator control is set too cold. Move the refrigerator control to a warmer
Food too close to the thermistor and
blocks the air flow to the thermistor.
Moist environment or salt air. Clean stainless steel with cleaners containing
Move the food away from the air vent.
temperature setting one increment at a time. See
About the controls.
Move the food away from the thermistor.
oxalic acid (e.g. Bar Keepers Friend Soft
Cleanser) will remove rust, lime,and other
tarnish. Do not wipe the refrigerator with a
soiled dish cloth or wet towel. Do not use
scouring pads, powdered cleaners, bleach or
cleaners containing bleach because these
SURGXFWVFDQVFUDWFKDQGUXLQWKHEUXVK¿QLVK
of the stainless steel.
14
Page 15

Notes. GEAppliances.com
15
Page 16
Refrigerator Warranty.
For US Customers, all warranty service provided by our Factory Service Centers, or an authorized
®
Customer Care
technician. To schedule service, on-line, 24 hours a day, visit GE Appliances at
GEAppliances.com, or call GE Appliances at 800.GE.CARES (800.432.2737). Please have serial number
and model number available when calling for service.
In Canada, call 800.561.3344.
Servicing your refrigerator may require the use of the onboard data port for diagnostics. This gives a GE
Appliances Factory Service technician the ability to quickly diagnose any issues with your appliance and helps
improve its products by providing information on your appliance. If you do not want your appliance data to be
sent to GE Appliances, please advise your technician NOT to submit the data at the time of service.
For the Period of: GE Appliances Will Replace
One Year
From the date of the original
purchase
Any part of the refrigerator which fails due to a defect in materials or workmanship.
During the limited one-year warranty, GE Appliances will also provide, free of charge, all labor and
related service to replace the defective part.
What is Not Covered:
■ Service trips to your home to teach you how to use the product.
■ Improper installation, delivery or maintenance.
■ Failure of the product if it is abused, misused, or used for other
than the intended purpose or used commercially.
■ Loss of food due to spoilage.
■ Replacement of house fuses or resetting of circuit breakers.
■ Damage caused after delivery.
■ Replacement of the water filter cartridge, if included, due to water
pressure that is outside the specified operating range or due to
excessive sediment in the water supply.
■ Replacement of the light bulbs, if included, or water filter cartridge,
if included, other than as noted above.
■ Damage to the product caused by accident, fire, floods or acts of
God.
■ Incidental or consequential damage caused by possible defects
with this appliance.
■ Product not accessible to provide required service.
■ Damage to finish, such as surface rust, tarnish, or small blemishes
not reported within 48 hours of delivery.
■ Products which are not defective, broken, or which are working as
described in the owner’s manual.
(;&/86,212),03/,(':$55$17,(6³<RXUVROHDQGH[FOXVLYHUHPHG\LVSURGXFWUHSDLUDVSURYLGHGLQWKLV
Limited Warranty. Any implied warranties, including the implied warranties of merchantability or fitness for
a particular purpose, are limited to one year or the shortest period allowed by law.
For US Customers: This warranty is extended to the original purchaser and any succeeding owner for products
purchased for home use within the USA. If the product is located in an area where service by a GE Appliances
Authorized Servicer is not available, you may be responsible for a trip charge or you may be required to bring the
product to an Authorized GE Appliances Service location for service. In Alaska, the warranty excludes the cost of
shipping or service calls to your home.
Some states do not allow the exclusion or limitation of incidental or consequential damages. This warranty gives
you specific legal rights, and you may also have other rights which vary from state to state. To know what your
legal rights are, consult your local or state consumer affairs office or your state’s Attorney General.
Warrantor US: GE Appliances, Louisville, KY 40225
For Customers in Canada: This warranty is extended to the original purchaser and any succeeding owner for
products purchased in Canada for home use within Canada. In-home warrant service will be provided in areas
where it is available and deemed reasonable by Mabe to provide.
Warrantor Canada: MC Commercial, Burlington, Ontario, L7R 5B6
16
Page 17

Mesures de sécurité ..........18, 19
Instructions de fonctionnement
Réglage des commandes .............20
Thermistance ........................20
Bacs de rangement ...................21
Production de glace ...................21
Entretien et nettoyage ............22, 23
Instructions d’installation
Planification ........................ 24
Composants du réfrigérateur .........25
Inversion de
l’ouverture des portes ............ 26, 27
Troubleshooting Tips
Bruits normaux
de fonctionnement .................. 28
Avant d’appeler
un réparateur ....................29, 30
Soutien au consommateur
Garantie ............................ 31
Soutien au consommateur .......... 32
Écrivez ici le numéro de modèle et le
numéro de série :
Modèle # ________________________
Série # __________________________
Vous les trouvez sur une étiquette
dans le coin supérieur gauche du
compartiment réfrigérateur.
17
Page 18

INSTRUCTIONS IMPORTANTES DE SÉCURITÉ.
LISEZ TOUTES LES INSTRUCTIONS AVANT
D’UTILISER VOTRE RÉFRIGÉRATEUR.
Site Internet d’Électroménagers GE
Pour de plus amples informations sur le fonctionnement de votre réfrigérateur, consultez le
site www.electromenagersge.ca ou composez le 800.561.3344.
CONSIGNES DE SÉCURITÉ POUR LE RÉFRIGÉRATEUR
Ce symbole représente une alerte de sécurité. Ce symbole vous avise de dangers possibles pouvant causer
la mort, des blessures ou autres. Tous les messages de sécurité seront précédés du symbole d’ alerte de sécurité
ainsi que des mots « DANGER », « AVER TISSEMENT » ou « MISE EN GARDE ». Ces messages sont les suivants :
DANGER
graves, voire la mort.
AVERTISSEMENT
blessures graves, voire la mort.
ATTENTION
blessures mineures ou graves.
Signale une situation qui présente un danger imminent et qui, si elle n’est pas évitée, entraînera des blessures
Signale une situation qui présente un danger imminent et qui, si elle n’est pas évitée, peut entraîner des
Signale une situation qui présente un danger imminent et qui, si elle n’est pas évitée, peut entraîner des
.
IMPORTANTES CONSIGNES DE SÉCURITÉ
AVERTISSEMENT
Ce réfrigérateur doit être correctement installé conformément aux
Consignes d’Installation avant toute utilisation.
Débranchez le réfrigérateur avant d’effectuer une réparation, de
remplacer une ampoule ou de le nettoyer.
Remarque : L’alimentation du réfrigérateur ne peut être
déconnectée par aucune des fonctions sur le panneau de
commande.
Remarque : Les réparations doivent être effectuées par un
professionnel qualifié.
Remettez toutes les pièces et panneaux en place avant d’utiliser
l’appareil.
Ne stockez pas ou n’utilisez pas d’essence ou d’autres vapeurs et
liquides inflammables à proximité de cet appareil ou de tout autre
appareil électroménager.
Nous déconseillons fortement l’utilisation d’une rallonge à cause
ATTENTION
Ne nettoyez pas les clayettes ou les couvercles en verre avec de
l’eau tiède quand ceux-ci sont froids. Les clayettes et couvercles
en verre peuvent se casser s’ils sont exposés à des changements
soudains de température ou si vous les cognez ou les faites
tomber. Le verre trempé est conçu pour se briser en petits
morceaux en cas de casse
Éloignez les doigts des parties du congélateur où l’on peut
facilement se pincer : les espaces entre les portes, et entre les
portes et les placards sont toujours étroits. Soyez prudent lorsque
vous fermez les portes en présence d’enfants.
Pour réduire le risque d’incendie, d’explosion, de choc électrique ou de blessures
lorsque vous utilisez votre réfrigérateurde , veuillez suivre ces consignes de sécurité :
Pour réduire le risque de blessures lorsque vous utilisez votre réfrigérateurde , veuillez
suivre ces consignes de sécurité.
des risques potentiels dans certaines conditions. Cependant, si
l’utilisation d’un cordon prolongateur est nécessaire, ce dernier doit
obligatoirement être homologué UL (aux USA) ou CSA (au Canada),
à trois brins avec mise à la terre pour appareil électroménager et
doit être équipé d’une fiche et d’une prise femelle avec terre. Les
caractéristiques électriques du cordon prolongateur doivent être
de 15 ampères (minimum) et de 120 volts.
Pour éviter les risques d’asphyxie et d’enfermement pour les
enfants. Démontez les portes du congélateur et du compartiment
de réfrigération avant de le mettre au rebut ou d’interrompre son
utilisation.
Ne laissez pas les enfants grimper, se mettre debout ou se
suspendre aux poignées de portes dans le réfrigérateur ou aux
clayettes du réfrigérateur. Ils pourraient se blesser gravement.
Ne recongelez pas les aliments surgelés qui ont complètement
dégelé.
Si votre réfrigérateur est doté d’une machine à glaçons
automatique, évitez le contact avec les pièces mobiles du
mécanisme éjecteur, ou avec l’élément chauffant qui libère les
glaçons. Ne posez pas les doigts ou les mains sur le mécanisme de
la machine à glaçons automatique pendant que le réfrigérateur
est branché.
18
Page 19

INSTRUCTIONS IMPORTANTES DE SÉCURITÉ.
LISEZ TOUTES LES INSTRUCTIONS AVANT
D’UTILISER VOTRE RÉFRIGÉRATEUR. electromenagersge.ca
INSTALLATION
AVERTISSEMENT
Risque d’explosion.
Conservez les matériaux et vapeurs inflammables tels que l’essence à l’écart de votre réfrigérateur.
Une explosion, un incendie voire la mort pourrait en résulter.
BRANCHEMENTS ÉLECTRIQUES
AVERTISSEMENT
Branchez l’appareil dans une prise triple avec terre.
Ne retirez pas la broche de terre.
N’utilisez pas d’adaptateur.
Le non-respect de ces instructions peut entraîner des risques d’incendies, des chocs électriques ou la mort.
Ne coupez pas ou n’enlevez pas, sous aucun prétexte, la troisième broche de mise à la terre du cordon
d’alimentation. Pour des raisons de sécurité, cet appareil doit être correctement mis à la terre.
Le cordon d’alimentation de cet appareil est équipé d’une fiche
à trois broches (pour une mise à la terre) qui s’adapte à la prise
de courant standard à 3 broches (pour une mise à la terre) pour
minimiser les risques de chocs électriques par cet appareil.
Faites vérifier la prise murale et le circuit électrique par
un électricien qualifié pour s’assurer que le système est
correctement mis à la terre.
Dans le cas d’une prise biphasée, l’installateur a la
responsabilité et l’obligation de la remplacer par une
prise triphasée correctement mise à la terre. N’utilisez pas
d’adaptateur.
Le réfrigérateur doit toujours être branché à sa propre prise
électrique d’une tension nominale correspondant à celle
indiquée sur sa plaque signalétique.
Risque de choc électrique.
Une alimentation électrique à 115 volts CA, 60 Hz, avec
un fusible de 15 ou 20 ampères et une mise à la terre est
nécessaire. Ceci permet d’obtenir un meilleur rendement et
évite de surcharger les circuits électriques du domicile qui
risque d’occasionner un incendie en surchauffant.
Ne débranchez jamais le réfrigérateur en tirant sur le cordon
d’alimentation. Prenez toujours fermement la fiche en main et
tirez pour la sortir de la prise.
Réparez ou remplacez immédiatement tout cordon électrique
usé ou endommagé. N’utilisez pas un cordon fissuré ou
présentant des dommages dus aux frottements soit sur sa
longueur ou aux extrémités.
Lorsque vous éloignez votre réfrigérateur du mur, faites
attention à ne pas le faire rouler sur le cordon d’alimentation
afin de ne pas l’endommager.
MISE AU REBUT APPROPRIÉE DE VOTRE ANCIEN RÉFRIGÉRATEUR
AVERTISSEMENT
Démontez les portes du compartiment de réfrigération et du compartiment de congélation du
réfrigérateur, avant mettre celui-ci au rebut. Le non-respect de cette recommandation peut entraîner
l’enfermement d’un enfant qui peut entraîner la mort ou des lésions cérébrales.
IMPORTANT:
Un enfant risque de suffoquer ou d’y être emprisonné.
Les enfants pris au piège ou morts d’asphyxie sont
toujours d’actualité. Les réfrigérateurs jetés ou abandonnés
restent dangereux même si vous ne les laissez au rebut
que pour « quelques jours ». Si vous voulez jeter votre
ancien réfrigérateur, suivez les instructions suivantes pour
empêcher les accidents.
Avant de jeter votre ancien réfrigérateur ou
congélateur:
Démontez les portes du compartiment de réfrigération
et du compartiment de congélation.
Laissez les clayettes en place, pour éviter que des enfants
puissent facilement grimper dans votre réfrigérateur.
Fluides frigorigènes
Les appareils réfrigérants contiennent des fluides
frigorigènes qui conformément à la législation fédérale
doivent être retirés avant la mise au rebut de l’appareil.
Si vous mettez au rebut un ancien réfrigérateur
contenant des fluides frigorigènes, vérifiez la procédure
à suivre auprès de la compagnie responsable de
l’élimination.
LISEZ ET SUIVEZ SOIGNEUSEMENT CES MESURES DE SÉCURITÉ.
CONSERVEZ CES INSTRUCTIONS
19
Page 20

À propos de la commande du réfrigérateur.
La commande de température est située dans le compartiment réfrigérateur. Au début,
réglez la commande à la température recommandée. Allouez 24 heures pour la stabilisation
de la température.
Temperature Control
Select
Coldest Colder
Commande de température du réfrigérateur
Recommended
Réglage des commandes
Cold
La commande dans le compartiment réfrigérateur doit être
réglée d’un échelon à la fois. Allouez 12 heures après chaque
réglage pour atteindre la température choisie. Le compartiment
congélateur est plus froid lorsque la température du
compartiment réfrigérateur est plus basse.
Thermistance
Thermistance
Les réglages vont varier en fonction de vos préférences et
des conditions d’utilisation, et ils peuvent nécessiter plus d’un
ajustement. Parmi les facteurs qui influencent la température,
mentionnons la quantité de nourriture dans les compartiments
réfrigérateur et congélateur, la fréquence d’ouverture des portes
et la température de l’aliment lorsqu’il est placé dans un des
compartiments.
La thermistance située dans le bas du boîtier de la
commande du compartiment réfrigérateur est un des
éléments essentiels du contrôle de température. Gardez
tous les articles à l’écart de la thermistance pour ne
pas réduire sa réactivité et causer des problèmes de
température. Les aliments peuvent geler ou devenir trop
chauds, selon le cycle du compresseur, si la circulation d’air
est obstruée.
20
Page 21

Bacs de rangement electromenagersge.ca
Bacs à légumes et à fruits
Ces bacs de rangement procurent de l’espace
pour les fruits, les légumes et la viande.
À propos de la production de glace.
Moules à glaçons
Pour produire de la glace, remplissez le moule
à glaçons avec de l’eau et placez-le sur une
surface de niveau dans le compartiment
congélateur. Les cubes de glace se formeront
en quelques heures.
Pour libérer les cubes, tournez le moule à
l’envers en le maintenant au-dessus d’un
récipient et tordez les deux extrémités.
Pour enlever et replacer les bacs et le
couvercle au-dessus d’eux, la porte doit
être entièrement ouverte. Dans certaines
installations, il peut s’avérer nécessaire
d’éloigner le réfrigérateur du mur pour obtenir
une ouverture totale de la porte.
Pour obtenir un ou deux cubes seulement,
tenez le moule à l’endroit, tordez
légèrement les deux extrémités puis retirez
le nombre de cubes désiré.
Lavez les moules à glaçons avec de l’eau
tiède seulement. Ne les placez pas dans un
lave-vaisselle automatique.
Ensemble de machine à glaçons
Un ensemble de machine à glaçons est
offert par votre revendeur. L’ensemble
IM-4D ou IM-6D est compatible avec votre
réfrigérateur. Pour commander, composez
le 1.800.661.1616.
NOTE : La tablette étagée du congélateur
DOIT être placée à la position la plus basse
lorsque la machine à glaçons est installée.
Ensembles d’alimentation d’eau
Des ensembles comprenant une tubulure
de cuivre, un robinet de sectionnement, des
raccords et des instructions nécessaires pour
le raccordement de la machine à glaçons
à votre conduite d’eau froide sont offerts
en option chez votre revendeur ou notre
service Pièces et accessoires, ou composez le
1.800.661.1616.
L’assemblage de recouvrement de robinet
d’eau fourni avec le manuel d’utilisation
doit être posé lors de l’installation de
l’ensemble de machine à glaçons en
option. Veuillez composer le 1.800.561.3344
et commander la pièce WR13X20070 si
l’assemblage de recouvrement de robinet
d’eau est absent.
21
Page 22

Soins et nettoyage de votre réfrigérateur.
Nettoyage de l’extérieur
Conservez l’extérieur propre. Essuyez avec
un linge propre légèrement humecté de de
détersif liquide à vaisselle doux. Séchez et
polissez avec un linge doux, propre.
N’essuyez pas la porte en acier inoxydable
avec un linge à vaisselle souillé ou une
serviette mouillée. Ils peuvent laisser un
résidu susceptible d’éroder le fini. N’utilisez
pas de tampons à récurer, de nettoyants
en poudre, de javellisants ni de nettoyants
qui contiennent du javellisant puisque
ces produits peuvent rayer et détériorer
le fini. Utilisez uniquement un nettoyant
liquide exempt d’abrasif et frottez dans la
direction des lignes de brosse.
Nettoyage de l’intérieur
Vous pouvez nettoyer les portes et les
poignées de porte en acier inoxydable
(sur certains modèles) avec un nettoyant
d’acier inoxydable vendu sur le marché.
Les nettoyants qui contiennent de l’acide
oxalique, tels que Bar Keepers Friend Soft
Cleanser™, éliminent la rouille
ternissement et les petites taches. Utilisez
uniquement un nettoyant liquide exempt
d’abrasif et frottez dans la direction des
lignes de brossage à l’aide d’une éponge
souple imbibée. N’utilisez pas de cire pour
appareils ménagers sur l’acier inoxydable.
Protection de la peinture de finition.
L’extérieur du réfrigérateur est revêtu d’une
peinture de haute qualité cuite au four.
Avec un entretien approprié, il gardera son
aspect neuf exempt de rouille pendant de
nombreuses années. Appliquez une couche
de cire pour cuisine/électroménagers à la
réception du réfrigérateur, puis au moins
deux fois l’an par la suite.
de surface
, le
Pour aider à empêcher les odeurs, laissez
une boîte ouverte de bicarbonate de soude
dans les compartiments réfrigération et
congélation.
Débranchez votre réfrigérateur avant de le
nettoyer.
Si ce n’est pas pratique, enlevez toute
humidité au moyen d’une éponge ou
d’un chiffon pour nettoyer autour des
commutateurs, des lumières ou des réglages.
Utilisez une solution d’eau chaude et de
bicarbonate de soude 15 ml (soit une cuillère
à soupe environ) de bicarbonate de soude
dans 1 litre (soit une pinte) d’eau). Cette
solution nettoie tout en neutralisant les
odeurs. Rincez et séchez en essuyant.
/HVDXWUHVSLqFHVGXUpIULJpUDWHXU³LQFOXDQW
les joints de porte, les bacs à fruits et légumes
HWWRXWHVOHVSLqFHVHQSODVWLTXH³SHXYHQW
être nettoyées de la même manière.
Après avoir nettoyé les joints de porte,
appliquez une mince couche de vaseline
sur les joints du côté charnières afin de
les empêcher de coller et de se déformer.
N’utilisez pas de nettoyants en poudre ni
d’autres nettoyants abrasifs.
ATTENTION
tablettes ou couvercles en verre avec de
l’eau chaude lorsqu’ils sont froids. Les
tablettes et couvercles en verre peuvent
se briser s’ils sont exposés à une variation
de température soudaine, ou soumis à un
impact s’ils sont heurtés ou échappés. S’il
se brise, le verre trempé est conçu pour
se fracturer en un grand nombre de petits
éclats. Ne lavez aucune pièce en plastique
du réfrigérateur au lave-vaisselle.
Ne nettoyez pas les
22
Page 23

GEAppliances.com
Pour remplacer l’ampoule DEL
Lampe
DEL
Enclencher
dans les
languettes
Lentille
La lampe DEL est située derrière la lentille
dans le plafond de la section réfrigérateur.
1. Enlevez la tablette supérieure (si
nécessaire).
2. Abaissez le boîtier de la commande.
3. Enlevez la lentille de la lampe à l’aide d’un
tournevis à lame plate afin de pousser
une des languettes vers le bas. La lentille
s’encliquète lors de son retrait ou de son
insertion.
4. Faites glisser la lampe DEL depuis sa fente
de montage.
Préparation de départ en vacances
Pour de longues vacances ou absences,
enlevez tous vos aliments et débranchez votre
réfrigérateur. Nettoyez l’intérieur avec une
solution de bicarbonate de soude, de 15 m l
(une cuillère à soupe) de bicarbonate de soude
pour 1 litre (une pinte) d’eau. Laissez les portes
ouvertes.
5. Tirez délicatement sur les fils et
débranchez-les du boîtier de commande.
6. Remplacez la lampe DEL et glissez celle-ci
dans sa fente de montage.
7. Replacez la lentille en l’encliquetant en
place.
8. Pour commander une lampe DEL, veuillez
communiquez avec les électroménagers
GE en composant le 800.GE.CARES
(800.492.2737) pendant les heures
d’affaires normales.
Préparation de déménagement
Enlevez tous vos aliments et débranchez
votre réfrigérateur. Attachez tous les articles
mobiles tels que les tablettes et les bacs en
les enrubannant en place afin de prévenir les
dommages.
Assurez-vous que votre réfrigérateur soit en
position droite pendant le déménagement.
23
Page 24

Instructions
Réfrigérateur
d’installation
Modèle GPE12
Si vous avez des questions, appelez le 1.800.561.3344 ou visitez notre site Web à l’adresse:
www.electromenagersge.ca
AVANT DE COMMENCER
Veuillez lire toutes les directives attentivement.
•
IMPORTANT – Conservez ces instructions pour
l’inspecteur local.
•
IMPORTANT – Respectez toutes les
ordonnances et les codes loca ux.
• Note à l’installateur – Assurez-vous de laisser ces
instructions au consommateur.
• Note au consommateur – Conservez ces
instructions pour référence future.
• Niveau de compétence – L’installation de cet appareil
nécessite des compétences mécaniques de base.
• Temps d’installation – Installation du réfrigérateur:
15 minutes
Inversion du sens d’ouverture
des portes : 1 heure
• L’installateur est responsable de bien installer ce
réfrigérateur.
• Toute panne du produit due à une mauvaise installation
n’est pas couverte par la garantie.
DÉBALLEMENT DU RÉFRIGÉRATEUR
• Retirez le ruban adhésif et toute étiquette (sauf l’étiquette
des spécifications) du réfrigérateur. Les résidus de ruban
ou de colle peuvent se dégager en frottant une petite
quantité de savon à vaisselle liquide sur l’adhésif avec les
doigts. Essuyez avec un chiffon imbibé d’eau chaude puis
asséchez.
• N’utilisez pas d’instruments coupants, d’alcool à friction,
de liquides inflammables ni de nettoyants abrasifs
pour enlever le ruban ou la colle. Ces produits peuvent
endommager la surface de votre réfrigérateur.
• Lors de son déplacement, ne penchez pas le réfrigérateur
de plus de 45° par rapport à sa position droite.
PIEDS DE NIVELLEMENT
Les pieds ajustables dans les coins avant du réfrigérateur
doivent être ajustés de façon que le réfrigérateur repose
solidement contre le plancher; il faut aussi que l’avant
soit légèrement plus haut afin que les portes se ferment
aisément lorsqu’elles sont ouvertes à mi-course.
SPÉCIFICATIONS D’EMPLACEMENT
• N’installez pas le réfrigérateur dans une pièce où les
températures descendent en-dessous de 60°F (16°C) parce
qu’il serait difficile d’y maintenir une température correcte.
• N’installez pas le réfrigérateur dans un endroit où la
température ambiante sera supérieure à 37°C, il ne
fonctionnera pas correctement.
•
N’installez pas le réfrigérateur dans un endroit exposé à l’eau
(pluie, etc.) ou directement aux rayons solaires.
• Installez le réfrigérateur sur un plancher suffisamment solide
pour le supporter à pleine charge.
DÉGAGEMENTS
• Installation amovible seulement.
• Si le réfrigérateur est installé à proximité d’un mur, laissez
suffisamment d’espace du côté charnière pour permettre
une ouverture de porte qui permettra l’accès aux bacs du
compartiment réfrigérateur.
• Ne pas installer à moins de 5 po (13 cm) de la cuisinière.
• Dégagements minimaux :Arrière – 3 po (7,6 cm) du mur
Pour ajuster les pieds, tournez-les dans le sens des
aiguilles d’une montre pour abaisser le réfrigérateur, et
dans le sens inverse pour le soulever..
Pour soulever le réfrigérateur
CORDON D’ALIMENTATION
• Branchez le cordon d’alimentation du réfrigérateur dans
sa propre prise murale correctement mise à la terre; la
spécification de tension de la prise doit correspondre à
celle figurant sur la fiche signalétique du réfrigérateur.
• N’utilisez pas une rallonge.
• Lisez les consignes de sécurité des pages 18 et 19.
24
Page 25

Instructions d’installation
COMPOSANTS DU RÉFRIGÉRATEUR
1
2
6
6
7
3
4
5
1 Tablette du congélateur 5 Pied ajustable
2 Commande de température du congélateur et
6 Compartiments de porte du congélateur
congélateur
3 Tablettes du réfrigérateur 7 Compartiment de porte du réfrigérateur
4 Vegetable Crisper with Glass Cover and Hu-
midity Control
8 Compartiment de porte pour ranger une
bouteille de 2 litres
8
7
25
Page 26

Instructions d’installation
INVERSION DE L’OUVERTURE DES PORTES
2
NOTES IMPORTANTES
Pour inverser le sens d’ouverture des portes :
• Lisez toutes les directives avant de commencer.
• Manipulez les pièces avec précaution pour éviter de rayer la
peinture.
• Posez les vis à côté des pièces correspondantes pour ne pas
les utiliser aux mauvais endroits.
• Posez les portes sur un plan de travail qui ne risque pas de
rayer la peinture.
• Nous recommandons que deux personnes participent à
cette tâche.
IMPORTANT : Une fois commencée votre inversion du sens
d’ouverture des portes, ne déplacez jamais votre réfrigérateur
avant d’avoir terminé.
Ces directives s’appliquent à l’inversion des charnières du côté
droit au côté gauche. Si vous voulez remettre les charnières
à droite, suivez les mêmes directives en inversant toutes les
références aux côtés gauche et droit.
Débranchez le réfrigérateur de sa prise électrique.
Videz tous les balconnets des portes.
ENLÈVEMENT DE LA PORTE DU
RÉFRIGÉRATEUR
Maintenez la porte fermée avec du ruban à masquer.
Enlevez la charnière centrale en retirant les vis. Soulevez
la charnière pour la dégager.
REMARQUE : Certains modèles comportent une
rondelle de calage entre la charnière centrale et la
carrosserie qui peut coller à cette dernière. Ne perdez
pas cette rondelle. Conservez aussi les rondelles de
visserie pour les vis de la charnière centrale pour
usage ultérieur.
Retirez le ruban qui maintient la porte fermée.
OUTILS REQUIS
Tourne-écrou à
douille de 8mm
Couteau à mastiquer ou
Tournevis Phillips
1
ENLÈVEMENT DE LA PORTE DU
tournevis à lame mince
Ruban-cache
CONGÉLATEUR
Retirez le couvercle de charnière. Dévissez et retirez la
charnière supérieure et la
rondelle de calage.
Soulevez la porte du
congélateur puis tirez-la
vers vous pour la dégager.
Placez la porte sur une
surface antiégratignure
avec la surface
extérieure vers le haut.
REMARQUE : Lors du
retrait de la charnière
supérieure, assurezvous que la rondelle de
calage entre le bas de la
charnière et le dessus de la carrosserie ne colle pas sur cette
dernière. Ne perdez pas cette rondelle.
REMARQUE : Lors du retrait de la porte, assurez-vous que
la rondelle entre l’axe de charnière centrale et le bas de la
porte du congélateur ne colle pas sur la porte. Ne perdez pas
cette rondelle.
NOTICE: Ne laissez pas la porte tomber sur le plancher. Cela
pourrait endommager la butée de porte.
Soulevez la porte du réfrigérateur puis dégagez-la de la
charnière inférieure.
Placez la porte avec l’extérieur vers le haut sur une
surface antiégratignure.
REMARQUE : Lors du retrait de la porte, assurez-vous
que la rondelle entre l’axe de charnière inférieure et
le bas de la porte du réfrigérateur ne colle pas sur la
porte. Ne perdez pas cette rondelle.
NOTICE: Ne laissez pas la porte tomber sur le plancher.
Cela pourrait endommager la butée de porte.
3
CHARNIÈRE INFÉRIEURE
Enlevez les vis et la charnière inférieure avec sa rondelle
de calage depuis le côté droit. Enlevez les capuchons de
vis du coin gauche.
À l’aide de la charnière gauche (incluse avec les
pièces fournies avec le réfrigérateur) et des vis (et des
rondelles s’il y a lieu) enlevées précédemment, posez la
charnière gauche sur la partie inférieure gauche de votre
réfrigérateur.
Placez les capuchons de vis dans les trous maintenant
libres sur la droite.
26
Page 27

Instructions d’installation
INVERSION DE L’OUVERTURE DES PORTES (SUITE)
6
4
TRANSFERT DE LA BUTÉE DE PORTE
DU RÉFRIGÉRATEUR SUR LA
GAUCHE
Enlevez la butée de porte et le manchon de l’axe de
charnière dans le bas du côté droit de la porte.
En utilisant la butée de porte gauche fournie avec
les pièces livrées
avec le réfrigérateur,
transférez le manchon
de l’axe de charnière
du côté gauche puis
posez la butée de
porte gauche.
5
RACCROCHAGE DE LA PORTE DU
RÉFRIGÉRATEUR
Assurez-vous que la ou les
rondelles sont en place sur
l’axe de charnière inférieure.
Assurez-vous que la porte
est alignée à l’horizontale et
la verticale. Placez la porte
du réfrigérateur sur la
charnière inférieure, fermez
la porte puis enrubannez-la
en place avec du ruban cache.
Enlevez les capuchons
de vis du bord gauche
de la porte et insérez-les
dans les trous du côté
opposé.
6
POSE DE LA CHARNIÈRE CENTRALE
Capuchons
de vis
SUR LA GAUCHE
Enlevez les trois capuchons
de vis sur le côté gauche et
posez deux d’entre eux sur
la droite.
À l’aide de la charnière
centrale et des vis (et
de rondelles s’il y a lieu)
enlevées précédemment,
posez la charnière centrale
sur le côté gauche.
Retirez le ruban qui
maintient la porte fermée.
POSE DE LA CHARNIÈRE CENTRALE
SUR LA GAUCHE (SUITE)
ATTENTION: Les vis doivent être serrées correctement.
Vissez les vis jusqu’au bout. Puis serrez au minimum d’un
autre 1/2 tour avec les deux mains.
7
TRANSFERT DE LA CHARNIÈRE
SUPÉRIEURE SUR LA GAUCHE
À l’aide d’un couteau à mastic,
son bord recouvert de ruban
cache, retirez le capuchon de
vis sur la gauche.
Veillez à ne pas endommager
la peinture de finition.
Replacez le capuchon de vis sur le côté droit.
8
TRANSFERT DE BUTÉE DE PORTE
DU CONGÉLATEUR SUR LA GAUCHE
Enlevez la butée de porte et le manchon de l’axe de
charnière dans le bas du côté droit de la porte.
En utilisant la butée de porte gauche fournie avec
les pièces livrées avec le
réfrigérateur, transférez
le manchon de l’axe de
charnière du côté gauche
puis posez la butée de porte
gauche.
9
RACCROCHAGE DE LA PORTE DU
CONGÉLATEUR
Transférez le capuchon sur
le dessus de la porte du côté
opposé.
Assurez-vous que la rondelle
(s’il y a lieu) est en place sur
l’axe de charnière centrale.
Placez la porte du congélateur sur la charnière centrale
au-dessus de l’axe. Assurez-vous que la porte est alignée
à l’horizontale et la verticale, et que les joints d’étanchéité
sont étanches sur tous les côtés.
Fixez la charnière supérieure enlevée précédemment du
côté gauche du réfrigérateur et replacez le couvercle de
charnière.
Capuchons
de vis
NOTICE: Posée
correctement, la charnière repose fermement contre la
carrosserie.
27
Page 28

Bruits normaux de fonctionnement
Les réfrigérateurs plus récents font des bruits différents de ceux des
anciens. Les réfrigérateurs modernes présentent plus de fonctions
et sont plus avancés sur le plan technologique.
Entendez-vous ce que j’entends? Ces bruits sont normaux.
HUMMM...
WOUUCH....
Le nouveau compresseur à rendement élevé peut
fonctionner plus longtemps et plus vite que votre
ancien réfrigérateur et vous pouvez entendre un
son modulé ou un ronflement aigu pendant son
fonctionnement.
Vous pouvez entendre un sifflement lorsque les portes se
ferment. Cela vient de l’équilibrage de pression dans le
réfrigérateur.
CLICS, CLAQUEMENTS,
CRAQUEMENTS et
GRÉSILLEMENTS
Vous pouvez entendre des craquements ou des
claquements lorsque le réfrigérateur est branché pour
la première fois. Cela se produit lorsque le réfrigérateur
se refroidit à la bonne température.
Le compresseur peut causer un clic ou un grésillement
lors de la tentative de redémarrage (cela peut prendre
5 minutes).
L’expansion et la contraction des serpentins de
refroidissement pendant et après le dégivrage peuvent
causer un craquement ou un claquement.
Sur les modèles équipés d’une machine à glaçons,
après un cycle de fabrication de glaçons, vous pouvez
entendre les glaçons tomber dans le bac.
OUIR !
Vous pouvez entendre les ventilateurs tourner à
hautes vitesses. Cela se produit lorsque le réfrigérateur
vient d’être branché, lorsque les portes sont ouvertes
fréquemment ou lors de l’ajout d’une grande quantité
d’aliments dans les compartiments congélateur ou
réfrigérateur. Les ventilateurs permettent de maintenir
les bonnes températures.
BRUITS D’EAU
Le passage de l’agent frigorifique dans les serpentins de
refroidissement du congélateur peut être accompagné
d’un gargouillement semblable à celui de l’eau en
ébullition.
L’eau tombant sur l’élément chauffant de dégivrage
peut faire un bruit de grésillement, de claquement ou de
bourdonnement pendant le cycle de dégivrage.
Un bruit de suintement d’eau peut être entendu pendant
le cycle de dégivrage lorsque la glace de l’évaporateur
fond et tombe dans le bac de récupération.
Fermer la porte peut causer un gargouillement en
raison de l’équilibrage de pression.
28
Page 29

Avant d’appeler un réparateur… www.electromenagersge.ca
En cas de panne
Économisez votre temps et votre argent! Consultez les tableaux des
pages suivantes, vous éviterez peut-être d’appeler un réparateur.
Problème Causes possibles Solutions
Le réfrigérateur ne fonctionne
pas
Vibration ou cliquetis (une
légère vibration est normale)
Le moteur fonctionne
pendant de longues périodes
ou se met en marche et
s’arrête fréquemment (Les
réfrigérateurs modernes, qui
ont davantage d’espace de
rangement et un compartiment
congélation plus grand,
nécessitent plus de temps de
fonctionnement. Ils se mettent
en marche et s’arrêtent
souvent pour maintenir des
températures constantes.)
Le compartiment réfrigérateur
ou congélateur est trop chaud
Du givre ou des cristaux
de glace se forment sur les
aliments congelés (du givre à
l’intérieur paquets d’aliments
est normal)
Les glaçons ont une odeur ou
un goût
La formation des glaçons est
lente
Le réfrigérateur sent Les aliments donnent une odeur au
De l’humidité se forme sur
l’extérieur du réfrigérateur
Le réfrigérateur est au cycle
dégivrage.
Le réfrigérateur est débranché. Poussez la fiche à fond dans la prise murale.
Le fusible est grillé/le disjoncteur
est déclenché.
Les pieds de nivellement avant
doivent être ajustés.
C’est normal quand on met en
marche le réfrigérateur pour la
première fois.
Cela arrive souvent quand on
met beaucoup d’aliments dans le
réfrigérateur.
La porte est restée ouverte. Vérifiez qu’un paquet d’aliments n’empêche pas la
Il fait chaud ou vous ouvrez
souvent la porte.
La commande de température est
réglée à la valeur la plus froide.
Le réglage de la commande
de température n’est pas
suffisamment froid.
Météo chaude ou ouvertures de
porte fréquentes.
La porte est restée ouverte. Vérifiez qu’un paquet d’aliments n’empêche pas la
La porte est restée ouverte. Vérifiez qu’un paquet d’aliments n’empêche pas la
Vous ouvrez la porte trop souvent
ou trop longtemps.
Les aliments donnent de l’odeur ou
du goût aux glaçons.
L’intérieur du réfrigérateur a
besoin d’être nettoyé.
La porte est restée ouverte. Vérifiez qu’un paquet d’aliments n’empêche pas la
Le réglage de la commande
de température n’est pas
suffisamment froid.
réfrigérateur.
L’intérieur a besoin d’un nettoyage. Consultez Soins et nettoyage
C’est normal pendant les périodes
de grande humidité.
Attendez environ 30 minutes pour la fin du cycle
dégivrage.
Remplacez le fusible ou réarmez le disjoncteur.
Voir la section Pieds de nivellement.
Attendez 24 heures que le réfrigérateur se
refroidisse complètement.
C’est normal.
porte de bien se fermer.
C’est normal.
Voir la section À propos de la commande.
Voir la section À propos de la commande.
Réglez la commande de température d’une unité
plus froid. Voir la section À propos de la commande.
porte de bien se fermer.
porte de bien se fermer.
Emballez bien les aliments.
Consultez Soins et nettoyage
porte de bien se fermer.
Voir la section À propos de la commande.
Vous devez bien empaqueter les aliments qui
sentent fort.
Conservez une boîte ouverte de bicarbonate de
soude dans votre réfrigérateur; remplacez-la tous
les trois mois.
Essuyez complètement la surface.
29
Page 30

Avant d’appeler un réparateur…
En cas de panne
Économisez votre temps et votre argent! Consultez les
tableaux des pages suivantes, vous éviterez peut-être
d’appeler un réparateur.
Problème Causes possibles Solutions
De l’humidité se forme à
l’intérieur (quand il fait
humide, l’air transporte de
l’humidité à l’intérieur du
réfrigérateur quand vous
ouvrez les portes)
La lampe intérieure ne
fonctionne pas
Les aliments gèlent dans le
réfrigérateur
De la rouille, du
ternissement ou de la
saleté est visible sur les
portes en acier inoxydable
Vous ouvrez les portes trop souvent ou
trop longtemps.
Pas de courant à la prise électrique. Remplacez le fusible ou réarmez le disjoncteur.
L’ampoule est grillée. Voir la section Remplacement de l’ampoule.
Les aliments sont trop proches de
l’évent à l’arrière du réfrigérateur.
Le réglage de la commande du
réfrigérateur est trop froid.
Des aliments sont trop près de la
thermistance et bloquent la circulation
d’air vers celle-ci.
Environnement humide ou air salé. Nettoyez l’acier inoxydable à l’aide de
Éloignez les aliments de l’évent.
Réglez la commande à une température plus
chaude, d’une unité à la fois. Voir la section À
propos des commandes.
Gardez les aliments à l’écart de la thermistance.
nettoyants qui contiennent de l’acide oxalique
(p.ex. la marque Bar Keepers Friend Soft
Cleanser) pour enlever la rouille, le calcaire
et les autres ternissements. N’essuyez pas le
réfrigérateur avec un linge à vaisselle souillé
ou une serviette mouillée. . N’utilisez pas de
tampons à récurer, de nettoyants en poudre,
de javellisants ni de nettoyants qui contiennent
du javellisant puisque ces produits peuvent
rayer et détériorer le fini.
30
Page 31

Garantie du réfrigérateur.
Pour les clients des États-Unis, toutes les réparations en vertu de
la garantie sont fournis par nos Centre de Service d’Usine ou par un
technicien autorisé Customer Care®. Pour prévoir une réparation,
consultez notre site GEAppliances.com ou appelez le 800.GE.CARE5
(800.432.2737). Veuillez avoir votre numéro de série et votre numéro
de modèle à portée de main lorsque vous appelez pour obtenir un
Agrafez votre facture ici.
Pour bénéficier du service
de réparation sous garantie,
une preuve de la date d’achat
initial est nécessaire.
service.
Au Canada, appelez le 800.561.3344.
Pour le diagnostic, la réparation de votre réfrigérateur peut nécessiter l’utilisation du port de données
embarqué. Celui-ci permet au technicien de réparation GE de diagnostiquer rapidement des problèmes
avec votre appareil. Il permet également à GE d’améliorer ses produits en fournissant à ces derniers des
informations sur votre appareil. Si vous ne voulez pas que les données de votre appareil soient envoyées à GE,
veuillez demander à votre technicien de NE PAS soumettre les données à GE pendant la réparation.
Pendant la période de
GE remplacera :
garantie de :
Un An
A compter de la date d’achat
initial
Toute pièce du réfrigérateur qui s’ avère défectueuse en raison d’un défaut de matériau ou de
fabrication. Pendant la validité de la présente garantie limitée d’un an, GE fournira également
gratuitement la main d’œuvre et le service pour réparer la pièce défectueuse.
Ce qui n’est pas couvert par GE :
■ Les déplacements à votre domicile pour vous expliquer
l’utilisation de ce produit
■ Une installation, livraison ou maintenance défectueuse.
■ Une panne du produit par abus d’utilisation, par mauvaise
utilisation, par modification ou s’il a été utilisé dans un but autre
que celui pour lequel il a été fabriqué.
■ Détérioration des aliments.
■ Le remplacement des fusibles ou le réenclenchement du
disjoncteur du domicile.
■ Les dommages causés après la livraison.
■ Le remplacement de la cartouche filtrante, si incluse, à cause
d’une pression d’eau en dehors de la gamme de fonctionnement
recommandée ou à cause d’une concentration excessive de
sédiments dans l’eau d’alimentation.
■ Le remplacement des ampoules, si incluses, ou la cartouche
filtrante, si incluse, et dans des conditions autres que celles
susmentionnées.
■ Tout dommage causé par accident, incendie, inondation ou une
catastrophe naturelle.
■ Tout dommage fortuit ou indirect causé par des défauts
éventuels de cet appareil.
■ Le service s’il est impossible d’avoir accès au produit.
■
Tout dommage au fini de l’appareil doit être signalé auprès du
magasin où a été effectué l’achat dans les 48 heures suivant la
livraison de l’appareil.
■
Les produits n’étant pas défectueux, brisés ou qui fonctionnent
selon la description du manuel du propriétaire.
EXCLUSION DES GARANTIES TACITES - Votre recours exclusif est l’échange du produit suivant les modalités de
la Garantie Limitée. Toutes garanties tacites, y compris les garanties de valeurs marchandes ou d’adéquation
à des fins particulières, sont limitées à une durée d’un an ou à la durée la plus courte autorisée par la loi.
Pour les clients des États-Unis : Cette garantie est étendue à l’acheteur d’origine et aux propriétaires suivants
pour tout produit acheté pour une utilisation domestique aux États-Unis. Si le produit est installé dans une
région où ne se trouve aucun réparateur autorisé GE, vous devrez peut-être assumer les frais de transport ou
apporter l’appareil à un centre de service autorisé GE. En Alaska, cette garantie exclut le coût d’expédition ou de
dépannage à votre domicile.
Certains états n’acceptent pas d’exclusion ou de limites aux dommages indirects consécutifs. Certains droits
particuliers vous sont dévolus en vertu de la présente garantie et peuvent s’accompagner d’autres droits qui
varient selon votre lieu de résidence. Pour connaître vos droits juridiques, veuillez consulter le bureau local ou le
bureau d’état des affaires aux consommateurs ou le Procureur Général de votre état.
Garant :
États-Unis :
General Electric Company. Louisville, KY 40225
Cette garantie est étendue à l’acheteur d’origine et aux propriétaires suivants pour tout produit acheté aux
Canada pour une utilisation domestique aux Canada.Le service à domicile en vertu de la garantie sera fourni
dans les régions où il est disponible et où Mabe estime raisonnable de le fournir.
Garant Canada: MC Commercial, Burlington, Ontario, L7R 5B6
31
Page 32
Soutien au consommateur.
Site Web appareils électroménagers GE electromenagersge.ca
Vous avez une question ou vous avez besoin d’aide pour votre appareil électroménager? Contactez-nous par
Internet au site electromenagersge.ca 24 heures par jour, tous les jours de l’année.
Service de réparations 1.800.561.3344
Service de réparations GE est tout près de vous.
Pour faire réparer votre électroménager GE, il suffit de nous téléphoner.
Studio de conception réaliste
Sur demande, GE peut fournir une brochure sur l’aménagement d’une cuisine pour les personnes
à mobilité réduite.
Écrivez: Directeur, Relations avec les consommateurs, Mabe Canada Inc.
Bureau 310, 1 Factory Lane
Moncton, N.B. E1C 9M3
Prolongation de garantie
Veuillez consulter votre annuaire local pour trouver un fournisseur de garantie pr olongée.
Pièces et accessoires
Ceux qui désirent réparer eux-mêmes leurs électroménagers peuvent recevoir pièces et accessoires
directement à la maison (cartes VISA, MasterCard et Discover acceptées).
Les directives stipulées dans le présent manuel peuvent être effectuées par n’importe quel utilisateur. Les
autres réparations doivent généralement être effectuées par un technicien qualifié. Soyez prudent, car
une réparation inadéquate peut affecter le fonctionnement sécuritaire de l’appareil.
Vous trouverez dans les pages jaunes de votre annuaire le numéro du Centre de service Mabe le plus proche.
Autrement, appelez-nous au 1.800.661.1616.
Contactez-nous
Si vous n’êtes pas satisfait du service après-vente dont vous avez bénéficié :
Premièrement, communiquez avec les gens qui ont réparé votre appareil.
Ensuite, si vous n’êtes toujours pas satisfait envoyez tous les détails–numéro de téléphone compris–au
Directeur, Relations avec les consommateurs, Mabe Canada Inc.
Bureau 310, 1 Factory Lane
Moncton, N.B. E1C 9M3
Inscrivez votre appareil électroménager electromenagersge.ca
Inscrivez votre appareil électroménager en direct, aussitôt que possible. Cela améliorera nos
communications et notre service après-vente. Vous pouvez également nous envoyer par la poste
le formulaire d’inscription joint à votre documentation.
32
Page 33

Instrucciones de seguridad .. 34, 35
Instrucciones de operación
Configuraciones de control ..........36
Termistor ............................36
Cajónes de almacenamiento .........37
Servicio de hielo .......................37
Cuidado y limpieza ............... 38, 39
Instrucciones de instalación
Planificación Avanzada .............. 40.
Funciones del Refrigerador ...........41
Cómo invertir el vaivén
de la puerta ..................... 42, 43.
Consejos para la identificación
y solución de problemas
Sonidos normales de la operación . . . 44
Solución de Problemas ...........45, 46
Apoyo al cliente
Garantía (U.S.) ....................... 50
Apoyo al cliente ..................... 51
Escriba los números de modelo y de serie
aquí:
Modelo # ______________________
Serie # ________________________
Usted puede encontrarlos en una etiqueta
dentro del refrigerador.
33
Page 34

INFORMACIÓN IMPORTANTE DE SEGURIDAD.
LEA TODAS LAS INSTRUCCIONES ANTES DE USAR.
Sitio Web de Electrodomésticos de GE
Para más información sobre el funcionamiento de su refrigerador, visite www.
GEAppliances.com
INFORMACIÓN DE SEGURIDAD DEL REFRIGERADOR
Éste es el símbolo de alerta de seguridad. El mismo alerta sobre potenciales riesgos de muerte o lesiones tanto para usted
con para otras personas. Todos los mensajes de seguridad estarán a continuación del símbolo de alerta de seguridad y con la
palabra “PELIGRO”, “ADVERTENCIA” o “PRECAUCIÓN”. Estas palabras se definen como:
PELIGRO
ADVERTENCIA
blessures graves, voire la mort. .
PRECAUCIÓN
blessures mineures ou graves.
ADVERTENCIA
Signale une situation qui présente un danger imminent et qui, si elle n’est pas évitée, entraînera des blessures
graves, voire la mort.
Signale une situation qui présente un danger imminent et qui, si elle n’est pas évitée, peut entraîner des
Signale une situation qui présente un danger imminent et qui, si elle n’est pas évitée, peut entraîner des
A fin de reducir el riesgo de incendio, explosión, descargas eléctricas o lesiones al usar
su refrigerador, siga estas precauciones básicas de seguridad:
o comuníquese al 1-800-GECARES (432-2737).
INSTRUCCIONES IMPORTANTES DE SEGURIDAD
Este refrigerador se deberá instalar y ubicar adecuadamente
de acuerdo con las Instrucciones de Instalación antes de ser
usado.
Desenchufe el refrigerador antes de hacer reparaciones,
reemplazar una lámpara de luz o hacer una limpieza.
Nota: La corriente que va al refrigerador no puede ser
desconectada por ninguna configuración del panel de control.
Nota: Las reparaciones deberán ser realizadas por un Profesional
del Servicio Técnico calificado.
Reemplace todas las piezas y paneles antes del uso.
No guarde ni use gasolina u otros vapores inflamables y líquidos
cerca de este u otros electrodomésticos.
Debido a los posibles riesgos sobre la seguridad bajo
ciertas condiciones, recomendamos enfáticamente no usar
PRECAUCIÓN
$¿QGHUHGXFLUHOULHVJRGHOHVLRQHVDOXVDUHOUHIULJHUDGRUVLJDHVWDVSUHFDXFLRQHV
básicas.
No limpie estantes de vidrio ni tapas con agua caliente cuando
estén fríos. Los estantes de vidrio y las tapas se pueden romper si
son expuestos a cambios de temperatura repentinos o impactos,
tales como sacudones o caídas. El vidrio templado está diseñado
para destruirse en pequeñas piezas en caso de rotura.
Mantenga los dedos fuera de los espacios de “riesgo de
lastimaduras”; los despejes entre las puertas y entre las puertas y
el gabinete son necesariamente pequeños. Tenga el cuidado de
cerrar las puertas cuando los niños se encuentren en el área.
prolongadores. Sin embargo, si se debe usar un prolongador,
es absolutamente necesario que sea un prolongador para
electrodoméstico de la lista UL (en Estados Unidos) o uno
certificado por CSA (en Canadá), de 3 cables con conexión a
tierra, que cuente con un enchufe con conexión a tierra y un
tomacorriente con una graduación eléctrica del cable de 15
amperes (mínimo) y 120 volts.
A fin de evitar riesgos de que los niños sufran asfixia o queden
atrapados, retire las puertas de comidas frescas y del freezer de
cualquier refrigerador antes de deshacerse o dejar de usar el
mismo.
No permita que los niños se trepen, paren o cuelguen de
las manijas de la puerta o de los estantes del refrigerador.
Podrían sufrir lesiones graves.
No vuelva a congelar comidas que hayan estado totalmente
congeladas en forma previa.
En refrigeradores con máquinas de hacer hielo automáticas, evite
el contacto con las partes móviles del mecanismo eyector o con el
elemento de calefacción que libera los cubos. No coloque los dedos
ni las manos en el mecanismo de la máquina de hielo automática
mientras el refrigerador esté enchufado.
34
Page 35

GEAppliances.com
ADVERTENCIA
Riesgo de Explosión.
Mantenga cualquier material y vapores inflamables, tales como gasolina, alejados del refrigerador. Si
no se cumple con esto se podrá producir una explosión, incendio o la muerte.
CONEXIÓN DE LA ELECTRICIDAD
ADVERTENCIA
Enchufe en un tomacorriente con conexión a tierra de 3 cables.
No elimine el cable de conexión a tierra.
No use un adaptador.
Si no se siguen estas instrucciones se podrá producir a muerte, incendios o descargas eléctricas.
Nunca, bajo ninguna circunstancia, corte o elimine el tercer cable (tierra) del cable de corriente.
Para su seguridad personal, este electrodoméstico debe estar adecuadamente conectado a tierra.
El cable de corriente de este electrodoméstico contiene un
enchufe de 3 cables (conexión a tierra) que se conecta a un
tomacorriente de pared estándar de 3 cables (conexión a
tierra) para minimizar la posibilidad de riesgos de descargas
eléctricas por parte del mismo.
Contrate a un electricista calificado para que controle el
tomacorriente y el circuito eléctrico, a fin de asegurar que el
enchufe esté correctamente conectado a tierra.
En caso de contar con un tomacorriente de pared de 2 cables,
es su responsabilidad y obligación reemplazarlo por un
tomacorriente de pared de 3 cables correctamente conectado
a tierra. No use un adaptador.
El refrigerador debería estar siempre conectado a un enchufe
específico con un índice de voltaje equivalente al que figura en
su etiqueta de características técnicas.
Riesgo de Descarga Eléctrica.
Se requiere un suministro eléctrico con fusible y conexión
a tierra de 115 voltios de CA, 60 Hz, 15 o 20 amperes. Esto
garantiza el mejor funcionamiento y además previene la
sobrecarga de los circuitos del hogar, lo cual podría ocasionar
riesgos de incendio debido al recalentamiento de cables.
Nunca desenchufe el refrigerador tirando del cable de
corriente. Siempre tome su enchufe firmemente y empuje el
mismo hacia afuera para retirarlo.
Repare o reemplace de inmediato todos los cables de corriente
pelados o con cualquier tipo de daño. No use un cable con
cortaduras o abrasión sobre su extensión o extremos.
Al alejar el refrigerador de la pared, se deberá tener cuidado de
que no ruede sobre ni dañe el cable de corriente.
FORMA ADECUADA DE DESCARTAR SU ANTIGUO REFRIGERADOR
ADVERTENCIA
Retire del refrigerador las puertas de comidas frescas y del freezer, antes de descartar el refrigerador.
Si esto no se realiza, los niños podrán quedar atrapados y ocasionar la muerte o daño cerebral.
IMPORTANTE:
: Riesgo de que los niños sufran asfixia o y queden atrapados.
Que un niño quede atrapado o que sufra una asfixia no
son problemas del pasado. Los refrigeradores antiguos
o abandonados aún son peligrosos, incluso aunque se
conserven por “sólo unos pocos días”. Si se deshará de su
antiguo refrigerador, siga las siguientes instrucciones a fin
de evitar accidentes.
Antes de Descartar su Antiguo Refrigerador o
Freezer:
Retire las puertas de comidas frescas y del freezer.
Deje los estantes en su lugar de modo que los niños no
puedan trepar dentro con facilidad.
Refrigerantes
Todos los productos de refrigeración cuentan con
refrigerantes, que de acuerdo con la ley federal
deberán ser eliminados antes de descartar el producto.
Si se deshará de un producto de refrigeración
antiguo, consulte a la compañía a cargo sobre cómo
deshacerse del mismo.
LEA Y SIGA ESTA INFORMACIÓN DE SEGURIDAD
CUIDADOSAMENTE.
GUARDE ESTAS INSTRUCCIONES
35
Page 36

Sobre el control del refrigerador.
The temperature control is located in the fresh food compartment. Initially set the control to
the recommended setting. Allow 24 hours for temperature to stabilize.
Temperature Control
Select
Coldest Colder
Control de temperatura de comida fresca
Configuraciones de los Controles
Recommended
Cold
El control del compartimiento de comida fresca debe ser
ajustado realizando un incremento por vez. Espere 12 horas
luego de cada ajuste para que el compartimiento alcance la
temperatura que configuró. El compartimiento del freezer estará
más frío cuando la temperatura del compartimiento de comida
fresca sea más baja.
Termistor
Termistor
Las configuraciones de control varían en base a las preferencias
personales, uso y condiciones de operación y pueden requerir
más de un ajuste. Los factores que afectan la temperatura
incluyen la cantidad de alimentos en los compartimentos de
alimentos frescos y del congelador, la frecuencia de apertura
de la puerta y la temperatura de los alimentos cuando se los
coloca en cualquiera de los dos compartimentos.
The thermistor located at the bottom of the fresh food
control housing is one of the key elements for temperature
control. Keep all items away from blocking the thermistor as
this will reduce the sensitivity of the thermistor and cause
temperature issues. Food may freeze or become too warm
depending on the compressor cycle if the air flow is blocked.
36
Page 37

Sobre los cajones de almacenamiento. GEAppliances.com
Cajones de frutas y vegetales
Estos cajones de almacenamiento ofrecen
espacio para almacenar frutas, vegetales y
carnes.
Sobre el servicio de hielo.
Bandejas para cubitos de hielo
Para hacer hielo, llene la bandeja de hielo con
agua y coloque la misma en una superficie
nivelada del compartimiento del freezer.
Se formarán cubos de hielo en unas pocas
horas.
Para sólo uno o dos cubitos de hielo, deje
Para retirar y reemplazar los cajones y
la tapa sobre estos, la puerta debe estar
completamente abierta. En algunas
instalaciones, el refrigerador puede tener que
alejarse de la pared para que la puerta pueda
abrirse por completo.
la bandeja hacia arriba, retuerza ambos
extremos ligeramente y quite todos los
cubitos que desee.
Lave las bandejas para cubitos de hielo sólo en
DJXDWLELD³QRODVFRORTXHHQHOODYDSODWRV
Ice maker kit de accesorios
Su vendedor tiene disponible un kit
de accesorios para la máquina de
hielo.Los kits de accesorios IM-4D o
IM-6D funcionarán con su refrigerador.
Para realizar una orden, ingrese a
GEApplianceparts.com o comuníquese al
800.626.2002.
NOTA: La repisa intermedia del freezer se
DEBERÁ colocar en la posición más baja
cuando se instale la máquina de hacer
hielo.
Kits de suministro de agua
Su vendedor o Piezas y Accesorios ponen a su
alcance, a un costo extra, kits que contienen
tuberías de cobre, una válvula de cierre,
accesorios e instrucciones necesarias para
conectar la máquina de hielo a su línea de
agua fría. En los EE.UU., llame al 800.626.2002.
La tapa de la válvula de agua provista
junto con el manual del usuario se debe
instalar al realizar la instalación del kit
opciona de la máquina de hacer hielo. Si
no cuenta con el ensamble de la tapa de
la válvula de agua, comuníquese al 1-800432-2737 y ordene la pieza WR13X20070.
37
Page 38

Cuidado y limpieza del refrigerador.
Limpieza de la parte exterior
Mantenga la parte exterior limpia. Límpiela
con un paño ligeramente humedecido con
un detergente líquido para platos no agresivo.
Seque con un paño suave y limpio.
No limpie el refrigerador con un repasador
sucio o con una toalla mojada. Estos pueden
dejar un residuo que puede desgastar la
pintura. No utilice esponjillas abrasivas,
limpiadores en polvo, blanqueadores o
limpiadores que contengan blanqueadores
porque estos productos pueden rayar y
dañar el acabado de la pintura. Use sólo un
limpiador líquido libre de material abrasivo y
frote en la dirección de las líneas del cepillo.
Los puertas y las manijas de las
puertas de acero inoxidable (en
algunos modelos) pueden ser
limpiados con un limpiador para acero
inoxidable para usos comerciales.
Los limpiadores con ácido oxálico
tales como Bar Keepers Friend Soft
Cleanser™ eliminarán el óxido sobre
la superficie, deslustres y pequeñas
manchas. Use sólo un limpiador líquido
libre de material abrasivo y frote en la
dirección de las líneas del cepillo con
una esponja suave y húmeda. No utilice
cera para electrodomésticos sobre el
acero inoxidable.
Proteja el acabado de la pintura. El acabado
de la parte exterior del refrigerador es de
una pintura cocida de alta calidad. Con los
cuidados adecuados, permanecerá como
nueva y libre de herrumbre durante años.
Aplique una mano de cera para cocinas/
aparatos al refrigerador nuevo, y luego
por lo menos dos veces por año.
Limpieza de la parte interior
Para ayudar a prevenir olores, deje una
caja abierta de bicarbonato de sodio en los
compartimentos de alimentos frescos y del
congelador.
Desenchufe el refrigerador antes de
limpiarlo. Si esto no resulta práctico, seque la
humedad excesiva con una esponja o paño
cuando limpie alrededor de los interruptores,
luces o controles.
Utilice una solución de agua tibia con
bicarbonato de sodio³alrededor de una
cucharada (15 ml) de bicarbonato de sodio
y un cuarto de galón (1 litro) de agua. Esta
solución limpia y neutraliza los olores.
Enjuague y seque con un paño.
2WUDVSLH]DVGHOUHIULJHUDGRU³LQFOX\HQGR
juntas de las puertas, cajones para frutas
\YHJHWDOHV\WRGDVODVSLH]DVSOiVWLFDV³
pueden limpiarse de la misma manera.
Después de limpiar las juntas de la puerta,
aplique una fina capa de vaselina a las juntas
sobre el lado de la bisagra. Esto ayuda a
que las juntas no se peguen y que no se
deformen. No utilice polvos limpiadores u
otros limpiadores abrasivos.
PRECAUCIÓN
vidrio ni tapas con agua caliente cuando
estén fríos. Los estantes de vidrio y las
tapas se pueden romper si son expuestos
a cambios de temperatura repentinos o
impactos tales como sacudones o caídas.
El vidrio templado está diseñado para
destruirse en pequeñas piezas en caso de
rotura.
No lave ninguna parte plástica del
refrigerador en la lavadora de platos.
No limpie estantes de
38
Page 39

GEAppliances.com
Reemplazo de la Luz LED
Ensamble
del LED
Calce en las
Lengüetas
Lente
La luz LED está ubicada detrás de una lente
luminosa en el cielo raso de la sección del
refrigerador.
1. Retire la repisa superior (si es necesario).
2. Baje el ensamble de la unidad de control.
3. Retire la lente luminosa usando un
destornillador de punta plana para
presionar una de las lengüetas hacia
abajo. Las lentes se calzan dentro y fuera.
4. Deslice el ensamble de la luz LED de la
ranura de montaje.
Preparación para vacaciones
Durante largas vacaciones o ausencias, quite
los alimentos y desenchufe el refrigerador.
Limpie la parte interior con una solución
compuesta por una cucharada bicarbonato de
sodio (15 ml) y un cuarto (1 litro) de agua. Deje
las puertas abiertas.
5. De forma suave, retire los cables y
desconecte los mismos del ensamble de
la unidad de control.
6. Reemplace por un ensamble LED nuevo y
vuelva a deslizar el ensamble en la ranura
de montaje.
7. Reemplace la lente luminosa haciendo
que calce en su posición.
8. Para ordenar el ensamble LED,
comuníquese a GE Appliances al 800.
GE.CARES (800.492.2737) durante el
horario comercial normal.
Preparación para una mudanza
Quite los alimentos y desenchufe el
refrigerador. Fije todos los elementos sueltos
como estantes o cajones asegurándolos bien
con cinta adhesiva para evitar daños.
Asegúrese de que el refrigerador quede
en posición vertical durante la mudanza.
39
Page 40

Instrucciones
de Instalación
Refrigerador
Modelos GPE12
¿Preguntas? Llame al 800.GE.CARES (800.432.2737) o bien Visite nuestra página Web:
ANTES DE COMENZAR
Lea estas instrucciones por completo y con detenimiento.
•
IMPORTANTE – Guarde estas instrucciones
para el uso de inspectores locales.
•
IMPORTANTE – Cumpla con todos los
códigos y ordenanzas vigentes.
• Nota al instalador – Asegúrese de dejar estas
instrucciones con el Consumidor.
• Nota al consumidor – Conserve estas instrucciones
para referencia futura.
• Nivel de capacidad – La instalación de este aparato
requiere capacidades mecánicas básicas.
• Tiempo de finalización – Instalación del refrigerador
15 minutos
Invertir el vaivén de la puerta
1 hora
• El instalador tiene la responsabilidad de efectuar
una instalación adecuada.
• La Garantía no cubre las fallas del producto debido
a una instalación incorrecta.
CÓMO DESEMBALAR SU REFRIGERADOR
• Retire la cinta y cualquier etiqueta (excepto la etiqueta
de calificación) de su refrigerador. Los residuos de cinta
o pegamento se pueden retirar fácilmente frotando con
los dedos una cantidad pequeña de jabón líquido para
lavar platos sobre el adhesivo. Limpie con agua caliente
y seque.
• No use instrumentos puntiagudos, no frote alcohol, no
use líquidos inflamables, ni limpiadores abrasivos para
retirar cinta o pegamento. Estos productos pueden dañar
la superficie del refrigerador.
• Al mover el refrigerador, no lo incline más de 45º desde
su posición vertical.
PATAS DE NIVELACIÓN
Deben instalarse patas ajustables en las esquinas
frontales del refrigerador para que éste se encuentre
bien asentado en el piso, y el frente debe estar elevado
lo suficiente para que la puerta cierre fácilmente cuando
se abre hasta alrededor de la mitad.
GEAppliances.com
UBICACIÓN DEL REFRIGERADOR
• No instale el refrigerador donde las temperaturas sean
inferiores a 60ºF (16ºC), ya que no se mantendrá en
funcionamiento el tiempo suficiente para conservar las
temperaturas adecuadas.
• No instale el refrigerador donde la temperatura sea
superior a los 100ºF (37ºC), ya que no funcionará de
forma correcta.
• No instale el refrigerador en una ubicación expuesta al
agua (lluvia, etc.) o en contacto directo con la luz solar.
• Instale el refrigerador en un piso lo suficientemente
fuerte como para soportarlo completamente cargado.
ESPACIO NECESARIO
• Instalación con modo de pie únicamente.
• Si el refrigerador está siendo instalado junto a la pared,
deje suficiente espacio del lado de la bisagra para
permitir que, al abrirse, la puerta gire lo suficiente como
para acceder a los cubos vacíos del compartimiento del
refrigerador.
• No realice la instalación a menos de 5” (13 cm.) de la
cocina.
• Espacios Necesarios Mínimos: Parte Trasera –
3” desde la pared
Para ajustar las patas de nivelación, gire las patas
patas en sentido de las agujas del reloj para levantar
el refrigerador o en sentido contrario a las agujas del
reloj para bajarlo.
Para elevar el refrigerador
CABLE DE CORRIENTE
• Enchufe el cable de corriente del refrigerador en su propio
tomacorriente correctamente conectado a tierra, con un
índice de voltaje que coincida con la placa de calificación
del refrigerador.
• No use un prolongador.
• Lea todas las precauciones de seguridad en las páginas
2 y 3.
40
Page 41

Instrucciones de instalación
FUNCIONES DEL REFRIGERADOR
1
2
6
6
7
3
4
5
1 Estante del Freezer 5 Pies ajustables
2 Control de temperatura del refrigerador y
6 Cestos de Puerta del Freezer
del freezer
3 Estantes del refrigerador 7 Cesto de la Puerta
4 Cajón de verduras con tapa de vidrio y
control de la humedad
8 Cesto de la Puerta para Almacenamiento de
Botellas de un Galón/ 2 Litros
8
7
41
Page 42

Instrucciones de instalación
CÓMO INVERTIR EL VAIVÉN DE LA PUERTA
2
NOTAS IMPORTANTES
Cuando invierta el vaivén de la puerta:
• Lea por completo todas las instrucciones antes
de comenzar.
• Manipule las piezas con cuidado para no rayar la pintura.
• Separe los tornillos por sus piezas relacionadas para
evitar usarlos en lugares equivocados.
• Coloque las puertas sobre una superficie de trabajo que
no raye.
• Se recomienda que 2 personas realicen esta tarea.
IMPORTANTE: Una vez que haya comenzado, no mueva
el gabinete hasta haber finalizado la inversión del vaivén
de la puerta.
Estas instrucciones son para cambiar las bisagras del lado
derecho al lado izquierdo; si alguna vez desea cambiarlas
de nuevo al lado derecho, siga las mismas instrucciones
e invierta todas las referencias de la izquierda a la derecha.
Desenchufe el refrigerador del tomacorriente.
Vacíe todos los estantes de la puerta.
HERRAMIENTAS NECESARIAS
Llave de cubo de 8 mm
Destornillador de estrella
Espátula o destornillador
de lados finos
Cinta adhesiva
QUITE LA PUERTA DE ALIMENTOS
FRESCOS
Cierre la puerta con cinta adhesiva.
Retire la bisagra central quitando los 2 tornillos. Levante
la bisagra para retirarla.
NOTA: Algunos modelos poseen una cuña entre la
bisagra central y la caja que puede adherirse a la caja
No la afloje. También guarde las arandelas de los tornillos
de la bisagra central para uso futuro.
Levante la puerta de comida fresca hacia arriba y afuera
de la bisagra inferior.
Coloque la puerta con la parte exterior hacia arriba sobre
una superficie que no raye.
NOTA: Al retirar la puerta, observe la arandela entre la
clavija de la bisagra inferior y la parte inferior de la puerta
de comida fresca que puede adherirse a la puerta. No la
.
afloje
AVISO : No deje caer la puerta al piso. Si esto sucede,
puede dañarse la traba de la puerta.
.
1
QUITE LA PUERTA
Retire la tapa de la bisagra. Destornille y retire la bisagra
superior y la cuña.
Levante la puerta de
alimentos frescos
hacia arriba y afuera del
electrodoméstico
Coloque la puerta sobre
una superficie que no
raye con la parte exterior
hacia arriba.
NOTA: Al retirar la
bisagra superior, tenga
cuidado con la cuña
entre la parte inferior
de la bisagra y la parte superior de la caja que puede
adherirse a la caja. No la afloje.
NOTA: Al retirar la puerta, observe la arandela entre la
clavija de la bisagra central y la parte inferior de la puerta
del freezer que puede adherirse a la puerta. No la afloje.
DEL CONGELADOR
AVISO : No deje caer la puerta al piso. Si esto sucede,
puede dañarse la traba de la puerta.
42
3
BISAGRA INFERIOR
Retire los tornillos y la bisagra inferior con cuña del lado
derecho. Retire las tapas de los tornillos de la esquina
izquierda.
Utilizando la bisagra izquierda incluida con las piezas
recibidas con su refrigerador junto con los tornillos (y
arandelas, si corresponde) retirados anteriormente,
instale la bisagra izquierda en el extremo inferior
izquierdo de su refrigerador. Asegúrese de que una
cuña esté adherida a la bisagra izquierda antes de la
instalación.
Coloque las tapas de los tornillos en los agujeros ahora
vacíos sobre la derecha.
Page 43

Installation Instructions
CÓMO INVERTIR EL VAIVÉN DE LA PUERTA (CONT.)
7
4
TRANSFIERA LA TRABA DE LA
PUERTA DEL CONGELADOR HACIA
LA IZQUIERDA
Retire la traba de la puerta y la manga de la clavija de
la bisagra desde la parte inferior del lado derecho de
la puerta.
Usando la traba de la puerta izquierda incluida con
las piezas enviadas con
su refrigerador, transfiera
la manga de la clavija de
la bisagra hacia el lado
izquierdo e instale la traba
de la puerta izquierda.
5
VUELVA A COLGAR LA PUERTA
DE ALIMENTOS FRESCOS
Asegúrese que las arandelas estén en su lugar
en el perno inferior de la
bisagra. Asegúrese de que la
puerta esté alineada tanto
de forma horizontal como
vertical. Coloque la puerta
del congelador en la bisagra
inferior, cierre la puerta y
ciérrela con cinta adhesiva.
Retire las tapas de
los tornillos desde el
extremo izquierdo de
la puerta e inserte las
mismas en el agujero
del lado opuesto.
6
INSTALE LA BISAGRA CENTRAL
Tapas de
los tornillos
EN LA IZQUIERDA
Retire las tres tapas de los
tornillos del lado izquierdo
e instale dos de las mismas
sobre la derecha.
Usando la bisagra
intermedia y los tornillos (y
arandelas, si corresponde)
retirados anteriormente,
instale la bisagra intermedia
izquierda del lado izquierdo.
Quite la cinta que sostiene la
puerta cerrada.
AVISO : Cuando se arma correctamente, la bisagra
queda firme contra el gabinete.
ATENCIÓN: Los tornillos deben estar bien ajustados.
Gire los tornillos hasta que queden firmes. Luego ajuste
los tornillos con 1/2 vuelta como mínimo utilizando
ambas manos.
43
TRANSFIERA LA BISAGRA SUPERIOR
A LA IZQUIERDA
Utilizando una espátula con
los bordes recubiertos con
cinta adhesiva, quite los las
tapas de los tornillos . Tenga
cuidado con el acabado de
pintura.
Vuelva a instalar la tapa del tornillo del lado derecho.
8
TRANSFIERA LA TRABA
DE LA PUERTA DEL
CONGELADOR A LA
IZQUIERDA
Retire la traba de la puerta
y la manga de la clavija de
la bisagra desde la parte
inferior del lado derecho de
la puerta.
Usando la traba de la puerta izquierda incluida con
las piezas enviadas con su refrigerador, transfiera
la manga de la clavija de la bisagra hacia el lado
izquierdo e instale la traba de la puerta izquierda.
9
VUELVA A COLGAR LA PUERTA DE
ALIMENTOS FRESCOS
Transfiera el las tapas
de los tornillos de la
parte superior de la
puerta al lado opuesto.
Asegúrese de que la
arandela (si corresponde) esté colocada en la clavija
de la bisagra central. Coloque la puerta del freezer en
la bisagra central sobre la clavija.Asegúrese de que
la puerta esté alineada de forma horizontal y vertical,
y que la junta quede sellada sobre todos los lados.
Adhiera la bisagra superior retirada anteriormente
sobre el lado izquierdo de su refrigerador y reemplace la
tapa de la bisagra.
Las tapas de
los tornillos
Page 44

Sonidos normales de la operación.
Los refrigeradores más nuevos producen sonidos diferentes a los modelos más antiguos.
Los refrigeradores modernos tienen más funciones y usan tecnología más reciente.
¿Usted escucha lo que yo escucho? Estos sonidos son normales.
HUMMM...
WHOOSH...
El nuevo compresor de alta eficiencia puede funcionar
más rápido y durar más que el de su refrigerador anterior
y puede escuchar un zumbido de tono alto
o un sonido pulsante mientras opera.
Puede escuchar un sonido de soplido cuando
las puertas se cierran. Esto se debe a que la presión
se está estabilizando dentro del refrigerador.
Puede escuchar los ventiladores moviéndose a gran
velocidad. Esto pasa cuando el refrigerador se conecta por
primera vez, cuando las puertas se abren frecuentemente
o cuando se guarda gran cantidad
de alimentos en el refrigerador o en los compartimientos
del congelador. Los ventiladores están ayudando a
mantener las temperaturas correctas.
CHASQUIDOS, ESTALLIDOS,
CRUJIDO
Puede escuchar sonidos como de crujido o estallidos
cuando el refrigerador se conecta por primera vez. Esto
pasa a medida que el refrigerador se enfría hasta la
temperatura correcta.
El compresor puede causar un chasquido o un gorjeo
cuando intenta volver a arrancar (esto puede tomar hasta
5 minutos).
Expansión y contracción de las bobinas durante
o después del ciclo de descongelación puede causar
sonidos como de crujido o estallidos.
En modelos con máquina de hielos, después de completar
un ciclo de hacer hielo, se pueden escuchar los cubos de
hielo cuando caen a la bandeja de hielos.
SONIDOS DE AGUA
El fluido del refrigerante a través de las bobinas puede
producir un sonido de borboteo como de agua hirviendo.
El agua que cae en el calentador de descongelación
puede causar un chisporroteo, estallido o zumbido
durante el ciclo de descongelación.
Un ruido de agua cayendo se puede escuchar durante
el ciclo de descongelación a medida que el hielo
se derrite del evaporador y fluye hacia la bandeja
de drenaje.
El cierre de las puertas puede producir un sonido
de gorgoteo debido a la estabilización de la presión.
44
Page 45

Antes de solicitar un servicio… GEAppliances.com
Solucionar problemas
¡Ahorre tiempo y dinero! Revise las tablas en las siguientes
páginas y tal vez no necesitará de solicitar un servicio.
Problema Causas Posibles Qué hacer
El refrigerador no
funciona
Vibración o golpeteo (una
leve vibración es normal)
El motor funciona por
períodos prolongados
o se enciende y apaga
frecuentemente (Los
refrigeradores modernos
con más espacio de
almacenamiento y un
congelador más grande
requieren más tiempo de
operación. Se encienden
y apagan a menudo para
mantener temperaturas
parejas)
El compartimento de
alimentos frescos o del
congelador están muy
calientes
Escarcha o cristales de
hielo sobre los alimentos
congelados (la escarcha
dentro del paquete es
normal)
El refrigerador está en el ciclo de descongelado. Espere alrededor de 30 minutos
para que termine el ciclo de
descongelado.
El refrigerador está desenchufado. Presione el enchufe
completamente dentro del
tomacorriente.
Fusible quemado/interruptor de circuitos accionado. Cambie el fusible o reconfigure
el interruptor.
Las patas de nivelación frontales deben ajustarse. Ver Patas de nivelación.
Normal cuando el refrigerador se enchufa por primera vez. Espere 24 horas para que
el refrigerador se enfríe por
completo.
Esto ocurre a menudo cuando se colocan grandes
cantidades de alimentos en el refrigerador.
Se dejó la puerta abierta. Constate que un paquete no
Clima caluroso o aperturas frecuentes de la puerta. Esto es normal.
Control de temperatura configurado en el nivel más frío. Ver Sobre el control.
El control de temperatura no se ha configurado lo
suficientemente frío.
Clima caluroso o aperturas frecuentes de la puerta. Configure el control de
Se dejó la puerta abierta. Constate que un paquete no
Se dejó la puerta abierta. Constate que un paquete no
Aperturas de la puerta muy frecuentes o muy prolongadas
Esto es normal.
esté manteniendo la puerta
abierta.
Ver Sobre el control.
temperatura un paso más frío.
Ver Sobre el control.
esté manteniendon la puerta
abierta.
esté manteniendo la puerta
abierta.
Los cubitos de hielo
tienen olor/sabor
Los cubitos de hielo
tardan en hacerse
Los alimentos transmiten olor/sabor a los cubitos de hielo Envuelva bien los alimentos.
Debe limpiarse la parte interior del refrigerador. Ver Cuidado y limpieza.
Se dejó la puerta abierta. Constate que un paquete no
esté manteniendo la puerta
abierta.
El control de temperatura no se ha configurado lo
suficientemente frío.
Ver Sobre el control.
45
Page 46

Antes de solicitar un servicio…
Solucionar problemas
¡Ahorre tiempo y dinero! Revise las tablas en las siguientes
páginas y tal vez no necesitará de solicitar un servicio.
Problema Causas Posibles Qué hacer
El refrigerador tiene olor Los alimentos transmiten olor
al refrigerador.
Debe limpiarse la parte interna. Ver Cuidado y limpieza.
Se forma humedad en la parte
exterior del refrigerador
Se acumula humedad en el
interior (en climas húmedos, el
aire transporta humedad dentro
del refrigerador cuando se abren
las puertas)
La luz interior no funciona El tomacorriente no recibe
Los alimentos se congelan en el
refrigerador
Óxido, pérdida de color o
suciedad en puertas
Resulta común durante
períodos de humedad elevada.
Aperturas de la puerta muy
frecuentes o muy prolongadas.
energía.
La bombilla de luz se ha
quemado.
Los alimentos se encuentran
muy cerca de la ventilación
de aire en la parte trasera del
refrigerador.
El control del refrigerador
está configurado en una
temperatura muy baja.
La comida está demasiado
cerca del termistor y bloquea el
flujo de aire hasta el mismo.
Ambiente húmedo o aire
salino.
Los alimentos con olores fuertes deben envolverse bien.
Mantenga una caja abierta de bicarbonato de sodio en
el refrigerador; cámbiela casa tres meses.
Seque la superficie con un paño.
Cambie el fusible o reconfigure el interruptor.
Ver Cómo cambiar la bombilla de luz.
Aleje los alimentos de la ventilación de aire.
Mueva el control del refrigerador a una configuración
más elevada subiendo una unidad por vez.
Aleje la comida del termistor.
Limpie el acero inoxidable con limpiadores que
contengan ácido oxálico (tal como un Limpiador
Suave de la marca BarKeepers Friend); estos
eliminarán el óxido, cal u otros deslustres. No limpie
el refrigerador con una tela sucia para platos o una
toalla mojada. No use estropajos, limpiadores en
polvo, blanqueadores ni limpiadores que contengan
blanqueador, ya que estos productos pueden rayar y
arruinar la terminación del acero inoxidable.
46
Page 47

Notas. GEAppliances.com
47
Page 48

Notas.
48
Page 49

Notas. GEAppliances.com
49
Page 50

Garantía del refrigerador.
Todos los servicios de garantía los proporcionan nuestros Centros de
Reparación de Fábrica o nuestros técnicos Customer Care® autorizados.
Para concertar una cita de reparación, en línea, 24 horas al día, visíte nos
al GEAppliances.com, o llame al 800.GE.CARES (800.432.2737). Cuando
llame para solicitar servicio, por favor tenga a mano el número de serie y el
número de modelo.
Grape aquí su recibo. Se
requiere facilitar prueba de
la fecha de compra original
para obtener un servicio
bajo la garantía.
Para realizar el servicio técnico de su refrigerador se podrá requerir el uso de datos del puerto de abordaje para su
diagnóstico. Esto da al técnico del Servicio de Fábrica de GE la habilidad de diagnosticar de forma rápida cualquier problema
con su electrodoméstico, y de ayudar a GE a mejorar sus productos al brindarle a GE la información sobre su electrodoméstico.
Si no desea que los datos de su electrodoméstico sean enviados a GE, solicitamos que le indique a su técnico NO entregar los
datos a GE en el momento del servicio.
Por el período de: GE reemplazará:
Un año Cualquier parte del refrigerador que falle debido a defectos en los materiales o en
A partir de la fecha la fabricación. Durante esta garantía limitada de un año, GE también proporcionará, sin costo
de la compra original alguno, toda la mano de obra y el servicio relacionado para reemplazar partes defectuosas.
Lo que GE no cubrirá:
■ Viajes del técnico del servicio a su hogar para enseñarle sobre cómo
usar el producto.
■ Instalación, entrega o mantenimiento inadecuados.
■ Fallas del producto en caso de abuso, mal uso, o uso para propósitos
diferentes al original o uso comercial.
■ Pérdida de alimentos por mal estado.
■ Reemplazo de fusibles de la casa o reinicio de disyuntores.
■ Daño causado después de la entrega.
■ Reemplazo del cartucho del filtro de agua, si se incluye, debido a
la presión del agua que está fuera del rango de funcionamiento
específico o debido a exceso de sedimentos en el suministro de agua.
■ Reemplazo de bombillas de luz, si se incluyen, o del cartucho del filtro
de agua, si se incluye, a diferencia de lo detallado anteriormente.
■ Daños ocasionados sobre el producto por accidente, incendio,
inundaciones o catástrofes naturales.
■ Daños consecuentes o incidentales causados por posibles defectos de
este producto.
■ Producto no accesible para brindar el servicio requerido.
■
Cualquier daño sobre la terminación deberá ser informado dentro
de las 48 horas luego de la entrega del electrodoméstico.
■
Productos que no presenten defectos ni estén rotos, o que
estén funcionando de acuerdo con lo descrito en el Manual del
Propietario.
(;&/86,Ï1'(*$5$17Ë$6,03/Ë&,7$6³6X~QLFR\H[FOXVLYRGHUHFKRHVODUHSDUDFLyQGHOSURGXFWR
tal y como se indica en esta Garantía limitada. Cualquier garantía implícita, incluyendo las garantías
implícitas de comerciabilidad o adecuación para un fin determinado, están limitadas a un año o el
período de tiempo más breve permitido por la ley.
Para los clientes de EE.UU. Esta garantía se extiende al comprador original y a cualquier dueño subsiguiente de
productos comprados para uso hogareño dentro de EE.UU. Si el producto está en un área donde no se encuentra
disponible un Proveedor Autorizado del Servicio Técnico de GE, usted será responsable por el costo de un viaje o se
podrá requerir que traiga el producto a una ubicación del Servicio Técnico de GE Autorizado para recibir el servicio.
En Alaska, la garantía excluye el costo de envío o llamadas del servicio a su hogar.
Algunos estados no permiten la exclusión o limitación de daños fortuitos o consecuentes. Esta garantía le da
derechos legales específicos y es posible que tenga otros derechos legales que varían entre un estado y otro. Para
conocer cuáles son sus derechos legales, consulte a la oficina de asuntos del consumidor local o estatal o al Fiscal
de su estado.
Garante: General Electric Company. Louisville, KY 40225
Para los clientes de Canadá : Esta garantía se extiende al comprador original y cualquier comprador posterior
de productos comprados en Canadá para uso residencial dentro de Canadá. El servicio a domicilio warrant será
proporcionado en las áreas donde está disponible y que se considere razonable por Mabe para ofrecer.
Mabe Canada Inc., Burlington, ON, L7R 5B6
50
Page 51

Servicio al consumidor.
Página Web de GE Appliances
¿Tiene alguna pregunta sobre su electrodoméstico? ¡Pruebe la página Web de GE Appliances, 24 horas al día,
cualquier día del año! Para mayor conveniencia y servicio más rápido, ya puede descargar los Manuales de los
Propietarios, pedir piezas o incluso hacer una cita en línea para que vengan a realizar una reparación.
GEAppliances.com
Solicite una reparación GEAppliances.com
El servicio de expertos GE está a tan sólo un paso de su puerta. ¡Entre en línea y solicite su reparación cuando
le venga cualquier día del año! O llame al 800.GE.CARES (800.432.2737) durante horas normales de oficina.
Real Life Design Studio (Estudio de diseño para la vida real)
*(DSR\DHOFRQFHSWRGH'LVHxR8QLYHUVDO³SURGXFWRVVHUYLFLRV\DPELHQWHVTXHSXHGHQXVDUJHQWHGHWRGDV
las edades, tamaños y capacidades. Reconocemos la necesidad de diseñar para una gran gama de habilidades
y dificultades físicas y mentales. Para más detalles cobre las aplicaciones de GE Diseño Universal, incluyendo
ideas de diseño para la cocina para personas con discapacidades, mire nuestra página Web hoy mismo.
Para personas con dificultades auditivas, favor de llamar al 800.TDD.GEAC (800.833.4322).
GEAppliances.com
Garantías ampliadas GEAppliances.com
Compre una garantía ampliada y obtenga detalles sobre descuentos especiales disponibles mientras su garantía
está aún activa. Puede comprarla en línea en cualquier momento, o llamar al (800.626.2224) durante horas
normales de oficina. GE Consumer Home Services estará aún ahí cuando su garantía termine.
Piezas y accesorios GEAppliancesparts.com
Aquellos individuos con la calificación necesaria para reparar sus propios electrodomésticos pueden
pedir que se les manden las piezas o accesorios directamente a sus hogares (aceptamos las tarjetas
VISA, MasterCard y Discover). Haga su pedido en línea hoy, 24 horas cada día o llamar por teléfono
al 800.626.2002 durante horas normales de oficina.
Las instrucciones descritas en este manual cubren los procedimientos a seguir por cualquier usuario.
Cualquier otra reparación debería, por regla general, referirse a personal calificado autorizado. Debe
ejercerse precaución ya que las reparaciones incorrectas pueden causar condiciones de funcionamiento
inseguras.
Póngase en contacto con nosotros GEAppliances.com
Si no está satisfecho con el servicio que recibe de GE, póngase en contacto con nosotros en nuestra
página Web indicando todos los detalles así como su número de teléfono o escríbanos a:
General Manager, Customer Relations
GE Appliances, Appliance Park
Louisville, KY 40225
Registre su electrodoméstico GEAppliances.com
£5HJLVWUHVXQXHYRHOHFWURGRPpVWLFRHQOtQHD³FXDQGRXVWHGSUHILHUD El registrar su producto a tiempo
le proporcionará, si surgiera la necesidad, una mejor comunicación y un servicio más rápido bajo los términos
de su garantía. También puede enviar su tarjeta de registro pre-impresa que se incluye en el material de
embalaje.
Impreso en China
51
Page 52

Consumer Support.
GE Appliances Website GEAppliances.com
Have a question or need assistance with your appliance? Try the GE Appliances Website, 24 hours a day, any day
of the year! For greater convenience and faster service, you can now download Owner’s Manuals, order parts
or even schedule service on-line. In Canada, visit www.geappliances.ca.
Schedule Service GEAppliances.com
Expert GE repair service is only one step away from your door. Get on-line and schedule your service at your
convenience any day of the year! Or call 800.GE.CARES (800.432.2737) during normal business hours.
In Canada, call 800.561.3344
Real Life Design Studio GEAppliances.com
*(VXSSRUWVWKH8QLYHUVDO'HVLJQFRQFHSW³SURGXFWVVHUYLFHVDQGHQYLURQPHQWVWKDWFDQEHXVHGE\SHRSOHRI
all ages, sizes and capabilities. We recognize the need to design for a wide range of physical and mental abilities
and impairments. For details of GE’s Universal Design applications, including kitchen design ideas for people with
disabilities, check out our Website today. For the hearing impaired, please call 800.TDD.GEAC (800.833.4322).
Extended Warranties GEAppliances.com
Purchase a GE extended warranty and learn about special discounts that are available while your warranty is still
in effect. You can purchase it on-line anytime, or call 800.626.2224 during normal business hours. GE Consumer Home
Services will still be there after your warranty expires. In Canada, consult your local listings for an extended warranty
provider.
Parts and Accessories GEAppliancesparts.com
Individuals qualified to service their own appliances can have parts or accessories sent directly to their homes
(VISA, MasterCard and Discover cards are accepted). Order on-line today, 24 hours every day or by phone at
800.626.2002 during normal business hours. In Canada, call 800.661.1616.
Instructions contained in this manual cover procedures to be performed by any user. Other servicing generally
should be referred to qualified service personnel. Caution must be exercised, since improper servicing may cause
unsafe operation.
Contact Us GEAppliances.com
If you are not satisfied with the service you receive from GE, contact us on our Website with all the details including your
phone number, or write to: General Manager, Customer Relations
GE Appliances, Appliance Park
Louisville, KY 40225
In Canada, contact: Director, Customer Relations
Suite 310, 1 Factory Lane
Moncton, N.B. E1C 9M3
Register Your Appliance GEAppliances.com
5HJLVWHU\RXUQHZDSSOLDQFHRQOLQH³DW\RXUFRQYHQLHQFH Timely product registration will allow for enhanced
communication and prompt service under the terms of your warranty, should the need arise. You may also
mail in the pre-printed registration card included in the packing material. In Canada, visit www.geappliances.ca.
Printed in China
 Loading...