

GE GNSV65RBL Installation Instructions Manual

Installation Instructions
Instrucciones de instalación
FQSVF
Replacement Filter / Filtro de recambio
Your new GE Appliances water dispenser/icemaker water replacement filter gives you up to 160 gallons or 6 months of
great-tasting water. Filter should be changed after 6 months of use.
Su nuevo filtro de reemplazo GE Appliances para el dispensador de agua/máquina de hielos le ofrece hasta 160
galones o 6 meses de agua de excelente sabor. El filtro deberá cambiarse después de 6 meses de uso.
Tested and certified by NSF International
WARNING
To reduce the risk associated with
the ingestion of contaminants, do not use with water that
is microbiologically unsafe or of unknown quality without
adequate disinfection before or after the system.
Small parts remaining after the installation could be a
choke hazard. Discard safely.
ADVERTENCIA
con la ingestión de contaminantes, no use con agua que
no sea segura a nivel microbacteriológico o de calidad
desconocida, sin una desinfección adecuada, antes o después,
del sistema.
Las pequeñas piezas que sobran después de la instalación
pueden constituir un riesgo de asfixia. Deséchelas
adecuadamente.
A fin de reducir el riesgo asociado
REPLACEMENT
ELEMENT
ELEMENTO DE
REEMPLAZO
Cartuchos de filtro de reemplazo/costos estimados
de reposición
FQSVF—Reposición del recipiente del filtro $45–$50
Para partes de reemplazo, llame gratis al 877.959.8688..
against NSF/ANSI Standard 42 and 53
in models GXSV65R, GNSV70RBL, and
GNSV75RWW for the reduction of the
claims specified on the Performance Data
Sheet.
Probado y certificado por NSF International
contra los Estándares NSF/ANSI 42 y 53
en los modelos GXSV65R, GNSV70RBL,
yGNSV75RWW para la reducción de los
reclamos especificados en la Hoja de Datos de
Desarrollo.
Replacement Filter Cartridge/Estimated Replacement
Costs
FQSVF—Replacement filter cartridge $45–$50
For replacement parts, call toll free 877.959.8688.
NOTE:
If this device is not maintained and operated as specified
in the owner’s manual, there is a risk of exposure to
contaminants. For more information, visit the manufacturer’s
internet website at www.geappliances.com or the California
State Water Resources Control Boards’ internet website at
www.waterboards.ca.gov.
NOTA:
Si este dispositivo no es mantenido y operado de acuerdo con
lo especificado en el manual del propietario, existe el riesgo de
exposición a contaminantes. Para más información, visite el sitio
Web del fabricante en www.geappliances.com o el sitio Web de
California State Water Resources Control Board (Junta de Control
de los Recursos del Agua del Estado de California) en www.
waterboards.ca.gov.
34-8716-6853-8 31-75012 (07-16 GEA)
Installation/Instalación
INCLUDED COMPONENTS
• Filter cartridge
• Instruction Manual
Replacing the Filter Cartridge
CAUTION
property damage due to water leakage, read and follow
instructions before installation and use of this filter.
Installation and use MUST comply with all state and local
plumbing codes.
• Protect from freezing, remove filter cartridge when
temperatures are expected to drop below 33° F (1° C).
• Do not install systems in areas where ambient
temperatures may go above 110° F or below 40° F.
• Do not install if water pressure exceeds 120 psi. If your
water pressure exceeds 80 psi (552 kPa), you should
install a pressure limiting valve. Contact a plumbing
professional if you are uncertain how to check your water
pressure.
• The filter cartridge should be replaced every six
months or at rated capacity of 160 gallons or when
indicated by the system monitor
or when noticeable reduction in
flow occurs.
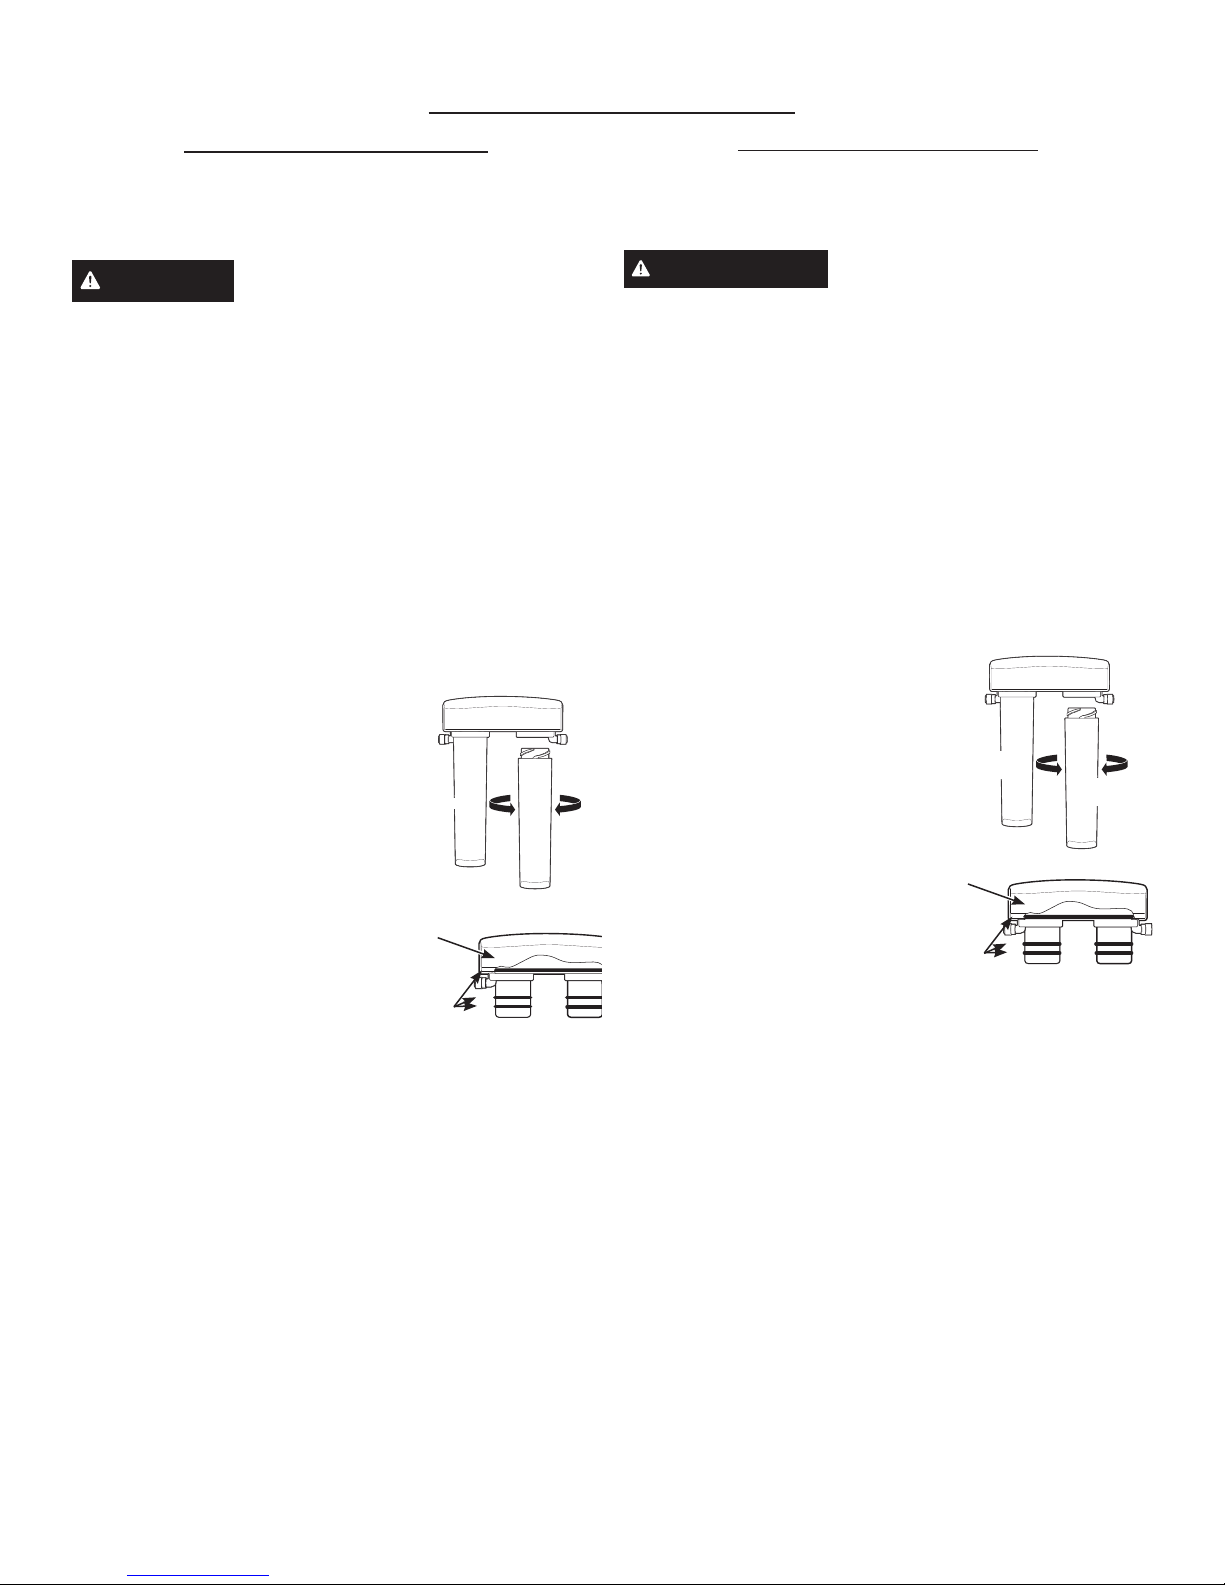
1. Remove the filter cartridge from
the manifold by rotating the
cartridge to the left about 1/3 turn.
NOTE: A small amount of water
from the tubing between the filter
and the faucet may come out. A
small towel should be able to
catch it.
2. Lightly lubricate the three black
o-ring seals in the manifold
with clean food grade silicone
grease. Silicone grease is
available through GE Appliances Parts and Services:
1.877-959-8688, Part Number: WS60X10005.
3. Remove foil on top of the new replacement filter
cartridges. Install the new cartridges into the manifold
by turning to the right about 1/3 turn until the
alignment marks line up and the filter stops. DO NOT
OVERTIGHTEN. The filter will rise up as it is turned.
4. Turn handle on faucet to allow trapped air to purge
from the system.
NOTE: System may make noise during this procedure.
5. Check for water leaks around the system.
Flush 4 gallons through the system (up to 5 minutes
6.
depending on flow rate) to flush out any harmless
carbon fines that may be present.
7. Turn off faucet and check around system for leaks.
8. Remove battery tray and replace battery to reset timer.
(See Battery Installation in your system manual for
proper procedure).
To reduce the risk associated with
To install
To remove
Manifold
O-Rings
COMPONENTES INCLUIDOS
• Cartucho del filtro
• Manual de instrucciones
Reemplace los cartuchos del filtro
PRECAUCIÓN
daños sobre la propiedad debido a pérdida de agua, lea y siga
las siguientes instrucciones antes de instalar y usar este sistema.
La instalación y uso DEBERÁN cumplir con todos los códigos de
plomería estatales y locales.
• Proteja del congelamiento retirando el cartucho del filtro
cuando se espere que las temperaturas sean inferiores a 33° F
(1° C).
• No instale sistemas en áreas donde la temperatura ambiente
pueda ser superior a 110° F o inferior a 40° F.
• No instale si la presión del agua supera los 120 psi. Si la
presión del agua es superior a los 80 psi (552 KPa), deberá
instalar una válvula limitadora de presión. Si no está seguro
sobre cómo controlar la presión del agua, comuníquese con un
plomero profesional.
• El cartucho del filtro debería ser reemplazado cada seis
meses o en una capacidad de flujo de 160 galones o
cuando se produzca una reducción
notoria del flujo.
1. Remueva los cartuchos del filtro del
múltiple rotando los cartuchos hacia
la izquierda aproximadamente 1/3 de
vuelta.
NOTA: Una pequeña cantidad de agua
del tubo entre el filtro y el grifo podría
salir. Use una toalla pequeña para
capturar este pequeño derrame.
2. Lubrique ligeramente los tres sellos
circulares negros en el colector
con grasa de silicona para cocinar
limpia. La grasa de silicona
está disponible a través de GE
Appliances partes y accesorios 1.877-959-8688, Parte número
WS60X10005.
3.Remueva el papel aluminio de encima de los nuevos
cartuchos de los nuevos filtros de reemplazo. Instale
los cartuchos nuevos en el múltiple girándolos hacia la
derecha aproximadamente 1/3 de vuelta hasta que queden
alineados con las marcas y el filtro se detenga. NO APRIETE
DEMASIADO. El filtro se levantará conforme es girado.
4. Gire la empuñadura del grifo para permitir que el aire atrapado
se purgue del sistema.
NOTA: Es posible que el sistema haga ruidos durante este
procedimiento.
5. Inspeccione en busca de fugas de agua alrededor del sistema.
6. Deje correr 4 galones de agua a través del sistema (durante
hasta 5 minutos dependiendo del caudal) para eliminar
cualquier polvo fino de carbón inofensivo que pueda estar
presente
7. Cierre el grifo e inspeccione en busca de fugas alrededor del
sistema.
8. Remueva la bandeja de la batería y reemplace la batería para
reajustar el sincronizador. (Ver Instalación de la Batería en el
Manual de su sistema para el procedimiento de instalación.)
A fin de reducir el riesgo asociado con
Para
instalar
Colector
Anillos
Para
retirar
2
 Loading...