

GE GHRE5550KWW Owner's Manual

www.geappliances.ca
Safety Instructions . . . .. . . . . .2, 3
Operating Instructions
Care and Cleaning
of the Washer . . . . . . . . .. . . . . . . . . . . . . 7
Control Panel . . . . . . . . . . . . . . . . .. . . . . .4
Control Settings . . . . . . . . . . . . . . . . .4–5
Features . . . . . . . . . . . . . .. . . . . . . . . . . .6, 7
Loading and Using
the Washer . . . . . . . . . .. . . . . . . . . . . . . . 7
Troubleshooting Tips . .. . . .8–10
Consumer Support
Consumer Support . . . . . . . . . . . . . .. .12
Warranty . . . . .. . . . . . . . . . . . . . . . .. . . .11
Owner’s Manual
Write the model and serial
number here:
Model #
Washers
Serial #
You can find them
under the lid of
the washer.
P647
175D1807P647 49-90385 06-09 JR
IMPORTANT SAFETY INFORMATION.
READ ALL INSTRUCTIONS BEFORE USING.
or your safety, the information in this manual must be followed to minimize the risk
WARNING!
F
of fire or explosion, electric shock, or to prevent property damage, personal injury,
or loss of life.
WATER HEATER SAFETY
Under certain conditions, hydrogen gas may be produced in a water heater that has not been
used for two weeks or more. Hydrogen gas can be explosive under these circumstances.
If the hot water has not been used for two weeks or more, prevent the possibility of damage or injury by
turning on all hot water faucets and allowing them to run for several minutes. Do this before using any
electrical appliance which is connected to the hot water system. This simple procedure will allow any
built-up hydrogen gas to escape. Since the gas is flammable, do not smoke or use an open flame or
appliance during this process.
PROPER INSTALLATION
This washer must be properly installed and located in accordance with the Installation
Instructions before it is used. If you did not receive an Installation Instructions sheet , you can
receive one by calling, toll-free, 1.800.561.3344.
Install or store where it will not be exposed to
temperatures below freezing or exposed to the
weather, which could cause permanent damage
Operating Instructions Safety InstructionsConsumer Support Troubleshooting Tips
and invalidate the warranty.
Properly ground washer to conform with all
governing codes and ordinances. Follow details
in Installation Instructions.
YOUR LAUNDRY AREA
Keep the area underneath and around your
appliances free of combustible materials such as
lint, paper, rags, chemicals, etc.
Close supervision is necessary if this appliance is
used by or near children. Do not allow children to
play on, with or inside this or any other appliance.
2
Use this
appliance
only for its
intended
purpose as
described in
this Owner’s
Manual.
WHEN USING THE WASHER
Never reach into washer while it is moving.
Wait until the machine has completely stopped
efore opening the lid.
b
Do not mix chlorine bleach with ammonia
or acids such as vinegar and/or rust remover.
Mixing different chemicals can produce a toxic gas
which may cause death.
Do not wash or dry articles that have been
cleaned in, washed in, soaked in or spotted with
combustible or explosive substances (such as
wax, oil, paint, gasoline, degreasers, dry-cleaning
solvents, kerosene, etc.). These substances give off
vapors that may ignite or explode. Do not add
these substances to the wash water. Do not use or
place these substances around your washer or
dryer during operation.
ww.geappliances.ca
w
The laundry process can reduce the flame
retardancy of fabrics. To avoid such a result,
arefully follow the garment manufacturer’s
c
wash and care instructions.
To minimize the possibility of electric shock,
unplug this appliance from the power supply
or disconnect the washer at the building’s
distribution panel by removing the fuse or
switching off the circuit breaker before attempting
any maintenance or cleaning.
NOTE: Turning the Cycle Selector Knob to an off
position, or pressing PAUSE does NOT disconnect
the appliance from the power supply.
Never attempt to operate this appliance if it is
damaged, malfunctioning, partially disassembled,
or has missing or broken parts, including a
damaged cord or plug.
WHEN NOT IN USE
Turn off water faucets to relieve pressure on hoses
and valves and to minimize leakage if a break or
rupture should occur. Check the condition of the fill
hoses; GE recommends changing the hoses every
5 years.
Before discarding a washer, or removing it
from service, remove the washer lid to prevent
children from hiding inside.
Do not attempt to repair or replace any part
of this appliance unless specifically recommended
in this Owner’s Manual, or in published user-repair
instructions that you understand and have
the skills to carry out.
Do not tamper with the controls.
READ AND FOLLOW THIS SAFETY INFORMATION
CAREFULLY.
SAVE THESE INSTRUCTIONS
Consumer SupportTroubleshooting TipsOperating InstructionsSafety Instructions
3
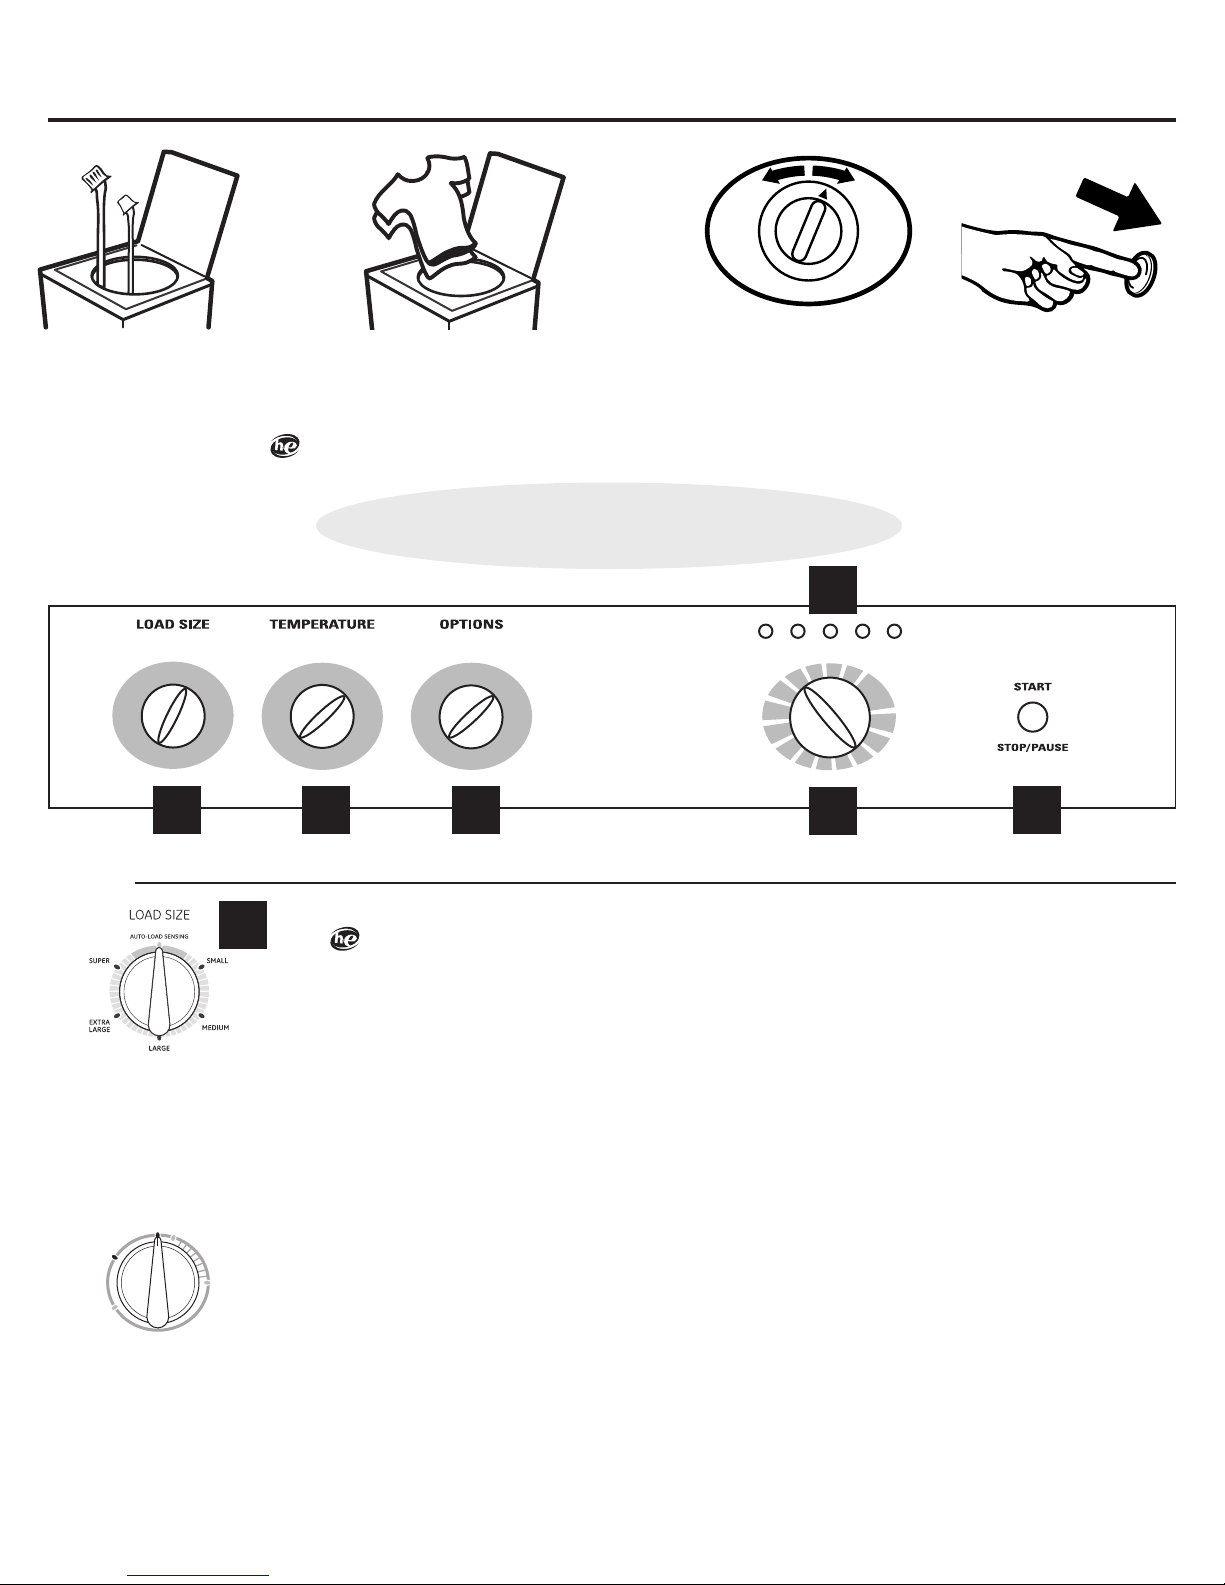
About the control panel—for models with START button.
SUPER
RESET
SMALL
MEDIUM
LARGE
LOAD SIZE
• Add fabric softener (on models
with a fabric softener dispenser);
see page 6 for details
• Add detergent. GE recommends
the use of High Efficiency
detergents in all Energy
Star-rated washers
Step 2
• Add clothes
• Close lid
NOTE: Washer will not start to fill
with lid open on Auto Load sensing
settings (on some models)
Quick Start Guide
• Select load size and
other wash options,
including Fabric
Softener option
• Select wash cycle
D
Step 3
Step 4
• Push START
A
Controls
AUTOMATIC LOAD
SENSING equipped
models
STANDARD FILL equipped
models
B C
E
F
Load Size
A
Add detergent to the bottom of the basket and fabric softener to the dispenser prior to loading clothes.
Loosely load clothes no higher than the top row of holes in the basket. For optimal performance, load items around
the outside of the basket.
Make the load selection:
For AUTOMATIC LOAD SENSING equipped models
– For convenience, best performance and optimal efficiency, select AUTOMATIC LOAD SENSING. This selection
automatically provides the correct amount of water suited to the size and type of load placed in the unit.
– If you prefer to manually select the water level, select SMALL through SUPER. While AUTOMATIC LOAD SENSING is best
for most loads and general washing, you may want to manually select the load size for specialty items such as bulky,
lightweight comforters or pillows, where you want to ensure a larger water level is applied. Manual load size selections
should be made for wet items placed in the washer, such as soaked towels or garments.
– The washer will not fill with water when automatic load sensing is selected if the lid is opened.
When the lid is closed the machine is able to begin filling with water in order to sense the load size.
For standard fill equipped models
– Select the load size that matches the load placed into the washer.
– For changing the water level to a higher level AFTER the unit has filled, turn load size knob to RESET, then turn the knob
back to your new setting. DO NOT leave the knob in the RESET position.
NOTE: This is a high-efficiency washing machine with Infusor™ wash action. This system requires less water while providing
effective cleaning action. You may notice that the water level is lower than on your previous washer. This is normal for an
Infusor™-equipped washer.
is selected.
The water level will be just above the top of the Infusor™ when the SUPER WASH size
4
www.geappliances.ca
Temperature
B
elect the water temperature for the wash and rinse cycles. Always follow fabric manufacturer’s care label or instructions when
S
aundering.
l
PerfecTemp senses the incoming water temperature and adjusts the fill water to obtain a more precise temperature range for all
wash temperatures. For example, in a COLD wash selection, some warm water may be added to reach a temperature needed to
better dissolve detergents. Often, detergents are not completely dissolved in very cold water, especially in cooler climates.
During winter months, when the water entering your home is colder, or for locations with very cold water year round,
use the PerfecTemp plus COLD to help dissolve powdered detergents and to improve the cleaning of your clothes.
The TAP COLD feature turns the PerfecTemp feature on your washer off and uses your household tap water temperature
for a COLD wash. This can provide energy savings by reducing the amount of hot water used in your wash.
Options
C
Autosoak Option (on some models)
This option begins with a brief agitation, soaks for a specified period of time, then moves through the rest of the cycle
automatically. On some models, this option is located on the Cycle Selector knob.
2nd Rinse Option (on some models)
When you use extra detergent or bleach to clean heavily soiled clothes, you may want to use the 2nd Rinse option.
It provides a second deep cold rinse.
Extended Spin Option (on some models)
Use this option to extract more water from your clothes. Clothes will be drier when this option is selected and will dry
more quickly in your dryer.
Fabric Softener
Set this option when adding fabric softener to the washer.
NOTE: Do not use fabric softener dispensing balls with this washer. They do not work correctly in high-efficiency
washers.
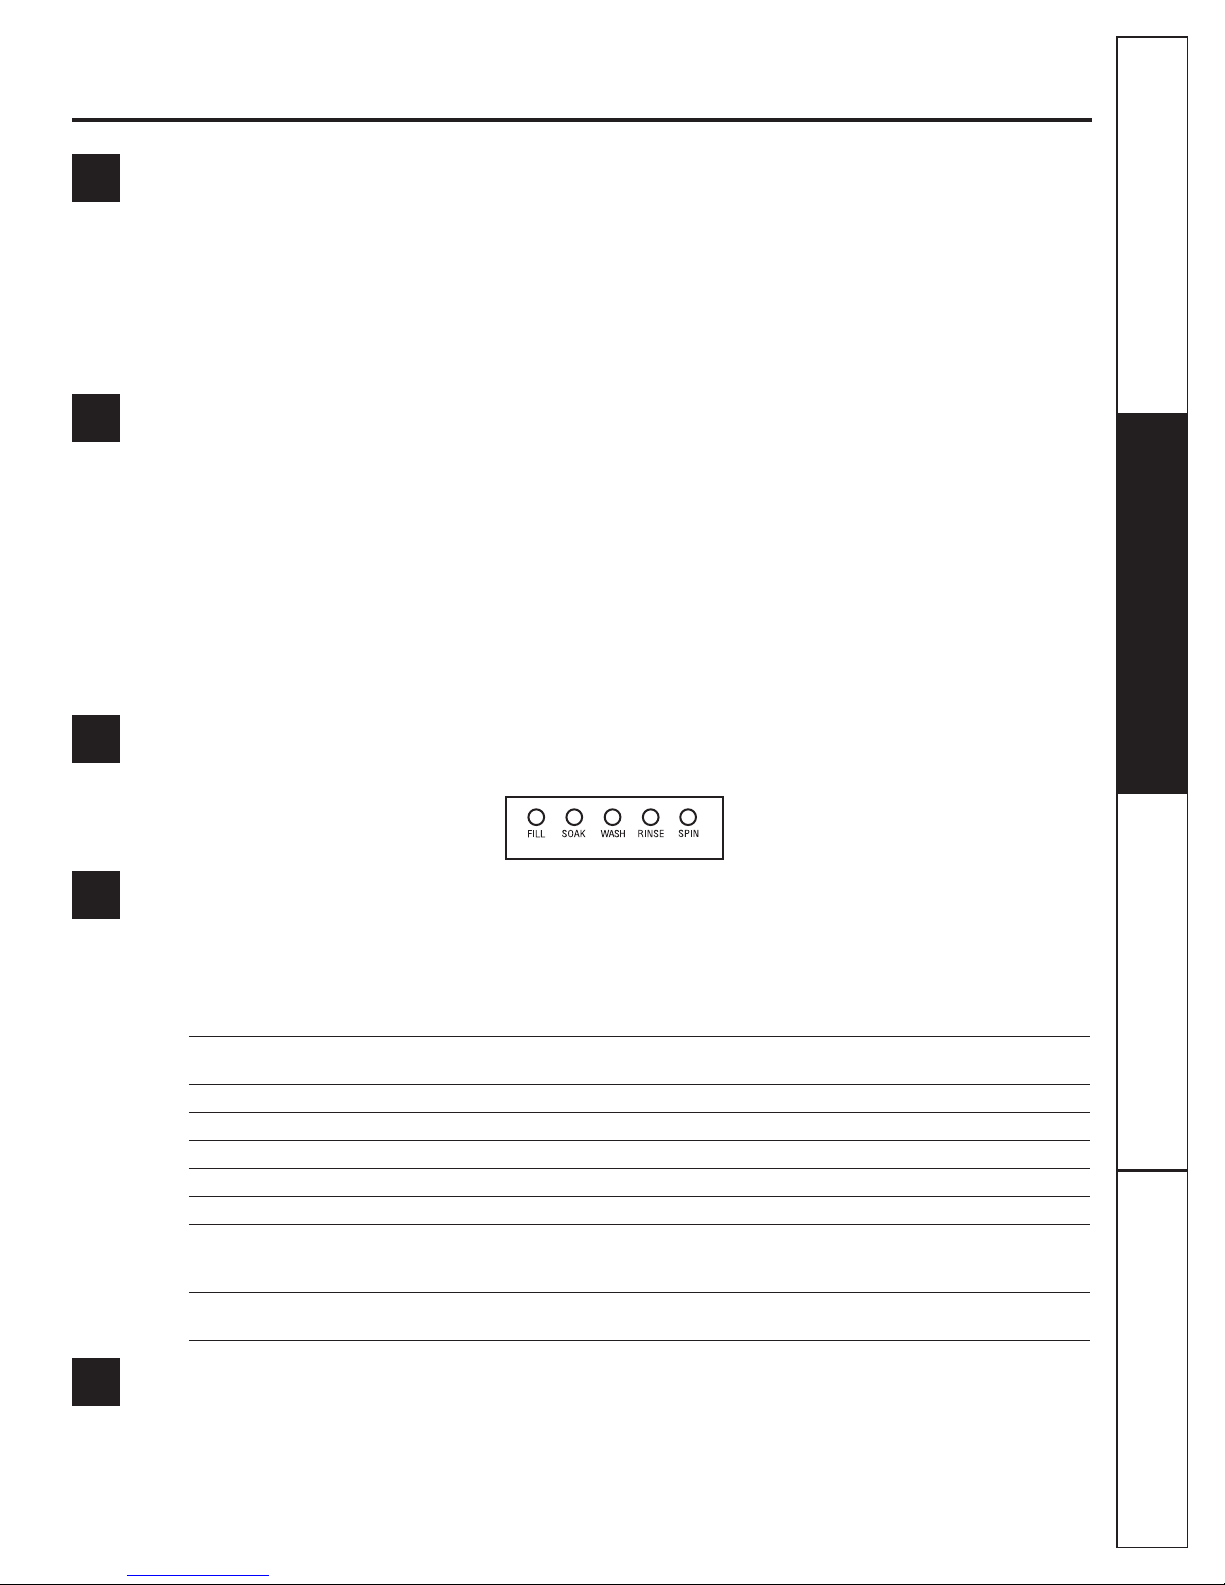
Status Indicator Lights
D
The Cycle Indicator Lights show what stage the washer is in. When the Selector knob is set to a new cycle, the Indicator
Lights will flash momentarily, showing what stages the cycle will go through. On models without an AUTO SOAK option,
the SOAK light will not light up.
Wash Cycle—Cycle Selector Knob
E
The wash cycle controls the length and intensity of the washing process. The knob can be turned in either direction.
Turning the Cycle Selector knob after starting a cycle will stop the washer and reset the cycle to the new selection.
Press STARTto begin the new cycle selection.
The chart below will help you match the wash cycle setting with your clothing.
COTTONS For heavy to lightly soiled cottons, household linens, work and play clothes.
the best overall cleaning and should be used for most everyday items. Provides a high speed spin.
PREWASH For removing surface dirt from heavily soiled clothes. Make sure to follow with a
regular wash cycle.
CASUALS For wrinkle-free and permanent press items and knits. Provides a low speed spin.
EASY CARE For wrinkle-free and permanent press items and knits. Provides a high speed spin.
DELICATES For lingerie and special-care fabrics with light soil. Provides a low speed spin.
HAND WASH For items labeled handwashable with light soil. Provides an extra low speed spin.
SPEED WASH For small loads of lightly soiled items that are needed in a hurry. Provides a high speed spin.
DRAIN & SPIN For draining the tub and spinning water out of the clothes. Provides a high speed spin.
OR
SPIN ONLY
AUTO SOAK For very soiled clothes. Begins with a brief agitation, soaks for a specified period of time,
then moves through the rest of the cycle automatically.
This cycle provides
START
F
Press START to begin the cycle. Pressing START again will PAUSE the cycle and the Cycle indicator light will blink.
To continue the cycle, press START again or close the lid. If machine is paused more than 24 hours, the cycle will be
cancelled. To stop the cycle, hold the button for 3 seconds. If water remains in the machine, select the DRAIN & SPIN
OR SPIN ONLY cycle to drain tub and spin water out of the washer tub.
Raising the lid will stop agitation or spin action but does not pause the cycle.
Consumer SupportTroubleshooting TipsOperating InstructionsSafety Instructions
5
About washer features.
OFF
AUTO
AUTOSOAK
EXTENDED
2nd
RINSE
SPIN
SOAK
FABRICSOF TENER
FABRICSOF TENER
FABRICSOF TENER
Set when adding
+ 2nd RINSE & EXTENDED SPIN
+ EXTENDED SPIN
+
2nd RINSE
OPTIONS
1
Tab
The Fabric Softener Dispenser (on some models)
The fabric softener dispenser automatically releases liquid fabric softener at the proper time
uring the cycle.
d
o not stop the washer during the first spin. This will cause the dispenser to empty
D
too soon.
2
Never pour fabric softener directly on clothes. This may cause stains on your clothing.
To use, follow these steps:
Lift the tab on the fabric softener
1
3
dispenser top.
Measure out fabric softener into
2
the cap and pour the softener into
the dispenser top. The fabric softener
will drain into the receiving cup inside
the dispenser. Use only “Ultra” or
4
concentrated fabric softeners.
Push down on the tab to close
3
the dispenser top. Make sure the tab
is pushed down fully and snaps shut.
Select FABRIC SOFTENER from OPTIONS
4
on the control panel.
NOTE: Overfilling the dispenser will cause
fabric softener to drain out of the holes
in the side of the Infusor™ when filling.
Do not overfill.
Operating Instructions Safety InstructionsConsumer Support Troubleshooting Tips
1
3
5
6
Turning Tabs
Turning Tabs
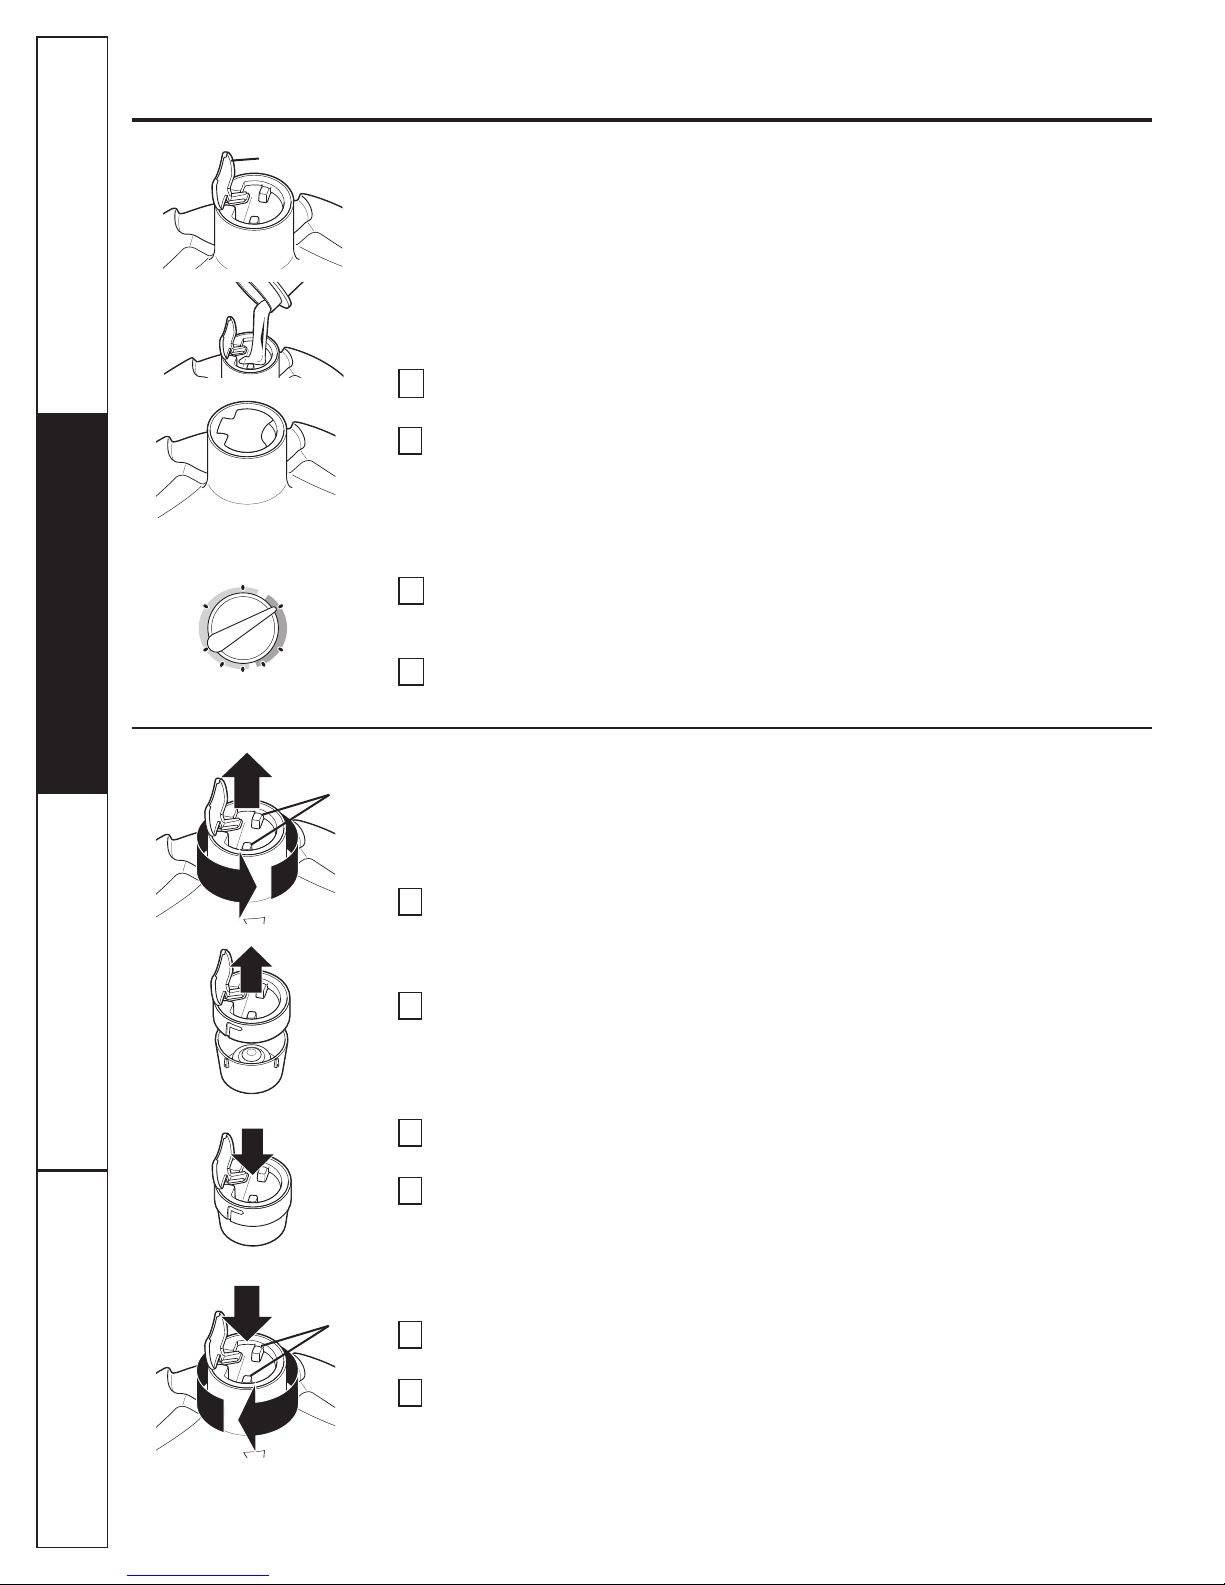
Cleaning the Fabric Softener Dispenser (on some models)
The Fabric Softener Dispenser is self cleaning. This dispenser does not require regular cleaning
like standard fabric softener dispensers. Wipe down exterior surfaces of the dispenser
as needed. If cleaning of the internal dispenser components is needed, follow these steps
after the wash cycle is complete:
Lift the dispenser top tab and turn the top
1
counterclockwise using the 2 turning tabs
shown. Lift the dispenser out of the
Infusor™.
Clean out any buildup from inside the
2
Infusor™ with a soft cloth or toothbrush.
Ensure the three rectangular holes
in the bottom which allow the fabric
softener to drain are not blocked.
Gently pull the cap away from
3
the dispenser cup to separate.
Wipe surfaces with a soft cloth or soak
4
the parts in a solution of 1 gallon warm
water, 1/4 cup liquid detergent and 1 cup
bleach. Ensure the small hole in the top
surface of the cap and associated tube
are not obstructed.
Reassemble the dispenser cup and cap
5
by snapping them together.
6
Place the dispenser assembly into
6
the Infusor™. Turn the top clockwise
using the 2 turning tabs shown. Push
down on the tab to close the dispenser
top. Make sure the tab is pushed down
fully and snaps shut.
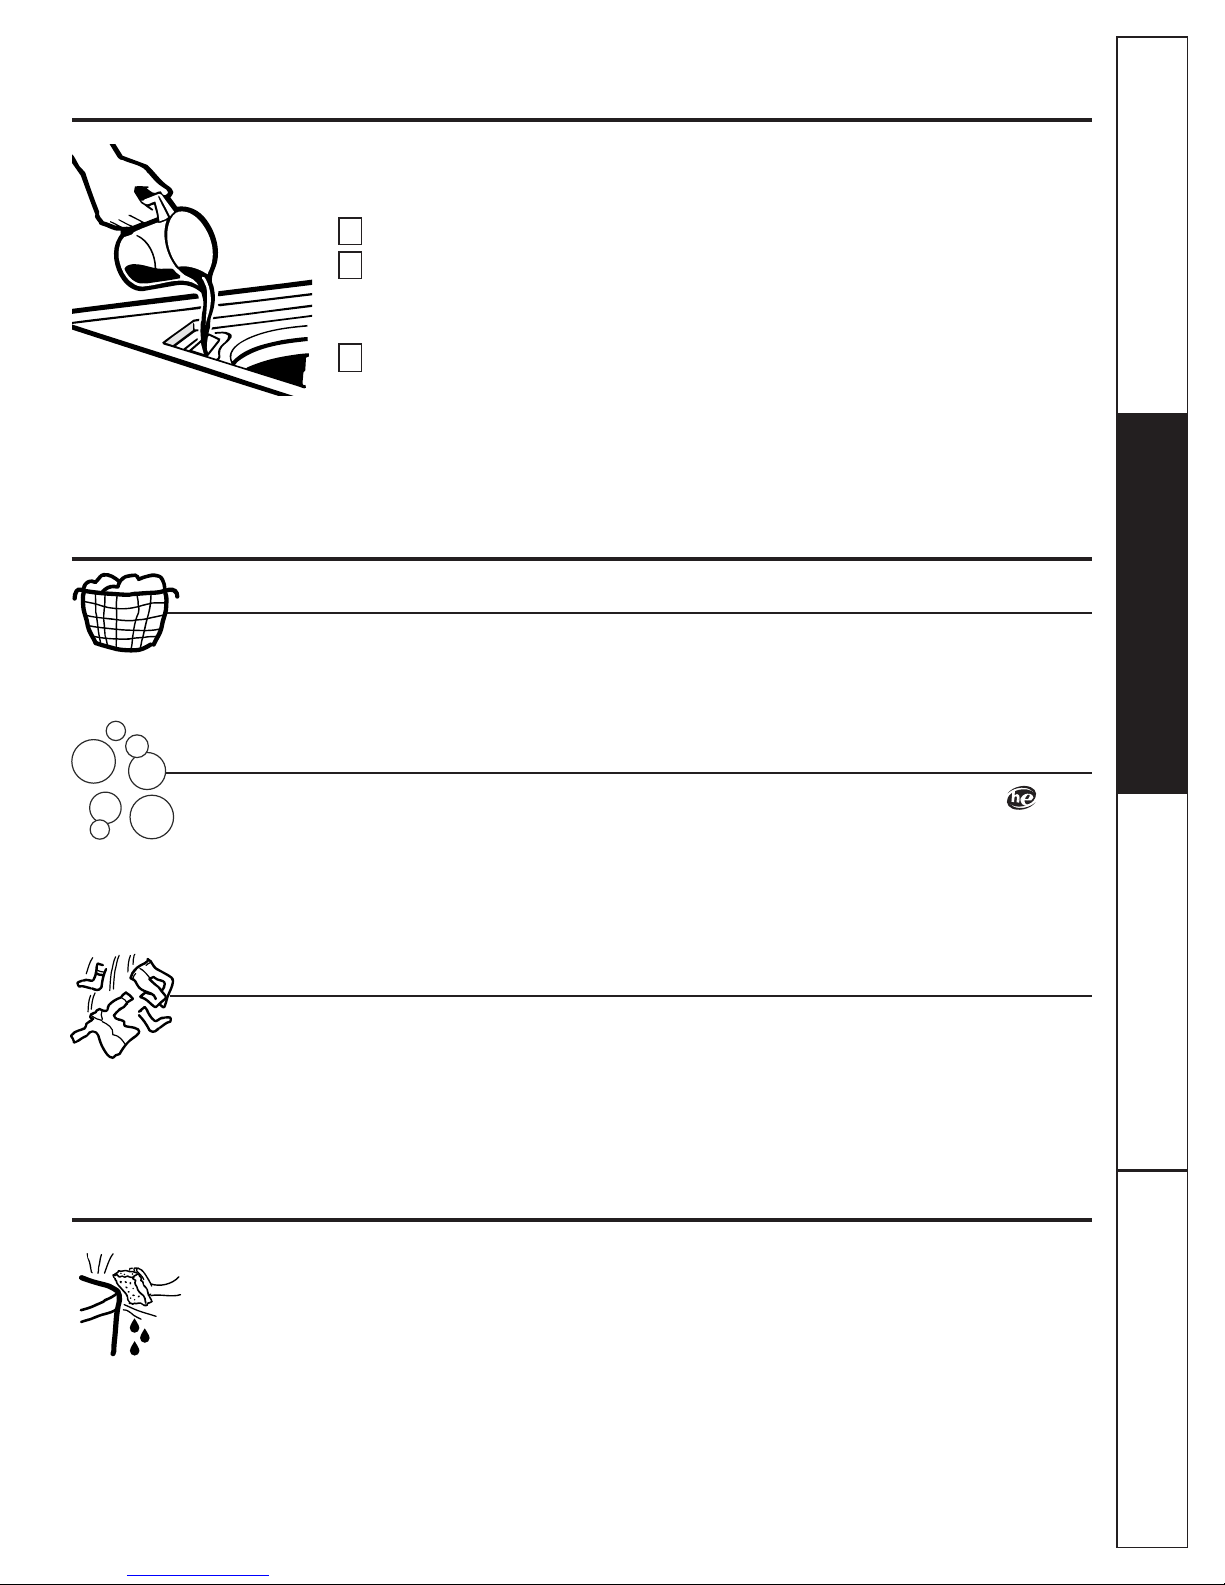
Liquid Bleach Funnel
The water fill dilutes liquid chlorine bleach as the washer fills for the wash cycle.
heck clothing care labels for special instructions.
C
1
Measure liquid bleach carefully, following instructions on the bottle.
2
Never pour undiluted liquid chlorine bleach directly onto clothes or into the wash basket.
Do not pour powdered bleach into bleach funnel.
Before starting the washer, pour measured amount of bleach directly into bleach funnel.
3
Avoid splashing or over-filling dispenser. If you prefer to use powdered bleach, add it into
the wash basket with your detergent.
Do not mix chlorine bleach with ammonia or acids such as vinegar and/or rust remover.
Mixing can produce a toxic gas which may cause death.
Loading and using the washer.
Always follow fabric manufacturer’s care label when laundering.
Sorting Wash Loads
Sort by color (whites, lights, colors), soil level,
fabric type (sturdy cottons, easy care, delicates)
and whether the fabric produces lint (terry cloth,
chenille) or collects lint (velveteen, corduroy).
www.geappliances.ca
Proper Use of Detergent
Add detergent and fabric softener before adding
clothes so that the detergent can work effectively.
Using too little or too much detergent is a common
cause of laundry problems.
Use less detergent if you have soft water, a smaller
load or a lightly soiled load.
Loading the Washer
Load dry items loosely, no higher than the top
row of holes in the washer basket. For best results,
load items evenly and loosely around the outside
of the basket, taking care not to cover the center of
the Infusor™. To add items after washer has started,
lift the lid and submerge additional items around
the outside of the basket.
Care and cleaning of the washer.
Wash Basket: Leave the lid open after washing to
allow moisture to evaporate. If you want to clean
the basket, use a clean, soft cloth dampened with
liquid detergent; then rinse. (Do not use harsh or
gritty cleaners.)
Fill Hoses: GE recommends changing the hoses
every 5 years.
Exterior: Immediately wipe off any spills. Wipe
with damp cloth. Try not to hit surface with
sharp objects.
Interior: The occasional use of a cycle that contains
bleach will keep the inside of the washer clean.
GE recommends the use of High Efficiency
detergents in all Energy Star rated washers.
HE detergents are formulated to work with low water
wash and rinse systems. HE detergents reduce
the oversudsing problems commonly associated
with regular detergents.
Do not place large items such as sheets, blankets
and towels across the Infusor™. Load them around
the outside of the basket.
Do not wash fabrics containing flammable
materials (waxes, cleaning fluids, etc.).
Agitation will not start with the lid up.
Moving and Storage: Ask the service technician
to remove water from drain pump and hoses.
See the Installation Instructions packed with product
for information on how to reinstall the shipping
rod to keep the tub stationary when moving
the washer. For more information, write to: Manager,
Consumer Relations, Mabe Canada Inc., 1 Factory
Lane, Suite 310, Moncton, N.B. E1C 9M3. Do not store
the washer where it will be exposed to the weather.
Long Vacations: Be sure water supply is shut off
at faucets. Drain all water from hoses if weather will
be below freezing.
Consumer SupportTroubleshooting TipsOperating InstructionsSafety Instructions
7
Before you call for service…
Troubleshooting Tips
Save time and money! Review the charts on the following pages, or visit
www.geappliances.ca. You may not need to call for service.
WATER Possible Causes What To Do
Water level seems low This is normal • Water may not cover the top level of the clothes.
Water fills and drains Drain stand pipe is too low • The drain stand pipe must be above 30".
at the same time
Too many suds Too much detergent • Measure your detergent carefully. Use less soap if you have
Type of detergent • Switch to HE detergent.
Soft water • Try less detergent.
Water leaks Using too much detergent • Use less detergent. Use less soap if you have soft water,
in washer a smaller load or a lightly soiled load.
Type of detergent • Switch to HE detergent.
Fill hoses or drain hose is • Make sure hose connections are tight at faucets and
improperly connected rubber washers are installed. Make sure end of drain hose
Household drain may • Check household plumbing. You may need to call
be clogged a plumber.
Operating Instructions Safety InstructionsConsumer Support Troubleshooting Tips
Water temperature Cooler water temperatures • New laundry detergents have been formulated to work
seems incorrect provide improved energy with cooler water temperatures without affecting wash
Water pumped out before Lid lifted or cycle was put in • Reset cycle.
cycle is complete pause for over 24 hours
Water won’t drain Drain hose is kinked or • Straighten drain hose and make sure washer is not
Washer pauses during The PREWASH Cycle or • This is normal. The washer alternates between agitate and
wash cycle AUTO SOAK Option was soak during these cycles to get your clothes cleaner with
Washer pauses during This is normal • The washer may pause during the spin cycle to remove
spin cycle soapy water more efficiently.
Constant water pressure • Tighten hoses at the faucets and turn the water off after
to the fill hoses at the each use.
water source
efficiency performance.
Water supply is turned off • Turn both hot and cold faucets fully on and make sure
or improperly connected hoses are connected to correct faucets.
Water valve screens are • Turn off the water source and remove the water connection
stopped up hoses from the upper back of the washer. Use a brush or
House water heater is • Make sure house water heater is delivering water at
not set properly 120°F–140°F (48°C–60°C).
improperly connected sitting on it.
chosen less wear.
This is normal for this high-efficiency washer.
soft water, a smaller load or a lightly soiled load.
is correctly inserted in and secured to drain facility.
• Check condition of the fill hoses; they should be replaced
every 5 years.
toothpick to clean the screens in the machine. Reconnect
the hoses and turn the water back on.
• Top of drain outlet should be less than 6 ft (1.8 m)
above floor.
8
 Loading...