

Page 1
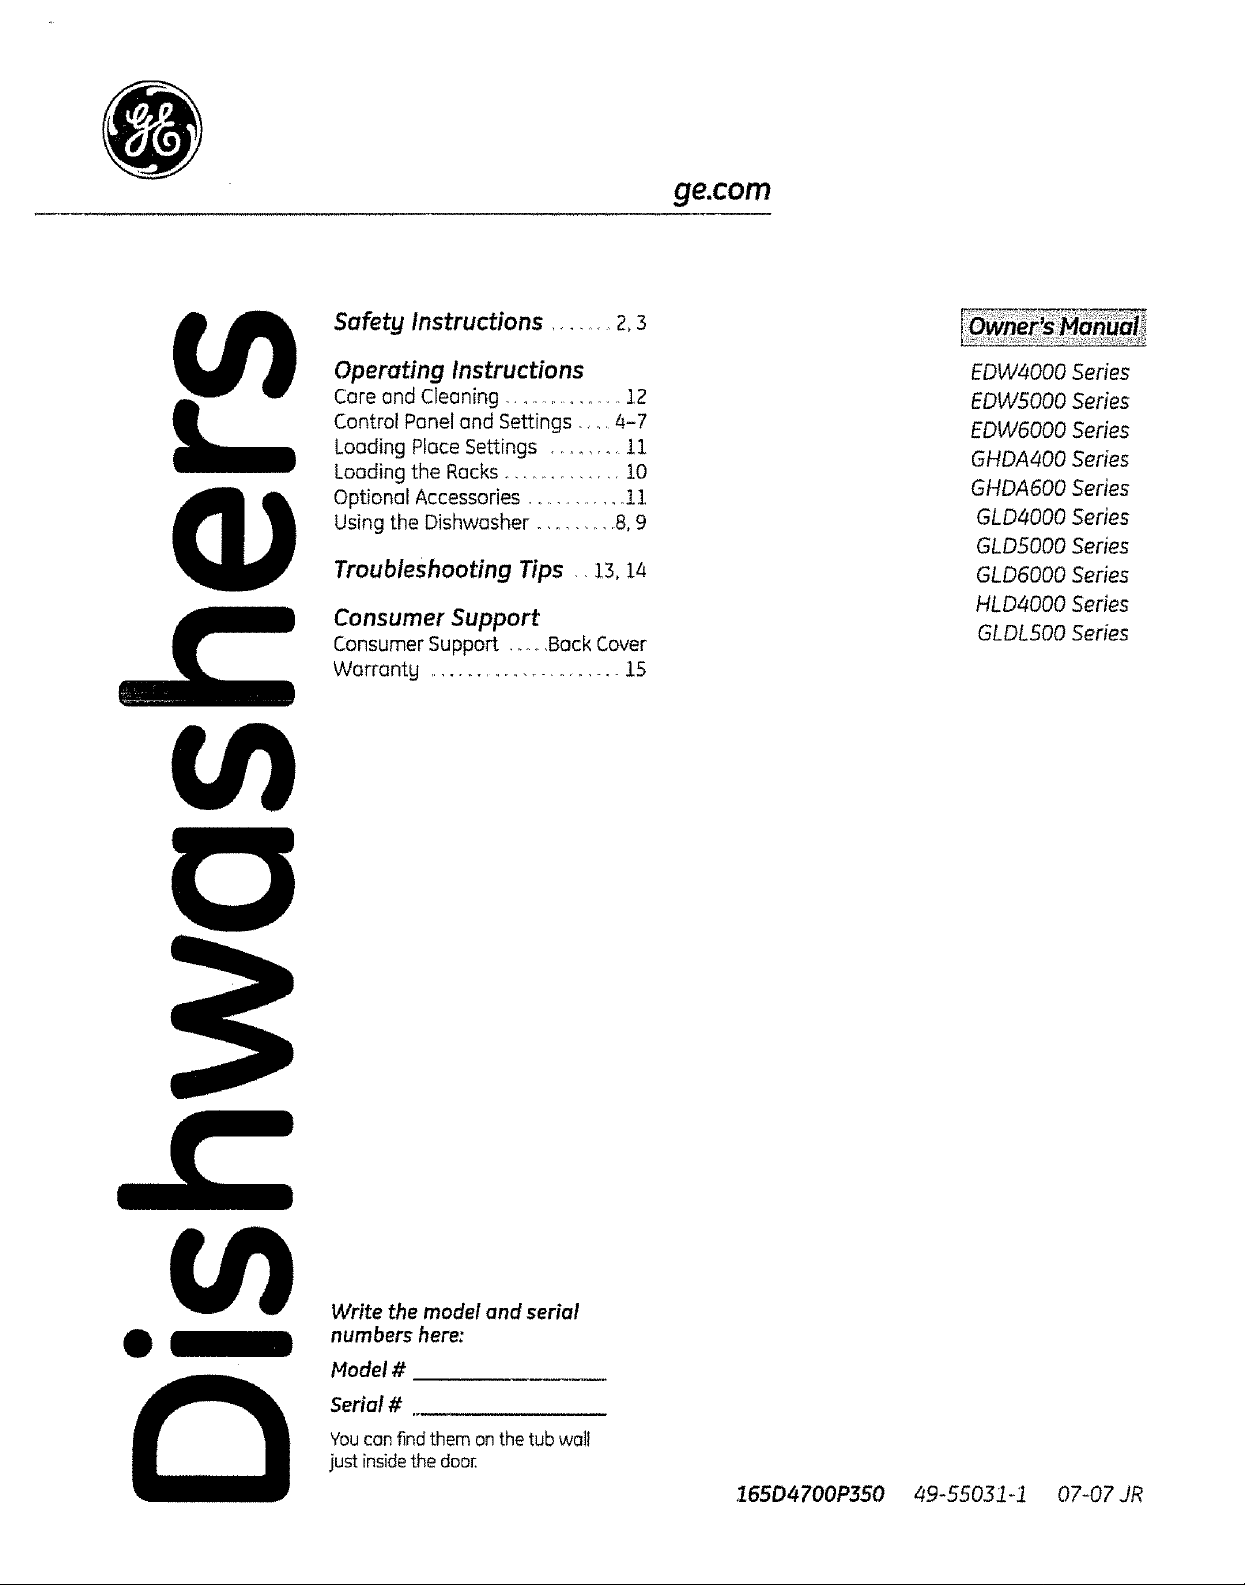
Safety Instructions ........ 2,3
ge.com
Operating Instructions
Care and Cleaning .................... 12
Control Panel and Settings .......z_-7
Loading Place Settings ..........11
Loading the Racks ............. 10
Optional Accessories ..............11
Using the Dishwasher ........ 8, 9
Troubleshooting Tips ,, 13,14
Consumer Support
Consumer Support ..... Back Cover
Warrantg ....................... IS
EDW4000 Series
EDWSO00 Senes
EDWSO00 Series
GHDA400 Series
GHDASO0 Series
GLD4000 Series
GLDSO00 Series
GLD6000 Series
HLD4000 Senes
GLDLSO0 Series
Write the model and serial
numbers here:
Model #
Serial #
Youcan findthem on the tub wall
just insidethe dour.
165D4 700P350 49-55031-i 07-07JR
Page 2
IMPORTANT SAFETYINFORMATION.
READ ALL INSTRUCTIONS BEFOREUSING --
SAVETHESE INSTRUCTIONS
iiiiiiiiiiiiiirllriiirl i illUllll inllll ii ..............................
WARNING!
For your safety, the information in this manual must be followed to minimize the risk of fire
or explosion, electric shock, and to prevent property damage, personal injury, or death.
WARNING! WATERHEATERSAFETY
f _,,._ Under certain conditions hydrogen gas may be produced in a water heater that has not been used
%
far two weeks or more. HYDROGENGASIS F-XPLO$1VE,
Ifthe hot waterhas not beenusedfor twoweeksor more, preventthe possibilityof damage orinjury
bg turningan all hot waterfaucets and allow them to run for severalminutes Dothis before usingany
electricalappliancewhich is connected to the hotwater system Thissimple procedurewill allow any built-
up hydrogengasto escape Sincethe gas isflammable, do not smoke or usean openflame or appliance
during this process
PROPER INSTALLATION AND MAINTENANCE
This dishwasher must be properly instafled and located in accordance with the Installation
Instructions before it is used° tf gou did not receive an Installation Instructions sheet with
your dishwasher, you can receive one bg visiting our website at ge.com_
• Connectto o grounded metal,permanent widng
sgstem;or runan equipment-grounding
conductorwith the circuitconductors and
connectto the equipment-groundingterminal
or lead ofthe appliance
Iil improperconnection of the equipment-grounding
conductor can resultina riskof electricshock..
Checkwith a qualifiedelectricianor service
representativeif gou arein doubt whether the
applianceis properlg grounded
I Disposeofdiscardedappliancesand shipping
or packing material properlg,
• Donot attempt to repairor replaceany part
of your dishwasherunlessitis specifically
recommendedinthis manual.Allother servicing
shouldbereferredto a qualifiedtechnidon.
• To minimizethe possibilitgof electricshock,
disconnectthis appliancefrom the power supplg
beforeattempting any maintenance,
NOTE:Turningthe dishwasheroffdoes nat
disconnecttheappliancefrom the power supplg,
Werecommendhavinga qualifiedtechnician
serviceyour appliance,
CAUTION: Toprevent minor injury or property damage
• ContentswashedinAnti-bacterialmode,if
available,may be hot to the touch, Usecore
beforehandling,
• Usinga detergentthat is
notspecificallgdesigned
for dishwasherswill cause
the dishwasherto fillwith
suds.
• Ifyour dishwasher is connected to a
wall switch, ensure that the switch is
on prior to use.
• Ondishwasherswith electroniccontrols,
if you choosetoturn the switch off
betweenwash cgcles,allow 5-10
secondsoffer turning the switch on before
touching START/RESETto allowthe control to
reboot,
[] Non-DishwareItems:Donat wash itemssuch
aselectronic air cleanerfilters,furnace filtersand
point brushesin gour dishwasher.Damageto
dishwasherand discolorationor stainingof
dishwashermag resuIL
• Closesupervisionisnecessargifthis appliance
isused bgor near children.
• Loadlight, plastic items so theg will not
become dislodged and drop to the bottom
of the dishwasher-theg might come into
contact with the heating element and be
damaged.
Page 3
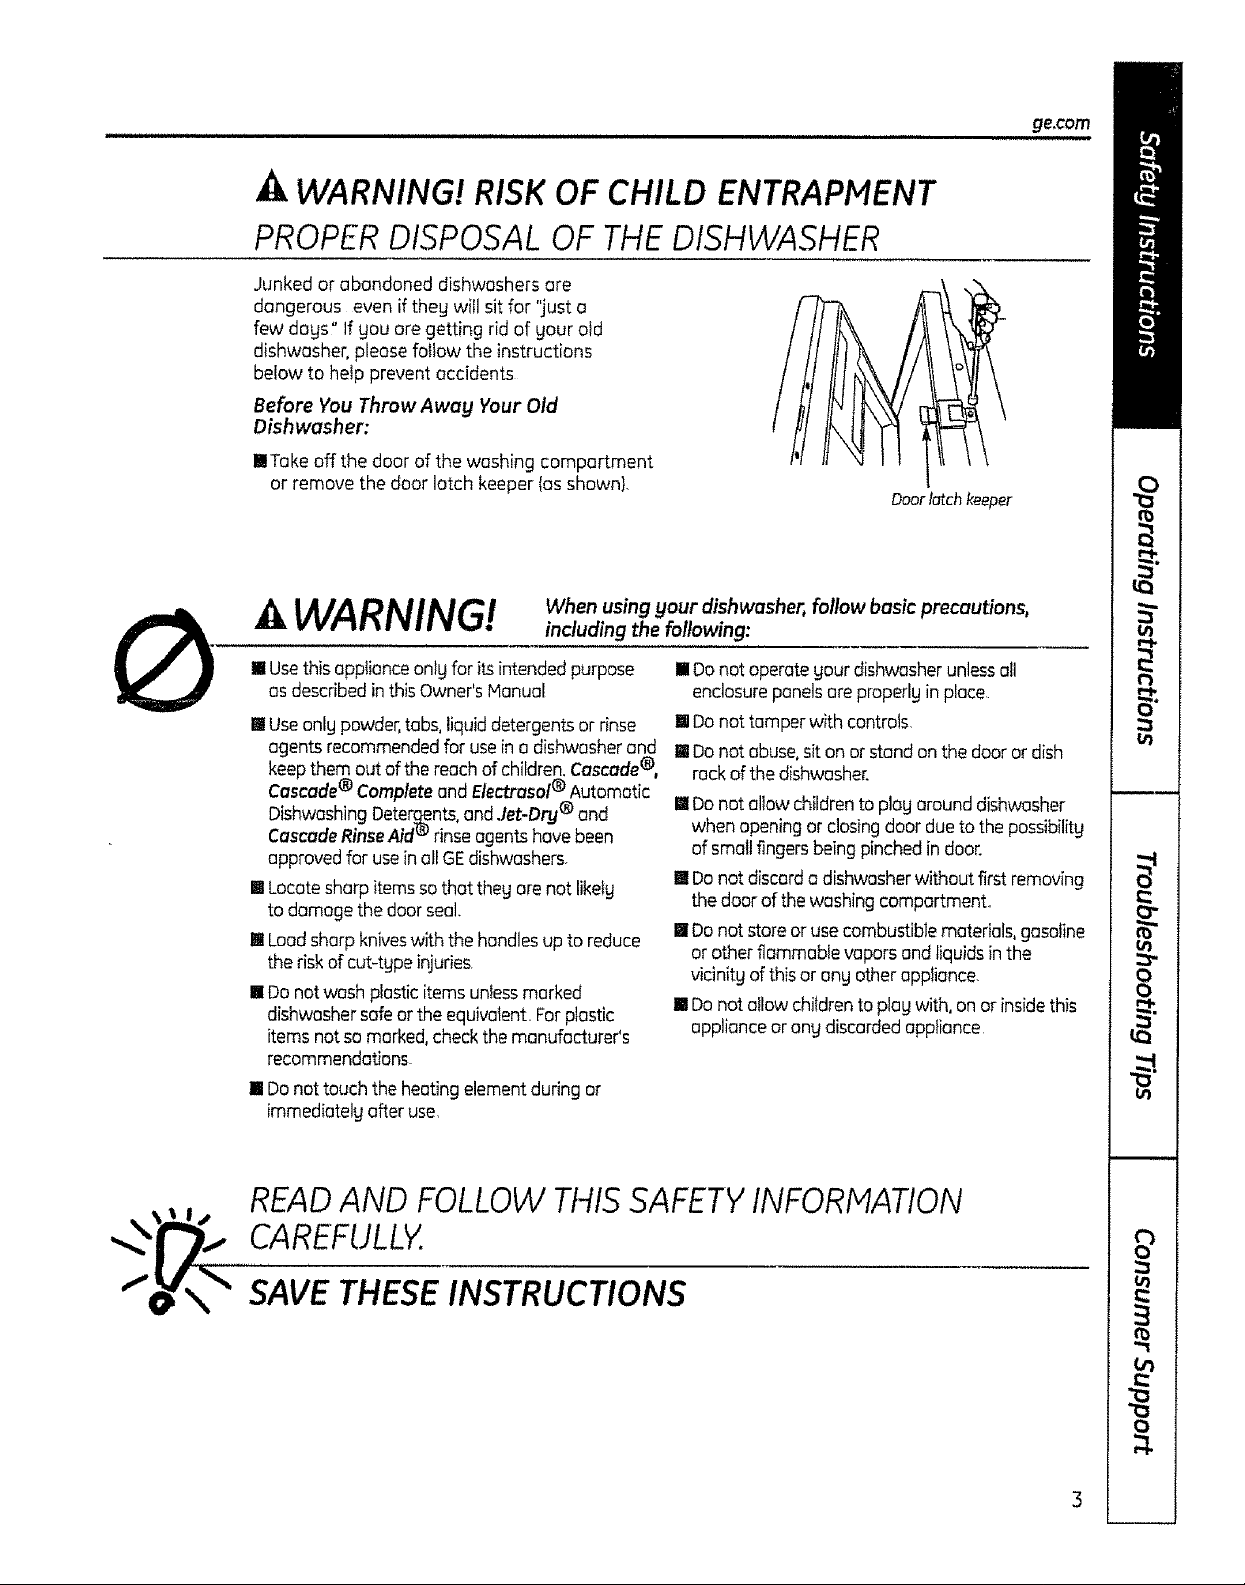
_k WARNING! RISK OF CHILD ENTRAPMENT
PROPER DISPOSAL OF THE DISHWASHER
Junked or abandoned dishwashers are
dangerous even if theg witl sitfor 'Just a
few days ° If you ore getting rid of your old
dishwasher, pleasefallow the instructions
below to help prevent accidents
Before You ThrowAway Your Old
Dishwasher:
reTake off the door of the washing compartment
or remove the door latch keeper {asshown}.
Door latch keeper
WARNING!
ffiUsethis applianceonlg for itsintendedpurpose i Donot operate gaur dishwasher unlessall
asdescribedin thisOwner'sHonual enclosurepanelsore properlgin place
[] Useonlg powder,tabs,liquiddetergentsor rinse [] Donot tamperwith controls.
agents recommendedfor usein adishwasherand [] Do not abuse,sit on orstand on the dooror dish
keepthem out ofthe reachof children.Cascade®, rockof the dishwasher.
Cascade®Completeand Electrasol® Automatic
Dbhwashing Deter_jents,and Jet-Dry® and
CascadeRinseAid '_rinseagentshave been
approved for usein all GEdishwashers.
[] Locatesharp items sothat theg are not likely
to damagethe door seal.
[] Loadsharpkniveswith the handlesup to reduce
the riskof cut-type injuries
[] Do notwash plastic items unlessmarked
dishwashersafeor the equivalent.Forplastic
items notso marked,checkthe manufacturer's
recommendations_
[] Donot touch the heatingelement during or
immedbtely after use.
When using gout dishwasher, follow basic precautions,
including the following:
[] Do natallow childrento play around dishwasher
when openingor closingdoor dueto thepossibility
of smallfingers beingpinched in door.
!! Donot discorda dishwasherwithout first removing
the doorof thewashingcompartment.
[] Do not store or usecombustiblematerials,gasoline
or other flammablevapors and liquidsinthe
vicinitgof thisor ang other appliance.
[] Do not aflowchildrento plag with, anor insidethis
applianceor any discardedappliance
READAND FOLLOWTHISSAFETYINFORMATION
CAREFULLY.
SAVETHESEINSTRUCTIONS
Page 4
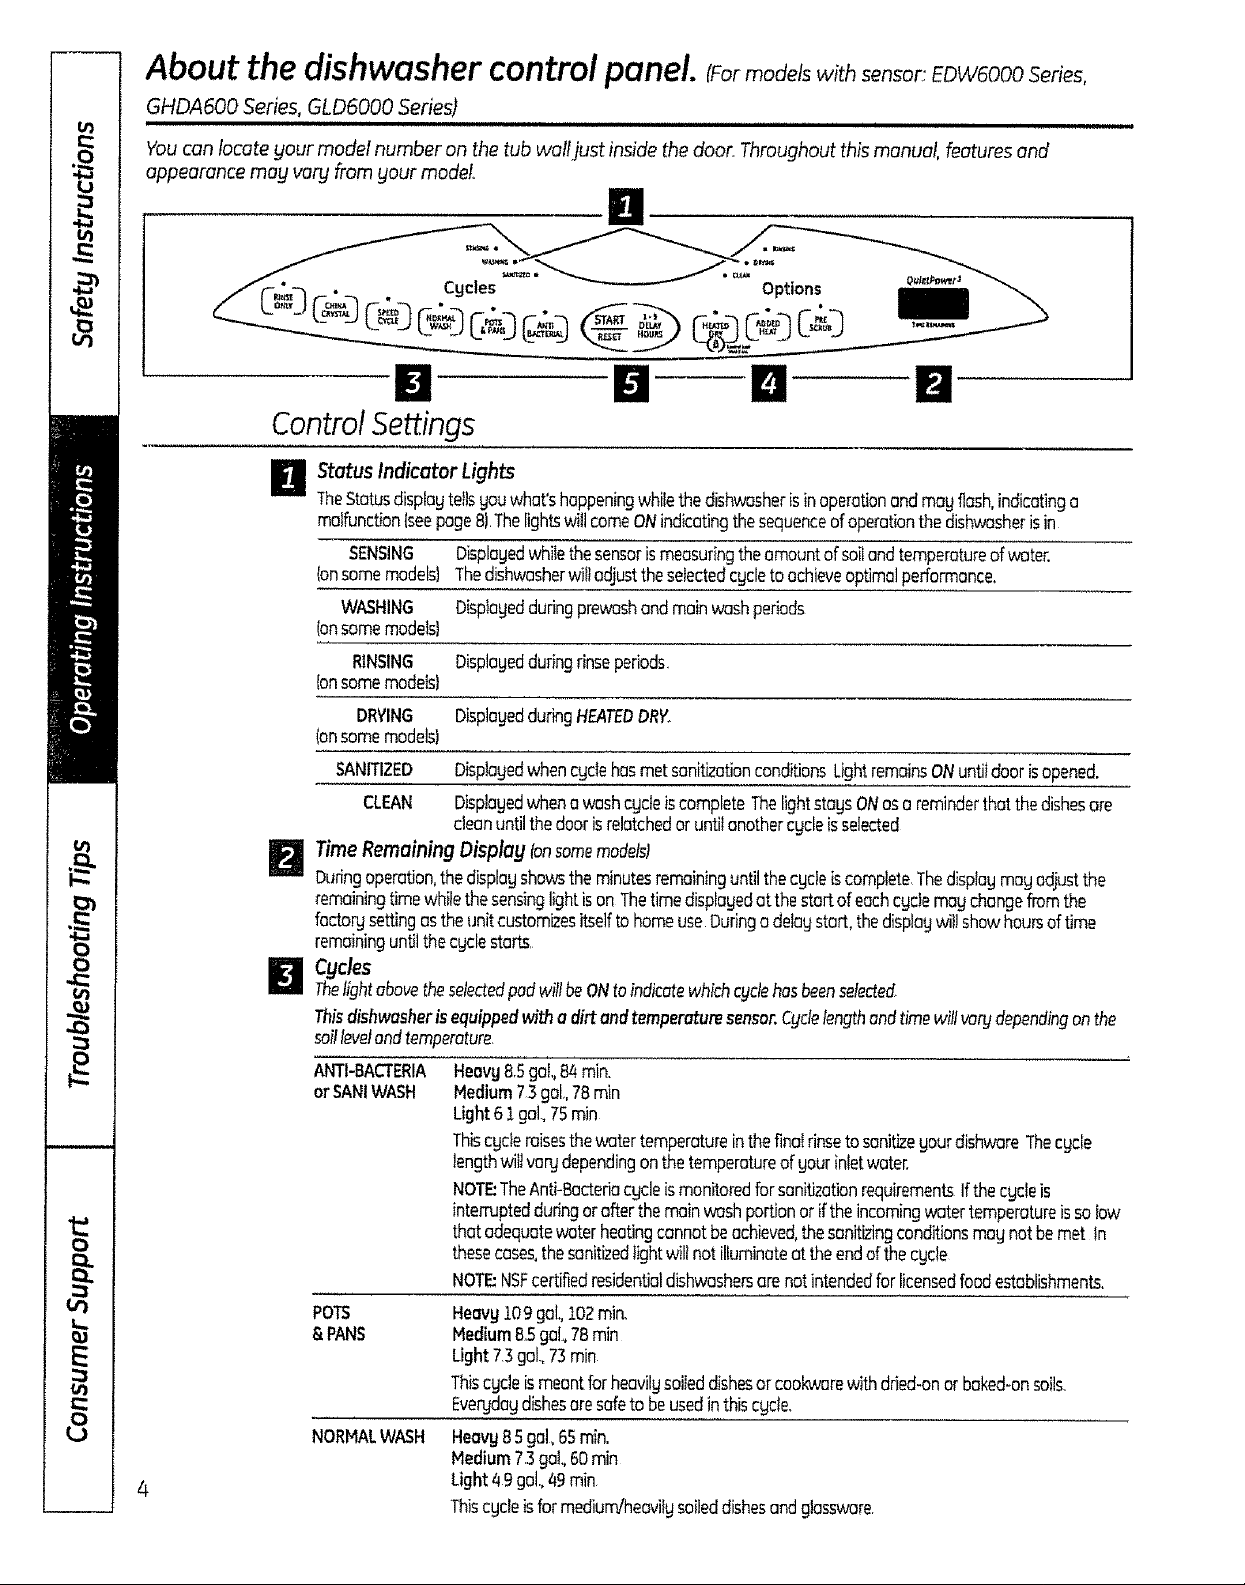
About the dishwasher
GHDAGO0 Series, GLDSO00 Series)
You can locate your model number on the tub wa!fjust inside the door_Throughout this manual, features and
appearance may vary from your model
control
pane . (For models with sensor: EDW6000 Series,
B
m
Control Settings
B StatusIndicatorLights
TheStatusdisp{aytellsyouwhat'shappeningwhiiethedishwasherisinoperationandmayflash,indicatinga
malfunction{seepage8)ThelightswillcomeONindicatingthesequenceofoperationthedishwasherisin
SENSING Displayedwhilethesensorismeasuringtheamountofsoilandtemperatureof water.
Ionsomemodels) Thedishwasherwiltadjusttheselectedcycletoachieveoptimalperformance,
WASHING Displayedduringprewoehandmainwashperiods
(onsamemodels)
RINSING Displayedduring rinseperiods.
{onsomemodeist
DRYING DisplayedduringHEATEDDRY.
bn somemodels)
SANITIZED DisplayedwhencgdehasmetsonitizationconditionsLightremainsONuntildoorisopened.
CLEAN DisplayedwhenawashcgdeiscompleteThelightstaysONasareminderthatthedishesore
cleonuntilthedoorisrelatchedor untilanothercycleisselected
_ ime Remaining Disptag tonsomemodelsl
Duringoperation,thedisplayshowstheminutesremaininguntilthecgdeiscompleteThedisplaymayadjustthe
remainingtimewhilethesensinglightisonThetimedisplayedatthestartofeacheyriemaychangefromthe
factorLJsettingastheunitcustomizesitselftohomeuseDuringa delaystart,thedisplaywil!showhoursoftime
remaininguntilthecyclestarts.
@des
ThelightabovetheselectedpadwiltbeONtoindicatewhichcyclehasbeenselected.
Thisdishwasherisequippedwith a dirt andtemperaturesensor.Cyclelengthandtimewillvarydependinganthe
soillevelandtemperature.
ANTI-BACTERIA
or SAN1WASH
POTS
&PANS
NORMALWASH
4
Heavy8.5geL,84rain.
Medium73gal,78min
Light6 2gaL,75min
ThiscycleraisesthewatertemperatureinthefinalrinsetosanitizeyourdishwareThecgde
lengthwiltvarydependingonthe temperatureofyourinletwater.
NOTE:TheAnti-BacteriacycleismonitoredforsonitizationrequirementsIfthecgdeis
interruptedduringorofferthemainwashportbnoriftheincomingwatertemperatureissoiow
thatadequatewaterheatingcannotbeachieved,thesanitizingconditionsmaynotbemet tn
thesecases,thesanitizedi;ghtwillnotilluminateattheendofthecycle
NOTE:NSFcertifiedresidentialdishwashersorenotintendedfor licensedfoodestablishments.
Heavy109gal.,102min.
MediumB,5gaL78min
Ught7.3gaL,73min
Thiscycleismeantforheavilysoileddishesor cookworewithdried-onorbaked-onsoils_
Everydaydishesaresafeto beusedinthiscycle.
Heavy85gal,,65rain,
Medium7,3gaL,60min
Light49 gal.,49rain
Thiscycleisformedium/heavilysoileddishesandglassware.
Page 5
ge_lcom
SPEEDCYCLE
or
SPEEDWASH
Ionsome models}
nlnnnlnnllln n n l
73 gaL35min
Thiscycleisforevergdaydishesandglassware
CHINACRYSTAL 73 gal,48rain
fansomemodels) ThiscycleisforlightlysoiledchinaandcrgstoL
RINSEONLY 25gal,,]2 min
Forrinsingpartialloadsthatwillbewashedlater,Donotusedetergentwith thiscycle.
NOTE:OnlgtheAnti-Bacteriacyclehasbeendesignedtomeettherequirementsof Section6,NSF184for
soilremovalandsan_izationefficacg
Options
ThelightabovetheselectedpodwiltbeONtoindicatewhichoptionhasbeenselected
PRESCRUB Forusewithheavilgsoiledand/ordried-on,baked-onsoilsThisoptionMUSTbesefectedPRIORto
{onsomemodels) startingthecycle.Thisoptionodds15minutesto thecgdetimeNOTE:Cannotbeselectedwith
RINSEONLYcgcle,
HEATEDDRY Shutsoffthe dryingheatoptbn DishesairdrgnaturallyandenergyissavedForfosterairdrg,
LightOFF youconpropthedooropenoffertheCLEANlightilluminates
HEATEDDRY Turnstheheateronforfastdrying Thiswillextendthetotalruntimeby BminutesfortheSPEED
LightON CYCLE,38minutesforNORMALandPOTS/PANS,and30minutesfor otlothercgcles
NOTE:CannotbeselectedwithRINSEONLYcgcle
LOCK
Youconlockthecontrolstopreventany selectionsfrombeingmodeOryoucontackthecontrols
aftergouhavestarteda cycle,
Childrencannotoccidenta!tgstartdishwasherbytouchingpadswiththisoptionselected
ToLOCKthedishwashercontrol,touchandholdtheHEATEDDRYpodfor3secondsThetight
belowtheHEATEDDRYpodwill turnon ToUNLOCKthedishwashercontrol,touchandholdthe
HEATEDPRYpodfor3 seconds.TheLOCKlightwillturnoff.
ADDED Whenselected,thecgctewillrunlongerwiththeheatingelementontoimprovebothwashand
HEAT dryperformanceNOTE:CannotbeselectedwithRINSEONLYcycle
DELAYHOURS YoucandelaythestartofowashcgcleforuptoghoursTouchtheDELAYHOURSpodto choose
thenumberofhours£_ouwanttodelaythestartofthecycle;thentouchSTART/RESETonetime
Thedishwasherwillcountdownandstartautomaticallyatthecorrecttime,Touching
START/RESETa secondtimewillcancelthe DELAYSTARTselection
RESET Tochangeocgcleofferwashingstarts,touchtheSTART/RESETpodtocancelthecycleThe
START/RESETIightwillflashwhilethewaterispumpedout ifneeded.Thistokesapproximately
90secondsWhenthelightstopsflashing,thedishwasherconbereprogrommedandrestarted
I_ Start
Closeandlatchthedishwasherdoorandselectthecycleanddesiredenhancements.TouchtheSTART/RESETpad
onceto beginthecycleWaterbeginstofitlthedishwasher,andapproximately60seconds]aterthewashaction
begins.TouchingtheSTART/RESETpodasecondtimewillcancelthecycleandcausethewaterto drainout.Thiswill
takeopproximatelg2minutes.
NOTE:Thedishwasherremembersyourlastcyclesoyoudon'thoveto reprogromeachtime Whenthedishwasher
doorisfullyclosed,thecontrolpanellightswilldisplaythelostsettingsgouselected
tfyoudon'twanttochangeanyofthesettings,simplgtouchtheSTART/RESETpodonceto beginthecycle
tfthedoorisclosed,theindicatorlightswilltumoffiftheSTART/RESETpodisnotpressedwithintwo minutes
Toactivatethedisplay,openendclosethedoorortouchanypod
Also,ifopowerfailureoccurs,NORMALandHEATEDDRYwillautomaticallybeprogrammed
Page 6

About thedishwasher control
EDWSO00Series,GHDA400Series,GLD4000Series,GLD5000Series,HLD4000 Seriesand GLDL500Series)
You con locate your model number on the tub well just inside the door. Throughout this manual, features end
appearance may vary from your model
................................ ii,11,1,1
panel. [Formodels without o sensor:EDW4000 Series,
I!
I " \
I'-,..,-h " • Cycles
_,_J
m li
Control Settings
Status Indicator Lights
The Status disptog tells you what's happening while the dishwasher is in operation and may flash,
indicating o malfunction lsee page 8).The lightswildcame ON indicating the sequence
of operation the dishwasher is in,
SANITIZED
{onsome
models)
CLEAN
(on some
modefs}
Cycles
Thelightabovetheselectedpad will beON to indicatewhich cgde has beenselected,
SANI WASH
(on some
models)
POTS& PANS
or HEAVY
WASH
NORMALWASH 5,9 gal., 56 rain.
Dispfoged when cycle has met sonitizotion conditions Light remains ONuntil
door is opened,
Displayed when o wash cgde is complete. Thelight stags ON aso reminder that
the dishes are cleon until the door is opened or until another cycle is selected.,
7.3gol, 97 min.
This cycle raises the water temperature inthe fino! rinse to sanitize your dishware
The cgde length wil! vary depending an the temperature of your inlet water.
NOTE:TheSANI-WASHcgde is monitored for sonitization requirements, If the
cycle isinterrupted during or after the main wash portion or if the incoming water
temperature is so low that adequate water heating cannot be achieved, the
sanitizing conditions may not be met° In these cases, the sanitized light will not
ilbminote at the end of the cycle.
NOTE:NSFcertified residential dishwashers ore not intended far licensed food
establishments,
'85 gaL,89 min,
This cycle is meant for heovilg soiled dishesor cookwore with dried-on or baked-
on soils. Everyday dishes are safe to be used in this cycle.
This cycle isfor medium/heovNg soiled dishesend glassware,
LIGHTWASH 6,1 gel.,36 rain.
(on some This cycle isfor everyday dishes and glassware,
models)
CHINA CRYSTAL6,1 gal, 39 rain,
fan some This cycle isfor tightlg soiled china and crgstaL
models)
RINSEONLY !2 got.,6 min.
For rinsing partial loads that wilt be washed later_Do not use detergent with
this cycle.
NOTE:Only the SANI-WASHcycle has been designed to meet the requirements of Section 6,
NSF184 for soil removal and sonitizotion efficacy
Page 7

i i i i i i
Options
Thelight above the selected pad will be ON to indicate which OPTIONhas beenselected.
HOTSTART Foruse with heavily soiledand/or dried-on, baked-on soils.This optionMUSTbe
{on some selected PRIORto starting the cgcle Thisoption will improve both wash and dry
models} performance. Thisoption adds 20 minutes to the cycle time
NOTE:Cannot be selected with RINSEONLYcgcle,
HEATEDDRY Shuts off the drging heat option, Dishesair drg naturallg and energg issaved,
Light OFF Forfaster air drg you can prop the door open after the CLEANlight illuminates_
HEATEDDRY Turns the heater on for fast drying Thiswil{ extend the total run time bg 38 minutes
Light ON NOTE:Cannot be selectedwith RINSEONLYcgcle
ge.com
LOCK
{onsome
models)
HOTWASH
DELAY HOURS
RESET
Youcan lock the centrals to prevent any selections from being mode Or you can tack
the controls after you have started a cycle
Childrencannot accidentoffgstart dishwasher bg touching pads with this option
selected,
ToLOCKthe dishwashercontrol,touchandholdtheHEATEDDRYpadfor3secondsThelightbeiow
theHEATEDDRYpadwiltturnonToUNLOCKthedishwashercontrol,touchandholdtheHEATED
DRYpadfor3seconds,TheLOCKlightwillturnoff
When selected,the cgcle will run longer with the heating element on to improve both
wash and dr# performance. NOTE:Cannot be selected with RINSEONLYcgde
You con delog the start of a wash cgcle for 2,4 or 8 hours {deiagtime options mog
vorg bg model),Touch the DELAYHOURSpad to choose the number of hours gou wont
to delog the start of the cgcte;then touch START/RESETone time, Thedishwasher will
count down and start outomatico!tg at the correct time Touching START/RESETa
second time will cancelthe DELAYETARTselection,
Tochange a cgcte after washing starts, touch the START/RESETpod to cancel the
cgcle, TheSTART/RESETlight will flashwhile the water is pumped out if needed,This
takes approximotelg 90 seconds When the light stops flashing, the dishwasher can be
reprogrammed and restarted,
Start
D
Closeand latch the dishwasher door and select the cgcle and desired enhancements Touchthe
START/RESETpod once to begin the cgcle Water begins to fill the dishwasher, and approximately 60
seconds later the wash action begins, Touching the START/RESETpod o second time will cancel the
cgc{e and cause the water to drain out. Thiswill take epproximgtefg 2 minutes,
NOTE:The dishwasher remembers your test cgde so gou don't hove to reprogrom each time When
the dishwasher door is fu{Ig closed, the control panel lights will displag the lost settings gou selected
If gou don't want to change ang of the settings, simplg touch the START/RESETpad once to begin
the cgcle
If the door isclosed, the indicator lights will turn off if the START/RESETpad is not pressed within two
minutes, Toactivate the display, open and dose the door or touch ong pod,
Also,if a power failure occurs, NORHALand HEATEDDRYwill outomoticallg be programmed
Page 8

Usingthe dishwasher.
Check the Water Temperature
The entering water should be at least 120°F Turn on the hot water faucet nearest the
and not more than 150°F,for effective cleaning dishwasher, piece the thermometer ina glass
and to prevent dish damage Check the water and let the water run continuously into the
temperature with o candy or meat thermometer, glass until the temperature stops rising,
rg or CascadeCrgstal Clear rinse agents remove spots and prevent new film buildup on
ishes,glasses, flatware, cookware and plastic,
Filling the Dispenser
The rinse agent dispenser holds !00 m! (35 fl oz} of rinse agent, Under
normai conditions; this wi!l last appro×imute!y one month. Try to keep it
full, but do not overfill.
[] Hake sure the dishwasher door is fully open
[] Turnthe dispenser cap to the left and lift it out.
[] Add rinse agent until the indicator window looks ful!
[] Cleanup any spilled rinse agent with a damp cloth,,
[] Replace the dispenser cap
lndi_
window Dispensercap
Rinse Aid Setting
The amountof rinse agentreleased into the final wash can be adjusted.
The factorg setting is at the midpoint, if there are rings of calcium (hard
water) spots on dishes,try a higher setting If you seefoam in the
dishwasher, move the indicator to a lower setting
To adjust the setting
Removethe dispenser cop; then turn the adjuster counterclockwise to adjuster
increase the amount of rinse agent, clockwise to reduce the amount of rinse agent.
Dish Preparation Prior to Loading
[]No pre-rinsing of normal food soil is required,
Ii Scrapeoff hard soils,including bones,
toothpicks, skins and seeds_
[] Remove large quantities of ang remaining
food,
[] Remove teafg vegetables, meat trimmings
and excessiveamounts of grease or oil.
[] Remove acidic food soils that can discolor
stainlesssteel,
Page 9

Using the
dishwasher, go..oom
Proper Use of Detergent
Use only detergent specifically made for use
in dishwashers Cascade_and Electrasot ®
Automatic Dishwashing Detergents have been
approved for usein all GEdishwashers. Keep
your detergent fresh and dry. Don't put powder
detergent into the dispenser,until you're ready
to wash dishes
Theamount of detergent to usedepends on
whether gour water is hard orsoft. With hard
water, gou need extra detergent. With soft water,
gou need lessdetergent.
Protect gour dishes and dishwasher bg
contactinggout water department and asking
how hard gaur water is Twelve or more grains
isextremetg hard water. A water softener, is
recommended, Without it, lime can build up
in the water valve,which could stick while open
and cause flooding Too much detergent with
soft water can cause apermanent cloudiness
of glassware, calied etching,
Usethe information in the table below as a
guideline to determine the amount of automatic
dishwasher,detergent to place in the dispenser,,
Number
of Grains DetergentCupsto Fill
Lessthan 4 Fillcup to first line
4 to 8 Fil!cupto second line
8 to 12 Fillmainwash cup
Greater Fillboth MainWash and
than 12 PreWash cup
Medium Medium Extremely
Soft Soft Hard Herd
/
For heovilL.psofledloads, use the Potsand Pans or
Heavy Washcgcle and odd a little extra detergent
DO NOT USEHAND DISH DETERGENT
m
i
NOTE:Usingadetergentthat is not specifically
designedfordishwasherswill causethe dishwasher
to fillwith suds,Duringoperation,thesesudswill spill
outof the dishwasher,vents,coveringthe kitchen
floorand makingthefloor wet
Becausesomany detergent containers lookalike,
storethedishwasherdetergent ina separatespace
from all othercleaners,.Showanyone who may use
the dishwasherthecorrect detergent and where
it isstored,
Whilethere will beno lastingdamageto the
dishwasher,your disheswill not get cleanusinga
dishwashingdetergentthat isnotformulated to
work with dishwashers
Forget to Add a Dish?
A forgotten dish can be added any time before
the main wash,
Squeezethe door latch to release the door.
[] Donot open the door until the water spray
action stops Steam may riseout of the
dishwasher.
[] Add forgotten dishes
[] Closethe door,
Page 10

Loading the dishwasher racks.
For best dishwashing results, follow these loading guidelines, Features and appearance of racks and silverware
baskets mag vary from your model
Upper Rack
Althoughtheupperrockisforglasses,cupsand
saucers,potsandpanscanbeplacedinthisrack
foreffectivecleaningCupsandglassesfitbest
otongthesides.Thisisalsoasecureplacefor
dishwasher-safeplastics
Theutititgshelf{onsomemodels}maybe#acedin
theupor downpositiontooddflexibil_gAwine
glossholder(onsomemodels)secureswine
glassesforbestwoshabilitg.Becausewineglasses
comeinvadoussizes,afterboding,stowlgpush
intherackto makesurethegwiIlclearthetop of
thedishwasher.
Theupperrackisgoodforallkindsofodd-shaped
utensilsSaucepans,mixingbowlsandotheritems
shouldbeplacedfacedown.Fold-downtinesIon
somemodels)providefle×ibilitgforextra-largeand
hard-to-fititems
Lower Rack
Thelowerrockisbestusedforplote£saucersend
cookworeLargeitemssuchasbroilerpansand
bakingrocksshouldgo alongtheleft-handside
Loadplatters,potsandbowlsalongthesides,in
comersor inthe back,Thesailedsideofitems
shouldfacethecenteroftherack tfnecessartj,
oversizedglossesandmugscanbeplacedinthe
lowerracktomaximizeloadingflexibilitg
Also,becarefulnotto leta portionof anitemsuch
asopot ordishhandleextendthroughthebottom
rockThiscouldblockthe washarmandcause
poorwashingresults,
Securelargerdishwasher-safeplasticsover2tines
whenpossible
Plakesuresmollplasticitemsaresecuresotheg
can_:fullontotheheater.
Besurethatitemsdonotprotrudethrough
thebottomoftherackandblockrotationofthe
middlesprogarm Thiscouldresultinpoorwash
performancefar itemsin theupperrack,
Checkto make
surethat noitems
willblockrotation
of the wash arms.
Fold-downtinesIonsomemodels)provide
fiexibilitgforextra-largeandhard-to-fititemsThe
tinesmugbeleftintheup positionor foldeddown
tocustomizethelowerrack.
Donot letangitem
extendthroughthe
bottomof the silverware
basket_Itemsthat
extendthroughtherack
couldpreventthesprag
arm fromturningand
causepoorwash
performance.
Single basket Ion some modelst
One-pieee basket (on some modelst
Three-piece basket Ion some modem
t t
Toremoveendbaskets,graspthe
brisketat oppositecomersandslide
aport
10
Silverware Basket
Toloadflatware,simplgpushtheadjustable
handletoeitherside[onsomemodels).Put
flatwareintheremovablebasketwithforkand
knifehandlesuptoprotectgourhandsPlace
spoonsinthebasketwithhandlesdown Hix
knives,forksandspoonssothegdon'tnest
together.Distributeevenlg,Smallplasticitems.
suchasmeasuringspoonsandlidsfromsmalt
containersshouldgointhebottomofthe
silverwarebasketwiththesilverwareontop
Theone-piecesilverwarebasket(onsomemodels)
canbeplacedinthefront,nghtsideorbackofthe
lowerrack
Avorietgof optionsisavaibbleregardingthe
three-piecesilverwarebasket(onsomemodels)
ingourdishwasher.Thecompletebasketis
designedtofit onthe rightsideofthelowerrock
Additionally,eachendof thebasketisremovable
tooddloadingflexibititgtoaccommodateflatware
andlowerrackcapocitgneeds,
Thelidsofbothendandmiddlebaskets
(onsomemodels)canbeclosedtocontainsmall
items,Longitemsconbeplacedontheutilit_Jshelf
intheupperrack
Theaccessorg
basket(onsome
modelslcon hold
small itemssuch
as:baby bottle
nipples,plasticlids,
corn cobholders,etc
Page 11

Loading place settings... o°com
Follow these guidelines for loading I0 place settings, Features and appearance of racks and silverware baskets
may vary from your model
Upper Rack--lO piece settings Lower Rack--lO piece settings Lower Rock-lO piece settings
Follow these guidelines for loading 12 place settings., Features and appearance of racks and silverware baskets
mug vary from your model,
Optional
Upper Rack--12 piece settings Lower Rack--12 place settings
accessories.
You can change the appearance of gaur
dishwasher bg adding a custom panel trim kit
Woodpanel trim kit--This occessorg contains
trim and instructions for you to supplg and install
a t/4" thick decorative woad door:
I GPF525B fBlack)
I GPFS25W (White)
[] GPF525C (Bisquef
Trimtess wood panel kit-This accessorg
containsparts and instructions for gou to supplg
and instalta 3/z_"thick decorative wood door:
[] GPF575
Non-wood countertop bracket kit-This isfor
installations which have nomwood countertops
and includes side=mountingbrackets and
instructions for securingthe dishwasher.
I GPF55
Theseaccessoriesare available at extra cost from
GE CallBO0525 2002 to order.Visa,Mastercard
or Discover cards are accepted
Specifg accessory number when ordering_
11
Page 12

Caring for the dishwasher.
Cleaning the Door Panel
Before cleaning the front panel, make sure
gnu know what type of ponet gnu hove,
Referto the lost two letters of your model
number. You con locate gour model
number on the taft-hand tub wall just
insidethe door.,If gour model number ends
with BB, WW,CC,SAor BG,then you have
a Pointed Door panel. If gour model
number endswith SS,then gnu have o
StainlessSteel Door panel. If your model
number endswith CS,then you hove a
CleanSteel Door panel
Followthe instructions below for cleaning
the door panel for your specific model.
Painted Door Panel {modelnumbers
ending in BB-black, WW-white, CO-bisque.
SA-silver metallic, BG-graphite metallic or
GS-silverl
Use o clean, soft, iightly dampened cloth,
then drg thoroughlg Youmeg also use a
good appliance wax or polish.
Stainless Steel Door Panel [model
numbers ending inSS)
Thestainless steel panels con be cleaned
with StainlessSteelMagic or o similar
product using o cleon, soft cloth. Do not
use appliance wax, polish,bleach or
products containing chlorine on Stainless
Steeldoors
Youcan order Stainless SteelMagic
#WXlOX25 through GEParts bg calling
800626,2002,
CleanSteet Door Panel !model numbers
ending in CSt
Useo cleon, soft, lighttg dampened cloth,
then drg thoroughly, Do not use appliance
wax, polish or ong chemical agent on
CleanSteeldoors,
Donot wipe the dishwasher with a soiled
dishcloth or wet towel Thesemeg leave
a residue.Do not usescouring pads or
powdered cleaners because these
products can scratch the finish.
A,rgp
i
Cleaning the Control Panel
Toclean the control panel, use a tightlg
dampened cloth Then drg thoroughlgo
Protect Against Freezing
If gour dishwasher isleft in an unheated
place during the winter, ask aservice
technician to:
[_l Cut off electrical power to the
dishwasher,,Remove fuses or trip
circuit breaker
[] Turn offthe water supplg and
disconnect the water inlet line from
the water valve,
Does Your Dishwasher Have an Air Gap?
An air gap protects your dishwasher
against water backing up into it if a drain
clogs The air gap is not a part of the
dishwasher, It is not covered bg your
warranty Not all plumbing codes require
air gaps, sogou mag not have one
l-_ Drain water from the water inlet line
Theair gap is easg to clean.
[] Turn offthe dishwasher and lift off the
]Remove the plastic cap and clean with
and water valve. (Useo pen to catch
the water.)
Reconnect the water inlet line to the
water valve,
cover,
a toothpick
Checkthe ak gap ang time
your dishwasher isn_ draining
well.
t2
Page 13

Before you call for service.., gocorn
Savetime and money!l Reviewthe charts on the following
pages, or visitge.com Youmay not need to call for service,
Troubleshooting Tips
Error Hessoges Possible Causes What To Do
START/RESETstatus Youhavepressedthe = PresstheSTART/RESETpadonlywhenyouwantto restartthe
indicatorlightflashingSTART/RESETpadwhilethe dishwasher,
DishwasherBEEPS Thisisa reminder that gour • Closeandlatchthedoorafteropeningitmid-cgde
onceeverg30secondsdishwasherdoorhasbeenleft
Problem PossibleCauses What To Do
Dishesandfla_/care Lowinletwatertemperature • Hakesureinletwatertemperatureiscorrect(seepage8),Turnon
notclean thehotwaterfaucetnearestthedishwasher,letrununtilthewater
Spotsandfilming
onglassesand
flatware
Cloudinesson Combinatbnofsoftwaterand
glassware toomuchdetergent
Sudsinthetub Wrongdetergent
dishwasheris running.Thiswill
cancelthe cgcle,Thelight will stop
flashing after thedishwasherdrains
(about90seconds}.
open duringoperation. Itwill
continue beepinguntil gouclose
the door°
temperaturestopsrisingThenstartthedishwasherandturnoff
thefaucet,Thisinsurestheentedngwaterishot,
Waterpressureistemporarilglaw • Turnonafaucet tswatercomingoutmoreslowlythanusual?
Ifso,waituntitpressureisnormalbeforeusingyourdLshwasher.
Airgapor disposerisdogged • Cleontheairgaporflushthedisposer.
Improperrackloading • Hakesurelargedishwaredoesnotblockthedetergentdispenser
orthewasharms,SeetheLoadingthedishwasherrockssection
Noair gaporhighdrainloop • Verifgthatgouhaveanairgapor a highdrainloop.Referto
Extremelyhardwater
Lowinletwatertemperature
Overloadingthedishwasher
Improperloading
aid or damppowderdetergent
Rinseagentdispenserempty
Toolittledetergent
Watertemperatureentering
thedishwasherexceeds150°F
theInstallationInstructions
• UseJet-Dry_orCascadeCrystalCIeoPrinseagentsto removespotsand
preventnewfilmbuildup,
• Toremovestubbornspotsandpre-existingfilmfromglassware:
1 Removenitmetalutensilsfromthedishwasher,
2 Donotodddetergent
3 SelectthePOTS&PANSorHEAWWASHcycle,
# Startthedishwasherandallowto runfor !8 to 22minutesDishwasher
wiltnowbeinthemainwash
S Openthedoorandpour2cups(500ml)ofwhitevinegarintothe
bottomofthedishwasher.
6 Closethedoorandallowtocompletethecgde Ifvinegarrinsedoesn't
work<Repeatasabove,exceptuse1/4cup{60ml}ofcitricacidcrLJstOIs
insteadofvinegar,
• ThisiscalledetchingandispermanentTopreventthisfromhappening,
usetessdetergentifgouhavesoftwater+Washglasswarein theshortest
cgclethatw_llgetthemclean.
• ThiscouldbeetchingLowerthewaterheatertemperature
• Useonlgautomaticdishwasherdetergentstoovoidsudsing,
Cascade_andElectn_soPAutomaticDishwoshingDetergents
havebeenapprovedforuseinallGEdish,rashers.
• Toremovesudsfromthetub,openthe dishwasherandlet
sudsdissipateCtoseandlatchthedishwasher,Pumpoutwater
bgtouchingtheSTART/R_ETpodonce;then30secondslater,
touchtheSTART/RESETpodagainRepeatifnecessorg,
• AtwagswipeuprinseagentspillsimmediatelyRinseagentwasspiUed 13
Page 14

Before you call for service...
Problem Possible Causes What To Do
Detergentleft in Dishesare blockingthe
,,,disPensercups detergentcup
Blockorgray Aluminumutensilshave
marksondishes rubbedagainstdishes
Dishesdon't dry Lowinletwatertemperature • Hakesureinletwatertemperatureisat least120°F
Rinseagentdispenserisempt,.j • Checktherinseagentdispenserandfillas required.
ControlpanelrespondedDoorlatchmoonotbeproperly • Makesurethedoorisfirmlycbsed
toinputsbutdishwasherseated
neverfilledwithwater Watervalvemaybeturnedoff • Makesurewatervalve{usuallylocatedunderthesink)isturnedon.
Stainedtubinterior Sometomato-basedfoodscan • UseoftheRINSEONLVcodeafteraddingthedishtotheiood
causereddishstains candecreasethelevelof stainingGErecommendsCascade®
Teaorcoffeestains
Anoverallyelloworbrownfilmcon •
because byirondepositsinwater
Whitefilm on insidesurface-
hardwaterminerals
Dishwasherwon'trun
Controlpanel lights
go off whenyou're
setting controls
Waterstanding in
thebottom of the tub
Waterwon'tpump
outof the tub
Steam
Sanitizedlightdoes
notilluminateatthe
endofthecycle
(Anti-Bacteria
cyc/eon/yj
Noise
14
Fuseisblownor circuitbreaker
istripped
Poweristurnedoff
Controlpanelislocked
Reboatgoutcontrol
Timetoo longbetween
touchingofselectedpods
Thisisnormal
Drainisdogged
Thisisnormal
Thedoorwasopenedandthe
cyclewasinterruptedduring
orafterthe mainwashportion
Theincomingwater
temperaturewastoolow
Normaloperating sounds
Rattlingdisheswhenthe spray
armrotates
• Repositionthedishes,sothewaterfrom the lowerspray armcan
flushthedetergentcup.SeetheLoadingthe dishwashersection.
• Removemarkswitho mild.abrasivecleaner,
, SelectHEATEDDRV.
" UseHOTSTART,HOTWASHorADDEDHEAToptions
• Selecto highercyde,suchasANTI-BACTERIA,SANIWASH,POTS&PANS
orHEAVYWA3H
PlasticBoosterto helpremus ofstains,
• Removethestainbghand_usinga solutionofU2 cupbleach
and3 cupswormwater.
A WARNING
Beforecleaninginterior,waitat ieost20minutesafteracgdeforthe
heatingelementstocoo!down.Failuretodosocanresultinburns.
Aspecialfilterinthewatersupplylineistheonlywagtocorrect
thisproblem.Contactawatersoftenercompany,...........
• GErecommendsJet-Oru®orCascadeCrystatClear_tohelp
preventhardwatermineraldepositsfromforming
, Rundishwasherwithcitricacidto removemineraldeposits.Citricacid
(Partnumber:WD35×153.)canbeorderedthroughGEPartsSeeback
coverfororderinginformation,
• Replacefuseorresetcircuitbreaker.Removeany otherappliancesfrom
thecircuit
• In someinstallations,thepowerto thedishwasherisprovidedthrougha
wallswitch,oftenlocatednexttothe disposerswitch Hakesureit ison
, UnlockcontrotpanelSeepage5or 7.
• Turnoff powerto thedishwasher(circuitbreakerorwallswitch}for
30seconds;thenturnbackon.
• Eachpodmustbetouchedwithin 30secondsof theothers
Torelight,touch anypadagain,or unlockand relatchdoor.
• Asmallamountofcleonwateraroundtheoutlet onthe tub
bottomat the backof thetub keepsthe waterseallubricated.
• Ifgouhaveanairgap,deanit Seepage12
• Ifthedishwasherdrainsintoadisposer,rundisposerclear.
• Checktoseeifyourkitchensinkisdrainingwell.tfnot,gou
mayneedo plumber.
, Warm,moistaircomesthroughtheventbgthedoorlatchduringdrying
andwhenwaterisbeingpumpedout.Thisisnecessanjfordrying.
• Donotinterruptthecodeanytimeduringoraftermainwash
• Raisethewaterheatertemperatureto between120_Fand140°F
• Detergentcupopening
• Waterenteringdishwasher.
• Themotorstopsand startsat varioustimesduring the cycle
• Drainpumpsoundsduringthe pumpoUL
• Makesuredishesereproperly loaded Seethe Loadingthe
dishwasherrackssection
Page 15

GEDishwasher Warranty.
III III II
Allwarranty serviceprovidedby ourFactoryServiceCenters,
oran authorizedCustomerCare®technician,1-oschedule
service,on-line,24 hoursa day,visitusat ge,com,or call
800GE£ARES(8004322737)Pleasehaveserialnumber
and modelnumber availablewhencallingforservice,
For The Period Of: GE Will Replace:
OneYear
Fromthedateof the
originalpurchase
Ang part of the dishwasherwhich fails clueto a defect in materials or workmanship.Duringthis
limited one-gear warranty, GEwill otsoprovide,freeof charge, alllabor and relatedserviceto
replacethe defectivepart.
What GE Will Not Cover:
! Servicetrips to gouthometo teach gou how to use
the pmducL
[] Improper installation, deliverg or maintenance.
R Failureof the product if it isabused, misused,or used for
other than the intendedpurpose or usedcommerciallg.
ffiReplacementof house fuses or resetting of circuit
breakers.
Stapleyour receipt here
Proofof the original purchase
Idate is needed to obtain service
L under the warranty.
[] Damage to the product causedbgoccident,fire,floods
or acts of God.
ggincidental or consequentialdamage caused bgpossible
defectswiththisappliance,
[] Cleaning or servicing of the air gapdevicein the
drain lineo
ffiDamagecaused after deliverg.
II Productnot accessibleto providerequiredservice.
i ,,,,,,,,,,,,,,,,,,,,,,,,,,,,,,,,,,,,,,,,,,,,,,,,,,,, , ...............................
Warrantg, Any impliedwarranties,includingthe impliedwarranties of merchantabilitg or fitnessfora particular
purpose,arelimited toonegear or the shortestperiodallowed bg law.
nnH,H,mmmmln n i I i .....................
This warrantg is extended to the original purchaser and any succeeding owner for products purchased for
home use within the USA, ff the product is located in an area where service bg a GEAuthorized Serviceris not
available, you may be responsible for a trip charge or gou mag be required to bring the product to an Authorized GE
Service location for service..Proof of original purchase date is needed to obtain service under the warranty. In
Alaska, the warranty excludes the cost of shipping or service calls to gaur home.
Some states do not allow the exclusion or hmitotion af inddental or consequential damages This warranty
gives you specific legal rights, and you may also have other rights which varg from state to state. To know
what gout legal rights are, consult gour local or state consumer affairs office or your state's Attorney General
Warrantor: General Electric Compango Louisville, KV 40225
15
Page 16

ConsumerSupport.
GEAppliances Website
Havea question orneed assistancewith gour appliance?Trgthe GEAppliancesWebsite24 hoursa dog,
ang dog of the gear! Forgreaterconvenienceand foster service,gou can nowdownload Owner's Manuals,
order parts orevenscheduleserviceon-line.
ge.corrl
ScheduleService ge.corn
ExpertGErepairserviceis onlyonestepowny fromyour door,Geton-lineand schedulegourserviceat
gour convenience24hoursong dogofthe year!Or coil800.GECARES(800zG22737)duringnormal businesshours.
RealLife Design Studio ge.corn
GEsupportsthe UniversalDesignconcept-products, servicesand environmentsthat can be used bg
peopleof all ages,sizesand capabilities Werecognizethe needto designfor awide range ofphysical and
mental abilitiesand impairments.Fordetailsof GE'sUniversalDesignapplications,including kitchendesignideas
for peoplewith disabilities,checkout our WebsJtetodag. Forthe hearing impaired,pleasecallB00TDD.GEAC
t8008334322).
Extended Warranties
Purchasea GEextended warranty and learnabout special discountsthat ore availablewhileyour warrantg
isstiit in effect.Youcan purchase iton-line anytime,or call 800626 222/4during normal businesshours
GEConsumerHomeServiceswill stillbe thereafter yourwarrantg expires
ge.com
Parts and Accessories ge.com
Individualsqualifiedto servicetheir ownappliancescan haveparts oraccessoriessentdirectlyto their homes
{VISA,HesterCardand Discovercards areaccepted} Orderon4inetodog, 2/4hourseveryday or by phoneat
800,6262002 duringnormal businesshours
Instructionscontainedin this manual coverproceduresto be performedby anguser.Otherservicing
generallgshouldbe referred to qualified servicepersonnel.Cautionmust be exercised,sinceimproper
servicing may causeunsafeoperation°
Contact Us
If you orenot satisfiedwith the service gou receivefrom GE,contact uson our Websitewith altthe details
includingyour phone number,or write to: GeneralManager,CustomerRelations
GEAppliances,AppliancePork
Louisville,KY/40225
Register YourAppliance
Register gournewapplianceon-line--at gourconveniencel"limelgproduct registrationwillallow for
enhancedcommunication end prompt serviceunder the terms ofgour warrantg, shouldthe needarise.
Youmogalso mailin the pre-pdntedregistrationcard includedin the packingmaterial,or detach end
usethe form in thisOwner's Manual,
ge.com
ge.com
@ finted in the United States
Printedon Recgcled Paper
 Loading...