

Page 1

GEAppliances.com
Safety Instructions . . . . . . . . 2–5
Operating Instructions
Control Panels . . . . . . . . . . . . . . . . 6–8
Cycle Options . . . . . . . . . . . . . . . . . 9-10
Dryer Features . . . . . . . . . . . . . . . . . . 10
Reversing the Door Swing . . . . 11-14
Loading and Using
the Dryer . . . . . . . . . . . . . . . . . . . . . 15-16
Venting the Dryer . . . . . . . . . . . . . . . 17
Connecting Inlet Hoses . . . . . . . . . . 18
Stacking . . . . . . . . . . . . . . . . . . . . . 19-22
Troubleshooting Tips . . . . 23-26
Consumer Support
Warranty . . . . . . . . . . . . . . . . . . . . . . . 27
Consumer Support . . . . . . . . . . . . . . 28
Owner’s Manual
GFDS350
GFDS355
GFDN240
GFDN245
Dryers
Write the model and serial
numbers here:
Model # _____________
Serial # ______________
They are on the label on
the front of the dryer behind
the door.
49-90394 05/14/10 GE
234D1050P001
Page 2
IMPORTANT SAFETY INFORMATION.
READ ALL INSTRUCTIONS BEFORE USING.
WARNING!
For your safety, the information in this manual must be followed to minimize the risk
of fire or explosion, electric shock, or to prevent property damage, personal injury, or
death.
n Do not store or use gasoline or other
flammable vapors and liquids in the
vicinity of this or any other appliance.
n Installation and service must be
performed by a qualified installer,
service agency or the gas supplier.
WHAT TO DO IF YOU SMELL GAS:
1
Do not try to light a match, or cigarette,
or turn on any gas or electrical
appliance.
2
Do not touch any electrical switch;
do not use any phone in your building.
3
Clear the room, building or area of all
occupants.
California Safe Drinking Water and Toxic Enforcement Act
This act requires the governor of California to publish a list of substances known to the state to cause cancer,
birth defects or other reproductive harm and requires businesses to warn customers of potential exposure
to such substances.
Gas appliances can cause minor exposure to four of these substances, namely benzene, carbon monoxide,
formaldehyde and soot, caused primarily by the incomplete combustion of natural gas or LP fuels.
4
Immediately call your gas supplier
from a neighbor’s phone. Follow the
gas supplier’s instructions carefully.
5
If you cannot reach your gas supplier,
call the fire department.
Properly adjusted dryers will minimize incomplete combustion. Exposure to these substances can be minimized
further by properly venting the dryer to the outdoors.
2
Page 3
GEAppliances.com
PROPER INSTALLATION
This dryer must be properly installed and located in accordance with the Installation Instructions
before it is used. If you did not receive an Installation Instructions sheet, you can receive one by
visiting GEAppliances.com, or by calling 800.GE.CARES (800.432.2737).
n Properly ground dryer to conform with all
governing codes and ordinances. Follow details
in Installation Instructions.
n Install or store where it will not be exposed
to temperatures below freezing or exposed
to the weather.
n Connect to a properly rated, protected and sized
power supply circuit to avoid electrical overload.
n Remove the colored protective film from both
the control panel and the door.
n Remove all sharp packing items and dispose
of all shipping materials properly.
n Do not remove the vent protector from the back
of the dryer (on some models).
n Pull the protector out and down to its lowest
position and connect the exhaust duct to the dryer.
The lowered protector will prevent the duct from
getting crushed (on some models).
Exhaust/Ducting:
Dryers MUST be exhausted to the outside to
1
prevent large amounts of moisture and lint from
being blown into the room.
Use only rigid metal 4″ diameter ductwork inside
2
the dryer cabinet and use only UL approved
transition ducting between the dryer and the
home duct. USE OF PLASTIC OR OTHER
COMBUSTIBLE DUCTWORK CAN CAUSE A FIRE.
PUNCTURED DUCTWORK CAN CAUSE A FIRE IF
IT COLLAPSES OR BECOMES OTHERWISE
RESTRICTED IN USE OR DURING INSTALLATION.
For complete details, follow the Installation
Instructions.
3
Page 4
IMPORTANT SAFETY INFORMATION.
READ ALL INSTRUCTIONS BEFORE USING.
WARNING!
YOUR LAUNDRY AREA
n Keep the area underneath and around your
appliances free of combustible materials
(lint, paper, rags, etc.), gasoline, chemicals
and other flammable vapors and liquids.
n Keep all laundry aids (such as detergents,
bleaches, etc.) out of the reach of children,
preferably in a locked cabinet. Observe all warnings
on container labels to avoid injury.
n Keep the floor around your appliances clean
and dry to reduce the possibility of slipping.
n Close supervision is necessary if this appliance
is used by or near children. Do not allow children to
play on, with or inside this or any other appliance.
WHEN USING YOUR DRYER
n Never reach into the dryer while the drum is
moving. Before loading, unloading or adding
clothes, wait until the drum has completely
stopped.
n Clean the lint filter before each load to prevent lint
accumulation inside the dryer or in the room.
DO NOT OPERATE THE DRYER WITHOUT
THE LINT FILTER IN PLACE.
n Do not wash or dry articles that have been
cleaned in, washed in, soaked in or spotted
with combustible or explosive substances
(such as wax, oil, paint, gasoline, degreasers,
dry-cleaning solvents, kerosene, etc.) which may
ignite or explode. Do not add these substances
to the wash water. Do not use or place these
substances around your washer or dryer during
operation.
n Do not place items exposed to cooking oils in your
dryer. Items contaminated with cooking oils may
contribute to a chemical reaction that could cause
a clothes load to catch fire
n Any article on which you have used a cleaning
solvent or that contains flammable materials
(such as cleaning cloths, mops, towels used in
beauty salons, restaurants or barber shops,
etc.) must not be placed in or near the dryer
until solvents or flammable materials have been
removed. There are many highly flammable items
used in homes such as acetone, denatured alcohol,
gasoline, kerosene, some household cleaners,
some spot removers, turpentines, waxes, wax
removers and products containing petroleum
distillates.
.
n Never climb on or stand on the dryer top.
n Keep the area around the exhaust opening
and adjacent surrounding areas free from the
accumulation of lint, dust and dirt.
n Do not dry articles containing rubber, plastic, foam
or similar materials such as padded bras, tennis
shoes, galoshes, bath mats, rugs, bibs, baby pants,
plastic bags, pillows, etc., that may melt or burn.
Some rubber materials, when heated, can under
certain circumstances produce fire by spontaneous
combustion.
n Do not store plastic, paper or clothing that may
burn or melt on top of the dryer during operation.
n Garments labeled Dry Away from Heat or Do Not
Tumble Dry (such as life jackets containing kapok)
must not be put in your dryer.
n Do not dry fiberglass articles in your dryer.
Skin irritation could result from the remaining
particles that may be picked up by clothing
during subsequent dryer uses.
n To minimize the possibility of electric shock, unplug
this appliance from the power supply or disconnect
the dryer at the building’s distribution panel by
removing the fuse or switching off the circuit
breaker before attempting any maintenance or
cleaning (except the removal and cleaning of the
lint filter). NOTE: Pressing START, STOP or POWER
does NOT disconnect the appliance from the
power supply.
n The laundry process can reduce the flame
retardancy of fabrics. To avoid such a result,
carefully follow the garment manufacturer’s
4
care instructions.
Page 5
GEAppliances.com
WHEN USING YOUR DRYER (cont.)
n Never attempt to operate this appliance if it is
damaged, malfunctioning, partially disassembled,
or has missing or broken parts, including a
damaged cord or plug.
n The interior of the machine and the exhaust
duct connection inside the dryer should be cleaned
at least once a year by a qualified technician.
See the Loading and Using the Dryer section.
n If yours is a gas dryer, it is equipped with an
automatic electric ignition and does not have
a pilot light. DO NOT ATTEMPT TO LIGHT WITH A
MATCH. Burns may result from having your hand
in the vicinity of the burner when the automatic
ignition turns on.
n You may wish to soften your laundered fabrics
n Never attempt to use the STEAM DEWRINKLE
WHEN NOT USING YOUR DRYER
n Grasp the plug firmly when disconnecting this
appliance to avoid damage to the cord while
pulling. Place the cord away from traffic areas
so it will not be stepped on, tripped over or
subjected to damage.
n Before discarding a dryer, or removing it from
n Do not tamper with controls.
or reduce the static electricity in them by using
a dryer-applied fabric softener or an anti-static
conditioner. We recommend you use either
a fabric softener in the wash cycle, according
to the manufacturer’s instructions for those
products, or try a dryer-added product for which
the manufacturer gives written assurance on
the package that their product can be safely
used in your dryer. Service or performance
problems caused by use of these products
are the responsibility of the manufacturers
of those products and are not covered under
the warranty to this appliance.
or STEAM REFRESH cycles without clothes in the
drum.
service, remove the dryer door to prevent children
from hiding inside.
n
Do not attempt to repair or replace any part
of this appliance or attempt any servicing unless
specifically recommended in this Owner’s Manual
or in published user-repair instructions that you
understand and have the skills to carry out.
READ AND FOLLOW THIS SAFETY INFORMATION CAREFULLY.
SAVE THESE INSTRUCTIONS
5
Page 6
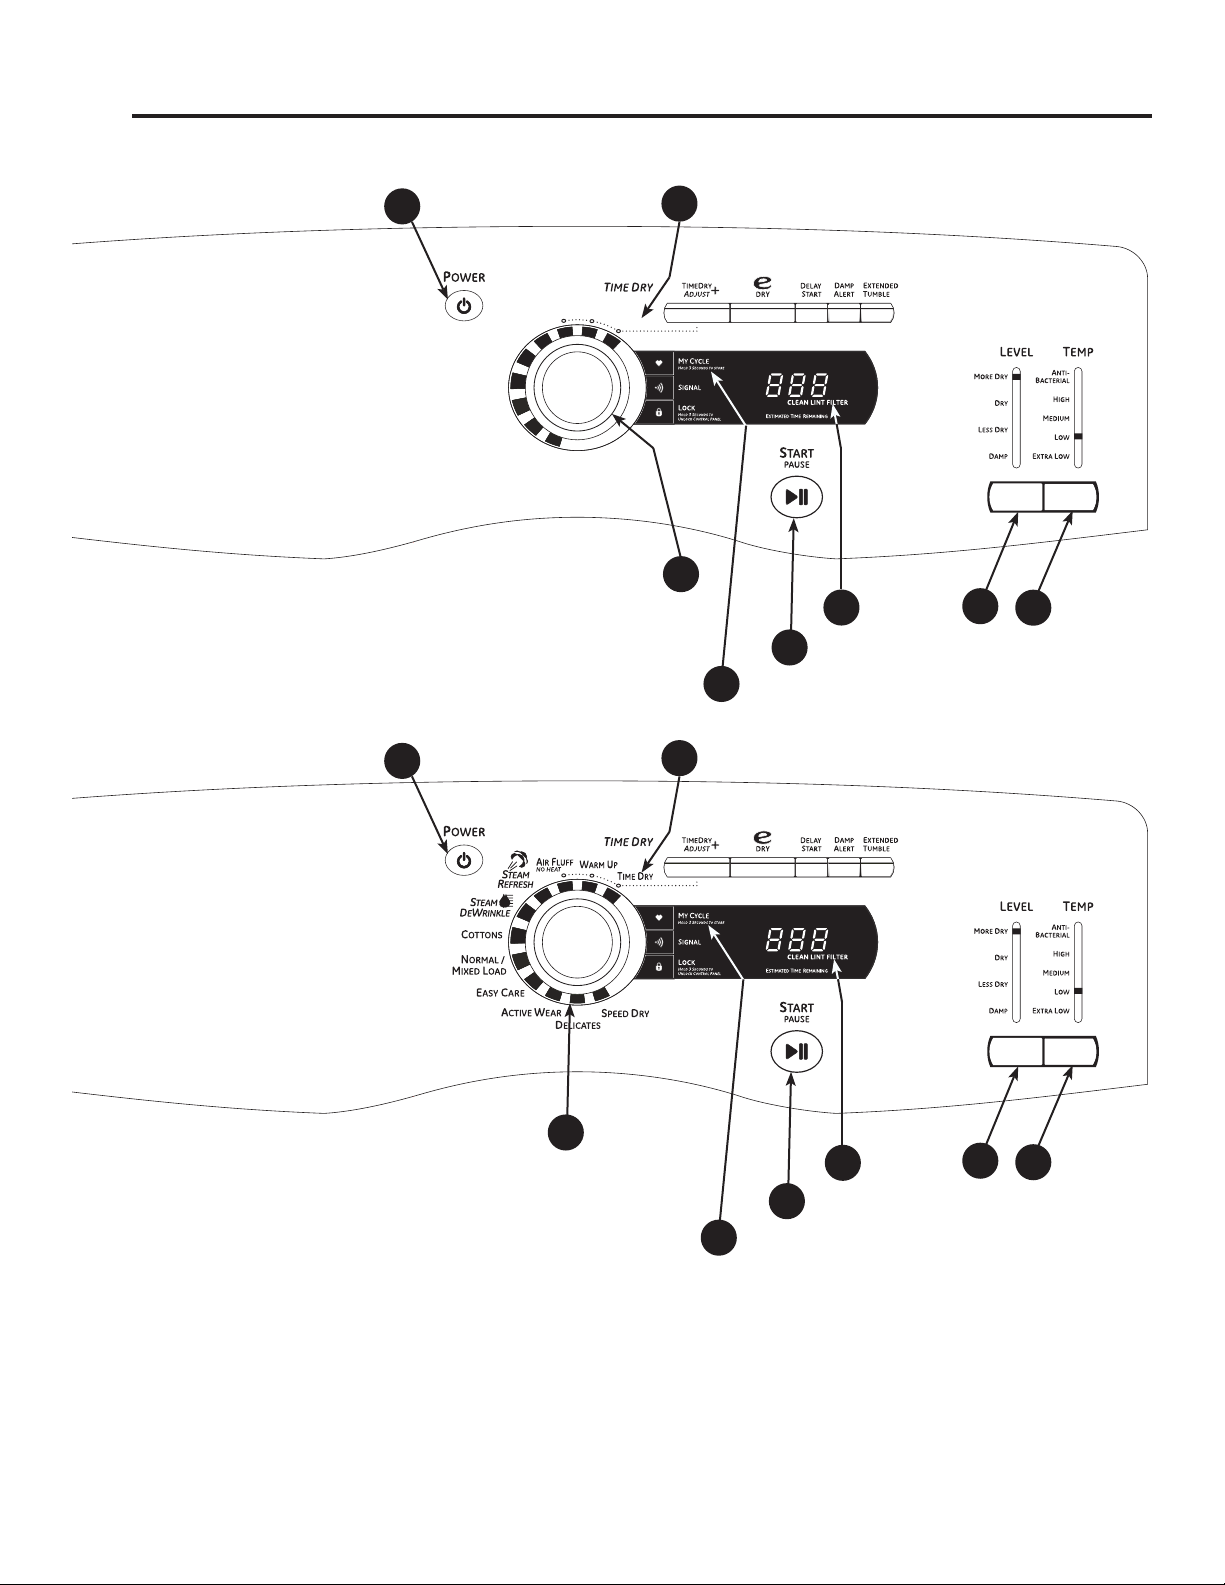
About the dryer control panel.
You can locate your model number at the top inside of the door opening.
Model GFDN240/245
T
IME DRY
3
2
1
NORMAL /
MIXED LOAD
E
ASY CARE
ACTIVE WEAR
DELICATES
COTTONS
SPEED DRY
A
IR FLUFF
NO HEAT
D
EWRINKLE
6
8
4
5
Model GFDS350/355
1
SENSOR DRY
2
3
7
7
6
8
4
5
6
Page 7
About the dryer control panel.
Power
1
Press to “wake up” the display. If the display is active, press to put the dryer in the standby mode.
NOTE: Pressing POWER does not disconnect the appliance from the power supply.
Dry Cycles
2
The dry cycle controls the length and tumble speed of the drying process. The chart below will help you match the dry
setting with the loads.
GEAppliances.com
Sensor Cycles Description
COTTONS
NORMAL/MIXED LOADS
For cottons and most linens.
For loads consisting of cottons and poly-blends.
EASY CARE
ACTIVE WEAR
DELICATES
SPEED DRY
For wrinkle-free and permanent press items.
Clothing worn for active sports exercise and some casual wear. Fabrics include new
technology finishes and stretch fibers such as Spandex.
For lingerie and special-care fabrics.
For small loads that are needed in a hurry, such as sports or school uniforms. Can also be
used if the previous cycle left some items damp, such as collars or waistbands.
Timed Dry Cycles Description
WARM UP
AIR FLUFF
DEWRINKLE
(on some models)
STEAM REFRESH
(on some models)
STEAM DEWRINKLE
(on some models)
Provides 10 minutes of warming time to warm up clothes.
Use this feature to tumble items without heat.
For removing wrinkles from items that are dry or slightly damp. This cycle is not
recommended for delicate fabrics.
For slightly wrinkled dry garments. Significantly reduces wrinkles on up to 5 garments. After
the STEAM REFRESH Cycle, the unit will beep and display “0:00.” If the unit is not turned off
or if the door is not opened, the dryer will continue to tumble for 30 minutes. At the end of 30
minutes, it will display “0:00” and the cycle will be complete.
Note: A single extremely light fabric item may need to have an additional item included in the
STEAM REFRESH cycle to achieve optimum results.
For use with larger loads than STEAM REFRESH. Ideal for loads left in dryer for an extended
time.
My Cycle Description
MY CYCLE
Timed Dry
3
Use to set your own dry time. TIMED DRY is also recommended for small loads
To use TIMED DRY:
1. Turn dry cycle dial to TIMED DRY.
2. Increase the drying time by pressing the TIMEDRY ADJUST + button.
Note: This button only increases the time. When max time is reached, pressing the button again will reset the counter to
the lowest setting.
3. Select the TEMP.
4. Close the door.
5. Press Start
Press to use, create or modify custom dry cycles. (See page 8 for more details)
7
Page 8
Sensor Dry “Level”
4
The sensor continuously monitors the amount of moisture in the load. When the moisture in your clothes reaches your
selected dry level, the dryer will stop.
Note: Sensor dry “LEVEL” only works for COTTONS, NORMAL/MIXED LOAD, ACTIVE WEAR, DELICATES, and SPEED DRY.
Dry “Temp”
5
You can change the temperature of your dry cycle.
ANTI-BACTERIAL
HIGH
MEDIUM
LOW
EXTRA LOW
START
6
Press to start a dry cycle. If the dryer is running, press it once and it will pause the dryer.
Press it again to resume the dry cycle.
My Cycle
7
Set up your favorite combination of settings and save them here for one touch recall.
These custom settings can be set while a cycle is in progress.
This option may only be used with COTTONS or NORMAL/MIXED LOAD cycles. This option reduces
(on some models) certain types of bacteria by 99.9%, including: Staphylococcus aureus, Pseudomonas aeruginosa and Klebsiella pneumoniae*. The anti-bacterial process occurs when high heat
is used during a portion of this drying cycle.
NOTE: Do not use this cycle on delicate fabrics.
* The Anti-Bacterial Cycle is Certified by NSF International (formerly National Sanitation Foundation) to
NSF Protocol P154 Sanitization Performance of Residential Clothes Dryers.
For regular to heavy cottons.
For synthetics, blends and items labeled permanent press.
For delicates, synthetics and items labeled Tumble Dry Low.
For lingerie and special-care fabrics.
To store a MY CYCLE combination of settings:
1. Select your drying cycle.
2. Change DRY “TEMP”, and SENSOR DRY “LEVEL” settings to fit your needs.
3. Select any drying OPTIONS you want.
4. Press and hold the
up.
To recall your stored MY CYCLE combination:
Press the MY CYCLE button before drying a load.
To change your stored MY CYCLE combination:
Follow steps 1–4 in “To store a MY CYCLE combination of settings”.
“CLEAN LINT FILTER” (message)
8
(This message represents only a reminder and does not always appear when filter needs cleaning. The filter should be
cleaned after every drying cycle is complete.)
This message will disappear after the START button is pressed. Even though you may have already cleaned the filter
(before or after the POWER button has been pressed), the “CLEAN LINT FILTER” message will still be displayed until the
START button is activated.
pad for three seconds to store your selection. A beep will sound and the pad will light
8
Page 9
About cycle options.
NOTE: Not all features are available on all dryer models. GEAppliances.com
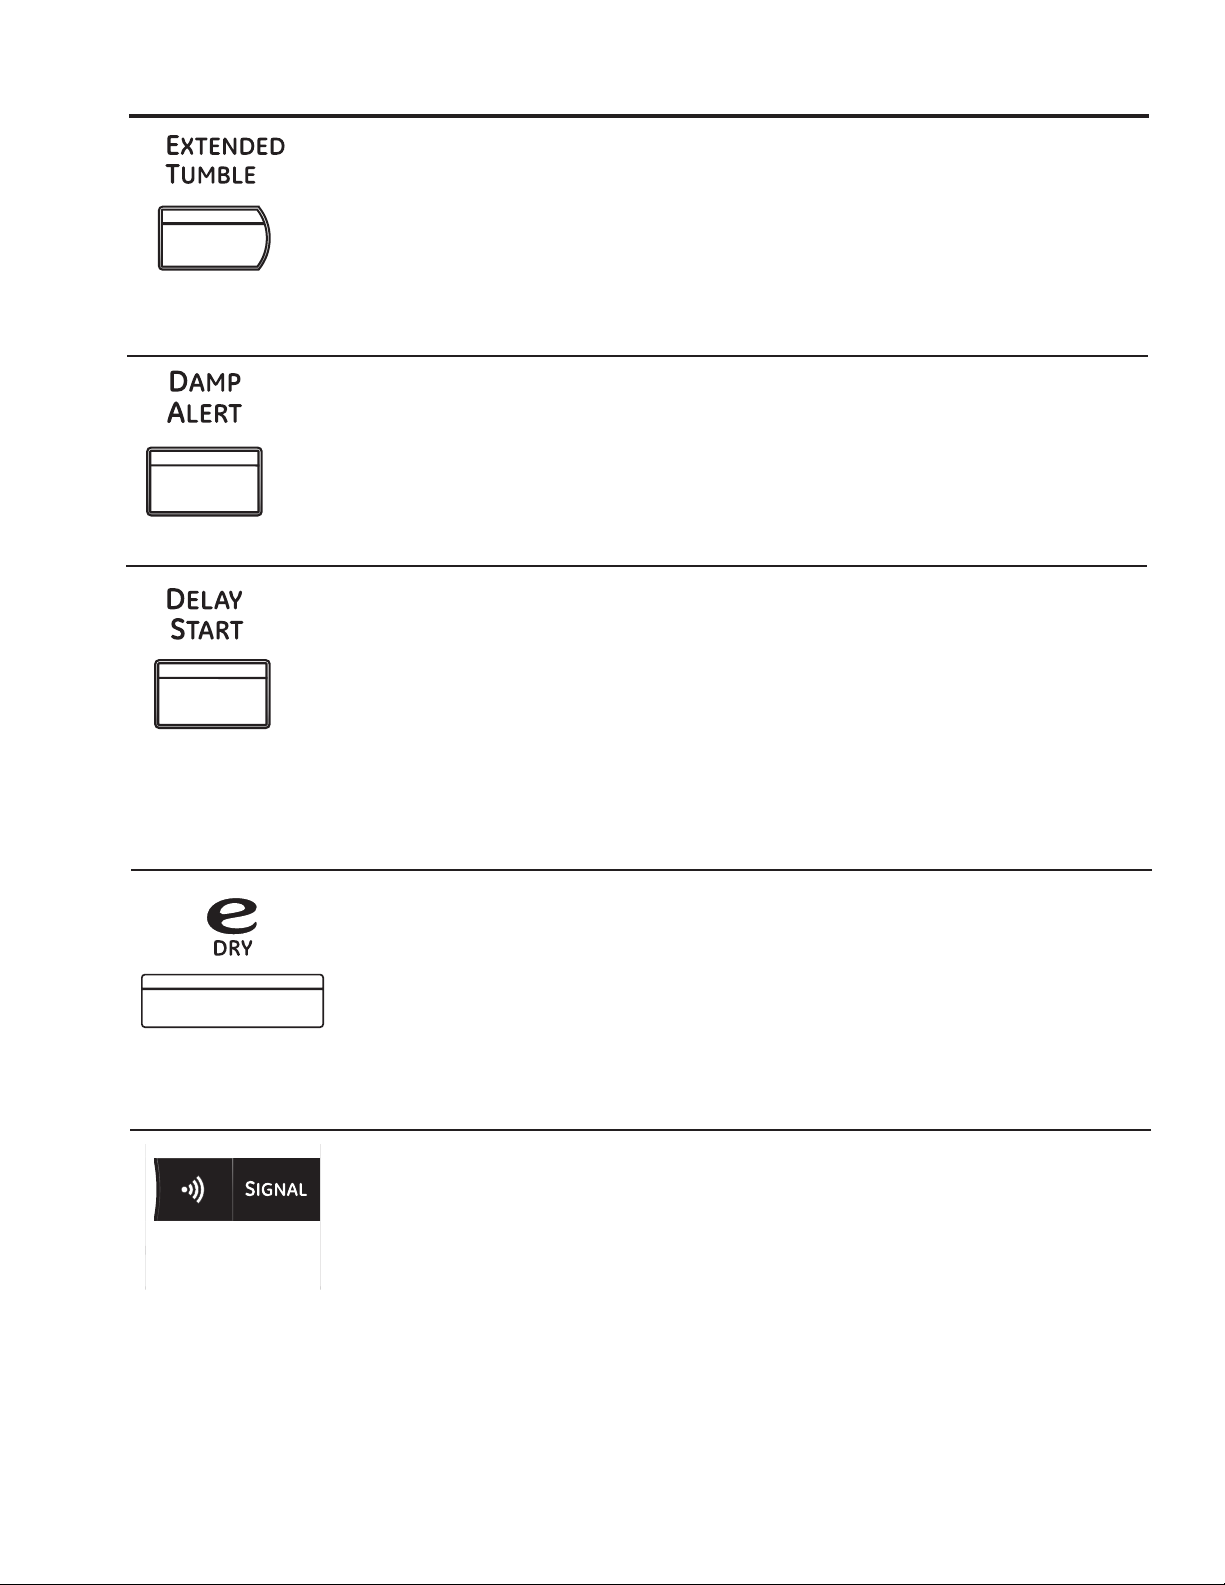
Extended Tumble
Minimizes wrinkles by adding approximately
60 minutes of no-heat tumbling after clothes
are dry. The beeper will sound every two
minutes as a reminder to remove the clothes.
The ESTIMATED TIME REMAINING display will
show 00.
Damp Alert
The Extended Tumble time does not get
added to the cycle time on the display
This option causes the dryer to beep when
clothes have dried to a damp level. Remove
items that you wish to hang dry. The
DAMP ALERT will only beep when this option
is selected.
Delay Start
Use to delay the start of your dryer.
1. Choose your dry cycle and any options.
2. Press DELAY START. You can increase
the delay time in 1 hour increments using
the DELAY START button.
3. Press the START pad to start
the countdown.
e-DRY
Reduces the total energy consumption of
specific dryer cycles by adjusting certain
heat settings.
Removing clothes and hanging them when
they are damp can reduce the need to iron
some items.
NOTES:
n If the door is opened while the dryer is
in DELAY START, the countdown time
will not restart unless the door is closed
and START has been pressed again.
This feature can be used with DELICATES,
ACTIVE WEAR, EASY CARE, NORMAL/MIXED
LOADS and COTTONS.
Note: Cycle times will change when e-DRY is
selected.
Signal
Alerts you that the cycle is complete.
The beeper will continue to sound every
minute for the next 5 minutes, until the
clothes have been removed. The clothes
should be removed when the beeper goes
off so wrinkles don’t set in.
Press SIGNAL to select low, medium or high
volume, or to turn the beeper off.
9
Page 10
About cycle options. NOTE: Not all features are available on all dryer models.
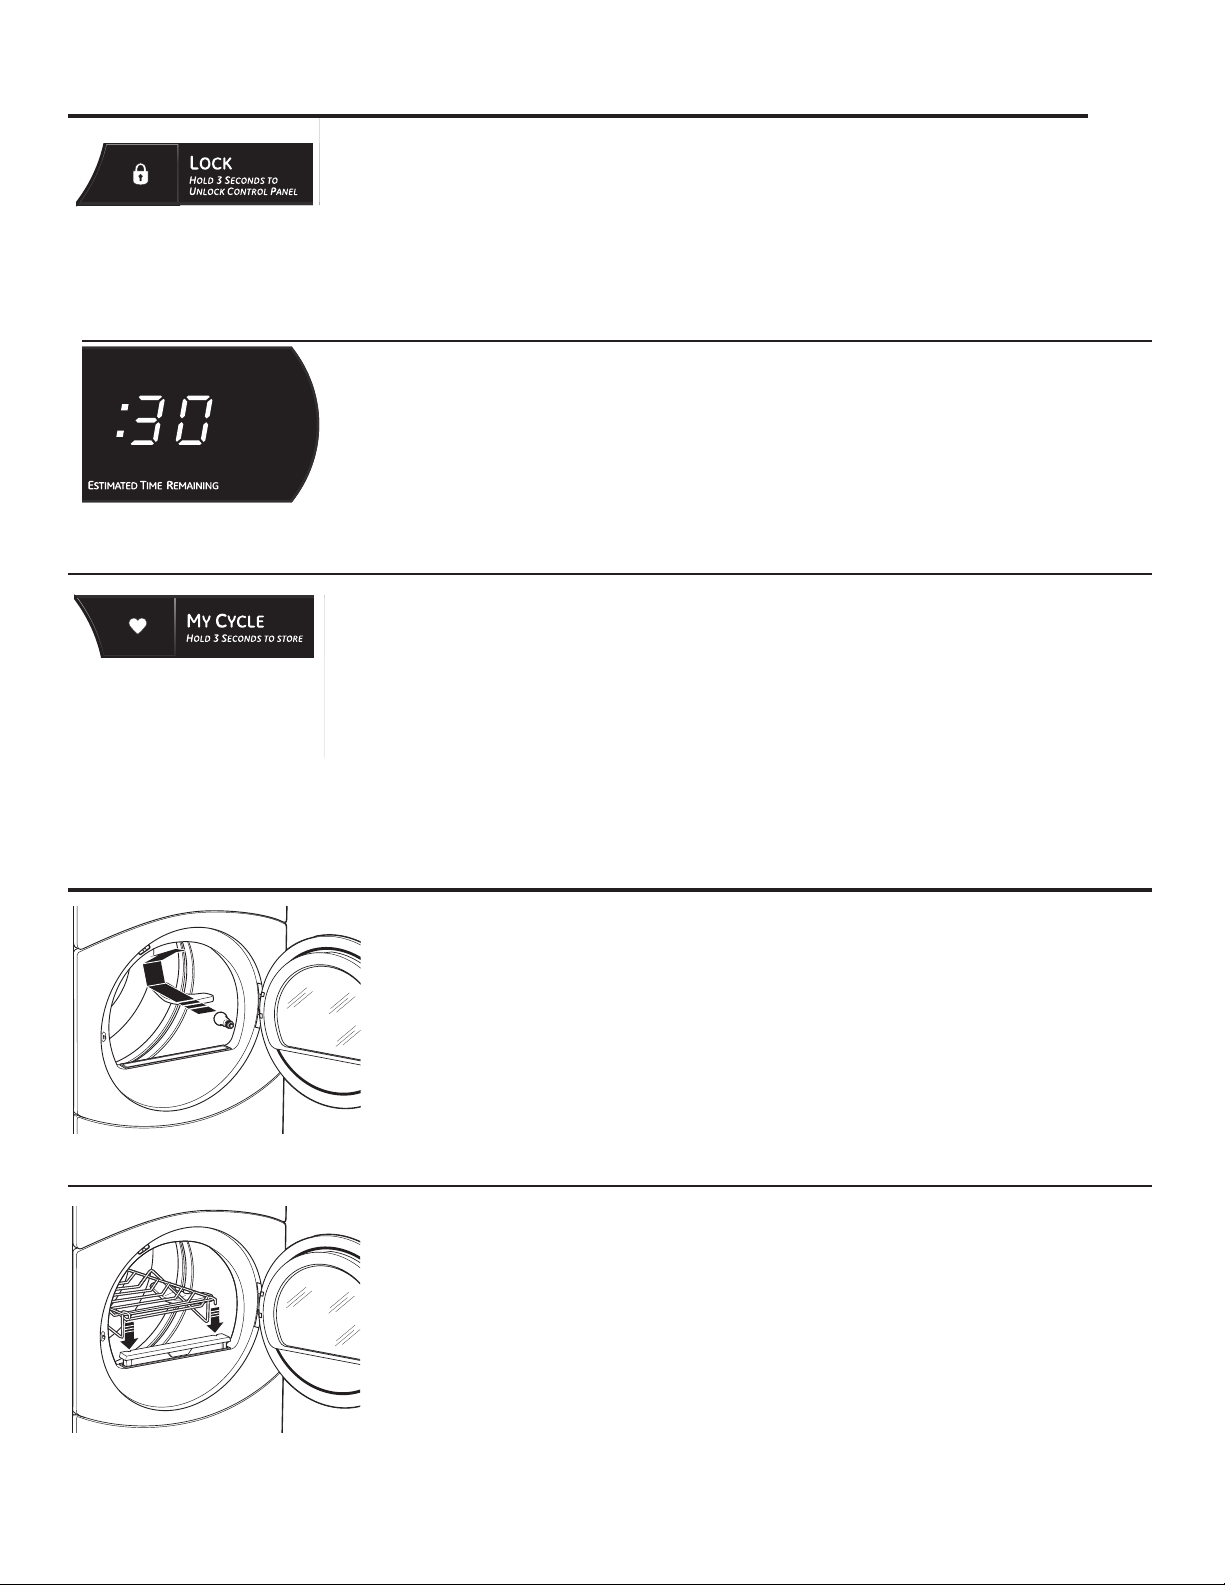
Lock
You can lock the controls to prevent any
selections from being made. You can also lock
the controls after you have started a cycle.
Children cannot accidentally start the dryer
by touching pads with this option selected.
Estimated Time Remaining
Displays the approximate time remaining until
the end of the cycle.
As the cycle begins, you will see an initial
approximate total cycle time in the display.
Then lights will “race” in the display. This means
the dryer is continuously monitoring
My Cycle
To save a favorite cycle, set the desired settings
and hold down the MY CYCLE button for 3
seconds. A beep will sound to indicate the cycle
has been saved.
To use your custom cycle, press
the MY CYCLE button before drying a load.
To lock the dryer, press the lock icon. To unlock
the dryer, press and hold the lock icon for 3
seconds.
The Lock icon next to the timer will light up
when the controls are locked.
the amount of moisture in the load.
The lights will continue until the dryer senses a
low level of moisture in the load. At that point,
the dryer will calculate and display
the approximate time remaining.
To change the saved cycle, set the desired
settings and hold down the MY CYCLE button
for 3 seconds.
About dryer features.
Drum Lamp
Before replacing the light bulb, be sure to unplug the dryer power cord
or disconnect the dryer at the household distribution panel by removing
the fuse or switching off the circuit breaker. Reach above dryer
from inside the drum. Remove the
Note: Drum lamp only (and automatically) turns on when the dryer door is open.
bulb and replace with the same size bulb.
opening
Drying Rack (on some models)
A handy drying rack may be used for drying delicate items such as washable
sweaters. Place items flat on the drying rack and block such items as wool
sweaters and delicate fabrics. Dry with low heat.
To install the drying rack, pull up the lint filter slightly. Insert the drying rack into
the slots, then push the filter back down.
NOTE:
n The drying rack is designed for use with the TIMED DRY cycles. Use with sensor
cycles may result in damp items or extended cycle times.
10
n Do not use this drying rack when there are other clothes in the dryer, that are
not placed on the rack.
Page 11
Reversing the door swing. GEAppliances.com
IMPORTANT NOTES:
n Read the instructions all the way
through before starting.
n Handle parts carefully to avoid
scratching paint.
n Set screws down by their related parts
to avoid using them in the wrong places.
n Provide a non-scratching work surface
for the door.
n Normal completion time to reverse
the door swing is 30–60 minutes.
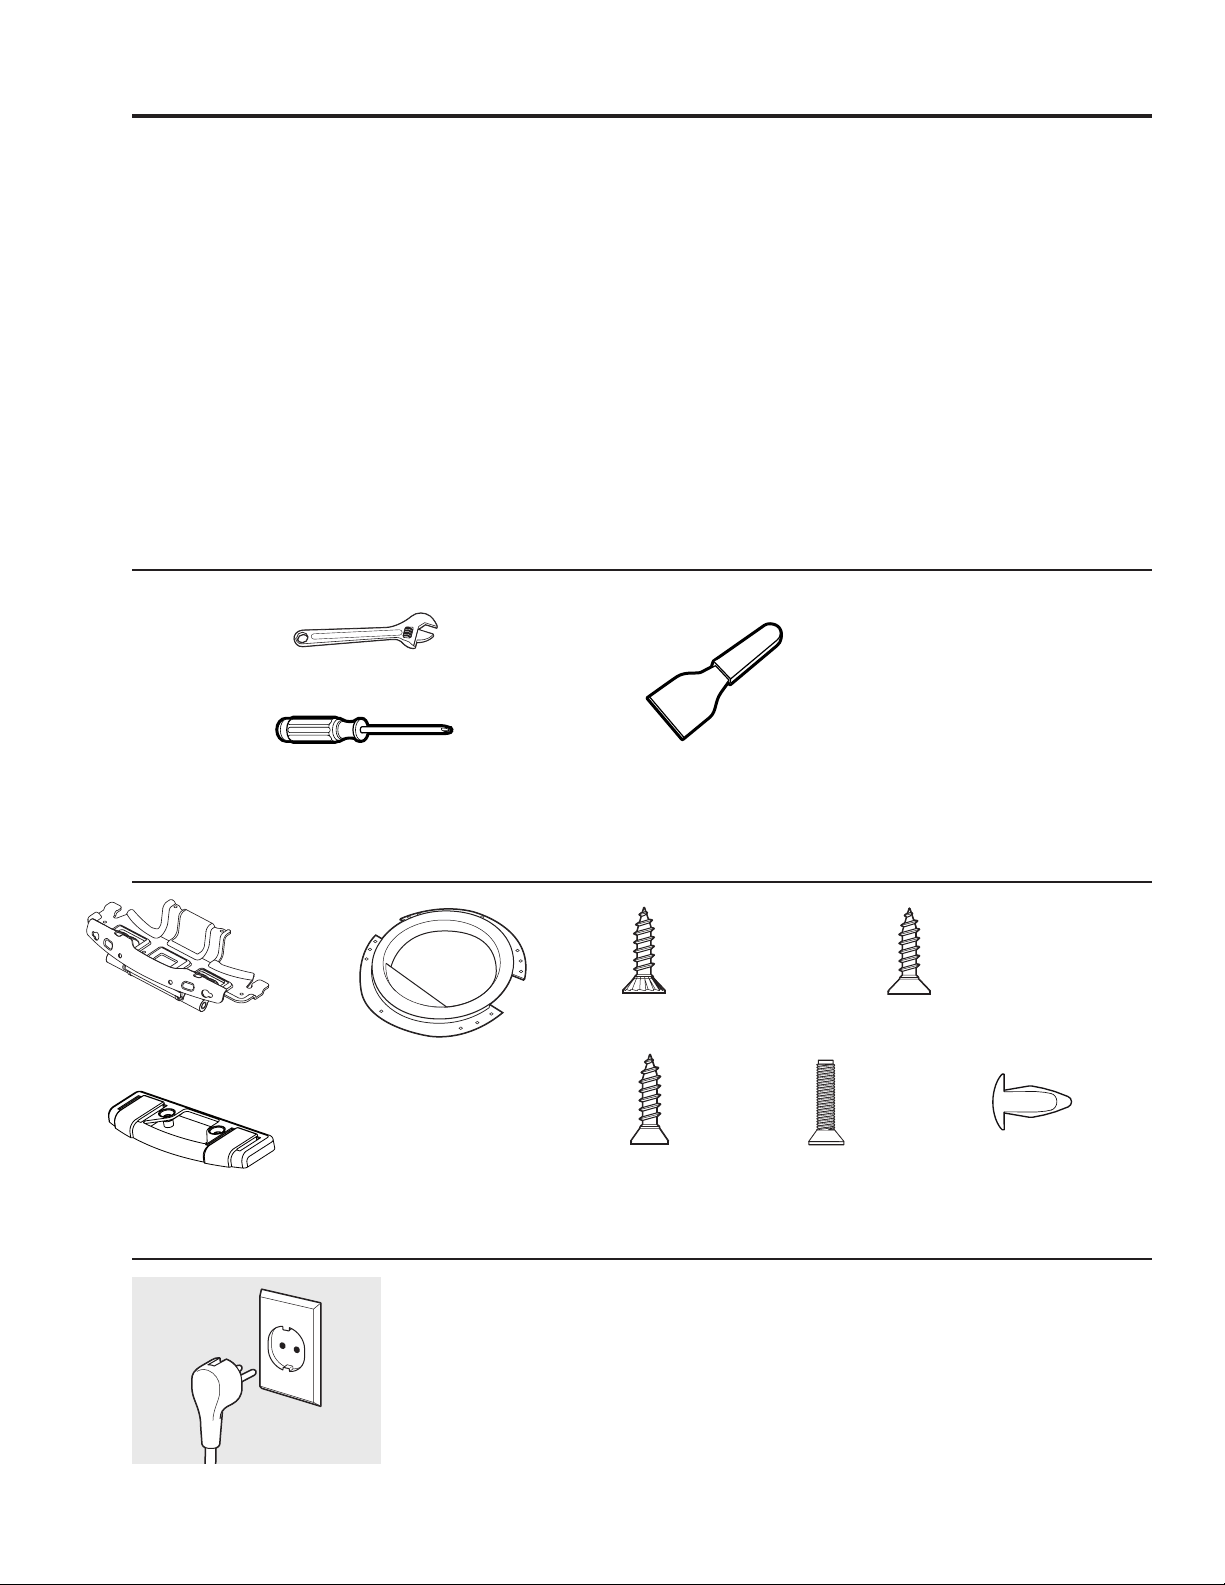
TOOLS YOU WILL NEED
Adjustable Crescent Wrench
IMPORTANT: Once you begin, do not move
the cabinet until door-swing reversal is
completed.
These instructions are for changing
the hinges from the right side to the left
side—if you ever want to switch them
back to the right side, follow these same
instructions and reverse all references
to the left and right.
Hinge Assembly
Hinge
Cover
Phillips Head Screwdriver
Putty Knife or
Thin-Blade
Screwdriver
DOOR PARTS
3 - # 8 Screws
(door asm and front panel)
Plastic Cover
4 - # 8 Screws
(strike plate)
STEP-BY-STEP INSTRUCTIONS
Before You Start
1. Unplug the dryer from its electrical outlet.
(inner door, outer ring & hinge cover)
8 - # 8 Screws
6 - # 8 Machine Screws
(inner door & hinge)
7 - Beauty Buttons
11
Page 12
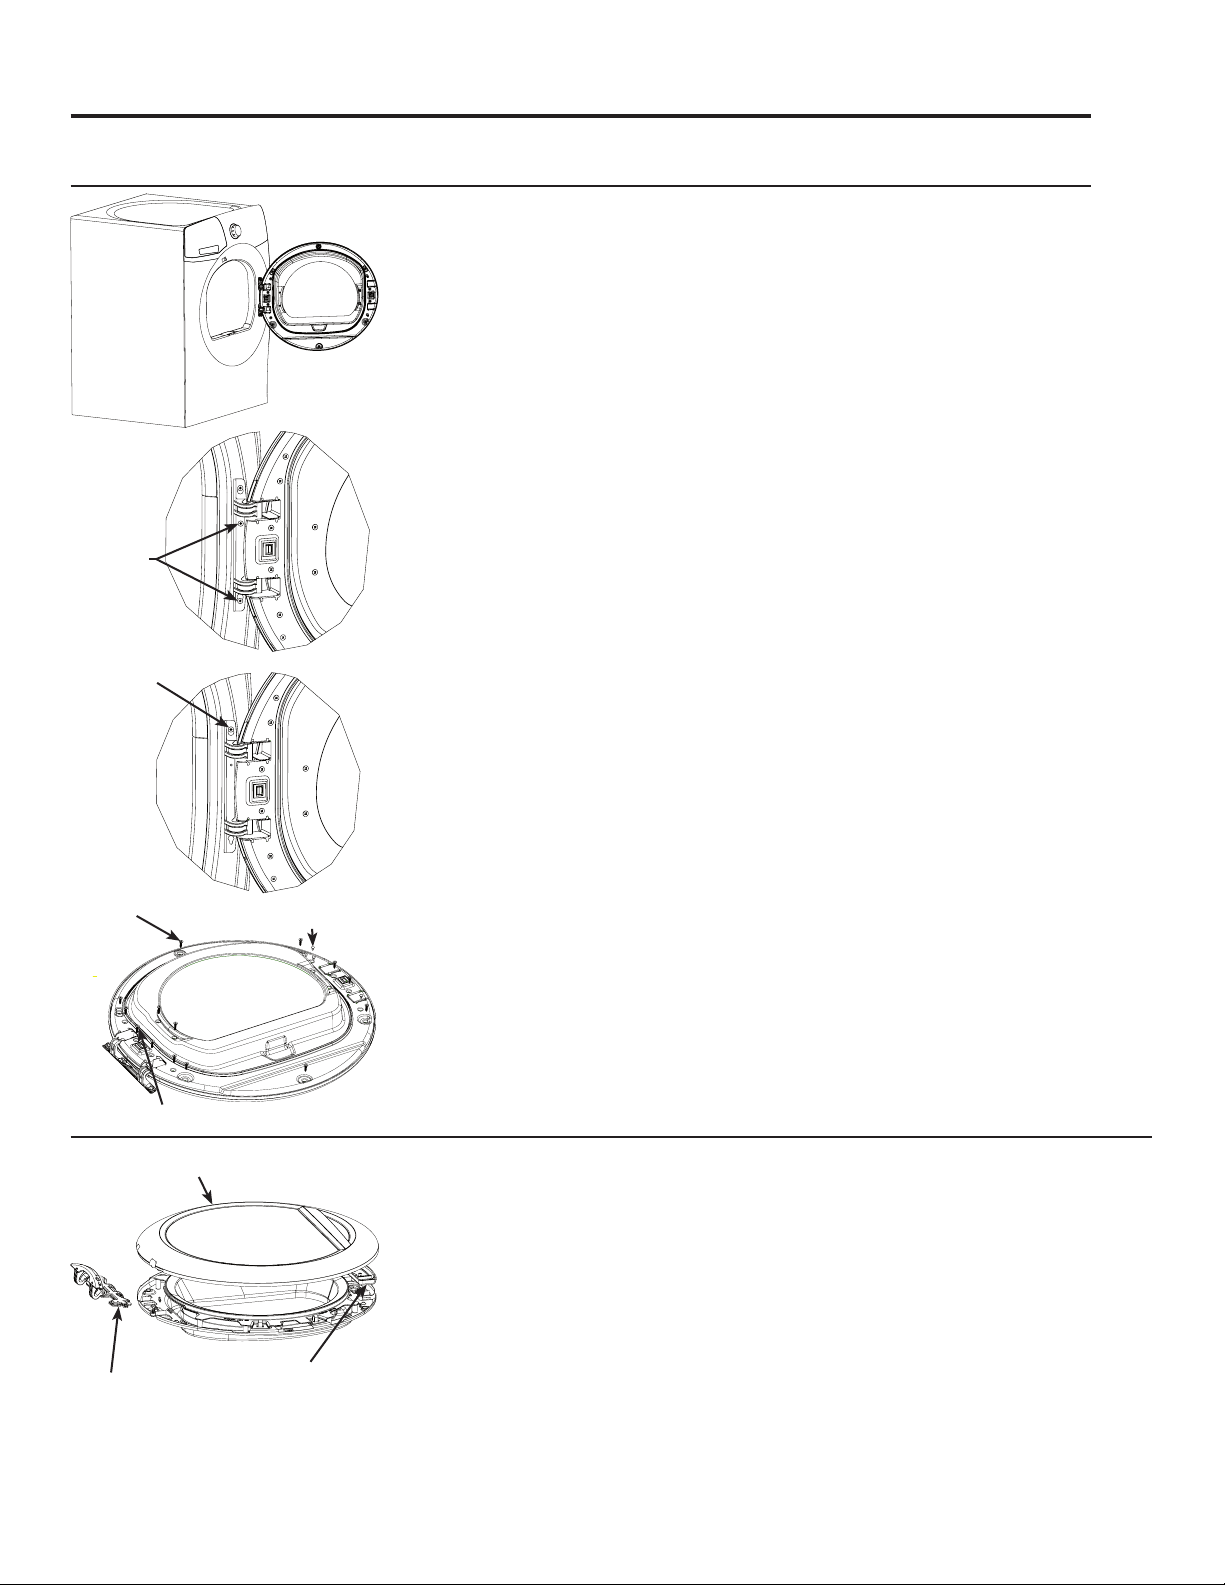
Reversing the door swing.
STEP-BY-STEP INSTRUCTIONS (cont.)
Remove Door Assembly
2. Open the door to approximately 130 degrees.
3. Remove the 2 screws starting from the bottom to the top. Make sure the door
is supported while removing the screws.
Remove
Top Screw
8-#8 Tapping Screws
6-# 8 Machine Tapping Screws
Outer Door Assembly
4 Beauty Buttons
4. Loosen the top screw as shown. Unhook the door by lifting and pulling.
5. Place the door on a soft protected flat surface so the inner door faces upward (door
resting on handle side). Remove the 8 tapping screws located around the perimeter of
the door outlining the gasket. Remove the 6 machine screws. Using a putty knife or any
other flat tool, remove the 2 beauty buttons and install them on the opposite side.
Remove Hinge and Cover
IMPORTANT: Note the location of the hinge (left or right) before removing.
6. With the screws removed, turn the door over and separate the outer door
assembly and hinge cover of the door from the door frame and set aside.
Hinge Assembly
12
Hinge Cover
Page 13

GEAppliances.com
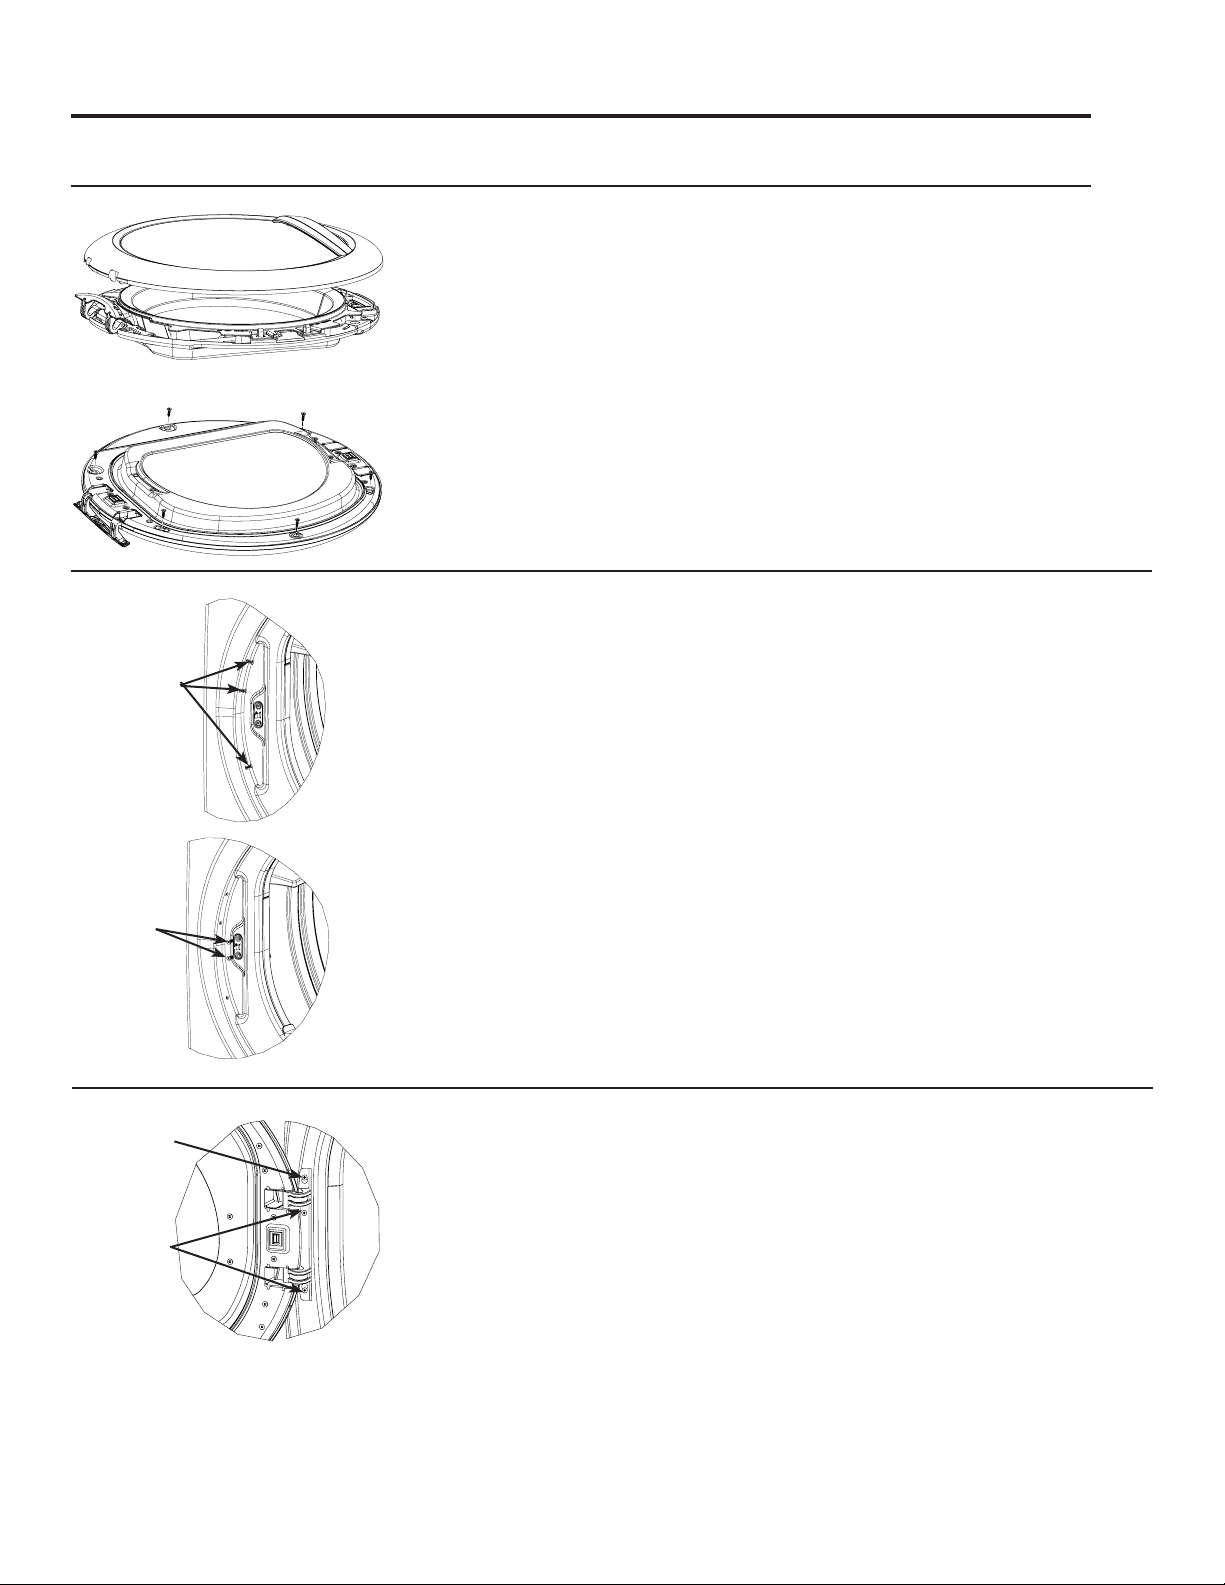
STEP-BY-STEP INSTRUCTIONS (cont.)
Reinstall Hinge Assembly
7. Install the hinge assembly in the opposite side of the door as shown. Push the
hinge assembly in place until the hinge holes align with the door holes.
8. Hold the hinge and door on their side with one hand and fasten the 6
machine screws as shown.
Machine
screws
Tapping
Screws
Reinstall Hinge Cover
9. Insert the hinge cover. Align the hinge cover holes with the holes in the door.
Hinge
Cover
10. Secure the hinge cover with 2 taping screws.
13
Page 14
Reversing the door swing.
STEP-BY-STEP INSTRUCTIONS (cont.)
Outer Door
Reassemble Door Assembly
IMPORTANT: Make sure there is no dirt or any other foreign material in between the
window panes.
11. Place the plastic outer door onto the inner door. Make sure that the handle part of
the outer door is opposite the hinge as shown.
Inner Door
12. Turn the door over and fasten the outer door to the inner door using the 6 tapping
screws.
Move Strike Bracket
Beauty Buttons
Tapping
Screws
Partially
Inserted
Screw
Tighten All
Screws
13. Using a putty knife or any other flat tool, remove the 3 beauty buttons located on the
dryer where the door will be installed and install them on the opposite side.
14. Switch the strike bracket and its cover to the opposite side by removing the screws.
Reinstall both on the opposite side.
Reinstall Door Assembly
15. The door is now ready to be installed on the dryer. To ease this step,
the hinge has keyholes that allow a partially fastened screw to be used
as a hook.
Partially fasten a screw to the uppermost screw hole. Hook the door on the partially
fastened screw.
Fasten the hinge by installing the other 2 screws and tightening the partially
fastened screw above.
14
Page 15
Loading and using the dryer.
Always follow the fabric manufacturer’s care label when laundering.
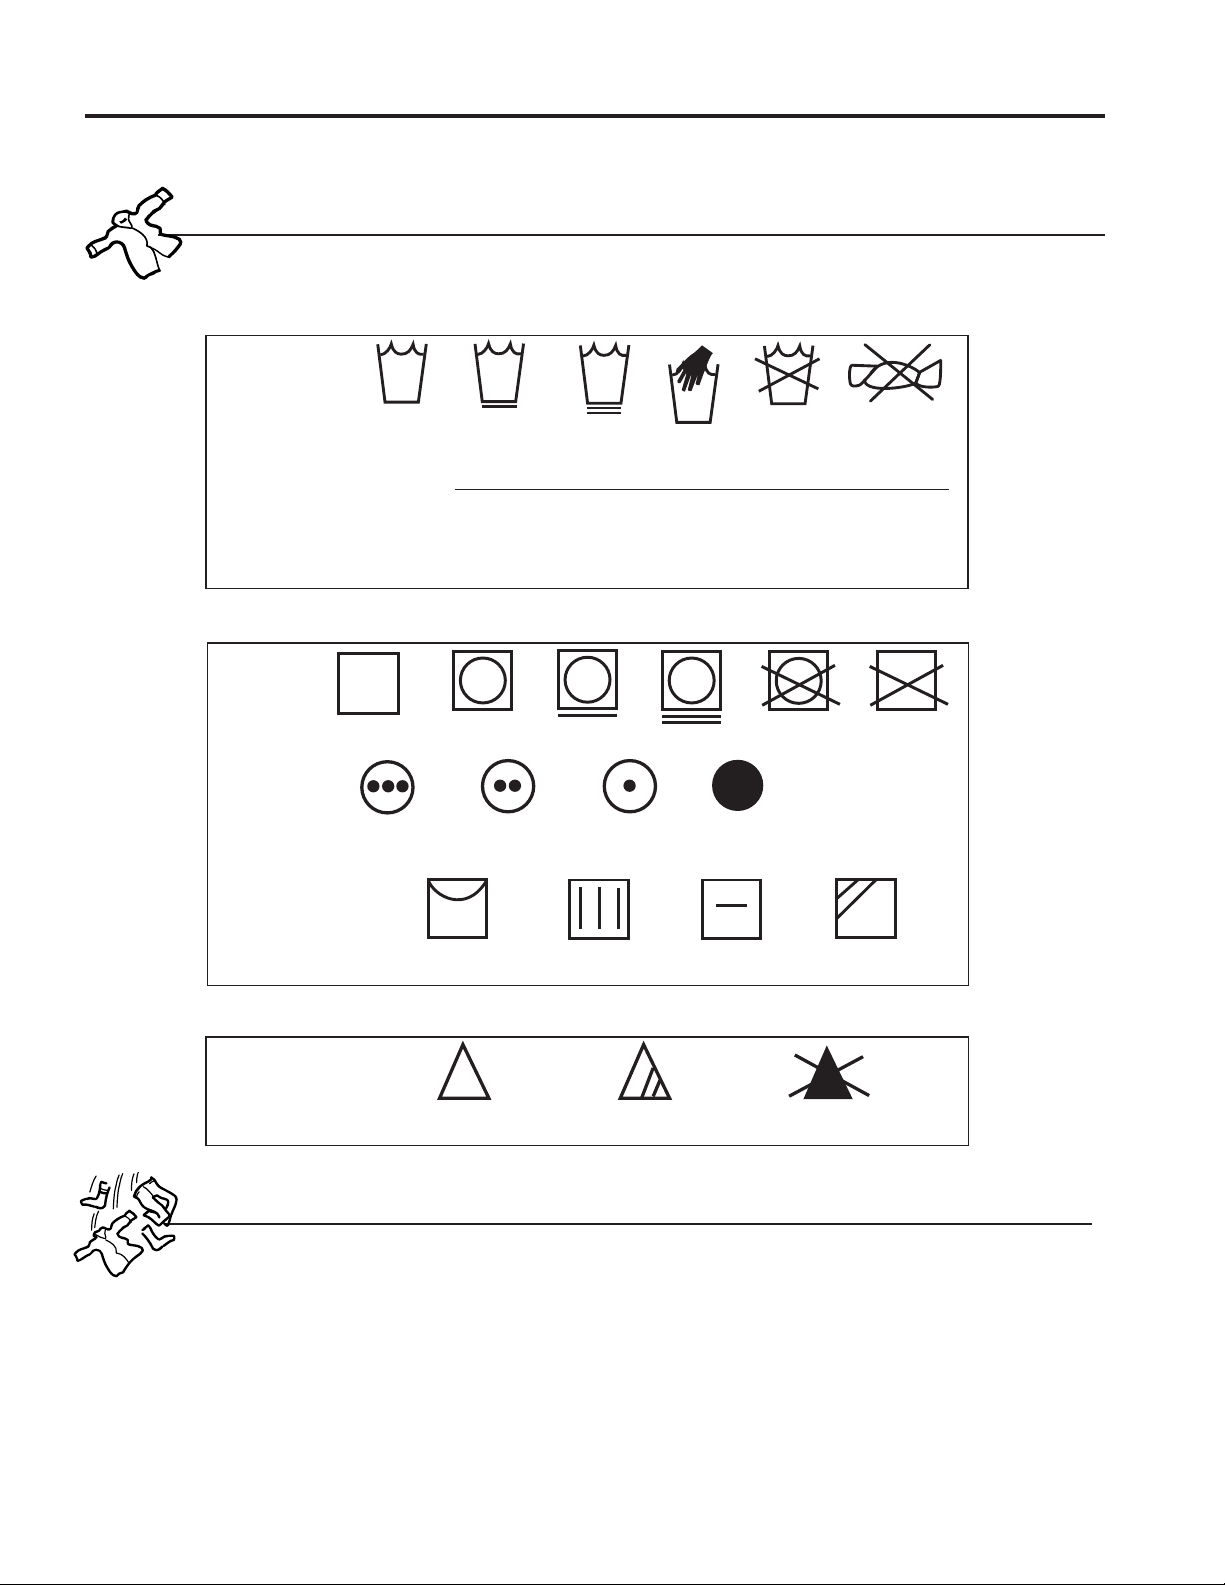
Fabric Care Labels
Below are fabric care label “symbols” that affect the clothing you will be laundering.
WASH LABELS
Machine
wash
cycle
Front load
target water
temperature
DRY LABELS
Normal
Permanent Press/
wrinkle resistant
Target Automatic
Category Water Temperature Temperature Control
Tap Cold Inlet Water Temperature Not used
Cold 27°C/80°F Used
Warm 40°C/105°F Used
Hot 50°C/120°F Used
Sanitize 70°C/160°F Used
Gentle/
delicate
Hand wash
GEAppliances.com
Do not wash Do not wring
Tumble
dry
Dry
Normal
Permanent Press/
wrinkle resistant
Heat
setting
High
Special
instructions
BLEACH LABELS
Line dry/
hang to dry
Medium
Drip dry
Bleach
symbols
Any bleach
(when needed)
Only non-chlorine bleach
(when needed)
Sorting and Loading Hints
As a general rule, if clothes are sorted
properly for the washer, they are sorted properly
for the dryer. Try also to sort items according to size.
For example, do not dry a sheet with socks or other
small items.
Do not add fabric softener sheets once the load
has become warm. They may cause fabric softener
stains. Bounce® Fabric Conditioner Dryer Sheets
have been approved for use in all GE Dryers when
used in accordance with the manufacturer’s
instructions.
Do not dry
Gentle/
delicate
Low
Do not overload. This wastes energy and causes
wrinkling.
Do not dry the following items: fiberglass items,
woolens, rubber-coated items, plastics, items with
plastic trim and foam-filled items.
Do not tumble dry
No heat/air
Dry at
Do not bleach
(used with
do not wash)
In the shade
15
Page 16
Loading and using the dryer.
Always follow the fabric manufacturer’s care label when laundering.
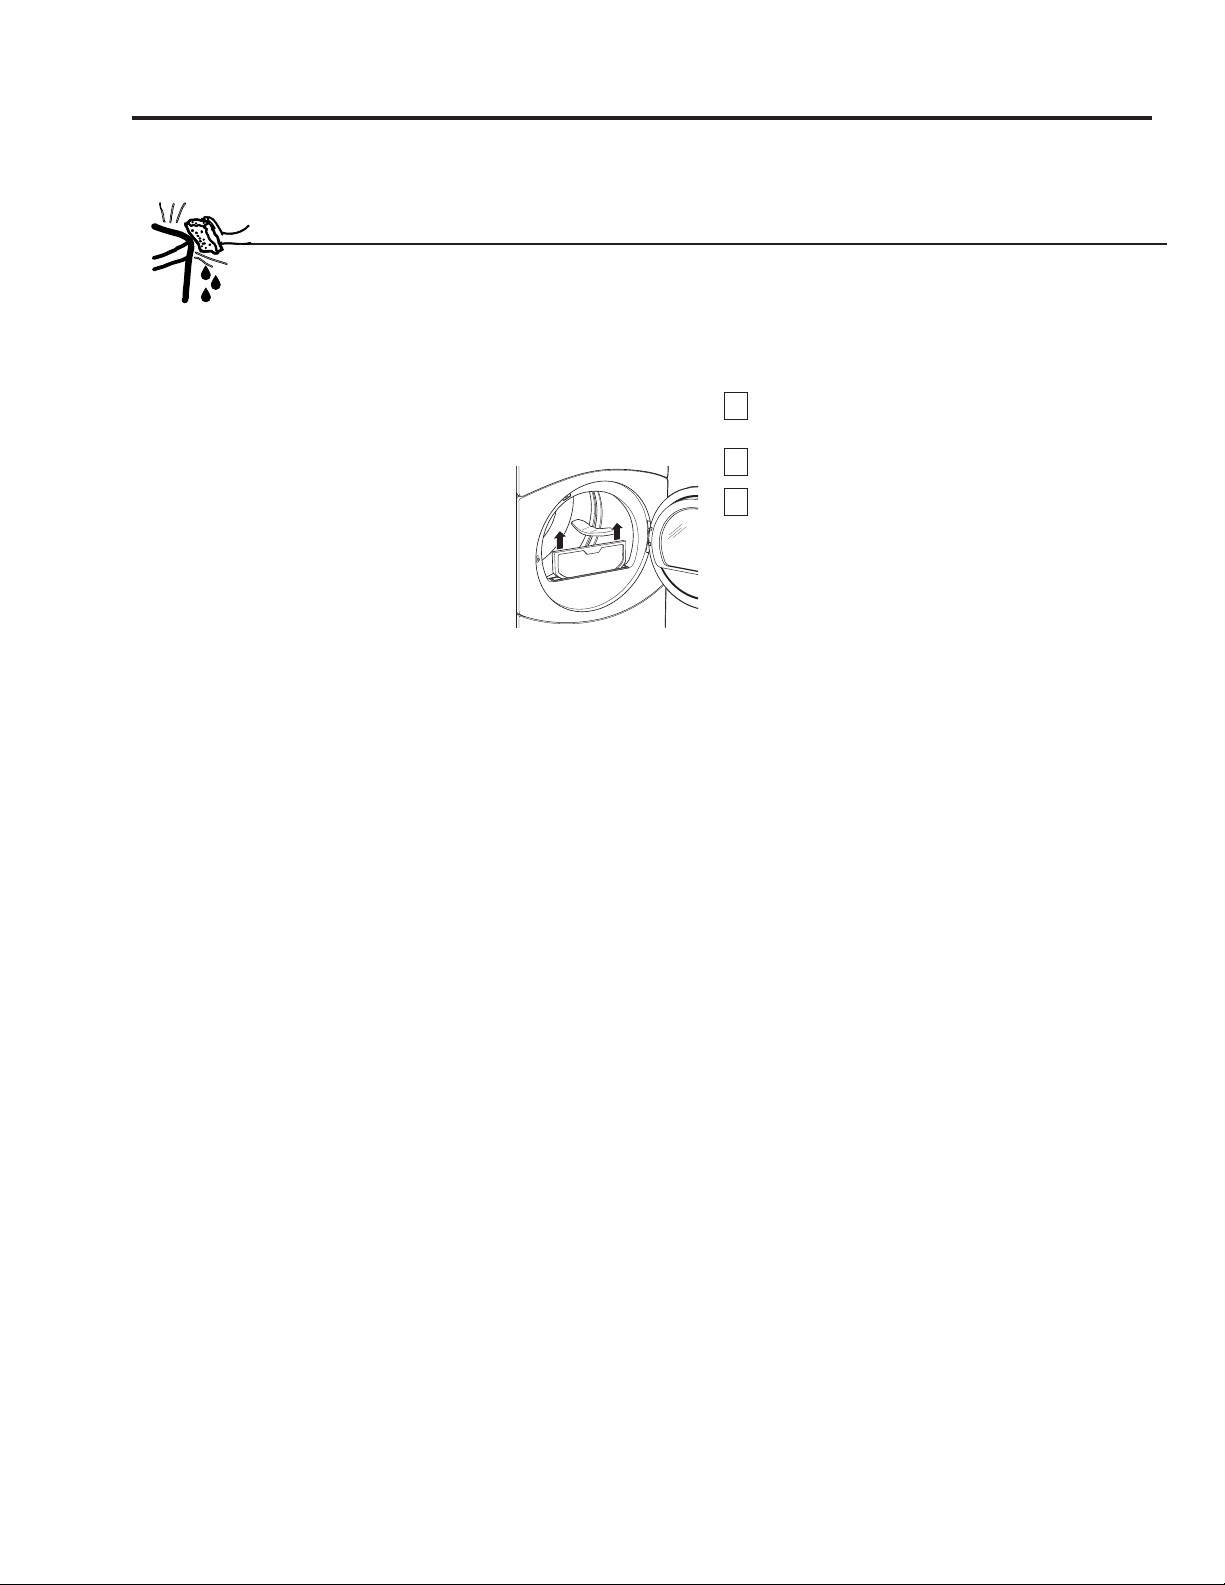
Care and Cleaning of the Dryer
The Exterior: Wipe or dust any spills or washing
compounds with a damp cloth. Dryer control
panel and finishes may be damaged by some
laundry pretreatment soil and stain remover
products. Apply these products away from
the dryer. The fabric may then be washed and
dried normally. Damage to your dryer caused by
these products is not covered by your warranty.
The Lint Filter: Clean the lint
filter before each use.
Pull out the lint filter.
Moisten your fingers and
remove the captured lint.
Once clean, slide the filter
back into position. Have a
qualified technician vacuum
the lint from the dryer once
a year.
NEVER OPERATE THE DRYER WITHOUT ITS FILTER
IN PLACE.
Stainless Steel: To clean stainless steel surfaces
use a damp cloth with a mild, non-abrasive cleaner
suitable for stainless steel surfaces. Remove the
cleaner residue and then dry with a clean cloth.
The Exhaust Duct: Inspect and clean the exhaust
ducting at least once a year to prevent clogging.
A partially clogged exhaust can lengthen the
drying time.
Follow these steps:
Turn off electrical supply by disconnecting
1
the plug from the wall socket.
Disconnect the duct from the dryer.
2
Vacuum the duct with the hose attachment
3
and reconnect the duct.
The Exhaust Hood: Check with a mirror that
the inside flaps of the hood move freely when
operating. Make sure that there is no wildlife
(birds, insects, etc.) nesting inside the duct
or hood.
The stainless steel used to make the dryer drum
provides the highest reliability available in a GE
dryer. If the dryer drum should be scratched or
dented during normal use, the drum will not rust or
corrode. These surface blemishes will not affect the
function or durability of the drum.
Dryer Interior and Duct: The interior of the
appliance and exhaust duct should be cleaned
once a year by qualified service personnel.
16
Page 17
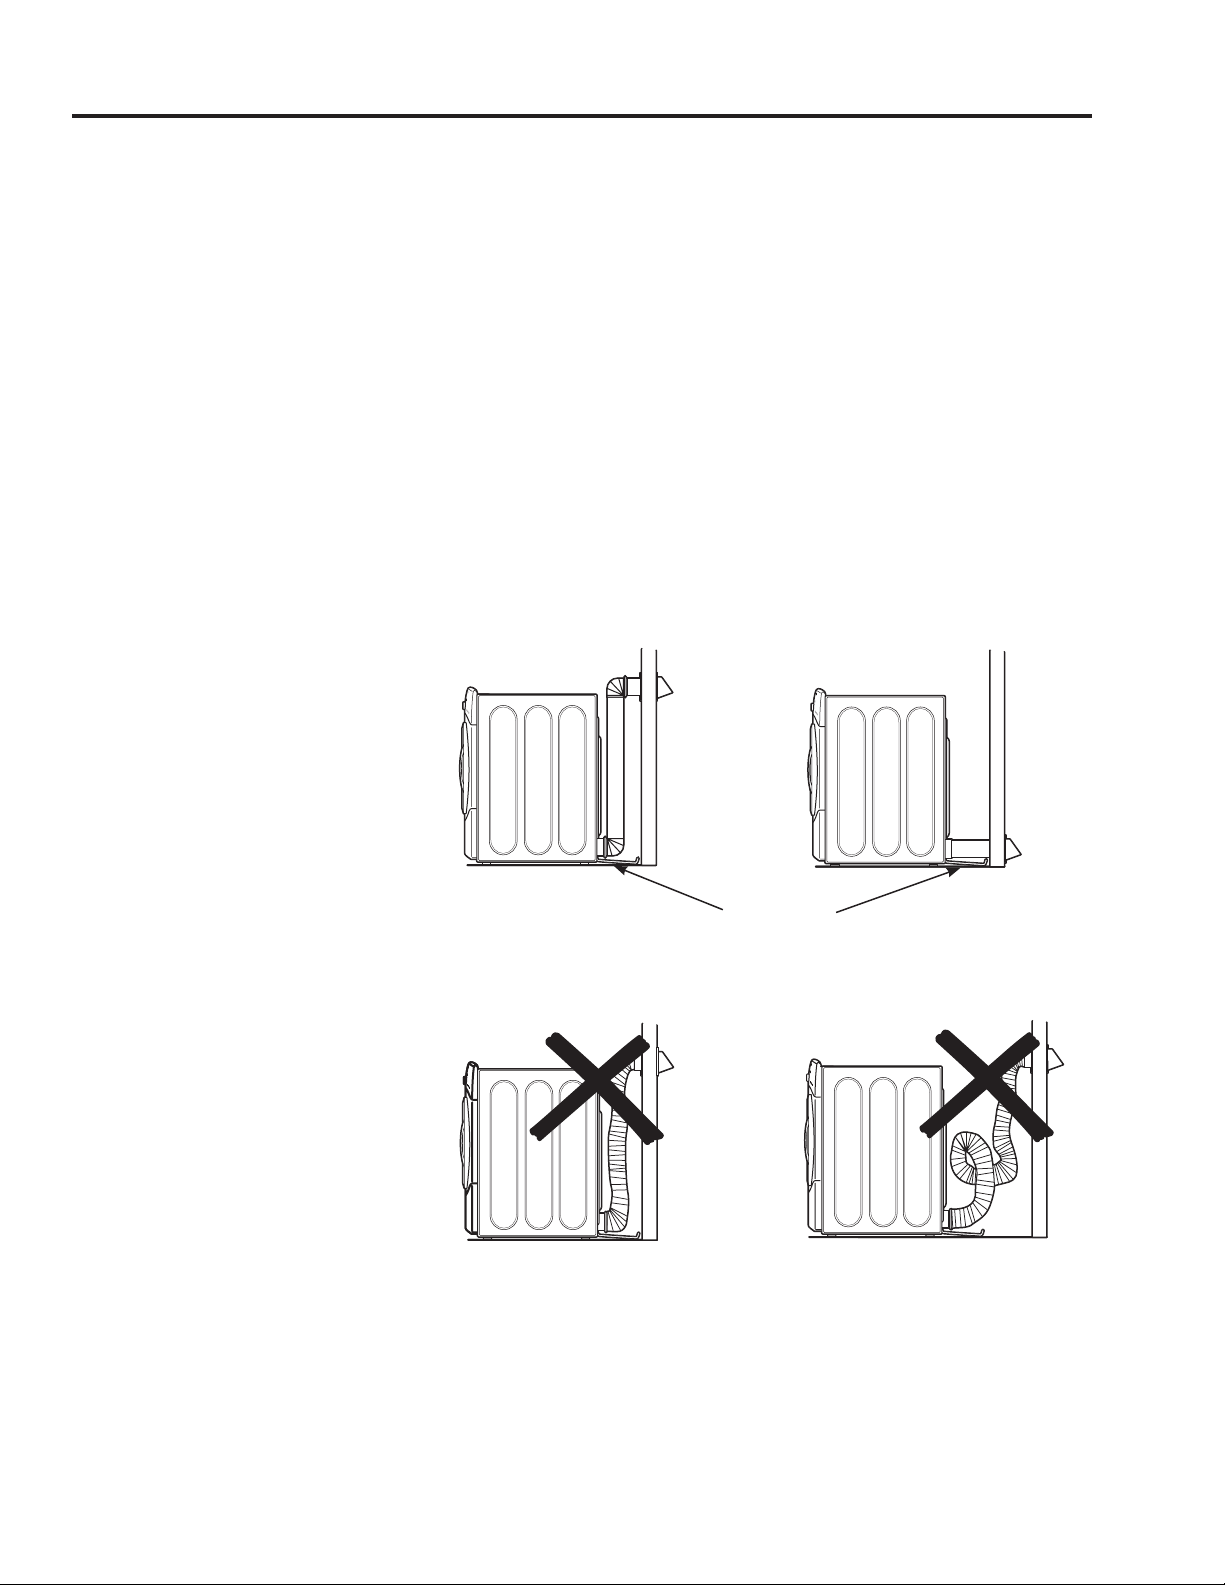
Venting the dryer. GEAppliances.com
For the best drying performance, the dryer needs to be properly vented. The dryer will use
more energy and run longer if it is not vented to the below specifications. Carefully follow
the details on Exhausting in the Installation Instructions.
n Use only rigid metal 4″ diameter ductwork inside the dryer cabinet and use only UL
approved transition ducting between the dryer and the home duct.
n Do not use plastic or other combustible ductwork.
n Use the shortest length possible.
n Do not crush, kink or collapse the duct.
n Avoid resting the duct on sharp objects.
n Venting must conform to local building codes.
n Do not remove the vent protector from the back of the dryer (on some models).
n Flip the protector down to its lowest position and connect the exhaust duct
to the dryer. The lowered protector will prevent the duct from getting crushed
(on some models).
Correct
Venting
Incorrect
Venting
Vent protector
in place
(on some models)
17
Page 18

Connecting Inlet Hoses.
“Y” Connector
To produce steam, the dryer must connect to the cold water supply. Since the washer
must also connect to the cold water, a “Y” connector is inserted to allow both inlet hoses
to make that connection at the same time.
NOTE: Use the new inlet hoses provided; never use old hoses.
Connect to Cold Water Supply
1. Turn the cold water faucet off. Remove the washer inlet hose from the washer fill
valve connector (cold).
2. Ensure the rubber flat washer is in place and screw the female coupling of the short
hose onto the washer fill valve connector. Tighten by hand until firmly seated.
3. Attach the female end of the ‘’Y’’ connector to the male coupling of the short hose.
Ensure the rubber flat washer is in place. Tighten by hand until firmly seated.
4. Insert the filter screen in the coupling of the washer’s inlet hose. If a rubber flat
washer is already in place remove it before installing the filter screen. Attach this
coupling to one male end of the ‘’Y’’ connector. Tighten by hand until firmly seated.
5. Ensure the rubber flat washer is in place and attach the dryer’s long inlet hose to the
other male end of the ‘’Y’’ connector. Tighten by hand until firmly seated.
6. Ensure the rubber flat washer is in place and attach the other end of the dryer’s long
inlet hose to the fill valve connector at the bottom of the dryer back panel. Tighten by
hand until firmly seated.
7. Using pliers, tighten all the couplings with an additional two–thirds turn.
NOTE: Do not overtighten. Damage to the couplings may result.
8. Turn the water faucet on.
9. Check for leaks around the ‘’Y’’ connector, faucet and hose couplings.
18
Page 19

Stacking. GEAppliances.com
BEFORE YOU BEGIN
Read these instructions completely and carefully.
n IMPORTANT: Save these instructions for local
electrical inspector’s use.
n IMPORTANT: Observe all governing codes and
ordinances.
n Note to Installer – Be sure to leave these
instructions with the Consumer.
n Note to Consumer – Keep these instructions
for future reference.
n Installation must be performed by a qualified
installer.
n Proper installation is the responsibility
of the installer.
FOR YOUR SAFETY
n
WARNING!
n Electric Shock Hazard. Disconnect power before
installing. Failure to do so could result in serious
injury or death.
n Potential Personal Injury. When stacking the
dryer, more than two people are recommended
to lift the dryer into position because of its
weight and size. Failure to do so could result in
personal injury or death.
When stacking the dryer,
rupture of utility services. Dryer must be
securely attached to the washer. DO NOT place
the washer on top of the dryer. Failure to do so
could result in personal injury/death or property
damage.
n Mobile Home or Manufactured Home Installation
– Stacking of a gas dryer is not permitted in a
mobile home or manufactured home.
avoid tipping and
MINIMUM CLEARANCE OTHER THAN ALCOVE OR CLOSET
INSTALLATION
Minimum clearance to combustible surfaces
and for air opening are: 0″ both sides, 1″ front, and
3″ rear. Consideration must be given to provide
adequate clearance for installation and service.
ALCOVE OR CLOSET INSTALLATION
n
If your dryer is approved for installation
in an alcove or closet, it will be stated on
a label on the dryer back.
n
The dryer MUST be vented to the outdoors. Refer
to dryer Installation Instructions for details.
n
Minimum clearance between dryer cabinet and
adjacent walls or other surfaces is:
0″ either side
3″ front
4″ rear
n
Minimum vertical space from floor to overhead
cabinets, ceiling, etc. is 43″ without pedestal,
55″ with pedestal and 84″ stacked.
n
Closet doors must be louvered or otherwise
ventilated and must contain a minimum
of 60 square inches of open area equally
distributed. If the closet contains both a washer
and a dryer, doors must contain a minimum
of 120 square inches of open area equally
distributed.
19
Page 20

Stacking.
KIT CONTENTS (optional kit GE FL STACK)
Right Hand Bracket
4 Rubber Pads
Left Hand Bracket
TOOLS YOU WILL NEED
Phillips Screwdriver
Open-Ended Wrench
INSTALLATION PREPARATION
Pliers
4 #12 x 1” Screws
4 #8 x 1/2” Screws
Gloves
Level
Remove the packaging.
Flatten the product carton to use as a pad
to lay the dryer down on its side. Continue using
the carton to protect the finished floor in front of
the installation location.
20
Page 21

GEAppliances.com
INSTALLING THE STACK BRACKET KIT
1. Remove the Dryer
Leveling Legs
A. Carefully lay the dryer on its side.
Use the packing material so you
don’t scratch the finish on the dryer.
B. Use an open-end wrench or pliers
to remove the dryer leveling legs.
Back out and remove
all 4 leveling legs
2. Install Rubber Pads
to Dryer Base
Locate the 4 rubber pads in the parts
package. Remove the adhesive backing
and firmly place over on the bracket
where you removed the leveling legs.
3. Install Bracket
to Dryer
A. Align the holes in the left bracket
with the holes in the bottom left
corner of the dryer. Use a Phillips
screwdriver to install the 2 #12 x 1″
tapping screws.
B. Repeat the above step with the right
bracket on the bottom right corner
of the dryer.
NOTE: Make sure to set the dryer
on a piece of packing material so
the brackets that are attached to
the bottom of the dryer do not damage
the floor.
C. Set the dryer upright.
21
Page 22

Stacking.
INSTALLING THE STACK BRACKET KIT (cont.)
4. Prepare the Washer
and Dryer
A. Place the washer in the approximate
location.
B. Make sure the washer is level.
Refer to washer Installation
Instructions for details.
C. Remove the back portion of
the control panel by removing
the 3 screws.
5. Install Dryer and Bracket
on Washer
A. Lift the dryer on top of the washer.
Be careful not to scratch the top
of the washer with the brackets.
Protect the washer control panel
with cardboard or other protection.
Be sure to lift the dryer high enough
to clear the washer control panel.
D. Reverse dryer door swing if desired.
See dryer Installation Instructions
for details.
NOTE: The washer door swing is not
reversible.
B. Align the holes in the bracket
with the holes in the back of
the washer. Using a Phillips
screwdriver, attach the 2 #8 x 1/2″
tapping screws. Repeat on both
sides of the washer.
Place
hands
here
Place
hands
here
WARNING!
Potential Personal Injury. More than
two people are recommended to lift
the dryer into position because of its
weight and size. Failure to do so could
result in personal injury or death.
6. Finalize the Installation
A. Refer to the washer Installation
Instructions to complete the washer
installation.
B. Refer to the dryer Installation
Instructions to complete the dryer
installation.
C. Carefully slide or walk the stacked
washer and dryer into place. Use
felt pads or other sliding device
to assist moving and to protect
flooring.
WARNING!
Potential Personal Injury. Do not push
on the dryer once installed to top of
the washer. Pushing on the dryer may
result in pinched fingers.
22
Page 23

Before you call for service… GEAppliances.com
Troubleshooting Tips
Save time and money! Review the charts on the following pages,
or visit GEAppliances.com. You may not need to call for service.
PROBLEM Possible Causes What To Do
Dryer shakes or Some shaking/noise is normal. • Move dryer to an even floor space, or adjust leveling legs
makes noise Dryer may be sitting unevenly as necessary until even.
Clothes take too long Improper or obstructed ducting • Check the Installation Instructions to make sure
to dry the dryer venting is correct.
• Make sure ducting is clean, free of kinks and unobstructed.
• Check to see if outside wall damper operates easily.
Improper sorting • Separate heavy items from lightweight items (generally,
a well-sorted washer load is a well-sorted dryer load).
Large loads of heavy fabrics • Large, heavy fabrics contain more moisture and take
(like beach towels) longer to dry. Separate large, heavy fabrics into smaller
loads to speed drying time.
Controls improperly set • Match control settings to the load you are drying.
Lint filter is full • Clean lint filter before every load.
Blown fuses or tripped circuit • Replace fuses or reset circuit breakers. Since most
breaker dryers use 2 fuses/breakers, make sure both are
operating.
Overloading/combining loads • Do not put more than one washer load in the dryer at
a time.
Underloading • If you are drying only one or two items, add a few items
to ensure proper tumbling.
The DRY dryness level Load consists of a mixture • When combining heavy and light fabrics in a load,
was chosen but load is of heavy and light fabrics choose MORE DRY if you are using a sensor cycle.
still damp
Exhaust system is blocked • Inspect and clean exhaust system.
Control pads not Controls accidentally put in • Press STOP.
responding service mode
Controls accidentally put in • Hold the LOCK button for 3 seconds to unlock the dryer.
lock mode
Controls performed an • Reset the in-house breaker.
incorrect operation
Dryer doesn’t start Control panel is “asleep” • This is normal. Press POWER to activate the control panel.
Dryer is unplugged • Make sure the dryer plug is pushed completely into
the outlet.
Fuse is blown/circuit breaker • Check the building’s fuse/circuit breaker box and
is tripped replace fuse or reset breaker. NOTE: Electric dryers
use two fuses or breakers.
Dryer was accidentally paused • If the light on the DELAY START pad is flashing, the
when starting Delay Start dryer is paused. Press START to restart the countdown.
No numbers displayed Dryer is continuously • This is normal. When the dryer senses a low level of
during cycle, only lights monitoring the amount of moisture in the load, the dryer will display the dry time
moisture in the clothes remaining.
23
Page 24

Before you call for service…
PROBLEM Possible Causes What To Do
Time Remaining The estimated time may change • This is normal.
jumped to a when a smaller load than usual
lower number is drying
Cannot make a The DRYNESS LEVEL, TEMP • This is normal.
selection and the or OPTION that you are
dryer beeps twice trying to select is incompatible
with the chosen dry cycle
Dryer is running but The EXTENDED TUMBLE • This is normal. During extended tumble, the time
00 is displayed in option was chosen remaining is not displayed. The extended tumbling
Time Remaining option lasts approximately 60 minutes.
Clean Lint Filter (message) POWER button was activated • Press START to begin a dry cycle and the message will
disappear.
Dryer doesn’t heat Fuse is blown/circuit breaker • Check the building’s fuse/circuit breaker box and
is tripped; the dryer may tumble replace both fuses or reset both breakers. Your dryer
but not heat may tumble if only one fuse is blown or one breaker
tripped.
Gas service is off • Make sure gas shutoff at dryer and main shutoff are
fully open.
LP gas supply tank is empty • Refill or replace tank. Dryer should heat when utility
or there has been a utility service is restored.
interruption of natural gas
(gas models)
Inconsistent drying times Type of heat • Drying time will vary according to the type of heat used.
If you recently changed from an electric to a gas
(natural or LP) dryer, or vice versa, the drying time
could be different.
Type of load and • The load size, types of fabric, wetness of clothes and the
drying conditions length and condition of the exhaust system will affect
drying times.
Glow at the rear Heaters behind the drum • This is normal. Under certain drying conditions and
of the drum room ambient lighting, the glow of the heaters may be
visible at the rear of the drum.
Clothes are still wet The door was opened mid-cycle. • A dry cycle must be reselected each time a new load
and dryer shut off The load was then removed from is put in.
after a short time the dryer and a new load put in
without selecting a new cycle
Small load • When drying 3 items or less, choose SPEED DRY or
TIMED DRY.
Load was already dry except • Choose SPEED DRY or TIMED DRY to dry damp collars
for collars and waistbands and waistbands. In the future, when drying a load with
collars and waistbands, choose MORE DRY.
Dryer is not level • Move dryer to an even floor space or adjust leveling legs
as necessary until even.
Clothes are wrinkled Overdrying • Select a shorter drying time.
• Remove items while they still hold a slight amount
of moisture. Select a LESS DRY or DAMP setting.
Letting items sit in dryer after • Remove items when cycle ends and fold or hang
cycle ends immediately, or use the EXTENDED TUMBLE option.
Overloading • Separate large loads into smaller ones.
24
Page 25

GEAppliances.com
PROBLEM Possible Causes What To Do
Clothes shrink Some fabrics will naturally shrink • To avoid shrinkage, follow garment care labels exactly.
when washed. Others can be
safely washed, but will shrink
in the dryer
item, do not machine wash or tumble dry it.
Greasy spots on clothes Improper use of fabric softener • Follow directions on fabric softener package.
Drying dirty items • Use your dryer to dry only clean items. Dirty items can
with clean ones stain clean items and the dryer.
Clothes were not • Sometimes stains which cannot be seen when the
completely clean clothes are wet appear after drying. Use proper washing
procedures before drying.
Lint on clothes Lint filter is full • Clean lint screen before each load.
Improper sorting • Sort lint producers (like chenille) from lint collectors
(like corduroy).
Static electricity can attract lint • See suggestions in this section under STATIC.
Overloading • Separate large loads into smaller ones.
Paper, tissue, etc., left in pockets • Empty all pockets before laundering clothes.
Static occurs No fabric softener was used • Try a fabric softener.
• Bounce® Fabric Conditioner Dryer Sheets have been
approved for use in all GE Dryers when used in
accordance with the manufacturer’s instructions.
Overdrying • Try a fabric softener.
• Adjust setting to LESS DRY or DAMP.
Synthetics, permanent press • Try a fabric softener.
and blends can cause static
• Some items may be pressed back into shape after drying.
• If you are concerned about shrinkage in a particular
Collars and waistbands The dryness monitor senses • Choose SPEED DRY or TIMED DRY to dry damp collars
still wet at end of cycle that the body of the clothes and waistbands. In the future, when drying a load with
is dry collars and waistbands, choose MORE DRY.
Slight variation This is normal • Due to the metallic properties of paint used for this unique
in metallic color product, slight variations of color may occur due to
viewing angles and lighting conditions.
Door is too foggy to see Steam condenses on inner door • This is normal.
clothes during a steam
cycle
Water seen on inside of Steam condenses on these • This is normal.
door and top of lint filter surfaces
when opening door after
steam cycle
Small areas on clothes are Steam condenses on inner drum • If using the STEAM DEWRINKLE cycle, manually reduce the
damp after steam cycle cycle time. If using the STEAM REFRESH cycle, add more
garments to the load.
25
Page 26

Before you call for service…
PROBLEM Possible Causes What To Do
Small amount of water Inadequate load size for steam • If using the STEAM DEWRINKLE cycle, manually reduce cycle
on floor in front of dryer cycle selected, excess steam time. If using the STEAM REFRESH cycle, add more garments
condenses inside cabinet and to the load.
leaks out
Water on floor in back Loose water hose connection to • Tighten connection.
of dryer valve
Hose missing rubber washer at • Install rubber washer provided with hose.
connection with valve
Water drips from door Steam condenses on inner door • This is normal.
when opened after
a Steam Cycle
Cannot see steam at Steam released at different • This is normal.
beginning of cycle time in cycle
Cannot see steam at any The steam nozzle might be • Call 800.GE.CARES to order nozzle replacement kit WE25M71
time during the cycle clogged with debris from your or to request a service technician to replace this for you.
water supply
Garments still wrinkled Too many garments • Load fewer garments; manually increase time.
after steam cycle
Dryer continues to Extended Tumble was selected • Ensure EXTENDED TUMBLE option is not selected. For the STEAM
tumble after display REFRESH cycle, EXTENDED TUMBLE will automatically be turned
says Complete on and cannot be turned off.
26
Page 27

GE Dryer Warranty.
All warranty service provided by our Factory Service Centers,
or an authorized Customer Care® technician. To schedule
service, on-line, visit us at GEAppliances.com, or call 800.
GE.CARES (800.432.2737).
Staple your receipt here.
Proof of the original purchase
date is needed to obtain service
under the warranty.
Please have serial number and model number available when
calling for service.
For The Period Of: We Will Replace:
One Year Any part of the dryer which fails due to a defect in materials or workmanship. During this
From the date of the limited one-year warranty, GE will also provide, free of charge, all labor and related service costs
original purchase to replace the defective part.
What Is Not Covered:
nService trips to your home to teach you how to use
the product.
nImproper installation, delivery or maintenance.
nFailure of the product if it is abused, misused or used for
other than the intended purpose or used commercially.
nReplacement of house fuses or resetting of circuit
breakers.
nDamage to the product caused by accident, fire, floods
or acts of God.
nIncidental or consequential damage caused by possible
defects with this appliance.
nDamage caused after delivery.
nProduct not accessible to provide required service.
EXCLUSION OF IMPLIED WARRANTIES—Your sole and exclusive remedy is product repair as provided in
this Limited Warranty. Any implied warranties, including the implied warranties of merchantability or
fitness for a particular purpose, are limited to one year or the shortest period allowed by law.
This warranty is extended to the original purchaser and any succeeding owner for products purchased
for home use within the USA. If the product is located in an area where service by a GE Authorized Servicer
is not available, you may be responsible for a trip charge or you may be required to bring the product to an
Authorized GE Service location for service. In Alaska, the warranty excludes the cost of shipping or service
calls to your home.
Some states do not allow the exclusion or limitation of incidental or consequential damages. This warranty
gives you specific legal rights, and you may also have other rights which vary from state to state. To know
what your legal rights are, consult your local or state consumer affairs office or your state’s Attorney General.
Warrantor: General Electric Company. Louisville, KY 40225
27
Page 28

Consumer Support.
GE Appliances Website GEAppliances.com
Have a question or need assistance with your appliance? Try the GE Appliances Website, any day of the year!
For greater convenience and faster service, you can now download Owner’s Manuals, order parts or even
schedule service on-line.
Schedule Service GEAppliances.com
Expert GE repair service is only one step away from your door. Get on-line and schedule your service at
your convenience any day of the year! Or call 800.GE.CARES (800.432.2737) during normal business hours.
Real Life Design Studio GEAppliances.com
GE supports the Universal Design concept—products, services and environments that can be used by
people of all ages, sizes and capabilities. We recognize the need to design for a wide range of physical and
mental abilities and impairments. For details of GE’s Universal Design applications, including kitchen design
ideas for people with disabilities, check out our Website today. For the hearing impaired, please call 800.TDD.
GEAC (800.833.4322).
Extended Warranties GEAppliances.com
Purchase a GE extended warranty and learn about special discounts that are available while your warranty
is still in effect. You can purchase it on-line anytime, or call 800.626.2224 during normal business hours.
GE Consumer Home Services will still be there after your warranty expires.
Parts and Accessories GEAppliances.com
Individuals qualified to service their own appliances can have parts or accessories sent directly to their homes
(VISA, MasterCard and Discover cards are accepted). Order on-line today, 24 hours every day or by phone
at 800.626.2002 during normal business hours.
Instructions contained in this manual cover procedures to be performed by any user. Other servicing generally
should be referred to qualified service personnel. Caution must be exercised, since improper servicing may
cause unsafe operation.
Contact Us GEAppliances.com
If you are not satisfied with the service you receive from GE, contact us on our Website with all the details
including your phone number, or write to: General Manager, Customer Relations
GE Appliances, Appliance Park
Louisville, KY 40225
Register Your Appliance GEAppliances.com
Register your new appliance on-line—at your convenience! Timely product registration will allow for
enhanced communication and prompt service under the terms of your warranty, should the need arise.
You may also mail in the pre-printed registration card included in the packing material.
Printed in Canada
Page 29

GEAppliances.com
Instrucciones
de seguridad . . . . . . . . . . . . . . . 2–5
Instrucciones de operación
Paneles de control . . . . . . . . . . . . 6–8
Opciones de los ciclos . . . . . . . . .9, 10
Funciones de la secadora . . . . . . . 10
Cómo cambiar el sentido
de apertura de la puerta . . . . .11–14
Cómo cargar y usar
la secadora . . . . . . . . . . . . . . . . . . . 15, 16
Ventilación de la secadora . . . . . . . 17
Conexión de las mangueras
de entrada . . . . . . . . . . . . . . . . . . . . . . 18
Apilado . . . . . . . . . . . . . . . . . . . . . . 19-22
Consejos para la solucíon
de problemas . . . . . . . . . . . . . . . . 23-26
Soporte al consumidor
Garantía . . . . . . . . . . . . . . . . . . . . . . . . 27
Soporte al consumidor . . . . . . . . . . 28
Manual del
propietario
GFDS350
GFDS355
GFDN240
GFDN245
Escriba el número de modelo
y de serie aquí:
No. de modelo _____________
No. de serie _______________
Estos números se encuentran
en una etiqueta en la parte
delantera de la secadora,
Secadoras
detrás de la puerta.
49-90394 05/14/10 GE
234D1050P001
Page 30

INFORMACIÓN DE SEGURIDAD IMPORTANTE.
LEA TODAS LAS INSTRUCCIONES ANTES DE USAR.
¡ADVERTENCIA!
Por su seguridad, debe seguir las indicaciones de este manual para minimizar el riesgo
de incendio o explosión, descarga eléctrica, o para evitar daños a la propiedad,
lesiones personales o muerte.
n No almacene ni use gasolina u otros
vapores y líquidos inflamables en las
proximidades de este o cualquier otro
electrodoméstico.
n La instalación y el servicio lo deben
llevar a cabo un instalador calificado,
la agencia de servicio o el proveedor
de gas.
QUÉ HACER SI USTED HUELE GAS:
No intente encender un fósforo,
1
o un cigarrillo, o encender cualquier
electrodoméstico eléctrico o de gas.
No toque ningún interruptor eléctrico;
2
no use ningún teléfono en el edificio.
3
Desocupe el habitación, edificio o área
afectada.
Decreto para hacer cumplir las leyes sobre tóxicos y agua potable de California
Este decreto requiere que el Gobernador de California publique una lista de las sustancias que
el estado sabe que causan cáncer, defectos de nacimiento y otros daños reproductivos y requiere que
los comerciantes le adviertan a sus consumidores sobre el potencial de exposición a tales sustancias.
Los electrodomésticos de gas pueden causar la exposición a cuatro de estas sustancias, concretamente
benceno, monóxido de carbono, formaldehído y hollín, principalmente causados por la combustión incompleta
del gas natural o de combustibles LP.
Cuando las secadoras están ajustadas apropiadamente, se minimiza la combustión incompleta. La exposición
a estas sustancias puede minimizarse aún más ventilando apropiadamente la secadora hacia el exterior.
Llame inmediatamente a su proveedor
4
de gas usando el teléfono de algún
vecino. Siga las instrucciones del
proveedor de gas cuidadosamente.
Si usted no puede ponerse en contacto
5
con su proveedor de gas, llame al
departamento de bomberos.
2
Page 31

GEAppliances.com
INSTALACIÓN APROPIADA
Antes de usarse, la secadora se debe instalar apropiadamente de acuerdo con
las Instrucciones de instalación. Si no recibió una Hoja de instrucciones de instalación,
puede obtener una visitando GEAppliances.com o llamando al 800.GE.CARES (800.432.2737).
n Conecte la secadora a tierra de manera apropiada
que cumpla con todos los códigos y ordenanzas
reguladoras. Siga con cuidado las Instrucciones
de instalación.
n Instálela o almacénela donde no esté expuesta
a temperaturas por debajo del punto de
congelación o expuesta a la intemperie.
n Conecte a un tomacorriente del tamaño y del
calibre apropiados para evitar una sobrecarga
eléctrica.
n Remueva la película de protección en color
del panel de control y la puerta.
n Remueva todos los objetos de empaquetado
y deshágase apropiadamente de todos
los materiales de envío.
n No quite el protector de la rejilla de ventilación que
se encuentra en la parte posterior de la secadora
(en algunos modelos).
n Jale el protector hacia afuera y hacia abajo
a su posición más baja y conecte el conducto
de escape a la secadora. El protector bajado
impedirá que se aplaste el conducto
(en algunos modelos).
Escape/Ductos:
Las secadoras DEBEN contar con escape
1
al exterior para impedir que grandes volúmenes
de humedad y pelusa ingresen a la habitación.
Utilice sólo un conducto rígido de metal de un
2
diámetro de 4” dentro del gabinete de la
secadora y use sólo un conducto de transición
aprobado por UL entre la secadora y el
conducto doméstico. EL USO DE DUCTOS
PLÁSTICOS U OTROS DUCTOS DE MATERIALES
COMBUSTIBLES PODRÍA CAUSAR UN INCENDIO.
LOS DUCTOS PERFORADOS PODRÍAN CAUSAR
UN INCENDIO SI COLAPSAN O SI OCURRE
ALGUNA OBSTRUCCIÓN DURANTE EL USO
O DURANTE LA INSTALACIÓN.
Para los detalles completos, siga las Instrucciones
de instalación.
3
Page 32

INFORMACIÓN DE SEGURIDAD IMPORTANTE.
LEA TODAS LAS INSTRUCCIONES ANTES DE USAR.
¡ADVERTENCIA!
SU ÁREA DE SECADO
n Mantenga el área debajo y alrededor de sus
electrodomésticos libre de materiales combustibles
(pelusas, papel, trapos, etc.), gasolina, productos
químicos y otros líquidos y vapores inflamables.
n Mantenga el piso alrededor de sus electrodomésticos
limpios y secos para reducir la posibilidad de
un accidente.
n Supervise a los niños en caso de que ellos usen
la secadora o jueguen cerca de ella durante
su operación. No permita que los niños jueguen
con la secadora, en su interior, sobre ella o ningún
otro electrodoméstico.
CUANDO USE SU SECADORA
n Nunca introduzca sus manos en el interior de
la secadora mientras el tambor giratorio esté
moviéndose. Antes de agregar y sacar ropa, espere
hasta que el tambor giratorio se haya detenido.
n Limpie el filtro de pelusa antes de cada carga
para evitar la acumulación de pelusa en el interior
de la secadora o en la habitación. NO OPERE LA
SECADORA SIN EL FILTRO DE PELUSA EN SU LUGAR.
n No lave ni seque artículos que se hayan limpiado,
lavado, remojado o salpicado con sustancias
combustibles o explosivas (tales como cera, aceite,
pintura, gasolina, desengrasadores, solventes de
tintorería, kerosene). Estas sustancias producen
vapores que podrían incendiarse o explotar.
No agregue estas sustancias al agua de lavado.
No use ni coloque estas sustancias alrededor
de la lavadora o secadora durante su uso.
n No coloque artículos expuestos a aceite de cocinar
en la secadora. Los artículos contaminados
con aceites de cocinar podrían contribuir a formar
una reacción química que podría causar que
una carga de ropas se incendie.
n Cualquier artículo sobre el cual usted usó
un solvente de limpieza o que contenga materiales
inflamables (tales como paños de limpieza,
trapeadores, toallas usadas en salones de belleza,
restaurantes o barberías) no se deben colocar en
el interior o en las proximidades de la secadora.
Existen muchos artículos inflamables en el hogar
tales como la acetona, el alcohol, la gasolina,
el kerosene, algunos limpiadores, algunos
quitamanchas, aguarrás, trementina, ceras,
removedores de cera y productos que contengan
derivados del petróleo.
4
n Mantenga todos los artículos de limpieza
(tales como detergentes y blanqueadores)
fuera del alcance de los niños, preferiblemente
encerrados en un gabinete. Ponga atención
a las advertencias en las etiquetas de los envases
para evitar accidentes.
n Nunca trepe ni se ponga de pie sobre la parte
superior de la secadora.
n Mantenga el área alrededor de la salida y las áreas
adyacentes libres de acumulación de pelusas,
polvillo y suciedad.
n El proceso de lavado puede reducir la habilidad
de retardar la flamabilidad de algunas telas.
Para evitar tal resultado, siga las instrucciones
del fabricante de las telas con mucho cuidado.
n No seque artículos que contengan goma, plástico,
espuma o materiales similares tales como sostenes
(brasieres) con relleno, zapatos deportivos, ganchos
de goma, alfombras de baño, baberos de niño,
pantalones de niño, bolsas plásticas y almohadas
que se puedan derretir o quemar. Algunos
materiales gomosos, cuando se calientan,
bajo ciertas circunstancias podrían incendiarse
por combustión espontánea.
n Durante su operación, no almacene encima
de la secadora plásticos, papel o ropa que
se puedan quemar o derretir.
n Las prendas de vestir etiquetadas “Dry away from
heat” (Secar alejadas del calor) o “Do not tumble
dry” (No secar por giro)—tales como chaquetas
salvavidas que contienen capoc—no se deben
colocar en su secadora.
n No seque artículos de fibra de vidrio en su secadora.
Esto podría ocasionar irritación en la piel debido
a las partículas restantes que se podrían adherir a
la ropa durante usos subsecuentes de la secadora.
n Para minimizar la posibilidad de una descarga
eléctrica, desconecte éste electrodoméstico
de su tomacorriente o desconecte la secadora
del panel de distribución eléctrica del edificio
removiendo el fusible o desconectando el circuito
antes de dar cualquier tipo de mantenimiento
o limpieza (con la excepción de remover y limpiar
el filtro de la pelusa). NOTA: Presionar START, STOP
o POWER NO desconecta el electrodoméstico
del tomacorriente.
Page 33

GEAppliances.com
CUANDO USE SU SECADORA (cont.)
n Nunca intente operar éste electrodoméstico
si está dañado, si no funciona bien, si está
parcialmente desarmado, o si le faltan partes
o éstas están rotas, incluyendo daños al cable
eléctrico.
n El interior de la máquina y la conexión del tubo
de escape en el interior de la secadora se deben
limpiar por lo menos una vez al año por parte de
un técnico calificado. Ver la sección Cómo cargar
y usar la secadora.
n Si su secadora es de gas, ésta está equipada con
un encendido eléctrico automático y no necesita
una luz piloto. NO INTENTE ENCENDERLA CON
UN FÓSFORO. Podrían resultar quemaduras por
tener su mano en las cercanías del quemador
cuando el encendido eléctrico automático
comience.
n Es posible que usted desee suavizar
su ropa o reducir la electricidad estática en ella
usando una toalla suavizante para secadora
o un acondicionador antiestático. Recomendamos
que usted use un suavizante de telas en el ciclo
de lavado, de acuerdo con las instrucciones
del fabricante para estos productos, o trate
un producto en el que el fabricante le proporcione
una garantía escrita en el paquete especificando
que es seguro para usar en las secadoras.
Los problemas de servicio o de rendimiento
causados por estos productos son responsabilidad
de los fabricantes de estos productos y no están
cubiertos por la garantía de éste electrodoméstico.
n Nunca trate de utilizar los ciclos STEAM
DEWRINKLE (estirar por vapor) o STEAM REFRESH
(renovación por vapor) sin prendas en el tambor.
CUANDO NO SE ENCUENTRE USANDO SU SECADORA
n Cuando desconecte éste electrodoméstico, agarre
el enchufe firmemente para evitar daños al cable
eléctrico mientras lo hale. Coloque el cable eléctrico
en un lugar alejado de las áreas de tráfico para
que nadie lo pise, tropiece o lo pueda dañar.
n No intente hacer reparaciones o reemplazar
ninguna parte de éste electrodoméstico ni intente
llevar a cabo ningún tipo de servicio a no ser que
lo recomiende el Manual del propietario
o instrucciones publicadas que usted entienda
y tenga la habilidad de llevar a cabo.
n Antes de desechar una secadora o
de removerla para darle servicio, remueva
la puerta de la secadora para evitar que algún
niño se esconda en su interior.
n No intente alterar los controles.
LEA Y SIGA ESTA INFORMACIÓN
DE SEGURIDAD CUIDADOSAMENTE.
CONSERVE ESTAS INSTRUCCIONES
5
Page 34

Panel de control de la secadora.
Puede ubicar el número de modelo en la parte superior del interior de la apertura de la puerta.
Model GFDN240/245
T
IME DRY
3
2
6
1
NORMAL /
MIXED LOAD
EASY CA RE
ACTIVE WEAR
DELICATES
COTTONS
SPEED DRY
A
IR FLUFF
NO HEAT
D
EWRINKLE
8
4
5
Model GFDS350/355
1
SENSOR DRY
2
3
7
7
6
8
4
5
6
Page 35

Panel de control de la secadora.
Power (Encendido)
1
Presione este botón para “iniciar” la pantalla. Si la pantalla se encuentra activa, presione este botón
para poner la secadora en modalidad standby (en espera).
NOTA: Presionar POWER (Encendido) no desconecta el electrodoméstico de la fuente eléctrica.
Ciclos de secado
2
El ciclo de secado controla el tiempo y velocidad de giro del proceso de secado. El cuadro que aparece a continuación le
ayudará a establecer el ajuste de secado según las cargas.
Ciclos de sensor la descripción
COTTONS (ALGODONES) Para prendas de algodón y la mayoría de la ropa blanca.
NORMAL/MIXED LOADS
(CARGA NORMAL/MIXTA)
Para cargas que consisten de algodones y mezclas variadas.
GEAppliances.com
EASY CARE
(CUIDADO FÁCIL)
ACTIVE WEAR
DELICATES (DELICADAS) For lingerie and special-care fabrics.
SPEED DRY
(SECADO RÁPIDO)
Ciclos de secado
cronometrados
WARM UP (CALENTAMIENTO) Proporciona 10 minutos de tiempo de calentamiento para calentar las prendas
AIR FLUFF
(ESPONJADO CON AIRE)
DEWRINKLE
(ELIMINACIÓN DE ARRUGAS)
(en algunos modelos)
STEAM REFRESH
(RENOVACIÓN POR VAPOR)
(en algunos modelos)
STEAM DEWRINKLE (ESTIRAR
POR VAPOR)
(en algunos modelos)
Para artículos “libres de arrugas” y de planchado permanente.
Clothing worn for active sports exercise and some casual wear. Fabrics include new
technology finishes and stretch fibers such as Spandex.
Para cargas de bajo volumen que necesita que estén listas rápidamente, tales como
prendas deportivas o uniformes escolares. También se puede utilizar si el ciclo previo dejó
algunaspartes de las prendas húmedas, tales como cuellos o pretinas.
la descripción
Utilice esta función para secar prendas sin aplicar calor.
Para quitar arrugas de prendas que se encuentran secas o apenas húmedas. No se
recomienda este ciclo para telas delicadas.
STEAM REFRESH (renovación por vapor) (en algunos modelos)
Para prendas secas ligeramente arrugadas. Reduce significativamente las arrugas en hasta
5 prendas. Después del ciclo STEAM REFRESH (renovación por vapor), la unidad emitirá un
pitido y se verá “0:00”. Si la unidad no se apaga o si la puerta no se abre, la secadora seguirá
girando por 30 minutos. Al finalizar los 30 minutos, aparecerá en la pantalla “0:00” y el ciclo
habrá finalizado.
Nota: Una prenda única extremadamente liviana puede necesitar la inclusión de un ítem
adicional en el ciclo STEAM REFRESH (renovación por vapor) para alcanzar resultados
óptimos.
Para usar con cargas más importantes que las de STEAM REFRESH (renovación por vapor).
Ideal para cargas que se dejan en la secadora durante períodos prolongados.
My Cycle (Mi ciclo) la descripción
MY CYCLE (MI CICLO)
Timed Dry (Secado cronometrado)
3
Utilícelo para programar su propio tiempo de secado. TIMED DRY (Secado cronometrado) también
se recomienda para cargas de poco volumen.
Para utilizar TIMED DRY:
1. Gire la perilla de ciclo a TIMED DRY.
2. Seleccione el tiempo de secado presionando el botón TIMEDRY ADJUST (tiempo de secado ajustar) + botón.
Nota: Este botón sólo aumenta el tiempo. Al alcanzar el tiempo máximo, si presiona el botón de nuevo se reconfigura el
contador en la configuración más baja.
3. Seleccione DRY TEMP (temperatura de secado).
4. Cierre la puerta.
5. Presione START.
Presione para utilizar, crear o modicar ciclos de secado personalizados (Ver página 8 para
más detalles)..
7
Page 36

Panel de control de la secadora.
Nivel del Sensor Dry “LEVEL”
4
El sensor monitorea constantemente la cantidad de humedad en la carga. Cuando la humedad
en sus prendas llega al nivel de secado seleccionado, la secadora se detendrá.
Nota: El “NIVEL” de secado por sensor sólo funciona con COTTONS (algodones), NORMAL/MIXED LOAD (carga normal/
mixta), ACTIVE WEAR (prendas deportivas), DELICATES (delicadas) y SPEED DRY (secado rápido).
Dry “Temp” (Temperatura de secado)
5
Puede cambiar la temperatura de su ciclo de secado.
ANTI-BACTERIAL
HIGH (ALTO)
MEDIUM (MEDIO)
LOW (BAJO)
EXTRA LOW
(EXTRA BAJO)
START (Iniciar)
6
Presione para iniciar un ciclo de secado. Si la secadora está funcionando, presione una vez y detendrá la secadora.
Presione de nuevo para reiniciar el ciclo de secado.
Esta opción sólo se puede usar con los ciclos COTTONS o MIXED LOAD. Esta opción reduce el
99,9% de ciertos tipos de bacterias, incluyendo: Staphylococcus aureus, Pseudomonas aeruginosa y
Klebsiella pneumoniae*. El proceso anti-bacterial ocurre cuando se usa calor elevado durante una
porción del ciclo de secado.
NOTA: No use este ciclo en telas delicadas
* El ciclo anti-bacterial ha sido certificado por NSF International (antiguamente National Sanitation
Foundation) de acuerdo con la Norma P154, rendimiento de desinfección
de las secadoras de ropa para uso residencial.
Para telas de algodón de normales a pesadas.
Para telas sintéticas, tejidos de mezcla y artículos etiquetados como de planchado permanente.
Para artículos delidados, de tela sintética y etiquetados como tumble dry low (centifugado de
secado lento).
Para lencería y telas de cuidado especial.
My Cycle (Mi ciclo)
7
Programe sus combinaciones de ajustes favoritos y almacénelos en la memoria para utilizarlos
al presionar un solo botón. Estos ajustes personalizados se pueden fijar mientras un ciclo se encuentra en progreso.
Para almacenar una combinación de ajustes en MY CYCLE:
1. Select your drying cycle.
2. Cambie los ajustes DRY TEMP y SENSOR DRY LEVEL para que se adapten a sus necesidades
3. Seleccione cualquier OPTION de secado que desee.
4. Presione y mantenga presionado el botón durante tres segundos para almacenar
su opción. Sonará una alarma sonora y se encenderá el botón.
Para utilizar una combinación MY CYCLE almacenada:
Presione el botón MY CYCLE antes de secar una carga.
Para cambiar su combinación MY CYCLE almacenada:
Siga los pasos 1 al 4 indicados en “Para almacenar una combinación de ajustes en MY CYCLE”.
Mensaje “CLEAN LINT FILTER” (Limpiar el filtro de pelusa)
8
(Este mensaje representa sólo un recordatorio y no siempre aparece cuando debe limpiarse el filtro. El filtro debe
limpiarse después de la finalización de cada ciclo de secado.)
Este mensaje desaparecerá después de presionar el botón START. Aunque haya limpiado el filtro (antes o después de
presionar el botón POWER), seguirá apareciendo el mensaje “CLEAN LINT FILTER” hasta que se active el botón START.
8
Page 37

Opciones de ciclo.
NOTA: No todas las funciones están disponibles en todos los modelos de secadoras. GEAppliances.com
Extend Tumble (Secado prolongado)
Minimiza las arrugas al aumentar aproximadamente
60 minutos de secado sin calor una vez que las
prendas están secas.
La alarma sonora se activará cada
2 minutos para recordarle que las retire.
La pantalla ESTIMATED TIME REMAINING (Tiempo
restante estimado) mostrará 00.
Damp Alert (Alerta de humedad)
El tiempo de Secado Prolongado no se agrega al
ciclo de la pantalla.
Esta opción hace que la secadora alerte cuando las
prendas hayan secado a un nivel húmedo. Retire las
prendas que desea
secar colgadas. DAMP ALERT se activará únicamente
cuando haya seleccionado
esta opción.
Delay Start (Inicio postergado)
Utilícelo para postergar el inicio
de su secadora.
1. Escoja su ciclo de secado y cualquier opción.
2. Presione DELAY START. Usted puede aumentar el
tiempo de retardo en unidades de 1 hora utilizando
el botón DELAY START (inicio retardado).
3. Presione el botón START para iniciar
la cuenta regresiva.
e-DRY (secado ecológico)
Reduce el consumo total de energía de ciclos
específicos de la secadora mediante el ajuste de
ciertas configuraciones de calor. .
Nota: Los tiempos de los ciclos cambiarán cuando se
selecciona e-DRY.
Retirar y colgar las prendas cuando aún
se encuentran húmedas puede reducir
la necesidad de plancharlas.
NOTAS:
n Si abre la puerta mientras la secadora
se encuentra en DELAY START, no reiniciará
la cuenta regresiva a menos que
se cierre la puerta y se presione
START de nuevo.
Esta característica puede utilizarse con DELICATES
(delicadas), ACTIVE WEAR (prendas deportivas), EASY
CARE (cuidado fácil), NORMAL/MIXED LOAD (carga
normal/mixta) y COTTONS (algodones).
Signal (Señal)
Le indica que el ciclo ha finalizado. El pito seguirá
sonando cada minuto durante los 5 minutos
siguientes, hasta que retire las prendas. Las prendas
deben retirarse cuando el pito deja de sonar para que
no se fijen las arrugas.
Presione SIGNAL para seleccionar volumen bajo,
medio o alto, o para apagar el pito.
9
Page 38

Opciones de ciclo.
NOTA: No todas las funciones están disponibles en todos los modelos de secadoras.
Bloquear
Puede bloquear los controles para evitar
que se realice cualquier selección. O puede
bloquear los controles después de haber
iniciado un ciclo.
Cuando se selecciona esta opción los
niños no podrán iniciar accidentalmente la
secadora al tocar los botones.
Estimated Time Remaining
(Tiempo restante estimado)
Muestra el tiempo restante estimado hasta
el final del ciclo.
A medida que inicia el ciclo, podrá ver
un tiempo de ciclo total inicial aproximado
en la pantalla. Las luces se encenderán
“a modo de carrera” en la pantalla. Esto
significa que la secadora está monitoreando
My Cycle (Mi ciclo) (en algunos modelos)
Para almacenar un ciclo favorito, programe
los ajustes deseados y mantenga presionado
el botón MY CYCLE durante 3 segundos.
Se activará una alarma sonora indicando
que se ha almacenado el ciclo.
Para bloquear la secadora, presione y
mantenga presionado el icono de candado
durante 3 segundos. Para desbloquear
la secadora, presione y mantenga presionado
el icono de candado durante
3 segundos.
Se encenderá el icono de candado junto
al cronómetro cuando los controles están
bloqueados.
continuamente la cantidad de humedad
en la carga. Las luces continuarán
encendiéndose hasta que la secadora
detecte un nivel de humedad bajo en
la carga. En este punto la secadora calculará
y mostrará el tiempo restante aproximado.
Para cambiar el ciclo almacenado, programe
los ajustes deseados y mantenga presionado
el botón MY CYCLE durante 3 segundos.
Para utilizar su ciclo personalizado, presione
el botón MY CYCLE antes de secar una carga.
Funciones de la secadora.
La bombilla del tambor giratorio
Antes de reemplazar la bombilla, asegúrese de desconectar la secadora
del tomacorriente o de desconectar la secadora del panel de distribución
de su casa removiendo el fusible o interrumpiendo el circuito eléctrico.
Alcance por encima de la abertura de la puerta de la secadora dentro del
tambor. Quite la bombilla y reemplace con una bombilla del mismo tamaño.
Nota: La bombilla del tambor sólo se enciende (y en forma automática)
cuando se abre la puerta de la secadora.
La rejilla de secado (en algunos modelos)
La rejilla de secado se puede usar para secar artículos delicados tales
como suéteres lavables. Coloque las prendas planas en la rejilla de secado y
asegure prendas tales como suéteres y telas delicadas. Seque con calor bajo.
Para instalar la rejilla de secado, levante el filtro de pelusa. Introduzca la rejilla
de secado en las ranuras, luego empuje el filtro hacia abajo nuevamente.
NOTA:
n ·La rejilla de secado se encuentra diseñada para utilizar con los ciclos
TIMED DRY (secado cronometrado). El uso con ciclos por sensor pueden
dejar las prendas húmedas o generar ciclos prolongados.
10
n ·No utilice esta rejilla de secado cuando haya otras prendas en la secadora
que no se encuentren en la rejilla.
Page 39

Cómo cambiar el sentido de apertura de la puerta. GEAppliances.com
NOTAS IMPORTANTES:
n Lea todas las instrucciones antes
de comenzar.
n Manipule las piezas con cuidado
para evitar rayar la pintura.
n Coloque los tornillos cercanos a sus
piezas correspondientes para evitar
utilizarlos en los lugares incorrectos.
n Coloque las puertas en una superficie
de trabajo que no produzca ralladuras.
n El tiempo normal necesario para invertir
el lado hacia el que abre la puerta es de
30 a 60 minutos.
IMPORTANTE: Una vez que comience,
no mueva el gabinete hasta que haya
completado el cambio de la puerta.
Estas instrucciones indican cómo cambiar
las bisagras del lado derecho al lado
izquierdo. En caso que desee cambiarlas
nuevamente al lado derecho, siga las mismas
instrucciones e invierta todas las referencias
de izquierda y derecha.
NECESITARÁ LAS SIGUIENTES HERRAMIENTAS
Llave ajustable
Destornillador de estrella
Espátula o destornillador
PIEZAS DE LA PUERTA
Conjunto de bisagras
Tapa de la
bisagra
Cubierta plástica
4 tornillos #8
(placa de cubierta)
INSTRUCCIONES PASO A PASO
Antes de empezar
de hoja delgada
3 tornillos #8
(montaje de la puerta y
panel frontal)
6 tornillos mecanizados #8
(puerta interior y bisagra)
(puerta interior, anillo exterior y
8 tornillos #8
tapa de la bisagra)
7 - Botones
decorativos
1. Desconecte la secadora del enchufe
eléctrico.
11
Page 40

Cómo cambiar el sentido de apertura de la puerta.
INSTRUCCIONES PASO A PASO (cont.)
Retire el conjunto de la puerta
2. Abra la puerta 130 grados aproximadamente.
3. Quite los 2 tornillos comenzando desde la parte inferior a la superior. Asegúrese de sostener
la puerta mientras quita los tornillos.
Quitar
Tornillo superior
8 tornillos #8
6 tornillos mecanizados #8
Montaje de la puerta exterior
4 Botones Decorativos
4. Apoye la puerta sobre una superficie plana protegida de modo que la parte interior apunte
hacia arriba
5. Coloque la puerta sobre una superficie plana, suave y protegida de modo que la parte
interior mire hacia arriba (la puerta descansa sobre el lado de la manija). Quite los 8 tornillos
roscadores ubicados alrededor del perímetro de la puerta que rodea la junta. Quite los 6
tornillos mecanizados. Utilizando una espátula u otra herramienta plana, quite los 4 botones
decorativos e instálelos en el lado opuesto.
Quite la bisagra y la tapa
IMPORTANTE: Observe la ubicación de la bisagra (izquierda o derecha) antes de quitar.
Montaje de la bisagra
12
6. Una vez que haya quitado los tornillos, gire la puerta y separe el montaje de la puerta
exterior y la tapa de la bisagra de la puerta del armazón de la puerta y coloque a un lado. .
Tapa de la bisagra
Page 41

Tornillos
mecanizados
GEAppliances.com
INSTRUCCIONES PASO A PASO (cont.)
Reinstale el conjunto de bisagras
7. Instale el montaje de la bisagra en el lado opuesto de la puerta como se indica.
Empuje el montaje de la bisagra en su lugar hasta que los orificios de la bisagra
queden alineados con los orificios de la puerta
8. Sostenga la bisagra y la puerta sobre su lado con una mano y ajuste los 6 tornillos
mecanizados como se indica. .
Tornillos
roscadores
Reinstale Tapa de la bisagra
9. Introduzca la tapa de la bisagra. Alinee los agujeros de la cubierta de bisagra
con los agujeros en la puerta
Tapa de
la bisagra
10. Fije la tapa de la bisagra con 2 tornillos roscadores.
13
Page 42

Cómo cambiar el sentido de apertura de la puerta.
INSTRUCCIONES PASO A PASO (cont.)
Puerta exterior
Reensamble el conjunto de puerta
IMPORTANTE: Asegúrese que no haya suciedad ni otro material extraño entre
los paneles de vidrio..
11. Coloque la puerta exterior de plástico en la puerta interior. Verifique que la parte de
la manija de la puerta exterior se encuentre en la posición opuesta a la bisagra como
se indica.
Puerta interior
12. Dé vuelta a la puerta y asegure la puerta exterior a la puerta interior utilizando los 6
tornillos roscadores grandes.
Mueva el soporte de impacto
Botones
decorativos
Tornillos
roscadores
Tornillo
parcialmente
introducido
Ajuste todos
los tornillos
13. Utilizando una espátula u otra herramienta plana, quite los 5 botones decrativos
ubicados en la secadora en el sitio donde se instalará la puerta
e instálelos en el lado opuesto.
14. Cambie el soporte de impacto y su cubierta al lado opuesto al quitar
los tornillos. Luego, reinstale ambos en el lado opuesto.
Reinstale el conjunto de puerta
15. En este punto la puerta estará lista para instalarla en la secadora.
Para facilitar este paso, la bisagra dispone de ojos para cerradura que permiten utilizar
un tornillo parcialmente apretado a modo de gancho.
Apriete parcialmente un tornillo en el agujero para tornillo más alto.
Enganche la puerta en el tornillo parcialmente apretado.
14
Ajuste la bisagra instalando los 4 tornillos adicionales y apretando
el tornillo que está parcialmente apretado y que se ubica más arriba.
Page 43

Cómo cargar y usar la secadora.
Siempre siga las instrucciones del fabricante de la ropa cuando lave.
Las etiquetas del cuidado de la tela
Aqui puede ver “símbolos” de etiquetas para indicar el cuidado de las telas.
ETIQUETAS DE LAVADO
Ciclo de
lavado en
máquina
Temperatura
objetivo del agua
en carga frontal
ETIQUETAS DE SECADO
Normal
Planchado permanente/
resistente a arrugas
Temperatura Control automático
Categoría objetivo del agua de temperatura
Agua fría del grifo Temperatura del agua de entrada No utilizado
Fría 27°C/80°F Utilizado
Tibia 40°C/105°F Utilizado
Caliente 50°C/120°F Utilizado
Desinfectar 70°C/160°F Utilizado
Suave/
delicado
Lavar a mano
GEAppliances.com
No lave No escurra
Tumble
dry /
Secado
con giro
Dry / Seco
Normal
Permanent Press/
wrinkle resistant /
Resistente a arrugas
Gentle/
delicate /
Gentil/
Delicado
Do not tumble dry /
No use secado
con giro
Do not dry
(used with
do not wash) /
No secar (No lavar)
Heat
setting /
Temperatura
de secado
Special
instructions /
Instrucciones
especiales
ETIQUETAS DE LA LEJÍA
High / Alto
Line dry/
hang to dry /
Cuelgue para secar
Medium / Mediana
Drip dry /
Ropa que no se arruga
Low / Baja
Dry flat /
Extendido
No heat/air /
Sin calor/Con aire
In the shade /
En la sombra
Símbolos de
blanqueador
Cualquier blanqueador
(cuando se necesita)
Sólo blanqueador sin cloro
(cuando se necesita)
No use blanqueador
Ideas para la clasificación y carga de la ropa
Como regla general, si la ropa es clasificada
apropiadamente para la lavadora, estará
clasificada apropiadamente para la secadora.
Intente también clasificar los artículos según
el tamaño. Por ejemplo, no seque una sábana
con medias u otras prendas pequeñas.
No agregue toallitas suavizantes una vez la ropa
se haya calentado. Esto podría causar que
la ropa se manche. Las toallitas suavizantes
acondicionadoras Bounce® se han aprobado para
usarse con todas las secadoras GE de acuerdo con
las instrucciones del fabricante.
No sobrecargue. Esto desperdicia energía y causa
arrugas.
No seque los siguientes artículos: artículos de fibra
de vidrio, prendas de lana que no sean lavables,
artículos con recubrimientos de goma, plásticos,
artículos con bordes plásticos o rellenos de
espuma.
15
Page 44

Cómo cargar y usar la secadora.
Siempre siga las instrucciones del fabricante de la ropa cuando lave.
Cuidado y limpieza de la secadora
El exterior: Pásele un trapo y elimine el polvo
o cualquier derrame de productos de lavandería
con un trapo húmedo. Los productos de
tratamiento para quitar mugre y manchas
podrían dañar el panel de control de la secadora
y afectar su apariencia. Aplique estos productos
a cierta distancia de la secadora. Luego las telas
podrán lavarse y secarse normalmente. Los daños
causados a la secadora por estos productos
no están cubiertos bajo su garantía.
El filtro de pelusa: Limpie
el filtro de pelusa antes
de cada uso.
Saque el filtro de pelusa.
Humedezca sus dedos y
quite la pelusa capturada.
Una vez que se encuentre
limpio, deslice el filtro
nuevamente a su lugar.
servicio calificado que aspire la pelusa de la
secadora
una vez al año.
NUNCA OPERE LA SECADORA SIN EL FILTRO
EN SU LUGAR.
Pida a un técnico de
El ducto de escape: Inspeccione y limpie el ducto
de escape por lo menos una vez al año para
evitar los obstrucciones. Un escape parcialmente
taponado puede prolongar el plazo de secado.
Siga estos pasos:
Apague el suministro eléctrico desconectando
1
el enchufe de la pared.
Desconecte el conducto de la secadora.
2
Aspire el conducto con la conexión
3
de manguera y vuelva a conectarlo.
La salida de escape: Verifique, utilizando un espejo,
que las aletas interiores de la salida de escape
se mueven libremente durante la operación.
Asegúrese de que ningún animal (pájaros,
insectos, etc.) haya hecho su nido en el interior
del conducto o en la salida de escape.
Acero inoxidable: Para limpiar superficies de
acero inoxidable, utilice un paño húmedo con un
limpiador suave y no abrasivo adecuado para
superficies de acero inoxidable. Quite los restos de
limpiador y luego seque con un paño limpio.
El acero inoxidable utilizado para fabricar el tambor
de la secadora ofrece la mayor confiabilidad de
una secadora GE. Si el tambor de la secadora se
raya o abolla durante un uso normal, éste no se
oxidará o corroerá. Estas imperfecciones de la
superficie no afectan la función o durabilidad del
tambor.
Interior y conducto de la secadora: Un técnico
calificado debe limpiar la parte interna del aparato
y del conducto de salida una vez por año.
16
Page 45

Ventilación de la secadora.
Para obtener el mejor desempeño, la secadora debe estar ventilada adecuadamente.
La secadora utilizará más energía y funcionará más tiempo si no se ventila siguiendo
las especificaciones indicadas más abajo. Siga cuidadosamente los detalles en la sección
de Escape en las Instrucciones de instalación.
n Solamente use ductos de metal rígido de 4″ de diámetro dentro de la secadora
y para escape hacia el exterior.
n No use ductos plásticos u otros ductos de materiales combustibles.
n Use la longitud más corta posible.
n No aplaste, arrugue o pliegue el conducto.
n Evite descansar el conducto sobre objetos filosos.
n La ventilación debe complir con los códigos de construcción locales.
n No quite el protector de la rejilla de ventilación de la parte posterior de la secadora
(en algunos modelos).
n Doble el protector hacia abajo a su posición más baja y conecte el conducto de escape en
la secadora. El protector bajado impedirá que se aplaste el conducto (en algunos modelos).
GEAppliances.com
Ventilación
correcta
Ventilación
incorrecta
El protector de ventilación
en su lugar
(en algunos modelos)
17
Page 46

Conexión de las mangueras de entrada.
Para producir vapor, la secadora debe conectarse al suministro de agua fría. Ya que la
lavadora también debe conectarse al agua fría, debe introducirse un conector en “Y”
para permitir que ambas mangueras de entrada puedan utilizarse al mismo tiempo.
NOTA: Utilice las nuevas mangueras de entrada provistas; nunca utilice mangueras
viejas.
Conexión al suministro de agua fría
1. Cierre el grifo de agua fría. Quite la manguera de entrada de la lavadora del conec-
“Y” Conector
tor de la válvula de llenado (fría). .
2. Asegúrese de que la arandela plana de goma se encuentre en su lugar y ajuste la
unión hembra de la manguera corta en el conector de la válvula de llenado de la
lavadora. Ajuste a mano hasta que esté firmemente asentada. .
3. Sujete el extremo hembra del conector en “Y” a la unión macho de la manguera
corta. Asegúrese de que la arandela plana de goma se encuentre en su lugar. Ajuste
a mano hasta que esté firmemente asentada.
4. Introduzca el filtro en la unión de la manguera de entrada de la lavadora. Si la arandela plana de goma ya se encuentra en su lugar, quítela antes de instalar el filtro.
Sujete esta unión a un extremo macho del conector en “Y”. Ajuste a mano hasta que
esté firmemente asentada.
5. Asegúrese de que la arandela plana de goma se encuentre en su lugar y sujete la
manguera larga de entrada de la secadora al otro extremo macho del conector en
“Y”. Ajuste a mano hasta que esté firmemente asentada.
6. Asegúrese de que la arandela plana de goma se encuentre en su lugar y sujete el
otro extremo de la manguera larga de entrada al conector de la válvula de llenado
en la parte inferior del panel trasero de la secadora. Ajuste a mano hasta que esté
firmemente asentada.
7. Utilizando alicates, ajuste todas las uniones con un giro adicional de dos tercios.
NOTA: No ajuste de más. Pueden dañarse las uniones.
8. Abra el grifo de agua.
9. Controle la presencia de pérdidas alrededor del conector en “Y”, el grifo y las uniones
de las mangueras.
18
Page 47

Apilado.
ANTES DE COMENZAR
Lea estas instrucciones por completo y con
cuidado.
n IMPORTANTE: Guarde estas instrucciones
para uso del inspector local.
n IMPORTANTE: Cumpla con todos los códigos
y ordenanzas regulatorias.
n Nota para el instalador – Asegúrese de dejar
estas instrucciones en poder del consumidor.
PARA SU SEGURIDAD
¡ADVERTENCIA!
n Peligro de descarga eléctrica. Desconecte
el suministro de energía antes de realizar
la instalación. El no hacerlo puede resultar
en lesiones graves o la muerte.
n Peligro de lesiones personales.
la secadora
personas levanten la secadora para colocarla
en su lugar. El no hacerlo puede resultar en
lesiones personales o la muerte.
, se recomienda que más de dos
Cuando apile
GEAppliances.com
n Nota para el consumidor – Conserve estas
instrucciones para referencias futuras.
n La instalación debe ser efectuada por
un instalador calificado.
n La instalación adecuada es responsabilidad
del instalador.
n
Cuando apile la secadora,
ruptura de las instalaciones de servicios
públicos. La secadora debe estar conectada
de manera segura a la lavadora. NO coloque
la lavadora sobre la secadora. De lo contrario,
esto puede resultar en lesiones personales o la
muerte, o en daños a la propiedad.
n Instalación en casas rodantes o casas
prefabricadas: No se permite apilar
una secadora de gas en una casa
rodante o prefabricada.
evite vuelcos y la
DISTANCIAS MÍNIMAS, NO APLICABLES A LA INSTALACIÓN
EN HUECOS O ARMARIOS
Los espacios libres mínimos respecto de
superficies combustibles y de aberturas de aire
son: 0” a ambos lados, 1” en el frente y 3” en la
parte trasera. Se debe prestar atención a fin de
dejar el espacio suficiente para la instalación y el
servicio.
INSTALACIÓN EN HUECOS O ARMARIOS
n
Si su secadora está aprobada para ser instalada
en un hueco o armario, esto estará indicado en
una etiqueta en la parte trasera de la secadora.
n
La secadora DEBE tener ventilación al exterior.
Consulte las Instrucciones de instalación
de la secadora para obtener más detalles.
n
La distancia mínima entre el armario
de la secadora y las paredes adyacentes
u otras superficies es:
0″ en cualquiera de los lados
3” en el frente
4” en la parte trasera
n
El espacio vertical mínimo del piso
los armarios aéreos, techo, etc., es de 43″ sin
el pedestal, 55″ con el pedestal y 84″ apilada.
n
Las puertas del armario deben tener ranuras
de ventilación u otro tipo de ventilación, y deben
tener un mínimo de 60 pulgadas cuadradas
de superficie abierta distribuida de manera
uniforme. Si el armario contiene una lavadora
y una secadora, las puertas deben tener
un mínimo de 120 pulgadas cuadradas
de superficie abierta distribuida de manera
uniforme.
19
Page 48

Apilado.
CONTENIDO DEL JUEGO
Abrazadera derecha
4 almohadillas de caucho
Abrazadera izquierda
HERRAMIENTAS QUE NECESITARÁ
Destornillador Phillips
Pinzas
Llave española
PREPARACIÓN PARA LA INSTALACIÓN
4 tornillos #12 x 1”
4 tornillos #8 x 1/2”
Guantes
Nivelador
Retire el embalaje.
Aplaste el cartón del producto para utilizarlo
como almohadilla para apoyar la secadora sobre
uno de sus costados. Continúe usando el cartón
para proteger el piso terminado que se encuentra
delante del lugar de instalación.
20
Page 49

GEAppliances.com
INSTALACIÓN DEL JUEGO DE ABRAZADERAS DE APILADO
1. Retire las patas niveladoras
de la secadora
A. Apoye cuidadosamente la secadora
sobre uno de sus costados.
Use el material de embalaje para
no rayar el acabado de la secadora.
B. Use una llave española o pinzas
para retirar las patas niveladoras
de la secadora.
Destornille y retire
las 4 patas niveladoras
2. Instale las almohadillas
de caucho en la base
de la secadora
Localice las 4 almohadillas de caucho
en el paquete de piezas. Retire
el reverso adhesivo y colóquelas
firmemente sobre la abrazadera
en el lugar donde retiró las patas
niveladoras.
3. Instale la abrazadera
en la secadora
A. Alinee los agujeros de la abrazadera
izquierda con los agujeros de
la esquina inferior izquierda de
la secadora. Use un destornillador
Phillips para instalar los 2 tornillos
roscadores #12 x 1″.
B. Repita el paso anterior con
la abrazadera derecha en la esquina
inferior derecha de la secadora.
NOTA: Asegúrese de colocar
la secadora sobre el material
de embalaje de manera tal que
las abrazaderas que estén adosadas
a la parte inferior de la secadora
no dañen el piso.
C. Coloque la secadora en posición
vertical.
21
Page 50

Apilado.
INSTALACIÓN DEL JUEGO DE ABRAZADERAS DE APILADO (cont.)
4. Prepare la lavadora
y la secadora
A. Coloque la lavadora en
la ubicación aproximada.
B. Asegúrese de que la lavadora
se encuentre nivelada. Consulte
las Instrucciones de instalación
de la lavadora para obtener más
detalles.
C. Para retirar la parte posterior
del panel de control, retire
los 3 tornillos.
5. Instale la secadora
y la abrazadera
en la lavadora
A. Levante la secadora y colóquela sobre
la lavadora. Tenga cuidado
de no rayar la parte superior de
la lavadora con las abrazaderas. Proteja
el panel de control de
la lavadora con cartón u otra protección.
Asegúrese de levantar
la secadora a una altura suficiente
para dejar libre el panel de control de la
lavadora.
D. Invierta el sentido de apertura
de la puerta de la secadora si lo desea.
Consulte las Instrucciones
de instalación de la secadora para
obtener más detalles.
NOTA: El sentido de apertura
de la puerta de la lavadora
no es reversible.
B. Alinee los agujeros de la abrazadera con
los agujeros de la parte posterior de la
lavadora. Con
el destornillador Phillips, ajuste
los 2 tornillos roscadores #8 x 1/2″.
Repita este paso en ambos lados
de la lavadora.
Coloque
las
manos
aquí
Coloque
las
manos
aquí
¡ADVERTENCIA!
Peligro de lesiones personales. Debido
a su peso y tamaño, se recomienda que
más de dos personas levanten
la secadora para colocarla en su lugar. El
no hacerlo puede resultar
en lesiones personales o la muerte.
6. Finalice la instalación
A. Consulte las Instrucciones de instalación
de la lavadora para completar la
instalación de
la lavadora.
B. Consulte las Instrucciones de instalación
de la secadora para completar la
instalación de
la secadora.
C. Deslice o mueva cuidadosamente
la lavadora y secadora apiladas a su
lugar. Use almohadillas afelpadas
u otro dispositivo de deslizamiento
para ayudar a mover los productos y
proteger el piso.
¡ADVERTENCIA!
Peligro de lesiones personales.
No empuje la secadora una vez instalada
sobre la lavadora.
De lo contrario, los dedos podrían
quedar atrapados entre la lavadora
y la secadora.
22
Page 51

Antes de llamar para solicitar servicio…
GEAppliances.com
Consejos para la solución de problemas
¡Ahorre tiempo y dinero! Consulte primero las tablas de las
páginas siguientes o visite GEAppliances.com y quizás no
necesite llamar al servicio.
Problema Causas posibles Qué hacer
La secadora tiembla Un poco de temblor/ruido • Coloque la secadora en un lugar con piso nivelado,
o produce ruido es normal. La secadora podría o ajuste las patas niveladoras según sea necesario hasta
estar disnivelada que esté nivelada.
Secar las prendas toma Conductos inadecuados • Verifique las Instrucciones de instalación para asegurar
demasiado tiempo u obstruidos que la ventilación de la secadora sea adecuada.
• Asegúrese de que los conductos estén limpios, libres
de puntos de agarre y no estén obstruidos.
• Revise observando que el regulador de pared exterior
esté funcionando con facilidad.
Clasificación incorrecta • Separe las prendas pesadas de las livianas (generalmente
una carga de lavado bien clasificada es una carga de
de secado bien clasificada).
Cargas grandes de telas pesadas • Las telas grandes y pesadas contienen más humedad
(como toallas de playa) y toman más tiempo para secar. Separe las telas grandes
y pesadas en cargas de menor tamaño para agilizar
el plazo de secado.
Los controles no están • Corresponde los ajustes de control a la carga que está
programados correctamente secando.
El filtro de pelusa está lleno • Limpie el filtro de pelusa antes de cada carga.
Fusibles quemados/disyuntor • Reemplace los fusibles o reconecte los disyuntores. Ya que
desconectado la mayoría de las secadoras utilizan 2 fusibles/disyuntores,
asegúrese de que ambos funcionen.
Sobrecarga/combinación • No coloque más de una carga de la lavadora en
de cargas la secadora al mismo tiempo.
Poca cantidad de carga • Si está secando solo una o dos prendas, añada varias
para asegurar un giro apropiado.
Se ha seleccionado La carga consiste de • Cuando combine telas pesadas con livianas en una carga,
el nivel de secado DRY una combinación de telas escoja MORE DRY (Más seco).
(Seco) pero la carga aún pesadas y livianas
se encuentra húmeda
Los botones de control
no responden en modalidad de servicio
Los controles están accidentalmente • Mantenga presionado el botón LOCK (Bloquear)
en modalidad de bloqueo durante 3 segundos para desbloquear la secadora.
Los controles efectuaron • Apague y encienda el disyuntor ubicado dentro
una operación incorrecta de la vivienda.
La secadora no funciona El panel de control está “dormido” • Esto es normal. Presione el botón POWER para activar
el panel de control.
La secadora está desenchufada • Asegúrese de que el enchufe esté completamente
colocado en el tomacorriente.
Fusible quemado/disyuntor • Revise la caja de fusibles/disyuntores y reemplace
desconectado el fusible o reconecte el disyuntor. NOTA: Secadoras
eléctricas usan dos fusibles/disyuntores.
Se pausó accidentalmente • Si la luz en el botón DELAY START se encuentra
la secadora al comenzar el inicio destellando, la secadora se encuentra en pausa.
postergado Presione START para volver a iniciar la cuentra regresiva.
El sistema de escape está tapado • Inspeccione y limpie el sistema de escape.
Los controles están accidentalmente
• Presione STOP (Alto).
23
Page 52

Antes de llamar para solicitar servicio…
Problema Causas posibles Qué hacer
No aparecen números en La secadora monitorea • Esto es normal. Cuando la secadora detecta un nivel
la pantalla durante el ciclo, constantemente la cantidad bajo de humedad en la carga, la secadora mostrará
sólo luces de humedad en la ropa el tiempo restante de secado.
El tiempo restante El tiempo estimado podría • Esto es normal.
ha saltado a un número cambiar si seca una carga
inferior menor a la normal
No puede realizar una El NIVEL DE SECADO, • Esto es normal.
selección y la secadora la TEMPERATURA o la OPCIÓN
activa la alarma sonora que intenta seleccionar es
dos veces incompatible con el ciclo
de secado que ha escogido
La secadora se encuentra Se ha escogido la opción • Esto es normal. Durante el secado prolongado,
funcionando, pero el tiempo EXTEND TUMBLE (Prolongar no se muestra el tiempo restante. La opción de secado
restante muestra 00 secado) prolongado tarda 20 minutos aproximadamente.
Mensaje “Clean Lint Filter” Se activó el botón POWER • Presione START para iniciar un ciclo de secado
(Limpie filtro de pelusa) y desaparecerá el mensaje.
La secadora no calienta Fusible quemado/disyuntor • Revise la caja de fusibles/disyuntores y reemplace ambos
desconectado; es posible que fusibles y reconecte ambos disyuntores. Es posible que
la secadora gire sin calentar la secadora gire si únicamente un fusible se ha quemado
o un solo disyuntor ha saltado.
Se ha cortado el suministro • Asegúrese que la válvula de cierre en la secadora
de gas y la válvula maestra está completamente abierta.
El tanque de suministro de gas LP • Rellene o reemplace el tanque. La secadora se deberá
está vacío o se ha producido una calentar cuando se reestablezca el servicio de gas.
interrupción en el servicio de gas
natural (en los modelos a gas)
Plazos de secado Tipo de calor • Los plazos de secado automático pueden variar según
inconsistentes el tipo de calor utilizado. Se ha cambiado recientemente
de una secadora eléctrica a una a base de gas (natural
o LP), o viceversa, el tiempo de secado podría ser diferente.
Tipo de carga y condiciones • El tamaño de la carga, tipos de telas, humedad de
de secado la ropa y longitud y condición del sistema de escape
afectará los tiempos de secado.
Brillo en la parte trasera Calentadores detrás del tambor • Esto es normal. Bajo ciertas condiciones de secado
del tambor e iluminación ambiental de la habitación, el brillo de
los calentadores podría ser visibles en la parte trasera
del tambor.
Las prendas aún Se abrió la puerta a la mitad del • Se debe volver a seleccionar un ciclo de secado cada vez
se encuentran húmedas ciclo. Luego se procedío a retirar que se coloca una carga nueva.
y la secadora se apaga la carga de la secadora y se colocó
después de un tiempo corto una carga nueva sin seleccionar
un ciclo nuevo
Carga pequeña • Cuando seque 3 o menos prendas, escoja SPEED DRY
o TIMED DRY.
La carga ya se encontraba seca a • Escoja SPEED DRY o TIMED DRY para secar los cuellos
excepción de los cuellos y pretinas y pretinas que estén húmedos. En el futuro, al secar
una carga que contenga cuellos y pretinas, escoja
MORE DRY.
La secadora no está nivelada • Mueva la secadora a un área con piso nivelado o ajuste
las patas niveladoras como sea necesario hasta que
se encuentre nivelada.
24
Page 53

Antes de llamar para solicitar servicio…
GEAppliances.com
Problema Causas posibles Qué hacer
Las prendas están Sobresecado • Seleccione un plazo de secado más breve.
arrugadas
el ajuste a LESS DRY (MENOS SECO) o DAMP
(SECADO HÚMEDO).
Las prendas permanecen en • Retire las prendas cuando finaliza el ciclo y doble
la secadora después que ha o cuélguelas inmediatamente, o utilice la opción
terminado el ciclo EXTEND TUMBLE.
Sobrecarga • Separe las cargas más grandes en más pequeñas.
Las prendas se encogen Algunas telas se encogen de • Para evitar encoger las prendas, siga las instrucciones
manera natural cuando se lavan. de las etiquetas exactamente.
no la lave a máquina ni la seque con giro.
Manchas de grasa Uso inapropiado de suavizador • Siga las direcciones en el envase del suavizador de telas.
en la ropa de telas
Secado de artículos sucios • Utilice su secadora para secar únicamente artículos
con limpios limpios. Los artículos sucios pueden manchar
los artículos limpios y la secadora.
Las prendas no están • Algunas manchas que no se pueden ver cuando
completamente limpias las prendas están mojadas aparecen después del secado.
Utilice procedimientos apropiados de lavado antes
del secado.
• Retire las prendas mientras están húmedas. Programe
Otras pueden lavarse sin
problemas, pero se encogerán
en la secadora
• Si tiene dudas sobre si una prenda en particular encogerá,
• Algunas prendas pueden plancharse nuevamente
a su forma original después de secarlas.
Pelusa en las prendas El filtro de pelusa está lleno • Limpie el filtro antes de cada carga.
Clasificación incorrecta • Clasifique las prendas que producen pelusa (como
felpilla) de las prendas que juntan pelusa (como la pana).
La electricidad estática puede • Consulte las sugerencias en esta sección bajo ESTÁTICA.
atraer pelusa
Sobrecarga • Separe las cargas más grandes en menor tamaño.
Papel, servilletas, etc., quedan • Vacie todos los bolsillos antes de lavar la ropa.
dentro de los bolsillos de la ropa
Ocurre estática No se utilizó ningún tipo • Intente utilizar un suavizador de telas.
aprobado para ser usado con todas las Secadoras GE
y cuando se usen de acuerdo con las instrucciones
del fabricante.
Sobresecado • Intente utilizar un suavizador de telas.
• Programe el ajuste a LESS DRY (MENOS SECO)
o DAMP DRY (SECADO HÚMEDO).
Artículos sintéticos, planchado • Intente utilizar un suavizador de telas.
permanente y combinaciones
pueden causar estática
Los cuellos y pretinas El monitor de sequedad detecta • Escoja SPEED DRY o TIMED DRY para secar dejando
aún se encuentran que el cuerpo de las prendas húmedos los cuellos y pretinas. En el futuro, cuando
húmedos al final del ciclo está seco seque una carga con cuellos y pretinas, escoja MORE DRY.
de suavizador de telas
• Bounce® Fabric Conditioner Dryer Sheets ha sido
Pequeña variación del Esto es normal. • Debido a las propiedades metálicas de la pintura utilizada
color metálico. con este producto único, pueden ocurrir pequeñas
variaciones de color debido ángulos de visualización y
condiciones de iluminación.
25
Page 54

Antes de llamar para solicitar servicio…
Problema Causas posibles Qué hacer
Durante un ciclo de vapor El vapor se condensa en • Esto es normal.
no pueden verse las la puerta interna.
prendas porque la puerta
está muy cubierta por
vapor.
Se ve agua dentro de la El vapor se condensa • Esto es normal.
puerta y sobre el filtro de sobre estas superficies.
pelusa cuando se abre la
puerta después del ciclo de
vapor
Pequeñas áreas de las El vapor se condensa en • Si va a utilizar el ciclo STEAM DEWRINKLE (estirar por vapor),
prendas se encuentran el tambor interno. reduzca manualmente el tiempo del ciclo. Si va a utilizar el ciclo
húmedas después del ciclo garments to the load. STEAM REFRESH (renovación por vapor),
de vapor agregue más prendas a la carga.
Hay una pequeña cantidad Tamaño de carga inadecuado • Si va a utilizar el ciclo STEAM DEWRINKLE (estirar por vapor),
de agua sobre el piso para el ciclo de vapor seleccionado, reduzca manualmente el tiempo del ciclo. Si va a utilizar el ciclo
frente a la secadora. el vapor excedente se condensa STEAM REFRESH (renovación por vapor), agregue más prendas
dentro del gabinete y se escapa. a la carga
Hay agua en el piso en la La conexión de manguera • Ajuste la conexión.
parte trasera de la de agua a la válvula se
secadora encuentra floja.
La manguera no cuenta con la • Instale la arandela de goma provista con la manguera.
arandela de goma en la
conexión con la válvula.
Cae agua de la puerta El vapor se condensa en • Esto es normal.
cuando se la abre después la puerta interna.
de un ciclo de vapor.
No puede verse vapor al El vapor se libera en un • Esto es normal.
comienzo del ciclo momento diferente en el ciclo.
Las prendas siguen Demasiadas prendas. • Cargue menos prendas; incremente el tiempo manualmente.
arrugadas después de
ciclo de vapor
No se ve vapor en La boquilla de vapor puede estar • Llame al 800.GE.CARES para solicitar el kit de reemplazo de
ningún momento bloqueada con suciedad boquilla WE25M71 o para solicitar un técnico que lo reemplace
durante el ciclo proveniente del suministro de agua por usted.
La secadora sigue Se seleccionó el secado • Asegúrese de que la opción de secado prolongado no esté
girando después de que prolongado. seleccionada. Para el ciclo STEAM REFRESH (renovación por
la pantalla indica vapor), se accionará automáticamente el secado
“Complete” (finalización). prolongado y no podrá apagarse.
26
Page 55

Garantía de la secadora GE.
Todos los servicios de garantía se ofrecen a través de
nuestros centros de asistencia técnica o un técnico
autorizado de Customer Care®. Para programar servicio de
asistencia técnica, en línea, visite la página geappliances.
com o llame al 800.GE.CARES (1.800.432.2737).
Cuando llame para solicitar servicio, por favor tenga a mano
el número de serie y el número de modelo.
Por el período de: GE reemplazará:
Un año Cualquier parte de la secadora que falle debido a defectos en los materiales o en la fabricación.
De la fecha de la Durante esta garantía limitada de un año, GE también proporcionará, sin costo alguno,
compra original toda la mano de obra y servicios relacionados con el reemplazo de las partes defectuosas.
Lo que no está cubierto:
Engrape el recibo aquí.
Se necesita el comprobante
con la fecha de compra original
para que la garantía cubra
los servicios.
n Viajes del personal de servicio a su casa para enseñarle
cómo usar su producto.
n Instalación, entrega o mantenimiento inapropiada.
n Fallas del producto si es maltratado, mal usado, o usado
para un propósito diferente del que se creó o si es usado
para usos comerciales.
n Cambio de los fusibles de su casa o reajuste del circuito
de interruptores.
n Daños al producto causados por accidentes, incendios,
inundaciones o actos de la naturaleza.
n Daños imprevistos resultantes causados por posibles
defectos con este electrodoméstico.
n Daños causados después del envío.
n Producto no accesible para facilitar el servicio requerido.
EXCLUSIÓN DE GARANTÍAS IMPLÍCITAS—Su único y exclusivo derecho es la reparación del producto,
tal y como se indica en esta Garantía limitada. Cualquier garantía implícita, incluyendo las garantías
implícitas de comerciabilidad o adecuación para un fin determinado, están limitadas a un año o el período
de tiempo más breve permitido por la ley.
Esta garantía se extiende al comprador original y a cualquier propietario subsecuente para productos
comprados para uso doméstico dentro Estados Unidos. Si el producto está situado en un área que no dispone
de servicio por parte de un proveedor de servicio autorizado de GE, podría tener que hacerse cargo de
los costes de envío o bien podría solicitársele que lleve el producto a un centro de servicio de GE autorizado
para realizar la reparación. En Alaska, la garantía excluye el costo de envío o las visitas de servicio a su casa.
Algunos estados no permiten la exclusión o limitación de daños imprevistos. Esta garantía le da sus derechos
legales específicos, y es posible que usted tenga otros derechos legales que varian de estado a estado. Para
informarse de cuáles son sus derechos legales, consulte a su oficina de asuntos del consumidor local o estatal
o póngase en contacto con la Oficina de su Procurador General.
Garante: General Electric Company. Louisville, KY 40225
27
Page 56

Soporte al consumidor.
Página Web de GE Appliances GEAppliances.com
¿Tiene alguna pregunta sobre su electrodoméstico? ¡Pruebe la página Web de GE Appliances, cualquier día
del año! Para mayor conveniencia y servicio más rápido, ya puede descargar los Manuales de los Propietarios,
pedir piezas o incluso hacer una cita en línea para que vengan a realizar una reparación.
Solicite una reparación GEAppliances.com
El servicio de expertos GE está a tan sólo un paso de su puerta. ¡Entre en línea y solicite su reparación cuando
le venga cualquier día del año! O llame al 800.GE.CARES (800.432.2737) durante horas normales de oficina.
Real Life Design Studio (Estudio de diseño para la vida real)
GE apoya el concepto de Diseño Universal—productos, servicios y ambientes que pueden usar gente de
todas las edades, tamaños y capacidades. Reconocemos la necesidad de diseñar para una gran gama de
habilidades y dificultades físicas y mentales. Para más detalles cobre las aplicaciones de GE Diseño Universal,
incluyendo ideas de diseño para la cocina para personas con discapacidades, mire nuestra página Web hoy
mismo.
Para personas con dificultades auditivas, favor de llamar al 800.TDD.GEAC (800.833.4322).
GEAppliances.com
Garantías ampliadas GEAppliances.com
Compre una garantía ampliada y obtenga detalles sobre descuentos especiales disponibles mientras
su garantía está aún activa. Puede comprarla en línea en cualquier momento, o llamar al 800.626.2224
durante horas normales de oficina. GE Consumer Home Services estará aún ahí cuando su garantía termine.
Piezas y accesorios GEAppliances.com
Aquellos individuos con la calificación necesaria para reparar sus propios electrodomésticos pueden
pedir que se les manden las piezas o accesorios directamente a sus hogares (aceptamos las tarjetas VISA,
MasterCard y Discover). Haga su pedido en línea hoy, 24 horas cada día o llamar por teléfono al 800.626.2002
durante horas normales de oficina.
Las instrucciones descritas en este manual cubren los procedimientos a seguir por cualquier usuario. Cualquier
otra reparación debería, por regla general, referirse a personal calificado autorizado. Debe ejercerse precaución ya
que las reparaciones incorrectas pueden causar condiciones de funcionamiento inseguras.
Póngase en contacto con nosotros GEAppliances.com
Si no está satisfecho con el servicio que recibe de GE, póngase en contacto con nosotros en nuestra página Web
indicando todos los detalles así como su número de teléfono o escríbanos a:
General Manager, Customer Relations
GE Appliances, Appliance Park
Louisville, KY 40225
Registre su electrodoméstico GEAppliances.com
¡Registre su nuevo electrodoméstico en línea —cuando usted prefiera! El registrar su producto a tiempo
le proporcionará, si surgiera la necesidad, una mejor comunicación y un servicio más rápido bajo los términos
de su garantía. También puede enviar su tarjeta de registro pre-impresa que se incluye en el material
de embalaje.
Impreso en Canadá
 Loading...