

Page 1
GE
Security
GEC-EVR/GEC-EVR-DN
User Manual
Page 2

Copyright Copyright © 2008, GE Security, Inc. All rights reserved.
This document may not be copied in whole or in part or otherwise reproduced without prior written consent from GE Security
except where specifically permitted under US and international
copyright law.
Document number/revision: 1056610A_EN (March 2008).
Disclaimer The information in this document is subject to change without
notice. GE Security, Inc. (“GE Security”) assumes no responsibility
for inaccuracies or omissions and specifically disclaims any
liabilities, losses, or risks, personal or otherwise, incurred as a
consequence, directly or indirectly, of the use or application of
any of the contents of this document. For the latest documentation, contact your local supplier or visit us online at www.gesecu-
rity.eu.
This publication may contain examples of screen captures and
reports used in daily operations. Examples may include fictitious
names of individuals and companies. Any similarity to names
and addresses of actual businesses or persons is entirely coincidental.
Trademarks
and patents
GE and the GE monogram are registered trademarks of General
Electric Company.
GEC-EVR/GEC-EVR-DN product and logo are registered trademarks of GE Security.
Other trade names used in this document may be trademarks or
registered trademarks of the manufacturers or vendors of the
respective products.
Software
license
agreement
Important: This end-user license agreement (“Agreement”) is a
legal agreement between GE Security and you. Read the
following terms and conditions carefully before installing or
using this software. This agreement provides a license from
GE Security to use the software. It also contains warranty information, disclaimers, and liability limitations. Installing and/or
using the software confirms your agreement to be bound by
these terms and conditions. If you do not agree with these terms
and conditions, do not install or use the software or, if already
installed, immediately cease all use of the software and
promptly uninstall all components of the software.
1. License. In this Agreement, you, the purchaser of the
rights granted by this Agreement, are referred to as You or
Your, whether an individual or a business entity of any kind.
Subject to the terms and conditions of this Agreement, GE
Security, Inc., a Delaware corporation, (“GE Security”) grants
You a nonexclusive license to use the accompanying software (including any upgrades, modified versions, updates,
additions and copies of the software furnished to You
during the term of the Agreement) (“Software”), and all
associated media, printed materials, and electronic documentation accompanying the Software (“Documentation”),
but only in the country where acquired from your supplier
and/or authorized reseller (“Supplier”). In this Agreement,
the Software and Documentation are referred to as the
Licensed Product.
Page 3

iii
All rights to and in the Licensed Product, including, but not
limited to, copyrights, patents, trademarks, and trade secrets,
belong to GE Security, and GE Security retains title to each copy
of the Software. You may only install and use the Software on a
single computer, workstation, or terminal (“Computing Device”)
at one time, unless You have purchased additional copies of the
Software, in which case You may install the software on the
number of Computing Devices for which You have purchased
copies of the Software. You may not use the Software over a
computer network. You may not transfer or distribute the
Licensed Product to others, in electronic format or otherwise,
and this Agreement shall automatically terminate in the event of
such a transfer or distribution. You may not sell, rent, lease, or
sublicense the Software. You may not copy or modify the
Licensed Product for any purpose, including for backup
purposes.
You may use the original copy of the Software provided to You
for backup purposes. You agree that GE Security at any time,
upon reasonable notice, may audit Your use of the Software for
compliance with the terms and conditions of this Agreement.
2. Term. This Agreement is effective until terminated. You
may terminate this Agreement by uninstalling all components of the Software from all Computing Devices and
returning the Licensed Product to GE Security. GE Security
may terminate this Agreement if You breach any of these
terms and conditions. Upon termination of this Agreement
for any reason, You agree to uninstall all components of the
Software and return the Licensed Product to GE Security. All
provisions of this Agreement relating to (i) disclaimer of
warranties; (ii) limitations on liability, remedies, and
damages; and (iii) GE Security’s proprietary rights, shall
survive termination of this Agreement.
3. Object code. The Software is delivered in object code
only. You may not alter, merge, modify, adapt, or translate
the Software, nor decompile, disassemble, reverse-engineer, or otherwise reduce the Software to a human-perceivable form, nor create derivative works or programs based
on the Software.
4. Limited warranty. GE Security warrants that for one (1)
year from the date of delivery of the Licensed Product (Software Warranty Period), the functions contained in the Software will be fit for their intended purpose as described in
the applicable Documentation from GE Security, and will
conform in all material respects to the specifications stated
in such Documentation.
Page 4

GEC-EVR/GEC-EVR-DN
User Manual
iv
GE Security does not warrant that the operation of the Software
will be uninterrupted or error-free. GE Security does warrant that
the media on which the Software is furnished will be free from
defects in materials and workmanship under normal use for a
period of thirty (30) days from the date of delivery (Media
Warranty Period). Except as specifically provided therein, any
other software and any hardware furnished with or accompanying the Software is not warranted by GE Security. Your exclusive remedy under this limited warranty for nonconforming
Software shall be repair or replacement of the Software, in the
sole discretion of GE Security. To obtain a repair or replacement
of nonconforming Software, contact GE Security Customer
Service toll free at 888-GESECURity or online at www.gesecu-
rity.com during the Software Warranty Period. Your exclusive
remedy under this limited warranty for defective media is
replacement of the defective media. To receive replacement
media under this limited warranty, return the defective media to
Supplier during the Media Warranty Period, with proof of
payment.
Except as expressly provided above, the licensed product is
provided “as is” without warranty of any kind, either expressed
or implied, including, but not limited to, implied warranties of
merchantability or fitness for a particular purpose and, except
as expressly provided above, you assume the entire risk as to the
quality and performance of the licensed product.
5. Limitation of liability. GE Security’s sole obligation or
liability under this agreement is the repair or replacement
of nonconforming software and/or defective media
according to the limited warranty above. In no event will
GE Security be liable for any damages, whether consequential, incidental, or indirect, nor for any loss of data, loss of
profits, or lost savings, arising out of use of or inability to
use the software or documentation (or any hardware
furnished with the software), even if GE Security has been
advised of the possibility of such damages, nor for any
claim by any third party.
6. General. Any hardware provided to You by GE Security
shall not be exported or reexported in violation of any
export provisions of the United States or any other applicable jurisdiction. Any attempt to sublicense, assign, or
transfer any of the rights, duties, or obligations hereunder
shall be void. This Agreement shall be governed by and
interpreted under the laws of the State of New York, United
States of America, without regard to conflicts of law provisions. You hereby consent to the exclusive jurisdiction of the
state and federal courts located in Multnomah County,
Oregon, to resolve any disputes arising under or in connection with this Agreement, with venue in Portland, Oregon.
Page 5

v
Restricted rights legend. The Licensed Product is provided
with restricted rights. In the event the United States Government or an agency thereof is granted a license, the
following additional terms apply: Restricted Computer Software, as defined in the Commercial Computer Software–
Restricted Rights clause at Federal Acquisition Regulations
52.227-19, and the restrictions as provided in subparagraphs (c)(1) and (c)(2) thereof; and as applicable, the
Government’s rights to use, modify, reproduce, release,
perform, display, or disclose the Software also are restricted
as provided by paragraphs (b)(2) and (b)(3) of the Rights in
Noncommercial Technical Data and Computer Software–
Small Business Innovative Research (SBIR) Program clause
at DFARS 252.227-7018.
You acknowledge that you have read and understand this
agreement and agree to be bound by its terms. You further
agree that this agreement is the complete and exclusive
statement of the agreement between you and GE Security,
and supersedes any proposal or prior agreement, oral or
written, and any other communication relating to the
subject matter of this agreement.
Intended use Use this product only for the purpose it was designed for; refer to
the data sheet and user documentation. For the latest product
information, contact your local supplier or visit us online at
www.gesecurity.eu.
FCC compliance This equipment has been tested and found to comply with the
limits for a Class A digital device, pursuant to part 15 of the FCC
Rules. These limits are designed to provide reasonable protection against harmful interference when the equipment is operated in a commercial environment. This equipment generates,
uses, and can radiate radio frequency energy and, if not
installed and used in accordance with the instruction manual,
may cause harmful interference to radio communications.
You are cautioned that any changes or modifications not
expressly approved by the party responsible for compliance
could void the user’s authority to operate the equipment.
European Union
directives
The European directive "Waste Electrical and Electronic Equipment" (WEEE) aims to minimise the impact of electrical and electronic equipment waste on the environment and human health.
To conform with this directive, electrical equipment marked with
this symbol must not be disposed of in European public disposal
systems. European users of electrical equipment must now
return end-of-life equipment for disposal. Further information
can be found on the following website: www.recyclethis.info.
European representative for manufacture (EMC): GE Security B.V.,
Kelvinstraat 7, 6003 DH Weert, The Netherlands
Page 6

GEC-EVR/GEC-EVR-DN
User Manual
vi
Page 7

vii
Contents
Preface . . . . . . . . . . . . . . . . . . . . . . . . . . . . . . . . . . . . . . 1
Conventions used in this document . . . . . . . . . . .3
Safety terms and symbols. . . . . . . . . . . . . . . . . . . .4
Chapter 1. Introduction . . . . . . . . . . . . . . . . . .5
Product overview . . . . . . . . . . . . . . . . . . . . . . . . . . . . . 6
Autoiris lens connector . . . . . . . . . . . . . . . . . . . . . . .8
Chapter 2. Controls . . . . . . . . . . . . . . . . . . . . .11
Controls . . . . . . . . . . . . . . . . . . . . . . . . . . . . . . . . . . . . 12
Onboard controls . . . . . . . . . . . . . . . . . . . . . . . . . . 12
PC configuration . . . . . . . . . . . . . . . . . . . . . . . . . . . 13
Chapter 3. Menus . . . . . . . . . . . . . . . . . . . . . . .17
Setup menus . . . . . . . . . . . . . . . . . . . . . . . . . . . . . . . . 18
Main menu . . . . . . . . . . . . . . . . . . . . . . . . . . . . . . . . 18
Camera ID. . . . . . . . . . . . . . . . . . . . . . . . . . . . . . . . . 20
Light control . . . . . . . . . . . . . . . . . . . . . . . . . . . . . . . 22
Day/night control . . . . . . . . . . . . . . . . . . . . . . . . . . 28
White balance . . . . . . . . . . . . . . . . . . . . . . . . . . . . . 31
Picture control . . . . . . . . . . . . . . . . . . . . . . . . . . . . . 32
Page 8

GEC-EVR1/GEC-EVR1-DN
User Manual
viii
Focus adjustment . . . . . . . . . . . . . . . . . . . . . . . . . . 35
Misc . . . . . . . . . . . . . . . . . . . . . . . . . . . . . . . . . . . . . . . 36
Chapter 4. Support . . . . . . . . . . . . . . . . . . . . . 43
Contacting technical support. . . . . . . . . . . . . . . . . 44
Online publication library . . . . . . . . . . . . . . . . . . . 45
Page 9

1
Preface
This is the User Manual for:
•GEC-EVR1
•GEC-EVR1-P
• GEC-EVR1-DN
• GEC-EVR1-DNP
•GEC-EVR2
•GEC-EVR2-P
• GEC-EVR2-DN
• GEC-EVR2-DNP
This document includes an overview of the
product and detailed instructions explaining:
• how to connect the camera; and
• how to program the camera.
There is also information describing how to
contact technical support if you have questions
or concerns.
Page 10

GEC-EVR/GEC-EVR-DN
User Manual
2
To use this document effectively, you should
have the following minimum qualifications:
• a basic knowledge of CCTV systems and
components; and
• a basic knowledge of electrical wiring
and low-voltage electrical connections.
Read these instructions and all ancillary
documentation entirely before installing or
operating this product. The most current versions
of this and related documentation may be found
on our website. Refer to Contacting technical
support on page 44 for instructions on accessing
our online publication library.
Note: A qualified service person, complying with all
applicable codes, should perform all required
hardware installation.
Page 11

3
Conventions used in this document
The following conventions are used in this
document:
Bold Menu items and buttons.
Italic Emphasis of an instruction or point;
special terms.
File names, path names, windows,
panes, tabs, fields, variables, and
other GUI elements.
Titles of books and documents.
Blue italic (Electronic version.) Hyperlinks to
cross-references, related topics, and
URL addresses.
Monospace Text that displays on the screen.
Programming or coding sequences.
Page 12
GEC-EVR/GEC-EVR-DN
User Manual
4
Safety terms and symbols
These terms may appear in this manual:
CAUTION: Cautions identify conditions or
practices that may result in damage to the
equipment or other property.
WARNING: Warnings identify conditions or
practices that could result in equipment
damage or serious personal injury.
Page 13

Chapter 1 Introduction
This chapter provides an overview of your
GEC-EVR/GEC-EVR-DN, including
minimum hardware/software requirements
and steps you need to perform before you
begin installing, configuring, and using
your video camera.
In this chapter:
Product overview . . . . . . . . . . . . . . . .6
Autoiris lens connector . . . . . . . .8
Page 14

GEC-EVR/GEC-EVR-DN
User Manual
6
Product overview
This color CCD video camera series employs a
1/3-inch charge-coupled device (CCD) solidstate imaging device with 470k/410k picture
elements, and is equipped with a newly
developed digital signal processor (DSP) for
processing the video signals.
The camera records im ages at 768 x 494 (NTSC)
or 752 x 582 (PAL).
A micro-controller is also introduced to provide
high quality, high color reproduction, and a
sharp, crisp picture.
Page 15
Chapter 1
Introduction
7
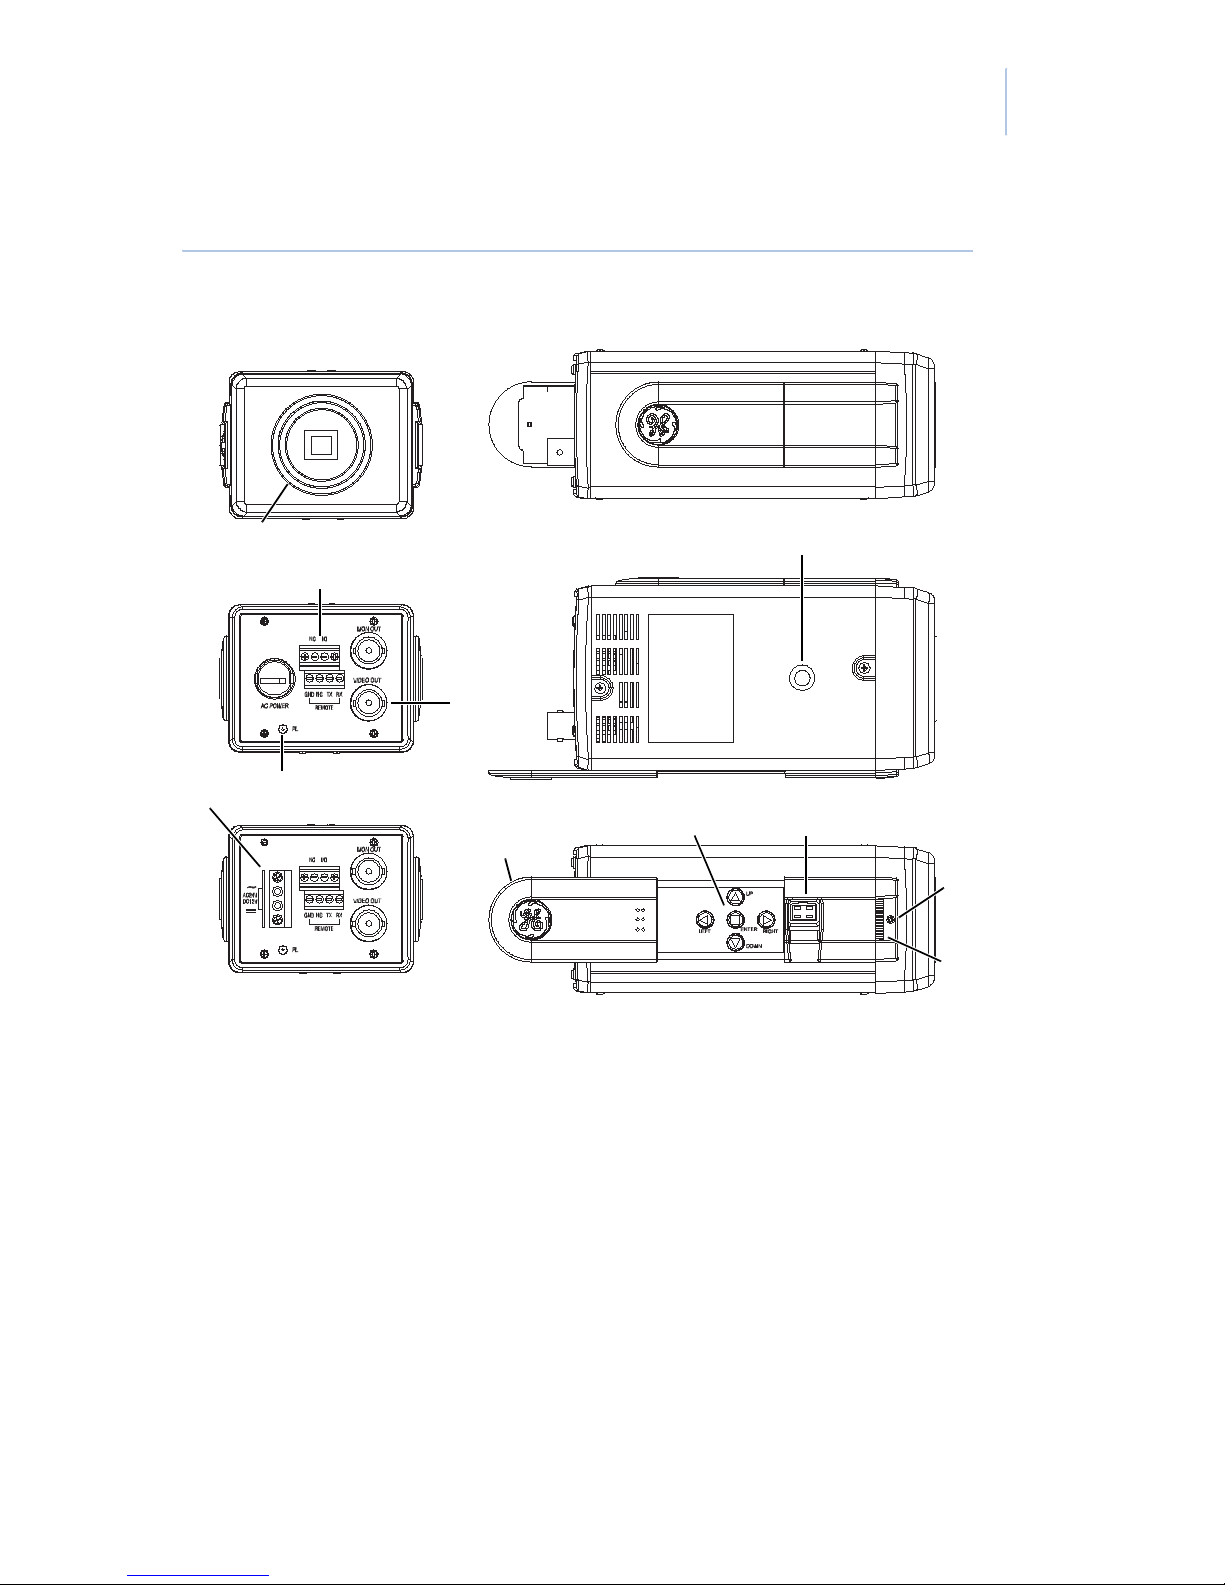
Figure 1. Camera overview
A
C (CS) mount adapter. If a CS-mounted lens is used,
remove the C mounting ring.
B
Standard photographic pan head screw size (1/4
in. - 20).
C
Focal length locking screw.
D
Backfocus thumb wheel.
E
Autoiris lens connector. For more information, see
Autoiris lens connector on page 8.
A
B
C
D
E
F
G
H
I
J
K
Page 16

GEC-EVR/GEC-EVR-DN
User Manual
8
Autoiris lens connector
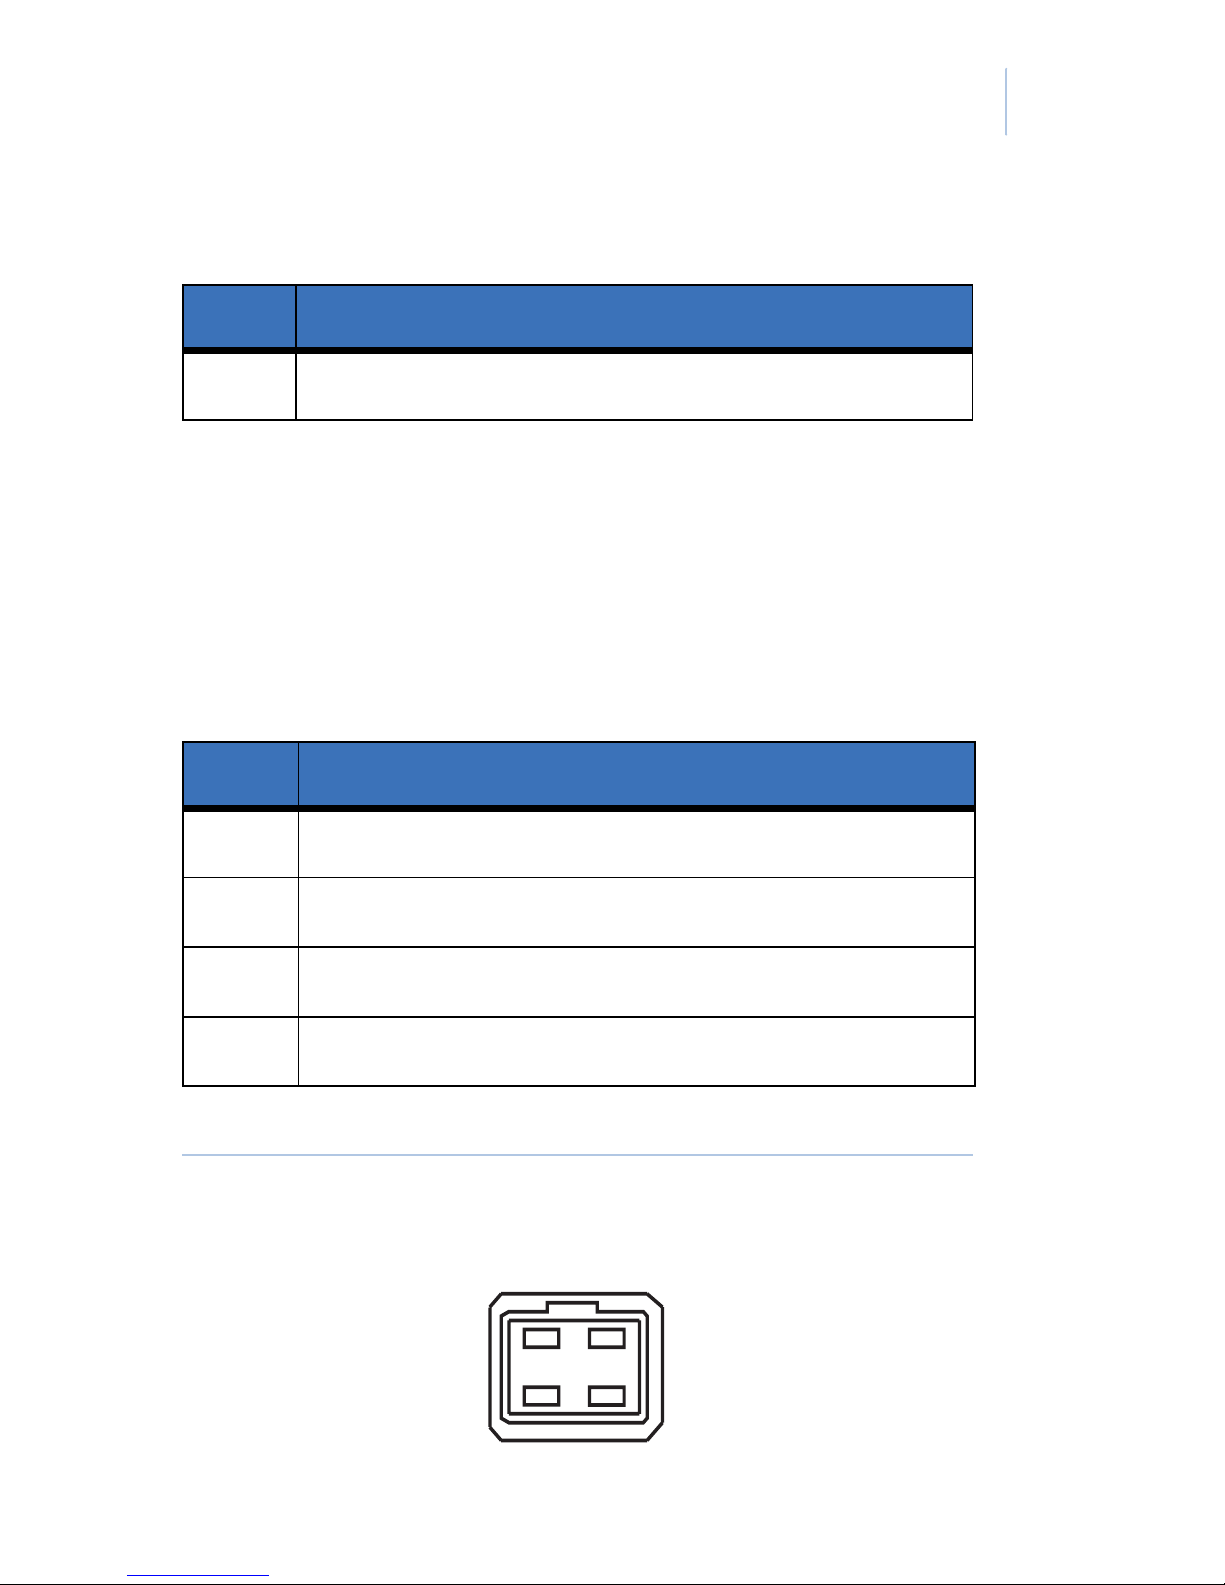
If your autoiris lens has a built-in EE amp (video
type), set the LIGHT CNTL to Video lens. With
this setting, the connector in Figure 2 on page 9
should be wired as shown in Table 1.
F
Video output terminal.
G
Onboard controls.
H
Slide out cover.
I
Power pilot LED.
J
GEC-EVR1(-P): 12 VDC/24 VAC block terminal. This
terminal accepts 12 VDC (nonparity) or 24 VAC.
GEC-EVR2(-P): These models accept 100 - 240 VAC.
K
OSD remote control connector.
Table 1. Built-in EE amp pinout
Pin Description
1Power (red)
2NC
3 Video (white)
Page 17
Chapter 1
Introduction
9
If your autoiris does not have a built-in EE amp
(DC type), set the LIGHT CNTL to DC lens.
With this setting, the connector in Figure 2
should be wired as shown in Table 2.
Figure 2. Autoiris pins
4Ground (black)
Table 2. No built-in EE amp pinout
Pin Description
1 Damping coil (+)
2 Damping coil (-)
3 Driving coil (+)
4 Driving coil (-)
Table 1. Built-in EE amp pinout
Pin Description
21
43
Page 18

GEC-EVR/GEC-EVR-DN
User Manual
10
Page 19

Chapter 2 Controls
This chapter provides an overview of your
video camera controls.
In this chapter:
Controls . . . . . . . . . . . . . . . . . . . . . .12
Onboard controls. . . . . . . . . . . .12
PC configuration . . . . . . . . . . . .13
Page 20

GEC-EVR/GEC-EVR-DN
User Manual
12
Controls
You can configure the camera through either the
onboard controls, or by an RS-232 conn ection to
a PC.
Onboard controls
Use the onboard up, down, left, right, and enter
buttons (Figure 3) to make selections on the
onscreen menus.
Figure 3. Onboard controls
Up
Right
Down
Left
Enter
Page 21

Chapter 2
Controls
13
PC configuration
To configure the camera with a PC, you’ll need
to connect them through an RS-232 connection.
Note: RS-232 cannot run longer than 15 m.
RS-232
T o connect the camera to an RS-232 cable, do the
following:
1. Connect the RX terminal to pin 3 on a
DB9 connector (Figure 4).
Figure 4. RS-232 connection
NC
GND NC TX RX
REMOTE
GND I/O
GND NC TX RX
REMOTE
GEC-EVR1(-P)/
GEC-EVR1-DN(P) /
GEC-EVR2(-P)
GEC-EVR2-DN(P)
Page 22

GEC-EVR/GEC-EVR-DN
User Manual
14
2. Connect the TX terminal to pin 2 on a
DB9 connector.
3. Connect the GND terminal to pin 5 on a
DB9 connector.
Note: The NC terminal does not connect to
anything.
PC
To configure the camera with a PC, do the
following:
1. Connect the DB9 connector to the serial
port (COM1) of your PC.
2. In a Windows 95/98/ME/2000/XP
system, insert the floppy disk that came
with the camera into the floppy disk
drive.
3. Click Start > Run > Browse. Navigate
to the disk drive, and double-click the
OSD_CONT.EXE file.
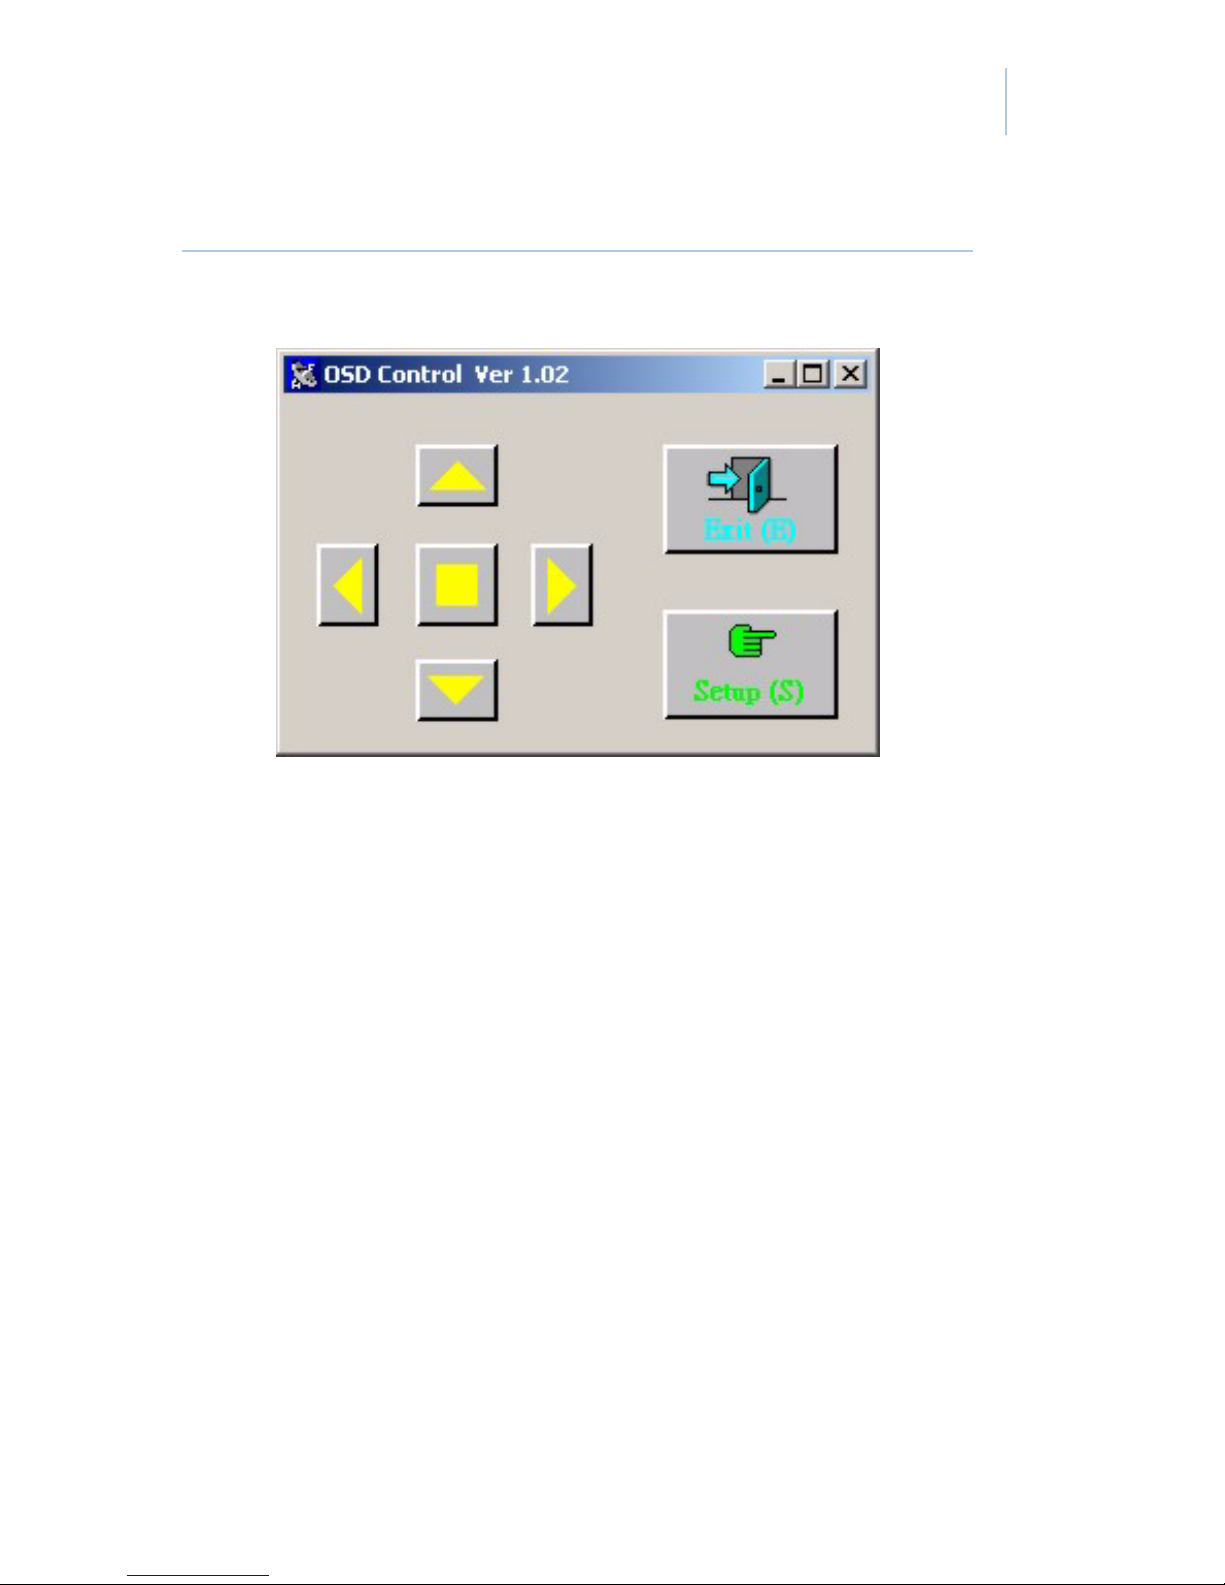
4. The OSD Control program will display
on your screen (Figure 5 on page 15).
Page 23
Chapter 2
Controls
15
Figure 5. The OSD program.
5. Click the center button to display the
Main Menu on the display monitor. Use
the arrow buttons or your PC’s keyboard
to navigate and select menu items.
6. Click on Exit to close the program.
Note: Try the following steps if the OSD Control
program doesn’t function as stated.
• Make sure the RS-232 cable is wired
correctly.
•Run the patch.exe program on the
provided floppy disk.
•Click on the Setup (S) button to make
sure the correct COM port is selected.
Page 24

GEC-EVR/GEC-EVR-DN
User Manual
16
I/O port
The I/O port can receive a signal from an
external device to switch between day or night
mode. For more information, see External day to
night menu on page 30.
Note: This is only for use with the GEC-EVR1-DN(P)
and GEC-EVR2-DN(P).
Page 25

Chapter 3 Menus
This chapter provides an overview of your
video camera menus.
In this chapter:
Setup menus . . . . . . . . . . . . . . . . . . .18
Main menu. . . . . . . . . . . . . . . . .18
Camera ID. . . . . . . . . . . . . . . . .20
Light control . . . . . . . . . . . . . . .22
Day/night control. . . . . . . . . . . .28
White balance . . . . . . . . . . . . . .31
Picture control. . . . . . . . . . . . . .32
Focus adjustment. . . . . . . . . . . .35
Misc . . . . . . . . . . . . . . . . . . . . . .36
Page 26

GEC-EVR/GEC-EVR-DN
User Manual
18
Setup menus
The camera is configured through the setup
menus which appear onscreen.
Main menu
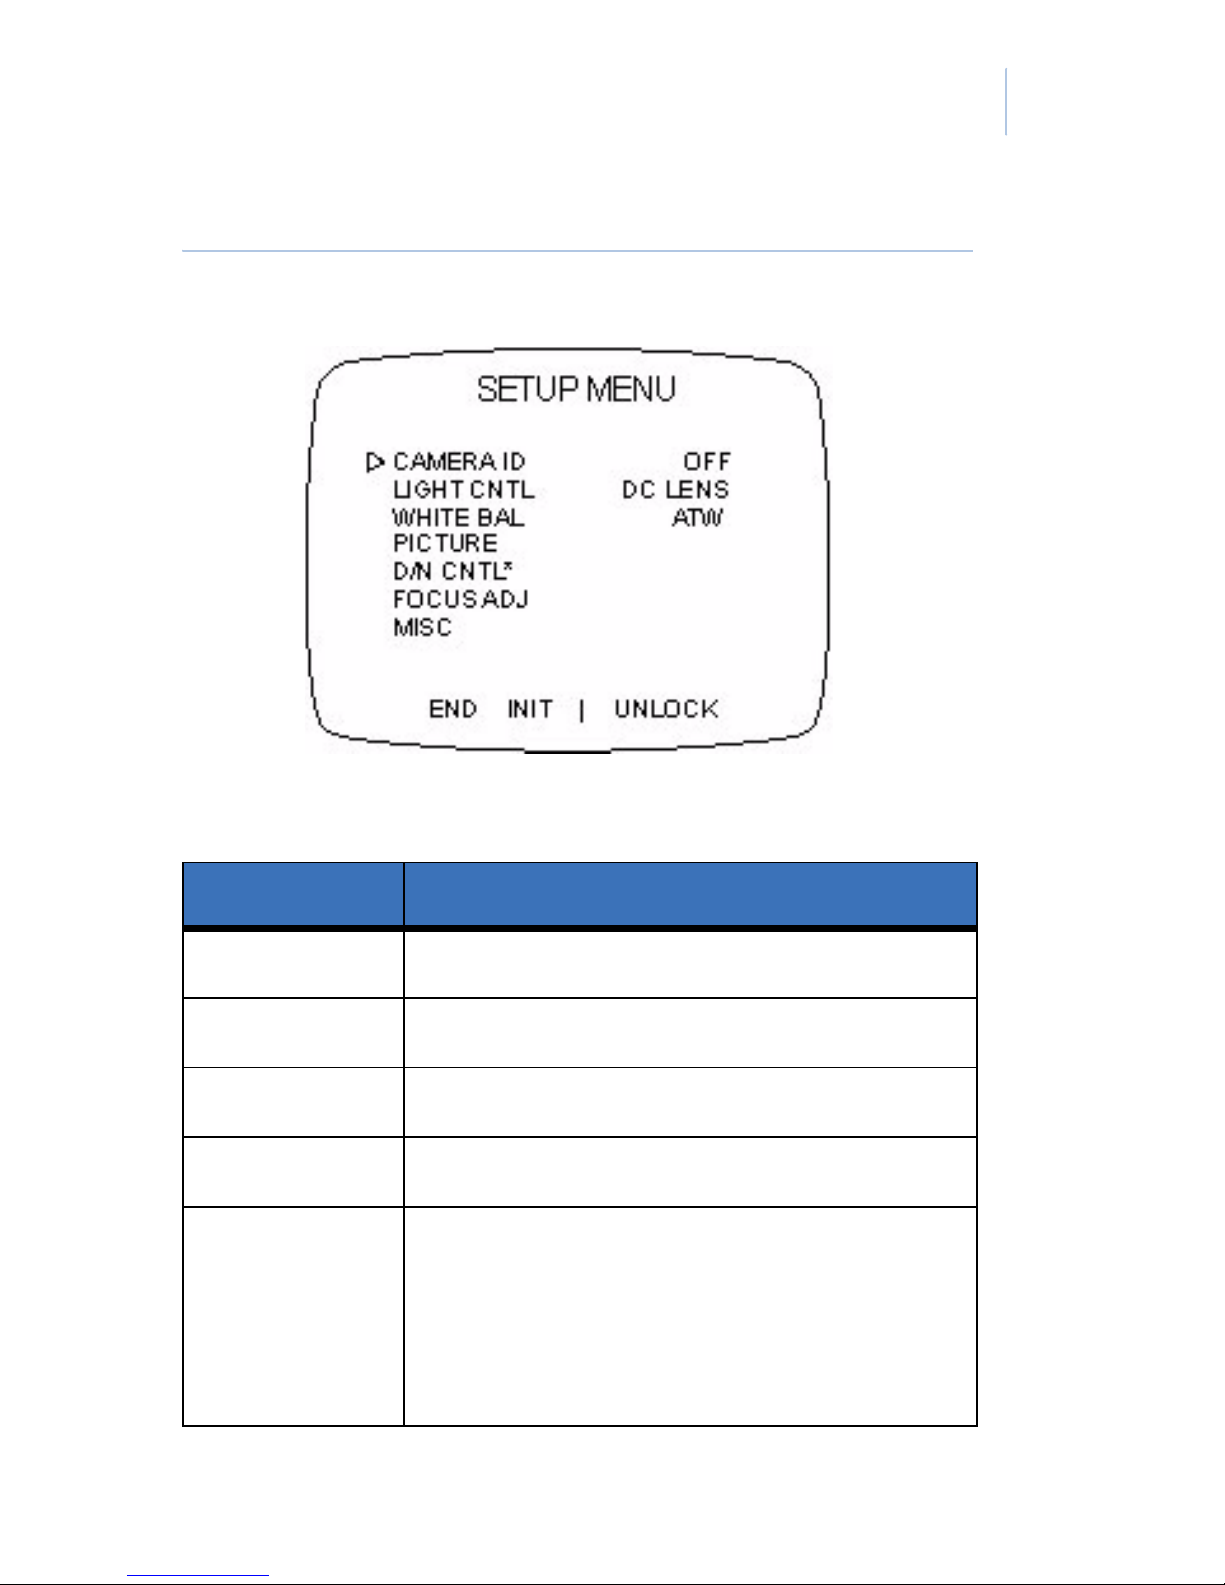
To access and navigate the main menu, press the
Enter button on the camera (Figure 1 on page 7
and Table 3 on page 19). Then you can use the
Up or Down keys to move between items, and
press Enter again to select the option (Figure 6
on page 19).
Page 27
Chapter 3
Menus
19
Figure 6. Main menu
Table 3. Main menu options
Menu option Description
Camera ID Camera identification.
Light cntl Options for light control.
White bal Options for white balance controls.
Picture Options for video display controls.
D/N cntl Options for day/night controls.
Note: This is only for use with the
GEC-EVR1-DN(P) and GECEVR2-DN(P).
Page 28

GEC-EVR/GEC-EVR-DN
User Manual
20
Note: If you don’t press a button for 2 minutes, your
changes are saved, and the camera returns to
its normal function.
Camera ID
You can set a camera ID to display on the
monitor ’s screen. To set the camera ID, do the
following:
Focus adj Focus adjustment screen.
Misc Adjust synchronization and lens
applications.
End Exits the menu.
Init Returns all settings to factory default.
Do this only when necessary.
(up arrow) Adjust menu positioning.
Unlock Lock or unlock the setup menu.
Note: To enter the unlock password,
press Up, Down, and Enter.
Table 3. Main menu options (continued)
Menu option Description
Page 29
Chapter 3
Menus
21
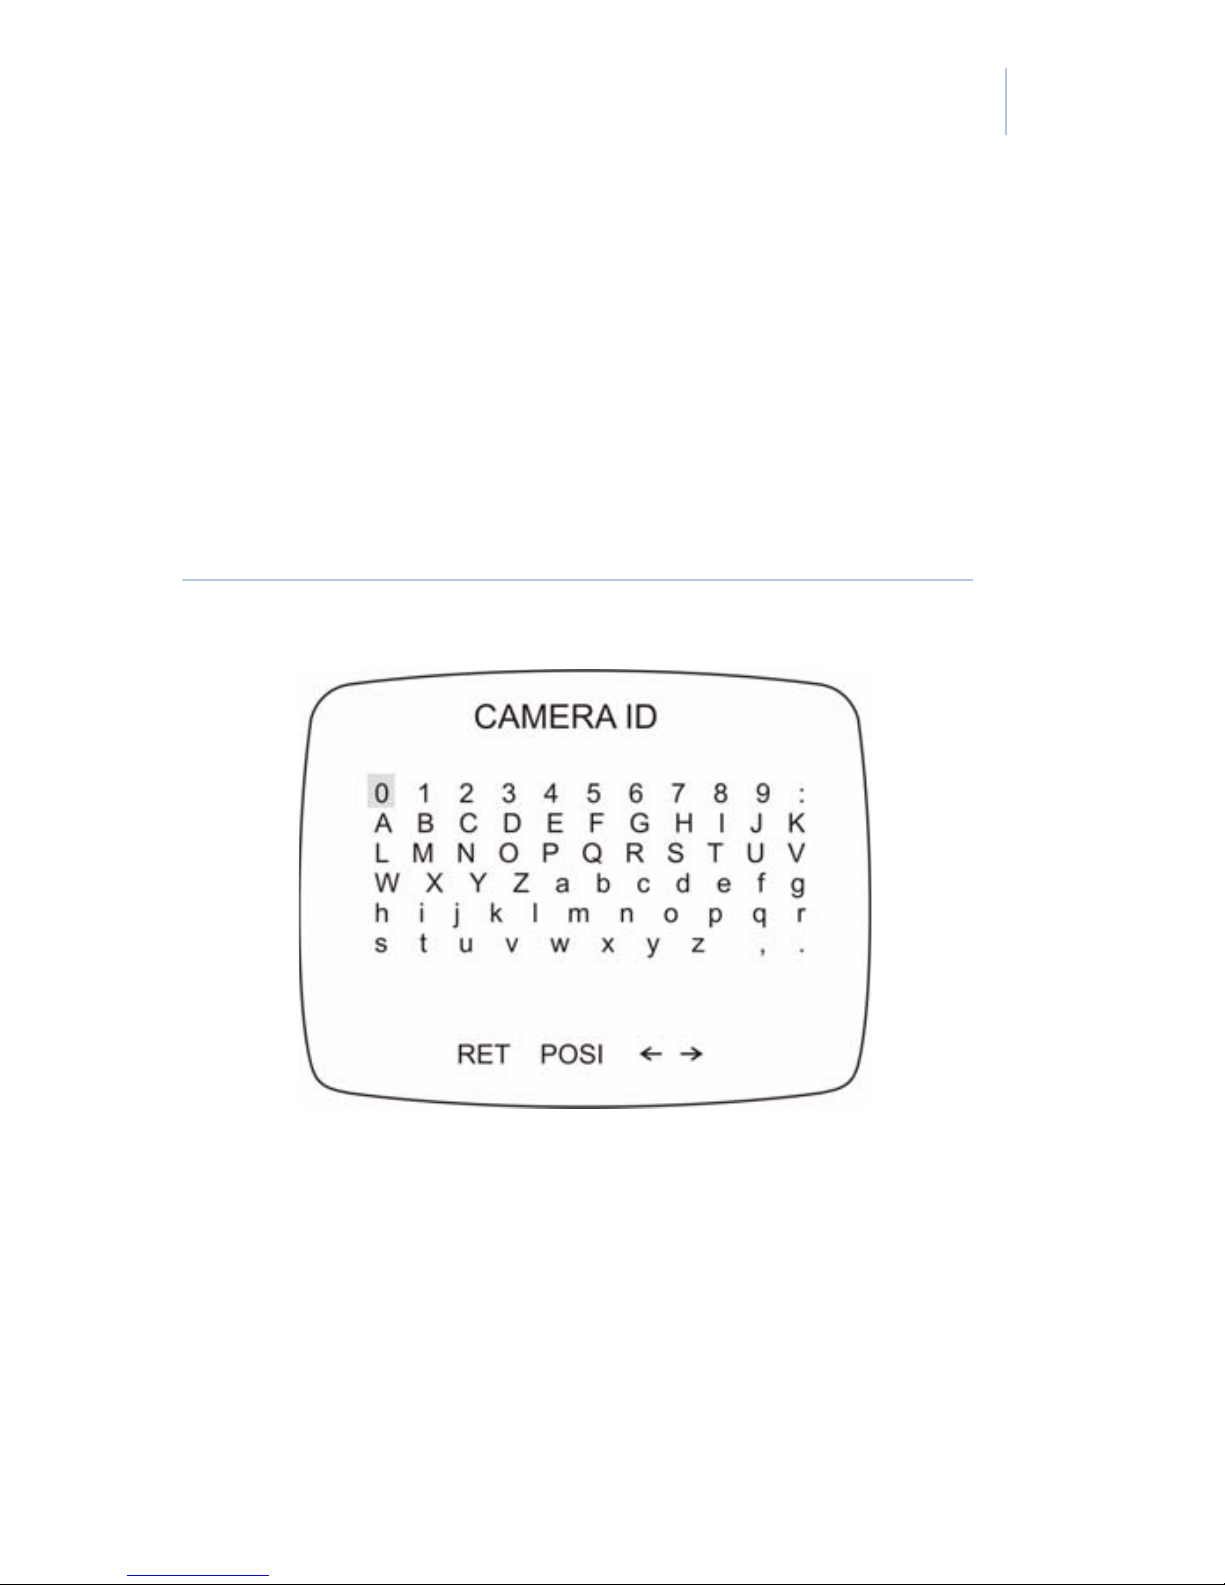
1. On the main menu, move the cursor to
Camera ID and press the Enter button.
2. Using the up, down, left, or right keys,
highlight the characters you want to
display. Press the Enter button to select
the characters (Figure 7).
Figure 7. Camera ID character selection
3. Press Left or Right to move and edit a
specific character in the editing area.
4. Use the blank character between the z
and , to delete the last character entered.
5. Select the Posi option to move the
position of the camera ID with the
Page 30

GEC-EVR/GEC-EVR-DN
User Manual
22
directional keys. When done, press
Enter.
6. When finished, select the Ret option to
return to the main menu.
Light control
You can adjust the camera’s light control. To
change the light control option on the main
menu, move the cursor to Light Cntl and press
Left or Right to select the mode (DC Lens,
Video Lens, AES, or ME). Then press Enter to
access that mode’s menu.
DC lens menu
Table 4 lists the DC lens menu options.
Table 4. DC lens menu options
Menu option Description
Iris window Adjust the autoiris level ranging from 0
to 10.
SHUTSPEED Choose between 1/250, 1/500, 1/1000,
1/2000, 1/5000, 1/10000 sec.
Page 31

Chapter 3
Menus
23
Av:Pk (for all
AE mode)
Adjust the value by pressing Left or
Right. Av stands for average
photometric method. Pk stands for
peak photometric method.
A greater Av value automatically
adjusts the electronic convergence
with the average video signal level of
the object as the correct photometric
value.
A greater Pk value automatically
adjusts the electronic convergence
with the peak video signal level of the
object as the correct photometric
value.
We recommend you adjust the
settings on a DC iris lens after you set
the level.
Range: 0:12, 1:11, 2:10, 3:9, 4:8, 5:7: 6:6,
7:5, 8:4, 9:3, 10:2, 11:1, 12:1. The
default is 8:4.
Table 4. DC lens menu options (continued)
Menu option Description
Page 32

GEC-EVR/GEC-EVR-DN
User Manual
24
Video lens menu
Table 5 lists the video lens menu options.
Table 5. Video lens menu options
Menu options Description
SHUTSPEED Choose between 1/250, 1/500, 1/1000,
1/2000, 1/5000, 1/10000 sec.
Page 33

Chapter 3
Menus
25
Av:Pk Adjust the value by pressing Left or
Right. Av stands for average
photometric method. Pk stands for
peak photometric method.
A greater Av value automatically
adjusts the electronic convergence
with the average video signal level of
the object as the correct photometric
value.
A greater Pk value automatically
adjusts the electronic convergence
with the peak video signal level of the
object as the correct photometric
value.
We recommend you adjust the
settings on a DC iris lens after you set
the level.
Range: 0:12, 1:11, 2:10, 3:9, 4:8, 5:7: 6:6,
7:5, 8:4, 9:3, 10:2, 11:1, 12:1. The
default is 8:4.
Table 5. Video lens menu options (continued)
Menu options Description
Page 34

GEC-EVR/GEC-EVR-DN
User Manual
26
AES menu
Table 6 lists the AES menu option.
Table 6. AES menu options
Menu option Description
Av:Pk Adjust the value by pressing Left or
Right. Av stands for average
photometric method. Pk stands for
peak photometric method.
A greater Av value automatically
adjusts the electronic convergence
with the average video signal level of
the object as the correct photometric
value.
A greater Pk value automatically
adjusts the electronic convergence
with the peak video signal level of the
object as the correct photometric
value.
We recommend you adjust the
settings on a DC iris lens after you set
the level.
Range: 0:12, 1:11, 2:10, 3:9, 4:8, 5:7: 6:6,
7:5, 8:4, 9:3, 10:2, 11:1, 12:1. The
default is 8:4.
Page 35

Chapter 3
Menus
27
ME menu
Table 7 lists the ME menu options.
Table 7. ME menu options
Menu options Description
Shutspeed Adjust the shutter speed between 1/60
(1/50), 1/100 (1/120), 1/250, 1/500,
1/1000, 1/2000, 1/5000, and 1/10000
sec.
Gain Adjust the gain between 5, 13, 22, and
30 dB.
Page 36
GEC-EVR/GEC-EVR-DN
User Manual
28
Day/night control
You can adjust the camera’s day/night controls.
To adjust the controls, do the following:
Note: This is only for use with the GEC-EVR1-DN(P)
and GEC-EVR2-DN(P).
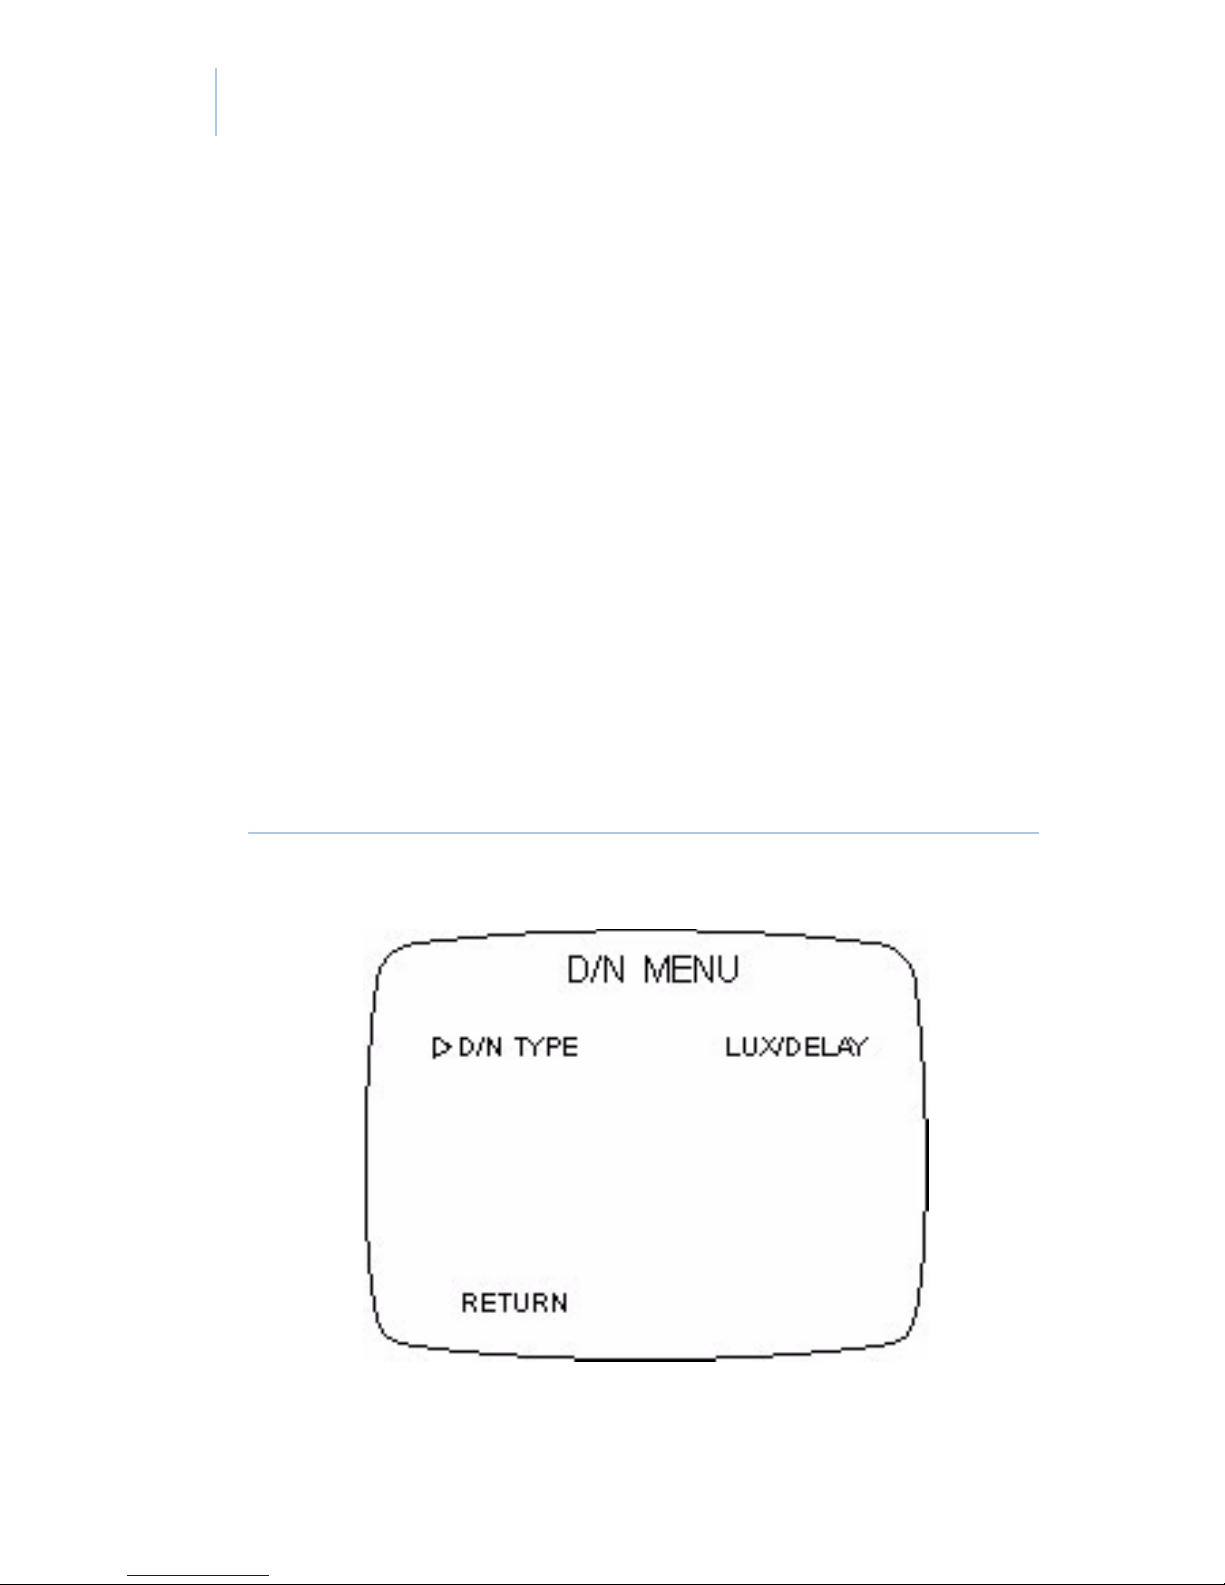
1. On the main menu, move the cursor to
D/N CNTL (Figure 8) and press Left or
Right to choose between LUX/DELAY,
SCHEDULE, EXTERNAL, DAY MODE,
and NIGHT MODE.
Figure 8. Day/night menu
Page 37

Chapter 3
Menus
29
2. Once you’ve chosen a mode, press
Enter to access the mode’s submenu.
Lux/delay menu
Table 8 lists the lux/delay menu options.
Table 8. Lux/delay menu options
Menu options Description
D J N LEVEL Press Left or Right to adjust the light
level at which the camera switches
from day mode to night mode.
N J D LEVEL Press Left or Right to adjust the light
level at which the camera switches
from night mode to day mode.
DELAY TIME Set the delay time that dictates how
long after the camera has detected
the appropriate level of light or dark to
switch modes. You can set from five to
60 seconds.
Page 38

GEC-EVR/GEC-EVR-DN
User Manual
30
Schedule menu
Table 9 lists the schedule menu options.
Note: If the D J N TIME and N J D TIME are identical,
the camera will automatically add one minute
to the N
J
D TIME.
External day to night menu
This function allows you to set whether the
camera switches to night mode by HI potential
(+5 V) or LOW potential (0 V). When finished,
move the cursor to RETURN and press Enter.
Table 9. Schedule menu options
Menu options Description
D J N TIME Set the HOUR and MIN at which the
camera will switch from day mode to
night mode.
N J D TIME Set the HOUR and MIN at which the
camera will switch from night mode to
day mode.
CHOICE D/N
TYPE
Press Enter to switch between day or
night mode.
Page 39

Chapter 3
Menus
31
Day mode
This switches the camera to day mode.
Night mode
This switches the camera to night mode.
White balance
You can adjust the camera’s white balance. To
adjust the white balance, do the following:
1. On the main menu, move the cursor to
WHITE BAL and press Left or Right to
change between ATW , PRESET, PTL
(Push to Lock), and AWB (Table 10).
Page 40

GEC-EVR/GEC-EVR-DN
User Manual
32
2. On the PRESET and PTL options, press
Enter to access a submenu.
Picture control
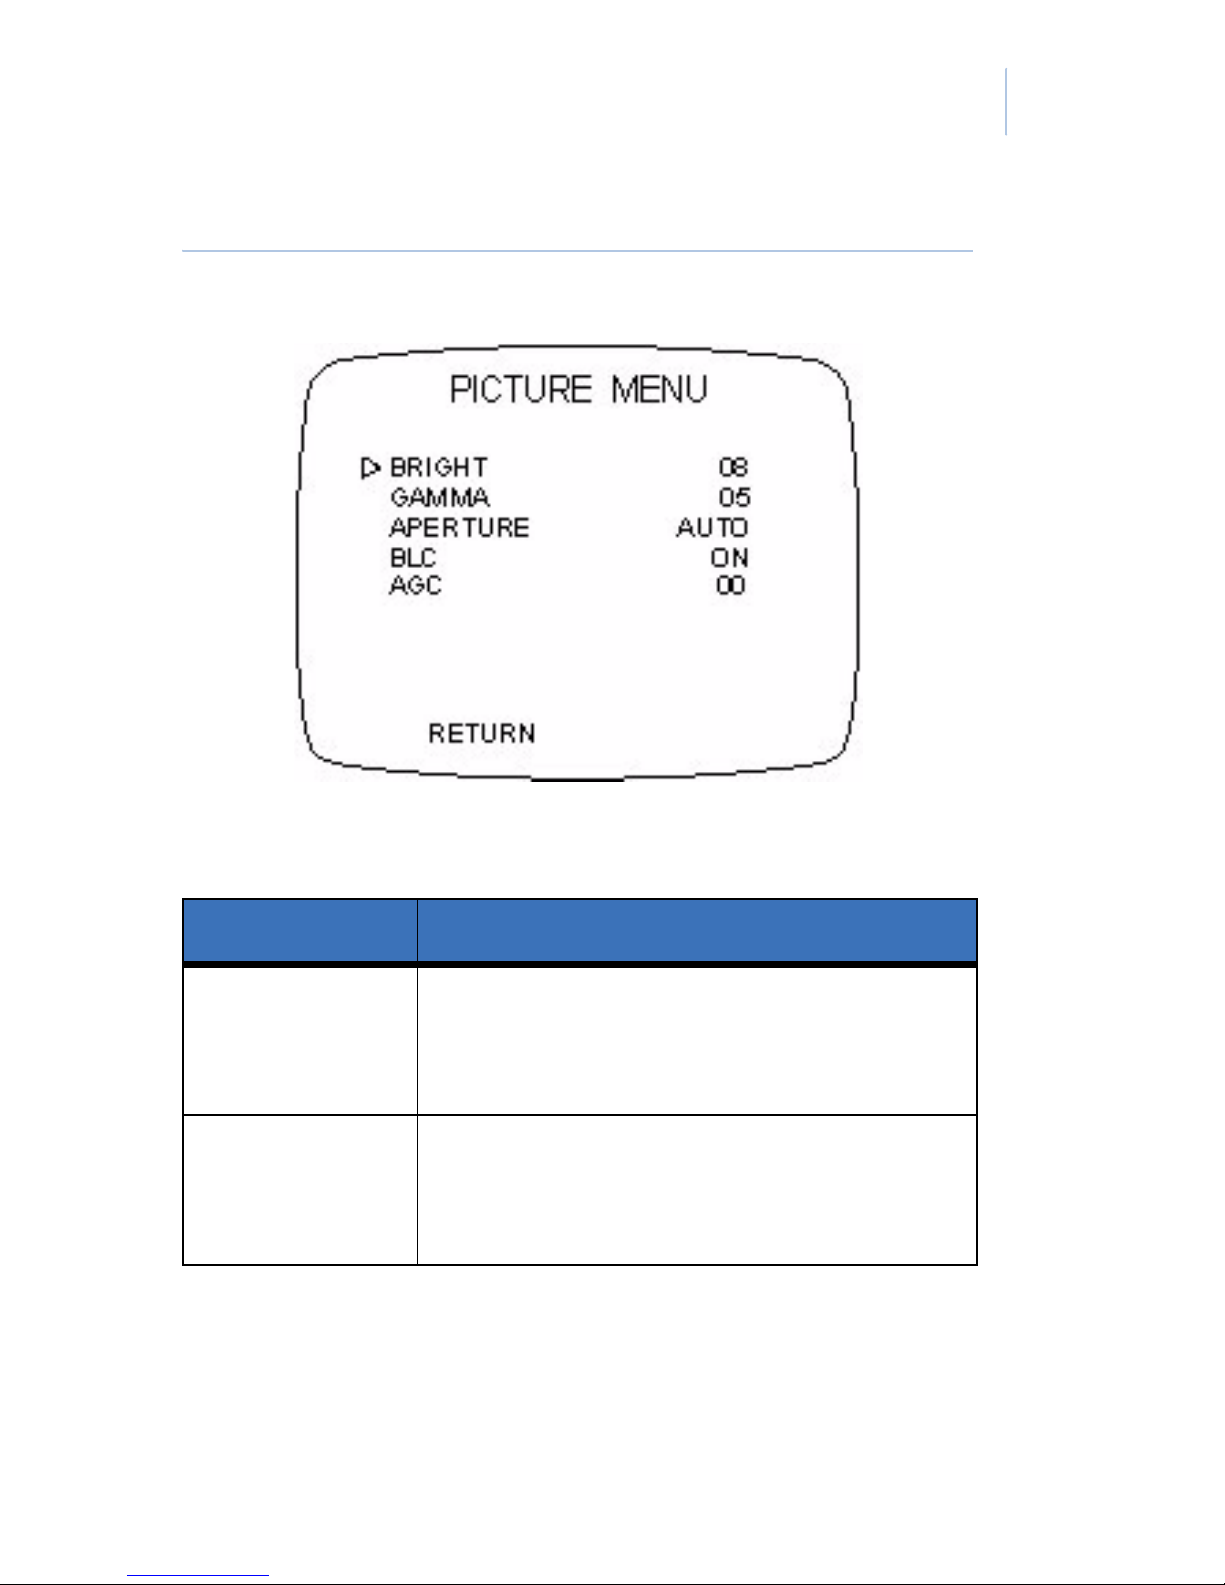
You can make adjustments to the camera’s
picture. To make adjustments, go to the main
menu and move the cursor to PICTURE, then
press Enter to access the PICTURE menu
(Figure 9 on page 33 and Table 11 on page 33).
Table 10. White balance menu options
Menu options Description
ATW Automatic tracking white balance.
Preset Choose the fixed color temperature
between Indoor, Outdoor, and
Fluorescent.
PTL Push to lock white balance. When you
press Enter, the camera will process
the white balance. The display will
change from PTL PUSH to PTL
SETTING. When the display changes
back to PTL PUSH, the process is
complete and you can exit the menu.
AWB Full range automatic white balance.
Page 41
Chapter 3
Menus
33
Figure 9. Picture menu
Table 11. Picture control menu options
Menu options Description
Bright Move the cursor to the BRIGHT
position and press Left or Right to
change the brightness.
Gamma Move the cursor to the GAMMA
position and press Left or Right to
choose from 9 settings.
Page 42

GEC-EVR/GEC-EVR-DN
User Manual
34
Aperture Move the cursor to the APERTURE
position and press Left or Right to
choose from 00, 09, and AUTO for your
aperture.
Note: We recommend you use
AUTO as your default
aperture setting. Otherwise,
you may see large amounts
of noise in a low-light
environment.
BLC Move the cursor to the BLC position
and press Left of Right to turn
backlight compensation on or off.
AGC Move the cursor to the AGC position
and press Left or Right to adjust the
bright level low light condition.
Table 11. Picture control menu options (continued)
Menu options Description
Page 43

Chapter 3
Menus
35
Focus adjustment
You can make adjustments to the camera’s back
focus. To make adjustments, do the following:
1. On the main menu, move the cursor to
FOCUS ADJ and press Enter
(Figure 10).
Figure 10. Focus adjustment
2. Adjust the back focus and press Enter
again when finished.
Page 44

GEC-EVR/GEC-EVR-DN
User Manual
36
Misc
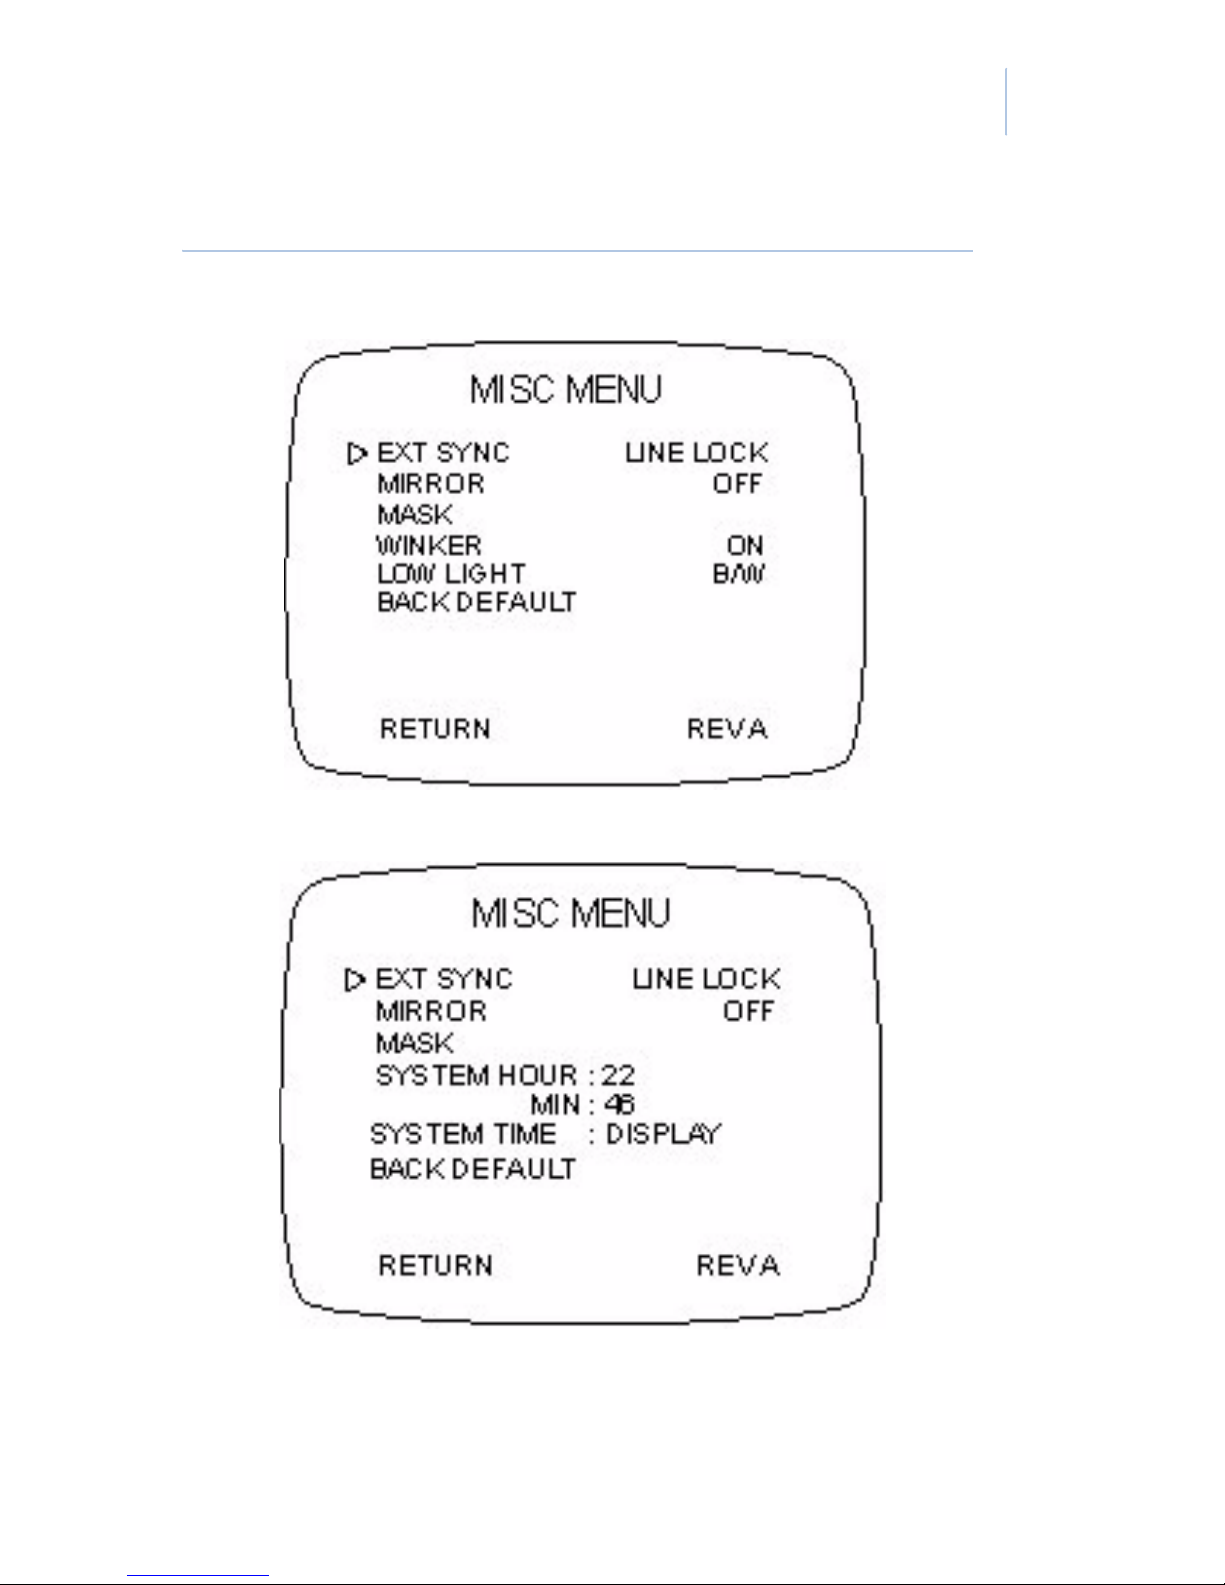
On the MISC menu, you can adjust things like
the camera’s synchronization an d len s
applications. To make these adjustments on the
main menu, move the cursor to MISC and press
Enter to access the MISC menu (Figure 11 and
Table 12).
Page 45
Chapter 3
Menus
37
Figure 11. Misc menu
GEC-EVR1(-P) and GEC-EVR2(-P)
GEC-EVR1-DN(P) and GEC-EVR2-DN(P)
Page 46

GEC-EVR/GEC-EVR-DN
User Manual
38
Table 12. Misc menu options
Menu options Description
EXT SYNC Press Left or Right to select the type
of synchronization, and press Enter to
access the external sync phase
adjusting menu. Align the sync phase
by pressing Left of Right.
MIRROR Press Left or Right to turn mirroring
on or off.
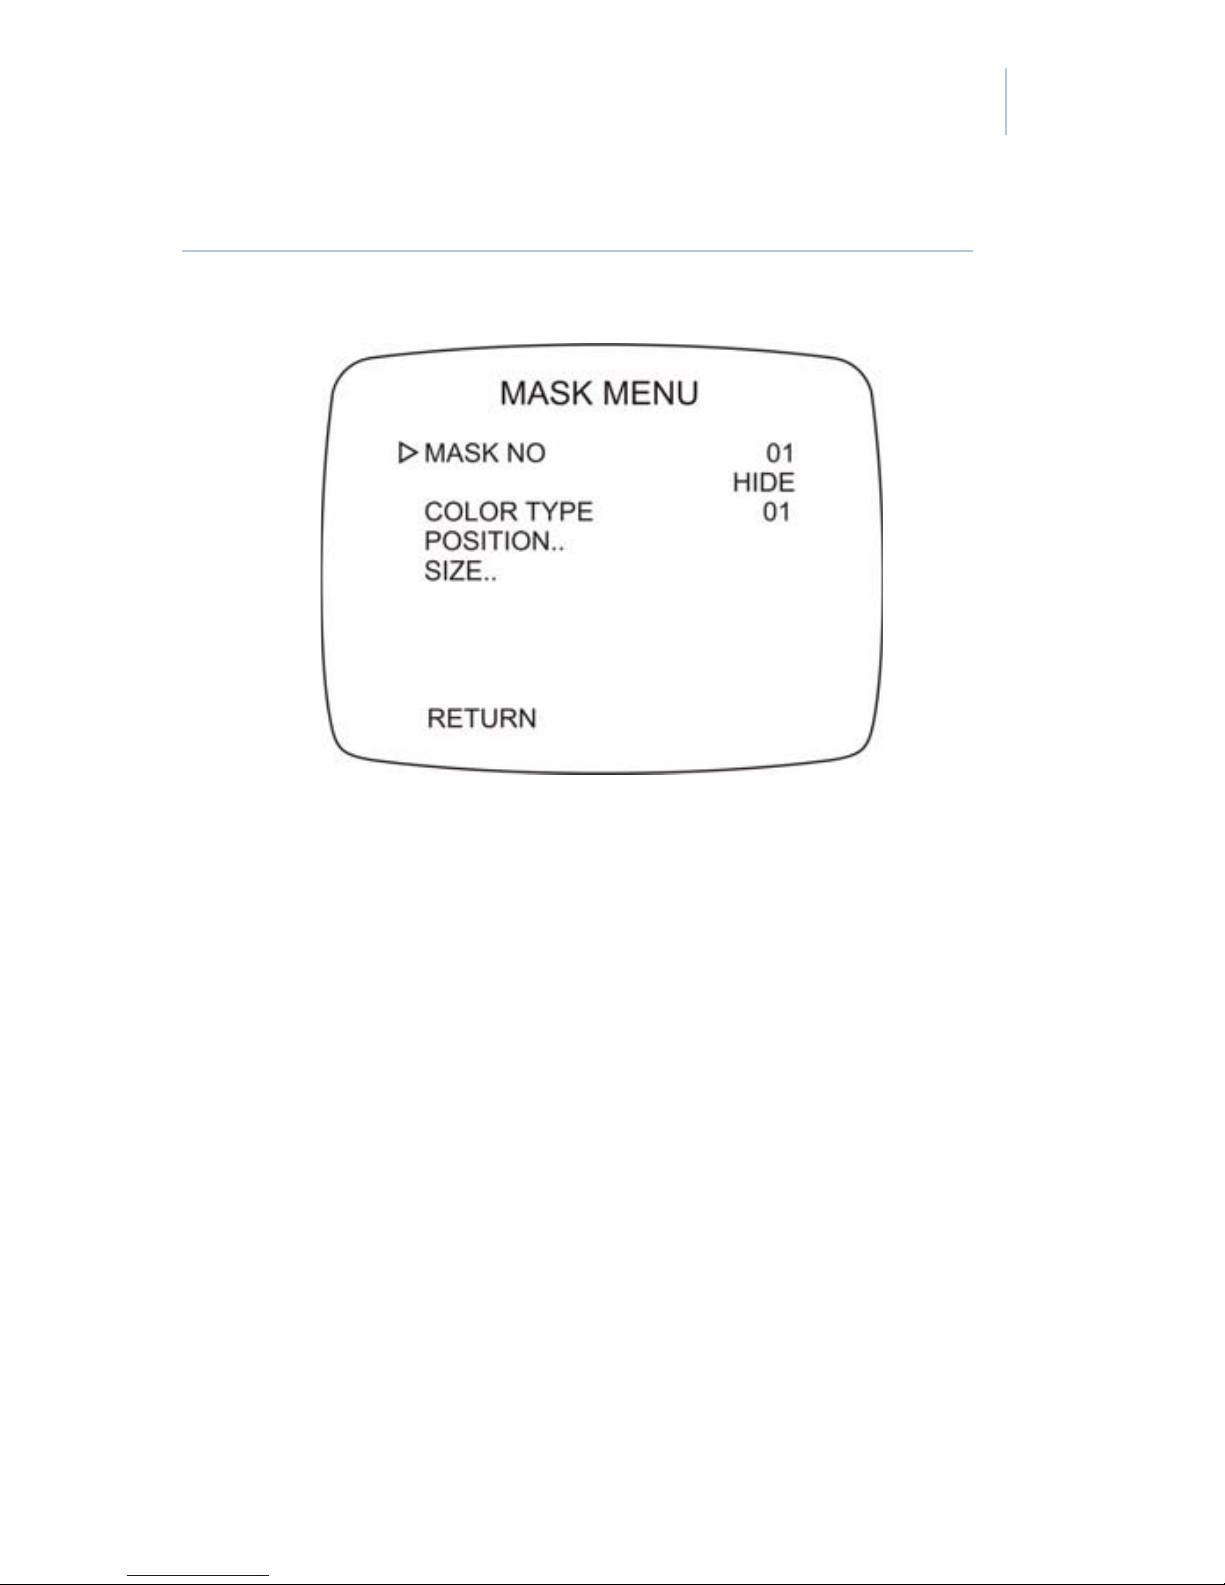
MASK Masks are used to cover private areas
in the camera’s view. Press Enter to
access the Mask menu (Figure 12 on
page 41). To set a mask, see Setting a
mask on page 40.
WINKER Turn the winker on to have an
indicator blink in the upper right
corner of the display, signaling that
the camera is on.
Note: This is only for use with the
GEC-EVR1(-P) and GECEVR2(-P).
Page 47

Chapter 3
Menus
39
LOW LIGHT Choose between color and black-
and-white when in a low light
environment.
Note: This is only for use with the
GEC-EVR1(-P) and GECEVR2(-P).
SYSTEM HOUR Set the hour of the current local time.
This will affect when the day/night
mode changes if you are using the
schedule option for your day/night
control.
Note: This is only for use with the
GEC-EVR1-DN(P) and
GEC-EVR2-DN(P).
SYSTEM MIN Set the minute of the current local
time. This will affect when the day/
night mode changes if you are using
the schedule option for your day/
night control.
Note: This is only for use with the
GEC-EVR1-DN(P) and
GEC-EVR2-DN(P).
Table 12. Misc menu options (continued)
Menu options Description
Page 48

GEC-EVR/GEC-EVR-DN
User Manual
40
Setting a mask
To set a mask, see Misc on page 36 to access the
MISC menu and do the following:
1. Press Left or Right to select the mask
you want to edit (Figure 12).
SYSTEM TIME Display or hide the system time on
the display.
Note: This is only for use with the
GEC-EVR1-DN(P) and
GEC-EVR2-DN(P).
BACK DEFAULT Restores the unit to the default
settings.
Table 12. Misc menu options (continued)
Menu options Description
Page 49
Chapter 3
Menus
41
Figure 12. Mask menu
2. Press Down to move to the next line, and
then press Left or Right to turn the mask
on or off.
3. Press Down to move to the next line, and
then press Left or Right to choose the
color of the mask (white, gray, or black).
4. Press Down to move to the next line, and
then press Enter to set the position of
the mask.
5. Press Down to move to the next line, and
then press Enter to set the size of the
mask.
Page 50

GEC-EVR/GEC-EVR-DN
User Manual
42
6. Press Down to move to RETURN, and
press Enter to exit the menu.
Page 51

Chapter 4 Support
This chapter provides information to help
you contact technical support in case you
need assistance with your GE equipment.
In this chapter:
Contacting technical support. . . . . .44
Online publication library. . . . .45
Page 52
GEC-EVR/GEC-EVR-DN
User Manual
44
Contacting technical
support
For assistance installing, operating, maintaining,
and troubleshooting this product, refer to this
document and any other documentation
provided. If you still have questions, contact
your local supplier during normal business hours.
Note: Be ready at the equipment before calling for
technical support. t
North America (US, including Alaska and Hawaii; Puerto
Rico; Canada
Phone Toll-free: 888 GESECURITY (888 437 3287)
Web site www.gesecurity.com
In the Customer Support menu, select Customer
Service.
Latin America
Phone +1 305 593 4301 (ET)
E-mail [email protected]
Fax +1 305 593 4300
Page 53

Chapter 4
Support
45
Online publication library
Another great resource for assistance with your
GE product is our online English-language
publication library. To access the library, go to
our website at the following location:
http://www.gesecurity.com
In the Customer Support menu, select the
Resource Library link. After you register and log
on, you may search through our on line library for
the documentation you need.
1
Europe, Middle East, and Africa
Web site www.gesecurity.eu
Contact your local supplier. Go to our EMEA web
site shown here to get the contact details for your
country.
Australia
E-mail [email protected]
1. Many GE documents are provided as PDFs (portable
document format). To read these documents, you
will need Adobe Reader, which can be downloaded
free from Adobe’s website at www.adobe.com.
Page 54

GEC-EVR/GEC-EVR-DN
User Manual
46
 Loading...