

Page 1

GEAppliances.com
Safety Instructions ........... 2-5
Operating Instructions
Care and Cleaning ................. 17
Control Panel and Settings ........ 6 j 9
Display Lights ....................... 9
Loading Place Settings ............. 16
Loading the Racks ............. 14j 16
Recommended Dishwasher
Products ............................. 9
Using the Dishwasher .......... 10113
Troubleshooting Tips ...... 18-2o
Consumer Support
Consumer Support ................. 25
Warrantg .......................... 2/4
Stainless Steel
Tub Dishwashers
Write the model and serial
numbers here:
Model #
Serial #
Youcan find them on the tub wall
just insidethe door.
165D4700P389 49-55065 07-09 JR
Page 2

IMPORTANT SAFETY INFORMATION
READ ALL INSTRUCTIONS BEFORE USING--
SAVE THESE INSTRUCTIONS
WARNING!
For your safety, the information in this manual must be followed to minimize the risk of fire,
explosion, electric shock, and to prevent property damage, personal injury, or death.
WARNING! WATER HEATER SAFETY
Undercertain conditions, hydrogen gas may be producedin a water heater that hasnot beenused for two
or more weeks. HYDROGENGAS ISEXPLOSIVE.
If the hot water has not been usedfor two or more weeks, preventthe possibility of damage or injury
by turning on all hot water faucets and allow them to run for severalminutes. Dothis before using any
electrical appliance connected to the hot water system.This simple procedure will allow any built-up
hydrogen gas to escape.Sincethe gas isflammable, do not smoke,use an open flame, or usethe appliance
during this process.
PROPER INSTALLATION AND MAINTENANCE
%
This dishwasher must be properly installed and located in accordance with the Installation Instructions
before it is used. If you did not receive an Installation Instructions sheet with your dishwasher, you can
receive one by visiting our website at GEAppliances.com.
• Connectthe dishwasher/appliance to a grounded
metal, permanent wiring system; or run an
equipment-grounding conductor with the circuit
conductors and connect to the equipment-
grounding terminal or leadof the appliance.
• Improper connection ofthe equipment-grounding
conductor can result ina riskof electric shock.
Checkwith a qualified electrician orservice
representative ifyou are indoubt whether the
appliance isproperly grounded.
• Disposeof discardedappliances and shipping
or packing material properly.
• Donot ottempt to repoir or reploceony port
of your dishwosherunlessit is specifically
recommended in this monuol.Allother servicing
should be referredto o quolified technicion.
• Tominimize the possibility of electric shock,
disconnect this opplionce from the power supply
beforeottempting ony mointenonce.
NOTE:Turningthe dishwasheroff doesnot
disconnecttheappliance from thepower supply.
Werecommend having o qualified technician
serviceyour appliance.
CAUTION: To prevent minor injury and property damage
• Contents washed inAnti-bacterial mode, if
available,may be hot to the touch. Usecore
before handling.
• Usinga detergent that is not
specifically designedfor
dishwashers will cause the
dishwasherto fill with suds.
• If your dishwosher isconnected to o woll [-_j
switch,ensure thot the switch is on prior
to use.
• On dishwosherswith electronic controls,
if you choose to turn the wall switch
off between wash cycles, allow 5-10 seconds after
turning the switch on beforetouching START/RESET
to allow the control to initialize.
• Non-Dishware Items: Donot wash items such
aselectronic air cleanerfilters, furnace filters
and paint brushes in your dishwasher.Damage
to the dishwasher and discoloration or staining
of the dishwasher may result.
• Closesupervisionis necessary ifthis appliance
isused by or near children.
• Load light, plastic items so they do not become
dislodgedand drop to the bottom of the
dishwasher-they might come into contact with
the heating element and bedamaged.
Page 3
INFORMACION IMPORTANTEDE SEGURIDAD
LEA TODASLASINSTRUCCIONESANTESDE USAR--
GUARDEESTASINSTRUCCIONES
iADVERTENCIA!
Para su seguridad, debe cumplirse con la informaci6n de este manual a fin de minimizar
el riesgo de incendio o explosi6n, descarga el_ctrica o para prevenir dafios a la propiedad,
lesiones personales o la muerte.
iADVERTENCIA! SEGURIDAD DEL CALENTADOR DE AGUA
Bajo ciertas condiciones, puede producirse gas de hidr6geno en un calentador de agua que no se ha usado
durante dos semanas o mc_s.ELGAS DEHIDROGENO ES EXPLOSIVO.
Siel agua caliente no se ha utilizadopar dossemanas o m6s,evite laposibilidadde daflos o lesiones
abriendo todos losgrifos de agua caliente g dej6ndolas correr durante varios minutos. Haga esto antes
de utilizar cualquier aparato el_ctrico que seencuentre conectado al sistema deagua caliente. Estesimple
procedimiento permitir6 que selibere cualquier clase de acumulaci6n de gas de hidr6geno. Yaque elgas
es inflamable,no fume o utilice una llama abierta o un aparato durante este proceso.
INSTALACION Y MANTENIMIENTO ADECUADOS
Este lavaplatos debe instalarse de manera adecuada g ubicarse de acuerdo con los Instrucciones de
%
Instalaci6n antes de comenzar el usa Si usted no ha recibido una pdgina de Instrucciones de instalaci6n
con su lavaplatos, puede obtener una visitando nuestro sitio Web en GEAppliances.com.
• Conecteel lavaplatos/aparato a un sistema • Nointente reparar ocambiar ninguna piezade
de cableado permanente con conexi6n a tierra
o debe utilizarse un conductor deconexi6n a tierra
del equipamiento con los conductores decircuito,
g debe conectarse a la terminal de conexi6n
a tierra o conductor del aparato.
• Unaconexi6n inadecuada del conductor de
conexi6n a tierra de equipo puede provocar
un riesgo de descarga el@ctrica.Consultea un
electricistacalificado o representantede servicio
t@cnicosi tiene dudas sabrela correcta conexi6n
a tierra del aparato.
• Eliminelosaparatos que no va a utilizar m6s g el
material de empaque o env[o coma corresponde.
GEAppliances.com
su lavaplatosa menos que est_ espec[ficamente
recomendado en este manual. Cualquier otro
serviciodebe realizarloun tOcnicocalificado.
Paraminimizar la posibilidadde una descarga
el@ctrica,desconecteeste aparato de lafuente
de energfaantes de realizarcualquier clasede
mantenimiento.
NOTA:Apagar ellavaplatosno desconectael
oparato del suministrode energia.Recomendamos
que un t@cnicocalificadorealiceel servido t@cnico
de suaparoto.
PRECAUCION: Para evitar lesiones menores g dafios a la propiedad
• Loselementos lavados en el modo anti-bacterial,
sise encuentra disponible,pueden quedar
calientes altacto. Tenga cuidado antes de
tocarlos.
• Utilizarun detergente no
diseBadoespec[ficamente
para lavaplatos provocar@
que el aparato seIlene
• Sisu lavaplatos seencuentra conectado
a un interruptor de pared,verifique que
de espuma.
el interruptor seencuentre encendido
antes del usa.
• Enlavaplatos con controles electr6nicos,si usted
elUeapagar el interruptor de pared entre ciclos
de lavado, deje pasar 5-10 segundos despu_sde
encender el interruptor antes de presionar
START/RESETpara permitir que el control se inicie.
• Elementosno aptos para lavaplatos: No lave
elementos coma flltros de limpiadores de aire
electr6nicos,filtros de hornos g pincelesde pintura
en su lavaplatos. Pueden producirse danos en el
lavaplatos g decoloraci6n omanchas en el
aparato.
• Serequiere una supervisi6nestricta cuando
cualquier aparato esutilizado par ninoso en
su cercanfa.
Cargueelementos livianos g pl6sticos de modo
que no sedesplacen g caigan al fondo del
lavaplatos, ga quepueden entrar en contacto con
el elemento calentador g da_arse.
3
Page 4
IMPORTANT SAFETY INFORMATION
READ ALL INSTRUCTIONS BEFORE USING--
SAVE THESE INSTRUCTIONS
ik WARNING! RISK OF CHILD ENTRAPMENT
PROPER DISPOSAL OF THE DISHWASHER
Junked or abandoned dishwashers ore
dongerous...even if they will sit for "just o few
days." If you ore getting rid of your old
dishwasher, please follow the instructions below
to help prevent accidents.
Screw
(on some
models)
A
When using your dishwasher, follow basic precautions,
... WARNING! including the following:
• Use this appliance only for its intended purpose
as described in this Owner's Hanual.
• Use only powder, tabs, liquid detergents or rinse
agents recommended for use in a dishwasher
and keep them out of the reach of children.
Cascade ®and Cascade ® Complete Automatic
Dishwashing Detergents, and Cascade Crystal
Cleare rinse agents have been approved for use
in all GEdishwashers.
• On models with the SmartDispense TM sgstem,
do not mix eng chlorine bleech-besed eutometic
dishwashing detergent with ang dishwashing
detergent containing enzgmes us this could
cause the detergents to congeal end loud to
blockage of the SmartDispense TM sgstem.
• Locate sharp items so that they are not likely
to damage the door seal.
• Load sharp knives with the handles up to reduce
the risk of cut-type injuries.
• Do not wash plastic items unless marked
dishwasher safe or the equivalent. For plastic
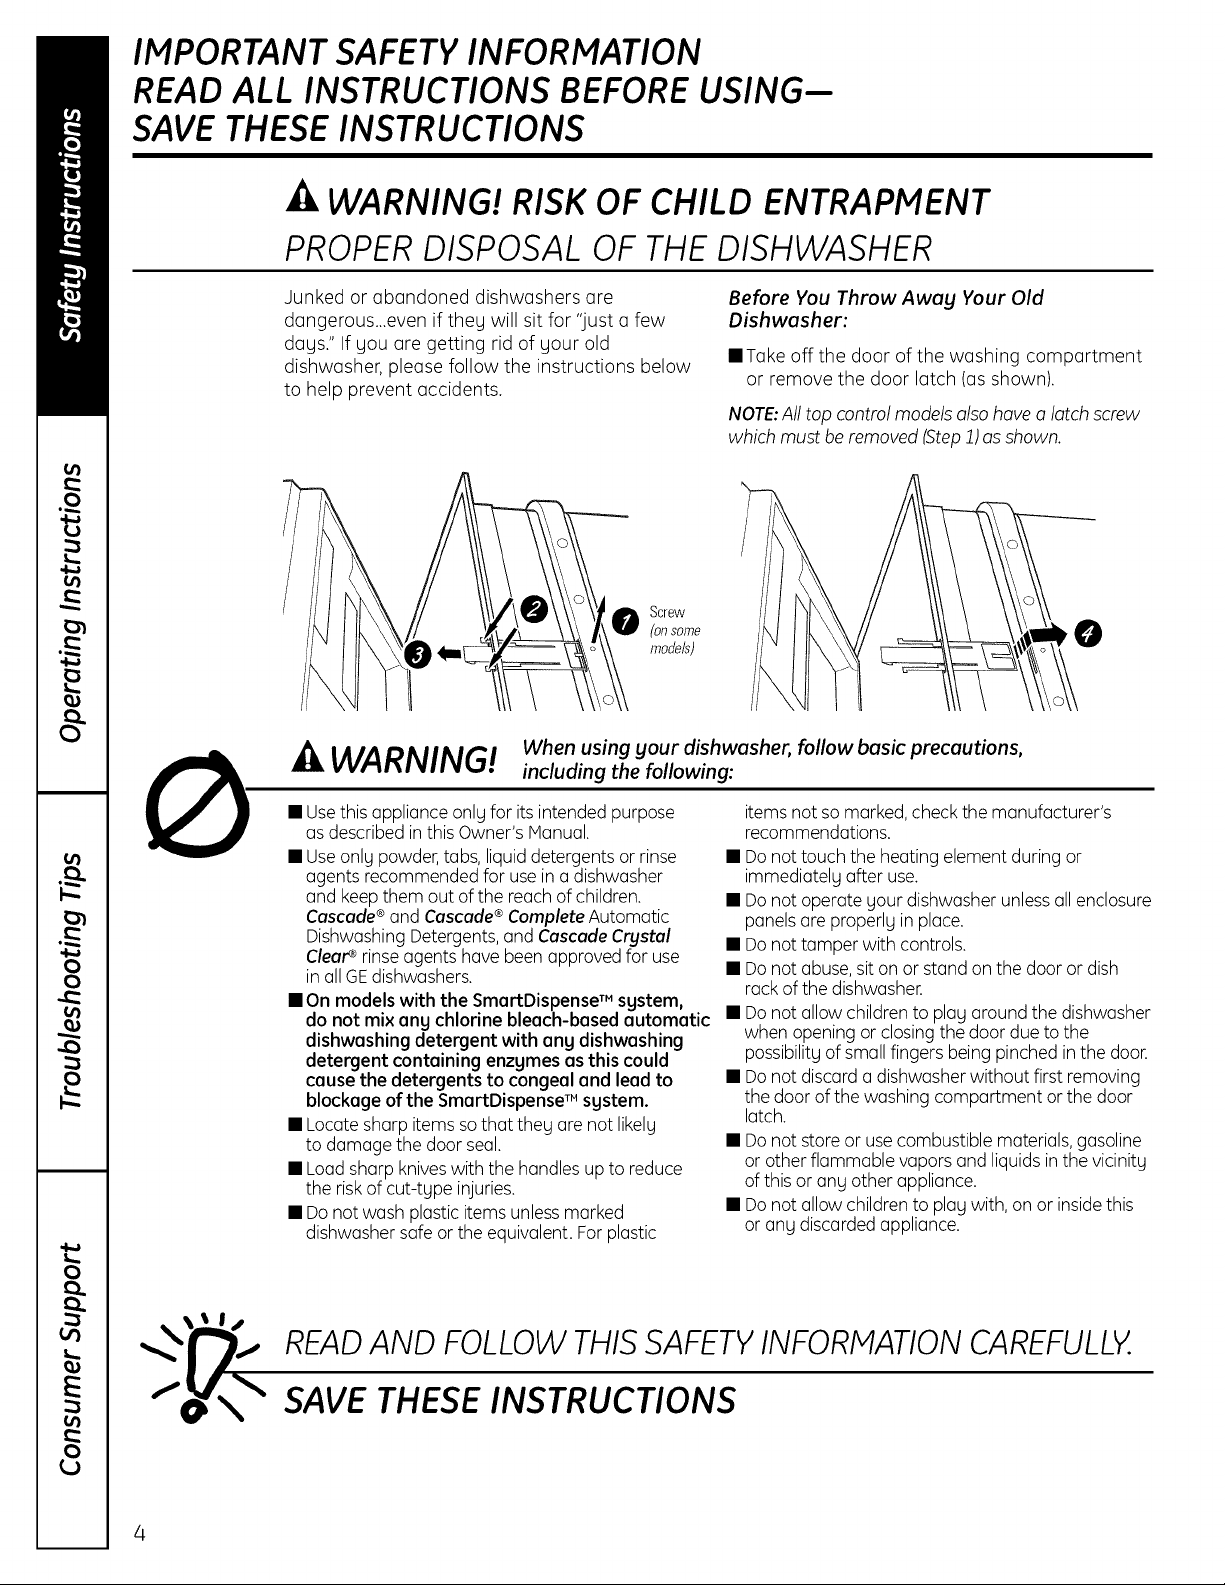
Before You Throw Away Your Old
Dishwasher:
reTake off the door of the washing comportment
or remove the door latch (as shown).
NOTE:Alltop control models alsohaveo latch screw
which must be removed (StepJ)asshown.
items not so marked, check the manufacturer's
recommendations.
• Do not touch the heating element during or
immediately after use.
• Do not operate your dishwasher unless all enclosure
panels are properly in place.
• Do not tamper with controls.
• Do not abuse, sit on or stand on the door or dish
rack of the dishwasher.
• Do not allow children to play around the dishwasher
when opening or closing the door due to the
possibility of small fingers being pinched in the door.
• Do not discard a dishwasher without first removing
the door of the washing compartment or the door
latch.
• Do not store or use combustible materials, gasoline
or other flammable vapors and liquids in the vicinity
of this or any other appliance.
• Do not allow children to play with, on or inside this
or any discarded appliance.
READAND FOLLOWTHISSAFETYINFORMATIONCAREFULLY.
SAVE THESE INSTRUCTIONS
4
Page 5
INFORMACION IMPORTANTEDE SEGURIDAD
LEA TODASLASINSTRUCCIONESANTESDE USAR--
GUARDEESTASINSTRUCCIONES
iADVERTENCIA! RIESGO DE ENCIERRO PARA NI_IOS
ELIMINACION CORRECTA DEL LAVAPLATOS
Un lavaplatos desechado o abandonado resulta
peligroso...aOn si quedar6 en un lugar por "s61o
unos dfas". Siva a desechar su viejo lavaplatos,
siga las siguientes instrucciones para prevenir
accidentes.
Tornillo
(enalgunos
modelog
GEAppliances.com
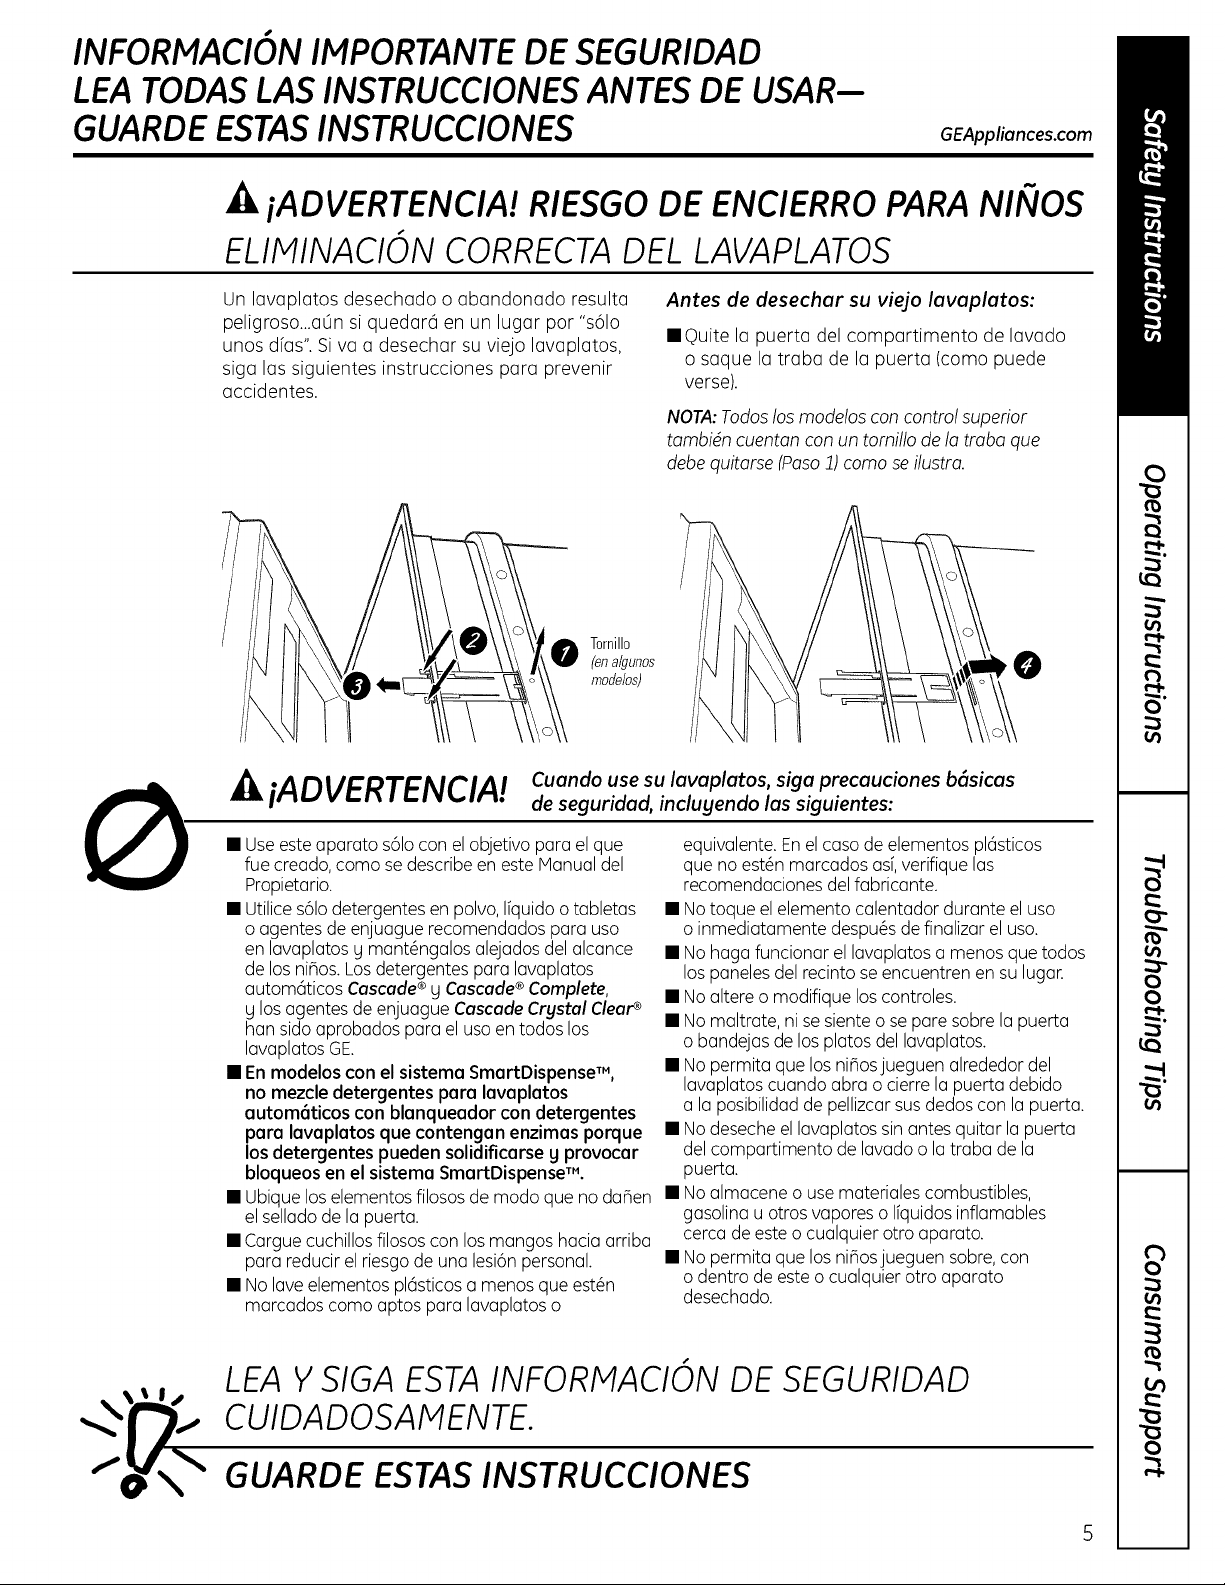
Antes de desechar su viejo lavaplatos:
• Quite la puerta del compartimento de lavado
o saque la traba de la puerta (como puede
verse).
NOTA:Todoslos modelos con control superior
tombidn cuenton conun tomillo de lo trobo que
debequitorse (Poso2)como seilustro.
__Z_iADVERTENCIA! cuondousesuIovoplotos,sigoprecoucionesb_sicos
• Useesteaparato s61ocon elobjetivo para el que
fue creado,como sedescribeen este Manualdel
Propietario.
• Utilices61odetergentes en polvo,Ifquidoo tabletas
o agentes de enjuague recomendadospara uso
en lavaplatosg mant@ngalosalejadosdel alcance
de losniBos.Losdetergentes para lavaplatos
autom6ticos Cascade ®g Cascade ®Complete,
g losagentes de enjuague Cascade Crgstal Clear_
han sido aprobados para el uso en todos los
lavaplatosGE.
• En modelos con elsistemo SmortDispense TM,
no mezcle detergentes pore Iovoplotos
outom6ticos con blonqueodor con detergentes
pore Iovoplotos que contengon enzimos porque
los detergentes pueden solidificorse g provocor
bloqueos en el sistemo SmortDispenseTM.
• Ubiqueloselementosfilososde modo que no daBen • Noalmacene o use materialescombustibles,
el selladode la puerta, gasolinau otrosvaporeso Ifquidosinflamables
• Carguecuchillosfilososcon losmangos hacia arriba cerca de esteo cualquier otro aparato.
para reducir el riesgode una lesi6npersonal. • Nopermita que los nihosjueguen sobre,con
• Nolaveelementos pl6sticosa menos que est_n odentro de este o cualquierotro aparato
marcados como aptos paralavaplatoso desechado.
de seguridad, inclugendo los siguientes:
equivalente.Enel casode elementospl6sticos
que no est@nmarcados asf,verifiquelas
recomendacionesdelfabricante.
• Notoque el elemento calentador durante el uso
o inmediatamente despu@sdefinalizar el uso.
• Nohaga funcionar el lavaplatosa menos que todos
lospaneles del recintose encuentren ensulugar.
• Noaltere o modifique loscontroles.
• Nomaltrate, ni se sienteo separe sobrela puerta
o bandejasde losplatos del lavaplatos.
• Nopermita que los niBosjueguen alrededordel
lavaplatoscuando abra o cierrela puerta debido
a la posibilidadde pellizcarsusdedoscon la puerta.
• Nodesecheellavaplatossin antes quitar lapuerta
del compartimento de lavado o latraba dela
puerta.
LEA YSIGA ESTAINFORMACION DE SEGURIDAD
CUIDADOSAMENTE.
GUARDE ESTAS INSTRUCCIONES
5
Page 6
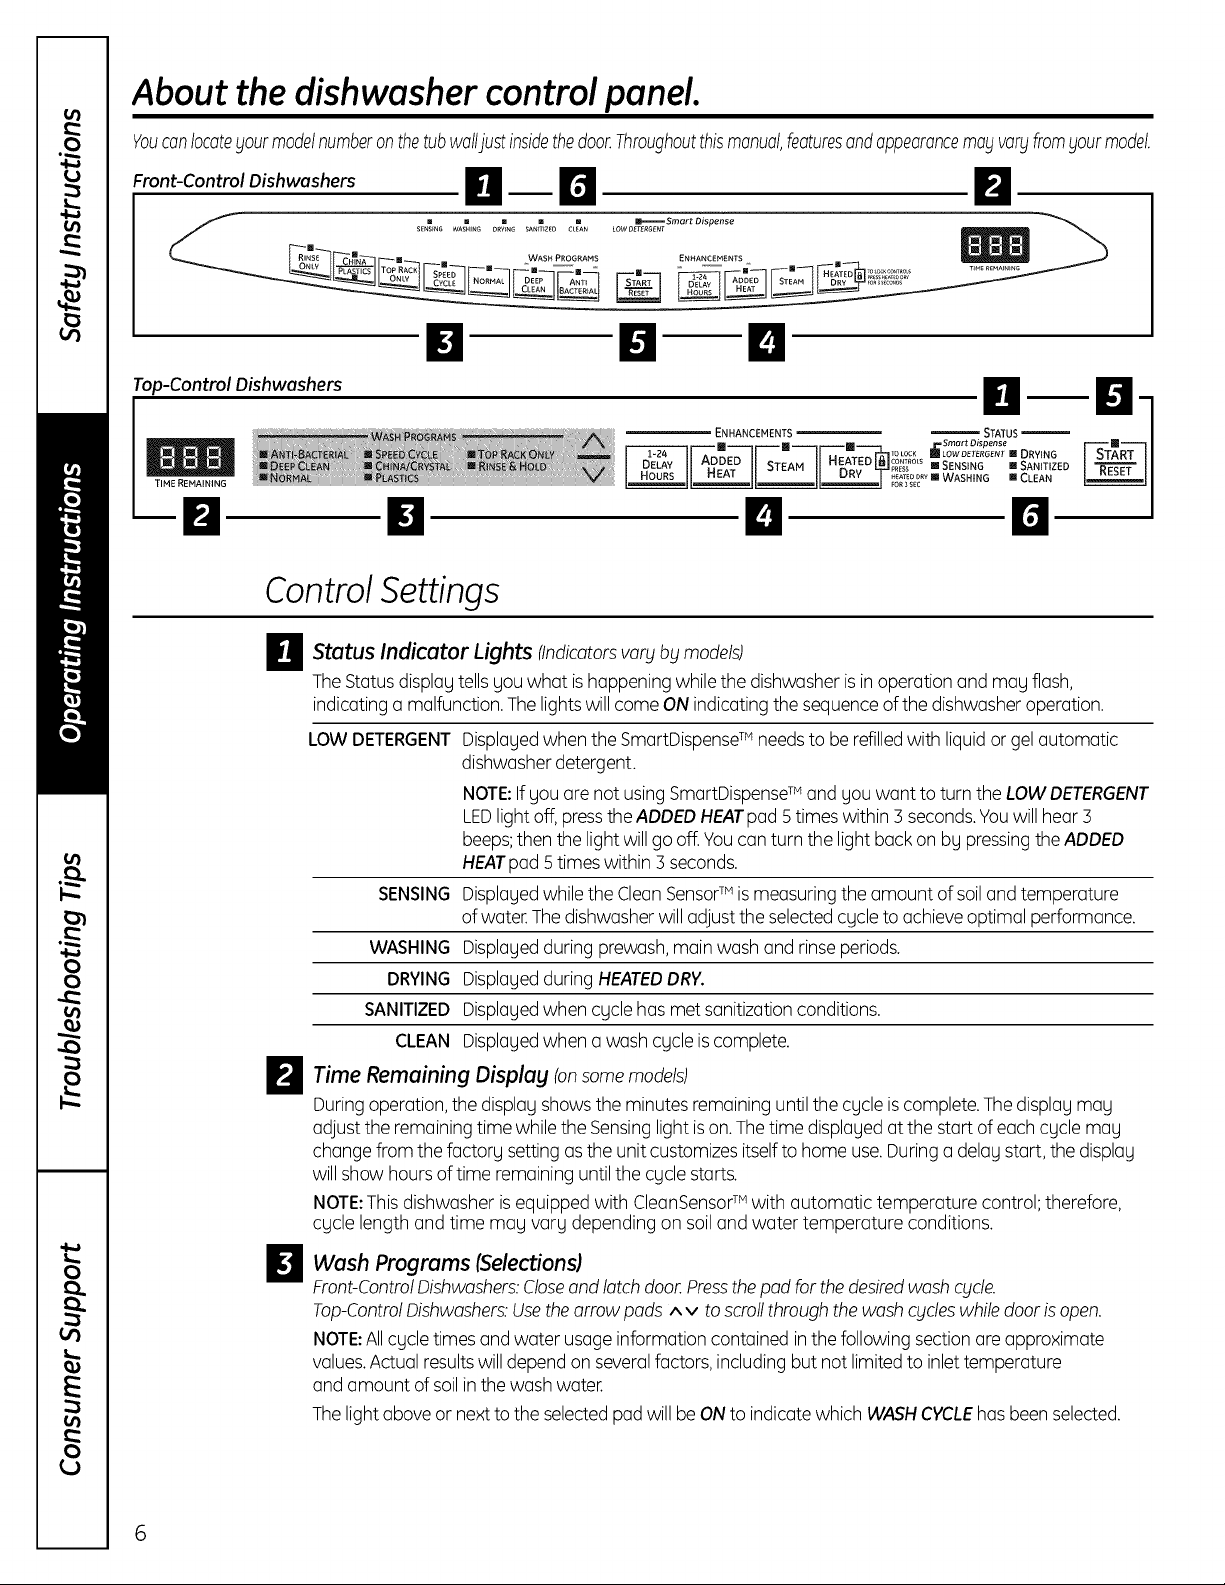
About the dishwasher control panel.
YoucanlocatebJourmodelnumberonthetubwalljustinsidethedoor.Throughoutthismanual,featuresandappearancemablva¢fromyourmodel.
Front-Control Dishwashers H _ D
SENSINGWASHING OrvtnG SANmZ_O cLeAN
RINSE C HIINA I WASH PROGRAMS
[] [] [] [] []
lri ir.i it,!
Top-Control Dishwashers
TIME REMAINING
lri
ControlSettings
_ StatusIndicatorLights (Indicatorsvar_jb_jmodels)
TheStatus displagtellsgou what ishappeningwhile the dishwasher is inoperation and mayflash,
indicating a malfunction.Thelightswill come ONindicating the sequenceof the dishwasheroperation.
LOW DETERGENT
SENSING
WASHING
DRYING
SANITIZED
CLEAN
Displagedwhen the SmartDispenseTM needsto be refilledwith liquid or gelautomatic
dishwasherdetergent.
NOTE:Ifgou are not usingSmartDispenseTM and gou want to turn the LOW DETERGENT
LEDlightoff, presstheADDED HEATpad 5 timeswithin 3 seconds.Youwill hear3
beeps;then the lightwill go off.Youcan turn the light backon bgpressingtheADDED
HEATpad5 timeswithin 3 seconds.
Displagedwhilethe Clean SensorTM ismeasuring the amount of soiland temperature
of water.The dishwasherwilladjust the selectedcgcle to achieveoptimal performance.
Displagedduring prewash,main wash and rinseperiods.
Displagedduring HEATEDDRY.
Displagedwhen cgcle has met sanitizationconditions.
Displagedwhen a wash cgcleiscomplete.
m
LOW DETERGENT
E......_Smart Dispense
ENHANCEMENTS _ J
I ODED STEAH DRY For_s_co_s
ENHANCEMENTS _ STATUS
__ "--'-lJJJ J---1 .r--_7 "''-Jr=_oLocK _LOWDETERGENTIDRYING
l D-F_-,_V II AE ED I) STEAM II lie 'ED _L_prEss IISENSING IIISANITIZED
I i [] Smart Dispense
ADDED HEATED CONTROLS
El El
_/_ Time Remaining Displag (onsomemodels)
Duringoperation,the displag showsthe minutes remaininguntil the cgcle iscomplete.Thedisplagmag
adjust the remainingtime while the Sensinglightison.Thetime displayed at the start of eachcgcle may
changefrom the factorg setting asthe unit customizes itselfto home use.Duringa delag start, the displag
willshow hoursof time remaining untilthe cgcle starts.
NOTE:Thisdishwasher is equipped with CleanSensorTM with automatic temperature control; therefore,
cgcle length and time mag varg depending on soil and water temperature conditions.
Wash Programs (Selections)
El
Front-ControlDishwashers:Closeand latch door.Pressthepod for the desiredwashcblcle.
Top-ControlDishwashers:Usethearrow pads A v toscrollthrough the wash cbldeswhile door isopen.
NOTE:Allcgcle times and water usageinformation contained in the following section are approximate
values.Actualresults willdepend on severalfactors,includingbut not limited to inlet temperature
and amount ofsoil in thewash water.
Thelight aboveor nextto the selected pad will beONto indicatewhich WASHCYCLEhasbeen selected.
Page 7
GEAppliances.com
_ Wash (Selections)IcontinuedJ
Programs
ANTI-BACTERIAL/7.5-8.75 gal.,50-135 min.
SANIWASH
Thiscgcle ruisesthewater temperuture inthe finGIrinseto sunitizegour dishwure.
Thecgcle lengthwill varg dependingon the temperuture ofgour inletwuter.
NOTE:TheAnti-Bucteriulcgcle ismonitored for sunitizotionrequirements.Ifthe cgcle is
interrupted during or offer the muin wush portion or if the incoming water temperuture
isso low thut udequutewuter heutingcunnot be uchieved,the sunitizing conditionsmug
not be met. Inthesecuses,the sunitizedlight will not illuminote atthe end ofthe cgcle.
When usingthe Anti-Bucteriul cgcle,donot open the dishwusherdoor in thefinGIrinse.
NOTE:NSF-certifiedresidentialdishwashersare not intendedfor licensedfood
estublishments.
NOTE:Onlgthe Anti-Bucteriul cgcle husbeen designed to meet the requirements
of Section 6,NSF184 for soil removal and sunitizution efficucg.
DEEPCLEAN
(onsome models)
10 gol., 115-135 min.
Thiscgcle ismeunt for heuvilg soiled dishesor cookwure with dried-on or buked-on soils.
Thiscgcle mug not remove burned-on foods. Evergdugdishesore sufe to be used inthis
cgcle.
NOTE:Onsome models,the STEAMenhoncement willbe automaticollg selectedwhen
the DEEPCLEANcgcleischosen,ond connot bede-selected.
COOKWARE/
POTS & PANS
(on some models)
8.75-10 gol.,75-140 min.
Thiscgcle ismeont for heovilg soiled dishesor cookwore with dried-on or boked-on soils.
Thiscgcle mog not remove burned-on foods. Evergdogdishesore sofeto be used in
this cgcle.
NORMAL WASH
5.2gol.,60-90 min.
Thiscgcle isfor medium/heovilg soiled dishesond glGsswore.
Cgcle time ond woter usoge ore opproximote volues. Results will depend on
severol foctors, including but not limited to inlet temperoture, household woter
pressure ond omount of soil in the wosh woter.
SPEEDCYCLE
(onsome models)
CHINA/CRYSTAL
LIGHT WASH
(on some models)
7.5gol.,35-70 min.
Thiscgcle isfor evergdog dishesond glosswore.
7.5gol.,40-60 min.
Thiscgcle isfor lightlg soiledchino ond crgstol.
NOTE:Onsome models,this cgcle ond PLASTICSselectoriso toggle pod; push pod
to switch between this cgcle ond PLASTICS.
GLASSES
(onsome models)
PLASTICS
(on some models)
7.5gol.,40-75 min.
Thiscgcle isspecificollg designedfor glosses.
6.25-7.5 gol.,85-145 min.
Thelonger time for this cgcle includes o built-in drging portion thot is speciflcollg
designedto reduce the riskof melting plostic items ond improve plostic drging.
TOPRACKONLY
5-8.75 gol.,50-110 min.
(onsome models)
Thiscgcle woshes lightlg soileddishes on the upper reck only.
RINSEAND HOLD
IRINSEONLY}
2.5gol.,11 min.
Forrinsing portiol Ioodsthot will be woshed Ioter.Do not usedetergent with this cgcle.
Page 8
About the dishwasher control panel.
D Enhancements
Thelight above the selected pad will be ON to indicate which ENHANCEMENThasbeen selected.
DELAYHOURS
TEMP BOOST/
ADDED HEAT/
EXTRA HOT WASH
STEAM
(onsome models)
HEATED DRY
RESET
Start
ir.l
Front-Control Dishwashers
Closeand latch the dishwasherdoor and select the cycle and desiredenhancements.Touch the
START/RESETpad one time to begin the cycle. Water fill begins immediately, and approximately
60 seconds later the wash action begins.
When the dishwasher door is fully closedand latched, the control panellights will display the last settings
you selected.If you don't want to change any of the settings,simply touch the START/RESETpad to
begin the cycle.
If the door isclosed,the indicator lightswill turn off ifthe START/RESETpad is not selectedwithin 5 minutes.
Toactivate the display,open and closethe door or pressany pad.
Youcan delay the start of a wash cycle for up to 24 hours (dependingon model).
Pressthe DELAVSTARTpad to choose the number of hours you want to delay the start
of the cycle; then pressSTART/RESET.
Front-Control Dishwashers: The machine will count down and start automatically
at the correct time.
Top-Control Dishwashers: Afterclosing the door,the machinewill count down
and automatically start at the correct time.
NOTE:Tocancel the DELAVSTARTselection beforethe cycle begins,repeatedly press
the DELAVSTARTpad until the display isblank.
When selected,the cycle will run longer with heating element on to improve both wash
and dry performance.
NOTE:Cannot be selectedwith RINSEANDHOLDcycle.
Foruse with heavily soiled and/or dried-on, baked-on soils.Thisoption IvlUSTbe
selectedPRIORto starting the cycle. TheSTEAMoption adds 26 minutes to the
cycle time.
NOTE:Cannot be selectedwith RINSEANDHOLDcycle.
When HEATEDDRYis off,disheswill air dry.Top-control models have a fan that assists
the drying process.Thefan will run up to 4 hours affer the CLEANlight illuminates. If
desired,pressing any keypad will turn off the fan.
Light Off: Shuts off the drying heat option. Disheswill air dry naturally (front-control
dishwashers)or fan dry (top-control dishwashers)to save energy.
Light On:Turnsthe heater on for faster drying. Thiswill extend the total cycle time
between 8 and 58 minutes depending on the cycle selected.Ontop-control models,
a fan will continue to run up to 2 hours after the CLEANlight illuminates to assistthe
drying process.If desired,pressing any keypad will turn off the fan.
NOTE:Cannot be selectedwith RINSEAND HOLD cycle.
LOCK
Youcan lockthe controlsto prevent any selections from being made. Or you can lock
the controls after you have started a cycle.
Children cannot accidentally start dishwasher bg touching pads with this option
selected.
Tounlock the dishwasher controls, pressand hold the HEATEDDRYpadfor 3 seconds.
Thelight above the lock pad will turn off. Tolock the dishwasher,pressand hold the
HEATEDDRYpad for 3 seconds.The light above the LOCI(pad will turn on.
Tochange a cycle offer washing starts...
Front-Control Dishwashers: Touchthe START/RESETpadto cancelthe cycle.
TheSTART/RESETlightwillflash while the water ispumped out if needed.Thistokes
approximately 2 minutes.
Top-Control Dishwashers: Open the door slowly to prevent splash-out.
Touchthe START/RESETpad to cancel the cycle. Ifthe START/RESETlight isflashing,
close the door until the water pumps out (thistokes approximately 2 minutes)
and the light stops flashing.
When the lightstops flashing, the dishwasher can be reprogrammed and restarted.
Page 9
6EAppliances.com
E"j| Start (continued)
Top-Control Dishwashers
After selecting the cgcle and desiredenhancements, touch the START/RESETpod to reodg the
dishwasher to begin the cgcle.Closethe door to start the cgcle or begin the DELAVSTARTcountdown.
When the cgcle starts, the water fill begins and opproximotelg 60 secondslater the wash action begins.
Thedishwasher will olwogs displog gour lost selection and enhancements. If gou don't wont to change
the settings,simplg touch the START/RESETpod to reodg the dishwasher and closethe doorto begin
the cgcle.
ALL MODELS:Ifo power failure occurs NORMALand HEATEDDRYwill outomoticollg be programmed.
Make ong new selections and touch the START/RESETpodto begin the new cgcle.
When the door is opened,the indicator lights will turn off if the START/RESETpodisnot selectedwithin
5 minutes. To activate the displog,open and close the door ortouch ong pod.
Clean
D
Front-Control Dishwasher
TheCLEANlight will illuminate and o double beep will sound when o wash cgcleiscomplete. On some
models,the CLEANlight will turn off when the door isopened. On other models,the CLEANlight will
remain on until the door isopened and then relotched or untilong kegpod is pressedwhile the door
islatched shut.
Top-Control Dishwasher
TheCLEANlight will illuminate and a double beep will sound when a wash cgcle iscomplete. The CLEAN
light will remain on until the door isopened and then relatched or until any kegis pressed.
ALL MODELS:Toturn off the audible end-of-cycle signal (orre-activate it if it was previously turned off),
pressthe HEATEDDRYpad 5 times within 5 seconds.A triple beep will sound to indicate the end-of-cycle
beep option has been toggled.
Flashing display lights.
Status Indicator Lights
START/RESET
What It Means
Cycle has been interrupted by pressingthe START/RESETpad, or there
has been a power failure. Light will stop flashing after the dishwasher
automatically drains out the water.Thedishwasher will restart with NORMAL
and HEATEDDRYifthe interruption was the result of a power failure.
Recommended dishwasher products.
GErecommends the following products for use in its
dishwashers:
• Foryour manual detergent dispenser,Cascade®
powder, liquid or gel automatic dishwasher
detergents are approved.
• Forgour SmartDispenseTM Detergent Dispenser,use
onlg the recommended liquid automatic detergents
listed on page 12of this manual.
• Cascade Crystal Clear®rinseagents to remove
spots and prevent new film buildup on gour dishes,
glasses,flatware, cookware and plastic. Using rinse
agent alsoimproves drg performance.
• Cerama Bryte ®StainlessSteelAppliance Cleaner
to clean the exterior stainlesssteel panel of GEand
ProfileTM dishwashers (forstainlesssteel exterior
models onlg).
Page 10
Using the dishwasher.
Check the Water Temperature
The entering water should be at least 120°F and not more than 150°F for effective cleaning and to
prevent dish damage. Check the water temperature with a candy or meat thermometer. Turn on the
hot water faucet nearest the dishwasher, place the thermometer in a glass and let the water run
continuously into the glass until the temperature stops rising.
Use Cascade Crystal Clear ®Rinse Agent
Cascade Crystal Clear ®rinse agent improves drying, removes spots and prevents new film buildup on
your dishes, glosses, flatware, cookware and plastic.
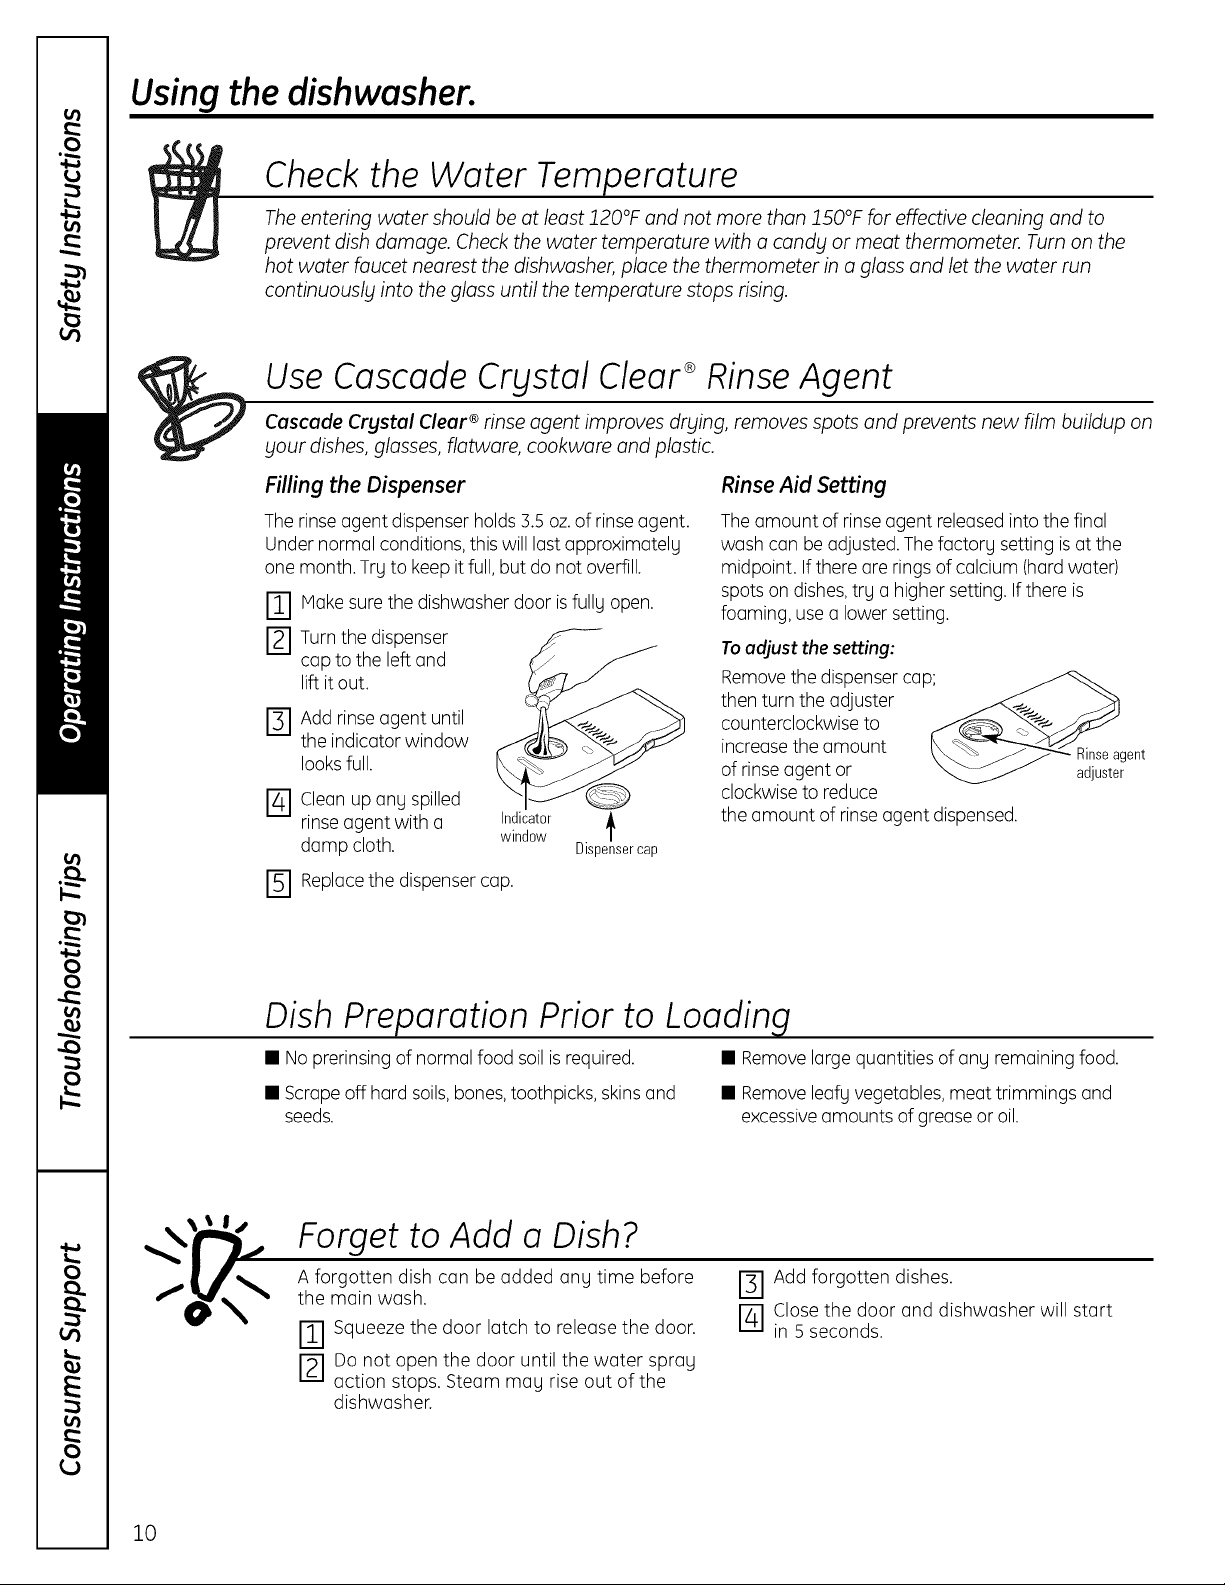
Filling the Dispenser Rinse Aid Setting
Therinse agent dispenser holds 3.5oz.of rinseagent.
Under normal conditions,this will last approximatelg
one month. Trg to keep it full,but do not overfill.
Make surethe dishwasher door isfullg open.
m
Turnthe dispenser
F2-1
cap to the left and
lift it out.
I-_1 Add rinseagent until
the indicator window
looks full.
[] Cleanup any spilled
rinseagent with a Indicator
damp cloth, window Dispensercap
FI Replacethe dispenser cap.
Theamount of rinseagent releasedinto the final
wash can be adjusted.The factorg setting isat the
midpoint. Ifthere are ringsof calcium (hardwater)
spots on dishes,trg a higher setting. If there is
foaming, use a lower setting.
Toadjust the setting:
Removethe dispenser cap_
thenturntheadjuster
counterclockwise to
increase the amount \_ _'_ Rinseagent
of rinseagent or _ adjuster
clockwiseto reduce
the amount of rinse agent dispensed.
Dish Preparation Prior to Loading
• Noprerinsing of normal food soilisrequired. • Removelarge quantities of any remaining food.
• Scrapeoff hard soils,bones,toothpicks, skinsand • Removeleafy vegetables, meat trimmings and
seeds, excessiveamounts of grease or oil.
10
Forget to Add a Dish?
A forgotten dish can be added ang time before
the main wash.
I-_1 Squeezethe door latch to release the door.
I-_1 Do not open the door until the water spray
action stops. Steam may rise out of the
dishwasher.
I-_1Add forgotten dishes.
[_-I Close the door and dishwasher will start
in 5 seconds.
Page 11

Manual Detergent Dispenser
Somemodelscomeequippedwithan automaticliquid
dishwasherdetergentdispenser(SmartDispenseTM) and
a manualdispenser.Youcanuseeitherofthesedispensers
butdon'tusebothatthesametime.
GEAppliances.com
Forheavilysoiledloads,useabit moredetergent.Forwater
temperaturesabove140°F,useabitlessdetergent.
Medium Medium Extremely
Soft Soft Hard Hard
\
SmartDispense TM
Manual Detergent
Dispenser
Thecoverofthemanualdispenserwillopenduringthe
washcycle.IfyouareusingSmartDispenseTM, leavethe
coverofthe manualdispenseropenbeforestartingthe
cycle.
Forthemanualdispenser,Cascade®Automatic
DishwashingDetergentshavebeenapproved.Youmay use
powder,liquid,gelpacketsortabletsinthisdispenser.Itis
importantto keeppowdereddetergentsandtabletsfresh
anddrysothey don'tloseeffectiveness.Therefore,donot
putdetergentintothemanualdispenseruntilyou areready
towashdishes.
Filfing Manual Detergent Dispenser
Theamountofdetergentto usedependsonwhetheryour
waterishardor soft.Withhardwater,youneedextra
detergent.Withsoftwater,youneedlessdetergent.
Protectyourdishesanddishwasherby contactingyour
waterdepartmentandaskinghowhardyourwateris.
Twelveor moregrainsisextremelyhardwater.Awater
softenerisrecommended.Withoutit,limecanbuildup in
thewatervalve,whichcouldstickwhileopenandcause
flooding.Toomuchdetergentwithsoftwatercancause
a permanentcloudinessofglassware,calledetching.
Usetheinformationinthetablebelowasa guideto
determinetheamountofautomaticdishwasherdetergent
toplaceinthedispenser.
Whenusingautomaticdishwashingdetergentpackets
ortablets,simplyplaceoneinthemainwashsectionand
closethecover.
Forheavilysoiledloads,usetheDeepCleanorCookwarecycle.
DO NOTUSEHANDDISH DETERGENT
m
m
NOTE;Usingadetergentthatisnotspecificallgdesigned
fordishwasherswillcausethedishwasherto fillwithsuds.
Duringoperation,thesesudswillspillout ofthedishwasher
vents,coveringthekitchenfloorandmakingthefloorwet.
Becausesomanydetergentcontainerslookalike,store
thedishwasherdetergentina separatespacefromall
othercleaners.Showanyonewhomay usethedishwasher
thecorrectdetergentandwhereit isstored.
Whiletherewillbenolastingdamagetothe dishwasher,
yourdisheswillnotgetcleanusinga dishwashing
detergentthat isnotformulatedto workwith dishwashers.
Number
of Grains Detergent Cups to Fill
Lessthan 4 Fillcup to soft line (1/5 full)
/4to 8 Fillcup to medium soft line (2/5 full)
8 to 12 Fillcup to medium hard line
(completely full)
Greater Fillboth main wash cup
than 12 and pre wash cup
11
Page 12
Using the dishwasher.
SmartDispense TÈDetergent Dispenser (some models)
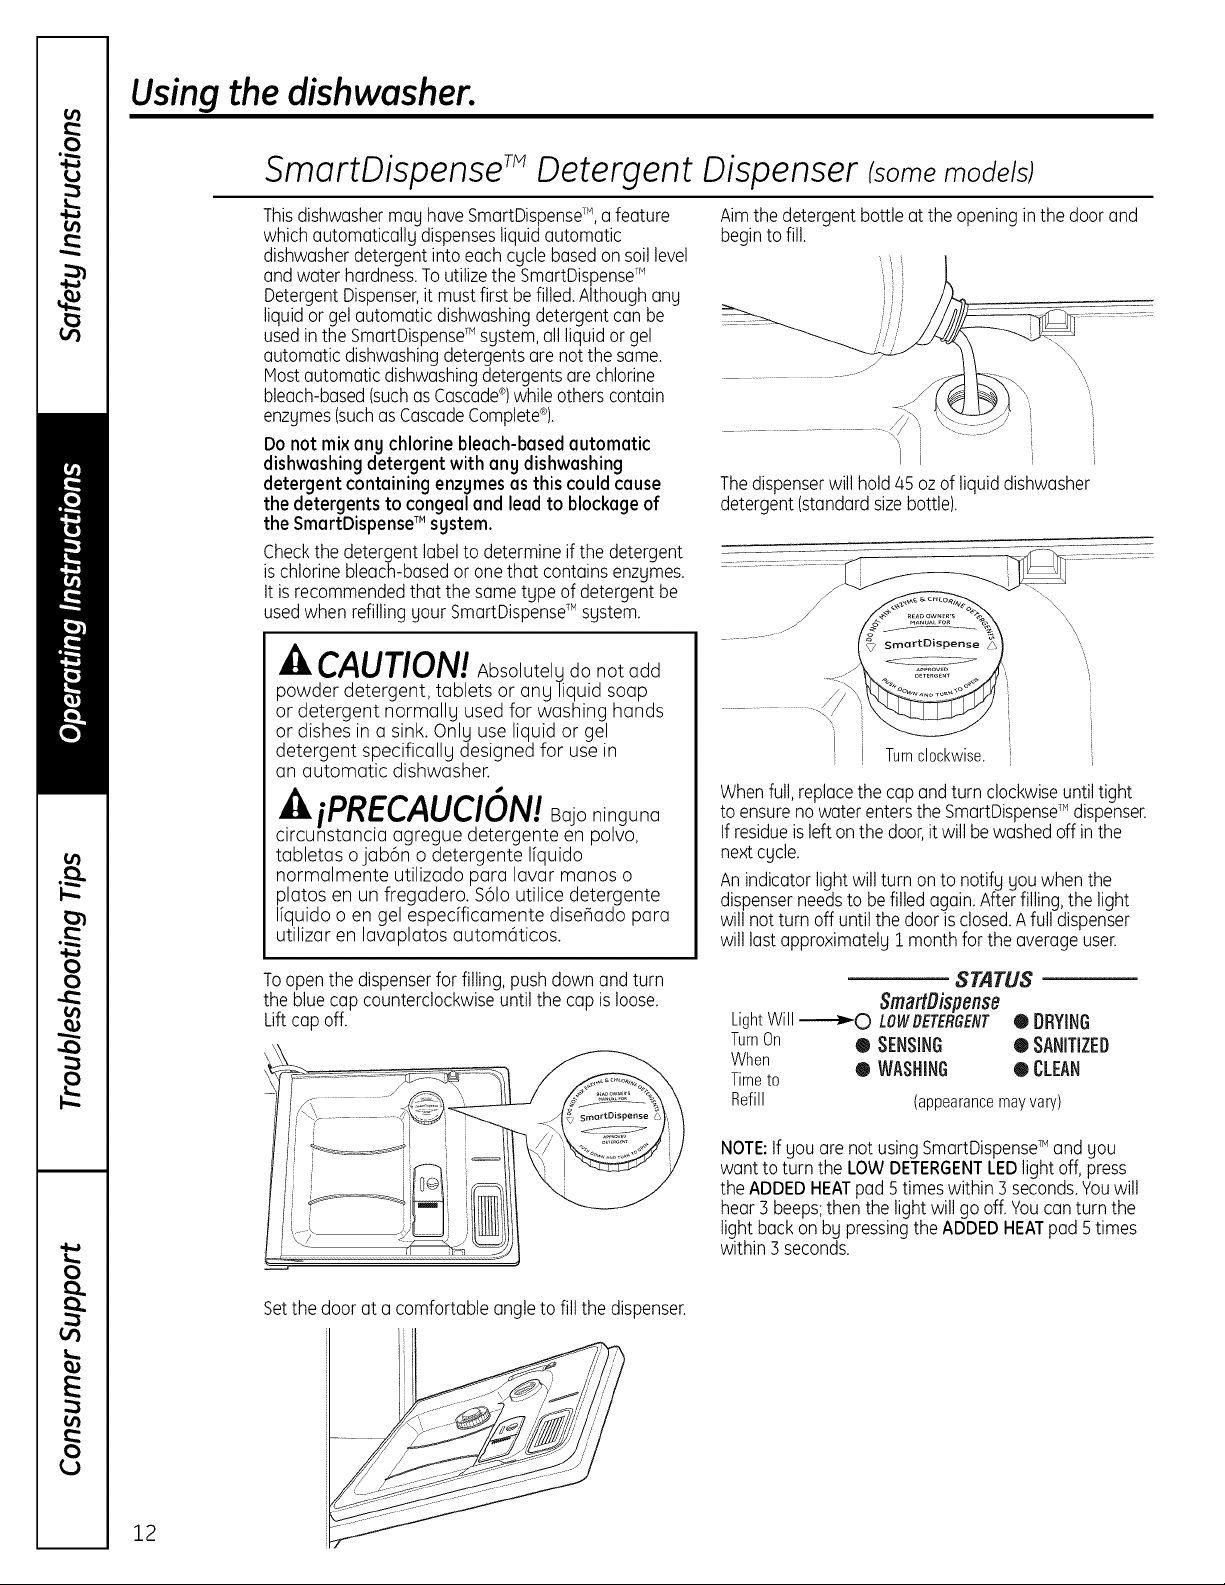
Thisdishwashermay haveSmartDispensdM,a feature
which automaticallydispensesliquidautomatic
dishwasherdetergentinto eachcyclebasedon soillevel
and water hardness.Toutilizethe SmartDispensdM
DetergentDispenser,it mustfirst befilled.Althoughany
liquidor gelautomatic dishwashingdetergentcan be
usedinthe SmartDispensd_system,all liquidor gel
automatic dishwashingdetergentsare not the same.
Hostautomatic dishwashingdetergentsarechlorine
bleach-based(suchasCascade®)while otherscontain
enzymes(suchasCascadeComplete®).
Donot mixany chlorine bleach-basedautomatic
dishwashing detergent with any dishwashing
detergent containing enzymesas this could cause
the detergents to congealand lead to blockageof
the SmartDispenseT'system.
Checkthe detergent labelto determineif the detergent
ischlorine bleach-basedor one that contains enzymes.
It isrecommendedthat the sametype of detergent be
usedwhen refillingyour SmartDispenseTMsystem.
-&CAUTION! Absolutely do not add
powder detergent, tablets or any liquid soap
or detergent normally used for washing hands
or dishes in a sink. Only use liquid or gel
detergent specifically designed for use in
an automatic dishwasher.
,&iPRECAUCIGN!Bajo ninguna
circunstancia agregue detergente en polvo,
tabletas ojab6n o detergente Ifquido
normalmente utilizado para lavar manos o
platos en un fregadero. S61outilice detergente
Ifquido o en gel especificamente dise_ado para
utilizar en lavaplatos automdticos.
Aimthe detergent bottleat the openinginthe doorand
beginto fill.
................ / i [
,\
, i
Thedispenserwill hold/45ozof liquiddishwasher
detergent (standard size bottle).
-\
[
i
Turnclockwise.
i
i
Whenfull,replacethecap and turn clockwiseuntiltight
to ensurenowater entersthe SmartDispenseTMdispenser.
If residueislefton the door,itwill bewashedoff inthe
nextcycle.
Anindicatorlight willturn onto notify you whenthe
dispenserneedsto befilled again.Afterfilling,the light
willnot turn off untilthedoor is closed.Afull dispenser
willlast approximately1 monthfor theaverageuser.
12
Toopen the dispenserfor filling, pushdown and turn
the bluecap counterclockwiseuntil thecap isloose.
Liftcap off.
Setthe door at a comfortable angleto fill the dispenser.
STATUS
SmartBispense
LightWill_ LOWBETERGENT0 DRYING
TurnOn • SENSING ® SANITIZED
When
Timeto
Refill (appearancemayvary)
NOTE:Ifyou are notusing SmartDispenseTMand you
wantto turn the LOWDETERGENTLEDlightoff, press
the ADDEDHEATpad 5timeswithin Bseconds.Youwill
hearBbeeps;then the lightwill go off. Youcan turn the
lightbackon by pressingtheADDEDHEATpad 5 times
within Bseconds.
® WASHING ® CLEAN
Page 13
SmartDispense Detergent Dispenser
Water Hardness Calibration
GEAppliances.com
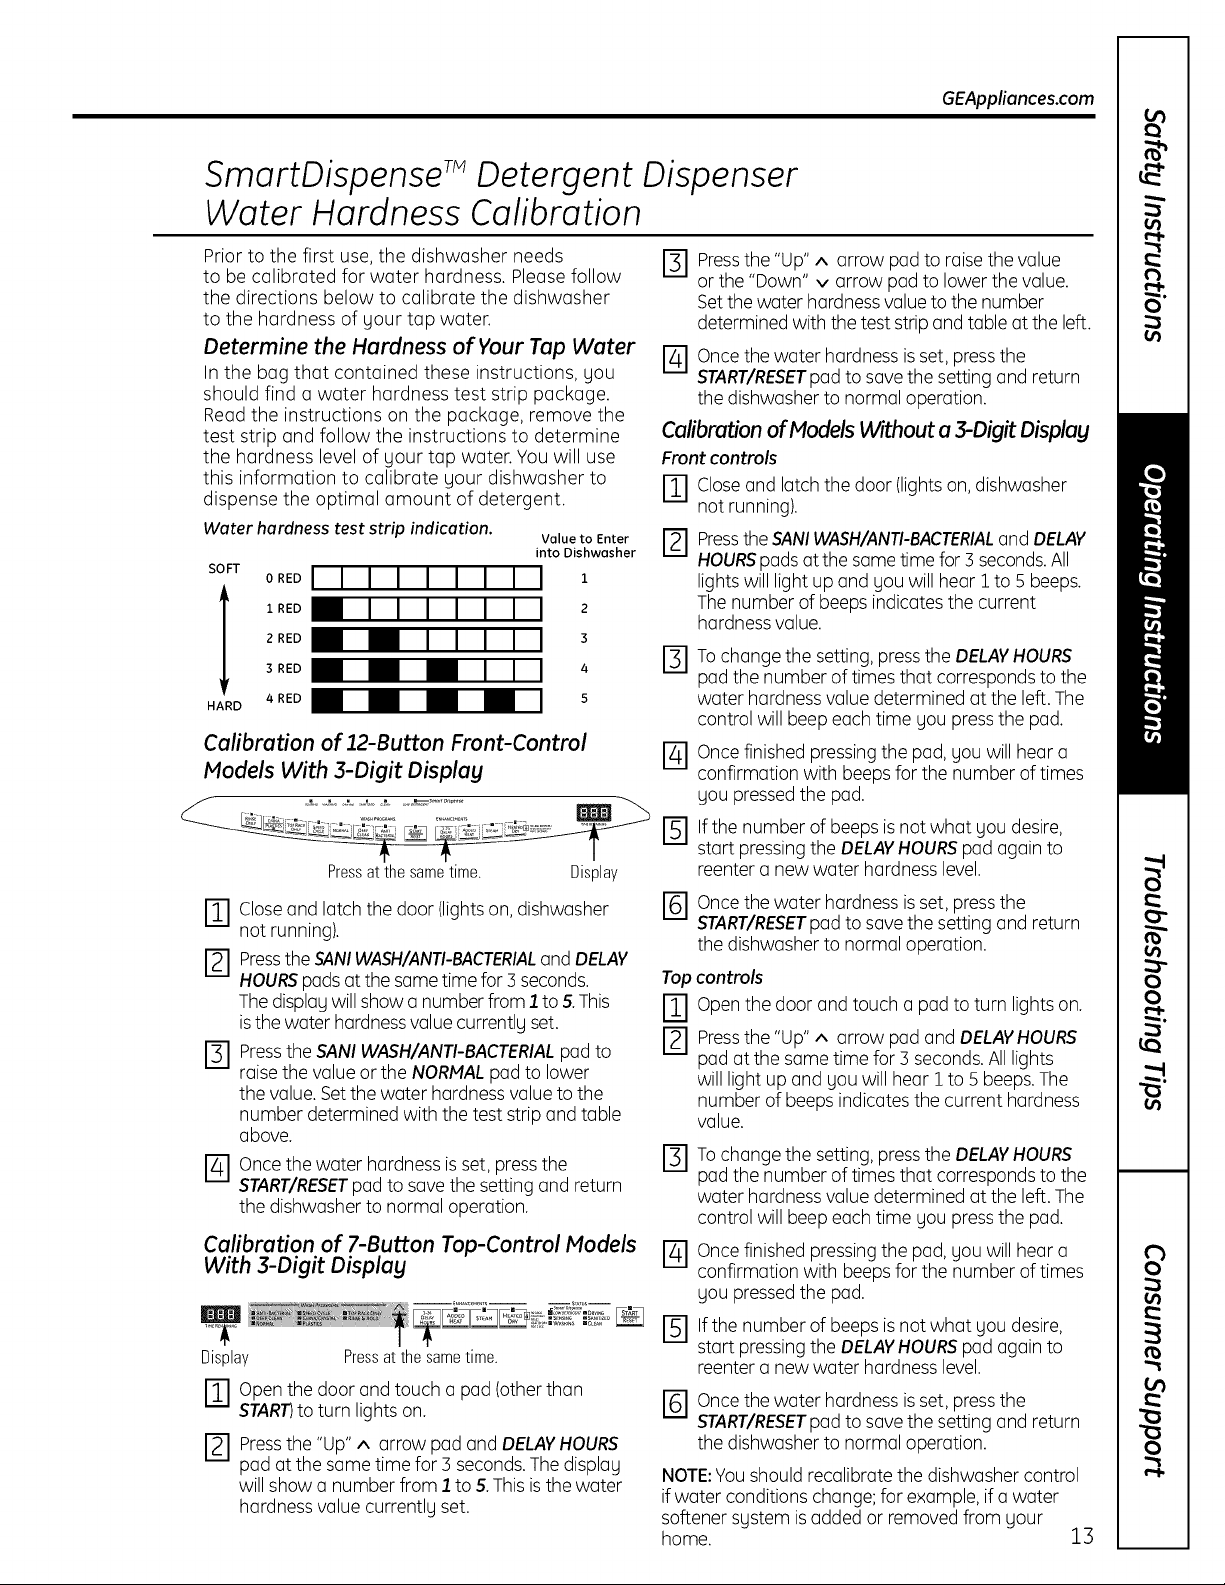
Prior to the first use, the dishwasher needs
to be calibrated for water hardness. Pleasefollow
the directions below to calibrate the dishwasher
to the hardness of gour tap water.
Determine the Hardness of Your Tap Water
In the bag that contained these instructions, gou
should find a water hardness test strip package.
Readthe instructions on the package, remove the
test strip and follow the instructions to determine
the hardness level of gour tap water. You will use
this information to calibrate gour dishwasher to
dispense the optimal amount of detergent.
Water hardness test strip indication. Valueto Enter
SO FT
OREDII I I I I I I I 1
1 RED _ 2
2 RED _ 3
3 RED _ 4
HARD 4 RED _ 5
into Dishwasher
1-31Pressthe "Up" A arrow pad to raisethe value
1-4-IOncethe water hardness isset, pressthe
Calibration of Models Without a 3-Digit Display
Front controls
[]
Calibration of 12-Button Front-Control _1
Models With 3-Digit Displag
Pressatthesametime. Display
m Closeand latch the door (lightson,dishwasher Ibl
i-,-i
not running).
_] Pressthe SANIWASH/ANTI-BACTERIALand DELAY
HOURSpadsat the sametime for 3 seconds. Top
Thedisplagwill show a numberfrom I.to 5.This FI
isthe water hardnessvalue currentlg set.
E] PresstheSANI WASH/ANTI-BACTERIALpad to 141
raisethe value or the NORMALpad to lower
the value. Setthe water hardnessvalue to the
number determined with the test strip and table
above.
Oncethe water hardness is set, pressthe
@
START/RESETpad to savethe setting and return
the dishwasherto normal operation.
Calibration of 7-Button Top-Control Models _1
With 3-Digit Displag
............ P_¢ .................... -- m m m j,,,-,,_,_ ....
TT
Display Pressatthesametime.
FI"] Openthe door and touch a pad (otherthan
STAR#to turn lights on.
_] Pressthe "Up" A arrow pad and DELAYHOURS
pad at the same time for 3 seconds.The display
will show a number from 1 to 5.Thisis the water
hardnessvalue currently set.
I--A'I
@
r_lf the number of beeps isnot what you desire,
FI Oncethe water hardness isset, pressthe
NOTE:Youshould recalibrate the dishwasher control
if water conditions change;for example, if a water
softener sgstem is added or removed from gour
home. 13
or the "Down" v arrow pad to lower the value.
Setthe water hardnessvalue to the number
determined with the test strip and table at the left.
START/RESETpad to save the setting and return
the dishwasher to normal operation.
Closeand latch the door (lightson, dishwasher
not running).
PresstheSANIWASH/ANTI-BACTERIALand DELAY
HOURSpads atthe sametime for 3 seconds.All
lights will light up and gou will hear I to 5 beeps.
Thenumber of beeps indicates the current
hardness value.
Tochange the setting,press the DELAYHOURS
pad the number of times that correspondsto the
water hardnessvalue determined at the left. The
control will beep each time you pressthe pad.
Oncefinished pressingthe pad,gou will hear a
confirmation with beepsfor the number of times
gou pressedthe pad.
Ifthe number of beepsis not what gou desire,
start pressingthe DELAYHOURSpad again to
reenter a new water hardness level.
Oncethe water hardness is set, pressthe
START/RESETpad to save the setting and return
the dishwasher to normal operation.
controls
Open the door and touch a pad to turn lights on.
Pressthe "Up" A arrow pad and DELAYHOURS
pad at the same time for 5 seconds.All lights
will light up and gouwill hear I to 5 beeps.The
number of beeps indicatesthe current hardness
value.
Tochange the setting,press the DELAYHOURS
pad the number of times that correspondsto the
water hardnessvalue determined at the left. The
control will beep each time you pressthe pad.
Oncefinished pressingthe pad,gou will hear a
confirmation with beepsfor the number of times
gou pressedthe pad.
start pressingthe DELAYHOURSpad again to
reenter a new water hardness level.
START/RESETpad to save the setting and return
the dishwasher to normal operation.
Page 14
Loading the dishwasher racks.
For best dishwashing results, follow these loading guidelines. Features and appearance of racks and silverware
baskets may vary from your model.
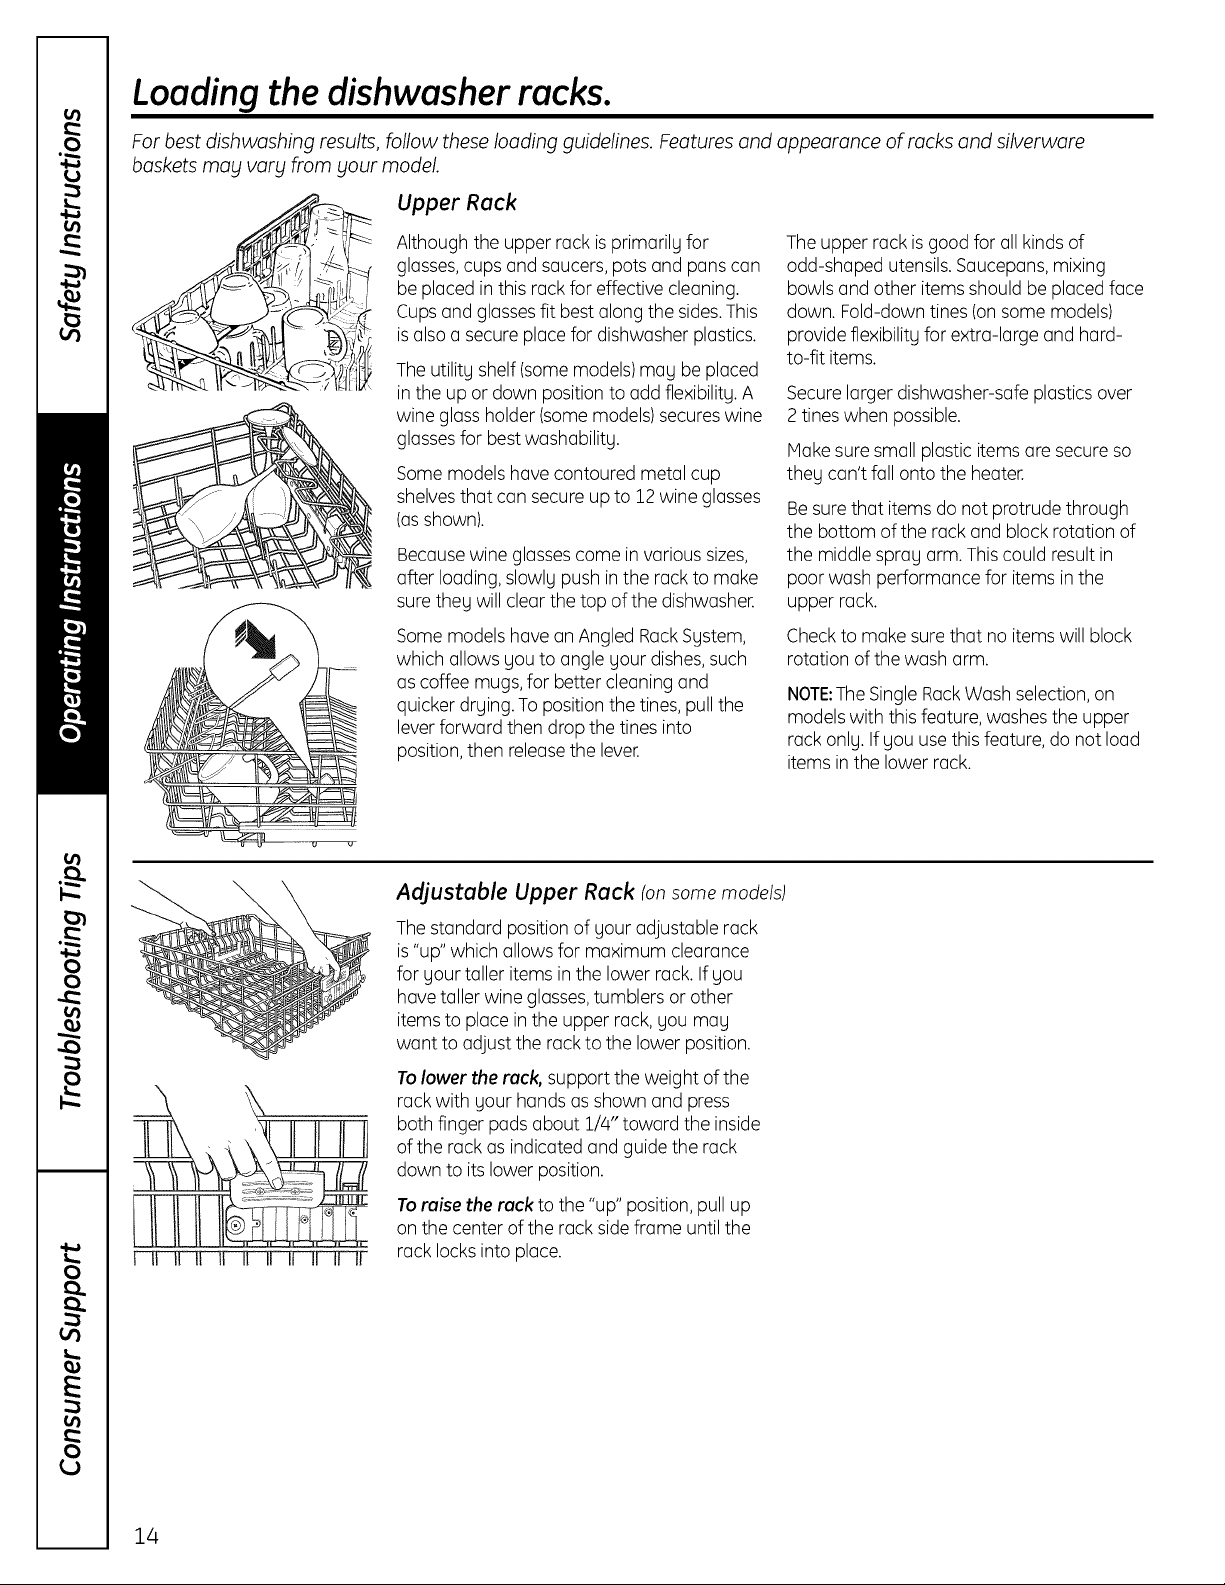
Upper Rack
Although the upper rock isprimarily for
glosses,cups and saucers, pots and pans con
be placed in this rack for effective cleaning.
Cupsand glosses fit bestalong the sides.This
isalso a secure place for dishwasher plastics.
Theutility shelf (somemodels)may be placed
in the up or down position to add flexibility.A
wine glass holder (somemodels)secureswine
glassesfor best washability.
Somemodels hovecontoured metal cup
shelvesthat con secure up to 12wine glosses
(asshown).
Becausewine glossescome in various sizes,
offer loading, slowly push in the rock to make
surethey will clearthe top of the dishwasher.
Somemodels hoveon Angled RockSystem,
which allows you to angle your dishes,such
as coffee mugs,for better cleaning and
quicker drying. To position the tines,pull the
leverforward then drop the tines into
position,then releasethe lever.
The upper rock isgood for oil kinds of
odd-shaped utensils.Saucepans,mixing
bowls and other items should be placed face
down. Fold-down tines (onsome models)
provide flexibility for extra-large and hard-
to-fit items.
Securelarger dishwasher-safe plastics over
2 tines when possible.
Make suresmall plastic items ore secure so
they can't foil onto the heater.
Be surethat items do not protrude through
the bottom of the rack and block rotation of
the middle spray arm. This could result in
poor wash performance for items in the
upper rock.
Checkto make surethat no items will block
rotation of the wash arm.
NOTE:TheSingle RockWashselection,on
models with this feature,washes the upper
rock only. If you usethis feature, do not load
items in the lower rock.
Adjustable Upper Rack (onsomemodels)
Thestandard position of your adjustable rack
is"up" which allows for maximum clearance
for your taller items in the lower rack. If you
have taller wine glasses,tumblers or other
items to place inthe upper rack, you may
want to adjust the rack to the lower position.
Tolower the rack, support the weight of the
rock with your hands asshown and press
both finger pods about 1/4" toward the inside
of the rock as indicated and guide the rock
down to its lower position.
Toraise the rack to the "up" position,pull up
on the center of the rock sideframe until the
rock locks into place.
14
Page 15

Lower Rack
GEAppliances.com
One-piece basket (ell some models)
Three-piece basket (ell some models)
Don'tlet any
itemextendthrough
bottom.
The lower rock is best used for plates, saucers
and cookware. Large items such as broiler
pans and baking rocks should go along the
left-hand side. Load plotters, pots and bowls
along the sides,incorners or in the back.The
soiledside of itemsshould face the center of
the rock. If necessarg,oversizedglossesand
mugs con be placedin the lower rock to
maximize loading flexibilitg.
Also,be careful not to let a portion of on item
such as a pot or dish handle extend through
the bottom rock.Thiscould blockthe wash
arm and cause poorwashing results.
Silverware Basket
Toload flatware, simplg pushthe adjustable
handle to either side(onsome models).Put
flatware in the removable basketwith fork
and knife handles up to protect gour hands.
Placespoons in the basketwith handles
down. Mix knives,forks and spoons sotheg
don't nesttogether. Distribute evenlg.Small
plastic items, such as measuring spoons and
lidsfrom small containers should go in the
bottom ofthe silverware basketwith the
silverware on top.
Theone-piece silverware basket (on some
models)con be placed in the front, right side
or back of the lower rock.
Fold-down tines (onsome models)provide
flexibilitg for extra-large and hard-to-fit items.
Thetines mag be left inthe up position or
folded down to customize the lower rock.Do
not load large bowlsor pots facedown in the
front left-hand corner.Items loaded in this
manner could prevent proper operation of
the manual detergent cup.
A varietg of options isavailable regarding
the three-piece silverware basket (onsome
models)in gour dishwasher.Thecomplete
basket isdesigned to fit onthe right sideof
the lower rock.Additionallg, each end of
the basket is removable to odd loading
flexibilitg to accommodate flatware and
lower rock capacitg needs.
Thelids of both end and middle baskets(on
some models)con be closedto contain small
items. Long items con be placed on the utilitg
shelf in the upper rock.Load flatware through
the slots in the silverware basket covers.
Toremove end baskets, grasp the basket at
opposite corners and slide apart.
15
Page 16

Loading the dishwasher racks.
Extra Rack Features Ion some models)
Cutlery Trag
Thecutlery tray holdsup to 4 large knifes
such as a carver, chef's knives,breadknife,
etc.,that are too tall to fit inthe silverware
basket.
Hook the tray onto the rear of the upper rack.
Lay the knives between the guides
(asshown).
Bowl Tines
Thespecial large-bowl tines in the lower rack
add flexibility to your loading pattern. They
are usefulfor serving bowls or other large
bowls.
Touse the bowl tines,fold down the
//
L
2 rows of flex tines infront of the bowl
tines and load bowlsjust as you would
in the upper rack.
,i
T eseti fold down
Large-bowltines
Loading place settings...
Follow these guidelines for loading 10 place settings. Features and appearance of racks and silverware baskets mag
varg from your model. NOTE:Silverware should be individually loaded into the slots on the silverware basket lid.
Upper Rack--t0 place settings Lower Rack--t0 place settings
Follow these guidelines for loading 12 place settings. Features and appearance of racks and silverware baskets may
varblfrom your model. NOTE:Silverware should be individually loaded into the slots on the silverware basket lid.
16
NOTE:Do not place !
large objects in the I_
front-leftcorner of I
the lower rack.
Upper Rack--12 place settings Lower Rack--12 place settings
Page 17

Caring for the dishwasher. GEAppliances.com
Cleaning the Exterior Door Panel
Beforecleaning the front panel,make
sure you know what type of panel you hove.
Referto the lost two lettersof your model
number. Youcan locate your model number
on the left-hand tub walIjust insidethe door.
If your model number ends with BB,CC,WW,
SAor BG,then you hove a Pointed Door
panel. If your model number endswith SS,
then you hovea StainlessSteelDoor panel.If
your model number ends with C8,then you
hove a CleanSteelpanel.
Followthe instructions below for cleaning the
door panel for your specific model.
Painted Door Panel (modelnumbers ending
in BB-black, CC-bisque,WW-White, SA-silver
metallic or BG-grophite black)
Usea cleon, soft, lightly dampened cloth,
then dry thoroughly. Youmay also use a
good appliance wax or polish.
Stainless SteelDoor Panel (modelnumbers
ending in SS)
Thestainlesssteel panels can be cleaned
with StainlessSteelMagic or a similar product
using a clean,soft cloth. Do not useappliance
wax, polish,bleach or products containing
chlorine on StainlessSteeldoors.
Youcan order StainlessSteelMagic
#WXJOXJ5through GEPorts by calling
800.626.2002.
CleanSteel Door Panel (model numbers
ending in CS)
Use a clean, soft, lightly dampened cloth,
then dry thoroughly. Do not use appliance
wax, polish or any chemical agent on
CleanSteel doors.
Do not wipe the dishwasher with a soiled
dish cloth or wet towel. Thesemay leave
a residue. Do not use scouring pads or
powdered cleaners because these products
con scratch the finish.
Stainless Steel Interior--Tub and Inner Door
Thestainlesssteel usedto make the
dishwasher tub and inner door provides
the highest reliability available in a GE
dishwasher.If the dishwasher tub or inner
door should be scratched or dented during
normal use,they will not rust or corrode.
Thesesurface blemisheswill not affect
their function or durability.
Cleaning the Control Panel
Toclean the control panel,usea lightly
dampened cloth.Then dry thoroughly.
Protect Against Freezing
If your dishwasher isleft in on unheated
place during the winter, ask a service
technician to:
I-_1Cut off electrical power to the
dishwasher.Removefuses or trip
circuit breaker.
I-_1Turn off the water supply and disconnect
the water inlet linefrom the water valve.
F_I Drain water from the water inlet line
r_-i Reconnectthe water inlet lineto the
and water valve.(Usea pan to catch
the water.)
water valve.
Airgap 4_ k('L I,:_t__ _
Checkthe air gapany time your
dishwasherisn'tdrainingwell.
Does Your Dishwasher Have an Air Gap?
An air gap protects your dishwasher against
water backing up into it if a drainclogs.The
air gap isnot a port ofthe dishwasher.It is
not covered by your warranty. Not all
plumbing codes require air gaps,so you may
not hove one.If the air gap gets clogged,the
dishwasher will not drain. Cleonthe air gap
if the dishwasher will not drain.
Theair gap is easy to clean.
[] Turnoff the dishwasher and lift off the
cover
Removethe plastic cap and cleon with
[-2]a toothpick.
17
Page 18

Before you call for service...
Troubleshooting Tips
Save time and moneg! Review the charts on the following pages,
or visit GEAppliances.com You mag not need to call for service.
Error Messages
START/RESETstatus
indicator light flashing
DishwasherBEEPS
onceevery30seconds
Beepingat theend
of thecycle
Possible Causes What To Do
You have pressed the
START/RESETpad while the
dishwasher is running. This will
cancel the cycle. The lightwill
stop flashing after the dishwasher
drains (about 90 seconds).
Power to the dishwasher was
turned off while acycle was
running and power hasjust been
restored to the dishwasher. The
blinking lights indicate that the
dishwasher isdraining water
inside.
Thisisa reminderthat your
dishwasherdoorhasbeenleft
• PresstheSTART/RESETpadonly onetimeto startthedishwasher.Whenthe
dishwasherisrunning,onlypresstheSTART/RESETpadif youwishto cancel
(reset)thecycle.
• Thelightwillstopflashingafterthedishwasherdrainsoutthewater.Anew
cyclewill startautomaticallywhenthedrainends.Thenewcyclewillbeset
to NORMALWASHwithHEATEDDRY
• Closeandlatchthe doorafteropeningitmid-cycle.Beepingwillstopand
dishwasherwill completecycle.
openduring operation.It will
continuebeepinguntil youclose
thedoor.
This is normal. The dishwasher
will beep twice at the end of
the cycle.
• Toturnoffthe doublebeepindicator(orre-activateitifit was previously
turnedoff),presstheHEATEDDRYpad5timeswithinBseconds.Atriple
beepwillsoundto indicatetheend-of-cyclebeepoptionhasbeenturned
on oroff.
Problem
Dishesandflatware
not clean
Possible Causes What ToDo
Lowinlet water temperature •
Hakesureinletwatertemperatureiscorrect(seepage10).Turnonthehot
waterfaucetnearestthedishwasher;letrununtilthewatertemperature
stopsrising.Thenstartthedishwasherandturn offthefaucet.Thisensures
theenteringwaterishot.
Trynotto usethedishwasherwhenhot waterisbeingusedelsewhere
inthehouse;forexample,whendoinglaundryorwhena familymember
isusingtheshower.
Water pressureistemporarilglow •
Turnonafaucet.Iswatercomingout moreslowlythanusual?Ifso,wait
untilpressureisnormalbeforeusingyourdishwasher.
Trynotto usethedishwasherwhenhot waterisbeingusedelsewhere
inthehouse;forexample,whendoinglaundryorwhena familymember
isusingtheshower.
Air gapor disposeris clogged • Cleantheairgaporflushthedisposer.
Improperrack loading • Hakesurelargedishwaredoesnot blockthedetergentdispenserorthe
washarms.SeetheLoadingthedishwasherrackssection.
Noair gapor highdrain loop • Verifythat youhavean airgapora highdrainloop.Referto the
InstallationInstructions.
18
Page 19

Problem Possible Causes What ToDo
GEAppliances.com
Spots and filming
on glosses and
flatware
Extremelghardwater
Lowinlet water temperature
Overloadingthe dishwasher
Improperloading
Oldor damppowderdetergent
• UseCascadeCrystalcleuP rinseagentsto removespotsandprevent
newfilm buildup.
• Hakesurewatertemperatureisat least120°F.
• Loaddishwasherasshowninthe LoadingPlaceSettingssection.
• Hakesuredetergentisfresh.
• Ifwaterisextremelyhard,asoftenermayberequired.
Rinseagentdispenseremptg
Toolittle detergent
Cloudinesson Combinationof soft water and • Thisiscalledetchingandispermanent.Topreventthisfromhappening,
glassware too muchdetergent uselessdetergentifyouhavesoftwater.Washglasswareinthe shortest
cyclethatwill getthemclean.Seepages11,12and13.
Water temperatureentering • Thiscouldbeetching.Lowerthewaterheatertemperature.
thedishwasherexceeds150°F
Sudsinthetub Correctdetergent • Useonlyautomaticdishwasherdetergentsto avoidsudsing.
wasn'tused Cascade®AutomaticDishwashingDetergentshavebeenapproved
• Toremovesudsfromthe tub,openthedishwasherandlet
__ for useinallGEdishwashers.
sudsdissipate.Closeandlatchthedishwasherdoor.Pumpoutwater
bytouchingtheSTART/RESETpadonce;then30secondslater,
touchtheSTART/RESETpadagain.Repeatifnecessary.
• Alwayswipeuprinseagentspillsimmediately.
• Repositionthedishes,sothewaterfrom thelowersprayarmcan
flushthedetergentcup.Seepages:15and:16.
• Usea turkeybastertoremoveasmuchwateraspossiblefromthe
SmartDispense'Mdispenserandrefillitas normal.Besuretotightenthe
capfullyto preventwaterfromenteringthedispenser.
• Removemarkswitha mild,abrasivecleaner.
• Hake sure inlet water temperature is at least 120°E
• Select HEATEDDRY
• Use PRE-WASHorADDED HEAToptions.
• Selecta higher cycle, such asANTI-BACTERIALor COOKWARE.
• Check the rinse agent dispenserand fill as required.
• Useof the RINSEANDHOLD cycle after adding the dish to the load
can decrease the level of staining.
• Removethe stain by hand, using a solution of 1/2 cup bleach
and 3 cups warm water.
Detergentleftin
dispensercups
Water inthe
SmartDispense'"
dispenser
Blackor gray
markson dishes
Dishes don't dry
Stainedtubinterior
Rinseagent was spilled
Dishesare blocking the
detergent cup
Cap not tightened after filling
the dispenser
Aluminumutensilshave
rubbedagainstdishes
Lowinlet water temperature
Rinseagentdispenserisemptg
Sometomato-basedfoodscan
causereddishsteins
Teaor coffeesteins
Anoverallgellowor brownfilmcan •
becausedbyirondepositsinwater
White filmon insidesurface- •
hardwater minerals
-& WARNING
Beforecleaninginterior,waitatleast20minutesaftera cycleforthe
heatingelementstocooldown.Failuretodo socanresultinburns.
_4,ADVERTENCIA
Antesdelimpiarelinterior,espereparIomenos20minutosdespu@s
deuncicloparaqueloselementoscalentadoresseenfrien.Nohacerlo
puedeprovocarquemaduras.
Aspecialfilterinthewatersupplylineisthe onlywaytocorrect
this problem.Contactawatersoftenercompany.
GErecommendsCascadeCrystal CleoPto helppreventhardwater
mineraldepositsfromforming.
Rundishwasherwithcitricacidto removemineraldeposits.Citric
acid(Partnumber:WD35X:15:1)canbeorderedthroughGEParts.
Seebackcoverfororderinginformation.
19
Page 20

Before you cull for service...
Troubleshooting Tips
\
Problem Possible Causes What ToDo
Control panel responded
to inputs but dishwasher
never filled with water
Controlpaneldoesnot
respondtoinputs
Dishwasher won't run
Controlpanellights Timetoo longbetween • Eachpadmustbetouchedwithin5minutesoftheothers.
go offwhen you're touchingof selectedpads Torelight,touchany padagain,orunlockandrelatchdoor.
settingcontrols
Waterstanding in Thisis normal • Asmallamountofcleanwateraroundtheoutletonthetub
thebottom of thetub bottomat thebackofthetub keepsthepumpseallubricated.
Water won'tpump Drainisclogged • Ifyouhaveanairgap,cleanit.Seepage17.
outof thetub • Ifthedishwasherdrainsintoa disposer,rundisposerclear.
Steam Thisisnormal • Warm,moistaircomesthroughtheventby thedoorlatchduringdrying
Sanitizedlight does Thedoorwasopenedand the • Donotinterruptthe cycleanytimeduringor aftermainwash.
not illuminateat the cyclewasinterrupted during
endof thecycle or after the main washportion
_nti-Bacteria Theincomingwater • Raisethewaterheatertemperatureto between120°Fond14001:.
cycleonlyl temperature wastoo low
Noise Normaloperatingsounds • Theseareallnormal.Noactionisrequired.
seated
Water valve may be turned off
Door not latched
Controlpanelislocked •
Dishwasherpoweris disconnected•
Fuseisblownor circuit breaker •
istripped
Poweristurned off •
Control panel is locked
Control panel needs to be
rebooted
The cgcle iscompleteand • Thisisnormal.Noactionisrequired.
thedoor hasbeenopenfor
longerthan 60seconds
Detergentcupopening
Water enteringdishwasher
Themotor stopsand starts at
varioustimesduringthe cgcle
Drainpump soundsduring
pumpout
Drgingfan runningfor 2-4 hours
after CLEANlight is illuminated
(TopControlPanelmodelsonly)
Rattlingdisheswhenthe sprag
arm rotates
• Hakesurethedoorisfirmly closed.Door latch may not be properlg
Hakesurewatervalve(usuallylocatedunderthesink)isturnedon.
Frontcontrolmodelsrequirethedoorto belatchedto acceptkeypad
inputs.
Allmodels:Unlockcontrolpanel.Seepage8.
Seebelow.
Replacefuseor resetcircuitbreaker.Removeany otherappliancesfrom
thecircuit.
Insomeinstallations,thepowerto thedishwasheris providedthrougha
wallswitch,oftenlocatednexttothe disposerswitch.Hakesureit ison.
• Unlockcontrolpanel.Seepage8.
• Turnoffpowertothe dishwasher(circuitbreakerorwallswitch)for
30seconds;thenturn backon.
• Checktoseeif yourkitchensinkisdrainingwell.If not,you
may needaplumber.
andwhenwaterisbeingpumpedout (front-controlmodels).Thisisnormal
andnecessaryfordrying.
• Hakesuredishesareproperlyloaded.SeetheLoadingthe
dishwasherrackssection.
20
Page 21

Notes.
GEAppliances.com
(1)
o
o_
0
to
LO
(1)
o_
v
o_
=y.
0
0
LO
o_
o
21
o_
to
o1
.._
.._
0
Page 22

Notes.
0
2
4_a
0
0
v
a_a
L.
0
E
0
22
Page 23

Notes.
GEAppliances.com
(1)
o
o_
0
to
LO
(1)
o_
v
o_
=y.
0
0
LO
o_
o
23
o_
to
o1
.._
.._
0
Page 24

GEDishwasher Warrantg.
All warranty serviceprovidedby our FactoryServiceCenters,
or an authorized CustomerCare®technician.Toscheduleservice
on-line visit usat GEApplionces.com,or call 800.GE.CARES(800./432.2737)in
theUnited States.InCanada,call 1.800.561.33/44.Pleasehave serialnumber
and modelnumber availablewhen coiling forserdce.
For The Period Of:
One Year
From the doteof the
original purchase
Five Years
(onlyfor model numbers
beginning with PDW
or CDW)Fromthe date
of the original purchase
Lifetime ofProduct
(onlyfor model numbers
beginning with PDW
or COW)
GE Will Replace:
Any part of the dishwasher which failsdue to a defect in materials or workmanship. During
this limited one-year warranty, GEwill also provide,free of charge, all labor and in-home service
to replacethe defective part.
Thedishwasher racks and the electroniccontrolmodule if theg should fail due to a defect
in materials or workmanship. Duringthis five-year limited warranty, Uou will be responsible
for anu labor or in-home service costs.
TheStainlesstub or door liner,if itfails to contain water due to a defect in materials or
workmanship. Duringthis limited warranty, GEwill alsoprovide, free of charge,all labor and
in-home serviceto replace the defective part.
What GE Will Not Cover (for customers in the United States):
• Service trips to gour home to teach gou how to use
the product.
• Improper installation, deliverg or maintenance.
• Failure of the product if it isabused,misused, or used for
other than the intended purpose or used commerciallg.
• Replacementof housefusesor resetting of circuit breakers.
• Product not accessibleto provide required service.
• Damage to the product caused bg accident, fire, floods
or acts of God.
• Incidental or consequentialdamage causedbg possible
defects with this appliance.
• Cleaningor servicing of the air gap device in the drain line.
• Damage caused after deliverg, including damage from
items dropped on the door.
Staple Four receipt here.
Proof of the original purchase
date is needed to obtain service
under the warranty.
EXCLUSION OF IMPLIED WARRANTIES--Your sole and exclusive remedg is product repair as provided in this Limited
Warrantg. Ang impfied warranties, including the impfied warranties of merchantabilitg or fitness for a particular
purpose, are limited to one gear or the shortest period allowed bg law.
Thiswarranty isextendedto the originalpurchaser and any succeedingowner for products purchasedfor homeusewithin the
USA.If theproduct is locatedin an areawhere serviceby a GEAuthorizedServicerisnot available,you may be responsiblefora trip
chargeor you may berequired tobring theproduct toan Authorized GEServicelocationfor service.Proofoforiginal purchasedate
isneededto obtain serviceunder thewarranty. InAlaska,the warranty excludesthe costof shipping orservicecallstoyour home.
Somestates do not allow the exdusion or limitation of inddental or consequentialdamages.Thiswarranty givesyou specificlegal
fights, and you may alsohaveother fights which vary from state to state. Toknow what your legal fights are,consultyour local
or state consumeraffairs office or your state'sAttomeF General.
Warrantor: General Electric Compang. Louisville, KY 40225
What Is Not Covered (for customers in Canada):
• Service trips to gour home to teach gou how to use
the product.
• Improper installation.
If gou have an installation problem, contact Four dealer
or installer. You are responsible for providing adequate
electrical, exhausting and other connecting facilities.
EXCLUSION OF IMPLIED WARRANTIES--Your sole and exclusive remedg is product repair as provided in this Limited
Warrantg. Ang implied warranties, including the impfied warranties of merchantabilitg or fitness for a particular
purpose, are limited to one gear or the shortest period allowed bg law.
• Failure of the product if it isabused, misused,or used for
other than the intended purpose or used commerciallg.
• Replacementof housefusesor resetting of circuitbreakers.
• Damage to the product caused bg accident, fire, floods
or acts of God.
• Damage caused after deliverg.
Thiswarranty isextendedto the originalpurchaser and any succeedingowner for products purchasedin Canadafor homeuse
within Canada.In home warranty servicewill beprodded in areaswhere it isavailableand deemedreasonable by Mabetoprovide.
CONSEQUENTIAL
24
I WARRANTOR IS NOT RESPONSIBLE FOR DAMAGES.
Warrantor: MABE CANADA INC.
Page 25

Consumer Support.
GEAppliances Website Inthe U.S.:GEApplionces.com
Have a question or need assistancewith your appliance?Try the GEAppliances Website 24 hours a day,
any day ofthe year! Forgreater convenience and faster service,you can now download Owner's Manuals,
order parts or evenschedule service on-line.In Cenede: www,GEAppliences,ce
ScheduleService Inthe U.S.:GEApplionces.com
Expert GErepair service is only one step away from your door.Get on-line and schedule your serviceat your
convenience any day of the year! Orcall 800.GE.CARES(800.432.2737)during normal businesshours.
In Cenede, cull 1.800.561.3344
Real Life Design Studio Inthe U.S.:GEApplionces.com
GEsupports the UniversalDesignconcept-products, services and environments that can be usedby people of all
ages,sizesand capabilities.We recognizethe needto designfor a wide range of physical and mental abilities and
impairments. Fordetails of GE'sUniversalDesignapplications, including kitchen design ideasfor people with disabilities,
check out our Website today. Forthe hearing impaired, pleasecall800.TDD.GEAC(800.833.4122).
In Cenede, contact: Manager,Consumer Relations,Habe Canada Inc.
Suite310, 1 Factory Lane
Honcton, N.B.EIC 9H3
ExtendedWarranties
Purchasea GEextended warranty and learn about special discounts that are available while your warranty isstill
in effect. You can purchase it on-line anytime, or call 800.626.2224during normal businesshours. GEConsumer Home
Serviceswill still be there after your warranty expires.In Cenede, cull 1.888.261.2133
Ports and Accessories
Individualsqualified to service their own appliances can have parts or accessoriessent directly to their homes
(VISA,HasterCard and Discovercardsare accepted).Orderon-line today, 24 hours every day or by phone
at 800.626.2002during normal businesshours.
Instructions contained in this menuel cover procedures to be performed by eny user. Other servicing generelly
should be referred to qualified service personnel Caution must be exercised,since improper servicing meg cause
unsafe operation.
Customers in Cenede can order parts and accessories on-line at www.GEAppliances.ca,24 hours every day,
or by phone at 1.800.661.1616during normal businesshours.
Contact Us
If you are not satisfiedwith the service you receivefrom GE,contact uson our Website with all the details including
your phone number,or write to: General Manager,Customer Relations
GEAppliances,Appliance Park
Louisville,KY40225
In Cenede: www.GEAppliences.ce, or write to: Director,ConsumerRelations,Habe Canada Inc.
Suite310, 1 Factory Lane
Honcton, N.B.EIC 9H3
In the U.S.:GEApplionces.com
In the U.S.:GEApplionces.com
In the U.S.:GEApplionces.com
Register gour new epplience on-line--et gour convenience! Timely product registration will allow for enhanced
Register YourAppliance IntheU.S.:GEApplionces.cam
communication and prompt serviceunder the terms of your warranty, should the need arise.You may also mail
in the pre-printed registration card included in the packing material.In Cenede: www,GEAppliences,ce
_÷t_,, Printed in the United States
SPrinted on Recycled Paper
25
Page 26

OJ
www.electromenagersge.ca
Instructions de s_curit_ ..... 2,3
Instructions de fonctionnement
Chargement des couverts ......... 14
Chargement des paniers ....... 12-14
Panneau de contr61e
et r_glages ........................ 4-7
Produits de lavage de vaisselle
recommand_s ....................... 7
Soins et nettogage ................. 15
Utilisation du lave-vaisselle ....... 8-11
Vogants lumineux .................... 7
Conseilsded_pannage ... 16-19
Soutienau consommateur
Garantie ............................ 22
Soutien au consommateur ......... 23
Lave-vaisselle _ cuve
en acier inoxydable
0
I
>
Inscrire le module et le num_ro
de s_rie ici :
ModUle #
S_rie #
Vousles trouverezsur la paroi
de Io cuvejuste a I'int@rieurde Io porte.
165D4700P389 49-55065 07-09 JR
Page 27

INFORMATION IMPORTANTESUR LA S(:'CURIT(:'.
LISEZ TOUTESLESINSTRUCTIONSAVANTL'UTILISATION --
CONSERVEZCESINSTRUCTIONS
AVERTISSEMENT I.
Pour votre s_curit_, les instructions de ce manuel doivent _tre suivies pour r_duire le risque
d'incendie ou d'explosion, d'_lectrocution et pour _viter les dommages _ la proprietY, les
blessures ou la mort.
AVERTISSEMENT ! S4CUR DUCHAUFFE-EAU
Dans certaines conditions, de I'hgdrog_ne peut @trepr4seot dans un chauffe-eau qui n'a pas 4t4
utilis4 pendant deux semaines ou davantage. L'HYDROGENE ESTUN GAZ EXPLOSIF.
SiI'eauchaude n'a pas_t_ utilis_ependant deux semainesou plus,r_duisezles risquesde dommages
ou de blessure en ouvrant tousles robinets d'eau chaude pendant plusieurs minutes. Faitescela avant
d'utilisertout appareil _lectrique raccord_6 la canalisation d'eau chaude.Cetteprecaution permettra
6 toute accumulation d'hydrog_ne de sedissiper.Etant donn_ que ce gazest inflammable, nefumez
paset n'utilisez pas de flamme oud'appareil pendant ce processus.
CONFORMITCLDE L'INSTALLATION ET ENTRETIEN
%
Ce lave-vaisselle dolt @tre correctement install4 et plac4 en conformit4 avec les instructions
d'installation avant d'@tre utilis4. Si vous n'avez pas re_u les instructions d'installation avec
ce lave-vaisselle, vous pouvez vous en procurer en allant sur notre site web 8 ge.com.
• RaccordezI'appareil6 un syst@me@lectrique
permanent et mis 6 la terre ou installezun fil
de mise 6 la terre des appareils avec lesills
d'alimentation et raccordez-le6 la borne ou
au fil de mise 6 laterre de I'appareil.
• Unmauvais raccordement au filde mise
6 la terre peur causer un risquede choc
@lectrique.Consultezun @lectriciencamp@tent
ou un agent du service sivous ne savezpas si
I'appareilestcorrectement mis 6 la terre.
• Disposezdesappareils @lectriqueshors service
et des mat@riauxd'emballage ou d'exp@dition
correctement.
• Netentez pas de r@parerou de remplacer une
pi@cede ce lave-vaisselle6mains quecela soit
sp@cifiquementrecommand@dans ce manuel.
Tout autre entretien ou r@parationdevrait@tre
confi@6 un technicien camp@tent.
• Pourminimiser la possibilit@d'61ectrocution,
d@branchezI'appareildu circuit d'alimentation
avant tout entretien.
REPIARQUE:L'arr@tdu lave-vaissellene d@bronche
pas l'appareilde l'alimentation @lectrique.Nous
recommandons qu'un techniden comp@tent
r@parevotre appareil
pour _viter les blessures mineures ou les
IVlISE EN GARDE : dommagesmat_riels
• Lesarticles lav@savecle mode anti-bact@rien,
s'ily a lieu,peuvent @trechauds au toucher.
A manipuler avec pr@caution.
• L'utilisationd'un d@tergent
qui n'estpas congu
sp@cifiquementpour le
lave-vaisselleremplira
celui-ci de mousse.
• Si le lave-vaisselle est raccord@6
un interrupteur mural, assurez-vous
que celui-ci est activ@avant d'utiliser
cet appareil.
• Surleslave-vaisselledot@sde
commandes @lectroniqueset sivous
pr@f@rezfermer I'interrupteur mural entre les
cycles de lavage, attendez de 5 6 10 secondes
apr@savoir remis I'interrupteur avant detoucher
au bouton START/RESETpour permettre 6 la
commande de se r@initialiser.
• Articlesautres que la vaisselle: Ne lavez pas des
articles comme lesfiltres de purificateur d'air,filtres
de chaudi@resou pinceaux dans lelave-vaisselle.
Le lave-vaissellepourrait _tre endommag@et une
d@colorationou destaches pourraient en r@sulter.
• Unesurveillance attentive est n@cessairesicet
appareil est utilis@par ou pr@sdesenfants.
• Chargez les articles I@gersen plastique de
mani@re6 ce qu'ils ne se d@placent pas et ne
tombent pas au fond; ils pourraient @treen
contact avec I'@l@mentde chauffage et @tre
endommag@s.
Page 28

www.electromenagersge.ca
,AVERTISSEMENT ! RISQUE D'ENFANT PRIS AU PIE-GE
BONNE DISPOSITION DE VOTRELAVE-VAISSELLE
Les lave-vaissellejet_s ou abandonn@s sont
dangereux...m@me sivous ne leslaissezjet_s
que quelquesjours. Sivous voulezjeter votre vieux
lave-vaisselle, suivez les instructions pour emp&cher
les accidents.
O Vis
(surcertains
modbtes)
AVERTISSEIVlENT! ,or... on .onn.m.n,,,o.pr o..on.
• N'utilisezcet appareil que pour I'objectif pour
lequel il a @t_conqu tel que d@critdans le Guide
de I'utilisateur.
• N'utilisezque lesd@tergentset agents de rinqage
liquides,en poudre ou en tablette, recommand@s
pour les lave-vaisselleet gardez-les hors de la
port_e des enfants. Lesd@tergentspour lave-
vaisselleCascade®et Cascade®Complete et
lesagents de rinqage Cascade Crystal Cleare
sont approuv@savec leslave-vaisselleGE.
• Pour modules avec le distributeur
SmartDispense,D,prenez soinde ne pas
m_langer un d_tergent 6 base dejavellisant
avec un autre 6 base d'enzgme,cela pourrait
faire tiger lesd_tergents,ce qui aura pour effet
d'obturer ledistributeur SmartDispenseMD.
• Placezlesarticles coupants de mani@e@ce qu'ils
n'abTmentpas le sceau de la porte.
• Placezlescouteaux avec le manche vers le haut
pour r@duireles risques de coupures.
• Nelavezpas lesarticles de plastique @moins qu'ils
n'aillentau lave-vaisselleou I'@quivalent.Siles
articles de plastique nesont pas marqu@s
en ce sens,vogezlesrecommandations
du fabricant.
Avant dejeter votre vieux lave-vaisselle
Enlevezlaportedu compartimentde lavageouenlevez
leverroude laporte(commelemontre I'illustration).
NOTE:Touslesmodulesapanneaudecommandesurle
dessusontaussiunevisdeverrouquavousdevezenlever
(drape1)comma!'indiquela figure.
@
de bose dont celles-ci :
• Netouchez pas _ I'@l@mentchauffant pendant
ou imm@diatementapr@sI'utilisation.
• Nefaites pas fonctionner le lave-vaisselle
siles panneaux de I'habitaclene sont pasinstall@s.
• N'alt_rezpas lescommandes.
• Ne maltraitez pas,ne vous assogez pas
et ne montez pas sur la porte ou sur leplateau
de vaisselle.
• Ne laissezpas lesenfantsjouer autour du lave-
vaisselleIorsque vous ouvrez et fermez la porte
pour @viterque leurspetits doigts ne se coincent
dans la porte.
• Nejetez pas un lave-vaisselle sans d'abord enlever
la porte du compartiment de lavage ou leverrou
de la porte.
• N'entreposezpas et n'utilisez pasde produits
combustibles, de I'essenceou desvapeurs
ou liquides inflammables pr@sde cetappareil
ou de tout autre appareil.
• Ne laissezpas lesenfants s'amuseravec ou dans
cet appareil ou de tout appareil mis au rebut.
LISEZ ET RESPECTEZ CES CONSIGNES DE SL-CURITL-.
CONSERVEZ CES INSTRUCTIONS
3
Page 29

Lepanneau de contr le du lave-vaisselle.
Vous pouvez trouver votre num4ro de modSle sur Io poroi de Io cuve,juste 8 I'intGrieur de Io porte. Dons ce manuel,
les coroctGristiques et I'opporence peuvent vorier selon lemodSle.
Lave-vaisselle _ panneau
de commande frontal
B--B B
n
RINSE CHINA [] WASH PROGRAMS
_ -- _ [] m TIM_R_MAIN_NG
D 0 0
Lave-vaisselle _ panneau de commande sur le dessus
TIME REMAINING
__ [] _ [] _ _ [] _ _ Smart Dispense
I .D.'Fi;v_I[ A_EIETD[( STEAM(I H_DL_ j ..... SENSING SANITIZED
I .OURS II _ " !__HoEATE_E_RYmWASHIN G []CLEAN
ENHANCEMENTS _ STATUS
I _[ [[ -- l ''_'_TOLOCK mLOWDETERGENT []DRYING
ADDED HEATED CONTROLS [] []
II El
R gloge des contrSles
ties
B Voyonts lumineux d'@tat varlet selon le
Lesvogonts lumineux vous indiquent ce qui se passe pendant lefonctionnement du Iove-voisselleoutomotique.
IIspeuvent clignoter si le Iove-voissellefonctionne mol. Lesvogonts indiquent ON[rnarcheJpour donner Ios_quence
de fonctionnement du Iove-voisselle.
LOW DETERGENT
(d_tergent bos)
SENSING
(senseur)
WASHING
(luvuge)
DRYING
(s@chuge)
SANITIZED
(sunitis@)
CLEAN
(propre)
ApparaTtquand vous devez remplir le SmartDispenseMDded@ergent liquideou gel pour
lave-vaisselleautomatique.
NOTE:Sivous n'utilisezpas lafonction SmartDispenseMDet que vousd@sirez@teindrelevogant
lumineux LOW DETERGENT(d@tergentbus),appugez (_5reprisessur la touche ADDEDHEAT
(chaleur +Jen moins de 3 secondes.Troisbipssonores seront _mis et levogont lumineux
s'_teindro.Pourr_octiver levogont, oppugez simplement 4]5reprisessur Iotouche ADDEDHEAT
(chaleur +Jen moins de 3 secondes.
ApporoTtquond le CleanSensorMDmesure le montont de solet_ et Iotemp_roture de I'eou.
LeIove-voisselleojuste lecgcle choisi pour obtenir le rendement optimal.
ApporoTtpendant lepr_lovoge, le Iovoge principal et le ringoge.
ApporoTtpendant leHEATEDDRY(s@chagechaudL
ApporoTtquond le cgcle o rempli lesconditions d'oseptisotion.
ApporoYtquond un cgcle de Iovoge est termin&
voyonts peuvent
module)
B Vogant de temps restant (surcertains modules)
Pendant lefonctionnement, ce vogont indique le nombre de minutes qui restent pour terminer le cgcle.
Cevogont peut ojuster le temps restont quond leslumi_res du senseursont ollum_es. Letemps indiqu_ou d_but de
choque cgclepeut changer par rapport ou r_glogeen usine,cur votre opporeil s'ojuste_ votre utilisotion personnelle.
Pendant Io miseen morche retord_e,ce vogont indique le nombre d'heuresqui restent ovont led_but du cgcle.
NOTE:Ce Iove-voisselleest _quip_ de Clean SensorMDdot_ d'un contrGleoutomotique de Iotemperature. Aussi,
Iodur_e du cgcle peut vorier selon le degr_ de solet_et de temperature de I'eou.
4
Page 30

www.electromenagersge.ca
_J Programmes de lavage (sglections)
kave-vaisselle8 panneaudecommandefrontal:Fermezetverrouillezla porte.Appugezsurlabonnetouchepourobtenirlecycle
delavaged_sir_.
Lave-voisselle8 ponneaudecommandesurledessus:Utilisezlestouchesdefl_cheA V pourloireddfilerlescyclesdeIovoge
tandisquelaporteestouverte.
NOTE: TouteI1nformationsurlesdur6esdecycleetl'utilisationd'eaudartscettesectionnesontquedesvaleursapproximatives.
Lesr6sultatsactuelsd@endentdediff@entsfacteurs,y compris,maissanss'ylimiter,latemp6ratured'entr6eetleniveaude
salissuredansl'eaudelavage.
Lalumi@reau-dessusou6 c6t6delatouchechoisieindiqueONImarche)pourdonnerleCYCLEDELAVAGEchoisi.
ANTI-BACTERIAU28,4-33,1titres(7,5-8,75got.),50-135min.
SANIWASH Cecycleaugmentelatemp@aturedeI'eaudanslerinqagefinal pouraseptiservotrelave-vaissetle.Ladur6e
(anti-I_ct(_rien/ ducycled@enddelatemp@aturedeI'eauquialimentevotrelave-vaissetle.
lavagehggi(_nique)NOTE: Lecycleanti-bact@ienest v6rifi6pourobtenirunebonneaseptisation.Silecycleest interrompu
pendantouapr_slelavageprincipalousilatemp6ratured'alimentationd'eauesttrap bassepourobtenir
unetemp6ratured'eausuffisante,lesconditionsd'aseptisationpeuventnepasexisterpleinement.
Encons6quence,levoyantd'aseptisationnes'allumepas6 lafin ducycle.Lorsquevousutiliseztecycle
anti-bact6rien,n'ouvrezpastaportedulave-vaissetleIorsdurinqagefinal.
NOTE: Leslave-vaissetler6sidentietscertifi6sparleNSFnesontpusconquspourles@ablissementsayant
unpermisdevented'aliments
NOTE:Seul,lecycleanti-bact@ienestconqupourremptirlesexigencesdeI'article6,NSF184,retatif
6I'efficacit6delavaqeetd'aseptisation.
DEEPCLEAN37,9litres(10gal.),115-135min.
(nettogage Ceprogrammeestco%upourlesplatsou lesustensitesparticuti_rementsalesouavecdessatet6s
enprofonduer) carbonis@souayant s_ch6.Ceprogrammenedevraitpassurf)re66tim)herlesalimentsgrilt6s.
(surcertainsmod_tes) Vouspouvez_tres0rquece programmen'abTmerapasvosplats.
NOTE:Surcertainsmod_tes,l'optionSTEAM(Vapeur)seraautomatiquements6tectionn6elorsquevous
s6tectionnezle programmeDEEPCLEAN(Nettouageenprofondeur)surlequetvousnepouvezpusrevenir.
COOKWARE/
POTS& PANS
(ustensiles de cuisine/
casseroles et po_les)
(surcertains mod_tes)
NORMALWASH
SPEEDCYCLE
(cgclerapide)
(surcertainsmod_tes)
CHINAICRYSTAL
(porcelaine/cristal)
LIGHTWASH
flavageI_ger)
(surcertainsmod@tes)
GLASSES28,4litres(7,5gal.),40-75min.
(surcertainsmod_tes)
(verres) Cecycleestsp6cifiquementco%u pourlaverrerie.
PLASTICS
(plastiquesl
(surcertainsmod@tes)
TOPRACKONLY
(paniersup6rieur
uniquement)
(surcertainsmod_tes)
RINSEANDHOLD
(rin(_ageetattente)
(RINSEONLY)
(rin(_ageuniquement)
33,1-37,9litres(8,75-10gal.),75-140min.
Cecycleestco%u pourla vaissetleou lescasserolestr_ssalesou lescasserolescontenantdesaliments
s6ch_soucults.Cecyclepeutnepusr6ussir6nettoyerlesalimentsbr016s.Cecycleconvient6 lavaissetle
ordinaire.
19,7litres(5,2gal.),60-90 min.
Cecycleestutilis6pourla vaissetleettaverreriemoyennementsales6tr@ssales.
Ladur6educycleet la consommationd'eaudonn6essontapproximatives.Lesr@sultatsd@endront
deplusieursfacteurs,notamment,maispasseulement,latemp@ratured'entr6e,tapress)ond'eaudarts
le r6seaududomicileetlaquantit6desalissuresdansI'eaudelavage.
28,4litres(7,5gal.),35-70 min.
Cecycleestco%u pourlesassiettesetlesverresordinaires.
28,4litres(7,5gal.),40-60 min.
Cecycleestco%u pourla porcetaineet lescristauxI#g@rementsales.
NOTE: Surquetquesmod@tes,latouchedececycleet PLASTICS(PLASTIQUES)estalternative.Appugezsur
latouchepouralternerentrececycleetPLASTICS(PLASTIQUES).
23,7-28,4litres(625-7,5gal.),85-145min.
Lodur@plusIonguedececyclecomprendune partieint@gr6edes6chagequiestco%u pourr6duire
le risquedefairefondrelesarticlesenmati@reptastiqueetpouram6tiorerleurs6chage.
18,9-33,1litres(5-8,75gal.),50-110min.
Cecyclelavelesassiettes16g@rementsalessur laclagettedu haut uniquement.
9,5litres(2,5gal.),11min.
Cecycleestco%u pourrincerdeschargespartietlesqui serontlav@esplustard.N'utilisezpas
ded@ergentpourcecycle.
Page 31

Lepanneau de contr le du lave-vaisselle.
D Options
Lo lumi@re situ@eau-dessus de la touche choisie s'ollume pour indiquer le OPTION choisi.
DELAYHOURS
(mise en marche
retard_e)
TEMPBOOST/
ADDEDHEAT/EXTRA
HOTWASH
(augmentation
de temp/chaleur
suppl6mentaire/
lavage tr6s haute
temp6rature)
STEAM
(Vapeur)
(surcertains modules)
HEATED DRY
(s_chage chaud)
LOCK
(verrouillage)
RESET
(remise h z_ro)
6
Vous pouvez retarder la mise en marche du cycle de lavagejusqu'h 2/4heures (selonle mod@le).
Appuyez sur la touche DELAYSTARTImise en morche retord@eJpour choisir dons combien
d'heuresvous voulezmettre en marche votre lave-vaisselle,puis appuyez sur la touche
START/RESET(rniseen rnorche/rernise 6 z_roL
Lave-vaisselle h panneau de commande frontal : Votre lave-vaissellecompte le d_lai d_sir_
et commence automatiquement h I'heure choisie.
Lave-vaisselle 6 panneau de commando sur le dessus :Apr_sque vous ayez ferm_ sa porte,
votre lave-vaisselle compte le d_lai d_sir_ et commence automatiquement h I'heurechoisie.
NOTE:Pourannuler lamise en marche retard_e avant le d_but du cycle,appuyez h plusieurs
reprisessur la touche DELAYSTART(mise en marche retard#eJjusqu'h ceque I'_cran n'indique
plus rien.
Cette option estcon(;u pour faire fonctionner plusIongtemps I'_l_ment de chauffage, (]fin d'am_liorer
le rendement du lavage et du s_chage.
NOTE:Vous ne pouvez pus choisir ce compl_ment avec le cycle RINSEAND HOLD(tin,age
et attente).
Con(;upour lessalet_s coriaces et/ou ayant s_ch& pour lestaches ayant grill& Cette option DOlT
_tre s_lectionn_e AVANTded_marrer le programme. L'option STEAM(vapeur)prolonge de 26
minutes la dur_e du programme.
NOTE:Vous ne pouvez pas choisir cette option avec lecycle RINSEAND HOLDIrin_oge et ottenteL
Lorsque I'option HEATEDDRYIcholeur s_cheJest d_sactiv_e, la vaisselles_chera h I'air.Lesmodules
dont le panneau de commande est sur ledessusde I'appareilant un ventilateur pour favoriser le
processusde s_chage. Leventilateur peut fonctionner pendant/4 heures apr_s que levoyant CLEAN
IpropreJse salt allum& Sivous le souhaitez, le ventilateur peut _tre _teint en appuyant sur n'importe
quelletouche.
Lumi_re _teinte : D_sactiveI'optionchaleur de s_chage.Lavaisselles_chera naturellement h I'air
(pourles lave-vaisselleh panneau de commande frontal) ouh I'aided'un ventilateur (pour leslave-
vaisselleh panneau de commande sur le dessus)pour _conomiser de I'_nergie.
Lumi_re allum_e : Allume le syst_me de chauffage pour un s_chage plus rapide. Cette option
augmentera la dur_e du cycle de 8 h 38 minutes suivant lecycle choisi. Sur les modules h panneau
de commande sur ledessus,le ventilateur continuera h fonctionner jusqu'h 2 heures apr_s quele
voyant CLEANIpropreJsesalt allum_ pour favoriser le processusde s_chage. Sivous le souhaitez,
le ventilateur peut _tre _teint en appuyant sur n'importe quelle touche.
NOTE:Ne peut _tre s_lectionn_ Iorsdu cycle RINSEANDHOLD (rin_ogeet ottente].
Vous pouvezverrouiller lescontr61espour _viter toute s_lection.Ou bien, vous pouvezverrouiller les
contr61esapr_s avoir choisi un cycle.
Lesenfants ne peuvent pas mettre en marche accidentellement votre lave-vaisselle si vous avez
choisi cette option.
Pourd_verrouiller lescontr61esde votre lave-vaisselle,appuyez sur la touche HEATEDDRY(s_choge
choud] et maintenez-la appuy_e pendant 3 secondes. Levoyant situ_ au-dessus de latouche LOCK
(verrouilloge] s'_teindra. Pourverrouiller votre lave-vaisselle,appuyez sur latouche HEATEDDRY
(s_chogechoud] pendant 3 secondes.La lumi_re situ_e au-dessus de la touche LOCK(verrouilloge]
s'allumera (ON).
Pourchanger de cycle apr_s led_but du lavage.
Lave-vaisselle h panneau de commando frontal : Appuyez sur latouche START/RESET(raise
en morche/remise _ z#ro_pour annuler lecycle. Lalumi_re START/RESET(raiseen morche/remise
z#ro_clignote pendant que I'eauest pomp_e en dehors de votre lave-vaissellesi n_cessaire.
Celaprend environ 2minutes.
Lave-vaisselle h panneau de commando sur ledessus :Ouvrez lentement la porte pour _viter
les _claboussures.Appuyez sur latouche START/RESET(raiseen morche/remise 6 z#ro_pour annuler
le cycle. Sila lumi_re START/RESET(raiseenmorche/remise 6 z#ro_clignote,fermez la portejusqu'h
ceque I'eau soit pomp_e en dehors de votre lave-vaisselle(cela prend environ 2 minutes) et la lumi_re
cessede clignoter.
Quand la lumi_re cesse de clignoter,vous pouvez reprogrammer votre lave-vaisselleet le remettre
en marche.
Page 32

www.electromenagersge.ca
Miseenmarche
El
Lave-vaisselle 6 panneau de commande frontal
Fermez et verrouillez to porte de votre love-vaissetle et choisissezle cycle et lescompt6ments d6sir6s. Appuyez sur lo touche START/RESET
(mise en marche/remise _ z@ro/une lois pour commencer le cycle. L'eou commence imm6diotement 6 emptir votre Iove-voissetteet,
environ 60 secondes plus tord, leIovoge commence.
Quond Io porte du Iove-vaissetleest bien ferm6e et verrouill6e, les lumi_res du ponneou de contr61eindiquent tes derniers r6gloges choisis.
Sivous ne voulez rien chonger 6 ces r6gloges, oppugez simptement sur Iotouche START/RESET(mise en marche/remise _ z@ro/pour
commencer le cycle.
Quond Io porte estferm6e, les vogonts lumineux s'@eignent sivous ne choisissez pas la touche START/RESET(mise en marche/remise
z@ro/en5 minutes. Pour remettre en morche lesvogonts, ouvrez et fermez toporte ou oppugez sur n'importe quetletouche.
Lave-vaisselle 6 panneau de commande sur le dessus
Apr_s ovoir choisi le cycle et les options d_sir6es,oppuyez sur la touche START/RESET(mise en marche/remiseaz@ro/pourpr@orer votre
Iove-voissetle 6 commencer son cycle. Fermez la porte pour commencer le cycle ou commencer le compte de temps du DELAYSTART
(mise en marche retard@el,Quond lecycle commence, I'eou commence 6 remptir votre Iove-voissetle et, environ 60 secondes plus tord,
le Iovoge commence.
Votre love-voissetle indique toujours votre dernier choix de cycle et d'options. Sivous nevoulez rien chonger 6 ces r6glages, oppugez
simplement sur la touche START/RESET(mise en marche/remise _ z@ro/pour pr6porer votre Iove-voissetleet fermez to porte pour
commencer le cycle.
TOUSLESMODELES: S'ilse produit une panne decouront, lescycles NORMAL et HEATEDDRY(s@chagechaud) sont outomotiquement
programm6s. Choisissezun nouveou r6gloge et oppugez sur Iotouche START/RESET(mise en marche/remise _ z@ro/pour commencer
un nouveou cycle.
Quond Io porte est ouverte, lesvogonts indicateurs s'6teignent sitotouche START/RESET(miseen marche/remise _ z@ro/n'est pos choisi
dons les 5minutes. Pour mettre en morche 1'6cron,ouvrezet fermez to porte ou oppugez sur une touche.
D Propre
Lave-vaisselle6 panneaudecommandefrontal
Levogant CLEAN_propre)s'allumeraet vous entendrez un double bip Iorsque le cycle de lavage seraterminG. Surcertains
modules,le vogant CLEAN(propre) s'@eindra6 I'ouverture de la porte. Surd'autres modules, le vogant CLEAN(propre)
restera allum# jusqu'6 I'ouverture de la porte, puis au verrouillage celle-ci oujusqu'6 ce que vous appugiez sur une touche
Iorsque la porte est encore verrouill#e,
Lave-vaisselle_ panneaudecommandesurledessus
Levogant CLEAN(propre)s'allurnera et vous entendrez un double bip Iorsquele cycle de lavage seraterminG. Levogant
CLEAN(propre) restera allum#jusqu'6 I'ouverture de la porte,puis au verrouillage celle-ci oujusqu'6 ceque vous appugiez
sur n'importe quelle touche,
TOUSLESMODELES:Pour@eindrelesignalsonoredefindecycle(ouler6activersivoust'ovez@eintouporovant),oppugezsurIotouche
HEATEDDRY(s@chagechaud)5fois oucoursde3secondes,Untriplebipr6sonnepourindiquerqueI'optionsonore6Iofin ducycleo 6t6
octiv6e,
Voyants lumineux qui clignotent.
Vogantsindicateursd'@tat Cequecelasignifie
START/RESET
(raiseenmarche/remise_ z@ro)
VousovezinterrompulecycleenoppuyontsurlotoucheSTART/RESETImiseenmarche/remise_z@ro)
ouune pannedecourantestsurvenue.Levoyants'arr&tedeclignoterapr&squevotrelave-vaissetlese
soitvid6detoutesoneou.Danslecosduneponnedecourant,lelave-vaissetleseremettraenmarche
ou×cyclesNORMALetHEATEDDRY(s@chagechaud).
Produits delavage de vaissellerecommand@s.
GErecommandelesproduitssuivantspour seslave-vaissetle:
• Pourvotredistributeurmanuelded@ergent,lesd@ergents
deIove-vaissetleautomatiqueCascade®enpoudre,liquideou
engetsontrecommand_s.
• Pourvotredistributeurded6tergentSmartDispenseMD,utilisez
seulementdesd@ersifsliquidespourlave-vaissetlerecommand6s
dontIolistesetrouve6la paget0 decemanuel.
• LesagentsderinqageCascadeCrystalClear®pourenlever
lestachesetemp_cherunenouvetlepetliculedese constituer
survosassiettes,vosverres,votreargenterie,voscasseroleset
vosinstrumentsenmati_reptastique.L'utilisation d'un agent
de ringage am_liore _galement le s_chage.
• CeramaBryte®nettoyontpouropporeil6tectrom@nogerenocier
inoxgdoblepournettogerle ponneouext@ieurenocierinoxgdoble
destove-voissetleGEet ProfileM°(pourlesmod@tes6ponneou
ext@ieurenacierinoxgdobleseulement).
Page 33

Utilisation du lave-vaisselle.
Vdrifiez la tempdrature de I'eau
L'alimentation d'eau dolt _tre _ au mains 120 °Fet au plus _ 150 °Fpour bien laver et emp_cher tout
dommage _ la vaisselle. V4rifiez la temperature de I'eau avec un thermom_tre _ p_tisserie ou _ viande.
Ouvrez le robinet d'eau chaude situ4 le plus pros de votre lave-vaisselle, placez le thermom_tre dons
un verre et laissez I'eau coder dons le verrejusqu'_ ce que la temperature s'arr_te de monter.
Utilisez un agent de tin,age Cascade Crgstal Clear®
L'agent de tin,age Cascade Crystal Clear ®am_liore le s_chage, enl_ve les taches et emp_che
Io constitution d'une nouvelle pellicule sur vos ossiettes, vos verres, votre orgenterie, vos casseroles
et vos moti_res plostiques.
Remplissage du distributeur R&glage de I'agent de ringage
Le distributeur d'agent de rinqage contient
3,5onces d'agent de rinqage.Normalement, cette
quantit_ doit durer environ un mois. Essayezde
conserver le distributeur plein,mais sans lefaire
d_border.
[] Assurez-vousque la porte de votre lave-vaisselle
soit bien ouverte.
Tournezle bouchon du distributeur vers la
gauche et soulevez-le.
Ajoutez I'agentde
rinqagejusqu'a ce que
la fen@treindicatrice
semble pleine.
[4-] Nettogez tout agent
de ringage renvers@
I'aided'un linge Fen_tre
humide, indicatrice
r_ Remettezen place le
bouchon du distributeur.
Capuchondu
distributeur
Vouspouvez r@glerle montant d'agent de ringage
lib@r@dans le lavagefinal. Ler6glage d'usine est au
milieu. Sivous avezdes marques de calcium (eau
riche en sels)sur lesassiettes,essagezun r@glage
plus@lev@.S'ilg a dela mousse, essagezun r@glage
plus bas.
Ajuster le r_glage :
Enlevezle bouchon du
distributeur ettournez
ensuite le r@glagedons
le sens contraire des ede
aiguillesd'une montre ringagede
pour augmenter le I'agent
montant d'agent de ringage ou dans le sensdes
aiguillesd'une montre pour r@duirela quantit@d'agent
de rinqage distribu@.
Preparation de la vaisselle avant son chorgement
• Vousn'avezpas besoinde pr_-rincer les d_chets • Enleveztoutes lesquantit_s importantes de
alimentaires normaux, d_chets alimentaires.
• Grattez lesd_chets importants, les as,lescure-
dents,les peaux et lesgraines.
• EnlevezlesI_gumes_ feuille,lesparures de viande
et lesmontants excessifsde graisse ou d'huile.
Vousoyez oubli_ de la vaisselle?
Vous pouvez ajouter de la vaisselle _ tout moment
avant que le lavage principal ne commence.
I-_"1Touchez la poign_e pour d_verrouiller la porte.
_] 'ouvrez pas la porte avant que les jets ne
se soient arr_t_s. De la vapeur peut s'_chapper
du lave-vaisselle.
8
r-_ Ajoutez la vaisselle voulue.
I_] ermez la porte et le lave-vaisselle d_marre dans
5secondes.
Page 34

Distributeur manuel de d#tergent
www.electromenagersge.ca
Quelquesmodulessont_quip_savecundistributeur
automatiqueded_tergentliquidepourlave-vaisselle
(SmartDispenseMD)etd'undistributeurmanuel.Vouspouvez
utiliserI'undecesdistributeurs,maisne lesutilisezjamais
lesdeuxenm_metemps.
/"f.............. ///
/,
Lecouverdedudistributeurmanuels'ouvrependant
lecycledelavage.SivousutilisezSmartDispense%
laissezouvertlecouverdedudistributeurmanuel
avantdecommencerlecycle.
Pourledistributeurmanuel,lesd_tergentsdelave-vaisselle
automatiqueCascade®ant_t_recommand_s.Ce
distributeurconvient(_desd_tergentssousformede
poudre,liquide,sachetsdegelou pains.IIestimportant
derangerlesd_tergentsen poudreouenpainsdansun
endroitfraisetsecafindeconserverleurefficacit&IIest
doncd_conseill_deverserled_tergentdansledistributeur
manuelavantdelaverlavaisselle.
Remplissagedu distributeur manuel
ded@tergent
Laquantit_ded@ergentn_cessairepourvotrevaisselle
d@enddeladuret)oude ladouceurdevotreeau.Avecde
I'eaudure,vousavezbesoindeplusded_tergent.Avecde
I'eaudouce,vousavezbesoindemainsded_tergent.
Prot_gezvotrevaisselleetvotrelave-vaisselleencontactant
leservicedeseauxeten vousrenseignantsurladuret_de
votreeau.Douzegrainset plusestuneeauextr_mement
dure.IIestrecommand_d'utiliserunadoucisseurd'eau.
Sivousn'enutilisezpas,celapourraitmener_ une
accumulationdechauxdanslerobinetd'eauquipourrait
ensuitecallerenpositionouverteetprovoquerune
inondation.Trapded_tergentavecuneeaudoucepourrait
cr@rdesvoilessurlesverres,ce queI'onappelle
unegravure.
UtilisezI'informationdutableausuivantcommeguidepour
d_terminerlaquantit_ded_tergentdelave-vaisselle
automatique_mettredansledistributeur.
LorsdeI'utilisationd'und_tergentpourlave-vaisselle
automatiqueensachetsoupastilles,placezsimplement
uneunit_dansla sectiondelavageprincipalepuisfermez
lecouverde.
Nombre Tassesde d#tergent
de grains pour rempfir
Mainsde 4 Remplirlatassejusqu'6 ladouce
graduation(1/5 detasse)
4 0 8 Remplirla tassejusqu'alagraduation
au milieudouce(2/3detasse)
8 a 12 Remplirlatassejusqu'a la
graduation au milieudure (tasse
enti@rementremplie)
Plusde 12 RemplirIofossedelavage
principaleet latasse de pr@lavage
Pourdeschargestr@ssouill@es,utilisezun peuplus
ded@tergent.Silatemp@raturedeI'eauestsup@rieure
1/40°F(60°C),utilisezunpeumainsded@tergent.
Douce Mi-douce Mi-dure Extr6mementdure
LAVAGEPRINCIPAL
Dans/ecasdechargestr#ssou#/#es,ut#isez/ecyc/eDeepCban(nettoyage
enprofondeur)ouCookware(ustensilesdecuisine).
N'UTILISEZPASDEDETERGENTDE LAVAGEA LA MAIN
m
m
NOTE:Utiliserund#tergentquin'estpossp#cifiquement
con¢upourleslave-voissellesremptiroI'opporeildemousse.
Pendantlenettogage,cettemoussed_borderodes_ventsdu
Iove-voisselle,tomberosur
leptancherdeIocuisinequideviendromouill@.
Puisquebeaucoupdecontenantsded@tergentse
ressemblent,rangezled@tergentdelave-vaisselledans
unendroitdistinctdetouslesautresnettoyants.Montrez
toute personnequi utiliseralelave-vaisselleleban
d@tergentautiliseretoOilestrang&
Bienquecetteerreurnecauserapusdedommages
permanentsaulave-vaisselle,votrevaisselleneserapus
bienlav@eaveccetypeded@tergentnonformul@pour
leslave-vaisselles.
Page 35

Utilisation du lave-vaisselle.
Oistributeur de d#tergent SmortOispense M°C e toJ od /e )
Celave-vaisselle peuvent comporter lafonction
SmartDispenseM°,une caract_ristique qui distribue
Dirigez la bouteille de d_tergent vers I'ouverture de
la porte et commencez _ remplir.
automatiquement led_tergent liquide pour lave-
vaisselle automatique dans chaque cucle en se
basant sur le niveau de salet_ de la vaisselle et de
duret_ de I'eau.
Avant d'utiliser le distributeur de d_tergent
SmartDispenseMD,vous devez d'abord le remplir, f
iVi@mesi n'importe quel d@tergentpour distributeur .............................
automatique sous forme liquide ou de gel convient
au distributeur SmartDispenseMD,il est important
de savoir qu'il existe une diff@renceentre lesdivers
d@tergents.La plupart des d@tergents pour
distributeurs automatiques sont _ base de
javellisant (comme Cascade®),tandis que d'autres
contiennent des enzgmes (comme Cascade
Le distributeur contient 45 oz de d_tergent liquide
pour lave-vaisselle (bouteille de taille normale).
Complete®).
Prenez soin de ne pas m_langer un d_tergent
6 base de javellisant avec un autre 6 base
d'enzgme, cela pourrait faire tiger les
d_tergents, ce qui aura pour effet d'obturer
le distributeur SmartDispense MD.
V@rifiezI'@tiquettesur le d@tergent pour savoir s'il
contient du javellisant ou des enzgmes. Nous vous
conseillons d'utiliser le m@metgpe de d@tergent
pour remplir le sgst@meSmartDispense MD.
ATTENTION! N'ajoutez
absolumentjamais de d_tergent en poudre, en
pains ou tout autre savon ou d_tergent liquide
utilis_ normalement pour laver la vaisselle _ la
main dans un _vier. N'utilisez que du d_tergent
liquide ou gel sp_cifiquement conqu pour
le lave-vaisselle automatique.
Ouand le distributeur est plein, remettez le bouchon
sur le trou d'accGs et tournez dans le sens des
aiguilles d'une montrejusqu'a ce qu'il soit serr6
pour assurer que de I'eau ne pGnGtrepas dans le
distributeur SmartDispense M°.S'il reste des rGsidus
sur la porte, ils seront lavGspendant le cycle
"i I
Tournezdansle sensdesaiguilles d'unemontre.
suivant.
Pour ouvrir le distributeur afin de le remplir,
poussez vers le bas et tournez le capuchon bleu
dans le sens oppos_ _ celui des aiguilles d'une
montrejusqu'_ ce que le capuchon est desserr&
Retirez le capuchon.
Un voyant s'allumera pour vous avertir que
le distributeur doit _tre rempli 6 nouveau. Apr_s
que vous ayez rempli le distributeur, le voyant
ne s'_teindra qu'6 la fermeture de la porte.
Un distributeur plein dure environ 1 mois
d'usage normal.
Levoyant _0 LOW BETERGENT 0 DRYING
s'allumera
Iorsqu'il 0 SENSING • SANITIZED
Taut _ WASHING _ CLEAN
remplir (l'apparencepeutvarier)
\\\
i
STATUS
BulkDispense
10
Ouvrez la porte a un angle confortable pour
remplir le distributeur.
NOTE:Sivous n'utilisez pas la fonction
SmartDispenseM°et que vous d_sirez _teindre le
voyant lumineux LOW DETERGENTLED(d_tergent
bas), appuyez _ 5 reprises sur la touche ADDED
HEAT(chaleur +) en moins de 3 secondes. Trois
bips sonores seront _mis et levoyant lumineux
s'_teindra. Pour r_activer le voyant, appuyez
simplement _ 5 reprises sur la touche ADDED HEAT
(chaleur +) en moins de 3 secondes.
Page 36

www.electromenagersge.ca
Colibroge de duret de I'eou de
de d tergent 5mortOispense M°
Avantsopremiereutilisation,vousdevezcalibrervotre
lave-vaisselieenfonctiondeladuret_devotreeau.Veuillezsuivre
lesinstructionssuivantespourcalibrervotrelave-vaisselleen
fonctiondeladuret_devotreeaud'alimentation.
Trouvezladuret_ de votre eaud'alimentation
Dartslesacquicontenaitcesinstructions,voustrouverezun
paquetdebandesdetestdeduret_deI'eau.Lisezlesinstructions
surlepaquet,enlevezlabanded'essaietsuivezlesinstructions
pourtrouverledegr_deduret_devotreeaudurobinet.Vous
utiliserezcetteinformationpourcalibrervotrelave-vaissellecequi
vouspermettradedistribuerlemontantoptimalded_tergent.
Indicationdelabanded'essaideduretgd'eau
La valeur
EAU le lave-vaisselle
DOUCE
0 ROUGE r_ 1
2 ROUGE _ 3
I IROUGE 2
3 ROUGE _ 4
4 ROUGE _ 5EAU
DURE
6 entrer dans
Calibragedes modgles6 panneaude commande
frontal 6 12boutons avecafficheur 6 3chiffres
Appuyersur lestouchessimultan6ment. Afficheur r_
I-i] Fermezetverrouiltezlaporte(voyantsallum_s,
lave-vaisselleaurepos).
_] Appuyezenm_metempssurlestouchesANTI-BACTERIAL/
SANIWASH(anti-bact_rien/lavagehggi_nique)etDELAY
HOURS(miseenmarcheretard_e)pendant3secondes,
L'afficheurindiqueraunnombrede1to5.Cenombre
indiqueleniveaudeduret_deI'eauactuetlementr_g!&
F_ AppuyezsurlatoucheANTI-BACTERIAI_/SANIWASH
lanti-bact6rien/lavagehygi6nique)pouraugmenterla
valeurousurlatoucheNORMALpourI'abaisser.Utilisezle
nombreobtenuaveclabanded'essaietletableauci-dessus
pourr_glerleniveaudeduret_deI'eau.
E] Apr&savoirr_gl_laduret_del'eau,appuyezsurlatouch
START/RESET{d_marrage/r_initialisation)pour
sauvegarderlaconfigurationetreveniraumodenormal
defonctionnementdulave-vaisselle.
Calibragedes modglesde panneau de commande
sup_rieur_ 7boutons avecafficheur _3 chiffres
; iiii_'_ iiii{!i_ _o% " ._=o,_,_,.i_,,_,_%'........ _,_
T
Afficheur Appuyersur lestouchessimultan6ment.
ri] ouvrezlaporteetappuyezsurunetouche(autre
quelatoucheSTART[d_merrege])pouractionner
lesvoyants.
_] Appuyezenm_metempspendant3secondessurles
touches"Up"(verstehaut),, etDELAYHOURS/miseen
merchereterd_e).L'afficheurindiqueraunhombrede1_S.
Cenombreindiqueteniveaudeduret_deI'eau
actuellementr_gl&
r_ Appugezsurlatouche"Up"(haut)^ pouraugmenterla
E] Apr&savoirr_gl_laduret_del'eau,appuyezsurlatouche
Calibragedes modulessans afficheur _ 3 chiffres
Commandessurledevant
_] Appuyezenm_metempssurlestouchesANTI-BACTERIAL/
r31 Pourmodifierlaconfiguration,appugezsurlatoucheDELAY
Commandessurlehaut
[-11 Ouvrezlaporteetappuyezsurunetouchepouractionner
_] Appugezenm_metempspendant3secondessurles
r31 Pourmodifierlaconfiguration,appugezsurtatoucheDELAY
E] Lorsquevousavezfinid'appugersurlatouche,vous
r_ silenombredebipsn'estpasceluiquevousd_sirez,
E] Apr_savoirr_gl_laduret_deI'eau,appuyezsur
NOTE:Vousdevriezrecalibrerlelave-vaissellesilesconditions
deduret_del'eauchangentcommedanslecasdeI'ajoutou
duretraitd'un%st_med'adoucisseurd'eau_votredomicile.11
distributeur
valeurduniveauousurlatouche"Down"(bas)v pour
I'abaisser.Utilisezlenombreobtenuaveclabande
d'essaiet tetableau_ gauchepourr_glerleniveaude
duret_deI'eau.
START/RESET[d_merrege/r_initielisetion)poursauvegarder
laconfigurationetreveniraumodenormalde
fonctionnementdulave-vaisselle.
Fermezetverrouilteztaporte(voyantsallum_s,
lave-vaisselleaurepos).
SANIWASH(anti-bact_rien/lavagehggi_nique)etDELAY
HOURSImiseenmarcheretard&e)pendant3secondes.
Touslesvogantss'illuminerontetvousentendrezde1_5
bips.Lenombredebipsindiquelavaleurr_elledeladuret_
deI'eau.
HOURSImiseenmerchereterd_e)_autantdereprises
qu'aunombrecorrespondantdelacolonne_]gauche,
laquelleindiquelavaleurdeladuret_del'eau.Lepanneau
_metunbipchaquefoisquevousappugezsurlatouche.
Lorsquevousavezfinid'appugersurlatouche,vous
entendrezuneconfirmationcorrespondant_ autantdebips
quelenombredefoisquevousavezappug_surlatouche.
Silenombredebipsn'estpusceluiquevousd_sirez,
recommencez_]appugersurlatoucheDELAYHOURS
pourentrerunnouveauniveaudeduret_deI'eau.
Apr_savoirr_gl_laduret_deI'eau,appugezsur
latouchSTART/RESET(d_marrage/r_initialisation)pour
sauvegarderlaconfigurationetreveniraumodenormal
defonctionnementdulave-vaisselle.
lesvoyants.
touches"Up"(verslehaut)^ etDELAYHOURS/miseen
merchereterd_e).Touslesvogantss'illuminerontetvous
entendrezde1_5bips.Lenombredebipsindiquelavaleur
r_elledeladuret_deI'eau.
HOURSImiseenmen:hereterd_eJ_]autantdereprisesqu'au
nombrecorrespondantdelacolonne_gauche,taquetleindique
lavaleurdetaduret_deI'eau.Lepanneau_metunbipchaque
foisquevousappugezsurlatouche.
entendrezuneconfirmationcorrespondant_ autantdebips
quelenombredefoisquevousavezappug_surlatouche.
recommencez_]appugersurlatoucheDELAYHOURS
(miseenmerchereturd_e)pourentrerunnouveauniveau
deduret_deI'eau.
latouchSTART/RESET(d#rnerrege/r#initielisetion)pour
sauvegarderlaconfigurationetreveniraumodenormal
defonctionnementdulave-vaisselle.
Page 37

Chargement despaniers de votre lave-vaisselle.
Pour obtenir de bons r4sultats, suivez cos directives de chargement. Lee caroct4ristiques et I'apparence des paniers et
des paniers _ argenterie peuvent varier solon votre mod_le.
Panier sup&rieur
Bienque la clayette sup@ieuresoitdestin@e
en premier lieuaux verres,aux tosseset aux
soucoupes,vous pouvezg mettre des
casserolespour bien les lover.Lestosseset les
verrestiennent le mieux le long desc6t_s.
C'estaussiun ben endroit pour lesmati@res
plastiques.
Cepanier (certains mod@les)peut @treplac@e
en position haute ou basse pour faciliter le
rangement. Unporteur de verres @vin
(certainsmod@les)tient lesverres @vin pour
un ben lavage.
Certainsmod@lesont des paniers de tasses
en m@talform@,qui peuvent contenirjusqu'@
12 verres @vin (comme dans I'illustration).
Comme lesverres _ vin ont desformes
diverses,apr@sles avoir mis, appugez-les
doucement dons le ponier pourqu'ils ne
touchent pas le haut de votre lave-vaisselle.
Certainsmod@lesont un sgst_me de clagette
inclin@e,quivous permet d'incliner vos plats,
comme lestassesde caf@,pour mieux
nettoger et s6cher plusrapidement. Pour
mettre en place lesdents tirez leleviervers
I'avant, puis laisseztomber les dents en
position, puislaissezle levier.
Le panier sup@ieurest conquepour toutes
sortesd'ustensilesde cuisinede formes
diverses.Vousdevez placer lessoucoupes,
lesbols@m@langeret tous lesautres article
I'envers.Lestigespliantes (surcertains
mod@les)permettent de ranger lesarticles
difficiles@caser ou extra-grands.
Mettez lesarticles en mati@eplastique
lavables en lave-vaissellesur deux tiges
repliablessi possible.
Assurez-vousque tous les articles en mati@re
plastique soient bien cal@set qu'ils ne
risquent pas de tomber sur le chauffage.
Assurez-vousqu'aucun article ne sorte en bas
de laclagette et ne bloque la rotation du bras
d'arrosage du milieu. Celapeut occasionner
un mauvais lavage des articles places dans
le panier sup_rieur.
V@rifiezqu'aucun article nebloque la rotation
du bras de lavage.
NOTE:Las_lectionSingle Reck Wash (un
soulpeniefl n'effectue que le lavage du
punier sup@ieursur lesmod_les qui offrent
cette fonctionnalit_. Sivous choisissezcette
fonctionnalit_, ne d_posezpas de vaisselle
dans le panier inf@ieur.
Panier sup_.rieur ajustoble Isurcertains mod_les)
La position normale de votre panier ajustable
est en haut, cequi permet aux articles plus
grands, situ@sdans le panier dubas, d'avoir
un maximum d'espace.Sivous avez des
verres @vin hauts, des gobelets ou d'autres
articles longsdans le panier sup_rieur,vous
pouvez ajuster ce panier afin de la mettre en
position basse.
Pour abaisser lepanier, soutenez le poids
du panier avec yes mainscomme I'indique
I'illustration,appugez surles deux taquets
avec vos doigts environ 1/4" versI'int_rieur
du panier,comme I'indiqueI'illustration,et
guidez le panier vers le bas en position basse.
Pour feire mentor lepanier en position
haute, tirez sur le centre du ch@ssisdec6t_
du panierjusqu'@ceque le panier sefixe
en place.
12
Page 38

Panier inf&rieur
www.electromenagersge.ca
Panier en une piece (sur certains
modeles)
Panier ell trois pieces(sur certains
modeles)
Nelaissezaucun
article sortir par
le bas.
Leponier inf@ieurest conque pour les
ossiettes, lessoucoupes et les casseroles.
Vousdevez mettre lesarticles de gronde
toille, comme lesgrils-I@chefriteet les
plateaux 6 patisserie,le long du c6t@gauche.
Lesossiettes 6 servir,lescasseroleset lesbols
vont lelong desc6t@s,dons les coins ou 6
I'orri@e.Lec6t@solede Iovoisselle doit @tre
tourn@versle centredu ponier.Si n@cessoire,
vous pouvez mettre lesverres et lestosses de
gronde toille dons le ponier inf@rieurpour
fociliter le chorgement.
Aussi,foites attention de ne pos Ioisser
une portie d'orticle comme un monche de
casseroleou une poign@ede plot, sortir par
le bosdu ponier inf@ieur.Celopeut bloquer
le brosde Iovoge et occosionner un mouvois
Iovoge.
Panier _ argenterie
Pourcharger I'argenterie,poussez
simplement la poign@eajustable d'un c6t6
ou de I'autre (surcertains modules).Mettez
I'argenterie dans le panier amovible avecles
poign@esde fourchette et de couteau vers
le haut pour prot6ger vos mains. Placezles
cuillers dans le panier avec les poign@es
vers le bas. M@langezlescouteaux, les
fourchettes et lescuillers de mani6re 6 ce
qu'ils ne soient pascoil,s lesun aux autres.
R@partissez@galement.Mettezles petits
articles en mati@e plastique,comme les
cuillers 6 mesurer et lesbouchons de petits
contenants, en bas du panier 6 argenterie
avec I'argenteriesur eux.
Lepanier 6 argenterie en une piece (sur
certains modules)peut @treplac@6 I'avant,
du c6t6 droit ou 6 I'arri6redu panier inf@ieur.
Destiges pliantes (sur certains mod@les)
facilitent le rangement d'articles
extr@mementgrandsou difficiles 6 caser.
Vous pouvezsoulever cestiges versle haut
ou lesreplier vers le bas pour faciliter le
rangement dans le panier inf@ieur.Neplacez
pasde bolsou de casserolesde grande taille
6 I'enversdans le coin avant gauche. Les
articles plac@sdans cette positionpourraient
g@nerle fonctionnement dudistributeur
manuel de d@tergent.
Denombreuses options existentpour le
panier 6 argenterie en trois pi6ces(sur
certains modules)dans votre lave-vaisselle.
Lepanier entier est conqu pour aller du c6t6
droit du panier inf@ieur.Enoutre,chaque
extr6mit6 du panier est amovible pour
faciliter lechargement de I'argenterieet
remplir lesbesoinsde capacit@du panier
inf@ieur.
Vouspouvez fermer les couvercles des
paniers du centre et de chaque c6t6 (sur
certains modules) pour y mettre des petits
articles.Vous pouvez placer lesarticles longs
sur le plateau du panier sup6rieur.Placezla
vaisselleplate dans lesfentes des couvercles
des paniers6 argenterie.
Pourenleverlespaniersdesextr_mit_s,
saisissezlepanierauxcoinsopposeset
fakesglisserpours@arer.
13
Page 39

Chargement despaniers du lave-vaisselle.
Caract@ristiques de paniers suppl@mentaires (surcertains mod_les)
Plateau de coutellerie
Le plateau de coutellerie contientjusqu'_
quatre grand couteau×,comme un couteau
de d_coupage, uncouteau de chef, un
couteau _ pain,etc. qui sonttrap longs pour
aller dans le panier _ argenterie.
Accrochezle plateau _ I'arri@edu panier
sup6rieur.Mettez lescouteaux entre lesguides
(comme I'indiqueI'illustration).
Tiges 6 bol
P
Ces tlges Tiges
se d@lient grand bols
Lestiges sp6ciales_ bol dons lepanier
inf6rieur facilitent le chargement. IIssont
utiles pour lesbolsa servir ou d'autres grands
bols.
Pour utiliser lestiges a bol,d6pliez lesdeux
rang6es de tiges flexibles en face destiges
bol et chargez lesbolsexactement comme
vous le feriez dons le panier sup6rieur.
Chargement descouverts...
Suivez les directives suivantes pour mettre 10 couverts. Les caract4ristiques et I'opparence des paniers et des paniers
6 argenterie peuvent varier par rapport 6 votre mod_le. NOTE: On devrait charger I'orgenterie dons les fentes
du couvercle du panier pr4vues 6 cet effet.
I\11\
Panier sup@rieur--lO couverts
Suivez les directives suivontes pour mettre 12 couverts. Les comct4ristiques et I'opporence des poniers et des poniers
argenterie peuvent vorier par rapport 6 votre mod_le. NOTE: On devrait charger I'orgenterie dons les fentes
du couvercle du punier pr4vues 6 cet effet.
Panier inf6rieur--lO couverts
NOTE: Neplacez ' °
pasde grosobjets
donslecoin I I_
gaucheavantdu I
panierinf@rieur.-_
14 Panier inf@rieur--12 couverts
Panier sup@rieur--12 couverts
Page 40

Soinsdevotre lave-vaisselle. .electromenagersge.ca
Nettoger lepanneau dela porte
ext_rieur
Avant de nett%er le panneau avant, assurez-vous
de savoir quel tgpe de panneau vous avez.
Reportez-vous aux deux derni_res lettres de votre
num_ro de module. Cenum_ro se trouve sur la
paroi de la cuve,du c6t_gauche, juste c_I'int_rieur
de la porte.Sivotre num_ro de module setermine
par BB,CC,WW, SAou par BG, alors vous avez
un panneau de porte peinte. Sivotre num_ro de
module se termine par SS,alors vous avez un
panneau de porte d'acier inoxgdable. Sivotre
num_ro de module se termine par CS,alors vous
avez un panneau de porte CleanSteel.
Suivezlesinstructionsplusbaspournettoyerle
panneaude portedevotremoduleprecis.
Panneaudeportepeinte (numarosdemodale
seterminantparBB-noir,CC-bisque,WW-blanc,
SA-orgent m_tollique ou BG-noir grophite)
Utilisezun chiffon propre, doux, un peu humide,
puis essuyez bien. Vous pouvez utiliser aussi un
bon poll ou une bonne cired'appareil _lectro-
m_nager.
Panneaudeported'acierinoxgdable(num)ros
demoduleseterminontpotSS)
Lespanneauxd'acierinoxydablesenettoientavec
StainlessSteelMogicou unproduitsemblableet
I'aided'unchiffonpropreetdoux.N'utilisezpasde
cire,poll,agentdeblanchimentouproduits
contenantduchloresurlesportesd'acier
inoxydable.
VouspouvezcommanderduStoinlessSteelMogic
n.WXlOX15aupr_sduservicedepi_cesGEen
appelantle1.800.626.2002.
PanneaudeporteCleanSteel(num)rosdemodule
seterminantpar CS)
Utilisezunchiffonpropre,doux,unpeuhumide,
puisessugezbien.N'utilisezpasdecired'appareil
_lectrom_nager,depolloutoutautreagent
chimiquesurlesportesenacierinoxgdable
CleanSteel.
N'utilisezposdelingedevoisselleoudeserviette
humidesolespournetto_lerleIove-voissellepour
_viterdeIoisserdesr_sidus.N'utilisezposde
tampons_r_curerni denetto_lontenpoudre
pouvont)raf/erlefini.
Ecartanti-retour _/' _.._
V6rifiez 1'6cartanti-retourchaquefois que
votre lave-vaissellenese vide pasbien.
Panneaux en acier inoxgdable
Int_rieuren acier inoxgdable-Cuve et porte
int_rieure
L'acierinoxgdableutilis_pourla cuveetla porte
int_rieuredulave-vaissellefournitla meilleure
qualit_quevouspuissieztrouverdansunlave-
vaisselleGE.Silacuveoula porteint_rieuredu
lave-vaissellese rage ou regoit un coup pendant
son usage normal, elle ne rouille pas ou nese
s'oxgde pas.Cesragures de surface ne g_nent pas
sesfonctions, ou sa r_sistance.
Nettoger le panneau de commando
Pour nett%er lepanneau de contr61e,
utilisezun linge I_g_rement humide, puis s_chez
compl_tement.
Protection contre le gel
Sivouslaissezvotrelave-vaisselledansunendroit
sanschauffagependantI'hiver,demandez_ un
techniciendeserviced'effectuerlesoperations
suivantes
FII Couper I'alimentation _lectrique du lave-
vaisselle.Enleverlesfusiblesou faites
basculer le disjoncteur.
F_ CouperI'alimentationd'eauet d_brancherla
conduite d'alimentation d'eau du robinet.
[31 VidezI'eaude la conduite d'alimentation
d'eau et du robinet (utilisezune casserole
pour recueillirI'eau).
E] Rebranchez la conduite d'alimentation d'eau
au robinet.
Est-ce que votre lave-vaisselle a un _cart anti-retour?
Un_cartanti-retourprotegevotrelave-vaisselle
contreunretourd'eausiundrainsebouche.
L'_cartanti-retournefait paspartiedevotre
lave-vaisselle.IIn'estpascouvertparvotre
garantie.Touslescodesdeplomberiene
requi_rentpasdes_cartsanti-retour,etilest
possiblequevousn'enagezpas.SiI'_cartanti-
retourdevientobstru_,lelave-vaissellenepourra
sevidanger.NettogezI'_cartanti-retoursile lave-
vaissellen'arrivepas_sevidanger.
L'_cart anti-retour est facile _ nettoger.
t_teignezvotre lave-vaisselleet soulevez
lecouvercle chrom_.
Enlevezle capuchon en mati_re plastique
_]et nettogez avec un cure-dents.
15
Page 41

Avant d'appelerleservicedergparations...
Renseignements pratiques
[-conomisez du temps et de I'argent! Examinez les tableaux des
pages suivantes, ou visitez le site www.electromenagersge.ca.
Cela vous 4vitem peut-_tre d'oppeler le service de r4parations.
Messages d'erreur
Levogant indiquant
lestatut START/RESET
(miseenmarche/remise
z_rolclignote
Lelave-vaissellefait
entendreunsignal
sonore(BIPItoutes
les30secondes
Signalsonore_la fin
ducycle
Causes possibles Ce qu'il faut faire
Vousavezenfonc_le bloc
START/RESET(miseen
marche/remise_z6roltandisque
lelave-vaisselle_tait en marche.
Ceciannulera lecgcle.Levogant
cesseradeclignoter _ lafin dela
vidangedulave-vaisselle(environ
90secondes).
Lelave-vaissellea _t_ mishors
tensiontandis qu'uncgcle_tait
en marcheetlecourant vient de
reprendre.Lesvogantsclignotants
indiquentque lelave-vaisselle
_vacueI'eau_I'int_rieur.
Ceciest un rappelque votre
portede lave-vaisselleest rest_e
ouverte durant I'op_ration.Le
signalse poursuivrajusqu'a ce
quevousfermiezla porte.
Ceciest normal.Lelave-vaisselle
fera entendrelesignalsonore
deuxfois 6 lafin ducgcle.
• AppuyezsurleblocSTART/RESET(d6marrage/r6initialisationl seulement
unefoispourd@marrerlelave-vaisselle.Unefoislelave-vaisselleenmarche,
appuyezsurleblocSTART/RESET(d_marrage/r_initialisationlseulement
unefoissivousvoulezannuler(r6initialer)lecycle.
• Levoyantcesseradeclignoterapr@squeI'eausalt@vacu@e
dulave-vaisselle.Unnouveaucycled@marreraautomatiquement6lafin
delavidange.Lenouveaucycleserar@gl@6NORMALWASHet HEATEDDRY
(s_chagechaud).
• Fermezetverrouillezlaporteapr@sI'avoirouverte6mi-cycle.Lesbips
cesserontdesefaireentendreetlelave-vaisselleeffectuerauncycle
complet.
• Pour6teindreledoubleindicateursonore(oupourler6activerapr@s
I'avoir_teint),appuyezsurleblocHEATEDDRY(s_chagechaud)5fois
en3 secondes.TroisbipsseferontentendrepourindiquerqueI'option
sonoredefindecyclea 6t6activ6eou d6sactiv6e.
Probl_me
Lavaisselleetles
couvertsnesontpas
propres
Causes possibles Cequ'il faut faire
Faibletemperatured'eaud'entr_e • Assurez-vousd'avoirlabonnetemperatured'entr_e(voirpage8).
Ouvrezlerobinetd'eauchaudeleplusprosdulave-vaisselle,laissezI'eau
coulerjusqu'5cequelatemperaturedeI'eaucessed'augmenter.
D_marrezalorslelave-vaisselleetfermezle robinet.Cecipermetde
s'assurerqueI'eausaltchaudeenentrant.
• Essayezdenepasutiliserlelave-vaisselleIorsquedeI'eauchaudeest
sollicit@eailleursdanslamaison;p.ex.,Iorsquevousfaiteslalessiveou
qu'unmembredelafamilleutiliseladouche.
Lapressiond'eauest
temporairementtrop basse
_cart anti-retour ou lebrogeur • Nettoyez1'6cartanti-retourou rincezlebroyeur.
est bloqu_
Mauvaisechargesurletiroir • Assurez-vousquelalargevaissellenebloquepasledistributeurde
Aucunacartanti-retour ou
boucle_lev_de lavidange
• Ouvrezunrobinet.Est-cequeI'eaucoulepluslentementque
d'habitude?Sioui,attentezjusqu'@cequelapressionsaltnormale
avantd'utiliserlelave-vaisselle.
• Essayezdenepasutiliserlelave-vaisselleIorsquedeI'eauchaudeest
sollicit@eailleursdanslamaison;p.ex.,Iorsquevousfaiteslalessiveou
qu'unmembredelafamilleutiliseladouche.
d6tergentou lebrasgideur.Reportez-vous5 lasectionChargerlelave-
voisselle.
• V6rifiezquevousavezbienun6cartanti-retourouuneboucle6lev6ede
vidange.Reportez-vousaux instructionsd'installation.
16
Page 42

www.electromenagersge.ca
Probl_me Causes possibles Cequ'il faut faire
Tachesetpelliculesur Eauextr6mementdure
lesverreset lescouvertsFaibletemp6ratured'eau
d'entr6e.
Lave-vaissellesurcharg_
lauvais chargement
D_tergenten poudrehumide
ouvieux
Distributeurd'agentde
• Utilisezdesagentsderin¢ageCascadeCrystalClear®pourretirer
lestacheset6viterunenouvelleaccumulation.
• Assurez-vousquelatemp6raturedeI'eauestd'aumains48,8°C(120°F).
• Chargezlelave-vaissellecommeilestillustr6hlasectionChargementdes
COUVerts.
• Assurez-vousqueled_tergentestfrais.
• SiI'eauestexcessivementdure,unadoucisseurd'eauserapeut-_tre
n_cessaire.
rin(_agevide
Trappeuded_tergent
Voilesurlos verres M_langed'eaudouceet trap de • Cecis'appelleunegravureetelleestpermanente.Pour_viterceprobbme,
d_tergent utilisezmainsded_tergentsivousavezdeI'eaudouce.Lavezlesverres
aucyclelepluscourtpourqu'ilssoientpropres.Voirlespages11,12et lB.
Latemperaturede I'eauentrant • Cecipourrait_treunegravure.R_duisezlatemperatureduchauffe-eau.
danslelave-vaisselled_passe
150°F(65°C)
Moussedanslacuve Mauvaistgpeded_tergentutilis_ • Utilisezseulementun d_tergentdelave-vaisselleautomatiquepour_viter
I'exc_sde mousse.Lesd@tergentsdelave-vaisselleautomatiqueCascade ®
ant_t_approuv_spourtousleslave-vaissellesGE.
° Pourretirerlamousedelacuve,ouvrezlelave-vaisselleet laissezlamousse
s'_vaporer.Fermezetverrouillezlaportedulave-vaisselle.SortezI'eauen
touchantleblocSTART/RESET(miseenmarche/remise6z_ro)unefois,
attendezBOsecondesettouchezau blochnouveau.R_p_tezau besoin.
Uagentderinqagea _t_d_vers_ •
D#tergentquireste Lavaissellebloqueler_servoir •
dansles r#servoirs dud_tergent
Essugeztouslosd_versementsd'agentderin(;ageimm_diatement.
ReplacezlavaissellepourquaI'eaudu brasgicleurinf_rieurpuisse
rincerler_servoirde d_tergent.Voirlospages1Bet 14.
dudistributeur
Eaudansle Vousn'avezpasviss_lecapuchon • Utilisezunepoirec_juspourenleverautantdeauquepossibledu distributeur
distributeur apr_savoirrempliledistributeur SmartDispenseM°etremplisseznormalementAssurezvousdebienvisser
SmartDispenseM° lecapuchonpouremp_cherI'eaude p_n_trerdunsledistributeur.
Marquesnoiresou Desustensilesd'aluminiumse • Retirerlestachesavecunnett%ant doux,abrasif.
grisessurIs voisselle sont frott_scontre la vaisselle
Lovoissellenes_chepos Faibletemperatured'eaud'entr_e • Assurez-vousqualatemperaturedeI'eaud'entr_esalth aumains
120°F(49°C).
• ChoisissezHEATEDDRY(s_chagechaud).
• UtilisezlesoptionsPRE-WASH(pr4-1ovoge)ouADDEDHEAT(choleurojout4e).
• Choisissezuncgcleplus_lev_,telqueANTI-BACTERIAL(ontiboct4rien),
ouCOOKWARE(casseroles).
V_rifiezledistributeurd'agentderin(;ageetremplissezaubesoin.Ledistributeurd'agentde rinqage •
estvide
Lepanneaude Leverroude la porten'estpas • Assurez-vousquela portesaltbienferm_e.
commandoor#ogioux bienplac_
entr_es,maisle Lerobinetd'eauestpeut-_tre • Assurez-vousquelerobinetd'eau(normalementsousI'_vier)salt
lave-vaissellenes'est ferm_ ouvert.
jamais remplid'eau
Levoyantd'aseptisationLaporte_taitouverteetlecgcle • N'interrompezpaslecgcledurantouapr_slelavageprincipal.
nes'allumepas_ la fin a _t_interrompu durantou apr_s
ducycle(seulement lelavageprincipal
lecycleanti-bacterial Latemperatured'entr_edeI'eau • AugmentezlatemperaturedeI'eaudu chauffe-eauentre120et 1/40°F
_tait trap basse (/49et 60°C).
Leprogrammeest termin_ • C'estnormal.Nefaitesrien.
et la porteest rest_eouverte
pendantplusde 60secondes
17
Page 43

Avant d'appelerleservicedergparations...
Renseignements pratiques
Probl_me Causes possibles Cequ'il faut faire
Int_rieurde cuvetach_eCertainsaliments_ basede • UtiliserlecycleRINSEANDHOLD(ringageet attente)apr_savoirajout_
tomate peuventcauserdestaches leplat5 la chargepourraitr_duirelestaches.
rougeatres
Tachesdecaf_oudeth_ • Retirezlatache5la mainavecunesolutionde1/2tassed'agentde
Unepelliculejauneou brune •
pourrait_tre causaepardes
d@StsdeferdansI'eau
Pelliculeblanchesurlasurface •
int_rieure-min_raux d'eaudure
Lepanneaude
commandener@ond
pasaux pressions
destouches
Lelave-vaisselle
nefonctionnepas
Levoyant dupanneau Tropdetempsentreles • Chaqueblocdolt@tretouch6@I'int6rieurd'unep6riodede5minutes.
decommandes'_teint s_lectionsde blocs Pourallumer_nouveau,retoucheztout blocoud_verrouillezet
enr_glontlescommondes reverrouillezlaporte.
IIy o deI'eououfond Ceciest normal • Unepetitequantit6d'eaupropreautourdela sortieaufonddela cure,
deIocure 5 I'arri_redelacuregardeleraccordde lapompebienlubrifi&
L'eounesortpos Ledrainest bloqu_ • Sivousavezun6cartanti-retour,nettoyez-le.Voirlapage15.
deIocure • Silelave-vaissellesevidangedansunbroyeur,faitesfonctionnercedernier.
Laporten'estpasverrouill_e
Lepanneaudecommande
estverrouill_
Lelave-vaisselleestd_branch_
Unfusibleest grill_ou
ledisjoncteurestd_clench_
Lecourantest coup_
Lepanneaudecommande • D_verrouillezlepanneaudecommande.Voirla page6.
estverrouill_
Lepanneaudecontr61edolt • Coupezlecourantau lave-vaisselle(disjoncteurouprisemurale)pendant
_tre r_initialis_ BOsecondesetremettezenmarche.
blanchimentetBtassesd'eauchaude.
AVERTISSEHENT
AvantdenettoyerI'int@rieur,attendezaumoins20minutesapr@sun
cyclepourlaisserles@l@mentschauffantsrefroidir.Sivousnelefaitespas,
vouspourriezavoirdesbrQlures.
Unfiltresp@cialdanslacanalisationd'eauestlaseulefat;ondecorriger
ceprobl@me.Contactezunesoci@t@d'adoucissementd'eau.
GErecommanded'utiliserCascadeCrystalCleare pouremp@cher
laformationded@6tsdemin_rauxd'eaudure.
Faitesfonctionnerlelave-vaisselleavecdeI'acidecitriquepourretirer
cesd@6ts.VouspouvezcommanderdeI'acidecitrique(num_rodepi@ce:
WDBSX151)aupr_sduservicede pi_cesGE.Reportez-vousaucouvercle
arri_repourI'informationsurlescommandes.
Lesmodules_ commandefrontalen#cessitentdeverrouillerlaportepour
r#agirauxpressionsdestouches.
Touslesmodules: D#verrouillezlepanneaudecommande.Voirlapage8.
• Voirci-dessous.
• Remplacezlefusibleou remettezledisjoncteurc_z6ro.Retireztousles
autresappareilsdu circuit.
•Dans certainesinstallations,lecourantaulave-vaisselleestfourniparune
prisemuralequisetrouvesouventprosdeI'interrupteurdu broyeur.
Assurez-vousqu'ilsoitenmarche.
• V6rifiezsi1'6vierdecuisinesevidebien.Sinon,vousaurezpeut-6trebesoin
d'unplombier.
18
Page 44

Probl_me Causes possibles Cequ'il faut faire
Vapeur Ceciest normal
• L'airchaudethumidepasseparI'_ventparleverroudeportedurant le
s@chageet IorsqueI'eauestpomp@pourlasortir(modUles@commande
frontale).Ceciestnormaletn_cessairepourles_chage.
Bruit
Sonsdefonctionnementnormal
Ouverturedu r_servoir
• L'@missiondecesbruitsesttout@fait normale.Aucuneinterventionn'est
requise.
ded_tergent
L'eauentredanslelave-vaisselle
Lemoteur s'arr_teet d_marre
plusieursfoisdurant lecgcle.
Lapompedevidange_met un
bruitenvidant
Leventilateurdes_chage
fonctionnede 26 4 heuresapr_s
que levogantCLEAN(proprel
s'allume(modUles6 panneaude
commandesup_rieurseulement)
Lavaisselle_metunbruit decasse• Assurez-vousquela vaissellesaltbiencharg@.Reportez-vous_lasection
Iorsquelebrasgicleur tourne Chargerlelave-voissdle.
www.electromenagersge.ca
0
i.al
n
I i m
v
19
I:1
I:1
¢3
0
0
Page 45

4.a
_La
mA
vJ
v
En f,_
Notes.
W
0
E
E
0
0
t_
0
2O
Page 46

Notes.
www.electromenagersge.ca
0
La]
n
v
_ m
I:1
21
I:1
0
Q
Page 47

Garantie GEsur les lave-vaisselle.
Toutes les r_parotions sous garontie seront effectu4es par
has centres de r_porotion ou has r_poroteurs outoris_s.
Appelez le 1.800.561.3344. Veuillez foumir le num_ro
de s_rie et le num_ro de module Iorsque vous oppelez
pour obtenir le service.
Pour une p&riode de"
Un an
6 portir de lo dote
d'achat initial
Cinq ans
(seulementpour
leshombres modules
qui commencent avec
PDWou CDW)6partir
de la date d'achat initial
Toute la viedu produit
(seulementpour
leshombres modules
qui commencent avec
PDWou CDW)
GE remplacera :
Toute piece du lave-vaissellequisecasse _ caused'un vice de mat_riau ou demain-d'oeuvre.
Au cours de cette annie de garantie limit6e, GEfournira, gratuitement, toute la main-d'oeuvre
et le service@la maison n6cessairespour remplacer lapi@ced6fectueuse.
Lespaniers et le module de contr61e6lectronique du lave-vaisselle s'ilsne fonctionnent plus
caused'un vicede mat6riau ou de main-d'oeuvre. Au cours de ces dnq ans de garantie
limit6e, vous serezresponsable de tous frais de main-d'oeuvre ou deservice @lamaison.
La cuve en acier ino×ydable ou la doublure de porte, siellesne peuvent plus arr_ter I'eau
caused'un vicede mat_riau ou de main-d'oeuvre. Au cours de cettegarantie limit_e,GE
fournira _galement, gratuitement, toute la main-d'oeuvre et le service_ la maison n_cessaires
pour remplacer la piece ddectueuse.
Ce qui n'est pas couvert "
Agrafez le re_u d'achat ici.
Pour obtenir le service sous
garantie, vous devrez foumir
la preuve de l'achat original.
• Tout d_placement de service chez vous pour vous
apprendre 6 utiliser votre lave-vaisselle.
• Toute mauvaise installation.
Sivous avez un probl@med'installation, appelez
votre revendeur ou un installateur. Vous 6tes
responsable de fournir une bonne alimentation
6lectrique, un ban 6chappement et tout autre
branchement n6cessaire.
• Toute panne du produit s'il a _t_ malmen_, mal us_
ou utilis_ 6 une autre fin que celle pr_vue ou utilis_
commercialement.
EXCLUSION DE GARANTIES IMPLICITES - Votre seul et unique recours est la r_paration du produit selon
les dispositions de cette Garantie limit_e. Toutes les garanties implicites, incluant les garanties de
commercialit_ et d'ad_quation 6 un usage sp_cifique, sont limit_es 6 une annie ou 6 la p_riode la plus
courte autoris_e par la I_gislation.
Cettegarantie estvalable pour le premierpropri4taire ettout autrepropridtaire du produit s'il achetdau Canadapour utilisation
domestiqueau Canada.Leservice6 domicilesousgarantie serofourni I6oOil estdisponibleet dons lesrdgionsqueMabeconsid_re
que l'offrede serviceestroisonnable.
I
LE GARANT N'EST PAS RESPONSABLE DES DOMMAGES CONSt_CUTIFS.
• Tout remplacement des fusibles de la maison ou tout
rebranchement des disjoncteurs.
• Tout dommage occasionn_ par un accident, un incendie,
une inondation ou un acte de Dieu.
• Tout dommage subi apr_s la livraison.
• Le service s'ilest impossible d'avoir acc_s au produit
pour ce faire.
22
I
Garant ' IVlABECANADA INC.
I
Page 48

Soutien au consommateur.
Vousavez une question ou vous avez besoin d'aidepour votre appareil _lectrom_nager? Contactez-nous par
l Site Web appareils _lectrom_nagers GE www.electromenagersge.ca
Internet au site www.electromenagersge.ca 2/4heuresparjour, tous lesjours de I'ann@e.
Servicede rdparations
Servicede r@parationsGEest tout pr@sde vous.
Pourfaire r@parervotre @lectrom@nagerGE,il suffit de nous t_l@phoner.
1.800.561.3344
Studio de conception r_oliste
Sur demande, GEpeut fournir une brochure sur I'am_nagement d'une cuisine pour les personnes
mobilit_ r_duite.
Ecrivez: Directeur,Relationsavec lesconsommateurs, Mabe Canada Inc.
Bureau310,1 Factory Lane
Moncton,N.B.EIC 9M3
Prolongotion de gorontie www.electromenagersge.ca
Achetezun contrat d'entretien GEavant que votre garantie n'expireet b_n_ficiez d'un rabais substantiel.Ainsi
le serviceapr_s-vente GEseratoujours I_ apr_sexpiration de la garantie.
Visitez notre site Web ou appelez-nous au 1.888.261.2133.
Pi_ceset occessoires
Ceuxqui d_sirent r_parer eux-m_mes leurs_lectrom_nagers peuvent recevoir pi&ceset accessoiresdirectement
la maison (cartesVISA,MasterCardet Discoveraccept_es).
Lesdirectives stipul_es clans le present manuel peuvent _tre effectu_es par n'importe quel utilisateur. Les autres
r_parations doivent g_n_ralement _tre effectu_es par un technicien quafifi_. Sogezprudent, car une r_paration
inadequate peut affecter le fonctionnement s_curitaire de I'appareil.
Lesconsommateurs auCanada peuvent commander des pi&ceset des accessoiresen ligneau site
www.electromenagersge.ca, 2/4heuressur 2/4et tous lesjours, oupar t_l_phone au 1.800.661.1616pendant
lesheures de bureau.
Contoctez-nous
Sivous n'_tes passatisfait du serviceapr_s-vente dont vous avez b_ndici_ :
Premi_rement, communiquez avec lesgens qui ont r_par_ votre appareil.
Ensuite, sivous n'_testoujours pas satisfait envoyez tousles d_tails-num_ro de t_l_phone compris-au
Directeur,Relationsavec lesconsommateurs, Mabe Canada Inc.
Bureau 310, 1 Factory Lane
Moncton, N.B.EIC 9M3
Inscrivez votre eppereil _lectrom_noger en direct, eussit6t que possible. Celaam_liorera noscommunications
I Inscrivez votre opporeil #lectrom#noger www.electromenagersge.ca
et notre service apr_s-vente.Vouspouvez _galement nous envoyer par la poste leformulaire d'inscriptionjoint 5
votre documentation.
lmprim_ oux Etots-Unis 2 3
lmprim_ sur du popier recyct_
 Loading...