

Page 1
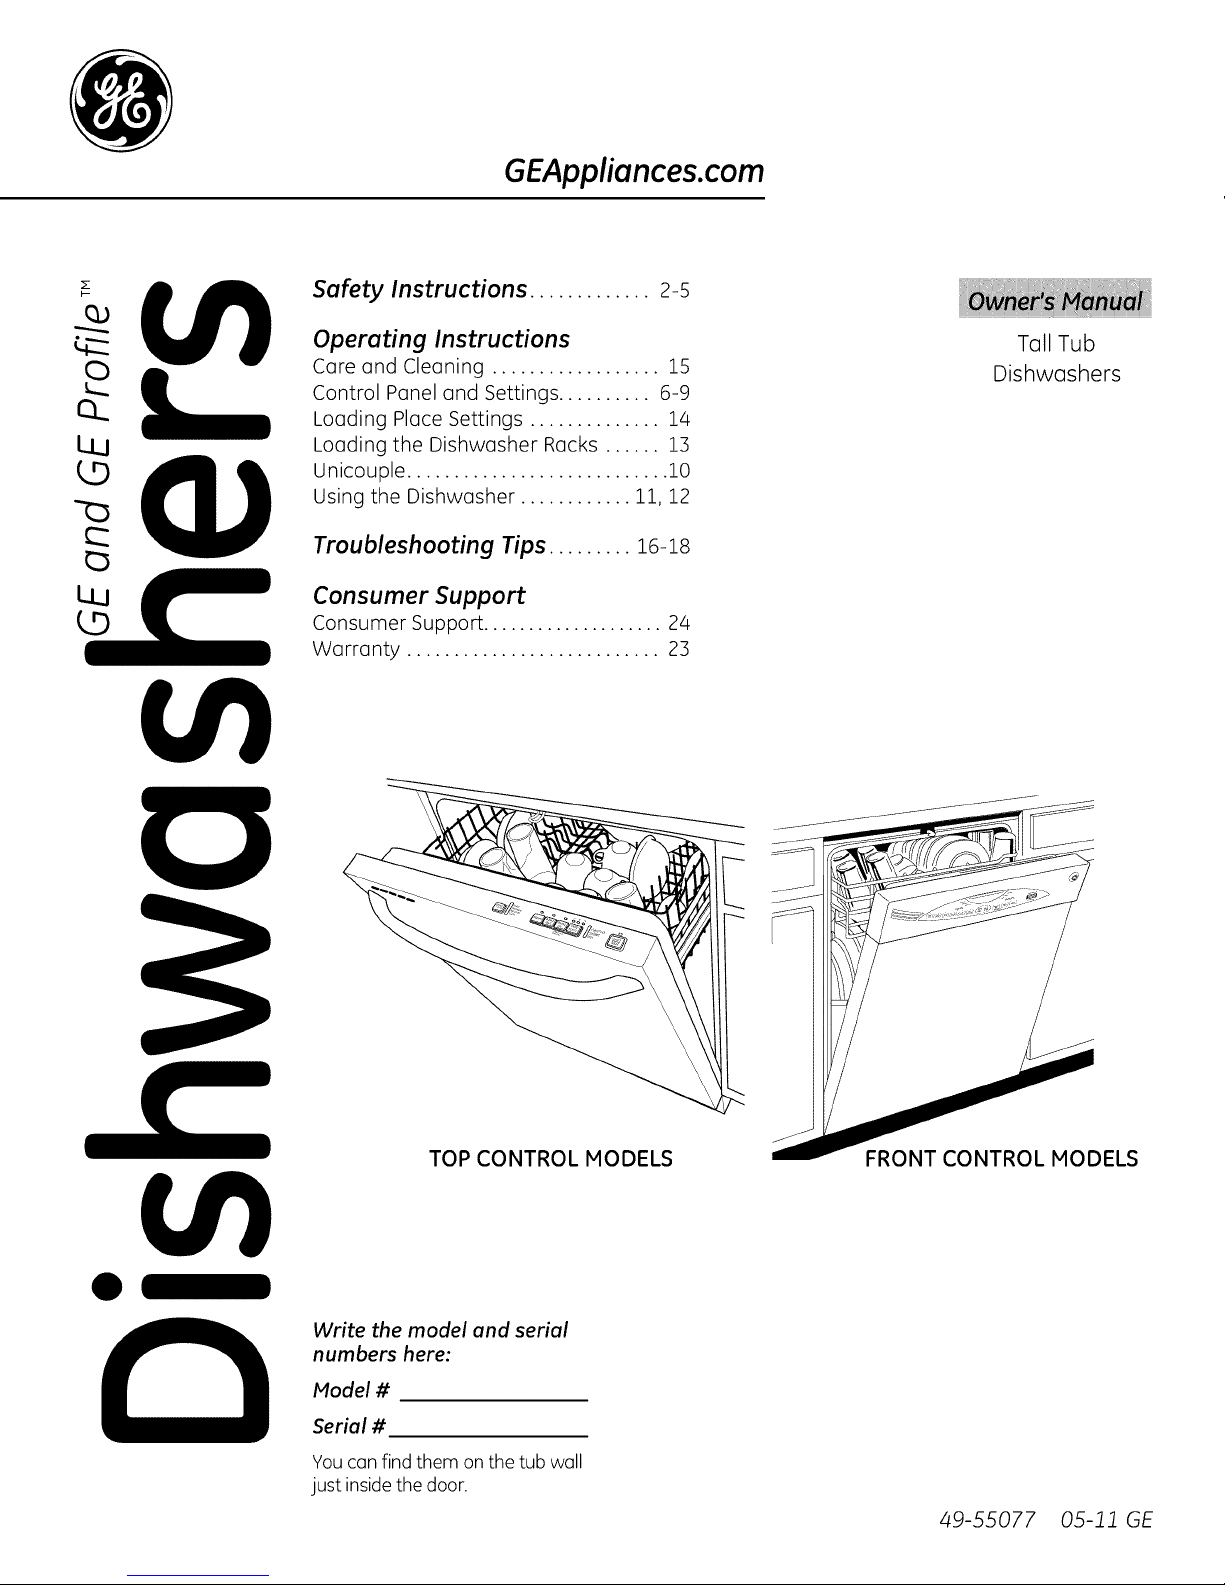
GEAppliances.com
Safety Instructions ............. 2-s
LLJ
Operating Instructions
Care and Cleaning .................. lS
Control Panel and Settings .......... 6-9
Loading Place Settings .............. 14
Loading the Dishwasher Racks ...... 13
Unicouple ............................ 10
Using the Dishwasher ............ 11, 12
Troubleshooting Tips ......... 16-18
Consumer Support
Consumer Support .................... 24
Warranty ........................... 23
Tall Tub
Dishwashers
Write the model and serial
numbers here:
Model #
Serial #
Youcan find them on the tub wall
just inside thedoor.
TOP CONTROL MODELS
FRONT CONTROL MODELS
49-55077 05-11 GE
Page 2
IMPORTANT SAFETY INFORMATION
READ ALL INSTRUCTIONS BEFORE USING-
SAVE THESE INSTRUCTIONS
_, WARNING!
For your safety, the information in this manual must be followed to minimize the risk of fire,
explosion, electric shock, and to prevent property damage, personal injury, or death.
_iADVERTENCIA!
Para su seguridad, siga las instrucciones de este manual a fin de minimizar riesgos de incendio,
explosiSn, descargas el_ctricas, y para evitar dafios en su propiedad, lesiones personales o la
muerte.
,_ WARNING! WATER HEATER SAFETY
Under certain conditions,hydrogen gas may be produced in a water heater that hasnot beenused for two or
more weeks.HYDROGENGASISEXPLOSIVE.
Ifthe hot water has not been usedfor two or more weeks, prevent the possibilityof damage or injury by turning
on all hot water faucets and allow them to run for several minutes. Dothis before usingany electrical appliance
connected to the hot water system.Thissimple procedure will allow any built-up hydrogen gas to escape.Since
the gas isflammable, do not smoke, usean open flame, or use the appliance during this process.
""_'_ _, iADVERTENCIA! SEGURIDADDELCALENTADORDEAGUA
Bajo ciertascondiciones,se podrd producir gas de hidr6geno en un calentador de agua que no rue usadopar dos
semanas o mds.ELGASDE HIDROGENOESE×PLOSlVO.
Siel agua caliente no seus6 par dos semanas o mSs,evite la posibilidad de que ocurran da5os o lesiones
abriendo todos losgrifos deagua caliente y dejando que corra agua par varios minutos. Haga esto antes de
usar cualquier artefacto el6ctrico conectado al sistema de agua caliente. Esteprocedimiento simple permitirc_la
sol!do de cuolquier acumulaci6n de gas de hidr6geno. Debido o que el gas es inflomoble, no fume, no use uno
llama abierta ni useel electrodom6stico durante este proceso.
PROPER INSTALLATION AND MAINTENANCE
This dishwasher must be properly installed and located in accordance with the Installation Instructions
before it is used. If you did not receive an Installation Instructions sheet with your dishwasher, you can
receive one by visiting our Website at GEAppliances.com. In Canada, visit www.GEAppliances.ca.
[] Connect the dishwasher/appliance to a grounded
metal,permanent wiring system;or run an
equipment-grounding conductor with the circuit
conductors and connect to the equipment-
grounding terminal or lead of the appliance.
[] Improper connection of the equipment-grounding
conductor can result in a riskof electric shock.Check
with a qualifiedelectrician or servicerepresentative
ifyou are in doubt whether the appliance is properly
grounded.
[] Disposeofdiscarded appliances and shipping
or packing material properly.
[] Donot attempt to repair or replace any part
of your dishwasher unless it isspecifically
recommended in this manual. Allother servicing
should be referred to a qualified technician.
[] To minimizethe possibilityof electric shock,
disconnect this appliance from the power supply
before attempting any maintenance.
NOTE'.Turningthe dishwasher off does not
disconnect the appliance from the power supply.We
recommend having a qualifiedtechnician service
your appliance.
Page 3

IMPORTANT SAFETY INFORMATION
READ ALL INSTRUCTIONS BEFORE USING-
SAVE THESE INSTRUCTIONS GEApp'°,,ces.co,,
" CAUTION: To prevent minor injury and property damage
• Contentswashed in SANI WASH/SANITIZEmode, if
available, may be hot to the touch. Usecure before
handling.
• Usinga detergent that is
not specifically designed for
dishwashers will cause the
dishwasher to fill with suds.
• Ifyour dishwasher is
connected to a wall switch, ensure that
the switch ison prior to use.
• Ondishwashers with electronic controls,
ifyou choose to turn the wall switch
off between wash cycles,allow 5-10
secondsafter turning the switch on
before touching START/RESETto allow the control to
initialize.
• Non-Dishwure Items: Donot wash items such
as electronic air cleaner filters, furnace filters
and paint brushes in your dishwasher. Damage
to the dishwasher and discoloration or staining
of the dishwasher may result.
• Closesupervision is necessary ifthis appliance
isused by or near children.
• Load light,plastic items sothey do not become
dislodged and drop to the bottom of the
dishwasher-they might come into contact with
the heating element and be damaged.
PRECAUCION: A tin _e evitar lesiones menores y dafios sobre la propiedad
• Loscontenidos lavados en el modo SANIWASH/
SANITIZE(Lavado Desinfectante/ Desinfecci6n},
sieste producto est6 disponible,podrSn estar
calientes al tacto. Tenga
cuidado antes de tomar los
mismos con las manos.
• Eluso de un detergente
que no est6 diseBado
lavavajillas har6 que este Oltimose Ilene
de agua conjab6n.
espec[ficamente para !_
• Siellavavajillasest_ conectado a un
tomacorriente, asegOresede que el
interruptor est6 encendido antes del uso.
• Siellavavajillastiene controles electr6nicos,en
caso de decidir apagar elinterruptor entre ciclos
tM
de lavado, espere entre 5 y 10 segundos luego de
encender el interruptor antes de presionar START/
RESET(Iniciaff Reiniciar)para permitir que el control
se inicie..
• items que no sean Utensilios:Nolave art[culos tales
como filtros electr6nicos de limpieza con aire,filtros
de horno y brochas de pintura en su lavavajillas.Se
podrc_nproducir daBos,descoloraci6n o manchas
sobre el lavavajillas.
• Sedeber(_estarespecialmente atento siel
electrodom6stico es usado por niBoso sise
encuentra cerca de losmismos.
• Cargueartfculos deplSstico livianos,de modo
que no sean desplazadosni caigan al rondo del
lavavajillas- es posible que entren en contacto con
el elemento calentador y sean daBados.
ELECTRICALREQUIREMENTS
• Thisappliance must be supplied with 120V,60 Hz,
and connected to an
individual, properly
grounded branch circuit,
protected bya 15or 20
amp circuit breaker or
time-delay fuse.
• Ifthe electric sup-
ply provided does
not meet the above
Ensurepropergroundexist
beforeuse(portablemodels
only).
specifications, it is recommended that a licensed
electrician install an approved outlet.
• Yourdishwasher circuit should not be used for
any other appliance while the dishwasher is in
operation as the dishwasher requires the full
capacity of the circuit.
imlf the wall receptacle you plug the dishwasher's
power cord into iscontrolled by a switch, turn on
the switch.
Page 4
IMPORTANT SAFETY INFORMATION
READ ALL INSTRUCTIONS BEFORE USING-
SAVE THESEINSTRUCTIONS
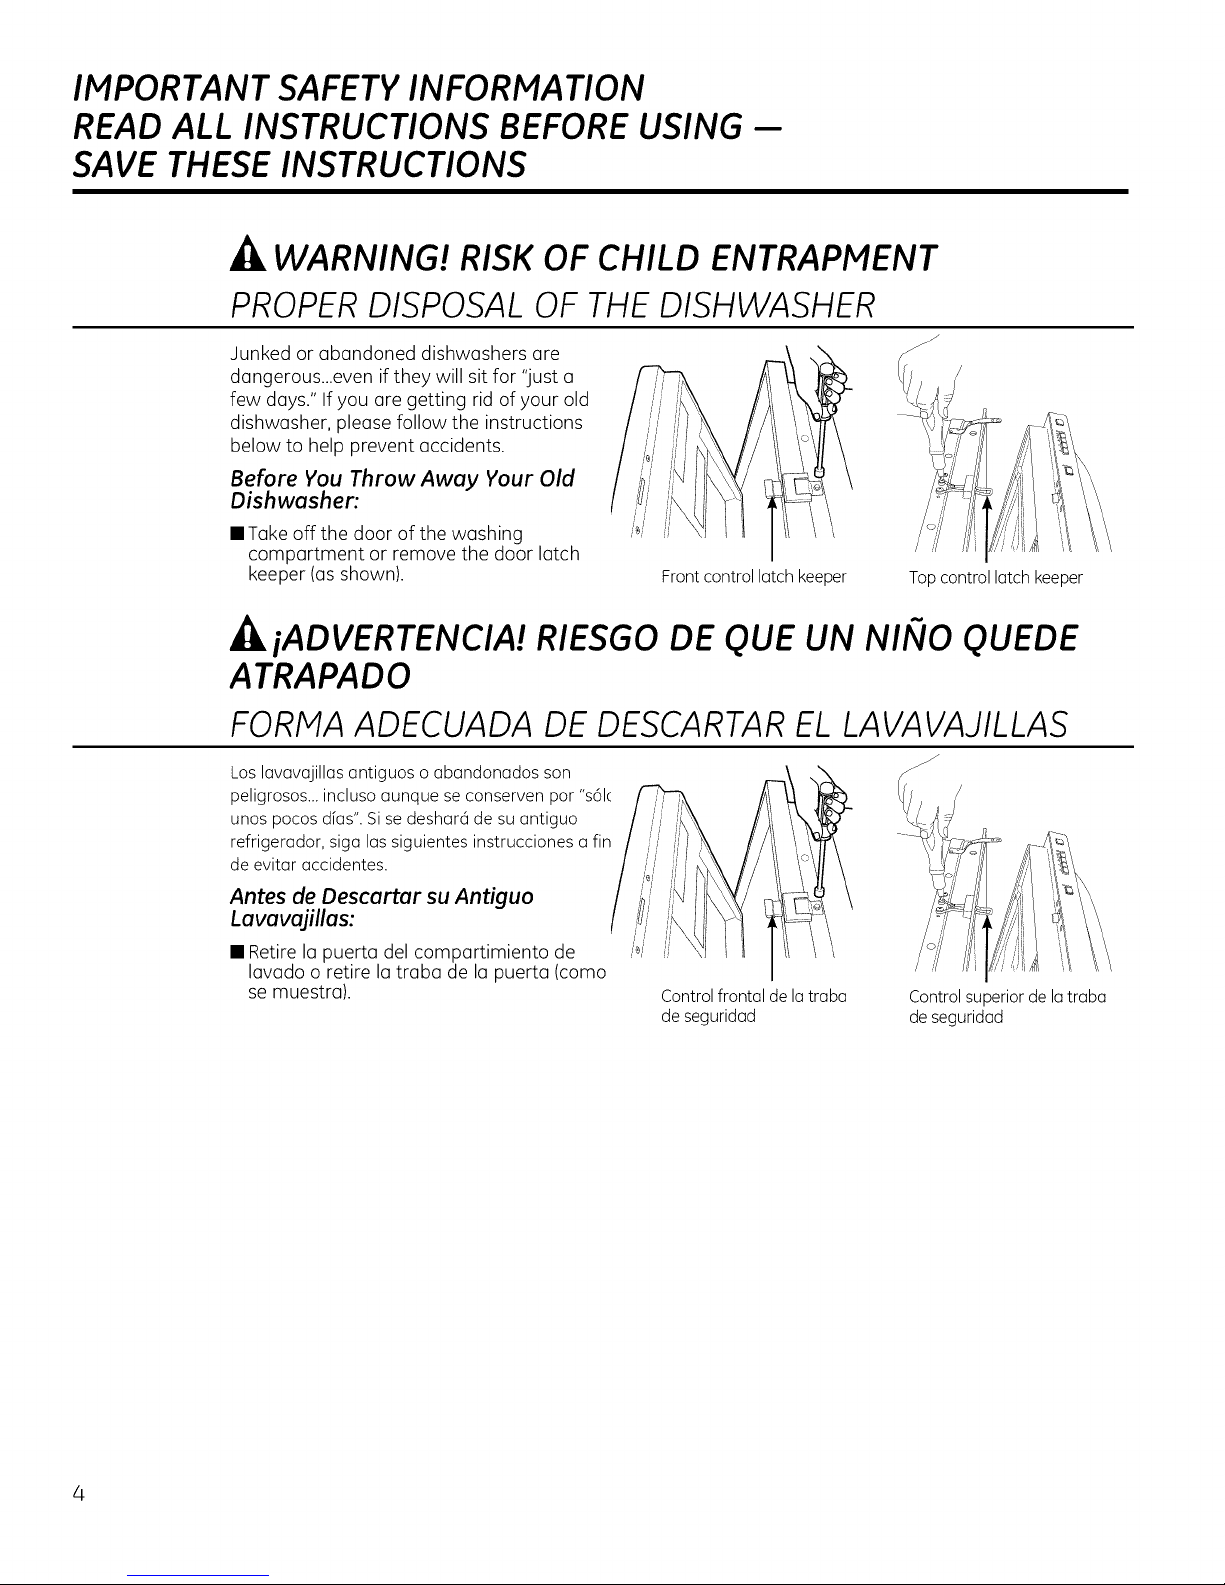
WARNING! RISK OF CHILD ENTRAPMENT
PROPER DISPOSAL OF THE DISHWASHER
Junked or abandoned dishwashers (]re
dangerous...even if they will sit for "just a
few doys." If you (]re getting rid of your old
dishwasher, please follow the instructions
below to help prevent accidents.
Before You Throw Away Your Old
Dishwasher:
• Takeoff the door of the washing
compartment or remove the door latch
keeper (as shown).
Front control latch keeper
iADVERTENCIA! RIESGO DE QUE UN NINO QUEDE
ATRAPADO
Topcontrol latch keeper
FORMA ADECUADA DE DESCARTAR EL LAVAVAJILLAS
Los lavavajillas antiguos o abandonados son
peligrosos.., incluso aunque seconserven por "s61(
unos pocos dfas". Si se deshara de su antiguo
refrigerador, siga las siguientes instrucciones a fin
de evitar accidentes.
Antes de Descartar su Antiguo
Lavavajillas:
• Retire la puerta del compartimiento de
lavado o retire la traba de la puerta (como
se muestra).
Control frontal de la traba
de seguridad
Control superior de la traba
de seguridad
Page 5
IMPORTANT SAFETY INFORMATION
READ ALL INSTRUCTIONS BEFORE USING-
SAVE THESE INSTRUCTIONS GEApplionces.com
...A WARNING! When using your dishwasher, follow basic precautions.
• Usethisappliance only for its intended purpose •
usdescribed in this Owner'sManual.
• Use only powder, Cascade ®Complete Action Packs, •
liquid detergentsor rinseagents recommendedfor •
usein u dishwasherand keepthem out of the reach
of children.Cascade®and Cascade®Complete •
Automatic DishwashingDetergents,andCascade
Crystal Clearerinseagents have beenapproved for
usein all GEdishwashers. •
• Locatesharpitems sothat they are not likelyto
damage the door seal.
• Loadsharp kniveswith the handlesupto reduce the •
risk ofcut-type injuries.
• Donotwash plasticitems unlessmarked dishwasher
safe or the equivalent.For plasticitemsnot so marked, •
checkthe manufacturer's recommendations.
• Donottouch the heating element during or
immediately after use.
iADVERTENCIA!
• Useesteelectrodom6sticos61opar(]suprop6sito
original,como se describeen el Manual del Propietario.
• Use s61opolvo, Paquetes de Acci6n Completa
de Cascade@, detergentes Ifquidos o ogentes de
enjuogue recomendodos p(]ro uso en un Iovovojillos,
y monteng(] los mismos fuer(] del (]lconce de los
niflos. Los Detergentes poro L(]vodoen Lovovojillos
Autom6ticos Cascade@ y Cascade@ Complete, y
los ogentes de enjuogue de Cascade Crystal Clear@
fueron oprobodos por su uso en todos los Iovovojillos
deGE
• Ubique (]rticulos puntiogudos de modo que no h(]yo
posibilidudesde duflos sobreelsellodorde Io puertu.
• Ubiqueartfculos puntiagudos de modo que no hayu
posibilidudesde d(]flossobre el selludorde la puerto.
• Nolaveartfculosde pl(_stico,o menosquefigure que
sonseguros par(] uso en Iovovojilloso una indicoci6n
equivolente.Sise trot(] de artfculos de pl6stico
que no cuenton con dicha indicoci6n,consulte los
recomendocionesdel fobriconte.
• Notoque elelemento de colefacci6n duronte o
inmediotomente despu6sdel uso.
including the following:
Donot operateyour dishwasherunlessall enclosure
panelsare properlyin place.
Donot tamper with controls.
Donot abuse,sit on or stand on the door or dish rack
ofthe dishwasher.
Donot allow childrento play around the dishwasher
when openingor closingthe door dueto the possibility
ofsmall fingers being pinched inthe door.
Donot discard a dishwasher without first removing
the door of thewashing compartment or the latch
keeper.
Donot store or use combustible materials,gasolineor
otherflammable vapors and liquidsin the vicinity of
this or any other appliance.
Donot allow childrento play with, on or insidethis or
anydiscarded appliance.
AI usar su lavavajillas, siga las precauciones b6sicas,
incluyendo Io siguiente:
• Notoque el elemento de colefacci6n duronte o
inmediotamente despu6sdel uso.
• Notoque el elemento de colefacci6n duronte o
inmediatomente despu6sdel uso.
• Noabuse,no se siente ni separe sobrelu puerto o Io
bundejo del platodel Iovovajillas.
• Nopermit(] que losniflosjueguen olrededor del
Iovovojillosal abrir o cerrar Io puerto,debido o
Ioposibilidadde que sus dedospequeflos seon
presionodoscontro lu puerta.
• Nopermit(] que losniflosjueguen olrededor del
Iovavojillasal abrir o cerrar Io puerta,debido a
la posibilidadde que sus dedospequeflossean
presionadoscontra Iopuerta.
• Noguarde niusemateriales combustibles,gasolina u
otrosvapores inflamoblesy Ifquidoscerca de _ste ni
de otros electrodom_sticos.
• Noguarde niusemateriales combustibles,gasolina u
otrosvapores inflamoblesy Ifquidoscerca de _ste ni
de otros electrodom_sticos.
READAND FOLLOW THISSAFETYINFORMATIONCAREFULLY'.
SAVE THESE INSTRUCTIONS
Page 6

About the dishwasher control panel.
Front Control Models Only. For top control models see Top Control Models Only section.
m
® SANmZED
R,NS_ " Cgcles
ONLY .... •
"__ U'_Y_ADC_,O.T'I " .... .
11
Front Control Settings
R tatus Indicator Lights
TheStatus display tellsyou what's happening while the dishwasher is in operation and may flash, indicating
a malfunction. The lights will come ON indicating the sequence of operation the dishwasher is in.
CLEAN
SANITIZED
B Cycles
The light above the selected pad willbe ON to indicate which cycle has been selected.
SANI WASH
(on some
models)
POTS & PANS
or HEAVY
WASH (onsome
models)
Displayed when a wash cycle is complete. The light stays ON as a reminder that
the dishes are clean. Openingthe door or pressingany keywhile the door isclosedand
latchedwill turn off the light.
Displayedat the end of the cyclewhen SAN!WASHhas been selected and the dishwasher
has met the requirements for sanitization. SeeSAN! WASH,below,for complete cycle
description. Opening the door or pressing any key while the door isclosed and latched will
turn off the light.
7.5-8.8 gal., 50-135 min.
This cycle raises the water temperature in the final rinse to sanitize your dishware.
The cycle length will vary depending on the temperature of your inlet water.
NOTE:The SANI WASHcycle is monitored for sanitization requirements. If the
cycle is interrupted during or after the main wash portion or if the incoming water
temperature is so low that adequate water heating cannot be achieved, the sanitizing
conditions may not be met. In these cases, the Sanitized light will not illuminate at the
end of the cycle.
NOTE:NSFcertified residentialdishwashersare not intended for licensedfood establishments.
8.8 gal., 88 min.
This cycle is meant for heavily soiled dishes or cookware with dried-on or baked-
on soils. Everyday dishes are safe to be used in this cycle.
2 4 8
L_ .tu.Lj
bTO
Options
e
R
m
CLEAN
o
NORMAL WASH
LIGHTWASH 7.6 gal., 46 min.
(onsome models) This cycle is for light to medium soiled dishes.
CHINA CRYSTAL6.3 gal., 41 min.
(onsome models) This cycle is for lightly soiled china and crystal.
RINSEONLY 1.2 gal., 7 min.
(on some For rinsing partial loads that will be washed later. Do not use detergent with this cycle.
models)
NOTE:Only the SANI WASHcycle has been designed to meet the requirements of Section 6, NSF184
for soil removal and sanitization efficacy.
3.3 gal., 54 min..
This cycle is meant for normal every day soil levels and is designed to conserve both
water and energy. NOTE:NORMAL WASHwas used to rate the energy efficiency of
this dishwasher.
Page 7
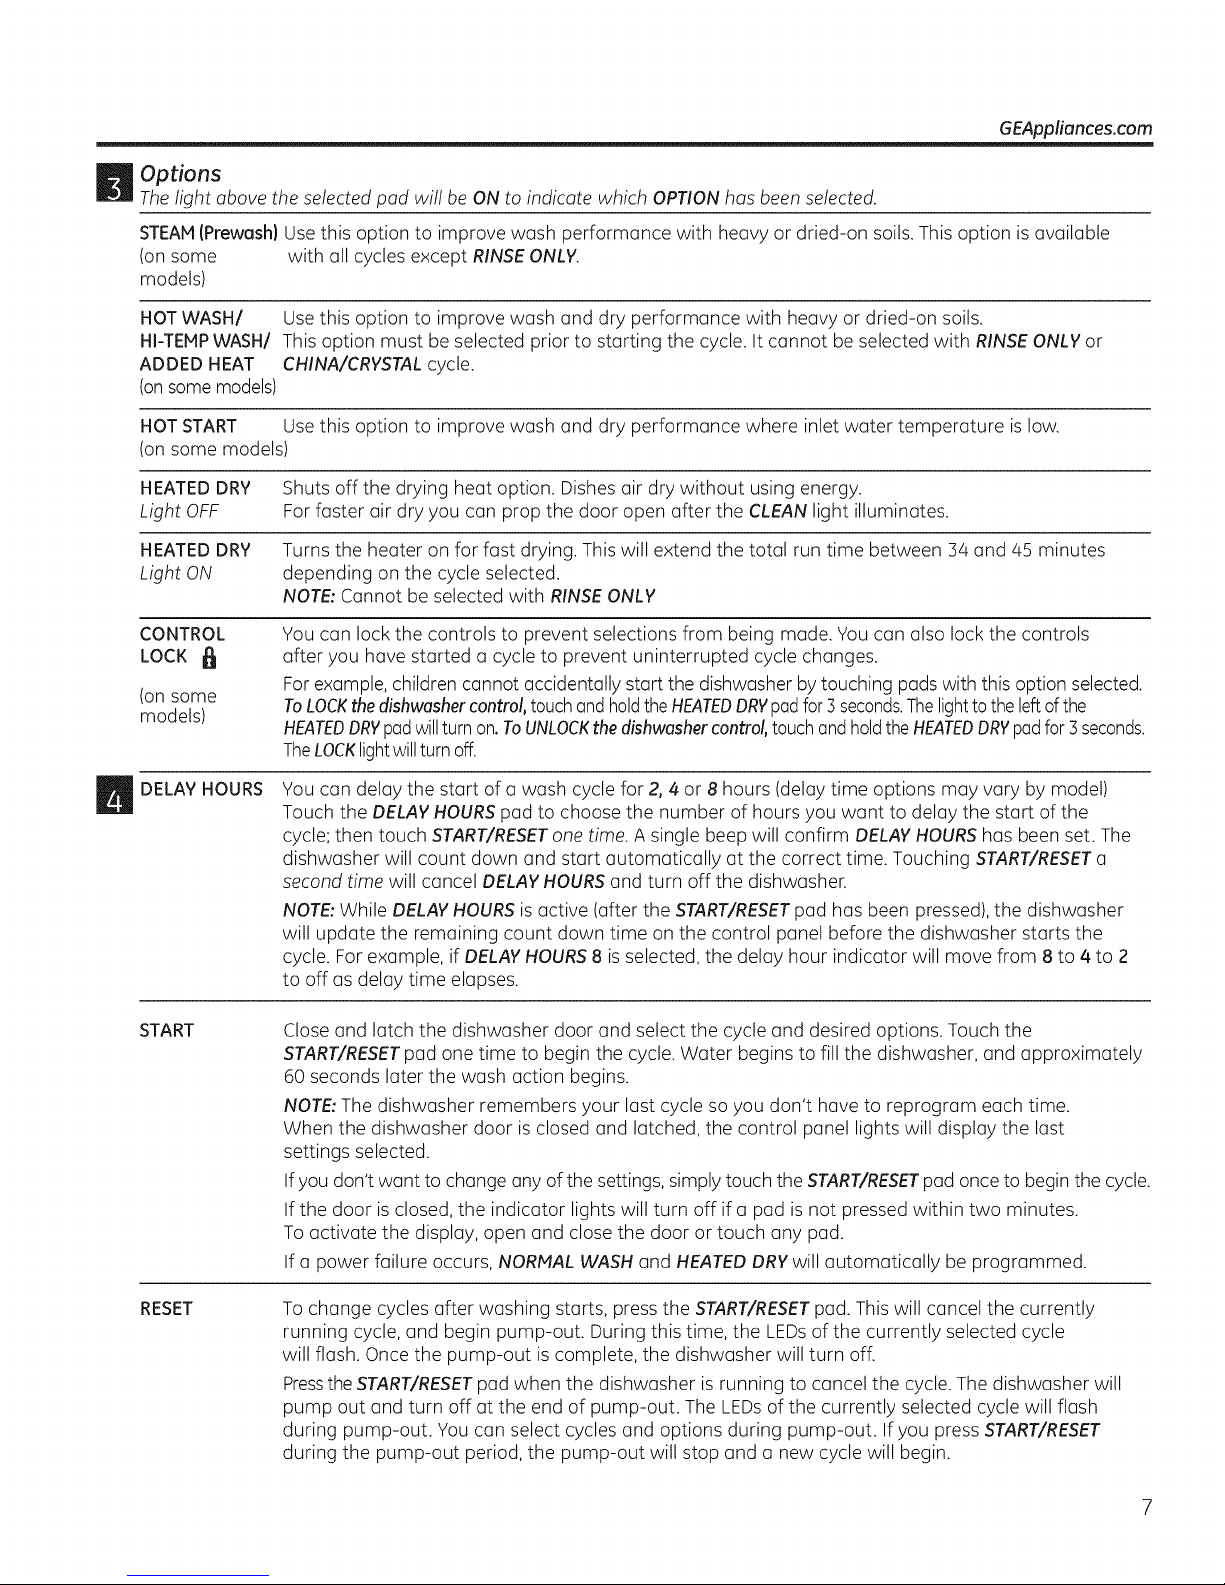
_t_ Options
The light above the selected pad will be ON to indicate which OPTION has been selected.
STEAM(Prewash) Use this option to improve wash performance with heavy or dried-on soils. This option is available
(on some with all cycles except RINSE ONLY.
models)
HOTWASH/ Use this option to improve wash and dry performance with heavy or dried-on soils.
HI-TEHPWASH/ This option must be selected prior to starting the cycle. It cannot be selected with RINSE ONLY or
ADDED HEAT CHINA/CRYSTAL cycle.
(on some models)
HOT START Use this option to improve wash and dry performance where inlet water temperature is low.
(on some models)
HEATED DRY Shuts off the drying heat option. Dishes air dry without using energy.
Light OFF Forfaster air dry you can prop the door open after the CLEAN light illuminates.
HEATEDDRY Turns the heater on for fast drying. This will extend the total run time between 54 and 45 minutes
Light ON depending on the cycle selected.
NOTE:Cannot be selected with RINSEONLY
GEAppliances.com
CONTROL
LOCK
(on some
models)
DELAY HOURS
START
You can lock the controls to prevent selections from being made. You can also lock the controls
after you have started u cycle to prevent uninterrupted cycle changes.
Forexample, children cannot accidentally start the dishwasher by touching pads with this option selected.
ToLOCKthedishwashercontrol,touchandholdthe HEATEDDRYpadfor3 seconds.Thelightto theleftof the
HEATEDDRYpadwillturnon.ToUNLOCKthedishwashercontrol,touchand holdthe HEATEDDRYpadfor3seconds.
TheLOCKlightwillturnoff.
You can delay the start of a wash cycle for 2, 4 or 8 hours (delay time options may vary by model)
Touch the DELAYHOURSpad to choose the number of hours you want to delay the start of the
cycle; then touch START/RESETone time. A single beep will confirm DELAYHOURShas been set. The
dishwasher will count down and start automatically at the correct time. Touching START/RESETa
second time will cancel DELAYHOURSand turn off the dishwasher.
NOTE:While DELAYHOURSis active (after the START/RESETpad has been pressed),the dishwasher
will update the remaining count down time on the control panel before the dishwasher starts the
cycle. For example, if DELAYHOURS8 is selected, the delay hour indicator will move from 8 to 4 to 2
to off as delay time elapses.
Close and latch the dishwasher door and select the cycle and desired options. Touch the
START/RESETpad one time to begin the cycle. Water begins to fill the dishwasher, and approximately
60 seconds later the wash action begins.
NOTE:The dishwasher remembers your last cycle so you don't have to reprogram each time.
When the dishwasher door is closed and latched, the control panel lights will display the last
settings selected.
If you don't want to change any of the settings, simply touch the START/RESETpad once to begin the cycle.
If the door is closed, the indicator lights will turn off if a pad is not pressed within two minutes.
To activate the display, open and close the door or touch any pad.
If a power failure occurs, NORMAL WASH and HEATEDDRY will automatically be programmed.
RESET
To change cycles after washing starts, press the START/RESETpad. This will cancel the currently
running cycle, and begin pump-out. During this time, the LEDsof the currently selected cycle
will flash. Once the pump-out is complete, the dishwasher will turn off.
Pressthe START/RESETpad when the dishwasher is running to cancel the cycle. The dishwasher will
pump out and turn off at the end of pump-out. The LEDsof the currently selected cycle will flash
during pump-out. You can select cycles and options during pump-out. If you press START/RESET
during the pump-out period, the pump-out will stop and a new cycle will begin.
Page 8
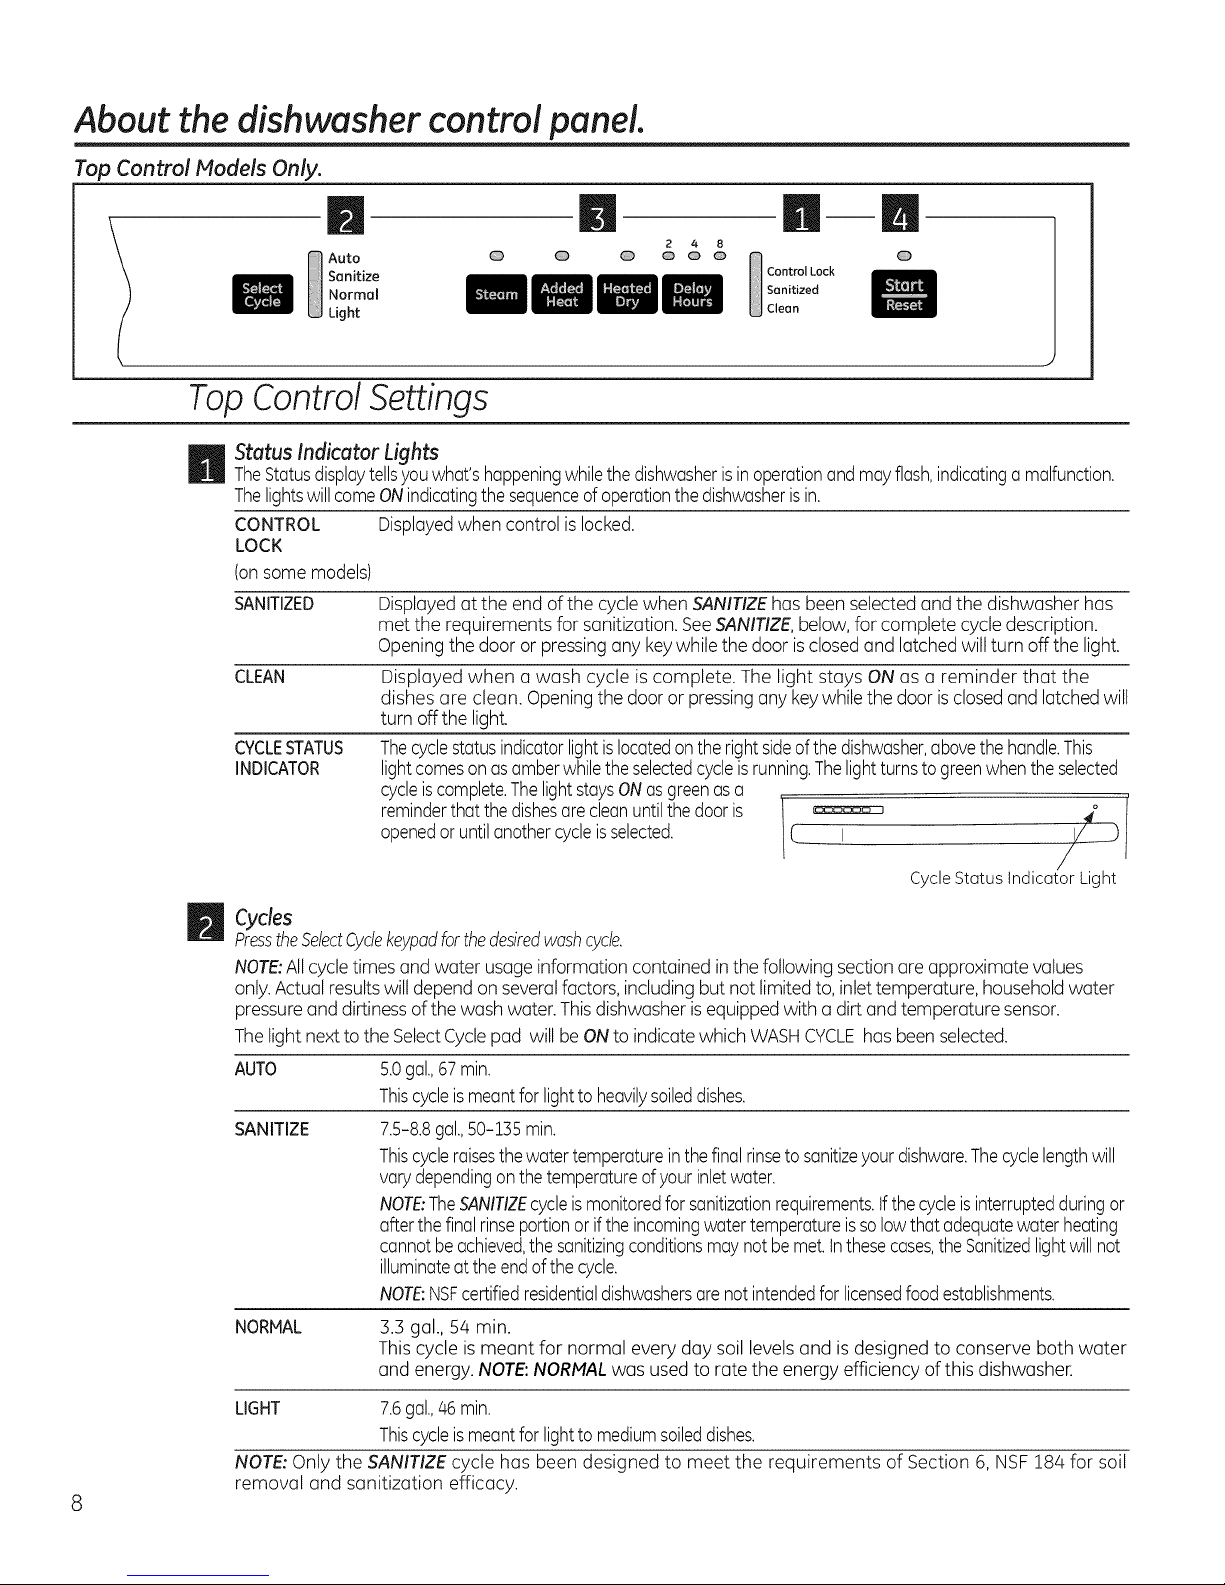
About the dishwasher control panel.
Top Control Models Only.
B
Auto
Sanitize
Normal
Light
\ J
@ @ @ @ @ @
2 4 8
ini--m
Control Lock
Sanitized
Clean
@
TopControlSettings
_ tatus Indicator Lights
TheStatusdisplaytellsyouwhat'shappeningwhilethe dishwasheris inoperationandmayflash,indicatingamalfunction.
ThelightswillcomeONindicatingthesequenceofoperationthedishwasherisin.
CONTROL Displayedwhen control islocked.
LOCK
(onsome models)
SANITIZED Displayedat the end of the cyclewhen SANITIZEhas been selected and the dishwasher has
met the requirements for sanitization. SeeSANITIZE,below,for complete cycledescription.
Openingthe door or pressingany keywhile the door isclosedand latched will turn off the light.
CLEAN Displayed when a wash cycle is complete. The light stays ON as a reminder that the
dishes are clean. Openingthe door or pressingany keywhile the door isclosedand latchedwill
turn off the light.
CYCLESTATUS Thecyclestatusindicatorlightislocatedonthe rightsideofthe dishwasher,abovethehandle.This
INDICATOR lightcomesonasamberwhiletheselectedcycleisrunning.Thelightturnstogreenwhentheselected
cycleiscomplete.ThelightstaysONasgreenasa
reminderthatthe dishesarecleanuntilthe dooris I _ 2
openedoruntilanothercycleisselected. 1[. I
r
CycleStatusIndicatorLight
7
Cycles
PresstheSelectCydekeypadforthedesiredwashcycle.
NOTE:Allcycletimes and water usageinformation contained in the following section are approximate values
only.Actual resultswill depend on severalfactors, including but not limited to, inlettemperature, householdwater
pressureand dirtinessof the wash water. Thisdishwasher isequippedwith a dirtand temperature sensor.
Thelight nextto the SelectCyclepad will be ONto indicate which WASHCYCLEhas beenselected.
AUTO S.0gal.,67min.
Thiscycleismeantforlightto heavilysoileddishes.
SANITIZE
NORMAL 3.3 gal., 54 min.
LIGHT 7.6gal.,46min.
NOTE:Only the SANITIZEcycle has been designed to meet the requirements of Section 6, NSF184 for soil
removal and sanitization efficacy.
8
7.5-8.8gal.,50-1% min.
Thiscycleraisesthewatertemperaturein thefinalrinsetosanitizeyourdishware.Thecyclelengthwill
varydependingonthetemperatureofyourinletwater.
NOTE:TheSANITIZEcycleismonitoredfor sanitizationrequirements,if thecycleisinterruptedduringor
afterthefinal rinseportionorifthe incomingwatertemperatureisso lowthatadequatewaterheating
cannotbeachieved,the sanitizingconditionsmaynotbemet.tnthesecases,the Sanitizedlightwillnot
illuminateattheendof thecycle.
NOTE:NSFcertifiedresidentialdishwashersarenotintendedfor licensedfoodestablishments.
This cycle is meant for normal every day soil levels and isdesigned to conserve both water
and energy. NOTE:NORMALwas used to rate the energy efficiency of this dishwasher.
Thiscycleismeantforlightto mediumsoileddishes.
Page 9

GEAppliances.com
Options
The light above the selected pad will be ON to indicate which OPTION has been selected.
DELAYHOURS You can delay the start of a wash cycle for 2, 4 or 8 hours (delay time options may vary by
model). Touch the DELAY HOURS pad to choose the number of hours you want to delay
the start of the cycle: then touch START/RESET one time. A single beep will confirm DELAY
HOURS has been set. The dishwasher will count down and start automatically at the correct
time. Touching START/RESET a second time will cancel DELAY HOURS and turn off the
dishwasher.
NOTE: While DELAY HOURS is active (after the START/RESET pad has been pressed), the
dishwasher will update the remaining count down time on the control panel before the
dishwasher starts the cycle. For example, if DELAY HOURS 8 is selected, the delay hour
indicator will move from 8 to 4 to 2 to off as delay time elapses.
HEATEDDRY Shuts off the drying heat option. Dishes air dry without using energy.
Light OFF For faster air dry you can prop the door open after the CLEAN light illuminates.
HEATEDDRY Turns the heater on for fast drying. This will extend the total run time between 34 and 45
Light ON minutes depending on the cycle selected.
ADDED HEAT When selected, the cycle will run with heating element on longer and may increase
cycle times to improve both wash and dry performance.
STEAM(Prewash) Forusewithheavilysoiledand/ordried-on,baked-onsoils.ThisoptionlUST beselectedPRIOR
tostartingthecycle.TheSTEAMoptionadds30minutestothecycletime.
CONTROL
LOCK
(on some
models)
START
RESET
You can lock the controls to prevent selections from being made. You can also lock the
controls after you have started a cycle to prevent uninterrupted cycle changes.
For example, children cannot accidentally start the dishwasher by touching pads with this
option selected.
ToLOCKthedishwashercontrol,touchand holdthe HEATEDDRYpadfor 3seconds.Thecontrollocklight
willturn on.ToUNLOCKthedishwashercontrol,touchandholdtheHEATEDDRYpadfor 3seconds.The
controllocklightwill turnoff.
Door can be open to start the cycle and select desired options. Pressthe START/RESET
pad one time to begin the cycle.Close the door to start the cycle or begin the DELAYHOURS
countdown. Approximately 60 seconds later the wash action begins.
NOTE:The dishwasher remembers your last cycle. Youdon't have to reprogram each time.
Pressthe START/RESETpad to ready the dishwasher and close the door to begin. If the door
isopen, the illuminated lights will turn off if a pad is not pressed within two minutes. To
activate the display, close and open the door or touch any pad.
On some models, if a power failure occurs, AUTO and HEATEDDRYwill automatically be
programmed. For all other models, if a power failure occurs, NORMAL and HEATEDDRYwill
automatically be programmed.
To change cycles after washing starts, press the START/RESETpad. This will cancel
the currently running cycle, and begin pump-out Once the pump-out is complete, the
dishwasher will turn off.
PresstheSTART/RESETpad when the dishwasher is running to cancel the cycle. The
dishwasher will pump out and turn off at the end of pump-out. You can select cycles
and options during pump-out. If you press START/RESETduring the pump-out period, the
pump-out will stop and a new cycle will begin.
Page 10

About the unicouple (portable models only).
Before Operating the Dishwasher the First Time
Attach the faucet adapter. The special faucet
adapter supplied with your dishwasher must
be assembled to the sink faucet before you can
use your dishwasher.
The faucet adapter is designed to fit standard
spouts having internal or external threads. You
willfind the adapter and two washers in the
faucet adapter packet in your dishwasher.
To install faucet adapter, first remove the old
aerator or trim ring on your faucet spout.
If faucet has external threads: Insert the
thinner of the two washers into the faucet
adapter and attach itto the faucet spout.
/
Tighten with pliers.
How to Connect the Unicouple
[Z] Run the hot water faucet to purge cold
water from the hot water line.The hot
water must be between 120°F and 150°F
for best wash performance.
[] Pull Unicouple and its hoses completely out
from storage compartment located at rear
of dishwasher.
[-_ Attach the Unicouple connector to the
faucet adapter by depressing the collar at
the top of the connector. When Unicouple
is all the way up onto the adapter, release
the collar. Itwillthen snap into position to
lock the Unicouple in place.
If faucet has internal threads: Insert both
of the washersinto the faucet adapterand
attach it to the faucet spout.
Tighten with pliers.
If the faucet adapter threads do not match
your faucet spout, your local hardware
or plumbing supply store normally has
additional fittings to adapt your faucet spout
to the special faucet adapter.
NOTE:A sink spray attachment hose can
burst if it is installed on the same sink with
your dishwasher. We suggest that you
disconnect the sink spray attachment if your
sink has one and plug the hole.
%
%
TheUnicouple's small hosecarries water
from the faucet to the dishwasher.Its large
hose curries drain water to the sink. Be
sure Unicouple ispointing toward the sink
bowl drain opening and the sinkdrain is
open for water that will drain from your
dishwasher.
If your dishwasher drains into u disposer,
operate the disposer until it is completely
empty before starting the dishwasher.
Turn hot water fully on before starting the
dishwasher.
Plugthe dishwasher power cord into the
outlet.
Pressure releose
button
10
How to Disconnect the Dishwasher
E_ Unplugthe dishwasher.
Pushthe cord buck into its storage locution.
[_ Turn off the hot water.
[] Releasethe water pressure by depressing
the pressure releasebutton.
Releasethe Unicouple from the faucet
% by depressing the collar at the top of the
Unicouple connector.
I-_ Drain excess water from the unicouple
hoses (see below). Push the hoses back
into their storage location.
How to Drain Excess Water from Unicouple Hoses
If the sink is 34"or higher from the floor,the
excesswater in Unicouple hoses cannot
be drained directly into the sink.Itwill be
necessary to drain excesswater from hoses
into a bowl or suitable container that isheld
outside and lower than the sink.
and theroom fromseveresplashing,relieve
waterpressurepriortodisconnectingthe
unicouple.
protegerse usted y la habitaci6n de
salpicaduras severas, alivie la presi6n del
ogua antes de desconectar la manguera de
alimentaci6n.
CAUTION TO protectyourseff
PRECAUCION Afinde
Page 11

Using the
dishwasher. GEAppliances.com
Check the Water Temperature
Theenteringwatershouldbeatleast120°F(49°C)and
notmorethan 150°F(66°C)foreffectivecleaningandto
preventdishdamage.Checkthewatertemperaturewitha
candyormeatthermometer.Turnonthehot waterfaucet
nearestthedishwasher,placethethermometerina glass
andletthe waterrun continuouslyintotheglassuntilthe
temperaturestopsrising.
Usea Rinse Agent such as Cascade Crystal Clear®
Rinseagentssuchas CascadeCrystalClear®removespotsandpreventnewfilmbuilduponyourdishes,glasses,
flatware,cookwareandplastic.
Filling the Dispenser
TherinseagentdispenserholdsS.Soz.(1055ml)of rinseagent.Undernormal
conditions,thiswilllastapproximatelyonemonth.Tryto keepitfull,butdonotoverfill.
[_ Hakesurethedishwasherdoorisfullyopen.
E] Turnthedispensercaptothe leftandliftit out.
[_ Addrinseagentuntiltheindicatorwindowlooksfull.
E] Cleanupanyspilledrinseagentwith a dampcloth.
[] Replacethedispensercap.
Rinse Aid Setting
Theamountof rinseagentreleasedintothefinalwashcan beadjusted.Thefactory
settingisatthe midpoint.Ifthereareringsof calcium(hardwater)spotsondishes,try a
highersetting,tfyouseefoaminthe dishwasher,movetheindicatorto a lowersetting.
Toadjustthe setting
Removethedispensercap;thenturntheadjustercounterclockwisetoincreasethe
amountofrinseagent,clockwiseto reducetheamountof rinseagent.
in '
window Dispensercap
Rinse
agent
adjuster
Dish Preparation Prior to Loading
[] No pre-rinsingof normalfoodsoilisrequired.
[] Scrapeoff hardsoils,includingbones,toothpicks,skins
andseeds.
[] Removelargequantitiesof anyremainingfood.
[] Removeleafyvegetables,meattrimmingsand
excessiveamountsofgreaseoroil.
[] Removeacidicfoodsoilsthat can discolorstainless
steel.
11
Page 12

Using the dishwasher.
_ Thedetergent dispenseris on the upper left hand side of
_ the dishwasherdoor.It ha two compartments.Usethe
main wash compartment for all loads.Usethe pre-wash
compartment only when yourwater isextremely hard or
whenyou havea heavysoiledload.
Detergent
Dispenser
Youmayusetablet,powder,liquidor gelautomatic
dishwasherdetergent.Makesureyouuseonlydetergents
specificallylabeledforuseinautomaticdishwashers.Never
useliquidhanddisdetergentinan automaticdishwasher.
Sudsingand poorwashperformancewill resultwith theuseof
improperdetergents.
Detergentsshouldbestoredinadrylocationand intheir
originalcontainertopreventlossofeffectiveness.Place
detergentin thecupjustpriorto startingthedishwasherand
thencloseandlatchthe cover.Thecoverwillopenduringthe
washcycle.
Filling the Detergent Dispenser
GErecommendsusingdetergentintabletor packetform.
Independenttestinghasshownthisform ofdetergentisvery
effectiveinthe dishwasher.Cascade®Complete2 in 1
Action Packsareanexampleofthistypeofdetergent.Simply
puta tabletor packetintothemainwashcompartmentand
thencloseandlatchthe detergentcupcover.Pleasenotice
thatthetabletor packetmustbeplacedinthemainwash
compartmentofthedetergentcup.ifthetabletor packetis
tossedinthe bottomof thedishwasher,thedetergentwillbe
flusheddownthedrainina veryshortperiodof timeandwill
thusbewasted.Washperformancewillbeverypoorasa
result.
tfyou chooseto usedetergentinpowder,liquidor gelform,
theamountof detergentyou usewillbedeterminedby the
hardnessofyourwater,thetemperatureofyourwater,
andthefoodsoilloadinsidethedishwasher.Contactyour
watercompanytogetinformationaboutthe hardnessof
thewater inyourarea.Youmaypurchasea hardwatertest
stripfrom GE.Call1-800-626-2002and askfor partnumber
WD01×10295.
12
Number of
Grains Detergent Cups to Fill
Lessthan 4 Fillcup to soft line (1/3 full)
4 to 8 Fillcup to medium soft line (2/3full)
8 to 12 Fillcup to medium hard line
(completely full)
Greater Fillboth main wash cup and pre
than 12 wash cup
Medium Medium Extremely Hard or
Soft Soft Hard Heavy Soils
Usingtoo muchdetergentwith verysoftand/orvery
hotwatermaycauseaconditioncalledetchingonyour
glassware.Etchingis a permanentcloudinessinyour
glassware.Thisconditionisirreversible.However,usingtoo
littledetergentwillcausepoorwashperformance.
Usethetableasa startingpointandthenadjustthe amount
ofdetergentyouuse.Usejustenoughtogetgoodwash
performance.Usingjustthe rightamountofdetergentwill
providegreatwashperformancewithout wastingdetergent
oretchingofglassware.
DO NOTUSEHANDDISHDETERGENT
m
m
NOTE:Usingadetergentthatisnot specificallydesigned
fordishwasherswillcausethedishwashertofillwithsuds.
Duringoperation,thesesudswillspilloutofthedishwasher
vents,coveringthekitchenfloorandmakingthefloorwet.
Becausesomanydetergentcontainerslookalike,storethe
dishwasherdetergentina separatespacefrom allother
cleaners.Showanyonewhomayusethe dishwasherthe
correctdetergentandwhereitisstored.
Whiletherewillbenolastingdamagetothe dishwasher,your
disheswillnotget cleanusinga dishwashingdetergentthat is
notformulatedtoworkwith automaticdishwashers.
Page 13

the dishwasher racks. GffAppliances.com
For best dishwashing results, follow these loading guidelines. Features and appearance of racks and silverware
baskets may vary from your model.
Upper Rack
Althoughtheupperrockisprimarilyfor glosses,cups
and saucers,potsandpunsconbeplaced
inthisrockforeffectivecleaning.Cupsandglasses
fit bestalongthesides.Thisisalsoa secureplacefor
dishwasher-safeplastics.
Theupperrackisadjustable(onsomemodels
to addflexibilityinloadingyourdishwasher.
Tolower,pushtabsin andlowerrack.Toraise
just pullup onrackuntilitsnaps.
Theutilityshelf(onsomemodels)maybeplaced
intheupor downpositionto oddflexibility.Awine
glassholder(onsomemodels)secureswineglasses
for bestwashability.Becausewineglassescomein
varioussizes,after loading,slowlypush
intherackto makesuretheywillclearthetop
ofthe dishwasher.
Theupperrackisgoodfor allkindsof odd-shaped
utensils.Saucepans,mixingbowlsandother items
shouldbeplacedfacedown.
Fold-downtines(onsomemodels)provideflexibility
forextra-largeandhard-to-fititems.
Securelargerdishwasher-safeplasticsover2tines
whenpossible.
Makesuresmallplasticitemsaresecuresothey
can'tfallontotheheater.
Besurethatitemsdonotprotrudethroughthe
bottomof therackand blockrotationofthe
middlesprayarm.Thiscouldresultin poorwash
performanceforitemsintheupperrack.
Checkto makesure
that no itemswill block
rotation ofthewash
arms.
i helowerrackis bestusedfor plates,saucersand
One-piece basket (on some models)
Square basket (on some models)
Lower Rack
cookware.Largeitemssuchasbroilerpansand
bakingracksshouldgoalongthe le_hand side.
Loadplatters,potsandbowlsalongthesides,in
cornersor inthe back.Thesoiledsideof itemsshould
facethecenterof therack.if necessary,oversized
glassesandmugscanbeplacedinthe lowerrackto
maximizeloadingflexibility.
Also,becarefulnottolet a portionofan itemsuch
asa potor dishhandleextendthroughthe bottom
rack.Thiscouldblockthewasharmandcausepoor
washingresults.
Silverware Basket
Put flatware inthe removable basket with forkand
knifehandles up to protect your hands. Place spoons
inthe basket with handles down. Hixknives,forks
and spoons so they don't nest together. Distribute
evenly.Smallplasticitems,suchasmeasuring
spoonsandlidsfromsmallcontainersshouldgo
inthebottom ofthe silverwarebasketwiththe
silverwareontop.
Thelidsofboth endand middlebaskets
(onsomemodels)canbeclosedto containsmall
items.Longitemscanbeplacedontheutilityshelfin
theupperrack.
Fold-downtines(onsomemodels)provideflexibility
for extra-largeand hard-to-fititems.Thetinesmay
beleftintheup positionorfoldeddownto customize
the lowerrack.
Donot letanyitem extend
_7 If f _ I thr°ugh theb°tt°m °f the
_ !,:._ couldpreventthesprayarm
_ _ _!washperformance.
Theaccessory basket (onsome models)can
hold small items such as baby bottle nipples,
plastic lids,or corn cob holders.
Accessory basket (on some models)
silverwarebasket.Items
romturningandcausepoor
13
Page 14

Loading place settings...
Follow these guidelines for loading 10 place settings. Features and appearance of racks and silverware baskets
may vary from your model. NOTE:Silverware should be individually loaded into the slots on the silverware basket lid.
Upper Rack--lO place settings (on some models) Lower Rack--lO place settings (on some models)
Front Control models
with square basket
*Tine finger: Vertical wire that separates and holds plates on the rack.
Long silverware basket
models
Front Control models
with square basket
Long silverware basket Long silverware basket
models (!2 tine models (!3 tine
fingers* by row) fingers* by row)
Follow these guidelines for loading 12 place settings. Features and appearance of racks and silverware baskets
may vary from your model. NOTE:Silverware should be individually loaded into the slots on the silverware basket lid.
Upper Rack--12 place settings (on some models) Lower Rack--12 place settings (on some models)
! _'i!'!'ii'/' _i"f" '!i'_ii';'"/_"_,'ii'_,i,/ ! !" ' _" ,
l k%!_tll_Itl//)_t
Front Control models Long silverware basket
with square basket models
*Tine finger: Vertical wire that separates and holds plates on the rack.
Front Control models
with square basket
NOTE: Do not place plates smaller than 6" on the back of the lower rack, refer to figures shown above.
Long silverware basket Long silverware basket
models (!2 tine models (!3 tine
fingers* by row) fingers* by row)
Optional accessory.
Non-wood countertop bracket kit-This isfor
installations which have non-wood countertops and
includes side-mounting brackets and instructions for
securing the dishwasher.
II GPF65
This accessory is available at extra cost from GE.
Coil 800.626.2002 to order. Vise, MosterCord or
Discover cords ore accepted.
Specify accessory number when ordering.
14
Page 15

Caring for the dishwasher. GEAppliances.com
Cleaning the Exterior Door Panel
Beforecleaning the front panel,make sure you know
what type of panel you have. Referto the last two
lettersof your model number. Youcan locate your
model number on the left-hand tub walljust inside the
door. Ifyour model number ends with BB,CC,WW,
SAor BG,then you have a painted door panel. Ifyour
model number ends with SS,then you have a Stainless
SteelDoor panel. Ifyour model number ends with CS,
then you have a CleanSteelpanel.
Followthe instructions below for cleaning the door
panel for your specific model.
Painted Door Panel (model numbers ending in BB-
black, CC-bisque, WW-white, SA-silver metallic or BG-
graphite black)
Use a clean, soft, lightly dampened cloth, then dry
thoroughly. You may also use a good appliance wax
or polish.
Cleaning the Control Panel
Toclean the control panel,usea lightly dampened
cloth. Then dry thoroughly.
Stainless Steel Door Panel (model numbers ending in
SS)
The stainless steel panels can be cleaned with
Stainless Steel Magic or a similar product using a clean,
soft cloth. Do not use appliance wax, polish, bleach or
products containing chlorine on Stainless Steel doors.
You can order StainlessSteelMagic #WX! 0X!5
through GEPartsby calling 800.626.2002.
CleanSteel Door Panel (modelnumbersending in CS)
Use a clean, soft, lightly dampened cloth, then dry
thoroughly. Do not use appliance wax, polish or any
chemical agent on CleanSteeldoors.
Do not wipe the dishwasher with a soiled dish cloth
or wet towel. These may leave a residue.
Do not use scouring pads or powdered cleaners
because these products can scratch the finish.
Protect Against Freezing
Ifyour dishwasher is left in an unheated place during
the winter, ask a servicetechnician to:
r_cut off electrical power to the dishwasher.
Removefuses or trip circuit breaker.
E] Turn off the water supply and disconnect the
water inlet line from the water valve.
Does Your Dishwasher Have an Air Gap?
An air gap protects your dishwasher against water
backing up into it ifa drain clogs.Theair gap isnot
a part of the dishwasher. It is not covered by your
warranty. Not all plumbing codes require air gaps,
soyou may not have one.
r31 Drain water from the water inlet line and water
valve.(Usea pan to catch the water.)
j4-] Reconnectthe water inlet line to the water valve.
The air gup is easy to clean.
r_ Turn off the dishwasher and liftoff the cover.
Remove the plastic cup and clean with
E]a toothpick.
Air gap __
Checktheairgapanytimeyour
dishwasherisn'tdrainingwell.
15
Page 16

Before you call for service...
Troubleshooting Tips
Save time and money! Review the charts on the following pages, or visit GEAppliances.com.
_ ln Canada visit www.GEAppfiances.ca. You may not need to call for service.
Problem
START/RESETstatus
indicatorlight flashing
(Frontcontrol only)
DishwasherBEEPS
onceeveryminute
Beepingat the end This is normal. The dishwasher • Toturnoffthe doublebeepindicator(orre-activateit if itwas previously
of the cycle will beeptwice at the end of the turned off),pressthe HEATEDDRYpad 5 timeswithin 3seconds.
Dishesandflatware Lowinletwater temperature * Makesureinletwatertemperatureiscorrect(seepage11).Turnonthe hot
notclean waterfaucetnearestthedishwasher,letrun untilthewatertemperature
Possible Causes What To Do
Youhave pressedthe
START/RESETpad while the
dishwasher is running. This will
cancel the cycle. Thelight(s)will
stopflashingafter thedishwasher
drains (about 75 seconds).
Powertothe dishwasherwas
turnedoffwhile a cyclewas
runningandpowerhasjust been
restoredto the dishwasher.The
blinkinglights indicatethat the
dishwasherisdrainingthepotential
water inside.
This isa reminder that your
dishwasher door hasbeen left
open during operation. It will
continue beepinguntil youclose
the door.
cycle Atriple beepwill soundto indicatethe end-of-cyclebeepoption
Water pressureis temporarilylow * Turnona faucet.Iswatercomingout moreslowlythan usual?tfso,wait
Airgapor disposerisclogged • Cleanthe airgaporflushthedisposer.
Improperrackloading * Makesurelargedishwaredoesnotblockthedetergentdispenseror the
Noair gap or highdrain loop * Verifythatyouhaveanairgapor a highdrainloop.Refertothe
• PresstheSTART/RESETpad onceto startthe dishwasher.Pressthe
START/RESETpadasecondtimewhenthedishwasherisrunningonlyifyou
wish to cancelthe cycle.
* Thelightwillstopflashingafterthedishwasherdrains.Anew cyclewill
startautomatically.
• Closeand latchthedoorafteropeningitmid-cycle.
hasbeenturned on or off.
stopsrising.Thenstartthe dishwasherandturn off thefaucet.Thisinsures
theenteringwater ishot.SelectHotStart if available.
untilpressureis normalbeforeusingyourdishwasher.
washarms.SeetheLoadingthedishwasherrackssection.
InstallationInstructions.
Poorperformingdetergent * UseahighlyrateddetergentsuchasCascade®Complete.
Spotsandfilming Extremelyhardwater • UserinseagentssuchasCascadeCrystalClear° to removespots
onglassesand andpreventnewfilmbuildup.
flatware Lowinletwater temperature • Hakesurewatertemperatureisat least120°F.
Overloadingorimproper • Loaddishwasherasshowninthe LoadingPlaceSettingssection.
loadingofthe dishwasher
Oldor damppowderdetergent • Hakesuredetergentisfresh.
Rinseagentdispenserempty • tfwaterisextremelyhard,asoftenermayberequired.
Toolittle or lowperforming* Hakesureyouusethe properamountof highlyrateddetergent.
detergent
Cloudinesson Combinationof softwaterand * Thisiscalledetchingandispermanent.Topreventthisfrom happening,
glassware too muchdetergent uselessdetergentif youhavesoftwater.Washglasswareintheshortest
Lowperformingphosphate • SeeWhitefilmon insidesurfacepage17
freedetergent
Water temperatureentering the * Thiscouldbeetching.Lowerthewaterheatertemperature.
dishwasherexceeds150°F(66°C}
16
cyclethatwill getit clean.
Page 17

GEAppliances.com
Problem Possible Causes What To Do
Sudsinthe tub Correctdetergent • Useonlyautomaticdishwasherdetergentsto avoidsudsing.Cascade*
wasn't used AutomaticDishwashingDetergentshavebeenapprovedforuseinall
GEdishwashers.
=_ • Toremovesudsfromthetub,openthedishwasherand letsudsdissipate.
Rinseagentwasspilled • Alwayswipeuprinseagentspillsimmediately.
Detergent left in
dispensercups
Blackor gray
marksondishes
Dishesdon'tdry Makesureinletwatertemperatureisatleast120°F.
ControlpanelrespondedDoorlatch may not be properly
toinputsbutdishwasherseated
neverfilled with water
Stainedtub interior
Dishesare blocking the • Repositionthedishes,sothe water from the lowerspray arm can
detergent cup flush the detergent cup.Seethe Loadingthe dishwashersection.
Aluminumutensilshave • Removemarkswith a mild,abrasivecleaner.
rubbedagainst dishes
Lowinlet water temperature
Rinseagentdispenserisempty
Water valvemay beturnedoff
Sometomato-basedfoodscan
causereddishstains
Teaor coffeestains
Closeandlatchthedishwasher.Pumpoutwater bytouchingthe
START/RESETpadonce;then30secondslater,touchthe
START/RESETpadagain.Repeatif necessary.
SelectHEATEDDRY
UseHOTSTART,HOTWASHorADDEDHEAToptions.
• Selecta highercycle,suchasSANIWASH/SANITIZEorPOTS&PANS.
• Checkthe rinseagentdispenserandfillasrequired.
Hakesurethedoorisfirmly closed.
• Makesurewatervalve(usuallylocatedunderthe sink)isturnedon.
Useofthe RINSEONLYcycleafteraddingthedishto the load
candecreasethelevelofstaining.
Removethestainbyhand,usinga solutionof 1/2cupbleach
and3 cupswarmwater.
AkWARNING
Beforecleaninginterior,wait atleast20minutesafteracycleforthe
heatingelementsto cooldown.Failureto dosocanresultinburns.
AADVERTENCIA
Antesdelimpiarelinterior,espereparIomenos20minutosdespu_s
de uncicloparaqueloselementoscalentadoresseenfrfen.Nohacerlo
puedeprovocarquemaduras.
Anoverallyellowor brownfilm can •
becausedbyirondepositsin water
White film on insidesurface- •
hardwater minerals
Dishwasherwon't run Fuseisblownorcircuit breaker •
istripped
Poweristurnedoff
Controlpanelislocked
Rebootyourcontrol
Aspecialfilterinthe watersupplylineisthe onlywaytocorrect
thisproblem.Contactawatersoftenercompany.
GErecommendsCascadeCrystalC/ear_to helppreventhardwater
mineraldepositsfrom forming.
Rundishwasherwithcitricacidto removemineraldeposits.Citricacid
(Partnumber:WD35×151)canbeorderedthroughGEParts.Seeback
coverfororderinginformation.
Replacefuseor resetcircuitbreaker.Removeany otherappliancesfrom
thecircuit.
tnsomeinstallations,thepowertothe dishwasherisprovidedthrougha
wallswitch,oftenlocatednexttothe disposerswitch.Hakesureit ison.
Unlockcontrolpanel.Seepage7or9.
Turnoffpowertothe dishwasher(circuitbreakerorwall switch)for
30seconds;thenturnbackon.
17
Page 18

Before you call for service...
Problem Possible Causes What ToDo
Control panel lights Time too long between • Eachpad must betouchedwithin 30 secondsofthe others.
go offwhen you're touching of selected pads To relight,touch anypad again,or unlockand relatch door (front control)
setting controls or openthe door and unlock(top control).
Water standing in This is normal • Asmallamount of cleanwater around theoutlet onthe tub
the bottom of the tub bottom at the backof thetub keepsthe water seal lubricated.
Waterwon't pump Drainis clogged • tfyou haveanairgap,cleanit.Seepage14.
outof thetub • tfthedishwasherdrainsintoa disposer,rundisposerclear.
• Checkto seeifyourkitchensinkis drainingwell.tfnot,you
mayneeda plumber.
Steam Thisis normal • Warm,moistaircomesthroughtheventbythedoorlatchduringdrying
andwhenwateris beingpumpedout.Thisisnecessaryfordrying.
Sanitizedlight does Thedoorwasopenedandthe • Donotinterruptthecyclebyopeningthedoorduringthewashcycle.
notilluminate at the cyclewas interruptedduring
endof the cycle final rinse
Theincomingwater • Raisethewaterheatertemperaturetobetween120°Fand140°F.
temperaturewastoo low
Noise Normal operating sounds • Theseareoilnormal.Noactionisrequired.
Detergentcup opening
Water enteringdishwasher
Themotor stopsand starts at
varioustimesduringthe cycle
Drainpump soundsduring
pumpout
A white film on
glassware,dishware
andtheinterior
Rattling disheswhen the spray •
arm rotates
This problemcaused by
phosphate4reedishwasher
detergent
Hake suredishesare properlyloaded.Seethe Loadingthe
dishwasherrackssection.
Toremovethewhitefilm,runyourdishesthroughadishwashercyclewith
citricacid.UseaWD35X15].citricacidkitfound atthe localsupermarketor
online.
Pourthecitricacid inthedetergentcupandclosethe cover.Placethefilmed
butotherwisecleanglasswareand dishwearinthe dishwasher.Leave
silverwareandother metalitemsoutofthe dishwasher.Turnthedishwasher
onand letit runthrougha completecyclewithoutdetergent.Theglassware,
dishware,anddishwashershouldcomeoutfilmfree.Alternativey,
avinegarrinsemaybeused.PourI cupofvinegarintodishwasherjust after
thedetergentcupopensandletthedishwashercompleteitscycle.
Thismayberepeatedseveraltimesayearas needed
Theuseofa rinseagenasCascadeCrystalClearmayhelpminimizea repeat
buildup offilm. Also,the useofa highlyrateddetergentsuchasCascade®
CompleteActionPadswillhelppreventfilm build-up.
18
Page 19

Notes. GEAppliances.com
19
Page 20

Notes.
20
Page 21

Notes. GEAppliances.com
21
Page 22

Notes.
22
Page 23

GE Dishwasher Warranty. GEAppliances.com
All warranty service provided by our Factory Service Centers, or an
authorized Customer Care®technician. Toschedule service, visit us on-line
at GEAppliances.com, or call 800.GE.CARES(800.432.2737) in the United
States. In Canada, call 1.800.561.3344. Please have serial number and
model number available when calling for service.
For The Period Of: GE Will Replace:
One Year
From the date of the
original purchase
Five Years
(for Profile Models
PDW7000 Series)
From the date of the
original purchase
Lifetime of Product The PermaTuf ®tub or door liner, if it fails to contain water due to a defect in materials or
(for Profile Models workmanship. During this limited warranty, GE willalso provide, free of charge, all labor and
PDW7000 Series) in-home service to replace the defective part.
Any part of the dishwasher which fails due to a defect in materials or workmanship. During
this limited one-year warranty, GEwill alsoprovide, freeof charge,all labor and in-home service
to replacethe defective part.
The dishwasher racks and the electronic control module if they should faildue to a defect
in materials or workmanship. During this five-year limited warranty, you will be responsible
for any labor or in-home service costs.
Stapleyour receipt here.
Proof of the original purchase
date is needed to obtain service
under the warranty.
What GE Will Not Cover (for customers in the United States):
[] Service trips to your home to teach you how to use
the product.
[] Improper installation, delivery or maintenance.
[] Failure of the product if it is abused, misused,or used for
other than the intended purpose or used commercially.
[] Replacementof housefusesor resetting of circuit breakers.
[] Product not accessible to provide required service.
E
1 EXCLUSIONOFIMPLIEDWARRANTIES--Yoursole and exclusive remedy is product repair as provided in this Limited
I Warranty. Any implied warranties, including the implied warranties of merchantability or fitness for a particular purpose,
_ are limited to oneyear or the shortest period allowed by law.
[] Damage to the product caused by accident, fire, floods
or acts of God.
[] Incidental or consequentioJ damage caused by possible
defects with this appliance.
[] Cleaning or servicing of the air gap device in the drain line.
[] Damage caused after delivery, including damage from
items dropped on the door.
Thiswarranty isextended to the original purchaser and any succeedingowner for products purchased for home usewithin the USA.
If the product is located in an areawhere service by a GEAuthorized Serviceris not available,you may be responsiblefor a trip charge
or you may be required to bring the product to an Authorized GEServicelocation for service.Proofof original purchase date isneeded
to obtain service under the warranty. InAlaska,the warranty excludesthe cost of shipping or servicecalls toyour home.
Somestates do not allow the exclusionor limitation of incidental or consequential damages. Thiswarranty gives you specific legal
rights,and you may alsohave other rights which vary from state to state. Toknow what your legal rights are, consult your local or
state consumer affairs office or your state's Attorney General.
Warrantor: General Electric Company. Louisville, KY 40225
What Is Not Covered (for customers in Canada):
[] Service trips to your home to teach you how to use
the product.
[] Improper installation.
If you have an installation problem, contact your dealer
or installer. You are responsible for providing adequate
electrical, exhausting and other connecting facilities.
EXCLUSION OF IMPLIED WARRANTIES--Your sole and exclusive remedy is product repair as provided in this Limited
Warranty. Any impfied warranties, including the implied warranties of merchantability or fitness for a particular purpose,
ore limited to one year or the shortest period allowed by law.
Thiswarranty isextended to the original purchaser and any succeedingowner for products purchased inCanadafor home usewithin
Canada. Inhome warranty service will be provided in areaswhere it is availableand deemed reasonable by ivlabeto provide.
[ WARRANTOR IS NOT RESPONSIBLE FOR CONSEOUENTIAL DAMAGES. ]
[] Failure of the product if it is abused, misused, or used for
other than the intended purpose or used commercially.
[] Replacementof housefuses or resetting of circuitbreakers.
[] Damage to the product caused by accident, fire, floods
or acts of God.
[] Damage caused after delivery.
[ Warrantor: HABE CANADA INC. j 23
Page 24

Consumer Support.
_GEAppliances Website ,ntheus GEAppliances.com
| |Have a question or need assistancewith your appliance? Trythe GEAppliancesWebsite 24 hours a day,
| .............................................................................Jany day of the year! Forgreater convenience and faster service,you can now download Owner's Manuals,
k J order parts or even schedule service on-line. InCanada: www.GEAppliances.ca
Schedule Service IntheU.S.:GEAppliances.com
Expert GE repair service is only one step away from your door. Get on-line and schedule your service at your
convenience any day of the year! Or call 800.GE.CARES(800.432.2737) during normal business hours.
In Canada, call 1.800.561.3344
Real Life Design Studio Inthe U.S.:GEAppliances.com
GEsupports the Universal Designconcept-products, servicesand environments that can be usedby people of
all ages,sizesand capabilities. We recognize the need to designfor awide range of physicaland mental abilities
and impairments. Fordetailsof GE'sUniversalDesign applications, including kitchen designideasfor people with
disabilities,check out our Website today. Forthe hearing impaired, please call 800.TDD.GEAC(800.833.4322).
InCanada, contact: Manager, Consumer Relations,ivlabeCanada Inc.
Suite310, ! FactoryLane
Honcton, N.B.E1C9H3
Extended Warranties
Purchasea GEextended warranty and learn about special discounts that are available whileyour warranty isstill
in effect.You can purchase it on-line anytime, or call 800.626.2224during normal businesshours. GEConsumer
Home Serviceswill still be there after your warranty expires.In Canada, call 1.888.261.2133
PartsandAccessories
Individualsqualified to servicetheir own appliances can have parts or accessoriessentdirectly to their homes
(VISA,klasterCard and Discovercardsare accepted).Order on-line today, 24 hours every day or by phone at
800.626.2002during normal businesshours.
Instructions contained in this manual cover procedures to be performed by any user. Other servicing generally
should be referred to qualified service personnel Caution must be exercised, since improper servicing may
cause unsafe operation.
Customers in Canada can order parts and accessories on-line at ww_,.GEAppliances.ca, 24 hours every day, or by
phone at 1.800.881.1818 during normal business hours.
Contact Us
Ifyou are not satisfied with the serviceyou receive from GE,contact uson our Websitewith all the details including
your phone number, or write to: GeneralManager, Customer Relations
GEAppliances,Appliance Park
Louisville,KYz_0225
In Canada: www.GEAppliances.ca, or write to: Director,Consumer Relations,ivlabeCanada Inc.
Suite310, 1 FactoryLane
Honcton, N.B.EIC 9H3
Inthe U.S.:GEAppliances.com
Inthe U.S.:GEAppliances.corn
Inthe U.S.:GEAppliances.com
Register Your Appliance ,ntheus GEAppliances.com
Register your new appliance on-line--at your convenience! Timely product registration willallow for enhanced
communication and prompt service under the terms of your warranty, should the need arise. You may also mail
in the pre-printed registration card included in the packing material. In Canada: www.GEAppliances.ca
_ Printed in the United States
Printed on Recycled Paper
 Loading...