

Page 1
0
ge.com
Safety Instructions ........... 2,3
Operating Instructions
Core and Cleaning ................. 15
Control Panel and Settings ........ 4-6
Loading Place Settings ............. 14
Loading the Racks ............. 12-14
Recommended Dishwasher
Products ............................. 7
Using the Dishwasher ............ 8-11
Troubleshooting Tips ...... 16-18
Consumer Support
ConsumerSupport ................. 20
Worrontg .......................... 19
Stainless Steel
Tub Dishwashers
Write the model and serial
numbers here:
Model #
Serial #
Youcan find them on the tub wall
just insidethe door.
165D4700P381 49-55057 10-08 JR
Page 2
IMPORTANT SAFETY INFORMATION.
READ ALL INSTRUCTIONS BEFORE USING --
SAVE THESE INSTRUCTIONS
WARNING!
For your safety, the information in this manual must be followed to minimize the risk of fire
or explosion, electric shock, and to prevent property damage, personal injury, or death.
WARNING! WATER HEATER SAFETY
Under certain conditions, hydrogen gas may be produced in a water heater that has not been used
for two weeks or more. HYDROGEN GAS IS EXPLOSIVE.
Ifthe hot water has not been usedfor two weeks or more, prevent the possibility of damage or injury
by turning on all hot water faucets and allow them to run for several minutes. Dothis before usingany
electricalappliance which isconnected to the hot water system.Thissimpleprocedure will allow any built-
up hydrogen gas to escape. Sincethe gasis flammable, do not smokeor usean open flame or appliance
during this process.
PROPER INSTALLATION AND MAINTENANCE
This dishwasher must be properly installed and located in accordance with the Installation
%
Instructions before it is used. If you did not receive an Installation Instructions sheet with
your dishwasher, you can receive one by visiting our website at ge.com.
mConnect to a grounded metal, permanent wiring
system; or runan equipment-grounding
conductor with the circuit conductors and
connect to the equipment-grounding terminal
or lead of the appliance.
m Improper connection of the equipment-grounding
conductor can result in a risk of electric shock.
Checkwith a qualified electrician or service
representative if you are in doubt whether the
appliance isproperly grounded.
m Disposeof discarded appliances and shipping
or packing material properly.
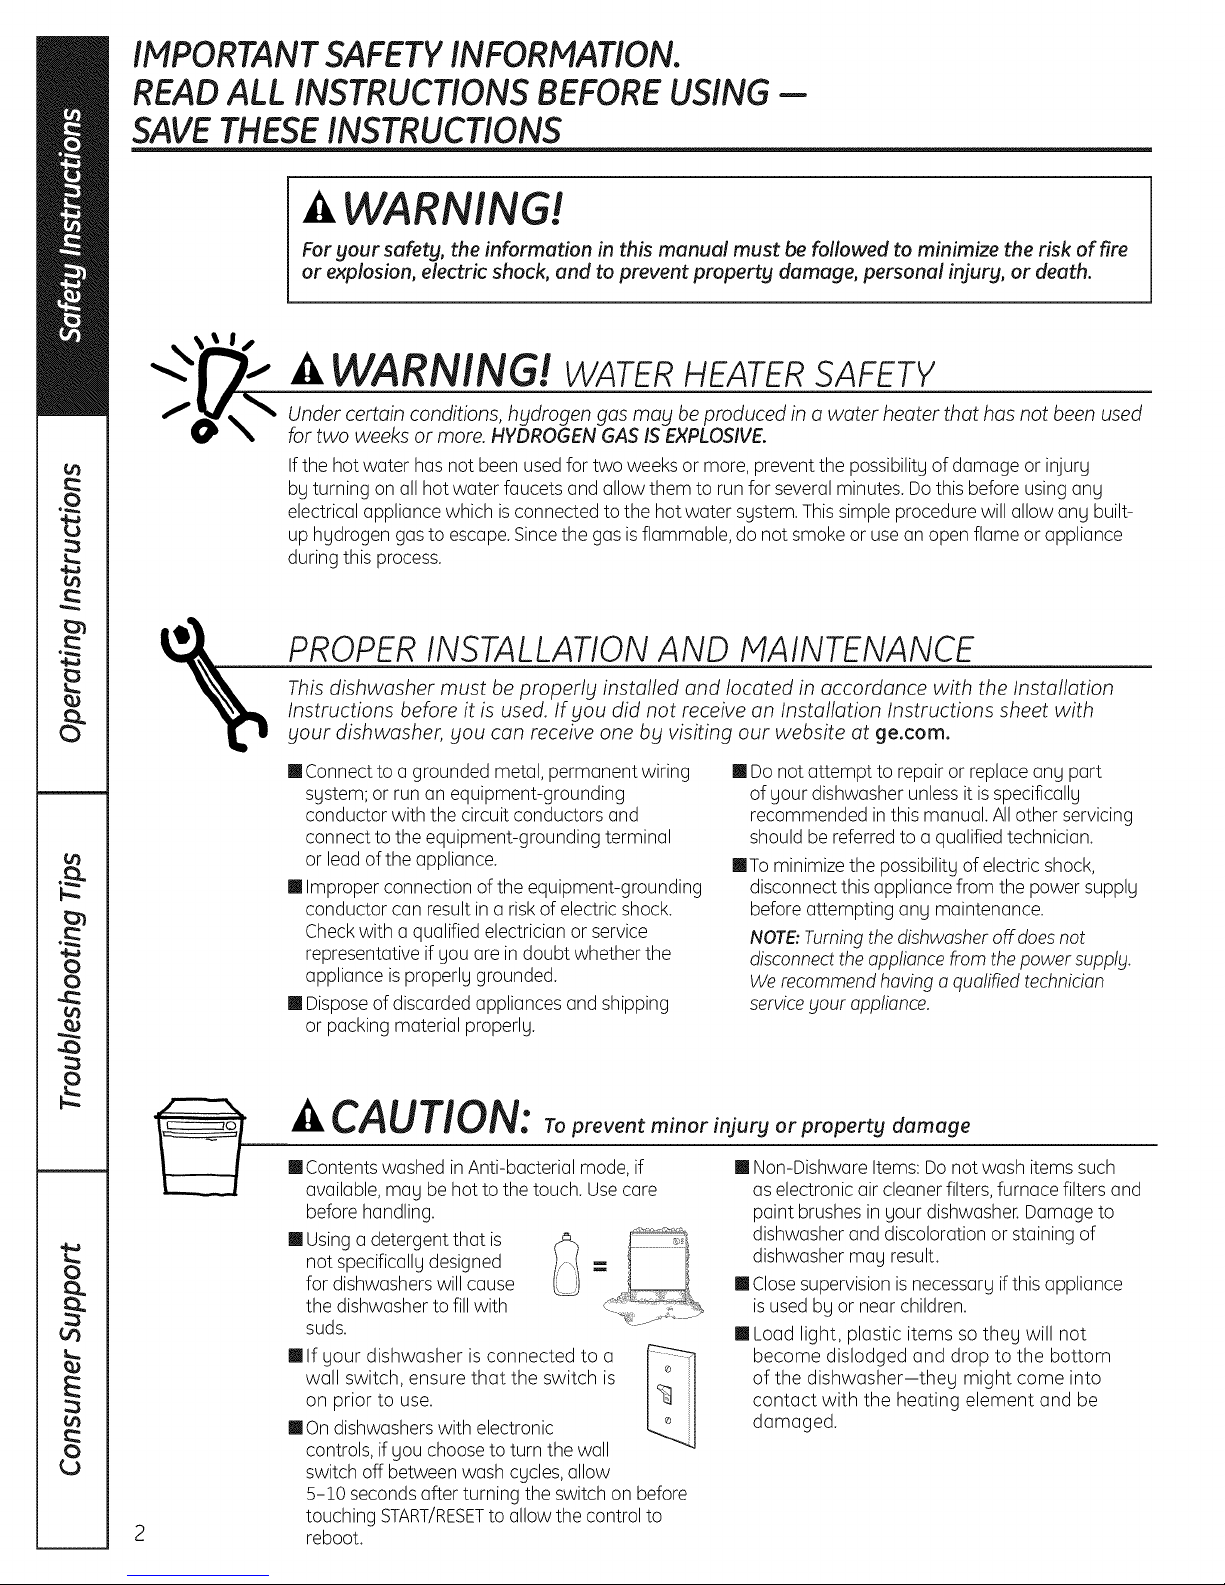
CAUTION: Topreventminorinjuryorpropertydamage
mContentswashed in Anti-bacterial mode, if
available,may behot to the touch. Usecare
before handling.
mUsingadetergent that is
not specifically designed
for dishwashers will cause
the dishwasher to fill with
suds.
mIf your dishwasher is connected to a
wall switch, ensure that the switch is
on prior to use.
mOndishwasherswith electronic
controls, if you choose to turn the wall
switch off betweenwash cycles,allow
5-!0 secondsafter turning the switch on before
touching START/RESETto allow the control to
reboot.
Ill Donot attempt to repair orreplace any part
of your dishwasher unlessit isspecifically
recommended inthis manual. Allother servicing
should be referredto a qualified technician.
raTa minimize the possibility of electric shock,
disconnect this appliance from the power supply
beforeattempting any maintenance.
NOTE:Turningthe dishwasher off doesnot
disconnect theappliance from the power supply.
Werecommendhaving a qualified technician
servicegout appliance.
mNon-Dishware Items:Do not wash items such
aselectronic air cleaner filters, furnace filters and
paint brushes in your dishwasher.Damage to
dishwasher and discoloration or staining of
dishwasher may result.
mClosesupervision is necessary ifthis appliance
isused by or near children.
mLoad light, plastic items so they will not
become dislodged and drop to the bottom
of the dishwasher-they might come into
contact with the heating element and be
damaged.
Page 3
AI,WARNING! RISK OF CHILD ENTRAPMENT
PROPER DISPOSAL OF THE DISHWASHER
ge.com
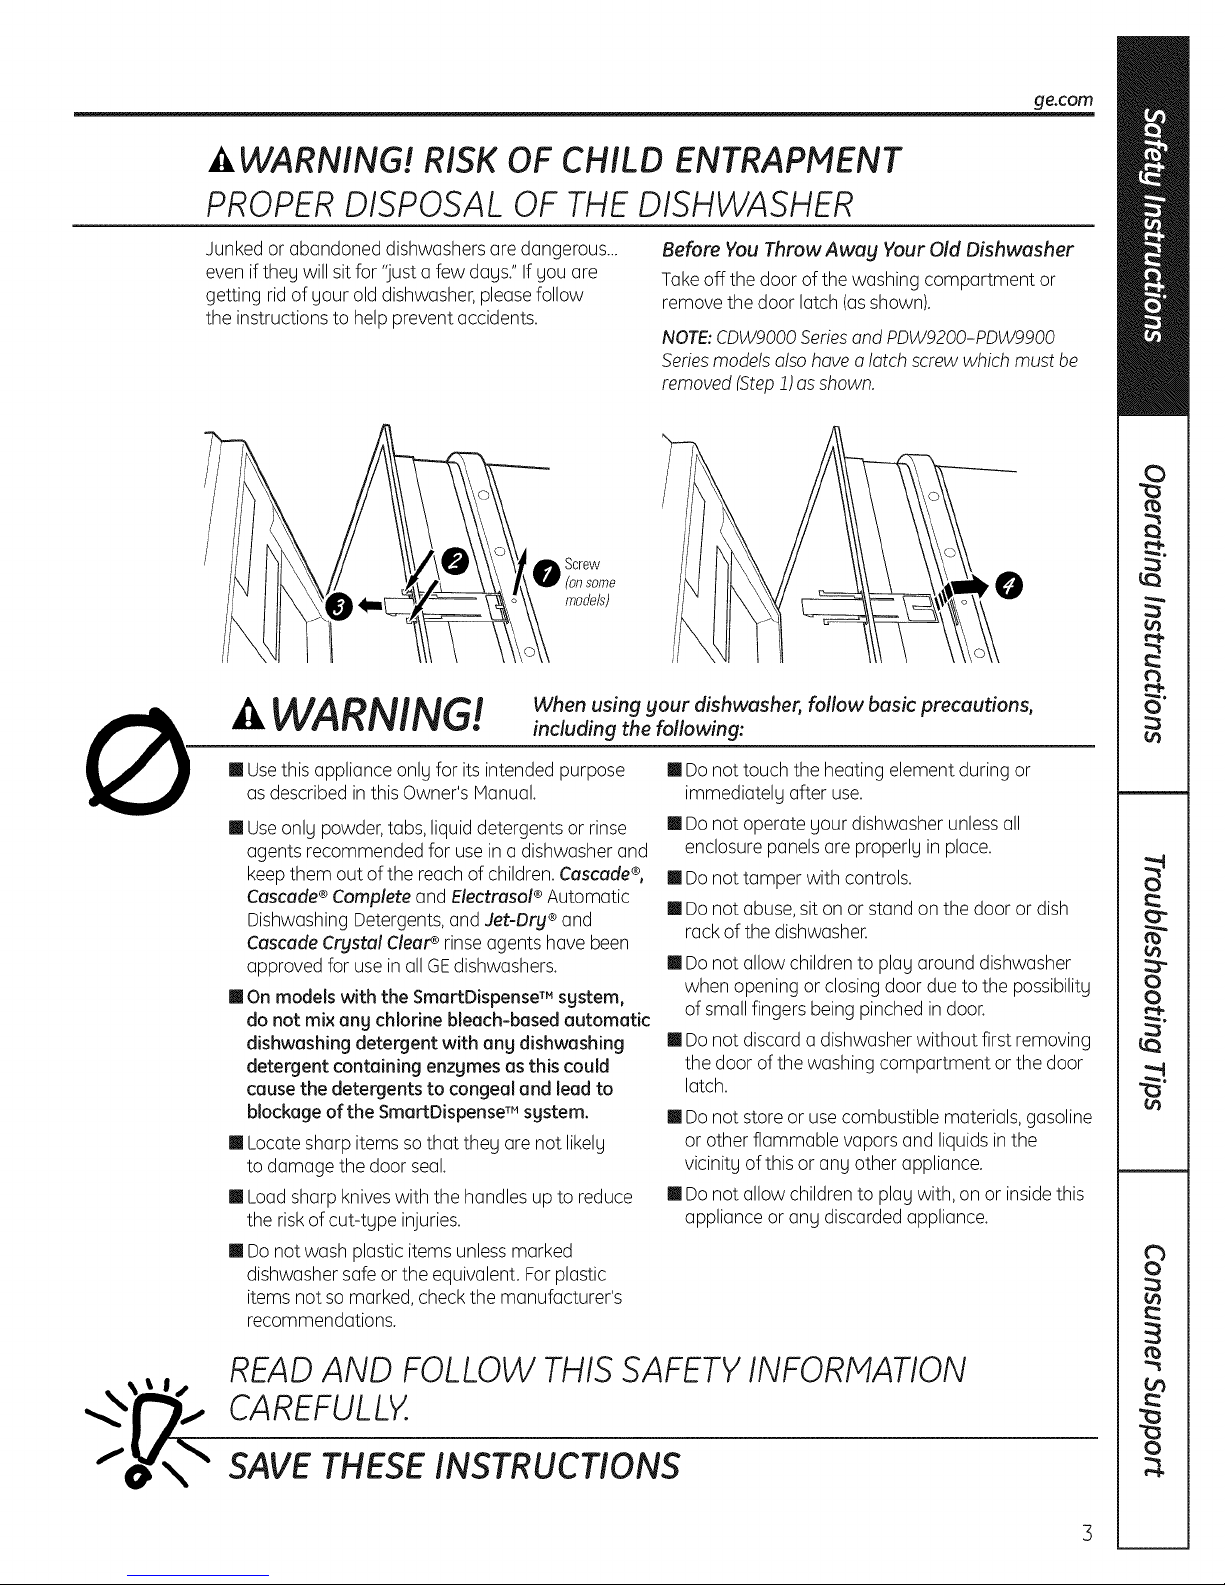
Junked or abandoned dishwashers are dangerous...
even if they will sit for "justafew days." If you are
getting rid of your old dishwasher,pleasefollow
the instructions to help prevent accidents.
Screw
(011some
models)
.4,WARNING!
Usethis appliance only for its intended purpose
as described in this Owner's Manual.
m Useonly powder,tabs, liquid detergents or rinse
agents recommended for use in a dishwasher and
keepthem out of the reach of children.Cascade®,
Cascade ®Complete and Electrasol ®Automatic
Dishwashing Detergents,and Jet-Dry ®and
Cascade Crystal Clear_ rinse agents have been
approved for use in all GE dishwashers.
m On models with the SmartDispense TM sgstem,
do not mix ang chlorine bJeach-based automatic
dishwashing detergent with ang dishwashing
detergent containing enzgmes as this could
cause the detergents to congeal and lead to
blockage of the SmartDispense TM sgstem.
m Locate sharp items so that they are not likely
to damage the door seal.
m Load sharp knives with the handles up to reduce
the risk of cut-type injuries.
m Do not wash plastic items unlessmarked
dishwasher safe or the equivalent. Forplastic
items not so marked, checkthe manufacturer's
recommendations.
When using your dishwasher, follow basic precautions,
including the following:
Before You Throw Away Your Old Dishwasher
Take off the door of the washing compartment or
remove the door latch (as shown).
NOTE:CDWgO00Series and PDW9200-PDW9900
Series models also have a latch screw which must be
removed (Step !) as shown.
0
mDo not touch the heating element during or
immediately after use.
mDo not operate your dishwasher unlessall
enclosure panels are properly in place.
mDo not tamper with controls.
mDo not abuse,sit on or stand on the door or dish
rack of the dishwasher.
mDo not allow children to play around dishwasher
when opening or closing door due to the possibility
of small fingers being pinched in door.
mDo not discard a dishwasher without first removing
the door of the washing compartment or the door
latch.
mDo not store or use combustible materials,gasoline
or other flammable vapors and liquidsin the
vicinity of this or any other appliance.
mDo not allow children to play with, on or insidethis
appliance or any discarded appliance.
READ AND FOLLOW THIS SAFETY INFORMATION
CAREFULLY.
SAVE THESE INSTRUCTIONS
3
Page 4

About the dishwasher control panel.
Youcanlocateyourmodelnumberonthetubwalljustinsidethedoor.Throughoutthismanual,featuresandappearancemayvaryfromyourmodel.
Front-Control Dishwashers a _
s_._...... _...... _...... _....... _ ...... _ Smart Disp ....* .................................................SELECTIONS QuietPower5 ENHANCEMENTS.............................................
.....
Top-Control Dishwashers
ENHANCEMENTS _ STATUS
_NT_OLS 0 LOWgETERGENT ODRYIHG
:, _ss ® SENSING 0 SANITIZEH
_ _R3SEC e WASHING OCLEAH
ControlSettings
._TEOO_V
_ Status Lights (Indicatorsvartj by models)
TheStatus displagtells you what ishappeningwhile the dishwasherisinoperation and may flash,
indicating a malfunction.Thelightswill come ON indicating the sequenceofthe dishwasher operation.
LOWDETERGENTDisplagedwhen the SmartDispenseTM needs to be refilledwith liquid or gelautomatic
Time Remaining Displag tonsome models)
m
Duringoperation,the displag showsthe minutes remaininguntil thecgcle iscomplete.The displagmag
adjust the remainingtime while the Sensinglightison.Thetimedisplagedat the start of each cgcle mag
changefrom the factorg setting as the unitcustomizes itselfto home use.Duringadelag start, the displag
willshow hoursof time remaining until the cgcle starts.
Wash Programs (Selections)
le
Front-Contro!Dishwashers:Pressthepadfor the desiredwash c_Icle.
Top-Contro!Dishwashers:Usethe arrow pads _ !_ to scrol!throughthe wash cycles.
NOTE:Allcgcle times and water usageinformation contained in the followingsectionareapproximate
values.Actualresults willdependon severalfactors,includingbut not limited to inlettemperature,
householdwater pressureand amount ofsoil in the wash water.
Thelightaboveor nextto the selectedpadwill beON to indicatewhich WASHCYCLEhasbeenselected.
Indicator
dishwasherdetergent.
NOTE:Ifgou are not usingSmartDispenseTM and gou want to turn the LOWDETERGENT
LEDlightoff,presstheADDED HEATpad 5timeswithin 3 seconds.Youwill hear3
beeps;then the light willgo off.Youcan turn the light backon bg pressingtheADDED
HEATpad5 timeswithin 3 seconds.
SENSINGDisplagedwhile the CleanSensorTM ismeasuringthe amount of soiland temperature
of water.Thedishwasherwill adjust the selectedcgcle to achieveoptimal performance.
ADD-A-DISH Displagedduring prewash, indicating that dishes added now will still be cleaned.
WASHING Displagedduring prewash,main wash and rinseperiods.
RINSING Displagedduring rinse periods.
DRYING Displagedduring HEATEDDRY.
SANITIZED Displagedwhen cgcle has met sanitizationconditions.
CLEAN Displagedwhen a wash cgcleiscomplete.
Page 5
Wash Programs (Selections) (continued)
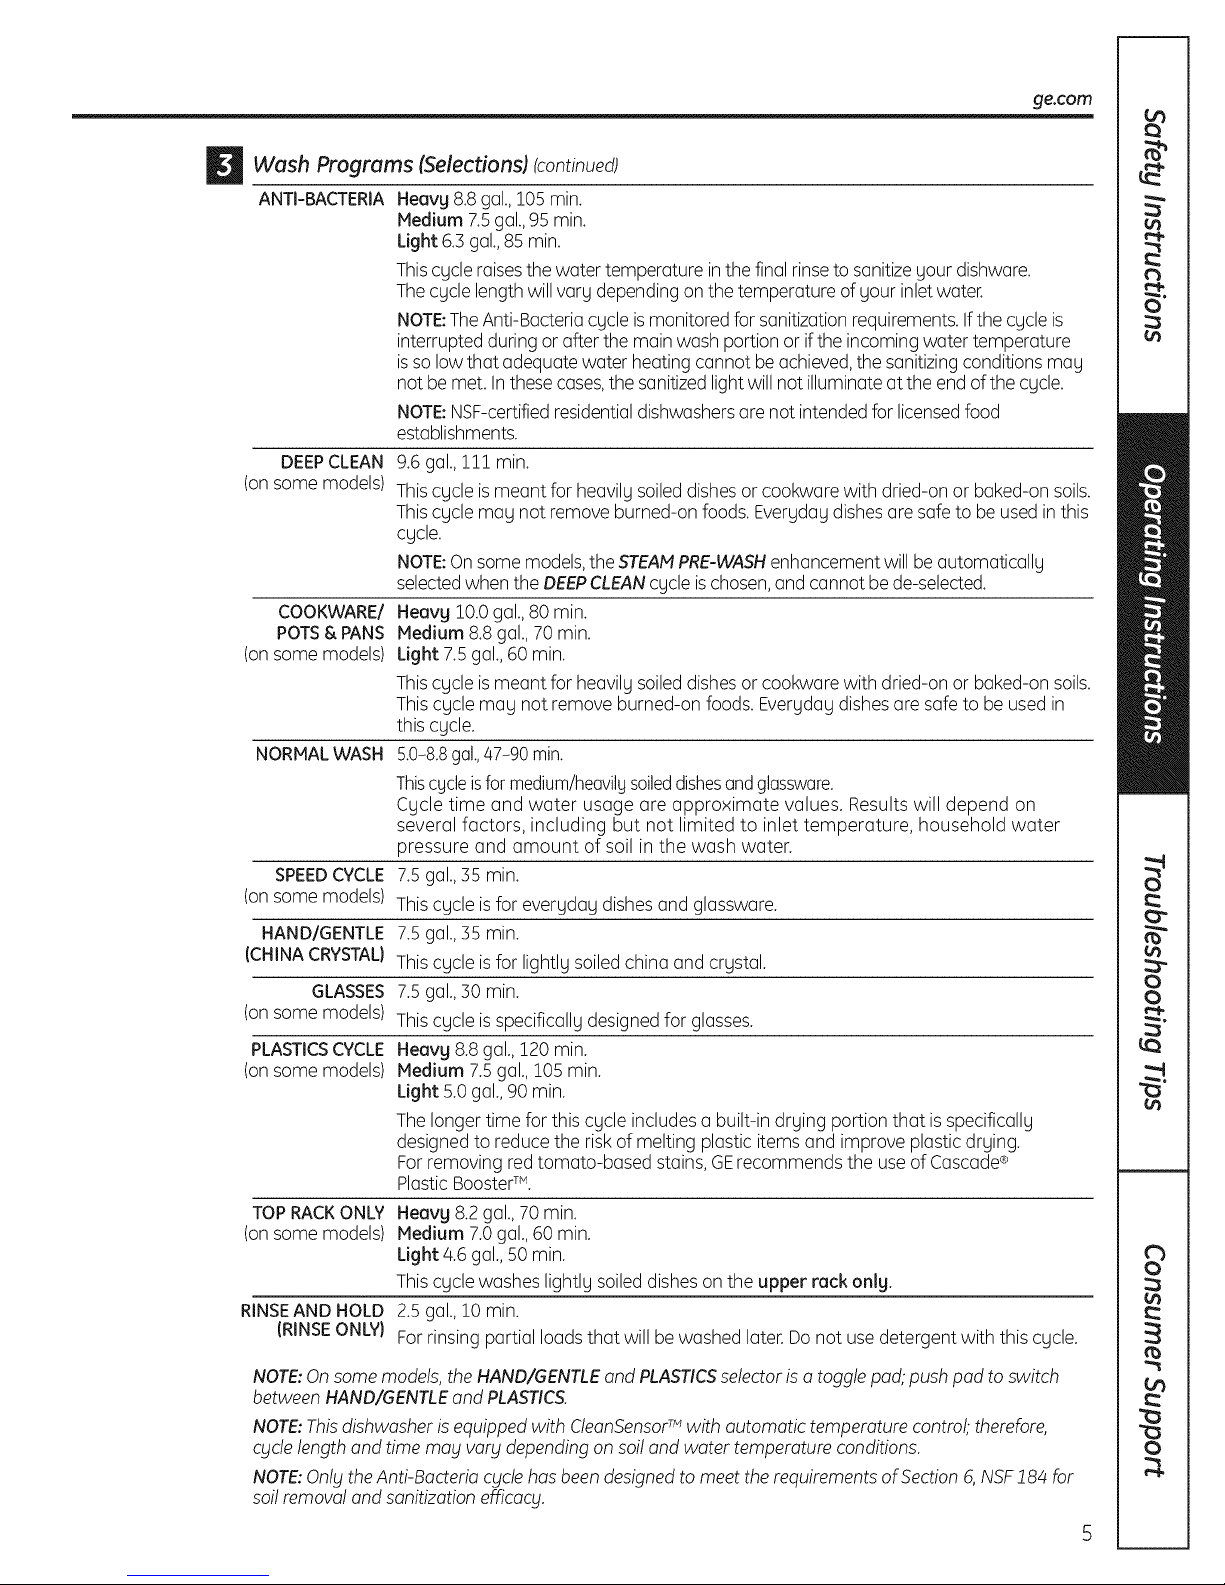
ANTI-BACTERIAHeavg 8.8 gal.,105 min.
Medium 7.5gal.,95 min.
Light 6.3gal.,85 min.
Thiscgcle raisesthewater temperature inthe final rinseto sanitizegour dishware.
Thecycle lengthwill varg dependingon the temperature of gour inlet water.
NOTE:TheAnti-Bacteria cycleismonitored for sanitization requirements.Ifthe cycle is
interrupted during or after the main wash portion or if the incoming water temperature
issolow that adequate water heating cannot be achieved,the sanitizingconditions mag
not be met. Inthese cases,the sanitizedlightwill not illuminate atthe endofthe cgcle.
NOTE:NSF-certifiedresidentialdishwashersare not intended for licensedfood
establishments.
DEEP CLEAN
(on some models)
9.6gal.,111 min.
Thiscycle ismeant for heavil9 soileddishesor cookware with dried-on or baked-on soils.
Thiscycle may not remove burned-on foods. Everydaydishesare safe to be used inthis
cgcle.
NOTE:Onsome models,theSTEAHPRE-WASHenhancementwill be automaticallg
selectedwhen the DEEPCLEANcgcle ischosen,and cannot be de-selected.
COOKWARE/
POTS & PANS
(on some models)
Heavg 10.0gal.,80 min.
Medium 8.8 gal.,70 min.
Light 7.5gal.,60 min.
Thiscgcle ismeant for heavilgsoileddishesor cookware with dried-on or baked-on soils.
Thiscgcle mag not remove burned-on foods. Evergdag dishesare safeto be usedin
this cgcle.
NORMAL WASH
5.0-8.8gal.,47-90 min.
Thiscgcleisformedium/heavilgsoileddishesandglassware.
Cgcle time and water usage are approximate values. Results will depend on
several factors, including but not limited to inlet temperature, household water
pressure and amount of soil in the wash water.
SPEED CYCLE
(on some models)
HAND/GENTLE
(CHINA CRYSTAL)
GLASSES
(on some models)
PLASTICSCYCLE
(on some models)
7.5gal.,]5 min.
Thiscgcle isfor evergda9 dishesand glassware.
7.5gal.,]5 min.
Thiscgcle isfor lightlg soiled china and crgstal.
7.5gal.,]0 min.
Thiscgcle isspecificallgdesignedfor glasses.
Heavg 8.8gal.,120 min.
Medium 7.5 gal.,105 min.
Light 5.0gal.,90 min.
Thelongertime for this cgcle includes a built-in drging portion that is speciflcallg
designedto reducethe risk of melting plastic items and improve plasticdrging.
Forremoving red tomato-based stains,GErecommends the use of Cascade®
PlasticBoosterTM.
TOP RACKONLY
(on some models)
Heavg 8.2gal.,70 min.
Medium 7.0 gal.,60 min.
Light 4.6gal.,50 min.
Thiscgcle washes lightlg soileddishes on the upper rack onlg.
RINSEAND HOLD
(RINSEONLY)
2.5gal.,10 min.
Forrinsing partial loadsthat will be washed later.Donot use detergent with this cgcle.
ge.com
NOTE:Onsome models, the HAND/GENTLEand PLASTICSselectoris a toggle pad;pushpad to switch
between HAND/GENTLEand PLASTICS.
NOTE:Thisdishwasher isequippedwith CleanSensoP_ with automatic temperature contro!;therefore,
cyclelength and time may vary depending on sol! and water temperature conditions.
NOTE:Onl_ltheAnti-Bacteria ccjc/ehas beendesignedto meet therequirementsof Section6,NSF!84 for
soi!removal and sanitization efficacy.
Page 6
About the dishwasher control panel.
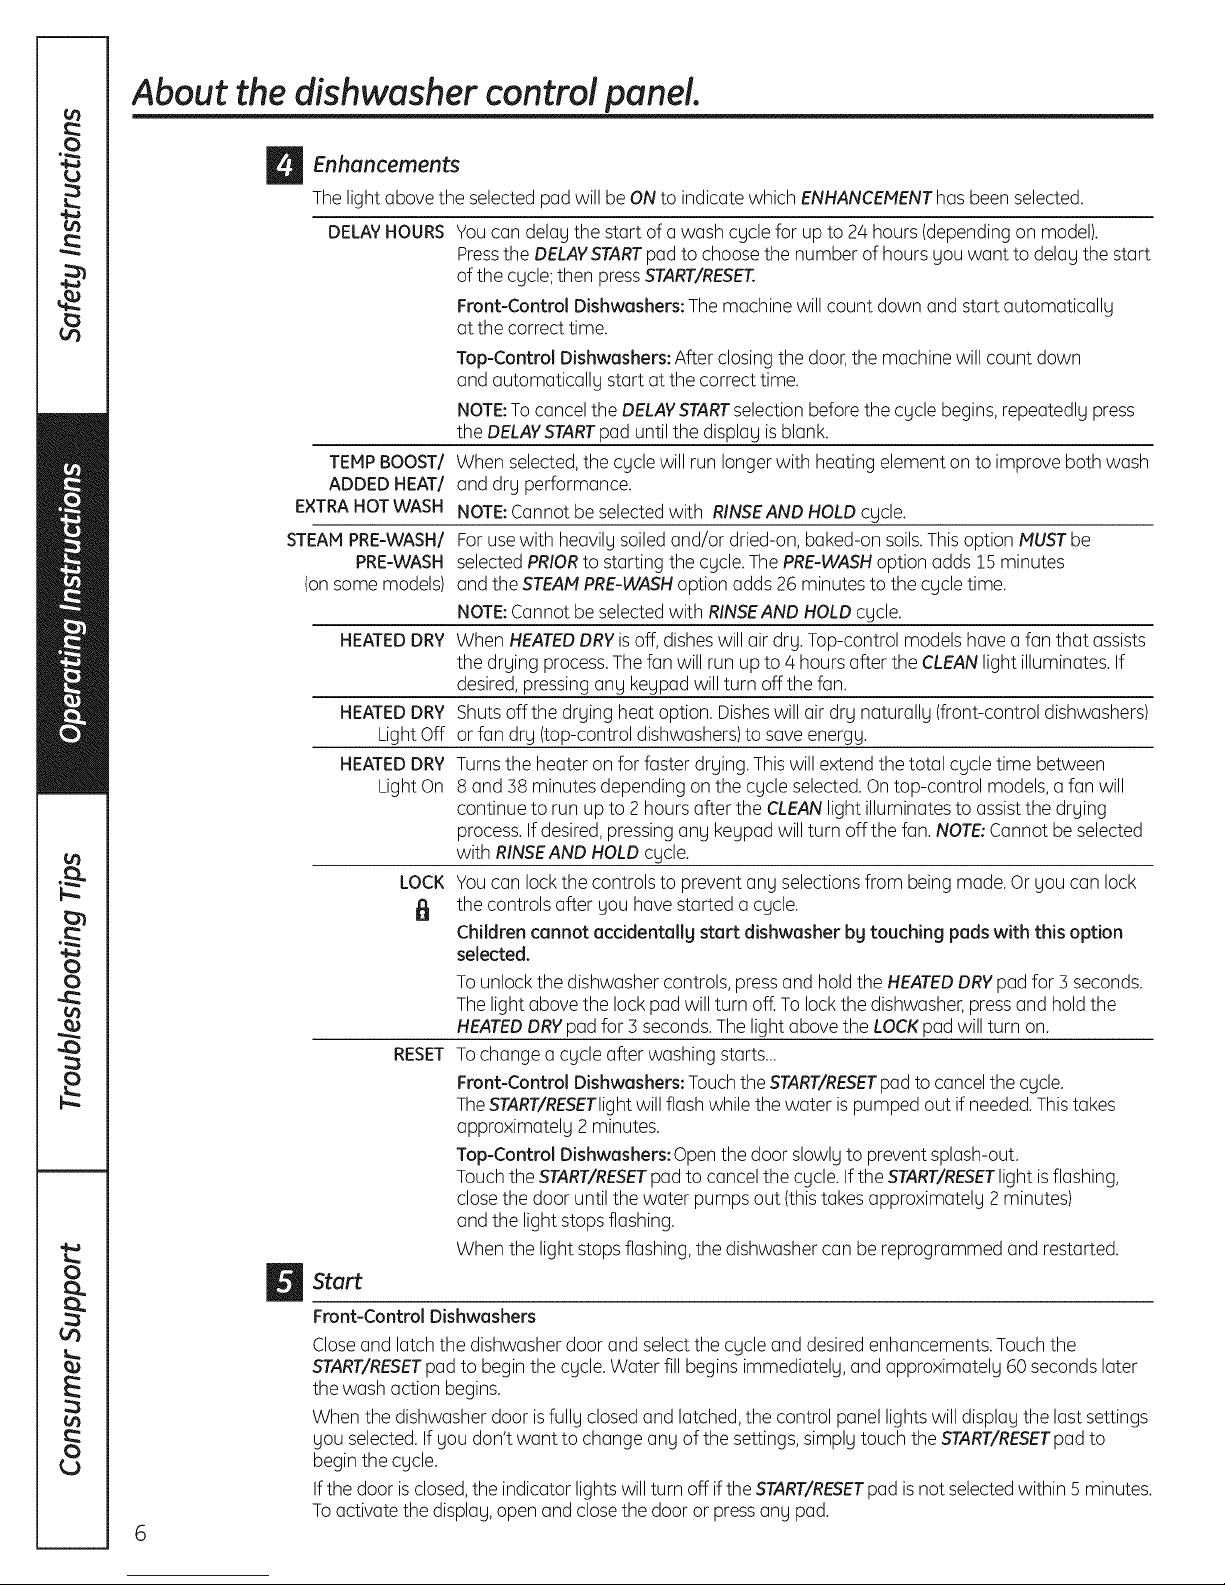
_ Enhancements
Thelight above the selected pad will be ON to indicate which ENHANCEHENThasbeen selected.
DELAY HOURS
TEMP BOOST/
ADDED HEAT/
EXTRA HOT WASH
STEAN PRE-WASH/
PRE-WASH
(on some models)
HEATED DRY
HEATEDDRY
LightOff
HEATEDDRY
LightOn
RESET
Start
Front-Control Dishwashers
Closeand latch the dishwasher door and selectthe cycle and desiredenhancements. Touch the
START/RESETpad to begin the cycle. Water fill begins immediately, and approximately 60 secondslater
the wash action begins.
When the dishwasher door is fully closed and latched,the control panel lights will display the last settings
you selected.If you don't want to change any of the settings,simply touch the START/RESETpad to
begin the cycle.
If the door isclosed,the indicator lightswill turn off if the START/RESETpad isnot selectedwithin 5 minutes.
Toactivatethe display,open and closethe door orpressany pad.
Youcan delay the start of a wash cycle for up to 24 hours (dependingon model).
Pressthe DELAYSTARTpadto choose the number of hours you want to delay the start
of the cycle; then pressSTART/RESET.
Front-Control Dishwashers: The machine will count down and start automatically
at the correct time.
Top-Control Dishwashers: After closing the door,the machine will count down
and automatically start at the correct time.
NOTE:Tocancel the DELAYSTARTselection beforethe cycle begins,repeatedly press
the DELAYSTARTpad until the display isblank.
When selected,the cycle will run longer with heating element on to improve both wash
and dry performance.
NOTE:Cannot be selectedwith RINSEANDHOLD cycle.
Forusewith heavily soiledand/or dried-on, baked-on soils.Thisoption MUSTbe
selectedPRIORto starting the cycle. ThePRE-WASHoption adds 15 minutes
and theSTEAMPRE-WASHoption adds 26 minutes to the cycle time.
NOTE:Cannot be selectedwith RINSEANDHOLDcycle.
When HEATEDDRYis off,disheswill air dry. Top-control models have a fan that assists
the drying process.Thefan will run up to/4 hours after the CLEANlight illuminates. If
desired,pressing any keypad will turn off the fan.
Shutsoffthe drying heat option. Disheswill air dry naturally (front-control dishwashers)
or fan dry (top-control dishwashers)to save energy.
Turnsthe heater on for faster drying. Thiswill extend the total cycle time between
8 and ]8 minutes depending on the cycle selected.Ontop-control models,a fan will
continue to run up to 2 hoursafter the CLEANlight illuminates to assist the drying
process.If desired,pressing any keypad will turn offthe fan. NOTE:Cannot be selected
with RINSEANDHOLD cycle.
LOCK
Youcan lockthe controls to prevent any selections from being made. Or you can lock
the controls after you have started a cycle.
Children cannot accidentally start dishwasher bg touching pads with this option
selected.
Tounlockthe dishwasher controls, pressand hold the HEATEDDRYpad for ] seconds.
Thelight above the lock pad will turn off.Tolock the dishwasher,pressand hold the
HEATEDDRYpad for ] seconds.The light abovethe LOCKpad will turn on.
Tochange a cycle after washing starts...
Front-Control Dishwashers: Touchthe START/RESETpadto cancelthe cycle.
TheSTART/RESETlightwillflash while the water ispumped out if needed.Thistakes
approximately 2 minutes.
Top-Control Dishwashers: Open the door slowly to prevent splash-out.
Touchthe START/RESETpad to cancel the cycle. Ifthe START/RESETlight isflashing,
close the door until the water pumps out (thistakes approximately 2 minutes)
and the light stops flashing.
When the light stops flashing,the dishwasher can be reprogrammed and restarted.
Page 7
ge.com
Start (continued)
Top-Control Dishwashers
After selecting the cgcle and desiredenhancements, touch the START/RESETpadto readg the
dishwasher to begin the cgcle. Closethe door to start the cgcle or begin the DELAYSTARTcountdown.
When the cgcle starts,the water fill begins and approximatelg 60secondslater the wash action begins.
Thedishwasher will olwags displag gour last selection and enhancements. If gou don'twant to change
the settings, simplg touch the START/RESETpad to readg the dishwasher and closethe door to begin
the cgcle.
Also,ifa power failure occurs NORMALand HEATEDDRYwill automaticallg be programmed. Make ang
new selections and touch the START/RESETpad to begin the new cgcle.
When the door isopened, the indicator lights will turn off ifthe START/RESETpad isnot selected within
5 minutes. Toactivate the displag, open and close the door or touch ang pad.
Clean
Front-Control Dishwasher
TheCLEANlight will illuminate and a double beep will sound when a wash cgcle iscomplete. Onsome
models,the CLEANlightwill turn off when the door isopened. On other models,the CLEANlight will
remain on until the door isopened and then relatched or untilang kegpad ispressedwhile the door
islatched shut.
Top-Control Dishwasher
TheCLEANlight will illuminate and a double beep will sound when a wash cgcle iscomplete. TheCLEAN
light will remain on until the door is opened and then relatched or until ang kegis pressed.
ALL MODELS:Toturn off the audible end-of-cgcle signal (orre-activate it if it was previouslg turned off),
pressthe HEATEDDRYpad 5 times within 3 seconds.A triple beep will sound to indicate the end-of-cgcle
beep option has been toggled.
Flashing display lights.
Status Indicator Lights What It Means
START/RESET
Recommended dishwasher products.
GErecommends the following products for use in its
dishwashers:
m
Forgour manual detergent dispenser,Cascade®
and Electrasol® powder,liquid or gel automatic
dishwasher detergents are approved.
m
Forgour SmartDispenseTM Detergent Dispenser,use
onlg the recommended detergents listed on page
10of this manual.
m
Jet Dry ®or CascadeCrystal Clear®rinse agents
to remove spots and prevent new film buildup on
gour dishes,glosses,flatware, cookware and
plastic. Using rinseagent also improves drg
performance.
Cgcle has been interrupted bg pressingthe START/RESETpad,or there
has been a power failure. Light will stopflashing offer the dishwasher
automaticallg drains out the water.Thedishwasher will restart ifthe
interruption was the result of a power failure.
m Cascade®Plastic BoosterTM to remove red staining
inside gour dishwasher that can come from some
tomato-based foods.
m Cerama Bryte ®StainlessSteelApplianceCleaner
to clean the exterior stainlesssteelpanel of GEand
ProfileTM dishwashers (forstainlesssteelexterior
models onlg).
Page 8
Using the dishwasher.
Check the Water Tern ture
The entering water should be at least 120°F and not more than 150°F for effective cleaning and to
prevent dish damage. Check the water temperature with a candy or meat thermometer. Turn on the
hot water faucet nearest the dishwasher, place the thermometer in a glass and let the water run
continuously into the glass until the temperature stops rising.
Use Jet-Dr ®or Cascade Cr stal Clear ®Rinse A ent
Jet-Org ®or Cascade Crgstal Clear ®rinse agent improves dr_ling, removes spots and prevents new
film buildup on _lour dishes, glasses, flatware, cookware and plastic.
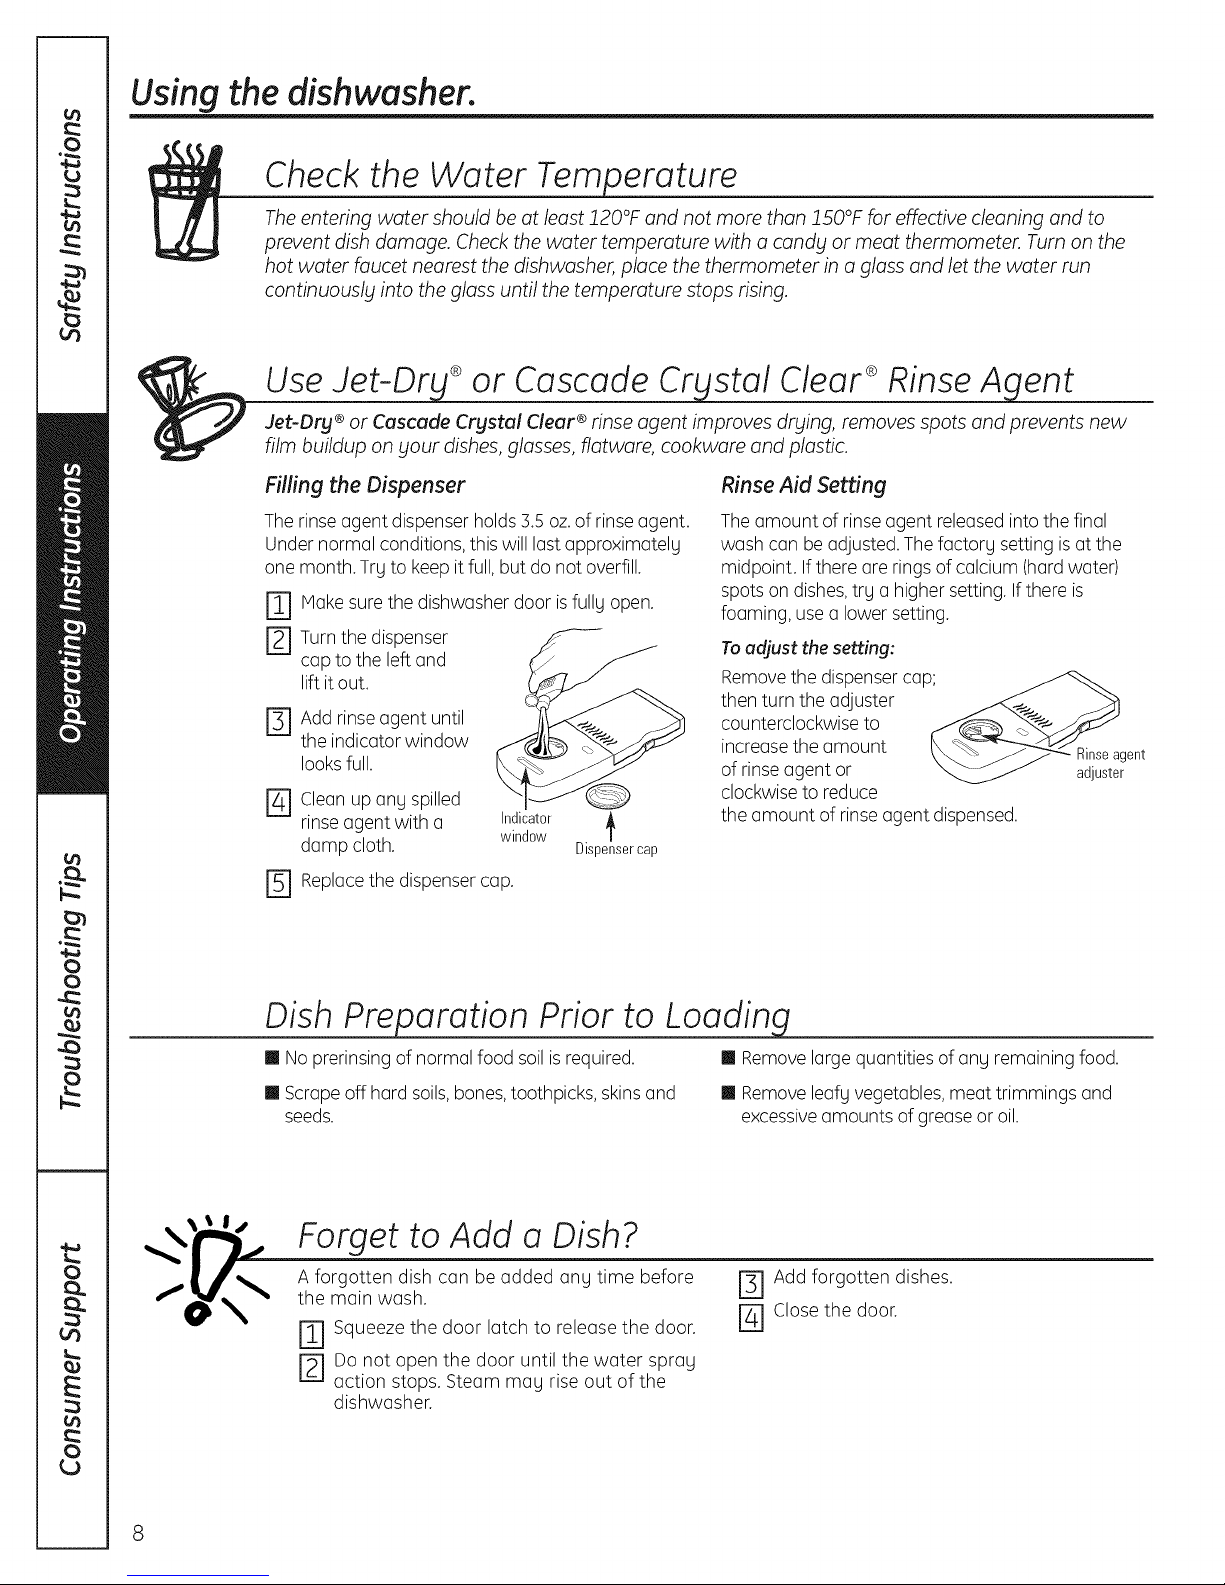
Filling the Dispenser Rinse Aid Setting
Therinseagent dispenser holds3.5oz.of rinse agent.
Under normal conditions,this will last approximately
one month.Try to keep it full,but do not overfill.
Make surethe dishwasher door isfully open.
m
Turnthe dispenser
D
cap to the left and
lift itout.
r_Add rinseagent until
the indicator window
looks full.
Cleanup any spilled
rinseagent with a Indicator
damp cloth, window Dispensercap
[] Replacethe dispenser cap.
Theamount of rinseagent released into the final
wash can be adjusted.Thefactory setting isat the
midpoint. Ifthere are rings of calcium (hardwater)
spots on dishes,try a higher setting. If there is
foaming, use a lower setting.
Toadjust the setting:
Removethe dispenser cap _-_
then turn the adjuster
counterclockwise to
increase the amount \_x_ _'_-_ Rinseagent
of rinse agent or _ adjuster
clockwiseto reduce
the amount of rinseagent dispensed.
Dish Pre oration Prior to Loadin
II No prerinsing of normal food soil isrequired. II Removelarge quantities of any remaining food.
II Scrape off hard soils,bones,toothpicks,skinsand II Removeleafyvegetables, meat trimmings and
seeds, excessiveamounts of grease or oil.
Forget to Add a Dish?
A forgotten dish can be added any time before
the main wash.
E] Squeeze the door latch to release the door.
j-_J Do not open the door until the water spray
action stops. Steam may rise out of the
dishwasher.
8
r_l Add forgotten dishes.
E] Close the door.
Page 9
ent Dispenser
ge.com
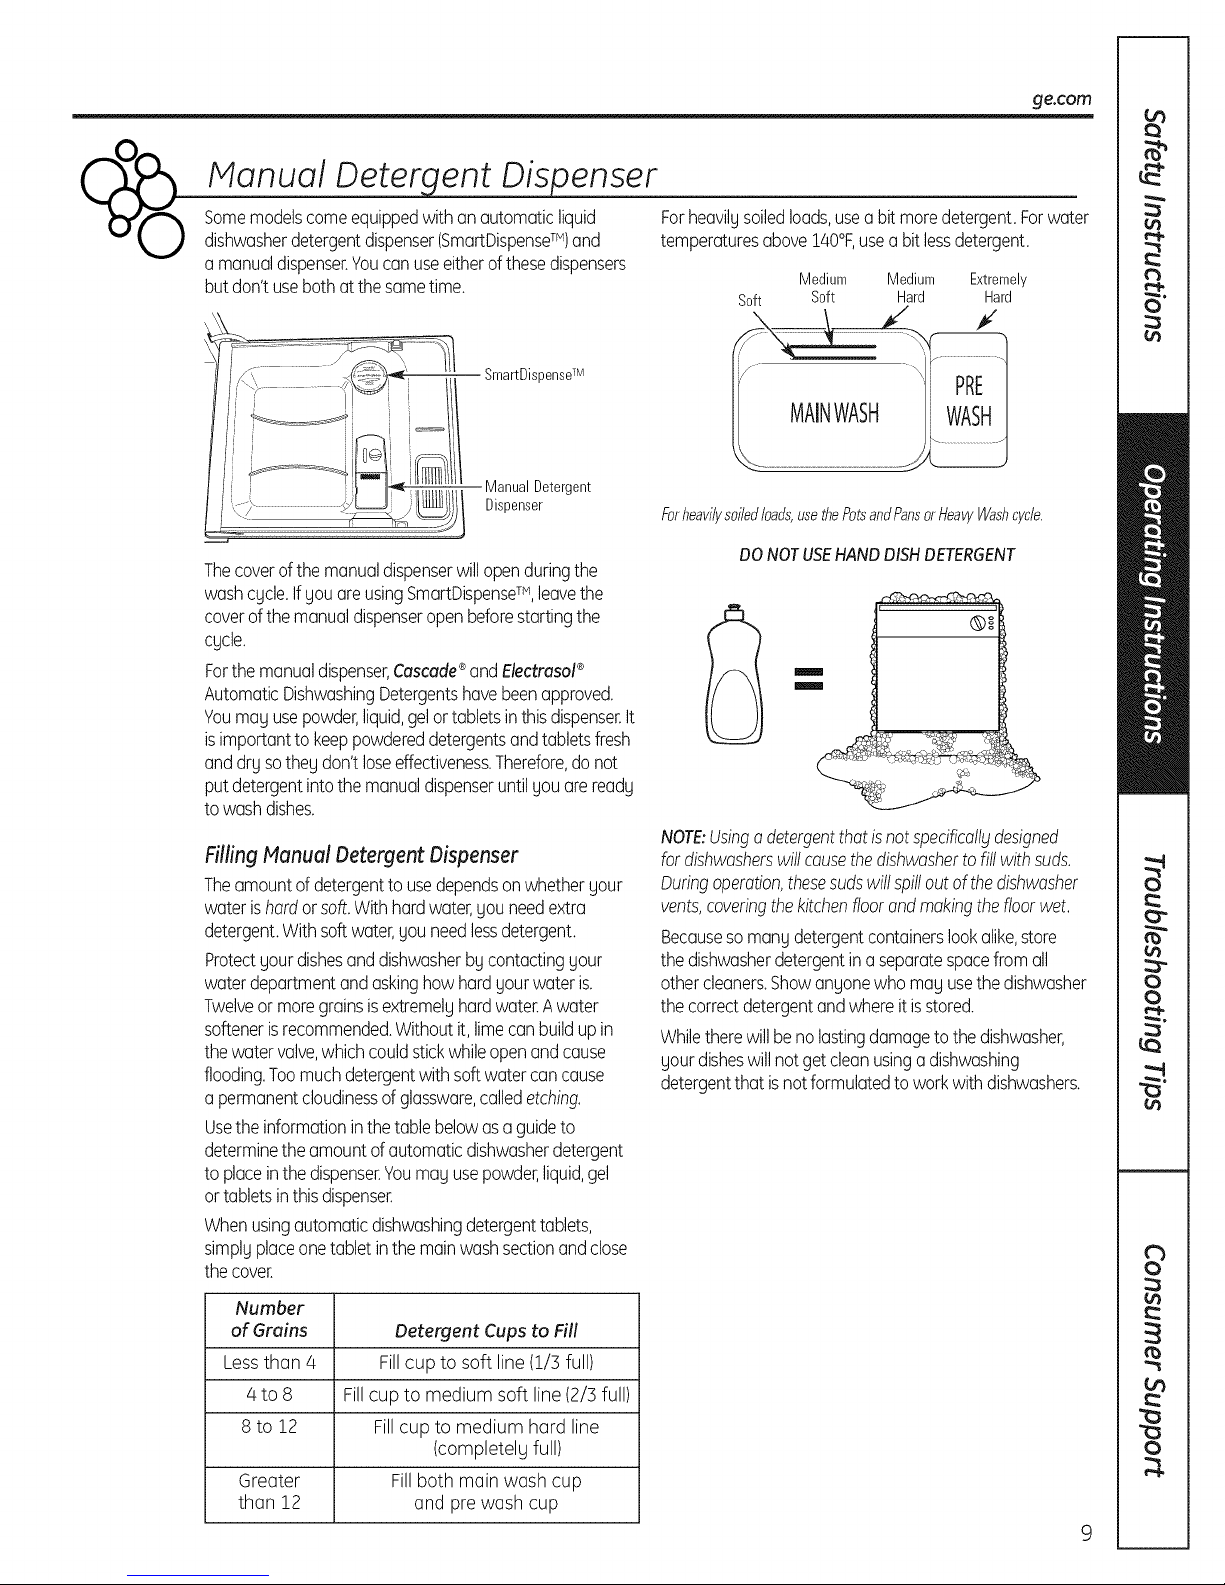
_'_f'_ Somemodelscomeequippedwithanautomaticliquid
"" _ dishwasherdetergentdispenser(SmartDispenseTM) and
a manualdispenser.Youcanuseeitherofthesedispensers
butdon'tusebothatthe sametime.
SmartDispense TM
Manual Detergent
Dispenser
Thecoverofthemanualdispenserwillopenduringthe
washcgcle.IfOouareusingSmartDispenseTM, leavethe
coverofthe manualdispenseropenbeforestartingthe
cocle.
Forthemanualdispenser,Cascade®and Electrasol®
AutomaticDishwashingDetergentshavebeenapproved.
Youmagusepowder,liquid,gelortabletsinthisdispenser.It
isimportanttokeeppowdereddetergentsandtabletsfresh
anddrgsotheUdon'tloseeffectiveness.Therefore,do not
putdetergentintothemanualdispenseruntilgouarereadg
towashdishes.
FflfingManual Detergent Dispenser
Theamountofdetergentto usedependsonwhethergour
waterishardorsoft.Withhardwater,Oouneedextra
detergent.Withsoftwater,Oouneedlessdetergent.
Protectoourdishesanddishwasherbgcontactinggour
waterdepartmentand askinghow hardoourwateris.
TwelveormoregrainsisextremelUhardwater.Awater
softenerisrecommended.Withoutit, limecanbuildup in
thewatervalve,whichcouldstickwhileopenandcause
flooding.Toomuchdetergentwithsoft watercancause
a permanentcloudinessofglassware,calledetching.
Usetheinformationinthe tablebelowasaguideto
determinetheamountofautomaticdishwasherdetergent
toplaceinthedispenser.YoumaUusepowder,liquid,gel
ortabletsinthisdispenser.
Whenusingautomaticdishwashingdetergenttablets,
simplgplaceonetabletinthe mainwashsectionandclose
thecover.
ForheavilUsoiledloads,usea bit moredetergent.Forwater
temperaturesabove140%,useabit lessdetergent.
Medium Medium Extremely
Soft Soft Hard Hard
Forheavilysoiledloads,usethePotsandPansorHeavyWashcycle.
DO NOTUSEHANDDISH DETERGENT
m
NOTE:Usinga detergent that isnot specificallgdesigned
fordishwasherswillcausethedishwasherto fillwithsuds.
Duringoperation,thesesudswillspilloutofthedishwasher
vents,coveringthekitchenfloorandmakingthefloorwet.
Becausesomangdetergentcontainerslookalike,store
thedishwasherdetergentinaseparatespacefromall
othercleaners.Showangonewhomagusethedishwasher
thecorrectdetergentandwhereitisstored.
Whiletherewillbenolastingdamagetothe dishwasher,
gourdisheswillnotgetcleanusingadishwashing
detergentthat isnotformulatedto workwith dishwashers.
Number
of Grains Detergent Cups to Fill
Less than 4 Fillcup to soft line (1/] full)
4 to 8 Fillcup to medium soft line (2/] full)
8 to 12 Fillcup to medium hard line
Greater Fillboth main wash cup
than 12 and pre wash cup
(completelg full)
Page 10
Using the dishwasher.
SmartDis ent Dispenser (some models)
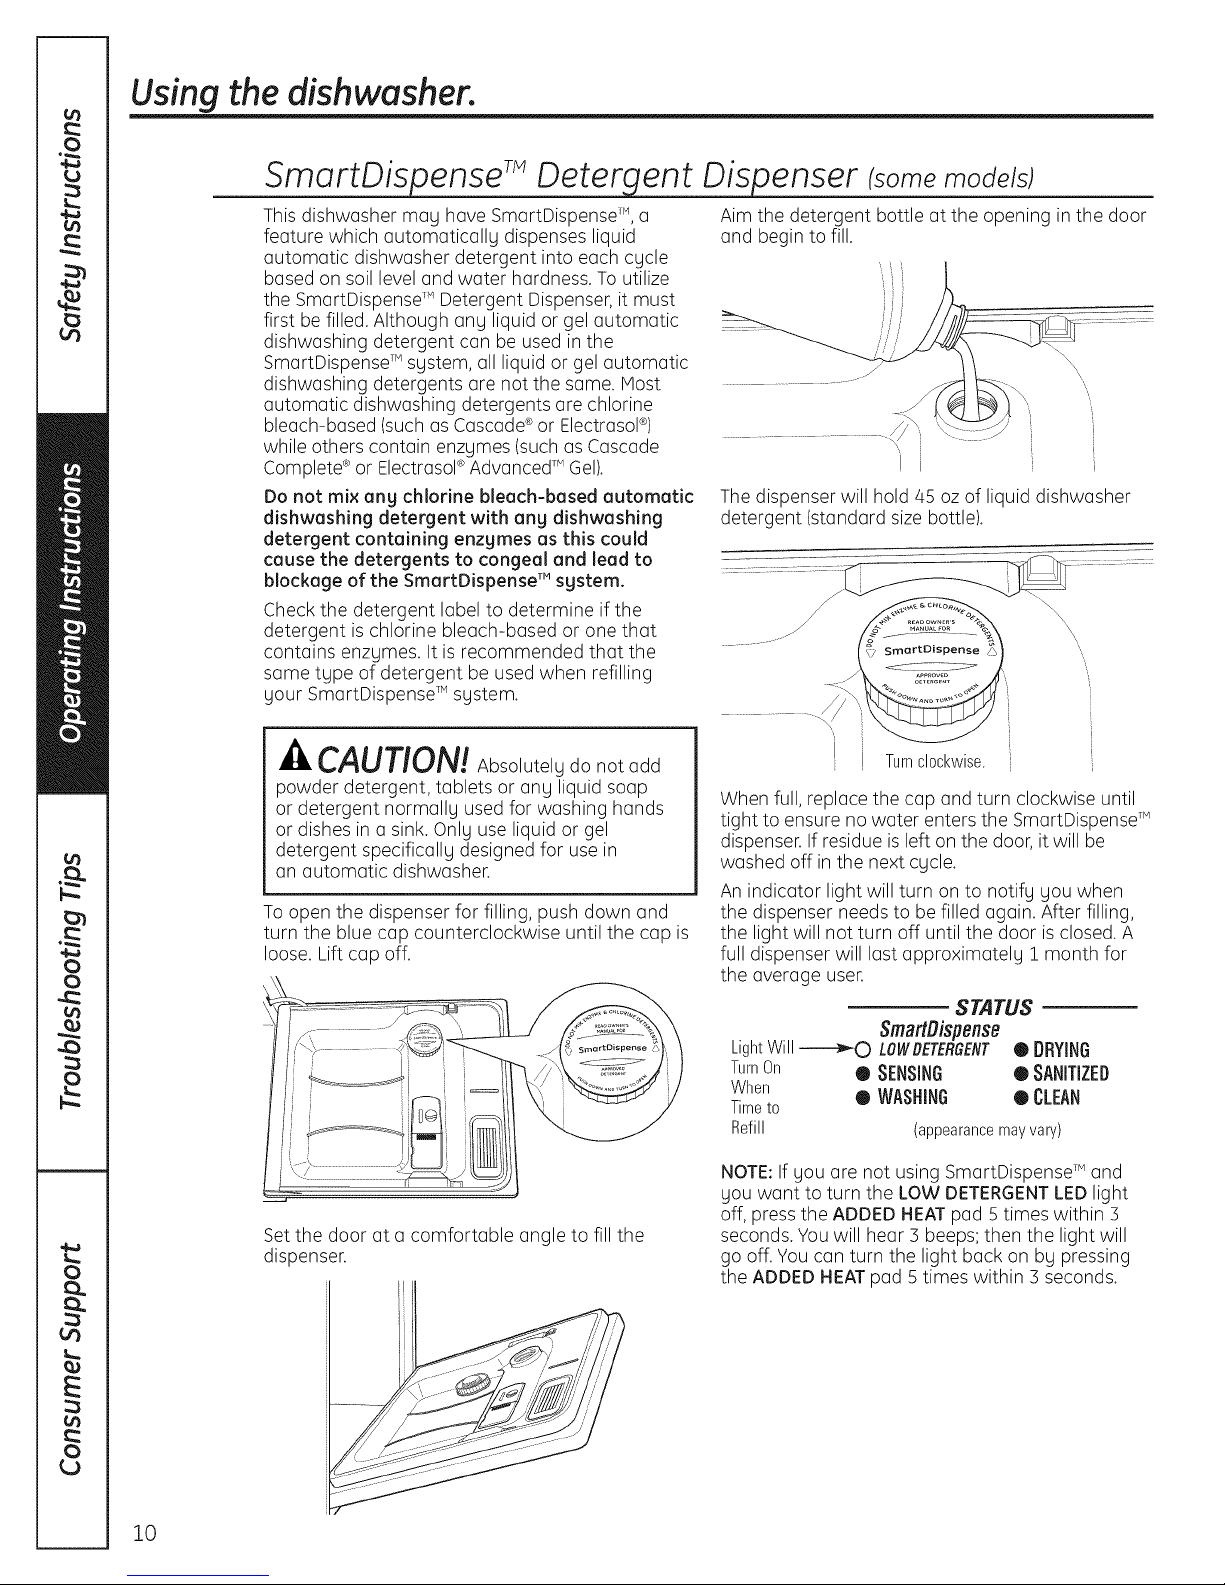
This dishwasher may have SmartDispense TM,a
feature which automatically dispenses liquid
automatic dishwasher detergent into each cycle
based on soil level and water hardness. To utilize
the SmartDispenseTMDetergent Dispenser, it must
first be filled. Although any liquid or gel automatic
dishwashing detergent can be used in the
SmartDispenseTMsystem, all liquid or gel automatic
dishwashing detergents are not the same. Most
automatic dishwashing detergents are chlorine
bleach-based (such as Cascade®or Electrasol®)
while others contain enzymes (such as Cascade
Complete®or Electrasol®AdvancedTMGel).
Do not mix ann chlorine bleach-based automatic
dishwashing detergent with ang dishwashing
detergent containing enzymes as this could
cause the detergents to congeal and lead to
blockage of the SmartDispense TMsystem.
Check the detergent label to determine if the
detergent is chlorine bleach-based or one that
contains enzymes. It is recommended that the
same type of detergent be used when refilling
your SmartDispenseT'system.
Aim the detergent bottle at the opening inthe door
and begin to fill.
i
i
i
The dispenser will hold 45 oz of liquid dishwasher
detergent (standard size bottle).
\
CAUTION! Absolutely do not add
powder detergent, tablets or any liquid soap
or detergent normally used for washing hands
or dishes ina sink. Only use liquid or gel
detergent specifically designed for use in
an automatic dishwasher.
To open the dispenser for filling, push down and
turn the blue cap counterclockwise until the cap is
loose. Lift cap off.
Setthe door at a comfortable angle to fill the
dispenser.
Turnclockwise.
When full, replace the cap and turn clockwise until
tight to ensure no water enters the SmartDispenseTM
dispenser.If residue is left on the door, it will be
washed off in the next cycle.
An indicator light will turn on to notify you when
the dispenser needs to be filled again. After filling,
the light will not turn off until the door is closed. A
full dispenser will last approximately 1 month for
the average user.
STATUS
LightWill_ LOWDETERGENT0 DRYING
TurnOn O SENSING 0 SANITIZED
When
Time to
Refill (appearancemayvary)
NOTE:Ifyou are not using SmartDispense TMand
you want to turn the LOW DETERGENTLEDlight
off, press the ADDED HEATpad 5times within 3
seconds. You will hear 3 beeps; then the light will
go off. You can turn the light back on by pressing
the ADDED HEATpad 5 times within 3 seconds.
SmartDispense
• WASHING • CLEAN
10
Page 11
SmartDispense Detergent Dispenser
Water Hardness Calibration
ge.com
Prior to the first use, the dishwasher needs
to be calibrated for water hardness. Please follow
the directions below to calibrate the dishwasher
to the hardness of sour tap water.
Determine the Hardness of Your Tap Water
In the bag that contained these instructions, SOU
should find a water hardness test strip package.
Readthe instructions on the package, remove the
test strip and follow the instructions to determine
the hardness level of sour tap water. You will use
this information to calibrate sour dishwasher to
dispense the optimal amount of detergent.
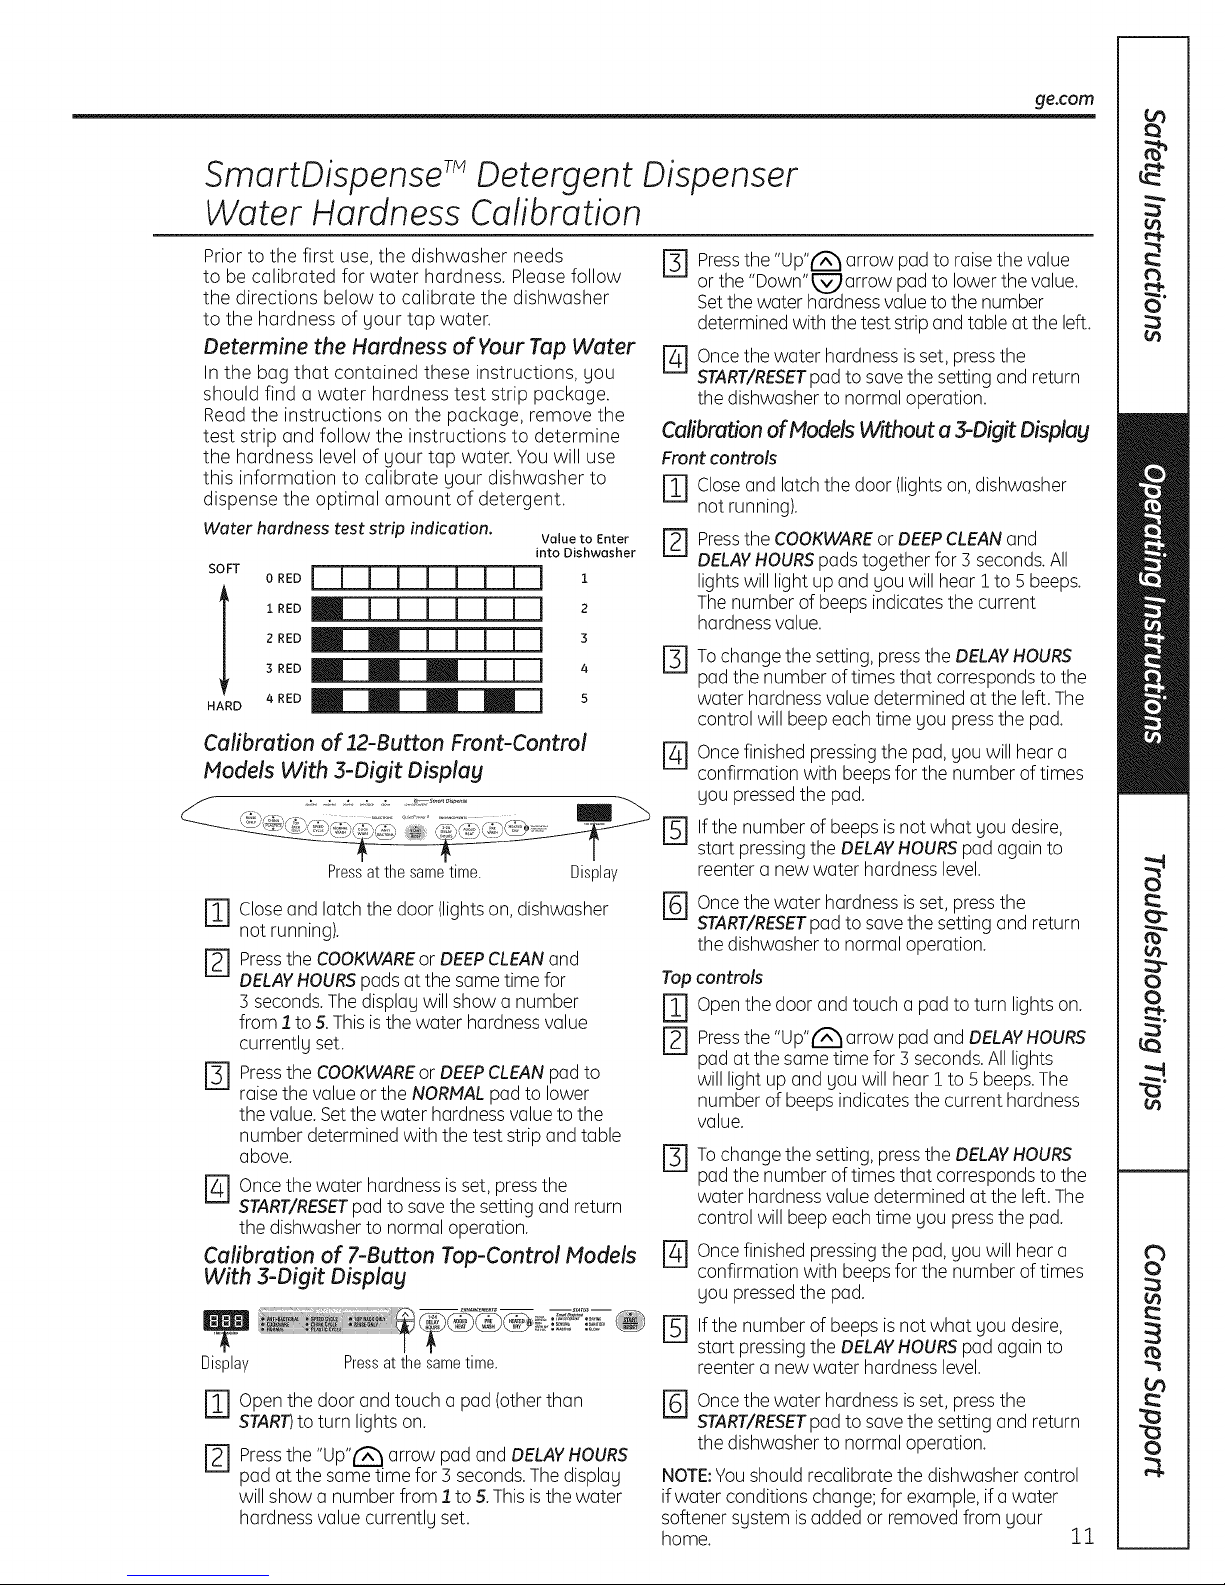
Water hardness test strip indication, value to Enter
into Dishwasher
SOFT 0 RED _ 1
1 RED _ 2
2 RED _ 3
3 RED _ 4
HARD 4 RED _ 5
Calibration of Models Without a 3-Digit Displag
Front controls
Calibration of 12-Button Front-Control E]
Models With 3-Digit Display
Pressat the same time. Display
r_ Closeand latch the door (lightson,dishwasher r_
not running).
[_ Pressthe COOKWAREor DEEPCLEANand
DELAYHOURSpads at the same time for Top
5 seconds.Thedisplag will show a number r_
from 1 to 5.Thisisthe water hardness value
currentlg set. r_
r_ Pressthe COOKWAREor DEEPCLEANpad to
raisethe value or the NORMALpadto lower
the value. Setthe water hardnessvalue to the
number determined with the test strip and table
above, r_
r_ once the water hardness isset, pressthe
START/RESETpad to savethe setting and return
the dishwasherto normal operation.
Calibration of 7-Button Top-Control Models
With 3-Digit Displag
r_ Pressthe "Up"('Z_ arrow pad to raise the value
or the "Down"l_arrow pad to lower the value.
Setthe water hardnessvalue to the number
determined with the test strip and table at the left.
r_ once the water hardness isset, pressthe
START/RESETpad to save the setting and return
the dishwasher to normal operation.
r_ Closeand latch the door (lightson,dishwasher
not running).
Pressthe COOKWAREor DEEPCLEANand
rq
DELAYHOURSpadstogether for 3 seconds.All
lights will light up and you will hear ! to 5beeps.
Thenumber of beeps indicatesthe current
hardness value.
Tochange the setting, press the DELAYHOURS
pad the number of times that correspondsto the
water hardnessvalue determined at the left. The
control will beep each time SOUpressthe pad.
Oncefinished pressingthe pad,SOUwill heara
confirmation with beepsfor the number of times
SOUpressedthe pad.
Ifthe number of beepsisnot what SOUdesire,
start pressingthe DELAYHOURSpad again to
reenter a new water hardness level.
Oncethe water hardness isset, pressthe
START/RESETpad to save the setting and return
the dishwasher to normal operation.
controls
Open the door and touch a pad to turn lights on.
Pressthe "Up"(R'_arrow pad and DELAYHOURS
pad at the same time for 3 seconds.Alllights
will light up and gou will hear 1 to 5 beeps.The
number of beeps indicates the current hardness
value.
Tochange the setting, press the DELAYHOURS
pad the number of times that correspondsto the
water hardnessvalue determined at the left. The
control will beep each time gou pressthe pad.
Oncefinished pressingthe pad,SOUwill heara
r4]
confirmation with beepsfor the number of times
SOUpressedthe pad.
!i!iiiii!!iiii!ii!!!!! ®
Display Pressat the same time.
r_ open the door and touch a pad (otherthan
START)to turn lights on.
r_ Pressthe "Up"/fA'harrow pad and DELAYHOURS
pad at the same time for 3 seconds.The displag
will show a number from 1 to 5. Thisisthe water
hardnessvalue currentlg set.
r_lf the number of beepsisnot what SOUdesire,
start pressingthe DELAYHOURSpad again to
reenter a new water hardness level.
r_ once the water hardness isset, pressthe
START/RESETpad to save the setting and return
the dishwasher to normal operation.
NOTE:Youshould recalibrate the dishwasher control
if water conditions change;for example, ifawater
softener sgstem isadded or removed from sour
home. 22
Page 12
Loading the dishwasher racks.
For best dishwashing results, follow these loading guidelines. Features and appearance of racks and silverware
baskets may vary from your model.
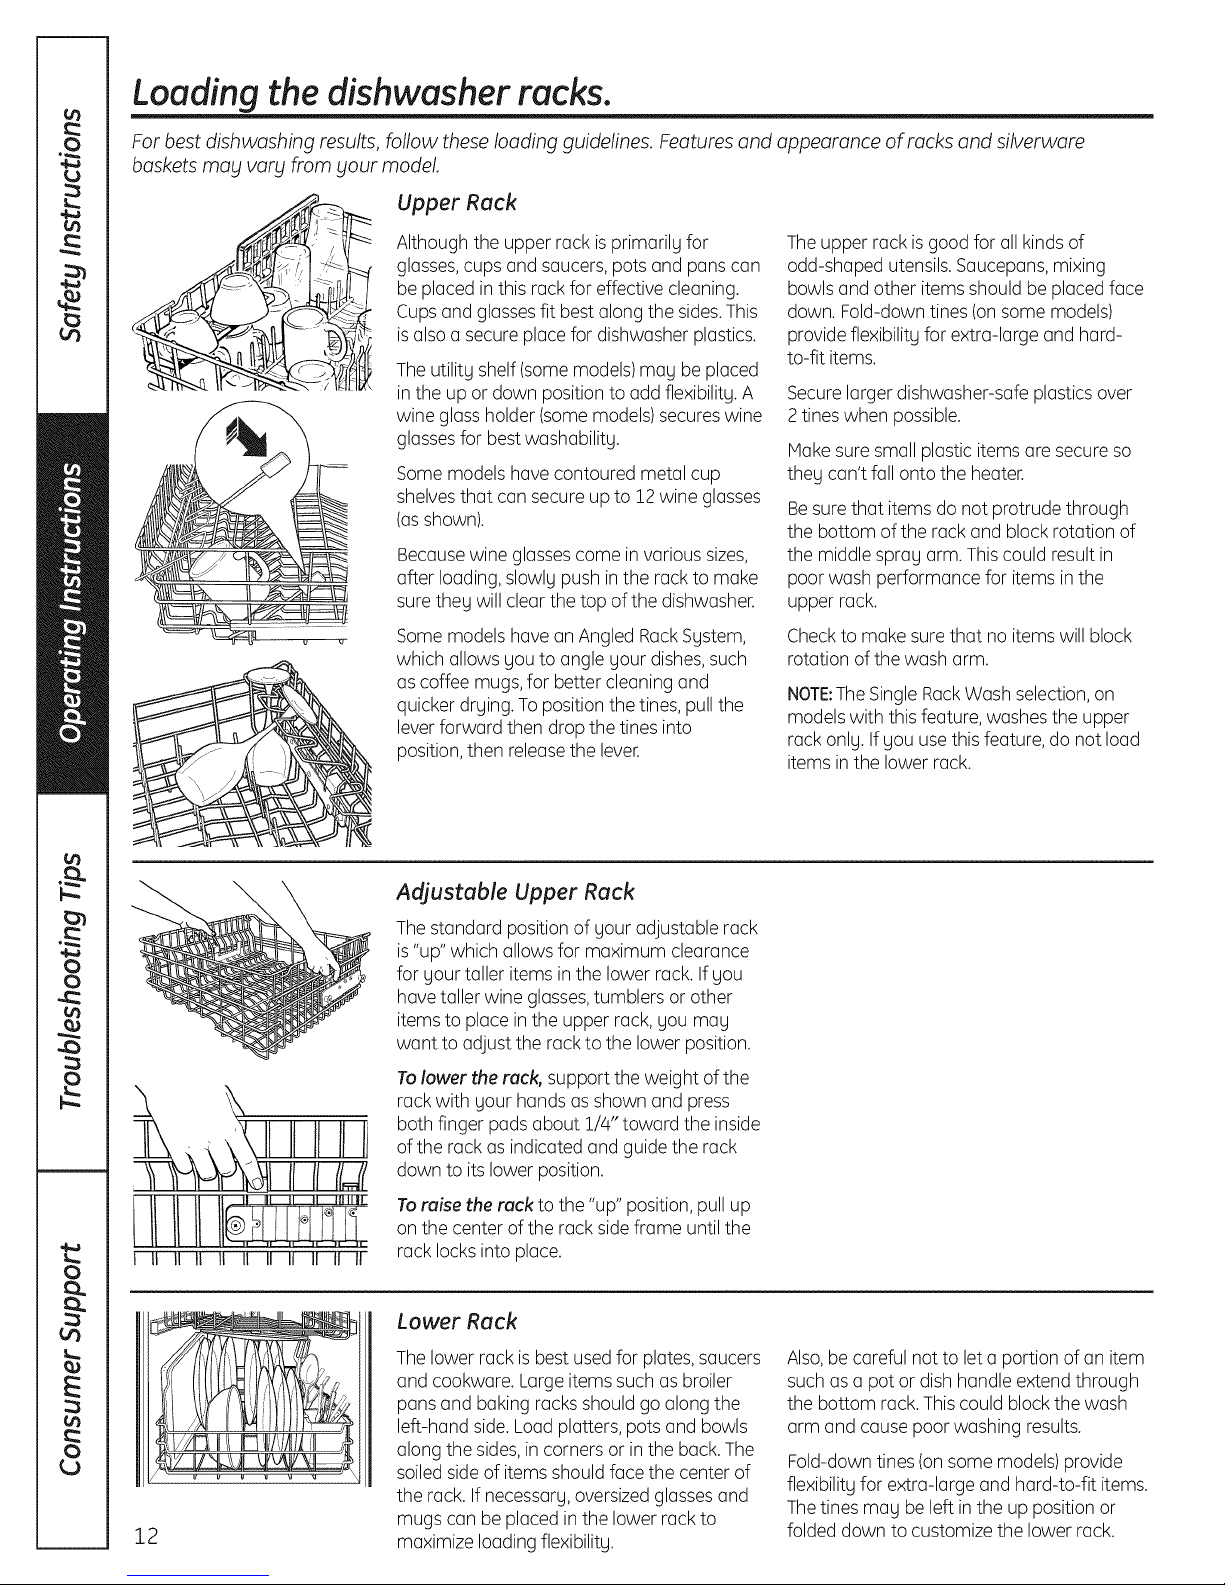
Upper Rack
Although the upper rack isprimarily for
glasses,cups and saucers, pots and pans can
be placed inthis rack for effective cleaning.
Cupsand glasses fit best along the sides.This
isalso a secure place for dishwasher plastics.
Theutility shelf (somemodels)may be placed
in the up or down position to add flexibility.A
wine glass holder (somemodels)secures wine
glassesfor best washability.
Somemodels havecontoured metal cup
shelvesthat can secure up to 12wine glasses
(asshown).
Becausewine glassescome in various sizes,
after loading,slowly push in the rack to make
surethey will clearthe top of the dishwasher.
Somemodels havean Angled RackSystem,
which allows you to angle your dishes,such
as coffee mugs, for better cleaning and
quicker drying. To position the tines,pullthe
leverforward then drop the tines into
position,then releasethe lever.
Theupper rack isgood for all kinds of
odd-shaped utensils.Saucepans,mixing
bowls and other items should be placed face
down. Fold-down tines (onsome models)
provide flexibility for extra-large and hard-
to-fit items.
Securelarger dishwasher-safe plastics over
2 tines when possible.
Makesure small plastic items are secure so
they can't fall onto the heater.
Besurethat items do not protrude through
the bottom of the rack and blockrotation of
the middle spray arm. This could result in
poor wash performance for items in the
upper rack.
Checkto make sure that noitems will block
rotation of the wash arm.
NOTE:TheSingle RackWash selection,on
models with this feature,washes the upper
rack only. If you use this feature, do not load
items in the lower rack.
Adjustable Upper Rack
Thestandard position of your adjustable rack
is"up" which allowsfor maximum clearance
for your taller items in the lower rack. If you
have taller wine glasses,tumblers or other
items to place inthe upper rack,you may
want to adjust the rack to the lower position.
Tolower the reck, support the weight of the
\
I II 11 II II II II II II II 11
12
rack with your hands as shown and press
both finger pads about 1/4" toward the inside
of the rack as indicated and guide the rack
down to its lower position.
Toreise the reck to the "up" position, pull up
on the center of the rack sideframe until the
rack locksinto place.
Lower Rack
Thelower rack is best usedfor plates,saucers
and cookware. Large items such as broiler
pans and baking racks should go along the
left-hand side. Load platters, pots and bowls
along the sides,in corners or in the back. The
soiledside of items shouldface the center of
the rack. If necessary, oversizedglassesand
mugs can be placed inthe lower rack to
maximize loading flexibility.
Also,be careful not to let a portion of an item
such as a pot or dish handle extend through
the bottom rack.Thiscould blockthe wash
arm and cause poor washing results.
Fold-down tines (onsome models)provide
flexibility for extra-large and hard-to-fit items.
Thetines may be left inthe up positionor
folded down to customize the lower rack.
Page 13

go.corn
ShowerNozzleService
PartNumberWD12X10134
tab out Remove end cap
Removing the Upper Rack
Yournew dishwasher hasthe capabilitg to
wash extra largeitems in the lower rack. This
isaccomplished bg removing the upper rack
and installing a nozzleoverthe port that
normallg supplieswater to the upper rack.
The nozzleis not includedwith gour
dishwasher,but isavailable for purchase from
GE.CallGEat 1.800.626.2002or go to the GE
website ge.com and request NozzleSprag
Asm,part number WD12X10114.
Customers in Canada can order on-line at
geappliances.ca 24 hours everg dag, or bg
phone at 1.800.66!.!6!6 during normal
businesshours.
NOTE:Do not usethe TOPRACKONLYcgcle
(some models)with this feature. SingleRack
Wash cgcle is for upper rack wash onlg.
The recommended cgcle for lower rack
onlg useisthe COOKWAREcgcle.
NOTE:Nozzlemust be in place with upper
rack removed.If not installed properlg, poor
wash performance and noisewill result.
Toremove the upper rack:
E] Pressthumb tab out and remove the
front end capson each sideofthe rail.
_1 Pullthe rack straight out and offthe rails.
r31 Replacethe end caps.
E] Pushthe railsall the wag back into the
dishwasher.
Slidethe shower nozzleattachment over
the spout.
"Showernozzle
attachment
@ Thenfill the lower rack and begin
gour cgcle.
NOTE:Don'tforget to remove the shower
nozzleattachment before gou replace the
upper rack.
One-piece basket (oil some models)
Three-piece basket (oil some models)
Don't let any
item extend through
bottom.
Toremove end baskets, grasp the basket at
opposite corners and slide apart.
Silverware Basket
Toloadflatware, simplg pushthe adjustable
handle to either side(on some models).Put
flatware in the removable basket with fork
and knife handles up to protect gour hands.
Placespoons in the basketwith handles
down. Mix knives,forks and spoons sotheg
don't nesttogether. Distribute evenlg.Small
plastic items, such as measuring spoons and
lidsfrom small containers should go in the
bottom ofthe silverware basket with the
silverware on top.
Theone-piece silverware basket(onsome
models)can be placed in the front, right side
or back of the lower rack.
A varietg of options isavailable regarding
the three-piece silverware basket(onsome
models)in gour dishwasher.Thecomplete
basket is designedto fit on the right sideof
the lower rack. Additionallg, each end of
the basket is removable to add loading
flexibilitg to accommodate flatware and
lower rack capacitg needs.
Thelidsof both end and middle baskets(on
some models)can be closedto contain small
items. Long items can be placed on the utilitg
shelf in the upper rack.
13
Page 14

Loading the dishwasher racks.
Extra Rack Features (onsome models)
Cutlery Tray
Thecutlers trag holdsup to 4 large knifes
such as a carver,chef's knives,breadknife,
etc.,that ore too toll to fit inthe silverware
basket.
Hook the trog onto the rear of the upper rock.
Lag the knives between the guides
(asshown).
Bowl Tines
Thespeciallarge-bowl tines inthe lower rack
add flexibility to uour loading pattern.Theg
are usefulfor serving bowlsor other large
bowls.
Tousethe bowl tines,fold down the
//
2 rows of flex tines infront of the bowl
tines and load bowlsjust as Uouwould
in the upper rack.
T eseti fold down
Large-bowl tines
Loading place settings...
Follow these guidelines for loading JO place settings. Features and appearance of racks and silverware baskets ma_t
varbtfrom btour model. NOTE:Silverware should be individuallbt loaded into the slots on the silverware basket lid.
Upper Rack--lO place settings Lower Rack--lO place settings
Follow these guidelines for loading J2 place settings. Features and appearance of racks and silverware baskets may
vary from your model. NOTE: Silverware should be individually loaded into the slots on the silverware basket lid.
14 Upper Rack--12 place settings Lower Rack--12 place settings
Page 15

Caring for the dishwasher, ge.com
Cleaning the Exterior Door Panel
Beforecleaning the front panel, make
sure you know what type of panel you have.
Referto the last two letters of your model
number. Youcan locate your model number
on the left-hand tub wall just insidethe door.
If your model number ends with BB,CC,WW,
SAor BG,then you have a PaintedDoor
panel. If your model number ends with SS,
then you havea StainlessSteelDoor panel.If
your model number ends with CS,then you
have a CleanSteelpanel.
Followthe instructions below for cleaning the
door panel for your specific model.
Painted Door Panel (modelnumbersending
in BB-black,CC-bisque,WW-White, SA-silver
metallic or BG-gmphite black)
Usea clean, soft, lightly dampened cloth,
then dry thoroughly. Youmay also usea
good appliance wax or polish.
Stainless Steel Door Panel (modelnumbers
ending in SS)
Thestainlesssteel panels can be cleaned
with StainlessStee!Magic or a similar product
using a clean,soft cloth. Donot use appliance
wax, polish,bleach or products containing
chlorine on StainlessSteeldoors.
Youcan order StainlessStee!Magic
#WXJOXJ5through GEParts by calling
800.626.2002.
CleanSteel Door Panel (model numbers
ending in CS)
Use a clean, soft, lightly dampened cloth,
then dry thoroughly. Do not use appliance
wax, polish or any chemical agent on
¢leanSteel doors.
Do not wipe the dishwasher with a soiled
dish cloth or wet towel Thesemay leave
a residue. Do not use scouring pads or
powdered cleaners because these products
can scratch the finish.
Stainless Steel Interior--Tub and Inner Door
Thestainlesssteel usedto make the
dishwasher tub and inner door provides
the highest reliability available in a GE
dishwasher.If the dishwasher tub or inner
door should be scratched or dented during
normal use,they will not rust orcorrode.
Thesesurface blemisheswill not affect
their function or durability.
Cleaning the Control Panel
Tocleanthe control panel, usea lightly
dampened cloth.Then dry thoroughly.
Protect Against Freezing
If your dishwasher isleft in an unheated
place during the winter,ask a service
technician to:
r_cut off electrical power to the
dishwasher.Removefusesor trip
circuit breaker.
r_ Turnoff the water supply and disconnect
the water inlet linefrom the water valve.
r_ Drainwater from the water inlet line
r_ Reconnectthe water inlet lineto the
and water valve.(Usea pan to catch
the water.)
water valve.
Airgap _._L('L I.:_t_=___
Checkthe airgapanytimeyour
dishwasherisn'tdrainingwell.
Does Your Dishwasher Have an Air Gap?
An air gap protects your dishwasher
against water backing up into it if a drain
clogs.The air gap is not a part of the
dishwasher.It is not covered by your
warranty. Not all plumbing codes require
air gaps,so you may not have one.
The air gap is easy to clean.
r_ Turnoff the dishwasher and lift off the
cover.
Removethe plastic cap and clean with
r_a toothpick.
15
Page 16

Before you call for service...
Troubleshooting Tips
Save time and money! Review the charts on the following
pages, or visit ge.com. Youmay not need to call for service.
Error Nessages
START/RESETstatus
indicator light flashing
DishwasherBEEPS
onceevery30seconds
Beepingat theend
of thecycle
Possible Causes What To Do
Youhavepressedthe
START/RESETpadwhilethe
dishwasherisrunning.Thiswill
cancelthecgcle.Thelightwill
stopflashingafter the dishwasher
drains(about 90seconds).
Powerto thedishwasherwas
turnedoff whileacgclewas
runningand powerhasjust been
restoredto the dishwasher.The
blinkinglightsindicatethat the
dishwasherisdrainingwater
inside.
Thisisareminderthat gour
dishwasherdoorhasbeenleft
openduring operation.It will
continuebeepinguntil youclose
thedoor.
Thisisnormal.Thedishwasher
will beeptwice at theendof
thecgcle.
PresstheSTART/RESETpadonlgonetimeto startthe dishwasher.Whenthe
dishwasherisrunning,onlgpressthe START/RESETpadif gouwishto cancel
(reset)thecgcle.
Thelightwillstopflashingafterthedishwasherdrainsoutthewater.Anew
cgclewillstartautomaticallgwhenthedrainends.
,, Closeandlatchthedoorafteropeningit mid-cgcle.Beepingwillstopand
dishwasherwillcompletecgcle.
• Toturnoffthedoublebeepindicator(orre-activateitif itwaspreviouslg
turnedoff),presstheHEATEDDRYpad Stimeswithin3 seconds.Atriple
beepwillsoundto indicatetheend-of-cgclebeepoptionhasbeenturned
on oroff.
Problem
Dishesandflatware
nat clean
Possible Causes What To Do
Lowinlet water temperature •
Water pressureistemporarilg low ,,
Air gapor disposerisclogged • Cleantheair gaporflushthe disposer.
Improperrack loading • Makesurelargedishwaredoesnotblockthedetergentdispenserorthe
Noair gapor highdrain loop • VerifUthatgouhavean airgapora highdrainloop.Refertothe
Makesureinletwatertemperatureiscorrect(seepage8).Turnonthehot
waterfaucetnearestthedishwasher;let rununtilthewatertemperature
stopsrising.Thenstart thedishwasherandturn offthefaucet.Thisensures
theenteringwaterishot.
Trgnot tousethedishwasherwhenhotwaterisbeingusedelsewhere
inthehouse;forexample,whendoinglaundrUorwhena familUmember
isusingtheshower.
Turnonafaucet.Iswatercomingoutmoreslowlgthanusual?Ifso,wait
untilpressureisnormalbeforeusinggourdishwasher.
o
Trgnot tousethedishwasherwhenhotwaterisbeingusedelsewhere
inthehouse;forexample,whendoinglaundrUorwhena familUmember
isusingtheshower.
washarms.SeetheLoadingthedishwasherrackssection.
InstallationInstructions.
16
Page 17

Problem Possible Causes What To Do
ge.com
Spotsand filming
onglossesand
flatware
Extremelyhardwater
Lowinletwater temperature
Overloadingthedishwasher
Improperloading
Oldor damppowderdetergent
• UseJet-Dry ®or Cascade Crystal Clear_rinse agents to remove spots and
prevent new filmbuildup.
• Hake sure water temperature isat least 120°F.
• Load dishwasher as shown inthe LoadingPlaceSettingssection.
• Hakesuredetergentisfresh.
• Ifwaterisextremelyhard,asoftenermay berequired.
Rinseagentdispenserempty
Toolittledetergent
Cloudinessan Combinationof softwaterand • Thisiscalledetchingandis permanent.Topreventthisfromhappening,
glassware too much detergent use less detergent ifyou have soft water. Wash glassware inthe shortest
cycle that willget them clean.
Water temperatureentering • Thiscouldbeetching.Lowerthewaterheatertemperature.
thedishwasherexceeds150°F
Sudsinthe tub • Useonlyautomaticdishwasherdetergentsto avoidsudsing.
Cascade®andElectrasol®AutomaticDishwashingDetergents
havebeenapprovedfor useinallGEdishwashers.
• Toremovesudsfromthetub,openthedishwasherandlet
sudsdissipate.Closeandlatchthedishwasherdoor.Pumpout water
bytouchingtheSTART/RESETpadonce;then 30secondslater,
touchtheSTART/RESETpadagain.Repeatifnecessary.
Alwayswipeuprinseagentspillsimmediately.
Repositionthedishes,sothewaterfromthelowersprayarmcan
flushthedetergentcup.Seepages13and14.
Usea turkeybastertoremoveasmuchwateraspossiblefromthe
SmartDispenseT"dispenserandrefillitas normal.Besuretotightenthe
capfullyto preventwaterfromenteringthe dispenser.
Removemarkswitha mild,abrasivecleaner.
• Hakesureinletwatertemperatureisat least120°R
Detergent left in
dispenser cups
Water in the
SmartDispense T"
dispenser
Blackor gray
marks on dishes
Dishes don't dry
Rinseagentwasspilled
Dishesareblockingthe
detergentcup
Capnot tightened after filling
thedispenser
Aluminumutensilshave
rubbedagainstdishes
Lowinlet water temperature
• SelectHEATEDDRY.
UsePRE-WASHor ADDEDHEAToptions.
Selecta highercycle,suchasANTI-BACTERIAor COOKWARE.
Rinseagentdispenserisempty
ContralpandrespondedDoorlatch may not beproperly
Checktherinseagentdispenserandfillas required.
Hakesurethedoorisfirmlyclosed.
toinputsbutdishwasherseated
neverfilledwith water Water valvemaybeturnedoff
Stainedtub interior Sometomato-basedfoodscan
causereddishstains
• Hakesurewatervalve(usuallylocatedunderthesink)isturnedon.
• Useofthe RINSEANDHOLDcycleafteraddingthe dishto theload
candecreasethelevelofstaining.GErecommendsCascade®
PlasticBoosterto helpremovethesetypesofstains.
Teaor coffeestains
• Removethestainby hand,usingasolutionof 1/2cup bleach
and] cupswarmwater.
WARNING
Beforecleaninginterior,waitatleast20minutesaftera cycleforthe
heatingelementstocooldown.Failureto do socanresultinburns.
Anoverallyellowor brownfilmcan •
becausedb_ _osits inwater
White film on insidesurface- •
hardwater minerals
Aspecialfilterinthe watersupplylineistheonlyway tocorrect
thisproblem.Contactawatersoftenercorn an .
GErecommends Jet-Dry ®or Cascade Crystal Clear*to help
prevent hard water mineraldepositsfrom forming.
• Rundishwasherwithcitricacidto removemineraldeposits.Citric
acid(Partnumber:WD35X151)canbeorderedthroughGEParts.
17
Page 18

Before gou call for service...
Troubleshooting Tips
\
Problem
Dishwasherwon't run
Controlpanellights Timetoo longbetween • EachpadmustbetouchedwithinSminutesoftheothers.
go offwhen you're touchingof selectedpads Torelight,touchanUpadagain,or unlockandrelatchdoor.
settingcontrols
Waterstanding in Thisis normal • Asmallamountof cleanwateraroundtheoutletonthetub
thebottom of thetub bottomat thebackofthetub keepsthepumpseallubricated.
Waterwon't pump Drainisclogged • IfLlouhaveanairgap,cleanit.Seepage15.
outof the tub • Ifthe dishwasherdrainsintoa disposer,rundisposerclear.
Steam Thisis normal • Warm,moistaircomesthroughtheventbll thedoorlatchduringdrlling
Sanitizedlight does Thedoorwasopenedand the • Donotinterruptthecllcleanlltimeduringor aftermainwash.
not illuminateat the cycle wasinterrupted during
endofthe cycle or after the mainwashportion
_Anti-Bacteria Theincomingwater • Raisethe waterheatertemperatureto between120°Fand140°F.
cycleonly) temperaturewastoo low
Noise Normaloperatingsounds • Theseareallnormal.Noactionisrequired.
Fuseis blown or circuit breaker
istripped
Power isturned off
Controlpanelislocked
Controlpanelneedsto be
rebooted
Thecycle iscompleteand • Thisisnormal.Noactionisrequired.
thedoor hasbeenopenfor
longerthan 60seconds
Detergentcupopening
Water enteringdishwasher
Themotor stopsand starts at
varioustimesduringthecycle
Drainpump soundsduring
pumpout
Dryingfan runningfor 2-4 hours
after CLEANlight isilluminated
(TopControlPanelmodelsonly}
Rattlingdisheswhenthe spray
arm rotates
What To DoPossible Causes
• Replacefuseor resetcircuitbreaker.Removeanyotherappliancesfrom
thecircuit.
• Insomeinstallations,thepowertothedishwasherisprovidedthrougha
wallswitch,oftenlocatednextto thedisposerswitch.Rakesureitison.
• Unlockcontrolpanel.Seepage6.
• Turnoffpowertothedishwasher(circuitbreakerorwall switch)for
]0 seconds;thenturn backon.
• Checktoseeifuourkitchensinkisdrainingwell.Ifnot,Uou
malt needaplumber.
andwhenwaterisbeingpumpedout.Thisisnecessarllfordrlling.
• Hakesuredishesare properlllloaded.Seethe Loadingthe
dishwasherrackssection.
18
Page 19

GE Dishwasher Warranty.
Al!warranty service providedby our Factory ServiceCenters,
or an authorizedCustomerCare®technician.Toscheduleservice,
on-l!ne,visitus at ge.com,or ca!!800.GE.CARES(800.452.2757)inthe United
States.InCanada,ca!!!.800.56!.5544. Pleasehaveserial numberand mode!
number availablewhen calling forservice.
For The Period Of:
One Year
From the date of the
origina!purchase
Five Years
(onlyformodel numbers
beginning with PDW
or CDW)Fromthedate
of the origina! pumhose
Lifetime of Product
(onlyformodel numbers
beginning with PDW
or COW)
GE Will Replace:
Any part of the dishwasher which fails due to a defect in materials or workmanship. During
this limited one-year warranty, GEwill alsoprovide, freeof charge, all labor and in-home service
to replacethe defective part.
The dishwasher racks and the electronic control module ifthey should fail due to a defect
in materials or workmanship. During this five-year limited warranty, you will be responsible
for anu labor or in-home servicecosts.
TheStainless tub ordoor liner, ifit fails to contain water due to a defect in materials or
workmanship. Duringthis limited warranty, GEwill also provide,free of charge, all laborand
in-home service to replacethe defectivepart.
What GE Will Not Cover (for customers in the United States):
Service trips to your home to teach you how to use
the product.
m Improper installation, delivery or maintenance.
m Failure of the product if it is abused, misused, or used for
other than the intended purpose or used commemiallg.
m Replacement of house fuses or resetting ofcimuit breakers.
m Product not accessible to provide required service.
Ill Damage to the product caused by accident, fire, floods
or acts of God.
m Incidental or consequential damage caused by possible
defects with this appliance.
II Cleaning or servicing of the air gap device inthe drain line.
II Damage caused after delivery, including damage from
items dropped on the door.
Staple your receipt here.
Proof of the original purchase
date is needed to obtain service
under the warranty.
EXCLUSION OF IMPLIED WARRANTIES--Your sole and exclusive remedy is product repair as provided in this Limited
Warrantg. Ang implied warranties, including the implied warranties of merchantabilitg or fitness for a particular
purpose, are limited to one gear or the shortest period allowed bg law.
Thiswarranty isextendedtothe originalpurchaser and any succeedingowner for products purchasedfor home usewithin the
USA.If the product islocated in an area where serviceby a GEAuthorized Servicerisnot available,you may be responsiblefor a trip
chargeor you may be requiredto bring the product to anAuthorized GEServicelocation forservice.Proof of originalpurchasedate
isneededto obtain serviceunder the warranty. InAlaska, thewarranty excludesthe costofshipping or servicecallsto your home.
Somestates do not allow theexclusion or limitation of incidental or consequential damages.Thiswarranty givesyou specific lega!
rights, and you may alsohave other rights which vary from state to state. Toknow what your legal rights are,consult your local
or stateconsumer affairs office or your state'sAttomeFGeneral.
Warrantor: General Electric Company. Louisville, KY 40225
What Is Not Covered (for customers in Canada):
m Service trips to your home to teachyou how to use
the product.
m Improper installation.
If you have an installation problem, contact your dealer
or installer. You are responsible for providing adequate
electrical, exhausting and other connecting facilities.
EXCLUSION OF IMPLIED WARRANTIES--Your sole and exclusive remedg is product repair as provided in this Limited
Warrantg. Ang implied warranties, including the implied warranties of merchantabilitg or fitness for a particular
purpose, are limited to one gear or the shortest period allowed bg law.
m Failure of the product if it is abused, misused, or used for
other than the intended purpose or used commemiallg.
m Replacement of house fuses or resetting ofdmuit breakers.
m Damage to the product caused by accident, fire, floods
or acts of God.
m Damage caused after delivery.
Thiswarranty isextendedtothe origina!purchaserand any succeedingowner for productspurchasedin Canadafor home use
within Canada.In home warranty servicewi!! be providedinareaswhere it isavailableand deemed reasonableby Mabeto provide.
WARRANTOR IS NOT RESPONSIBLE FOR CONSEQUENTIAL DAMAGES.
Warrantor: MABE CANADA INC.
19
Page 20

Consumer Support.
GEAppliances Website
Have a question or need assistancewith your appliance?Try the GEAppliancesWebsite 24 hours a day,
any day ofthe gear! Forgreater convenience and faster service,you can now download Owner's Manuals,
order parts orevenschedule service on-line. In Canada: www.geappliances.ca
Inthe U.S.:ge.com
ScheduleService Inthe U.S.:ge.com
Expert GErepair service isonly one step away from your door.Geton-line and schedule your serviceat your
convenience any day of the gear! Orcall 800.GE.CARES(800.432.2737)during normal businesshours.
In Canada, call 1.800.561.3344
RealLifeDesignStudio Inthe u.s.:ge.com
GEsupports the Universal Designconcept-products, services and environments that can be usedby people of all
ages,sizesand capabilities.We recognizethe needto design for a wide range of physical and mental abilities and
impairments. Fordetailsof GE'sUniversalDesignapplications, including kitchen designideas for people with disabilities,
check out our Websitetoday. Forthe hearing impaired, please call800.TDD.GEAC(800.833./4322).
In Canada, contact: Manager,Consumer Relations,Mabe Canada Inc.
Suite3!0, ! Factory Lane
Moncton, N.B.EIC 9M3
Extended Warranties
Purchasea GEextended warranty and learn about special discounts that are available while your warranty is still
in effect. You can purchaseit on-line anytime, or call800.626.2224during normal businesshours.GEConsumer Home
Serviceswill still be there after your warranty expires.InCanada, call 1.888.261.2133
In the U.S.:ge.com
Parts and Accessories
Individualsqualified to service their own appliances can have parts or accessoriessent directly to their homes
(VISA,MasterCardand Discovercards are accepted).Orderon-line today, 24 hours every day or by phone
at 800.626.2002during normal businesshours.
Instructions contained in this manual cover procedures to be performed by any user. Other servicing generally
should be referred to qualified service personnel Caution must be exercised, since improper servicing may cause
unsafe operation.
Customers in Canada can order parts and accessories on-line at www.geappliances.ca,2/4hoursevery day,
or by phone at 1.800.661.1616during normal businesshours.
Contact Us
If you are not satisfiedwith the service you receivefrom GE,contact uson our Website with all the details including
your phone number,or write to: General Manager,Customer Relations
GEAppliances,Appliance Park
Louisville,KY40225
In Canada: www.geappliances.ca, or write to: Director,ConsumerRelations,MabeCanada Inc.
Suite310, 1 Factory Lane
Moncton, N.B.EIC 9M3
In the U.S.:ge.com
In the U.S.:ge.com
Register YourAppliance Inthe U.S.:ge.com
Register your new appliance on-line--at sour convenience! Timely product registration will allow for enhanced
communication and prompt serviceunderthe terms of your warranty, should the need arise.Youmay also mail
in the pre-printed registration card included in the packing material.In Canada: www.geappliances.ca
20 _ Printed in the United States
.... Printed on Recycled Paper
Page 21

0
www.electromenagersge.ca
Instructions de s_curit_ ..... 2,3
Instructions de fonctionnement
Chargement des couverts ......... 14
Chargement des paniers ....... 12-14
Panneau de contr61e
et r6glages ........................ 4-6
Produits de lavage de vaisselle
recommand6s ....................... 7
Soins et nettoyage ................. 15
Utilisation du lave-vaisselle ....... 8-11
Conseils de d_pannage ... 16-t8
Soutien au consommateur
Garantie ............................ 19
Soutien au consommateur ......... 20
Lave-vaisselle _ cure
en acier inoxydable
O
|
Inscrire le mod_le et le num_ro
de s_rie ici :
NodUle #
S_rie #
Vousles trouverezsur la paroi
de la cuvejuste _ I'int_rieurdela porte.
165D4700P381 49-55057 10-08 JR
Page 22

J J
INFORMATION IMPORTANTE SUR LA SECURITE.
LISEZ TOUTES LES INSTRUCTIONS AVANT L'UTILISATION --
CONSERVEZCESINSTRUCTIONS
AVERTISSEMENT !
Pour votre s#cufit#, les instructions de ce manuel doivent _tre suivies pour r#duire le risque
d'incendie ou d'explosion, d'#lectrocution et pour #viter les dommages _ la proprietY, les
blessures ou la mort.
AVERT/SSEMENT ! S4CUR/T DUCHAUFFE-EAU
Dans certaines conditions, de I'hydrog_ne peut #tre pr4seot dons un chauffe-eau qui n'a pas 4t4
utilis_ pendant deux semaines ou davantage. L'HVDROGENE ESTUN GAZ EXPLOSIF.
SiI'eauchaude n'a pas @t@utilis@ependant deux semainesou plus,r@duisezles risquesde dommages
ou de blessure en ouvrant tousles robinets d'eau chaude pendant plusieurs minutes. Faitescela avant
d'utilisertout appareil @lectriqueraccord_ (_la canalisation d'eau chaude. Cettepr@cautionpermettra
toute accumulation d'hgdrog_ne de se dissiper.Etant donn_ que ce gazest inflammable, nefumez
paset n'utilisez pasde flamme ou d'appareil pendant ce processus.
%
CONFORMITE DE L'INSTALLATION ET ENTRETIEN
Ce lave-vaisselle doit #tre correctement install_ et placd en conformit4 avec les instructions
d'installation avant d'etre utilis_. Si vous n'avez pas requ les instructions d'installation avec
ce lave-vaisselle, vous pouvez vous en procurer en allant sur notre site web a ge.com.
ImRaccordezI'appareil(_un sgst_me _lectrique
permanent et mis _ la terre ou installezunfil
de raise(_la terre des appareils avec lesills
d'alimentation et raccordez-le(_la borne ou
au fil de raise(_la terre de I'appareil.
m Un mauvais raccordement au filde raise
la terre peur causer un risquede choc
_lectrique. Consultezun_lectricien competent
ou un agent du servicesi vous ne savezpas si
I'appareilest correctement mis (_la terre.
m Disposezdes appareils _lectriques hors service
et des mat@iaux d'emballage ou d'exp_dition
correctement.
-&MISE EN GARDE" pour#viterlesblessuresmineuresoules
Lesarticles lav@savec lemode anti-bact@ien,
s'ilga lieu,peuvent _tre chauds au toucher.
/_manipuler avec precaution.
L'utilisationd'un d_tergent
qui n'estpas conqu
sp_cifiquement pour le
lave-vaisselleremplira
celui-ci de mousse.
• Si le lave-vaisselle est raccord_ _
un interrupteur mural, assurez-vous
que celui-ci est activ@avant d'utiliser
cet appareil.
mSurles lave-vaisselledot@sde
commandes @lectroniqueset si vous
prd@rezfermer I'interrupteur mural entre les
cgclesdelavage,attendez de 5 _ 10 secondes
imNe tentez pas de r_parerou de remplacer une
piecede ce lave-vaisselle_mains que cela soit
sp_cifiquement recommand_ dans ce manuel.
Tout autre entretien ou r_paration devrait _tre
confi_ (_un technicien competent.
m Pourminimiser la possibilit_d'_lectrocution,
d_branchez I'appareil du circuit d'alimentation
avant tout entretien.
REMARQUE:!'arr_tdu lave-vaisse!lene d_branche
pas !'apparel!de !'alimentation _lectrique.Nous
recommandons qu'un techniden competent
r_pare votre opporei!
• dommages materiels
apr_savoir remisI'interrupteur avant de toucher
au bouton START/RESETpour permettre _ la
commande de ser@initialiser.
• Articlesautres que la vaisselle: ne lavezpas des
articles comme lesfiltres de purificateur d'air,filtres
de chaudi@resou pinceaux dans lelave-vaisselle.
Le lave-vaissellepourrait @treendommag_ et une
d_coloration ou des taches pourraient en r@sulter.
Unesurveillance attentive est n_cessaire sicet
appareil est utilis@parou prosdesenfants.
• Chargez lesarticles I@gersen plastique de
mani@re_ ce qu'ils ne se d@lacent paset ne
tombent pas au fond; ils pourraient _tre en
contact avec I'@l_mentde chauffage et @tre
endommag_s.
Page 23

www.electromenagersge.ca
%
-4,AVERTISSEMENT ! RISQUE D'ENFANT PRIS AU PIEGE
BONNE DISPOSITION DE VOTRE LAVE-VAISSELLE
Les lave-vaisselle jet,s ou abandonn_s sont
dangereux...m_me sivous neles laissezjet, s
qua quelques jours. Si vous voulezjeter votre vieux
lave-vaisselle, suivez les instructions pour emp_cher
les accidents.
Vis
(surcertabs
modSles)
il N'utilisezcet appareil que pourI'objectif pour
lequel il a _t_ conqu tel que d_crit dans le Guide
de I'utilisateur.
II N'utilisezque lesd_tergents etagents de rinqage
liquides,en poudre ou en tablette, recommand_s
pour leslave-vaisselleet gardez-les horsde la
port_e des enfants. Lesd_tergents pour lave-
vaisselleCascade®,Cascade®Complete et
Electrasol®etles agents de rinqageJet-Org ®
et Cascade Crgstal Cleare sont approuv_s
avec leslave-vaisselleGE.
mlPour modSles avec le distributeur
SmartDispenseMD,prenez soin de ne pas
m@langerun d_tergent 6 base dejavellisant
avec un autre 6 base d'enzgme, cela pourrait
faire tiger lesd_tergents, ce qui aura pour effet
d'obturer le distributeur SmartDispenseMD.
In
Placezlesarticles coupants de mani_re _ ce qu'ils
n'abTmentpas le sceau de la porte.
In
Placezlescouteaux avec le manche vers le haut
pour r_duire les risques de coupures.
In
Nelavezpas les articles deplastique 6 mains qu'ils
n'aillentau lave-vaisselleou I'@quivalent.Siles
articles de plastique ne sont pasmarquis
Avant dejeter votre vieu× lave-vaisselle
Enlevezlaporte du comportimentdeIovogeouenlevez
leverroudelaporte(commelemantra I'illustration).
NOTE : Les modSles des s_ries CDWgO00 et
PDW9200-PDW9900ant aussiunevisdeverrou qua
vousdevezenlever(_tape1)commel'indiquelafigure.
0
de base dont celles-ci :
en ce sens,vouez les recommandations
du fabricant.
IINe touchez pas_ I'@l_mentchauffant pendant
ou imm@diatementapr@sI'utilisation.
IINe faites pasfonctionner le lave-vaisselle
siles panneaux de I'habitacle ne sont pasinstall_s.
mN'alt@ezpas lescommandes.
mNe maltraitez pas,nevousassogez pas
et ne montez passur la porte ou sur leplateau
de vaisselle.
mNe laissezpas lesenfantsjouer autour du lave-
vaisselleIorsque vous ouvrez et fermez la porte
pour @viterque leurspetits doigts ne secoincent
dans la porte.
mNejetez pas un lave-vaissellesans d'abord enlever
la porte du compartimentde lavageou leverrou
de laporte.
II N'entreposezpas et n'utilisez pasde produits
combustibles, de I'essenceou desvapeurs
ou liquidesinflammables pr@sde cet appareil
ou de tout autre appareil.
mNe laissezpas lesenfants s'amuser avec ou dans
cet appareil ou de tout appareil mis au rebut.
LISEZ ET RESPECTEZ CES
CONSERVEZ CES INSTRUCTIONS
CONSIGNES DE SbLCURITbL.
3
Page 24

Le panneau de contr61e du iave-vaisselle.
Vous pouvez trouver votre numdro de module sur la paroi de la cuve,juste a I'intdrieur de la porte. Dans ce manuel,
les caractdristiques et I'apparence peuvent varier selon le module.
Lave-vaisselle6 panneau
decommande frontal
n
__ .............................................. SELECTIONS @uJetPovverS ENHANCEMENTS .....................................................
_ s_ ..... _..... _..... _..... _ ...... _ Smart Disp....
Lave-vaisselle 6 panneau de commande sur le dessus
m
Rdg/oge des contr6/es
(les
B Voyants lumineux d'_tot varierse!onle
Lesvogants lumineux vous indiquent ce qui se passe pendant le fonctionnement du lave-vaisselleautomatique.
IIspeuvent clignoter si le lave-vaissellefonctionne mal. Lesvogants indiquent ONfmarche)pour donner las@quence
de fonctionnement du lave-vaisselle.
LOW DETERGENT
(d6tergent bus)
SENSING
(senseur)
ADD-A-DISH
(ajoutez une ossiette)
WASHING
(lavage)
RINSING
(tin,age)
DRYING
(s6chage)
SANITIZED
(sanitis6)
CLEAN
(propre)
Appara_ quandvous devezremplirle SmartDispenseMDde d_tergent liquideou gel pour
lave-vaisselleautomatique.
NOTE:sivousn'utilisezpas la fonction SmartDispenseM_et que vousd_sirez_teindrelevogant
lumineux LOW DETERGENT(d_tergentbog, appugezb 5 reprisessur la touche ADDEDHEAT
(cheleur+1en moins de 3 secondes.Troisbipssonores seront _mis et levogant lumineux
s'_teindra.Pourr_activer levogant, appugez simplement _ 5reprisessur latouche ADDEDHEAT
(chaleur+1en moins de 3 secondes.
ApparaTtquand le CleanSensor"_ mesure le montant de salet_ et la temperature de I'eau.
Lelave-vaisselleajuste le cgcle choisi pour obtenir le rendement optimal.
ApparaTtpendant le pr_lavage pour indiquer que si vous ajoutez maintenant de la vaisselle,
ellesera_galement lav_e.
ApparaTtpendant le pr_lavage, le lavage principal et le rinqage.
Apparait pendant le rinc;age.
Apparait pendant le HEATEDDRY(s_chagechaudl.
Appara_tquand le cgcle a rempli lesconditions d'aseptisation.
Apparait quand un cgcle de lavage est termin@.
vogantspeuvent
modSle)
_ Vogant de restant (surcertainsmodules)
Pendant lefonctionnement, cevogant indiquele nombre de minutes qui restentpour terminer le cgcle.
Cevogant peut ajuster le temps restant quand leslumi@resdu senseur sont allum@es.Letemps indiqu@au d@butde
chaque cgclepeut changer par rapport au r@glageen usine,car votre appareil s'ajuste @votre utilisation personnelle.
Pendant la raiseen marche retard@e,ce vogant indique le nombre d'heures qui restent avant led@butducgcle.
4
temps
Page 25

www.electromenagersge.ca
_/J Programmes de lavuge (s_lections)
Lave-vaisselle 8 panneau de commande frontal: Appuyez sur la bonne touche pour obtenir le cycle de lavage ddsird.
kave-vaisselle d panneau de commande sur le dessus : Utilisezles touches de fl_che t'_!_ pour faire ddfi/er /es
cycles delavage.
NOTE:toute I'information sur les dur@esde cgcle et I'utilisation d'eau dans cette section ne sont que des valeurs
approximatives. Lesr@sultatsactuels d@pendentdediff@rentsfacteurs, g compris, mais sans s'g limiter,latemp@rature
d'entr@e,lapressiond'eau r@sidentielleet le niveaude salissuredans I'eau de lavage.
La lumi@reau-dessus ou 6 c6t@de la touche choisie indique ON(murche) pour donner le CYCLEDE LAVAGEchoisi.
ANTI-BACTERIA Maximum 8.8 gal., i05 min.
(anti-bact@rie} Medium 7,5gal.,95 min.
DEEPCLEAN 9,6gal., !!! min.
(nettogage Ceprogramme estconqu pour lesplats oules ustensilesparticuli_rement salesou avec des salet_s
en profonduer} carbonis_es ou agant s_ch& Ce programme ne devrait pas suffire 6 _liminer lesaliments grill_s.
(surcertains modules) Vouspouvez QtresOrque ce programme n'abTmerapas vosplats.
COOKWARE/ Maximum !0,0 gal., 80 min.
POTS& PANS Medium 8,8 gal.,70 min.
(ustensiles de cuisine/ Minimum 7,5gal.,60 min.
casseroles et po_les} Cecgcle est conqu pour la vaisselleoules casserolestr_s salesoules casserolescontenant des
(surcertains modules) aliments s_ch_sou cults.Cecgcle peut ne pas r_ussir6 nettoger lesaliments broils. Cecycle
NORMALWASH 5,0-8,8gaL,47-90min,
SPEEDCYCLE
(cgcle rapide)
(surcertains modules)
HAND/GENTLE
(CHINACRYSTAL}
(main/doux
[porcelaine cristal]}
GLASSES
(verres}
(surcertains modules)
PLASTICSCYCLE
(mati_res plastiques)
(surcertains modules)
TOPRACKONLY
(panier sup6rieur
uniquement}
(surcertains modules)
RINSEANDHOLD
(rin(_ageet attente}
(RINSEONLY}
(rin_age uniquement}
NOTE:surquelquesmodules, la touche HAND/GENTLE(MAIN/DOUX)et PLASTICS(PLASTIQUES)estalternative.
Appugezsur /a touche pour a/temer entreHAND/GENTLE(MAtN/DOUX)et PLASTICS(PLASTIOUES).
NOTE:celave-vaisse//eest dquipd deClean Sensor_Ddotd d'un contr6/eautomatique dela tempdrature.
Aussi,la durde du cgclepeut varlet selonle degrdde saletdet detempdrature de I'eau.
NOTE :seul, le cgcle anti-bactdrie est congu pour remplir les exigences de I'article 6, NSF 184, relatif
I'efficacitd de lavage et dbseptisation.
Minimum 6,3 gal.,85 min.
Cecgcle augmente latemp@raturede I'eau danslerinqagefinal pour aseptiservotre lave-vaisselle.
Ladur@edu cycle d@pendde latemp@raturede I'eau qui alimente votre lave-vaisselle.
NOTE: lecycle bact@ricideest v@rifi@pour obtenir une bonne aseptisation. Sile cgcle est
interrompu pendant ou apr@slelavage principal ou si la temp@ratured'alimentation d'eau est trap
bassepour obtenir une temp@ratured'eau suffisante, lesconditions d'aseptisation peuvent ne pas
exister pleinement. En cons@quence,levogant d'aseptisation ne s'allume pas 6 lafin
du cgcle.
NOTE:les lave-vaisselle r@sidentielscertifi@spar le NSFne sont pas conqus pour
les@tablissementsagant un permis de vente d'aliments.
NOTE:surcertainsmodules,I'option STEAMPRE-WASH(Pr_lavagevapeur)sera automatiquement
s_lectionn_eIorsquevous s_lectionnezle programme DEEPCLEAN(Nettogageenprofondeur)
sur lequelvous ne pouvezpas revenir.
convient 6 la vaisselleordinaire.
Cecgcteestutilis#pourlavaisselleetlaverreriemogennementsales6tr@ssales,
Ladur6educgcleet laconsommationd'eaudonn6essontapproximatives.Lesr6sultatsd6pendront
deplusieursfacteurs,notamment,maispasseulement,latemp6ratured'entr6e,la pressiond'eaudans
ler6seaududomicileetlaquantit6desatissuresdansI'eaudetavage.
7,5gal., 3Smin.
Cecgcle est conqu pour lesassiettes et lesverres ordinaires.
7,5gal., 35 min.
Cecgcle est conqu pour laporcelaine et lescristaux I_g_rement sales.
7,5gal., 30 min.
Cecgcle est sp_cifiquement conqu pour la verrerie.
Maximum 8,8 gal., 120min.
Medium 7,5gal., !05 min.
Minimum 5,0gal.,90 min.
Ladur#e plus Iongue de ce cgcle comprend une partie int#gr#e de s#chage qui est conqu pour
r#duire le risque defaire fondre les articles en mati_re plastique et pour am#liorer leur s#chage.
Pourenlever lestaches rouges occasionn#es par les produits6 base detomates, GErecommande
I'utilisation de Cascade®PlasticBoosterMD,
Maximum 8,2 gal.,70 min.
Medium 7,0gal.,60 min.
Minimum 4,6 gal.,50 min.
Cecycle lave les assiettes I_g_rement sales sur la clmlette du haut uniquement
2,5gal., 10 min.
Cecgcle est conqu pour rincer des charges partielles qui seront lav_es plustard. N'utilisezpas
de d_tergent pour ce cgcle.
Page 26

Le panneau de contr61e du iave-vaisseile.
_ Options
Lalumi_re situ_e au-dessusde la touche choisie s'allume pour indiquer leOPTIONchoisi.
DELAY HOURS
(raise en marche
retard_e}
TEMPBOOST/
ADDEDHEAT/EXTRA
HOTWASH
(augmentation
de temp/chaleur
suppl_mentaire/
lavage tr_s haute
temperature}
STEAMPRE-WASH/
PRE-WASH
(Pr_lavage vapeur/
pr_lavage}
(surcertains modules)
HEATEDDRY
(s_chage chaud)
HEATEDDRY
(s_chage chaud)
(lumi_re _teinte)
HEATEDDRY
(s_chage chaud}
(lumi_reallum_e)
LOCK
(verrouillage}
RESET
(remise 6 z_ro}
6
Vous pouvez retarder la mise en marche du cycle de lavage jusqu'('_2/4heures(selonlemodule).
Appuyez sur la touche DELAYSTART(mise en rnarche retard_e) pour choisir duns combien
d'heuresvous voulezmettre en marche votre lave-vaisselle,puis appuyez sur la touche
START/RESET(raiseen marche/remise (_z_ro).
Lave-vaisselle (] panneau de commande frontal : Votre lave-vaissellecompte le d@laid@sir@
et commence automatiquement @I'heurechoisie.
Lave-vaisselle _ panneau de commande sur le dessus : Apr@sque vous ayez ferm@sa porte,
votre lave-vaisselle compte le d@laid@sir@et commence automatiquement d I'heurechoisie.
NOTE: Pourannuler la mise en marche retard@eavant le d@butdu cycle,appuyez @plusieurs
reprisessur latouche DELAYSTART(miseen marche retard_e)jusqu'@ce queI'@crann'indique
plus rien.
Cette option est conqu pour faire fonctionner plus Iongtemps I'@l@mentde chauffage, afin d'am@liorer
le rendement du lavage et du s@chage.
NOTE:vous ne pouvez pas choisir ce compl_ment avec le cycle RINSEAND HOLD (rin_age
et attente)
Conqupour lessalet@scoriaces et/ou ayant s@ch@,pour lestaches ayant grill& Cette option DOlT
_tre s_lectionn_e AVANTde d_marrer le programme. L'option PRE-WASH(Pr_lavage)prolonge de
15minutes et I'option STEAMPRE-WASH(Pr_lavagevapeur)de 26 minutes Iodur_e du programme.
NOTE:vous ne pouvez pas choisir cette option avec le cycle RINSEAND HOLD[rin_age et attente).
Lorsque I'option HEATEDDRY(chaleur s#che)est d@sactiv@e,la vaisselles@chera6 I'air.Lesmod@les
dont le panneau de commande est sur ledessus de I'appareil ant un ventilateur pour favoriser le
processusde s@chage.Leventilateur peut fonctionner pendant/4 heures apr@sque le voyant CLEAN
(propre)sesoit allum& Sivous lesouhaitez,le ventilateur peut @tre@teinten appuyant surn'importe
quelletouche.
D@sactiveroption chaleur des@chage.La vaisselles@cheranaturellement @I'air(pour leslave-vaisselle
panneau de commande frontal) ou (_raide d'un ventilateur (pour les lave-vaisselle@panneau de
commande sur le dessus)pour @conomiserder@nergie.
Allume lesyst@medechauffage pour un s@chageplus rapide.Cetteoption augmentera ladur@e
du cycle de 8 @38minutes suivant le cycle choisi. Sur lesmod@les@panneau de commande sur
le dessus,le ventilateur continuera @fonctionner jusqu'(_2 heures apr@sque levoyant CLEAN
(propre)sesoit allum@pour favoriser le processus de s@chage.Sivous lesouhaitez, leventilateur peut
@tre@teinten appuyant surn'importe quelle touche. NOTE: Ne peut @tres@lectionn@Iorsdu cycle
RINSEAND HOLD (rin_age et attente).
Vous pouvezverrouiller lescontr61espour _viter toute s_lection.Ou bien, vous pouvezverrouiller les
contr61esupr_s uvoir choisiun cycle.
Lesenfants ne peuvent pas mettre en marche accidentellement votre lave-vaisselle si vous avez
choisi cette option.
Pourd_verrouiller lescontr61esde votre luve-vaisselle,appuyez sur la touche HEATEDDRY(s_chage
chaud) et maintenez-la appuy_e pendant 3 secondes. Levoyant situ_ au-dessus de latouche LOCK
(verrouillage) s'_teindra. Pourverrouiller votre lave-vaisselle,appuyez sur lu touche HEATEDDRY
_s_chogechaud) pendant 3 secondes.La lumi_re situ_e au-dessus de la touche LOCK(verrouillage)
s'allumera (ON).
Pourchanger de cycle apr@sled@butdu lavage.
Lave-vaisselle (] panneau de commande frontal : Appuyez sur la touche START/RESET(raise
en marche/remise _ z_ro) pour annuler le cycle. Lalumi_re START/RESET(miseen marche/remise
z_ro) clignote pendant que I'eauest pomp_e en dehors de votre lave-vaissellesi n_cessaire.
Celaprend environ 2 minutes.
Lave-vaisselle _ panneau de commande sur le dessus :Ouvrez lentement la porte pour @viter
les _claboussures.Appuyez sur la touche START/RESET(raiseen marche/remise (_z_ro)pour annuler
le cycle. Sila lumi_re START/RESET(raiseen marche/rernise _ z6ro) clignote,fermez la porte jusqu'_
ceque I'eau salt pomp6e en dehors de votre lave-vaisselle(celaprend environ 2 minutes)et la lumi_re
cessede clignoter.
Quand la lumi_re cesse de clignoter,vous pouvez reprogrammer votre lave-vaisselleet le remettre
en marche.
Page 27

www.electromenagersge.ca
h4ise en marche
m
Lave-vaisselle6panneaudecommandefrontal
Fermezetverrouillezla portedevotrelave-vaisselleet choisisseztecycleet lescomplementsdEsirEs.AppugezsurlatoucheSTART/RESET
(rniseenmarche/remiseOz_ro/pourcommencerlecycle.L'eaucommenceimmEdiatement_emplirvotrelave-vaisselleet,environ60
secondesplustard,lelavagecommence.
Ouandla portedu lave-vaisselleest bienfermEeet verrouillEe,leslumi_resdu panneaudecontrOleindiquentlesderniersrEglageschoisis.
Sivousnevoutezrienchanger_]cesrEglages,appugezsimplementsurlatoucheSTART/RESET(raiseenmarche/remiseOz_ro)pour
commencerlecycle.
Ouandlaporte estfermEe,lesvogantslumineuxs'EteignentsivousnechoisissezpaslatoucheSTART/RESET(raiseenmarche/remise
Oz_ro)en5 minutes.Pourremettreenmarchelesvoyants,ouvrezetfermezlaporteouappugezsur n'importequelletouche.
Lave-vaisselle6panneaudecommandesurledessus
Apr_savoirchoisilecycleetles optionsdEsirEes,appuyezsurlatoucheSTART/RESET(raiseenmarche/rernise_ z_ro)pourpr@arervotre
lave-vaisselle5 commencersoncycle.Fermezla portepourcommencerlecycleoucommencerlecomptedetemps duDELAYSTART
(raiseenmarcheretard_e).Ouandlecyclecommence,I'eaucommence6 remplirvotrelave-vaisselleet, environ60secondesplustard,
le lavagecommence,
Votrelave-vaisselleindiquetoujoursvotredemierchoixde cycleet d'options.Sivousnevoulezrienchanger5 cesrEglages,appuyez
simplementsurlatoucheSTART/RESET(raiseenmarche/remiseOz_ro)pourpr@arervotre lave-vaisselleetfermezla portepour
commencerlecycle.
Egalement,s'itseproduitunepannedecourant,lescyclesNORMALetHEATEDDRY(sEchagechaud)sentautomatiquement
programm#s,Choisissezun nouveaur#glageetappuyezsurlatoucheSTART/RESET(raiseenmarche/remiseOz#ro/pour commencer
unnouveaucycle,
Ouandlaporte estouverte,tesvoyantsindicateurss'#teignentsilatoucheSTART/RESET(rniseen marche/remiseOz#ro/n'estpaschoisi
donsles5minutes,Pourmettreenmarche1'Ecran,ouvrezetfermezla porteou appuyezsurunetouche,
Propre
Luve-vaisselle6panneaudecommandefrontal
Levogant CLEAN(propre) s'allumera et vous entendrez un double bip Iorsquele cycle de lavage sera terminG.Sur certains
mod_les,levogant CLEAN(propre) s'@eindra_ I'ouverture de la porte. Surd'autres mod_les, levogant CLEAN(propre)
restera allum_jusqu'(_I'ouverture de la porte, puis au verrouillage celle-ci oujusqu'(_cequa vous appugiez sur une touche
Iorsquela porte est encore verrouill_e.
Lave-vaisselle6panneaudecommandesurle dessus
Levogant CLEAN_propre)s'ellumere et vous entendrez un double bip Iorsquele cycle de levage sere terminG.Levogent
CLEAN(propre) restera allum_jusqu'(_ I'ouverture de le porte, puis eu verrouillege celle-ci oujusqu'_ ceque vous eppugiez
sur n'importe quelletouche.
TOUSLESMODELES:pour6teindrelesignalsonoredefin decycle(oulerEactiversivousl'ovez6teintouporovont),oppuyezsurIotouche
HEATEDDRYIs_chagechaud)5foisoucoursde3secondes.UntriplebiprEsonnepourindiquerqueI'optionsonore6Iofin ducycleo 6t6
octi%e.
Vogants iumineux qui clignotent.
Vayants indicateurs d'_tat
START/RESET
(raise en marche/remise _ z_ro_
Cequace/asignifie
Vousovezinterrompule cycleenoppuyontsurIotoucheSTART/RESET(miseenmarche/remise_ z#ro)
ouuneponnedecourontestsurvenue.Levoyonts'orr6tededignoteropr_squevotreIove-voissellese
soitvidederoutesoneou.Donslecosd'uneponnedecouront,leIove-voisselleseremettroenmorche.
Produits de lavage de vaisseile recommand .s.
GErecommondelesproduitssuivontspour sesIove-voisselle:
m Pourvotredistributeurmanueldedetergent,lesdetergents
deIove-voisselleoutomotiqueCascade®et Electrasol® en poudre,
liquideouengelsentrecommondEs.
m PourvotredistributeurdedetergentSmortDispense"D,utilisez
seutementlesdetergentsrecommondEsdentIolistesetrouve
_]Iopage10dece manuel.
m Lesagentsderi%ogeJet Dry®ouCascadeCrystalClear®
pourenleverlestachesetempOcherunenouvellepellicule
deseconstituersurvosassiettes,vosverres,votreargenterie,
yescasseroleset vosinstrumentsen ma%repiastique.L'utilisetion
d'un agent de rinc;ageamEliore 6galement lesEchage.
Cascade®PlasticBoosternopourentever@I'intErieurdevotre
lave-vaissellelestachesrougeslaissEesparcertainsaliments
_]basedetomate.
CeramaBryte®nettoyantpourappareil61ectrom6nagerenacier
inoxgdablepournettoyerlepanneauext6rieurenacierinoxydable
deslave-vaisselleGEetProfile"° (pourtesmod@les6 panneau
extErieurenacierinoxydableseulement).
Page 28

Utilisation du iave-vaisselle.
Vdrifiezla tempdrature de I'eau
L'alimentation d'eau doit _tre _ au mains 120 °Fet au plus _ 150 °Fpour bien laver et emp_cher tout
dommage _ la vaisselle. V4rifiez la temperature de I'eau avec un thermom_tre _ p_tisserie ou _ viande.
Ouvrez le robinet d'eau chaude situd le plus pros de votre lave-vaisselle, placez le thermom_tre dans
un verre et laissez I'eau coder dans le verrejusqu'a ce que la tempdrature s'arr_te de monter.
Utilisezun agent derinqageJet-Dry®ou CascadeCrystalClear®
L'agent de rin_age Jet-Drg ®ou Cascade Crystal Clear ®am4liore le s4chage, enl_ve les taches et
emp_che la constitution d'une nouvelle pellicule sur vos assiettes, vos verres, votre argenterie, vos
casseroles et vos mati_res plastiques.
Remplissuge du distributeur R_glage de I'agent de rin_age
Le distributeur d'agent de rinqage contient
3,5onces d'agent de rinqage. Normalement, cette
quantit@doit durer environ un mois.Essagezde
conserver le distributeur plein,mais sans lefaire
d_border.
r_ Assurez-vousque laporte de votre lave-vaisselle
soit bien ouverte.
Tournezle bouchon du distributeur vers la
gauche et soulevez-le.
Ajoutez I'agentde
rinqagejusqu'_ ceque
la fen@treindicatrice
semble pleine.
r41 Nettogez tout agent
de rinqage renvers@
I'aided'un linge Fen@tre
humide, indicatrice
r_ Remettezen place le
bouchon du distributeur.
Capuchondu
distributeur
Vouspouvez r@glerle montant d'agent de rinqage
lib@r@dans le lavagefinal. Ler@glaged'usine est au
milieu. Sivous avezdes marques de calcium (eau
riche en sels)sur les assiettes,essagezun r@glage
plus@lev&S'ilga de la mousse, essagezun r@glage
plus bas.
Ajuster le r_gluge :
Enlevez le bouchon du
distributeur ettournez
ensuite le r_glage dans
le sens contraire des de
aiguillesd'une montre rinqagede
pour augmenter le I'agent
montant d'agent de rinqage ou dans le sensdes
aiguillesd'une montre pour r_duire la quantit_ d'agent
de rinqage distribu&
Prdparation de la vaisselle avant son chargement
m Vous n'avez pas besoinde pr@-rincerlesd_chets m Enleveztoutes lesquantit_s importantes de
alimentaires normaux, d_chets alimentaires.
m Grattez lesd@chetsimportants, lesas,lescure-
dents,les peaux et lesgraines.
Vous oyez oub/id de/a vaisse//e?
Vous pouvez ajouter de la vaisselle @tout moment
avant que le lavage principal ne commence.
r_-i Touchez la poign@epour d@verrouiller la porte.
r_ N'ouvrez pas la porte avant que lesjets ne
se soient arr@t@s.De la vapeur peut s'@chapper
du lave-vaisselle.
8
m EnlevezlesI_gumes(_feuille,lesparures de viande
et les montants excessifsde graisse ou d'huile.
r_l Ajoutez la vaisselle voulue.
[_1 Fermez la porte.
Page 29

www.electromenagersge.ca
o Distributeur manuel de ddter
" " " ent
Quelquesmod@lessont@quip@savecundistributeur
automatiqueded@ergentliquidepourlave-vaisselle Nombre
(SmartDispensenD)et d'undistributeurmanuel.Vouspouvez
utiliserI'undecesdistributeurs,maisne lesutilisezjamais Hoinsde 4
lesdeuxenm_metemps.
SmartDispense MD
i ii .........."!i i ///
Lecouvercledudistributeurmanuels'ouvrependant
lecycledelavage.SivousutilisezSmartDispense%
laissezouvertlecouvercledudistributeurmanuel
avantdecommencerlecycle.
Pourledistributeurmanuel,lesd_tergentsdelave-
vaisselleautomatiqueCascade®etElectrasol®ont _t_
recommand6s.Cedistributeurconvient_desd@ergents
sousformedepoudre,liquide,geloupains.IIestimportant
derangerlesd6tergentsen poudreouenpainsdans
unendroitfraiset secdin deconserverleurefficacit6.IIest
doncd6conseill6deverserled6tergentdansledistributeur
manuelavantdelaverlavaisselle.
Remplissagedu distributeur manuel
ded_tergent
Laquantit_ded@ergentn_cessairepourvotrevaisselle
d@enddela duret_oude ladouceurdevotreeau.Avecde
I'eaudure,vousavezbesoindeplusded6tergent.Avecde
I'eaudouce,vousavezbesoindemoinsded6tergent.
Prot6gezvotrevaisselleetvotrelave-vaisselleencontactant
leservicedeseauxeten vousrenseignantsurladuret6de
votreeau.Douzegrainset plusestuneeauextr6mement
dure.IIestrecommand6d'utiliserunadoucisseurd'eau.
Sivousn'enutilisezpas,cela pourraitmener_ une
accumulationdechauxdanslerobinetd'eauquipourrait
ensuitecollerenpositionouverteetprovoquerune
inondation.Tropded6tergentavecuneeaudouce aourrait
cr@rdesvoilessurlesverres,ce queI'onappelle
unegrovure.
UtilisezI'informationdutableausuivantcommeguidepour
d6terminerlaquantit6ded6tergentdelave-vaisselle
automatique0mettredansledistributeur.Vouspouvez
utiliser lesd6tergents de lave-vaisselleautomatique
en poudre, gel,liquide ou des pains.
q)uandvousutilisezdespainsded6tergentpourlave-
vaisselleautomatique,placezsimplementunpainde
d6tergentdanslasectionprincipalede lavageetfermez
lecouvercle.
Distributeur manuel
de d@ergent
Tassesde d_tergent
de grains
Remplirlatassejusqu'_ la douce
4 _ 8 Remplirla tassejusqu'alagraduation
8 _ 12 Remplirlatussejusqu'_ la
Plusde 12 Remplirlatassede luvage
principuleet latasse de pr_lavuge
Pourdeschargestr_ssouill@s,utilisezunpeuplus
ded@ergent.Silatemp@aturedeI'eauestsup@ieure
1/40°F(60°C),utilisezunpeumoinsded@ergent.
Douce Mi-douce Mi-dure Extr6mementdure
pourrempfir
graduation(1/] detasse)
au milieudouce(2/3detasse)
graduation au milieudure (tusse
enti_rement remplie)
LAVAGEPRINCIPAL
Pour/eschargesparticulibrernentsa/es,uti/isez/e cycle
dechaudronsou/ecyc/ede/avagesa/e.
N'UTILISEZMS DEDETERGENTDE LAVAGEA LAMAIN
m
m
NOTE:utiliserund_tergentquin'estpussp_cifiquement
conqupourleslove-voissellesremplirot'opporeildemousse.
Pendontlenettogoge,cettemoussed_borderodes_ventsdu
love-voisselle,tomberosur
teploncherdetocuisinequideviendromouill_.
Puisquebeaucoupdecontenantsded_tergentse
ressemblent,rangezled_tergentdelave-vaisselledons
unendroitdistinctdetousles autresnettogants.Montrez
toute personnequi utiliseralelave-vaissellelebon
d_tergent_ utiliseretoOilestrang_.
Bienquecetteerreurnecauserapasdedommages
permanentsaulave-vaisselle,votrevaisselleneserapas
bienlav@aveccetypeded_tergentnonformul_pour
leslave-vaisselles.
Page 30

Utilisation du iave-vaisselle.
Distributeur de ddter ant SmartDispense (certainsmoddles)
Celave-voisselle peuvent comporter la fonction
SmartDispenseMe,une caract_ristique qui distribue
automatiquement le d_tergent liquide pour lave-
vaisselle automatique dans chaque cgcle en se
basant sur le niveau desalet_ de la vaisselle et de
duret_ de I'eau.
Avant d'utiliser le distributeur de d_tergent
SmartDispenseMe,vous devez d'abord le remplir, f
M_me si n'importe quel d_tergent pour distributeur .............................
automatique seas forme liquide ou de gel convient
au distributeur SmartDispense"D,il est important
de savoir qu'il existe une difference entre les divers
d_tergents. La plupart des d_tergents pour
distributeurs automatiques sent (_base de
javellisant (comma Cascade®ou Electrasol®),tandis
qua d'autres contiennent des enzgmes (comme
Cascade Complete®ou Electrasol®Advanced "° Gel).
Prenez soin de ne pus m61anger un d6tergent
6 base dejavellisant avecun autre 6 base
d'enzgme, cela pourrait faire tiger les
d6tergents, ce qui aura pour effet d'obturer
le distributeur SmartDispense Me.
V_rifiez I'_tiquette sur le d_tergent pour savoir s'il
contient du javellisant ou des enzgmes. Nous vous
conseillons d'utiliser le m_me tgpe de d_tergent
pour remplir le syst_me SmartDispense MD.
ATTENTION! N'ajoutez
absolumentjamais de d_tergent en poudre, en
pains ou tout autre savon ou d_tergent liquide
utilis_ normalement pour laver la vaisselle (_la
main dans un _vier. N'utilisez que du d_tergent
liquide ou gel sp_cifiquement conqu pour
le lave-vaisselle automatique.
Pour ouvrir le distributeur afin de le remplir,
poussez vers le bas et tournez lecapuchon bleu
dans le sans oppos_ 5 celui des aiguilles d'une
montrejusqu'5 ce qua lecapuchon est desserr_.
Retirez le capuchon.
Dirigez la bouteille de d_tergent vers I'ouverture de
la porte et commencez _ remplir.
Le distributeur contient 45 oz de d_tergent liquide
pour lave-vaisselle (bouteille de taille normale).
Tournez dans le sens des aiguilles d'une montre.
Quand le distributeur est plein, remettez le bouchon
sur le trou d'acc6s et tournez dans le sans des
aiguilles d'une montrejusqu'5 ce qu'il soit serf6
pour assurer qua de I'eau ne p6n6tre pas dans le
distributeur SmartDispenseMe.S'il taste des r6sidus
sur la porte, ils seront lav6s pendant le cgcle
suivant.
Un voyant s'allumera pour vous avertir que
le distributeur doit _tre rempli (_nouveau. Apr_s
que vous agez rempli le distributeur, levogant
ne s'6teindra qu'_ la fermeture de la porte.
Un distributeur plain dure environ 1 mois
d'usage normal.
Levoyant --""'-_0 LOWOETERGENT 0 DRYING
s'allumera
Iorsqu'il 0 SENSING ® SANITIZED
faut _ WASHING ® CLEAN
remplir (l'apparence peut varier)
...._i'
\
i
STATUS
BulkDispense
Ouvrez la porte a un angle confortable pour
remplir le distributeur.
10
NOTE:Sivous n'utilisez pas la fonction
SmartDispenseMDet que vous d6sirez 6teindre le
vogant lumineux LOW DETERGENTLED(d_tergent
has), appugez _ 5 reprises sur la touche ADDED
HEAT(chaleur +)en mains de 3 secondes. Trois
bips sonores seront 6mis et le vogant lumineux
s'6teindra. Pour r6activer levogant, appugez
simplement _ 5 reprises sur la touche ADDED HEAT
(cheleur +)en mains de 3 secondes.
Page 31

www.electromenagersge.ca
Calibrage de duretd de I'eau de
ent SmartOispense
Avantsapremiereutitisation,vousdevezcalibrervotre
lave-vaisseileenfonctiondeladuret6devotreeau.Veuitlezsuivre
lesinstructionssuivantespourcalibrervotrelave-vaisselteen
fonctiondeladuret6devotreeaud'atimentation.
Trouvezladuret_ de votre eau d'alimentation
Donstesacquicontenaitcesinstructions,voustrouverezun
paquetdebandesdetestdeduret6del'eau.Lisezlesinstructions
surlepaquet,enlevezlabanded'essaietsuivezlesinstructions
pourtrouverledegr6deduret6devotreeaudurobinet.Vous
utitiserezcetteinformationpourcatibrervotrelave-vaissellecequi
vouspermettradedistribuerlemontantoptimalded_tergent.
Indicationde labanded'essaideduret_d'eau
EAU le lave-vaisselJe
DOUCE
0 ROUGE _ 1
2 ROUGE _ 3
I 1ROUGEI[]E]Ci]E]Z] 2
3 ROUGE _ 4
4 ROUGE _ 5EAU
DURE
Calibragedes modules6 panneau de commande
frontal 6 12 boutons avecafficheur 6 3chiffres
cf ..... ......... :zX'CZ _. ml b D
Appuyersur lestouchessimultan_ment. Afficheur []
r_ Fermezetverrouillezlaporte(vogantsallum6s,
lave-vaisselleaurepos).
J2] Appuuezenm_metempssurlestouchesCOOKWARE
(vaisselle)ouDEEPCLEAN(nettogageenprofondeur)
pendant3secondes.L'afficheurindiqueraunnombre
de1to5.Cenombreindiqueleniveaudeduret6deI'eau
actuetlementr6gt&
r_ AppugezsurlatoucheCOOKWARE(voisselle)ouDEEP
CLEAN(nettogugeenprofondeuflpouraugmenter
lavateurousurlatoucheNORMALpourl'abaisser.Utilisezle
nombreobtenuaveclabanded'essaietletableauci-dessus
pourr_glerleniveaudeduret6deI'eau.
E] Apr_savoirr6gt6laduret6deI'eau,appugezsur
h touchSTART/RESET(d_marrage/r_initialisation)
poursauvegarderhconfigurationetreveniraumodenormal
defonctionnementduhve-voisselte.
Calibragedes modulesde panneau de commande
sup_rieur6 7boutons avecafficheur 6 3 chiffres
....................... ................@
Afficheur Appuyersur lestouchessimultan_ment.
E] OuvrezIoporteetoppugezsurunetouche(autre
quelatoucheSTART[de'marrage])pouractionner
lesvogants.
Appugezenm6metempspendant] secondessurles
touches"Up"(verslehaut)f_ etDELAYHOURSImiseen
marcheretard6e).L'afficheurindiqueraunnombrede16 5.
Cenombreindiqueleniveaudeduret6deI'eau
actuellementr6gt&
La valeur
6 entrer dans
T
distributeur
r31 AppugezsurIotouche"Up"(haut)f_ pouraugmenter
lavateurduniveauousurlatouche"Down"(bas)
pourl'abaisser.Utitisezlenombreobtenuavecla bande
d'essaiet letableau6gauchepourr6gterleniveaude
duret6deI'eau.
E] Apr6savoirr6gt6laduret6deI'eau,appugezsurlatouche
START/RESET[d6marrage/r#initialisation)poursauvegarder
h configurationetreveniraumodenormalde
fonctionnementduIove-voissetle.
Calibrage des modules sans afficheur 6 3 chiffres
Commandessurledevant
r_ Fermezetverrouitlezlaporte(vogantsallum6s,
lave-vaisselleaurepos).
J2] Appugezenm6metempssurlestouchesCOOKWARE
(vaisselle)ouDEEPCLEAN(nettogageen profondeur)
etDELAYHOURS(raiseenmarcheretard_e)pendant
3secondesTouslesvogantss'illuminerontet vous
entendrezde16 5bips Lenombrede bipsindique
lavaleurr@llede laduret6de I'eau
r31 Pourmodiferlaconfiguration,oppugezsurlatoucheDELAY
HOURSImiseenmarcheretard6e)6autantdereprises
qu'aunombrecorrespondantdelacolonne6gauche,
laquelleindiquelavaleurdeladuret6deI'eau.Lepanneau
6metunbipchaquefoisquevousappugezsurlatouche.
Lorsquevousoyezfinid'appugersurlatouche,vous
entendrezuneconfirmationcorrespondant6autantdebips
quelenombredefoisquevousavezappug6surlatouche.
Silenombredebipsn'estpascetuiquevousd6sirez,
recommencez6oppugersurlatoucheDELAYHOURS
pourentrerunnouveauniveaudeduret_deI'eau.
['_ Apr6savoirr6gt6taduret6deI'eau,appugezsur
latouchSTART/RESET(d6marrage/r6initialisation)pour
souvegarderIoconfigurationetreveniraumodenormal
defonctionnementduhve-voisselle.
Cammandessurlehaut
E] Ouvrezh porteetoppugezsurunetouchepouractionner
lesvogants.
[_ Appugezenm@metempspendant] secondessurles
touches"Up"(verslehaut)_ etDELAYHOURSImiseen
marcheretard6eLTouslesvogantss'illuminerontetvous
entendrezde16 5bips.Lenombredebipsindiquelavateur
r6elledeladuret6deI'eau.
r31 pourmodifierlaconfiguration,appugezsurlatoucheDELAY
HOURS(miseenmarcher_tard_0autantdereprisesqu'au
nombrecorrespondantdelacolonne5gauche,laquetleindique
lavaleurdeladuret@deI'eau.Lepanneau@metunbipchaque
foisquevousappugezsurlatouche.
Lorsquevousavezfinid'appugersurlatouche,vous
entendrezuneconfirmationcorrespondant6autantdebips
quelenombredefoisquevousavezappug6surlatouche.
[-_ Silenombredebipsn'estpasceluiquevousd6sirez,
recommencez6appugersurlatoucheDELAYHOURS
(miseen marcheretard@)pourentrerunnouveauniveau
deduret_deI'eau.
[6-1 Apr_savoirr_gt_laduret_deI'eau,appugezsur
latouchSTART/RESET(d#marrage/r#initialisation)pour
sauvegarderlaconfigurationetreveniraumodenormal
defonctionnementdulave-vaisselle.
NOTE:Vousdevriezrecolibrerlelave-voisseltesilesconditions
deduret6deI'eauchangentcommedonslecosdeI'ajoutou
duretraitd'unsgst6med'adoucisseurd'eau6votredomicile.].].
Page 32

Chargement despaniers de votre lave-vaisseile.
Pour obtenir de bons r4sultats, suivez ces directives de chargement. Les caract4ristiques et I'apparence des paniers et
des paniers 6 argenterie peuvent varier selon votre module.
Panier sup_rieur
Bienque la clagette sup6rieure soitdestin6e
en premier lieuaux verres,aux tasses etaux
soucoupes,vous pouvezg mettre des
casserolespour bien leslaver.Lestasseset les
verrestiennent le mieux le long descBt6s.
C'estaussi un bon endroit pour les mati@res
plastiques.
Cepanier(certains mod@les)peut @treplac6e
en position haute ou basse pour faciliter le
rangement. Unporteur de verres h vin
(certainsmod@les)tient lesverres hvin pour
un bon lavage.
Certainsmod@lesont despaniers de tasses
en m6tal form6, qui peuvent contenirjusqu'h
12 verres h vin (comme dans I'illustration).
Comme les verres h vin ont desformes
diverses,apr@slesavoir mis,appugez-les
doucement dans le panier pour qu'ils ne
touchent pas le haut de votre lave-vaisselle.
Certainsmodulesont un sgst@mede clagette
inclin@e,qui vous permet d'inclinervos plats,
comme lestassesde caf@,pour mieux
nettoger et s@cherplusrapidement. Pour
mettre en place lesdents tirez le leviervers
I'avant, puis laisseztomber lesdents en
position, puis laissezlelevier.
Lepanier sup@ieurest conquepour toutes
sortesd'ustensilesde cuisinede formes
diverses.Vousdevez placer lessoucoupes,
lesbolsh m@langerettousles autres article
h I'envers.Lestiges pliantes (surcertains
mod@les)permettent de ranger lesarticles
difficilesh caser ou extra-grands.
Mettezlesarticles en mati@replastique
lavables en lave-vaissellesur deuxtiges
repliablessi possible.
Assurez-vousque tousles articles en mati_re
plastique soient bien cal_s et qu'ils ne
risquent pasde tomber sur le chauffage.
Assurez-vousqu'aucun article ne sorte en bas
de laclagette et ne bloquela rotation du bras
d'arrosage du milieu. Celapeut occasionner
un mauvais lavage desarticles places dans
le panier sup6rieur.
V6rifiezqu'aucun article ne bloque la rotation
du bras de lavage.
NOTE:Las_lectionSingle Rack Wash (un
seulpanier) n'effectue que le lavage du
panier sup6rieursur les modules qui offrent
cette fonctionnalit_. Sivous choisissezcette
fonctionnalit@,ne d_posezpas de vaisselle
dans le panier inf@ieur.
Panier sup_rieur ajustable
La position normale de votre panier ajustable
est en haut, cequi permet aux articles plus
grands, situ6sdans le panier du bas, d'avoir
un maximum d'espace.Sivous avez des
verres h vin hauts,des gobelets ou d'autres
articles longs dans le panier sup6rieur,vous
\
pouvez ajuster ce panier afin de la mettre en
position basse.
tlIIifJr
I II II I1 II II II I1 II II II
Panier inf6rieur
Le panier inf6rieur est conque pour les
assiettes,lessoucoupeset lescasseroles.
Vousdevez mettre les articles de grande
taille,comme lesgrils-I_chefrite et les
plateaux h p6tisserie,lelongdu cBt6 gauche.
Lesassiettes h servir,lescasseroleset les bols
vont le long des cBt6s,dans lescoinsou h
I'arri@re.LecBt6sale de la vaisselledoit @tre
tourn6 vers lecentre du panier.Sin6cessaire,
vous pouvez mettre lesverreset les tassesde
grande taille dans le panier inf6rieur pour
12
faciliter le chargement.
Pour abaisser le panier, soutenezle poids
du panier avec vos mains comme I'indique
I'illustration,appugez sur lesdeux taquets
avec vos doigts environ 1/4" vers I'int6rieur
du panier,comme I'indiqueI'illustration,et
guidez le panier vers le bas en position basse.
Pour faire monter le panier en position
haute, tirez sur le centre du chhssisdecBt6
du panierjusqu'h ceque le panier sefixe
en place.
Aussi,faites attention de ne pas laisser
une partie d'article comme unmanche de
casseroleou une poign6e de plat,sortir par
le bas du panier inf@ieur.Celapeut bloquer
le bras de lavage et occasionner un mauvais
lavage.
Destiges pliantes (surcertains mod@les)
facilitent le rangement d'articles
extr_mement grands ou difficiles 6 caser.
Vouspouvez souleverces tiges vers le haut
ou lesrepliervers le bas pour faciliter le
rangement dans le panier inf6rieur.
Page 33

www.electromenagersge.ca
Pommededouche,
num6rode pi6ceWD12X10134
Appuyez avec .._.___/_
votre pouce Enlevez le capuchon
pour enlever
le taquet
Enl#vement du panier sup#rieur
Pour enlever le panier inf_rieur :
La clagette inf_rieuredevotre nouveau rl]
lave-vaissellepeut recevoir de grands articles.
Pour cefaire,enlevezsimplement laclagette
sup6rieureet installezune pomme de douche
sur le gicleur qui alimente normalement r_
la clegette sup@rieureen eau.Lapomme
de douche n'est pas comprise avec le
lave-vaiselle,mois on peat se la procurer r3]
aupr6s de GE.Communiquezavec GEau
1.800.626.2002ou visitez lesitege.com et r_
demandez I'article <<NozzleSpragAsm>>,
num#ro de pi6ceWD!2X10134.
Lesconsommateurs ¢anadiens peuvent
r_ lebec.
commander sur lesite electromenagers.ca
24 heuresparjour, 7jours par semeine, ou
par t616phoneau 1.800.661.!616 durant les
heuresd'affaires normales.
NOTE: N'utilisezpas lecgcle de TOPRACK
ONLY(certains mod61es)(paniersup6rieur
uniquement) avec cette fonction. Lecycle <<
SingleRackWash >>n'effectue qua le lavage
de la vaisselled_pos6edans le panier
sup_rieur.Lecycle recommand6 pour
I'utilisation du panierinf6rieur seulement est
E] Remplissezensuite le panier inf6rieur et
le cgcle COOKWARE(casserole).
NOTE:Lapommededouchedoit@treenplace
aveclaclayettesup@rieureenlev@.Sivousne
I'installezpasbien,vouslaverezmal etvotrelave-
NOTE: N'oubliezpus d'enlever la pomme
de douche avant de remettre en place le
panier sup_rieur.
vaisselleferadubruit.
Appugezavec votre pouce pour
enlever letaquet et enlevezles
capuchons d'extr_mit_ de devant
de chaque c6t_ des rails.
Tirezle panier tout droit et enlevez-la
des rails.
Remettezen place les capuchons
d'extr6mit&
Poussezlesrailsjusqu'au fond du
lave-vaisselle.
Faitesglisserla pomme de douche sur
•Pomme
dedouche
commencez votre cycle.
Panier en une piece (sur certains
modeles)
Panier en trois pieces {sat certains
modeles)
Nelaissezaucun
article sortir par
le bas.
Pourenleverlespaniers desextr6mit@,
saisissezlepanierauxcoinsoppos@et
faitesglisserpours@arer.
Panier a argenterie
Pourcharger I'argenterie,poussez
simplement la poign_e ajustable d'un c6t6
ou de I'autre (surcertains modules).Mettez
I'argenterie dans le panier amovible avec les
poign6es de fourchette et de couteau vers
le haut pour prot_ger vos mains. Placezles
cuillers dans le punier avec les poign_es
vers le bas. M_langezles couteaux, les
fourchettes etles cuillers de mani@re6ce
qu'ils ne soient pascoll_s lesun aux autres.
R_partissez@galement.Mettez lespetits
articles en mati_re plastique,comme les
cuillers 6 mesurer et los bouchons de petits
contenants, en basdu panier 6 argenterie
avec I'argenteriesur eux.
Lepanier 6 argenterie en une pi@ce(sur
certains modules)peut @treplac@6 I'avant,
du cBt@droit ou 6 I'arri_redu panier inf@rieur.
Denombreusesoptions existent pour le
panier 6 argenterie en trois pi@ces(sur
certains modules)dans votre lave-vaisselle.
Lepanier entier est conqu pour aller du cBt@
droit du panier inf@rieur.Enoutre,chaque
extr@mit_du panier est amovible pour
faciliter lechargement de I'argenterieet
remplir losbesoinsde capacit@du panier
inf@rieur.
Vouspouvez former lescouvercles des
paniers du centre et de chaque c6t@(sur
certains modules) pour y mettre des petits
articles.Vous pouvez placer losarticles longs
sur le plateau du panier sup@rieur.
13
Page 34

Chargement despaniers du iave-vaisselle.
Caract6ristiques de paniers suppl6mentaires (surcertains modules)
Plateau de coutellerie
Le plateau de coutellerie contientjusqu'(_
quatre grand couteaux, comme un couteau
de d6coupage, un couteau de chef, un
couteau _ pain, etc.qui sont trap longs pour
aller dans le panier _ argenterie.
Accrochezle plateau (_I'arri@redu panier
sup6rieur.Mettez lescouteaux entre lesguides
(comme I'indiqueI'illustration).
Tiges 6 bol
Lestiges sp6ciales(_bol dans lepanier
inf6rieur facilitent le chargement. IIssont
utiles pour les bols_ servir ou d'autres grands
bols.
Pour utiliser lestiges (_bol, d6pliez lesdeux
Ces hges Tiges
se d6plient grand bols
rang6es de tiges flexiblesenface destiges
bol et chargez lesbolsexactement comme
vous le feriez dans le panier sup6rieur.
Chargement des couverts...
Suivez les directives suivantes pour mettre 10 couverts. Les caract_ristiques et I'apparence des paniers et des paniers
6 argenterie peuvent varier par rapport 6 votre module. NOTE: on devrait charger I'argenterie dons les fentes
du couvercle du partier pr_vues 6 cet effet.
Panier sup6rieur--lO couverts
Suivez les directives suivantes pour mettre 12 couverts. Les caract_ristiques et I'apparence des paniers et des paniers
6 argenterie peuvent varier par rapport 6 votre module. NOTE: on devrait charger I'argenterie dons les fentes
du couvercle du partier prdvues 6cet effet.
Panier inf_rieur--lO couverts
1/4 Panier sup_rieur--12 couverts Panier inf_rieur--12 couverts
Page 35

Soins de votre lave-vaisselle. w .ele t ome.oge ge. o
Nettoyerlepanneaudela porte
ext_rieur
Avantdenettoger lepanneauavant,assurez-vous
desavoirqueltgpedepanneauvousavez.
Reportez-vousauxdeuxderni@reslettresdevotre
num@rodemo@le.Cenum@rosetrouvesurla
paroide lacure,du c6t@gauche,juste@rint@rieur
dela porte.Sivotrenum@rodemo@lesetermine
par BB,CC,WW, SAou parBG,alorsvousavez
unpanneaudeportepeinte.Sivotrenum@rode
mo@lesetermineparSS,alorsvousavezun
panneaude ported'acierinoxgdable.Sivotre
num@rodemo@lesetermineparCS,alorsvous
avezunpanneaude porteCleanSteel.
Suivezlesinstructionsplusbaspournettogerle
panneaude portedevotremod@leprecis.
Panneaudeporte peinte(numdrosdemoddle
seterminantpar BB-noir,CC-bisque,WW-blanc,
SA-argent mdta!lique ou BG-noir graphite)
Utilisezunchiffonpropre,doux,unpeuhumide,
puisessugezbien.Vouspouvezutiliseraussiun
banpollou unebonnecired'appareil@lectro-
m@nager.
Ponneaudeporte d'ocierinoxgdable(numdros
demoddleseterminantparSS)
Lospanneauxd'acierinoxgdablesenettoientavec
StainlessSteelMagicou unproduitsemblableet
I'aided'unchiffonpropreet doux.N'utilisezpasde
cire,poll,agentdeblanchimentouproduits
contenantduchloresurlosportesd'acier
inoxgdable.
VouspouvezcommanderduStainlessSteelMagic
n.WXIOM5aupr@sduservicedepi@cesGEen
appelantle1.800.626.2002.
Panneaudeporte CleanSteel(numdrosdemoddle
seterminantpar CS)
Utilisezunchiffonpropre,doux,unpeuhumide,
puisessugezbien.N'utilisezpasdecired'appareil
@lectrom@nager,depolloutoutautreagent
chimiquesurlosportesenacierinoxgdable
CleanSteel.
N'utilisezpasdetingedevaisselleoudeserviette
humidesalespournettobterlelave-vaissellepour
dviterdelaisserdesrdsidus.N'utilisezposde
tampons0rdcurerni denettobtantenpoudre
pouvontgraftertefini.
Ecartanti-retour,_' __
Panneaux en acier inoxydable
Int_rieuren acierinoxydable-Cuveet porte
int_rieure
L'acierinoxgdableutilis@pourlacuveet la porte
int@ieuredulave-vaissellefournitla meilleure
qualit@quevouspuissieztrouverdansunlave-
vaisselleGE.Silacuveoulaporteint@ieuredu
Nettoyer le panneau de commande
Pournettogerlepanneaudecontr61e,
utilisezunlingoI@g@rementhumide,puiss@chez
compl@tement.
Protection contre le gel
Sivouslaissezvotrelave-vaisselledansunendroit
sanschauffagependantI'hiver,demandez(_un
techniciendeserviced'effectuerlosop@ations
suivantes
r_ couperI'alimentation@lectriquedu lave-
vaisselle.Enleverlosfusiblesoufaites
basculerledisjoncteur.
Est-ce que votre lave-vaisselle a un _cart anti-retour?
Un@cartanti-retourprot@gevotrelave-vaisselle
contreunretourd'eausiundrainsebouche.
L'@cartanti-retournefait paspartiedevotre
lave-vaisselle.IIn'estpaseouvertparvotre
garantie.Tousloscodesdeplomberiene
requi@rentpasdes@cartsanti-retour,etil
estpossiblequevousn'enagezpas.
lave-vaissellese rageouregoituncouppendant
sonusagenormal,ellenerouillepasounese
s'oxgdepas.CesraguresdesurfacenegCnentpas
sesfonctions,ou sar@sistance.
r2-] couperI'alimentationd'eauetd@brancherla
conduited'alimentationd'eaudurobinet.
r31 VidezI'eaudelaconduited'alimentation
d'eauetdurobinet(utilisezunecasserole
pourrecueillirI'eau).
r_ Rebranchezlaconduited'alimentationd'eau
au robinet.
Lgcart anti-retourestfacile6 nettoyer.
r_ Eteignezvotrelave-vaisselleet soulevez
lecouverclechrom&
Enlevezlecapuchonenmati@eplastique
r2]et nettogezavecuncure-dents.
Wrifiez I'_cartanti-retourchaquefois que
votre lave-vaissellenesevide pasbien.
15
Page 36

Avant d°appeler ie service de r .parations...
Renseignements protiques
[-conomisez du temps et de I'argent! Examinez les tableaux des
pages suivantes, ou visitez le site www.electromenagersge.ca.
Cela vous dvitem peut-_tre d'appeler le service de rdparations.
Messages d'erreur
Levogant indiquant
lestatut START/RESET
(raiseenmarche/remise
z_ro)clignote
Lelave-vaisselle fait
entendre un signal
sonora(BIP)routes
les30secondes
Signal sonora 6 la fin
du cycle
Causes possibles Ce qu'il faut faire
Vous avez enfonc_ le bloc
START/RESET(raiseen
marche/remise 6 z_ro) tandis qua
le lave-vaisselle _tait en marche.
Ceciannulera lecycle. Le vogant
cessera de clignoter (] la fin de la
vidange du lave-vaisselle (environ
90 secondes).
Le lave-vaisselle a _t_ mis hors
tension tandis qu'un cycle _tait
en marche et le courant vient de
reprendre. Les vogants clignotants
indiquent qua le lave-vaisselle
_vacue I'eau (] I'int_rieur.
Ceciest un rappelquevotre
portede lave-vaisselleest rest_e
ouverte durant I'op_ration.Le
• AppuyezsurleblocSTART/RESET(d(,.marrage/r_initialisation) seulement
unefoispourd_marrerlelave-vaisselle.Unefoislelave-vaisselleenmarche,
appuyezsurleblocSTART/RESET(d_marrage/r_initialisation) seulement
unefoissivousvoulezannular(r_initialer)lecycle.
• Levoyantcesseradeclignoterapr@squeI'eausalt@vacu@e
dulave-vaisselle.Unnouveaucycled@marreraautomatiquement_ lafin
delavidange.
• Fermezetverrouillezlaporteapr@sI'avoirouvertec)mi-cycle.Lesbips
cesserontdesefaireentendreetlelave-vaisselleeffectuerauncycle
complet.
signalse poursuivrajusqu'6 ce
quavousfermiezlaporte.
Ceciest normal. Le lave-vaisselle
fera entendre le signal sonore
deu× fois (_la fin du cycle.
• Pour@teindreledoubleindicateursonore(oupourler@activerapr@s
I'avoir_teint),appuyezsurleblocHEATEDDRYIs#chagechaud)5fois
en3 secondes.TroisbipsseferontentendrepourindiquerqueI'option
sonoredefindecyclea _t_activ_eou d_sactiv_e.
Probl_me
Lavaisselle etles
cauvertsnesantpas
propres
Causes possibles Ce qu'il faut faire
Faibletemperatured'eaud'entr_e • Assurez-vousd'avoirlabonnetemperatured'entr6e(voirpage8).
Ouvrezlerobinetd'eauchaudelepluspr@sdulave-vaisselle,laissezI'eau
coulerjusqu'c_cequalatemperaturedeI'eaucessed'augmenter.
D6marrezalorslelave-vaisselleet fermezlerobinet.Cecipermetde
s'assurerquaI'eausaltchaudeenentrant.
• Essayezdenepas utiliserlelave-vaisselleIorsquede reauchaudeest
sollicit@eailleursdanslamaison;p.ex.,Iorsquevousfaiteslalessiveou
qu'unmembredelafamilleutiliseladouche.
Lapressiond'eauest
temporairementtrap basse
• Ouvrezunrobinet.Est-cequeI'eaucoulepluslentementque
d'habitude?Sioui,attentezjusqu'_cequalapressionsaltnormale
avantd'utiliserlelave-vaisselle.
• Essayezdenepas utiliserlelave-vaisselleIorsquede I'eauchaudeest
sollicit@eailleursdanslamaison;p.ex.,Iorsquevousfaiteslalessiveou
qu'unmembredelafamilleutiliseladouche.
I_cartanti-retourou lebrogeur • NettoyezI'@cartanti-retourou rincezlebroyeur.
est bloqu_
Hauvaisechargesurletiroir • Assurez-vousqualalargevaissellenebloquepasledistributeurde
d@tergentou lebrasgicleur.Reportez-vous_ lasectionChargertelave-
vaissdle.
Aucun_cartanti-retour ou
boucle_lev_de lavidange
• V6rifiezquevousavezbienun6cartanti-retourouuneboucle61ev6ede
vidange.Reportez-vousauxinstructionsd'installation.
16
Page 37

www.electromenagersge.ca
ProblSme Causes possibles Ce qu'il faut faire
Toches et pellicule sur Eauextr_mement dure
les verres etles couverts Foible temp(_rature d'eau
d'entr(_e.
Lave-vaisselle surcharg_
Mauvais chargement
D_tergent en poudre humide
ouvieux
Distributeurd'agentde
rin(_age vide
Trap peu de d_tergent
• Utilisezdesagentsderin(_ageJet-Drg®ou CascadeCrystalClear®pour
retirerlestacheset@iterunenouvelleaccumulation.
• Assurez-vousquelatemp6raturedeI'eauestd'aumains/48,8oc(120°F).
• Chargezlelave-vaissellecommeilestillustr_6 lasectionChargementdes
couverts.
• Assurez-vousqueled@ergentestfrais.
• SiI'eauestexcessivementdure,unadoucisseurd'eauserapeut-@tre
n_cessaire.
Voilesurles verres M(_langed'eaudouceettrap de * Cecis'appelleunegravureetellaestpermanente.Pour@iterce
d_tergent probl_me,utilisezmainsde d@tergentsivousavezdeI'eaudouce.
Lavezlosverresaucgclelepluscourtpourqu'ilssoientpropres.
Latemp(_raturedeI'eauentrant • Cecipourrait@treunegravure.R@duisezlatemp@atureduchauffe-eau.
dunslelave-vaisselled_passe
150°F(65°C)
Moussedanslacuve Mauvaistgpeded_tergentutilis(_• Utilisezseulementun d4tergentdelave-vaisselleautomatiquepoureviter
I'exc@sde mousse.Lesd@ergentsdelave-vaisselleautomatiqueCascade ®
et Electrosol®ont_t_ approuv_s pour tousles lave-vaissellesGE
• Pour retirerla mouse de la cure, ouvrez lelave-vaisselleet laissez la mousse
s'@aporer.Fermez et verrouillezla porte du lave-vaisselle.Sortez I'eau en
touchant le blocSTART/RESET(raiseen morche/remise _ z@ro)une fois,
attendez 30 secondes ettouchez au bloc 6 nouveau. R@_tezau besoin.
Uagent de rin(_agea _t_ d_vers_ •
D@tergentqui testa Lavaisselle bloque le r(_servoir *
dons los r@servoirs du d_tergent
du distributeur
Eau duns le Vous n'avez pus viss_ le capuchon * Utilisezune poire6 jus pour enleverautant d'eau que possibledu distributeur
distributeur apr_s avoir rempli ledistributeur SmartDispenseMDet remplisseznormalement. Assurez-vousde bien visser
SmartDispensen_ lecapuchon pour emp_cher I'eaude p_n_trer dans le distributeur.
Marques noires ou Des ustensiles d'aluminium se • Retirerlostaches avec un nettogant doux, abrasif.
grises sur Io voisselle sont frott(_s contre la vaisselle
Lo vaissellenes#chepus Foible temp(_rature d'eau d'entr(_e • Assurez-vousqua la temp@ature de I'eaud'entr@ salt _ au mains
est vide
Leponneou de Leverrou de la porte n'est pus • Assurez-vousqua la porte salt bienfarm@.
commando a r@agiaux bien plac_
entr#es, mais le Lerobinet d'eau est peut-@tre • Assurez-vousqua le robinet d'eau (normalement sous I'@ier)salt
Iove-voisselle ne s'est ferm_ ouvert.
jamais rempli d'eau
Le vo£lant d'aseptisation La porte (_tait ouverte et le cgcle • N'interrompez pas le cgcle durant ou apr_s le lavage principal.
ne s'allume pus _ la fin a (}t_ interrompu dumnt ou apr_s
du cgcle (seulement le lavage principal
le cgcle anti-bact_rie) Latemperature d'entr(_ede I'eau • Augmentez la temp@ature de reau du chauffe-eau entre 120 et 140 °F
_tait trap basse (/49et 60 oc).
Leprogramme est termin(_ •Cest normal. Nefaites rien.
et la porte est rustle ouverte
pendant plus de 60 secondes 17
Essugeztousles d@ersements d'agent de ringage imm_diatement.
ReplacezlavaissellepourquaI'eaudubrasgicleurinf@ieurpuisse
rincerler@servoirde d@tergent.Reportez-vousauxpages13et 14.
120°F(/49°C).
• ChoisissezHEATEDDRYIs_chage choud).
• UtilisezlesoptionsPRE-WASHIpr_-Iovoge)ouAODEDHEATIcholeur
ojout@e).
• Choisissezun cgcle plus_lev_,tel que ANTI-BACTERIA(ontiboct_rien),
ou COOKWARE(casseroles).
V@ifiezle distributeur d'agent de rinc;ageet remplissez au besoin.Ledistributeur d'agent de rin(_age •
Page 38

Avant d'uppeler ie service de r#.parations...
Renseignements pratiques
Probl_me Causes possibles Ce qu'il faut faire
Int_deur de cure tach_e Certains aliments (] base de
tomate peuventcauserdestaches
rougeOtres
Tachesdecaf_oudeth_
Une pelliculejaune ou brune
pourrait _tre caus_e par des
d_pSts de fer dans I'eau
Pelliculeblanchesurlasurface •
int_rieure-min_raux d'eaudure
Lelave-vaisselle
ne fonctionne pas
Levoyant dupanneau Trapdetempsentreles * ChaqueblocdoltCtretouch66 I'int6rieurd'unep@iodede5 minutes.
decommandes'#teint s_lectionsdeblocs Pourallumerc_nouveau,retoucheztout blocoud@errouillezet
enr_glantlescommandes reverrouillezlaporte.
IIy a deI'eauaufond Ceciestnormal * Unepetitequantit6d'eaupropreautourdela sortieaufonddela cuve,
dela cuve @I'arri@redelacuvegardeleraccordde lapompebienlubrifi&
L'eaunesortpas Ledrainestbloqu_ • Sivousavezun6cartanti-retour,nettogez-le.Voirpage15.
dela cuve * Silelave-vaissellesevidangedansunbrogeur,faitesfonctionnercedernier.
Vapeur Ceciest normal * L'airchaudethumidepasseparI'6ventparleverroudeportedurantle
Bruit Sonsdefonctionnementnormal • L'_missiondecesbruitsesttout6faitnormale.Aucuneinterventionn'est
18
Unfusibleest grill_ou
ledisjoncteurestd_clench_
Lecoumntest coup_
Lepanneaudecommande • D6verrouillezlepanneaudecommande.Voirpage6.
estverrouill_
LepanneaudecontrBledolt * Coupezlecourantaulave-vaisselle(disjoncteurouprisemurale)pendant
6tre r_initialis_ 50secondesetremettezenmarche.
Ouverturedu r_servoir requise.
ded_tergent
Ueauentredanslelave-vaisselle
Lemoteur s'arr6teet d_marre
plusieursloisdurant lecgcle.
Lapompedevidange_met un
bruitenvidant
Leventilateurdes_chage
fonctionnede 2_4heuresapr_s
que levogantCLEANIpropre)
s'allume(modUles(]panneaude
commandesup_rieurseulement}
Lavaisselle_metunbruit decasse•
Iorsquelebrasgicleur tourne
UtiliserlecgcleRINSEANDHOLD(rin_ageet attente)apr_savoirajout_
leplat6 la chargepourraitr_duirelestaches.GErecommanded'utiliser
Cascade®PlasticBoosterpouraider6retirercestqpesdetaches.
Retirezlatache6la mainavecunesolutionde 1/2tassed'agentde
blanchimentet3tassesd'eauchaude.
4VERTISSEMENT
Avantdenett%er rint_rieur,attendezau moins20minutesapr_sun
curiepourlaisserles_l_mentschauffantsreffoidinSivousnelefaitespas,
vouspourriezavoirdesbrQlures.
Unfiltrespecialdanslacanalisationd'eauestlaseulefa(;ondecorriger
ceprobl_me.Contactezunesoci_t_d'adoucissementd'eau.
GErecommanded'utiliserJet-Drg®ouCascadeCnjstalClear®pour
emp¢cherlaformationded@6tsdemin6rauxd'eaudure.
o
Faitesfonctionnerlelave-vaisselleavecdeI'acidecitriquepourretirer
cesd@6ts.VouspouvezcommanderdeI'acidecitrique(num6rodepiece:
WD35X151)aupr_sduservicedepi_cesGE.Reportez-vousaucouvercle
ar@repourI'informationsurlescommandes.
• Remplacezlefusibleouremettezledisjoncteur6 z@o.Retireztousles
autresappareilsdu circuit.
• Danscertainesinstallations,lecourantaulave-vaisselleestfoumiparune
prisemuralequisetrouvesouventprosderinterrupteurdu brogeur.
Assurez-vousqu'ilsoitenmarche.
• V6rifiezsi I'6vierdecuisinesevidebien.Sinon,vousaurezpeut-¢trebesoin
d'unplombier.
s6chageet IorsqueI'eauestpomp@pourlasortir.Ceciestn6cessaire
pourles_chage.
Assurez-vousquela vaissellesoitbiencharg@.Reportez-vous6 lasection
Chargertelove-voissdle.
Page 39

Garantie GEsur iesiave-vaisselle.
Toutes les rdparations sous garantie seront effectu4es par
has centres de r_paration ou has r_parateurs autoris_s.
Appelez le 1.800.561.3344. Veuillez foumir le numdro
de sdrie et le num4ro de module Iorsque vous appelez
pour obtenir le service.
Pour une p#.riode de"
Un an
partir de !adate
d'achat initia!
Cinq ans
(seulementpour
loshombresmodules
qui commencent avec
PDWou CDW)_partir
de la date d'achat initia!
Toute la vie du produit
(seulementpour
loshombresmodules
qui commencent avec
PDWou CDW)
GE remplacera :
Toute piece du lave-vaissellequi secasse_ cause d'un vice de mat@riauou demain-d'oeuvre.
Au cours de cette annie degaruntie limit_e, GEfournira, grutuitement, toute la main-d'oeuvre
et le service_ la maison n_cessairespour remplacer la piece ddectueuse.
Lesponiers et le module de contr61e_lectronique du lave-voisselle s'ilsne fonctionnent plus
caused'un vice de mat@riauou de main-d'oeuvre. Au cours de ces dnq ans degaruntie
limit_e, vous serezresponsable de tous frais de main-d'oeuvre ou de service _ la maison.
La cuve en acier inoxydable ou la doub/ure de porte, siellesne peuvent plus arr_ter I'eau
6 caused'un vice de mat_riau ou de main-d'oeuvre. Au cours de cette garantie fimit_e, GE
fournira _galement, gratuitement, toute la main-d'oeuvre et le service 6 la maison n_cessaires
pour remplacer lapiece ddectueuse.
Ce qui n'est pas couvert "
il Tout d_placement de service chez vous pour vous
apprendre _ utiliser votre lave-vaisselle.
m Toute mauvaise installation.
Sivous avez un probl_me d'installation, appelez
votre revendeur ou un installateur. Vous _tes
responsable de fournir une bonne alimentation
_lectrique, un ban _chappement et tout autre
branchement n_cessaire.
I Toute pannedu produit s'il a _t_ malmen_, mal us_
ou utilis_ 6 une autre fin que celle pr_vue ou utilis_
commemialement.
Agrafez le requ d'achat ici.
Pour obtenir le service sous
garantie, vous devrez fournir
la preuve de !'achat origina!.
II
Tout remplacement des fusibles de la maison ou tout
rebmnchement des disjoncteurs.
II
Tout dommoge occosionn_ per un occident, un incendie,
une inondotion ou un octe de Dieu.
II
Tout dommage subi apr_s la Iivraison.
II
Le service s'iIest impossible d'avoir acc_s au pmduit
pour ce faire.
EXCLUSION BE GARANTIES /MPLIC/TES- Votre seul et unique recours est la r#paration du pmduit solon los
dispositions de cette Garantie limit#e. Toutes los garanties implicites, incluant los garanties de commercial##
et d'ad#quation a un usage sp#cifique, sont limitees a une ann#e ou a la p#riode la plus courte autoris#e par
/a /egislation.
Cettegarantie estvalable pour le premierpropri_taireet tout autre propri_taire du produit s'i!achet_au Canada pour utilisation
domestiqueou Canada.Leservice_domicilesousgarantie serafoumi !_oF;i! estdisponibleet dons losr_gionsque Mabeconsid_re
que !'afirede serviceestraisonnable.
i LE GARANT N'EST PAS RESPONSABLE DES DOMMAGES CONSECUTIFS. i
i Garant ' MABE CANADA INC. ]
19
Page 40

Soutien au consommateur.
Vousavez une question ou vous avez besoin d'aidepour votre appareil _lectrom_nager? Contactez-nous par
--i Site Web appareils dlectromdnagers GE www.electromenagersge.ca
Internet au site www.electromenegersge.ce 2/4heuresparjour, tous lesjours de I'ann_e.
Servicede rdparations
Servicede r@parationsGEest tout pr@sde vous.
Pourfaire r_parer votre @lectrom@nagerGE,ilsuffit de nous t@l_phoner.
1.800.561.3344
Studio de conception rdaliste
Sur demande, GEpeut fournir une brochure sur I'am_nagement d'une cuisine pour les personnes
mobilit@r@duite.
Ecrivez: Directeur,Relationsavec lesconsommateurs, Habe Canada Inc.
Bureau 3!0, ! Factory Lane
Honcton, N.B.E1C9H3
Prolongation de gorontie www.electromenugersge.cu
Achetezun contrat d'entretien GEavant que votre garantie n'expire et b_n_ficiezd'un rabais substantiel.Ainsi
le serviceapr@s-venteGEsera toujours I@apr@sexpiration de la garantie.
VJsiteznotre site Web ou eppelez-nous eu 1.888.261.2133.
Pi6ces et accessoires
Ceuxqui d_sirent r@parereux-m@mesleurs@lectrom@nagerspeuvent recevoir pi@ceset accessoiresdirectement
la maison (cartes VISA,HasterCard et Discoveraccept@es).
Los directives stipul_es duns le present manuel peuvent _tre effectu_es par n'importe quel utilisuteur. Los autres
r_parations doivent g_n_ralement _tre effectu_es par un technicien qualifi_. Sogez prudent, car une r_paration
inadequate peat affecter le fonctionnement s_curitaire de I'appareiL
Les consommateurs au Canada peuvent commander des pi_ces et des accessoires en ligne au site
www.electromenagersge.ca, 24 heures sur 24 et tous lesjours, ou par t_l_phone au !.800.661.!616 pendant
lesheuresde bureau.
Contoctez-nous
Sivous n'@tespassatisfait du service apr@s-ventedont vousavez b@ndici@:
Premi_rement, communiquez avec lesgens qui ont r@par@votre appareil.
Ensuite, si vous n'@testoujours pas satisfait envogeztousles d_tails-num@o de t@l_phonecompris-au
Directeur,Relationsavec lesconsommateurs, Habe Canada Inc.
Bureau 3!0, 1Factory Lane
Honcton, N.B.EIC 9H3
Inscrivez votre oppereil _lectrom_neger en direct, eussit6t que possible. Celaam@lioreranos communications
l lnscrivez votre appareildlectromdnager www.electromenagersge.cu
et notre service ap@s-vente.Vouspouvez@galementnous envoyer par la poste leformulaire d'inscriptionjoint
votre documentation.
20 Imprim4 aux Etats-Unis
Imprim4 sur du papier recgcl4
 Loading...