

GE PDWT280VSS, GDWF160V00SS, PDWT200VBB, CDWT280V00SS, PDWT380V00SS Owner's Manual
...
GEAppliances.com
Safety Instructions ........... 2-5
Operating Instructions
Care and Cleaning ................. 17
Control Panel and Settings ........ 6-9
Display Lights ....................... 6
Loading Place Settings ............. 16
Loading the Racks ............. 14-16
Recommended Dishwasher
Products ............................. 9
Using the Dishwasher .......... 10-13
Troubleshooting Tips ...... 18-20
Consumer Support
Consumer Support ................. 24
Warranty ........................... 25
Stainless Steel
Tub Dishwashers
Write the model und seriul
numbers here:
Model #
Seriul #
Youcan find them on the tub wall
just inside the door.
49-55078 05-11GE
IMPORTANT SAFETY INFORMATION
READ ALL INSTRUCTIONS BEFORE USING--
SAVE THESE INSTRUCTIONS
WARNING!
For your safety, the information in this manual must be followed to minimize the risk of fire,
explosion, electric shock, and to prevent property damage, personal injury, or death.
Ik iADVERTENCIA!
Para su seguridad, siga las instrucciones de este manual a fin de minimizar riesgos de
incendio, explosi6n, descargas el_ctricas, g para evitar dafios en su propiedad,
lesiones persona/es o la muerte.
A WARNING! WATER HEATER SAFETY
Undercertain conditions, hFdrogengas meF be produced in a water heater that has not been usedfor two
or more weeks.HYDROGENGASISEXPLOSIVE.
If the hot water hasnot beenusedfor two or more weeks,prevent the possibility of damage or injury
by turning on all hot water faucets and allow them to run for several minutes. Dothis before using any
electrical appliance connected to the hot water system.Thissimpleprocedure will allow any built-up
hydrogen gasto escape.Sincethe gas isflammable, do not smoke, useanopen flame, orusethe appliance
during this process.
%
iADVERTENCIA! SEGURIDADDELCALENTADORDEAGUA
Bajo ciertas condiciones,se podrd producir gasdehidr6geno enun calentadorde agua qua norue usadopar
dossemanaso mds. ELGASDEHIDROGENOESEXPLOSIVO.
Sielagua caliente no se us6 par dos semanaso m6s, evite laposibilidad de que ocurran da_os o lesiones
abriendo todos losgrifos de agua caliente y dejando que corra agua par varios minutos. Hagaesto antes de
usar cualquier artefacto el6ctrico conectado al sistema de agua caliente. Esteprocedimiento simple
permit!r6 la salida de cualquier acumulaci6n de gasde hidr6geno. Debidoaque elgases inflamable, no
fume, no use una llama abierta ni use el electrodom6stico durante este proceso.
PROPER INSTALLATION AND MAINTENANCE
This dishwasher must be properlF installed and located in accordance with the Installation Instructions
before it is used.If Fou did not receive an Installation Instructions sheet with Four dishwasher, Fou can
receive one bg visiting our webs!re at GEAppliences.com. In Canada, visit www.GEAppliences.ca.
[] Connect the dishwasher/appliance to a grounded
metal, permanent wiring system;or run an
equipment-grounding conductor with the circuit
conductors and connect to the equipment-
grounding terminal or leadof the appliance.
[] Improper connection ofthe equipment-grounding
conductor can result in a risk of electricshock.
Checkwith a qualified electrician or service
representative if you are indoubt whether the
appliance isproperly grounded.
[] Disposeof discarded appliances and shipping
or packing material properly.
[] Do not attempt to repairor replaceany part
ofyour dishwasher unlessitisspecifically
recommended inthis manual. Allother servicing
should be referred to a qualified technician.
[] To minimize the possibility ofelectric shock,
disconnect this appliance from the power supply
before attempting any maintenance.
NOTE:Turningthedishwasheroffdoesnot
disconnecttheappliancefrom thepower supplg.
Werecommendhaving a qualified technician
serviceFour appliance.
IMPORTANT SAFETY INFORMATION
READ ALL INSTRUCTIONS BEFORE USING--
SAVE THESE INSTRUCTIONS
CAUTION: To prevent minor injury and property damage
[] Contents washed in Anti-bacterial mode, if
available, may behot to the touch. Usecare
before handling.
[] Usinga detergent that is not
specifically designedfor
dishwashers will cause the
dishwasher to fill with suds.
[] Ifyour dishwasher is
connected to a wall switch,ensure that
the switch is on prior to use.
[] On dishwashers with electronic controls,
ifyou chooseto turn the wall switch
off between wash cycles,allow 5-10
secondsafter turning the switch on
before touching START/RESETtoallow the control
to initialize.
s
[] Non-Dishware Items:Do not wash items such
as electronic air cleaner filters, furnace filters
and paint brushes inyour dishwasher. Damage
to the dishwasher and discoloration or staining
of the dishwasher may result.
[] Closesupervisionisnecessaryifthis appliance
is usedby or near children.
[] Load light, plastic items so they do not become
dislodged and drop to the bottom of the
dishwasher-they might come into contact with
the heating element and bedamaged.
ik PRECAUCION: A fin de evitar lesiones menores g dafios sabre la propiedad
[] Loscontenidos lavados en el modo SANI
WASH/SANITIZE(Lavado Desinfectunte/ Des
infecci6nJ,si este producto esta disponible, podran
estar calientes al tacto. Tenga
cuidado antes de tomar los
mismos con las manos.
[] Elusa de un detergente que
no est6 dise_ado
especfficamente para lavavajillas hara
que este OltimoseIlenedeagua con
jab6n.
[] Siel lavavajillas est6 conectado a un
tomacorriente, asegOresedeque el
interruptor est6 encendido antes del usa.
[] Siel lavavajillas tiene controles electr6nicos, en
caso de decidir apagar el interruptor entre ciclos
de lavado,espereentre 5y 10 segundos luego de
encender el interruptor antes de presionar START/
RESET(Inidar/Reiniciar) para permitir que el
control se inicie..
[] items que no sean Utensilios:No lave art[culos
tales coma filtros electr6nicosde limpiezacon
aire,filtros de horno y brochasde pintura en su
lavavajillas.Sepodrc_nproducir dahos,
descoloraci6n o manchas sabre el lavavajillas.
[] Sedeber_ estar especialmente atento si el
electrodom6stico es usado par nihoso si se
encuentra cerca de los mismos.
[] Cargue articulos de pl6stico livianos,de modo que
no sean desplazados ni caigan al rondo del
lavavajillas- es posible que entren encontacto
con el elemento calentador y sean dahados.
ELECTRICALREQUIREMENTS
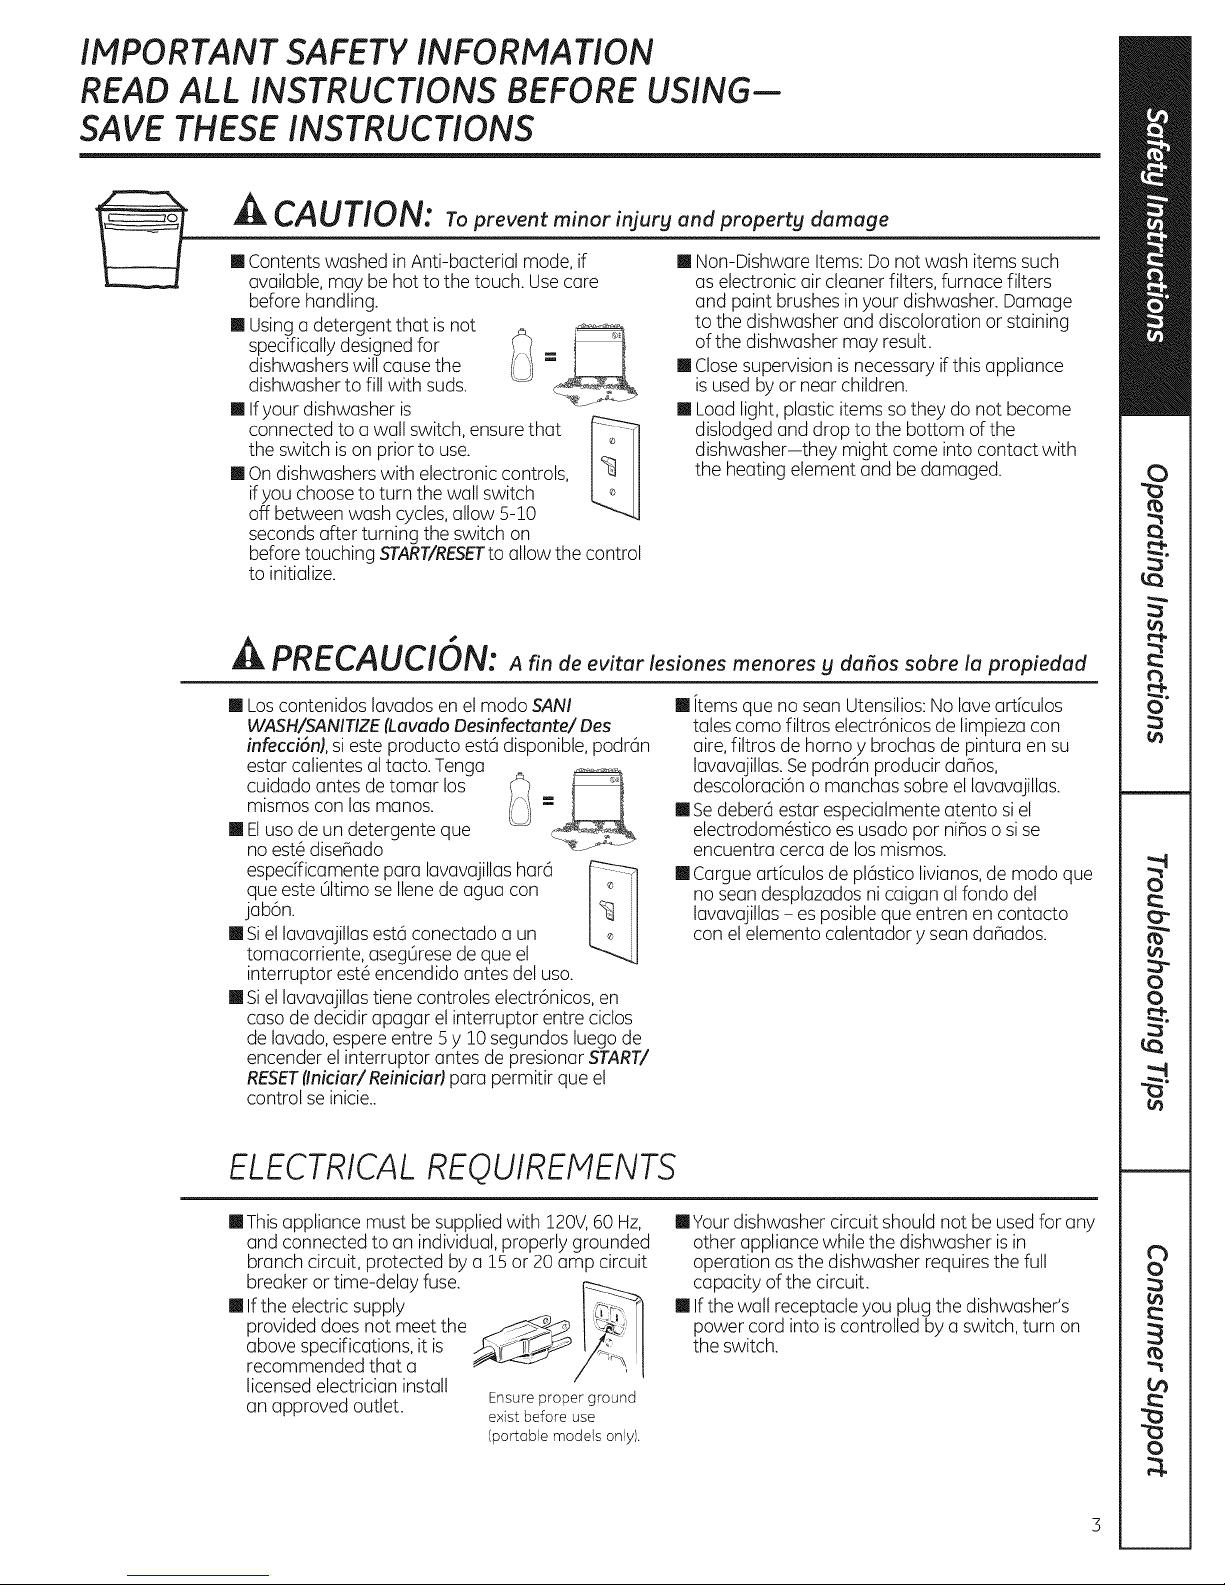
[] Thisappliance must besupplied with 120V,60 Hz,
and connected to an individual,properly grounded
branch circuit, protected by a 15or 20 amp circuit
breaker or time-delay fuse.
[] If the electric supply
provided does not meet the
above specifications, it is
recommended that a
licensed electrician install
an approved outlet. Ensure proper ground
[]Your dishwasher circuit should not be usedfor any
other appliance while the dishwasher isin
operation asthe dishwasher requires the full
capacity of the circuit.
[] Ifthe wall receptacleyou plug the dishwasher's
power cord into iscontrolled by a switch, turn on
the switch.
exist before use
(portable models only).

IMPORTANT SAFETY INFORMATION
READ ALL INSTRUCTIONS BEFORE USING--
SAVE THESE INSTRUCTIONS
ik WARNING! RISK OF CHILD ENTRAPMENT
PROPER DISPOSAL OF THE DISHWASHER
Junked or abandoned dishwashers are
dangerous...even if they will sit for "just
a few days." Ifyou are getting rid of
your old dishwasher, please follow the
instructions below to help prevent
accidents.
Before You Throw Away Your Old
Dishwasher:
[]Take off the door of the washing
compartment or remove the door
latch (as shown).
Front control latch keeper Top control latch keeper
_kiADVERTENCIA! RIESGO DE QUE UN Nlfi!O QUEDE
ATRAPADO
FORIVlAADECUADA DE DESCARTAR EL LAVAVA.JILLAS
Los lavavajillas antiguos o abandonados son
peligrosos.., incluso aunque se
conserven par %61ounos pocos digs".
Si se deshara de su antigua
refrigerodor, siga los siguientes
instrucciones o fin de evitor
occidentes.
Antes de Descartar su Antigua
Lavavajillas:
[] Retire la puerto del comportimiento
de lavado o retire la traba de Io
puerto (coma se muestro).
Control frontal de Io trobo
de seguridod
Control superior de Io
trobo de seguridod
4
IMPORTANT SAFETY INFORMATION
READ ALL INSTRUCTIONS BEFORE USING--
SAVE THESE INSTRUCTIONS
A
... WARNING! including the following:
[] Usethis applionceonlyfor its intended purpose []
asdescribed inthis Owner's Manual.
[] Useonly powder,Cascade®CompleteAction Packs, []
liquid detergents or rinseagents recommended for []
usein o dishwasherand keepthem out of the reach
of children. Cascade ®and Cascade ®Complete []
Automatic Dishwashing Detergents, and Cascade ®
RinseAid rinse agents havebeen approved for use
in all GEdishwashers.
[] Locate sharpitems so that they are not likely
to damage the door seal.
[] Load sharpkniveswith the handlesup to reduce []
the riskof cut-type injuries.
[] Do not wash plasticitems unlessmarked
dishwashersafeor the equivalent. Forplastic []
items not somarked,checkthe manufacturer's
recommendations.
[] Do not touch the heatingelement during or
immediately after use.
Ik iADVERTENCIA! AI usar su lavavajillas, siga las precauciones b6sicas,
When using your dishwasher, follow basic precautions,
Donot operate yourdishwasher unlessall enclosure
panelsare properly in place.
Donot tamper with controls.
Donot abuse,sit onor stand on the dooror dish
rack of the dishwasher.
Donot allow childrento play around the dishwasher
when opening or closingthe door dueto the
possibilityof smallfingers beingpinchedin thedoor.
[]
Donot discard a dishwasherwithout first removing
the door of the washing compartment orthe door
latch.
Donot store or usecombustible materials,gasoline
or other flammable vapors and liquids in the vicinity
ofthis or any otherappliance.
Donot allow childrento play with,on or insidethis
or any discarded appliance.
inclugendo Io siguiente:
[] Useesteelectrodom6stico s61opora su prop6sito
original,como sedescribeen el Manualdel
Propietorio.
[] Use s61opolvo, Paquetes de Acci6n Completa de
Cascade@, detergentes liquidos o agentes de
enjuague recomendados para uso en un
lavavajillos,y mantenga losmismosfuera del
alcance de losni_os.LosDetergentespara Lavado
en LavavajillasAutom(XicosCascade@y Cascade@
Complete,y los agentesde enjuague de Cascade@
RinseAid fueron aprobados pot su uso en todos los
lavavajillosde GE.
[] Ubique articulospuntiagudos demodo que nohaya
posibilidadesde dahos sobre el selladorde la
puerto.
[] Ubique articulospuntiagudos demodo que nohaya
posibilidadesde dahos sobre el selladorde la
puerta.
[] No lavearticulos de pl6stico,a menos quefigure
que son segurospara usoen lavavajillaso una
indicaci6n equivalente.Sisetrata de articulos de
pl6sticoque no cuentan con dicha indicaci6n,
consultelasrecomendacionesdel fabricante.
[] No toque el elemento de calefacci6n durante o
inmediatamente despu6sdel uso.
[] No toque el elemento de calefacci6n durante o
inmediatomente despu6sdel uso.
[] No toque el elemento de calefacci6n durante o
inmediotamente despu6sdel uso.
[] No abuse,no sesiente ni separe sobre la puerta o
la bondejo del plato del lavovajillos.
[] No permita que los nihosjueguen olrededordel
lavavajillosal abrir o cerrar Io puerto,debido ala
posibilidadde que susdedospequehossean
presionadoscontra lapuerta.
[] No permita que los nihosjueguen olrededordel
lavavajillasal abrir o cerrar la puerta,debido a la
posibilidadde que susdedospeque_ossean
presionadoscontra lapuerta.
[] No guarde niusematerialescombustibles,gasolina
u otros vapores inflamablesy liquidoscerca de@ste
ni de otros electrodom_sticos.
[] No guarde niusemoteriolescombustibles,gasolina
u otros vapores inflomablesy liquidoscerca de6ste
ni de otros electrodom6sticos.
READAND FOLLOWTHISSAFETYINFORMATIONCAREFULLY.
SAVE THESE INSTRUCTIONS
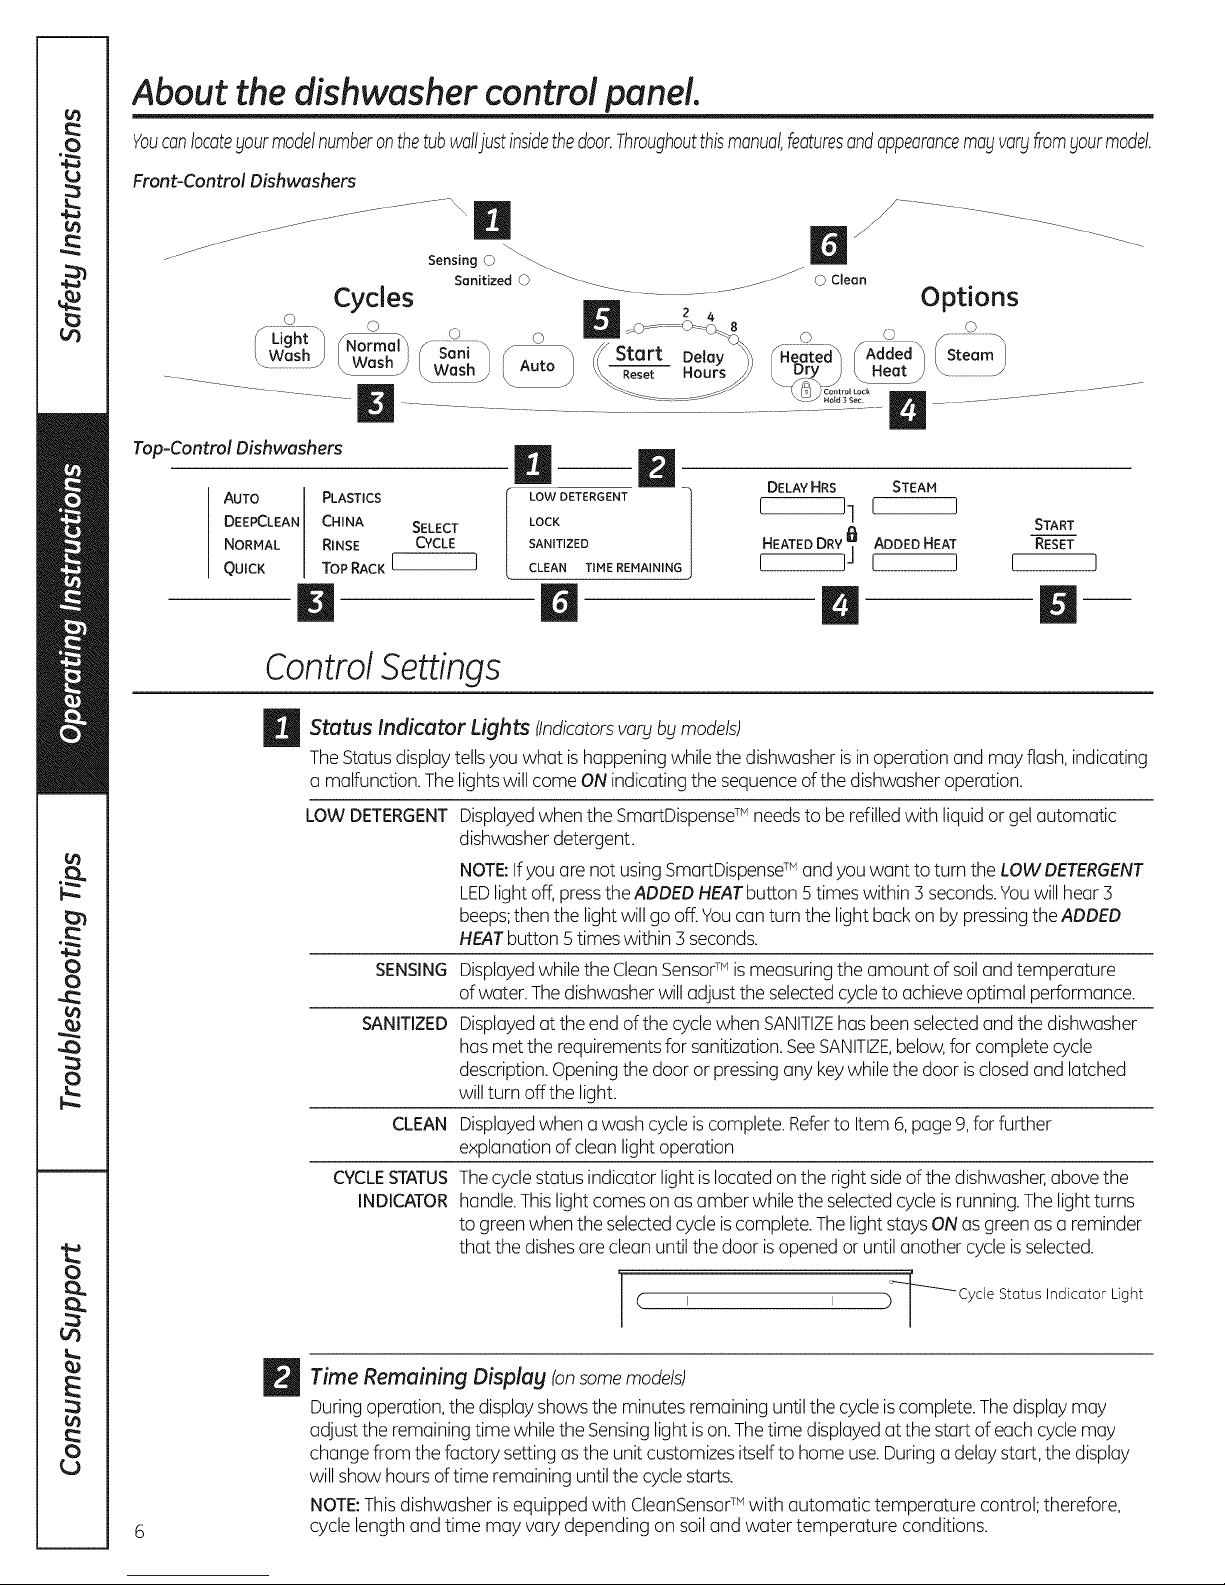
About the dishwasher control panel.
Youcanlocateyourmodelnumberonthetubwal!justinsidethedoor.Throughoutthismanualfeaturesandappearancemayvaryfromyourmodel.
Front-Control Dishwashers
_ _..
Sensing © _
Sanitized O _ _ © Clean
Cycles .............................................. Options
Light ......... 0 _.s--- .............. ................ 0
(_ash) /N_ f" San,_ F_ //Start Del_y_°_ Seeeted_,f_Added_ (S;iam)
.............................._ ...... / k Wash_ / Auto , \\_ Hours // [Dry) [ Heat )
............................................................................... ................................
N "N.......
Top-Control Dishwashers
AUTO PLASTICS
DEEPCLEAN CHINA SELECT
NORMAL RINSE CYCLE
QUICK TOP RACK I I
B
LOW DETERGENT
LOCK
SANITIZED
CLEAN TIME REMAINING
DELAY HRS STEAM
I 11 I I
HEATED DRY]_] ADDED HEAT RESET
I I I [
/
START
D
ControlSettings
_ Status Lights (Indicatorsvary by models)
TheStatusdisplaytellsyou what ishappening whilethe dishwasher isin operation and may flash,indicating
o malfunction. The lightswill comeONindicating the sequenceofthe dishwasheroperation.
LOW DETERGENT
Indicator
SENSING
SANITIZED
CLEAN
CYCLESTATUS
INDICATOR
Displayedwhen the SmartDispenseTM needs to berefilledwith liquidor gelautomatic
dishwasherdetergent.
NOTE:Ifyou are not usingSmartDispenseTM andyou want to turn theLOW DETERGENT
LEDlightoff,presstheADDEDHEATbutton 5times within 3 seconds.Youwill hear 3
beeps;then the lightwill go off.Youcan turn the light back on by pressingthe ADDED
HEATbutton 5 timeswithin 3 seconds.
Displayedwhilethe CleanSensorTM ismeasuring the amount of soiland temperature
of water.Thedishwasherwilladjust the selected cycleto achieve optimal performance.
Displayedat the end of the cyclewhen SANITIZEhas beenselectedand the dishwasher
has met the requirements for sanitization.SeeSANITIZE,below,for complete cycle
description.Openingthe door orpressingany keywhilethe door is closedand latched
willturn off the light.
Displayedwhen a wash cycle is complete.Referto Item 6,page 9,forfurther
explanation of clean light operation
Thecyclestatus indicatorlight is located on the right sideof the dishwasher,abovethe
handle.Thislight comeson as amber whilethe selected cycle is running.Thelightturns
to green when the selectedcycle iscomplete.Thelight staysONas greenas a reminder
that the dishesare clean until the door isopened or until anothercycle is selected.
/
I I _'_Cycle Status Indicator Light
(
1
_ ime Remaining Displag (onsome models)
During operation, the display shows the minutes remaining until the cycle is complete. The display may
adjust the remaining time while the Sensing lightis on. The time displayed at the start of each cycle may
change from the factory setting as the unit customizes itselfto home use. During a delay start, the display
willshow hours of time remaining until the cycle starts.
NOTE:This dishwasher is equipped with CleanSensor TM with automatic temperature control; therefore,
cycle length and time may vary depending on soil and water temperature conditions.
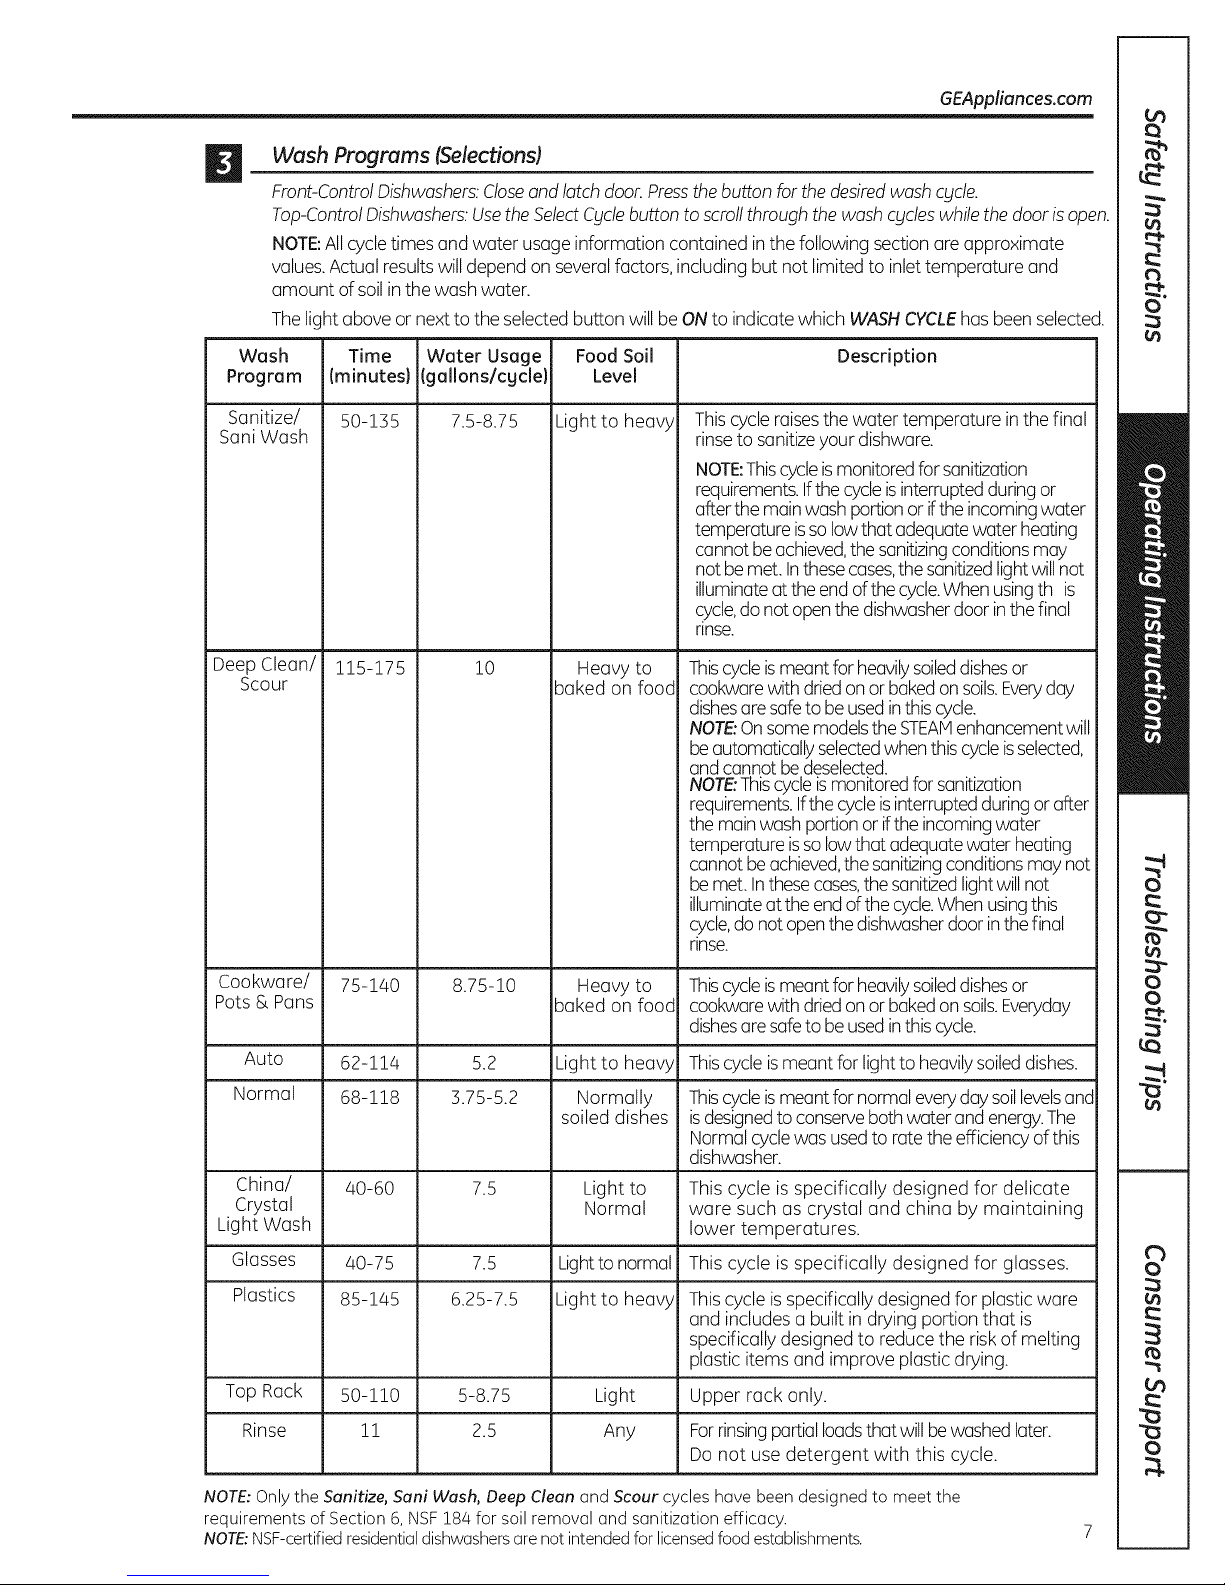
D Wash Programs (Selections)
FronbControlDishwashers:Closeand latch door.Pressthebutton forthedesiredwash cycle.
Top-ControlDishwashers:Usethe SelectCyclebutton to scrollthrough thewash cycleswhile the door isopen.
NOTE:Allcycle times and water usage information contained inthe following section are approximate
values.Actual resultswill depend on severalfactors,includingbut not limitedto inlettemperature and
amount of soilin the washwater.
Thelight aboveor nextto the selectedbutton will beONto indicatewhich WASHCYCLEhasbeenselected.
Wash Time Water Usage Food Soil Description
Program (minutes) (gallons/cgcle) Level
GEAppliances.com
Sanitize/ 50-135 7.5-8.75 Light to heavy
Sani Wash
Thiscycleraisesthe water temperature inthe final
rinseto sanitizeyour dishware.
NOTE:Thiscycleismonitoredfor sanitization
requirements.Ifthecycleis interruptedduringor
afterthe mainwash portionor ifthe incomingwater
temperatureisso low that adequatewater heating
cannot beachieved,the sanitizingconditionsmay
not bemet. Inthesecases,the sanitizedlightwillnot
illuminateat theend of the cycle.Whenusingth is
cycle,do not openthe dishwasherdoor inthefinal
rinse.
Deep Clean/
Scour
115-175 10
Heavy to
baked on food
Thiscycleismeant forheavilysoileddishesor
cookwarewith driedon orbakedonsoils.Everyday
dishesaresafeto beused inthiscycle.
NOTE:Onsomemodelsthe STEAMenhancementwill
be automaticallyselectedwhen thiscycleisselected,
and cannot bedeselected.
NOTE:Thiscycle ismonitoredforsanitizmtion
requirements.Ifthecycleis interruptedduringor after
the mainwash portionor ifthe incomingwater
temperatureisso low that adequatewater heating
cannot beachieved,the sanitizingconditionsmay not
be met. In thesecases,thesanitizedlightwillnot
illuminateat theendof thecycle.Whenusingthis
cycle,do not openthe dishwasherdoor inthefinal
nnse.
Cookware/ 75-140 8.75-10 Heavy to Thiscycleismeant forheavilysoileddishesor
Pots & Pans baked on food cookwarewith driedon or bakedon soils.Everyday
dishesaresafeto beused inthiscycle.
Auto 62-114 5.2 Light to heavy Thiscycleismeant for lightto heavilysoileddishes.
Normal 68-118 3.75-5.2 Normally Thiscycleismeant for normal everyday soil levelsand
China/ 40-60 7.5 Light to This cycle is specifically designed for delicate
Crystal Normal ware such as crystal and china by maintaining
Light Wash lower temperatures.
Glasses 40-75 7.5 Lightto normal This cycle isspecifically designed for glasses.
Plastics 85-145 6.25-7.5 Light to heavy Thiscycle isspecificallydesigned for plastic ware
Top Rack 50-110 5-8.75 Light Upper rack only.
Rinse 11 2.5 Any Forrinsingpartialloadsthatwillbewashed later.
NOTE:Only the Sanitize, Sani Wash, Deep Clean and Scour cycles have been designed to meet the
requirements of Section 6, NSF184 for soil removal and sanitization efficacy.
NOTE:NSF-certifiedresidentialdishwashers are not intendedfor licensedfood establishments.
soiled dishes isdesignedtoconserveboth water andenergy.The
Normalcyclewas usedto rate theefficiencyofthis
dishwasher.
and includes a built in drying portion that is
specifically designedto reducethe risk of melting
plastic items and improve plastic drying.
Do not use detergent with this cycle.
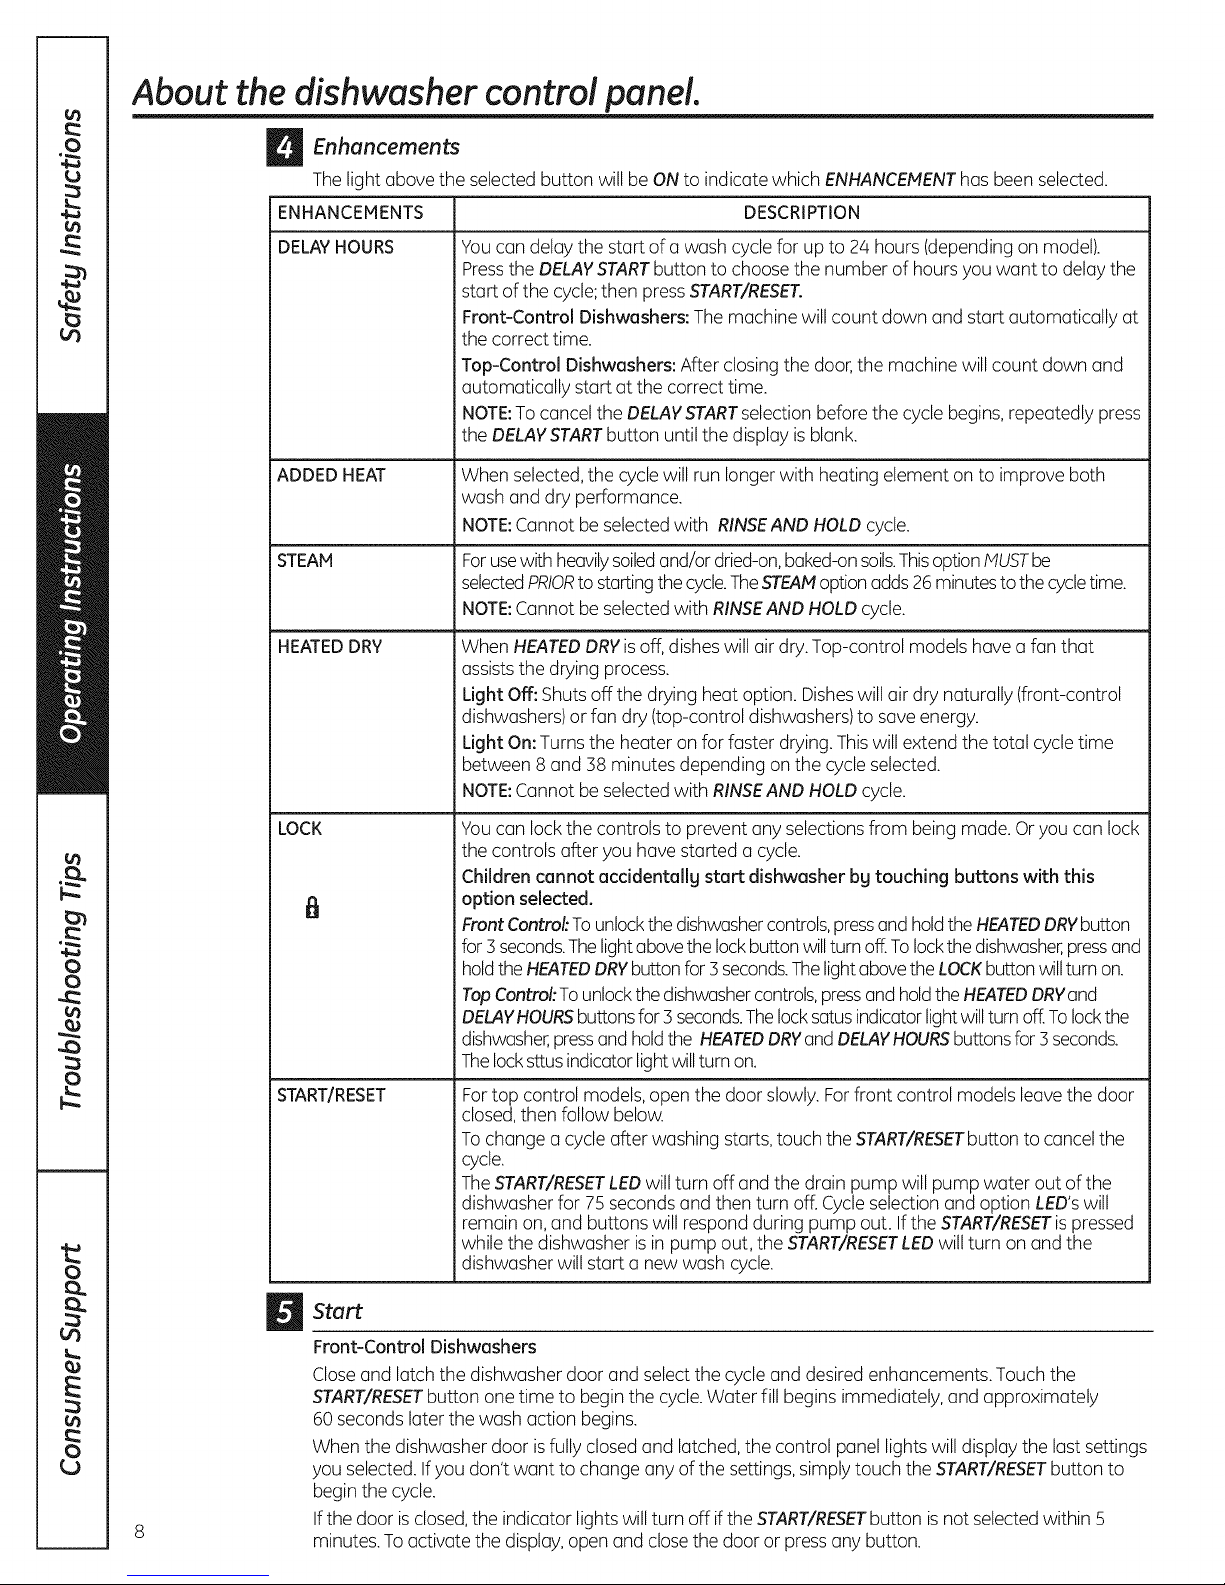
About the dishwasher control panel.
_)_ Enhancements
Thelight above the selected button will be ONto indicate which ENHANCEMENThas been selected.
ENHANCEMENTS DESCRIPTION
DELAYHOURS Youcan delay the start of a wash cycle for up to 24 hours (dependingon model).
Pressthe DELAYSTARTbutton to choose the number of hoursyou want to delaythe
start of the cycle;then pressSTART/RESET.
Front-Control Dishwashers: The machine will count down and start automatically at
the correct time.
Top-Control Dishwashers: After closing the door,the machine will count down and
automatically start at the correct time.
NOTE:To cancel the DELAYSTARTselection beforethe cycle begins,repeatedly press
the DELAYSTARTbutton untilthe display is blank.
ADDEDHEAT When selected,the cyclewill run longerwith heating element on to improve both
wash and dry performance.
NOTE:Cannotbe selected with RINSEAND HOLDcycle.
STEAM Forusewith heavilysoiledand/or dried-on,baked-onsoils.ThisoptionP1USTbe
selectedPRIORto startingthe cycle.TheSTEAMoptionadds26minutesto thecycletime.
NOTE:Cannotbe selected with RINSEAND HOLDcycle.
HEATEDDRY When HEATEDDRYisoff, disheswill air dry.Top-control models have a fan that
assiststhe drying process.
Light Off: Shuts off the drying heat option. Disheswill air dry naturally (front-control
dishwashers)or fan dry (top-control dishwashers)to save energy.
Light On:Turns the heater on for faster drying. Thiswill extend the total cycle time
between 8 and 38 minutes depending on the cycle selected.
NOTE:Cannotbe selected with RINSEAND HOLDcycle.
LOCK Youcan lockthe controls to prevent any selectionsfrom being made. Oryou can lock
I_1 option selected.
START/RESET Fortop control models,open the door slowly. Forfront control models leavethe door
_l Start
Front-Control Dishwashers
Closeand latchthe dishwasher door and select the cycleand desired enhancements. Touch the
START/RESETbutton one time to begin the cycle.Water fill begins immediately, and approximately
60 seconds later the wash action begins.
When the dishwasher door is fully closedand latched, the control panel lights will display the lastsettings
you selected.If you don't want to change any of the settings, simply touch the START/RESETbutton to
begin the cycle.
If the door isclosed,the indicator lights willturn off if the START/RESETbutton isnot selectedwithin 5
minutes.To activate the display,open and closethe door or pressany button.
the controls after you have started a cycle.
Children cannot accidentally start dishwasher bg touching buttons with this
Front Control:Tounlockthe dishwashercontrols,pressandholdtheHEATEDDRYbutton
for 3seconds.Thelightabovethelockbutton willturn off.Tolockthedishwasher,pressand
holdthe HEATEDDRYbuttonfor3 seconds.ThelightabovetheLOCKbutton willturn on.
TopControl:To unlockthedishwashercontrols,pressendholdtheHEATEDDRYand
DELAYHOURSbuttonsfor 3seconds.Thelocksatusindicatorlightwillturn off.Tolockthe
dishwasher,pressand holdthe HEATEDDRYGndDELAYHOURSbuttonsfor 3 seconds.
Thelocksttusindicatorlightwillturnon.
closed,then follow below.
Tochange acycle after washing starts,touch the START/RESETbutton to cancel the
cycle.
TheSTART/RESETLEDwill turn off and the drain pump will pump water out of the
dishwasher for 75 seconds and then turn off. Cycleselection and option LED'swill
remain on,and buttons will respond during pump out. If the START/RESETispressed
while the dishwasher isin pump out, the START/RESETLEDwill turn on and the
dishwasher will start a new wash cycle.
 Loading...