

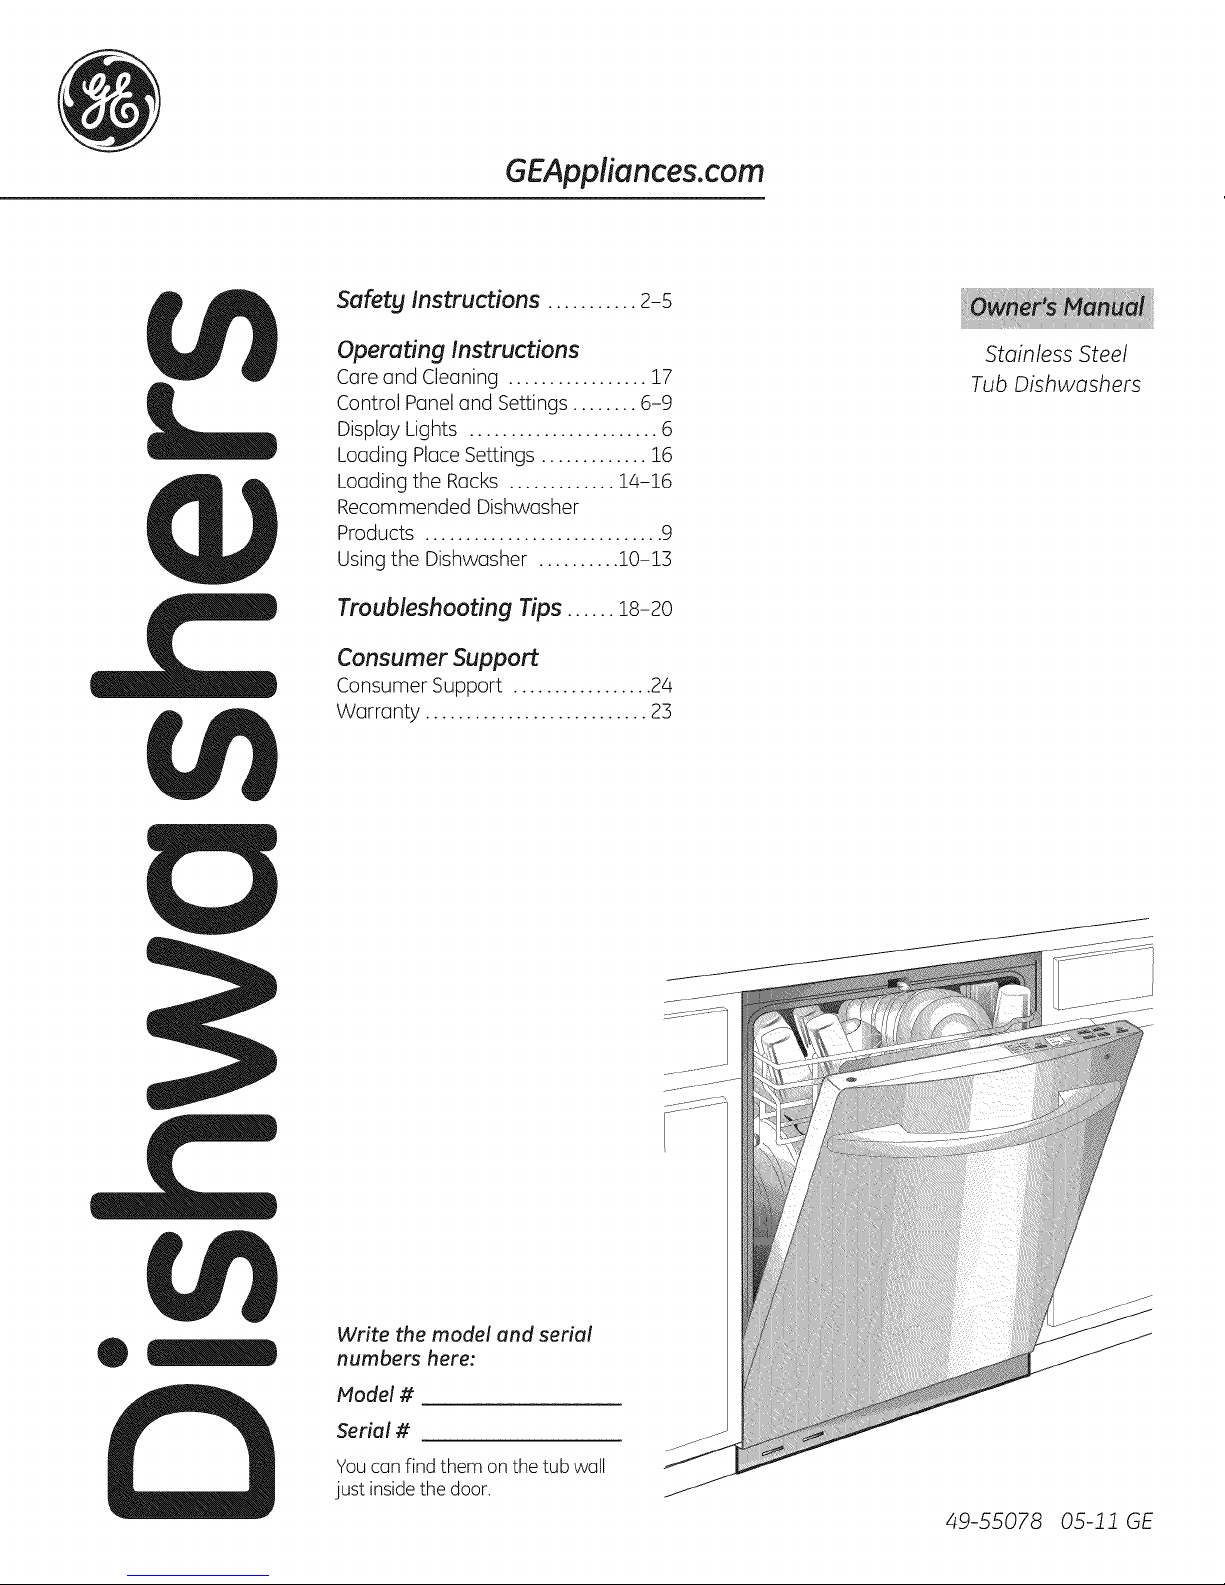
Page 1
GEAppliances.com
Safety Instructions ........... 2-5
Operating Instructions
Care and Cleaning ................. 17
Control Panel and Settings ........ 6-9
Display Lights ....................... 6
Loading Place Settings ............. 16
Loading the Racks ............. 14-16
Recommended Dishwasher
Products ............................. 9
Using the Dishwasher .......... 10-13
Troubleshooting Tips ...... 18-20
Consumer Support
Consumer Support ................. 24
Warranty ........................... 25
Stainless Steel
Tub Dishwashers
Write the model und seriul
numbers here:
Model #
Seriul #
Youcan find them on the tub wall
just inside the door.
49-55078 05-11GE
Page 2
IMPORTANT SAFETY INFORMATION
READ ALL INSTRUCTIONS BEFORE USING--
SAVE THESE INSTRUCTIONS
WARNING!
For your safety, the information in this manual must be followed to minimize the risk of fire,
explosion, electric shock, and to prevent property damage, personal injury, or death.
Ik iADVERTENCIA!
Para su seguridad, siga las instrucciones de este manual a fin de minimizar riesgos de
incendio, explosi6n, descargas el_ctricas, g para evitar dafios en su propiedad,
lesiones persona/es o la muerte.
A WARNING! WATER HEATER SAFETY
Undercertain conditions, hFdrogengas meF be produced in a water heater that has not been usedfor two
or more weeks.HYDROGENGASISEXPLOSIVE.
If the hot water hasnot beenusedfor two or more weeks,prevent the possibility of damage or injury
by turning on all hot water faucets and allow them to run for several minutes. Dothis before using any
electrical appliance connected to the hot water system.Thissimpleprocedure will allow any built-up
hydrogen gasto escape.Sincethe gas isflammable, do not smoke, useanopen flame, orusethe appliance
during this process.
%
iADVERTENCIA! SEGURIDADDELCALENTADORDEAGUA
Bajo ciertas condiciones,se podrd producir gasdehidr6geno enun calentadorde agua qua norue usadopar
dossemanaso mds. ELGASDEHIDROGENOESEXPLOSIVO.
Sielagua caliente no se us6 par dos semanaso m6s, evite laposibilidad de que ocurran da_os o lesiones
abriendo todos losgrifos de agua caliente y dejando que corra agua par varios minutos. Hagaesto antes de
usar cualquier artefacto el6ctrico conectado al sistema de agua caliente. Esteprocedimiento simple
permit!r6 la salida de cualquier acumulaci6n de gasde hidr6geno. Debidoaque elgases inflamable, no
fume, no use una llama abierta ni use el electrodom6stico durante este proceso.
PROPER INSTALLATION AND MAINTENANCE
This dishwasher must be properlF installed and located in accordance with the Installation Instructions
before it is used.If Fou did not receive an Installation Instructions sheet with Four dishwasher, Fou can
receive one bg visiting our webs!re at GEAppliences.com. In Canada, visit www.GEAppliences.ca.
[] Connect the dishwasher/appliance to a grounded
metal, permanent wiring system;or run an
equipment-grounding conductor with the circuit
conductors and connect to the equipment-
grounding terminal or leadof the appliance.
[] Improper connection ofthe equipment-grounding
conductor can result in a risk of electricshock.
Checkwith a qualified electrician or service
representative if you are indoubt whether the
appliance isproperly grounded.
[] Disposeof discarded appliances and shipping
or packing material properly.
[] Do not attempt to repairor replaceany part
ofyour dishwasher unlessitisspecifically
recommended inthis manual. Allother servicing
should be referred to a qualified technician.
[] To minimize the possibility ofelectric shock,
disconnect this appliance from the power supply
before attempting any maintenance.
NOTE:Turningthedishwasheroffdoesnot
disconnecttheappliancefrom thepower supplg.
Werecommendhaving a qualified technician
serviceFour appliance.
Page 3
IMPORTANT SAFETY INFORMATION
READ ALL INSTRUCTIONS BEFORE USING--
SAVE THESE INSTRUCTIONS
CAUTION: To prevent minor injury and property damage
[] Contents washed in Anti-bacterial mode, if
available, may behot to the touch. Usecare
before handling.
[] Usinga detergent that is not
specifically designedfor
dishwashers will cause the
dishwasher to fill with suds.
[] Ifyour dishwasher is
connected to a wall switch,ensure that
the switch is on prior to use.
[] On dishwashers with electronic controls,
ifyou chooseto turn the wall switch
off between wash cycles,allow 5-10
secondsafter turning the switch on
before touching START/RESETtoallow the control
to initialize.
s
[] Non-Dishware Items:Do not wash items such
as electronic air cleaner filters, furnace filters
and paint brushes inyour dishwasher. Damage
to the dishwasher and discoloration or staining
of the dishwasher may result.
[] Closesupervisionisnecessaryifthis appliance
is usedby or near children.
[] Load light, plastic items so they do not become
dislodged and drop to the bottom of the
dishwasher-they might come into contact with
the heating element and bedamaged.
ik PRECAUCION: A fin de evitar lesiones menores g dafios sabre la propiedad
[] Loscontenidos lavados en el modo SANI
WASH/SANITIZE(Lavado Desinfectunte/ Des
infecci6nJ,si este producto esta disponible, podran
estar calientes al tacto. Tenga
cuidado antes de tomar los
mismos con las manos.
[] Elusa de un detergente que
no est6 dise_ado
especfficamente para lavavajillas hara
que este OltimoseIlenedeagua con
jab6n.
[] Siel lavavajillas est6 conectado a un
tomacorriente, asegOresedeque el
interruptor est6 encendido antes del usa.
[] Siel lavavajillas tiene controles electr6nicos, en
caso de decidir apagar el interruptor entre ciclos
de lavado,espereentre 5y 10 segundos luego de
encender el interruptor antes de presionar START/
RESET(Inidar/Reiniciar) para permitir que el
control se inicie..
[] items que no sean Utensilios:No lave art[culos
tales coma filtros electr6nicosde limpiezacon
aire,filtros de horno y brochasde pintura en su
lavavajillas.Sepodrc_nproducir dahos,
descoloraci6n o manchas sabre el lavavajillas.
[] Sedeber_ estar especialmente atento si el
electrodom6stico es usado par nihoso si se
encuentra cerca de los mismos.
[] Cargue articulos de pl6stico livianos,de modo que
no sean desplazados ni caigan al rondo del
lavavajillas- es posible que entren encontacto
con el elemento calentador y sean dahados.
ELECTRICALREQUIREMENTS
[] Thisappliance must besupplied with 120V,60 Hz,
and connected to an individual,properly grounded
branch circuit, protected by a 15or 20 amp circuit
breaker or time-delay fuse.
[] If the electric supply
provided does not meet the
above specifications, it is
recommended that a
licensed electrician install
an approved outlet. Ensure proper ground
[]Your dishwasher circuit should not be usedfor any
other appliance while the dishwasher isin
operation asthe dishwasher requires the full
capacity of the circuit.
[] Ifthe wall receptacleyou plug the dishwasher's
power cord into iscontrolled by a switch, turn on
the switch.
exist before use
(portable models only).
Page 4

IMPORTANT SAFETY INFORMATION
READ ALL INSTRUCTIONS BEFORE USING--
SAVE THESE INSTRUCTIONS
ik WARNING! RISK OF CHILD ENTRAPMENT
PROPER DISPOSAL OF THE DISHWASHER
Junked or abandoned dishwashers are
dangerous...even if they will sit for "just
a few days." Ifyou are getting rid of
your old dishwasher, please follow the
instructions below to help prevent
accidents.
Before You Throw Away Your Old
Dishwasher:
[]Take off the door of the washing
compartment or remove the door
latch (as shown).
Front control latch keeper Top control latch keeper
_kiADVERTENCIA! RIESGO DE QUE UN Nlfi!O QUEDE
ATRAPADO
FORIVlAADECUADA DE DESCARTAR EL LAVAVA.JILLAS
Los lavavajillas antiguos o abandonados son
peligrosos.., incluso aunque se
conserven par %61ounos pocos digs".
Si se deshara de su antigua
refrigerodor, siga los siguientes
instrucciones o fin de evitor
occidentes.
Antes de Descartar su Antigua
Lavavajillas:
[] Retire la puerto del comportimiento
de lavado o retire la traba de Io
puerto (coma se muestro).
Control frontal de Io trobo
de seguridod
Control superior de Io
trobo de seguridod
4
Page 5
IMPORTANT SAFETY INFORMATION
READ ALL INSTRUCTIONS BEFORE USING--
SAVE THESE INSTRUCTIONS
A
... WARNING! including the following:
[] Usethis applionceonlyfor its intended purpose []
asdescribed inthis Owner's Manual.
[] Useonly powder,Cascade®CompleteAction Packs, []
liquid detergents or rinseagents recommended for []
usein o dishwasherand keepthem out of the reach
of children. Cascade ®and Cascade ®Complete []
Automatic Dishwashing Detergents, and Cascade ®
RinseAid rinse agents havebeen approved for use
in all GEdishwashers.
[] Locate sharpitems so that they are not likely
to damage the door seal.
[] Load sharpkniveswith the handlesup to reduce []
the riskof cut-type injuries.
[] Do not wash plasticitems unlessmarked
dishwashersafeor the equivalent. Forplastic []
items not somarked,checkthe manufacturer's
recommendations.
[] Do not touch the heatingelement during or
immediately after use.
Ik iADVERTENCIA! AI usar su lavavajillas, siga las precauciones b6sicas,
When using your dishwasher, follow basic precautions,
Donot operate yourdishwasher unlessall enclosure
panelsare properly in place.
Donot tamper with controls.
Donot abuse,sit onor stand on the dooror dish
rack of the dishwasher.
Donot allow childrento play around the dishwasher
when opening or closingthe door dueto the
possibilityof smallfingers beingpinchedin thedoor.
[]
Donot discard a dishwasherwithout first removing
the door of the washing compartment orthe door
latch.
Donot store or usecombustible materials,gasoline
or other flammable vapors and liquids in the vicinity
ofthis or any otherappliance.
Donot allow childrento play with,on or insidethis
or any discarded appliance.
inclugendo Io siguiente:
[] Useesteelectrodom6stico s61opora su prop6sito
original,como sedescribeen el Manualdel
Propietorio.
[] Use s61opolvo, Paquetes de Acci6n Completa de
Cascade@, detergentes liquidos o agentes de
enjuague recomendados para uso en un
lavavajillos,y mantenga losmismosfuera del
alcance de losni_os.LosDetergentespara Lavado
en LavavajillasAutom(XicosCascade@y Cascade@
Complete,y los agentesde enjuague de Cascade@
RinseAid fueron aprobados pot su uso en todos los
lavavajillosde GE.
[] Ubique articulospuntiagudos demodo que nohaya
posibilidadesde dahos sobre el selladorde la
puerto.
[] Ubique articulospuntiagudos demodo que nohaya
posibilidadesde dahos sobre el selladorde la
puerta.
[] No lavearticulos de pl6stico,a menos quefigure
que son segurospara usoen lavavajillaso una
indicaci6n equivalente.Sisetrata de articulos de
pl6sticoque no cuentan con dicha indicaci6n,
consultelasrecomendacionesdel fabricante.
[] No toque el elemento de calefacci6n durante o
inmediatamente despu6sdel uso.
[] No toque el elemento de calefacci6n durante o
inmediatomente despu6sdel uso.
[] No toque el elemento de calefacci6n durante o
inmediotamente despu6sdel uso.
[] No abuse,no sesiente ni separe sobre la puerta o
la bondejo del plato del lavovajillos.
[] No permita que los nihosjueguen olrededordel
lavavajillosal abrir o cerrar Io puerto,debido ala
posibilidadde que susdedospequehossean
presionadoscontra lapuerta.
[] No permita que los nihosjueguen olrededordel
lavavajillasal abrir o cerrar la puerta,debido a la
posibilidadde que susdedospeque_ossean
presionadoscontra lapuerta.
[] No guarde niusematerialescombustibles,gasolina
u otros vapores inflamablesy liquidoscerca de@ste
ni de otros electrodom_sticos.
[] No guarde niusemoteriolescombustibles,gasolina
u otros vapores inflomablesy liquidoscerca de6ste
ni de otros electrodom6sticos.
READAND FOLLOWTHISSAFETYINFORMATIONCAREFULLY.
SAVE THESE INSTRUCTIONS
Page 6
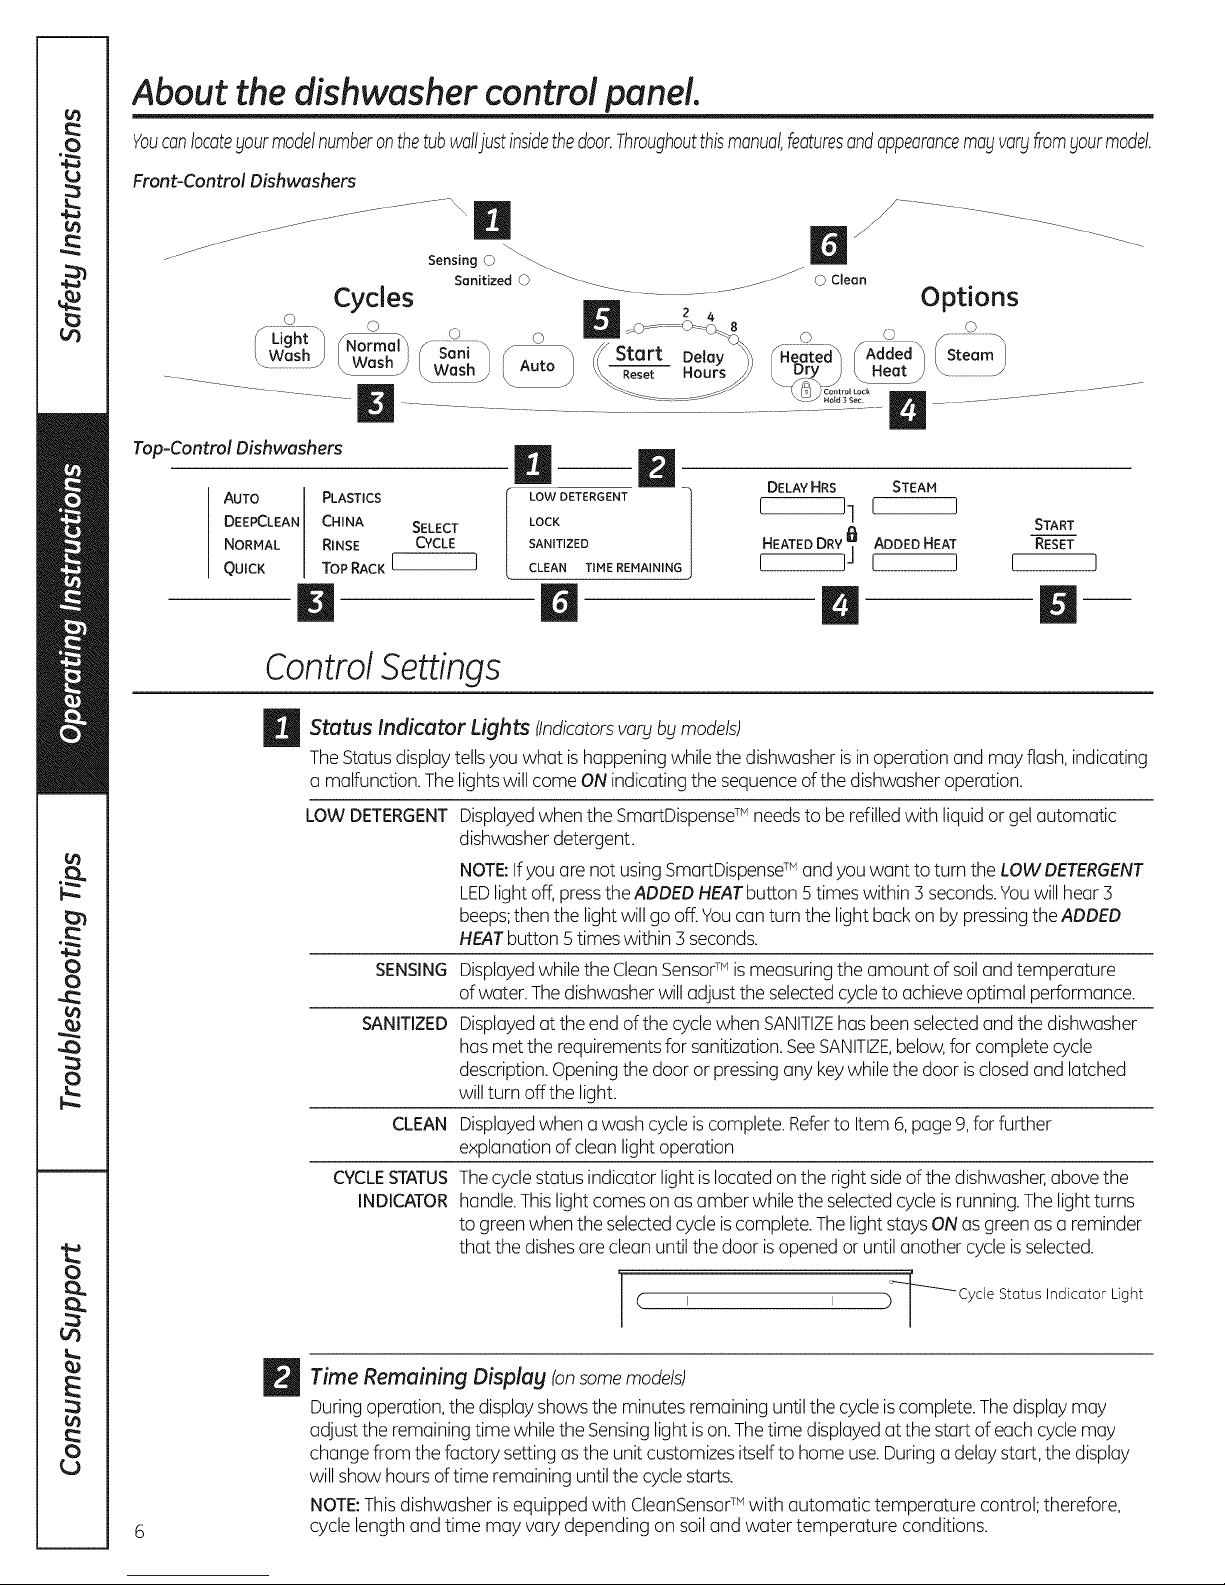
About the dishwasher control panel.
Youcanlocateyourmodelnumberonthetubwal!justinsidethedoor.Throughoutthismanualfeaturesandappearancemayvaryfromyourmodel.
Front-Control Dishwashers
_ _..
Sensing © _
Sanitized O _ _ © Clean
Cycles .............................................. Options
Light ......... 0 _.s--- .............. ................ 0
(_ash) /N_ f" San,_ F_ //Start Del_y_°_ Seeeted_,f_Added_ (S;iam)
.............................._ ...... / k Wash_ / Auto , \\_ Hours // [Dry) [ Heat )
............................................................................... ................................
N "N.......
Top-Control Dishwashers
AUTO PLASTICS
DEEPCLEAN CHINA SELECT
NORMAL RINSE CYCLE
QUICK TOP RACK I I
B
LOW DETERGENT
LOCK
SANITIZED
CLEAN TIME REMAINING
DELAY HRS STEAM
I 11 I I
HEATED DRY]_] ADDED HEAT RESET
I I I [
/
START
D
ControlSettings
_ Status Lights (Indicatorsvary by models)
TheStatusdisplaytellsyou what ishappening whilethe dishwasher isin operation and may flash,indicating
o malfunction. The lightswill comeONindicating the sequenceofthe dishwasheroperation.
LOW DETERGENT
Indicator
SENSING
SANITIZED
CLEAN
CYCLESTATUS
INDICATOR
Displayedwhen the SmartDispenseTM needs to berefilledwith liquidor gelautomatic
dishwasherdetergent.
NOTE:Ifyou are not usingSmartDispenseTM andyou want to turn theLOW DETERGENT
LEDlightoff,presstheADDEDHEATbutton 5times within 3 seconds.Youwill hear 3
beeps;then the lightwill go off.Youcan turn the light back on by pressingthe ADDED
HEATbutton 5 timeswithin 3 seconds.
Displayedwhilethe CleanSensorTM ismeasuring the amount of soiland temperature
of water.Thedishwasherwilladjust the selected cycleto achieve optimal performance.
Displayedat the end of the cyclewhen SANITIZEhas beenselectedand the dishwasher
has met the requirements for sanitization.SeeSANITIZE,below,for complete cycle
description.Openingthe door orpressingany keywhilethe door is closedand latched
willturn off the light.
Displayedwhen a wash cycle is complete.Referto Item 6,page 9,forfurther
explanation of clean light operation
Thecyclestatus indicatorlight is located on the right sideof the dishwasher,abovethe
handle.Thislight comeson as amber whilethe selected cycle is running.Thelightturns
to green when the selectedcycle iscomplete.Thelight staysONas greenas a reminder
that the dishesare clean until the door isopened or until anothercycle is selected.
/
I I _'_Cycle Status Indicator Light
(
1
_ ime Remaining Displag (onsome models)
During operation, the display shows the minutes remaining until the cycle is complete. The display may
adjust the remaining time while the Sensing lightis on. The time displayed at the start of each cycle may
change from the factory setting as the unit customizes itselfto home use. During a delay start, the display
willshow hours of time remaining until the cycle starts.
NOTE:This dishwasher is equipped with CleanSensor TM with automatic temperature control; therefore,
cycle length and time may vary depending on soil and water temperature conditions.
Page 7
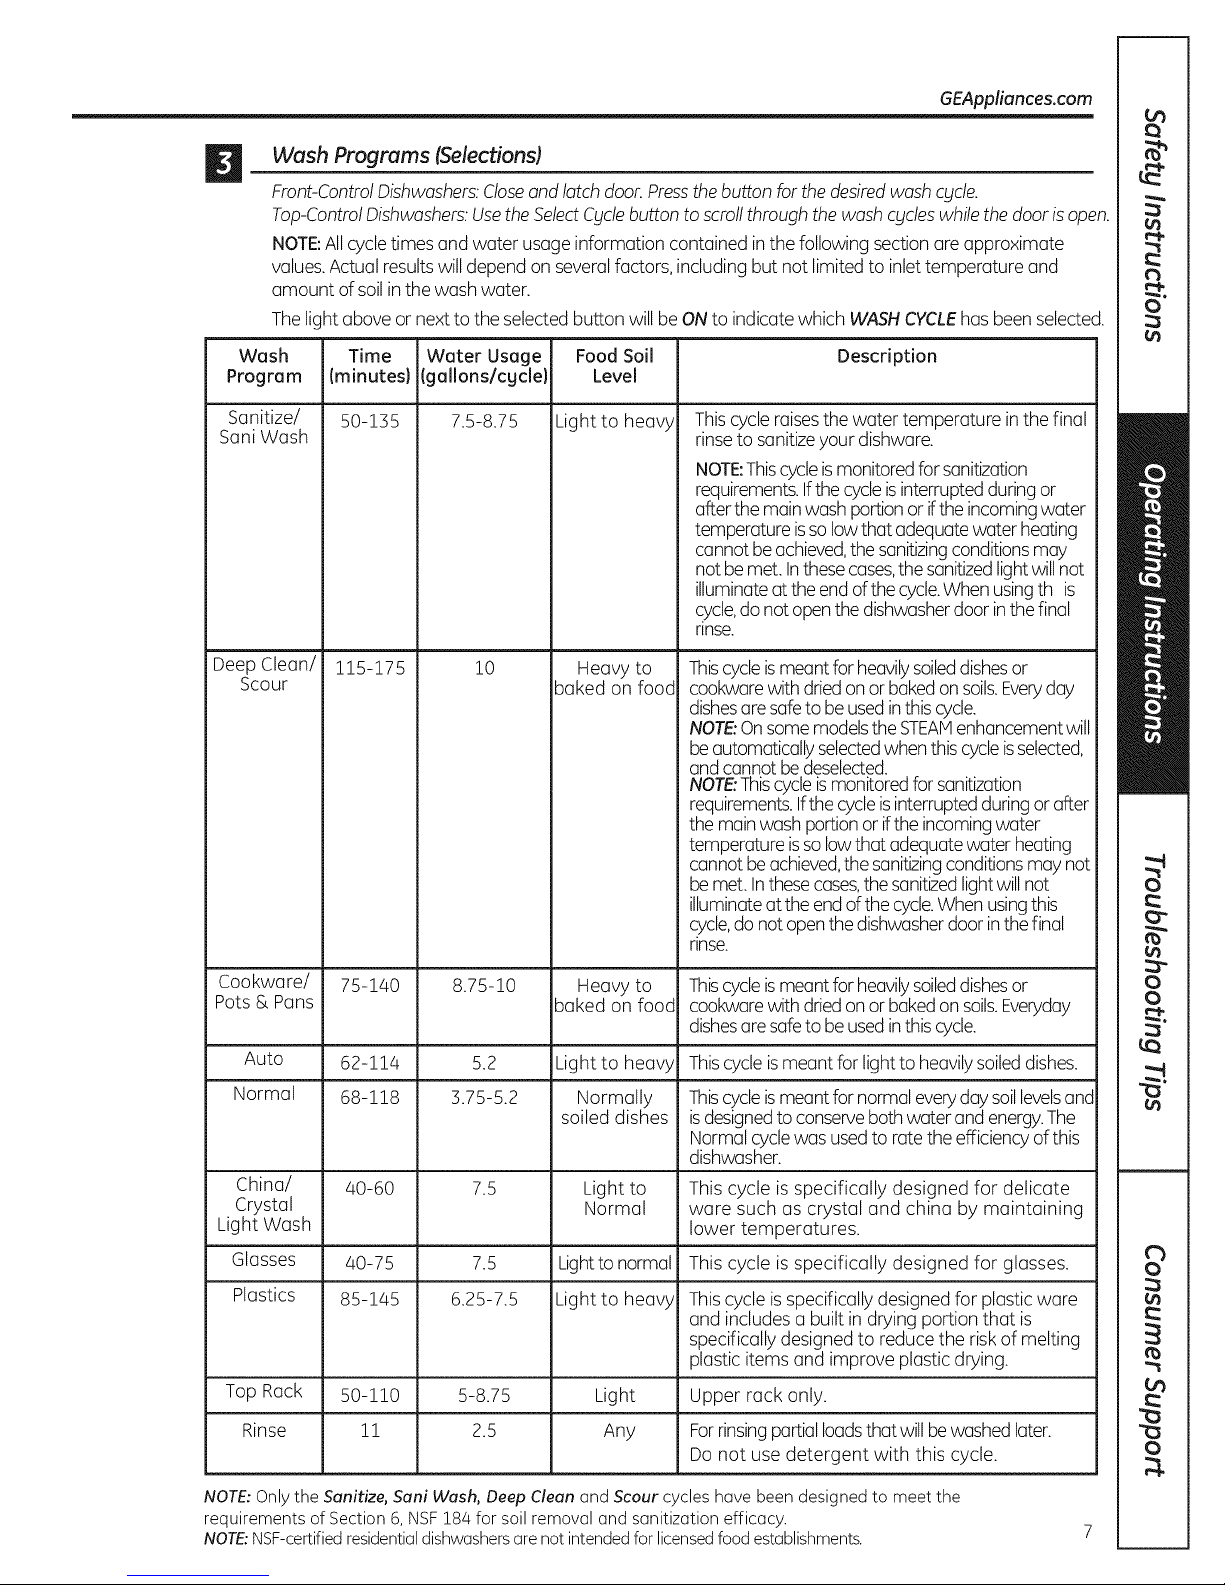
D Wash Programs (Selections)
FronbControlDishwashers:Closeand latch door.Pressthebutton forthedesiredwash cycle.
Top-ControlDishwashers:Usethe SelectCyclebutton to scrollthrough thewash cycleswhile the door isopen.
NOTE:Allcycle times and water usage information contained inthe following section are approximate
values.Actual resultswill depend on severalfactors,includingbut not limitedto inlettemperature and
amount of soilin the washwater.
Thelight aboveor nextto the selectedbutton will beONto indicatewhich WASHCYCLEhasbeenselected.
Wash Time Water Usage Food Soil Description
Program (minutes) (gallons/cgcle) Level
GEAppliances.com
Sanitize/ 50-135 7.5-8.75 Light to heavy
Sani Wash
Thiscycleraisesthe water temperature inthe final
rinseto sanitizeyour dishware.
NOTE:Thiscycleismonitoredfor sanitization
requirements.Ifthecycleis interruptedduringor
afterthe mainwash portionor ifthe incomingwater
temperatureisso low that adequatewater heating
cannot beachieved,the sanitizingconditionsmay
not bemet. Inthesecases,the sanitizedlightwillnot
illuminateat theend of the cycle.Whenusingth is
cycle,do not openthe dishwasherdoor inthefinal
rinse.
Deep Clean/
Scour
115-175 10
Heavy to
baked on food
Thiscycleismeant forheavilysoileddishesor
cookwarewith driedon orbakedonsoils.Everyday
dishesaresafeto beused inthiscycle.
NOTE:Onsomemodelsthe STEAMenhancementwill
be automaticallyselectedwhen thiscycleisselected,
and cannot bedeselected.
NOTE:Thiscycle ismonitoredforsanitizmtion
requirements.Ifthecycleis interruptedduringor after
the mainwash portionor ifthe incomingwater
temperatureisso low that adequatewater heating
cannot beachieved,the sanitizingconditionsmay not
be met. In thesecases,thesanitizedlightwillnot
illuminateat theendof thecycle.Whenusingthis
cycle,do not openthe dishwasherdoor inthefinal
nnse.
Cookware/ 75-140 8.75-10 Heavy to Thiscycleismeant forheavilysoileddishesor
Pots & Pans baked on food cookwarewith driedon or bakedon soils.Everyday
dishesaresafeto beused inthiscycle.
Auto 62-114 5.2 Light to heavy Thiscycleismeant for lightto heavilysoileddishes.
Normal 68-118 3.75-5.2 Normally Thiscycleismeant for normal everyday soil levelsand
China/ 40-60 7.5 Light to This cycle is specifically designed for delicate
Crystal Normal ware such as crystal and china by maintaining
Light Wash lower temperatures.
Glasses 40-75 7.5 Lightto normal This cycle isspecifically designed for glasses.
Plastics 85-145 6.25-7.5 Light to heavy Thiscycle isspecificallydesigned for plastic ware
Top Rack 50-110 5-8.75 Light Upper rack only.
Rinse 11 2.5 Any Forrinsingpartialloadsthatwillbewashed later.
NOTE:Only the Sanitize, Sani Wash, Deep Clean and Scour cycles have been designed to meet the
requirements of Section 6, NSF184 for soil removal and sanitization efficacy.
NOTE:NSF-certifiedresidentialdishwashers are not intendedfor licensedfood establishments.
soiled dishes isdesignedtoconserveboth water andenergy.The
Normalcyclewas usedto rate theefficiencyofthis
dishwasher.
and includes a built in drying portion that is
specifically designedto reducethe risk of melting
plastic items and improve plastic drying.
Do not use detergent with this cycle.
Page 8
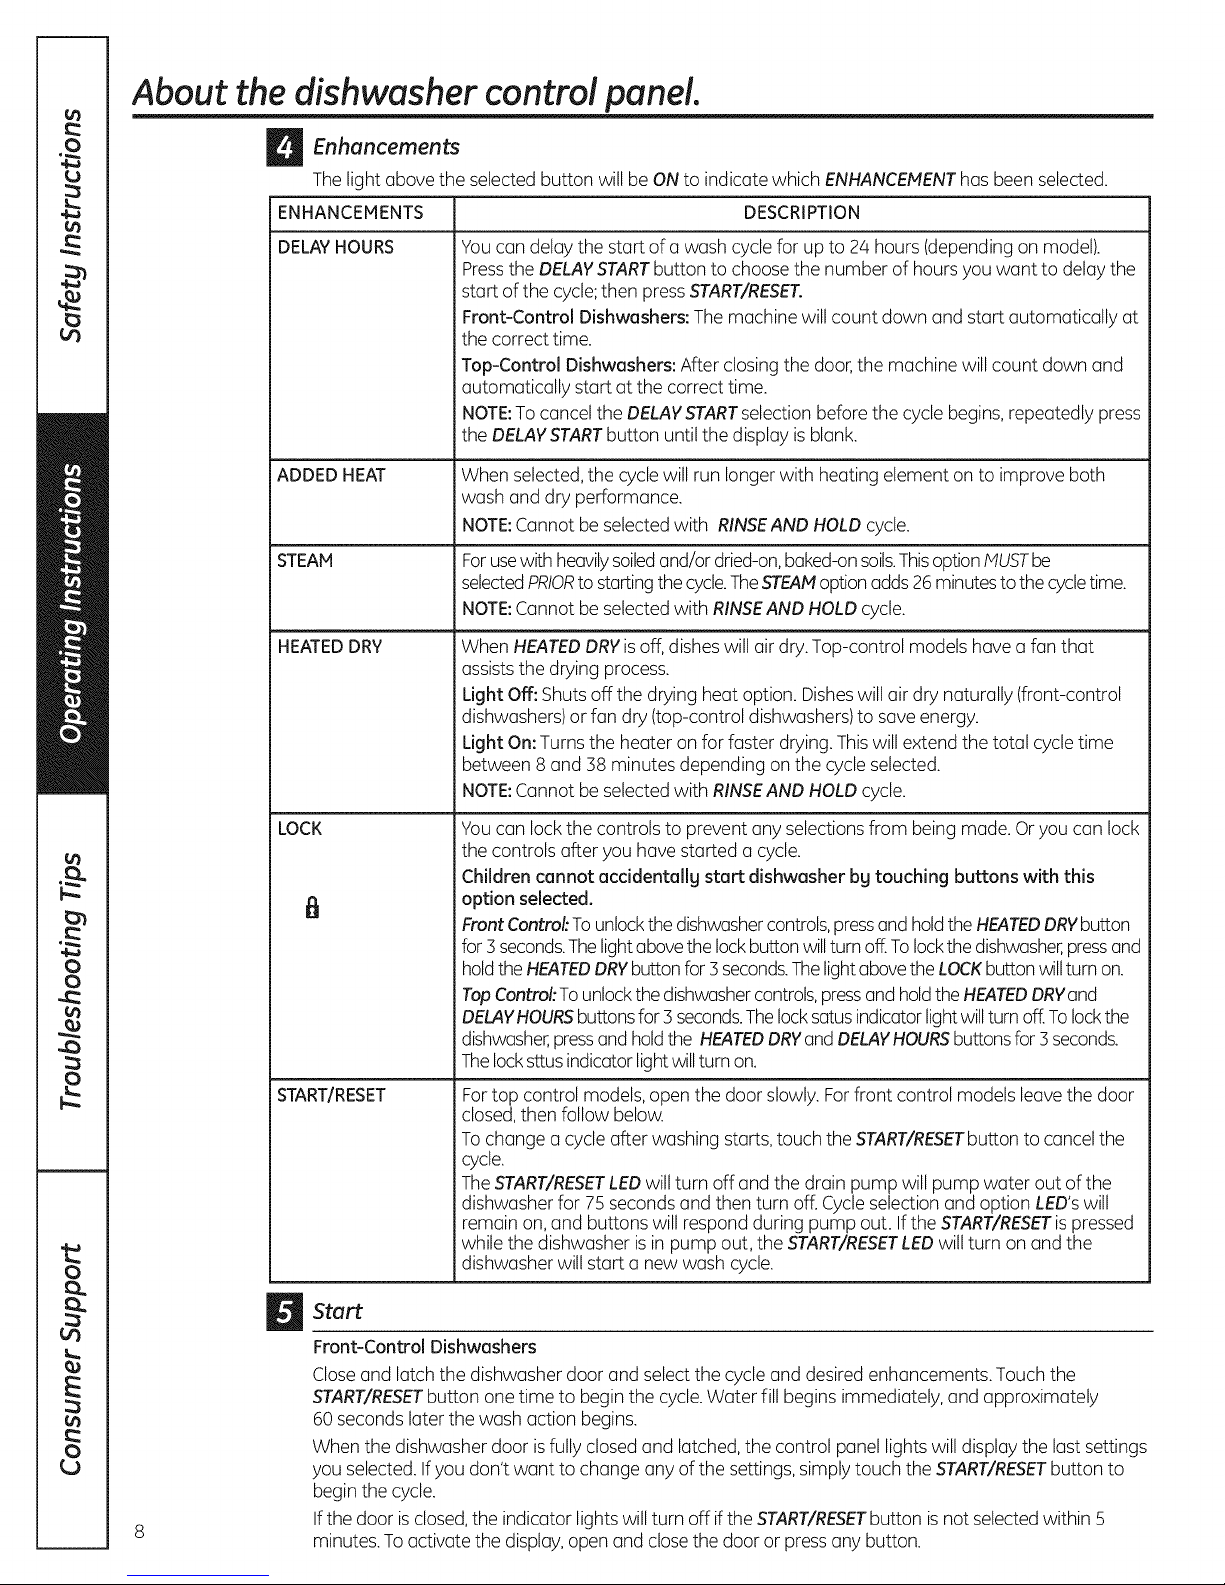
About the dishwasher control panel.
_)_ Enhancements
Thelight above the selected button will be ONto indicate which ENHANCEMENThas been selected.
ENHANCEMENTS DESCRIPTION
DELAYHOURS Youcan delay the start of a wash cycle for up to 24 hours (dependingon model).
Pressthe DELAYSTARTbutton to choose the number of hoursyou want to delaythe
start of the cycle;then pressSTART/RESET.
Front-Control Dishwashers: The machine will count down and start automatically at
the correct time.
Top-Control Dishwashers: After closing the door,the machine will count down and
automatically start at the correct time.
NOTE:To cancel the DELAYSTARTselection beforethe cycle begins,repeatedly press
the DELAYSTARTbutton untilthe display is blank.
ADDEDHEAT When selected,the cyclewill run longerwith heating element on to improve both
wash and dry performance.
NOTE:Cannotbe selected with RINSEAND HOLDcycle.
STEAM Forusewith heavilysoiledand/or dried-on,baked-onsoils.ThisoptionP1USTbe
selectedPRIORto startingthe cycle.TheSTEAMoptionadds26minutesto thecycletime.
NOTE:Cannotbe selected with RINSEAND HOLDcycle.
HEATEDDRY When HEATEDDRYisoff, disheswill air dry.Top-control models have a fan that
assiststhe drying process.
Light Off: Shuts off the drying heat option. Disheswill air dry naturally (front-control
dishwashers)or fan dry (top-control dishwashers)to save energy.
Light On:Turns the heater on for faster drying. Thiswill extend the total cycle time
between 8 and 38 minutes depending on the cycle selected.
NOTE:Cannotbe selected with RINSEAND HOLDcycle.
LOCK Youcan lockthe controls to prevent any selectionsfrom being made. Oryou can lock
I_1 option selected.
START/RESET Fortop control models,open the door slowly. Forfront control models leavethe door
_l Start
Front-Control Dishwashers
Closeand latchthe dishwasher door and select the cycleand desired enhancements. Touch the
START/RESETbutton one time to begin the cycle.Water fill begins immediately, and approximately
60 seconds later the wash action begins.
When the dishwasher door is fully closedand latched, the control panel lights will display the lastsettings
you selected.If you don't want to change any of the settings, simply touch the START/RESETbutton to
begin the cycle.
If the door isclosed,the indicator lights willturn off if the START/RESETbutton isnot selectedwithin 5
minutes.To activate the display,open and closethe door or pressany button.
the controls after you have started a cycle.
Children cannot accidentally start dishwasher bg touching buttons with this
Front Control:Tounlockthe dishwashercontrols,pressandholdtheHEATEDDRYbutton
for 3seconds.Thelightabovethelockbutton willturn off.Tolockthedishwasher,pressand
holdthe HEATEDDRYbuttonfor3 seconds.ThelightabovetheLOCKbutton willturn on.
TopControl:To unlockthedishwashercontrols,pressendholdtheHEATEDDRYand
DELAYHOURSbuttonsfor 3seconds.Thelocksatusindicatorlightwillturn off.Tolockthe
dishwasher,pressand holdthe HEATEDDRYGndDELAYHOURSbuttonsfor 3 seconds.
Thelocksttusindicatorlightwillturnon.
closed,then follow below.
Tochange acycle after washing starts,touch the START/RESETbutton to cancel the
cycle.
TheSTART/RESETLEDwill turn off and the drain pump will pump water out of the
dishwasher for 75 seconds and then turn off. Cycleselection and option LED'swill
remain on,and buttons will respond during pump out. If the START/RESETispressed
while the dishwasher isin pump out, the START/RESETLEDwill turn on and the
dishwasher will start a new wash cycle.
Page 9

GEAppliances.com
Start (continued)
Top-Control Dishwashers
After selecting the cycle and desired enhancements, touch the START/RESETbutton to readythe
dishwasher to begin the cycle.Closethe door to start the cycle or begin the DELAYSTARTcountdown.
When the cycle starts,the water fill begins and approximately 60 seconds later the wash action begins.
Thedishwasher will always display your lastselection and enhancements. Ifyou don't want to change
the settings,simply touch the START/RESETbutton to ready the dishwasher and closethe door to begin
the cycle.
ALL MODELS:If a power failure occursAUTOand HEATEDDRYwill automatically be programmed. Make
any new selections and touch the START/RESETbutton to beginthe new cycle.
When the door is opened, the indicator lightswill turn off if the START/RESETbutton is not selectedwithin
5 minutes. Toactivate the display, open and close the door or touch any button.
Clean
Front-Control Dishwasher
TheCLEANlight will illuminate and a double beep will sound when a wash cycle is complete. On some
models,the CLEANlight will turn off when the door isopened.On other models,the CLEANlight will
remain on until the door isopened and then relatched or until any keypad ispressedwhile the door
islatched shut.
Top-Control Dishwasher
TheCLEANlight will illuminate and a double beep will sound when a wash cycle is complete. TheCLEAN
light will remain on until the door isopened and then relatched or until any keyis pressed.
ALL MODELS:Toturn off the audible end-of-cycle signal (or re-activate it if it was previouslyturned off),
press the HEATEDDRYbutton 5 times within 3 seconds.A triple beepwill sound to indicate the end-of-
cycle beep option has been toggled.
Recommended dishwasher products.
GErecommends the following products for usein its
dishwashers:
[] Foryour manual detergent dispenser,Cascade®
CompleteActionPacs are recommended. Powders,
liquids,and gels may alsobe used but may not
work as effectively. Seepage 11 for more details.
[] Foryour SmartDispenseTM Detergent Dispenser,
Cascade®Completegel is recommended. Seepage
12 for differences between liquid gel types and a
warning about mixing liquid detergents together.
[] Cascade®RinseAid TM rinse agent to remove spots
and prevent new film buildup on your dishes,
glasses,flatware, cookware and plastic.Using rinse
agent alsoimproves dry performance.
9
Page 10

Using the dishwasher.
Check the Water Temperature
The entering water should be at least 120°F and not more than 150°F for effective cleaning and to
prevent dish damage. Check the water temperature with a candy or meat thermometer. Turn on the
hot water faucet nearest the dishwasher, place the thermometer in a glass and let the water run
continuouslbt into the glass until the temperature stops rising.
Use Cascade ®Rinse Aid TMRinse Agent
Cascade ®Rinse AidTM rinse agent improves drbting, removes spots and prevents new film buildup on
btour dishes, glasses, flatware, cookware and plastic.
Filling the Dispenser Rinse Aid Setting
Therinseagent dispenserholds3.5oz.of rinse agent.
Under normal conditions,this will lastapproximately
one month. Try to keepit full,but do not overfill.
Make sure the dishwasher door isfully open.
m
Turnthe dispenser
ra
cap to the left and
lift it out.
F1Add rinseagent until
the indicator window is
full.
J_l Clean up any spilled
rinseagent with a Indicator t
damp cloth, window Dispenser cap
r51 Replacethe dispensercap.
Theamount of rinse agent releasedinto the final rinse
can be adjusted.Thefactory setting isat the
midpoint. Ifthere are rings of calcium (hardwater)
spots on dishes,try a higher setting.Ifthere is
foaming, use a lower setting.
Toadjust the setting:
Removethe dispenser cap;
then turn the adjuster
counterclockwise to
increase the amount
of rinseagent or
clockwiseto reduce
the amount of rinseagent dispensed.
Rinse agent
adjuster
Dish Preparation Prior to Loadin
[] No prerinsing of normal food soil is required. [] Removelarge quantities of any remaining food.
[] Scrape off hard soils,bones,toothpicks, skinsand [] Removeleafy vegetables,meat trimmings and
seeds, excessiveamounts of grease or oil.
Forget to Add a Dish?
A forgotten dish can be added any time,
however, for best wash performance it is
recommended to add a dish prior to the opening
of the detergetnt cup.
ri1 Squeezethe door latch to release the door.
10
r_-i Do not open the door until the water spray
action stops. Steam may rise out of the
dishwasher.
r_Add forgotten dishes.
E] Close the door and dishwasher will start
in 5 seconds.
Page 11

Dispenser
_'_ Thedetergentdispenserison theupperlefthandsideofthe
_ dishwasherdoor.It hastwocompartments.Usethemain
washcompartmentforallloads.Usethe pre-wash
compartmentonlywhenyourwaterisextremelyhardor
whenyou havea heavysoiledload.
! ........... DIDIDIDMia_eUaIse_retergent
Youmayusetablet,powder,liquidor gelautomatic
dishwasherdetergent.Makesureyouuseonlydetergents
specificallylabeledfor useinautomaticdishwashers.Never
useliquidhanddishdetergentinan automaticdishwasher.
Sudsingand poorwashperformancewillresultwiththe use
ofimproperdetergents.
Detergentsshouldbestoredina dry locationandintheir
originalcontainerto preventlossofeffectiveness.Place
detergentin thecupjust priorto startingthedishwasher
andthencloseandlatchthecover.Thecoverwillopen
duringthewashcycle.
Fillingthe DetergentDispenser
GErecommendsusingdetergentintabletor packetform.
Independenttestinghasshownthisformof detergentis
veryeffectiveinthe dishwasher.Cascade@Complete
ActionPecksarean exampleofthistypeofdetergent.
Simplyputatabletor packetintothemainwash
compartmentandthencloseandlatchthedetergentcup
cover.Pleasenoticethatthetabletorpacketmustbe
placedinthe mainwashcompartmentofthedetergent
cup.ifthetabletorpacketistossedinthebottomof the
dishwasher,thedetergentwillbeflusheddownthedrainin
averyshortperiodoftimeandwill thusbewasted.Wash
performancewill beverypoorasa result.
tfyou chooseto usedetergentinpowder,liquidorgelform,
theamountofdetergentyouusewillbedeterminedbythe
hardnessofyourwater,thetemperatureof yourwater,and
thefood soilloadinsidethedishwasher.Contactyourwater
companytogetinformationaboutthehardnessofthe
waterinyourarea.Alternatively,youmaypurchasea hard
waterteststripfromGE.Call1-800-626-2002andaskfor
partnumberWD01×10295.
GEAppliances.com
Number
ofGroins Detergent Cups to Fill
Lessthan 4 Fillcup to soft line (1/3 full)
4 to 8 Fillcup to medium soft line (2/3 full)
8 to 12 Fillcup to medium hard line
(completely full)
Greater Fill both main wash cup
than12 and prewash cup
Usingtoomuch(etergentwithverysoftand/orveryhot
watermaycauseaconditioncalledetchingonyour
glassware.Etchingisa permanentcloudinessinyour
glassware.Thisconditionisirreversible.However,usingtoo
littledetergentwillcausepoorwashperformance.
Usethetableasastartingpointandthenadjustthe
amountof detergentyouuse.Usejust enoughto getgood
washperformance.Usingjustthe rightamountofdetergent
willprovidegreatwashperformancewithoutwasting
detergentor etchingofglassware.
DONOTUSEHANDDISHDETERGENT
NOTE:Usingadetergentthat isnotspecificallydesignedfor
dishwasherswillcausethe dishwashertofillwith suds.
Duringoperation,thesesudswillspilloutofthedishwasher
vents,coveringthekitchenfloorandmakingthefloorwet.
Becausesomanydetergentcontainerslookalike,storethe
dishwasherdetergentina separatespacefromallother
cleaners.Showanyonewho mayusethedishwasherthe
correctdetergentandwhereit isstored.
Whiletherewillbenolastingdamageto thedishwasher,
yourdisheswillnotgetcleanusingadishwashing
detergentthatisnotformulatedtoworkwith automatic
dishwashers.
11
Page 12

Using the dishwasher.
SmartDispense Detergent Dispenser (some models)
ThisdishwashermayhaveSmartDispenseTM,afeature
which automatically dispensesliquidautomatic
dishwasherdetergentinto eachcyclebasedon soillevel
andwater hardness.Toutilizethe SmartDispensd
DetergentDispenser,it must first befilled.Althoughany
liquidor gelautomaticdishwashingdetergentcan be
usedin theSmartDispensdMsystem,all liquidor gel
automaticdishwashingdetergentsare notthe same.
Mostautomaticdishwashingdetergentsarechlorine ...........................
bleach-based(suchasCascade®)whileotherscontain
enzymes(suchasCascadeComplete®).
Donot mixang chlorine bleach-based automatic
dishwashing detergent with ang dishwashing
detergent containing enzgmesas this could cause
the detergents to congealand lead to blockageof
the SmartDispenseT"sgstem.
Checkthe detergentlabel to determineif the detergent
ischlorinebleach-basedor onethat containsenzymes. =1_ /
tt is recommendedthat the sametype ofdetergent be
usedwhen refilling your SmartDispenseT_system.
Aimthe detergentbottle at the openingin the door and
beginto fill.
Thedispenserwill holda,Sozof liquiddishwasher
detergent (standard size bottle).
z_
CAUTION! Absolutelydonot add
powder detergent, tablets or any liquid soap
or detergent normally used for washing hands
or dishes in a sink. Only use liquid or gel
detergent specifically designed for use in
an automatic dishwasher.
Whenfull,replacethe cap andturn clockwiseuntiltight
iPRECAUCION!Bajo ninguna
circunstancia agregue detergente en polvo,
tabletas ojab6n o detergente liquido
normalmente utilizado para lavar manos o
platos en un fregadero. $61outilice detergente
liquido o en gel especificamente diseBado para
utilizar en lavaplatos automaticos.
to ensurenowater entersthe SmartDispenseT_dispenser.
tf residueisleft onthe door,itwill bewashedoff inthe
nextcycle.
Anindicator lightwillturn on to notifyyouwhen the
dispenserneedsto be filledagain.After filling,the light
willnot turn off until the door isclosed.Afulldispenser
willlast approximately1month for theaverageuser.
, i
-\
i
Turnclockwise.
12
Toopenthe dispenserfor filling, pushdown and turn
the blue cap counterclockwiseuntilthe cap isloose.
Liftcap off.
Setthe door at a comfortableangle to fill the dispenser.
STATUS
SmartDispense
LightWill_ LOWDETERGENT• DRYING
TurnOn ® SENSING ® SANITIZED
When
Time to
Refill (appearancemayvary)
NOTE:tfyou are not usingSmartDispensem_andyou
want to turn the LOWDETERGENTLEDlightoff,press
theADDEDHEATbutton 5timeswithin 3 seconds.You
willhear 3 beeps;thenthe light will gooff.Youcanturn
thelight backon by pressingthe ADDEDHEATbutton 5
timeswithin 3seconds.
® WASHING ® CLEAN
Page 13

SmartDispense Detergent Dispenser
Water Hardness Calibration
GEAppliances.com
Prior to the first use, the dishwasher needs
to be calibrated for water hardness. Pleasefollow
the directions below to calibrate the dishwasher
to the hardness of your tap water.
Determine the Hardness of Your Tap Water
In the bag that contained these instructions, you
should find a water hardness test strip package.
Read the instructions on the package, remove the
test strip and follow the instructions to determine
the hardness level of your tap water. You will use
this information to calibrate your dishwasher to
dispense the optimal amount of detergent.
Calibration of Front-Control Models With
3-Digit Displag
_J" ........ Cycles ,_,,_o "--. ......... -J o_,.o,, Options "'--
IT] Closeand latch the door (lightson,dishwasher
not running).
[_ PresstheAUTOand DELAYHOURSbuttons at the
same time for 3 seconds.
Thedisplaywill show anumber from 1to 5.This
isthe water hardnessvaluecurrently set.
[_ Pressthe AUTObutton to raisethe value or the
NORMALbutton to lower the value. Setthe water
hardnessvalue to the number determined with
the test strip and table above
E] Oncethe water hardness isset, the
START/RESETbutton to savethe setting and
return the dishwasher to normal operation.
Calibration of Front-Control Models Without a
3-Digit Display
[_ Closeand latch the door (lightson,dishwasher
not running).
[2] PresstheAUTObutton andDELAYHOURSbuttons
atthe same time for 3 seconds.Alllights will light
up and you will hear I to 5 beeps.Thenumber of
beepsindicates the current hardnessvalue.
r_To change the setting, pressthe DELAYHOURS
button the number of times that correspondsto
the water hardness value determined at the left.
Thecontrol will beep eachtime you pressthe
button.
E] Oncefinished pressing the button,you will hear a
confirmation with beepsfor the hardness value
selected.
[_lf the number of beepsis notwhat you desire,
start pressingthe DELAYHOURSbutton again to
reenter a new water hardness level.
B-] Oncethe water hardnessis set,pressthe
START/RESETbutton to save the setting and
return the dishwasher to normal operation.
NOTE:You should recalibrate the dishwasher control if water conditions change; for example, ifa water softener
system is added or removed from your home. 13
press
Display
Water hardness test strip indication.
SOFT
0 RED _ -- 1
1 RED _ 2
2 RED _ 3
l
3 RED _ 4
4 RED _ 5
HARD
Value to Enter into
Dishwasher
Calibration of Top-Control Models With
3-Digit Display Diplay
O_eC_EANCH_A S__CT .....................] _ STA_IT
_J_u_° _As_lcs _aaAYHRs _T_AM
............_......... _ ..............
TOP.OK_ _ _
r_ open thedoorand touch anybutton other than
STARTtoturn lightson.
[2] Pressthe Select Cycle button and DELAYHOURS
button at the same time for 3 seconds.The
display will show a number from i to 5.This isthe
water hardness value currently set.
r_ Pressthe STEAMbutton to raise the value
or the Select Cycle button to lower the value.Set
the water hardnessvalue to the number
determined with the test strip and table at the left.
[_ Oncethe water hardness isset, the
START/RESETbutton to save the setting and
return the dishwasher to normal operation.
Pressatthe sametime.
press
Calibration of-Top-Control Models Without
a 3-Digit Displag
[_ Open the door and touch any button other than
STARTto turn lights on.
Pressthe Select Cycle button and DELAYHOURS
D
button atthe same time for 3 seconds.Alllights
will light up and you will hear i to 5 beeps.The
number of beeps indicatesthe current hardness
value.
Tochange the setting,pressthe DELAYHOURS
r3
button the numberoftimesthat correspondstothe
water hardnessvaluedeterminedattheleft The
controlwillbeepeachtime you pressthe button
r_ once finished pressingthe button, you will hear a
confirmation with beepsfor the hardness value
selected.
r_lf the number of beepsisnot what you desire,
start pressingthe DELAYHOURSbutton again to
reenter a new water hardness level.
B-] Oncethe water hardnessisset, pressthe
START/RESETbutton to save the setting and
return the dishwasher to normal operation.
Page 14

Loading the dishwasher racks.
For best dishwashing results, follow these loading guidelines. Features and appearance of racks and silverware
baskets mag varg from gour model.
Upper Rack
Although the upper rack isprimarily for
glasses,cups and saucers, pots and pans can
be placed inthis rack for effective cleaning.
Cupsand glassesfit bestalong the sides.This
isalso a secure place for dishwasher plastics.
Theutility shelf (some models)may beplaced
in the up or down position to add flexibility. A
wine glass holder (somemodels)secures
wine glassesfor best washability.
Somemodels have contoured metal cup
shelvesthat can secure up to 12wine glasses
(asshown).
Becausewine glassescome in various sizes,
after loading, slowly push in the rack to make
surethey will clear the top of the dishwasher.
Somemodels have an Angled Rack System,
which allows you to angle your dishes,such
as coffee mugs,for better cleaning and
quicker drying. Toposition the tines, pull the
leverforward then drop the tines into
position,then releasethe lever.
Theupper rack isgood for all kinds of
odd-shaped utensils.Saucepans,mixing
bowls and other items should be placed face
down. Fold-down tines (onsome models)
provide flexibility for extra-large and hard-
to-fit items.
Securelarger dishwasher-safe plasticsover
2 tines when possible.
Hake sure small plastic items are secure so
they can't fall onto the heater.
Besurethat items do not protrude through
the bottom of the rack and block rotation of
the middle spray arm. Thiscould result in
poor wash performance for items in the
upper rack.
Checkto make sure that no items will block
rotation of the wash arm.
NOTE:The Single RackWash selection,on
models with this feature, washes the upper
rack only. Ifyou usethis feature, donot load
items in the lower rack.
Adjustable Upper Rack Ion some models)
Thestandard position ofyour adjustable rack
is"up" which allowsfor maximum clearance
for your taller items in the lower rack. Ifyou
have taller wine glasses,tumblers or other
items to place inthe upper rack, you may
want to adjust the rackto the lower position.
Tolower the rack, supportthe weight of the
rack with your hands as shownand press
both finger padsabout !/4" toward the inside
of the rack as indicated and guide the rack
down to its lower position.
Toraise the rack to the "up" position, pull up
on the center of the racksideframe until the
rack locks into place.
14
Page 15

Lower Rack
GEAppliances.com
One-piece basket (on some models)
Three-piece basket (on some models)
Don't let any
item extend
through bottom.
Thelower rack is best usedfor plates,saucers
and cookware. Large items such as broiler
pans and baking racks should go along the
left-hand side.Load platters, pots and bowls
along the sides,in corners or in the back.The
soiledsideof items shouldface the center of
the rack. If necessary,oversizedglassesand
mugs can be placedin the lower rack to
maximize loading flexibility.
Also,be careful notto leta portion of an item
such as a pot or dish handle extendthrough
the bottom rack.Thiscould blockthe wash
arm and cause poorwashing results.
Silverware Basket
Toload flatware, simply push the adjustable
handle to either side (on some models). Put
flatware in the removable basketwith fork
and knife handles up to protect your hands.
Placespoons in the basket with handles
down. Mix knives,forks and spoons sothey
don't nesttogether. Distribute evenly.Small
plastic items, such as measuring spoons and
lidsfrom small containers shouldgo in the
bottom of the silverware basketwith the
silverware on top.
Theone-piece silverwarebasket (onsome
models)can be placed in the front, right side
or back of the lower rack.
Fold-down tines (onsome models)provide
flexibility for extra-large and hard-to-fit items.
Thetines may beleft inthe up positionor
folded down to customize the lower rack. Do
not load large bowlsor potsfacedown inthe
front left-hand corner. Items loadedin this
manner could prevent proper operation of
the manual detergent cup.
A variety of options isavailable regarding
the three-piece silverware basket (onsome
models) inyour dishwasher.Thecomplete
basket isdesignedto fit on the right sideof
the lower rack.Additionally, each end of
the basket is removable to add loading
flexibility to accommodate flatware and
lower rack capacity needs.
Thelidsof both end and middle baskets(on
some models)can be closedto contain small
items. Long items can be placed on the utility
shelf in the upper rack. Load flatware through
the slots in the silverware basket covers.
To remove end baskets, grasp the
basket at opposite corners and slide
apart.
15
Page 16

Loading the dishwasher racks.
Extra Rack Features (on some models)
Cutlery Tray
Thecutlery tray holds up to 4 large knifes
such as a carver,chef's knives,bread knife,
etc.,that are too tall to fit in the silverware
basket.
Hook the tray onto the rear of the upper rack.
Laythe knivesbetween the guides
(usshown).
Bowl Tines
Thespecial large-bowl tines in the lower rack
add flexibility to your loading pattern. They
are usefulfor serving bowls or other large
bowls.
Tousethe bowl tines,fold down the
2 rows of flex tines infront of the bowl
tines and load bowlsjust as you would
in the upper rack.
These tines fold down Large-bowl tines
Loading place settings...
Follow these guidelines for loading 10 place settings. Features and appearance of racks and silverware baskets may
vary from gout model. NOTE:Silverware should be individually loaded into the slots on the silverware basket lid.
Upper Rack--lO place settings Lower Rack--lO place settings
Follow these guidelines for loading 12 place settings. Features and appearance of racks and silverware baskets may
varbtfrom btour model. NOTE: Silverware should be individuallbt loaded into the slots on the silverware basket lid.
16
Upper Rack--12 place settings
NOTE: Do not place I
large objects in the I //
front-left corner of I
the lower rack.
Lower Rack--12 place settings
Page 17

Caring for the dishwasher. GEAppliances.com
Cleaning the Exterior Door Panel
Beforecleaningthe front panel,make
sureyou knowwhat type of panel you have.
Referto the lust two lettersof your model
number. You can locate your model number
on the left-hand tub walljust insidethe door.
Ifyour model number endswith BB,CC,WW,
SAor BG,then you havea Painted Door
panel. Ifyour model number endswith SS,
then you havea StainlessSteel Door panel. If
your model number endswith CS,then you
have a CleanSteelpanel.
Followthe instructions below for cleaning the
door panel for your specific model.
Painted Door Panel (model numbers ending
in BB-black, CC-bisque, WW-White, SA-silver
metallic or BG-gmphite black)
Use a clean, soft, lightlydampened cloth,
then dry thoroughly. Youmay also use a
good appliance wax or polish.
Stainless Steel Door Panel (model numbers
ending in SS)
The stainless steel panels can be cleaned
with Stainless Steel Magic or a similar product
using u clean, soft cloth. Do not use appliance
wax, polish, bleach or products containing
chlorine on Stainless Steel doors.
Youcan order StainlessSteelMagic
#WX!OX!5 through GEPartsbycalling
800.626.2002.
CleanSteel Door Panel (model numbers
ending in CS)
Use a clean, soft, lightly dampened cloth,
then dry thoroughly. Donot use appliance
wax, polish or any chemical agent on
CleanSteel doors.
Do not wipe the dishwasher with a soiled
dish cloth or wet towel. Thesemay leave
a residue. Do not usescouring pads or
powdered cleaners because these products
can scratch the finish.
Stainless Steel Interior--Tub and Inner Door
Thestainlesssteel used to make the
dishwasher tub and inner door provides
the highestreliability available in a GE
dishwasher. Ifthe dishwasher tub or inner
door should be scratched or dented during
normal use,they will not rust or corrode.
Thesesurface blemisheswill not affect
their function or durability.
Cleaning the Control Panel
To clean the control panel, use a lightly
dampened cloth. Then dry thoroughly.
Protect Against Freezing
Ifyour dishwasher is left inan unheated place
during the winter, ask a service technician to:
IT] Cut off electrical power to the
dishwasher. Remove fuses or trip
circuit breaker.
[Z] Turn off the water supply and disconnect
the water inlet line from the water valve.
r_ Drain water from the water inletline
[_ Reconnectthe water inlet lineto the
and water valve.(Usea pan to catch
the water.)
water valve.
Air gap _ 'i{" I"ti_l_---b-
Checkthe air gap any time your
dishwasher isn't draining well.
Does Your Dishwasher Have an Air Gap?
An air gap protects your dishwasher against
water backing upinto it ifa drain clogs.The
air gap isnot a part of the dishwasher. It is
not coveredbyyour warranty. Notall
plumbing codesrequire air gaps, soyou may
not have one.If the air gap gets clogged,the
dishwasher will not drain.Cleanthe air gap
if the dishwasher will not drain.
The air gap is easy to clean.
[] Turn off the dishwasher and liftoff the
cover.
Removethe plasticcap and clean with
E]a toothpick.
!7
Page 18

Before you call for service...
Troubleshooting Tips
Save time and money! Review the charts on the following pages,
or visit 6EAppliences.com. You may not need to call for service.
Error Messages
DishwasherBEEPS
onceeveryminute
Beepingat theend
of thecyde
Dishesandflatware
nat clean
Spatsandfilming
anglassesand flatware
Cloudinessan
glassware
Possible Causes What To Do
Thisisa reminderthat gour • dose andlatch thedoorafteropeningit mid-cycle.
dishwasherdoorhasbeenleft
openduringoperation. It will
continuebeepinguntil gouclose
the door.
Thisis normal.Thedishwasher , Toturnoffthe doublebeepindicator(orre-activateitif itwaspreviously
will beeptwice at theendof the turnedoff),presstheHEATEDDRYpad 5timeswithin3seconds.
cgcle Atriplebeepwittsoundto indicatetheend-of-cyclebeepoption
hasbeenturnedonor off.
Lowinlet water temperature • Makesureinletwatertemperatureiscorrect(seepage10).Turnonthehot
waterfaucet nearestthedishwasher,Jetrun untilthewatertemperature
stopsrising.Thenstartthe dishwasherandturnoff thefaucet.Thisinsures
the enteringwaterishot.
Waterpressureistemporarilg low • Turnona faucet.Iswatercomingout moreslowlythanusual?Ifso,wait
untilpressureisnormalbeforeusingyour dishwasher.
Airgap or disposerisclogged • Cleanthe airgapor flushthedisposer.
Improperrack loading , Makesurelargedishwaredoesnotblockthedetergentdispenserorthe
washarms.SeetheLoadingthedishwasherrockssection.
Noair gap orhighdrain loop , Verifythatyouhavean airgapor a highdrainloop.Refertothe
InstallationInstructions.
Poorperforming detergent * Usea highlyrateddetergentsuchasCascade@Complete.
Extremelghardwater • UserinseagentssuchasCascade@RinseAidTM to removespots
andpreventnewfilmbuildup.
Lowinlet water temperature • Makesurewatertemperatureisat least120°R
Overloadingor improper , Loaddishwasheras shownin theLoadingPlaceSettingssection.
loadingof the dishwasher
Oldor damp powderdetergent , Makesuredetergentisfresh.
Rinseagentdispenseremptg • Ifwaterisextremelyhard,a softenermay berequired.
Toolittle or low performing , Makesureyou usetheproperamount ofhighlyrateddetergent.
detergent
Combinationofsoft water and , Thisiscaltedetchingand ispermanent.Topreventthisfromhappening,
too much detergent uselessdetergentifyou havesoftwater.Washglasswarein theshortest
cyclethatwittgetit clean.
Lowperformingphosphate ° SeeWhitefilmoninsidesurfacepage20
freedetergent
Watertemperatureentering the * Thiscouldbeetching.Lowerthe waterheatertemperature.
dishwasherexceeds150°F{66°C)
18
Page 19

Problem Possible Causes What ToDo
GEAppliances.com
Sudsinthetub Correctdetergent •
wasn'tused
Rinseagentwas spilled
Detergentleftin Dishesare blockingthe •
dispensercups detergentcup
Blackor gray Aluminumutensilshave •
marksondishes rubbedagainstdishes
Dishesdon'tdry Lowinletwater temperature
Rinseagentdispenserisemptg
ControlpanelrespondedDoor latchmay not beproperly
toinputsbutdishwasherseated
neverfilledwith water
Watervalvemay beturnedoff •
Stainedtubinterior Sometomato-basedfoodscan •
causereddishstains
Teaor coffeestains
Useonlyautomaticdishwasherdetergentsto avoidsudsing.
Cascade®AutomaticDishwashingDetergentshavebeenapproved
foruseinallGEdishwashers.
Toremovesudsfromthe tub,openthe dishwasherand let
sudsdissipate.Closeand latchthe dishwasherdoor.Pumpoutwater
•
bytouchingthe START/RESETbuttononce;then30secondslater,
touchtheSTART/RESETbuttonagain.Repeatifnecessary.
Alwayswipe uprinseagentspillsimmediately.
Repositionthe dishes,sothe waterfromthelowersprayarmcan
flushthedetergentcup.Seepages1Sand 16.
Removemarkswitha mild,abrasivecleaner.
• Makesureinletwatertemperatureisatleast120°F.
• SelectHEATEDDRY.
• UseADDEDHEAToptions.
• Selectahighercycle,suchasSANIWASH/SANITIZEorDEEPCLEAN.
• Checktherinseagentdispenserandfillasrequired.
• Nakesurethedoorisfirmly dosed.
Nakesurewatervalve(usuallylocatedunderthesink)isturnedon.
UseoftheRINSEANDHOLDcycleafter addingthedishtothe load
candecreasethe levelofstaining.
Removethe stainbyhand,usingasolutionof 1/2 cup bleach
and3 cupswarmwater.
Dishwasherwon't run
ik WARNING
Beforecleaninginterior,waitat least20minutesaftera cycleforthe
heatingelementsto cooldown.Failureto dosocanresultinburns.
ADVERTENCIA
Antesde limpiarelinterior,espereparIomenDs20minutosdespu_s
deuncicloparaqueloselementoscalentadoresseenfrfen.No hacerlo
puedeprovocarquemaduras.
Anoverallyelloworbrownfilm can •
becausedbgirondepositsinwater
Dishwasherdoor is not closed •
and latched
Fuseisblownor circuitbreaker • Replacefuseorresetcircuitbreaker.Removeanyotherappliancesfrom
Poweristurnedoff
Controlpanelislocked
Rebootyourcontrol
Aspecialfilter inthewatersupplylineisthe onlywayto correct
thisproblem.Contactawatersoftenercompany.
Dishwasherdoormustbeclosedandlatchedfordishwasherto operate.
thecircuit.
• tn someinstallations,the powertothedishwasherisprovidedthrougha
wallswitch,oftenlocatednexttothedisposerswitch.Makesureitison.
• Unlockcontrol_ 8.
• Turnoff powerto thedishwasher(circuitbreakerorwall switch)for
30seconds;thenturnbackon.
19
Page 20

Before gou call for service...
Troubleshooting Tips
Problem Possible Causes What ToDo
Controlpanellights Timetoo longbetween • Eachbuttonmustbetouchedwithin5minutesoftheothers.
gooffwhen you're touchingof selectedbuttons Torelight,touchanybuttonagain,orunlockandrelatchdoor.
settingcontrols
Waterstandingin Thisisnormal • Asmallamountof cleanwateraroundthe outletonthetub
thebottomof thetub bottomat the backof thetub keepsthe pumpseallubricated.
Waterwon'tpump Drainis clogged • tfyou havean airgap,cleanit.Seepage17.
outof thetub • tfthedishwasherdrainsintoa disposer,rundisposerclear.
• Checktoseeif yourkitchensinkisdrainingwell.tfnot,you
mayneeda plumber.
Steam Thisis normal • Warm,moistaircomesthroughthevent bythedoorlatchduringdrying
andwhenwaterisbeingpumpedout(front-controlmodels).Thisisnormal
andnecessaryfordrying.
Sanitizedlight does Thedoorwas openedandthe • Donotinterruptthecycleanytimeduringor offermainwash.
notilluminateat the cgclewasinterrupted during
endof thecycle or after the main washportion
Theincomingwater • Raisethewaterheatertemperatureto between120°Fand 140°E
temperaturewastoo low
Thecycle iscompleteand • Thisisnormal.Noactionisrequired.
thedoor has beenopenfor
longerthan 60seconds
Noise Normaloperatingsounds • Theseareallnormal.Noactionis required.
Detergentcupopening
Water entering dishwasher
Themotor stopsand starts at
varioustimesduringthecycle
Drainpump soundsduring
pumpout
Awhite filmon
glassware,dishware
andtheinterior
Rattlingdisheswhenthe sprag
arm rotates
Thisproblemcausedbg
phosphate-freedishwasher
detergent
* Hakesuredishesareproperlyloaded.SeetheLoadingthe
dishwasherrackssection.
o
Toremovethewhitefilm,runyourdishesthroughadishwashercyclewith
citricacid.YoumaypurchaseacitricacidkitfromGEbycalling1-800-626-2002
andaskingforWDB5X151.Alternatively,youcan purchasecitricacid
crystalsfromyourlocalsupermarket.
Pourthecitricacidinthedetergentcupandclosethecover.Placethe
filmedbutotherwisecleonglasswareanddishwareinthedishwasher.
Leavesilverwareandothermetalitemsoutofthedishwasher.Turnthe
dishwasheron andletitrunthroughacompletecyclewithoutdetergent.
Theglassware,dishware,anddishwashershouldcomeoutfilmfree.
Alternatively,avinegarrinsemaybeused.Pour1cupofvinegarinto
dishwasherjust offerthedetergentcupopensand letthedishwasher
completeitscycle.Thismayberepeatedseveraltimesayearasneeded
Theuseofa rinseagentsuchasCascade@RinseAidTM mayhelpminimize
a repeatbuildupoffilm. Also,the useofa highlyrateddetergentsuchas
Cascade@CompleteActionPadswillhelppreventfilm build-up.
20
Page 21

Notes.
0 r
0
0 r
v
0
0
t_
0
2!
Page 22

o
0
LJ
O_
Notes.
GEAppliances.com
O_
0
0
A
t_
0
E
0
22
Page 23

GE Dishwasher Warrants.
All warranty service provided by our Factory Service Centers,
or an authorized Customer Care® technician. Toschedule service,
on-line, visit us at GEAppliances.com, or call 800.GE.CARES(800.432.2737) in
the United States. In Canada, call 1.800.56!.3344. Please have serial number
and model number available when calling for service.
For The Period Of: GE Will Replace:
One Year
From the date of the
original purchase
Five Years
(onlyfor modelnumbers
beginning with PDW
or CDW)From the date
of the original purchase
Lifetime of Product
(onlyfor modelnumbers
beginning with PDW
or CDW)
Ang part of the dishwasher which fails due to a defect in materials or workmanship. During
this limited one-gear warrants, GEwill also provide, free of charge, all labor and in-home service
to replace the defective part.
Thedishwasher racks and the electronic control module ifthey should fail due to a defect
in materials or workmanship. Duringthis five-gear limited warrants, you will be responsible
for any labor or in-home servicecosts.
TheStainlesstub or door liner, if itfails to contain water dueto a defect inmaterials or
workmanship. Duringthis limited warrants, GEwill also provide,free of charge, all laborand
in-home serviceto replacethe defective part.
Staple Four receipt here.
Proof of the original purchase
date is needed to obtain service
under the warranty.
What GE Will Not Cover (for customers in the United States):
[] Service trips to sour home to teach SOUhow to use
the product.
[] Improper installation, deliverg or maintenance.
[] Failure of the product if it is abused, misused, or used for
other than the intended purpose or used commerciallg.
[] Replacement of house fuses or resetting of dmuit breakers.
[] Product not accessible to provide required service.
m
II EXCLUSIONOFIMPLIEDWARRANTIES--Yoursole and exclusive remedy is product repair asprovided in this Limited
I Warranty. Any implied warranties, including the implied warranties of merchantability or fitness for a particular
l purpose, are limited to oneyear or the shortest period allowed by law.
[] Damage to the product caused bg accident, fire, floods
or acts of God.
[] Incidental or consequential damage caused bg possible
defects with this appliance.
[] Cleaning or servicing of the air gap device inthe drain line.
[] Damage caused after deliverg, including damage from
items dropped on the door.
Thiswarranty is extended to the original purchaser and any succeeding owner forproducts purchased for home use within the
USA.If the product is located in an area where service by a GEAuthorized Servicer is not available, you may be responsible for a trip
charge or you may be required to bring the product to an Authorized GEService location for service. Proof of original purchase date
isneeded to obtain service under the warranty. InAlaska, the warranty excludes the cost of shipping or service calls to Four home.
Some states do not allow the exclusion or limitation of incidental or consequential damages. Thiswarranty gives you specific legal
rights, and you may also have other rights which vary from state to state. To know what your legal rights are, consult your local
or state consumer affairs office or Four state's Attome F General.
Warrantor: General Electric Compang. Louisville, KY 40225
What Is Not Covered (for customers in Canada):
[] Service trips to sour home to teach SOUhow to use
the product.
[] Improper installation.
If you have an installation problem, contact your dealer
or installer. You are responsible for providing adequate
electrical, exhausting and other connecting facilities.
EXCLUSION OF IMPLIED WARRANTIES--Your sole and exclusive remedy is product repair as provided in this Limited
Warranty. Any implied warranties, including the implied warranties of merchantability or fitness for a particular
purpose, are limited to one year or the shortest period allowed by law.
Thiswarranty is extended to the original purchaser and any succeeding owner forproducts purchased in Canada for home use
within Canada. Inhome warranty service will be provided in areas where it is available and deemed reasonable by Mabe to provide.
[ WARRANTOR IS NOT RESPONSIBLE FOR CONSEq)UENTIAL DAMAGES. J
[] Failure of the product if it is abused, misused,or usedfor
other than the intended purpose or usedcommerdallg.
[] Replacementof housefusesor resetting of circuit breakers.
[] Damage to the product caused bg accident, fire, floods
or acts of God.
[] Damage caused after deliverg.
[ Warrantor: IVlABECANADA INC. ] 23
Page 24

Consumer Support.
GEAppliances Website Inthe U.S.:GEAppliances.com
Have a question or need assistance with your appliance?Trythe GEAppliances Website 24 hours a day,
any day of the year! For greater convenience and faster service,you can now download Owner's Manuals,
order parts or even schedule service on-line.In Canada: w,,_v.GEAppliances.ca
Schedule Service Inthe U.S.:GEApplionces.com
Expert GErepair service is only one step away from your door. Get on-line and schedule your service at your
convenience any day of the year! Or call 800.GE.CARES(800./432.2737) during normal business hours.
In Canada, call 1.800.561.$344
Real Life Design Studio Inthe U.S.:GEAppliances.com
GEsupports the Universal Design concept-products, services and environments that can be used by people of all
ages, sizes and capabilities. We recognize the need to design for a wide range of physical and mental abilities and
impairments. For details of GE's Universal Design applications, including kitchen design ideas for people with disabilities,
check out our Website today. For the hearing impaired, please call 800.TDD.GEAC(800.833.4322).
In Canada, contact: Manager, Consumer Relations, Mabe Canada Inc.
Suite 310, ! Factory Lane
P1oncton, N.B.EIC 9M3
ExtendedWarranties
Purchasea GEextendedwarranty and learn about special discounts that are available while your warranty isstill
in effect. You can purchase it on-line anytime, or call 800.626.2224during normal businesshours.GEConsumer Home
Serviceswill still be there after your warranty expires.InCanada, call 1.888.281.2133
PartsandAccessories
Individuals qualified to servicetheir own appliances can haveparts or accessoriessent directlyto their homes
(VISA,iVlasterCardand Discovercards are accepted).Order on-line today, 24 hours everyday or byphone
at 800.626.2002during normal businesshours.
Instructions contained in this manual cover procedures to be performed bg ang user. Other servicing generally
should be referred to qualified service personnel Caution must be exercised, since improper servicing mug cause
unsafe operation.
Customers in Canada can order parts and accessorieson-line at www.GEAppliances.ca,24hours every day,
or by phone at !.800.66!.!6!6 during normal business hours.
Contact Us
If you are not satisfied with the serviceyou receive from GE,contact us on our Website with allthe details including
your phone number, or write to: General Manager,Customer Relations
GEAppliances,Appliance Park
Louisville,KV/40225
In Canada: w_,_v.GEAppliances.ca,or write to: Director,Consumer Relations,ivlabeCanada Inc.
Suite310, ]_FactoryLane
Moncton, N.B.EIC 9M3
Inthe U.S.:GEAppliances.corn
Inthe U.S.:GEAppliances.corn
Inthe U.S.:GEAppliances.corn
Register Your Appliance Inthe U.S.:GEAppliances.corn
Register gour new appliance on-line--at gour convenience! Timely product registration will allow for enhanced
communication and prompt service under the terms of your warranty, should the need arise. You may also mail
in the pre-printed registration card included inthe packing material. In Canada: www.GEAppliances.ca
_*_' Printed in the United States
SPrinted on RecLtcledPaper
2/4
 Loading...