

Page 1
GEAppliances.com
Safety Instructions ............. 2-3
Operating Instructions
Care and Cleaning .............. 22, 23
Getting Started ..................... 4-7
Loading the Dishwasher .......... 10-21
Using the Dishwasher ...............8-9
Troubleshooting Tips ......... 24-26
Owner’s Manual
Dishwashers
CDT 725-765 Series
DDT 575 Series
GDF 570 Series
GDT 580-740 Series
PDT 750-760 Series
Includes GE®, GE Profile™ Series
™
and GE Café
Series products
Consumer Support
Consumer Support ........... Back Cover
Warranty ............................27
Lave-vaisselle
Manuel d’utilisation
La section française commence à la page 33
Lavaplatos
Manual del propietario
La sección en español empieza en la página 65
Printed in the United States
FRONT CONTROL MODELS TOP CONTROL MODELS
Write the model and serial
numbers here:
Model # _________________
Serial # __________________
You can find them on the tub wall,
just inside the door.
Dishwashers
49-55094 09-14 GE
Page 2
IMPORTANT SAFETY INFORMATION
5($'$//,16758&7,216%()25(86,1*³
SAVE THESE INSTRUCTIONS
WARNING!
WARNING!
Under certain conditions, hydrogen gas may be produced in a water heater that has not been used for two or more weeks.
HYDROGEN GAS IS EXPLOSIVE.
If the hot water has not been used for two or more weeks, prevent the possibility of damage or injury by turning on all hot
water faucets and allowing them to run for several minutes. Do this before using any electrical appliance connected to
the hot water system. This simple procedure will allow any built-up hydrogen gas to escape. Since the gas is flammable,
do not smoke, use an open flame, or use the appliance during this process.
WARNING!
This dishwasher must be properly installed and located in accordance with the Installation Instructions before it is used. If
you did not receive an Installation Instructions sheet with your dishwasher, you can receive one by visiting our Website at
GEAppliances.com. In Canada, visit www.GEAppliances.ca.
Connect the dishwasher/appliance to a grounded metal,
permanent wiring system; or run an equipment-grounding
conductor with the circuit conductors and connect to the
equipment-grounding terminal or lead of the appliance.
Improper connection of the equipment-grounding conductor
can result in a risk of electric shock. Check with a qualified
electrician or service representative if you are in doubt
whether the appliance is properly grounded.
Dispose of discarded appliances and shipping or packing
material properly.
For your safety, the information in this manual must be followed to minimize the risk
of fire, explosion, electric shock, and to prevent property damage, personal injury, or
death.
WATER HEATER SAFETY
PROPER INSTALLATION AND MAINTENANCE
Do not attempt to repair or replace any part of your
dishwasher unless it is specifically recommended in this
manual. All other servicing should be referred to a qualified
technician.
Use only cord kit WX09X70910 or hard-wire to building
electrical. Failure to follow this instruction, could result in risk of
fire and personal injury.
To minimize the possibility of electric shock, disconnect this
appliance from the power supply before attempting any
maintenance.
NOTE: Turning the dishwasher off does not disconnect the
appliance from the power supply. We recommend having
a qualified technician service your appliance.
WARNING!
Use this appliance only for its intended purpose as
described in this Owner’s Manual.
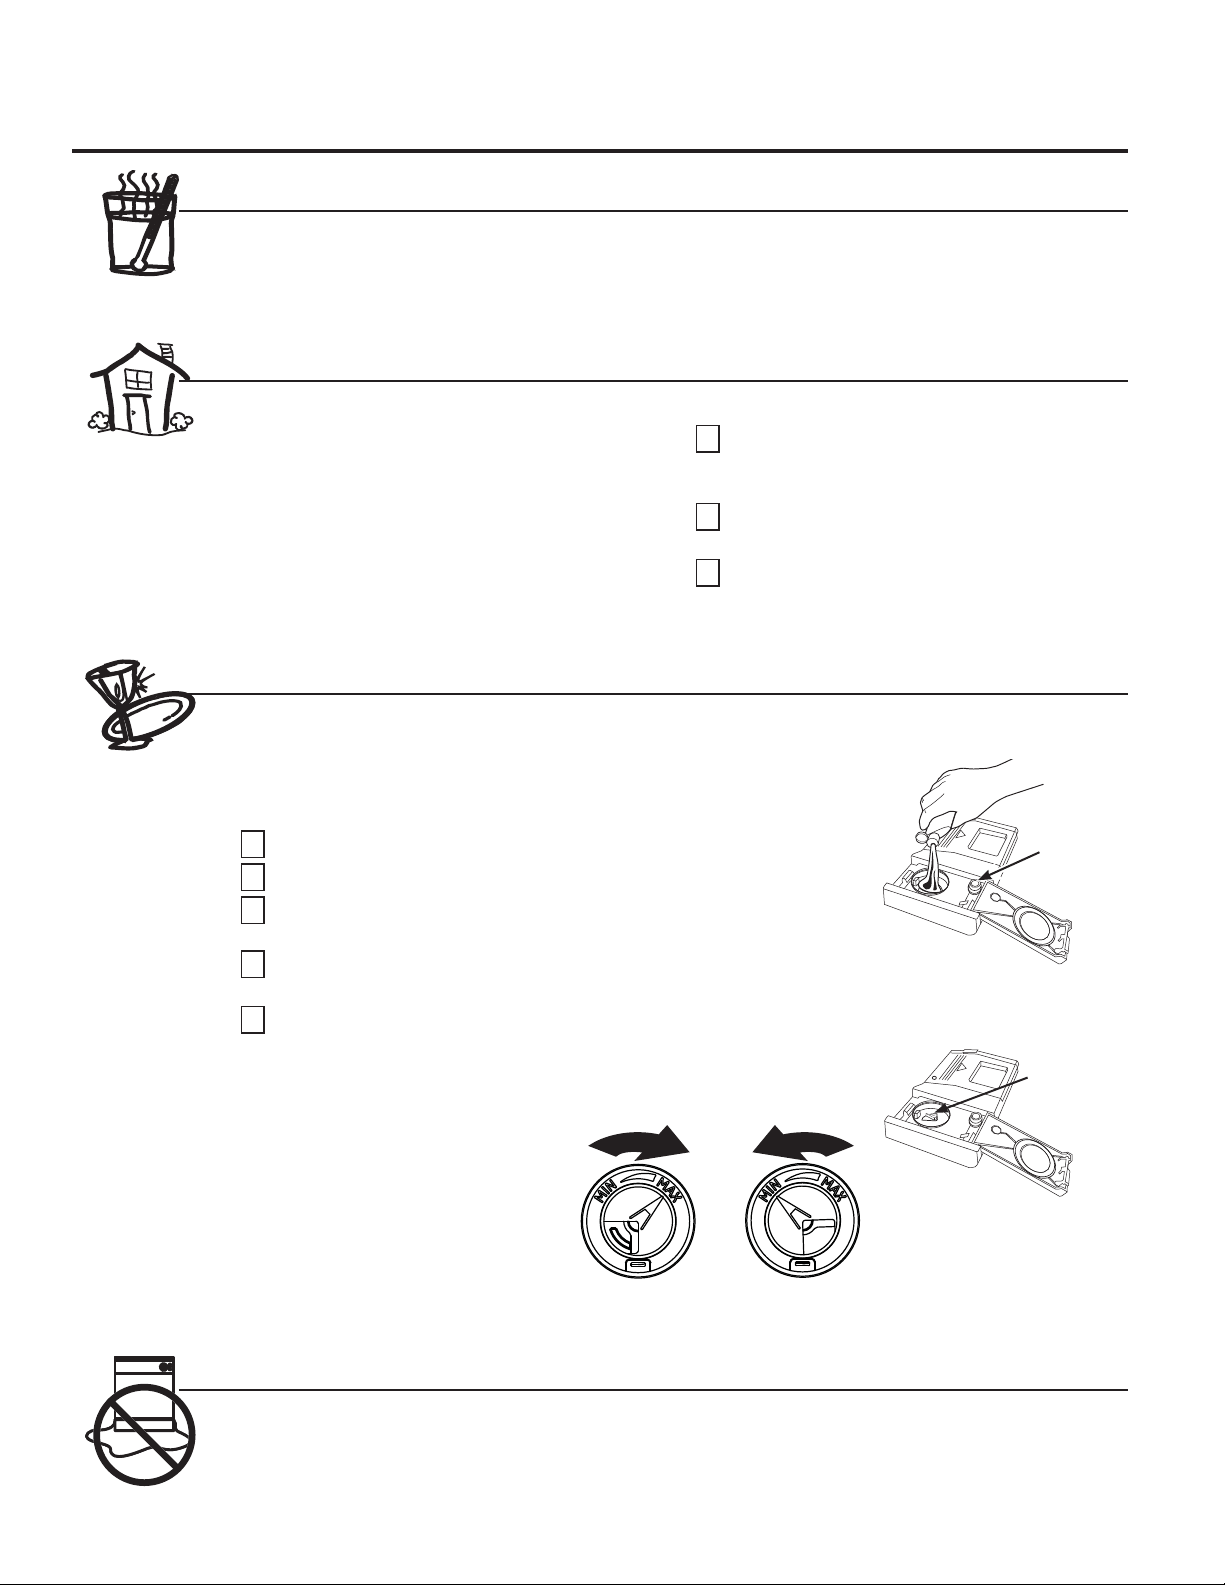
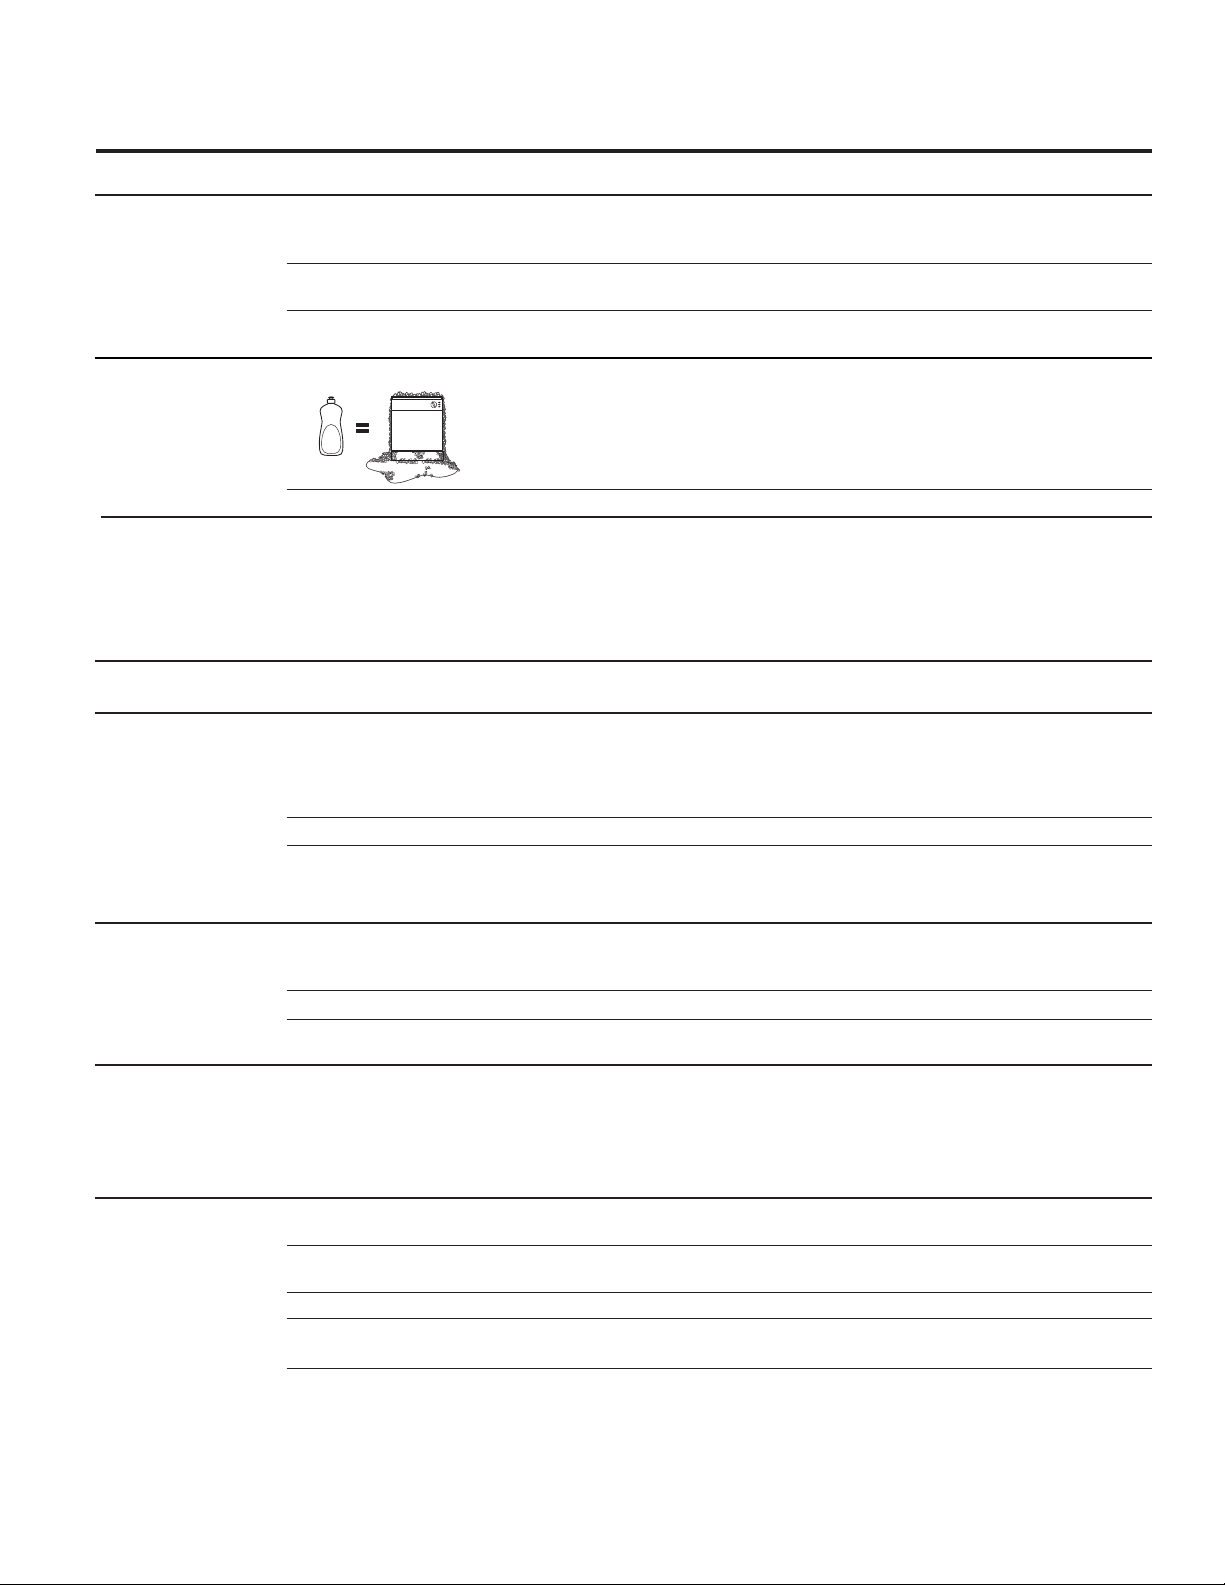
Use only detergents or wetting agents
recommended for use in a dishwasher
and keep them out of reach of children.
Using a detergent that is not specifically
designed for dishwashers will cause the
dishwasher to fill with suds.
Locate sharp items so that they are not likely to damage the
door seal.
Load sharp knives with the handles up to reduce the risk of
cut-type injuries.
Do not wash plastic items unless marked dishwasher safe
or the equivalent. For plastic items not so marked, check the
manufacturer’s recommendations.
When using your dishwasher, follow basic precautions, including the following:
2
Do not touch the heating element during or immediately
after use.
Do not operate your dishwasher unless all enclosure
panels are properly in place.
Do not tamper with controls.
Do not abuse, sit on or stand on the door or dish rack of the
dishwasher.
To reduce the risk of injury, do not allow children to play with,
on or inside this appliance at any time.
Do not store or use combustible materials including gasoline
or other flammable liquids or vapors in the vicinity of this or any
other appliance.
Small parts, such as rack clips and filter retaining posts, can
be a choke hazard to small children if removed from the
dishwasher. Keep out of reach of small children.
Page 3
IMPORTANT SAFETY INFORMATION
5($'$//,16758&7,216%()25(86,1*³
SAVE THESE INSTRUCTIONS
WARNING!
PROPER DISPOSAL OF THE DISHWASHER
Junked or abandoned dishwashers are dangerous…even if they will sit for “just a few days.” If you
are getting rid of your dishwasher, please follow the instructions below to help prevent accidents.
Do not allow children to play with, on, or inside this or any discarded appliance.
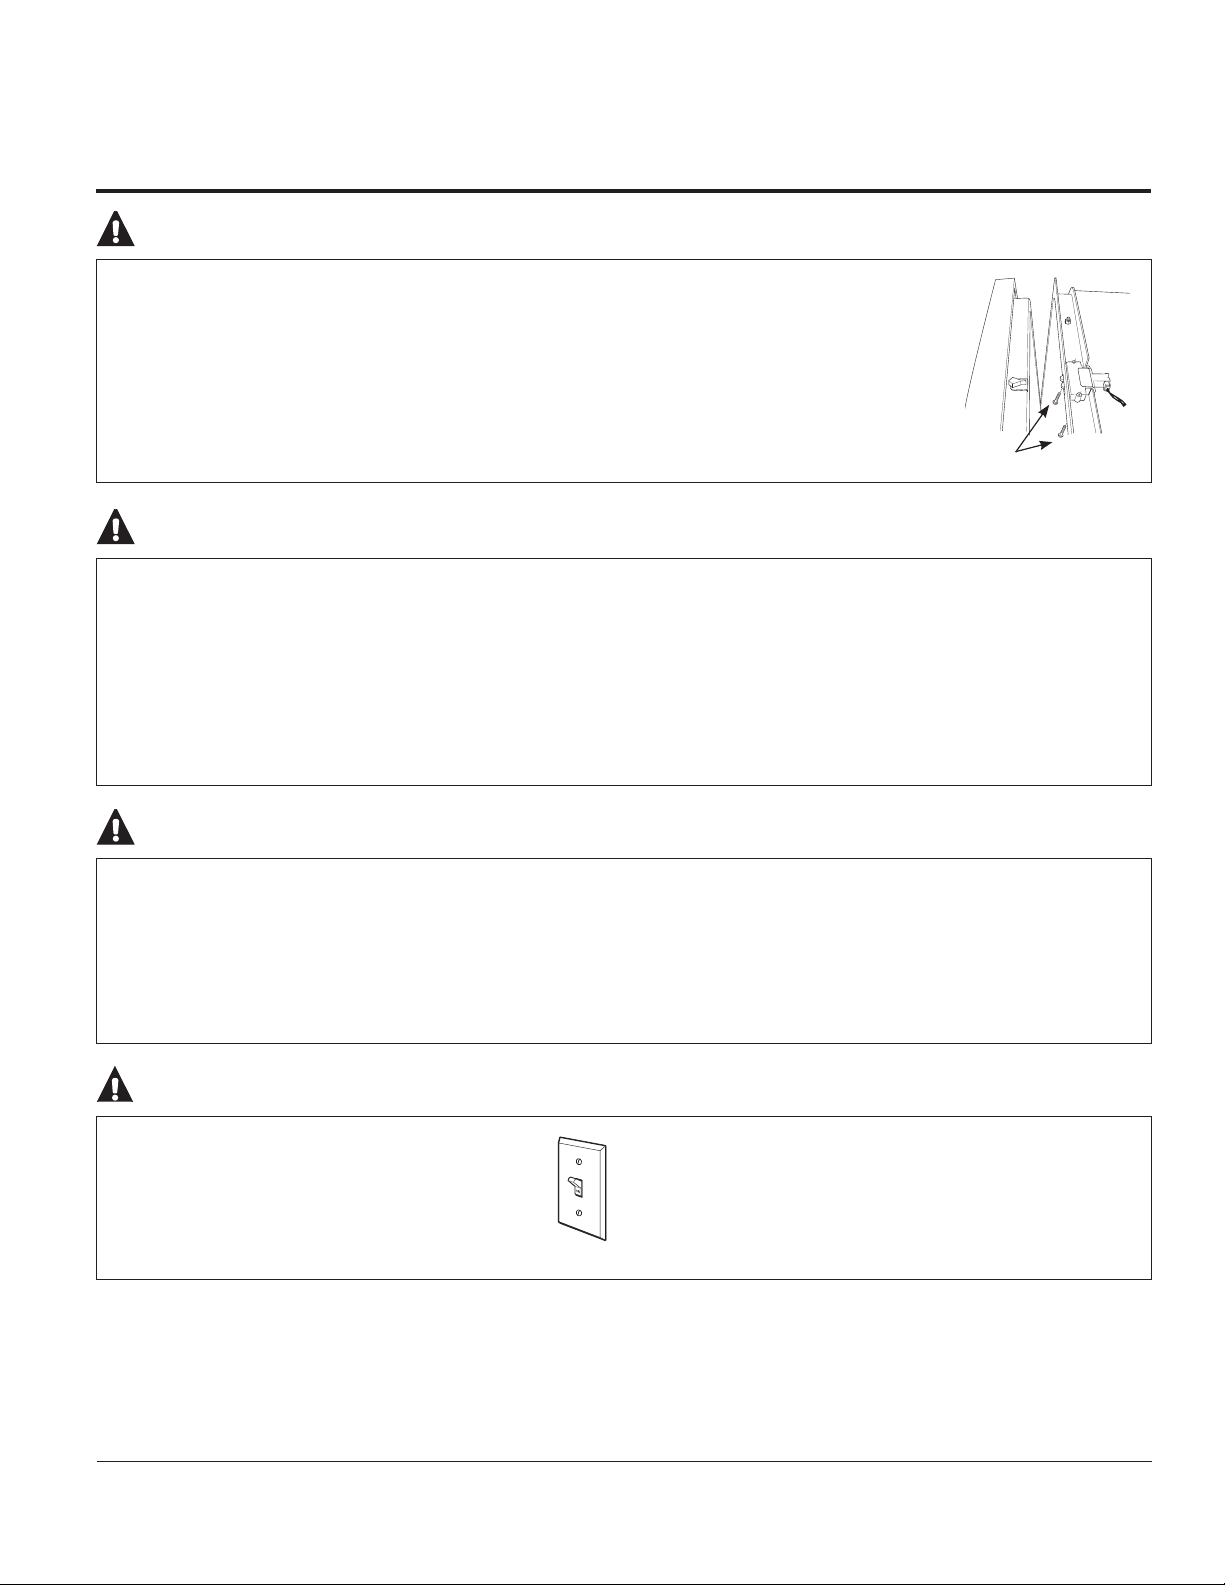
Take off the door of the washing compartment or remove the latch by removing the two screws
from the latch receiver inside the tub (as shown).
CAUTION:
During or after wash cycle, contents may be hot to the
touch. Use care before handling.
Close supervision is necessary if this appliance is used by
or near children. Do not allow children to play around the
dishwasher when closing the door, closing the upper rack,
or while vertically adjusting the upper rack due to the
possibility of small fingers being pinched.
RISK OF CHILD ENTRAPMENT
To prevent minor injury and property damage
Non-Dishware Items: Do not wash items such as
electronic air cleaner filters, furnace filters and paint
brushes in your dishwasher. Damage to the dishwasher
and discoloration or staining of the dishwasher may
result.
Load light-weight, plastic items so they do not become
GLVORGJHGDQGGURSWRWKHERWWRPRIWKHGLVKZDVKHU³
they might come into contact with the heating element
and be damaged.
GEAppliances.com
Two screws
CAUTION:
This appliance must be supplied with 120V, 60 Hz, and
connected to an individual, properly grounded branch
circuit, protected by a 15 or 20 amp circuit breaker or
time-delay fuse.
If the electric supply provided does not meet the above
specifications, it is recommended that a licensed
electrician install an approved outlet.
ELECTRICAL REQUIREMENTS
NOTICE
If your dishwasher is connected to a wall switch,
ensure that the switch is on prior to use.
If you choose to turn the wall switch off between
wash cycles, allow 5-10 seconds after turning the
switch on before touching Start to allow the control
to initialize.
Your dishwasher circuit should not be used for any other
appliance while the dishwasher is in operation as the
dishwasher requires the full capacity of the circuit.
Use only powder, Cascade® All-in-1 ActionPacs™, liquid
detergents or rinse agents recommended for use in a
dishwasher and keep them out of the reach of children.
Cascade® All-in-1 ActionPacs™ Automatic Dishwashing
Detergent, and Cascade® Rinse Aid™ rinse agents have
been approved for use in all GE dishwashers.
READ AND FOLLOW THIS SAFETY INFORMATION CAREFULLY.
SAVE THESE INSTRUCTIONS
3
Page 4

Getting started!
Features and appearance will vary throughout this manual
GDF570
DDT575, GDT580,
GDT680
GDT720
GDT740, PDT750, PDT760
CDT725
6WHDP
CDT765
Load Dishwasher
1
For best dishwashing results, follow the loading guidelines found in the Loading the dishwasher section. No pre-rinsing of normal
food soil is required. Scrape off hard soils, including bones, toothpicks, skins, and seeds. Remove leafy vegetables, meat trimmings,
and excessive amounts of grease or oil.
Add Detergent
2
Add needed amount of detergent to the detergent dispenser. Use a detergent such as Cascade® Platinum Pacs. See Detergent
Dispenser in the Using the dishwasher section.
Add Rinse Agent
3
Add Rinse Agent to the rinse agent dispenser. See Use a Rinse Agent in the Using the dishwasher section.
4
Page 5

GEAppliances.com
Select Cycle
4
Press the Select Cycle button for the desired wash cycle. On some models, the light next to the Select Cycle button will be lit to
indicate which wash cycle has been selected. On other models, pressing the Select Cycle button will show various cycles in the
display window. Press the button until the desired cycle is shown.
NOTE: Actual cycle times vary based on soil level, water temperature, and options selected.
The cycle may be selected with the door in the open position. The cycle will not start until after the door is closed and Start selected
within 10 seconds.
AutoSense
minutes - 2 hours 10 minutes.
This cycle automatically senses the soil level and adjusts the wash cycle accordingly. *Time range: 1 hour 50
Heavy This cycle is meant for heavily soiled dishes, cookware, pots, or pans with dried-on or baked-on soils.
Everyday dishes are safe to be used in this cycle. *Time: 2 hours 31 minutes.
Normal
designed to conserve both water and energy. *Time range: 1 hour 15 minutes - 1 hour 50 minutes. NOTE: Normal
was used to rate the energy efficiency of this dishwasher.
Light
This cycle is meant for daily, regular, or typical use to completely wash a full load of normally soiled dishes and is
This cycle is for light to medium soiled dishes. It is safe for china and crystal. *Time: 50 minutes.
Rinse For rinsing partial loads that will be washed later. Do not use detergent. Detergent is not dispensed during the
(on some models) rinse cycle. *Time: 16 minutes.
Express This cycle will quickly wash lightly soiled dishes. *Time: 32 minutes. For faster drying, select Power Dry. The final rinse
(on some models) temperature will be increased. Power Dry will add 15 minutes to the cycle time. When the Clean light comes on,
open the door, pull the racks out, and the dishes will “flash” dry in approximately five minutes.
eWash This cycle will efficiently wash dishes using about 2 gallons of water and .8 KWhr. Selecting Power Dry with this cycle
(on some models) adds an energy efficient 1 1/2 hour dry period. Drying is accomplished with an efficient 2 watt fan. *Time: 1 hour 3 minutes.
*Washing time only. Does not include drying time, Auto Hot Start, or options. NOTE: If the incoming water temperature is too low,
the Auto Hot Start feature may add up to 11 minutes of additional time.
5
Page 6

Getting started!
Select Options
5
The light by the selected button will be lit to indicate which Option has been selected.
Normal Temp
(on some models)
Wash Temp
Boost or Option may be turned On or Off during the wash cycle. This option will also improve dry performance on the
Boost Temp Normal cycle.
Wash Temp This option raises the water temperature in the final rinse to sanitize your dishware. The cycle length will
Sani or vary depending on the temperature of your inlet water.
Sanitize NOTE: This option is monitored for sanitization requirements. If the cycle is interrupted during or after the main
Temp wash portion or if the incoming water temperature is so low that adequate water heating cannot be achieved,
the sanitizing conditions may not be met. In these cases, the Sanitized or Cycle Sanitized light will not illuminate
at the end of the cycle. Utilizing this option will modify the cycle to meet the requirements of Section 6, NSF 184
for soil removal and sanitization efficacy.
NOTE: NSF certified residential dishwashers are not intended for licensed food establishments.
Heated or Shuts off the drying option. Dishes air dry naturally and energy is saved. Open the dishwasher door to
Power Dry Off speed drying.
Heated or Turns on the option for faster drying. This option may add up to 65 minutes to the cycle time.
Power Dry On On models with the hidden heater feature, this option boosts the temperature of the dishwasher during the final
rinse portion of the cycle then utilizes a fan to circulate air to dry the dishes.
Rinse cycle.
Steam For use with heavily soiled and/or dried-on, baked-on soils. This option MUST be selected PRIOR to
(Prewash) starting the cycle. The Steam option adds up to 30 minutes to the cycle time. This option is
(on some models)
Pre Soak
(on some models)
Wash Zones Selecting either the Upper or Lower Wash Zones will target dishwashing of just one rack. This will shorten
(on some models)
Bottle Wash
(on some models)
recommendations in the Loading the dishwasher section.
Delay Hours
number of hours, then press Start one time and close door to begin countdown. The cycle will start once allotted
time has expired.
Control You can lock the controls to prevent selections from being made. You can also lock the controls
Lock after you have started a cycle to prevent cycle changes. For example, children cannot accidentally
start the dishwasher by pressing buttons with this option selected.
Energy When connected to a smart meter and your electric company, the dishwasher will automatically delay starting a
cycle during the more expensive peak demand times, and run when demand is low. However, you can override
Smart
the delay settings and use the dishwasher as needed. Learn more about Energy Smart under the Using the
Dishwasher section.
This option is for normally soiled dishes, optimizes wash performance while conserving energy.
This option increases the temperature to help clean heavily soiled dishes and may increase the overall cycle time.
This option is not available with the
available with Heavy, AutoSense, and Normal cycles.
Use this option to improve wash performance with heavy or dried-on soils. This option is available
on Heavy, AutoSense, and Normal cycles and may add up to 30 minutes to the cycle time.
the cycle time and conserve energy. This option should be used when dishes are placed in only one rack.
This option increases the time that the bottle jets are on and may add up to 23 minutes to the cycle
time. Use this to wash difficult to clean, dishwasher safe baby bottles, sport bottles, tall coffee cups, etc. See use
Delays the start of a wash cycle up to 8 to 12 hours depending on model. Press Delay Hours, to select the
To LOCK the dishwasher control, depending on the model, press and hold the 1 or 2 buttons indicated on the
controls for 3 seconds. On some models, it will be the Heated Dry, another the Steam and Wash Temp buttons,
and another model is the Pre-Soak and Bottle Wash buttons. The Control Lock light will turn on to indicate the
control is locked.
To UNLOCK the dishwasher control, depending on the model, press and hold the 1 or 2 buttons indicated on
the controls for 3 seconds. The Control Lock light will turn off to indicate the control is unlocked.
6
Page 7
GEAppliances.com
Start Dishwasher
6
Start Open door to select the desired options. Press the Start button and close the door within 10 seconds to start the
cycle or begin the Delay Hours countdown. The wash cycle will begin shortly after closing the door. The display
will turn off if the door remains open for two minutes. To activate the display, close and open the door or press
any button.
Interrupt To interrupt or pause a dish cycle, slowly open the door. Opening the door will cause the wash cycle to
or Pause pause. The dishwasher will beep every minute to remind you to close the door. To restart or resume
the cycle, press Start, and close the door within 10 seconds.
Cancel To cancel a wash cycle, press and hold the Start button for 3 seconds and close door. The dishwasher will drain,
emit a beep sound, and the wash cycle light will turn OFF.
Cycle Indicator Lights and Sounds
7
Sanitized or
Cycle Sanitized
or pressing any button will turn off light.
Clean or
Displayed when a wash cycle is complete. The light stays ON as a reminder that the dishes are clean.
Displayed at end of the cycle when Wash Temp Sani or Sanitize Temp has been selected and dishwasher has
met requirements for sanitization. See Wash Temp Sani or Sanitize Temp, for complete description. Closing door
Cycle Complete
Low Rinse Aid
(on some models) Pre-Soak or Steam button 7 times within 5 seconds. Repeat this process to turn the Low Rinse Aid indicator back
on.
Cycle Status
(on some models) indicator light will be amber. When the wash cycle is complete, the light will change to green.
Sounds
press the Heated Dry or Power Dry button 7 times within 5 seconds. Repeat this process to turn sounds back on.
Door Wake
Displayed when rinse agent is low or empty. See page 8 for Use a Rinse Agent. To turn indicator off, press the
The indicator light on the door front will change color to indicate the wash status. During the wash cycle, the
The dishwasher will emit a sound to indicate cycle completion, button presses, and door ajar. To mute all sounds,
To turn this option ON/OFF, press and hold the START and WASH TEMP pads for 5 seconds, close the door and wait
Up Mode 3 minutes for the dishwasher to go into sleep mode. In the OFF mode, the control display, control sounds,
(on some models)
observing certain religious holidays such as the Sabbath. To activate the control and interior lights
models)
and interior lights
, press any pad.
(on some models)
will not respond to the door opening/closing. This mode can be used when
(on some
7
Page 8
Using the dishwasher.
Check the Water Temperature
The entering water should be at least 120°F (49°C) and not
more than 150°F (66°C) for effective cleaning and to prevent
dish damage. Check the water temperature with a candy or
meat thermometer.
Turn on the hot water faucet nearest the dishwasher,
place the thermometer in a glass and let the water run
continuously into the glass until the temperature stops rising.
Energy Smart
Energy Smart enables your dishwasher to reduce energy
consumption during periods of high energy costs. If you are
in an area where your electricity provider charges variable
rates at different times of the day, your dishwasher will
inform you of those times when you are paying the highest
rate. You can then either delay starting your dishwasher until
the rate goes down; or you can override the feature and run
your dishwasher at your convenience.
What you will need:
Smart Meter that will communicate with your dishwasher.
1
Consult your local electricity provider to determine if the
technology is available in your area.
An Energy Smart dishwasher model (CDT725-765,
2
DDT575, GDF570, GDT580-740, PDT750-760).
An Appliance Communication Module (ACM). Please visit,
3
gebrillion.com to order the communication device that
will need to be installed in the dishwasher.
Use a Rinse Agent
Rinse agents, such as Cascade® Complete Rinse Aid are designed for great drying action and to protect
against spots and film build-up on your dishes, glasses, flatware, cookware, and plastic.
Filling the Dispenser
The rinse agent dispenser holds 3.5 oz. (104 ml) of rinse agent. Under normal
conditions, this will last approximately one month.
Make sure the dishwasher door is fully open.
1
Open the Rinse Agent dispenser door.
2
Slowly add rinse agent until the cup is full. You may need to pause several times to
3
allow rinse aid to settle.
Clean up any spilled rinse agent with a damp cloth to prevent foam from forming
4
inside the dishwasher.
Close the Rinse Agent dispenser door.
5
Indicator
window
Rinse Aid Setting
The amount of rinse agent released into the final wash can be adjusted.
If water drops or hard water spots
remain on dishes after the dry cycle,
increase the setting.
Rinse
agent
adjuster
To adjust the setting
Open the
then turn the adjuster clockwise to
increase the amount of rinse agent,
counterclockwise to reduce the amount
of rinse agent.
Rinse Agent
dispenser door;
Clockwise to reduce
water drops and
hard water spots
Counterclockwise
to reduce foaming
Leak Protection (on some models)
If a leak is detected, the dishwasher will drain and the cycle
will stop. The display will show “LEAK DETECTED”. Call for
service.
8
Page 9
GEAppliances.com
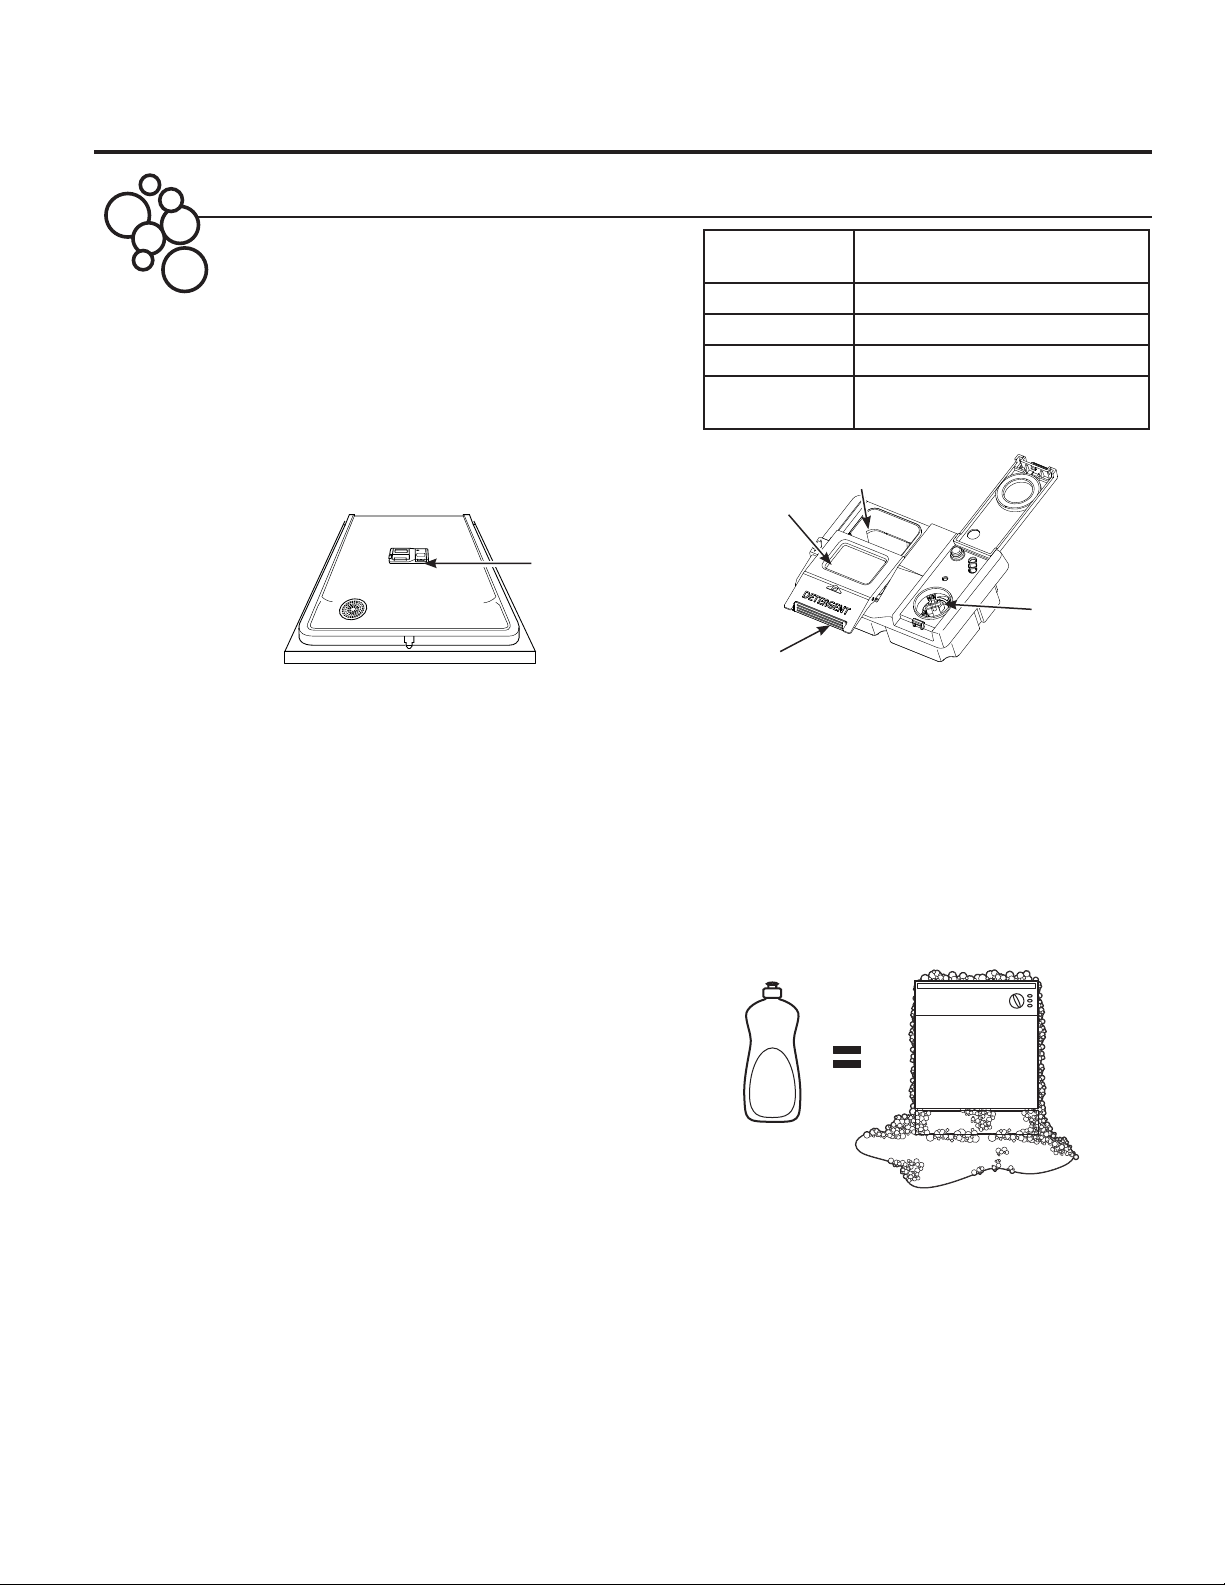
Detergent Dispenser
The detergent dispenser is located in the center of the
dishwasher door. It has two compartments. The main wash
compartment is found inside the detergent dispenser.
To open, press the button on the side of the dispenser.
The pre-wash compartment is on the lid of the detergent
dispenser. Use the pre-wash compartment only when your
water is extremely hard or when you have a heavy soiled
load. The pre-wash compartment is not used when tablet
or packet detergents are used.
NOTE: Do not load large items in the lower rack where
they may block the wash jets from rinsing out the
detergent dispenser.
Detergent
Dispenser
You may use tablet, packet, powder, liquid or gel automatic
dishwasher detergent. Make sure you use only detergents
specifically labeled for use in automatic dishwashers.
Never use liquid hand dish detergent in an automatic
dishwasher. Sudsing and poor wash performance will
result with the use of improper detergents.
Detergents should be stored in a dry location and in their
original container to prevent loss of effectiveness. Place
detergent in the cup just prior to starting the dishwasher
and then close the cover. The cover will open during the
wash cycle.
Filling the Detergent Dispenser
GE recommends using detergent in tablet or packet form.
Independent testing has shown this form of detergent is
very effective in the dishwasher. Cascade
Pacs
are an example of this type of detergent. Simply put
a tablet or packet into the main wash compartment and
slide to close the detergent cup cover. Please notice that
the tablet or packet must be placed in the main wash
compartment of the detergent cup. If the tablet or packet
is tossed in the bottom of the dishwasher, the detergent
will be flushed down the drain in a very short period of
time and will thus be wasted. Wash performance will be
very poor as a result.
If you choose to use detergent in powder, liquid or gel
form, the amount of detergent you use will be determined
by the hardness of your water, the temperature of your
water, and the food soil load inside the dishwasher.
Contact your water company to get information about
the hardness of the water in your area. Water hardness is
measured in grains per gallon. Use this information and
the table above to determine the amount of detergent
to use. You may purchase a hard water test strip
from GE. Call 1-877-959-8688 and ask for part number
WD01X10295. In Canada, call 1-800-661-1616.
®
Platinum
Number of
Grains/Gal.
Less than 4 Fill cup to 1/3 full
4 to 8 Fill cup to 2/3 full
8 to 12 Fill cup completely full
Greater than 12
Main
Wash
Pre-Wash
Push/Slide
to Close
Using too much detergent with very soft and/or very hot water
may cause a condition called etching on your glassware.
Etching is a permanent cloudiness in your glassware. This
condition is irreversible. However, using too little detergent will
cause poor wash performance.
Use the table as a starting point and then adjust the amount
of detergent you use. Use just enough to get good wash
performance. Using just the right amount of detergent will
provide great wash performance without wasting detergent or
etching glassware.
DO NOT USE HAND DISH DETERGENT
NOTE: Using a detergent that is not specifically designed
for dishwashers will cause the dishwasher to fill with suds.
During operation, these suds will spill out of the dishwasher
vents, covering the kitchen floor and making the floor wet.
Because so many detergent containers look alike, store the
dishwasher detergent in a separate space from all other
cleaners. Show anyone who may use the dishwasher the
correct detergent and where it is stored.
While there will be no lasting damage to the dishwasher, your
dishes will not get clean using a dishwashing detergent that is
not formulated for automatic dishwashers.
Detergent Cups to Fill
Fill both main wash cup and pre
wash cup
Rinse Agent
9
Page 10
Loading the dishwasher.
For best dishwashing results, follow these loading guidelines. Features and appearance of racks and silverware
baskets may vary from your model.
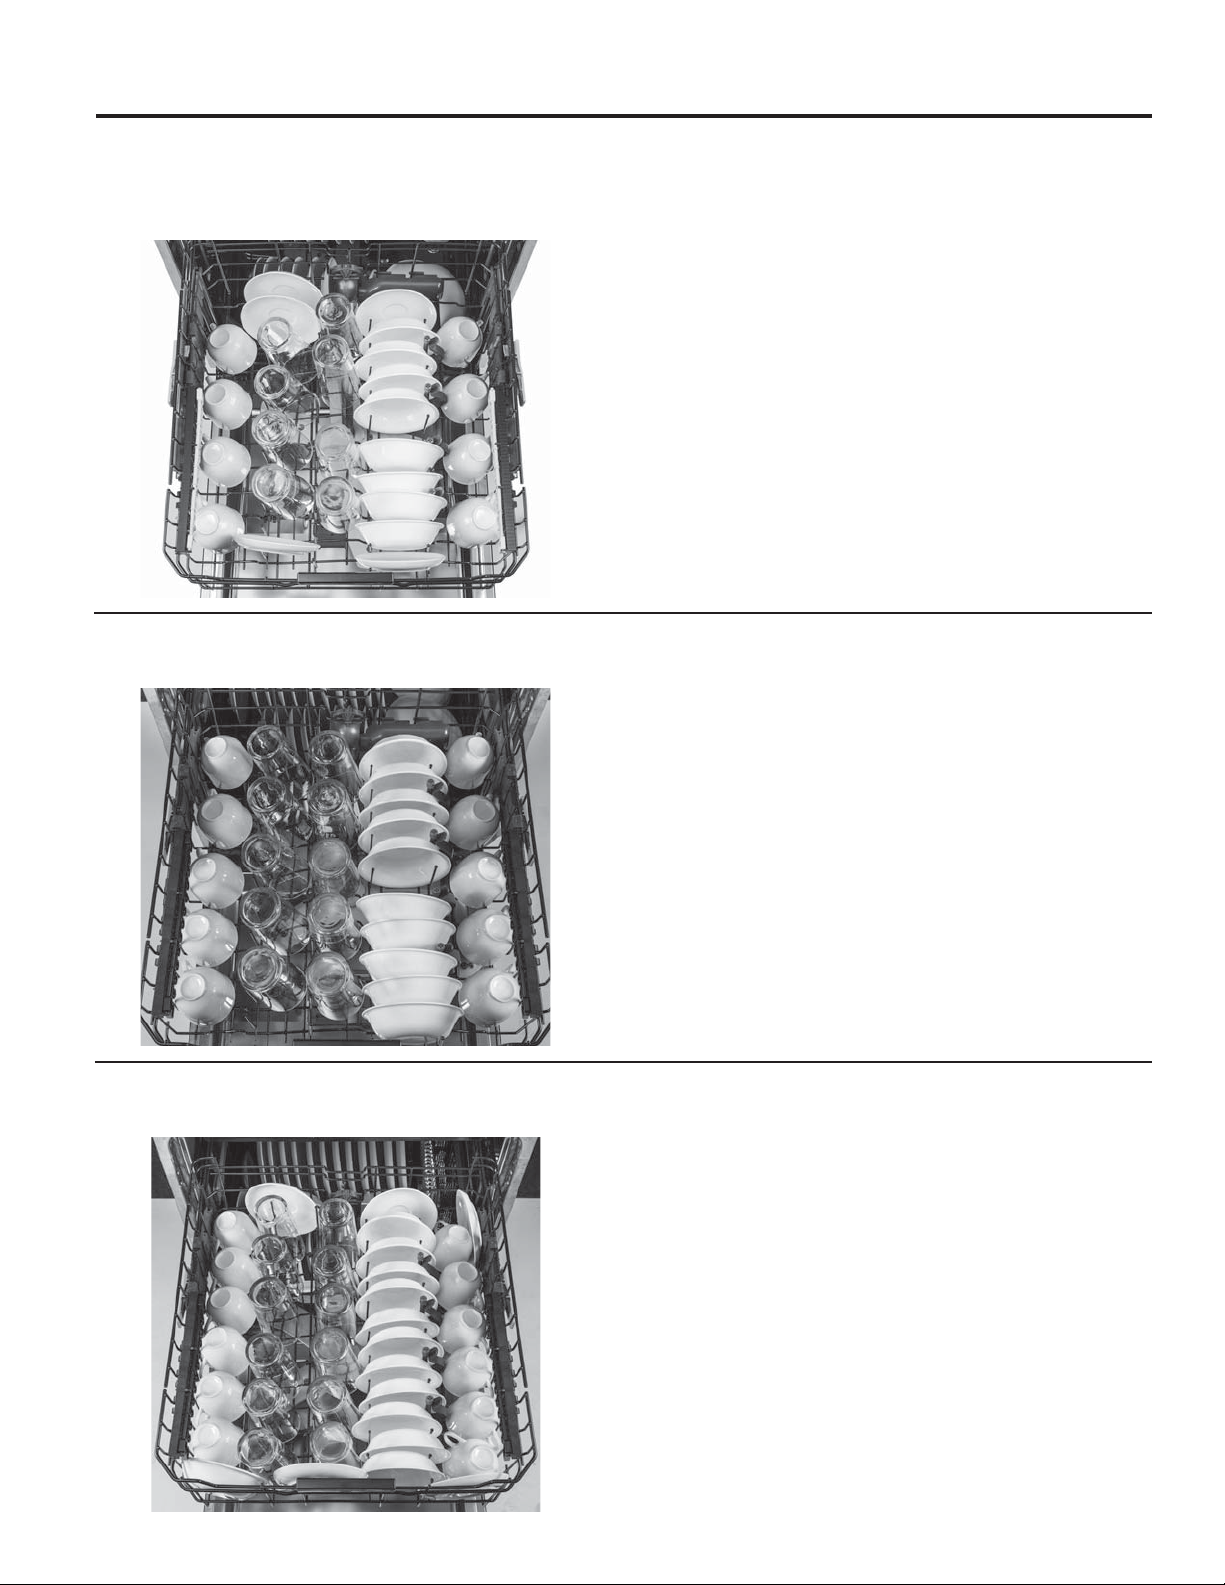
Upper Rack
The upper rack is primarily for glasses, cups, and
saucers. For best wash performance, tilt cup and
glass openings toward the center of the rack. Other
items such as pots, pans, and plates may be placed
in the upper rack. This is also a secure place for
dishwasher-safe plastic items. The upper rack can
be used for odd sized utensils. Sauce pans, mixing
bowls, and other similarly shaped items should
be placed face down for best wash performance.
Ensure small plastic items are secure so that they
cannot fall on the heater at the bottom of the
dishwasher, potentially damaging the item. Some
models are equipped with a hidden heater, so
dishwasher safe plastic items can be placed in the
lower rack.
IMPORTANT: Ensure items in the upper rack do not
interfere with the 3rd Rack (on some models) when
loading and unloading.
IMPORTANT: Ensure that items do not protrude
through the bottom of the rack or silverware basket
where they will block the rotation of the middle spray
arm. This could result in noise during operation and/
or poor wash performance.
Bottle Wash
Clip
Nozzle
The Bottle Wash system (on some models) is
the ideal location to position baby bottles and
tall sports bottles. The Bottle Wash clips hold
bottles with small openings in place so water jets
are directed inside the bottles to clean hard to reach
areas. Clips can be installed or removed by simply
slipping the clip opening over the top of the nozzle.
Sports bottle held in
place over a Bottle Wash
clip
Baby bottle held in place
under a Bottle Wash clip
10
Page 11
GEAppliances.com
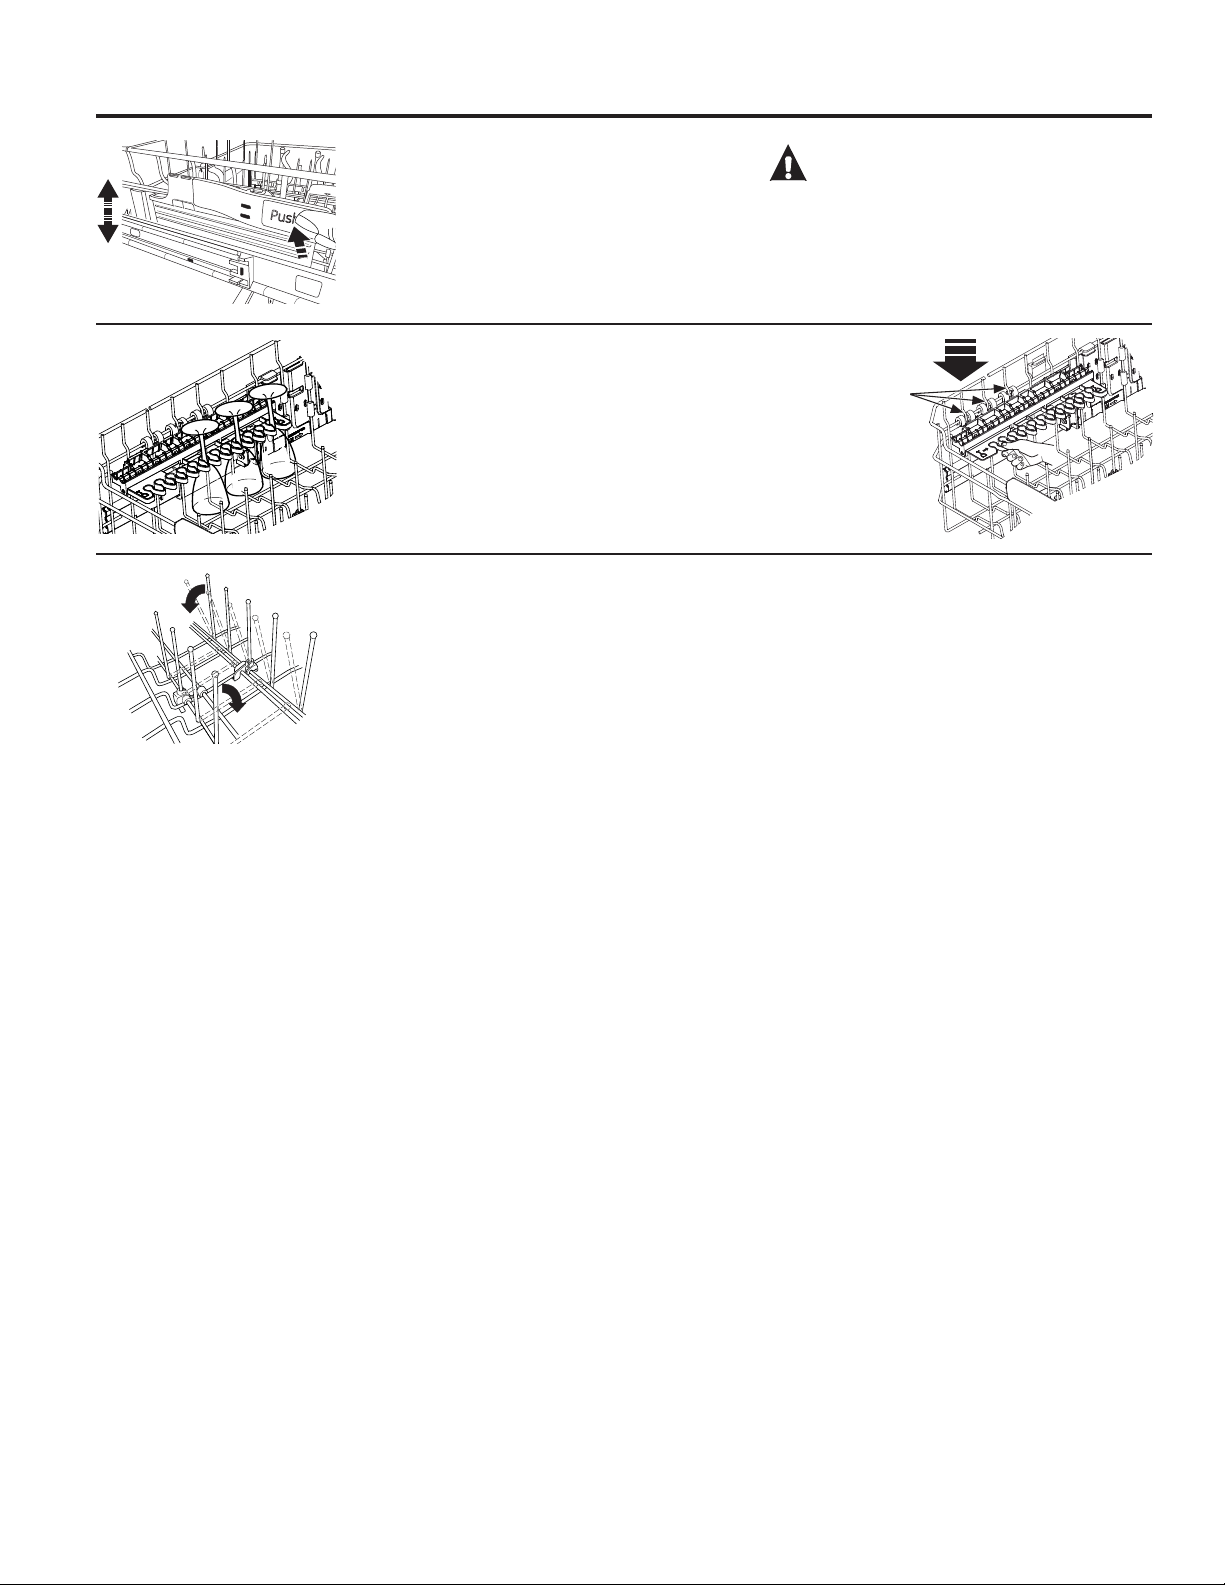
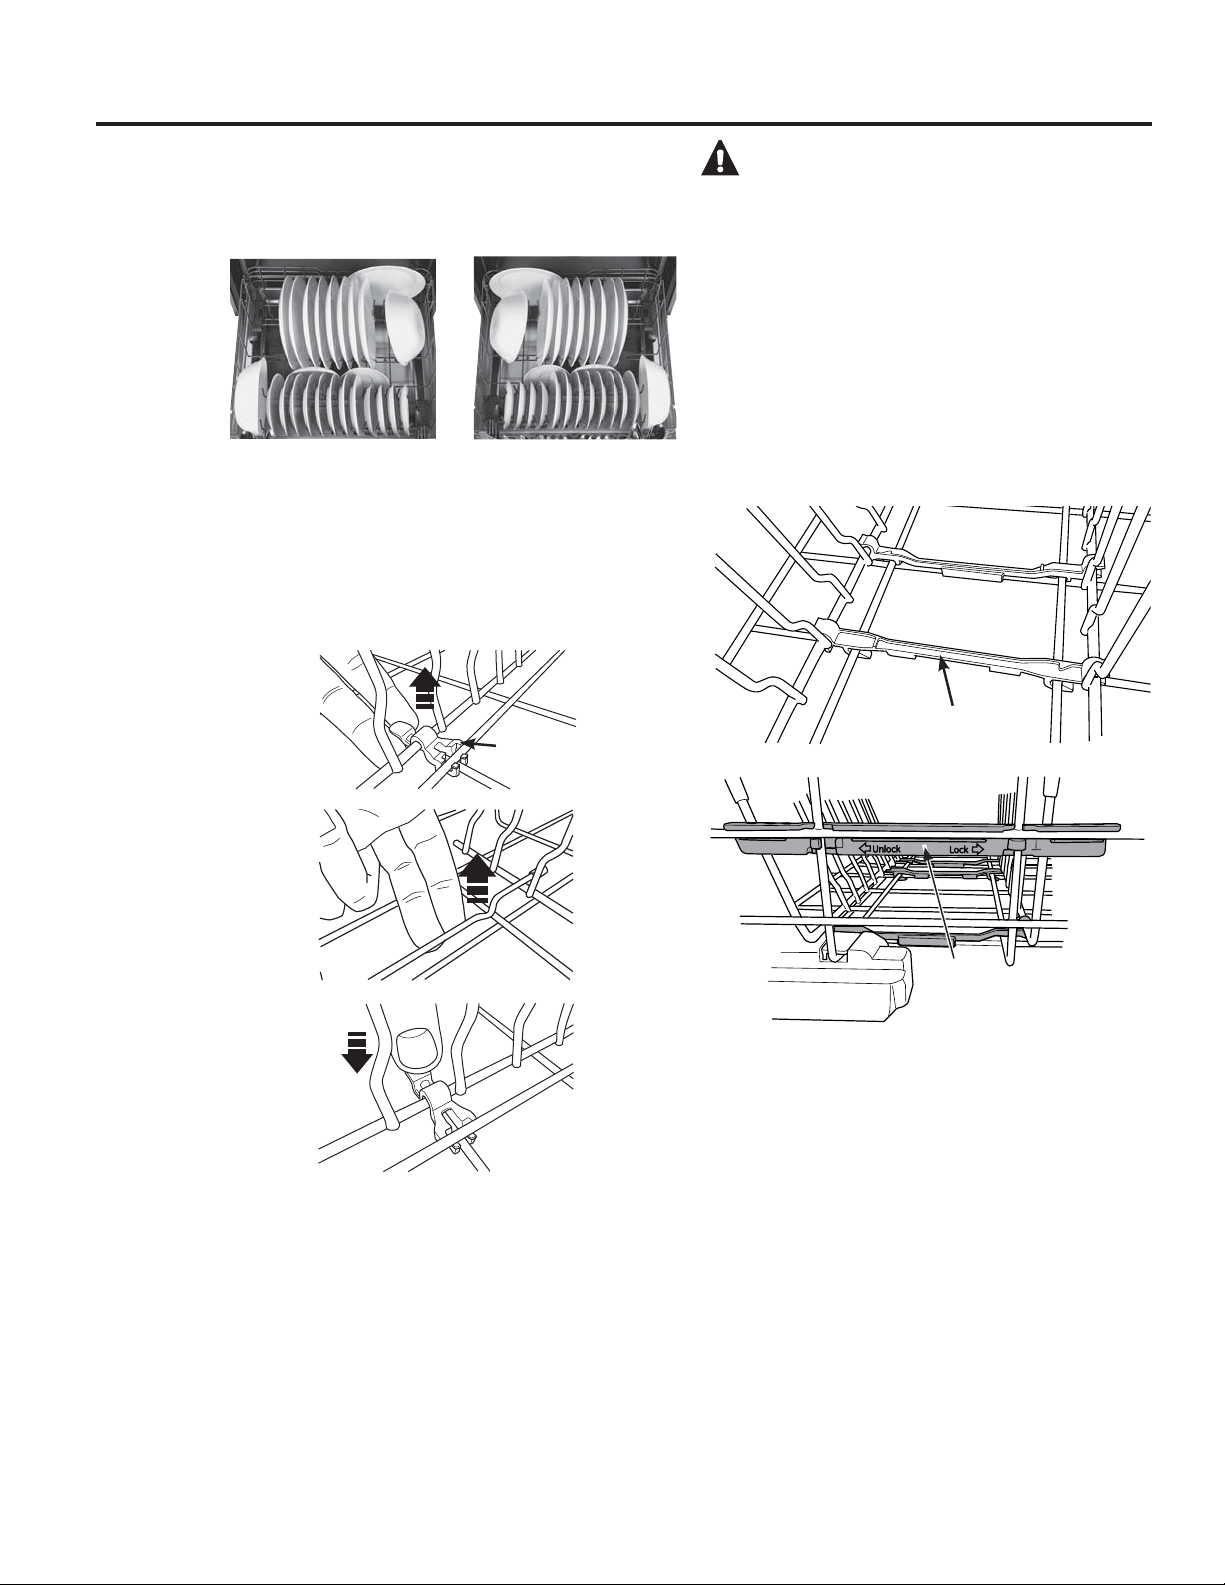
The upper rack allows 2” of adjustment up or down
Upper Rack
Push
to accommodate large items. The upper rack may
be lowered by pushing the long flaps on each side of
the rack. This will allow you to lower the rack (see fig.
Upper Rack). To raise the rack, lift up on the rack until
the rack locks in place.
To add flexibility in loading, the utility shelf (on
some models) may be placed in the up or down
position or unfolded and placed in the lower
unfolded position. The shelf may also be used to
secure stemware such as wine glasses. Because
these stemware items come in various sizes, slowly
push the rack in to ensure the items do not bump
into the edges of the dishwasher, which may cause
damage to the items.
The fold down tines (on some models) provide
flexibility for extra-large and hard-to-fit items.
The tine rows can be adjusted to a vertical or
lay-down position.
CAUTION: A loaded upper
rack may be heavier than anticipated. To
prevent minor injury or damage to the
contents, do not raise or lower the upper
rack after the rack is loaded.
Place the slots in the
utility shelf clips over
the vertical rack wires
and
push down to
attach
utility shelf onto
second wire of rack
11
Page 12

Loading the dishwasher.
For best dishwashing results, follow these loading guidelines. Features and appearance of racks and silverware
baskets may vary from your model.
8 Place Settings - Upper Rack
Models - GDT580, GDT680, GDT720, GDT740, PDT750 & CDT725
10 Place Settings - Upper Rack
Models - GDT580, GDT680, GDT720, GDT740, PDT750 & CDT725
Models - GDF570 and DDT575
Models - GDF570 and DDT575
12 Place Settings - Upper Rack
Models - GDT580, GDT680, GDT720, GDT740, PDT750 & CDT725
12
Models - GDF570 and DDT575
Page 13
GEAppliances.com
8 Place Settings - Upper Rack
Models - PDT760 and CDT765
10 Place Settings - Upper Rack
Models - PDT760 and CDT765
12 Place Settings - Upper Rack
Models - PDT760 and CDT765
13
Page 14

Loading the dishwasher (cont.).
For best dishwashing results, follow these loading guidelines. Features and appearance of racks and silverware
baskets may vary from your model.
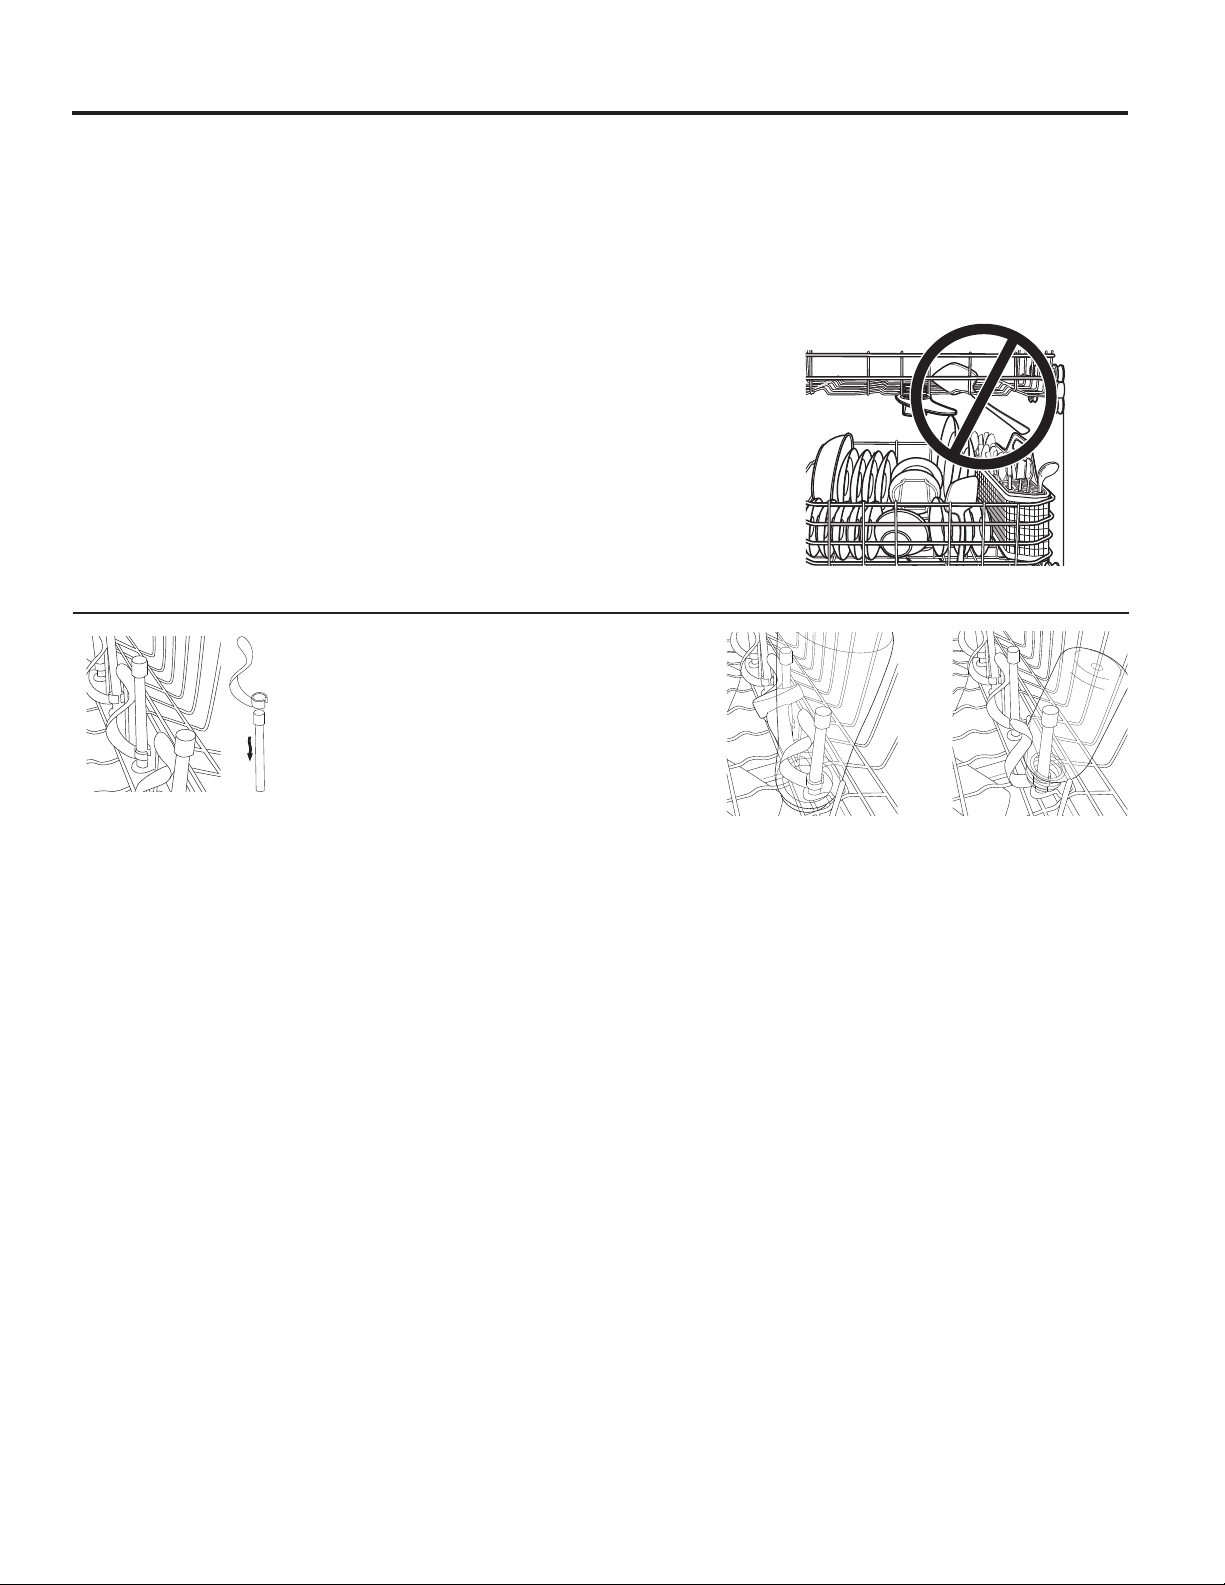
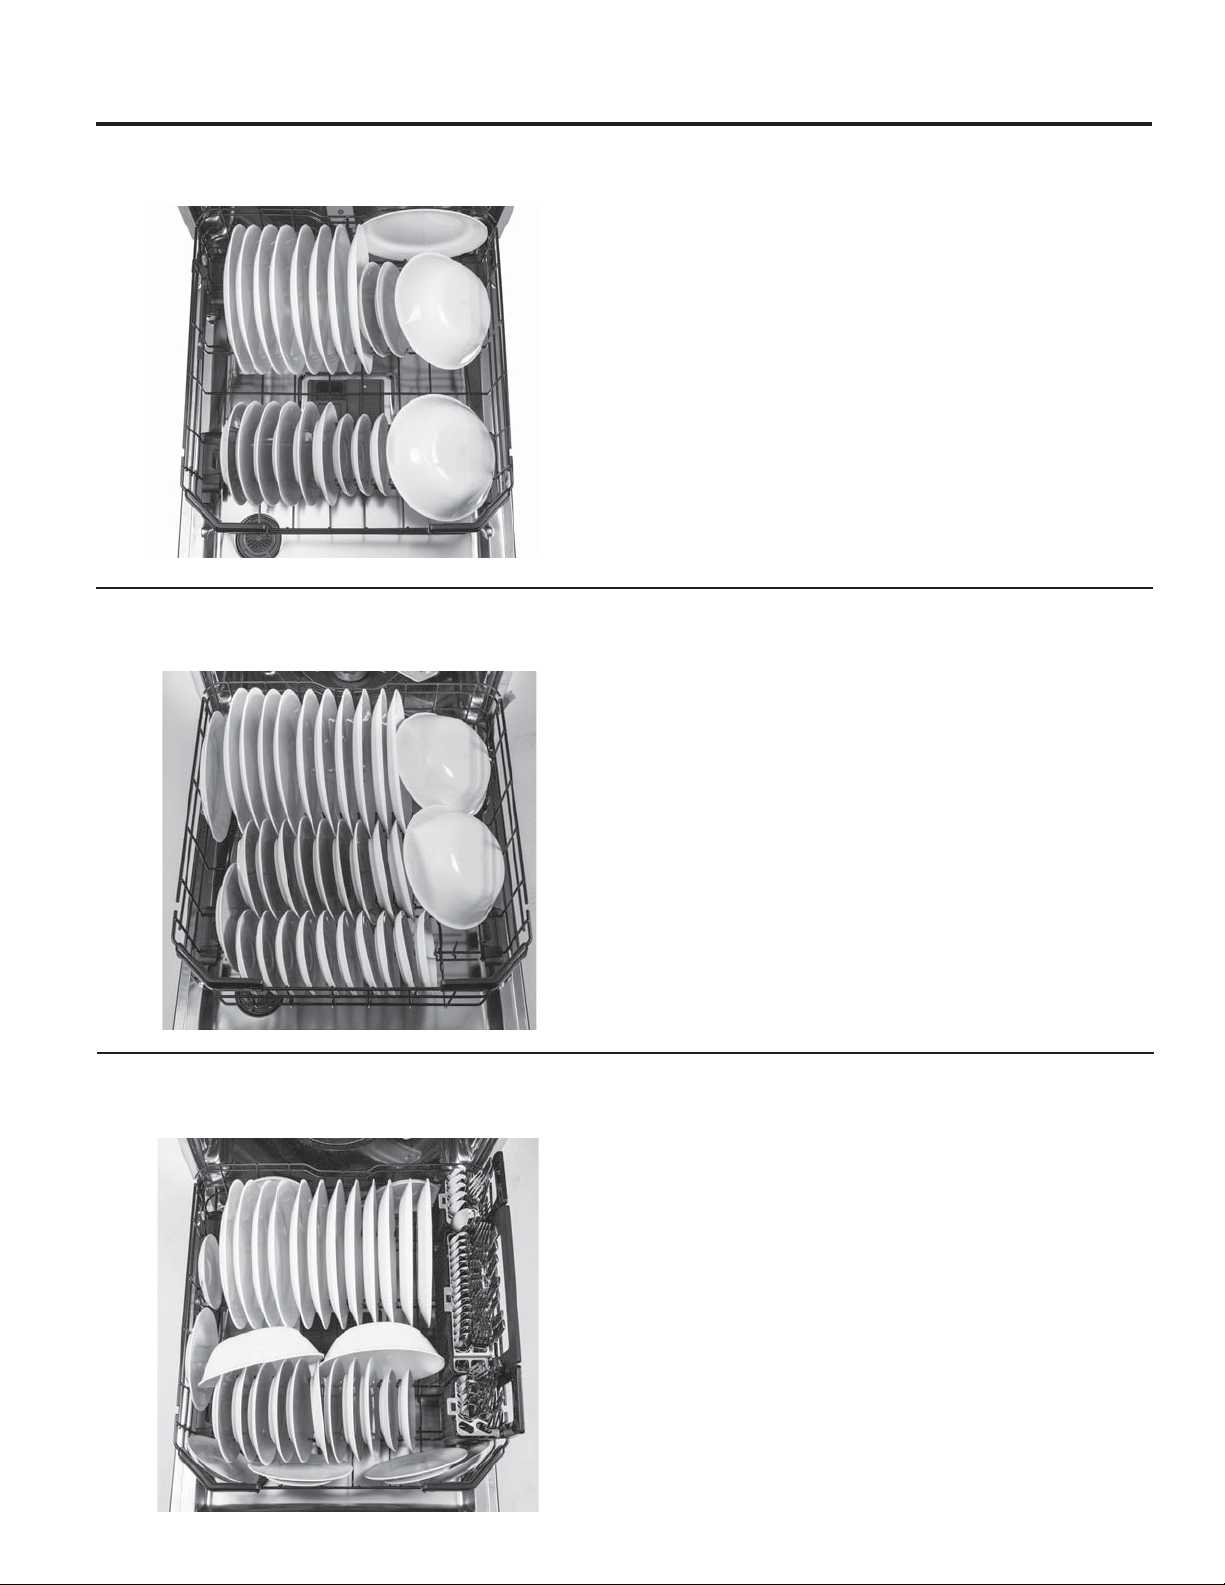
Lower Rack
The lower rack is best used for plates, saucers
and cookware items. Large items, such as
broiler pans and baking racks should be
placed along the sides of the rack. If necessary,
oversized glasses and mugs can be placed in
the lower rack to maximize loading flexibility.
Plates, saucers and similar items should be
placed between the tines in the direction that
allows the item to remain secure in the rack.
The lower rack fold down tines (on some
models) can be adjusted to different upright
angles or placed flat to provide flexibility for
hard-to-fit or extra-large items.
NOTE:
Do not load large items in the lower
rack where they may block the wash jets from
rinsing out the detergent dispenser.
3 Angled
Positions
Available
or Folded
Down
14
Page 15
GEAppliances.com
The reversible tine blocks (on some models) are
designed to allow greater flexibility in loading dishes.
The direction of the tine blocks can be changed to
match your preferred loading direction as shown in
Figure A or Figure B:
Figure A Figure B
To adjust the tine block direction, remove the clips
securing the tine blocks to the racks by pulling up
on the tab, then gently flex the retaining wire from
the center to unseat the tine block from the lower
rack. The tine block may be turned in the opposite
direction to reverse loading direction. Secure the tine
block to the rack using the same process and be
sure to snap the clips back in place.
WARNING! The clips can be a choke
hazard for small children if removed from the
dishwasher. Keep out of reach of children.
To change the direction of the fold down tines, lower
the tines, then pull away from the bar clips that
secure the tines to the rack and remove. Reverse
the direction of the tines, orienting the handle on the
opposite side of the rack. Reattach the tines to the
bar clips by pushing the tines back until they click in
place. The indexer will also need to be switched to
the opposite side of the dishwasher. To remove the
indexer, simply slide it the in the direction labeled
“unlock.” Then, align the indexer with the rack on the
other side and slide in the direction that says “lock”
in order to reattach the indexer to the rack.
Clip
Bar Clip
Indexer
To lock, slide right.
To unlock, slide left.
IMPORTANT:
not protrude through the bottom of the rack or the
silverware basket where they will block the rotation
of the lower spray arm. Also, ensure that large
plates, pots, or tall items don’t hit the mid spray arm.
This could result in noise during operation and/or
poor wash performance.
It is important to ensure that items do
15
Page 16

Loading the dishwasher (cont.).
8 Place Settings - Lower Rack
Models - GDT580, GDT680, GDT720, GDT740, PDT750 & CDT725
10 Place Settings - Lower Rack
Models - GDT580, GDT680, GDT720, GDT740, PDT750 & CDT725
Models - GDF570 and DDT575
Models - GDF570 and DDT575
12 Place Settings - Lower Rack
Models - GDT580, GDT680, GDT720, GDT740, PDT750 & CDT725
16
Models - GDF570 and DDT575
Page 17
GEAppliances.com
8 Place Settings - Lower Rack
Models - PDT760 and CDT765
10 Place Settings - Lower Rack
Models - PDT760 and CDT765
12 Place Settings - Lower Rack
Models - PDT760 and CDT765
17
Page 18
Loading the dishwasher (cont.).
For best dishwashing results, follow these loading guidelines. Features and appearance of racks and silverware
baskets may vary from your model.
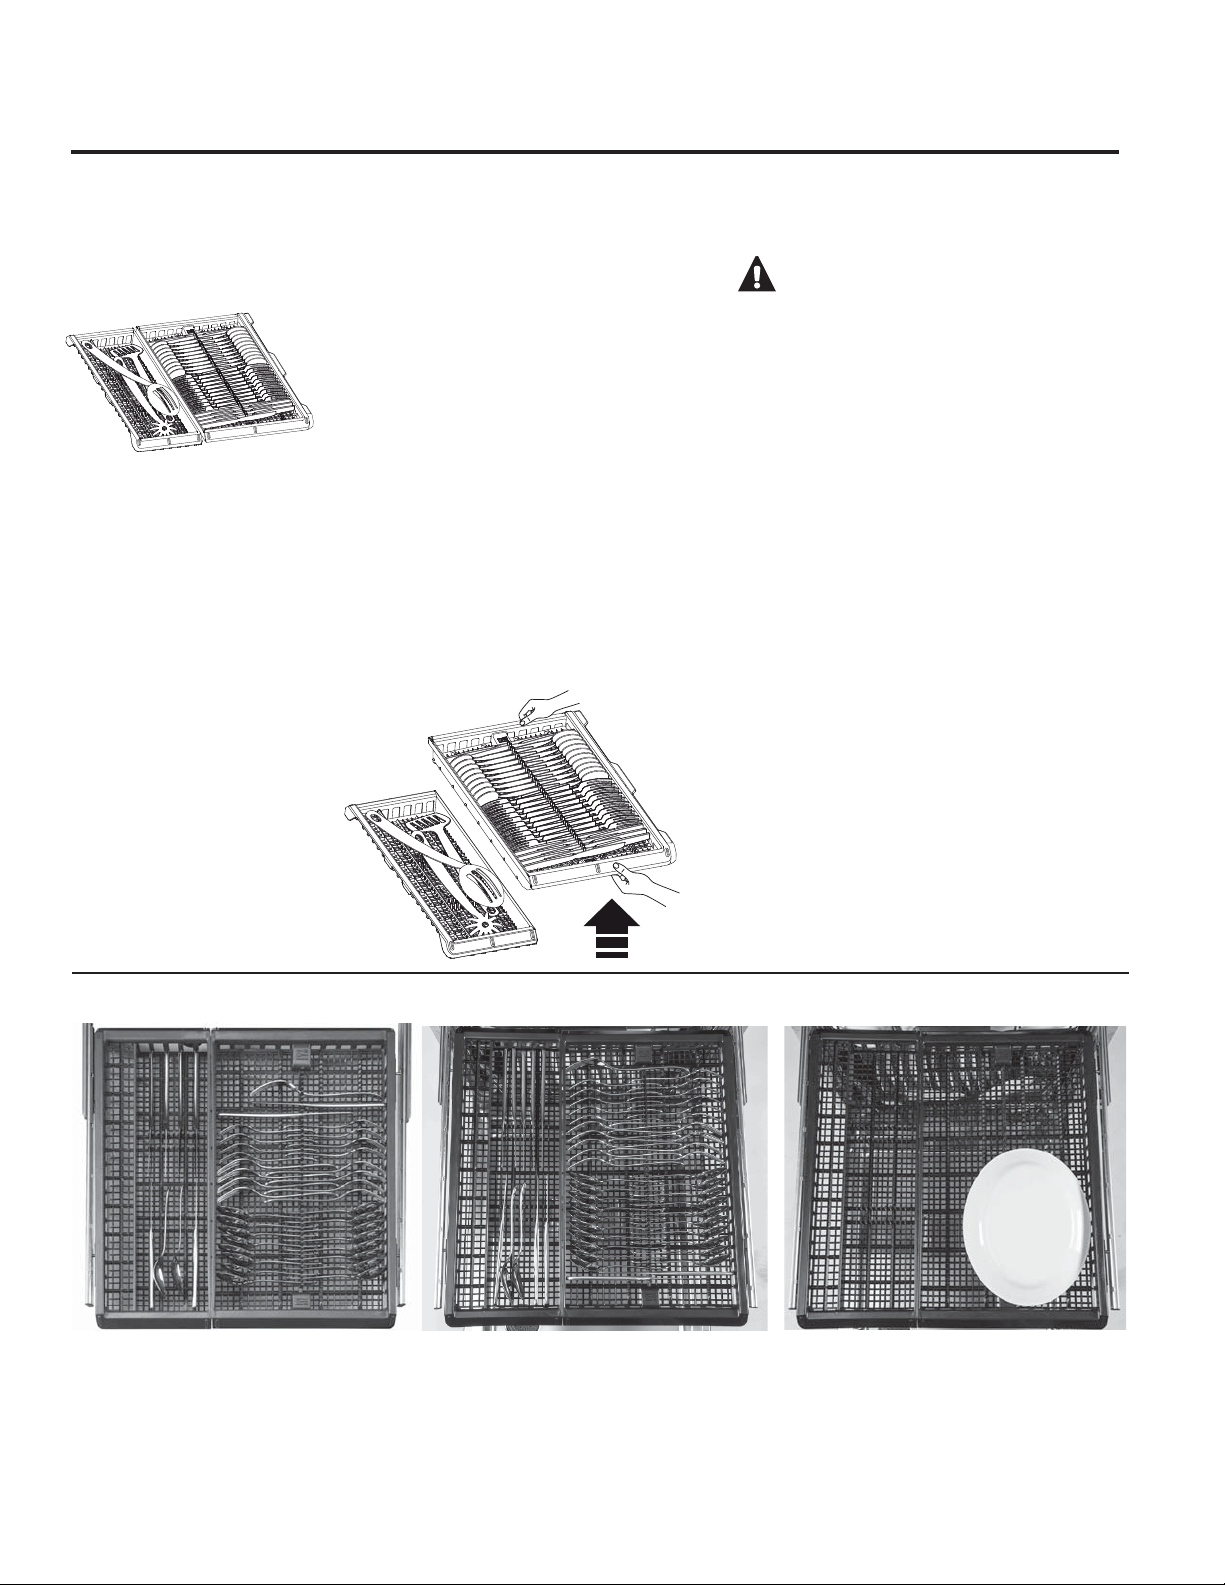
3rd Rack (on some models)
Utensil Tray
Silverware
Tray
The 3rd rack is the recommended location for
silverware and has 2 trays:
The utensil tray holds serving spoons, chop
sticks, spatulas, cutlery, whisks, etc. Be sure
not to overlap the utensil heads.
The silverware tray holds silverware
individually in slots and is positioned by
alternating the heads of the silverware.
These trays may be removed to allow for
easier loading and unloading, changing the
side that the trays are on, or to create extra
space for the upper rack.
To remove a tray, fully extended the 3rd rack,
grasp both the front and back handles on one
tray and gently lift the tray out of the rack.
To replace the tray, grasp both handles and
gently place it on the rack so that the deepest
part is towards the center of the rack.
CAUTION! Take care when
loading, unloading, or transporting the
silverware or utensil trays. The trays may
contain sharp or heavy items. If items are
dropped from the trays or the trays are
dropped, injury could occur.
IMPORTANT NOTES:
Do not place cutlery of different materials
next to each other in the 3rd rack. Doing
show may cause discoloration of the
cutlery.
The trays are only meant to be used with a
GE 3rd rack dishwasher to hold silverware,
cooking utensils, and other small items.
Using the trays for any other purpose could
result in damage to the trays or damage to
anything interacting with the trays.
Ensure that the 3rd rack is fully closed
before shutting the dishwasher door.
Shutting the door with the rack partially
extended could cause damage to the
dishwasher.
8 Place Settings
18
10 Place Settings 12 Place Settings
*See Silverware Basket section
on how to load silverware.
Page 19
GEAppliances.com
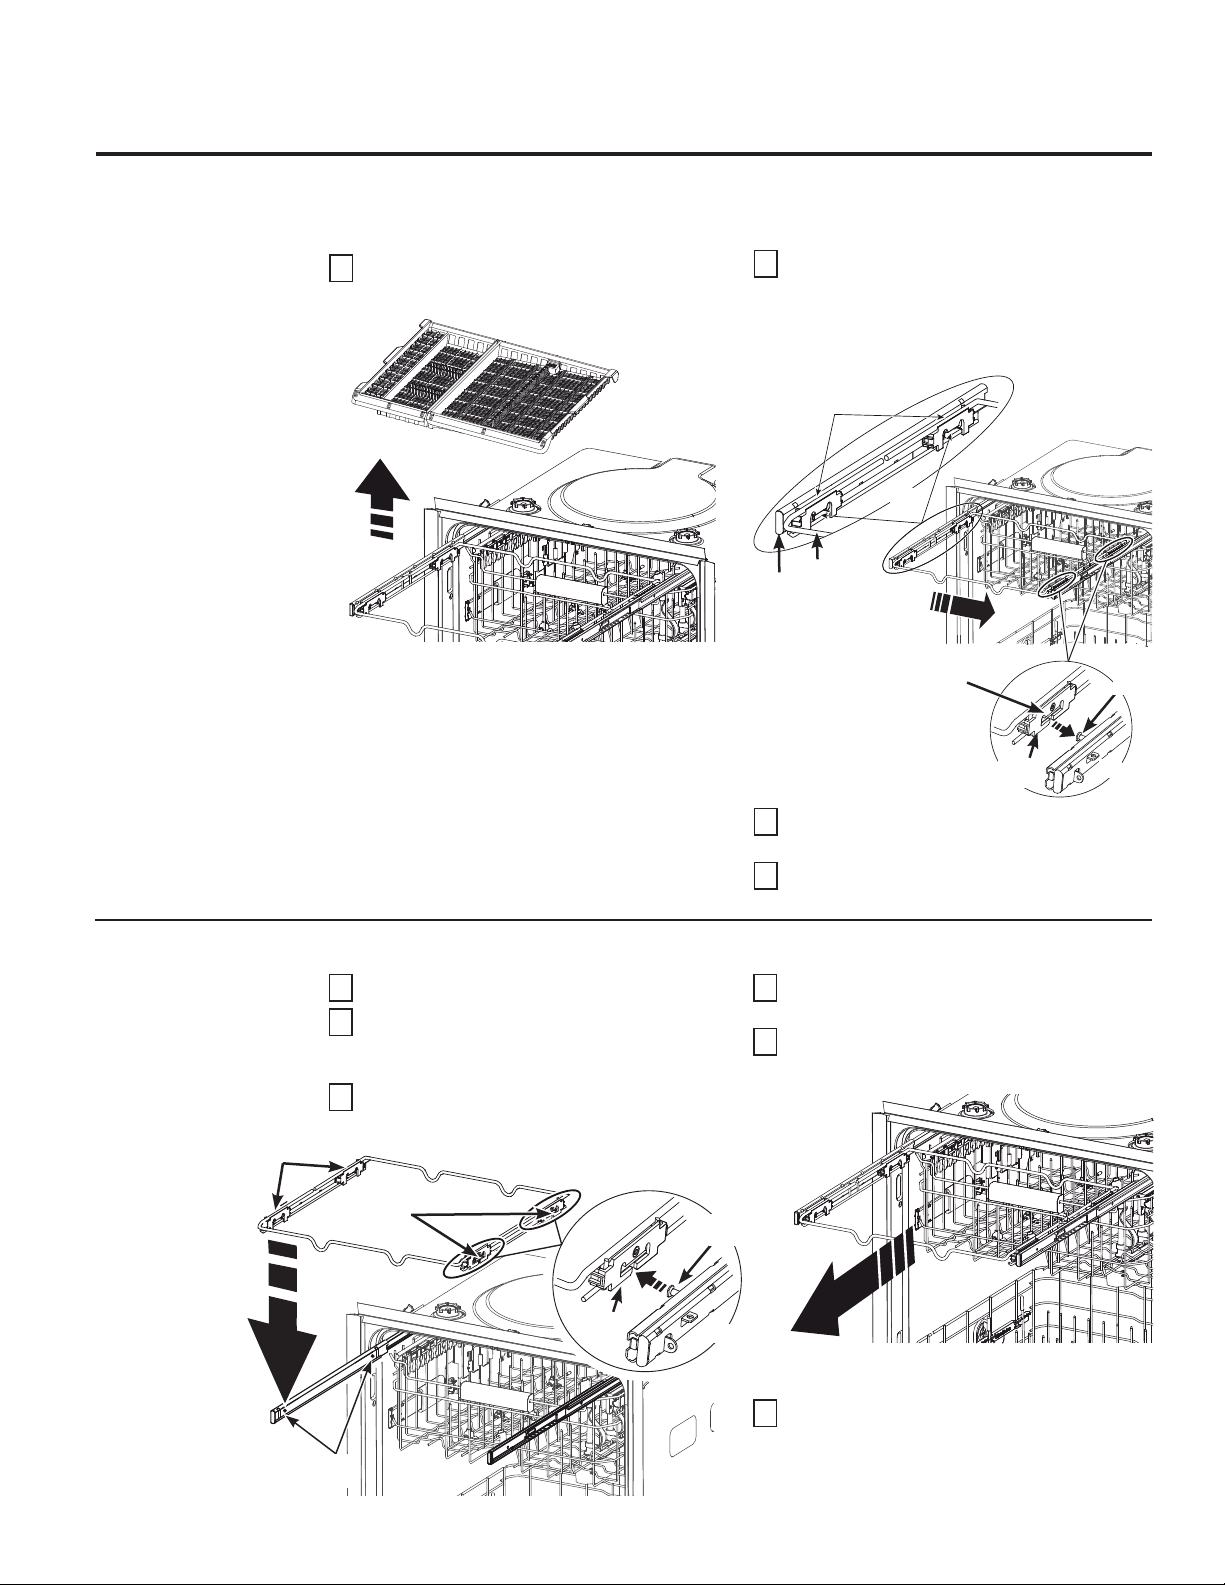
The 3rd rack is also removable to allow extra large items to be placed in the upper rack:
To remove the 3rd rack:
Push the rack all the way to one side so that
Remove the silverware and utensil trays.
1
(See the IMPORTANT NOTES in this section.)
2
a gap between it and the side rail forms on
the other side. Align the side rail posts with
the center of the clips on the rack and lift
straight up.
To replace the 3rd rack:
Rail posts
on inside
of rails
Rack
clips
Rack
Rail
3
4
Push rack to
one side
Rail post
will slide
in or out
of this
opening
Continuing to hold the rack in the lifted
position, repeat on the other side.
Once the rack is removed, push the side
rails all the way back into the dishwasher.
Align rail posts with
rack clips - Pull rack up
Rack
clip
Rail
Rail
post
Rack
clips
Extend both side rails fully out of the dishwasher.
1
Orient the rack so that its side clips are aligned
2
and centered with the posts on the side rail and
lower the clips onto the posts
Move the rack to one side of the dishwasher until
3
the clips fall onto the posts
Rack
clips
Rail
posts
.
.
Rack
clip
post
Rail
Rail
Continuing to hold the rack in the lifted
4
position, repeat on the other side.
Once the rack is replaced, pull it all the way
5
out to lock it in place in its side rails.
Pull rack all the way
out to lock it in place
Replace the silverware and utensil trays.
6
19
Page 20
Loading the dishwasher (cont.).
For best dishwashing results, follow these loading guidelines. Features and appearance of racks and silverware
baskets may vary from your model.
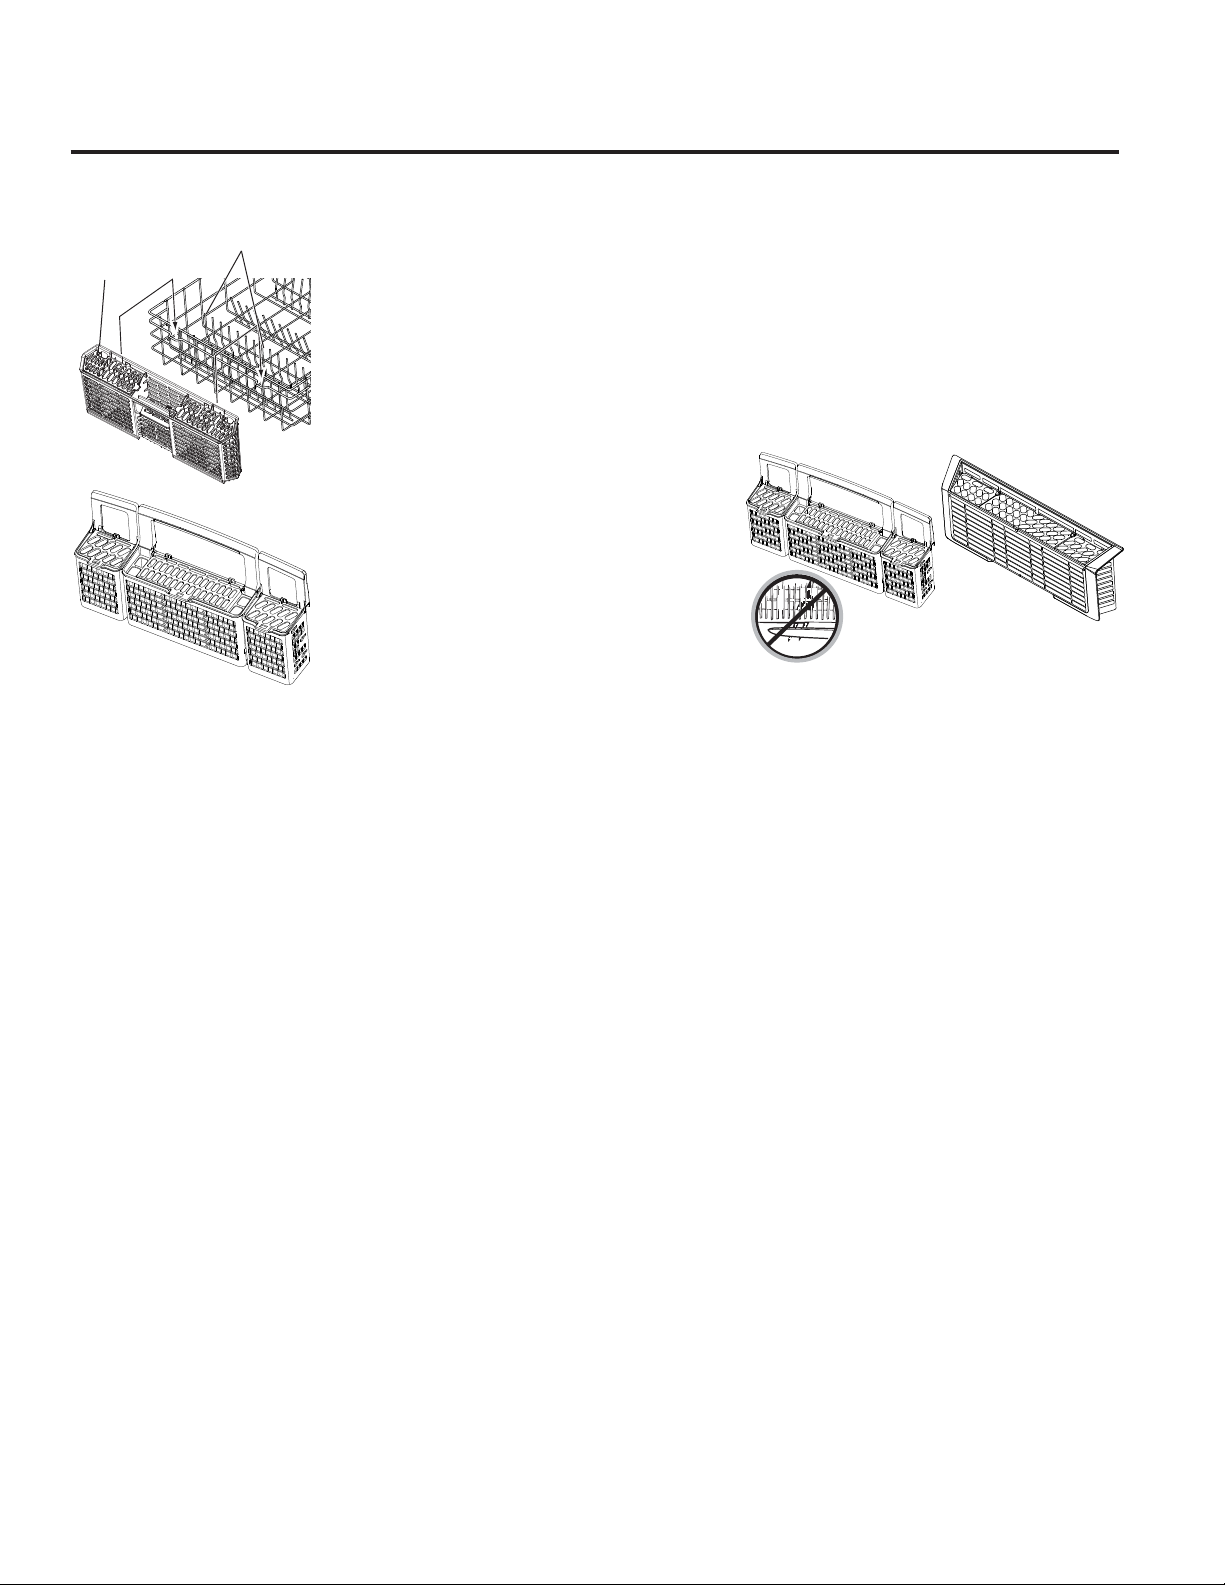
Silverware
Basket
Wire Loops
Silverware Basket
Place flatware in the removable silverware baskets.
Sharp objects, such as forks and knives, may be placed
with the handles facing up, in order to protect your
hands. For the best wash performance, place other
items such as spoons with the handles facing down.
Avoid allowing items to nest together, which may keep
them from being properly washed. When loading,
distribute items evenly in the basket.
The silverware baskets may also be used for small
items, such as measuring spoons, baby bottle nipples,
plastic lids, or corn cob holders. The silverware basket
covers can be closed to contain small items.
The Easy Access Silverware Baskets (on GDF570 and
DDT575 models) may be positioned on the front of
either the upper or lower racks. Secure the basket to
the rack using the wire loop on the front of the upper
and lower racks to engage the tabs on the rear of the
basket.
On other models, the silverware basket may be
positioned by placing the hooks on the back of the
basket over the top wire on the sides of the lower rack.
IMPORTANT NOTE: Do not load large or tall utensils
where they may block the detergent dispenser, mid
spray arm, or become trapped between the door and
the gasket when the door is closed.
20
Page 21
GEAppliances.com
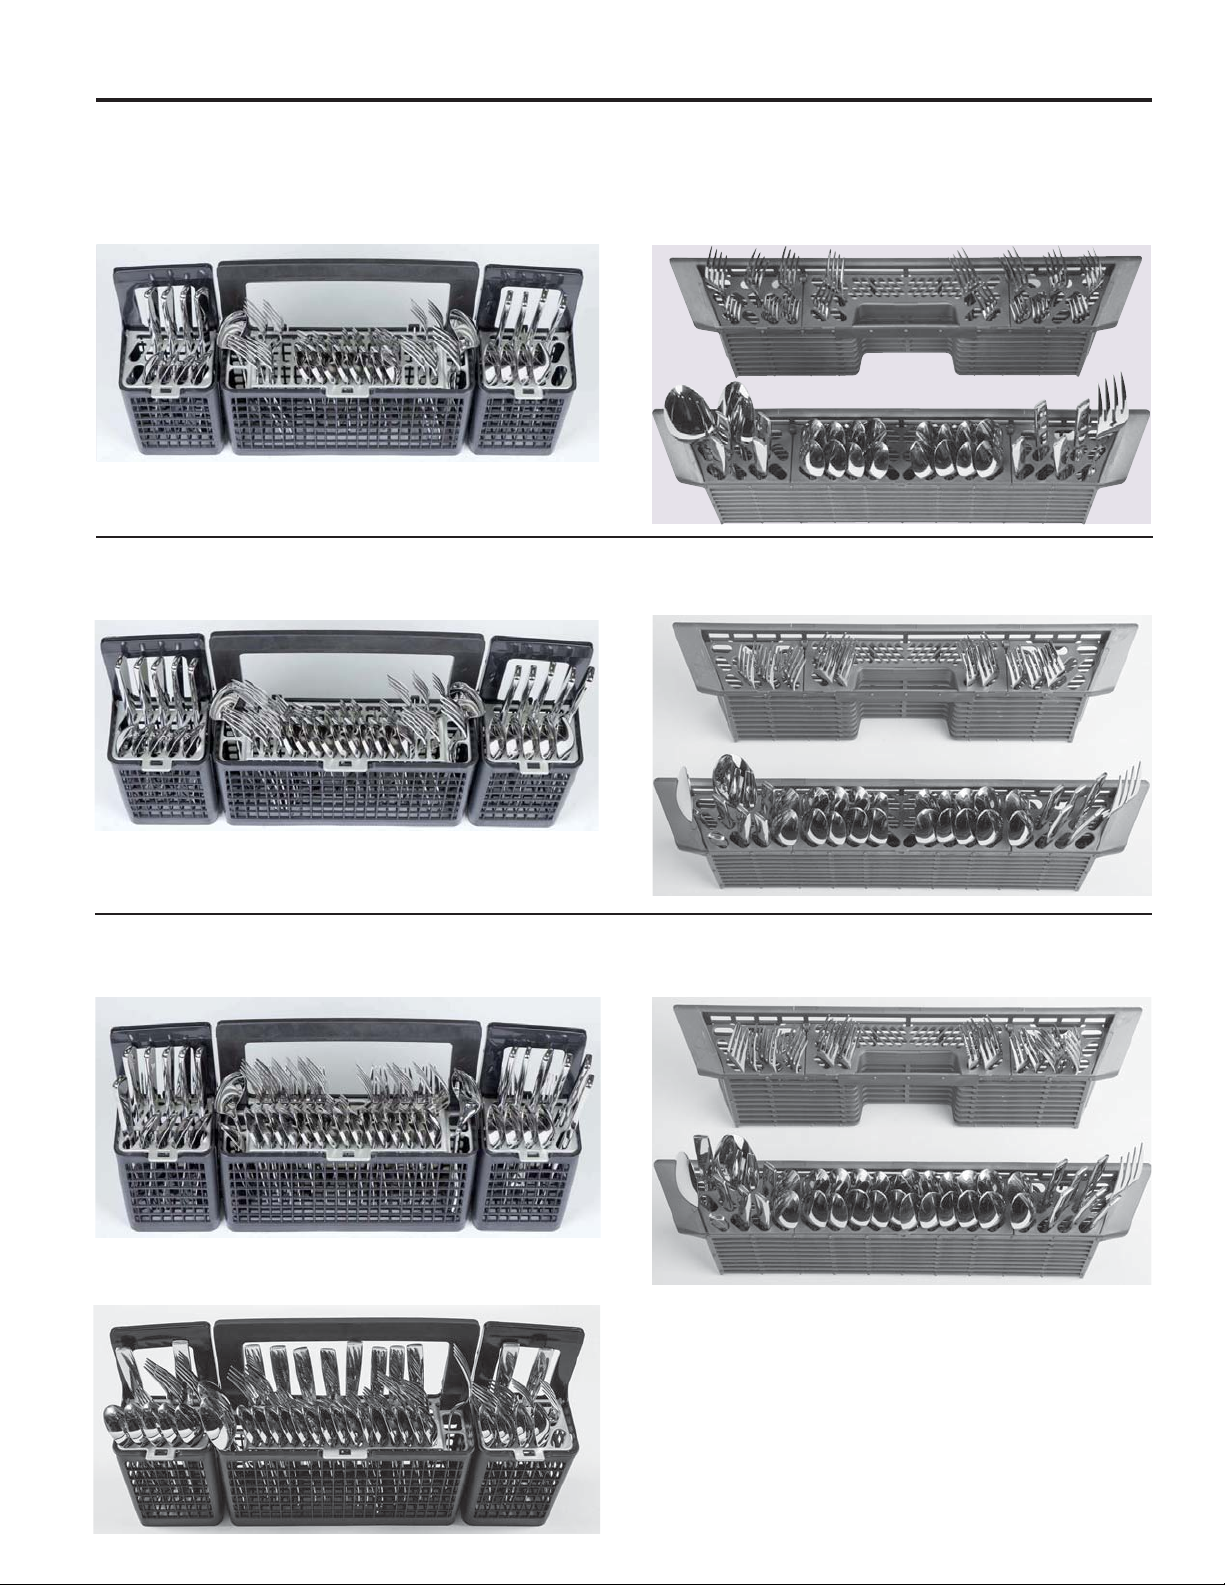
Silverware/flatware is loaded using the silverware basket lids. This ensures great wash performance of the
silverware. Loading in this manner prevents nesting and makes sure all items are washed uniformly.
8 Place Settings - Silverware Basket
Models - GDT580, GDT680, GDT720, GDT740, PDT750 & CDT725
NOTE: For models PDT760 and CDT765, refer to the
3rd Rack in this Loading The Dishwasher section.
10 Place Settings - Silverware Basket
Models - GDT580, GDT680, GDT720, GDT740, PDT750 & CDT725
Models - GDF570 and DDT575
Models - GDF570 and DDT575
NOTE: For models PDT760 and CDT765, refer to the
3rd Rack in this Loading The Dishwasher section.
12 Place Settings - Silverware Basket
Models - GDT580, GDT680, GDT720, GDT740, PDT750 & CDT725
Models - PDT760 and CDT765
Models - GDF570 and DDT575
21
Page 22

Care and cleaning.
Cleaning the Exterior Door Panel
Before cleaning the front panel, make sure you
know what type of panel you have. Refer to the
last two letters of your model number. You can
locate your model number on the left-hand tub
wall just inside the door. If your model number
ends with BB, CC, WW, SA or ES then you have
a painted door panel. If your model number
ends with SS, then you have a Stainless Steel
door panel. If your model number ends with II,
then you have an Integrated door panel.
Follow the instructions below for cleaning the
door panel for your specific model.
Painted Door Panel (model numbers ending in
BB–black, CC–bisque, WW–white, SA-silver or
ES-slate)
Use a clean, soft, lightly dampened cloth, then
dry thoroughly.
Stainless Steel Door Panel (model numbers
ending in SS)
For cleaning rust and tarnish, cleaners with
oxalic acid such as Bar Keepers Friend Soft
Cleanser™ will remove rust, tarnish and small
blemishes. Use only a liquid cleanser free
of grit and rub in the direction of the brush
lines with a damp soft sponge. Do not use
appliance wax or polish on the stainless steel.
For other blemishes and marks, use Stainless
Steel Magic or a similar product using a clean
soft cloth. Do not use appliance wax, polish,
bleach or products containing chlorine on
Stainless Steel. You can order Stainless Steel
Magic # WX10X29 through
877.959.8688. In Canada, call 1-800-661-1616.
Integrated Door Panel (model numbers ending
in II)
This is a custom installed door panel, and you
will need to refer to the cabinet manufacturers
recommendations for proper cleaning.
GE Parts by calling
Cleaning the Control Panel
To clean the control panel, use a lightly
dampened cloth. Then dry thoroughly.
Cleaning the Dishwasher Interior
To clean and de-odorize your dishwasher,
use citric acid or Lemi Shine®*, a detergent
additive. Lemi Shine will break up mineral
deposits, and remove hard water film and
stains. You can order citric acid #WD35X151
through GE Parts by calling 877-959-8688 or
visiting GEApplianceparts.com. In Canada,
call 1-800-661-1616. You can purchase
Lemi Shine at your local grocery store or by
calling GE at the numbers above and ask for
WX10X10019.
Stainless Steel Inner Door and Tub
The stainless steel used to make the dishwasher
tub and inner door provides the highest
reliability available in a GE dishwasher.
If the dishwasher tub or inner door should
be scratched or dented during normal use,
they will not rust or corrode. These surface
blemishes will not affect their function or
durability.
22
* Lemi Shine® is a registered trademark of Envirocon Technologies, Inc.
Page 23
GEAppliances.com
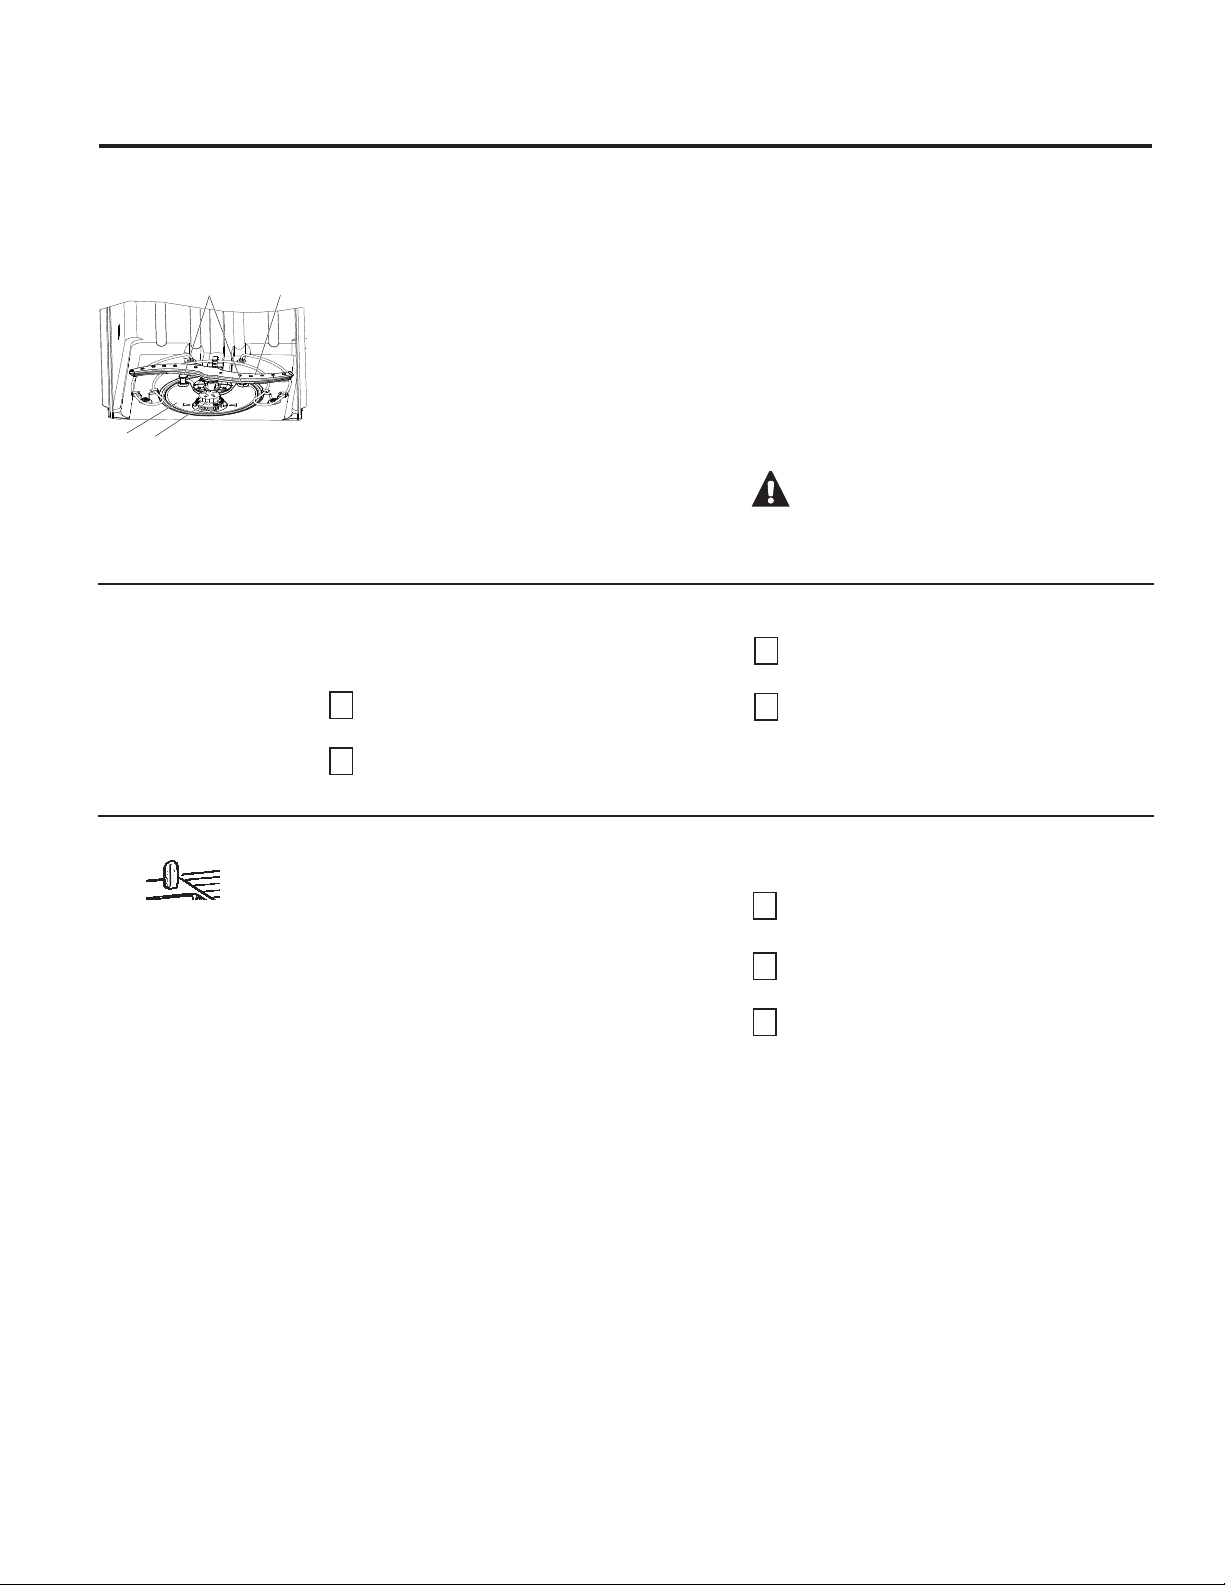
Cleaning the Filters
Inspect and clean the filters periodically. This should be done every other month or so depending on usage. If there is a
decrease in wash performance or dishes feel gritty, this is also an indication the filters need to be cleaned.
Ultra-Fine Filter
Twist counterclockwise each of the two retaining
posts located toward the back bottom of the
tub, and remove the Fine Filter. Rinse filter with
warm soapy water. Scouring pads or brushes
can scratch the filter surface but a soft brush or
sponge may be needed to remove stubborn soils
or calcium deposits caused by hard water. Once
cleaned, replace the Fine Filter, the Ultra-Fine
Filter, and twist clockwise the two retaining posts
into place.
WARNING! The retaining posts
can be a choke hazard for small children if
removed from the dishwasher. Keep out of
reach of children.
Drain water from the water inlet line and
3
water valve. (Use a pan to catch the water.)
Reconnect the water inlet line to the water
4
valve.
Fine
Filter
Ultra-Fine
Filter
Retaining
Posts
To clean the Ultra-Fine Filter, remove the bottom
Spray
Arm
rack. Twist counterclockwise and remove the
Ultra-Fine Filter. Rinse filter with warm soapy
water and use a sponge to carefully remove any
stubborn particles. Scrubbing with scouring pads
or brushes can damage the filter. Once cleaned,
replace the Ultra-Fine Filter, and twist clockwise to
lock in place.
Fine Filter
To clean the Fine Filter (mesh plate), remove the
bottom rack. Remove the Ultra-Fine Filter.
Protect Against Freezing
If your dishwasher is left in an unheated place
during the winter, ask a service technician to:
Turn off electrical power to the dishwasher.
1
Remove fuses or trip circuit breaker.
Turn off the water supply and disconnect the
2
water inlet line from the water valve.
Air gap
Check the air gap any
time your dishwasher
isn’t draining well.
Does Your Dishwasher Have an Air Gap?
An air gap protects your dishwasher against water
backing up into it if a drain clogs. The air gap is not
a part of the dishwasher. It is not covered by your
warranty. Not all plumbing codes require air gaps,
so you may not have one.
The air gap is easy to clean.
Turn off the dishwasher and lift off the air gap
1
cover.
Remove the plastic cap under the cover and
2
clean with a toothpick.
Replace the cap and cover when the air gap is
3
clean.
23
Page 24

Before you call for service…
Troubleshooting Tips
Save time and money! Review the charts on the following pages, or visit GEAppliances.com.
In Canada visit www.GEAppliances.ca. You may not need to call for service.
Problem
Start status The door was opened or the • Press the Start button once and close the door to start the dishwasher.
indicator light flashing cycle was interrupted. Press the Start button a second time when the dishwasher is running only
if you wish to cancel the cycle.
Dishwasher BEEPS This is a reminder that your • Press Start and close the door.
once every minute dishwasher door has been left
open during operation. It will
continue beeping until you press
Start and close the door.
Display shows Possible leak is detected • Some models are equipped with leak detection and the cycle will be cancelled if
“LEAK DETECTED” a leak is detected. The display will show “LEAK DETECTED”. Call for service.
Beeping at the end This is normal. The dishwasher • To turn off the double beep indicator (or re-activate it if it was previously
of the cycle will beep twice at the end of the turned off), press the Heated Dry button 5 times within 3 seconds.
(on some models) cycle. A triple beep will sound to indicate the end-of-cycle beep option
has been turned on or off.
Dishes and flatware Ultra Fine or Fine filter is clogged • See the Care and cleaning section.
not clean Low inlet water temperature • Make sure inlet water temperature is correct (see the Using the dishwasher
section). Turn on the hot water faucet nearest the dishwasher, let run until
the water temperature stops rising. Then start the dishwasher and turn
off the faucet. This ensures the entering water is hot. Select Wash Temp Boost
or Boost Temp if available.
Water pressure is temporarily low • Turn on a faucet. Is water coming out more slowly than usual? If so, wait
until pressure is normal before using your dishwasher.
Air gap or disposer is clogged • Clean the air gap or flush the disposer.
Improper rack loading • Make sure large dishware does not block the detergent dispenser or the
wash arms. See the Loading the dishwasher section.
Poor performing detergent • Use a highly rated detergent such as
Leak detected • Some models are equipped with leak detection and the cycle will be cancelled if
a leak is detected. The display will show “LEAK DETECTED”. Call for service.
Spots and filming Extremely hard water • Use rinse agents such as Cascade® Complete Rinse Aid to prevent spots and
on glasses and prevent new film buildup.
flatware
Low inlet water temperature • Make sure water temperature is at least 120°F (49°C).
Overloading or improper • Load dishwasher as shown in the Loading Place Settings section.
loading of the dishwasher
Old or damp powder detergent • Make sure detergent is fresh.
Rinse agent dispenser empty • Refill with rinse agent such as Cascade® Complete Rinse Aid.
Too little or low performing • Make sure you use the proper amount of highly rated detergent.
detergent
Possible Causes What To Do
Cascade® Platinum Pacs
• If water is extremely hard, a softener may be required.
.
24
Page 25
GEAppliances.com
Problem Possible Causes What To Do
Cloudiness on Combination of soft water and • This is called etching and is permanent. To prevent this from happening,
glassware too much detergent use less detergent if you have soft water. Wash glassware in the shortest
cycle that will get it clean.
Low performing phosphate • See A white film on glassware, dishware and the interior in this
free detergent Troubleshooting section.
Water temperature entering the • This could be etching. Lower the water heater temperature.
dishwasher exceeds 150°F (66°C)
Suds in the tub Wrong detergent • Use only automatic dishwasher detergents to avoid sudsing. Cascade®
Automatic Dishwashing Detergents have been approved for use in all
GE dishwashers.
• To remove suds from the tub, open the dishwasher and let suds dissipate.
Open the door, press and hold Start for 3 seconds, and close the door.
Rinse agent was spilled • Always wipe up rinse agent spills immediately.
Detergent left in Dishes or utensils are blocking • Reposition the dishes, so the water from the lower spray arm can flush
dispenser cups the detergent cup the detergent cup. See the Loading the dishwasher section.
• Reposition the tall utensils or heavy silverware that may be keeping the
dispenser cup door from opening. See the Loading the dishwasher
section.
• Don’t place large bowls or pots directly under the detergent dispenser.
Black or gray Aluminum utensils have • Remove marks with a mild, abrasive cleaner.
marks on dishes rubbed against dishes
Dishes don’t dry Low inlet water temperature • Make sure inlet water temperature is at least 120°F.
• Select Heated Dry.
• Use Wash Temp Boost or Boost Temp option.
• Select a higher cycle, such as Wash
Rinse agent dispenser is empty • Check the rinse agent dispenser and fill as required.
Additional drying time is needed • Leave door closed after the Clean light appears to allow the fan to run an
additional 90 minutes.
Note: If you open the door, this fan extension will be cancelled.
Control panel responded Door may not be completely • Make sure the door is firmly closed.
to inputs but dishwasher closed
never filled with water
Water valve may be turned off • Make sure water valve (usually located under the sink) is turned on.
Flood float may be stuck • Remove Ultra-Fine filter and lightly tap the piece under the ultra fine filter that
looks like a salt shaker. Replace the filter.
Stained tub interior :KLWHILOPRQLQVLGHVXUIDFH³ • GE recommends Cascade® Complete Rinse Aid to help prevent hard water
hard water minerals mineral deposits from forming.
• Run dishwasher with citric acid to remove mineral deposits. Citric acid
(Part number: WD35X151) can be ordered through GE Parts. See back
cover for ordering information. Alternatively, purchase Lemi Shine and follow
the directions on the label.
Dishwasher won’t run Fuse is blown or circuit breaker • Replace fuse or reset circuit breaker. Remove any other appliances from
is tripped the circuit.
Power is turned off • In some installations, the power to the dishwasher is provided through a
wall switch, often located next to the disposer switch. Make sure it is on.
Control panel is locked • Unlock control panel. See the Getting started section.
Possible leak is detected • Some models are equipped with leak detection and the cycle will be cancelled if
a leak is detected. The display will show “LEAK DETECTED”. Call for service.
Proper Start sequence was • See the Using the dishwasher section.
not followed
Temp Sani,
Sanitize Temp or Heavy.
25
Page 26

Before you call for service…
Problem Possible Causes What To Do
Control panel lights Time too long between • Each button must be touched within 30 seconds of the others.
go off when you’re touching of selected buttons To relight, touch any button again or open the door and
setting controls unlock (top control).
Water standing in Air gap is clogged • Clean the air gap. See the Care and cleaning section.
the bottom of the tub
High drain loop or air • Refer to the Installation Instructions for proper drain line installation.
gap not installed
Water won’t pump Drain is clogged • If you have an air gap, clean it. See the Care and cleaning section.
out of the tub
• Check to see if your kitchen sink is draining well. If not, you
may need a plumber.
Steam This is normal • Warm, moist air comes through the vent during drying and when
water is being pumped out. This is necessary for drying.
Sanitized or Cycle The door was opened and the • Do not interrupt the cycle by opening the door during the wash cycle.
Sanitized light does cycle was interrupted during
not illuminate at the final rinse
end of the cycle
temperature was too low
Noise Normal operating sounds: • These are all normal. No action is required.
Detergent cup opening
Water entering dishwasher
The motor stops and starts at
various times during the cycle
Spray arms start and stop at
various times
Drain pump sounds during
pump out
Drain pump starts and stops
several times during each drain
Rattling dishes when the spray • Make sure dishes are properly loaded. See the Loading the
arm rotates dishwasher section.
Rattling silverware against door • Tall utensils may be placed in the upper rack to avoid bumping against
during wash inner door during wash cycle.
A white film on This problem is likely caused • To remove the white film, run your dishes through a dishwasher cycle with
glassware, dishware by a low quality phosphate-free citric acid. Use a WD35X151 citric acid kit found online. Otherwise, use Lemi
and the interior dishwasher detergent Shine (WX10X10019) found at your local grocery store.
Pour the citric acid in the detergent cup and close the cover. Place the filmed
but otherwise clean glassware and dishware in the dishwasher. Leave
silverware and other metal items out of the dishwasher. Turn the dishwasher
on and let it run through a complete cycle without detergent. The glassware,
dishware, and dishwasher should come out film free. Alternatively,
a vinegar rinse may be used. Pour 1 cup of vinegar into dishwasher just after
the detergent cup opens and let the dishwasher complete its cycle.
This may be repeated several times a year as needed
The use of a rinse agent such as Cascade® Complete Rinse Aid may help
minimize a repeat build up of film. Also, the use of a highly rated detergent
such as Cascade® Platinum Pacs will help prevent film build-up.
• If the dishwasher drains into a disposer, run disposer clear.
The incoming water • Raise the water heater temperature to between 120°F and 150°F.
26
Page 27
GE Dishwasher Warranty. GEAppliances.com
All warranty service provided by our Factory Service Centers, or an
®
authorized Customer Care
technician. To schedule service, visit us on-line
at GEAppliances.com, or call 800.GE.CARES (800.432.2737) in the United
States. In Canada, call 1.800.561.3344. Please have serial number and
model number available when calling for service.
Staple your receipt here.
Proof of the original purchase
date is needed to obtain service
under the warranty.
Servicing your appliance may require the use of the onboard data port for diagnostics. This gives a GE
Factory Service technician the ability to quickly diagnose any issues with your appliance and helps GE
improve its products by providing GE with information on your appliance. If you do not want your appliance
data to be sent to GE, please advise your technician NOT to submit the data to GE at the time of service.
For The Period Of: GE Will Replace:
One Year Any part of the dishwasher which fails due to a defect in materials or workmanship. During
From the date of the this limited one-year warranty, GE will also provide, free of charge, all labor and in-home
original purchase service to replace the defective part.
What GE Will Not Cover (for customers in the United States):
Service trips to your home to teach you how to use the
product.
Improper installation, delivery or maintenance.
Failure of the product if it is abused, misused, or used for
other than the intended purpose or used commercially.
Replacement of house fuses or resetting of circuit breakers.
Product not accessible to provide required service.
Damage to the product caused by accident, fire, floods or
acts of God.
Incidental or consequential damage caused by possible
defects with this appliance.
Cleaning or servicing of the air gap device in the drain line.
Damage caused after delivery, including damage from
items dropped on the door.
(;&/86,212),03/,(':$55$17,(6³<RXUVROHDQGH[FOXVLYHUHPHG\LVSURGXFWUHSDLUDVSURYLGHGLQWKLV/LPLWHG
Warranty. Any implied warranties, including the implied warranties of merchantability or fitness for a particular purpose,
are limited to one year or the shortest period allowed by law.
This warranty is extended to the original purchaser and any succeeding owner for products purchased for home use within the USA.
If the product is located in an area where service by a GE Authorized Servicer is not available, you may be responsible for a trip charge
or you may be required to bring the product to an Authorized GE Service location for service. Proof of original purchase date is needed
to obtain service under the warranty. In Alaska, the warranty excludes the cost of shipping or service calls to your home.
Some states do not allow the exclusion or limitation of incidental or consequential damages. This warranty gives you specific legal
rights, and you may also have other rights which vary from state to state. To know what your legal rights are, consult your local or
state consumer affairs office or your state’s Attorney General.
Warrantor: General Electric Company. Louisville, KY 40225
What Is Not Covered (for customers in Canada):
Service trips to your home to teach you how to use
the product.
Improper installation.
If you have an installation problem, contact your dealer
or installer. You
electrical, exhausting and other connecting facilities.
(;&/86,212),03/,(':$55$17,(6³<RXUVROHDQGH[FOXVLYHUHPHG\LVSURGXFWUHSDLUDVSURYLGHGLQWKLV/LPLWHG
Warranty. Any implied warranties, including the implied warranties of merchantability or fitness for a particular purpose,
are limited to one year or the shortest period allowed by law.
are responsible for providing adequate
Failure of the product if it is abused, misused, or used for
other than the intended purpose or used commercially.
Replacement of house fuses or resetting of circuit breakers.
Damage to the product caused by accident, fire, floods or
acts of God.
Damage caused after delivery.
This warranty is extended to the original purchaser and any succeeding owner for products purchased in Canada for home use within
Canada. In home warranty service will be provided in areas where it is available and deemed reasonable by Mabe to provide.
WARRANTOR IS NOT RESPONSIBLE FOR CONSE QUEN TIAL DAMAGES.
Warrantor: MC Commercial, Burlington, ON, L7R 5B6
27
Page 28

Notes.
28
Page 29

GEAppliances.com
29
Page 30

Notes.
30
Page 31

GEAppliances.com
31
Page 32

Notes.
32
Page 33

Consignes De Sécurité .......... 34-35
Directives De Fonctionnement
Chargement du lave-vaisselle ......42-53
Entretien et nettoyage .................... 54-55
Comment démarrer ........................ 36–39
Utilisation du lave-vaisselle .......... 40–41
Conseils de dépannage ......... 56-58
Service À La Clientèle
Garantie ........................................................ 59
Service à la clientèle ................................... 64
Modèles avec commandes à l'avant
Inscrivez ci-dessous les numéros
de modèle et de série :
N° de modèle _______________
N° de série __________________
Ils se trouvent sur la paroi de la cuve,
à l’intérieur de la porte.
Modèles avec commandes sur le dessus
33
Page 34

CONSIGNES DE SÉCURITÉ IMPORTANTES
VEUILLEZ LIRE TOUTES LES CONSIGNES AVANT D’UTILISER
/·$33$5(,/³&216(59(=&(6',5(&7,9(6
AVERTISSEMENT!
AVERTISSEMENT!
Dans certaines conditions, il peut se former de l’hydrogène dans un chauffe-eau qui n’a pas été utilisé pendant deux
semaines ou plus. L’HYDROGÈNE EST UN GAZ EXPLOSIF.
Si vous n’avez pas utilisé votre chauffe-eau pendant deux semaines ou plus, ouvrez tous les robinets d’eau chaude
et laissez couler l’eau pendant plusieurs minutes afin de réduire les risques de dommages matériels ou de blessures.
Prenez cette précaution avant même d’utiliser un électroménager raccordé au chauffe-eau pour éliminer l’hydrogène qui
pourrait s’y être accumuléé. Puisqu’il s’agit d’un gaz inflammable, ne fumez pas ou n’utilisez pas une flamme nue ou un
électroménager au cours de ce processus.
AVERTISSEMENT!
Ce lave-vaisselle doit être correctement installé, en conformité avec les directives d’installation fournies, avant d’être utilisé.
Si vous n’avez pas reçu les directives d’installation avec votre appareil, vous pouvez vous les procurer en visitant notre site
Web à l’adresse www.electromenagersge.ca.
Cet appareil doit être relié à un système de câblage électrique
permanent en métal, mis à la terre. Sinon, un fil de mise à la
terre pour appareillage doit être installé et raccordé à la borne
ou au fil de mise à la terre de l’appareil.
Un raccordement incorrect du fil de mise à la terre peut
présenter un risque d’électrocution. Consultez un électricien
ou un technicien qualifié si vous n’êtes pas certain que
l’appareil est correctement mis à la terre.
Veuillez vous débarrasser de la façon appropriée de vos
vieux électroménagers et des matériaux d’emballage ou
d’expédition.
Pour votre sécurité, veuillez suivre les directives données dans le présent
manuel afin de réduire au minimum les risques d’incendie, d’explosion et de
chocs électriques et prévenir tout dommage et blessure grave ou mortelle.
SÉCURITÉ DU CHAUFFE-EAU
INSTALLATION ET ENTRETIEN APPROPRIÉS
Ne tentez pas de réparer ou de remplacer une pièce
quelconque de votre
spécifiquement recommandé dans le présent manuel. Confiez
toutes les autres réparations à un technicien qualifié.
Utilisez uniquement un nécessaire de cordon électrique
WX09X70910 ou câblez directement sur le circuit électrique
du domicile. L’omission d’observer cette instruction peut
causer un risque d’incendie ou de blessure.
Pour réduire au minimum les risques d’électrocution, débranchez
l’appareil de sa source d’alimentation avant d’en effectuer l’entretien.
REMARQUE : Le fait d’arrêter le lave-vaisselle ne coupe l’alimentation
électrique de l’appareil. Nous vous recommandons de confier la
réparation de votre électroménager à un technicien qualifié.
lave-vaisselle, à moins que cela ne soit
AVERTISSEMENT!
N’utilisez cet appareil que pour l’usage pour lequel il a été
conçu, comme expliqué dans le présent manuel.
Utilisez uniquement un détergent ou
un agent mouillant recommandés pour
utilisation dans un lave-vaisselle et
tenez-les à l’écart des enfants. L’utilisation
d’un détergent non conçu pour les lavevaisselles peut provoquer la formation de mousse.
Placez les articles coupants de manière à ce qu’ils
n’endommagent pas le joint d’étanchéité de la porte.
Placez dans le panie r à couverts les couteaux tranchants le
manche vers le haut afin de réduire les risques de coupures.
Ne lavez pas les articles en plastique à moins qu’ils
ne portent la mention « Lavable au lave-vaisselle » ou
l’équivalent. Si certains articles en plastique ne portent
pas cette mention, reportez-vous aux recommandations du
fabricant.
Lors du fonctionnement de votre lave-vaisselle, prenez les précautions
de base, notamment les suivantes :
34
Ne touchez pas à l’élément chauffant pendant ou
immédiatement après le fonctionnement de l’appareil.
Ne faite pas fonctionner le lave-vaisselle si tous les panneaux
de la carrosserie n’ont pas été correctement réinstallés.
Ne modifiez pas le fonctionnement des commandes.
Abstenez-vous de vous asseoir, de vous accrocher ou de vous
tenir sur la porte ou
emploi abusif de toute autre manière.
Pour réduire le risque de blessure, ne laissez pas les enfants
jouer avec l’électroménager, grimper dessus ou s’y introduire.
Ne rangez ni n’utilisez des matières combustibles, y compris de
l’essence ou d’autres liquides ou vapeurs inflammables, à proximité
de cet appareil ou de tout autre.
Les petites pièces, telles qu’attaches de panier et tiges de
retenue de filtre, représentent un risque d’étouffement
pour les jeunes enfants si elles sont retirées du lavevaisselle. Gardez-les à l’écart des jeunes enfants.
le panier du lave-vaisselle, ou d’en faire un
Page 35

CONSIGNES DE SÉCURITÉ IMPORTANTES
VEUILLEZ LIRE TOUTES LES CONSIGNES AVANT D’UTILISER
/·$33$5(,/³&216(59(=&(6',5(&7,9(6 www.electromenagersge.ca
AVERTISSEMENT!
ÉLIMINATION APPROPRIÉE DU LAVE-VAISSELLE
Les lave-vaisselle jetés ou abandonnés sont dangereux… même si vous ne les laissez là que pour
quelques jours. Si vous voulez jeter votre lave-vaisselle, veuillez suivre les directives ci-dessous pour
éviter les accidents.
Ne laissez pas les enfants jouer avec, sur, le lave-vaisselle, ou à l’intérieur de celui-ci ou de tout autre
électroménager mis aux rebuts.
Enlevez la porte du compartiment de lavage ou enlevez le verrou en ôtant les deux vis du loquet
à l’intérieur de la cuve (comme illustré).
ATTENTION :
Pendant ou après le cycle de lavage, le contenu peut
s’avérer très chaud au toucher. Manipulez-le avec soin.
Une surveillance attentive est nécessaire lorsque cet
appareil est utilisé par ou près des enfants. Ne laissez pas
les enfants jouer à proximité du lave-vaisselle lorsque vous
la fermeture de la porte, la fermeture de la crémaillère
supérieure, ou tout réglage en hauteur du panier supérieur
afin d’éviter que leurs petits doigts se coincent.
Pour éviter les blessures mineures ou les dommages matériels
RISQUE DE SUFFOCATION POUR UN ENFANT
COINCÉ
À L’INT RIEUR DE L’APPAREIL
Articles autres que la vaisselle : ne lavez pas dans le lave-
vaisselle des articles comme des filtres de purificateur
d’air, des filtres de systèmes de chauffage ou des
pinceaux. Vous pourriez endommager le lave-vaisselle et
provoquer une décoloration ou des taches dans l’appareil.
Placez les articles légers en plastique de manière qu’ils
ne se déplacent pas ou ne tombent pas au fond de
O·DSSDUHLO³LOVSRXUUDLHQWHQWUHUHQFRQWDFWDYHFO·pOpPHQW
chauffant, ce qui pourrait les endommager.
Deux vis
ATTENTION : EXIGENCES ÉLECTRIQUES
Cet appareil électroménager doit être alimenté par du courant
de 120V, 60 Hz, et branchéà un circuit de dérivation bien
mis à la terre, protégé par un fusible à retardement ou un
disjoncteur de 15 ou 20 ampéres.
Si l’alimentation électrique fournie ne remplit pas les
caractéristiques ci-dessus, nous vousrecommandons de
faire installer par un électricien qualifié une bonne prise.
Le circuit de votre lave-vaisselle ne doit être utilisépar
aucun autre appareil électroménager quandle lavevaisselle fonctionne, car le lave-vaissellenécessite toute la
capacité du circuit.
NOTICE
Si votre lave-vaisselle est branché sur un circuit relié
à un interrupteur mural, assurez-vous d’actionner
celui-ci avant d’utiliser votre appareil.
Si vous fermez l’interrupteur mural entre les cycles
de lavage, attendez de 5 à 10 secondes après
avoir ramené l’interrupteur à ON (Marche) avant
d’appuyer sur la touche Start (Marche) pour permettre aux
commandes de se réinitialiser.
VEUILLEZ LIRE ET SUIVRE À LA LETTRE CES CONSIGNES DE SÉCURITÉ.
N’utilisez que les détergents et agents de rinçage liquides,
en poudre ou en tablette ou les Cascade Complete® All-in-1
ActionPacs™ recommandés pour les lave-vaisselle et
gardez-les hors de la portée des enfants. Les détergents pour
lave-vaisselle Cascade Complete
les agents de rinçage Cascade
avec les lave-vaisselle GE.
®
All-in-1 ActionPacs™ et
®
Rinse Aid™ sont approuvés
CONSERVEZ CES DIRECTIVES
35
Page 36

Comment démarrer!
Les caractéristiques et l’apparence des appareils varient tout au long de ce manuel selon les modèles
GDF570
DDT575, GDT580,
GDT680
GDT720
GDT740, PDT750, PDT760
CDT725
6WHDP
CDT765
Charger le lave-vaisselle
1
Pour de meilleurs résultats de lavage, suivez les directives de chargement dans la section Chargement du lave-vaisselle. Aucun prérinçage des dépôts alimentaires normaux n’est nécessaire. Enlevez les dépôts durs, notamment les os, les cure-dents, la peau et les
graines. Enlevez les légumes-feuilles, les parties non comestibles de la viande et les quantités excédentaires de graisse ou d’huile.
Ajouter le détergent
2
Ajoutez la quantité de détergent requise dans le distributeur à détergent. Utilisez un détergent du type Cascade® Platinum Pacs.
Consultez la rubrique Distributeur de détergent dans la section Utilisation du lave-vaisselle.
Ajouter le produit de rinçage
3
Ajoutez le produit de rinçage dans le distributeur. Consultez la rubrique Utilisation d’un produit de rinçage dans la section Utilisation du lave-vaisselle.
36
Page 37

Sélectionner le cycle
4
Appuyez sur la touche Select Cycle pour choisir le cycle de lavage désiré. Sur certains modèles, le voyant vis-à-vis de la touche Select
Cycle s’allumera pour indiquer le cycle qui a été choisi. Sur d’autres modèles, une pression sur la touche Select Cycle fera apparaître
un choix de cycles sur la fenêtre d’affichage. Appuyez sur la touche jusqu’à l’affichage du cycle désiré.
REMARQUE : La durée effective des cycles dépend du degré de saleté, de la température de l’eau et des options sélectionnées.
Le cycle peut être sélectionné même si la porte est ouverte. Le cycle ne démarrera qu’une fois la porte fermée et la commande
Start sélectionnée dans les 10 secondes.
AutoSense
temps : 1 heure 50 minutes - 2 heures 10 minutes.
Ce cycle détecte automatiquement le degré de saleté et règle le cycle de lavage en conséquence. *Plage de
www.electromenagersge.ca
Heavy Ce cycle est destiné à la vaisselle et batterie de cuisine très sale, avec dépôts alimentaires séchés ou cuits.
(Très sale) Ce cycle convient aussi à la vaisselle de tous les jours. *Durée : 2 heure 31 minutes.
Normal
économeen eau et en énergie. *Plage de temps : 1 heure 15 minutes - 1 heure 50 minutes. REMARQUE : Le cycle
Normal a servi à évaluer l’efficacité énergétique de ce lave-vaisselle.
Light
Ce cycle, destiné à un lavage quotidien, régulier et typique d’une pleine charge de vaisselle normalement sale, est aussi
Ce cycle est conçu pour la vaisselle de saleté légère à moyenne. Il convient à la porcelaine et au cristal.
(Légèrement *Durée : 50 minutes.
sale)
Rinse
Pour le rinçage de charges partielles qui seront lavées plus tard. N’utilisez pas de détergent. Le détergent n’est
(Rinçage) pas distribué pendant le cycle de rinçage. *Durée : 16 minutes.
(certains modèles)
Express Ce cycle lave rapidement la vaisselle de saleté légère. *Durée : 32 minutes. Pour le séchage rapide, sélectionnez
(certains modèles) Power Dry. La température de rinçage finale sera augmentée. L’option Power Dry ajoute 15 minutes à la durée
du cycle. Lorsque le voyant vis-à-vis de l’option Clean (Nettoyer) s’allumera, ouvrez la porte, tirez le panier vers
l’extérieur, et la vaisselle “clignotera” qu’elle est sèche environ 5 minutes.
eWash Ce cycle lavera efficacement la vaisselle en utilisant environ 1,7 litre d’eau et 0,8 kWh d’électricité. La sélection
(certains modèles) de l’option Power Dry pour ce cycle ajoute une période de séchage éconergétique de 1 1/2 heure. Le séchage
est réalisé par un ventilateur économe de 2 watts. *Durée : 1 heure 3 minutes.
*Durée du lavage seulement. Ne comprend pas la durée de séchage, la fonction Auto Hot Start ni les options. REMARQUE : Si la
température de l’eau d’admission est trop basse, la fonction Auto Hot Start peut ajouter jusqu’à 11 minutes à la durée du cycle.
37
Page 38

Comment démarrer!
Sélectionner les options
5
Le voyant vis-à-vis de la touche sélectionnée s’allumera pour indiquer l’option qui a été sélectionnée.
Normal Temp
(Température économisant l’énergie
normale)
Wash Temp
Boost or Boost a durée totale du cycle. L’option peut être activée ou désactivée pendant le cycle de lavage. Cette option
Temp (Lavez améliorera aussi le rendement du séchage du cycle Normal.
boost temp)
Wash Temp
Sani or cycle variera selon la température de l’eau d’admission.
Sanitize REMARQUE : Cette option est contrôlée en fonction de critères de désinfection. Si le cycle est interrompu pendant
Temp (Lavez ou après l’étape du lavage principal, ou si la température de l’eau d’admission est si basse qu’un lavage adéquat
désinfecter ne peut être obtenu, il se peut que les critères de désinfection ne soient pas atteints. Dans ce cas, le voyant
temp) Sanitized ne s’allumera pas à la fin du cycle. L’utilisation de cette option modifiera le cycle pour satisfaire à la
Section 6 de la norme NSF 184 relative au délogement de la saleté et à l’efficacité de la désinfection.
REMARQUE : Les lave-vaisselle domestiques homologués NSF ne sont pas destinés aux établissements
alimentaires du commerce.
Heated or Désactive l’option de séchage. La vaisselle sèche naturellement à l’air et l’énergie est économisée. Ouvrez la
Power Dry Off porte du lave-vaisselle pour accélérer le séchage.
(Séchage à air
chauffé ou
forcé désactivé)
Heated or Active l’option afin d’accélérer le séchage. Cette option ajoute 65 minutes à la durée du cycle. Sur les modèles
Power Dry On équipés d’une fonction de chauffage intégrée, cette option augmente la température du lave-vaisselle durant
(Séchage à air la phase de rinçage finale du cycle puis utilise un ventilateur afin de faire circuler de l’air pour sécher la vaisselle.
chauffé ou Cette option n’est pas disponible avec le cycle Rinse (Rinçage).
forcé activé)
Steam (Prewash)
(Vapeur) être sélectionnée AVAN T de démarrer le cycle. L’option Steam ajoute 30 minutes à la durée du cycle. Cette
(certains modèles) option est disponible avec les cycles Heavy (Très sale), AutoSense et Normal.
Pre Soak
(Prétrempage) aliments ont séché ou cuit. Cette option est disponible avec les cycles Heavy (Très sale), AutoSense et Normal
(certains modèles) et peut ajouter jusqu’à 30 minutes de la durée du cycle.
Wash Zones La sélection de la zone de lavage supérieure ou inférieure dirigera le lavage sur un panier seulement. La durée
(Zones de lavage) du cycle sera ainsi raccourcie et l’énergie sera économisée. Cette option doit être utilisée lorsque la vaisselle est
(certains modèles) placée sur un seul panier.
Bottle Wash
(Lavage de la durée du cycle. Utilisez cette option pour laver les bouteilles pour bébé qui vont au lave-vaisselle mais
bouteille) s’avèrent difficiles à nettoyer, les bouteilles de sports, les tasses à café hautes, etc. Consultez les
(certains modèles) recommandations d’utilisation dans la section Chargement du lave-vaisselle.
Delay Hours
commande Delay Hours, sélectionnez le nombre d’heures, touchez une fois la commande Start (Démarrer) et
fermez la porte pour lancer le décompte. Le lave-vaisselle commencera à fonctionner une fois le délai expiré.
Control Vous pouvez verrouiller les commandes pour empêcher que des sélections ne soient effectuées. Vous pouvez
Lock aussi verrouiller les commandes après le démarrage d’un cycle pour empêcher une modification. Par exemple,
(commande cette option empêchera le démarrage accidentel du lave-vaisselle lorsqu’un enfant appuie sur des touches par
de inadvertance.
verrouillage) Pour VERROUILLER la commande du lave-vaisselle, selon le modèle, maintenez une pression sur la touche
(ou les 2 touches) indiquée pendant 3 secondes. Sur certains modèles, il s’agira de la touche Heated Dry, sur
d’autres, des touches Steam et Wash Temp, et sur d’autres encore, des touches Pre-Soak et Bottle Wash. Le
voyant Control Lock s’allumera pour indiquer que les commandes sont verrouillées.
Pour DÉVERROUILLER la commande du lave-vaisselle, selon le modèle, maintenez enfoncée la touche (ou les
2 touches) indiquée sur les commandes pendant 3 secondes. Le voyant Control Lock s’éteindra pour indiquer
que la commande est déverrouillée.
Energy Lorsque connectée à un compteur intelligent de votre compagnie d’électricité, le lave-vaisselle retardera
Smart automatiquement le démarrage d’un cycle pendant les demandes de pointe à tarif plus élevé, et il fonctionnera
(l’énergie pendant les périodes de faible demande. Cependant, vous pouvez outrepasser les réglages de retardement
intelligente) et utiliser le lave-vaisselle au besoin. Renseignez-vous davantage sur la fonction Energy Smart dans la section
Utilisation du lave-vaisselle.
Cette option (certains modèles) sert pour la vaisselle normalement sale et optimise la performance du lavage tout en
.
Cette option augmente la température pour faciliter le lavage de la vaisselle très sale et elle peut allonger l
Cette option augmente la température de l’eau lors du rinçage final afin de désinfecter la vaisselle. La durée du
Pour utilisation avec une vaisselle très sale et/ou sur laquelle des aliments ont séché ou cuit. Cette option DOIT
Utilisez cette option pour améliorer la puissance de lavage avec une vaisselle très sale ou sur laquelle des
Cette option augmente la durée d’activation des jets pour bouteilles et peut ajouter jusqu’à 23 minutes de
Retarde le démarrage d’un cycle de lavage d’une durée allant de 8 à 12 heures selon le modèle. Touchez la
38
Page 39

Démarrer le lave-vaisselle
6
Start Ouverte la porte pour sélectionner les options désirées. Appuyez sur la touche Start et et fermez
www.electromenagersge.ca
(Démarrer) la porte en moins de 10 secondes pour démarrer le cycle ou débuter le décompte de l’option Delay Hours.
Le cycle de lavage commencera peu de temps après la fermeture de la porte. Si la porte est ouverte, L’affichage
s’éteindra si la porte demeure ouverte plus de deux minutes Pour activer l’affichage, fermer ou ouvrir la porte,
ou encore toucher à n’importe quelle touche.
Interrupt Pour interrompre un cycle ou faire une pause, ouvrez la porte lentement. L’ouverture de la porte occasionnera
ou Pause une pause dans le cycle. Le lave-vaisselle émettra un bip à chaque minute pour vous rappeler de fermer la
(Interruption porte. Pour redémarrer ou poursuivre le cycle, appuyez sur Start puis fermez la porte dans les 10 secondes.
ou pause)
Cancel
Pour annuler un cycle de lavage, maintenir une pression sur la touche Start pendant 3 secondes puis fermer la
(Annuler) porte. Le lave-vaisselle se vidangera, émettra un bip, et le voyant du cycle de lavage s’éteindra.
Voyants et sonorités des indicateurs de cycle
7
Sanitized ou
Cycle
Sanitized
(
Hygiénique)
Clean or
Cycle
Voyant allumé à la fin du cycle lorsque Wash Temp Sani ou Sanitize Temp a été sélectionné et que le lave-vaisselle
a satisfait aux critères de désinfection. Consultez la rubrique Wash Temp Sani ou Sanitize Temp pour une
description complète de l’option.Fermer la porte ou appuyer sur n’importe quelle touche éteindra le voyant.
Ce voyant s’allume lorsque le cycle de lavage est terminé. Il reste allumé pour rappeler que la vaisselle est
Complete propre.
(Nettoyer ou
Cycle Terminé)
Low Rinse Aid
Ce voyant s’allume lorsque la quantité de produit de rinçage est faible ou nulle. Consultez la rubrique Utilisation
(Faible niveau d’un produit de rinçage. Pour éteindre le voyant, touchez la commande Pre-Soak ou Steam 7 fois pendant
du produit de 5 secondes. Répétez cette manoeuvre pour rallumer le voyant Low Rinse Aid.
rinçage)
(certains modèles)
Cycle Status
Le voyant sur le devant de la porte changera de couleur pour indiquer l’état d’avancement du lavage. Durant le
(Statut du cycle de lavage, le voyant sera de couleur ambre jaune. Une fois le cycle de lavage terminé, le voyant passe au
cycle) vert.
(certains modèles)
Sounds
(Sons) Pour mettre tous les sons en sourdine, appuyez sur la touche Heated Dry ou
secondes. Répétez cette manoeuvre pour réactiver les sons.
Door Wake Up
Mode (Mode fermez la porte et attendez 3 minutes que le lave-vaisselle passe en mode veille.
d’activation
de la porte)
commande et les lampes
Le lave-vaisselle émettra un bip pour indiquer la fin d’un cycle, une pression de touche ou l’ouverture de la porte.
Power Dry
Pour activer ou désactiver (ON/OFF) cette option, maintenez enfoncées les touches START et WASH TEMP pendant 5 secondes,
Dans la position OFF, l’affichage et les
sonorités des commandes et les lampes intérieures (certains modèles) ne répondront pas à l’ouverture ou la fermeture de
la porte. Ce mode
peut être utilisé lors de l’observation de certains rites religieux tels que le sabbat. Pour activer la
(certains modèles)
intérieures, pressez n’importe quelle touche.
7 fois pendant 5
39
Page 40

Utilisation du lave-vaisselle.
Vérification de la température de l’eau
L’eau qui alimente le lave-vaisselle doit être à une
température d’au moins 49°C (120°F) et d’au plus 66°C (150°F)
pour que l’action de lavage soit efficace et pour prévenir
tout dommage à la vaisselle. Vérifiez la température de
l’eau avec un thermomètre à bonbons ou à viande.
Ouvrez le robinet d’eau chaude le plus près du
lave-vaisselle, placez le thermomètre dans un verre
et laissez l’eau couler continuellement dans le verre
jusqu’à ce que la tempàrature cesse d’augmenter.
Energy Smart
La fonction Energy Smart permet à votre lavevaisselle de réduire sa consommation d’énergie
durant les périodes de pointe à tarif plus élevé.
Si vous êtes situé dans une région où votre
compagnie d’électricité facture des taux variables
selon la période du jour, votre lave-vaisselle vous
informera des périodes à tarif élevé. Vous pouvez
alors retarder le démarrage du lave-vaisselle
jusqu’à une période à tarif moins élevé, ou encore
outrepasser cette fonction et faire fonctionner le
lave-vaisselle à votre gré.
Ce dont vous aurez besoin
Un compteur intelligent qui communiquera
1
avec votre lave-vaisselle. Consultez votre
compagnie d’électricité pour déterminer si la
technologie est disponible dans votre région.
Un modèle de lave-vaisselle Energy Smart
2
765, DDT575, GDF570, GDT580-740, PDT750-760).
Un module de communication ACM (Appliance
3
Communication Module). Veuillez visiter le site
gebrillion.com pour commander le module de
communication qui devra être installé dans
votre lave-vaisselle.
Utilisation d’un produit de rinçage
Les produits de rinçage tels que Cascade® Complete Rinse Aid sont conçus pour une meilleure
efficacité au séchage et une protection contre les taches et le film susceptibles de se former sur la
vaisselle, la verrerie, la coutellerie, la batterie de cuisine et le plastique.
Remplissage du distributeur
Le distributeur de produit de rinÁage contient 104 ml (3,5 oz) de produit de
rinçage. Dans des conditions normales de fonctionnement, cette quantité
est suffisante pour environ un mois.
Assurez-vous que la porte du lave-vaisselle est entièrement ouverte.
1
Ouvrez le couvercle du distributeur de produit de rinçage.
2
Ajoutez lentement le produit de rinçage jusqu’à remplir le contenant. Il
3
se peut que vous deviez vous arrêter à quelques reprises pour
permettre la décantation.
Nettoyez le produit de rinçage renversé avec un linge humide afin
4
de prévenir la formation de mousse à l’intérieur du lave-vaisselle.
Fermez le couvercle du distributeur de produit de rinçage.
5
Dosage du produit de rinçage
Vous pouvez régler la quantité de produit de rinçage
versée au rinçage final. Si des taches de gouttes d’eau
ou d’eau dure subsistent sur la vaisselle après le cycle
de séchage, augmentez ce dosage.
Pour régler le dosage
Ouvrez le couvercle du distributeur de produit de
rinçage ; puis tournez le doseur dans le sens des
aiguilles d’une montre pour augmenter la quantité
du produit de rinçage, et dans le sens inverse des
aiguilles pour réduire la quantité.
Dans le sens des
aiguilles d’une
montre pour réduire
les taches de gouttes
d’eau et d’eau dure.
Dans le sens
inverse des
aiguilles pour
réduire le
moussage.
Indicateur
de niveau
Dispositif de
réglage du
produit de
rinçage
(CDT725-
40
Protection contre les fuites (certains modèles)
Si une fuite est détectée, le lave-vaisselle se
vidangera et arrêtera le cycle. L’affichage indiquera
« LEAK DETECTED » (fuite détectée). Appelez un
technicien.
Page 41

www.electromenagersge.ca
Distributeur de détergent
Le distributeur de détergent est situé au centre
de la porte du lave-vaisselle. Il comporte deux
compartiments. Le compartiment de lavage principal
se trouve à l’intérieur du distributeur de détergent.
Pour l’ouvrir, appuyez sur le bouton sur le côté du
distributeur. Le compartiment de pré-lavage se situe
sur le couvercle du distributeur de détergent. Utilisez le
compartiment de pré-lavage uniquement lorsque l’eau
est extrêmement dure ou que la vaisselle est très sale.
Le compartiment de pré-lavage n’est pas utilisé lorsque
du détergent en pastille ou en sachet est employé.
REMARQUE : Ne placez pas les gros articles dans le
panier inférieur où ils risquent de bloquer les jets qui
rincent le distributeur de détergent.
Distributeur de
détergent
Vous pouvez utiliser du détergent à lave-vaisselle en
tablettes, en poudre, en liquide ou en gel. Assurez-vous
de n’utiliser que des détergents spécifiquement adaptés
aux lave-vaisselle automatiques. N’utilisez jamais de
détergent liquide pour le lavage de la vaisselle à la main
Si vous utilisez un détergent inadapté, il se formera de la
mousse et le lavage ne sera pas optimal.
Il est important de conserver le détergent dans un
endroit sec et dans son emballage d’origine afin qu’il
ne perde pas de son efficacité. Par conséquent, ne
versez le détergent dans distributeur qu’au moment
de mettre le lave-vaisselle en marche, puis fermez
le couvercle. Le couvercle s’ouvrira pendant le
programme.
Remplissage du distributeur de détergent
GE recommande l’utilisation d’un détergent en
tablette ou en dose. Des essais indépendants ont
démontré que ce type de détergent est très efficace
dans le lave-vaisselle. Cascade® Platinum Pacs
sont un exemple de ce type de détergent. Mettez
simplement une tablette ou une dose dans le
compartiment principal et faites glisser pour fermer
le couvercle du compartiment à détergent. Veuillez
noter que la tablette ou la dose doit être placée dans
le compartiment principal de détergent. Si la tablette
ou la dose se retrouve au fond du lave-vaisselle, le
détergent sera éliminé très rapidement et sera donc
inutilisé. Les performances de lavage seront alors
très mauvaises.
Si vous choisissez d’utiliser un détergent en poudre,
liquide ou en gel, la quantité utilisée sera fonction de la
dureté et de la température de votre eau ainsi que de
degré de salissure de vitre vaisselle. Contactez votre
compagnie distributrice des eaux pour obtenir des
informations sur la dureté de l’eau dans votre région.
La dureté de l’eau se mesure en grains par gallon.
Utilisez cette information et le tableau ci-dessus pour
déterminer la quantité de détergent à utiliser. Vous
pouvez également acheter des bandes tests de dureté
de l’eau auprès de GE. Appelez le 1-877-959-8688
et demandez le numéro de pièces WD01X10295. Au
Canada, composez le 1-800-661-1616.
Nombre de
grains/gal.
Moins de 4 Remplir le compartiment au 1/3
4 à 8 Remplir le compartiment au 2/3
8 à 12 Remplir le compartiment complètement
Plus de 12 Remplissez le compartiment de lavage
Pré-lavage
Push /
coulisser
pour
fermer
L’utilisation de trop de détergent avec une eau
trop douce et/ ou trop chaude peut attaquer
chimiquement votre verrerie. Le « voile » qui en
résulte affectera votre verrerie en permanence.
Cette situation est irréversible. Toutefois, trop peu de
détergent peut affecter les performances de lavage.
Utilisez le tableau comme point de départ puis
ajustez la quantité de détergent que vous utilisez.
Utilisez juste assez de détergent pour obtenir une
qualité de lavage adéquate. L’utilisation de la
quantité appropriée procurera une excellente qualité
de lavage sans gaspiller de détergent ou attaquer la
verrerie.
N’UTILISEZ PAS DE DÉTERGENT LIQUIDE POUR LE
LAVAGE DE LA VAISSELLE À LA MAIN
REMARQUE : Si vous utilisez un détergent qui n’est
pas conçu pour les lave-vaisselle, il se formera de
la mousse à l’intérieur de l’appareil. Pendant le
fonctionnement, cette mousse sortira par les évents
de l’appareil et s’écoulera sur le plancher de cuisine.
Comme bon nombre de contenants de détergent se
ressemblent, rangez le détergent pour lave-vaisselle
à part de vos autres produits nettoyants. Montrez le
bon détergent à toute personne susceptible d’utiliser
le lave-vaisselle, ainsi que l’endroit où vous le gardez.
Même si l’utilisation d’un détergent non conçu pour
les lave-vaisselle automatiques ne risque pas de
causer des dommages permanents à votre appareil,
votre vaisselle ne sera pas aussi propre.
Niveau de compartiment de
détergent à remplir
principal et celui du pré-lavage
Lavage
principal
Produit de
rinçage
41
Page 42

Chargement du lave-vaisselle.
Pour un lavage optimal, veuillez suivre les lignes directrices ci-dessous pour le chargement des paniers. Les
caractéristiques et l’apparence des paniers et du panier à couverts peuvent être différentes de celles de votre modèle.
Panier supérieur
Le panier supérieur est principalement
destiné aux verres, aux tasses et aux
soucoupes.
de lavage, inclinez tasse et ouvertures vitrées
vers le centre de la panier. O
como ollas, cacerolas y platos pueden
être placés dans le panier supérieur. C’est
aussi un endroit sûr pour les articles de
plastique qui vont au lave-vaisselle. Le
panier supérieur peut être utilisé pour les
ustensiles aux dimensions spéciales. Les
poêlons, les bols à mélanger et d’autres
articles de taille similaire doivent être placés
à l’envers pour un meilleur résultat de
lavage. Veillez à ce que les petits articles
en plastique ne puissent bouger car ils
pourraient s’endommager en tombant dans
l’élément chauffant au fond du lave-vaisselle.
Certains modèles sont équipés d’un élément
chauffant dissimulé, de sorte que les articles
en plastique qui vont au lave-vaisselle
peuvent être placés dans le panier inférieur.
IMPORTANT : Assurez-vous que les articles dans le
panier supérieur ne gênent pas le 3e panier (certains
modèles) lors du chargement ou déchargement.
Pour de meilleures performances
tros ítems tales
IMPORTANT : Il est important de faire en
sorte que les articles ne dépassent pas du
bas du panier ou du panier à couverts pour
ne pas gêner la rotation du bras gicleur
intermédiaire. Cette situation pourrait causer
du bruit pendant le fonctionnement et/ou un
lavage de piètre qualité.
Lavage de bouteille
Pince
Buse
Le système Bottle Wash (lavage de
bouteilles) (certains modèles) est l’endroit
idéal pour placer les bouteilles pour bébé et
les bouteilles de sports allongées. Les pinces
du système Bottle Wash maintiennent les
bouteilles dotées de petits orifices en place
de façon que les jets d’eau puissent atteindre
l’intérieur des bouteilles afin de nettoyer les
zones d’accès difficile. Les pinces peuvent
être placées ou retirées simplement en
glissant l’orifice de la pince sur le dessus de
la buse.
Bouteille de sports
maintenu en place sur
un pince de Bottle Wash
(lavage de bouteilles)
Bouteille de bébé
maintenu en place sous
pince de Bottle Wash
(lavage de bouteilles)
42
Page 43

www.electromenagersge.ca
Le panier supérieur permet un ajustement
Panier
supérieur
Push
de 5 cm vers le haut ou le bas pour recevoir
les gros articles. Le panier supérieur peut
être abaissé en poussant les longs rabats de
chaque côté du panier. Cela vous permettra
d’abaisser le panier (voir l’illustration du
panier supérieur). Pour monter le panier,
soulevez-le jusqu’à ce que le panier se
verrouille ene place.
Pour ajouter de la polyvalence au chargement, la
grille utilitaire (certains modèles) peut être placée
dans le haut ou le bas, ou encore dépliée puis placée
dans la position dépliée inférieure.
servir à fixer des verres à pied comme les verres
à vin. Étant donné que ces verres présentent
différentes tailles, poussez lentement le panier
vers l’intérieur afin que les articles ne percutent
pas les bords du lave-vaisselle.
Les tiges rabattables (certains modèles)
ajoutent de la flexibilité supplémentaire pour
le chargement des articles de grande taille
ou difficiles à placer. Ces tiges rabattables
peuvent être positionnées à la verticale ou en
position couchée.
Elle peut aussi
ATTENTION : Un panier
supérieur chargé peut être plus lourd qu’il
ne semble. Évitez de soulever ou d’abaisser
ce panier s’il est chargé afin d’éviter les
blessures et d’endommager son contenu.
Placez les fentes des
attaches de
sur les broches du panier
vertical et poussez
le bas pour fixer
utilitaire
broche du panier
la grille utilitaire
vers
la grille
sur la deuxième
43
Page 44

Chargement du lave-vaisselle.
Pour un lavage optimal, veuillez suivre les lignes directrices ci-dessous pour le chargement des paniers. Les
caractéristiques et l’apparence des paniers et du panier à couverts peuvent être différentes de celles de votre modèle.
8 couverts
Modèles - GDT580, GDT680, GDT720, GDT740, PDT750 et CDT725
-
Panier supérieur
Modèles - GDF570 et DDT575
10 couverts
Modèles - GDT580, GDT680, GDT720, GDT740, PDT750 et CDT725
12 couverts
Modèles - GDT580, GDT680, GDT720, GDT740, PDT750 et CDT725
-
Panier supérieur
-
Panier supérieur
Modèles - GDF570 et DDT575
Modèles - GDF570 et DDT575
44
Page 45

www.electromenagersge.ca
8 couverts
Modèles - PDT760 et CDT765
10 couverts
Modèles - PDT760 et CDT765
-
Panier supérieur
-
Panier supérieur
12 couverts
Modèles - PDT760 et CDT765
-
Panier supérieur
45
Page 46

Chargement du lave-vaisselle. (suite).
Pour un lavage optimal, veuillez suivre les lignes directrices ci-dessous pour le chargement des paniers. Les caractéristiques et
l’apparence des paniers et du panier à couverts peuvent être différentes de celles de votre modèle.
Panier inférieur
Le panier inférieur est destiné aux assiettes,
aux soucoupes et aux articles de batterie
de cuisine. Les gros articles tels que les
lèchefrites et les plaques à pâtisserie doivent
aller sur les côtés du panier. Si nécessaire, les
verres et les tasses de grande taille peuvent
être placés dans le panier inférieur pour
optimaliser le chargement. Les assiettes, les
soucoupes et les articles similaires doivent
être placés entre les tiges dans la direction
qui permet un appui sûr.
Les tiges rabattables du panier inférieur
(certains modèles) peuvent être placées à
différents angles ou à plat afin de permettre
le chargement des articles de grande taille
ou difficiles à placer.
REMARQUE : Ne placez pas les gros articles
dans le panier inférieur où ils risquent de
bloquer les jets qui rincent le distributeur de
détergent.
3 positions
d’angle ou
rabattement
complet
46
Page 47

www.electromenagersge.ca
Les blocs de tiges réversibles (certains modèles)
offrent une polyvalence accrue pour la disposition
des assiettes. La direction des blocs peut être modifiée
pour convenir aux besoins la façon illustrée dans la
Figure A ou la Figure B:
Figure A Figure B
Pour régler la direction, retirez les attaches qui fixent
les blocs au panier en tirant sur la languette vers le
haut, puis courbez délicatement la tige de retenue
à partir du centre pour dégager le bloc de tiges du
panier inférieur. Le bloc de tiges peut être tourné dans
la direction opposée pour inverser le chargement.
Fixez les blocs au panier selon le même procédé en
vous assurant de bien enclencher les attaches.
AVERTISSEMENT! Les attaches
peuvent constituer un risque d’étouffement pour
les enfants en bas âge si elles sont retirées du lave-
vaisselle. Gardez-les à l’écart des enfants.
Pour changer la direction des tiges rabattables,
abaissez-les puis tirez sur les attaches qui fixent les
tiges, au panier et retirez-les. Inversez la direction
des tiges en orientant la poignée du côté opposé du
panier. Refixez les tiges aux attaches en les poussant
jusqu’à ce qu’elles s’enclenchent en place. Le repère
devra aussi être placé du côté opposé du lavevaisselle. Pour retirer le repère, le glisser simplement
dans la direction désignée « unlock » (déverrouiller).
Ensuite, alignez le repère sur le panier de l’autre
côté et glissez-le dans la direction désignée « lock »
(verrouiller) afin de refixer le repère au panier.
Attache
Attache de
barre
Repère
Pour verrouiller, glisser vers la
droite.
Pour déverrouiller, glisser vers la
gauche.
IMPORTANTE : Il est important de faire en sorte que
les articles ne dépassent pas du bas du panier ou
du panier à couverts (certains modèles) pour ne pas
gêner la rotation du bras gicleur inférieur. Assurezvous aussi que les grandes assiettes, les pots et les
autres articles de grande taille ne percutent le bras
gicleur intermédiaire. Cette situation pourrait causer
du bruit pendant le fonctionnement et/ou un lavage
de piètre qualité.
47
Page 48

Chargement du lave-vaisselle. (suite).
8 couverts
Modèles - GDT580, GDT680, GDT720, GDT740, PDT750 et CDT725
10 couverts
Modèles - GDT580, GDT680, GDT720, GDT740, PDT750 et CDT725
-
Panier inférieur
-
Panier inférieur
Modèles - GDF570 et DDT575
Modèles - GDF570 et DDT575
12 couverts
Modèles - GDT580, GDT680, GDT720, GDT740, PDT750 et CDT725
48
-
Panier inférieur
Modèles - GDF570 et DDT575
Page 49

www.electromenagersge.ca
8 couverts
Modèles - PDT760 et CDT765
10 couverts
Modèles - PDT760 et CDT765
-
Panier inférieur
-
Panier inférieur
12 couverts
Modèles - PDT760 et CDT765
-
Panier inférieur
49
Page 50

Chargement du lave-vaisselle. (suite).
Pour un lavage optimal, veuillez suivre les lignes directrices ci-dessous pour le chargement des paniers. Les
caractéristiques et l’apparence des paniers et du panier à couverts peuvent être différentes de celles de votre modèle.
3e panier (certains modèles)
Plateau à
ustensiles
Plateau à
argenterie
Le 3e panier est celui recommandé pour
l’argenterie et il comporte 2 plateaux :
Le plateau à ustensiles dispose les cuillères
à servir, les baguettes, les spatules, la
coutellerie, les fouets, etc. Assurez-vous de ne
pas superposer les têtes des ustensiles.
Le plateau à argenterie maintient chaque
pièce dans des fentes en alternant la position
de leurs têtes.
Ces plateaux peuvent se retirer pour faciliter
le chargement et le déchargement, changer
de côté ou faire plus de place pour le panier
supérieur.
Pour retirer un plateau, tirez complètement
le 3e panier, agrippez simultanément les
poignées avant et arrière d’un plateau, puis
soulevez délicatement celui-ci pour le sortir
du panier. Pour replacer le panier, agrippez
les deux poignées et placez-le délicatement
dans le panier de façon que sa partie la plus
profonde se trouve vers le centre du panier.
MISE EN GARDE !
Usez de prudence lors du chargement, du
déchargement ou du transport des plateaux
à argenterie ou à ustensiles. Les plateaux
peuvent contenir des articles coupants ou
lourds. La chute d’articles ou d’un plateau
peut causer des blessures.
REMARQUES IMPORTANTES :
Ne placez pas des pièces de coutellerie de
matières différentes l’une à côté de l’autre
dans le 3e panier. Autrement, cela pourrait
causer une décoloration de la coutellerie.
Les plateaux ne sont conçus que pour
servir dans le 3e panier GE pour organiser
l’argenterie, les ustensiles de cuisson et
d’autres petits articles. L’utilisation des
plateaux à d’autres fins risque de les
endommager ou d’endommager des objets
à leur contact.
Assurez-vous de fermer totalement le 3e
panier avant de pousser la porte du lavevaisselle. Pousser la porte avec le panier
partiellement tiré peut endommager le
lave-vaisselle.
8 couverts
50
10 couverts 12 couverts
*Consultez la section du Panier à
argenterie pour la façon de charger
l’argenterie.
Page 51

www.electromenagersge.ca
Le 3e panier est aussi amovible pour permettre le placement de gros articles dans le panier supérieur :
Pour enlever le 3e panier :
Poussez le panier jusqu’au bout d’un côté de
Retirez les plateaux à couverts et à ustensiles.
1
(Voir les REMARQUES IMPORTANTES dans cette
section.)
2
façon à créer un espace entre celui-ci et le rail
latéral de l’autre côté. Alignez les montants du
rail latéral sur le centre des pinces du panier puis
soulevez en ligne droite.
Les montants
du rail sur
l’intérieur le
rails
Pinces du
panier
Panier
Rail
Poussez le
panier vers
un côté
Le montant
du rail
glissera à
l’intérieur ou
à l’extérieur
de cette
ouverture
Toujours en maintenant le panier dans le position
3
soulevée, répétez la manoeuvre de l’autre côté.
Une fois le panier enlevé, repoussez les rails
4
latéraux jusqu’au fond du lave-vaisselle.
Alignez les montants
du rail sur les pinces
du panier - Tirez le
panier vers le haut
Pinces
du
panier
Montant
du rail
Rail
Pinces du
panier
Pour replacer le 3e panier :
Tirez complètement les rails latéraux à l’extérieur
1
du lave-vaisselle.
Orientez le panier de façon que les pinces latérales
2
soient alignées et centrées sur les montants du rail,
puis abaissez les pinces sur les montants.
Déplacez le panier sur un côté du lave-vaisselle
3
jusqu’à ce que les pinces tombent sur les montants.
Pinces du
panier
Montant
du rail
Pinces
du
panier
Montant
du rail
Rail
Toujours en maintenant le panier dans le position
4
soulevée, répétez la manoeuvre de l’autre côté.
Une fois le panier remis en place, tirez-le
5
complètement à l’extérieur pour le verrouiller en
place dans ses rails latéraux.
Tirez le panier
complètement à l’extérieur
pour le verrouiller en place
Replacez les plateaux à couverts et à
6
ustensiles.
51
Page 52

Chargement du lave-vaisselle. (suite).
Pour un lavage optimal, veuillez suivre les lignes directrices ci-dessous pour le chargement des paniers. Les
caractéristiques et l’apparence des paniers et du panier à couverts peuvent être différentes de celles de votre modèle.
Panier à
couverts
Saillies de
broche
Panier à couverts
Placez les ustensiles dans les paniers
amovibles pour couverts. Les objets pointus,
comme les fourchettes et les couteaux,
peuvent être placés avec les poignées vers
le haut de façon à protéger vos mains. Pour
les meilleurs résultats de lavage, placez les
autres articles comme les cuillères avec la
poignée vers le bas. Évitez de regrouper les
articles afin de favoriser un lavage optimal.
Lors du chargement, répartissez les articles
uniformément dans le panier.
Les paniers amovibles pour couverts peuvent
aussi servir pour les petits articles, tels que
cuillères à mesurer, suces de bouteille pour
bébé, capuchons de plastique ou porte-épis
de maïs. Les couvercles des paniers amovibles
peuvent être fermés pour contenir les petits
articles.
Les paniers à couverts de type Easy Access
(modèles GDF570 et DDT575) peuvent être
placés sur le devant du panier supérieur ou
inférieur. Fixez le FlexBaskets en engageant
ses languettes arrière dans la saillie de la
broche à l’avant du panier supérieur ou
inférieur.
Sur d’autres modèles, le panier à couverts est
doté de crochets à l’arrière qui permettent de
le fixer sur la broche supérieure des côtés du
panier inférieur.
REMARQUE IMPORTANTE : Ne placez pas
de gros ou grand ustensiles de façon qu’ils
puissent bloquer le distributeur de détergent,
le bras gicleur intermédiaire ou se coincer
entre la porte et le joint d’étanchéité lorsque
la porte est fermée.
52
Page 53

www.electromenagersge.ca
L’argenterie ou la coutellerie est disposée dans les couvercles du panier à couverts. Cette façon de procéder permet
d’obtenir une excellente qualité de lavage de l’argenterie. Cette disposition prévient l’imbrication des ustensiles et
ainsi le lavage uniforme de ceux-ci.
8 couverts
Modèles - GDT580, GDT680, GDT720, GDT740, PDT750 et CDT725
REMARQUE : Pour les modèles PDT760 et CDT765,
reportez-vous à la rubrique 3e panier de la section
Chargement du lave-vaisselle.
10 couverts
Modèles - GDT580, GDT680, GDT720, GDT740, PDT750 et CDT725
-
Panier à couverts
-
Panier à couverts
Modèles - GDF570 et DDT575
Modèles - GDF570 et DDT575
REMARQUE : Pour les modèles PDT760 et CDT765,
reportez-vous à la rubrique 3e panier de la section
Chargement du lave-vaisselle.
12 couverts - Panier à couverts
Modèles - GDT580, GDT680, GDT720, GDT740, PDT750 et CDT725
Modèles - PDT760 et CDT765
Modèles - GDF570 et DDT575
53
Page 54

Entretien et nettoyage.
Nettoyage du panneau de la porte
Avant de nettoyer le panneau avant de la porte,
vérifiez de quel type de panneau il s’agit. Vérifiez
les deux dernières lettres de votre numéro de
modèle. Vous trouverez le numéro de votre
modèle sur la paroi gauche de la cuve, tout
juste à l’intérieur de la porte. Si votre numéro de
modèle se termine par les lettres BB, CC, WW, SA
ou ES, votre appareil est doté d’un panneau de
porte peint. Si votre numéro de modèle se termine
par les lettres SS, votre appareil est doté d’un
panneau de porte en acier inoxydable. Si votre
numéro de modèle se termine par « II », alors il
est doté d’un panneau de porte intégré.
Veuillez suivre les directives ci-dessous pour
nettoyer le panneau de porte de votre modèle.
Panneau de porte peint (numéro de modèle se
terminant par BB-noir, CC-bisque, WW-blanc,
SA-argent ou ES-ardoise)
Utilisez un chiffon doux et propre légèrement
humide, puis séchez.
Panneau de porte en acier inoxydable (numéro de
modèle se terminant par SS)
Pour faire disparaître la rouille, le
ternissement et les petites
utilisez des nettoyants à l’acide oxalique tels
que Bar
uniquement un nettoyant
et frottez dans la direction des lignes de
l’aide d’une éponge douce humide. N’utilisez pas de
cire ou
sur l’acier inoxydable.
Pour faire disparaître d’autres imperfections ou
marques, utilisez le
ou un produit similaire avec un linge
N’utilisez pas de cire pour électroménagers,
d’agents
chlorés sur l’acier inoxydable.
commander le produit nettoyant Stainless Steel
Magic
Pièces GE en composant le
Canada, composez le 1-800-661-1616.
Panneau de porte intégré (numéros de modèle se
terminant par II)
Il s’agit d’un panneau de porte personnalisé et vous
devez vous reporter aux recommandations du
fabricant d’armoires pour le nettoyage approprié.
Keepers Friend Soft Cleanser™. Utilisez
de produit à polir pour électroménagers
nettoyant Stainless Steel Magic
polissants, de javellisants ni de produits
(no WX10X29) auprès du service des
imperfections,
liquide exempt d’abrasif
brosse à
doux humide.
Vous pouvez
877.959.8688. Au
54
Nettoyage du tableau de commande
Pour nettoyer le tableau de commande, utilisez
un chiffon doux légèrement humide, puis
asséchez-le.
Nettoyage de l’intérieur du lave-vaisselle
Pour nettoyer et désodoriser votre lavevaiselle, utilisez de l’acide citrique ou le
produit Lemi Shine®*, un additif détergent.
Lemi Shine délogera les dépôts minéraux
et fera disparaître la pellicule et les taches
d’eau dure. Vous pouvez commander de
l’acide citrique n° WD35X151 au service des
Pièces de GE au numéro 1.877.959.8688
ou sur le site GEApplianceparts.com. Au
Canada, composez le 1-800-661-1616.
Vous pouvez vous procurer le produit Lemi
Shine chez votre épicier ou en appelant GE
au numéro susmentionné pour demander
l’article WX10X10019.
Porte intérieure en acier inoxydable et d’un bain
L’acier inoxydable utilisé pour fabriquer la cuve
et la porte intérieure du lave-vaisselle procure
la plus haute fiabilité dans la gamme des lavevaisselle GE. Si la cuve et la porte intérieure du
lave-vaisselle devaient être rayées ou ébréchées
dans le cours d’un usage normal, elles ne
rouilleront pas pour autant. Les dommages en
surface n’affecteront pas leur fonction et leur
durabilité.
* Lemi Shine® est une marque déposée de Envirocon Technologies, Inc.
Page 55

www.electromenagersge.ca
Nettoyage des filtres
Inspectez et nettoyez les filtres régulièrement. Nous recommandons de le faire tous les deux mois environ, selon
l’usage. Le besoin de nettoyer les filtres se remarque par une performance moindre de lavage ou lorsque la vaisselle
semble rugueuse.
Filtre ultra-fin
Spray
Pour nettoyer le Filtre ultra-fin, retirez le
Arm
panier inférieur. Tournez dans le sens inverse
des aiguilles d’une montre et retirez le Filtre
ultra-fin. Rincez le filtre à l’aide d’eau tiède
savonneuse et utilisez une éponge pour
essuyer les particules résistantes. L’utilisation
de tampons à récurer ou de brosses peut
endommager le filtre. Une fois nettoyé, replacez
le Filtre ultra-fin et tournez-le dans le sens des
aiguilles pour le verrouiller en place.
Filtre fin
Pour nettoyer le Filtre fin (plaque grillagée
plate), retirez le panier inférieur. Retirez le Filtre
ultra-fin.
Protection contre le gel
Si vous laissez votre lave-vaisselle dans un endroit
non chauffé pendant l’hiver, demandez à un
technicien d’effectuer les tâches qui suivent :
Enlever l’alimentation électrique du lave-
1
vaisselle. Enlever les fusibles ou déclencher
les disjoncteurs.
Couper l’alimentation en eau et débrancher la
2
conduite d’alimentation en eau de
l’électrovanne.
Tournez chacune des deux tiges de retenue
situées vers le fond arrière de la cuve, et retirez
le Filtre fin. Rincez le filtre dans l’eau tiède
savonneuse. L’utilisation de tampons à récurer
ou de brosses peut rayer le filtre. Utiliser une
brosse douce ou une éponge pour enlever la
saleté rebelle ou les dépôts de calcium laissés
par l’eau dure. Une fois nettoyé, replacez le
Filtre fin, le Filtre ultra-fin, et tournez dans le
sens des aiguilles les deux tiges de retenue
pour les enclencher.
AVERTISSEMENT ! Les
tiges de retenue peuvent constituer un risque
d’étouffement pour les enfants en bas âge si
elles sont retirées du lave-vaisselle.
Gardez-les à l’écart des enfants.
Vidanger l’eau de la conduite d’alimentation
3
et de l’électrovanne (utiliser un récipient pour
recueillir l’eau).
Rebrancher la conduite d’alimentation en eau
4
à l’électrovanne de l’appareil.
Fine
Filtre
Filter
fin
Ultra-Fine
Filtre
Filter
ultra-fin
Tiges de
Retaining
retenue
Posts
Bras
gicleur
Coupure
antirefoulement
Vérifiez la coupure
antirefoulement dès
que votre lave-
vaisselle ne se vide
pas bien.
Votre lave-vaisselle est-il doté d’une coupure antirefoulement?
Votre lave-vaisselle est-il doté d’une coupure
antirefoulement?
Une coupure antirefoulement protège votre
lavevaisselle contre les refoulements d’eau
lors d’un blocage du renvoi. Ce dispositif ne
fait pas partie du lave-vaisselle. Il n’est pas
couvert par votre garantie. Puisque tous les
codes de plomberie n’exigent pas de coupures
antirefoulement, il est possible que vous n’ayez
pas un tel dispositif.
Il est facile de nettoyer la coupure
antirefoulement.
Arrêtez le lave-vaisselle et enlevez le
1
couvercle de la coupure antirefoulement.
Enlevez le capuchon en plastique sous le
2
couvercle et nettoyez-le à l’aide d’un
cure-dents.
Replacez le capuchon et le couvercle une
3
fois la coupure antirefoulement nettoyée.
55
Page 56

Avant d’appeler un réparateur…
Conseils de dépannage
Gagnez du temps et économisez de l’argent! Consultez les tableaux des
pages qui suivent ou visitez notre site Web www.electromenagersge.ca.
Vous pourriez vous éviter d’appeler un réparateur.
Problème Causes possibles Correctifs
Le voyant d'état La porte a été ouverte • Appuyez sur le bouton Start fois et fermer la porte pour démarrer le lave-vaisselle.
Start clignote ou le cycle a été interrompu. Appuyez une deuxième fois sur la touche Start pendant que le lave-vaisselle est en
marche pour annuler le programme.
Le lave-vaisselle fait Ce signal vous rappelle que vous • Appuyez sur Start et fermer la porte.
entendre un signal avez ouvert la porte du lave-vaisselle
sonore (BIP) toutes pendant le fonctionnement. Le signal
les 30 secondes se fera entendre jusqu’à ce que vous
fermiez la porte
L’écran affiche Éventuelle fuite est détectée • Voir la section
<< LEAK DETECTED >> détection des fuites et le cycle seront annulées si une fuite est détectée. L’écran affichera
(FUITE DÉTECTÉE) << LEAK DETECTED >> (FUITE DÉTECTÉE). Appel de service.
Un signal sonore se fait Ce phènomène est normal. Le • Pour annuler ce double signal sonore (ou pour le remettre en fonction si vous l’aviez
entendre à la fin du lave-vaisselle fait entendre deux prècèdemment annulè), appuyez 5 fois sur la touche Heated Dry en moins
programme signaux sonores à la fin du. de 3 secondes. Trois signaux sonores se feront entendre pour indiquer que vous
(
sur certains modèles
La vaisselle et les filtre ultra-fin ou fin est obstrué
couverts ne sont pas
propres
près du lave-vaisselle, puis laissez couler l’eau jusqu’à ce que la tempèrature cesse de
grimper. Mettez ensuite le lave-vaisselle en marche et fermez le robinet. Vous
aurez ainsi la certitude que l’eau qui alimente le lave-vaisselle est chaude
l'option Wash Temp Boost ou Boost Temp si elle disponible.
Faible pression d’eau temporaire • Ouvrez un robinet. Le dèbit d’eau est-il plus faible que d’habitude? Si tel est le cas,
attendez que la pression revienne à la normale avant d’utiliser votre lave-vaisselle.
Coupure anti-refoulement ou broyeur • Nettoyez la coupure anti-refoulement ou rincez le broyeur à dèchets.
à dèchets obstruès
Chargement incorrect des paniers • Assurez-vous que les articles de grande dimension ne bloquent pas le distributeur
dedètergent ou les bras gicleurs. Reportez-vous à la section Chargement des paniers
du lave-vaisselle.
Fuite détectée • Voir la section
détection des fuites et le cycle seront annulées si une fuite est détectée. L’écran affichera
<< LEAK DETECTED >> (FUITE DÉTECTÉE). Appel de service.
Taches et pellicule sur Eau extrêmement dure • Utilisez le produit de rinçage Cascade® Complete Rinse Aid pour faire prévenir les
les verres et les couverts taches et prèvenir la formation d’une pellicule.
Basse température de l’eau • Assurez-vous que la tempèrature de l’eau atteint au moins 49 °C (120 °F).
Le lave-vaisselle est • Placez la vaisselle dans l’appareil de la façon indiquèe à la section Chargement des
Détergent en poudre trop vieux
ou humide • Utilisez du dètergent frais.
Distributeur de produit de rinçage vide •
Trop peu de détergent ou détergent • Assurez-vous d’utiliser une quantité correcte de détergent reconnu.
Assurez-vous d’utiliser une quantité
correcte de détergent reconnu.
) avez annulè ou remis en fonction l’option du signal sonore à la fin du programme.
La tempèrature de l’eau est trop basse • Assurez-vous que la tempèrature de l’eau qui alimente le lave-vaisselle est correcte
Détergent donnant de mauvais
résultats
mal ou trop chargé paniers du lave-vaisselle.
donnant de mauvais résultats
et appuyez sur Start.
Utilisation du lave-vaisselle
• Voir la section Entretien et nettoyage
(Voir la section Utilisation du lave-vaisselle). Ouvrez le robinet d’eau chaude situè le plus
• Utilisez un détergent reconnu comme
Utilisation du lave-vaisselle
• Si l'eau est très dure, un adoucisseur peut s'avérer nécessaire.
Remplissez avec un produit de rinçage tel que Cascade
. Certains modèles sont équipés de la
Cascade® Platinum Pacs
. Certains modèles sont équipés de la
®
Complete Rinse Aid.
. Sélectionnez
.
56
Page 57

www.electromenagersge.ca
Problème Causes possibles Correctifs
Voile sur la verrerie Combinaison d’une eau trop douce • Ceci est une « attaque chimique » et est irréversible. Pour éviter ce phénomène,
et de trop de détergent utilisez moins de détergent si votre eau est douce. Lavez la verrerie sur le
programme le plus court possible.
Détergent sans phosphate peu efficace • Voir Une pellicule blanche sur la verrerie, la vaisselle en et les surfaces internes
du lave-vaisselle en dans la section Dépanna
Température de l’eau entrant dans • Ceci pour être une « attaque chimique ». Abaissez la température de l’eau.
le lave-vaisselle est supérieure
à 150°F (66°C)
Mousse dans la cuve Mauvais détergent • Pour éviter la formation de mousse, n’utilisez qu’un détergent conçu pour les lave vaisselle automatiques. L’utilisation des détergents pour lave-vaisselle Cascade
est approuvée dans tous les lave-vaisselles GE.
• Pour faire disparaître la mousse de la cuve, ouvrez le lave-vaisselle et laissez-la se
dissiper. Ouvrez la porte, appuyez sur Start pendant 3 secondes, puis fermez
la porte
Renversement de produit de rinçage • Essuyez immédiatement le produit de rinçage renversé.
Il reste du détergent dans La vaisselle ou des ustensiles • Repositionnez la vaisselle afin que l’eau provenant du bras inférieur puisse atteindre
les distributeurs empêche l’accès au compartiment le distributeur de détergent. Reportez-vous à la section Chargement
à détergent
• Repositionnez les ustensiles longs ou l'argenterie lourde susceptible de bloquer
.
du lave-vaisselle
.
ge.
l'ouverture du couvercle du distributeur. Consultez la section
Chargement du panier à argenterie.
• Ne pas placer de grands bols ou des pots directement dans le distributeur de détergent.
Marques noires ou Frottement d’ustensiles en aluminium • Faites disparaÓtre ces marques à l’aide d’un produit nettoyant abrasif doux.
gris tres sur la vaisselle sur la vaisselle
La vaisselle ne sèche pas Basse température de l’eau •
moins 49 °C (120 °F).
•
• Sélectionnez les options Wash Temp Boost ou Boost Temp.
• Sélectionnez un programme dont l’action de lavage est plus puissante, comme
Le robinet d’eau chaude est peut-être • Assurez-vous que le robinet d’eau chaude (habituellement situé sous l’évier) est
fermé ouvert.
Du temps de séchage
supplémentaire est requis le ventilateur fonctionner durant un délai supplémentaire de 90 minutes.
Remarque : Si vous ouvrez la porte, ce délai supplémentaire sera annulé.
Le panneau de La porte n'est peut-être pas • Assurez-vous que la porte soit bien fermée.
commande a réagi totalement fermée.
aux entrées, mais le
lave-vaisselle ne s’est
jamais rempli d’eau
une salière. Remplacez le filtre.
Taches à l’intérieur de Pellicule blanch tre sur les surfaces • GE recommande l’utilisation du produit de rinçage
la cuve internes – dépùts de minéraux pour empêcher la formation de dépùts de minéraux causés par l’eau dure.
dépùts de minéraux. Vous pouvez acheter ce produit au service des pièces de GE
(n° de pièce WD35X151). Pour obtenir les renseignements pour commander,
reportez-vous à la dernière page. Sinon, acheter Lemi Shine et suivez les instructions
sur l’étiquette.
Le lave-vaisselle Un fusible est grillé ou • Remplacez le fusible ou réenclenchez le disjoncteur. Débranchez tous les autres
ne fonctionne pas le disjoncteur est déclenché électroménagers du circuit.
L’alimentation électrique est coupée • Dans certaines installations, l’alimentation électrique du lave-vaisselle est
commandée par un interrupteur mural, souvent placé à cùté de l’interrupteur
du broyeur à déchets. Assurez-vous que l’interrupteur est à ON (Marche).
Les commandes sont verrouillées • Déverrouillez les commandes. Voir la section Pour démarrer.
Éventuelle fuite est détectée • Certains modèles sont équipés de la détection des fuites et le cycle seront annulées
si une fuite est détectée. L’écran affichera << LEAK DETECTED >> (FUITE DÉTECTÉE).
Appel de service.
Le robinet d’eau est peut-être • Assurez-vous que le robinet d’eau (normalement sous l’évier) soit
fermé ouvert.
Flotteur d’inondation peut être coincé • Retirez le filtre ultra-fin et tapoter sur la pièce sous le filtre ultra fine qui ressemble à
causés par l’eau dure
• Laissez la porte fermée une fois le voyant Clean (propre) allumé pour laisser
• Faites fonctionner le lave-vaisselle en y versant de l’acide citrique pour enlever les
La séquence de démarrage (Start) • Voir la section
appropriée n’a pas été suivie
Assurez-vous que la température de l’eau qui alimente le lave-vaisselle atteint au
Sélectionnez l’option Heated Dry.
Wash
Temp Sani or
Sanitize Temp or Heavy.
Utilisation du lave-vaisselle
®
Cascade
.
Complete Rinse Aid
des paniers
®
57
Page 58

Avant d’appeler un réparateur…
Problème Causes possibles Correctifs
Les voyants du tableau Délai trop long entre les choix des • Vous avez un délai de 30 secondes pour appuyer sur chaque touche. Pour allumer
de commande s’éteignent touches à nouveau le tableau de commande, appuyez sur une touche ou déverrouillez,
lorsque vous réglez les puis verrouillez la porte.
commandes
Il reste de l’eau propre au La coupure anti-refoulement • Nettoyez la coupure anti-refoulement. Voir la section Entretien et nettoyage
fond de la cuve est obstruée.
Boucle de drainage secondaires ou • Reportez-vous aux instructions d’installation pour l’installation du tuyau d’évacuation
la coupure anti-refoulement n’est adéquat .
pas installé
Il reste de l’eau au fond Le renvoi est bloqué •
de la cuve
• Si l’eau du lave-vaisselle se vide dans un broyeur à déchets, faites fonctionner
le broyeur pour le dégager.
• Vérifiez si l’évier de votre cuisine se vide correctement. S’il ne se vide pas, vous
aurez peut-être besoin d’un plombier.
Vapeur Ceci est normal • De la vapeur s’échappe de l’évent pendant le lavage, le séchage et la vidange
de l’eau. Elle est nécessaire pour le séchage.
Le voyant SANITIZED ne Vous avez ouvert la porte et le • Il ne faut pas interrompre le programme pendant ou après le cycle de lavage
s’allume pas à la fin du programme a été interrompu pendant principal.
programme (programme lou après le cycle de lavage principal
Wash Temp Sani ou
sanitize Temp seulement)
Bruit Bruits de fonctionnement normaux: • Tous ces bruits sont normaux. Aucun correctif n’est requis.
Ouverture du distributeur de détergent
Entrée de l’eau dans le lave-vaisselle
Arrêt et mise en marche du moteur
à différents moments pendant le
programme
Les bras gicleurs démarrent et s'arrêtent
à différents moments.
Bruit de la pompe pendant la vidange
de l’eau
La pompe de vidange démarre et s'arrête
à différents moments.
Bruit causé par la vaisselle lorsque • Assurez-vous que les articles sont bien placés dans les paniers. Reportez-vous
le bras gicleur tourne à la section Chargement des paniers du lave-vaisselle.
Les ustensiles frottent bruyamment • Les ustensiles de grande taille peuvent être placés dans le panier supérieur
contre la porte pendant le lavage. pour éviter qu'ils percutent contre la porte intérieure durant le cycle de lavage.
Une pellicule blanche Ce problème est probablement • Pour éliminer cette pellicule blanche, faites fonctionner votre lave-vaisselle
sur la verrerie, la vaisselle par une qualité détergent avec de l’acide citrique. Utilisez la trousse d’acide citrique n°WD35X151
et les surfaces internes lave-vaisselle sans phosphate disponible dans votre magasin le plus proche ou en ligne. Sinon, utilisez Lemi Shine
du lave-vaisselle bas (WX10X10019) trouvé à votre épicerie locale.
Versez l’acide citrique dans le compartiment à détergent et fermez le couvercle. Placez
dans le lave-vaisselle, la verrerie et la vaisselle propres mais recouvertes de la pellicule
blanche. Ne mettez pas l’argenterie et les autres articles métalliques dans le lave vaisselle. Faites fonctionner le lave-vaisselle sans détergent. La verrerie, la vaisselle et
les surfaces intérieures du lave-vaisselle devraient ressortir propres. Un rinçage au
vinaigre peut également être utilisé. Versez 1 tasse de vinaigre dans le lave-vaisselle
aprés ouverture du compartiment à détergent et laissez le lave-vaisselle terminer le
programme.
L’utilisation d’un agent de rinçage tel que
minimiser la formation de cette pellicule. De plus, utilisez un détergent reconnu comme
Cascade
nettoyage.
La température de l’eau qui alimente • Augmentez le réglage du chauffe-eau pour que la température de l’eau varie entre
le lave-vaisselle est trop basse 49 °C (120 °F) et 66°C (150 °F).
Si vous avez une coupure anti-refoulement, nettoyez-la. Voir la section Entretien et
®
Cascade
®
Platinum Pacs qui peut éviter la formation de cette pellicule.
Complete Rinse Aid peut aider à
58
Page 59

Garantie GE sur les lave-vaisselle.
Toutes les réparations sous garantie seront effectuées par
nos centres de réparation ou nos réparateurs autorisés.
Appelez le 1.800.561.3344. Veuillez fournir le numéro
de série et le numéro de modèle lorsque vous appelez
pour obtenir le service.
www.electromenagersge.ca
Agrafez le reçu d’achat ici.
Pour obtenir le service sous
garantie, vous devrez fournir
la preuve de l’achat original.
Pour le diagnostic, la réparation de votre appareil peut nécessiter l’utilisation du port de données embarqué.
Celui-ci permet au technicien de réparation GE de diagnostiquer rapidement des problèmes avec votre
appareil. Il permet également à GE d’améliorer ses produits en fournissant à ces derniers des informations
sur votre appareil. Si vous ne voulez pas que les données de votre appareil soient envoyées à GE, veuillez
demander à votre technicien de NE PAS soumettre les données à GE pendant la réparation.
Pour une période de : GE remplacera :
Un an à partir Toute pièce du lave-vaisselle qui se casse à cause d’un vice de matériau ou de main-d’oeuvre.
de la date Au cours de cette année de garantie limitée, GE fournira, gratuitement, toute la main-d’oeuvre
d’achat initial et le service à la maison nécessaires pour remplacer la pièce défectueuse.
Ce qui n’est pas couvert :
Tout déplacement de service chez vous pour vous
apprendre à utiliser votre lave-vaisselle.
Toute mauvaise installation.
Si vous avez un problème d’installation, appelez
votre revendeur ou un installateur. Vous êtes responsable
de fournir une bonne alimentation électrique, un bon
échappement et tout autre branchement nécessaire.
Toute panne du produit s’il a été malmené, mal usé
ou utilisé à une autre fin que celle prévue ou utilisé
commercialement.
Tout remplacement des fusibles de la maison ou tout
rebranchement des disjoncteurs.
Tout dommage occasionné par un accident, un incendie,
une inondation ou un acte de Dieu.
Tout dommage subi après la livraison.
Le service s’il est impossible d’avoir accès au produit pour
ce faire.
EXCLUSION DE GARANTIES IMPLICITES – Votre seul et unique recours est la réparation du produit selon
les dispositions de cette Garantie limitée. Toutes les garanties implicites, incluant les garanties de
commercialité et d’adéquation à un usage spécifique, sont limitées à une année ou à la période la plus
courte autorisée par la législation.
Cette garantie est valable pour le premier propriétaire et tout autre propriétaire du produit s’il acheté au Canada pour utilisation
domestique au Canada. Le service à domicile sous garantie sera fourni là où il est disponible et dans les régions que Mabe considère
que l’offre de service est raisonnable.
LE GARANT N’EST PAS RESPONSABLE DES DOMMAGES CONSÉQUENTS.
Garant : MC Commercial, Burlington, ON, L7R 5B6
59
Page 60

Notes.
60
Page 61

www.electromenagersge.ca
61
Page 62

Notes.
62
Page 63

www.electromenagersge.ca
63
Page 64

Soutien au consommateur.
SiteWeb appareils électroménagers GE www.electromenagersge.ca
Vous avez une question ou vous avez besoin d’aide pour votre appareil électroménager? Contactez-nous par
Internet au site www.electromenagersge.ca 24 heures par jour, tous les jours de l’année.
Service de réparations 1.800.561.3344
Service de réparations GE est tout près de vous.
Pour faire réparer votre électroménager GE, il suffit de nous téléphoner.
Studio de Conception Réaliste
Sur demande, GE peut fournir une brochure sur l’aménagement d’une cuisine pour les personnes
à mobilité réduite.
Écrivez : Directeur, Relations avec les consommateurs, MC Commercial
Bureau 310, 1 Factory Lane
Moncton, N.B. E1C 9M3
Pièces et Accessoires
Ceux qui désirent réparer eux-mêmes leurs électroménagers peuvent recevoir pièces et accessoires directement
à lamaison (cartes VISA, MasterCard et Discover acceptées).
Les directives stipulées dans le présentmanuel peuvent être effectuées par n’importe quel utilisateur. Les
autres réparations doivent généralement être effectuées par un technicien qualifié. Soyez prudent, car une
réparation inadéquate peut affecter le fonctionnement sécuritaire de l’appareil.
Vous trouverez dans les pages jaunes de votre annuaire le numéro fournisseur de pièces Mabe le plus proche.
Autrement, appelez-nous au 800.661.1616.
Contactez-nous
Si vous n’êtes pas satisfait du service après-vente dont vous avez bénéficié
Premièrement, communiquez avec les gens qui ont réparé votre appareil.
(QVXLWHVLYRXVQ·rWHVWRXMRXUVSDVVDWLVIDLWHQYR\H]WRXVOHVGpWDLOV³QXPpURGHWpOpSKRQHFRPSULV³DX
Directeur, Relations avec les consommateurs, Mabe Canada Inc
Bureau 310, 1 Factory Lane
Moncton, N.B. E1C 9M3
Inscrivez votre appareil électroménager electromenagersge.ca
Inscrivez votre appareil électroménager en direct, aussitôt que possible. Cela améliorera nos
communications et notre service après-vente. Vous pouvez également nous envoyer par la poste
le formulaire d’inscription joint à votre documentation.
64
Page 65

Instrucciones de Seguridad . 66-67
Instrucciones de Funcionamiento
Carga del lavavajillas ............. 74-83
Cuidado y Limpieza .............. 86-87
Puesta en Marcha ................ 68-71
Uso del Lavavajillas ..............72-73
Consejos para la Solución
de Problemas .................. 88-90
Soporte al Cliente
Garantía .............................91
Soporte al Cliente .....................95
MODELOS DE CONTROL FRONTAL
MODELOS DE CONTROL FRONTAL
Escriba los números de
Escriba los números de
modelo y de serie aquí:
modelo y de serie aquí:
Nº de Modelo _____________
Nº de Modelo _____________
Nº de Serie _______________
Nº de Serie _______________
Los podrá encontrar en la pared de
Los podrá encontrar en la pared de
la tina dentro de la puerta.
la tina dentro de la puerta.
MODELOS DE
MODELOS DE
CONTROL SUPERIOR
CONTROL SUPERIOR
65
Page 66

INFORMACIÓN IMPORTANTE DE SEGURIDAD
/($72'$6/$6,16758&&,21(6$17(6'(86$5³
GUARDE ESTAS INSTRUCCIONES
¡
ADVERTENCIA!
¡
ADVERTENCIA!
Bajo ciertas condiciones, se podrá producir gas de hidrógeno en un calentador de agua que no fue usado por dos semanas
o más. EL GAS DE HIDRÓGENO ES UN EXPLOSIVO.
Si el agua caliente no se usó durante dos semanas o más, evite la posibilidad de daño o lesión abriendo todos los grifos de agua
caliente y permitiendo que el agua corra durante varios minutos. Haga esto antes de usar cualquier artefacto eléctrico que esté
conectado al sistema de agua caliente. Este procedimiento simple permitirá el escape de cualquier gas de hidrógeno acumulado.
Debido a que el gas es inflamable, no fume, no use una llama abierta ni use el electrodoméstico durante este proceso.
¡
ADVERTENCIA!
Esta lavadora se deberá instalar y ubicar de acuerdo con las Instrucciones de Instalación antes de ser usada. Si no
recibió una ficha de Instrucciones de Instalación con su lavavajillas, podrá acceder a una visitando nuestro sitio web en
GEAppliances.com.
Conecte el lavavajillas/ electrodoméstico a un sistema de
cableado de metal permanente con conexión a tierra o
se debe tender un conducto para la conexión a tierra del
equipo con los conductores del circuito y conectado al
terminal de tierra del equipo o al conductor de suministro del
electrodoméstico.
Una conexión inapropiada del conductor de conexión a
tierra del equipo puede provocar riesgos de descargas
eléctricas. Consulte a un electricista calificado o personal del
servicio técnico si tiene dudas de que el electrodoméstico se
encuentre conectado a tierra apropiadamente.
Deshágase de forma correcta de electrodomésticos y
materiales de envío o embalajes descargados.
Para su seguridad, siga las instrucciones de este manual a fin de minimizar
riesgos de incendio, explosión, descargas eléctricas, y para evitar daños en
su propiedad, lesiones personales o la muerte.
SEGURIDAD DEL CALENTADOR DE AGUA
INSTALACIÓN Y MANTENIMIENTO ADECUADOS
No intente reparar o reemplazar ninguna parte de la cocina, a
menos que se lo recomiende específicamente en este manual.
Cualquier otra reparación deberá ser realizada por un técnico
calificado.
Use sólo el kit de cables WX09X70910 o cables duros para
la conexión eléctrica. Si no se siguen estas instrucciones,
se pueden producir riesgos de incendio y lesiones
personales.
A fin de minimizar la posibilidad de descargas eléctricas,
desconecte este electrodoméstico del suministro de corriente
antes de intentar cualquier mantenimiento.
NOTA: Apagar el lavavajillas no desconecta el
electrodoméstico del suministro de corriente. Le
recomendamos que el servicio técnico de su electrodoméstico
sea realizado por un técnico calificado.
¡
ADVERTENCIA!
Use este electrodoméstico sólo para su propósito original,
como se describe en el Manual del Propietario.
Use sólo detergentes o agentes
humectantes recomendados para
use con un lavavajillas y mantenga los
mismos fuera del alcance de los niños.
El uso de un detergente que no esté
diseñado específicamente para lavavajillas hará que este
último se llene de agua con jabón.
Ubique artículos puntiagudos de modo que no haya
posibilidades de daños sobre el sellador de la puertal.
Cargue los cuchillos puntiagudos con los mangos hacia
arriba, a fin de reducir el riesgo de lesiones por cortes.
No lave productos de plástico, a menos que contengan una
marca de seguridad en lavavajillas o su equivalente. Cuando
se trate de productos de plástico que no estén marcados de
esta manera, consulte las recomendaciones del fabricante.
Al usar su lavavajillas, siga las precauciones básicas, incluyendo lo siguiente:
66
No toque el elemento de calefacción durante o inmediatamente
después del uso.
No use su lavavajillas a menos que todos los paneles de
cercamiento estén correctamente en sus lugares.
No manipule indebidamente los controles.
No abuse, no se siente, no se sostenga ni se pare sobre la
puerta o la bandeja del plato del lavavajillas.
A fin de reducir el riesgo de incendios, no permita
que los niños jueguen con, sobre o dentro de este
electrodoméstico en cualquier momento.
No guarde ni use materiales combustibles, incluyendo
gasolina u otros líquidos o vapores inflamables cerca de
éste o de otros electrodomésticos.
Las piezas pequeñas, tales como los sujetadores de
estantes y los pivotes de retención de filtros, pueden
generar riesgos de asfixia en niños pequeños si son
retirados del lavavajillas. Mantenga los mismos fuera del
alcance de los niños pequeños.
Page 67

INFORMACIÓN IMPORTANTE DE SEGURIDAD
/($72'$6/$6,16758&&,21(6$17(6'(86$5³
GUARDE ESTAS INSTRUCCIONES
¡
ADVERTENCIA!
FORMA ADECUADA DE DESCARTAR EL LAVAVAJILLAS
Los lavavajillas tirados o abandonados son peligrosos…incluso aunque se conserven por “sólo
unos pocos días”. Si se deshará de su lavavajilla, siga las siguientes instrucciones a fin de evitar
accidentes.
No permita que los niños jueguen con, en, o dentro de éste o cualquier electrodoméstico que haya
descartado.
Retire la puerta del compartimiento de lavado o quite la traba, retirando los dos tornillos del
receptor de la traba dentro de la tina (como se muestra).
PRECAUCIÓN:
Durante o después del ciclo de lavado, es posible que los
contenidos estén calientes al tacto. Tenga cuidado antes
de tomar los mismos.
Se deberá estar especialmente atento si el
electrodoméstico es usado por niños o se encuentra
cerca de los mismos. No permita que los niños jueguen
alrededor del lavavajillas cerrar la puerta, cerrar la
bandeja superior, o mientras verticalmente ajustando la
rejilla superior debido a la posibilidad de que sus dedos
pequeños sean presionados.
RIESGO DE QUE UN NIÑO QUEDE ATRAPADO
A fin de evitar lesiones menores y daños sobre la propiedad
Productos que no sean utensilios: no lave artículos tales
como filtros electrónicos de limpieza con aire, filtros de
horno y brochas de pintura en su lavavajillas. Se podrán
producir daños, descoloración o manchas sobre el
lavavajillas.
Cargue artículos de plástico livianos, de modo que no
sean desplazados ni caigan al fondo del lavavajillas – es
posible que entren en contacto con el calentador y sean
dañados.
GEAppliances.com
Dos tornillos
PRECAUCIÓN: REQUISITOS ELÉCTRICOS
Este electrodoméstico deberá ser provisto con 120V, 60 Hz,
y estar conectado a un circuito individual correctamente
conectado a tierra, protegido por un disyuntor o fusible de
retardo de 15 o 20 amp.
Si el suministro de corriente provisto no cumple con
las especificaciones anteriores, se recomienda que
un electricista matriculado instale un tomacorriente
aprobado.
Su circuito del lavavajillas no debería ser usado para
ningún otro electrodoméstico mientras el lavavajillas está
funcionando, ya que éste requiere toda la capacidad del
circuito.
AVISO
Si el lavavajillas está conectado a un tomacorriente
de pared, asegúrese de que el interruptor esté
encendido antes del uso.
Si decide apagar el interruptor entre ciclos de
lavado, espere entre 5 y 10 segundos luego de
encender el interruptor antes de presionar Start (Iniciar) para
permitir que el control se inicie.
LEA Y SIGA ESTA INFORMACIÓN DE SEGURIDAD CUIDADOSAMENTE.
Use sólo polvo, Cascade® All-in-1 ActionPacs™, detergentes
líquidos o agentes de enjuague recomendados para uso
con un lavavajillas y mantenga los mismos fuera del alcance
de los niños. El Detergente para Lavavajillas Automáticos
Cascade® All-in-1 ActionPacs™, y los agentes de enjuagues
Cascade ® Rinse Aid™ fueron aprobados para su uso en
todos los lavavajillas de GE.
GUARDE ESTAS INSTRUCCIONES
67
Page 68

¡Puesta en marcha!
Las funciones y la apariencia variarán a través de este manual.
GDF570
DDT575, GDT580,
GDT680
GDT720
GDT740, PDT750, PDT760
CDT725
6WHDP
CDT765
Cargue el Lavavajillas
1
Para obtener mejores resultados con el lavavajillas, siga las pautas para la carga de los estantes que figuran en la sección Carga
de los estantes del lavavajillas. No se requiere enjuague previo sobre la suciedad normal de comida. Raspe las suciedades duras,
incluyendo huesos, palillos, pieles y semillas. Retire las verduras con muchas hojas, restos de carne, y cantidades excesivas de grasa
o aceite.
Agregue Detergente
2
Agregue la cantidad necesaria de detergente al dispensador de detergente. Use un detergente tal como Cascade® Platinum Pacs.
Lea sobre el Dispensador de Detergente en la sección de Uso del Lavavajillas.
Agregue el Agente de Enjuague
3
Agregue el Agente de Enjuague en el dispensador del agente de enjuague. Lea sobre el Uso del Agente de Enjuague en la sección de
Uso del Lavavajillas.
68
Page 69

GEAppliances.com
Seleccione el Ciclo
4
Presione la tecla Select Cycle (Selección del Ciclo) para realizar el ciclo de lavado deseado. En algunos modelos, la luz que se encuentra junto al botón Select Cycle (Selección de Ciclo) estará encendida para indicar qué ciclo de lavado ha sido seleccionado. En
algunos modelos, presionar el botón Select Cycle (Selección del Ciclo) mostrará diferentes ciclos en la pantalla de exhibición. Presione
el botón hasta que el ciclo deseado aparezca.
NOTA: Los tiempos del ciclo actual varían de acuerdo con el nivel de suciedad, la temperatura del agua, y las opciones seleccionadas.
El ciclo puede ser seleccionado con la puerta en la posición abierta. El ciclo no comenzará hasta que la puerta esté cerrada y se
haya seleccionado Start (Iniciar) dentro 10 segundos.
AutoSense
proporcional. *Rango de tiempo: 1 hora y 50 minutos – 2 horas y 10 minutos.
Este ciclo cuenta con un sensor automático del nivel de suciedad y ajusta el ciclo de lavado de forma
Heavy Este ciclo se utiliza con platos, utensilios, cacerolas u ollas muy sucios y con suciedad seca u horneada.
(Pesado) Es seguro usar los platos que utiliza a diario con este ciclo. *Rango de tiempo: 2 hora y 31 minutos.
Normal
sucios y fue diseñado para ahorrar tanto agua como corriente. *Rango de tiempo: 1 hora y 15 minutos – 1 hora y
50 minutos. NOTA: La función Normal se usó para medir el nivel de eficiencia de la corriente de este lavavajillas.
Light (Suave)
cristal. *Tiempo: 50 minutos.
Este ciclo es para uso diario, regular o típico a fin de lavar totalmente una carga completa de platos normalmente
Este ciclo se utiliza con platos con un nivel de suciedad entre leve y medio. Es seguro el uso con porcelana y
Rinse Para enjuagar cargas parciales que se lavarán después. No use detergente. El detergente no es dispensado
(Enjuague) durante el ciclo de enjuague. *Tiempo: 16 minutos.
(algunos modelos)
Express Este ciclo lavará rápidamente platos con poco nivel de suciedad. *Tiempo: 32 minutos. Para usar el secado
(algunos modelos) rápido, seleccione Power Dry (Secado Potente). La temperatura de enjuague final será incrementada. Power Dry
(Secado Potente) agregará 15 minutos al tiempo del ciclo. Cuando la luz de Clean (Limpieza) se encienda, abra la
puerta, retire los estantes, y los platos se secarán en aproximadamente cinco minutos.
eWash Este ciclo lavará de forma eficiente los platos, usando aproximadamente 2 galones de agua y 8 KWh. La
(algunos modelos) selección de Power Dry (Secado Potente) con este ciclo agrega un período de secado con energía eficiente
de 1 1/2 hora. El secado se logra con un ventilador eficiente de 2 watts. *Tiempo: 1 hora y 3 minutos.
*Sólo tiempo de lavado. No incluye el tiempo de secado, Auto Hot Start (Inicio con Calor Automático), u opciones. NOTA: Si la
temperatura del agua entrante es demasiado baja, la función Auto Hot Start (Inicio con Calor Automático) podrá agregar hasta 11
minutos de tiempo adicional.
69
Page 70

¡Puesta en marcha!
Seleccione Opciones
5
La luz junto al botón seleccionado estará iluminada para indicar que la función opción ha sido seleccionada.
Normal Temp
energía
Wash Temp
Boost or Boost aumentar el tiempo del ciclo en general. Esta opción puede estar en On (Encendido) o Off (Apagado) durante el
Temp (Aumento ciclo de lavado. Esta opción también mejorará el rendimiento del secado en el ciclo Normal.
de la Temperatura
de Lavado)
Wash Temp
Sani or Sanitize duración del ciclo variará dependiendo de la temperatura del agua entrante.
Temp NOTA: Esta opción es monitoreada con relación a los requisitos de desinfección. Si el ciclo es interrumpido
(Temperatura durante o después de la parte del lavado principal o si la temperatura del agua entrante es tan baja que no se
de Lavado puede lograr un nivel de calor adecuado del agua, es posible que no se cumpla con las condiciones de
para desinfección. En estos casos, la luz de Sanitized (Desinfectado) no se iluminará al final del ciclo. Utilizar esta
Desinfectar) opción modificará el ciclo para cubrir los requisitos de la Sección 6, NSF 184 para la eliminación de suciedad y
eficiencia de la desinfección.
NOTA: Los lavavajillas residenciales certificados por NSF no podrán ser usados en establecimientos de comidas
con licencia.
Heated or Apaga la opción de secado. Los platos se secan con el aire en forma natural y se ahorra energía. Abra la puerta
Power Dry Off del lavavajillas para acelerar el secado.
(Secado con
Calor o Corriente
Apagado)
Heated or
Power Dry On En modelos con la función de calentamiento oculta, esta opción incrementa la temperatura del lavavajillas durante
(Secado con la parte del enjuague final del ciclo, y luego utiliza un ventilador para hacer circular aire a fin de secar los platos.
Calor o Corriente
Encendido)
Steam
(Prewash) comenzar el ciclo. La opción Steam (Vapor) agrega hasta 30 minutos al tiempo del ciclo. Esta opción está
(Vapor) disponible con los ciclos Heavy (Pesado), Auto Sense (Sensor Automático), y Normal.
((Prelavado))
(algunos modelos)
Pre Soak
(Preremojo) disponible con los ciclos Heavy (Pesado), AutoSense (Sensor Automático), y Normal y puede añadir un máximo
(algunos modelos) de 30 minutos para el tiempo de ciclo.
Wash Zones Seleccionar las Áreas de Lavado Superior o Inferior apuntará al lavado de un solo estante. Esto acortará
(Áreas de el tiempo del ciclo y ahorrará energía. Esta opción debería ser usada cuando los platos sean colocados
Lavado) en un solo estante.
(algunos modelos)
Bottle Wash
(Lavado de 23 minutos para el tiempo de ciclo. Use esta opción para lavar de forma segura en el lavavajillas objetos difíciles
Botellas) como biberones, botellas para deportistas, tazas de café altas, etc. Consulte las recomendaciones de uso en la
(algunos modelos) sección de Carga del Lavavajillas.
Delay Hours
(Horas de Hours (Horas de Retraso), para seleccionar la cantidad de horas, y luego presione Start (Iniciar) una vez y cierre
Retraso) la puerta para comenzar la cuenta regresiva. El ciclo comenzará una vez que el tiempo asignado haya inalizado.
Control Puede bloquear los controles para evitar que se haga cualquier selección. También puede bloquear los controles
Lock luego de haber comenzado un ciclo, a fin de evitar cambios en el ciclo. Por ejemplo: los niños no podrán iniciar
(Bloqueo del de forma accidental el lavavajillas presionando los botones cuando esta opción haya sido seleccionada.
Control)
1 o 2 indicados en los controles durante 3 segundos. En algunos modelos, será la función Heated Dry (Secado
con Calor), en otros los botones Steam (Vapor) y Wash (Lavado), y en algunos otros son los botones Pre-Soak
(Preremojo) y Bottle Wash (Lavado de Botellas). La luz de Control Lock (Bloqueo del Control) se encenderá para
indicar que el control está bloqueado.
Para DESBLOQUEAR el control del lavavajillas, dependiendo del modelo, mantenga presionados los botones
1 o 2 indicados en los controles durante 3 segundos. La luz de Control Lock (Bloqueo del Control) se apagará
para indicar que el control está bloqueado.
Energy Al estar conectado a un medidor inteligente y a su compañía de electricidad, el lavavajillas retrasará de forma
Smart automática el comienzo de un ciclo durante las horas más caras con pico de demanda, y funcionará cuando
la demanda sea baja. Sin embargo, usted puede anular las configuraciones con retraso y usar el lavavajillas
70
según sea necesario. Aprenda más sobre Energy Smart en la sección Uso del Lavavajillas.
Esta opción (en algunos modelos) es para platos con suciedad normal, y optimiza el rendimiento del lavado mientras se ahorra
.
Esta opción incrementa la temperatura para ayudar a lavar los platos con alto nivel de suciedad y puede
Esta opción incrementa la temperatura del agua en el enjuague final a fin de desinfectar su juego de platos. La
Enciende la opción para un secado más rápido. Esta opción podrá agregar hasta 65 minutos al tiempo del ciclo.
Esta opción no está disponible con el ciclo Rinse (Enjuague).
Para uso con suciedad pesada y/o suciedad seca u horneada. Esta opción DEBE ser seleccionada ANTES de
Use esta opción para mejorar el rendimiento del lavado con suciedades pesadas o resecas. Esta opción está
Esta opción incrementa el tiempo en que los chorros de la botella están activados y puede añadir un máximo de
Retrasa el comienzo de un ciclo de lavado hasta entre 8 y 12 horas, dependiendo del modelo. Presione Delay
Para DESBLOQUEAR el control del lavavajillas, dependiendo del modelo, mantenga presionados los botones
Page 71

GEAppliances.com
Inicio del Lavavajillas
6
Start Abierta la puerta para seleccionar las opciones deseadas. Presione el botón Start (Iniciar) y cierre la puerta
(Iniciar) dentro de los 10 segundos para iniciar el ciclo o comenzar la cuenta regresiva de Delay Hours (Horas de Retraso). El
ciclo de lavado comenzará en breve luego de cerrar la puerta. La pantalla se apagará si la puerta permanece abierta
durante más de dos minutos.. Para activar a pantalla, cierra y abra la puerta o presione cualquier botón.
Interrupt Para interrumpir o pausar un ciclo de lavado, abra la puerta lentamente. Abrir la puerta hará que el ciclo de
or Pause lavado quede pausado. El lavavajillas emitirá pitidos cada un minuto para recordarle que debe cerrar la puerta.
(Interrupción Para reiniciar o reactivar el ciclo, presione Start (Iniciar), y cierre la puerta dentro 10 segundos.
o Pausa)
Cancel
Para cancelar un ciclo de lavado, mantenga presionado el botón Start (Iniciar) por 3 segundos y cierre la puerta.
(Cancelar) El lavavajillas se drenará, emitirá un pitido, y la luz del ciclo de lavado quedará en OFF (Apagado).
Luces y Sonidos del Ciclo Indicador
7
Sanitized or
Cycle
Sanitized
(Desinfectado)
Desinfectar). Cerrar la puerta o presionar cualquier botón apagará la luz.
Clean or
Cycle
Se muestra al final del ciclo cuando la función Wash Temp Sani
Desinfectar) haya sido seleccionada y el lavavajillas haya cumplido con los requisitos de desinfección. Para una
descripción completa de esta opción, lea Wash Temp Sani
Se muestra cuando un ciclo de lavado fue completado. La luz permanece en ON (Encendido) como recordatorio
o Sanitize Temp
o Sanitize Temp
(Temperatura de Lavado para
(Temperatura de Lavado para
Complete de que los platos están limpios.
(Limpieza o ciclo
completado)
Low Rinse Aid
Exhibido cuando el agente de enjuague esté en un nivel bajo o vacío. Consulte el Uso de un Agente de
(Ayuda para Enjuague. Para apagar el indicador, presione el botón Pre-Soak (Preremojo) o Steam (Vapor) 7 veces dentro de
Enjuague Bajo) los 5 segundos. Repita este proceso para volver a encender el indicador Low Rinse Aid (Ayuda de Enjuague Bajo).
(algunos modelos)
Cycle Status
La luz indicadora sobre el frente de la puerta cambiará de color para indicar el estado del lavado. Durante
(Estado el ciclo de lavado, la luz indicadora será de color ámbar. Cuando el ciclo de lavado esté completo, la luz
del Ciclo) cambiará a verde.
(algunos modelos)
Sounds
(Sonidos) entreabierta. Para anular todos los sonidos, presione el botón Heated Dry (Secar con Calor) o
(Opciones de Secado) 7 veces dentro de los 5 segundos. Repita este proceso para reactivar los sonidos.
Modo de
El lavavajillas emitirá un sonido para indicar las finalizaciones de ciclos, presiones de botones y la puerta
Power Dry
Para que esta opción esté en ON/OFF (Encendida/Apagada), mantenga presionados los botones START (Iniciar) y
Activación WASH TEMP (Temperatura de Lavado) durante 5 segundos, cierre la puerta y espere 3 minutos hasta que se
(algunos modelos) active el modo de apagado automático del lavavajillas. En el modo OFF (Apagado), la pantalla de control, los
sonidos de control y las luces internas (en algunos modelos) no responderán a la apertura o cierre de la puerta.
Este modo puede ser usado al celebrar ciertos feriados religiosos tales como el Sabbat. Para activar el control y
las luces internas (en algunos modelos), presione cualquier botón.
71
Page 72

Uso del lavavajillas.
Controle la Temperatura del Agua
El agua entrante deberá ser de por lo menos
120°F (49°C) y no más de 150°F (66°C) para una
limpieza efectiva y para evitar daños sobre los
platos. Controle la temperatura del agua con un
termómetro para caramelos o para carne.
Abra el grifo de agua caliente más cercano al
lavavajillas, coloque el termómetro en un vaso y
deje que el agua corra de forma continua en el
vaso hasta que la temperatura deje de subir.
Energy Smart
Energy Smart permite que su lavavajillas reduzca
el consumo de corriente durante períodos de altos
costos de corriente. Si usted se encuentra en un
área donde su proveedor de electricidad cobra
costos variables en diferentes horas del día, su
lavavajillas le informará sobre dichos momentos
cuando esté pagando el costo más alto. Usted
puede entonces retrasar el inicio del lavavajillas
hasta que el costo descienda; o puede anular la
función y usar el lavavajillas a su conveniencia.
Qué necesitará:
Medidor Inteligente que se comunicará con su
1
lavavajillas. Consulte a su proveedor local de
electricidad para determinar si la tecnología
está disponible en su área
Un lavavajillas con Energy Smart
2
DDT575, GDF570, GDT580-740, PDT750-760).
Un Módulo de Comunicación para
3
Electrodomésticos (Appliance Communication
Module, ACM). Para ordenar el dispositivo de
comunicación que será necesario instalar en
el lavavajillas, visite gebrillion.com
.
(CDT725-765,
.
Use un Agente de Enjuague
Los agentes de enjuague tales como Cascade® Complete Rinse Aid están diseñados para una gran
acción de secado y para brindar protección contra manchas y acumulación de películas en sus
platos, vasos, cubiertos, utensilios y plástico.
Llenado del Dispensador
El dispensador del agente de enjuague tiene una capacidad de 3.5 oz.
(104 ml) de agente de enjuague. Bajo condiciones normales, esto durará
aproximadamente un mes.
Asegúrese de que la puerta del lavavajillas esté completamente abierta.
1
Abra la puerta del dispensador del Agente de Enjuague.
2
Lentamente agregue el agente de enjuague hasta que la taza esté
3
llena. Es posible que se deba pausar varias veces para permitir que la
ayuda para el enjuague se asiente.
Limpie cualquier derrame producido por el agente de enjuague con
4
una tela seca, a fin de evitar que haya espuma dentro del lavavajillas.
Cierre la puerta del dispensador de Agente de Enjuague.
5
Ventana
indicadora
Ajuste del
agente de
enjuague
72
Configuración de la Ayuda para el Enjuague
La cantidad del agente de enjuague liberado en el lavado final
se puede ajustar. Si las manchas con gotas de agua o agua
dura permanecen en los platos luego del ciclo de
lavado, incremente la configuración.
Para ajustar la configuración
Abra la puerta del dispensador del Agente de Enjuague;
luego gire el ajuste en dirección de las agujas del reloj
para incrementar la cantidad de agente de enjuague,
y en dirección contraria a las agujas del reloj para reducir
la cantidad de agente de enjuague.
En dirección de las
agujas del reloj para
reducir las manchas
con gotas de agua y
agua dura
En dirección
contraria a las
agujas del reloj
para reducir la
espuma
Protección contra Pérdidas (en algunos modelos)
Si se detecta una pérdida, el lavavajillas se drenará
y el ciclo se detendrá. La pantalla mostrará “LEAK
DETECTED” (Gotera Detectada). Llame al servicio
técnico.
Page 73

GEAppliances.com
Dispensador de Detergente
El dispensador de detergente está ubicado en el
centro de la puerta del lavavajillas. Cuenta con dos
compartimientos. El compartimiento de lavado principal
se encuentra dentro del dispensador de detergente. Para
abrirlo, presione el botón al costado del dispensador. El
compartimiento de prelavado se encuentra en la tapa
del dispensador de detergente. Use el compartimiento
de prelavado sólo cuando el agua sea extremadamente
dura o cuando la carga contenga un nivel de suciedad
pesada. El compartimiento de prelavado no será utilizado
cuando se usen detergentes en tableta o paquete.
NOTE:
No cargue ítems grandes en el estante inferior
cuando puedan bloquear la salida de los chorros de
agua hacia el dispensador de detergente.
Dispensador de
Detergente
Puede usar detergente para lavavajillas automáticos
en pastilla, polvo, líquido o gel. Asegúrese de usar
sólo detergentes específicamente etiquetados para
uso con lavavajillas automáticos. Nunca use detergente líquido de mano para platos en un lavavajillas
automático. Como resultado del uso de detergentes inapropiados se producirá agua jabonosa o un
lavado deficiente.
Los detergentes deberían ser guardados en una ubicación seca y en sus envases originales para evitar
la pérdida de efectividad. Coloque detergente en una
taza antes de encender el lavavajillas y luego cierre
la tapa. La tapa se abrirá durante el ciclo de lavado.
Llenado del Dispensador de Detergente
GE recomienda el uso de detergente en forma
de pastilla o paquete. Pruebas independientes
demostraron que esta forma de detergente es muy
efectiva en el lavavajillas. Cascade® Platinum Pacs es
un ejemplo de este tipo de detergente. Simplemente
coloque una tableta o paquete en el compartimiento
principal de lavado y cierre la tapa de la taza de
detergente deslizando esta última. Se debe observar
que la pastilla o paquete deben ser colocados en el
compartimiento de lavado principal de la taza de
detergente. Si la pastilla o paquete son revueltos en el
fondo del lavavajillas, el detergente será descartado
por el drenaje en un período muy corto de tiempo y
será de este modo desperdiciado. Como resultado de
esto, el rendimiento del lavado será muy deficiente.
Si decide usar detergente en polvo, líquido o en gel, la cantidad
de detergente que use será determinada por la dureza del
agua, la temperatura del agua, y la carga de suciedad de
comida dentro del lavavajillas. Para acceder a información
sobre la dureza del agua en su área, comuníquese con
su compañía proveedora de agua. La dureza del agua se
mide en granos por galón. Use esta información y la tabla
que aparece más arriba para determinar la cantidad de
detergente que se debe usar. Usted puede adquirir una tira
de prueba de agua dura de GE. Llame al 1-877-959-8688
y solicite el número de pieza WD01X10295. En Canadá,
comuníquese al 1-800-661-1616.
Cantidad de
Granos/Gal.
Menos de 4 Llene la taza hasta 1/3
4 a 8 Llene la taza hasta 2/3
8 a 12 Llene la taza completamente
Superior a 12 Llene tanto la taza principal de
lavado como la taza de prelavado
Lavado
Principal
Prelavado
Empuje/
Deslice
para Cerrar
El uso de demasiado detergente con agua muy
suave y/o muy caliente podrá ocasionar una
condición llamada grabado sobre su cristalería. El
grabado es un enturbiamiento permanente sobre
su cristalería. Esta condición es irreversible. Sin
embargo, el uso de muy poco detergente ocasionará
un rendimiento deficiente del lavado.
Use la tabla como punto inicial y luego ajuste la
cantidad de detergente que usará. Use sólo la
cantidad suficiente para un buen rendimiento del
lavado. Usar sólo la cantidad correcta de detergente
proveerá un gran rendimiento del lavado sin
desperdiciar detergente ni enturbiar su cristalería.
NO USE DETERGENTE PARA LAVADO MANUAL
NOTA:
El uso de un detergente que no esté diseñado
específicamente para lavavajillas hará que este último
se llene de agua con jabón. Durante el funcionamiento,
esta agua con jabón se esparcirá por las ventilaciones
del lavavajillas, cubriendo el piso de la cocina y
mojando el mismo.
Debido a que muchos envases de detergente son
parecidos, guarde el detergente para lavavajillas en
un espacio aparte de los demás limpiadores. Muestre
a cualquier persona que pueda usar el lavavajillas el
detergente correcto y dónde se guarda.
Mientras que no habrá daños duraderos sobre el
lavavajillas, sus platos no se limpiarán si usa un
detergente para platos cuya fórmula no haya sido
diseñada para funcionar en lavavajillas automáticos.
Galones a Llenar
Agente de
Enjuague
73
Page 74

Carga del lavavajillas.
Para obtener mejores resultados con el lavavajillas, siga estas pautas de carga. Las funciones y apariencia de los
estantes y canastas de cubiertos pueden variar con relación a su modelo.
Lavado de Botellas
Sujetador
Boquilla
Estante Superior
El estante superior es principalmente para
vasos, tazas y platitos.
rendimiento de lavado, incline la taza y aberturas
de vidrio hacia el centro de la parrilla. O
tales como ollas, cacerolas y platos pueden
ser ubicados en el estante superior. Éste es
también un lugar seguro para colocar ítems
de plástico de uso seguro en lavavajillas. El
estante superior se puede usar con utensilios
de tamaños atípicos. Las cacerolas,
recipientes de mezcla y otros ítems con
forma similar deberían ser colocados boca
abajo para un mejor rendimiento del lavado.
Asegúrese de que los ítems pequeños de
plástico estén seguros, de modo que no
puedan caer en el calefactor en el fondo del
lavavajillas, dañando posiblemente el ítem.
Algunos modelos están equipados con un
calentador escondido, de modo que los ítems
de plástico de uso seguro en el lavavajillas
puedan ser colocados en el estante inferior.
IMPORTANTE: Asegúrese de que los ítems en el
estante superior no interfieran con el tercer estante
(en algunos modelos), al hacer cargas y descargas.
El sistema Bottle Wash (Lavado de Botellas)
(en algunos modelos) es la ubicación ideal
para posicionar los biberones y botellas
altas para deportistas. Los sujetadores para
Bottle Wash (Lavado de Botellas) sostienen
las botellas con pequeñas aberturas propias,
de modo que los chorros de agua estén
dirigidos hacia adentro de las botellas a
fin de limpiar áreas difíciles de alcanzar.
Los sujetadores pueden ser instalados
o retirados, simplemente deslizando la
abertura de los sujetadores sobre la parte
superior de la boquilla.
Para obtener el mejor
tros ítems
IMPORTANTE: Asegúrese de que los
productos no sobresalgan más allá del fondo
del estante o la canasta de plata donde
bloquearán la rotación del brazo intermedio
de rociado. Esto podría ocasionar ruidos
durante el funcionamiento y/o un lavado
deficiente.
Botella de deportistas
mantiene en su lugar
Bottle Wash (Lavado de
sobre un sujetador
Botellas)
Biberón
mantiene en su lugar
debajo de un sujetador
Bottle Wash (Lavado
de Botellas)
74
Page 75

GEAppliances.com
El estante superior permite un ajuste de 2”
Estante
Superior
Push
hacia arriba o abajo, a fin de ubicar ítems
grandes. El estante superior se podrá bajar
empujando las solapas alagadas sobre
cada lado del estante. Esto le permitirá bajar
el estante (consulte la figura del Estante
Superior). Para elevar el estante, levante el
mismo hasta que quede bloqueado en su
posición.
A fin de agregar flexibilidad en la carga,
el estante utilitario (en algunos modelos)
podrá ser ubicado en la posición superior o
inferior, o podrá ser desplegado y colocado
en la posición inferior. La repisa también
podrá ser usada para asegurar productos
de vidrio tales como copas de vino. Debido
a que estos productos vienen en diferentes
tamaños, lentamente empuje el estante
hacia adentro para asegurar que los productos
no choquen contra el lavavajillas, lo cual podrá
ocasionar daños sobre los productos.
Los brazos plegables (en algunos modelos)
brindan flexibilidad para ítems extra grandes
o difíciles de sostener. Las filas de brazos
pueden ser ajustadas en una posición
vertical o recostadas.
PRECAUCIÓN: Un estante
superior cargado puede ser más pesado de
lo previsto. Para evitar lesiones leves o
daños en el contenido, no levante ni baje el
estante superior luego de que el mismo
esté cargado con platos.
Coloque las ranuras de los
sujetadores de el estante
sobre los alambres
utilitario
de la repisa vertical, y empuje
hacia abajo para adherir
el estante utilitario sobre el
segundo alambre del estante
75
Page 76

Carga del lavavajillas.
Para obtener mejores resultados con el lavavajillas, siga estas pautas de carga. Las funciones y apariencia de los
estantes y canastas de cubiertos pueden variar con relación a su modelo.
Configuraciones de 8 lugares
Modelos - GDT580, GDT680, GDT720, GDT740, PDT750 y CDT725
-
Estante Superior
Modelos - GDF570 y DDT575
Configuraciones de 10 lugares
Modelos - GDT580, GDT680, GDT720, GDT740, PDT750 y CDT725
Configuraciones de 12 lugares
Modelos - GDT580, GDT680, GDT720, GDT740, PDT750 y CDT725
-
Estante Superior
-
Estante Superior
Modelos - GDF570 y DDT575
Modelos - GDF570 y DDT575
76
Page 77

GEAppliances.com
Configuraciones de 8 lugares
Modelos - PDT760 y CDT765
Configuraciones de 10 lugares
Modelos - PDT760 y CDT765
-
Estante Superior
-
Estante Superior
Configuraciones de 12 lugares
Modelos - PDT760 y CDT765
-
Estante Superior
77
Page 78

Carga del lavavajillas (cont.).
Para obtener mejores resultados con el lavavajillas, siga estas pautas de carga. Las funciones y apariencia de los estantes y
canastas de cubiertos pueden variar con relación a su modelo.
Estante Inferior
El estante inferior es más conveniente para
platos, platitos y utensilios. Los productos
grandes, tales como bandejas para asar y
estantes para hornear deberán estar a los
costados del estante. De ser necesario, los
vasos y tazones de tamaños muy grandes
podrán ser ubicados en el estante inferior, a
fin de maximizar la flexibilidad de la carga.
Los platos, platitos y productos similares
deberían ser colocados entre los brazos en
la dirección que permita que el producto
permanezca seguro en el estante.
Los brazos plegables del estante inferior (en
algunos modelos) pueden ser ajustados a
diferentes ángulos erguidos o ser colocados
de forma plana para brindar flexibilidad
sobre ítems difíciles de ubicar o extra
grandes.
NOTA: No cargue ítems grandes en el
estante inferior, de modo que no se bloquee
la salida de los chorros de agua hacia el
dispensador de detergente.
Posiciones
de 3 Ángulos
Disponibles o
Plegadas
78
Page 79

GEAppliances.com
Los bloques con brazos reversibles (en algunos
modelos) están diseñados para permitir mayor
flexibilidad en la carga de platos. La dirección de
los bloques de los brazos se puede modificar para
que coincida con la dirección de carga preferida
del modo en que se muestra en la Figura A o en la
Figura B
A fin de ajustar la dirección del bloque de los brazos,
retire los sujetadores que aseguran los bloques de
los brazos a los estantes empujando hacia arriba
en la lengüeta, luego flexione el cable de retención
para desmontar el bloque de los brazos del estante
inferior. El bloque de los brazos podrá ser doblado
en la dirección opuesta para invertir la dirección
de la carga. Asegure el bloque de los brazos al
estante, usando el mismo proceso y asegúrese
de cerrar los mismos sujetadores en sus lugares
correspondientes.
:
Figura A Figura B
¡ADVERTENCIA! Los sujetadores
pueden presentar riesgos de asfixia para niños
pequeños si son retirados del lavavajillas. Mantenga
los mismos fuera del alcance de los niños.
Para cambiar la dirección de los brazos plegables,
baje los brazos, y luego aleje los mismos de los
sujetadores de la barra que aseguran los brazos
al estante y retírelos. Invierta la dirección de los
brazos, orientando la manija hacia el lado opuesto
del estante. Reajuste los brazos a los sujetadores
de la barra, empujando los brazos nuevamente
hasta que queden colocados. El indizador también
se deberá cambiar al lado opuesto del lavavajillas.
Para retirar el indizador, simplemente deslice el
mismo en la dirección con la etiqueta “desbloquear”.
Luego, alinee el indizador con el estante en el lado
opuesto y deslice el mismo en la dirección que dice
“bloquear”, a fin de reajustarlo al estante
.
Sujetador
Sujetador
de la Barra
Indizador
Para bloquear, deslice hacia la
derecha.
Para desbloquear, deslice hacia
la izquierda.
IMPORTANTE: Es importante asegurar que los
productos no sobresalgan más allá del fondo del
estante o la canasta de plata (en algunos modelos)
donde bloquearán la rotación del brazo inferior
de rociado. Además, asegúrese de que los platos
grandes, ollas o ítems altos no golpeen el brazo
intermedio de rociado. Esto podría ocasionar ruidos
durante el funcionamiento y/o un lavado deficiente.
79
Page 80

Carga del lavavajillas (cont.).
Configuraciones de 8 lugares
Modelos - GDT580, GDT680, GDT720, GDT740, PDT750 y CDT725
Configuraciones de 10 lugares
Modelos - GDT580, GDT680, GDT720, GDT740, PDT750 y CDT725
-
Estante
-
Estante
inférieur
inférieur
Modelos - GDF570 y DDT575
Modelos - GDF570 y DDT575
Configuraciones de 12 lugares
Modelos - GDT580, GDT680, GDT720, GDT740, PDT750 y CDT725
80
-
Estante
inférieur
Modelos - GDF570 y DDT575
Page 81

GEAppliances.com
Configuraciones de 8 lugares
Modelos - PDT760 y CDT765
Configuraciones de 10 lugares
Modelos - PDT760 y CDT765
-
Estante
-
inférieur
Estante
inférieur
Configuraciones de 12 lugares
Modelos - PDT760 y CDT765
-
Estante
inférieur
81
Page 82

Carga del lavavajillas (cont.).
Para obtener mejores resultados con el lavavajillas, siga estas pautas de carga. Las funciones y apariencia de los
estantes y canastas de cubiertos pueden variar con relación a su modelo.
Tercer Estante (en algunos modelos)
Bandeja de
utensilios
Bandeja
para
vajillas de
plata
El tercer estante es la ubicación recomendada
para vajillas de plata y cuenta con 2 bandejas:
La bandeja de utensilios sostiene cucharas
para servir, palillos, espátulas, cuchillería,
batidoras manuales, etc. Asegúrese de no
superponer las cabezas de los utensilios.
La bandeja para vajillas de plata sostiene
la misma en forma individual en ranuras y se
posiciona alternando las cabezas de la vajilla
de plata.
Estas bandejas pueden ser retiradas a fin de
facilitar la carga y descarga, cambiando el lado
en el cual se encuentran las mismas o para
crear espacio adicional para el estante superior.
Para retirar una bandeja, con el tercer
estante completamente extendido, tome las
manijas frontales y traseras de una bandeja
y suavemente levante y retire la misma del
estante. Para reemplazar la bandeja, tome
ambas manijas y de forma suave coloque la
misma en el estante, de modo que la parte más
profunda apunte hacia el centro del estante.
¡PRECAUCIÓN! Tenga
cuidado al cargar, descargar o transportar
las bandejas de la vajilla de plata o de los
utensilios. Es posible que las bandejas
contengan ítems filosos o pesados. Si se
caen ítems de las bandejas o si se caen
bandejas, se podrán producir lesiones.
NOTAS IMPORTANTES:
No coloque cuchillerías de diferentes
materiales una junto a otra en el tercer
estante. Hacer esto podrá ocasionar la
descoloración de la cuchillería.
Las bandejas sólo deben ser usadas con
un lavavajillas para el tercer estante de GE
para usar con la vajilla de plata, utensilios
de cocción y otros ítems pequeños. El
uso de las bandejas para cualquier otro
propósito podría ocasionar daños sobre las
bandejas o daños sobre cualquier cosa que
interactúe con las bandejas.
Asegúrese de que el tercer estante esté
completamente cerrado antes de cerrar la
puerta del lavavajillas. Cerrar la puerta con
el estante parcialmente extendido podría
ocasionar daños sobre el lavavajillas.
Configuraciones de 8 lugares
82
Configuraciones de 10 lugares
Configuraciones de 12 lugares
*Consulte sobre cómo cargar la vajilla
de plata en la sección de la Bandeja
de la Vajilla de Plata
Page 83

GEAppliances.com
El tercer estante también se puede retirar, a fin de que se puedan colocar ítems muy grandes en el estante superior:
Para retirar el tercer estante:
Empuje el estante totalmente hacia un lado, de
Retire la vajilla de plata y las bandejas de
1
utensilios. (Consulte las NOTAS IMPORTANTES
en esta sección.)
2
modo que una brecha entre éste y el riel lateral se
forme del otro lado. Alinee las correderas laterales
con el centro de los ganchos en el estante y levante.
Correderas
riel en el
interior de riel
Estante
Riel
Ganchos
del estante
Empuje el
estante
hacia uno
de los lados
La corredera
se deslizará
hacia adentro
y afuera de
esta abertura.
Alinee las correderas
con los ganchos del
estante – Empuje el
estante hacia arriba
Ganchos
del estante
Correderas
Riel
riel
Ganchos
del estante
Para reemplazar el tercer estante:
Extienda ambos rieles laterales completamente
1
hacia afuera del lavavajillas.
Oriente el estante de modo que los ganchos laterales
2
queden alineados y centrados con las correderas sobre
el riel lateral y baje los ganchos sobre las correderas
Mueva el estante hacia un lado del lavavajillas
3
hasta que los ganchos caigan sobre las correderas
Ganchos
del estante
Gancho
del estante
Correderas
Riel
.
riel
Mientras continúa sosteniendo el estante
3
en la posición levantada, repita este
procedimiento del otro lado.
Una vez retirado el estante, empuje los rieles
4
laterales totalmente hacia la parte trasera del
lavavajillas
Mientras continúa sosteniendo el estante en la
4
posición levantada, repita este procedimiento
del otro lado
Una vez reemplazado el estante, empuje el
5
mismo completamente hacia afuera para que
calce en sus rieles laterales
.
.
.
.
Correderas
riel
Empuje el estante completamente
hacia afuera hasta que calce en su
posición
R
eemplace las bandejas de la vajilla de
6
plata y de los utensilios.
83
Page 84

Carga del lavavajillas (cont.).
Para obtener mejores resultados con el lavavajillas, siga estas pautas de carga. Las funciones y apariencia de los
estantes y canastas de cubiertos pueden variar con relación a su modelo.
Canasta de
Cubiertos
Asas
Canasta de Cubiertos
Coloque la vajilla plana en las canastas de
cubiertos retirables. Los objetos puntiagudos,
tales como tenedores y cuchillos, podrán
ser colocados con los mangos hacia arriba,
a fin de proteger sus manos. Para el mejor
rendimiento del lavado, coloque otros
utensilios tales como cucharas con los
mangos hacia abajo. Evite que los utensilios
queden ubicados juntos, lo cual podría evitar
que se laven de forma adecuada. Al realizar
la carga, distribuya los utensilios de forma
pareja en la canasta.
Las canastas de cubiertos podrán también
ser usadas para utensilios pequeños, tales
como cucharas de medición, tetinas de
biberones, tapas de plástico, o recipientes de
maíz. Las tapas de las canastas de cubiertos
(en algunos modelos) se pueden cerrar con
utensilios pequeños dentro.
Las Canastas de Cubiertos de Fácil Acceso
(en los modelos GDF570 y DDT575) pueden
ser posicionadas frente al estante superior
o al estante inferior. Asegure la canasta al
estante usando el asa en la parte frontal de
los estantes superior e inferior para adjuntar
las lengüetas en la parte trasera de la
canasta.
En otros modelos, la canasta de cubiertos
podrá ser posicionada colocando los ganchos
en la parte trasera de la canasta sobre el
cable superior a los costados del estante
inferior.
NOTA IMPORTANTE: No cargue utensilios
grandes o altos donde puedan bloquear el
dispensador de detergente, el brazo rociador
intermedio, o queden atrapados entre la
puerta y la junta cuando la puerta se cierre.
84
Page 85

GEAppliances.com
Los cubiertos/ vajilla plana se cargan usando las tapas de la canasta de cubiertos. Esto asegura un óptimo
rendimiento del lavado de la vajilla. Realizar la carga de este modo, evita anidaciones y asegura que todos los ítems
sean lavados de manera uniforme.
Configuraciones de 8 lugares
Modelos - GDT580, GDT680, GDT720, GDT740, PDT750 y CDT725
NOTA: Para los modelos PDT760 y CDT765, consulte
sobre el Tercer Estante en esta sección de Cómo
Cargar el Lavavajillas.
-
Canasta de cubiertos
Modelos - GDF570 y DDT575
Configuraciones de 10 lugares
Modelos - GDT580, GDT680, GDT720, GDT740, PDT750 y CDT725
NOTA: Para los modelos PDT760 y CDT765, consulte
sobre el Tercer Estante en esta sección de Cómo
Cargar el Lavavajillas.
Configuraciones de 12 lugares
Modelos - GDT580, GDT680, GDT720, GDT740, PDT750 y CDT725
-
Canasta de cubiertos
-
Canasta de cubiertos
Modelos - GDF570 y DDT575
Modelos - GDF570 y DDT575
Modelos - PDT760 y CDT765
85
Page 86

Cuidado y limpieza.
Limpieza del Panel de la Puerta Exterior
Antes de limpiar el panel frontal, asegúrese
de saber qué tipo de panel posee. Consulte
las últimas dos letras de su número de
modelo. Puede ubicar su número de modelo
en la pared de la tina del lado izquierdo, justo
dentro de la puerta. Si su número de modelo
termina en BB, CC, WW, SA o ES, entonces
el panel de su puerta está pintado. Si su
número de modelo termina en SS, entonces
el panel de su puerta es de acero inoxidable.
Si su número de modelo termina en II,
entonces el panel de su puerta es integrado.
Siga las siguientes instrucciones para
la limpieza del panel de la puerta
correspondientes a su modelo específico.
Panel de la Puerta Pintado (números de
modelo con terminación en BB– Negro, CC–
galleta, WW–blanco, SA-plateado o ES-pizarra)
Limpie con un paño suave, limpio y levemente
húmedo, y luego seque completamente.
Panel de la Puerta de Acero Inoxidable
(número de modelo con terminación en SS)
Para limpiar óxido y deslustres, los
limpiadores con ácido oxálico tales como
Bar Keepers Friend Soft
el óxido, deslustres y pequeñas manchas.
Use sólo un limpiador líquido libre de material
abrasivo y frote en la dirección de las líneas
del cepillo con una esponja suave y húmeda.
No use cera para electrodomésticos ni pula
sobre el acero inoxidable.
Para otras manchas y marcas, use Stainless
Steel Magic o un producto similar, con
una tela limpia y suave. Para limpiar su
electrodoméstico, no use cera, limpia metales,
blanqueadores ni productos que contengan
cloro sobre el acero inoxidable. Puede
ordenar Stainless Steel Magic Nº WX10X29 a
través de GE Parts (Piezas de GE) llamando al
1.877.959.8688.
Panel de la Puerta Integrado (números de
modelo con terminación en II)
Se trata de un panel de la puerta con
instalación normal, y será necesario consultar
las recomendaciones de los fabricantes de
gabinetes para una limpieza adecuada.
Cleanser™ eliminarán
Limpieza del Panel de Control
A fin de limpiar el panel de control, use una
tela levemente suave y húmeda. Luego seque
totalmente.
Cómo Limpiar el Interior del Lavavajillas
Para limpiar y desodorizar su lavavajillas,
utilice ácido cítrico o Lemi Shine®*, un
detergente aditivo. Lemi Shine destruirá los
depósitos minerales, y eliminará la película
y manchas de agua dura. Puede ordenar el
ácido cítrico n° WD35X151 a través de GE
Parts (Piezas de GE) llamando al 877-9598688 o visitando GEApplianceparts.com. En
Canadá, llame al 1-800-661-1616. Puede
adquirir Lemi Shine en su tienda local o
llamando a GE a los números anteriores y
solicitar el modelo WX10X10019.
Puerta Interna y La Tina de Acero
Inoxidable
El acero inoxidable usado para fabricar la
tina del lavavajillas y la puerta interna brinda
la mayor confiabilidad disponible en un
lavavajillas de GE.
Si la tina del lavavajillas o la puerta interna
fueran rayados o abollados durante el
uso normal, los mismos no se oxidarán ni
corroerán. Estas imperfecciones sobre la
superficie no afectarán su funcionamiento o
durabilidad.
86
* Lemi Shine® es una marca registrada de Envirocon Technologies, Inc.
Page 87

GEAppliances.com
Limpieza de los Filtros
Inspeccione y limpie los filtros en forma periódica. Esto debería ser realizado cada dos meses aproximadamente,
dependiendo del uso. Si hay una reducción en el rendimiento del lavado o los platos están arenosos, también hay
una indicación de que es necesario lavar los filtros.
Filtro Ultra Fino
Spray
Para limpiar el Filtro Ultra Fino retire el estante
Arm
inferior. Tuerza en dirección contraria a las agujas
del reloj y retire el Filtro Ultra Fino. Enjuague el
filtro con agua caliente y jabón y use una esponja
para eliminar con cuidado cualquier partícula
rebelde. Fregar con estropajos o cepillos podrá
dañar el filtro. Una vez limpio, reemplace el Filtro
Ultra Fino, y gire en dirección de las agujas del
reloj para bloquearlo.
Filtro Fino
Para limpiar el Filtro Fino (placa de malla) retire
el estante inferior. Retire el Filtro Ultra Fino.
Gire en dirección contraria a las agujas del
reloj cada uno de los dos pivotes de retención
ubicados hacia la parte inferior trasera de la
tina, y retire el Filtro Fino. Enjuague el filtro con
agua caliente y jabón. Los estropajos o cepillos
pueden dañar la superficie del filtro, pero es
posible que sea necesario usar un cepillo suave
o esponja para retirar la suciedad difícil o los
depósitos de calcio ocasionados por el agua
dura. Una vez limpio, reemplace el Filtro Fino,
el Filtro Ultra Fino, y gire los dos pivotes de
retención en dirección de las agujas del reloj.
Fine
Filtro
Filter
Fino
Pivotes de
Retención
Ultra-Fine
Filtro
Filter
Ultra
Fino
Retaining
Posts
Brazo
Rociador
¡ADVERTENCIA! Los pivotes
de retención pueden presentar riesgos de
asfixia para niños pequeños si son retirados
del lavavajillas. Mantenga los mismos fuera
del alcance de los niños.
Protección Contra Congelamientos
Si su lavavajillas se deja en un lugar sin
calefacción durante el invierno, solicité a un
técnico del servicio que:
Corte la corriente eléctrica al lavavajillas.
1
Retire fusibles quemados o disyuntores
desactivados.
Corte el suministro de agua y desconecte la
2
línea de entrada de agua desde la válvula
de agua.
Drene el agua desde la línea de entrada de
3
agua y la válvula de agua. (Use una olla
para atrapar el agua.)
Vuelva a conectar la línea de entrada de
4
agua a la válvula de agua.
Espacio
de aire
Controle el espacio
de aire en cualquier
momento en que
su lavavajillas no
esté drenando de
forma correcta.
¿Posee su Lavavajillas un Espacio de Aire?
Un espacio de aire protege su lavavajillas
contra la acumulación de agua en éste si un
drenaje se atasca. El espacio de aire no es una
parte del lavavajillas. No está cubierto por su
garantía. No todos los códigos de plomería
requieren espacios de aire; por lo tanto, es
posible que usted no tenga uno.
El espacio de aire es fácil de limpiar.
Apague el lavavajillas y levante la tapa del
1
espacio de aire.
Retire el tapón de plástico debajo de la tapa
2
y limpie con un palillo.
Reemplace el tapón y la tapa cuando el
3
espacio de aire esté limpio.
87
Page 88

Antes de Solicitar el Servicio Técnico…
Consejos para la Solución de Problemas
¡Ahorre tiempo y dinero! Revise los cuadros en las siguientes páginas, o visite GEAppliances.com.
In Canadá visite www.GEAppliances.ca. Es posible que no necesite llamar al servicio técnico.
Problema
Luz titilante del La puerta fue abierta o el •
indicador del ciclo fue interrumpido.
estado de Inicio el lavavajillas esté funcionando únicamente si desea cancelar el ciclo.
El lavavajillas emite Esto es un recordatorio de que • Presione Start (Iniciar) y cierre la puerta.
un PITIDO una vez la puerta de su lavavajillas se dejó
por minuto abierta durante el funcionamiento.
Continuará emitiendo pitidos hasta
que presione Start (Iniciar)
y cierre la puerta.
La pantalla muestra Se detecta una fuga posible • Consulte la sección
“LEAK DETECTED” con la detección de fugas y el ciclo se cancelarán si se detecta una fuga. La
(FUGA DETECTADA) pantalla mostrará “LEAK DETECTED” (FUGA DETECTADA). Llame al servicio
técnico.
Pitidos al final del Esto es normal. El lavavajillas • Para apagar el indicador del doble pitido (o reactivarlo si fue apagado en forma
ciclo emitirá dos pitidos al final del previa, presione la tecla Heated Dry (Secado en Caliente) 5 veces dentro de
(en algunos modelos) ciclo. un período de 3 segundos. Un triple pitido sonará para indicar que la opción
del pitido de final del ciclo fue encendida o apagada.
Los platos y los El filtro ultra-fino o fino • Lea la sección de Cuidado y limpieza.
cubiertos no
están limpios Temperatura baja del agua • Asegúrese de que la temperatura del agua entrante sea la correcta (consulte la
entrante sección Uso del lavavajillas). Encienda el grifo de agua caliente más cercano al
lavavajillas, deje correr hasta que la temperatura del agua deje de subir. Luego
inicie el lavavajillas y apague el grifo. Esto asegura que el agua entrante está
caliente. Seleccione Wash Temp Boost o Boost Temp (Aumento de la Temperatura
de Lavado) si está disponible.
La presión del agua está • Abra el grifo. ¿Sale el agua de forma más lenta que lo normal? Si es así, espere
temporariamente baja hasta que la presión sea normal antes de usar el lavavajillas.
El espacio de aire o la salida • Limpie el espacio de aire o despeje la salida de residuos.
de residuos están atascados
Carga inadecuada del estante • Asegúrese de que los utensilios grandes no bloqueen el dispensador de
detergente o los brazos de lavado. Lea la sección de Carga de los estantes del
lavavajillas.
Detergente de bajo rendimiento • Use un detergente de alta calificación tal como
Se detecta fuga • Consulte la sección
con la detección de fugas y el ciclo se cancelarán si se detecta una fuga. La
pantalla mostrará “LEAK DETECTED” (FUGA DETECTADA). Llame al servicio
técnico.
Manchas y películas Agua extremadamente dura • Use agentes de enjuague tales como Cascade® Complete Rinse Aid para evitar
en vasos y y utensilios manchas y evitar una nueva acumulación de películas.
• Si sólo cuando el agua sea extremadamente dura, un ablandador puede
ser necesario.
Temperatura baja del agua • Asegúrese de que la temperatura del agua sea de por lo menos 120°F (49°C).
entrante
Sobrecarga o carga inadecuada • Cargue el lavavajillas como se muestra en la sección Configuraciones del
del lavavajillas Lugar de Carga.
Detergente en polvo viejo • Asegúrese de que el detergente esté fresco.
o húmedo
El dispensador del agente de • Vuelva a llenar con un agente de enjuague tal como Cascade
enjuague está vacío Aid.
Demasiado poco o bajo • Asegúrese de usar la cantidad correcta de detergente con alta calificación.
rendimiento del detergente
Causas Posibles Qué Hacer
Presione el botón Start (
el lavavajillas.
está atascado
Iniciar
) una vez y cierre la puerta para iniciar
Presione la tecla Start (Iniciar) una segunda vez cuando
Uso del lavavajillas
Uso del lavavajillas
. Algunos modelos están equipados
Cascade® Platinum Pacs
. Algunos modelos están equipados
®
Complete Rinse
.
88
Page 89

GEAppliances.com
Problema Causas Posibles Qué Hacer
Enturbiamiento de Combinación de agua suave • Esto se llama aguafuerte y es permanente. Para evitar que esto suceda, use
la cristalería y demasiado detergente menos detergente si cuenta con agua suave. Lave la cristalería en el ciclo más
corto en que pueda quedar limpia.
Detergente libre de fosfato • Lea sobre Una película blanca sobre la cristalería, utensilios y su parte
con bajo rendimiento interna en esta sección de Solución de Problemas.
La temperatura del agua que • Esto podría ser aguafuerte. Baje la temperatura del agua caliente.
ingresa al lavavajillas supera los
150°F (66°C)
Agua con jabón en Detergente equivocado • Use sólo detergentes para lavavajillas automáticos para evitar la generación
la tina de agua con jabón. Se probó que los Detergentes para Lavavajillas Automáticos
Cascade® fueron aprobados para su uso en todos los lavavajillas de GE.
• Para eliminar el agua con jabón en la tina, abra el lavavajillas y permita que el
agua con jabón se disipe. Abra la puerta, mantenga presionado Start
(Iniciar) por 3 segundos y cierre la puerta.
El agente de enjuague se derramó • Siempre limpie los derrames del agente de enjuague de forma inmediata.
Se dejó detergente Los platos o utensilios están • Reposicione los platos, de modo que el agua del brazo rociador inferior
en las tazas del bloqueando la taza pueda despejar el detergente de la taza. Lea la sección Carga de los
dispensador de detergente estantes del lavavajillas.
que la puerta de la taza del dispensador se abra. Lea la sección
Carga de la canasta de la vajilla.
• No coloque recipientes ni ollas grandes directamente debajo del
dispensador de detergente.
Marcas negras o grises Utensilios de aluminio fueron • Retire las marcas con un limpiador suave y abrasivo.
en los platos frotados contra los platos
Los platos no se secan Temperatura baja del agua • Asegúrese de que la temperatura del agua entrante sea de por lo menos 120°F.
entrante • Seleccione Heated Dry (Secado en Caliente).
• Use la opción Wash Temp Boost o Boost Temp (Aumento de la Temperatura de
Lavado).
• Seleccione un ciclo más alto, tal como Wash Temp Sani o Sanitize Temp
(Temperatura de Lavado para Desinfectar), o Heavy (Pesado).
El dispensador del agente • Controle el dispensador del agente de enjuague y llene como se requiere.
de enjuague está vacío
Es necesario tiempo de secado • Deje la puerta cerrada cuando se encienda la luz de Clean (Limpio), para
adicional permitir que el ventilador funcione durante 90 minutos adicionales.
Nota: Si abre la puerta, esta extensión del ventilador será cancelada.
El panel de control Es posible que la puerta no esté • Asegúrese de que la puerta esté firmemente cerrada.
respondió a las completamente cerrada
instrucciones pero el
lavavajillas nunca se
llenó de agua
Los elementos flotantes • Retire el filtro Ultra Fino y suavemente golpee la pieza que se encuentra
podrán quedar atascados debajo del filtro ultra fino, el cual parece un salero. Reemplace el filtro.
Interior de la tina Película blanca en la superficie • GE recomienda el uso de Cascade® Complete Rinse Aid para evitar la
interna ³ minerales de agua formación de depósitos minerales de agua dura.
dura • Haga funcionar el lavavajillas con ácido cítrico para eliminar los depósitos
minerales. El ácido cítrico (número de pieza: WD35X151) se puede ordenar a
través de GE Parts (Piezas de GE). Para acceder a información sobre cómo
ordenar, lea la contratapa. De forma alternativa, adquiera Lemi Shine y siga las
instrucciones en la etiqueta.
El lavavajillas Se quemó el fusible o el disyuntor • Reemplace el fusible o reinicie el disyuntor. Retire cualquier otro
no funciona está desactivado electrodoméstico del circuito.
El encendido está apagado • En algunas instalaciones, el encendido del lavavajillas es provisto a través de un
interruptor de pared, con frecuencia ubicado junto al interruptor de desechos.
Asegúrese de que esté encendido
El panel de control está • Desbloquee el panel de control. Consulte la sección Getting started (Puesta
bloqueado en marcha).
Se detecta fuga • Algunos modelos están equipados con la detección de fugas y el ciclo se
cancelarán si se detecta una fuga. La pantalla mostrará “LEAK DETECTED”
(FUGA DETECTADA). Llame al servicio técnico.
Es posible que la válvula de • Asegúrese de que la válvula de agua (normalmente ubicada debajo del lavabo)
agua esté cerrada esté abierta.
No se siguió la secuencia de
proper Start (Inicio) adecuado
• Reposiciones los utensilios o la vajilla pesada que pudiera estar impidiendo
• Consulte la sección
Uso del lavavajillas
.
89
Page 90

Antes de Solicitar el Servicio Técnico…
Problema Causas Posibles Qué Hacer
Las luces del panel Demasiado tiempo para • Cada tecla deberá ser presionada dentro de los 30 segundos con relación
de control se presionar las teclas a las demás. Para volver a iluminarlas, presione cualquier tecla
apagan cuando seleccionadas nuevamente o abra la puerta y desbloquee (control superior).
está los controles
Agua en el fondo de El espacio de aire está • Limpie el espacio de aire. Lea la sección de Cuidado y limpieza.
la tina atascado
El bucle de drenaje alto o • Consulte las Instrucciones de Instalación para instalar una línea de drenaje
el espacio de aire no fueron adecuada.
instalados
El agua no es El drenaje está atascado • Si hay un espacio de aire, limpie el mismo. Lea la sección de Cuidado y limpieza.
bombeada fuera • Si el lavavajillas drena hacia la salida de residuos, despeje esta última.
de la tina • Controle que el lavabo de su cocina esté realizando un drenaje correcto. De no
ser así, es posible que deba llamar a un plomero.
Vapor Esto es normal • Aparece aire caliente y húmero a través de la ventilación durante el secado y
cuando el agua es bombeada hacia afuera. Esto es necesario para el secado.
La luz de desinfección La puerta fue abierta y el ciclo • No interrumpa el ciclo abriendo la puerta durante el ciclo de lavado.
no se ilumina al fue interrumpido durante
finalizar el ciclo el enjuague final
La temperatura del agua • Eleve la temperatura del calentador de agua a entre 120°F y 150°F.
entrante era demasiado baja
Ruido Sonidos de funcionamiento • Todos estos son normales. Ninguna acción es requerida.
normal:
Apertura de la taza de detergente
Entra agua al lavavajillas
El motor se detiene y activa en
diferentes momentos durante el
ciclo
Los brazos rociadores se activan
y detienen en diferentes
momentos
Sonidos de bombeo del drenaje
durante el vaciado
El bombeo del drenaje se activa
y detiene varias veces durante
cada drenaje
Sonido ruidoso de los platos • Asegúrese de que los platos hayan sido cargados de forma adecuada. Lea
cuando el brazo rociador gira la sección Carga de los estantes del lavavajillas.
Sonido ruidoso de los • Los utensilios altos podrán ser colocados en el estante superior a fin de
durante el lavado
Una película blanca Es posible que este problema • A fin de eliminar la película blanca, lave los platos a través del ciclo del
en la cristalería, sea ocasionado por un lavavajillas con ácido cítrico. Use el kit de ácido cítrico WD35X151, el cual
utensilios y el interior libre de fosfato de baja calidad puede encontrar a través de Internet. De otra forma, use Lemi Shine
(WX10X10019), el cual puede adquirir en una tienda de compras local.
Vierta el ácido cítrico en la taza de detergente y cierre la tapa. Coloque la
cristalería y utensilios con la película o de otro modo limpia en el lavavajillas.
Deje los utensilios de plata y otros artículos metálicos fuera del lavavajillas.
Encienda el lavavajillas y haga que funcione un ciclo completo sin
detergente. La cristalería, los utensilios y el lavavajillas deberían finalizar sin
la película sobre éstos. De forma alternativa, se podrá usar un enjuague con
vinagre. Vierta una taza de vinagre en el lavavajillas justo después de que la
taza de detergente se abra y deje que el lavavajillas complete su ciclo.
Esto se podrá repetir varias veces al año, de ser necesario.
El uso de un agente de enjuague tal como Cascade® Complete Rinse Aid
podrá ayudar a minimizar una nueva acumulación de la película. Además,
el uso de un detergente altamente calificado como Cascade® Platinum Pacs
ayudará a evitar la acumulación de la película.
utensilios contra la puerta evitar el bombeo contra la puerta interna durante el ciclo de lavado.
90
Page 91

Garantía del Lavavajillas de GE. GEAppliances.com
Todo el servicio de garantía es provisto por nuestros Centros de Servicio
de Fabricación, o un técnico autorizado de Servicio al Cliente (Customer
Care®). Para programar una visita del servicio técnico, visítenos a través
de Internet en GEAppliances.com, o llame al 800.GE.CARES (800.432.2737).
Cuando llame para solicitar el servicio, tenga los números de serie y modelo
disponibles.
Abroche su recibo aquí. Para
acceder al servicio técnico de
acuerdo con la garantía deberá
contar con la prueba de la
fecha original de compra.
Para realizar el servicio técnico de su electrodoméstico se podrá requerir el uso de datos del puerto de abordaje para su
diagnóstico. Esto da al técnico del Servicio de Fábrica de GE la habilidad de diagnosticar de forma rápida cualquier problema
con su electrodoméstico, y de ayudar a GE a mejorar sus productos al brindarle a GE la información sobre su electrodoméstico.
Si no desea que los datos de su electrodoméstico sean enviados a GE, solicitamos que le indique a su técnico NO entregar los
datos a GE en el momento del servicio.
Por el Período de: GE reemplazará:
Un Año Cualquier parte del lavavajillas que falle debido a un defecto en los materiales o la fabricación. Durante
Desde la fecha de esta garantía limitada de un año, GE también proveerá, sin costo, todo el trabajo y el servicio en el
compra original shogar relacionado con el reemplazo de la pieza que presente defectos.
Qué No Cubrirá GE:
Viajes del técnico del servicio a su hogar para enseñarle
sobre cómo usar el producto.
Instalación, entrega o mantenimiento inadecuados.
Fallas del producto en caso de abuso, mal uso, o uso para
propósitos diferentes al original o uso comercial.
Reemplazo de fusibles de la casa o reinicio de disyuntores.
Producto no accesible para brindar el servicio requerido.
Daños ocasionados sobre el producto por accidente,
incendio, inundaciones o catástrofes naturales.
Daños incidentales o consecuentes causados por posibles
defectos sobre este producto.
Limpieza o servicio técnico del dispositivo de espacio de aire
en la línea de drenaje.
Daño ocasionado luego de la entrega, incluyendo daños
sobre productos que sufrieron caídas al suelo.
(;&/86,Ï1'(*$5$17Ë$6,03/Ë&,7$6³6X~QLFD\H[FOXVLYDDOWHUQDWLYDHVODUHSDUDFLyQGHOSURGXFWRFRPRVHLQGLFDHQ
la Garantía Limitada. Las garantías implícitas, incluyendo garantías implícitas de comerciabilidad o conveniencia sobre un
propósito particular, se limitan a un año o al período más corto permitido por la ley.
Esta garantía se extiende al comprador original y a cualquier dueño subsiguiente de productos comprados para uso hogareño
dentro de EE.UU. Si el producto está en un área donde no se encuentra disponible un Proveedor Autorizado del Servicio Técnico de
GE, usted será responsable por el costo de un viaje o se podrá requerir que traiga el producto a una ubicación del Servicio Técnico de
GE Autorizado para recibir el servicio. Para acceder al servicio técnico correspondiente a la garantía, se deberá contar con la prueba
de la fecha original de compra. En Alaska, la garantía excluye el costo de envío o llamadas del servicio a su hogar.
Algunos estados no permiten la exclusión o limitación de daños fortuitos o consecuentes. Esta garantía le da derechos legales
específicos y es posible que tenga otros derechos legales que varían entre un estado y otro. Para conocer cuáles son sus derechos
legales, consulte a la oficina de asuntos del consumidor local o estatal o al Fiscal de su estado.
Garante: General Electric Company. Louisville, KY 40225
91
Page 92

Notas.
92
Page 93

GEAppliances.com
93
Page 94

Notas.
94
Page 95

Servicio al consumidor.
Página Web de GE Appliances
¿Tiene alguna pregunta sobre su electrodoméstico? ¡Pruebe la página Web de GE Appliances, 24 horas al día,
cualquier día del año! Para mayor conveniencia y servicio más rápido, ya puede descargar los Manuales
de los Propietarios, pedir piezas o incluso hacer una cita en línea para que vengan a realizar una reparación.
GEAppliances.com
Solicite una reparación GEAppliances.com
El servicio de expertos GE está a tan sólo un paso de su puerta. ¡Entre en línea y solicite su reparación cuando
le venga cualquier día del año! O llame al 800.GE.CARES (800.432.2737) durante horas normales de oficina.
Estudio de diseño para la vida real
*(DSR\DHOFRQFHSWRGH'LVHxR8QLYHUVDO³SURGXFWRVVHUYLFLRV\DPELHQWHVTXHSXHGHQXVDUJHQWHGHWRGDV
las edades, tamaños y capacidades. Reconocemos la necesidad de diseñar para una gran gama de habilidades
y dificultades físicas y mentales. Para más detalles cobre las aplicaciones de GE Diseño Universal, incluyendo
ideas de diseño para la cocina para personas con discapacidades, mire nuestra página Web hoy mismo.
Para personas con dificultades auditivas, favor de llamar al 800.TDD.GEAC (800.833.4322).
GEAppliances.com
Garantías ampliadas GEAppliances.com
Compre una garantía ampliada y obtenga detalles sobre descuentos especiales disponibles mientras su garantía
está aún activa. Puede comprarla en línea en cualquier momento, o llamar al (800.626.2224) durante horas
normales de oficina. GE Consumer Home Services estará aún ahí cuando su garantía termine.
Piezas y accesorios GEAppliances.com
Aquellos individuos con la calificación necesaria para reparar sus propios electrodomésticos pueden
pedir que se les manden las piezas o accesorios directamente a sus hogares (aceptamos las tarjetas
VISA, MasterCard y Discover). Haga su pedido en línea hoy, 24 horas cada día o llamar por teléfono
al 800.626.2002 durante horas normales de oficina.
Las instrucciones descritas en este manual cubren los procedimientos a seguir por cualquier usuario.
Cualquier otra reparación debería, por regla general, referirse a personal calificado autorizado. Debe
ejercerse precaución ya que las reparaciones incorrectas pueden causar condiciones de funcionamiento
inseguras.
Póngase en contacto con nosotros GEAppliances.com
Si no está satisfecho con el servicio que recibe de GE, póngase en contacto con nosotros en nuestra
página Web indicando todos los detalles así como su número de teléfono o escríbanos a:
General Manager, Customer Relations
GE Appliances, Appliance Park
Louisville, KY 40225
Registre su electrodoméstico GEAppliances.com
£5HJLVWUHVXQXHYRHOHFWURGRPpVWLFRHQOtQHD³FXDQGRXVWHGSUHILHUD El registrar su producto a tiempo
le proporcionará, si surgiera la necesidad, una mejor comunicación y un servicio más rápido bajo los términos
de su garantía. También puede enviar su tarjeta de registro pre-impresa que se incluye en el material
de embalaje o recorte y use el formulario de este Manual del Propietario.
95
Page 96

Consumer Support.
GE Appliances Website
Have a question or need assistance with your appliance? Try the GE Appliances Website 24 hours a day,
any day of the year! For greater convenience and faster service, you can now download Owner’s Manuals,
order parts or even schedule service on-line.
Schedule Service
Expert GE repair service is only one step away from your door. Get on-line and schedule your service at your
convenience any day of the year! Or call 800.GE.CARES (800.432.2737) during normal business hours.
In Canada, call 800.561.3344
In the US: GEAppliances.com
In Canada: GEAppliances.ca
In the US: GEAppliances.com
In Canada: GEAppliances.ca
Real Life Design Studio In the US: GEAppliances.com
*(VXSSRUWVWKH8QLYHUVDO'HVLJQFRQFHSW³SURGXFWVVHUYLFHVDQGHQYLURQPHQWVWKDWFDQEHXVHGE\SHRSOHRI
all ages, sizes and capabilities. We recognize the need to design for a wide range of physical and mental abilities
and impairments. For details of GE’s Universal Design applications, including kitchen design ideas for people with
disabilities, check out our Website today. For the hearing impaired, please call 800.TDD.GEAC (800.833.4322).
In Canada, please write to: Director, Consumer Relations, MC Commercial
1 Factory Lane, Suite 310
Moncton, N.B. E1C 9M3
Extended Warranties
In the US: GEAppliances.com
In Canada: GEAppliances.ca
Purchase a GE extended warranty and learn about special discounts that are available while your warranty is still
in effect. You can purchase it on-line anytime, or call 800.626.2224 during normal business hours. GE Consumer
Home Services will still be there after your warranty expires. In Canada, please consult your local listings for your
extended warranty provider.
Parts and Accessories In the US: GEAppliances.com
Individuals qualified to service their own appliances can have parts or accessories sent directly to their homes
(VISA, MasterCard and Discover cards are accepted). Order on-line today, 24 hours every day or by phone at
877.959.8688 during normal business hours.
Instructions contained in this manual cover procedures to be performed by any user. Other servicing generally
should be referred to qualified service personnel. Caution must be exercised, since improper servicing may
cause unsafe operation.
In Canada, call 800.661.1616
Contact Us
If you are not satisfied with the service you receive from GE, contact us on our Website with all the details including
your phone number, or write to: General Manager, Customer Relations
GE Appliances, Appliance Park
Louisville, KY 40225
In Canada, please write to: Director, Consumer Relations, MC Commercial
1 Factory Lane, Suite 310
Moncton, N.B. E1C 9M3
In the US: GEAppliances.com
In Canada: GEAppliances.ca
96
Register Your Appliance
5HJLVWHU\RXUQHZDSSOLDQFHRQOLQH³DW\RXUFRQYHQLHQFHTimely product registration will allow for enhanced
communication and prompt service under the terms of your warranty, should the need arise. You may also
mail in the pre-printed registration card included in the packing material.
In the US: GEAppliances.com
In Canada: GEAppliances.ca
Printed on Recycled Paper
 Loading...