

Page 1

0
N
EL
GEAppliances.com
Safety Instructions ........... 2,3
Operating Instructions
Automatic Icemaker ............... 11
Care and Cleaning ............. 12, 13
Controls ............................ 4
Crispers and Pans ................... 8
Freezer .......................... 9, 10
Replacing the Light Bulbs .......... 14
Shelves and Bins .................... 7
Water Filter ....................... 5, 6
Installation Instructions
Installing the Refrigerator ....... 16-20
Installing the Water Line ........ 30-32
Preparing to Install
the Refrigerator .................... 15
Removing and Replacing
the Doors (Double Door
Refrigerator Models onlg) ....... 27-29
Removing and Replacing the
Freezer Drawer ................. 21, 22
Reversing the Door Swing
(Single Door Refrigerator
Models only) ................... 23-26
Models 20, 22 and 23
Cong61ateur inf6rieur
R frig rateurs
La section ffan_aise commence 6 la page 45
Congelador inferior
Refrigeradores
4.--
Troubleshooting Tips ...... 33-36
Normal Operating Sounds .......... 33
Consumer Support
Consumer Support ........ Back Cover
Performance Data Sheet ....... 41, 42
Owner's Registration
for Canadian Customers ........ 37, 38
State of California Water
Treatment Device Certificate .... 43, 44
Warrantg for Canadian
Customers ......................... 40
Warrantg for U.S. Customers ....... 39
Write the model and serial
numbers here:
Model #
Serial #
La secci6n en espa_ol empieza en la p6gina 85
Find these numbers on a label
on the right side, near the top of the
refrigerator compartment.
200D9366PO015 49-60604 04-09JR
Page 2
IMPORTANT SAFETY INFORMATION.
READ ALL INSTRUCTIONS BEFORE USING.
tL WARNING!
Use this appliance only for its intended purpose as described in this Owner's Manual.
SAFETY PRECAUTIONS
When using electrical appliances, basic safety precautions should be followed, including the following:
_,This refrigerator must be properly installed
and located in accordance with the Installation
Instructions before it is used.
Donot allow children to climb,stand or hang
on the shelvesinthe refrigerator.They could
damage the refrigerator and seriously injure
themselves.
Donot touch the cold surfaces in the freezer
compartment when hands are damp or wet.
Skinmay stick to these extremely cold surfaces.
Donot store or usegasolineor other flammable
vapors and liquidsinthe vicinity of this or any
other appliance.
Keepfingers out of the "pinch point" areas;
clearancesbetween the doorsand between
the doors and cabinet are necessarilgsmall.
Becareful closing doors when children are
inthe area.
_, Inrefrigerators with automatic icemakers,
avoidcontact with the moving parts of the
ejector mechanism, or with the heating element
that releasesthe cubes. Do not place fingers or
handson the automatic icemaking mechanism
while the refrigerator is plugged in.
Unplugthe refrigerator before cleaning and making
repairs.
NOTE:Westronglg recommend that ang servicing
beperformed bg a qualifiedindividua!.
Settingeither or both controlsto the Offposition
doesnot remove power to the light circuit.
Donot refreezefrozen foods which have
thawed completelg.
DANGER! RISK OF CHILD ENTRAPMENT
PROPERDISPOSAL OF THE REFRIGERATOR
Childentrapment and suffocation are not problems of
the past. Junked or abandoned refrigerators are still
dangerous...evenif theg will sit for "just a few dags."
If gou are getting rid of gour old refrigerator, please
follow the instructions below to help prevent
accidents.
Before You Throw Away Your Old
Refrigerator or Freezer:
Takeoff the doors.
Leavethe shelves in place sothat children mag not
easilgclimb inside.
Refrigerants
All refrigeration products contain refrigerants,
which under federal law must be removed prior
to product disposal. If gou are getting rid of an
old refrigeration product, check with the compang
handling the disposal about what to do.
USEOF EXTENSION CORDS
Because of potential safetg hazards under certain conditions, we stronglg recommend against
the use of an extension cord.
However,if gou must use an extension cord, it isabsolutelg necessargthat it be a UL-listed (inthe UnitedStates)
or a CSAcertified (inCanada),S-wiregrounding tgpe appliance extension cord having a grounding tgpe plug
2
and outlet and that the electrical rating of the cord be 15 amperes (minimum) and 120volts.
Page 3
GEAppliances.com
WARNING!
HOW TO CONNECT ELECTRICITY
Do not, under any circumstances, cut or remove the third (ground) prong from the power cord.
For personal safety, this appliance must be properly grounded.
Thepower cord of this appliance is equipped
with a 3-prong (grounding)plug which mates
with a standard 3-prong (grounding)wall outlet to
minimize the possibility of electricshock hazard from
this appliance.
Have the wall outlet and circuit checked bg a
qualified electrician to make surethe outlet is
properlg grounded.
Where a standard 2-prong wall outlet is encountered,
it is your personal responsibility and obligation to
have it replaced with a properly grounded 3-prong
wall outlet.
Therefrigerator should alwags be plugged into its
own individual electrical outlet which hasa voltage
rating that matches the rating plate.
USE OF ADAPTER PLUGS
Adapter plugs are not permitted in Canada.
Thisprovides the best performance and alsoprevents
overloading house wiring circuits which could cause a
fire hazardfrom overheated wires.
Never unplug gour refrigerator bg pulling on the
power cord.Alwags grip plug firmlg and pull straight
out from the outlet.
Repairor replace immediatelg all power cords that
have become fraged or otherwise damaged. Do not
usea cord that shows cracks or abrasion damage
along its length or at either end.
When moving the refrigerator awag from the
wall, be careful not to roll overor damage the
power cord.
READAND FOLLOWTHISSAFETYINFORMATIONCAREFULLY.
SAVETHESEINSTRUCTIONS
Page 4
About the controlswith temperature settings.
_ Adjust F...... _Co'de_ Q _irm_ _C0,derj_ Q _irmer_ Adjust Refdgerotor )
o_soff o_soff
9 is Coidest 9 is Coldest
(onsome models)
i ® o,o,, ®
L 9 is ColdestAdjust Freezer Adjust Refrigerator
Temperature Temperature
(on some models)
9is Coldest
9FsColdest
01sOft
0isoff
(on some models)
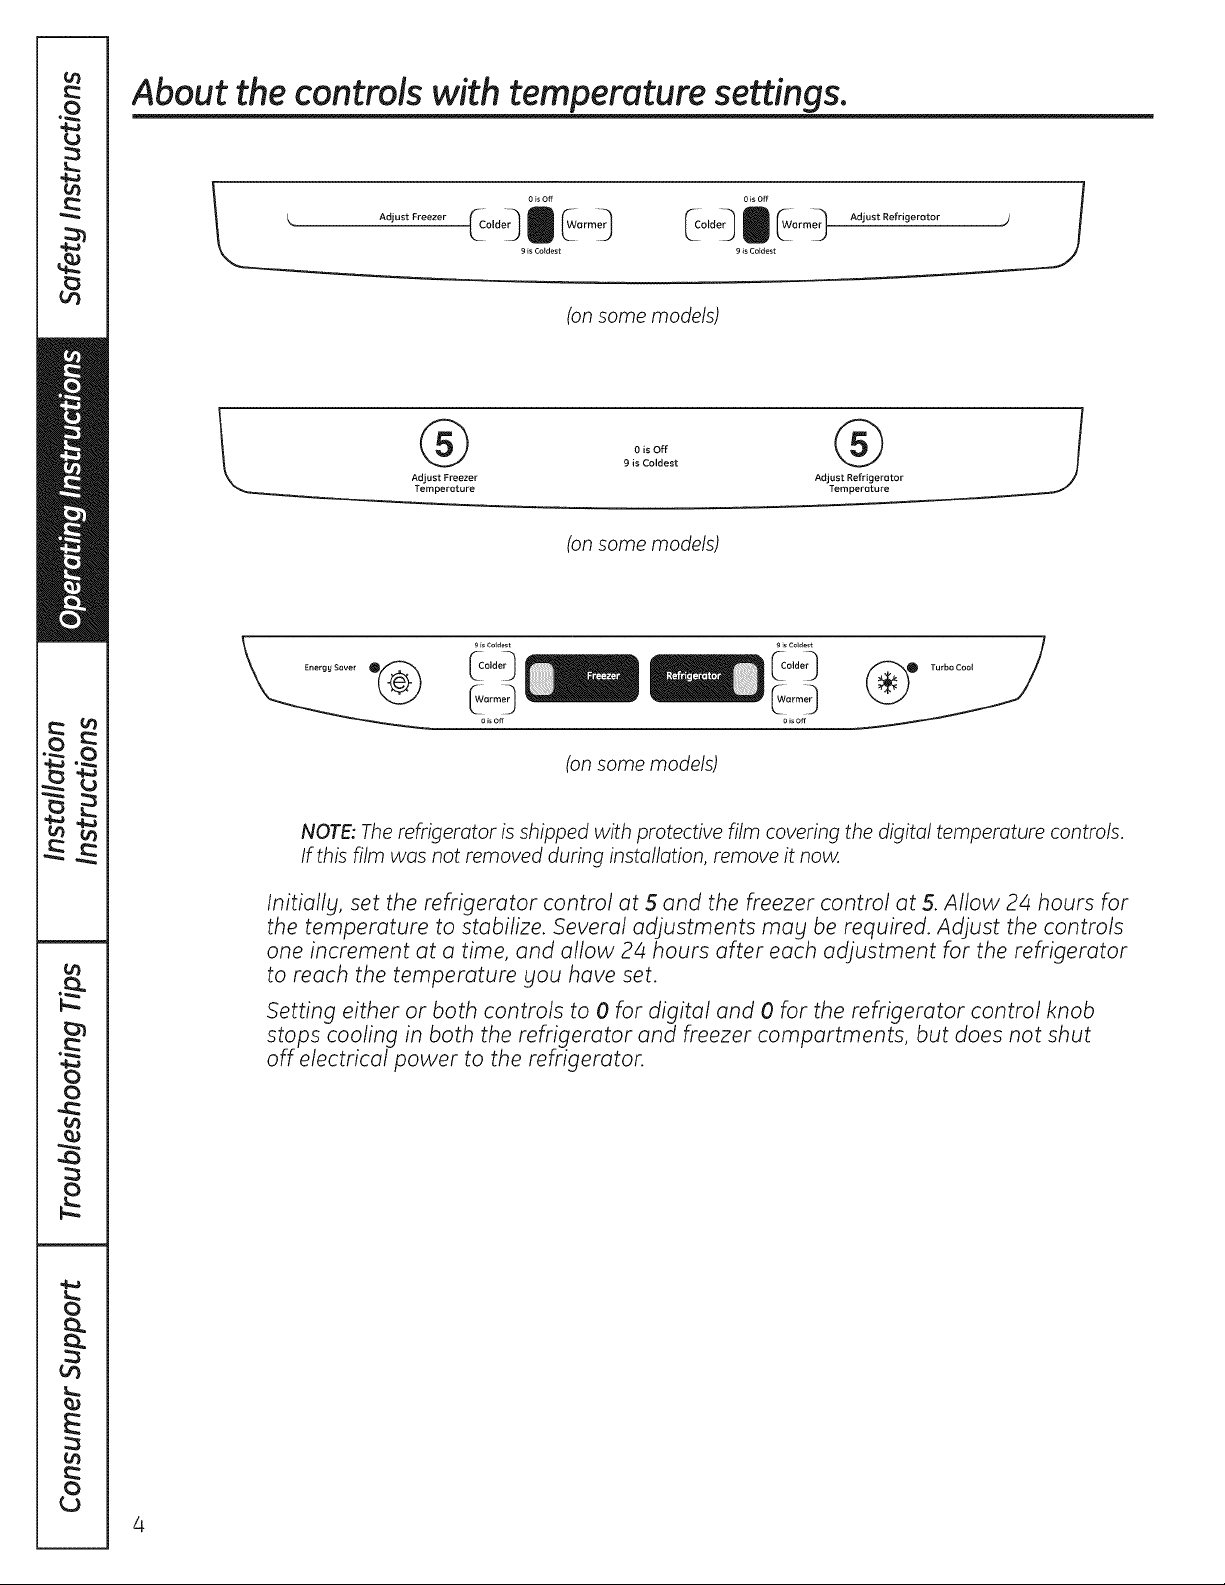
NOTE: The refrigerator is shipped with protective film covering the digital temperature controls.
If this film was not removed during installation, remove it now.
Initially, set the refrigerator control at 5 and the freezer control at 5. Allow 24 hours for
the temperature to stabilize. Several adjustments mabt be required. Adjust the controls
one increment at a time, and allow 24 hours after each adjustment for the refrigerator
to reach the temperature blou have set.
Setting either or both controls to 0 for digital and 0 for the refrigerator control knob
stops cooling in both the refrigerator and freezer compartments, but does not shut
off electrical power to the refrigerator.
4
Page 5
About the water filter. Ion20 modelsonly) GEAppliances.com
Water Filter Cartridge
Thewater filter cartridge islocated in the
back upper right corner of the refrigerator
compartment.
When to Replace the Filter
Thefilter cartridge should be replaced
when the flow of water to the icemaker
decreases,or everg romonths.
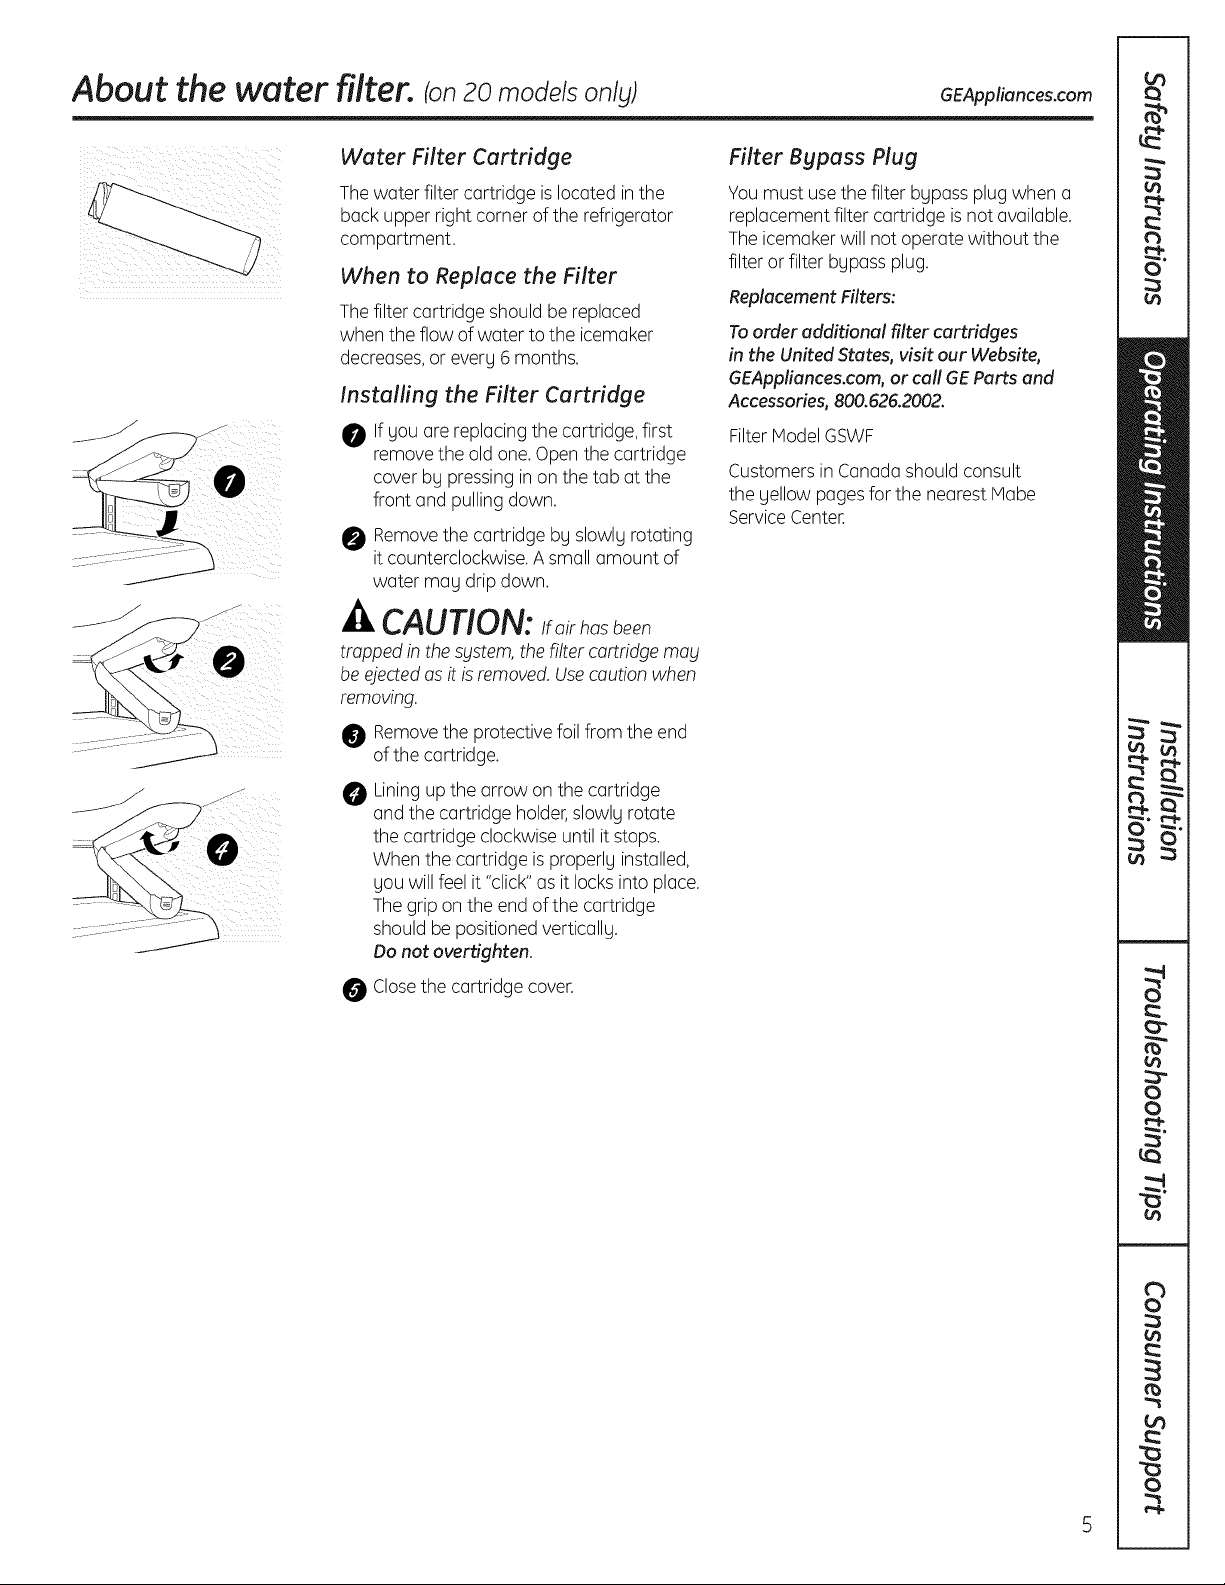
Installing the Filter Cartridge
0 If gou are replacingthe cartridge,first
remove the old one.Open the cartridge
cover bg pressing in on the tab at the
front and pulling down.
Removethe cartridge bg slowlg rotating
it counterclockwise. A small amount of
water mag drip down.
CAUTION:Ifairhasbeen
trapped in the system,the filter cartridge may
be ejectedasit is removed.Usecautionwhen
removing.
Removethe protective foil from the end
of the cartridge.
Liningup the arrow on the cartridge
@
and the cartridge holder,slowlg rotate
the cartridge clockwise until itstops.
When the cartridge isproperlg installed,
gou will feel it "click" as it locks into place.
Thegrip on the end of the cartridge
should be positionedverticallg.
Do not overtighten.
Filter Bypass Plug
Youmust usethe filter bgpass plug when a
replacement filter cartridge is not available.
The icemaker will not operate without the
filter or filter bgpass plug.
Replacement Filters:
To order additional filter cartridges
in the United States, visit our Website,
GEAppliances.com, or call GE Parts and
Accessories, 800.626.2002.
Filter Model GSWF
Customersin Canadashould consult
the gellow pages for the nearest Habe
ServiceCenter.
Closethe cartridge cover.
Page 6
About the water filter. (on22 and 23 models only)
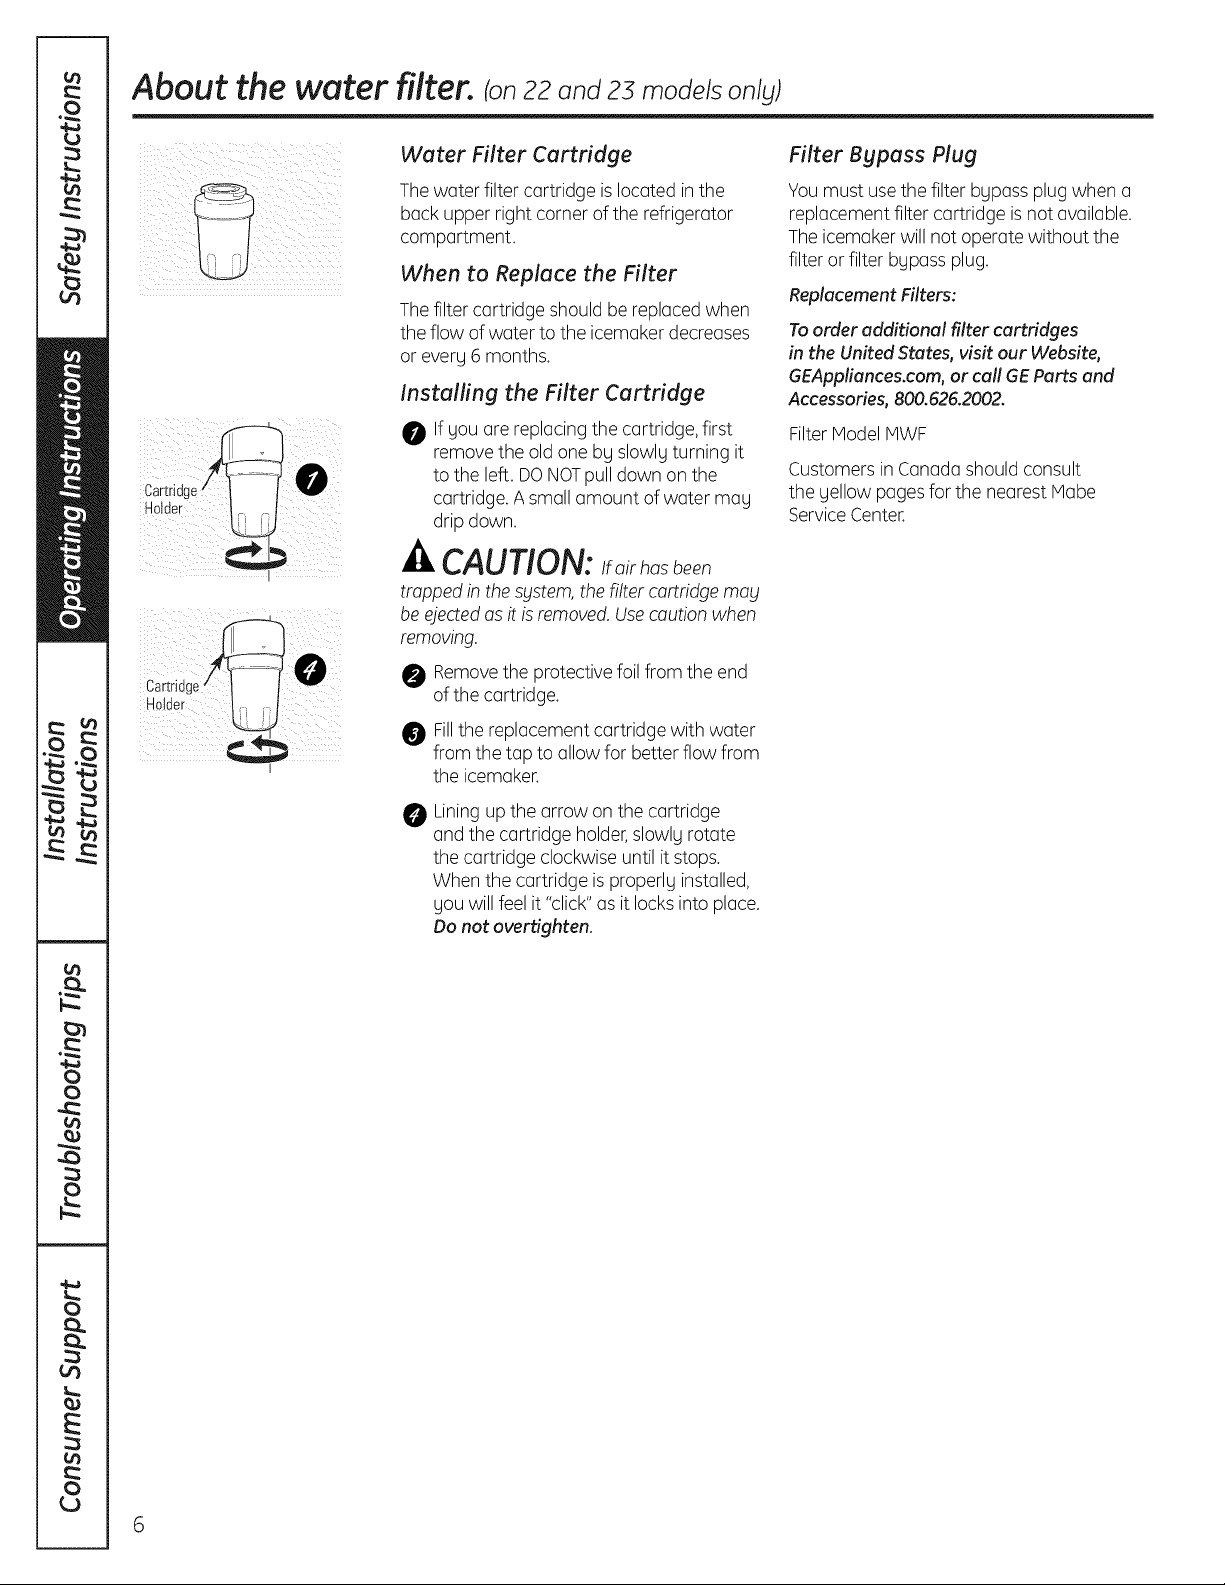
Water Filter Cartridge
Thewater filter cartridge islocated in the
back upper right corner of the refrigerator
compartment.
When to Replace the Filter
Thefilter cartridge should be replacedwhen
the flow of water to the icemaker decreases
or every 6 months.
Installing the Filter Cartridge
0 If you are replacing the cartridge,first
remove the old one by slowly turning it
to the left. DONOTpull down on the
cartridge. A small amount of water may
drip down.
CAUTION:Ifairhasbeen
trapped in the system,the filter cartridge may
be ejectedasit is removed.Usecautionwhen
removing.
Removethe protective foil from the end
0 of the cartridge.
Fillthe replacement cartridge with water
from the tap to allow for better flow from
the icemaker.
Filter Bypass Plug
Youmust usethe filter bypass plug when a
replacement filter cartridge is not available.
The icemaker will not operate without the
filter or filter bypass plug.
Replacement Filters:
To order additional filter cartridges
in the United States, visit our Website,
GEAppliances.com, or call GE Parts and
Accessories, 800.626.2002.
Filter iVlodel iVlWF
Customersin Canadashould consult
the yellow pagesfor the nearest Mabe
ServiceCenter.
Liningup the arrow on the cartridge
O
and the cartridge holder,slowly rotate
the cartridge clockwise until itstops.
When the cartridge isproperly installed,
you will feelit "click" as it locksinto place.
Do not overtighten.
6
Page 7
About: the shelves and bins. GEApp,ances.com
Not all features are on all models.
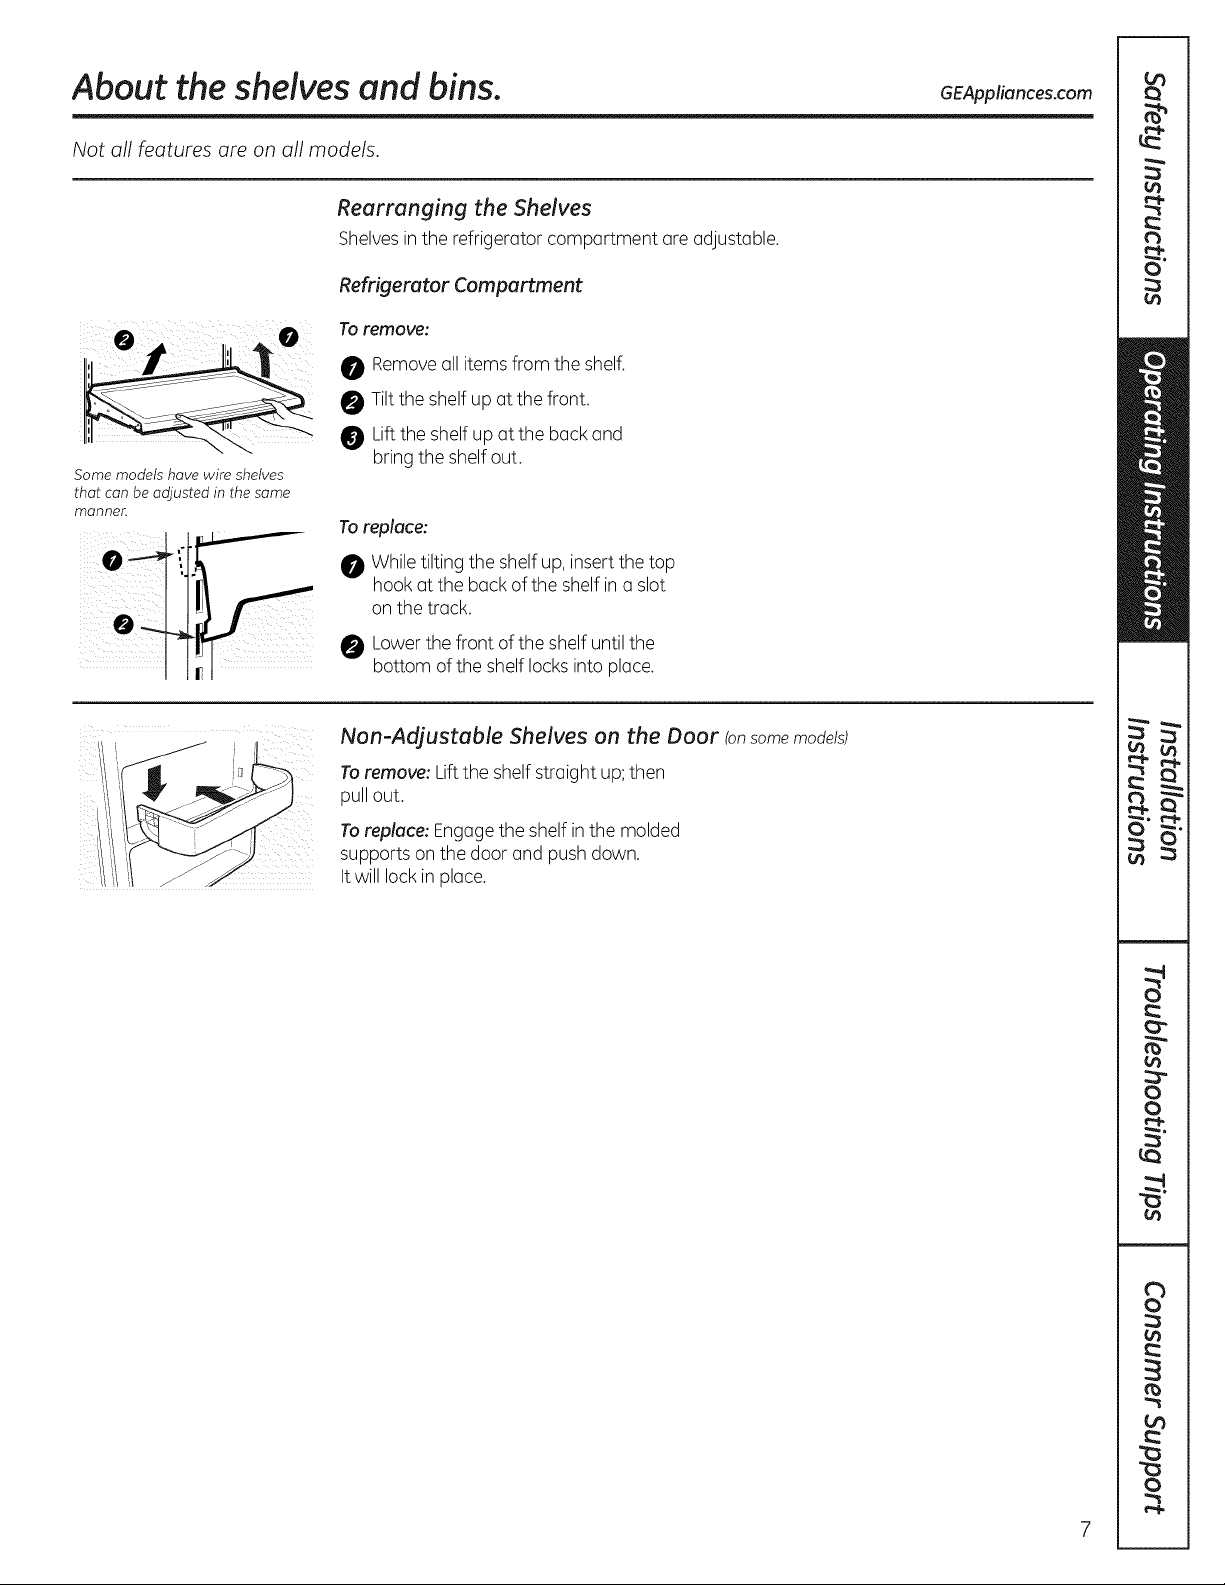
Rearranging the Shelves
Shelves inthe refrigerator compartment are adjustable.
Refrigerator Compartment
To remove:
0 Removeall items from the shelf.
0 Tilt the shelf up at the front.
Liftthe shelf up at the back and
Some models have wire shelves
that can be adjusted in the same
manneK
bring the shelf out.
To replace:
While tilting the shelf up, insert the top
hook at the back of the shelf in a slot
on the track.
Lowerthe front ofthe shelf until the
bottom of the shelf locksinto place.
Non-Adjustable Shelves on the Door (onsome models)
Toremove: Lift the shelf straight up;then
pull out.
Toreplace: Engagethe shelf in the molded
supports on the door and pushdown.
It will lock in place.
Page 8
About the crispers and pans.
Not all features are on all models.
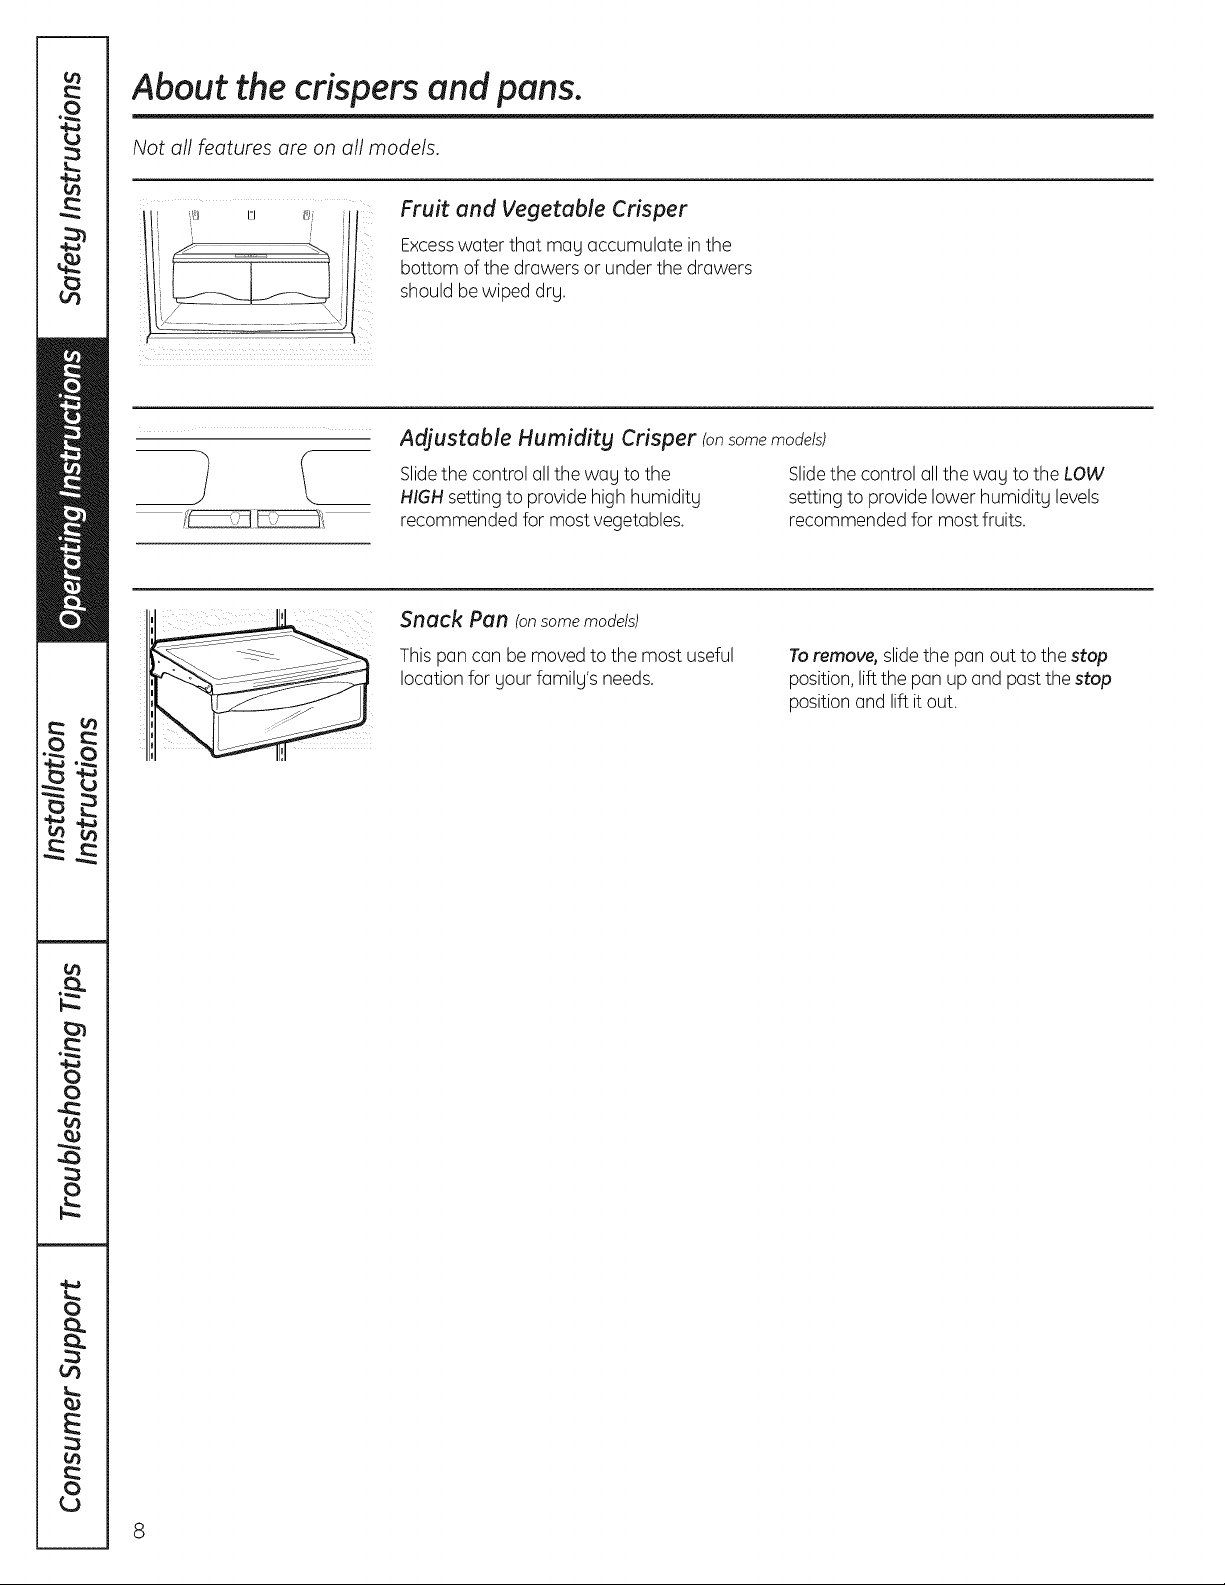
Fruit and Vegetable Crisper
Excesswater that mag accumulate in the
bottom of the drawers or under the drawers
should bewiped dru.
Adjustable Humiditg Crisper (onsome models)
Slidethe control allthe wag to the
HIGHsetting to provide high humidity
recommended for most vegetables.
Snack Pan (onsomemodels)
Slidethe control all the wag to the LOW
setting to provide lower humidity levels
recommended for most fruits.
This pan can be moved to the most useful
location for uour familu's needs.
Toremove, slide the pan out to the stop
position,lift the pan up and pastthe stop
position and lift it out.
8
Page 9
About the freezer drawer. (onsome models) GEAppliances.com
Not all features are on all models.
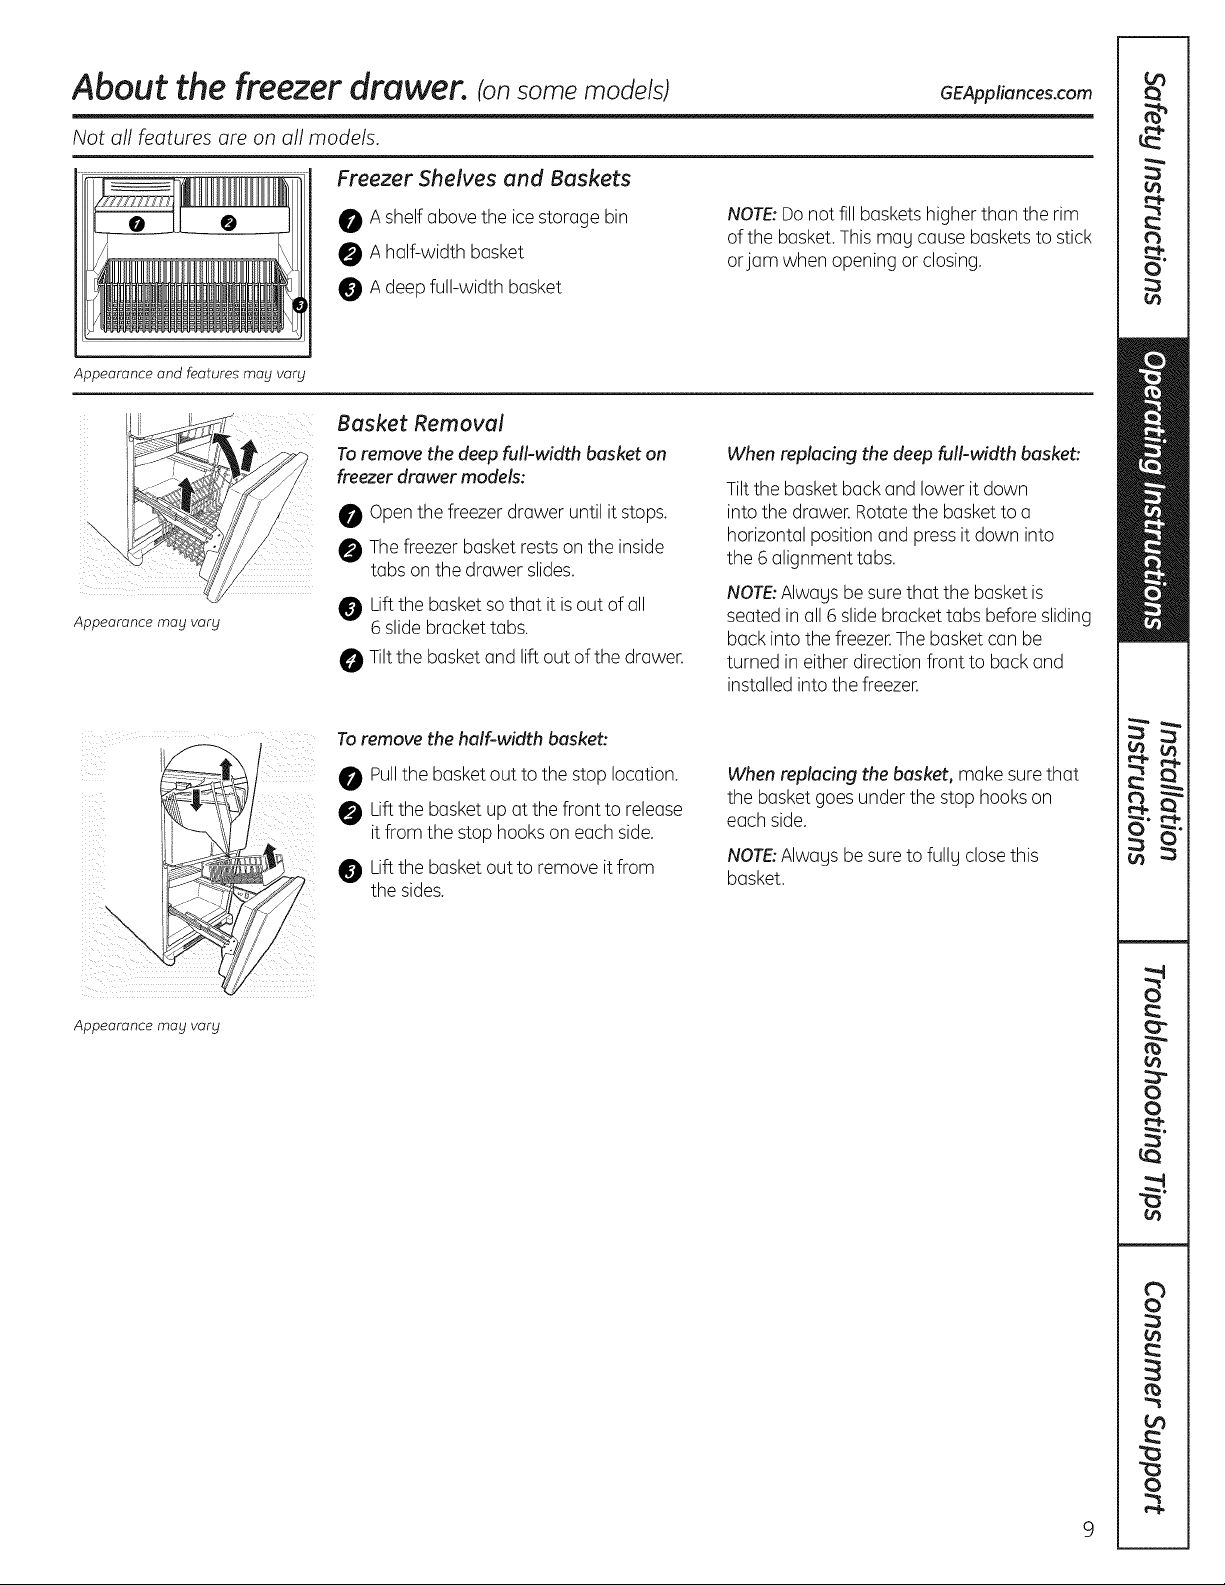
Freezer Shelves and Baskets
Appearance and features may vary
Appearance may vary
0 A shelf above the icestorage bin
0 A half-width basket
A deep full-width basket
Basket Removal
To remove the deep full-width basket on
freezer drawer models:
Openthe freezer drawer until it stops.
Thefreezer basket rests on the inside
tabs on the drawer slides.
Liftthe basket so that it is out of all
6 slide bracket tabs.
Tilt the basket and lift out ofthe drawer.
To remove the half-width basket:
_! Pullthe basket out to the stop location.
Liftthe basket up at the front to release
it from the stop hooks on each side.
Liftthe basket out to remove it from
the sides.
NOTE:Do not fill basketshigher than the rim
of the basket.This mag cause basketsto stick
orjam when opening or closing.
When replacing the deep full-width basket:
Tiltthe basket back and lower it down
into the drawer.Rotatethe basketto a
horizontal position and press it down into
the 6 alignment tabs.
NOTE:Alwagsbe surethat the basket is
seated in all 6 slidebracket tabs before sliding
back into the freezer.Thebasket can be
turned in either direction front to back and
installed into the freezer.
When replacing the basket, make sure that
the basket goes under the stop hooks on
each side.
NOTE:Alwagsbe sureto fullg closethis
basket.
Appearance may vary
9
Page 10
About the freezer compartment. Ionsome models)
Not all features are on all models.
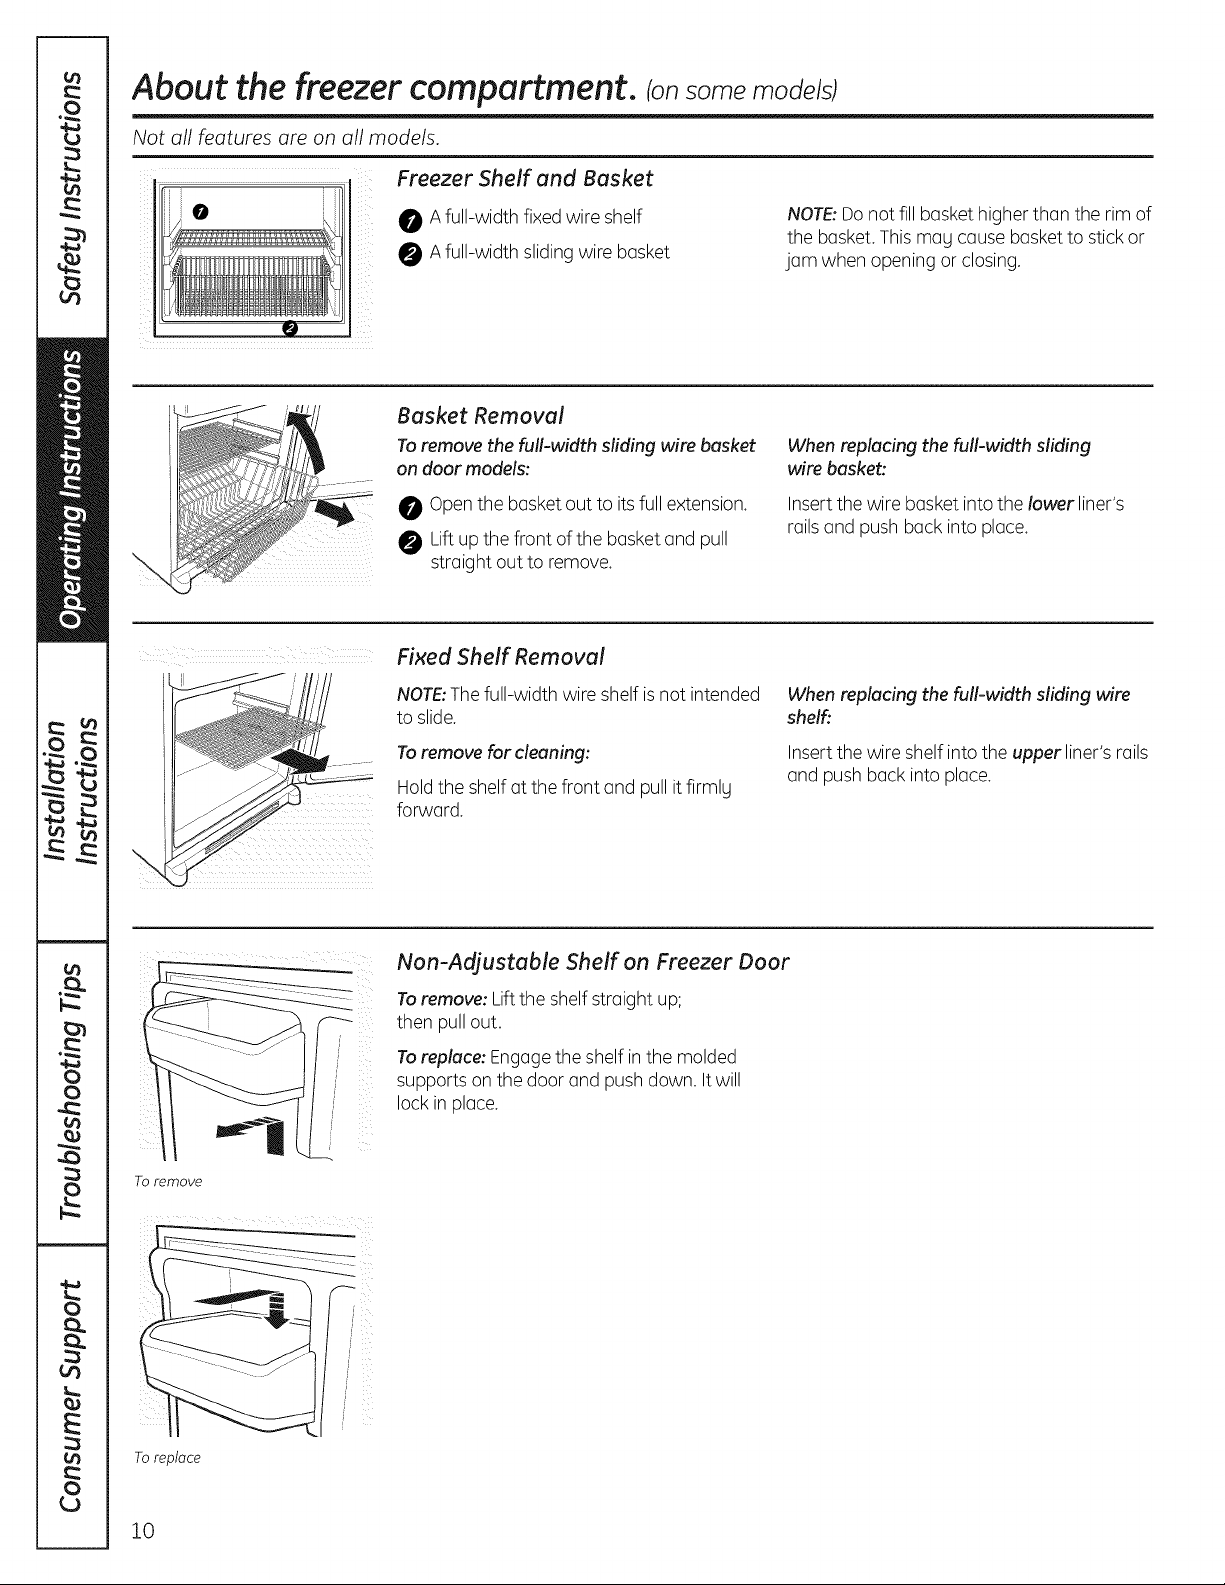
Freezer Shelf and Basket
0 A full-width fixed wire shelf
0 A full-width sliding wire basket
Basket Removal
To remove the full-width sliding wire basket
on door models:
Open the basket out to its full extension.
Lift up the front of the basket and pull
straight out to remove.
Fixed Shelf Removal
NOTE:Thefull-width wire shelf isnot intended
to slide.
To remove for cleaning:
Holdthe shelf at the front and pull itfirmlg
forward.
NOTE:Do not fill baskethigher than the rim of
the basket. This mag cause basket to stick or
jam when opening or closing.
When replacing the full-width sliding
wire basket:
Insertthe wire basket into the lower liner's
railsand push back into place.
When replacing the full-width sliding wire
shelfi
Insertthe wire shelf into the upper liner's rails
and push back into place.
To remove
To replace
10
Non-Adjustable Shelf on Freezer Door
Toremove: Liftthe shelfstraight up;
then pull out.
Toreplace: Engagethe shelf inthe molded
supports on the door and push down. Itwill
lock in place.
Page 11
About the.automatic ice.maker. Ionsome models) GEAppliances.com
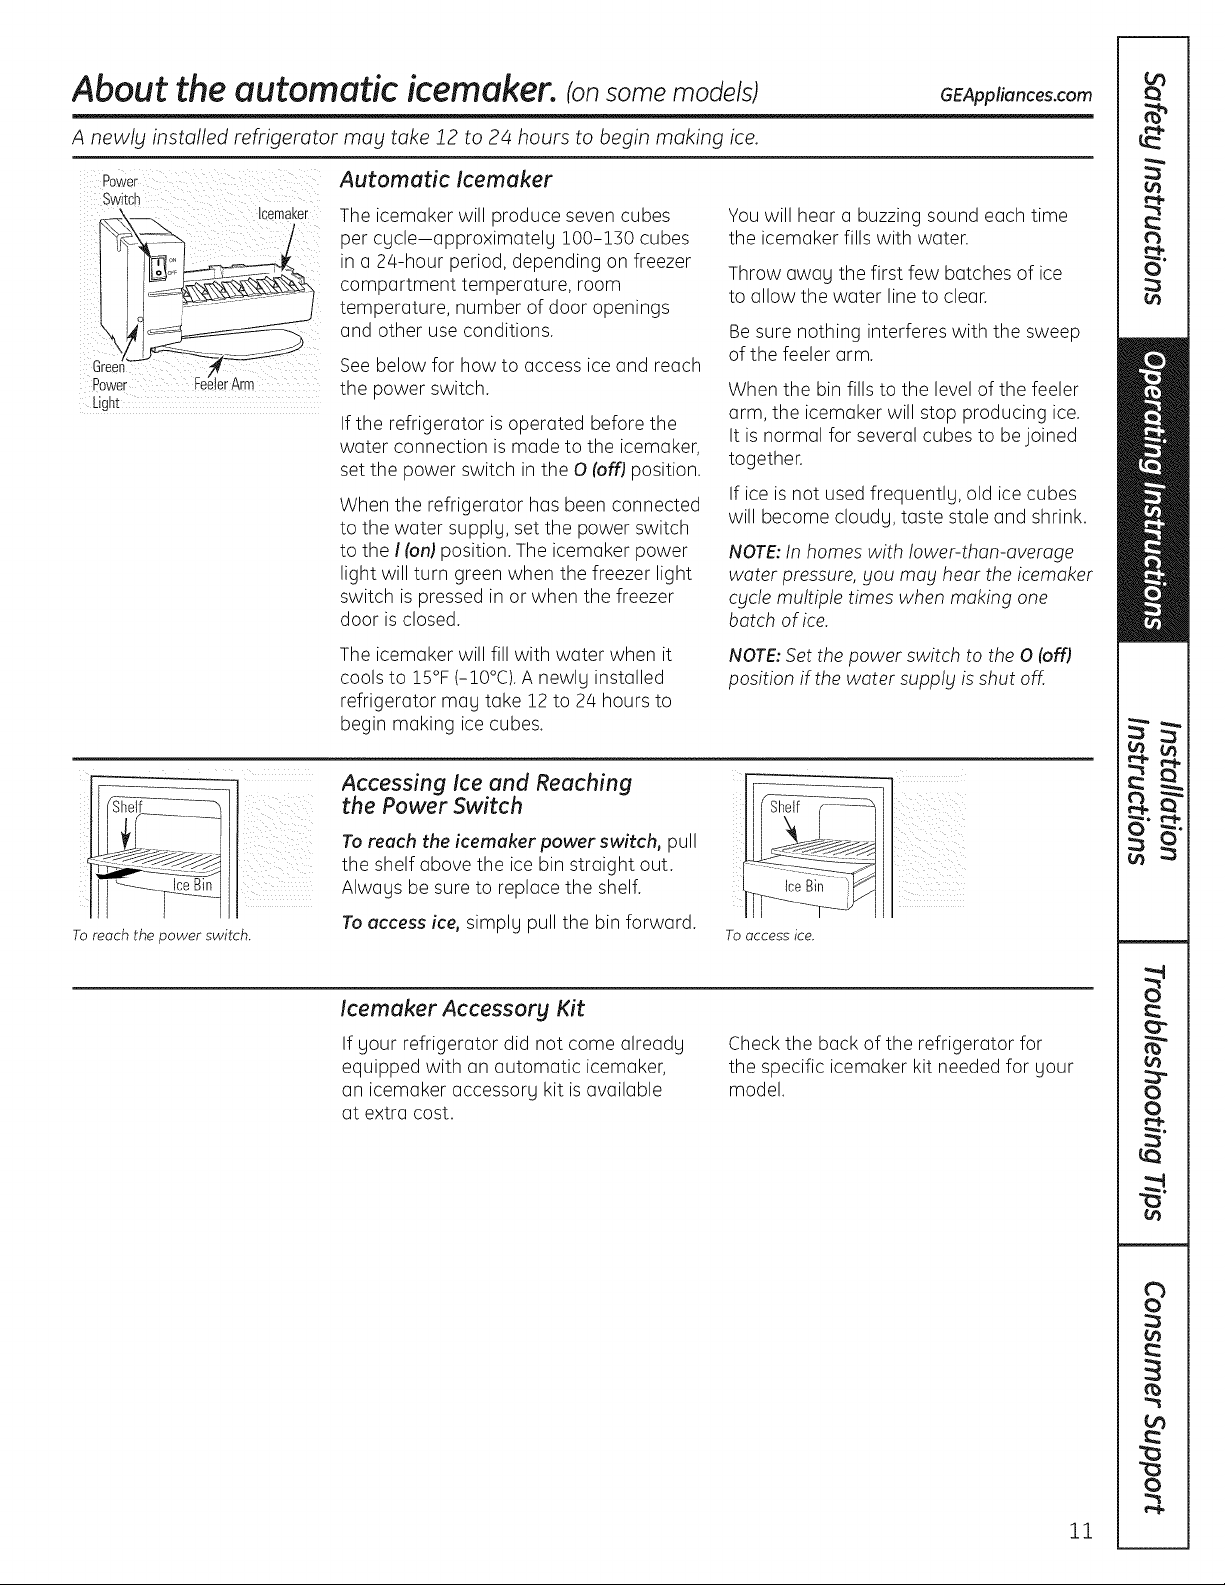
A newly installed refrigerator may take 12 to 2/4 hours to begin making ice.
Power Automatic Icemaker
Switch
._ icemaKer
Power _rArm
LIgn_
The icemaker will produce seven cubes
per cycle-approximately 100-!30 cubes
in a 24-hour period, depending on freezer
compartment temperature, room
temperature, number of door openings
and other use conditions.
See below for how to access ice and reach
the power switch.
If the refrigerator is operated before the
water connection is made to the icemaker,
set the power switch in the O (off) position.
When the refrigerator has been connected
to the water supply, set the power switch
to the I (on) position. The icemaker power
light will turn green when the freezer light
switch is pressed in or when the freezer
door is closed.
The icemaker will fill with water when it
cools to 15°F (-10°C). A newly installed
refrigerator may take 12 to 2/4hours to
begin making ice cubes.
Mouwill hear a buzzing sound each time
the icemaker fills with water.
Throw away the first few batches of ice
to allow the water line to clear.
Be sure nothing interferes with the sweep
of the feeler arm.
When the bin fills to the level of the feeler
arm, the icemaker will stop producing ice.
It is normal for several cubes to bejoined
together.
If ice is not used frequently, old ice cubes
will become cloudy, taste stale and shrink.
NOTE:In homes with lower-than-average
water pressure, _jouma_j hear the icemaker
Cblclemultiple times when making one
batch of ice.
NOTE:Set the power switch to the 0 (off)
position if the water supplg is shut off.
To reach the power switch.
Accessing Ice and Reaching
:ii i ii ii iiIII IIIIIII
the shelf above the ice bin straight out.
Always be sure to replace the shelf.
Icemaker Accessory Kit
the Power Switch
To reach the icemeker power switch, pull
Touccess ice, simply pull the bin forward.
If your refrigerator did not come already
equipped with an automatic icemaker,
an icemaker accessory kit is available
at extra cost.
TO access ice.
Check the back of the refrigerator for
the specific icemaker kit needed for your
model.
11
Page 12
Careand cleaning of the refrigerator.
Cleaning the Outside
Thedoor handles and trim. Clean with a
cloth dampened with soapy water. Dry with
a soft cloth. Do not usewax on the door
handlesand trim.
Keepthe outside clean. Wipe with
a clean cloth lightly dampened with kitchen
appliance wax or mild liquid dishdetergent.
Dry and polish with a clean,soft cloth.
Do not wipe the refrigerator with o soiled
dish cloth or wet towe!. These may leave
a residue that can erode the paint. Do not
usescouring pads, powdered cleaners,
bleach or cleaners containing bleach
because these products can scratch
and weaken the paint finish.
Cleaning the Inside
Tohelp prevent odors, leavean open box
of baking soda in the refrigerator and freezer
compartments.
Unplug the refrigerator before cleaning.
If this is not practical, wring excessmoisture
out of sponge or cloth when cleaning around
switches, lights or controls.
Usean appliance wax polishon the inside
surface between the doors.
Usewarm water and baking soda solution-
about a tablespoon (15ml) of baking sodato
a quart (1liter)of water.This both cleansand
neutralizesodors. Rinseand wipe dry.
Thestainless steel panels and door
handles. Stainlesssteel (onsome models)
can be cleanedwith a commercially
available stainlesssteel cleaner.A spray-on
stainlesssteel cleaner works best.
Donot use appliance wax or polish
on the stainlesssteel.
After cleaning the door gaskets, apply a thin
layer of petroleumjelly to the door gaskets
at the hinge side.This helpskeepthe gaskets
from sticking and bending out of shape.
Avoid cleaning cold glass shelves with hot
water because the extreme temperature
difference mag cause them to break.
Handle glass shelves carefu!lg. Bumping
tempered glass can cause it to shatter.
Do not wash any plastic refrigerator parts
in the dishwasher.
12
Page 13
Behind the Refrigerator
Becareful when moving the refrigerator
awag from the wall. Alltgpes of floor
coveringscan be damaged, particularlg
cushioned coverings and those with
embossedsurfaces.
Raisethe levelinglegs located at the bottom
front of the refrigerator.
Pullthe refrigerator straight out and return it
to position bg pushing it straight in.Having
Preparing for Vacation
GEAppliances.com
the refrigerator in a sidedirection mag
result in damage to the floor covering
or refrigerator.
Lowerthe leveling legsuntil theg touch
the floor.
When pushing the refrigerator back, make
sure gou don't rol! over the power cord or
icemaker supplg line (on some models).
Forlong vacations or absences,remove
food and unplug the refrigerator. Cleanthe
interior with a baking soda solution of one
tablespoon (15ml) of baking soda to one
quart (1liter)of water. Leavethe doors open.
Setthe icemaker power switch to the O (offJ
position and shut off the water supplg to
the refrigerator.
Preparing to Move
Secureall looseitems such as base grille,
shelvesand drawers bg taping them
securelg in place to prevent damage.
When using a hand truck to move the
refrigerator,do not rest the front or back
ofthe refrigerator against the hand truck.
This could damage the refrigerator.Handle
onlg from the sidesof the refrigerator.
If the temperature can drop below freezing,
have a qualified servicerdrain the water
supplg sgstem (on some models)to prevent
serious propertg damage due to flooding.
Be sure the refrigerator stags in an upright
position during moving.
13
Page 14

Replacing the light bulbs.
Turning the control to the Off position does not remove power to the light circuit.
Refrigerator Lights
Appearance mag varg
CAUTION:Lightbu/b_n_oy
/
be hot.
Unplugthe refrigerator.
0
Toremove the light shield,grasp the
0
shieldat the back and pull out to release
the tabs at the back.
Rotatethe shield down and then forward
@
to releasethe tabs at the front of the
shield.
Freezer Light
Zi,CAUTION:Lightbu/b_n_oy
be hot.
Unplugthe refrigerator.
0
The bulb islocated at the top of the
0
freezer insidealight shield.Toremove the
shield,grasp the shield at the back and
pull out to releasethe tabs at the back.
Rotatethe shield down and then forward
@
to releasethe tabs at the front of the
shield.
O After replacing with an appliance bulb
of the same or lower wattage, replace
the shield.
Plugthe refrigerator back in.
NOTE:Appliance bulbs mag be ordered from
GEPartsand Accessories,800.626.2002.
After replacing with an appliance bulb
of the same or lower wattage, replace
the shield.
Plugthe refrigerator back in.
14
Page 15
I tallati
structi
I
Questions? Call 800.GE.CARES (800.432.2737} or Visit our Website at: GEAppliances.com
In Canada, call 1.800.561.3344 or Visit our Website at: www.GEAppliances.ca
efrigerator
Models 20, 22 and 23
BEFORE YOU BEGIN
Read these instructions completelg and carefullg.
• IMPORTANT - Savetheseinstructions
for local inspector's use.
• IMPORTANT - Observeallgoverning
codes and ordinances.
• Note to Installer- Be sureto leavethese
instructionswiththe Consumer,
• Note to Consumer - Keep these instructionsfor
future reference.
• Skill level -Installation of this appliance requires
basic mechanical skills.
• Completion time - Refrigerator Installation
20 minutes
Water Line Installation
30 minutes
Proper installation is the responsibilitg of the
installer,
• Product failure due to improper installation is not
covered under the Warrantg.
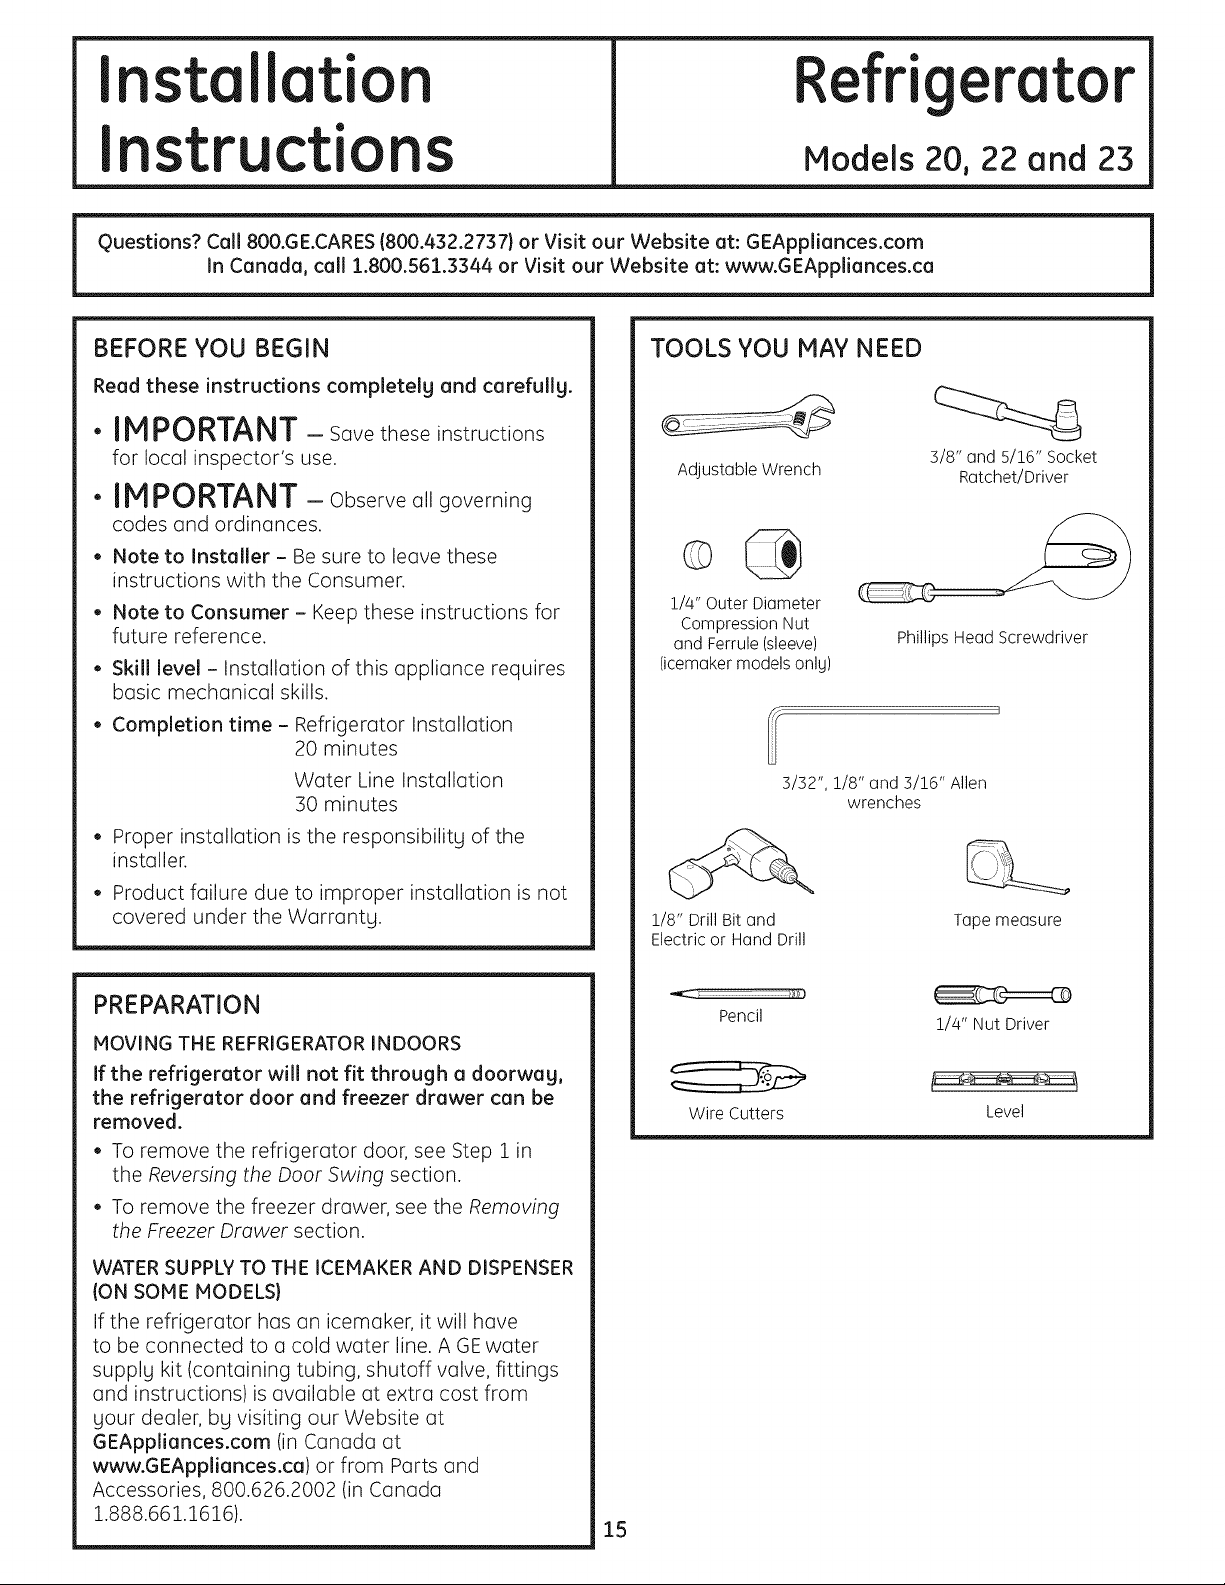
TOOLS YOU MAY NEED
Adjustable Wrench
1/4" Outer Diameter
Compression Nut
and Ferrule (sleeve)
(icemaker models onlg)
3/32", 1/8" and 3/16" Allen
1/8" Drill Bit and
Electric or Hand Drill
Phillips Head Screwdriver
wrenches
3/8" and 5/16" Socket
Ratchet/Driver
Tope measure
PREPARATION
MOVING THE REFRIGERATOR INDOORS
If the refrigerator will not fit through a doorwag,
the refrigerator door and freezer drawer can be
removed.
• To remove the refrigerator door, see Step 1 in
the Reversing the Door Swing section.
• To remove the freezer drawer, see the Removing
the Freezer Drawer section.
WATER SUPPLYTO THE ICEMAKER AND DISPENSER
(ON SOME MODELS}
If the refrigerator has an icemaker, it will have
to be connected to a cold water line. A GEwater
supply kit (containing tubing, shutoff valve, fittings
and instructions) is available at extra cost from
gout dealer, by visiting our Website at
GEAppliances.com (in Canada at
www.GEAppliances.ca) or from Parts and
Accessories, 800.626.2002 (in Canada
1.888.661.1616).
15
Pencil
Wire Cutters
1/4" Nut Driver
Level
Page 16
Installation Instructions
INSTALLING THE REFRIGERATOR
REFRIGERATOR LOCATION
• Do not install the refrigerator where the temperature
will go below 60% (lro°c) because it will not run often
enough to maintain proper temperatures.
• Do not install the refrigerator where the temperature
will go above 100% (37°C)because it will not perform
properly.
Install it on (] floor strong enough to support it fully
loaded.
CLEARANCES
Allow the following cle(]r(]nces for ease of inst(]ll(]tion,
proper air circulation and plumbing and electrical
connections.
Standard Depth
Models
Sides 1/8" (3mm)
Top 1" (25 mm)
Back 1" (25 mm)
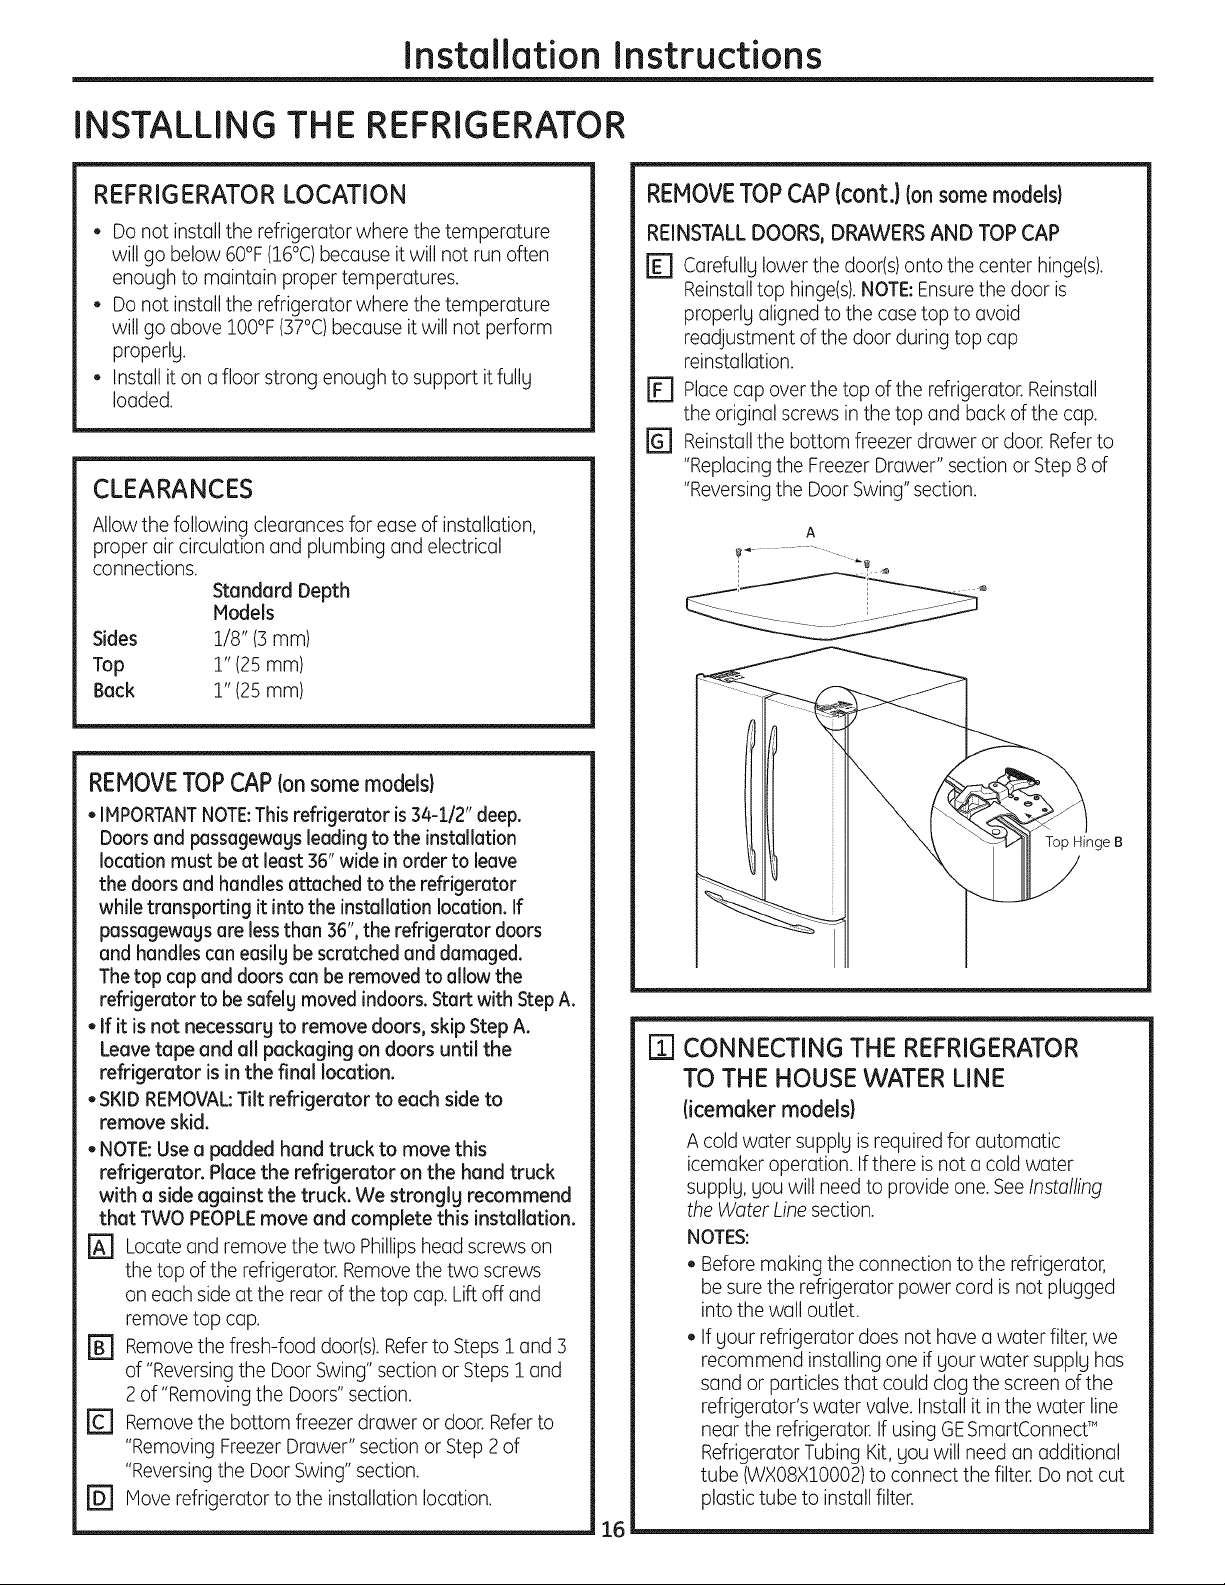
REMOVETOPCAP{cont.)Ion somemodels)
REINSTALL DOORS, DRAWERS AND TOP CAP
r_ carefully lower the door(s)onto the center hinge(s).
Reinstalltop hinge(s).NOTE: Ensurethe door is
properly aligned to the case top to avoid
readjustment of the door during top cup
reinstc]llc]tion.
r_ Place cap over the top of the refrigerator. Reinstall
the original screws in the top and back of the cap.
[] Reinstallthe bottom freezer drawer or door. Referto
"Replacing the Freezer Drawer" section or Step 8 of
"Reversing the Door Swing" section.
A
REMOVETOPCAPIonsomemodels)
• IMPORTANTNOTE:This refrigerator is34-1/2" deep.
Doors and passagewags leading to the installation
location must be at least 36" wide in order to leave
the doors and handles attached to the refrigerator
while transporting it into the installation location. If
passageways are lessthan 36", the refrigerator doors
and handles can easily be scratched and damaged.
Thetop cap and doors can be removed to allow the
refrigerator to be safely moved indoors. Start with Step A.
• If it is not necessary to remove doors, skip Step A.
Leave tape and all packaging on doors until the
refrigerator is in the final location.
•SKID REMOVAL:Tilt refrigerator to each side to
remove skid.
• NOTE:Usea padded hand truck to move this
refrigerator. Place the refrigerator on the hand truck
with a side against the truck. We strongly recommend
that TWO PEOPLEmove and complete this installation.
[] Locate and remove the two Phillips head screws on
the top of the refrigerator. Removethe two screws
on each side (It the rear of the top cap. Lift off and
remove top cap.
rB1 Removethe fresh-food door(s).Refer to Steps i and 3
of "Reversing the Door Swing" section or Steps i and
2 of "Removing the Doors" section.
rc1 Remove the bottom freezer drawer or door. Referto
"Removing FreezerDrawer" section or Step 2 of
"Reversing the Door Swing" section.
rD1 Move refrigerator to the inst(]ll(]tion location.
Top Hinge B
[] CONNECTING THE REFRIGERATOR
TO THE HOUSE WATER LINE
(icemaker models)
A cold water supplLIisrequired for automatic
icem(]ker operation. Ifthere isnot (]cold water
supplLI,LlOUwill need to provide one. See Instolling
the Woter Line section.
NOTES:
• Before making the connection to the refrigerator,
be sure the refrigerator power cord is not plugged
into the wall outlet.
• If your refrigerator does not have c]water filter, we
recommend installing one if your water supply has
sand or particles that could clog the screen of the
refrigerator's water valve. Install it in the water line
near the refrigerator. If using GESmc]rtConnectT"
Refrigerator Tubing Kit, you will need tin additional
tube (WX08X10002)to connect the filter. Do not cut
plastic tube to install filter.
16
Page 17
Installation Instructions
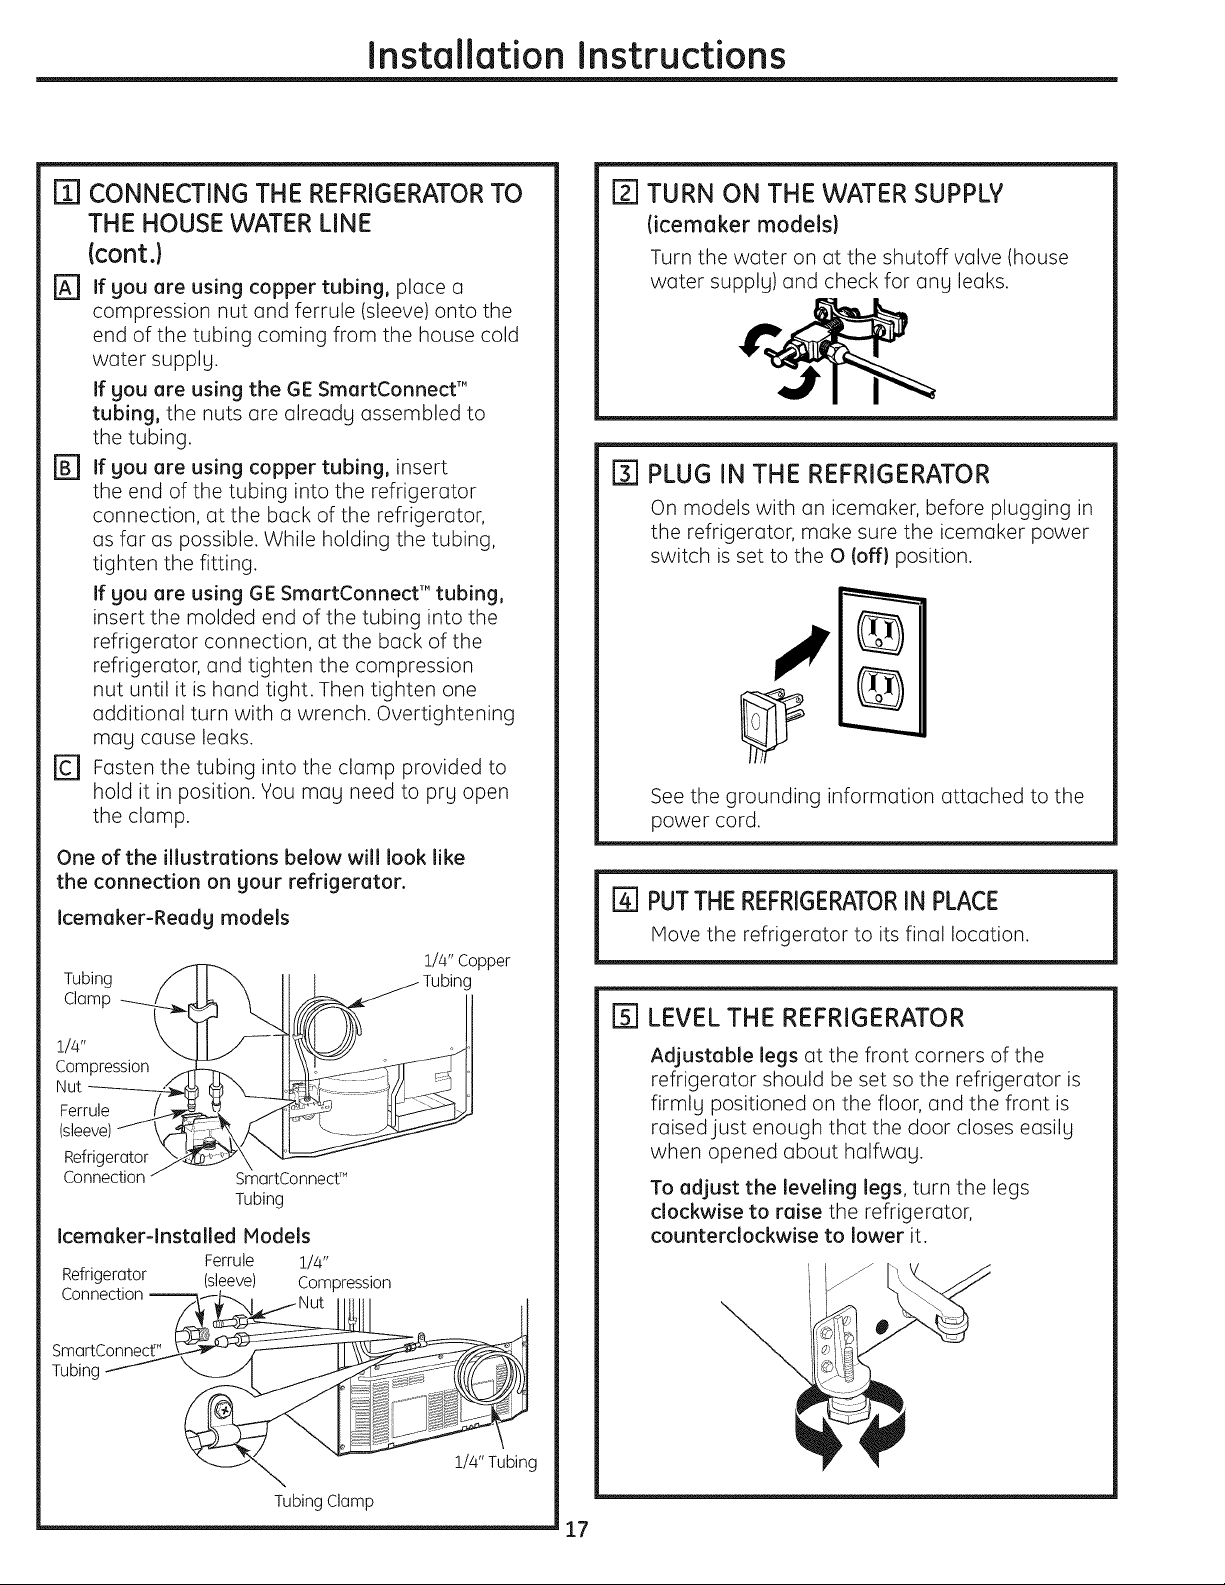
B3CONNECTING THE REFRIGERATOR TO
THE HOUSE WATER LINE
(cont.)
j'_ If you are using copper tubing, place a
compression nut and ferrule (sleeve) onto the
end of the tubing coming from the house cold
water supplg.
If gou are using the GE SmartConnect'"
tubing, the nuts are alreadg assembled to
the tubing.
r_ if gou are using copper tubing, insert
the end of the tubing into the refrigerator
connection, at the back of the refrigerator,
as far as possible. While holding the tubing,
tighten the fitting.
If gou are using GE SmartConnect'" tubing,
insert the molded end of the tubing into the
refrigerator connection, at the back of the
refrigerator, and tighten the compression
nut until it is hand tight. Then tighten one
additional turn with a wrench. Overtightening
may cause leaks.
[] Fasten the tubing into the clamp provided to
hold it in position. You may need to pry open
the clamp.
One of the illustrations below will look like
the connection on gour refrigerator.
Icemaker-Readg models
Tubing
Clamp
1/4"
Compression
Nut
Ferrule
(sleeve)
Refrigerator
Connection
Icemaker-lnstalled Models
Refrigerator (sleeve) Compression
Connection
SmartConnecf M
Tubing
Ferrule 1/4"
1/4" Copper
Tubing
[] TURN ON THE WATER SUPPLY
(icemaker models)
Turn the water on at the shutoff valve (house
water supply) and check for any leaks.
[] PLUG IN THE REFRIGERATOR
On models with an icemaker, before plugging in
the refrigerator, make sure the icemaker power
switch is set to the O (off) position.
See the grounding information attached to the
power cord.
[_[] PUTTHEREFRIGERATORIN PLACE
Hove the refrigerator to its final location.
LEVEL THE REFRIGERATOR
Adjustable legs at the front corners of the
refrigerator should be set so the refrigerator is
firmlg positioned on the floor, and the front is
raised just enough that the door closes easilg
when opened about halfway.
To adjust the leveling legs, turn the legs
clockwise to raise the refrigerator,
counterclockwise to lower it.
SmartConnect[M
Tubing
1/4" Tubing
TubingClamp
17
Page 18
Installation Instructions
INSTALLING THE REFRIGERATOR {cont.}
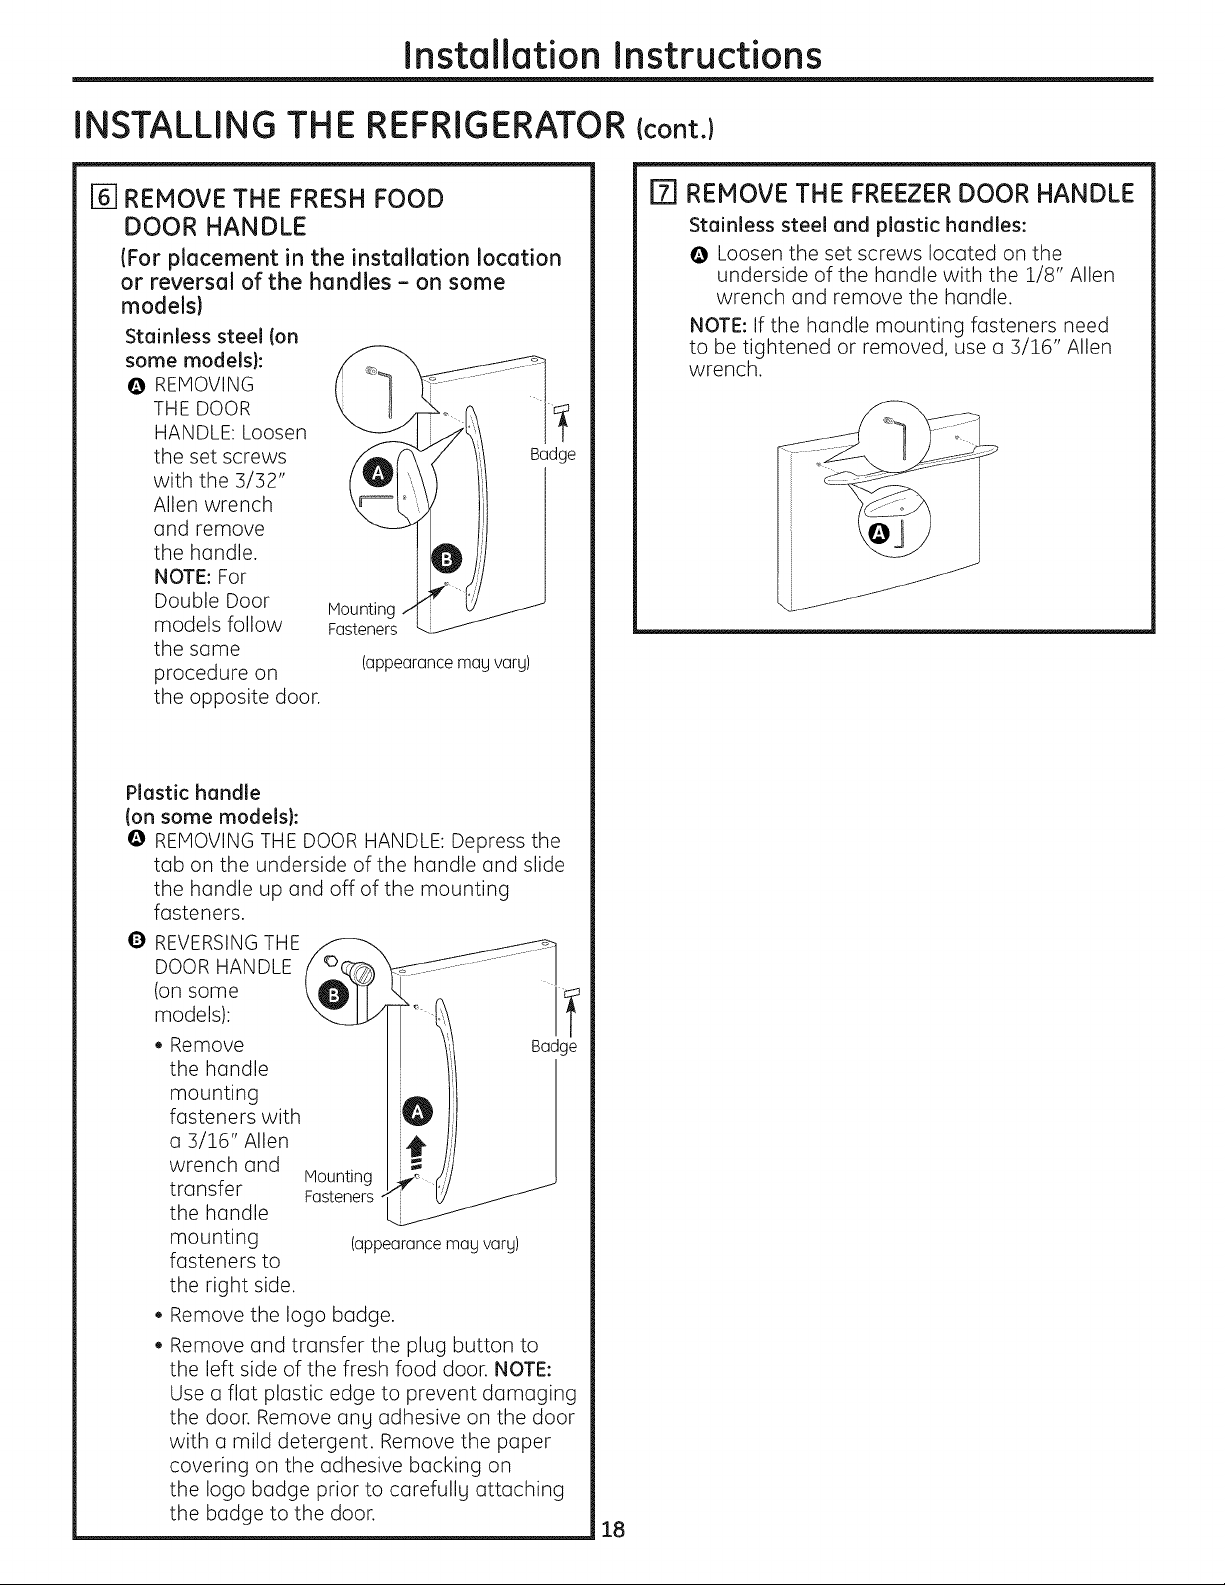
_-I REMOVE THE FRESH FOOD
DOOR HANDLE
(For placement in the installation location
or reversal of the handles - on some
models}
Stainless steel (on
some models}:
0 REMOVING
THE DOOR
HANDLE: Loosen
the set screws
with the 3/32"
Allen wrench
and remove
the handle.
NOTE: For
Double Door
models follow
the same
procedure on
the opposite door.
Mounting
Fasteners
(appearance mag varg)
m REMOVE THE FREEZER DOOR HANDLE
Stainless steel and plastic handles:
O Loosen the set screws located on the
underside of the handle with the 1/8" Allen
wrench and remove the handle.
NOTE: If the handle mounting fasteners need
to be tightened or removed, use a 3/16" Allen
wrench.
Badge
Plastic handle
(on some models):
O REMOVING THE DOOR HANDLE: Depress the
tab on the underside of the handle and slide
the handle up and off of the mounting
fasteners.
0
REVERSING THE
DOOR HANDLE
(on some
models):
• Remove
the handle
mounting
fasteners with
a 3/16" Allen
wrench and
transfer
the handle
mounting
fasteners to
the right side.
o
Remove the logo badge.
o
Remove and transfer the plug button to
the left side of the fresh food door. NOTE:
Use a flat plastic edge to prevent damaging
the door. Remove any adhesive on the door
with a mild detergent. Remove the paper
covering on the adhesive backing on
the logo badge prior to carefullg attaching
the badge to the door.
(appearance mag varg)
18
Page 19
Installation Instructions
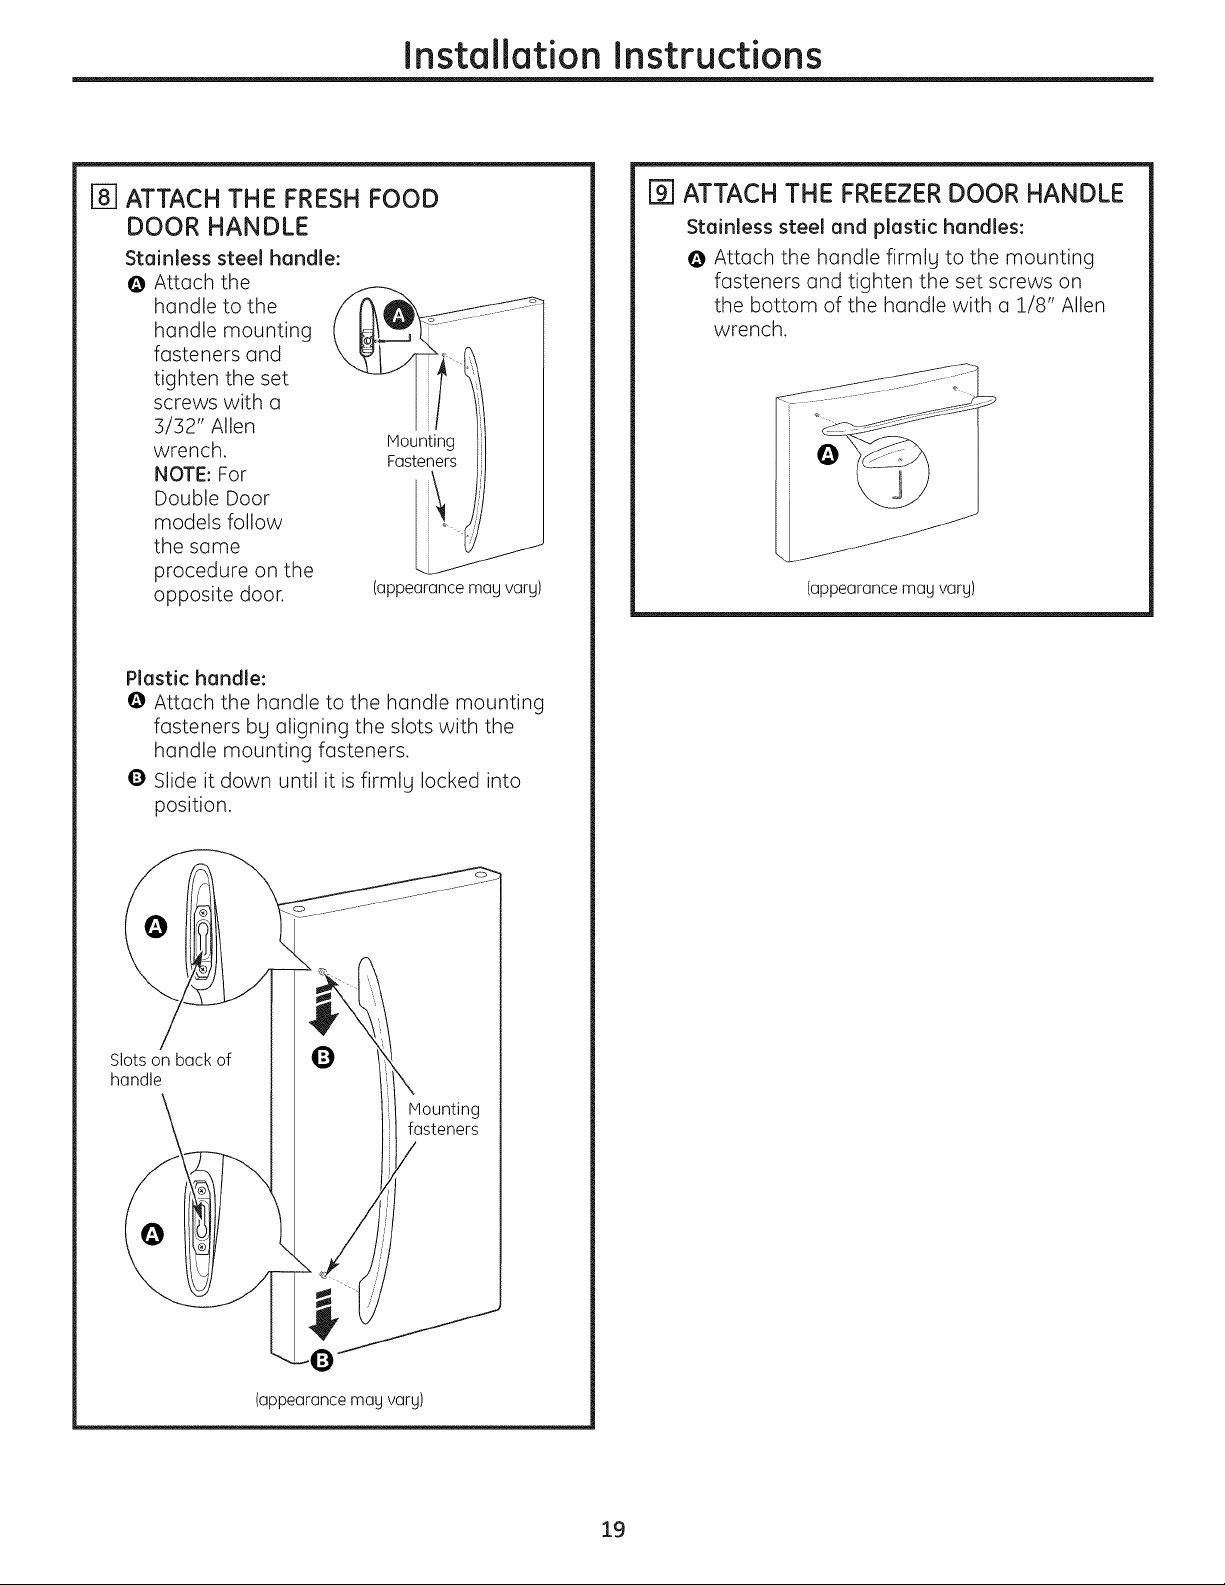
[_] ATTACH THE FRESH FOOD
DOOR HANDLE
Stainless steel handle:
@ Attach the
handle to the
handle mounting
fasteners and
tighten the set
screws with a
3/32" Allen
wrench.
NOTE: For
Double Door
models follow
the same
procedure on the
opposite door.
Plastic handle:
@ Attach the handle to the handle mounting
fasteners bLI aligning the slots with the
handle mounting fasteners.
@ Slide it down until it is firmly locked into
position.
Mounting
Fasteners
(appearance mau vary)
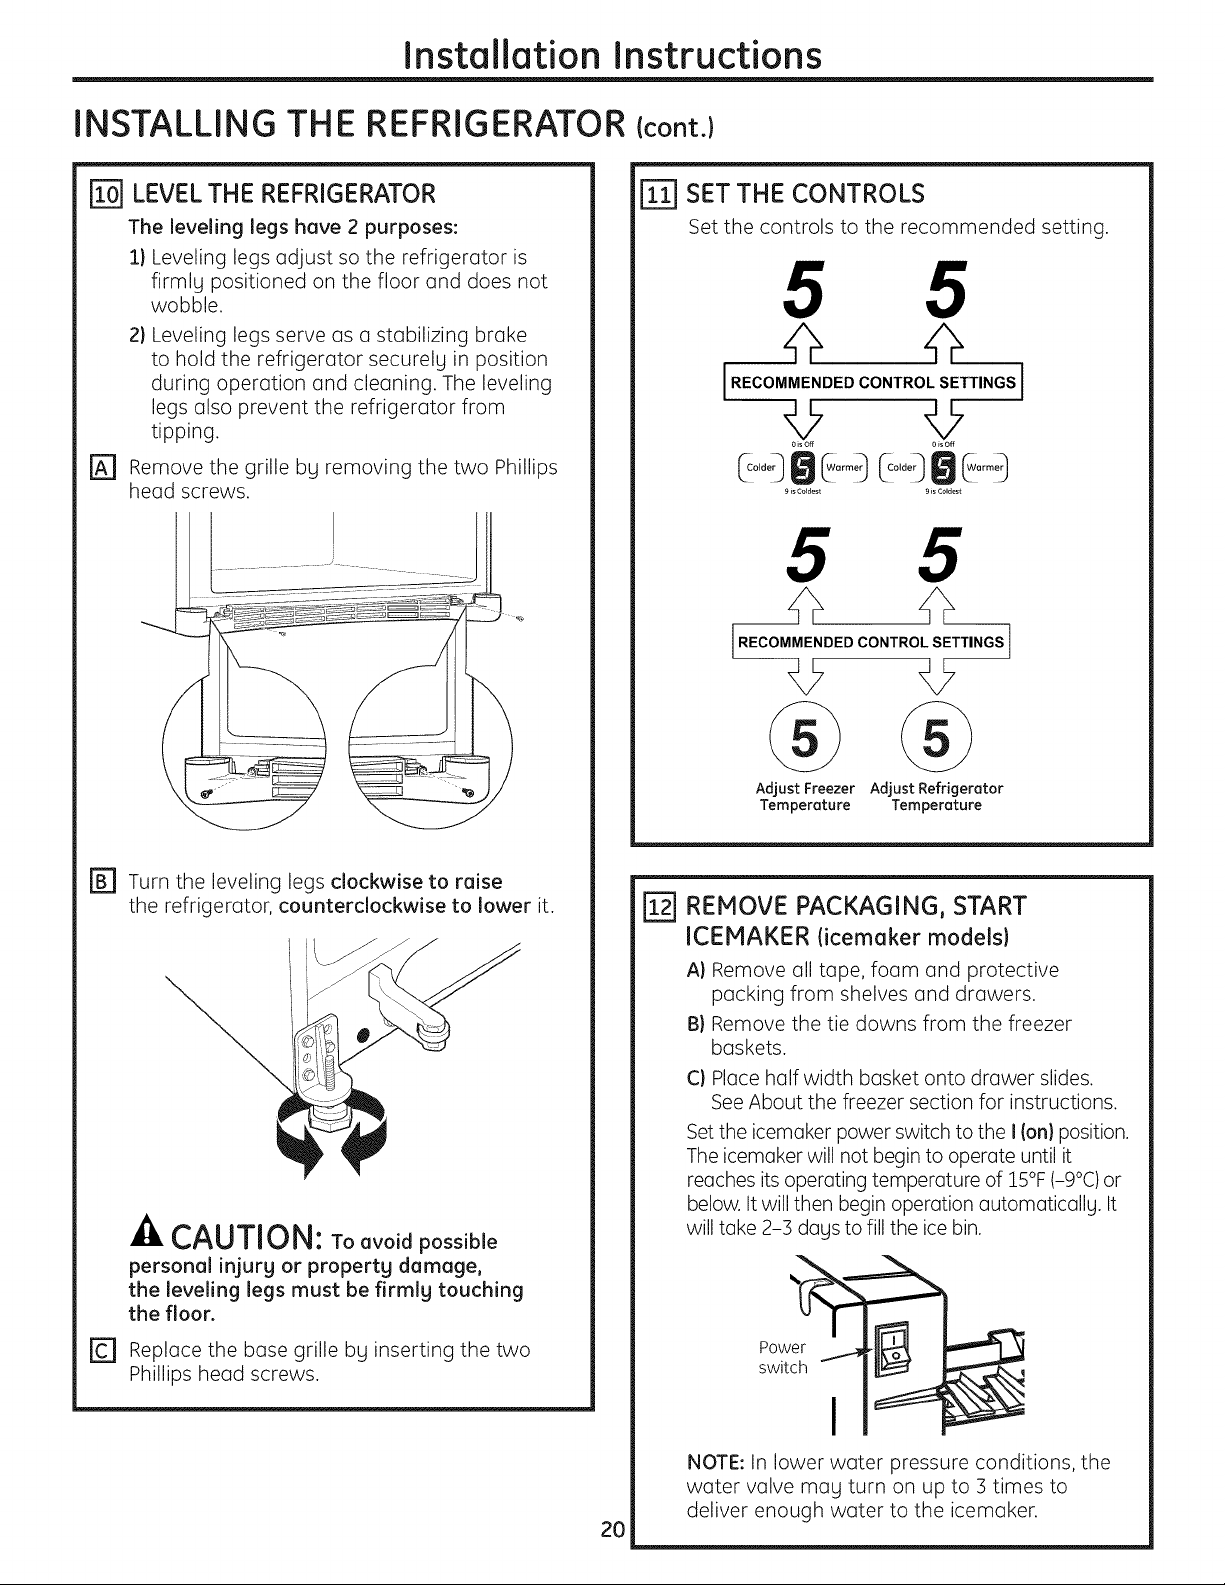
[] ATTACH THE FREEZER DOOR HANDLE
Stainless steel and plastic handles:
@ Attach the handle firmly to the mounting
fasteners and tighten the set screws on
the bottom of the handle with a 1/8" Allen
wrench.
\
(appearance mau vary)
Slots on back of U
handle
(appearance mau vary)
A
Mounting
fasteners
19
Page 20
Installation Instructions
INSTALLING THE REFRIGERATOR {cont.}
r_] LEVEL THE REFRIGERATOR
The leveling legs hove 2 purposes:
1) Leveling legs adjust so the refrigerator is
firmlg positioned on the floor and does not
wobble.
2} Leveling legs serve as a stabilizing brake
to hold the refrigerator securely in position
during operation and cleaning. The leveling
legs also prevent the refrigerator from
tipping.
r_ Remove the grille bg removing the two Phillips
head screws.
r_] SET THE CONTROLS
Set the controls to the recommended setting.
5 5
I"EOO''E"OEOOO"'"O'SETT'"osl
0 is off 0 is off
(C°lde0 0 _°rmer_ (COlder_ 0 _0rm_
9 is Coldest 9 is Coldest
® ®
r_ Turn the leveling legs clockwise to ruise
the refrigerator, counterclockwise to lower it.
CAUTION: To°voidpossible
personal injurg or propertg damage,
the leveling legs must be firmlg touching
the floor.
r_ Replace the base grille bg inserting the two
Phillips head screws.
Adjust Freezer Adjust Refrigerator
Temperoture Tempereture
REMOVE PACKAGING, START
ICEMAKER (icemoker models}
A) Remove all tape, foam and protective
packing from shelves and drawers.
B) Remove the tie downs from the freezer
baskets.
C} Place half width basket onto drawer slides.
See About the freezer section for instructions.
Set the icemaker power switch to the I (on} position.
The icemaker will not begin to operate until it
reaches its operating temperature of 15°F (-9°C) or
below. It will then begin operation automaticallg. It
will take 2-3 dags to fill the ice bin.
2O
NOTE: In lower water pressure conditions, the
water valve mag turn on up to 3 times to
deliver enough water to the icemaker.
Page 21
Installation Instructions
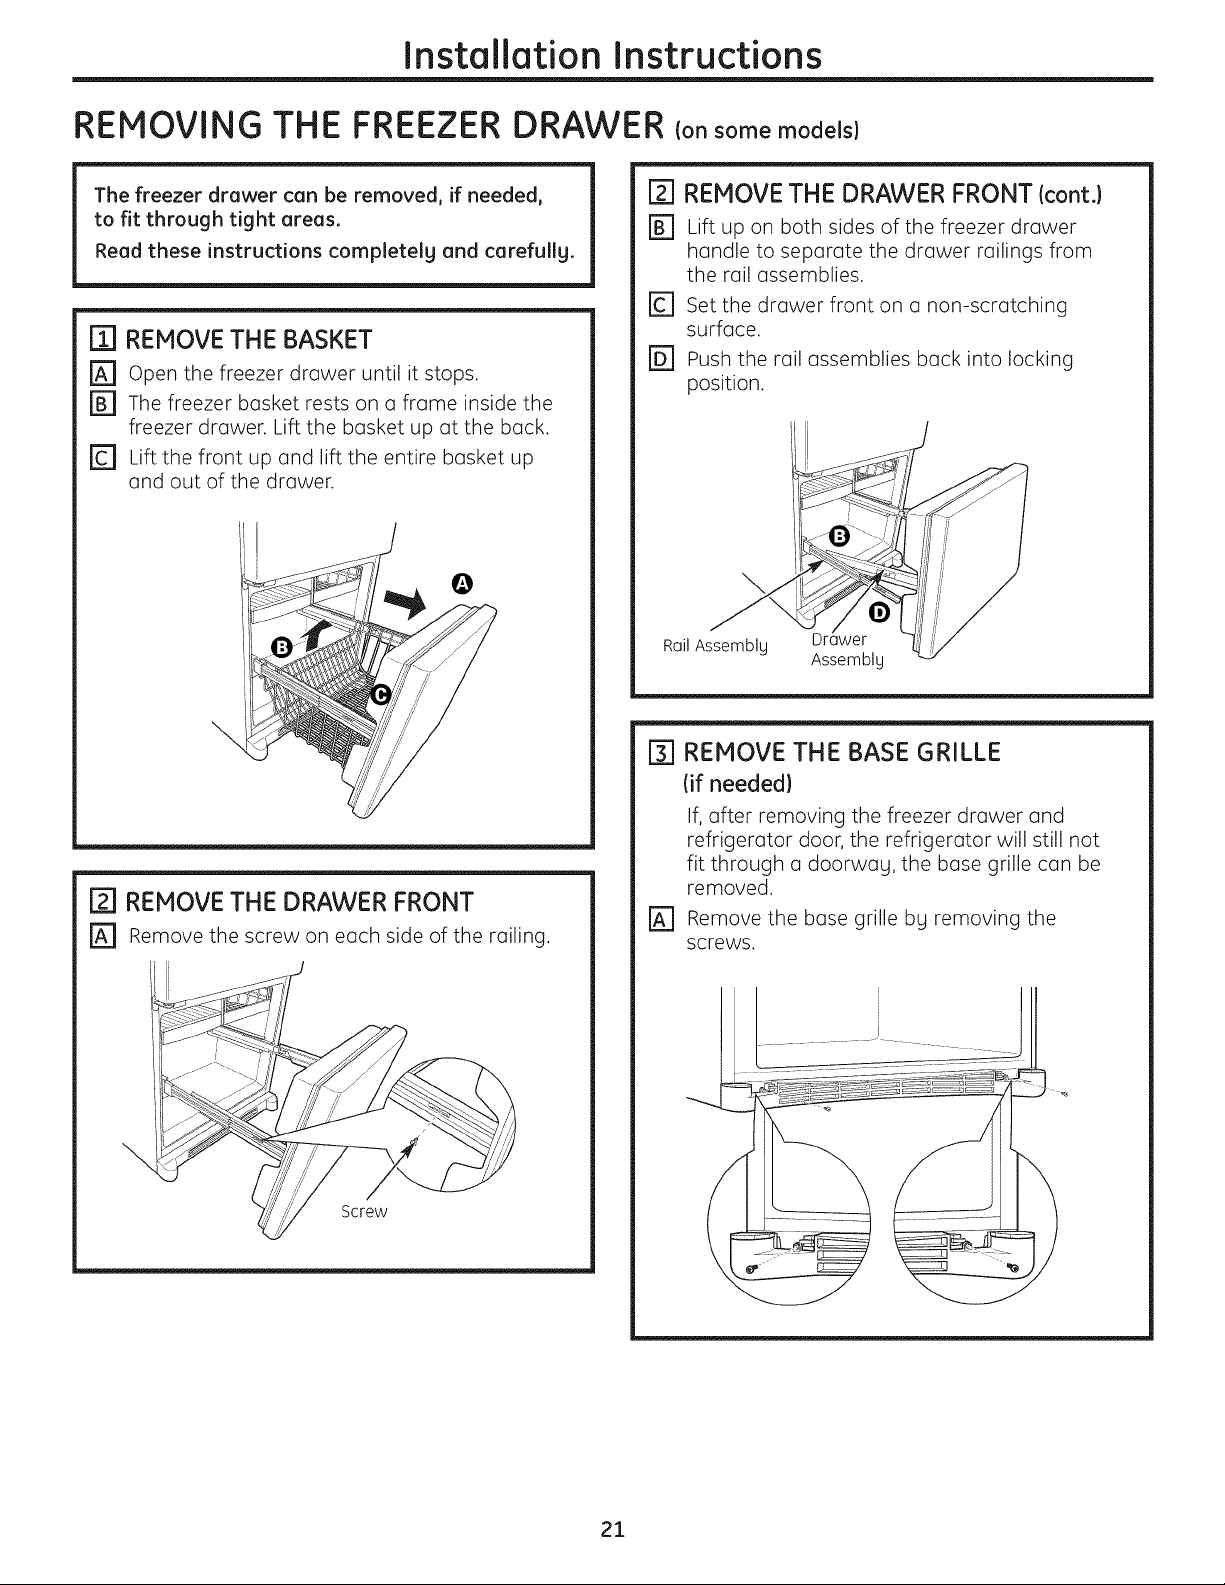
REMOVING THE FREEZER DRAWER (onsome models}
The freezer drawer can be removed, if needed,
to fit through tight areas.
Read these instructions completelg and carefullg.
_] REMOVE THE BASKET
r_ open the freezer drawer until it stops.
r_ The freezer basket rests on a frame inside the
freezer drawer. Lift the basket up at the back.
r_ Lift the front up and lift the entire basket up
and out of the drawer.
[_ REMOVE THE DRAWER FRONT
r_ Remove the screw on each side of the railing.
REMOVE THE DRAWER FRONT {cont.)
Lift up on both sides of the freezer drawer
handle to separate the drawer railings from
the rail assemblies.
Set the drawer front on a non-scratching
surface.
Push the rail assemblies back into locking
position.
Rail Assemblg Drawer
Assemblg
[_] REMOVE THE BASE GRILLE
(if needed}
If, after removing the freezer drawer and
refrigerator door, the refrigerator will still not
fit through a doorwag, the base grille can be
removed.
[_ Remove the base grille bg removing the
screws.
\
Screw
21
Page 22
Installation Instructions
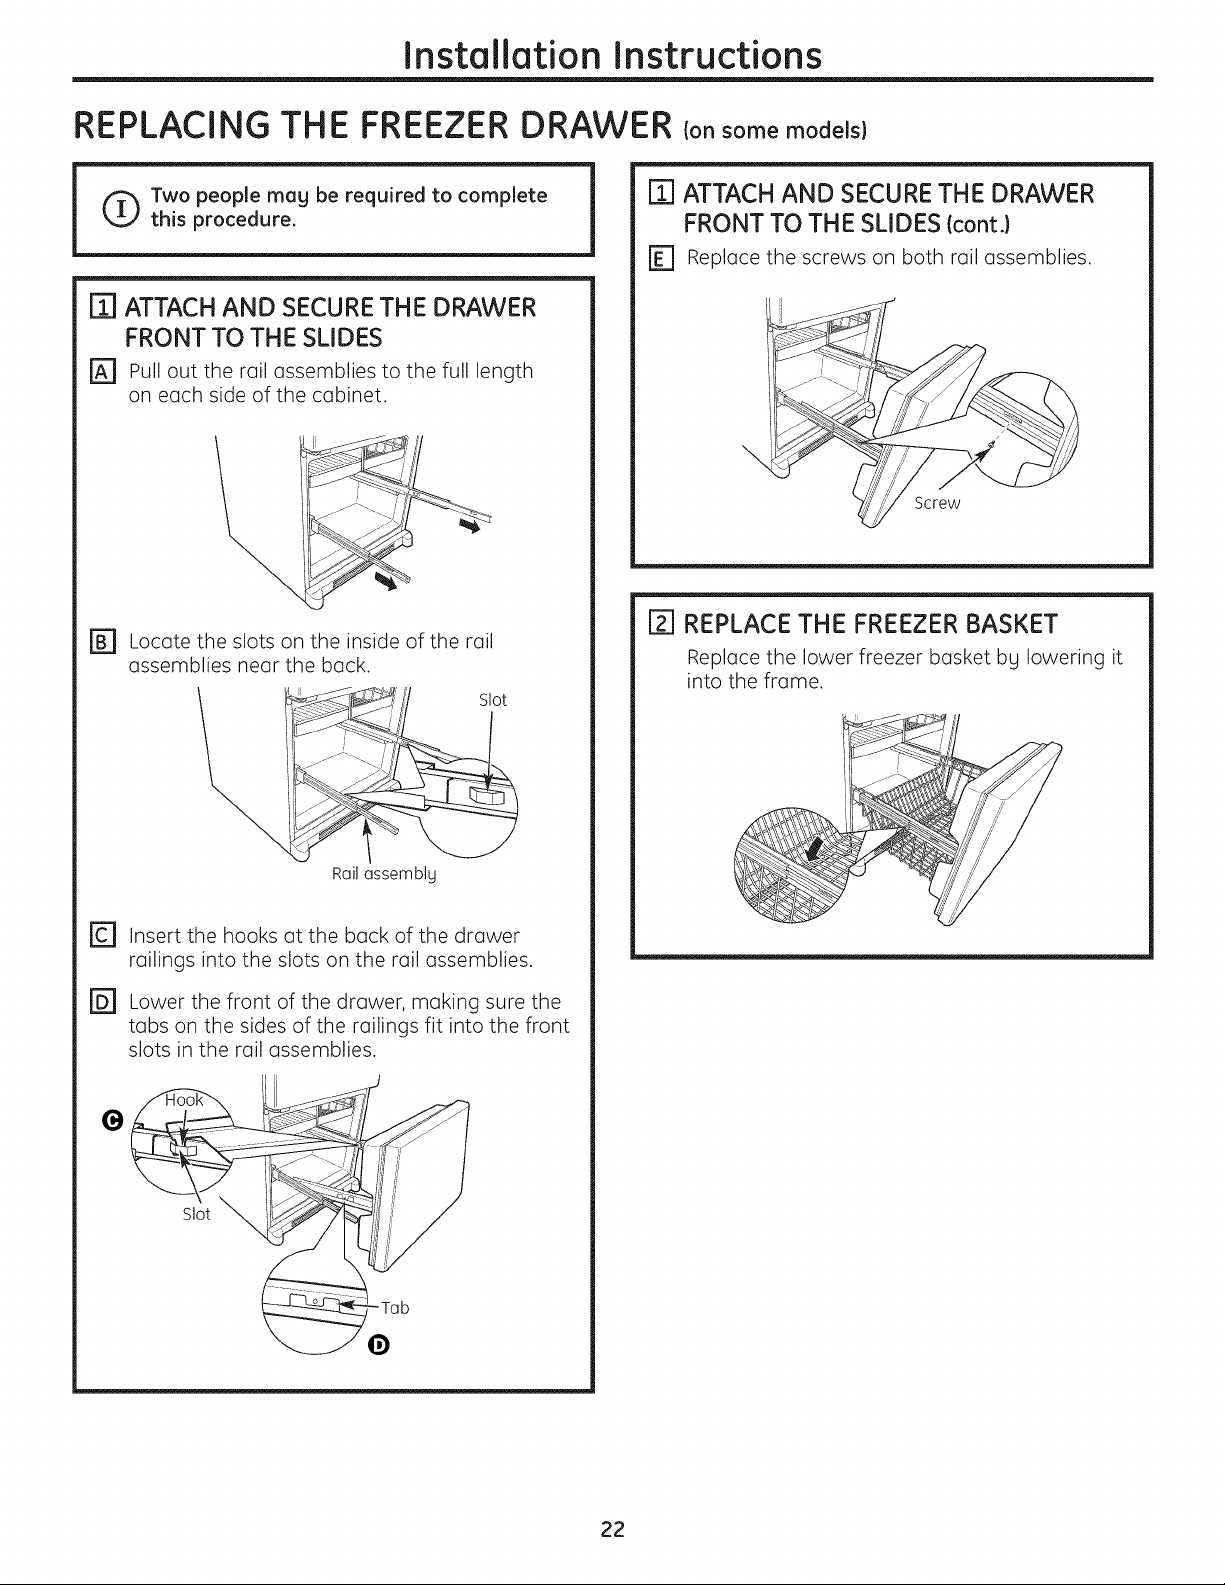
REPLACING THE FREEZER DRAWER (onsomemodeIsI
r_ ATTACH AND SECURETHE DRAWER
Two people mag be required to complete
this procedure.
I_ ATTACH AND SECURETHE DRAWER
FRONT TO THE SLIDES
rA1 Pull out the rail assemblies to the full length
on each side of the cabinet.
FRONT TO THE SLIDES (cont.)
[] Replace the screws on both rail assemblies.
i /!
.!l
rB1 Locate the slots on the inside of the rail
assemblies near the back.
Slot
...........-... _. ! iJ
Railassembly
rc] Insert the hooks at the back of the drawer
railings into the slots on the rail assemblies.
r_ Lower the front of the drawer, making sure the
tabs on the sides of the railings fit into the front
slots in the rail assemblies.
\
Screw
[_] REPLACE THE FREEZER BASKET
Replace the lower freezer basket by lowering it
into the frame.
22
Page 23

Installation Instructions
REVERSINGTHE DOOR SWING {Single Door Refrigerator Models onlg)
IMPORTANT NOTES
When reversing the door swing:
NOTE: Door swing is not reversible on GDSL3KC
series models.
• Read the instructions all the wag through before
starting.
• Parts are included in the door hinge kit.
To order a reversible door hinge kit in the United
States, visit our Website at GEAppliances.com
or call GE Parts and Accessories, 800.626.2002.
Customers in Canada should consult the yellow
pages for the nearest IVlabe Service Center.
• Handle parts carefully to avoid scratching paint.
• Set screws down bg their related parts to avoid
using them in the wrong places.
• Provide a non-scratching work surface for
the doors.
IMPORTANT: Once gou begin, do not move the
cabinet until door-swing reversal is completed.
These instructions are for changing the hinges
from the right side to the left side-if gou ever want
to change the hinges back to the right side, follow
these same instructions and reverse all references
to left and right.
• Once door swing is finalized, ensure the logo
badge is properly aligned and permanentlg
secured to the door by removing the adhesive
cover on the back side. NOTE: A replacement
logo badge is included in the hinge kit.
Unplug the refrigerator from its electrical outlet.
Emptg all door shelves, including the dairg
compartment.
E] REMOVE THE
REFRIGERATOR DOOR
r_ Tape the door shut with masking tape.
r_ Remove the hinge cover on top of the
refrigerator door bg carefullg prging it up with
a puttg knife, if necessarg.
r_ using a 5/16" socket ratchet/driver, remove
the bolts securing the top hinge to the cabinet.
Then lift the hinge straight up to free the hinge
pin from the socket in the top of the door.
r_ Carefullg remove the door thimble from inside
the socket. This will be used again when
reinstalling the door on the other side.
0
Hinge Cover
TopHinge
qmbe
TOOLS YOU WILL NEED
Adjustable Wrench
MaskingTape
Phillips Screwdriver
5/16" Socket
Ratchet/Driver
Thin-blade Screwdriver
©
Torx T-20 Driver
[]
Remove the tape and tilt the door awag from
the cabinet. Lift the door off the center hinge
pin. Ensure that the plastic hinge pin thimble
remains on the hinge pin or inside door hinge
pin hole located in the bottom of the door.
r_ set the door on a non-scratching surface with
the inside up.
23
Page 24
Installation Instructions
REVERSINGTHE DOOR SWING {cont.}
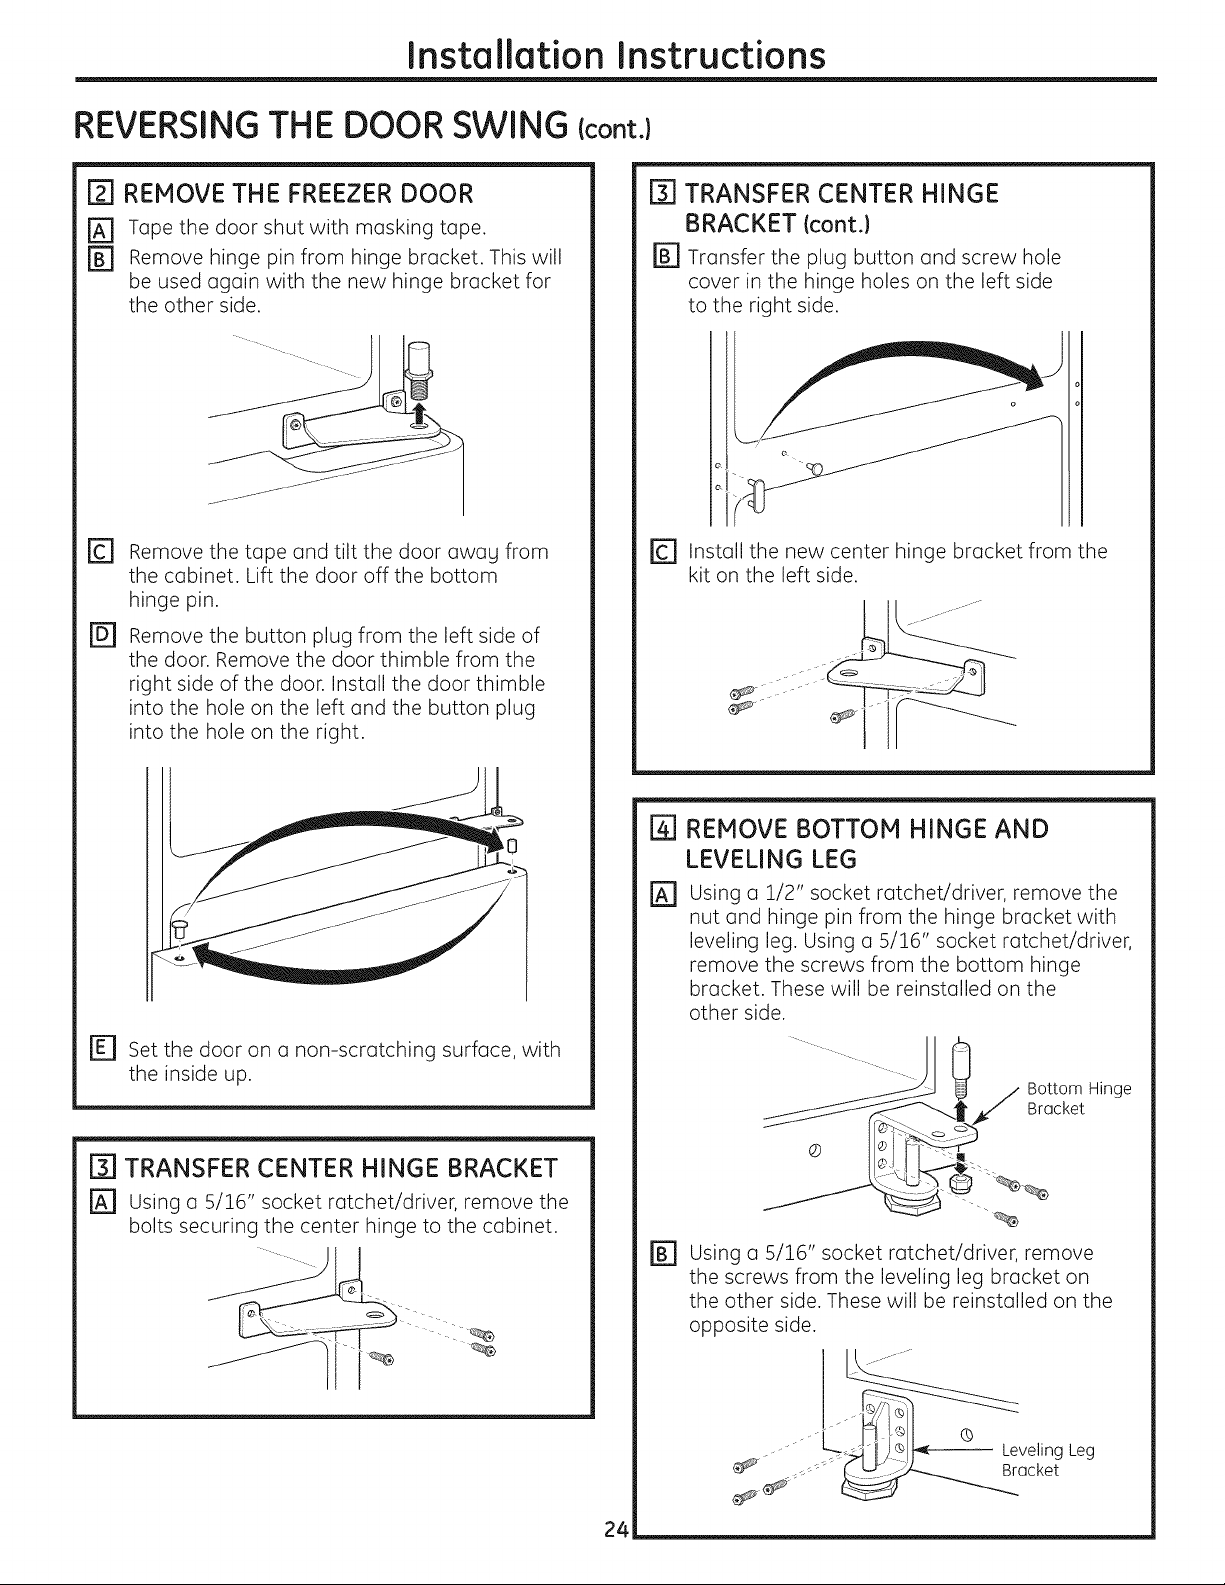
[] REMOVE THE FREEZER DOOR
r_ Tape the door shut with masking tape.
r_ Remove hinge pin from hinge bracket. This will
be used again with the new hinge bracket for
the other side.
@
Remove the tape and tilt the door awag from
the cabinet. Lift the door off the bottom
hinge pin.
@
Remove the button plug from the left side of
the door. Remove the door thimble from the
right side of the door. Install the door thimble
into the hole on the left and the button plug
into the hole on the right.
TRANSFER CENTER HINGE
BRACKET {cont.)
r_ Transfer the plug button and screw hole
cover in the hinge holes on the left side
to the right side.
E] Install the new center hinge bracket from the
kit on the left side.
r_ set the door on a non-scratching surface, with
the inside up.
[] TRANSFER CENTER HINGE BRACKET
r_ using a 5/16" socket ratchet/driver, remove the
bolts securing the center hinge to the cabinet.
REMOVE BOTTOM HINGE AND
LEVELING LEG
Using a 1/2" socket ratchet/driver, remove the
nut and hinge pin from the hinge bracket with
leveling leg. Using a 5/16" socket ratchet/driver,
remove the screws from the bottom hinge
bracket. These will be reinstalled on the
other side.
@
Using a 5/16" socket ratchet/driver, remove
the screws from the leveling leg bracket on
the other side. These will be reinstalled on the
opposite side.
24
Page 25

Installation Instructions
Fsl INSTALL BOTTOM HINGE AND
LEVELING LEG
r_ using a 1/2" socket ratchet/driver, install the
hinge pin and nut in the opposite hole on the
hinge bracket with leveling leg.
r_ using a 5/16" socket ratchet/driver, install the
hinge bracket with leveling leg on the left side
of the refrigerator. The pin will be toward the
outside of the refric erator.
[_] Using a 5/16" socket ratchet/driver, install the
leveling leg bracket on the right side of the
refrigerator.
TRANSFER REFRIGERATOR AND
%
FREEZER DOOR STOPS
r_ Remove the door stop on the right side of the
bottom of the door bg removing the two screws.
r_ Move the plastic hinge hole thimble to the
opposite hole.
r_ Install the door stop on the left side, making
sure to line up the screw holes in the door stop
with the holes in the bottom of the door.
Bottom of Door(Right Side)
Bottom of Door (Left Side)
[_ TRANSFER REFRIGERATOR
DOOR HANDLE TO RIGHT
Refer to Remove the Fresh Food Door Handle
and Attach the Fresh Food Door Handle
sections for instructions.
[_]REHANG FREEZER DOOR
[] Lower the freezer door onto the bottom hinge pin.
Ensure that the plastic hinge pin thimble is on the
hinge pin or inside the door hinge pin hole located
in the bottom of the door.
r_ straighten the door and line it up with the
center hinge bracket.
r_ Install the center hinge pin with a 3/4" socket
ratchet/driver. Turn it until it extends through
the hinge bracket and into the freezer door.
25
Page 26
Installation Instructions
REVERSINGTHE DOOR SWING {cont.}
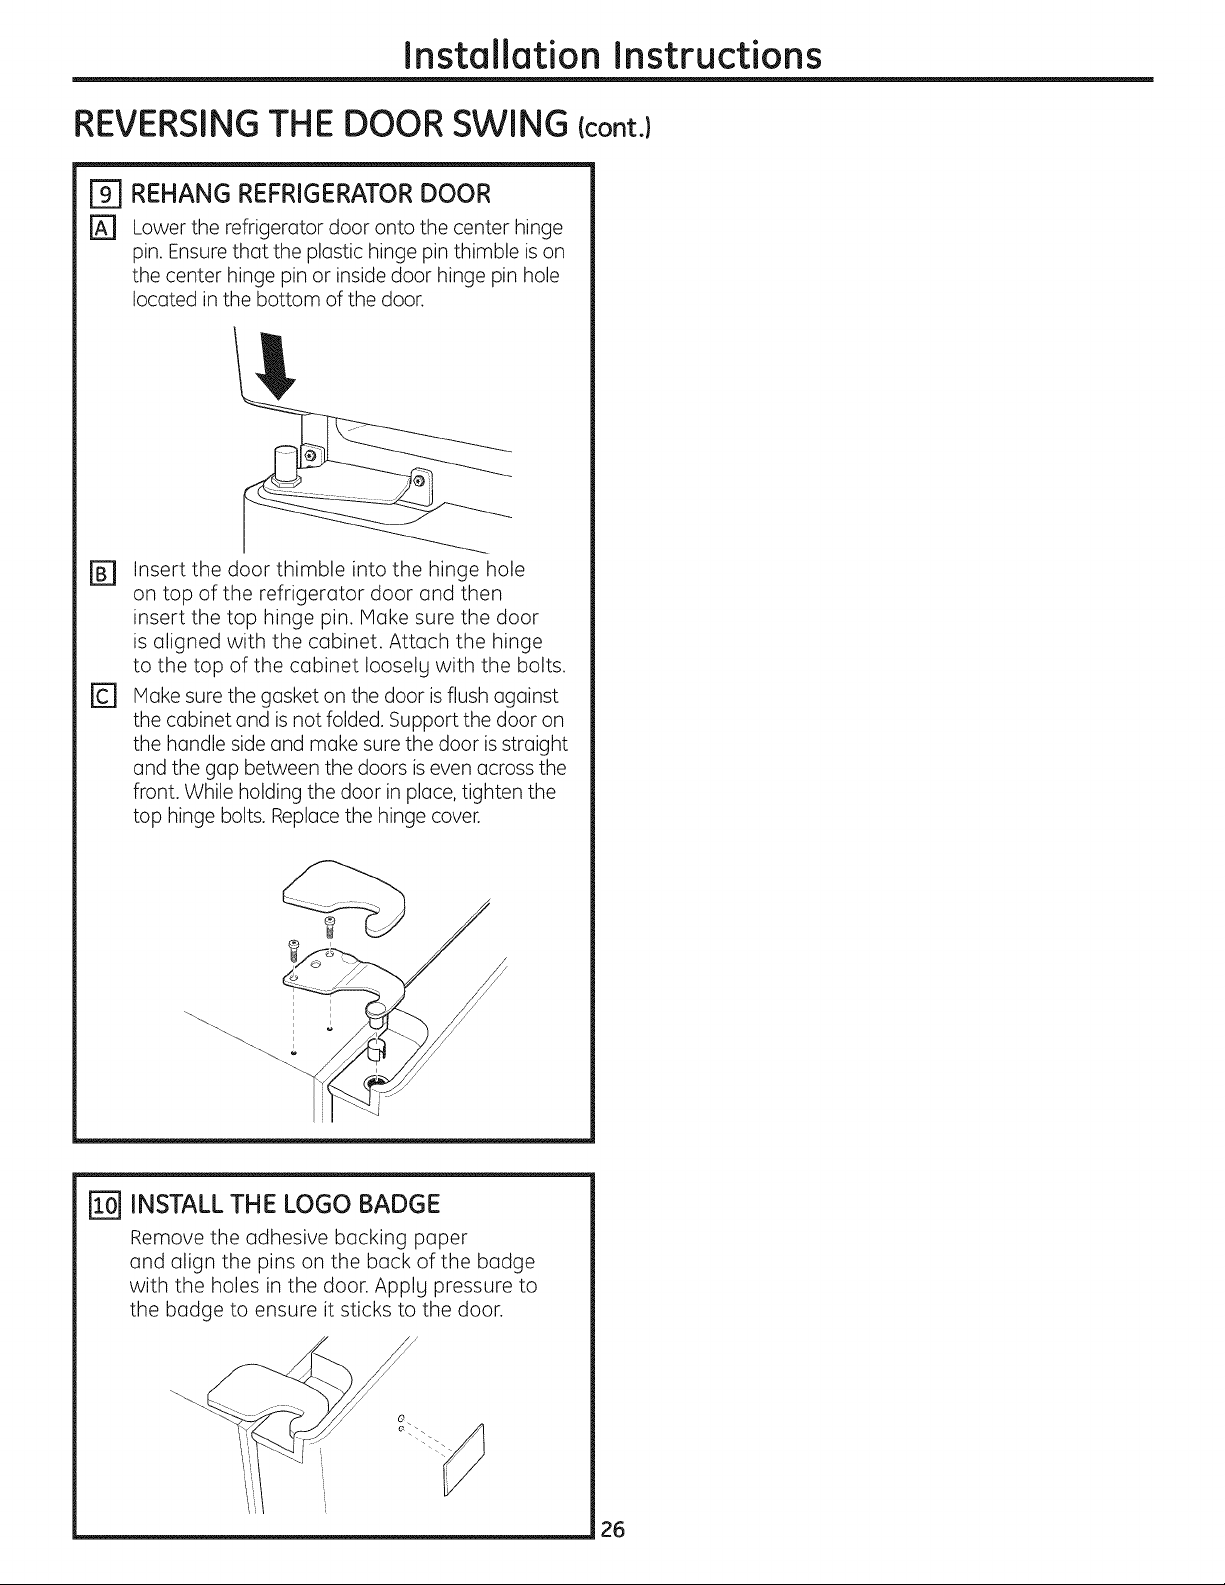
_-I REHANG REFRIGERATOR DOOR
rA] Lower the refrigerator door onto the center hinge
pin. Ensure that the plastic hinge pin thimble is on
the center hinge pin or inside door hinge pin hole
located in the bottom of the door.
r_ Insert the door thimble into the hinge hole
on top of the refrigerator door and then
insert the top hinge pin. Make sure the door
is aligned with the cabinet. Attach the hinge
to the top of the cabinet Iooselg with the bolts.
rc] Make sure the gasket on the door isflush against
the cabinet and is not folded. Support the door on
the handle side and make sure the door is straight
and the gap between the doors is even across the
front. While holding the door in place, tighten the
top hinge bolts. Replace the hinge cover.
INSTALL THE LOGO BADGE
Remove the adhesive backing paper
and align the pins on the back of the badge
with the holes in the door. Apply pressure to
the badge to ensure it sticks to the door.
26
Page 27
Installation Instructions
REMOVING THE DOORS {Double Door RefrigeratorModels only)
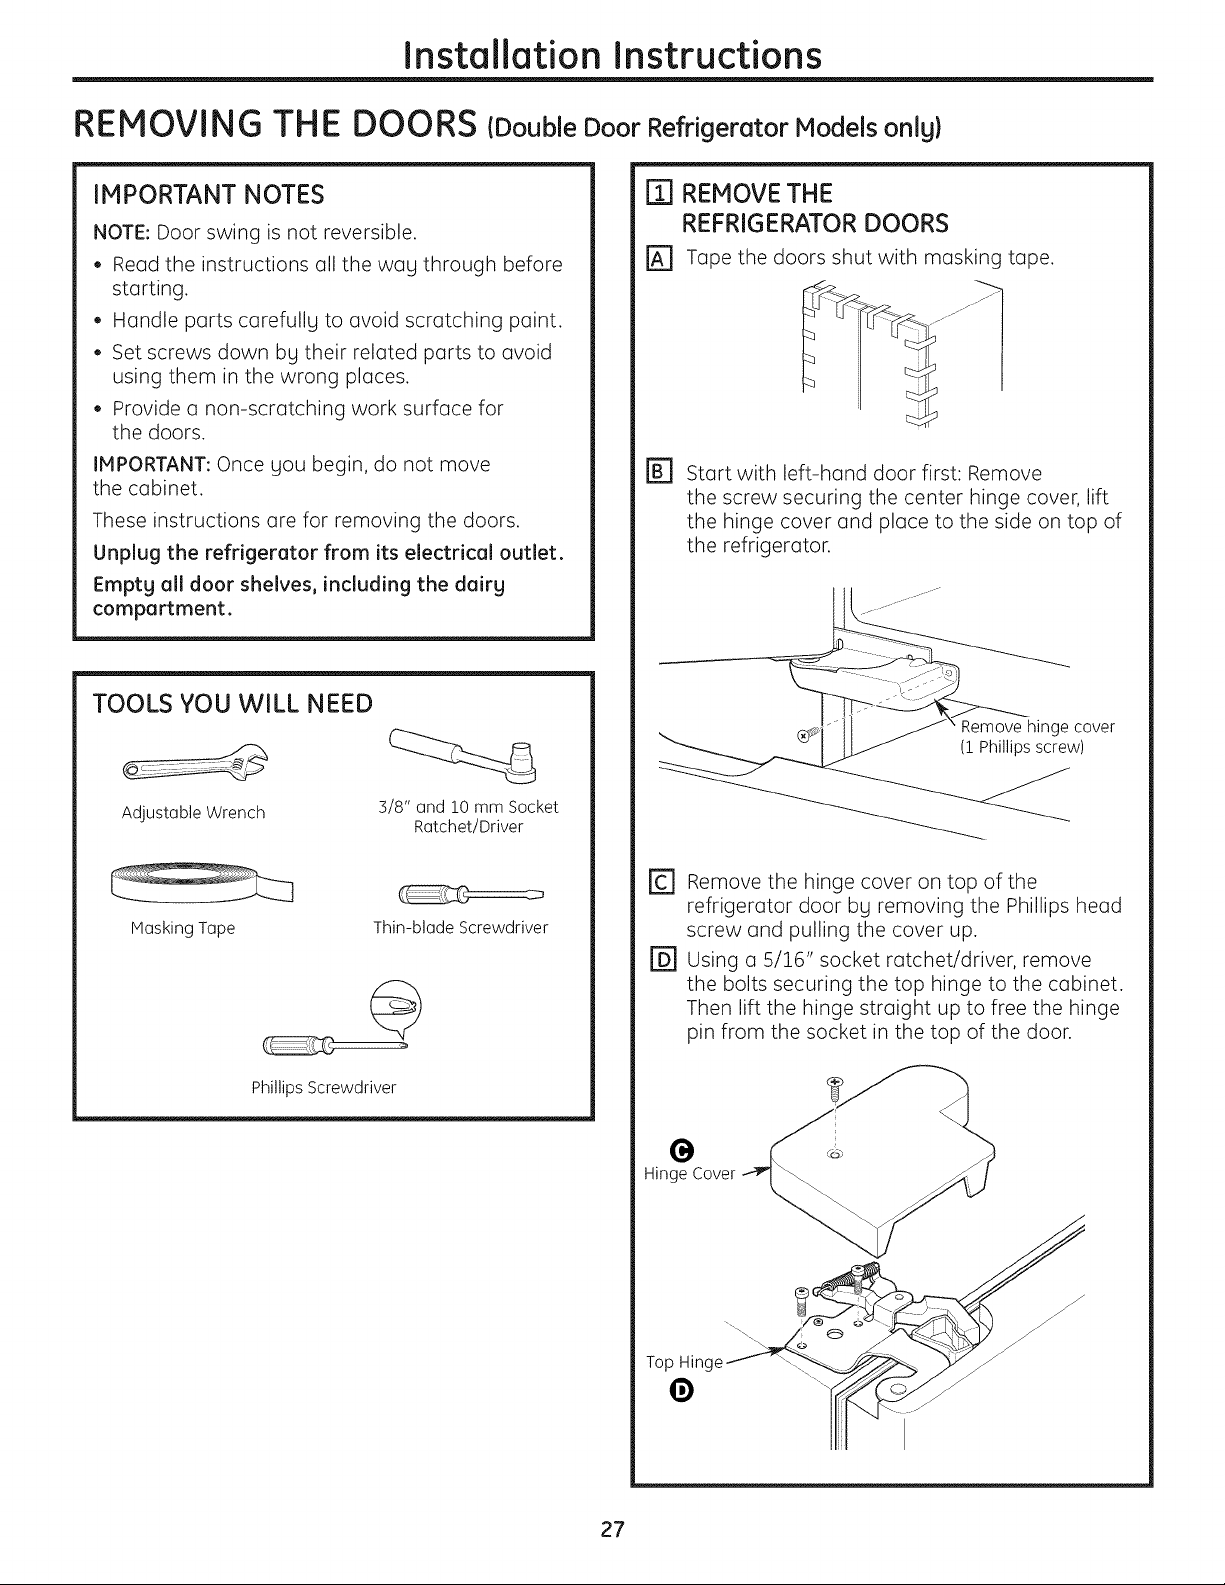
IMPORTANT NOTES
NOTE: Door swing is not reversible.
• Read the instructions oil the wag through before
starting.
Handle ports carefully to ovoid scratching point.
Set screws down bg their related ports to ovoid
using them in the wrong places.
Provide o non-scratching work surface for
the doors.
IMPORTANT: Once gou begin, do not move
the cabinet.
These instructions ore for removing the doors.
Unplug the refrigerator from its electrical outlet.
Emptg all door shelves, including the dairg
comportment.
TOOLS YOU WILL NEED
l_l REMOVE THE
REFRIGERATOR DOORS
r_ Tape the doors shut with masking tope.
@ Start with left-hand door first: Remove
the screw securing the center hinge cover, lift
the hinge cover and place to the side on top of
the refrigerator.
_" (1 Phillips screw)
Remove hinge cover
Adjustable Wrench
MaskingTape
Thin-blade Screwdriver
Phillips Screwdriver
318" and !0 mm Socket
Ratchet/Driver
r_ Remove the hinge cover on top of the
refrigerator door bg removing the Phillips head
screw and pulling the cover up.
FD-]using o 5/16" socket ratchet/driver, remove
the bolts securing the top hinge to the cabinet.
Then lift the hinge straight up to free the hinge
pin from the socket in the top of the door.
G
Hinge Cover
Top Hinge
19
27
Page 28

Installation Instructions
REMOVING THE DOORS {Double Door Refrigerator Models only){cont.}
m REMOVETHE REFRIGERATORDOORS
{cont.}
Remove the tape and tilt the door awag from
the cabinet. Lift the door off the center hinge
pin. Ensure that the plastic hinge pin thimble
remains on the hinge pin or inside door hinge
pin hole located in the bottom of the door.
r_ set the door on a non-scratching surface with
the inside up.
I'_ REMOVE CENTER HINGE
Using a 5/16" socket ratchet/driver, remove the
bolts securing the center hinge to the cabinet.
Set the hinge and bolts aside.
.....iiii
[_] REMOVE OPPOSITE DOOR
Follow the same procedure on the opposite
door. There are no center hinge covers on the
opposite side.
[_] REMOVE FREEZER DRAWER
Refer to the Removing the Freezer Drawer
section for instructions.
28
Page 29
Installation Instructions
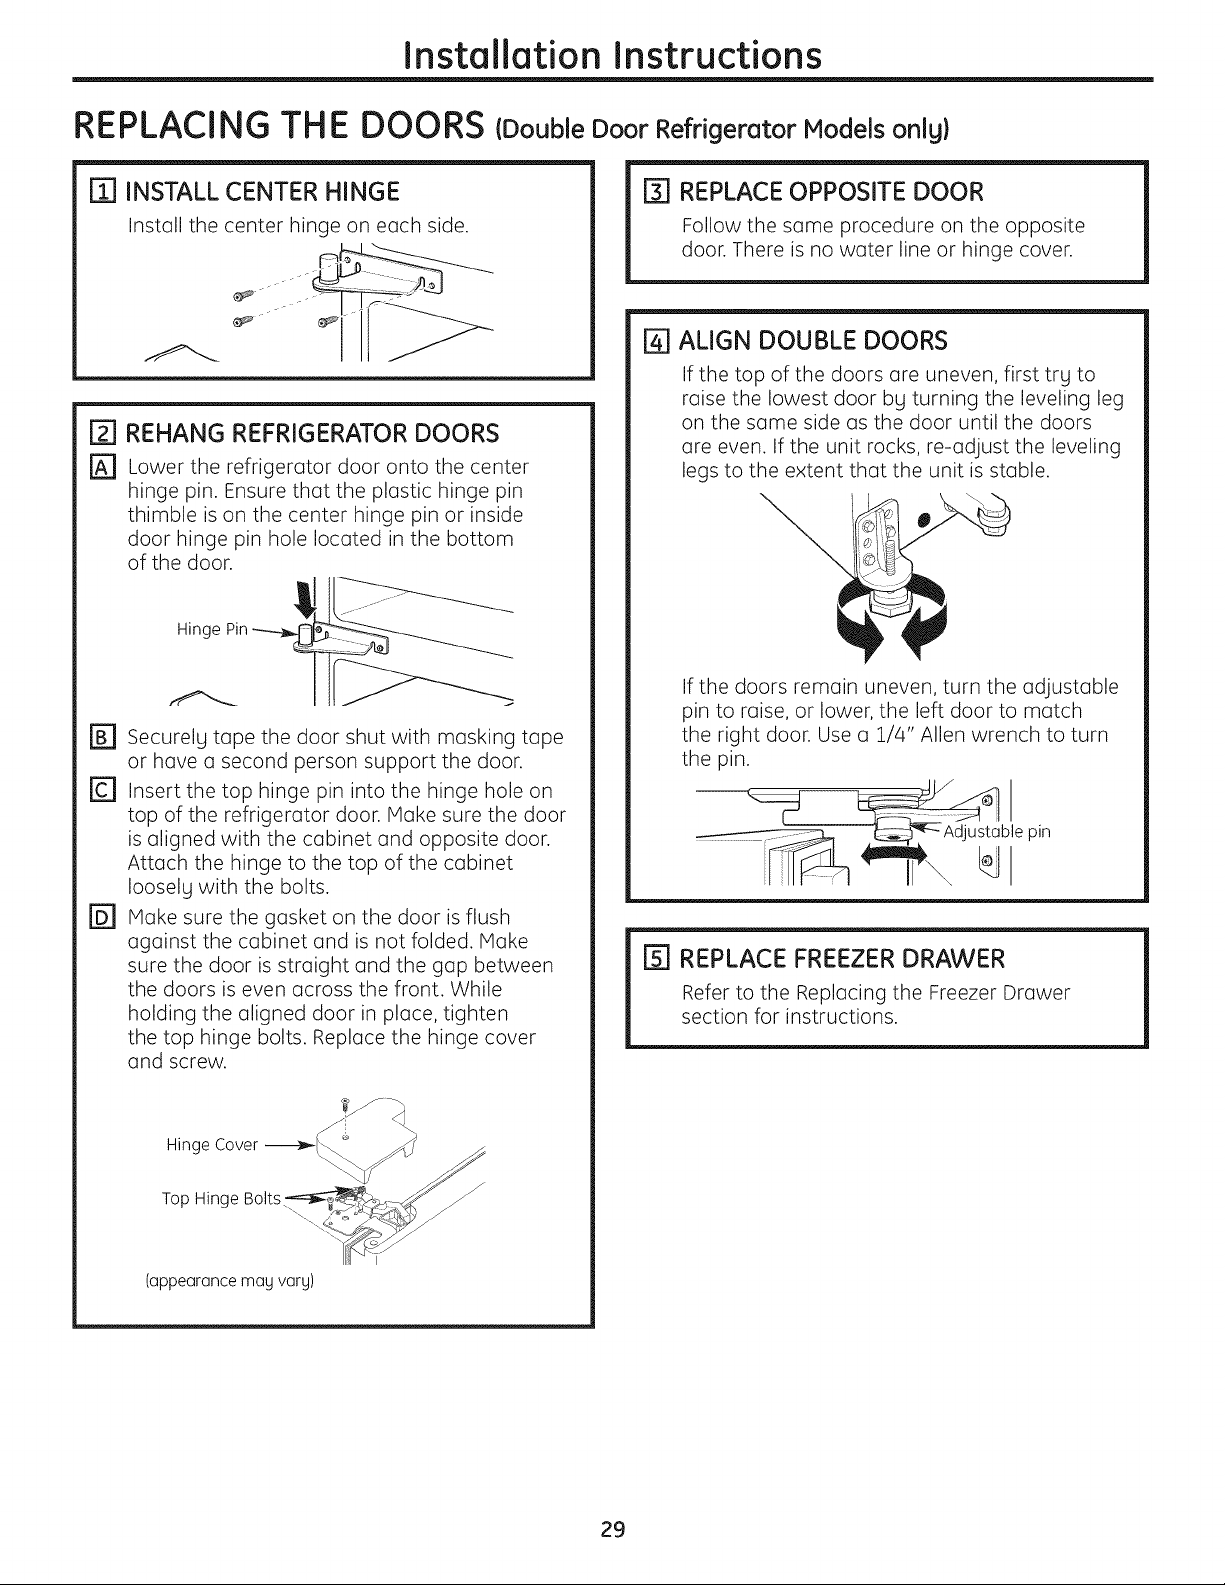
REPLACI NG TH E DOORS {Double Door Refrigerator Models onlg)
[i] INSTALL CENTER HINGE
Install the center hinge on each side.
ITI REHANG REFRIGERATOR DOORS
[] Lower the refrigerator door onto the center
hinge pin. Ensure that the plastic hinge pin
thimble is on the center hinge pin or inside
door hinge pin hole located in the bottom
of the door.
FB1 Securelg tape the door shut with masking tape
or have o second person support the door.
r_ Insert the top hinge pin into the hinge hole on
top of the refrigerator door. Make sure the door
is aligned with the cabinet and opposite door.
Attach the hinge to the top of the cabinet
Iooselg with the bolts.
r_ Make sure the gasket on the door is flush
against the cabinet and is not folded. Make
sure the door is straight and the gap between
the doors is even across the front. While
holding the aligned door in place, tighten
the top hinge bolts. Replace the hinge cover
and screw.
[_] REPLACE OPPOSITE DOOR
Follow the same procedure on the opposite
door. There is no water line or hinge cover.
143ALIGN DOUBLE DOORS
If the top of the doors are uneven, first trg to
raise the lowest door bg turning the leveling leg
on the same side as the door until the doors
are even. If the unit rocks, re-adjust the leveling
legs to the extent that the unit is stable.
If the doors remain uneven, turn the adjustable
pin to raise, or lower, the left door to match
the right door. Use a 1/4" Allen wrench to turn
the pin.
[_] REPLACE FREEZER DRAWER
Refer to the Replacing the Freezer Drawer
section for instructions.
Hinge '°_
Bolts o
Top Hinge __
(appearance may vary)
_5_ _
29
Page 30
Installation Instructions
INSTALLING THE WATER LINE (ICEMAKER MODELS}
BEFORE YOU BEGIN
Recommended copper water supplg kits are
WX8X2, WX8X3 or WX8X4, depending on the
amount of tubing gou need. Approved plastic
water supplg lines ore GE SmurtConnect"
Refrigerator Tubing (WXO8XIO006, WXO8X10015
and WXO8X10025).
When connecting gour refrigerator to a GE Reverse
Osmosis Water Sgstem, the onlg approved
installation is with u GE RVKit. For other reverse
osmosis water systems, follow the manufacturer's
recommendations.
If the water supplg to the refrigerator is from
u Reverse Osmosis Water Filtration Sgstem
AND the refrigerator also has a water filter,
use the refrigerator's filter bgpass plug. Using
the refrigerator's water filtration cartridge in
conjunction with the RO filter con result in hollow
ice cubes.
This water line installation is not warranted bg
the refrigerator or icemaker manufacturer. Follow
these instructions carefullg to minimize the risk of
expensive water damage.
Water hummer (water bunging in the pipes)in
house plumbing can cause damage to refrigerator
parts and lead to water leakage or flooding. Call a
qualified plumber to correct water hammer before
installing the water supplg line to the refrigerator.
To prevent burns and product damage, do not hook
up the water line to the hot water line.
If gou use gour refrigerator before connecting
the water line, make sure the icemoker power
switch is in the 0 {off} position.
Do not install the icemaker tubing in areas where
temperatures full below freezing.
When using ung electrical device (such as u power
drill) during installation, be sure the device is double
insulated or grounded in u manner to prevent the
hazard of electric shock, or is batterg powered.
All installations must be in accordance with local
plumbing code requirements.
WHAT YOU WILL NEED
/
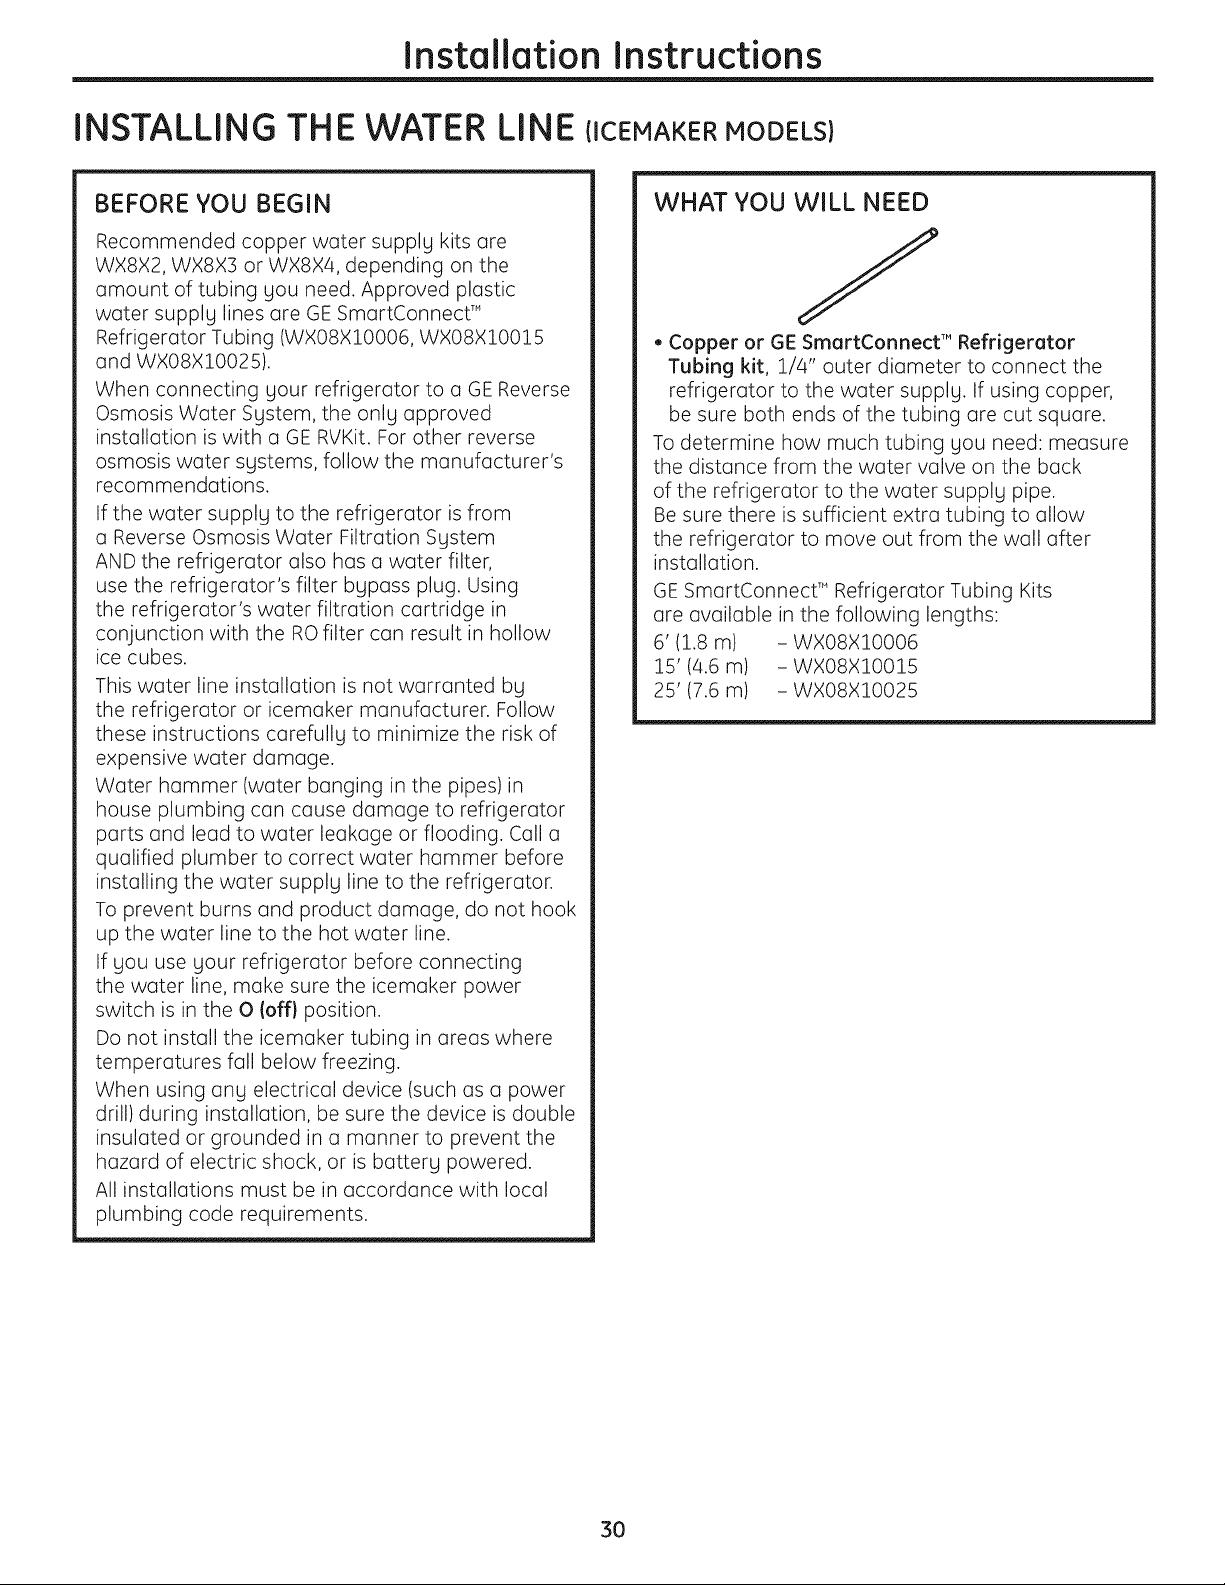
• Copper or GE SmartConnect'" Refrigerator
Tubing kit, 1/4" outer diameter to connect the
refrigerator to the water supplg. If using copper,
be sure both ends of the tubing are cut square.
To determine how much tubing gou need: measure
the distance from the water valve on the back
of the refrigerator to the water supplg pipe.
Be sure there is sufficient extra tubing to allow
the refrigerator to move out from the wall after
installation.
GE SmartConnect T"Refrigerator Tubing Kits
are available in the following lengths:
6' (1.8 m) - WXO8XIO006
15' (4.6 m) - WXO8X10015
25' (7.6 m) - WXO8X10025
3O
Page 31

Installation Instructions
WHAT YOU WILL NEED (CONT.)
NOTE: The only GEapproved plastic tubing
is that supplied in GE SmartConnect TM
Refrigerator Tubing kits. Do not use ang other
plastic water supplg line because the line is
under pressure at all times. Certain tgpes of
plastic will crack or rupture with age and cause
water damage to gour home.
• AGE water supplg kit (containing tubing,
shutoff valve and fittings listed below) is available
at extra cost from gour dealer or from Parts and
Accessories, 800.626.2002 (in Canada
1.888.261.3055).
• A cold water supply. The water pressure must
be between 20 and 120 p.s.i. (1.4-8.1 bar).
Install the shutoff valve on the nearest frequentlg
used drinking water line.
[_] HUT OFF THE MAIN WATER SUPPLY
_oUr_oan_ee inne_roefStJ_t_cetlong enough
[] CHOOSE THE VALVE LOCATION
Choose a location for the valve that is easilg
accessible. It is best to connect into the side
of a vertical water pipe. When it is necessarg
to connect into a horizontal water pipe, make
the connection to the top or side, rather than at
the bottom, to avoid drawing off ang sediment
from the water pipe.
• Power drill.
• 1/2" or adjustable wrench.
• Straight and Phillips blade screwdriver.
• Two 1/4" outer diameter compression nuts
and 2 ferrules (sleeves)-to connect the copper
tubing to the shutoff valve and the refrigerator
water valve.
OR
• If you are using a GE SmartConnect TM
Refrigerator Tubing kit, the necessary fittings
are preassembled to the tubing.
• If gour existing copper water line has a flared
fitting at the end, gou will need an adapter
(available at plumbing supplg stores) to connect
the water line to the refrigerator OR gou can cut
off the flared fitting with a tube cutter and then
use a compression fitting. Do not cut formed end
from GE SmartConnect" Refrigerator tubing.
DRILL THE HOLE FOR THE VALVE
Drill a 1/4" hole in the water pipe (even if using
a self-piercing valve), using a sharp bit. Remove
any burrs resulting from drilling the hole in
the pipe.
Take care not to allow water to drain into the
drill.
Failure to drill a 1/4" hole mag result in reduced
ice production or smaller cubes.
• Shutoff valve to connect to the cold water line.
The shutoff valve should have a water inlet with
a minimum inside diameter of 5/32" at the point
of connection to the COLD WATER LINE. Saddle-
tgpe shutoff valves are included in mang water
supplg kits. Before purchasing, make sure a
saddle-tgpe valve complies with gour local
plumbing codes.
31
Page 32

Installation Instructions
INSTALLING THE WATER LINE {CONT.}
[] FASTEN THE SHUTOFF VALVE
Fasten the shutoff valve to the cold water pipe
with the pipe clamp.
Pipe Clamp.
,)
Saddle-Tgpe
Shutoff Valve
NOTE: Commonwealth of Massachusetts
Plumbing Codes 248CMR shall be adhered to.
Saddle valves are illegal and use is not permitted
in Massachusetts. Consult with your licensed
plumber.
E] TIGHTEN THE PIPE CLAMP
Tighten the clamp screws until the sealing
washer begins to swell.
NOTE: Do not overtighten or you may crush
the tubing.
Pipe
Clamp
e-- Vertical Cold Water Pipe
Washer
Inlet End
[Z] CONNECT THE TUBING TO THE VALVE
Place the compression nut and ferrule (sleeve)
for copper tubing onto the end of the tubing and
connect it to the shutoff valve.
Make sure the tubing is fully inserted into
the valve. Tighten the compression nut securely.
For plastic tubing from a GE SmartConnect TM
Refrigerator Tubing kit, insert the molded end
of the tubing into the shutoff valve and tighten
compression nut until it is hand tight, then
tighten one additional turn with a wrench.
Overtightening may cause leaks.
Saddle-Type
Shutoff Valve
Packing Nut _'_
Outlet Valve
NOTE: Commonwealth of Massachusetts
Plumbing Codes 248CIVlR shall be adhered to.
Saddle valves are illegal and use is not permitted
in Massachusetts. Consult with your licensed
plumber.
Ferrule (sleeve)
Compression Nut
/ SmartConnect"
_ Tubing
[] ROUTE THE TUBING
Route the tubing between the cold water line
and the refrigerator.
Route the tubing through a hole drilled in the
wall or floor (behind the refrigerator or adjacent
base cabinet) as close to the wall as possible.
FLUSH OUT THE TUBING
Turn the main water supply on and flush out
the tubing until the water is clear.
Shut the water off at the water valve after
about one quart (1 liter) of water has been
flushed through the tubing.
To complete the installation of the refrigerator,
go back to Step 1 in Installing the Refrigerator.
32
Page 33

Normal operating sounds. GEAppliances.com
Newer refrigerators sound different from older refrigerators.
Modern refrigerators have more features and use newer technology.
Do you hear what I hear? These sounds are normal.
HUMMM...
--WHOOSH...
The new high efficiency compressor may run faster
and longer than your old refrigerator and you may
hear a high-pitched hum or pulsating sound while
it is operating.
You may hear a whooshing sound when the
doors close. This is due to pressure equalizing within
the refrigerator.
CLICKS,POPS,
CRACKS and SNAPS
You may hear cracking or popping sounds when
the refrigerator is first plugged in. This happens as
the refrigerator cools to the correct temperature.
The freezer control will click when starting or stopping
the compressor.
Defrost timer snapping in and out of the defrost cycle.
Expansion and contraction of cooling coils during and
after defrost can cause a cracking or popping sound.
On models with an icemaker, (]tier an icemaking cycle,
you may hear the ice cubes dropping into the ice
bucket.
On models with a dispenser, during water dispense,
you may hear the water lines move at initial dispense
and after dispenser button is released.
WHIR!
You may hear the fans spinning at high speeds.
This happens when the refrigerator is first plugged in,
when the doors (]re opened frequently or when a large
amount of food is added to the refrigerator or freezer
compartments. The fans are helping to maintain the
correct temperatures.
The fans change speeds in order to provide optimal
cooling and energy savings.
WATERSOUNDS
6
The flow of refrigerant through the freezer cooling coils
may make a gurgling noise like boiling water.
Water dropping on the defrost heater can cause a
sizzling, popping or buzzing sound during the defrost
cycle.
A water dripping noise may occur during the defrost
cycle as ice melts from the evaporator and flows into
the drain pan.
Closing the door may cause a gurgling sound due to
pressure equalization.
Before you call for service...
Troubleshooting Tips
Save time and mone_l! Review the charts on
the following pages first and you may not need to call
for service.
Possible Causes What To Do
Refrigerator does not Refrigerator in defrost cycle. • Wait about 50 minutes for defrost cycle to end.
operate Control in Off position. •Move the control to a temperature setting.
Refrigerator is unplugged. • Push the plug completely into the outlet.
The fuse is blown/circuit • Replace fuse or reset the breaker.
breaker is tripped.
Vibration or rattling
(slight vibration
is normal)
Leveling legs need adjusting. • See Level the Refrigerator.
33
Page 34

Before gou call for service...
Troubleshooting Tips
Possible Causes What To Do
Motor operates for Normal when refrigerator • Wait 24 hoursfor the refrigerator to completelg
long periods or cgcles is first plugged in. cool down.
on and off frequently.
IModern refrigerators Often occurs when large • Thisis normal.
with more storage
space and a larger placed in refrigerator.
freezer require more Door left open. • Checkto see if package isholding door open.
operating time. Theg
start and stop often Hot weather or frequent • Thisis normal.
to maintain even door openings.
temperaturesJ Temperature control • SeeAbout thecontrols.
Refrigerator or freezer Temperature controls not set • See About the controls.
compartment too warm cold enough.
Frost or ice crgstals Door left open. • Check to see if package is holding door open.
on frozen food
(frost within package Door openings too frequent • This is normal.
is normal) or too long.
amounts of food are
set at the coldest setting.
Warm weather or frequent • Set the temperature control onestepcolder.
door openings. SeeAbout thecontrols.
Door left open. • Checkto see if package isholding door open.
Frequent "buzzing" Icemaker power switch is in • Set the power switch to the 0 (off) position. Keeping it
sound the !(on/ position, but the inthe !(on/ position will damage the water valve.
water supplg to the refrigerator
has not been connected.
Small or hollow cubes Water filter clogged. • Replacefilter cartridge with new cartridge orwith plug.
Automatic icemaker Icemaker power switch is • Setthe power switch to the I(onl position.
(onsome models) not on. Theicemaker power light will turn green when the
does not work freezer light switch is pressedin or when the freezer
door is closed.
Water supplg turned offor • SeeInstallingthe water line.
not connected.
Freezer compartment • Wait 24 hoursfor the refrigerator to completely
too warm. cool down.
Piled up cubes in the storage • Levelcubes bg hand.
bin cause the icemaker
to shut off.
Ice cubes stuck in icemaker. • Turn off the icemaker,remove cubes and turn
(Green power light on the icemaker back on.
icemaker blinking.}
Icemaker light is not lit. • Thisis normal when the freezer door is open.The
icemaker power light will turn green when the freezer
light switch is pressedin or when the freezer door is
closed.
34
Page 35

GEAppliances.com
Possible Causes What To Do
Ice cubes have Food transmitting odor/taste • Wrap foods well.
odor/taste to ice cubes.
Interior of refrigeratar • See Core and cleaning.
needs cleaning. • Keep an open box of boking sodo in the refrigerator;
reploce every three months.
Slow ice cube freeing Door left open. • Check to see if pockoge is holding door open.
Freezer control nat set • See About the controls.
cold enough.
Refrigerator has odor Foods transmitting • Foods with strong odors should be tightlg wrapped.
odor to refrigerator. • Keep an open box of bQking sodQ in the refrigerator;
replace every three months.
Interior needs cleaning. • SeeCare and cleaning.
Moisture forms on Not unusual during • Wipe surface drg and reset the refrigerator control
outside of refrigerator periads af high humiditg, one setting colder.
Moisture collects inside Too frequent or too • This is normal.
(in humid weather, air long door apenings.
carries moisture into
refrigerator when
doors are opened)
Refrigerator or freezer No power at outlet. • Replace fuse or reset the breoker.
compartment light
does not work Light bulb burned aut ar loose. • See Rap!acing the light bulbs.
Door/drawer does not Leveling legs need adjusting. • See Insta!ling the Refrigerator.
close by itself
Freezer door/drawer This is normal if, after popping • This indicotes thQt there is o good seQI on the freezer
pops open when open, the freezer daar/drawer door/drower. Ifthe freezer door/drower does not
refrigerator door closed an its awn. outomoticollg close offer popping open, then see the
is closed Problem: Door/drawer does not close bg itself, above.
Hot air from bottom
of refrigerator
Normal air flow cooling
motor. In the refrigeratian
process, it is normal that
heat be expelled in the
area under the refrigerator.
Some floor coverings will
discolor at these normal
and safe temperatures.
Food freezing in
the refrigerator
Orange glow Defrost heater is an. • This is normal.
in the freezer
Food too close to the air vent
at the back of the refrigerator.
Refrigeratar control is set
taa cold.
Move the food away from the air vent.
Move the refrigerator control to a warmer
temperature setting one increment at a time.
35
Page 36

Before gou call for service...
Troubleshooting Tips
Possible Causes What To Do
No ice cube Supplg line or shutoff valve • Call a plumber.
production is clogged.
ion some models)
Handle is loose/ Handle needs adjusting. • SeeAttach the FreshFood Door Handle and Attach the
handle has a gap Freezer Door Handle sections for detailed instructions.
Refrigerator beeping This is the door alarm. • Close door.
Water filter clogged. • Replace filter cartridge or remove filter and install plug.
Filter cartridge not • Remove and reinstall filter cartridge, being certain that
properlg installed, it locks into place. The blade on the end of the cartridge
should be positioned vertically.
Control setting is
not lit
Refrigerator doors are
not even (on Double
Door models onlgl
Baskets stick or jam
when opening or
i i _ ii ii i i i i i i i i i
iiii
On some models, the light bulbs
at the top of the refrigerator
compartment light up the
temperature control settings.
Doors need realigning.
Baskets are too full.
• If the control settings do not light up, check to see if
the light bulbs are burned out, and replace if necessary.
• SeeAlign Double Doors section located under
Replacing the Door (Double Door Refrigerator Models
onlg).
To open: remove some of the products from
the basket when opened as far as possible.
Readjust the products left in the basket and
trg to open the basket again.
To close: readjust products in the basket or remove
ang product that isabove the rim of the basket and
close the basket.
]6
Page 37

Please place in envelope and mail to:
Veuillez mettre dans une enveloppe et envoyez _ :
OWNERSHIPREGJSTRATJOH
P.O. BOX1780
MISSJSSAUGA,OHTARJO
L4Y4G1
(FORCAHADJAHCOHSUMERSOHLY)
37
Page 38

For Canadian
Customers
Pour les
Consommateurs
Canadiens
i.....
Pleaseregisteryourproducttoenableustocontactyou Veuillezenregis_ervob_produitafindenouspe_ettrede
in the remote event a safety nddce is issued for this product communiquer avec vous sijamais un avis de s6curit_ concemant
Z
and to allow for efficient communica_on under the terms ce produit 6tait _mis et de communiquer facilement avec vous en
of your warranty, should the need arise, verba de votre garanlie, sile besoin sen fair sen'dr.
REGISTERON-LINE: www.geappliances.ca MAILTO: RO.BOX1780,MISSISSAOGA
rr"
ENREGISTREMENTSURINTERNETD,: www.electmmenagersge.ea POSTERD,: ONTARIO,14Y4Gl
Z
[][] MISS/MLLE.MR'/M[][] as.MRS'/MME'FIRSTNAME/PRENOM LASTNAME/NOM
STREETNO/N° RUE STREETNAME/RUE
CITY/VILLE
Z
w
Z
_.1
AREACODE/IND.RING.[TELEPHONE JE-M_L
DIDYOUPURCHASEASERVICECONTRACTPORTHISAPPUANCE? YES/OUI [] IFYES/SlOUI:EXPIRATION
AVEZ-VOUSACHETI"UNCONTRATDESERVICEPOURCETAPPAREE? NO/NON D
_9
Z
NAME OFSELLINGDEALER/ NOM DU MARCHAND MODEL/MODELE
7
INSTALLA'I]ONDATE/DATED'INSTALLATION
C3
Y/A M D/J CORRESPONDENCE [] ENGLISH
CORRESPONDANCE [] FRAN?AIS
[] Idonotwishtoreceiveanypromotionaloffeisregardingthisproduct.
[] Jened_sirepasrecevoird'offrespromotionnellesconcemantceproduit
PROVINCE POSTALCODE/POSTAL
Y/A M D/J
SERIAL/SCRIE
AP%.NO/APP./RR#
38
Page 39

Refrigerator Warranty. IForcustomersin the UnitedStates)
All warranty service provided by our Factory Service Centers,
or an authorized Customer Care®technician. Toschedule service,
on-line, visit us at ge.com, or call 800.GE.CARES(800.432.2737).
Pleasehave serial number and model number available when
Staple Four receipt here.
Proof of the original purchase
date is needed to obtain service
under the warranty.
calling for service.
GE Wi// Rep/ace:
GEand GEPROFILEMODELS:
One Year Ang part ofthe refrigerator which fails due to a defect in materials or workmanship.
Fromthe dateof the During this limited one-gear warrantg, GEwill also provide,free of charge, alllabor and
original purchase related service to replacethe defective part.
Thirty Dags
(Water filter if included)
From the orioinal
pumhase date of
the refrigerator
GE PROFILE MODELS ONLY:
Five Years Ang part of the sealed refrigerating sgstem (the compressor,condenser,evaporator
(GEProfilemodelsonly) and all connecting tubing) which fails due to a defect in materials or workmanship.
Fromthe date of the During this limited five-gear sealed refrigerating sgstem warrantg, GEwill also provide,
Ang part ofthe water filter cartridge which fails due to a defect in materials or workmanship.
During this limited thirty-day warranty, GEwill also provide, freeof charge, a replacement water
filter cartridge.
origina!mrch se freeofcharge,aUlaborandrelatedservicetoreplacethedefectivepartinthesealed
refrigerating sustem.
Service trips to gour home to teach gou how to use
the product.
Improper installation, deliverg or maintenance.
Failure of the product ifit is abused, misused, or used for
other than the intended purpose or used commemiallg.
Loss of food due to spoilage.
Replacement of house fuses or resetting of circuit
breakers.
Damage ca used after deliverg.
EXCLUSION OF IMPLIED WARRANTIES--Your sole and exclusive remedy is product repair as provided
in this Limited Warranty. Ang implied warranties, including the implied warranties of merchantability
or fitness for a particular purpose, are limited to one gear or the shortest period allowed bg law.
This warranty is extended to the original purchaser and any succeeding owner for products purchased
for home use within the USA. If the product is located in an area where service by a GE Authorized Servicer
is not available, you may be responsible for a trip charge or you may be required to bring the product to an
Authorized GE Service location for service. In Alaska, the warranty excludes the cost of shipping or service calls
to your home.
Replacement of the water filter cartridge, if included, due
to water pressure that is outside the specified operating
range or due to excessive sediment in the water supplg.
Replacement of the light bulbs, if included, or water filter
cartridge, ifincluded, other than as noted above.
Damage to the product caused bg accident, fire, floods
or acts of God.
Incidental or consequential damage caused bg possible
defects with th is a pplia nce.
Product not accessible to provide required service.
Some states do not allow the exclusion or limitation of incidental or consequential damages. This warranty
gives you specific legal rights, and you may also have other rights which vary from state to state. To know
what your legal rights are, consult your local or state consumer affairs office or your state's Attorney General.
Warrantor: General Electric Compang. Louisville, KY 40225
39
Page 40

CUSTOMER WARRANTY
(for customers in Canada)
Your refrigerator is warranted to be free of defects in material and workmanship.
What is covered How Long Warranted Parts Labour L_
(From Date of Sale) Repair or Replace
atMabe's Option
Compressor GEProfile: Ten (10)Years GEProfile:Ten (!0) Years GEProfile: Five (5)Years
Sealed System (including GEProfile: Five(5)Years GEProfile: Five(5)Years GEProfile: Five (5)Years
evaporator, condenser GEand All Other GEand All Other GEand All Other @
tubing and refrigerant) Brands: One (!) Year Brands: One (!) Year Brands: One (!) Year _
All Other Parts One (!) Year One (!) Year One (!) Year
TERMS AND CONDITIONS:
Thiswarranty applies only for single family domestic
use in Canada when the Refrigerator has been properly
installed according to the instructions supplied by Mabe
and is connected to an adequate and proper utility
service.
Damage due to abuse, accident, commercial use, and
alteration or defacing of the serial plate cancels all
obligations of this warranty.
Service during this warranty period must be
performed by an Authorized Mabe ServiceAgent.
Neither Mabe nor the Dealer is liable for any claims or
damages resulting from failure of the Refrigerator or
from service delays beyond their reasonable control.
Toobtain warranty service, purchaser must present the
original Billof Sale. Components repairedor replacedare
warranted through the remainder of the original warranty
period only.
Thiswarranty isextended to the original purchaser and
any succeedingowner for products purchased for home
usewithin Canada. Inhome warranty service will be
provided in areaswhere it is availableand deemed
reasonable by babe to provide.
Thiswarranty is in addition to any statutory warranty.
GEand All Other GEand All Other GEand All Other
Brands: One (!) Year Brands: One (!) Year Brands: One (!) Year
WHAT IS NOT COVERED:
• Owner isresponsible to pay for service calls related
to product installation and/or teaching how to use
the product.
• Damage to finish must be reported within 48 hours
following the delivery of the appliance.
Damage to finish after delivery.
Improper installation-proper installation includes
adequate air circulation to the refrigeration system,
adequate electrical, plumbing and other connecting
facilities.
Replacement of house fuses or resetting of circuit
breakers.
,, Replacement of light bulbs.
Damage to product caused by accident, fire, floods
or acts of God.
• Lossof food due to spoilage.
,, Proper use and care of product as listed in the
owner's manual, proper setting of controls.
Product not accessible to provide required service.
WARRANTORISNOTRESPONSIBLEFOR
CONSEQUENTIALDAMAGES.
40
Limited Warranty. Any implied warranties, including the implied warranties of merchantability or fitness for
i XCLUSIONOFIMPLIEDWARRANTIES--Yoursole and exclusive remedg isproduct repuir usprovided in this
a particular purpose, are limited to one gear or the shortest period allowedby law.
IMPORTANT
Keepthis warrantg and gour bill of sale as proof of original purchase and purchase date.
Pleasehave serial number and model number available when calling for service.
Mabe Service is available coast to coast. If further help is
needed concerning this warranty, contact:
Manager, Consumer Relations
Mabe Canada Inc., Consumer Service
! Factory Lane, Suite 310
Moncton, New Brunswick EIC 9M3
1.800.561.:3344
Staple your receipt here.
Proof of the origina! purchase
date is needed to obtain service
under the warrants.
Page 41

Performance Data Sheet
SmartWater Filtration System
This system has been tested according to NSF/ANSI 42/53 for reduction of the substances listed below.
The concentration of the indicated substances in water entering the system was reduced to a concentration
less than or equal to the permissible limit for water leaving the system, as specified in NSF/ANSI 42/55.*
200% safety factors built in for unmetered usage)
Parameter USEPA Influent
MCL Challenge Concentration
Chlorine - 2.0mg/L+10%
T&O - -
Particulate** - _>10,000particles/mL
Parameter
Turbidity
Cysts
Asbestos
LeadatpH65
LeadatpH8.5
NercurgatpH6.5
NercurgatpH8.5
Alachlor
Lindane
2,4-D
Toxaphene
Benzene
Carbofuran
1,4dichlorobenzene
USEPA
MCL
05 NTU
_>99.95%Reduction
_>99%Reduction
0,015mg/L
0.015mg/L
0.002mg/L
0.002mg/L
0.002mg/L
0.0002mg/L
0.070mg/L
0.003mg/L
0.005mg/L
0.040mg/L
0.075mg/L
Influent
Challenge Concentration
11+1 NTU***
Ninimum50,000L
107to 108fibers/L;>10pm
0.15mg/L+ 10%
0.15mg/L+ 10%
0.006mg/L+ 10%
0.006mg/L+ 10%
0.04mg/L+ 10%
0.002mg/L+ 10%
0.210mg/L+ 10%
0.015mg/L+ 10%
0.015mg/L+ 10%
0.080mg/L+ 10%
0.225mg/L+ 10%
Atrazine 0.003mg/L 0.009 mg/L±10% 0.0087 mg/L < 0.0005 mg/L < 0.0005 mg/L 94.22% 93.33%
Tested using a flow rate of 0.50 gpm; pressure of 60 psig; pH of 7.5 +_0.5; temp. of 68 ° +_5°F (20° +_3°C)
** Measurement in Particles/ml. Particles used were 0.5-ff microns
*** NTU=Nephelometric Turbidity units
MWF Cartridge
Standard No.42: Aesthetic Effects
Influent
Average
1,96 mg/L
6,400,000#/mL
Standard No. 53: Health Effects
Influent
Average
10.5NTU
118,750 #/L
57 MF/L
0.1567 mg/L
0.1433 mg/L
0.0059 mg/L
0.0057 mg/L
0.0367 mg/L
0.0020 mg/L
0.2033 mg/L
0.0160 mg/L
0.0145 mg/L
0.0830 mg/L
0.2283 mg/L
58,833#/mL 150,000#/mL
0.996MF/L
<0.001mg/L
<0.001mg/L
0.000350mg/L
0.000325mg!L
0.00023mg/L
<0.00002mg/L
0.00337mg/L
0.00100mg/L
0.000500mg/L
0.001000mg/L
0.000500mg/L
Effluent
Average Maximum
0.06mg/L 0.11mg/L
Effluent
Average
0.14NTU
<I#/L
Maximum
0.28NTU
4#/L
<1 MF/L
<0,001mg/L
<0,001mg/L
0.0007mg/L
0.0006mg/L
0.0004mg/L
<0.00002mg/L
0.011000mg/L
0.001000mg/L
0.000500mg/L
0.001000mg/L
0.000500mg/L
% Reduction
Average Minimum
96.77% 94.74%
99.14% 97.97%
% Reduction
Average Minimum
98.54% 97.20%
> 99.99% > 99.99%
99.60% 99.39%
99.36% 99.29%
99.30% 99.29%
94.70% 87.50%
93.20% 89.29%
99,34% 98.67%
99.00% 98.95%
98.32% 94.50%
93.44% 91.67%
9651% 95.83%
98.78% 98.65%
99.78% 99.77%
Min. Required
Reduction
>50%
_>85%
Min. Required
Reduction
0.5NTU
_>99.95%
_>99%
0.010mg/L
0.010mg/L
0.002mg/L
0.002mg/L
0.002mg/L
0.0002mg/L
0.070mg/L
0.003mg/L
0.005mg/L
0.04mg/L
0.075mg/L
0.003mg/L
Operating Specifications
[] Capacity: certified for up to ]00 gallons (1115 I); up to six months for models without a replacement filter indicator light;
up to one year for models with a replacement filter indicator light
[] Pressure requirement: 40-120 psi (2.8-8.2 bar), non-shock
[] Temperature: ]]-IO0°F (0.6-]8°C)
[] Flow rate: 0.5 gpm (1.9 Ipm)
General Installation/Operation/Maintenance Requirements
[] Flush new cartridge at full flow for ] minutes to purge out trapped air.
[] Replace cartridge when the indicator light flashes or water flow rate is reduced on non-indicator units.
Special Notices
[] Installation instructions, parts and service availability, and standard warranty are included with the product when shipped.
[] This drinking water system must be maintained according to manufacturer's instructions, including replacement of filter cartridges.
[] Do not use with water that is microbiologically unsafe or of unknown quality without adequate disinfection before or
after the system. Systems certified for cyst reduction may be used on disinfected water that may contain filterable cysts.
[] The contaminants or other substances removed or reduced by this water treatment system are not necessarily in your water.
[] Check for compliance with the state and local laws and regulations.
[] Note that while the testing was performed under standard laboratory conditions, actual performance may vary. Systems must be
installed and operated in accordance with manufacturer's recommended procedures and guidelines.
System Tested and Certified by NSF International against ANSI/NSF Standard 42 & 53 for the reduction of:
Standard No. 42: Aesthetic Effects
Chemical Unit
Chlorine Taste and Odor
Mechanical Filtration Unit
Particulate Reduction, Class I
Manufactured for: General Electric Company, Louisville, KY40225
EPAEST.No. 070595-MN-001
Standard No. 53: Health Effects
Chemical Reduction Unit
Alachlor and Atrazine Reduction
Benzene and Carbofuran Reduction
1,4dichlorobenzene and 2,4-D Reduction
Lead and Lindane Reduction
Mercury and Toxaphene Reduction
Mechanical Filtration Unit
Turbidity Reduction
Cyst and Asbestos Reduction
41
Page 42

Performance Data Sheet
SmartWater Filtration Sustem
GSWF Cartridge
This sustem has been tested according to NSF/ANSI 42/53 for reduction of the substances listed below.
The concentration of the indicated substances in water entering the sustem was reduced to a concentration
less than or equal to the permissible limit for water leaving the sustem, as specified in NSF/ANSI 42/5&*
(!00% safetg factors built in for unmetered usage)
Standard No. 42: Aesthetic Effects
Parameter
Chlorine
T&O
Particulate**
Parameter
Turbiditg
Cgsts
Leadat pH 6.5
Leadat pH 8.5
Lindane
Atrazine
* Tested using a flow rate of 0..5gpm; pressure of 60 psig; pH of 7.5+_0.5; temp. of 68°+_5°F (20°+_3°C)
** Measurement in Particles/mL Particles used were 0.5-1 microns
*** NTU=Nephelometric Turbiditg units
USEPA
MCL
USEPA
MCL
1 NTU***
99.95% Reduction
0.015 mg/L
0.015 mg/L
0.0002 mg/L
0.003 mg/L
Influent
Average
1.845 mg/L
143,333 #/mL
Average
10.3 NTU***
200,000 #/L
0.15 mg/L
0,14 mg/L
0.0216 mg/L
0,008 mg/L
Influent Challenge Effluent
Concentration Average Maximum
2.0 mg/L+10% < 0.05 mg/L 0.05 mg/L
at least 10,000 particles/mL 29.83 #/mL 140 #/mL
Standard No. 53: Health Effects
Influent
Influent Challenge
Concentration
1+1NTU***
Hinimum50,000L
0.15mg/L+10%
0.15 mg/L+10%
0.002 mg/L+10%
0.009 mg/L+10%
0.106 NTU
< 0.001 mg/L
0.001 mg/L
< 0.00002 mg/L
< 0.002 mg/L
Effluent
Average
0
Maximum
0.14 NTU
0
< 0.001 mg/L
0.003 mg/L
< 0.00002 mg/L
< 0.002 mg/L
% Reduction
Average Minimum
> 97.29% 96.43%
99.98% 99.91%
% Reduction
Average Minimum
98.97% 98.61%
> 99.99% > 99.99%
> 99.33% > 99.33%
> 99.29% 97.86%
99.07% 98.75%
> 76.12% > 66.67%
Min. Required
Reduction
> 50%
>85%
Min. Required
Reduction
0.5 NTU
> 99.95%
0.010 mg/L
0,010 mg/L
0,0002 mg/L
0,003 mg/L
Operating Specifications
[] Capacity: certified for up to 750 gallons (2,838I);up to six months
[] Pressure requirement: 40-120 psi (2.8-8.2 bar)
[] Temperature: 33-100°F (0.6-38°C)
[] Flow rate: 0.5 gpm (1.9 Ipm)
General Installation/Operation/Maintenance Requirements
[] Flush new cartridge at full flow for 3 minutes to purge out trapped air.
[] Replace cartridge when flow becomes too slow.
Special Notices
[] Installation instructions, parts and service availabilitg, and standard warrantg are included with the product when shipped.
[] This drinking water system must be maintained according to manufacturer's instructions, including replacement of filter
cartridges.
[] Do not use with water that is microbiologically unsafe or of unknown quality without adequate disinfection before or after
the system. Systems certified for cyst reduction may be used on disinfected water that may contain filterable cysts.
[] The contaminants or other substances removed or reduced by this water treatment system are not necessarily in your water.
[] Check for compliance with the state and local laws and regulations.
[] Note that while the testing was performed under standard laboratory conditions, actual performance may vary. Systems
must be installed and operated in accordance with manufacturer's recommended procedures and guidelines.
Sgstem tested and certified bg NSFInternational against Standard 42 for the reduction of
chlorine, taste and odor, particulate Class I and Standard 53 for the reduction of cgst, lead,
Lindane, Atrazine and turbiditg.
Manufactured for: General Electric Compang, Louisville, KY40225
i
42
Page 43

State of California
Department of Health Services
Water Treatment Device
Certificate Number
05-1698
Date issued: February 2, 2005
Trademark/Model Designation .......... ........: , Replacement Elements
MWF ....................
Manufacturer: ....
The water
116830 of the Healit
%¸,¸¸
pursuant to Section
Microbiolo
Cysts
Turbidity
Organic
Alachl6 ...........
Atrazi_
linants
Bellini
Ca_bi_
Lindane
Me_cu_....
Toxaphehe
1
:}i!) ::::: 0.5gpm
...... eonaRions ofC er tifi:_at[o n:;: ...................
Do not use where water is microbiologic_lly uo_fife u_kh{i_n q0aiity, except that systems certified for
cyst reduction may be used on disinfected waterg that may contain filterable cysts.
43
Page 44

Stateof California
Departmentof HealthServices
Water Treatment Device
Certificate Number
03- 1559
Date issued: April 28, 2003
Trademark/Model Designation ...... Replacement Elements
Manufacturer: al ectfii _:_i
The water treatment
116830 of the g
Microbiolo: and Turbidity
Cysts
,_ _i_¸_ dii_¸
%¸¸¸¸¸¸
Rated Service Capacityl 750gal i;I :, Rat_ Ser_ic_,F[6:_: 0:5 gpm
.... ...._6ndi_hmsof r/_t'i_ati_ :: : : : ......
Do not use where water is microbiologically unsafe or of ufiknown quality, except that systems certified for
cyst reduction may be used on disinfected waters tt_at may contain filterfible cysts.
44
Page 45

Mesures de s@curit@................. 48,47
Fonctionnement
Clagettes et bacs ............................ 51
Cong61ateur ............................. 53, 54
Entretien et nettogage
du r6frig6rateur .......................... 56, 57
Le filtre (_eau ............................ 49, 50
Les bacs (_rangement et bacs 5 16gume .... 52
Les commandes ............................ 48
Machine 5 gla_ons automatique ............ 55
Remplacement des ampoules .............. 58
Installation
Changement du sens
d'ouverture des portes
(mod@lesde r6frig6rateurs
une porte uniquement) ................ 67-70
Enl@vementet remise en place
des portes (modUles de r6frig6rateurs
deux portes uniquement) .............. 70-72
Enl@vementdu tiroir
du compartiment cong6lation .............. 65
Installation de la conduite d'eau ......... 73-75
Installation du r6frig6rateur ............. 60-64
Pr6paration .................................. 59
Remise en place du tiroir
du compartiment cong6lation .............. 66
Conseils de d@pannage ............ 76-79
Bruits normaux de fonctionnement ......... 76
Soutienau consommateur
Feuillet de donn6es relatives 5 la
performance de la cartouche ........... 81, 82
Garantie pour la clientele au Canada ....... 80
Soutien au consommateur .................. 84
Transcrivez les num@ros de mod@le et de s@rieici :
# de mod@le
# de s@rie
IIsfigurent sur I'_tiquette qui setrouve 5 I'interieur
du compartiment rdrig_rateur en haute 5 droite.
N"
I:1
¢3
_ ira
_ O
45
Page 46

MESURESDE S 'CURIT -IMPORTANTES.
LISEZD'ABORD TOUTESLESDIRECTIVES.
-&AVERTISSEMENT!
N'utilisez cet4lectrom4nager que pour I'usage auquel il est destin4, comme expliqu4 dans le present
manuel.
MESURESDE SCLCURIT4L
Lorsque vous utilisez un appareil 4lectrique, observez toujours les mesures de s4curit4 de base,
y compris lessuivantes.
Installezle rdrig_rateur conform@mentaux
directives d'installation avant de I'utiliser.
Nelaissezpas lesenfants grimper,s'asseoir,setenir
debout ni sependreaux clagettes du r@frig_rateur.
IIspourraient endommager le r_frig_rateur et
seblessergravement.
Netouchez pas lessurfaces froides du cong@lateur
sivous avez lesmains humides ou mouill_es :
la peau risque d'adh_rer h ces surfaces tr@sfroides.
N'entreposezet n'utilisez pas d'essenceou autres
vapeurset liquidesinflammablesh proximit@decet
appareilou detout autre appareil @lectrom@nager.
,, Sivotre rdrig_rateur est dot_ d'une machine
h glaqons automatique @vitezle contact avec
lespi_ces mobiles du m@canisme@jecteur,ou
avec I'_l@mentchauffant situ_ @la partie inf@rieure
de la machine h glaqons. Ne posez paslesdoigts
ou les mains sur le m@canismedela machine
h glaqons pendant que le rdrig_rateur est branch&
Eloignezles doigts des parties durdrig_rateur o0
I'onpeut facilement sepincer: lesespaces entre
lesportes et entre les portes et les placards sont
toujours @traits.Sogezprudent Iorsquevousfermez
lesportes de I'appareil en pr@sencedes enfants.
D@branchezvotre rdrig_rateur avant de le nettoger
ou de le r@parer.
RENARQUE : Nous vous mcommandons vivement
de confier toute rdparation _ un technicien qualifid.
Lorsquevous r@glezla commande enpositionOff
larr_gI'alimentation @lectriquede I'ampoule n'est
pas coup@e.
Nerecongelezpas les aliments surgel6squi ant
compl_tement d_gel&
-&DANGER! RISQUES POUR LES ENFANTS
COMMENT VOUS DCLBARRASSERCONVENABLEMENT
46
DE VOTREANCIEN RCLFRIGCLRATEUR
Lesenfants pris au pi@geou marts d'asphgxie sont
toujours d'actualit& Lesrdrig_rateurs abandonn_s
sont toujours aussidangereux, m@mesion n'attend
que <<quelquesjours>>pour s'end_barrasser.Sivous
ne gardez pasvotre ancien rdrig_rateur, veuillez
suivre lesdirectivesci-dessousafin de pr_venir les
accidents.
Avant de vous d_barrasser de votre ancien
r_frig_rateur ou cong_lateur :
D_montez lesportes.
Laissezlesclagettes en place afin d'emp@cher
lesenfants de grimper hI'int@rieur.
R_frig_rants
Touslesappareils de rdrig_ration contiennent
des rdrig_rants qui,conform@mentaux loisf@d_rales,
doivent @treenlev_savant toute @liminationde
I'appareil.Sivous vous d_barrassez de vieux appareils
de r@frig_ration,v@rifiez,aupr@sde la soci_t@qui
s'occupe de leur _limination, ce que vous devezfaire.
CORDONS PROLONGATEURS
Nous vous recommandons fortement de ne pas utiliser de cordons prolongateurs 8 cause des risques
potentiels qu'ils pr_sentent dans certaines conditions.
Toutefois sivousd@cidezd'utiliser tout de m@meun cordon prolongateur, il est absolument n@cessairequ'il
s'agissed'un cordon @3ills avec mise @la terre pour appareils @lectrom@nagershomologu_ UL(auxEtats-Unis)
ou certifi@CSA(au Canada),pourvu d'une fiche et d'une prisemisesh la terre de 15 amp@res(minimum)et
de 120 volts.
Page 47

www.electromenagersge.ca
AVERTISSEMENT!
RACCORDEMENT ELECTRIQUE
Ne coupez ni retirez en aucun cos/a troisi_me broche (raise 8 la terre) de la fiche du cordon
d'alimentation. Pour votre s_curit_, cet appareil dolt 8tre correctement mis 8 la terre.
Le cordon d'alimentation de cet appareil est
muni d'une fiche 6 3 broches (mise6 la terre)
qui se branche dans une prise murale ordinaire
6 3 alv_oles(mise6 la terre) pour r_duireau minimum
lesrisques de chocs _lectriques.
Faitesexaminer la prisedecourant et le circuit par
un _lectricien qualifi_ pour vous assurer que laprise
est correctement mise6 la terre.
Sila prise murale est du tgpe standard 6 2 alv_oles,
il vous incombe de lafaire remplacer parune prise
6 3 alv_olescorrectement mise6 la terre.
Le rdrig_rateur doittoujours _trebranch6 dans sa
propre prisede courant,dont la tensionnominaleest
identique6 celle indiqu_esur la plaquesignal6tique.
FICHE D'ADAPTATION
Fiches d'adaptation non permises au Canada.
Cette precaution est recommand_e pour garantir
un rendement optimum et _viter une surcharge des
circuits _lectriques de la r_sidence, cequi pourrait
crier un risqued'incendie par surchauffe desfils.
Ned_branchezjamais lerdrig_rateur entirant sur
le cordond'alimentation.Saisissezfermement la fiche
du cordon ettirez droit pour la retirer de la prise.
R_parezou remplacez imm_diatement tout cordon
effiloch_ ou endommag& N'utilisez pas un cordon
fendill_ou pr_sentant dessignesd'usure.
Lorsquevous d_placezvotre rdrig_rateur du mur,
faitesattention de ne pas lefaire foulersur lecordon
d'alimentationafin de ne pasI'endommager.
VEUILLEZLIRE ETSUIVREATTENTIVEtvlENTCE5 tvlESURE5
DE 5L-CURITE.
CONSERVEZ CES DIRECTIVES
/47
Page 48

Les commandes uvec la es de temp .rature.
€4
o_
o_
N
II
m
M
II
BI
H
Ig
H
m
m
B WamII
m
I
.o
Adjust F ...... _-C°'deO I _arm_ _ColdeO I _arm_
!_ Adj UmSp_FrreteuZ_ree
9isColdest 9isColdest
'Surcertains modSles
0 is Off
9 is Coldest
'Surcertains modSles
9 is Coldest
o_soff
'Surcertains modSles
9 is Coldest
o_soff
Adjust Refrigerator
®
Adjust Refrigerotor
Temperoture
o_
NOTE : Le r4frig_rateur est exp4di_ avec une pellicule de protection couvrant les
commandes digitales de temperature. Si cette pellicule n'a pas _t_ retiree au cours
de I'installation faites-le maintenant.
Rdglez le contr61e du r_frig_rateur sur 5 et le congdloteur sur 5.. Patientez 24 jusqu'8 ce
que la tempdroture se stobilise. II peut s'av_rer ndcessoire de proc_der 8 divers r_glages.
Ajustez les contr61es niveau par niveau, et potientez 24 heures oprSs choque r_gloge
jusqu'8 ce que le r_frigdrateur atteigne o temperature s_lectionn_e.
Si vous rdglez I'un des boutons de contr61e ou les deux sur 0 pour numdrique et 0 pour
le bouton de commande du r_frigdroteur, les comportiments du rdfrig_roteur et du
cong_lateur s'arrStent de refroidir, mais le r_frig_rateur reste sous tension.
w
v
n rA
u vJ
vm
0
48
Page 49

Le fJ[tre cl eQu. (seulement pour les modules 20) www.electromenagersge.ca
Cartouche du filtre _ eau
Lacartouche du filtre 6 eau se trouve
dans le coin droit arri_re sup_rieur
du compartiment rdrig_rateur.
Remplacement du filtre
Lacartouche du filtre doit _tre remplac_e
Iorsque led_bit d'eau dans la machine 6
glaqonsdiminue, ou bien tous lessix mois.
Installation de la cartouche
du filtre _ eau
Sivous remplacez la cartouche,
0
d'abord enlevezlavieillecartouche.
Ouvrezle couvercle de cartouche en
I'appugant sur letaquet situ_ 6 I'avant
et en tirant vers le bas.
Enlevezla cartouche en la faisant tourner
O
doucement dans le sens contraire 6celui
des aiguilles d'une montre. Un peu d'eau
peut tomber.
MISE EN GARDE : s'i/u
a de !'airpi_g_ dons les!#st_me,!acartouche
de filtre peut _tre_ject_ependant qu'e!leest
enlevde.Procddezavec soinpour !'enlever.
Bouchon de d_rivation du filtre
IIfaut utiliser le bouchon de d6rivation du
filtre Iorsqu'unecartouche deremplacement
n'est pas disponible.Ledistributeur et
Iomachine 6 gloqons ne peuvent pos
fonctionner sans lefiltre ou sans
le bouchon de d@rivationdu filtre.
Filtres de remplacement :
Pour commander des cartouches
suppl6mentaires, visitez notre site Web
I'adresse www.electromenagersge.ca, ou
appelez le Service des pi_ces et accessoires
au 888.261.3055.
iVlod&leGSWF
Lesclients ou Canadadevroient consulter
lespagesjaunes pour connattre la succursale
Mabe la plus pr@s.
O Enlevezla feuille de protection
de I'extr@mit@de la cartouche.
Enalignant lesfl@chesde lacartouche
O
et du battier de cartouche, faites tourner
doucement la cartouche dans le sens
des aiguilles d'une montrejusqu'6 son
arr@t.Sila cartouche est correctement
install@e,vous devezentendre un d_clic
quand elle s'engage en place. Lapoign6e
6 I'extr@mit@de la cartouche doit @tre
plac@everticalement. Ne serrezpus
trap fort.
Fermezle couvercle de cartouche.
O
49
Page 50

{j
o_
u}
v}
N
BW
m
M
i Qwmml
B_
H
Bg
B _iIITIJ
H
m
m
B_
m
Le filtre euu. (seulement pour les modules 22 et 23)
Cartouche du filtre _ euu
Lacartouche du filtre 6 eau se trouve
dans le coin droit arri_re sup@ieur
du compartiment rdrig_rateur.
Remplacement du filtre
Lacartouche du filtre dolt 6tre remplac6e
Iorsque led6bit d'eau dans la machine 6
glaqonsdiminue, ou bien tousles six mois.
Installation de la cartouche
du filtre _ eau
Sivous remplacez la cartouche, d'abord
enlevez la vieillecartouche en tournant
Porte4/
Cartouche
doucement vers la gauche. NEtirez PAS
la cartouche vers le bas.Une petite
quantit@d'eau peut s'@couler.
AMISE EN GARDE : si/u
a de Fairpi_g_dons lesgst_me,!acartouche
de filtre peut _tre_ject_ependant qu'e!leest
enlevde.Procddezavec soinpour !'enlever.
peuvent pas fonctionner sans lefiltre ou sans
le bouchon de d_rivation dufiltre.
Filtres de remplacement :
Pour commander des cartouches
suppl6mentaires, visitez notre site Web 6
I'adresse www.electromenagersge.ca, ou
appelez le Service des pi_ces et accessoires
au 888.251.3055.
ModUle de filtre MWF
Lesclients au Canadadevraient consulter
lespagesjaunes pour connaTtrela succursale
Mabe la plus pr@s.
.£
u_
O_
ul
8
Enlevezla feuillede protection de
I'extr@mit@de la cartouche.
Remplissezlacartouche de
@
remplacement avec d'eau du robinet
pour permettre un meilleur d_bit de
la machine 6 glaqons.
Enalignant lesfl@chesde lacartouche
0
et du battier de cartouche, faites tourner
doucement la cartouche dans le sens
des aiguilles d'une montrejusqu'6 son
arr@t.Sila cartouche est correctement
install@e,vous devezentendre un d@clic
quand elle s'engage en place.Neserrez
pus trap fort.
w
Bouchon de d#rivation du filtre
IIfaut utiliser le bouchon de d@ivation du
filtre Iorsqu'une cartouche de remplacement
n'est pas disponible. La machine 6 glaqons ne
v
n rA
u vJ
vm
L,.
0
50
Page 51

Les clayettes et les balconnets, wwwelectromenagersgeca
Toutes les caract_ristiques ne sont pas disponibles sur tousles modules.
Mise en place des clayettes
Lesclayettes du rdrig_rateur sont r_glables.
Compartiment r_frig6ration
Enl_vement :
O Enleveztousles articles de la clayette.
Soulevezla clayette h I'avant.
Soulevezla clayette h I'arri_re etfaites-la
Certains modules ant des clayettes
en fil de fer que vous pouvez regler
de la m_me mani_re.
sortir.
Remiseen place :
0
Enfaisant basculer la clayette vers
le haut, ins@fezle crochet sup@rieurh
I'arri@rede la clayette dans une fente
du rail.
Abaissezledevant de la clayette
jusqu'5 ce que lebas de la clauette
se fixe en place.
Clayettes non-r_glables de porte Isurcertainsmodules)
Enl_vement: Soulevezla clayette droitvers
le haut, puis enlevez en soulevant.
Remiseenplace : Engagezla clauette dans
lessoutiens moul_s de Ioporte et poussez
vers le bas.IIsefixera en place.
51
Page 52

N
BW
m
M
B_
H
Bg
B_
H
m
m
B_
m
€4
Bats 6 rangement et bats 6 l gume.
Tousles modules n'ont pas routes ces caract_ristiques.
Bacs 6 fruits et I6gumes
i
Vous devezbien essuger toute eau en exc@s
qui peut s'accumuler au fond des bacs ou
en dessousdes bacs.
f-
_ Faitesglisser le r_glage en position HIGH Faitesglisserler_glage en positionLOW
k_ (_lev_e)pour obtenir I'humidit_ maximum (basse)pour obtenir I'humidit_ minimum qui
Bac 6 I_gume 6 humidit_ r6glable Csurcertainsmodules)
qui est recommand#e pour laplupart des est recommand#e pour la plupart desfruits.
16gumes.
Bac 6 cosse-cro_te Uurcertainsmodules)
.o
8
Vous pouvez mettre le bac_ case-cro0te
I'endroit qui convient le mieux aux besoins de
votre famille.
Pour enlever, faites glisser le bac vers
I'ext@ieurjusqu'_ sa position d'orr_t,
soulevezle bac pour luifaire d@passer
sa position d'orr_t et enlevez-le.
w
v
n rA
u vJ
vm
0
52
Page 53

Tiroir du
Tous les modules n'ont pus toutes ces caract_ristiques.
congela eur. (sur certains modules) www.electromenugersge.cu
Clayettes et paniers du compartiment cong6lation
L'apparence et lescaract4ristiques
peuvent varier
L'apparence peut varier
O Une clagette situ6e au-dessus du bac
6 glaqons
O Un panier sur la moiti6 de la largeur
Unpanier profond sur toute la largeur
Enl_vement du punier
Pour enlever lepanier profond sur route
la largeur dans les modules avec un tiroir
de compartiment cong6lation :
Ouvrezletiroir du compartiment
cong61ationjusqu'6 son arr6t complet.
Lepanier du compartiment cong61ation
O
reposesur lestaquets int6rieursdes
guidesdu tiroir.
Soulevezle panier afin qu'il selib_re
desrotaquets coulissants lat6raux.
Faitesbasculer le panier et soulevez-le
pour le faire sortir du tiroir.
NOTE: Neremplissezpas les paniersau-del@
du bord du panier.Cela pourrait provoquer
un bourrage ou coincer le panier,Iorsde
I'ouverture ou de la fermeture.
Remplacement du punier profond route
lurgeur :
Faitesbasculer le panier vers I'arri@re
et abaissez-ledans letiroir. Faitestourner
le panier en position horizontale et pressez-le
vers le bas dans lessixtaquets d'alignement.
NOTE:Assurez-voustoujours que le panier
est engag6 dans les rotaquets coulissants
lat6raux avant de lefaire glisser 6 sa place
dans le compartiment cong61ation.Lepanier
peut @tretourn6 dans n'importe quel sens
avant ou arri@re,puis@treinstall6 dans
le compartiment cong61ation.
L'apparence peut varier
Pour enlever lepanier sur la moiti6
de la largeur :
Tirezle panier horsde sonemplacement
d'arr@t.
Soulevezle panier 6 I'avantpour le retirer
descrochets de calage sur chaque
extr6mit&
Soulevez le punier pour I'extraire des
deux c6t6s.
Quand vous remettez en place le panier,
veillez hce que le punier s'embo_te sous les
crochets de calage sur chaque c6t&
NOTE:Assurez-vous toujours de bien fermer
le panier.
53
Page 54

Compartiment du cong lateur certainsmodules)
€4
o_
N
BW
Tousles modules n'ont pas toutes ces caract4ristiques.
Panier et _tag_re du cong_lateur
Une_tag_re m_tallique fixe pleine largeur
Unpanier m@talliquefixe pleine largeu
Enl_vement du panier
Pour retirer le panier m_tallique coulissant
B@ ; ¢!L_;'_'_,_-,,.............
pleine largeur sur les modules de porte :
_10uvrez le panier au maximum.
' /
SoulevezI'avantdu panier et coulissez
droit pour le retirer.
D_sinstaller I'_tag_re fixe
NOTE: Neremplissezpas le panier au del@de
I'anneau. Lepanier pourrait rester coinc@ou
@treencombr@Iorsquevous I'ouvrezou le
fermez.
Pour remplacer le panier m6tallique
caulissant pleine largeur :
Introduisezle panier m@talliquedans lesrails
de cuve inf_rieurs repoussez.
.o
4_J
O_
8
NOTE: L'_tag_rem_tallique pleine largeur n'a
pas @t@conque pour coulisser.
Retirer pour la nettoger :
TenezI'_tag_re_ I'avantet tirez-la avec
fermet@vers I'avant.
Pour remplacer le panier m_tallique
coulissant pleine largeur :
IntroduisezI'@tag_rem@talliquedanslesrails
de cuve sup_rieurs et poussez.
Clagette non-r_glable de porte du cong_lateur
Enl_vement: Soulevezla clagette droit vers
le haut, puis enlevezen soulevant.
Remiseen place : Engagez la clagette dans
w
Enl_vement
lessoutiens moul_s de la porte et poussez
vers le bas. IIse fixera en place.
v
n rA
u vJ
vm
Remise en place
0
54
Page 55

Machine
II faut pr_voir entre 12 et 24 heures avant qu'un r_frig_rateur nouvellement install_ commence a produire des gla_ons.
gla ons automatique, ce ain mod le www.electromenagersge.ca
Commutateurdemarche Machne
verte de
fonctionnement
Machine _ glagons automatique
La machine h glaqons produit sept glaqons
par cgcle, soit environ !00 h !30 glaqons
par 2/4heures, selon la temp6rature du
compartiment cong61ation, la temp6rature
de la pi6ce, le nombre de fois que la porte
est ouverte et les autres conditions
d'utilisation.
Consultez ci-dessous la mani6re d'avoir
acc6s aux glaqons et d'atteindre le
commutateur de marche.
Sivous faites fonctionner le r6frig6rateur
avant de raccorder I'eau h la machine
h glaqons, mettez le commutateur de
marche en position O (arr_tL
Apr6s avoir raccord6 le r6frig6rateur
h I'alimentation d'eau, mettez le
commutateur de marche en position
On (marcheL Levogant lumineux de
la machine h glaqons devient vert
quand le commutateur de la lumi6re du
compartiment cong61ation est press6
ou quand la porte du compartiment
cong61ation est ferm6e.
La machine h glaqons se remplira d'eau si
sa temperature baisse h -!0°C (!5°F). Un
r6frig6rateur nouvellement install6 prend
de 12 h 2/4heures pour commencer h
produire des glaqons.
Vous entendrez un bourdonnement
chaque fois que la machine h glaqons
se remplit d'eau.
Jetez les premiers lots de glaqons pour
permettre h la conduite d'eau de se purger.
Assurez-vous que rien ne g6ne la course
du bras palpeur.
q)uand le bac se remplitjusqu'au niveau du
bras palpeur, la machine h glaqons s'arr_te
de produire des glaqons. IIest normal de
trouver des glaqons qui soient soud_s
ensemble.
Si vous n'utilisez pas souvent vos glaqons,
les vieux glaqons deviennent opaques,
prennent un mauvais goOt et r_tr_cissent.
NOTE: Dons les moisons qui ant une
pression d'eou plus foible que Io mogenne,
vous pouvez entendre !o machine
gloqons recommencer plusieurs lois son
cycle pour produire une livroison de
gloqons.
NOTE: Mettez le commutoteur de morche
en position 0 [off) (arr_g si !'olimentotion
d'eou estcouple.
...........111
Pour otteindre le commutoteur
de morche.
Acc_s aux gla_ons et au
commutateur de marche
Pour atteindre le commutateur de
marche de la machine _ glagons, tirez
la clagette situ_e au-dessus du bach
glaqons et faites-la sortir. Assurez-vous
toujours de bien la remettre en place.
Pour avoir acc_s aux gla_ons, tirez
simplement le bac vers vous.
Pour ovoir occ_s oux gloqons.
Trousse accessoire de machine _ gla¢ons
Sivotre r_frig_rateur n'est pas d_jh _quip_ V_rifiez derriere votre r_frig_rateur le
d'une machine h glaqons automatique, module de trousse h glaqons que vous
vous pouvez acheter une trousse devez acheter pour votre r_frig_rateur.
accessoire de machine h glaqons.
55
Page 56

€4
o_
N
BW
m
M
B_
H
Bg
B _iIITIJ
H
m
m
B_
m
Entretien et nettoyage de votre r frig rateur.
Nettogoge de I'ext_rieur
Lespoign_es de porte et les garnitures.
Nettogez avec un linge tremp_ dansde I'eau
savonneuse.S_chezavec un linge doux.
N'appliquez pas de cite sur lespoign_es
et lesgarnitures de porte.
Conservez I'e_rieur propre. Essugezavec
un linge propre I_g_rementhumect_ de cire
appareil _lectrom_nager ou de d_tersif
liquide _ vaisselledoux. S_chezet polissez
avec un linge doux, propre.
N'essugezjamais votre rdrig_mteur avec
un torchon sale ou une serviette moui!!_e.
Celapeut !oisserun r#siduqui risque
d'endommager la peinture.N'utilisezjamais
de tampon _ r#curer,de nettoblantenpoudre,
d'eau dejavd ou de pmduit nettoblant
contenant un agentde b!onchiment, car
cespmduits peuvent roger et endommager
la peinture.
Vouspouvez nettoyer lespanneaux et
lespoign_es de porte en acier inoxydable
(surcertains modules)avec un nettogant
d'acier inoxgdablevendu sur lemarch_.
IIvaut mieux utiliser un produit de nettogage
vaporis_ pour acier inoxgdable.
N'utilisezpas de cite pour appareils m_nagers
sur I'acierinoxgdable.
.o
O_
a
Nettoyuge de I'int_rieur
Pour aider _ emp_cher les odeurs, laissez
une boTteouverte de bicarbonate de soude
dans les compartiments rdrig_ration et
cong_lation.
D_branchez votre r_frig_rateur avant de
le nettogen Si ce n'est pas pratique, enlevez
toute humidit_ au mogen d'une _ponge
ou d'un chiffon pour nettoger autour des
commutateurs, des lumi_res ou des r_glages.
Utilisezune cite pour appareils
_lectrom_nagers sur la surface int_rieure
entre les portes.
Utilisezune solution d'eau chaude et de
w
bicarbonate de soude (15ml [soit une cuill_re
soupe environ] de bicarbonate de soude
dans i litre[soit une pinte] d'eau).Cette
solution nettoie tout en neutralisant
lesodeurs. Rincezet s_chezen essugant.
Apr_savoir nettog_ lesjoints de porte,
appliquez une fine couche de vaseline
sur lesjoints du c6t_ des charni_res
pour emp_cher lesjoints de coller
et de sed_former.
Evitez de nettoger les clagettes froides
en verre _ !'eau chaude, parce qu'e!les
risquent de se cosset _ cause de la grande
dill#fence de temp#ratures. Manipulez avec
soins le verre. Vouspouvez briser en _c!ats
le verre tremp# en le heurtant.
Ne lavez aucune piece en mati_re plastique
de votre r#frig4rateur dans votre machine
laver la vaisse!le.
v
n rA
u vJ
vm
0
56
Page 57

Derriere le r_ffig_rateur
Prenezun soin particulier Iorsque vous
_loignezle rdrig_rateur du mur.Tous
lestgpes de rev_tements de sol peuvent
_tre endommag_s, particuli_rement ceux qui
sont coussin_sou dont lasurfaceest gaufr_e.
Soulevezlespieds d'inclinaison situ_s
en bas _ I'avant de votre rdrig_rateur.
Tirezle rdrig_rateur en lignedroite
et, Iorsque vous le remettez en place,
poussez-levers lemur en lignedroite.
Lesd_placements lat_raux du rdrig_rateur
D_part en vacances
www.electromenagersge.ca
pourraient endommager le rev_tement
de sol ou le rdrig_rateur.
Abaissezles piedsd'inclinaison jusqu'5
ce qu'ilstouchent lesol.
Lorsque vous remettez le rdfrig4rateur
en place en le poussant, vei!lez _ ne pas
le faire fouler sur le cordon d'alimentation
ou sur la conduite d'eau de la machine
glaqons (surcertains modules).
Lorsquevous vous absentez pendant
une p_riode prolong6e,videz et d_branchez
le rdrig_rateur. Nettogez I'int@rieuravec
une solution d'eau et de bicarbonate de
soude,_ raison 15 ml (d'une cuill_re_ soupe)
de bicarbonate par litre(! pinte)d'eau.
Laissezles portes ouvertes.
Mettez I'interrupteur d'alimentation
de la machine _ glaqons_ la position
O (err_g et fermez I'alimentation d'eau
au r_frig_rateur.
D m nagement
Immobiliseztous les@l@ments
amovibles,tels que les clagettes et les bacs,
I'aidede ruban gomm@pour @viter
de lesendommager.
Sivous utilisez un charriot pourd@m@nager
le rdrig_rateur, ne laissezjamais le devant
ou lederri@redu rdrig_rateur reposer contre
le charriot. Celapourrait endommager
le rdrig_rateur. Ne transportez
le rdrig_rateur que parlescBt_s.
Sila temp@raturerisque de descendre
sous le point de cong_lation, demandez
un r_parateur de vidanger la conduite
d'eau afin d'@viterlesd_gOtss@rieuxcaus@s
par les inondations.
Assurez-vousque le rdfrig4mteur demeure
deboutpendant son ddm4nagement.
57
Page 58

€4
o_
Remplacement des ampoules.
Lorsque vous r_glez les commandes en position Off(arr_t), I'alimentation _lectrique de/'ampoule n'est pus couple.
Lumi_res du compurtiment r_frig_rution
N
BW
m
M
B_
H
Bg
B _iIITIJ
H
m
m
B_
m
.o
L'apparence peut varier
A MISE EN GARDE:
Lesampoules @lectriquespeuvent @tre
brOlantes.
D@branchezlerdrig_rateur.
@
Pourenleverle pare-lumi@re,saisissez
@
I'arri@rede le pare-lumi_re et tirez-le pour
le lib@erde sestaquets _ I'arri@re.
Faitestourner le pare-lumi@reversle bas,
@
puistirez pour lib@erlestaquets
I'avantde lepare-lumi_re.
Lumi_re du compurtiment cong_lution
_k MISE EN GARDE :
Lesompoules @lectriquespeuvent @tre
brOlantes.
D@branchezlerdrig_rateur.
@
L'ampouleest situ_e en haut du
@
compartiment cong@lation_I'int@ieur
d'un pare-lumi_re.Pourenlever
le pare-lumi@re,saisissezI'arri@re
de le pare-lumi@reet tirez-le pour
le lib@erde sestaquets _ I'arri_re.
Apr@savoir remplac@I'ampoulepar
une ampoule d'appareil@lectrom@nager
de m@mevoltage ou d'un voltage plus
bas, remettez en place le pare-lumi_re.
Rebranchezle rdrig_rateur.
NOTE:Vous pouvez commander des
ampoules pour appareils@lectrom@nagers
en t@l_phonantau service de pi@ces
et accessoiresGE,au 1.888.261.3055.
Apr@savoir remplac@I'ampoulepar
une ampoule d'appareil@lectrom@nager
de m@mevoltageou d'un voltage plus
bas, remettez en place le pare-lumi_re.
Rebranchezle rdrig_rateur.
8
v
n rA
u vJ
vm
Faitestourner le pare-lumi_re vers le bas,
puistirez pour lib@erlestaquets _ I'avant
de le pare-lumi_re.
O_
w
0
58
Page 59

I structi
R frig teur
d'i stall tio
AVANT DE COMMENCER
Veuillez lire toutes les directives ottentivement.
• IMPORTANT - Conservezces instructions
pour I'inspecteur local.
• IMPORTANT - Respecteztoutes
les ordonnances et les codes Iocaux.
• Note 6 I'instolloteur - Assurez-vous de laisser
ces instructions au consommateur.
• Note ou consommoteur - Conservez
ces instructions pour r6f6rence future.
• Niveou de competence - L'installation
de cet appareil n6cessite des comp#tences
m6caniques de base.
• Temps d'instollotion -Installation du r6frig#rateur
20 minutes
Installation de la conduite
d'eau 30 minutes
• L'installateur est responsable de bien installer
ce r6frig@ateur.
• Toute panne du produit due 6 une mauvaise
installation n'est pas couverte par la garantie.
ModUles20, 22 et 23
PREPARATION (suite)
ALIMENTATION D'EAU DE LA MACHINE A GLA_ONS
ET DU DISTRIBUTEUR (SUR CERTAINS MODELES)
Si votre r6frig6rateur est dot6 d'une machine 6 glaqons,
la machine 6 glaqons doit _tre raccord6e 6 une
conduite d'eau froide. Vous pouvez acheter une trousse
d'alimentation d'eau GE (contenant la tugauterie,
le robinet d'arr_t, lesjoints et les instructions) chez
votre revendeur ou en vous adressant (_notre site Web
c_I'adresse www.electromenogersge.co ou _]notre
service de Pi_ces et accessoires au num6ro de
t616phone 1.888.261.3055.
OUTILS DONT VOUS POUVEZ AVOIR
BESOIN
Tournevis 6 cliquet
de 3/8 poet de 5/16po
CI@r_glable
PRI_PARATION
D(=PLACEMENT DU REFRIGI_RATEUR#, L'INTI_RIEUR
DE LA MAISON
Si le r_frig_roteur ne peut pos posser pot Io porte,
vous pouvez eniever Io porte du comportiment
r_frig_rotion et le tiroir du comportiment
cong_lotion.
• Pour enlever la porte du compartiment
r6frig@ation, consultez 1'6tape I de la section
Changement de sens d'ouverture de la porte.
• Pour enlever le tiroir du compartiment
cong61ation, consultez la section Enl_vement
du tiroir du compartiment cong4lation.
Ecrou 6 compression
d'un diam@treexterieur
de 1/4 po et bague
(mod@lesavec
machine 6 glaqons
Perceuse 6 main
ou @lectrique
et m@chede 1/8 po
59
Tournevis cruciforme
II CI@6 sixpansde 3/32po,
seulement)
Cragon
Cisaille Niveau
W 1/8po et 3/16po
Tourne-@crou de 1/4 po
IVl_tre
Page 60

Instructions d'installation
J J
INSTALLATION DU REFRIGERATEUR
EMPLACEMENTDU RI FRIGI RATEUR
• N'instollezjamoisvotrerdrig@oteurdonsunemplacement
o_latemp@atureambianteserainf@ieure_ 160C(60oF).
IInesemettrapasenmarchesuffisammentsouventpour
maintenirdestemp@aturesconvenables.
• N'installezjamaisvotrerdrig@ateurdonsunemplacement
o_latemp@atureambianteserasup@ieure_ 370C(100oF).
IInefonctionnerapasbien.
• Installezvotrerdrig@ateursurunplanchersuffisammentsolide
pourleporterIorsqu'ilestplein.
DEGAGEMENTS
Pr@ogezlesd6gagementssuivantspourfaciliterI'installation,
labonnecirculationd'airetlesraccordementsdeplomberie
etd'61ectricit6:
ModUlesde
profondeurnormale
C6t_s 3 mm(i/8 po)
Dessus 25 mm (1po)
Arri_re 25 mm (1po)
ENLEVEZLECAPUCHONDU HAUT
(surcerMns modules)
• NOTEIMPORTANTE:Cer_frig_rateura uneprofondeurde
34-1/2po.Lesportesetles passagesqui m_nent6 I'endroit
oOvousd_sJrezI'installezdoJventavolr unelargeurdu mains
de 36po.,pour permettredetransporter ler_frig_rateur
jusqu'6catendroitsans_treoblig_d'enleverlesporteset
lespoign_es.Silepassagea mainsqua36po.de largeur,
vousrisquezvraimentderogeretd'endommagerlesportes
etlespoign_esdevotrer_frig_rateur.Vouspouvezenlever
facilementlecapuchondu hautetles portespourd_placer
plusais_mentler_frig_rateurchezvous.Commencezpar
I'_tape A.
• Sivousn'avezpas6 enleverlesportes,passezdirectement
6 I'_tape B.Laissezle ruban et tousles mat_riaux d'emballage
sur les portes,jusqu'6 ce que vous agez d_m_nag_
ler_frig_rateur dons son emplacement final.
• ENLEVEMENTDUPATINDEGLISSEHENT:Faitesbasculer
ler_frig_roteurdechaquec6t_pourenleverle patinde
glissement.
• NOTE:Utilisezunchariotmanuelrembourr_pourd_placerle
r_frig_rateur.Placezler_frig_rateursurlechariotmanuelavec
unc6t_contrelechariot.Nousvousrecommandonsvivement
d'utiliserDEU×PERSONNESpourd_placerler_frig_rateur
etl'installer.
Trouvezetenlevezlesdeuxvis_t_tePhillipssitu6esenhaut
durefngeroteur.Enlevezlesdeuxwssltueesdechaquecoteo
I'ar@reducopuchonduhout.Soulevezetenlevezlecopuchon
duhout.
r_ EnlevezIo(les)porte(s)ducompartimentalimentsfrais.
Consultezles6topesIet 3 deIosection<<Changementdu
sensd'ouverturedesportes>>oules6topes:1et2 deIosection
<<Elevementdesportes>>.
ENLEVEZLECAPUCHONDU HAUT {suite)
(surcertains modules)
Enlevezletiroiroulaporteducomportimentcong61otion
r_ du bas.Consultezlasection<<Enl@ementdutiroirdu
compartimentcong61otion>>ou1'6tape2deIosection<<
Changementdusensd'ouverturedesportes>>.
r_ Amenezlerdrig@oteurjusqu'8I'emplocementoOvousd6sirez
I'instoller.
REMETTEZEN PLACE LESPORTES,LESTIROIRS
ETLECAPUCHON DU HAUT
r_ AboissezsoigneusementIo(les)porte(s)donsIo(les)charniere(s)
centrole.RemettezenplaceIo(les)charniere(s)duhaut.NOTE:
Veillez6cequelaportesaltbienolign6eousommetde
I'armoirepour@iterdeIor6ojusterpendantIoremiseenplace
du copuchonduhaut.
r_ plocezlecopuchonenhoutdurdrig@oteur.Remettez
enplacelesvisquevousoyezenlev_esenhoutet6 I'or@re
du copuchon.
r_ RemettezenplaceletiroirouIoporteducompartiment
cong_lotiondubos.Consultezlasection<<Remiseenplacedu
tiroirducompartimentcong_lotion>>ouI'_tope8deIosection
<<Chongementdusensd'ouverturedesportes>>.
[]
BRANCHEMENTDU RI FRIGI RATEUR
A LACONDUITED'EAU DELA MAISON
(modUlesavecmachine(_gla_:ons)
Unealimentationd'eaufroideestrequisepourfoirefonctionner
Iomachine_glo(_ons.Vousdevrezenfournirunesiellen'existe
pos.VoirIosectionInstallationdelaconduited'eau.
NOTES:
• AvontdebrancherIoconduiteourdrig@oteur,ossurez-vous
quelecordond'alimentation@lectriquen'estpasbranch@
6laprisemurale.
• Sivotrerdrig@rateurn'estpas@uip@defiltre6 eau,nous
recommandonsd'enmonterunsivotrealimentationd'eau
contientdusableoudesparticulesquipeuventboucher
lagrilledurobinetd'eaudu rdrig@ateur.Installez-lesur
laconduited'eaupr@sdurdrig@ateur.Sivousutilisez
unetrousseGESmartConnecf"RefrigeratorTubing,vous
aurezbesoind'untugauadditionnel(WXO8X10002)pour
brancherlefiltre.Necoupezpasletugaudeplastiquepour
6O
installerlefiltre.
Charni@e
de haut B
Page 61

Instructions d'installation
[_] BRANCHEMENT DU RI_FRIGI_RATEUR
LA CONDUITE D'EAU DE LA MAISON
{suite)
[] Sivous utilisezun tugau de cuivre, placez
un 6crou de compression et une bague
(manchon) 6 I'extr6mit6 du tugau qui vient
de I'alimentation d'eau froide de la maison.
SIvous utillsezun tugau GE SmartConnect, TM
les 6crous sont d6j6 assembl6s au tugau.
r_ sivous utilisezun tugau de cuivre,ins@ez
aussi loin que possible I'extr6mit6 du tugau
dans le raccord 6 I'arri_re du r6frig6rateur.
Tout en tenant le tugau, serrez le raccord.
Si vous utilisez un tugau GE SmartConnect, _"
ins@ez I'extr6mit6 moul6e du tuyau dans
le raccord 6 I'arri_re du r6frig@ateur, puis
serrez 1'6crou 6 compression 6 la main.
Serrez ensuite un autre tour 6 I'aide d'une cl6.
Un serrage excessif pourrait occasionner
des fuites.
r_ Fixez le tuyau dans le caller (fourni) pour
le maintenir en position. II est possible que vous
deviez 6carter le caller.
L'unedesillustrations ci-dessous repr(_sente
le brunchement de votre r@frig(_ruteur.
ModUlespr@ts6recevoir une machine 6 gleqons
Tugau
Collet6 /
tugau
Ecrou6
campression
1//4po ,__f
Bague
(manchon) \,,-_
Raccorddu _
rdrig@ateur -/
ModUles dot@s d'une machine (] glaqons
Raccorddu (manchon) compression
rdrig6rateur --
b
Tuyau
SmartConnecf"
Bague Ecrou6
de cuivre
o o
[_ OUVREZ L'ALIMENTATION D'EAU
(modUlesavec machine 6 glaqons)
au niveau du robinet d'arr6t
(l'alimentationd'eau de
la maison)et v6rifiez
OuvrezI'alimentation d'eau %I_L_ L
la pr6sencede fuites.
FTIBRANCHEZ LE CORDON DU
REFRIGERATEUR DANS LA PRISE
Surmod@lesavec machine 6
glaqons: avant de brancher
le r6frig6rateur,assurez-vous
que I'interrupteur de
la machine 6 glaqons
est6 la position 0 (art@t).
Lisez1'6tiquetteconcernant
la mise 6 la terre qui est attach6e au cordon
d'alimentation.
METTEZ LE RI]FRIGERATEUR
EN PLACE
Transportezlerdrig@ateurjusqu'6sonemplacementfinal.
FTIMETTEZ DE NIVEAU
LE RI_FRIGI_RATEUR
Les pattes r@glables des coins avant
du r6frig6rateur doivent @treajust6es pour que
le r6frig6rateur repose solidement sur le sol
et pour que I'avant soit suffisamment lev6 afin
que la porte se ferme facilement, Iors de son
ouverture 6 moiti6 chemin.
Pour ajuster les pattes r@glables, tournez-les
dans le sens horaire pour lever le r6frig@ateur
et dans le sens antihoraire pour le baisser.
Tuyau
SmartConnecf"
Tuyau
de i//4po
Collet6 tugau
61
Page 62

Instructions d'installation
J J
INSTALLATION DU REFRIGERATEUR {suite}
_-I ENLEVEZLA POIGNI_EDE PORTE
DUCOMPARTIMENTPOURALIMENTSFRAIS
(Pour placer dans l'emplacement
de l'installation ou changer le sens
d'ouverture des portes - sur certaJns
modules)
Poign_e en acier inoxgdable
(sur certains modules) :
@ ENLEVEMENT
DE LA POIGNEE
DE PORTE:
Desserrez les vis
de I'ensemble 6
I'aide d'une cl6
Allen de 3/32 po.
et enlevez
la poign_e.
NOTE : Pour
les modules
6 deux portes,
suivez la m_me
proc6dure pour Fixations
la porte de montage
oppos6e. (l'aspectpeut varier)
Poign_e en mati_re plastique
(sur certains modules) :
Q ENLI_VEMENT DE LA POIGNEE DE PORTE:
Appuyez sur le taquet situ@6 I'int6rieur de
la poign6e et faites glisser la poign6e vers
le haut pour la faire sortir de la fixation
de montage.
J
[Z] ENLEVEZ LA POIGNI_E DE LA PORTE
DU COMPARTIMENT CONGI_LATION
Poign_es en acier inoxgdable et en mati_re
plastique :
@ Desserrez les vis de I'ensemble situ6es en
bas de la poign6e 6 I'aide de la cl6 Allen de
1/8 po et enlevez la poign6e.
NOTE : Si vous devez resserrer ou enlever
les fixations de montage de la poign_e,
utilisez la cl6 Allen de 3/16 po.
Logo
DE LA
POIGNEE
(sur certains
modules)
• Enlevez les
fixations de Fixations
DE PORTE
montage de de
la poign6e 6 montage,
I'aide d'une
cl6 Allen de (l'aspectpeutvarier)
3/16 po et
faites passer les fixations de montage de
la poign6e du c6t6 gauche au c6t6 droit.
• Enlevez le logo.
• Enlevez et faites passer de I'autre c6t6
le bouchon du c6t6 droit au c6t6 gauche
de la porte du compartiment aliments frais.
NOTE : Utilisez une lame en mati_re
plastique pour 6viter d'endommager
la porte. Enlevez route colle de la porte 6
I'aide d'un d6tergent doux. Enlevez le papier
adh6sif de I'arri_re du logo avant de fixer
le logo soigneusement 6 la porte.
62
Page 63

Instructions d'installation
[_] FIXEZ LA POIGNI_E DE LA PORTE
DU COMPARTIMENT ALIMENTS FRAIS
Poign_e en acier inoxgdable :
Q Fixez la poign_e
aux fixations
de montage
de la poign6e et
resserrez lesvis
de I'ensemble
6 I'aide d'une cl6
Allen de 3/:32 po. Fixations
NOTE : Pour les
mod@les6 deux
portes, suivez
la m@me
proc6dure
pour la porte
oppos6e. (l'aspectpeutvarier)
Poign_e en mati_re plastique :
O Fixez la poign6e aux fixations de montage
de la poign6e en alignant les fentes
aux fixations de montage de poign6e.
O Faites glisser la poign@evers le basjusqu'6
ce qu'elle soit bien fix6e en position.
[_] FIXEZ LA POIGNI_E DE LA PORTE
DU COMPARTIMENT CONGI_LATION
Poign_es en acier inoxgdable et en mati_re
plastique :
O Fixez bien la poign6e aux fixations
de montage de la poign6e et resserrez les vis
de I'ensemble situ6es en has de la poign@e
6 I'aide d'une cl6 Allen de 1/8 po.
(l'aspectpeut varier)
Trous 6 I'arri@re
de la poign@e
O
Fixations
de montage
(l'aspectpeutvarier)
63
Page 64

Instructions d'installation
J J
INSTALLATION DU REFRIGERATEUR {suite}
METTEZ LE RI_FRIGI_RATEUR
DE NIVEAU
Les pieds de nivellement jouent deux r61es :
1} Elles peuvent #tre r#gl#es de mani_re
6 permettre 6 I'appareil de reposer
solidement sur le sol.
2) Les pieds de nivellement servent
de frein de stabilisation, pour tenir
le r6frig6rateur bien en place pendant
son fonctionnement et son nettogage.
Les pieds d'inclinaison emp_chent
6galement le r6frig6rateur de basculer.
r_ Enlevez la grille en d_vissant les deux vis 6 t_te
Phillips.
F_ RI_GLEZ LES COMMANDES
R6glez les commandes selon les recommendations.
5 5
[. cooo .o oco...o,s z...os]
(c°'°i_0 _i_m_Cc°'_:;]g _armo_
5 5
SETTINGS
Adjust Freezer Adjust Refrigerator
Temperature Temperature
r_ Tournez les pieds dens le sens des
aiguilles d'une montre pour faire monter
le r6frig6rateur, dens le sens oppos_ _ celui des
aiguilles d'une montre pour le faire descendre.
m,
PRECAUTION :Pour_viter
tous risques de blessures corporelles ou de
dommages materiels, les pieds de nivellement
doit bien reposer sur le plancher.
rC1 Remettez la grille en remettant les deux vis 6 t_te
Phillips.
r_] ENLEVEZ LESMATE_RIAU×D'EMBALLAGE
ET METTEZ EN MARCHE LA MACHINE
GLA_ONS (modUles avec machine 6 glaqons}
A) Enlevez toes les mat6riaux d'emballage
(rubans, mousse et autre protection)
des clagettes et des tiroirs.
B) Enlevez les arrimages des bacs
du compartiment cong61ation.
CJ Placez le demi bac dans les rails 6 tiroir.
Consultez les instructions de la section
<<Compartiment cong61ation >>.
Mettez le commutateur de la machine 6 glaqons en
position I {marche}. La machine 6 glaqons ne se met
en marche que Iorsqu'elle atteint une temp6rature
de fonctionnement de -9 ° C(15° F)ou moins. Elle
commence imm6diatement 6 fonctionner. IIfaudra
2 6 3jours pour remplir le bac 6 glaqons.
Commutateur_ _'_
_lectrique _
I
NOTE :
Sivotre pression d'eau est trop faible, le robinet
peut se remettre en marchejusqu'6 trois fois pour
envoger suffisamment d'eau 6 lamachine 6 glaqons.
64
Page 65

Instructions d'installation
s
ENLEVEMENTDUTIROIRDUCOHPARTIMENTCONGELATION(setcertoins modules}
Vous pouvez enlever le tiroir du compartiment
cong_lation, si n_cessaire, pour passer par
des endroits _troits.
Lisez ces instructions avec soin et compl_tement.
B3
ENLEVEZ LE PANIER
%
Ouvrez le tiroir du compartiment cong_lation
jusqu'6 son arr_t complet.
r_ Le panier du compartiment cong_lation
repose sur un cadre 6 I'int6rieur du tiroir du
compartiment cong_lation. Soulevez I'arri_re
du panier.
r_ Soulevez I'avant du panier et soulevez
I'ensemble du panier pour I'enlever
et enlevez-le compl_tement.
ENLEVEZ L'AVANT DU TIROIR {suite)
Soulevez les deux c6t6s de la poign_e du tiroir
[]
du compartiment cong_lation pour s6parer
les rails du tiroir du m6canisme de rails.
r_ Posez I'avant du tiroir sur une surface qui
ne rage pas.
r_ Repoussez les m6canismes de rail en position
de verrouillage.
M@canisme M@canisme
de rail de tiroir
ENLI_VEMENT LA GRILLE
B]
DE BASE {si n_cessaire}
[] ENLEVEZ L'AVANT DU TIROIR
r_ Enlevez la vis de chaque c6t6 des rails.
Vis
Si, apr_s avoir enlev6 le tiroir du compartiment
cong61ation et la porte du compartiment
r6frig6ration, le r6frig6rateur ne peut toujours
pas passer par une porte, vous pouvez enlever
la grille de base.
Enlevez la grille de base en d_vissant
%
les deux vis.
65
Page 66

Instructions d'installation
S
REMISEENPLACEDUTIROIRDUCOMPARTIMENTCONGELATION(surcertainsmod_les)
rTl PLACEMENT ET FIXATION DE L'AVANT
Vous aurez peut-_tre besoin de deux
personnes pour terminer cette procedure.
[i] PLACEMENT ET FIXATION DE L'AVANT
DU TIROIR AUX GUIDES
r_ Tirez les m6canismes de rail 6 fond de chaque
c6t6 de I'armoire.
DU TIROIR AUX GUIDES (suite)
r_ Remettez en place les vis sur les deux
m6canismes de rail.
\
Vis
r_ Trouvez les fentes 6 I'int@ieur des m6canismes
de rail, vers I'arri@re.
- i i !' _
___ - '__'! ! Fente
M_canisme de rail
Ins@ez les crochets situ6s 6 I'arri_re
[]
des rails du tiroir dans les fentes des
m6canismes de rail.
@
Abaissez I'avant du tiroir, en vous assurant
que les taquets des deux c6t_s des rails entrent
dans les fentes 6 I'avant des m6canismes
de rail.
r_ REMISE EN PLACE DU PANIER
DU COMPARTIMENT CONGI_LATION
Remettez en place le panier du bas
du compartiment cong@lation en I'abaissant
dans son cadre.
66
Page 67

Instructions d'installation
CHANGEMENT DU SENS D'OUVERTURE DES PORTES
(mod@les de r@frig@rateurs 6 une porte uniquement}
NOTES IMPORTANTES
Pourchanger lesens d'ouverture des portes :
NOTE: Lesensd'ouverture de porte n'est pasr@ersiblepour
lesmodules de Ios6rieGDSL3KC.
• Lisezlesinstructionsjusqu% lafin avant de commencer.
• Lespiecessont comprises clansI'ensembledecharni@e
de porte.
Pourcommander unjeu de charnieres de porte
r6versiblesau× Etats-Unis,consultez notre site internet
www.electromenagersge.ca ou appelez leCentre de Pieces
D@ach#eset Accessoiresde GEau 800.626.2002.Lesclients
au Canada devront consulter lespagesjaunes pour trouver
le Centrede ServiceMabe le plus proche.
• Manipulezlespiecesavec soinpour 6viter de roger
Io peinture.
• Posezlesvis pros despiecesqu'ellesfixent, pour @iter
de lesutiliserau mauvais endroit.
• Pr@ogezune surfacede travail qui ne rage pas lesportes.
IMPORTANT:Unefois que vous aurez commenc6,
ne bougez plusI'armoire avant d'avoir fini de changer
le sensd'ouverture des portes.
Cesinstructionssont donn6espour faire passer5 gauche
lescharni@essitu6esdu c6t6 droit. Sivous voulez remettre
lescharnieres5 droite, suivezcesinstructionsen remplaqant
routes lesr6f6rencesau c6t6 gauche par des r6f@ences
au c6t6 droit.
[] ENLI_VEMENT DE LA PORTE
DU COMPARTIMENT RISFRIGI_RATION
[A] Fermez la porteetattachez-laavec leruban
masque.
rB] Enlevez le couvercle de la charni@re du haut
de la porte du compartiment r#frig@ation
en faisant doucement levier vers le haut
avec un couteau de vitrier, si n#cessaire.
[] A I'aide d'un tournevis 5 cliquet de 5/16 po,
enlevez les boulons qui fixent 5 I'armoire
la charni@re du haut. Ensuite, soulevez
la charni@re tout droit vers le haut pour lib@er
I'axe de la charni@re du support situ6 en haut
de la porte.
r_ sortez doucement le manchon de porte
de son emplacement. II sera r@utilis6 pour
installer la porte de I'autre c6t&
O
de charni_re
Unefois que vous aurez chang6 lesens d'ouverture de
la porte,assurez-vousque le logo soit bien align# et bien
fix# 4]la porte en enlevant lepapier adh6sif au verso.
NOTE:Un logo de rechange est compris dons I'ensemble
de charni_re.
D_bmnchez ler_frig_rateur de sa prise _lectrique.
Videztoutes les clagettes de porte, g compris
le compartiment laitier.
OUTILS NI_CESSAIRES
CI@r@glable Tournevis (_cliquet
de 5/16 po
Ruban masque
@
Tournevis cruciforme
Tournevis (_lame mince
©
Tournevis Torx T20
. bx,\ _ Charni_re
du haut
Couverce
U__ Manchon de porte
Enlevez le ruban masque et #cartez la porte
E]
de I'armoire en la soulevant. Enlevez la porte
de I'axe de la charni@re du centre. Assurez-vous
que la bague de I'axe de charni@re de plastique
demeure sur I'axe de charni@re ou 5 I'int@ieur
du trou de I'axe de charni@re de la porte, situ@
en bas de la porte.
r_ Posez la porte sur une surface qui ne rage pas,
avec I'int@ieur vers le haut.
67
Page 68

Instructions d'installation
CHANGEMENT DU SENS D'OUVERTURE DES PORTES
(mod@les de r@frig@rateurs _ une porte uniquement)(suite)
[] ENLI_VEMENT DE LA PORTE
DU COMPARTIMENT CONGELATION
rA_ Fermez la porteetattachez-laavec leruban
masque.
FB1 Retirez le gond du support charni@re. II sera
utilis6 6 nouveau avec le support charni@re
neuf I'autre c6t6.
©
Enlevezle ruban masque et 6cortez la porte
de I'armoire en la soulevant. Enlevezla porte
de I'axe de la charni@redu bas.
@
Retirez le bouchon du bouton du c6t6 gauche
de la porte. Retirez la rondelle de la porte du
c6t6 droit de la porte. Installez la rondelle de la
porte dans le trou sur la gauche et le bouchon
du bouton dans le trou sur la droite.
TRANSFERT BRACKET DE LA
CHARNII_RE DU CENTRE (suite)
Faites passer le bouton et le couvercle
des trous de charni@re du c6t6 gauche
au c6t6 droit.
o.
e
r_ Installez le support 6 charni_re centrale 6 partir
du kit plac6 sur le c6t6 gauche.
COMMENT RETIRER LA CHARNII_RE
ET LE TREPIED
rE1 Posez la porte sur une surface qui ne rage pas,
avec I'int@ieur vers le haut.
r_ TRANSFERTBRACKETDELA
CHARNII_REDU CENTRE
r_ A I'aide d'une cl6 6 cliquet/douilles 5/16"
(7,9 mm), retirez les boulons fixant la charni@re
centrale 6 I'armoire.
A I'aide d'une cl6 6 cliquet/douilles 1/2" (12,7 mm),
retirez 1'6crou et la douille de charni@e du support
charni@e avec le tr6pied. A I'aide d'une cl6 6
cliquet/douilles 5/16" (7,9 mm), retirez les boulons
retirez les vis du support charni_re inf@ieur.
-_ _ / Support
_'f"_f_ _!-. J charni_re
I _'_-_. o _-_" inf_rieur
r_ ces 616ments seront r6install6s sur I'autre
extr6mit6. A I'aide d'une cl6 6 cliquet/douilles
5/16" (7,9 mm), retirez les vis du support du
tr6pied sur I'autre c6t& Ces 616ments seront
r6install6s sur I'autre c6t6.
L
68
Page 69

Instructions d'installation
[_] COMMENT INSTALLER LA CHARNII_RE
INFI_RIEURE ET LE TRI_PIED
r_ _, I'aide d'une cl6 6 cliquet/douilles 1/2" (12 mm),
installez la douille de charni@e et 1'6croudans letrou
oppos6 du support charni@e avec le tr6pied.
r_ _, I'aide d'une cl6 6 cliquet!douilles 5/16" (7,9mm),
installez le support charni@e avec letr@ied sur
le c6t6 gauche du r6frig@ateur. La douille sera plac6e
vers I'ext@ieur du rdrig6rateur.
E] TRANSFERTDE L'ARRETDELA PORTEDU
COMPARTIMENTRI_FRIGI_RATIONET
CONGELATION(suite}
_] Installez I'arr@de la porte 6 gauche, en vous
assurant de bien aligner les trous de vis de I'arr_t
de la porte aux trous du bas de la porte.
Basde la porte (c6t@droit) Basde la porte (c6t@gauche)
[Z] TRANSFERT A DROITE DE LA POIGNI_E
DE LA PORTE DU COMPARTIMENT
RI_FRIGI_RATION
Consultez les sections Enlevezla poign6e du
compartiment aliments frais et Fixezla poign6e du
compartiment aliments frais pour des instructions.
r_ _, I'aide d'une cl6 6 cliquet/douilles 5/16"
(7,9mm), installez le support du tr@ied sur
le c6t6 droit du rdrig6rateur.
[_] TRANSFERT DE L'ARR[_T DE LA PORTE
DU COMPARTIMENT RI_FRIGI_RATIONET
CONGELATION
r_ EnlevezI'arr_t de la porte situ6 en bas 6 droite
de la porte en enlevant les deux vis.
r_ Faites passer la bague du trou de charni@e
en mati@e plastique dans le trou oppos6.
[_] COMMENT RACCROCHER LE PORTE
DU CONGI_LATEUR
[_ Coulissez la porte du cong_lateur sur la douille de
charni@e inf@ieure.Veillez6 ce que la rondelle de
la douille de charni@e en plastique se trouve sur la
douille de charni@e ou dans le trou pr6vu pour la
douille de charni@e de la porte au bas de la porte.
r_ Redressezla porte et alignez-la sur le support
6 charni@e centrale.
r_ Installez la douille de charniere centrale 6 I'aided'une
cl6 6 cliquet/douille 3/4" (:L9mm). Tournez-la de sorte
qu'elle traverse le support charni@e et s'ins@e dans
la porte du cong61ateur.
69
Page 70

Instructions d'installation
CHANGEIVlENT DU SENS
D'OUVERTURE DES PORTES
(mod@les de r_frJg_rateurs 6 one porte
unJquement) (suite}
%
ENLEVEMENT DES PORTES
(mod@les de r@frig_rateurs 6 deux
portes uniquement)
RE-SUSPENSION DE LA PORTE
DU COMPARTIMENT RI_FRIGI_RATION
Aboissezla porte du comportiment rdrig@otion sur
I'axede la charniere du centre.Assurez-vousque la
bague en matiere plastiquede I'axede charniere
demeure sur I'axede charniere du centre ou6
I'int6rieurdu trou de I'axede charni@ede la porte,
situ6 en bas de la porte.
F_ Ins@ezlemanchon de porte dons letrou 6 manchon
en bout de Io porte du r6frig@ateur,puisins6rezI'axe
de churniere sup6rieur.Assurez-vousque la porte soit
align@ 6 I'armoire.Fixezla charni@een haut de
I'armoire,sanstrap serrer,avec lesboulons.
rc] Assurez-vousque lejoint de Io porte soit align6 contre
I'ormoireet ne soit pus tordu. SoutenezIo porte du c6t6
de Io poign6eet ossurez-vousque Ioporte soit droite et
1'6cortemententre lesportessoit uniforme 6 I'ovont.
Touten tenant la porte en place,serrezles boulonsde
la charni@esup6rieure.Remettezen place le couvercle
de charni@e.
NOTES IMPORTANTES
NOTE : Vous ne pouvez pas changer lesens
d'ouverture des portes.
• Lisezles instructionsjusqu'6 la fin avant
de commencer.
Manipulez les pi@cesavec soin pour @iter de roger
la peinture.
Posez les vis pros des pi@cesqu'elles fixent,
pour @iter de les utiliser au mauvais endroit.
Pr6vogez une surface de travail qui ne rage pas
les portes.
IMPORTANT : Une lois que vous aurez commenc6,
ne bougez plus I'armoire.
Ces instructions servent 6 I'enl@vement des portes.
D_branchez le r_frig_rateur de sa prise _lectrique.
Videz toutes les clagettes de porte, g compris
le compartiment laitier.
OUTILS NI_CESSAIRES
CI@r@glable
Tournevis 6 cliquet
de 3/8 poet de !0 mm
[70] FIXEZ LE LOGO
Enlevezle papier adh6sif protecteur et alignez les
taquets de I'arri@edu logo avec les trous de la porte.
Faites pression sur le logo pour vous assurer qu'il
colle bien 6 la porte.
"..-.
7O
Ruban masque
Tournevis 6 lame mince
Tournevis cruciforme
Page 71

Instructions d'installation
I]] ENLI_VEMENT DES PORTES DU
COMPARTIMENT RI_FRIGI_RATION{suite}
FA1 Fermez les portes et attachez-les avec le ruban
masque.
r_ Commencez avec la porte de gauche. Enlevez
la vis qui tient le couvercle de la charni_re
du centre, soulevez le couvercle de la charni_re
du centre et mettez-le en haut de c6t6
du r6frig@ateur.
le couvercle
(! vis phillips)
rE1 Enlevez le ruban et faites basculer la porte pour
1'61oignerde I'armoire. Soulevez la porte pour
I'enlever de I'axe de la charni@e centrale.
Assurez-vous que la bague de I'axe de charni@re
en mati_re plastique demeure sur I'axe de
la charni@re ou @I'int@ieur du trou d'axe de
charni@re de la porte situ@en bas de la porte.
r_ posez la porte sur une surface qui ne
I'int@ieur vers le haut.
raye pas,
I_ ENLEVEZ LA CHARNII_RE DU CENTRE
de la charni@re
j]_] Enlevez le couvercle de la charni@re du haut
de la porte du compartiment r6frig@ation en
enlevant le vis @t@te Phillips et en le tirant vers
le haut.
r_ A I'aide d'une cl6 @douille de 5/16 po, enlevez
les boulons qui tiennent la charni_re du haut
@I'armoire. Soulevez ensuite la charni@re droit
vers le haut pour lib@er I'axe de la charni@e
de support du haut de la porte.
I
Couvercle de
la charni@re
Charni@re
du haut
0
A I'aide d'une cl# 6 douille de 5/16 po,
enlevez les boulons qui tiennent la charni_re
du centre 6 I'armoire. Mettez de c6t6
les boulons et la charni_re.
[_] ENLI_VEMENT DE LA PORTE OPPOSITE
Suivez la m_me proc@dure pour la porte
oppos6e. II n'g a pas de ills, de conduite d'eau
ou de couvercle de charni@re de I'autre c6t6.
[] ENLI_VEMENT DU TIROIR DU
COMPARTIMENT CONGI_LATION
Consultez la section Enl_vement du tiroir
du compartiment cong_lation pour des
instructions.
71
Page 72

Instructions d'installation
REMISEENPLACEDESPORTES(mod61esde r6frig6rateurs a deux portes uniquement)
rl] INSTALLATION DE LA CHARNII'RE
DU CENTRE
Installezla charni@edu centre de chaque c6t6.
RE-SUSPENSION DES PORTES DU
COMPARTIMENT RI-'-FRIG(RATION
AboissezIo porte du comportiment r6frig@otion
surI'axede la charniere du centre. Assurez-vousque
la bague en moti6replastique de I'axede charniere
setrouve sur I'oxe de chornieredu centre ou 6 I'int6rieur
du trou de I'oxede chorni@ede porte situ6en bos
de la porte.
r_ Fermezla porte ettenez-la ferm6e 6 I'aidede
ruban-masque ou utilisezune deuxieme personne
pour soutenir Io porte.
rc1 Ins6rezI'axede la charniere du haut dons le trou de la
charniereen haut de la porte du compartiment
r6frig@ation.Assurez-vousque la porte soit align6e 6
I'armoireet la porte oppos6e.Fixezlacharni_re en haut
de I'armoire,sonstrop serrer,avec lesboulons.
r_ Assurezwous que lejoint de la porte soit align6 contre
I'armoireet ne soit pas tordu. Assurez-vousque la porte
soit droite et I'@artement entre les portes soit uniforme
6 I'avant.Tout en tenant la porte align6e en place,
serrezlesboulons de lacharni_re sup6rieure.Remettez
en place lecouverclede charni@eet la vis.
[] REMETTEZ EN PLACE LA PORTE
OPPOSEE
Suivezla m_me proc6dure pour la porte oppos6e.IIn'g
a pasde conduite d'eau ou decouverclede charni@e.
I_I ALIGNEMENT DES DEU× PORTES
Silehaut desportes n'estpas bien align6, d'abord
essagezd'61everla porte la plus basseen tournant
le pied d'inclination surle m_me c6t6 que la porte
jusqu'6 ceque les portes soient bien align6es.Si
I'appareilresteinstable,rajustez lespieds d'inclination
dans la mesureoOI'apparail devient stable.
Si lesportesne sont toujours pas6 niveau,tournez
I'axer6glablepour souleverou abaisserla porte de
gauche afin qu'elle soit 6 niveauavec la porte de droite.
Utilisezune cl6Allende 1/4 po pour tourner I'axe.
"Axe r@glable
E] REMETTEZ EN PLACE LE TIROIR
s
DU COMPARTIMENT CONGELATION
Consultezlasection Remiseenplacedutiroir
ducompartimentcong61ationpourdesinstructions.
Couve rcle _- -_.<.
de charni_re __
Be°U'_n_n,ere _ _'J
uhout"
""_-__'-_ _ _ (rasi(raspectpeut varier)
72
Page 73

Instructions d'installation
INSTALLATION DE LA CONDUITE D'EAU (modUles AVEC machine a glaqons)
AVANT DE COMMENCER
Nous recommandons lestrousses d'alimentation d'eau en
cuivreWX8X2,WX8X3,WX8X4,selon le montant de conduite
dont vous avezbesoin. Nousapprouvons lesconduites d'eau
en matiere plastique GESmartConnecf" RefrigeratorTubing
(WXO8XIO006,WXO8X10015et WXO8X10025).
Sivous installezun sgsteme d'eau GEReverseOsmosisdons
votre r6frig@ateur,la seuleinstallationapprouv6e est celle
de la trousseGERVKIT.Pourles autres sgstemes d'osmose
de I'eau,suivez lesrecommandations du fabricant.
SiI'alimentationd'eau 6 votre rdrig@ateur vient
d'un sgsteme de filtration d'osmoseinvers6eETsivotre
rdrig6rateur a 6galement un filtre d'eau, utilisezle bouchon
de d@ivationdu filtre devotre rdrig@ateur. Sivous utilisez
la cartouche de filtration de votre r6frig@ateur
en conjonction avec le filtre d'osmose invers6e,
vous pouvezproduire des glaqons creux.
Cetteinstallation de conduite d'eau n'est pasgarantie
par le fabricant de r6frig@ateur ou de machine 6 glaqons.
Suivezsoigneusement cesinstructions pour minimiser
le risquededommages on6reux d'inondation.
Lescoups de b61ier(eauqui donne des coups dons
lestugaux) dons la tugauterie de la maison peut occasionner
desdommages aux pieces devotre r6frig@ateur,ainsi que
desfuites ou desinondations. Appelezun plombier certifi6
pour corriger lescoupsde b61ieravant d'installerla conduite
d'eau devotre rdrig@ateur.
Pourpr@enirroute br01ureettout dommage 6 votre
rdrig@ateur,ne branchezjamais laconduite d'eau
6 une canalisation d'eau chaude.
Sivous utilisezvotre rdrig@ateur avant de brancher
la conduite d'eau, assurez-vousde laisserlecommutateur
de la machine 6glaqon en position O (arr_t}.
N'installezjamais lestugaux de la machine 6 glaqon
donsdes endroits oOla temp6rature risque de descendre
en dessousdu point de cong61ation.
Sivous utilisezun outil 61ectrique(comme une perceuse
61ectrique)pendant I'installation,assurez-vousque I'isolement
ou le c_blage de cet outil emp_che tout danger de secousse
61ectrique.
Vousdevez proc6der 6 routes vos installations
conform6ment aux exigencesde votre code local
de plomberie.
CE DONT VOUS AUREZ BESOIN
//
• Tugau× en cuivre ou trousse GESmartConnect'"
Refrigerotor Tubing, diametre ext6rieur de 1/4 po pour
brancher le rdrig6rateur 6 I'alimentation d'eau. Sivous
utilisez un tugau en cuivre, assurez-vous que les deux
extr6mit6s du tugau soient coup6es bien droit.
Pour trouver la Iongueur de tugau dont vous aurez
besoin : mesurez la distance qui va du robinet d'eau situ6
derriere le rdrig@ateurjusqu'au tugau d'alimentation
d'eau. Assurez-vous qu'il gait assez de tugau en trap pour
vous permettre de d6coller le r6frig@ateur du mur apr_s
I'installation.
Lestrousses GESmartConnecff Refrigerator Tubing sont
disponibles dons les dimensions suivantes :
1,8m (6 pi) - WXO8XIO006
4,6 m (15pi)- WXO8X10015
7,6m (25 pi) - WXO8X10025
NOTE: Les seuls tuguu× en muti_re plestique
upprouv_s pur GEsont ceu× qui font fournis
duns les trousses GESmurtConnect'" Refrigerator
Tubing. N'utilisezjemuis un uutre tugeu en muti_re
plostique, cur le tugou d'olimentotion d'eou est
tout le temps sous pression. Certoines categories
de tugeu× en moti_re plestique peuvent devenir
cossonts ovec 1'6geet peuvent se fendre,
en occosionnont des dommuges d'inondution
duns votre moison.
• Vous pouvez acheter une trousse d'alimentution d'eau
GE(contenant un tugau, un robinet d'arr@ et lesjoints
6num6r6s ci-dessous) chez votre distributeur local
ou en le commandant au service de pieces et
accessoires, au 1.888.261.3055.
73
Page 74

Instructions d'installation
INSTALLATION DE LA CONDUITE D'EAU (suite}
CE DONT VOUS AUREZ BESOIN (SUITE}
• Une olimentotion d'eou froide potable. La pression
de I'eau doit @reentre 20 et 120 p.s.i.(1,4 et 8,1 bar).
• Une perceuse _lectrique.
• Une cl_ de 1/2 po ou une cl_ r_glable.
• Un tournevis _ lame plate et un tournevis Phillips.
• Deux _crous 6 compression d'un diam_tre ext_rieur
de 1/4 po et deux bagues (monchons)-pour brancher
le tuyau en cuivre au robinet d'arr6t et au robinet d'eau
du r6frig6roteur.
OU
• Sivous utilisez une trousse d'alimentation d'eau GEavec
tugau en mati@e plastique, lesgarnitures n6cessaires
sent d6j6 mont6es au tugau.
Installez le robinet d'arr_t sur la canalisation d'eau
)otable la plus fr6quemment utilis6e.
[] FERMEZ L'ALIMENTATION
PRINCIPALE D'EAU
Ouvrez le robinet le plus proche suffisamment
Iongtemps pour purger le tugau.
r_ CHOISISSEZ L'EIPLACEIENT
DU ROBINET
Choisissez pour le robinet un emplacement
facilement accessible. II vaut mieux le brancher
de c6t6 @un tugau vertical. Si vous devez
le brancher @un tugau horizontal, faites
le branchement en haut ou de c6t6, plut6t
qu'en bas du tugau, pour 6viter de recevoir
des s6diments du tugau d'alimentation d'eau.
• Sivotrecanalisationd'eauactuellea un raccord @as6
(_uneextr6mit6,vousaurezbesoind'un adaptateur
(quevoustrouverezdansvotre magasindemat6riel
deplomberie)pourbrancherletugau d'eauau
rdrig6rateur,OUBIEN vouspouvezcouperleraccord
@as6(_I'aided'uncoupe-tube, puisutiliserunraccord
(_compression.Necoupezjamais I'extr6mit6finie
d'untuyau de latrousseGESmartConnectT"
RefrigeratorTubing.
• Un robinet d'orr_t pour brancher le tuyau d'eau froide.
Le robinet d'arr@ doit avoir une entr6e d'eau avec
un diametre int6rieur minimal de 5/32 po au point
dejonction avec le TUYAU D'EAU FROIDE.Des robinets
d'arr@ 6 6trier sent souvent inclus dans les trousses
d'alimentation d'eau. Avant d'acheter, assurez-vous
que le robinet 6 6trier se conforme 6 yes codes de
plomberie Iocaux.
PERCEZ UN TROU POUR LE ROBINET
Percez un trou de 1/4 podans le tugau d'eau,
6 I'aide d'un foret dur. Enlevez toute barbure
due au perqage du trou dens le tugau.
Faites attention de ne pas laisser de I'eau
couler dens votre perceuse _lectrique.
Si vous ne percez pas un trou de 1/4 po, vous
obtiendrez une alimentation d'eau r6duite et
des glaqons plus petits.
Y
74
Page 75

Instructions d'installation
FIXEZ LE ROBINET D'ARRET
Fixez le robinet d'arr_t au tuyau d'eau froide
6 I'aide du collier de serrage.
Collier de serrage.
Robinet d'arr_t 6
@rier
NOTE :Vous devez vous conformer aux Codes
de plomberie 248CIVlRdu Commonwealth of
Massachusetts. Les robinets d'arr_t 6 6trier sont
ill6gaux et leur utilisation n'est pas autoris_e au
Massachusetts. Consultez votre plombier local.
-- Tugau vertical
d'eau froide
r_ SERREZ LE COLLIER DE SERRAGE
Serrez les vis du collierjusqu'6 ce que la rondelle
d'6tanch_it6 commence 6 enfler.
NOTE : Ne serrez pas trap. Vous risquez d'6craser
le tugau.
Rondelle
Entree
Y
171BRANCHEZ LE TUYAU AU ROBINET
Placez un 6crou de compression et une bague
(manchon) 6 I'extr6mit6 du tugau et branchezdes
au robinet d'arr_t.
Assurez-vous que le tugau soit bien ins@6 dans
le robinet. Serrez fort 1'6crou de compression.
Pour le tugau en mati@e plastique d'une trousse
GE SmartConnect TM Refrigerator Tubing, ins6rez
I'extr6mit6 moul6e du tugau dans le robinet
d'arr@ et serrez 1'6crou de compression
6 la main, puis serrez un autre demi tour avec
une cl6. Si vous serrez trap fort, vous pouvez
occasionner des fuites.
Robinet d'arrQt
_ f,._ __ ,/ TUsmgaar_connectT.
6 @rier
Presse-joint
Robinet de sortie
NOTE : Vous devez vous conformer aux Codes
de plomberie 248CIVlRdu Commonwealth of
Massachusetts. Les robinets d'arr_t 6 6trier sont
ill6gaux et leur utilisation n'est pas autoris6e au
Massachusetts. Consultez votre plombier local.
Bague (manchon)
I_crou de compression
Collier devisSerrage,_du_
collie_
ACHEMINEZ LE TUYAU
Acheminez le tuyau du tuyau d'eau froide
au r6frig@ateur.
Faites passer le tugau par un trou perc6 dans
lemur ou le plancher (derri@e le r6frig@ateur
ou au niveau de I'armoire de cuisine adjacente),
aussi pros du murque possible.
PU RG EZ LE TUYAU
Ouvrez le robinet d'alimentation principale
d'eau et purgez le tugau jusqu'6 ce que I'eau
soit claire.
Fermez I'eau au niveau du robinet d'eau apr_s
6coulement d'environ 1 Iitre (1 quart) d'eau par
le tugau.
@
Pour compl6ter I'installation du r6frig@ateur, retournez
6 1'6tape I de la section Installation du r_frig_rateur.
75
Page 76

Bruits de fonctionnement normaux.
Les r4frig4rateurs plus r4cents font des bruits diff4rents de ceux des anciens. Les r4frig4rateurs
modemes pr4sentent plus de fonctions et sont plus avarices sur leplan technologique.
Entendez-vous ce que j'entends ? Ces bruits sont normaux.
HUMMM...
--OUUCH ....
Lenouveaucompresseur6rendement61ev@peutfonctionnerplus
Iongtempsetplusvitequevotreancienrdrig@ateuretvouspouvez
entendreunsonmodul@ouunronflementaigupendantson
fonctionnement.
VouspouvezentendreunsifflementIorsquelesportesseferment.
CelavientdeI'@quilibragedepressiondanslerdrig@ateur.
CLICSet CLAQUEIENTS
VouspouvezentendredescraquementsoudesclaquementsIorsque
lerdrig@ateurestbranch@pourlapremi@efois.CelaseproduitIorsque
lerdrig@rateurserefroidit6labonnetemp@ature.
Ler@glageducong@lateurcliquequandlecompresseursemet
enmarcheous'@rete.
Laminuterieded@givragesemettantenmarcheous'@retantpendant
lecycleded@givrage.
L'expansionetlacontractiondesserpentinsderefroidissementpendant
etapr@sled@givragepeuventcauseruncraquementouunclaquement.
Surlesmod@ies@quip@sd'unemachine6giaqons,apr@suncycle
defabricationdeglaqons,vouspouvezentendrelesglaqonstomber
danslebac.
Surlesmod@lesmunisd'undistributeur,lemouvementdesconduites
peut@treaudibleIorsdelapremi@edistributiond'eauetapr@s
lerel@chementduboutondudistributeur.
OUIR !
VouspouvezentendreJesventiJateurstourner6hautesvJtesses.CeJa
seproduitIorsquelerdrig@ateurvientd'@trebranch@,Iorsquelesportes
sontouvertesfr@quemmentouIorsdeI'ajoutd'unegrandequantit@
d'alimentsdanslescompartimentscong@lateurourdrig@ateur.
Lesventilateurspermettentdemaintenirlesbonnestemp@atures.
Lesventilateurschangentdevitessespourassurerdes@conomies
d'@nergieetunrefroidissementoptimaux.
BRUITSD'EAU
6
LepassagedeI'agentfrigorifiquedanslesserpentinsderefroidissement
ducong@lateurpeut@treaccompagn@d'ungargouillementsemblable
6celuideI'eauen@bullition.
L'eautombantsurI'@l@mentchauffantded@givragepeutfaireunbruit
degr@sillement,declaquementoudebourdonnementpendantlecycle
ded@givrage.
Unbruitdesuintementd'eaupeut@treentendupendantlecycle
ded@givrageIorsquelaglacedeI'@vaporateurfondettombedanslebac
der@cup@ation.
FermerlaportepeutcauserungargouillementenraisondeI'@quilibrage
depression.
Avant d'appeler un r parateur...
Conseilsded4pannage-E-conomisezdu temps et de !'argent!
Consultezd'abordlestableaux qui suiventetvous pourrez
peut-_tre _viter defaire appe/6 un r_parateur.
Causespossibles Correctifs
Ler_frig_rateur Lecycleded_givrageesten cours. . Attendezenviron30minutespermettreau cycleded6givrage
nefonctionnepas deseterminer.
Lacommandeestr_gl_e , R_glezla commandedetemp@aturesurunr_glage
en positionOff(arr_fl. detemp6rature.
Ler_frig_rateurestd_branch_. ,,EnfoncezlafichedeI'appareildansla prisemurale.
Ledisjoncteurou lefusible • Remplacezlefusibleour6enclenchezledisjoncteur.
peutavoir saute.
Vibrationou bruit Lespiedsdenivellement • ConsultezMettezler_frig_roteurdeniveou.
m_tallique(uneI_g_re ant besoind'etrer_gl6s.
vibrationest normale)
76
Page 77

Avant d'appeler un r parateur., www.electromenagersge.ca
Causes possibles Correctifs
Lemoteurfonctionne CeciestnormalIorsquele • Attendez2/4heurespourqualerdrig_rateurrefroidisse
pendantdeIongues r_frig_rateurvient d'etre branch& compl_tement.
p_riodes ou d_marre et
s'arr_tefr_quemment.(Les Ceciarrive souventIorsque , ¢'estnormal.
r#frig#rateursmadameset
feurs cong_lateurs_tant a _t_miseau r_frig_rateur.
plusgrands,lear moteur Portelaiss_eouverte. • V_rifiezqu'iln'yapusun paquetquiemp_chelaporte defarmer.
dolt fonctionnerplus Tempschaudououverture • C'estnormal.
fongtemps.IIsd_marrent fr_quentedesportes.
ets'arr_tentafin de
maintenirdes Lescommandesde temperature • ConsultezLescommandes.
temperaturesuniformesJ ant_t_ r_gl_es au×temperatures
Temperature trap _lev_e Lacommande de temperature * ConsultezLes commandes.
dunslecong_lateurou du r_frig_rateuroudu
ler_frig_rateur cong_lateurn'estpasr_gl_e
Givresurlesaliments Portelaiss_eouverte. • V_rifiezqu'iln'ga pusun paquetquiemp_chelaporte defarmer.
surget_s(ilestnormal
quadu givrese forme Lesouverturesde portesont • C'estnormal.
I'int#rieurdupaquetl trap fr_quentesoutrap Iongues.
unegrandequantit_ d'aliments
lesplusbasses.
0 unetemperatureassezbasse.
Tempschaudououverture , Abaissezla commandedetemperatured'uneposition.
fr_quentedesportes. ConsultezLescommandes.
Portelaiss_eouverte. • V_rifiezqu'iln'ga pusunpaquetquiemp_chelaporte defarmer.
Vibrationfr#quente Lecommutateurde marche • Hettezlecommutateurdemarcheen position0(arr_t).
de lamachine0 glaqonsest Lerobinetd'eausaraendommag_sigardezlecommutateur
en positionI(marche),mais demarcheenpositionI(marche).
I'approvisionnementeneaudu
r_frig_rateur n'estpus branch&
Petitsgla_onsougla_ons Lefiltre 0 eauestbouch& • Remplacezlacartouchedufiltreavecunenouvelle
creux_ I'int_rieur cartoucheou installezlebouchondufiltre.
Lamachine_ gla_ons Lecommutateurde marche • Hettezlecommutateurdemarcheen positionI(marche).
automatiquene n'estpasbranch& Levogantlumineuxde lamachine_ glac;onsdeviantvertquand
fonctionnepus lecommutateurdevogantlumineuxdecompartimentcong_lation
{surcurtainsmodules) estpress_ouquandla porteducompartimentcong_lationest
L'alimentationd'eauestarr_t_e
ou n'estpusbranchia.
Lecompartiment
cong_lateuresttrap chaud.
Uneaccumulationdegla_ons
dansle tiroir _gla_onspeut
causerunarr_t dela machine
6 gla_ons.
Desgla_onssesontcoll_sduns
la machine_ gla_onsfievogant
lumineuxvert de la machine
6 gla_onsclignote}.
Levogant lumineuxde machine
6 glaqonsnes'allumepas.
ferrule.
, ConsultezInstallationdetoconduited'eou.
* Attendez 2/4heures qua le rdrig_rateur salt
compl_tement froid.
. Egalisezlesglac;ons_ la main.
. D_branchezla machine c_glac;ons,enlevez lesglac;ons,
puis remettez en marche la machine _ glac;ons.
• ¢'estnormalquandla porteducompartimentcong_lation
estouverte.Levogantlumineuxdela machine_ gluttons
deviantvertquandlecommutateurdevogantlumineux
decompartimentcong_lationestpress_ouquandlaporte
ducompartimentcong_lationestferm_e.
77
Page 78

Avant d°appeler un r parateur...
Causes possibles Correctifs
Odeur/saveur Desalimentsant transmisleur , Emballezbienlesaliments.
anormaledesgla_ons odeur/goQtau×glaqons.
IIfaut nettogerI'int_rieur • ConsultezEntretienetnettogage.
du r_frig_rateur. • Gerdezune boite de bicarbonate de soude ouverte dens
votre rdrig_reteur. Remplecez-letous lestrois mois.
Formationlente Portelaiss_eouverte. • V_rifiezqu'iln'Uapasun paquetquiemp_chelaporte defarmer.
desglagons Lacommandedetemperature • ConsultezLescommandes.
ducong_lateurn'estpasr_gl_e
unetemperatureassezbasse.
Odeurdens Desalimentsant transmis • Lesaliments_ odeurfortedoivent@treemball@s
ler_frig_rateur leurodeurau r_frig_rateur, herm_tiquement.
, Gardezunebo?teouvertedebicarbonatedesoude
danslerdrig_rateur.
IIfaut nettogerI'int_rieur. • ConsultezEntretienetnettogoge.
Dela condensation Celan'estpasinhabituelpendant • Essugezbienlasurfaceext_rieureetabaissez
s'accumule_ I'ext_rieur lesp_riodesde forte humiditY, lacommendedurdrig_rateurd'uneposition.
DeI'humidit_seforme Vousouvrezlesportestrap • C'estnormal.
I'int_rieur{quand
il fair humide,Fair
transportedeI'humidit_
I'int_rieurdu
r_frig_rateurquana
vousouvrezlesportes]
Lalumi_redecompartiment Pasd'_lectricit_6 laprise. , Remplacezlefusibleouremettezenmarche
r_frig_rationoucong_lation ledisjoncteur.
nes'allumepas L'ampoulea br_l_ouella • ConsultezRemptacementdesampoutes_tectriques.
Laporte/letiroir Vousdevezajuster lespieds • ConsultezInstallationdu rdrig_rateur.
nefermepussaul de nivellement.
Laporte/letiroir du C'estnormalsi,apr_ss'_tre • Celaindiquequelaporte/letiroirducompartimentcong_lation
compartimentcong_lation ouvert, laporte/le tiroir du aunbenjoint. Silaporte/letiroirducompartimentcong_lation
s'ouvrequandla porte du compartimentcong_lation neserefermepasautomatiquementapr_ss'_treouvert,consultez
r_frig_rateurest ferm_e se refermetout seul. lasectionProbl_me:Loportdtetiroirnefermepasseut,ci-dessus.
DeIair chaudsouffle
du hasdu r_frig_rateur
Lesalimentsg_lent Lesalimentssenttrap prosde • EloignezlesalimentsdeI'ouverturedecirculationd'air.
danslecompartiment I'ouverturedecirculationd'air
r_frig_ration 6 I'arri_reducompartiment
IIg a unelueurorang_e Lechauffagedud_givrage • C'estnormal.
danslecompartiment fonctionne.
cong_lation
78
souvent ou trap Iongtemps.
n'estpasviss_e(_fond.
C'est normal. Le moteur
se refroidit 6 I'air. Dans le processus
de r_frig_ration ilest normal qua
de la chaleur salt _mise en bas
du r_frig_rateur. Certains
rev_tements de sol sent sensibles
et changent de couleur
cestemperatures normales
et pas dangereuses.
r_frig_ration.
Ler_glagedevotre • R_glezvotrerdrig_rateur5unetemperatureplus
r_frig_rateuresttrap froid, chaudeens_lectionnantunegraduation_lafois.
Page 79

www.electromenagersge.ca
Causes possibles Correctifs
La machine _ gla¢ons La conduite d'eau ou • Appelez un plombier.
ne distriOue ni glu_ons le robinet d'a rr_t est bouch_.
Lefiltre Oeau est bouch_. • Remplacezla cartouche du filtre avec une nouvelle
cartouche ou installez le bouchon du filtre.
Cartouche de filtre • Retirezet r_installez la cartouche de filtre en vous
mal install_e, assurantqu'ellesebloque en place.Lalame 5 I'extr_mit_
de la cartouche dolt _tre positionn6e verticalement.
Levogant lumineux du C'est normal. • ¢onsultez la section Filtred'eau pour deplus amples
filtre d'eau a chang_ de informotions.
ouleur
La poign_e est I5che/
IIg a un espace vide pour
la poign_e
Son du r_frig_rateur
Ler_glage de contr61es
n'est pas allum_
Lesportes ne sont pas
bien align_es (Uniquement
sur les modules _ deux
portes)
Lespaniers se coincent
Iors de I'ouverture
ou de la fermeture
Vous devez ajuster la poign_e
de porte.
• Consultezlessections Fixez/a poign#e de porte
du compartiment pour aliments frais et Fixezla poign@
de la porte du compartiment congdlationpour des
instructions d_taill6es.
C'estI'alarme de porte. • Fermezla porte.
Sur certains modules,
lesampoules _lectriques situ_es
en haut du compartiment
• Silesr_glagesde contr61ene s'allument pas,v@ifiez
que les ampoules _lectriques ne soient pasbrOl_es,
et remplacez-les le cas _ch_ant.
r_frig_ration allument les r_glages
de contr61e de la temperature.
II faut r_aligner les pores. • ConsultezlasectionAlignement desdeux portes situ_e
dans la section Remiseenplace desportes (modUles
de rdfrigdmteurs _ deux portes uniquement).
Lespaniers sont trap remplis. • Pour ouvrir :Enlevezcertains produits du panier,Iorsque
celui-ci est ouvert aussiloin que possible. Repositionnez
lesproduits laiss_sdans le panier et essagezde I'ouvrir
nouveau.
Pour fermer: Repositionnezlesproduits dans le panier
et enleveztout produit plac_ au-dessus du bard du panier,
puisfermez-le.
79
Page 80

GARANTIE DU CLIENT
(pourlaclienteleau Canada)
Votre r6frig6rateurestgaranticontretoutd6fautde mat6riau et de fabrication.
Ce qua cette Dur_e de garantie Pi_ces Main-d'oeuvre
garantie couvre (5 partir de la R_paration ou
date d'achat) remplacement au
choix de Mabe
Compresseur GE Profile: Dix (!0) ans GE Profile: Dix (!0) ans GE Profile: Cinq (5) ans
Syst_me scell# (y GE Profile: Cinq (5)ans GE Profile: Cinq (5)ans GE Profile: Cinq (5)ans
compris I'#vaporateur, la GEet routes autre GEet routes autre GEet routes autre
tuyauterie du condenseur marques : Un (!) an marques : Un (!) an marques : Un (!) an
et lefrigorig_ne)
l-auras les autres pi_ces Un (!) an Un (!) an Un (!) an
TERHESETCONDITIONS:
La pr#sente garantie nes'applique qu'6 I'utilisation domestique
par uneseule famille au Canada, Iorsque le r#frig#rateur a #t#
install# conform#ment aux instructions fournies par Habe et
est aliment# correctement en eau et en #lectricit#.
Lesdommages dos _]une utilisation abusive, un accident,
une exploitation commerciale, ainsi qua la modification,
I'enl_vement ou I'alt6ration de la plaque signal#tique annulent
la pr#sente garantie.
L'entretien effectu# dans le cadre de la pr#sente garantie dolt
I'_tre par un r@arateur agr## Habe.
Habe et le marchand ne peuvent _tre tenus pour responsables
en cas de r#clamations ou dommages r6sultant de toute
panne du rdrig@ateur ou d'un entretien retard# pour des
raisons qui raisonnablement #chappent _]lear contr61e.
L'acheteur dolt, pour obtenir un service dans le cadre
de la garantie, pr#senter la facture originale. Les#l#ments
r#par#s ou remplac#s ne sent garantis qua pendant le restant
de la p#riode de garantie initiale.
Cette garantie est offerte _]I'acheteur initial, ainsi qu'_]tout
propri#taire subs6quent d'un produit achet# envue d'une
utilisation domestique au Canada. Leservice _]domicile en
vertu de la garantie sara fourni dans les r6gions o0 ilest
disponible et o0 Habe estime raisonnable de le fournir.
Cette garantie est en susde toute garantie statutaire.
GEet routes autre GEet routes autre GEet routes autre
marques : Un (!) an marques : Un (!) an marques : Un (!) an
EXCLUSIONS DE LA GARANTIE :
• Lepropri#taire est responsablede payer les r#parations
occasionn6es par I'installation de ce produit et/ou lesvisites
n#cessairespour lui apprendre _]utiliser ce produit.
• Tout dommage au fini de I'appareil dolt #tre signal# aupr_s
du magasin o0 a 6t# effectu# I'achat dans les48 heures
suivant la livraison de I'appareil.
Dommages caus#s 6 la peinture ou 6 I'#mail apr&s livraison.
Installation incorrecte-I'installation correcte inclut la bonne
circulation d'air pour le syst_me de r_frig@ation, des
possibilit_s de branchement aux circuits _lectriques,
d'alimentation eneau et autres.
• Remplacement des fusibles ou r_armement des disjoncteurs.
• Remplacement des ampoules _lectriques.
• Dommages subis par I'appareil _]la suite d'un accident,
d'un incendie,d'inondations ou en cas de force majeure.
• Utilisation correcte et entretien ad_quat de I'appareil salon
le manuel d'utilisation, r_glage correct des commandes.
• Pertedes aliments doe 6 la d_terioration.
• Leservices'ilest impossibled'avoir acc&sau produit pour
cefaire.
• LEGARANTN'ESTPASRESPONSABLEDESDOHHAGES
INDIRECTS.
i EXCLUSIONDEGARANTIESIlvtPLIClTES--Votreseal et unique recours est la r_paration du produit salon les dispositions JI
de cette Garantie lirnit_e. Toutesles garanties implicites, incluant lesgaranties de commerciulit_ et d'ad_quation I
5 un usage sp_cifique, sontlimit_es 5 une annie ou 5 la p_riode la plus courte autoris_e par la I_gislation. j
IMPORTANT
Gardez cette garantie et votre facture originale comma preuve d'achat et preuve de la date d'achat.
Mabe vous afire ses services dans tout le pays. Pour de plus amples
renseignements sur la pr_sente garantie, veuillez prendre contact avec :
Directeur, Relations avec les consommateurs, Mabe Canada Inc.,
Bureau 310, ! Factory Lane, Moncton, N.B. E1C9M3
1.800.561.3344
Agraphez votre requ ici.
Vousdevez foumir la preuve de I
!'achat origina! pour obtenir des I
services en vertu de la garantie.J
80
Page 81

Feuillet de donn_es relatives _ la performance
Cartouche MWF du sgst_me de
Filtration d'eau GE SmartWater
Ce sgst_me o _t_ essog_ selon les normes NSF/ANSI 42/53 pour une r_duction des substonces _num_r_es ci-dessous.
Lo concentrotion des substonces indiqu_es dons I'eou qui entre dons le sgst_me o _t_ r_duite _ une concentrotion inf_rieure
ou _gole _ Io limite permise pour I'eou quittont le syst_me, telle que pr_cis_e pot Io norme NSF/ANS! 42/53.*
'facteurs intdgrds de s_curitd _ !00% pour one utilisation sans compteur)
Norme N°42 : Effetsesth_tiques
Param_tre
Chlore
T&O
Particules**
Param_tre
Turbiditg
Spores
Asbestos
Plomb au pH 6,5
Plomb au pH 8,5
Mercure6 pH6,5
Mercure6 pH8,5
Alachlore
Lindane
2,4-D
Toxaph_ne
Benz_ne
Carbofurane
1,4Dichlorobenz_ne
Atrazine
USEPA
HCL
influent concentration
10.000 particles/mL minimum
USEPA
HCL
0,5NTU
_>99,95%r6duction
_>99%r6duction
0,015mg/L
0,015mg/L
0,002mg/L
0,002mg/L
0,002mg/L
0,0002mg/L
0,070mg/L
0,003mg/L
0,005mg/L
0,040mg/L
0,075mg/L
0,003mg/L
Qualit_
2,0mg/L+10%
Oualit_
influent concentration
11+ 1 NTU***
50.000 Lminimum
1076 108fibres/L; > 10pm
0,15mg/L+ 10%
0,15mg/L+ 10%
0,006 mg/L + 10%
0,006 mg/L + 10%
0,04mg/L+ 10%
0,002 mg/L + 10%
0,210 mg/L + 10%
0,015mg/L + 10%
0,015 mg/L + 10%
0,080 mg/L + 10%
0,225 mg/L + 10%
0,009 mg/L + 10%
Mogenne Effluent
influente Mogenne Maximum
1,96mg/L 0,06mg/L 0,11mg/L
6.400.000#/mL 58.833#/mL 150.000#/mL
Norme N° 53
Mogenne
influente
10,5NTU
i18,750#/L
57 MF/L
0,1567 mg/L
0,1433 mg/L
0,0059 mg/L
0,0057 mg/L
0,0367 mg/L
0,0020 mg/L
0,2033 mg/L
0,0160 mg/L
0,0145 mg/L
0,0830 mg/L
0,2283 mg/L
0,0087 mg/L
: Effets de sant_
Mogenne
0,14NTU
<I#/L
0,996MF/L
<0,001mg/L
<0,001mg/L
0,000350mg/L
0,000325mg/L
0,00023mg/L
<0,00002mg/L
0,00337mg/L
0,00100mg/L
0,000500mg/L
0,001000mg/L
0,000500mg/L
<0,0005mg/L
Effluent
Maximum
0,28NTU
4#/L
<i MF/L
<0,001mg/L
<0,001mg/L
0,0007mg/L
0,0006mg/L
0,0004mg/L
<0,00002mg/L
0,011000mg/L
0,001000mg/L
0,000500mg/L
0,001000mg/L
0,000500mg/L
<0,0005mg/L
% R_duction
Mogenne Minimum
96,77% 94,74%
99,14% 97,97%
% R_duction
Mogenne Minimum
98,54% 97,20%
> 99,99% > 99,99%
99,60% 99,39%
99,36% 99,29%
99,30% 99,29%
94,70% 87,50%
93,20% 89,29%
99,34% 98,67%
99,00% 98,95%
98,32% 94,50%
93,44% 91,67%
96,51% 95,83%
98,78% 98,65%
99,78% 99,77%
94,22% 93,33%
R_duction
exigeante min.
>50%
_>85%
R_duction
exigeante min.
0,5NTU
_>99,95%
_>99%
0,010mg/L
0,010mg/L
0,002mg/L
0,002mg/L
0,002mg/L
0,0002mg/L
0,070mg/L
0,003mg/L
0,005mg/L
0,04mg/L
0,075mg/L
0,003mg/L
* Test6utilisantun d6bitde0,50gpm; unepressionde60psig;unpH de 7,5+_0,5;etunetemp.de20°C_+3°C(68°F+_ 5°F)
** Hlesuresen particules/mL Les particules utilis6s4taientde0,5-1 micron.
*** NTU= unitdsdeturbidit6n6ph61om6trique
Specifications d'op_ration
[] Capacity: certifi_ejusqu'6 maximum de 300 gallons (!!35 I);jusqu'6 maximum de six mois pour les modules non dot_s d'un vogant indicateur
de remplacement de filtre;jusqu'6 maximum d'un an pour les modules dot_s d'un vogant indicateur de remplacement de filtre
[] Exigence en mati_re de pression : 2,8 6 8,2 bar (40 6 120 psi), sans choc
[] Temp@ature : 0,6°-38 °C (33°-!00 °F)
[] D_bit : 1,9 Ipm (0,5 gpm)
Exigences g_n_rales d'installation/op_ration/entretien
[] Rincez la nouvelle cartouche 6 plein d_bit pendant 3 minutes afin de lib_rer de Fair.
[] Remplacez la cartouche Iorsque le vogant clignote ou Iorsque le d_bit d'eau est r_duit pour les appareils sans vogants.
Avis sp_ciaux
[] Les directives d'installation, la disponibilit_ de pi_ces et de service ainsi que la garantie standard sont expedites avec le produit.
[] Ce sgst_me d'eau potable dolt _tre entretenu conform_ment aux directives du fabricant, g compris le remplacement des cartouches du filtre.
[] N'utilisez pas Iorsque I'eau pr_sente un danger microbiologique ou Iorsque I'eau est d'une qualit_ inconnue sans d_sinfecter ad_quatement
le sgst_me avant ou apr_s; le sgst_me peut servir pour de I'eau d_sinfect_e qui pourrait contenir des spores filtrables.
[] Les contaminants ou autres substances retirees ou r_duites par ce sgst_me de traitement de I'eau ne sont pas n_cessairement dans votre eau.
[] V_rifiez pour vous assurer de vous conformer aux lois et r_glements Iocaux et de I'@at.
[] Notez que bien que I'essai a eu lieu dans des conditions normales de laboratoire, mais que le rendement r_el peut varlet. Les sgst_mes doivent
_tre install_s et fonctionner conform_ment aux procedures et directives recommand_es par le fabricant.
Test_eet certifi_e selonles normes 42 et 53de ANSI/NSFpour Io r#duction de :
Norme NO42 : Effets esth_tiques
Unit_ chimique
L'odeur et le goOtde chlore
Unit_ defiltration m_canique
R_duction de particules, cat_gorie I
Norme No 53 :Effets desant_
Unit_ de r_duction chimique
R_duction alachlore et atrazine
R_duction benz_ne et carbofuran
R_duction 1,4 dichlorobenz_ne et 2,4-D
R_duction plomb et lindane
R#duction mercure et toxaph_ne
Unit_ defiltration m_canique
R_duction de turbidit_
R_duction de spores et asbestos
Fabriqu#e pour : General Electric Compang, Louisville, KY40225 EPA EST.No. 070595-MN-00!
81
Page 82

Feuillet de donn6es relatives _ la performance
Cartouche GSWF du sgst_me de
Filtration d'eau GE SmartWater
Ce sust_me u _t_ essug_ selon les normes NSF/ANSI 42/53 pour une r_duction des substunces _num_r_es ci-dessous.
Lu concentration des substances indiqu_es duns I'euu qui entre duns le sgst_me u _t_ r_duite 6 une concentration
inf_rieure ou _gule _ lu limite permise pour I'euu quittunt le sust_me, telle que pr_cis_e par It norme NSF/ANS! 42/53.*
'focteurs int6grds de s6curitd _ !00% pour une utilisation sans compteud
Norme N° 42 "Effets esth_tiques
Param_tre Oualit_ Effluent
Chlore
T&O
Part_icules**
USEPA
MCL
Param_tre
Turbidit#
Spores
99,95% r#duction
Plomb au pH 6,5
Plomb au pH 8,5
Lindane
0,015 mg/L
0,0002 mg/L
Atrazine
* Testd utilisant un ddbit de 0,5 gpm; une pression de 60 psig; un pH de 7,5 +_0,5; et une temp. de 20 °C +_3 °C.
** h4esures en porticules/ml. Les particules utilisds dtaient de 0,5-1 micron.
*** NTU = unitds de turbiditd ndphdlomdtrique
1,845 mg/L
143.333 #/mL
USEPA
MCL
1 NTU***
0,015 mg/L
0,003 mg/L
Influent
mogen
influent concentration
2,0 mg/L± 10%
10.000 particles/mL minimum
Influent
mogen
10,3 NTU***
200.000 #/L
0,15 mg/L
0,14 mg/L
0,0216 mg/L
0,008 mg/L
Norme N°53:Effets de sant_
Oualit_ influent
concentration
1 + 1 NTU***
50.000 L minimum
0,15 mg/L+ 10%
0,15 mg/L+ 10%
0,002 mg/L+ 10%
0,009 mg/L+ 10%
< 0,00002 mg/L
Mogenne
< 0,05 mg/L
29,83 #/mL
Mogenne
0,106 NTU
0
< 0,001 mg/L
0,001 mg/L
< 0,002 mg/L
Effluent
Maximum
0,05mg/L
140 #/mL
Maximum
0,14 NTU
0
< 0,001 mg/L
0,003 mg/L
< 0,00002 mg/L
< 0,002 mg/L
% R_duction
Mogenne Minimum
97,29% 96,43%
99,98% 99,91%
% R&duction
Mogenne Minimum
98,97% 98,61%
> 99,99% > 99,99%
> 99,33% > 99,33%
> 99,29% 97,86%
99,07% 98,75%
> 76,12% > 66,67%
R_duction
exigeante min.
>50%
>85%
R_duction
exigeante min.
0,5 NTU
> 99,95%
0,010 mg/L
0,010 mg/L
0,0002 mg/L
0,003 mg/L
Specifications d'op_ration
[] Capacit@:certifi@ejusqu'@maximum de 750 gallons (2838I);jusqu'@maximum de six mois
[] Exigence en mati@rede pression :2,8 @8,2 bar (40_ 120 psi), sans choc
[] Temp@rature : 0,6°-38 °C(33°-100 °F)
[] D@bit:1,9 Ipm (0,5 gpm)
Exigences g_n_rales d'installation/op_ration/entretien
[] Rincez la nouvelle cartouche 5 plein d_bit pendant 3 minutes afin de lib_rer de I'air.
[] Remplacez la cartouche Iorsque le d_bit devient trap lent.
Avis sp6ciaux
[] Lesdirectives d'installation, la disponibilit6 de pi_ces et de service ainsi que la garantie standard sont exp6di6es avec le produit.
[] Ce sgst_me d'eau potable dolt 6tre entretenu conform6ment aux directives du fabricant, g compris le remplacement des cartouches
du filtre.
[] N'utilisez pas Iorsque I'eau pr6sente un danger microbiologique ou Iorsque I'eau est d'une qualit6 inconnue sans d6sinfecter ad6quatement
le sgst_me avant ou apr_s; le sgst_me peut servir pour de I'eau d6sinfect6e qui pourrait contenir des spores filtrables.
[] Lescontaminants ou autres substances retir6es ou r6duites par ce sgst_me de traitement de I'eau ne sont pas n6cessairement dans
votre eau.
[] V#rifiez pour vous assurer de vous conformer aux lois et r@glements Iocaux et de I'#tat.
[] Notez que bien que I'essai a eu lieu dans des conditions normales de laboratoire, mais que le rendement r#el peut varier. Lessgst@mes
doivent #tre install#s et fonctionner conform#ment aux procedures et directives recommand#es par le fabricant.
la concentration de chlore, la suppression des goOts et odeurs, particules Cat#gorie I, et selon
Sgst#me test# et homologu# par NSF International, selon la norme NO42 pour la r#duction de ]
la normeNo53 pourla r#duction despores,plomb,Lindane,Atrazineet turbidit#.
Fabriqu@epour :General ElectricCompang, Louisville,KY40225
1
82
Page 83

Notes.
¢3
83
fA
Page 84

Soutien au consommateur.
Site Web appareils dlectromdnagers GE www.electromenagersge.ca
Vousavez une question ou vousavez besoin d'aidepour votre appareil _lectrom_nager? Contactez-nous par
Internet au site www.electromenagersge.ca 24 heuresparjour, tous lesjours de I'ann6e.
Servicede rdparations
Servicede r@parationsGEesttout pr@sde vous.
Pourfaire r_parer votre _lectrom@nagerGE,il suffit de noust_l_phoner.
1.800.561.3344
Studio de conception rdaliste
Sur demande, GEpeut fournir une brochure sur I'am@nagementd'unecuisine pour les personnes _ mobilit_ r_duite.
Ecrivez: Directeur,Relationsavec lesconsommateurs, Mabe Canada Inc.
Bureau 3!0, ! Factors Lane
Moncton, N.B.E1C9M3
Prolongation de garantie www.electromenagersge.ca
Achetezun contrat d'entretien GEavant quevotre garantie n'expire et b@n@ficiezd'un rabais substantiel.
Ainsile serviceapr@s-venteGEsera toujours I_apr@sexpiration delagarantie.
Visitez notre site Web ou eppelez-nous au 1.888.261.2133.
Pi_ceset accessoires
Ceuxqui d@sirentr_parer eux-m_mes leurs@lectrom_nagerspeuvent recevoir pi@ceset accessoires
directement _ la maison (cartes VISA,iVlasterCardet Discoveraccept@es).
Lesdirectives stipul_es clans le present manuel peuvent _tre effectu_es par n'importe quel utilisateur.
Lesautres r_parations doivent g_n_ralement _tre effectu_es par un technicien quafifii Sogezprudent,
car une r_paration inadequate peut affecter lefonctionnement s_curitaire de I'appareiL
Voustrouverez dans lespagesjaunes de votre annuaire le num@odu Centredeservice Mabe le plusproche.
Autrement, appelez-nous au 1.800.661.1616.
84
Contoctez-nous
Sivous n'_tes pas satisfait du service apr@s-ventedont vous avez b_ndici_ :
Premi_rement, communiquez avec lesgens qui ont r@par@votreappareil.
Ensuite, si vous n'_testoujours pas satisfait envogeztousles d_tails-num@o de t_l_phone compris-au
Directeur,Relationsavec lesconsommateurs, Mabe Canada Inc.
Bureau 310, 1 Factors Lane
Moncton, N.B.EIC 9k13
"l Inscrivez votre apparei/ d/ectrom_nager www.electromenagersge.ca
communications et notre service apr_s-vente.Vous pouvez_galement nousenvoger par la poste
Inscrivez votre appereil _lectrom_neger en direct, eussit6t que possible. Celaam_liorera nos
le formulaire d'inscription joint 5 votre documentation.
Page 85

Informuci6n de seguridud ...... 86, 87
Instrucciones de operaci6n
C6mo reemplazar
las bombillas de luz....................... 98
Congelador ........................... 93,9a
Cuidadoy limpieza
del refrigerador ....................... 96, 97
Elfiltro de agua ....................... 89,90
Gavetaspreservadoras
y contenedores........................... 92
Loscontrolesdel refrigerador ............ 88
Losestantes y compartimientos
del refrigerador........................... 91
M6quina de hielo autom@ica ............ 95
Instrucciones de instuluci6n
c6mo invertir
el vaiv6n de la puerta
(Modelos de refrigerador
de una sola puerta Onicamente)... 107-110
C6mo reemplazar la gaveta
del congelador .......................... 108
C6mo retirar la gaveta
del congelador .......................... 105
C6mo retirar g volver a colocar
las puertas (Modelosde refrigerador
dedoble puerta 0nicamente) ..... 111-114
Instalaci6n de latuberia
del agua ........................... 115-117
Instalaci6n del refrigerador ........ 100-104
Preparaci6npara
instalar el refrigerador.................... 9g
5"
0
t_
O,
B
O,
Solucionar problemas ........ 118-121
Sonidos normales de la operaci6n ...... 118
Servicio u! consumidor
Garantia para consumidores
en los EstadosUnidos................... 122
Hoja de datos
defuncionamiento ................. 12B,12a
Servicioal consumidor .................. 127
Anote aqu[ los n4meros de modelo
g de serie:
No. de modelo
No. de serie
Usted los ver(i en una etiqueta en el interior
del compartimiento de refrigerador en
la parte superior en el lado derecho.
Q
tO
Q
0
o_
85
Page 86

INFORMACIONESIMPORTANTESDE SEGURIDAD.
LEA PRIMERO TODAS LAS INSTRUCCIONES.
iADVERTENCIA!
Use este aparato s61o para los fines que se describen en este Manual de/propietario.
PRECAUCIONESDE SEGURIDAD
Cuando use electrodom4sticos, siga las precauciones bdsicas de seguridad, incluyendo las siguientes:
Antes de usarse,este refrigerador deber6
estar instalado g ubicado de acuerdo con
las instruccionesde instalaci6n.
No permita que losnihos se suban, separen o
secuelguen de los charolas del refrigerador.Podrfa
daharse el refrigerador g causarlesserias lesiones.
No toque las superficiesfrfas del congelador
cuando tenga las manos h0medas o mojadas.
La piel sepodrfa adherir alas superficies
extremadamente frfas.
Noguarde ni usegasolinau otrosvapores
o Ifquidosinflamables cerca de este o cualquier
otto aparato.
,,Aleje los dedos fuera de las 6reos donde se puede
pinchor losdedos; losespocios entre lospuertas
g entre los puertas g losgobinetes son
necesoriamente estrechos. Cierrelos puertas
con cuidodo en Iopresencio de los nihos.
Sisu refrigerador tiene un dispositivoautom6tico
para hacer hielo, evite el contacto con las partes
m6viles del mecanismo de expulsi6n,o con
el elemento calefactor Iocalizadoen la parte inferior
del dispositivo para hacer hielo. No ponga los dedos
ni las manos en el mecanismo autom6tico para
hacer hielo mientras el refrigerador est@conectado.
Desconecteel refrigerador antes de limpiarlo
o efectuar reparaciones.
NOTA:Recomendamosenfdticamente encargar
cualquierservicio a un personalcalificado.
Elcolocar el control en posici6n Off(upugadoJ no
quita la corriente del circuito de la luz.
No vuelva a congelar losalimentos congelados
uno vezque sehogan descongelodo.
.4,iPELIGRO! RIESGO DE QUE
UN NINO PUEDA QUEDAR ATRAPADO
86
DESHACERSEDEBIDAMENTE DE SU REFRIGERADOR
Elatrapamiento g la sofocaci6n de los nihos no
son un problem(] del pasado. Los refrigeradores
abandonados son un peligro...aunquesea s61opar
"pocosdos." Sisedeshace de su viejo refrigerador,
par favor siga los instruccionesabojo pora agudornos
a prevenir alg0n accidente.
Antes de deshucerse de su viejo
refrigerudor o congelador:
Quite las puertas.
Dejelos entrepahos en su sitio para que losnihos
no se suban.
Refrigerantes
Todoslosaparatos de refrigeraci6n contienen
refrigerantes, loscualessedeben retirar antes de
la eliminaci6n del producto de acuerdo con la leg
federal. Siva a desechar alg0n aparato antigua
de refrigeraci6n, consulte con la compahfa a cargo
de desechar elaparato para saberqu_ hacer.
USO DE CABLESDE EXTENSION
Debido a los accidentes potenciales que pudieran ocurrir bajo determinadas condiciones,
se recomienda estrictamente no usar cables de extensi6n.
Sinembargo, si decidiera usarlos,es absolutamente necesarioque sea del tipo ULtrifilar para aparatos
g cuente con una clavija con conexi6n atierra g que el cable el_ctricosea de 15 amperios (mfnimo)
g 120voltios.
Page 87

GEAppliances.com
iADVERTENCIA!
COMO CONECTARLA ELECTRICIDAD
Bajo ninguna cimunstancia debe cortar o quitar la tercem punta (tierra) de la clavija. Pare su seguridad
personal, este aparato deberd conectarse debidamente a tierra.
Elcable el_ctrico de este aparato est6 equipado
con una clavijade tres puntas(tierra)que enchufa en
un contacto est6ndar de pared de tres salidas(tierra)
para reducir al mfnimo la posibilidad de dahos par
un choque el_ctrico con este aparato.
Haga que un electricista calificado verifique
el enchufe de la pared g el circuito para asegurarse
que la salida est_ conectada debidamente a tierra.
Dondesedispongas61ode un contacto de pared con
salidapara dospuntas,essu responsabilidadpersonal
g suobligaci6nreemplazarloparun contacto adecuado
para tres puntas con conexi6na tierra.
Elrefrigerador deber(i conectarse siempre en
su propio contacto el#ctrico individual que tenga
un voltaje que vaga de acuerdo con latabla de
clasificaci6n.
Estogarantiza la mejor ejecuci6n g evita
la sobrecarga del circuito el@ctricode la casa
y losdanos a causa del sobrecalentamiento
de los cables.
Nunca desconecte el refrigeradorjalando el cable.
Tomesiempre firmemente la clavija g sciquela
del contacto sin doblarla.
Repareo reemplace inmediatamente todos los cables
el#ctricos de servicioque se hagan desgastado o
dahado en alguna otra forma. No utilice cables que
muestren roturas o dahos par abrasi6n a Iolargo
de #ste ni enla clavija o enalguno de sus extremos.
AIalejar su refrigerador de la pared,cuide que
no pase sabre el cableo Io dahe.
FAVORDE LEERYSEGUIRCUIDADOSAMENTE
LAS PRECAUCIONESDE SEGURIDAD.
GUARDE ESTAS INSTRUCCIONES
87
Page 88

Los controles con niveles de temperatures.
i oisoff o is off
_ Adjust F...... _oldeF_ Q _irme_ _older_ Q _irmer_
9isColdest 9isColdest
(enalgunos modelog
0 is Off
k A#j.j;;rtt@r
(en algunos modelos)
__sColdest
o isoff
(en algunos modelos)
9 is Coldest
AdJust Refrigerator j
®
Adjust Refrigerotor
Temperoture
Tu bocoo
9 is Coldest /
OisOff
NOTA: El refrigerador se envla con una pelicula de proteccidn que cubre los controles
digitalede la temperature. Siesta pelicula no se retir6 durante la instalacidn, hdgalo ahora.
Inicialmente, configure el control del refrigerador en 5 blel control del congelador en 5.
Deje pasar 24 horas para que la temperatura se estabilice. Pueden requerirse ratios
ajustes. Ajuste los contmles subiendo una unidad pot vez bl deje pasar 24 horas
despuds de cada ajuste para que el refrigerador alcance la temperatura que usted
ha configurado.
Si se configura alguno de los dos controles o ambos contmles en 0 para digital
bl en 0 para la perilla de control del refrigerador se detiene la refrigeraci6n en los
compartimentos del refrigerador btdel congelador, peru no se corta la energla eldctrica
hacia el refrigerador.
88
Page 89

E!filtro de agua. (en modelos 20 Onicamente) GEAp lionces.com
Cartucho del filtro
Elcartucho del filtro deagua est6 ubicado
en la esquina superior derecha trosera
del compartimento del refrigerodor.
Reemplazar el filtro
Elcartucho del filtro debecambiarse cuando
disminuge el flujo de agua hacia la m6quina
de hielo,ocoda seis meses.
Instalar el cartucho del filtro
Siest6 reemplazando el cartucho,
0
primero retireel anterior. Abro Iotopa
del cartucho presionando la pestaBa
al frente g halando hacia abajo.
0 Retireel cartucho rot6ndolo lentomente
en contra del sentido de lasogujas del
reloj.Esposibleque caiga una peque_a
contidad de ogua.
J
PRECAUCiON: Sise
ha quedodo aire atropado en e!sistema,
e!cartucho de!filtm podfia set expulsado
conforme esremovido.Useprecauci6n
cuando !o remueva.
Tap6n de derivaci6n del filtro
Sedebe usar el tap6n de derivaci6n
del filtro cuando un cartucho de filtro de
reemplazomiento no se puede encontror.
Eldispensador g eldispositivo para hacer
hielo no pueden funcionar sin elfiltro
o sin eltap6n de derivaci6n del filtro.
Filtros de recambio:
Para pedir cartuchos adicionales
en los Estados Unidos, visite nuestro sitio
Web, GEAppliances.com, o Ilame a GEpara
partes g accesorios a1800.626.2002.
Modelo de filtro GSWF
Retireel papel de oluminio protector
del extremo del cortucho.
Alinee la flecha del cartucho
g el soporte del cortucho, lentomente
rote el cortucho en sentido de
las agujasdel reloj hasta que pare.
Cuando el cortucho est6 instalado
opropiadamente, usted siente un "clic"
cuando encoja en su lugar.Lomonija
en el extremo del cartucho deberfa estor
colocada verticalmente. No Io upriete
demusiudo.
Cierrela topa del cortucho.
89
Page 90

E! fi#tro de.agua. lenmodelos 22 bt25 Onicamente)
, ii
Cartucho del filtro
Elcartucho del filtro deagua est6 ubicado
en la esquina superior derecha trosera
del compartimento del refrigerodor.
Reemplazar el filtro
Elcartucho del filtro debecambiarse cuando
disminuge el flujo de agua hacia la m6quina
de hielo,ocoda seis meses.
Instular el cartucho del filtro
O Siest6 reemplazondoel cortucho,
primero retireel anterio gir6ndolo hacia
la izquierda lentomente. NO tire del
cortucho hacia abajo. Puedeperder
un poco de agua.
J
PRECAUCiON: Si eho
quedado aire atrapado ene!sistema,e!
cartucho de! filtro podfia set expu!sado
conforme esremovido.Useprecauci6n
cuando !o remueva.
Retireel papel de oluminio protector
del extremo del cortucho.
Tap6n de derivaci6n del filtro
Sedebe usar el tap6n de derivaci6n
del filtro cuando un cartucho de filtro de
reemplazomiento no se puede encontror.
Eldispensador g eldispositivo para hacer
hielo no pueden funcionar sin elfiltro
o sin eltap6n de derivaci6n del filtro.
Filtros de recambio:
Para pedir cartuchos adicionales
en los Estados Unidos, visite nuestro sitio
Web, GEAppliances.com, o Ilame a GEpara
partes g accesorios a1800.626.2002.
Modelo de filtro MWF
Lleneelcartucho de reemplazo con agua
de la canilla para permitir un mejor flujo
de la m6quina de hacer hielo.
Alinee la flecha del cartucho g el soporte
del cortucho, lentomente rote el cortucho
en sentido de las agujasdel reloj hasto
que pare. Cuandoel cortucho est6
instolado opropiadamente, usted siente
un "clic" cuando encaja en su lugar.No Io
apriete demasiado.
90
Page 91

Sobre los estantes y compartimientos. GEApUiunces.com
No todas las caracteristicas estdn presentes en redes los mode/os.
Reorganizaci6n de los estantes
Los estantes en el compartimiento del refrigerador son ajustables.
Compartimiento de! refrigerador
Pure quiter:
0 Quite todos los elementos del estante.
Inclineel estante en la parte del frente.
Levanteel estante hacia arriba
Algunos modules tienen estantes
con cable que pueden ajustarse de
la misma manera.
en la parte de atr6s y saque el estante.
Para reemplazarlo:
Mientrasinclina el estante hacia arriba,
,nserteel gancho superior en la parte
posterior del estante en la ranura
de la corredera.
Bajeel frente del estante hasta que
la parte inferior del estante se ajuste
en su lugar.
Estuntes no ujustubles en lu puertu
Pure retirurlos: Levante el estante recto g
luego h@lelo.
Pure reempluzurlos: Inserte el estante en los
soportes moldeados en la puerta g empuje
hacia abajo. Estese ajustar6 en su lugar.
91
Page 92

Sobre las gavetas preservadoras y contenedores.
No todas las caracteristicas estdn presentes en todos los modelos.
Gevete preservedore de frutes y vegetules
Elexcesode agua que pueda acumularse
al fondo de las gavetas debe retirarse
y sedeben limpiar lasgavetas.
Gevete preservadora de humeded ejusteble (enalgunos moddos)
Desliceel control completamente hasta
la posici6n HIGH(alto)para ofrecer la alta
humedad recomendada pare la mayoria
de losvegetales.
Contenedor pure Dell (enalgunos moddos)
Estecontenedor puede moverse a la
ubicaci6n m6s Otil pare las necesidades
de sufamilia.
Lleveel control per complete hasta
la posici6n LOW (bajo)pare ofrecer losniveles
bajos de humedad recomendados pare
la mayorfa de las frutas.
Peru retirerlo: Desliceelcontenedor hacia
fuera haste la posici6n de freno, levante el
contenedor y pase la posici6n de freno y
levcintela.
92
Page 93

Sobre la gaveta del congelador, tenolgunosmodelos) GEAppliances.com
No todas las caractefisticas estdn presentes en todos los modelos.
Estantes g canastas del congelador
NOTA:No Ilenelascanastas m6sall6 del
borde de la canasta. Estopuede provocar
que las canastas se traben o bloqueen
cuando seabren o cierran.
Cuando vuelva a colocar la canasta
profunda de ancho completo:
Inclinela canasta hacia atr6s g desci@ndala
en el caj6n. Girela canasta a la posici6n
horizontal y presi6nela hacia abajo dentro
de las roleng0etas de alineaci6n.
NOTA:Siempreverifique que la canasta
est@bien colocada en las 6 leng0etas
del soporte deslizadorantes de deslizarlo
dentro del congelador.La canasta puede
girarse en cualquier direcci6n delfrente
hacia atr6s e instalarse en el congelador.
Elaspecto g las caracteristicas
pueden variar
Elaspecto puede variar
Unestante par encima del recipente
para hielo
O Una canasta de ancho media
Unacanasta profunda de ancho
completo
Retiro de la canasta
Para retirar la canasta profunda de ancho
completo en los modelos con gaveta
de!congelador:
Abra la gaveta del congelador hasta
que pare.
La canasta del congelador se apoga
sabre las leng0etas internas de
los deslizadores del caj6n.
Levante la canasta para liberarla
de las roleng0etas del soporte deslizador.
O Incline la canasta g s6quelodel caj6n.
\
\
Elaspecto puede variar
Para retirar la canasta de ancho media:
Halela canasta hacia fuera hasta
el punto del freno.
Levante la canasta desde el frente
para liberarla de las trabas ubicadas
a cada lado.
Levante la canasta para quitarla de los
lados.
AIreemplazar la canasta, asegOrese de que
la canasta quede bajo lastrabas ubicadas a
cada lado.
NOTA:Siemprecerci6rese de cerrar
completamente la canasta.
93
Page 94

Sabre la compartimiento del congelador, o guno moddos)
No todas las caracteristicas estdn presentes en todos los modelos.
Estante g canasta de! congelador
NOTA:No Ilenelacanasta m6s all6 del Ifmite
del borde. Estopuede provocar que la
canasta setrabe o bloquee cuando seabre
o cierra.
Cuando vuelva a colocar la canasta
dedizable de alambre de ancho completo"
Introduzca la canasta de alambre dentro de
los rielesinferiores g empuje hasta colocar
en su lugar.
Cuando vuelva a colocar el estante
deslizable de alambre de ancho completo:
Introduzca el estante de alambre dentro de
los deles superiores g empuje hasta colocar
en su lugar.
B@ ; s_;:!L_;'?;',.'.............
_9
0 Unestante fijo de alambre de ancho
completo
0 Unacanasta deslizablede alambre de
ancho completo
Retiro de la canasta
Para quitar la canasta deslizable de
alambre de ancho completo en los modelos
con puerta:
Abra la canasta en su extensi6n total.
Levante la parte frontal dela canasta g
tire hacia afuera para quitarla.
Remoci6n de! estante fijo
NOTA"Elestante de alambre de ancho
completo no est6 diseBado para deslizarse.
C6mo quitarlo para Iimpiarlo.
Sostenga elestante desdeel frente g tire del
mismo confirmeza hacia adelante.
Toremove
To replace
94
Estante no ajustable de la puerta del congelador
Para retirarlos: Levanteelestante recto g
luego h61elo.
Para reemplazarlos" Inserteel estante en los
soportes moldeados en la puerto g empuje
hacia abajo. Estese ajustar6 ensu lugar.
Page 95

Sabre la m6quina de hielo autom6tica, c .olgu.o mode/as)GEAppliances.com
Un refrigerador recientemente instalado puede tamer entre J2 _t24 hares pare empezar ahacer hielo.
Interrupterdecarriente M_quina
\ dehielos
i "
ta corriente
M_quina de hielo autom_tica
La m6quina de hielos producir6 siete
cubes par ciclo, aproximadamente
entre 100 g 1]0 cubes en un periodo de
24 hares, dependiendo de la temperature
del compartimiento del congelador, la
temperature del cuarto, el nOmero de
veces qua se abre la puerta Uotras
condiciones de usa.
Vea m6s abajo para la forma de alcanzar
el hielo y el interrupter el6ctrico.
Si el refrigerador se opera antes de hacer
la conexi6n del agua hacia la m6quina de
hielo, fije el interrupter de corriente en la
posici6n 0 (apagadoL
Cuando se haga conectado el refrigerador
al suministro de agua, fije el interrupter
de corriente en la posici6n I (encendidoL
La luz de encendido del dispositivo de
hacer hielo sere1de color verde cuando
el interrupter de la luz del congelador est6
pulsado o cuando la puerta del congelador
se encuentre cerrada.
La mciquina de hielos se Ilenarci de agua
cuando se enfrfe a -10°C (15°F).Un
refrigerador reci6n instalado se puede
tamer entre 12 y 24 hares pare empezar
a hacer cubes de hielo. Escucharci un
zumbido cada vez qua la mciquina de
hielos se liana de agua.
Deseche los primates cubes de hielo pare
permitir qua la Ifnea del agua se limpie.
AsegOrese de qua nada interfiera con
el movimiento del braze indicador.
Cuando el contenedor se liana al nivel
del braze indicador, la mciquina de hielos
dejarci de producir hielos. Es normal qua
varies cubes de hielo sejunten.
Si el hielo no se usa con frecuencia, los
cubes de hielo viejo se volvercin turbios,
con saber rancio y se encogercin.
NOTA:En hogares con presi6n de agua
inferior a! promedio, es posible qua escuche
e! ciclo de !a mdquina de hie!as varies
veces a! hacer un !ate de hie!o.
NOTA:Configure e! interrupter de energfa
en la posici6n 0 (apagadol si e! suministro
de agua estd apagado.
[
Pare alcanzar el interrupter el4ctrico.
C6mo alcanzar el hielo
g el interruptor el6ctrico
Para alcanzar el interruptor el6ctrico
de la m6quina de hielos, hale el estante
par encima del recipiente pare hielo
directamente hacia fuera. Siempre
cerci6rese de reemplazar el estante.
Pare alcanzar el hielo, simplemente hale
el recipiente hacia delante.
Pare alcanzar el hielo
Kit de accesorios de la m(Tquina de hielos
Sisu refrigerador no viene ga equipado Reviseen la parte posterior del
con una m6quina de hielos autom6tica, refrigerador en busca del kit pare
existe un kit accesorio pare la m6quina la m6quina de hielos espedfica qua
de hielos qua est6 disponible par un costa necesita para su modelo.
adicional.
95
Page 96

Cuidado y limpieza de! refrigerador.
Limpiar el exterior
Lasmanijas de la puerta y los ornamentos.
Selimpian con un patio humedecido con
una soluci6n de detergente suave g agua.
Sequecon un patio suave.No usecera
en las manijas de lapuerta ni en
losornamentos.
Mantenga limpio el terminado.
Limpiecon un patio limpio ligeramente
humedecido con cera para aparatos
de cocina o un detergente suave g agua.
Sequeg pula con un patio limpio g suave.
Nolimpie e! refrigemdor con un paho
sucio pare tmstes ni con un pa_o hOmedo.
Estospodrfan dejar residuosque afecten
a la pintum. Nouseestropajos,limpiadores
enpolvo, blanqueadoresni limpiadores
que contengan blanqueador,9a que estos
productos podrfan mgar g desprender
e!acabado de pintum.
Limpier el interior
Para evitar olores, deje una caja
abierta de bicarbonato de sodio
en loscompartimientos del refrigerador
g del congelador.
Desconecte el refrigerador antes
de fimpiarlo. Sino fuera posible,exprima
el excesodehumedad de la esponja o del
patio cuando se limpie alrededor debotones,
bombillas o controles.
Use cera para electrodom_sticos
en el interior entre las puertas.
Useagua caliente g una soluci6n de
bicarbonato de sodio-aproximadamente
una cucharada (!S ml) de bicarbonato
de sodio par cada cuarto (! litro)de agua.
Estasoluci6n limpia g neutraliza olores.
Enjuague g seque.
Lospaneles y las manijas de las puertas
de acero inoxidable. Acero inoxidable
(enalgunos modelos)pueden set limpiados
con un limpiador para acero inoxidable
para usos comerciales.
No utilice cera para electrodom@sticos
sabre el acero inoxidable.
Despu_sde limpiar los sellosmagn_ticos
de las puertas,aplique una capa delgada
de vaselina del lado de la bisagra. Estoaguda
a evitar que lossellosmagn_ticos sedoblen
o se peguen.
Evitelimpiar losestantesde vidrio frfoscon
agua caliente,ya que la extrema diferencia
de temperature puede hacer que se quiebren.
Manejelos estantesde vidrio concuidado.
Chocarvidrio templado puede hacer que
semmpe enpedazos.
No lavepartes pldsticasde!refrigerodor
en e!lavaplatos.
96
Page 97

Arras del refrigerador
Sedeber6 tener cuidado al retirar
el refrigeradorde la pared.Todos lostipos
de recubrimiento de pisos se pueden da_ar,
sabretodo los recubrimientos acojinados
g losque tienen superficies repujadas.
Elevelas patas niveladoras ubicadas
en la porte inferior frontal delrefrigerador.
Haleel refrigerador enforma recta g empuje
nuevamente para devolverloa su posici6n.
Mover el refrigerador
Preparaci6n para vacaciones
Enel caso de vacaciones o ausencias
prolongadas, quite losalimentos
g desenchufe el refrigerador. Limpie
el interior con soluci6n de bicarbonato
de una cucharada (15 ml)de bicarbonato
pot un cuarto (1 litro)de agua. Dejeabiertas
laspuertas.
Coloqueel interruptor de alimentaci6n
el_ctrica de la m6quina de hielo
en la posici6n 0 (upugudo) g cierre
el suministro de agua al refrigerador.
GEAppliances.com
en direcci6n lateral puede causar dahos
al recubrimiento del piso o al refrigerador.
Baje laspatas niveladoras hasta que toquen
el piso.
A!empujar e!reffigemdor a su lugar,
asegOresede no pasar sabree! cable
e!_ctficonisabre !a linea de alimentaci6n
de la mdquina de hie!as(enalgunos mode!og.
Sila temperatura pueda Ilegaral punto
de congelaci6n,haga una persona calificada
para desaguar el sistema del suministro
de agua para evitar danos a la propiedad
causados pot inundaci6n.
En caso de mudanza
Aseguretodos los elementos sueltos coma
parrilla de la base,entrepa_os g recipientes
peg6ndolos con cinta adhesiva en su lugar
para evitar dahos.
AIusar una carretilla para mover
el refrigerador,no haga descansar la parte
frontal o trasera del refrigerador contra
la carretilla. Estopodrfada_ar el refrigerador.
Man_jelos61odesdelos laterales del
refrigerador.
AsegOresede que e!refrigemdor seco!oque
en posid6n vertica! dumnte lamudanza.
97
Page 98

C6mo reemplazar las bombillas.
Girar el control a/a posici6n Off (apagado) no e/imina /a corriente en el circuito de/uces.
Luces del refrigerador
Elaspecto puede variar
PRECAUCION:
Las bombi!las podrfan estar calientes.
Desconecteel refrigerador.
0
Pararetirar el protector de la luz,tome
0
el protector por la parte posterior g hale
hacia fuera para liberar las pestahas
en la parte posterior.
0 Roteel protector hacia abajo g luego
hacia delante para liberar laspesta_as
al frente del protector.
Luz del congelador
PRECAUCiON:
Losbombi!!ospodrfon estar colientes.
Desconecteel refrigerador.
0
La bombilla est6 ubicada en la parte
0
superior del compartimiento del
congelador al interior de un protector
para la luz.Pararetirar el protector,
tome el protector por la parte posterior
g hale hacia fuera para liberar
laspestaBas en la parte posterior.
Despu_sde reemplazarlo con
una bombilla de electrodom_sticos
del mismo o de inferior voltaje,reemplace
el protector.
0 Conecte de nuevo el refrigerador.
NOTA:Lasbombillas del artefacto pueden
solicitarse en PiezasgAccesorios de GE,
800.626.2002.
Despu@sde reemplazarlo con
una bombilla de electrodom@sticos
del mismo o de inferior voltaje,reemplace
el protector.
Conecte de nuevo el refrigerador.
Roteel protector hacia abajo g luego
hacia delante para liberar laspesta_as
al frente del protector.
98
Page 99

IIstruccion
Refrigeraor
Instalaci6n
l 2.Preguntas? Llame al 800.GE.CARES{800.432.2737) o bien Visite nuestra p6gina Web: GEAppliances.com 1
ANTES DE INICIAR
Lea estas instrucdones completag cuidadosamente.
HERRAMIENTAS QUE
USTED PUEDE NECESITAR
Modelos20,22g 23
IMPORTANTE- Guardeestasinstrucciones
poro uso del inspector local.
• IMPORTANTE- Observetodos losc6digos
g 6rdenesde leg.
• Nota al instalador- AsegOresede dejor estos
instruccionescon el consumidor.
• Nota al consumidor- Conserveestas instrucciones
para referenciafutura.
• Nivel de destreza - La instalaci6n de esteaparato
requierede destrezasmec6nicas b6sicas.
• Tiempo de ejecuci6n - Instalaci6ndel refrigerador
20 minutos
Llave ajustable de 3/8" g de 5/16"
Tuerca de compresi6n
de 1/4" g f@ula (manga)
(modelos con m6quina
de hielos solamente)
Destornillador de casquillo
Destornillador Phillips
Instalaci6n de la Ifneade agua
30 minutos
La instalaci6napropiada esla responsabilidad
del instalador.
Lafalla del producto debido a una instalaci6n
inadecuada no est6 cubierta porla garantfa.
PREPARACI6N
C6MO MOVER EL REFRIGERADORAL INTERIOR
Siel refrigerador no entra por una puerta, sepueden
retirar la puerta del refrigerador g lagaveta del
congelador.
• Pararetirar la puerto del refrigerador,consulte el Paso1
en la secci6n COmoinvertir el voiv_nde !opuerto.
• Pararetirar la gaveta del congelador,consultela secci6n
COmoretimr Iogovetode!conge!odor.
SUMINISTRODEAGUAHACIALAMAQUINADEHIELOS
YELDISPENSADOR(ENALGUNOSMODELOS)
Siel refrigerador tiene una m6quina de hielos,setendr6
que conectar a una tuber[a de agua potable fr[a. Un kit
de suministrode aguo (contienetuber[a, v61vulade cierre,
accesorios e instrucciones)est6 disponiblecon un costo
adicionol a trav6s de su proveedor,visitando nuestra p6gino
Web GEAppliances.como bien o trov6s de Portesg
Accesorios,800.626.2002.
i 1/8" g 3/16"
Broca de perforadora
de 1/8" g perforadora
el@ctricao de mano
'q_"Z }})_)
L6piz
Pinza corta alambres
Llaves Allen de 3/32",
Cinta m@trica
Llave de tuercas de 1/4"
Nivel
99
Page 100

J
NSTALACION DEL REFRIGERADOR
UBICACI6N DEL REFRIGERADOR
• Noinstaleelrefrigeradordondelatemperaturebajede60°F
(16°@ya quenocarter6consuficientefrecuenciaparemantener
lostemperaturesapropiadas.
• Noinstaleelrefrigeradordondelatemperaturesubaparencima
de100°F(37°@yaquenofuncionar6correctamente.
• Inst61eloenunpisofuerteparequeIosoporteconcargo
complete.
ESPACIO LIBRE
Permitaelsiguienteespaciopareunaf6cilinstalaci6n,apropiada
circulaci6ndelaireyconexionesdeplomeriay el6ctricas:
Costados 1/8" (3mm)
Arriba r' (25mm)
Atr6s r' (25mm)
Modelos de
profundidud
est6ndar
RETIRODELA TAPASUPERIOR
(en algunos modelos}
• NOTAIMPORTANTE:Esterefdgemdortieneuna profundidad
i
de 34/2pulgadas.Laspuertasg lospasillosquellevan
ala ubicaci6ndela instalad6ndebentenetunanchode
parIomenos36pulgadasparedejarlospuertasg losmanijas
conectadasal refrigeradormientras_stesetransporta
a la ubicad6n de la instalaci6n. Silospasillos tiene menos
que 36 pulgadas, las puertas g las manijas del refdgerador
se pueden rager g debar con fadlidad. Se pueden retirar
latape superior glas puertas pare permitir eltraslado seguro
del refrigerador al interior.Empiece con el Paso A.
• Omitael PasoAsinosenecesitaretirar laspuertas.
Dejeladnta gtodo el embalaje en las puertas haste
que el refrigerador se encuentre en su destine final.
• REMOCI6NDELACORREDERA:Inclineel refrigerador hacia
ambos lades pare retirar la corredera.
• NOTA:Utiliceuna carretilla de mane almohadillada pare
trasladar el refrigerudor. Coloqueel refrigerador en la carretilla
de mane con un costado centre la carretilla. Recomendamos
fuertemente que DOSPERSONAStrasladen g completen
lainstalad6n.
r_ LocalicegretirelosdostornillosdecabezaPhillipsenlaporte
superiordelrefrigerador.Retirelosdostornillosencodaladeen
laporteposteriordelatapesuperior.Despegueg retirelatape
superior.
r_ Retirela(s)puerto(s)delacomidafresco.ConsultelosPesos1g
3 enla secci6ntitulada"C6moinvertirelvai@ndelapuerto"o
losPesosI g 2enlasecci6ntitulada"C6moretirarlospuertas".
[] Retirelagavetaola puertodelcongeladorinferior.Consulte
lasecci6ntitulada"C6moretirarla gavetadelcongelador"o
losPesos2enlasecci6ntitulada"C6moinvertirelvai@nde
lapuerto'.
r_ Trasladeelrefrigeradorala ubicaci6ndelainstalaci6n.
RETIRODELA TAPASUPERIOR(cont.)
(en algunos modelos)
REINSTALACI6NDE LASPUERTAS,GAVETASY
LATAM SUPERIOR
r_ Bajela(s)puerto(s)cuidadosamenteala bisagra(s)central.
Reinstalela(s)bisagra(s)superior.NOTA:Cerci6resequela
puertaseencuentrealineadaapropiadamenteconlaporte
superiordelatapepareevitarelreajustedelapuertodurante
lareinstalaci6ndelatapesuperior.
r_ Coloquelatapesabrela portesuperiordelrefrigerador.
Reinstalelostornillosoriginalesenlaportesuperior
g latraseradelatape.
r_Reinstale lagavetainferiordelcongelador.Consultelasecci6n
titulada"C6moreemplazarlagavetadelcongelador"o los
Pesos2 enlasecci6ntitulada"C6moinvertirelvai@nde
lapuerto".
A
Bisagra
_ _ superiorB
rE] C6MQ CONECTARELREFRIGERADOR
A LALINEADEAGUADELACASA
(losmodelos de m(_quinasde hielo)
Serequiereunsuministrodeaguefriaparelaoperaci6n
dela m6quinadehielos.Sinoexisteunsuministrodeague
fria,ustednecesitar6haceruno.Verlasecci6nInstalaci6n
delatuberiadeague.
NOTAS:
•Antesdehacerlaconexi6n,cerci6resedequeelcable
el6ctricodelrefrigeradornoest6conectadoalinterrupter
delapared.
•Siel refrigeradornotieneunfiltrodeague,recomendamos
queinstaleunosisusuministrodeaguetienearenao
particulasquepudieranobstruirlapantalladelav61vula
deaguedelrefrigerador.Inst61eloenlaIineadeaguecerca
delrefrigerador.Siustedest6usandounkitdetuberia
derefrigeraci6n6ESmartConnect?ustednecesitar6
unatuberiaadicional(WXO8X10002)pareconectar
elfiltro.Nocartetuberiaspl6sticaspareinstalarelfiltro.
j'_ Siustedest6usandotuberiadecobra,coloqueunatuerca
decompresi6ngunaf@ula(mange)enelextremede
latuberiaquevienedelsuministrodeaguefriadelacase.
SiseencuentrausandotubedasdeGESmartConnect["
lostuercasest6ngaensambladasalatuberia.
leo
 Loading...