

GE G008 Owner's Manual

GEAppliances.com
Safety Instructions ..........2, 3
Operating Instructions
Appliance Communication ....... 12
Care and Cleaning
of the Washer .................... 13
Features .........................7-9
Loading and Using
the Washer ...................... 11
Operating instructions ..........4–6
Special Features ..................10
Troubleshooting Tips .....14–16
Consumer Support
Consumer Support ................18
Parts and Accessories. . . . . . . . . . .3, 18
Warranty ..........................17
Owner’s Manual
As an ENERGY STAR® partner,
GE has determined that this
product meets the ENERGY STAR®
guidelines for energy efficiency.
Write the model and serial
numbers here:
Model # _____________
Washers
Printed in the United States
Serial # ______________
You can find
them under
the lid of the
washer.
G008
49-90489-1 05-13 GE
IMPORTANT SAFETY INFORMATION.
READ ALL INSTRUCTIONS BEFORE USING.
This is the safety alert symbol. This symbol alerts you to potential hazards that can kill you or hurt you and others. All safety
messages will follow the safety alert symbol and the word “DANGER”, “WARNING”, or “CAUTION”. These words are defined as:
DANGER
WARNING
CAUTION
Indicates a hazardous situation which, if not avoided, will result in death or serious injury.
Indicates a hazardous situation which, if not avoided, could result in death or serious injury.
Indicates a hazardous situation which, if not avoided, could result in minor or moderate injury.
IMPORTANT SAFETY INSTRUCTIONS
WARNING
Read all instructions before using the appliance.
DO NOT wash or dry articles that have been previously cleaned in, washed in, soaked in or spotted with gasoline, dry-
cleaning solvents, or other flammable or explosive substances, as they give off vapors that could ignite or explode.
DO NOT add gasoline, dry-cleaning solvents, or other flammable or explosive substances to the wash water. These
substances give off vapors that could ignite or explode.
Under certain conditions, hydrogen gas may be produced in a hot-water system that has not been used for 2 weeks
or more. HYDROGEN GAS IS EXPLOSIVE. If the hot water system has not been used for such a period, before using a
washing machine, turn on all hot-water faucets and let the water flow from each for several minutes. This will release
any accumulated hydrogen gas. As the gas is flammable, DO NOT smoke or use an open flame during this time.
DO NOT allow children to play on or in this appliance. Close supervision of children is necessary when this appliance is
used near children. Before the washer is removed from service or discarded, remove the door or lid. Failure to follow
these instructions may result in death or injury to persons.
To reduce the risk of death, fire, explosion, electric shock, or injury to persons when using your appliance,
follow basic precautions, including the following:
DO NOT reach into the appliance if the tub or agitator is moving to prevent accidental entanglement.
DO NOT install or store this appliance where it will be exposed to the weather.
DO NOT tamper with controls, repair or replace any part of this appliance or attempt any servicing unless specifically
recommended in the user maintenance instructions or in published user repair instructions that you understand and
have the skills to carry out.
Keep the area around your appliance clean and dry to reduce the possibility of slipping.
DO NOT operate this appliance if it is damaged, malfunctioning, partially disassembled, or has missing or broken parts
including a damaged cord or plug.
Unplug the appliance or turn off the circuit breaker before servicing. Pressing the Power button DOES NOT disconnect power.
See “Electrical Requirements” located in the Installation Instructions for grounding instructions.
SAVE THESE INSTRUCTIONS
2
GEAppliances.com
PROPER INSTALLATION
This washer must be properly installed and located in accordance with the Installation Instructions before it is used.
If you did not receive an Installation Instructions, you can receive one by visiting GEAppliances.com or by calling
800.GE.CARES (800.432.2737).
Ensure that the hot water hose is connected to the “H”
(internal red screened) valve and the cold water hose is
connected to the “C” (internal blue screened) valve.
Install or store where it will not be exposed to
temperatures below freezing or exposed to the weather,
which could cause permanent damage and invalidate the
warranty.
Properly ground washer to conform with all
governing codes and ordinances. Follow details
in Installation Instructions.
WARNING
Plug into a grounded 3 prong outlet.
DO NOT remove ground prong.
DO NOT use an adapter.
DO NOT use an extension cord.
Failure to do so can result in death, fire or electrical
shock.
- Electrical Shock Hazard
Optional drain hose extension recommended for
discharging heights from 60” - 96”.
This washer does not include water supply hoses.
GE strongly recommends the use of factory specified
parts. A list of factory hoses available for purchase are
listed. These hoses are manufactured and tested to meet
GE specifications.
GE strongly recommends the use of new water supply
hoses. Hoses degrade over time and need to be replaced
every 5 years to reduce the risk of hose failures and water
damage.
Parts and Accessories
Order on-line at GEApplianceparts.com today, 24 hours a
day or by phone at 800.626.2002 during normal business
hours.
Part Number Accessory
PM14X10002 4 ft Rubber Water Supply Hoses
Or
PM14X10005 4 ft Braided Water Supply Hoses
FUNCTIONALITY CHECK
¥
If the lid is opened between cycles (i.e. not pausing and
restarting the current cycle, changing cycles after it
started, etc.) pushing the Start button will cause the
washer to turn on the cold water for 5 seconds followed
by a 10 second delay before locking the lid and starting
the cycle.
WHEN NOT IN USE
Turn off water faucets to minimize leakage if a break or
rupture should occur. Check the condition of the fill hoses;
GE recommends changing the hoses every 5 years.
WH49X301 Drain Hose Extension
WX10X10011 Tide
WX7X1 Washer Floor Tray
DR07X10005 6’ Cable
If the lid is opened during this 15 second period, the word
PAUSE will start scrolling across its display. You will have
to push the Start button again to restart the cycle.
®
Washing Machine Cleaner*
* Tide® is a registered trademark of Procter & Gamble
SAVE THESE INSTRUCTIONS
3
Operating instructions.
Throughout this manual, features and appearance may vary from your model.
Step 1
Step 2
Step 3
Step 4
• Add fabric softener to the fabric
softener dispenser; see page 7.
• Add detergent. GE recommends
the use of High Efficiency
detergents in all Energy
Star-rated washers.
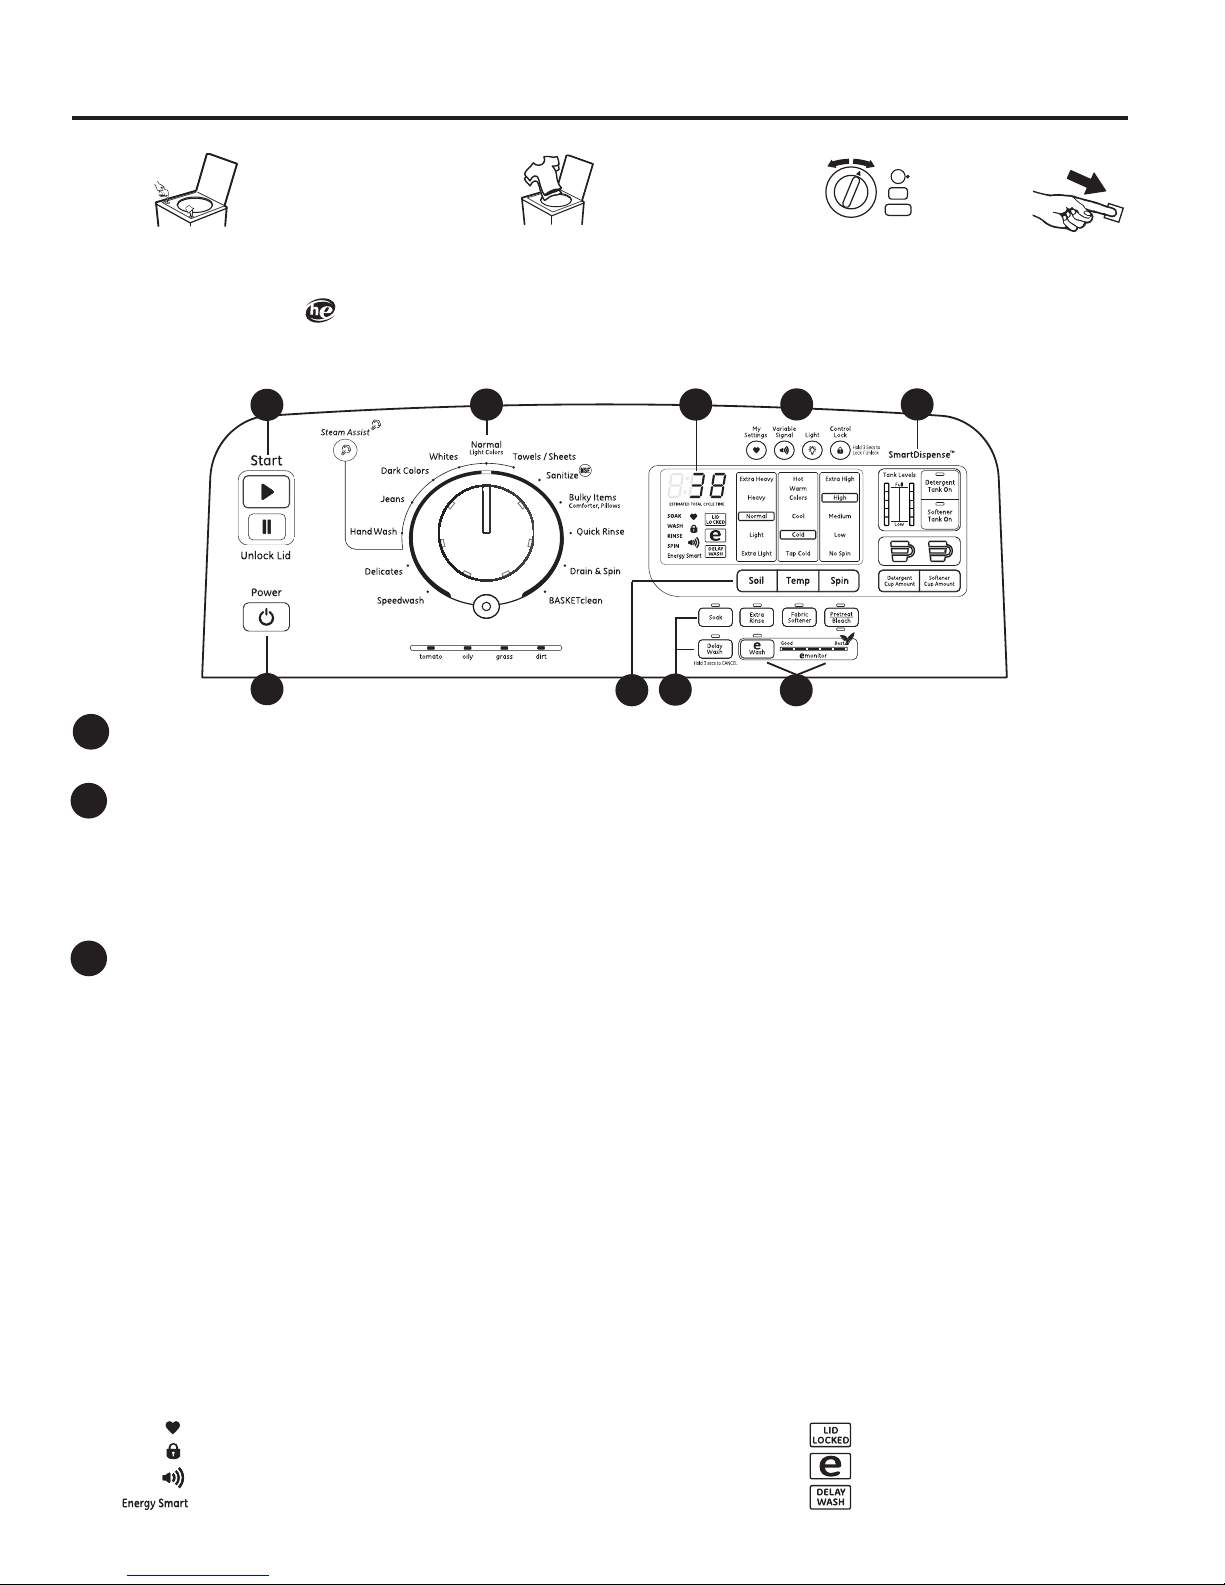
Controls
B
A
Power
A
Press to “wake up” the display. If the display is active, press to put the washer into idle mode.
NOTE: Pressing POWER does not disconnect the appliance from the power supply.
Start and Unlock Lid
B
Press Start to begin the cycle. NOTE: The lid must be closed for the washer to fill and the cycle to start. If the lid is open, “LID” will scroll across
the display. If the lid is closed, the lid will lock, the LID LOCKED light will light, the detergent will be dispensed, and “FILL” will scroll across the
display.
Pressing Unlock Lid will Pause the cycle and the Start indicator light will blink.
To continue the cycle, press Start again. If machine is paused more than 24 hours, the cycle will be cancelled. If water remains in the machine,
select the Drain & Spin cycle to drain tub and spin water out of the washer tub.
Display and Status Lights
C
Display:
The display shows the approximate time remaining until the end of the cycle.
NOTE: The cycle time is affected by how long it takes the washer to fill. This depends on the water pressure in your home. The “smart” timer
“learns” the amount of time it takes to fill your washer and adjusts the total time accordingly.
In addition, this display will, “scroll” the washer status:
• bALAnCINg Start of rebalancing cycle to redistribute clothes. Stops after rebalancing is complete.
• CyCLE PrEP Sensing dry load size prior to fill (normal).
• dELAY When Delay Wash is initiated. Replaced with estimated time when cycle starts.
• End End of current cycle.
• ES Washer in a delay start (4 hour maximum) awaiting lower energy rates (see the Energy Smart section).
• FILL For the first 45 seconds of a fill, the estimated end of cycle time is displayed. For the rest of the fill time, “FILL” is scrolled
until the fill completes.
• H2O SUPPLY Can not sense water level (valves possibly turned off).
• HEAt Water being heated for Sanitize cycle.
• LId Cycle stopped because lid is open. Close the lid.
• LOAd SenSE Sensing wet load size (normal).
• PAUSE Cycle paused because the Start/Pause button was pressed and the washer was set to Pause. Press Start button again to
restart the cycle.
Cycle status lights:
Shows whether the washer is in the SOAK, WASH, RINSE or SPIN cycle.
Feature status lights indicate (see sections F, G and H for more details):
The My Settings feature is on for this cycle.
The washer is locked - will blink once if you press any button or turn the cycle knob.
The signal is on. See the Variable Signal description.
4
The Energy Smart feature is selected. See About Appliance Communication section.
• Loosely add items around infusor
Overloading may negatively impact
wash performance. See page 11 for
suggested loading examples.
• Close lid.
NOTE: Washer will not fill with lid
open.
D
Stain Removal Guide
Select Cycle and Push Button for stain options
™
C
F
E
• Select wash cycle.
.
• Select wash options,
including Fabric Softener
option.
• Select options including
Pretreat/Bleach option.
G
Basket
H
The lid is locked. See the Control
Lock description.
The eWash feature is selected.
A Delay Wash time is set.
• Press Start.
I
TM
Wash Cycles-Cycle Selector Knob
D
The wash cycle controls the type of washing process. The Cycle Selector knob can be turned in either direction. Turning the knob after
starting a cycle will stop the washer and change the cycle/options to the new selection. Press Start to begin the new cycle selection.
NOTE: When the knob is turned to another cycle, the tub light is turned on to assist in loading.
The chart below will help you match the wash cycle setting with your clothing.
Speedwash
Delicates
Hand Wash
Jeans
work jeans, use Whites cycle.)
Dark Colors* For non-colorfast cottons and blends or items that are labeled cold wash. Provides normal wash and medium speed
spin.
Whites
speed spin.
Normal/
overall cleaning and should be used for most everyday items. Provides normal wash and medium speed spin.
Towels/Sheets* Provides periods of agitation and soak tailored for washing towels and sheets. Provides normal wash and a
high speed spin.
Light Colors
For small loads of lightly soiled items that are needed in a hurry. Provides light wash/rinse and short high speed spin.
For lingerie and special-care fabrics with light to normal soil. Provides light
*
For items labeled hand washable with light soils. Provides an extra light wash and medium speed spin.
* For washing medium to lightly soiled jeans.
* For heavy to lightly soiled whites, household linens, work and play clothes.
* For heavy to lightly soiled colorfast cottons, household linens, work and play clothes.
Provides
normal wash
wash and
and medium speed spin. (
low speed spin.
Provides a heavy wash and a high
This cycle provides the best
GEAppliances.com
For heavily soiled
Sanitize When selecting sanitize, the washer increases the water temperature to sanitize and remove 99.9% of
bacteria found in home laundry. Provides an extra heavy wash and a medium spin.
NSF Protocol P172
Sanitization Performance of Residential and
Commercial, Family-Sized Clothes Washers
NOTE: The default Sanitize cycle water
temperature (Hot) can NOT be changed.
Bulky Items/ For large coats, bed spreads, mattress covers, sleeping bags and similar large and bulky items. Large items
Comforters, Pillows such as blankets, comforters, jackets and small rugs. Provides a normal wash and an extra heavy spin.
Quick Rinse
Rinses and spins non-soiled items where a rinse only is desired. Provides an extra light wash and an
extra high speed spin. Fabric Softener and Extra Rinse options are available with this cycle.
Drain & Spin
BASKETclean Use for cleaning the basket of residue and odor. Recommended use of at least once per month.
For draining the tub and spinning water out of the clothes.
NOTE: Never load laundry while using BASKETclean. The laundry may become damaged or contaminated.
See the Care and Cleaning section.
* Cycles available with Steam Assist
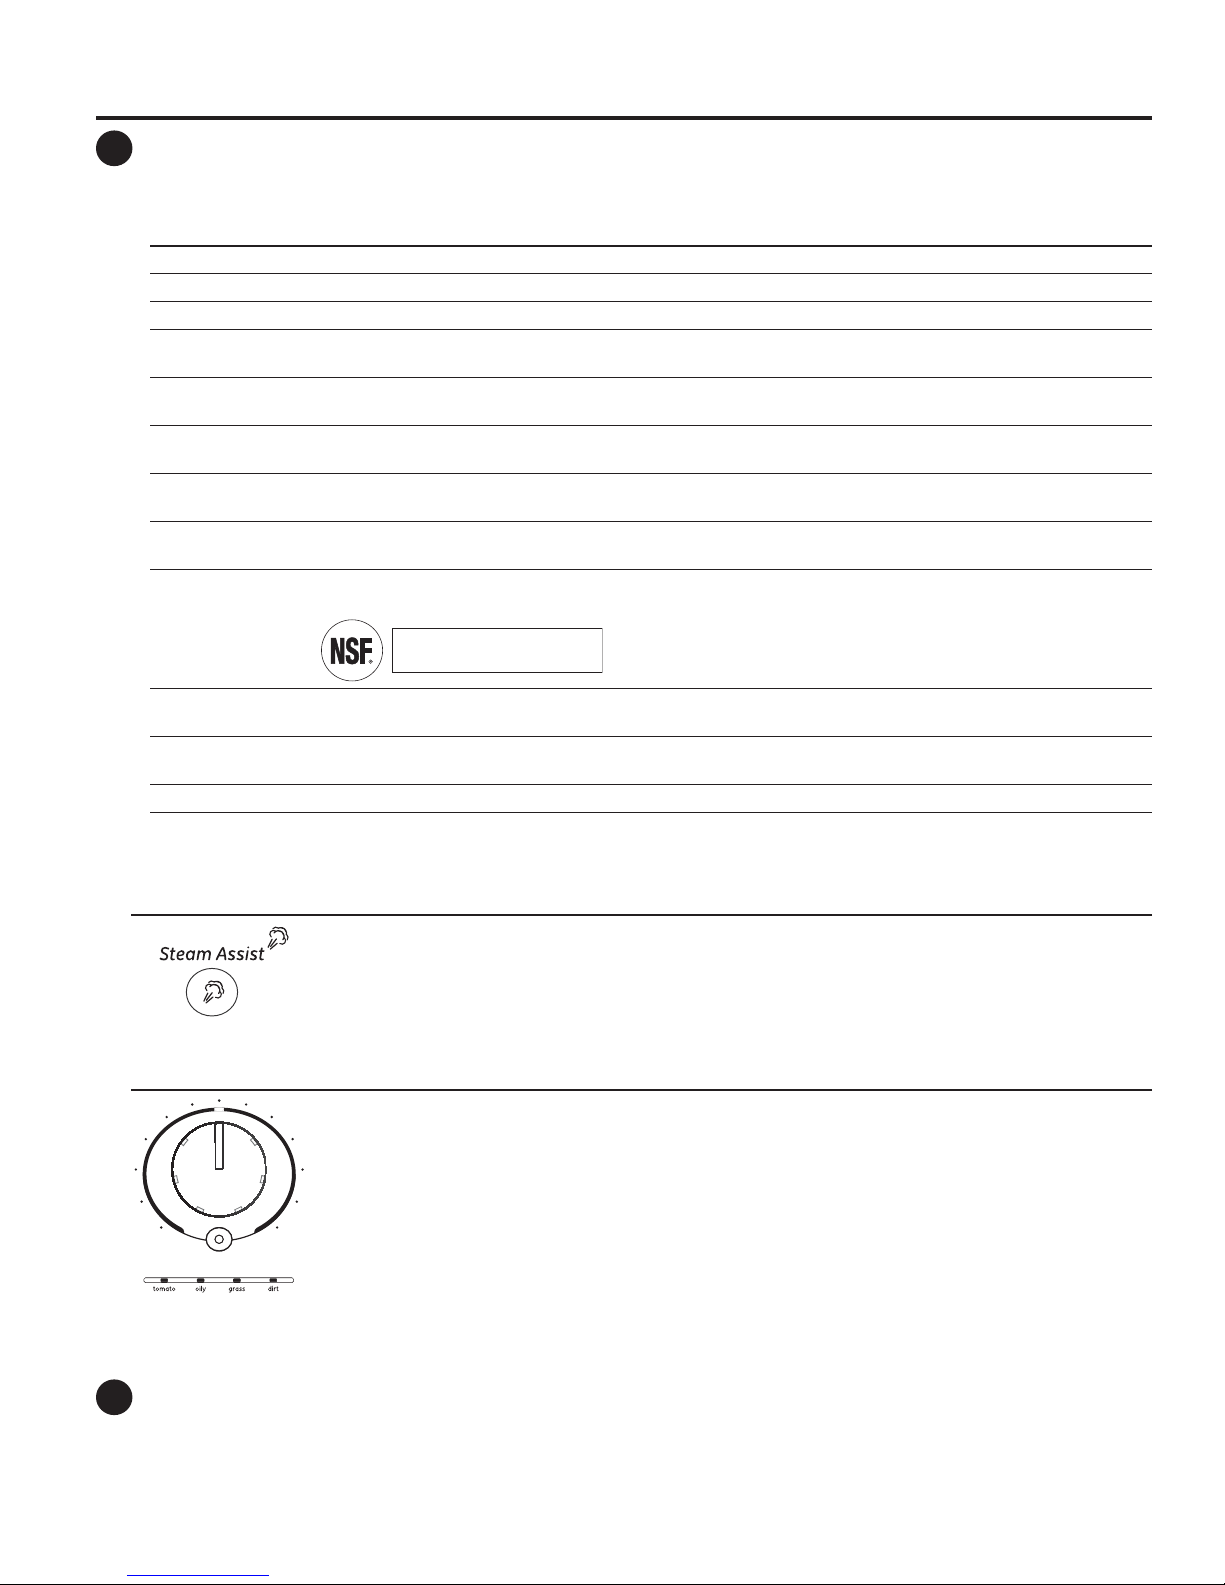
Steam Assist
Steam Assist adds steam into the washer during Hand Wash, Jeans, Dark Colors, Whites, Normal/Light
Colors and Towels/Sheets cycles.
To use:
1. Turn Power on and select one of the above wash cycles.
2. Press the Steam Assist button to activate.
3. Press the Start button.
Stain Removal Guide
The Stain Removal Guide feature allows you to indicate what stains are on the garments in your load. This
feature can be used with any wash cycle except Sanitize.
To use Stain Removal Guide:
1. Select the wash cycle.
2. Press the Stain Removal Guide button (the button will light up when it is on).
Stain Removal Guide
Select Cycle and Push Button for stain options
Settings
E
Individual settings for agitation (Soil), water temperature (Temp), and spin (Spin) can be set from the minimum (lowest in column) to
maximum (highest in column). In general, the higher up the column, the more washer energy will be used.
NOTE: Higher Spin speeds typically reduce dryer time/energy usage (i.e. reduces total energy when using both a washer and a dryer).
Continue to press to select tomato stain, oily stain, grass stain or dirt stain. The indicator light will show the
selected stain.
To select a different stain, press the Stain Removal Guide button until desired stain to be removed is lit.
To turn off Stain Removal Guide, press until the light on the button turns off.
NOTE: The Soil and Temperature levels will be changed to match each stain type. Turning off Stain Removal
Guide will return the settings to default.
5

Operating instructions.
F
G
H
Cycle Options
Soak
This option begins with a brief agitation, soaks for a specified period of time, then moves through the rest of the cycle automatically.
Repeated pressing of the Soak button will add 15 minutes, then 30 minutes and then return back to 0 soak minutes.
Extra Rinse
When you use extra detergent or bleach to clean heavily soiled clothes, use the Extra Rinse option to better remove additional residues.
NOTE: This option is not allowed for some cycles.
Fabric Softener
Set this option to provide a deep rinse or when manually adding fabric softener to the rinse cycle. NOTE: This option is not allowed for some
cycles. When allowed, it may change other settings (e.g. Spin may go to a higher setting) to maximize performance.
NOTE: Do not use fabric softener dispensing balls with this washer. They do not work correctly in high efficiency washers.
Pretreat/Bleach
Set this option to add liquid pretreatment -OR- liquid bleach in the next load. Press once to indicate adding pretreatment (light on above
button), twice to specify bleach (light on below button), three times to turn off (no light). Pretreatment or bleach will be added at the optimal
time during the wash cycle (differs for pretreatment or bleach).
NOTE: Do NOT use pretreatment and bleach in the same load. If you forget to dispense (did not press button once or twice), you can flush
out the dispenser by pouring water into the compartment and running a Quick Rinse cycle to remove from the tub.
Delay Wash
When the Delay Wash button is repeatedly pressed, the delay time is set from 1 (01H) to 9 (09H) hours and back to clear (00H) hours. If you
press and hold the Delay Wash button for 3 seconds, it will immediately reset.
Additional Options
My Settings
As the cycle selector knob is turned, the Soil, Temp and Spin settings change to automatic pre-set default settings. If you desire a different
setting, select the desired options or changes to cycle settings. Press and hold the My Settings button for 3 seconds, the washer will save
these settings for that cycle and the status heart and My Settings button will light when active. In the future, when you turn the selector
knob to that cycle, your settings will be automatically recalled. To temporarily (i.e. for this load) return to the pre-set default settings, press the
My Settings button for 1/2 second. The status heart and button lights will turn off and the options will change back to these defaults. To
make these default settings permanent, hold the My Settings button again for 3 seconds to make them your preferred settings (the lights
will turn back on). NOTE: My Settings includes Stain Removal Guide and Steam Assist but not Delay Wash or Variable Signal - or any bulk
dispense options.
Variable Signal
Use the Variable Signal button to change the volume of the end of cycle signal. Press the button until you reach the desired volume (high,
medium, low) or off.
Basket Light
The basket light will turn on when the Basket Light button is pressed, the lid is lifted, or the cycle knob is turned. It will stay on for 5 minutes or until the
Basket Light button or Power button is pressed.
Control Lock
You can lock the controls to prevent any selections from being made. Or you can lock the controls after you have started a cycle. Children
cannot accidentally start the washer by touching buttons with this option selected.
To lock the washer controls, press and hold the Control Lock button for 3 seconds. The control lock icon will light up when it is on.
To unlock the washer controls, press and hold the Control Lock button for 3 seconds.
NOTE: The Power button can still be used when the machine is locked.
eWash
When the eWash button is pressed, the cycle changes to its most energy efficient settings and all of the eMonitor lights will light to indicate
that the most efficient settings are on. If you change settings, the eWash light will go off and the number of eMonitor lights will decrease (or
increase) to indicate decreased (or increased) energy efficiency settings.
SmartDispense™
I
The SmartDispense™ feature allows you to set your liquid HE (High Efficiency) detergent and/or softener dispensing preferences for
your load. This feature can be used with any wash cycle, except for Quick Rinse, Drain & Spin and BASKETclean cycles.
The SmartDispense™ system automatically dispenses liquid HE (High Efficiency) detergent and/or concentrated liquid fabric
softener into each cycle at the optimal times.
To utilize the SmartDispense™ dispensers, they must first be filled. Although any liquid HE (High Efficiency) laundry detergent
and concentrated liquid fabric softener can be used in the SmartDispense™ system, all liquid HE (High Efficiency) detergents and
concentrated liquid fabric softeners are not the same.
CAUTION! Absolutely do not store liquid chlorine bleach, powder detergent, non-concentrated liquid fabric softener or other
laundry additives in any of the tanks. Use only liquid detergent which has been specifically designed for use in High Efficiency washers.
6
About washer features.
GEAppliances.com
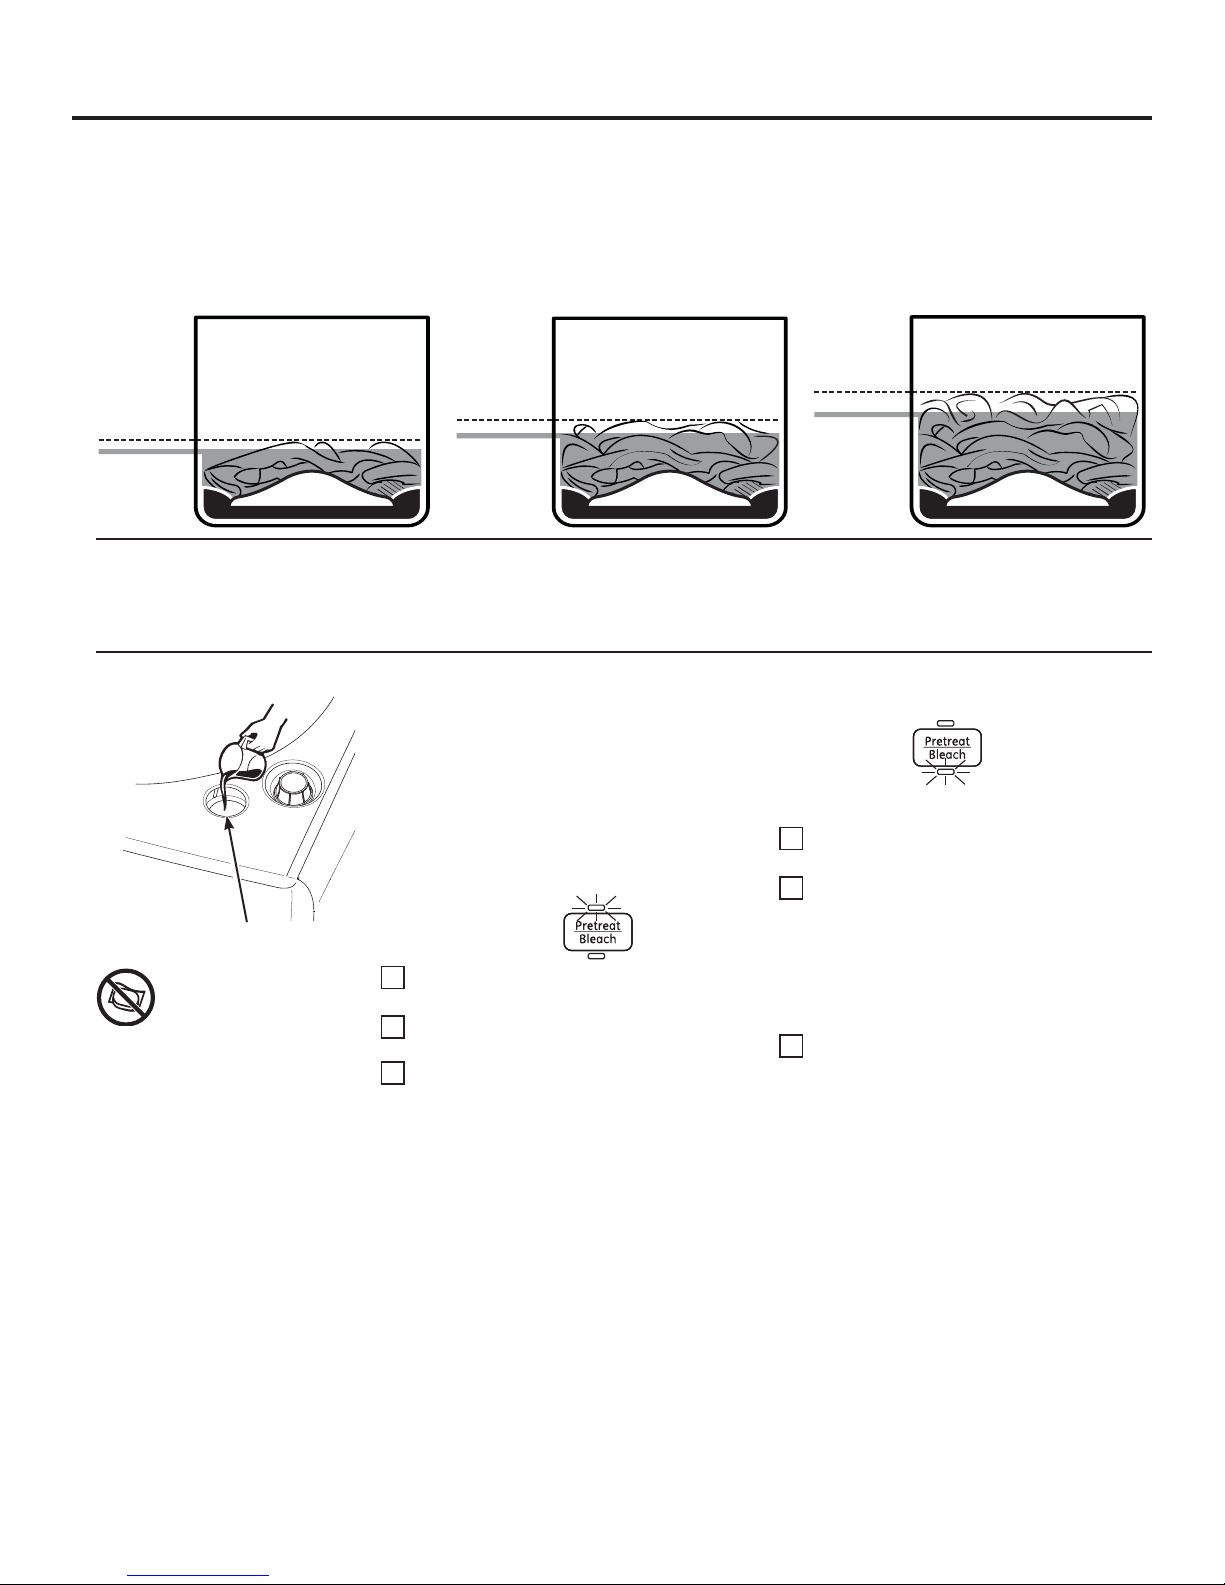
Automatic Load Sensing
This provides the correct amount of water suited to the size and type of load placed in the unit. The washer will not fill with water during
automatic load sensing if the lid is open. When the lid is closed the machine is able to begin filling with water in order to sense the load
size.
NOTE: This is a high efficiency washing machine with Infusor™ wash action. This system requires less water while providing effective
cleaning action. You may notice that the water level is lower than on your previous washer. This is normal for an Infusor™-equipped
washer.
Clothes Level
Water Level
Average Small Load
Clothes Level
Water Level
Average Medium Load
Average Large Load
Clothes Level
Water Level
Dispensers - Laundry Additives
Liquid detergent and concentrated liquid fabric softener can be dispensed through the SmartDispense® system. Single dosages of bleach,
pretreatment (such as OxiClean
when each additive is automatically dispensed at its optimal time in the wash or rinse cycle.
®
) or detergent are added through the dispensers in the front corners. Your option selections will determine
Pretreatment or Liquid
Bleach Compartment
DO NOT put detergent
packets in dispenser
compartments. Laundry
detergent packets should only be
added directly to the wash tub
following the manufacturer’s
directions.
Single Use Pretreatment or Liquid
Bleach
To add either liquid pretreatment or liquid bleach
to the next load, pour only one of them in the right
front compartment and press the Pretreat/Bleach
button either once to light the pretreat light (above
button) or twice to light the bleach light (below
button). The liquid will be added at the optimal time
(pretreatment - early or bleach – late) in the wash
cycle.
Pretreatment option
Check clothing care labels for special
1
instructions.
Measure liquid pretreatment carefully, following
2
instructions on the bottle.
Before starting the washer, pour measured
3
amount of pretreatment directly into the
compartment.
Bleach option
The water fill
dilutes liquid
chlorine bleach as the washer fills for the wash
cycle.
Check clothing care labels for special
1
instructions.
Measure liquid bleach carefully, following
2
instructions on the bottle.
Never pour undiluted liquid chlorine bleach
directly onto clothes or into the wash
basket.
Do not pour powdered bleach into bleach
compartment.
Before starting the washer, pour measured
3
amount of bleach directly into bleach
compartment. Avoid splashing or over-filling
dispenser. If you prefer to use powdered
bleach, add it into the wash basket with your
detergent.
Do not mix chlorine bleach with ammonia
or acids such as vinegar and/or rust
remover. Mixing can produce a toxic gas
which may cause death.
7

About washer features.
Bulk Detergent Tank
The bulk detergent tank holds over a gallon (140
ounces or 4100 ml) of liquid bulk detergent. After
filling the tank, press the Detergent Tank On button
to turn on its light and designate bulk (rather than
manual) detergent dispense.
The Tank Levels lights (1-5) indicate how much
detergent is left. An empty tank is shown by a single
Bulk Detergent Tank
DO NOT put detergent
packets in dispenser
compartments.
Laundry detergent packets
should only be added directly
to the wash tub following the
manufacturer’s directions.
red light. A full (or nearly full) tank is shown by 5
lights.
NOTE: The initial fill of the bulk tank will require 50
ounces of detergent to prime the system. If you
press the Start button when the tank is empty, the
Detergent Tank On button and red empty Tank
Level light will blink. The machine will not start. A
beep will also sound if Variable Signal is on. To start
the machine, you must add more detergent to the
tank or turn off the bulk detergent tank.
Set the Bulk Detergent Cup Amount Preference
When the Detergent Tank On light is on, pressing the Detergent Cup Amount button will set the Detergent
Cup Amount lights (1, 2, or 3).
Level 1 will distribute the standard amount minus 25%.
Level 2 will distribute the standard amount.
Level 3 will distribute the standard amount plus 25%.
Examples:
Factory default standard amount is 1.5 oz (44 ml) (Concentration Setting 15).
The Detergent Cup Amount lights indicate if a Low,
Medium, or High amount will be dispensed.
See the Bulk Tank Special Functions Option 1: Set
Concentration Settings on page 10 to understand
how the Low, Medium, and High amounts are
established.
Detergent will be automatically dispensed at the
optimum time at the beginning of each fill cycle.
Concentration
Setting
15
Single Wash Detergent Dispenser
If Detergent Cup Amount shows 3 lights then 1.9 oz (55 ml) will be dispensed.
If Detergent Cup Amount shows 2 lights then 1.5 oz (44 ml) will be dispensed.
If Detergent Cup Amount shows 1 light then 1.1 oz (33 ml) will be dispensed.
NOTE: Each cycle knob position defaults to a different Detergent Cup Amount (including 0 if no
detergent is used). If you change the Soil setting, the Detergent Cup Amount may change. You can
then manually change the Detergent Cup Amount, but your change will not be saved when you leave
this knob position or if you set a My Settings.
3 lights:
2 lights:
1 light:
1.9 oz.
1.5 oz.
1.1 oz.
Single Use Wash Detergent Dispenser
If you prefer to manually add either powder or liquid
detergent to the next wash cycle, pour it in the left
front opening and make sure the Tank On light is
off (press button if light is on). Most detergent will
immediately enter the tub. The washer will flush
water through this opening just prior to the fill cycle
to add any detergent that did not fall into the tub.
added directly to the wash tub following the
manufacturer’s directions.
DO NOT put detergent packets in
dispenser compartments. Laundry
detergent packets should only be
8
GEAppliances.com
Bulk Softener Tank
DO NOT put detergent
packets in dispenser
compartments.
Laundry detergent packets
should only be added directly
to the wash tub following the
manufacturer’s directions.
Bulk Softener Tank
The bulk softener tank holds over a gallon (140
ounces or 4100 ml) of liquid non-concentrated bulk
softener. After filling the tank, press the Softener
Tank On button to turn on its light and designate
bulk fabric softener dispense.
The Tank Levels light (1-5) indicate how much
softener is left. An empty tank is shown by a single
red light. A full (or nearly full) tank is shown by 5
lights.
NOTE: The initial fill of the bulk tank will require
50 ounces of softener to prime the system. If you
press the Start button when the tank is empty,
the Softener Tank On button and red empty Tank
Level light will blink. The machine will not start. A
beep will also sound if Variable Signal is on. To
start the machine, you must add more softener to
the tank or turn off the bulk softener tank.
The Softener Cup Amount lights indicate if a Low,
Medium, or High amount will be dispensed.
See the Bulk Tank Special Functions Option 1: Set
Concentration Settings on page 10 to understand
how the Low, Medium, and High amounts are
established.
The spin speed will be increased to the highest
speed and the softener will be dispensed during
the rinse cycle.
Set the Bulk Softener Cup Amount Preference
When the Softener Tank On light is on, pressing the Softener Cup Amount button will set the Softener Cup
Amount lights (1, 2, or 3).
Level 1 will distribute the standard amount minus 25%.
Level 2 will distribute the standard amount.
Level 3 will distribute the standard amount plus 25%.
Examples:
Factory default standard amount is 1.0 oz (30 ml) (Concentration Setting 10).
Concentration
Setting
10
Pour into the
washer basket
If Softener Cup Amount shows 3 lights then 1.3 oz (37 ml) will be dispensed.
If Softener Cup Amount shows 2 lights then 1.0 oz (30 ml) will be dispensed.
If Softener Cup Amount shows 1 light then .8 oz (22 ml) will be dispensed.
NOTE: Softener Cup Amount is 0 for non softener knob positions or whatever was set the last time
softener was dispensed. If you manually change the Softener Cup Amount, this will be used for all
further softener cycles. It will not be (uniquely) saved if you set a My Settings.
3 lights:
2 lights:
1 light:
1.3 oz.
1.0 oz.
0.8 oz.
Single Use Softener
To manually add a specific softener amount to a
single load:
Make sure Softener Tank On button light is off.
1
Press the Fabric Softener button (and ensure
its light is on) at the beginning of the cycle or
before the RINSE light turns on.
When the RINSE light turns on, allow washer to
2
mostly fill with water and then press the Unlock
Lid button.
Open the lid and pour measured fabric softener
3
(well diluted with water) into the washer basket.
Press the Start button.
4
NOTE: If you missed the RINSE cycle but need to
add fabric softener, set a Quick Rinse cycle (see the
Quick Rinse section) and follow steps 1-4 above.
added directly to the wash tub following the
manufacturer’s directions.
DO NOT put detergent packets in
dispenser compartments. Laundry
detergent packets should only be
9

About special features.
To Enter Special Features
To enter the bulk tank Special Features Mode:
Press the Power button.
1
Simultaneously press and hold either the
2
Detergent Tank On and Detergent Cup Amount buttons
for 3 seconds
or
Softener Tank On and Softener Cup Amount buttons for
3 seconds
The My Settings and Extra Rinse lights will flash to
indicate you are in the Special Features Mode.
Option 1: Set Concentration Settings
NOTE: During initial installation, or if the household
water pressure dramatically changes, the bulk
dispenser will change to accommodate your homes’
unique water pressure. Wait a few wash cycles before
changing concentrations.
The factory default concentration settings are 1.5 oz
(44 ml) for detergent and 1.0 oz (30 ml) for softener.
To allow maximum user flexibility either of these can
be changed to between 0.5 and 10 ounces.
Enter Special Features mode. See To Enter Special
1
Features section above.
Press the My Settings button.
2
The My Settings and the chosen (Detergent or Softener)
3 Cup Amount lights will come on and the Extra Rinse
light will go out. The display will show “10
the current concentration setting (e.g. 15 represents 1.5
ounces). This amount will be
Cup Amount lights are lit.
The following table shows the approximate amount dispensed (oz) at each Cup Amount setting (1, 2 or 3) for each
Concentration Setting:
Concentration
Setting
Number of
Loads*
5 10 15 20 25 30 35 40 45 50 55 60 65 70 75 80 85 90 95 100
200 100 67 50 40 33 29 25 22 20 18 17 15 14 13 13 12 11 11 10
0.6 1.3 1.9 2.5 3.1 3.8 4.4 5.0 5.6 6.3 6.9 7.5 8.1 8.8 9.4 10.0 10.6 11.3 11.9 12.5
times in ounces”
dispensed when 2 (of the 3)
OR
Turn the cycle knob clockwise to increase or
3
counter-clockwise to decrease the setting (within
preset limits). Each click increases or decreases Level
2 (standard amount) by 1/2 ounce. Levels 1 & 3
change proportionally.
Press the Cup Amount button to save the new
4
setting.
This function will then exit and the display will reflect
whatever cycle the cycle knob is on.
To exit without changing the setting, press the Power
button. This function will automatically exit (without
saving) if neither button is pressed within 1 minute.
* For a 100 oz (2957 ml) bottle for normal ( ) setting.
Option 2: SmartDispenseTM Tank Cleaning
Enter Special Features mode. See To Enter Special
1
Features section above.
Remove all articles from the washer basket.
2
Press the Extra Rinse button.
3
The My Settings and lights will go out. The Start
button light will blink. The corresponding Tank Levels
lights will show the current tank level.
Press the Start button.
4
The tank will dispense for the minutes shown in the
display to empty the selected tank. The Tank Levels
lights will cycle 0,1,2,3,4,5,4,3,2,1,0 until the flush is
finished.
Once finished, the Tank Level will indicate an empty tank
10
(a single blinking red LED light) and the Start button will
0.5 1.0 1.5 2.0 2.5 3.0 3.5 4.0 4.5 5.0 5.5 6.0 6.5 7.0 7.5 8.0 8.5 9.0 9.5 10.0
0.4 0.8 1.1 1.5 1.9 2.3 2.6 3.0 3.4 3.8 4.1 4.5 4.9 5.3 5.6 6.0 6.4 6.8 7.1 7.5
be lit. You can (repeatedly) refill the tank with water and
press the Start button to rinse out the tank as needed.
NOTE: If you suspect that the dispenser is plugged, add
lemon juice to make the water slightly acidic.
Press the Power button to exit (when the tank is
5
empty).
This function will automatically exit if neither button is
pressed for 2 hours.
NOTE: Bulk tank flush is recommended if you:
1)
Change detergent or softener brands
2)
Accidently add softener to the detergent tank or
vice versa
3)
Put powdered detergent in the detergent tank
4)
Put non-concentrated fabric softener in the
softener tank
Loading and using the washer.
Always follow fabric manufacturer’s care label when laundering.
Proper Use of Detergent
GEAppliances.com
Using too little or too much detergent is a common
cause of laundry problems.
Use less detergent if you have soft water, a smaller load
or a lightly soiled load.
For spots, apply pre-treatment to items as recommended
on the product label. Application should be made in
the basket to prevent overspray which may cause the
coloring on the lid or graphics to fade.
GE recommends the use of High Efficiency
detergents in all Energy Star rated washers.
HE detergents are formulated to work with low water
wash and rinse systems. HE detergents reduce
the oversudsing problems commonly associated
with regular detergents.
When using high efficiency or concentrated detergents,
consult the product label to determine amount required
for optimum performance. Excessive detergent will
negatively impact wash performance.
Sorting Wash Loads
Sort by color (whites, lights, colors), soil level,
fabric type (sturdy cottons, easy care, delicates)
WARNING
- Fire Hazard
Never place items in the washer that are dampened with gasoline or other flammable liquids.
No washer can completely remove oil.
Do not dry anything that has ever had any type of oil on it (including cooking oils).
Doing so so can result in death, explosion, or fire.
and whether the fabric produces lint (terry cloth,
chenille) or collects lint (velveteen, corduroy).
Loading the Washer
Load dry items loosely in the washer basket. For best
results, load items evenly and loosely around the
outside of the basket. To add items after washer has
started, press Unlock Lid, lift the lid and submerge
additional items around the outside of the basket. Close
the lid and press Start to resume.
Do not place large items such as sheets, blankets
and towels across the Infusor™. Load them around
the outside of the basket.
Do not put lawn or sofa cushions into the washer as
they are too big to move. Remove outer covers and
ONLY wash them.
Loading Examples*
JEANS
3 Jeans
5 Work Wear Shirts
4 Work Wear Pants
TOWELS/SHEETS
2 Bath Sheets
5 Bath Towels/
12 Washcloths
6 Hand Towels/
2 Terrycloth Bath Mats
OR
2 Flat Queen-Sized
Sheets
2 Fitted Queen-Sized
Sheets
4 Pillowcases
NORMAL
4 Pillowcases
2 Hand Towels
2 Flat Sheets/
2 Fitted Sheets
2 Bath Towels/
4 Washcloths
OR
6 Shirts (Men’s
or Women’s)
4 Pair Pants (Khakis
or Twills)
5 T-shirts
7 Pairs of Boxers
4 Pairs of Shorts
OR
6 T-shirts
4 Pairs of Sweatpants
4 Sweatshirts
2 Hoodies
7 Pairs of Socks
DELICATES*
7 Bras
7 Pairs of Underwear
3 Slips
2 Camisoles
4 Nightgowns
* Using a nylon mesh
bag for small items is
recommended.
SPEEDWASH
(2–4 GARMENTS)
2 Casual Wear
Work Shirts
1 Pair Casual Wear
Work Pants
OR
3 Soccer Uniforms
11
 Loading...