

Page 1
O
GEAppliances.com
Safety Instructions .......... 2,s
iii!
Operating Instructions
Appliance Communication ..... 9, 10
Care and Cleaning
of the Washer .................... 11
Features ........................... 7
Loading and Using
the Washer ........................ 8
Operating instructions .......... 4-6
Troubleshooting Tips..... 12-14
Consumer Support
Consumer Support ................ 16
Parts and Accessories ........... 3, 16
Warranty .......................... 15
"_ i iii_'iJi'il]
ENERGYSTAR
As an ENERGYSTAR®partner,
GEhas determined that this
product meets the ENERGYSTAR®
guidelines for energy efficiency.
Write the model and serial
numbers here:
Model #
Serial #
You can find
them under
the lid of the
Printed in the United States
washer.
49-90458 09-12 GE
Page 2
IMPORTANT SAFETY INFORMATION.
READ ALL INSTRUCTIONS BEFORE USING.
__ Thisisthe safety alert symbol. Thissymbol alerts you to potential hazards that can kill you or hurt you and others. Allsafety
messageswill follow the safety alert symbol and the word "DANGER","WARNING",or "CAUTION".Thesewords are defined as:
Indicates a hazardous situation which, if not avoided, will result in death or serious injury.
Indicates a hazardous situation which, if not avoided, could result in death or serious injury.
Indicates a hazardous situation which, if not avoided, could result in minor or moderate injury.
IMPORTANT SAFETYINSTRUCTIONS
To reduce the risk of fire, explosion,electric shock,or _njuryto personswhen using your appliance, follow
basic precautions, including the following:
• Read all instructions before using the appliance.
• DO NOT wash or dry articles that have been previously cleaned in, washed in, soaked in or spotted with gasoline, dry-
cleaning solvents, or other flammable or explosive substances, as they give off vapors that could ignite or explode.
• DO NOT add gasoline, dry-cleaning solvents, or other flammable or explosive substances to the wash water. These
substances give off vapors that could ignite or explode.
• Under certain conditions, hydrogen gas may be produced in a hot-water system that has not been used for 2 weeks
or more. HYDROGEN GAS IS EXPLOSIVE. If the hot water system has not been used for such a period, before using a
washing machine, turn on all hot-water faucets and let the water flow from each for several minutes. This will release
any accumulated hydrogen gas. As the gas is flammable, DO NOT smoke or use an open flame during this time.
• DO NOT allow children to play on or in this appliance. Close supervision of children is necessary when this appliance is
used near children.
• Before the washer is removed from service or discarded, remove the door or lid.
• DO NOT reach into the appliance if the tub or agitator is moving. Wait until the machine has completely stopped before
opening the lid.
• DO NOT install or store this appliance where it will be exposed to the weather.
• DO NOT tamper with controls.
• DO NOT repair or replace any part of this appliance or attempt any servicing unless specifically recommended in the
user maintenance instructions or in published user repair instructions that you understand and have the skills to carry
out.
• Keep the area around your appliance free of combustible materials such as lint, paper, rags and chemicals.
• DO NOT operate this appliance if it is damaged, malfunctioning, partially disassembled, or has missing or broken parts
including a damaged cord or plug.
• Unplug the appliance or turn off the circuit breaker before servicing. Pressing the Power or Start/Pause button DOES NOT
disconnect power.
• DO NOT mix chlorine bleach with ammonia or acids such as vinegar or rust remover. A toxic gas may be produced.
• DO NOT leave the washer door open. An open door could entice children to crawl inside the washer.
• The laundry process can reduce the flame retardancy of fabrics. Carefully follow the garment manufacturer's wash and care
instructions.
• See "Electrical Requirements" located in the Installation Instructions for grounding instructions.
SAVETHESE INSTRUCTIONS
2
Page 3
GEAppliances.com
PROPERINSTALLATION
This washer must be properly installed and located in accordance with the Installation Instructions before it is used.
If you did not receive an Installation Instructions, you can receive one by visiting GEAppliences.com or by calling
800.GE.CARES (800.432.2737).
• Insurethat the hot water hoseisconnected to the "H"
(internalred screened)valve and the cold water hose is
connected to the "C"(internal blue screened)valve.
Installor store where it will not be exposed to
temperatures below freezing or exposedto the weather,
which could cause permanent damage and invalidate the
warranty.
Properlyground washer to conform with all
governing codes and ordinances. Follow details
in Installation Instructions.
• This washer does not include water supply hoses.
GEstrongly recommends the use of factory specified
parts.A list of factory hoses available for purchase are
listed below.These hosesare manufactured and tested to
meet GEspecifications.
GEstrongly recommends the useof new water supply
hoses.Hosesdegrade over time and need to be replaced
every 5 years to reducethe risk of hosefailures and water
damage.
Parts and Accessories
Order on-lineat GEAppliuncepurts.com today, 24 hoursa
day or by phone at 800.626.2002during normal business
hours.
Part Number
plVil4X10002
Or
plVi14X10005
WX10X10011
WX7X1
DR07X10002
DRIV12ES00V0
Accessory
4 ft_RubberWater Supply Hoses
4 ft BraidedWater Supply Hoses
Tide®Washing IVlachineCleaner*
Washer FloorTray
6' Cable
ACM,Splitter,two 6' Cables& a 1'
Cable
FUNCTIONALITYCHECK
4
DONOTallow children to play on or in this appliance. Close supervision of children is necessary
when this appliance is used near children. Failure to follow this instruction may result in death
or injury to persons.
Confined
Space Hazard
• If the lid isopened between cycles(i.e.not pausing and
restarting the current cycle, changing cycles after it
started, etc.)pushingthe Start button will cause the
washer to turn on the cold water for 5 secondsfollowed
by a 10 second delay before locking the lidand starting
the cycle.
WHEN NOT IN USE
• Turn off water faucets to minimize leakage ifa break or
rupture should occur. Check the condition of the fill hoses;
GErecommends changing the hoses every Syears.
• If the lid isopened during this 15 second period, the word
PAUSEwillstart scrolling across its display.You will have
to push the Start button again to restart the cycle.
* Tide@is a registered trademark of Procter & Gamble 3
SAVE THESE INSTRUCTIONS
Page 4
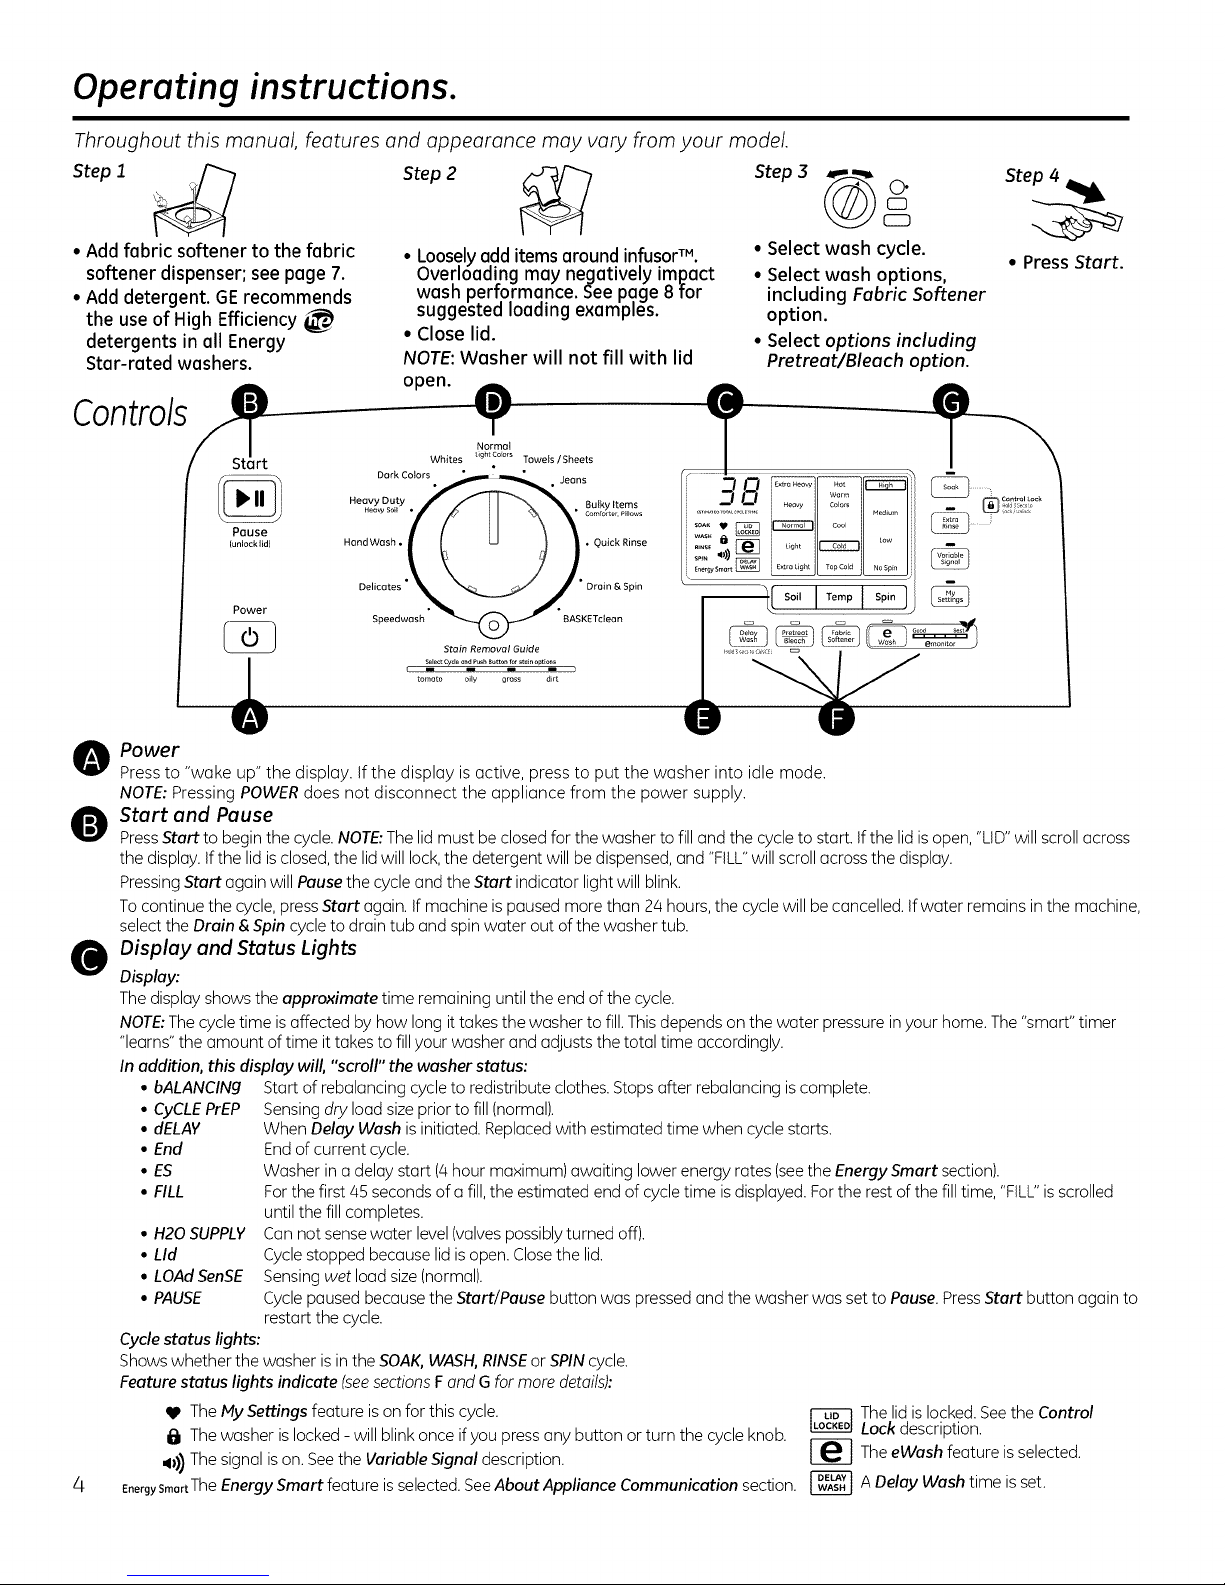
Operating instructions.
Throughout this manual, features and appearance may vary from your model.
Step 4
Step 1
• Add fabric softener to the fabric
softener dispenser; see page 7.
• Add detergent. GE recommends
the use of High Efficiency
detergents in ell Energy
Star-rated washers.
Controls
Pause
{unlock lid)
Power
Power
Pressto "wake up" the display. If the display is active, press to put the washer into idle mode.
NOTE:Pressing POWERdoes not disconnect the appliance from the power supply.
Step 2 _ Step 3 _ C:::30"
!??:
sin. _0)
E.e,gysmart
• Select wash cycle.
• Select wash options,
including Fabric Softener
option.
• Select options including
Pretreot/Bleach option.
• Loosely add items around in.fusoff M.
Overloading may negatively impact
wash performance, gee page 8 for
suggested loading examples.
• Close lid.
NOTE: Washer will not fill with lid
open. e
Normal
Whites lightColors Towels/Sheets
Dark Colors
Heavy Duty Bulky Items
HeaW Soil Comforter, Pillows
HandWash • • Quick Rinse
Delicotes
Speedwash Stain Removal Guide
r i i i i
tomato oily gross d_rt
Drain & Spin
BASKETdean
.T_,,_, T
CD
• Press Start.
Q
I,omot,o,n}
Start and Pause
PressStart to beginthe cycle.NOTE:Thelid must be closed for the washer to fill and the cycle to start. If the lid is open,"LID"will scroll across
the display. Ifthe lid isclosed,the lid will lock,the detergent will bedispensed, and "FILL"will scrollacross the display.
PressingStart again will Pause the cycle and the Start indicator light will blink.
Tocontinue the cycle, press Start again. If machine ispaused more than 2/4hours, the cycle will becancelled. If water remains inthe machine,
selectthe Drain & Spin cycle to drain tub and spin water out of the washer tub.
Display and Status Lights
Q
Display:
The display shows the approximate time remaining until the end of the cycle.
NOTE:Thecycle time isaffected by how long it takes the washer to fill. This depends on the water pressure in your home. The"smart" timer
"learns"the amount of time it takes to fillyour washer and adjusts the total time accordingly.
In addition, this display will, "scroll" the washer status:
• bALANCINg Start of rebalancing cycle to redistribute clothes. Stops after rebalancing iscomplete.
• CYCLEPrEP Sensingdry load size prior to fill (normal).
• dELAY When Delay Wash isinitiated. Replacedwith estimated time when cycle starts.
• End Endof current cycle.
• ES Washer in a delay start (/4hour maximum) awaiting lower energy rates (seethe Energy Smart section).
• FILL Forthe first/45 secondsof afill,the estimated end of cycle time isdisplayed. Forthe rest ofthe fill time, "FILL"isscrolled
until the fill completes.
• 1-120SUPPLY Cannot sense water level (valvespossiblyturned off).
• Lid Cyclestopped because lid is open. Closethe lid.
• LOAdSenSE Sensingwet load size(normal).
• PAUSE Cyclepaused because the Start/Pause button was pressed and the washer was set to Pause. PressStart button again to
Cyclestatus lights:
Showswhether the washer is inthe SOAK,WASH,RINSEorSPIN cycle
Feature status lights indicate (seesections Fand G for more details):
V TheMy Settings feature ison for this cycle.
6 Thewasherislocked-willblinkonceifyoupressanybuttonorturnthecycleknob. _ Thelidislocked. SeetheContrOlLockdescription.
_0) Thesignal is on. Seethe Variable Signal description.
EnergysmortThe Energy Smart feature is selected. SeeAbout Appliance Communication section. _ A Delay Wash time is set.
restart the cycle.
TheeWash feature is selected.
Page 5
GEAppliances.com
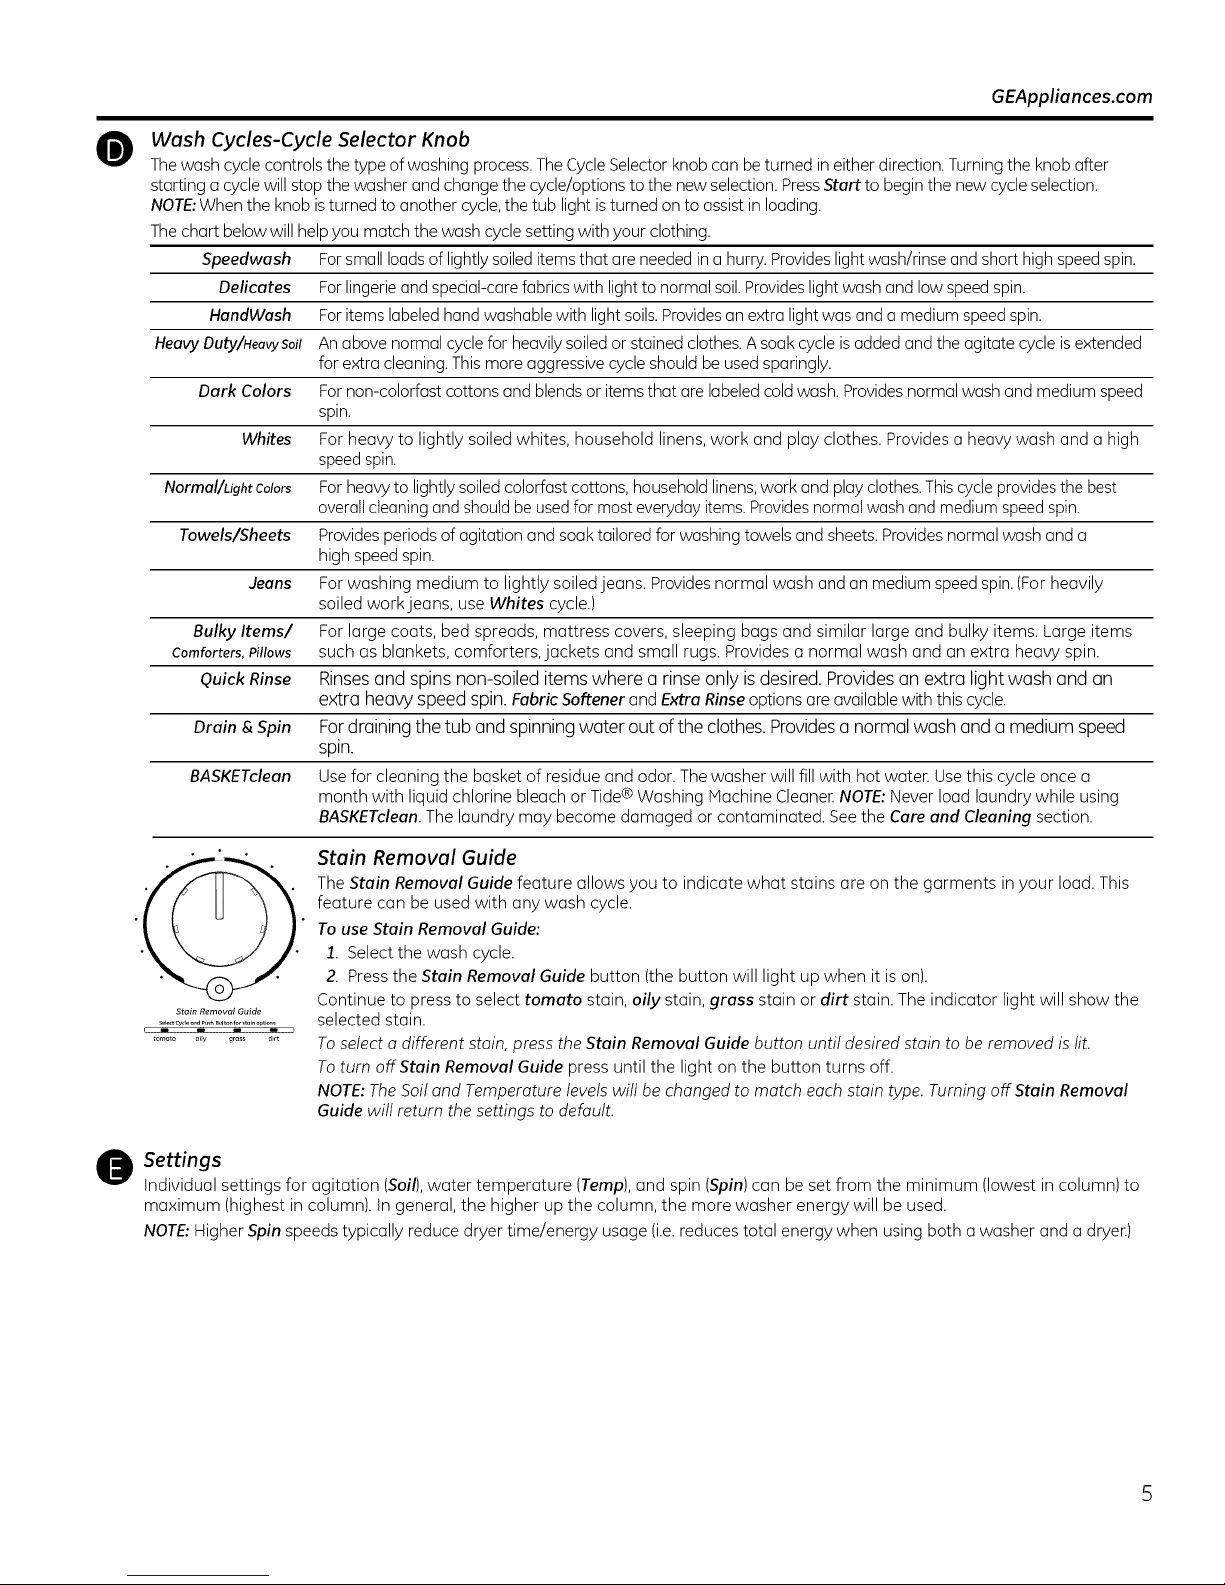
Wash Cycles-Cycle Selector Knob
03
Thewash cyclecontrols the type of washing process. TheCycleSelector knob can be turned in either direction. Turning the knob after
starting ucycle will stop the washer and change the cycle/options to the new selection.PressStart to begin the new cycleselection.
NOTE:When the knob is turned to another cycle, the tub light isturned on to assist in loading.
Thechart below will helpyou match the wash cyclesetting with your clothing.
Speedwash Forsmall loads of lightly soileditems that areneeded in a hurry. Provideslightwash/rinse and short high speed spin.
Delicates Forlingerie and special-carefabrics with lightto normal soil.Provideslightwash and low speedspin.
HandWash Foritems labeled hand washable with light soils.Providesan extra lightwas and a medium speed spin.
HeavyDuBy/HeowSoJlAn above normal cycle for heavilysoiled or stained clothes. A soak cycle is added and the agitate cycle is extended
for extra cleaning.This more aggressive cycle should be used sparingly.
Dark Colors For non-colorfast cottons and blends or items that are labeled cold wash. Providesnormal wash and medium speed
spin.
Whites For heavy to lightly soiled whites, household linens, work and play clothes. Provides a heavy wash and a high
speedspin.
Normal/ughtcolors ForheaW to lightly soiled colorfast cottons, household linens,work and play clothes.Thiscycle providesthe best
overallcleaning and should be usedfor most everyday items. Providesnormal wash and medium speedspin.
Towels/Sheets Providesperiods of agitation and soak tailored for washing towels and sheets. Providesnormal wash and a
high speed spin.
Jeans Forwashing medium to lightly soiled jeans. Providesnormal wash and an medium speedspin.(For heavily
soiled work jeans, use Whites cycle.)
Bulky Items/ For large coats, bed spreads, mattress covers, sleeping bags and similar large and bulky items. Large items
comforters,Pillows such as blankets, comforters, jackets and small rugs. Provides a normal wash and an extra heavy spin.
Quick Rinse Rinses and spins non-soiled items where a rinse only is desired. Provides an extra light wash and an
extra heavy speed spin. Fabric Softener and Extra Rinse options are available with this cycle.
Drain & Spin For draining the tub and spinning water out of the clothes. Provides a normal wash and a medium speed
spin.
BASKETclean Use for cleaning the basket of residue and odor. The washer will fill with hot water. Usethis cycle once a
month with liquid chlorine bleach or Tide@Washing Machine Cleaner.NOTE:Never load laundry while using
BASKETclean The laundry may become damaged or contaminated. See the Care and Cleaning section.
Stain Removal Guide
The Stain Removal Guide feature allows you to indicate what stains are on the garments in your loud. This
feature can be used with any wash cycle.
To use Stain Removal Guide:
1. Select the wash cycle.
2. Press the Stain Removal Guide button (the button will light up when it is on).
Stein Rernovel Guide
_l_t _cle and push B_ton fors_in options
tomato o_y grass d_rt
O ettings
Individual settings for agitation (Soil),water temperature (Temp), and spin (Spin) can be set from the minimum (lowest in column) to
maximum (highest in column). In general, the higher up the column, the more washer energy will be used.
NOTE:Higher Spin speeds typically reduce dryer time/energy usage (i.e.reduces total energy when using both a washer and a dryer.)
Continue to press to select tomato stain, oily stain, grass stain or dirt stain. The indicator light will show the
selected stain.
To select a different stain, press the Stain Removal Guide button until desired stain to be removed is lit.
To turn offStain Removal Guide press until the light on the button turns off.
NOTE: The Soil and Temperature levels will be changed to match each stain type. Turning off Stain Removal
Guide will return the settings to default.
Page 6
Operating instructions.
0
®
Cycle Options
Delay Wash
When the Delay Wash button is repeatedly pressed,the delay time isset from 1(01H)to 9 (09H)hours and back to clear (00H)hours. Ifyou
pressand hold the Delay Wash button for 5 seconds, it will immediately reset.
Pretreat/Bleach
Setthis option to add pretreatment -OR-bleach in the next load.Pressonce to indicate adding pretreatment (light on above button), twice
to specify bleach (light on below button),three times to turn off (nolight).Pretreatment or bleach will be added at the optimal time during the
wash cycle (differsfor pretreatment or bleach).
NOTE:DoNOTuse pretreatment and bleach in the same load. If you forget to dispense (did not press button once or twice),you can flush
out the dispenser by pouring water into the compartment and running a Quick Rinse cycle to remove from the tub.
Fabric Softener
Set this option to provide a deep rinse or when manually adding fabric softener to the rinse cycle. NOTE: This option is not allowed for some
cycles. When allowed, it may change other settings (e.g. Spin may go to a higher setting) to maximize performance.
NOTE:Do not use fabric softener dispensing bails with this washer. They do not work correctly in high efficiency washers.
eWash
When the eWash button is pressed, the cycle changes to its most energy efficient settings and all of the eMonitor lights will light to indicate
that the most efficient settings are on. Ifyou change settings, the eWash light will go off and the number of eMonitor lights will decrease (or
increase) to indicate decreased (or increased) energy efficiency settings.
Additional Options
Soak
This option begins with a brief agitation, soaks for a specified period of time, then moves through the rest of the cycle automatically.
Repeatedpressing of the Soak button will add 15,then 30 and then return back to 0 soak minutes.
Extra Rinse
When you useextra detergent or bleach to clean heavily soiled clothes,use the Extra Rinse option to better remove additional residues.
NOTE:Thisoption is not allowed for some cycles.
Control Lock
You can lock the controls to prevent any selections from being made. Oryou can lock the controls after you have starLeda cycle. Children
cannot accidentally start the washer by touching buttons with this option selected.
To lock the washer controls, pressand hold both the Soak and Extra Rinse buttons for 5 seconds. Thecontrol lock icon will light up when it
ison.
To unlock the washer controls, pressand hold both the Soak and Extra Rinse buttons for 5seconds.
NOTE: The Power button can still be used when the machine is locked.
Variable Signal
Use the Variable Signal button to change the volume of the end of cycle signal. Press the button until you reach the desired volume (high,
medium, low) or off.
My Settings
Asthe cycle selector knob isturned, the Soil, Tamp and Spin settings change to automatic pre-set default settings. Ifyou desire a different
setting, select the desired options or changes to cyclesettings. Pressand hold the My Settings button for 5 seconds,the washer will save
these settings for that cycle and theVand My Settings button will light when active. In the future, when you turn the selector knob to that
cycle,your settings will beautomatically recalled.To temporarily (i.e.for this load) return to the pre-set default settings,press the My Settings
button for 1/2 second.Thestatus hearLV and button lights will turn off and the options will change back to these defaults. Tomake these
default settings permanent, hold the My Settings button again for 5 seconds to make them your preferred settings (the lights will turn back
on).NOTE: My Settings includes Stain Removal Guide but NOT Delay Wash or Variable Signal.
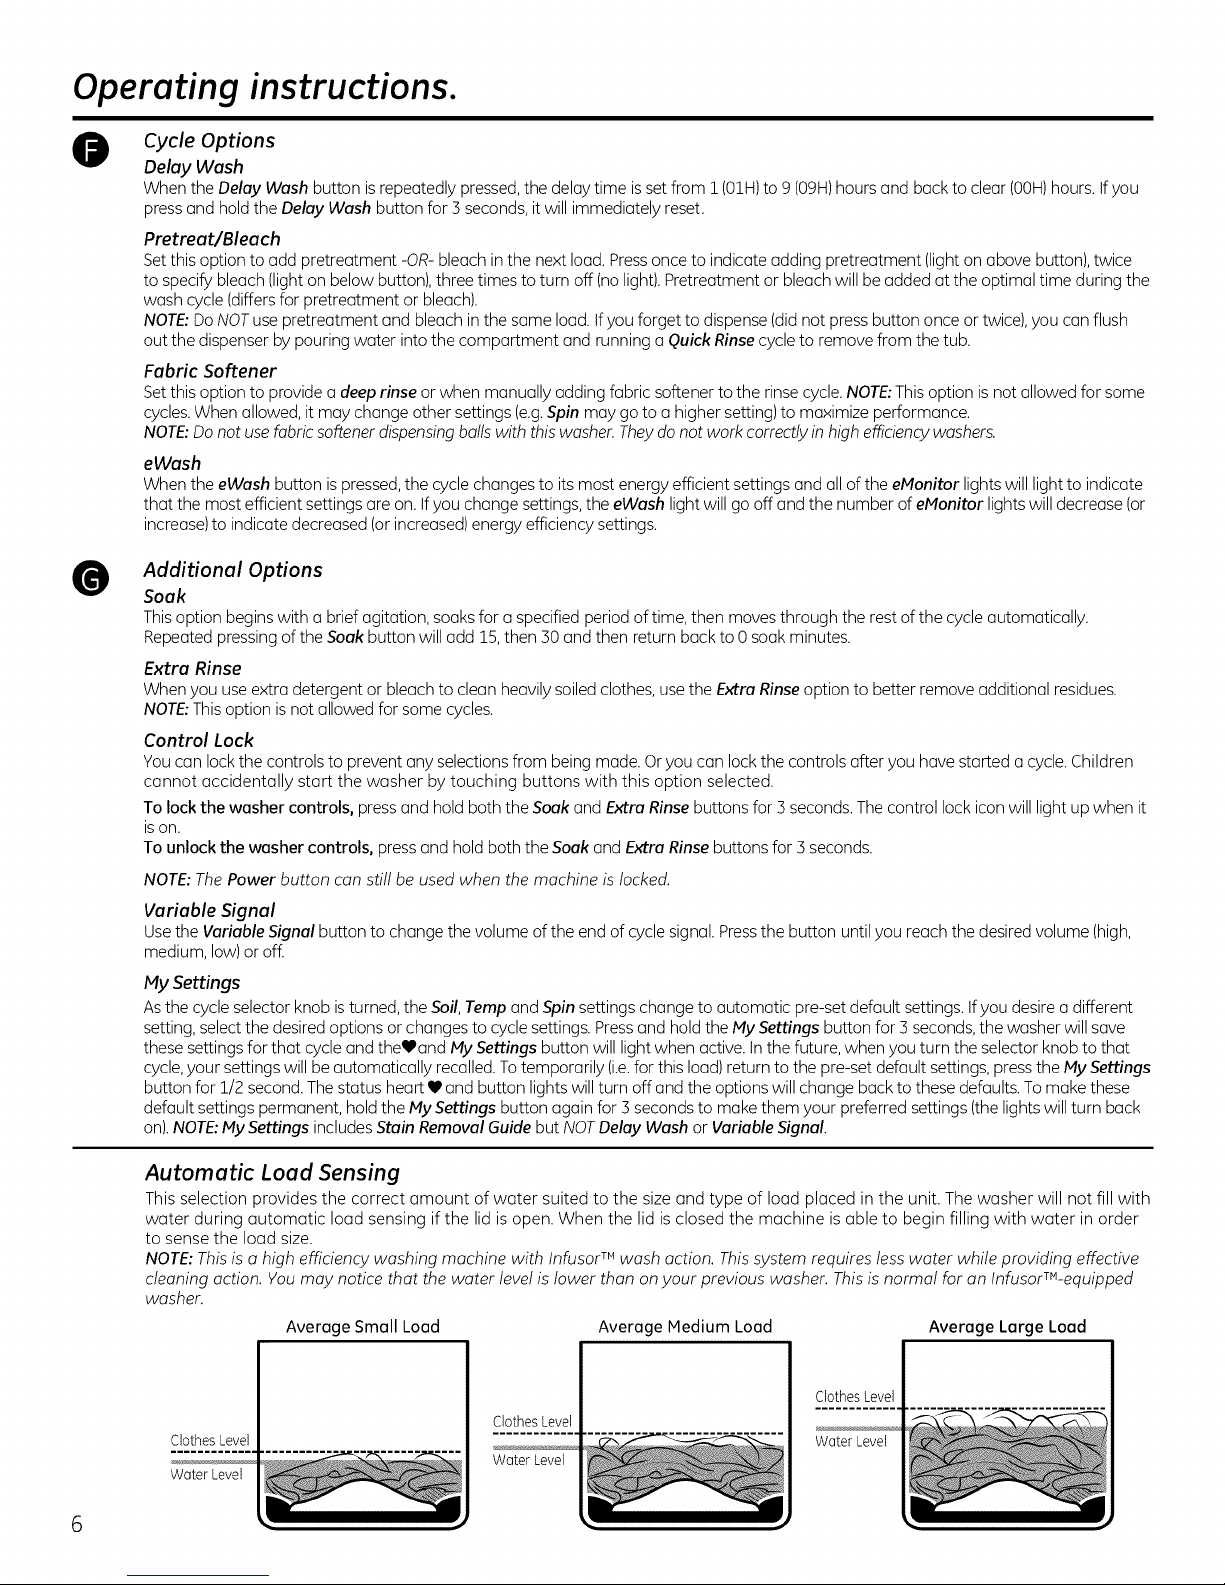
Automatic Load Sensing
This selection provides the correct amount of water suited to the size and type of load placed inthe unit. The washer will not fill with
water during automatic load sensing if the lid is open. When the lid isclosed the machine is able to begin filling with water in order
to sense the load size.
NOTE: Thisis a high efficiency washing machine with Infuser TM wash action. Thissystem requires less water while providing effective
cleaning action. You may notice that the water level is lower than on your previous washer. This is normal for an lnfusorm-equipped
washer.
Average Small Load
ClothesLevelI
Water Level
6
ClothesLevel
Water Level
Average Medium Load
Average Large Loud
ClothesLevel
Water Level
Page 7
About washer features. GEAppliances.com
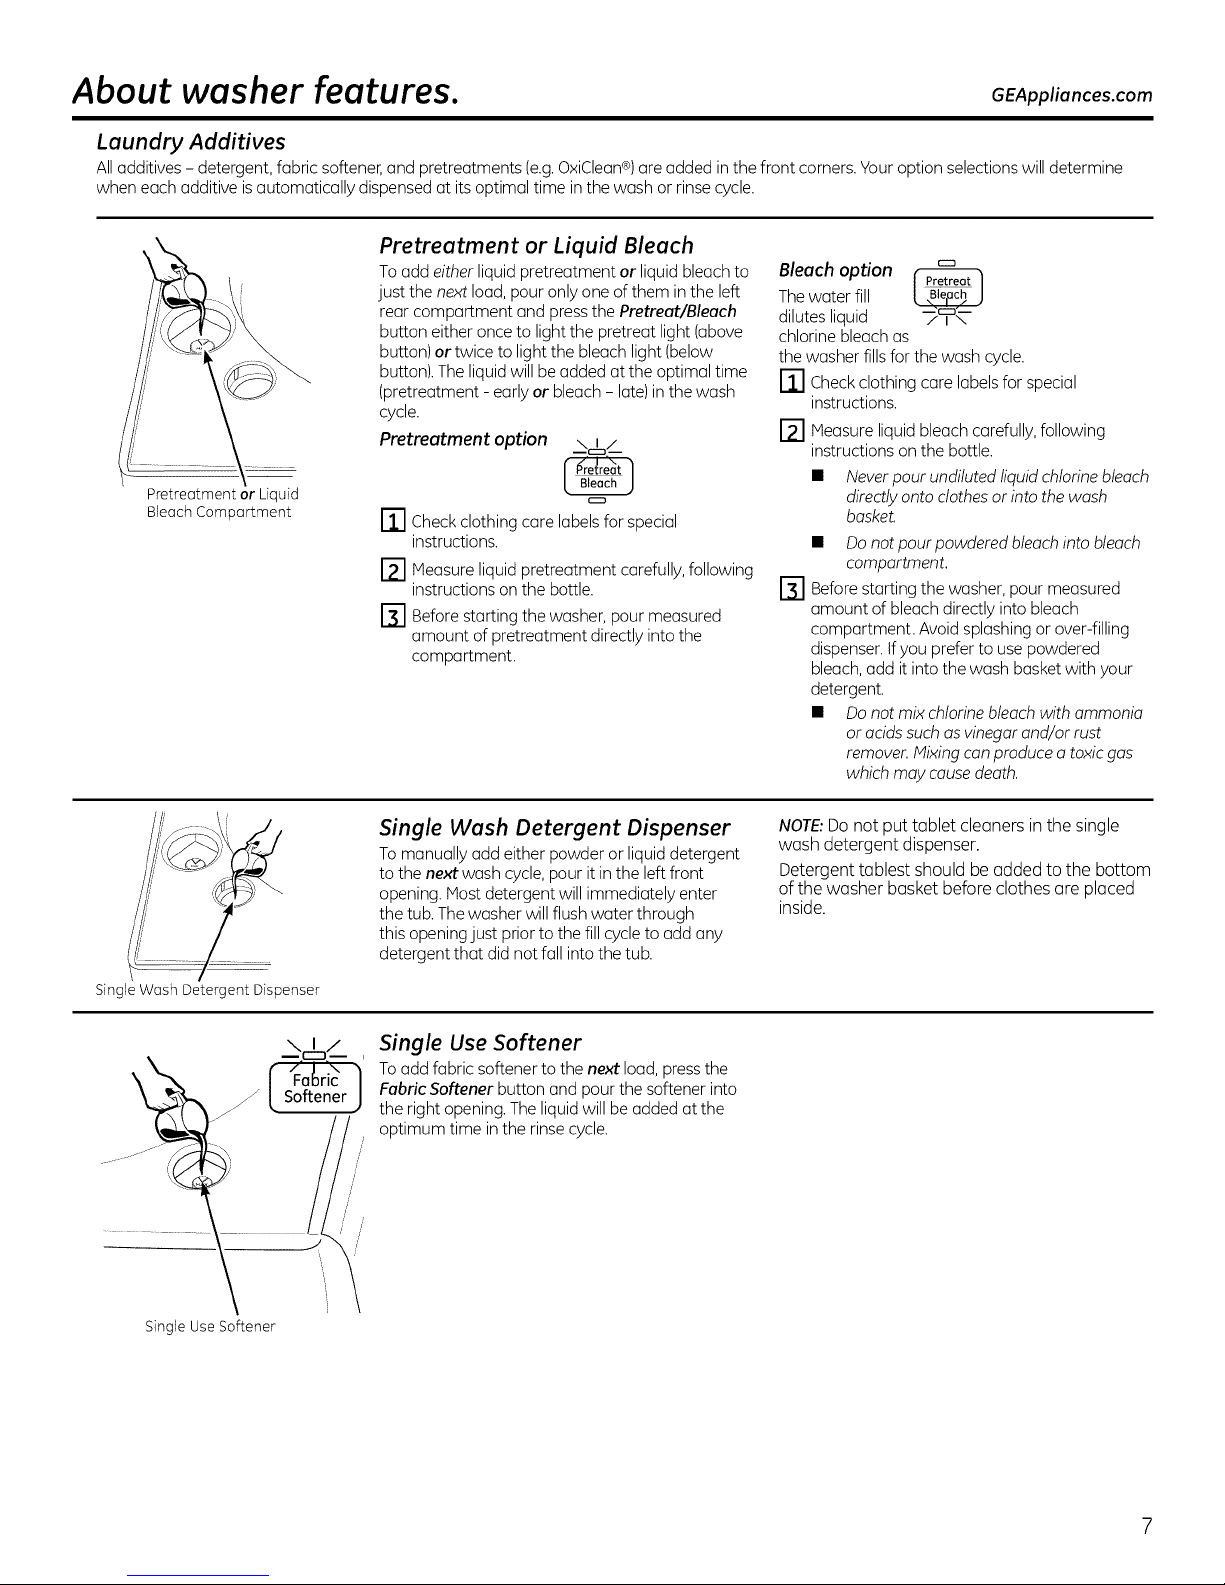
Laundry Additives
Alladditives - detergent, fabric softener,and pretreatments (e.g.OxiClean®)areadded inthe front corners. Youroption selections will determine
when each additive is automatically dispensed at its optimal time in the wash or rinse cycle.
Pretreatment or Liquid Bleach
Toadd either liquid pretreatment or liquid bleach to
Pretreatment or Liquid
Bleach Compartment
just the next load, pour only one of them in the left
rear compartment and pressthe Pretreat/Bleach
button either once to light the pretreat light (above
button) or twice to light the bleach light (below
button).The liquid will beadded at the optimal time
(pretreatment - early or bleach - late) in the wash
cycle.
Pretreotment option _/__
r22_
r_ Check clothing care labelsfor special
instructions.
r21 Measure liquid pretreatment carefully, following
instructions on the bottle.
r31 Before starting the washer, pour measured
amount of pretreatment directly into the
compartment.
Thewater fill
Bleach option
dilutes liquid
chlorine bleach as
the washer fills for the wash cycle.
r_ Checkclothing care labelsfor special
instructions.
[] Measureliquid bleach carefully,following
instructions on the bottle.
• Neverpour undiluted liquid chlorine bleach
directlyonto clothes or into the wash
basket.
• Donot pour powdered bleach into bleach
compartment.
Beforestarting the washer, pour measured
B1
amount of bleach directly into bleach
compartment. Avoid splashing or over-filling
dispenser.If you prefer to use powdered
bleach,add it into the wash basket with your
detergent.
• Donot mix chlorine bleach with ammonia
or acidssuch as vinegar and/or rust
remover.Mixing can produce atoxic gas
which may cause death.
Single Wash Detergent Dispenser
_t -- i
Fal_ric
Softener
Single Use Softener
Single Wash Detergent Dispenser
Tomanually add either powder or liquid detergent
to the next wash cycle,pour it in the left front
opening. Host detergent will immediately enter
the tub. The washer will flush water through
this opening just prior to the fill cycle to add any
detergent that did not fall into the tub.
Single Use Softener
Toadd fabric softener to the next load, pressthe
Fabric Softener button and pour the softener into
the right opening.The liquid will be added at the
optimum time in the rinse cycle.
NOTE:Do not put tablet cleaners inthe single
wash detergent dispenser.
Detergent tablest should be added to the bottom
of the washer basket before clothes are placed
inside.
Page 8

Loading and using the washer.
Always follow fabric manufacturer's core label when laundering.
Sort by color (whites,lights,colors),soillevel, and whether the fabric produces lint (terry cloth,
SortingWashLoads
fabric type (sturdy cottons, easy care, delicates) chenille)or collects lint (velveteen,corduroy).
DONOTwashfabricssoiledwith flammableliquidsor cleaningsolvents.
Nowashercan completelyremoveoil.
DONOTdry anythingthat has ever had anytype ofoil on it(includingcookingoils).
Doingso can resultin death,explosion,or fire.
II
Fire Hazard
ProperUseof Detergent
Usingtoo little or too much detergent is a common
cause of laundry problems.
Uselessdetergent ifyou have soft water, a smaller load
or a lightly soiled load.
Forspots,apply pre-treatment to itemsas recommended
on the productlabel.Application shouldbe made in
the basketto preventoverspraywhich may causethe
coloring on the lid or graphicsto fade.
GErecommends the useof High Efficiency
detergents in all Energy Star rated washers.
HEdetergents are formulated to work with low water
wash and rinse systems. HEdetergents reduce
the oversudsing problems commonly associated
with regular detergents.
When using high efficiency or concentrated detergents,
consult the product label to determine amount required
for optimum performance. Excessivedetergent will
negatively impact wash performance.
LoadingtheWasher
Load dry items loosely in the washer basket. For best
results,load itemsevenly and looselyaround the
outside of the basket.Toadd items after washer has
started, press Unlock Lid, lift the lidand submerge
additional items around the outside of the basket. Close
the lid and pressStart to resume.
Loading Examples*
JEANS
3 Jeans
5 Work Wear Shirts
/4Work Wear Pants
8
TOWELS/SHEETS
2 Bath Sheets
5 Bath Towels/
12 Washcloths
6 Hand Towels/
2 Terrycloth Bath Mats
OR
2 Flat Queen-Sized
Sheets
2 Fitted Queen-Sized
Sheets
/4Pillowcases
NORMAL
/4Pillowcases
2 Hand Towels
2 Flat Sheets/
2 Fitted Sheets
2 Bath Towels/
/4Washcloths
6 Shirts (Men's
or Women's)
/4Pair Pants (Khakis
7 Pairs of Boxers
/4Pairs of Shorts
/4Pairs of Sweatpants
/4Sweatshirts
7 Pairs of Socks
• Do not place large items such as sheets,blankets
and towels acrossthe InfusorTM. Loadthem around
the outside of the basket.
• Do not wash fabrics containing flammable materials
(waxes,cleaning fluids, etc.).
• Donot put lawn or sofa cushions into the washer as
they are too bigto move.Remove outer coversand
ONLYwash them.
SPEEDWASH
(2-4 GARMENTS)
2CasualWear
WorkShirts
ZPairCasualWear
WorkPants
3SoccerUniforms
OR
or Twills)
5T-shirts
OR
6T-shirts
2 Hoodies
DELICATES*
7 Bras
7 Panties
3 Slips
2 Camisoles
/4Nightgowns
*Using a nylon mesh
bag for small items is
recommended.
OR
Page 9
About Appliance Communication. GEAppliances.com
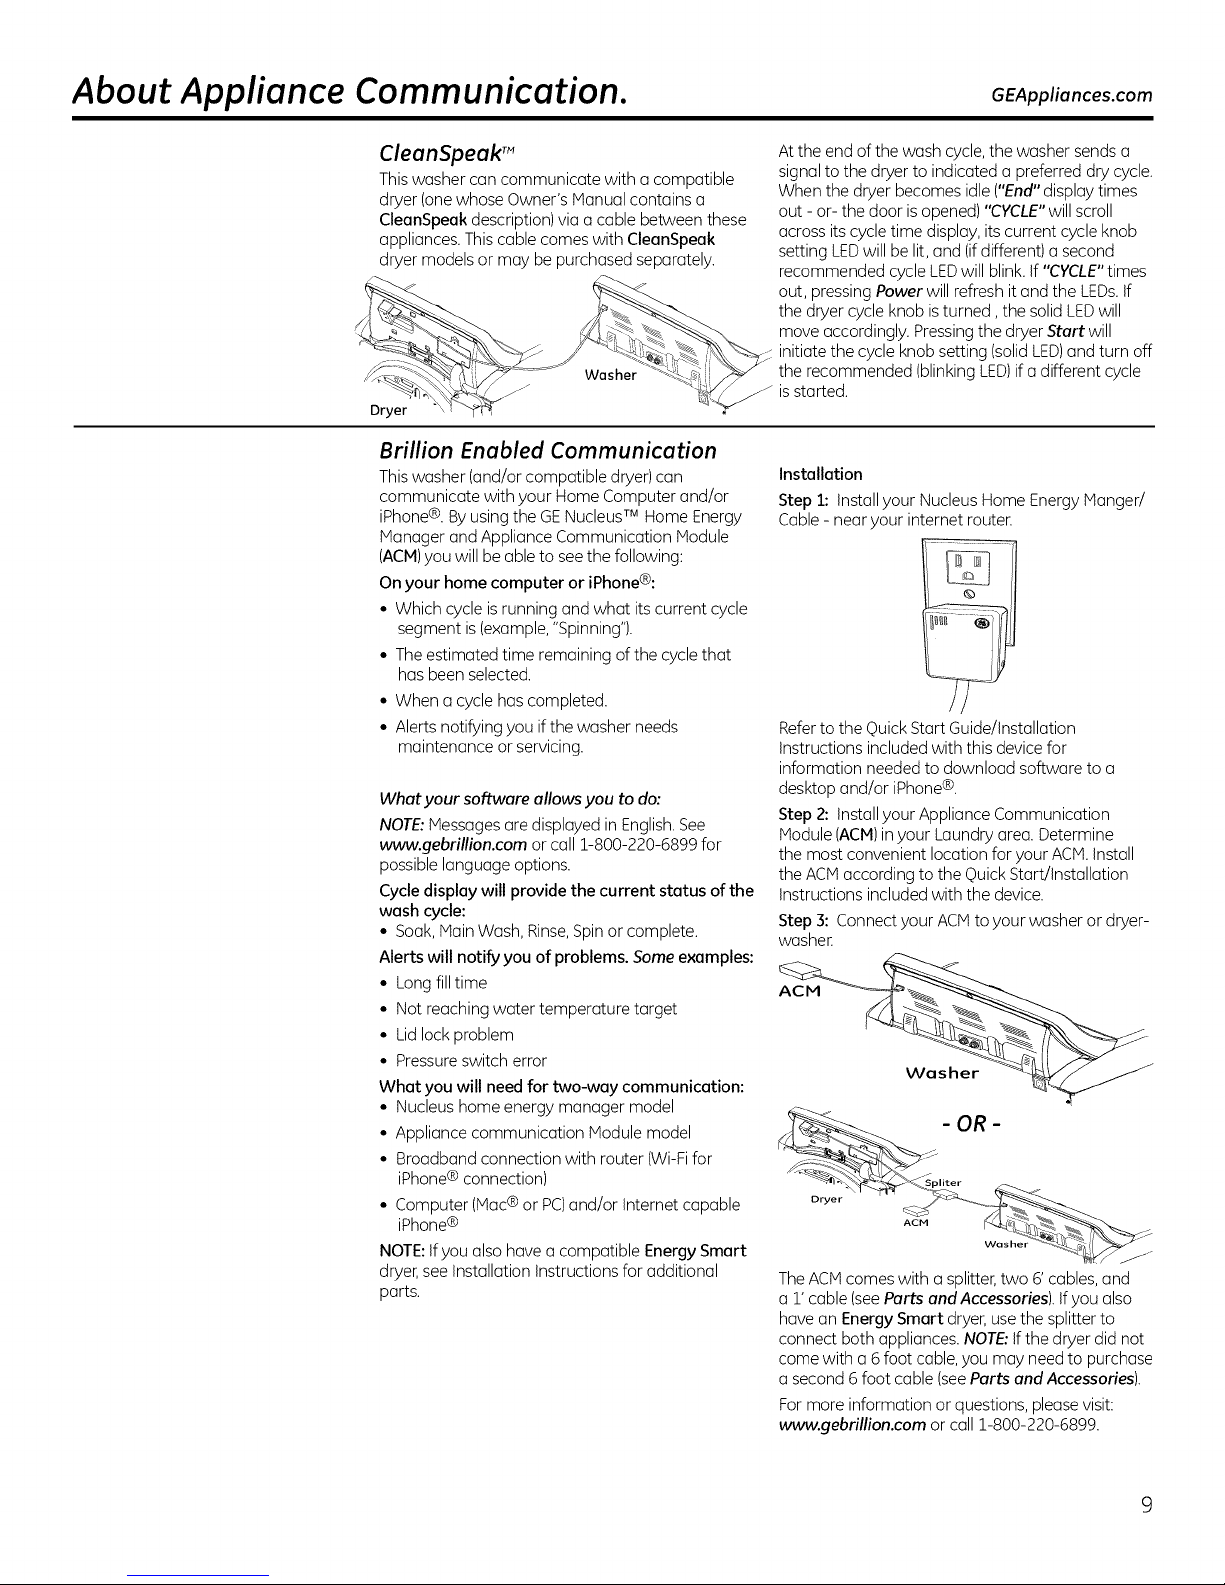
CleanSpeak"
Thiswasher can communicate with a compatible
dryer (one whose Owner's Manual contains a
CleonSpeok description) via a cable between these
appliances. Thiscable comes with CleonSpeok
dryer models or may be purchased separately.
Washer
Dryer
Brillion Enabled Communication
Thiswasher (and/or compatible dryer)can
communicate with your Home Computer and/or
iPhone®. By using the GENucleusTM Home Energy
Manager and Appliance Communication Module
(ACM)you will be able to seethe following:
On your home computer or iPhone®:
• Which cycle is running and what its current cycle
segment is(example,"Spinning").
• The estimated time remaining of the cycle that
has been selected.
• When a cycle has completed.
• Alerts notifying you ifthe washer needs
maintenance or servicing.
What your software allows you to do:
NOTE:Messages are displayed in English.See
www.gebrillion.com or call 1-800-220-6899 for
possiblelanguage options.
Cycle disploy will provide the current status of the
wosh cycle:
° Soak,Main Wash, Rinse,Spinor complete.
Alerts will notify you of problems. Some exomples:
• Longfill time
• Not reaching water temperature target
° Lidlock problem
• Pressureswitch error
Whot you will need for two-woy communication:
• Nucleus home energy manager model
• Appliance communication Module model
• Broadband connection with router (Wi-Fifor
iPhone® connection)
• Computer (Mac® or PC)and/or Internet capable
iPhone®
NOTE:Ifyou also have a compatible EnergySmort
dryer,see Installation Instructions for additional
parts.
Atthe end of the wash cycle,the washer sends a
signal to the dryer to indicated a preferred dry cycle.
When the dryer becomes idle ("End" display times
out - or- the door isopened) "CYCLE"will scroll
acrossits cycle time display, its current cycle knob
setting LEDwill be lit, and (ifdifferent) asecond
recommended cycleLEDwill blink. If "CYCLE"times
out, pressing Power will refresh it and the LEDs.If
the dryer cycle knob isturned, the solid LEDwill
move accordingly. Pressingthe dryer Start will
initiate the cycle knob setting (solid LED)and turn off
the recommended (blinkingLED)if a different cycle
isstarted.
Instollation
Step 1: Install your Nucleus Home Energy Manger/
Cable - near your internet router.
Referto theQuick Start Guide/Installation
Instructions included with this devicefor
information needed to download software to a
desktop and/or iPhone®.
Step 2: Installyour Appliance Communication
Module (ACM)in your Laundry area. Determine
the most convenient location for your ACM.Install
the ACMaccording to the QuickStart/Installation
Instructions included with the device.
Step 3: Connect your ACMto your washer or dryer-
washer
Wosher
__ - OR -
--___Spli
jJ
TheACMcomes with a splitter,two 6'cables, and
a 1' cable (seeParts and Accessories). Ifyou also
havean Energy Smart dryer, usethe splitter to
connect both appliances.NOTE:If the dryer did not
come with a 6foot cable,you may needto purchase
a second 6foot cable(seeParts and Accessories).
For more information or questions, pleasevisit:
www.gebrillion.com or call 1-800-220-6899.
Page 10
About Appliance Communication.
Energy Smart TM
EnergySmart enables your washer to reduce
energy consumption during periods of high energy
costs. Ifyou live in an area where your power
provider charges different rates at various times of
the day,your washer can inform you when you are
paying the highest rate. TheEnergy Smart icon will
illuminate on the washer control panel,the cycle
time will display "ES",and the operation will be in
a delay mode. Thewasher will delay start (up to 4
hours)until the rate goes down. You can override
this feature by holding the Delay Wash button for
3 secondsto cancel and run it at your convenience
(immediately or delayed 1-9hours).
What you will need:
• Smart Meter to communicate with your washer
(callyour power provider)
• An EnergySmart washer (likethis one)
• An Appliance Communication Module (ACM)
Installation:
Step 1:Power provider installs a Smart Meter
Steps2 & 3: Installan ACM.Seethe Brillion Enabled
Communication section.
l0
Page 11

Care and cleaning of the washer. GEApp/iances.com
Wash Basket: Leove the lid open offer woshing to ollow
moisture to evoporote. Ifyou wont to cleon the bosket,
use o cleon, soft cloth dompened with liquid detergent;
then rinse. (Do not use horsh or gritty cleoners.)
Use the BASKETclean cycle:
Using the woshing mochine in o humid spoce for o long
period of time moy leod to o buildup of block mold ond
germs inthe oir inside the wosher bosket ond offect your
heolth. If you cleon the wosher tub regulorly on o monthly
bosis using BASKETclean it will keep the wosher bosket
cleon for hygienic use.
1 Add tub cleoner or lime scole remover directly into the
wosher bosket.
• Detergent moy remoin in the wosher tub offer
cleoning.
• When you use liquid chlorine bleach, Iood it into the
liquid chlorine bleoch comportment.
• When you use a powdered cleaner, odd it into the
single wosh detergent dispenser. Seethe Single
Wash Detergent Dispenser section.
• When you use cleaning tablets, ploce them directly
into the wosher tub. (Do not odd toblet cleoner to
the single wosh detergent dispenser.) See the Single
Wash Detergent Dispenser section.
2
Press the Power button.
3
Turn the selector knob to BASKETclean.
4 Press the Start button.
NOTES:
• Neverloud luundrywhile usingBASKETclean.Theluundry
moy becomedumoged or becomecontominoted.Pluke
sureto cleonthe wosherbosketwhen it isempty.
• It isrecommendedto leovethe lid openoffer finishingthe
luundryto keepthe tub cleon.
• It isrecommendedthot BASKETcleanshouldbe repeoted
monthly.
• If mildew or musty smellolreodyexists,run BASKETclean
for 5 consecutiveweeks.
G/ass Lid (on some models): Use o cleon, soft cloth
dompened with o vinegor ond woter solution.
Fill Hoses: GE recommends chonging the hoses every
5 yeors.
Exterion Immediotely wipe off ony spills. Wipe with domp
cloth. Try not to hit surfoce with shorp objects.
Interior: The occosionol use of o cycle thot contoins
bleoch will keep the inside of the wosher cleon.
Moving and Storage: Askthe service techniciun to remove
woter from droin pump ond hoses. See the Instollotion
Instructions pocked with product for informotion on how
to reinstoll the shipping rod to keep the tub stotionory
when moving the wosher. For more informotion, visit
GEAppliances.com or coil BOO.GE.CARES(800.452.2757).
Do not store the wosher where it will be exposed to weother.
Long Vacations: Besure woter supply is shut off ot
foucets. Droin oll woter from hoses if weother will be
below freezing.
11
Page 12

Before you call for service...
Save time and money! Review the charts on the following pages,
_ roubleshooting Tips
WATER Possible Causes What To Do
or visit GEAppliances.com. You may not need to call for service.
Short spray and delay
after pushing the Start
button
Water level seems low
Banging sound during
drain
Too many suds
Water leaks Type of detergent • Switchto HE_ detergent.
Water temperature Cooler water temperatures • New laundry detergents have been formulated to work
seems incorrect provide improved energy with cooler water temperatures without affecting wash
Water pumped out before Lid lifted or cycle was put in • Resetcycle.
cycle is complete pause for over 8 hours
Water won't drain Drain hose is kinked or • Straighten drain hose and make surewasher isnot sitting on it.
Washer pauses at the Thisis normal • Thewasher issensing the load.
beginning of cycles
Washer pauses during The Auto Soak Option • This is normal. The washer alternates between agitate and
wash cycle was chosen soak during these cycles to get your clothes cleaner with
Washer pauses during This is normal • Thewasher may pause during the spin cycleto remove
spin cycle soapy water more efficiently.
12
Lid was opened and closed
between cycle selection and
start
This is normal
Drain stand pipe is too low
Softwater
Too much detergent
Type of detergent • Switchto HE_ detergent.
Using too much detergent • Uselessdetergent. Uselesssoap if you havesoft water,
in washer a smaller load or a lightly soiled load.
Fill hoses or drain hose is • Make sure hose connections are tight at faucets and
improperly connected rubber washers are installed.Make sureend of drain hose
Household drain may • Checkhousehold plumbing. You may need to call
be clogged a plumber.
Drain hose rubs on wall • Makesure drain hosedoes not make contact with the wall.
Constant water pressure • Tightenhoses at the faucets and turn the water off after each use.
to the fill hoses at the • Check condition of the fill hoses;they should be replaced
water source every 5 years.
efficiency performance.
Water supply is turned off • Turn both hot and cold faucets fully on and make sure hoses
or improperly connected are connected to correct faucets. NOTE:Water valves are marked
Woter valve screens are • Turnoff the water source and remove the water connection
stopped up hosesfrom the upper back of the washer. Usea brush or
Cool/Cold Water when • Thisis normal. PerfecTempsenseswater temperature and
selecting Hot optimizes for best results.Cold water isadded periodically
House woter heoter is • Make sure housewater heater is delivering water at
not set properly 120%-140% (48°C-60°C).
improperly connected • Topof drain outlet should be lessthan 6 ft (1.8m)
• Thisis normal. SeeFUNCTIONALITYCHECKin the Safety
Instructions section.
• Water may not cover the top levelof the clothes.
Thisis normal for this high efficiency washer.
• Thedrain hose must exceed 32" height at some point between
the washer back and the drain pipe.
• Trylessdetergent.
• Measureyour detergent carefully. Uselesssoap if you have
soft water, a smaller load or a lightly soiledload.
iscorrectly insertedin and secured to drain facility.
May cause excessivewear on the hose.
"H" and "C"and internal valve screens are color coded.
toothpick to clean the screens inthe machine. Reconnect
the hosesand turn the water back on.
when hot is selected.
above floor.
lesswear.
Page 13

GEAppliances.com
OPERATION Possible Causes What To Do
Washer does not fill This is normal • The lid must be closed for washer to fill or operate.
when lid is open
Washer won't operate Washer is unplugged • Hake sure cord is plugged securely into a working outlet.
Water supply is turned off • Turn both hot and cold faucets fully on.
Controls (]re not set properly • Check controls.
Lid is openisafety feature • Close lid and press Start.
prevents agitation and
spinning when lid is up
Circuit breaker/fuse is • Check house circuit breakers/fuses. Replace fuses or
tripped/blown reset breaker. Washer should have a separate outlet.
Electronics need to be reset • Unplug washer, wait 2 minutes, plug back in and press Start.
Start was not pressed • Press Start.
Lid magnet missing • Call for service.
Unexplained time and/or Changing options • This is normal. Several options will change other options to
settings changes maximize washer performance.
Movement inside machine Shifting mechanism is • When the machine is manually turned off, the shifter will
when shut off disengaging the motor disengage the motor before completely shutting down.
Basket seems loose Basket moves or rotates freely • Washer basket does not have a traditional brake. Basket will
PERFORMANCE Possible Causes What To Do
Clothes too wet Incorrect cycle selected. • Make sure the cycle selected matches the load you are
Wash loud out of balance • Redistribute load in washer and run through Drain &Spin cycle.
Colored spots Incorrect use of fabric • Check fabric softener package for instructions and follow
softener directions for using dispenser.
Dye transfer • Sort whites or lightly colored items from dark colors.
Grayed oryellowed Detergent (]mount • Be sure to follow detergent manufacturer's directions.
clothes Herd water • Usea water conditioner like Calgon brand or install
Water is not hot enough • Make sure water heater is delivering water at
Washer is overloaded • Loosely load clothes no higher than the top row of holes in the
Dye transfer • Sort clothes by color. If fabric label states wash separately,
Lint or residue on Clothes (]re air or line dried • If you do not dry your clothes with a clothes dryer, your
clothes clothes may retain more lint.
Incorrect sorting • Separate lint producers from lint collectors.
Washing too long • Wash small loads for a shorter time than larger loads.
Detergent not dissolving • Rewash using Quick Rinse cycle with Extra Rinse option.
Overloading • Loosely load clothes inthe washer basket. For best results, load
Incorrect use of fabric
softener
If lid is raised before the motor isdisengaged, it will resume
when lid is closed.
move freely. This is normal.
washing. Somefabrics will feel wetter when rinsed with cold water.
• Make sure you have selected the Fabric Softener option.
• Pretreat stain and rewash using Quick Rinse cycle before drying.
a water softener.
120°F-140°F (48°C-60°C).
washer basket. For best results, load items around the outside
of the basket.
unstable dyes may be indicated.
• Try a liquid detergent.
• Use warmer water temperature.
items around the outside of the basket.
• Check fabric softener package for instructions
and follow directions for using dispenser.
• Make sure you have selected the Fabric Softener option.
13
Page 14

Before you coil for service...
Troubleshooting Tips
PERFORMANCE (conL) Possible Causes What To Do
Pilling Result of normal wear on poly- • Whilethis is not caused by the washer, you can slow the
cotton blends and fuzzy fabrics pilling processby washing garments insideout.
Snags, holes,tears, rips Pins,snaps, hooks, sharp • Fastensnaps,hooks,buttons and zippers.
or excessivewear buttons, belt buckles, • Remove loose items likepins,objectsin pockets and
zippers and sharp objects sharp buttons.
left in pockets • Turn knits(which snag easily)inside out.
Undiluted chlorine bleach • Check bleach package instructions for proper amount.
• Neveradd undiluted bleachto wash or allow clothes to
come in contact with undiluted bleach.
Chemicals like hair bleach or • Rinseitemsthat may havechemicals on them before
dye, permanent wave solution washing. UseQuick Rinse cyclewith Extra Rinseoption.
Wrinkling Incorrect wash and • Match Cycleselectionto the type of fabric you are washing
dry cycles (especiallyfor easy care loads).
Improper sorting • Avoid mixing heavy items (likework clothes)with light items
(likeblouses).
• Trya fabric softener.
Overloading or incorrect • Looselyloadclothesinthe washer basket.
water level
Repeated washing in • Wash inworm or cold water.
water that istoo hot
Bleach left in dispenser Didn't start or finish cycle • Runeither a BASI(ETcleunora Quick Rinse cycle(with Bleach
after adding bleach option)to clean out the dispenser.Inthe future, make sure to
selectBleach option when adding bleach.
SOUNDS Possible Causes Reason
Washer seems Thisis normal • Thewasher isvery quiet during portions of the wash cycle.
too quiet
"Netullic clicking" Shifter mechanism is • The drive system will engage at the start of agitate and
engaging or disengaging disengage when agitate iscomplete. This occurs multiple
times during the wash.
Back and forth "swoosh" Electric motor reversing • Thismachine has a drive system that doesn't use gears.
or light "clicking" sound direction Thissound isthe motor rotating backand forth to clean
during agitate your laundry.
Quick short agitation Clothing redistribution • At the endof agitate, the motor makes short agitation strokes
sounds at end of agitate to redistribute the load.
"Click" when water Relay switch • Therelay makes a click sound when activated. The water
stops filling levelactivates the relay and stopsfilling.
"Clicking" behind Control Automatic Temperature • Two valves mix cold and hot water. The "clicking" iswhen either
Panel during fill Control Valve valve turns on oroffto raise or lower the fill water temperature.
Water flow changes Automatic Temperature • Two valves mix cold and hot water. Theflow changes when either
during fill Control Valve valve turns on oroffto raise or lower the fill water temperature.
Plotor "whining up" or Motor rompingup/down • Themotor will speed up incrementally during the spin cycle.
"coasting down" in spin during spin cycle When spin iscomplete, itwill coast until it stops.
"Humming" Water drain pump • Thedrain pump will make a humming sound when pumping
outwater after agitation stops and continue until spin is complete.
"Gurgling" Water drain pump • When the pump starts drawing inair,It starts to gurgle.
Thewasher should then begin spinning and the sound will
continue until it isdone spinning.
Water "swishing" Thisis normal • Thiswasher usesa InfusorTM wash action.Water swishingwhile
the unit isagitating isnormal,especiallywith smaller loads.
Washer is noisy Washer is uneven • Tolevel the washer, adjust the leveling legsby rotating the
individual leg in the proper direction for up or down.
14
Page 15

GEWasher Warranty.
All warranty service provided by our Factory .%rvice Centers,
or an authorized Customer Care®technician. Toschedule service
on-line visit us at GEAppliances.com, or call 800.GE.CARES
(800.432.2737). Please have serial number and model number
available when coiling for service.
For The Period Of'.
One Year
From the date of the
original purchase
We Will Replace:
Any factory specified part of the washer which fails due to a defect in materials or workmanship.
During this limited one-year warranty, we willalso provide, free of charge, all labor and related
service to replace the defective part.
What Is Not Covered:
• Service trips to your home to teach you how to use
the product.
• Improper installation, delivery or maintenance.
• Failure of the product if it is abused, misused, or
used for other than the intended purpose or used
commercially.
• Replacement of house fuses or resetting of circuit breakers.
• Products which are not defective or broken, or which are
working as described in the OwneKs Manual.
• Damage to the product caused by accident, fire, floods
or acts of God.
Staple your receipt here.
Proof of the original purchase
date is needed to obtain service
under the warranty.
• Incidental or consequential damage caused by possible
defects with this appliance.
• Defects or damage due to operation in freezing
temperatures.
• Damage caused after delivery.
• Product not accessible to provide required service.
EXCLUSION OF IMPLIED WARRANTIES--Your sole and exclusive remedy is product repair as provided in this Limited
Warranty. Any implied warranties, including the implied warranties of merchantability or fitness for a particular purpose,
are limited to one year or the shortest period allowed by law.
Thiswarranty is extended to the original purchaser and any succeedingowner for products purchased for home usewithin
the USA.If the product islocatedin an area where service bya GEAuthorized Servicerisnot available,you may be responsible
for a trip chargeor you may berequired to bringthe product to an Authorized GEServicelocation. InAlaska, the warranty excludesthe
costof shipping or service callstoyour home.
Ifyou needto order replacementparts, we recommend that you only use GEfactory specifiedparts. Theseparts are designed to work
with your appliance and are manufactured and tested to meet GEspecifications.
Some states do not allow the exclusion or limitation of incidental or consequential damages. This warranty gives you specific legal
rights, ond you may also have other rights which vary from state to state. To know what your legal rights are, consult your local or
state consumer affairs office oryour state's Attorney General.
Warranton General Electric Company. Louisville, KY 40225
15
Page 16

ConsumerSupport.
GEAppliances Website GEAppliances.com
Have a question or need assistancewith your appliance? Trythe GEAppliancesWebsite 24 hours a day,
any day of the year! Forgreater convenience and faster service,you can now download Owner's Manuals,
order parts or even schedule serviceon-line.
Schedule Service GEAppliunces.com
Expert GErepair service is only one step away from your door. Get on-line and schedule your service at
your convenience any day of the year! Or call 800.GE.CARES(800.452.2757) during normal business hours.
RealLifeDesign Studio GEAppliences.com
GEsupports the Universal Designconcept-products, servicesand environments that can be used by
people of allages,sizesand capabilities. We recognize the need to design for a wide rangeof physicaland
mental abilities and impairments. For details of GE'sUniversalDesignapplications, including kitchen design
ideasfor people with disabilities, checkout our Website today. Forthe hearing impaired, pleasecall 800.TDD.
GEAC(800.833.4322).
Extended Warranties
Purchase a GEextended warranty and learn about special discounts that are available while your warranty
isstill in effect. You can purchase it on-line anytime, or call 800.626.222/4during normal businesshours.
GEConsumer Home Serviceswill still be there after your warranty expires.
PartsandAccessories
Individuals qualified to service their own appliances can have parts or accessoriessent directly to their homes
(VISA,MasterCard and Discovercards are accepted).Order on-line today, 2/4hours every day or by phone
at 800.626.2002 during normal businesshours.
If you need to order replacement parts,we recommend that you only useGEfactory specified parts.These
parts are designed to work with your appliance and are manufactured and tested to meet GEspecifications.
Instructions contained in this manual cover procedures to be performed by any user. Other servicing
generally should be referred to qualified service personnel. Caution must be exercised, since improper
servicing may cause unsafe operation.
Contact Us
If you are not satisfied with the service you receivefrom GE,contact us on our Website with all the details
including your phone number, or write to: General Manager, Customer Relations
GEAppliances,Appliance Park
Louisville,KY/40225
GEAppliunces.com
GEApplianceparts.com
GEAppliunces.corn
Register your new appliance on-line--at your convenience! Timely product registration will allow for
RegisterYourAppliance GEAppliunces.com
enhanced communication and prompt service under the terms of your warranty, should the need arise.
You may also mail inthe pre-printed registration card included in the packing material.
16
Page 17

GEAppliances.com
Instrucciones
de seguridad .................. 2,s
Instrucciones de operaci6n
C6mo cargar y usar
la lavadora ......................... 8
Comunicaci6n del
Electrodom6stico ........... 9, 10
Cuidado y limpieza
de la lavadora .................... 11
Funciones .......................... 7
Instrucciones de uso ............ 4-6
Consejospara la soluci6n
de problemas .............. 12-14
Soporte al consumidor
Garantia .......................... 1S
Piezas y accesorios ........... B, 16
Soporte al consumidor ............ 16
ENERGYSTAR
Como socio de Energy Star®,GE
ha confirmado que este producto
cumple las directrices de Energy
Star®relativas al rendimiento
energ6tico.
Escriba el n4mero de modelo
y de serie aqui:
No. de modelo
No. de serie
bajo la puerta
Impreso en los Estados Unidos
Puecteencontrarlos _
de la lavadora.
49-90458 09-12 GE
Page 18

INFORMACION DESEGURIDAD IMPORTANTE.
LEA TODAS LAS INSTRUCCIONES ANTES DE USAR.
_i, Estees elsfmbolode alerta de seguridad.Elmismoalertasabrepotencialesriesgosque lepuedenproducirla muerte o lesiones
tanto a ustedcoma a arras personas.Todoslosmensajesde seguridadestar6na continuaci6ndels[mbolode alertade seguridad
y con la palabra"PELIGRO","ADVERTENCIA"o"PRECAUCION".Estaspalabrassedefinen coma:
Indica una situaci6n deriesgo que, si no se evita, producir6 la muerte o lesionesgraves.
Indica una situaci6n deriesgo que, si no se evita, podria producir la muerte o lesionesgraves.
Indica una situaci6n deriesgo que, si no se evita, podria resultar en lesionesmenores o moderadas.
INSTRUCCIONESIIvlPORTANTESDE SEGURIDAD
Para reducir el riesgo de incendio, explosi6n, descargas el6ctricas o lesiones sabre las personas al usar su
electrodom6stico, siga las precauciones b6sicas,incluyendo Iosiguiente
• Leatodas lasinstruccionesantesde usaresteelectrodom6stico.
• NOlave ni sequeprendas que en farina previa hayan sido secadas, lavadas, mojadas o manchadas con gasolina, solventes
de limpiezaen seco, u otras sustanciasinflamables o e×plosivas,ya quedespidenvapores que sepodrfan encendero e×plotar.
• NOagregue gasolina, solventes de limpieza en seco,u otras sustancias inflamables o explosivas al agua de lavado. Estas
sustancias despiden vapores que sepodrian prender fuego o explotar.
• Bajociertas condiciones, se podr6 producir gas de hidr6geno en un sistema de agua caliente que no fue usado par 2
semanas o m6s. ELGASDEHIDROGENOESUN EXPLOSIVO.Siel sistema de agua caliente no fue usado par dicho periodo,
antes de usar una lavadora, abra todos los grifos de agua caliente y deje que corra agua de cada unodurante varios minutos.
Estoliberar6 cualquier gas de hidr6geno acumulado. Debido a que el gas esinflamable, NOfume ni useuna llama abierta
durante este proceso.
• NOpermita que los ni_osjueguen sabre o dentro de este electrodomestico. Cuando el electrodomestico se use cerca de
ni_os,ser6 necesario supervisarlos de cerca.
• Antes de dejar la lavadora fuera de servicio o de deshacersede 6sta,quite la puerta o la tapa.
• NOintroduzca las manos en el electrodom6stico si el tambor o agitador se encuentra en movimiento. Esperehasta que el
motor se haya detenido completamente antes de abrir la tapa.
• NOinstale ni guarde este electrodom6stico donde quede expuesto alos factores clim6ticos.
• NOmanipule indebidamente los controles.
• No intente reparar ni reemplazar cualquier parte del electrodom6stico o realizar cualquier otto trabajo t6cnico, a menos
que esto sea espec[ficamente recomendado en las instrucciones de mantenimiento del usuario o en instrucciones
publicadas sabre reparaciones del usuario, que entienda y para las cuales posea las destrezas necesarias.
• IVlantengael 6rea alrededor del electrodom6stico libre de materiales combustibles tales coma pelusa, papel,trapos y
quimicos.
• NOintente usar este electrodom6stico si seencuentra dahado, funcionando real,parcialmente desensamblado, o sitiene
partes faltantes o rotas, incluyendo un cable o enchufe dahado.
• Desenchufeel electrodom6stico o apague el disyuntor antes de realizar el servicio t6cnico. Presionarel bot6n Power
(Encendido)oStart/Pause (fnicio/Pausa)NOdesconecta el encendido.
• Nomezcle blanqueador con clarajunto con amoniaco o 6cidos tales coma vinagre y/o removedor de 6×ida.Se podr6 producir
un gas t6xico.
• NOdeje la puerta de la lavadora abierta. Una puerta abierta podr6 atraer a los ni_os a trepar dentro de la lavadora.
• Elproceso de lavado puede reducir el tiempo previoa la inflamaci6n de los tejidos.Sigacon atenci6n las instrucciones de
lavadoy cuidado del fabricante de la prenda.
• Paraacceder alas instruccionesde conexi6n a tierra, lea los "RequisitosEl6ctricos"ubicados en las Instruccionesde Instalaci6n.
GUARDE ESTAS INSTRUCCIONES
Page 19

GEAppliances.com
INSTALACIONCORRECTA
La lavadorase debeinstalar y colocar correctamente de acuerdocon lasinstruccionesde instalaci6n,antes de utilizarla.Si no
recibi6 la hoja con instrucciones de instalaci6n, puede obtener una visitando GEAppliences.com o Ilamando al
800.GE.CARES(800.452.2757).
• AsegOresedeque la manguera de agua caliente est# Piezasy accesorios
conectada a la v61vula"H"(interna proyectada de color
rojo)y que la manguera de agua fr[a est# conectada a la
v61vula"C"(interna proyectada de color azul).
Instaleo almacenela lavadoraen un lugardonde
no est6 expuestaa temperaturas bajo ceroni alas
inclemenciasclim6ticas,ya que esto puede provocardahos
irreversibleseinvalidarla garant[a.
Conectecorrectamente a tierra la lavadora de conformidad
contodos losc6digosy ordenanzasregulatorias.Sigala
informaci6n de Instrucciones
de instalaci6n.
Estalavadora no incluye mangueras de suministro de
agua.
GErecomienda enf6ticamente el uso de piezas
especificadas de f6brica. A continuaci6n seencuentra
una lista de mangueras de f6brica disponibles para la
compra. Estas mangueras est6n fabricadas y probadas
para cumplir con lasespecificacionesde GE.
GErecomiendaenf6ticamenteel usode manguerasnuevas
de suministrodeagua. Lasmanguerassedesgastanconel
tiempoy debenreemplazarsecada5 a_osparareducirel
riesgodefallasen lasmanguerasydahosprovocadospor el
agua.
Solicffeloson-line hoy mismoa GEAppliuncepurts.com, las
24 horas del d[a o por tel@fonoal 800.626.2002en horario
normal de trabajo.
N6mem de Pieza Accesorio
PM14XIO002
0
PMI4XIO005
WXIOXIO011
WX7XI
DR07XI0002
DRM2E300V0
Mangueras de goma de
suministro de agua de 4 pies
IVlanguerastrenzada de
suministro de agua de 4 pies
Limpiador Tide@para Lavadoras*
Bandeja del Pisode la Lavadora
Cablede 6'
ACM,Divisor,dos Cablesde 6'y
un Cable de 1'
CONTROLDE LA FUNClONALIDAD
4
NOpermita que los ni_osjueguen sobre o dentro de este electrodom@stico.Cuandoel
electrodom@sticose usecerca de ni_os, ser6 necesario supervisarlos de cerca. Si no se siguen
estas instrucciones, se podr@producir la muerte o lesiones personales.
Riesgo en
Espacios
Confinados
• Sila tapa es abierta entre losciclos (es decir,sin pausar y
reiniciarelciclo actual, cambiar ciclos una vez iniciados,
etc.),presionar el bot6n Start (Inicio)har6 que la lavadora
abra el agua fr[a durante 5segundos,seguido de un
retraso de 10 segundos antes de bloquear la tapa e iniciar
el ciclo.
CUANDO NO ESTEEN USO
• CierrelasIlavesde paso minimizar lasfugas en caso
de que se produzca una rotura o grieta. Compruebe el
estado de lasmangueras de Ilenado;GErecomienda el
cambio de las mangueras cada 5 aBos.
• Si latapa es abierta durante este per[odo de 15 segundos,
la palabra Pause IPausa)comenzar6 a moverse a trav6s
de la pantalla. Sedeber6 presionar el bot6n Start (Iniciar)
nuevamente para reiniciar el ciclo.
GUARDE ESTAS INSTRUCCIONES
*Tide@ es una marca registrada de Procter & Gamble. 3
Page 20

Instrucciones de uso.
Esposible qua las funciones y apariencias varien con relaci6n a su modelo a Io largo del manual.
Paso 2
Paso 1
• Agregue el suavizante al
dosificador para suavizante;
para m_s detalles, lea la p_gina 7.
• Agregue el detergente. GE
recomienda el usa de
detergentes de Alta Eficiencia
en todas las lavadoras
clasificaclas par Energy Star.
•Agreguelas prendassin ajustar alrededor
del Infusor TM. Sobrecargar el tambor
puede producir un impacto negativo enel
desempefiodelavado.Consultela p_gina 8
para obtener ejemplos decarga sugeridos.
• Cierre la tapa. NOTA: La lavadora
no comienza a Ilenarse con la tapa
abierta.
Paso 3 @ O.
•Seleccione el tamaSo de carga
y otras opciones de lavado0
incluyendo laopci6n del Suavizante.
• Seleccione el ciclo de lavado.
• Seleccione las opciones incluida
Pretreat/Bleach (Pretratamienta/
Blanqueadar).
Controles
Normal
Whites &_ghtC°l°_ Towels / Sheets
Dark Colors
Heavy Duty Bulky _tems
H_,y so_k •
Pause
lunlocklidl HandWash. . Quick Rinse
Paso 4
(3
CED
•Oprima Start.
Power
Delicates
Speedwash
Stain Removal Guide
tomato o@ grass d_rt
Drain & Spin
Power (Encendidol
Presione para "activar" la pantalla. Si la pantalla esta activa, presione para qua la lavadora quede en el modo inactivo.
NOTA:Presionar POWER(Encendido) no desconecta el electrodom6stico del suministro de corriente.
Start and Pause (Inicio y Pausal
PresioneStart (lnicio)para comenzar el ciclo. NOTA:Latapa se debera cerrar para que la lavadora seIlene y el ciclo comience. Si la
tapa estc_abierta, se visualizarc_"LID" (Tapa)a trav6s de la pantalla. Sila tapa estc_cerrada, la tapa se bloquearc_,eldetergente serc_
dispensado,y "FILL"(Llenar)sevisualizarc_a trav6s de la pantalla.
PresionarStart (lnicio)otra vezharc_Pause (Pausa)el ciclo y la luz del indicador de Start (lnicio)titilar&
Paracontinuar el ciclo, presione Start (Inicio)nuevamente. Sila mc_quinaqueda pausada par mc_sde 2/4horas, el ciclo serc_cancelado. Si el
agua permanece en la mc_quina,seleccioneel ciclo Drain &Spin (Drenary Girar)para drenar el tuba y desagotar elagua de la lavadora.
Q
Display and Status Lights (Pantalla y las Luces de Status (Estatus))
Pantalla:
La pantalla muestra el tiempo restante apraximada hasta el final del ciclo.
NOTA:Eltiempo del ciclo es afectado par el tiempo quetoma Ilenar la lavadora. Estodepende de lapresi6n delagua en su hoga_ El
temporizador "inteligente" "registra" la cantidad de tiempo que tarda en Ilenarse la lavadora y ajusta eltiempo total de forma consecuente.
Adem4s, esta pantalla "mastrar6" el estada de la lavadara:
• bALANCINg Comienzodel ciclo de rebalanceo para redistribuir la ropa. Se detiene unavez completado el rebalanceo.
• CYCLEPrEP Siente eltama_o de la carga seca antes del Ilenado (normal).
• dELAY Cuando Delayed Wash (LavadoRetrasado)esiniciado. Reemplazado con tiempo estimado cuando comienza el ciclo.
• End Findel ciclo actual.
• ES Lavadoraenun inicioretrasado(m6ximode/4horas)esperandoindicesinferioresdecorriente(consultelasecci6nEnergySmart).
• FILL Durante los primeros/45 minutos de un Ilenado,semuestra el tiempo de fin de ciclo estimado Para el resto del tiempo
de Ilenado, "FILL"(Llenado)se muestra hasta que el mismo se completa.
• H20 SUPPLY No puede sentir el nivel del agua (esposible que las vcilvulasest6n apagadas).
• Lid Elciclo se detuvo porque la tapa estciabierta. Cierrela tapa.
• LOAdSenSE Siente eltama_o de lacarga mojada (normal).
• PAUSE Elciclo fue pausado debido a qua la tecla Start/Pause (lnicio/Pausat fue presionado y la lavadora rue configurada en
Lucesde estado del ciclo:
tVtuestrasi la lavadora est6 en el cicloSOAK(Enjuagar),WASH(Lavarl,RINSE(Enjuagar)o SPIN(Girarl.
Las luces de estada de las funcianes indican (lea las secciones Fy G para m6s detalles):
Lafunci6n My Settings (MisConfiguraciones)est6 activada en este ciclo. _ Tapa est6 bloqueada. Consulte
6 Secadoraest6btoqueada- tititar6unavezsi presionacualquierbot6no gira perillade cicto. _ descripci6n Blaquea del Control.
,I0) Lasepal estc_activada. Consulte la descripci6n Variable Signal (SehalVariable). _
EnergysmartEnergySmart fueseieccionada.Consuitesecci6nAcercadela Comunicaci6ndelElectradom_stico.
Pause(Pausa).Presione el bot6n Start (lnicio)nuevamente para reiniciar el ciclo.
Funci6nawash rue seteccionada.
Se
configur6
Ulq
Wash (Lavado con Retraso).
tiempodeDelay
Page 21

GEAppliances.com
Pefilla de Ciclos de Lavado-Selector de Ciclo
@
Elciclo de lavado controla el tipo de proceso de lavado. La perilla Selectorde Ciclo se puede girar en cualquier direcci6n. Girar la perilla
luego de iniciar un ciclo detendrci la lavadora y modificarci el ciclo/opciones en la nueva selecci6n.PresioneStart (Iniciar)para comenzar la
selecci6ndel nuevo ciclo.NOTA:Cuando la perilla es girada a otro ciclo, la luz deltambor es encendida para asistir en la carga.
Elsiguiente cuadro le ayudarci a configurar el ciclo de lavado correcto para su ropa.
Speedwash Para pequehas cantidades de prendas con poca suciedad que senecesitan de forma rdpida. Brinda un lavado/
(Lavado R6pido) Enjuaguey bajo un giro en alta velocidad
Delicates Para lenceriay telas que requieren cuidado especialcon suciedad entre suave a normal. Brinda un lavado ligero
(PrendasDelicadas) y giro en bajo velocidad.
HandWash Para prendascon etiqueta de lavado amano con poca suciedad.Brindauntavadoextraligeroy un giroenmedia
(Lavado Manuall vetocidad.
HeavyDuty/HeavysoJl Un ciclo parsabre Io normal para ropa con mucha suciedad o manchas. Unciclo deenjuague esagregado y el ciclo
(SuciedadDuralPesadd de agitaci6n esextendido para unalimpiezaadicional.EsteciclomSsagresivo sedeberia usarcon mayor moderaci6n.
Dark Colors Para algodonesy mezclas que no sedestiBeno prendas con la etiqueta de lavado en frfo.Brinda un lavado normal y
(Colores OscurosJ con giro en media velocidad.
Whites(Blancosl Parablancos con mucha o poca suciedad,ropa blanca,ropa de trabajo y dejuego. Brindalavado pesadoy giro en alta
Normal/ughtcolors Paraalgodones que destiBencon mucha o poca suciedad,ropa blanca,ropa detrabajo y dejuego. Estecictobrindala
(Normal/colores c/aros)mejorlimpieza general y se deberia usar con la mayoria de los items todos los dias. Brinda lavado normal y giro en
Towels/Sheetsba Proveeperfodos de agitaci6n y remojo adecuado para lavar toallas y s@banas.Brinda lavado normal y giro en
ffoallaslS6banag altavelocidad.
Jeans Para lavar vaqueros poca suciedad o ligeramente sucios. Brinda un lavado normal y giro en media velocidad.
(Vaquerasl (Paravaqueros usados para trabajar con mucha suciedad, use el ciclo Whites (Blancos).
Bulky Items Para abrigos grandes, colchas, cubre colchones, balsas de dormir y articulos similares grandes y voluminosos.
(PrendasVoluminosas) Artfculos grandes tales coma mantas, edredones, chamarras y tapetes pequer_os. Brinda un lavado normal y
Quick Rinse Enjuaga y hace girar las prendas sin suciedad cuando s61osedesea un enjuague. Brindalavado extra ligeroy giro
(Enjuaguer_pidol en extra pesadovelocidad. Lasopciones Fabric Softener (Suavizantede Telas)y Extra Rinse (EnjuagueAdicional)
Drain & Spin Paradrenar el tuba y elagua que gira de la ropa.Brinda un lavado normal y con giro en media velocidad.
(Secary Centrifugad
BASKETclean Use para limpiar la canasta de residuosy olores. La lavadora se Ilenarci de agua caliente. Useeste ciclo una
(Limpieza de vez par mes con blanqueador de clara Ifquido o Limpiador para Lavadora Tide@.
la Canastaj NOTA: Nunca cargue ropa sucia mientras se est6 usando BASKETclean(Limpieza de la Canasta). La ropa sucia
vetocidad.
media velocidad.
giro en extra pesadovelocidad.
estcindisponibles con este ciclo.
se podrci dar_aro contaminar. Lea la secci6n de Cuidada y Limpieza.
Stain Removal Guide (Guia de Eliminaci6n de Manchasl
La caracterfstica Stain Removal Guide (Guia de Eliminaci6n de t_lanchas) le permite se_alar las manchas que
se encuentran en las prendas de la carga. Esta caracterfstica puede usarse con cualquier ciclo de lavado.
C6mo usar Stain Removal Guide (Gu[a de Eliminaci6n de Manchas):
1. Seleccione el ciclo de lavado.
2. Presione el bot6n Stain Removal Guide (Guia de Eliminaci6n de Manchas) (el bot6n se iluminar6 cuando se
encienda).
ContinOe presionando para seleccionar manchas de tomato (tomato), mancha oily (aceitosa), mancha de
grass (hierba) o mancha de dirt (tierra). La luz indicadora mostrarc_ la mancha seleccionada.
Para seleccionar una manchu diferente, presione el bot6n Stain Removal Guide (Guia de Eliminaci6n de
Manchas) hasta que la mancha que se desee eliminar se ilumine.
Para apagar Stain Removal Guide (Guia de Eliminaci6n de Manchas) presione hasta que la luz del bot6n se
apague.
NOTA:Los niveles de Suciedad y Temperatura ser6n modificados de acuerdo con carla tipo de mancha.
Apagar Stain Removal Guide (Guia de Eliminaci6n de Manchas) har6 que se regrese a la configuraci6n par
omisi6n.
Settings (Configuracionesl
0
Configuraciones individuales para agitaci6n (Soil/Suciedad), temperatura del agua (Temperature/memperatura), y giro (Spin/Giro)
se pueden configurar de mfnimo (inferior en la columna) a mciximo (superior en la columna). Engeneral, cuanto mcis arriba en la
columna, mcis lavadoras energfa se usarci.
NOTA:Velocidades de Giro mcis altas tfpicamente reducen el tiempo de la secadora/usa de energfa (es decir: reduce el usa de la
energfa total al usar tanto una lavadora coma una secadora).
Page 22

Instrucciones de uso.
Opciones de ciclo
Q
Delay Wash (Lavado Retrasado)
AIpresionar deforma repetida el baton Delay Wash (LavadoRetrasado),eltiempo de retraso se configura de 1 (01H)a 9(09H)horas,y vuelve a
cero (00H).Sisemantiene presionado el bot6n Delay Wash (LavadoRetrasado)durante Ssegundos, se reiniciar6 de inmediato.
Pretreat/Bleach (Pretratamiento/ Blanqueador)
Configure esta opci6n para agregar pretratamiento - O- blanqueador en la pr6xima carga. Presioneuna vez para indicar el agregado de
pretratamiento (seilumina el bot6n de arriba), dos veces para especificar el tipo de blanqueamiento (seilumina el bot6n de abajo),tres veces
para apagar (no hay luz).Elpretratamiento o blanqueador serc_agregado en el tiempo 6ptimo durante el ciclo de lavado (difierepara el
pretratamiento o el blanqueador).
NOTA:NO use pretratamiento y blanqueador en una misma carga. Siolvida dispensar (nopresion6 el bot6n una o dos veces),puede despejar el
dispensador vertiendo agua en el compartimiento y dejando correr un ciclo de Quick Rinse(EnjuagueRdpido)para el despejedel tambor.
Fabric Softener (Suavizante para Tela)
Configure esta opci6n para brindar un enjuague profundo o al agregar de forma manual suavizante detelas alciclo de enjuague. NOTA:Esta
opci6n no estc_permitida en algunos ciclos.Cuando est6 permitida, podrc_cambiar otras configuraciones (esdecir: Spin (6irar) se podrc_activar
en una configuraci6n mc_salta)afin de maximizar el rendimiento.
NOTA:Nousebolasde dispensadordesuavizantedetela enestalavadora.No fundonan correctamenteconlavadoras conalto nivel deefidencia.
eWash
Cuando se presionan lasteclas eWash, el ciclo cambia alas configuraciones de mayor eficiencia de la energia y todas las luces de eMonitor se
iluminarc_npara indicar que las configuraciones mc_seficientes estc_nencendidas. Sicambia lasconfiguraciones, la cantidad de luces de eWash
y la cantidad de lucesde eMonitor se reducirc_n(oincrementarc_n)para indicar que lasconfiguraciones de eficiencia de la energ[a se redujeron
(ose incrementaron).
Opciones Adicionales
®
Soak (Remojo)
Esta opci6n comienza con una breve agitaci6n, realiza el remojo durante un perfodo de tiempo especffico, y luego realiza el resto del
ciclo de forma automcXica. En algunos modelos, esta opci6n estc_ubicada en la perilla Cycle Selector (Selector de Ciclo). Presionarde
forma repetida el bot6n Soak (Enjuagar)agregarc_15,luego 30y luego regresarc_a 0 minutos de mojado.
Extra Rinse (Enjuague Adicional)
AI usar detergente o blanqueador adicional para limpiar ropa muy sucia, use la opci6n Extra Rinse (Enjuague Adicional) para eliminar
mejor los residuos adicionales.
NOTA:Estaopci6n no estc_permitida en algunos ciclos.
Control Lock (Control de Bloquear)
Puede bloquear los controles para impedir que se realice cualquier selecci6n. O bien puede bloquear los controles despu6s de haber iniciado un
ciclo. Con esta opci6n seleccionada, los nifios no podrc_nponer en marcha la lavadora de manera fortuita aunque toquen el panel.
Para bloquear la lavadora, mantenga presionados los botones Soak (Enjuagar)y Extra Rinse (EnjuagueAdicional)durante 3segundos. Elicono
de bloqueo de los controles que aparece en la pantalla se encendercicuando est6 activado.
Para desbloquear los controles de la lavadora, mantenga presionados los botones Soak (Enjuagar)y Extra Rinse (EnjuagueAdicional)durante
3 segundos.NOTA: El botdn de Power (Encendido)puede seguir utilizdndose cuando la lavadora estd bloqueada.
Variable Signal (Serial de variable)
Useelbot6n Variable Signal(SePalde varia ble) para cambiar elvolumen de lasepaldelfin delciclo.Presionelatecla hasta quealcance elvolumen
(alta,media,baja)deseadoo seapague.
My Settings (Mis Configuracianes)
Amedida quela perilla del selector de ciclo es girada, las configuraciones de Sail (Suciedad),Temp (Temperatura)y Spin (Giro)cambian a
configuraciones automcitica preconfiguradas por omisi6n. Si@sea una configuraci6n diferente, seleccione las opciones o modificaciones
deseadas sobre las configuraciones del cicIo, iVtanteniendopresionado elbot6n My Settings (MisConfiguraciones)durante 3segundos,
la lavadora guardarci estas configuraciones para dicho cicloy _y el bot6n My Settings (MisConfiguraciones)se iluminarci cuando est6
activo. En elfuturo, al girar la perilla del selector a ese ciclo,sus configuraciones sercin reactivadas de forma automcitica. Para regresar
temporariamente (es decir, para esta carga) a las configuraciones por omisi6n preconfiguradas, presione el bot6n My Settings (Mis
Configuraciones) durante 1/2 segundo. Elcoraz6n de estadoV y las luces de los botones seapagarcin y las opciones regresarcin
a aquellas por omisi6n. Para hacer que estas configuraciones por omisi6n sean permanentes, mantenga presionado el bot6n My
Settings (Mis Configuraciones) nuevamente durante 3 segundos para que sean sus configuraciones preferidas (las luces se volvercin
a encender). NOTA:My Settings (Mis Configuraciones) incluye Stain Removal Guide (Guia de Eliminaci6n de Man@as) pero NO Delay
Wash (Lavado con Re(rosa) ni Variable Signal (Sehal Variable).
Sensorde CargaAutom6tico
Estasetecci6nproporcionatacantidadcorrectadeaguaqueseajustaattama_oy tipodecargacolocadaenla unidad.Latavadoranosettenarddeagua
duranteetciclode sensordecargaautomdticositatapa seencuentraabierta.Cuandosecierratatapatare@ulnapuedecomenzarattenarsedeaguapara
poderdetectarettama_ode tacarga.
No(a:Estaesunatava@ra@aftaeficienciaconunaacci6n@lava@ InfuserTM. Estesistemarequiemmenosaguaaf tiempoquebrin@unaacd6n@timpieza
excepcionaf.Ustedpue@no(atqueelnivd deaguaesmenorqueel@ sutava@raanterior.Estoesnormalparaunafava@raequipa@conunInfuserTM.
Carga PequeBa Promedio
I
Linea de ropa I
Linea de1
6
agua
Linea de ropa ]
Linea del
agua
Carga Hediana Promedio
I
Carga Grande Promedio
Page 23

Funciones de la lavadora. GEAppliances.com
Aditivos de Lavanderia
Todos los aditivos - detergente,suavizante de telas, pretratamientos (talescoma OxiClean®),son agregados a trav6s de losesquinas frontales.
Susseleccionesde opciones determinaran cuando coda aditivo es dispensado deforma autom@ica en su tiempo 6ptimo en el ciclo de lavado o
enjuague.
Pretratamiento o Blanqueador Liquido
Compartimiento de
Pretratamiento o
Blanqueador Lfquido
Paraagregar tonto pretratamiento Ifquidoo
blanqueador Ifquido en la siguiente cargo, vierta
s61ouna de elias en el compartimiento trasero
izquierdoy presione el bot6n Pretreat/Bleach
(Pretratar/Blanquear) una vez para iluminar la luz
de pretratamiento (bot6n de arriba) o dos veces
para iluminar la luz del blanqueador (bot6n de
abajo).ElIfquido sera agregado en el tiempo 6ptimo
(pretratamiento- temprano o blanqueador - tarde)
en el ciclo de lavado.
Opci6n con Pretratamiento __
r_ Controle los etiquetas de cuidado de la ropa
para conocer los instrucciones especiales.
r21 Hida el pretratamiento Ifquido con cuidado,
siguiendo los instrucciones de la botella.
[] Antes de encender la lavadora, vierta una
cantidad medida de pretratamiento
directamente en el compartimiento.
Opci6n con blanqueador
ElIlenado de agua diluye [_J
el blanqueador de clara a
medida que la lavadora se
Ilenapara el ciclo de lavado.
r_ Controle losetiquetas de cuidado de la ropa
para conocer los instrucciones especiales.
[] Hida el blanqueador Ifquido con cuidado,
siguiendo los instrucciones en labotella.
• Nunca vierta blanqueador de doro lfquidosin
diluir directamente en la ropa o en la canasta
de lavado.
• No vierta blanqueador enpolvo en el
compartimiento del blanqueador.
[] Antesde encender la lavadora, vierLa una
cantidad medida de blanqueador directamente
en el compartimiento del blanqueador. Evite
salpicaduras o un Ilenado excesivo del
dispensador. Siprefiere usar blanqueador en
polvo,agregue el mismo en la canasta de la
lavadora con el detergente.
• No mezcle blanqueador con clorojunto con
amonfaco o dcidos talescomo vinagrey/o
removedor de 6xido.Lo mezda puede producir
un gas t6xico que podfia ocasionar la muerte.
Dispensador de Detergente para
Un Solo Lavado
\
Suavizante para Una
Solo Cargo
Oispensador de Oetergente para
Un Solo Lavado
Agregar manualmente detergente elpolvo o en
forma Ifquidaen el siguiente ciclo de lavado,
vierta el mismo en la abertura frontal izquierda. La
mayorfa de losdetergentes ingresarcinde farina
inmediata en el tambon La lavadora dejarci correr el
agua a trav6s de esta aberturajusto antes del ciclo
de Ilenado,para agregar cualquier detergente que
no haya cafdo en el tambon
Suavizante para Una Solo Cargo
Paraagregar suavizante a la siguiente cargo,
presioneel bot6n Fabric Softener (Suavizantede
Tela)y vierta el suavizante en la abertura derecho.
ElIfquidosere1agregado en el momento 6ptimo del
ciclo de enjuague.
NOTA:No coloque tabletas de detergente en el
dispensador de detergente de lavados simples.
Lostabletas de detergente deberfan ser agregadas
en el fondo de la canasta de lavado, antes de
colocar la ropa dentro.
Page 24

C6mo cargar y usar la lavadora.
Siempre siga los instrucciones det fabricante de la ropa cuando lave.
Separaci6ndecargas
Separepar color (blancos,claros,colores),nivel de suciedad, la tela produce pelusa (tela de toalla, felpilla)o junta pelusa
tipo detela (algodones rOsticos,limpiezaf6cil, delicados)y si (terciopelo,pana).
Nuncacoloqueen lalavadora prendasque est6nhumedecidascon gasolinauotros fluidosinflamables.
Ningunalavadorapuedeeliminar el aceitepar completo.
NOsequenada que algunavez hayatenido algOntipo deaceite (incluyendoaceitesdecocina).
Sino secumplecon esto,sepodr6 producirla muerte, unaexplosi6no un incendio.
Pe_dio
Usacorrectodeldetergente
Etusadedemasiado poco o cantidades excesivasdedetergente
escausacom0n de problemascon la colada.
Usemenosdetergente sitieneaguablanda, una carga m6s
livianao ropa poco sucia.
Paratratar manchas, apliquepretratamiento a losprendasseg0n
serecomiendaenla etiquetadel producto.La apticaci6ndebe
realizarseenel tambor para evitaruna pulverizaci6nexcesiva
quepodria provocarque loscolores dela tapa ode losgrdicos
pierdansu intensidad.
Cargadelalavadoro
Agregue lasprendas secas sin apretar en el tambor de
la lavadora. Paramejoresresultados,carguelasprendasen
forma uniformey sinapretarlasalrededor dela parte exteriordel
tambor. Paraagregar prendasunavezque se inici6uncicloen
la lavadora,presioneUnlack Lid (Desbloquearla tapa),levante
latapa y sumerjaprendasadicionalesalrededordela parte
externadela canasta.Cierrela tapa y presioneStart (lniciar)para
reanudarel lavado.
Ejemplos de carga*
TO.ALLAS/
VAO,UEROS
3 Jeans
Scamisas
de trabajo
/4pantalones
de trabajo
SABANAS NORMAL
2 toallones grandes
Stoallas de baflo/
12 toallitas
6 toallas de mano/
2 aFombras de ba_o
de toalla
0
2s6banas rectos
tamaBo Queen
2 s6banas ajustables
tamaBo Queen
/4fundas
de almohada
4 fundasde almohada
2s6banasajustables
2toallasde boca/
/4pantalones (Khakis o
7 pares de medias
2toallasdemona
2s6banasrectos/
4 toallitas
6 camisas
(de hombre
o de mujer)
de sarga)
Scamisetas
7 boxers
/4shorts
6 camisetas
/4pantalones
de gimnasia
/4sudaderas
2 sudaderas
con capucha
GErecomiendaelusade detergentesdeAlta Eficiencia_ en
todas laslavadorasclasificadaspar EnergyStar.Los
detergentesHEest6nformulados para funcionar ensistemasde
lavadoy enjuaguecon pocaagua. LosdetergentesHEreducen
losproblemasde espumaexcesivacomOnmenteasociadoscon
losdetergentescomunes.
Cuando utilice detergentes de alta eficiencia oconcentrados,
consulte la etiqueta del producto para determinar la cantidad
requerida para un desempeflo 6ptimo. Una cantidad excesiva
de detergente puede tener un impacto negativo en el
desempeflo de lavado.
• No coloque prendas grandes tales coma s6banas,colchas
y toallas sabre el (nfusor"M.C6rguelas alrededor de la parte
exterior deltambor.
• No lavetelas quecontengan materiales inflamables (ceras,
Ifquidosde limpieza,etc.).
• No coloque almohadones dejardfn o sof6 en la lavadora,
ya que son demasiado granges para poder moverlos.
Retirelas tapas externas y SOLOlave las mismas.
LAVADORAPIDO
DELICADOS*
7sostenes
7 pantaletas
s enaguas
(2-4 PRENDAS)
2 camisas de
traba]o informales
1 pantal6n de trabajo
informal
2camisolas
0
O
4 camisones
*Se recomienda
el usa de una balsa de
malla de nylon para
elementos peque_os
3 uniformes
de fOtbol
Page 25

Acerca de la Comunicaci6n del Electrodom stico. pp, on o, om
CleanSpeak TM
Estalavadora puede tener comunicaci6n con
unasecadora compatible (unacuyo Manual
del Propietariocuente con una descripci6n de
CleanSpeak) a tray,s de un cable entre dichos
electrodom@sticos.Estecable es provisto con los
modelos para secadoras con CleanSpeak o puede
ser adquirido en forma aparte.
Lavadorc
Secado
Comunicaci6n Permitida por Brillion
Estalavadora (y/o una secadora compatible)
podr6 tener comunicaci6n con su Computadora
Hogarefla y/o iPhone®. Utilizando el Gestor
Inteligente de Energia NucleusTM de GEy el tVt6dulo
de Comunicaci6n del Electrodom@stico(ACM),usted
podrd visualizar Io siguiente:
Ensu computadora hogare_a o iPhone®:
• Qu@ciclo esta en funcionamiento y en qu@
segmento seencuentra del ciclo actual (por
ejemplo: "Girar").
• Eltiempo estimado restante del ciclo que fue
seleccionado.
• Cuando un ciclo se ha completado.
• Alertas que le notifican sila lavadora necesita
mantenimiento o servicio t@cnico.
Qu_ le permite hacer su software:
NOTA:Losmensajes aparecen en ingl@s,para
conocer las opciones posibles de idiomas,visite
www.gebrillion.com o Ilame al 1-800-220-6899.
Lapantalla del ciclo le informar6 sobre el estado
actual del ciclo de la lavadora:
• Soak(Enjuagar),Main Wash (Lavado Principal),
Rinse(Enjuaguar),Spin(Girar)o completan
Lasalertas le notificar6n sobre problemas.
Algunos ejemplos:
• Largo tiempo de Ilenado
• No se alcanza el objetivo de temperatura del
agua
• Problema para cerrar la tapa
• Errorde presi6n del interruptor
Qu_ necesitar6 para una comunicaci6n de dos
vias:
• iVtodelode gesti6n de energfa hogarer_aNucleus
• tVtodelocon tVt6dulode Comunicaci6n del
Electrodom@stico
• Conexi6nde banda ancha con enrutador (Wi-Fi
para la conexi6n con iPhone®)
• Computadora (Mac®o PC)y/o iPhone® con
conexi6n a Internet
NOTA:Sitambi_n cuenta con una lavadora Energy
Smart, consulte las Instrucciones de Instalaci6n
para acceder apiezas adicionales.
AIfinalizar el ciclo de lavado, la lavadora envia
una sepal a la secadora para indicar un ciclo de
secado preferido. Cuando la secadora deja de
funcionar (aparece "End" en la pantalla - o - se
abre la puerta)"CYCLE" (Ciclo)aparecer6 en la
pantalla de este ciclo, el LED de configuraci6n
de la perilla del ciclo actual se encender6,
y (sies diferente) un segundo LEDdel ciclo
recomendado titilar6. Sifinaliza el tiempo de
"CVCLE"(Ciclo),presionar Power (Encendido)
reiniciara 6ste y las luces LED.Si la perilla del
ciclo de secado es girada, el LED s61ido se
movera de forma consecuente. Presionar el
bot6n Start (lniciar) de la secadora iniciara la
configuraci6n de laperilla de ciclo (LEDs61ido)
y apagara el recomendado (LEDtitilante) si un
ciclo diferente es iniciado.
Instalaci6n
Paso 1: Instale su Gestor/Cable de Energfa
Hogarer_aNucleus - cerca de su enrutador de
internet.
Consultela Gufade InicioRcipido/Instrucciones
de Instalaci6n incluidas con este dispositivo para
acceder a informaci6n necesaria para descargar
software a un escritorio y/o iPhone®.
Paso 2: Instale su tVt6dulode Comunicaci6n de
Electrodom@sticos(ACM)en su cireade lavanderfa.
Determine la ubicaci6n mcis conveniente para su
tVt6dulode Comunicaci6n de Electrodom@sticos
(ACiVt).Instale el ACiVtde acuerdo con la Gufa
Rcipida/Instrucciones de Instalaci6n incluidas con
este dispositivo.
Paso 3: Conecte el tVt6dulode Comunicaci6n de
Etectrodom@sticos(ACM)a su lavadora o lavasecadora.
avadora __
:: - O-
ElN6dulo de Comunicaci6n de Electrodom_sticos
(ACtVi)incluye un divisor,dos cables de 6',y un cable
de 1' (consulte Piezasy Accesorios).Sitambi@n
cuenta con unasecadora Energy Smart, use el
divisor para conectar ambos electrodom@sticos.
NOTA:Siesta secadora no incluye un cable de 6
pies,sere1necesario que adquiera un segundo cable
de 6 pies(consulte Piezasy Accesorios). Para mcis
informaci6n o para realizar consultas, visite:
www.gebrillion.com o Ilameal 1-800-220-6899. 9
Page 26

Acerca de la Comunicaci6n del Electrodom stico.
Energy Smart"
EnergySmart permite quesu lavadora reduzca el
consumo de corriente durante periodos de altos
costos de corriente. Siusted se encuentra en un
area donde su proveedor de electricidad cobra
costos variables en diferentes horas del dia,su
lavadora le informara sabre dichos momentos
cuando est6 pagando el costa mas alto. Elicono
de Energy Smart seiluminara en el panel de
control de la lavadora, el tiempo del ciclo exhibira
"ES",y el funcionamiento estara en modo con
retraso. La lavadora retrasara el comienzo (hasta
durante 4 horas) hasta que el fndice descienda.
Listedpodra anular esta funci6n sosteniendo el
bot6n Delay Wash (Lavado Retrasado) durante 3
segundos para cancelar y hacerlo funcionar a su
conveniencia (inmediatamente o con retrasa de
entre 1 y 9 horas).
Ou_ necesitar6:
• Smart Meter podra tener comunicaci6n con su
lavadora (llamea su proveedor de electricidad)
• Lina lavadora Energy Smart (como esta)
• Lin M6dulo de Comunicaci6n para
Electrodom6sticos (ACM)
Instalaci6n:
Paso 1:Elproveedor de corriente instala un Smart
Meter
Pasos 2 & 3: Instale un ivt6dulode Comunicaci6n
para Electrodom6sticos (ACM).Consulte la secci6n
de comunicaci6n de Comunicaci6n Permitida por
Brillian.
2O
Page 27

Cuidado y limpieza de la lavadora. GEAppliances.com
Cesto de lavado: Deje la tapa abierta despu6s de lavar para
que se evapore la humedad. Sidesea limpiar el cesto, use un
paBo suavey limpio empapado en detergente Ifquido;luego
enju6guelo. (Nouse limpiadores duros.)
Use el ciclo BASKETclean(Limpiezade la Canasta):
Usar la lavadora en un lugar hOmedodurante un perbdo
de tiempo prolongado podr6 ocasionar la acumulaci6n de
moho negroy g6rmenes en el aire dentro de la canasta de
la lavadora y afectar su salud. Silimpia el tubo de la lavadora
en forma mensual utilizando BASKETclean(Limpiezade la
Canasta),esto mantendr6 la canasta de la lavadora limpia
para un uso higi6nico.
1 Agregue un limpiador de tambor o removedor de
dep6sitos de cal directamente en la canasta de la
lavadora.
• Esposibleque quede detergente en el tubo de la
lavadora luego de la limpieza.
• AI usar blanqueador de cloro liquido, cargue el mismo
en el compartimiento del blanqueador de cloro Ifquido.
• Cuanda use un limpiadar enpalva, agregue el mismo
al dispensador de detergente para un solo lavado.
Consulte la secci6n Dispensadar de Detergente para
un Solo Lavado.
•AI usar tabletas de limpieza, coloquelosmismas
directamenteen eltambor de la lavadora.(No
agregueel limpiadoresentabletas enel dispensador
de detergentepara un solo lavado).Consultela
secci6nDispensadar deDetergente para un Solo
Lavada.
2 Presioneel bot6n Power(Encendido).
3 Gire la perilla selectora a BASKETclean(Limpiezade la
Canasta).
4 Presioneel bot6n Start(Iniciar).
NOTAS:
•Nunca cargue ropa sucia mientras se est6 usando
BASKETclean(Limpiezade la Canasta).La ropa sucia se
podr6 da_ar o contaminar. AsegOresede limpiar la canasta
de la lavadora cuando est6vada.
• Serecomienda dejar la tapa abierta luego de finalizar el
lavado para mantener eltubo limpio.
• Serecomienda repetir en forma mensual BASKETclean
(Limpiezade la Canasta).
• SiaOnhayoloramoho o humedad,hagafuncionarBASKETclean
(Limpiezade la Canasta) durante 3 semanas consecutivas.
Tapa de Vidria (enalgunos modelos):Use una tela limpia y
h0meda con vinagre y soluci6n de agua.
Mangueras de Ilenada: GErecomienda elcambio
de las mangueras cada 5 aBos.
Exterior: Sequelos derrames de inmediato. S6quelos
con un pa_o h0medo. Evitegolpear la superficie con objetos
cortantes.
Interior: Eluso ocasional de un ciclo que contiene lejfa
mantendr6 limpia la parte interna de la lavadora.
Traslada y almacenamienta: Pfdale al t6cnico de servicio
queelimine el agua de la bombay las mangueras. Consulte
las instrucciones de instalaci6n que se incluyen con el
producto para recibir informaci6n sobre c6mo reinstalar
la varilla de embarque para mantener el cesto met61ico
estacionario cuando se cambie la lavadora de lugar. Para
mayor informaci6n, visiteGEAppliances.cam o Ilame al 800.
GE.CARES(800.452.2757).Noguarde la lavadora donde
pudiera quedar expuesta alas condiciones clim6ticas.
Vacadones prolongadas: Aseg0resede cerrar la provisi6n de
agua en losgrifos. Drene toda el agua de las mangueras si la
temperatura Ilegar6avalores inferiores acero.
11
Page 28

Antes de Ilamar para solicitar servicio...
_ onsejos para la soluci6n de problemas
AGUA
Espray corto y retraso
luego de presionar el
bot6n Start (Iniciad
El nivel de agua
parece bajo
Sonido durante el
drenaje
Demasiada espuma
Fugasdeagua
La temperatura del agua Temperaturas m6s frias • Se han formulado nuevos detergentes para colada que
parece incorrecta del agua proporcionan trabajan con temperaturas mas frfas del agua sin afectar
Agua bombeada antes La puerta est6 levantada o • Reconfigure el ciclo.
de completarse el cido el ciclo se puso en pausa por
El agua no drena La manguera de desagLie • Enderece la manguera de desag0e y aseg6rese de que
La lavadora sepausa en Esto es normal • La lavadora est6sintiendo la carga.
el inicio de los ciclos
La lavadora seinterrumpe Seseleccion6 la opci6n Auto • Estoes normal. La lavadora alterna entre agitar y remojer
durante elciclo de lavado Soak (Remojo Autom6tico) durante estos ciclos para que sus prendas se limpien mejor
La lavadora seinterrumpe Esto es normal • La lavadora puede hacer pausas durante el ciclo de
durante elciclo de centrifugado para eliminar el aguajabonosa con m6s
centrifugado eficiencia.
iAhorre tiempo y dinero! Consulte primero las tablas de las p6ginas siguientes o
visite GEAppliances.com y quiz6s no necesite Ilamar al servicio.
Causas posibles
La tapa fue abierta y cerrada
entre la selecci6n del ciclo y
el inicio
Fsto es normal
El tubo de alimentaci6n del •
drenaje est6 demasiado bajo
Agua blanda •
Demasiado detergente •
Tipo de detergente
Tipo de detergente
Demasiado detergente
en la lavadora
La manguera de Ilenado • Aseg0resede que las conexionesde la manguera est@nfirmes
o la de desagLie est6 mal en los grifos y que las arandelas de goma est6n instaladas.
conectada Aseg0rese de que el extremo de la manguera de desag0e
EldesagLiedela casaest6 tapado • Examinela tuberfa de la casa.Tendr@que Ilamar al fontanero.
La manguera de desagLie • Aseg0rese de que la manguera de desag0e no haga contacto con
roza la pared la pared. Estopuede provocar un desgaste excesivo en la manguera.
Presi6n de agua constante • Ajuste las mangueras a los grifos y cierre el agua despu6s
alas mangueras de Ilenado de cada usa.
en la fuente de agua • Verifique la condici6n de las mangueras de Ilenado; sedeben
mayor eficiencia energ_tica el rendimiento del lavado.
La provisi6n de agua est6 • Abra los grifos de agua caliente y frfa y aseg6rese de que los Imangueras
cerrada o mal conectada estan conectadas a los grifos correctos. NOTA: Las valvulas de agua
Los filtros de malla de • Cierre lafuente de agua y retire las mangueras de conexi6n de
la v61vula de agua est6n agua de la paCcesuperior trasera de la lavadora. Use un cepillo o
tapados mondadientes para limpiar los filtros de malla de la lavadora.
Agua fresca/fria cuando • Estoes normal. PerfecTemp detecta latemperatura delagua y
seselecciona caliente, la optimiza para mejores resultadosse. Elagua frfa se agrega
Elcalentador de ague de la case no • Aseg6rese de que el calentador est6 suministrando agua
est6 configurado correctamente a 120°F-140°F (48°C-60°C).
m6s de 8 horas
est6doblada o mal conectada la lavadora no est6 apoyada sobre ella.
Qu_ hacer
• Esto es normal. Lea la secci6n CONTROLDELA FUNCIONALIDAD
en los Instrucciones de seguridad.
• Elagua puede no cubrir el nivel superior de las prendas.
Estoes normal para esta lavadora de alta eficiencia.
La manguera de drenaje debe superar los 32" en alg0n punto entre
la parte trasera de la lavadora y el tuba de drenaje.
Pruebe con menos detergente.
iv]idael detergente con cuidado. Use menosjab6n sitiene ague
blonde, una cargo m6s liviana o ropa poco sucia.
• Cambie a detergente HE_.
• Cambie a detergente HE_.
• Use menos detegente. Use menosjab6n sitiene ague blonde,
una cargo m6s liviana o ropa poco sucia.
est6 insertado coma corresponde y bien seguro al desag0e.
reemplazar cada SaBos.
estan marcadas con "H"y "C"y los filtros de lavalvula interna poseen
c6digos con colores.
Vuelvaa conectar las mangueras y abra el agua de nuevo.
en forma peri6dica cuando seselecciona agua caliente.
• La parte superior de la salida del desag0e debe estar
a menos de 6 pies(:1,8m) por encima del piso.
con menos desgaste.
12
Page 29

GEAppliances.com
OPERACION Causasposibles Ou_ hacer
LalavadoranoseIlena Estoesnormal. • LatapadebeestarcerradaparaquelalavadoraseIlene
cuandolatapasehallaabierta, ofuncione.
Lalavadorano funciona Lalavadora noest6enchufada • Aseg0resedequeelcableestebienenchufadoauntomacorriente
quefuncione.
Lafuentedeagua est6cerrada • Abrapar completolosgrifosdeaguafr[ay caliente.
Loscontrolesnoest6nbienpuestos• Verifiqueloscontroles.
Lapuertaest6abierta-una • Cierrelapuertay oprimaStart.
caracteristicadeseguridad
impidelaagitaci6ny centrifugado
cuandola puertaest6levantada
Eldisyuntor/fusibleest6 • Verifiqueeldisyuntor/fusibles.Reemplacelosfusibleso reajuste
cortado/quemado eldisyuntor.Lalavadoradebeteneruntomacorrienteseparado.
Hayquereajustarla electr6nica • Desenchufela lavadora,espere2 minutos,vuelvaaenchufarla
y oprimaStart.
Noseoprimi6START • OprimaStart.
Faltael im6nde la puerta • Llameaservicio.
Cambiossinexplicaci6nen el Opcionesdecambios • Estoesnormal.Variasopcionescarnbiar6narrasopcionesa finde
tiempoy/o la contiguraci6n maximizareldesempehodellavado.
Movimientodentrodela Elmecanismodeconmutaci6n • Cuandolam6quinaseapagamanualmente,laconmutaci6n
m6quinacuandaseapaga desenganchael motor desenganchael motorantesdeapagarseparcompleto.
Siselevantalapuertaantesdequeel motorsedesenganche,
volver6a funcionarcuandosecierrelapuerta.
Eltamborparece suelto Eltambor se mueve o gira. • Eltambor de la lavadora nocuenta con un freno tradicional.
librernente Eltambor semueve libremente. Estoes normal.
RENDIMIENTO Causasposibles Ou_ hater
Laropa est6demasiado Cicloseleccionado • Aseg0resequeel cicloseleccionadocoincidaconlacargaqueeste
mojada incorrecto lavando.Algunastelassesentir6nm6sh0medascuandose
enjuaguenconaguafib.
Cargadelavadodesbalanceada • Redistribuyalacargaenla lavadorayactiveelciclodeDrain &Spin
(SecaryCentrifugar).
Man@asdecolores Usaincorrectodeltejido • Lealasinstruccionesenelenvasedelsuavizantey siga
suavizante lasrecomendacionesparaelusadeldosificador.
• Verifiquequehayaseleccionadolaopci6ndesuavizante
• Tratemanchasenformapreviay vuelvaalavarusandoelciclo
OuickRinse(EnjuagueRdpido)antesdesecar.
Transferenciadecolores
Prendasgriseso Cantidaddedetergente
amarillentas Aguapesada
• Separelasprendasblancasodecoloresclarosdelasdecoloresoscuros.
• Aseg0resedeseguirlasinstruccionesdelfabricantedeldetergente.
• UseunacondicionadordeaguacomaCalgono instale
unsuavizadordeagua.
Elagua no est6Io
suficientementecaliente
Lalavadoraest6sobrecargada
• Aseg0resedequeelcalentadordeaguaestesuministrando
aguaa 120°F-140°F (48°C-60°C).
• Cargueropadeformano excesivademodoquenosuperelailia superior
dela canastadelalavadora.Paraunmejorresultado,carguelositems
alrededordela parteexteriordelacanasta.
Transferenciadecolores
• Separelasprendasparcolor.Silaetiquetadelatela indicalavar
separadamente,puedenestarindicadosloscoloresinestables.
Pelusaoresiduos Lasprendassonsecadas
enlasprendas al aireo enel tendedor
Separaci6nincorrecta
Lavadodemasiadoprolongado
Eldetergenteno sedisuelve
• Sinosecasucoladaconunasecadora,susprendaspueden
retenerm6spelusa.
• Separelosproductoresde pelusadelosquelacapten.
• Lavecargaspequehasparmenostiempoquelasm6sgrandes.
• Vuelvaa lavarusandoelcicloQuick Rinse(EnjuagueRdpido)
conla opci6nExtra Rinse(EnjuagueAdiciona!).
• Pruebeundetergenteliquido.
• Useunatemperaturadelaguam6scaliente.
Sobrecarga
• Agreguelasprendassinapretareneltambordelalavadora.Paraunmejor
resultado,carguelositemsalrededorde laparteexteriordelacanasta.
Usaincorrectodeltejido
suavizante
• Lealasinstruccionesenelenvasedelsuavizantey siga
lasrecomendacionesparaelusadeldosificador. 13
Page 30

Antes de Ilamar para solicitar servicio...
(_ Consejos para la soluci6n de problemas
RENDIMIENTO (cont.) Causas posibles Qu_ hacer
Formaci6ndebolitas Resultadodeldesgastenormal • SibienestonosedebeaFaFavadora,puedereducir
demezclasdealgod6ny tavelocidaddetprocesodeformaci6ndebolitastavando
poli_stertelascon pelusa tasprendasdadasvuetta.
Enganches,agujeros,
desgarros,rasgoneso
desgasteexcesivo
Alfileres,broches,ganchos, • Cierrebroches,ganchos,botonesy cierres.
botonescortantes,hebillas • Retirelosobjetossueltoscomodfiteres,objetosenbs boisillos
decintur6n,cierresy objetos y botonescortantes.
cortantesdejadosentos
bolsillos • DevueltaFasprendasdepunto(queseenganchanf_cilmente).
Blanqueadorconclorono diluido • VeaFasinstruccionesenelenvasedelblanqueadorparaver
guimicoscomo el blanqueador • EnjuagueFasprendasquepuedantenetqdmicosantes
para elcabelloo tintura, de tavarlas.UseetcictoQuickRinse(EnjuagueRdpido)conta
soluci6npara permanente opci6nExtraRinse(EnjuogueAdicionof).
Arrugas Ciclosde lavadoy secado • Hagacoincidirtaselecci6ndelcido coneltipodetelaque
incorrectos est6tavando(especiatmenteparacargasf@citesdetimpiar).
Separaci6nincorrecta • Evitemezdarlasprendaspesadas(comoropade trabajo)
Sobrecargao niveldeagua • Agregue las prendas sin apretar en el tambor de la lavadora.
incorrecto
Lavadorepetidoen agua • Laveenagua tibiaofria.
demasiadocaliente
El blanqueador est5 No se inici6 ni finaliz6 elciclo • Dejecorrer una BASKETclean(Limpiezadela CANASTA)o el ciclo Quick
a la izquierda del luego de agregar blanqueador Rinse(EnjuagueRdpido)(con la opci6n de Bleach (Blanqueador))para
dispensador limpiar eldispensador.Enel futuro, asegOresede seleccionar la opci6n
SONIDOS Causas posibles Motivo
La lavadora parece estar Estoesnormal ° LGlavadora permanece m W inm6vil durante parLesdelcicIode lavado.
demasiado inm6vil
"Clicmet_lico" Elmecanismodeconmutaci6n • Elsistemadetransmisi6nseenganchaal iniciodeFaagitaci6n
est8enganchadoo suelto y sesuettacuando6stasecompteta.Estoocurrevariasvecesdurante
'Silbidos"oscilantes Elmotor el_ctricorevierte • Estam6quinatieneunsistemadetransmisi6nquenousaengranajes.
osonidoligero"clic" la direcci6n Esteeset sonidoquehaceetmotor at rotar haciaatrdspara limpiar
duranteel agitaci6n tatavado.
Sonidodeagitaci6n corto Redistribuci6ndela ropa • Atfinalde Faagitaci6n,el motorhacegoipesdeagitaci6ncortospara
al finaldela agitaci6n distribuirtacarga.
Haceunchasquidocuando Rel_ • Etrel_haceunchasquidocuandoseactiva.Elniveldeagua
elagua dejade Ilenarse activaatret6y dejadettenarse.
Sonidode"dic" detr_s V61vulade control • Dosv61vulamezclaetaguafriay la caliente.El"clic"escuandocualquierv61vula
elpaneldecontrol dela temperatura delagua seenciendeoapagaparaetevaroreducirtatemperaturadettenadodeagua.
mientrasIlena
Elflu]odeagua V61vulade control • Dosv61vulamezdaelaguafriay lacaliente.Elflujocambiacuandocualquierv@lvula
cambiaduranteel Ilenado dela temperatura del agua seenciendeoapaga paraetevaroreducirtatemperaturadettenadodeagua.
Elmotor "a4lla" o"semueve" Elmotor cambiela velocidad • Elmotor va aumentandotavelocidadduranteelcidodecentrifugado.
duranteel centrifugado durante elciclo decentrifugado Cuandoetcentrifugadosecompteta,seit6deteniendohastaquepare.
"Zumbido" Bombadedesagtie • LabombadedesagQebar6unzumbidocuandoelimine
"Gorgoteo" Bombadedesagtie • Cuandolabombacomienzaa aspiraraire,haceun gorgoteo.
Elagua"borbotea" Estoes normal • Estalavadorautiiizaunaacci6nde lavadomedianteInfusorTM.
Lalavadorahaceruido Lalavadoraest6torcida • Paranivelarlalavadora,ajustelaspatasdenivelaci6ngirandolapataindividualen
14
tacantidadcorrecta.
• Noagregueblanqueadorsin diluira Facoladanipermitaque
tasprendasentrenencontactoconelbianqueadorsindiiuir.
conotraslivianas(comobtusas).
• Pruebeconunsuavizante.
Bleach (Btanqueador)al agregar blanqueador.
ettavado.
etaguatrasta agitaci6ny continuar6hastaque secomplete
etcentrifugado.
Latavadoracomenzardelcentrifugadoyetsonidocontinuar6
hastaquesecompleteetcentrifugado.
Resuttanormalqueelaguaborboteemientraslaunidadreatiza
taagitaci6n,especiatmenteconcargaspequeSas.
tadirecci6napropiadaparasubirobajar.
Page 31

Garantia de la lavadora GE.
_ odos los servicios de garantia se ofrecen a trav_s de nuestros
centros de asistencia t_cnica o un tdcnico autorizado de
Customer Care®.Para programar servicio, visite la pdgina
GEAppliances.com o Ilame a1800.GE.CARES (1.800.432.2737).
Cuando Ilame para solicitor servicio, par favor tenga a mona el
nOmero de serie y el nOmero de modelo.
Por el periodo de:
Un ufio
Delafecha de la
compm original
Reemplazuremos:
Cualquierpieza especificada de f6brica de la lavadora que falle debido a un defecto de los materiales
o la mona de obra. Durante esta garantia limitada de un a_o, tambi_n ofrecemos, en farina gratuita,
toda la mano de obra y los costos de servicio para reemplazar la pieza defectuosa.
Lo que no est6 cubierto:
• Viajes del personal de servicio a su casa para ense_arle •
c6mo usar su producto.
• Instalaci6n, entrega o mantenimiento inapropiada.
• Fallasdel pmducto sies maltratado, mal usado,o usado
para un prop6sito diferente clelque se cre6 osi es usado
para usos comerciales.
• Cambio de losfusiblesde sucasao reajustedelcircuitode
interruptores.
• Productos sin defectos o taros, o los cuales se encuentmn
funcionando como se indica en el Manual
del propietario.
Da_os al producto causados por accidentes, incendios,
inundaciones o actos de la naturaleza.
Daffos imprevistos resultantes causados por posibles
clefectos con este electrodom_stico.
• Defectos o daffos debido a la puesta en funcionamiento a
temperaturas de congelaci6n.
• Daffos causados despu_s clel envio.
• Producto no accesible para facilitar el servicio requerido.
Engrape el recibo aquL
Senecesita el comprobante con
la fecha de compra original para
que la garantia cubra
losservicios.
EXCLUSION DE GARANT[AS IMPLiCITAS--Su _nico y exclusivo derecho es la reparaci6n del producto, tal y como
se indica en esta Garantia fimffada. Cualquier garantia implicffa, incluyendo las garantias implicffas de comerciabilidad
o adecuaci6n para un fin determinado, est6n limitadas a un afio o el periodo de tiempo m6s breve permitido por la ley.
Esta garantia se extiende al comprador original y a cualquier propietario subsecuente para productos comprados para usa
domgstico dentro Estados Unidos. Si el producto estd situado en un drea que no dispone de servicio par porte de un proveedor
de servicio autorizado de GE,podria tenet que hacerse cargo de los castes de envio o bien podria solicitdrsele que Ileve el
producto a un centro de servicio de GE autorizado para realizar la reparaci6n. EnAlaska, la gamnda excluye
el costa de envio o los visitas de servicio a su casa.
Sinecesitasolicitorpiezasderepuesto,lerecomendamosque utilices61olospiezasde GEespecificadasdefdbfica.Estaspiezasestdn
disehadaspare funcionarconsu aparotoy seencuentranfabricadasy probadaspare cumplir conlosespecificacionesdeGE.
Algunos estados no permiten la exclusi6n o limitaci6n de dahos imprevistos. Esta garantia le do sus derechos legales
espedficos, yes posible que usted tenga arras derechos legales que varian de estado a estado. Para informarse de cudles son
sus derechos legales, consulte a su oficina de asuntos del consurnidor local o estatal o p6ngase en contacto con
la Oficina de su Procurador General.
Garante: General Electric Company. Louisville, KV 40225
IS
Page 32

Soporte al consumidor.
Pdgina Web de GEAppliances GEAppliances.com
_LTienealguna pregunta sabre su electrodom6stico? iPruebe la p6gina Web de GEAppliances 24 horas al d[a,
cualquier d[a del aBo! Para mayor conveniencia y servicio m6s r6pido, ya puede descargar los Manuales de los
Propietarios, pedir piezas o incluso hacer una cita en I[nea para que vengan a realizar una reparaci6n.
Solicite una reparaci6n GEAppliances.com
Elservicio de expertos GE est6 a tan s61o un paso de su puerta, iEntre en I[nea y solicite su reparaci6n cuando
le venga bien al d[a cualquier d[a del a_o! O Ilame a1800.GE.CARES(800.452.2737) durante horas normales
de oficina.
RealLifeDesignStudio(Estudiodedisehoparalavidareal)
GEapoya el concepto de Dise_o Universal-productos, servicios y ambientes que pueden usar gente de todas
las edades, tama_os y capacidades. Reconocemos la necesidad de dise_ar para una gran gama de habilidades
y dificultades fisicas y mentales. Para m6s detalles cobre las aplicaciones de GE Dise_o Universal, incluyendo
ideas de dise_o para la cocina para personas con discapacidades, mire nuestra p6gina Web hay mismo. Para
personas con dificultades auditivas, favor de Ilamar al 800.TDD.GEAC(800.833.4522).
GEAppliances.com
Garantias ampliadas GEAppliances.com
Compre una garant[a ampliada y obtenga detalles sabre descuentos especiales disponibles mientras su
garantia est6 a0n activa. Puede comprarla en I[nea en cualquier momenta, o Ilamar a1800.626.2224 durante
horas normales de oficina. GEConsumer Home Services estar6 a0n ahi cuando su garantia termine.
Piezasy accesorios GEApplianceparts.com
Aquellosindividuos con lacalificaci6n necesaria para reparar sus propios electrodom6sticos puedenpedir que
se lesmanden las piezas o accesorios directamente a sus hogares (aceptamos lastarjetas VISA,MasterCard
y Discover).Hagasu pedido en linea hay, 24 horascada dia o Ilamar par tel6fono a1800.626.2002durante
horas normales de oficina.
Sinecesita solicitar piezasde repuesto, le recomendamos que utilice s61olaspiezasde GEespecificadas de
fc_brica.Estaspiezasestc_ndiseBadaspara funcionar con su aparato y seencuentran fabricadas y probadas
para cumplir con lasespecificaciones de @E.
Las instrucciones descritas en este manual cubren los procedimientos a seguir par cualquier usuario.
Cualquier otra reparaci6n deberia, par regla general, referirse a personal calificado autorizado. Debe ejercerse
precauci6n ya que las reparaciones incorrectas pueden causar condiciones de funcionamiento inseguras.
P6ngose en contocto con nosotros GSAppliances.com
Sino est6 satisfecho con el servicio que recibe de GE,p6ngase en contacto con nosotros en nuestra p6gina Web
indicando todos los detalles as[ coma su n0mero de tel6fono o escr[banos a:
General Manager, Customer Relations
GEAppliances, Appliance Park
Louisville,KY40225
Registre su electrodom_stico GEAppliances.com
iRegistre su nuevo electrodom_stico en linea-cuando usted prefiera! Elregistrar su producto a tiempo le
proporcionar6, si surgiera la necesidad, una mejor comunicaci6n y un servicio m6s r6pido bajo los t@minos de
su garantia, mambi6n puede enviar su tarjeta de registro pre-impresa que se incluye en el material de embalaje.
16
 Loading...