

Page 1
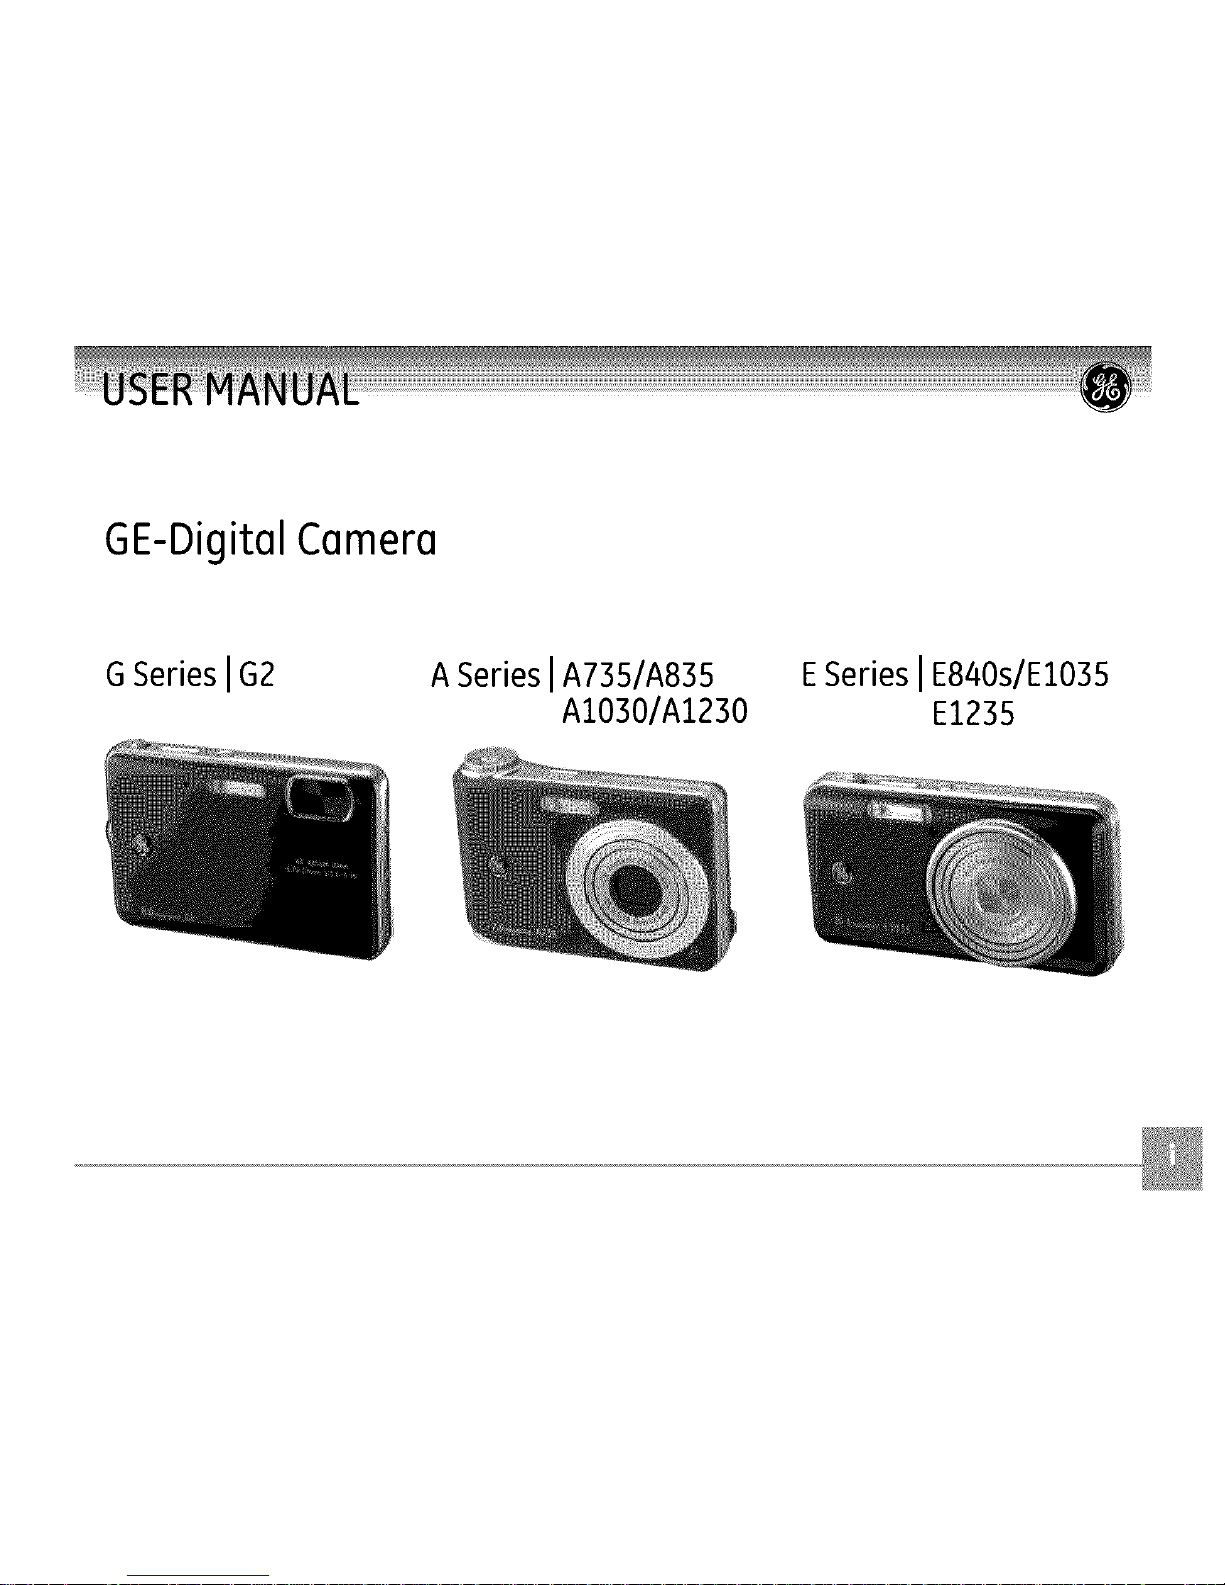
GE-DigitalCamera
G Series IG2 A Series IA735/A835
AI030/AI230
ESeries IE840s/EI035
E1235
Page 2

Page 3

Toprevent fire or shockhazard,do not exposethe
unit to rainor moisture.
For customers in the U.S.A.
Tested To Comply
With FCC Standards
FOR HOME OR OFFICE USE
FCC Statement
Thisdevicecomplieswith part 15ofthe FCCRules.
Operationissubjectto the following two conditions:
(1)Thisdevicemay not causeharmful interference,
and (2)this device must accept any interference
received, including interference that may cause
undesiredoperation.
For customers in Europe
"CE"mark indicatesthat this product
complieswith the Europeanrequirements
for safety,health, environmentand customer
protection. "CE"markcamerasareintendedfor
salesinEurope.
This symbol [crossed-out wheeled bin
WEEEAnnex IV] indicates separate collection
of waste electrical and electronic equipment in the
EU countries. Please do not throw the equipment
into the domestic refuse. Please use the return and
collection systems available in your country for the
disposal of this product.
Declaration of Conformity
ModelName :G2/A735/A835/A1030/A1230
E840s/E1035/E1235
Trade Name :GE
Responsible Party : General Imaging Co.
Address : 2158 W.190th Street,
Torrance, CA90504, USA
Telephone Number : 1-800-730-6597
Conforms to the following Standards:
EMC:EN55022:I998/AI:2000/A2:2003 Class B
EN55024:I9981AI:2001/A2:2003
EN61000-3-2:2000/AI:2001
EN 61000-3-3:1995/AI:2001
following the provision of the EMCDirective
(89/336/EEC,2004/1081EEC)
Page 4
Camera notes:
U Donot storeor usethe camerainthefollowing
typesof locations:
• Intherain,veryhumidanddustyplaces.
• Inaplacewherethe cameracanbeexposed
directlyto thesunlight orsubjectto high
temperature,e.g.Insideaclosedcar insummer.
• Inaplacewherethe cameraissubjecttoa high
magneticfield, e.g.nearmotors,transformers
or magnets.
II1 Donotplacethecameraonawet surfaceorplaces
wheredrippingwater orsandmaycomeincontact
withthecamera,whichmaycauseirrepairabtefaults.
U If the camerawill not be usedfor a long periodof
time, wesuggestyou removethe battery and the
memorycard.
U If you carry the camera suddenlyfrom a cold lo-
cation to a warm place, moisture may condense
insidethe camera.Wesuggestyouwait for awhile
beforeturning onthecamera.
U Nocompensationfor lossof recordings.Lossofre-
cordingscannot becompensatedfor if a malfunc-
tion ofyour cameraor recordingmedia,etc,makes
the playbackofrecordingsnotpossible.
Battery notes:
U Incorrect use of the batteries may cause them to
leak, become hot, ignite or burst. Always observe
the precautions given below.
• Do not expose the batteries to water, and take
particular care to keep the terminals dry.
• Donot heat the batteries or throw them into a fire.
• Do not attempt to deform, disassemble or modify
the batteries.
• UseGEcharger in the package to charge the
lithium battery only (for G and Eseries).
U Keep the batteries out of reach of babies and small
children.
In cold locations, battery performance deteriorates
and the time for which they can be used shortens
markedly.
Memory card notes:
UWhen usinga new memorycard,or amemoryca.rd
has.beeninitialized by a PC,be sureto tormat the
cardwith your digitalcamerabeforeusingit.
UTo edit imagedata,copythe imagedatato the PC's
hard disk andthentormat memorycard if upgrade
thefirmware.
UDo notchangeor deletethe directorynames,orfile
namesinthe memorycardfromyourPC,asthis may
makeit impossibleto usethecardinyour camera.
Page 5
ThankyouforpurchasingGEdigitalcameras.
Pleasereadthismanualcarefullyandkeepitina
safeplaceforfuturereference.
Copyright
©Copyright2008GeneralImagingCompanyAll
rightsreserved.
Nopartofthispublicationmaybereproduced,
transmitted,transcribed,storedinaretrievalsys-
tem,ortranslatedintoanylanguageorcomputer
language,inanyform,byanymeans,without
thepriorwrittenpermissionofGeneralImaging
Company.
Trademarks
Alltrademarks mentionedin this manual areused
for identification purposesonlyand may beprop-
erties oftheir respectiveowners.
Pleasereadthe following important information
carefullybeforeusingthe product.
• Donottake apart or attempt to servicethe
camerayourself.
• Donot dropor knockthe camera.Improper
handling maydamagethe product.
• Turnoffthe camerabeforeinserting or removing
the battery and memorycard.
• Useonlythetype of battery andchargerthat
camewith your camera.Usingother types of
batteries or chargersmaydamagethe camera
and invalidate thewarranty.
• WhenusingLi-ionbatteries in this product,
ensurethat they are inserted correctly.Inserting
the batteries upsidedowncancausedamageto
thecamera andpossiblystart afire.
• Donottouch the camera lens.
Page 6
• Donotexposethecameratomoisture,orex-
tremetemperatures.Extremeenvironmentsmay
shortenthelifeofyourcameraordamagethe
batteries.
• Donotuseorstorethecameraindusty,dirty,or
sandyareas,asitscomponentsmaybedam-
aged.
• Donotexposethelenstodirectsunlightfor
extendedperiods.
• Downloadallpicturesandremovethebatteries
fromthecameraifyouaregoingtostorethe
cameraforlongperiods.
• Donotuseabrasivecleansers,alcohol-based,
orsolvent-basedcleanerstocleanthecamera.
Wipethecamerawithaslightlydampsoftcloth.
Thismanualprovidesyouwithinstructionson
howtouseyourGEdigitalcamera.Everyeffort
hasbeenmadetoensurethatthecontentsof
thismanualareaccurate,butGeneralImaging
Companyreservestherighttomakechanges
withoutnotice.
Symbols used in this manual
Throughoutthis manual,thefollowing symbols
are usedto helpyoulocate information quickly
andeasily.
Indicatesthe usefulinformation to know.
Indicatesthe precautionsto betaken
while operatingthe camera.
Page 7
WARNING
SAFETYPRECAUTIONS
BEFOREYOU START................................1
Preface ............................................................1
Copyright ..................................................1
Trademarks ..............................................1
Safety information ........................................1
About this manual ........................................2
Symbols used in this manual ...............2
CONTENTS................................................3
GETTING READY......................................7
Unpacking ......................................................7
Camera Views: 62 .........................................8
:A73S/A835 .......................10
:A1030/A1230 ...................12
: E840s.................................14
: E1035/E1235...................16
Charging the battery .................................18
Inserting the battery ..................................19
Inserting an optional SDISDHCcard ......22
Turning on and off ......................................23
Using the Mode Dial ...................................24
Setting date/time and language .............25
Setting the Date and Time..................25
Setting the Language ..........................26
About the LCDscreen.................................27
BASICOPERATION................................28
Shooting in Auto mode ..............................28
Using the zoom function ...........................28
Using the flash .............................................29
Using the self-timer ....................................29
Using Macro mode......................................30
Exposure compensation ............................30
Advanced function menu ..........................31
WB (White Balance)..............................31
Page 8
ISO............................................................32
Quality ..................................................... 33
Size........................................................... 34
Color........................................................35
USINGTHE MODES...............................38
LCDScreen display .....................................38
Still shooting mode display ................38
Video shooting mode display .............40
Playback mode display ........................41
Scene mode..................................................42
Sport........................................................42
Children ..................................................42
Indoor ......................................................42
Leaf..........................................................42
Snow........................................................43
Sunset .....................................................43
Fireworks ................................................43
Glass........................................................43
Museum ..................................................43
Landscape ..............................................43
Night landscape ....................................43
Night portrait ........................................43
Return to the scene mode palette ....44
Panorama mode..........................................45
Image stabilization mode .........................46
Facedetection .............................................48
Smile detection ...........................................48
Blink detection ............................................48
PLAYBACK...............................................51
Viewing photos and videos .......................51
Editing video ..........................................53
Thumbnail view ...........................................54
Using zoom playback
(for still pictures only) ................................55
Using the delete button .............................56
USINGTHE MENUS...............................57
Page 9
Still menu......................................................57
AFmode (Auto-Focus mode) ..............57
AF-assist beam......................................58
ExpoMetering (Exposure Metering)..S8
Cont.Shot (Continuous shot) ..............59
Grid ..........................................................59
Quick Review.........................................60
Digital Zoom ..........................................60
Histogram ..............................................62
Slow shutter ...........................................62
Blink detection ......................................62
Date Imprint ..........................................62
Movie menu..................................................63
ExpoMetering (Exposure Metering)..64
Stabilization ...........................................64
Playback menu ............................................65
Protect ....................................................65
Delete ......................................................66
DPOF(Digital Print Order Format) ....68
Info. Box (Information Box).................68
Trim..........................................................69
Resize......................................................69
Rotate......................................................70
Slide show ..............................................70
Red-eye removal ...................................71
Setup menu ..................................................72
Format Hemory ....................................72
Beep.........................................................73
LCDBrightness ......................................74
Power Sever...........................................74
Date/Time ..............................................75
World time .............................................75
File Numbering ......................................76
Language................................................76
Video system .........................................76
Copy to Card (Copy internal memory
to memory card) ...................................77
ResetSettings........................................78
Page 10
FWVer.(Firmwareversion).................78
CON NECTION S ...................................... 79
Connecting to a TV.....................................79
Connecting to a PC.....................................79
Setting the USBmode..........................80
Transferring files to your PC..............80
Connecting to a PictBridge compatible
printer ...........................................................83
Setting the USBmode..........................83
Connecting the camera and priter....84
Using the PictBridge menu .......................85
Print with date ......................................85
Print without date ................................86
Print index ..............................................87
Print DPOF..............................................88
Exit ...........................................................88
Appendices ............................................ 89
specifications:
62...............................................................89
A735/A835 ...............................................93
A1030/A1230 ...........................................97
E840s/EIO35/EI235.............................101
Errormessages.........................................107
Troubleshooting........................................109
Page 11
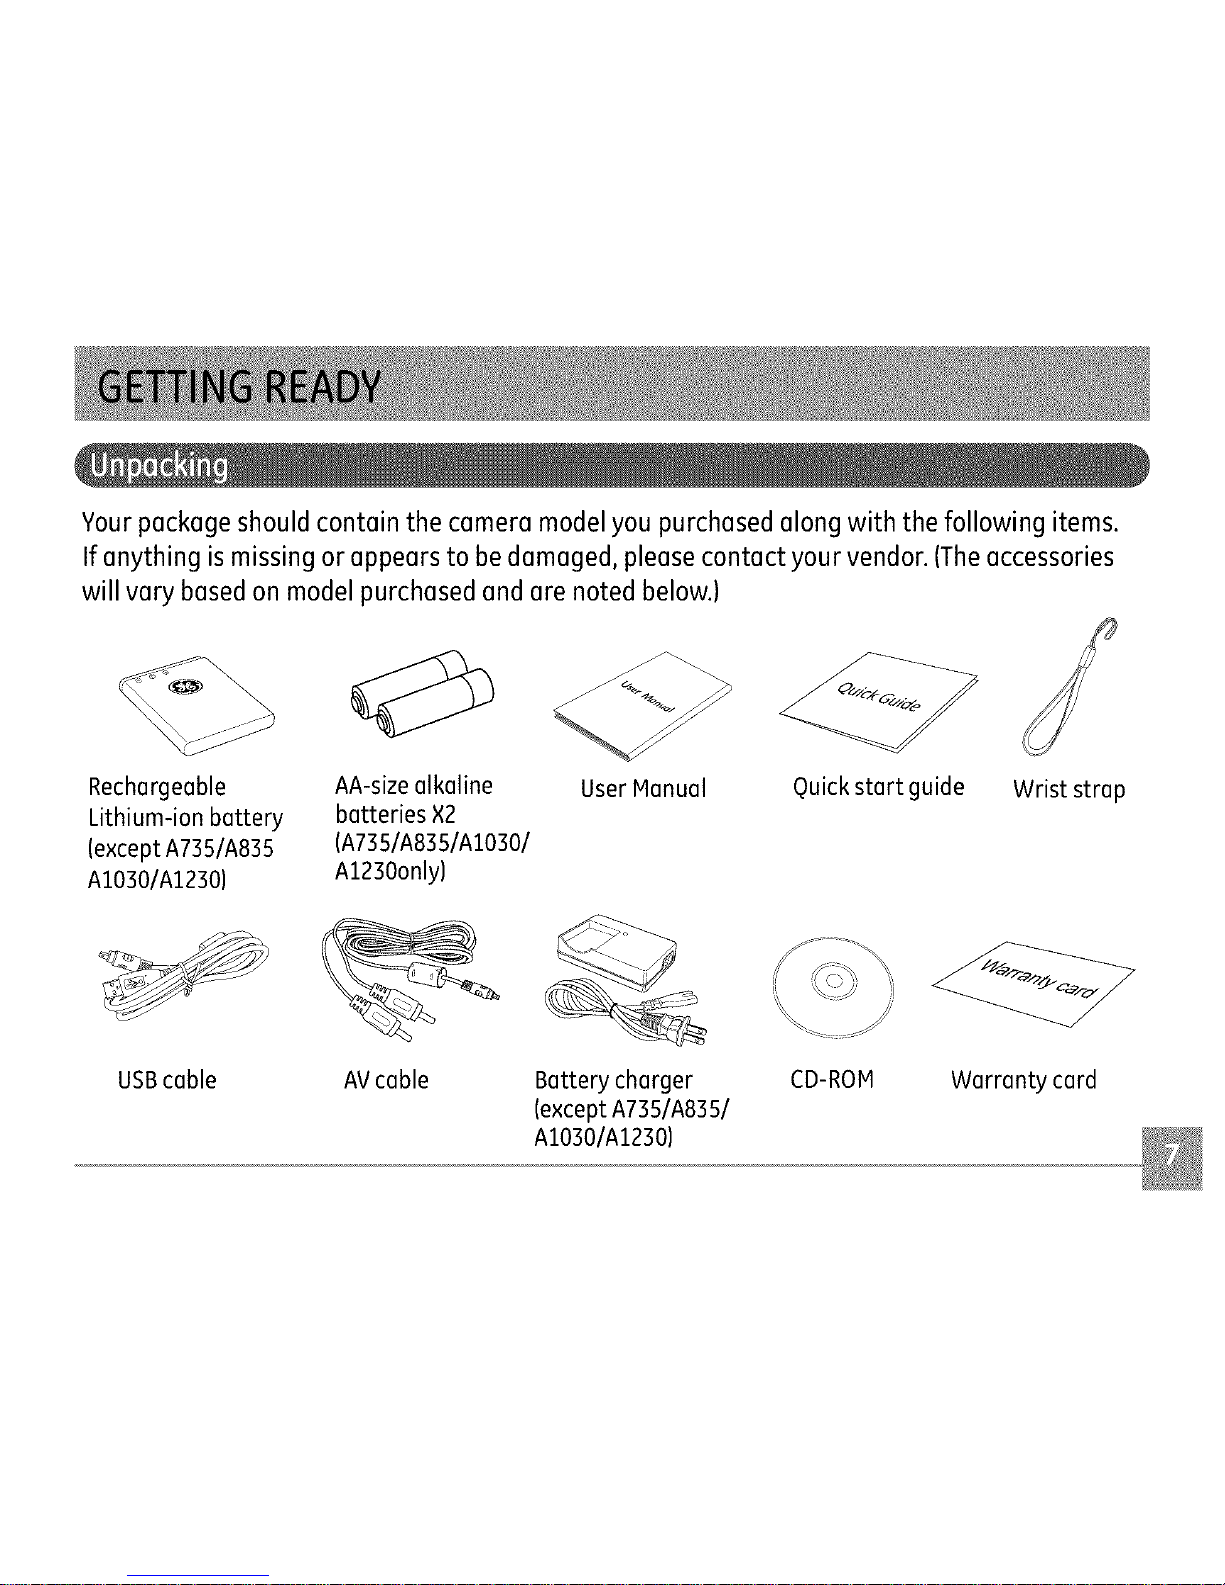
Your package should contain the camera model you purchased along with the following items.
If anything is missing or appears to be damaged, please contact your vendor. (Theaccessories
will vary based on model purchased and are noted below.)
Rechargeable
Lithium-ion battery
(exceptA735/A835
A1030/A1230)
USBcable
AA-sizealkaline
batteries ×2
(A735/A835/A1030/
A1230only)
AVcable
UserManual Quickstart guide Wrist strap
Battery charger
(exceptA735/A835/
AI030/AI230)
CD-ROM Warranty card
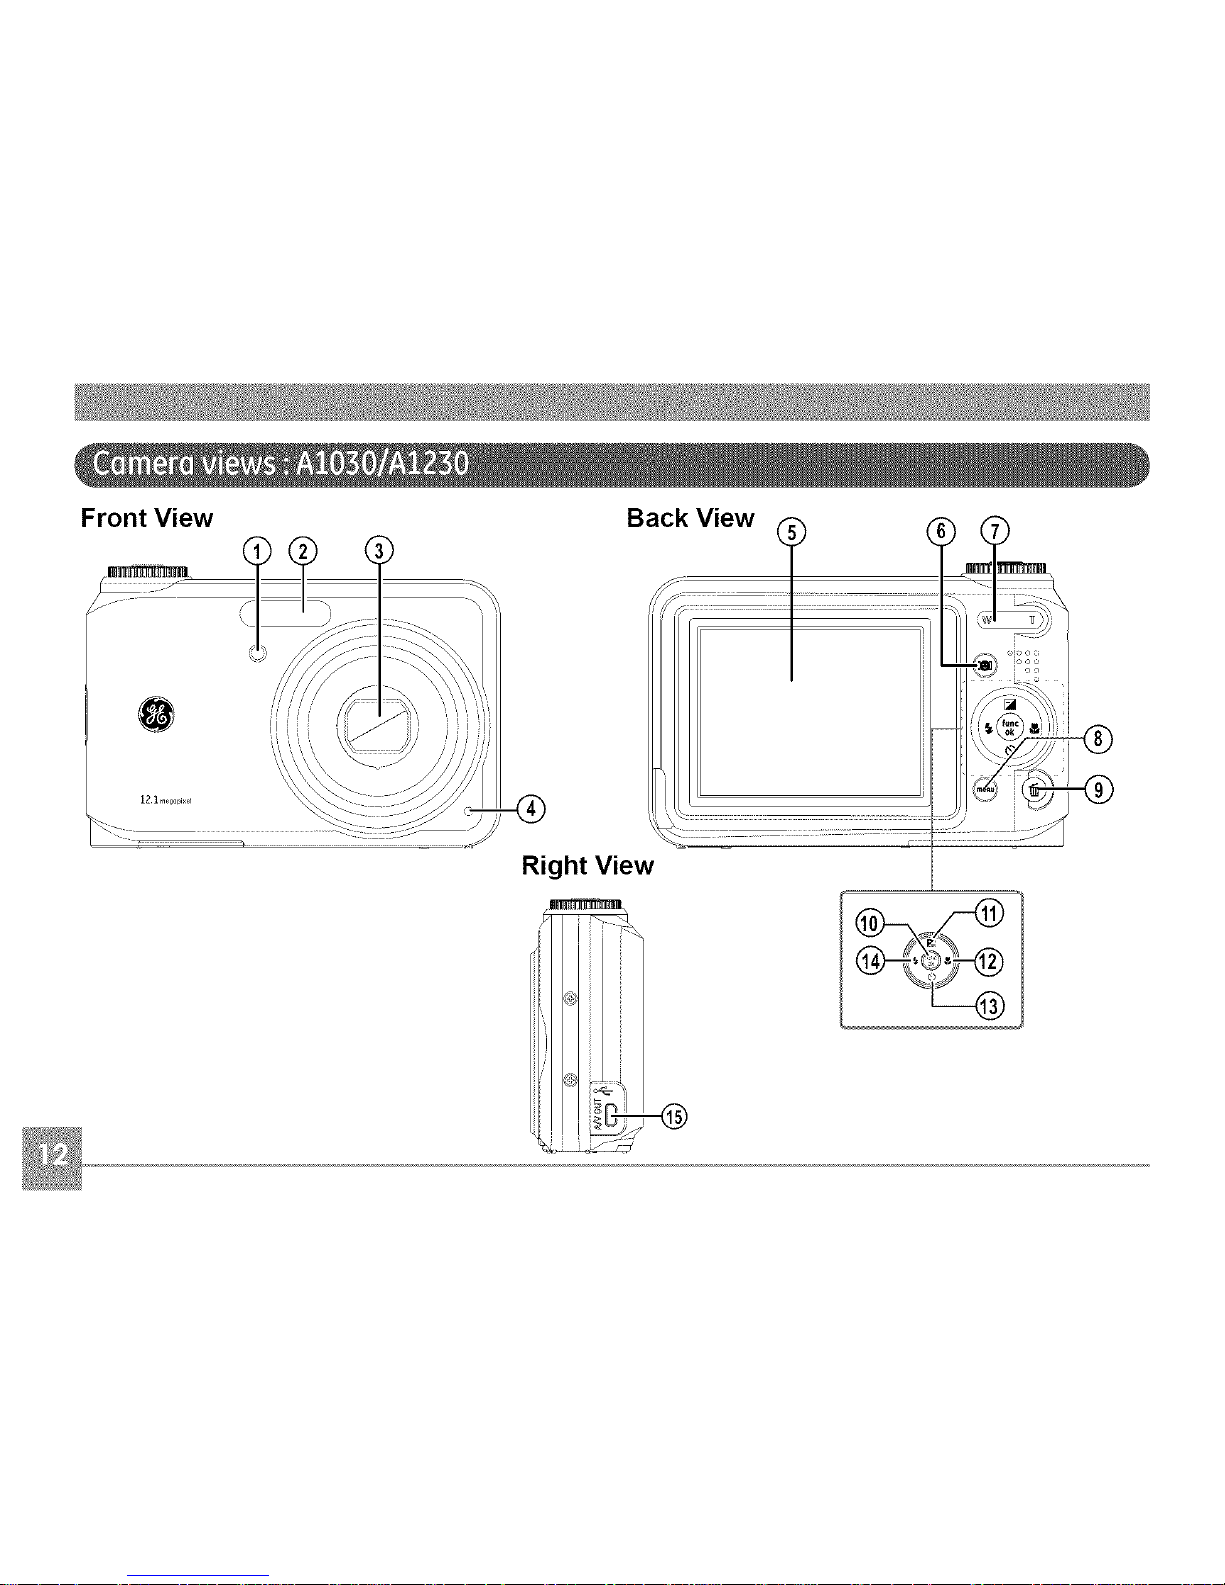
Page 12
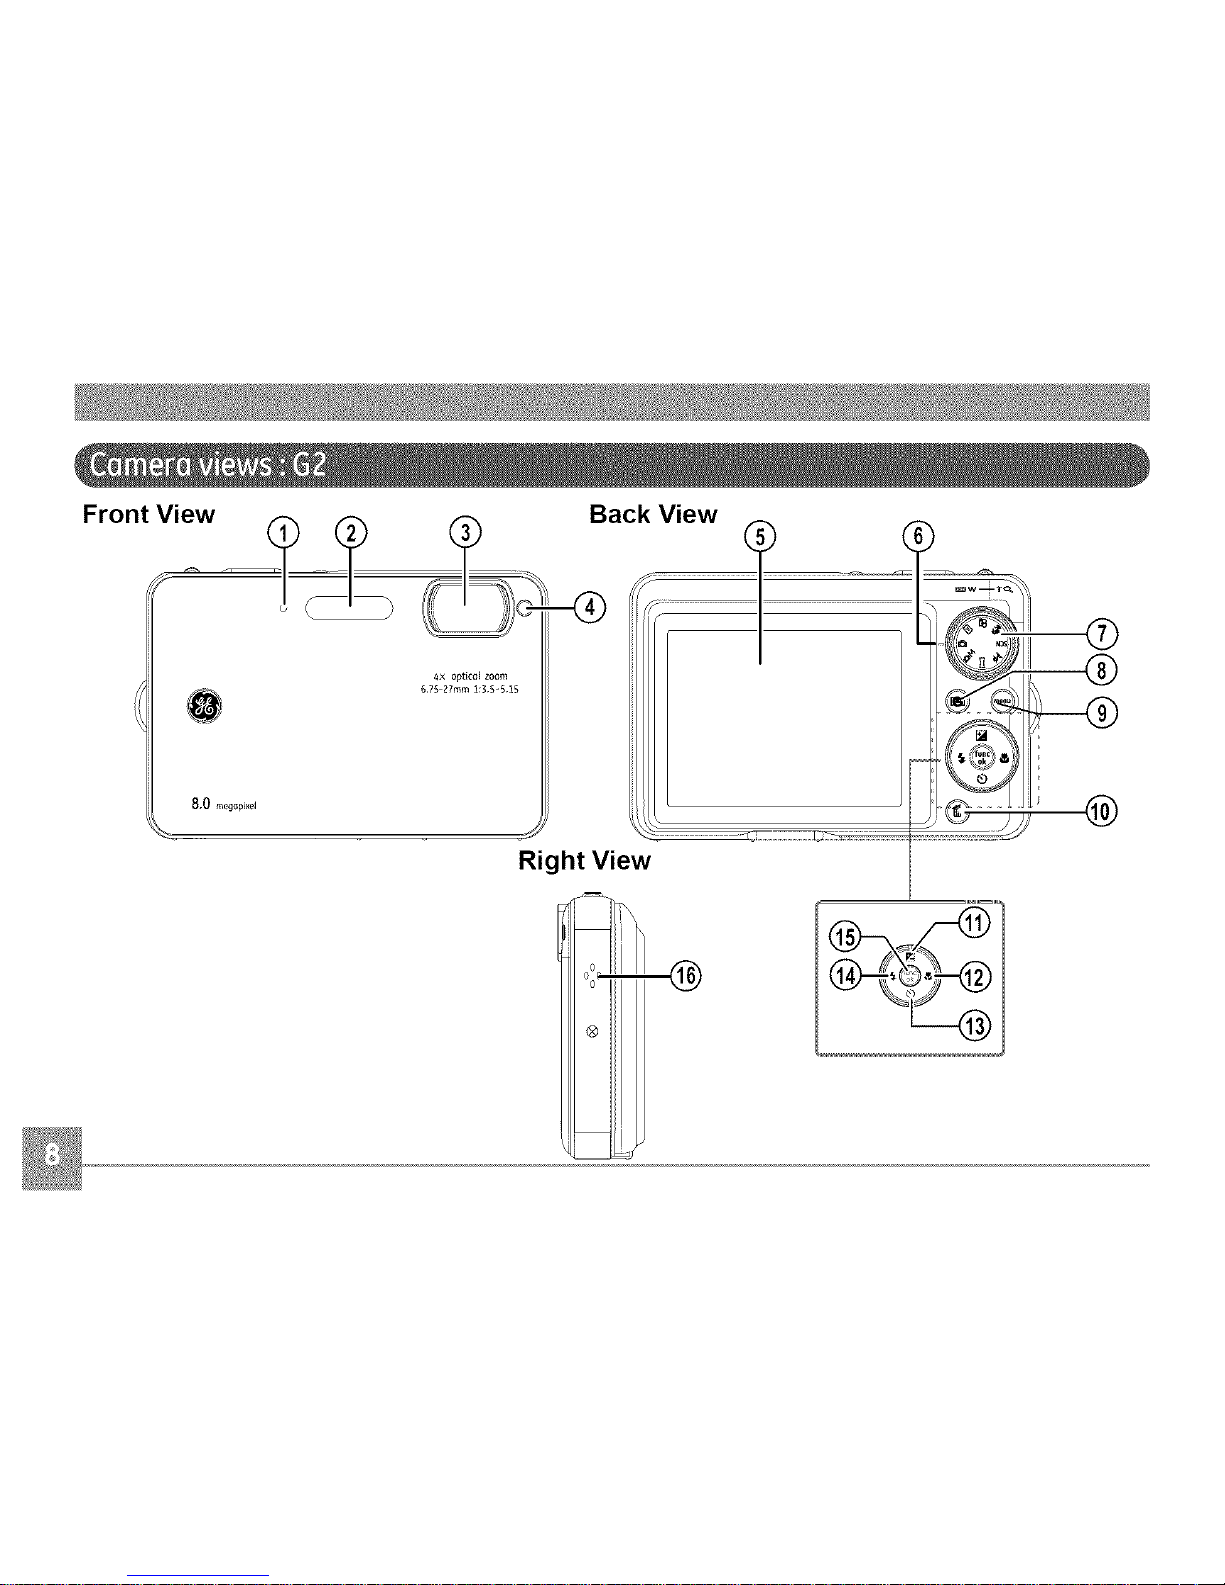
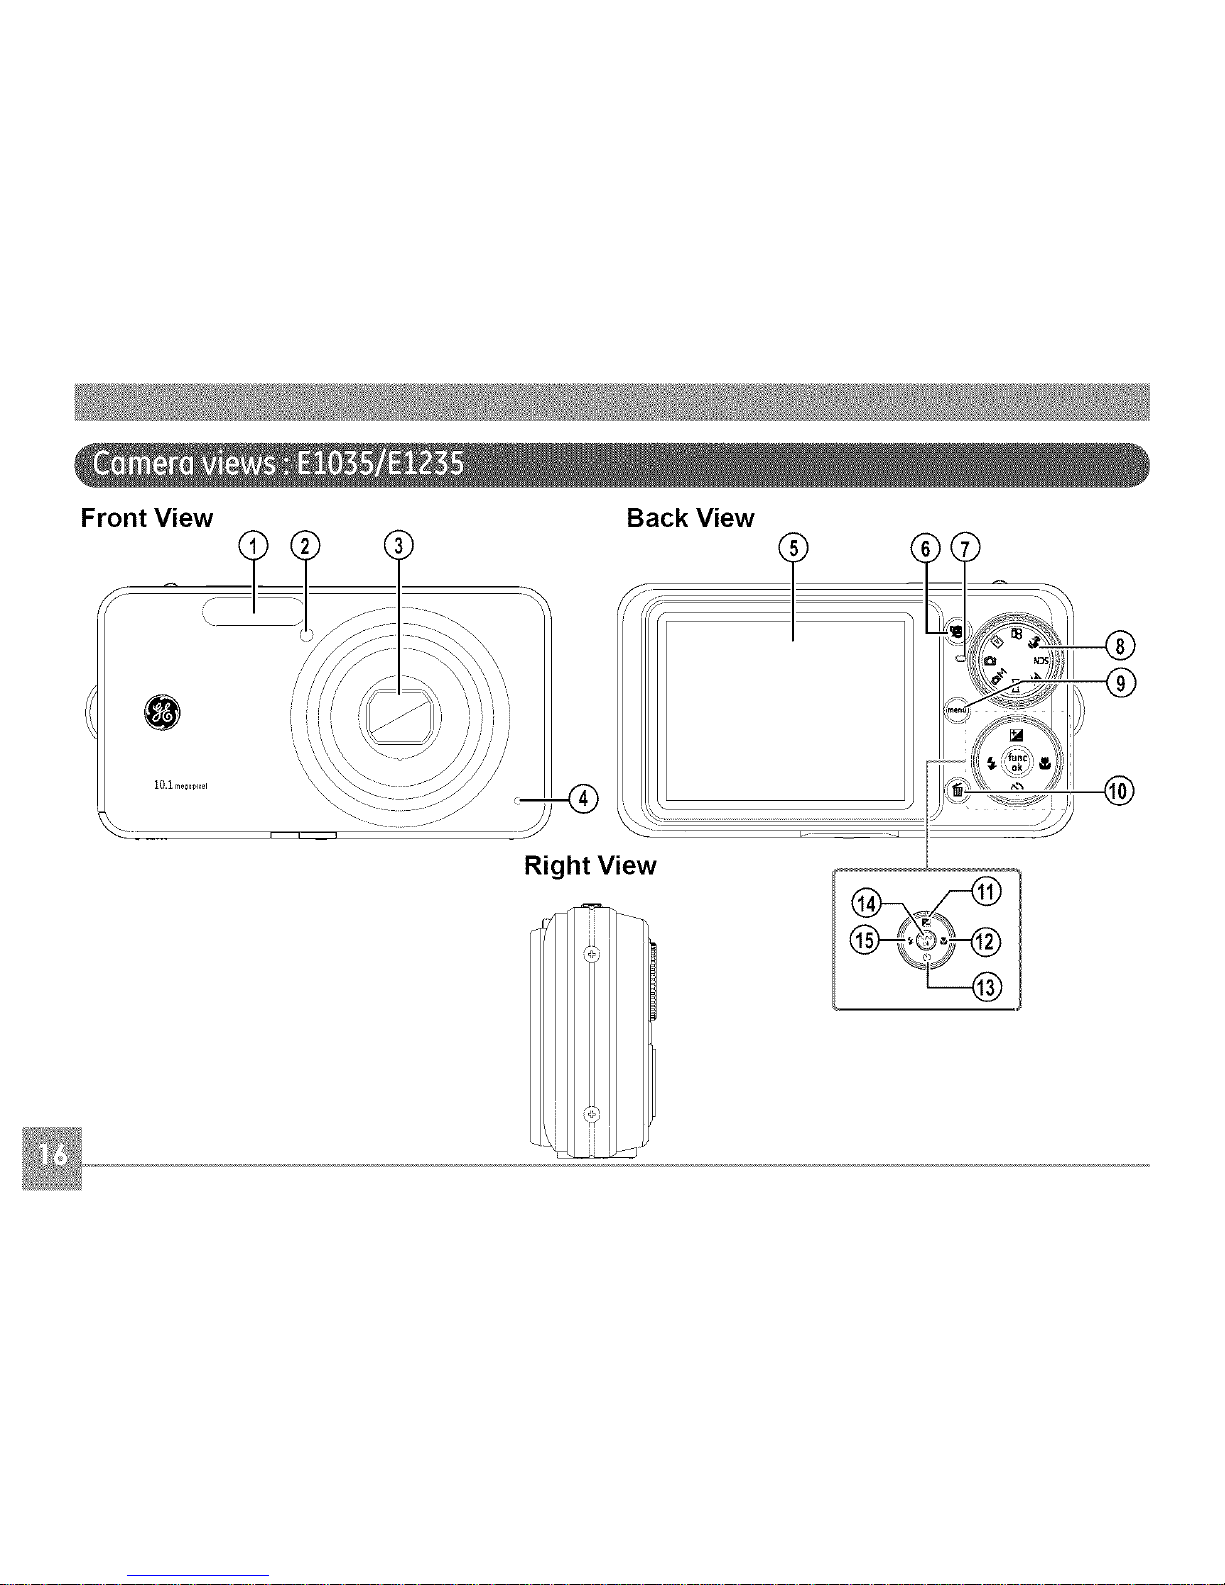
FrontView OackView
,0,
l_x optical zoom
67S 27ram 1:3 S-5 IS
Ri¢lht View
o
o_-
o
®
Page 13
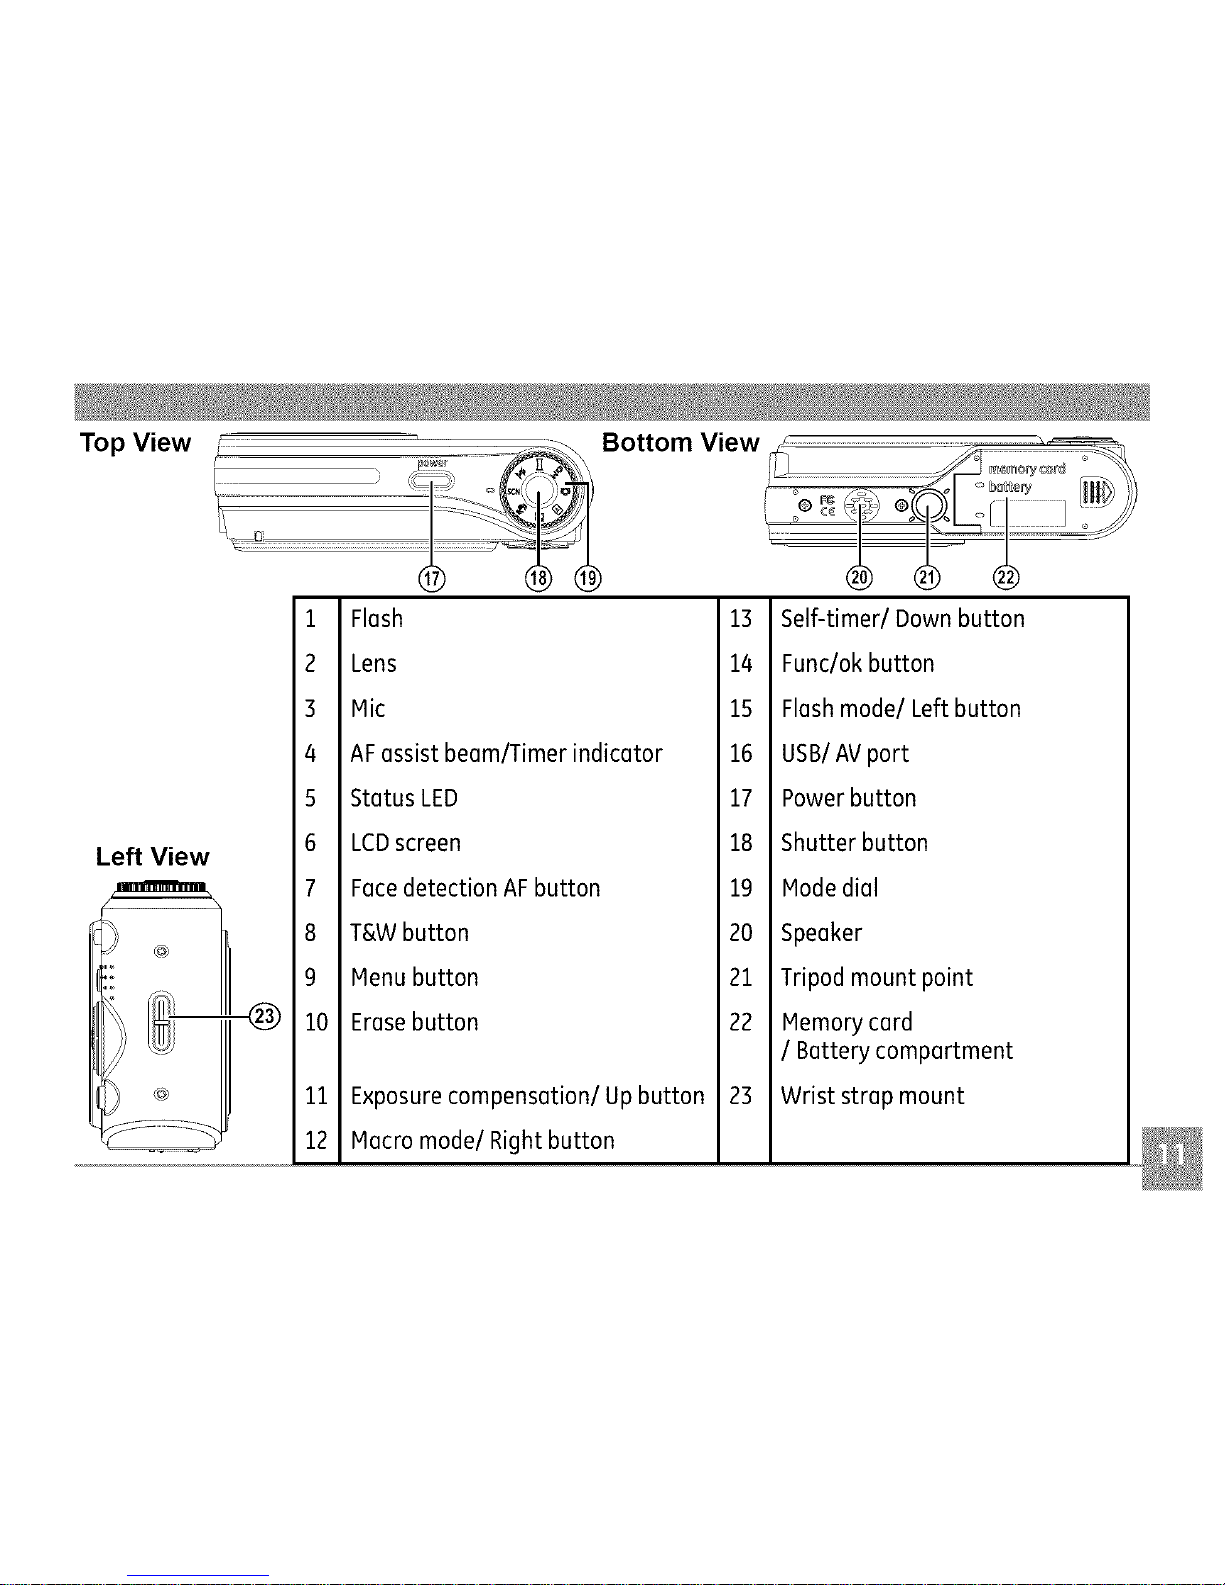
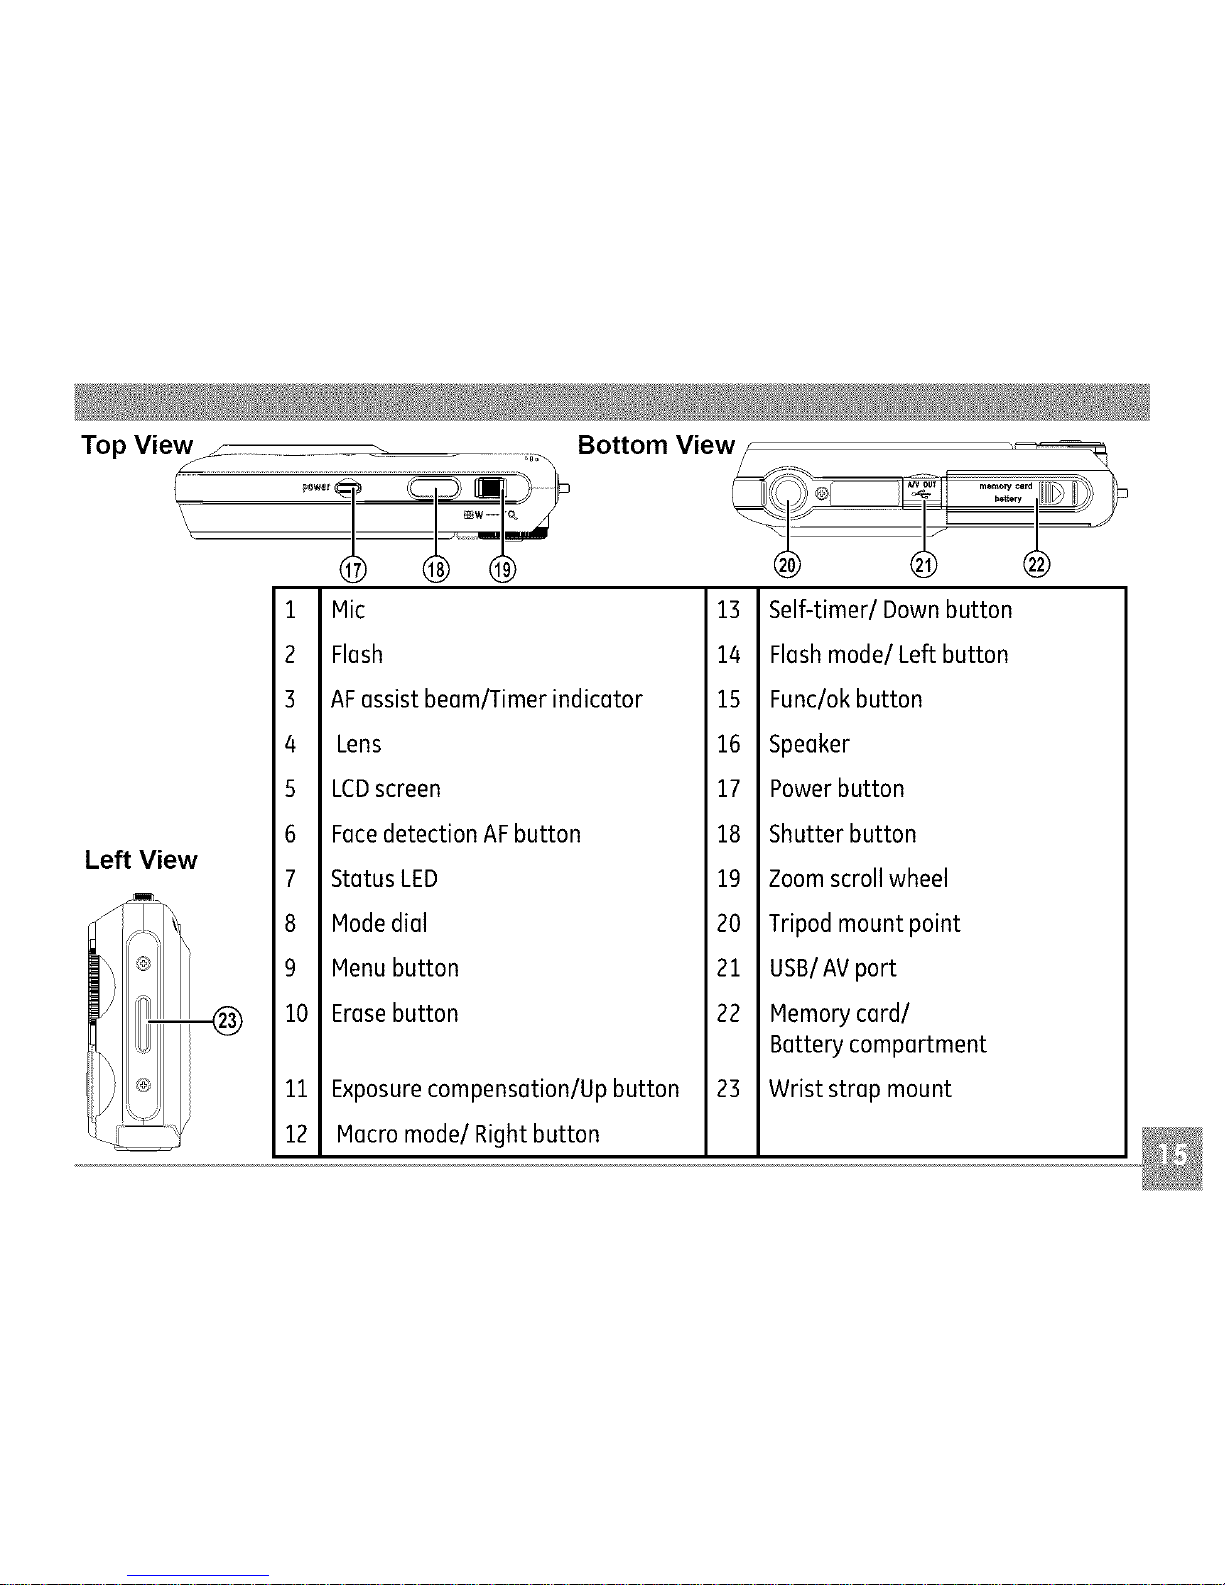
Top View Bottom View
Left View
1
2
3
4
5
6
7
8
9
10
11
12
Mic
Flash
Lens
AFassistbeam/Timerindicator
LCDscreen
StatusLED
Modedial
FacedetectionAFbutton
Menubutton
Erasebutton
Exposurecompensation/Up button
Macromode/Right button
13
14
15
16
17
18
19
20
21
22
23
Self-timer/Down button
Flashmode/Left button
Func/okbutton
Speaker
Zoomscrollwheel
Shutter button
Powerbutton
Memorycardl
Batterycompartment
Tripodmount point
USBIAVport
Wrist strap mount
Page 14
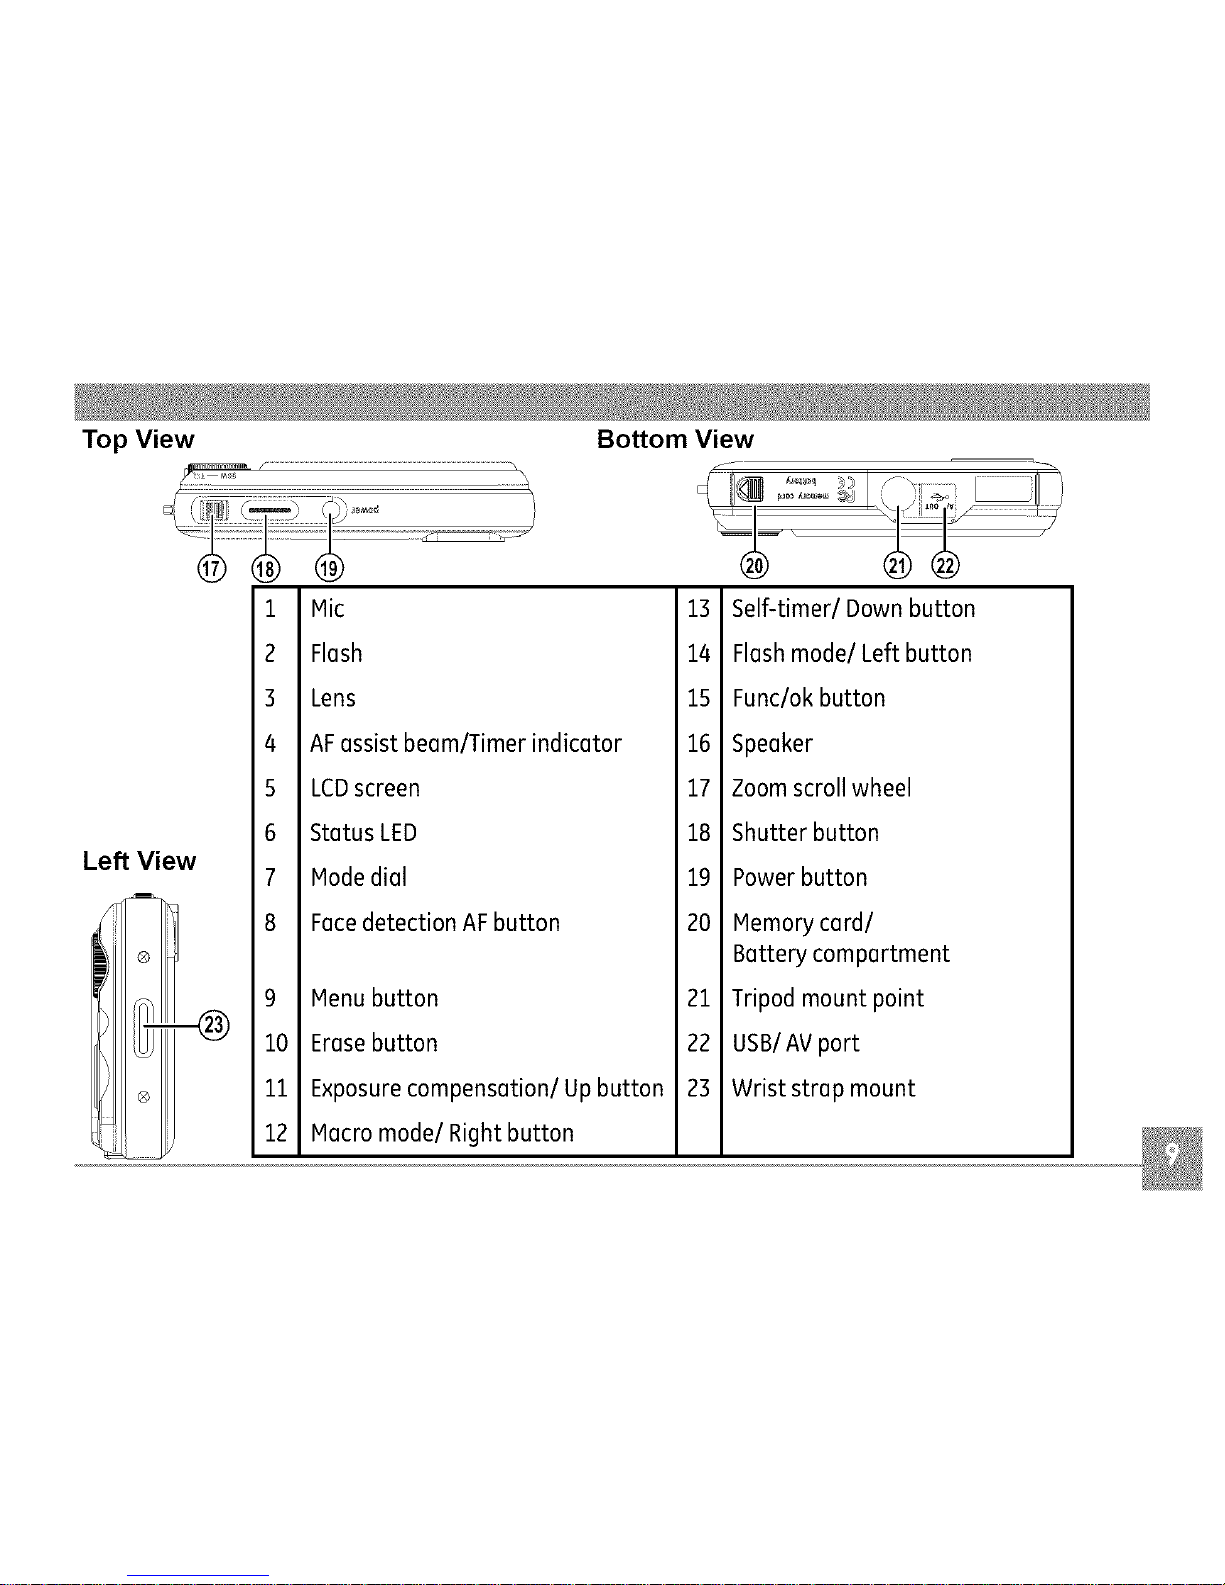
Front View
f
Back View_ t ........
Right View
Page 15
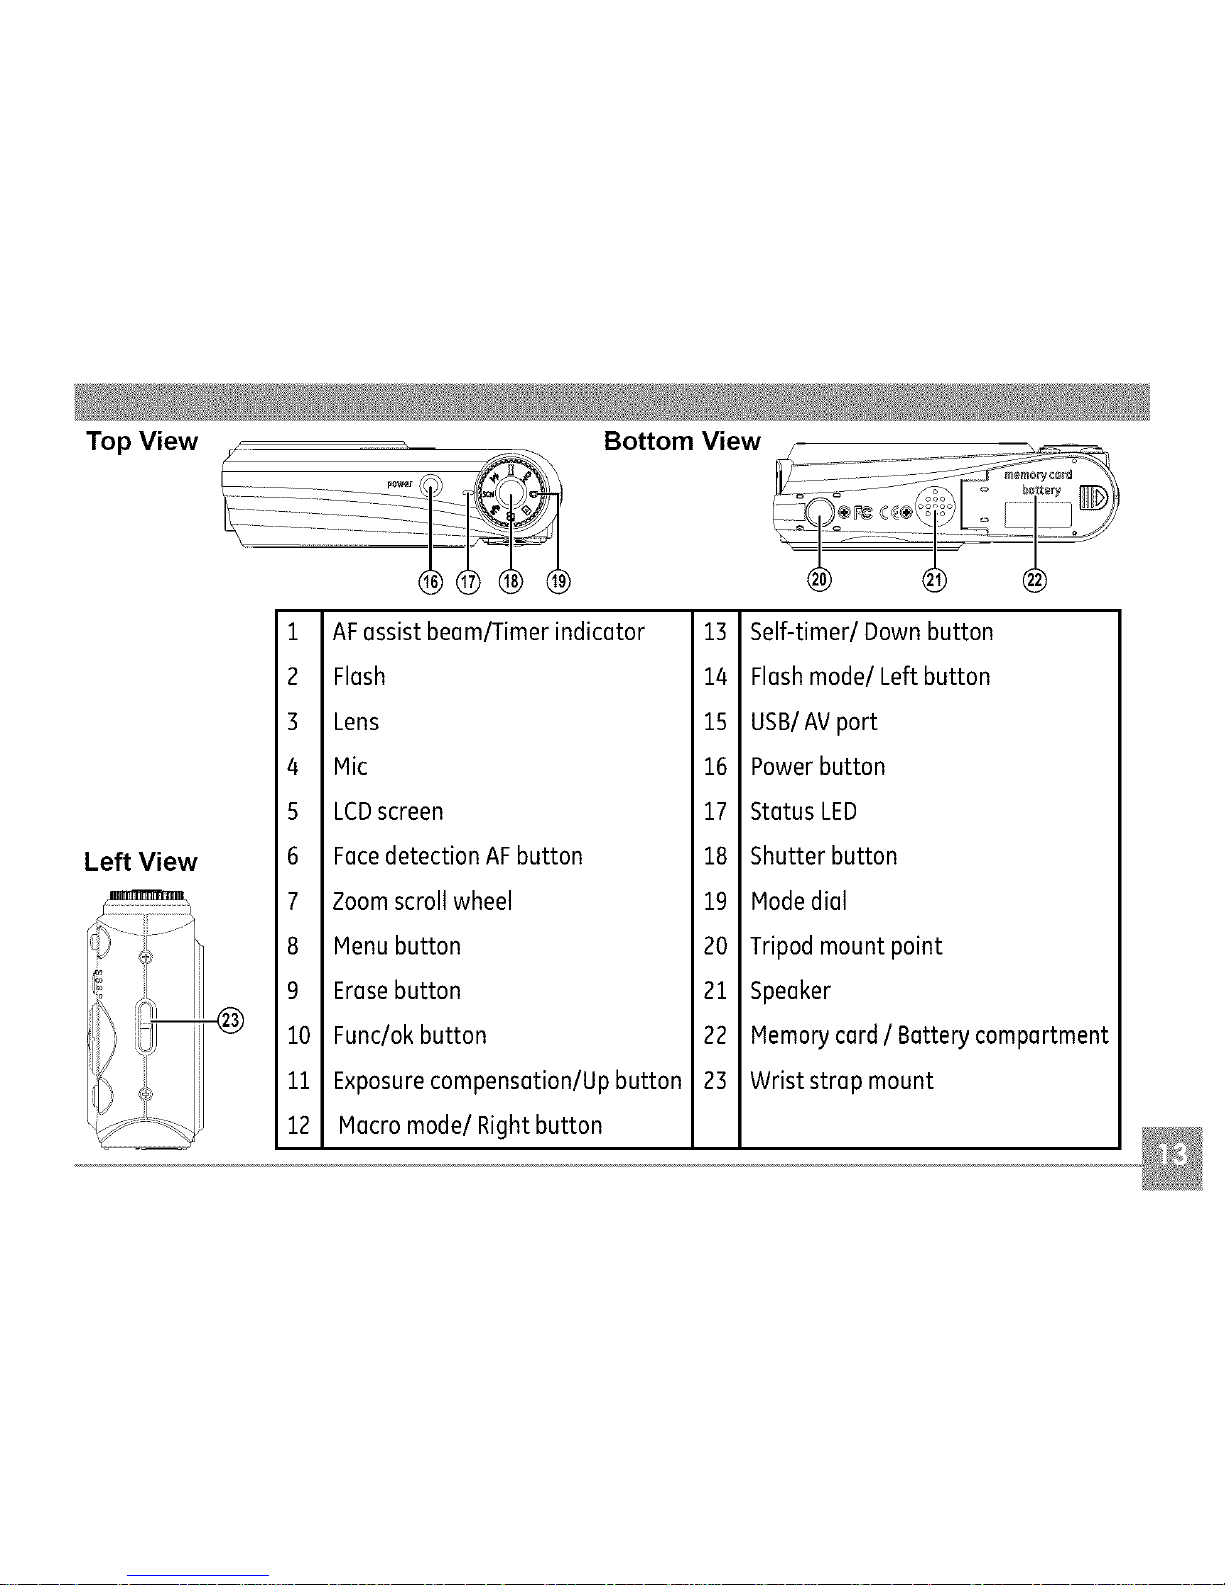
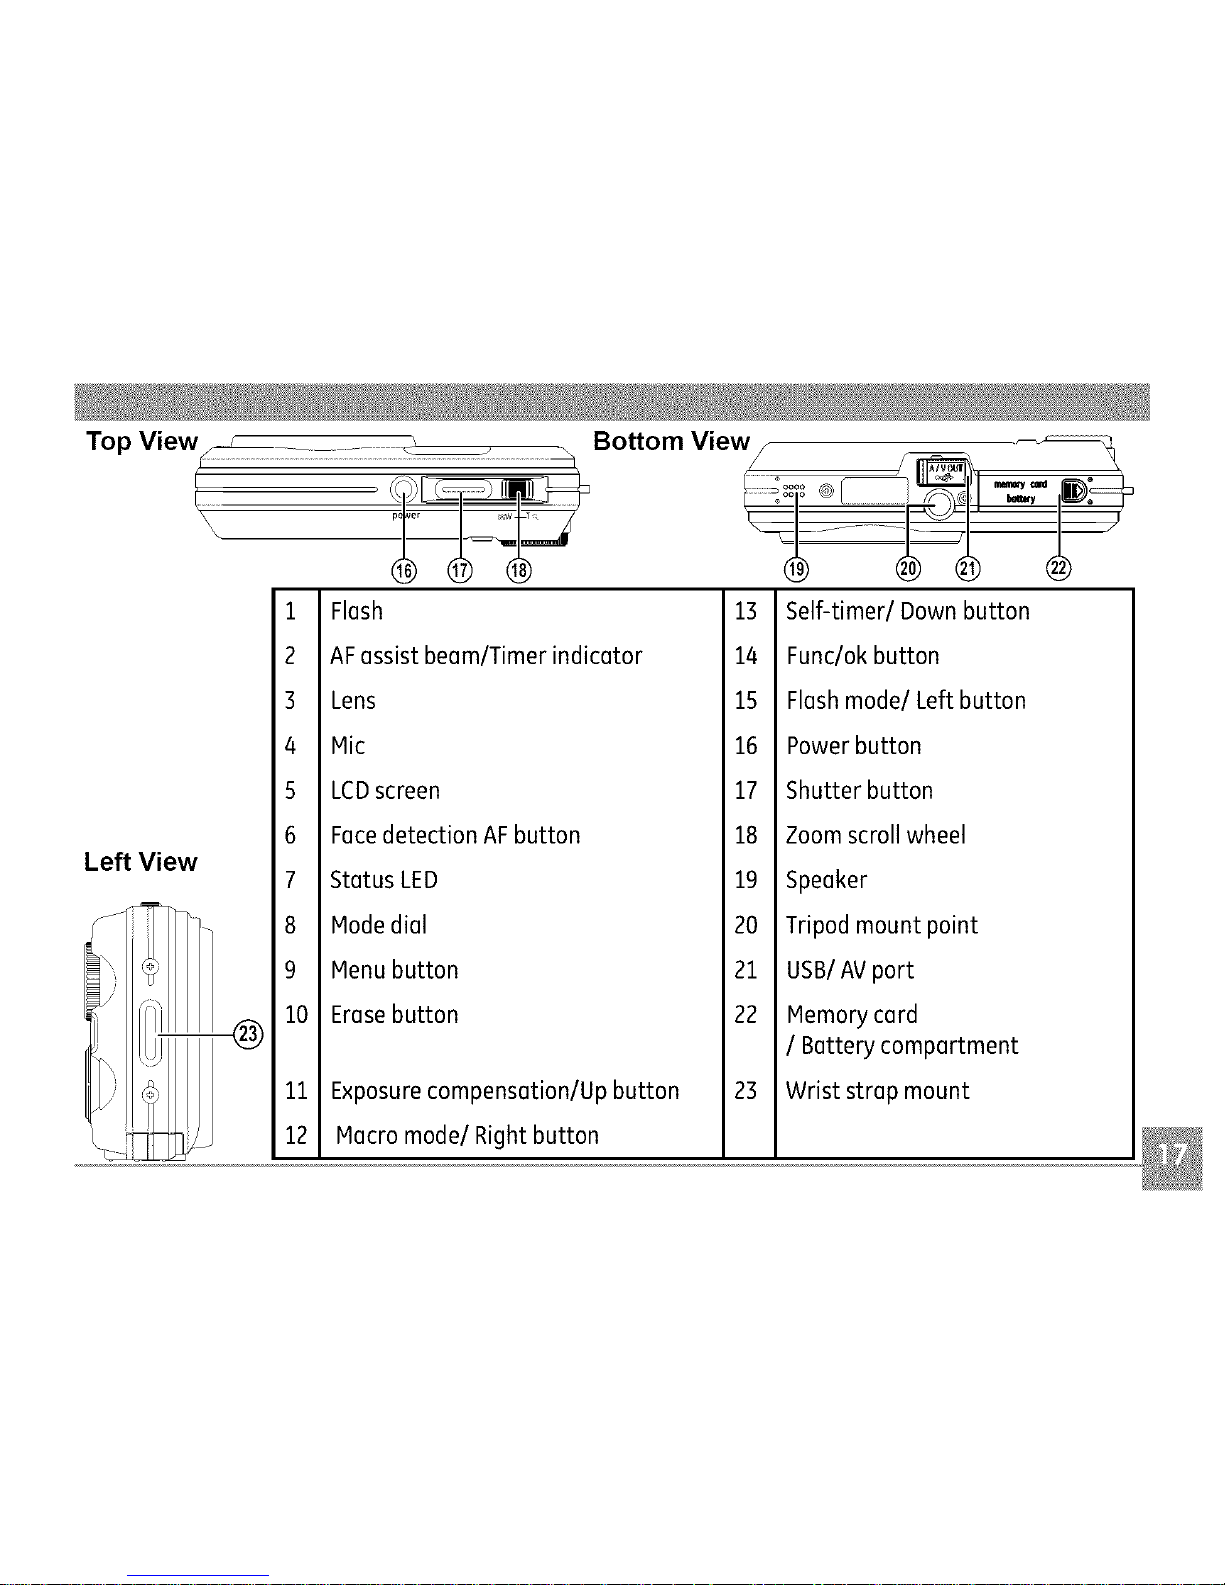
TopView _ Bottom View
Left View
1
2
3
4
5
6
7
8
9
10
11
12
Flash
Lens
Mic
AFassist beam/Timerindicator
StatusLED
LCDscreen
FacedetectionAFbutton
T&Wbutton
Menubutton
Erasebutton
Exposurecompensation/Up button
Macromode/Right button
13
14
15
16
17
18
19
20
21
22
23
Self-timer/Down button
Func/okbutton
Flashmode/Left button
USBIAVport
Powerbutton
Shutter button
Modedial
Speaker
Tripodmount point
Memorycard
/ Battery compartment
Wrist strap mount
Page 16
Front View
_,
-<_
Right View
_%-_
Page 17
Top View
Left View
1
2
3
4
5
6
7
8
9
i0
ii
12
AFassistbeam/Timerindicator
Flash
Lens
Mic
LCDscreen
FacedetectionAFbutton
Zoomscroll wheel
Menubutton
Erasebutton
Func/okbutton
Exposurecompensation/Upbutton
Macromode/Right button
Bottom View
13
14
15
16
17
18
19
2O
21
22
23
Self-timer/Down button
Flashmode/Left button
USB/AVport
Powerbutton
StatusLED
Shutter button
Modedial
Tripodmount point
Speaker
MemorycardI Batterycompartment
Wrist strap mount
Page 18
Front View Back View
®
Right View
........................!__ _®
Page 19
Top View_ _ ,_
1
2
3
4
5
6
Left View
7
8
9
10
11
12
Bottom View _ _
Mic
Flash
AFassistbeam/Timerindicator
Lens
LCDscreen
FacedetectionAFbutton
StatusLED
Modedial
Menubutton
Erasebutton
13
14
15
16
17
18
19
2O
21
22
23
Exposurecompensation/Upbutton
Macromode/Right button
Self-timer/Down button
Flashmode/Left button
Func/okbutton
Speaker
Powerbutton
Shutterbutton
Zoomscrollwheel
Tripodmount point
USB/AVport
Memorycard/
Batterycompartment
Wriststrap mount
Page 20
Front View Back View
r
Right View
Page 21
Top View_-_:::_ Bottom View// _, _
...................U
Left View
1
2
3
4
5
6
7
8
9
10
ii
12
Flash
AFassistbeam/Timerindicator
Lens
Mic
LCDscreen
FacedetectionAFbutton
StatusLED
Hadedial
Henu button
Erasebutton
Exposurecompensation/Upbutton
Macromode/Right button
13
14
15
16
17
18
19
20
21
22
23
Self-timer/Down button
Func/okbutton
Flashmode/Left button
Powerbutton
Shutter button
Zoomscrollwheel
Speaker
Tripodmount point
USB/AVport
Hemorycard
/ Battery compartment
Wrist strap mount
Page 22
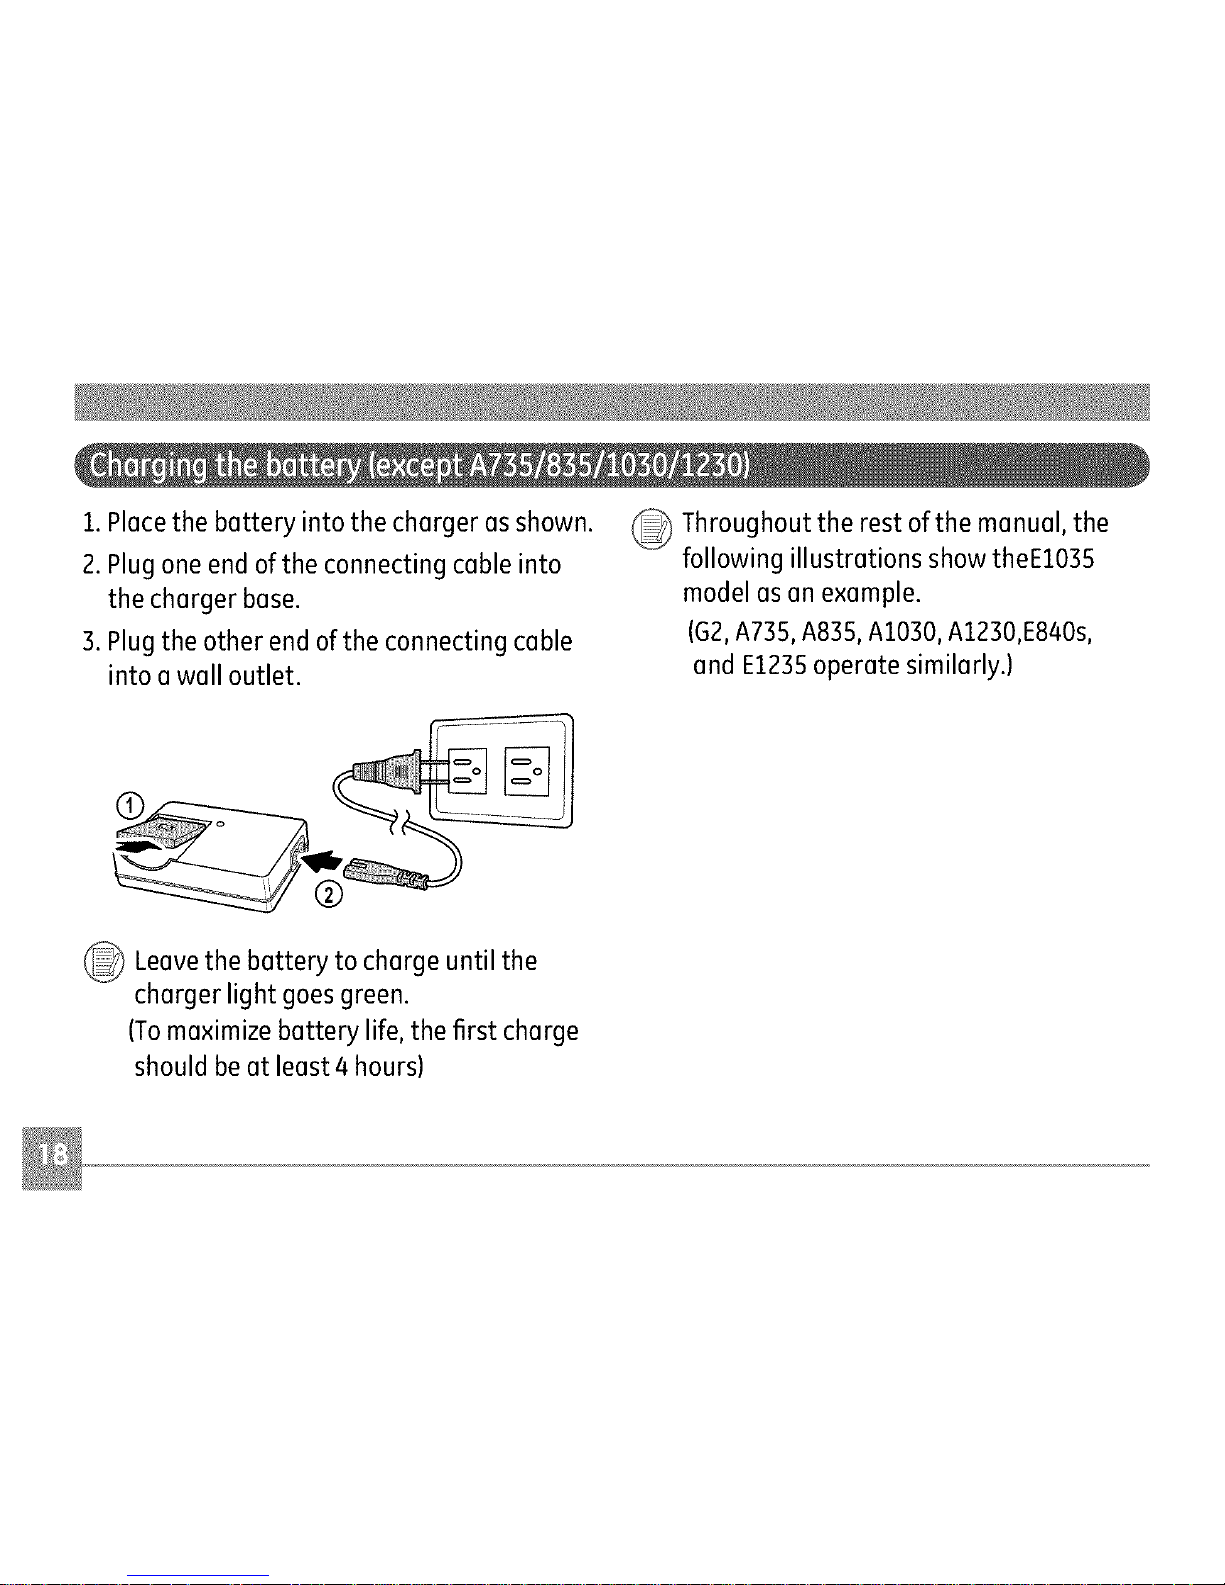
1.Piecethe bettery into the cherger es shown.
2. Plug one end of the connecting ceble into
the cherger bese.
3. Plug the other end of the connecting ceble
into e well outlet.
_ Throughout the rest of the menuel, the
following illustretions show theE1035
model es en exemple.
(G2,A735, A835,A1030, A1230,E840s,
end E1235operete similerly.)
®
_ Leevethe to until the
bettery cherge
cherger light goes green.
(Tome×imize bettery life, the first cherge
should be et leest 4 hours)
Page 23
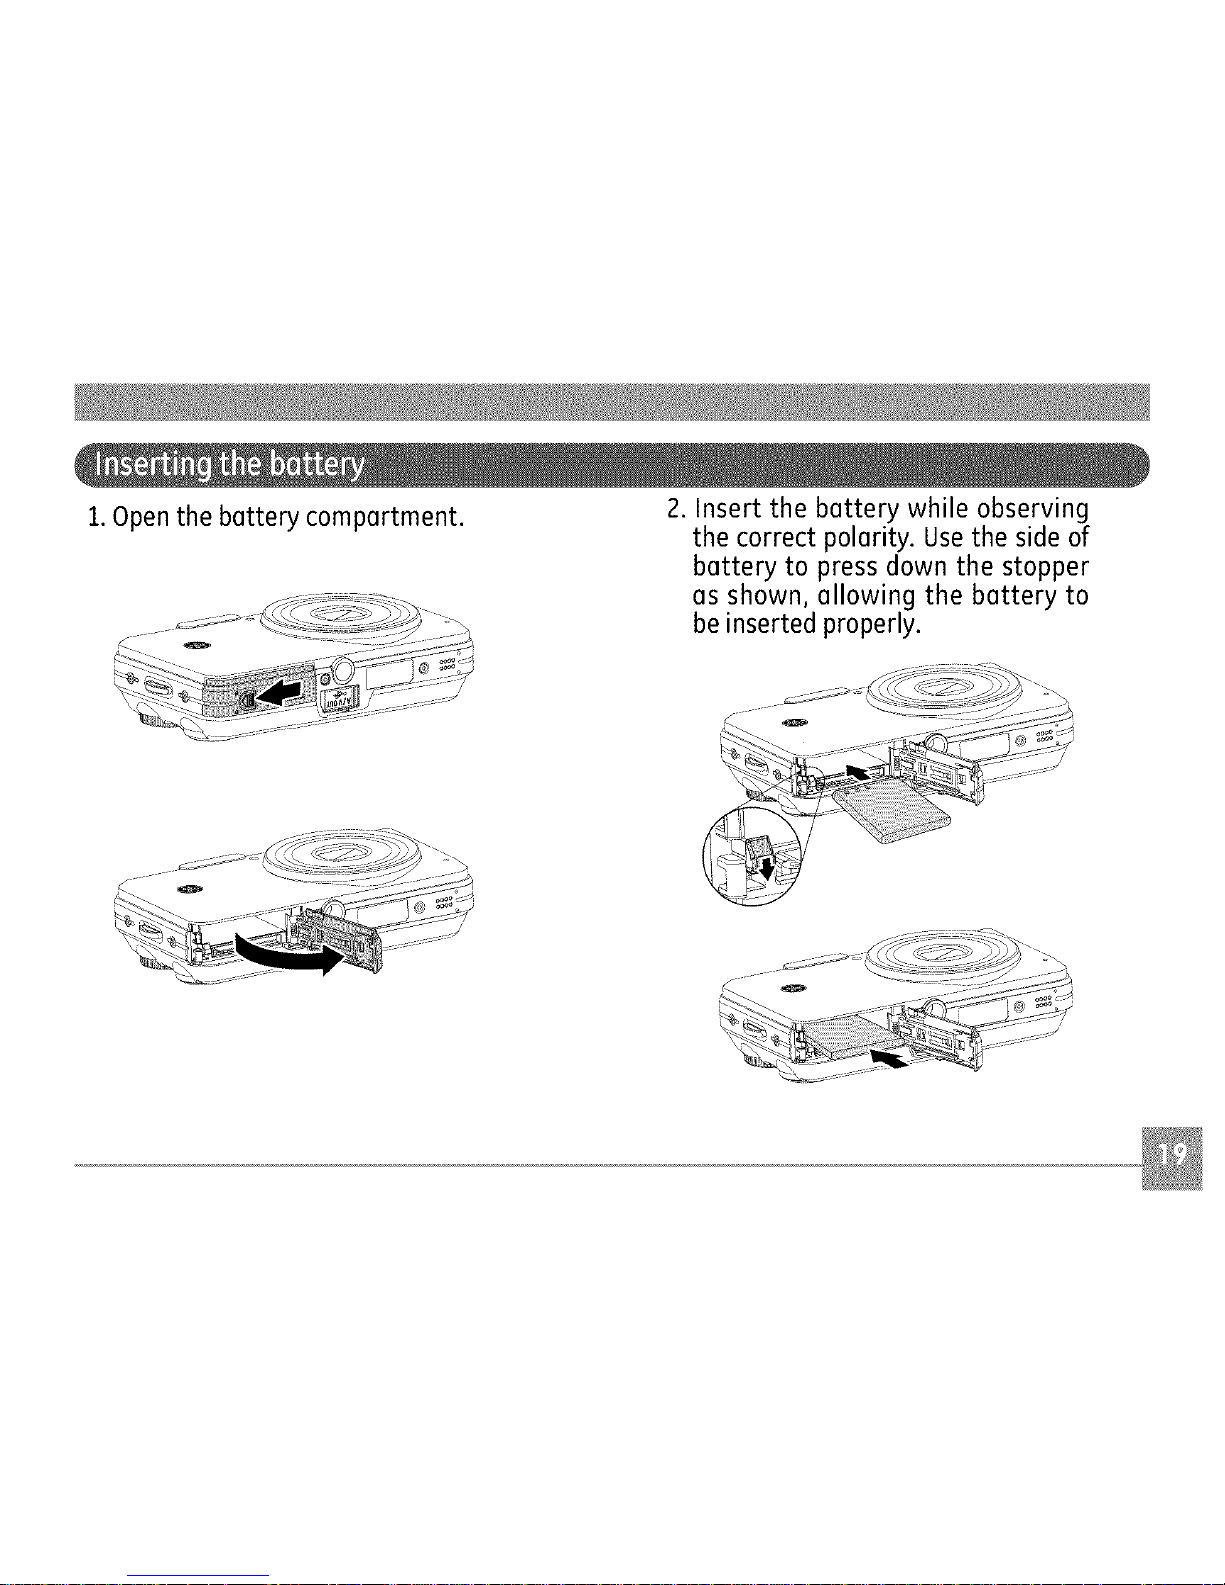
1.Open the bettery compertment.
2. Insert the bettery while observing
the correct polerity. Use the side of
bettery to press down the stopper
es shown, ellowing the bettery to
be inserted properly.
Page 24
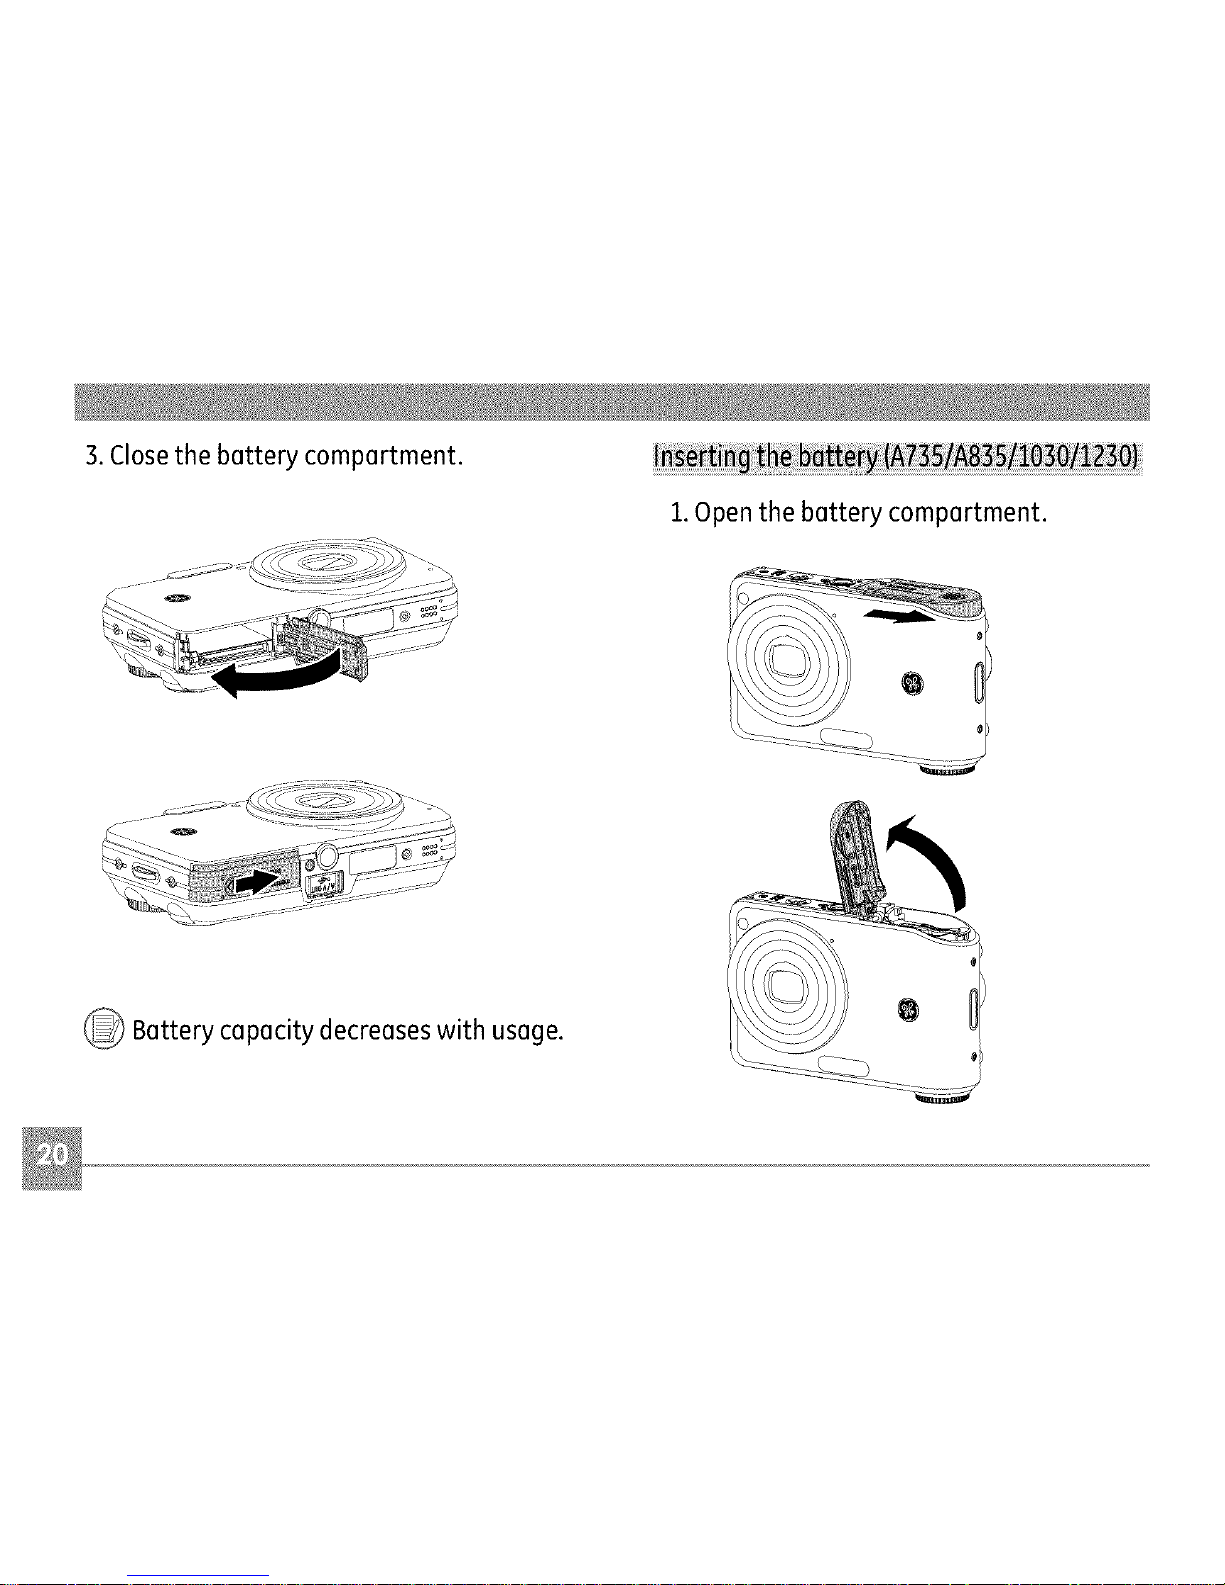
3. Closethe battery compartment.
1.Open the battery compartment.
_ Battery capacity decreases with usage.
Page 25
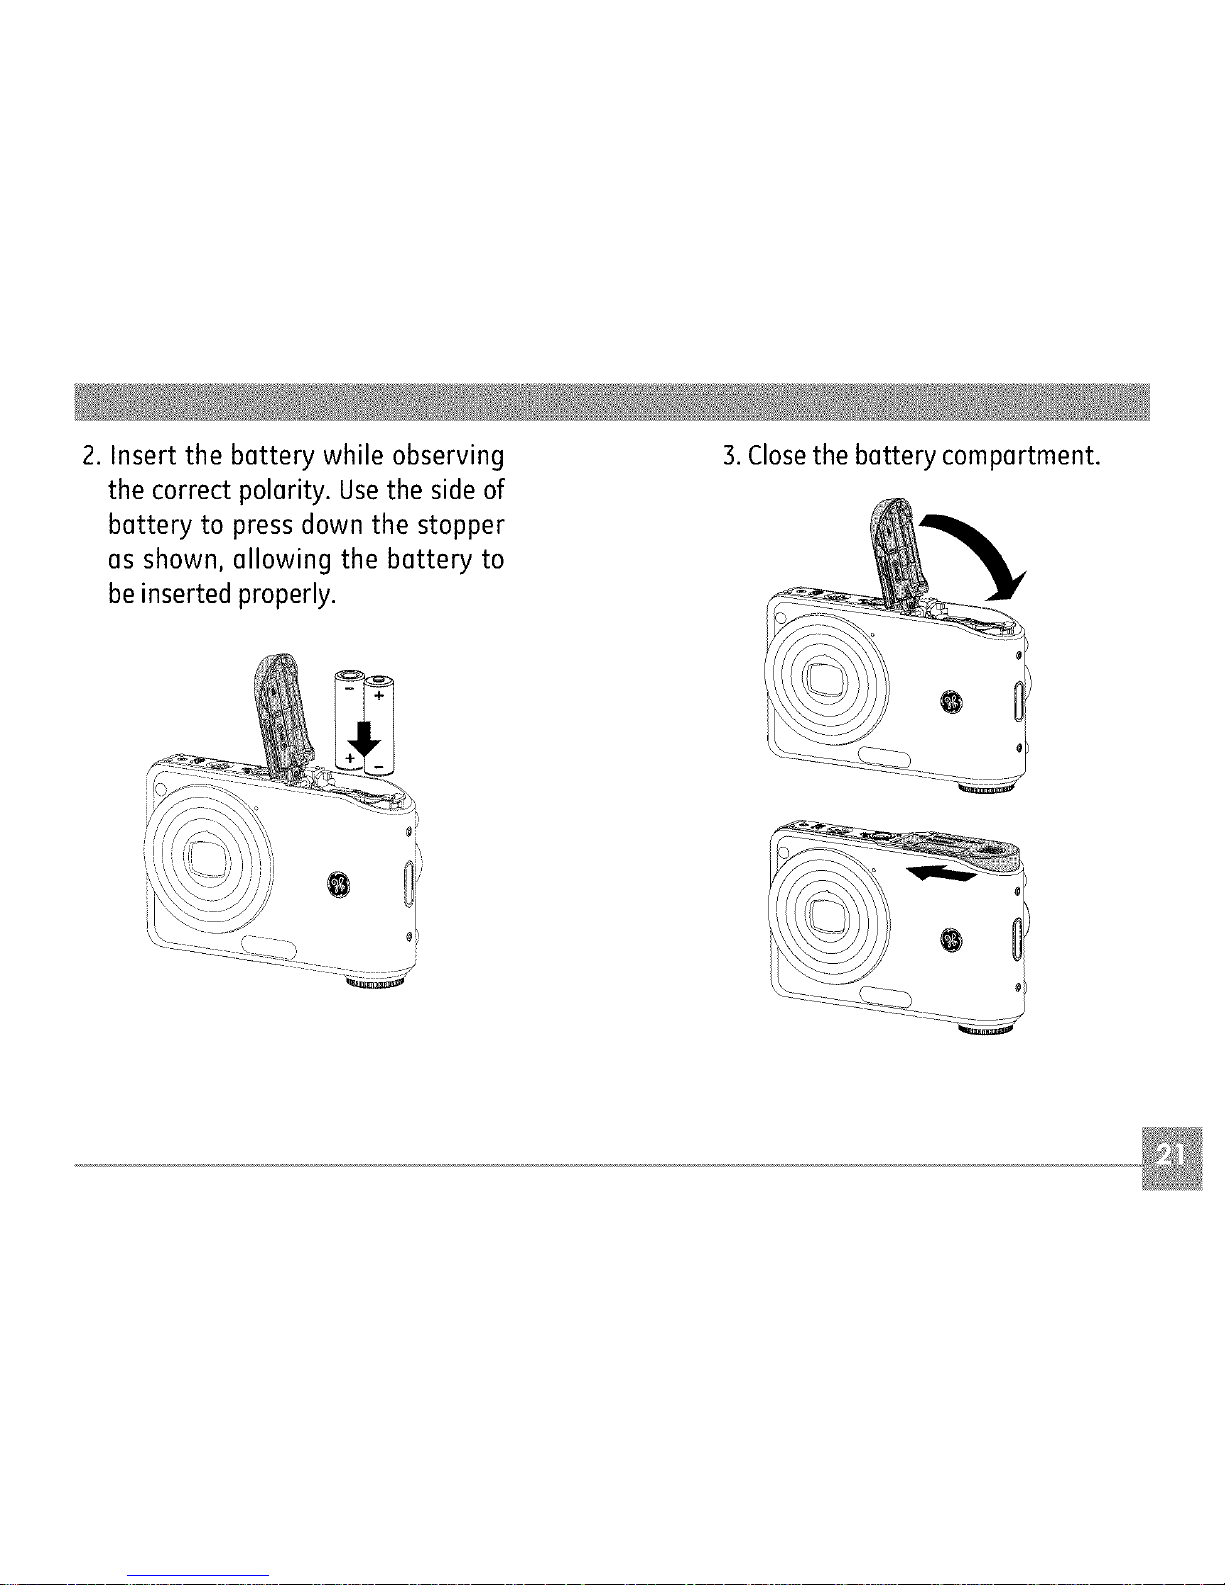
2.Insertthebatterywhileobserving
thecorrectpolarity.Usethesideof
batteryto pressdownthestopper
asshown,allowingthebatteryto
beinsertedproperly.
3.Closethebatterycompartment.
Page 26

1.Openthebatterycompartment. 2. Insert an optional SD/SDHCcard into
the memory card slot as shown.
_ Optional SD/SDHC cards are not included.
The use of 64HB to 4GBmemory cards from
recognized manufacturers such as SanDisk,
Panasonic and Toshiba is recommended for
reliable data storage.
Page 27

3.Closethebatterycompartment.
PressthePowerbuttontoturnthecamera
on.Toturnoffthecamera,pressthePower
buttonagain.
Power button
Toremove the SD/SDHCcard, open the battery
compartment and gently push the card to
release it. Pull the card carefully.
When turned on, the camera will enter the
mode according to the mode dial setting. You
can also turn the mode dial to change the
modes after the camera isturned on.
Page 28
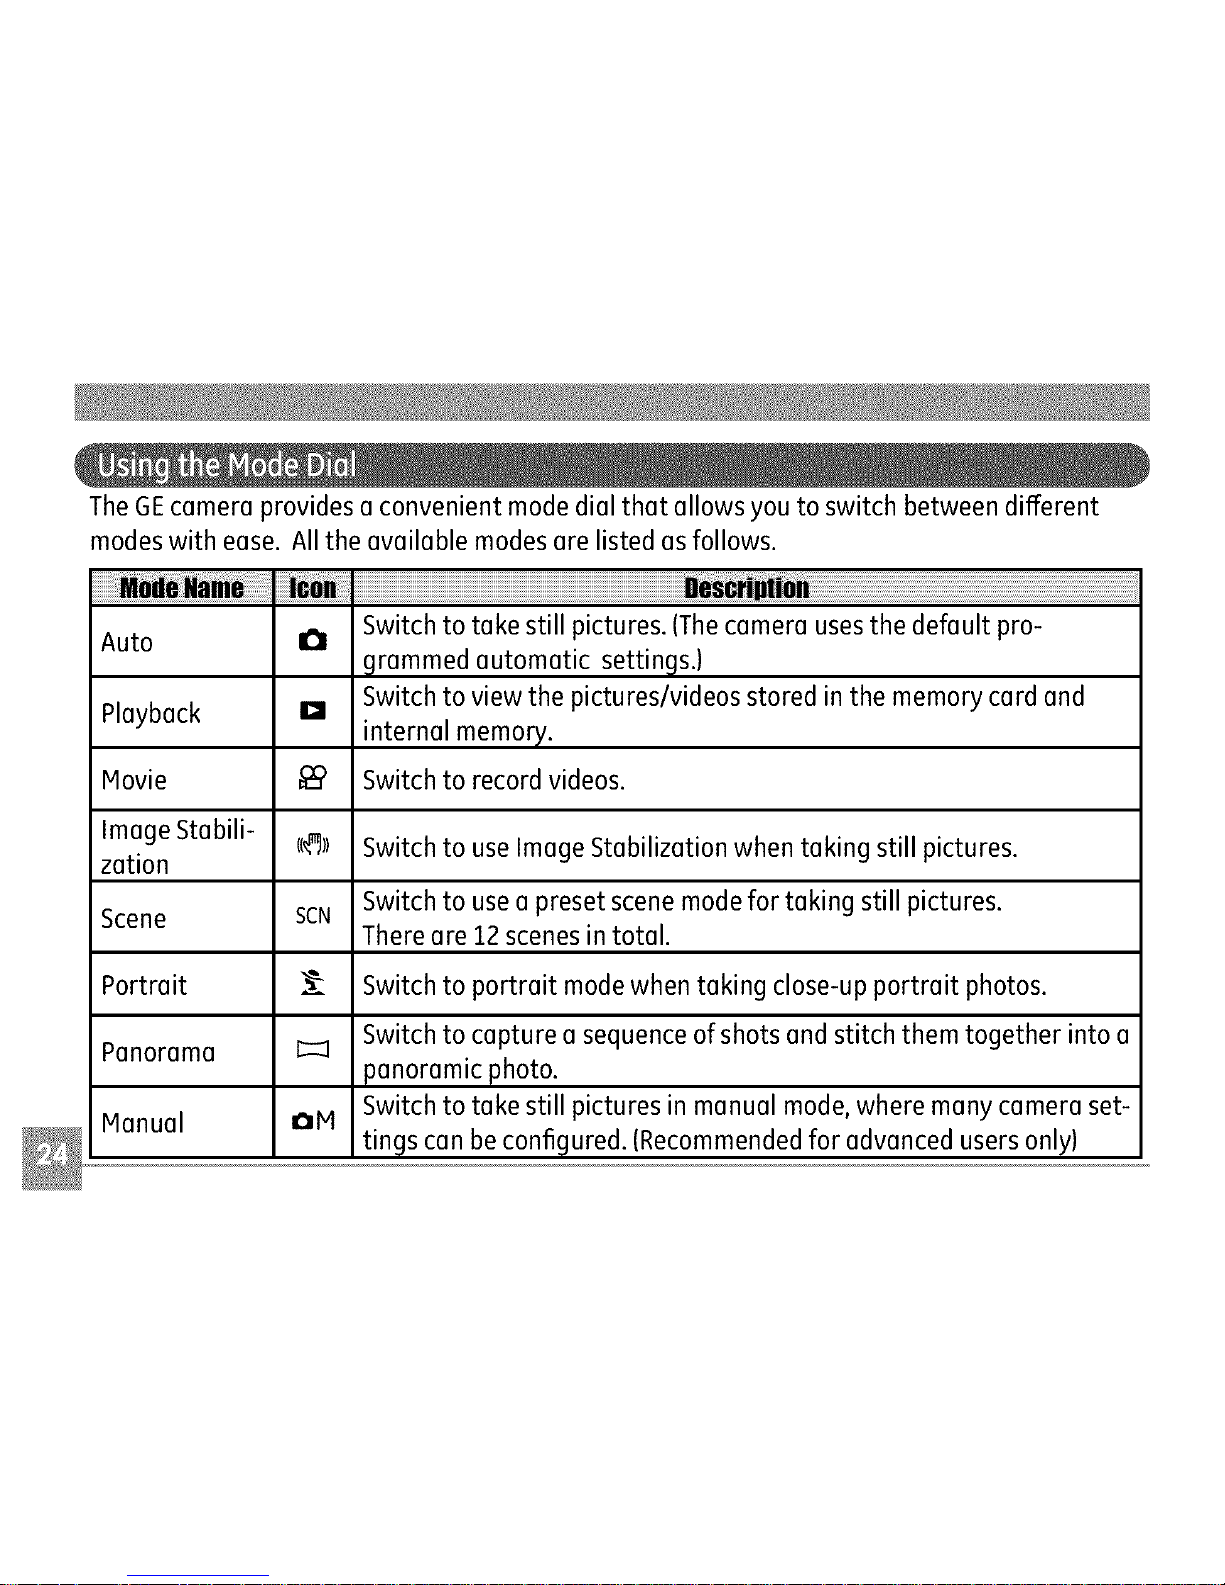
TheGEcameraprovidesaconvenientmodedialthatallowsyoutoswitchbetweendifferent
modeswithease.Alltheavailablemodes(]relistedasfollows.
Auto
Playback
Movie
Image Stabili-
zation
Scene
Portrait
Panorama
Hanual
Switch to take still pictures. (Thecamera uses the default pro-
a
grammed automatic settings.)
Switch to view the pictures/videos stored in the memory card and
D
internal memory.
Switch to record videos.
cc_)l Switch to use Image Stabilization when taking still pictures.
Switch to use a preset scene mode for taking still pictures.
SCN
There are 12 scenes in total.
Switch to portrait mode when taking close-up portrait photos.
Switch to capture a sequence of shots and stitch them together into a
panoramic photo.
Switch to take still pictures in manual mode, where many camera set-
OH
tings can be configured. (Recommended for advanced users only)
Page 29
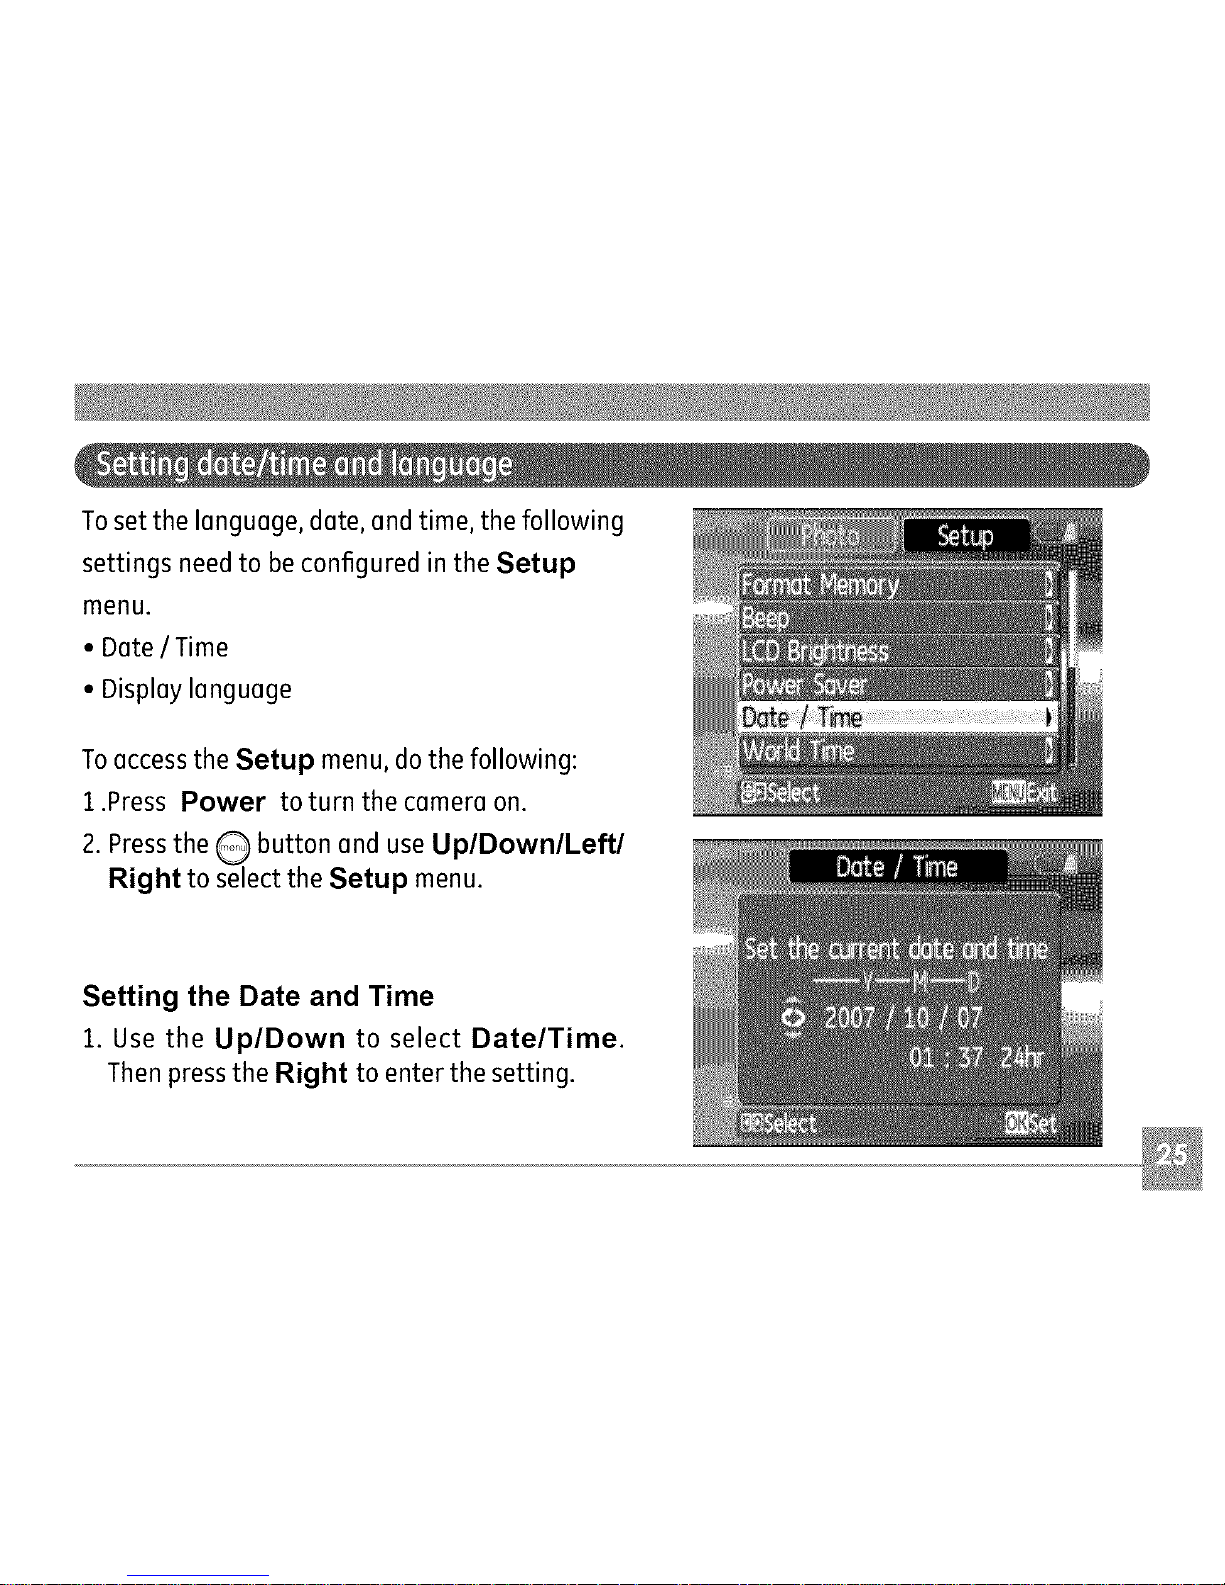
Tosetthelanguage,date,andtime,thefollowing
settingsneedtobeconfiguredintheSetup
menu.
• Date/Time
• Display language
Toaccess the Setup menu, do the following:
1.Press Power to turn the camera on.
2. Pressthe Q button and use UplDownlLeftl
Right to select the Setup menu.
Setting the Date and Time
1. Use the Up/Down to select Date/Time.
Then press the Right to enter the setting.
Page 30
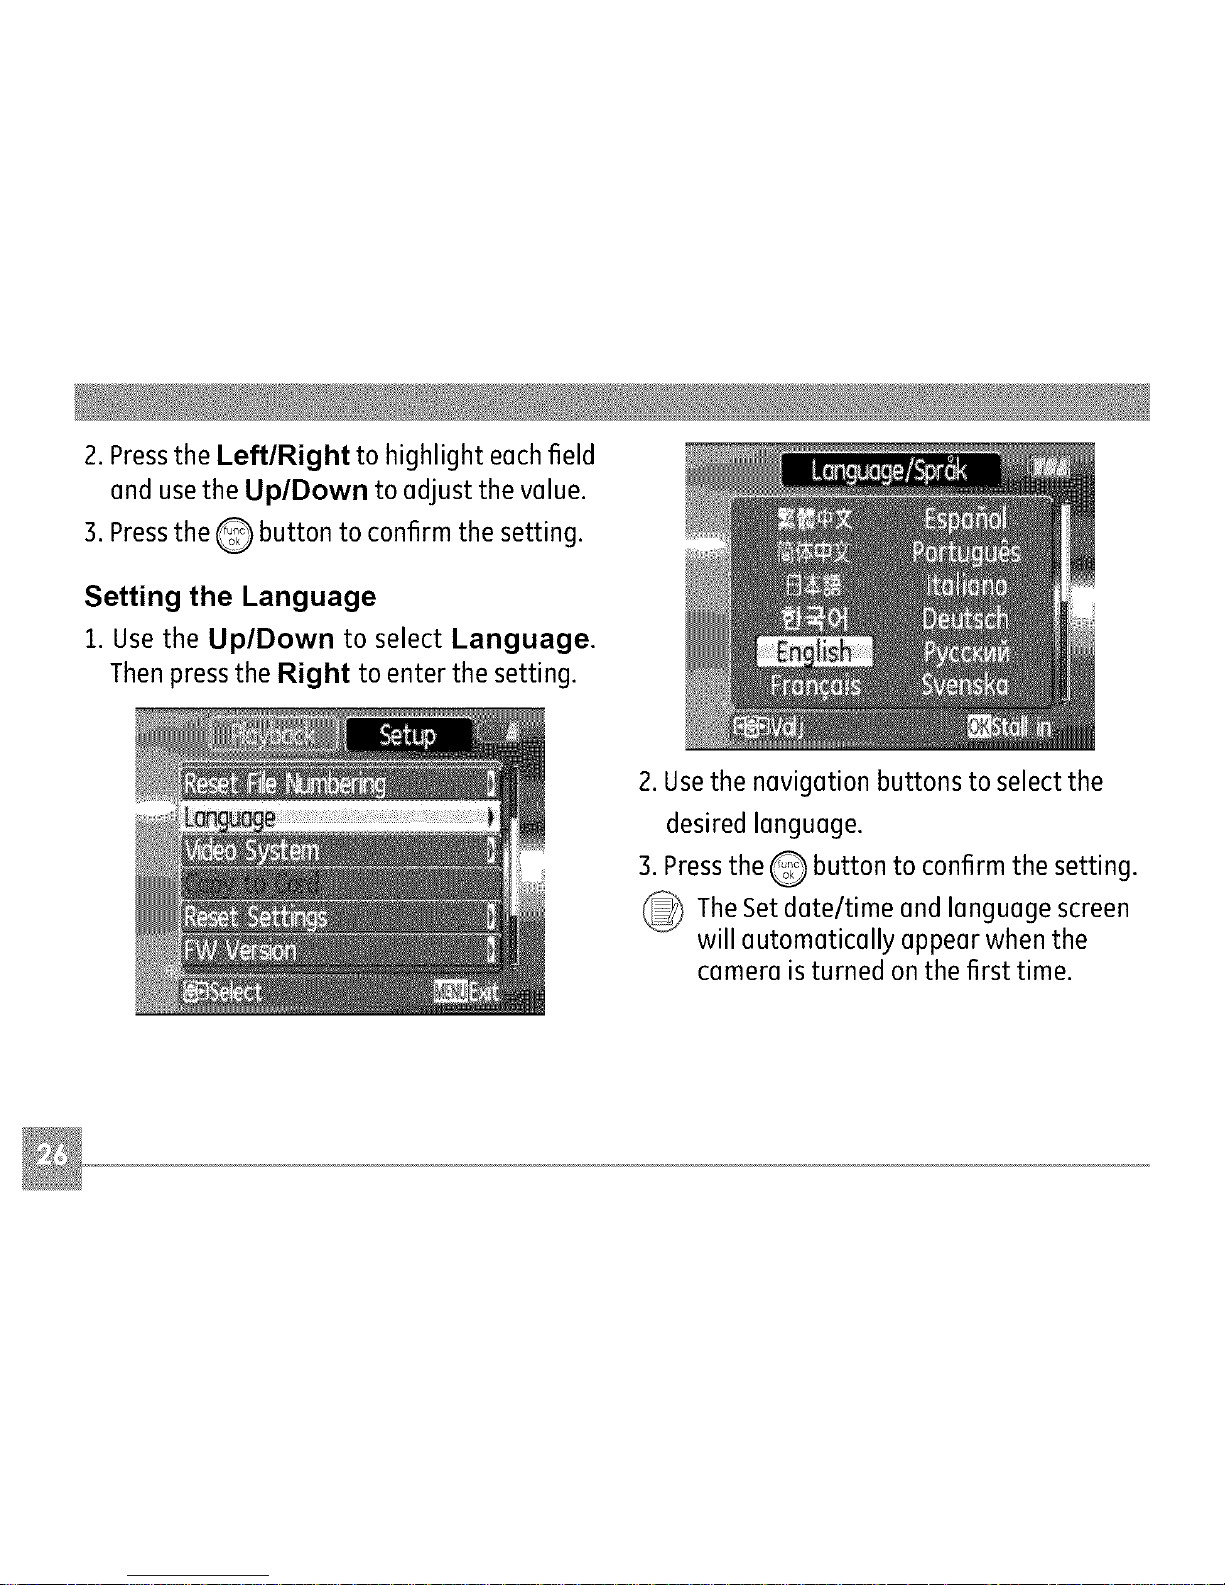
2.PresstheLeft/Right to highlight eech field
end use the Up/Down to edjust the velue.
3. Pressthe Q button to confirm the setting.
Setting the Language
1. Use the Up/Down to select Language.
Then press the Right to enter the setting.
2. Usethe nevigotion buttons to select the
desired lenguege.
3. Pressthe Q button to confirm the setting.
_The Setdote/time end lenguege screen
will eutometicelly eppeer when the
cemere is turned on the first time.
Page 31

Whenyouturnthecameraon,variousicons
areshownontheLCDscreentoindicatethe
currentcamerasettingsandstatus.Tolearn
moreaboutthedisplayedicons,see"LCD
Screendisplay"onpage38.
LCDScreen notes:
Extremely high-precision technology had
been used to manufacture the LCDscreen
so that most of the pixels are operational
for use. However, there may be some minute
points (black, white, red, blue or green) that
constantly appear on the LCDscreen. These
points are normal in the manufacturing pro-
cess and the recording is not affected in any
way.
_ If the LCDmonitor is damaged, take
particular care with the liquid crystal in
the monitor. If any of the following
situations arise, take the urgent action
indicated.
•If liquid crystal comes in contact with your
skin, wipe the area with a cloth and then
wash thoroughly with soap and running
water.
•If liquid crystal gets into your eye,flush the
affected eye with clean water for at least 15
minutes and then seek medical assistance.
•If liquid crystal is swallowed, flush your
mouth thoroughly with water. Drink large
quantities of water and induce vomiting.
Then seek medical assistance.
Page 32

Automodeistheeasiestmodetotakepho-
tos.Whileoperatinginthismode,thecamera
automaticallyoptimizesyourphotosforbest
results.
Tostartshooting,dothefollowing:
1.SetthemodedialtoAuto mode(a).
2.PressPowertoturnthecameraon.
3.ComposeyourpictureontheLCDscreen
andpresstheshutterbuttonhalfwayto
focusonthesubject.
4.Whenthesubjectisinfocus,thegreen
coloredfocusframeappearsonthecenter
oftheLCDscreen.
5.PressShutterfullytocapturetheimage.
Yourcameraisequippedwithtwotypesofzoom:
opticalzoomanddigitalzoom.UsetheZoom
scroll wheelonthetopofthecameratozoom
inoroutonyoursubjectwhiletakingpictures.
Zoom Scroll wheel
[
indicator
(See"Digital Zoom"
on page 60)
When the optical zoom factor reaches its
maximum value, it stops momentarily. Keep
the (Tale) zoom button depressed and zoom
will switch over to digital zoom automatically.
Page 33

Therearesixfleshmodes.PresstheLeft/
Flashtocyclethroughthefollowingflesh
modes.
•_ Autoflesh
Camerafleshfiresautomaticallybased
onexistinglightconditions.
•_ Red-eyereductionflesh
Thecamerafiresabriefflashbeforethe
pictureistakentoreducered-eyeeffects.
• _ Forcedflash
Flashalwaysfires.
• 0 Flashoff
Flashisturnedoff.
• _ SlowSynchro
Thisallowsyou to take pictures of people
at night that clearly show both your
subjects and the night time backdrop.
• _ Red-EyeReduction+Slow Synchro
Usethis mode for slow synchro shots
with red-eye reduction.
To enable the self-timer function, press the
Down/Self-timer to select 2-second timer
delay, lO-second timer delay, or a continuous
shot.
• _ 2-second timer delay
A single picture is shot 2 seconds after
the shutter button is pressed.
• _ lO-second timer delay
A single picture is shot 10 seconds after
the shutter button is pressed.
• _ Continuous shot
Pictures are shot continuously when the
shutter button is pressed based on the
Continuous Shot settings in the menu.
(See"Continuous Shot" on page 59).
Page 34

InMacro mode, you can capture tiny details
of the subject at a very close range. Pressthe
Right/Macro to take close-up shots.
• _ Hacro
Select this to focus on subjects Scm from
the lens.
The exposure compensation allows you to
adjust the background brightness to produce
the best result of photos. To change the expo-
sure values, do the following:
1.When taking a picture, press the Up/
Exposure button to activate the set
exposure screen.
2. Usethe Left/Right to adjust the exposure
value for the picture. The range isfrom EV
-2.0 to EV+2.0(steps of 0.3).
Page 35

WB (White Balance)
Thewhite balance allowsthe user to adjust
the color temperature under different light
source to ensure faithful color reproduction.
(TheWB setting is only available when the
camera is in the o! Manual mode).
Toset the white balance, do the following:
1.Pressthe Q button to enter the Function
menu. Make sure the WB function is
selected.
2. Use Up/Down navigation buttons to
select the setting you want. The following
options are available:
•/_4b_ _Auto
• _ Daylight
• C_,_ Cloudy
• _ Fluorescent
• _ Fluorescent CWF
• _ Incandescent
• _c_ Manual WB adjustment (press the
menu button to set)
3. Usethe LeftlRight buttons to select
other options, or press the Q button
once to confirm your selection and exit the
current menu.
Page 36

ISO
The ISOfunction allows you to set the camera
sensor sensitivity to light. To improve the
performance in darker environments, a higher
ISOvalue is required. On the other hand, a
lower ISOvalue is needed when in bright
conditions.
(TheISOsetting is only available when the
camera is inthe OH Manual mode).
To set the ISOvalue, dothe following:
1. Pressthe Q button to enter the Function
menu.
2. Usethe Left/Right navigation buttons to
highlight the ISO function.
Higher ISOpictures will naturally have
more noise then lower ISOpictures.
3. Usethe Up/Down navigation buttons to
select the desired ISOvalue from Auto, 64,
80,100, 200, 400, 800, or 1600.
4. Pressthe Q button to confirm your setting.
5. Usethe Left/Right buttons to select other
options, or press the _ button once to
confirm your selection and exit the current
menu.
Page 37

Quality
Thequality setting adjuststhe compression
ratio of the images. Higher quality settings
give better photos, but will take up more
memory space.
Toset the image quality, do the following:
1.Pressthe Q button to enter the Function
menu.
2. Usethe Left/Right navigation buttons to
highlight the Quality function.
3. Usethe Up/Down navigation buttons to
select a desired setting. Threeoptions are
available.
• _
._%
: Best quality (Standard compression)
: Finequality (High compression)
: Normal quality
(Maximum compression)
4. Pressthe Q button to confirm your setting.
5.The number of available shots remaining is
displayed on the LCD.
.
Usethe Left/Right buttons to select other
options, or press the _ button once to
confirm your selection and exit the current
menu.
Page 38

Size
The size setting refers to the image resolution
in pi×els.A higher image resolution allows
you to print that image in larger sizeswithout
degrading the image.
3. Usethe Up/Down navigation buttons to
select e resolution.
4. Pressthe Q button to confirm your setting.
5.The number of available shots is displayed
on the screen.
Toset the image size, do the following:
1. Pressthe Q button to enter the Function
menu.
2. Usethe Left/Right navigation buttons to
highlight the Size function.
_The bigger the number of recorded pixels
is, the better the image quality becomes.
Asthe number of recorded pixels becomes
smaller, you will be able to record more
frames on o memory cord.
_ lease refer to page 36 for o list of image
sizesthat ore available to the various GE
digital camera models
Page 39

Color
Thecolor setting allows you to add artistic
effects directly when taking shots. Youcan try
different color tones to alter the mood of your
pictures.
(TheColor setting is only available when the
camera is in the oP1 Manual mode).
Toset the image color, do the following:
1.Pressthe Q button to enter the Function
menu.
2. Usethe LefflRight navigation buttons to
highlight the Color function.
3. Use UplDown to select an option.
Thefollowing options are available:
• _ Auto
• _ Black & White
• Sepia
• _ Vivid
4. Pressthe Q button to confirm your setting.
Page 40

• Size settings in shooting mode. (•: available)
0.3M:
640x480 ........
IM: ........
i024x768
2.: ........
1600x1200
3M: ........
2048x1536
5M:
• • • • •
2560x1920
5M(16:9):
3072x1728
6M:
° °
2816x2112
6M(3:2):
_ 3072x2048 "
6M(16:91: • • •
3264x1836
Page 41

7M:
3072x2304
7M(3:21: • • •
3264x2176
7M116:91: • •
3648x2052
[_ 8M: • • •
3264x2448
9M(3:2): • •
3648x2432
9M(16:9): • •
4032x2268
IOM: • •
36L18x2736
10M(3:2): • •
4032x2688
[_ 12M: • •
4032x3024
Page 42

Still shooting mode display
Mode: a ,',M _ _ SCNcl_}_
®
®
I Shooting modeicon
_Auto
_Panorama
Scene
_Manual
H Portrait
ImageStabilization
2 Sceneicon(onlyavailablefor Scene mode)
Sport _ Fireworks
Children _ Glass
Indoor _ Museum
Leaf _ Landscape
Snow _ Night landscape
Sunset _ Night portrait
3 Lightmetering method
_o_ SpotAE
_©_ Center-Weight
_°_ AiAE
4 EVindicator
5 Self-timerindicator
2-secondself-timer
10-secondself-timer
Continuousshot
Page 43

6Macromodeindicator
@ Macromode
7 Flashmodeindicator
Autoflash
Red-eyereductionflash
@ Forcedflash
0 Flashoff
@_ SlowSynchro
Red-EyeReduction+SlowSynchro
8 Batterystatus
9 Facedetection "on"indicator
10 Remainingnumberof photosthat canbe
taken.
11 Focusframe
12Zoomindicator
13White balance€onlyavailablefor Manual
model
14 ISO(onlyavailablefor OM Manual model
15Imagequality
16Imagesize
17Imagecolor(onlyavailablefor,_M Manual
model
18 Slowshutter warning indicator
19 Memorycard/internal memoryindicator
20 EVadjustment slider
Page 44

Video shooting mode display
Mode:
®
1 Shooting modeicon
2 Lightmetering method
o_ SpotAE
j]:©:j] Center-Weight
IZoo AiAF
3 EVindicator
4 Self-timerindicator
10-secondself-timer
5 Macromodeindicator
_ Macro mode
6 Battery status
7 Movierecording"on" indicator
8 Remainingtime for videosthat canbetaken.
9 Focusframe
10 Zoomindicator
11 Videoresolution
12 Videoquality
13 Memorycardlbuilt-in memory indicator
Forbestmovie results,the useofSDcardsis
recommended.Movierecordingsusinginternal
memoryaresubjectto quality degradations.
_ Whilemovierecordingisin progress,optical
zoomwill stay fixed,but upto 1.5×digital
zoomwill remain available.
Page 45

Playback mode display
Mode: I_I
1 Playbackmodeicon
2 DPOFfile icon
3 Fileprotection icon
4 Audiofile icon
5 Videofile icon
6 Memorycard/internal
memoryindicator
7 PictureID
8 Batterystatus
9 Photoaudiostatus
(Pressthe shutter button
to recordsound)
(Pressthe shutter button
to playsound)
10 Recordingdateandtime
11Histogram
12Aperture value
13Shutterspeed
14Exposurevalue
15Memorycapacity
(current picture/
total picture number)
16ISOvalue
17WB
18Imagesize
Page 46

InScene mode, you can select from atotal
of 12 scene types to match your needs. You
just need to select the right scenefor the
occasion and the camera will automatically
adjustto the optimal settings for you.
Toenter the scene mode, turn the mode dial
to Scene mode. The scene mode palette
appears.
Use Up/Down/Left/Right to select a
scene, and press the Q button.
Sport
For shooting fast-moving objects. Bring lively
pictures to life.
Children
Suitable for photographing children and pets.
The flash shuts offautomatically in order not
to disturb the subject being photographed.
Indoor
For shooting people indoors. Clearly show
background and atmosphere.
Leaf
For shooting plants. Vivid reproduction of
green.
Page 47

Snow
Suitable for snowy landscape. Camera auto-
matically adjusts and corrects exposure value
(EV).
Sunset
Forshooting sunsets. Vivid reproduction of
red and yellow.
Fireworks
Forshooting at night and fireworks. Shutter-
speed is slower than normal.(Use of tripod is
recommended)
Glass
Suitable for photographing objects behind
glass or window.
Museum
Forshooting in museums or places where
flash is not allowed.
Landscape
For shooting landscapes. Vivid reproduction
of green and blue.
Night landscape
For shooting night scenes. Useof tripod is
recommended.
Night portrait
For shooting portraits with night scenesas
background.
Page 48

Returning to the Scene selection
menu
1.In Scene mode, press the Q button to
activate the main function menu.
2. Select the "SCENE"menu optionand then
press the Q button to return to the to
Sceneselection menu.
The main function menu also allows you
configure image quality and image size.
Pleaserefer to the "Advanced Functions
Menu" section on pages 29for detailed
Panorama mode allows you create a pan-
oramic picture. Thecamera will to automati-
cally compose apanoramic picture using the
individual shots that you take.
Follow these steps to create a panoramic
picture:
1.Set the mode dial to Panorama mode
(1_).
Page 49

2. Usethe Left/Right buttons to specify
the direction of picture taking, and then
in 2 seconds the panoramic sequence will
commence automatically.
3. Composeyour first view on the LCDscreen
and press the shutter button.
4.The frame record icon will display under
the focus frame to indicate the number of
photos you have taken.
5. Using the same steps for the first shot, take
the second and the third shots. Compose
your shots so that the edges of the pictures
overlap. The numeric indicators on the LCD
inform you which shot is being taken.
6.The camera will then stitch the pictures into
a panorama automatically.
7.Turn the mode dial to playback mode to
view the panoramic picture.
Forbest results the use of a tripod is
recommended.
While panorama mode, press
©in the
button to save images and exit pan-
orama shooting. Press the Q button to
discard images and exit.
Page 50

The Image Stabilization mode combats the
effect of hand shake and allows you to take
pictures that would otherwise be blurred.
1.Switch the mode dial to (j_) mode.
2.PressShutter halfway to focus on the
subject.
3.PressShutter fully to capture the image.
Setting the Image Stabilization function under
( _ )mode.
(Stabilization during Movie mode is only
available when the Frame Rate is set to 15 fps)
1.Switch the mode dial to ( _ )mode.
2.Pressthe Q button to enter the Function
menu.
3.Usethe LeftlRight navigation buttons to
highlight the Quality function.
4.Use the UplDown navigation buttons to
select ISfps, and press the Q button to
confirm your settings.
5.Pressthe Menu button, and use UplDown
to select the Image Stabilization settings.
6.UseUp/Down to select Off or On.
Then press the _ button to confirm.
Page 51

Thestabilizerfunctionisusedforlessblur
picturecausedbyhandshakeunderadark
environment,thecamerawouldincreasethe
ISOlevelunderthemodetohaveahigher
shutterspeed.
_This functionmaynothelptotakeaclear
pictureofafastmovingtarget,suchas
acarpassingby,etc.
This function may not help to stabilize
photos if you are in a moving vehicle (car,
boat, etc.). It is best used when taking
normal shots.
Increasing the ISOlevel may cause heavier
noise on the photo.
_Use of a tripod is always best to get the
clearest picture.
Page 52

TheFaceDetectionmodewill detectfacesof
personsinaphotosothatthefaceswillbeas
clearaspossible.
1.Whileinphotographymode,pressthe
buttontoactivateFaceDetection.The
indicatorappearsontheLCD.
2.Holdthecamerasecurely,andpointthe
cameratowardsthesubjecttostarttheface
detectionprocess.Whenthecameradetects
aface,awhiterectangularframewill be
drawnaroundthe face.(Note:Forbest
results,thefaceofthe subjectshouldbe
relativelylargeontheLCDscreen,andthe
subjectshouldbefacingthecameraasfront
onaspossible.)
3.PressShutterhalfwaytofocusonthe
subject.
PressShutterfullytocapturetheimage.
5.Pressthe_ buttonogointo
deactivate
focedetection.
Page 53

With the camera'snew"smile detection"feoture,
which automatically detects onctcaptureso person
smiling,you'll nevermisso smile.
1. While in shooting mode, press the _ button
repeatedly until _ appears on the LCD.
This icon incticotes that the camera is in Smile
Detection mode.
2. Pointthe camera at the subjectuntil the subject's
face is detected and brocketectby o square box.
Press the shutter button oil the way clown onct
releasethe shutter button. Thecamera will now
'wait' for the subjectto smile.
3. When the subject smiles, the camera will
automatically releasethe shutter onctcapture the
photo.
4.To ctisoblethe automatic shutter release,pressthe
shutter ogoin._
Note:
• Aface must be detectedbythe camerain order for
smiledetection to function correctly.
• Foroptimal detection results,the subject shouldbe
framed to occupymostofthe screenspace.
Page 54

TheBlinkDetectionfeatureisonbydefault,and
aftertakingeachphoto,awarningmessagewill
popupifablinkhadbeendetectedinthephoto.
1. In photography modes,press the button Q to
enterthe Photo menu.
2. Usethe Up/Down navigation buttons to select
"Blinkdetection" setting.
3. Use the Right navigation buttons to enter the
submenu,andselect"On"option.
4. Pressthe button _ to confirm the setting and
exit the menu,
5.The "Blink detection" indicator appears onthe
LCD.
6. Pressthe shutter button fully to capture the
image, if someone'seyes blink, the camera will
automatically show blink detection warning
message.
Note:
• Foroptimal results,thesubjectshouldbeframed
to occupymost ofthe screenspace.
Page 55

To view the captured photos and video clips
on the LCDscreen:
1.Turn your camera to Playback mode.
The lest recorded photo or video clip is
displayed.
2. Usethe Left/Right navigation buttons
to scroll through the photos or video clips
stored in the internal memory or memory
card.
3.To play a selected video clip, press the Q
button to enter the movie playback mode.
4. Usethe Left/Right navigation buttons
to select a program button and press the
button to confirm the selection. The
function of each button is described in the
following.
1 Exit
2 Play
3 Slow motion
4 First frame
5 Previous frame
6 Next frame
7 EditHovie
Page 56

During the video playback, an operation
guide appears on the screen. Youcan use the
navigation pad to perform the functions ac-
cordingly.
During the slow motion playback, you can use
the Left/Right navigation buttons to adjust
the speed of playback.
During the video playback, you can use the
Up/Down navigation buttons to adjust the
volume of playback.
Volume will be muted when using the
slow motion playback.
Page 57

Editing video
Pressthe Edit _ progrem button to enter
the following screen end usethe buttons on
the left side to edit the pleybeck. Use the Up/
Down nevigetion buttons to select e button.
3.Tos(]ve the file, select the _ button
end press the Q button.
4. Usethe Up/Down nevigetion buttons to
select en option.
1.Select the _ button end use the Left/
Right nevigetion buttons to specify the
new beginning of the pleybeck.
2. Select the _ button end use the Left/
Right nevigetion buttons to specify the
new end of the pleybeck.
• New file: Sevees e new file.
• Overwrite: Overwrite the originel file.
• Back: Do not sevethe file end return to
the Edit screen.
S.Pressthe Q button to confirm your
setting.
Page 58

ToexittheEditscreen,selectthe_ but-
tonandpresstheQ button.
_ EditedvideomustbeatleastI second
long.
_With sufficientbatteryandatleastIGB
available memory, up to 30 minutes
offootage can be recorded per movie.
When in Playback mode, move the zoom
scroll wheel to the Wide position ([]w} once
to display the thumbnail of photos and video
clips on the screen.
1. Usethe zoom scroll wheel to switch
between the 2x2, 3x3, and 4x4
thumbnail display.
2. UseUp/Down/Left/Right to select a
photo or video clip to view.
If the I_ indicator appears on the
LCD,then a movie file is currently being
displayed.
Pressthe Q button to restore a
preview icon to its original image size.
Page 59

Thezoom scroll wheel can also be used
during playback. This allowsyou to magnify
photos up to 8X.
1.Turn your camera to Playback mode.
2. Usethe Left/Right navigation buttons to
select a photo to magnify.
3. Move the zoom scroll wheel to the Tele
position ( TO.,)once.
4. Usethe zoom scroll wheel to zoom in
and out. The zoom indicator and pan box
appear on the screen.
5. Usethe navigation buttons to pan across
the image.
6. Pressthe Q button to return the image to
its original scale.
Movie images cannot be enlarged.
Page 60

Thecamera is equipped with a quick Delete
button Q for you to delete photos or video-
clips without entering the Playback menu.
Todelete a photo or video:
1.Turn your camera to Playback mode.
2. Usethe navigation buttons to select the
photo/video clip you want to delete.
3. Pressthe Q button. The Delete screen
appears.
4.Press the Up/Down navigation buttons
to select Yes or No. Then pressthe
button to confirm.
Erasedphotos/video clips cannot be
recovered.
Pleaserefer to page 66for
instructions on the delete menu
options.
Thec_ indicator appears if the pic-
ture has a sound file attached. ¥ou
can choose to delete the attached
sound file alone otto delete both the
picture and the sound file.
Page 61

Mode:I_I cc_llSCN _ [1_ aM
Instill shooting modes, press the Q button
to enter the Still menu.
3. Usethe UplDown navigation buttons to
select an option.
4. Pressthe Q button to confirm the setting
and exit the menu.
Refer to the following sections for more de-
tailed information on each setting.
Toconfigure the settings:
1.Usethe UplDown navigation buttons to
scroll through the menu items.
2. Pressthe Right navigation button to enter
the submenu.
AF mode (Auto-Focus mode)
Usethis setting to control the auto-focus
mechanism while taking pictures.
Page 62

Twooptionsareavailable:
• Single-AF:Thefocusframeappearson
thecenteroftheLCDscreentofocuson
thesubject.
• Multi-AF: The camera automatically
focuses the subject in a wide area to find
the focus point.
AF-assist beam
Usethis setting to aid focus in dark condi-
tions. Select On to turn on the AF assist beam,
or Off to disable the function.
Expo Metering (Exposure Metering)
Usethis setting to select an area for the
exposure to be obtained.
Three options are available:
• Spot AE (Spot Auto Exposure)
• Center-Weight
• AiAE (Artificial Intelligence AE)
Page 63

• Time-Lapse :Automatically capture pic-
tures in at predefined intervals.
Cont. Shot (Continuous shot)
Use this setting to perform continuous shoot-
ing. Once in this mode, you must continuously
hold the shutter button to usethis function.
Four options are available:
• Off: Capture a single shot only.
• 5 shot: Capture up to Sconsecutive
pictures.
• Last 5 shots: Capture pictures continu-
ously until the shutter button is released
but only the last S shots are recorded.
The flash isdesigned not to work in this mode
in order to enable quick succession of shots.
To activate this mode, the camera must have
the self-timer for multiple shots already
turned on (as described on page 29)
Grid
Usethis setting to turn on or offthe framing grids
when taking photos. This may help you posltlon
the subject in your composition.
Page 64

Fouroptionsareavailable:
• Off
• 1 sec
• 2 sec
• 3 sec
Quick Review
This setting refers to the quick photo review
immediately after taking a picture. The picture
stays on the LCDscreen for an adjustable
period of time.
Digital Zoom
Usethis setting to enable or disable the digi-
tal zoom function. When disabled, only the
optical zoom is enabled.
Page 65

DigitalZoomindicator
• Off:graycolor.
• On:reddishcolor.
Histogram
Thehistogramisusedforcheckingtheexpo-
surewhiletakingpictures.Usethissettingto
enableordisablethehistogramdisplayonthe
LCDscreen.
Slow Shutter
In Slow shutter mode, the shutter will remain
open as long as the shutter button is pressed.
This gives you complete control over the
duration of exposure. (The slow shutter mode
is available only in OH manual mode.
• Off
•On
• Manual: To set a long exposure time
between 2~30 sec.
_The of is recommended for
use tripod
prolonged exposure.
Page 66

Blink Detection
The Blink Detection feature is on by default,
and after taking each photo, a warning
message will pop up if a blink had been
detected in the photo.
• Off:
• On
Date Imprint
Include a date/time stamp in the photo image.
• Off:
• Date
• Date and time
Page 67

Mode: _)
In movie shooting mode, press the Q button
to enter the Movie menu.
3. Usethe Up/Down navigation buttons to
select an option.
4. Pressthe Q button to confirm the setting
and exit the menu.
Refer to the following sections for more de-
tailed information on each setting.
Toconfigure the settings:
1.Usethe Up/Down buttons to scroll
through menu items.
2. Pressthe Right navigation button to enter
the submenu.
Page 68

Expo Metering (Exposure Metering)
Set metering mode for various lighting condi-
tions.
Stabilization
Please refer to page 46 for instructions on
image stabilization.
While in Movie mode, image stabilization can
be activated and de-activated via the record-
ing menu.
Three options are available:
•Spot metering
•Center-weighted average meter-
ing
•Artificial intelligence automatic
exposure (Ai AE)
Page 69

Mode: D
In pleybeck mode, press the Q button to
enter the Playback menu.
Protect
To prevent pictures or videos being eresed
eccidentelly, you con usethis setting to lock
one or ell files.
Pleeserefer to the following sections for
deteiled instructions on the verious menu
options.
To protect/unprotect e picture or video:
1.Switch to pleybeck mode using the mode
diel. Use the Left/Right buttons to Iocete
end displey the photo or movie thet you
went to protect.
Page 70

2.SelecttheProtect setting from the
Playback menu as described previously.
3. Usethe Up/Down navigation buttons to
select One to protect this picture/video,
or select All to protect all pictures/videos in
the internal memory or memory card. Then
press the Right navigation button.
4. Usethe Q button to select Yes to lock
the displayed picture/video or Unlock
to unlock it, and usethe Up/Down
navigation buttons to select Back to
return to the Playback menu.
5.A key ( Co_:_)icon will appear on the top of
the screen to indicate that the picture/
video is protected.
6. Select reset to cancel protection for all
files that have been placed in the protected
mode.
Delete
There (]re three ways to delete files: (please
note that a file cannot be recovered once it is
deleted.)
•Delete One:
1.On the Delete menu, select Delete One
and then press the Right button.
2. Using the Left/Right buttons, locate the
photo or movie file to be deleted. Select
Yes (to delete file) or No (to return to the
Page 71

previousmenu)usingtheUplDown buttons,
then pressthe Q button to confirm.
•Delete All:
1.Onthe Delete menu, select Delete All and
then press the Right button.
2. Using the LeftlRight buttons, select Yes
(to delete all files) or No (to cancel and
return to the previous menu).
•Delete Selected:
1.Onthe Delete menu, select Delete
Selected Files and then press the Right
button.
2. Usethe UplDownlLeftlRight buttons to
locate eachfile to be deleted, and then press
the Q button to mark the file for deletion.
An indicator will appear for eachfile that is
marked for deletion. (Usethe Zoom button
to re-size image icons for easy viewing.)
3. Pressthe _ button to delete the selected
files. Choose Yes to confirm file deletion
or No to return to the previous menu.
_The "G_" indicator means a file is
pro-
tected. File protection must be removed
first before a file can bedeleted.
_ Deleting files will cause DPOFsettings
to be reset.
Page 72

DPOF (Digital Print Order Format)
DPOFallows you to record your selection of
pictures that you would like to print, and will
save your selection in the memory card, so
that you can simply hand your memory card
to a photo kiosk without having to tell them
in person which photos you would like to
print.
Info. Box (Information Box)
Usethis setting to enable or disable the text
display for taking pictures. Thefollowing
information will be displayed on the screen:
histogram display, aperture value, shutter
speed, exposure value, image size, image
quality, and ISOvalue. (Pleaserefer to page
38 for information on the menu options
shown.
Page 73

Trim
Thetrim setting allows you select an area of
the photo you want to keep and then save it
as a new photo.
Totrim a picture:
1.Select the Trim setting from the
Playback menu as described previously.
2. Using the Left/Right buttons, locate the
photo that you want to crop and have it
displayed on the LCD.
3. Usethe zoom scroll wheel and navigation
buttons to adjust the trimming box to fit the
location and size of the new picture.
4. Pressthe Shutter button to savewhat you
see on the LCDscreen as a new picture, or
the G button to cancel and return to the
Playback menu.
Resize
This setting allows you to resizepicture to a
specifiedresolution,and saveit asa new picture.
1.Select the Resize setting from the
Playback menu as described previously.
2. Use the LefflRight navigation buttons to
select a picture to resize.
3. Usethe UplDown navigation buttons
to select a resolution (I 024X768 or
Page 74

640X480)toresizetheimageorbackto
cancelandreturntothePlaybackmenu.
4.PresstheQ buttontoconfirmthesetting.
_ Resizinganimagecreatesanewfile
thatcontainstheimageinthesizeyou
select.Thefilewiththeoriginalimage
alsoremainsinmemory.
_ Ifthemessage"Theimagecannotbe
edited."appears,itmeansthatthe
currentimagecannotberesized.
Rotate
You can use this setting to change the picture
orientation of the picture.
1.Select the Rotate setting from the
Playback menu as described previously.
2. Usethe Left/Right navigation buttons to
select a picture to rotate.
3. Use the Up/Down navigation buttons to
select the direction for rotation or Back to
cancel and return to the Playback menu.
4. Pressthe Q button to confirm the setting.
The rotated image will be saved as a
new file, and the original image will
remain intact in memory.
Slide show
This setting allows you to view all the stored
pictures as a slideshow.
1.Select the Slide show setting from the
Playback menu as described previously.
2. Usethe Up/Down navigation buttons to
select Effect, Interval time, or Repeat and
Page 75

usetheLeft/Rightnevigetionbuttonsto
edjustthesetting.
selecttheimegeforwhichred-eyewillbe
removed.
3.UsetheUp/Downnevigetionbuttons
toselectYestofixtheselectedimege
orbacktocencelendreturntothe
Playbackmenu.
3.UsetheUp/Downnevigetionbuttons
toselectStarttoruntheslideshowor
CanceltoreturntothePlaybackmenu.
4.PresstheQ buttontoconfirmthesetting.
Red-eyeremoval
Usethissettingto removered-eyeeffectin
yourphotos.
1.SelecttheRed-eyeremovalsettingfrom
thePlaybackmenuesdescribedpreviously.
2.UsetheLeft/Right nevigetionbuttonsto
4.PresstheQ buttontoconfirmthesetting.
Forbestresults,thefeceofthesubject
shouldbereletivelylergeontheLCD
screen,thesubjectshouldbefecingthe
cemereesfrontonespossible,endthe
redeyesshouldbeeslergeespossible.
Page 76

Mode:I_1cc_t_SCN _ I_ aM _ I_
TheSetup menu is available in all modes.
Pressthe Q button in any modes, then use
the navigation buttons to select the Setup
menu.
2. Pressthe Right navigation button to enter
the setting.
Refer to the following sections for more de-
tailed information on each setting.
Format Memory
Please note: formatting enables you to
delete all contents in the memory card and
built-in memory, including protected photo
and movie files.
Toconfigure the settings:
1.Usethe UplDown navigation buttons to
scroll through the menu items.
To usethis setting:
1.Select the Format Memory setting from
the Setup menu as described previously.
2. Usethe Left/Right navigation buttons to
select Yes or No, and press the Q button
to confirm.
Page 77

2.UsetheUp/Downnavigationbuttons
toswitchbetweenvolume,shuttertone,
keytone,self-timertone,and power tone
fields.
3.The current media isformatted.
Beep
Usethis setting to adjust the volume of beep
when buttons are pressed and change the
tones for shutter, buttons, self-timer, and
power-onlpower-off.
Tochange this setting:
1.Select the Beep setting from the Setup
menu as described previously.
3. Usethe Left/Right navigation buttons to
adjustthe volume and change each tone
style. Then press the Q button to confirm.
Page 78

LCD Brightness
Usethis setting to adjust the brightness of
your LCDscreen.
1.Select the LCD Brightness setting from
the Setup menu as described previously.
2. Usethe Up/Down buttons to select to
Auto or Manual brightness adjustment,
and then press Qto confirm your election.
Power Saver
This setting allows you to save power and get
the maximum possible running time foryour
battery. Follow the steps below to turn offthe
LCDscreen and camera automatically after a
period of inactivity.
1.Select the Power Save setting from the
Setup menu as described previously.
2. Usethe Up/Down navigation buttons to
switch between LCDpower and Camera
power fields.
3. For manual adjustment, usethe Left/
Right buttons to adjust the brightness.
Page 79

3.UsetheLeft/Rightnevigetionbuttonsto
specifytheidleperiodbeforeeutometic
power-off.Thelevelherscorrespondtothe
followingidleperiods.
• LCDoff:
30seconds,1minute,2minutes,end
Alweyson.
•Cemereoff:
3minutes,Sminutes,10minutes,end
Alweyson.
4.PresstheQ buttontoconfirm.
Date/Time
See"Setting the Date and Time" section
on pege 25.
World time
Theworld time setting is euseful function on
your oversees trips. This feeture enebles you
to displey the Iocel time on the LCDscreen
while you ere oversees.
1.Select the World time setting from the
Setup menu es described previously. The
world time screen eppeers.
2. Usethe Up/Down nevigetion buttons to
switch between the hometown (fit) end
trevel destinetion (_-) fields.
3. Usethe Left/Right nevigetion buttons to
select e city close to the desired time zone.
Then press the Q button to confirm.
Page 80

File Numbering
Aftercopturingphotosorvideos,thecomero
willoutomoticollysovethefilewithonumeric
suffix.
Language
See"Settingthe Language" section on
poge 26.
Selectthis
setting:
Continue
Reset
Seriolnumber isderivedond
ossignedto o newfile osfollows:
whether the number should
continue on from the lost photo
you hove token
reset the counter to 1ond
sore files in o new folder in the
memory cord.
Video system
Usethis setting to determine your video
system in the current oreo.
1.Select the Video system setting from
the Setup menu os described previously.
2. Usethe Up/Down novigotion buttons to
select NTSC or PAL. Then press the Q
button to confirm.
The video output signol con beswitched
to NTSCor PALto occommodote different
regionol stondords. The oppropriote setting
will vory between regions.
Page 81

NTSC:USA,Canada,Taiwan,Japan,etc.
PAL : Europe,AsialexcludingTaiwan),
Oceania,etc.
Note:TheTVoutputwillnot display properly if
an incorrect video system is selected.
Copy to Card (Copy internal memory
to memory card)
Usethis setting to copy the files stored in the
internal memory to the memory card.
1.Select the Copy to memory card
setting from the Setup menu asdescribed
previously.
2. Usethe Up/Down navigation buttons
to select Yes or No. Then pressthe Q
button to confirm.
Page 82

Reset Settings
Usethis setting to restore the camera to its
default settings.
1.Select the Reset setting from the Setup
menu as described previously.
2. Usethe Up/Down navigation buttons
to select Yes or No. Then press the Q
button to confirm.
FW Ver. (Firmware version)
Use this setting to view the current camera
firmware version.
1.Select the FW Ver. setting from the Setup
menu as described previously.
2. IfSD card contains anew version of
firmware, please upgrade accordinglyas
necessary.
Page 83

Youcanconnectyourcameratoyour
television,computer,orprintertoview
pictureyouhavetaken.
ByusingtheAVcable,youcanviewthe
capturedimagesonaTV.Followthesteps
belowtoconnectthesuppliedAVcableto
a TV.
1.Choose [NTSC] or [PAL] to match
your TV video standard (see page 77)
and then turn offthe camera.
2. Connect oneend of the AVcable to the
USB/AVOUTport on your camera.
3. Connect the plugs onthe other end of the
cable to the audio and video input ports
on the TV.
4.Turn on the camera and the TVon.
Makesure that both the camera and TVare
turned off before connecting the AVcable.
Usea fully charged battery to prevent the
camera from turning off unexpectedly
while connected.
Page 84

Use the USBcable and ArcSoft software (CD-
ROM) supplied with your camera to copy
(transfer) pictures to a computer.
Setting the USB mode
Sincethe camera's USBport can be set to
connect with either a PCor a Printer, the
following steps will allowyou to ensure that
the camera is correctly configured to connect
with a PC.
1.Pressthe Q button and usethe Up/
Down navigation buttons to select USB
Connect, and then press the Right
navigation button.
2. Use the Up/Down navigation buttons to
select PC.
3. Pressthe Q button to confirm the setting.
Transferring files to your PC
The computer will automatically detect the
camera as a removable drive. Double-click
My Computer icon on the desktop to locate
the removable drive and to copy the folders
and files in the drive to a directory on your PC
asyou would copy any typical folder or file.
Page 85

ByusingtheUSBcable,youcantransfer
thecapturedphotosandvideostoa PC.
Followthestepsbelowto connectthe
cameratoaPC.
1.Start acomputer to which ArcSoft
software has been installed.
2. Make sure both the camera and PCare
turned on.
3. Connect oneend of the supplied USB
cable to the USB/AVOUTport on your
camera.
4. Connect the other end of the cable to
an available USBport on your PC.
5. Disconnect the camera once transfer is
completed.
If the USB option is set to [PC]"
Turn the camera off and disconnect the USB
cable.
If the USB option is set to [PC (PTP) ] :
Removethe camera from the system as described
below before turning the camera off and
disconnecting the USBcable.
Window XP Home Edition/XP Professional
Clickthe [Safely Remove Hardware] icon ( )
in the taskbar and select [Safely remove USB
Hess Storage Device] from the menu displayed.
'Remove Hardware
Page 86

Window 2000 Professional
Clickthe [Unplugor Eject Hardware] icon (_!)
in the taskbar and select [Stop USBMass
Storage Device] from the menu displayed.
Macintosh
Drag the untitled icon to the Trash. ("Untitled")
Page 87

PictBridge allows printing images
from a memory card in a digital
camera directly to a printer,
PictBrJ_geregardless of brand.
Tofind out ifa printer is PictBridge compat-
ible, simply look for the PictBridge logo on the
packaging or check the manual for specifica-
tions.With the PictBridge function on your
camera, you can print the captured photos
directly with a PictBridge compatible printer
using the supplied USBcable, without the
need for a PC.
i. Pressthe Q button and use UplDown to
select USB Connect, and then pressthe
Right navigation button.
2. UseUp/Down to select Printer.
3. Pressthe Q button to confirm the setting.
Setting the USB mode
Sincethe camera's USBport can beset to connect
with either a PCor a Printer, the following steps
will allow you to ensure that the camera is
correctly configured to connect with a Printer.
@
Every time the camera is powered off,
the USBMode will automatically revert
back to PCmode.
Page 88

Connecting the camera and printer.
1. Heke sure both the cemere end printer ere
turned on.
2. Connect one end of the supplied USBceble
to the USBport on your cemere.
3. Connect the other end of the ceble to the
USBport on the printer.
If the cemere is not connected to e PictBridge
competible printer, the following error
messege eppeers on the LCDscreen.
The ebove error messege would
elso eppeer if the USBmode were
set incorrectly, in which cese you
should disconnect the USBceble,
check the USB mode settings,
ensure thet the Printer is turned
on, end then try connecting the
USBceble egein.
Page 89

AftersettingtheUSBmodetoPrinter,the
PictBridge menuappears.
Print with date
Ifyou have set the date and time ofyour
camera, the date record would besaved with
the photos you take. Youcon print the photos
with date by following the steps below.
1.Select Print with date from the
PictBridge menu. The following screen
appears.
Usethe Up/Down navigation buttons to
select a menu item, and press the Right
navigation button to enter.
Referto the following sections for more de-
tailed information on each setting.
Page 90

2.UsetheLeft/Rightnavigationbuttonsto
scrollthroughthephotos.
3.UsetheUp/Downnavigationbuttonsto
selectthenumberofprintsforthecurrent
displayedphoto.
4.PresstheQ buttonandthefollowing
screenappears.
Print without date
Usethis setting to print the photos without
dates on them.
1.Select Print without date from the
PictBridge menu. The following screen
appears.
5. Select Yes to confirm printing, or No to
cancel. Then pressthe Q button.
2. Usethe Left/Right navigation buttons to
scroll through the images.
Page 91

3. Usethe UplDown navigation buttons to
select the number of prints for the current
displayed image.
4. Pressthe Q button and the following
screen appears.
Print index
Youcan usethis setting to print all indexes to
show all the photos currently in your camera.
1.Select Print index from the PictBridge
menu. The following screen appears.
S.Select Yes to confirm printing, or No to
cancel. Then pressthe Q button.
2.Select Yes to confirm the printing, or No
to cancel. Then press the _ button.
Page 92

Print DPOF (Digital Print Order Format) Exit
Touse DPOFprinting, you must make the
selection of photos for printing using the DPOF
settings before hand. See"DPOF" section on
page 68.
1.Select Print DPOF from the PictBridge
menu. The following screen appears.
Toexit the PictBridge menu, select Exit.
The "Remove USBcable" message will be
displayed.
Disconnect the USBcable from the camera
and printer.
2. Select Yes to confirm the printing, or No to
cancel. Then pressthe Q button.
Page 93

_ "Design and specifications are subject to change without notice."
Effective Image Sensor Pixels 8.0 Megapixels
Image Sensor 8.31 Megapixels [1/2.35" Charge Coupled Device (CCD)]
Focal Length F = 6.75mm (Wide) ~27mm (Tele)
[35mm film equivalent] [38mm (Wide) ~ 152mm (Tele)]
Fnumber F3.5(Wide) ~ F5.15(Tele)
Lens LensConstruction 14 elements in 11 groups
Optical Zoom 4×
Focusing Range Normal: 60cm ~oo;(Tele)80cm ~ oo
Macro: (Wide) 6cm ~ oo
Anti-Handshake Electronic Image Stabilization
Digital Zoom 4.5× digital zoom (Combined Zoom: 18×)
Number of Still Image 8MP,7MP (3:2),6MP(16:9),SMP,3MP,2MP,1MP,0.3MP
Recording
Pixels Movie 640x480pixels: 30fps115fps, 320x240pixels: 30fps115fps
Page 94

Image Compression Best, Fine, Normal
DCF,DPOF(Verl.1) Support Yes
Still Image Exif 2.2(JPEG)
File Format Movie Image Compression: MPEG4,Audio: G.711[Monaural]
Audio WAVE[Monaural] (Max 60 seconds)
Auto, Manual, Image Stabilization, Movie, Scene(Sport,
Shooting Modes Children, Indoor, Leaf, Snow, Sunset, Fireworks, Glass,
Museum, Landscape, Night Landscape, Night Portrait),
Panorama, Portrait
Smile Detection Yes
Blink Detection Yes
Face-Detection Yes
Red-eye Removal Yes
Panorama Stitching Yes
2.7 inch LTPS(low-temperature polycrystalline silicon)
LCDDisplay TFTcolor LCD(230,400 pixels)
ISOSensitivity Auto, ISO64/100/200/400/800/1600
Page 95

AF Method
Light Metering Method
Exposure Control Hethod
Exposure Compensetion
Shutter Speed
Continuous Shooting
Pleybeck Modes
White Belence Control
Internel Flesh (Shooting Renge)
Single AF, Multi-AF (TTL9-point), Fece-Detection,
AFAssist Light (On/Off)
Artificiel Intelligence AE (Ai AE), Center-weighted
Averege, Spot (Fixed to center of freme)
ProgremAE (AE-Iockeveileble)
_+2EVin 1/3 steps
4 ~ 1/2000 second (Henuel 30 seconds)
Approx. 1.8fps (Lerge/Fine mode)
Single Photo, Index (4/9/16 thumbneils), Slide Show,
Movie (Slow-Motion possible), Zoom (Approx. 2X~8X),
Audio, Histogrem Displey
Auto (AWB),Deylight, Cloudy, Fluorescent, Fluorescent
CWF,Incendescent, Henuel
Auto/Red-Eye Reduction/Forced Flesh/No Flesh/Slow
Synchro/Red-Eye Reduction+Slow Synchro
Gno.5.9(ISO100)
(Shooting Renge) Wide: Approx. O.3m~3.3m /
Tele: Approx. 0.3m~2.Tm (ISO400)
Page 96

Recording Media
Other Features
Jacks
Power
Battery Charger
Shooting Capability
(Battery Performance) Approx. 200 shots (based on CIPAstandards)
Operation Environment Temperature: 0~40°C, Humidity: 0~90%
Dimensions (Wx Hx D) 91mmx6Omm x 18 mm
Moss Approx. 120g (Body only)
Internal Hemory: 26HB
SDCard/SDHCCard (Upto 4GBsupport)
PictBridge, Exif Print Support,
Multi-language Support (23 languages)
USB2.0/AV-OUT(Integrated Proprietary Connector)
Rechargeable Lithium-ion Battery GB-20,3.7V750mAh
Input Voltage :AC100 to 240V,50/60Hz, 100mA
Output Voltage : DC4.2V,SOOmA"
Page 97

_ "Designandspecificationsaresubjecttochangewithoutnotice."
EffectiveImageSensorPixels 7.07/8.0Megapixels
ImageSensor 7.40/8.5Megapixels[1/2.5"(CGD)]
Focal Length F= 6.1ram (Wide)~ 18.3ram (Tele)
[35mm film equivalent] [36mm (Wide}~ 108mm (Tele)]
Fnumber F2.8(Wide}~ F4.8(Tele)
Lens LensConstruction 7 elements in 6 groups
Optical Zoom 3×
Normal: 60cm ~oo
Focusing Range Macro: (Wide) 5cm ~ oo;(Tele)40cm ~ oo
Anti-Handshake Electronic Image Stabilization
Digital Zoom 4.5× digital zoom (Combined Zoom: 13.5×)
Page 98

Numberof Still Image
Recording
Pixels Movie
Image Compression
DCF,DPOF(Verl.1) Support
Still Image
File
Movie
Format
Audio
A735: 7MP,(3:2)6MP,(16:9)5MP, 3MP, 2MP, 1MP, 0.3MP
A835: 8MP,(3:2)7MP,(16:9)6MP,5MP,3MP,2MP, IMP, 0.3MP
640×480pi×els: 30fps/15fps, 320×240pi×els: 30fps/15fps
Best, Fine, Normal
Yes
E×if2.21 (JPEG)
Quick Time Motion ]PEG,Audio: G.711[Monaural]
WAVE[Monaural] (Max60 seconds)
Auto, Manual,Image Stabilization, Scene (Sport, Children,
Indoor, Leaf, Snow, Sunset, Fireworks, Glass, Museum,
Shooting Modes Landscape, Night Landscape, Night Portrait), Panorama,
Portrait
Smile Detection Yes
Blink Detection Yes
Face-Detection Yes
Red-eye Removal Yes
Page 99

PanoramaStitching Yes
2.5inchLTPS(low-temperaturepolycrystallinesilicon)TFT
LCDDisplay colorLCD(153,600pixels)
ISOSensitivity Auto,ISO80/100/200/400/800/1600
AFMethod SingleAF,Multi-AF(TTL9-point),AFAssistLight(On/Off)
ArtificialIntelligenceAE(AiAE),Center-weightedAverage,
LightMeteringMethod
Spot(Fixedtocenterofframe)
ExposureControlMethod ProgramAE(AE-Iockavailable)
ExposureCompensation +2 EVin 1/3 Step increments
Shutter Speed 4 ~ 1/2000 second (Manual 30s)
Continuous Shooting Approx. 1.8fps (LargelFine mode)
Single Photo, Index (419116thumbnails), Slide Show, Movie
Playback Modes (Slow-Motion possible), Zoom (Approx. 2X~8X),Audio,
Histogram Display
Auto (AWB),Daylight, Cloudy, Fluorescent, Fluorescent CWF,
White Balance Control
Incandescent, Manual
Page 100

InternalFlash
(ShootingRange)
Recording Media
Other Features
Jacks
Power
Shooting Capability
(Battery Performance)
Operation Environment
Dimensions (W x Hx D)
Mass
Auto/Red-EyeReduction/ForcedFlesh/NoFlash/
SlowSynchro/Red-EyeReduction+SlowSynchro
Gno.6.5(ISO100)
ShootingRange Wide:Approx.0.3m~4.6m/
Tale:Approx.0.3m~2.Tm(ISO400)
Internal Hemory:32HB
SDCard/SDHCCard(Upto4GBsupport)
PictBridge,ExifPrintSupport, Hulti-language Support(23 languages)
USB2.0/AV-OUT(Integrated ProprietaryConnector)
2XAAAlkalineBattery, AANiHH Battery[SoldSeparately]
AAAlkalineBatteries:Approx.130shots(basedon CIPAstandards)
AANiHH Battery:Approx.400shots(CIPAStandards)
Temperature:0~40Oc,Humidity:0~90%
92mmx60mmx25 mm
Approx.133g(Bodyonly)
 Loading...