

Page 1
—
~a%w #R3s~~uc~~o~s ........................,3
Tips
Energy-SavingTips
FoodFreezingSuggestions................,.5-l2
InteriorLight
Key-EjectingLock. . .. ... . . . .. ...................4
Packaging~..~~~~~.~~~.fi...~. .................13
TemperatureControl
TemperatureMonitor... . . . . ......................4
Shelves._...~..........~.... ....................4
BookshelfDoorStorage . .
Juice-CanDoorShelf . . . . . . . . .
StorageTimes . . . . . . . . . . . . .........................6
Cleaning,Outsideandlnside ..,.,,.....,........15
Defrosting
Power Failure... .... ...... ..... ...... ..... ..... ...... ...... ..15
RemovingFreezerDoor
.... ..... .... ..... ...... ..... ................... ......14
.... ..... .... .... .... .... ..... ..... .... ..2
... .... .... .... ..... .... .... ..... ..... .... .... ......4
.... .... ..... ..... .... ..... ..... .... .4
. ......................4
. .............4
... .... ...... ...... ...... .....
15
.~ ,
... .
,“
AdjustableLegs
,-
. Clearance
‘ Location
Vacationand Moving Precautions...........l6
Installation... ...... ...... .... ..... .... ...... ..... .... ..... .....
ModelandSerial Numbers
RepairService ...... ..... ...... ...... ..... ...... ..... ...... ....2
Warranty
.... .... ..... ..... .... ..... ..... .... .... ..................16
Adapter Plug... ...... .... ..... ..... ..... ..... ..... ..... ...17
ElectricalRequirements..
ExtensionCords. . . . . . . . . .
Grounding. . . . . . . . . . . . . . . . ..................17
.... ................ ..... .... ..... .... ..... .
... ...... .... ..... .... .... ..... ..... .... ..... ..........16
. ....................17
. ..................17
.... ..... ...... ..... ...... 2
..... ...... ...... .... ....... ..... ...,.,,
16
17
BackCover
ManualDefiostUpightModek
FP9 FP12 W14
FP17 FP21
Page 2
us You-
Read this book
It is intended to help you operate and maintain your
new freezer properly.
Keep it handy for answersto your questions.
If you don’tunderstand something or need more help,
write (includeyour phonenumber):
ConsumerAffairs
GE Appliances
AppliancePark
Louisville, KY 40225
Keep proof of originalpurchase date (such as your
sales slip or cancelled check) with this book to
establishthe warranty period.
.
—
downthe model andserialnwnbxs.
You’Hfind them on a plate eitherat the bottom,just
insidethe door, or on the back of the cabinet.
These numbersare also on the ConsumerProduct
OwnershipRegistrationCard that came with your
freezer.Before sending in this card, please write these
numbershere:
Model Number
Serial Number
Use these numbers in any correspondenceor service
calls concerningyour freezer.
If you received a damaged freezer, immediately
contact the dealer (or builder)that sold you the
freezer.
Savetime and money.Before you call for service,
check the Problem Solver.It lists causes of minor
operatingproblems that you can correct yourself.
*Location of your freezer is important. Don’t locate it
in a warm, unventilated laundry area or storage
room..Avoidputting it next to your range, a heating
vent or where the sun will shine directly on it. -
*Try to arrange your frozen foods systematically so
you can tlnd what you want in the freezer quickly.
- Don‘t open the freezer door more often than
necessary and close it as soon as possible,
particukwlyin hot, humid weather.
m
We’re proud of our service and want you to be
p]caseci.If for some reason yoLlam not happy with the
service yOL~receive, ha-e are three steps to follow for
fUI”thel.help.
FIRST, contact the people who serviced your
app~i:mcc.Explain why yoLlare not pleased. h most
cawi. ~hiswill solve the problen~.
. When using your freezer,be careful not to leave the —
door open. Always check to make sure the freezer
door is properly closed before leaving the house or
retiring-for-the-night.
oIf you turn the temperature control to the coldest
position for quick freezing, don’t forget to turn it
back to the regular setting.
NEXT, if you are still not pleased, write all the
details—including your phone number-to:
Manager, Consumer Relations
GE A13Dliances
Appli;;ce Park
Louisville, Kentucky 40225
FINALLY, if your problem is still not resolved, write:
Major Appliance
Consumer Action Panel
Z()North Wackel”Drive
Chicago, Illinois 60606
.
—
—
Page 3
AU
.. ——-.
-.
-
ahvaysextxcisebasicsafetyprecautions,
dingthe.Mlowing:
o~S~ $Msapp]ianceonly foritsintendedpurpose
asdescribedinthisUseandCareBook.
~l’~is
‘Q~:4b.,
“.~.~
o
~ ~e~er~npi~g
powercord.Alwaysgripplugfiiy andpull
straightoutfromtheoutlet.
~~epfi or replaceimmediatelyallelectric
cordsthathavebecomefrayedorotherwise
damaged.Donotusea cordthatshowscracksor
abrasiondamagealongitslengthorateitherthe
plugorconnectorend.
~After yow freezeris inOperation9iiOnOttoUCh
thecoldsurfaces,particularlywhenhandsare
damporwet.Skinmayadheretotheseextremely
coldsurfaces.
on%refreezefrozenfoodswhichhavethawed
~~OUIKMy
thawediftheystillcontainicecrystalsorif they
mestillcoki—below4001?.(Shellfishcannotbe
keptaboveIO°F.safelybecauseofbacteria
growth.)
freezermustbe properly fnstihi
inaccordancewiththe
Instructionsbeforeit isused,See
groundinginstructionsinthisbook.
yourfreezerbypallingonthe
safelyrefreezefrozenfoodsthathave
usingthisappliance,
service
~~ve~ andrefrwwingreducethe
eating offbods9particularlyfruits,
vegetablesandprqxiredfoods.Theeatingquality
ofredmeatsisaffectedlessthanthatofmany
otherfoods,Userefrozenfoodsassoonas
possible—theywon’tkeepaslongasfoodsfrozen
onlyonce,andthesoonerthey’reused,thebetter
theireatingwillbe.
o~ y~~r 0~~freezerisstillaroundthehWM?
butnotinme~besuretoremovetheM or
door.Thiswillreducethepossibilityofdanger
tochildren.
@Cautionshdd beusedwhenremovingthe
doorofa freezer.Particularcautionshouldbe
usedwhenremovingtheM ofachestfreezer,as
mostchestfreezerlidsareunderspringtension.
Contactthemanufacturer’srepresentativefora
methodofsaferemoval.
~~nplugyourfreezer,
repairs,cleaningorchangingthelightIxdhe
NOTE:Westronglyrecommendthatanyservicing
beperformedbyaquaMedindividual.
TurningthetemperaturecontroltotheOFF
positiondoesnotremovepowerto~helightcircuit
onmodelswithinterimlight.
e Do not~~oreorusegasolineorother
vaporsandliquidsinthevicinityof’thisorany
otherappliance.
beforematingany
* meatsy orfishthat
havemy or”off-color’ notbe
refrozenand notbeeaten.Thawedice
crem shouldbediscarded.Iftheodororcolorof
anyfoodispoororquestionable,getridof it.‘I’he
foodmaybedangerousto eat.
.“, -=.. -... .,—. -— —.- ——.. . . . . . .
.——
3
Page 4
.
—
=>
—
-...
,...--.....-.. .,=----..—-..
--*-- =—...-..—.———-...
..-
.-
—
1.Clean the insideof the freezer with a mild solution
of baking sodaand water (referto Care and
Cleaningsection).
2. Connect cord to power outlet,
3. The temperaturecontrol has been factory pre-set to
a position which shouldprovide satisfactoryfood
storagetemperatures.The control knob is
adjustabletoprovide a range of temperaturesfor
your personal satisfaction.
4. A11owfreezer to operatefor at least two hours
before placing food inside.
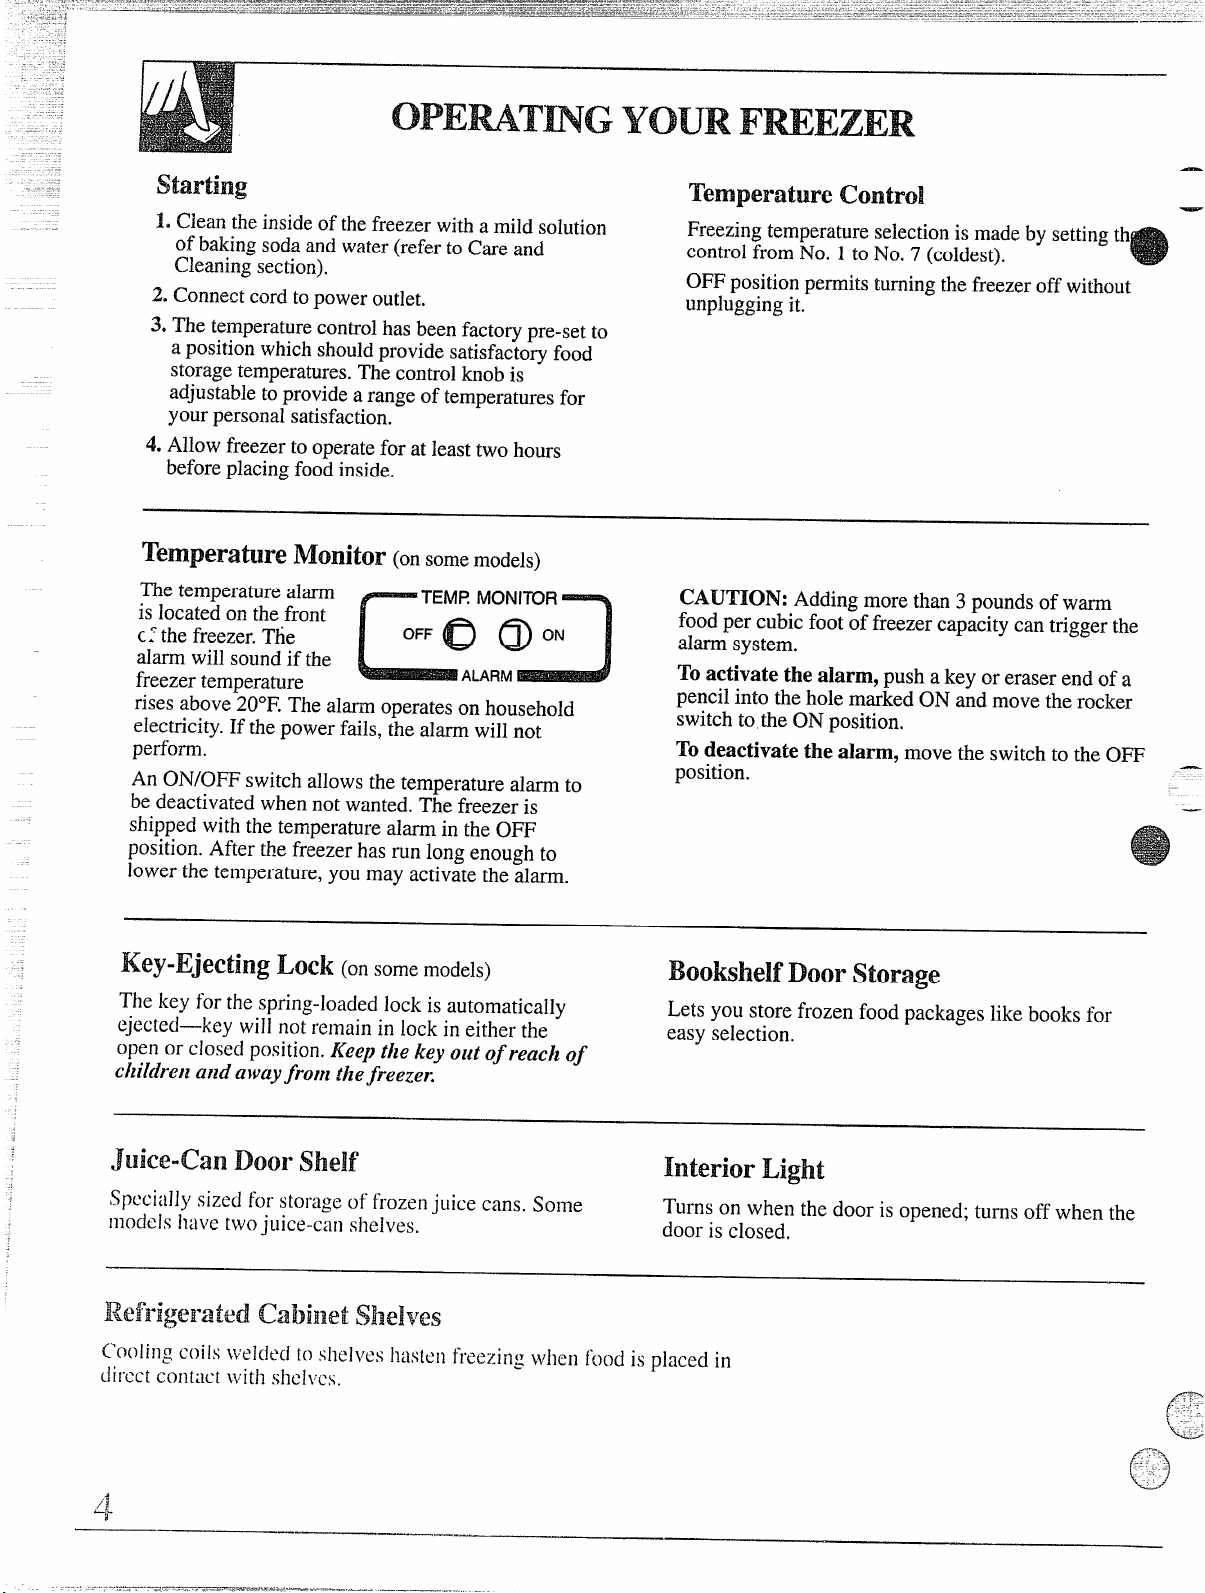
~t?~~t?~~~ll~~ ~~~~~o~ (onsomemodels)
Ckmtrdi
Freezing temperatureselectionis made by settingth
controlfrom No. 1 to No. 7 (coldest).
OFF positionpermits turningthe freezer off without
unpluggingit.
The temperature alarm
is located on the front
C:the freezer. The
alarm will sound if the
freezer temperature
rises above 20°F. The alarm operates on household
electricity.If the power fails, the alarm will not
perform.
An ON/OFF switch allows the temperature alarm to
be deactivated when not wanted. The freezer is
shipped with the temperature alarm in the OFF
position.After !he freezer has run long enough to
lower the temperature, you may activate the alarm.
~Ot!~ (on somemodels)
The key for the spring-loaded iock is automatically
ejected—key will not rcxnainin lock in either the
open or closed position.Keep the key out of reach of
chikhn andawayfrom thefreezer.
w-cm mm’ shelf
Specially sizeclfor storage of frozenjuice cans. Some
models have twojuice-can shelves,
r
_l_Efvll?MOIWIWl
OFF~ (j)ON
-
ALARM
1
CAUTION: Adding more than 3 pounds of warm
food per cubic foot of freezer capacity can trigger the
alarmsystem.
To activate the alarm, push a key or eraser end of a
pencil into the hole marked ON and move the rocker
switch to the ON position.
To deactivate the alarm, move the switch to the OFF
position.
Bookshelf Door storage
Lets you store frozen food packages like books for
easy selection.
Interior Light
Turns on when the door is opened; turns off when the
door is closed.
—
—
SMwM’
(’ooling coils weldecllo shelves hasten freezing when food is placed in
direct contact Ivithshelves.
/[
3
———-
Cl
Q3
.
..
F
~:;
.
/
Page 5
“.
...
-
—
“’-- R&% forSI..M-xessfd Food FIx?ezing
—
Freeze the best. Freeze only top-qualityfoods,
Freezingretains qualityand flavor; it cannot
improvequality.
2. Keep work area dean.
3. Workquickly.The quicker fruits and vegetables
are frozen after picking, the betterthe frozen
productwill be. You’llsave time, too, with less
cullingand sorting.
4. Chose correct packaging materiaIs.Frozen
foods will dry out if not properly wrapped or
packaged.Both rigid containersand flexible bags
or wrappers can be used.Make sure they are
especiallydesigned forfreezing.
5.FOMOWreliableinstructions for freezing different
typesof food.
6. Freeze foods in pract;calmeal-sized packages.
7.FiUcontainer properlg.When placing Iiquidor
semi-liquidfoods in containers, leave about 1/2”at
top (1k“ for glass containers) to allow for
expansionduring freezing.
8. Freeze correctquantities.There is an established
maximumof food your freezer is designed to freeze
at one time—approximately3 poundsper cubic
footof freezer capacity.In normal position,your
freezer’scontrol dial will maintain sufficientlylow
temperaturesin the freezer to freeze recommended
quantitiesof food,
If you have a large quantity of food to freeze, store
part of it in your refrigerator’s fresh food
compartmentuntil the first quantity is frozen.
9. Freeze foods quickly. Continually rotate frozen
foods to the front of the freezer so the longestfrozen foods are used first.
10. Storefrozen foods immediately.Commercially
frozen food can be stored any place in the freezer.
These foods should not be allowed to thaw before
being placed in the freezer.
quick-freeze small amounts of food, place it in direct contact with any
frigerated shelf. To quick-freeze k.rge amounts of food, turn control to
No. 7. Return it to No. 1after freezing is completed. Never freeze more
than three pounds of food per cubic foot of freezer capacity at one time.
Materials
You’11find these materials helpful in preparing foods
for the freezer:
*Large kettle with ciosc-fitting 1id for blanching
vcgctables and fruits
*Fine sieve or smail cokmder to put vegetables in for
blanching
~Assortnwnt of knives for cu[ting up meat, fruits and
vegetables
*Rolls of absorbent paper towels or soft cloth towels
for draining foods
~Proper freezer packaging materials for various types
of food
~Small loading funnel for fruit and vegetable
containers, to keep sealing edge clean
~Glass marking pencil for labeling packages
eRoll of freezer tape
(continued i7extpage)
—..
—
5
Page 6
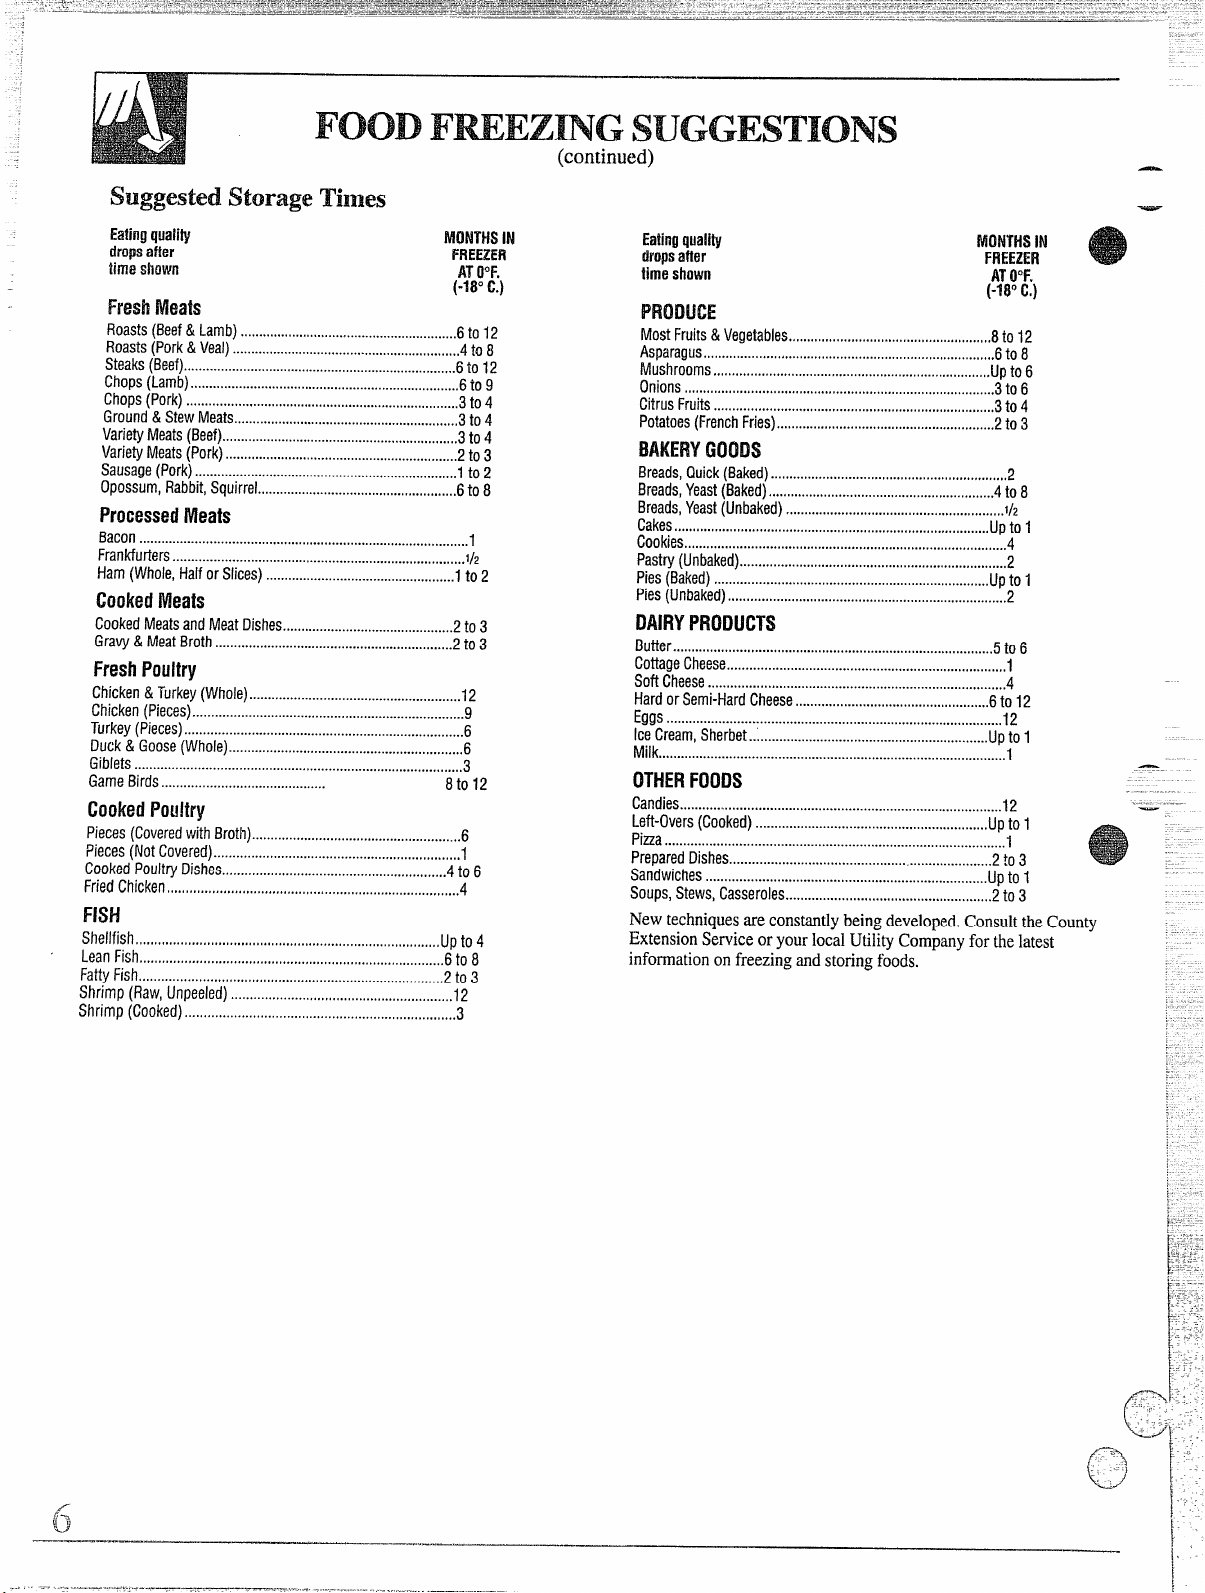
storageTimes
(continued)
—
~afiflgq~ality
dropsaf!er
tirm s~mm
MmmsIN
FREEZER
(-m”
FreshMeats
Roasts(Beef&Lamb)
Roasts(Pork& Veal)
Steaks(Beef)
Chops(Lamb)
Chops(Pork)
Ground&StewMeats
VarietyMeats(Beef)
VarietyMeats(Pork)
Sausage(Pork)
Opossum,Rabbit,Squirrel
......... ......... ..................... ......... ...........
...... ........... ..................... ......... ...............
...... ................. ................... ........... ........... ..........
............. ........... ...................... ........... ........... .....
........ ................ .................... ........... ............. ......
..........................................................#..3to4
................................................................3to4
......... ........... ...................... ........... ..........
........... ............. ....................... ........... .......,,,,,.
......................................................6to 8
ProcessedMeats
Bacon.... .............. ............................ ............... .......... ..................
Frankfurters...................... .......
Ham(Whole,Halfor Slices)
.......,...................,.....,.o...o...Q,T.mo.I/2
...................................................lto2
cooked Meats
CookedMeatsandMeatDishes..............................................2to3
Gravy& MeatBroth
........... .............. ........................... ............
2to 3
FreshPoultry
Chicken&Turkey(Whole) . .
Chicken(Pieces)
Turkey(Pieces)
Duck& Goose(Whole).
Giblets........ ......................... ............................... ............... .........
GameBirds.......... .................... ..............
................. ............... ............................ ...............
..... .......--.........................................l2
................. .............. ............................ ..............
.......... ............... .................................. ...
8to 12
CookedPoultry
Pieces(Coveredwith Broth)
Pieces(Not
CookedPoultryDishes.......................................................c....4to 6
FriedChicken,.,,,,,,,,.,,.,,,,,,,,,..., ..,,,,,,,,,,,,,...,,,,,, ,,..,,.,,,.,,.,,,, ,,.,,,,.,
FISH
Shellfish
LeanFish
FattyFish
Shrimp (Raw,Unpeeled)
Shrimp(Cooked)...............,....,................................ ...................
Covered)
!,.,,,,,,....,,,,,. ,,,,.,.,,,,,,,,.,,.,,.,,..,,,,.,,.,,.,,,,,,,,,,,, .,,,,.,,,,,.,
.........................................................o......................6to8
,,,,...,...,,.,.,...,, .,,,..,,,.,.......... ......................................
............ .................... ........................
.. ........................................ .. ......................
upto4
2to 3
......................o.o#oc...............................l2
AT(J°Fo
c.)
6to 12
4to 8
6to 12
6to 9
3to 4
2to 3
1to 2
1
9
6
:
7
4
3
Ea!inoquality
~rapsaftw
time shown
MostFruits& Vegetables
Asparagus
Mushrooms
Onions
CitrusFruits
Potatoes(FrenchFfies)..........................................................<2to3
Bread$Quick(Baked)
Bread$Yeast(Baked)
Breads,Yeast(Unbaked)
Cakes
Cookies..,,,....... ............................... ................. ...........................
Pastry(Unbaked)
Pies(Brdied)
Pies(Unbaked)...........................................................................2
.,,,, .,,,,....,.,,,,,,, ,..,,..,,,,.,..,........ ........... ........... ..,..,,,,.
0....... .....,.,,,,,,, ..,........................ ..,.,,,,,...,,...,,,.,.,,,
.,!..,.. ........,...,.,,,,.,,,!,,.,.,,...........,,,,,,,,. .,..,.,.,.,,.,.,,....... ..
,...<....,.,.... ..........#...........,..,,,.,,...... ......................,
..!,,,.,,. ,..,.,.,...... .....................#,,..,,,.............. ...........,,..,,,
..........................................................................uptol
.4,.,,,,,,,,,,. ..,....,,.,.,.,............ ........... .,
..,,,,...,.,,.,,,.,.,..,...,,.,,,,,............,,, ,,,,.,,..,,,, ,
.............,,.,.,.,.,................ .............. ........
...........................................................I/2
........... ............ ................................ ............. ....
MONTHSIN
FREEZER
ATOOF.
(-WC.)
8to 12
6t08
Upto6
3t06
3t04
2
4t08
Uptol
4
2
DAIRYPRODUCTS
Butier......................................................................................5to6
CottageCheese.................................. ................................. ........1
SofiCheese................................................................................4
HardorSemi-HardCheese
Eggs
..........................................................................................l2
lceCream,Sherbet
Milk... ................ ............................................ .............. ................
....................................................6to12
................................................................uptol
1
OTHH3F(XIDS
Candies.......... .............................................. ................. .............12
Lefi.Overs(Cooked)..............................................................Uptol
Pica.................................. ....................... ..................................-I
PreparedDishes................................ .....................................2:03
Sandwiches
Soups.Stews.Casseroles.......................................................2to3
..................... ......................... .............................
Uptol
Newtechniquesareconstantlybeingdeveloped.ConsulttheCounty
ExtensionServiceoryourlocalUtilityCompanyforthelatest
informationonfreezingand storingfoods.
_,/
f,-?
~“w
—..—-. .-——
——.——”,.
-——
Page 7

-.
‘=-’” Rw?zing Meat.Fish, & Game
PreparationandPackaging.Packagemeat,poultry,
fish and game in moisture/vapor-proofmaterialsuch
as aluminumfoil, cellophane,freezer foil or plastic
bags. Exclude as mtlchair as possible. Label and
freeze at once.
NOTE: Packages of fresh meats and poultry as
commonlypurchased in retail storesare not suitably
wrappedfor freezing. Rewrap in moisture/vapor-
proof material.
~Meat. Remove as much bone and fat as possible
from meat before packaging.Do not salt meat.
When individualpieces of meat are packaged
together,place doublethickness of freezer wrap
between them for easier separation duringthawing.
ePoultry. Cleanthoroughly before packaging. Pad
sharp or protruding bones with folded freezer paper
or aluminumfoil. Wrapgiblets separately.
oVViMGame. The same methods suggested for
poultry and meat may be used for preparing and
freezing wild game.
~Fish. Clean fish thoroughlybefore packaging. Cut-
—
—
up pieces of “lean” fish such as haddock and cod
should be rinsed in brine made with 2/3 CUDof mre
table salt per gallon of water to reduce lea~age
during thawing. Keep in solution not over 1minute.
Brine is unnecessary for whole fish or fatty fish such
as salmon or mackerel,
.
UIOysters, Clams, $hrhnps~Scallops.Washshellsin
runningwater (soak clams) and shuck, working
quickly. Discard shells,Do not wash clamsor
oysters.Scallopsmay be rinsed in fresh water.Pack
in freezer carton and freeze immediately,Shrimps
are best if frozen uncooked.Remove and discard
heads and black vein. Wash and package in freezer
containers.
8Crabs and Lobsters. Chillfkh and remove back
shell.Steam or boilin water for 15to 20 minutes.
Cool thoroughly,then pick ediblemeat from shells
and package in proper containers. Seal and freeze
immediately.
eThawing. Frozen meat, f~shor poultry shouldbe left
in the originalpackageand thawedin the refrigerator
or cooked frozen. Allow approximately5 hours per
pound to thaw meat in the refrigerator.When
cookingfrozen meat, increase the cooking time by
approximately1/3to 1/2if cookingconventionaHy—
much less if cooking with microwaves. If necessary
to thaw meat quickly,thaw at room temperature—
allowing only 2 hours per pound.
Don’trefreezemeat thathas completelythawed;meat,
whether raw or cooked, can be frozen successfully
only once.
IFreezing-vegetables
1. Only vegetables at their peak of maturity should be
chosen for freezing. Some varieties of vegetables
are better adapted for freezing than others. For
complete information, contact your County
Extension Service,
2. Sort, clean and wash vegetables in cold water. Keep
those of the same size all together. Large pieces
take Ionger blanching. -
-.
3. Work with small amounts, about one pound, that
can be packaged in a short time.
4. Blanch all vegetables except tomatoes, green
peppers and herbs before packaging. Proper
blanching stops the ripening process so vegetables
are held at their peak of freshness.
(continued next page)
Page 8

?
.,......=.,-.,--.-...——->..-—
————.-
.
.
—
(continued)
by Steam
Useprfmwe cde~; vegetableMmcheqorother large
ulensii.
L Fill utensil with 2 inches of water. Bring to
boiling point,
the
2. Place vegetables in a wire basket or rack above the
boiling water, Cover and begin timing immediately
(refer to guide at right for steaming times). Keep
heaton HIGH whilevegetablesare steaming.If using
a pressure cooker, the petcock shouldbe left open.
3. Chill vegetables quickly the same length of time as
for steaming by plunging them into ice water, or
under cold running water. Remove from water and
drain on towels.
1. Select large utensilof 4- or 5-quartcapacityand fi
with one gallon of water for each poundof
vegetablesto be blanched at onetime. Use two
gallonsfor each pound of leafy vegetables,Bring
water to boiling.
2. Blanch one pound of vegetablesat a time, Place
vegetablesin a wire basket or colander.Immerse in
boiling water and cover. Count time immediately
after boilingbegins (see guide at right). For high
altitudes,add 1minuteto blanchingand chilling
times.
3. Chill vegetablesquickly the same length of time as
for blanching by plunging them into ice water, or
under cold running water. Remove from water and
drain on towels.
Packing
Package vegetables in moisture/vapor-proof containers. Leave l/2-inch
head space in package. (1k-inch for glass containers). Freeze quickly.
by Boiling water
~
—
—
8
.——
—
Page 9

-—--—
“-=”
GuidetoFm?ezing
PEAS
POTATOES
FrenchFried
POTATOES
White
POTATOES –
sweet
SQUASH
Shellanddiscardover-maturepeas.
Peelandslicelengthwisefor frying. Fryin deepfat heatedto
3600F,for 4 minutes until tenderbut not browned. Drainwell,
Selectsmooth newpotatoesdirectly from garden.Wash,peel
or scrape,and scald.
Wash,Cookuntil almost tenderand cool. Peel;cut
in halves,sliceor mash,
Selecttendersquashwith soft rind. Cutin l/2-inch slices.
1l/2to 2min.*
2 rein,**
3 to 5 min.
3 min.*
Spinach
2 min.
4 1/2 min.
*Preferreo’ method
Chilianddrain. Packaqe
compactly,leavingl/~-inch
headspace.
Coolto room temperature.
Packageinfreezerbagsor
cartonsandseal.Toserve,
thawandcook in 3750F.fat
until brown. Orcook,
unthawed,in 5000F,oven.
Chill,drain, packagein cartons,
bagsor boxes. Leavel/2-inch
headspace.Seal,
Packin freezercontainers,
allowing l/2-inch head
space.Seal.
Chillimmediately,drain and
package.Leavel/2-inch
headspace.Seal,
4 teaspoons salt to a gallof]
**Use
(cotltitluecjne.u p~lge)
Page 10

--
(continued)
~
forFreezing Fruits
-.
1. Sort fruitsfor uniform ripeness,qualityand size.
2, Wash fruits thoroughlyin cold water and drain
thoroughly.
3. Work with small quantitiesand freeze quickly.
4. Pack in cartons, cuttingor slicing larger fruits. Add
sugaror syrup.
5. To avoid discolorationof apples, apricots,peaches
and pears, (1) add ascorbicacid mixture to syrup (1
teaspoon to 1cup of syrup) followingdirectionson
label, or (2) dip slices of fruit for 1minute in
solutionof 3 tablespoonslemonjuice to 1gaHon
water, rinse in cold water, drain, and pack in sugar
or syrup. Place crumpled piece of cello or waxed
wrap on top of fruitbefore closingto keep fruit in
syrup.
Packing Frozen Fruits
Always allow bead space. Allow V2-inch head spac
in pint containers(1 inch for glass), l-inch head spac
in quart containers (2 inches for glass).
Sweeteningfruits helps retain flavor,color and
texture.The method of sweetening depends on fruit
used. See guide at rightfor recommendedmethod.
(a) Dry sugar pack. Suitable for fruits that make their
ownjuice when sugar is added. Add dry sugar (see
guide at right) and stir gently untilmost of the sugar
has dissolved in thejuice drawn from the fruit, then
pour into containers.
(b) Syrup pack. Suitablefor fruits which have
comparativelylittlejuice, and those which darken
readily.Add syrup to cover fruit. AHOWl/2-inch head -
space (1!4-inchfor glass containers).
(c) Unsweetened pack. Suitable for special diets.
~
Guidefor syrup servingFrozen Fmit$:
Cups of suger
Percentage
of syrup pint of water yield in pints
to be added per Approximate
Place unopened containers in refrigerator. Serve while
fmit is still slightly icy.
—
—.
30% (light)* 1
40% (light)* 1!4
50% (medium) 2!A
60% (medium)
65% (heavy) 4!4
,}:Recommendedfor most fmits
IVlethod:Dissolve sugar in boiling water or mix
thoroughly with cold water until dissolved. Chill
before using.
3!4
1!4
1%
1%
2
2%
-.
Page 11

drab
.—
=’ Guide toFreezing Fruits
—
—
PREPARATION
Wash,peel and slice applesto about l/2-inch thickness.If apples are to be packedin
sugar,preventdiscolorationby (1)steamingfor 1Z to 2 minutes,or (2)dipping in
solutionof 3 tablespoons lemonjuice to 1 gallon water for 1 minute, rinsing in cold
water,and draining, Solution may be reused,
APRICOTS
BERFNES Proper maturity is important. Immature berriesshould not be used. Wash in cold or
CHERRIES Wash,sort and stem. Chill in refrigeratoruntil firm enough to removepits.
Sour
CHERRIES
Sweet whole, with or without pits.
CRANBERRIES Wash in iced water,stem and eliminate poor berries. Drain well.
MELONS Selectfirm, well ripened fruit. Cut in half and remove seeds (removewatermelon
Cantaloupes seedsas you cut balls). Scoop out melon balls or cut in 3/4-inch cubes.These fruits
Honeydews maybe frozen alone or in combination.
Watermelons
ORANGE and Selectfirm fruit, free of soft spots. Peel with sharp knifejust below white membrane.
GRAPEFRUIT Remove all membrane. Cut sections from divider-membranes. Drain.
SECTIONS
PEACHES Promptness in handling is important. Sort, peel (skinsmaybe loosenedbyscalding
—
PINEAPPLEIPeel, core, slice or cube.
PLUMS and Sort,wash in iced water. Halve and pit, or leave whole.
PRUNES
RHUBARB Wash,trim and cut stalks into l-inch pieces or in lengths to fit package.
Selectfirm, fully ripefruit of bright,uniform color,Wash and sort as to size. Halveand
removepits. Peeland slice, if desired, Heat unpeeledfruit in boilingwater 1/2 minute.
icedwater and drain thoroughly on absorbent paper towels.
Preparequickly in same way as sour cherries. However,sweet cherriesmaybe frozen
whole peach 30 seconds in boiling water) and pit. Peel and slice 1 quart of peaches
at a time.
Select pears which are fully tree-ripened. Wash, peel and core. Cut in halves or
quarters. Heat in boiling 40% syrup for 1 to 2 minutes. Cool in syrup, then drain.
PACKAGING
Syruppack: Slice into container,coverwith40% syrup.
Add 1teaspoon ascorbicacid to eachcup of syrup.
Sugarpack: Sprinkle 1/2cup of sugar over each quart
of apples, Stir to coverall surfaceswith sugar.Seal,
Adding 1teaspoon ascorbicacid to sugar is an extra
~recautionc
Syruppack:Packin container;cover with 40% syrup
to which ascorbicacid has been added (lteaspoon
ascorbicacid to 1cup syrup).Sugarpac/c Mix 1
teaspooncrystalline ascorbicacid with 1/2 cup of sugar
and sprinkleover 1 quart of fruit, Stir.
(1) May be packed dry,or (2) packed whole in a 40 to
50%sugarsyrup.(3) Forcrushed or pureed berries
pack4 parts of berries to 1 part of sugar,Stir until sugar
isdissolved.Seal.
Mix 1 part sugar to 4 or 5 partsfruit by weight until sugar
isdissolved.Pack.Seal.
Coverwith 40% sugar syrup which contains 1
teaspoon ascorbicacid per cup.
Cranberriesmay be packed whole, without sugar, or
in a 50’%0sugar syrup.
Coverwith orange juice or 30% sugar syrup.
Seal and freeze.
Packsectionsin layerS.COVf.?rgrapefrUitwith
containing 1 teaspoon ascorbic acid per quart. Oranges
do not need syrup. Stir in 1/2 teaspoon ascorbic acid
perquart.
Packimmediately into cold 40Y0syrupwith 1teaspoon
ascorbicacid per cup in container; cover with more
svrumSeal.
Packimmediately in freezer carton. Add 40% syrup to
whichascorbic acid has been added (1 teaspoon
ascorbicacid to 1cup syrup). Seal.
Packsliceswith two circlescf cellophanepaper between
I
eachslice. Pack without sugar or cover with 30Y0syrup.
Or,pineapple juice could be used.
Packin carton and cover with 40Y0syrupto which 1
teaspoonascorbic acid has been added per cup. Seal.
Packwithout sugar or cover with 40% syrup.
4110whead space. Seal.
30Y0 syrup
FMx?zing
Dairy
o(hese. Freezecheese in 1/2-to 1-pound pieces. ~Ice Cream. Commercial ice creams can be stored in
Wrap in moisture/vapor-proof material. Uncreamed
cottage and Camembert cheese may be kept in the
fmczcr though there ~maybe some water separation
on thawing. Cream and processed cheese do not
freeze well as freezing affects their smooth texture.
—
5Cream. Ordinmyhouseholdcream for table use does
not freeze weli, bLllwill be suitable for cooking.
pastet~rizedheavy cream containing
not!~ssthanQO
percent butterfat &y be frozen. Heavy cream which
has been whim]ed freezes well. too, Drot) InOUMkof
whipped cream on baking sheets. Freeze’.
*,
‘Ilansfer
frozen mounds quickly to a rigid container and seal,
the freezer in their original carton. Home-made ice
cream should be packed in moisture/vapor-proof
cartons. For best results, place ice cream in the
interiorof thefreezer rather than on the door shelves.
Fine-qualityice cream, with high cream content,will
normally require slightly low~r temperatures than
“airy” already-packaged brands with low cream
content. Experiment to determine the location in the
freezer (the rear is slightly colder than the front) and
the temperature control setting to keep yoLu.favorite
ice cream at the right serving temperature.
@Butter and Margarine. Overwrap original carton in
separating layers with paper. moisture/vapor- proof material or enclose in
moisture/vapor-proof containers.
(cmti;lued }Ie.rf page)
Page 12

(continued)
~
Fmxing Eggs
Useonly fresh eggs for freezing. Chillbefore
freezing.Whole eggs may be frozen or the whitesand
yoiksfrozen separtelyas follows:
W-holeEggs—Mix yolks and whites thoroughlywith
a folk. Do not beat in air. Add 1 teaspoon salt to each
2 cups of eggs.
Egg Whites—Separate and freeze in recipe-sized
amounts.
Freezing Prepared Foods
@Bread and RoW. Bake, cool, wrap and freeze. To
serve: thaw in wrappings at room temperature. Or,
heator toastfrozen.If desired,wrap in foiland warm
for 15 minutes in 250° to 300”F oven. Note: most
commercially baked products should be rewrapped
in moisture/vapor-proof material before freezing.
eBiscuits. May be frozen baked or unbaked. To serve
baked biscuits:defrost in wrappingsat room
temperature for one hour.Reheat for 5 minutes in
425°F oven. Or place frozen biscuitsin 375°F oven
for 15minutes. Unbaked biscuits should be thawed,
then baked as usual.
eCake. Bake and cool. If frosted, freeze before
wrapping to avoid sticking.To serve: unwrap frosted
cakes; thaw at room temperature. Thaw unfrosted
cakes in wrappings at room temperature. Allow
about two hours to thaw a large cake.
Icings made with egg white do not freeze
satisfactorily. Those made with powdered sugar,
butter, fudge or whipped cream freeze well.
oCookies. If baked before freezing, cool and package
them carefully in moisture/vapor-proof material.
They will thaw in about 15minutes at room
temperature in wrappings. Refrigerator cookie
dough may be wrapped and frozen in bars. Slice as
ncccicd,without defrosting, and bake.
~Pies. Most pies except cream, custarcior meringue-
toppecipies freeze well, baked or unbaked. Baked
pies store for a longer time. Omit steam vents from
pies to be frozen unbaked.
To serve unbaked pies: Cut steam vents in top crust
and placc frozen pie in oven at usLIaltemperature,
Increase baking time 10to 15minutes. Thaw frozen
bnked pies, wrapped, for 1 to 1!4hours at room
temperature.To serve warm, unwrap without thawing
and heu[ in 300°F oven for 30 to 40 minutes.
~
Egg l?ok+-—+$eparateand add 1 teaspoonof salt or 1
tablespoonof corn syrup or sugar per cupfulof yolks.
Blend with fork.
Pack eggs in freezer carton allowing l/2-inch head
space(1fi-inch for glass containers).Thaw eggs in
unopenedcontainerin refrigeratoror atmomtemperature,
@Quick Breadsand Muffins. Bake,cooland wrap at
once. For serving,thaw,unwrapped, at room
temperatureor warm, unwrapped,in 300°Foven.
eMain Dishes. Such foodsas chili, spaghettisauce,
casseroles,etc., are prepared in the same manner as
for immediate serving with the exceptionof
seasoning.During storage, onion flavor becomes
less noticeable and celery flavor more pronounced.
Spices also lose their strength during long periods of
storage. Omit potatoes from stews and soups as they
become mushy.
Coolmain dishes after cooking; package in
moisture/vapor-proofmaterial and freeze. To serve
these foods, thaw gradually over low heat adding a
little liquid if necessary to prevent foods from
stickingto the pan. Or heat in a 300”Foven for
about 1hour or until heated thoroughly.
eSandwich Tips. All varieties of bread can be frozen.
Spread softened butter on each slice, then spread
filling. It is not advisable to use salad dressings for
spreading as they separate and soak into the bread.
Meat, fish, some cheeses, poultry and peanut butter
are recommended fillings for freezing. Cooked eggs
become tough when frozen. Other fillings can be
moistenedwith milk,cream, picklerelish,chili sauce,
catsup,fruitjuice, a littlemayonnaiseor saladdressing.
Lettuce or other salad greens and raw vegetables do :
not freeze well and should be added just before
serving.
Wrap sandwiches in moisture/vapor-proof material ~ 7and freeze.
—
—
Page 13

—
-. -.
.-wiE=$-
F’mperpackagingis essentialfor successfulfreezing,Because solidlyfrozen
foodslose moisture in thedry 0° to 5“F.temperatureof a freezer, they must
e properly protected by top quality packagingmaterialsthat are moisture/
vapor-proof.Freezer tapeis used to sealwrappingsand for labeling.
Freezer packaging materials
Materials
Cartons with moisture,
and vapor proof liners
, Foil containers
Polyethylenebags
Glass freezer jars
Plastic containers and
boil-inbags
—
Drugstore Wrap
L Place food in center
of wrapping paper.
2. Bring
wo parallel
edges together. Fold
in lock seam, repeat
untij the last fold rests
firmly on food.
3. Fold ends, excluding
as much air as
possible. SeaI with
tape or tic firmly witl-
heavy string.
instructions
I -- ~ --
I
uses
Fruits, vegetables,
somemeats
Cooked foods
Baked foods, meats
Juices,fruits,vegetables,
cooked foods
Sauces,fruits,vegetables
cookedfoods
—..-.
—
Materials
~aminatedpaper
Heavy-dutyfoil
uses
Meats
Meats,bakedgoods,
leftovers
Cellophane
Baked goods,
sandwiches,small
meatcuts
Butchers’ Wrap
Place food diagonally on one corner of paper. Roll
paper and food together diagonally,folding in extra
material as you roll. Seal with freezer tape.
Cartonsandcontainers.
Fruits, vegetables and
cooked foods may be
pa@@ in freezer
I
cartons, containers
andjars.
I
—.—
I
Aluminum foiL
Place food on heavyduty foil and mold foi
to shape of the food.
Only one thickness is
reqllired.No heat sealing
or taping is necessary.
I
——— — -
d
Labeling containers.
Be sure to label all
containers and packages
with contents and date
J
that it was placed in the
freezer.
. . ..—
—..————.
-.
Page 14

..
.-
In most climates,defrostingwill be necessary only abouttwice a year.
Tohave your freezer operatemost efficiently,do not
inchesof frost to WJcmnuklteon the SMw?s.
Toremovethis light coatingof frost from the shelves,simplyscrapewith a
plastic or woodspatulaor scraper.Scrape the top and bottom surfaces of the
shelvesandthe refrigerated surface at the top of the cabinet.
Never use an ice pick or metal scraper.Any such instrumentcan darnage
the freezer.
Do not useany electricaldevice in defrosting your freezer.
permitmm-w than M?
For Defrosting
1.Turn temperaturecontrolto OFF.
2. Remove all food and place it in corrugated boxes,
insulatedbag, picnic coolers, etc. Use towels and
newspapersfor insulationas needed.
3. With door open, use pans of hot water to speed
looseningof frost. Remove large pieces before they
melt.
4. A drainhose (on some \l ]
models)behind the
base griile carries the
defrostwater out from
the freezer. Remove
the base grille; then
remove the drain duQ
and let the defros~
water
drain into a pan. Sponge excess water from
bottomof freezer as it collects to prevent
overflowing.
‘I’oremove the base grille,
(on some models), grasp
the grilie at both ends and
Dull
outward.
.
*
w
~49—
\
a-
Drain Hose
5. After defrosting,clean inside of freezer (see the
Care and Cleaning section).
6. Return temperature control to regular position and
return food to freezer.
7. Be sure to replace drain plug (on some models) and
return drain tube to its position.
8. Replace base grille by aligning pins in grille with
holes in cabinet and gently pushing grille forward
until it sriapsinto place.
—
—
utward
Page 15

.--m
—
-“- -MOWFreezer
outside, Protect the paint finish.The finish on the
outsideof the freezer is a high quality,baked-on
paintfinish. Whh propercare,it will~ay new-looking
andrust-free for years. Apply a coat of appliance
polish wax when the freezer is new and then at least
twicea year.Appliancepolish wax also works well
to remove tape residue from freezer surfaces.
Keep the finish clean. Wipe with a clean cloth
lightlydampened with appliancepolish wax or mild
liquiddishwashingdetergent.Dry and polish with a
clean, soft cloth. Do not wipe the freezer with a
soileddishwashingcloth or-wettowel. Do not use
scouringpads, powdered cleaners, bleach, or
cleanerscontaining bleach.
CAUT1ON-Care should be taken in moving the
freezer away from the wall. All types of floor
coveringscan be damaged,particularly cushioned
coveringsand those with embossed surfaces.
m Remove! the Freezer Door
~
~
Lift up the plastic hinge cover and fold it back. It is
very important that a screwdriver be used both to
Ioosen and retighten the flat head screws on the top
inge, to insure a secure assembly and prevent hinge
ippage.
Remove the top hinge from the cabinet, then lift the
door off the lower hinge pin.
After the door is removed from the freezer remove the
two screws from the bottom hinge.
To replace the door,reverse the order of the above
instructions.
*Inside. Clean the insideof your freezer at leastonce
a year!We
beforecleaning. If this is not practical, wring excess
moistureout of spongeor cloth when cleaningin the
vicinityof switches,lightsor controls.
Use warm water and baking soda solution—abouta
tablespoonof baking soda to a quart of water.Rinse
thoroughlywith water and wipe dry.Do not use
cleaningpowders or other abrasive cleaners.
An open box of baking soda in the freezer will
absorb stalefreezer odors. Change the box every
three months.
recommendthatthe freezer be unplugged
h case ofExtended Power Ram:
L Keep freezer door closed. Yourfreezer will keep
food frozen for 24 hours provided warm air is not
admitted.
2. If freezer is out of operation for 24 hours or more,
add dry ice. Leave ice in large pieces. Add more ice
as required.
WARIWNG: Handling of dry ice can cause freezing
of the hands— gloves or other protection is
recommended.
3. If dry ice is not available, move food to a frozen
food locker temporarily-until power is restored.
—
.—..
Page 16

Yourfreezer shouldbe convenientlylocated for dayto-day use in a dry, well-ventilatedroom.
For most efficientoperation,it should not be located
where air temperaturearoundthe freezer is ever
higher than 1IO°F.or colderthan 32°F.
Be sure to install your freezer on a floor strong
enough to support it when it is fully loaded.
Also see Energy-Saving Tips regarding location.
Allow 3 inches on all sidesfor proper air circulation
Legs
Legs at the front corners of the freezer should be set so the freezer is firmly
positioned on the floor, and the front is raisedjust enoughso the door closes
easily when opened abouthalfway.
Mm GO m Vacation
To maintain freezer in operationduring vacations,be
sure your house power is not turned off. For sure
protection of freezer contents, you may want to ask a
neighbor to check thepower supply and freezer
operation every 48 hours.
For extended vacations or absences, you may prefer to
moveyour frozen foodsto a storagelockertemporarily.
If your freezer is to be left empty, disconnect power
cord piug from wall outlet. To prevent formation of
When YiN.IMOW
Disconnectthe power cord plug from the wall outlet.
Remove foods, defrost and clean the freezer.
Secure all loose items such as grille and shelves by ~
taping them securely in place to prevent damage.
Be sure freezer stays in upright position during actual “
moving and in van. The freezer mustbe secured in
van to prevent movement. Protect outside of freezer
with blanket.
odors, place open box of baking soda in freezer and
leave freezer lid open.
When the freezer is not operating, it can be left in an
unheated house or room without damage to cabinet or
mechanism,
—
—
Turn left to raise—
—
Page 17

~
-=- HowtoC%med Ektricity
orpersond
roperlygrounded.
‘he power cord of
thisapplianceis
equippedwith a
three-prong
(grounding) plug
which mates with
a standard three-
Prong (grounding)
wall outlet (Fig. 1)
to minimize the
possibilityof
electric shock hazard from this appliance.
safety~thisappliancemust be
UseIofAdapterPlug
readcarefully
Have wall outlet and circuit checkedby a qualified
electricianto make sure the outlet is properly
grounded.
Where a standardtwo-prongwall outletis
encountered,it is yourpersonal responsibilityand
obligation to have it replaced with a properly
groundedthree-prongwall outlet.
DO NOT, UNDER ANY CI.RCIJMSZ4JW!ES,
ICUTOR REMOVE THETHIRD(GROUND)
PRONG FROM THE
R3wlmCORD.
Because of
potential safety
hazards under
certain conditions,
we strongly
recommendagainst
use of an ada~ter
where local codes
permit, a
TEMPORARY CONNECTION may be made to a
properly grounded two-prong wall outlet by use of a
UL listed adapter (Fig. 2) available at most local
hardware stores.
The larger slot in the adapter must be aligned with the
1argerslot in the wall outlet to provide proper polarity
in the connection of the power cord.
TEMPORARYMETHOD
ig.2
BEFOREUSE
use‘of cords
Because of potential safety hazmls under certain
conciitions,wc strongly recommend against the use of
:mextension cord. However, if yoL~still elect to use an
extension cord. it is absolutely necessary that it be a
LJLlisted 3-wire grourlding type app]iance extension
Coi”dhaving [1
[heclcc[ricai rating of the cord bc 15:impercs
{minimum)and 120 voi[s.
gN}LIIldiilg [}]~?c p]LIg 211d OUtlCt Wld [hat
CAUTION: Attaching adapter ground terminalto
wall outlet cover screw does not groundthe appliance
unlesscover screw is metal, and not insulated,and
wall outlet is grounded throughhouse wiring.You
shouldhave the circuit checked by a qualified
electrician to make sure the outlet is properly
grounded.
When disconnectingthe power cord from the adapter,
always hold the adapter with one hand. If this is not
done, the adapter ground terminal is very likely to
break with repeated use.
Should the adapter ground terminal break, DO NOT
USE the appliance until a proper ground has been
established.
The freezer should always be plugged into its own
individual electrical outlet-( 115volt, 60 Hertz single
phase AC. Some models are also rated 100volt, 50
Hertz. Check the model and serial number plate,) This
is recommended for best performance and to prevent
overloading house ~viringcircuits, which could cause
a possible fire hazard from overheating wires.
—
k
17
—
—
Page 18

--
-=issJ
PROBLEM
I?REEZER Dcms
NOT OPERATE
POSSIBLE CAt.JSE
——
~Temperaturecontrolis in OFF position,
QIf interiorlight (on somemodels)is not cm,freezer may notbe pluggedin.
*If plug is secure and the fiwzer stillfails to operate,plug a small applianceinto
1%.EEZERSTARTS ~
TOO FREQUENTLY
thesameoutlet to determineif thereis a trippedcircuitbrmkeror burnedoutfuse.
~Package holdingdoor open, or dooroptmedtoo f..eqitentlyor too king,
+Temperaturecontrol set on too high a
number, I
———
FREEZER Ol?E&lTES
TOO LONG
Packageholding door open, or door opened too frequently or too long.
*
~T&n&rature control set on’too high a number. I
~Inadequateair circulationspace around cabinet.
I’40.ISYOPERATION --
@The floormay be weak,causingthe freezerto vibratewhenthecompressoris on.
~Cabinetis notpositionedsolidlycmfloor.Adjustlegs or use sh@nsforunevenfloor,
CABINET V?33RATES
@Weaknessin room floor. Placing 2 X 4’sunder the length qf the freezer will help
supportit and may redudevibration.
*Cabinetnotpositionedsolidlyon floor.Adjustlegs or use shimsfor unevenfloor,
Whenyour freezer is operating correctly you should:
Be able to
transfersheathorntheinsidetotheoutsidethroughtheexterior
. . ..
cabinet walls.
feelthewarmcabinetexteriorastherefrigerationsystem
,,
—
Beabletohearthehighefficiencycompressormotor.
THE3ETHINGSARE Do NOT
A
NEED FORSERVICE.
\
—
Page 19

‘-~ PROBLEM
POSSIBLECAUSE
REEmR TEMPEMWRH
WAIUM
—
~
~ EXCESSWEFROST
T(X?
FOODS D.mmosmm
FREEZER TEMPERATURE
T(X3COLD
FOODS DRYING C.IUT
MOR3TURECOLLECTING
ON OUTSIDE CM?CABINET
INTERIOR LIGHT DOES
NOT’LIGHT(on somemodels)
DOOR WON’T FULLY
CLOSE BY ITSELF
SLOW STARTINGTIME
AFTER BEING
OFF
@Packageholding door open, or door openedtoo frequentlyor too long,
oBlownfusemtrippedcircuitbreaker.
@Not plugged in.
~TemperatureGontrolin OFF position.
*Packagehcddingdooropen,ordooropenedtoofrequentlyortoolong,
—
*Temperaturecontrolsetontoohighanumber.
@Packagesnotproperly<wrappedorsealed.
*
~Extendedhot,humidweather.
*BlownIi..u3eorci.rcuit’breaker.
~Not plugged in,
~
Bulbtmrnedout. ‘
*Legsneedadjusting.
~Package holding door open.
oEMlt-inoverloadprotection.
~Package holding door open, or door opened too frequently or too long.
eExtended hot, humid weather.
H’you needmore hdp...d, toll free:
GEAnswer Center@
800.626.2000
Page 20

I
I
i
I
Saveproof of original purchase date suchasyoursalesslip or cancelledcheckto establishwarrantyperiod.
Ii
1s
FULL
f% oneyear from date of
purchase, we will provide,
charge,parts and servicelabor in
your hometo repair or replace
any pati of the free~erthat fails
becauseof a manufacturing
defect.
FULL FIVE-YEAR WARRANTY
Forfive yearsfrom date or original
purchase,we will provide,free of
charge, partsand service labor in
your home to repair or replace any
part of the sealed refrigerating
system (the compressor,
condenser,evaporatorand all
connectingtubing) that fails
becauseof a manufacturing
defect.
original
free of
—
LJMIT’ED
KXNJ SWXLAGE...
Wewill payfor foodspoilage
(notto exceedthecumulative
limitspecifiedbelow)that occurs
becauseof a manufacturingdefect
eitherin: a)
withinoneyearfromdateor original
purchase,orb) anypafi otthe
sealedrefrigeratingsystemwithin
fiveyearsfrom the dateof original
purchase.
FreezerCapacity
14.9cu. ft. and smaller $100.00
15.0cu. ft. and larger $150.00
Within 30 days after food
spoilage occurs, you must provide
satisfactory proof of the spoilage
to a Factory Service Center, an
authorized Customer Care@
service or the dealer from whom
the freezer was purchased.
anypartof the freezer
Cumulative
Limit
——————
This warranty is extendedto
the original purchaserand any
succeedingownerfor products
purchas~dfor ordinaryhome use
in the 48 mainlandstates, Alaska,
Hawaiiand Washington,D,C.In
Alaskathe warrantyis the same
exceptthat it is LIMITEDbecause
you must payto ship the productto
the serviceshoporfor the service
technician’stravelcoststo your
home.
All warranty servicewill be
provided by our Factory Service
Centers or by our authorized
Customer Care@servicers during
normal working hours.
Should your appliance need
service, during warranty period
or beyond, call 800-GE-CARES
(800-432-2737).
—.
1S
* Service trips to your home to
teachyou howto usethe product,
Read your Use anci Care material.
If you then have any questions
about operating the product please
contact your dealer or our
Consumer Affairs office at the
address below,or call, toll free:
GE Answer Center@
800.626.2000
consumer information service
~Improper installation.
Some states do not allow the exclusion or limitation of incidental or consequential damages, so the above limitation or exclusion
may not apply to
To know what your legal rights are in your state, consult your local or state consumer affairs office or your state’s Attorney General.
you. This warranty gives you specific legal rights, and you may also have other rights which vary from state to state.
Mfurther help is needed concerning this warranty, write:
if you have an installation problem, ~Replacement of house fuses or
contact your dealer or insta!ler. You
are responsible for providing
adequate electrical, plumbing and
other connecting facilities.
@Foodspoilage caused by:
a) Power interruption from the
utility.
b) Blown fuse, open circuit breaker
or other power disconnection on
the owner’s premises.
c) Freezer not operating because
of abnormally low electric power
voltage or inadequate house
wiring.
VVarrantcw: Gerwai Electric Company
Affairs, GE Appliances, ILouiwillq K’f 4022!5
resetting of circuit breakers.
~Failure of the product if it is used
for other than its intended
purpose or used commercially.
@Damage to product caused
by accident, fire, floods or acts “
of God.
WARRANTOR IS NOT
RESPONSIBLE FOR
CONSEQUENTIAL DAMAGES.
Pati No. 162D3944POOI
NO. 49-6725
Pub
1-
[
‘:!42 CG
I
 Loading...