

Page 1
"')
~'~"
PL
•
fo
d :
..
AND
ocessor
~~~~
from General Electric
__
\)
3 f p
2_
\)
~
..:.._
-r'
~~----..::======:-
@
LISTED
Page 2

l
Because
of
tts speed and versatility, this FOOD PROCESSOR from
General Electric appeals
to
all types
of
cooks, the gourmet and the
non-
-
gourmet alike
As you use this FOOD PROCESSOR,
you'll
discover so many ways in
which
this appliance can help to speed
you
through food preparation •
tasks of:
*CH
OPPING
*GRATING
*G
RINDING
* CRUMBING
* SHREDDING
*MINCING
*MIXING
*PUREEING
*SLICING
* MIXING YEAST BREAD DOUGH
THIS BOOK IS YOUR GUIDE
TO
FAST AND SURE PROCESSING
TECHNIQUES. PLEASE
READ IT CAREFULLY. BEFORE USING
YOUR
GE FOOD PROCESSOR.
NOT~.
The maximum rating is based
on
the attachment that draws the
most power.
Other recommended attachments may draw significantly
less power.
PAGE
lmpo'1ant Safeguards
..................................
. . ·. . . . . .
..
3
Get
.,.o
Know Your Food Processor
....................
.
•.........
4
Wha Each Attachment Can Do . . . . . . . . . . . . . . . . . . . . . . . . . . . . . . . . . . . 5
Befurf' First Use
..........
.
............................
.
..........
6
Takin~
the Processor Apart and Putting
It
Together
.............
7-10
ContrCJ
Buttons . . . . . . . . . . . . . . . . . . . . . . . . . . . . . . . . . . . . . . . . . . . . . . . . . 1 1
How
To
Use Knife Blade
....................................
11-13
How
To Use Reverstble Disc
................................
14-17
How To Use Knife Blade and Disc Together
.......•.........
18-20 ,
Cleaning and Storage
...........................................
20
Da
ly
Use Chart
......................................
.... ....
21-27
Rectpe Section
.•..................................•.........•
28-47
Keep this booklet handy; review
product
warranty and servtce
statements on separate sheet and record
below:
Date product received:
________________
_
Comple:e model number {located on bottom
of
Base):
____
_ _
2
Page 3
When
using
electrical
appliances,
basic
safety
precautions
shou
ld
always be
fol
owed
including
the
foUowing:
*
Read
all
instructions.
*
To
protect
against
electrical
hazards
do
not
immerse
Base, plug, or
cord
in
water
or
other
liquid
*
Close
supervision
is
necessary
when
any
appliance
is
used
by
or
near
children.
*
Unplug
from
outlet
when
not
is
use,
before
putting
on
or
taking
off
part
s,
and
before
cleaning.
*
Avoid
contacting
moving
parts.
*
Do
not
operate
any
appliance
with a damaged
cord
or
plug
or
after
the appliance
malfunctions,
or
has
been
dropped
or
damaged
in
any
manner.
Return
app1
ance
to
the
nearest
authorized
service
facility
for
examination,
repair
or
electrical
or mechamcal
adjustment
*
The
use
of
attachments
not
recommended
or
sold
by
the
appliance
man
ufacturer
may
cause
hazards.
*
Do
not
use
outdoors.
*
Do
not
let
cord
hang
over
edge
of
table
or
counter,
or
touch
hot
surfaces
.
*
Never
feed food
into
the
Food
Chute
by
hand
when
slicing
or
slvedding
food.
Always
use
the
Food
Pusher
provided.
*
To
avoid
injury,
never
place
cutter
assembly
or
Disc
on
Base
without
first
havi
ng put
Bowl
property
in
place.
*
Always
operate
Food
Processor
with
Cover
correctly
in
place.
Do
not
attemr tu
defeat
the
Cover
interlock
system.
,,
*
Keep
hands
and
utensils
out
of
container
while
operating
appliance
to
preveirt
.he
possibility
of
severe
personal
injury
and/or
damage
to
the
Food
Processor. A rub
bt:t
scraper
may
be
used
but
must
be
used
only
when
the
Food
Processor
is
not runnmg
.
*
Handle
the
sharp
Knife
Blade
and
Reversible
Disc
carefully
to
avoid cuts
and
injuries.
When
han~
ling
Knife
Blade,
always
grasp
by
center
plastic
hub.
Always remove
Knife
Blade
before
removing
processed
food
from
Bowl
or
reaching
into
Bowl
with
hand
.
*
This
appliance
is
intended
for
home
use
ONlY
and
not
for
commercial
or industria
l
use.
*
Do
not
process
hot
liquids.
*
Never
exceed
Fill
Level
on
Bowl
when
using
Knife
Blade
or
Reversible
Disc.
*
Do
not
place
on
or
near a hot
gas
or
electric
burner.
*
To
disconnec~
grip
plug
and
pull
from
wall
outlet
Never
yank
on cord.
*
Make
sure
motor, Disc
and/or
Knife
Blade
has
stopped
completely
before removing
Cover.
*
Always
use
ON/Off
switch
or
PULSE-Oft
switch
to
operate
applia
nce.
Never
use
Cover Rel
ease
Knob
to
turn
unit
OFF
since
this
will
allow
the
applian
ce
to
turn
ON
unexpectedly
when
Cover
is
again
put
in
place.
*
Never
leave
room
while
appliance
is
operating.
*
This
appliance
should
be
used
for
its
intended
use
as
described
in this U
se
and
care
Book.
*
Do
not
operate
this
appliance
in
the
presence
of
explosive
and/or
fla
mmable
fumes
or
use
it
to
mix
flammable
materials
.
3
Page 4
4
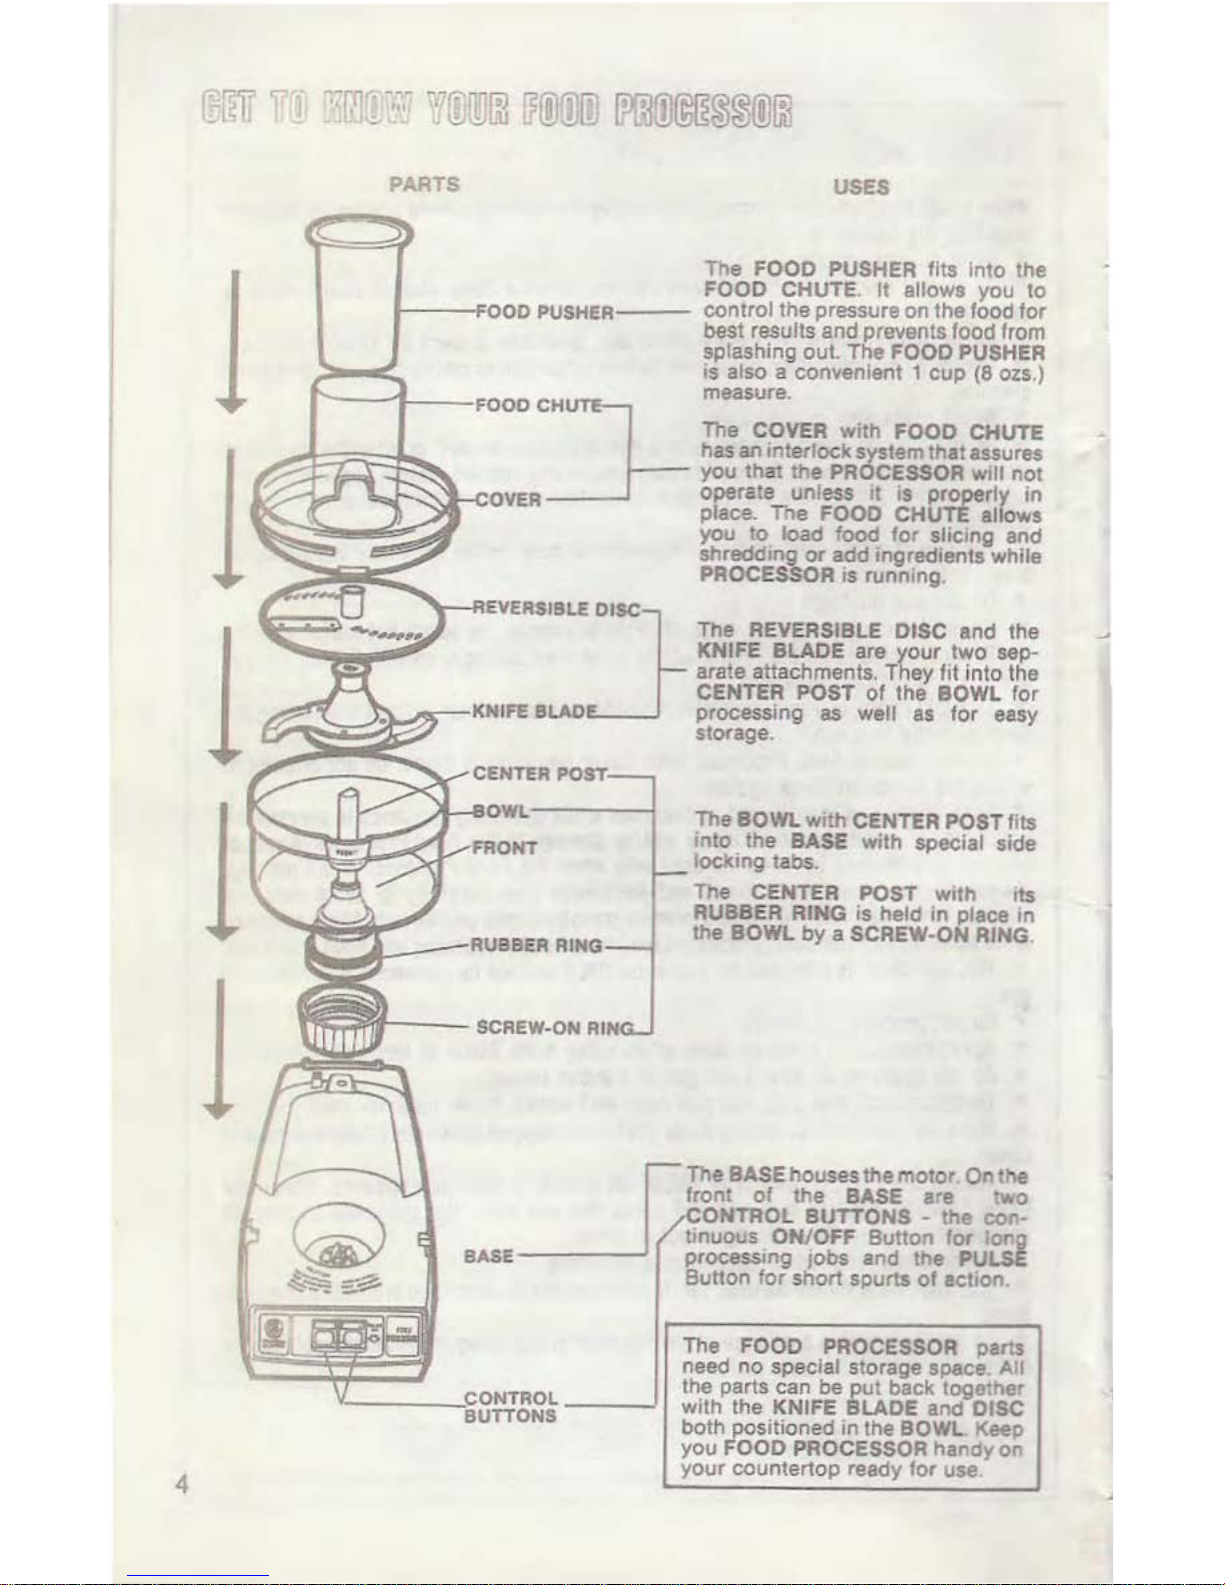
PARTS
USES
The FOOD PUSHER
fits Into the
FOOD CHUTE.
It
allows you to
---f'OOD
PUSHER---
control
the
pressure on
the
food
for
best results and prevents food from
splashing
out
The FOOD PUSHER
is
also a convenient 1
cup
(8 ozs.)
measure.
The COVER
with
FOOD CHUTE
has
an
tnterlock system that assures
you that
the PROCESSOR will not
FOOD
C:J-UT£
OVER operate unless
1t
1s
property
in
place.
rne
FOOD CHUTE allows
you to load food
for
slicong and
shredding
or
add ingredients while
PROCESSOR
IS running.
The
REVERSIBLE DISC and the
KNIFE BLADE are your two sep-
arate attachments. They
fit
into the
CENTER
POST
of
the BOWL for
EVERSIBL£]-ISC
KNIFE BLAD processing
as
well
as
for easy
storage.
The
BOWl.
with
CENTER POST fits
into the
BASE with special side
lOCking
tabs.
The CENTER POST With
1ts
RUBBER RING is held in place 10
the BOWL
by
a SCREW-ON RING
The BASE
houses the
motor
On
t.,e
front
of
the BASE are two
CONTROL
BUTTONS • the
con-
tinuous ON/OFF Button
lor
lon
BASE processmg
JObs
and the
PULS~
Button for short spurts
of
action .
v-------~CONTROL
___
~
BUTTONS
The FOOD PROCESSOR parts
need
no
special storage space. All
the parts can be put back together
with the
KNIFE BLADE and DISC
both positioned
in
lhe BOWL Keep
you FOOD PROCESSOR handy on
your
countertop ready for use
Page 5
;
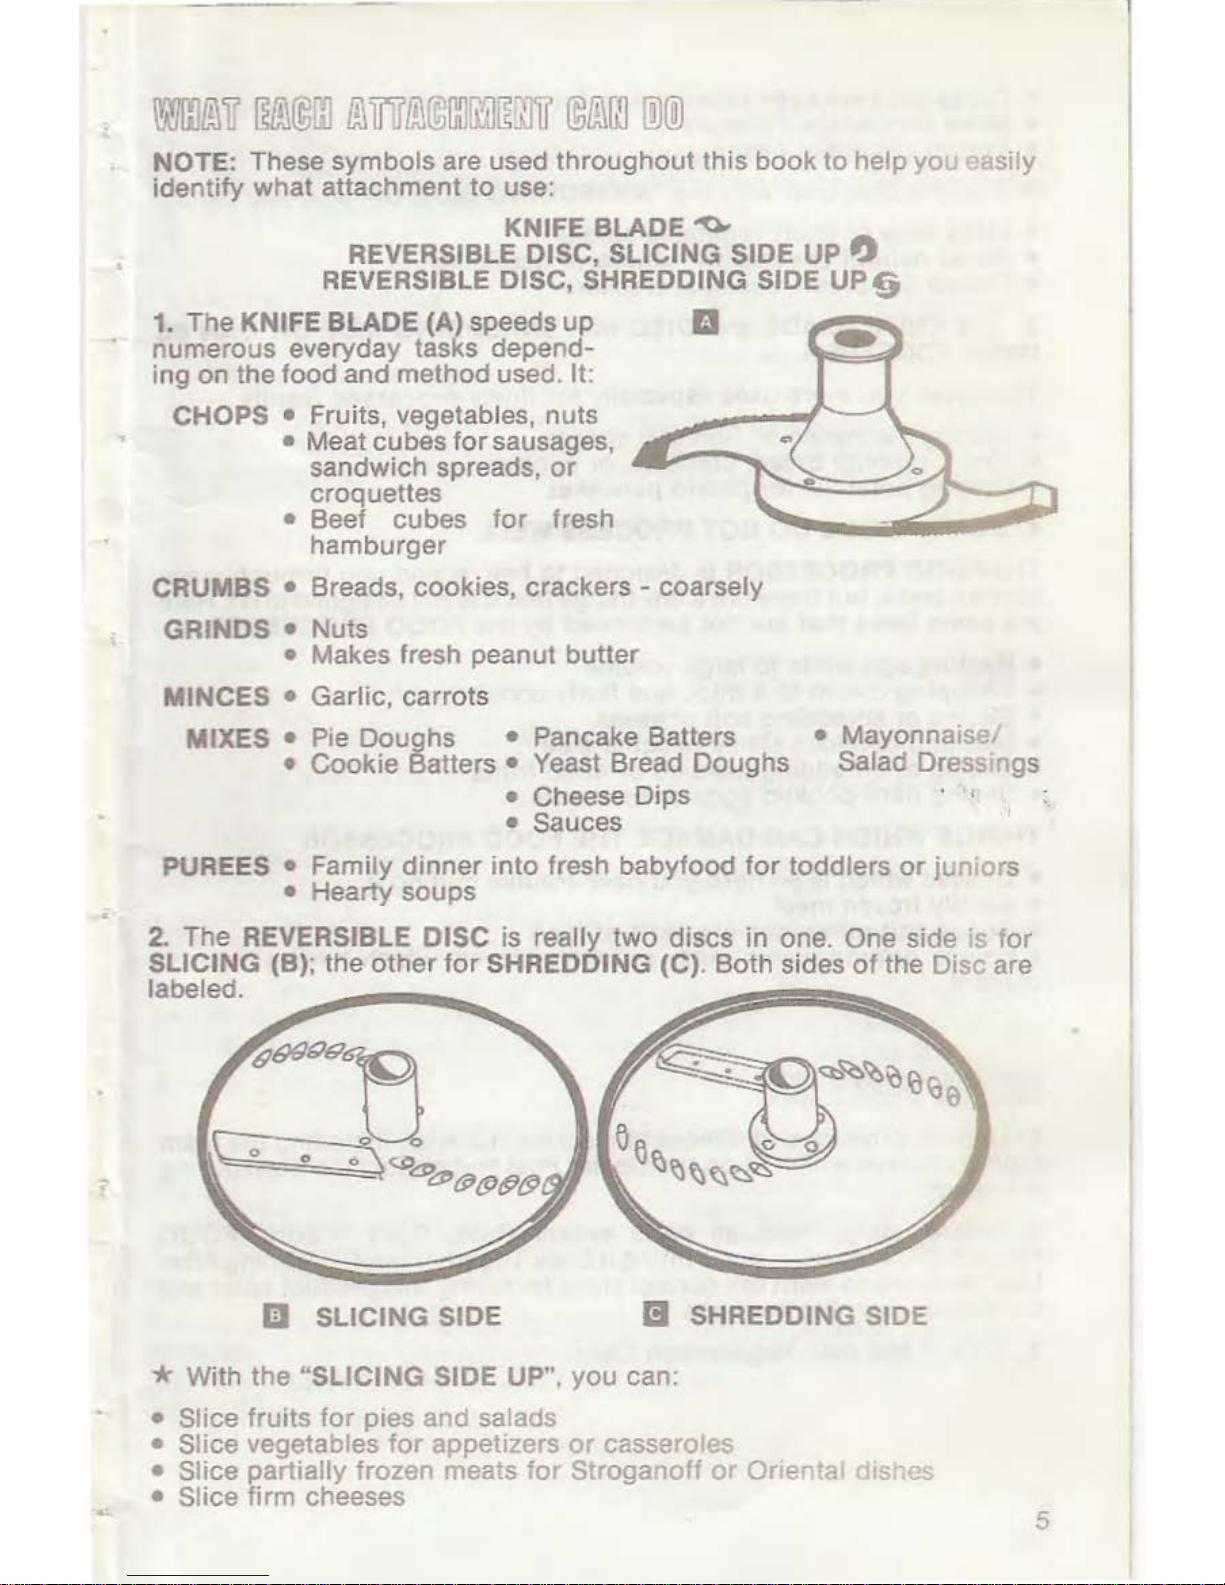
NOTE: These symbols are used throughout this
book
to help you easily
identify what attachment
to
use:
KNIFE BLADE
~
REVERSIBLE DISC, SLICING SIDE UP ~
REVERSIBLE DISC, SHREDDING SIDE
UP§
1. The KNIFE BLADE (A) speeds
up
E1
numerous everyday tasks depending on the food and method used.
It:
CHOPS •
Fruits, vegetables, nuts
• Meat cubes
for
sausages,
sandwich spreads,
or
croquettes
• Beef cubes
for
fresh
hamburger
CRUMBS • Breads, cookies, crackers - coarsely
GRINDS •
Nuts
• Makes fresh peanut butter
MINCES • Garlic, carrots
MIXES •
P1e
Doughs • Pancake Batters
• Cookie Batters • Yeast Bread Doughs
• Mayonna
ise/
Salad Dressings
• Cheese Dips
. '
• Sauces
PUREES •
Family
dinner
into
fresh babyfood
for
toddlers
or
j1..1n
lor
s
•
Hearty soups
2.
The REVERSIBLE DISC is really two discs in one. One side is
for
SLICING (B); the
other
for
SHREDDING (C). Both sides
of
the Disc are
labeled.
I]
SLICING SIDE
lJ
SHREDDING SIDE
* With the "SLICING SIDE UP", you can:
• Slice fruits
for
pies and salads
• Slice vegetables
for
appetizers
or
casseroles
• Slice partially frozen meats
for
Stroganoff
or
Onental diShes
• Slice
firm cheeses
5
Page 6
• Cross-cut packaged s
lic
ed
meats
for
Chef
Salad
• Make
Matchst
ck
Potatoes
• French
cut
green beans
* Fl p t e
D1sc
over
with
the "SHREDDING
SIDE
UP"
and
you
can:
• Make
long
or short
vegetable s ·eds
•
Sh
ed natural cheeses
for
sauces
or
garnishes
•
Crumb
dry
bread cookies , crackers
3. T e
KNIFE
BLADE
and
DISC
with
SHREDDING SIDE UP.
CAN
BE
USED TOGETHER.
es
you
more uses especially
for
finely processed results.
Parmesan
or
Romano cheese
b ng bread, crackers,
or
cookies
t
oes
for
potato
pancakes
FOODS
DO
NOT
PROCESS WELL
OCESSOR s
oes
gned
to
he p
speed
you
through
many
re
are
a
fe'fli
t-
gs
that
t
lS
no• des
gned
to do. Here
re
perlormed
by
the
FOOD
PROCESSOR.
• to -
..
ge
vo
ume
•
cream
o a
ck
and f uffy
consiStency
"lQ
or
s redo
ng_
soft
cheeses
• ll,...,_ ...
,
~g
pota·oes
(They
become g uey)
•
54
c
n~
or
shredding
candied
or
dried
fruits
• Sl c ng
hard-cooked
eggs
or
hard
nuts
THINGS
WHICH
CAN
DAMAGE
THE
FOOD
PROCESSOR
• Cheese
which
Is
so
hard
you
have
trouble
cutting
it
• Sol id ly frozen meat
•
Bone
s and
other
inedible
parts
of
food
•
Sp1ces
ground
alone, such
as
whole
cloves,
which
have a
high
oil
content
1. Unpack
product
and
remove all packing material,
including
the
foam
rubbe
sauares
which
fit
on
the
Center Post and
protect
the Bowl
during
sh p e t
2.
Be
ore u
sing
, wash
all
parts
except
Base. Read
"Taking
FOOD
PROCESSOR
apart .
..
and Puttmg
it
Back
Together"
and "Cleaning
After
Use' sections to Jearn
the
correct
steps
for
tal<
ng this
product
apart and
the p
oper cleani
ng
methods
.
3. Fi
out
and
mail
Regi
strat
on
Card
6
Page 7

M2i:e
Sll~e
the
FOOD
PROCESSOR is
not
pluggeo
in ana
the
OFF
Button
s
....,
iJ?
position
before
taking
apart
or
putting
pans
toget
her.
Food Processor Bowl
•
-:u
Bowl
apart
by
twisting Screw-On Ring in
counterclockwise
.,...
, d
rection
(D)
until
it
comes
off
Bowl.
•
Push
Center
Post
out
from
bottom
of
Bowl. Note position
of
rubber
ring
- -•.z over the
Center
Post (E). Be sure
to
always replace
rubber
ring
c.::·,.ectly.
II
WRONG
WAY
7
Page 8

LATCHING
SLOT
LOCKING
TABS
FLUTED
DRIVE
WHEEL
CONTROL BUTTONS
NOTE:
If
Bowl does
not
imme-
diately
drop
down, made sure
unit
is unplugged,
lift
off
and slightly
turn
Fluted Drive Wheel
in
center
of
Round Well
by
hand (G).
Replace
Bowl.
It
should
drop
down easily
with
only
a slight
turning
motion. Make sure Bowl is
seated and
firmly
in place before
using appliance.
8
t
Bow
together.
pos1t1on
ng
over Center Post -
1t
s o
ne
er
be placed in the
Sc -On Rmg (E). Fit Cente
ost, with rubber ring
in
place,
t1
rough openmg m bottom
of
Bowl. Attach Screw-On Ring
(D)
by
turning
m clockwise
(~)
d1rection. Tighten securely,
out
do
not
overtighten.
* To attach Bowl
to
Base, hold
bowl
with
"FRONr
facing you
(F). Set Screw-On Ring section
of
Bowl
into
Round Well area
of
Base. Rotate Bowl until Locking
Tabs
on
bottom
of
Bowl
drop
down
into
Locking Holes in Base.
Twist
Bowl
clock
ise <rl> as
far as
1t
will go. Be certain both
Lockmg Tabs
drop
down
into
place.
Page 9

2. Knife Blade
~
* Grasp Knife Blade
by
center
hub
(H). With blade-side
down
line
up
flat
side
of
center
hub
with
flat
side
of
Center Post
and
lower Knife Blade
to
bottom
of
Bowl.
m
3. Reversible Disc § '1
CENTER HUB
WITH OPENING
a
*
Th
is Disc will slice
or
shred depending on
which
side is facing up.
* Grasp Reversible Disc
by
center
hub
(I)
and
turn
so desired side (eith
er
slicing
or
shredding) is facing upward.
* Position opening in center hub
of
Reversible
Disc
over Center Post
of
Bowl
(1).
(Note that
flat
side
of
center
hub
on side
of
Disc facing upward is
always oppos i
te
flat
side
of
Center Post.)
* Rotate Disc
until
it
slides down Center Post
into
place-
abo
ut
1 inch
dow
n.
NOTE: Remember
to
remove Knife Blade before using Reversible Disc,
unless
both
attachments are
to
be used together.
4. Food Processor Cover
For
your
protection,
this
appliance has a
cover interlock
system The
cover must be
correctly
in place before
the
Food Processor
will
operate.
DO
NOT
ATTEMPT
TO
OPERATE
WITHOUT
THE FOOD
PROCESSOR COVER CORRECTLY
IN
PLACE.
9
Page 10

L
*
Hold
Cover
by
Fooa
Chute
with
Latching
Tab
facmg
you
{J). The Food
Chute
can
be
used as a handle
*
Tilt
front
edge
of
Cover
downward
and
fit
Latching
Tab
mto
Slot at
top
of
Bowl
(J). Be
sure
Tab
fits
into
Slot.
FOOD
CHUTE
COVER
LATCHING
SLOT
TILT
COVER
DOWNWARD
PIN
OPENING
a·
* L
1wer
back
of
Cover
to
allow
Latch Pin
to
fit
into
Pin Opening at
top
of
Base (K).
* Press Latch Pin
down
into
Pin
Opening
until
it
clicks
into
place.
*
T·
remove
the
Cover.
shut
Food Processor OFF
and
make
sure
Disc
and/or
Knife Blade has stopped rotating. Press
Cover
Release Knob
to
the
r
ght~(L)
and
lift
off
Cover.
a
5. Food Pusher
* Insert Food Pusher
into
Food
Chute
and
lower
mto
place (M). Always use Food Push-
er
to
guide
food
through
Reversible Disc
during
shredding
or
slicing, and
to
prevent
spattering
out
of
Food
Chute
when proces-
sing
with
Knife Blade.
10
m
.;
.
Page 11
NOTE: The open Food Pusher holds slightly more than 1 cup. There
1s
a
line
on
the inside
of
the Pusher to mark a 1 cup
(8
ozs.) level (M). Use
1t,
if
desired, when adding
liq
uid ingredients
during
pro
cessing.
For
your
convenience, there are two Control Buttons on the front
of
the
Base (N).
m
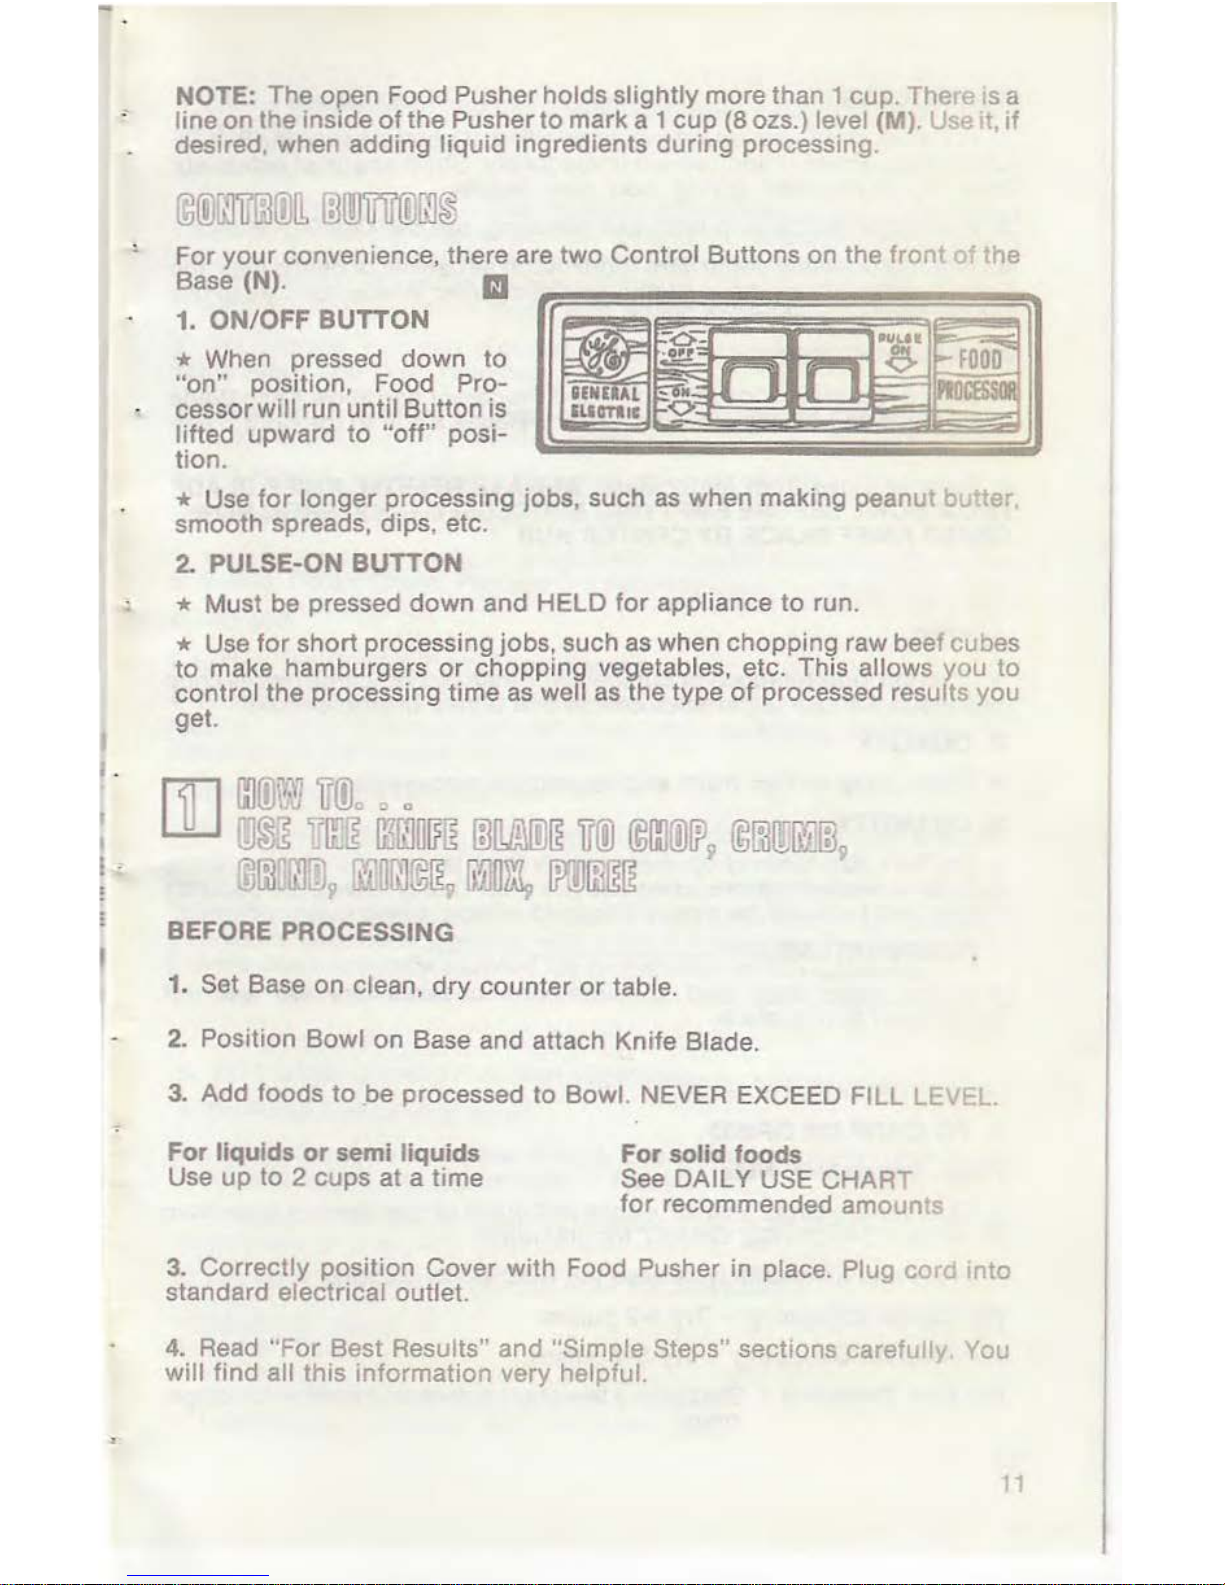
1. ON/OFF
BUTTON
* When pressed down to
"on"
position, Food Processorwill run until Button is
lifted upward
to
"off"
posi-
tion.
~
111~.1:::
~119
8ENUAL
uam•c
-.c;:
·~~
·
0~;
...
FOOD
=
ln.
lr1
;m
r--
~~~
0'
* Use
for
longer
processing jobs, such
as
when making pea
nut
butter,
smooth spreads, dips, etc.
2. PULSE-ON
BUTTON
* Must be pressed down and HELD
for
appliance
to
run .
* Use
for
short processing jobs, such as when chopping raw beef cubes
to
make hamburgers
or
chopping vegetables, etc. This allows you to
control the processing
time
as well
as
the type
of
processed results you
get.
[[)
l:J(0~9
tJffic
_ a
rJJ@~
um1
rnr11~~~
r;J~~
rroo
@!IlOOfP9
©rn~!)it;J~
OO!itw:IJlp
!Plflr.~~~g
fi~O~
lffillill~
BEFORE PROCESSING
1. Set Base on clean,
dry
counter
or
table.
2.
Position Bowl
on
Base and attach Knife Blade.
3.
Add foods
to
be processed to Bowl. NEVER EXCEED FILL LEVEL.
For
liquids
or
semi
liquids
Use
up
to 2 cups at a
time
For
solid
foods
See DAILY USE CH ART
for
recommended amounts
3.
Correctly position Cover
wit
h Food Pusher in place. Plug
cord
into
standard electrica l outlet.
4.
Read
"For Best Results" and "Simple Steps" sections carefully. You
will fin d all this information very helpful.
11
Page 12

TO
PROCESS
1. For most chopping, crumbing,
or
grinding, it's better
to
use the PULSE
ON
Button. Press
1t
and release immediately. Short spurts
of
action
stir
food
as
1t
IS chopped, giving more even results.
2. For longer processing jobs. like pureeing, use the ON/OFF Button.
3. When processing some hard foods, such
as
carrots
or
beef cubes, the
Food Processor may move slightly on the counter. Always be sure to use
recommended processing loads.
AFTER
PROCESSING
1.
After
proc
essing food, shut
off
Food Processor and allow Knife Blade
to stop rotating before pressing
Cover Release Knob
to
the right. Then
remove Cover.
2. Remove Bowl from Motor Base. ALWAYS REMOVE KNIFE BLADE
FROM BOWL BEFORE EMPTYING PROCESSED FOOD FROM BOWL.
GRASP KNIFE BLADE BY CENTER HUB.
[
1. SIZE
*
To
chop, quarter foods
or
cut
them in 1-inch pieces. Large pieces chop
unevenly, with some particles coarse and others overprocessed.
2. QUALITY
* Fresh,
crisp
or
firm
fruits and vegetables process best.
3.
QUANTITY
* Medium size loads
chop
more evenly than large ones.
If
your
recipe
calls
for
4 medium onions, chop
two
at a time. It
only
takes a few seconds
longer and food
will be evenly chopped
without
being overprocessed.
4. TEMPERATURE
*
F,..u1ts,
vegetables and medium-hard cheeses process best at
refngerator temperature.
1.
TO CHOP
OR
GRIND
Fruits, Vegetables. Nuts
*
C;.~t
food
no
larger than 1" cubes and place recommended amount in
Bowl (see DAILY USE CHART
for
amounts).
* Press and immediately release the PULSE ON Button.
For Coarse Chopping -
Try
1-2 pulses.
For Medium Chopping -
Try
3-4 pulses.
For
Fine Chopping - Start with a few short pulses and finish with longer
ones.
12
Page 13

* Check results often and use a spatula
to
scrape
down
sides
of Bowl
if
necessary.
Uncooked
Meat
Food
Processors
CHOP
rather than GRIND uncooked meat. sue las beef
for
fresh hamburger.
The
result
with
the
Food Processor is fine
I)' ·hopp
ed
meat
for
patties, sausages,
or
meat loaf. Uncooked meat
chopp
ed m th
e
Food
Processor is used in the same dishes as the
ground
meat
you
b..ry
in
the supermarket,
which
is made
with
a Meat Grinder.
2. TO CRUMB, coarsely (For
fine
crumbs, see section
on
"How
To
Use
Knife Blade and Disc
Together".)
* Break
up
to
4 slices
of
fresh bread
into
quarters and
p1acP
ir
Bowl.
Process
by
Pulsing
to
desired fineness.
3.
TO
MINCE
garlic
cloves,
1"
pieces
onion
or
carrots
* Use well
dried
Bowl
for
best results.
* With Processor running,
drop
up
to
4-5 pieces
through
Food
Chu
te one
at
a time. Cover Chute. Process 3-5 seconds.
4.
TO
MIX
Cookies, Pie
Dough,
Party Dips, Sauces
* Follow the recipes
found
in this
book
or
adapt
your
own
fav
orite
recipes
to
the
Processor
by
combining
and
processing ingredients
as
described in the recipes in
this
book.
Pancake
Batters, Crepe Batters
* Add
dry
ingredients
to
Bowl, then
the
liquids. Process until smooth.
NOTE: Use
only
Yeast Bread recipes in
this
book
and in
the
General
Electric
Cookbook,Cooking
with a Food
Processor.
These
recipes
have been
specially adapted
for
preparation in
this
appliance.
5.
TO
PUREE
Cooked
Fruit
and Vegetables
* Drain food, reserving liquid.
* Add
to
Bowl
1/2
to
3 cups
of
food. and
1/4
cup
liquid
for each
cup
of
food.
Add
butter
and seasonings,
if
des~red.
* Process
to
desired consistency.
If
necessary,
stop
Processor
to scrape
down
sides
of
Bowl
with
spatula.
6.
DO
NOT
USE KNIFE BLADE FOR PROCESSING:
•
Marshmallows
• Frozen Meat
• Ice
Cubes
• Spices
with
high
oil
conten such as cloves
• Inedible parts
of
foods,
such
as
bones, pits
13
Page 14

BEFORE PROCESSING .
..
1. Set Base on clean,
dry
counter
or
table.
2. Posit1on Bowl
on
Base and attach Disc, desired side
up
3. Correctly position Cover. Plug
cord
into
standard electric outlet.
4. Read the
"For
Best Results" and "Helpful Hints" sections carefully.
You will find all the information very helpful.
TO
PRO CESS
1. Fill Fo
od
Chute
with
food and position Food Pusher on top
of
the food.
2.
Press Food Processor
ON
or
PULSE Button and gently guide food
through Disc w
it
h Food Pusher.
AFTER PROCESSING
1.
Aft
er
processing food, shut
off
Food Processor, and allow Disc to stop
rotati ng before pressing
Cover Release Knob
to
th~
right. Then
remove
Cover.
2.
Rem
ove Disc and
empty
sliced
or
shredded
food
rom Bowl.
3. When processi
ng
large quantities, be sure
to
emptr
Bowl when
processed food reaches
FILL
LEVEL
in
any section o the Bowl.
If
overfille
d,
processed food may interfere
with
Disc rotation and cause
hub
of
Disc to rise
up
and
rub
against inside
of
Cover
:hS<!"II
~ I ~F.
mi.
•
1. TEM PERATURE
*
Fru1ts
veg
etables and medium-hard cheeses should be processed
at
refrigerator temperature
* Grate Parmesan and Romano cheese at room temperature.
*
To
slice raw meat. it should be partially frozen, firm
but
not
solid.
2.
SIZE
* Foods
that
are too large
for
the Food Chute must be
cut
to
fit.
Try
to
buy
foods that fit the Chute whole
(0)
.
*
Cut
long foods
into
5" lengths
for
slicing
or
shredding.
14
Page 15

FOOD CHUTE
m
3.
QUALITY
* Fresh, crisp
or
firm
fruits and vegetables process bes
t.
That
doesn t
mean you can't use up an
old
carrot
or
limp piece
of
celery, but
you
should
not
expect the same results
as
with
fresh produce.
~OOUll.OOW
'!rul~~~
:fllli[JIWJ6
ill{l[lf~
1.
LOADING OF FOOD CHUTE
* When
pr
ocessing long
narrow
foods, pack Chute so food will stand
upright,
by
alternati
ng
thick and thin ends (P).
*
To
process a single food, position
it
on
the left side
of
the Chute (OFF
Button side). Hold
it
in place with the Pusher. The clockwise rota
tion
of
t
he
Disc pushes the food against the left wall
of
the Chute, which helps
to
hold food upright.
* For long shreds or slices, arrange 2 1/2 inch food pieces
ho
rlzontal!y in
the Chute. These are attractive in salads, Oriental dishes and vegetable
dips
(Q).
* For
foods
that
don't
seem to
fit
the Chute, try loading Chute froM the
bottom when slicing. Bottom
of
Chute is
slight
ly larger than the top,
so
food which
won
't f
it
the top may
fit
the bottom. For neater slices -.;uta
sr.
1all slice
off
one end
of
food so
it
rests flat on Disc.
* Place small foods,
or
short pieces, which will stand upri
ght
directly
on
the Disc to simplify arrangement. Then carefully position Food Chute
over them and slice.
2.
USING THE FOOD PUSHER
* Position food in the
Chute
and hold Food Pusher over the food before
turning Processor on.
* The amo
un
t of pressure you should app
ly
on the Pusher varies
depending
on
the firmness
of
the food you are slicing
or
shredding and
th
e results desired. For most foods, steady, even pressure is needed.
Press d
own
lightly
on food
with
Food Pusher. Let the Food Processor
do
the work. HEAVY PRESSURE WILL
NOT
SPEED UP processi11g.
15
Page 16

* Use firm pressure on
ne
Food Pusher
for
hard foods, such as lemons.
Alw
ays
be
sure to position the Pusher before starting
to
process
* Light pressure should be used
for
soft
foods, such as strawberries.
Cuc
umbers and potatoes wi
ll
self-feed
without
pressure for thinner. but
slig
htly
irregular pieces.
* W
ith
some foods, such as hard
or
medium-hard cheeses, use a press
dow
n, then release
motion
with
the Food Pusher instead
of
constant
press
ur
e.
*
To
slice partia lly frozen meat, use firm pressure on Pusher. Result is
thi
nl
y sliced meat
for
casseroles and stir-fries.
1J'l."€."
·...
~
<:.
~mJJ11!lill.
'.ill@!IDJDOC
1 1
1.
TO SLICE UNCOOKED MEAT
* Spread boned meat
on
cookie sheet and place in freezer until partially
frozen (firm,
but
not
solid).
* When using
thick
pieces
of
beef
or
pork,
cut
to
fit
Food Chute.
* When using
thin
flat pieces
of
chicken, roll
up
to
size
of
Food Chute
before freezing.
* Position Disc in Bowl
with
Slicing Side Up. Insert meat through bottom
of
Chute. Pack
firmly
for
best results. Slice using firm pressure.
2.
TO
JULIENNE OR MATCHSTICK SLICE
Potatoes, Cucumbers, Eggplant
* S
li
ce vegetables
using
firm pressure. TURN
UNIT
OFF. Remove slices
fro
m Bowl. Reposition Disc with
Slicing
Side Up.
* H
old
Cover sideways with Food Pusher inserted part way
to
act
as
a
sto
pper
(R).
* Stack enough slices together so you can wedge slices
tightly
into
bottom of Chute with
cut
surfaces side
to
side across the bottom
of
the
Chute
(R).
* Carefully place Cover
on
Bowl
holding
slices
in
position. TURN
UNIT
ON
again to slice. Repeat procedure
with
remaining slices.
Ca
rrots
* S tee
lar
ge, fat
car
rots. horizont
ally
for
long s.lices. TURN
UNIT
C?FF.
Stack slices and wedge m bottom
of
Chute honzontally (S). Reposition
disc
with Slicing Side Up. Carefully position Cover on Bowl. TURN
UNIT
ON to slice again. Repeat
with
remaining slices.
16
Page 17

Packaged Meats, Cross-Cut
* Position Discs in Bowl with Slicmg
S1de
Up.
* Stack several slices
of
boiled ham, bologna, soft (not hard) sala
mi
or
other lunch meat. (An 8 oz. package works best.) Roll
up
or fold ov
er
stack.
* Wedge roll
up
the bottom
of
Food Chute (T). Place Cover
on
Bowl a
nd
slice meat. Use in chef salad, sandwich spreads
or
soups.
3.
TO
FRENCH
CUT
SNAP BEANS
* Trim
off
ends and
cut
beans in 2
1/2
inch lengths.
* Beans may be blanched five minutes before slicing, then briefly cooked
before serving.
* Position Disc in Bowl with Slicing Side Up. Stack beans
hor
izontally 1n
Food Chute, using a spatula
to
help arrange them. Slice using light
pressure.
4.
TO
CRUMB
Fresh Bread, Finely
* Position Disc in
Bowl
with
Shredding Side Up.
* Fold 1
or
2 slices
of
fresh bread in
half
and place in Food Chute
* Using
light
pressure on Food Pusher, shred
17
Page 18

BEFORE PROCESSING
I
v·
~J~ r i"~D~Plurf~(ij
l111~.1m.
J~m
m · ~~mJ
~
rm
1. Set Base
on
clean,
dry
counter
or
table.
2. Position Bowl
on
Base and position
Knife Blade.
Position Disc. Shredding
Side Up over Knife Balde
(U).
3. Correctly position Cover on Bowl. Place
food in Food Chute
with
Food Pusher in
place on
top
of
it.
4. Plug cord
in
standard electrical outlet.
TO
PROCESS
1. Process using
the
PULSE ON
or
ON/OFF Control Button.
AFTER
PROCESSING
1!1
1.
After processing food, shut
off
Food Processor and allow Knife Blade
and Disc to
stop
rotating before pressing Cover Release Knob. Then
remove Cover.
2. Remove Bowl from
Motor
8ase. ALWAYS REMOVE DISC AND KNIFE
BLADE
FROM BOWL BEFORE EMPTYING PROCESSED FOOD FROM
BOWL. GRASP DISC
AND KNIFE BLADE FROM CENTER HUB.
1.
TO
GRATE Parmesan
or
Romano Cheese
* Position Knife Blade in
Bowl
with
Disc above it, Shredding Side Up.
* Cut room temperature cheese
to
fit Food Chute.
If
you can't insert a
knife point in cheese, it's too hard to process.
* Place cheese in Chute. Use
only
light
pressure with the Food Pusher.
* Process
to
desired fineness.
2.
TO FINE CRUMB
Dry
Bread, Crackers, Cookies
* Position Knife Blade in Bowl
with
Disc above it, Shredding Side Up.
* Pack food in Chute.
* Using
light
pressure, process
to
desired fineness.
18
Page 19

ffil!l~~IOW@
f!\ffl1rnm
rnr~
1. Always
unplug
from electrical outlet before cleaning.
2.
Whenever possible, rinse
off
parts immediately
to
make clean-up
easier.
3.
Wipe Base with damp cloth when necessary. Remove stubborn spots
by
rubbing with damp cloth and mild, non-abrasive cleanser. Dry with
clean soft cloth.
DO
NOT
IMMERSE MOTOR BASE IN ANY LIQUID.
4.
The Bowl should be taken apart
for
thorough
cleaning after use
at
the
end
of
each meal preparation session. See "Taking FOOD PROCESSOR
Apart"
section.
NOTE: Sometimes the Screw-On Ring may become overly tights;
ted
and
will
not
readily twist
off
the Food Processor.
If
this
happens. post ion the
Screw-On Ring portion under
hot
running water
for
15-20seconn
s.
Then
wrap a dishtowel around
Screw-On Ring and
turn
countercl ockwise
(....,)
to
loosen. Repeat
if
necessary.
5.
Except
tor
the Center Post. rubber ring, and,
of
course. the Base, all
remaining FOOD PROCESSOR parts may be washed in a dish washer.
* The Food Pusher and Screw-On Ring should be placed
on
the
dishwasher rack that is furthest away from heating element. Positton
these parts carefully, making sure they
will
not
fall through the rack
during
washing.
* The Knife Blade and Reversible Disc should also be placed
on
the
upper rack
of
the
dishwasher-
not
in
or
near the silverware basket since
someone could acctdentally
cut
their
hand when removing silverware.
6.
ALL FOOD PROCESSOR
parts-
except
Base-
may be washed by
hand using hot. sudsy water.
If
necessary, use a
nylon
bristle
brusr
when
hand washing to clean
all parts
of
Bowl and Food Chute.
7.
The Center Post and rubber ring must be washed by hand in hot, sudsy
water
- never
in
the dishwasher since the high dishwasher heat could
damage these parts.
8.
Use a nylon bristle brush to prevent cutting yourself when washmg the
Knife Blade and Reversible Disc by hand. Rinse and
dry
the· P parts
carefully.
9.
For
proper
care
of
FOOD PROCESSOR
a.
DO NOT use rough scouring pads
or
cleansers on any plastic
or
metal
parts.
b.
DO
NOT
fill Bowl with boiling
water
or
put
any
of
the parts in boiling
water.
c.
DO
NOT
allow Knife Blade
or
Disc to soak in water
for
long penods
of
time.
d.
DO
NOT
attempt
to
sharpen cutting edges - it is
not
necessary
10. Other than cleaning steps listed in this book.
no
additional
t"lome
maintenance is required. Repairs must be handled by an autnorized
service facility.
19
Page 20

Think
of
your
Food Processor as a cou ntertop appliance. Keep
it
handy,
ready
for
use After cleaning,
put
it
back together
with
the Knife Blade and
Revers ble Disc in the Bowl.
Remember
to:
* Remove c
ord
from outlet when not
in
use.
* Coil cord in large loops
or
wrap around Base.
@li
®~~~~
For
expan
ded,
step-by-step
hints,
tips
and
recipes
for
using the
G.E.
Food Processor, you may want
to
order a
copy
of
our
cookbook,
Cooking
with
a F
ood
Processor.
It
contains over 200 easy-to-read, tested rectpes
and over 350
color
photographs.
To purcha
se
this cookbook , use the enclosed return ma
iler
or
write to:
General Electric Company
Housewares Product
Service
P.O.
Box
861
Bridgeport,
CT
06602
Enclose a check or money order payable
to
the General Electric
CoMpan
y.
Include $7.95
for
each copy
of
the
cookbook
, plus $ .75 for
postage
or
handling, and , where applicable, state and local tax. Allow 2-4
y•eeks
for
delivery.
20
Page 21

IIDL~D~
W
mJ®rn
®:~&11lli'if
SEE
PROCESS/ "HOW
TO"
FOOD ATTACHMENT SECTION
SPEC
IAL
INSTRUCTIONS
Apples Chopped
~
Peel
if
desired. Quarter core.
Add
up
to
one
cup
at a time.
Sliced
I)
72
Stack quarters horizontally
Use firm pressure.
Artichokes,
Sliced
I)
g
Peel before slicing. lJse
wrote
Jerusalem
if
small
or
cut
to
fit chute
Asparagus,
Sliced
I)
~
Cut
crosswise
in
thirds. Place
fresh
upright
in
chute. Use
firr"
pressure.
Avocado
Sliced
I)
~
Pit; quarter: core. Arrangfl
quarters back
to
back i chute,
alternating thick and
thir
ends.
~
Use firm pressure.
Baby
Food Pureed
~
Results are best
for
toddlers
or
juniors.
Bananas
Mashed
~
~
Use ripe fruit. Peel;
cut
in 1 mch
pieces. Process
up
to
3 bananas
at
a time.
Sliced
I)
~
Peel. cut in half. Place wrth cut
side against Disc. Use
light
pressur
e.
Beans, Snap
French
Cut
I)
?;
t;)
Beets Sliced
I)
&
Cook
whole with
2"
top and
root
left
on. Cool: trim; remove
skins. Cut
to
fit
Chute.
Bread Fine
'tl
A
good
way
to
use
up
stale
~§
.,
Dry
Crumbed
bread.
Store crumbs
in
~
refrigerator.
Fresh
Coarsely
~
Process
up
to
4 slices at a
Crumbed
time.
Cabbage Chopped
~
1!
Core; cut
in
1"
pieces.
Add
up
to
2 handfuls
at
a time.
Shredded.
I)
~
Cut
in
pieces
to
tit
chute Use
Coarse
(ij
light
pressure. Use coarse
Fine
~
shreds for cole slaw. soups.
Carrots Chopped
~
1 Peel:
cut
in 1" lengths. Add
up
to
2 cups
at
a time.
Sliced Round
I)
l2
For best results. slice
mor~
than
Long
Sliced
one
stalk
at
a time.
Julienne
Sliced
Shredded , Short
§
~:
Position stand
ing
up
in Chute.
Shredded, Long
~
Arrange 2 112" lengths srdeways t
in Chute.
Cauliflower
Sliced
I)
Q
Divide into flowerets. Arrange
in Chute alternating heads and
stems. Wedge large pieces
up
into bottom
of
Chute. Use
crumbled pieces
m soups and
salads.
Celery
Sliced
I)
Remove strings. r:or best results.
slice more than 1 stalk
111
a ume.
If
base
of
stalk is very
w1de,
slit
lengthwise 1
or
2 inches.
21
Page 22

SEE
PROCESS/
"HOW
TO"
FOOD
ATTACHMENT
SECTION SPECIAL INSTRUCTIONS
Cheese
Harc1
Grolllld
~5
Parmesan,
If
knrfe
pomted
can'! be
Romano
inserted easrly it's
too
hard
to
process.
Bring
to
room temper-
ature
Mt::diUm
Hard
Shredded 5 Cheddar,
Process at refrrgerator
Swiss
temperature.
Soft
Feta
Crumbled~
Break
chilled
cheese rn
1"
Mozzarella,
Blue Cheese
pieces. With Processor
runnmg.
drop
up
to
hve preces
down
Chute. Process about 5
seconds
Coconut,
fresh
Shredded§
~.
Remove
brown
husk. Cut
meat
to
fit
Chute.
Grated~
't
Prepare as above.
Chocolate
Grated~
Chill
well. Process 1
cup
at a
1'
hme.
1Q-20
seconds.
Cookies, Crumbed
~5
,.
Break
up
to
fit
Crackers
Chute.
Cranbenies
Chopped~
Add
up
to
1 cup.
Cream, Thrckened
~
Add 1 cup
to bowl. Process
whipping
or
unti• thickened.
Check
after
heavy
20 seconds. Sweeten wrth 1-2
tablespoons confectioners'
~
sugar
Cucumbers
Chopped~
Peel.
if
desrred. Halve
length-
wise.
Scoop
out
seeds
if
tou~h.
Cut
rn
1~
prcccs
Add
up
to
cups
at a time.
Sliced
.,
I
Prepare as above,
cutting
to
fit
"'
Julienne
Sliced
Chute
lengthwise
.•
Shredded§
•
Prepare as above,
culling
to
fit
t!.
Chute
lengthwise Use
in
relishes. salads
and
fish
sauces.
Eggplant
Sliced.,
Peel
of
desired;
quarter
or
cut
to
fit
Chute. Slice using frrm
pressure.
Julienne.
Sliced.,
To
fry
after
slicing.
salt
and
let
stand
in
colander
to
drain
oft
excess moisture.
Egg a,
hard
cooked
Chopped~
Peel.
dry;
halve. add
up
to
6
eggs
at
a time.
F'JSh,
boned,
Chopped~
Add
up
to 2 cups
at
raw
a time.
Fruit,
Chopped~
Add
up
to
2 cups. pitted.
Add
candied,
1/2
cup
flour
per
cup
of
fruit.
dried
Remember
to
substract
the
flour
used in processing
fruit
from
amount
called
for
rn
recipe.
22
Page 23

SEE
PROCESS/ "HOW
TO"
FOOD
ATTACHMENT SECTION SPECIAL INSTRUCTIONS
Garlic.
Minced~
Glngeroot
Grated "().. §
Horseradish
Jicama
Sliced~
Shredded 9
Prepare as
for
potatoes
Lemons
Sliced. whole
~
Choose a lemon
to
I t Ci" .Jte
Slice
the top oft. Placr. ., Chute
with
cut end
on
Disc.
S ::eusing
Sliced
in
to stri ps
4!»
firm
pressure
Lettuce
DO
NOT USE
SHREDDI"'u
SIDE OF DISC. C
ut
wedges
to
fit
Chute
Limes
Sliced~
Prepare
as
for lemons
Meat
Boneless,
Sliced~
Slice meat par tially rroze'l,
Uncookod
If
meat
15
too solid, it can
pork, beef. damage Processor
chicken
Chopped
~
Cut in 1'' cubes. Add
up
to
1
cup
of
cubes at a
tJrn,.,
Boneless.
Chopped~
Cutin
1"cubes.Addup
to2
cups
Cooked,
at
a time .
Chop
coarse
ly
to
r
ham, lamb. salads. hnely
for
spreads.
beef. pork, veal
Cross-Cut'!)
Packaged meat Use in salads
or
soups.
Melon
Sliced'!)
-·
Halve and remove seeds. Cut
to
lit
Chute Slice using moderate
pressure
Mushrooms
Choppeo~§
Wash: keep stems on. Use Kmfe
Blade and Drsc together Place
5·6
mushrooms
10
Chute. Pulse
until
chopped
to
desired texture.
Sliced
4!)
Cut a th10
slice o
ff
one side
of
2
mushrooms
Place c
ut
sides
directly on Discs
10
the area
beneath the Food Chut
e;
then
cover.
Stack remai ning mus
h-
rooms
sideways in Chute. Slice
usmg
f1rm
pressure alle•nating
stems
and caps.
Nuts
Hard
Almonds.
Grou
nd~
Use
Knife
Blade. Use w.,. dned
Peanu:s Bowl.
Add up
to
2 cups
at
a time.
For best resul
ts
. process
frozen.
Very Finely
Ground~
Use Knife Blade.
Add
1 4
cup
flour f
or 1 cup
nuts. Su:Otract
fl
our
used in proccsstng from
rec1pe.
Soft
Chopped. Coarsely
4!)
Walnuts. Use Shcmg Disc. Fill Chute with
Pecans. Brazil
n~Jts.
Use 'llOderate pressure.
Chopped,
Finely~
Use
KFJife
Blade
Add
up
to 1 cup
at
a time
23
Page 24

SEE
PROCESS/
"HOW
TO~
FOOD ATTACHMENT
SECTION
SPECIAL INSTRUCTIONS
Okra
Shced
'!)
(!,
Remove ends and
cut
10
half
crosswi
se.
Place
upright
in
Chute. alternating
thick
and thin
ends. Use
in
Gumbos
or
other
Creole
d1shes.
Olives
Chopped~
~
Add
up
to 1 cup
pitted
or
stuffed.
Sliced~
l~
Arrange
p11ted
or
stuffed olives,
open end
down
on Disc,
in
area
beneath the Food Chute; then
cover.
Slice, usmg moderate
~
pressure.
Onions
Chopped~
Peel and quarter.
Cut
large ones
Wh
ite
1n
e1ghts.
Add
up
to
two
med1um
at a time. Pulse desired
size
Sliced~
i2
Peel, slice
off
ends. Use small
ones whole
for
rings
Pos11!on
on
Disc w1th root side down.
for
large onions. cut In half from
root
to
stem and
wed~e
upnght
in
Chute
. Slice using
irm
....
.
pressure
Green Onions
Chopped~
Remove roots and all but 3
Sc?l.lons inches
of
green tops Cut onions
in
1"
pieces Add
up
to
2 cups
at a lime
to
Bowl. Chopped
pieces
may
be
slightly longer
~
than hand-chopped results
Sliced~
Remove roots and
soft
parts
of
tops. Place onions upright
1n
~
Chute Pack
tightly
Oranges
Sliced~
Cut
a slice
off
one
end
of
orange
If
orange is
too
large
to
fitChu!e,
halve lengthwise
by
cutting
straight
down
through stem
Insert orange
throu~h
bottom o!
Chute
with
sliced o end
down
u
Slice using firm pressure.
Parsley
Chopped~
Wash and
dry
thoroughly.
Chopped parsley can
be
stored
covered.
10
the refrigerator
a!
least a week
Parsnips
Sliced
f.t
~
Halve crossw1se, place
upr:!9~
in
Chute with
cut
side on
DISC
Shredded§
~
Peaches
Sliced~
~
Peel: halve
and
pit
firm.
npe
peaches. Position 2 halves
1.1\
Chute. Slice using firm pressure
Sprinkle
with lemon
juice
to
pre-
~~
vent browning.
Pears
Shead'!)
Quarter and core
f1rrn
npe
pears
Arrange quarters 10 Chute
back
to
back, alternating
thick
ana
thin
ends. Sprinkle slices Will'!
lemon
JUice
to
prevent
browning.
24
Page 25

SEE
PROCESS/ "HOW
TO"
FOOD
ATTACHMENT SECTION SPECIAL INSTRUCTIONS
Pepperoni
Sliced~
~
Cut
into
3" lengths. Remove
in-
edib
le casin9. Wedge pieces
up-
right
in
Foo Chute. Slice. using
firm pressure.
Peppers
Chopped"'().
Quarter, remove tops, seeds and Sweet, Red
or
Green
pith.
Cut
quarters crosswise in
thirds.
Add' up
to
12 pieces at a
t1me
to
Bowl. Pulse to desired
size.
Sliced~
{2
Remove
top
from pepper.
If
pepper is small enough
to
lit
Food Chute, remove seeds and
pith from top. Leave
pepper
whole. Halve large peppers and
remove insides. Fit pepper into
bottom
of
Food
Chute
by gently
squeezing pepper by the sides.
u
Slice. usmg moderate pressure.
Pickles
Chopped~
Prepare as
for
cucumbers.
..
.
Sliced~
~
Pineapples,
Sliced~
:2
Remove top and
cut
mto
fresh wedl)eS
to
fit
Chute. Trim
off
nnd
. eyes and core.
Stand wedge upright in
Chute.
Slice, using
firm
Sliced~
~
pressure.
Ptantins Process as for bananas.
Potatoes
Chopped
~
Peel
if
desired; quarter:
cut
each
quarter
in
half crosswise.
If
very
large
cut
quarters into thirds.
Julienne
or
4!)
Matchst1ck
Cut
~
Shredded§
Z!
Place shreds
in
cold
water
to
prevent darkening. Drain before
~
cooking.
Dry
well for frying.
Sliced4!)
"'
Peel
if
desired. Use small
potatoes for whole slices
or
cut
,·
larger ones
to
fit
Chute
.
Pumpkin Mashed
"'().
L Peel;
cut
into
1"
pieces. Simmer
in salted
water
unt
il
tender.
Drain
well
and
process
up
to
3
cups
at
a time.
Radishes
Sliced
4!)
~~
Remove roots and tops. Add
to
Food Chute. Slice, using
Sliced
4!)
~
1
moderate pressure.
Rhubarb Process as
for
celery
Rutabagas
Shced
4!)
~
Process as f
or
potatoes.
salami, Hard
Shead
~
Process as
for
pepperon
_.,
Sausage
Shallots
Minced~
Sweet Potatoes
Mashed~
Process as
for
pumpkin.
Squash,
Butternut Mashed
"'().
Process as
tor
pu'llpki'l.
Summer
Sliced
4!)
Process as
for
zucchim.
25
Page 26

SEE
PROCESS/
"HOW TO"
FOOD
ATTACHMENT
SECTION SPECIAL INSTRUCTIONS
81rawberrles
Chopped~
Hull; halve
il
large. Add
up
to
2 cups at a
lime to Bowl.
Pulse.
Pureed~
']
Prepare
as
above. Process 10
seconds. Use
rn
fruat
topping
or
gelatin desserts.
Sliced')
{2
Hull
Arran~:~e
strawberries on
their
s1des
m Chute for length-
w1se
slices
S11ce
usrng very
light
Tomatoes
Chopped~
11
pressure
Quarter, remove
peel and seeds
if
des~red.
Add
up
to 8 quarters
at a lime
to Bowl. Use tn soup.
sauces
or
casseroles
Sliced')
4)
"'
Select tomatoes small enough to
fit Food
Chute.
Peel
if
desired;
remove stem end.
Insert tomato
through bottom
of
Chute. For
mealier slices. turn tomato on
its
side. Slice. usmg
med1um
Ptum Tomatoes
Sliced
I)
~~
pressure
Peel1f
des~red.
Cut off stem end.
(excellent
for
Wedge tomato
in
Chute and cut
slicing because side down on Disc.
Slice,
they are small
using medium pressure.
and meaty)
~~
Turnips
Sliced')
Process
as
for
potatoes.
Water
Sliced
I)
~~
Process
as
for
radishes.
Chestnu
t.
Watercress
Chopped"().
11 Process
as
for parsley.
Yams
Mashed~
~
Process
as
for
pumpk1n.
Zucchini Sliced
I)
~
Process
as
for
cucumbers
Shredded§
~.
Slice off ends. Cut to fit horizontally in Food
Chute Salt
shreds: toss: drain
at
least
10
minutes in colander Squeeze
out
excess moisture. Zucchini
shreds cook
qu1ckly in butter
or
oil.
26
Page 27

k.
APPETIZERS
Cheddar Cheese Pennies
Lo
Cal Cheese Spread
Party Cheese Spread
Spicy
Avocado Dip
SOUPS
Heaty Soup Special
Speedy
Homemade Onion Soup
MAIN DISHES
Chicken Oriental
Low
Budget Tuna Supper
Beef-Zucchini Dinner
Tasty Beef
Stew
Vegetable
Fish Bake
Quick
And
Easy Meatloaf
Bacon
'N
Cheese Pie
Spicy
Lamb
Curry
Easy-Slice Sukiyaki
VEGETABLES
Cheesy Scalloped Potatoes
Vegetable Saute
Mushroom-Rice
Pilaf
Tomato-Zucchini Bake
Sliced Carrots
Potatoes Pancakes
SALADS
Tomato-Mushroom Salad
Chicken 'N Orange Toss
Creamy Cucumber
Salad
Cheese 'N
Ham
Salad
Short-
Cut
Waldorf Salad
YEAST BREADS
Golden Rich Bread
Cinnamon
Pull Aparts
Whole Wheat Bread
QUICK
BREADS
Oatmeal Biscuits
Tea Biscuits
Garden Fresh
Zucchini
Bread
SANDWICH SPREADS
Tuna-Egg
Olive 'N Cream Cheese
Ham
Salad Spread
Old
Fashioned Peanut Butter
ACCOMPANIMENTS
Down
Home
Relish
Orange Marmalade
Homemade Mayonnaise
Homemade
Butter
Cucumber
Sauce
DESSERTS
Rocky Road Candy
Butter Pie Crusts
One
Crust Standard Pie Crust
Best Ever Pie Dough
Pumpkin Pie
Apple
Crisp
Honey Tea Cake
Chewy
Fruit
Squares
Cheesecake Bars
Pecan
Balls
Nutty
Half
Moons
27
Page 28

CHEDDAR CHEESE PENNIES
1 2 lb. Cheddar cheese, cut in
wedges
7 cup fl
our
112 cup
butter
or margarine,
softened
1 teaspoon dry mustard
Preheat oven
to
400° F. Position Disc in Bowl, shredding side up, and
shred cheese. Transfer cheese to mixing
bowl. Position Knife Blade in
Bowl and then add shredded cheese, flour, butter
or
margarine and
dry
mustard to Bowl. Process until mixture forms a ball - about
10
sees.
Remove
Kn
ife Blade. Roll
dough
into
1"
balls and place 2" apart
on
ungreased cookie sheets. Bake
at
400°
F.
for
12-15 mins. Serve hot.
MAKES 3 dozen
1"
appetizers
LO CAL CHEESE SPREAD
2 cups cottage cheese 2 teaspoons dried
minced
2 teaspoons instant
beef
onion
bouillon
2 teaspoons lemon juice
Position Knife Blade in Bowl and add all
ingredie
nts. Process until
smooth - about
1 min. Serve with raw vegetables
or
crackers.
MAKES 2 cups spread
PARTY CHEESE SPREAD
1
10 oz. pkg. sharp Cheddar
c
old
pack cheese food,
cut
i
nto
10
pieces
112
cup
sour
cream
2 tablespoons sherry
Pos1t1on
Knife Blade in Bowl and add all ingredients. Process
until
smooth
-about
15
sees. Serve with assorted crackers and raw vegetables.
Store leftover spread
in
refrigerator.
MA
KES 1 1/2 cups cheese spread
SPICY AVOCADO
DIP
2 large avocados 2 tablespoons lemon juice
1 medium
onion
1 teaspoon
chili
powder
5 slices bacon.
cooked
112 teaspoon
garlic
powder
Halve.
pit and
peel avocados.
Cut
avocados and onion i
nto
1"
cubes.
Position
Knif
e Blade in Bowl and combine all ingredients.
Pul
se
2-3 times to mix; them process
for
1 min. Scrape down sides
of
bowl
if
necessary. Refrigerate until serving .
Serve
chi
lled with
Burrito
chips
or
other favorite crackers.
M
AKES
2 cups dip
28
Page 29

HEARTY SOUP SPECIAL
-a
meal
in
itself-
2 onions
3 stalks celery
2 carrots, peeled
3 potatoes, peeled
2
10
3.'4
oz.
cans condensed
chicken broth
1
bay
leaf
1 teaspoon thyme
4 cups cooked.
diced
chicken
1
20 oz. can chick-peas,
undrained,
or 1 12
oz. can corn,
undrained
1
10 oz.
pkg
frozen pea pods,
string
beans,
or
lima beans
2
small
zucchini
or
112 lb.
fresh mushrooms, sltced
1/4-112 cup rice
or
pasta
1-2 cups leftover
cooked
meat
cubes (optional)
Position Disc in Bowl, slicing side up. Shce onions, celery, carrots
and
potatoes. In 8
qt.
saucepot.
combine
soup. onions, celery, carrots,
pota-
toes. bay leaf and thyme.
Add 2 cups
water (or enough
to
cover
'ege-
tables). Simmer
for
15 mins.
Add
remaining ingredients (including 1rozen
vegetables) and simmer another 30 mins. Add additional water.
if
neces-
sary.
Stir
occasionally.
MAKES 8-10 servings
(about 5 qts.)
NOTE: Substitute ingredients
of
your
choice
for
any
of
the
vegetables
in
this
recipe.
SPEEDY HOMEMADE
ONION
SOUP
7 medium onions. halved
4 tablespoons
butter
3 10 1/2 oz. cans condensed
beef broth
3 whole peppercorns
112
cup
robust
red
wine
Position Disc in Bowl, slicing side up, and slice onions. In
6qt.
saucepan,
melt butter. Add sliced
onions
and saute until soft.
Add
beef broth, 3
cups water and peppercorns. Bring
to
a boil; reduce heat; cover; simmer
for
10 mins.
Stir
in
wine
and serve.
If
desired,
top
each serving with a
piece
of
toasted French bread
and
sprinkle
with
grated Parmesan cheese.
MAKES 6 servings
29
Page 30

CHICKEN ORIENTAL
4
medwm
omons
4
medwm
green peppers.
halved
2 tablespoons
butter
or
margarine
1 8
oz
. can water chestnuts.
dr
ain
ed
1
10
1 2 oz. can
con
densed
cream of
chic
ken soup
3(4 cup
Sauterne
or
another
dry white wine
Salt and pepper to taste
1/2 teaspoon thyme leaves
5 cups
diced
cooked chicken
Po
sition Disc in Bowl, slicing side up. Slice onions and peppers . In
large
skr
llet, melt butter Saute onions and peppers until soft.
Using
slicm g side
of
Disc, slice water chestnuts; set aside.
Add
soup,
wi
ne and seasonings to onions and peppers;
stir
together and continue
heatmg until mixture is smooth. Stir
in
chicken and water chestnuts.
Cover and simmer
for
15 mins.
Add
additional chicken broth
or
water
if
ne
cessary. Serve over rice.
MAKES 6-8 servings
LOW BUDGET TUNA SUPPER
3 slices bread, white
or
1 10 3 4 oz. can condensed
whole wheat, torn in half
chicken
broth
1/4
cup
butter
or
margarine, 2 6 1/2
or
7 oz. cans tuna.
divided drained
and
flaked
1/2 l
b.
Cheddar cheese 1 16 oz. can Chinese
2 tablespoons
flour
vegetables. drained
Position Disc in Bowl, shredding side up. Fill Food Chute with halved
br
ead slices and shred. In large skillet, melt 2 tablespoons butter
or
mar
gann
e.
Add
shredded bread and saute until golden brown. Transfer
to
mixin
g bowl. Shred cheese; set aside. using same skillet, melt re-
maining butter
or
margarine over low heat and blend in flour. Add chicken
broth
all at once; cook, stirring constantly, until
thick
and smooth. Add
tuna. Chinese vegetables, and shredded cheese. Simmer
until
cheese
melts and mixture is thoroughly heated - about
10 mins. Sprinkle top
with
sauteed bread crumbs and serve.
MAKES 4 servings
BEEF-ZUCCHINI DINNER
1 mediUm
oni
on
2 tablespoons butter
or
margarine
1 lb. lean grou
nd
bee t·
1
11
oz.
can condensed
cream
of
tomato soup with
tomato pieces
1
1/2
2
1
teaspoon
salt
teaspoon pepper
medium
zucchi
ni
large tomato.
cut
in half
Position Disc in Bowl, shredding side up, and shred onion. In 10" skillet,
m
elt
butter.
Add
onio
n and saute until soft.
Add
ground
beef and cook
30
Page 31

until meat is browned.
St1r
occasionally and break
up
large
p1ece
s. Dram
off fat,
if
necessary.
Stir
in soup,
1/4
cup
water, salt and pepper.
Turn Disc and
with
slicing side up, slice zucchini and tomato.
Stir
slices
into
meat mixture. Cover and simmer
for
30 mins.
MAKES 4 servings
Make
your
own
ground
beef
from
beef cubes,
if
desired. Use the Knife
Blade.
See instructions
under
"Daily Use Chart•·.
TASTY BEEF STEW
2 tablespoons vegetable
oil
4 lbs. beet
stew
meat,
cut
in
1"
cubes
1
10
112 oz. can condensed
omon
soup
1
cup
water
1 teaspoon salt
1/2 teaspoon
pepper
1/2
teaspoon
ground
sage
6 medium carrots
5 medium potatoes,
cut
to
fit
Food Chute
3 medium
omons,
hal
ved
In 8 qt. heavy pot, heat
011
over medium
high
heat.
Brown
meat
on
all
sides. about
12
pieces at a time. (Meat browns better
if
pieces aren't
touchmg.) Set aside and brown remaining pieces. Reduce heat
to
sim-
mer. Return meat
to
skillet
and
stir in soup, water and seasonings. Cover
and
s1mmer
for
1
1/2
hrs.,
stirring
occasionally. Position Disc in Bowl
with slicing side up.
Slice vegetables. As vegetables reach Fill Level,
empty
Bowl
into
pot
Cover; simmer.
stirring
occasionally,
until
meat is
tender and vegetables are done,
about
40
- 45 mins.
MAKES 8
(1
1/2
cup)
servings
VEGETABLE FtSH BAKE
3 medtum
onions
2 tablespoons
butter
1 lb. fillet
of
sole, thawed
and
drained
Salt
and
pepper
4 large mushrooms
1 green pepper, halved
2 whole pimentos
1/4
cup
dry
white wine
1 tablespoon lemon
juice
Preheat oven
to
350°
F.
Position Disc in Bowl, slicing side up. and shce
onions. Arrange in
bottom
of
greased
9"
square baking
dish. Dot
with
butter.
Season
both
sides
of
sole with salt and pepper. Arrange
on
top
of
onions.
Slice mushrooms. green pepper and pimentos. Spread evenly
over
sole.
Combine wine and lemon juice. Pour over vegetables. Bake at
350°
F.
for
25-30 mins.
or
until sole flakes when tested
with
a fork.
MAKES 6 servings
31
Page 32

QUICK AND EASY MEAT LOAF
3 slices whole wheat bread
7 small green
pepper
cut
into
8 pieces
1 medium onion, quartered
1
1/2
lbs. gr
ound
beet
"
1 teaspoon salt
1/2
teaspoon pepper
1 egg
1.'4
cup
milk
Preheat oven
to
350°
F.
Tear each bread slice
into
6 pieces. w ;th
Kn
fe
Blade in
place, add bread
to
Bowl. Process until bread is crumbed -
about
10 se
es.
Transfer
to
mixing bowl. Reposition Knife Blade: add
green pepper and quartered onion to
Bowl. Process until finely choppeo
-
about
5 sees.
Add
to
bread crumbs along with
ground
beef, salt and
pepper. Using Knife Blade again, combine egg and
milk
in Bowl. Process
about
5 se
es.
Add to meat mixture and blend ingredients thoroughly by
hand.
Shape meat i
nto
a
9" x 4"
l
oaf
and place in shallow baking pan
Bake
at
350°
F.
for
1 hr.
MAKES 6 servings
• Make
yo
ur
own
ground beef from beef cubes,
if
desired. Use the Knife
Blade.
See instructions under "Daily Use Chart".
BACON 'N CHEESE PIE
(Quiche Lorraine Variation)
~
unbaked 9" pie crust, 1 3/4 cups milk
chilled
1 teaspoon chtves
11
2 lb. Swiss cheese 1/2 teaspoon salt
8 slices bacon,
cooked
114 teaspoon pepper
4 eggs Nutmeg
Preheat oven to
400° F. Place a piece
of
aluminum foil over pie crust in
pan and
fill
with
dry
beans to weigh down pastry and prevent 1• frorn
puffing
as
it bakes. Bake at 400°
F.
for
20
mins. Remove foil and beans
Position Disc, shredding side up. in Bowl; shred cheese Transfer
to
mixing
bowl. Position Knife Blade in Bowl and add bacon and eggs.
Process
unt
il
bacon is
chopped-
about 10 sees. Pour over cheese. Add
milk
, chives, salt and pepper to cheese
mix
ture.
Stir
to
blend thoroughly.
Pour over h
ot
, partially baked pie crust. Sprinkle surface with nutmeg.
Return
to
oven and bake
at
400°
F.
for
30-35 mins.
or
until knife mserted
in center comes
out
clean. Let cool 10 mins. before serving.
MAKES
9"
pte
32
Page 33

SPICY LAMB CURRY
2 tablespoons vegetable
oil
1 1 2
Jbs.
Jean
lamb.
cut
m
1"
cubes
2 medium onions. quartered
1 apple. peeled. halved.
cored
1
112
cups
water
1 1 lb. can whole tomatoes
2 teaspoons salt
1-2 teaspoons
curry
powder
1 teaspoon sugar
1/4
teaspoon
pepper
Add
oil
to
12"
or
electrical
skillet
and brown meat well
on
all
sides
Position Disc in Bowl with slicing side up;
slice
onions
and
apple. Add
to
meat. Add remaining ingredients
to
meat. Break tomatoes
up
slightl
y
with spoon. Cover;
simmer
until
meat IS tender;
about
1 1/2 - 2 hrs
Stir occasionally.
Add
more water if necessary. Uncover and
simmer
until
liquid sauce thickens slightly. Serve over rice with chutney and
curry
condiments,
if
desired.
MAKES 4 (3/4
cup)
servings
NOTE: Chutney IS the most
popular
condiment
and
traditionally
served
with
curry
dishes. To prepare
other
condiments use
the
Food
Processor (when necessary)
to
chop
or
shred small
amou
nts
of
the
following: grated coconut, chopped hard-cooked eggs, crisp
bacon bits,
chopped
salted peanuts, raisins,
currant
jelly,
chop-
ped red onion, crushed pineapple .
EASY-SLICE SUKIYAKI
1
112
lbs. s1rlom.
partially
frozen·
1 8
oz.
can water chestnuts,
drained
4 ozs. fresh mushrooms
2 med1um stalks celery,
each
cut
crossw1se in
thirds
1 medium omon, quartered
1/2
1/3
1/4
1
2
head
Chinese cabbage,
cut
to
fit
Food Chute
teaspoon
instant
beef
bouillon
granules
cup
hot
water
cup
soy
sauce
tablespoon sugar
tablespoons vegetable
oil
Position Disc in Bowl with slicing side up; slice meat
and
set aside.
Position Disc in Bowl
with
slicing side up. Slice each
vegetablesepar~te
ly
and arrange on tray. Cover and refrigerate until serving time. In
2-cup
measure,
combine
beef granules and water; add
soy
sauce and sugar
Stir together and set aside.
At
serving time, in
12"
or
electric skillet,
heat oil over
high
heat.
Quickly
sear beef on both sides.
Add
soy
mix-
ture and push beet
to
one side
of
skillet. Keeping
them
separat
e.
add
water chestnuts, mushrooms. celery
and
onion.
Cook
until
almost tender,
4-5 mins. Push
to
side. Add cabbage and
cook
until
heated through ,
2-3 mins.
Do
not
overcook. Serve with nee.
1f
desired.
MAKES 6 (1
cup)
servings
• To freeze meat
tor
slicing, spread boned meat
on
cookie
sheet and
place in freezer
until
partially
fro
zen
firm
but
not
solid.
Too
solid meat
can damage the Processor.
Cut
meat
to
f1t
chute
and slice using
firm
pressure.
33
Page 34

CHEESY SCALLOPED POTATOES
1/2 lb. Cheddar cheese 1 teaspoon sa
lt
1/4 cup b
utter
or margarine 1/2 teaspoon pepper
4 tables
poons
flour
5 medium potatoes •
2 cups mi
lk
2 small
yellow
ontons
Preheat oven
to
350°
F.
Position Disc in Bowl. shredding side up. Shred
cheese, set aside.
In 2 qt. saucepan, melt butter over
low
heat. Blend in
flour. Add
milk
all
at
onc
e; cook, stirring constantly, until
slightly
thickened.
Add
shred-
ded chee
se,
salt and pepper. Continue cooking and stirring until cheese
melts.
Re
move from heat. Spread one-half cheese sauce In bottom
of
shallow 2 1/2 qt. baking dish.
Turn
Disc and with slicing side up, slice potatoes and onions. (Cut
vegetabl
es
to
fit
Food Chute,
if
necessary.) Arrange potato and onion
s
li
ces ov
er
cheese sauce layer.
Top
with remaining cheese sauce, spread-
ing evenly. Bake at 350°
F.
for
1 hr.
or
until potatoes are done.
MAKES 6-8 servings
• Peel potatoes
only
if
desired - they look fine
with
the skins left on.
VEGETABLE SAUTE
2 medium ontons,
sliced
and
halved
2 tablespoons olive
oil
1 s
mall
eggplant, unpeeled,
c
ut
in long thin strips
3 medium tomatoes, cored
and
halved
1 teaspoon salt
1 teaspoon tarragon
2-3 dashes
hot
pepper sauce
Position Disc in Bowl, slicing side up. Slice onions. In 10" skillet, heat
olive
)
jJ
over
moderate heat. Saute onions until soft. Slice eggplant and
tomo
.,es with slicing
s1de
of
Disc. Add sliced vegetables and their juices,
along
with
salt, tarragon and
hot
pepper sauce
to
onions. Mix slightly.
Add
no
water. Cov
er
and simmer
for 1 hr
.. stirring occasionally.
MAKES 4-6
servmgs
MUSHROOM-RICE PILAF
1 2
lb
fresh mushrooms (6
or
7
large ones)
7 medium
onion
4 tablespoons butt
er
2 cups
quick
cooking rice
2 chicken
bouillon
cubes,
crushed
1 teaspoon salt
1 bay
leaf
1 '2 teaspoon pepper
Posttion Disc
in Bow
l, slicing side up. Slice mushrooms and onion. Melt
butter in large
skillet. Saute mushrooms and
onion
until soft.
Add
rice,
crumbed
bou
illon
cubes, salt, bay leaf, pepper along with 1
2/3
cups
water. Bring to a vigorous boil. Cover; reduce heat and simmer until
water is ab
sor
bed and rice is
tender-
about 5-
10
mins.
MAKES 6 servings
34
Page 35

TOMATO-ZUCCHINI
BAKE
4 small
zucchini
4 tomatoes, halved
2 green peppers, halved
Basil leaves (optional)
6
sl
ices
Am
eric
an cheese
2 tablespoons butte r
Preheat oven
to
350°
F.
Pos1tion Disc in
Bow
l,
slic
ing side u
p,
and slice
vegetables. Spread half
of
the sliced vegetables
into
2 qt. baking dish
Sprinkle with
1/2
teaspoon basil leaves. Cover with 3 slices cheese. Add
remaining vegetables. Sprinkle with
1/2
teaspoon basil leaves and cover
with remaining cheese.
Dot
surface with butter. Cover and bake
at
350 ° F.
for
45
mins.
or
until zucchini is tender.
MAKES 8 servings
8 medium carrots
1 teaspoon
salt
1/4
cup
milk
SLICED CARROTS
2 tablespoons butter
1
2 teaspoon
dill
weed
114 teaspoon nutmeg
Trim and peel carrots. Position Disc in Bowl , slicing side up, and slice
carrots. Add
3/4
cup water and 1 teaspoon salt
to
2
qt.
saucepan.
Bring
to a boil.
Add
carrots; cover and simmer until carrots are tender - abo
ut
15-20 mins. Drain.
Quickly
stir
in milk, butter, dill weed and nutme
g.
Serve immediately while hot.
MAKES 4 servings
POTATO
PANCAKES
3 eggs
3 medium potatoes.
un-
peeled
and
cut
into
1"
cubes
1 medium onion. quartered
2 tablespoons
flour
1 teaspoon lemon
juice
1 teaspoon salt
112 teaspoon pepper
Vegetable
oil
Position Knife Blade in Bowl. Add eggs and process 5 sees. Leave Knfte
Blade in Bowl. Position Disc above Knife Blade, shredding side up. Shred
potatoes and continue to process until finely chopped. Remove Disc
from Bowl Add flour, lemon
juice
salt and pepper; process 5 sees.
Using medium high setting, heat
small amount
of
ve~etable
oil In
10"
skillet Spoon 2 heaping tablespoonfuls
of
potato m1xture i
nto
skillet
for
each pancake. Brown
on
both sides until
done
. Serve
top
ped with
sour cream,
if
desired.
MAKES 1 dozen pancakes
35
Page 36

~r,
ll
~
TOMATO-MUSHROOM SALAD
6 large mushrooms
4
medwm
tomatoes.
cored
and halved
2 tablespoons olive
oil
2 teaspoons lemon juice
1 teaspoon basil
Salt and pep,:-er to taste
Position Disc in Bowl, slicmg side up. Slice mushrooms and tomatoes.
Transfer
to
salad bowl.
Add
olive oil, lemon juice, basil, and salt and
pepper
to
taste. Toss and serve over lettuce leaves.
MAKES 6-8 servings
CHICKEN
'N
ORANGE TOSS
(a perfect luncheon
or
light
dinner
dish)
2
split
chicken
breasts.
boned
and
cooked
(4 pieces)
1 medium green pepper,
halved
1 medium onion
2 medium stalks celery
2
11
oz. cans mandarin orange
segments. drained
1/2
cup
mayonna1se
Position Disc in Bowl, slicing side up.
Cut
celery
into
5" lengths. Slice
chicken (be sure it's well boned), pepper, onion and celery. Transfer to
large serving bowl.
Add
mandarin orange segments and mayonnaise to
chicken mixture Toss
well and serve over
crisp
lettuce leaves.
MAKES 4-6 servings
CREAMY
CUCUMBER SALAD
2 small cucumbers
2 medium red onions
1 tablespoon parsley
112
cup
mayonnaise
1 teaspoon lemon juice
1/2
teaspoon
sugar
Pos1t1on
Disc
in
Bowl, slicing side up. Slice cucumbers, onions and
pa'"sley. Transfer to serving bowl.
Add
mayonnaise, lemon juice and
sugar. Toss
well.
MAKES 8-10
servings
1 small
omon
CHEESE
'N
HAM
SALAD
-a Chef Salad Variation-
1.
4 lb Swiss cheese.
chilled
~
hard-cooked eggs. chilled
1/4
lb.
sliced
boiled
ham
1/2
head lettuce
Salt,
pepper
and
dill
weed
Pos
10'1 Disc in Bowl. shredding side up. Shred
onion
and Swiss cheese.
Transfer
to
salad bowl. Turn Disc
to
slicing side and slice eggs. Roll
up
ham slices,
jelly
roll
fashion. Place in Food Chute and slice.
Cut
lettuce in wedges; slice. Add egg, ham, and lettuce slices to salad bowl.
Sease:~
with
salt, pepper and
dill
weed.
Add
salad dressing
of
your
choice. Toss well.
MAKES
2 servings
36
Page 37

SHORT
CUT
WALDORF SALAD
1 2
cup
walnuts
6 m
edium stalks celery,
cut
mo 5 " len
gths
6
medium
apples,
cored
and
quartered
1/2
cup
seedless raisins
11
2-3
14
cup
mayonnaise
Position Disc in Bowl, slicing side up, and process wal nuts; empty into
m
lXmg bowL Re
position Disc,
w1th
slicing side up, and slice celery Add
sl
ced celery
to
nuts. Then slice apples. Add sliced apples
to
nuts along
w
tn
ra1sins and mayonnaise. Blend well making sure apples are coated
w1
th
mayonnaise. Serve
on
lettuce leaves.
MAKES
8 servings
GOLDEN RICH BREAD
3 cups
all-purpose
flour
1 teaspoon salt
1/4
cup
instant
nonfat
dry
1 package active
dry
·east
milk
solids
{optional
) 1/4
cup
lukewarm
water f1100
3 tablespoons soft butter
to
115°
F.)
or
margarine, divided 1 egg, slightly beaten
in
4 pieces 1/2-3/4
cup
lukewarm water
2 tablespoons sugar
(110 o
F.
to
115° F.)
Position Knife Blade in Bowl; add flour,
dry
milk, butter, sugar and salt.
Process
to
mix
, 5 sees. Leave mixture in Bowl. In a small measuring cup,
add yeast
to
water.
Stir
and allow to dissolve,
about
10
mins. Wit
t> Processor running, add yeast mixture through Food Chute, then egg In a
slow. steady stream, add just enough water to make
dough
form a 1oose
ball. Stop Processor immediately. (All the water may
not
be needed;
add only enough to form a
soft
dough.)
Turn
dough
out
onto
well-floured surface and toss
or
fold over 9-10"
tiMes by hand. Shape
into
ball. Place dough in greased bowl and
rot
ate
to grease surface. Cover; let rise in warm place until doubled
In siz
e,
about 1 1/2 hrs. Turn dough
out
onto
well-floured surface. Punch down
and toss
until
no
longer sticky. Form i
nto
smooth ball. On floured sur-
face, cover with bowl and let rest
15
mins. To shape
into loaf
, roll dough
out
on lightly-floured surface
to
14" x
7"
rectangle. Roll
up
tightly
starting with
7"
end, sealing ends and bottom
with
heels
of hands. Place,
seam side down , in well-greased 9" x
5"
loaf pan. Cover a
nd
let rise
in warm place until dough has risen
1"
over sides
of
pan, a
bout
1 hr.
Ba
ke in preheated
375°
F.
oven until golden brown, about 35-40
mm
s.
Remo
ve
from pan immediately.
MAKES 1 {9
'' x 5") loaf
VARIATION: Dinner Rolls
After dough has risen once, divide
dough
into
18-24 pieces. Shape Into
balls.
Place
2"
apart on greased cookie sheets. Cover, let rise until
doubled, about 1 hr. Bake in preheated 400°
F.
over
for
12-15 mms.
37
Page 38

CI
NNAMON PULL APARTS
rectpe Golden Rich
Rroad
3 4
cup
brown
sugar
1 2
cup
coco
nut
2 teasp oons
cinnamo
n
1 4
cup butter
or
margarine
Make 1 recipe Golden Rich Bre a
d. After
bread dou
gh
has •\sen once.
divide
mto
24
piece
s.
Combine sugar,
coconut
and cinnamon. In 1 qt.
sa
ucepan melt butter. Coat
dough
pieces
with
butter, then roll in sugar
mixture.
Pl
ace coated dough pieces in well-greased 10" Sundt pan
or
tupe
pan (with solid bottom). Sprinkle any remaining sugar mixture over
top
Cover, let rise again until doubled in size, about 1
1/2
hrs. Bake m
preheated 350 o
F.
oven
for
25-30 mins.
MAKES 1 (10
")
loa f
WHOLE WHEAT BREAD
2 cups a
ll-purp
ose flour
1
cup whole
wheat
flour
2 table spoons
brown
sugar
2 table spoons
soft butter
1 1/2 teaspoons
salt
1 package acttve
dry
yeast
1/4
cup
lukewarm water
(110°
to
115° F.)
2/3-1 cup lukewarm water
{110°
to
115° F.)
Pos1tion Knife Blade
in
Bowl. Add white and whole wheat flour, brown
sugar, b
utter
and salt. Process until blended. about 5 sees. Leave mix-
ture
in
Bowl. In a small measuri
ng
cup, add yeast to water. Stir and allow
to
dissolv
e,
about 10 mins. With Processor running, add yeast mixture
through Food Ch
ut
e:
then add enough water in
slow
steady stream
to
make t
he
dough form a loose ball. Stop Processor immediately. (All
the water may
not
be needed add
only
enough to form a soft dough.)
T
um
dou
gh out onto well-floured surface and toss
or
fold
over
9-10
times
by
hand. Shape
into
ball. Place dough
in
greased bowl and rotate
to
grease surface.
Co
ver.
let
rise in warm place until doubled in srze,
about
1 1/2
hr
s.
Turn dough
out
onto well-floured surface. Punch down
and toss
until
no
longer sticky. Form
into
smooth ball. Cover with bowl
and
le:t
rest 15 mins. Shape mto loaf,
as
directed
for
Golden Rich Bread.
Place
in
well-greased 9" x 5' pan. Cover and let rise until doubled
in size, about
1 hr. Bake
in
preheated 375°
F.
oven
for
35-40 m•ns.
Turn
out
of
pan immediately.
MAKES 1 (9" x 5") loaf
38
Page 39

OATMEAL BISCUITS
1
cup
flour
3 teaspoons
baking
powder
1/2 teaspoon salt
3 tablespoons butter,
chilled
and
cut
into
thirds
1
cup
quick
cooking oats
1
egg, slightl
y-beaten
1/3
cup
milk
2 tablespoons ho
ney
Preheat oven to 425°
F.
Position Knife Blade in Bowl.
Add
flo•Jr,
ba.
jlQ
powder, salt and butter. Process
for
10secs. Remove Cover a
nJ
a ats
egg, milk, and honey.
Process
just
until
moistened-
about 5 sees.
Re
ove
Knife Blade.
(If any flour remains unblended,
stir
in
with
rubber spa
:...;
Drop by well-rounded tablespoons
onto
greased cookie sheet. Bake a,
425°
F.
for 8 mins.
MAKES
14
2"
biscuits
TEA
BISCUITS
2 1/4 cups
all-purpose
flour
1 tablespoon
baking
powder
1 tablespoon
sugar
1/4 teaspoon
salt
1/4
cup
butter
or
mar
gan
1e
chilled
and
cut
int
o
4 pieces
1/2
cup
milk
1
egg
Preheat oven
to
425°
F.
Position Knife Blade in Bowl.
Add
dry
ingre
c.aents
and butter. Process until butter is evenly
cut
into
flour mixture - about
15
sees. Whisk
milk
and egg together. With Food Processor running, add
milk mixture
all
at
once
through Food Chute. Continue processi
ng
unt
il
well
blended-
about
10
sees. (Dough may be
slightly
dry.) Remove Knife
Blade and transfer dough to lightly-floured board.
Pat
dough
into a 7"
square and 1
/2"
thick.
Cut
into
12 portions. Place on greased cookie
sheet. Bake
at
425°
F.
for
15
mins. Serve
hot
with
butter and jan
•.
MAKES
1 dozen biscuits
3
Page 40

GARDEN FRESH ZUCCHINI BREAD
1 cup walnuts
112
teaspoon baking soda
1 medium zucchini,
cut
to 1/2 teaspoon cinnamon
fit
Food Chute 1/2 teaspoon salt
112
cup vegetable
oil
1
'4
teaspoon baking
powde
r
1 cup sugar 1 1
1
2 cups all-purpose
flour
2 eggs
2 teaspoons vanilla
Preheat oven
to
350°
F.
Position Disc in Bowl
with
slicing side up. Slice
walnuts. Set aside. Position Disc in Bowl with shredding side up. Shred
zucchini. (You should have about 1 1/2 cups.) Set aside. Position Knife
Blade in
Bowl.
Add
oil, sugar, eggs, vanilla, baking soda, cinnamon, salt
and baking
powder
. Process to mix, about
15
sees. Add
flour
to
Bowl
Pulse 2-3 times to mix.
Stop and scrape down sides
of
Bowl. Pulse 1-2
times
mo
re.
Remove Knife Blade. Add nuts and zucchini;
stir
in by hand .
Pour batter into greased and floured
9" x 5"
loaf
pan. Bake until loaf
tests done, about 1 1/4 hrs.
MAKES 1
(9"
x 5
")
loaf
TUNA-EGG SANDWICH SPREAD
2 hard-cooked eggs, chilled
1/4 lb.
Swiss
or
Cheddar
cheese,
chilled
small
onion
2 stalks celery.
cut
into
5"
lengths
1
7 oz. can tuna, drained
and
flaked
1/4 cup mayonnaise
6
hard
rolls,
split
LeHuce leaves
Positron Disc
in
Bowl, shredding side up. Shred eggs, cheese and on ron.
Transfer
to
mixing
bowl. Turn Disc
to
slicing side; slice celery. Add celery.
tuna, and mayonnaise
to
mixing bowl Toss well. Spread mixture
on
bottom half
of
each roll. Cover with lettuce leaves and then w
ith
other
half
of
roll.
MAKES
6 sandwiches
OLIVE 'N CREAM CHEESE SPREAD
8
oz.
pkg. cream cheese,
chilled
and
cut
into
6 pieces
10 stuffed olives
Position Knife Blade in Bowl and add cream cheese and
olives. Process
untrl blended
-about
10 sees. Spread on dark bread
or
crackers. Refri-
gerate unused portion.
MAKES 1 cup spread
40
Page 41

HAM SALAD SPREAD
2
cups
ham
cut
in
1"
cubes 7
dill
pickle, quartere
1 medium onion, quartered
114-112
cup
mayonnaise
1
cup
celery,
cut
in 1
"pieces
112
teaspoon
pepper
Position Knife Blade m Bowl; add ham. Process until
ground-
a
sees. Transfer
to
mixing bowl. Reposttlon Knife Blade in Bowl
Add
celery, and pickle. Process until ground - about 10 sees.
Ad
along
with
mayonnaise and pepper.
Mix
together.
MAKES 3 cups
OLD-FASHIONED PEANUT BUTTER
2
cups
salted peanuts
Position Knife Blade in Bowl; add peanuts. (Do
not
use
dry
roas
nuts.) Process
until
smooth. about 5-6 mms. For a
chunky
peanu
add 2 tablespoons peanuts after mtxture is
smooth· process
ate
more. Store peanut butter in refrigerator.
MAKES
about 1 cup
NOTE: Homemade peanut butter will be thin. It thickens slightly en
refrigerated.
DOWN
HOME
RELISH
12
large cucumbers. peeled,
cut
in
half
lengthwise
and
crosswise
12 medium
yellow
onions,
quartered
1
1/2
tablespoons
salt
1 1/2 qts. white vinegar
4 cups
sugar
2-112 tablespoons celery see
2
112
tablespoons
mustard
s
~
2 tablespoons
ground
mustard
1 tablespoon turmeric
4 tablespoons cornstarc
Scoop
out
cucumber seeds
if
they are tough. Position Disc in
Bo
shredding side up. Shred cucumbers. When shredded cucumbers
Fill Level, empty
into
large mixing bowl. Position Knife Blade
in
Bo~
2 quartered onions
to
Bowl. Pulse until onions are coarsely cho
Empty chopped onions
into
mixing
bowl with shredded cucumber
remaining onions, 2 at a time.
Stir salt
into
vegetables:
let
stand
Drain
Drain well. Transfer to an
8-10 qt. heavy pot.
Stir
in
vinegar, suga
seed and mustard seed.
Bring
to a boil: simmer
for
1/2
hr
..
stirrin
sional.
Stir
in spices. In small dish. stir together cornstarch and 5-6
spoons liquid from relish unttl smooth.
Add
mixture
to
reltsh C
rmg
constantly, until slightly thickened. Pour
into
sterile
1ars
a
ttghtly.
MAKE$ 7 pints
Page 42

ORANGE
MARMALADE
3
medium
oranges
3
medium
lemons
1 1/2
cups
water
1/4 teaspoon
baking
soda
5 cups
suga
r
3 ozs.
(1/
2 6 oz.
bottle)
liquid
fruit
pectin
Peel oranges and lemons, cutting
off
as little white membrane as pos-
si ble. Position Knife Blade in Bowl; add
half
the peel. Process
to
chop,
about 10 sees. Transfer
to
heavy 8 qt. pot. Repeat
with
remam,ng
pee
l.
Add water and baking soda
to
pot. Cover and simmer
20
mins. Remove
and discard white membrane from
peeled fruit. Quarter
fruit
and
~etT.ove
seeds. Position Knife Blade
in
Bowl; add 1 cup fruit. Process
u~til
crop-
ped.
Add
to
saucepan. Repeat with remaining fruit. Cover at'd sirnrr1er
10
mins. Strain
fruit
mixture, reserving juice. Measure 3 cuos
a:
frui;
mx
-
ture
into
same 8 qt. pot. (Set
fruit
juice aside
for
use
in
fru;t
'la.ored
gelatin salad
or
chill and drink.)
Add
sugar to pot. Over
J"l
gh '"lea: Dring
to
a full rolling boil; boil hard
for
1 min., stirring constantly
Re"'"•O•e
"'rom
heat and
stir
in
liquid
pectin. Skim
off
foam with metal sooo., Sttr and
skim occasionally
for
7 mins. (This helps
to
cool
mixture and Keep
frui;
from floating.) Pour
into
hot
sterilized jars. Cover
witt>
"1
8 ·
"lot
paraffin.
MAKES 5 cups
HOMEMADE
MAY
ONNAISE
1 egg
1/3
cup
vegetable
oil
2 tablespoons vinegar*
1 teaspoon
sugar
1/2 teaspoon
dry
mustard
1/2 teaspoon salt
2/3
cup
vegetable
011
Pos
itio
n Knife Blade in
dry
Bowl. (Recipe
won't
work
unless
sa
...
IS dry!'
Add all ingredients and process 5 sees.
Quickly
add oil in astead1 stream
through
Food Chute with Processor running.
After
all oil is addec
pro-
cess
only until
mixture is
thick
and smooth, about 10 sees.
MAKES 1
1/4
cups
• Use a fight vinegar
such
as white,
or
use lemon juice.
HOMEMADE
BUTTER
1
cup
well-chilled
heavy cream,
about
a
week
old
2-3
drops
yellow
food
co
·onng
(optional, use
tor
a dee:Jer
color)
Position
Knif
e Blade in Bowl; add cream including
thick
cream
trat
may
have formed
on
sides
of
carton. Process until butter forms
into
oall, 2-5
mins., depe
nding
on age
of
cream. Drain butter 1n a colander.
then
olace
in
bowl and press
out
remaining
liquid
with
wooden spoon.
If
desired, add 1/2 teaspoon salt. Place in crock
or
dish and refrigerate.
Keeps 1 week.
MAKES
about
1/2
cup
42
Page 43

...
-
VARIATION
For flavored butter, add 1 small clove garlic,
1/2
teaspoon onion salt
or
garlic powder
or
1/2 teaspoon
or
your
favor•te ground herb
or
spice to
cream and process
as
above.
CUCUMBER
SAUCE
112
small cucumber,
unpeeled, seeded
1 cup
sour
cream
1 teaspoon
dill
weed
1 teaspoon instant
minced
onion
Salt and pepper
to
taste
Position Disc
in
Bowl with shredding side up; shred cucumber. Transfer
to
small
mixing
bowl. Add remaining ingredients
to
shredded cucumber
and
mix
together. Refrigerate
until
serving. Serve
with
tuna, salmon, sea-
food and other fish.
MAKES about 1
cup
SHORT
CUT
ROCKY ROAD CANDY
1 6
oz.
pkg. butterscotch
flavored
p1eces
7 6
oz.
pkg. semi-sweet
chocolate pieces
1
14
oz. can sweetened
condensed
milk
1 8
oz.
can walnuts
2 cups miniature
marshmallows
Combine butterscotch and chocolate pieces with sweetened condensed
milk. Melt over hot, not boiling, water until smooth. Remove from heat.
Position Disc, slicing side up, in Bowl and process walnuts.
Stir
nuts
and marshmallows
into
chocolate mixture Spread
into
greased
9"
square
baking pan. Refrigerate until firm - about 2 hrs.
Cut
into
squares.
MAKES 2 lbs. candy
ONE CRUST STANDARD PIE
CRUST
1 cup all-purpose flour
112
teaspoon salt
1/4
cup
vegetable shortening,
room
temperature. divided
in
3 pieces
1 tablespoon
butter
or
margarine, frozen
3 tablespoons
cold
water
Follow procedure
for
Butter Pie Crusts, adding shortening and butter
together.
If
crust is
to
be baked before filling,
prick
generously
with
fork
and bake
in
preheated 450°
F.
oven 9-12 mins.
MAKES 1 (9
inch)
pie
crust
43
Page 44

BUTTER
PIE CRUSTS
-for
flavorful, all-purpose pie crusts-
2 cups all-purpose
flour•
1/2
cup
b~
te
roze- a.-:;
1 teaspoon salt
cut
nto 6 p aces
1/3
cup
co
a wa e
Position Knife Blade in Bowl.
Add
flour
and salt and
then
butt:-
p
=.=e.s
Process
until
butter
is
evenly
cut
into
flour-
aoout
20
sec •
=oo~
Processor running,
quickly
add water through
Food
Chute
a
::.!
o:.ce
Process until dough forms a ball - about
2Q-30
sees. Rer:;ove
""·:~
3.:.
divide
in
half
and
shape
into
balls. Roll
out
according
to
yc
_-h
;:;
:
method. (C
hill
~hr.
before using,
if
necessary.)
MAKES
2
9"
pie crusts
' No need
to
sift flour. Instead
stir
it
in canister 3
or
~
ttrnes b€
1
-:-·e
measuring to
fluff
it
slightly. Measure using
dry
measunng cups, le -
eling them
off
with a straight edge
or
metal spatula.
BEST
EVER PIE
DOUGH
-for
flaky, tender pie crusts-
2
1/4
cups all-purpose
flour•
1/4 lb. lard,
chilled
1 teaspoon salt
1/3
cup
cold
water
Position Knife Blade
in
Bowl.
Add
flour
and salt.
Cut
lard
into
6-7 pieces;
add to Bowl. Process until lard is evenly
cut
into
flour
- about 20 sees.
With Fo
od
Processor running, quicKly add
1/3
cup
water through Food
Chute all at
once
(Have a few tablespoons add'tona water
on
nand
.)
Process
for
about 30 sees.
If
all
of
the flour M,xture
r,as
not
been moist-
ened. add a tablespoon
or
so more water ano process a few seconds
longer. Do
not
add too much water;
dough
may be crumbly. tlemove
Knife Blade; divide
dough
in
halt and shape
into
two
ba
Is
~cll
out
according to
your
favorite method.
MAKES
2
9"
pie
crusts
• No need to sift flour. Instead,
stir
it
10 canister 3
or
.!
t
-es
:)ez.ore
measuri
ng
to
fluff
it
slightly. Measure using
dry
measurin g :_:;,s
ev-
eling them
off
with a straight edge
or
metal spatu,a.
PUMPKIN PIE
7
30
oz. can
pumpkm
pte
mix
2 eggs
2!3 cup evaporated
milk
1
9"
pie
she!/
, un:;a
1/2 teaspoon nutme;
Position Knife Blade in Bowl. Combine pumpkin pie rnix.
eg.;-s
::...-..=
rr.
in
Bowl Process until
smooth-
about 15 sees. Pour
into
pie sn: ::: - :
top
with
nutmeg,
if
desired. Follow directions
on
can
of
P-
,.,.._;,::r
-
~..;
- :x
for
baking temperature and time.
MAKES 1 9"
pie
44
Page 45

APPLE CRISP
6 medium
cooking
apples,
peeled, cored, quartered
2 tablespoons lemon juice
1 cup quick oats, uncooked
3/4
cup packed
brown
sugar
1/2
cup
all-purpose
flour
1 '2
cup
butter
or
margarine,
chilled,
cut
in 6 pteces
1 teaspoon cinnamon
Preheat oven to 375°
F.
Position Disc in Bowl with slicing side up, slice
apples. As slices reach Fill Level, empty Bowl into ungreased
9"
square
baking pan. Sprinkle lemon juice over apples. Position Knife Blade in
Bowl; add remaining ingredients. Process until crumbly, about
10 sees
Crumble evenly over apples. Bake until apples are tender, 40-45 mins
Serve warm
or
cold, plain
or
with
1ce
cream
or
sweetened whipped cream
MAKES 6
(314
cup)
servings
NOTE: Substitute 5-6 cups fruits in season such as peaches
or
rhubarb
With rhubarb, add 1
/2
cup sugar to fruit.
HONEY TEA CAKE
2 cups pecans
or
walnuts
2 3 1/2
oz.
jars candied
cherries - red
or
green
3 cups flour, divided
1 cup butter.
cut
in 1
''
cubes
1
cup
honey
4 eggs
1/4 cup bourbon
or
orange juice
Preheat oven
to
300°
F.
Position Disc in Bowl, slicing side up. Pro
·ess
pecans
or
walnuts. Transfer
to
large mixing bowl. With Knife Blade n
place, add cherries and 2 cups
flour
to
Bowl. Process until cherries are
coarsely chopped
about
3 sees. Add to chopped
nuts
along with addi-
tional 1 cup
flour
. Reposition Knife Blade and combine remaining ingre-
dients in Bowl. Process until butter is evenly
cut
into mixture - about
20
-30 sees. Pour over dry, chopped ingredients;
mix
until blended. Then
pour into ungreased 10" tube pan. Bake at 300°
F.
for 1 hr.
20
mins. or
until golden brown. Cool completely. Remove from pan and sprinkle top
with confectioners' sugar,
if
desired.
MAKES 1 10" tube cake
CHEWY FRUIT
SQUARES
1 '2
cup
butter,
chilled
and
cut
into
6 pieces
1 1/2 cups
flour
1/4 cup firmly-packed
brown
sugar
1 egg, slightly-beatef1
1
cup
raisins
3/4
cup
coarsely-chopped nuts
Preheat oven to 325°
F.
Position Knife Blade in Bowl. Add butter, fl
our
and brown sugar to Bowl. Process until butter is thoroughly cut into dry
mgredients - about 15 sees. Remove Cover. Evenly add slightly-beaten
egg, ra sins and nuts around Bowl. Process until mixture clings together
-about
15-20secs. Carefully remove Knife Blade. Spread mixture evenly
over greased
9"
square pan, using spatula, and press dough down along
edges. Bake at 325° F.
for
25-30 mins.
or
until done.
Cut
into squares
immediately.
MAKES 16
2"
squares
45
Page 46

CHEESECAKE BARS
13 graham cracker rectan-
gles. broken
in
quarters
( 1 1 2 cups crumbs)
1 6
oz
. pkg. butterscotch
flavored pieces
5 tablespoo ns
butter
1 8
oz.
pkg. cream cheese,
chilled
and
cut
in
6 pieces
1/4
cup
sugar
2 eggs
2 tablespoons
flour
1 tablespoon lemon juice
Preheat oven
to
350°
F.
Position Knife Blade in Bowl
with
Disc above
it
shredding side up.
Crumb
graham crackers. Over
low
heat, melt together
butterscotch flavored pieces and butter. Remove from heat.
Stir in
graham cracker crumbs.
Set aside
1/2
cup
of
this mixture. Press remain-
ing mixture
into
ungreased
8"
square baking pan. Bake
at
350°
F.
for
10
- ·
ns.
Reposition Knife Blade in Bowl and add remaining ingredients. Process
until smooth - about
10 sees. Spread over hot, baked crust. Sprinkle
reserved
crumb
mixture over top. Return
to
oven and bake
20..25
mins.
Cool and
cut
into
squares. Store 1n refrigerator.
MAKES 16
2"
squares
PECAN BALLS
7 7/2 cups pecan halves
2 cups flour
1
cup
butter
or
margarine,
chilled
and
cut
in
1"
pieces
1/4
cup
firmly
-packed
brown
sugar
1 tablespoon water
2 teaspoons
vanilla
Preheat oven to 300°
F.
Position Knife Blade in Bowl; add pecans. Pro-
cess until finely chopped - about 5 sees. Transfer
to
large mixing bowl.
Reposition Knife Blade. Add remaining ingredients. Process until dough
is
cr.ixed
and sticks
together-
about 30 sees. Add to pecans and
mix to-
gether with hands. Form
into
small
3/4"
balls. Place
on
ungreased cookie
sheets and bake
for
30..35
mins.
If
desired, sprinkle
with
confectioners'
sugar
wh
ile hot.
MAKES 5 dozen cookies
46
Page 47

NUTTY HALF MOONS
1 4 1/2
oz.
can whole,
skinned almonds
2 cups flour, divided
1
cup
butter,
ch11/ed
and
cut
into
1"
pieces
1
cup
sugar
1 egg,
slightl
y-beaten
Preheat oven
to
350°
F.
Position Knife Blade in Bowl.
Add
almonds and
process
until finely ground
-about
15
sees. Transfer
to
large
m1xrng
owl.
Reposition Knife Blade. Add
1
cup
flour and butter
to
Bowl. Process ntil
butter is
cut
into
flour-
about
15
sees. Remove Cover and add 1 c p
our
and sugar. Process to blend - about
10
sees. Remove Cover
an
our
slightly-beaten egg evenly over butter mixture Process again until dough
is
blended-
about
15
sees. (If
dough
is
too
dry
add 1 tablespoon water
to mixture and process a
few
sees. longer.)
Add
dough
to
grou al-
monds;
mix
together
with
hands.
Using a
3/4"
ball
of
dough
for
each cookie, shape
into
crescents makrng
small
half moons. Place on ungreased cookie sheets. Bake at 350° F
for
15-20 mins. While warm, sprinkle
with
confectioners' sugar,
if
des1red.
MAKES 7 dozen cookies
47
Page 48

GENERAL ELECTRIC COMPANY
HOUSEWARES
AND
AUDIO
BUSINESS DIVISION
1285 BOSTON AVENUE
BRIDGEPORT, CONNECTICUT 06602
GENERAL.
ELECTRIC
Pub. No. 5
7A600057-
Rev.
4
Prin!ed
:t
USA
..
 Loading...