

Page 1

Chest Freezer
Service Manual
●Features
●Deep and quick freezing.
●Streamline shaped and top opening with castors.
●Mechanical temperature control with power indicator.
●High pressure foam cover for efficient Temperature preservation.
●Eximious water disposal device.
●Wide climate zone design.
Manual No.:FHV5/7SGWW Edition: 20051130
FHV5SGWW
FHV7SGWW
PDF created with pdfFactory trial version www.pdffactory.com
Page 2

Freezer Model:FHV5SGWW/FHV7SGWW
1
CONTENTS
Contents
1. Contents……………………………………………………………………….……1
2. Product Code Illumination and Series Introduction……………………………
2
3. Features …………………………………………………………………………... 3
4. Specifications………………………………………………………………………4
5. Safety Precautions(including Warning and Cautions)………………………...5
6. Net Dimension……………………………………………………………… …....6
7. Installation and Accessory Parts ………………………………………………. 7
8. Parts and Functions …………………………………………………………… 11
9. System Flow Chart………………………………………………………………12
10. Function Schedule……………………………………………………………… 13
11. Circuit Diagram ………………………………………………………………… 14
12. Maintenance Service and Trouble Shooting
1. System Troubleshooting…………………………………………………16
2. Common freezer problems………………………………………………28
3. Service and technical requirements of R134a freezer ……………… 30
4. Application and maintenance of freezer ……………………………… 33
5. Procedure and tools required for evacuation and Charging …………38
6. Freezers Noise…………………………………………………………… 40
7. National Standard for noise………………………………………………49
8. Measuring technology of freezer performance parameter……………51
PDF created with pdfFactory trial version www.pdffactory.com
Page 3

Freezer Model:FHV5SGWW/FHV7SGWW
2
PRODUCT CODE ILLUMINNATION AND SERIES INTRODUCTION
Product Code Illumination and Series Introduction
F H V □ S G W W
A B C D E F G H
A: The first letter of “FREEZER”.
B: ?
C: ?
D: Capacity. (Unit: 10Cu.Ft).
E:……
PDF created with pdfFactory trial version www.pdffactory.com
Page 4

Freezer Model:FHV5SGWW/FHV7SGWW
3
FEATURES
Features
3.1Feature of freezer
●Deep and quick freezing.
●Streamline shaped and top opening with castors.
●Mechanical temperature control with power indicator.
●High pressure foam cover for efficient Temperature preservation.
●Adjustable thermostat.
●Eximious water disposal device.
●Wide climate zone design.
PDF created with pdfFactory trial version www.pdffactory.com
Page 5

Freezer Model:FHV5SGWW/FHV7SGWW
4
SPECIFICATIONS
Specifications
Model FHV5SGWW FHV7SGWW
Capacity(l)
143 199
Power Supply(V/Hz)
220V/50Hz 220V/50Hz
Power Consumption
(kW.h/day)
0.85 1.15
Unit Dimersion (W*D*H)
804*610*850 940*610*850
Unit Weight (Kg)
40 42
Box Dimensions
(W*D*H)
860*637*890 995*637*890
Box Weight (Kg)
45 48
Container Quantity
(40HC’)
135 126
PDF created with pdfFactory trial version www.pdffactory.com
Page 6

Freezer Model:FHV5SGWW/FHV7SGWW
5
SAFETY PRECAUTIONS
Safety Precautions
Read all of the instructions before using this appliance. When using
this appliance, always exercise basic safety precautions, including the
following:
1. Use this appliance only for its intended purpose as described in this
uses and care guide.
2. This freezer must be properly installed in accordance with the
installation section. Instructions before it is used, See grounding
instructions in the installation section.
3. Never unplug your freezer by puling on the power cord, Always
grasp the plug firmly and pull straight out from the outlet.
4. Repair or replace immediately, all electric service cords that have
become frayed or otherwise damaged, Do not use a cord that
shows cracks or abrasion damage along its length, the plug or the
connector end.
5. Unplug your freezer before cleaning or before making any repairs,
Note: If for any reason this product requires service, we strongly,
recommend that a certified technician perform the service.
6. If your old freezer is not being used, we recommend that you
remove the door and leave the shelves in place; this will reduce the
possibility of danger to children.
PDF created with pdfFactory trial version www.pdffactory.com
Page 7

Freezer Model:FHV5SGWW/FHV7SGWW
6
SAFETY PRECAUTIONS
Safety Precautions
7. This freezer should not be recessed or built-in an enclosed
Cabinet. It is designed for freestanding installation only
8. Do not operate your freezer in the presence of explosive fumes.
9. Do not refreeze foods, which have been thawed completely.
10.Do not use any electrical device or any sharp instrument in
defrosting your freezer.
PDF created with pdfFactory trial version www.pdffactory.com
Page 8

Freezer Model:FHV5SGWW/FHV7SGWW
7
NET DIMENSION
Net Dimension
Model
FHV5SGWW FHV7SGWW
Unit Dimension
(W*D*H)
804*610*850 940*610*850
Dimension
(Door open W*D*H’)
804*610*1370 940*610*1370
PDF created with pdfFactory trial version www.pdffactory.com
Page 9

Freezer Model:FHV5SGWW/FHV7SGWW
8
INSTALLATION AND ACCESSORY PARTS
Installation and Accessory Parts
Unpacking Your Freezer
1.Remove all packaging material; this includes the foam base and all adhesive
tape holding the freezer accessories inside and outside.
2.Inspect and remove any remains of packing, tape or printed materials before
powering on the freezer.
Adjusting Your Freezer
1.Your freezer is designed for freestanding installation only. It should not be
recessed or built-in.
2.Place the freezer on a floor strong enough to support it fully loaded.
3.When moving the freezer, never tilt it more than a 45-degree angle. This could
damage the compressor and the sealed system.
4.If the freezer is tilted let it stand in an upright position for at least 24 hours prior
to plugging. This is to allow the refrigerant to settle.
·Proper Air Circulation
l To assure your freezer works at the maximum efficiency it was designed for,
you should install it in a location where there is proper air circulation,
l Plumbing and electrical connections.
l The following are recommended clearances around the freezer:
Sides…………..2”(50mm)
Top. ……………2”(50mm)
Back…………..2”(50mm)
PDF created with pdfFactory trial version www.pdffactory.com
Page 10

Freezer Model:FHV5SGWW/FHV7SGWW
9
INSTALLATION AND ACCESSORY PARTS
Installation and Accessory Parts
l Do not over fill freezer for proper internal air circulation.
Electrical Requirement
l Make sure there is a suitable power Outlet (220V) with proper grounding to power the
freezer.
l Avoid the use of three plug adapters or cutting off the third grounding in order to
accommodate a two-plug outlet, this is a dangerous practice since it provides no effective
grounding for the freezer and may result in shock hazard.
Install Limitations
l Do not install your freezer in any location not properly insulated or heated e.g. garage etc,
your freezer was not designed to operate in temperature settings below 32· Fahrenheit.
l Select a suitable location for the freezer on a hard even surfaces away from direct sunlight
or heat source e.g. radiators, baseboard heaters, cooking appliances etc, Any floor
unevenness should be corrected.
Installing Casters(delete?)
Your freezer can be equipped with casters for easy moving. We recommend
installing casters before using the freezer. Install following these easy steps:
1.Remove the food basket from the freezer.
2.Slowly tilt the freezer on its side.
3.Tap one caster into the bottom of the freezer. Fasten the caster into place
with screws provided.
4.Install the other three casters in the same manner.
5.Return the freezer to its upright position and replace the food basket.
Note: It is important to wait for 24 hours after installation before plugging in
the unit to allow the refrigerant to stabilize.
Initial Setup
Operating Your Freezer
PDF created with pdfFactory trial version www.pdffactory.com
Page 11

Freezer Model:FHV5SGWW/FHV7SGWW
10
INSTALLATION AND ACCESSORY PARTS
Installation and Accessory Parts
Once the freezer is in its proper place, plug it in an electrical outlet having 220
volts.
Set the temperature, on the temperature contrail knob.”1”being the warmest and
“7”being the coldest. Initially set the temperature on”4”. Place food inside the
freezer (green light will come on indicating that the freezer is in operation). After
using the freezer for 24 hours set the freezer to your desired setting.
In case you unplug your freezer or experience an electrical outage, allow 5
Minutes before plugging it back in.
(Note: If the freezer has been placed in a horizontal or tilted position for any
period of time wait 24 hours before plugging the unit in.)
Adjustable temperature dial:
Your freezer will automatically maintain the temperature level you select. The
temperature level you select. The temperature control dial has 7 settings plus
OFF.”1I”is the warmest,”7”is the coldest. Turning the dial to OFF stops cooling the
freezer. Set the dial to “4and allow 24 hours to pass before adjusting the
temperature to your needs.
PDF created with pdfFactory trial version www.pdffactory.com
Page 12

Freezer Model:FHV5SGWW/FHV7SGWW
11
INSTALLATION AND ACCESSORY PARTS
Installation and Accessory Parts
Food Storage Basket
Your Freezer has 1 removable basket. It allows you to store food more accessibly
or you can remove it if not needed.
Defrosting and Draining The Freezer
·Defrost whenever the frost becomes 1/4” thick. Never use a sharp or
metallic instrument to remove the frost as it may damage the cooling
coils.(A punctured coil will void the warranty)
·Turn the temperature control to OFF position and unplug the unit. For
draining, place a tray beneath the outer drain plug. Pull out the drain dial
and rotate it so that the arrow points down ward. This will let the water flow
out into the tray.
·Remove the drain plug from the inside of the freezer. Defrosting usually
takes a few hours. To defrost faster keep the freezer door open. When done,
push the drain dial in and turn the arrow to the up position. Re-plug the
drain plug inside the freezer compartment. Note: monitor the container
under the drain to avoid overflow.
·Wipe the interior of the freezer and replace the electrical plug in the
electrical outlet.
·Rest the temperature control to the desired setting.
PDF created with pdfFactory trial version www.pdffactory.com
Page 13

Freezer Model:FHV5SGWW/FHV7SGWW
12
PARTS AND FUNCTIONS
Parts and Functions
PDF created with pdfFactory trial version www.pdffactory.com
Page 14

Freezer Model:FHV5SGWW/FHV7SGWW
13
SYSTEM FLOW CHART
System Flow Chart
The refrigeration system of direct cooling single-system freezers
belongs to the category of a single-temperature and single-control
refrigerating system with only one evaporator and is controlled by a
single temperature control.
PDF created with pdfFactory trial version www.pdffactory.com
Page 15

Freezer Model:FHV5SGWW/FHV7SGWW
14
FUNCTION SCHEDULE
Function Schedule
Set the temperature, on the temperature contrail knob.”1being the warmest and
“7being the coldest. Initially set the temperature on”4. Place food inside the
freezer (green light will come on indicating that the freezer is in operation).After
using the freezer for 24 hours set the freezer to your desired setting.
In case you unplug your freezer or experience an electrical outage, allow 5
minutes before plugging it back in.
(Note: If the freezer has been placed in a horizontal or tilted position for any
period of time wait 24 hours before plugging the unit in.)
Adjustable temperature dial:
Your freezer will automatically maintain the temperature level you select. The
temperature level you select. The temperature control dial has 7settings plus
OFF.”1is the warmest,”7”is the coldest. Turning the dial to OFF stops cooling the
freezer. Set the dial to “5”nd allow 24 hours to pass before adjusting the
temperature to your needs.
PDF created with pdfFactory trial version www.pdffactory.com
Page 16
Freezer Model:FHV5SGWW/FHV7SGWW
15
CIRCUIT DIAGRAM
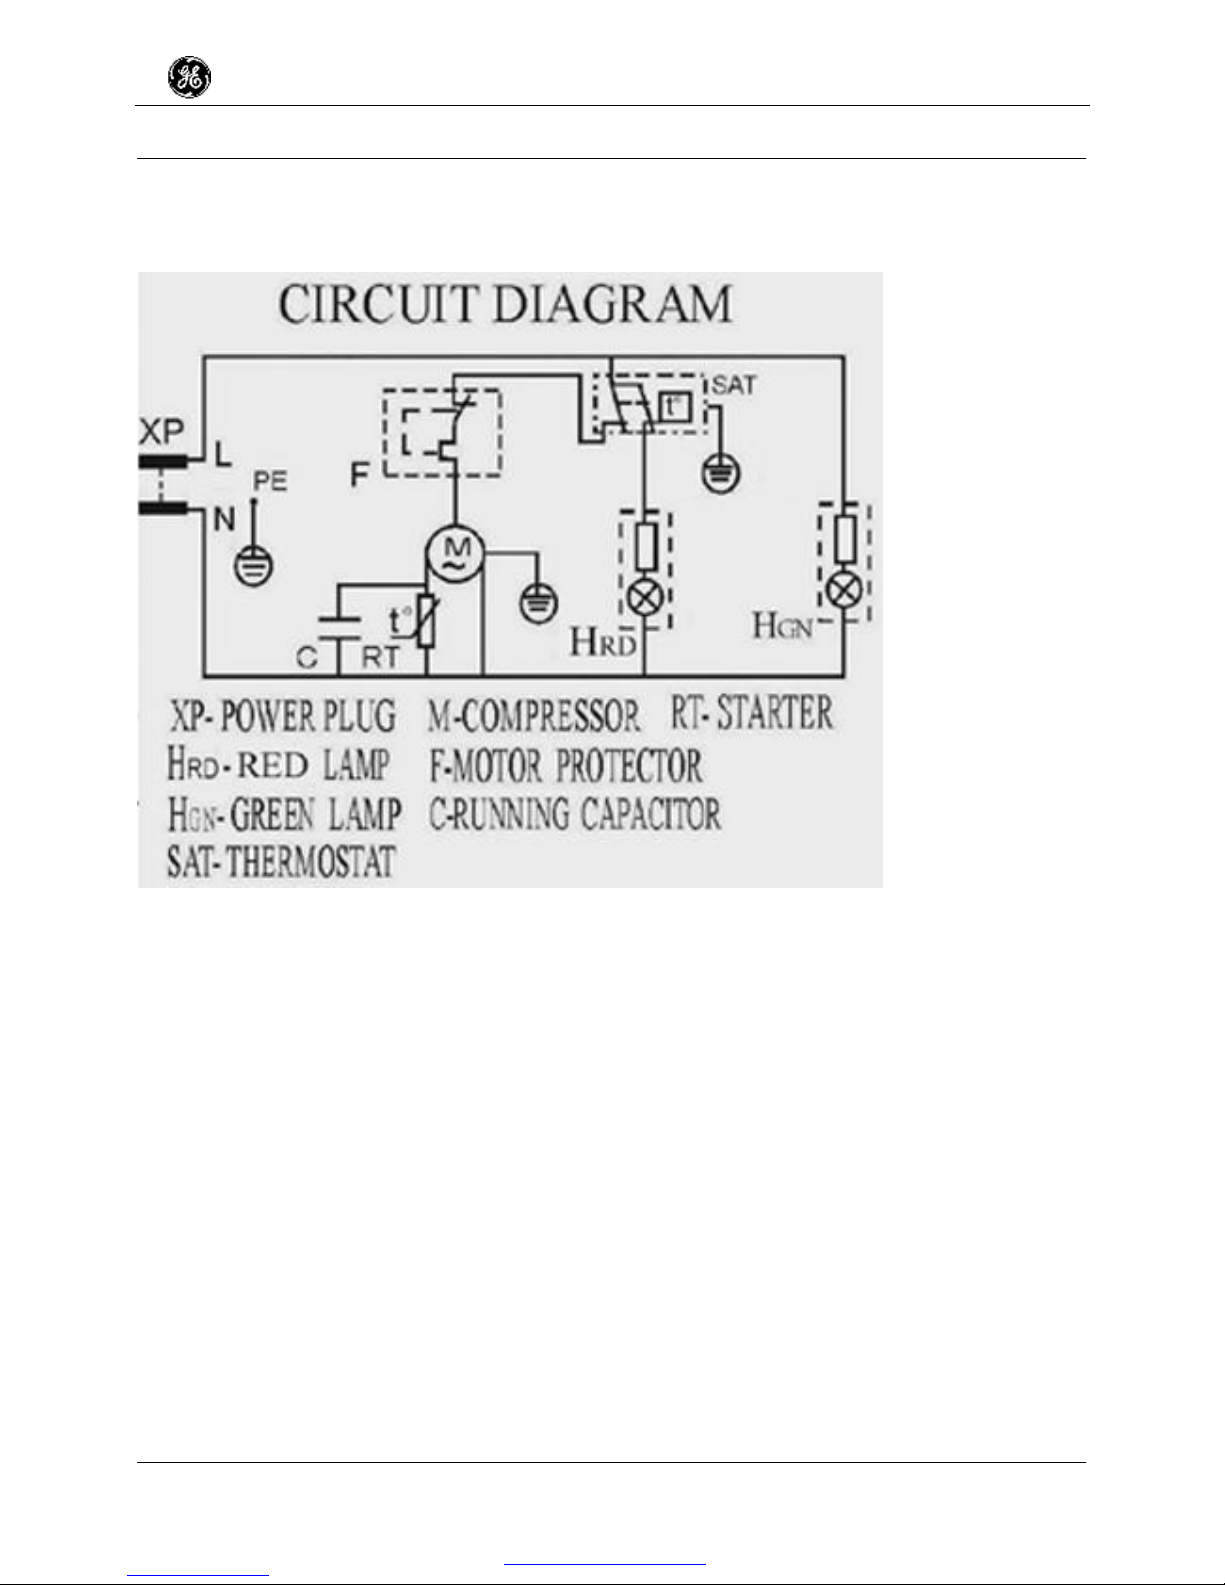
Circuit Diagram
Brief description of principle about FHV5SGWW/7SGWW:
1.The red lamp is the alarm lamp. When the temperature>-15℃,
the lamp will be on.
2.The green lamp is a power indication lamp. When the power
is on, the lamp will be on.
3.Thermostat: When the temperature in the freezer is higher and
reaches the value for starting the machine, the thermostat will be
closed, the compressor will run; When the temperature in the
freezer is lower and reaches the value for closing the machine,
the thermostat will be open, thus the compressor will be stop
running.
PDF created with pdfFactory trial version www.pdffactory.com
Page 17

Freezer Model:FHV5SGWW/FHV7SGWW
16
MAINTENANCE SERVICE AND TROUBLE SHOOTING
Maintenance Service and Trouble Shooting
12.1 System Trouble shooting
12.1.1 Servicing freezer
(1)Check the whole circuit of freezer, if there are wire connections
came off, any wires broken, or a short circuit.
(2) Check the insulation of the whole freezer. At normal situation,
the resistance is greater than 2 mebohms; if it is less than 2
mebohms, please make a further check of the freezer resistance.
Set the voltmeter to R1 Ohm position, put the two voltmeter leads
pencils into L and N terminals respectively, watch the indication
of odometer. The normal value is several Ohm to tens of ohm. If
the resistance is zero, means that there is a short in the freezer
circuit or there is a short caused by a bad compressor or fan
motor. The reason should be found out and repaired. If the
resistance is too big or infinite, this means that there is broken
circuit, please check and solve it.
After the above checks, the freezer will not have any
electrical problem and you can switch power on for further
completely check.
PDF created with pdfFactory trial version www.pdffactory.com
Page 18

Freezer Model:FHV5SGWW/FHV7SGWW
17
MAINTENANCE SERVICE AND TROUBLE SHOOTING
Maintenance Service and Trouble Shooting
12.1.2 Reasons of electricity leakage of freezer
(1) Leakage of compressor: mainly because of serious vibration,
the motor coil of compressor contacts with the shell, the coat of
enameled wire will come off some where and connect with shell.
Other reasons may be over voltage, insufficient of voltage,
adverse circumstances (temperature too high, ventilation and
heat radiation to bad) for freezer, thermal protection unit out of
order, etc. They will make the motor coil over temperature,
insulation material loose, insulation is damaged then electricity
will occur.
(2) Leakage of motor connection terminals: the connection
terminals of fully enclosed compressor are made from high
temperature soda glass sintered ceramics, around the terminals
are filled with a high polymer. The terminals and insulation
material must have the same linear expansion coefficient, the for
requirement between terminals and the shell is more than 0.5
million ohm. The reason of terminal leakage is that soda glass is
broken or there are conductive materials such as water, dirt, etc.,
adhered to terminals.
PDF created with pdfFactory trial version www.pdffactory.com
Page 19

Freezer Model:FHV5SGWW/FHV7SGWW
18
MAINTENANCE SERVICE AND TROUBLE SHOOTING
Maintenance Service and Trouble Shooting
If electricity leakage occurs outside the compressor, please use
tetra chloromethane or alcohol to clean it. If the leakage occurs in
the inner of compressor, it needs to be changed.
(3) Leakage of temperature controller: because of too long a
period of service or too high temperature, or too much dirt, or too
high humidity, there may be electricity leakage. If it has been
defined that there is leakage of temperature controller, please
change.
(4) Leakage of starting relay: during mounting and repairing,
screw of relay lead is easy to contact the shell and leakage will
then occur. If you suspect the relay is bad, check it. If there is
leakage, please make the connections again and leave a piece of
insulation paper under the screw.
(5) Leakage of fan: because of too high humidity of freezer
environment or a bad fan controlling unit, the fan is burned after
long time operation and thus causes leakage. Using voltammeter
to measure the insulation resistance between each respective
connection terminal and the freezer body, if the resistance is too
little, means there is leakage caused by humidity; if the resistance
Is zero, means the fan coil is burned or short-circuited. Please
change the fan.
PDF created with pdfFactory trial version www.pdffactory.com
Page 20

Freezer Model:FHV5SGWW/FHV7SGWW
19
MAINTENANCE SERVICE AND TROUBLE SHOOTING
Maintenance Service and Trouble Shooting
12.1.3 Troubleshooting observation
(1) At normal operation conditions, the temperature around the
surface of freezer evaporator is nearly the same; the thickness of
frost layer is similar. If there is no frost at the surface of
evaporator (bed type freezer at all of its inner wall), or only a small
part at the upper, conclusion can be made that the operation of
refrigeration system is not normal, the refrigerant is insufficient or
there is leakage.
(2) Check the system tubing and make sure there is no leakage,
especially at the joint connections. Refrigerant has good
permeability, and it also contains a little refrigerant oil. If there is
leak, there will be traces of oil at the leak points.
12.1.4 Troubleshooting by sounds
(1) When the freezer is working normal, high-pressure liquid
refrigerant flows into the low-pressure evaporator via
acapillarytube, a gas flowing sound and water flowing sound can
be heard. Open the freezer door and access to the evaporator, you
can hear the sound. If there is no sound or there is sound a little
now and then, there must be leakage of system refrigerant or
insufficient charge.
PDF created with pdfFactory trial version www.pdffactory.com
Page 21

Freezer Model:FHV5SGWW/FHV7SGWW
20
MAINTENANCE SERVICE AND TROUBLE SHOOTING
Maintenance Service and Trouble Shooting
(2) After switching on power, Listen to the running sound of the
compressor whether it is normal or not. Whether or not hear
normal running sounds. If there is heavy buzz that means the
motor has not been started normally. If there is bump sound, this
means that the suspended spring in the compressor is broken
and the compressor is running in tilt. When these matters occur,
please change compressor.
12.1.5 troubleshooting by touch
(1) Touch the cover of condenser, after continuous operation,
the upper part of the cover is the warmest; the temperature of
lower part is similar to room temperature. Its temperature is
relative to environment temperature. The temperature in winter is
low and the condenser’s temperature is low too, and there is only
a small part warm. In summer, the temperature is high and the
temperature of condenser cover is high too, and the whole
condenser is warm.
(2) The temperature of high-pressure exhaust pipe is high, when
touching with your hand, in summer it is hot; in winter it is also
hot. The temperature of low-pressure gas inlet pipe is low. In
summer there is dew at the pipe wall and it will feel cool when
touching; when touching in winter, it will feel cooler.
PDF created with pdfFactory trial version www.pdffactory.com
Page 22

Freezer Model:FHV5SGWW/FHV7SGWW
21
MAINTENANCE SERVICE AND TROUBLE SHOOTING
Maintenance Service and Trouble Shooting
(3) The cover temperature of The evaporator can be as low as
-30℃it will feel sticky when touching. If you’d like to touch,
please move your hand over it quickly, otherwise your hand will
be stuck.
(4) At normal operation of freezer, the temperature of filter dryer
cover is similar to room temperature, only a little warmer. If the
cover temperature is much higher or lower than that of
environment, and there is frost, there must be problem with the
refrigeration system.
Touching the above mentioned parts, if there is big temperature
difference compared with normal, there must be problem and
further decision should be made.
12.1.6 System noise repair
Normally there are two kinds of freezer noise, one is the natural
noise of compressor and fan, and the other is the resonance
noise or structural noise. The natural noise of compressor and
fan is controlled within a standard range, if the range is exceeded,
the compressor or fan needs to be repaired or changed. The
resonance or structural noise can be handled as follows:
PDF created with pdfFactory trial version www.pdffactory.com
Page 23

Freezer Model:FHV5SGWW/FHV7SGWW
22
MAINTENANCE SERVICE AND TROUBLE SHOOTING
Maintenance Service and Trouble Shooting
(1) If the freezer is not level, or if the floor is loose, please adjust
the base cover or fasten the floor.
(2) If noise is caused by tighten loose of screw between the base
cover and freezer body, please make it tight.
(3) If the reason for noise is the aging rubber cushion of
compressor or a loose fastening clip, please change rubber
cushion, or secure clip.
(4) If tubing bumps against freezer body, or against each other,
make adjustments accordingly to remove noise.
(5) If fan blade is blocked and thus causes noise, please clear the
obstacles around the fan, or adjust fan blades.
(6) If the fan supporter is loose and noise is caused, please
tighten.
12.1.7 Poor freezing effect analysis and solutions
(1) Check the position of temperature control dial, if it is set at
“weak” position, please change to “middle” or close to strong
position.
PDF created with pdfFactory trial version www.pdffactory.com
Page 24

Freezer Model:FHV5SGWW/FHV7SGWW
23
MAINTENANCE SERVICE AND TROUBLE SHOOTING
Maintenance Service and Trouble Shooting
(2) Check the rear side and the top of freezer, if it is too close to
the wall or not; if the freezer is under sunlight directly or if it is
near thermal source or not; if the room temperature is too high or
not; if the condenser is blocked by cloth pieces or paper or dirt or
not. Any one of these matters will affect heat radiation of
condenser and refrigeration ability will be reduced.
(3) Check if there are too much food stored in the freezer, if hot
food has been put in or not, Too full of food is not good for cold
air circulation. Hot foodstuff can only be put in when it gets cool.
(4) Check if the freezer door has been closed well, if the door seal
bar is too dirty and the door cannot be sealed well. Remove dirt
and put on a little talcum powder.
(5) Frequent opening and extended opening of freezer door will
reduce refrigeration ability.
12.1.8 How to handle the seal bar for poor sealing
If there is too much dirt and the sealing effect is not well, please
take a rag and dip in warm water and clean the seal bar. After
cleaned, put on a little talcum powder. If there is still seam, you
can put an electrical blower outside the seal bar and make it warm,
PDF created with pdfFactory trial version www.pdffactory.com
Page 25

Freezer Model:FHV5SGWW/FHV7SGWW
24
MAINTENANCE SERVICE AND TROUBLE SHOOTING
Maintenance Service and Trouble Shooting
keep the temperature at 50-60℃, press the bar to make it recover,
and press the bar around by hand, so that it can recover. If this is
not effective, take a piece of sponge with about 10mm wide, 5mm
thick, a little longer than the seam and put it inside the seal bar,
i.e., the place between the bottom of seal bar and the door
cushion. This will make the seam place higher and adhere to
freezer body the same as other places.
12.1.9 Why freezer cannot be used at low temperature
environment
When environment temperature is below zero, the lubrication
ability of freezing oil in freezer compressor will decrease, the
compressor will be difficult to start or cannot be started, or
Compressor damage may occur.
12.1.10 How to know there is problem with compressor
motor
It is easy to find out motor problem by checking the resistance of
coil. The method is to connect the terminals of “common” and
“run” using ohm- meter, the coil resistance can then be
determined. Using terminals “common” and “start” can measure
the resistance of starting coil. If the value is infinite, the coil must
be open. If the resistance is much less than the value the motor
has, there must be short circuit problem inside the motor or the
windings are burned.
PDF created with pdfFactory trial version www.pdffactory.com
Page 26

Freezer Model:FHV5SGWW/FHV7SGWW
25
MAINTENANCE SERVICE AND TROUBLE SHOOTING
Maintenance Service and Trouble Shooting
12.1.11 Freezer problem analysis and service
Problems Reasons Removing methods
Compressor
can not be
started
1. Fuse is broken
2. The contact of plug, socket, and cable
is not good. Cable broken.
3. The voltage is too low, 10-15% less
than rated voltage
4. The knob of temperature controller is at
“rest” position.
5. The temperature controller is out of
order.
6. Starting relay or thermal protection unit
is out of order or broken.
7. Wire broken of motor starting coil or
operation coil.
8. The compressor motor is burned or
rotator and stator are blocked to dead.
9. There is leakage of high-pressure gas
valve or the shaft is embraced to dead.
1. Check if there is short circuit and
solve it, if not, change capable fuse
2. Check and connect tightly, or
change.
3. Use till voltage rises to rated
value or attach a stabilizer.
4. Rotate the knob to wanted
position for suitable temperature.
5. Change the controller.
6. Change starting relay or thermal
protection unit.
7. Measure using R×1 position of
avometer, if there is wire broken,
change compressor.
8. Change compressor.
9. Change compressor.
Compressor
starts too
frequent,
operation
time too long,
but
temperature
drop in
freezer is too
slow
1. The distance between temperatures
sensing tube of temp. Controller and
evaporator are too big.
2. The temperature controller is out of
order.
3. Food stuffs in the freezer too much,
door opens too frequent and open time
too long.
4. The environment temperature is too
high, humidity too high, airflow is
impeded.
5. The frost layer at the evaporator is too
thick.
6. The refrigerant is insufficient or
leakage.
7. Compressor efficiency is reduced.
8. The drying filter is blocked.
1 Adjust and make it close to
evaporator cover.
2.Change the temperature
controller.
3.Reduce them.
4.Put the freezer to suitable place
and make air circulate well.
5.Remove frost regularly.
6.Check or supplement refrigerant.
7.Change compressor.
8.Change new drying filter.
Compressor
runs without
stop,
temperature
in freezer is
too low
1.The knob of temperature controller has
been set to “over cooling” position.
2.The contacting point of temperature
controller is adhered.
3.The temperature sensing probe of
controller is not placed well, and causes
maladjustment
1. Change the position to
moderate.
2. Repair or change.
3. Adjust to suitable position,
normally contact tightly with
evaporator cover.
PDF created with pdfFactory trial version www.pdffactory.com
Page 27

Freezer Model:FHV5SGWW/FHV7SGWW
26
4.Compressor efficiency reduced. 4.Change compressor.
Compressor
buzzes and
cannot be
started,
thermal
protection
unit jump
repeatedly.
1. Voltage is too low.
2. Starting relay out of order.
3. The starting coil of starting motor is
broken.
4. Compressor does not run.
1. Supplement a stabilizer, adjust
to rated value.
2. Change starting relay.
3. Change compressor.
4.The shaft and piston in the
compressor is blocked, please
change.
After short
time of
operation,
over load
protection
unit cuts off
1. The voltage is too high.
2. Over load protection unit is not good, it
jumps earlier.
3. Starter contacting point is adhered.
4. There is short circuit in compressor.
5. There is mechanical problem in the
compressor.
6. Temperature around compressor is too
high.
1. Supplement a stabilizer and
adjust its value to rated.
2. Change over load protection
unit.
3. Change starting relay.
4. Change compressor.
5. Change compressor.
6.Increase heat radiation space.
Too much
noise when
compressor
runs
1. The floor is loose.
2. The freezer body is not stable and in
level.
3. When compressor runs, friction
between tubes and freezer body causes
resonance.
4. Compressor fixing screw is loose.
5. The vibration absorption cushion for
compressor fixing is too tight, or too
loose or ageing.
6. Compressor inside noise is too big or
vibration absorption suspending spring
is broken.
1. Reinforce the floor.
2. Make the freezer body stable.
3. Move the tube a little away to
avoid friction.
4. Make the screw tight.
5. Adjust the degree of tight or
loose of vibration absorption
cushion, or change cushion.
6. Change compressor.
There is no
frost at
evaporator
1. There is serious leakage of
refrigerant.
2. There is dirt blocked the capillary or
system.
1. Check leakage, make welding
repair, and fill refrigerant again.
2. Clean the capillary or change
filter.
Frost at
evaporator is
not full
1. There is some leakage of refrigerant.
2. There is dirt block, but not serious.
3. Refrigeration quantity of compressor
is reduced.
1. Check leakage, make welding
repair, and fill refrigerant again.
2Clean the capillary and filter.
3.Change compressor.
Evaporator
frosts too
rapid, frost
layer too thick
or frozen to
ice
1. Food put into freezer contains water.
2. Too much food has been stored.
1.
Please let or make food dry
after cleaning, then store it.
2. Store only corrects quantity of
food.
Electricity
leakage of
freezer body,
you will feel
tingle when
touching by
1. Freezer body has not been connected
to the ground.
2. The compressor terminal contacts body
shell and causes short circuit.
3. When the components of electrical
system get we
t, insulation ability is
1. Make the ground connection as
stipulated.
2. Change compressor.
3. Check carefully step by step, if
insulation is seriously damaged,
please change; remove wet parts
PDF created with pdfFactory trial version www.pdffactory.com
Page 28

Freezer Model:FHV5SGWW/FHV7SGWW
27
hand dropped, electricity leaks. and put them into drying box to
make them dry.
Electricity
leakage of
fan
1. Environment temperature too high or
insulation ability of insulator is dropped.
2. There is short circuit between fan
coils or the fan coil is burned.
1. Change fan.
2.Change fan.
Fan too noisy
1. The blade of fan is blocked or fan
supporter is loose.
2. The clearance of fan axle is too big.
1. Clear obstacles around the fan
or tighten the supporter.
2. Change the fan.
The fan
doesn’t run
1. Check if any connection has come off.
2. Check is the fan is burned.
1. Change the fan.
2. Change the fan.
Electricity
leakage of
temperature
controller
1. The service time is too long.
2. The environment is too dirty.
3. Humidity is too high.
1. Change temperature controller.
2. Use brush to remove dust.
3. Make the temperature dry and
control the environment humidity.
Temperature
controller out
of order
1. There is leakage of temperature
sensing medium.
2. Damage of cam of contacting point
spring, etc.
Change temperature controller.
The probe of
temperature
sensing tube
doesn’t
contact
evaporator
well
It has not been mounted to position or
changed during transportation.
Mount it again.
12.1.12 Procedure for fan change
(1) Switch off power and open the fan protection cover.
(2) Remove the fan bolts by using fork wrench or universal tool.
(3) Loose the fan blade and take it out.
(4) Take the fan out from the space between compressor and tubes.
(5) Mount new fan from the space between the compressor and tubes, put
blade onto position and secure it by using a fork wrench or universal
tool.
(6) Make a test run; check if the operation is normal, if there is any blocking
of blade.
(7) Make sure not to bend or damage tubing during removal and
installation.
PDF created with pdfFactory trial version www.pdffactory.com
Page 29

Freezer Model:FHV5SGWW/FHV7SGWW
28
MAINTENANCE SERVICE AND TROUBLE SHOOTING
Maintenance Service and Trouble Shooting
12.1.13 Procedure for temperature controller change
(1) Switch off power.
(2) Remove side protection cover.
(3) Unscrew fastening nut.
(4) Hold the base end of temperature sensing tube and the controller, pull
out downward.
(5) Change with new temperature controller.
12.2 Common freezer problems
12.2.1 Freezer cannot be started
When switching on power, the freezer cannot be started. Determine first
that the failure is caused by inside or outside factors. The factors may be:
(1) Outside factors
① The fuse is burned, or the contact of plug and socket is not well, or the
voltage is too low.
② The knob of temperature controller is set to off position.
(2) In side factors
① Electrical problem of freezer (normally caused by connection terminals
coming off or not in good contact).
② Temperature controller out of order (contact point are burned or switch
element is damaged, etc.).
③ The start capacitor is bad.
PDF created with pdfFactory trial version www.pdffactory.com
Page 30

Freezer Model:FHV5SGWW/FHV7SGWW
29
MAINTENANCE SERVICE AND TROUBLE SHOOTING
Maintenance Service and Trouble Shooting
④ The starter relay or overload protector is bad. A bad starter normally is
caused by a burn a contact points or the welded point has come off; a
bad thermal protection unit is normally caused by burn contact points or
a bad heating wire.
⑤ The motor winding are burned.
⑥ The compressor shaft is broken and blocking the cylinder.
12.2.2 Operation of freezer is not normal
Freezer starts when power is switched on, but after a few seconds or 1-2
minutes, it stops automatically and will start again in several minutes. It
stops again within a very short time period after starting. If it runs like this
Continuity and can not work normally; there are several reasons for this
matter:
(1) Big fluctuation of voltage
The voltage required for proper operation is 220V olts. If the voltage is too
high, the current flowing through the starter will increase accordingly.
When it exceeds the permissible value, the starting contact point will keep
in connection state for a long time and cannot be released in time (at
normal situation, the motor starting coil will cut off in about 1s after
starting). This will make the coil temperature rising rapidly, and then the
thermal protection unit cuts off the circuit and stop operation. When power
is cut off, the temperature of thermal protection unit reduces quickly and
will switch power on when reaching the reset temperature. At this time, if
the contact point has not been released, the starting contact point could
not contact tightly and it is in false connection. This will make the
compressor tremble; thermal protection unit will open after a short time.
(2) Operating amperage too high
Freezer operation current is too big and will not operate normally. There are
two reasons way:
PDF created with pdfFactory trial version www.pdffactory.com
Page 31

Freezer Model:FHV5SGWW/FHV7SGWW
30
MAINTENANCE SERVICE AND TROUBLE SHOOTING
Maintenance Service and Trouble Shooting
First, the freezer stops automatically after a few seconds after starting,
several minutes later it starts again and stops automatically again. With in
cycles like this and the motor, or starter, and thermal protection unit will
burn up after a long time. The main reason is: the motor coil is shorted at
some parts.
Second, the freezer operates a certain time after starting, but it will stop
automatically before the temperature reduces before the desired
temperature is reached. After several minutes, it will start again, and the
electricity consumption increases bad. The reason is that the insulation
around the motor windings bad.
12.3 Service and technical requirements of a R134a freezer
12.3.1 Refrigeration equipment requirements
The compressor, condenser, evaporator, drying filter must be special for
R134a freezer and not be confused.
12.3.2 Repair equipment Requirements
(1) The evacuation and fill machine is special only for R134a use.
(2) Other equipment (such as pressure gauge) has no special requirements,
but once it is used for R134a freezer, it can be no longer for other use.
PDF created with pdfFactory trial version www.pdffactory.com
Page 32

Freezer Model:FHV5SGWW/FHV7SGWW
31
MAINTENANCE SERVICE AND TROUBLE SHOOTING
Maintenance Service and Trouble Shooting
12.3.3 Service procedure
(1) Operation method of repairing equipment (please see instruction
manual).
(2) Special requirements
① The time interval from opening of compressor to the beginning of
evacuation can not exceed 10 minutes.
② The evacuation time shall not be less than 45 min.
③ In case there is leakage of freezer, if leakage occurs at high-pressure end,
it is repairable. Please blow high purity N2 before welding. If leakage
occurs at low-pressure end, Check system pressure, if the system has
no pressure, the freezer has to be scrapped and change with new one, if
there is pressure, it is repairable.
12.3.4 Changing procedure of R134a compressor
(1) Switch power off:Open the protection cover by using cross screwdriver
or universal
(2) Screwdriver.
(3) Remove electrical parts of compressor.
PDF created with pdfFactory trial version www.pdffactory.com
Page 33

Freezer Model:FHV5SGWW/FHV7SGWW
32
MAINTENANCE SERVICE AND TROUBLE SHOOTING
Maintenance Service and Trouble Shooting
(4) Remove the four mounting bolts of compressor by using fork wrench or
universal tool.
(5) Remove the compressor.
(6) Install new compressor and new filter dryer and weld them. The open
time of system shall not be more than 10 min.
(7) Connect the R134a recovery unit to the low sideline of the compressor,
and then evacuate. The evacuation time shall not be less than 45 min.
(8) Fill system with R134a according to its original quantity.
(9) Check if there is any leakage at welded point by using soapsuds.
(10) Use clean gauze to wipe away welding powder and flux.
(11) Connect the electrical controlling unit of compressor.
(12) Mount and adjust temperature controller.
(13) Switch on power for test run, check unit operation.
12.3.5 Compressor installation and brazing procedures
(1) Install new compressor.
(2) Compressor is not allowed to suck in air directly for check or other test.
PDF created with pdfFactory trial version www.pdffactory.com
Page 34

Freezer Model:FHV5SGWW/FHV7SGWW
33
MAINTENANCE SERVICE AND TROUBLE SHOOTING
Maintenance Service and Trouble Shooting
(3) When changing with new compressor during service, the seal plug shall
be opened last and make the brazing and evacuation immediately.
(4) When seal plug of compressor is removed, if there is no gas flowing
sound (no pressure), the compressor shall not be used.
(5) Compressor has no seal plug it cannot be used.
(6) There should be no grease adhered to service operator’s hands.
(7) The unpacking of the filter dryer of freezer should be opened right
before use.
12.4 Application and maintenance of freezer
12.4.1 Product characters
(1) Completely green environmental bed type freezer uses R134a as the
refrigerant, which is recognized internationally. It has an ozonosphere
depletion coefficient ODP=0.
New climate type design: commercial freezer uses wide temperature zone
design. At 38℃(100°F) high temperature, the freezer can start and stop
freely.
(2) New refrigeration system design: it takes dual direction refrigeration
system, thus increases refrigeration speed and prolongs compressor
life.
PDF created with pdfFactory trial version www.pdffactory.com
Page 35

Freezer Model:FHV5SGWW/FHV7SGWW
34
MAINTENANCE SERVICE AND TROUBLE SHOOTING
Maintenance Service and Trouble Shooting
12.4.2 Notice for use
(1) The freezer should level, the tilting angle when moving shall not be
greater than 45°, so that the sliding door could not move out from its
guiding slot and other accident will not happen.
(2) The clearance between freezer and other objects should be more than
30 cm for ventilation and heat radiation.
(3) Please don’t leave the freezer at humid or corrosive gas area.
(4) Freezer should be placed at a place with proper ventilation, away from
heat source, and avoiding direct sunlight.
At the first application, please wait some time for operation (in summer 6
hours, in winter, 4 hours), when the temperature inside the freezer has
(5) reached to -15℃ and below, then you can put food in. If food is put in
too early, it may get damaged, as the temperature is still high.
(6) Do not over pack refrigerator.
(7) Place food by reasonable sorts, try to power open door frequency and
time so as to reduce the loss of refrigeration and reduce consumption.
(8) There are four wheels at the bottom of freezer, but it can only be used
for short distance and on level road movement. If it is required to move
frequently, please put the freezer onto a strong trolley base.
PDF created with pdfFactory trial version www.pdffactory.com
Page 36

Freezer Model:FHV5SGWW/FHV7SGWW
35
MAINTENANCE SERVICE AND TROUBLE SHOOTING
Maintenance Service and Trouble Shooting
(9) As this type freezer is often used outdoors, please make sure that the
plug is firm, so that unnecessary loss caused by infirm plug can be
avoided.
(10) Cold drinks and snacks, which contain much milk and needs to be
stored at low temperature, please try to put them at lower part of freezer.
(11) When the freezer is used outdoors, please keep unit away from direct
sun light. Frequently clean the inside and outside of freezer especially
the cabin part including condenser, compressor, etc.
12.4.3 Safety notice of product
(1) The freezer needs to be on a separate ground circuit with a 5A minimum
carrying capacity.
(2) If the electrical cable needs to be extended, the cross section of
extending wire should not be less than 1.5mm2.
(3) There must be reliable ground connection for the freezer; ground line is
not allowed to connect to water pipe, gas pipe, etc.
(4) Once the freezer is cut off, at least 5 minute must be waited for starting
again, otherwise the compressor or refrigeration system will be
damaged.
(5) Explosive, flammable and volatile substance, liquid filled glass
containers, alkalis or corrosive acids are not or be stored in freezer.
(6) Do not let children play in freezer compartment so as to avoid
suffocation or damage to freezer.
PDF created with pdfFactory trial version www.pdffactory.com
Page 37

Freezer Model:FHV5SGWW/FHV7SGWW
36
MAINTENANCE SERVICE AND TROUBLE SHOOTING
Maintenance Service and Trouble Shooting
12.4.4 Maintenance
Frost removal: At the inner container, there will be frost layer after using
some time. If the layer is too thick, it will affect refrigeration and increase
electricity consumption.
(1) At a regular period, when the frost layer reaches about 5mm, please
remove it by plastic shovel.
(2) When removing frost, switch power off, take out stored food and place
in a cool place. In order to accelerate frost-removing speed, containers
with warm water can be put into compartment.
(3) When frost buildup has melted, pull out the drainage plug wipe freezer
so water can drain out. Compartment down with a dry cloth.
(4) Cleaning: For safety reason, please disconnect before cleaning so as to
avoid electrical shock or damage to unit.
(5) When cleaning the freezer, please use soft cloth or sponge and dip in
water or soap water (non-corrosive neutral detergent is available). After
cleaning please make it dry by using cloth so as to avoid rust.
(6) Please clean the condenser, compressor in the cabin and dust proof
element by using soft brush regularly, so as to keep good refrigeration
effect. (Dust proof element 2-3 days)
(7) Down time: If the freezer has extended down time, please disconnect
power supply, and wipe unit clean according to the above-mentioned
methods. Open the door, till it is dry and then seal for storage.
PDF created with pdfFactory trial version www.pdffactory.com
Page 38

Freezer Model:FHV5SGWW/FHV7SGWW
37
MAINTENANCE SERVICE AND TROUBLE SHOOTING
Maintenance Service and Trouble Shooting
12.4.5 Standard procedure of maintenance
(1) Cleaning unit cabinet: Take a cross screwdriver, remove the cabinet
board and rear protection cover. Take a brush and wipe away dust from
condenser, fan, compressor and temperature controller. Wipe clean and
avoid damaging pipes and electrical parts.
(2) Switch on power and check the freezer operation. If not normal, check
and repair.
(3) Check all brazing connections. If the black paint has peeled off and
there is rust, please grind the surface slightly using No.0 grinding paper.
When the rust is removed, wipe it with clean towel. Then take a brush
and dip in alcoholic paint and paint the welded points and pipes.
(4) Check the casters and change if there is any damage.
(5) Check the power cord, if there is any wear or damage, please change.
(6) Take an avometer and check if the resistance of ground resistor is
normal.
(7) Check the insulation by using, if it is abnormal; please check the circuit
and various components.
(8) If the trademark is damaged or lost, please change with new Haier
trademark.
(9) Wipe the inside and outside of freezer clean. If freezer will be off for a
long time, wipe water away, and put the freezer into a plastic bag and
leave it at a dry warehouse with good air convection and a level floor.
PDF created with pdfFactory trial version www.pdffactory.com
Page 39

Freezer Model:FHV5SGWW/FHV7SGWW
38
MAINTENANCE SERVICE AND TROUBLE SHOOTING
Maintenance Service and Trouble Shooting
12.5
12.5.1 Freezer repair tool and equipment
(1) Recovery machine
(2) N2 container, O2 container, acetylene container and torch kit.
(3) Thermometer.
(4) Voltmeter.
(5) Test pencil.
(6) Manifold gauges
(7) Flathead screw driver.
(8) Philip screwdriver.
(9) Needle nose pliers, notch pliers, sealing pliers.
(10) Hansen valve.
(11) Tube cutters.
12.5.2 Notice for use
R134a filling equipment can only be used specially for R134a refrigerant,
PDF created with pdfFactory trial version www.pdffactory.com
Page 40

Freezer Model:FHV5SGWW/FHV7SGWW
39
MAINTENANCE SERVICE AND TROUBLE SHOOTING
Maintenance Service and Trouble Shooting
(1) It is not allowed to fill R134a by R12 filling equipment.
(2) Please keep the pliers, pipe cutting unit and Hansen valve clean, and
keep them away from grease dirt.
12.5.3 Procedure for filling equipment
(1) Preparation before use
① Visually inspect recovery machine for abnormalities, etc.
② Keep all valves closed to equipment until really to proceed.
(2) Evacuation
① Connect recovery machine hoses to system fittings
② Switch on power.
③ Switch on motor.
④ Open all related valves.
⑤ Observe the pointer of vacuum meter when it is accessing the mark –1.
⑥ Evacuation time shall not be less than 45 min.
⑦ After evacuation close valves.
PDF created with pdfFactory trial version www.pdffactory.com
Page 41

Freezer Model:FHV5SGWW/FHV7SGWW
40
MAINTENANCE SERVICE AND TROUBLE SHOOTING
Maintenance Service and Trouble Shooting
⑧ Switch off motor.
(3) Filling
① Determine the filling quantity first according to the freezer being
repaired. (Each small mark of the liquid tube is 25g, each big mark is 100g).
② Open all related valves.
③ When the liquid level has reached filling quantity, close valves.
(4) Test run
① After filling, turn on power to freezer for test run. Observe the unit
operation.
② Switch off power.
12.6 Freezer noise
12.6.1 Freezer noise sources
Freezer noise comes from the expanding with heat and contracting with
cold of compressor, evaporator or condenser; from the contacting or
resonance of pipes; from the flowing of refrigerant; or from the vibration of
freezer because the floor is not level, etc.
PDF created with pdfFactory trial version www.pdffactory.com
Page 42

Freezer Model:FHV5SGWW/FHV7SGWW
41
MAINTENANCE SERVICE AND TROUBLE SHOOTING
Maintenance Service and Trouble Shooting
12.6.2 Compressor
Freezer noise mainly comes from the compressor. The Compressor
generates various sounds. There are continuous and not continuous,
periodic and not periodic. Their frequencies may be from tens of Hertz to
thousands of Hertz. Reasons for compressor noise are:
(1) There are two pieces thin elastic steel slice inside the compressor (gas
in valve and gas out valve), when the freezer starts, each steel slice will
open and close about 47 times per second, this will cause vibration
sound. At the same time, the open and close of steel slice will contacts
other parts and also make sound. The continuous buzz we heard is this
kind of sound.
(2) When compressor is produced, there must be clearance between
components. When freezer is running, the existing of clearance will make
some components touch and gives out sound. Especially, at starting and
stopping, the forces acted on compressor components changes greatly
and bigger sound will be generated.
(3) Noise of flowing liquid
The running process of compressor is a continuous gas in and out
process.
If the pressure of refrigerant gas breathed in or exhausted out changes
suddenly, vibration sound will be generated.
PDF created with pdfFactory trial version www.pdffactory.com
Page 43

Freezer Model:FHV5SGWW/FHV7SGWW
42
MAINTENANCE SERVICE AND TROUBLE SHOOTING
Maintenance Service and Trouble Shooting
(4) Resonance sound of compressor components
Compressor parts, such as compressor body, exhaust tube, noise
eliminator in compressor, supporting spring, etc., will cause resonance
sometimes and give out sound.
(5) Collision between body and shell
Compressor body is suspended by three pieces of spring or supported by
spring in the shell. At starting or stopping, forces acted on compressor
changes greatly and sometimes make the body contact its shell and makes
sound. This situation is of shore duration.
(6) The electromagnetic sound a hermetically sealed motor, is relatively
small
12.6.3 How is the sound of water flowing generated?
Answer: When liquid refrigerant is flowing especially through the
evaporator, there will sound like water flowing. This sound is different, for
the evaporator used and assembly technologies during producing are
different. If there is not this sound at freezer operation, and evaporator
cannot make refrigeration, condenser is not hot, this means there is
restriction or there is a refrigerant leak.
PDF created with pdfFactory trial version www.pdffactory.com
Page 44

Freezer Model:FHV5SGWW/FHV7SGWW
43
MAINTENANCE SERVICE AND TROUBLE SHOOTING
Maintenance Service and Trouble Shooting
12.6.4 Gas flowing sound
At operation of compressor, it breathes in and exhausts out gas
continuously. When liquid refrigerant flows through capillary, there will be
gas jet and makes sound of gas flowing. This is normal sound and may be
different for various freezers as compressors and evaporators used are
different.
12.6.5 Why there is sudden “cluck” sound or “pattering”
sound from freezer?
Answer: This is the sound of expanding with heat and contracting with cold
of condenser and evaporator, or the sound of ice at evaporator surface
because of sudden heat or cold. This sound may occur at the following
situations:
(1) Newly bought freezer, the internal stress of materials has not been
eliminated. With time going on, the stress of materials will disappear
and it is less possible to make this sound.
(2) Temperature in the freezer is not uniform just after frost melting.
(3) When open door and take out food, the evaporator feels hot suddenly.
(4) Temperature changes greatly of condenser and evaporator several
minutes after starting or stopping of freezer.
Expand with heat and contract with cold is natural law, and this sound is
normal.
PDF created with pdfFactory trial version www.pdffactory.com
Page 45

Freezer Model:FHV5SGWW/FHV7SGWW
44
MAINTENANCE SERVICE AND TROUBLE SHOOTING
Maintenance Service and Trouble Shooting
12.6.6 Why the freezer’s noise increases after using
sometime?
Answer: After half a year or one year’s use, clearance will increase because
of wear of inner components, and compressor’s noise will increase
accordingly. Then it will get stable till the whole life of freezer.
12.6.7 Why freezer’s noise increases after stop use for
sometime?
Answer: After long time stop of freezer, the crankshaft of compressor may
be blocked by dirt brought in by lubrication oil or blocked by freezing
lubrication oil because of low temperature. For this reason, compressor
cannot be started, or noise will increase after starting, and the wear of
crankshaft will increase too. It is better that freezer doesn’t stop use.
Sometimes newly bought freezer also has this characteristic. After a period
operation, it will get normal.
12.6.8 How to reduce freezer’s noise?
At present, all kinds of freezers have the problem of noise. Scientists have
been seeking a method to solve it but to little effect. The final solution
depends on new improvements and developments in technology.
PDF created with pdfFactory trial version www.pdffactory.com
Page 46

Freezer Model:FHV5SGWW/FHV7SGWW
45
MAINTENANCE SERVICE AND TROUBLE SHOOTING
Maintenance Service and Trouble Shooting
12.6.9 why freezer noise changes greater at night?
Answer: This is because the affection of freezer noise to people is relative
to the level of environmental sound. In noisy city or shops, people feel the
noise is little, while in countryside or quiet living room will feel the same
noise greater. This is the reason that people feel the freezer gets noisier at
home than at shop.
12.6.10 What are the national stipulations for freezer
noise?
Answer: Regarding the side effect of noise to people’s health and the
technological level freezer industry can reach at present, standardized
stipulations for freezer noise is made in national standard GB8059.1-87:
family use freezer with the volume below 250L, noise≤52 dB(A) sound
power level. The noise at offices we stay everyday or other public places is
much higher than this freezer noise.
12.6.11 Why freezer noise measured at home is incorrect?
Answer: Because at home there is not the environment conditions for
freezer noise measuring, and the value measured is not effective. The
conditions for noise measuring are stipulated in national standard as the
followings:
PDF created with pdfFactory trial version www.pdffactory.com
Page 47

Freezer Model:FHV5SGWW/FHV7SGWW
46
MAINTENANCE SERVICE AND TROUBLE SHOOTING
Maintenance Service and Trouble Shooting
(1) In semi-sound eliminating room or in sound eliminating room without
sound wave reflection.
(2) Put freezer onto 5-10mm elastic cushion.
(3) Freezer must be empty and running at least 30 minutes before
measuring. If normal stop happens, please make the measurement 3
minutes after freezer starting again.
(4) 4 measuring positions are required, they are 1m away from freezer at
front, back, front left, front right respectively. The height is 1/2 of freezer;
the instrument is accurate sound level meter (A weighted).
12.6.12 What’s the different between national noise
standard 52dB(A) and ministry of light industry standard
42dB?
Answer: The noise of 52dB(A) in national standard is the sound power level.
Under the measuring conditions stipulated in national standard, measure
the freezer noise at four points, take the average of indicated reading at
greater noise situation, calculate the arithmetic average value of the four
points. This value is the average sound pressure level of noise, the
calculation formula is:
Lw=(LPA-2)+10LgS
where: LW—sound power level, dB
LPA-average sound pressure level of measuring surface, dB
S—the envelope area of measuring surface, m
2
PDF created with pdfFactory trial version www.pdffactory.com
Page 48

Freezer Model:FHV5SGWW/FHV7SGWW
47
MAINTENANCE SERVICE AND TROUBLE SHOOTING
Maintenance Service and Trouble Shooting
The standard 42dB of the ministry of light industry is the noise pressure
level measured 1m away from freezer door. This value plus 10 is the
approximate value of sound power level.
The restriction to noise in national standard is more strict and scientific. At
present, freezer noise is required to take sound power level stipulated in
national standard.
12.6.13 Why the noises of it type freezers are different?
Answer: The noise of each qualified freezer ex-factory is within the range of
national standard. Different types of freezers have different powers,
compressors used are not the same neither, and so their noises are
different. Even for same type freezers, as the noise of compressors are
different, their differences to national standard 52dB(A) are not the same,
and the noises are different.
12.6.14 Why there are greater noises at starting and
stopping of freezer?
Answer:
(1) At the starting of freezer, starting relay will make sound. The
acceleration of motor will cause vibration of compressor and makes sound.
PDF created with pdfFactory trial version www.pdffactory.com
Page 49

Freezer Model:FHV5SGWW/FHV7SGWW
48
MAINTENANCE SERVICE AND TROUBLE SHOOTING
Maintenance Service and Trouble Shooting
(2) When freezer stops, because of inertial rotation, there will be vibration
sound from compressor.
(3) When freezer stops, the compressor decelerates, high pressure and low
pressure at gas exhausting tube and returning tube will get balance, thus
causes sound of compressor.
(4) At the starting of compressor, if the voltage is low, the hammer
type-starting relay will make loud sound. Even if stabilizer is equipped with,
measurement should be made in time. If it cannot reach the requirement of
stabilizing, there must be quality problem with it, please don’t use in case
the voltage output is low.
For the previous reasons, freezer makes sound at starting and stopping.
12.6.15 Why sometimes noise at far distance is greater
than at near distance?
Answer: Because the transfer of freezer noise has relations with freezer
position, room space, etc. The sound wave giving out at freezer operation
will reflect when it touches wall or furniture. So it is possible that at a far
distance, it is noisier than near distance. So it is not correct to make
decision of big sound just by it can be heard meters away.
PDF created with pdfFactory trial version www.pdffactory.com
Page 50

Freezer Model:FHV5SGWW/FHV7SGWW
49
MAINTENANCE SERVICE AND TROUBLE SHOOTING
Maintenance Service and Trouble Shooting
12.6.16 How to determine that the sound is noise or
normal?
Answer: Normally speaking, freezer noise within the range of national
standard is normal. But if there is continuous sound of metal contacting
from compressor, please check and solve the problem in time.
12.7 National standard for noise
There are stipulations in Items 6.5.7.1 and 6.3.6.1.of GB/T 8059.3-1995.
12.7.1 When freezer is running for freezing, there will be no
obvious noise?
The noise of sound power level of freezer with the volume 250L and below,
measuring according to the stipulations in item 6.3.6.1, will not greater than
52dB(A).
Sound power level noise of freezing freezer with fan
300L below ≤55dB(A)
300-400L(including 400L) ≤60dB(A)
401-500L(including 500L) ≤63dB(A)
PDF created with pdfFactory trial version www.pdffactory.com
Page 51

Freezer Model:FHV5SGWW/FHV7SGWW
50
MAINTENANCE SERVICE AND TROUBLE SHOOTING
Maintenance Service and Trouble Shooting
12.7.2 Noise test
At the geometrical center of measuring field, put the freezing freezer onto
an elastic base (5-6mm thick elastic rubber cushion). The freezer should be
empty. Turn the knob of temperature controller to middle or near to strong
position and close the door or cover. Make the measurement at least 30 min.
after freezer operation.
During test, if the freezer reaches the temperature the knob stipulated, and
the freezer stops, the measurement must be interrupted and resume 3min.
after the freezer starts again.
The test environment is semi-sound-eliminating-room. Other test field must
comply with the stipulations in GB4214.
The test of noise is carried out as shown in figure 8. Put sound transfer
units to measurement point 1,2,3,4, measure the sound level by sound level
meter (A weighted). Take the greater readings and calculate the average
value. The arithmetic average value of these four points is taken as the
average sound pressure level noise.
According to the testing result, sound power level of the freezer being
measured can be calculated out.
LW=(LPA-2)+10LgS
Where: LW--A sound power level, dB (datum value is 1PW);
LPA --average sound pressure level of measuring surface,
dB(datum value is 20μPa);
S—measuring surface enveloped area, m2
PDF created with pdfFactory trial version www.pdffactory.com
Page 52

Freezer Model:FHV5SGWW/FHV7SGWW
51
MAINTENANCE SERVICE AND TROUBLE SHOOTING
Maintenance Service and Trouble Shooting
Assume l1, l2, l3 is the length, width, height of freezer respectively, unit is
m.
A=l1/2 +d b=l2/2 +d c=l3/2 +d
Take d=1m
Then S=4(ab+bc+ac)
The positions of measuring points are shown in table 4.
12.8Measuring technology of freezer performance
parameter
12.8.1 Measuring content
The measuring technology of freezer includes measurement of refrigeration
property and measurement of safety requirement of electrical parts. The
following items must be done before ex-factory: (1) appearance
requirement; (2) cooling speed; (3) leakage of current; (4) insulation
resistor (cool state); (5) electrical intensity; (6) starting performance; (7)
ground resistor; (8) sealing performance of refrigeration system; (9)
documents and accessories.
Spot tests for ex-factory are: (10) store temperature; (11) insulation resistor
(wet state and hot state); (12) electrical intensity (wet state and hot state);
PDF created with pdfFactory trial version www.pdffactory.com
Page 53

Freezer Model:FHV5SGWW/FHV7SGWW
52
MAINTENANCE SERVICE AND TROUBLE SHOOTING
Maintenance Service and Trouble Shooting
(13) Electricity consumption; (14) noise and vibration; (15) electroplated
parts; (16) painting cover; (17) protection of anti-electric shock; (18) cables;
(19) door opening force; (20) freezing ability; (21) rising up speed of
temperature with load.
Type tests include items (1), (2), (8), (9), (10), (13), (17), (18), (20), (21) and
the followings: (22) total effective volume; (23) ice producing ability; (24)
frost melting performance; (25) heat insulation performance and anti dew;
(26) gas tightness of door seal; (27) duration of door bar and handle; (28)
strength of supporting bracket and similar parts; (29) internal freezer
material and smell; (30) firmness of freezer and transportation test.
12.8.2 Test method and instrument
12.8.2.1 Sealing performance test of refrigeration system
In this test, freezer is put to positive pressure room, temperature is 16-32℃.
Leakage inspection instrument is set to 0.5g of yearly leakage, check every
position of refrigeration system. Leakage at any point shall not greater than
0.5g. Leakage inspection instrument normally used includes H-25 of
American GE product and Halogen instrument HLD4000 made by a German
company.
12.8.2.2 Insulation resistor
This test is to check the insulation performance of freezer. The resistance is
measured with a voltage of 500V DC added to live parts and accessible
metal parts. The resistance must be not less than 2 million ohm.
PDF created with pdfFactory trial version www.pdffactory.com
Page 54

Freezer Model:FHV5SGWW/FHV7SGWW
53
MAINTENANCE SERVICE AND TROUBLE SHOOTING
Maintenance Service and Trouble Shooting
12.8.2.3 Electrical intensity
This test is to check the electrical intensity of live parts and all accessible
metal parts. The testing equipment is flashover and breakdown unit,
voltage is 1650V (50Hz) for 2s. At the test, there will not flashover and
breakdown occurring.
12.8.2.4 Ground resistor
Check the voltage drop between freezer ground connection point and
accessible metal parts, using AC power of load empty voltage not over 12V
and 10A current. Calculate the resistance according to the current and
voltage drop. Ground connection resistance shall not exceed 0.1 ohm.
12.8.2.5 Leakage of current
When testing, give 1.06 times rated voltage to the freezer, and make the test
at operation status. The test complies with GB4706.1-84, the leakage
current testing instrument is made in accordance with the stipulations. The
leakage current measured shall not exceed 1.5mA.
12.8.2.6 Noise test
This test is carried out at semi sound eliminating room. The freezer is put
to the geometrical center of room, on a 5-10mm thick elastic cushion. The
freezer should be empty when testing. Turn the knob of temperature
controller to middle or near to strong position and close the door. Test after
the freezer has running more than 30 minutes. The freezer noise power
level, 250L and below, ≤52dB(A); 250L above ≤55dB(A)
PDF created with pdfFactory trial version www.pdffactory.com
Page 55

Freezer Model:FHV5SGWW/FHV7SGWW
54
MAINTENANCE SERVICE AND TROUBLE SHOOTING
Maintenance Service and Trouble Shooting
12.8.2.7 Test method of refrigeration performance
(1) 4 or 6 freezers can be tested simultaneously at the test room. The
material of enclosure structure of test room is made up of 10mm thick
polyurethane or polystyrene, which has good insulation. There are air
re-treatment motor sets in the test room. Air comes into the room from
the ceiling of porous plate with uniform pressure, so as to assure
airflow speed in the room not over 0.25m/s and thus keep the room
temperature uniformly.
The temperature of test room is adjustable within the range of 10-43℃.
(2) Temperature requirements for different climate freezers please refer to
table 6-1.
Each test point shall keep the stipulated environment temperature, the
fluctuation range is +-0.5K. Within the range of 2m heights away from the
test platform, the vertical temperature gradient shall not exceed 2K/m.
Table 6-1 Different climate sorts for freezers
Climate types Symbols Suitable
temperature (℃)
Measuring
temperature (℃)
Sub-temperate
zone
Temperate zone
Sub-tropical
zone
Tropical zone
SN
N
ST
T
10-32
16-32
18-38
18-43
25
25
25
32
(3) Environmental humidity: normally the relative humidity is 45-75%.
PDF created with pdfFactory trial version www.pdffactory.com
Page 56

Freezer Model:FHV5SGWW/FHV7SGWW
55
MAINTENANCE SERVICE AND TROUBLE SHOOTING
Maintenance Service and Trouble Shooting
(3) Test pack: Use the rectangle packs of following dimensions as the load
of freezer.
(4) Table 6-2 Test packs for freezer performance
Dimensions (mm) Mass (g)
Note
Small
Middle
Big
25×50×100
50×100×100
50×100×200
125
500
1000
In the geometrical center of 5oog
pack, there is a thermal element;
this pack is called M pack.
The contents of test packs are (take 1000g pack as the datum):
hydroxyethlmethylcellulose 230g; water 764.2g; sodium chloride 5g;
parachlorometacresol 0.8g. The freezing point of filling of pack is -1℃, its
thermal property is similar to lean beef.
(5) Temperature measuring gauge: The measuring of temperature normally
use platinum resistor. There are two types:
Put the platinum resistor directly into test pack (M pack) when measuring
a. Its temperature;
b. Insert the platinum resistor into the center of four tin electroplated
copper columns, the diameter and height of column is the same 15.2mm.
The measuring equipment is temperature-measuring bridge with the
accuracy of +-0.3K.
PDF created with pdfFactory trial version www.pdffactory.com
Page 57

Freezer Model:FHV5SGWW/FHV7SGWW
56
MAINTENANCE SERVICE AND TROUBLE SHOOTING
Maintenance Service and Trouble Shooting
(6) Humidity measuring instrument: the measurement of relative humidity
is wet and dry bulb method. Put the dry bulb thermometer and wet bulb
thermometer (enclose 1.5-2 layers of degreased gauze at the temperature
sensing parts of thermometers, and put the bottom end of gauze into
distilled water) under the blowing of wind with the speed of 2.5-3m/s.
Record the temperature of dry bulb thermometer, and calculate the relative
humidity using the <<Relative humidity referring table for environment
test>> GB6999-86.
(7) Cooling speed
Leave the freezer at test room, room temperature is 32℃ , the inner
temperature of freezer gets balance with room temperature (temperature
difference +-1K). Close freezer door and let the freezer running
continuously. Record the time needed for storage temperature tm to reach
tm(max) in accordance with table 13-3, cooling temperature tm to reach +14
℃, and the time the freezing temperature reaches the corresponding star
level. According to standard, 250L below freezer will not exceed 2h;
250L-500L freezers will not exceed 3h.
(8) Freezing ability
The freezing ability of freezer shall not be less than 90% of rated ability.
PDF created with pdfFactory trial version www.pdffactory.com
Page 58

Freezer Model:FHV5SGWW/FHV7SGWW
57
MAINTENANCE SERVICE AND TROUBLE SHOOTING
Maintenance Service and Trouble Shooting
(9) Electricity consumption
Leave the freezer at test room, climate temperatures are: SN, N, and ST
types 25℃; T type 32℃.
Test time is 24h. The consumption of storage freezer and storage and
freezing freezer shall be less than 115% of rated; freezing freezer is less
than 110% of rated.
Other tests to be done: the measurement of temperature of storage
(10) Freezer and freezing freezer; test of storage temperature, ice
producing ability, etc.
Table 6-3 Storage temperature of freezer
Storage Cabin Climate
type
Climat
e type
Environme
nt
temp(℃)
t1,t2,t3 tm max
Cooling
cabin
Freezing
cabin
10 Sub-temp
erate
SN
32
-1≤t1,t2,t3≤10
7
16 Temperat
e
N
32
0≤t1,t2,t3≤10
5
8≤tcm≤14
18 Sub-
tropical
ST
38
18 Tropical
T
43
0≤t1,t2,t3≤12 7
Complies
with
One star≤6
Two stars≤12
three stars≤
18
PDF created with pdfFactory trial version www.pdffactory.com
Page 59

Freezer Model:FHV5SGWW/FHV7SGWW
58
Exploded View
Model: FHV5SGWW / FHV7SGWW Manual No.:BD-146G Edition:2005.11.30
PDF created with pdfFactory trial version www.pdffactory.com
Page 60

Freezer Model:FHV5SGWW/FHV7SGWW
59
FREEZER
Model:FHV5SGWW/FHV7SGWW
No.
Spare parts
number
Spare parts description in
English
Model QTY.
Price list
($)
Failure
rate
the proportion
of the
spare-part
stock
Remark
0070808758
Foaming Lid
FHV5SGWW
1
15.327
0.15%
0.30%
1
0070808759
Foaming Lid
FHV7SGWW
1
#N/A
0.15%
0.30%
2
0070200337
Top hinge cover 2
0.024
0.03%
0.06%
3
0070202046
Bottom hinge cover 2
0.136
0.03%
0.06%
4
0077050002
Philip screw 16
0.006
0 0 X
5
0070803613
Right Hinge 1
1.175
0.14%
0.28% *
6
0072040402
Hole cap(small) 1
0.007
0 0 X
7
0077010059 Screw
2
0.005
0 0 X
8
0070803613
Right Hinge 1
1.175
0.14%
0.28% *
0070100415 Food basket
FHV5SGWW
1
0.545
0.01%
0.02%
9
0070103338
Food basket
FHV7SGWW
1
0.850
0.01%
0.02%
10
0071250010
Taenia 1
0.010
0 0 X
11
0072040004
Drain stopper 1
0.012
0 0 X
0070805177
Outer cabinet
FHV5SGWW
1
47.263
0.15%
0.30%
12
0070805180
Outer cabinet
FHV7SGWW
1
56.172
0.15%
0.30%
13
0070201812
Hole cap(large) 1
0.027
0 0 X
14
0072040012
Drain plug 1
0.034
0 0 X
15
0077070015 Washer
4
0.003
0 0 X
16
0070101899
Castors
4
0.397
0.30%
0.60% *
17
0070202498
Thermostat knob
1
#N/A
0 0 X
18
0075050002
Red light 1
0.230
0.50%
1.00% *
19
0075050008 Green light
1
0.670
0.50%
1.00% *
20
0070202499
Control panal
1
#N/A
0.05%
0.10%
21
0075040013 Thermostat
1
2.587
0.10%
0.20%
22
0070401521
Wire
1
#N/A
0.30%
0.60% *
23
0072070014 clip
1
0.007
0.01%
0.02%
24
0072070010 Thermostat protectbag
1
0.070
0 0.012%
25
0070102761
Capacitor clip
1
0.051
0 0.012%
26
0075020244 Capacitor
1
1.744
0.78%
0.12% *
27
0077010062
screw 1
0.004
0 0 X
28
0075020010
Ground screw 4
0.015
0 0 X
29
0075020051
Compressor spring washer
4
0.011
0 0 X
30
0075020137
Compressor washer 4
0.003
0 0 X
31
0075020182
Compressor sleeve 4
0.057
0 0 X
32
0075020185
Rubber spacer 4
0.046
0 0 X
33
0074000035 Compressor
1
40.543
0.30%
0.60% *
34
0075020238 Protector
1
1.505
0.40%
0.80% *
35
0075020131 Starter
1
3.398
0.40%
0.80% *
36
0075020187 Compressor cover
1
1.015
0.40%
0.80% *
PDF created with pdfFactory trial version www.pdffactory.com
Page 61

Freezer Model:FHV5SGWW/FHV7SGWW
60
37
0077050002
Handle 4
0.006
0 0 X
38
0070804793
Handle 1
#N/A
0 0 X
39
0070803227 Lock
1
1.284
0 0 X
40
0077050051 Lock group
2
0.010
0.10%
0.20%
41
0071150025 Lock nose
1
0.099
0 0 X
42
0077010062 Screw
1
0.004
0 0 X
43
0070103022
Engine room cover 1
0.435
0 0 X
44
0074180003 Filter drier
1
0.530
0.10%
0.20% *
45
0079020006 Hot shorten tube
1
0.070
0 0 X
46
0077010024 Screw
1
0.003
0 0 X
47
0072060002 Wire clip
1
0.022
0 0 X
48
0071250271 strap
1
0.053
0 0 X
49
0077070006 spring washer
3
0.001
0 0 X
50
0077050006 Ground screw
3
0.012
0 0 X
51
0071190021 Compressor supporter
1
1.429
0 0 X
52
0077010022 Philip screw
2
0.004
0 0 X
53
0070401761
Power cord
1
#N/A
0.02%
0.04% *
54
0070101897 Compartment grill
1
0.417
0 0 X
55
0077010022 Philip screw
4
0.004
0 0 X
56
0070503547A
Use manual
1
0.284
0.10%
0.20%
0070500917A
Carton
FHV5S
GWW
1
2.181
0.20%
0.40%
57
0070501088A
Carton
FHV7SGWW
1
2.552
0.20%
0.40%
1,The failer rate and the proportion of the spare-
part stock are regarded as the reference of the stock for
spare-parts;The first time should be stocked accroded with the proportion of the spare-
parts,and it should be
adjusted with the actual quantity 3 m
2,easy-damaged;The spare-part which is often damaged and the customer must stock in the spare-
parts
warehouse,and should be marked with"*"
3,possible damaged:The spare-pa
rt which is not often damaged like the easy damaged one and the customer
may stock in the spare-part warehouse accord with the actual case,should be marked with " "
4,not need provided :The spare-part which is seldom damaged or the maintenance man could
not
maitmains.The spare parts may be air freighted by the factory if they were damaged.The customer nees not
stock in the spare-part warehouse,should be marked wit
5,Above should be improved accord with the reply of the market half a year per time.
6.The spare parts price on net is FOB Qingdao term.
PDF created with pdfFactory trial version www.pdffactory.com
 Loading...