

Page 1
❉
●
❑
Useand Care Guide
Food Freezer
Safety instructions .........................3
❑
●
.
Problem Solver . . . . . . .
More questions
GEAnswerCenter@
?...call
8011626.217011
..........18
w
Operating Instructions, Tips
Energy-Saving Tips . . . . . .
Food Freezing Suggestions..................5-12
lntetior
l<ey-Ejecting Lock . . . . . . .............................4
Packaging . . . . . . . . . . . . . . . . .......................13
Temperature Control .....................................4
Temperature Monitor . ................................4
Shding Basket . . . . . . . . . . . . ..........................4
Storage Times . . . . . . . . ...............................6
..-.
-+::
Careand Cleaning
IiiD
Cleaning, Outside and inside ....................l5
Defrosting
Power Failure . . . . . . . . . . . ..........................15
Light
......~
............................2
......~
. . . . . ............................4
. . . . . . . ..........................14
❑
Eiiill
‘0
El
Preparation
Clearance...__~_~...~.~
Location...~t~..~...~....
Vacationand Moving
Installation
Installation .
Adapter Plug . . . . . . . . . . . . . ....................17
Electrical Requirements.... ......................17
Extension Cords . . . . . . .
Grounding . . . . . . . . . . . . . . ......................17
Consumer Services . .
Model and Serial Numbers .............2
Repair Service . . . . . . . . . .
Warranty . . . . . . . . . . . . . . . .
...........................16
..........................16
Precautions...........l6
.... ...........................17
HHtiM.H.M
.........................17
...........................2
.
........Back Cover
.
..........19
GE Appliances
ChestModel
FH25
Page 2
HELP US HELP YOU...
Read this book carefully.
It is intended to help you operate and maintain your
new freezer properly.
Keep it handy for answers to your questions. These numbers are also on the Consumer Product
If you don’t understand something or need more help,
write (include your phone number):
Consumer Affairs
GE Appliances
Appliance Park
Louisville, KY 40225
Keep proof of original purchase date (such as your
sales slip or
establish the warranty period.
cancelled
check) with this book to
Write down the model and serial numbers.
You’ll find them on a plate located at the top outside
rear corner of the freezer.
Ownership Registration Card that came with your
freezer. Before sending in this card, please write these
numbers here:
Model Number
Serial Number
Use these numbers in any correspondence or service
calls concerning your freezer.
If you received a damaged freezer, immediately
contact the dealer (or builder) that sold you the
freezer.
Save time and money. Before you call for service,
check the Problem Solver. It lists causes
operating problems that you can correct yourself.
of minor
ENERGY-SAVING TIPS
●
Location of your freezer is important. Don’t locate it ● When using your freezer, be careful not to leave the
in a warm, unventilated laundry area or storage
room. Avoid putting it next to your range, a heating
vent or where the sun will shine directly on it.
●
Try to arrange your frozen foods systematically so . If you turn the temperature control to the coldest
you can find what you want in the freezer quickly. position for quick freezing, don’t forget to turn it
●
Don’t open the freezer lid more often than necessary
and close it as soon as possible, particularly in hot,
humid weather.
IF YOU NEED SERVICE
To obtain service, see the Consumer Services page in
the back page of this book.
We’re proud of our service and want you to be
pleased. If for some reason you are not happy with the
service you receive, here are three steps to follow for
further help.
FIRST, contact the people who serviced your
appliance. Explain why you are not pleased. In most
cases, this will solve the problem.
lid open. Always check to make sure the freezer lid
is properly closed before leaving the house or
retiring for the night.
back to the regular setting.
NEXT, if you are still not pleased, write all the
details—including your phone number—to:
Manager, Consumer Relations
GE Appliances
Appliance Park
Louisville, Kentucky 40225
FINALLY, if your problem is still not resolved, write:
Major Appliance
Consumer Action Panel
20 North Wacker Drive
Chicago, Illinois 60606
2
—.
—
Page 3
WARNING—When using this appliance,
A
always exercise basic safety precautions,
including the following:
.
Use
this
appliance
as described in this Use and Care Book.
●
‘aJJi
0
●
Never unplug your freezer by pulling on the
power cord.
straight out from the outlet.
.
Repair or replace immediately all electric service
This freezer must be properly installed
in accordance with the Installation
-.. ‘
Instructions before it is used. See
grounding
only for its intended purpose
instructions in this book.
Always grip plug firmly and pull
cords that have become frayed or otherwise
damaged.
abrasion damage along its length or at either the
plug or connector end.
●
After your freezer is in operation, do not touch
Do not use a cord that shows cracks or
the cold surfaces, particularly when hands are
damp or wet.
cold surfaces.
●
Don’t refreeze frozen foods which have thawed
Skin may adhere to these extremely
completely.
●
You may safely refreeze frozen foods that have
thawed if they still contain ice crystals
are still cold—below 40°F. (Shellfish cannot be
10°F.
kept above
growth.)
●
Thawed ground meats, poultry or fish that
safely because of bacteria
or if they
have any off-odor or off-color should not be
refrozen and should not be eaten.
cream should be discarded. If the odor or color of
any food is poor or questionable, get rid of it. The
food may be dangerous to eat.
Thawed ice
●
Even partial thawing and refreezing reduce the
eating quality of foods,
vegetables and prepared foods. The eating quality
of red meats is affected less than that of many
other foods, Use refrozen foods as soon as
possible—they won’t keep as long as foods frozen
only once, and the sooner they’re used, the better
their eating will be.
particularly fruits,
. If your old freezer is still around the house
but not in use, be sure to remove the lid or
door.
This will reduce the possibility of danger
to children.
●
Caution should be used when removing the
door of a freezer.
used when removing the lid of a chest freezer, as
most chest freezer lids are under spring tension.
Contact the manufacturer’s representative for a
method of safe removal.
Q
Unplug your freezer, before making any
Particular caution should be
repairs, cleaning or changing the light bulb.
NOTE:
be performed by a qualified individual.
Turning the temperature control to the
position does not remove
on models with interior light.
s
Do not store or use gasoline or other flammable
We strongly recommend that any servicing
OFF
power
to the light circuit
vapors and liquids in the vicinity of this or any
other appliance.
SAVE THESE
INSTRUCTIONS
3
.
.
Page 4
OPERATING YOUR FREEZER
Starting
1. Clean the inside of the freezer with a mild solution
of baking soda and water (refer to Care and control from No.
Cleaning section).
2. Connect cord to power outlet.
3.
Set alarm to OFF.
4. The temperature control has been factory pre-set to
a position which should provide satisfactory food
storage temperatures. The control knob is
adjustable to provide a range of temperatures for
your personal satisfaction.
5 Allow freezer to operate for at least two hours
before placing food inside.
6.
Set alarm to ON.
Temperature Control
Freezing temperature selection is made by setting the
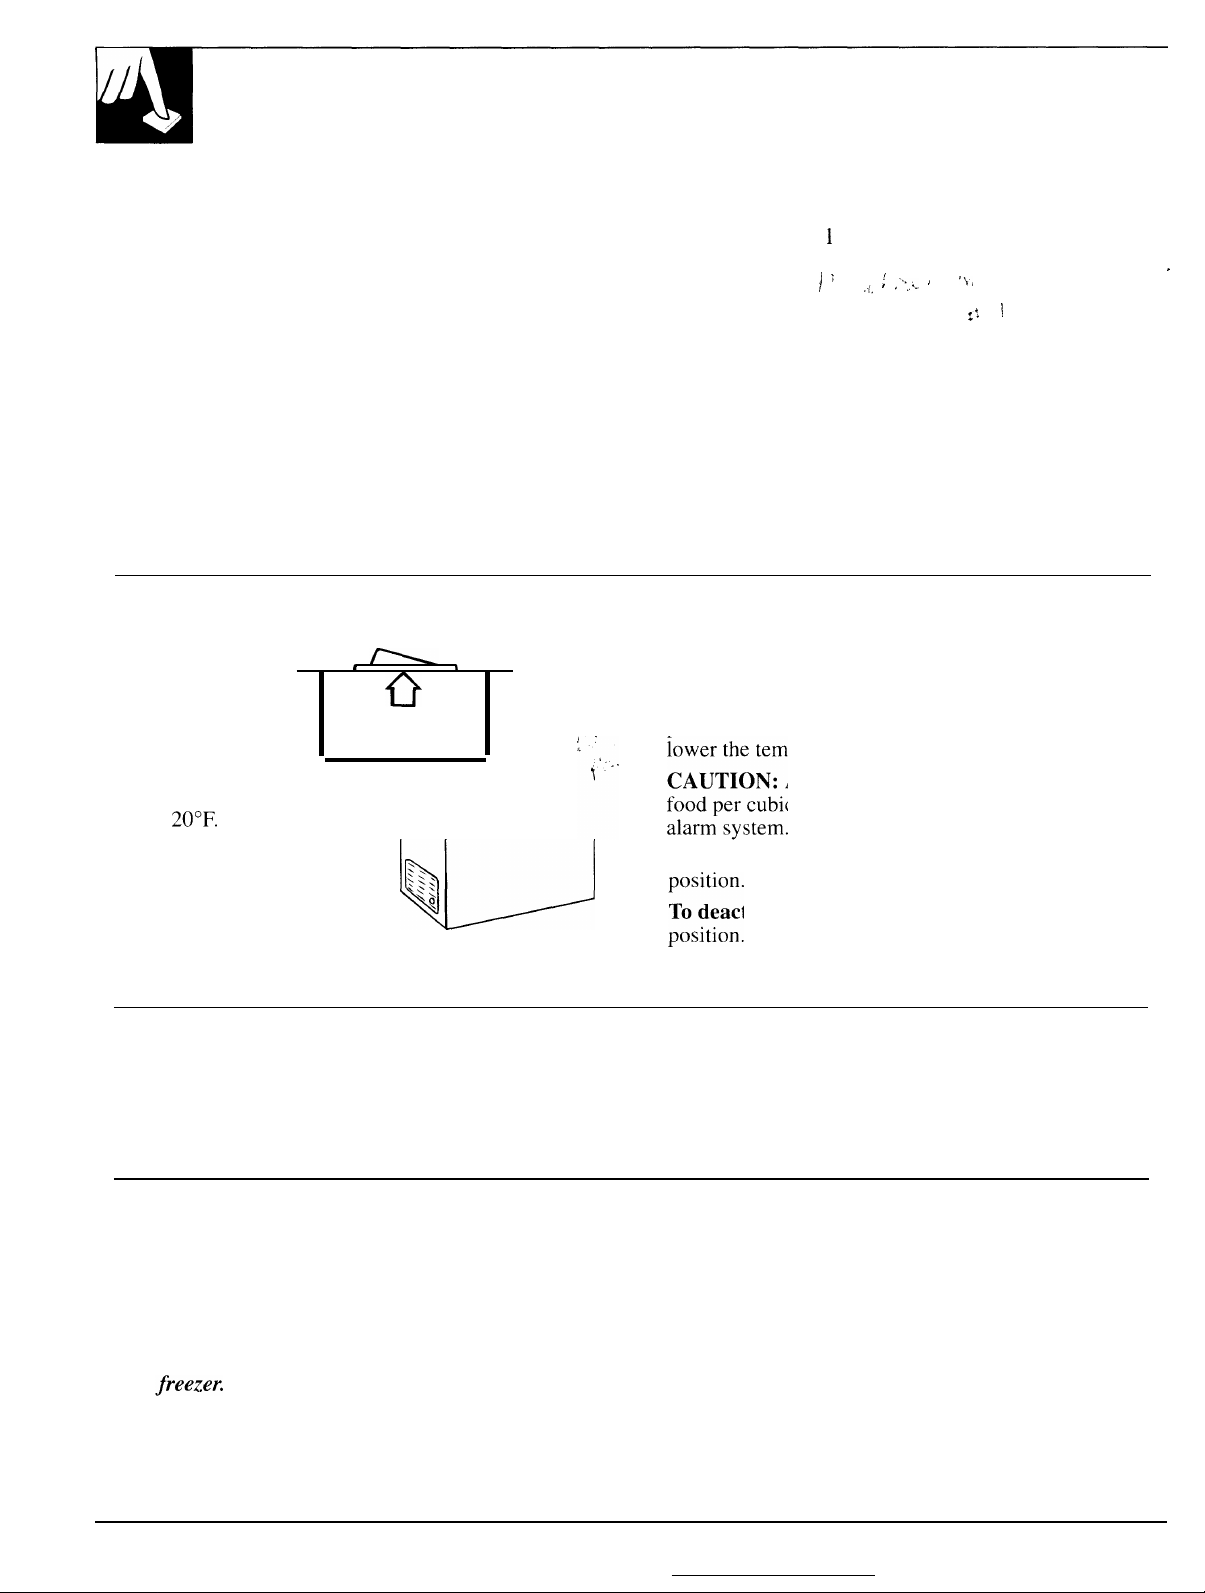
Temperature Monitor
The temperature
alarm switch is
located in the back
of the lid on the left
side. The alarm will
sound if the freezer
temperature rises
above
20”F.
The alarm operates
on household
electricity. If the
power fails, the
alarm will not
perform.
t
ON
HIGH-TEMP
ALARM SWITCH
‘ “i
W/
OFF
&
;
’””al armsystem.
An ON/OFF switch allows the temperature alarm to
be deactivated when not wanted. The freezer is
shipped with the temperature alarm in the OFF
position. After the freezer has run long enough to
, lower the temperature, you may activate the alarm.
‘ CAUTION: Adding more than 3 pounds of warm
food per cubic foot of freezer capacity can trigger the
To activate the alarm, flip the switch to the ON
To deactivate the alarm, flip the switch to the OFF
:::
1
to No. 7 (coldest).
/ ~
,
,,, : ,%,,- ~
, ‘} .,..- . ‘ “ ‘ ‘
)
-
\
:i
Interior Light
Turns on when the door is opened; turns off when the
door is closed.
Key-Ejecting Lock
Keeps your frozen food supply secure. The springloaded lock is designed so that the key is automatically
ejected–key will not remain in lock in either the open
or locked position.
Keep key out of reach of children and away from the
food
freeze~
4
Sliding Basket
Keeps frequently-wanted foods within easy reach;
can be moved aside to make foods below more
readily accessible.
Defrost Water Drain
Up-front drain with hose adapter speeds emptying of
defrost water.
Page 5
FOOD FREEZING SUGGESTIONS
Rules for Successful Food Freezing
w!
/
1. Freeze the best. Freeze only top-quality foods.
Freezing retains quality and flavor; it cannot
improve quality.
2. Keep work area clean.
3. Work quickly. The quicker fruits and vegetables
are frozen after picking, the better the
product will be. You’ll save time, too, with less
culling and sorting.
4.
Choose correct packaging materials. Frozen
foods will dry out if not properly wrapped or
packaged. Both rigid containers and flexible bags
or wrappers can be used. Make sure
especi~~ly
Follow reliable instructions for freezing different
5.
types of food.
Freeze foods in practical meal-sized packages.
6.
7.
Fill container properly. When placing liquid or
semi-liquid foods in containers, leave about 1/2” at
top ( 1 X“ for glass containers) to allow for
expansion during freezing.
designed for freezing.
fro~en
they
.
are
Helpful Materials
8.
Freeze correct quantities. There is an established
maximum of food your freezer is designed to freeze
at one time—approximately 3 pounds per cubic
foot of freezer capacity. In normal position, your
freezer’s control dial will maintain sufficiently low
temperatures in the freezer to freeze recommended
quantities of food.
. .
H
you have a large quantity of food to freeze, store
part of it in your-refrigerator’s fresh food
compartment until the first quantity is frozen.
9. Freeze foods quickly. Continually rotate frozen
foods to the front of the freezer so the
frozen
foods are used first.
10. Store frozen foods immediately. Commercially
frozen food can be stored any place in the freezer.
These foods should not be allowed to thaw before
being placed in the freezer.
—
longest-
You’ll find these materials helpful in preparing foods
for the freezer:
● Large kettle with close-fitting lid for blanching
vegetables and fruits
● Fine sieve or small colander to put vegetables in
for blanching
c
Assortment of knives for cutting up meat, fruits
and vegetables
. Rolls of absorbent paper towels or soft cloth towels
for draining foods
● Proper freezer packaging materials for various types
of food
. Small loading funnel for fruit and vegetable
containers, to keep sealing edge clean
● Glass marking pencil for labeling packages
● Roll of freezer tape
Quick-Freezing
For quick-freezing large amounts of food, turn control to No. 7 two hours
before loading.
Never freeze more than three pounds of food per cubic foot of freezer
capacity at one time.
(continued next page)
5
Page 6
FOOD
FREEZING SUGGESTIONS
(continued)
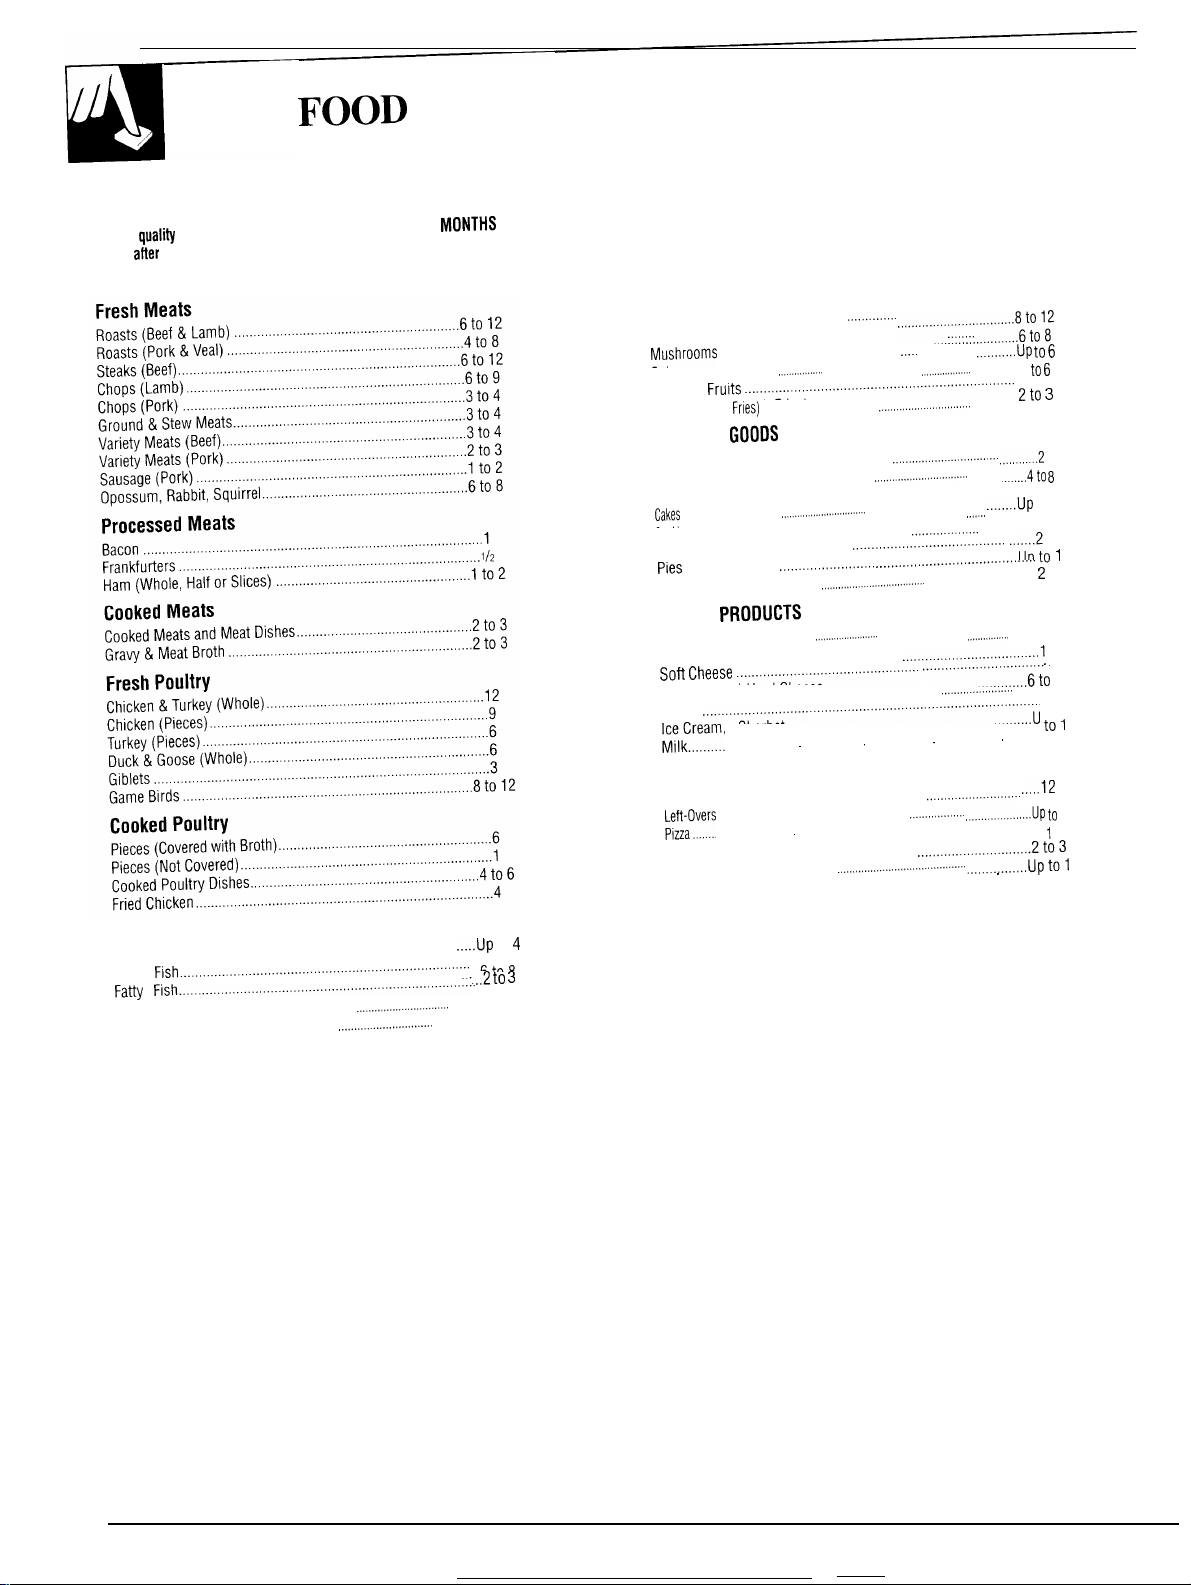
Suggested Storage Times
Eating
quality
drops
aft(?r
time
shown
FISH
Shellfish ...............""""""""'""""""""'"""""""""
Lean
Flsh,,,,,,,,,,,,,,,,.,,,,,.,.,,......,..,..................'''''
Fafly Fish,,,,,,,,,,,,,,,,,,,,,,,,.,,..,.,.....,.............
Shrimp (Raw, Unpeeled) . . . . . . . . . . . . . . . . . . . . . . . . . . . . .
Shrimp (Cooked) . . . . . . . . . . . . . . . . . . . . . .
.
,...................3
lYIONTHS
FREEZER
AT OOF.
(-18° C.)
.....up
to
.,,,,6 t.*
,,,2 t. ~
,
IN
Eating
quality
drops after
time shown
MONTHS IN
FREEZER
AT OOF.
(-18° C.)
PRODUCE
Most Fruits & Vegetables . . . . . . . . .
Asparagus . . . . . . . . . . . . . . . . . . . . . . . . . . . . . . . .
Mu,shroonIS . . . . . . . . . . . . . . . . . . . . . . . . . . . .................,,,,,,,,,,,,3 t.
On Ions . . . . . . . . . . . . . . . . . . . . . . . . . . . . . . . . . . . . . .
Citrus
Fruits .,,,,,,,:,,,,,,,.,...,.,..,...............’”
Potatoes (French
BAKERY
Breads, Quick (Baked) . . . . . . . . . . . . . . . . . . .
Breads, Yeast (Baked) . . . . . . . . . . . . . . . . . . . . . . . . . . . . . .
Breads, Yeast (Unbaked) . . . . . . . . . . . . . . . . . . . . . . . .. I/2
Cake: . . . . . . . . . . . . . . . . . . . . . . . . . . . . . . . . . . . . . . .
Cookies . . . . . . . . . . . . . . . . . . . . . . . . . . . . .
Fries)
. . . . . . . . . . . . . . . . . . . .
GOODS
pastry (unbaked) ““”’””’’”””””””””””
pies
(Baked) . . . . . .
Pies (Unbaked) . . . . . . . . . . . . . . . . . . . . . . . . . . . . . . . . . . . . . .
DAIRY
Butter . . . . . . . . . . . . . . . . . . . . . . . . . . . . . . . . . . . . . . . . . . .
PRODUCTS
Cottage Cheese . . . . . . . . . . .
Sofi
Cheese
Hard or Semi-Hard Cheese . . . . . . . . . . . . . . . . . . . . . . . . . .....,,,,12
Eggs
.,..,......................"""""""""""'""'""""""u
fi;l~ream, Sherbet ..........””””””””””””” p,
. . . . . . . . . . . . . . . . . . . . . . . . . . . . .
.
,,,,,,,,,,,,,,,,,,,,,,.,..,..,................
. . . . . . . . . . . . . . . .
.
OTHER FOODS
Candies . . . . . . . . . . . . . . . . . . . . . . . . . . . . . . .
;:ft;Overs
(Cooked) . . . . . . . . . . . . . . . . . . . . . . . . ....................UP ~0 1
. . . . . . . . . . . . . . . . . . . . . . . . .
Prepared Dishes . . . . . . . . . . . . .
Sandwiches . . . . . . . . . . . . . . . . . . .
Soups, Stews, Casseroles.. . . . . . . . . . . . . . . . . . . . .
New
techniques are constantly being developed. Consult the County
4
2
Extension Service or your local Utility Company for the latest
information on freezing and storing foods.
. . . . . . . . . . . . . . . . . . . . . . . . . . . . . . . . . . . . . . . . . . . . . . . . . .
.
....................::::::::::::~t~ol~
.
.
.
‘“”’’”””””””””’’’””””’”””””
.....................~
. . . . . . . . . . . . . . . . .
.
.
.....................:::::::~~~031
.
,,,,,,,,,,UP t.
.
...,.3 to 4
*t. ~
. . . . . . . .
........4; ~
.,.,,...up
.
. . . . . . . . . . . . . . .
““up~o 1
....5 to 6
.
.“’’”’6to
. . . . . . . . . . . . . . . . .
.
.
. . . . . . . . . .
.
. . . . . . . . . . . . . .
.
. . . . .
.
to 1
4
2
,.,,.12
2 to 3
~
6
,
2
t.,
6
Page 7

Freezing Meat, Fish, Poultry & Game
●
Preparation and Packaging.
fish and game in moisture/vapor-proof material such
as aluminum foil, cellophane, freezer foil or plastic
bags. Exclude as much air as possible. Label and
freeze
at
once.
NOTE: Packages of fresh meats and poultry as
commonly purchased in retail stores are not suitably
wrapped for freezing. Rewrap in
proof material.
● Meat. Remove as much bone and fat as possible
from meat before packaging. Do not salt meat.
When individual pieces of meat are packaged
together, place double thickness of freezer wrap
between them for easier separation during thawing.
● Poultry. Clean thoroughly before packaging, Pad
sharp or protruding bones with folded freezer paper
or aluminum foil. Wrap giblets separately.
. Wild Game. The same methods suggested for
poultry and meat may be used for preparing and
freezing wild game.
. Fish. Clean fish thoroughly before packaging. Cut-
up pieces of “lean”
fish such as haddock and cod
should be rinsed in brine made with 2/3 cup of pure
table salt per gallon of water to reduce leakage
during thawing. Keep in solution not over 1 minute.
Brine is unnecessary for whole fish or fatty fish such
as salmon or mackerel.
Package meat, poultry,
moisture/vapor-
●
Oysters, Clams, Shrimps, Scallops. Wash shells in
running water (soak clams) and shuck, working
quickly. Discard shells. Do not wash clams or
oysters. Scallops may be rinsed in fresh water. Pack
in freezer carton and freeze immediately. Shrimps
are best if frozen uncooked. Remove and discard
heads and black vein. Wash and package in freezer
containers.
●
Crabs and Lobsters. Chill fish and remove back
shell. Steam or boil in water for 15 to 20 minutes.
Cool thoroughly, then pick edible meat from
shells
and package in proper containers. Seal and freeze
immediately.
●
Thawing. Frozen meat, fish or poultry should be left
in the
oti-ginal
package and thawed in the refrigerator
or cooked frozen. AHOW approximately 5 hours per
pound to thaw meat in the refrigerator. When
cooking frozen meat, increase the cooking time by
approximately 1/3 to 1/2 if cooking
conventionally—
much less if cooking with microwaves. If necessary
to thaw meat quickly, thaw at room
temperature-
allowing only 2 hours per pound.
Don’t refreeze meat that has completely thawed; meat,
whether raw or cooked, can be frozen successfully
only once.
o“
o
a
Freezing Vegetables
1.
Only vegetables at their peak of maturity should be
chosen for freezing. Some varieties of vegetables
are better adapted for freezing than others. For
complete information, contact your County
Extension Service.
2.
Sort, clean and wash vegetables in cold water. Keep
those of the same size all together. Large pieces
take longer blanching.
Work with
3.
small
amounts, about one pound, that
can be packaged in a short time.
Blanch all vegetables except tomatoes, green
4.
peppers and herbs before packaging. Proper
blanching stops the ripening process so vegetables
are held at their peak of freshness.
(continued
fle.rt pa<qe)
7
—
Page 8

FOOD FREEZING SUGGESTIONS
(continued)
Blanching Vegetables by Steam
Use pressure
utensil.
1. Fill utensil with 2 inches of water. Bring to the
boiling point.
2. Place vegetables in a wire basket or rack above the
boiling water. Cover and begin timing immediately
(refer to guide at right for steaming times). Keep
heat on HIGH while vegetables are steaming. If using
a pressure cooker, the petcock should be left open.
3. Chill vegetables quickly the same length of time as
for steaming by plunging them into ice water, or
under cold running water. Remove from water and
drain on towels.
cooke<
vegetable
blanche~
or other large
Blanching Vegetables by Boiling Water
1. Select large utensil of 4- or 5-quart capacity and fill
with one gallon of water for each pound of
vegetables to be blanched at one time. Use two
gallons for each pound of leafy vegetables. Bring
water to boiling.
2. Blanch one pound of vegetables at a time. Place
vegetables in a wire basket or colander. Immerse in
boiling water and cover. Count time immediately
after boiling begins (see guide at right). For high
altitudes, add
times.
3. Chill vegetables quickly the same length of time as
for blanching by plunging them into ice water, or
under cold running water. Remove from water and
drain on towels.
Packing
Package vegetables in moisture/vapor-proof containers. Leave l/2-inch
head space in package. (1
X-inch
for glass containers). Freeze quickly.
1
minute to blanching and chilling
Page 9

Guide to 1
VEGETABLE
reezing Vegetables
PREPARATION
B;;;;;
BLANCHING
Steam
PACKAGING
ASPARAGUS
BEANS
Green
BEANS
Lima
BROCCOLI
BRUSSELS
SPROUTS
CARROTS
CAULIFLOWER
CORN on COB
CORN
Whole Kernel
GREENS
PEAS
POTATOES
French Fried
POTATOES
White
POTATOES
Sweet
SQUASH
Wash in cold water, remove tough part of stalk, sort according
to size of stalk, Cut spears to fit containers, or cut in 2-inch
lengths. Scald according to size of stalk.
Cut snap beans in 1 or 2-inch
whole or slice.
Wash and sort pods in cold water. Scald, cool in ice water and
squeeze beans out of pods,
Select tender uniform heads of dark green color. Let stand
l/2-hour in salted water (4 teaspoons salt in 1 gallon water)
to remove insects, Wash and remove woody stems. Split
lengthwise into pieces so buds are not more than 1 1/2 inches
across. Scald.
Clean and cut sprouts from main stem, sort according to size
and scald.
Clean, wash and peel, Leave small carrots whole. Cut others
into slices or cubes.
Trim and wash. Break into flowerets 1 inch wide and about
1 1/2 to 2 inches long. Soak in salted water for 30 minutes.
Drain,
Select young corn with thin, sweet milk, Husk and remove silk. Small ears
Wash ears carefully. Sort according to size.
Scald corn on cob and chill, Cut off whole kernels.
Beet greens, collards, kale, mustard greens, spinach, Swiss
chard, turnip greens. Wash and lift out of water to drain.
Remove tough stems and imperfect leaves, Cut in pieces, if
desired. Scald.
Shell and discard over-mature peas.
Peel and slice lengthwise for frying. Fry in deep fat heated to
3600F,
for 4 minutes until tender but not browned. Drain well.
Select smooth new potatoes directly from garden. Wash, peel
or scrape, and scald.
Wash, Cook until almost tender and cool, Peel; cut
in halves, slice or mash,
Select tender
sauash
with soft rind. Cut in l/2-inch slices.
I
pieces. Leave “French” beans
I
1
I
I
Small stalks
2 min. 3 min. *
Medium stalks
3 min.
3 min.’ 4 1/2 min.
1
min. * 4 min
2 to 3 min
3
4 rein’
Small
Medium to large
min. 5 min.’
3 min.’
3 min.** 4 1/2 min.
7 min.’
Medium
9 min. *
Large ears
11 min.’
5 to 6 min. *
Beet greens, kale,
chard, mustard and
turnip greens
2 min.’
Collards
3 min.
l/2to
2 min.’* 2 min. Chill and drain. Package
3 to 5 min
Soinach
2
min.;
3 min. * 4 1/2 min.
4 min.’
4 to 5
5 1/2 min.
4 1/2
ear:
‘in”
10 min.
12 min.
6 min.
min.
min.
Chill immediately. Drain. Pack
whole stalks parallel with heads
in alternate directions, leaving
sr)ace.
Seal.
st)ace.
sDace.
500°F.
Seal.
Seal,
Packaae
oven.
no head
Chill and drain. Pack in freezer
carton leaving l/2-inch space.
Cool promptly in cold water.
Drain. Pack in cartons, bags
or boxes, leaving l/2-inch
head space. Seal.
Chill immediately. Drain.
Package in cartons in alternate
directions, leaving no head
space. Seal.
Chill and drain. Pack in
freezer containers, leaving
no head space,
Chill, drain and pack into
containers, leaving l/2-inch
head space.
Chill immediately. Dram.
compactly, leaving no head
sDace.
Chill twice as long as you
scald. Wrap several ears
together in freezer paper.
Place in polyethylene bag.
Seal,
Package, Leave l/2-inch
Chill in cold water and drain
thoroughly between absorbent
towels. Pack in freezer cartons
or bags and seal.
compactly, leaving l/2-inch
head
Cool to room temperature.
Package in freezer bags or
cartons and seal, To serve,
thaw and cook in 375°F. fat
until brown. Or cook,
unthawed, in
Chill, drain, package in cartons,
bags or boxes. Leave l/2-inch
head
pack in freezer containers,
allowing l/2-inch head
space, Seal,
Chill immediately, drain and
package. Leave l/2-inch
head space. Seal.
I
-
*Preferred method ‘‘Use 4 teaspoons salt to a gallon
(continued next page)
9
Page 10

FOOD FREEZING SUGGESTIONS
(continued)
Preparation for Freezing Fruits
1. Sort fruits for uniform ripeness, quality and size.
2. Wash fruits thoroughly in cold water and drain
thoroughly.
3. Work with small quantities and freeze quickly.
4. Pack in cartons, cutting or slicing larger fruits. Add
sugar or syrup.
5. To avoid discoloration of apples, apricots, peaches
and pears, (
teaspoon to 1 cup of syrup) following directions on
label, or (2) dip slices of fruit for
solution of
water, rinse in cold water, drain, and pack in sugar
or syrup. Place crumpled piece
wrap on top of fruit before closing to keep fruit in
syrup.
1
) add ascorbic acid mixture to syrup (
1
minute in
3
tablespoons lemon juice to 1 gallon
of cello or waxed
Guide for Making Syrup
Cups of suger
Percentage
of syrup
to be added per
pint of water
Approximate
yield in pints
Packing Frozen Fruits
Always allow head space. Allow l/2-inch head space
in pint containers ( 1 inch for glass), 1 -inch head space
in quart containers (2 inches for glass).
Sweetening fruits helps retain flavor,
texture. The method
used.
See
guide at right for recommended method.
(a) Dry sugar pack. Suitable for
own
1
juice when
~ulde at
has dissolved in the juice drawn from the fruit, then
pour into containers.
(b)
comparatively little juice, and those which darken
readily. Add syrup to cover fruit. Allow 1/2-inch head
space ( 1 X-inch for
(c) Unsweetened pack. Suitable for special diets.
right) and
Syrup pack. Suitable for fruits which
of sweetening depends on fruit
sugar
is added. Add dry
stir
gently Urlti 1
glass
containers).
color
and
fruits
that make their
sugar
(see
most of the sugar
hake
Serving Frozen Fruits:
Place unopened containers in refrigerator. Ser\e while
fruit is still slightly icy.
3(YZC (light)*
40% (light)
50% (medium)
60% (medium)
65% (heavy)
*Recommended for most
Method: Dissolve sugar in boiling water or mix
thoroughly with cold water until dissolved. Chill
before using.
$
’
fruits
Page 11

Guide to Freezing Fruits
FRUIT
APPLES
APRICOTS
BERRIES
CHERRIES
Sour
CHERRIES
Sweet
CRANBERRIES
MELONS
Cantaloupes
Honeydews
Watermelons
ORANGE and
GRAPEFRUIT
SECTIONS
PEACHES
PEARS
PINEAPPLE
PLUMS and
PRUNES
RHUBARB
PREPARATION
Wash, peel and
sugar, prevent discoloration by (1) steaming for 1
solutlon
water, and
Select firm, fully ripe fruit of bright,
remove pits. Peel and
Proper maturity
iced
water and drain thoroughly on absorbent paper towels.
Wash, sort and stem. Chill in refrigerator until firm enough to remove pits Mix
Prepare quickly In same way as sour cherries However, sweet cherries may be frozen
whole, with or wlhout
In Iced
Wash
Select firm, well ripened fruit. Cut In half and remove seeds (remove watermelon
seeds as you cut balls). Scoop out melon balls or cut
may be frozen alone or in combination
Select
Remove all membrane Cut sections from divider-membranes Drain. containing 1 teaspoon ascorbic acid per quart. Oranges
Promptness In
whole peach 30 seconds
time. syrup. Seal.
at a
Select pears
quarters. Heat m boding 40% syrup for 1 to 2 minutes. Cool in syrup, then drain. which ascorbic acid has been added (1 teaspoon
Peel, core,
Sort, wash
Wash, trim and cut stalks
sllce
apples to about l/2-inch thickness. If apples are to be packed in
of 3 tablespoons lemon
dramng.
Solutlon
slice, If
IS important. Immature berries should not be used, Wash
water, stem and
firm
fruit, free of soft spots. Peel with sharp knife just below
handllng
IS Important. Sort, peel (skins may be loosened by scalding
which
are fully tree-ripened. Wash, peel and core. Cut m halves or
sl!ce
or cube.
In Iced
water. Halve and pit, or leave whole.
Jutce
to 1 gallon water for 1
may be reused.
uniform
desired. Heat unpeeled
p!ts.
el!mlnate
poor
In
boiling water) and
Into
1 -inch
pieces
X
to 2 minutes, or (2)
color Wash and sort as to
or In lengths to fit package
frulf
berries.
Dram well. Cranberries may be packed whole.
In
3/4-inch cubes. These
plt
Peel and
minute, rmslng
m
slice
size.
bolllng
water
white
1 quart of peaches
dipping In
m cold
Halve and
1/2
minute.
In
cold or (1) May be packed dry, or (2) packed whole In a 40 to
fruits
membrane.
PACKAGING
SyrUp
pack:
ShCe
1
teaspoon ascorbic acid to each cup of syrup.
Add
Sugar pack: Sprinkle
of apples. Stir to cover all surfaces with sugar. Seal.
Adding 1 teaspoon ascorbic
rxecautlon.
Syrup
pack”
to which ascorbic
ascorbic
teaspoon crystalline ascorbic acid with 1/2 cup of sugar
sDrinkle
and
50°/0 sugar syrup. (3) For crushed or pureed berries
pack 4 parts of berries to 1 part of sugar. Stir
IS dissolved, Seal,
1
part sugar to 4 or 5 parts fruit by weight
is dissolved. Pack. Seal.
Cover with 400/. sugar syrup which contains 1
teaspoon
In
a 50°/0 sugar syrup.
Cover with orange juice or
Seal and freeze.
Pack sections In layers. Cover grapefruit with 300/. syrup
do not need syrup. Stir m 1/2 teaspoon ascorbic acid
per quart.
Pack immediately
ascorbic acid per cup in container; cover with more
Pack immediately m freezer carton. Add 400/. syrup to
ascorbic acid to 1 cup syrup). Seal.
Pack
sllces
slice.
each
Or, pineapple
Pack in carton and cover with 400/. syrup to which 1
teaspoon ascorbic acid has been added per cup, Seal.
Pack without sugar or cover
Allow head space, Seal.
into container, cover with 407. syrup
112
cup of sugar over each quart
acid
to sugar IS an extra
Pack in container; cover with 40°/0 syrup
actd
acid to 1 cup syrup) .Sugarpack.’ Mix 1
ascorbic
with two circles of cellophane paper between
Pack without sugar or cover with 300/. syrup.
has been added (1 teaspoon
over 1 auafl of fruit, Stir.
acid per cup
300/.
sugar syrup.
Into
cold 400/. syrup with 1 teaspoon
juice
could be used.
with
400/. syrup.
wtthout
until
sugar
until
sugar. or
sugar
Freezing Dairy Products
. Cheese. Freeze cheese in 1/2- to 1-pound pieces.
Wrap in moisture/vapor-proof material. Uncreamed
cottage and Camembert cheese may be kept in the
freezer though there may be some water separation
on
thawing. Cream and processed cheese do not
freeze well as freezing affects their smooth texture.
. Cream.
not freeze well, but will be suitable for cooking.
Pasteurized heavy cream containing not less than 40
percent butterfat may be frozen. Heavy cream which
has been whipped freezes well, too. Drop mounds of
whipped cream on baking sheets. Freeze. Transfer
frozen mounds quickly to a rigid container and seal,
separating layers with paper.
Ordinary household cream for table use does
●
Ice Cream. Commercial ice creams can be stored in
the freezer in their original carton. Home-made ice
cream should be packed in moisture/vapor-proof
cartons. For best results, place ice cream in the
interior of the freezer rather than on the door shelves.
Fine-quality ice cream, with high cream content, will
normally require slightly lower temperatures than
“airy” already-packaged brands with low cream
content. Experiment to determine the location in the
freezer (the rear is slightly colder than the front) and
the temperature control setting to keep your favorite
ice cream at the right serving temperature.
●
Butter and Margarine. Overwrap original carton in
moisture/vapor- proof material or enclose in
moisture/vapor-proof containers.
(continued next
pqge)
11
Page 12

Freezing Eggs
FOOD FREEZING SUGGESTIONS
(continued)
Use only fresh eggs for freezing. Chill before
freezing. Whole eggs may be frozen or the whites and
yolks frozen separtely as follows:
Whole Eggs—Mix yolks and whites thoroughly with
a
fork, Do not beat in air. Add 1 teaspoon salt to each
2 cups of eggs.
Egg Whites—Separate and freeze in recipe-sized
amounts.
Freezing Prepared Foods
● Bread and Rolls. Bake, cool, wrap and freeze. To
serve: thaw in wrappings at room temperature. Or,
heat or toast frozen. If desired, wrap in foil and warm
for 15 minutes in 250° to 300”F oven. Note: most
commercially baked products should be rewrapped
in moisture/vapor-proof material before freezing.
● Biscuits. May be frozen baked or unbaked. To serve
baked biscuits: defrost in wrappings at room
temperature for one hour. Reheat for 5 minutes in
425°F oven. Or place frozen biscuits in 375°F oven
for 15 minutes. Unbaked biscuits should be thawed,
then baked as usual.
. Cake. Bake and cool. If frosted, freeze before
wrapping to avoid sticking. To serve: unwrap frosted
cakes; thaw at room temperature. Thaw unfrosted
cakes in wrappings at room temperature. Allow
about two hours to thaw a large cake.
Icings made with egg white do not freeze
satisfactorily. Those made with powdered sugar,
butter, fudge or whipped cream freeze well.
c
Cookies. If baked before freezing, cool and package
them carefully in moisture/vapor-proof material.
They will thaw in about 15 minutes at room
temperature in wrappings, Refrigerator cookie
dough may be wrapped and frozen in bars. Slice as
needed, without defrosting, and bake.
● Pies. Most pies except cream, custard or
topped pies freeze well, baked or unbaked. Baked
pies store for a longer time. Omit steam vents from
pies to be frozen unbaked.
To serve unbaked pies: Cut steam vents in top crust
and place frozen pie in oven at usual temperature.
Increase baking time 10 to 15 minutes. Thaw frozen
baked pies, wrapped, for
1
to 1 X hours at room
temperature. To serve warm, unwrap without thawing
and heat in 300”F oven for 30 to 40 minutes.
meringue-
Egg Yolks—Separate and add 1 teaspoon of salt or 1
tablespoon of corn syrup or sugar per cupful of yolks.
Blend with fork.
Pack eggs in freezer carton allowing l/2-inch head
space ( 1 ‘/~-inch for glass containers). Thaw eggs in
unopened container in refrigerator or at room temperature.
● Quick Breads and Muffins. Bake, cool and wrap at
once. For serving, thaw, unwrapped, at room
temperature or warm, unwrapped, in 300”F oven.
● Main Dishes. Such foods as chili, spaghetti sauce,
casseroles, etc., are prepared in the same manner as
for immediate serving with the exception of
seasoning. During storage, onion flavor becomes
less noticeable and celery
flavor
more pronounced.
Spices also lose their strength during long periods of
storage. Omit potatoes from stews and soups as they
become mushy.
Cool main dishes after cooking; package in
moisture/vapor-proof material and freeze. To serve
these foods, thaw gradually over low heat adding a
little liquid if necessary to prevent foods from
sticking to the pan. Or heat in a 300”F oven for
about 1 hour or until heated thoroughly.
. Sandwich Tips. All varieties of bread can be frozen.
Spread softened butter on each slice, then spread
filling. It is not advisable to use salad dressings for
spreading as they separate and soak into the bread.
Meat, fish, some cheeses, poultry and peanut butter
are recommended fillings for freezing. Cooked eggs
become tough when frozen. Other fillings can be
moistened with milk, cream, pickle relish, chili sauce,
catsup, fruit juice, a little mayonnaise or salad dressing.
Lettuce or other salad greens and raw vegetables do
not freeze well and should be added just before
serving.
Wrap sandwiches in moisture/vapor-proof material
and freeze.
12
.
Page 13

FREEZER PACKAGING
Proper packaging is essential for successful freezing. Because solidly frozen
foods lose moisture in the dry 0° to 5“F. temperature of a freezer, they must
be properly protected by top quality packaging materials that are moisture/
vapor-proof. Freezer tape is used to seal wrappings and for labeling.
Freezer packaging materials
Materials
Cartons with moisture,
and vapor proof liners
Foil containers
Polyethylene bags
Glass freezer jars
Plastic containers and
boil-in bags
Packaging instructions
Drugstore Wrap
1. Place food in center
of wrapping paper.
2.3.Bring
two parallel
together. Fold
edges
in lock seam, repeat
until the last fold rests
firmly on food.
Fold ends, excluding
as much air as
possible. Seal with
tape or tie firmly with
heavy string.
Uses
Fruits, vegetables,
some meats
Cooked foods
Baked foods, meats
Juices, fruits, vegetables,
cooked foods
Sauces, fruits, vegetables
cooked foods
Materials
Laminated paper
Heavy-duty foil
Cellophane
Butchers’ Wrap
Place food diagonally on one corner of paper. Roll
paper and food together diagonally, folding in extra
material as you roll. Seal with freezer tape.
Cartons and containers.
Fruits, vegetables and
cooked foods may be
packaged in freezer
cartons, containers
and jars.
Aluminum foil.
Place food on
duty foil and mold foil
to shape of the food.
Only one thickness is
required. No heat sealing
or taping is necessary.
Labeling containers.
Be sure to label all
containers and packages
with contents and date
that it was placed in the
freezer.
heavy-
-
Uses
Meats
Meats, baked goods,
leftovers
Baked goods,
sandwiches, small
meat cuts
t
—
II
i
13
Page 14

DEFROSTING INSTRUCTIONS
Do not use any electrical device in defrosting your freezer.
Depending on the climate you live in, humidity and usage, your freezer may
need defrosting only once or twice a year. If possible, choose a time to
defrost when food supply is lowest.
The Fastest Way to Defrost
Defrosting can be done quickly and easily by scraping
freezer surfaces with a plastic scraper or wooden
spatula when frost is more than 1/4 inch thick.
DO NOT use an ice pick or sharp edged
instrument as it may damage or scratch the freezer.
For Periodic Complete Cleaning and Frost Removal
If frost is too thick or too hard to be scraped, we
suggest you do the following:
1.
Remove power cord from outlet.
Remove all food from freezer. Food may be
2.
temporarily stored in large corrugated paper boxes,
insulated bags, towels or wrapped in newspapers to
preserve coldness.
Your freezer has a defrost water drain at the front
3.
and a hose adapter that is packaged in a bag in the
bottom of the freezer. Remove the drain cap on the
front of the freezer, insert the hose connector and
attach the hose.
After attaching the hose, remove the drain plug
inside the cabinet. Sponge remaining moisture
from the bottom of the freezer.
4. You may hasten defrosting by leaving the freezer
lid open and removing large, loose pieces of frost
before they melt, or by sitting pans of hot water in
the freezer cavity.
NOTE: Water may drip from the back flange of the
lid cover during defrosting. This is normal. Ice
builds up in the lid insulation when the lid is open
for adding or removing food and melts during the
defrosting operation.
5. After frost is completely removed, rinse the inside
of the freezer with a solution of warm water and
baking soda (about one tablespoon of soda to each
quart of water). You may use mild soap and warm
water, but follow with a baking soda solution.
Rinse with clean water and wipe dry. DO NOT use
harsh or gritty cleaners in the interior.
WARNING: When cleaning in the vicinity of
electrical parts (lamps, switches, controls, etc.)
wring excess moisture out of sponge or cloth so
that it will be barely damp to prevent water or
liquid from getting into any electrical part and
causing a possible shock hazard.
6.
Replace the drain plug inside the cabinet and the
cap on the defrost drain.
7. Fold over and dry the gasket on the hinge side of
the lid.
8. Plug in the freezer at the electrical outlet. Turn the
temperature control to its regular position and
return food to the freezer.
14
Page 15

Cleaning Your Freezer
s
Outside. Protect the paint finish. The finish on the
outside of the freezer is a high quality, baked-on
paint finish. With proper care, it will stay new-looking
and rust-free for years. Apply a coat of appliance
polish wax when the freezer is new and then at least
twice
a
year. Appliance polish wax also works well
to remove tape residue from freezer surfaces.
Keep the finish clean. Wipe with a clean cloth
lightly dampened with appliance polish wax or mild
liquid dishwashing detergent. Dry and polish with a
clean, soft cloth. Do not wipe the freezer with a
soiled dishwashing cloth or wet towel. Do not use
scouring pads, powdered cleaners, bleach, or
● Inside. Clean the inside of your freezer at least once
a year. We recommend that the freezer be unplugged
before cleaning. If this is not practical, wring excess
moisture out of sponge or cloth when cleaning in the
vicinity of switches, lights or controls.
Use warm water and baking soda solution—about a
tablespoon of baking soda to a quart of water. Rinse
thoroughly with water and wipe dry. Do not use
cleaning powders or other abrasive cleaners.
An open box of baking soda in the freezer will
absorb stale freezer odors. Change the box every
three months.
cleaners containing bleach.
CAUTION—Care should be taken in moving the
freezer away from the wall. All types of
floor
coverings can be damaged, particularly cushioned
coverings and those with embossed surfaces.
In Case of Extended Power Failure:
1. Keep freezer door closed. Your freezer will keep food frozen for 24 hours
provided warm air is not admitted.
2. If freezer is out of operation for 24 hours or more, add dry ice. Leave ice
in large pieces. Add more ice as required.
WARNING: Handling of dry ice can cause freezing of the
gloves or other protection is recommended.
3. If dry ice is not available, move food to a frozen food locker
temporarily—until power is restored.
hands—
I
Page 16

PREPARATION
Location
Your freezer should be conveniently located for dayto-day use in a dry, well-ventilated room.
For most efficient operation, it should not be located
where air temperature around the freezer is ever
higher than 110°F. or colder than 32°F.
Be sure to install your freezer on a floor strong
enough to support it when it is fully loaded.
Also see Energy-Saving Tips regarding location.
The freezer must be
is to function at its best. Shims may be used to
accomplish this wherever the floor is too uneven. If
the place selected for the freezer is damp or moist,
place
2
X 4’s under its entire length to assure
adequate support.
solidy
positioned on the floor if it
When You Goon Vacation
To maintain freezer in operation during vacations, be
sure your house power is not turned off. For sure
protection of freezer contents, you may want to ask a
neighbor to check the power supply and freezer
operation every 48 hours.
For extended vacations or absences, you may prefer to
move your frozen foods to a storage locker temporarily.
If your freezer is to be left empty, disconnect power
cord plug from wall outlet. To prevent formation of
odors, place open box of baking soda in freezer and
leave freezer lid open.
When the freezer is not operating, it can be left in an
unheated house or room without damage to cabinet or
mechanism.
Clearance
The lid and hinge arrangement makes it impossible to
install the freezer directly against a wall. The space at
the back is essential to maintain proper air circulation
around the freezer.
When You Move
Disconnect the power cord plug from the wall outlet.
Remove foods, defrost and clean the freezer.
Secure all loose items such as grille and shelves by
taping them securely in place to prevent damage.
Be sure freezer stays in upright position during actual
moving and in van. The freezer must be secured in
van to prevent movement. Protect outside of freezer
with blanket.
16
Page 17

How to Connect Electricity
For personal safety, this appliance must be
properly grounded.
The power cord of
this appliance is
equipped with a
three-prong
(grounding) plug
which mates with
a standard
prong (grounding)
wall outlet (Fig. 1 )
to minimize the
possibility of
electric shock hazard
three-
PRE
MET
Fig. 1
I
from this appliance.
Use of Adapter Plug
Because of
potential safety
hazards under
certain conditions,
we strongly
recommend against
use of an adapter
plug. However,
if you still elect to
use an adapter,
where local codes
permit, a
TEMPORARY CONNECTION may be made to a
properly grounded two-prong wall outlet by use of a
UL listed adapter (Fig. 2) available at most local
hardware stores.
The larger slot in the adapter must be aligned with the
larger slot in the wall outlet to provide proper polarity
in the connection of the power cord.
TEMPORARY METHOD
Fig. 2
BEFORE USE
Have wall outlet and circuit checked by a qualified
electrician to make sure the outlet is properly
grounded.
Where a standard two-prong wall outlet is
encountered, it is your personal responsibility and
obligation to have it replaced with a properly
grounded three-prong wall outlet.
DO NOT, UNDER ANY CIRCUMSTANCES,
CUT OR REMOVE THE THIRD (GROUND)
PRONG FROM THE POWER CORD.
CAUTION: Attaching adapter ground terminal to
wall outlet cover screw does not ground the appliance
unless cover screw is metal, and not insulated, and
wall outlet is grounded through house wiring. You
should have the circuit checked by a qualified
electrician to make sure the outlet is properly
grounded.
When disconnecting the power cord from the adapter,
always hold the adapter with one hand. If this is not
done, the adapter ground terminal is very likely to
break with repeated use.
Should the adapter ground terminal break, DO NOT
USE the appliance until a proper ground has been
established.
Use of Extension Cords
Because of potential safety hazards under certain
conditions, we strongly recommend against the use of
an extension cord. However, if you still elect to use an phase AC. Some models are also rated 100 volt, 50
extension cord, it is absolutely necessary that it be a
I_JL listed
cord having a grounding type plug and outlet and that
the electrical rating of the cord be 15 amperes
(minimum) and 120 volts.
q-wk-e grounding type appliance extension
The freezer should always be plugged into its own
individual electrical outlet—( 115 volt, 60 Hertz single
Hertz. Check the model and serial number plate.) This
is recommended for best performance and to prevent
overloading house wiring circuits, which could cause
a possible fire hazard from overheating wires.
17
Page 18

QUESTIONS?
USE THIS PROBLEM SOLVER
PROBLEM
FREEZER DOES
NOT OPERATE
FREEZER STARTS
TOO FREQUENTLY
FREEZER OPERATES
TOO LONG
NOISY OPERATION
CABINET VIBRATES
FREEZERTEMPERATURE
TOOWARM
ALARM SOUNDS
POSSIBLE CAUSE
● Freezer may not be plugged in at wall outlet.
● If plug is secure and the freezer still fails to operate, plug a small appliance into
the same outlet to determine if there is a tripped circuit breaker or burned out fuse.
● Package holding lid open, or lid opened too frequently or too long.
● Temperature control set on too high a number.
● Uniform temperature in cabinet is being maintained.
● Package holding lid open, or lid opened too frequently or too long.
Q
Temperature control set on too high a number.
● Inadequate air circulation space around cabinet.
●
The floor may be weak, causing the freezer to vibrate when the compressor is on.
. Cabinet is not positioned solidly on floor. Use shims to correct for uneven
“
Weakness in room floor. Placing 2 X 4’s under the length of the freezer will help
floor.
support it and may reduce vibration.
. Cabinet not positioned solidly on floor. Adjust legs or use shims for uneven floor.
●
Package holding lid open, or 1 id opened too frequently or too long.
c
Freezer has not yet cooled down after temperature control dial is turned to a colder
setting. Set TEMP ALARM switch OFF temporarily until new cold level is reached.
●
A lot of unfrozen food added at one time will raise freezer temperature. Set TEMP
ALARM switch at OFF temporarily until temperature returns to normal for the
selected setting.
c
FOODS DEFROSTING
FREEZER TEMPERATURE
Blown fuse or tripped circuit breaker.
● Not plugged in.
● Package holding lid open, or lid opened too frequently or too long.
● Temperature control set on too high a number.
TOOCOLD
FOODSDRYINGOUT
MOISTURECOLLECTING
● Packages not properly wrapped or sealed.
. Extended hot, humid weather.
ON OUTSIDEOFCABINET
LIDWON’TFULLY
● Package holding lid open.
CLOSEBYITSELF
SLOWSTARTINGTIME
● Built-in overload protection.
AFTERBEINGOFF
c
EXCESSIVE FROST
BUILD-UP
Package holding lid open, or lid opened too frequently or too long.
● Extended hot, humid weather.
If you need more help... call, toll free:
GE Answer Center”
800.626.2000
consumer information service
18
Page 19

We’ll Be There
With the purchase of your new GE appliance, receive the assurance that
information
or assistance from GE, we’ll be there. All you have to do is call—toll-free!
In-Home Repair Service
ifyou
ever need
800-GE-CARES
A
I;E cf)nsun~er
scheciLdcd at a time that convenient fi)r
coIIlp;tIIJ’-() ~lcI”:ltt>cl
con\7enience (7:()() a.ill. to
our
f;ictol-}-tl-:iilled technicians
repairs
can be handled in just
(800+#32-2737)
ser~ice
professional
locaLi(lns
~:(]() p.n~. t$reekda~’s, !):()()
offer T’OU
kno~
one \isit.
mill
prokide
~’OLl.
sert’ice today or
~our appliance inside and out-so most
expert repair service,
Man}’ GE Consumer Service
GEAnswer Center@
800.626.2000
W’hatmer ~our question
information
ans\~7c>rc>d
Cell(er@ ser~ice is open 24 hours a &y, 7 da?s a week.
“.,.’> .”.,.,. .,,..
,.. s”.,.,O.,
ser~ice is
prompt 117 and
SECTION A A
s,. ,
W,,” .......,.
s.
.,,,.”,.... !.0
,..,, ,.,
about
an;’
(;E
mqjor appliance, GE Answer Center@
atailable
For
(’(
)urte(
to help.
)LlSl}r. .\nci }’OU
YOLII-
call—and your question-will be
can call any time. GE Answer
Customers With
8011626.2000
~Jpon request,
~raille contI-”ls
.
appliances, and a
s
assist in
kitchen
Inobilit}’. T() obtain these items,
fi-ee of” ~-harge,
CTE
will pro~ide
foI-
a
I’ariet} of
brochm-e to
plannin<g
f’or
a barrier-free
persons with limited
call 800.626 .2000.”
tomorroW7,
a.m. to
or at your
2:()()
p.m. Saturdays).
Special Needs...
Consumers with impaired hearing or speech who have
GE
access
to a TDD or a conventional teletv~ewriter mav
call
800-TDD-CTEAC
information or
(800-833-4322) to
ser~’ice.
’r’equest
/
Service Contracts
800-626-2224
You can ha~e the secure fkeling that
af’ter )’OUI- w’arranty” expiles.
in
eflect
and
}011
’11 receive a substantial discount. With a multiple-~ear contract,
~rt)tl
re
ass~lred of-
Parts
f’uture
andAccessories
kn”chase a GE contract while vour
ser~’ice
800-626-2002
Individuals qualified to service their own appliances
can ha~’e nc(>ded
their honle.
-!7,
()()()
parts . . .
ftlll?
~~zrrranted.
are accepted.
parts or accessories sent
me (;li
parts
s~stem pro~’icles
and all GE Genuine Renewal Parts are
t71SA,
31asterCard
(;E (knsumer Sertice
at todav ’s prices.
directly’
access to o~er
ancl
Disco\er cards
to
—————
will still be there
warI-anty
User maintenance instructions contained in this booklet
cover procedures intended to be performed by any user.
Other servicing generally should be referred to qualified
service personnel. Caution must be exercised, since
improper servicing may cause unsafe operation.
is still
—
Page 20

YOUR GENERAL ELECTRIC FREEZER
I
1
Save proof of original purchase date such as your sales slip or
WHAT IS COVERED
FULL ONE-YEAR WARRANTY
For one year from date of original
purchase, we will provide, free of
charge, parts and service labor in
your home to repair or replace
any part of the freezer that fails
because of a manufacturing
defect.
FULL FIVE-YEAR WARRANTY
For five years from date or original
purchase, we will provide, free of
charge, parts and service labor in
your home to repair or replace
part of the sealed refrigerating
system
condenser, evaporator and all
connecting tubing) that fails
because of a manufacturing
defect.
(the compressor,
any
WARRANTY
cancelled
LIMITED WARRANTY,
FOOD SPOILAGE...
We will pay for food spoilage
(not to exceed the cumulative
limit specified below) that occurs
because of a manufacturing defect
either in: a)
within one year from date or original
purchase, orb) anypatl of
sea/ed
five years from the date of original
purchase.
Freezer Capacity
14.9
cu. ft. and smaller
15.0
Within 30 days after food
spoilage occurs, you must provide
satisfactory proof of the spoilage
to a Factory Service Center, an
authorized Customer
service or the dealer from whom
the freezer was purchased.
any part
refrigerating
cu. ft. and larger
of the freezer
the
system
within
Cumulative
Limit
$100.00
$150.00
CareR
check to establish warranty period.
This warranty is extended to
the original purchaser and any
succeeding owner for products
purchased for ordinary home use
in the 48 mainland states, Alaska,
Hawaii and Washington,
Alaska the warranty is the same
except that it is LIMITED because
you must pay to ship the product to
the service shop or for the service
technician’s travel costs to your
home.
All warranty service will be
provided by our Factory Service
Centers or by our authorized
Caree
Customer
normal working hours.
Should your appliance need
service, during warranty period
or beyond, call 800-GE-CARES
(800-432-2737).
servicers during
D.C.
IU
In
WHAT IS NOT COVERED
● Service trips to your home to
teach you how to use the product.
Read your Use and Care material.
If you then have any questions
about operating the product please
contact your dealer or our
Consumer Affairs office at the
address below, or call, toll free:
GE Answer Center
800.626.2000
consumer information service
● Improper installation.
Some states do not allow the exclusion or limitation of incidental or consequential damages, so the above limitation or exclusion
may not apply to you. This warranty gives you specific legal rights, and you may also have other rights which vary from state to state.
To know what your legal rights are in your state, consult your local or state consumer affairs office or your state’s Attorney General.
H
I
Manager—Consumer Affairs, GE Appliances, Louisville, KY 40225
Part No.
Pub No. 49-6726
216169400
162
D3918PO03
Q
If you have an installation problem,
contact your dealer or installer. You
are responsible for providing
adequate electrical, plumbing and
other connecting facilities.
c
Food spoilage caused by:
a) Power interruption from the
utility.
b) Blown fuse, open circuit breaker
or other power disconnection on
the owner’s premises.
c) Freezer not operating because
of abnormally low electric power
voltage or inadequate house
wiring.
Warrantor: General Electric Company
If further help is needed concerning this warranty, write:
Replacement of house fuses or
resetting of circuit breakers.
. Failure of the product if it is used
for other than its intended
Purpose
,,
● Damage to product caused
by accident, fire, floods or acts
of God.
WARRANTOR IS NOT
RESPONSIBLE FOR
CONSEQUENTIAL DAMAGES.
or used commercially.
1 I
I
lLd
12-92 CG
 Loading...