

Page 1

Q;
Safety Information
How to Connect Electricitg ......... 3
Proper Disposal .................... 2
Safetg Precautions ................ 2
Use of Extension Cords ............. 2
Operating Instructions
Care and Cleaning ............... 6, 7
Defrosting Instructions ............. 5
Features .......................... 4
Starting the Freezer ................ /4
ge.com
Chest-Manual
Defrost Models:
FCM5
FCF17
FCN9
N
Q;
Q;
I.-
U..
-0
Installation Instructions
Preparing to Install the Freezer ..... 8
Troubleshooting Tips
Before You Call For Service ...... 9, 10
Normal Operating
Characteristics ..................... 9
Consumer Support
consumer support ............... 16
ProductionRegistrationfor
Customersin Canada ............ 13,14
ProductionRegistrationfor
Customersin the U.S.............. 11,12
Warrantg ........................ 15
0
Write the model and serial numbers
0
here:
Model #
Serial #
You can find them on a plute on the
top-center on the buck of the unit.
197D3355POO5 49-60518-i 10-07 JR
Page 2
IMPORTANTSAFETYINFORMATION.
READALL INSTRUCTIONSBEFOREUSING.
WARNING!
Use this appliance onlg for its intended purpose as described in this Owner's Manual.
SAFETYPRECAUTIONS
When using electrical appliances, basic safety precautions should be followed, induding the following:
_bThisfreezer mustbe properlg installed and located
in accordance with the Installation Instructions
before it isused.
_ Do not allow children to climb, stand or hang
on the shelvesin the freezenTheg could damage
the freezer and seriouslginjurethemselves.
R;i!Aftergourfreezer is in operation, do not touch
the cold surfaces,particularlg when hands are
damp or wet. Skin mag stick to these extremely
cold surfaces.
_ Do not store or use gasoline or other flammable
vapors and liquids in the vicinitg of this or ang other
appliance.
5:Unplug the freezer before cleaning, making repairs
or changing the light bulb.
NOTE:Westrongly recommend that any servicing
beperformed by o qualified individual.
it_Turning the control to the OFF position does
not remove power to the light circuit on models
with interior light.
_}Do not refreezefrozenfoods which have thawed
completelg.
The maximum amount of food gour freezer is
designedto freeze at one time isapproximatelg
Bpounds (1.5kg)percubic foot of freezer capacitg.
In normal position,gour freezer'stemperature
control will maintain sufficientlg low temperatures
in the freezer to freeze recommended quantities
of food.
Caution should be usedwhen removing the door
of a freezenParticular caution should be usedwhen
removing the lid of a Chestfreezer,asmost Chest
freezer lidsare under spring tension.Contact the
manufacturer's representativefor a method
of safe removal.
tL DANGER! RISK OF CHILD ENTRAPMENT
PROPERDISPOSALOFTHEFREEZER
Childentrapment and suffocation are not problems
of the past. Junked or abandoned refrigerators and
freezersarestill dangerous..even if thegwill sit for
".justa few dags."If gou are getting rid of gour old
refrigerator or freezer,pleasefollow the instructions
below to help prevent accidents.
Before You ThrowAway Your Old
Refrigerator or Freezer:
i!i:,Take off the doors.
;'_Leavethe shelves in place sothat children mag not
easilgclimb inside.
Refrigerants
All refrigeration products contain refrigerants,
which under federal law must be removed prior
to product disposal. If gou are getting rid of an old
refrigeration product, check with the compang
handling the disposalabout what to do.
USEOFEXTENSIONCORDS
Because of potential safety hazards under certain conditions, we stronglg recommend against
the use of an extension cord.
However,if SOUmust usean extension cord, it isabsolutelg necessarg that it be a ULdisted(inthe United
States)or a CSAdisted(inCanada),3-wire grounding tgpe appliance extensioncord having a grounding tgpe
plug and outlet and that the electrical rating of the cord be 15amperes (minimum)and 120volts.
Page 3

A WARNING!
HOW TOCONNECTELECTRICITY
Do not, under any circumstances, cut or remove the third (ground) prong from the power cord.
For personal safety, this appliance must be proped_l grounded.
ge,com
Thepower cord of this appliance is equipped
with a 3-prong (grounding)plug which mates
with a standard 3-prong (grounding)wall outlet
to minimize the possibilitg of electric shockhazard
from this appliance.
Have the wall outlet and circuit checked by
a qualified electrician to make sure the outlet
isproperl9 grounded.
If the outlet is a standard 2-prong wall outlet,
it isgour personal responsibilitgand obligation
to have it replaced with a properlg grounded B-prong
wall outlet.
Thefreezershould alwags be plugged into its own
individual electrical outlet which has a voltage rating
that matches the rating plate.
Thisprovides the best performance and also prevents
overloading housewiring circuitswhich could cause
a fire hazard from overheated wires.
Never unplug gour freezer bg pulling on the power
cord. Alwags grip plug firmlg and pull straight out
from the outlet.
Repairor replace immediatelg allpower cordsthat
have become frayed or otherwise damaged. Do not
usea cord that shows cracks or abrasion damage
along its length or at either end.
When moving the freezer awag from thewall, be
careful not to roll over or damage the power cord.
READAND FOLLOWTHISSAFETYINFORMATIONCAREFULLY.
SAVETHESEINSTRUCTIONS
3
Page 4

About the operation ofgour freezer.
Starting the Freezer
[] Clean the inside of the freezer with a mild solution of baking soda and water (seeCore and Cleaning}.
[] Connect cord to power outlet.
[] On models with a Temperature Monitor or High-Temp Alarm Switch, set the switch to the OFF position.
[] Make sure the temperature control is set at 4.
[] Allow freezer to operate for at least four hours before placing food inside.
]On models with a Temperature Monitor or High-Temp Alarm Switch, set the switch to the ON position.
Temperature Control
Freezing temperature selection is made bg
setting the control from 1 to 7 {coldest}.
If gou want colder or warmer temperatures,
adjust the control one step at a time.
Power-On Light (onsome models)
The Power-OnLightindicates that the freezer Thelight glows evenwhen the temperature
isproperlgconnected to the electrical power control isturned off.
Keg-Ejecting Lock (on some models)
Thekeg for the spring-loaded lockis
automaticallg ejected-keg will not
remain in lock in either the openor
closed position.
Allowseveralhours after each one-step
adjustment forthe freezertemperature
to stabilize.
Turning the control to the OFF position stops
the cooling process but does not shut off
power to the freezer.
Keepthe kegout of reach ofchildrenand
away from the freeze_
Page 5

Defrosting instructions, ge.com
In most climates, defrosting will benecessary
onlgabout twice agear
Tohavegout freezeroperatemost efficientlg,
do not permit more than 1/2 "_13ram)
of frost to accumulate on the shelves.
For Complete Defrosting
[_ Turn the temperature control
to the OFFposition and unplug
the freezer.
[_ Remove all food and place it in
corrugated boxes,insulated bags,
picnic coolers,etc. Usetowels and
newspapers far insulation as needed.
[_ With the door/lid open, use pans of
hot water to speed loosening of frost.
Remove large pieces before theg melt.
Chestmodelshave a defrostwater drain
at the front.
NOTE: Water may drip from the back
flange of the lid cover during defrosting.
This is normal lee builds up in the lid
insulation when the lid is open for adding
or removing food, and melts during
the defrosting operation.
Toremovefrost, scrape with a plastic
or wood spatula or scraper
Do not use an ice pick or sharp-edged
instrument asit may damage or scratch
the freezer.
Do not use ang electrical device
in defrosting gour freezer,
[_ Sponge excesswater from the bottom
of the freezer asit collects to prevent
overflowing.
[]After defrosting, clean the inside
of the freezer (seeCoreand Cleaning}.
[_ Replacethe drain plug inside
the cabinet and the cap on the defrost
drain. Foldover and drg the gasket on
the hinge side of the lid.
[_ Plug in the freezen Return the
temperature control to its previous
position and return food to the freezen
5
Page 6

Careand cleaning ofthe freezer.
Cleaning Vour Freezer
_'_Outside. Protect the paint finish. The finish
on the outside of the freezer is a high
quality, baked-on paint finish. With proper
care, it will stag newdooking and rust-free
for gears. Apply a coat of appliance polish
wax when the freezer is new and then at
least twice a gear Appliance polish wax
also works well to remove tape residue
from freezer surfaces.
Keepthe finish clean.Wipe with a clean
cloth lightly dampened with appliance
polishwax or mild liquiddishwashing
detergent. Dry and polishwith a clean, soft
cloth. Do notwipe the freezerwith a soiled
dishwashing cloth or wet towel. Donot use
scouring pads, powdered cleaners, bleach
or cleaners containing bleach.
CAUTION:Careshould be taken in moving
the freezeraway from the wall. All types
of floor coveringscan bedamaged,
particularly cushionedcoverings
and those with embossedsurfaces.
_flnside. Clean the insideof your freezer
at least once a gear.We recommend that
the freezer be unplugged before cleaning.
Ifthis isnot practical, wring excess
moisture out of spongeor cloth when
cleaning in the vicinity of switches, lights
or controls.
Usewarm water and baking soda
solution-about a tablespoon of baking
sodato a quart of waten Rinsethoroughlg
with water and wipe drg. Donot use
cleaning powders or other abrasive
cleaners.
An open box of baking soda in the freezer
will absorb stalefreezerodors. Change
the box every three months.
Page 7

In Case of Extended Power Failure
ge.com
i!!_Keep freezer door/lid closed. Your freezer
will keep food frozen for 24 hours provided
warm air is not admitted.
!_fIf freezer isout of operation for 2/4hours or
more, add drg ice.Leave icein large pieces.
Add more ice as required.
Preparing to Move
Disconnect the power cord plug from
thewall outlet. Removefoods, defrost
and clean the freezer.
Securealllooseitems such as grille and
shelvesbgtaping them securely in place
to prevent damage.
Preparing for Vacation
Tomaintain freezer in operation during
vacations, be sure your house power is not
turned off. Forsure protection of freezer
contents, you may want to ask a neighbor
to check the power supply and freezer
operation every 48 hours.
Forextendedvacations or absences,you
may prefer to move your frozen foods to a
storage locker temporarily. If your freezer is
to be left empty, disconnect power cord plug
from wall outlet. Toprevent formation of
odors, placeopen box of baking soda in
freezer and leavefreezer door/lid open.
WARNING:Handling of dry ice concause
freezingof the hands-gloves or other
protection isrecommended.
i!i:,If dry ice isnot available, move food to
a frozen food locker temporarily-until
power is restored.
Besure freezer stays in upright position
during actual moving and in van.
Thefreezermust be secured in van
to prevent movement. Protectoutside
of freezerwith blanket.
When the freezer is not operating, it can be
left in an unheated house or room without
damage to cabinet or mechanism.
7
Page 8

Preparing to install the freezer.
Read these instructions completelg and carefullg.
FreezerLocation
Your freezer should be conveniently located for
dag-to-da 9 use in a drg, well-ventilated room.
Do not install the freezer where the temperature
will go below O°For above 110°F,because it will
not maintain proper temperatures.
Besureto install gour freezer on a floor strong
enough to support itwhen it isfullg loaded.
Clearances
On all models, allow 3" (76 ram) on top, back
and sides for proper air circulation.
Thefreezermust besolidlgpositioned on the floor
if it isto function at its best.Shimsmag be used to
accomplish thiswherever the floor istoo uneven.
If the place selectedfor the freezer is damp or moist,
place 2 X4's{51 mm X 102 mm) under its entire
length to assure adequate support.
Page 9

Normal operating characteristics.
These things ore normal and
do not indicate a need for service.
_'_Awarm cabinet exterior as the refrigeration sgstem transfers heat from the insideto the outside through
the exterior cabinet walls.
i!i:,The sound of the high-efficiency compressor moton
Beforeyou call for service...
Troubleshooting Tips
Save time and money! Review the charts on the following
pages first and you may not need to call for serdce.
Possible Causes What To Do
Temperature control • Hovethe control to a temperature setting.
in OFFposition.
Freezer is unplugged. • Pushthe plug completelg into the outlet.
Thefuse is blown/circuit • Replacefuseor resetthe breaker
breaker is tripped.
ge,com
Door/lid left open. • Checkto see if package is holding door/lid open.
Toofrequent or too long
door/lid openings.
Temperature control • SeeAbout theoperation ofyour freeze_
set too cold.
Door/lid left open. • Checkto see if package is holding door/lid open.
Toofrequent or too long
door/lid openings.
Temperature control • SeeAbout theoperation ofyour freeze_
set too cold.
Inadequate air circulation • SeePreparingto install the freeze_
space around cabinet.
Fast Freezeswitch is in the • SeeAbout theoperation ofyour freeze_
ON position (on some models).
Floor mag beweak, causing • Placing2 X4's (51mm X102 mm) under the length of
freezer to vibrate when the freezer will help support it and mag reduce vibration.
compressor ison.
Cabinet is not positioned • SeePreparingto install the freeze_Or useshimsfor
solidlg on floor, uneven floor.
Door/lid left open.
Toofrequent or too long
door/lid openings.
• Checkto see if package is holding door/lid open.
9
Page 10
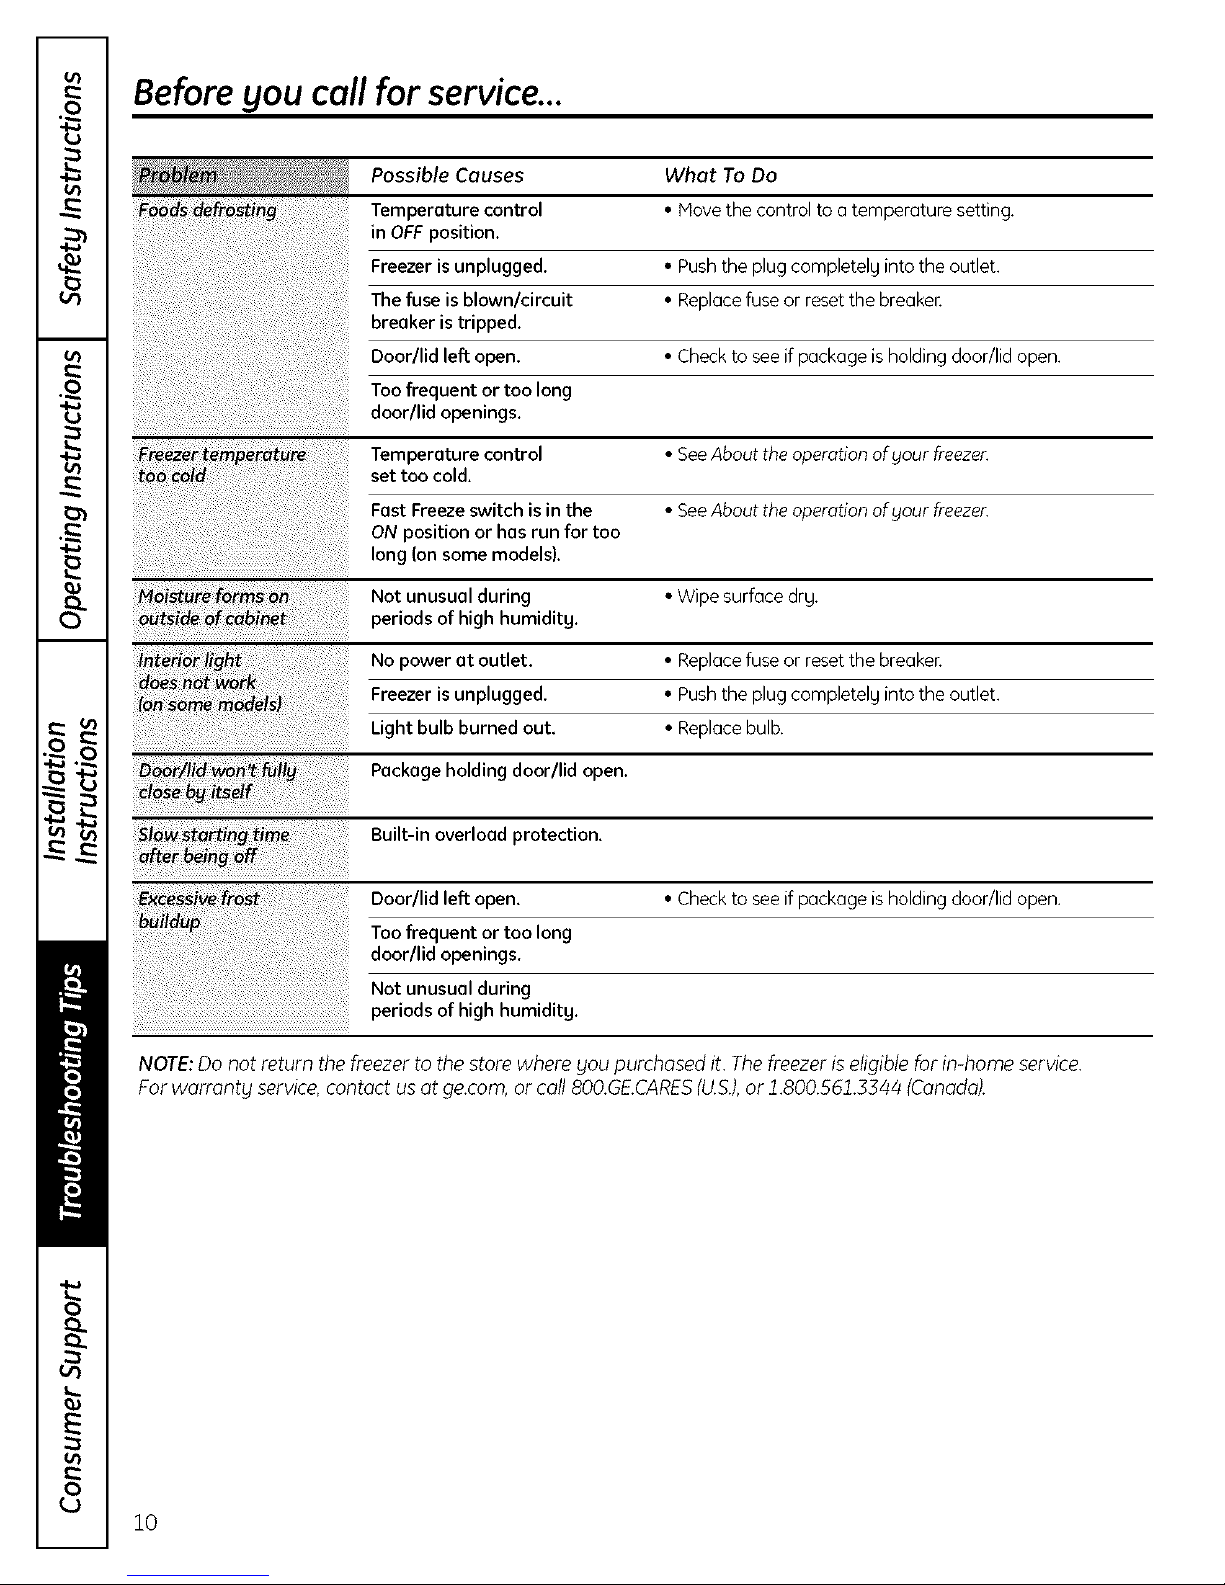
Beforeyou coil for service...
Possible Causes What To Do
Temperaturecontrol • Movethe control to atemperature setting.
in OFFposition,
Freezer is unplugged. • Pushthe plug completely into the outlet.
Thefuse is blownlcircuit * Replacefuse or reset the breaker.
breaker is tripped.
Door/lid left open. * Check to see ifpackage is holding door/lid open.
Toofrequent or too long
door/lid openings.
Temperature control * SeeAbout the operationof gout freezer.
set too cold.
Fast Freezeswitch isin the * SeeAbout the operationofgour freezer.
ON position or hasrun for too
long (on some models),
Not unusualduring ° Wipe surface drg.
periods of high humiditg,
No power at outlet, * Replacefuse or reset the breaker.
Freezer is unplugged. • Pushthe plug completelg into the outlet.
Light bulb burned out, * Replacebulb.
Package holding door/lid open.
!_et
Built-in overload protection.
Door/lid left open. • Checkto see ifpackage isholding door/lid open.
Toofrequent or too long
door/lid openings.
Not unusual during
periods of high humiditg.
NOTE: Do not return the freezer to the store where gou purchased it. The freezer is eligible for in-home service.
For warrantg service, contact us at ge.com, or call 800.GE.CARES(U.S.),or 1.800.561.3344 (Canada).
10
Page 11

GE Service Protection Plus TM
GE, a name recognized worldwide for quality and dependability, offers you
Service Protection PlusTM--comprehensive protection on all your appliances-
No Matter What Brand!
Benefits Include:
• Backed by GE
• All brands covered
• Unlimited service calls
• All parts and labor costs included
• No out-of-pocket expenses
• No hidden deductibles
• One 800 number to call
You will be completelg satisfied with our service protection or gou mag request gour moneg back
on the remaining value of gour contract. No questions asked. It's that simple.
Protect gour refrigerator, dishwasher, washer and drger, range, TV,VCRand much more-ang brand!
Plusthere's no extra charge for emergencg service and low monthlg financing is available. Even icemaker
coverage and food spoilage protection is offered. You can rest easg, knowing that all gour valuable household
products are protected against expensive repairs.
Place your confidence in GE and call us in the U.S. toll-free at 800.626.2224
for more information.
*ALLbrands covered, up to 20 gears old, in the continental US
We'll Cover Ang Appliance.
Angwhere. Angtime.*
,._.. Cut here
Please place in envelope and mail to:
General Electric Company
Warrantg Registration Department
P.O.Box 32150
Louisville, KV40232-2150
11
Page 12

Consumer Product Ownership Registration
Dear Customer:
Thank you for purchasing our product and thank you for placing your confidence in us.
We ore proud to hove you us u customer!
Follow these three steps to protect your new appliance investment:
Complete and mail
your Consumer
Product Ownership
Registration today.
Hove the peace of mind
of knowing we con
contact you in the
unlikelg event of a
safety modification
Model Number Serial Number
I I I I I I I I I I I IIIIIII
Important: If you did not get a registration card with your
product, detach and return the form below to
ensure that your product is registered, or register
online at ge.com.
Consumer Product Ownership Registration
Read your Owner's
Manual carefully
It will help you
operate your new
appliance properly
,_.,-_ Cut here
I I I I I I I I I I I I I I I I I
Model Number Serial Number
Nr Ms Mrs Niss
First I Lost I
Name I I I I I I I I I Name I I I I I I I I I I I I
Street J
Address I I I I I I I I I I I I I I I I I I I I I I I I
Apt # I I I I I I I I E-mailAddress
City I I I
DatePlaced
_nUse I_
Month
I I I
GE Consumer & Industrial
Appliances
General Electric Company
Louisville, KY 40225
gecom
I I I I I I I Code I I I I
Year_ PhoneNumber I I I I I I I I
* Please provide gour e-mail address to receive, via e-mail, discounts, special offers and other important
communications from GEAppliances (GEA).
} Check here if you do not want to receive communications from GEA'scarefully selected partners
FAILURE TO COMPLETE AND RETURN THIS CARD DOES NOT DIMINISH YOUR WARRANTY RIGHTS
For information about GEA'spdvacg and data usage policy, go to gecom and click on "Privacy Policy"
or call 8006262234
z_pI
12
Page 13

Pleaseplacein envelopeand mail to:
Veuillezmettre dans une enveloppeet envoyez&:
OWNERSHIPREGISTRATION
P.O.BOX1780
MISSISSAUGA,ONTARIO
L4Y4G1
(FORCANADIANCONSUMERSONLY)
13
Page 14

i,,,i i
For Canadian _:
z
P',easeregisteryourproduott_enab',eust_contaotyou Veui',',ezenregis_'ervo_eproduitafindenous_rmot_ede
in1heremoteeventasafetynoticeisissuedforlhisproduct communiqueravecvoussiiamaisanavisdes_curi_concemant
andtoa',',owforefficientcommunicationundertheterms ceproduE_taE_misetdecommuniquerfacilementavecvousen
ofyourwarranty,should_heneedarise, vertudevo_egarar_e,silebesoins'enfaitseniJr.
REG;SERONqJNE: www.geapp;iances,ca MA;LTO: P.O.BOX1780,M;SS;SSAUGA
ENREGiSTREMENTSURiNTERNET)_:www.e;eotromenaEersge_ca POSTERA: ONTAR-'O,L4Y4G1
[3 MR./M C_ MRS./MM£.I FIRSTNAME/PR_NOM ,LASTNAME/NOM
D MiSS/MLLE.C_MS. , I
L L
r
STREETNO/N"RUEISTRE£TNAME/RUE IAF_NO/APR/RR#
Customers i
-- i I
"_ a a
{-_ll
--i i
_,,
i I
Pour',es
Consommateurs _ 11
Canadiens _',I
C_
O'Ff/ViLLE TPROViNCE =
I I
AREACODE/iND.RE'G.I_TELEPHONE iE.-MAiL
I I
• ±
DIDYOUPURCHASEASERVICECONTRACTFOR]]41SAPHJANCE? YES/OUi113 iFYES/SiOUi:EXPiRATfON
AVEZ-VOUSACHE11_UNCONTRATDESERVICEPOURCETAPPAREiL? NO/NONC]
iNAMES EW DEALER/NOMDU ,' C ND
INSTA£LATIONDA_E/DA_D'INSTALLATION_ CORRESPONDENCE 113ENGbSN
y_A _,t DJ I
[] i do notw_shtoreceiveanypromo_onaioffersregardingth_sproduct,
[] Je nedeske_asre:evolrd'offrespromotbnneiiesconcemantceprodu&
_ CORRESPONDAN_ [] FP_NS SERiAk/$EFtiE
I
MODEL/MODELE
I
]
IPOSTALCODE/ POST_
¥A M O_J
14
Page 15

FreezerWarranty.
All warranty service provided bg our Factory Service Centers,
or an authorized Customer Care®technician. Toschedule serdce,
on-line, contact us at ge.eom, or call 800.GE.CARES(U.S.),
1.800.561.3344 (Canada). Please have serial number
and model number available when calling for service.
GE Will Replace:
Any part of the freezerwhich fails due to a defect in materials or workmanship. During this
_imited _ne_year warranty_ GEwi__a_s_pr_vide_free _f charge_a___ab_rand re_atedservice
to replace the defective part.
i_,Servicetrips to sour hometo teach Sou howto use
the product.
i_;Improper installation, delivers or maintenance.
i_;Failure of the product if it is abused, misused, or used for
other than the intended purpose or used commerciallg.
!_ Lossof food due to spoilage.
_ Damage caused after delivery.
I Staple your receipt here.
Proof of the original purchase
date is needed to obtain service
under the warranty.
i!_;_Replacement of housefuses or resetting of circuit
breakers.
i_;Damage to the product caused bg accident, fire, floods
or acts of God.
Incidental or consequential damage caused bg possible
defects with this appliance.
Product not accessible to provide required service.
EXCLUSION OF IMPLIED WARRANTIES--Your sole and exclusive remedy is product repair as provided
in this Limited Warranty. Any implied warranties, including the implied warranties of merchantability
or fitness for a particular purpose, are limited to one year or the shortest period allowed by law.
I
This warranty is extended to the original pumhaser and any succeeding owner for products purchased for home
use within the USA and Canada. If the product is located in an area where service by a GEAuthorized Serdcer
is not available, you may be responsible for a trip charge or {jou may be required to bring the product to an
Authorized GE Service location for service. In Alaska, the warrantt_j excludes the cost of shipping or serdce
calls to your home.
Some states do not allow the exclusion or limitation of incidental or consequential damages. This warranty
gives you specific legal rights, and you may also have other rights which vary from state to state. To know
what your legal rights are, consult gout local or state consumer affairs office or your state's Attorney General.
Warrantor: General Electric Company. Louisville, KY 40225
Mabe Canada Inc., Burlington, ON, L7R 5B6
II
15
Page 16

Consumer Support.
GEAppliances Wet)site
Have a question or need assistancewith gour appliance? Trg the GEAppliancesWebsite, ang dog of the gear!
Forgreater convenienceand faster service,gou can now download Owner's Manuals, order parts or even schedule
serviceon-line. In Canada: www.geappliances.ca
In the U.S.:ge,corn
Schedule Service Inthe U.S.:Be.corn
Expert GErepair service isonlg one step away from your doon Geton-line and schedule gour serviceat gour
convenience any day of the gear! Orcall 800.GECARES(800.4522757}during normal business hours.
In Canada, call 1.800.561.3344
Real LifeDesign Studio
GEsupports the Universal Designconcept-products, services and environments that can be used bg people of all
s
ages,sizesand capabilities.We recognize the need to design for awide rangeof phgsical and mental abilitiesand
impairments. For details of GE'sUniversalDesignapplications, including kitchen design ideas for peoplewith disabilities,
check out our Websitetodag. Forthe hearing impaired, pleasecall800.TDD.GEAC(800.833.4522).
In Canada, contact Manager,Consumer Relations,Nabe Canada Inc.
Suite310, 1 Factorg Lane
Noncton, N.B.E1C9H3
ExtendedWarranties
In the U.S.:ge, corn
In the U.S.:ge.corn
Purchasea GEextendedwarrantg and learn about special discounts that are available while gour warrantg is still
in effect. Youcan purchase it on-line angtime, or call800.626.2224during normal businesshours. GEConsumerHome
Serviceswill still be there after gour warrantg expires.In Canada, call 1.888.261.2133
Partsand Accessories
Individualsqualified to service their own appliances can have parts or accessoriessent directlg to their homes
(VISA,MasterCardand Discovercards are accepted).Orderon-line todag, 24 hours everg dog or bg phone at
800.626.2002during normal business hours.
Instructions contained in this manual cover procedures to be performed by any user. Other servicing generally
should be referred to qualified service personnel Caution must be exercised,since improper servicing may cause
unsafe operation.
Customersin Canada should consult the yellow pages for the nearestMabeservice center,or call 1.800.661.1616.
Contact Us
If gou are not satisfied with the service gou receive from GE,contact us on our Website with all the details including gour
phone number, or write to: General Hanager, Customer Relations
GEAppliances, Appliance Park
Louisville, KY40225
In Canada: www.geappliances.ca, or write to:
Director,ConsumerRelations,MabeCanada Inc.
Suite310, 1 FactorgLane
Honcton, N.B.EIC 9H3
In the U.S.:ge,corn
In the U.S.:ge,corn
RegisterYourAppliance
Register gour new appliance on-line--at gour convenienceJTimelg product registration will allow for enhanced
communication and prompt service under the terms of gour warrantg, should the need arise.Youmag also
mail inthe pre-printed registration card included inthe packing material. In Canada: www.geappliances.ca
16
In the U.S.:ge,corn
Printed in Chino
Page 17

www.electromenogersge.ca
Mesures de s_curit_
Comment vous d_barrasser
convenablement de votre
cong_lateur .......................... 3
Cordons prolongateurs ............... 3
lesures de s#curit_ .................. 2
Raccordement _lectrique ............. 4
Fonctionnement
Caroct_ristiques ................... 5, 6
Directives de d_givrage ............... 7
Entretien et nettogage ............. 8, 9
Hise en marche du cong_lateur ...... 5
Mod6tes coffre--
Ddgivrage non
automatique :
FCM5
FCH7
FCM9
(I,)
Installation
pr_paratifs pour I'installation
du cong61ateur ..................... i0
Conseilsde d6pannage ..... 11,12
Caract#ristiques normales
de fonctionnement .................. 11
Soutien ou consommateur
Garantie ........................... 15
Soutien au consommateur ......... 16
Inscrivez ici les num_ros
de module et de s_rie :
ModUle #
S_rie #
IIssont inscrits sur une plaque qui
se trouve sur ledessus central de I'arri_re
du cong_lateun
19 7D3355PO05 49-60518-i 10-07 JR
Page 18

MESURESDE S -CURITEIMPORTANTES.
LISEZD BORD TOUTESLESDIRECTIVES.
AVERTISSEMENT!
N'utilisez eet 41eetrom4nager que pour I'usoge ouqud il est destin4, eomme expliqu4 dons le present
manuel.
MESURESDESE-CURITE
Lorsque vous utilisez un appardl 41eetrique, observez toujours /es mesures de s4eurit4 de base,
_1eompris /es suivontes.
i!_Installezle cong_lateur conform&ment aux
directives d'installation avant de I'utilisen
_J,Ne laissezpas lesenfants grimper,s'asseoic
setenir debout ni se pendre aux clagettes
du congSlateun IIspourraient endommager
le cong_lateur et se blessergravement.
4_J,Apr_sla mise en route du cong61ateur,ne touchez
pas lessurfaces froides de celui-ci,surtout sivous
avez lesmains humides ou mouillSes.Lapeau
risque d'adh@eraces surfaces tr@sfroides.
_i N'entreposezet n'utilisezpas d'essence
ou autres vapeurset liquidesinflammables
6 proximit@decet appareilou detout autre
appareil 61ectrom&nagen
i!_D6branchezvotre cong&lateur avant de le nettoger
ou de ler_parer,et avant de remplacer I'ampoule.
REMARQUE: Nous vousrecommandons vivement
de confier toute r6parotion 6 un technicien quolifi&
i!_Lorsque vous r_glezlacommande surOFF(&teint),
lecourant alimentant lecircuit @lectriquede
I'ampoule n'est pas coup6 sur lesmodules
avec une lampe int_rieure.
_!_Ne recongelez pas les aliments surgel_s qui
ont compl_tement d_gel&
4_J,Laquantit@maximum d'aliments que vous pouvez
placerd'un seulcoup dans votre cong61ateurest
environ 3 livres(1,5kg)par pied cube de volume
int@ieur.Au r&glagenormal, la commande de
temp@aturede votre cong61ateurmaintiendra
unetemp@ature suffisamment basse pour
la cong_lationde la quantit_ recommand&
d'aliments.
_Sogez prudent Iorsquevous enlevez la porte
d'un cong@lateunSogezparticuli_rement prudent
Iorsquevous enlevezlecouvercled'un cong61ateur
coffre puisque la plupart deceux-ci sont _ ressort.
Communiquez avec un repr_sentant du fabricant
pour connaftre lameilleurem6thode d'enl@vement.
Page 19

www.electromenagersge.ca
A DANGER! RISQUES POUR LES ENFANTS
COMMENT VOUS DEBARRASSERCONVENABLEMENT
DE VOTRECONGELATEUR
Lesenfants prisau pi@geou marts d'asphgxie
sont toujours d'actaalit&Lesr_frig@ateurset
cong61ateursabandonn_s sont toujours aussi
dangereux, m@mesi on n'attend que <<quelques
jours>>pour s'en d6barrassenSivous ne gardez
pasvotre ancien r_frig&rateurou cong&lateur,
veuillezsuivre les directives ci-dessousafin de
pr6venir lesaccidents.
R6frig6rants
Tousles appareils de refrig6ration contiennent
desr6frig_rants qui,conform_ment aux lois
f_d_rales,doivent 6tre enlev6savant toute
_limination de I'appareil.Sivous vous d_barrassez
de vieux appareils de r6frig_ration, v&rifiez,aupr@s
de la soci_t&quis'occupe de leur &limination,
ce que vous devezfaire.
Avant de vous d_barrasser de votre ancien
r_frig_rateur ou cong_lateur :
D_montez les portes.
Si_,Laissezles clagettes en placeafin d'emp@cher
lesenfants de grimper h I'int&rieur.
CORDONSPROLONGATEURS
Nous vous recommandons fortement de ne pos utiliser de cordons prolongateurs 6 cause des risques
potentiels qu'ils pr4sentent dons certaines conditions.
Toutefoissivous d_cidezd'utiliser tout de m@meun cordon prolongateur,il est absolument n6cessaire
qu'il s'agissed'un cordon h 5ills avec mise h la terre pour appareils _lectrom&nagers homologu6 UL
(auxEtats-Unis}ou homologu_ CSA(au Canada),pourvu d'une fiche et d'une prise misesh la terre
de 15 amperes (minimum)et de 120 volts.
3
Page 20

MESURESDE S_-CURITEIMPORTANTES.
LISEZD_BORD TOUTESLESDIRECTIVES.
AVERTISSEMENT!
RACCORDEMENTELECTRIQUE
Ne coupez ni retirez en aucun cos/a troisi_me broche (mise a la terre) de Io fiche du cordon
d'alimentation. Pour votre s4curit4, cet appareil dolt _tre correctement mis a la terre.
Lecordon d'alimentation de cet appareil est
muni d'une fiche _]3 broches (mise_]la terre)
qui se branche dans une prisemurale ordinaire
6 3 alv@oles(raise_]la terre)pour rSduireau minimum
lesrisquesde chocs 61ectriques.
Faitesexaminer la prisede courant et le circuit
par un @lectricienqualifi6 pour vous assurer que
la priseest correctement mise _]la terre.
Sila prise murale est du tgpe standard 8 2 alv_oles,
il vous incombe de la faire remplacer par une prise
5 alv@olescorrectement raise8 la terre.
Lecong&lateur doit toujours &trebranch_ dans
sa propreprisede courant, dont la tension nominale
est identique8 celleindiqu_esur la plaque
signal&tique.
Cette pr6caution est recommand6e pour garantir
un rendement optimum et 6viter une surcharge des
circuits 61ectriquesde la r6sidence,ce qui pourrait
crier un risque d'incendie par surchauffe desills.
Ned6branchezjamais le cong@lateuren tirant sur
lecordon d'alimentation. Saisissezfermement la fiche
du cordon et tirez droit pour la retirer de la prise.
R_parezou remplacez imm_diatement tout cordon
effiloch_ ou endommag&. N'utilisezpas un cordon
fendill_ ou pr_sentant dessignes d'usure.
Lorsquevous d_placez votre cong_lateur du mur,
faitesattention de ne paslefaireroulersur lecordon
d'alimentation afin de ne pas I'endommager.
VEUILLEZLIREETSUIVREATTENTIVEMENTCESN1ESURES
DESECURITE.
CONSERVEZCESDIRECTIVES
Page 21

Fonctionnement de votre cong6lateur, www.e/ectromenagersge.ca
Miseenmarchedu cong lateur
[_ Nettoyez I'int@rieurdu cong61ateur avec une solution de bicarbonate de soude et d'eau {voir la section
Entretien et nettoyage}.
[] Branchez le cordon d'alimentation dans une prise de courant.
[_Si votre module est dot6 d'un Moniteur de temp@rature ou une Alarme de temp6rature @lev@e,
r@glezson interrupteur sur OFF {@teint).
[] Assurez-vous que la commande de temp6rature est r6gl6e sur 4.
[] Laissez fonctionner le cong_lateur pendant au moins quatre heures avant d'9 ranger des aliments.
]Si votre modele est dot_ d'un Ploniteur de temp@rature ou une Alarme de temp&rature 6levee,
r_glez son interrupteur sur ON (marche).
Commande de temperature
Le r6glage de la temp&rature
de cong61ations'effectue en pla_ant
la eommande 6 une position variant entre
1et 7(temperature la plusbasse).
Sivous d_sirezunetemperature plus
basse ou plus6levee,r6glez la commande
d'une position _]lafois.
IIfaudra attendre quelques heuresapr_s
chaque r@glementde la commande pour que
la temp6rature dueong_lateur sestabilise.
Lefait de r&glerla commande (_OFF(6teint/
arr&telacong_lation mais ne coupe pas
I'alimentation _lectrique du congelateur.
5
Page 22

Fonctionnementde votrecong lateur.
Voyant marche-arr_t (sur certains moddes)
Levogant marche-arr6t vousindique que
le cong61ateurest correctement raccord6
(_I'alimentation 61ectrique.
Levogant reste allum_ re&meIorsque
la commande detemperature est r6gl6e
OFF(_teint}.
Serrure 6 6]ection automatique de la cl6 (surcertainsmoddes)
Laserrure (_ressortassure I'ejection
automatique de la cl6-celle-ci nerestera pas
dans la serrure en position verrouill_eou
d6verrouill6e.
Gardez la cl6 hors deport_.e des enfants
et loin du cong6lateur.
Page 23

Directivesded givrage, www.ete romenagersge.ca
Dans la plupart des climats,ilfaut d6givrer
I'appareilseulement deuxfois par annie.
Pour un fonctionnement efficace de votre
cong6lateur, ne laissez pas s'accumuler
plus de 1/2 po/13 ram) de givre sur
les clayettes.
D6givrage complet
[_ R_glezlacommande de temperature sur
OFF(&teintjet d_branchezlecong_lateun
[_ Retireztousles aliments de I'appareil
et placezdesdans des bd[tesen carton
ondul6, dessacsisolants,desglaci@es,
etc. Enveloppezdesdans des couvertures
ou desjournaux pour les isoler,au besoin.
[_ Laissezla porte ou le couvercle ouvert
et placez _ I'int_rieurde I'appareildes
casserolesd'eau chaude pour acc_l@er
led6collement du givre. Enlevezlesgros
morceau×de givre avant qu'ils fondent.
Hod_les coffre poss_dent un _coulement
pour I'eau de d_givrage _ I'avant.
RENIARQUE:DeI'eaupeut d_goutter
du rebord du couverclependant
le d#givrage.Ceph6nom6neest normal.
Dela glacesbccumule donsI'isolation
du couvercleIorsqu'onouvre celui-ci
pour rojouter ou retirer desaliments,
et fondpendant le d_givroge.
Pourenleverlegivre,grattezavec un grattoir
ou une spatule en plastique ou en bois.
N'utilisez jamais un pic 6 glace ou
un instrument _ rive orate. IIs pourraient
endommager ou roger lecongdateur.
N'utilisez pas de dispositifs 6lectriques
pour d6givrer votre cong6lateur.
[_ Epongezle surplus d'eau dans le fond
du cong_lateur au fur et 0 mesure pour
_viter tout d&bordement.
[_ Apr_s led6givrage, nettogez I'int6rieur
du cong&lateur (voirla section Entretien
etnettoyoge).
[_ R6installezle bouchon d'6coulement
6 I'int6rieur du cong&lateur et remettez
le capuchon sur 1'6coulementde
d6givrage. Repliezet s_chezlejoint
qui setrouve du c6t6 des chami@es
du couvercle.
[_] Rebranchezle cong_lateun R_glez
la commande detemp@rature
a sa position initiale et remettez
lesaliments au cong&lateun
7
Page 24

Entretien et nettogage du cong lateur.
Nettogage de votre cong_lateur
i!i:,Ext_rieur. Prot6gezle fini de I'appareil.
La carrosseriedu cong61ateurest
recouverte d'une peinture de haute qualit6,
cuite au four. Sivaus I'entretenezde
la fagon appropri_e, le fini ne rouillera pas
et conservera son aspect neuf pendant
desann_es.Appliquezune couche de cire
pour _lectrom6nagers Iorsquevous
recevezvotreappareil et, par la suite,
au mains deux fois par annie. Lacire
pour _lectrom6nagers se r6v_le 6galement
efflcace pour enlever les r6sidusde ruban
gamin6 sur lessurfaces du cong_lateur.
Gardezle fini propre. Essugez-leavec
un linge propre I_g_rementhumect6 de
cire pour 61ectrom_nagersou de d_tergent
liquide doux pour la vaisselle.Essugez
et polissezavec un linge doux et prapre.
N'essugezpas le cong61ateuravec un linge
6 vaissellesaleou une serviette humide.
N'utilisezpas de tampons 8r&curer,
de produits nettogants en poudre,
dejavellisants ou de produits nettogants
cantenant du javellisant.
ATTENTION : Faites attention Iorsque vous
dloignez le congdateur du tour, car vous
risquez d'endommoger le rev_tement de
sol, plus porticuli_rement ceux qui sont
eoussin_s ou dont Io surface est gaufr_e
!::_Int6fieur. Nettogez I'int6rieurde votre
cong61ateurau mains une fois par annie.
Nous vous recommandons de d&brancher
I'appareilavantle nettogage.Sicelaesttrap
difficile,tordez bien votre linge ou votre
6ponge pourenlever I'excbsd'eauIorsque
vaus nettogezautour desinterrupteurs,
deslampeset descommandes.
Nettogez 8 I'aided'une solution d'eau
chaude et de bicarbonate de soude-
environ 1 cuill@re8 soupe (15 ml}
de bicarbonate par pinte (litre}d'eau.
Rincez8 fond avec de I'eauet essugez.
N'utilisezpasde poudres _ r6curer
ni de produits nettogants abrasifs.
Laissezune basteouverte de bicarbonate
de soude dans le cong@lateurpour
absorber lesodeurs. Remplacezla boite
taus lestrois reals.
Page 25

Lors d'une panne de courant prolong_e
www.electromenagersge.ca
i!!_Gardezla porte ou le couvercle
du cong61ateurferm& Votre cong_lateur
peut garder lesaliments congel_s pendant
24 heuresIorsque la porte ou le couvercle
n'est pas ouvert.
!_fSile cong@lateurne fonctionne pas
pendant plus de 24 heures,ajoutez
de la glaces_che.Plaeezde gros
morceaux de glaee dans I'appareil.
Ajoutez-en davantage au besoin.
D6m6nagement
D@branchezle cordon d'alimentation de
la prise murale. Retireztousles aliments,
faites d_givrer,puis nettogez le cong_lateur.
Fixeztoutes les pi_ces mobiles,comme
la grille et lesclagettes, en les immobilisant
I'aidede ruban gomm_ afin d'6viter
de lesendommager.
Lorsque vous partez en vaconces
Pour assurer le ben fonctionnement
de votre cong61ateurpendant vosvacances,
assurez-vousqueralimentation secteur
de votre r6sidence n'est pas coup6e.
Pour assurer la protection des denr6esdans
votre cong61ateur,vouspouvez demander
un voisin de v&rifiertoutes les48 heures
I'alimentation 61ectriqueet le fonctionnement
de votre cong@lateur.
Lorsquevous vous absentez pendant
une p&riodeprolong_e,il peut @trepr&f_rable
de ranger temporairement vos aliments
congel6s dans une armoire de rangement
pour produits congel@s.Sivous laissezvotre
cong_lateur vide,d6branchez le cordon
d'alimentation dela prisede courant.
Pour pr&venirla formation d'odeurs, placez
une bdte ouverte de bicarbonate de soude
dans le cong61ateuret laissezla porte ou
le couverclede I'appareilouvert.
MISEENGARDE: Lo manipulation de gloce
sechepeut causerdes gelures oux mains-
il est recommond_ de porter desgonts
ou autre 6quipement de protection.
;'_Sivous ne disposezpas de glace s_che,
enlevez lesaliments et placez-les
temporairement dans une armoire
pour produits congel6sjusqu'_ ce que
le courant soit r6tabli.
Assurez-vous que le cong_lateur demeure
debout pendant le d@m@nagement et dans
le camion. L'appareil doit &tre immobilis@
dans le camion. Prot@gezI'appareil _ I'aide
d'une couverture.
Lorsquele cong61ateurne fonctionne
pas,il peut @trelaiss6dans une pi@ce
non chauff@esans que I'appareilou son
m6canisme ne subissent de dommages.
9
Page 26

Pr paratifs pour I'installation du cong lateur.
Veuillez life routes les directives attentivement.
Emplacementdu cong61ateur
Votre cong_lateur doit _tre install@6 un endroit
pratique, en vue d'une utilisation quatidienne,
dans une piece bien a&r@eoO I'air est sec.
N'installez pas votre cong_lateur dans I'endroit
oO la temperature est au-dessous de 0° F ou
an-dessus de 110° F parce qu'il ne maintiendra pas
les temperatures apprapri@es.
Assurez-vous que le plancher sur lequel sera install_
votre cong_lateur est suffisamment solide pour
le supporter Iorsqu'il est plein.
Ddgagements
Surtous lesmod&les,pr_vogez un d_gagement de
3 po {76mm} de chaque c6t_,6 I'arri&reet au-dessus
de I'appareil afin d'assurer une circulation d'air
adequate.
Pourqu'il puisse offrir un rendement optimum,
leeong@lateurdoit repasersolidement sur le sol.
Vouspouvez installerdes cales Iorsquele sol est
in,gal. Si I'endroitchoisi pour I'installation du
cong_lateur est humide ou mouill&,installez
des morceauxdeboisde 2pox 4 po{51mm X 102ram/
sous I'appareil,surtoute la Iongueur.pour assurer
un support ad_quat.
10
Page 27

Caract ristiques normales de fonctionnement.
Ces ph)nom_nes sont normaux et
n'indiquent pas un besoin de r)porotion.
;'_L'ext_rieurdu cong_lateur devient chaud Iorsque le sgst_me de r_frig&ration transfere la chaleur de I'int_rieur
vers I'ext&rieur8 travers lesparois ext&rieuresdu cong&lateun
i!i:,Leson du moteur du compresseur 6 rendement hautement efficace.
Avant d'appeler un r parateur..
Conseils de d_pannage--Eeonomisez du temps et de I'argent!
Consultez d'abord les tableaux qui suivent et vous pourrez peut-_tre
_viter de loire appel _ un r_parateu_
www.etectromenagersge.ca
Causes possibles Correctifs
Cornmande de temp4rature * R6glez la commande 6 un r_glage de temp6rature.
r_gl4e 6 OFF(4teint).
Le cong41ateur n'est pas branch& * Enfoncez bien la fche dans la prise murale.
Le fusJble est grill,/ • Remplacez le fusible ou r_enclenchez le disjoncteur.
le disjoncteur est d4clench&
Porte ou couvercle laiss_ ouvert. * V_rifiezqu'il n'g a pas un paquet qui emp_che la porte
Ouverture trap fr_quente
ou trap prolong4e de la porte
ou du couvercle.
Commande r4gl_e ° Consultez Fonctionnement de votre cong_lateur
6 une temperature trap basse.
Porte ou eouvercle laiss_ ouvert. ° V_rifiezqu'il n'g a pas un paquet qui emp_che la porte
Ouverture trap fr4quente
ou trap prolong4e de la porte
ou du couvercle.
Commande r_gl4e * Consultez Fonctionnement de votre eong_lateur
6 une temperature trap basse.
Circulation d'air inadequate ° ConsultezPr_paratifspour I'installationdu cong_lateur
..... autour de I'appareil.
L'interrupteur de cong_lation * ConsultezFonctionnement de votre eongdateur
rapide est r_gl6 6 ON
..................................................................(sur certains modules).
ou le couvercle de se fermer.
ou le couvercle de se fermer.
11
Page 28

Avant d°appeler un r parateur...
Causes possibles Correctifs
Le plancher peut monquer • Placezdes morceaux de 2 po × 4 po (51 mm × 102 mml
de soliditY, ce qui foit vibrer sur la Iongueur,sous lecong61ateur,afin de mieux
le cong_loteur Iorsque lesoutenir et peut-6tre r6duire lesvibrations.
le compresseur fonctionne.
Uopporeil ne repose pos • Consultez Pr_paratifs pour I'installation du cong_iateur
solidement sur le sol. ou installez des cales pour compenser lesin6galit6s du sol
Porteou couverclelaiss6ouvert. • V6rifiezqull n'y a pas un paquet qui emp@cheJaporte
Ouverture trap fr6quente
ou trap prolong_e de la porte
ou du couvercle.
Commonde de temperature • R6glezla commande 6 un r6glage de temp6rature.
r_gl_e 6 OFF(6teint},
Lecong_lmteur n'est pas branch& • Enfoncezbien la fiche dans la prise murale.
Le fusible est grill_/ • Remplacez le fusible ou r6endenchez le disjoncteun
le disjoncteur est d_clench_.
Porte ou couvercle laiss_ ouvert. • V6dfiez qu'il n'g a pas un paquet qui emp_che la porte
Ouverture trap fr6quente
ou trap prolong6e de la porte
ou du couvercle.
Commande r_gl6e • ConsultezFonctionnement de votre cong_lateu_
une temperature trap busse.
L'interrupteur de cong61ation • ConsultezFonctionnementde votre cong_lateu_
rapide est r_gl_ _ ON ou
fonctionne trap Iongtemps
(suncertains modules).
par
temps tr_s humide.
Ph_nom_ne normal ° Essugezbien I'ext6deu_
ou lecouverde de se fermec
ou lecouverde de se ferme_
Pasde courant _ la prise. ° Remplacezle fusible ou r_enclenchez le disjoncteun
Leeong_lateur n'est pas branch,. ° Branchezlafiche comme ilfaut dons Io prisede couront.
L'ampoule est grill6e, ° RemplacezI'ampoule.
Un paquet emp_che la porte
ou le couvercle de se fermer.
Dispositif int_gr_
de protection contre
! ! !
NOTE:Nerenvogezpas I"appareil au magasin o8 vous Ibvez ocherS.Lecong6loteur estadmissible pour le service6 la maisen.Pourle service
degarontie, contactez-nous sur eJectromenagersge.ca,ou appelezle 1.80G561.33z_/4.
les surcharges.
Porte ou couvercle laiss_ ouvert. • V6rifiezqull n'g o pas un paquet qui empeche la porte
ou lecouvercle de se fermec
Ouverture trap fr6quente
ou trap prolong_e de la porte
ou du couvercle.
Ph_nom_ne normal par
temps tr_s humide.
12
Page 29

Notes.
www.etectromenagersge.ca
tO
o_
c.
tO
o_
tO_
t_
t_
0
to
tO
O"
m
o_
tO
u
to
t_
0
13
Page 30

m
Notes.
¢J
m
m
0
14
Page 31

Garantiedu cong lateur.
Toutes /es r_parations sous garantie seront effectu_es par nos
eentres de r_paration ou has r_paroteurs outoris_s. Appelez
le 800.GE.CARES. Au Canada appelez le 1.800.561.3344. Veuillez
foumir le num#,ro de s#,rie et le num_ro de module Iorsque vous
oppelez pour obtenir le service.
_:_;_i__i_:!_i_;_;_;_!_i_i_!_i!!_!_!_i_!_!_;!i_!_i_iii_;i!ii_i_i_!_i!_i!_!_!_!_!_!_;i!_:_!!_!_!_i!_i_!_i_!_i_i_i_i_i
In_ Toutepiece du cong_lateur qui se rgv_led&fectueuseen raisond'un vice de mati_res
ou defabrication. Pendantcette garantie timit_e d'un an, GEfournira _galement, gratuitement,
toute la main-d'oeuvre et tousles servicesreli&sn_cessairesau remplacement de la piece
d_fectueuse.
i!i_,Toute visite _1votre domicile pour vous expliquer
le fonctionnement de I'appareil,
i!i:,Mauvaise installation, livraisonou entretien.
;'_Toute d6fectuosit_ du produit Iorsqu'il est utilis_ de fa_on
abusive, ou _1des fins commercialesou _1toute autre fin
qua celia pour laquelle il a 6t6 con_u.
;'_Perte des aliments doe 6 la d_terioration.
i#i'Dommage subi apr_s la livraison.
i!i:.Le remplacement desfusibles ou le r_enclenchement
des disjoncteurs.
i!i_,Tout dommage au produit attribuable 6 un accident,
un incendie, une inondation ou un easde force majeure.
;'_Tout dommage direct ou indirect attribuable
6 une d6fectuosit_ _ventuelle de I'appareil.
;'_Le service s'ilest impossible d'avoir accas au produit
pour cefaJre.
Agrofez le regu d'ochot ieL
Pour obtenir le service sous
gorontie, vous devrez fournir
Io preuve de I'ochot original
EXCLUSION DE GARANTIES IMPLICITES - Votre seul et unique recours est la r_paration du produit
selon les dispositions de carte Garantie limit_e. Toutes les garanties implicites, incluant les garanties
de commercialit# et d'ad#quation 6 un usage sp_cifique, sont limit_es 6 une annie ou 6 la p_riode
la plus courte autoris6e par la I_gislation.
Lo pr#,sente garontie est offerte 6 I'ocheteur initial oinsi qu'6 tout acheteur subsdquent d'un produit ocher#,
6 des fins domestiques 6 I'int#,rieur des ":ctots-Unis et du Canada. Si le produit est situ4 dons un endroit oO
le Service autoris4 GE n'est pas offert, vous pourriez 6tre tenu d'acquitter des frais de transport ou d'apporter
le produit _ un d4p6t de Serdce autoris#, GE pour obtenir les r4parations. En Alaska, la garantie ne comprend
pos /es ffais d'exp#,dition du produit 6 I'atelier ni /es frais de d#,placement du r#,parateur _ votre domicile.
Dons certains 4tats, il est interdit d'exclure ou de Iimiter les dommages directs ou indirects. La pr#sente
gorantie vous confute des droits juridiques sp#cifiques. Vous pouvez b#n#ficier d'outres droits qui vorient
d'un #,tat 6 Ibutre. Pour connoTtre vos droitsjuridiques, prenez contact ovec le bureau des relations avec
/es consommateurs de votre r#,gion ou votre #.tat, ou avec le procureur g#,n#,ral de votre #,tat.
Garant :General Electric Compang. Louisville, KV 40225
Mabe Canada Inc., Burlington, ON, L7R 586
15
Page 32

Soutienau consommateur.
Site Web appareils #lectrom#nagers GE www.electromenagersge.ca
Vous oyez une question ou vous avez besoin d'aide pour votre appareil _lectrom_nager?
Contactez-nous par Internet au site electromenagersge.ca, tous lesjours de I'ann_e.
i_¸
Service de rdparations
Service de r_parations GE est tout pros de vous.
Pour fake r_parer votre _lectrom@nager GE,ilsuffit de nous t_l_phoner.
1.800.561.3344
Studio de conception r#oliste
Sur demande, GEpeut fournir une brochure sur I'am_nagement d'une cuisine pour les personnes
mobilit_ r_duite.
Ecrivez: Directeur, Relations avec les consommateurs, Habe Canada Inc.
Bureau 510, 1 Factorg Lane
Honcton, N.B.E1C 9H5
Prolongation de guruntie www.electromenagersge.ca
Achetez un contrat d'entretien GEavant que votre garantie n'expire et b_n_ficiez d'un rabais substantiel.
Ainsile service apr_s-vente GEsera toujours la apr_s expiration de la garantie.
Visitez notre site Web ou appelez-nous au 1.800.46:[.3636.
Pi_ces et accessoires
Ceux qui d@sirentr_parer eux-m@mes leurs @lectrom_nagers peuvent recevoir pi&ces et accessoires
directement a la maison (cartes VISA, NasterCard et Discover accept_esL
Les directives stiput_es dans le present manuel peuvent _tre effectu_es par n'importe quel utilisateur.
Les autres r_parations doivent g_n_ralement _tre effectu_es par un technicien qualifi_. Soyez prudent,
car une r_paration inadequate peut affecter le fonctionnement s_curitaire de I'appareil.
Vous trouverez dons les pagesjaunes de votre onnuaire le num_ro du Centre de service Hobe le plus proche.
Autrement, appelez-nous au 1.BBB.261.S055.
Contoctez-nous
Sivous n'_tes pas satisfait duserviceapr_s-vente dont vous avez b_n_fici_ :
Premi_rement, communiquez avec lesgens qui ont r_par_ votre appareil.
Ensuite, sivous n'@testoujours pas satisfait envogeztous les d_tails-num6ro de t616phonecompris-au
Directeur,Relationsavec lesconsommateurs, Habe Canada Inc.
Bureau 310, 1 Factorg Lane
Honcton, N.B.EIC 9H3
Inscrivez votre appareil dlectromdnager www.electromenagersge.ca
Inscrivez votre appareil _lectrom_nager en direct, aussitBt que possible. Celaam_liorera nos
communications et notre service opr_s-vente.Vouspouvez _golernent nous envoger par Io poste
le formuloire d'inscription joint 6 votre documentation.
16
Imprim_ _ la Chine
 Loading...